
88-2368-01 B H-Class PCL Operators Guide Report.....36! 4.3.6! GPIO Report ... Fault Handling with...
116
H8308p Operator’s Manual
-
Upload
nguyenmien -
Category
Documents
-
view
214 -
download
0
Transcript of 88-2368-01 B H-Class PCL Operators Guide Report.....36! 4.3.6! GPIO Report ... Fault Handling with...

H-‐8308pOperator’s Manual

Copyright Information CG Triumvirate is a trademark of Agfa Corporation. CG Times based upon Times New Roman under license from the Monotype Corporation. Windows is a registered trademark of the Microsoft Corporation. Ethernet is a registered trademark of Xerox Corporation. All other brand and product names are trademarks, service marks, registered trademarks,
or registered service marks of their respective companies. Limitation of Liability In no event shall Datamax-O’Neil be liable to the purchaser for any indirect, special or consequential damages or lost profits arising out of or relating to Datamax-O’Neil’s products, or the performance or a breach thereof, even if Datamax-O’Neil has been advised of the possibility thereof. Datamax-O’Neil’s liability, if any, to the purchaser or to the customer of the purchaser hereunder shall in no event exceed the total amounts paid to Datamax-O’Neil hereunder by the purchaser for a defective product. In no event shall Datamax-O’Neil be liable to the purchaser for any damages resulting from or related to any failure or delay of Datamax-O’Neil in the delivery or installation of the computer hardware, supplies or software or in the performance of any services. Some states do not permit the exclusion of incidental or consequential damages, and in those states the foregoing limitations may not apply. The warranties here give you specific legal rights, and you may have other legal rights which vary from state to state. Firmware (Software) Agreement The enclosed Firmware (Software) resident in the Printer is owned by Licensor or its suppliers and is licensed for used only on a single printer in the user’s Trade or Business. The User agrees not to, and not to authorize or permit any other person or party to duplicate, or copy the Firmware or the information contained in the non-volatile or programmable memory. The firmware (Software) is protected by applicable copyright laws and Licensor retains all rights not expressly granted. In no event will Licensor or its suppliers be liable for any damages or loss, including direct, incidental, economic, special, or consequential damages arising out of the use or inability to use the Firmware (Software). Information in this document is subject to change without notice and does not represent a commitment on the part of Datamax-O’Neil Corporation. No part of this manual may be reproduced or transmitted in any form or by any means, for any purpose other than the purchaser’s personal use, without the expressed written permission of Datamax-O’Neil Corporation.
All rights reserved
Copyright © 2015, Datamax-O’Neil
Part Number 88-2368-01, Revision B

Agency Compliance and Approvals
C US Listed
UL60950-1: 2007 2nd Edition Information Technology Equipment CSA C22.2 No. 60950-1-07 2nd Edition
The manufacturer declares under sole responsibility that this product conforms to the following standards or other normative documents: EMC: 2004/108/EC EN 55022 (2010, AC:2011) Class A EN 50024 (2010) Safety: This product complies with IEC 60950-1, 2nd Edition, 2007-03-27 ROHS: 2011/65/EC [EN50581 (2012)] LVD: 2006/95/EC
CISPR 22 Class A Warning Warning: This is a Class A product. In a domestic environment this product may cause radio interference in which case the user may be required to take adequate measures.
FCC: This device complies with FCC CFR 47 Part 15 Class A.
Note: This equipment has been tested and found to comply with the limits for a Class A digital device, pursuant to Part 15 of the FCC Rules. These limits are designed to provide reasonable protection against harmful interference when the equipment is operated in a commercial environment. This equipment generates, uses, and can radiate radio frequency energy, and if not installed and used in accordance with the instructions in this manual, it may cause harmful interference to radio communications. Operation of this equipment in a residential area is likely to cause harmful interference in which case users will be required to correct the interference at their own expense.
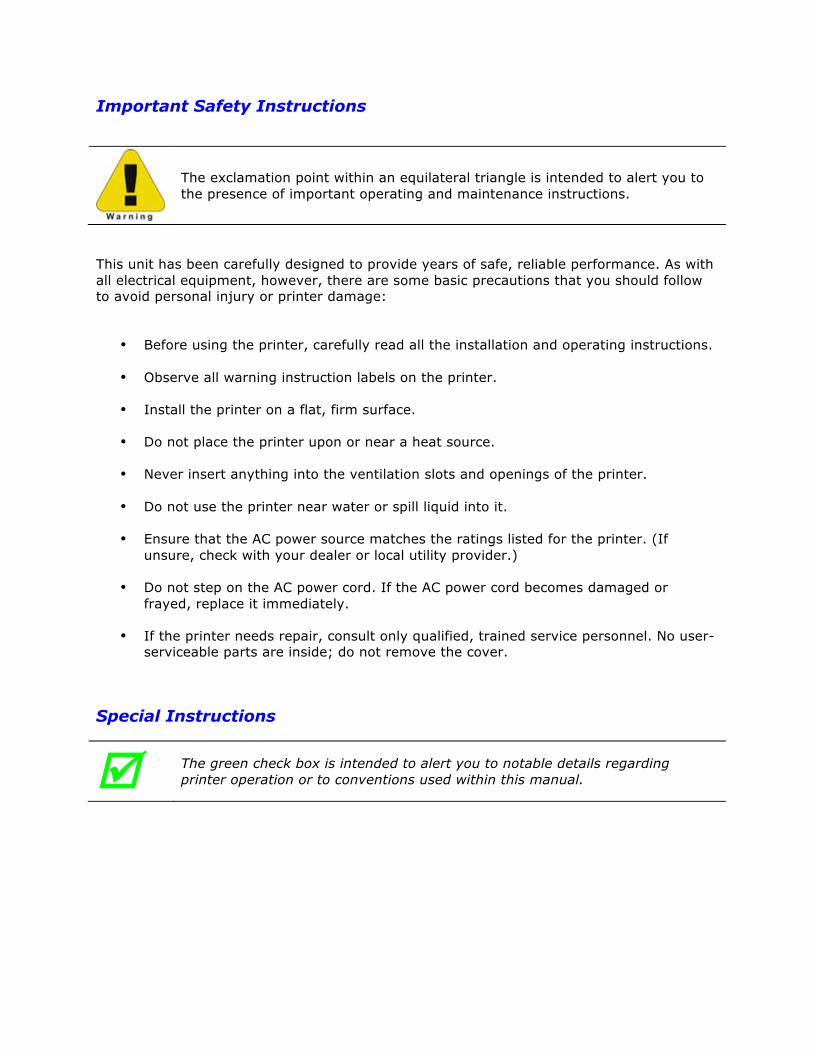
Important Safety Instructions
The exclamation point within an equilateral triangle is intended to alert you to the presence of important operating and maintenance instructions.
This unit has been carefully designed to provide years of safe, reliable performance. As with all electrical equipment, however, there are some basic precautions that you should follow to avoid personal injury or printer damage:
� Before using the printer, carefully read all the installation and operating instructions. � Observe all warning instruction labels on the printer. � Install the printer on a flat, firm surface. � Do not place the printer upon or near a heat source. � Never insert anything into the ventilation slots and openings of the printer. � Do not use the printer near water or spill liquid into it. � Ensure that the AC power source matches the ratings listed for the printer. (If
unsure, check with your dealer or local utility provider.) � Do not step on the AC power cord. If the AC power cord becomes damaged or
frayed, replace it immediately. � If the printer needs repair, consult only qualified, trained service personnel. No user-
serviceable parts are inside; do not remove the cover. Special Instructions
þ The green check box is intended to alert you to notable details regarding printer operation or to conventions used within this manual.

i
Contents
1 Overview ...................................................................................... 1
1.1 About the Printer ............................................................................... 1
1.1.1 Standard Features .................................................................... 1
1.1.2 Optional Features ..................................................................... 3
2 Getting Started ............................................................................. 5
2.1 Unpacking ........................................................................................ 5
2.1.1 Additional Requirements ........................................................... 6
2.2 Installation ....................................................................................... 6
2.2.1 Connecting the Power Cord ....................................................... 6
2.2.2 Connecting an Interface Cable .................................................... 7
3 Setting up the Printer ................................................................... 8
3.1 Media Loading .................................................................................... 8
3.1.1 Internal Media Sources ............................................................ 10
3.1.2 External Media Sources ........................................................... 12
3.1.3 Rewinding Media .................................................................... 14
3.2 Media Sensor Adjustment .................................................................. 20
3.3 Ribbon Loading ................................................................................ 21
3.4 Configuring Media and Ribbon Settings ................................................ 24
3.4.1 Using Media and Ribbon IDs ...................................................... 24
3.4.2 Selecting Media and Ribbon Types .............................................. 24
1. Select Menu > Basic > Media > Select Type. ................................ 24
3.4.3 Setting the Media and Ribbon Parameters Manually (Advanced) ...... 26
3.4.4 Load a Saved Media File ........................................................... 26
ii
3.5 Print-Driver Installation ..................................................................... 27
4 Using the Control Panel .............................................................. 29
4.1 Menu Overview ................................................................................ 29
4.2 Layout of the Display ......................................................................... 29
4.2.1 Three-Button Panel .................................................................. 30
4.2.2 Home Screen .......................................................................... 30
4.3 Menu Functions ................................................................................ 32
4.3.1 System Information ................................................................. 32
4.3.2 Settings Report ....................................................................... 32
4.3.3 Network Report ....................................................................... 35
4.3.4 Extended Status ...................................................................... 35
4.3.5 Serial Report ........................................................................... 36
4.3.6 GPIO Report ........................................................................... 36
4.3.7 Printhead Info ......................................................................... 36
4.3.8 Fonts Report ........................................................................... 37
4.3.9 Feed Button ............................................................................ 37
4.3.10 Menu Button .......................................................................... 37
4.3.11 Basic Settings ........................................................................ 37
4.3.12 User Labels ........................................................................... 41
4.3.13 Advanced Settings .................................................................. 41
4.3.14 Media Settings ....................................................................... 49
4.3.15 Communications .................................................................... 50
4.3.16 Tools .................................................................................... 54
4.3.17 Language .............................................................................. 67

iii
4.3.18 Test ...................................................................................... 68
5 Operating, Adjusting and Maintaining the Printer ....................... 73
5.1 Printhead Assembly Adjustments ........................................................ 73
5.1.1 Leveling-Cam Adjustment ......................................................... 73
5.1.2 Printhead-Pressure Adjustment ................................................. 75
5.2 Maintenance .................................................................................... 76
5.2.1 Cleaning the Printhead ............................................................. 77
5.2.2 Cleaning the Fan Filter ............................................................. 80
5.2.3 Cleaning the Interior Compartment ............................................ 80
5.2.4 Cleaning the Media-Sensing Components .................................... 81
5.2.5 Cleaning the Platen and Assist Rollers ........................................ 81
5.2.6 Cleaning the Ribbon-Path Components (Thermal Transfer) ............ 82
5.2.7 Cleaning the Exterior Surfaces ................................................... 84
5.3 Replacing the Printhead ..................................................................... 85
6 Troubleshooting ........................................................................ 87
6.1 Problem Resolution ........................................................................... 87
6.2 Troubleshooting Print Quality ................................................................ 89
6.3. Error and Warning Messages ................................................................ 90
7 Terms and Definitions ............................................................... 92
8 Specifications ........................................................................... 98
9.1 General ........................................................................................... 98
9.2 Specifications ................................................................................... 99
9.3 Approved Media and Ribbon ............................................................. 101
Appendix A ................................................................................... 104

iv

1
1 Overview
1.1 About the Printer
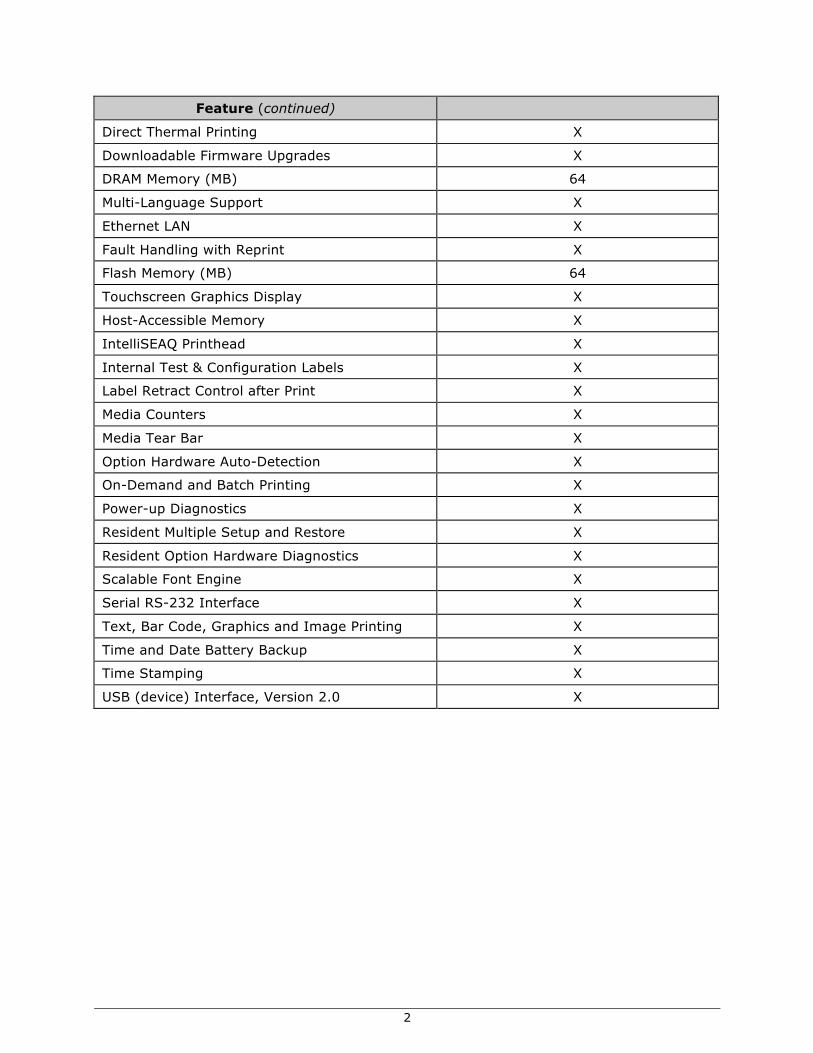
Congratulations on your purchase of the H-Class H-8308p thermal printer (hereafter referred to as “the printer”). This manual provides information regarding printer setup, operation and care. To print label formats, refer to the instructions provided with your labeling software, or, if you wish to write custom programs, a copy of the pw Series Programmer’s Manual can be found on the Accessories CD-ROM and at our website at http://www.datamax-oneil.com As detailed below, available standard and optional features can meet all of your labeling requirements. 1.1.1 Standard Features Depending upon the model and type, the printer offers the following standard features:
Feature
Control Panel Security X
Default Configuration Restorable X
Diagnostic Display and Modes X
Die-Cast Media Hub X
2
Feature (continued)
Direct Thermal Printing X
Downloadable Firmware Upgrades X
DRAM Memory (MB) 64
Multi-Language Support X
Ethernet LAN X
Fault Handling with Reprint X
Flash Memory (MB) 64
Touchscreen Graphics Display X
Host-Accessible Memory X
IntelliSEAQ Printhead X
Internal Test & Configuration Labels X
Label Retract Control after Print X
Media Counters X
Media Tear Bar X
Option Hardware Auto-Detection X
On-Demand and Batch Printing X
Power-up Diagnostics X
Resident Multiple Setup and Restore X
Resident Option Hardware Diagnostics X
Scalable Font Engine X
Serial RS-232 Interface X
Text, Bar Code, Graphics and Image Printing X
Time and Date Battery Backup X
Time Stamping X
USB (device) Interface, Version 2.0 X

3
1.1.2 Optional Features
The following optional features are offered for the printer: Wireless Ethernet
A WiFi Ethernet card with many features, including:
• 802.11b WiFi LAN standards-based technology
• Integrated module with radio, baseband, MAC and application processors
• Built-in TCP/IP and UDP for flexible LAN-connectivity options
• Built-in Web server for drop-in LAN and internet connectivity
• Built in WEP security protocol
• Integrated command interface that eliminates complicated software drivers
External Media Rewinders
Precision-crafted, bi-directional rewinding mechanisms with device-dependent features:
• DMXREW1 - accepts 1 to 4-inch (25 to 101 mm) diameter core that is up to 4.5 inches wide (114 mm), and rewinds to an 8-inch (203 mm) maximum outer diameter at 10 inches per second.
• DMXREW2 – accepts a 3-inch (76 mm) diameter core that is up to 9.5 inches wide (241 mm), and rewinds to a 12-inch (304 mm) maximum outer diameter at 30 inches per second.
Internal Rewinder, Powered "Full Roll"
A motorized internal mechanism to wind printed labels, or pull the backing material when using a Peel and Present option, into to a maximum outer diameter roll of 8 inches (203 mm).

4
Media Cutter
A rotary-type device that cuts material with a maximum thickness of 0.01 inch (0.254 mm) into lengths as small as 1.25 inches (31.8 mm).
Peel and Present Mechanism, Standard (Internal Rewind required)
A device that peels labels from the backing material for immediate application, regulated by previous label removal. [Minimum label length is 1.5 inches (38 mm)].
Present Sensor
An output regulator that inhibits printing when a label is presented.
USB Host Ports
Interface ports that allow the printer to accept external USB memory devices for storing graphics, label formats, fonts and firmware, and that allow USB keyboard connections for direct data input applications.
Thermal Transfer
A hub assembly that allows printing with ribbon for exceptional image clarity and durability, as compared to most direct thermal-media types. Option Installation The table below lists the experience needed to install the options described above. For more information, contact your dealer or Datamax-O’Neil.
Option Installation
Option Recommended Installer
External Media Rewinder Operator
Internal Rewinder Operator
Media Cutter Operator
Peel and Present Mechanism Operator
Present Sensor Operator
USB Host Ports DMX Certified Technician
Thermal Transfer Operator

5
2 Getting Started 2.1 Unpacking The printer has been carefully packaged to prevent transit damage. (Inspect the container for damage and, if evident, notify the shipping company before acceptance.) After removing the packaging, check the contents of the shipment.
The following items are included: • Printer
• Power Cord
• Quick Start Guide
• Accessories CD-ROM
• Warranty Card
• Any special or additionally purchased items
þ Save the carton and packing material for future use.
6
2.1.1 Additional Requirements Other items can also be needed for operation:
• An interface cable (see Section 2.2.2);
• Applicable media (see Section 7.3); and,
• Applicable software (consult the Accessories CD-ROM, your dealer, or Datamax-O’Neil).
2.2 Installation The printer features an auto-ranging power supply and several different interface types for easy installation.
Ensure that the Power Switch is OFF when making printer connections.
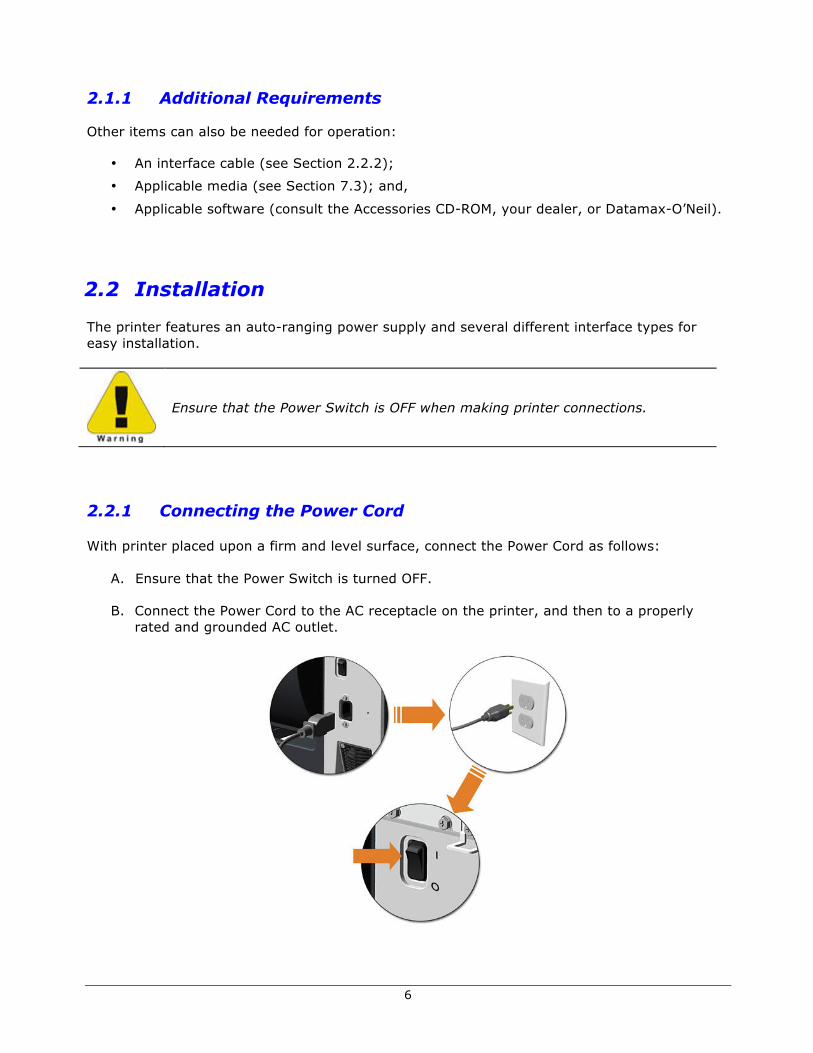
2.2.1 Connecting the Power Cord With printer placed upon a firm and level surface, connect the Power Cord as follows:
A. Ensure that the Power Switch is turned OFF. B. Connect the Power Cord to the AC receptacle on the printer, and then to a properly
rated and grounded AC outlet.

7
2.2.2 Connecting an Interface Cable The printer can be interfaced to a host device via the Ethernet, USB or optional serial port. Following power-up (or after inactivity), interface port selection occurs automatically upon detection of valid data.
þ • To change an active port immediately, cycle the power OFF and ON.
Ethernet Connection
The Ethernet interface supports several menu-selectable modes. Depending on the length, the cable should be Category/Type 3 or better. USB Connection The USB interface connection may differ slightly depending upon the operating system and hardware configuration of the host computer.
Optional Serial Connection
The serial interface supports RS-232C communications RS-232C cabling configurations via standard null-modem cable.
8
3 Setting up the Printer
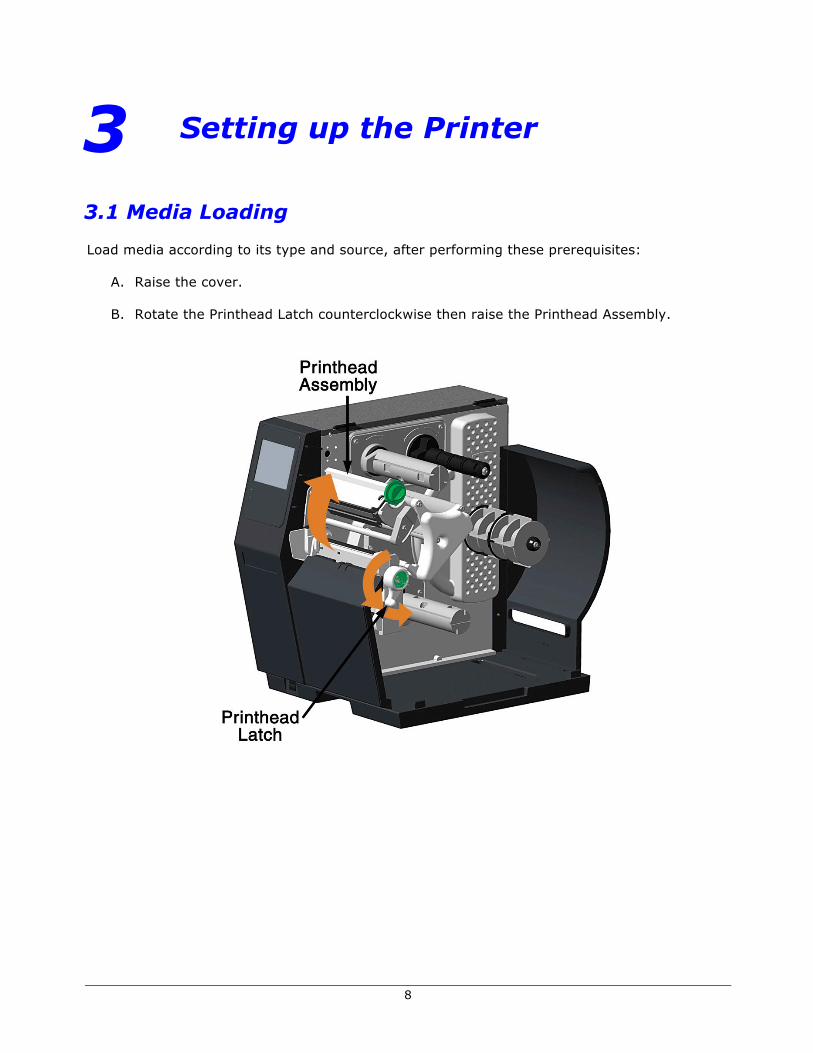
3.1 Media Loading Load media according to its type and source, after performing these prerequisites:
A. Raise the cover. B. Rotate the Printhead Latch counterclockwise then raise the Printhead Assembly.
9
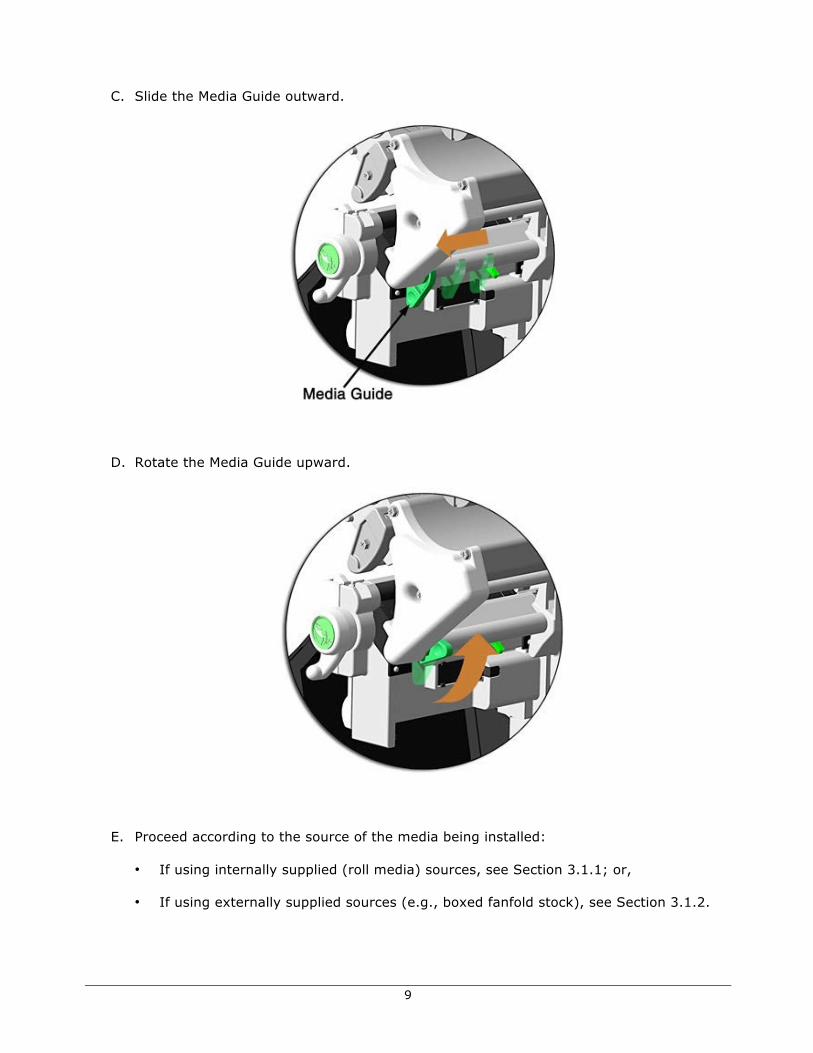
C. Slide the Media Guide outward.
D. Rotate the Media Guide upward.
E. Proceed according to the source of the media being installed:
• If using internally supplied (roll media) sources, see Section 3.1.1; or, • If using externally supplied sources (e.g., boxed fanfold stock), see Section 3.1.2.
10
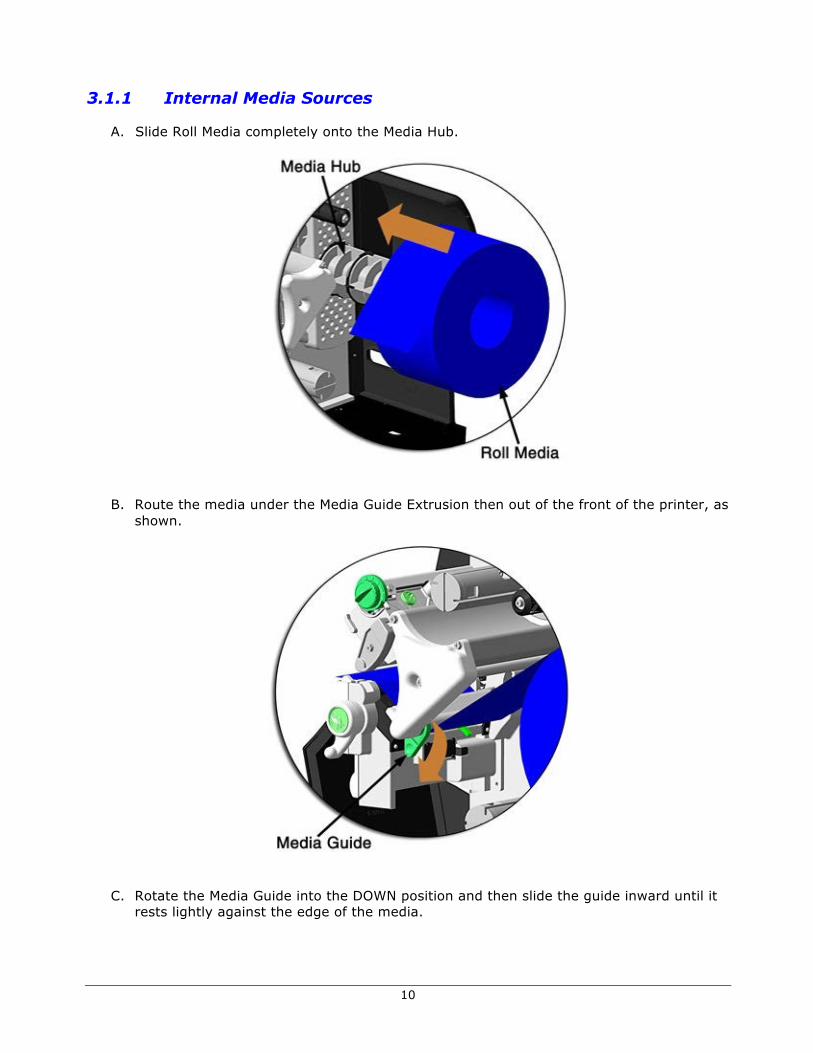
3.1.1 Internal Media Sources
A. Slide Roll Media completely onto the Media Hub.
B. Route the media under the Media Guide Extrusion then out of the front of the printer, as shown.
C. Rotate the Media Guide into the DOWN position and then slide the guide inward until it rests lightly against the edge of the media.
11
D. If loading media for the first time, or if switching media types, widths or configurations, position the Media Sensor as detailed in Section 3.2; otherwise, go to Step E.
þ If loading thermal transfer media, also load ribbon; see Section 3.3.
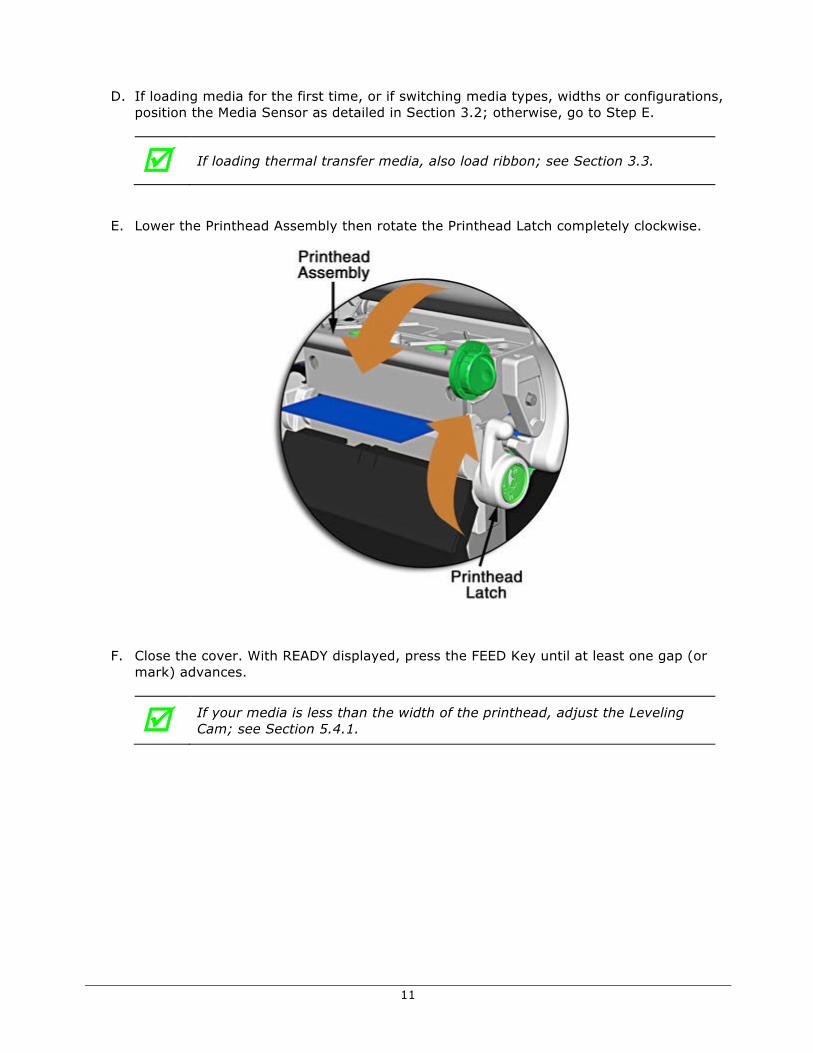
E. Lower the Printhead Assembly then rotate the Printhead Latch completely clockwise.
F. Close the cover. With READY displayed, press the FEED Key until at least one gap (or
mark) advances.
þ If your media is less than the width of the printhead, adjust the Leveling Cam; see Section 5.4.1.
12
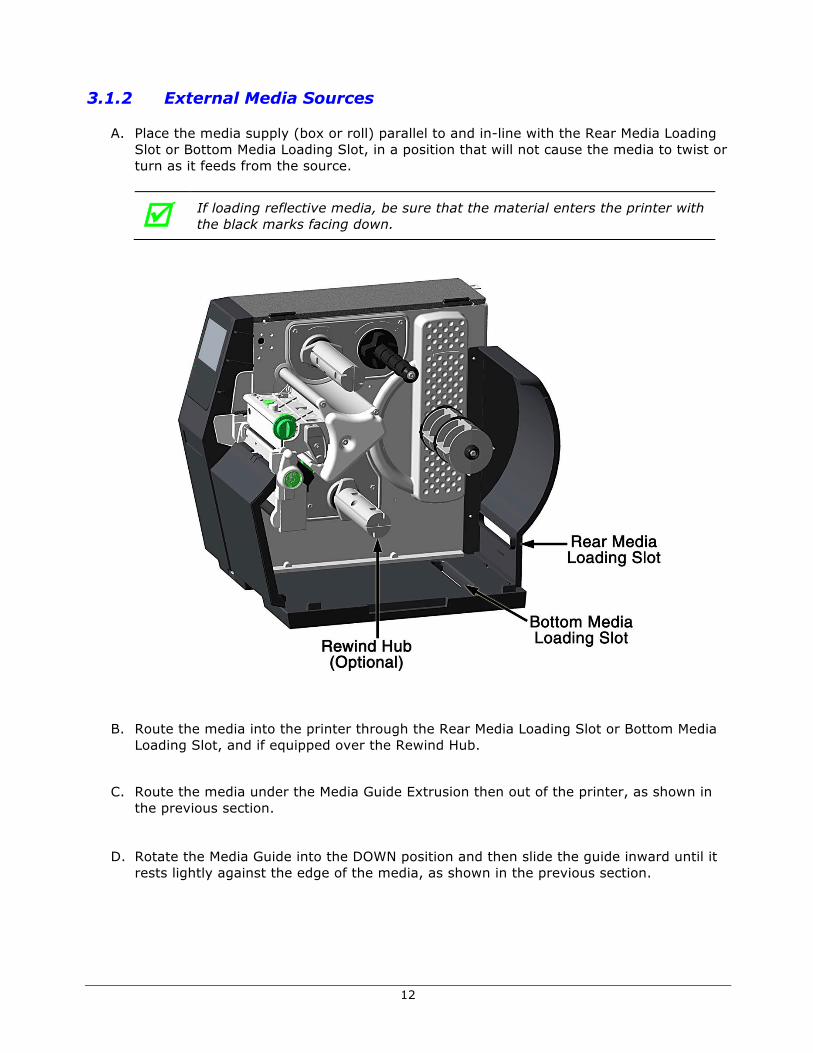
3.1.2 External Media Sources
A. Place the media supply (box or roll) parallel to and in-line with the Rear Media Loading Slot or Bottom Media Loading Slot, in a position that will not cause the media to twist or turn as it feeds from the source.
þ If loading reflective media, be sure that the material enters the printer with the black marks facing down.
B. Route the media into the printer through the Rear Media Loading Slot or Bottom Media Loading Slot, and if equipped over the Rewind Hub.
C. Route the media under the Media Guide Extrusion then out of the printer, as shown in
the previous section. D. Rotate the Media Guide into the DOWN position and then slide the guide inward until it
rests lightly against the edge of the media, as shown in the previous section.

13
E. If loading media for the first time, or when switching media types, widths or configurations, position the Media Sensor as detailed in Section 3.2; otherwise, go to Step F.
þ If loading thermal transfer media, also load ribbon; see Section 3.3.
F. Lower the Printhead Assembly then rotate the Printhead Latch completely clockwise. G. Close the cover. With READY displayed, press the FEED Key until at least one gap (or
mark) advances.
þ If your media is less than the width of the printhead, adjust the Leveling Cam; see Section 5.1.1.
14
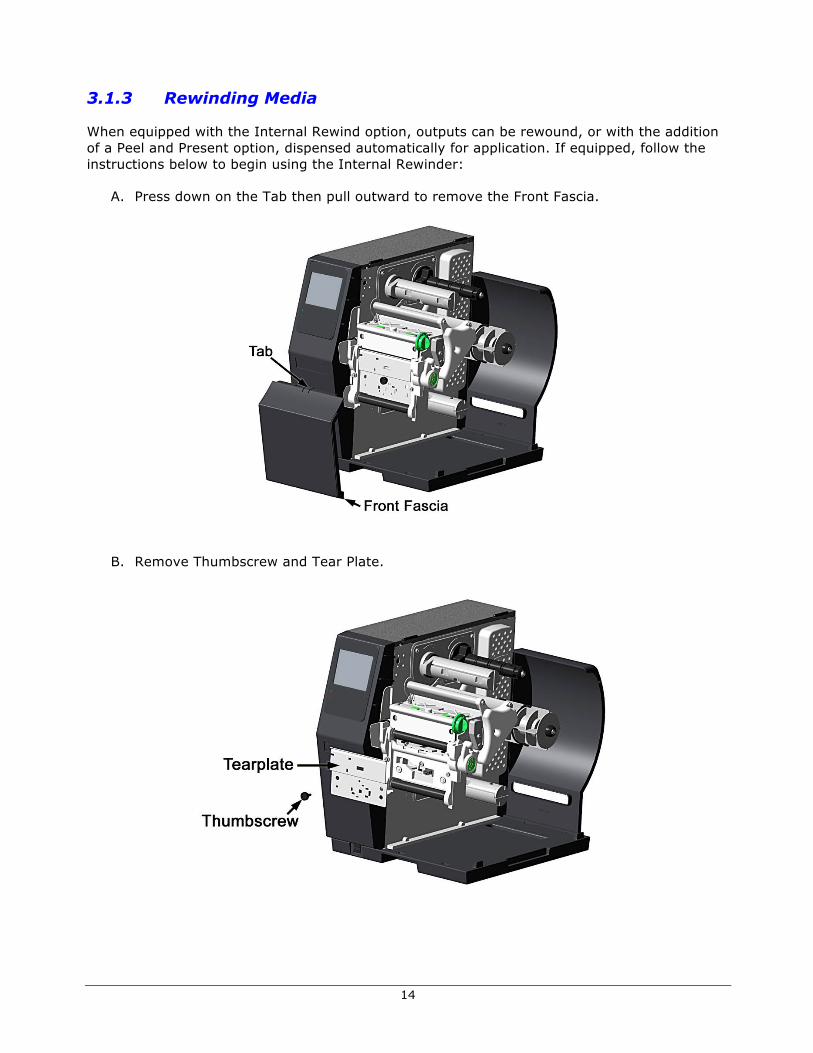
3.1.3 Rewinding Media When equipped with the Internal Rewind option, outputs can be rewound, or with the addition of a Peel and Present option, dispensed automatically for application. If equipped, follow the instructions below to begin using the Internal Rewinder:
A. Press down on the Tab then pull outward to remove the Front Fascia.
B. Remove Thumbscrew and Tear Plate.

15
C. Place the Arcplate on the front of the printer (as shown below) and tighten the Phillips Head Screw to secure it; or, to use the Peel and Present option attach that device.
D. Proceed according to your application:
• To rewind labels onto an empty media core, go to Step E. • To dispense labels using a Peel and Present option, refer to the instructions included
with that option.
E. Rotate the latch 1/4-turn counterclockwise to release the Rewind Support from the Rewind Hub then swing the Rewind Support outward.
16
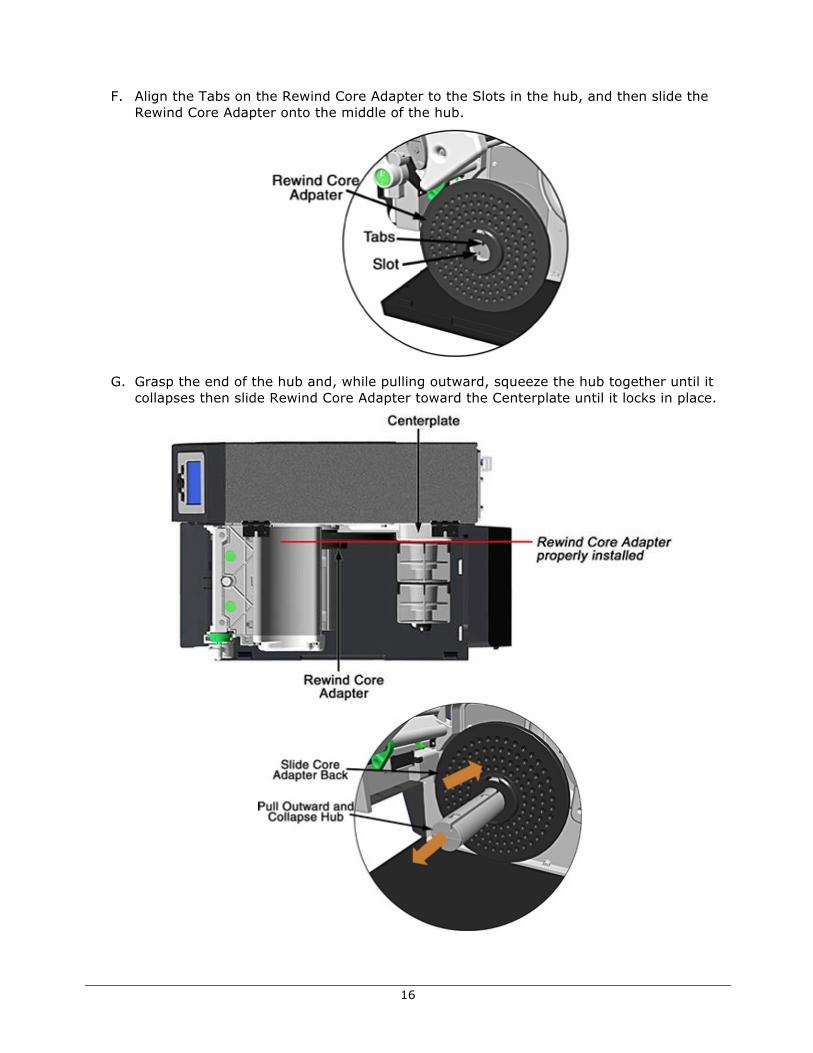
F. Align the Tabs on the Rewind Core Adapter to the Slots in the hub, and then slide the Rewind Core Adapter onto the middle of the hub.
G. Grasp the end of the hub and, while pulling outward, squeeze the hub together until it collapses then slide Rewind Core Adapter toward the Centerplate until it locks in place.

17
H. Slide an Empty Media Core (3-inch diameter) onto the Rewind Core Adapter.
I. Slide the Rewind Retainer into the Empty Media Core then close the Locking Lever.
J. Close the Rewind Support then rotate the latch1/4-turn clockwise to lock the Rewind Support.
K. With label stock installed as described in Loading Roll Media, repeatedly press the FEED Key until about 20 inches (50 cm) of media has been output.

18
L. Route the media back into the printer and around the media core (as shown below) then tape the leading edge to the media core. Rotate the Hub by hand to take up any slack in the media. There should be at least two or three full wraps of the media on the empty core before starting printing to ensure tight rewinded rolls.
M. Enter the menu, go to ADVANCED/PRINTER/OPTIONS/REWINDER. The rewinder is designed to rewind in either direction (clockwise or counterclockwise) but this direction must be set; enable your desired direction.
You may also increase tension to accommodate different media materials or to obtain a tighter core. Also, increasing tension can help peel aggressive adhesives.
Save the settings by pressing the Home icon. The rewinder will turn slowly for about 30 seconds to tension the material and afterward rotate as labels are advanced. Note: Either the peel plate or the rewinder plate must be installed.
19
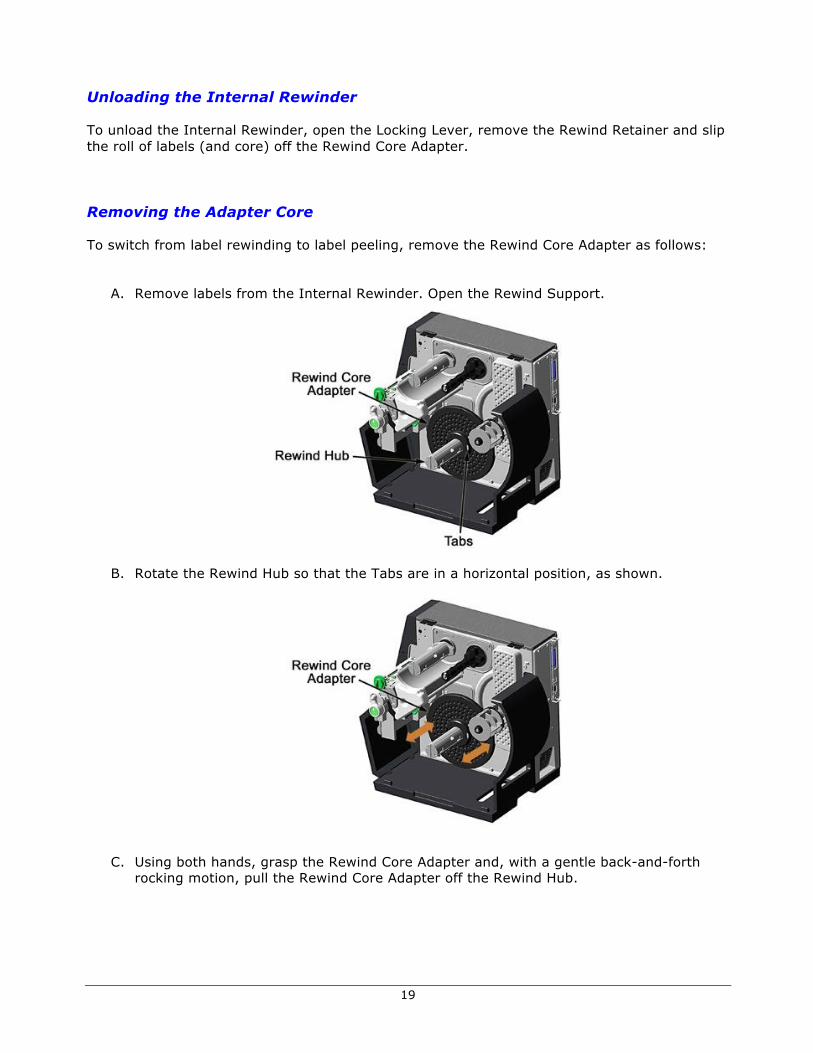
Unloading the Internal Rewinder To unload the Internal Rewinder, open the Locking Lever, remove the Rewind Retainer and slip the roll of labels (and core) off the Rewind Core Adapter. Removing the Adapter Core
To switch from label rewinding to label peeling, remove the Rewind Core Adapter as follows:
A. Remove labels from the Internal Rewinder. Open the Rewind Support.
B. Rotate the Rewind Hub so that the Tabs are in a horizontal position, as shown.
C. Using both hands, grasp the Rewind Core Adapter and, with a gentle back-and-forth rocking motion, pull the Rewind Core Adapter off the Rewind Hub.

20
3.2 Media Sensor Adjustment Position the Media Sensor for proper label detection:
A. Raise the Printhead Assembly. Note the Red Dot (see illustration below) that identifies the location of the Media Sensor.
B. Grasp the Slide Tab to position the Red Dot according to the Media Type, as detailed
below.
Media Sensor Adjustment Media Type Red Dot Position
Die-cut Centered over a label
Notched Centered over a notch
Reflective Centered over a black mark
Continuous Centered over the material
C. Lower the Printhead Assembly then rotate the Printhead Latch completely clockwise. D. If necessary, return to Media Loading to complete the setup process; otherwise, close
the cover. With READY displayed, press and hold the FEED Key until at least one gap (or mark) advances; see Section 3.4.
þ If using REFLECTIVE or CONTINUOUS media, select the appropriate SENSOR TYPE; see Section 3.4 Configuring Media and Ribbon Settings.

21
3.3 Ribbon Loading Ribbon, required when printing on thermal transfer media, should be loaded as follows:
þ The use of ribbon slightly wider than the media (and liner, if any) is recommended to help protect against abrasive wear.
A. Rotate the Printhead Latch counterclockwise then raise the Printhead Assembly.
22
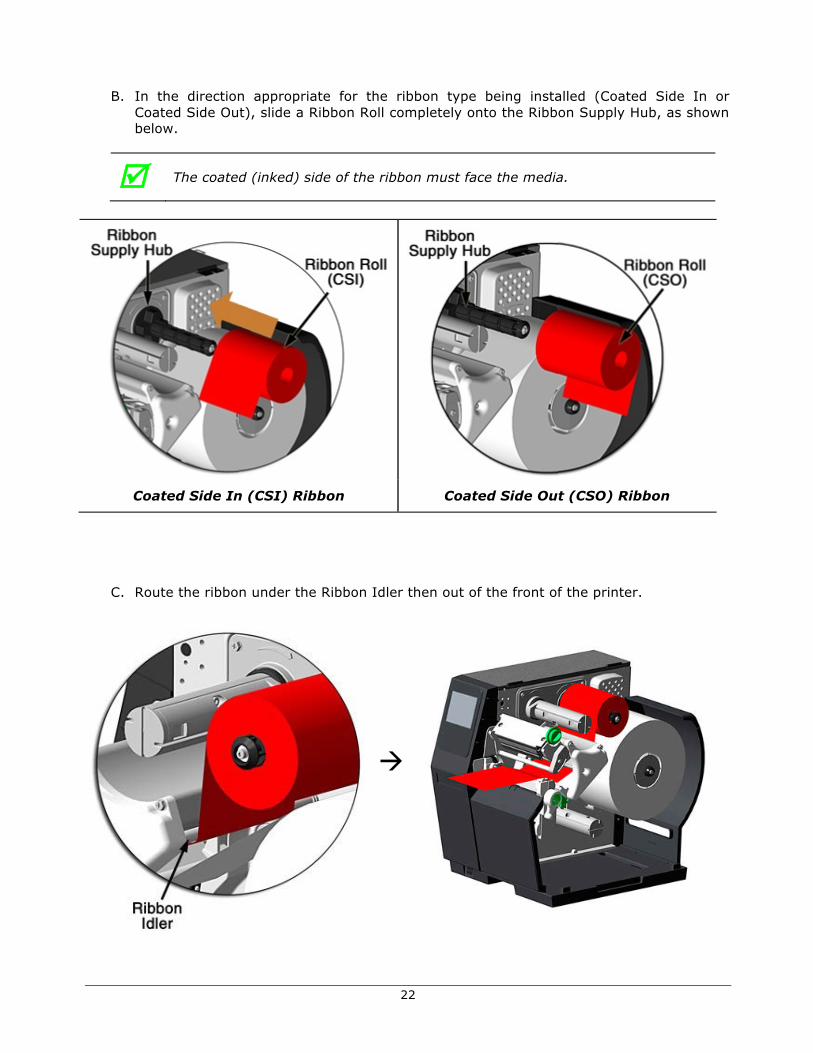
B. In the direction appropriate for the ribbon type being installed (Coated Side In or Coated Side Out), slide a Ribbon Roll completely onto the Ribbon Supply Hub, as shown below.
þ The coated (inked) side of the ribbon must face the media.
Coated Side In (CSI) Ribbon Coated Side Out (CSO) Ribbon
C. Route the ribbon under the Ribbon Idler then out of the front of the printer.
à
23
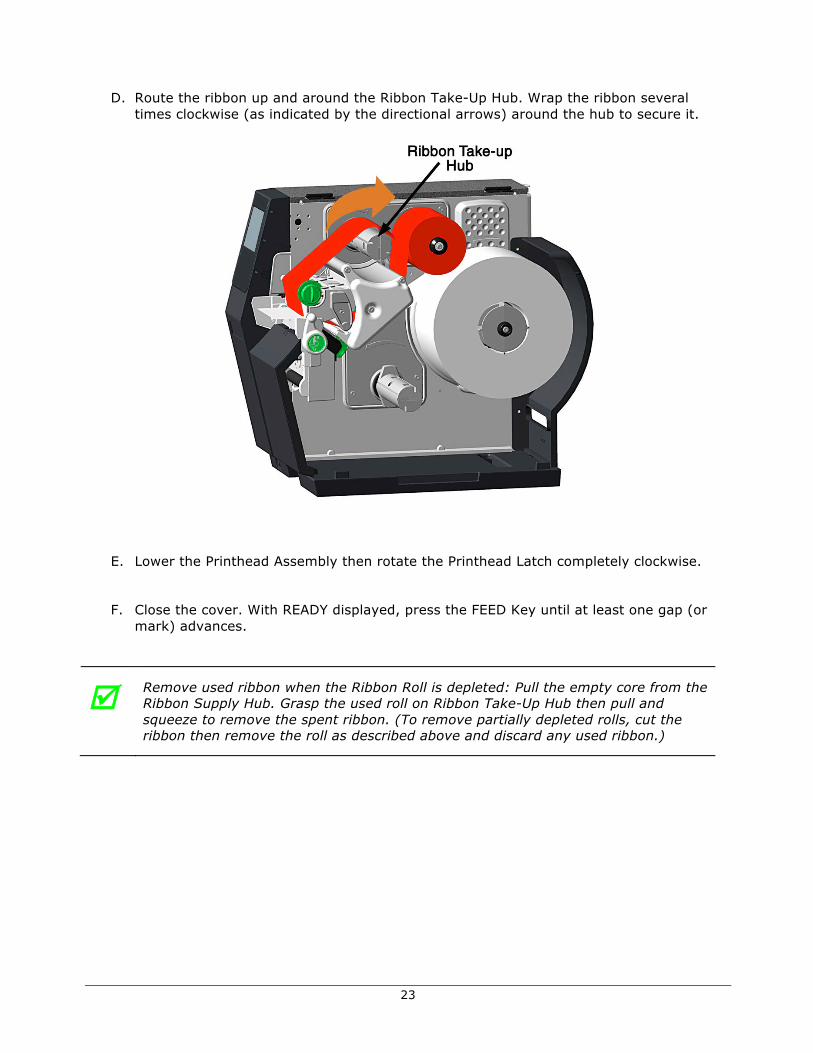
D. Route the ribbon up and around the Ribbon Take-Up Hub. Wrap the ribbon several times clockwise (as indicated by the directional arrows) around the hub to secure it.
E. Lower the Printhead Assembly then rotate the Printhead Latch completely clockwise.
F. Close the cover. With READY displayed, press the FEED Key until at least one gap (or mark) advances.
þ Remove used ribbon when the Ribbon Roll is depleted: Pull the empty core from the Ribbon Supply Hub. Grasp the used roll on Ribbon Take-Up Hub then pull and squeeze to remove the spent ribbon. (To remove partially depleted rolls, cut the ribbon then remove the roll as described above and discard any used ribbon.)

24
3.4 Configuring Media and Ribbon Settings
Once the media and ribbon have been loaded, the print parameters should be set to match the type of media and ribbon being used. This will ensure optimal print quality. Once set, the parameters will not need to be set again unless the media or ribbon types are changed.
3.4.1 Using Media and Ribbon IDs
Media and ribbons supplied by Datamax-O’Neil and other vendors may have up to an eight (8)-digit media ID and ribbon ID assigned. Additional codes may be created in the Utility menu and then selected from Media menu via the printer’s front panel. All relevant print parameters will be automatically configured.
1. Select Menu > Basic > Media > Media ID.
2. Using the up and down arrows, select the appropriate Paper ID.
3. To select the Ribbon ID, navigate to tab 2 and use the scroll arrows to highlight and select the appropriate Ribbon ID.
4. Select the Home button.
5. After selecting the Home button, select the green Accept button to again confirm your selection or the red Reject button to cancel the changes.
Note: Although using media and ribbon IDs usually produce very good results, minor adjustments may be required. Refer to the section titled Adjusting Media and Ribbon Settings.
3.4.2 Selecting Media and Ribbon Types
If media and ribbon IDs are not known, the media and ribbon types may be selected manually.
1. Select Menu > Basic > Media > Select Type.
2. Using the up and down arrows, select your paper type.
Note: If the paper type is not known, either select Coated Direct Thermal for direct thermal printing or select Coated Thermal Transfer for printing with a ribbon.
3. Tab to the Ribbon screen.
4. Using the up and down arrow, select your ribbon type.
Note: If the ribbon type is not known, select Wax to start. This selection can always be changed if required.
5. Tab to the Settings screen.

25
6. Select the Paper Sensor Type button until your paper type appears. The options are as follows:
§ Gap
§ Mark on Bottom
§ Notch
§ Continuous
Note: For more information, refer to the section “Top-of-Form Sensor.”
7. Select the Ribbon Mode button until the correct option appears. The options are as follows:
§ None
§ Coated In (CSI)
§ Coated Out (CSO)
Note: For more information, refer to the section “Top-of-Form Sensor.”
Note: CSI ribbon (shiny side facing outward) should be installed where the ribbon unwinds in a counterclockwise direction. CSO ribbon (dull side facing outward) should be installed where the ribbon unwinds in a clockwise direction. If these settings do not match the ribbon type being used, the ribbon supply hub will turn in the wrong direction.

26
3.4.3 Setting the Media and Ribbon Parameters Manually (Advanced)
There are times when all print parameters must be set manually. This can happen when a new or specialized media or ribbon is being used.
Note: Some values may be grayed-out, meaning they are automatically set by default or not available for the particular printer model. To change these values, select the Auto button next to the value field and then select the green Accept button to confirm your choice to change to manual mode.
Note: Please see the Menu section for more information.
1. Select Menu > Advanced > Media.
2. Select the Paper Sensor Type field until the correct paper type appears. The options are as follows: § Gap § Mark on Bottom § Notch § Continuous
3. Select the Ribbon Mode field until the correct option appears. The options are as follows: § None - for direct thermal printing § Coated In - for thermal transfer printing § Coated Out - for thermal transfer printing
4. Tab to the next screen and enter values for Heat and Heat Balance.
5. Tab to the next screen and enter values for Rewinder Tension.
6. Tab to the next screen and enter a value for Ribbon Low Diameter, Gap/Mark Offset and Gap Mark Noise.
7. If media levels are to be tracked, tab to the next screen and enter values for Ribbon Length, Form Length and Number of Forms. These parameters are used for media tracking when Paper Change Warning is enabled.
8. Select the Home button and select the green Accept button to confirm the settings. 3.4.4 Load a Saved Media File For media and ribbon settings that are frequently used, media setup files can be saved to the printer’s internal memory for easy access. For more information on saving the user setup files, refer to the section titled Setups from the Tools > User Files menu section. To select an internally saved media setup file, perform the following steps:
1. Select Menu > Basic > Media > User Media. 2. Using the up and down arrows, select the appropriate Internal Media Setup File. 3. Select the green Accept button and confirm the settings.
27
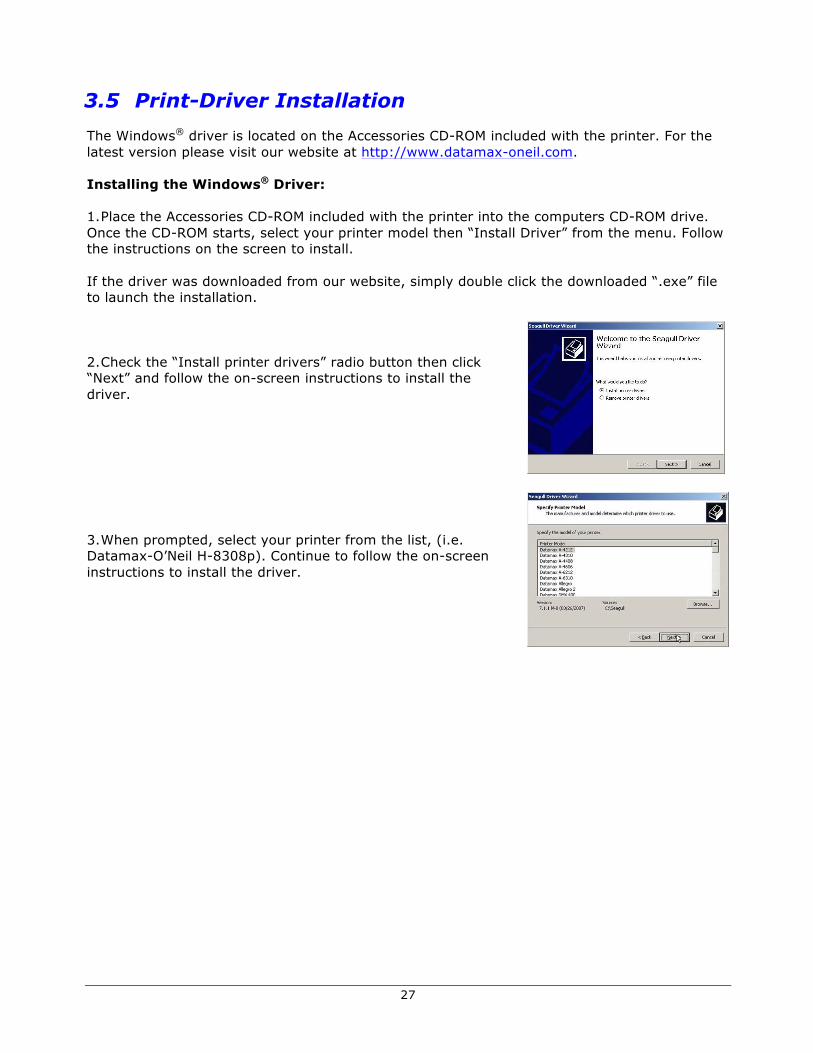
3.5 Print-Driver Installation The Windows® driver is located on the Accessories CD-ROM included with the printer. For the latest version please visit our website at http://www.datamax-oneil.com. Installing the Windows® Driver: 1. Place the Accessories CD-ROM included with the printer into the computers CD-ROM drive. Once the CD-ROM starts, select your printer model then “Install Driver” from the menu. Follow the instructions on the screen to install. If the driver was downloaded from our website, simply double click the downloaded “.exe” file to launch the installation. 2. Check the “Install printer drivers” radio button then click “Next” and follow the on-screen instructions to install the driver. 3. When prompted, select your printer from the list, (i.e. Datamax-O’Neil H-8308p). Continue to follow the on-screen instructions to install the driver.

28
Important Notes: The Windows® driver functions the same as any other Windows® printer. While built-in help files provide information on all settings, there are some important setting parameters that should be observed for trouble-free printing: Page Setup Tab: Stock
Options Tab: Print Speed & Printhead Temperature
It is important that the Stock setting matches the size of the label you are using. If you cannot find a match for your label click New and enter the dimensions of your label.
These two settings will have the greatest effect on print quality. Some label stocks will require more heat and slower print speeds to generate a quality image.
The Windows® application software used to create the label format will likely have a "Page Setup" screen. This will also need to match the size of the label you are using.
29
4
Using the Control Panel
4.1 Menu Overview The printer is designed with a touchscreen display. Functions can be enabled and disabled and settings can be changed through the on-screen menu. Press the buttons on the screen with the light touch of a finger. Note: Some items may be grayed-out or not available depending on the printer model and available options. Caution: Do not touch the screen with excessive force or by using sharp objects. Doing so will damage the touchscreen and may void the manufacturer’s warranty.
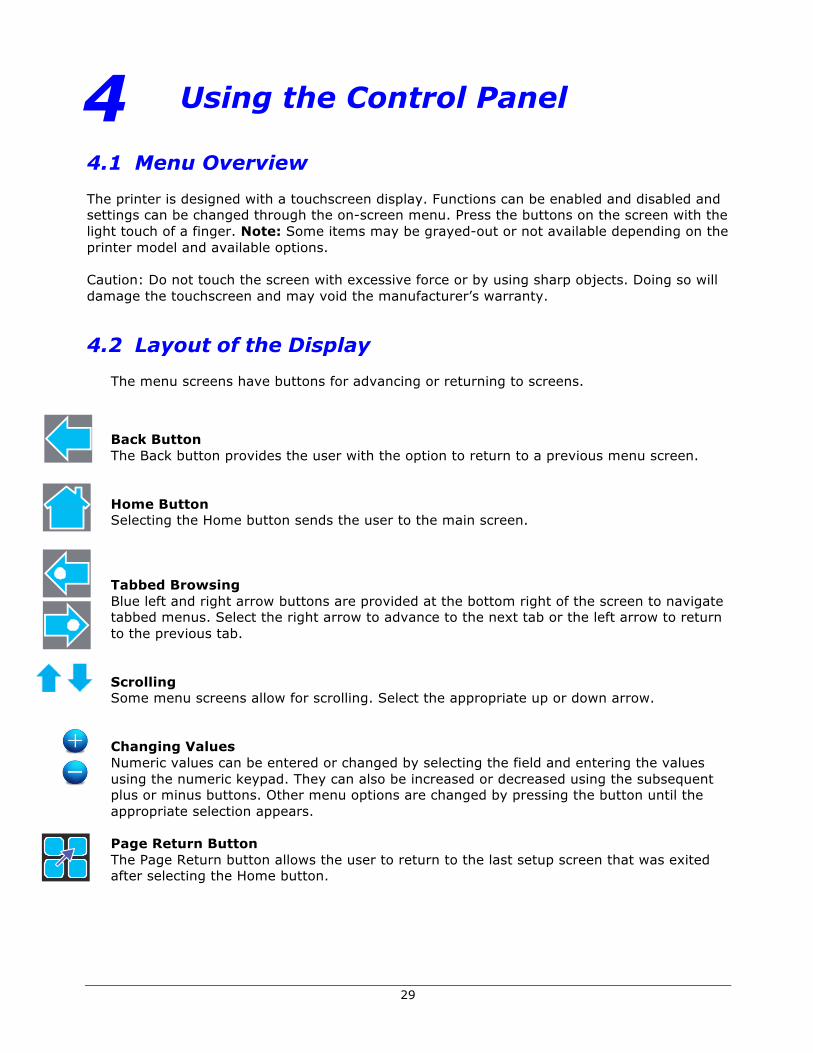
4.2 Layout of the Display The menu screens have buttons for advancing or returning to screens.
Back Button The Back button provides the user with the option to return to a previous menu screen. Home Button Selecting the Home button sends the user to the main screen. Tabbed Browsing Blue left and right arrow buttons are provided at the bottom right of the screen to navigate tabbed menus. Select the right arrow to advance to the next tab or the left arrow to return to the previous tab. Scrolling Some menu screens allow for scrolling. Select the appropriate up or down arrow. Changing Values Numeric values can be entered or changed by selecting the field and entering the values using the numeric keypad. They can also be increased or decreased using the subsequent plus or minus buttons. Other menu options are changed by pressing the button until the appropriate selection appears. Page Return Button The Page Return button allows the user to return to the last setup screen that was exited after selecting the Home button.

30
4.2.1 Three-Button Panel The printer may be placed in three-button security mode that restricts the operator from changing any settings or printing test labels. An administrator can access the printer menu by pressing on the “Model ID” in the taskbar and entering the appropriate security password. Once the password has been entered and accepted, the user will be allowed access to the full Home screen. To return the menu to the three-button security mode, select the “Model ID” again. 4.2.2 Home Screen The home screen presents several options to the user.
Printer Status
Operator Action Area
Date/Time
Fault Information Area
Model ID Connected Devices and
Mode Indicators Buttons
Printer Status
The printer status area displays the state of the printer. These states include the following:
• Ready - The printer is idle and ready to accept internal or external commands.
• Busy - Appears when printing or feeding paper.
• Fault - The printer has paused due to a fault condition.
• Warning - The printer has paused due to a warning indicator.
• Cooling Down - The printer has paused while it is cooling down.
• Waiting - The printer is blocked by the optional Applicator or Present Sensor.
• Configuration - The printer is connected to the Configuration Utility.
• Canceling - The printer is currently canceling a print job.

31
Operator Action Area
Information about the current printer action will be displayed in this area. For example, “Printing 1 of 3” might be displayed when printing the first of three labels for a print job.
Date/Time
The time and date may be toggled on by pressing the upper-right corner of the display. After pressing the blank area, the current date and time will be displayed on the screen. Once the Home button is pressed, a screen will appear asking the user if the date and time will be displayed. Select the green Accept button to display the time or the red Reject button to cancel.
Fault Information Area
Warnings and faults will be displayed in this area. Once the fault has been corrected, the message will disappear.
Connected Devices
The symbol for devices connected to the USB host will be presented in this area. Mode Indicators
The printer will display modes that have been activated. If options have been installed but not enabled, they will not appear in this area of the display.
Information Button
By selecting the information button from the task bar, the following information can be accessed. Select the Print button in the taskbar to print the information. Not all of the information listed below is available for every printer.
• System Info
• Settings Report
• Network Report
• Extended Status
• Serial Report
• GPIO Report
• Printhead Info
• Fonts Report
Note: Selecting the up or down arrow will display additional information.
32
4.3 Menu Functions
4.3.1 System Information
The following will be displayed upon selection of the System Info button:
• Printer Model • Printhead Model • Firmware Version • FPGA Version • Boot Version • Board ID • RAM Size • Flash Size • Printer Key • Absolute Counter • Printhead Counter • Setup File • Paper • Ribbon • Detected Options
4.3.2 Settings Report
The Settings Report provides information on the printer settings. Media Settings
• Paper Sensor Type
• Ribbon Mode
• Heat
• Heat Balance
• Rewinder Tension
• Ribbon Low Diameter
• Gap/Mark Offset
• Gap/Mark Noise
• Number of Forms
• Form Length
• Ribbon Length
33
Printer Settings
• Cutter Mode
• Cut by Count
• Rewinder Mode
• Present Sensor
• Print Speed
• Feed Speed
• Reverse Speed
• Present Distance
• Paper Out Warning
• Paper Change Warning
• Rewinder Full Warning
• Reprint on Error
• Present Timeout
• Pause Mode Page Defaults Settings
• Print Length
• Print Width
• Vertical Offset
• Horizontal Offset
• Orientation
• Raster Mode
• Font Name (Number)
• Point Size
• Pitch Size
• Symbol Set
• Print Truncation
• Print on Gap/Mark

34
Auto Settings
• Auto Option Detect
• Auto Present Distance
• Auto Tension
• Auto Speed Adjust Adjustment Settings
• Present Distance Adjust
• Cut Distance Adjust
• Cutter Rotation Adjust
• Vertical Adjust
• Horizontal Adjust
• Rewinder Tension Adjust
• Darkness
• Contrast Calibration Settings
• Paper Threshold
• Gap/Mark Threshold (for non-continuous sensor type)
• TOF Gain
35
4.3.3 Network Report
The Network Report option provides information about the network on which the printer resides. The following information is available:
• Ethernet IP
• Ethernet Subnet Mask
• Ethernet Gateway
• Ethernet MAC
• Ethernet DHCP
• Wireless IP*
• Wireless Subnet Mask*
• Wireless Gateway*
• Wireless SSID*
• Wireless MAC*
• Wireless DHCP*
• Hostname
• Network Time Protocol
• Web Pages
• SSH
• SNMP
• SNMP Trap IP
• LPD
*Available only if the wireless option is installed.
4.3.4 Extended Status
The Extended Status option provides sensor information including:
• Head Temperature
• Head Voltage
• Paper Level
• Ribbon Level
• Rewinder Level
• TOF Sensor
• Session Label Count
Extended Status is also available when printing by pressing the icon in the mode indicator area.
Note: With “Paper Change Warning” enabled, levels will be shown as percentages.

36
4.3.5 Serial Report
The Serial Report provides serial connectivity information including:
• Baud Rate
• Data Bits
• Stop Bits
• Parity
• Flow Control
4.3.6 GPIO Report
The GPIO Report provides the following information:
• GPIO Mode
• Slew Speed
• Pulse Width
• Signal 1 - I/O, Function, Type
• Signal 2 - I/O, Function, Type
• Signal 3 - I/O, Function, Type
• Signal 4 - I/O, Function, Type
• Signal 5 - I/O, Function, Type
• Signal 6 - I/O, Function, Type
• Signal 7 - I/O, Function, Type
• Signal 8 - I/O, Function, Type
4.3.7 Printhead Info
The Printhead Info report provides the following information:
• Printhead Serial Number
• Printhead Model
• Printer Serial Number
• Current Firmware
• Printhead Inches
• Installation Data (Initial)
• Installation Date (Current)
• Clean Schedule
• Clean Procedures
• Clean Counter Resets
• Number of Inches

37
4.3.8 Fonts Report
The Fonts Report provides the font name and the font ID/typeface ID number. This includes both the resident and user downloaded or imported fonts. It will also show a sample PCL sequence for addressing the font using the appropriate typeface number.
Note: The resident fonts are listed in the Appendix of this manual.
Note: It is the user’s responsibility to obtain the appropriate licenses for downloaded or imported fonts.
4.3.9 Feed Button Selecting the feed button will feed the media through the print mechanism one label at a time.
4.3.10 Menu Button The Menu Button provides the user with access to the system settings and also allows for the enabling of options. The Menu screen displays the following options:
• Basic
• User
• Advanced
• Tools
• Language
• Test
4.3.11 Basic Settings
Selecting the Basic Settings button allows for access to the basic settings. These include the following:
• Printer Mode
• Media
• Print Adjust
Printer Mode
The printer is available with several options that are enabled or disabled via the Printer screen. Three of the modes cannot happen concurrently so the highest priority mode will take precedence. The order is as follows:
1. Pause Mode (High)
2. Present Sensor Enable (Medium)
3. GPIO (Low)
a. Cutter Mode
The cutter supports the cutting of media into separate labels.
For printers with a print media cutter installed, select from the following Cutter Mode options:
• Off
• Cut By Label
38
• Cut By Job
• Cut By Count
Cut By Count enables the user to specify the number of labels printed prior to being cut. Select the Cut By Count field and enter the number of labels to be printed.
b. Rewinder Mode
Rewinder Mode controls the operation of the powered internal label rewinder.
For printers with a print media rewinder installed, select from the following Rewinder Mode options:
• Off
• Clockwise
• Counterclockwise
c. Present Sensor
The Present Sensor option controls the on-demand dispensing of labels.
To enable or disable the installed Present Sensor option, select or deselect the corresponding checkbox.
d. GPIO Mode
The GPIO Mode enables or disables the applicator function from the printer. For printers with an applicator connected, select from the following settings:
• Off
• Custom
e. Pause Mode
The Pause Mode option allows the user to prompt for the next label.
To enable or disable the Pause Mode, select or deselect the corresponding checkbox.
Media
Selecting the media button allows the user to change the print media and ribbon settings. The printer may automatically set up certain parameters once the paper and ribbon types have been input either using the Media ID or manual entry.
a. Media ID
The user can qualify various media and ribbon types and assign an ID value to them. After pressing the Media ID button, ID values can be selected that will configure the printer to the optimum print settings.
1. Using the up and down arrows, select the appropriate Paper ID.
2. If applicable, tab to the Ribbon ID page and use the up and down arrows to highlight the appropriate value.
3. Select the Home button and select either the green Accept button or the Red reject button.
39
b. User Media If media setup files have been stored internally or on a USB mass storage device connected to the USB host, the files can be selected from this interface.
Using the up and down buttons, highlight the file and then select the green Check button.
Note: The first tab displays files that have been saved internally. The second tab displays files from the mass storage device attached to the USB host. User files may be printed by selecting the print button in the taskbar.
Note: Further details are available in the Advanced section of the menu. Please refer to the Advanced section of the manual for more information.
c. Select Type
For print media types that have not been qualified by the printer manufacturer, the Select Type option allows the user to manually enter the media and ribbon types. This will configure the printer to the approximate print settings.
The interface has three tabs:
• Paper - Using the up and down arrows, highlight the appropriate paper to be used.
• Ribbon - Using the up and down arrows, highlight the appropriate ribbon to be used.
• Settings - Choose the appropriate settings for your media and ribbon types.
Note: Fine adjustments to print settings may be required to improve print quality. The Select Type utility is designed to approximate the print settings.
Paper Sensor Type
Print media contains distinctive characteristics and those characteristics must be accounted for in the settings to ensure finding Top-of-Form.
Select from the following options:
Paper Sensor Type Paper Sensor Side Gap Inside
Outside Mark on Bottom Inside
Outside Notch Inside
Outside Continuous Inside
Outside
Ribbon Mode
The Ribbon Mode option allows the user to enable and disable Ribbon Mode and notes the type of ribbon being used.
Ribbon Mode has three settings:
• Coated In (CSI) - for thermal transfer printing
40
• Coated Out (CSO) - for thermal transfer printing
• None - for direct thermal printing
Print Adjust
The Print Adjust selection allows for the adjustments of both the darkness and the contrast of print quality as well as horizontal and vertical adjustments.
Selecting the plus or minus buttons respectively increases or decreases the values.
Changes to the values may also be made by selecting the field and entering the appropriate values using the numeric keypad. During printing, the print-adjust screen will be available via an icon in the mode indicator area of the front display. When paused the icon will be accessible via the home screen icon.
Note: Settings that use the word “Adjust” should be considered fine adjustments and are not main settings.
a. Darkness
The darkness adjustment is set within the range of -20 to +20. To increase darkness, adjust the settings in a positive (+) direction.
1. Enter the appropriate value in the field.
2. Upon exiting the Print Adjust panel, either select the green Accept button or the red Reject button.
b. Contrast
The contrast adjustment is set within the range of -10 to +10. To increase contrast, adjust the settings in a positive (+) direction.
1. Enter the appropriate value in the field.
2. Upon exiting the Print Adjust panel, either select the green Accept button or the red Reject Button.
c. Vertical Adjust
The vertical adjustment is set within the range of -100 to +100 dots. To move the image down, adjust the settings in a positive (+) direction.
1. Enter the appropriate value in the field.
2. Upon exiting the Print Adjust panel, either select the green Accept button or the red Reject button.
d. Horizontal Adjust
The horizontal adjustment is set within the range of -100 to +100 dots. To move the image to the right, adjust the settings in a positive (+) direction.
1. Enter the appropriate value in the field.
2. Upon exiting the Print Adjust panel, either select the green Accept button or the red Reject button.

41
4.3.12 User Labels
The User Labels button allows for the usage of custom labels and custom printer configurations that are saved internally or saved to a memory stick inserted in the USB host.
User Labels
Custom User Labels that have been saved internally or in a mass storage device may be printed.
1. Select User Labels.
2. Select the file to be printed (internally or USB hosted).
3. Select the green Accept button.
4. Select the Print button to print the label.
Note: Further details are available in the Advanced section of the menu. Please refer to the Advanced section of the manual for more information. User Setups
Printer configurations that have been saved internally or on a mass-storage device attached to the USB host may be accessed and implemented from this utility.
1. Select User Setups.
2. Select the internally hosted user setup file.
3. Select the green Accept button.
Note: Further details are available in the Advanced section of the menu. Please refer to the Advanced section of the manual for more information.
4.3.13 Advanced Settings
The Advanced Settings button provides access to the advanced settings of the printer. These settings include the following:
• Page Defaults
• Printer
• Media
• Comm (communications)
• Adjustments

42
Page Defaults
The following page parameters can be modified. These settings are used only if they are not specified in the label format settings. They are typically controlled by the application software or the printer driver.
Settings Values Ranges Default
Print Length N/A .10 to 99.00 in. 4.00 in.
Print Width N/A Refer to the Overview section to find your specific model
4.00 in.
Vertical Offset N/A .00 to 10.00 in 0.00 in
Horizontal Offset N/A .00 to 4.00 in 0.00 in
Orientation Portrait
Landscape
Reverse Portrait
Reverse Landscape
Portrait
Raster Mode Transparent
Opaque
Opaque
Default Font Number (Please see Appendix A for the appropriate values)
0 to 52 23 (Courier)
Default Symbol Set (Please see Appendix A for the appropriate values)
[0] PC-8
Default Point Size N/A 4.00 to 999.75 12.00
Default Pitch Size N/A .44 to 99.99 10.00
Print Truncation Enabled
Disabled
Enabled
Print on Gap Enabled
Disabled
Disabled
Note: The default settings will be used if the print job does not directly specify the settings.
Note: Most of these settings will affect the internal Quality Label from the Test menu.
Note: Rotating oversized images with Print Truncation enabled may result in truncating the printout entirely.
Note: Setting the raster mode to transparent will allow for texts, barcodes and images that support transparency to be copied onto the destination without the white regions generally associated with images. Setting the raster mode to opaque allows for texts, barcodes and images to be applied onto the destination with the white pixels from the source. Generally, this is only noticed when text, barcodes or images are placed on top of each other.
Note: Print on Gap when enabled in Continuous paper mode eliminates simulated gap between labels. In this mode, vertical adjustment can be used to control the skip space size for different TOF types.
Note: Print Truncation takes precedence over Print on Gap.
43
Printer
The following settings may be adjusted:
• Presentation
• Auto
• Speeds
• Alarms
• Options
• Set Defaults
a. Presentation
The following settings can be adjusted:
Presentation Values Ranges Default
Pause Mode Enable
Disable
Disable
Present Time Out 0 - 1000 s 0 (never)
Present Distance 0.00 - 4.00 Auto
Note: To manually change the Present Distance settings, select the Auto button to the left of the value field and follow the instructions to enter and save the changes.
b. Auto
The printer has several Auto settings that can be enabled or disabled.
Selection Values Default
Auto Option Detect Enable
Disable
Enable
Auto Present Distance Enable
Disable
Enable
Auto Tension Enable
Disable
Enable
Auto Speed Adjust Enable Disable
Enable

44
c. Speeds
The following settings may be adjusted:
• Print Speed
• Feed Speed
• Reverse Speed
Speed Settings Speed Range (IPS)
Print Speed 2.0 - max speed; model dependent (Increments of 0.5)
Feed Speed 2.0 - max speed; model dependent (Increments of 0.5) or Auto
Reverse Speed 2.0 - max speed; model dependent (Increments of 0.5) or Auto
d. Alarms
The following alarm settings may be adjusted:
Adjustments Options Default
Paper Low Warning True False
True
Paper Out Warning True False
True
Paper Change Warning True False
False
Rewinder Full Warning True False
True
Reprint on Error True False
True

45
e. Options
The following settings may be adjusted:
• Cutter - Controls the cutting action of the media.
• GPIO - Controls the application of labels.
• Present Sensor - Controls the “on-demand” dispensing of labels.
• Rewinder - Controls the operation of the powered internal label rewinder.
Cutter The following settings may be adjusted for printers with the cutter option installed:
Adjustments Options Ranges Default
Cutter Mode Off
Cut By Label
Cut By Job Cut
By Count
Off
Cut By Count 1
Cut Distance Adjust -100 to 100 dots 0
Cut Rotation Adjust -10 to 10* 0
Note: *A positive value rotates the blade further.
GPIO
The following settings may be adjusted for printers with the GPIO option installed:
Adjustments Values Ranges Default
GPIO Mode Off
Custom
Off
Slew Speed 2 - 10 IPS 8 IPS
Pulse Width 1 - 2000µs 1000µs
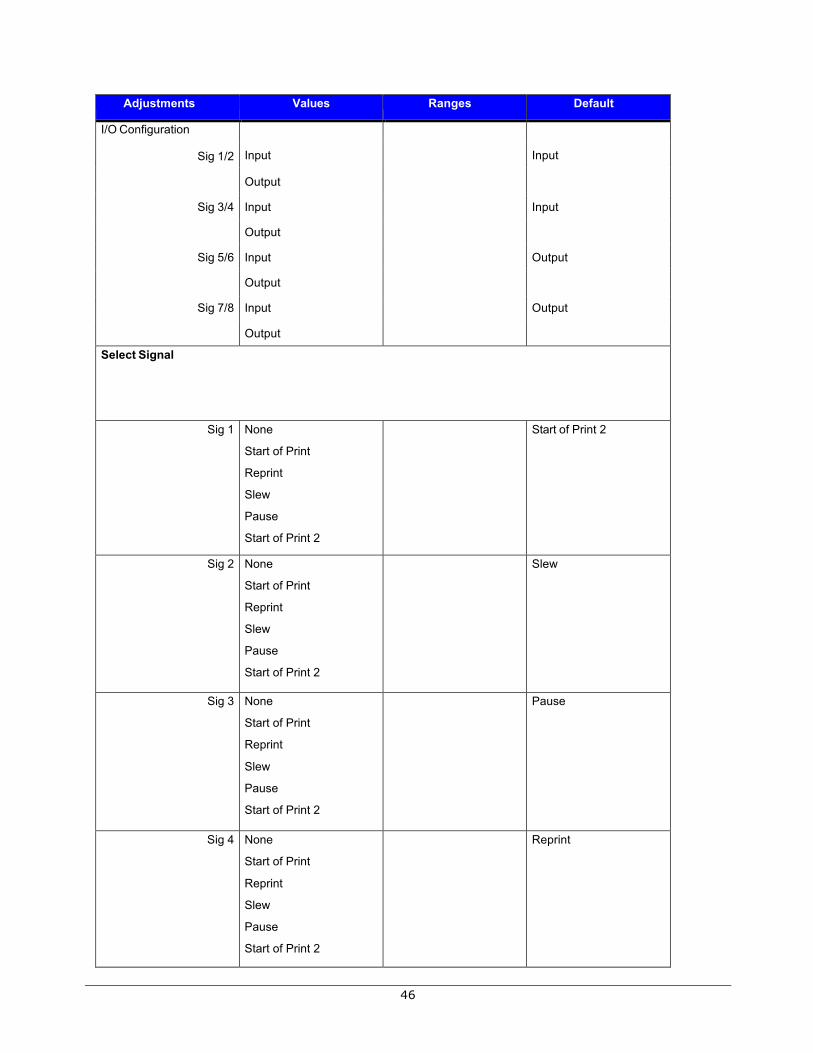
46
Adjustments Values Ranges Default
I/O Configuration Input
Input Sig 1/2
Output
Sig 3/4 Input Input
Output
Sig 5/6 Input Output
Output
Sig 7/8 Input Output
Output
Select Signal
Sig 1 None
Start of Print
Reprint
Slew
Pause
Start of Print 2
Start of Print 2
Sig 2 None
Start of Print
Reprint
Slew
Pause
Start of Print 2
Slew
Sig 3 None
Start of Print
Reprint
Slew
Pause
Start of Print 2
Pause
Sig 4 None
Start of Print
Reprint
Slew
Pause
Start of Print 2
Reprint
47
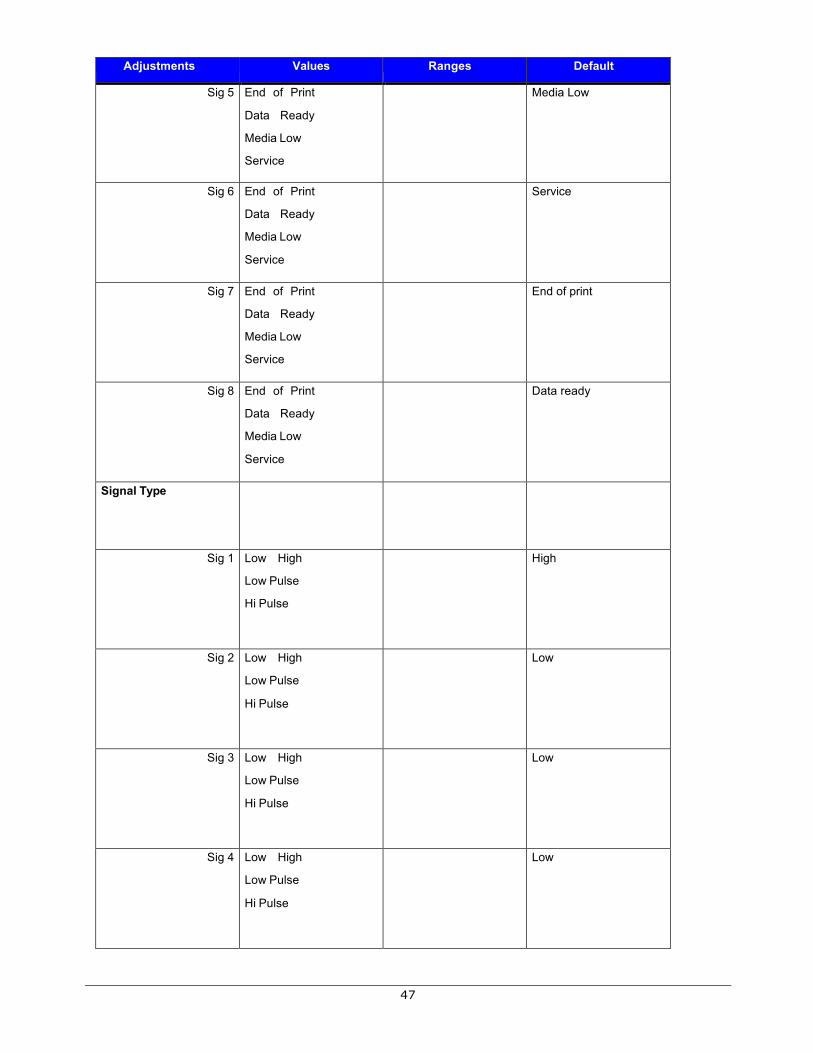
Adjustments Values Ranges Default
Sig 5 End of Print
Data Ready
Media Low
Service
Media Low
Sig 6 End of Print
Data Ready
Media Low
Service
Service
Sig 7 End of Print
Data Ready
Media Low
Service
End of print
Sig 8 End of Print
Data Ready
Media Low
Service
Data ready
Signal Type
Sig 1 Low High
Low Pulse
Hi Pulse
High
Sig 2 Low High
Low Pulse
Hi Pulse
Low
Sig 3 Low High
Low Pulse
Hi Pulse
Low
Sig 4 Low High
Low Pulse
Hi Pulse
Low
48
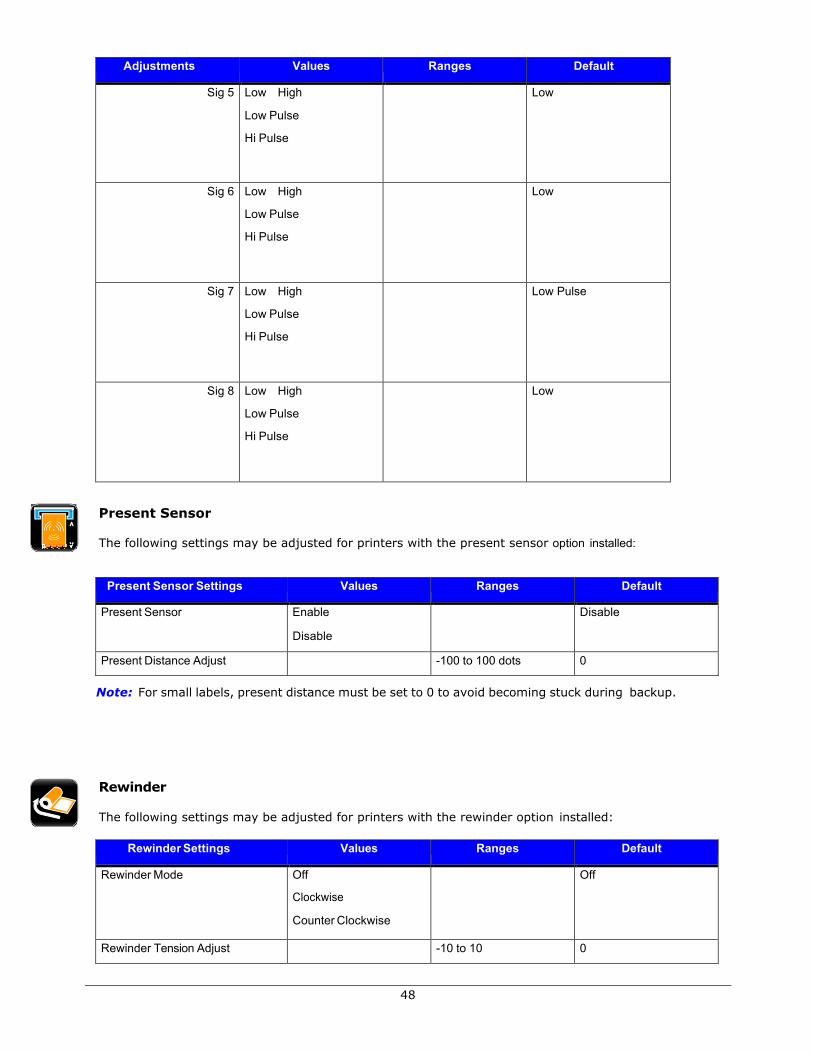
Adjustments Values Ranges Default
Sig 5 Low High
Low Pulse
Hi Pulse
Low
Sig 6 Low High
Low Pulse
Hi Pulse
Low
Sig 7 Low High
Low Pulse
Hi Pulse
Low Pulse
Sig 8 Low High
Low Pulse
Hi Pulse
Low
Present Sensor The following settings may be adjusted for printers with the present sensor option installed:
Present Sensor Settings Values Ranges Default
Present Sensor Enable
Disable
Disable
Present Distance Adjust -100 to 100 dots 0
Note: For small labels, present distance must be set to 0 to avoid becoming stuck during backup.
Rewinder The following settings may be adjusted for printers with the rewinder option installed:
Rewinder Settings Values Ranges Default
Rewinder Mode Off
Clockwise
Counter Clockwise
Off
Rewinder Tension Adjust -10 to 10 0

49
f. Set Defaults
The factory default settings for the printer setup can be reset. To reset to the default settings, select Set Defaults. Confirm your selection by selecting the green Accept button.
Note: If the current custom settings have not been saved but will be needed again, be sure to save them with the User Setups from the Tools menu before resetting to defaults.
4.3.14 Media Settings
Select Media to change the print media settings.
Media Settings Values
Ranges Default
Paper Sensor Type Gap
Mark on Bottom
Notch Continuous
Gap
Ribbon Mode Coated In
Coated Out None
Coated In
Heat 1 to 30 5*
Heat Balance 1 to 10 8*
Rewinder Tension 1 to 20 12*
Ribbon Low Diameter 1.0 to 2.0 in. 1.5 in.
Gap/Mark Offset -2.23 to 6 in. 0
Gap/Mark Noise 0 to 600 dots 0
Ribbon Length 0 to 1,000 in. 0
Form Length 0 to 99 in. 4 in.
Number of Forms 0 to 10,000 0
Note: *These values may vary depending on the printer model.
50
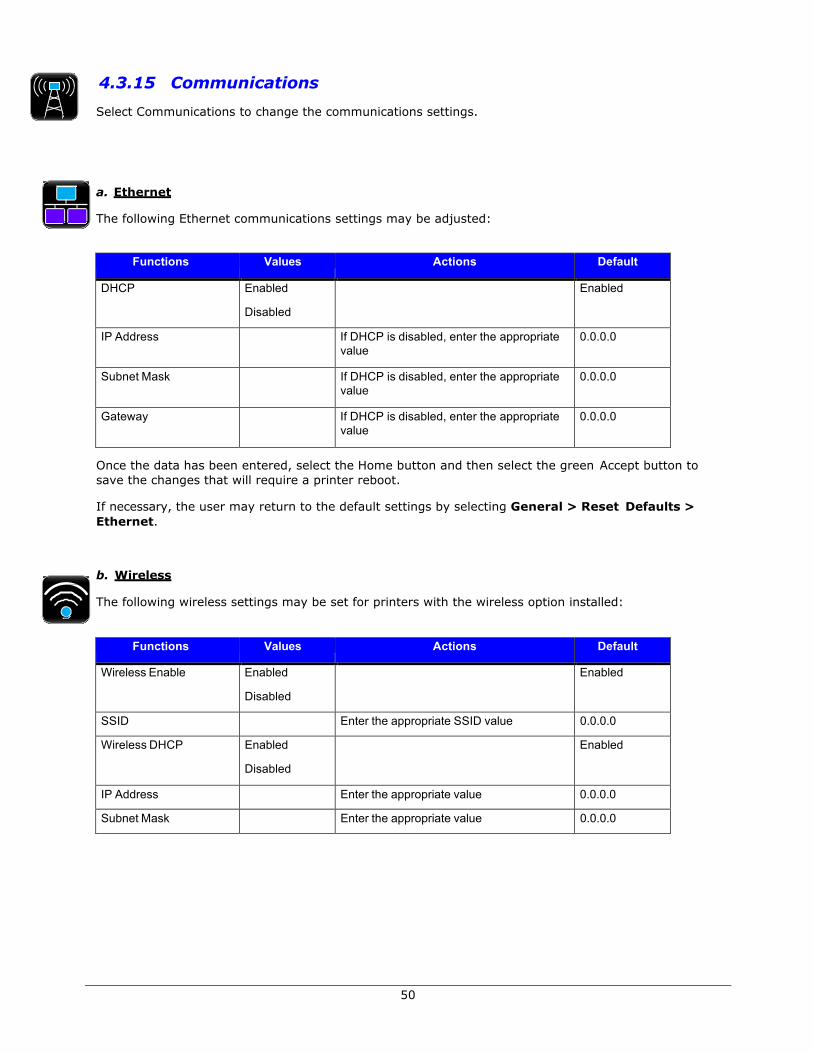
4.3.15 Communications
Select Communications to change the communications settings.
a. Ethernet
The following Ethernet communications settings may be adjusted:
Functions Values Actions Default
DHCP Enabled
Disabled
Enabled
IP Address If DHCP is disabled, enter the appropriate value
0.0.0.0
Subnet Mask If DHCP is disabled, enter the appropriate value
0.0.0.0
Gateway If DHCP is disabled, enter the appropriate value
0.0.0.0
Once the data has been entered, select the Home button and then select the green Accept button to save the changes that will require a printer reboot.
If necessary, the user may return to the default settings by selecting General > Reset Defaults > Ethernet.
b. Wireless
The following wireless settings may be set for printers with the wireless option installed:
Functions Values Actions Default
Wireless Enable Enabled
Disabled
Enabled
SSID Enter the appropriate SSID value 0.0.0.0
Wireless DHCP Enabled
Disabled
Enabled
IP Address Enter the appropriate value 0.0.0.0
Subnet Mask Enter the appropriate value 0.0.0.0
51
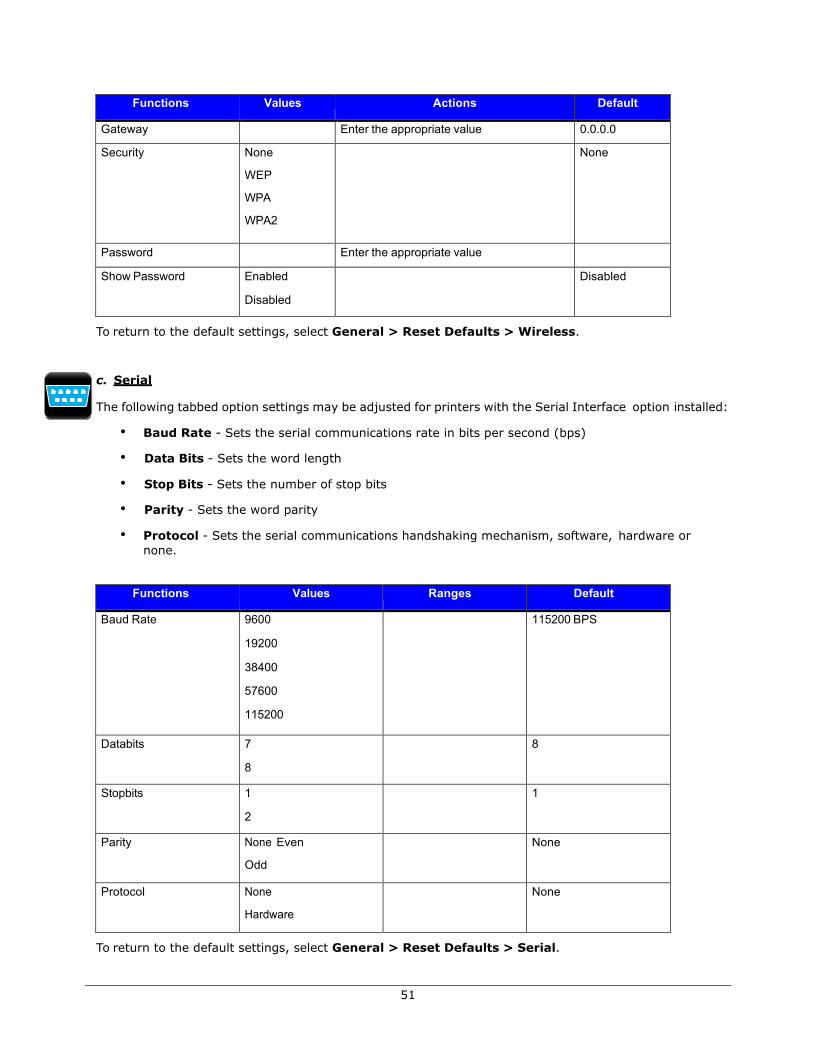
Functions Values Actions Default
Gateway Enter the appropriate value 0.0.0.0
Security None
WEP
WPA
WPA2
None
Password Enter the appropriate value
Show Password Enabled
Disabled
Disabled
To return to the default settings, select General > Reset Defaults > Wireless.
c. Serial
The following tabbed option settings may be adjusted for printers with the Serial Interface option installed:
• Baud Rate - Sets the serial communications rate in bits per second (bps)
• Data Bits - Sets the word length
• Stop Bits - Sets the number of stop bits
• Parity - Sets the word parity
• Protocol - Sets the serial communications handshaking mechanism, software, hardware or none.
Functions Values Ranges Default
Baud Rate 9600
19200
38400
57600
115200
115200 BPS
Databits 7
8
8
Stopbits 1
2
1
Parity None Even
Odd
None
Protocol None
Hardware
Software
Both
None
To return to the default settings, select General > Reset Defaults > Serial.

52
d. General
Select from the following to change the General communications settings:
Services The following services may be enabled or disabled:
• Enable Network Time Protocol
• Enable Webpages
• Enable SSH (SSH-2 is supported)
• Enable SNMP
• SNMP Trap IP
• Enable LPD To print using the LPD service, connect from a host using the LPR port and the queue name “lp”.
Services Default
Enable Network Time Protocol Disabled
Enable Webpages Enabled
Enable SSH Enabled
Enable SNMP Disabled
SNMP Trap IP 127.0.0.1
Enable LPD Enabled
Webpages provide a printer configuration interface for the user. Users can view the printer status, set printer parameters, print test labels and perform simple actions like printer calibration and setting defaults. To return to the default setting, select General > Reset Defaults > Services.
To access the printer Web pages from a computer where the printer has been installed, type the printer’s IP address into the Web browser URL field.
Note: The printer must be connected to the Ethernet. To find the IP address, select Info > Network Report and record the value for Ethernet IP.
Note: The following Web browsers are supported:
• Internet Explorer (version 8 and higher)
• Firefox (version 13 and higher)
• Google Chrome (version 23 and higher)

53
Host Settings Select from the following to change the Host Settings.
Function Range Default
Host Timeout 1 to 300 seconds 1
Port Number 0 -65535 9100
Host Name Any String Printer model number followed by the last 6 digits of the MAC address. Ex: p1115_208CB7
Hex Transfer True/False False
Reset Defaults The Reset Defaults function allows the user to reset the communications to the default settings. To reset the communication settings to the factory default settings, select one of the options and select the green Accept button to make the change.
• Ethernet
• Wireless
• Serial
• Services
Adjustments
Adjustments are considered fine adjustments and should not be considered main settings. Select from the following settings to change the values:
Adjustment Settings Ranges Default
Darkness -20 to 20 0
Contrast -10 to 10 0
Vertical Adjust -100 to 100 0
Horizontal Adjust -100 to 100 0
Rewinder Tension Adjust -10 to 10 0
Present Distance Adjust -100 to 100 0
Cut Distance Adjust -100 to 100 0
Note: Narrow labels may slip during backup if the head pressure is set too high.

54
4.3.16 Tools
Select from the following options to adjust the appropriate settings:
• Calibrate
• Security
• Maintenance
• User Files
• Date/Time
Calibrate
The Calibrate settings include:
• Calibrate Sensors
• Calibrate Paper
• Calibrate Manually
• Calibrate Display
a. Calibrate Sensors
Select Calibrate Sensors to automatically calibrate the printer without print media. Calibration includes changes to the following settings:
• Top-of-Form Sensor
Note: The print media must be removed and the printhead mechanism must be unlatched for the Calibrate Sensors to properly calibrate the printer.
b. Calibrate Paper
When selecting Calibrate Paper, the paper is scanned to determine the top-of-form media and top-of-form gap settings. Upon selection, the printer will move the paper forward and backward over the gap or mark. It may be helpful to place the identifying mark or notch just behind the TOF sensor so that the sensor will go over the mark as the media progresses through the printer.
Calibrate Paper is intended to sample paper with the default size of 4” x 4”. If a 4” x 6” label is used for calibration and the TOF sensor is placed just after the identifying mark or notch, it may not calibrate properly because it is designed to move the paper only 4”.
Note: Print media must be properly installed in the printer for the Calibrate Paper function.
Note: Manually selecting Calibrate Paper is not necessary if Auto Calibration is enabled. However, it may help in calibrating more difficult media.
55
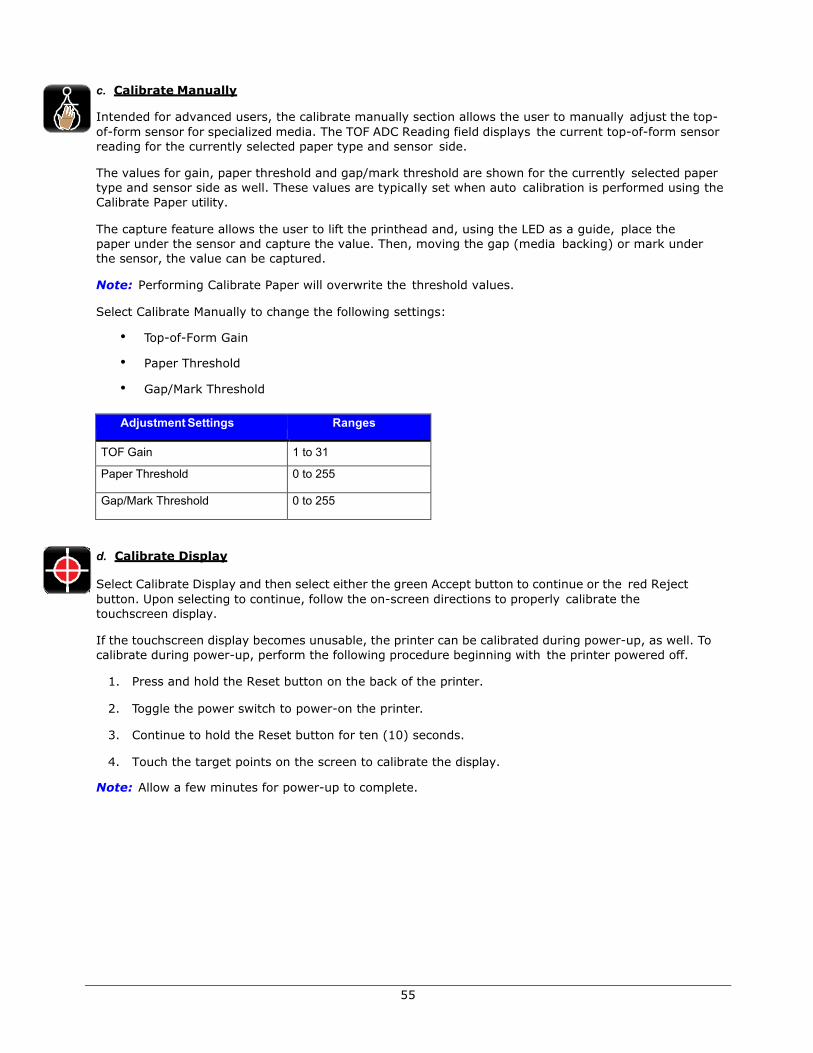
c. Calibrate Manually
Intended for advanced users, the calibrate manually section allows the user to manually adjust the top-of-form sensor for specialized media. The TOF ADC Reading field displays the current top-of-form sensor reading for the currently selected paper type and sensor side.
The values for gain, paper threshold and gap/mark threshold are shown for the currently selected paper type and sensor side as well. These values are typically set when auto calibration is performed using the Calibrate Paper utility.
The capture feature allows the user to lift the printhead and, using the LED as a guide, place the paper under the sensor and capture the value. Then, moving the gap (media backing) or mark under the sensor, the value can be captured.
Note: Performing Calibrate Paper will overwrite the threshold values.
Select Calibrate Manually to change the following settings:
• Top-of-Form Gain
• Paper Threshold
• Gap/Mark Threshold
Adjustment Settings Ranges
TOF Gain 1 to 31
Paper Threshold 0 to 255
Gap/Mark Threshold 0 to 255
d. Calibrate Display
Select Calibrate Display and then select either the green Accept button to continue or the red Reject button. Upon selecting to continue, follow the on-screen directions to properly calibrate the touchscreen display.
If the touchscreen display becomes unusable, the printer can be calibrated during power-up, as well. To calibrate during power-up, perform the following procedure beginning with the printer powered off.
1. Press and hold the Reset button on the back of the printer.
2. Toggle the power switch to power-on the printer.
3. Continue to hold the Reset button for ten (10) seconds.
4. Touch the target points on the screen to calibrate the display.
Note: Allow a few minutes for power-up to complete.
56
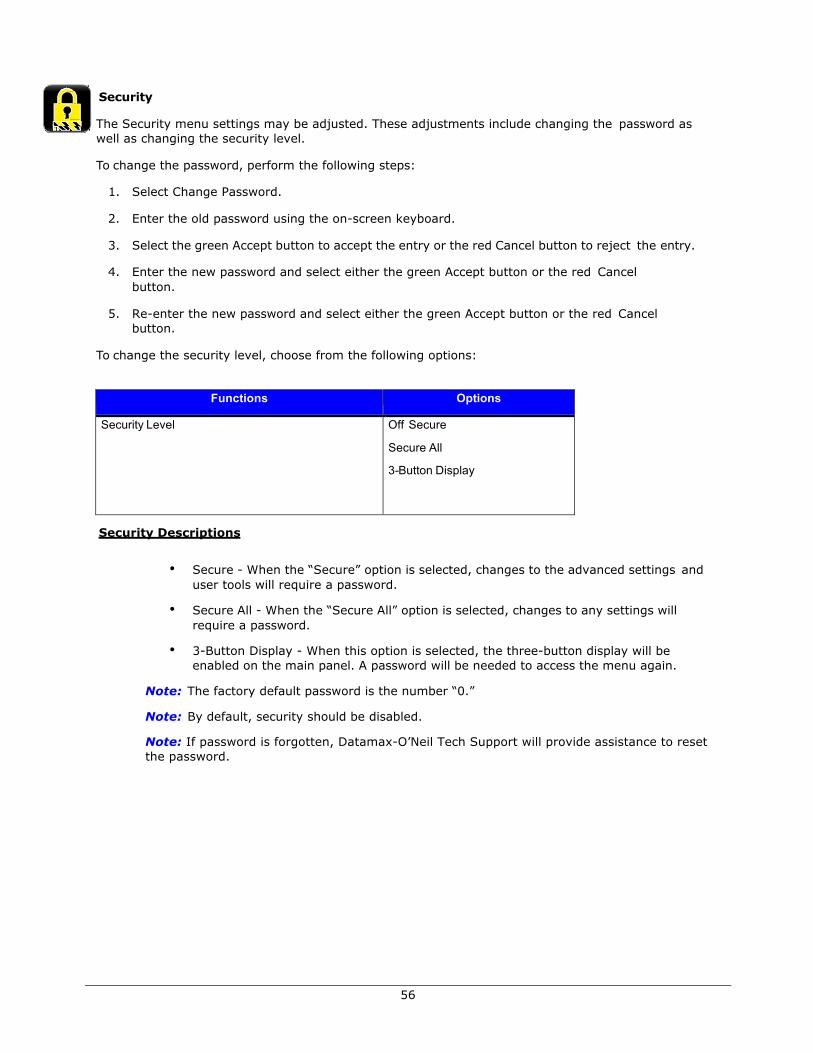
Security
The Security menu settings may be adjusted. These adjustments include changing the password as well as changing the security level.
To change the password, perform the following steps:
1. Select Change Password.
2. Enter the old password using the on-screen keyboard.
3. Select the green Accept button to accept the entry or the red Cancel button to reject the entry.
4. Enter the new password and select either the green Accept button or the red Cancel button.
5. Re-enter the new password and select either the green Accept button or the red Cancel button.
To change the security level, choose from the following options:
Functions Options
Security Level Off Secure
Secure All
3-Button Display
Security Descriptions
• Secure - When the “Secure” option is selected, changes to the advanced settings and user tools will require a password.
• Secure All - When the “Secure All” option is selected, changes to any settings will require a password.
• 3-Button Display - When this option is selected, the three-button display will be enabled on the main panel. A password will be needed to access the menu again.
Note: The factory default password is the number “0.”
Note: By default, security should be disabled.
Note: If password is forgotten, Datamax-O’Neil Tech Support will provide assistance to reset the password.

57
Remove Security
To remove security, select the lock icon to the right of the Change Password utility. Type your password and then select the green Accept button. To confirm, select the green Accept button.
Maintenace
To adjust the following Maintenance settings, select the Maintenance button. The maintenance settings include:
• Cleaning
• Upgrade
• Odometers
a. Cleaning
Cleaning should be routinely performed. The maintenance alarm is set by the user in thousandths of inches.
Enter the desired maintenance reminder interval. Once a fault appears directing the user to clean the printhead, insert a factory-approved cleaning card under the printhead and select Clean Now.
The Elapsed field displays the number of inches, in thousandths, since the last cleaning.
If the printhead is cleaned manually, the Reset Counter button can be used to reset the maintenance timer and start tracking again.
Maintenance Settings Ranges Actions Default
Maintenance 0k to 1000k in. 0 (never)
Clean Now Select Clean Now
Reset Counter Reset Clean Counter
b. Upgrade
The Upgrade function allows the user to upgrade the printer software. Insert a mass-storage device into the USB host with the appropriate file to be uploaded and then select Upgrade. Do not turn off the printer during the process. Once the printer has been updated, it will reboot. When the printer is back online, be sure to power-cycle the printer once more by turning it off and then back on.
Note: Save all user files, labels and setups to a mass-storage device connected to the USB host prior to updating your printer. Files that are not saved may be lost during the upgrade process.
Note: Upgrades may also be performed using the Configuration Utility.
58
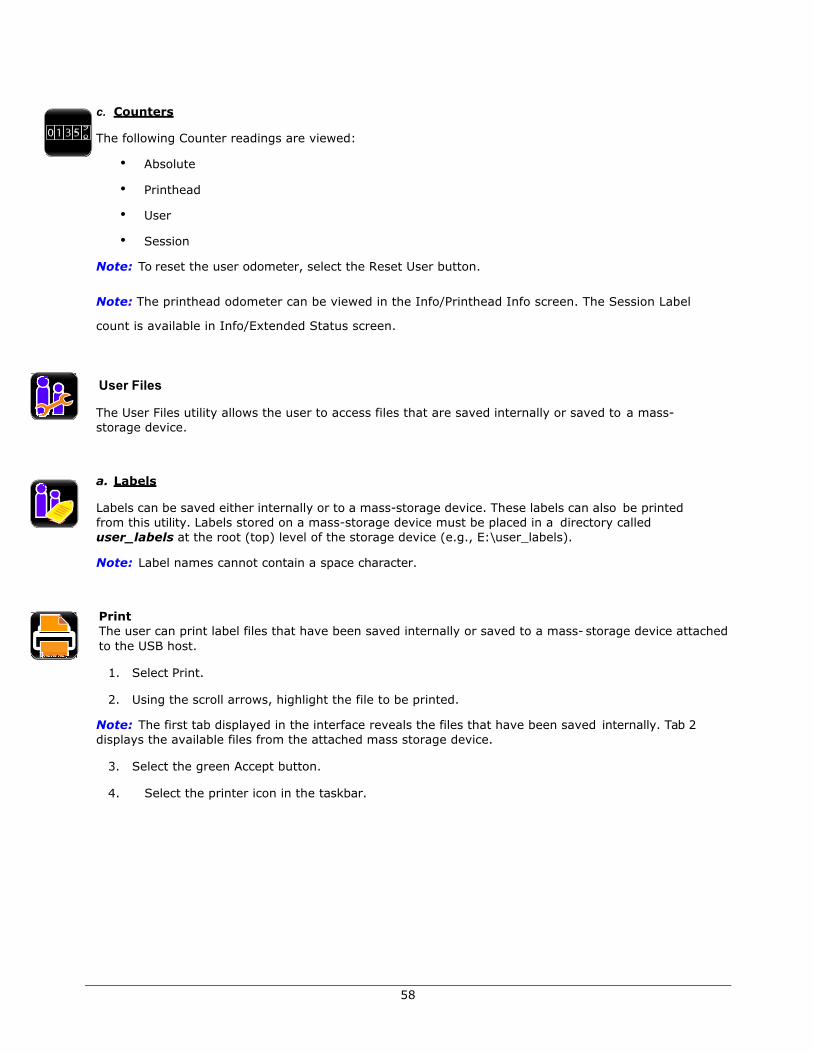
c. Counters
The following Counter readings are viewed:
• Absolute
• Printhead
• User
• Session
Note: To reset the user odometer, select the Reset User button.
Note: The printhead odometer can be viewed in the Info/Printhead Info screen. The Session Label
count is available in Info/Extended Status screen.
User Files
The User Files utility allows the user to access files that are saved internally or saved to a mass-storage device.
a. Labels
Labels can be saved either internally or to a mass-storage device. These labels can also be printed from this utility. Labels stored on a mass-storage device must be placed in a directory called user_labels at the root (top) level of the storage device (e.g., E:\user_labels).
Note: Label names cannot contain a space character.
Print The user can print label files that have been saved internally or saved to a mass- storage device attached to the USB host.
1. Select Print.
2. Using the scroll arrows, highlight the file to be printed.
Note: The first tab displayed in the interface reveals the files that have been saved internally. Tab 2 displays the available files from the attached mass storage device.
3. Select the green Accept button.
4. Select the printer icon in the taskbar.
59
Organize User labels may be copied from a mass-storage device to the internal memory or from the internal memory to a mass-storage device. They may also be deleted or renamed from this utility.
Copy
1. Select Organize.
2. Using the scroll arrows, highlight the appropriate file.
3. Select the green Accept button to continue.
4. Select Copy.
5. Select the green Accept button to copy the files between internal storage and the USB mass-storage device.
Delete
1. Select Organize.
2. Using the scroll arrows, highlight the appropriate file.
3. Select the green Accept button to continue.
4. Select Delete.
Rename R 1. Select Organize.
2. Using the scroll arrows, highlight the appropriate file.
3. Select the green Accept button to continue.
4. Select Rename.
5. Confirm your selection by selecting the green Accept button.
6. Using the alphanumeric keypad, enter a new name for the selected file.
7. Select the green Accept button to continue.
b. Media
The Media utility allows the user to copy, delete and rename media-configuration files. It also provides access to setup files stored internally or on a mass-storage device connected to the USB host. The user can also save the current media-configuration setup. Media-configuration files that are stored on a mass-storage device must be placed in a directory called user_media at the root (top) level of the storage device (e.g., E:\user_media).
Note: Media names cannot contain a space character.

60
The settings include the following:
• Paper ID • Ribbon ID • Paper Sensor Type • Ribbon Mode • Heat • Heat Balance • Rewinder Tension • Auto Tension • Print Speed • Gap/Mark Offset • Gap/Mark Noise • Number of Forms • Form Length • Ribbon Length • Auto Media Global
Organize To copy, delete or rename a file to or from a mass-storage device connected to the USB host, perform the following steps:
Copy
1. Select Organize.
2. Using the scroll arrows, highlight the appropriate media configuration file.
3. Select the green Accept button to continue.
4. Select Copy.
5. Select the green Accept button to confirm. Delete
1. Select Organize.
2. Using the scroll arrows, highlight the appropriate media configuration file.
3. Select the green Accept button to continue.
4. Select Delete.
5. Select the green Accept button to confirm.
N
61
Rename
1. Select Organize.
2. Using the scroll arrows, highlight the appropriate media-configuration file.
3. Select the green Accept button to continue.
4. Select Rename.
5. Using the alphanumeric keypad, enter a new name for the selected file.
6. Select the green Accept button to confirm.
Load The Load utility allows the user to change the media-configuration settings to a setup that was previously saved internally or to a mass-storage device.
Note: Media Setup files must be copied from a USB to the internal drive before loading.
1. Select Load.
2. Using the scroll arrows, highlight the appropriate media setup file.
3. Select the green Accept button.
4. Select the green Accept button to confirm. Save Media Settings The Media Setup utility allows the user to save the current media-configuration settings internally.
1. Select Media Setup.
2. Select the green Accept button.
3. Using the alphanumeric keypad, type a name for the setup file.
4. Select the green Accept button to confirm.
Save Media IDs The Media Setup utility allows the user to save current media ID settings internally.
1. Select Media ID.
2. Using the alphanumeric keypad, type the desired Paper ID.
3. Using the alphanumeric keypad, type the desired Ribbon ID.
4. Select the green Accept button to confirm.
Note: Media ID files use and equal (=) sign to separate between paperID and ribbonID.
c. Setups
The User Setup utility allows for the user to copy, delete and rename printer settings. The user can also save the current setup and load a saved setup. User setup files stored on a mass-storage device must be placed in a directory called user_configs at the root (top) level of the storage device (e.g., E:\user_configs).
These settings include the ones listed in the Setting Report from the Info menu.
Note: User Setups names cannot contain a space character. User Setup files will adjustment (fine adjustment) values. However, if transferred to another printer, these values will not take affect unless the security permission in the PJL Job header matches the printer key.

62
Organize To copy, delete or rename a printer configuration setup file to or from a mass- storage device connected to the USB host, perform the following steps:
Copy
1. Select Organize.
2. Using the scroll arrows, highlight the appropriate user setup file.
3. Select the green Accept button to continue.
4. Select Copy.
5. Select the green Accept button to confirm. Delete
1. Select Organize.
2. Using the scroll arrows, highlight the appropriate user setup file.
3. Select the green Accept button to continue.
4. Select Delete.
5. Select the green Accept button to confirm. Rename
1. Select Organize.
2. Using the scroll arrows, highlight the appropriate user setup file.
3. Select the green Accept button to continue.
4. Select Rename.
5. To confirm, select the green Accept button.
6. Using the alphanumeric keypad, type a name in the entry field.
7. Select the green Accept button to confirm.

63
Load The Load utility allows the printer settings to be changed to a previously saved setup.
Note: User Setup files must be copied from a USB to the internal drive before loading.
1. Select Load.
2. Using the scroll arrows, highlight the appropriate user setup file.
3. Select the green Accept button to continue.
4. Select the green Accept button to confirm.
Save The Save utility allows the user to save the current printer settings internally.
1. Select Save Setup.
2. Using the alphanumeric keypad, enter a name for the setup to be saved.
3. Select the green Accept button.
4. Select the green Accept button to confirm.
d. Languages
The Languages utility allows the user to load additional language files to the printer. Translation files can be created using QTLinguist. The language files created in “qm” format can be imported from the “user_languages” directory at the root (top) level of the mass storage device.
Organize
To copy, delete or rename a printer language file to or from a mass storage device connected to the USB host, perform the following steps:
Copy
1. Select Organize.
2. Using the scroll arrows, highlight the appropriate user language file.
3. Select the green Accept button to continue.
4. Select Copy.
5. Select the green Accept button to confirm.
Delete
1. Select Organize.
2. Using the scroll arrows, highlight the appropriate user language file.
3. Select the green Accept button to continue.
4. Select Delete.
5. Select the green Accept button to confirm.

64
Rename R
1. Select Organize.
2. Using the scroll arrows, highlight the appropriate user language file.
3. Select the green Accept button to continue.
4. Select Rename.
5. To confirm, select the green Accept button.
6. Using the alphanumeric keypad, type a name in the entry field.
7. Select the green Accept button to confirm.
Select The Select Languages utility allows the user to enable a different language that is installed in the printer.
Note: User Setup files must be copied from a USB to the internal drive before loading.
1. Select “Select” languages.
2. Using the scroll arrows, highlight the desired language file.
3. Select the green Accept button to continue.
4. To confirm, select the green Accept button.
e. Wallpaper
The Wallpaper utility enables the user to change the main screen background to another image. The image must be a 72-dpi JPEG and must be 320 pixels wide and 240 pixels high.
Note: Some colors may cause the buttons to blend into the menu and reduce their contrast.
Note: User images can contain graphic files such as wallpapers (.jpg format) or printer logos and imported from the “user_images” directory at the root (top) level of the mass storage device.
Organize
To copy, delete or rename a printer wallpaper file to or from a mass-storage device connected to the USB host, perform the following steps:

65
Copy
1. Select Organize. 2. Using the scroll arrows, highlight the appropriate user wallpaper file.
3. Select the green Accept button to continue.
4. Select Copy.
5. Select the green Accept button to confirm. Delete
1. Select Organize.
2. Using the scroll arrows, highlight the appropriate user wallpaper file.
3. Select the green Accept button to continue.
4. Select Delete.
5. Select the green Accept button to confirm. Rename R
N 1. Select Organize.
2. Using the scroll arrows, highlight the appropriate user wallpaper file.
3. Select the green Accept button to continue.
4. Select Rename.
5. To confirm, select the green Accept button.
6. Using the alphanumeric keypad, type a name in the entry field.
7. Select the green Accept button to confirm.
Select The Select Wallpaper utility allows the user to change the wallpaper background that has been previously installed in the printer.
Note: Wallpaper files must be copied from a USB to the internal drive before loading.
1. Select “Select” wallpaper.
2. Using the scroll arrows, highlight the desired wallpaper file.
3. Select the green Accept button to continue.
4. To confirm, select the green Accept button.
f. Fonts
The Fonts utility enables the user to change the fonts being used in the printer.
Note: It is the user’s responsibility to obtain the appropriate licenses for downloaded or imported fonts. Note: Typeface ID is shown in the file name after the font name and is separated by an equal (=) sign.
Note: The Font Report shows the Font Number in parentheses after the font name.
Note: User fonts can contain true type font files (ttf format) and imported from the “user_fonts” directory at the root (top) level of the mass storage device. The desired font ID must be entered from the Organize menu.

66
Organize To copy, delete or rename a font to or from a mass storage device connected to the USB host, perform the following steps:
Copy This function allows for the importing and exporting of fonts from and to a USB mass-storage device. When copying the font from the USB host to internal memory, the operator will be prompted to enter the desired Typeface ID by which the font is selected in label format. Internal Font IDs are assigned automatically.
1. Select Organize.
2. Using the scroll arrows, highlight the appropriate user font file.
3. Select the green Accept button to continue.
4. Select Copy.
5. Select the green Accept button to confirm. Delete
1. Select Organize.
2. Using the scroll arrows, highlight the appropriate user font file.
3. Select the green Accept button to continue.
4. Select Delete.
5. Select the green Accept button to confirm. Renumber R
N 1. Select Organize.
2. Using the scroll arrows, highlight the appropriate user font file.
3. Select the green Accept button to continue.
4. Select Renumber.
5. To confirm, select the green Accept button.
6. Using the numeric keypad, type a value in the entry field.
7. Select the green Accept button to confirm.
67
Date/Time
To set the date and time, select the Date/Time button from the Tools menu.
If the message “Network Time Protocol Enabled!” appears, select the green Accept button.
To adjust the settings, select the following buttons and input the appropriate information.
• Month
• Day
• Year
• Hour
• Minutes
• AM/PM
Note: Upon exit, the user can enable the displaying of the date and time on the main screen.
4.3.17 Language
Select from the localization settings and display units.
Language Files
• English
• Other Loaded Languages
Display Units
• Imperial
• Metric Display Font
• Standard
• CJKT (necessary for Asian languages)
Once the unit has been chosen, select the green Accept button to continue and then select the next green Accept button to confirm. Note: When switching to Asian display languages it is recommended to set CJKT first for Display Font, then select the Asian language file and “Accept.” The menu will reset at this point.

68
4.3.18 Test
The following options are available from the Test menu:
• Test labels
• Diagnostics
• Test Options
• Test Applicator
Test Labels
The Test Labels feature allows the user to select and print test labels.
1. Select the appropriate test label from the menu using the up and down arrows:
Note: You may also select the label name to move to the next one in the list.
2. Select the number of labels to be printed using the Select Count option.
3. Select the printer icon in the taskbar to print the test label.
Selections Values Ranges Default
Select Test Label Quality Label
10% Block Pattern
20% Block Pattern
Quality Label
Select Count 1 to 9,999 1
Select the Printer icon in the taskbar to begin printing the test label(s) entered into the Select Count field.
Diagnostics
To enter the Diagnostics panel, select the Diagnostics button from the Test menu.
a. Sensor Readings The Sensor Readings function allows the user to view the values of various printer sensors. The Sensor Readings menu has four (4) tabs that can be navigated by selecting the next and previous buttons in the taskbar.

69
b. General
Select General to enable or disable the appropriate settings:
• Page Format Shading - Used for diagnosing label format issues, enabling this option puts a shade over white areas of the image on a label.
• File Capture – Used for capturing print data for diagnosics. Print files will be generated using a time stamp for the name. These files will be placed in the user labels internal directory. If a USB memory stick is inserted, the files will be saved to /users_labels.
Test Options
The Test Options function of the Diagnostics menu allows the user to test the options currently installed on the printer. Select Test Options and navigate through the tabbed interface to select the option to be tested. The tabs are navigated using the next and previous arrows in the taskbar.
Test Options Values Ranges Default
Cycle Cutter 1 to 999 1
Test Present Sensor N/A
Test Rewinder N/A
Test Ribbon Assembly
N/A
Once the selections have been made, select the Start button to begin the test.
Test GPIO
The Test GPIO function allows the user to test a connected applicator.
Selections Values Ranges Default
Enable Wrap Around Enabled
Disabled
Disabled
Pulse Width 1 to 2,000 1,000
I/O Configuration
Sig 1/2 Input
Output
Input
Sig 3/4 Input
Output
Input

70
Selections Values Ranges Default
Sig 5/6 Input
Output
Output
Sig 7/8 Input
Output
Output
Select Test Write Mode
Read Mode
Pulse Mode
Write Mode
Write Mode
Enter the appropriate settings and select the green Start button.
Write Mode Values Ranges Default
Sig 1 N/A
Sig 2 N/A
Sig 3 N/A 1
Sig 4 N/A 1
Sig 5 0
1
1
Sig 6 0
1
1
Sig 7 0
1
1
Sig 8 0
1
1
Read Mode
Enter the appropriate settings and select the green Start button.
Read Mode Values Ranges Default
Sig 1 0
1
1
Sig 2 0
1
1
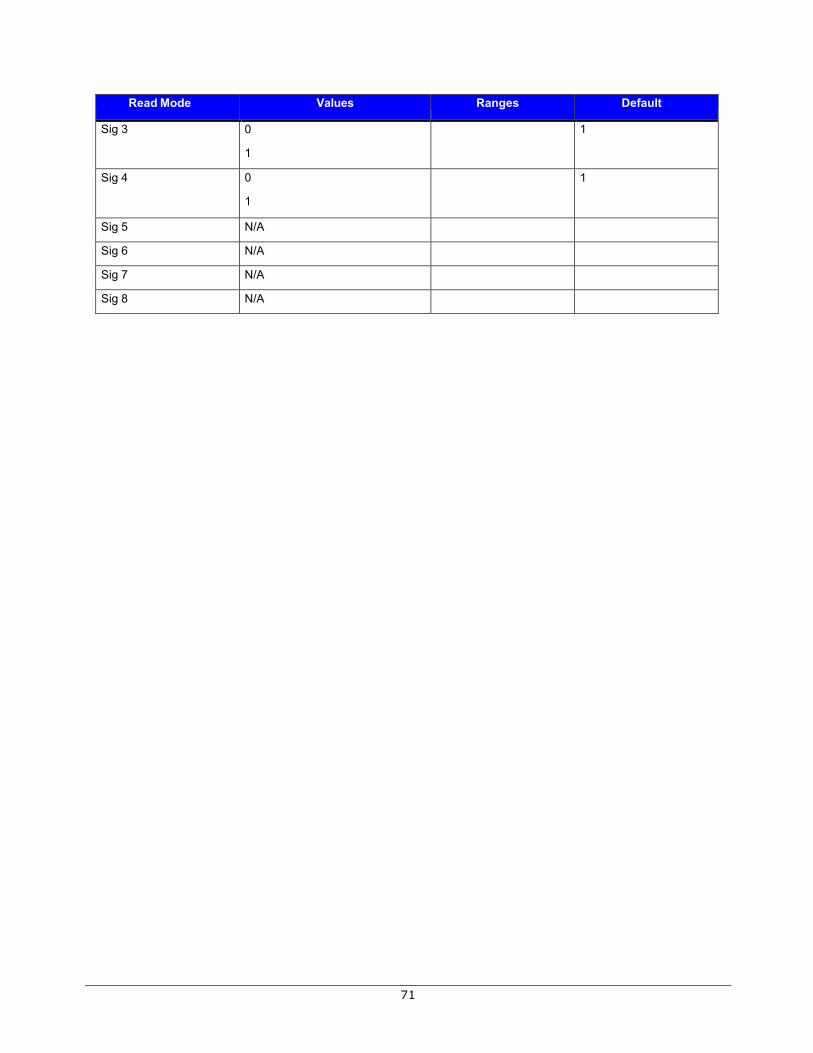
71
Read Mode Values Ranges Default
Sig 3 0
1
1
Sig 4 0
1
1
Sig 5 N/A
Sig 6 N/A
Sig 7 N/A
Sig 8 N/A

72
Pulse Mode
Enter the appropriate settings and select the green Start button.
Read Mode Values Ranges Default Sig 1 N/A
Sig 2 N/A
Sig 3 N/A
Sig 4 N/A
Sig 5 0
1
1
Sig 6 0
1
1
Sig 7 0
1
1
Sig 8 0
1
1

73
5 Operating, Adjusting and Maintaining the Printer
5.1 Printhead Assembly Adjustments
Printhead Assembly Adjustments permit the mechanical compensation sometimes needed to maintain print quality across the wide range of media types and sizes. The applicability and adjustment methods for the printhead are described below. 5.1.1 Leveling-Cam Adjustment Whenever using narrow media (sizes that are less than the width of the printhead), adjust the Leveling Cam for even pressure distribution.
þ If changing media sizes, readjust the Leveling Cam.

74
Adjust the Printhead Leveling Cam as follows:
A. With media loaded, download your label format (or use a Test Label format) then begin printing a small batch of labels.
B. While observing the printed output, rotate the Leveling Cam counterclockwise until
the image fades across the label, as shown in Example 1 (below). C. While observing the printed output, rotate the Leveling Cam clockwise until the
image is complete, with even contrast, as shown in Example 2 (below).
à
Example 1 – Too much adjustment Example 2 – Correct adjustment
þ Under-adjustment of the Leveling Cam can cause problems that include ribbon wrinkling, label tracking, and excessive platen and printhead wear.

75
5.1.2 Printhead-Pressure Adjustment Printhead Pressure Adjustment should only be performed after attempting to improve print quality through the use of other print-quality controls.
A. With media loaded, download your label format (or use a Test Label format) then begin printing a small batch of labels.
B. While observing the printed output, turn each Pressure Adjustment Screw (use a
small coin or screwdriver) by the same amount until the image is complete, with even contrast:
• Counterclockwise (+) to increase applied pressure, or;
• Clockwise (-) to decrease applied pressure.
þ Ensure that each arrow points in the same direction.

76
5.2 Maintenance This section details the recommended maintenance supplies, schedules, and methods. Supplies
These items will help to safely and effectively clean the printer:
• Isopropyl alcohol • Soapy water/mild detergent • Cotton swabs • Compressed air • Clean, lint-free cloth • Printhead Cleaning Cards or Printhead Cleaning Film • Lens tissue • Vacuum Cleaner • Soft-bristle brush
Schedule
The following table details the recommended cleaning schedules:
Recommended Cleaning Schedule*
Component / Area Cleaning Interval** Supplies / Method
Exterior Surfaces As needed, based on a weekly visual inspection.
Mild detergent applied with a dampened cloth; see Section 5.2.7.
Fan Filter
As needed, based on a weekly visual inspection.
Vacuum; see Section 5.2.2.
Interior Compartment As needed, based on a weekly visual inspection.
Compressed air or a soft brush; see Section 5.2.3.
Media Sensing Components
As needed, based on a weekly visual inspection.
Compressed air, soft brush, lens tissue and / or isopropyl alcohol; see Section 5.2.4.
Platen and Assist Rollers
After each roll of media or ribbon; sooner, if needed.
Cotton swab or a cloth dampened with isopropyl alcohol; see Section 5.2.5.
Printhead
Varies according to the media type:
• Thermal transfer media – after each roll of ribbon.
• Direct thermal media – after each roll of media, or as needed.
Isopropyl alcohol, and if necessary Cleaning Cards or Cleaning Film; see Section 5.2.1.
Ribbon Path Components
(equipped models only)
As needed, based on a weekly visual inspection.
Cotton swab or a cloth dampened with isopropyl alcohol; see Section 5.2.6.
*For optional equipment, refer to the documentation that accompanied the item(s). **Whichever interval comes first.
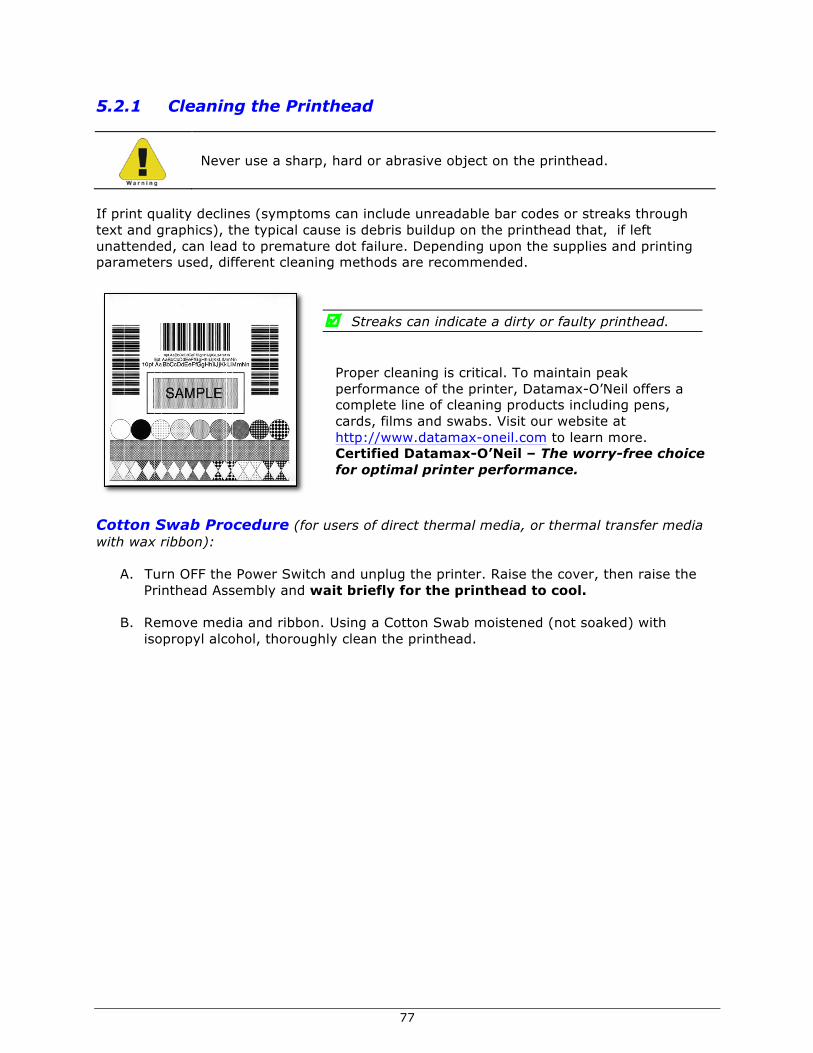
77
5.2.1 Cleaning the Printhead
Never use a sharp, hard or abrasive object on the printhead.
If print quality declines (symptoms can include unreadable bar codes or streaks through text and graphics), the typical cause is debris buildup on the printhead that, if left unattended, can lead to premature dot failure. Depending upon the supplies and printing parameters used, different cleaning methods are recommended.
þ Streaks can indicate a dirty or faulty printhead.
Proper cleaning is critical. To maintain peak performance of the printer, Datamax-O’Neil offers a complete line of cleaning products including pens, cards, films and swabs. Visit our website at http://www.datamax-oneil.com to learn more. Certified Datamax-O’Neil – The worry-free choice for optimal printer performance.
Cotton Swab Procedure (for users of direct thermal media, or thermal transfer media with wax ribbon):
A. Turn OFF the Power Switch and unplug the printer. Raise the cover, then raise the Printhead Assembly and wait briefly for the printhead to cool.
B. Remove media and ribbon. Using a Cotton Swab moistened (not soaked) with
isopropyl alcohol, thoroughly clean the printhead.

78
79
C. Allow the printhead to dry. Reinstall media (and ribbon, if needed). Plug in the printer and turn ON the Power Switch. Run a few sample labels and examine them. If streaking is still present, use Cleaning-Card Procedure below; otherwise, this completes cleaning.
Cleaning-Card Procedure (for users of direct thermal media, or thermal transfer media with wax/resin ribbon combinations; also for unsuccessful Cotton Swab cleaning attempts):
A. Raise the cover, then raise the Printhead Assembly and wait briefly for the printhead to cool.
B. Remove media and ribbon then place a Cleaning Card under the printhead. (Part
number 70-2013-01 for 4-inch cards; and, 70-2014-01 for 6-inch cards)
C. Close and lock the Printhead Latch and disengage the Leveling Cam.
D. Close the cover then navigate to Menu > Tools > Maintenance > Cleaning. Then select “Clean Now.”
E. After the Cleaning Card has been run through the printer, reinstall media (and ribbon, if needed). Plug in and turn ON the printer. Run a few sample labels and examine them. If streaking is still present, use the Cleaning Film Procedure, below; otherwise, this completes cleaning.
Cleaning-Film Procedure (for users of thermal transfer media and resin ribbon, when printing with a Heat Value of 22 or higher, or when other methods prove unsuccessful):
A. Raise the cover, then raise the Printhead Assembly and wait briefly for the printhead to cool.
B. Remove media and ribbon then place a sheet of Cleaning Film under the printhead.
(Part number 70-2087-01 for 4-inch film; 70-2087-02 for 6-inch film; and, 70-2087-03 for 8-inch film)
C. Close and lock the Printhead Latch and disengage the Leveling Cam. D. Close the cover then navigate to Menu > Tools > Maintenance > Cleaning. Then
select “Clean Now.”
E. After the Cleaning Film has been run through the printer, turn OFF the Power Switch and unplug the printer. Open the cover then raise the Printhead Assembly and wait briefly for the printhead to cool. Using a cotton swab moistened (not soaked) with isopropyl alcohol, clean the printhead then allow it to dry.
F. Reinstall media (and ribbon, if needed). Plug in and turn ON the printer. Run a few
sample labels and examine them. If streaking is still present the printhead may need to be replaced; see Section 5.3.
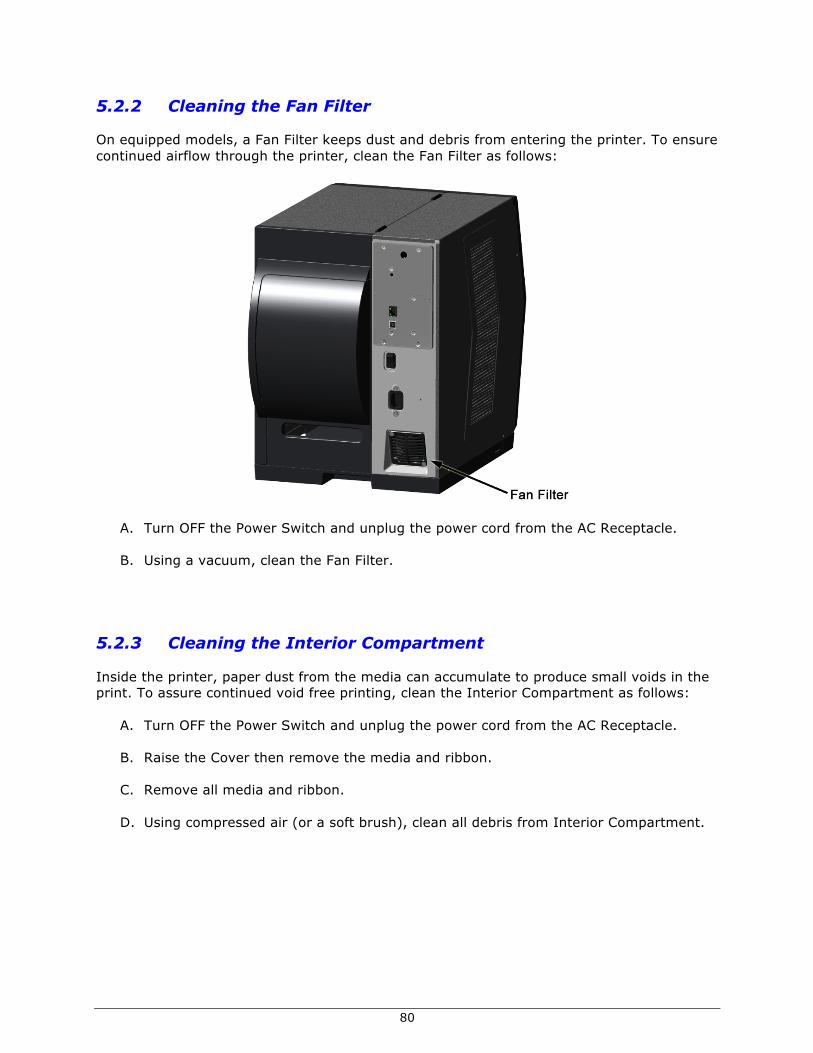
80
5.2.2 Cleaning the Fan Filter On equipped models, a Fan Filter keeps dust and debris from entering the printer. To ensure continued airflow through the printer, clean the Fan Filter as follows:
A. Turn OFF the Power Switch and unplug the power cord from the AC Receptacle. B. Using a vacuum, clean the Fan Filter.
5.2.3 Cleaning the Interior Compartment Inside the printer, paper dust from the media can accumulate to produce small voids in the print. To assure continued void free printing, clean the Interior Compartment as follows:
A. Turn OFF the Power Switch and unplug the power cord from the AC Receptacle. B. Raise the Cover then remove the media and ribbon. C. Remove all media and ribbon. D. Using compressed air (or a soft brush), clean all debris from Interior Compartment.

81
5.2.4 Cleaning the Media-Sensing Components Paper dust and adhesive from the media can accumulate on the sensing components and produce TOF problems. To avoid problems, clean the Media Sensor and Light Bar as follows:
A. Turn OFF the Power Switch and unplug the power cord from the AC Receptacle. B. Unlock the Printhead Latch, raise the Printhead Assembly and remove media. C. Using compressed air, clean all debris from the Media Sensor and the Light Bar. (In
cases of extreme buildup, a Cotton Swab or lens tissue dampened with isopropyl alcohol can be used.)
5.2.5 Cleaning the Platen and Assist Rollers Rollers contaminated with grit, label adhesive or ink can lead to a decline in print quality and, in extreme cases, cause labels to adhere and wrap the roller. Clean the Platen and Assist Rollers as follows:
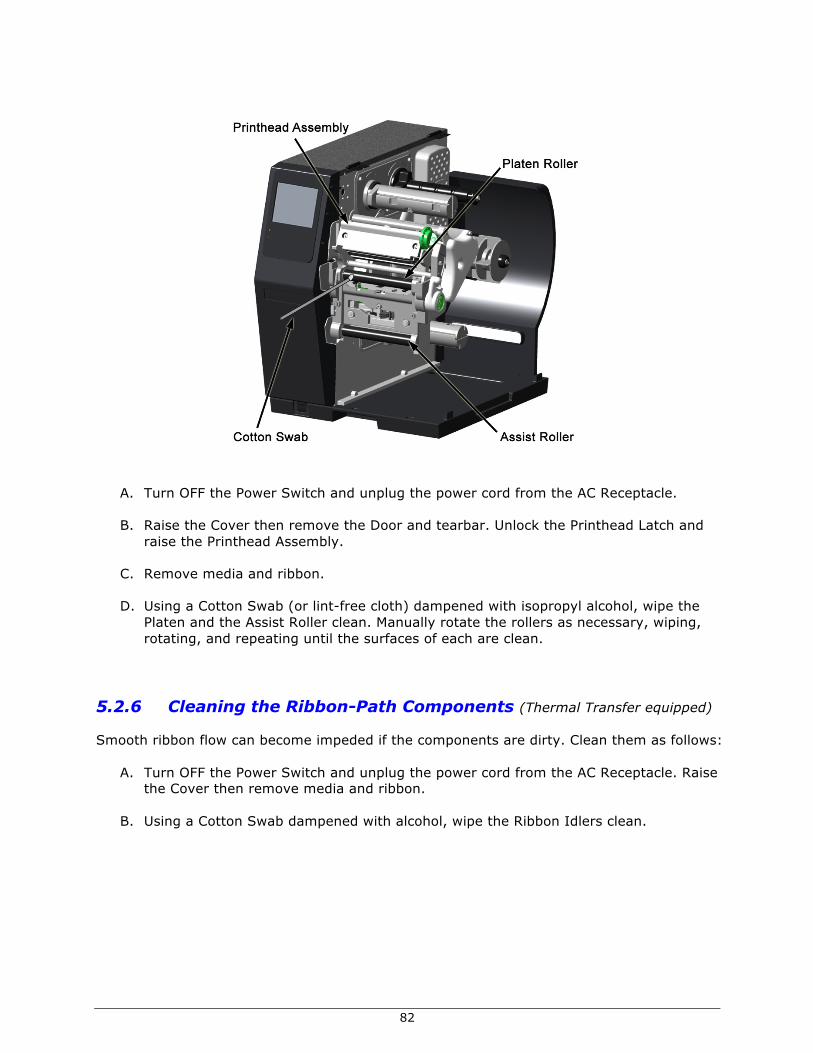
82
A. Turn OFF the Power Switch and unplug the power cord from the AC Receptacle. B. Raise the Cover then remove the Door and tearbar. Unlock the Printhead Latch and
raise the Printhead Assembly. C. Remove media and ribbon. D. Using a Cotton Swab (or lint-free cloth) dampened with isopropyl alcohol, wipe the
Platen and the Assist Roller clean. Manually rotate the rollers as necessary, wiping, rotating, and repeating until the surfaces of each are clean.
5.2.6 Cleaning the Ribbon-Path Components (Thermal Transfer equipped) Smooth ribbon flow can become impeded if the components are dirty. Clean them as follows:
A. Turn OFF the Power Switch and unplug the power cord from the AC Receptacle. Raise the Cover then remove media and ribbon.
B. Using a Cotton Swab dampened with alcohol, wipe the Ribbon Idlers clean.
83
C. Using a Cotton Swab dampened with alcohol, wipe the Ribbon Shield clean.
D. Reload media and ribbon then close the Cover.

84
5.2.7 Cleaning the Exterior Surfaces When soiled, the exterior surfaces of the printer should be cleaned using a general-purpose cleanser. Never use abrasive cleansers or solvents, and never pour a cleanser directly onto the printer.
A. Turn OFF the Power Switch and unplug the power cord from the AC Receptacle. B. Using a soft cloth (or sponge) dampened with a non-abrasive cleanser, wipe the
exterior surfaces clean. C. Allow the surfaces to dry before reconnecting power.

85
5.3 Replacing the Printhead If the printhead needs to be replaced, follow the procedure below:
• Only use a Datamax-O’Neil IntelliSEAQ™ printhead.
• Printheads are fragile; handle with extreme care and never use sharp objects on the surface.
• If you have questions, contact a qualified technician or Datamax-O’Neil Technical Support before proceeding.
A. Turn OFF the Power Switch then touch a bare metal printer surface (e.g., the frame) to discharge any static electricity present on your body.
B. Unplug the printer and open the access cover. If ribbon is installed, remove it. C. Lower the Printhead Assembly and loosen the Printhead Mounting Screw. (If using an
H-8308X model, loosen both mounting screws.) D. Carefully raise the Printhead Assembly. Grasp the printhead then disconnect the two
cables and remove the printhead. E. Position a new printhead under the Printhead Assembly and connect the previously
removed cables. F. After ensuring that the printhead cables are not pinched, place the printhead onto
the locating pins under the Printhead Assembly and secure it by tightening the Printhead Mounting Screw(s). [Do not over-tighten the screw(s)].

86
G. Using a Cotton Swab moistened (not soaked) with isopropyl alcohol, clean the printhead then allow it to dry.
H. If removed, reinstall ribbon. Lower and lock the Printhead Assembly. Plug in the printer and turn ON the Power Switch.
87
6 Troubleshooting 6.1 Problem Resolution The following chart provides basic troubleshooting steps for diagnosing problems with the printer. If the symptoms remain after troubleshooting, contact your technical support representative. Warning: Do not open the right side panel that covers the internal electronic components. Due to the high voltage and the sensitivity of the components, opening the panel can lead to injury and may void the manufacturer’s warranty.
Symptom Causes Solutions
System Error Label delivery too slow or invalid/complex label format.
§ Redesign the label using another method
§ Use a different communications channel.
§ Contact your Technical Support representative.
Out of Ribbon The printer may be out of ribbon. § Install a new ribbon A fault may have occurred with the ribbon controller hardware or software.
§ Ensure the latest software has been installed.
Out of Paper
The printer may be out of media. § Install a new media roll.
The media guides may not be adjusted correctly.
§ Correct the media guide set- tings.
§ Perform “Calibrate Sensors.” The media is too transparent to be detected. § Perform “Calibrate Sensors.”
Cutter Jammed
The cutter may have a jam or cutter cover is open.
§ Remove the jam from the cutter.
§ Test the cutter.
Cutter Home sensor may be dirty. § Clean the Cutter Home sensor.
§ Test the cutter.
Cutter hardware has failed. § Ensure the cutter is properly
installed.
§ Test the cutter.
Rewinder Full
The rewinder may be full. § Remove the media from the
rewinder.
§ Test the rewinder function.
The rewinder may be obstructed and turning slowly.
§ Check for obstructions that hinder the rewinder from turning.
§ Test the rewinder function.
Printhead Unlatched The printhead may be unlatched. § Close and latch the printhead
mechanism.
The printhead latch sensor may be faulty. § Contact your technical support representative.

88
Symptom Causes Solutions
Printhead Hot The printhead too hot or is faulty. § Allow to cool or contact your technical
support representative.
There may be a poor cable connection. § Contact your technical support representative.
FPGA Hardware The main controller board may be faulty. § Ensure the latest software update has been performed.
NV RAM Hardware The main controller board may be faulty. § Contact your technical support representative.
PAPER Sensor Blocked
Adhesive, dirt or remnants of a label may be covering the sensor.
§ Clean the debris from the sensor.
§ Perform “Calibrate Sensors” calibration.
The main controller board may be faulty. § Contact your technical support representative.
The Top-of-Form sensor failed the “Calibrate Sensors” calibration due to a faulty sensor.
§ Contact your technical support representative.
Paper Calibration
The wrong Top-of-Form sensor side may have been selected and not able to read media characteristics.
§ Ensure the Top-of-Form has been set correctly.
The characteristics of the media may not be sensed by the printer. (Ex. gap, notch, mark)
§ Set the paper mode to continuous.
§ Install different media.
No Top-of-Form Found
The gap or mark was not found. § Ensure the Top-of-Form has been
set correctly.
§ Install different media.
The label image size exceeded the maximum of 99 inches.
§ Check the print mechanism for a paper jam.
§ Calibrate the printer for the media being used.
There may be dirt or debris obstructing the Top-of-Form sensor.
§ Clean the debris from the sensors.
§ Perform “Calibrate Sensors” calibration.
GPIO Hardware
There may be a poor connection to the GPIO logic board.
§ Contact your technical support representative.
The GPIO logic board may be faulty. § Contact your technical support representative.
Present Sensor Hardware
There may be a poor connection. § Perform the Present Sensor test. The Present Sensor module may be faulty. § Perform the Present Sensor test.
The Ribbon Version may need to be upgraded.
§ Ensure the latest software has been installed.
There may be a poor connection. § Contact your technical support representative.
The Ribbon Controller module may be faulty.
§ Contact your technical support representative.

89
6.2 Troubleshooting Print Quality
Tools
§ Datamax-O’Neil approved media
§ Datamax-O’Neil approved matching ribbon (for printers with the thermal transfer option)
§ 3mm hex head wrench
§ 1.5mm hex head wrench
§ Magnifying lens
§ Barcode verifier and grading system
§ Printhead cleaning card
§ Printhead cleaning pen
Preliminary Instructions
1. Ensure the latest software has been loaded.
2. Load the media and ribbon according to the instructions in the Setup section.
Note: Verify that the ribbon is tightly wound on the supply roll with no wrinkles.
Note: Verify that the paper is properly exiting the printer.
3. Specify the appropriate media and ribbon in the menu.
4. Print a Quality Label from the Test menu.
5. Examine the print quality. Note: Some imperfections can be caused by a contaminated printhead. Clean the printhead and reprint the label.
Symptom Possible Solutions
No Print or Poor Print Quality Verify the proper media and ribbon are being used.
Verify the printhead connections are fully seated.
Light Print on One Side
Adjust the ribbon cam and ribbon shield to add tension to the light print side.
Verify the printhead connections are fully seated. Replace the
printhead.
Contact your technical support representative.
Print Quality Defect
Clean the printhead and platen roller with factory-approved cleaning supplies.
Verify there are no ribbon folds or wrinkles under the printhead.
Replace the printhead if there is a missing dot.
Print Quality gets worse over time Printhead is at the end of life and should be replaced.
Contact your technical support representative.

90
Symptom Possible Solutions
Diminished print quality on the Quality Label
Incomplete horizontal lines requires an increase in the sharpness setting and/or more tension applied to the lighter print side of the ribbon shield.
For higher-grade barcodes, lighten the print by reducing the darkness setting.
For white specks inside dark boxes, increase the darkness setting and clean the printhead and platen roller.
If the small font is not readable, increase the darkness setting.
When dithering increments are not equal, adjust the darkness setting.
If graphics are not displayed properly, adjust the sharpness setting.
Ladder barcode quality is diminished Examine the media adjustment levers and ensure there is a .8mm to 1.5mm gap between the levers and the media.
Image size is out of the print area (off the side or top or truncated from the next label
Turn off print truncation.
Ensure the image width is the same as the print width. 6.3. Error and Warning Messages The printer displays messages when the possibility of a problem or an actual fault occurs. Depending upon the displayed message, find the possible action or solution in the tables below. Error Messages
The following messages may be displayed:
Errors Description SYSTEM ERROR Illegal label format or communications error OUT OF RIBBON Out of ribbon OUT OF PAPER Out of paper CUTTER JAMMED Cutter is jammed REWINDER FULL Rewinder is full PRINTHEAD UNLATCHED Printhead is unlatched PRINTHEAD HOT Printhead is critically hot FPGA HARDWARE Analog to digital converter hardware fault NV RAM HARDWARE Non-volatile memory hardware fault PAPER SENSOR BLOCKED Top-of-form sensor blocked or hardware fault PAPER CALIBRATION Could not calibrate media NO TOP OF FORM FOUND Could not find a gap or mark RIBBON HARDWARE Ribbon controller hardware fault PRESENT SENSOR Present Sensor hardware fault or label not seen when expected. GPIO HARDWARE GPIO hardware fault MOTOR HOT Motor is critically hot
Note: System errors are not caused by media mismatches but can be caused by a poor label format.

91
Warning Messages
The following messages may be displayed:
Warnings Description RIBBON LOW Ribbon level low MAINTENANCE REMINDER Maintenance timer has expired POWER SUPPLY HARDWARE Printhead voltage above maximum specifications POWER SUPPLY LOW Printhead voltage below minimum specifications UNRECOGNIZED PRINTHEAD Unidentified printhead installed PRINTHEAD COOLING Printhead is cooling down PAPER CALIBRATION MARGINAL Paper sensor calibration marginal PERFORM CALIBRATE SENSORS There is a need to run Calibrate Sensors UNLATCH THE PRINTHEAD Printhead needs to be unlatched LOAD PAPER No paper while idle LATCH THE PRINTHEAD Printhead unlatched while in idle PAPER LOW The paper media is low CUTTER NOT INSTALLED The cutter is enabled but not installed GPIO NOT INSTALLED The GPIO is enabled but not installed PRESENT SENSOR NOT INSTALLED The present sensor is enabled but not installed RIBBON NOT INSTALLED The ribbon controller is enabled but not installed REWINDER NOT INSTALLED The rewinder is enabled but not installed CLOSE THE CUTTER COVER The cutter cover is not magnetically closed MODEL MISMATCH The printer has received settings intended for a different printer model PAPER WIDTH HARDWARE The paper width sensor is malfunctioning REWINDER NEAR FULL The rewinder take up is close to capacity
92
7 Terms and Definitions
Processing State
Terms Definitions Online The printer is ready to process jobs.
Online The printer has suspended job processing although the menu selection is available.
Printer State
Terms Definitions Ready The printer is idle and ready to accept internal or external commands.
Busy The printer is busy processing or executing a command.
Media State
Terms Definitions Paper ID The user-entered data identifying media code.
Ribbon ID The user-entered data identifying ribbon code.
Paper Type The user-entered data identifying paper material type.
Ribbon Type The user-entered data identifying ribbon material type.
Basic
Basic > Printer Mode
Terms Definitions Cutter Mode Controls the cutting of media into separate labels.
Rewinder Mode Enables or disables the rewinder function and directional state.
Present Sensor Enable Enables or disables the present sensor.
Pause Mode Enables or disables the ability of the user to prompt for the next label.
Basic > Printer Mode
Terms Definitions Darkness This provides the user with a fine adjustment of the darkness of the
printed image due to printhead and printer thermal variations.
Contrast This provides the user with the fine adjustment of the leading edges of the printed images to improve print quality and barcode readability.
Vertical Adjust User-entered value allowing for the vertical adjustment of the start of the image relative to the horizontal leading label edge due to mechanical
93
variations.
Horizontal Adjust User-entered value allowing for the horizontal adjustment of the image relative to the printhead center.
Advanced
Advanced > Page Defaults
Terms Definitions Print Truncation Specifically for gap or mark paper, print truncation prohibits print overflow.
Print on Gap Enables the printing on the gap or mark between labels.
Print Length Sets the length of the printer area.
Print Width Sets the width of the printer area.
Vertical Offset Shifts the vertical start of the print position on the labels.
Horizontal Offset Shifts the horizontal start of the print position on the labels.
Orientation Controls the page orientation.
Raster Mode Controls the raster image operation. Font Number Controls the font selection.
Point Size Controls the font size selection.
Pitch Size Controls the font pitch selection.
Select Symbol Set Controls the symbol set selection.
Advanced > Printer
Advanced > Printer > Presentation
Terms Definitions Pause Mode Allows the user to prompt for the next label via the menu.
Present Time Out Specifies how long the label will be presented before retracting back.
Present Distance Allows for the override of the default distance.
Advanced > Printer > Auto
Terms Definitions Auto Load The media loads automatically when detected in the media guides and
the head is closed and latched. Auto Option Detect Automatically generates a warning if an option is enabled yet not
detected. Auto Calibrate Calibrate paper sensors while auto-loading the media.
Auto Present Distance Automatically sets the present distance based on the detected hardware.
Auto Tension Automatically selects the tension based on the media width guides, paper and ribbon type or ID selected.
Auto Pressure Automatically selects the head pressure based on the selected Paper/Ribbon ID.
94
Auto Speed Adjust For labels less then 0.5” in length, the printer will automatically lower the print speed to prevent pausing on print batches.
Advanced > Printer > Speeds
Terms Definitions Print Speed Controls the rate of the label movement during printing. Feed Speed Controls the rate of the label movement during feed.
Reverse Speed Controls the rate of the label movement during backup positioning.
Advanced > Printer > Alarms
Terms Definitions Error Sound Controls the enabling and signal of the error buzzer. Warning Sound Controls the enabling and signal of the warning buzzer.
Paper Low Warning Enables or disables the paper low warning.
Paper Out Warning Enables or disables the paper out warning.
Cover Open Warning Enables or disables the cover open warning.
Paper Change Warning Enables media tracking features. When head is lifted or closed, user will be prompted to confirm media has changed. Media levels can be seen under Extended Status.
Rewinder Full Warning Enables or disables a warning when rewinder is near full.
Reprint on Error Enables or disables the automatic reprint on error.
Advanced > Printer > Options
Advanced > Printer > Options > Cutter
Terms Definitions Cut by Count Sets the label increment to cut.
Cut Distance Adjust Allows for the adjustment of the cut position due to mechanical tolerances.
Cut Rotation Adjust Allows for the fine-tuning of the cutter blade rotation.
Advanced > Printer > Options > Present Sensor
Terms Definitions Present Sensor Enable Controls the on-demand dispensing of labels.
Present Distance Adjust Sets the label stop position past the start of the print position.
Advanced > Printer > Options > Rewinder
Terms Definitions Rewinder Mode Sets the rewinder direction for the paper.
Rewinder Tension Adjust Allows for the fine adjustment of the rewinder motor.
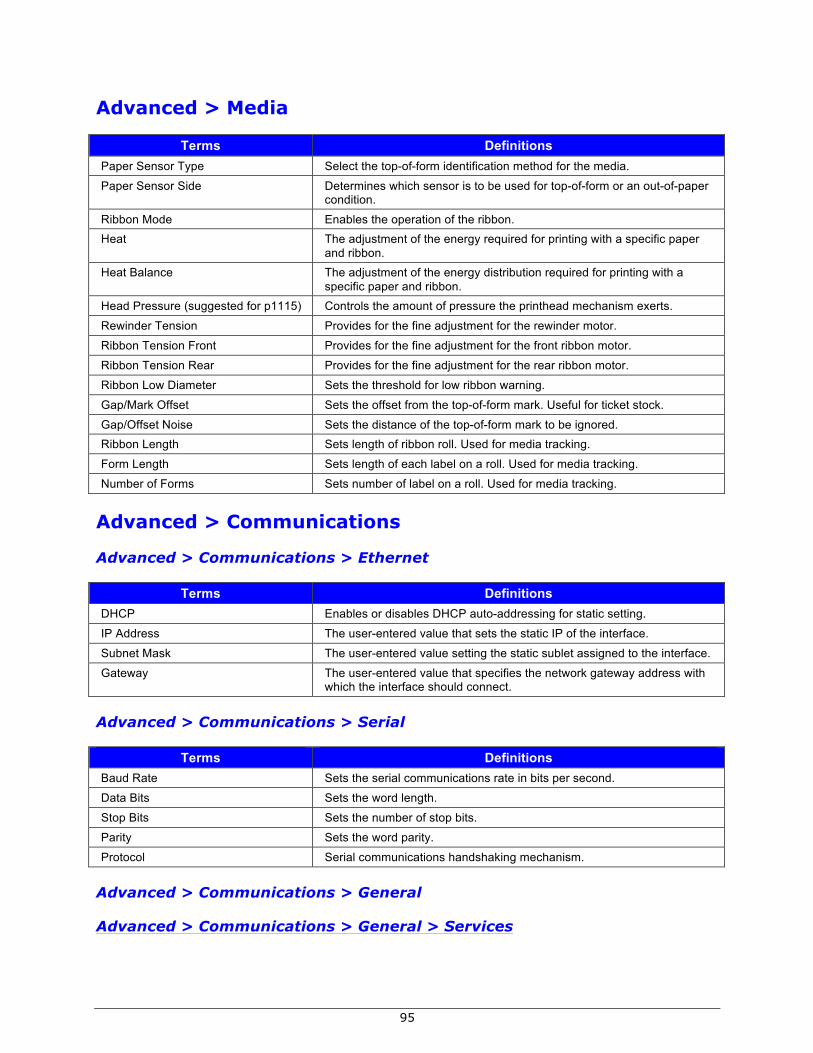
95
Advanced > Media
Terms Definitions Paper Sensor Type Select the top-of-form identification method for the media.
Paper Sensor Side Determines which sensor is to be used for top-of-form or an out-of-paper condition.
Ribbon Mode Enables the operation of the ribbon. Heat The adjustment of the energy required for printing with a specific paper
and ribbon. Heat Balance The adjustment of the energy distribution required for printing with a
specific paper and ribbon. Head Pressure (suggested for p1115) Controls the amount of pressure the printhead mechanism exerts.
Rewinder Tension Provides for the fine adjustment for the rewinder motor.
Ribbon Tension Front Provides for the fine adjustment for the front ribbon motor.
Ribbon Tension Rear Provides for the fine adjustment for the rear ribbon motor.
Ribbon Low Diameter Sets the threshold for low ribbon warning.
Gap/Mark Offset Sets the offset from the top-of-form mark. Useful for ticket stock.
Gap/Offset Noise Sets the distance of the top-of-form mark to be ignored. Ribbon Length Sets length of ribbon roll. Used for media tracking.
Form Length Sets length of each label on a roll. Used for media tracking.
Number of Forms Sets number of label on a roll. Used for media tracking.
Advanced > Communications
Advanced > Communications > Ethernet
Terms Definitions DHCP Enables or disables DHCP auto-addressing for static setting.
IP Address The user-entered value that sets the static IP of the interface.
Subnet Mask The user-entered value setting the static sublet assigned to the interface.
Gateway The user-entered value that specifies the network gateway address with which the interface should connect.
Advanced > Communications > Serial
Terms Definitions Baud Rate Sets the serial communications rate in bits per second.
Data Bits Sets the word length.
Stop Bits Sets the number of stop bits.
Parity Sets the word parity.
Protocol Serial communications handshaking mechanism.
Advanced > Communications > General
Advanced > Communications > General > Services

96
Terms Definitions Enable NTP (Network Time Protocol) Enables the Network Time Protocol for synchronizing the clock.
Enable SSH Enables the Secure Shell network protocol. Enable Webpages Enables the Webpages utility. If enabled, Webpages are served by the
printer to provide printer status and other information, and allow the user to configure the printer.
Enable SNMP Enables Simple Network Management Protocol. SNMP Trap IP Sets the IP address to send SNMP alerts.
Enable LPD Enables LPD network protocol on port 515; using queue name “lp”.
Advanced > Communications > General > Host Settings
Terms Definitions Host Timeout Print job input timeout in seconds before moving on to monitor other ports.
Port Number Sets TCP parameter. Default is 9100. Host Name Sets network host name.
Hex Transfer Enables or disables passing of hexadecimal data.
Advanced > Adjustments
Terms Definitions Present Distance Adjust User-entered value allowing for the adjustment of the tear bar position
due to mechanical variations.
Cut Distance Adjust User-entered value allowing for the adjustment of the cut position due to mechanical variations.
Vertical Adjust User-entered value allowing for the vertical adjustment of the start of the image relative to the horizontal leading label edge due to mechanical variations.
Horizontal Adjust User-entered value allowing for allowing for the horizontal adjustment of the image relative to the printhead center.
Head Pressure Adjust User-entered value allowing for allowing for the adjustment of the pressure the head exerts on the media.
Rewinder Tension Adjust User-entered value providing for the adjustment of the rewinder motor.
Ribbon Tension Front Adjust User-entered value providing for the adjustment of the front ribbon motor.
Ribbon Tension Rear Adjust User-entered value providing for the adjustment of the rear ribbon motor. Darkness User-entered value allowing for the fine adjustment of the darkness of the
printed image due to printhead and printer thermal variations. Contrast User-entered value allowing for the fine adjustment of the leading edges
of the printed images to improve print quality and barcode readability.
Tools
Tools > Calibrate
Terms Definitions Calibrate Paper The automatic scanning of the paper to determine top-of-form media and
top-of-form gap settings.
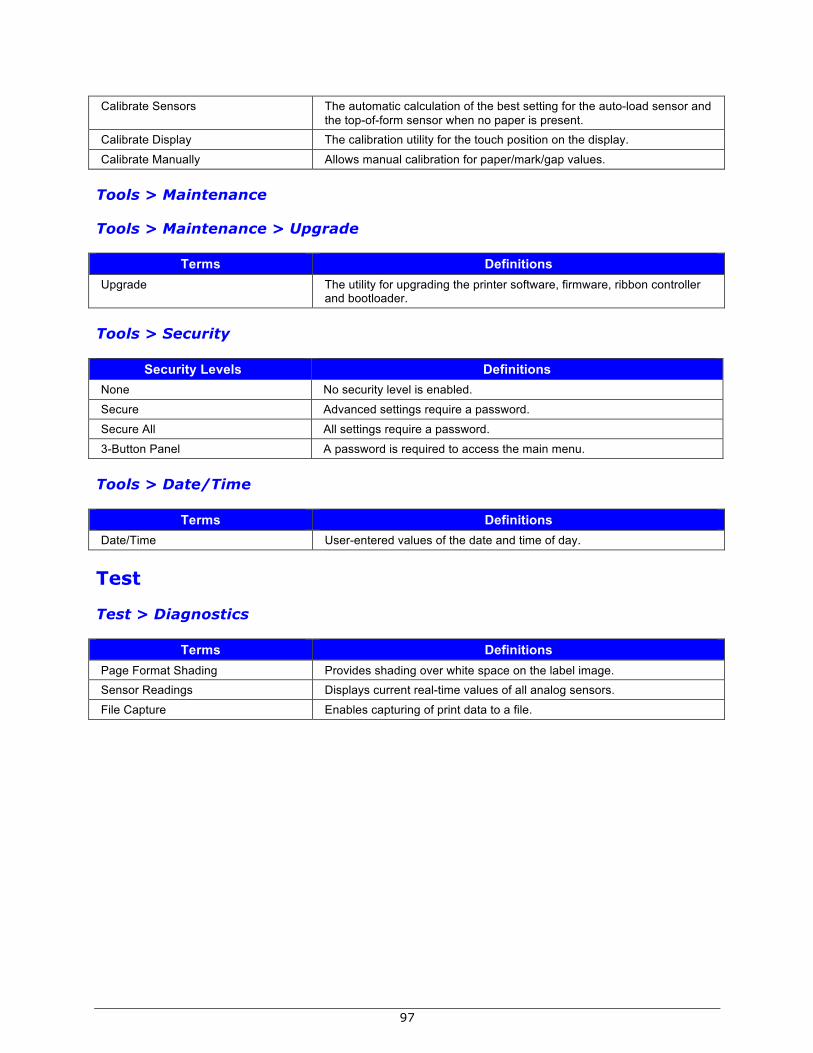
97
Calibrate Sensors The automatic calculation of the best setting for the auto-load sensor and the top-of-form sensor when no paper is present.
Calibrate Display The calibration utility for the touch position on the display.
Calibrate Manually Allows manual calibration for paper/mark/gap values.
Tools > Maintenance
Tools > Maintenance > Upgrade
Terms Definitions Upgrade The utility for upgrading the printer software, firmware, ribbon controller
and bootloader.
Tools > Security
Security Levels Definitions None No security level is enabled.
Secure Advanced settings require a password.
Secure All All settings require a password.
3-Button Panel A password is required to access the main menu.
Tools > Date/Time
Terms Definitions Date/Time User-entered values of the date and time of day.
Test
Test > Diagnostics
Terms Definitions Page Format Shading Provides shading over white space on the label image. Sensor Readings Displays current real-time values of all analog sensors.
File Capture Enables capturing of print data to a file.

98
8 Specifications
8.1 General This section identifies shared parameters and features of the printer models. Communications Interface Types: USB; Serial RS-232 (DB-9), and Ethernet Serial Data Rates (RS-232):
9600 to 115,000 bits per second
Handshaking:
Xon/Xoff; CTS/DTR
Parity:
Even, Odd, or None
Stop Bits:
1 or 2
Data Bits:
7 or 8
Electrical AC Input Voltage Range: 90 - 132 VAC, and 180 - 264 VAC @ 47 - 63 Hz
Power Consumption: Typical operating: 150 Watts; Standby: 21 Watts
Power Supply: Auto ranging switching type.
Printhead Protection: Thermistor protected to temporarily halt printing upon high temperature detection then resume after cool-down.

99
Environmental Operating Temperature Range: 32° to 100° F (0° to 38° C)
Storage Temperature: 0° F – 140° F (-17° C to 60° C)
Humidity Range: 10% – 95% non-condensing
Dust: Non-conducting, non-corrosive
Electromagnetic Radiation: Moderate RF fields can be tolerated.
8.2 Specifications This section identifies unique parameters and features of the printer. Mechanical Height: 16.4 inches (415.3 mm)
Width: 17 inches (432.8 mm)
Depth: 19.3 inches (489 mm)
Weight: 59 pounds (26.8 kg)
Electrical Display: Graphics touchscreen with backlight.

100
Printing Method: Direct Thermal or (optional) Thermal Transfer
Speed: 2 - 8 IPS (51 – 203 MMPS)
Resolution: 300 DPI (12 dots/mm)
Dot Size (nominal): .0027" X .0039" (.07 mm X .10 mm)
Tear Bar: Downward tear
Media Types: Die-Cut, Notched, Continuous, and Reflective
(Roll or Fanfold)
Internal Capacity: 8-inch (203 mm) Outer Diameter Roll (on a standard 3-inch core; or, on a 40 mm core with the optional supply hub)
Ribbon Width Range: 3 inches - 9 inches (76 mm – 228 mm)
Ribbon Length: 1968 feet (600 m)
Dimensions: Reference the drawing and table below:
EJ
I
C
K
A
B
D
H
FG
Side View Top View

101
Media (continued)
H-8308X Media Dimensional Requirements [1]
Designator Description Minimum Maximum
inches mm inches mm
A Label width 3.00 76 9 228
B Liner width 3.00 76 9 228
C Gap (or notch) between labels[3] .08 2 – –
D Label length[3] .25 6 – –
E Media thickness .0025 .06 .01 .25
F Notch opening width .08 2 – –
G Media edge to sensor aperture .20 5 2.25 70
H Reflective mark width[2] .47 12 9 228
I Distance between reflective marks[3] .25 6 – –
J Reflective mark length[3] .08 2 – –
K Label repeat distance[3] .33 8 – – [1] Units of measure are referenced by the direction of label feed. [2] The reflective (black) mark must be carbon based, placed on the backside of the stock, and the
reflectance shall be less than 10% at wavelengths of 950 and 640 nm. [3] The maximum allowable length of the combined label and gap (or mark) measurement cannot
exceed 99.99 inches. 8.3 Approved Media and Ribbon Media (and ribbon for thermal transfer) is an important determinant in the throughput, quality, and performance of the printed product. The following overview is an introduction to the different types of material that can be used in the printer. For complete information and advice regarding a specific application, consult a qualified media specialist or a Datamax-O’Neil Media Representative. Also available is an informative white paper, A Brief Introduction to Media, which can be found at www.datamax-oneil.com Direct Thermal Consider three important factors when selecting direct thermal stock:
• The abrasive qualities of the material that covers the thermal reactive layer of the paper;
• The amount of heat required to start the chemical reaction; and,
• The ability of the media to control that chemical reaction.
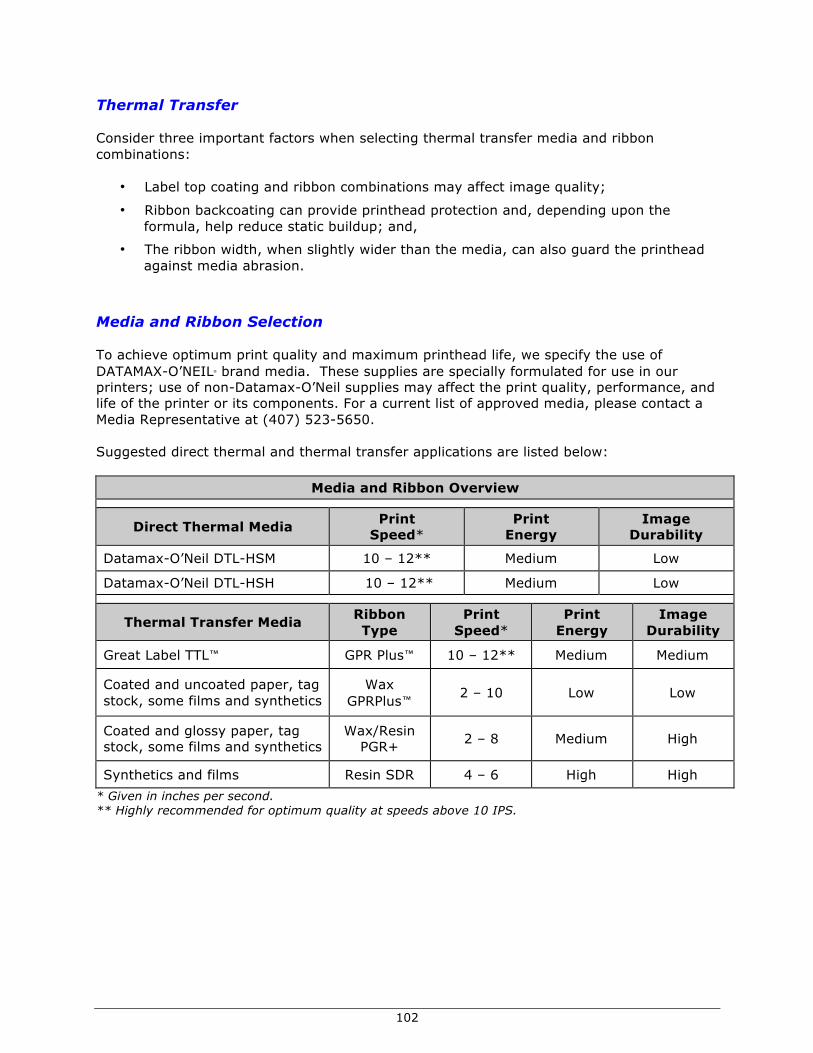
102
Thermal Transfer Consider three important factors when selecting thermal transfer media and ribbon combinations:
• Label top coating and ribbon combinations may affect image quality;
• Ribbon backcoating can provide printhead protection and, depending upon the formula, help reduce static buildup; and,
• The ribbon width, when slightly wider than the media, can also guard the printhead against media abrasion.
Media and Ribbon Selection To achieve optimum print quality and maximum printhead life, we specify the use of DATAMAX-O’NEIL® brand media. These supplies are specially formulated for use in our printers; use of non-Datamax-O’Neil supplies may affect the print quality, performance, and life of the printer or its components. For a current list of approved media, please contact a Media Representative at (407) 523-5650. Suggested direct thermal and thermal transfer applications are listed below:
Media and Ribbon Overview
Direct Thermal Media Print Speed*
Print Energy
Image Durability
Datamax-O’Neil DTL-HSM 10 – 12** Medium Low
Datamax-O’Neil DTL-HSH 10 – 12** Medium Low
Thermal Transfer Media Ribbon Type
Print Speed*
Print Energy
Image Durability
Great Label TTL™ GPR Plus™ 10 – 12** Medium Medium
Coated and uncoated paper, tag stock, some films and synthetics
Wax GPRPlus™ 2 – 10 Low Low
Coated and glossy paper, tag stock, some films and synthetics
Wax/Resin PGR+ 2 – 8 Medium High
Synthetics and films Resin SDR 4 – 6 High High * Given in inches per second. ** Highly recommended for optimum quality at speeds above 10 IPS.

103
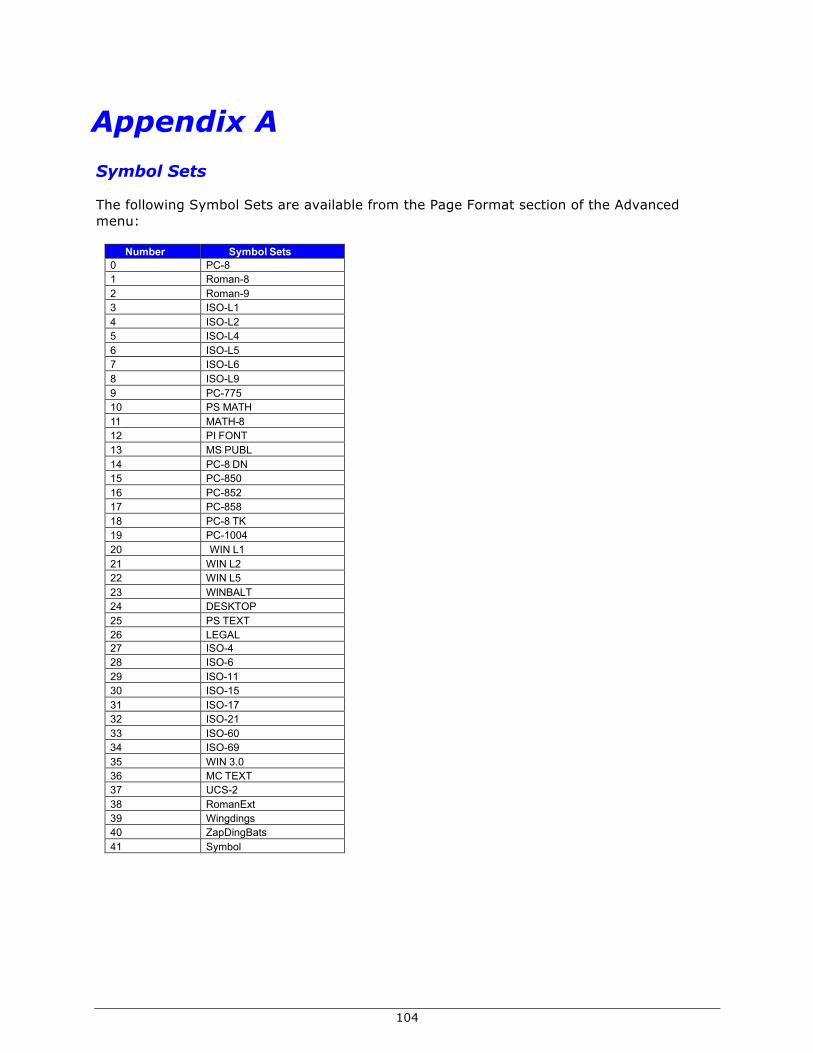
104
Appendix A Symbol Sets The following Symbol Sets are available from the Page Format section of the Advanced menu:
Number Symbol Sets 0 PC-8 1 Roman-8 2 Roman-9 3 ISO-L1 4 ISO-L2 5 ISO-L4 6 ISO-L5 7 ISO-L6 8 ISO-L9 9 PC-775 10 PS MATH 11 MATH-8 12 PI FONT 13 MS PUBL 14 PC-8 DN 15 PC-850 16 PC-852 17 PC-858 18 PC-8 TK 19 PC-1004 20 WIN L1 21 WIN L2 22 WIN L5 23 WINBALT 24 DESKTOP 25 PS TEXT 26 LEGAL 27 ISO-4 28 ISO-6 29 ISO-11 30 ISO-15 31 ISO-17 32 ISO-21 33 ISO-60 34 ISO-69 35 WIN 3.0 36 MC TEXT 37 UCS-2 38 RomanExt 39 Wingdings 40 ZapDingBats 41 Symbol

105
Fonts The following Fonts are supported:
Font Escape Sequence CG Times <ESC>(<symset><ESC>(s1p<ptsize>v0s0b4101T CG Times Italic <ESC>(<symset><ESC>(s1p<ptsize>v1s0b4101T CG Times Bold <ESC>(<symset><ESC>(s1p<ptsize>v0s3b4101T CG Times Bold Italic <ESC>(<symset><ESC>(s1p<ptsize>v1s3b4101T Univers Medium <ESC>(<symset><ESC>(s1p<ptsize>v0s0b4148T Univers Medium Italic <ESC>(<symset><ESC>(s1p<ptsize>v1s0b4148T Univers Bold <ESC>(<symset><ESC>(s1p<ptsize>v0s3b4148T Univers Bold Italic <ESC>(<symset><ESC>(s1p<ptsize>v1s3b4148T Univers Condensed Medium <ESC>(<symset><ESC>(s1p<ptsize>v4s0b4148T Univers Condensed Medium Italic <ESC>(<symset><ESC>(s1p<ptsize>v5s0b4148T Univers Condensed Bold <ESC>(<symset><ESC>(s1p<ptsize>v4s3b4148T Univers Condensed Bold Italic <ESC>(<symset><ESC>(s1p<ptsize>v5s3b4148T Antique Olive Italic <ESC>(<symset><ESC>(s1p<ptsize>v1s0b4168T Antique Olive Bold <ESC>(<symset><ESC>(s1p<ptsize>v0s3b4168T CG Omega <ESC>(<symset><ESC>(s1p<ptsize>v0s0b4113T CG Omega Italic <ESC>(<symset><ESC>(s1p<ptsize>v1s0b4113T CG Omega Bold <ESC>(<symset><ESC>(s1p<ptsize>v0s3b4113T CG Omega Bold Italic <ESC>(<symset><ESC>(s1p<ptsize>v1s3b4113T Garamond Antiqua <ESC>(<symset><ESC>(s1p<ptsize>v0s0b4197T Garamond Kursiv <ESC>(<symset><ESC>(s1p<ptsize>v1s0b4197T Garamond Halbfett <ESC>(<symset><ESC>(s1p<ptsize>v0s3b4197T Garamond Kursiv Halbfett <ESC>(<symset><ESC>(s1p<ptsize>v1s3b4197T Courier <ESC>(<symset><ESC>(s0p<pitch>h0s0b4099T Courier Italic <ESC>(<symset><ESC>(s0p<pitch>h1s0b4099T Courier Bold <ESC>(<symset><ESC>(s0p<pitch>h0s3b4099T Courier Bold Italic <ESC>(<symset><ESC>(s0p<pitch>h1s3b4099T Letter Gothic <ESC>(<symset><ESC>(s0p<pitch>h0s0b4102T Letter Gothic Bold <ESC>(<symset><ESC>(s0p<pitch>h0s3b4102T Letter Gothic Italic <ESC>(<symset><ESC>(s0p<pitch>h1s0b4102T Albertus Medium <ESC>(<symset><ESC>(s1p<ptsize>v0s1b4362T Albertus Extra Bold <ESC>(<symset><ESC>(s1p<ptsize>v0s4b4362T Clarendon Condensed Bold <ESC>(<symset><ESC>(s1p<ptsize>v4s3b4140T Coronet <ESC>(<symset><ESC>(s1p<ptsize>v1s0b4116T Marigold <ESC>(<symset><ESC>(s1p<ptsize>v0s0b4297T Arial <ESC>(<symset><ESC>(s1p<ptsize>v0s0b16602T Arial Italic <ESC>(<symset><ESC>(s1p<ptsize>v1s0b16602T Arial Bold <ESC>(<symset><ESC>(s1p<ptsize>v0s3b16602T Arial Bold Italic <ESC>(<symset><ESC>(s1p<ptsize>v1s3b16602T Times New Roman <ESC>(<symset><ESC>(s1p<ptsize>v0s0b16901T Times New Roman Italic <ESC>(<symset><ESC>(s1p<ptsize>v1s0b16901T Times New Roman Bold <ESC>(<symset><ESC>(s1p<ptsize>v0s3b16901T Times New Roman Bold Italic <ESC>(<symset><ESC>(s1p<ptsize>v1s3b16901T Symbol <ESC>(19M<ESC>(s1p<ptsize>v0s0b16686T Wingdings <ESC>(579L<ESC>(s1p<ptsize>v0s0b31402T OCR-A Fixed <Esc>(s0p10h0s0b23584T OCR-B Fixed <Esc>(s0p10h0s0b23590T Vera Regular Mono <Esc>(s1p__v0s0b23410T OCR-A Mono <Esc>(s1p__v0s0b23584T OCR-B Mono <Esc>(s1p__v0s0b23590T CG Triumvirate <Esc>(s1p v0s0b26708T CG Triumvirate Condensed Bold <Esc>(s1p__v0s0b26714T LinePrinter <Esc>(10U<Esc>(s0p16.67h8.5v0s0b0T

106
Barcodes The following barcodes are supported:
Barcode ID Type Length Valid ASCII Characters, decimal value representation 1000 Code 3 of 9 1-75 0-9, A-Z, $,%,+,-,.,/,space
Lower-case alpha characters will be converted to upper-case. 1001 Extended Code 3 of 9 1-66 ASCII 0-0x7F 1010 UPC-A 1-11 0-9
Checksum will be recalculated regardless if supplied. The “+” character can be used to separate UPC and addendum data.
1020 UPC-E 1-7 0-9 Checksum will be recalculated regardless if supplied. The “+” character can be used to separate UPC and addendum data.
1021 UPC/EANAdd-On 2 or 5 0-9 1030 Code 128 Autoselect 1-79 ASCII 0-0x7F 1031 Code 128 Code Set A 1-79 A-Z 1032 Code 128 Code Set B 1-79 ASCII 0-0x7F 1033 Code 128 Code Set C 1-79 0-9 1040 EAN-8 1-7 0-9
Checksum will be recalculated regardless if supplied. 1050 EAN-13 1-12 0-9
Checksum will be recalculated regardless if supplied. 1060 Interleaved 2 of 5 mod 10 1-89 0-9 1061 Interleaved 2 of 5 bearer
bars 1-89 0-9
1062 Interleaved 2 of 5 1-89 0-9 1070 GS1-128 1-79 ASCII 0x20-0x7F
The leading AI value must be placed in square brackets and a trailing checksum must be included.
1080 Codabar 1-60 0-9, A-D Lower-case alpha characters will be converted to upper-case.
1090 UK Plessey 1-65 48-57, 0-9, A-DF 1091 MSI Plessey Mod 10 1-55 0-9 1100 Code 93 1-107 0-0, A-Z, -, ., space, $, /, +, % 1110 HIBC Code 93 1-36 0-9, A-Z, $,%,+,-,.,/,space 1111 HIBC Code 128 1-36 0-9, A-Z, $,%,+,-,.,/,space 1120 Telepen 1-30 ASCII 0x20-0x7F 1130 GS1 Databar (RSS); linear
only 1-13
1131 GS1 Databar Expanded; linear only
1-45 ASCII 0x20-0x7F
1500 Postnet 1-38 0-9 1510 Planet 1-38 0-9 1520 FIM 1 A, B, C, D 1530 UPS Intelligent Mail
(OneCode) 20 0-9
2000 QR Code - Auto Format
1-256 ASCII 0x20-0x7F
2010 PDF-417 1-256 Full ASCII (0 – 0xFF) 2020 MicroPDF417 1-256 Full ASCII (0 – 0xFF) 2030 DataMatrix 1-256 Full ASCII (0 – 0xFF) 2040 UPS MaxiCode 1-138 Alphanumeric, ASCII 0x1E, 0x1D,0x04,[,),> 2050 Aztec 1-256 Full ASCII (0 – 0xFF)