711 SERIESa
8
711 SERIES RIM CLAMP Parts and Operating Manual ______________Machine Model ____________________ Serial # Po Box 472110, Tulsa, OK 74147 USA Toll Free: 800-725-7311 918-447-1288 office 918-447-0188 fax www.mathey.com
-
Upload
kristen-kaine -
Category
Documents
-
view
215 -
download
2
description
Po Box 472110, Tulsa, OK 74147 USA Toll Free: 800-725-7311 918-447-1288 office 918-447-0188 fax www.mathey.com ______________Machine Model ____________________ Serial # Mailing Address: Po Box 472110 Tulsa, Ok 74147-2110 USA Shipping Address: 4344 S. Maybelle Ave. Tulsa, OK 74107 USA Phone: (918) 447-1288 Fax: (918) 447-0188 Email: [email protected] Aligns Pipe to Schedule Reforms Pipe to Schedule Pipe Size Range (in./mm.) Shipping Weight (lbs./kg.) Part #
Transcript of 711 SERIESa
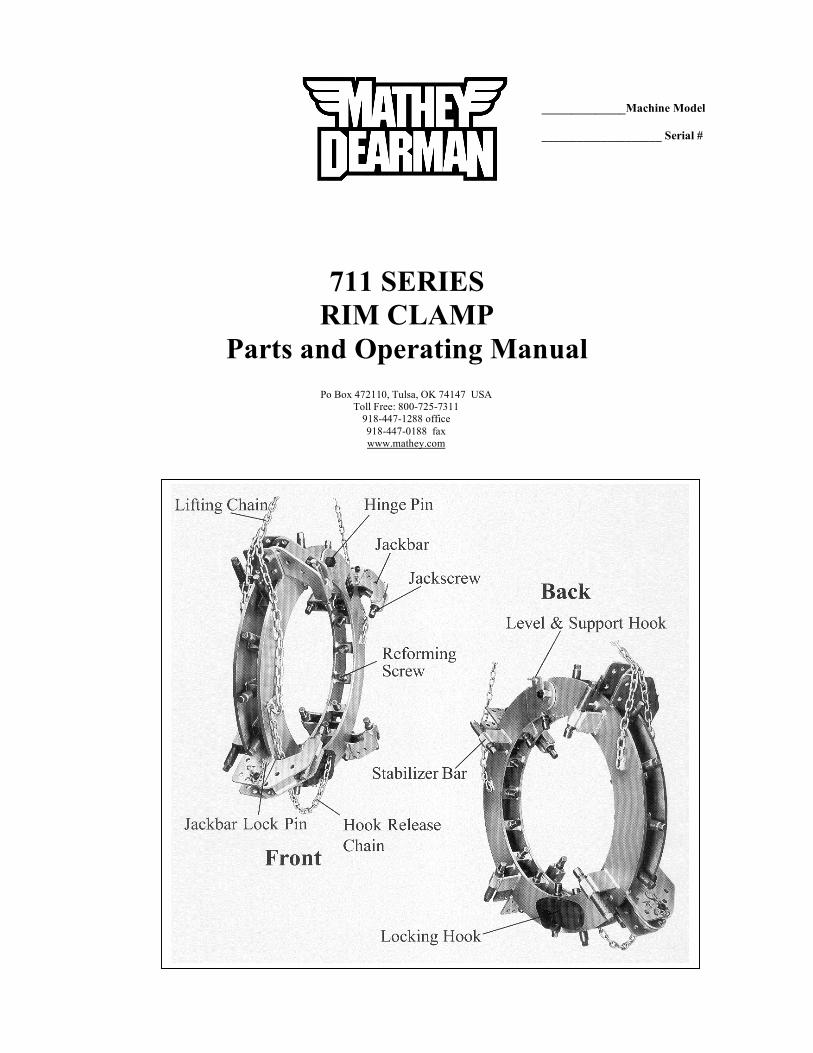
711 SERIES RIM CLAMP
Parts and Operating Manual
______________Machine Model ____________________ Serial #
Po Box 472110, Tulsa, OK 74147 USA Toll Free: 800-725-7311
918-447-1288 office 918-447-0188 fax www.mathey.com

Part # Pipe Size
Range (in./mm.)
Reforms Pipe to
Schedule
Aligns Pipe to
Schedule
Shipping Weight
(lbs./kg.) D711-0406 4-6/102-152 80 120 40/18 D711-0608 6-8/152-203 80 120 50/23 D711-0810 8-10/203-254 80 120 70/32 D711-1012 10-12/254-305 80 120 90/41 D711-1214 12-14/305-356 80 120 120/54 D711-1416 14-16/356-508 80 120 190/86 D711-1618 16-18/406-457 80 120 240/108 D711-1420 14-20/356-508 80 120 280/126 D711-1824 18-24/457-610 80 120 350/158 D711-2026 20-26/508-660 80 120 260/162 D711-2228 228-28/559-711 80 120 380/171 D711-2632 26-32/660-813 80 120 400/180 D711-3036 30-36/762-914 80 120 420/189 D711-3440 34-40/864-1016 80 120 450/203 D711-3844 38-44/965-1118 80 120 490/221 D711-4248 42-48/1067-1219 80 120 510/230 D711-4450 44-50/1118-1270 80 120 610/275 D711-4652 46-52/1168-1321 80 120 610/275 D711-5056 50-56/1270-1422 80 120 680/306 D711-5460 54-60/1372-1524 80 120 750/338 D711-5864 58-64/1473-1626 80 120 820/369 D711-6268 62-68/1575-1727 80 120 880/396 D711-6672 66-72/1676-1829 80 120 950/428
Mathey Dearman D711 Series Rim Clamp are the “Clamps with Muscle” for the tough reforming Jobs. Jackscrews apply pressure on specific high points to precisely reform and align the pipes or shells. FOR ALL YOUR PIPE CUTTING AND CLAMPING EQUIPMENT REQUIREMENTS, SEE YOUR NEAREST MATHEY DEARMAN DISTRIBUTOR OR CONTACT US …….1-800-725-7311
Mailing Address: Po Box 472110 Tulsa, Ok 74147-2110 USA Shipping Address: 4344 S. Maybelle Ave. Tulsa, OK 74107 USA Phone: (918) 447-1288 Fax: (918) 447-0188 Email: [email protected]

Instructions for the use of the Dearman Rim Clamp
Figure 1
Figure2
1. Unlatch the Locking Hook by pulling upward on the Hook Release Chain
2. To open the clamp, lift it by the lifting chain, if applicable. The clamp can now be placed over the pipe.
Figure 3
3. Back off all Reforming Screws, with the exception of the two near the top (as shown) prior to lowering clamp onto pipe. This procedure will allow the locking hook on bottom of the clamp to latch shut.
Figure 4
4. The clamp should be positioned on the pipe so the Jackbars (A), will extend beyond the end of the pipe 1 – 2 inches, allowing the Jackscrews on the Jackbars to grip the incoming piece of pipe. Close clamp until the Locking Hook (B) has latched.
Note: Make sure Locking Hook latch is closed.
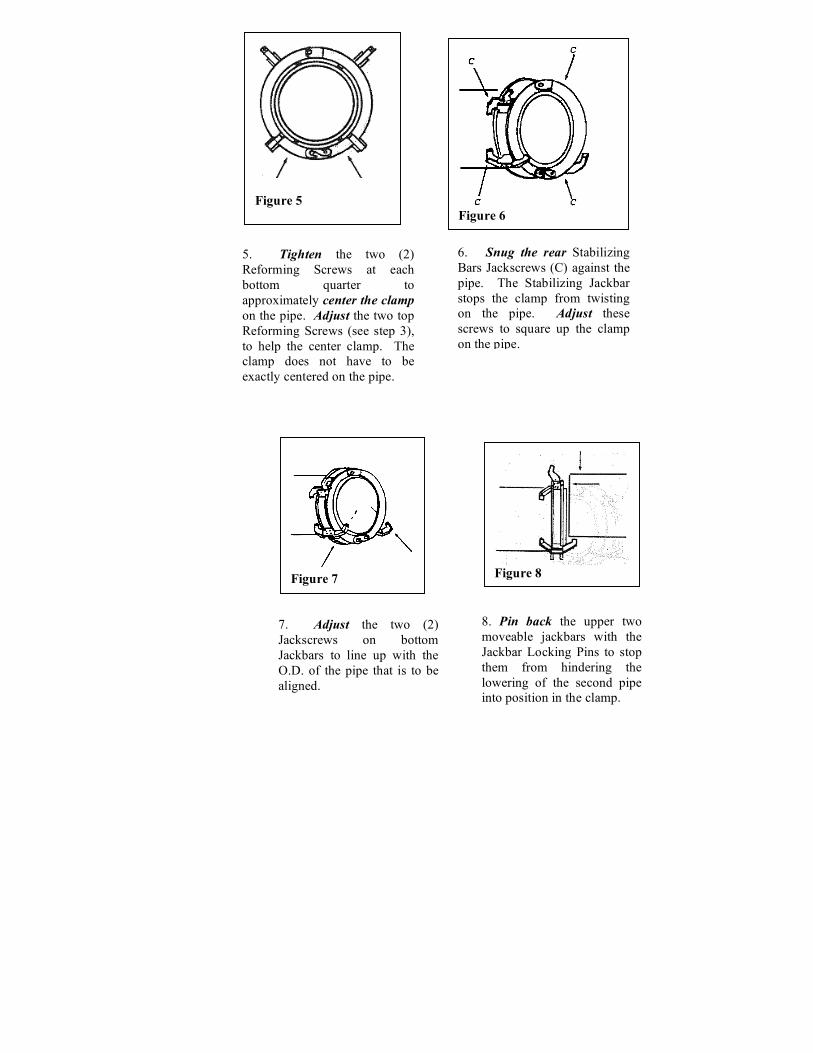
5. Tighten the two (2) Reforming Screws at each bottom quarter to approximately center the clamp on the pipe. Adjust the two top Reforming Screws (see step 3), to help the center clamp. The clamp does not have to be exactly centered on the pipe.
6. Snug the rear Stabilizing Bars Jackscrews (C) against the pipe. The Stabilizing Jackbar stops the clamp from twisting on the pipe. Adjust these screws to square up the clamp on the pipe.
Figure 5
Figure 6 See Figure 6
Figure 7
7. Adjust the two (2) Jackscrews on bottom Jackbars to line up with the O.D. of the pipe that is to be aligned.
Figure 8
8. Pin back the upper two moveable jackbars with the Jackbar Locking Pins to stop them from hindering the lowering of the second pipe into position in the clamp.

Figure 9
Figure 10
9. At the point the pipe is resting on lower Jackscrews of the Jackbars remove the Jackbar Locking Pins from the upper Jackbars (D) and lower them into position. Use Jackscrews (E), of Jackbars to move or shift the pipe into alignment with the piece of pipe that the clamp is around.
Note: Do not try to reshape the incoming pipe.
10. When the two (2) pieces of pipe are aligned as close as possible, determine the Reforming Screws that can be used to re-shape the pipe to the mating pipe. Adjust the Reforming screws as needed to re-shape the pipe to match the piece of pipe that is to be aligned. Use the Reforming Screws only where the high spots exist (F). It will be necessary to reduce the pressure on some of the Reforming Screws (F1) as you tighten others. It may be necessary to repeat this procedure several times before completing the fit-up. A small amount of pressure is all that is need, if the Reforming Screws are used to apply pressure only on the high spots.
Note: It is a common mistake to use all the Reforming Screws at the same time.

Figure 11
11. At the point that the two (2) inside or outside diameters are in near alignment, use the Jackscrews on the Jackbars screws to move the incoming pipe into perfect alignment.
Figure 12
12. Loosen the Jackscrews (G) enough to hold the pipe loosely in place, after adequate tack welding. Remove the Jackbar Locking Pins (H) from the upper Jackbars allowing the jackbar to be rotated out of the way. Reinsert the pin.
Note: The Jackbar can be left in place in position during the entire welding
process if required.
Figure 13
Figure 14
13. The entire weld area is now exposed for completing the weld and grinding process without having to release the reforming portion of the clamp.
Note: Following this procedure will eliminate any chance of a weld
fracture due to the clamp relieving the stress on a partially completed
weld, and will result in a much higher quality of weld.
14. When you have sufficient amount of weld, and are ready to take the clamp off, loosen all Reforming Screws and Jackscrew. You may leave the two top Reforming Screws (I), one on each side of the hinging point, extended down ½” more than the others so the clamp will be resting on the screws when you loosen the rest of them.

Maintenance 1. All Reforming Screws and Jackscrews should be inspected after each clamping operation for splatter and other foreign debris. Any slag, splatter and other foreign debris should be removed prior to the next clamping operation. 2. All Reforming Screws and Jackscrews should be checked for damaged threads. If the threads are damaged, the threads should be filed smooth so that the Jackscrew will smoothly move in and out of the Jackscrew Nut. 3. Anti-seize compound should be applied to all Reforming Screws and Jackscrews daily. Special Applications The Rim Clamp should be allowed to cool, when the welding inner pass temperature exceeds 375°F (190°C), before attempting to remove the clamp from the pipe. Warranty If any merchandise sold hereunder (except merchandise manufactured by other persons or firms) by Mathey Dearman, Inc. (the “Company”) is not in accordance with specifications shown on the order within customarily accepted tolerances, or is defective on account of workmanship or material, and if such merchandise is returned at the customer’s expense and rise, to the Company’s manufacturing facility (or at the Company’s option, is returned to a repair facility authorized by the Company), within ninety (90) days after the Company’s date of shipment thereof, the Company will, at its option, replace or repair the merchandise. This agreement, however, is upon the conditions: (A) that the customer promptly notifies the Company in writing of any claim under this agreement, setting forth in detail any such claimed defect. (B) That the Company be afforded a reasonable opportunity to examine the merchandise and to investigate the claimed defect at the Company’s manufacturing facility or at an authorized repair facility, the Company shall not be, in any event, liable for damages beyond the price paid by the customer for such defective merchandise; specifically but without limitation, the Company may fulfill its obligations under this Agreement by tendering such purchase price at any time. THE COMPANY SHALL NOT BE LIABLE FOR CONSEQUENTIAL, INCIDENTAL, PUNITITVE, OR EXEMPLARY DAMAGES. This agreement does not obligate the Company to bear any transportation charges in connection with the replacement or the repair of defective merchandise. As to any item manufactured by other persons or firms, the Company agrees to present a request for adjustment for repair to such manufacturer, and the customer agrees that the liability of the Company shall not exceed any adjustment with respect to which such manufacturer accepts responsibility. THE ABOVE AGREEMENT IS IN LIEU OF ALL WARRANTIES, EXPRESSED OR IMPLIED AND IT IS AGREED THAT THERE IS NO EXPRESSED OR IMPLIED WARRANTY BY THE COMPANY AS TO THE FITNESS, MERCHANTABILITY CAPACITY, OR EFFICIENCY OF ANY MERCHANDISE SOLD, AND THAT THERE ARE NO ORAL OR WRITTEN EXPRESSED OR IMPLIED WARRANTIES MADE IN CONNECTION WITH ANY SALE BY THE COMPANY. No modification or addition to this agreement, either before or after the contract of sale, shall be made except on written authority of the President or Vice President of the Company.
15. The locking hook (J) can be unlatched when a sufficient amount of pressure has been released from the Reforming Screws. Pull upward on the Hook Release Chain while lifting the clamp.

C.I.A. Mathey Italiana S.r.l. Via Isonzo, 26 - 20050 S. Damiano di Brugherio (MI)
Phone: +39 039 831019/2020021 • Fax: +39 039 2020079 [email protected] • www.ciamathey.com