6180 Naehmaschine Singer DE AT - Dittrich Nähmaschinen · IAN 59032 NÄHMASCHINE 6180 NÄHMASCHINE...
86
IAN 59032 NÄHMASCHINE 6180 NÄHMASCHINE Bedienungs- und Sicherheitshinweise SEWING MACHINE Operation and Safety Notes
Transcript of 6180 Naehmaschine Singer DE AT - Dittrich Nähmaschinen · IAN 59032 NÄHMASCHINE 6180 NÄHMASCHINE...
IAN 59032
NÄHMASCHINE 6180
NÄHMASCHINE Bedienungs- und Sicherheitshinweise
SEWING MACHINE Operation and Safety Notes
59032_Naehmaschine_Singer_Cover_DE_AT.indd 2 14.02.14 14:19

DE / AT / CH Bedienungs- und Sicherheitshinweise Seite 5GB / IE Operation and Safety Notes Page 45
Klappen Sie vor dem Lesen die Seite mit den Abbildungen aus und machen Sie sich anschließend mit allen Funktionen des Gerätes vertraut.
Before reading, unfold the page containing the illustrations and familiarise yourself with all functions of the device.
59032_Naehmaschine_Singer_Cover_DE_AT.indd 3 14.02.14 14:19

A B7
8
9
17
18
28
30
31
33
27
19
26
10
1
35 36
6
40
44
41 42 43
37 38 39
1112
2
3
4
5
13
14
22
25
32
34
23
24
21
20
15
16
6
29
59032_Naehmaschine_Singer_Cover_DE_AT.indd 4 14.02.14 14:19

59032_Naehmaschine_Singer_Cover_DE_AT.indd 5 14.02.14 14:19

5 DE/AT/CH
Wichtige Sicherheitshinweise ........................................................................................Seite 8
Technische Daten ......................................................................................................................Seite 9
TeilebeschreibungNähmaschine ......................................................................................................................................Seite 9Zubehör ...............................................................................................................................................Seite 9
InbetriebnahmeElektrischer Anschluss / Fußanlasser ..................................................................................................Seite 10Hauptschalter ......................................................................................................................................Seite 10Garnrollenhalter ..................................................................................................................................Seite 10Nähfußheber .......................................................................................................................................Seite 11Transportabdeckplatte ........................................................................................................................Seite 11Freiarm verwenden .............................................................................................................................Seite 11Unterfaden spulen ...............................................................................................................................Seite 12Herausnehmen der Spulenkapsel ......................................................................................................Seite 12Einsetzen der Spule in die Spulenkapsel ...........................................................................................Seite 13Einsetzen der Spulenkapsel in den Greifer .......................................................................................Seite 13Oberfaden einfädeln ..........................................................................................................................Seite 13Gebrauch des Nadeleinfädlers .........................................................................................................Seite 15Unterfaden heraufholen ......................................................................................................................Seite 15
Stoff-, Garn- und Nadeltabelle ......................................................................................Seite 16
Nadel auswechseln ................................................................................................................Seite 16
Fadenspannung einstellen ...............................................................................................Seite 17Bei Geradstich .....................................................................................................................................Seite 17Bei Zickzackstich und Zierstichen .......................................................................................................Seite 18
BedienungsfeldfunktionenStichnummertasten ..............................................................................................................................Seite 18Einstellungstasten für Stichlänge / Stichbreite und Nadelposition ...................................................Seite 18Nadelpositionen für den Geradstich .................................................................................................Seite 19Regulierung der Unterfadenspannung...............................................................................................Seite 19Nähfuß auswechseln ..........................................................................................................................Seite 19
Hilfemeldung ...............................................................................................................................Seite 20
RückwärtsschalterDoppelfunktionsschalter zum Rückwärtsnähen und Vernähen.........................................................Seite 20
NähbeginnNachschlagtabelle für Stichlängen und Stichbreiten ........................................................................Seite 21
Übersicht Stichmusternummern ...................................................................................Seite 24
59032_Naehmaschine_Singer_Content_DE_AT.indd 5 14.02.14 14:19

6 DE/AT/CH
Geradstich ......................................................................................................................................Seite 25Gerade nähen mit den Führungslinien ..............................................................................................Seite 26uiltstich mit Handarbeitoptik ...............................................................................................................Seite 26Reißverschluss einnähen / kordonieren ..............................................................................................Seite 26
ZickzackstichStichbreite und Stichlänge einstellen..................................................................................................Seite 27
Mehrfacher Zickzackstich .................................................................................................Seite 27
Muschelstich ..................................................................................................................................Seite 28
Raupenstich ...................................................................................................................................Seite 28
Platzierung von Mustern ...................................................................................................Seite 28
Knopf annähen ..........................................................................................................................Seite 29
Blindstich ..........................................................................................................................................Seite 29
Stretchstiche ..................................................................................................................................Seite 30
Stretchgeradstich ......................................................................................................................Seite 30
Wabenstich ....................................................................................................................................Seite 31
Overlockstich ...............................................................................................................................Seite 31
Federstich ........................................................................................................................................Seite 31
Stretchzickzackstich ...............................................................................................................Seite 31
Doppelter Overlockstich ....................................................................................................Seite 32
Kreuzstich .......................................................................................................................................Seite 32
Entredeuxstich ............................................................................................................................Seite 32
Leiterstich ........................................................................................................................................Seite 32
Pikotstich .........................................................................................................................................Seite 33
Kantenstich ....................................................................................................................................Seite 33
Geneigter Kantenstich .........................................................................................................Seite 33
Stretchoverlockstich ...............................................................................................................Seite 33
59032_Naehmaschine_Singer_Content_DE_AT.indd 6 14.02.14 14:19

7 DE/AT/CH
Hexenstich ......................................................................................................................................Seite 34
Griechischer Stich .....................................................................................................................Seite 34
Grätenstich .....................................................................................................................................Seite 34
Dornstich ..........................................................................................................................................Seite 34
Doppelter Overlockstich ....................................................................................................Seite 35
Fagottstich ......................................................................................................................................Seite 35
Stretchpatchworkstich .........................................................................................................Seite 35
Mehr Zierstiche & Ideen für Dekorationen ........................................................Seite 35
KnopflöcherAutomatische Knopflöcher .................................................................................................................Seite 36Knopfloch mit Einlauffaden ................................................................................................................Seite 37
Pflege und ReinigungPflege und Reinigung der Nähmaschine ...........................................................................................Seite 38Reinigung des Greiferbereichs ...........................................................................................................Seite 38
Optionales ZubehörGroßer Anschiebetisch .......................................................................................................................Seite 39
Nützliche Tipps bei StörungenAllgemeine Störungen ........................................................................................................................Seite 39Stichprobleme .....................................................................................................................................Seite 39Fadenprobleme ...................................................................................................................................Seite 40
SonderzubehörRollfuß ..................................................................................................................................................Seite 40Spezialfuß für unsichtbare Reißverschlüsse .......................................................................................Seite 40Knopfannähfuß ...................................................................................................................................Seite 41Blindstichfuß ........................................................................................................................................Seite 41Overlockfuß .........................................................................................................................................Seite 42
Garantie und ServiceGarantie ..............................................................................................................................................Seite 42Service .................................................................................................................................................Seite 43
Konformitätserklärung .......................................................................................................Seite 43
Entsorgung .....................................................................................................................................Seite 43
59032_Naehmaschine_Singer_Content_DE_AT.indd 7 14.02.14 14:19

8 DE/AT/CH
Nähmaschine
Wichtige Sicherheitshinweise
Beim Gebrauch dieser Maschine sollten Sie stets grundlegende Sicherheitsmaßnahmen beachten. Lesen Sie sämtliche Hinweise vor Gebrauch derMaschine aufmerksam durch.
ACHTUNG! Zur Vermeidung elektrischer Schläge:
Die Maschine nie unbeaufsichtigt lassen, wenn sie mit dem Stromnetz verbunden ist. Unmittelbar nach dem Gebrauch sowie vor jeder Reinigung den Netzstecker aus der Steckdose ziehen.
VORSICHT! Die Netzspannung (Spannung des Steckdosenanschlusses) muss unbedingt mit der Nennspannung des Motors überein-stimmen.
Die Maschine darf nur zur dem in diesem Handbuch beschriebenen Zweck verwendet werden. Benutzen Sie ausschließlich Zubehör, das vom Hersteller in dieser Bedienungsanlei-tung empfohlen wird.
Zur Durchführung von Arbeiten im Nadelbereich, wie Einfädeln der Nadel oder Greifer sowie zum Nadel-, Stichplatten- oder Nähfußwechsel usw. den Netzstecker aus der Steckdose zie-hen oder die Maschine ausschalten.
Den Netzstecker der Nähmaschine aus der Steckdose ziehen, wenn Abdeckungen entfernt werden, beim Schmieren oder wenn sonstige Wartungsarbeiten, die in dieser Anleitung be-schrieben sind, durch den Benutzer ausgeführt werden.
Selbstständige Einstellungen des Motorriemens sind nicht gestattet. Sollten entsprechende Ein-stellungen notwendig sein, ist die zuständige Service-Vertretung zu kontaktieren.
Den Netzstecker nicht am Kabel, sondern am Stecker aus der Steckdose ziehen.
Den Fußanlasser vorsichtig behandeln und nicht zu Boden fallen lassen. Insbesondere dür-fen keine Gegenstände auf den Fußanlasser gestellt werden.
Stets die korrekte Stichplatte verwenden. Eine falsche Stichplatte kann Nadelbruch verursachen.
Keine verbogenen Nadeln verwenden. Beim Nähen die Finger von allen sich bewe-
genden Teilen fernhalten. Besondere Vorsicht ist im Bereich um die Nähmaschinennadel geboten.
Das Nähgut beim Nähen nicht ziehen oder schieben. Dadurch könnte die Nadel verbogen werden und brechen.
Maschine ausschließlich am Tragegriff heben und bewegen.
Die Maschine darf auf keinen Fall betrieben werden, wenn Kabel bzw. Netzstecker beschä-digt sind, die Maschine nicht ordnungsgemäß arbeitet, zu Boden gefallen ist oder wenn sie beschädigt bzw. nass wurde. Ist eine Überprü-fung bzw. Reparatur notwendig oder sind elektrische bzw. mechanische Justierungen erforderlich, so bringen Sie die Maschine zum nächstgelegenen Vertragshändler oder Kun-dendienst.
Die Maschine darf nicht betrieben werden, falls irgendwelche Luftöffnungen verschlossen sind. Halten Sie die Belüftungsöffnungen der Maschine und des Fußanlassers frei von Flusen, Staub und losem Gewebe.
Keine Gegenstände in die Öffnungen der Maschine stecken bzw. fallen lassen.
Maschine nicht im Freien betreiben. Die Maschine darf nicht an Orten betrieben
werden, an denen Sprays oder reiner Sauer-stoff verwendet werden.
Die Maschine darf nicht als Spielzeug benutzt werden. Höchste Aufmerksamkeit ist geboten, wenn die Maschine von Kindern oder im Beisein von Kindern benutzt wird.
Weder Maschine noch Maschinenkoffer direk-ter Sonneneinstrahlung oder sehr warmem bzw. feuchtem Raumklima aussetzen.
Die Maschine, der Fußanlasser und das Netz-kabel dürfen nicht mit nassen Händen, nassen Tüchern oder sonstigen nassen Gegenständen angefasst werden.
Den Netzstecker nicht an eine Mehrfachsteck-dose anschließen, an die mehrere andere Netzkabel anderer Geräte angeschlossen sind.
59032_Naehmaschine_Singer_Content_DE_AT.indd 8 14.02.14 14:19

9 DE/AT/CH
Die Maschine nur auf einem ebenen und stabi-len Tisch benutzen.
Vor jeder Inbetriebnahme Freiarm- und Greifer-raumdeckel der Maschine schließen.
Nähfuß und Nadeln für Kinder unzugänglich aufbewahren.
Maschine nicht selbsttätig auseinanderbauen oder verändern.
Vor der Maschinenpflege sicherstellen, dass der Netzschalter ausgeschaltet und der Netz-stecker aus der Steckdose gezogen ist.
Ist das Netzkabel beschädigt, muss es vom Hersteller, Händler bzw. durch eine sonstige qualifizierte
Person ausgetauscht werden, um eine potenti-elle Gefahrenquelle zu eliminieren.
Dieses Gerät kann von Kindern ab 8 Jahren und darüber sowie von Personen mit verringer-ten physischen, sensorischen oder mentalen Fähigkeiten oder Mangel an Erfahrung und Wissen benutzt werden, wenn sie beaufsichtigt oder bezüglich des sicheren Gebrauchs des Ge-rätes unterwiesen wurden und die daraus resul-tierenden Gefahren verstehen. Kinder dürfen nicht mit dem Gerät spielen. Reinigung und Benutzerwartung dürfen nicht von Kindern ohne Beaufsichtigung durchgeführt werden.
Schalten Sie die Maschine stets aus, wenn Sie sie unbeaufsichtigt lassen.
Ziehen Sie vor Wartung der Maschine den Netzstecker.
Wenn die Leuchteinheit beschädigt ist, muss sie von einem autorisierten Händler ausgetauscht werden.
Technische Daten
Nennspannung: 230 V ~Netzfrequenz: 50 HzLeistungsaufnahme: 65 WUmgebungstemperatur: NormaltemperaturGewicht: 6,2 kg
Abmessungen: 420 x 205 x 311 mm Geräuschpegel: weniger als 70 db (A)
Teilebeschreibung
Nähmaschine (Abb. A)
1 Fadenführung2 Fadenhebel3 Fadenspannungs-Einstellrad4 Kopfdeckel5 Fadenabschneider6 Anschiebetisch (Zubehörbox)7 Spuler8 Spulstopp9 Stichmusterübersicht10 Rückwärtsschalter11 Tragegriff12 Horizontaler Garnrollenhalter13 Handrad14 Hauptschalter15 Netzanschluss16 Typenschild17 Fadenführung18 Knopflochhebel19 Nähfußheber20 Fadenführung21 Nadeleinfädler22 Fadenführung23 Nähfußschraube24 Nadel25 Stichplatte26 Nadelstange27 Nähfußhalter28 Nähfuß-Auslöser29 Nadelklemmschraube30 Nähfuß31 Transporteure32 Netzkabel33 Fußanlasser34 Gebrauchsanleitung
Zubehör (Abb. B)
35 Nadelsatz36 3 x Spulen (1 in der Maschine)37 Zweiter Garnrollenhalter38 Unterlegscheiben (2 x)39 Fadenablaufscheibe
59032_Naehmaschine_Singer_Content_DE_AT.indd 9 14.02.14 14:19

10 DE/AT/CH
40 Trennmesser/Pinsel41 Stichplattenschlüssel42 Transport-Abdeckplatte43 Reißverschlussfuß44 Knopflochfuß
Der mitgelieferte Nähfuß nennt sich Stan-dard-Nähfuß und wird bei den meisten Näharbeiten verwendet.
Inbetriebnahme
Maschine immer durch Her-ausziehen des Netzsteckers aus der Steckdose vom Netz
trennen. Bevor Sie die Maschine zum ersten Mal benut-
zen, wischen Sie bitte überschüssiges Öl ab, das sich während des Transports im Stichplat-tenbereich ansammeln kann.
Elektrischer Anschluss/Fußanlasser
Schließen Sie den Netzstecker (1) der Ma-schine an die Steckdose (2) wie abgebildet. Schließen Sie den Stecker (3) des Fußanlassers an die Anschlussbuchse der Nähmaschine an. Hinweis: Bei nicht angeschlossenem Fußan-lasser kann die Nähmaschine nicht in Betrieb genommen werden.
32
1
3
4
25
1
1 Hauptschalter auf OFF/AUS
2 Stecker
3 Netzkabel4 Fußanlasser5 Anschlussbuchse
Hauptschalter
Ihre Maschine näht nur, wenn der Hauptschal-ter eingeschaltet ist. Durch den Hauptschalter wird auch das Nählicht aus und eingeschaltet. Bei Wartungsarbeiten oder beim Auswechseln von Nadel oder Nählicht muss die Maschine durch Ziehen des Netzsteckers aus der Steck-dose vom Netz getrennt werden.
Hauptschalter OFF/AUS:
Hauptschalter ON/EIN:
Garnrollenhalter
HORIZONTALER GARNROLLENHALTER Stecken Sie die Garnrolle auf den Garnrollen-
halter und sichern Sie sie mit einer Fade-nablaufscheibe, damit der Faden gut abläuft. Ist die Garnrolle mit einer Fadenvorspannung ausgestattet, sollte diese nach rechts zeigen.
59032_Naehmaschine_Singer_Content_DE_AT.indd 10 14.02.14 14:19

11 DE/AT/CH
VERTIKALER GARNROLLENHALTER FÜRGRÖSSERE GARNROLLEN Garnrollenhalter anbringen und eine Unterleg-
scheibe darauf setzen. Stecken Sie eine Garn-rolle auf den Garnrollenhalter.
1
2
34516
1 Garnrolle2 Unterlegscheibe3 Vertikaler
Garnrollenhalter
4 Garnrollenhalter5 Fadenvorspannung6 Fadenablaufscheibe
Nähfußheber
Es gibt drei Positionen für den Nähfuß.
1. Nähfuß in unterster Stellung: zum Nähen.2. Nähfuß in mittlerer Stellung: zum Einlegen und
Herausnehmen des Nähgutes.3. Nähfuß in oberster Stellung: zum Auswechseln
des Nähfußes oder Herausnehmen von beson-ders dickem Nähgut.
Transportabdeckplatte
Verwenden Sie die Transport-Abdeckplatte, wenn Sie den automatischen Transport der Maschine zum Annähen von Knöpfen, Freihand-Nähen und Stopfen ausschalten wollen. Sie können dann den Stoff selbst führen und bewegen. Zum Einbauen bringen Sie Nadel und Nähfuß nach oben.
Legen Sie die Transport-Abdeckplatte so auf die Stichplatte, dass die unteren Kerben in die Bohrungen einrasten.
Freiarm verwenden
Sie können Ihre Maschine sowohl als Freiarm- als auch als Flachbett-Maschine benutzen. Bei eingebautem Anschiebetisch haben Sie eine größere Arbeitsfläche als bei einem Flachbett-Modell.
Zum Entfernen, halten Sie den Anschiebetisch mit beiden Händen fest und ziehen Sie ihn von der Maschine weg.
Zum Einsetzen, schieben Sie den Anschiebe-tisch in die richtige Position, bis er einrastet.
Ohne Anschiebetisch kann die Maschine als Freiarm - Nähmaschine zum Nähen von Kin-derbekleidung, Manschetten, Hosenbeinen und anderen schwer zugänglichen Stellen verwendet werden.
59032_Naehmaschine_Singer_Content_DE_AT.indd 11 14.02.14 14:19

12 DE/AT/CH
Unterfaden spulen
Stellen Sie sicher, dass Sie Spulen der Klasse 15 J verwenden.
1. Stecken Sie eine Garnrolle auf den Garnrollen-halter und sichern Sie sie mit der kleinen Fade-nablaufscheibe. Ziehen Sie den Faden von der Garnrolle durch die Fadenführungen, wie in der Abbildung gezeigt.
2. Ziehen Sie das Fadenende durch das Loch in der Spule (siehe Abbildung).
3. Drücken Sie den Spuler so weit wie möglich nach links, (wenn sich der Spuler nicht links be-findet). Stecken Sie die Spule so auf den Spu-ler, dass das Fadenende nach oben zeigt. Drücken Sie nun den Spuler nach rechts bis es klickt, und halten Sie das Fadenende fest.
4. Starten Sie die Maschine. Wenn die Spule voll ist, schaltet sich der Spuler von selbst ab. Drü-cken Sie den Spuler wieder nach links, nehmen Sie die Spule ab, und schneiden Sie die Fade-nenden ab.
4
1
32
Herausnehmen der Spulenkapsel
1. Bringen Sie die Nadel in ihre höchste Stellung, indem Sie das Handrad nach vorn drehen.
2. Öffnen Sie die Freiarmklappe, indem Sie sie nach vorn ziehen. Öffnen Sie die Klappe der Spulenkapsel (siehe Skizze), und ziehen Sie die Spulenkapsel aus dem Greifer.
3. Lassen Sie die Klappe der Spulenkapsel los, und die Spule fällt heraus.
59032_Naehmaschine_Singer_Content_DE_AT.indd 12 14.02.14 14:19

13 DE/AT/CH
Einsetzen der Spule in die Spulenkapsel
1. Nehmen Sie die Spulenkapsel in die linke. Hand, und legen Sie die Spule so ein, dass sich die Spule im Uhrzeigersinn dreht.
2. Legen Sie den Faden in den Schlitz der Spulenkapsel.
3. Ziehen Sie den Faden unter die Spannungsfe-der.
4. Ziehen Sie etwa 15 cm Faden aus der Spule heraus.
Einsetzen der Spulenkapsel in den Greifer
1. Fassen Sie die Spulenkapsel mit der linken Hand, öffnen Sie die Spulenklappe, und
stecken Sie die Kapsel mit dem Kapselfinger nach oben auf den Stift in der Mitte des Grei-fers.
2. Achten Sie darauf, dass der Faden frei nach außen hängt und nicht von der Kapsel einge-klemmt wird.
Hinweis: Vergewissern Sie sich, dass der Kapselfinger der Spulenkapsel genau in dem entsprechenden Ausschnitt des Greiferbahn-deckringes liegt.
3. Wenn Sie nun die Spulenklappe loslassen, rastet die Spulenkapsel im Greifer ein.
1
2
1 Ausschnitt für Kapselfinger2 Spulenklappe
Oberfaden einfädeln
A. Stellen Sie den Nähfußheber hoch. Vor dem Einfädeln ist immer zu prüfen, dass der Näh-fußheber „oben” steht. (Wenn der Nähfußheber nicht angehoben wird, kann keine korrekte Fadenspannung eingestellt werden.)
B. Drehen Sie das Handrad entgegen dem Uhr-zeigersinn, bis die Nadel in oberster Stellung und der Fadenhebel sichtbar ist.
59032_Naehmaschine_Singer_Content_DE_AT.indd 13 14.02.14 14:19

14 DE/AT/CH
A B
C. Halten Sie den Faden mit der rechten Hand fest und fädeln Sie die Maschine mit der linken Hand entsprechend der abgebildeten Reihen-folge.
– Dann von rechts nach links durch den Faden-hebel (3).
– Ziehen Sie dann den Faden durch das Nadel-öhr (5) von vorne nach hinten. (Der Gebrauch des automatischen Nadeleinfädlers ist auf folgender Seite beschrieben.)
②
③①
④⑤
1
2 3
54
C
Wichtiger Hinweis: Eine einfache Prüfung der korrekten Einfädelung durch die Spannungsschei-ben lässt sich wie folgt durchführen:1. Bei angehobenem Nähfuß ziehen Sie den Faden
zur Maschinenrückseite. Dabei sollten Sie nur einen leichten Widerstand spüren und keine bzw. nur eine leichte Biegung der Nadel beobachten.
2. Nun senken Sie den Nähfuß und ziehen Sie den Faden zur Maschinenrückseite noch ein-mal. Diesmal sollten Sie einen beträchtlichen Widerstand spüren sowie eine größere Biegung der Nadel beobachten. Sollten Sie keinen Widerstand spüren, weist dies auf eine falsche Einfädelung der Maschinen hin. Sie sollten das Einfädeln wiederholen.
59032_Naehmaschine_Singer_Content_DE_AT.indd 14 14.02.14 14:19

15 DE/AT/CH
Gebrauch des Nadeleinfädlers
Bringen Sie die Nadel in die höchste Stellung, indem Sie das Handrad entgegen dem Uhrzeiger-sinn drehen.
1. Haken Sie den Faden in den Einfädlerhaken ein, wie in der Abbildung gezeigt.
2. Halten Sie das Fadenende fest und senken Sie den Hebel des Nadeleinfädlers ab.
3. Drehen Sie nun den Hebel bis zum Anschlag.4. Ziehen Sie den Faden unter die Zunge des
Nadeleinfädlers und dann nach oben.5. Drehen Sie den Hebel zurück. Die Nadel wird
automatisch eingefädelt.6. Lassen Sie den Hebel los und ziehen Sie den
Faden weg. Hinweis: Zum Einfädeln mit dem Nadelein-
fädler sollte die Maschine auf Geradstich ein-gestellt sein.
1 2
3
5 6
4
Unterfaden heraufholen
1. Stellen Sie den Nähfußheber nach oben.2. Halten Sie den Oberfaden leicht mit der linken
Hand, und drehen Sie das Handrad entgegen dem Uhrzeigersinn, sodass die Nadel erst nach unten und dann in die höchste Stellung gebracht wird.
Hinweis: Der Unterfaden lässt sich schnell heraufholen, indem man bei eingestelltem Geradstich den Rückwärtsschalter kurz betätigt und loslässt. Die Nähmaschine wird eine Be-wegung nach unten und dann nach oben aus-führen und bei angehobener Nadel anhalten. Es ist typisch für diese computergesteuerte Nähmaschine, dass sie immer mit der Nadel in oberster Stellung stehen bleibt.
3. Ziehen Sie leicht am Oberfaden. Der Unterfa-den wird durch die Öffnung in der Stichplatte heraufkommen.
4. Ziehen Sie Ober- und Unterfaden etwa 15 cm heraus, und legen Sie beide Fäden nach hinten unter den Nähfuß.
1
2
3 4
59032_Naehmaschine_Singer_Content_DE_AT.indd 15 14.02.14 14:19
16 DE/AT/CH
Stoff-, Garn- und Nadeltabelle
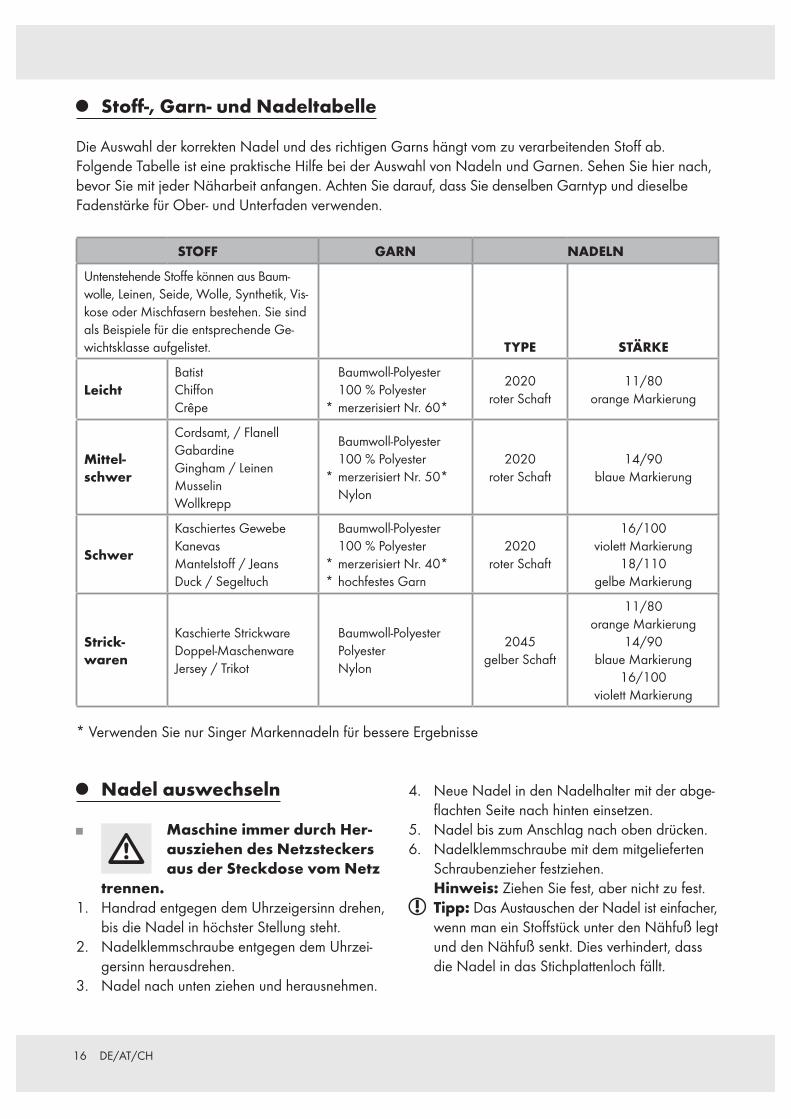
Die Auswahl der korrekten Nadel und des richtigen Garns hängt vom zu verarbeitenden Stoff ab. Folgende Tabelle ist eine praktische Hilfe bei der Auswahl von Nadeln und Garnen. Sehen Sie hier nach, bevor Sie mit jeder Näharbeit anfangen. Achten Sie darauf, dass Sie denselben Garntyp und dieselbe Fadenstärke für Ober- und Unterfaden verwenden.
STOFF GARN NADELN
Untenstehende Stoffe können aus Baum-wolle, Leinen, Seide, Wolle, Synthetik, Vis-kose oder Mischfasern bestehen. Sie sind als Beispiele für die entsprechende Ge-wichtsklasse aufgelistet. TYPE STÄRKE
LeichtBatistChiffonCrêpe
Baumwoll-Polyester 100 % Polyester
* merzerisiert Nr. 60*
2020roter Schaft
11/80orange Markierung
Mittel-schwer
Cordsamt, / FlanellGabardineGingham / LeinenMusselinWollkrepp
Baumwoll-Polyester 100 % Polyester
* merzerisiert Nr. 50* Nylon
2020roter Schaft
14/90blaue Markierung
Schwer
Kaschiertes GewebeKanevasMantelstoff / JeansDuck / Segeltuch
Baumwoll-Polyester 100 % Polyester
* merzerisiert Nr. 40** hochfestes Garn
2020roter Schaft
16/100violett Markierung
18/110gelbe Markierung
Strick- waren
Kaschierte StrickwareDoppel-MaschenwareJersey / Trikot
Baumwoll-Polyester Polyester Nylon
2045gelber Schaft
11/80orange Markierung
14/90blaue Markierung
16/100violett Markierung
* Verwenden Sie nur Singer Markennadeln für bessere Ergebnisse
Nadel auswechseln
Maschine immer durch Her-ausziehen des Netzsteckers aus der Steckdose vom Netz
trennen.1. Handrad entgegen dem Uhrzeigersinn drehen,
bis die Nadel in höchster Stellung steht.2. Nadelklemmschraube entgegen dem Uhrzei-
gersinn herausdrehen.3. Nadel nach unten ziehen und herausnehmen.
4. Neue Nadel in den Nadelhalter mit der abge-flachten Seite nach hinten einsetzen.
5. Nadel bis zum Anschlag nach oben drücken.6. Nadelklemmschraube mit dem mitgelieferten
Schraubenzieher festziehen. Hinweis: Ziehen Sie fest, aber nicht zu fest.
Tipp: Das Austauschen der Nadel ist einfacher, wenn man ein Stoffstück unter den Nähfuß legt und den Nähfuß senkt. Dies verhindert, dass die Nadel in das Stichplattenloch fällt.
59032_Naehmaschine_Singer_Content_DE_AT.indd 16 14.02.14 14:19

17 DE/AT/CH
3
1
2
Flache Seite nach hinten.
1 Flache Seite2 Nadel
3 Stift
Fadenspannung einstellen
Für 90 % Ihrer Näharbeiten brauchen Sie nur das Fadenspannungs-Einstellrad auf „ 5 ” zu stellen. Das Fadenspannungs-Einstellrad befindet sich auf dem Maschinenkopf.
Tipp: Durch eine leichte Verschiebung der 5 Grundstellung in + oder - Richtung erzielt man meistens ein besseres Nahtbild.
Bei Geradstich
Eine gutaussehende Naht hängt weitgehend von der richtigen Fadenspannung von Ober und Unter-faden ab. Bei korrekter Fadenspannung muss die
Verschlingung der beiden Fäden in der Mitte Ihres Nähgutes erfolgen.Wenn Ihnen Unregelmäßigkeiten in dem Nahtbild auffallen, müssen Sie wahrscheinlich die Faden-spannung einstellen. Zur Einstellung der Faden-
1
2
Oberfadenspannung zu niedrig
Oberfadenspannung zu hoch
Spannung verringern
Spannung erhöhen
KORREKT
1 Unterseite2 Oberseite
59032_Naehmaschine_Singer_Content_DE_AT.indd 17 14.02.14 14:19
18 DE/AT/CH
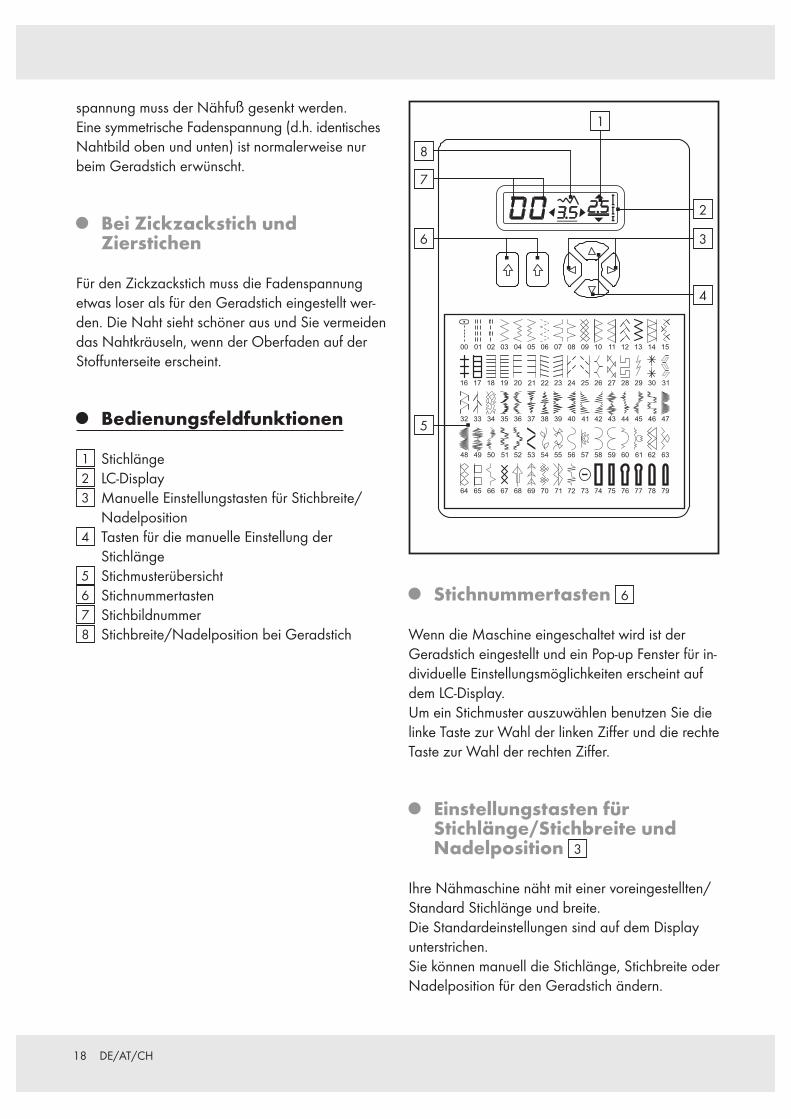
spannung muss der Nähfuß gesenkt werden. Eine symmetrische Fadenspannung (d.h. identisches Nahtbild oben und unten) ist normalerweise nur beim Geradstich erwünscht.
Bei Zickzackstich und Zierstichen
Für den Zickzackstich muss die Fadenspannung etwas loser als für den Geradstich eingestellt wer-den. Die Naht sieht schöner aus und Sie vermeiden das Nahtkräuseln, wenn der Oberfaden auf der Stoffunterseite erscheint.
Bedienungsfeldfunktionen
1 Stichlänge2 LC-Display3 Manuelle Einstellungstasten für Stichbreite/
Nadelposition4 Tasten für die manuelle Einstellung der
Stichlänge5 Stichmusterübersicht6 Stichnummertasten7 Stichbildnummer8 Stichbreite/Nadelposition bei Geradstich
5
2
36
7
8
4
1
Stichnummertasten 6
Wenn die Maschine eingeschaltet wird ist der Geradstich eingestellt und ein Pop-up Fenster für in-dividuelle Einstellungsmöglichkeiten erscheint auf dem LC-Display.Um ein Stichmuster auszuwählen benutzen Sie die linke Taste zur Wahl der linken Ziffer und die rechte Taste zur Wahl der rechten Ziffer.
Einstellungstasten für Stichlänge/Stichbreite und Nadelposition 3
Ihre Nähmaschine näht mit einer voreingestellten/Standard Stichlänge und breite.Die Standardeinstellungen sind auf dem Display unterstrichen.Sie können manuell die Stichlänge, Stichbreite oder Nadelposition für den Geradstich ändern.
59032_Naehmaschine_Singer_Content_DE_AT.indd 18 14.02.14 14:19

19 DE/AT/CH
Hinweis: Manche Stichmuster bieten mehr Mög-lichkeiten der manuellen Einstellung als andere.
Nadelpositionen für den Geradstich
Bei dem Geradstich stehen 13 unterschiedlichen Nadelpositionen zur Verfügung. Die Nadelposition wird mit der Nadelpositionstaste eingestellt (siehe folgende Abbildung).
nach rechts
Stichbreite
nach links
Regulierung der Unterfadenspannung
Die untere Fadenspannung wird nur dann verstellt, wenn durch Regulierung der Oberfadenspannung keine richtige Stichbildung erreicht wird. Durch Drehen der Schraube nach links wird die Spannung schwächer, nach rechts fester. Ist die Stichbildung in Ordnung, die Naht zieht sich aber zusammen, können gleichzeitig Ober- und Unterfadenspan-nung zu fest sein; beide Spannungen müssen dann nachreguliert werden.Um zu prüfen, ob die Kapselspannung korrekt ist, lassen Sie die Kapsel am Fadenende herabhängen, und rucken Sie einmal kurz an. Ist die Spannung richtig, zieht sich der Faden etwa 5–10 cm heraus.Ist die Spannung zu lose, rollt der Faden kontinuier-lich ab.
Erhöhen
Stoff zieht sich zusammen
Verringern
Nähfuß auswechseln
Vergewissern Sie sich, dass die Nadel „oben”steht. Stellen Sie den Nähfußheber hoch.1. Drücken Sie auf den Nähfuß-Auslöser. Der
Nähfuß löst sich automatisch aus seiner Halterung.
2. Legen Sie den gewünschten Nähfuß auf die Stichplatte, und zentrieren Sie den Stift des Nähfußes direkt unter den Schlitz des Nähfuß-halters.
3. Lassen Sie den Nähfußheber herunter, sodass der Nähfußhalter im Nähfuß einrastet.
1 3
2
1 3
2
1
2
3
1 Nähfußheber2 Nähfuß-Auslöser
3 Nähfußhalter
59032_Naehmaschine_Singer_Content_DE_AT.indd 19 14.02.14 14:19

20 DE/AT/CH
Hilfemeldung
Der Spuler ist während des Nähens nach rechts (Arbeits-position) gerutscht.
Spuler prüfen und nach links schie-ben.
Der Knopfloch-Hebel ist nicht heruntergelassen oder hoch-gestellt.
Knopfloch-Hebel zum Nähen von Knopflöchern herunterlassen.
Knopfloch-Hebel beim normalen Nähen hochstellen.
Der Stecker des Fußanlassers ist während der Betätigung des Anlassers heraugezogen worden.
Stecker einstecken.
Die Maschine blockiert weil sich Faden im Spulenbereich verfangen hat oder die Nähbewegung gewaltsam unterbrochen wurde.
Hauptschalter abschalten und das Problem beseitigen.
Die Rückwärtstaste/Hefttaste ist gedrückt worden während der Knopflochstich eingestellt ist.
Der Heftstich wird automatisch ge-näht, wenn das Knopfloch fertig ist. Es ist nicht nötig die Rück-wärtstaste zu drücken.
Der Spuler ist in Betrieb. Spuler nach links schieben, wenn er nicht benutzt wird.
Rückwärtsschalter
Doppelfunktionsschalter zum Rückwärtsnähen und Vernähen
– Rückwärtsfunktion für Geradstiche und Zickzackstiche ( )
Zum Rückwärtsnähen betätigen Sie den Rückwärtsschalter.
Die Maschine näht rückwärts, solange der Schalter betätigt wird.
– Riegelfunktion zum Vernähen von sonstigen Stichen ( )
Die Nähmaschine näht 4 kleine Nahtverriege-lungsstiche zum Vernähen aller Stichmuster außer Gerad- und Zickzackstichen.
Die Nahtverriegelungsstiche werden exakt auf der Stelle ausgeführt, bei der der Rückwärts-schalter betätigt wird.
Hinweis: Das Vernähen von Stichmustern ist sehr nützlich gegen das Ausfransen von Nahtenden.
59032_Naehmaschine_Singer_Content_DE_AT.indd 20 14.02.14 14:19

21 DE/AT/CH
Nähbeginn
Nachschlagtabelle für Stichlängen und Stichbreiten
STIC
H
MUSTER NR. STICHBREITE STICHLÄNGE
100 Stiche Modell
80 Stiche Modell
60 Stiche Modell
AUTO MANUELL AUTO MANUELL
00 00 00 MITTE LINKS - RECHTS 2,5 0,5–4,5
01 01 01 2,5 1,5–2,5
02 02 02 – 2,5 2,0–4,0
STIC
H
MUSTER NR. STICHBREITE STICHLÄNGE
100 Stiche Modell
80 Stiche Modell
60 Stiche Modell
AUTO MANUELL AUTO MANUELL
03 03 03 5,0 0–0,6 2,0 0,5–3,0
04 04 04 3,0 2, 3, 4, 5, 6 2,0 1,0–3,0
05 05 05 3,0 2, 3, 4, 5, 6 2,0 1,0–3,0
06 06 06 6,0 2, 3, 4, 5, 6 1,5 0–2,5
07 07 07 3,0 1,0–0,6 2,0 1,0–3,0
08 08 08 3,0 1,0–0,6 2,0 1,0–3,0
09 09 09 6,0 3,4 / 5,6 2,0 1,5–2,5
10 10 10 3,5 3,5–6,5 2,5 1,5–2,5
11 11 11 3,5 3,5–6,5 2,5 1,5–2,5
12 12 12 6,0 3,4 / 5,6 2,0 1,0–2,5
13 13 13 5,0 2,0–6,0 2,5 1,5–2,5
14 14 14 3,5 3,5–6,5 2,5 1,5–2,5
15 15 15 6,0 3,4 / 5,6 2,0 1,5–2,5
16 16 16 3,0 2,0–6,0 2,5 1,5–2,5
17 17 17 3,5 1,0–6,5 2,5 1,5–2,5
18 18 18 3,0 1,0–6,5 2,5 1,5–2,5
19 19 19 3,0 1,0–6,5 2,5 1,5–2,5
20 20 20 3,5 1,0–6,5 2,5 1,5–2,5
21 21 21 3,5 1,0–6,5 2,5 1,5–2,5
22 22 22 3,5 1,0–6,0 2,0 0,8–2,5
59032_Naehmaschine_Singer_Content_DE_AT.indd 21 14.02.14 14:19

22 DE/AT/CH
STIC
HMUSTER NR. STICHBREITE STICHLÄNGE
100 Stiche Modell
80 Stiche Modell
60 Stiche Modell
AUTO MANUELL AUTO MANUELL
23 23 23 3,5 1,0–6,0 2,0 0,8–2,5
24 24 24 5,0 1,0–6,0 2,0 1,0–2,5
25 25 25 5,0 1,0–6,0 2,0 1,0–2,5
26 26 26 5,0 3,5–6,0 2,5 1,5–2,5
27 27 27 4,0 2, 4, 5 2,5 1,0–2,5
28 – – 5,0 2,0–6,0 2,5 1,0–2,5
29 28 28 5,0 3, 4, 5, 6 2,5 1,3–2,5
30 – – 5,0 3, 4, 5, 6 1,8 1,5–2,5
31 29 29 1,0 – 2,5 1,5–30
32 30 30 5,0 5,0–6,0 2,5 –
33 31 31 5,0 3,5–6,0 2,5 1,5–2,5
34 32 – 5,0 3,0–6,5 2,5 1,5–2,5
35 33 – 5,0 1,0–6,0 2,5 0,8–2,5
36 34 32 – – Untersch. –
37 – – 6,0 3,5–6,0 0,8 0,5–1,5
38 – – 6,0 3,5–6,0 0,8 0,5–1,5
39 35 33 6,0 3,5–6,0 0,5 0,3–1,5
40 36 – 6,0 3,5–6,0 0,5 0,3–1,5
41 37 – 6,0 3,5 / 5,6 0,5 0,3–1,5
42 38 34 6,0 3,5 / 5,6 0,5 0,3–1,5
43 39 35 6,0 3,5 / 5,6 0,5 0,3–1,5
44 40 – 6,0 3,5 / 5,6 0,5 0,3–1,5
45 41 36 6,0 3,5 / 5,6 0,5 0,3–1,5
46 42 – 6,0 3,5 / 5,6 0,5 0,3–1,5
47 43 37 6,0 3,0–6,5 0,5 0,3–1,5
48 44 38 6,0 3,0–6,0 0,5 0,3–1,5
49 45 39 6,0 3,0–6,0 0,5 0,3–1,5
50 – – 6,0 3,0–6,0 0,5 0,3–1,5
51 – – 6,0 3,0–6,0 0,5 0,3–1,5
52 46 40 5,0 3,5–6,0 0,5 0,3–1,5
53 47 41 6,0 3,0–6,0 0,5 0,3–3,0
54 48 – 6,0 3,0–6,0 0,5 0,3–3,0
55 49 42 6,5 3,5–6,5 0,5 0,3–2,5
56 50 43 6,0 3,5–6,0 0,5 0,3–1,5
59032_Naehmaschine_Singer_Content_DE_AT.indd 22 14.02.14 14:19

23 DE/AT/CH
STIC
HMUSTER NR. STICHBREITE STICHLÄNGE
100 Stiche Modell
80 Stiche Modell
60 Stiche Modell
AUTO MANUELL AUTO MANUELL
57 51 44 6,0 3,0–6,0 0,5 0,3–1,5
58 52 45 6,0 3,4 / 5,6 0,5 0,3–1,3
59 – – 3,5 2,0–6,0 0,5 0,5–1,0
60 53 – 5,0 2,0–6,5 0,5 0,5–0,8
61 54 46 6,0 3,5–6,0 0,2 1,5–2,5
62 55 – 6,0 3,5–6,0 2,5 1,5–2,5
63 56 47 6,0 3,5 / 6,0 1,8 0,8–2,5
64 57 48 6,0 3,5 / 6,0 Untersch. –
65 – – 6,0 3,5 / 6,0 Untersch. –
66 58 49 6,0 3,5–6,0 1,3 0,8–4,0
67 59 – 6,0 3,5–6,0 1,3 0,8–4,0
68 60 50 6,0 3,5–6,0 1,8 1,0–4,0
69 – – 6,0 3,5–6,0 1,8 1,0–4,0
70 61 51 6,0 3,0–6,0 2,5 1,0–2,5
71 – – 6,0 3,0–6,0 2,5 1,5–2,5
72 62 – 4,5 3,4 / 5,6 2,5 1,5–2,5
73 – – 4,5 3,4 / 5,6 2,5 1,5–2,5
74 63 52 4,5 3,4 / 5,6 2,5 1,5–2,5
75 – – 4,5 3,4 / 5,6 2,5 1,5–2,5
76 64 53 5,0 3,5–6,0 2,5 1,5–2,5
77 – – 5,0 3,5–6,0 2,5 1,5–2,5
78 65 – 5,0 3,0–6,5 2,5 1,5–2,5
79 – – 5,0 3,0–6,5 2,5 1,5–2,5
80 66 5,0 3,0–6,0 2,0 1,0–2,5
81 67 – 5,0 3,5–6,5 2,5 1,5–2,5
82 – – 4,5 3,0 / 4,5 / 6,0 2,5 1,5–2,5
83 68 – 6,0 3,5–6,0 2,5 1,5–2,5
84 69 – 5,0 3,5–6,0 2,5 1,5–2,5
85 70 – 6,3 3,8–6,3 1,3 1,0–2,0
86 71 – 5,0 3,0–6,0 2,5 1,5–2,5
87 – – 5,0 4,0–6,0 2,5 1,5–2,5
88 72 – 5,0 2,0–6,0 1,5 0,5–2,0
89 – – – – 2,0 2,0–4,0
90 73 55 3,0 2,0–4,5 –
59032_Naehmaschine_Singer_Content_DE_AT.indd 23 14.02.14 14:19

24 DE/AT/CH
STIC
HMUSTER NR. STICHBREITE STICHLÄNGE
100 Stiche Modell
80 Stiche Modell
60 Stiche Modell
AUTO MANUELL AUTO MANUELL
91 – – – – 0,5 0,5 / 0,8
92 – – – – 0,5 –
93 – – – – 0,5 0,5 / 0,8
94 74 56 – – 0,5 0,5 / 0,8
95 75 57 – – 0,5 0,5 / 0,8
96 76 58 – – 0,5 0,5 / 0,8
97 77 59 – – 0,5 0,5 / 0,8
98 78 – – – 0,5 0,5 / 0,8
99 79 – – – 0,5 0,5 / 0,8
Übersicht Stichmusternummern
Modell 60 Stiche
Modell 80 Stiche
59032_Naehmaschine_Singer_Content_DE_AT.indd 24 14.02.14 14:19
25 DE/AT/CH
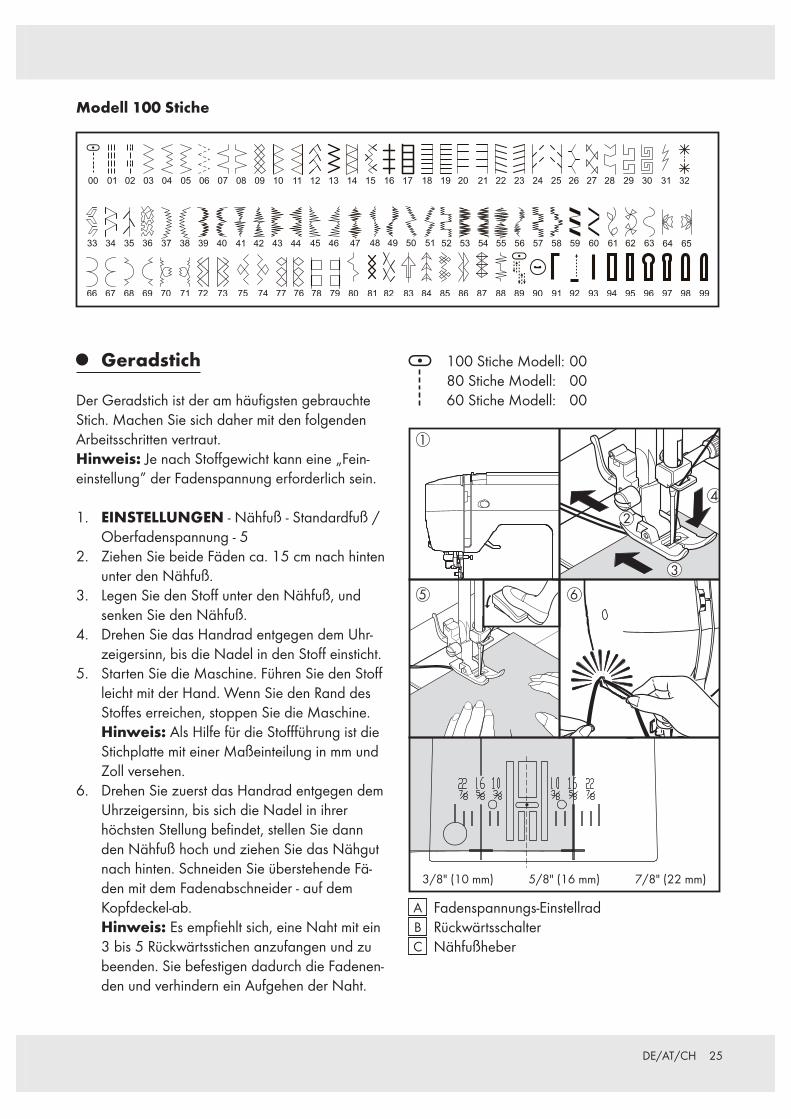
Modell 100 Stiche
Geradstich
Der Geradstich ist der am häufigsten gebrauchte Stich. Machen Sie sich daher mit den folgenden Arbeitsschritten vertraut.Hinweis: Je nach Stoffgewicht kann eine „Fein-einstellung” der Fadenspannung erforderlich sein.
1. EINSTELLUNGEN - Nähfuß - Standardfuß /Oberfadenspannung - 5
2. Ziehen Sie beide Fäden ca. 15 cm nach hinten unter den Nähfuß.
3. Legen Sie den Stoff unter den Nähfuß, und senken Sie den Nähfuß.
4. Drehen Sie das Handrad entgegen dem Uhr-zeigersinn, bis die Nadel in den Stoff einsticht.
5. Starten Sie die Maschine. Führen Sie den Stoff leicht mit der Hand. Wenn Sie den Rand des Stoffes erreichen, stoppen Sie die Maschine.
Hinweis: Als Hilfe für die Stoffführung ist die Stichplatte mit einer Maßeinteilung in mm und Zoll versehen.
6. Drehen Sie zuerst das Handrad entgegen dem Uhrzeigersinn, bis sich die Nadel in ihrer höchsten Stellung befindet, stellen Sie dann den Nähfuß hoch und ziehen Sie das Nähgut nach hinten. Schneiden Sie überstehende Fä-den mit dem Fadenabschneider - auf dem Kopfdeckel-ab.
Hinweis: Es empfiehlt sich, eine Naht mit ein 3 bis 5 Rückwärtsstichen anzufangen und zu beenden. Sie befestigen dadurch die Fadenen-den und verhindern ein Aufgehen der Naht.
100 Stiche Modell: 00 80 Stiche Modell: 00 60 Stiche Modell: 00
4
1
5 6
2
3
5/8" (16 mm) 7/8" (22 mm) 3/8" (10 mm)
A Fadenspannungs-EinstellradB RückwärtsschalterC Nähfußheber
59032_Naehmaschine_Singer_Content_DE_AT.indd 25 14.02.14 14:19

26 DE/AT/CH
Gerade nähen mit den Führungslinien
Die Führungslinien auf der Stichplatte sollen Ihnen helfen, die Naht gerade zu führen. Sie sind durch Zahlen markiert, die den Abstand zwischen der Naht und der zentrierten Nadel angeben.
Quiltstich mit Handarbeitoptik
Dieser Stich sieht wie handgemacht aus und eignet sich für Abstepp- und Quiltarbeiten.
1. Verwenden Sie die gewünschte Stickfarbe für den Unterfaden. Wenn Sie nähen, wird der Unterfaden auf der Oberseite erscheinen, was den handgearbeiteten Effekt ausmacht.
2. Verwenden Sie unsichtbares Nähgarn oder sehr leichtes Garn, dem Farbton des Stoffes entsprechend, für den Oberfaden, sodass dieser nicht sichtbar ist.
3. Erhöhen Sie die Fadenspannung, bis Sie die gewünschte Optik erzielen.
4. Beginnen Sie mit dem Nähen. Hinweis: Für ein ausgefallenes Ergebnis,
experimentieren Sie mit unterschiedlichen Fadenspannungen und Stichlängen.
100 Stiche Modell: 02 80 Stiche Modell: 02 60 Stiche Modell: 02
Reißverschluss einnähen/kordonieren
Verwenden Sie den Reißverschlussfuß zum Nähen der linken oder rechten Seiten eines Reißverschlus-ses bzw. zum Einnähen eines Einlaufgarnes.
Nadel links vom Nähfuß:
Nadel rechts vom Nähfuß:
Reißverschluss einnähenZum Nähen der rechten Seite des Reißverschlusses ist der Reißverschlussfuß links in den Nähfußhalter einzurasten, sodass die Nadel links von dem Nähfuß einsticht.Zum Nähen der linken Seite des Reißverschlusses ist der Reißverschlussfuß rechts in den Nähfußhal-ter einzurasten.
KordonierenZum Kordonieren von Vorhängen, Gardinen usw., legen Sie das Einlaufgarn in die umgeschlagene Stoffkante bzw. in ein Schrägband ein. Das Schräg-band muss dann um die Stoffkante geheftet werden.Rasten Sie den Reißverschlussfuß rechts in den Nähfußhalter, sodass die Nadel rechts von dem Nähfuß einsticht.
Tipp: Zum Führen der Nadel dicht an dem Einlaufgarn können Sie eine Feineinstellung der Nadelposition mithilfe der Stichbreitentasten errei-chen.
59032_Naehmaschine_Singer_Content_DE_AT.indd 26 14.02.14 14:19

27 DE/AT/CH
Zickzackstich
EINSTELLUNGEN: Nähfuß - Standardfuß Oberfadenspannung - 5
Je nach Faden, Stoff, Stich und Nähgeschwindigkeit kann der Oberfaden eventuell auf der Unterseite sichtbar sein.Der Unterfaden darf aber nie auf der Oberseite erscheinen.Falls der Unterfaden nach oben zieht oder die Naht kräuselt sich, senken Sie die Fadenspannung mit dem Einstellrad.
100 Stiche Modell: 03 80 Stiche Modell: 03 60 Stiche Modell: 03
1
2
1 Unterseite 2 Oberseite
Stichbreite und Stichlänge einstellen
Das dunkelgraue Feld steht für den Stan-dardwert, der bei Auswahl des Musters
automatisch eingestellt wird. Für den Zickzackstich beträgt die voreingestellte Stichlänge 2 mm und die voreingestellte Stichbreite 5 mm.
Die grauen Felder stehen für alle beliebigen Werte, die manuell einstellbar sind.
mm 0 0.5 1.0 1.5 2.0 2.5 3.0 3.5 4.0 4.5 5.0 5.5 6.0
0
0.3
0.5
0.8
1.0
1.3
1.5
1.8
2.0
2.5
3.0
Stichbreite
Stic
hlän
ge
Mehrfacher Zickzackstich
EINSTELLUNGEN: Nähfuß - Standardfuß Oberfadenspannung - 5
Der mehrfache Zickzackstich ist viel stärker als der normale Zickzackstich, weil er den Stoff mit jeweils drei Stichen verbindet. Er eignet sich deshalb zum Versäubern und als Kantenabschluss für alle Textil-sorten. Er ist auch ideal zum Riegeln, zum Verstärken von abgenutzten Stellen, zum Aufsetzen von Flicken, zum Aufnähen von Gummibändern, zum Nähen von Haushalttextilien sowie für Quiltarbeiten.Hinweis: Zum Stopfen oder Versäubern gemäß Abbildung ist eine manuelle Einstellung der Stich-länge erforderlich.
100 Stiche Modell: 06 80 Stiche Modell: 06 60 Stiche Modell: 06
59032_Naehmaschine_Singer_Content_DE_AT.indd 27 14.02.14 14:19

28 DE/AT/CH
Muschelstich
EINSTELLUNGEN: Nähfuß - Standardfuß Oberfadenspannung - 5
Schlagen Sie die Stoffkante um und bügeln Sie sie. Schieben Sie den Stoff mit der rechten Seite nach oben so unter den Nähfuß, dass die Spitze des Sti-ches knapp über der umgelegten Kante einsticht und den Stoff in Muschelform zieht. Schneiden Sie den überstehenden Stoff knapp entlang der Naht ab.
Tipp: Für ein kreatives Ergebnis können Sie mit unterschiedlichen Stichbreiten und -längen sowie Fadenspannung experimentieren.
100 Stiche Modell: 06 80 Stiche Modell: 06 60 Stiche Modell: 06
Raupenstich
Raupenstiche sind besonders enge Zickzackstiche, die eine „satinierte” Optik ergeben. Sie sind gut für Applikationen oder zum Nähen von Riegeln, usw. Die Oberfadenspannung sollte etwas reduziert werden. Die Stichlänge muss in dem Bereich 0,5–2,00 eingestellt werden. Bei sehr weichem Material benutzen Sie bitte ein Stickvlies oder Sei-denpapier, um ein Zusammenziehen des Stoffes zu verhindern.Hinweis: Zum Nähen von besonders engen (d.h. dichten) Zickzackstichen/ Raupenstichen MÜSSEN Sie den Raupenfuß verwenden.
Platzierung von Mustern
Die Musterstichbreite vergrößert sich ausgehend von der Nadelposition Mitte, wie nachstehend abgebildet.
Nadelposition Mitte
59032_Naehmaschine_Singer_Content_DE_AT.indd 28 14.02.14 14:19

29 DE/AT/CH
Knopf annähen
EINSTELLUNGEN: Nähfuß - Standardfuß Transport-Abdeckplatte
Stoff und Knopf unter den Nähfuß legen. Nähfuß absenken. Handrad drehen und prü-
fen, dass die Nadel in beide Knopflochbohrun-gen sauber einsticht.
Falls erforderlich, Stichbreite einstellen. Etwa 10 Stiche nähen. Um einen Knopf mit Stiel an-zunähen, eine gerade Steckoder Nähmaschi-nennadel zwischen die Knopfbohrungen legen und über der Stecknadel nähen.
Tipp: Durch Ziehen und Verknoten der beiden Fäden an der Stoffunterseite können Sie die Naht sichern.
100 Stiche Modell: 90 80 Stiche Modell: 73 60 Stiche Modell: 55
Blindstich
EINSTELLUNGEN: Nähfuß - Blindstichfuß Oberfadenspannung - 5
Der Blindstich wird hauptsächlich für die unsicht-bare Saumbefestigung von Haustextilen, Hosen, Röcken usw. verwendet.
100 Stiche Modell: 04, 05, 07 80 Stiche Modell: 04, 05, 07 60 Stiche Modell: 04, 05, 07
einfacher Blindstich für normale, feste Stoffe
elastischer Blindstich für Stretchwaren und feine Stoffe
1. Verarbeiten Sie zuerst die Schnittkante: Bei fei-nen Stoffen schlagen Sie die Kante um, bei mittleren bis schweren Stoffen versäubern Sie die Kante. Bügeln Sie dann den Saum auf die gewünschte Breite um und heften Sie ihn mit Stecknadeln.
2. Falten Sie nun den Stoff mit der Unterseite nach oben, wie in der Abbildung gezeigt.
3. Legen Sie das Nähgut so unter den Nähfuß. Drehen Sie das Handrad entgegen dem Uhr-zeigersinn, bis die Nadel völlig nach links schwenkt. Es ist wichtig, dass die Nadel mit ih-rem linken Anschlag ganz knapp an der Falte einsticht.
Hinweis: Für einen engeren oder breiteren Blindsaum, zuerst Stichlänge und -breite wie gewünscht einstellen. Dann Führung einstellen.
Nähen Sie langsam, und führen Sie den Stoff gleichmäßig entlang der Führung.
4. An der Oberseite ist der Blindstich nun kaum zu sehen.
Hinweis: Da diese Technik ein wenig Übung erfordert, wird immer die Durchführung einer Nähprobe empfohlen.
59032_Naehmaschine_Singer_Content_DE_AT.indd 29 14.02.14 14:19

30 DE/AT/CH
Stretchstiche
EINSTELLUNGEN: Nähfuß - Standardfuß Transport-Abdeckplatte
Die Stretch-Stiche sind besonders vorteilhaft für elastische Materialien und Strickstoffe. Sie können sie aber auch gut bei normalen, festen Stoffen verwenden.
Stretchgeradstich
Der Stretch-Geradstich ist viel stärker als der normale Geradstich, weil er den Stoff mit jeweils drei Stichen verbindet - vorwärts, rückwärts und wieder vorwärts. Er eignet sich deshalb vor allem für elastische Stoffe, zur Verstärkung von Nähten bei Sportbekleidung - ob elastisch oder nichtelas-tisch - und für alle besonders strapazierfähigen
Nähte. Sie können ihn auch zu dekorativen Zwe-cken z.B. auf Kragen oder Manschetten benutzen, um Ihrer Kleidung ein professionelles Finish zu verleihen.
100 Stiche Modell: 01 80 Stiche Modell: 01 60 Stiche Modell: 01
1 2
1 2 4
3Mittelschwere bis schwere Stoffe
Unterseite Unterseite
Unterseite
Oberseite
Unterseite
Feine Stoffe
59032_Naehmaschine_Singer_Content_DE_AT.indd 30 14.02.14 14:19
31 DE/AT/CH
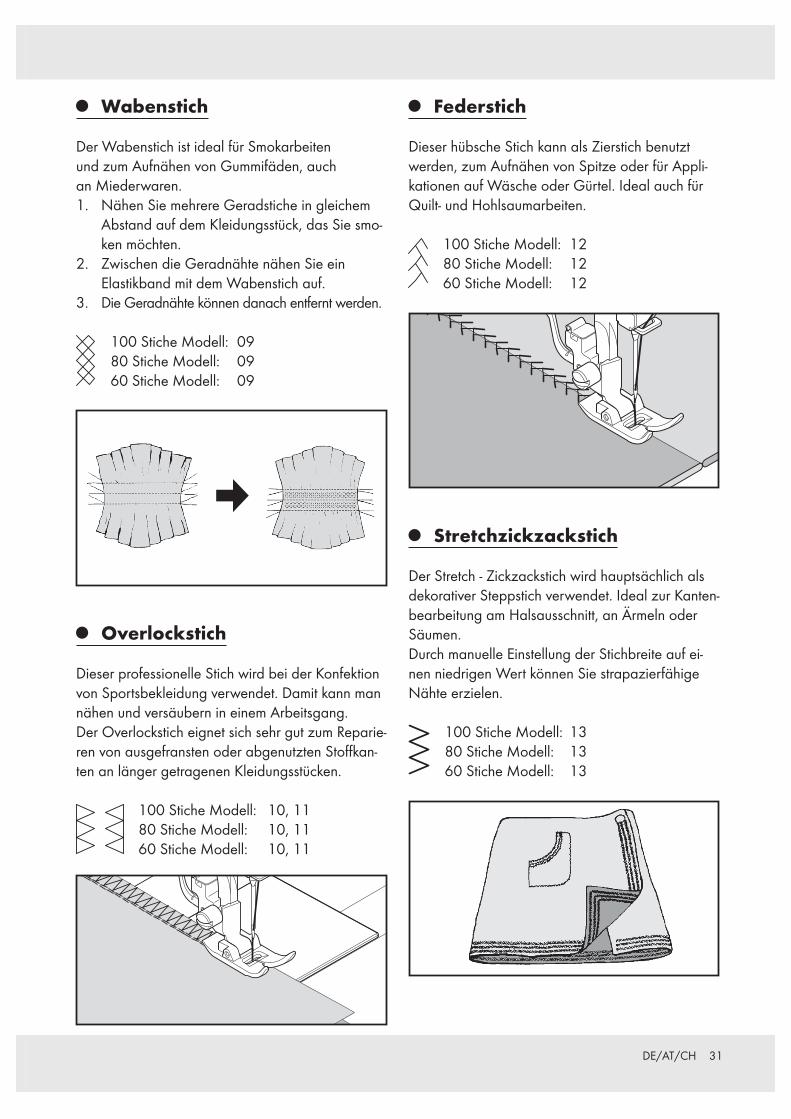
Wabenstich
Der Wabenstich ist ideal für Smokarbeitenund zum Aufnähen von Gummifäden, auchan Miederwaren.1. Nähen Sie mehrere Geradstiche in gleichem
Abstand auf dem Kleidungsstück, das Sie smo-ken möchten.
2. Zwischen die Geradnähte nähen Sie ein Elastikband mit dem Wabenstich auf.
3. Die Geradnähte können danach entfernt werden.
100 Stiche Modell: 09 80 Stiche Modell: 09 60 Stiche Modell: 09
Overlockstich
Dieser professionelle Stich wird bei der Konfektion von Sportsbekleidung verwendet. Damit kann man nähen und versäubern in einem Arbeitsgang.Der Overlockstich eignet sich sehr gut zum Reparie-ren von ausgefransten oder abgenutzten Stoffkan-ten an länger getragenen Kleidungsstücken.
100 Stiche Modell: 10, 11 80 Stiche Modell: 10, 11 60 Stiche Modell: 10, 11
Federstich
Dieser hübsche Stich kann als Zierstich benutzt werden, zum Aufnähen von Spitze oder für Appli-kationen auf Wäsche oder Gürtel. Ideal auch für Quilt- und Hohlsaumarbeiten.
100 Stiche Modell: 12 80 Stiche Modell: 12 60 Stiche Modell: 12
Stretchzickzackstich
Der Stretch - Zickzackstich wird hauptsächlich als dekorativer Steppstich verwendet. Ideal zur Kanten-bearbeitung am Halsausschnitt, an Ärmeln oder Säumen.Durch manuelle Einstellung der Stichbreite auf ei-nen niedrigen Wert können Sie strapazierfähige Nähte erzielen.
100 Stiche Modell: 13 80 Stiche Modell: 13 60 Stiche Modell: 13
59032_Naehmaschine_Singer_Content_DE_AT.indd 31 14.02.14 14:19

32 DE/AT/CH
Doppelter Overlockstich
Dieser Stich hat drei Hauptanwendungen.Sehr gut zum Aufnähen von flachen Gummibän-dern beim Nähen oder Reparieren von Unterwä-sche, und zum gleichzeitigen Nähen und Versäubern von leicht elastischen und nicht elasti-schen Stoffen wie Leinen, Tweed und mittlerer bis schwerer Baumwolle.
100 Stiche Modell: 14 80 Stiche Modell: 14 60 Stiche Modell: 14
Kreuzstich
Zum Nähen und Versäubern von elastischen Stoffen sowie zur Verzierung, insbesondere von Rändern.
100 Stiche Modell: 15 80 Stiche Modell: 15 60 Stiche Modell: 15
Entredeuxstich
Dieser Stich wird für Kantenverzierung und traditio-nelle Stickmuster verwendet. Für die Hohlsaumtech-nik benötigen Sie eine Wing-Nadel.
Tipp: Durch leichtes Erhöhen der Fadenspan-nung kann man größere Sticklöcher mit der Wing-Nadel erzielen.
100 Stiche Modell: 16 80 Stiche Modell: 16 60 Stiche Modell: 16
Leiterstich
Der Leiterstich wird hauptsächlich für Hohlsaumar-beiten verwendet. Er wird aber auch zum Aufstep-pen von schmalen Bändern, auch mit kontrastierenden Farben, eingesetzt. Durch gezielte Platzierung der Stichmuster können dekorative Effekte erzielt werden.Der Leiterstich eignet sich auch für Plattstickereien auf schmalen Bändern, Einlaufgarnen und Gummi-bändern.Hohlsaumarbeiten gelingen am besten mit gröberem Leinen. Nach Ausführung des Leiterstiches ziehen Sie die Fäden entlang den Innenkanten des Leiter-musters, um eine luftige Optik zu erzielen.
100 Stiche Modell: 17 80 Stiche Modell: 17 60 Stiche Modell: 17
59032_Naehmaschine_Singer_Content_DE_AT.indd 32 14.02.14 14:19

33 DE/AT/CH
Pikotstich
Der Pikotstich ist ein traditionelles Stichmuster für spitzen ähnliche Ziersaumnähte und Applikationen.
100 Stiche Modell: 18, 19 80 Stiche Modell: 18, 19 60 Stiche Modell: 18, 19
Kantenstich
Der Kantenstich ist ein traditionelles Handstickerei-muster zum Einfassen von Tischdecken. Er ist aber vielseitig einsetzbar, z.B. zum Annähen von Fran-sen, Schrägbändern, Applikationen sowie für Platt-stickereien und Hohlsaumarbeiten.
100 Stiche Modell: 20, 21 80 Stiche Modell: 20, 21 60 Stiche Modell: 20, 21
Geneigter Kantenstich
Hervorragend zum Verzieren von Tisch- und Bettwä-sche. Auf glatten Stoffen können Sie einen spitzen ähnlichen Effekt erzielen. Nähen Sie entlang der unversäuberten Stoffkante, und schneiden Sie den Stoff dicht an der Außenseite des Stiches ab.
100 Stiche Modell: 22, 23 80 Stiche Modell: 22, 23 60 Stiche Modell: 22, 23
Stretchoverlockstich
Mit dem elastischen Overlockstich nähen und ver-säubern Sie in einem Arbeitsgang und erhalten eine schmale, geschmeidige Naht. Besonders geeignet für Schwimm und Sportbekleidung sowie T-Shirts, elastische Säuglingsbekleidung,Frottee und Jersey.
100 Stiche Modell: 24, 25 80 Stiche Modell: 24, 25 60 Stiche Modell: 24, 25
59032_Naehmaschine_Singer_Content_DE_AT.indd 33 14.02.14 14:19

34 DE/AT/CH
Hexenstich
Zum Nähen und Versäubern von elastischen Stof-fen sowie zur Randverzierung.
100 Stiche Modell: 27 80 Stiche Modell: 27 60 Stiche Modell: 27
Griechischer Stich
Traditionelles Stichmuster für Kantenverzierung, Bordüren und Ziersaumnähte.
100 Stiche Modell: 29 80 Stiche Modell: 28 60 Stiche Modell: 28
Grätenstich
Hauptsächlich zum Dekorieren mit der Maschine.
100 Stiche Modell: 34 80 Stiche Modell: 32 60 Stiche Modell: –
Dornstich
Diesen Stich können Sie vielseitig zum Zusammen-fügen von Stücken als auch für dekorative Zwecke versenden.
100 Stiche Modell: 35 80 Stiche Modell: 33 60 Stiche Modell: –
59032_Naehmaschine_Singer_Content_DE_AT.indd 34 14.02.14 14:19

35 DE/AT/CH
Doppelter Overlockstich
Dieser Stich ist perfekt zum Aufnähen von elastischen Litzen. Sie können ihn auch für Smock-Arbeiten und zum Säumen verwenden.
100 Stiche Modell: 76 80 Stiche Modell: 64 60 Stiche Modell: 53
Fagottstich
EINSTELLUNGEN: Nähfuß - Standardfuß Oberfadenspannung - 5Dieser beliebte dekorative Stich wird häufig bei Ärmeln oder Vorderseiten von Blusen und Damen-kleidung verwendet. Zum Zusammennähen lassen Sie etwas Abstand zwischen beiden Stoffteilen.Zuerst schlagen Sie die Nahtzugaben an den Schnittkanten um, und bügeln Sie sie. Heften Sie dann die umgeschlagenen Kanten mit ca. 0,3 cm Abstand auf Seidenpapier. Übernähen Sie die 0,3 cm Lücke, sodass die Nadel jeweils rechts und links in den Stoff einsticht. Entfernen Sie Heftstiche und Seidenpapier und bügeln Sie.
100 Stiche Modell: 80 80 Stiche Modell: 66 60 Stiche Modell: 54
Stretchpatchworkstich
Neben seiner dekorativen Wirkung eignet sich dieses Stichmuster für Patchwork-Arbeiten mit elastischen Stoffen wie Jersey und Strickwaren.
100 Stiche Modell: 86 80 Stiche Modell: 71 60 Stiche Modell: –
Mehr Zierstiche & Ideen für Dekorationen
EINSTELLUNGEN: Nähfuß - Raupenfuß Oberfadenspannung - 5 oder -1
Im Folgenden sind Beispiele wie diese Stiche zu nähen und zu verwenden sind. Sie können einige andere dekorative Stiche für den gleichen Zweck verwenden. Sie sollten einen Test auf einem extra Stück Stoff nähen, um die dekorativen Muster zu prüfen, die Sie verwenden wollen. Bevor Sie anfangen zu nähen, prüfen Sie, ob genug Faden auf der Spule ist damit der Faden nicht während des Nähens ausgeht. Für
59032_Naehmaschine_Singer_Content_DE_AT.indd 35 14.02.14 14:19

36 DE/AT/CH
beste Ergebnisse, verstärken Sie Ihren Stoff mit einem entfernbaren oder auswaschbarem Stabilisator.
Tipp: Der Unterfaden sollte nicht auf der Oberseite des Gewebes erscheinen; anderenfalls kann es notwendig sein die Fadenspannung etwas niedriger einzustellen.
Knopflöcher
Automatische Knopflöcher
GEBRAUCH DES KNOPFLOCHFUSSES
Ihre Nähmaschine bietet Muster für Knopflochrau-pen in 2 verschiedenen Breiten sowie für Augen - und Rundknopflöcher und ist mit einem System zur Messung der Knopfgröße und Ermittlung der erforderlichen Knopflochlänge ausgestattet. Alles erfolgt in einem einzigen Arbeitsschritt.
1
2
1 Anschlag A 2 Anschlag B
VORBEREITUNG ZUM NÄHEN Im Knopflochbereich sollten Sie den Stoff mit
Stickvlies, Seidenpapier o. Ä. unterlegen. Nähen Sie ein Knopfloch zur Probe auf einem
Reststück Ihres Stoffes. Probieren Sie es mit dem gewünschten Knopf aus.
100 Stiche Modell: 94, 95 80 Stiche Modell: 74, 75 60 Stiche Modell: 56, 57
100 Stiche Modell: 96, 97 80 Stiche Modell: 76, 77 60 Stiche Modell: 58, 59
100 Stiche Modell: 98, 99 80 Stiche Modell: 78, 79 60 Stiche Modell: –, –
1. Wählen Sie eines der beiden Knopflochmuster.2. Bringen Sie den Knopflochfuß (D) an (siehe
Kapitel „Nähfuß auswechseln”).3. Legen Sie den Knopf in den Kopflochfuß ein
(siehe oben, „Gebrauch des Knopflochfußes”).4. Senken Sie den Knopflochhebel (C ) so ab,
dass er senkrecht zwischen beiden Anschlägen (A) und (B) steht.
5. Markieren Sie die Position des Knopflochs sorgfältig auf Ihrem Stoff.
6. Legen Sie den Stoff unter den Knopflochfuß. Ziehen Sie ca. 10 cm des Unterfadens unter dem Stoff nach hinten.
7. Bringen Sie die Markierung auf Ihrem Stoff und die Markierung am Knopflochfuß zur Deckung, und lassen Sie den Knopflochfuß herunter.
8. Halten Sie den Oberfaden leicht fest, und star-ten Sie die Maschine.
59032_Naehmaschine_Singer_Content_DE_AT.indd 36 14.02.14 14:19

37 DE/AT/CH
C D
C CC
A B
Markierung Stoff Markierung Knopflochfuß
Das Nähprogramm läuft automatisch nach folgender Reihenfolge ab.
1 2 3 4 5 6 7 8
1 2 3 4 5 6 7
2
1
1 Ausrichtung des Knopflochfußes
2 Markierung auf dem Stoff
9. Wenn das Knopfloch fertig genäht ist, schnei-den Sie das Knopfloch mit dem Trennmesser auf. Achten Sie darauf, die Knopflochraupen nicht zu beschädigen.
Knopfloch mit Einlauffaden
Hängen Sie den Einlauffaden (Häkelgarn oder Knopflochzwirn) an der Nocke des Nähfußes ein, ziehen Sie beide Fadenenden unter den Nähfuß und verknoten Sie sie an der Vorderseite, wie abgebildet. Nähen Sie das Knopfloch so, dass die Zickzackstiche den Einlauffaden überdecken. Wenn das Knopfloch fertig genäht ist, lösen Sie den Knoten und schnei-den Sie beide Enden des Einlauffadens knapp ab.
1
1 Nocke
59032_Naehmaschine_Singer_Content_DE_AT.indd 37 14.02.14 14:19

38 DE/AT/CH
Pflege und Reinigung
Pflege und Reinigung der Nähmaschine
Um eine langjährige einwandfreie Funktion zu ge-währleisten muss lhre Maschine regelmäßig gerei-nigt werden, indem Sie Staub und Flusen entfernen.
Vor jeglichen Reinigungs - oder Wartungsarbeiten: Maschine durch Herausziehen des
Netzsteckers aus der Steckdose vom Netz trennen.
1 Greifer2 Greiferbahndeckel3 Spulengehäuse
4 Greifertreiber5 Halterung(en)6 Transporteur
Reinigung des Greiferbereichs
A. Bringen Sie die Nadel in die höchste Stellung.B. 1. Nehmen Sie das Spulengehäuse aus dem
Greifer. 2. Drücken Sie die beiden Halterungen nach außen. 3. Nehmen Sie den Greifer und den Greifer-
bahndeckel heraus.
C. Reinigen Sie den Transporteur und den Greifer-bereich mit dem Flusenpinsel.
ACHTUNG! Geben Sie einen Tropfen Nähmaschinenöl auf den zentralen Stift des Greifers und den Greifertreiber; siehe Pfeile.
D. 1. Der Greifertreiber muss wie ein Halbmond an der linken Seite stehen.
2. Halten Sie den Greifer an dem zentralen Stift, und setzen Sie ihn so ein, dass er wie ein Halbmond auf der rechten Seite liegt.
3. Legen Sie den Greiferbahndeckel auf. 4. Drücken Sie die Halterungen wieder zu.
61
5
345
2
59032_Naehmaschine_Singer_Content_DE_AT.indd 38 14.02.14 14:19

39 DE/AT/CH
Optionales Zubehör
Großer Anschiebetisch
Zum Montieren des Anschiebetischs klappen Sie den Stützfuß auf und schieben Sie die Führungs-stifte des Tisches wie gezeigt in die Öffnungen A, B, C und D an der Maschine.
CD B
A
21
1 Anschiebetisch 2 Stützfuß
Nützliche Tipps bei Störungen
= Fehler = Ursache = Lösung
Allgemeine Störungen
= Maschine näht nicht. = Der Hauptschalter ist nicht eingeschaltet. = Hauptschalter einschalten. = Knopflochhebel befindet sich beim Nähen von
Stichmustern nicht in der oberen Position. = Bringen Sie den Knopflochhebel in die obere
Position. = Knopflochhebel ist beim Nähen von Knopflö-
chern nicht gesenkt. = Senken Sie den Knopflochhebel.
= Maschine blockiert/klopft. = Faden im Greifer verfangen. = Greiferraum reinigen. = Die Nadel ist beschädigt. = Nadel auswechseln.
= Maschine transportiert nicht. = Der Nähfuß ist hochgestellt. = Nähfuß absenken.
Stichprobleme
= Stichauslassen = Die Nadel ist nicht ganz in den Nadelhalter
eingeschoben. = Siehe „Nadel auswechseln“. = Die Nadel ist stumpf oder verbogen. = Nadel auswechseln. = Die Maschine ist nicht richtig eingefädelt. = Siehe „Herausnehmen der Spulenkapsel“,
„Einsetzen der Spule in die Spulenkapsel“, „Einsetzen der Spulenkapsel in den Greifer“.
= Faden im Greifer verfangen. = Greiferraum reinigen.
= Ungleichmäßige Stiche = Nadelstärke passt nicht zu Stoff und Faden. = Siehe „Nadel auswechseln“. = Die Maschine ist nicht richtig eingefädelt. = Siehe „Herausnehmen der Spulenkapsel“,
„Einsetzen der Spule in die Spulenkapsel“, „Einsetzen der Spulenkapsel in den Greifer“, „Oberfaden einfädeln“.
= Oberfadenspannung zu lose. = Siehe „Fadenspannung einstellen“. = Sie haben am Stoff gezogen oder ihn entge-
gen der Transportrichtung geschoben. = Stoff nur leicht führen. = Unterfaden nicht gleichmäßig aufgespult. = Neu spulen.
= Nadel bricht = Sie haben am Stoff gezogen oder ihn entge-
gen der Transportrichtung geschoben. = Stoff nur leicht führen. = Nadelstärke passt nicht zu Stoff und Faden. = Siehe „Nadel auswechseln“. = Die Nadel ist nicht ganz in den Nadelhalter
eingeschoben. = Siehe „Nadel auswechseln“.
59032_Naehmaschine_Singer_Content_DE_AT.indd 39 14.02.14 14:19

40 DE/AT/CH
Fadenprobleme
= Fäden verwickeln sich = Ober- und Unterfaden vor Nähbeginn nicht
nach hinten unter den Nähfuß gezogen. = Beide Fäden ca. 10 cm nach hinten unter den
Nähfuß ziehen und bei den ersten Stichen leicht festhalten.
= Oberfaden reißt = Die Maschine ist nicht richtig eingefädelt. = Siehe „Herausnehmen der Spulenkapsel“,
„Einsetzen der Spule in die Spulenkapsel“, „Einsetzen der Spulenkapsel in den Greifer“, „Oberfaden einfädeln“.
= Oberfadenspannung zu fest. = Siehe „Fadenspannung einstellen“. = Die Nadel ist verbogen. = Nadel auswechseln. = Die Nadelstärke passt nicht zu Stoff und Fa-
den. = Siehe „Nadel auswechseln“.
= Unterfaden reißt = Die Spule ist nicht richtig eingefädelt. = Siehe „Unterfaden spulen“. = Flusen an der Spule oder im Greifer. = Flusen entfernen.
= Stoff zieht sich zusammen = Oberspannung zu fest. = Fadenspannung nachstellen. = Stichlänge verändern.
Sonderzubehör
Rollfuß
Beim Nähen von Leder, Wildleder, Kunststoff und Samt den Rollfuß anbringen, damit der Stoff besser gleitet. Bessere Ergebnisse werden jedoch mögli-cherweise mit dem normalen Zickzackfuß erzielt, wenn weicheres Leder oder Wildleder genäht wird.
Spezialfuß für unsichtbare Reißverschlüsse
Der Spezialfuß für unsichtbare Reißverschlüsse er-möglicht ein verdecktes Verschließen zahlreicher Kleidungsstücke und Accessoires. Diese Art von Reißverschluss ist häufig an der Seite oder Rück-seite von Röcken und Kleidern zu finden.
Vorbereitung der Maschine Den Fuß für unsichtbare Reißverschlüsse
anbringen Die Maschine auf Geradstich einstellen Die Stichlänge auf den mittleren Bereich
einstellen Dafür sorgen, dass die Nadelposition ausge-
richtet ist
1. Den Reißverschluss öffnen, indem Sie den Schieber herunterziehen und das obere Ende des Reißverschlusses festhalten.
2. Den Reißverschluss mit der linken Seite nach oben auflegen und ihn auf der rechten Stoff-seite entlang der Naht der rechten Seite des Kleidungsstücks heften. Die Zähne des Reißver-schlusses zeigen zur Innenseite der Naht.
59032_Naehmaschine_Singer_Content_DE_AT.indd 40 14.02.14 14:19

41 DE/AT/CH
3. Die Zähne des Reißverschlusses auf die rechte Rille des Reißverschlussfußes ausrichten. Die Nadelsticht durch das Band des Reißver-schlusses neben den Zähnen.
4. Soweit wie möglich von oben nach unten nähen und zu Anfang und Ende der Naht mehrere Steppstiche anbringen.
5. Jetzt muss die andere Seite des Reißverschlus-ses genäht werden. Den Reißverschluss zwei-mal nach links umdrehen und dann das Band der gegenüberliegenden Seite des Reißver-schlusses an der Naht der linken Seite des Kleidungsstücks ausrichten.
6. Die Zähne des Reißverschlusses auf die linke Rille des Reißverschlussfußes ausrichten.
7. Soweit wie möglich von oben nach unten nähen und zu Anfang und Ende der Naht mehrere Steppstiche anbringen.
8. Den Reißverschluss schließen.9. Den Spezialfuß für unsichtbarer Reißverschlüsse
abnehmen und den normalen Reißverschluss-fuß anbringen.
10. Eine 1,5 cm Naht bis ganz nach unten zur Naht nähen. Dabei so nahe wie möglich am Reißverschluss beginnen.
Knopfannähfuß
Der Knopfannähfuß dient dazu, den Knopf fest zu halten, wenn er an ein Kleidungsstück oder an-deres Teil angenäht wird.
Vorbereitung der Maschine Die Greifer absenken oder abdecken Fuß: Den Knopfannähfuß anschrauben Stich: Geradstich
Nähanleitungen1. Die Stopfplatte anbringen und den Stoff unter
den Nähfuß legen.2. Den Knopf unter den Fuß legen und darauf
achten, dass die Löcher im Knopf auf die Fuß-öffnung ausgerichtet werden.
3. Die Nadelposition (linke Nadelposition) so einstellen, dass die Nadel durch die Öffnung
(das Loch) auf der linken Seite des Knopfes einsticht. (Immer die Breite prüfen, indem Sie Ihr Handrad manuell drehen, bevor Sie zu nähen beginnen.)
4. Das Fadenende mit drei oder vier Stichen fest-nähen.
5. Zickzackstich auswählen.6. Die Breite so einstellen, dass die Nadel bei der
Bewegung von links nach rechts in beide Öff-nungen (Löcher) in den Knöpfen sticht. (Immer die Breite prüfen, indem Sie Ihr Hand-rad manuell drehen, bevor Sie zu nähen beginnen.)
7. Zehn Zickzackstiche nähen.8. Geradstich auswählen.9. Prüfen, dass die Nadel auf die linke Öffnung
(das linke Loch) im Knopf ausgerichtet ist.10. Das Fadenende mit drei bis vier Stichen festnä-
hen.
Blindstichfuß A
B Der Blindstichfuß dient in erster Linie dazu, fast unsichtbare Säume an Gardinen, Hosen, Röcken, usw. zu nähen.
Vorbereitung der Maschine Blindstichfuß einsetzen Stich auswählen: 04 oder 07 Spannung auf 5 einstellen
Nähanleitungen1. Die Schnittkante mit passendem Garn säubern.
Bei feinen Stoffen muss der Stoff umgeschlagen und ein schmaler Saum von maximal 1,3 cm gepresst werden. Bei mittleren bis schweren Stoffen die Schnittkante des Stoffes überwend-lich nähen.
2. Nun den Stoff so falten, dass die linke Seite nach oben zeigt.
3. Den Stoff unter den Nähfuß legen. Das Hand-rad auf sich zu drehen (gegen den Uhrzeiger-sinn), bis die Nadel die äußerste linke Position erreicht hat. Sie müsste dabei die Falte des
59032_Naehmaschine_Singer_Content_DE_AT.indd 41 14.02.14 14:19

42 DE/AT/CH
Stoffes durchstechen. Ist dies nicht der Fall, die Führung (B) am Blindstichfuß (A) so verändern, dass die Nadel gerade die Stofffalte durch-sticht und die Führung an der Falte anliegt. Langsam nähen und den Stoff dabei vorsichtig entlang der Führungskante führen.
4. Bei fertig gestellter Arbeit sind die Stiche auf der rechten Stoffseite kaum erkennbar.
Hinweis: Es braucht Übung, Blindsäume zu nähen. Nähen Sie zuerst eine Probe.
Elastischer Blindstich für weiche, dehnbare Stoffe.
Regulärer Blindstich für normale Webstoffe.
Overlockfuß
Mit diesem Fuß können auf einer Nähmaschine einheitliche, akkurate Über-wendlingstiche für einen be-kettelten Abschluss genäht werden. Der Faden wird um die Stoffkante geschlungen
und auf die Kante ausgerichtet, um ein Ausfransen des Stoffes zu verhindern.
Vorbereitung der Maschine Overlockfuß einsetzen Auswählen: Nr. 8 (Stichbreite 5,0) Oder: Nr. 10 oder 14 (Stichbreite 5,0-7,0) Spannung auf 5 einstellen
NähanleitungenDen Stoff so gegen die Führungskante des Overlockfußes drücken, dass die Nadel nahe am Saumrand einsticht.a. Nr. 03 (Breite=5,0) wird benutzt, um ein
Ausfransen des Stoffes zu vermeiden.b-c. Nr. 10 und 14 können Überwendlingstiche
und normale Stiche gleichzeitig nähen. Sie
eignen sich daher für Stoffe, die leicht ausfran-sen, wie auch zum Nähen elastischer Stoffe.
VORSICHT! Um Unfälle zu verhindern, sollte der Overlockfuß nur für die Nähmuster 03, 10 und 14 verwendet werden. Weder sollte die Stichbreite auf schmaler als 5,0, noch der Stichmodus geändert oder der Stich verlängert werden. Ein solches Vorgehen kann dazu füh-ren, dass die Nadel auf den Nähfuß trifft und abbricht.
Garantie und Service
Garantie
Sie erhalten auf dieses Gerät 3 Jahre Garantie ab Kaufdatum. Das Gerät wurde sorgfältig produziert und vor Anlieferung gewissenhaft geprüft. Bitte bewahren Sie den Kassenbon auf als Nachweis für den Kauf. Bitte setzen Sie sich im Garantiefall mit unserer Ser-vicehotline telefonisch in Verbindung. Nur so kann eine kostenlose Einsendung Ihrer Ware gewährleis-tet werden. Bitte bewahren Sie den Original Karton auf, damit das Gerät im Garantiefall transportsicher.Die Garantieleistung gilt nur für Material- oder Fabrikationsfehler, nicht aber für Verschleißteile oder für Beschädigungen an zerbrechlichen Teilen. Das Produkt ist lediglich für den privaten und nicht für den gewerblichen Gebrauch bestimmt. Bei miss-bräuchlicher und unsachgemäßer Behandlung, Gewaltanwendung und bei Eingriffen, die nicht von unserer autorisierten Service-Niederlassung vorge-nommen wurden, erlischt die Garantie. Ihre gesetz-lichen Rechte werden durch diese Garantie nicht eingeschränkt. Diese Garantie gilt nur gegenüber dem Erstkäufer und ist nicht übertragbar.
59032_Naehmaschine_Singer_Content_DE_AT.indd 42 14.02.14 14:19

43 DE/AT/CH
Service
Singer Service CenterBreitefeld 15, D-64839 Münster bei DieburgTelefon: 00800-74643700E-Mail: [email protected]: www.singerdeutschland.de
VSM Austria GmbHMoosstr. 60, A-5020 SalzburgTelefon: 00800-74643700E-Mail: [email protected]: www.singeraustria.com
VSM Switzerland GmbHHauptstr. 91, CH-5070 FrickTelefon: 062-8715665E-Mail: [email protected]: www.singerswitzerland.com
IAN 59032
Bitte halten Sie für alle Anfragen den Kassenbon und die Artikelnummer (z. B. IAN 12345) als Nachweis für den Kauf bereit.
Konformitätserklärung
Dieses Gerät erfüllt die Anforderungen der gelten-den europäischen und nationalen Richtlinien.Dies wird durch CE-Kennzeichnung bestätigt. Entsprechende Erklärungen sind beim Hersteller hinterlegt.
Entsorgung
Halten Sie Verpackungsmaterial von Kindern fern und entsorgen Sie dieses umweltgerecht.
Wenn die Nähmaschine einmal ausgedient hat, dann entsorgen Sie diese an einer Sammelstelle für Elektro- und Elektronikschrott.
VSM Deutschland GmbH An der RaumFabrik 3476227 Karlsruhe
0721 4001-0 Fax: 0721 4001-513
SINGER und das Cameo “S” Design sind eingetra-gene Warenzeichen der Singer Company Limited S.à.r.l. oder ihrer Gesellschaften.
©2011 The Singer Company Limited S.à.r.l. oder ihre Gesellschaften.Alle Rechte vorbehalten.
59032_Naehmaschine_Singer_Content_DE_AT.indd 43 14.02.14 14:19

44
59032_Naehmaschine_Singer_Content_DE_AT.indd 44 14.02.14 14:19

45 GB/IE 45 GB/IE
Important safety instructions .........................................................................................Page 48
Technical Data .............................................................................................................................Page 49
Parts descriptionSewing Machine .................................................................................................................................Page 49Accessories ..........................................................................................................................................Page 49
Start-upElectrical connection / foot control .....................................................................................................Page 50Main switch .........................................................................................................................................Page 50Thread reel holder...............................................................................................................................Page 50Presser foot lifter ..................................................................................................................................Page 51Transport cover plate ..........................................................................................................................Page 51Using the free-arm ...............................................................................................................................Page 51Spooling the lower thread ..................................................................................................................Page 51Removing the bobbin case .................................................................................................................Page 52Inserting the bobbin into the case ......................................................................................................Page 52Inserting the bobbin case into the hook.............................................................................................Page 52Threading the top thread ....................................................................................................................Page 53Using the needle threader ..................................................................................................................Page 54Picking up the lower thread ................................................................................................................Page 54
Fabric, thread and needle table ..................................................................................Page 55
Changing the needle ..............................................................................................................Page 55
„Setting the tension of the thread“ ..........................................................................Page 56Straight stitch .......................................................................................................................................Page 56Zigzag stitch and embroidery ............................................................................................................Page 57
Operating panel functionsStitch number buttons ..........................................................................................................................Page 57Adjustment buttons for stitch length / stitch width and needle position ............................................Page 57Needle positions for the straight stitch ...............................................................................................Page 57Regulation of the lower thread tension ..............................................................................................Page 58Changing the sewing foot ..................................................................................................................Page 58
Help message ..............................................................................................................................Page 58
Return switchDouble functional switch for return sewing and sewing up..............................................................Page 59
Beginning sewingLook-up table for stitch lengths and widths ........................................................................................Page 59
Overview of stitch pattern numbers ........................................................................Page 63
59032_Naehmaschine_Singer_Content_DE_AT.indd 45 14.02.14 14:19

46 GB/IE
Straight stitchStraight sewing with the guiding lines ...............................................................................................Page 64uilt stitch with needlework look ..........................................................................................................Page 64Sewing / couching in a zipper ...........................................................................................................Page 65
Zigzag stitch ..................................................................................................................................Page 65Setting the stitch width and length .....................................................................................................Page 66
Multiple zigzag stitch ............................................................................................................Page 66
Shell stitch .......................................................................................................................................Page 66
Caterpillar stitch ........................................................................................................................Page 67
Placing of patterns ..................................................................................................................Page 67
Sewing on buttons ..................................................................................................................Page 67
Blind stitching ...............................................................................................................................Page 68
Stretch stitches ............................................................................................................................Page 69
Stretch straight stitch .............................................................................................................Page 69
Honeycomb stitch .....................................................................................................................Page 69
Overlock stitch ............................................................................................................................Page 69
Feather stitch ................................................................................................................................Page 69
Stretch zigzag stitch ...............................................................................................................Page 70
Double overlock stitch ..........................................................................................................Page 70
Cross stitch ......................................................................................................................................Page 70
Entredeux stitch .........................................................................................................................Page 70
Ladder stitch .................................................................................................................................Page 71
Picot stitch .......................................................................................................................................Page 71
Edging stitch ..................................................................................................................................Page 71
Inclined edging stitch .............................................................................................................Page 71
Stretch overlock stitch ..........................................................................................................Page 72
59032_Naehmaschine_Singer_Content_DE_AT.indd 46 14.02.14 14:19
47 GB/IE
Russian cross stitch ..................................................................................................................Page 72
Greek stitch ...................................................................................................................................Page 72
Herringbone stitch ...................................................................................................................Page 72
Thorn stitch .....................................................................................................................................Page 73
Double overlock stitch ..........................................................................................................Page 73
Faggot stitch ..................................................................................................................................Page 73
Stretch patchwork stitch .....................................................................................................Page 73
More decorative stitches & ideas for decoration ..........................................Page 74
ButtonholesAutomatic buttonholes ........................................................................................................................Page 74Buttonholes with cord..........................................................................................................................Page 75
Cleaning and careCleaning and care of the sewing machine .......................................................................................Page 76Cleaning the hook region ...................................................................................................................Page 76
Optional accessoriesLarge extension table ..........................................................................................................................Page 77
Useful tips for trouble shootingGeneral disturbances..........................................................................................................................Page 77Problems with stitches .........................................................................................................................Page 77Problems with thread ..........................................................................................................................Page 78
Special accessoriesRoller foot ............................................................................................................................................Page 78Special foot for invisible zippers ........................................................................................................Page 78Sew on button foot ..............................................................................................................................Page 79Blind stitch foot ....................................................................................................................................Page 79Overlock foot ......................................................................................................................................Page 80
Guarantee and ServiceWarranty .............................................................................................................................................Page 80Service .................................................................................................................................................Page 80
Declaration of Conformity ................................................................................................Page 81
Disposal ............................................................................................................................................Page 81
59032_Naehmaschine_Singer_Content_DE_AT.indd 47 14.02.14 14:19
48 GB/IE
Sewing Machine
Important safety instructions
You should always observe the basic safety instruc-tions when you use the machine. Read all the instructions attentively before you use the machine.
ATTENTION! To prevent electric shocks:
Never leave the machine unattended while it is connected to the power supply. Remove the mains plug from the socket after every use as well as before cleaning the machine.
CAUTION! The mains voltage (voltage of the socket connection) must comply with the volt-age of the motor.
The machine may only be used for the purpo-ses described in this handbook. Only use the accessories which are recommended by the manufacturer in these instructions for use.
Disconnect the plug from the socket or switch off the machine to do any work in the region of the needle such as threading the needle, or hook or to the needle, needle plates, or chang-ing the presser foot.
Disconnect the plug of the sewing machine from the socket to remove covers, for lubrication or other maintenance work, which are described in these instructions and are carried out by the user.
It is prohibited to make adjustments to the mo-tor belt yourself. You must contact the service representative if such adjustments are necessary.
Do not pull the mains plug by grasping the lead, pull the plug out of the socket.
Handle the foot control carefully and do not let it fall to the ground. In particular, no objects may be placed on the foot control.
Always use the correct needle plate. The wrong needle plate can cause the needle to break.
Do not use bent needles.
Keep your fingers away from any moving parts while sewing. Special caution is required in the vicinity of the needle of the sewing machine.
Do not pull or push the sewn fabric while you are sewing. This can bend or break the needle.
Only lift or carry the machine using the handle. The machine may not be operated if the lead
or mains plug is damaged, the machine is not operating properly, has fallen to the floor or has become damaged or wet. If an overhaul or repair work is necessary or electrical or me-chanical adjustments are required, bring the machine to your next contractual retailer or to the customer service.
The machine may not be operated if venting ports are sealed. Keep the venting ports of the machine and foot control free from fluff, dust and loose tissue.
Do not allow any objects to fall into the ope-nings of the machine.
Do not operate the machine outdoors. The machine may not be operated in locations
where aerosol sprays or pure oxygen are used. The machine may not be used as a toy. Maxi-
mum attention is called for if the machine is being operated in the presence of children.
Do not expose the machine or the machine case to direct sunlight or to an extremely hot or humid room climate.
Do not touch the machine or foot control with wet hands, wet cloths or other wet objects.
Do not connect the mains plug to a multiple so-cket to which several leads of other appliances are connected.
Only use the machine on a level and stable table.
Prior to every start-up, close the free-arm and hook cavity cover of the machine.
Keep the sewing feet and needles out of reach of children.
Do not take the machine apart or change it yourself.
Ensure than the main switch is switched off and the mains plug is disconnected from the socket before you carry out any maintenance of the machine.
59032_Naehmaschine_Singer_Content_DE_AT.indd 48 14.02.14 14:19

49 GB/IE
If the power cable is damaged, it must be replaced by the manufac-turer, retailer or another qualified
person to eliminate potential hazards. This appliance may be used by children age
8 years and up, as well as by persons with re-duced physical, sensory or mental capacities, or lacking experience and/or knowledge, so long as they are supervised or instructed in the safe use of the appliance and understand the associated risks. Children should not be allowed to play with the appliance. Cleaning and user maintenance should not be performed by children without supervision.
Always switch off the machine when you leave it unattended.
Pull out the mains plug from the socket prior to maintenance.
If the lighting unit is damaged, it must be replaced by authorised retailer.
Technical Data
Mains voltage: 230 V ~Mains frequency: 50 HzPower input: 65 WAmbient temperature: normal temperatureWeight: 6.2 kg
Dimensions: 420 x 205 x 311 mm Noise level: less than is 70 dB (A)
Parts description
Sewing Machine (fig. A)
1 Thread guide2 Thread take-up3 Thread tension adjustment wheel4 Head cover5 Thread trimmer6 Extension table (Accessory box)7 Spooler8 Spool stop9 Overview of stitch patterns
10 Return switch11 Carrying handle12 Horizontal thread reel holder13 Handwheel14 Main switch15 Mains connection16 Rating plate17 Thread guide18 Buttonhole lever19 Presser foot lifter20 Thread guide21 Needle threader22 Thread guide23 Presser foot screw24 Needle25 Needle plate26 Needle bar27 Presser foot holder28 Presser foot release29 Needle clamping screw30 Presser foot31 Feed dog32 Mains lead33 Foot control34 Instructions for use
Accessories (fig. B)
35 Set of needles36 3 x bobbins (1 in the machine)37 Second thread reel holder38 Plain washers (2 x)39 Spool cap40 Cutting knife/brush41 Needle plate button42 Transport cover plate43 Zipper foot44 Buttonhole foot
The presser foot included in the delivery is a standard presser foot and is used for the majority of sewing operations.
59032_Naehmaschine_Singer_Content_DE_AT.indd 49 14.02.14 14:19

50 GB/IE
Start-up
Disconnect the machine from the power supply by remov-ing the plug from the socket.
Before you use the machine for the first time, wipe off any oil residue that could have accu-mulated in the vicinity of the needle plate dur-ing transport.
Electrical connection/foot control
Plug the mains plug (1) of the machine into the mains socket (2) as shown. Connect the plug (3) of the foot control to the connection socket of the sewing machine.
Note: The sewing machine cannot be started up if the foot control is not connected.
32
1
3
4
25
1
1 Main switch to OFF/AUS
2 Plug-in connector
3 Mains connection lead
4 Foot control5 Connection socket
Main switch
Your sewing machine will only sew if the main switch is switched on. The sewing light is also switched on and off by the main switch. Dis-connect the plug from the socket before you carry out any maintenance or change the needle.
Main switch OFF/AUS:
Main switch ON/EIN:
Thread reel holder
HORIZONTAL THREAD REEL HOLDER Put the thread reel onto the reel holder and
secure it with a spool cap so that the thread will run smoothly. If the thread reel is equipped with a thread tension disc, this should be fac-ing to the right.
VERTICAL THREAD REEL HOLDER FORLARGER THREAD REELS Attach the thread reel holder and fix with a
washer. Place a thread reel on the reel holder.
1
2
34516
1 Thread reel2 Washer3 Vertical thread reel
holder
4 Thread reel holder5 Thread tension disc6 Spool cap
59032_Naehmaschine_Singer_Content_DE_AT.indd 50 14.02.14 14:19

51 GB/IE
Presser foot lifter
There are three positions for the sewing foot.
1. Presser foot in the lowest position: for sewing.2. Presser foot in the middle position: to insert and
take out the fabric being sewn.3. Presser foot in the top position: to change the
presser foot and removal of especially heavy weight fabric.
Transport cover plate
Use the transport cover plate when you want to switch off the automatic transport of the ma-chine for sewing on buttons, free-hand sewing and darning. You can then guide and move the fabric yourself. For installation, bring the needle and presser foot to the top.
Lay the transport cover plate onto the needle plate in such a way that the lower notches en-gage into the bores.
Using the free-arm
You can use your machine both as a free-arm and as a flat-bed machine. When the exten-sion table is fitted, you will have more working space than on a flat-bed model.
To remove, hold the extension table with both hands and pull it away from the machine.
To insert, push the extension table into the right position until it engages.
Without the extension table, the machine can be used as a free-arm sewing machine to sew children´s clothing, cuffs, trouser legs and other inaccessible places.
Spooling the lower thread
Ensure that you are using class 15 J bobbins.
1. Put the thread reel onto the reel holder and secure it with the small spool cap. Draw the thread from the reel through the thread guides, as shown in the picture.
2. Draw the end of the thread through the hole in the bobbin (see picture).
3. Press the bobbin as far as possible to the left, (if the bobbin is not on the left). Place the bob-bin on the winder so that the end of the thread is pointing upwards. Now press the winder to the right until it clicks and hold the end of the thread.
4. Start the machine. The winder will stop itself when the bobbin is full. Press the winder to the
59032_Naehmaschine_Singer_Content_DE_AT.indd 51 14.02.14 14:19

52 GB/IE
left again, remove the bobbin and cut off the end of the thread.
4
1
32
Removing the bobbin case
1. Bring the needle to the top position by turning the handwheel forwards.
2. Open the free-arm flap by pulling it forwards. Open the flap of the bobbin case (see dia-gram), and pull the bobbin case out of the hook.
3. Let go of the bobbin case flap and the bobbin will fall out.
Inserting the bobbin into the case
1. Take the bobbin case in your left hand and place the bobbin into the case in such a way that the bobbin is turning clockwise.
2. Lay the thread into the slit in the case.3. Draw the thread under the tension spring.4. Pull about 15 cm thread out of the bobbin.
Inserting the bobbin case into the hook
1. Grasp the bobbin case with your left hand, open the flap and place the case with the case finger above on the pin in the middle of the hook.
2. Ensure that the thread is hanging outwards and is not caught in the case.
59032_Naehmaschine_Singer_Content_DE_AT.indd 52 14.02.14 14:19

53 GB/IE
Note: Verify that the finger of the bobbin case is lying on the corresponding cut-out of the hook path cover ring.
3. If you now release the bobbin flap, the bobbin case will engage in the hook.
1
2
1 Cut-out for case finger2 Bobbin flap
Threading the top thread
A. Raise the presser foot lifter. Before threading the needle, always check that the presser foot is „up”. (If the presser foot lifter cannot be raised, it is impossible to set the correct thread tension).
B. Turn the handwheel anti-clockwise until the needle reaches its top position and the thread take-up is visible.
A B
C. Hold the thread firmly with your right hand and thread the machine with your left hand in accordance with the sequence shown.
– Then from right to left through the thread take-up (3).
– Draw the thread through the needle eye (5) from the front to the rear. (The use of the auto-matic needle threader is described on the next page.)
②
③①
④⑤
1
2 3
54
C
Important note: A simple test of whether the machine has been threaded correctly can be carried out as described below:1. With the presser foot raised, draw the thread
to the rear of the machine. You should feel a slight resistance but no, or only a slight bend-ing of the needle.
2. Now lower the presser foot and draw the thread to the rear of the machine once again.
59032_Naehmaschine_Singer_Content_DE_AT.indd 53 14.02.14 14:19

54 GB/IE
This time you should notice a considerable resist-ance and much more bending of the needle. If you do not feel any resistance, this means that the machine has not been threaded correctly. Repeat the threading procedure.
Using the needle threader
Bring the needle to the top position by turning the handwheel anti-clockwise.
1. Hook the thread into the threading hook, as shown in the picture.
2. Hold the end of the thread firmly and lower the lever of the needle threader.
3. Turn the lever as far as it goes.4. Draw the thread under the tongue of the nee-
dle threader and then upwards.5. Turn back the lever. The needle will be thread
automatically.6. Release the lever and pull the thread away. Note: The machine must be set to straight
stitch for threading with the needle threader.
1 2
3
5 6
4
Picking up the lower thread
1. Raise the presser foot lifter.2. Hold the upper thread with your left hand and
turn the handwheel anti-clockwise so that the needle is brought into the lowest position and then into the highest position.
Note: You can quickly pick up the lower thread if you briefly activate and then release the reverse switch with the machine set to straight stitch. The sewing machine will make a downward and then upward movement and stop with the needle raised. It is a typical fea-ture of this computerised sewing machine that it always stops with the needle up.
3. Pull slightly at the upper thread. The lower thread will come up through the opening in the needle plate.
4. Draw out both threads approx. 15 cm and lay both threads backwards under the presser foot.
1
2
3 4
59032_Naehmaschine_Singer_Content_DE_AT.indd 54 14.02.14 14:19

55 GB/IE
Fabric, thread and needle table
The selection of the correct needle and the right thread depends on the fabric to be sewn. The following table is a practical aid for the selection of needles and threads. Consult the table before you start sewing. Ensure that you use the same type of thread and thread thickness for the top and bottom threads.
FABRIC THREAD NEEDLES
The fabrics listed below can consist of cotton, linen. silk, wool, synthetic fabric, viscose or mixed fibres. They are listed as examples of the corresponding weight classes. TYPE THICKNESS
LightBatisteChiffonCrêpe
Cotton-Polyester 100 % Polyester
* mercerized no. 60*
2020red shank
11/80orange band
Medium weight
Corduroy, / FlannelGabardineGingham / LinenMuslinWool crepe
Cotton-Polyester 100 % Polyester
* mercerized no. 50* nylon
2020red shank
14/90blue band
Heavy
Bonded wovensCanvasCoat fabric / denimDuck / canvas
Cotton-Polyester 100 % Polyester
* mercerized no. 40** reinforced thread
2020red shank
16/100violet band18/110
yellow band
Knitted fabrics
Concealed knitted fabricDouble knitted fabricJersey / tricot
Cotton-Polyester Polyester Nylon
2045yellow shaft
11/80orange band
14/90blue band16/100
violet band
* Use only Singer brand needles for better results
Changing the needle
Disconnect the machine from the power supply by remov-ing the plug from the socket
socket.1. Bring the needle to the highest position by
turning the handwheel anticlockwise.2. Loosen the needle clamp screw by turning
anti-clockwise.3. Remove the needle by pulling it downwards.
4. Insert the new needle in the needle holder with the flat side towards the back.
5. Push up the needle as far as it will go.6. Tighten the needle clamp screw with the screw-
driver included in the delivery. Note: Pull firmly but not too hard.
Tip: It is easier to change the needle if you put a piece of fabric under the presser foot and lower the presser foot. This prevents the needle from falling into the needle plate hole.
59032_Naehmaschine_Singer_Content_DE_AT.indd 55 14.02.14 14:19

56 GB/IE
Straight stitch
An attractive seam is predominantly dependent on the correct tension of the upper and lower threads. If the thread tension is correct, the two threads should interlock in the middle of your fabric.
You must probably adjust the thread tension if you notice any irregularities in the seam pattern. You must lower the presser foot to adjust the thread tension. A symmetrical thread tension (i.e. identical seam pat-tern above and below) is normally only desired for straight stitching.
1
2
Upper thread tension is too lowUpper thread tension is too high
Reducing the tension Increasing the tension
CORRECT
1 Bottom2 Top
3
1
2
Flat side to the rear.
1 Flat side2 Needle
3 Pin
„Setting the tension of the thread“
For 90 % of your sewing, you will only need to set the thread tension adjustment wheel to „ 5 ”. The thread tension adjustment wheel is located on the machine head.
Tip: By slightly pushing the 5 basic setting in + or - direction, a better stitch pattern is usually achieved.
59032_Naehmaschine_Singer_Content_DE_AT.indd 56 14.02.14 14:19

57 GB/IE
Zigzag stitch and embroidery
For the zigzag stitch, the thread tension should be somewhat looser than for the straight stitch. The seam is more attractive and you will avoid gather-ing if the upper thread appears on the underside of the fabric.
Operating panel functions
1 Stitch length2 LC display3 Manual adjustment buttons for stitch width/
needle position4 Buttons for manual adjustment of the stitch length5 Overview of stitch patterns6 Stitch number buttons7 Stitch pattern number8 Stitch width/needle position for straight stich
5
2
36
7
8
4
1
Stitch number buttons 6
When you switch on the machine, the straight stitch is set and a pop-up window appears on the LC dis-play for individual adjustments.To select a stitch pattern, use the left button to se-lect the left digit and the right button to select the right digit.
Adjustment buttons for stitch length/stitch width and needle position 3
You sewing machine sews with a default/standard stitch length and width.The default settings are underlined on the display.You can change the stitch length, stitch width or needle position for the straight stitch.Note: Some stitch patterns offer more possibilities for manual adjustment than others.
Needle positions for the straight stitch
There are 13 different needle positions available for the straight stitch. The needle position is ad-justed with the needle position button (see picture below).
to the right
Stitch width
to the left
59032_Naehmaschine_Singer_Content_DE_AT.indd 57 14.02.14 14:19

58 GB/IE
Regulation of the lower thread tension
Only adjust the lower thread tension of a correct stitch pattern cannot be achieved by regulating the upper thread tension. Turn the screw left to weaken the tension and right to tighten the tension. If the stitch pattern is all right but the seam is gathering, both the upper and the lower tension could be too tight and must be readjusted.To check whether the case tension is right, let the case hang by the end of the thread and press it in briefly. If the tension is right,, the thread will pull out approx. 5–10 cm. If the tension is too loose, the thread rolls of continuously.
Raise
Fabric gathers
Reducing
Changing the sewing foot
Ensure that the needle is in the „top“position. Raise the presser foot lifter.1. Press the presser foot release. The presser foot
is automatically released from its holder.2. Lay the desired presser foot on the needle
plate and centre the pin of the presser foot di-rectly under the slot of the presser foot holder.
3. Lower the presser foot lifter to allow it to en-gage in the presser foot.
1 3
2
1 3
2
1
2
3
1 Presser foot lifter2 Presser foot release
3 Presser foot holder
Help message
The winder has slid to the right during sewing (operating position).
Check the winder and push to the left.
The buttonhole lever is not low-ered or raised.
Lower the buttonhole lever for sewing buttonholes.
Raising the buttonhole lever while sew-ing normally.
The plug of the foot control has been pulled out during activation.
Insert the plug.
The machine is blocked because threads have been caught in the region of the bobbin or the sewing motion has been inter-rupted suddenly.
Switch off the main switch and rectify the problem.
The return button/tacking button is pressed while the buttonhole stitch is set.
The tacking stitch is sewn automatically when the buttonhole is finished. It is not necessary to press the return button.
The winder is in operation. Push the winder to the left if it is not be-ing used.
59032_Naehmaschine_Singer_Content_DE_AT.indd 58 14.02.14 14:19

59 GB/IE
Return switch
Double functional switch for return sewing and sewing up
– Backwards function for straight stitches and zigzag stitches ( )
Activate the return switch for backwards sewing.
The machine sews backwards as long as the switch is activated.
– Bar-tacking function for sewing mis-cellaneous stitches ( )
The sewing machine sews 4 small bar-tacking stitches for the sewing of all stitch patterns apart from straight and zigzag stitches.
The bar-tacking stitches are sewn exactly at the position where the return switch is activated.
Note: The finishing of stitch patterns is very useful for the prevention of fraying seams.
Beginning sewing
Look-up table for stitch lengths and widths
STIT
CH
PATTERN NO. STITCH WIDTH STITCH LENGTH
100 stitch
pattern
80 stitch
pattern
60 stitch
patternAUTO MANUAL AUTO MANUAL
00 00 00 MIDDLE LEFT - RIGHT 2.5 0.5–4.5
01 01 01 2.5 1.5–2.5
02 02 02 – 2.5 2.0–4.0
59032_Naehmaschine_Singer_Content_DE_AT.indd 59 14.02.14 14:19

60 GB/IE
STIT
CHPATTERN NO. STITCH WIDTH STITCH LENGTH
100 stitch
pattern
80 stitch
pattern
60 stitch
patternAUTO MANUAL AUTO MANUAL
03 03 03 5.0 0–0.6 2.0 0.5–3.0
04 04 04 3.0 2, 3, 4, 5, 6 2.0 1.0–3.0
05 05 05 3.0 2, 3, 4, 5, 6 2.0 1.0–3.0
06 06 06 6.0 2, 3, 4, 5, 6 1.5 0–2.5
07 07 07 3.0 1.0–0.6 2.0 1.0–3.0
08 08 08 3.0 1.0–0.6 2.0 1.0–3.0
09 09 09 6.0 3.4 / 5.6 2.0 1.5–2.5
10 10 10 3.5 3.5–6.5 2.5 1.5–2.5
11 11 11 3.5 3.5–6.5 2.5 1.5–2.5
12 12 12 6.0 3.4 / 5.6 2.0 1.0–2.5
13 13 13 5.0 2.0–6.0 2.5 1.5–2.5
14 14 14 3.5 3.5–6.5 2.5 1.5–2.5
15 15 15 6.0 3.4 / 5.6 2.0 1.5–2.5
16 16 16 3.0 2.0–6.0 2.5 1.5–2.5
17 17 17 3.5 1.0–6.5 2.5 1.5–2.5
18 18 18 3.0 1.0–6.5 2.5 1.5–2.5
19 19 19 3.0 1.0–6.5 2.5 1.5–2.5
20 20 20 3.5 1.0–6.5 2.5 1.5–2.5
21 21 21 3.5 1.0–6.5 2.5 1.5–2.5
22 22 22 3.5 1.0–6.0 2.0 0.8–2.5
23 23 23 3.5 1.0–6.0 2.0 0.8–2.5
24 24 24 5.0 1.0–6.0 2.0 1.0–2.5
25 25 25 5.0 1.0–6.0 2.0 1.0–2.5
26 26 26 5.0 3.5–6.0 2.5 1.5–2.5
27 27 27 4.0 2, 4, 5 2.5 1.0–2.5
28 – – 5.0 2.0–6.0 2.5 1.0–2.5
29 28 28 5.0 3, 4, 5, 6 2.5 1.3–2.5
30 – – 5.0 3, 4, 5, 6 1.8 1.5–2.5
31 29 29 1.0 – 2.5 1.5–30
32 30 30 5.0 5.0–6.0 2.5 –
33 31 31 5.0 3.5–6.0 2.5 1.5–2.5
34 32 – 5.0 3.0–6.5 2.5 1.5–2.5
35 33 – 5.0 1.0–6.0 2.5 0.8–2.5
36 34 32 – – Diff. –
59032_Naehmaschine_Singer_Content_DE_AT.indd 60 14.02.14 14:19

61 GB/IE
STIT
CHPATTERN NO. STITCH WIDTH STITCH LENGTH
100 stitch
pattern
80 stitch
pattern
60 stitch
patternAUTO MANUAL AUTO MANUAL
37 – – 6.0 3.5–6.0 0.8 0.5–1.5
38 – – 6.0 3.5–6.0 0.8 0.5–1.5
39 35 33 6.0 3.5–6.0 0.5 0.3–1.5
40 36 – 6.0 3.5–6.0 0.5 0.3–1.5
41 37 – 6.0 3.5 / 5.6 0.5 0.3–1.5
42 38 34 6.0 3.5 / 5.6 0.5 0.3–1.5
43 39 35 6.0 3.5 / 5.6 0.5 0.3–1.5
44 40 – 6.0 3.5 / 5.6 0.5 0.3–1.5
45 41 36 6.0 3.5 / 5.6 0.5 0.3–1.5
46 42 – 6.0 3.5 / 5.6 0.5 0.3–1.5
47 43 37 6.0 3.0–6.5 0.5 0.3–1.5
48 44 38 6.0 3.0–6.0 0.5 0.3–1.5
49 45 39 6.0 3.0–6.0 0.5 0.3–1.5
50 – – 6.0 3.0–6.0 0.5 0.3–1.5
51 – – 6.0 3.0–6.0 0.5 0.3–1.5
52 46 40 5.0 3.5–6.0 0.5 0.3–1.5
53 47 41 6.0 3.0–6.0 0.5 0.3–3.0
54 48 – 6.0 3.0–6.0 0.5 0.3–3.0
55 49 42 6.5 3.5–6.5 0.5 0.3–2.5
56 50 43 6.0 3.5–6.0 0.5 0.3–1.5
57 51 44 6.0 3.0–6.0 0.5 0.3–1.5
58 52 45 6.0 3.4 / 5.6 0.5 0.3–1.3
59 – – 3.5 2.0–6.0 0.5 0.5–1.0
60 53 – 5.0 2.0–6.5 0.5 0.5–0.8
61 54 46 6.0 3.5–6.0 0.2 1.5–2.5
62 55 – 6.0 3.5–6.0 2.5 1.5–2.5
63 56 47 6.0 3.5 / 6.0 1.8 0.8–2.5
64 57 48 6.0 3.5 / 6.0 Diff. –
65 – – 6.0 3.5 / 6.0 Diff. –
66 58 49 6.0 3.5–6.0 1.3 0.8–4.0
67 59 – 6.0 3.5–6.0 1.3 0.8–4.0
68 60 50 6.0 3.5–6.0 1.8 1.0–4.0
69 – – 6.0 3.5–6.0 1.8 1.0–4.0
70 61 51 6.0 3.0–6.0 2.5 1.0–2.5
59032_Naehmaschine_Singer_Content_DE_AT.indd 61 14.02.14 14:19

62 GB/IE
STIT
CHPATTERN NO. STITCH WIDTH STITCH LENGTH
100 stitch
pattern
80 stitch
pattern
60 stitch
patternAUTO MANUAL AUTO MANUAL
71 – – 6.0 3.0–6.0 2.5 1.5–2.5
72 62 – 4.5 3.4 / 5.6 2.5 1.5–2.5
73 – – 4.5 3.4 / 5.6 2.5 1.5–2.5
74 63 52 4.5 3.4 / 5.6 2.5 1.5–2.5
75 – – 4.5 3.4 / 5.6 2.5 1.5–2.5
76 64 53 5.0 3.5–6.0 2.5 1.5–2.5
77 – – 5.0 3.5–6.0 2.5 1.5–2.5
78 65 – 5.0 3.0–6.5 2.5 1.5–2.5
79 – – 5.0 3.0–6.5 2.5 1.5–2.5
80 66 5.0 3.0–6.0 2.0 1.0–2.5
81 67 – 5.0 3.5–6.5 2.5 1.5–2.5
82 – – 4.5 3.0 / 4.5 / 6.0 2.5 1.5–2.5
83 68 – 6.0 3.5–6.0 2.5 1.5–2.5
84 69 – 5.0 3.5–6.0 2.5 1.5–2.5
85 70 – 6.3 3.8–6.3 1.3 1.0–2.0
86 71 – 5.0 3.0–6.0 2.5 1.5–2.5
87 – – 5.0 4.0–6.0 2.5 1.5–2.5
88 72 – 5.0 2.0–6.0 1.5 0.5–2.0
89 – – – – 2.0 2.0–4.0
90 73 55 3.0 2.0–4.5 –
91 – – – – 0.5 0.5 / 0.8
92 – – – – 0.5 –
93 – – – – 0.5 0.5 / 0.8
94 74 56 – – 0.5 0.5 / 0.8
95 75 57 – – 0.5 0.5 / 0.8
96 76 58 – – 0.5 0.5 / 0.8
97 77 59 – – 0.5 0.5 / 0.8
98 78 – – – 0.5 0.5 / 0.8
99 79 – – – 0.5 0.5 / 0.8
59032_Naehmaschine_Singer_Content_DE_AT.indd 62 14.02.14 14:19

63 GB/IE
Overview of stitch pattern numbers
Pattern 60 stitches
Pattern 80 stitches
Pattern 100 stitches
59032_Naehmaschine_Singer_Content_DE_AT.indd 63 14.02.14 14:19

64 GB/IE
Straight stitch
The straight stitch is the most frequently stitch used. Therefore become familiar with the following steps.Note: According to the fabric weight, a „fine ad-justment” of the thread tension could be required.
1. SETTINGS - Presser foot - standard foot /up-per thread tension - 5
2. Draw both threads approx. 15 cm backwards under the presser foots.
3. Lay the fabric under the presser foot and lower the presser foot.
4. Turn the handwheel anti-clockwise until the nee-dle pierces the fabric.
5. Start the machine. Guide the fabric lightly with your hand. Stop the machine when you reach the edge of the fabric.
Note: The needle plate is fitted with a scale in mm and inches as a fabric guiding aid.
6. First turn the handwheel anti-clockwise until the needle is at its highest position, raise the presser foot and pull the fabric to the rear. Cut off excess thread with the thread cutter - lo-cated on the head cover.
Note: We recommend starting and ending a seam with 3 to 5 backwards stitches. In this way you will secure the ends of the threads and prevent the seam from loosening.
100 stitch pattern: 00 80 stitch pattern: 00 60 stitch pattern: 00
4
1
5 6
2
3
5/8" (16 mm) 7/8" (22 mm) 3/8" (10 mm)
A Thread tension adjustment wheelB Return switchC Presser foot lifter
Straight sewing with the guiding lines
The guiding lines on the needle plate will help you to sew a straight seam. They are marked with fig-ures that define the distance between the seam and the centred needle.
Quilt stitch with needlework look
This stitch looks as though it has been sewn by hand and is suitable for quilting and padding work.
1. Use the desired stitch colour for the lower thread. While you sew, the lower thread will
59032_Naehmaschine_Singer_Content_DE_AT.indd 64 14.02.14 14:19

65 GB/IE
appear on the top side, making it look hand-sewn.
2. Use an invisible or very fine thread in accord-ance with the colour of the fabric for the upper thread so that this will not be visible.
3. Increase the thread tension until you obtain the desired effect.
4. Begin sewing. Note: For unusual results, experiment with
different thread tensions and stitch lengths.
100 stitch pattern: 0280 stitch pattern: 0260 stitch pattern: 02
Sewing/couching in a zipper
Use the zipper foot to sew the left or right side of a zipper or to sew in an inlet thread.
Needle left of the sewing foot:
Needle right of the sewing foot:
Sewing in a zipperTo sew the right side of the zipper, engage the zipper foot left into the foot holder, so that the nee-dle pierces left of the presser foot.To sew the left side of the zipper, engage the zipper foot right into the foot holder.
CouchingTo couch curtains etc. lay the inlet thread in the folded fabric edge or in the bias binding. The bias binding must be tacked around the fabric edge.Engage the zipper foot right in the pressure foot holder so that the needle pierces right of the presser foot.
Tip: To guide the needle closely to the inlet thread, you can achieve a fine adjustment of the needle position with the aid the the stretch width buttons.
Zigzag stitch
SETTINGS:Presser foot - standard footUpper thread tension - 5
The upper thread could be visible from the wrong side depending on the thread, stitch and sewing speed.The lower thread must never appear on the top side.Lower the thread tension with the adjustment wheel if the lower thread can be seen on the top side or the seam is gathered.
59032_Naehmaschine_Singer_Content_DE_AT.indd 65 14.02.14 14:19

66 GB/IE
100 stitch pattern: 0380 stitch pattern: 0360 stitch pattern: 03
1
2
1 Bottom side 2 Top side
Setting the stitch width and length
The dark grey field represents the standard value that is automatically set when the pat-
tern is selected. The default setting for the zigzag stitch is 2 mm and the stitch width is 5 mm.
The grey fields represent values that can be manually set.
mm 0 0.5 1.0 1.5 2.0 2.5 3.0 3.5 4.0 4.5 5.0 5.5 6.0
0
0.3
0.5
0.8
1.0
1.3
1.5
1.8
2.0
2.5
3.0
Stitch width
Stitc
h le
ngth
Multiple zigzag stitch
SETTINGS:Presser foot - standard footUpper thread tension - 5
The multiple zigzag stitch is much stronger than the normal zigzag stitch because it binds the fabric with three stitches. It is therefore suitable for the tidying and edging of all kinds of fabrics. It is also ideal for bar tacking, for the reinforcement of worn points, for the application of patches, sewing on elastic bands, for sewing household textiles and for quilting.Note: A manual adjustment of the stitch length is necessary for darning or finishing as shown in the figure.
100 stitch pattern: 0680 stitch pattern: 0660 stitch pattern: 06
Shell stitch
SETTINGS:Presser foot - standard footUpper thread tension - 5
Fold over the fabric edge and iron. Push the fabric with the right side facing upwards under the presser foot so that the tip of the stitch penetrates just over the folded edge and pulls the fabric into a shell shape. Trim the projecting fabric along the seam.
Tip: For creative results, you can experiment with different stitch widths and lengths as well as thread tensions.
100 stitch pattern: 0680 stitch pattern: 0660 stitch pattern: 06
59032_Naehmaschine_Singer_Content_DE_AT.indd 66 14.02.14 14:19

67 GB/IE
Caterpillar stitch
Caterpillar stitches are especially dense zigzag stitches, resulting in a „satin” finish. They are good for applique or for sewing on cords etc. The upper thread tension should be slightly reduced. The stitch length must be set within the range of 0.5–2.00. If you are sewing very soft fabric, please use tear-away stabiliser or tissue paper to prevent the fabric from gathering.Note: If you are sewing particularly dense zigzag stitches/ caterpillar stitches, you MUST use the caterpillar foot.
Placing of patterns
The stitch width of the pattern increases proceeding from the centre of the needle position, as shown below.
Needle position centre
Sewing on buttons
SETTINGS:Presser foot - standard footTransport cover plate
Lay the fabric and button under the sewing foot.
Lower the sewing foot. Turn the handwheel and check that the needle punctures both button holes precisely.
Adjust the stitch width if necessary. Sew around 10 stitches. To sew on a button with a thread shank, lay a straight pin or sewing ma-chine needle between the button bores and sew over the pin or needle.
Tip: You can secure the seam by pulling and knotting the two threads on the wrong side of the fabric.
100 stitch pattern: 9080 stitch pattern: 7360 stitch pattern: 55
59032_Naehmaschine_Singer_Content_DE_AT.indd 67 14.02.14 14:19

68 GB/IE
1 2
1 2 4
3Medium to heavy duty fabrics
Bottom side Bottom side
Bottom side
Top side
Bottom side
Fine materials
Blind stitching
SETTINGS:Presser foot - blind stitch footUpper thread tension - 5
The blind stitch is used mostly for invisible hemming of household textiles, trousers and skirts etc.
100 stitch pattern: 04, 05, 0780 stitch pattern: 04, 05, 0760 stitch pattern: 04, 05, 07
Simple blind stitch for normal, firm fabrics
Elastic blind stitch for stretch fabrics and fine fabrics
1. Work the cut edge first: with fine fabrics, fold the edge, finish the edge in medium and heavy duty fabrics. Then iron the hem and tack it with pins.
2. Now fold the fabric with the wrong side up-wards, as shown in the picture.
3. Lay the fabric and button under the presser foot in this way. Turn the handwheel anti-clock-wise until the needle swivels to the left com-pletely. It is important that the needle with its left block barely pierces the fold.
Note: For a narrower or broader blind hem, adjust the stitch length and width first as de-sired. Then adjust the guide.
Sew slowly and guide the fabric smoothly along the guide.
4. The blind stitch is practically invisible on the top side.
Note: Sewing a sample is recommended as this technique requires a little practice.
59032_Naehmaschine_Singer_Content_DE_AT.indd 68 14.02.14 14:19

69 GB/IE
Stretch stitches
SETTINGS:Presser foot - standard footTransport cover plate
The stretch stitches are especially suitable for elas-tic materials and knitted fabrics. But you can also use them for normal, firm fabrics.
Stretch straight stitch
The stretch-straight stitch is much stronger than the normal straight stitch because it binds the fabric with three stitches - forwards, backwards and forwards again. Therefore it is suitable for elastic fabrics, for seam reinforcement in sports clothing - whether elastic or non-elastic - and for all espe-cially resilient seams. You can also use it for decorative purposes e.g. on collars and cuffs to give your clothing a professional finish.
100 stitch pattern: 0180 stitch pattern: 0160 stitch pattern: 01
Honeycomb stitch
The honeycomb stitch is ideal for smocking and for sewing on elastic threads, also on corsetry articles.1. Sew several straight stitches at equal intervals
on the garment that you would like to smock.2. Sew on an elastic band using honeycomb
stitch between the straight stitches.3. The straight stitches can then be removed.
100 stitch pattern: 0980 stitch pattern: 0960 stitch pattern: 09
Overlock stitch
The professional stitch is used for the manufacturing of sports clothing. You can sew and edge-finish in one operation.The overlock stitch is very suitable for the repair of frayed and worn edges of clothing that has been subjected to frequent wear.
100 stitch pattern: 10, 1180 stitch pattern: 10, 1160 stitch pattern: 10, 11
Feather stitch
This attractive stitch can be used as a decorative stitch, for sewing lace or applications onto linen or belts. Also ideal for quilting and hemstitching.
100 stitch pattern: 1280 stitch pattern: 1260 stitch pattern: 12
59032_Naehmaschine_Singer_Content_DE_AT.indd 69 14.02.14 14:19

70 GB/IE
Stretch zigzag stitch
The stretch - zigzag stitch is mainly used as a decorative lockstitch. Ideal for working edges on necklines, sleeves or hems.Resilient seams can be achieved by adjusting the stitch width to a lower setting manually.
100 stitch pattern: 1380 stitch pattern: 1360 stitch pattern: 13
Double overlock stitch
This stitch has three main uses.Very good for sewing on flat elastic bands for the sewing or repairing of underwear and for the simul-taneous sewing and edging of slightly elastic and non-elastic fabrics such as linen, tweed and me-dium to heavy cotton.
100 stitch pattern: 1480 stitch pattern: 1460 stitch pattern: 14
Cross stitch
For the sewing and edging of elastic fabrics and for decoration of edges, in particular.
100 stitch pattern: 1580 stitch pattern: 1560 stitch pattern: 15
Entredeux stitch
This stitch is used for decorating edges and tradi-tional embroidery patterns. You need a wing nee-dle for the hollow seam technique.
Tip: By slightly increasing the thread tension, you can achieve larger embroidery holes with the wing needle.
100 stitch pattern: 1680 stitch pattern: 1660 stitch pattern: 16
59032_Naehmaschine_Singer_Content_DE_AT.indd 70 14.02.14 14:19

71 GB/IE
Ladder stitch
The ladder stitch is mainly used for hollow seams. But it is also used to sew on narrow bands, also in contrasting colours. Decorative effects can be achieved by targeted placing of the stitch patterns.The ladder stitch is also suitable for satin stitch em-broidery on narrow bands, cords and elastic bands.Hollow seams are most successful on coarser linen fabrics. After carrying out the ladder stitch, pull the threads along the inner edges of the ladder pattern to achieve an airy effect.
100 stitch pattern: 1780 stitch pattern: 1760 stitch pattern: 17
Picot stitch
The picot stitch is a traditional stitch pattern for lacy, decorative hem seams and applique.
100 stitch pattern: 18, 1980 stitch pattern: 18, 1960 stitch pattern: 18, 19
Edging stitch
The edging stitch is a traditional hand embroidery pattern for edging tablecloths. But it is extremely versatile, e.g. for sewing on fringes, bias binding, applique and for satin stitch embroidery and hol-low seams.
100 stitch pattern: 20, 2180 stitch pattern: 20, 2160 stitch pattern: 20, 21
Inclined edging stitch
Excellent for the decoration of table cloths and bedding. You can achieve lacy effects on smooth fabrics. Sew along the unfinished fabric edge and trim the fabric close to the outside of the stitch.
100 stitch pattern: 22, 2380 stitch pattern: 22, 2360 stitch pattern: 22, 23
59032_Naehmaschine_Singer_Content_DE_AT.indd 71 14.02.14 14:19

72 GB/IE
Stretch overlock stitch
With the elastic overlock stitch, you can sew and edge-finish in one operation and obtain a narrow and even seam. Especially suitable for swimwear and sports clothing as well as T-shirts, elastic infant clothing and jersey.
100 stitch pattern: 24, 2580 stitch pattern: 24, 2560 stitch pattern: 24, 25
Russian cross stitch
For the sewing and edging of elastic fabrics and for decoration of edges.
100 stitch pattern: 2780 stitch pattern: 2760 stitch pattern: 27
Greek stitch
Traditional stitch pattern for decorating edges, borders and decorative hem seams.
100 stitch pattern: 2980 stitch pattern: 2860 stitch pattern: 28
Herringbone stitch
Mainly for decorating with the machine.
100 stitch pattern: 3480 stitch pattern: 3260 stitch pattern: -
59032_Naehmaschine_Singer_Content_DE_AT.indd 72 14.02.14 14:19

73 GB/IE
Thorn stitch
This stitch has versatile uses in joining pieces together and for decorative purposes.
100 stitch pattern: 3580 stitch pattern: 3360 stitch pattern: -
Double overlock stitch
This stitch is perfect for sewing on elastic braids. You can also use it for smocking and hemming.
100 stitch pattern: 7680 stitch pattern: 6460 stitch pattern: 53
Faggot stitch
SETTINGS:Presser foot - standard footUpper thread tension - 5This popular, decorative stitch is frequently used for the sleeves and fronts of blouses and ladies´ cloth-
ing. Leave some space between the two fabrics when you are sewing together.First fold over the seam allowance at the cut edge and iron. Then tack the folded over edges to tissue paper with a distance of approx. 0.3 cm. Sew over this 0.3 cm gap so that the needle pierces the fab-ric on the right and on the left. Remove the tacking stitches and tissue paper and iron.
100 stitch pattern: 8080 stitch pattern: 6660 stitch pattern: 54
Stretch patchwork stitch
Apart from its decorative effect, this stitch pattern is suitable for patchworking with elastic fabrics such as jersey and knitted fabrics.
100 stitch pattern: 8680 stitch pattern: 7160 stitch pattern: -
59032_Naehmaschine_Singer_Content_DE_AT.indd 73 14.02.14 14:19

74 GB/IE
More decorative stitches & ideas for decoration
SETTINGS:Presser foot - caterpillar footUpper thread tension - 5 or -1
Examples of how these stitches are to be sewn and used are shown below. You can use other decorative stitches for the same purpose. You should do a test on an extra piece of fabric to check the decorative pattern you would like to use. Before you begin sewing, check that there is enough thread on the bobbin so that you will not run out of thread while sewing. For the best results, reinforce your fabric with a removable or rinsable stabiliser.
Tip: The lower thread should not appear on the top side of the tissue; otherwise it could be necessary to set the tension a little lower.
Buttonholes
Automatic buttonholes
USING THE BUTTONHOLE FOOT
Your sewing machine provides patterns for button-hole caterpillars in 2 different widths and for eye holes and eyelet and round buttonholes and is
equipped with a system for measuring the button size and determining the required buttonhole length. Everything is achieved in one single operation.
1
2
1 Block A 2 Block B
PREPARATION FOR SEWING You should lay backing or tissue paper etc.
under the fabric in the region of the buttonhole. For a trial, sew a buttonhole in a remnant of
your fabric. Try it out with the chosen button.
100 stitch pattern: 94, 9580 stitch pattern: 74, 7560 stitch pattern: 56, 57
100 stitch pattern: 96, 9780 stitch pattern: 76, 7760 stitch pattern: 58, 59
100 stitch pattern: 98, 9980 stitch pattern: 78, 7960 stitch pattern: –, –
1. Select one of the two buttonhole patterns.2. Attach the buttonhole foot (D) (see chapter
„Changing the sewing foot”).3. Lay the button into the buttonhole foot (see
above, „Using the buttonhole foot”).
59032_Naehmaschine_Singer_Content_DE_AT.indd 74 14.02.14 14:19
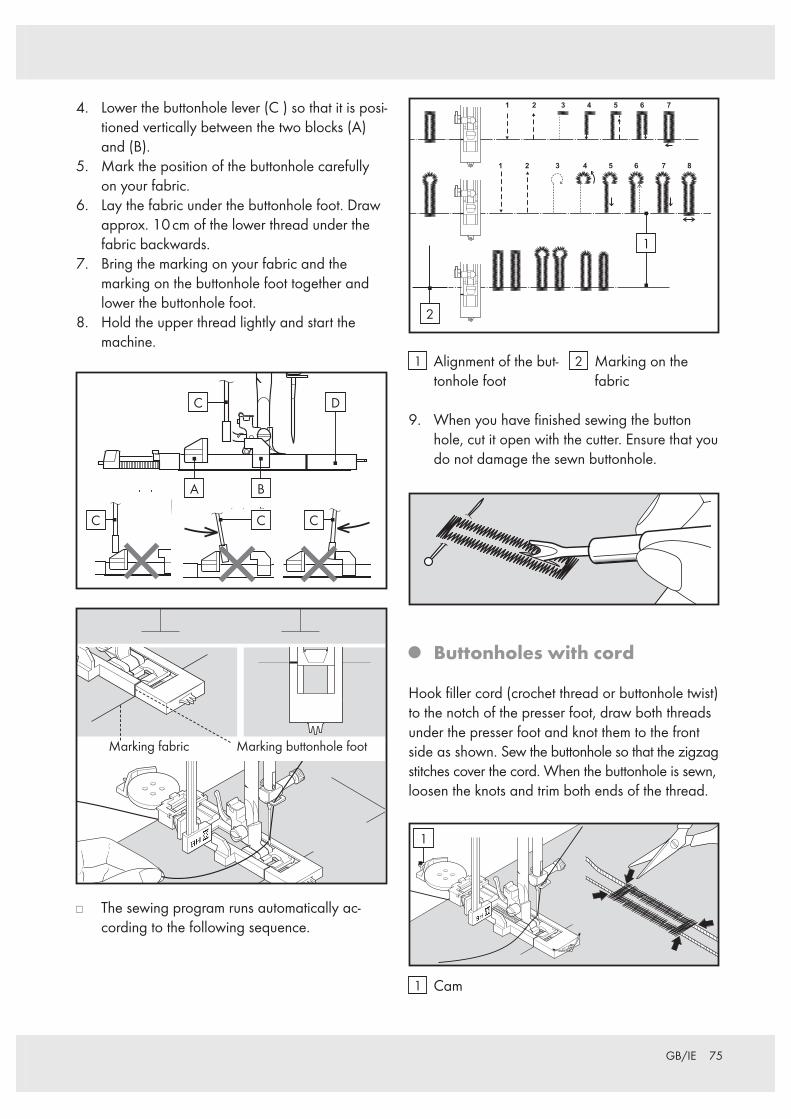
75 GB/IE
4. Lower the buttonhole lever (C ) so that it is posi-tioned vertically between the two blocks (A) and (B).
5. Mark the position of the buttonhole carefully on your fabric.
6. Lay the fabric under the buttonhole foot. Draw approx. 10 cm of the lower thread under the fabric backwards.
7. Bring the marking on your fabric and the marking on the buttonhole foot together and lower the buttonhole foot.
8. Hold the upper thread lightly and start the machine.
C D
C CC
A B
Marking fabric Marking buttonhole foot
The sewing program runs automatically ac-cording to the following sequence.
1 2 3 4 5 6 7 8
1 2 3 4 5 6 7
2
1
1 Alignment of the but-tonhole foot
2 Marking on the fabric
9. When you have finished sewing the button hole, cut it open with the cutter. Ensure that you do not damage the sewn buttonhole.
Buttonholes with cord
Hook filler cord (crochet thread or buttonhole twist) to the notch of the presser foot, draw both threads under the presser foot and knot them to the front side as shown. Sew the buttonhole so that the zigzag stitches cover the cord. When the buttonhole is sewn, loosen the knots and trim both ends of the thread.
1
1 Cam
59032_Naehmaschine_Singer_Content_DE_AT.indd 75 14.02.14 14:19

76 GB/IE
Cleaning and care
Cleaning and care of the sewing machine
To guarantee long-term, proper functioning, your machine must be regularly cleaned to remove fluff and dust.
Disconnect the plug from the socket before you carry out any maintenance or clean the
machine.
1 Hook2 Hook path cover3 Bobbin casing
4 Hook drive5 Holder(s)6 Feed dog
Cleaning the hook region
A. Bring the needle to the top position.B. 1. Take the bobbin casing out of the hook. 2. Press the two holders outwards. 3. Remove the hook and the hook path cover.C. Clean the feed dog and the hook area with the
brush.
ATTENTION! Apply a drop of sewing machine oil to the central pin of the hook and the hook drive; see arrow.
D. 1. The hook drive must be positioned like a crescent on the left side.
2. Hold the hook by the central pin and insert it so that it is positioned like a crescent on the right side.
3. Put on the hook path cover. 4. Close the holders by pressing inwards.
61
5
345
2
59032_Naehmaschine_Singer_Content_DE_AT.indd 76 14.02.14 14:19

77 GB/IE
Optional accessories
Large extension table
To mount the extension table, open the support base and push the guide pins of the table as shown into the openings A, B, C and D on the machine.
CD B
A
21
1 Extension table 2 Support base
Useful tips for trouble shooting
= Fault = Cause = Solution
General disturbances
= Machine does not sew. = The main switch is not switched on. = Switch on the main switch. = Buttonhole lever is not in the top position
during sewing of patterns. = Bring the buttonhole lever into the upper
position. = Buttonhole lever is not lowered during sewing
of buttonholes. = Lower the buttonhole lever.
= Machine is blocked/knocking. = Thread is caught in the hook. = Clean the hook area. = The needle is damaged. = Replace the needle.
= Machine does not transport. = The presser foot is in the upper position. = Lower the presser foot.
Problems with stitches
= Leaving out stitches = The needle is not completely pushed into the
needle holder. = See „Changing the needle“. = The needle is blunt or bent. = Replace the needle. = The machine is not properly threaded. = See „Removing the bobbin case“, „Inserting
the bobbin into the bobbin case“, „Inserting the bobbin case into the hook“.
= Thread is caught in the hook. = Clean the hook area.
= Irregular stitches = Needle thickness does not match the fabric
and thread. = See „Changing the needle“. = The machine is not properly threaded. = See „Removing the bobbin case“, „Inserting
the bobbin into the bobbin case“, „Inserting the bobbin case into the hook“, „Threading the upper thread“.
= Upper thread tension is too loose. = See „Setting the tension of the thread“. = You have pulled at the fabric or pushed it
against the transport direction. = Only guide the fabric lightly. = Lower thread is not evenly wound. = Wind again.
= Needle breaks = You have pulled at the fabric or pushed it
against the transport direction. = Only guide the fabric lightly. = Needle thickness does not match the fabric
and thread. = See „Changing the needle“. = The needle is not completely pushed into the
needle holder. = See „Changing the needle“.
59032_Naehmaschine_Singer_Content_DE_AT.indd 77 14.02.14 14:19

78 GB/IE
Problems with thread
= Threads are tangled = Upper and lower thread have not been drawn
backwards under the presser foot before be-ginning sewing.
= Draw both threads approx. 10 cm backwards under the presser foot and hold lightly while sewing the first stitches.
= Top thread tears = The machine is not properly threaded. = See „Removing the bobbin case“, „Inserting
the bobbin into the bobbin case“, „Inserting the bobbin case into the hook“, „Threading the upper thread“.
= Upper thread tension is too tight. = See „Setting the tension of the thread“. = The needle is bent. = Replace the needle. = Needle thickness does not match the fabric
and thread. = See „Changing the needle“.
= Lower thread tears = The bobbin is not properly threaded. = See „Spooling the lower thread“. = Fluff at the bobbin or in the hook. = Remove fluff.
= Fabric gathers = Upper tension is too tight. = Adjust thread tension. = Change stitch length.
Special accessories
Roller foot
Attach the roller foot if you are sewing leather, suede, plastic and velvet so that the fabric will glide more easily. Better results will possibly be achieved with the normal zigzag foot if you are sewing soft leather or suede.
Special foot for invisible zippers
The special foot for invisible zippers allows the con-cealed closing of numerous pieces of clothing and accessories. This kind of zipper is often found on the sides or backs of skirts and dresses.
Preparation of the machine Attaching the foot for invisible zippers Set the machine to straight stitch Set the stitch length to the medium range Ensure that the needle position is aligned
1. Open the zipper by pulling down the slider and holding the top end of the zipper firmly.
2. Position the zipper with left side facing up-wards and tack it onto the right side along the seam of the right side of the piece of clothing. The teeth of the zipper point to the inside of the seam.
3. Align the teeth of the zipper to the right groove of the zipper foot. The needle is piecing through the band of the zipper beside the teeth.
59032_Naehmaschine_Singer_Content_DE_AT.indd 78 14.02.14 14:19

79 GB/IE
4. If possible, sew from the top to the bottom and sew several step stitches at the beginning and end of the seam.
5. The other side of the zipper must be sewn now. Turn over the zipper twice to the left and then align the band of the opposite side of the zip-per to the seam on the left side of the piece of clothing.
6. Align the teeth of the zipper to the left groove of the zipper foot.
7. If possible, sew from the top to the bottom and sew several step stitches at the beginning and end of the seam.
8. Close the zipper.9. Take off the special foot for concealed zippers
and attach the normal zipper foot.10. Sew a 1.5 cm seam to the bottom seam. Begin
as closely as possible to the zipper.
Sew on button foot
The sew on button foot holds the button firmly while it is being sewn onto a piece of clothing or another item.
Preparation of the machine Lower or cover the hook Foot: Screw on the sew on button foot Stitch: straight stitch
Sewing instructions1. Attach the darning plate and lay the fabric
under the sewing foot.2. Position the button under the foot and ensure
that the holes in the button are aligned to the foot opening.
3. Adjust the needle position (left needle position) to ensure that the needle penetrates through the opening (the hole) in the left side of the but-ton. (Always check the width by turning the handwheel manually before you begin sewing.)
4. Fix the end of the thread by sewing three or more stitches.
5. Select zigzag stitch.
6. Adjust the width to ensure that the needle pen-etrates the button during the movement from left to right in both openings (holes). (Always check the width by turning the handwheel manually before you begin sewing.)
7. Sew ten zigzag stitches.8. Select straight stitch.9. Check that the needle in the left opening (the
left hole) is aligned in the button.10. Fix the end of the thread by sewing three or
more stitches.
Blind stitch foot A
B The main purpose of the blind stitch is to sew practically invisi-ble hems on curtains, trousers, skirts etc.
Preparation of the machine Attach the blind stitch foot Select stitch: 04 or 07 Set the tension to 5
Sewing instructions1. Tidy the edge with matching thread. For fine
fabrics, tuck over the fabric and press a narrow seam of maximum 1.3 cm. For medium to heavy-duty fabrics, sew the cut edge of the fabric in overlock.
2. Now fold the fabric so that the wrong side is facing upwards.
3. Lay the fabric under the sewing foot. Turn the handwheel towards you (anti-clockwise) until the needle has reached the utmost left position. You must have pierced the fold of the fabric. If this is not the case, change the guide (B) of the blind stitch foot (A) so that the needle will go straight through the fabric fold and the guide lies on the fold. Sew slowly and carefully guide the fabric along the guide edge.
4. When the work is completed, the stitches will be barely visible on the right side.
Note: Sewing blind hems requires practice. Sew a sample first.
59032_Naehmaschine_Singer_Content_DE_AT.indd 79 14.02.14 14:19

80 GB/IE
Elastic blind stitch for stretch fabrics and fine fabrics.
Regular blind stitch for normal woven fabrics.
Overlock foot
With this foot, uniform, ac-curate overlock stitches can be sewn for a chain finish on a sewing machine. The thread is lopped around the fabric edge and aligned to the edge to prevent the fabric from fraying.
Preparation of the machine Insert overlock foot Select: No. 8 (stitch width 5.0) Or: No. 10 or 14 (stitch width 5.0-7.0) Set the tension to 5
Sewing instructionsPress the fabric against the guiding edge of the overlock foot so that the needle pierces the fabric near to the edge of the seam.a. No. 03 (width=5.0) is used to prevent the
fabric from fraying.b-c. No. 10 and 14 can sew overlock stitches and
normal stitches at the same time. They are therefore suitable for sewing fabrics that easily fray and for sewing elastic fabrics.
CAUTION! To prevent accidents, the overlock foot should only be used for the sewing patterns 03, 10 and 14. The stitches should neither be narrower than 5.0, nor should the sewing mode be changed or the stitch ex-tended. This procedure could lead to the needle colliding with the presser foot and breaking.
Guarantee and Service
Warranty
This appliance has a warranty of 3 years from the date of purchase. The appliance has been manu-factured with care and thoroughly inspected before delivery. Please keep your receipt as proof of purchase. In the event of a warranty claim, please contact our service hotline by telephone. This will ensure you will be able to return your produce postage-free. Please keep the original carton so that your appliance can be transported safely in the event of a warranty claim.The warranty applies to faults in materials or manu-facture only and not to damage to wear parts nor to damage to breakable parts. This product is in-tended for private, non-commercial use only. Any incorrect or improper use of the device, use of force and changes not performed by our author-ized service branch will void the warranty. This warranty does not limit your legal rights. This war-ranty is only applicable to the initial purchaser and is not transferrable.
Service
Bogod & Company Ltd.Fortran Road, St Mellons, CF3 0WJ Cardiff, GB
0044-29-20774910
IAN 59032
For all inquiries about your product, please have your receipt and the article number (e.g. IAN 12345) ready as your proof of purchase.
59032_Naehmaschine_Singer_Content_DE_AT.indd 80 14.02.14 14:19
81 GB/IE
Declaration of Conformity
This appliance complies with the requirements of the relevant European and national guidelines.This is confirmed by the CE mark. The relevant declarations are held by the manufacturer.
Disposal
Keep packaging materials out of reach of children and dispose of them in an environmentally-friendly way.
When your sewing machine has become obsolete, please dispose of it at a collection point for electric and electronic scrap.
VSM Deutschland GmbH An der RaumFabrik 3476227 KarlsruheTelephone: 0721 4001-0 Fax: 0721 4001-513
SINGER and “S” Design are registered trademarks of der Singer Company Limited S.à.r.l. or its affili-ated companies.
©2011 The Singer Company Limited S.à.r.l. or its affiliated companies.All rights are reserved.
59032_Naehmaschine_Singer_Content_DE_AT.indd 81 14.02.14 14:19

82
59032_Naehmaschine_Singer_Content_DE_AT.indd 82 14.02.14 14:19

83
59032_Naehmaschine_Singer_Content_DE_AT.indd 83 14.02.14 14:19

84
59032_Naehmaschine_Singer_Content_DE_AT.indd 84 14.02.14 14:19

59032_Naehmaschine_Singer_Cover_DE_AT.indd 6 14.02.14 14:19

IAN 59032
VSM GROUP AB Drottninggatan 2 SE- 56184 Huskvarna Stand der Informationen Last Information Update: 02 / 2014 Ident.-No.: 6180022014-DE / AT
59032_Naehmaschine_Singer_Cover_DE_AT.indd 1 14.02.14 14:19