6 th Annual Focus Users’ Conference Teacher Lesson Plans Presented by: Kori Watkins.
33
6 th Annual Focus Users’ Conference Teacher Lesson Plans Presented by: Kori Watkins
-
Upload
tobias-lang -
Category
Documents
-
view
220 -
download
2
Transcript of 6 th Annual Focus Users’ Conference Teacher Lesson Plans Presented by: Kori Watkins.

6th Annual Focus Users’ Conference
Teacher Lesson PlansPresented by:Kori Watkins

Lesson Plans
Agenda:
Importing Curriculum GuidesBuilding Lessons under curriculum
guidesResources
Files (embedding) Links
Labels Activities Tests Discussion Forums Standards
Formatting Year at a GlanceExporting Lesson Plans to ShareImporting Shared Lesson Plans
Creating Lesson Plans from Scratch
Viewing the Curriculum Calendar Where to print and view lesson plans

Resourced
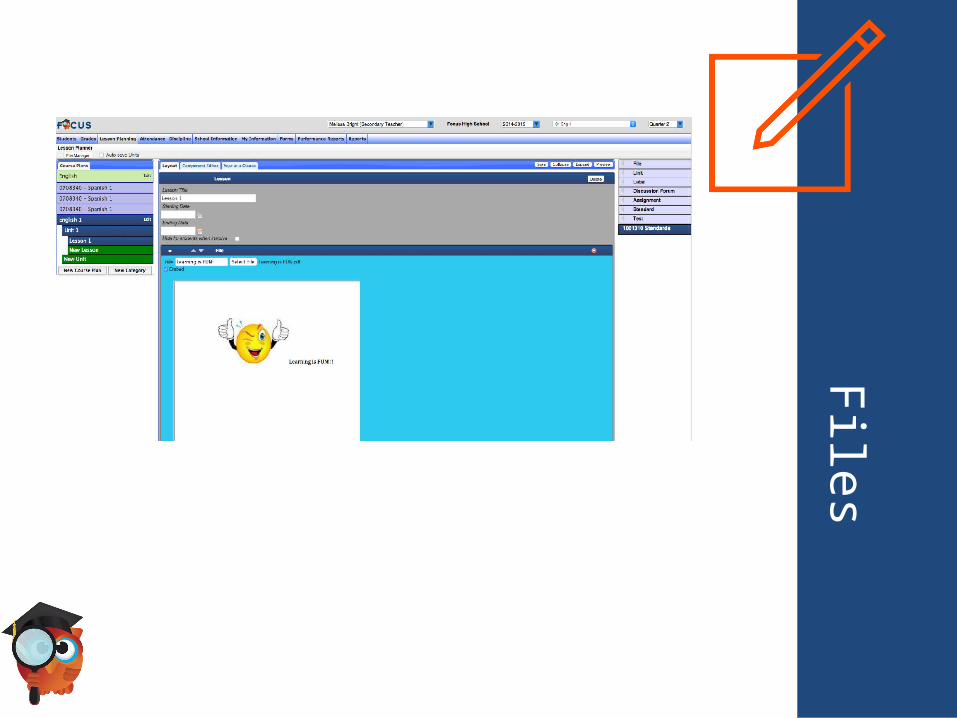
On the right hand side of the screen, there are resources that can be addedto the created lesson.
To add a resource, simply drag and drop it into the desired lesson

Resources
There are various resources that can be added to the curriculum guide .
Files: Any file type. PDFs, JPEGs, GIFs can all be embedded
Link: Links to external websites
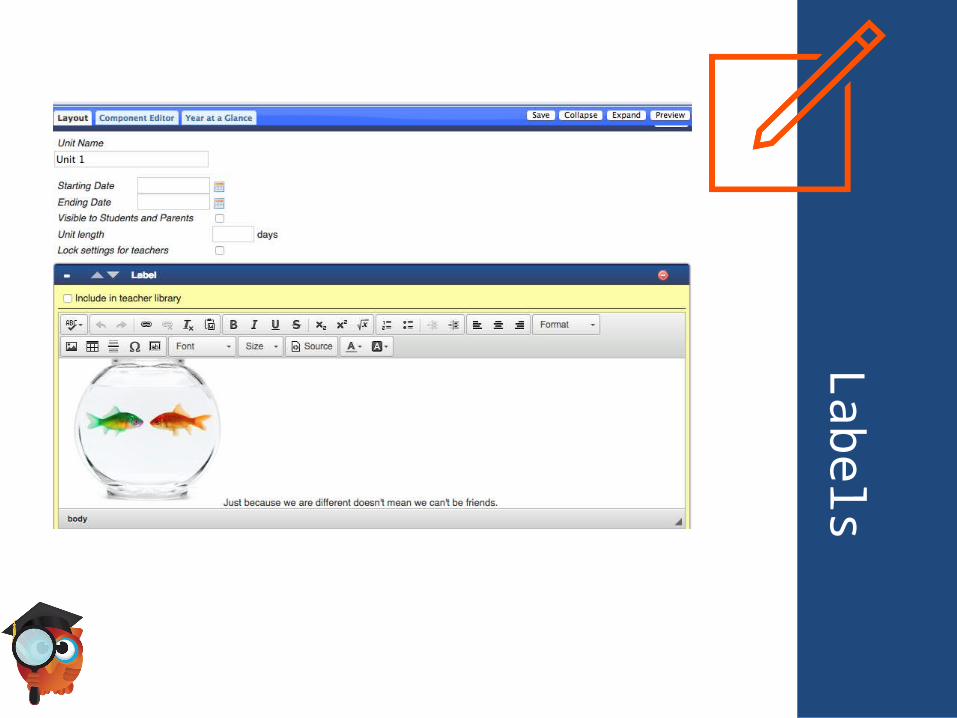
Label: Insert text, pictures, charts etc.
Discussion Forum: Allows for students to discuss an assigned topic
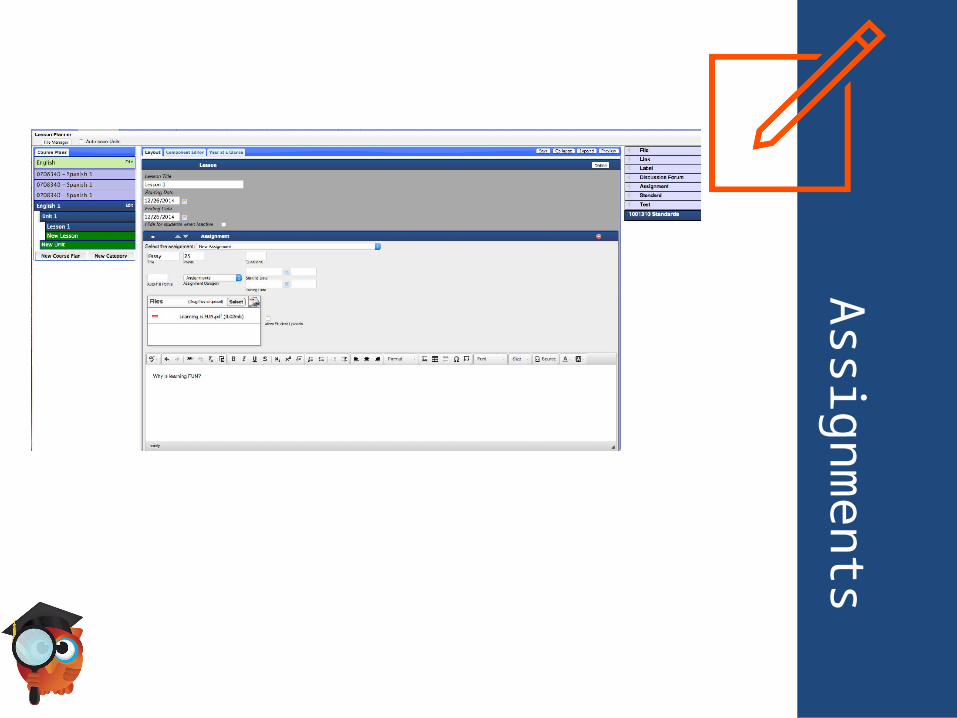
Assignment: Add an assignment to the selected unit within the lesson plan
Standard: Search for standards to associate with the selected unit within the lesson plan.

Im
porting Curriculum
Guides
Districts are able create curriculum guides for teachers to use as anoutline for teacher lesson plans.
To access the district created curriculum guides, navigate to the Lesson Plan menu and select Lesson Planner.
Next, select New Course Plan

Importing Curriculum
G
uides
Select the appropriate course code from the Course Plan Catalogcolumn on the left hand side of the box.
If a curriculum guide has been created for the course code selected it will appear

Importing Curriculum
G
uides
Click on the name of the curriculum guide to view a list of all the units createdwithin the curriculum guide
To view what is housed with an individual unit, select Preview

Im
porting Curriculum
Guides
To add the entire curriculum guide, select the double triangle
To add an individual unit from a curriculum guide, select the single triangle ofthe desired unit.
The imported guide will now display on the right hand side of the box where it saysUnits In This Plan.
Im
porting Curriculum
Guides
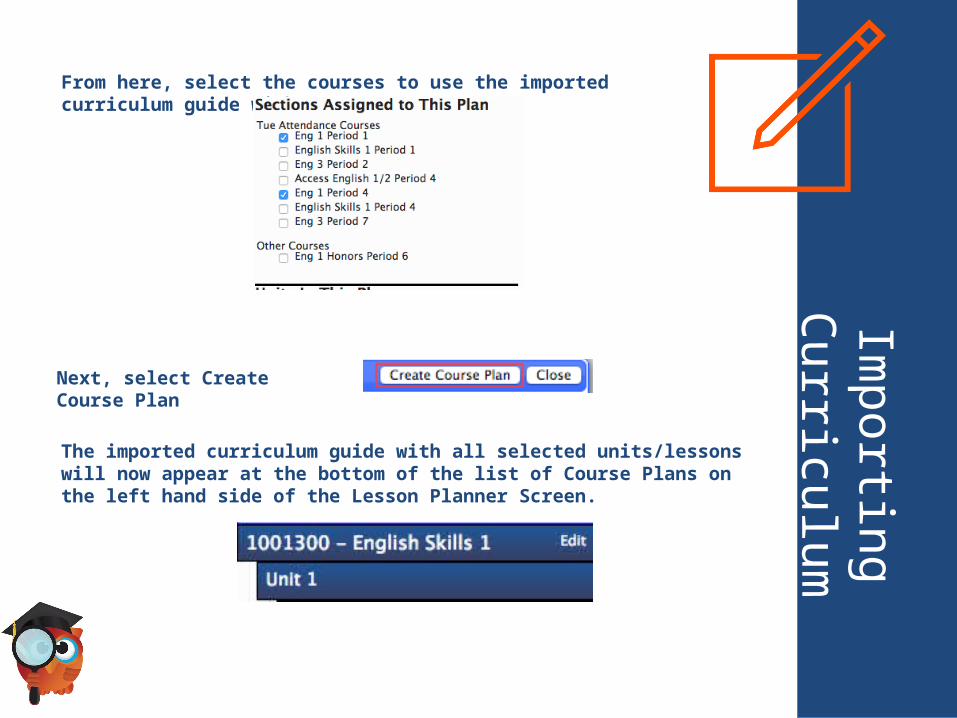
From here, select the courses to use the imported curriculum guide with.
Next, select Create Course Plan
The imported curriculum guide with all selected units/lessons will now appear at the bottom of the list of Course Plans on the left hand side of the Lesson Planner Screen.

Adding Lessons to an
imported guide
To begin building lessons under the imported curriculum guide, selectNew Lesson.
A blank lesson template will now appear on the screen.
Title the new lesson and select start and end dates. These dates will affect when the students will be able to view the lesson, as well, as the display of the lesson on the Curriculum Calendar and the Year at a Glance
To ensure that students are only able to view the lesson during the selected dates, check the Hide for Students When Inactive box
Adding Lessons to an
imported guide
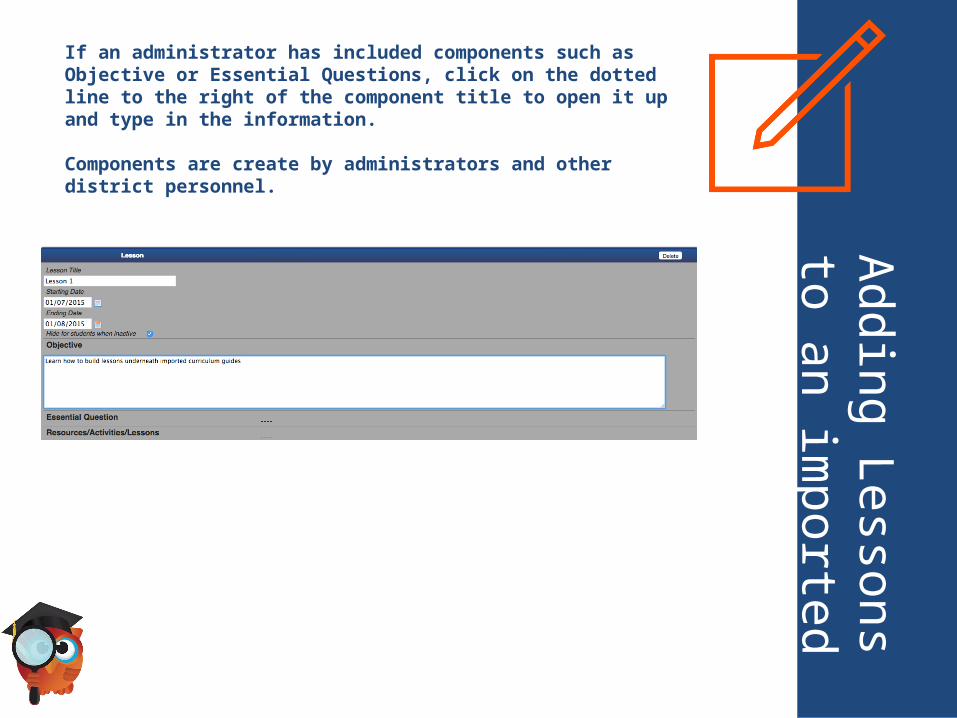
If an administrator has included components such as Objective or Essential Questions, click on the dotted line to the right of the component title to open it up and type in the information.
Components are create by administrators and other district personnel.

Adding Resources
As show before are various resources that can be added to the curriculum guide .
Files: Any file type. PDFs, JPEGs, GIFs can all be embedded
Link: Links to external websites
Label: Insert text, pictures, charts etc.
Discussion Forum: Allows for students to discuss an assigned topic
Assignment: Add an assignment to the selected unit within the lesson plan
Standard: Search for standards to associate with the selected unit within the lesson plan.
Files

Links
Labels

D
iscussion Forums
Assignm
ents

Standards

Tests

M
oving Resources
To control the order that the resources appear use the gray triangles to move the resources up and down.
Use the minus sign to the left of the triangles to minimize the resource
If the resource is minimized click on the plus open it it back up
To completely delete a resource, click on the red minus sign.
To save the lesson plan, click the Save button at the top of the screen.
Collapse and Expand will open minimize or open all resources in the selected unit/lesson of the lesson plan
The view what the lesson plan will look like, select the Preview button

Year at a G
lance
The Year at a Glance button will show all the terms in the school year, and where all the units/lessons fall within the calendar.

Exporting Lesson
Plans to Share
To export a lesson plan to share with other teachers, click on the Edit button on the desired lesson plan.
Then, select the Export button
Im
porting Shared Lesson Plans
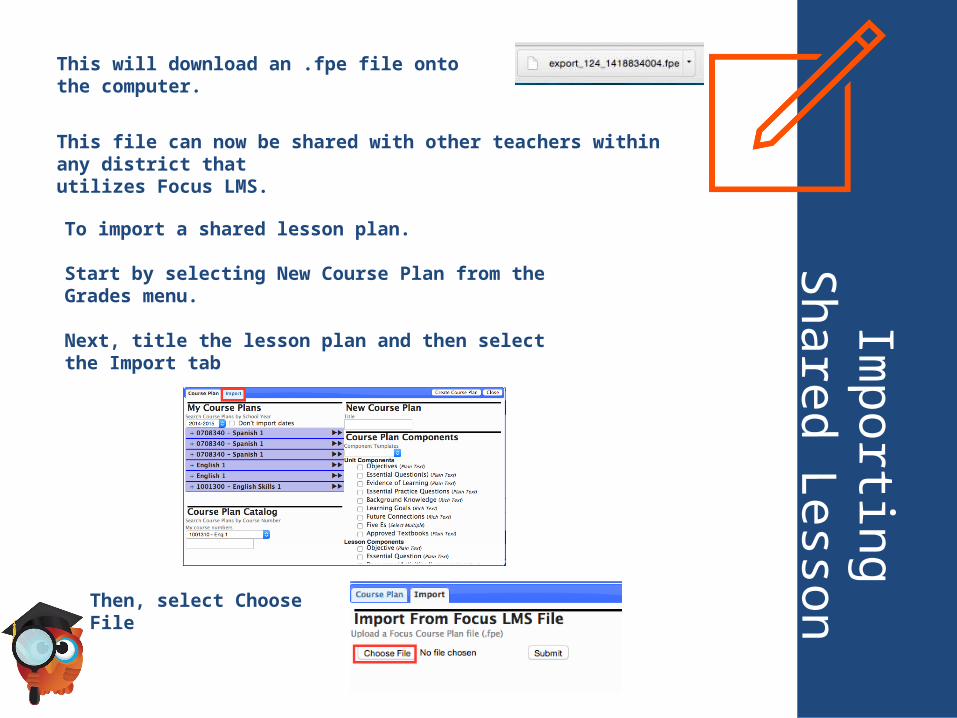
This will download an .fpe file onto the computer.
This file can now be shared with other teachers within any district thatutilizes Focus LMS.
To import a shared lesson plan.
Start by selecting New Course Plan from the Grades menu.
Next, title the lesson plan and then select the Import tab
Then, select Choose File
Im
porting Shared Lesson Plans
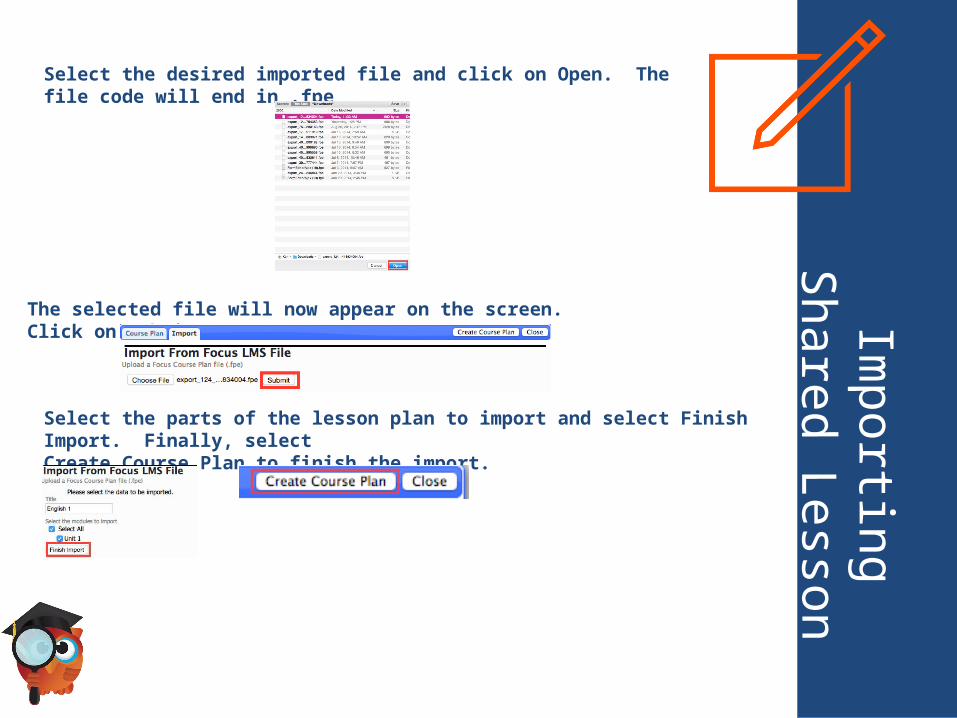
Select the desired imported file and click on Open. The file code will end in .fpe
The selected file will now appear on the screen. Click on Submit.
Select the parts of the lesson plan to import and select Finish Import. Finally, selectCreate Course Plan to finish the import.

Creating Lesson Plans
from Scratch
To create a lesson plan from scratch, navigate to the Grades menu andSelect Lesson Planner.
Next, select New Course Plan
Title the lesson plan, select components, and assign it to the desired course by selecting the appropriate checkboxes.
Once finished, select Create Course Plan.

Creating Lesson Plans
from Scratch
The newly created lesson plan will appear on the screen.
Select New Unit to begin building the lesson plan. A Unit is the “big picture” in a course plan. Lessons can be added to Units. The lesson are the pieces of a lesson, often the day to to day plans.
After typing in the desired title, select the plus sign.
The newly created unit now opens up on the screen

Creating Lesson Plans
from Scratch
Clicking on the dotted lines of the components will open them up so that users are able to add information.
On the right hand side of the screen, there are resources that can be added to the lesson plan
To add a resource, simply drag and drop it into the unit within the lesson plan. The follow the same process as before for adding lessons to the plan.

Curriculum
Calendar
To see all units, lessons, and assignments in a monthly calendar, selectCurriculum Calendar from the Lesson Planner menu.
A color coded calendar will now appear, showing the start and end date for lessonsand units, as well as, assignment assigned and due dates.
Printing Lessons
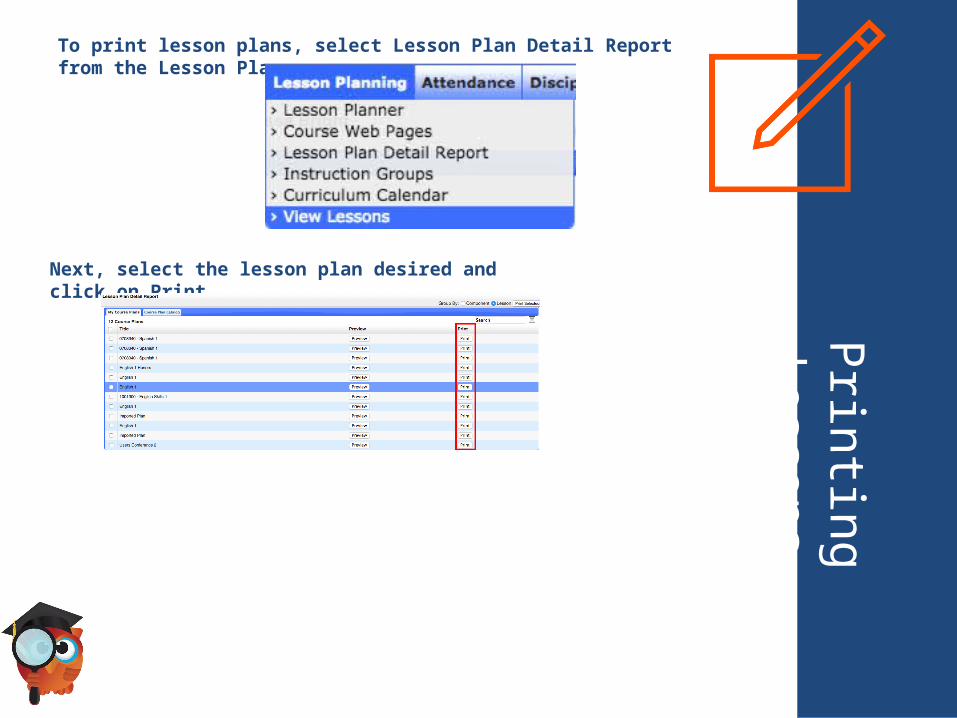
To print lesson plans, select Lesson Plan Detail Report from the Lesson Planner menu.
Next, select the lesson plan desired and click on Print
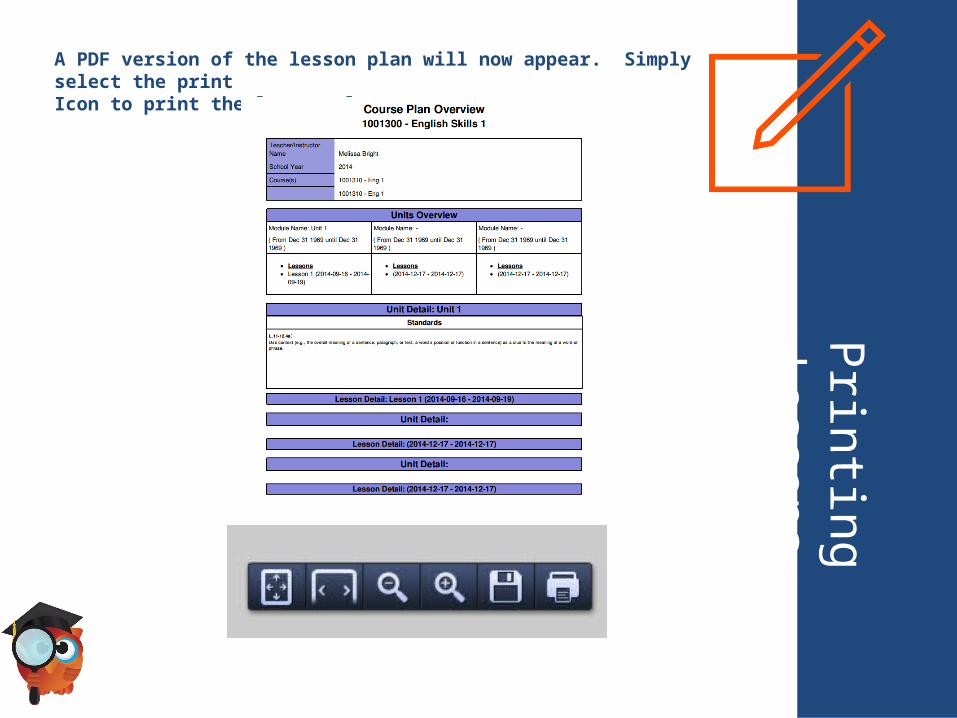
Printing Lessons
A PDF version of the lesson plan will now appear. Simply select the printIcon to print the lesson plan.

Lesson Plans
Focus’s Lesson Planner in the LMS platform makes creating lesson plans fast and easy.
In addition, Focus saves all created lesson plans for future use.

Questions ??
Kori WatkinsSoftware Trainer, Focus School Software
[email protected] ph: (727) 388-6049 fax: (727) 213-6999
http://www.focus-sis.org

Thank YouPlease be sure to complete the comment card for this session and
enjoy the rest of the Users’ Conference!