
6 Steps to Denial Management in CPS - CHUG … Steps to Denial Management in CPS 1 Meet Your Hayes...
84
Oct 2014 ~ Palm Desert Centricity Healthcare User Group CHUG PRESENTED BY Angela Hunsberger, Senior Healthcare Consultant Ambulatory Services Team Hayes Management Consulting 6 Steps to Denial Management in CPS 1
Transcript of 6 Steps to Denial Management in CPS - CHUG … Steps to Denial Management in CPS 1 Meet Your Hayes...
Oct 2014 ~ Palm DesertCentricity Healthcare User GroupCHUG
PRESENTED BYAngela Hunsberger, Senior Healthcare ConsultantAmbulatory Services TeamHayes Management Consulting
6 Steps to Denial Management in CPS
1

Meet Your Hayes Consultant
» Angela Hunsberger• Senior Healthcare Consultant• Ambulatory Services Team
» YEARS OF EXPERIENCE: Sixteen» SYSTEMS KNOWLEDGE: GE Centricity Practice Management
(Millbrook), EMR (Logician), Centricity Practice Solutions (CPS), Centricity Analytics, GE EDI, & McKesson Clearinghouse, Docutrak, Visual Form Editor, CCC forms, Kryptiq Secure Messaging, Patient Portal, and ePrescribe, HL7, LinkLogic, Microsoft Office, Microsoft CRM, Microsoft , SharePoint. Allscripts Enterprise EHR version 11.2
» KEY RESPONSIBILITIES: implementations, system build, project management, training, testing PM/EMR system and workflow optimizations, EMR VFE forms, training, billing, EDI clearinghouse, revenue cycle analysis
Fun personal fact: Angela lives in Indianapolis and got her start as an Optician for two providers for more than seven years!
2

Local CHUG User Groups
• Stop by and sign up for your local user group• Hayes volunteered to host Indiana, Ohio, and Kentucky
and will also be hosting virtual meetings for special topics/specialties. Stop by the booth to get on the contact list.
Local CHUG
Meetings
3

THANK YOU
A BIG thank you to the individuals who took time to interview and share their “best tips” and perspectives on denial management. My deepest apologies if I unintentionally left anyone out.» Debi Mitchel, Children’s Orthopaedic and Scoliosis Surgery Associates, LLP» Paul Utterback and Allison Trout, Valley Professionals Community Health Center
(Vermillion-Parke)» Dulcye Field, Carlos Ruiz, Kimberly Yerbich, Columbia Basin» Joann Morgantini, Theresa Snyder, Michele Davis and Denise Zapko,
Commonwealth Health Physician Network» Kevin Cronin, Hallmark Health Medical Associates» Darlene Johnson, John Tidwell and the entire billing team at Affinity Health
Group (Vantage Health Plan)» Cindy Klain, GE Healthcare
This sharing is the spirit of CHUG!4

Agenda
» Introductions» Understanding filed rejected vs. denials» Denial management defined» Six steps to denial management
5
Introduction
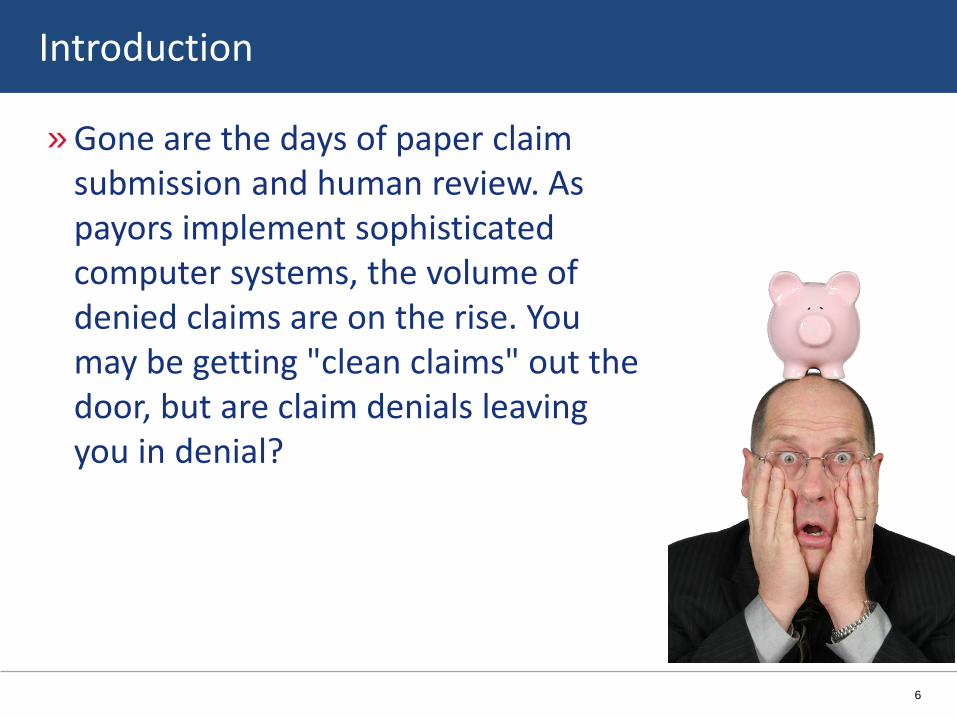
» Gone are the days of paper claim submission and human review. As payors implement sophisticated computer systems, the volume of denied claims are on the rise. You may be getting "clean claims" out the door, but are claim denials leaving you in denial?
6

Filed Rejected vs. Denials
» Let’s spend a moment discussing the difference between a rejection and a denial
vs.
7
Filed Rejected vs. Denials
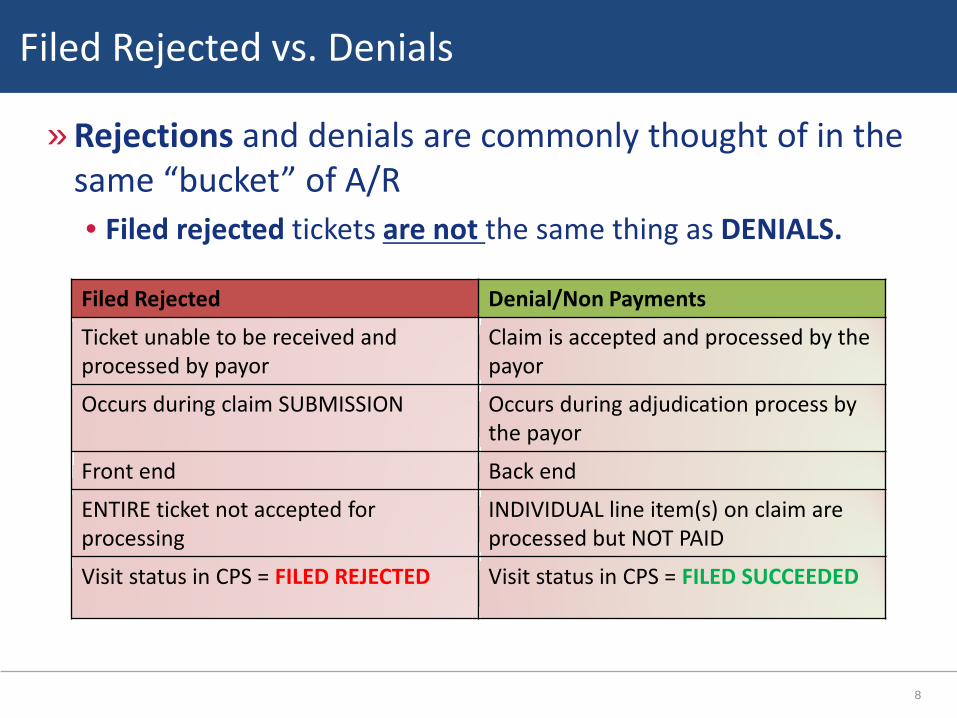
» Rejections and denials are commonly thought of in the same “bucket” of A/R• Filed rejected tickets are not the same thing as DENIALS.
Filed Rejected Denial/Non Payments
Ticket unable to be received and processed by payor
Claim is accepted and processed by the payor
Occurs during claim SUBMISSION Occurs during adjudication process by the payor
Front end Back end
ENTIRE ticket not accepted for processing
INDIVIDUAL line item(s) on claim are processed but NOT PAID
Visit status in CPS = FILED REJECTED Visit status in CPS = FILED SUCCEEDED
8
Filed Rejected vs. Denials
» Filed rejected tickets are a major part of the revenue cycle and we will spend the next few minutes discussing rejections
- TIP: If you have the CEDI Clearinghouse, check out the Rejection Reports on your website
» However, the majority of this session specifically focuses on tools, tips, and workflows for Denial Management in Centricity.
9

Filed Rejected vs. Denials
NEW In Progress Approved Batched Sent Filed Succeeded Pay/Deny
» Filed rejected can happen during the claim submission process. Claims do not move past step 6 if rejected.
» Once past step 6, payors accept the claim for processing and “deny” line item(s) on the claim for non payment
» A ticket typically goes through 7 steps before getting paid in Centricity
10

Filed Rejected Tickets
» How do tickets become “Filed Rejected”?• Tickets go through several “scrubs” or “edits”
during the claim lifecycle. Within Centricity, you have to “approve” the claim and “batch” the claim. Sometimes the claims fail these scrubs and you have to correct and repeat.
• Then, when you send the claim to the clearinghouse it can get “kicked out” by failing those edits too
• If your claim does get past the clearinghouse it still needs to pass the payor edits in order to be accepted for processing
11

Electronic Claims Submission Process:
Centricity Clearinghouse(s) Insurance PayorEDI EDI
FILED REJECTED?FILED REJECTED?
FILED REJECTED?
Understanding WHERE your claim failed will help you figure out how to fix it
12

Filed Rejected Tickets
» How do I fix “Filed Rejected”?• Fixing the rejection depends upon the reason it was rejected
and where in the claims process it was rejected• Rejection reasons can be found on the notes tab (Centricity
edit) or on the claims tab (clearinghouse or payor edit) within the visit
• Rejection reasons are sometimes hard to understand. Use your support department to help troubleshoot as needed.
• Typing the rejection in an internet search can also be helpful!
13

Filed Rejected Tickets
» Special note regarding rejections due to eligibility:• Enroll and use electronic eligibility (RTE). While the data
returned by the payor is limited, it does help reduce front-end rejections and promotes better patient/subscriber data entry.
• You will likely find and fix rejections due to: punctuation, wrong DOB, misspelled names, incorrectly keyed subscriber ID numbers, etc.
14

Filed Rejected Tickets
» The Do’s and Don’ts of Filed Rejected Tickets:DO DON’T
Try to research and understand the point of rejection and rejection reason before resending the claim. Use the GE EDI Clearinghouse as a tool to help troubleshoot and report rejections
Do not keep resubmitting the claim hoping for a miracle. Do not play “hot potato” with claims to get them out the door and off of your desk.
Follow up with payors on “Filed Succeeded” tickets. Use Correspondence Notes on EVERY action you take for a rejected ticket.
Do not hesitate to find and show proof of filing for submitted claims. Do not put pop up notes any and everywhere you can find a spot.
Track rejection reasons so that you can fix the issue and send more 1st-time clean claims. Use the GE EDI website and the CPS Dashboard Reporting tools to identify trends.
Do not drop the claim to send on paper if you cannot figure out the reason. Do not be afraid to use your SUPPORT Department!!!
15

Managing Denials
» What is a denial and at what point in the claim lifecycle does it occur?
» What makes denials difficult to manage?
16
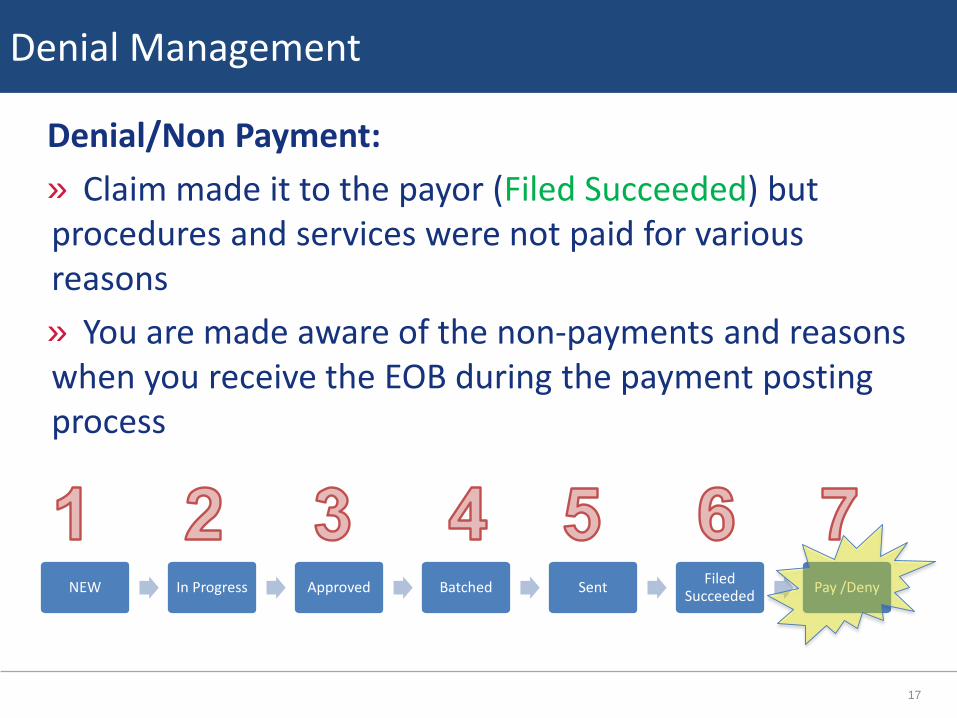
Denial Management
Denial/Non Payment: » Claim made it to the payor (Filed Succeeded) but procedures and services were not paid for various reasons» You are made aware of the non-payments and reasons when you receive the EOB during the payment posting process
NEW In Progress Approved Batched Sent Filed Succeeded Pay /Deny
17

Denial Management
Technical Challenges to Denial Management:» Lack of reporting in CPS to gather metrics to track and
trend non-payment reason codes per payor (or provider)
» Some EOBs come electronically (835 remit file) for auto-posting and some come on paper for hand posting
» Old remittance settings put all non-payment codes into one big bucket (at best) unaware of CPS tools to help automate and track non-payments for follow up
18

Denial Management
Personal Challenges to Denial Management:» No formal policy or expectations on non-payment
follow up. No documented processes for follow up.» Easier to “file it away” than to take action and follow up» Easier to adjust off the balance and make the A/R look
better than to hold on to the balance» Lack of communication and collaboration with payment
posters and other departments (different teams doing different tasks)
19

Denial Management
Bottom Line: Don’t let denials leave you in denial!» Unpaid services and procedures cost your organization
lots of time and money» Denials and lower reimbursements are on the rise (and
will significantly increase with ICD-10) and payors have leveraged technology to implement sophisticated processes
» Insurance policies are designed to place more responsibility on the patient (higher deductibles/non-covered services) than ever before
» Denials/non-payments are $ in the payors pocket
20
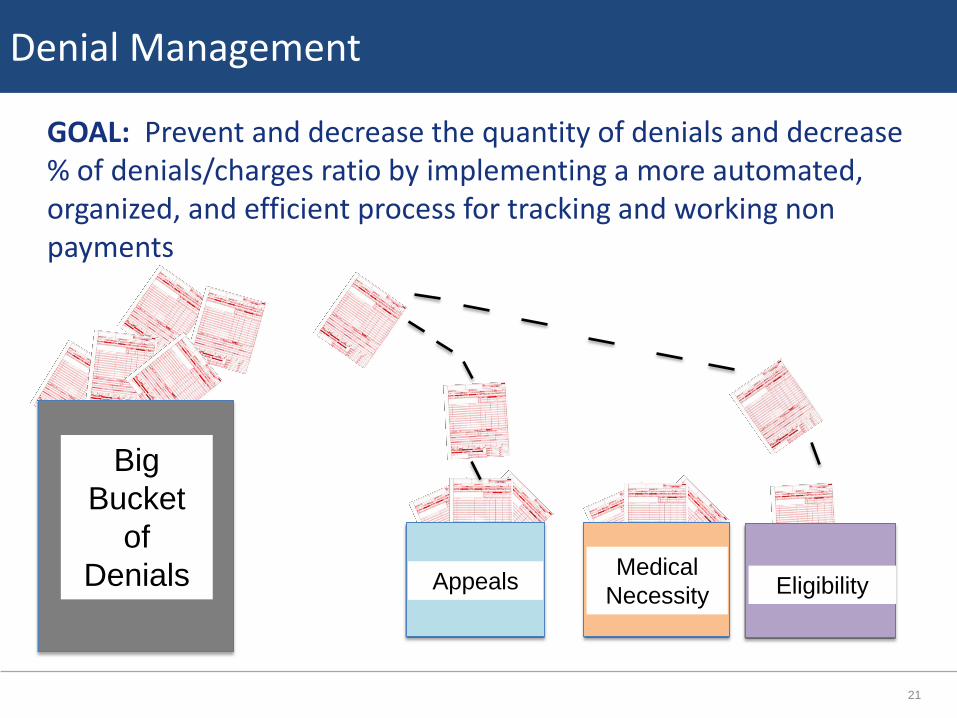
Denial Management
GOAL: Prevent and decrease the quantity of denials and decrease % of denials/charges ratio by implementing a more automated, organized, and efficient process for tracking and working non payments
Appeals Medical Necessity Eligibility
Big Bucket
of Denials
21

6 Steps to Denial Management
» 6 Steps to Denial Management» The CPS tools shared today will help speed up your
recognition of issues so you can react to them quickly and future denials
22

6 Steps to Denial Management
» Step 1. Define» Step 2. Track» Step 3. Analyze and improve» Step 4. Measure and control» Step 5. Just do it» Step 6. Share and celebrate success!
23

6 Steps to Denial Management
» Step 1. Define» Step 2. Track» Step 3. Analyze and Improve» Step 4. Measure and Control» Step 5. Just Do It» Step 6. Share and Celebrate Success!
24

Step 1. Define
» Step 1. Define • Investigate and identify your most common denial reasons• Denial codes are your call to action on where improvements
need made in your practice• Denial code frequency and impact to your revenue cycle are
your compass to process improvement
25

Step 1. Define
» Where to start:• Denial codes are found on
the EOB (paper and 835 electronic remittance files)
• Start by listening to your payment posting, A/R or other billing staff about the denials that they encounter most often
• Chances are that they know where the pain points are, but just may not have the “data” to back it up
26

Step 1. Define
» CEDI Clearinghouse:• If you have the GE Centricity EDI Clearinghouse, look at the
remittance reports
27

CEDI Clearinghouse Tools
» Once logged in to your website, go to the ‘Reports’ tab and scroll down to the ‘Remit Summary Reports’
» Click on the standard/default report named ‘Remit Summary By Payor For Last Calendar Month’
28

Step 1. Define
» Remit Summary By Payor:
These nonpayment codes are your compass for process improvement!
29

CEDI Clearinghouse Tools
» This ‘Remit Summary By Payor’ report is useful for identifying the most frequent and highest financial impact of non-payment codes by payor using your 835 remit files
» The report is dynamic in that it provides high-level view with the option to filter and drill down to granular detail right down to the visit
» It is a great starting point to see where potential problems are by payor or by provider
» You can save various versions of this report. For example, you could save by payor by provider.
30

CEDI Clearinghouse Tools
» Click the ‘Modify’ button to see all the filtering options. It may take some “playing around” to become familiar and get the data to display what you want to see.
31

CEDI Clearinghouse Tools
» TIP: Filter for Adj. Group Code: Does not contain ‘Contractual Obligations’. Also, change the ‘Drill Down Order’ to ‘Scenario’ then ‘Payor’.
Scenario = non payment reason + remark code. Tells a better story!
32

CEDI Clearinghouse Tools
» TIP: Click the ‘HELP’ button on the CEDI website to download a free 200+ page manual!
33

Step 1. Define
» I don’t use the CEDI clearinghouse. Now what?• Contact your clearinghouse and ask what kind of reports are
available. (free or for purchase)
34

Step 1. Define
» Do you have any other suggestions that are FREE?• Create a denial tracking spreadsheet in Excel • A simple spreadsheet will allow you to see the top payors and
reasons for denial for $ and volume. Use the 80/20 rule to focus priority.- Possible columns: Claim Status, Provider, Patient ID, Payer Name, Denial Code,
Denial Reason, Date of Denial, Actionable?, Appeal/Refile Date,$ of Denial, $ Recovered, Notes
35

Resources – WPC website
http://www.wpc-edi.com/reference/
» Claim adjustment reason codes and definitions can be found online at the WPC website
» Also check out the Medicare Remit Easy Print Tool
36
Step 1. Define
» Once you identify your most common codes, gather metrics so that you can have a “before” and “after” benchmark for reporting purposes and tracking
» $ of insurance denials per month» Percentage of denials/charges ratio (three month
average)» Volume of denials
37

Step 1. Define
» Not all denials or non-payments are “actionable”. But, for the ones that are, the next steps will be helpful.
38

6 Steps to Denial Management
» Step 1. Define» Step 2. Track» Step 3. Analyze and Improve» Step 4. Measure and Control» Step 5. Just Do It» Step 6. Share and Celebrate Success!
39
Step 2. Track
» Step 2. Track » Now that you have your common codes, let’s discuss
some ideas on how to track and automate workflows in Centricity
40

Step 2. Track
» Sign up for electronic remittance for as many payors as possible
» Review the payors you are still getting paper EOBs and sign up for remittance!
41

Step 2. Track
» Paper EOBs promote a more manual process. Electronic EOBs sent in the 835 remittance file contains structured data which is reportable and promotes automation. • 835 EOBs are easier to look up and find than paper EOB(s)
that have been scanned in• The 835 file fills out line information and even preps the
claim for secondary electronic filing
42
Step 2. Track
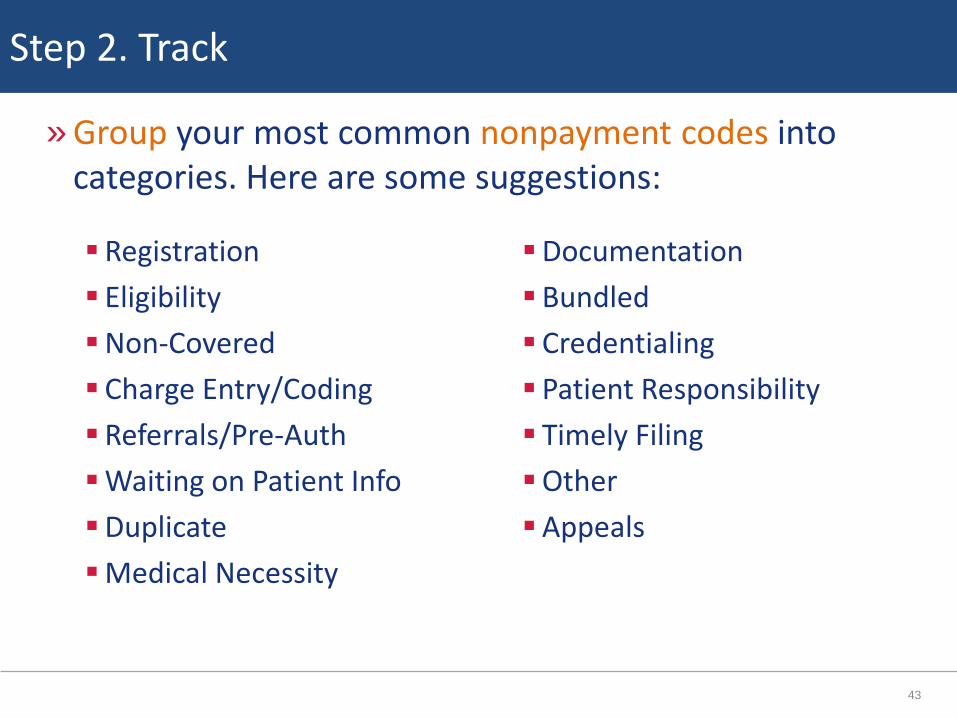
Registration EligibilityNon-Covered Charge Entry/Coding Referrals/Pre-AuthWaiting on Patient InfoDuplicateMedical Necessity
Documentation Bundled Credentialing Patient Responsibility Timely FilingOtherAppeals
» Group your most common nonpayment codes into categories. Here are some suggestions:
43

Step 2. Track
» Build your denial categories as visit owners in CPS• Better organizes denial management by creating “buckets” of
actionable items to work on • Visit owners can be assigned within the visit in billing or
payment entry
Appeals Medical Necessity Eligibility
44

Step 2. Track
» Review your remittance setup. Include the non-payment codes and “auto-assign” the visit owner during remit processing
Some offices even choose to “reject” the visit during payment posting. This throws the whole ticket into Filed Rejected when
these non-payment codes are in the 835 remit file.
Use more specific visit
owner?
45

Step 2. Track
» BONUS TIP: EDI Response Processors pull from the insurance carrier with the ‘Payer Literal’ with the lowest Centricity ID
» Technically, the response processors only need setup on the carrier with the lowest ID, but you will need to review your carrier settings for any carrier that has the same payor ID if you want to be thorough
46
Step 2. Track
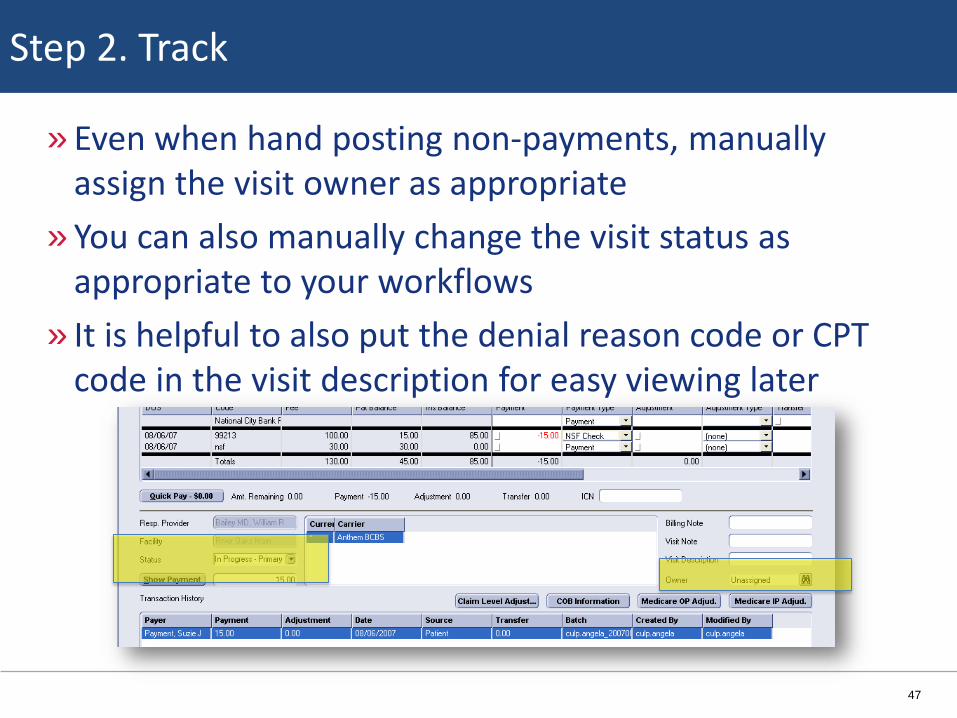
» Even when hand posting non-payments, manually assign the visit owner as appropriate
» You can also manually change the visit status as appropriate to your workflows
» It is helpful to also put the denial reason code or CPT code in the visit description for easy viewing later
47

Step 2. Track
» Some offices have built Quick Notes for common non-payment code reasons
» You can choose if these notes show up on patient statements or not
» This can be easily referenced by staff during payment posting
48

Step 2. Track
» Enter ‘HC’ for “hard copy EOB” in the ‘Visit Note’ or ‘Visit Description’ during payment posting so that it is easy for staff to know when to look for the paper/scanned EOB if needed
49

Step 2. Track
» Some offices have even used the “Collection” billing status and created sub-collection statuses to categorize and follow up on appeals, non-payments
50

Step 2. Track
» Setup Task Management to “catch” all the visit owners and organize them into queues
51
Step 2. Track
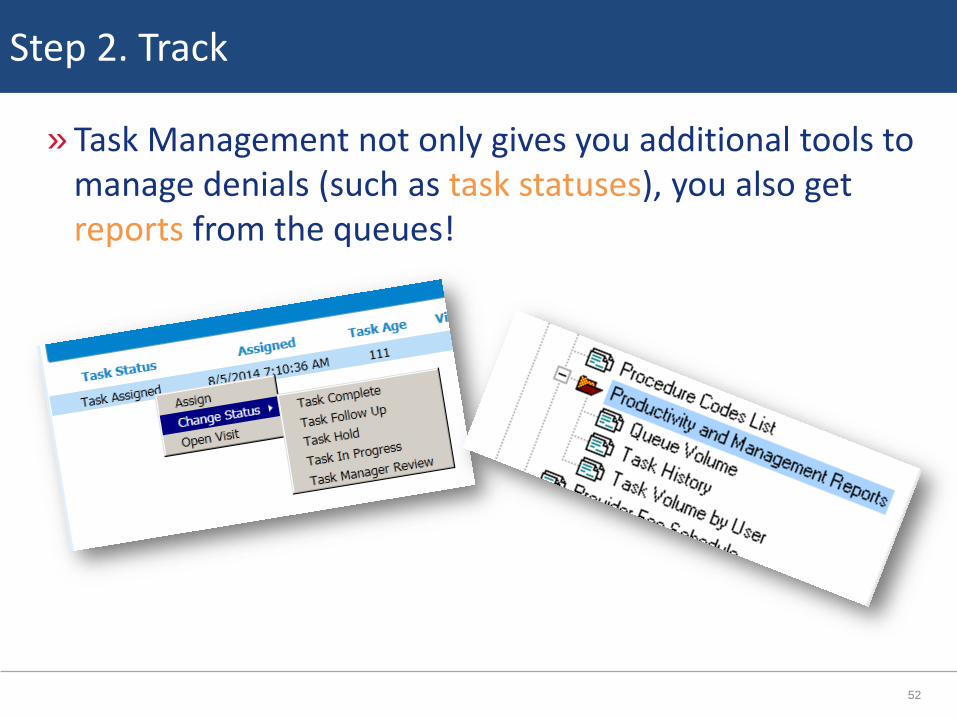
» Task Management not only gives you additional tools to manage denials (such as task statuses), you also get reports from the queues!
52
Step 2. Track
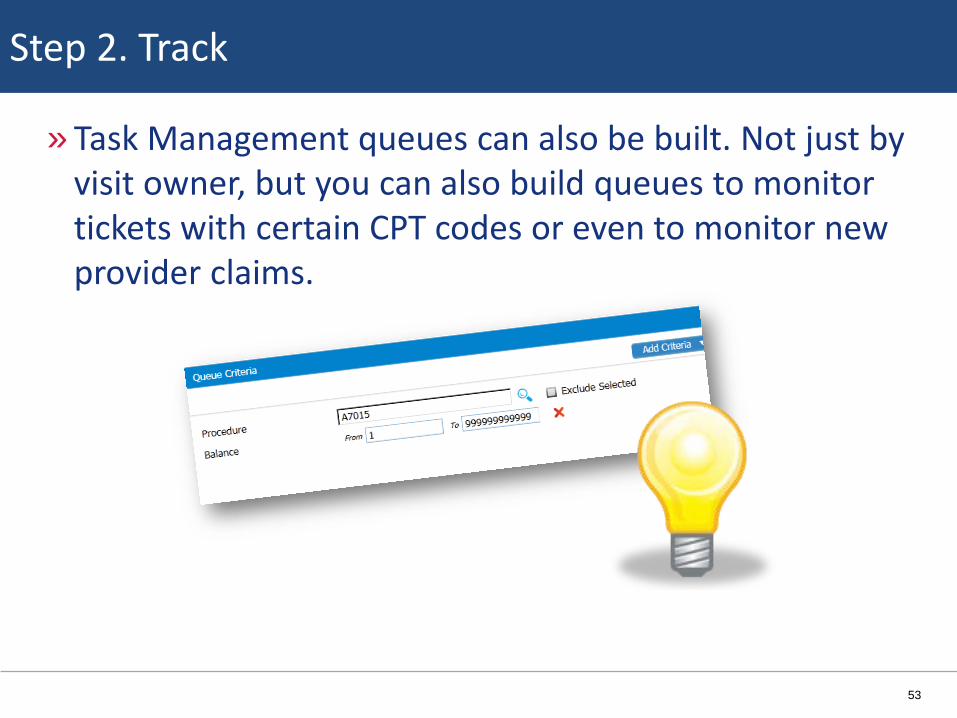
» Task Management queues can also be built. Not just by visit owner, but you can also build queues to monitor tickets with certain CPT codes or even to monitor new provider claims.
53

Step 2. Track
» Revisit your Fee Schedules» Storing allowed amounts “what’s expected” for
procedures/services in your fee schedules and tracking the actual allowed “what you got paid” will help you identify underpayments/partial payments
55.23
54

Step 2. Track
» There are even remit settings that you can “flag” and auto-assign visit owners when the actual allowed amount does not match the allowed. • Make a task management queue to investigate allowed
amounts and update the fee schedule or follow up with the payor as needed
55
Step 2. Track
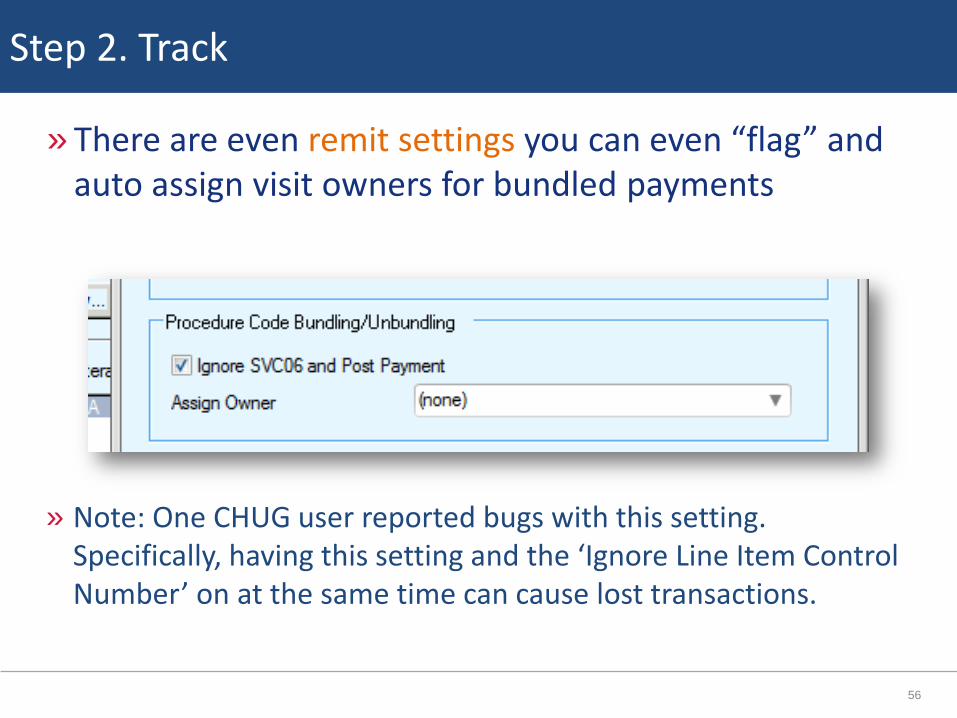
» There are even remit settings you can even “flag” and auto assign visit owners for bundled payments
» Note: One CHUG user reported bugs with this setting. Specifically, having this setting and the ‘Ignore Line Item Control Number’ on at the same time can cause lost transactions.
56

6 Steps to Denial Management
» Step 1. Define» Step 2. Track» Step 3. Analyze and Improve» Step 4. Measure and Control» Step 5. Just Do It» Step 6. Share and Celebrate Success!
57

Step 3. Analyze and Improve
» Best practice: use correspondence notes in visits when following up on unpaid tickets/line items
58

Step 3. Analyze and Improve
» Meet as a group in cross-functional meetings and look at tickets together to find trends. Discuss details as you peel back the layers.• The PM Outstanding Insurance Report is great for group
discussion
» Reorganize billing tasks and assign dedicated “A/R Specialists” for insurance carrier follow up
59

Step 3. Analyze and Improve
» Assign responsibility to queues and monitor productivity
» Analyze the denial reasons and seek knowledge regarding the details for payor-specific or state-specific non-payments
Appeals Medical Necessity Eligibility
60

Step 3. Analyze and Improve
» Understand the payor contract language and coding. Defend your coding and provide supporting documentation as appropriate.
» Involve your payor representative when terms of the contract are not met or when your supporting documentation could provide better terms
» Refine coding policies and procedures and train staff for workflow corrections as needed
61

Step 3. Analyze and Improve
» Load Appeal letters right into Centricity for easy access and to save time by defaulting information and pulling in info right from the visit
62

Step 3. Analyze and Improve
» Create multiple appeal letters for carrier or common appeals. Include supporting images/documentation as needed based on common appeals
» This can be accomplished with a custom Crystal Report!
63

Step 3. Analyze and Improve
» Once your custom Crystal Report is loaded, the appeal can be filled out by going to File > Reports> in billing. Then the appeal can be scanned and viewed by clicking on the “paperclip” within the visit in billing.
64
Step 3. Analyze and Improve
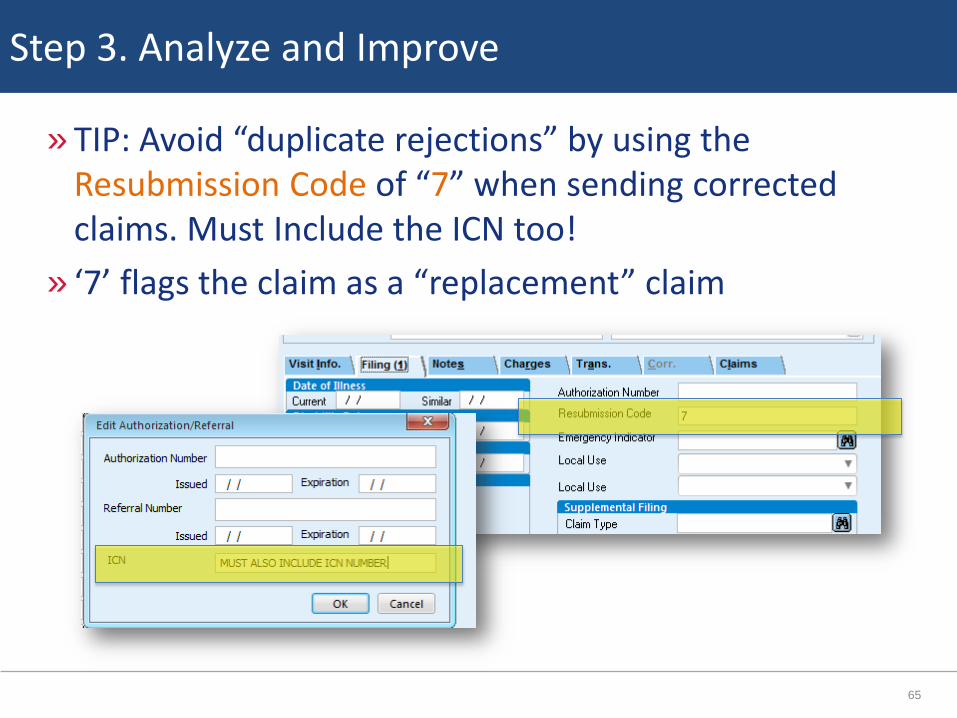
» TIP: Avoid “duplicate rejections” by using the Resubmission Code of “7” when sending corrected claims. Must Include the ICN too!
» ‘7’ flags the claim as a “replacement” claim
65

Step 3. Analyze and Improve
Decide how each “notes” field could be best used:Note Type Location in CPS
Visit Billing Note Can be viewed/edited from within the visit on the notes tab or from payment entry. Helpful for notes regarding one DOS.
Visit Description Can be viewed/edited from within the visit, in payment entry. Can also be viewed in Task Management and from the Billing spreadsheet. Helpful for quickly identifying info for a ticket.
Correspondence Notes Can be viewed within the visit. Reportable. Best practice to document all activity for a ticket. Can be auto-copied to multiple tickets.
Patient Billing Notes Can be viewed/edited from within the visit on the charges tab and in payment entry. Helpful for notes regarding an entire patient account.
Patient ALERT Notes Important notes that “popup” every time the patient is accessed
Patient Appt. Notes Can be viewed in Registration or when booking an appointment. Helpful for storing copay amounts for PCP vs. specialist.
Line Info Viewed/edited within payment entry. Displays info on how a claim was processed by payor. Required for secondary electronic filing.
66

Step 3. Analyze and Improve
» Remember to utilize payor websites for claim research and drill down for more specifics on denied claims» TIP: On the insurance carrier
setup, enter your insurance customer service number and contact for easy access
» You can view this information from billing, payment entry, and registration
67
Step 3. Analyze and Improve
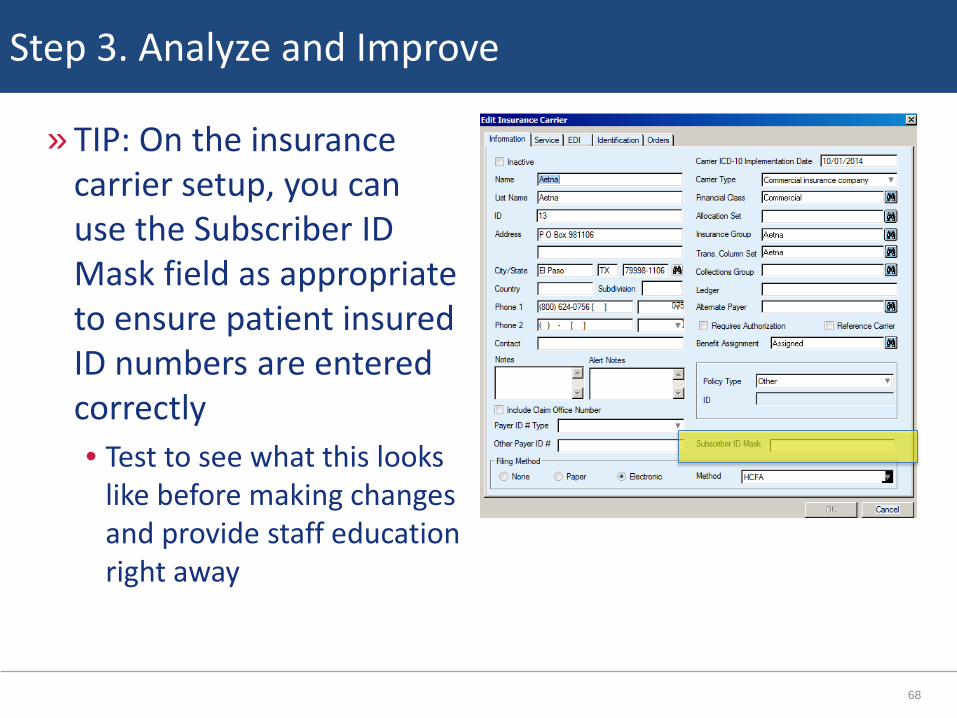
» TIP: On the insurance carrier setup, you can use the Subscriber ID Mask field as appropriate to ensure patient insured ID numbers are entered correctly• Test to see what this looks
like before making changes and provide staff education right away
68

CEDI Clearinghouse Tools
» CEDI Late Payment Summary Report. The CEDI Clearinghouse offers reports on your website to predict when a claim is expected to be paid based on your claim and payment history. • If a claim has not been paid by the expected payment date, the
Clearinghouse will “flag” the claim and it will be listed on the report
If you do not see these reports, ask your support for them.
69

CEDI Clearinghouse Tools
» The Late Payment Reports are a powerful tool to bring down your A/R days
» At a minimum, use the late payment detail report and at least work the high dollar claims. You will start to see patterns.
70

CEDI Clearinghouse Tools
» Rumored to be coming soon…you may start to see (or have to ask for) the auto-claim status inquiry so that the CEDI automatically pings the payor and the payor response can be viewed here. Note, the information received about the claim will vary but it’s still a nice feature. • You will be able to see this when you click on a claim, there will be a new tab that says
‘Claim Status Information’
» If you have ‘Hosted Claims Manager’ you will also see additional reports on your CEDI website
» These features are mentioned in this presentation to highlight otherwise missed tools for denials and proactive A/R management
71

6 Steps to Denial Management
» Step 1. Define» Step 2. Track» Step 3. Analyze and Improve» Step 4. Measure and Control» Step 5. Just Do It» Step 6. Share and Celebrate Success!
72

Step 4. Measure and Control
» Measure and Control = part of a constant cycle
Share and Celebrate Success!
Define
TrackAnalyze
and Improve
Measure and
Control
Just Do It
• Track your progress by taking periodic metrics
• Assign subject matter experts for monitoring, improving workflows and training staff
• Stay on top of payor changes, shift efforts as needed
73

Step 4. Measure and Control
» On the CEDI website, the Remit Trend report shows denial trends over time• Filter for specific reason codes and see if the changes you
made have been effective
74

Step 4. Measure and Control
» PM Reports in Centricity• The PM reports are typically a weak area for many
organizations. They are limited, and contain static data unlike a dashboard where you can “play” with the data.
• However, you can CUSTOMIZE these reports or get custom reports created to meet your needs. If it is a great report, the return on investment pays for itself.
75

6 Steps to Denial Management
» Step 1. Define» Step 2. Track» Step 3. Analyze and Improve» Step 4. Measure and Control» Step 5. Just Do It» Step 6. Share and Celebrate Success!
76

Step 5. Just Do It
» Just do it, but keep it simple• If you are overwhelmed, start small because even the smallest
changes can make a big impact• If you are ready to start big, set thresholds of A/R (ex. all visits
over $1,000 and then all visits over $500)
» Ask for help! There are many resources out there for help, including Hayes. • The “Life of a Visit” CPS training is helpful because it covers the
entire patient visit from A-Z and includes the entire claim lifecycle
• Email me if you want hands-on learning focusing on your unique office, workflows, and needs
77

Denials/Non Payments
» The Do’s and Don’ts of Denials/Non-PaymentsDO DON’T
Use the CPS tools and tips to streamline workflows for denial follow up. Keep processes transparent by holding regular group meetings and share experiences.
Adjust off the line item as “contractual” and file the EOB away for good
Have each payor specialist document processes and create a denial/appeal playbook. Store it on a central shared location.
Don’t let all the knowledge walk out the door if an employee leaves. Don’t be a knowledge hoarder or stay stuck in a rut of “this is the way I’ve always done it”.
Reorganize billing tasks if appropriate and assign dedicated “A/R specialists” for insurance carrier follow up
Don’t be afraid to shake things up a bit. If the new plan is not working, try a different approach.
Use the data to leverage terms when negotiating with payors
Don’t turn the other cheek and “allow” payors to keep monies for services that have been earned by your organization
78
6 Steps to Denial Management
» Step 1. Define» Step 2. Track» Step 3. Analyze and Improve» Step 4. Measure and Control» Step 5. Just Do It» Step 6. Share and Celebrate Success!
79

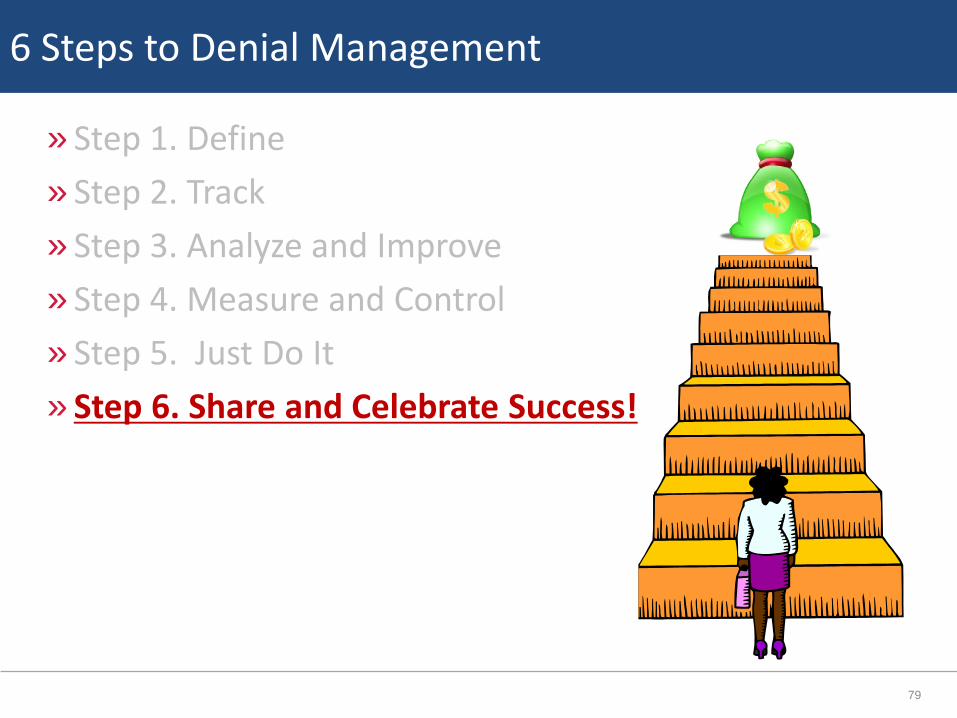
Step 6. Share and Celebrate Success!
» When you see positive changes, share the news and celebrate success
• Provide employee or team recognition incentives or rewards
• Share the news company-wide
• A job well done deserves recognition and rewards provide further motivation!
80

Additional Resources
» Several vendors provide Business Intelligence solutions for denial tracking, denial management, and A/R for insurance and patient collections
81

Additional Resources
» Check out these solutions:• GE Hosted ClaimsManager – front-end and back-end tools help
find the root cause of rejections and denials• GE Reimbursement Analytics – denial trending, dashboard,
excellent features to check out• Unlimited Systems – there is a whole suite of CPS-friendly
products that can streamline denials and A/R• Summit Software Technologies – automate patient phone calls
based on nonpayment codes received in the 835 remit file
*Note: Hayes Management Consulting is not endorsing any particular vendor or product mentioned above. The products mentioned are of my professional opinion because they offer valuable data mining, reporting, and denial management tools.
82

Hayes’ Contact Information
» Angela Hunsberger, Senior Healthcare [email protected] (cell)
» Visit our website – sign up for our blog!www.HayesManagement.com
83

In Closing:
» Questions?
84