6-in-1 K-Cup Coffee Maker - gourmia.com not let the coffee maker operate without water to ... lid...
9
USER MANUAL 6-in-1 K-Cup Coffee Maker Model# GCM-6000
Transcript of 6-in-1 K-Cup Coffee Maker - gourmia.com not let the coffee maker operate without water to ... lid...

USER MANUAL
6-in-1 K-Cup Coffee Maker
Model# GCM-6000

Model: GCM-6000
© 2017 Gourmiawww.gourmia.comThe Steelstone GroupBrooklyn, NY
All rights reserved. No portion of this manual may be reproduced by any means whatsoever without written permission from The Steelstone Group, except for the inclusion of quotations in a media review.
Although every precaution has been taken in the preparation of this manual, The Steelstone Group assumes no responsibility for errors or omissions. Nor is any liability assumed for damages resulting from the use of the information contained herein. Although every effort has been made to ensure that the information contained in this manual is complete and accurate, The Steelstone Group is not engaged in rendering professional advice or services to the individual consumer; further, The Steelstone Group shall not be held responsible for any loss or damage allegedly arising from any information or suggestion in this manual.
Welcome to the Delicious & Aromatic World
of a 6-in-1 Coffee Maker from GourmiaCongratulations on your purchase of your 6-in-1 K-Cup Coffee Maker from Gourmia, exclusively designed for the discerning coffee house beverage lover!
If you are one the those people who appreciates the convenience of an all in one practical kitchen appliance, then you’ll love using our 6-in-1 K-Cup Coffee Maker. Create a perfectly balanced coffee, latte, cappuccino or teas with the push of just one button! With its well thought out design and easy operation you’ll never again have to think twice about which type of hot, fresh drink to make.
The pages of this manual offer full and comprehensive instructions to guide you through the functions and features of the Gourmia 6-in-1 K-Cup Coffee Maker. Inside this guide you will also find information on its modes of opera-tion, complete step-by-step instructions for the operation, assembly, cleaning, and maintenance of your appliance.
Please read all safety instructions thoroughly to ensure safe usage at all times.
Thank you for your purchase! We sincerely hope you will enjoy this as well as all the many innovative products brought to you by our family at Gourmia.
Read this manual thoroughly before using and save it for future reference
2 3
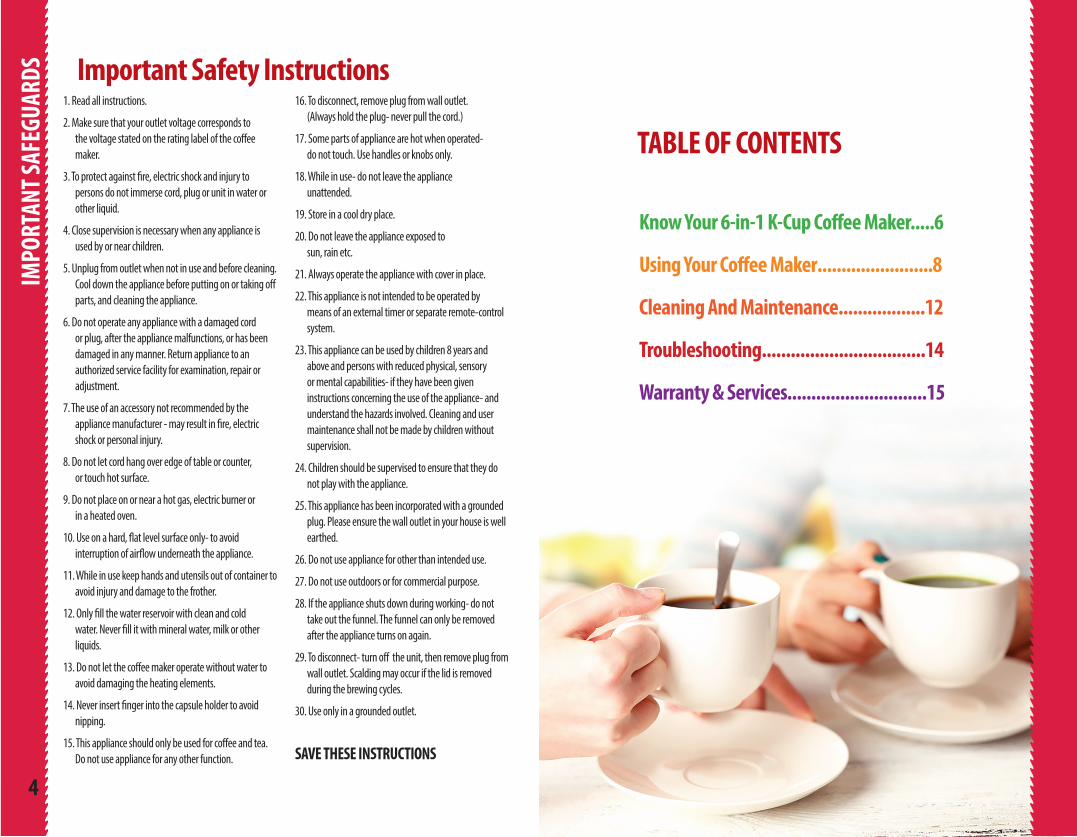
TABLE OF CONTENTS
4 5
IMPO
RTAN
T SAF
EGUA
RDS TABLE OF CONTENTS
1. Read all instructions.
2. Make sure that your outlet voltage corresponds to the voltage stated on the rating label of the coffee maker.
3. To protect against fire, electric shock and injury to persons do not immerse cord, plug or unit in water or other liquid.
4. Close supervision is necessary when any appliance is used by or near children.
5. Unplug from outlet when not in use and before cleaning. Cool down the appliance before putting on or taking off parts, and cleaning the appliance.
6. Do not operate any appliance with a damaged cord or plug, after the appliance malfunctions, or has been damaged in any manner. Return appliance to an authorized service facility for examination, repair or adjustment.
7. The use of an accessory not recommended by the appliance manufacturer - may result in fire, electric shock or personal injury.
8. Do not let cord hang over edge of table or counter, or touch hot surface.
9. Do not place on or near a hot gas, electric burner or in a heated oven.
10. Use on a hard, flat level surface only- to avoid interruption of airflow underneath the appliance.
11. While in use keep hands and utensils out of container to avoid injury and damage to the frother.
12. Only fill the water reservoir with clean and cold water. Never fill it with mineral water, milk or other liquids.
13. Do not let the coffee maker operate without water to avoid damaging the heating elements.
14. Never insert finger into the capsule holder to avoid nipping.
15. This appliance should only be used for coffee and tea. Do not use appliance for any other function.
16. To disconnect, remove plug from wall outlet. (Always hold the plug- never pull the cord.)
17. Some parts of appliance are hot when operated- do not touch. Use handles or knobs only.
18. While in use- do not leave the appliance unattended.
19. Store in a cool dry place.
20. Do not leave the appliance exposed to sun, rain etc.
21. Always operate the appliance with cover in place.
22. This appliance is not intended to be operated by means of an external timer or separate remote-control system.
23. This appliance can be used by children 8 years and above and persons with reduced physical, sensory or mental capabilities- if they have been given instructions concerning the use of the appliance- and understand the hazards involved. Cleaning and user maintenance shall not be made by children without supervision.
24. Children should be supervised to ensure that they do not play with the appliance.
25. This appliance has been incorporated with a grounded plug. Please ensure the wall outlet in your house is well earthed.
26. Do not use appliance for other than intended use.
27. Do not use outdoors or for commercial purpose.
28. If the appliance shuts down during working- do not take out the funnel. The funnel can only be removed after the appliance turns on again.
29. To disconnect- turn off the unit, then remove plug from wall outlet. Scalding may occur if the lid is removed during the brewing cycles.
30. Use only in a grounded outlet.
SAVE THESE INSTRUCTIONS
Important Safety Instructions
Know Your 6-in-1 K-Cup Coffee Maker.....6
Using Your Coffee Maker ........................8
Cleaning And Maintenance ..................12
Troubleshooting ..................................14
Warranty & Services.............................15

KNOW YOUR COFFEE MAKER
6
KNOW
YOUR
COFF
EE M
AKER
Upper Jaw
Water Reservoir
Foaming Chamber
Release Button
FoamingChamber
FoamingChamber
PowerButton
AdjustableCup Shelf
K-cupHolder
Tea Leaves Holder
HousingFront
Milk Spout Water Reservoir
Lid
KNOW YOUR COFFEE M
AKER
MilkTank
Drip Tray
Milk Tank
Milk Tank Cover
7
Brewing Adapter
Brewing Holder
Ground Coffee Holder
CAPPUCCINOLATTE
MILK TEA
MILK FROTH
COFFEETEA
K-cup
CAPPUCCINOLATTE
MILK TEA
MILK FROTH
COFFEETEA
CAPPUCCINOLATTE
MILK TEA
MILK FROTH
COFFEETEA
MAX
MAXLine
MAX
K-cup
WaterReservoir
WaterReservoir Lid

8 9
USIN
G YO
UR CO
FFEE
MAK
ERUSING YOUR COFFEE M
AKER
• Insert the milk spout. Fill the milk tank and make sure it is inserted in the correct position. If not inserted properly the machine will not operate.
• Before brewing- make sure the tank is filled with enough water.
• Lift the water reservoir lid- fill the reservoir with the desired amount of water and ensure it does not exceed MAX mark on the reservoir. Never use warm or hot water to fill the water reservoir. Close the water reservoir lid.
• Plug in and press the power button. The machine will start pumping water for three seconds, then the power button will flash. The system will start preheating. When the power button stops flashing the machine is in standby mode and ready to start brewing.
• When the machine is in standby mode, over five minutes the system will go to energy saving mode and all lights will flash. You could press any one button to restart.
Cover
Holder
Container
CAPPUCCINOLATTE
MILK TEA
MILK FROTH
COFFEETEA
CAPPUCCINOLATTE
MILK TEA
MILK FROTH
COFFEETEA
Milk Tank
COFFEE/ K-CUP:
• Fill the water reservoir. Insert your k-cup into the adapter or put coffee powder (max 15g) into ground coffee adapter- twist and close. Close the top lid making sure to hear a click sound.
• Press the coffee button to start brewing. this function will auto-matically stop when brewing is complete. Pressing the button again while brewing, will stop the process.
1. Carefully unpack your Coffee / Tea Maker and remove all packing materials.
2. Remove any dust that may have accumulated during packaging.
3. It is advisable to first wash all removeable parts with
warm soapy water and soft cloth. Rinse and dry thorougly.
4. Run a full water cycle in the coffee machine and built-in milk frother.
5. Place a mug or coffee cup on the cup holder grid.
Using Your Coffee Maker For The First Time
Note: The machine will not be able to operate without water in the water reservoir or
if the milk tank is not assembled.
MILK TEA:
• Fill the reservoir with water.
• Take out the milk tank and fill with milk. Place the milk tank back in its correct position.
• Add 3g tea leaf into the tea adapt-er- twist and close. Close the top lid making sure to hear a click sound.
• Press the milk tea button to start brewing. This function will auto-matically stop when brewing is complete. Pressing the button again while brewing, will stop the process.
Note: After the tea brewing some water remains in the tea holder. Wait until the cycle is completely finished.
Cover
Tea Holder
Water Reservoir
Power Light
Milk Tank
Milk Spout
MAX
MAXLine
Note: Two beeps continously means the tank needs water. The beeping will stop when water is added. One beep means the foaming chamber is not well positioned correctly. Reposition or check if the magnet cover is missing.
• You can adjust the cup shelf for tall or short cups. When placing the cup shelf into the machine- hold the bottom of the cup shelf, and insert the protruding end into slot. When taking out the cup shelf, hold the bottom of the cup shelf and lift it out.

10 11
CAPPUCCINO:
• Fill the water reservoir. Insert your k-cup into the adapter or put coffee powder into ground coffee adapter-twist and close.
• Fill the milk tank with enough milk for one cup of cappuccino.
• Close the top lid making sure to hear a click sound.
• Press the cappuccino button to start brewing. this function will automat-ically stop when brewing is complete. Pressing the button again while brew-ing, will stop the process.
MILK FOAM:
• Fill the water reservoir.
• Place a cup under the milk foam spout. Adjust the position of the milk foam spout.
• Press milk foam button to start brewing. This funtion can be stopped manually by pressing the milk foam button again or automati-cally after 30 sec.
TEA:
• Fill the water reservoir. Add 3g of tea leaves into the tea adapter-twist and close.
• Close the top lid making sure to hear a click sound.
• Press the tea button to start brewing. This function will automatically stop when brewing is complete. Pressing the button again while brewing, will stop the process.
LATTE:
• Fill the water reservoir.
• Insert your k-cup into the adapter or put coffee powder into ground coffee adapter-twist and close. Close the top lid making sure you hear a click sound.
• Fill the milk tank with enough milk for one cup latte.
• Press latte button to start brewing. This function will automatically stop when brewing is complete. Pressing the button again while brewing, will stop the process.
IMPORTANT NOTE FOR GROUND COFFEE: • Avoid using fine espresso coffee powder as this may block the screen filter. • Only medium- coarse ground coffee should be used • Do not overfill coffee powder in the screen line.
USIN
G YO
UR CO
FFEE
MAK
ERUSING YOUR COFFEE M
AKER
Holder
Cover
Holder
Adapter
CAPPUCCINOLATTE
MILK TEA
MILK FROTH
COFFEETEA
Cover
Holder
Adapter
CAPPUCCINOLATTE
MILK TEA
MILK FROTH
COFFEETEA
CAPPUCCINOLATTE
MILK TEA
MILK FROTH
COFFEETEA
Note: The difference between cappuccino and latte is the milk foam volume and its brewing time.
CAUTION: When brewing cappuccino or latte, make sure to adjust the frothing tube lever to the angle of the cup.
CAPPUCCINOLATTE
MILK TEA
MILK FROTH
COFFEETEA
Ground Coffee
Adapter
Cover
Tea Holder

12 13
CLEA
NING
AND
MAI
NTEN
ANCE
CLEANING AND MAINTENANCE
CLEANING AND MAINTENANCE • Remove the main plug from the wall outlet and let the appliance cool down.Make sure the appliance is completely cooled off before cleaning
MILK SYSTEM CLEANING
1. Pour out the milk.
2. Remove the milk tank cover and the milk tube.
3. Press the release button on the milk chamber and pull out the chamber.
4. Remove the milk spout.
5. Open the cover on the foaming chamber- turn and remove the foaming tube.
6. It is very important to thoroughly clean the milk frothing system.
7. Clean all the parts before next use.
Warnings
1. If the functions on the machine auto-matically complete- let the machine shut down and wait a few minutes before restarting.
2. After continuosly using (6 cycles, and less then 10 minutes between 2 cycles) the machine will be hot, the system will use the water to cool off the machine. Steam will escape from the steam release hole and the drip plate tray will become hot. Do not touch.
Type of Water
Soft Water (Filtered Water) Every 80 Brew Cycle
Every 40 Brew CycleHard Water (Tap Water)
Cleaning Frequency
The following table gives the suggested cleaning intervals:
CAUTION:
• In order to protect the system make sure there is a 3 minute cooling time between 2 milk foam function cycles.
• After the milk foam spout is finished frothing- the milk foam spout will be very hot. Do not touch the metal parts.
• Holders may be hot after brewing- handle with care.
• The K-cup Holder has a sharp blade on the inside of the container- which is designed to puncture the capsule, handle with care to avoid injury from the needle.
• The water temperature inside the holder is extremely hot, therefore, do not open the upper jaw areas while brewing is taking place.
• Always make sure there is nothing blocking the milk spout and milk tube at anytime.
• Clean the milk spout and milk tube daily.
Disposal
Dispose of the packaging in the proper manner. If at any time you should need to dispose this product please note that waste electrical products should not be disposed of with household waste. Please recycle. Check with your local Authority or retailer for recycling advice.
TROUBLESHOOTING
14 15
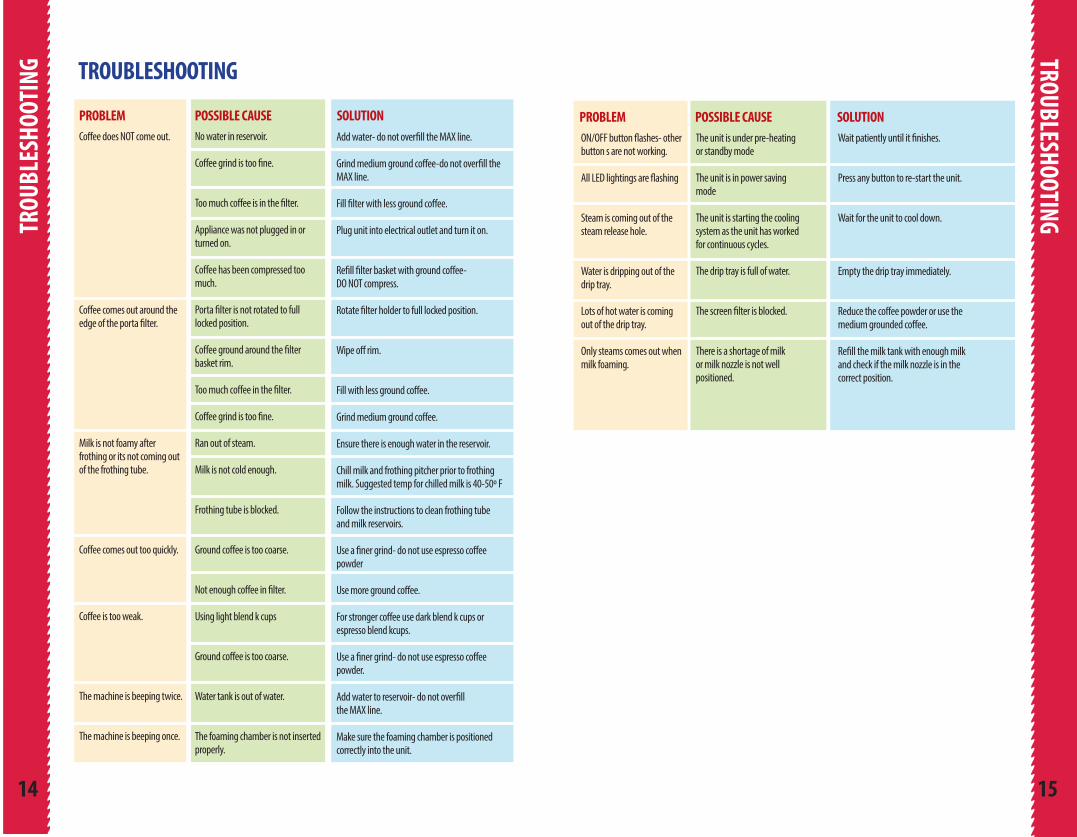
Add water- do not overfill the MAX line.
Grind medium ground coffee-do not overfill the MAX line.
Fill filter with less ground coffee.
Plug unit into electrical outlet and turn it on.
Refill filter basket with ground coffee- DO NOT compress.
Rotate filter holder to full locked position.
Wipe off rim.
Fill with less ground coffee.
Grind medium ground coffee.
Ensure there is enough water in the reservoir.
Chill milk and frothing pitcher prior to frothing milk. Suggested temp for chilled milk is 40-50º F Follow the instructions to clean frothing tube and milk reservoirs.
Use a finer grind- do not use espresso coffee powder Use more ground coffee.
For stronger coffee use dark blend k cups or espresso blend kcups. Use a finer grind- do not use espresso coffee powder.
Add water to reservoir- do not overfill the MAX line.
Make sure the foaming chamber is positioned correctly into the unit.
Coffee does NOT come out.
Coffee comes out around the edge of the porta filter.
Milk is not foamy after frothing or its not coming out of the frothing tube.
Coffee comes out too quickly.
Coffee is too weak. The machine is beeping twice.
The machine is beeping once.
ON/OFF button flashes- other button s are not working.
All LED lightings are flashing
Steam is coming out of the steam release hole.
Water is dripping out of the drip tray. Lots of hot water is coming out of the drip tray.
Only steams comes out when milk foaming.
The unit is under pre-heating or standby mode The unit is in power saving mode
The unit is starting the cooling system as the unit has worked for continuous cycles. The drip tray is full of water.
The screen filter is blocked.
There is a shortage of milk or milk nozzle is not well positioned.
Wait patiently until it finishes.
Press any button to re-start the unit.
Wait for the unit to cool down.
Empty the drip tray immediately.
Reduce the coffee powder or use the medium grounded coffee.
Refill the milk tank with enough milk and check if the milk nozzle is in the correct position.
No water in reservoir.
Coffee grind is too fine.
Too much coffee is in the filter.
Appliance was not plugged in or turned on.
Coffee has been compressed too much.
Porta filter is not rotated to full locked position.
Coffee ground around the filter basket rim.
Too much coffee in the filter.
Coffee grind is too fine. Ran out of steam.
Milk is not cold enough.
Frothing tube is blocked.
Ground coffee is too coarse.
Not enough coffee in filter.
Using light blend k cups Ground coffee is too coarse. Water tank is out of water.
The foaming chamber is not inserted properly.
PROBLEM POSSIBLE CAUSE SOLUTION PROBLEM POSSIBLE CAUSE SOLUTION
TROU
BLES
HOOT
ING TROUBLESHOOTING

FOR CUSTOMER SERVICEQUESTIONS OR COMMENTSVISIT US @ GOURMIA.COM
[email protected] CALL 888.552.0033
WARRANTY & SERVICEThis Limited Warranty is for one full year from the date of purchase. It is applicable to the original purchaser only and is not transferable to a third party user. Repair or replacement of defective parts is solely at the seller’s discretion. In the event that repair isn’t possible, the seller will replace the product/part. If product repair/replacement won’t suffice, the seller has the option of refunding the cash value of the product or component returned.
Product defects not covered under the Warranty provisions include normal wear and damage incurred from use or accidental negligence, misuse of instruction specifications or repair by unauthorized parties. The manufacturing company is not liable for any incidental or consequential damages incurred by such circumstances.