5S Program Guide - Custom Learning Solutions
27
5S Program Guide SMSgt Nicosia, SAF/MGM Updated 15 November 2015
Transcript of 5S Program Guide - Custom Learning Solutions

5S Program Guide SMSgt Nicosia, SAF/MGM Updated 15 November 2015
1
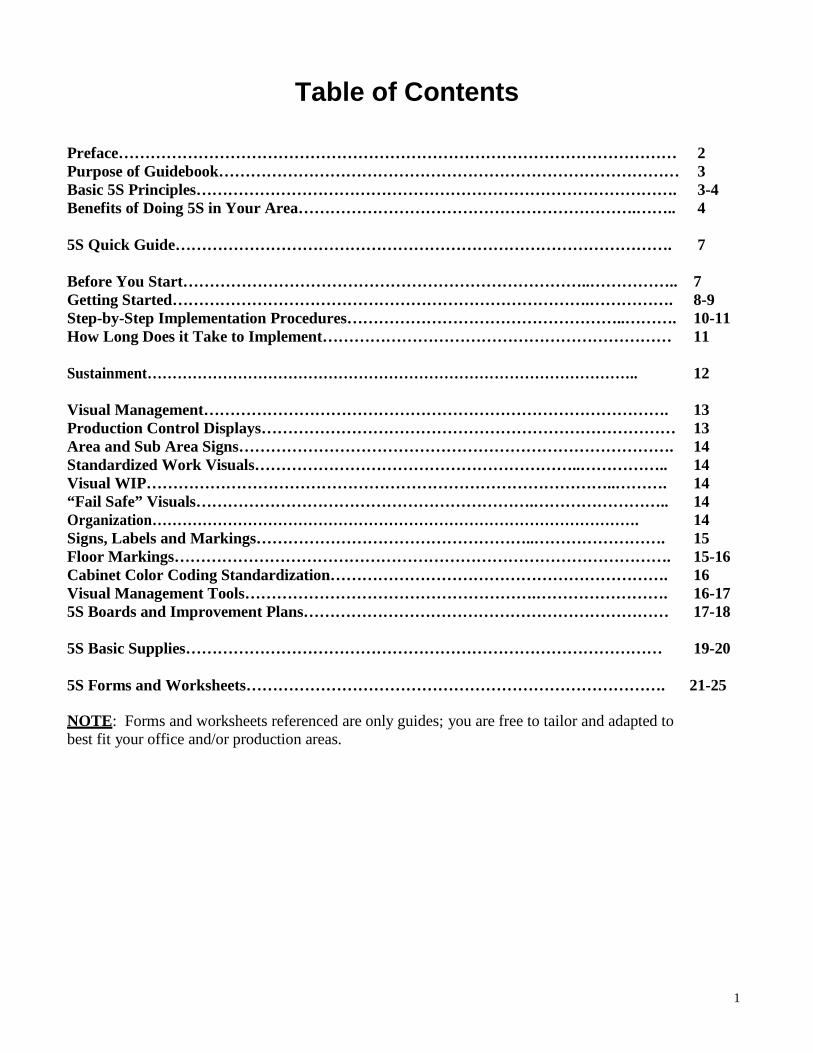
Table of Contents Preface…………………………………………………………………………………………… 2 Purpose of Guidebook…………………………………………………………………………… 3 Basic 5S Principles………………………………………………………………………………. 3-4 Benefits of Doing 5S in Your Area……………………………………………………….…….. 4
5S Quick Guide…………………………………………………………………………………. 7
Before You Start…………………………………………………………………..…………….. 7 Getting Started…………………………………………………………………….……………. 8-9 Step-by-Step Implementation Procedures……………………………………………..………. 10-11 How Long Does it Take to Implement………………………………………………………… 11
Sustainment…………………………………………………………………………………….. 12
Visual Management……………………………………………………………………………. 13 Production Control Displays…………………………………………………………………… 13 Area and Sub Area Signs………………………………………………………………………. 14 Standardized Work Visuals……………………………………………………..…………….. 14 Visual WIP……………………………………………………………………………..………. 14 “Fail Safe” Visuals……………………………………………………….…………………….. 14 Organization……………………………………………………………………………………. 14 Signs, Labels and Markings……………………………………………..……………………. 15 Floor Markings…………………………………………………………………………………. 15-16 Cabinet Color Coding Standardization………………………………………………………. 16 Visual Management Tools……………………………………………….……………………. 16-17 5S Boards and Improvement Plans…………………………………………………………… 17-18
5S Basic Supplies……………………………………………………………………………… 19-20
5S Forms and Worksheets……………………………………………………………………. 21-25
NOTE: Forms and worksheets referenced are only guides; you are free to tailor and adapted to best fit your office and/or production areas.
2
Preface This guide was compiled using information from multiple sources to include:
• 309th Maintenance Wing, Hill AFB, Utah
• AF, AMC and Mainstream Training Material and Sources
• Results of baseline 5S Lean Events within the 627th Logistics Readiness Squadron, Vehicle Management Flight, Joint Base Lewis-McChord, Washington
• Visual Systems, Harnessing the Power of a Visual Workplace, Gwendolyn D. Galsworth The purpose of this guide is to formally document marking and visual management standards. It also provides insight into cultural considerations and tendencies while stepping you through a logical and sequential 5S improvement process.
Beyond that, this guide was written to help you. While we’ve tried to make every effort to provide valuable information, be aware the process is continually evolving and further defined. Many new ideas and improvement suggestions will come from 5S process experiences and training.
We encourage you to contact your CPI Office and share any new ideas and suggestions you feel could improve this guide and further promote our goal of improving visual management in our workplaces.

3
Purpose of Guidebook: To provide all personnel with the tools and information they need to successfully implement and sustain 5S practices in their work areas and begin systematically shifting from an environment where they rely heavily on "specialists” to an environment where everyone can see and understand his/her role in moving the mission. Finally, promote the visual management culture and understand its relationship with 5S.
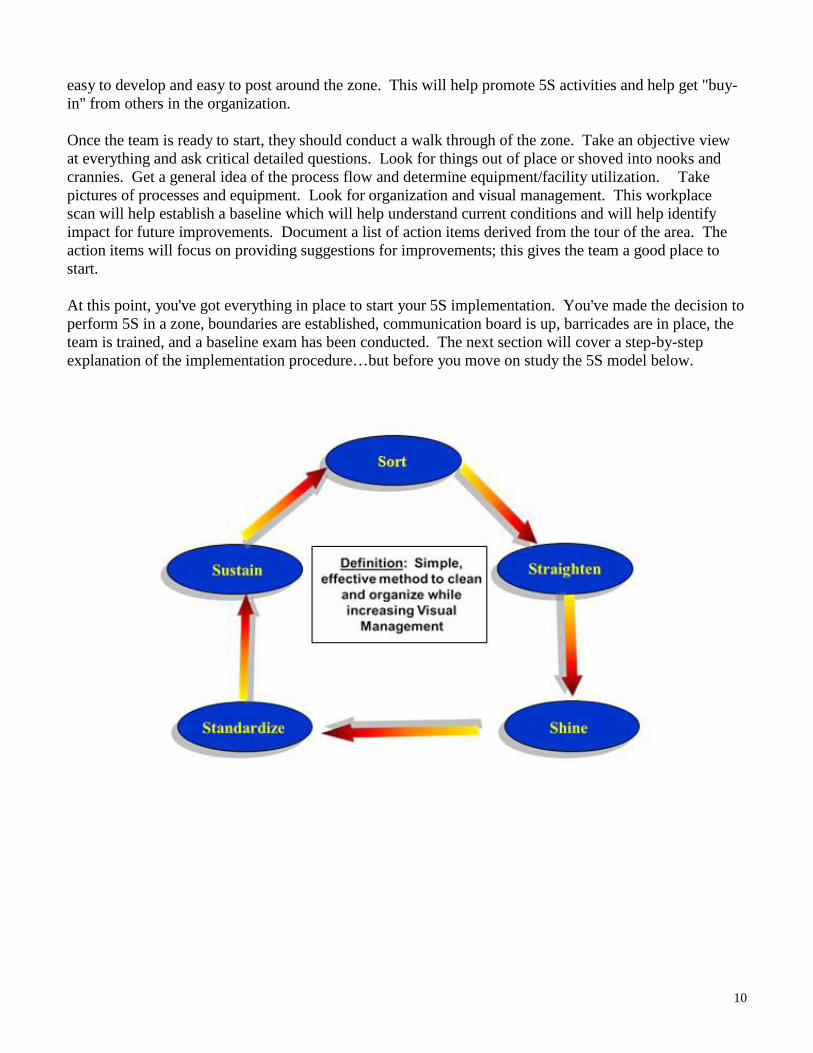
Basic 5S Principles: Sort - Separate the “needed” from the “unneeded” tools, supplies, and materials. The needed items that are kept in the work area will be labeled, will have an adequate storage device, and will be located as close as possible to the "point-of-use." Items not used on a daily or weekly basis should be evaluated for disposition to short-term or long-term storage or disposal utilizing the correct Air Force processes for proper accountability. The tendency may be to save something “just in case”; guard against that temptation. If you have to think about it, you probably don’t need it.
Straighten (Set in Order/Organize) – Simply put, “Everything has a Place and Everything in its Place”. Identify and mark a specific location for all items in the work area so anyone can visually see if things are where they should be. All moveable or portable items should have a home location clearly identified and labeled.
Shine - Clean and straighten regularly as you work. Down time is clean up time, no longer do we wait to the end-of-shift for cleaning. Clean often and shine your equipment. Always keep your area, office, or floors "Tour ready."
Standardize – The last 2 elements separate success from failure. Implementing 5S is one thing, standardizing and sustaining it is another. It is critical everyone understand and buy-into the merits of 5S and visual management. The goal is to ensure work methods, tools, and identification markings are consistent and recognizable throughout the area. Simplifying the processes is an everyday occurrence.
Sustain - 5S is a regular part of work and continuous actions are taken to improve work areas. Ideas for improvement are generated and acted upon immediately by supervision.
NOTE: The above steps must be followed in the logical and sequential order they are listed above.
Benefits of Doing 5S in Your Area Some of the benefits for implementing and sustaining 5S include:
Reducing accidents Decreasing the learning curve for personnel Enhancing communications Increasing time for improvements Reducing wasted time Reducing oversight Standardizing work Creating a visual workplace Improving working conditions Decreasing unplanned activities Simplifying work Reducing search time for tools and parts Increasing safety and cleanliness Decreasing clutter Increase quality
4
Put simply, under 5S, everything is in its place and there is a place for everything. By systematically instituting 5S process, we can create a better workplace that is organized, safer, makes work easier, and more understandable.
Without 5S, process improvements are difficult, and without all levels of management and personnel involvement, 5S cannot happen. Additional tools, forms and training are available through the CPI office.
5
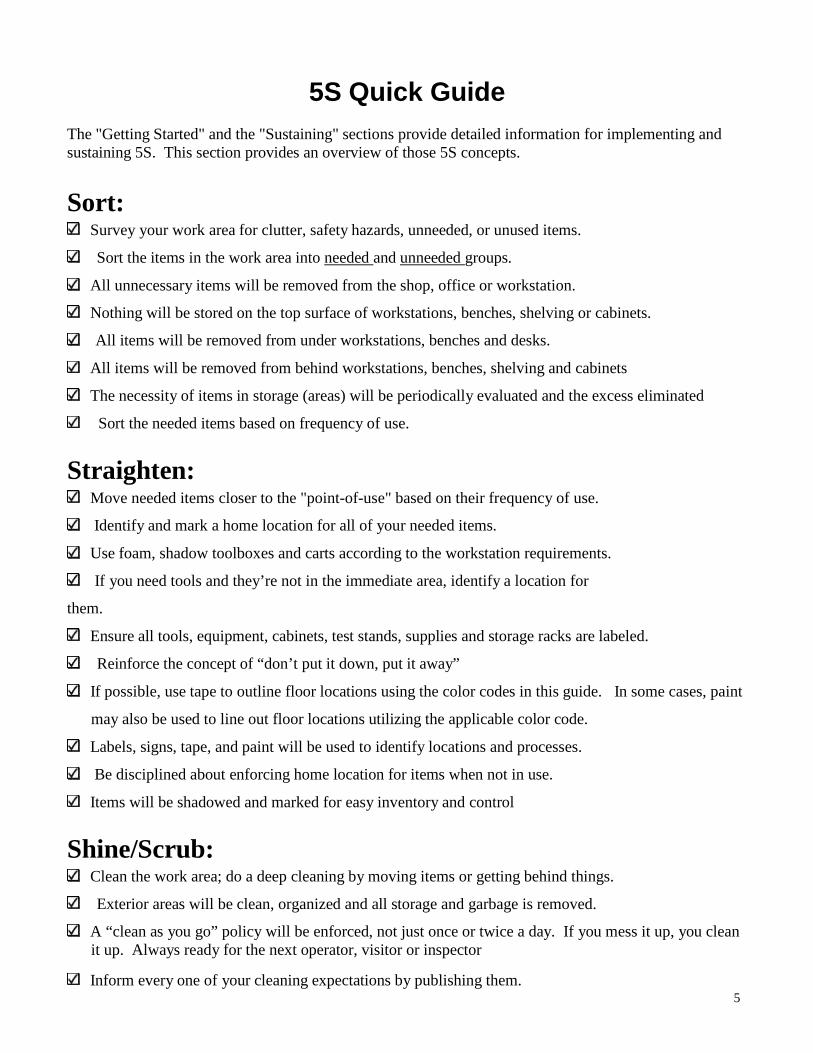
5S Quick Guide The "Getting Started" and the "Sustaining" sections provide detailed information for implementing and sustaining 5S. This section provides an overview of those 5S concepts.
Sort:
Survey your work area for clutter, safety hazards, unneeded, or unused items.
Sort the items in the work area into needed and unneeded groups.
All unnecessary items will be removed from the shop, office or workstation.
Nothing will be stored on the top surface of workstations, benches, shelving or cabinets.
All items will be removed from under workstations, benches and desks.
All items will be removed from behind workstations, benches, shelving and cabinets
The necessity of items in storage (areas) will be periodically evaluated and the excess eliminated
Sort the needed items based on frequency of use.
Straighten: Move needed items closer to the "point-of-use" based on their frequency of use.
Identify and mark a home location for all of your needed items.
Use foam, shadow toolboxes and carts according to the workstation requirements.
If you need tools and they’re not in the immediate area, identify a location for
them.
Ensure all tools, equipment, cabinets, test stands, supplies and storage racks are labeled.
Reinforce the concept of “don’t put it down, put it away”
If possible, use tape to outline floor locations using the color codes in this guide. In some cases, paint
may also be used to line out floor locations utilizing the applicable color code.
Labels, signs, tape, and paint will be used to identify locations and processes.
Be disciplined about enforcing home location for items when not in use.
Items will be shadowed and marked for easy inventory and control Shine/Scrub:
Clean the work area; do a deep cleaning by moving items or getting behind things.
Exterior areas will be clean, organized and all storage and garbage is removed.
A “clean as you go” policy will be enforced, not just once or twice a day. If you mess it up, you clean it up. Always ready for the next operator, visitor or inspector
Inform every one of your cleaning expectations by publishing them.
6
Machinery, test stands, and shop/office equipment will be clean and ready for use
7
Make it easy to clean by keeping cleaning supplies and trash receptacle close at hand.
Provide incentives for clean work environments.
Standardize: Labels, signs, tape and paint will be consistent and standardized in the shop/office/work space.
Standardized worksheets will be used on machinery, test stands, and equipment.
If standards don’t exist, identify the best way and do it the same way every time.
Suggest improvements to the standard methods currently used.
Implement visual management techniques to improve worker/manager awareness.
Production control displays will be visible and include useful information such as expected production, on-going projects, production/project inhibitors or limitations, and schedule/stockage effectiveness.
Sustain: Requires a disciplined system for eliminating waste and sustaining your 5S efforts.
Clearly define and publicize your expectations for maintaining standards.
Hold people accountable and responsible for their areas.
Enforce current 5S efforts: home locations, labeling, cleaning, and sorting.
Everyone needs to be involved, give them roles and responsibilities.
Champion your successes…turn shortcomings into opportunities.
Continually look ahead for improvement opportunities; we can always make things better.
Publish an improvement plan and make assignments using an action list to implement.
Each shop will support and participate in the 5S Audit Program.
Each shop will show continual improvement in their 5S appearance and audit scores.
8
Before you get Started All personnel should be trained in and expected to use the 5S techniques. This includes managers, supervisors, specialists, and office personnel. The training will inform everyone the 5S steps of sort, straighten, shine, standardize, sustain at every turn happens in that exact logical order—one after another.
Each area will post 5S achievements in a prominent area so that all personnel will be able to determine their success level. Supervisors and managers will chart a course to continuous improvement levels.
Management will support the needs of personnel working 5S by providing time to implement changes. Also, management is responsible for removing obstacles that make 5S difficult.
5S experts will be assigned by supervisors to represent their area. Those 5S experts will form the basis for implementing and maintaining 5S in their area. But they can’t do it on their own. They will need support from everyone in the area, including management.
Start small, but start. It is perfectly acceptable to start on a limited scale in just a few areas.
Say NO to a blitz approach. This is an attempt to put a whole new set of principles, values, and practices in place in the span of four to five days. While it can from time to time be useful to loose some serious logjams in thinking and application, it has never been know to create long lasting, sustainable improvements. (Galsworth, G., 1997, Visual Systems, Harnessing the Power of a Visual Workplace, p. 266.)
Say YES to incremental hands-on learning. This instructional approach lets teams learn series of new concepts and tools in small segments, asking them to apply new learning immediately in their own work areas. The result is a steady, visible improvement of how the shop floor looks and runs as new practices get established, then deepen and spread. (Galsworth, G., 1997, Visual Systems, Harnessing the Power of a Visual Workplace, p. 267.). In other words, slow is sometimes faster!
9
Getting Started The five essential start-up considerations:
Establish a clear and attainable vision Define specific roles for the team and its members Establish an improvement action plan with
timelines Define performance measures Follow the 5S steps in the sequence they have been laid out for you.
If this is the first time 5S will be applied in your area, it is critical that management takes the time to conduct a communication campaign in the area. There will be less resistance to change if top management engages officers, enlisted and civilian personnel in the area. Most people in the area have probably never heard about 5S. Management should communicate what is about to happen. Also, ask all personnel about their opinion. Change is difficult for everybody. Nobody wants to go outside his or her "comfort zone." Personnel need to hear (directly from management) that management is behind them 100%, and that management is there to support them during their 5S journey.
Before any 5S activity starts, it might be necessary to purchase low cost 5S materials (i.e., floor marking tape). It is crucial that the material is readily available during 5S activity to avoid any interruptions.
Next, identify the zones for 5S implementation. Remember it is perfectly acceptable to start on a limited scale in just a few areas. There should be a distinct boundary identified so that the team can focus on one particular zone. But include all areas in the zone; take a “wall to wall” approach (i.e. Walls, halls, aisle ways, and break rooms). Once the first zone is complete, migrate the 5S initiative to the next zone until all zones have been covered. The size and number of zones should be determined by the size of the area. Make sure the zones are well documented in a binder and housed in its respective zone.
Identify the team members from the affected zone to implement 5S. Historically this should be about 10% of total number of people working in that zone with representation from all skills working there (i.e., technicians, supervisors, customers, suppliers, kitting). The supervisor chooses the team and management approves them. The team chosen will spearhead the 5S implementation for their zone. Create a list of names and contact information for the people involved during the implementation.
Once you’ve identified a zone, established boundaries, and identified your team, post a communication board in the area. It is recommended that an easel pad sized board be used. The communication board should contain information on the upcoming 5S activity and we recommend "before" pictures of the zone. Keep everybody informed about what is going on, even if they are not directly involved.
At this point, management should schedule 5S training for everybody on the team. Some of the team members might have already received an introduction to 5S. However, the training conducted at this point is much more detailed in nature and will cover 5S principles, application, and implementation. Everybody on the team should attend this training.
It is recommended that the 5S zone be blocked off at the start of implementation. It is not necessary to stop regular daily activity in the zone, but understand that operations might slow down at first due to some 5S activity interruptions (i.e., moving equipment around). Previous 5S implementations have used barricades to block off the zone. Others have used yellow "Caution" tape. The purpose for blocking off the zone is to identify that the zone is under 5S Construction. Signs reading "Under 5S Construction" are
10
easy to develop and easy to post around the zone. This will help promote 5S activities and help get "buy- in" from others in the organization.
Once the team is ready to start, they should conduct a walk through of the zone. Take an objective view at everything and ask critical detailed questions. Look for things out of place or shoved into nooks and crannies. Get a general idea of the process flow and determine equipment/facility utilization. Take pictures of processes and equipment. Look for organization and visual management. This workplace scan will help establish a baseline which will help understand current conditions and will help identify impact for future improvements. Document a list of action items derived from the tour of the area. The action items will focus on providing suggestions for improvements; this gives the team a good place to start.
At this point, you've got everything in place to start your 5S implementation. You've made the decision to perform 5S in a zone, boundaries are established, communication board is up, barricades are in place, the team is trained, and a baseline exam has been conducted. The next section will cover a step-by-step explanation of the implementation procedure…but before you move on study the 5S model below.
11
Step by Step 5S Implementation Procedures 1. SAFETY is an inherent part of 5S. Safety should always be first in everything that you do. When
making changes during your 5S journey, make sure that you consider the safety and ergonomic issues that could be created from the changes.
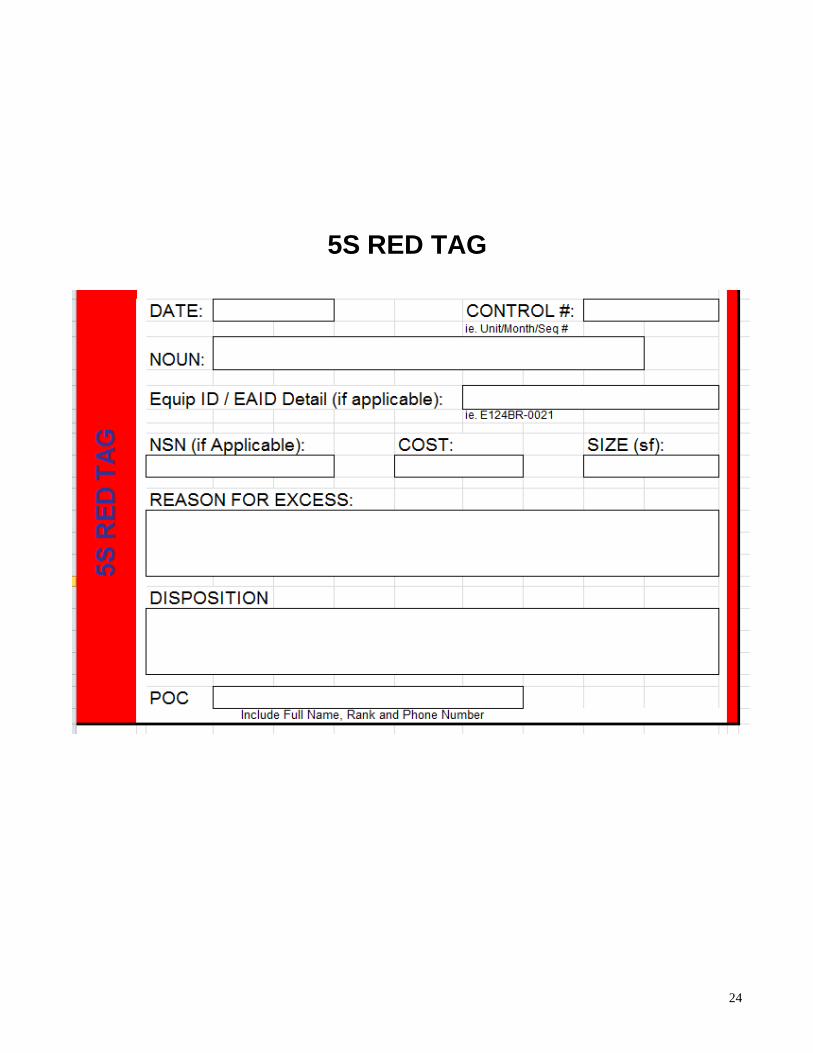
2. The first step is to conduct a "red tag campaign" as part of the 5S SORT. The purpose of the "red tag
campaign" is to remove (sort) any equipment, tools, cabinets, etc. that are not used in that zone. Have the team walk the zone and "red tag" any items which are not needed, or whose necessity is questionable. If in doubt, "red tag" it! Be thorough as you do this, but make sure to listen to every team member's opinion. All "red tagged" items need to be logged into a logbook and moved to a holding area. Continue to sort items in the holding area based upon their disposition intentions (i.e. throwaway, DRMO, Storage, Return To). It is important that accountable items are handled appropriately. Samples of 5S Red Tags and 5S Red Tag Inventory Worksheets are referenced at the end of this guide.
3. Provide your Red Tag Inventory List to all other areas to assess the usefulness of the red-tagged items
placed in the holding area. Maybe someone else has use of an item you don’t need. Let them know where the items are located and how to get them out of the holding area. Also establish a deadline date (3 days to 1 week) for reviews to be completed so that you may start disposition. After the team agrees that the items are unneeded, have the items removed from the holding area and disposed of according to the recommendations on the Red Tag. Things that are questionable should be left in the holding area until all questions are resolved. Make sure you update the Red Tag Inventory List to indicate final disposition on all red tagged items.
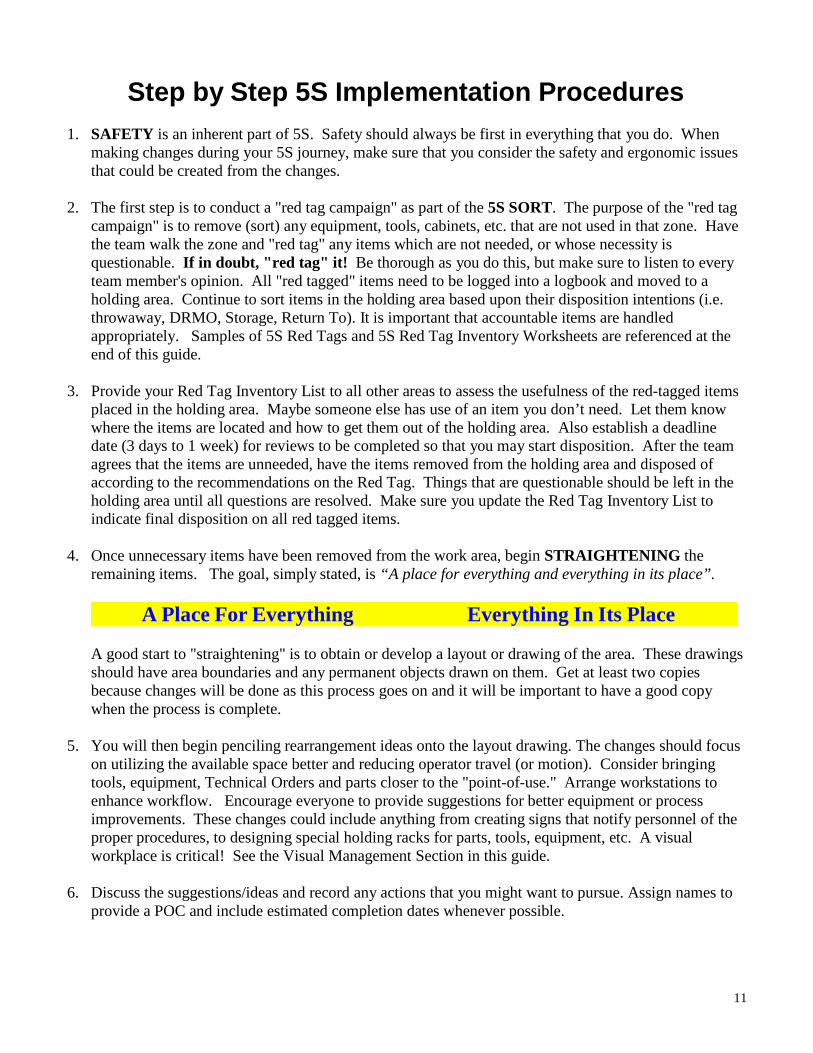
4. Once unnecessary items have been removed from the work area, begin STRAIGHTENING the
remaining items. The goal, simply stated, is “A place for everything and everything in its place”.
A good start to "straightening" is to obtain or develop a layout or drawing of the area. These drawings should have area boundaries and any permanent objects drawn on them. Get at least two copies because changes will be done as this process goes on and it will be important to have a good copy when the process is complete.
5. You will then begin penciling rearrangement ideas onto the layout drawing. The changes should focus
on utilizing the available space better and reducing operator travel (or motion). Consider bringing tools, equipment, Technical Orders and parts closer to the "point-of-use." Arrange workstations to enhance workflow. Encourage everyone to provide suggestions for better equipment or process improvements. These changes could include anything from creating signs that notify personnel of the proper procedures, to designing special holding racks for parts, tools, equipment, etc. A visual workplace is critical! See the Visual Management Section in this guide.
6. Discuss the suggestions/ideas and record any actions that you might want to pursue. Assign names to
provide a POC and include estimated completion dates whenever possible.
A Place For Everything Everything In Its Place
12
7. After agreeing on the new layout and exploring any ideas that were generated, determine if the ideas should actually be put into place and start rearranging the items/equipment. This would also be the proper time to order new equipment if needed.
8. List items that need a specific location within the zone, preferably at the "point-of-use". Also, make a
list of items that need to be labeled. Solicit solutions for storage problems within the zone, and make sure that every item has a place or a "home" for storage. Labels and signs go a long way to ensure that items are returned to their designated storage place. Once everyone agrees on what to label, start labeling. Emphasize visual workplace!
9. Keep the door open for changes as items/equipment is rearranged. Some things look better on paper
than they do when actually placed in the work area. Rearranging items/equipment can often cause new and better ideas to surface.
10. Once the area is rearranged to everyone's satisfaction, it’s time to SCRUB and SHINE. Everything
in the zone should be cleaned. The following things are commonly cleaned at this time:
Floors swept and mopped Cabinets, computers, equipment, etc. wiped down Benches swept / cleaned around everything that collects dirt, dust, or grime Remove old labels and stickers Consider painting where needed to enhance appearance
12. Once the area has been rearranged, scrubbed and shined, it is time to "tape out" the area using
the colored tape that designates its function. Remember that the tape is not permanent, so as new changes are suggested and implemented it is possible to move items and re-tape them. Once you’re sure on a permanent location you may want to use paint; it will last longer. There is a standard color code for tape used to mark the floor in this guidebook (see Visual Management)
13. As new ideas are generated, begin sharing them to other areas so that all areas can benefit from a good
idea. This is part of STANDARDIZING. It is important for areas to look and function similarly. This allows personnel to function efficiently; regardless of what zone they are working in. Standardization saves time and frustration. For example:
Every zone in the area uses the same color code for floor markings Signs and labels should follow the same format in all zones.
14. Once you’ve gone through the entire process it’s time to maintain it. We’ll cover Sustaining in the
next section.
How long does it take to implement? The sooner an action is taken to produce a VISIBLE CHANGE the better. If you have the manpower available, it is possible to assign actions the day they are decided upon and have them carried out that same day. This allows you to see improvement almost immediately and allows you to get "buy- in" from the rest of the organization. Management should help the teams stay focused on the task and remove any obstacles that might slow down the implementation process. The 5S process is a continual journey, but the initial implementation can be accomplished in just a few weeks if the effort is concentrated and well organized.
13
Sustainment—the never ending process Once everything is in-place and functioning, it is time to SUSTAIN all of the hard work. The sustaining part of 5S is the most challenging…because it never stops. It’s easy to get people fired up to do the other steps once they see the benefit. It’s much harder to change their daily routine…forever. But, sustaining the improvements is the responsibility of all personnel.
There are several ways to sustain a 5S platform and we encourage use of all of them. But no matter what your choice, the program must be disciplined and focused on eliminating waste.
Here are just a few examples:
Audit Programs. A 5S Audit program should be conducted routinely by supervision in their
areas. Auditors from other areas may come in as well to provide “new” ideas and an objective perspective, but the main focus must come from the manager of that area. This lets the people know that this is important to their leadership. Each zone should conduct weekly audits of their area. You can find a sample "5S Audit Checklist" and “Opportunity Watch Cards” in the "5S Forms" section of this guide.
Supervisor Expectations. Supervision must clearly define what they expect. These expectations
must be published and enforced. Responsibility and accountability for each zone must be worked into the sustainment function. These expectations should be identified by zones or individuals and should include daily, weekly and even monthly tasks. Instill a “Clean As You Go” policy, but don’t limit your expectations to just cleaning. A lot of work went into Sorting, straighten, and standardize, and these must be maintained as well. You can find a sample "5S Inspection/ Expectations Form" in the "5S Forms" section of this guide.
Zone Leaders. While everyone must be involved and accountable for 5S, there should be experts
or leaders identified for each zone. The zone experts make sure all 5S efforts are maintained and enforced. Signs, labels and floor markings should be checked and enforced. They help train other personnel and champion the 5S cause.
Improvement Plans. Because this is a continuous improvement process, there will always be
opportunities for improving. Conduct regular 5S walkthroughs in order to generate new ideas and move your organization to the "next level." Publish those plans and formalize an action list to accomplish your goals.
Awards and Rewards. Champion your success…change shortcomings into opportunity.
Positive Feedback and Letters of appreciation can go a long way towards instilling 5S as a way of life.
14
Visual Management
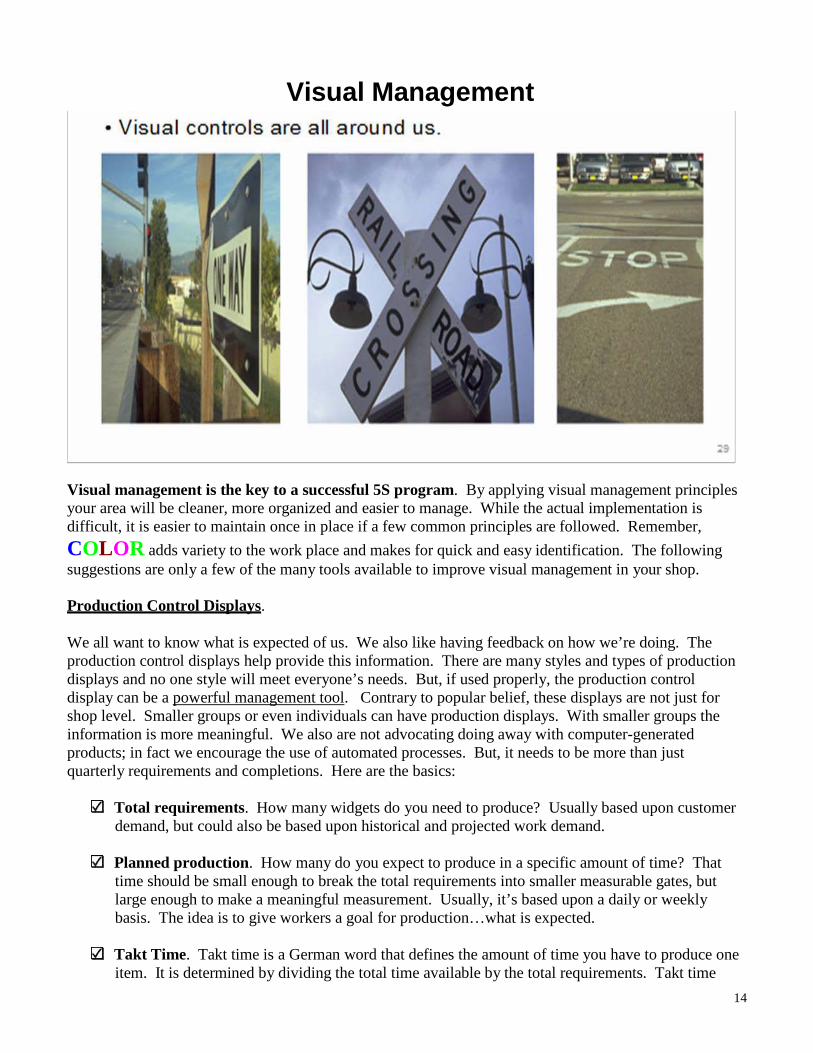
Visual management is the key to a successful 5S program. By applying visual management principles your area will be cleaner, more organized and easier to manage. While the actual implementation is difficult, it is easier to maintain once in place if a few common principles are followed. Remember, COLOR adds variety to the work place and makes for quick and easy identification. The following suggestions are only a few of the many tools available to improve visual management in your shop.
Production Control Displays.
We all want to know what is expected of us. We also like having feedback on how we’re doing. The production control displays help provide this information. There are many styles and types of production displays and no one style will meet everyone’s needs. But, if used properly, the production control display can be a powerful management tool. Contrary to popular belief, these displays are not just for shop level. Smaller groups or even individuals can have production displays. With smaller groups the information is more meaningful. We also are not advocating doing away with computer-generated products; in fact we encourage the use of automated processes. But, it needs to be more than just quarterly requirements and completions. Here are the basics:
Total requirements. How many widgets do you need to produce? Usually based upon customer
demand, but could also be based upon historical and projected work demand.
Planned production. How many do you expect to produce in a specific amount of time? That time should be small enough to break the total requirements into smaller measurable gates, but large enough to make a meaningful measurement. Usually, it’s based upon a daily or weekly basis. The idea is to give workers a goal for production…what is expected.
Takt Time. Takt time is a German word that defines the amount of time you have to produce one
item. It is determined by dividing the total time available by the total requirements. Takt time
15
doesn’t consider the number of people working a unit, but it can help you determine how many people you may have to align to a specific task.
Actual production. How many units did you actually produce? This is measured against both
the total requirements and the planned production. This needs to be based upon the same time level as the planned production.
Production Limitations. If your actual production is behind schedule, what happened e.g.
technicians on leave, test stand down, parts problems, engineering support, etc? What ever caused the problem should be clearly explained. This gives the supervisor an area to focus on for corrective action. This may also include projected problems (test stand down next week, technician on leave next month) to help develop an accurate plan for production.
Area and Sub-Area Signs
We all know where we work so we don’t need a sign to tell us…right? But signs do foster pride in a work area and develop team camaraderie. “Bill” is more likely to keep his area clean if it has his name all over it. Ever walk into a building and scratching you head wonder how you will locate an individual. Visual aids provide meaningful and immediate clues to speed up your search.
Standardized Work Visuals
We all have our own way of doing things, but which way is the best? By doing work in the right sequence and the same way every time, you reduce time while increasing quality and repeatability. Visual displays of standard work (picture grams, labeling) help the workers establish routines and ease in training.
Visual Work In Progress (WIP)
How many units do you have in work? Where are they in the process? Visual management gives you the answers at a glance. While putting WIP into cabinets may improve the appearance, it also makes it more difficult for managers to observe and pin point problems. We recommend open shelves that are labeled to indicate steps in the process (waiting parts, waiting diagnostics, waiting test, etc) to make it easy for managers to visualize bottlenecks.
“Fail Saf e” Visuals
These are visual indicators that take the guesswork out of production. For example, the acceptable tolerance on an air pressure gauge could be marked with green and red tape so that anyone looking at the gauge knows if it’s within tolerance. These are known as Zone labels, identifying acceptable zones on meters or equipment. There are Shadow Boards to easily store and inventory equipment. Direction markers can be used for equipment, processes, tooling, air/water flow, etc. Preventative maintenance labels can be color coded to reduce the risk of using outdated equipment.
Organization (AKA Signs, Labels and Home Locations)
A clean, well-organized work area is not only more pleasant but more efficient. We help organize our shops by sorting out what we don’t need and identifying locations for everything else. Locations should be based upon frequency of use. Those items used most frequently would be closest to the operation. Other items used less frequently would be moved farther away, perhaps even to another area. Once
16
the location has been determined, it needs to be marked and labeled. Why you ask? Everyone knows that’s where it goes, right? But the reality is things do move and you can’t find them because someone didn’t put it back where “it’s supposed to be.” You can also easily identify when things magically appear or disappear from your shop. I’m sure all of us have experienced this before.
Signs, Labels and Markings
Signs, labels, and markings are a key part of having an organized work area. They help keep everyone informed and aid in identifying areas, tools, equipment locations, as well as foster standardized work. Marking item locations ensures the items are in the right place at the right time. Placing signs over an area helps identify a particular shop or process. They help foster pride of ownership in an area. Using labels and signs identifies "Home Locations" for moveable items, which organizes the shop and helps people find things when they need them. It helps eliminate "junk" that migrates into the work area.
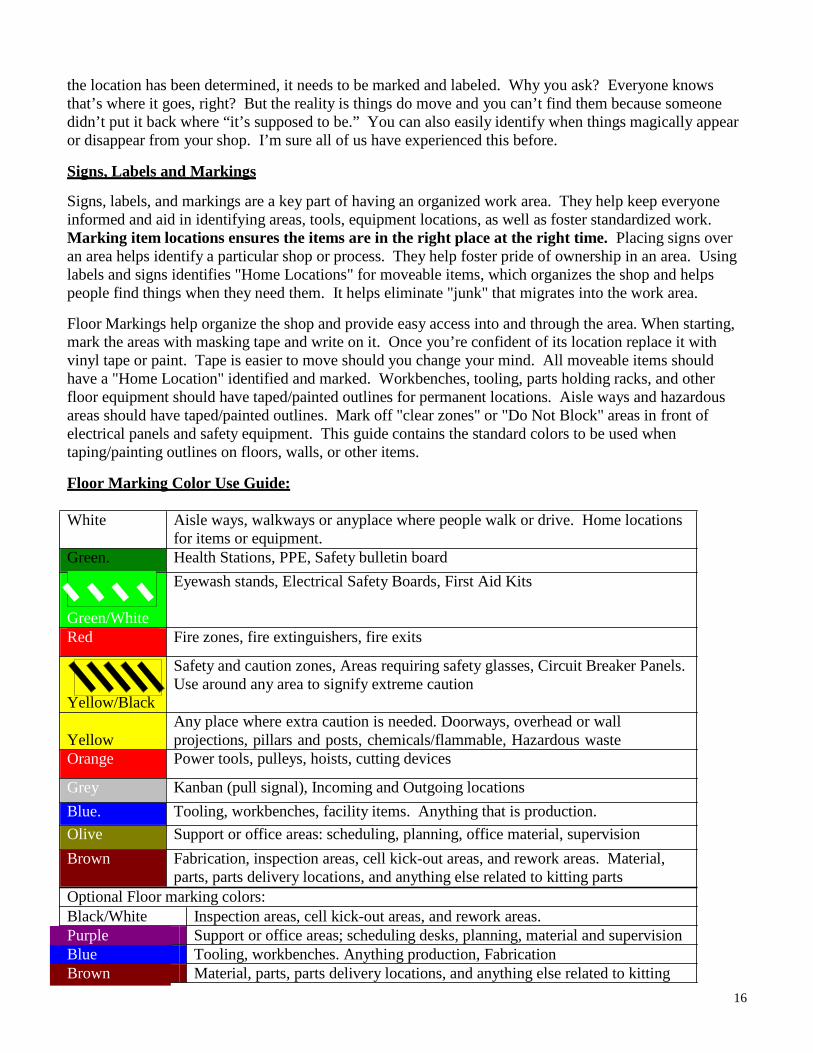
Floor Markings help organize the shop and provide easy access into and through the area. When starting, mark the areas with masking tape and write on it. Once you’re confident of its location replace it with vinyl tape or paint. Tape is easier to move should you change your mind. All moveable items should have a "Home Location" identified and marked. Workbenches, tooling, parts holding racks, and other floor equipment should have taped/painted outlines for permanent locations. Aisle ways and hazardous areas should have taped/painted outlines. Mark off "clear zones" or "Do Not Block" areas in front of electrical panels and safety equipment. This guide contains the standard colors to be used when taping/painting outlines on floors, walls, or other items.
Floor Marking Color Use Guide:
White Aisle ways, walkways or anyplace where people walk or drive. Home locations for items or equipment.
Green. Health Stations, PPE, Safety bulletin board Eyewash stands, Electrical Safety Boards, First Aid Kits
Green/White Red Fire zones, fire extinguishers, fire exits
Safety and caution zones, Areas requiring safety glasses, Circuit Breaker Panels. Use around any area to signify extreme caution
Yellow/Black Any place where extra caution is needed. Doorways, overhead or wall
Yellow projections, pillars and posts, chemicals/flammable, Hazardous waste Orange Power tools, pulleys, hoists, cutting devices
Grey Kanban (pull signal), Incoming and Outgoing locations Blue. Tooling, workbenches, facility items. Anything that is production. Olive Support or office areas: scheduling, planning, office material, supervision Brown Fabrication, inspection areas, cell kick-out areas, and rework areas. Material,
parts, parts delivery locations, and anything else related to kitting parts Optional Floor marking colors: Black/White Inspection areas, cell kick-out areas, and rework areas. Purple Support or office areas; scheduling desks, planning, material and supervision Blue Tooling, workbenches. Anything production, Fabrication Brown Material, parts, parts delivery locations, and anything else related to kitting
17
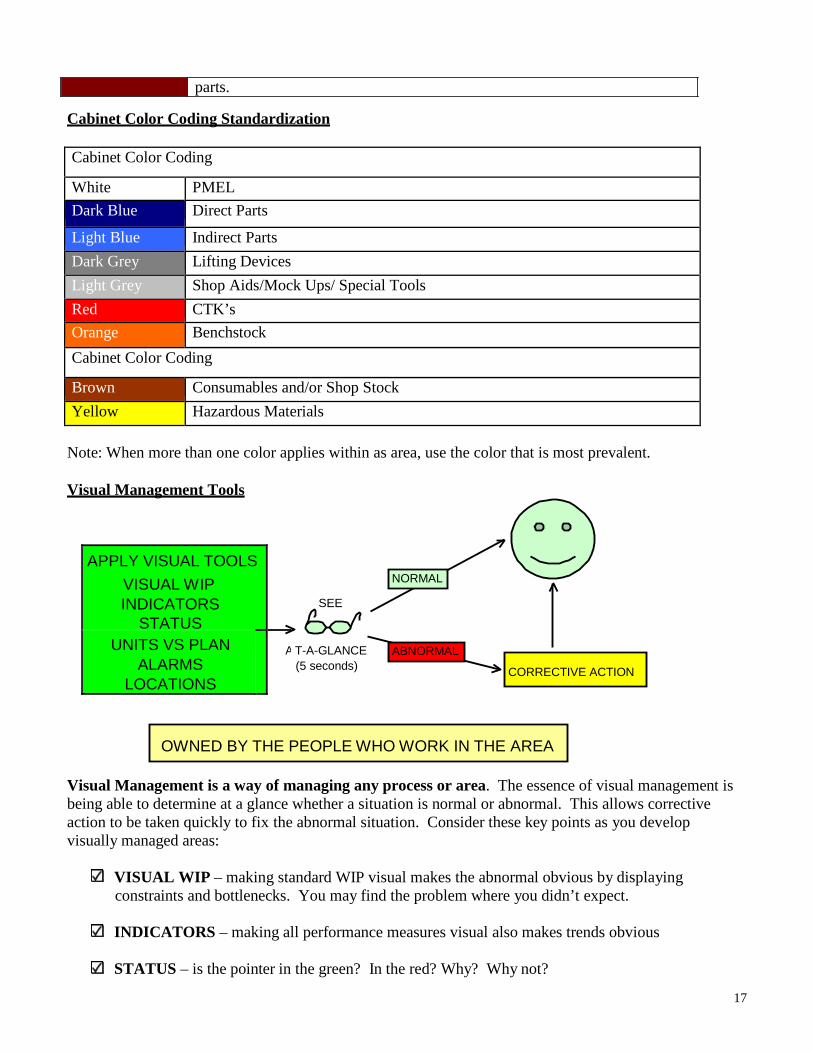
Cabinet Color Coding Standardization
Cabinet Color Coding
White PMEL Dark Blue Direct Parts
Light Blue Indirect Parts Dark Grey Lifting Devices Light Grey Shop Aids/Mock Ups/ Special Tools Red CTK’s Orange Benchstock Cabinet Color Coding
Brown Consumables and/or Shop Stock Yellow Hazardous Materials
Note: When more than one color applies within as area, use the color that is most prevalent.
Visual Management Tools
T-A-GLANCE (5 seconds)
Visual Management is a way of managing any process or area. The essence of visual management is being able to determine at a glance whether a situation is normal or abnormal. This allows corrective action to be taken quickly to fix the abnormal situation. Consider these key points as you develop visually managed areas:
VISUAL WIP – making standard WIP visual makes the abnormal obvious by displaying
constraints and bottlenecks. You may find the problem where you didn’t expect.
INDICATORS – making all performance measures visual also makes trends obvious
STATUS – is the pointer in the green? In the red? Why? Why not?
OWNED BY THE PEOPLE WHO WORK IN THE AREA
NORMAL
SEE
parts.
ABNORMAL CORRECTIVE ACTION
APPLY VISUAL TOOLS VISUAL WIP INDICATORS
STATUS
UNITS VS PLAN ALARMS
LOCATIONS
A

18
ACTUAL VS PLAN – Do production control displays show actual output vs. planned? Is Takt time used to measure hour-by-hour, day-by-day or week-by-week performance?
ALARMS – are there signals to get people’s attention when abnormal events occur?
LOCATIONS – is it obvious where everything goes? What’s out of place? Why?
SEEING AT A GLANCE: Can supervisors and support people observe the workplace and know
if things are going well? Can they determine what’s normal or abnormal?
OWNERSHIP: Do the people who work in, manage and support the workplace take ownership in making it a visually managed workplace? Are they establishing visual tools? Are they using these tools to communicate?
CORRECTIVE ACTION / PROCESS IMPROVEMENT: When something is obviously abnormal what happens? Are people encouraged to stop and bring up problems? Are problems prioritized with a balance between improvement and practical operation? Are the most important problems being resolved diligently and permanently?
5S Boards and Improvement Plans
5S Boards are designed to help publicize and promote the shops 5S efforts. They provide an avenue for communication on plans, programs and expectations. Every shop should have a 5S board readily displayed for all to see. Even sub-areas within a shop can have their own 5S board if it helps promote their effort. While one person should be assigned the “maintenance” of the board, the entire shop should have a say in designing it for display. The goal is for it to be functional and reflect the areas commitment to 5S.
While boards can be different, the following recommendations will help you in designing your board.
Area of Responsibility Chart: This chart separates the shop into zones and identifies a single
person responsible for each zone. This helps eliminate confusion and fosters pride of ownership. The chart should include all shifts working that area.
Daily/Weekly Expectations: This clearly specifies what supervision expects for 5S sustainment
on a daily and weekly basis. You’re trying to establish routines. While cleaning activities are important, you should not limit your sustainment activities to just cleaning. All the hard work you’ve gone through so far must be maintained and solidified. Sorting and straightening are 5S areas that can be enhanced by continued vigilance. Be as specific as possible with these tasks so there is no confusion on your expectations. A sample expectations checklist is provided in the forms section of this guide.
Audit Reports: This provides feedback to the team on their 5S performance, and gives them
suggestions on areas to improve. Either the whole report can be posted or a summation of it. Also a bar chart or line graph helps provide a visual indicator of progress over time.
Improvement Plan: While the daily expectations help you sustain your 5S efforts, the
improvement plan helps you focus on taking 5S to the next level, or migrating 5S into more areas
19
of your shop. We should always be striving to improve our area. This requires insight and forecasting.
Take an objective view of your shop and ask, “Would a “World Class” operation have ?” Identify
the need for change and develop a plan to change it. Look at floors, walls, ceiling, environment, equipment, lighting or any other facility issues. But also look at your process. Would the work flow smoother by rearranging some equipment or benches? Your improvement plan could extend from 2 weeks to 5 years.
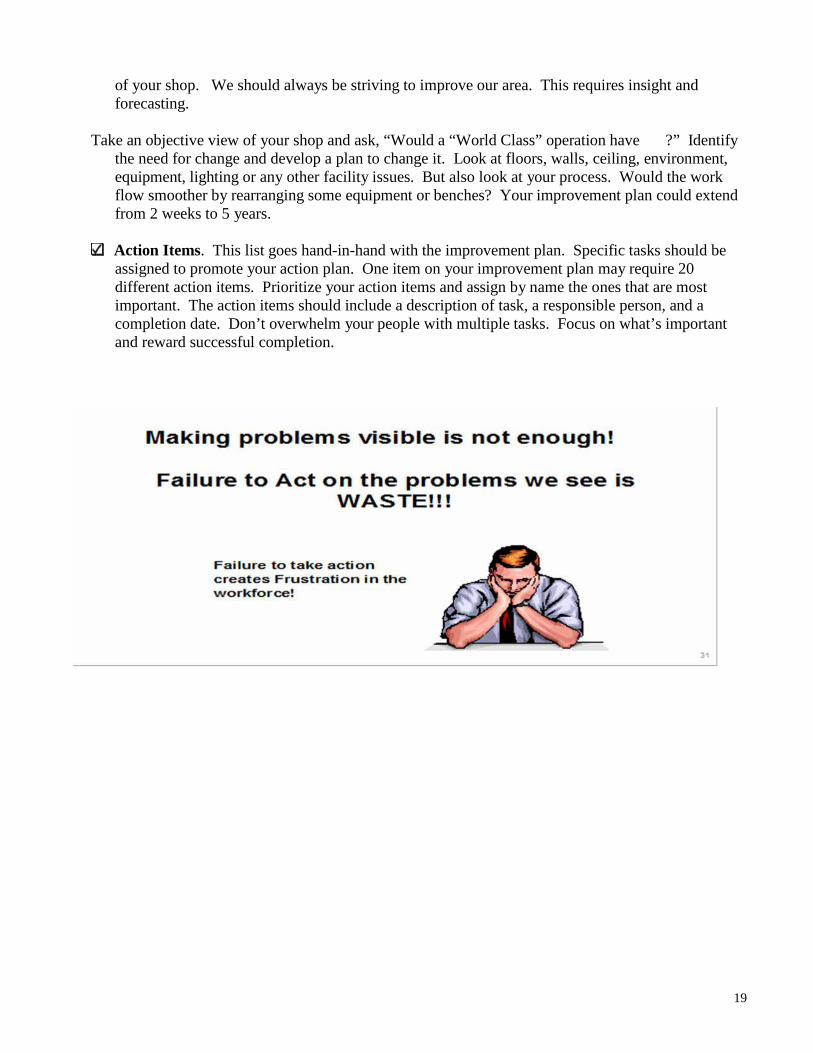
Action Items. This list goes hand-in-hand with the improvement plan. Specific tasks should be
assigned to promote your action plan. One item on your improvement plan may require 20 different action items. Prioritize your action items and assign by name the ones that are most important. The action items should include a description of task, a responsible person, and a completion date. Don’t overwhelm your people with multiple tasks. Focus on what’s important and reward successful completion.

5S Basic Supplies that can be used
These are just a few items to help you with 5S
2" Orange Tape 2" Red Tape 2" Olive Tape 2" Green Tape 2" Brown Tape 2" Blue Tape
2" Yellow Tape 2" Yellow / Black 2" White Tape 2” Grey Tape Broom Handle
Floor Broom 18" Hook Fastener Magnetic Pickup 13-27" Small Storage Tote Box (Velcro)
Loop Fastener
Tray / Box 6" x 16-1/2" x 10-7/8"
8" x 16 -1/2" x 10-7/8"
8" x 22-3/8" x 17-3/8"
Short Dividers Labeler Red Plastic Shelf Bin Red Plastic Storage Bin For 4W026 11-5/8" x 6-5/8" x 4" 7-3/8" x 4-1/8" x 3"
Long Dividers Black Ribbon Blue Plastic Shelf Bin Blue Plastic Storage Bins 11-5/8" x 6-5/8" x 4" 7-3/8" x 4-1/8" x 3"
Short Dividers White Tape (1/2", 1", 2") Yellow Plastic Shelf Bin Yellow Plastic Storage Bins 11-5/8" x 6-5/8" x 4" 7-3/8" x 4-1/8" x 3"
Long Dividers Clear Tape (1/2", 1") Plastic Shelf Bin Dividers
20
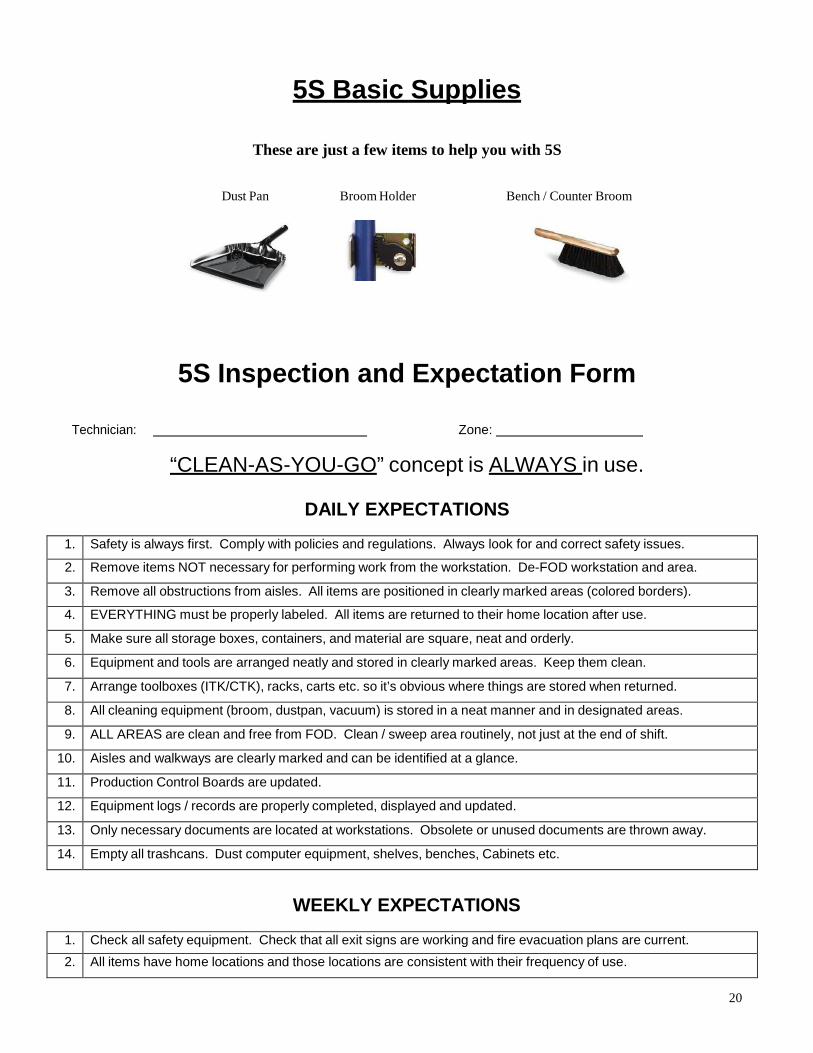
5S Basic Supplies
These are just a few items to help you with 5S
Dust Pan Broom Holder Bench / Counter Broom
5S Inspection and Expectation Form
Technician: Zone:
“CLEAN-AS-YOU-GO” concept is ALWAYS in use.
DAILY EXPECTATIONS
1. Safety is always first. Comply with policies and regulations. Always look for and correct safety issues.
2. Remove items NOT necessary for performing work from the workstation. De-FOD workstation and area.
3. Remove all obstructions from aisles. All items are positioned in clearly marked areas (colored borders).
4. EVERYTHING must be properly labeled. All items are returned to their home location after use.
5. Make sure all storage boxes, containers, and material are square, neat and orderly.
6. Equipment and tools are arranged neatly and stored in clearly marked areas. Keep them clean.
7. Arrange toolboxes (ITK/CTK), racks, carts etc. so it’s obvious where things are stored when returned.
8. All cleaning equipment (broom, dustpan, vacuum) is stored in a neat manner and in designated areas.
9. ALL AREAS are clean and free from FOD. Clean / sweep area routinely, not just at the end of shift.
10. Aisles and walkways are clearly marked and can be identified at a glance.
11. Production Control Boards are updated.
12. Equipment logs / records are properly completed, displayed and updated.
13. Only necessary documents are located at workstations. Obsolete or unused documents are thrown away.
14. Empty all trashcans. Dust computer equipment, shelves, benches, Cabinets etc.
WEEKLY EXPECTATIONS
1. Check all safety equipment. Check that all exit signs are working and fire evacuation plans are current. 2. All items have home locations and those locations are consistent with their frequency of use.
21
3. Check condition of floor border tape / paint. Replace any worn tape / paint.
4. All floor items are properly stored and secured. Remove ALL unnecessary items. Check for FOD.
5. Check labels on equipment, tools, cabinets and storage racks. Replace any missing or torn labels.
22
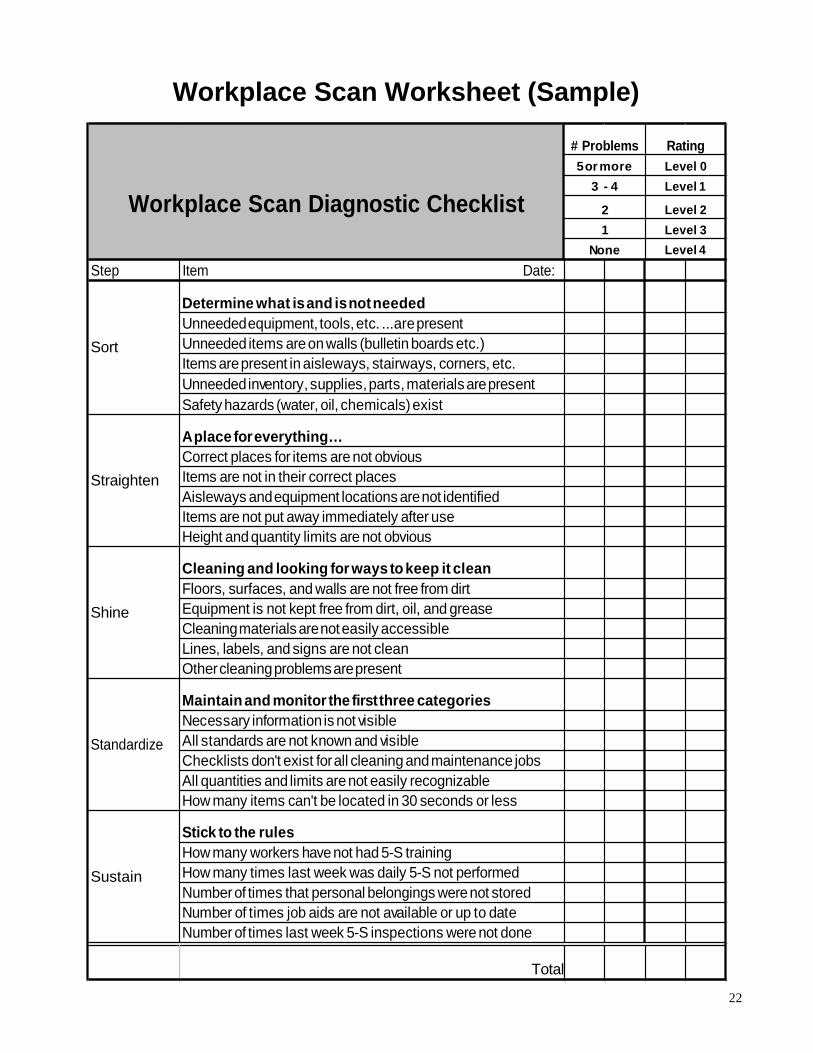
Workplace Scan Worksheet (Sample)
# Problems Rating
Workplace Scan Diagnostic Checklist
Step Item Date:
5 or more 3 - 4
2 1
None
Level 0 Level 1
Level 2 Level 3 Level 4
Sort
Straighten
Shine
Standardize
Sustain
Determine what is and is not needed Unneeded equipment, tools, etc. ...are present Unneeded items are on walls (bulletin boards etc.) Items are present in aisleways, stairways, corners, etc. Unneeded inventory, supplies, parts, materials are present Safety hazards (water, oil, chemicals) exist
A place for everything… Correct places for items are not obvious Items are not in their correct places Aisleways and equipment locations are not identified Items are not put away immediately after use Height and quantity limits are not obvious
Cleaning and looking for ways to keep it clean Floors, surfaces, and walls are not free from dirt Equipment is not kept free from dirt, oil, and grease Cleaning materials are not easily accessible Lines, labels, and signs are not clean Other cleaning problems are present
Maintain and monitor the first three categories Necessary information is not visible All standards are not known and visible Checklists don't exist for all cleaning and maintenance jobs All quantities and limits are not easily recognizable How many items can't be located in 30 seconds or less
Stick to the rules How many workers have not had 5-S training How many times last week was daily 5-S not performed Number of times that personal belongings were not stored Number of times job aids are not available or up to date Number of times last week 5-S inspections were not done
Total
23
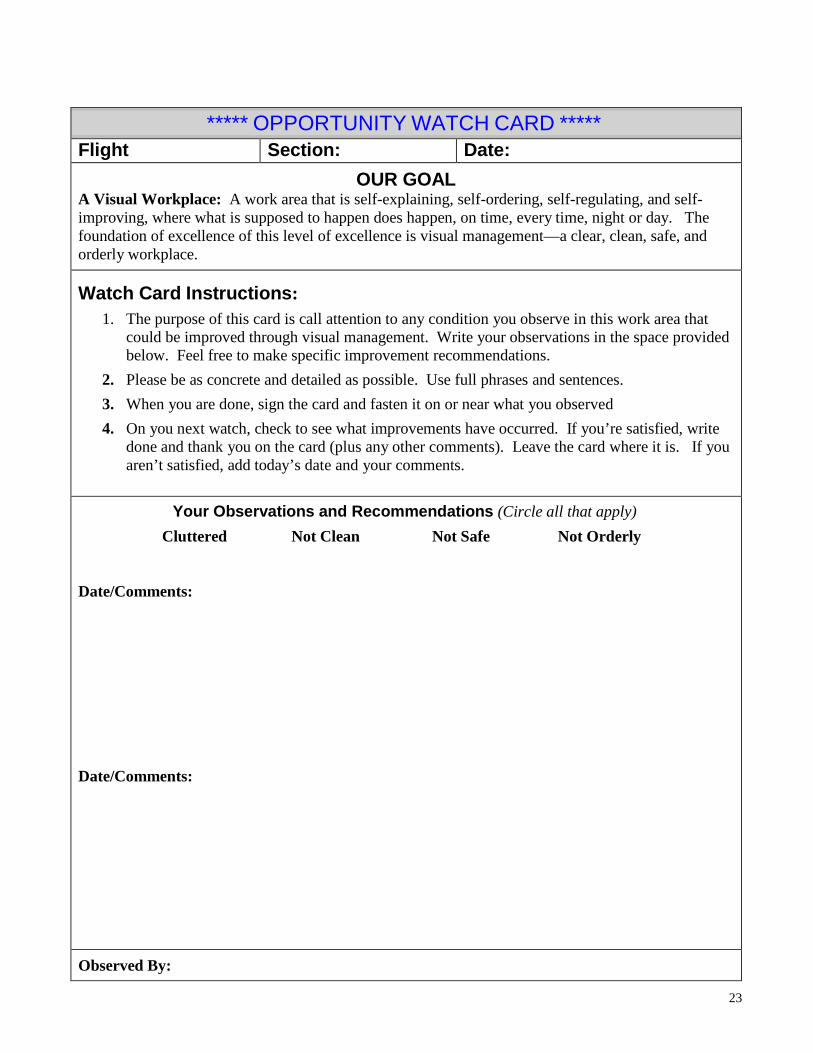
***** OPPORTUNITY WATCH CARD ***** Flight Section: Date:
OUR GOAL A Visual Workplace: A work area that is self-explaining, self-ordering, self-regulating, and self- improving, where what is supposed to happen does happen, on time, every time, night or day. The foundation of excellence of this level of excellence is visual management—a clear, clean, safe, and orderly workplace.
Watch Card Instructions: 1. The purpose of this card is call attention to any condition you observe in this work area that
could be improved through visual management. Write your observations in the space provided below. Feel free to make specific improvement recommendations.
2. Please be as concrete and detailed as possible. Use full phrases and sentences. 3. When you are done, sign the card and fasten it on or near what you observed 4. On you next watch, check to see what improvements have occurred. If you’re satisfied, write
done and thank you on the card (plus any other comments). Leave the card where it is. If you aren’t satisfied, add today’s date and your comments.
Your Observations and Recommendations (Circle all that apply) Cluttered Not Clean Not Safe Not Orderly
Date/Comments:
Date/Comments:
Observed By:
24
5S RED TAG

25
5S RED INVENTORY WORKSHEET