
5620 SAM SERVICE AWARE MANAGER 14.0 R8 FlexiPacket ... · 5620 SAM SERVICE AWARE MANAGER 14.0 R8...
58
5620 SAM SERVICE AWARE MANAGER 14.0 R8 FlexiPacket Microwave User Guide 3HE-11587-AAAB-TQZZA Issue 1 March 2017
Transcript of 5620 SAM SERVICE AWARE MANAGER 14.0 R8 FlexiPacket ... · 5620 SAM SERVICE AWARE MANAGER 14.0 R8...

5620 SAMSERVICE AWARE MANAGER14.0 R8
FlexiPacket Microwave UserGuide
3HE-11587-AAAB-TQZZA
Issue 1
March 2017

Legal notice
Nokia is a registered trademark of Nokia Corporation. Other products and company names mentioned herein may be trademarks ortradenames of their respective owners.
The information presented is subject to change without notice. No responsibility is assumed for inaccuracies contained herein.
© 2017 Nokia.
5620 SAM
2 Issue 13HE-11587-AAAB-TQZZA

Contents
About this document............................................................................................................................................5
1 What’s new? ...................................................................................................................................................7
1.1 What’s new in 5620 SAM Release 14.0 for FlexiPacket Microwave .....................................................7
2 FlexiPacket Microwave overview................................................................................................................11
2.1 FlexiPacket Microwave device support ...............................................................................................11
3 FPMR and Hub 800 — device discovery ....................................................................................................13
3.1 Introduction..........................................................................................................................................13
3.2 To configure mediation and discover FPMR and Hub 800 devices.....................................................14
4 External EMS launch from the 5620 SAM ..................................................................................................17
4.1 WebLCT — Hub 800 and FPMR.........................................................................................................17
4.2 To start the WebLCT ...........................................................................................................................17
5 Hub 800 object management ......................................................................................................................19
5.1 Hub 800 shelf, card, and port objects..................................................................................................19
5.2 To configure a Hub 800 card ...............................................................................................................21
5.3 To configure a Hub 800 E1 port ..........................................................................................................22
5.4 To configure a Hub 800 Ethernet port ................................................................................................23
5.5 To configure a Hub 800 SFP port .......................................................................................................23
5.6 To configure loopback in Hub 800 .......................................................................................................24
6 FPMR object management ..........................................................................................................................27
6.1 FPMR shelf, card, and port objects .....................................................................................................27
6.2 To configure FPMR device properties .................................................................................................29
6.3 To configure radio port parameters .....................................................................................................29
6.4 To configure an FPMR Ethernet port ..................................................................................................30
6.5 To configure FPMR modulation — static or ACM ................................................................................31
6.6 To configure loopback in FPMR ..........................................................................................................33
7 FPMR and Hub 800 inventory management ..............................................................................................35
7.1 Hardware inventory of the equipped cards..........................................................................................35
7.2 FlexiPacket Microwave device hardware and software inventory .......................................................36
5620 SAM
Issue 1 33HE-11587-AAAB-TQZZA

8 FPMR and Hub 800 link discovery..............................................................................................................37
8.1 Link discovery from 5620 SAM............................................................................................................37
8.2 To discover links on Hub 800 and FPMR devices ...............................................................................38
9 FPMR and Hub 800 device backup.............................................................................................................41
9.1 Backup ................................................................................................................................................41
9.2 To configure a backup policy for a FPMR or Hub 800device ..............................................................42
9.3 To perform an on-demand backup for a FPMR or Hub 800 device.....................................................43
9.4 To view the backup status of a FPMR or Hub 800 device...................................................................44
9.5 To export a device configuration backup .............................................................................................45
9.6 To import a FlexiPacket Microwave device configuration backup .......................................................46
9.7 To delete backups ..............................................................................................................................47
10 FPMR and Hub 800 performance management.........................................................................................49
10.1 Collecting and reporting statistics........................................................................................................49
10.2 FPMR counters ...................................................................................................................................50
10.3 Hub 800 counters ................................................................................................................................51
10.4 To configure retention time .................................................................................................................52
10.5 To collect and display the statistics values ..........................................................................................52
10.6 To configure polling for a MIB statistics class......................................................................................54
11 FPMR and Hub 800 alarm management.....................................................................................................55
11.1 Overview .............................................................................................................................................55
12 FPMR and Hub 800 license management ..................................................................................................57
12.1 License management ..........................................................................................................................57
12.2 Feature license reporting.....................................................................................................................57
5620 SAM
4 Issue 13HE-11587-AAAB-TQZZA

About this document
Purpose
The FlexiPacket Microwave User Guide describes how to discover, configure, andmanage FlexiPacket Microwave devices: Hub 800 and FPMR, from the 5620 SAM.
Document support
Customer documentation and product support URLs:
• Customer Documentation Welcome Page
• Technical support
How to comment
Documentation feedback
5620 SAM
Issue 1 53HE-11587-AAAB-TQZZA

5620 SAM
6 Issue 13HE-11587-AAAB-TQZZA

1 What’s new?
1.1 What’s new in 5620 SAM Release 14.0 for FlexiPacketMicrowave
1.1.1 General information
This section highlights FlexiPacket Microwave features introduced in Release 14.0 of the5620 SAM and provides pointers for more information. Feature lists and high-levelfeature descriptions are also available in the 5620 SAM Release Description.
1.1.2 What’s new in 5620 SAM Release 14.0 R7 for FlexiPacket Microwave
Table 1, “5620 SAM Release 14.0 R7 FlexiPacket Microwave features” (p. 7) , lists thefeatures and functions added in 5620 SAM Release 14.0 R7 for FlexiPacket Microwavesupport. See the 5620 SAM User Guide for more information about non-FlexiPacketMicrowave features and functions.
Table 1 5620 SAM Release 14.0 R7 FlexiPacket Microwave features
Feature Description and Reference
SAM-83174 — Hub 800 R 2.6.6Management
The 5620 SAM supports the native management of the Hub 800 device fromRelease 2.6.6 or later.
SAM-83181 — FPMR R 2.5Management
The 5620 SAM supports the native management of the FPMR device fromRelease 2.5 or later.
SAM-84161 and SAM-84163 — Hub800 and FPMR device discovery
You can discover the Hub 800 and FPMR devices using the 5620 SAM.
3.1.2 “Mediation policy” (p. 13)
3.1.3 “Discovery rule” (p. 13)
3.2 “To configure mediation and discover FPMR and Hub 800 devices” (p. 14)
SAM-85719 — Links on the topologymap
The links between two Hub 800 devices appear as solid lines. The linksbetween two FPMR devices appear as dotted lines. The link between a Hub800 and a FPMR device appears as a solid line.
8.1.6 “Links on the topology map” (p. 38)
SAM-85721 — FlexiPacket Microwavedevice SNMPv2 management
The 5620 SAM manages the FlexiPacket Microwave devices using SNMPv2.
3.1.1 “SNMPv2 management” (p. 13)
SAM-86030 — License management Support for license management.
Chapter 12, “FPMR and Hub 800 license management”
SAM-86057 —Hub 800 - Nodemanagement
The 5620 SAM supports the native management of the Hub 800 device fromRelease 2.6.6 or later.
5620 SAM What’s new?
Issue 1 73HE-11587-AAAB-TQZZA

Table 1 5620 SAM Release 14.0 R7 FlexiPacket Microwave features (continued)
Feature Description and Reference
SAM-86071 — Hub 800 cardmanagement
Support for Hub 800 card management.
5.1.3 “Plugin cards” (p. 19)
5.2 “To configure a Hub 800 card” (p. 21)
SAM-86077, SAM-86147, SAM-87964,and SAM-87964 — Inventorymanagement
Support for inventory management.
Chapter 7, “FPMR and Hub 800 inventory management”
SAM-86879 — Manage Hub 800alarms
SAM-87971 — Manage FPMR alarms
SAM-91327 — Fault correlation
Alarm management
Chapter 11, “FPMR and Hub 800 alarm management”
SAM-87071 — Hub 800 G.821/G.826performance statistics
SAM-87134 — Hub 800 Ethernet portperformance statistics
SAM-88002 — FPMR counters
SAM-88010 — FPMR performancedata management
Support for performance management.
Chapter 10, “FPMR and Hub 800 performance management”
SAM-87551 — Hub 800 E1 portmanagement
Support for Hub 800 E1 port management.
5.1.4 “E1 ports” (p. 20)
5.3 “To configure a Hub 800 E1 port ” (p. 22)
SAM-87497 and SAM-87950 —Backup configuration
Support for FlexiPacket Microwave device backup configuration.
Chapter 9, “FPMR and Hub 800 device backup”
SAM-87561 — Hub 800 SFP modulesetting
SAM-87599 — Hub 800 SFP GE andEthernet port setting
SAM-87601 — Hub 800 STM-1settings
Support for Hub 800 SFP port management
5.1.6 “SFP ports” (p. 20)
5.5 “To configure a Hub 800 SFP port ” (p. 23)
SAM-87607 — Hub 800 DCN portmanagement.
Support for Hub 800 DCN port management
5.1.9 “DCN port” (p. 21)
SAM-87746 —Hub 800 Port loopback Support for Hub 800 port loopback configuration
5.1.8 “Loopback” (p. 20)
SAM-87749 — Power injector cardmanagement
Support for power injector card.
5.1.7 “Power injector card” (p. 20)
SAM-87866 — FPMR nodemanagement
The 5620 SAM supports the native management of the FPMR device fromRelease 2.5 or later.
What’s new in 5620 SAM Release 14.0 for FlexiPacket Microwave 5620 SAM
8 Issue 13HE-11587-AAAB-TQZZA

Table 1 5620 SAM Release 14.0 R7 FlexiPacket Microwave features (continued)
Feature Description and Reference
SAM-87878 — FPMR loopback Support for performing loopback in FPMR devices.
6.1.7 “Loopback” (p. 28)
SAM-87881 — FPMR - GbEthInterface Configuration
Support for the configuration of FPMR Ethernet port parameters.
6.1.5 “Ethernet port” (p. 28)
SAM-87918 — FPMR - BB ModemConfiguration
Support for the configuration of FPMR BB Modem parameters.
6.1.6 “BB modem” (p. 28)
SAM-87948 — FPMR - RFConfiguration
Support for the configuration of FPMR radio frequency parameters.
6.1.4 “Radio port” (p. 28)
SAM-87967 — FPMR - Networkingsettings
Support for FPMR DCN configuration.
6.1.2 “FPMR device information” (p. 27)
SAM-87980 — FPMR - Radio PortProperty
Support for the configuration of radio port parameters.
6.1.4 “Radio port” (p. 28)
SAM-88004 — FPMR WebLCT launch
SAM-88006 — Hub 800 WebLCTlaunch
You can launch the WebLCT from the 5620 SAM
Chapter 4, “External EMS launch from the 5620 SAM”
SAM-91321 — Hub 800 to FPMR linkdiscovery
SAM-91323 — Hub 800 to Hub 800link discovery
SAM-91935 — FPMR to FPMR linkdiscovery
Support for discovery of links between Hub 800 to Hub 800, Hub 800 toFPMR, and FPMR to FPMR.
Chapter 8, “FPMR and Hub 800 link discovery”
5620 SAM What’s new in 5620 SAM Release 14.0 for FlexiPacket Microwave
Issue 1 93HE-11587-AAAB-TQZZA

What’s new in 5620 SAM Release 14.0 for FlexiPacket Microwave 5620 SAM
10 Issue 13HE-11587-AAAB-TQZZA

2 FlexiPacket Microwave overview
2.1 FlexiPacket Microwave device support
2.1.1 FlexiPacket Microwave devices
FlexiPacket Microwave is a packet microwave system that meets the requirements ofevolved transport networks and has the benefits of an advanced scalable microwaveradio and of a carrier grade Ethernet nodal solution. The FlexiPacket Microwave allowsthe deployment of a cost-effective microwave infrastructure for 3G, WiMAX and LTEbackhaul, high speed wireless Internet networks, fixed broadband access backhaul andprivate wireless networks. The FlexiPacket Microwave solution is a dual mode platform,supporting both packet and hybrid modes on the same hardware.
The 5620 SAM supports the native management of following FlexiPacket Microwavedevices:
• FPMR (ODU)
• Hub 800 (IDU)
2.1.2 FPMR
FPMR is a reliable and flexible microwave radio, which efficiently transports Ethernettraffic in RF bands from 3.5 GHz up to 42 GHz. It is used in different transmissionnetworks: mobile networks, fixed networks, or private networks.
FPMR is composed of three boards:
• Baseband Modem
• RF/IF board
• Power Supply
2.1.3 Hub 800
Hub 800 is an indoor unit, 1U in height, that is used for tail, chain, hub, and aggregationsite application in the mobile backhaul solution. It is connected to and works with outdoorunits (ODUs ) to transfer and receive local traffic to and from remote equipment. Hub800 uses multi-slots structure to support various plug-in cards with various interfaces.With the help of small form-factor pluggables (SFPs), plug-in cards and patch panels,Hub 800 can be connected to various interfaces of local traffic, for example, FE, GE, E1/T1/J1, STM-1 and FlexBus interface.
5620 SAM FlexiPacket Microwave overview
Issue 1 113HE-11587-AAAB-TQZZA

FlexiPacket Microwave device support 5620 SAM
12 Issue 13HE-11587-AAAB-TQZZA

3 FPMR and Hub 800 — device discovery
3.1 Introduction
3.1.1 SNMPv2 management
The 5620 SAM manages the FPMR (IDU) and Hub 800 (ODU) through the SNMPprotocol. Each device supports an SNMP Agent. The default management protocol is thecommunity-based SNMPv2 (SNMPv2C) as defined by ETF RFC 1901. The SNMPnotifications are sent to the 5620 SAM as traps to inform the 5620 SAM of relevantstatus changes in the device. The device inserts a sequential counter in the SNMP trapsthat increments the value for each transmitted trap. The traps that are transmitted todifferent IP destination addresses but containing the same information have the samecounter value. See 3.2 “To configure mediation and discover FPMR and Hub 800devices” (p. 14) for more information about SNMPv2 configuration.
3.1.2 Mediation policy
You must create a mediation security policy to setup the security and communicationinfrastructure between the 5620 SAM and each device within the specified discovery ruleIP range. You can also optionally configure other mediation policies to specify othernetwork mediation tasks such as specifying the polling interval for MIB configurationchanges, how the 5620 SAM processes specific events, and how the 5620 SAM pingsdevices in the network to ensure they are reachable.
You need a SNMPv2 mediation policy with the default community string “private” forread, write, and security access and a SNMPv2 mediation policy with the communitystring “public” for SNMPv2 trap access. See 3.2 “To configure mediation and discoverFPMR and Hub 800 devices” (p. 14) for more information about mediation policyconfiguration.
3.1.3 Discovery rule
You must create a discovery rule and then scan the network for devices according to theIP addresses or address ranges specified in the discovery rule, to discover one or moredevices in your network. See 3.2 “To configure mediation and discover FPMR and Hub800 devices” (p. 14) for more information about discovery rule configuration.
5620 SAM FPMR and Hub 800 — device discovery
Issue 1 133HE-11587-AAAB-TQZZA

3.2 To configure mediation and discover FPMR and Hub 800devices
3.2.1 Purpose
Perform this procedure to configure the mediation policies, and discover the FlexiPacketMicrowave and Hub 800 devices.
3.2.2 Hub 800 and FPMR mediation policy• Hub 800 — You need a SNMPv2 mediation policy with the default community string
“sysmanager” for read, write, and security access and a SNMPv2 mediation policywith the community string “public” for SNMPv2 trap access.
• FPMR — You need a SNMPv2 mediation policy with the default community string“sysmanager” for read, write, trap, and security access.
3.2.3 Steps
Mediation policy configuration
1
Choose Administration→Mediation from the 5620 SAM main menu. The Mediation(Edit) form opens.
2
Configure the parameters on the General tab and verify the SNMP trap parametersin the SNMP Trap panel.
3
Click on the Mediation Security tab and click Create. The Mediation Policy (Create)form opens.
4
Configure the Policy ID and Displayed Name parameters.
5
Configure the Security Model parameter to SNMP v2c.
6
Perform one of the following:
a. Enter ‘public’ in the Community String parameter field, to configure the Hub 800mediation policy for trap access.
To configure mediation and discover FPMR and Hub 800 devices 5620 SAM
14 Issue 13HE-11587-AAAB-TQZZA

b. Enter ‘sysmanager’ in the Community String field, to configure the Hub 800mediation policy for read, write, and security access.
c. Enter ‘sysmanager’ in the Community String parameter field, to configure theFPMR mediation policy for read, write, trap, and security access.
7
Configure the parameters in the SNMP panel.
8
Configure the parameters in the File Transfer and FTP panels.
9
Save your changes and close the form.
Discovery rule configuration
10
Choose Administration→Discovery Manager from the 5620 SAM main menu. TheDiscovery Manager (Edit) form opens.
11
Click Create to configure a new discovery rule. The Create Discovery Rule step formopens.
12
Configure the required parameters in the Specify General Attributes step and clickNext. The Add Rule Elements step form opens.
13
Click Create, configure the required IP parameters, and click OK. The rule element isadded to the list.
14
Click Next. The Add Auto Discovery Rule Elements ACL step form opens.
15
Click Create, configure the required IP parameters, and click OK.
16
Click Next and the Configure Mediation Security step form opens.
5620 SAM To configure mediation and discover FPMR and Hub 800 devices
Issue 1 153HE-11587-AAAB-TQZZA

17
Click Select in each of the following panels to specify the mediation security policies.Choose the mediation security policy with community string configured as listed inTable 2, “Mapping of mediation policy and community string” (p. 15)
Table 2 Mapping of mediation policy and community string
Device Mediation policy Community string
FPMR • Read Access MediationPolicy
• Write Access MediationPolicy
• Trap Access MediationPolicy
• Security AccessMediation Policy
sysmanager
Hub 800 • Read Access MediationPolicy
• Write Access MediationPolicy
• Security AccessMediation Policy
sysmanager
• Trap Access MediationPolicy
public
Note: If you do not specify a policy, the default policy is applied.
18
Click Finish to close the Create Discovery Rule form.
19
Apply your changes in the Discovery Manager form. If the Administrative State of thenewly created discovery rule is set to Up, the 5620 SAM scans the network using thediscovery rule.
END OF STEPS
To configure mediation and discover FPMR and Hub 800 devices 5620 SAM
16 Issue 13HE-11587-AAAB-TQZZA

4 External EMS launch from the 5620 SAM
4.1 WebLCT — Hub 800 and FPMR
4.1.1 Introduction
You can launch the Hub 800 and the FPMR WebLCT programs from the 5620 SAM.
The WebLCT supports:
• NE management
• Interface management
• Ethernet configuration
• Service management
• Clock synchronization settings
• Performance management
• Maintenance
• OAM settings
• Protection settings
• Security management
4.2 To start the WebLCT
4.2.1 Steps
1
Perform the following to specify the web browser to start the WebLCT:
1. Choose Application→User Preferences. The User Preferences form opens.
2. Click Browse beside the Browser Path parameter. The Browser Path form opens.
3. Choose the exe file from the appropriate folder and click Open.
4. Save your changes and close the form.
2
Choose Equipment from the navigation tree view selector. The navigation treedisplays the Equipment tree.
5620 SAM External EMS launch from the 5620 SAM
Issue 1 173HE-11587-AAAB-TQZZA

3
Right-click on a Hub 800 or FPMR device object and choose Launch External EMSBrowser. The WebLCT screen appears on the browser specified in Step 1.
END OF STEPS
To start the WebLCT 5620 SAM
18 Issue 13HE-11587-AAAB-TQZZA

5 Hub 800 object management
5.1 Hub 800 shelf, card, and port objects
5.1.1 Hub 800 device
Hub 800 is an indoor unit that is 1 U in height with the following features:
• Hub 800 has a multi-slot structure for a maximum of two plug-in cards.
• The faceplate accommodates the user interface, management interface, power supplyinterface, alarm interface.
• The grounding point is on the lateral side and the backplate accommodates thestacking and protection interface for dual-IDU structure. LEDs on the faceplateindicate the status of different types of signal or connection.
• The internal fan tray is used for heat dissipation.Hub 800 requires a power supplyinput of -48 V DC. The USB interface is for the USB key.
• A reset button is located besides the USB interface on Hub 800 faceplate.
5.1.2 Shelf, card, and port objects in the 5620 SAM navigation tree
In the equipment navigation tree, shelf objects are children of device objects. Theyappear below the device logical group objects in the navigation tree. Card slot objectsare children of shelf objects, and appear below the shelf object in the navigation tree.Port slot objects are children of card objects, and appear below the card object in thenavigation tree.
The shelf objects appear automatically in the navigation tree when the 5620 SAMdiscovers an Hub 800 device. The shelves cannot be manually added or deleted fromthe 5620 SAM.
5.1.3 Plugin cards
The following plug-in cards are supported in the slots:
• 16-port E1/T1 Multi-Service card
• 4-port GE RJ45 Card
• 4-port SFP Card
• 2-port Power Injector
• 2-port FlexBus Card
See 5.2 “To configure a Hub 800 card” (p. 21) for more information about cardconfiguration.
5620 SAM Hub 800 object management
Issue 1 193HE-11587-AAAB-TQZZA
5.1.4 E1 ports
The E1 ports are located in the faceplate of theHub 800 device and appear below theCard Slot 0 object of the 5620 SAM equipment tree. They are labelled E1 Port 1/0/1 toE1 Port 1/016. The E1 ports are also automatically provisioned when the 16 x E1/T1plug-in card is configured. See 5.3 “To configure a Hub 800 E1 port ” (p. 22) for moreinformation about configuring an E1 port.
5.1.5 Ethernet ports
The Ethernet ports are located in the faceplate of the Hub 800 device and appear belowthe Card Slot 0 object of the 5620 SAM equipment tree. They are labelled ETH Port1/0/1 to ETH Port 1/0/4. See 5.4 “To configure a Hub 800 Ethernet port ” (p. 23) for moreinformation about configuring an Ethernet port.
5.1.6 SFP ports
The SFP ports are located in the faceplate of the Hub 800 device and appear below theCard Slot 0 object of the 5620 SAM equipment tree. They are numbered from 1/0/1 to1/0/2. See 5.5 “To configure a Hub 800 SFP port ” (p. 23) for more information aboutconfiguring an SFP port.
5.1.7 Power injector card
The Power injector card is used to provide power and Ethernet to two ODUs along withthe two ODUs fed with power and Ethernet on the main board. Therefore up to fourODUs can be powered using one IDU. The 5620 SAM supports the configuration of thepower injector card. The power supply panel of the power injector card in displayed onETH1 1/0/1 and ETH2 1/0/2 ports on main board. See 5.2 “To configure a Hub 800 card”(p. 21) for more information about configuring a power injector card.
5.1.8 Loopback
The 5620 SAM supports configuration of the E1, ETH, or SFP ports as loopbackinterfaces. The loopback type is set as local or remote. The release time is configured todetermine the duration of setting the E1 port as a loopback interface. The statusparameter displays the whether the loopback is in progress, completed, or failed. Youcan also configure loopback from the Network Element (Edit) form by clicking on theLoopback tab. All the loopbacks are listed in the Loopback tab of the Network Element(Edit) form. You can create a loopback test only from the port level. You can perform aloopback test and edit the parameters from both port and device levels.
See 5.6 “To configure loopback in Hub 800” (p. 24) for more information aboutconfiguring the E1 port as loopback.
Hub 800 shelf, card, and port objects 5620 SAM
20 Issue 13HE-11587-AAAB-TQZZA

5.1.9 DCN port
DCN port is an Ethernet port for local management through IP packets and it isconnected to the switch in IDU. The 5620 SAM displays the DCN port parameters in theDCN panel of the NE Specifics tab→DCN/OOB sub-tab on the Network Element (Edit)form. The IP address, Subnet mask, Default gateway information, DCN auto discoveryinformation are displayed.
5.1.10 OoB port
The OoB port can be used for out-of-band management or for debug purpose. There aretwo interfaces combined on this port: one is the LCT through Ethernet interface and theother is console through UART interface. This interface creates a managementcommunication channel between the two IDUs in the Dual-IDU configuration. The 5620SAM displays the OoB port parameters in the OOB panel of the NE Specifics tab→DCN/OOB sub-tab on the Network Element (Edit) form. The IP address and Subnet maskinformation are displayed.
5.1.11 Management VLAN
The 5620 SAM displays the management VLAN parameters in the Management VLANtab of the Network Element properties form.
5.2 To configure a Hub 800 card
5.2.1 Purpose
Perform this procedure to configure a card in an empty card slot.
5.2.2 Steps
1
On the equipment tree, expand Network→Hub 800→Shelf→Card Slot (EMPTY)
2
Right-click on the empty Card Slot object and choose Configure Card. The Card Slot(Create) form opens.
3
Configure the required parameters.
5620 SAM To configure a Hub 800 card
Issue 1 213HE-11587-AAAB-TQZZA

Note:
You can configure the following values for the Assigned Card Type parameter:
• 16 x E1/T1 Card
• 2 x FlexBus Card
• 4 x GE card
• 4–port GE SFP Optical Card
• 2 x Power Injector Card
4
Save your changes and close the form.
END OF STEPS
5.3 To configure a Hub 800 E1 port
5.3.1 Steps
1
On the equipment tree, expand Network→Hub 800→Shelf→Card→E1 port.
2
Right-click on the E1 port object and choose properties. The Physical Port (Edit)form opens.
3
Configure the parameters in the General tab.
4
Click on the E1/T1 Specifics tab and configure the parameters.
5
Save your changes and close the form.
END OF STEPS
To configure a Hub 800 E1 port 5620 SAM
22 Issue 13HE-11587-AAAB-TQZZA
5.4 To configure a Hub 800 Ethernet port
5.4.1 Steps
1
On the equipment tree, expand Network→Hub 800→Shelf→Card Slot 0→ETH port.
2
Right-click on the ETH port object and choose properties. The Physical Port (Edit)form opens.
3
Configure the parameters in the General tab.
4
Click on the Ethernet Specifics tab and configure the parameters.
5
Click on the States tab and configure the parameters.
6
Click on the Auto Negotiation tab and configure the parameters.
7
Save your changes and close the form.
END OF STEPS
5.5 To configure a Hub 800 SFP port
5.5.1 Steps
1
On the equipment tree, expand Network→Hub 800→Shelf→Card Slot 0→SFP port.
2
Right-click on the SFP port object and choose properties. The Physical Port (Edit)form opens.
3
Configure the parameters in the General tab.
5620 SAM To configure a Hub 800 Ethernet port
Issue 1 233HE-11587-AAAB-TQZZA

4
Click on the SFP Specifics tab and perform one of the following:
a. Perform the following to configure the SDH parameters:
1. Retain the SFP Mode parameter value as STM-1.
2. Click on the SDH Specifics tab and configure the parameters.
b. Perform the following to configure the Ethernet parameters:
1. Configure the SFP Mode parameter as GbE.
2. Click on the Ethernet Specifics tab and configure the parameters.
3. Click on the Auto Negotiation tab and configure the parameters.
5
Save your changes and close the form.
END OF STEPS
5.6 To configure loopback in Hub 800
5.6.1 Steps
1
On the equipment tree, expand Network→Device→Shelf→Card→Port.
2
Right-click on the port object and choose properties. The Physical Port (Edit) formopens.
3
Click Start Loopback. The Loopback (Create) form opens.
4
Configure the parameters in the Loopback panel and save your changes. TheLoopback tab is activated in the Physical Port (Edit) form.
5
a. Perform one of the following:
Configure loopback in the device level.
1. On the equipment tree, expand Network, right-click on the device object, andchoose Properties. The Network Element (Edit) form opens.
To configure loopback in Hub 800 5620 SAM
24 Issue 13HE-11587-AAAB-TQZZA

2. Click on the Loopback tab, choose a port, and click Properties. The Loopback(Edit) form opens.
3. Configure the parameters in the Loopback panel, save your changes, andclose the form. The Network Element (Edit) form reappears.
4. Choose one or more ports and click Start Loopback. The Loopback statusappears in the Status column.
5. Click Stop Loopback to stop the loopback function.
b. Configure loopback in the port level.
1. On the equipment tree, expand Network→Device→Shelf→Card→Port.
2. Right-click on the port object and choose properties. The Physical Port (Edit)form opens.
3. Click Start Loopback and click on the Loopback tab. The Loopback Statusparameter displays the status as In Progress.
4. Click Stop Loopback to stop the loopback function.
6
Save your changes and close the forms.
END OF STEPS
5620 SAM To configure loopback in Hub 800
Issue 1 253HE-11587-AAAB-TQZZA

To configure loopback in Hub 800 5620 SAM
26 Issue 13HE-11587-AAAB-TQZZA

6 FPMR object management
6.1 FPMR shelf, card, and port objects
6.1.1 Introduction
FPMR has the following functional units:
• BB modem board
• Power supply unit
• RF/IF unit
• Duplexer filter (DPX)
The BB-modem board consists of:
• Gigabit Ethernet Physical Layer
• L2 Switch
• Microprocessor
• Baseband Unit
• Modem Unit
6.1.2 FPMR device information
The 5620 SAM provides the FPMR device information in the Network Element (Edit)form. See 6.2 “To configure FPMR device properties” (p. 29) for more information.
DCN
The 5620 SAM displays the DCN parameters in the DCN panel of the NE Specifics tabon the Network Element (Edit) form. The IP address, Subnet mask, Default gateway, andbase MAC address information are displayed.
Management VLAN
The 5620 SAM displays the management VLAN parameters in the Management VLANtab of the Network Element (Edit) form.
6.1.3 Shelf, card, and port objects in the 5620 SAM navigation tree
After FPMR device discovery, the shelf, card, and port objects appear automatically inthe navigation tree. Each FPMR device has one shelf, one card, and three port objects.The three port objects are, Ethernet port, radio port, and microprocessor port.
5620 SAM FPMR object management
Issue 1 273HE-11587-AAAB-TQZZA

6.1.4 Radio port
The 5620 SAM supports the display and configuration of radio port and radio frequencyparameters for FPMR devices.
You can only view the following parameters:
• Frequency
• ATPC
• Radio port
• Rx AGC
• Duplexer
You can configure the following parameters:
• Continuous wave test
• Hardware mode
See 6.3 “To configure radio port parameters” (p. 29) for more information.
6.1.5 Ethernet port
The Gigabit Ethernet Physical Layer supports a 10/100/1000 Base-T interface towardsthe Gigabit Ethernet and has a GMII interface to the L2 Switch. It is synchronousEthernet compliant. the 5620 SAM supports the configuration of the Ethernet portparameters. See 6.4 “To configure an FPMR Ethernet port ” (p. 30)
6.1.6 BB modem
The 5620 SAM supports the configuration of BB modem parameters which includes:
• Radio port status — See 6.3 “To configure radio port parameters” (p. 29)
• Static modulation — See 6.5 “To configure FPMR modulation — static or ACM” (p. 31)
• Adaptive code modulation (ACM) — See 6.5 “To configure FPMR modulation — staticor ACM” (p. 31)
• ATPC — See 6.3 “To configure radio port parameters” (p. 29)
6.1.7 Loopback
The 5620 SAM supports the configuration of loopbacks in local (signal looped backtowards the GbE cable) and remote (signal looped back towards the radio interface)modes in the FPMR devices. All the loopbacks are enabled for a specified time, afterwhich the loopback is disabled. Not more than one loopback can be enabled at a giventime. When a loopback is enabled, the system moves to a "test mode" configurationdesigned for transmitting back traffic. The differences between the test and the normalare in the L2 switch configuration. When operating in test mode the auto-learning andfiltering functions are disabled; the MAC forwarding table is flushed. During the entire
FPMR shelf, card, and port objects 5620 SAM
28 Issue 13HE-11587-AAAB-TQZZA

duration of the loopback FPMR is not reachable for management. After loopback isperformed, a file is available containing the result of the counters.
You can create a loopback only from port level. You can modify the loopback parametersand perform the loopback test from both the port and device levels. See 6.6 “Toconfigure loopback in FPMR” (p. 33) for more information about configuring loopback inFPMR devices.
6.2 To configure FPMR device properties
6.2.1 Steps
1
On the equipment tree, right-click on an FPMR device object and choose Properties.The Network Element (Edit) form opens.
2
Configure the general parameters:
• Name — ID name of the system
• Location — location of the FPMR device
• Contact Information — contact information for the FPMR device
3
Set the Power Supply Source parameter as:
• External PS — when the power supply source is retrieved from an external device
• Midspam Injector — when the power supply is taken from a power injector that isan off-the-shelf mid-spam high power device
• Switch PSE — when the power supply source is located at the switch device
4
Save your changes and close the form.
END OF STEPS
6.3 To configure radio port parameters
6.3.1 Steps
1
On the equipment tree, expand Network→FPMR device object→Shelf object→CardSlot object.
5620 SAM To configure FPMR device properties
Issue 1 293HE-11587-AAAB-TQZZA

2
Right-click on the Radio Port object and choose Properties. The Physical Port (Edit)form opens.
3
Click on the Radio tab and configure the parameters only in the Test and HWParameters panel. The remaining parameters cannot be configured.
4
Save the changes and close the form.
END OF STEPS
6.4 To configure an FPMR Ethernet port
6.4.1 Steps
1
On the equipment tree, expand Network→FPMR→Shelf→Card Slot.
2
Right-click on the ETH port object and choose properties. The Physical Port (Edit)form opens.
3
Configure the parameters in the General tab.
4
Click on the Auto Negotiation tab and perform one of the following:
a. Set the Auto Negotiation Admin State parameter in the Ethernet Auto Negotiationpanel to Enabled and configure the parameters.
Note: When you set the Auto Negotiation Admin State parameter in theEthernet Auto Negotiation panel to Disabled, except the Auto NegotiationPort Status and the Port Default Type, the remaining parameters disappear.
b. Set the Auto Negotiation Admin State parameter in the Ethernet Auto Negotiationpanel to Disabled, and configure the Port Default Type parameter.
5
Click on the Ethernet Specifics tab and configure the parameters.
To configure an FPMR Ethernet port 5620 SAM
30 Issue 13HE-11587-AAAB-TQZZA

Note: When you set the Shutdown Enable parameter in the InterfaceShutdown on Radio Link Failure panel to Disabled, the remaining parametersin the panel are dimmed.
6
Save your changes and close the form.
END OF STEPS
6.5 To configure FPMR modulation — static or ACM
6.5.1 Steps
1
On the equipment tree, right-click on an FPMR device object and choose Properties.The Network Element (Edit) form opens.
2
Click on the Modulation tab and perform one of the following
a. Configure the static modulation parameters in the Profile Configuration panel.
Figure 1 Static modulation
5620 SAM To configure FPMR modulation — static or ACM
Issue 1 313HE-11587-AAAB-TQZZA
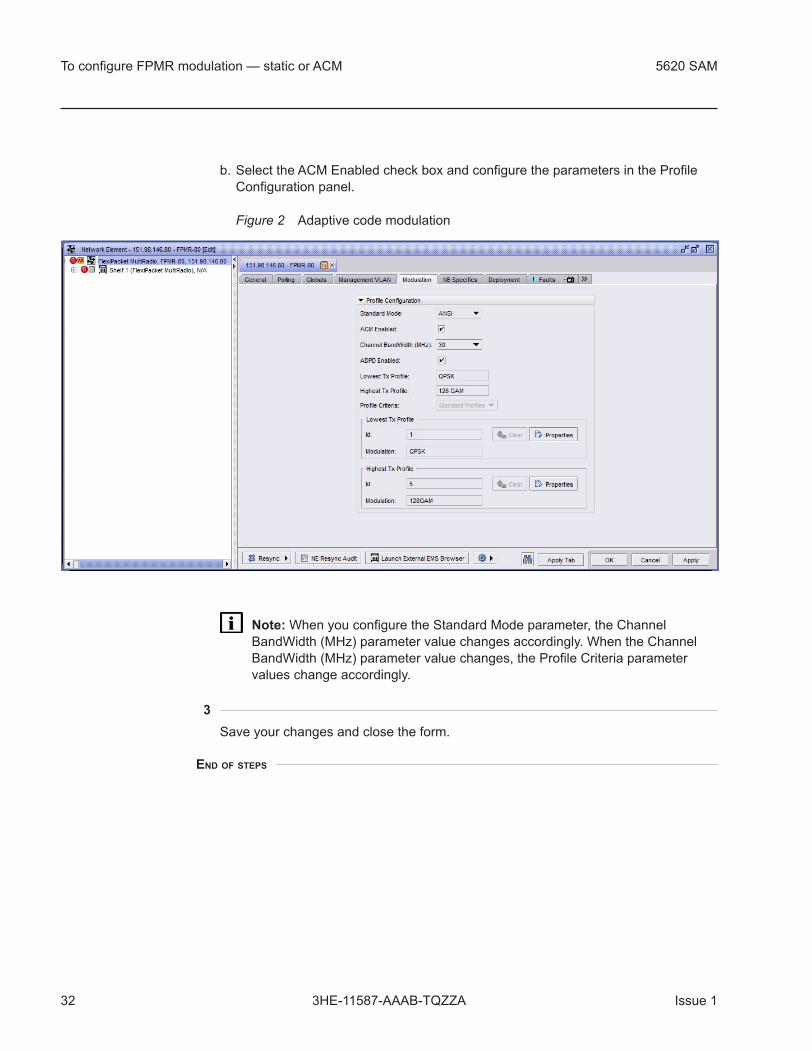
b. Select the ACM Enabled check box and configure the parameters in the ProfileConfiguration panel.
Note: When you configure the Standard Mode parameter, the ChannelBandWidth (MHz) parameter value changes accordingly. When the ChannelBandWidth (MHz) parameter value changes, the Profile Criteria parametervalues change accordingly.
3
Save your changes and close the form.
END OF STEPS
Figure 2 Adaptive code modulation
To configure FPMR modulation — static or ACM 5620 SAM
32 Issue 13HE-11587-AAAB-TQZZA

6.6 To configure loopback in FPMR
6.6.1 Steps
1
On the equipment tree, expand Network→Device→Shelf→Card→Port.
2
Right-click on the port object and choose properties. The Physical Port (Edit) formopens.
3
Click Activate Loopback. The Loopback (Create) form opens.
4
Configure the parameters in the Loopback panel and save your changes. TheLoopback tab is activated in the Physical Port (Edit) form.
5
Save your changes and close the form.
6
a. Perform one of the following to start loopback:
Configure loopback in the device level.
1. On the equipment tree, expand Network, right-click on the device object, andchoose Properties. The Network Element (Edit) form opens.
2. Click on the Loopback tab, choose an entry, and click Properties. TheLoopback (View) form opens.
3. View the parameters in the Loopback panel and the Release Time panel andclose the form. The Network Element (Edit) form reappears.
4. Choose an entry and click Activate Loopback. The Loopback status appears inthe Status column.
5. Click View Results in External Browser to view the results in WebCT.
6. Click Download Results to download the file containing the results of theloopback test.
7. Click Delete Loopback to stop the loopback, if required.
b. Configure loopback in the port level.
1. On the equipment tree, expand Network→Device→Shelf→Card→Port.
5620 SAM To configure loopback in FPMR
Issue 1 333HE-11587-AAAB-TQZZA

2. Right-click on the port object and choose properties. The Physical Port (Edit)form opens.
3. Click on the Loopback tab and configure the parameters, if required, and clickLoopback.
4. Click Delete Loopback to stop the loopback, if required.
7
Save your changes and close the forms.
END OF STEPS
To configure loopback in FPMR 5620 SAM
34 Issue 13HE-11587-AAAB-TQZZA

7 FPMR and Hub 800 inventory management
7.1 Hardware inventory of the equipped cards
7.1.1 Introduction
You can use a 5620 SAM GUI or OSS client to inventory the managed networkequipment. The inventory information is available to GUI clients on equipment list,properties, and management forms. For information about using the 5620 SAM-Ointerface to perform inventory management, see the “Inventory management” chapter ofthe 5620 SAM XML OSS Interface Developer Guide.
Inventory information may be required for the following purposes:• spare equipment management
• SLA audits
• license capacity tracking
7.1.2 Viewing inventory information in the GUI
Using the 5620 SAM Equipment Manager, you can list the license information for thefollowing object types:• cards, using Card (Physical Equipment) as the search criterion
• card child objects
You can use a GUI client to retrieve the inventory information for equipment objects inthe following contexts:• one managed NE
• entire managed network
Note: Not all columns in an inventory list apply to all equipment types.
7.1.3 Generating inventory data for all managed devices
Figure 3, “Generating inventory data for managed devices” (p. 36) shows the steps togenerate inventory data for managed devices.
5620 SAM FPMR and Hub 800 inventory management
Issue 1 353HE-11587-AAAB-TQZZA

7.2 FlexiPacket Microwave device hardware and softwareinventory
7.2.1 FlexiPacket Microwave device hardware inventory
You can view the hardware inventory parameters in the NE Specifics tab→HardwareInventory sub-tab of the Network Element (Edit) form.
7.2.2 FlexiPacket Microwave device software inventory
You can view the software inventory parameters in the NE Specifics tab→SoftwareInventory sub-tab of the Network Element (Edit) form.
Figure 3 Generating inventory data for managed devices
FlexiPacket Microwave device hardware and software inventory 5620 SAM
36 Issue 13HE-11587-AAAB-TQZZA
8 FPMR and Hub 800 link discovery
8.1 Link discovery from 5620 SAM
8.1.1 Introduction
The 5620 SAM supports the discovery of the physical links and radio links.
8.1.2 LLDP
LLDP is supported in FPMR and Hub 800. LLDP is neighbor-discovery protocol thatallows devices to advertise the system key capabilities on the Ethernet LAN and alsolearn the key capabilities of other systems on the same Ethernet LAN. Information likesystem name and description, IP management address, and so on, can be sent orreceived as LLDPDU (LLDP data unit) using SNMP MIB for every station to know theneighbors. LLDP frames are sent at a fixed rate on each port of every station and noacknowledgement is expected from the receiver. One way connectionless data link layerprotocol runs on MAC layer. LLDP allows the 5620 SAM to build the physical topology ofthe network. The 5620 SAM can only get a complete picture of the controlled networkwhen all the devices support LLDP.
8.1.3 Hub 800 to Hub 800 link discovery
The 5620 SAM supports the automatic discovery of the link between two Hub 800devices. See 8.2 “To discover links on Hub 800 and FPMR devices” (p. 38) for moreinformation about link discovery from the 5620 SAM. See the FPMR nodedocumentation for more information about how to perform the connections.
8.1.4 Hub 800 to FPMR link discovery
The 5620 SAM supports the automatic discovery of the link between a Hub 800 and aFPMR. See 8.2 “To discover links on Hub 800 and FPMR devices” (p. 38) for moreinformation about link discovery from the 5620 SAM. See the FPMR nodedocumentation for more information about how to perform the connections.
8.1.5 FPMR to FPMR link discovery
The 5620 SAM supports the automatic discovery of the 1+0 radio link between twoFPMR devices.
See 8.2 “To discover links on Hub 800 and FPMR devices” (p. 38) for more informationabout link discovery from the 5620 SAM. See the FPMR node documentation for moreinformation about how to perform the connections.
5620 SAM FPMR and Hub 800 link discovery
Issue 1 373HE-11587-AAAB-TQZZA

8.1.6 Links on the topology map
The links appear as follows on the 5620 SAM topology map:
• Link between two FPMR devices (Radio link) — dotted line
• Link between two Hub 800 devices (Ethernet link) — solid line
• Link between a Hub 800 and a FPMR devices (Ethernet link) — solid line
When two FPMR devices have a radio link and one of the device is un-managed, theradio link is deleted from topology map.
When two Hub 800 devices have a Ethernet link and one of the device is un-managed,the Ethernet link points to the Unmanaged NE group in topology map.
When Hub 800 and FPMR devices have a Ethernet link and one of the device is un-managed, the Ethernet link points to the Unmanaged NE group in topology map.
8.2 To discover links on Hub 800 and FPMR devices
8.2.1 Steps
1
On the equipment tree, expand Network→Hub 800 or FPMR→Shelf→Card Slot→ETH or Radio port.
2
Right-click on the port object that is one end of the link and choose properties. ThePhysical Port (Edit) form opens.
3
Click on the LLDP tab and set the Administrative Status as Tx, Rx, or Tx and Rx.
Note:
• If the Administrative Status parameter is correctly configured, and the 5620SAM has discovered the devices, then the 5620 SAM automaticallydiscovers the physical and radio links.
• If the Administrative Status parameter is set to Down, the link is deleted.
• If the5620 SAM has not discovered the neighboring device, an Ethernet linkis automatically created to the unmanaged device. The radio link is onlycreated if both devices are discovered in the 5620 SAM.
4
Save your changes and close the form.
To discover links on Hub 800 and FPMR devices 5620 SAM
38 Issue 13HE-11587-AAAB-TQZZA

5
Repeat Step 1 to Step 4 for port that is the other end of the link.
6
Right click on both the port objects (that are end points of the link) on the equipmenttree and choose Turn Up. The link appears between the nodes on the topology map.
Note: The radio links appear as dotted lines and the physical links appear assolid lines on the topology map.
END OF STEPS
5620 SAM To discover links on Hub 800 and FPMR devices
Issue 1 393HE-11587-AAAB-TQZZA

To discover links on Hub 800 and FPMR devices 5620 SAM
40 Issue 13HE-11587-AAAB-TQZZA

9 FPMR and Hub 800 device backup
9.1 Backup
9.1.1 Backup policy
A 5620 SAM backup policy specifies the conditions under which the 5620 SAM performsdevice configuration backups. A FPMR or a Hub 800 that is not associated with a policyis assigned to a Dragon Wave Based Default Policy, but you can create multipleadditional policies and assign FlexiPacket Microwave devices to the policies according toyour requirements. See 9.2 “To configure a backup policy for a FPMR or Hub 800device”(p. 42) for more information about configuring a backup policy.
A backup policy specifies settings that include the following:
• the backup schedule
• the files that a backup is to retrieve
• the type of file compression to use, if any
• the age and number of backup files that the 5620 SAM retains
9.1.2 On-demand backup
An on-demand backup takes priority over scheduled backup operations, and isprocessed as soon as the 5620 SAM has the required resources. A 5620 SAM user thathas the network element software management scope of command role can performdevice backup operations. See 9.3 “To perform an on-demand backup for a FPMR orHub 800 device” (p. 43) for more information about performing an on-demand backup.
9.1.3 Backup status
You can view the status of backup. See 9.4 “To view the backup status of a FPMR orHub 800 device” (p. 44) for more information.
9.1.4 Export backup file
You can export a backup file set from the 5620 SAM to a GUI client file system. See9.5 “To export a device configuration backup” (p. 45) for more information.
9.1.5 Import backup file
You can import a backup file set from a GUI client file system to the 5620 SAM. See9.6 “To import a FlexiPacket Microwave device configuration backup” (p. 46)
5620 SAM FPMR and Hub 800 device backup
Issue 1 413HE-11587-AAAB-TQZZA

9.1.6 Trap destination
Backup only works when the trap destination, that is, the management system IPaddress and the ports to receive traps, are configured on the FlexiPacket MicrowaveUser Guide and Hub 800 devices. During the 5620 SAM discovery of the FlexiPacketMicrowave User Guide and Hub 800 devices, the 5620 SAM automatically sets the trapdestination. In case the devices reject the trap destination set request, the 5620 SAMgenerates the TrapDestinationNotSet alarm. If you initiate backup in this scenario, theback up fails and the “Time Out Receiving Trap” error message is displayed. Initiate abackup only if the TrapDestinationNotSet alarm is not present in the 5620 SAM.
You need to configure the trap destination manually using the WebCT. See the nodedocumentation for more information.
9.1.7 Delete backups
You can delete the backup files from the 5620 SAM. See 9.7 “To delete backups ” (p. 47)for more information.
9.2 To configure a backup policy for a FPMR or Hub 800device
9.2.1 Steps
1
Choose Administration→NE Maintenance→Backup/Restore from the 5620 SAMmain menu. The Backup/Restore form opens.
2
Click on the Backup/Restore Policy tab.
3
Click Create, or select the Dragon Wave Based Default Policy and click Properties.The Backup Policy (Create | Edit) form opens.
4
Configure the required parameters.
5
Configure the Policy Type parameter as Dragon Wave Node if you are creating thepolicy.
To configure a backup policy for a FPMR or Hub 800device 5620 SAM
42 Issue 13HE-11587-AAAB-TQZZA

6
Configure the parameters in the Backup Triggering, Backup Purging panels, andDragon Wave BAckup/Restore Settings panels.
You can schedule backups based on a time interval, or based on the number ofconfiguration saves initiated by the 5620 SAM.
Backup purge parameters allow you to specify the number of backup files that areretained. The purge settings eliminate the need for manual backup file deletion. Thepurge criteria can be the number of files, the age of the files, or both.
7
Click Apply.
8
Click on the Backup/Restore Policy Assignment tab and assign one or moreFlexiPacket Microwave devices to the policy, as required.
9
Close the form.
END OF STEPS
9.3 To perform an on-demand backup for a FPMR or Hub 800device
9.3.1 Prerequisites
The following must be true in order for you to perform this procedure:
• You have a 5620 SAM user account with an administrator or network element softwaremanagement scope of command role, or a scope of command role with write accessto the mediation package.
• FTP is configured in the FlexiPacket Microwave mediation policy. See 3.2 “Toconfigure mediation and discover FPMR and Hub 800 devices” (p. 14).
9.3.2 Steps
1
Choose Administration→NE Maintenance→Backup/Restore from the 5620 SAMmain menu. The Backup/Restore form opens.
2
Click on the Backup/Restore Status tab. The managed devices are listed.
5620 SAM To perform an on-demand backup for a FPMR or Hub 800 device
Issue 1 433HE-11587-AAAB-TQZZA

3
Select a FlexiPacket Microwave device and click Backup.
4
Click Yes. The operation begins, and the current operation state is indicated in theappropriate column.
Note: The backup is successful only when the trap destination is configured onthe FlexiPacket Microwave devices. The 5620 SAM configures the trapdestination automatically during device discovery. If the device rejects the trapdestination request, configure the trap destination using the WebLCT. See thecustomer documentation for FlexiPacket Microwave device WebLCT for moreinformation about configuring the trap destination using the WebLCT.
5
You can resynchronize the device with the 5620 SAM, if required, by clickingResync.
6
Close the form.
END OF STEPS
9.4 To view the backup status of a FPMR or Hub 800 device
9.4.1 Steps
1
Choose Administration→NE Maintenance→Backup/Restore from the 5620 SAMmain menu. The Backup/Restore form opens.
2
Click on the Backup/Restore Status tab. The column displays Backup State statusfor each listed devices as follows:
• Not Attempted—The operation has not begun.
• Transferring Files—A file transfer is in progress.
• Success—The operation is complete and successful.
• Failure—The operation is complete but unsuccessful.
3
To view more information about the operations performed on a FlexiPacketMicrowave device, select the FlexiPacket Microwave device and click Properties.
To view the backup status of a FPMR or Hub 800 device 5620 SAM
44 Issue 13HE-11587-AAAB-TQZZA

The NE Backup/Restore Status form opens. The Last Operation Details indicatordescribes the most recent operation type.
4
Click on the Backups tab to display a list of the recent device backups, if required.
5
Close the forms.
END OF STEPS
9.5 To export a device configuration backup
9.5.1 Steps
Perform this procedure to export a backup file set from the 5620 SAM to a GUI client filesystem.
1
Choose Administration→NE Maintenance→Backup/Restore from the 5620 SAMmain menu. The Backup/Restore form opens.
2
Click on the Backup/Restore Status tab.
3
Select the FlexiPacket Microwave device for which you are exporting a backup andclick Properties. The NE Backup/Restore Status form opens.
4
Click on the Backups tab. A list of backups for the FlexiPacket Microwave device isdisplayed.
5
Select a backup and click Export. A file browser form opens.
6
Specify the local directory that is to contain the exported file set and click OK. Thebackup file set is saved in the directory.
5620 SAM To export a device configuration backup
Issue 1 453HE-11587-AAAB-TQZZA

7
Close the forms.
END OF STEPS
9.6 To import a FlexiPacket Microwave device configurationbackup
9.6.1 Steps
Perform this procedure to import a backup file set from a GUI client file system to the5620 SAM.
1
Choose Administration→NE Maintenance→Backup/Restore from the 5620 SAMmain menu. The Backup/Restore form opens.
2
Click on the Backup/Restore Status tab.
3
Select the FlexiPacket Microwave device for which you are importing a backup andclick Properties. The NE Backup/Restore Status form opens.
4
Click Import. A file browser form opens.
5
Specify the directory that contains the backup file set and click OK. The 5620 SAMimports and stores the backup file set.
6
Close the forms.
END OF STEPS
To import a FlexiPacket Microwave device configuration backup 5620 SAM
46 Issue 13HE-11587-AAAB-TQZZA
9.7 To delete backups
9.7.1 Steps
1
Choose Administration→NE Maintenance→Backup/Restore from the 5620 SAMmain menu. The Backup/Restore form opens.
2
Click on the Backup/Restore Status tab.
3
Select the FlexiPacket Microwave device for which you are deleting backups andclick Properties. The NE Backup/Restore Status form opens.
4
Click on the Backups tab, select backups, and click Delete.
5
Close the forms.
END OF STEPS
5620 SAM To delete backups
Issue 1 473HE-11587-AAAB-TQZZA

To delete backups 5620 SAM
48 Issue 13HE-11587-AAAB-TQZZA

10 FPMR and Hub 800 performancemanagement
10.1 Collecting and reporting statistics
10.1.1 Statistics policy
The 5620 SAM supports collecting and reporting statistics from the managed FPMRdevices. You can use the 5620 SAM GUI to view statistics data in tabular or graphicalform, and save the tabular or graphical data to a file. A 5620 SAM OSS client canretrieve statistics data using the 5620 SAM-O interface. See 5620 SAM StatisticsManagement Guide for more information about statistics management.
To collect performance or accounting statistics, the 5620 SAM uses policies that specifythe following:
• the network or service objects to collect statistics from
• the statistics counters to collect
• the collection rate
• how long the 5620 SAM is to retain the collected statistics data
The FPMR and Hub 800 devices use the 5620 SAM default policy and the policy appliesautomatically when the devices are managed by the 5620 SAM.
10.1.2 Collection interval
The collection interval for each counter in the default policy is 15 min, and collection isdisabled by default to conserve NE resources. The FPMR and Hub 800 counters arecollected for a time interval of 15 min and 24 hrs. Four bins are collected in 24 hrs and16 bins are collected in 15 min, including the current bin.
You can configure the polling interval to decrease the collection frequency, if duplicaterecords are collected at shorter time intervals. See 10.6 “To configure polling for a MIBstatistics class” (p. 54) for more information about configuring the polling interval.
10.1.3 Retention period
Statistics are stored for a configurable retention period that is defined in a 5620 SAMstatistics policy. When the retention period elapses, the statistics are removed. However,statistics that are collected for real-time display are not stored; the statistics are availableonly for the duration of the current session, and only for the operator that initiates thesession. See 10.4 “To configure retention time ” (p. 52) for more information aboutconfiguring the retention period.
5620 SAM FPMR and Hub 800 performance management
Issue 1 493HE-11587-AAAB-TQZZA

10.1.4 Scheduled and on-demand
Performance statistics counters are collected from NE MIBs using SNMP. The collectioncan be scheduled, or performed on demand. See 10.5 “To collect and display thestatistics values” (p. 52) for more information.
10.2 FPMR counters
10.2.1 Ethernet and radio port counters
The statistics data is available in the Statistics tab of the radio port and Ethernet portPhysical Port (Edit) form. See 5620 SAM Statistics Management Guide for the detailedlist of the counters and the descriptions.
The counters are collected for classes:
• Ethernet Port Current Data Stats — 15 Min
• Ethernet Port Current Data Stats — 24 Hrs
• Ethernet Port History Stats — 15 Min
• Ethernet Port History Stats — 24 Hrs
• Interface Additional Statistics
• Interface Statistics
• LLDP Frame Reception Stats
• LLDP Frame Transmission Stats
10.2.2 RSPI counters
The statistics data is available in the Statistics tab of the Network Element (Edit) form.See 5620 SAM Statistics Management Guide for the detailed list of the counters and thedescriptions.
The counters are collected for classes:
• RSPI Rx Current Data Stats — 15 Min
• RSPI Rx Current Data Stats — 24 Hrs
• RSPI Rx History Stats — 15 Min
• RSPI Rx History Stats — 24 Hrs
• RSPI Tx Current Data Stats — 15 Min
• RSPI Tx Current Data Stats — 24 Hrs
• RSPI Tx History Stats — 15 Min
• RSPI Tx History Stats — 24 Hrs
• LLDP System Stats
FPMR counters 5620 SAM
50 Issue 13HE-11587-AAAB-TQZZA

10.2.3 ACM counters
The ACM profile modulation types are listed in the ACM Profile tab of the NetworkElement (Edit) form. Choose the modulation type and click Properties ACM Profile (View)form opens. The statistics data is available in the Statistics tab of the ACM Profile (View)form. See 5620 SAM Statistics Management Guide for the detailed list of the countersand the descriptions.
The counters are collected for classes:
• ACM Current Data Stats — 15 Min
• ACM Current Data Stats — 24 Hrs
• ACM History Stats — 15 Min
• ACM History Stats — 24 Hrs
10.3 Hub 800 counters
10.3.1 E1 port counters
The statistics data is available in the Statistics tab of the E1 port Physical Port (Edit)form. See 5620 SAM Statistics Management Guide for the detailed list of the countersand the descriptions.
The counters are collected for classes:
• E1 Port Additional History Stats — 15 Min
• E1 Port Additional History Stats — 24 Hrs
• E1 Port Current Additional Statistics — 15 Min
• E1 Port Current Additional Statistics — 24 Hrs
• E1 Port Current Statistics — 15 Min
• E1 Port Current Statistics — 24 Hrs
• E1 Port History Stats — 15 Min
• E1 Port History Stats — 24 Hrs
10.3.2 Ethernet port counters
The statistics data is available in the Statistics tab of the Ethernet port Physical Port(Edit) form. See 5620 SAM Statistics Management Guide for the detailed list of thecounters and the descriptions.
The counters are collected for classes:
• Ethernet Port Current Data Stats — 15 Min
• Ethernet Port Current Data Stats — 24 Hrs
• Ethernet Port History Stats — 15 Min
• Ethernet Port History Stats — 24 Hrs
5620 SAM Hub 800 counters
Issue 1 513HE-11587-AAAB-TQZZA

• LLDP Frame Reception Stats
• LLDP Frame Transmission Stats
10.4 To configure retention time
10.4.1 Steps
1
On the navigation tree, expand Network→FPMR or Hub 800→Shelf→CardSlot→Port.
2
Right-click on the Port and choose Properties. The Physical Port (Edit) form opens.
3
Click on the Statistics tab and choose an object type from the Select Object Typedrop-down menu.
4
Click Statistics Policies and choose the Statistics Policy from the drop-down menu.The Statistics Policy form opens.
5
Configure the required parameters.
6
Click Purge Statistics Records to purge all statistics records, if required.
7
Save your changes and close the forms.
END OF STEPS
10.5 To collect and display the statistics values
10.5.1 Steps
1
Open the properties form of the object for which you want to view statistics. TheGeneral tab is displayed.
To configure retention time 5620 SAM
52 Issue 13HE-11587-AAAB-TQZZA

2
Click on the Statistics tab and perform one of the following.
a. View scheduled statistics.
1. Choose a statistics class that is not identified as on-demand from the objectdrop-down menu.
2. Specify a filter to create a filtered list of statistics records, if required, and clickSearch.
b. View on-demand statistics.
1. Choose a statistics class identified as on-demand from the object drop-downmenu.
2. Specify a filter to create a filtered list of statistics records, if required, and clickCollect.
Note: The Collect button is not displayed when you choose a statistics classthat does not support on-demand statistics collection.
c. View statistics for all classes.
1. Choose a statistics class identified as on-demand from the object drop-downmenu.
Note: The Collect and Collect All buttons are not displayed when you choose astatistics class that is not identified as on-demand.
2. Specify a filter to create a filtered list of statistics records, if required.
3. Click Collect All to collect statistics for all classes.
3
Choose a statistics record and perform one of the following.
a. Scroll horizontally to view the statistics counter values for the statistics record.
b. Open the statistics record to view it.
1. Select the statistics record and click on the Properties button. The StatisticsRecord form opens.
2. View the statistics record.
3. Click on the Close button to close the Statistics Record form.
4
Close the object properties form.
END OF STEPS
5620 SAM To collect and display the statistics values
Issue 1 533HE-11587-AAAB-TQZZA

10.6 To configure polling for a MIB statistics class
10.6.1 Steps
1
Choose an object on which to configure the MIB statistics polling interval.
2
Right-click on the object and choose Properties from the contextual menu. Theproperties form for the object opens with the General tab displayed.
3
Click on the Statistics tab.
4
Choose a statistics class from the object drop-down menu.
5
Click on the Statistics Policies button and choose MIB Entry Policy from the drop-down menu. The MIB Entry Policy form opens with the General tab displayed.
Note: The MIB Entry Policy menu item is dimmed if you choose an invalidperformance statistics class.
6
Configure the parameters:
• Polling Interval
• Administrative State
• Number of Varbind per PDU
7
Click on the OK button. A dialog box appears.
8
Click on the Yes button. The MIB Entry Policy form closes and the object propertiesform reappears.
9
Close the object properties form.
END OF STEPS
To configure polling for a MIB statistics class 5620 SAM
54 Issue 13HE-11587-AAAB-TQZZA

11 FPMR and Hub 800 alarm management
11.1 Overview
11.1.1 Introduction
The 5620 SAM supports alarms of FPMR and Hub 800 devices.
See the following for more information:
• 5620 SAM User Guide for information about alarm behavior, configuring alarmpolicies, and general information about using the Alarm Window
• 5620 SAM Troubleshooting Guide for workflows that describe acknowledging,clearing, and correlating alarms using the 5620 SAM
• 5620 SAM Alarm Reference for a list of alarms and events that the 5620 SAM canraise for the FPMR and Hub 800 devices and all other supported NE types
11.1.2 Fault correlation to network topology
The faults affecting the radio and Ethernet ports are correlated to the correspondingradio link or physical link. When you double-click on the Ethernet link or radio link on thetopology map that is red in color, the faults are listed in the Faults→Affecting Alarms sub-tab of the Radio or Ethernet Link (Edit) form.
5620 SAM FPMR and Hub 800 alarm management
Issue 1 553HE-11587-AAAB-TQZZA

Overview 5620 SAM
56 Issue 13HE-11587-AAAB-TQZZA

12 FPMR and Hub 800 license management
12.1 License management
12.1.1 Overview
You can view the 5620 SAM license information by choosing Help→5620 SAM LicenseInformation from the 5620 SAM main menu. The 5620 SAM License form listsinformation that includes the following, which you can export to a file, if required:• 5620 SAM software release and license type
• main server associated with the license
• licensed 5620 SAM software options
• total consumed and remaining license points
• number of allowed operator positions
12.2 Feature license reporting
12.2.1 Introduction
You can view the current available feature licenses and the operating status on theLicense tab of the Network Element (Edit) form.
5620 SAM FPMR and Hub 800 license management
Issue 1 573HE-11587-AAAB-TQZZA

Feature license reporting 5620 SAM
58 Issue 13HE-11587-AAAB-TQZZA


![FlexiPacket Microwave Smart Evolution to All-IP Backhaul[1]](https://static.fdocuments.us/doc/165x107/547728405806b550068b45b3/flexipacket-microwave-smart-evolution-to-all-ip-backhaul1.jpg)


