55439-Desktop Integration Suite User Guide
120
Cover Page Desktop Integration Suite User Guide 10 g Release 3 (10.1.3.3.1) July 2007
-
Upload
uzair-arain -
Category
Documents
-
view
229 -
download
0
Transcript of 55439-Desktop Integration Suite User Guide

7/24/2019 55439-Desktop Integration Suite User Guide
http://slidepdf.com/reader/full/55439-desktop-integration-suite-user-guide 1/120
Cover Page
Desktop Integration Suite User Guide
10 g Release 3 (10.1.3.3.1)
July 2007

7/24/2019 55439-Desktop Integration Suite User Guide
http://slidepdf.com/reader/full/55439-desktop-integration-suite-user-guide 2/120
Desktop Integration Suite User Guide, 10 g Release 3 (10.1.3.3.1)
Copyright © 2007, Oracle. All rights reserved.
Contributing Authors: Ron van de Crommert
The Programs (which include both the software and documentation) contain proprietary information; they
are provided under a license agreement containing restrictions on use and disclosure and are also protected by
copyright, patent, and other intellectual and industrial property laws. Reverse engineering, disassembly, or
decompilation of the Programs, except to the extent required to obtain interoperability with other independently
created software or as specified by law, is prohibited.
The information contained in this document is subject to change without notice. If you find any problems in the
documentation, please report them to us in writing. This document is not warranted to be error-free. Except as may
be expressly permitted in your license agreement for these Programs, no part of these Programs may be reproduced
or transmitted in any form or by any means, electronic or mechanical, for any purpose.
If the Programs are delivered to the United States Government or anyone licensing or using the Programs on behalf
of the United States Government, the following notice is applicable:
U.S. GOVERNMENT RIGHTS Programs, software, databases, and related documentation and technical data
delivered to U.S. Government customers are "commercial computer software" or "commercial technical data"
pursuant to the applicable Federal Acquisition Regulation and agency-specific supplemental regulations. As such,
use, duplication, disclosure, modification, and adaptation of the Programs, including documentation and technical
data, shall be subject to the licensing restrictions set forth in the applicable Oracle license agreement, and, to the
extent applicable, the additional rights set forth in FAR 52.227-19, Commercial Computer Software--Restricted
Rights (June 1987). Oracle USA, Inc., 500 Oracle Parkway, Redwood City, CA 94065.
The Programs are not intended for use in any nuclear, aviation, mass transit, medical, or other inherently dangerous
applications. It shall be the licensee's responsibility to take all appropriate fail-safe, backup, redundancy and other
measures to ensure the safe use of such applications if the Programs are used for such purposes, and we disclaim
liability for any damages caused by such use of the Programs.
Oracle, JD Edwards, PeopleSoft, and Siebel are registered trademarks of Oracle Corporation and/or its affiliates.
Other names may be trademarks of their respective owners.
The Programs may provide links to Web sites and access to content, products, and services from third parties.
Oracle is not responsible for the availability of, or any content provided on, third-party Web sites. You bear all
risks associated with the use of such content. If you choose to purchase any products or services from a third party,
the relationship is directly between you and the third party. Oracle is not responsible for: (a) the quality of third-
party products or services; or (b) fulfilling any of the terms of the agreement with the third party, including
delivery of products or services and warranty obligations related to purchased products or services. Oracle is not
responsible for any loss or damage of any sort that you may incur from dealing with any third party.

7/24/2019 55439-Desktop Integration Suite User Guide
http://slidepdf.com/reader/full/55439-desktop-integration-suite-user-guide 3/120
Desktop Integration Suite User Guide iii
T a b l e o f C o n t e n t s
Chapter 1: Introduction
Overview . . . . . . . . . . . . . . . . . . . . . . . . . . . . . . . . . . . . . . . . . . . . . . . . . . .1-1
About Desktop Integration Suite . . . . . . . . . . . . . . . . . . . . . . . . . . . . . . . . .1-1
About This Guide . . . . . . . . . . . . . . . . . . . . . . . . . . . . . . . . . . . . . . . . . . . . .1-2
What’s New . . . . . . . . . . . . . . . . . . . . . . . . . . . . . . . . . . . . . . . . . . . . . . . . .1-2
Chapter 2: Managing Content With Content Server Folders
Overview . . . . . . . . . . . . . . . . . . . . . . . . . . . . . . . . . . . . . . . . . . . . . . . . . . .2-1
Folders Terms and Concepts. . . . . . . . . . . . . . . . . . . . . . . . . . . . . . . . . . . .2-2
Content Server Folders . . . . . . . . . . . . . . . . . . . . . . . . . . . . . . . . . . . . .2-2
File Names. . . . . . . . . . . . . . . . . . . . . . . . . . . . . . . . . . . . . . . . . . . . . . .2-3
Metadata . . . . . . . . . . . . . . . . . . . . . . . . . . . . . . . . . . . . . . . . . . . . . . . .2-3
Folder Inheritance . . . . . . . . . . . . . . . . . . . . . . . . . . . . . . . . . . . . . . . . .2-4
Security . . . . . . . . . . . . . . . . . . . . . . . . . . . . . . . . . . . . . . . . . . . . . . . . .2-5
Content Server Folders Overview . . . . . . . . . . . . . . . . . . . . . . . . . . . . . . . .2-5
Accessing Folders Through Windows Explorer . . . . . . . . . . . . . . . . . . .2-6
Accessing Folders Through Microsoft Outlook . . . . . . . . . . . . . . . . . . .2-7
Accessing Folders Through Lotus Notes Mail . . . . . . . . . . . . . . . . . . . .2-7
The Folders Directory Structure. . . . . . . . . . . . . . . . . . . . . . . . . . . . . . .2-8
Overview of Folders Menu Options . . . . . . . . . . . . . . . . . . . . . . . . . . . . . . .2-9
Top-Level Folder Options . . . . . . . . . . . . . . . . . . . . . . . . . . . . . . . . . . .2-9
In Windows Explorer . . . . . . . . . . . . . . . . . . . . . . . . . . . . . . . . . . .2-10In Your E-Mail Client . . . . . . . . . . . . . . . . . . . . . . . . . . . . . . . . . . .2-10
Server Options. . . . . . . . . . . . . . . . . . . . . . . . . . . . . . . . . . . . . . . . . . .2-11
Folder Options . . . . . . . . . . . . . . . . . . . . . . . . . . . . . . . . . . . . . . . . . . .2-12
Folder Options When Nothing is Selected. . . . . . . . . . . . . . . . . . . . . .2-13
Content Options. . . . . . . . . . . . . . . . . . . . . . . . . . . . . . . . . . . . . . . . . .2-14
Viewing the Content Information Page. . . . . . . . . . . . . . . . . . . . . . . . . . . .2-15

7/24/2019 55439-Desktop Integration Suite User Guide
http://slidepdf.com/reader/full/55439-desktop-integration-suite-user-guide 4/120
iv Desktop Integration Suite User Guide
Table of Contents
Working With Servers . . . . . . . . . . . . . . . . . . . . . . . . . . . . . . . . . . . . . . . .2-17
Adding a Content Server Connection . . . . . . . . . . . . . . . . . . . . . . . . .2-18
Connecting to a Content Server . . . . . . . . . . . . . . . . . . . . . . . . . . . . .2-19
Logging Onto the Content Server . . . . . . . . . . . . . . . . . . . . . . . . . . . .2-20
Viewing Server Properties . . . . . . . . . . . . . . . . . . . . . . . . . . . . . . . . . .2-21
Searching a Content Server . . . . . . . . . . . . . . . . . . . . . . . . . . . . . . . .2-21
Logging Off a Content Server . . . . . . . . . . . . . . . . . . . . . . . . . . . . . . .2-22
Removing a Server Connection. . . . . . . . . . . . . . . . . . . . . . . . . . . . . .2-23
Working With Folders. . . . . . . . . . . . . . . . . . . . . . . . . . . . . . . . . . . . . . . . .2-23
Adding a Folder . . . . . . . . . . . . . . . . . . . . . . . . . . . . . . . . . . . . . . . . . .2-23
Copying and Pasting a Folder . . . . . . . . . . . . . . . . . . . . . . . . . . . . . . .2-24
Renaming a Folder . . . . . . . . . . . . . . . . . . . . . . . . . . . . . . . . . . . . . . .2-25
Deleting a Folder . . . . . . . . . . . . . . . . . . . . . . . . . . . . . . . . . . . . . . . . .2-26
Viewing Folder Properties . . . . . . . . . . . . . . . . . . . . . . . . . . . . . . . . . .2-26
Working With Content . . . . . . . . . . . . . . . . . . . . . . . . . . . . . . . . . . . . . . . .2-27
Checking In Content . . . . . . . . . . . . . . . . . . . . . . . . . . . . . . . . . . . . . .2-27
Checking Out Content . . . . . . . . . . . . . . . . . . . . . . . . . . . . . . . . . . . . .2-28
Copying and Pasting Content . . . . . . . . . . . . . . . . . . . . . . . . . . . . . . .2-29
Copying Links . . . . . . . . . . . . . . . . . . . . . . . . . . . . . . . . . . . . . . . . . . .2-30
Viewing Content Properties . . . . . . . . . . . . . . . . . . . . . . . . . . . . . . . . .2-31
Renaming Content. . . . . . . . . . . . . . . . . . . . . . . . . . . . . . . . . . . . . . . .2-32
Changing the Column Display . . . . . . . . . . . . . . . . . . . . . . . . . . . . . . .2-32
Deleting Content . . . . . . . . . . . . . . . . . . . . . . . . . . . . . . . . . . . . . . . . .2-34
Viewing Content. . . . . . . . . . . . . . . . . . . . . . . . . . . . . . . . . . . . . . . . . .2-34
Copying and Pasting Between Applications . . . . . . . . . . . . . . . . . . . .2-34 Attaching Content to an E-Mail Message. . . . . . . . . . . . . . . . . . . . . . . . . .2-35
Attaching Content From the Content Server . . . . . . . . . . . . . . . . . . . .2-35
Attaching Content From the File System . . . . . . . . . . . . . . . . . . . . . . .2-37
Attaching Content From an Offline Location . . . . . . . . . . . . . . . . . . . .2-37
Working With Shortcuts . . . . . . . . . . . . . . . . . . . . . . . . . . . . . . . . . . . . . . .2-38
Syndicating Content. . . . . . . . . . . . . . . . . . . . . . . . . . . . . . . . . . . . . . . . . .2-38
About Syndication . . . . . . . . . . . . . . . . . . . . . . . . . . . . . . . . . . . . . . . .2-39
Marking Content for Syndication . . . . . . . . . . . . . . . . . . . . . . . . . . . . .2-39
Downloading the Most Recent Revision of Syndicated Content . . . . .2-40
Managing Content Available for Offline Use . . . . . . . . . . . . . . . . . . . .2-41Customizing the Offline Content Manager Display . . . . . . . . . . . .2-41
Checking the Status . . . . . . . . . . . . . . . . . . . . . . . . . . . . . . . . . . .2-42
Viewing Syndicated Content . . . . . . . . . . . . . . . . . . . . . . . . . . . . .2-42
Refreshing Syndicated Content . . . . . . . . . . . . . . . . . . . . . . . . . .2-42
Unsyndicating Content and Folders . . . . . . . . . . . . . . . . . . . . . . .2-43
Checking in an Offline Content Item . . . . . . . . . . . . . . . . . . . . . . .2-43
Viewing Properties of Offline Content . . . . . . . . . . . . . . . . . . . . . .2-43

7/24/2019 55439-Desktop Integration Suite User Guide
http://slidepdf.com/reader/full/55439-desktop-integration-suite-user-guide 5/120
Desktop Integration Suite User Guide v
Table of Contents
Opening the Offline Content Manager. . . . . . . . . . . . . . . . . . . . . . . . .2-43
Working Offline . . . . . . . . . . . . . . . . . . . . . . . . . . . . . . . . . . . . . . . . . .2-44
The Offline Content Manager Filter. . . . . . . . . . . . . . . . . . . . . . . .2-44
Offline PropertiesDialog Box . . . . . . . . . . . . . . . . . . . . . . . . . . . . .2-46
Chapter 3: Managing Content Through the Common DialogsInterface
Overview . . . . . . . . . . . . . . . . . . . . . . . . . . . . . . . . . . . . . . . . . . . . . . . . . . .3-1
The User Interface . . . . . . . . . . . . . . . . . . . . . . . . . . . . . . . . . . . . . . . . . . . .3-2
Understanding Metadata . . . . . . . . . . . . . . . . . . . . . . . . . . . . . . . . . . . . . . .3-3
Managing Your Server Connections . . . . . . . . . . . . . . . . . . . . . . . . . . . . . .3-4
Adding a Server Connection . . . . . . . . . . . . . . . . . . . . . . . . . . . . . . . . . . . .3-5
Determining the Server CGI URL Path . . . . . . . . . . . . . . . . . . . . . . . . . . . .3-7Editing a Server Connection . . . . . . . . . . . . . . . . . . . . . . . . . . . . . . . . . . . .3-7
Creating a New File . . . . . . . . . . . . . . . . . . . . . . . . . . . . . . . . . . . . . . . . . . .3-9
Checking a New File Into the Content Server . . . . . . . . . . . . . . . . . . . . . .3-10
Checking an Existing File Into the Content Server. . . . . . . . . . . . . . . . . . .3-11
Checking a File Out of the Content Server . . . . . . . . . . . . . . . . . . . . . . . .3-12
Viewing a File That Is in the Content Server . . . . . . . . . . . . . . . . . . . . . . .3-12
Opening a Previous Revision. . . . . . . . . . . . . . . . . . . . . . . . . . . . . . . . . . .3-13
Saving a New File to the Local File System. . . . . . . . . . . . . . . . . . . . . . . .3-14
Opening a File From the Local File System. . . . . . . . . . . . . . . . . . . . . . . .3-14
Working With Content Offline. . . . . . . . . . . . . . . . . . . . . . . . . . . . . . . . . . .3-14
New Files . . . . . . . . . . . . . . . . . . . . . . . . . . . . . . . . . . . . . . . . . . . . . . .3-15
Read-Only Files . . . . . . . . . . . . . . . . . . . . . . . . . . . . . . . . . . . . . . . . . .3-16
Checked-Out Files . . . . . . . . . . . . . . . . . . . . . . . . . . . . . . . . . . . . . . . .3-16
Setting the Authentication Method . . . . . . . . . . . . . . . . . . . . . . . . . . . . . . .3-16
Setting the Server to Remember Metadata . . . . . . . . . . . . . . . . . . . . . . . .3-17
Chapter 4: Managing Content Through Your E-Mail Client
Overview . . . . . . . . . . . . . . . . . . . . . . . . . . . . . . . . . . . . . . . . . . . . . . . . . . .4-1
Setting Up Metadata on a Content Server . . . . . . . . . . . . . . . . . . . . . . . . . .4-2
E-Mail Specific Metadata . . . . . . . . . . . . . . . . . . . . . . . . . . . . . . . . . . . .4-3
Configuring the Server to Remember Metadata . . . . . . . . . . . . . . . . . .4-4
Configuring Your E-Mail Check-In Settings . . . . . . . . . . . . . . . . . . . . . .4-7

7/24/2019 55439-Desktop Integration Suite User Guide
http://slidepdf.com/reader/full/55439-desktop-integration-suite-user-guide 6/120
vi Desktop Integration Suite User Guide
Table of Contents
Managing Your Server Connections . . . . . . . . . . . . . . . . . . . . . . . . . . . . . .4-8
Adding a Server Connection . . . . . . . . . . . . . . . . . . . . . . . . . . . . . . . . .4-8
Viewing the Server CGI URL Path. . . . . . . . . . . . . . . . . . . . . . . . . . . .4-11
Editing a Server Connection . . . . . . . . . . . . . . . . . . . . . . . . . . . . . . . .4-11
Removing a Server Connection. . . . . . . . . . . . . . . . . . . . . . . . . . . . . .4-12
Setting the Authentication Method. . . . . . . . . . . . . . . . . . . . . . . . . . . .4-12
Setting the E-Mail Attachment Option . . . . . . . . . . . . . . . . . . . . . . . . .4-13
Checking In Content. . . . . . . . . . . . . . . . . . . . . . . . . . . . . . . . . . . . . . . . . .4-15
Checking In an E-Mail Message . . . . . . . . . . . . . . . . . . . . . . . . . . . . .4-15
Checking In an E-Mail Message With Attachments. . . . . . . . . . . . . . .4-17
Showing Content Server Folders in Lotus Notes . . . . . . . . . . . . . . . . . . . .4-19
Working With Distribution Lists . . . . . . . . . . . . . . . . . . . . . . . . . . . . . . . . .4-19
Checking In a Distribution List . . . . . . . . . . . . . . . . . . . . . . . . . . . . . . .4-20
Editing a Distribution List . . . . . . . . . . . . . . . . . . . . . . . . . . . . . . . . . . .4-23 Adding a New Member to a Distribution List . . . . . . . . . . . . . . . . .4-23
Changing the Name or Address of a Member. . . . . . . . . . . . . . . .4-25
Deleting a Member from a Distribution List . . . . . . . . . . . . . . . . . .4-25
Deleting a Distribution List . . . . . . . . . . . . . . . . . . . . . . . . . . . . . . . . . .4-26
Attaching Content to an E-Mail Message. . . . . . . . . . . . . . . . . . . . . . . . . .4-26
Attaching Content From the Content Server . . . . . . . . . . . . . . . . . . . .4-27
Attaching Content From the File System . . . . . . . . . . . . . . . . . . . . . . .4-28
Attaching Content From an Offline Location . . . . . . . . . . . . . . . . . . . .4-29
Appendix A: Third Party Licenses
Overview . . . . . . . . . . . . . . . . . . . . . . . . . . . . . . . . . . . . . . . . . . . . . . . . . . A-1
Apache Software License . . . . . . . . . . . . . . . . . . . . . . . . . . . . . . . . . . . . . A-1
W3C® Software Notice and License . . . . . . . . . . . . . . . . . . . . . . . . . . . . . A-2
Zlib License . . . . . . . . . . . . . . . . . . . . . . . . . . . . . . . . . . . . . . . . . . . . . . . . A-4
General BSD License. . . . . . . . . . . . . . . . . . . . . . . . . . . . . . . . . . . . . . . . . A-5
General MIT License . . . . . . . . . . . . . . . . . . . . . . . . . . . . . . . . . . . . . . . . . A-5
Unicode License. . . . . . . . . . . . . . . . . . . . . . . . . . . . . . . . . . . . . . . . . . . . . A-6
Miscellaneous Attributions . . . . . . . . . . . . . . . . . . . . . . . . . . . . . . . . . . . . . A-7
Glossary
Index

7/24/2019 55439-Desktop Integration Suite User Guide
http://slidepdf.com/reader/full/55439-desktop-integration-suite-user-guide 7/120
Desktop Integration Suite User Guide 1-1
C h a p t e r
1.INTRODUCTION
OVERVIEW
This section covers the following topics:
About Desktop Integration Suite (page 1-1)
About This Guide (page 1-2)
What’s New (page 1-2)
ABOUT DESKTOP INTEGRATION SUITE
Desktop Integration Suite provides a set of embedded applications that help you
seamlessly integrate your desktop experience with Content Server. More specifically,
it provides convenient access to the content server from Microsoft Windows Explorer,
desktop applications like Microsoft Word and Excel, and e-mail clients like Microsoft
Outlook and Lotus Notes.
As a result, you can easily manage files in the content server and share files with users
directly from your desktop instead of logging onto the content server and using a web
browser.

7/24/2019 55439-Desktop Integration Suite User Guide
http://slidepdf.com/reader/full/55439-desktop-integration-suite-user-guide 8/120
1-2 Desktop Integration Suite User Guide
Introduction
ABOUT THIS GUIDE
This guide is built up as follows:
Chapter 2 — Managing Content With Content Server Folders
Chapter 3 — Managing Content Through the Common Dialogs Interface
Chapter 4 — Managing Content Through Your E-Mail Client
WHAT’S NEW
New Features and Enhancements in Release 10gR3
Desktop Integration Suite 10 g R3 has the following new features and enhancements
(compared to version 7.7):
This version of Desktop Integration Suite fully supports Content Server 10 g R3.
This version of Desktop Integration Suite comes with an MSI installer, which
enables system administrators to push out the Desktop client software to multiple
workstations. See Appendix A of the Desktop Integration Suite Installation Guide
for more information on using the MSI installer.
Updates in Release 10g Release 3 (10.1.3.3.1)
Desktop Integration Suite 10 g Release 3 (10.1.3.3.1) contains the following updates
(compared to release 10.1.3.3.0):
This version of Desktop Integration Suite now supports Windows Vista.

7/24/2019 55439-Desktop Integration Suite User Guide
http://slidepdf.com/reader/full/55439-desktop-integration-suite-user-guide 9/120
Desktop Integration Suite User Guide 2-1
C h a p t e r
2.MANAGING CONTENT WITH
CONTENT SERVER FOLDERS
OVERVIEW
The integration between Microsoft Windows Explorer, e-mail clients Microsoft Outlook
or Lotus Notes with Content Server allows you to easily manage server content using the
applications you know best, and you don’t have to log onto the content server with a web
browser. You work with the content server using the Content Server Folders feature.
This section describes the content server tasks a contributor performs using folders,
including the following:
Folders Terms and Concepts (page 2-2)
Content Server Folders Overview (page 2-5)
Overview of Folders Menu Options (page 2-9)
Viewing the Content Information Page (page 2-15)
Working With Servers (page 2-17)
Working With Folders (page 2-23)
Working With Content (page 2-27)
Attaching Content to an E-Mail Message (page 2-35)
Working With Shortcuts (page 2-38)
Syndicating Content (page 2-38)

7/24/2019 55439-Desktop Integration Suite User Guide
http://slidepdf.com/reader/full/55439-desktop-integration-suite-user-guide 10/120
2-2 Desktop Integration Suite User Guide
Managing Content With Content Server Folders
For instructions on configuring Content Server for Windows Explorer or e-mail client
integration, see the Desktop Integration Suite Installation Guide.
FOLDERS TERMS AND CONCEPTS
Before you contribute to Content Server, you should become familiar with the following
terms and concepts:
Content Server Folders (page 2-2)
File Names (page 2-3)
Metadata (page 2-3)
Folder Inheritance (page 2-4)
Security (page 2-5)
These concepts, explained in the following sections, help you understand how Windows
Explorer and e-mail clients that interact with the content server.
Content Server Folders
When you integrate Windows Explorer and e-mail clients Microsoft Outlook or Lotus
Notes with Content Server, a top-level Folders directory appears in the folder hierarchy.
The Content Server Folders feature provides a direct interface to the content server as an
alternative to using a web browser.
With Folders, you can continue to work with supported applications such as Microsoft
Word or Excel to edit and otherwise manage content that you have checked out of the
content server.
The Content Server Folders features enable you to manage content on the server using
custom popup menus, while taking advantage of standard Windows drag-and-drop and
copy-and-paste functionality.
Note: Depending on your exact Windows operating system (2000, XP, or Vista), thescreenshots in this guide may look slightly different from what you are seeing on your
computer.
Note: There is no access to administrative functions through the Content Server Folders
features. All administrative functions, which are available through the Folders component,
are performed through the content server web browser interface.

7/24/2019 55439-Desktop Integration Suite User Guide
http://slidepdf.com/reader/full/55439-desktop-integration-suite-user-guide 11/120
Desktop Integration Suite User Guide 2-3
Managing Content With Content Server Folders
File Names
In Content Server, it is acceptable for multiple content items to have the same original file
name. However, in the integration of Content Server with Windows Explorer or an e-mail
client, file names need to be unique. Because of this requirement, when you add content to
a folder that already contains a content item with the same name, the content is checked in
as a new revision to the existing content item.
For example, if process.doc is in a folder and you add a second process.doc file to the
folder, the second file becomes a new revision of the first file. If process.doc is in a folder
and you add process.xls to the folder, they remain separate content items because they
have different extensions.
The file name that displays in the Name column in Windows Explorer or an e-mail client
and in the Name field of the Content Properties dialog box is the same as the original filename in the content server repository. When you rename content through the Windows
Explorer integration, the original file name also changes to reflect the new name.
If the automatic content ID generation option is enabled in Content Server, the content IDs
follow the established numbering convention. If the option is not enabled, checking in a
new content item through Windows Explorer or an e-mail client will generate a unique
sequential content ID number or MSG ID.
Metadata
Each folder and content item that is displayed in the Folders hierarchy contains metadata
associated with the content server.
Whenever you check a file into Content Server, default metadata values are automatically
assigned to the content. These default values, which are set by the system administrator
through the Content Server web interface, are evaluated in the following order:
1. Folder: When you add content to a folder, the content inherits any default metadata
values for the folder that have been set through the Content Server web browser
interface.
2. User: For any metadata defaults not set for the folder, the user’s default metadata
values are applied.
3. System: The system default values are applied to any fields that are not set by either
the folder metadata or the user’s default metadata.
4. EmailMetadata: If the EmailMetadata component is installed, e-mail specific default
metadata is assigned to the content.

7/24/2019 55439-Desktop Integration Suite User Guide
http://slidepdf.com/reader/full/55439-desktop-integration-suite-user-guide 12/120
2-4 Desktop Integration Suite User Guide
Managing Content With Content Server Folders
After you check content into the content server through the Content Server Folders
feature, you can change the metadata for the content on the Content Information page
(see Viewing the Content Information Page on page 2-15).
If you leave the Title field blank, the file name will be used as the title.
A metadata field can be blank as long as it is not required. If a required field is left blank,
an error will occur and the content item will not be checked in.
If you change metadata for a folder, the new metadata is applied to content you add to the
folder after the change. The metadata of the content that is in the folder prior to the change
remains the same.
Metadata Propagation
When you create a new folder, the metadata from the parent folder will populate the fields
for the new folder. This allows the folder to initially “inherit” metadata, but allows you to
make changes to the new folder.
Subsequent changes to a parent folder’s metadata do not affect the metadata for existing
subfolders. If you want to apply a parent folder’s metadata to subfolders and content
items, you can use the metadata propagation function. See the Folders and WebDAV
Administration Guide for more information on metadata propagation.
Folder Inheritance
When you create a new folder, the metadata from the parent folder will populate the fields
for the new folder. This allows the folder to initially “inherit” metadata, but allows you to
make changes to the new folder. Subsequent changes to a parent folder’s metadata do not
affect the metadata for existing subfolders.
The content server administrator can use the metadata propagation function to apply a
parent folder’s metadata to subfolders and content items.
Caution: If you change Security Group, Doc Type or Accounts metadata, you will change
the URL of the content in the content server.

7/24/2019 55439-Desktop Integration Suite User Guide
http://slidepdf.com/reader/full/55439-desktop-integration-suite-user-guide 13/120
Desktop Integration Suite User Guide 2-5
Managing Content With Content Server Folders
Security
The following security controls apply to the Content Server Folders functionality:
Users can see only the folders that are assigned no security group, or a security group
for which they have Read (R) permission.
Each folder has an owner, which is a user who has permission to manage the folder.
The owner can change a folder’s metadata and delete the folder, even if they do not
have Write (W) or Delete (D) permission to the folder’s security group. However, the
owner does not have additional permissions to content items within the folder.
To change a folder’s default metadata, you must have Delete (D) permission to the
folder or you must be the owner of the folder.
To delete a folder, you must have delete permission to the folder or you must be theowner of the folder. You must also have permission to delete all of the content items
and subfolders in that folder.
If you interact with collaboration projects through the Content Server Folders features,
then the Project folders you use have different features for document and project-level
security. See the Collaboration Manager Administration Guide for more information
regarding projects.
For more information regarding content item security, see the Folders and WebDAV
Administration Guide.
CONTENT SERVER FOLDERS OVERVIEW
You work with content managed by the Content Server Folders feature in much the same
way you do with other folders and files in a file system. However, tasks typically
performed on files in the local file system may have a different effect when performed on
files in folders managed by Content Server. For example, opening a file also checks the
content item out of the content server.
The user logins and security controls in Content Server and the Content Server Folders
feature also apply to content that is managed through Folders. For example, if you haveRead (R) permission for a content item, you will be able to open a copy of the native file,
but you will not be able to check in a revision to the file.

7/24/2019 55439-Desktop Integration Suite User Guide
http://slidepdf.com/reader/full/55439-desktop-integration-suite-user-guide 14/120
2-6 Desktop Integration Suite User Guide
Managing Content With Content Server Folders
Accessing the Content Server Folders feature differs depending on the integration you are
using.
Accessing Folders Through Windows Explorer (page 2-6)
Accessing Folders Through Microsoft Outlook (page 2-7)
Accessing Folders Through Lotus Notes Mail (page 2-7)
The Folders Directory Structure (page 2-8)
Accessing Folders Through Windows Explorer
When you integrate Windows Explorer with Content Server, the top-level Folders
directory is added to the Windows Explorer hierarchy, providing an interface through
which you can connect to and manage content servers.
You can access the Content Server Folders feature using any of the following methods:
Double-click the Folders icon ( ) that displays on your desktop.
Navigate to the top-level Folders directory in Windows Explorer.
Double-click a shortcut to a particular server, folder, or content item. See Working
With Shortcuts (page 2-38) for more information.
Figure 2-1 Folders interface in Windows Explorer
Caution: Be careful when changing the security group of a folder. If you change a folder
to a more restrictive security group, authors may no longer have permission to manage
their own content items. See Security (page 2-5) for further information and the Foldersand WebDAV Administration Guide.

7/24/2019 55439-Desktop Integration Suite User Guide
http://slidepdf.com/reader/full/55439-desktop-integration-suite-user-guide 15/120
Desktop Integration Suite User Guide 2-7
Managing Content With Content Server Folders
Accessing Folders Through Microsoft Outlook
When you integrate Microsoft Outlook with Content Server, the top-level Folders
directory is added to Outlook, providing an interface through which you can connect to
and manage content servers. You can access the Content Server Folders feature through
the folder list in Microsoft Outlook.
Figure 2-2 Folders interface in Microsoft Outlook
Accessing Folders Through Lotus Notes Mail
When you integrate Lotus Notes Mail with Content Server, the top-level Folders directory
is added to Lotus Notes, providing an interface through which you can connect to and
manage content servers. You can access the Content Server Folders feature through the
folder list in Lotus Notes Mail.

7/24/2019 55439-Desktop Integration Suite User Guide
http://slidepdf.com/reader/full/55439-desktop-integration-suite-user-guide 16/120
2-8 Desktop Integration Suite User Guide
Managing Content With Content Server Folders
Figure 2-3 Folders interface in Lotus Notes Mail
The Folders Directory Structure
When you integrate Windows Explorer or your e-mail client (Microsoft Outlook or Lotus
Notes) with Content Server, you view and interact with the content server through the
Content Server Folders hierarchy. You can create a multi-level folder structure with
folders.
Figure 2-4 Folders directory structure

7/24/2019 55439-Desktop Integration Suite User Guide
http://slidepdf.com/reader/full/55439-desktop-integration-suite-user-guide 17/120
Desktop Integration Suite User Guide 2-9
Managing Content With Content Server Folders
This illustration shows the following:
The top-level Folders directory (“Oracle Content Servers”).
Content Server connections that have been added through Folders. (In the exampleabove, there are three servers: Consumption Server, Development Server, and
Production Server.)
The contents of the Corporate Documents folder, which is under Contribution Folders
in Development Server.
OVERVIEW OF FOLDERS MENU OPTIONS
The following sections describe the options available through the popup menus that
display when you right-click the servers, folders, and content items in the Folders
hierarchy (see Content Server Folders Overview on page 2-5). For instructions on
performing specific tasks using these menu options, see Working With Content
(page 2-27).
Depending on where you are and what you right-click on in the Folders hierarchy,
the following menu options are available:
Top-Level Folder Options (page 2-9)
Server Options (page 2-11)
Folder Options (page 2-12)
Folder Options When Nothing is Selected (page 2-13)
Content Options (page 2-14)
The popup menus may differ from the examples shown in the following sections,
depending on how your system is set up.
Top-Level Folder Options
Depending on how you access the Content Server Folders functionality (using Windows
Explorer or your e-mail client), you see a different right-click menu:
In Windows Explorer (page 2-10)
In Your E-Mail Client (page 2-10)

7/24/2019 55439-Desktop Integration Suite User Guide
http://slidepdf.com/reader/full/55439-desktop-integration-suite-user-guide 18/120
2-10 Desktop Integration Suite User Guide
Managing Content With Content Server Folders
In Windows Explorer
When you right-click the top-level folder in Windows Explorer, a popup menu appears.
Figure 2-5 Windows Explorer popup menu
The following options are available from this menu:
Explore —Opens the selection in a two-pane window.
Open —Opens the selection in a single-pane window.
Add Server —Opens the Add Server dialog box so you can add a server connection to
your Windows Explorer desktop. See Working With Servers (page 2-17).
Offline Content Manager —Opens the Offline Content Manager dialog box, which
you can use to manage all of your syndicated and checked-out content.
In Your E-Mail Client
When you right-click the top-level folder in Microsoft Outlook or Lotus Notes, a popup
menu appears.
Figure 2-6 E-mail client popup menu
To access the popup menu, you must navigate to the top-level folder in the hierarchy and
then right-click in the right window pane with nothing selected. The top-level folder menu
is not accessible through the folder list.

7/24/2019 55439-Desktop Integration Suite User Guide
http://slidepdf.com/reader/full/55439-desktop-integration-suite-user-guide 19/120
Desktop Integration Suite User Guide 2-11
Managing Content With Content Server Folders
The following options are available from the top-level folder popup menu:
Add Server —Opens the Add Server dialog box so you can add a server connection to
your Windows Explorer desktop. See Working With Servers (page 2-17). Offline Content Manager —Opens the Offline Content Manager dialog box, which
you can use to manage all of your syndicated and checked-out content. See Managing
Content Available for Offline Use (page 2-41).
View —Changes how the servers are displayed.
Refresh —Updates the window with current content server information.
Server Options
When you right-click a server from Windows Explorer or the content pane of MicrosoftOutlook or Lotus Notes, a popup menu appears.
Figure 2-7 Microsoft Outlook/Lotus Notes popup menu
The popup menu offers the following options:
Explore —Opens the selection in a two-pane window.
Open —Opens the selection in a single-pane window.
Search —Searches the content server. See Searching a Content Server (page 2-21).
Log off —Logs you off of the server under Oracle Folders. See Logging Off a Content
Server (page 2-22).
Work Offline —Disconnects you from the content server. This is used with
syndication, which you can use to access a read-only copy of content when you select
the Work Offline option. See About Syndication (page 2-39) and Working Offline
(page 2-44).

7/24/2019 55439-Desktop Integration Suite User Guide
http://slidepdf.com/reader/full/55439-desktop-integration-suite-user-guide 20/120
2-12 Desktop Integration Suite User Guide
Managing Content With Content Server Folders
Remove —Removes the server connection from your Windows Explorer desktop.
See Working With Servers (page 2-17) and Removing a Server Connection
(page 2-23).
Properties —Displays the server name and URL. See Viewing Server Properties
(page 2-21).
Folder Options
When you right-click a folder in one of the servers configured for Oracle Folders,
the following popup menu appears:
Figure 2-8 Oracle Folders popup menu
The following options are available from this menu:
Open —Opens the folder in a single-pane window.
Explore —Opens the selection in a two-pane window.
Syndicate —Marks a folder for syndication. See Marking Content for Syndication
(page 2-39).
Refresh syndicated content —Refreshes the syndicated folder, so that any changes
are reflected in the folder hierarchy when offline. See Downloading the Most Recent
Revision of Syndicated Content (page 2-40).

7/24/2019 55439-Desktop Integration Suite User Guide
http://slidepdf.com/reader/full/55439-desktop-integration-suite-user-guide 21/120
Desktop Integration Suite User Guide 2-13
Managing Content With Content Server Folders
Unsyndicate syndicated content —Removes the folder from syndication. When you
unsyndicate a folder, only the folder is unsyndicated. See Managing Content Available
for Offline Use (page 2-41)
Propagate —Propagates metadata. This is set up in the content server web browser
interface. See Content Server Help for instructions on metadata propagation.
Copy —Copies the folder. See Copying and Pasting a Folder (page 2-24)
Paste —Pastes information into the folder. See Copying and Pasting a Folder
(page 2-24).
Create Shortcut —Creates a shortcut to the folder on the desktop. See Working With
Shortcuts (page 2-38).
Delete —Deletes the folder and its content from the content server. See Deleting a
Folder (page 2-26).
Rename —Renames the folder. See Renaming a Folder (page 2-25).
Content Information —Opens the content information page in the content server for
the content item. See Viewing the Content Information Page (page 2-15).
Properties —Displays folder properties. See Viewing Server Properties (page 2-21).
Folder Options When Nothing is Selected
When you right-click in the right pane of Windows Explorer or your e-mail client
(Microsoft Outlook or Lotus Notes) with a folder selected in the left pane, a popup menu
displays.
Figure 2-9 Unselected folder option popup menu
The following options are available from this menu:
New Folder or New Project —Creates a new folder or a new project.

7/24/2019 55439-Desktop Integration Suite User Guide
http://slidepdf.com/reader/full/55439-desktop-integration-suite-user-guide 22/120
2-14 Desktop Integration Suite User Guide
Managing Content With Content Server Folders
View —Changes how the folders are displayed and includes the following options:
• Large Icons – Displays content items as large icons.
• Small Icons – Displays content items as small icons.• List – Displays content items as a list.
• Details – Displays content items in a detailed view.
• Preview Pane – When checked, displays the preview pane. See Viewing the
Content Information Page (page 2-15).
Refresh —Updates the window with current content server information.
Paste —Pastes information into the folder. See Copying and Pasting a Folder
(page 2-24).
Properties
—Displays server or folder properties, depending on what you selected in
the left-hand pane. See Viewing Server Properties (page 2-21) or Viewing Folder
Properties (page 2-26).
Content Options
When you right-click a content item in a folder in the folder hierarchy, a popup menu
appears.
Figure 2-10 Content options popup menu
The following options are available from this menu:
View —Opens a read-only copy of a content item in its associated application. This isthe same as double-clicking a content item. See Viewing Content (page 2-34).
Open —Checks the content item out of the content server and opens it in its associated
application. (When you finish editing the content, you will check it back into the
content server using the “Check In” option.) See Checking Out Content (page 2-28).

7/24/2019 55439-Desktop Integration Suite User Guide
http://slidepdf.com/reader/full/55439-desktop-integration-suite-user-guide 23/120
Desktop Integration Suite User Guide 2-15
Managing Content With Content Server Folders
Check Out —Checks out content to a location outside of a content server.
See Checking Out Content (page 2-28).
Check In —Checks content back into the content server after you checked it out usingthe “Open” or “Check Out” option. See Checking In Content (page 2-27).
Undo Check Out – Cancels the latest checkout performed on a file. Available only
when a file is checked out of the content server. See Checking Out Content
(page 2-28).
Syndicate —Marks a content item for syndication. See Marking Content for
Syndication (page 2-39).
Copy —Copies the content. You can then use the Paste command to place the copy
in another folder. Copying and Pasting Content (page 2-29).
Create Shortcut —Creates a shortcut to the content on the desktop. See Working WithShortcuts (page 2-38).
Delete —Deletes the content from the content server. See Deleting Content
(page 2-34).
Rename —Opens a text box for the current name that allows you to rename the
content item. See Renaming Content (page 2-32).
Content Information —Opens the Content Information page in the content server for
the content item. See Viewing the Content Information Page (page 2-15).
Properties —Displays content item information, such as the name and URL.
See Viewing Content Properties (page 2-31).
VIEWING THE CONTENT INFORMATION PAGE
You can view the content information page for a managed content item directly from
Windows Explorer or your e-mail client. The content information page displays in the
preview pane when a content item is selected.

7/24/2019 55439-Desktop Integration Suite User Guide
http://slidepdf.com/reader/full/55439-desktop-integration-suite-user-guide 24/120
2-16 Desktop Integration Suite User Guide
Managing Content With Content Server Folders
Figure 2-11 Preview pane
You can view the metadata assigned to the content item, check the content item out of the
content server, and perform any task that you normally would in the content server—
directly from this pane.
To enable or disable the content information preview pane, right-click in the contents
pane, choose View and select Preview Pane (see Folder Options When Nothing is
Selected on page 2-13).
The preview pane will remain enabled (or disabled) for this particular server connection,
which includes every folder in it. If you open a folder from a different server connection,
you will only see the preview pane if it was enabled there.
You can also open the content information page in a separate window by right-clicking the
content item or folder and choosing Content Information in the popup menu.
Figure 2-12 Content information popup menu

7/24/2019 55439-Desktop Integration Suite User Guide
http://slidepdf.com/reader/full/55439-desktop-integration-suite-user-guide 25/120
Desktop Integration Suite User Guide 2-17
Managing Content With Content Server Folders
You can access Content Server Help from the Content Information page for more
information, just as you could if you opened the page from the web browser interface.
WORKING WITH SERVERS
When you first integrate Content Server with Windows Explorer or your e-mail client
(Microsoft Outlook or Lotus Notes), only the top-level folder directory appears. As you
add server connections, those servers are listed under this top-level folder and you can
begin working with them based on your permissions.
Figure 2-13 Folder hierarchy
You can add or remove a server connection from the folder hierarchy, and you can also
change the server name that displays in the hierarchy.
If you add or remove a server connection, or change the name that displays, it only affects
the view from Windows Explorer or your e-mail client on your desktop. The server
settings are stored on your computer.
This section covers the following topics:
Adding a Content Server Connection (page 2-18)
Connecting to a Content Server (page 2-19)
Logging Onto the Content Server (page 2-20)
Viewing Server Properties (page 2-21)
Searching a Content Server (page 2-21)
Logging Off a Content Server (page 2-22)
Removing a Server Connection (page 2-23)
7/24/2019 55439-Desktop Integration Suite User Guide
http://slidepdf.com/reader/full/55439-desktop-integration-suite-user-guide 26/120
2-18 Desktop Integration Suite User Guide
Managing Content With Content Server Folders
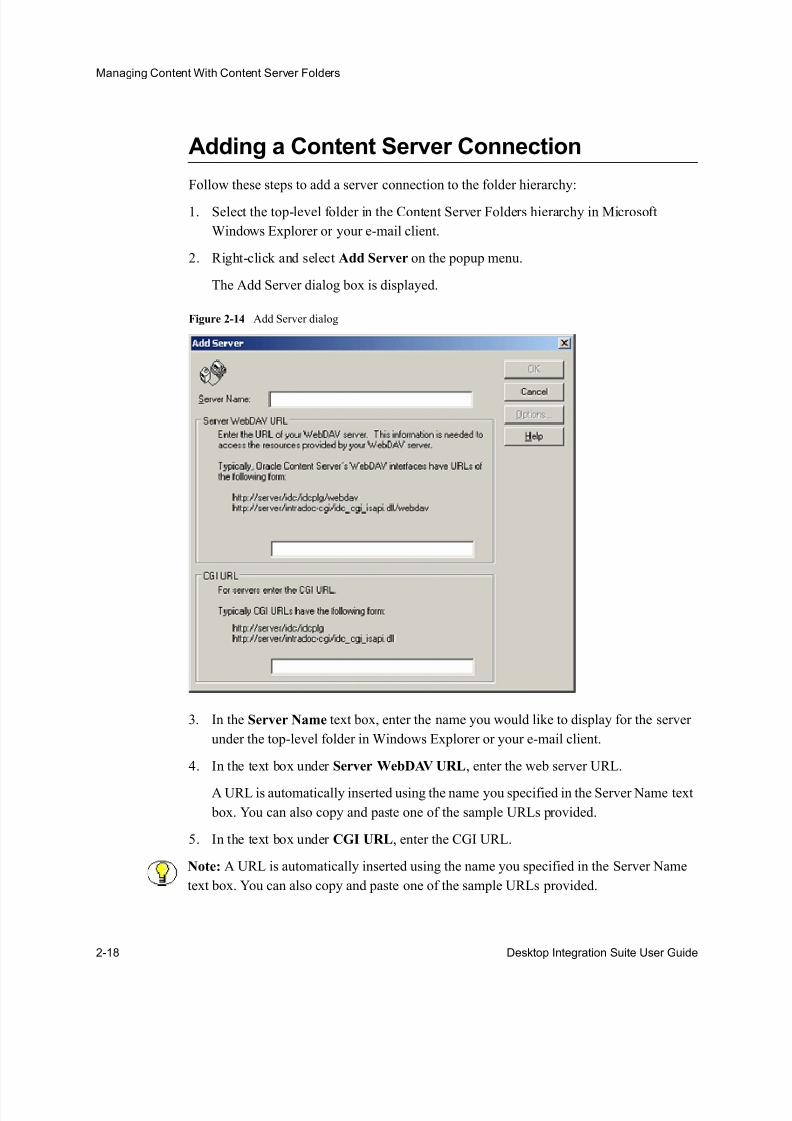
Adding a Content Server Connection
Follow these steps to add a server connection to the folder hierarchy:
1. Select the top-level folder in the Content Server Folders hierarchy in Microsoft
Windows Explorer or your e-mail client.
2. Right-click and select Add Server on the popup menu.
The Add Server dialog box is displayed.
Figure 2-14 Add Server dialog
3. In the Server Name text box, enter the name you would like to display for the server
under the top-level folder in Windows Explorer or your e-mail client.
4. In the text box under Server WebDAV URL, enter the web server URL.
A URL is automatically inserted using the name you specified in the Server Name text
box. You can also copy and paste one of the sample URLs provided.
5. In the text box under CGI URL, enter the CGI URL.
Note: A URL is automatically inserted using the name you specified in the Server Name
text box. You can also copy and paste one of the sample URLs provided.

7/24/2019 55439-Desktop Integration Suite User Guide
http://slidepdf.com/reader/full/55439-desktop-integration-suite-user-guide 27/120
Desktop Integration Suite User Guide 2-19
Managing Content With Content Server Folders
6. Click OK .
The new server connection will appear in all of the applications you use to interact with
the content server (Windows Explorer, e-mail clients, and other integrated applications).
Connecting to a Content Server
You can access and manage content server connections through the Content Server
Folders hierarchy. Once you click a content server that you are connected to through the
Folders hierarchy, and log on to that server, you can view and interact with the folders and
content in the server, based on your content server permissions, while still in Windows
Explorer or your e-mail client.
Figure 2-15 Connection in Windows Explorer
Figure 2-16 Connection from Microsoft Outlook

7/24/2019 55439-Desktop Integration Suite User Guide
http://slidepdf.com/reader/full/55439-desktop-integration-suite-user-guide 28/120
2-20 Desktop Integration Suite User Guide
Managing Content With Content Server Folders
Figure 2-17 Connection from Lotus Notes
You may view a different number of folders for each server, depending on how each server
you are connected to is set up. You may also view additional folders, such as a Project
folder, if Collaboration Manager is enabled on the content server.
When working on a content server, the Address field displays your location.
Logging Onto the Content Server
In order to access the content server from Windows Explorer or your e-mail client, youwill be prompted to log onto the server. The login screen that you see depends on the
server authentication that has been set up by your site administrator.
You see either the Content Server login or the Netegrity SiteMinder login.
Figure 2-18 Content Server Login

7/24/2019 55439-Desktop Integration Suite User Guide
http://slidepdf.com/reader/full/55439-desktop-integration-suite-user-guide 29/120
Desktop Integration Suite User Guide 2-21
Managing Content With Content Server Folders
Figure 2-19 Netegrity SiteMinder Login
Once you enter your login credentials, you will be able to view and interact with the
content on the content server.
For information on configuring Netegrity SiteMinder support in Desktop, see the Desktop
Integration Suite Installation Guide.
Viewing Server Properties
You can view the URL and display name of any server in the Content Server Folders
hierarchy. Each content server has a unique URL that cannot be changed, but you can
change the display name at any time. To view the properties of a server in the folder
hierarchy, right-click the server and click Properties in the popup menu.
Follow these steps to view the properties of a server:
1. Right-click the server you want to rename, and click Properties in the popup menu.
The Server Properties dialog is displayed.
2. Under Name, type the new name.
3. Click OK .
Searching a Content Server
You can search a content server directly from the Content Server folder hierarchy in
Windows Explorer or your e-mail client. The search results are displayed within a Search
Results folder, so you can conveniently access the search results from your desktop
without having to open the content server web browser interface.

7/24/2019 55439-Desktop Integration Suite User Guide
http://slidepdf.com/reader/full/55439-desktop-integration-suite-user-guide 30/120
2-22 Desktop Integration Suite User Guide
Managing Content With Content Server Folders
You can interact with content items that display in the Search Results folder just as you
could any other content item in the content server. For example, you can conveniently
view, check in, and check out a content item in the folder. You can also view the content
information page and make changes to the assigned metadata, if necessary.
Because the content that is in a Search Results folder is the actual content, you may see the
content display in two places, such as in a Contribution Folder and in the Search Results
folder.
Follow these steps to search the content server:
1. Right-click the server or project you wish to search.
2. Click Search from the popup menu.
3. Enter the search criteria on the Content Query Capture page and click Search.
The results are displayed in a special Search Results folder, which is represented by
the Search icon ( ) in Oracle Folders.
By default, search results only include content items contained within folders. The system
administrator can configure the content server to search all content items, regardless of
whether they are in folders, so that all content items in the content server are included
when you search from the server level.
You can view one set of search results at a time, for each server you are connected tothrough the Content Server Folders functionality. The last search you entered while you
were in that explorer session display. When you close that session by closing the window,
the search results folder is cleared.
Logging Off a Content Server
When you are finished interacting with a content server, you may wish to log off of
the server. To do so, follow these steps in Windows Explorer or your e-mail client.
Under the Content Server folder hierarchy, right-click the server you want to log off
from.
Click Log off on the popup menu.
To log on to a server after you logged off, click the server in the Folders hierarchy. When
you are prompted to log on, enter your user name and password. If you are using NTLM
Caution: If you delete a content item from the Search Results folder, you are removing the
actual content item from the content server.
7/24/2019 55439-Desktop Integration Suite User Guide
http://slidepdf.com/reader/full/55439-desktop-integration-suite-user-guide 31/120
Desktop Integration Suite User Guide 2-23
Managing Content With Content Server Folders
security, your user name and password are automatically supplied when you click the
server, so you may not be prompted for log on information.
Removing a Server Connection
Perform the following steps in Windows Explorer or your e-mail client to remove a server
connection:
1. Under the Content Server folder hierarchy, select the server for which you want to
remove the connection.
2. Right-click and select Remove on the popup menu.
3. Click OK on the confirmation dialog that displays. The server no longer displays in
Windows Explorer on your computer. (ClickCancel
to retain the server connection.)
This removes the server connection from all of the applications you use to interact with the
content server (Windows Explorer, e-mail clients, and other integrated applications).
WORKING WITH FOLDERS
When you create a new folder in the Content Server folder hierarchy, each person who has
the rights to view that folder will see the folder. The content you add to the folder will also
be available to each person on that server, again according to their security permissions.
This section covers the following topics:
Adding a Folder (page 2-23)
Copying and Pasting a Folder (page 2-24)
Renaming a Folder (page 2-25)
Deleting a Folder (page 2-26)
Viewing Folder Properties (page 2-26)
Adding a Folder When you add a new folder, default metadata is assigned to it. You can change the default
metadata for the folder while adding the new folder, or any time after you add it if you
wish. When you add content to a folder, the content inherits default metadata from the
folder (see Metadata on page 2-3 for more information).
7/24/2019 55439-Desktop Integration Suite User Guide
http://slidepdf.com/reader/full/55439-desktop-integration-suite-user-guide 32/120
2-24 Desktop Integration Suite User Guide
Managing Content With Content Server Folders
Follow these steps to add a new folder:
1. Open Windows Explorer or your e-mail client so that both the left and the right-hand
panes display.2. Open the top-level folder in the Content Server folder hierarchy. The content servers
will display under this folder.
3. Click the server where you want to create a folder, and log in, if prompted, by entering
your username and password.
4. Browse to the location in the hierarchy where you want to add the folder.
5. In the right-hand pane, right-click in the white space on the screen while nothing is
selected. A popup window is displayed.
6. Click New Folder (or New Project if you are adding a Project folder). A new folder
displays, and the folder name is highlighted.
7. Type the name of the folder and press Enter on your keyboard.
If you’re using Windows Explorer, the Folder Properties dialog box displays, showing
the folder Name and URL. From this dialog box, you can do the following:
Enter a new folder or project name in the Name field.
View the folder or project URL.
Click the Content Information button to open the content information page for
the folder or project in the content server.
8. You can change the properties of the new folder at any time by right-clicking the
folder and choosing Properties. This opens the Folder Properties dialog box. When
finished making changes, click OK .
Copying and Pasting a Folder
You can copy and paste a folder and its contents from one location in the Content Server
folder hierarchy to another:
You can copy and paste a folder and its contents from the file system to a server that
is displayed in the Content Server folder hierarchy. When you paste the folder into the
server, the folder and its content is checked into the content server.
Important: Before you can add content to your folder, you need to assign metadata to it,
in particular the document “Type” and “Security Group.

7/24/2019 55439-Desktop Integration Suite User Guide
http://slidepdf.com/reader/full/55439-desktop-integration-suite-user-guide 33/120
Desktop Integration Suite User Guide 2-25
Managing Content With Content Server Folders
You can copy and paste a folder that resides in a server in the Content Server folder
hierarchy from one location to another within the same server, or to a different server
if you wish. When you copy and paste a folder to a server, the content in the folder
that you pasted to another location is checked into the content server as new, separate
content with new content IDs, unless content with the same file name and extension
already exist in the folder. If content with the same file name and extension already
exist in the folder, the duplicate file will be checked into the content server as a new
revision to the existing content.
You can copy and paste a folder from a server in the Content Server folder hierarchy
to your file system. The folder (and its contents) you paste on the file system is not
checked into the content server.
You may also want to consider adding a shortcut to the top-level folder in the Content
Server folder hierarchy on your file system so you can easily access the folder each timeyou double-click the shortcut.
Follow these steps to copy and paste a folder and its content:
1. Browse to the folder you want to copy. The folder can exist on your local system, or in
a server in the Content Server folder hierarchy.
2. Right-click the folder and click Copy on the popup menu.
3. Browse to the location where you want to paste the folder. You can paste the folder to
your local system or to a server in the Content Server folder hierarchy.
4. Right-click and select Paste on the popup menu to add the folder and its contents tothe new location.
For information regarding how metadata is assigned to folders and content that are added
to the content server, see Metadata (page 2-3).
Renaming a Folder
When you rename a folder in the Content Server folder hierarchy, the new folder name
displays server-wide so that everyone who views that folder in the content server will see
the new folder name.
Follow these steps to rename a folder:
1. Right-click the folder to rename, and click Rename on the popup menu that displays.
2. In the edit box that appears, type the new folder name.
3. Press Enter on your keyboard, and the folder is renamed.

7/24/2019 55439-Desktop Integration Suite User Guide
http://slidepdf.com/reader/full/55439-desktop-integration-suite-user-guide 34/120
2-26 Desktop Integration Suite User Guide
Managing Content With Content Server Folders
Follow these instructions to rename a folder from the Folder Properties dialog box:
1. Right-click the folder you want to rename, and click Properties on the popup menu
that displays.2. In the Folder Properties dialog box, under Name, enter the new name.
3. Click OK .
Deleting a Folder
We do not recommend deleting a folder. If you delete one, all subfolders and all revisions
of all content items in that folder may also be deleted, which might affect everyone who
uses that content server.
To delete a content item, you must have Delete (D) permission for the security group of
that content item.
To delete a folder, you must be the owner of the folder or have Delete (D) permission for
the folder’s security group, and you must have Delete (D) permission for the security
groups of all subfolders and content items within the folder.
To delete a folder, right-click the folder and click Delete on the popup menu. This option
is not available for top-level folders, such as “Contribution Folders.”
If you have permission to delete, the folder and its contents will be deleted from the
content server. If, during the delete process, the system encounters content that you do not
have permission to delete, the delete process will end at that item, and the remainder of the
content in the folder will be retained.
Viewing Folder Properties
You can view the properties of a folder to change the folder name, view the URL, or toaccess the content information page in the content server.
If you change the folder name, the name is changed throughout the server, so everyone
using that server who views the folder will view the folder by its new name.
Important: When you delete a folder or a content item, it may be permanently deleted ormoved to a Trash folder, depending on how the system administrator set up your content
server. For information on the Trash folder and its effect on folder and content deletion,
see the Folders and WebDAV Administration Guide.

7/24/2019 55439-Desktop Integration Suite User Guide
http://slidepdf.com/reader/full/55439-desktop-integration-suite-user-guide 35/120
Desktop Integration Suite User Guide 2-27
Managing Content With Content Server Folders
Follow these steps to view the properties of a folder:
1. Right-click the folder for which you want to view or change the properties, and click
Properties on the popup menu.2. In the Folder Properties dialog box, under Name, leave the name as is or type a new
name if you wish.
3. If you would like to access the content information page in the content server
web browser interface, such as to view or change metadata, click the Content
Information button.
4. Click OK .
WORKING WITH CONTENTWhen you add content to a folder in the Content Server folder hierarchy, the content is
checked into the content server and default metadata is applied to the content.
The following topics are discussed:
Checking In Content (page 2-27)
Checking Out Content (page 2-28)
Copying and Pasting Content (page 2-29)
Copying Links (page 2-30)
Viewing Content Properties (page 2-31)
Renaming Content (page 2-32)
Changing the Column Display (page 2-32)
Deleting Content (page 2-34)
Viewing Content (page 2-34)
Checking In Content
You can check content into a content server from the Content Server folder hierarchy in
Windows Explorer or your e-mail client by:
Using drag-and-drop
Using the Copy and Paste options in the right-click menu

7/24/2019 55439-Desktop Integration Suite User Guide
http://slidepdf.com/reader/full/55439-desktop-integration-suite-user-guide 36/120
2-28 Desktop Integration Suite User Guide
Managing Content With Content Server Folders
In an e-mail client, choosing Check In Mail Item (which is available in the toolbar of
Outlook and the Actions menu in Lotus Notes).
If an item is currently checked out, you can check it back in by: Using the Offline Content Manager (see Managing Content Available for Offline Use
on page 2-41).
Clicking the “Check In” option on the right-click menu.
Figure 2-20 Right-click menu for content
After the content is checked in, the red check mark that displays in Windows Explorer is
removed, indicating that the file is checked into the content server. A new revision is
created when you check the content into the content server.
Checking Out Content
The following options are available for checking content out of the content server:
Open —Checks out and opens the selected content using its associated application.
You must use the Check In option to check the content back into the content server.
A new revision is created when you check the content back into the content server.
Check Out —Checks out the content to your local desktop. The content must be
opened with its associated application. You must check the content back into the
Important: f you add content to a folder that already contains a content item with the
same name, the content is checked in as a new revision to the existing content item.
See File Names (page 2-3) for more information.

7/24/2019 55439-Desktop Integration Suite User Guide
http://slidepdf.com/reader/full/55439-desktop-integration-suite-user-guide 37/120
Desktop Integration Suite User Guide 2-29
Managing Content With Content Server Folders
content server using the Check In option when you finish editing the content. A new
revision is created when you check the content back into the content server.
Undo Check Out —Cancels the last checkout. This option is available when a contentitem is checked out of the content server. You may want to use this option if you
checked content out of the content server unintentionally, or if you want to cancel your
checkout for any reason.
A red check mark in a content item ( ) indicates that the content is currently checked out
of the content server.
You may want to use the Offline Content Manager to manage your checked-out files.
See Managing Content Available for Offline Use (page 2-41) for more information.
Copying and Pasting ContentUsing Windows Explorer and your e-mail client, you can copy and paste content from one
location to another:
You can copy and paste content from the file system to a server in the Content Server
folder hierarchy. The content is checked into the content server.
You can copy and paste content from a server in the Content Server folder hierarchy
to your file system. The content you paste to the file system is not checked into the
content server.
You can copy and paste content from one location in the Content Server folderhierarchy to another, either within the same server or between two servers.
When you copy and paste between servers, the content you paste to the new location is
checked into that content server as new, separate content with a new content ID,
unless content with the same file name and extension already exist in the folder. In that
event, the duplicate file will be checked into the content server as a new revision to the
existing content.
You may want to consider adding a shortcut to content so you can easily access the file
each time you double-click the shortcut.
Follow these steps to copy and paste content:1. Browse to the item you want to copy. It can be on your local file system or in the
Content Server folder hierarchy.
2. Right-click the item and click Copy on the popup menu.

7/24/2019 55439-Desktop Integration Suite User Guide
http://slidepdf.com/reader/full/55439-desktop-integration-suite-user-guide 38/120
2-30 Desktop Integration Suite User Guide
Managing Content With Content Server Folders
3. Browse to the location where you want to paste the item (this can be on your local file
system or in the Content Server folder hierarchy).
4. Right-click and choose Paste on the popup menu to add the item to the new location.You can also use the Edit > Copy and Edit > Paste command in Windows Explorer to
perform this same action. (This is not supported, however, in an e-mail client.)
For information regarding how metadata is assigned to folders and content that are added
to the content server, see Metadata (page 2-3).
Copying Links
Using Windows Explorer or your e-mail client, you can copy the link properties of a
content item (or multiple content items) and paste that information into an e-mail message,
a Word document, or another business document. Link properties are the three links
associated with a content item in the content server. They include the web-viewable link,
native file link, and content information link.
Typically, you see this information when you open the content information page and
choose Send link by e-mail in the Actions menu. A new e-mail message displays with the
three links in it.
By using “Copy Links” in Windows Explorer or your e-mail client, the same three links
are placed in your Windows clipboard so that you can easily paste them into another file.
This makes it a lot easier to share content with others without having to open the content
information page each time.
Follow these steps to copy links:
1. Browse to the content item (or items) you want to copy links for in the Content Server
folder hierarchy.
To select multiple items, press the Ctrl key (for non-consecutive selections) or Shift
key (for consecutive selections) and select the items with your mouse.
2. Right-click the item (or items) and choose Copy Links on the popup menu.

7/24/2019 55439-Desktop Integration Suite User Guide
http://slidepdf.com/reader/full/55439-desktop-integration-suite-user-guide 39/120
Desktop Integration Suite User Guide 2-31
Managing Content With Content Server Folders
Figure 2-21 Popup menu sample
3. Open the file (e-mail message, Word document, etc.) where you want to place this
information and paste it there.
4. The three links (web-viewable link, native file link, and content information link) are
displayed in your document for each content item.
Viewing Content Properties
You can view content properties to change the name or to view the content URL.
Follow these steps to view the properties of content:
1. Right-click the content item for which you want to view or change the properties, and
click Properties on the popup menu.
The Content Properties dialog box opens.
2. Under Name, leave the name as is or type a new name if you wish.
3. If you would like to access the content information page in the content server web
browser interface, such as to view or change metadata, click the Content
Information button.
4. Click OK .

7/24/2019 55439-Desktop Integration Suite User Guide
http://slidepdf.com/reader/full/55439-desktop-integration-suite-user-guide 40/120
2-32 Desktop Integration Suite User Guide
Managing Content With Content Server Folders
Renaming Content
The file name that is displayed in the Name column in Windows Explorer, in your e-mail
client, and in the Name field of the Properties dialog box is the same as the original file
name in the Content Server repository. When you rename content through the Content
Server folder hierarchy, the original file name also changes to reflect the new name.
Follow these steps to rename content:
1. Right-click the content item you want to rename, and click Rename on the popup
menu.
2. Enter the new name, and press Enter on your keyboard.
Follow these steps to rename content from the Content Properties dialog:
1. Right-click the content item you want to rename, and click Properties on the popup
menu. The Content Properties dialog box opens.
2. Under Name, enter the new name.
3. Click OK .
Changing the Column Display
When you view content through the Content Server folder hierarchy, its content server
properties display as column headers in the right-hand pane so you can quickly see the
metadata that is assigned to the content.
Follow these steps to change the display of columns:
1. Log into the content server for which you want to change the content display.
2. Right-click in the column headings in the right-hand pane, and a Column Settings
option is displayed.
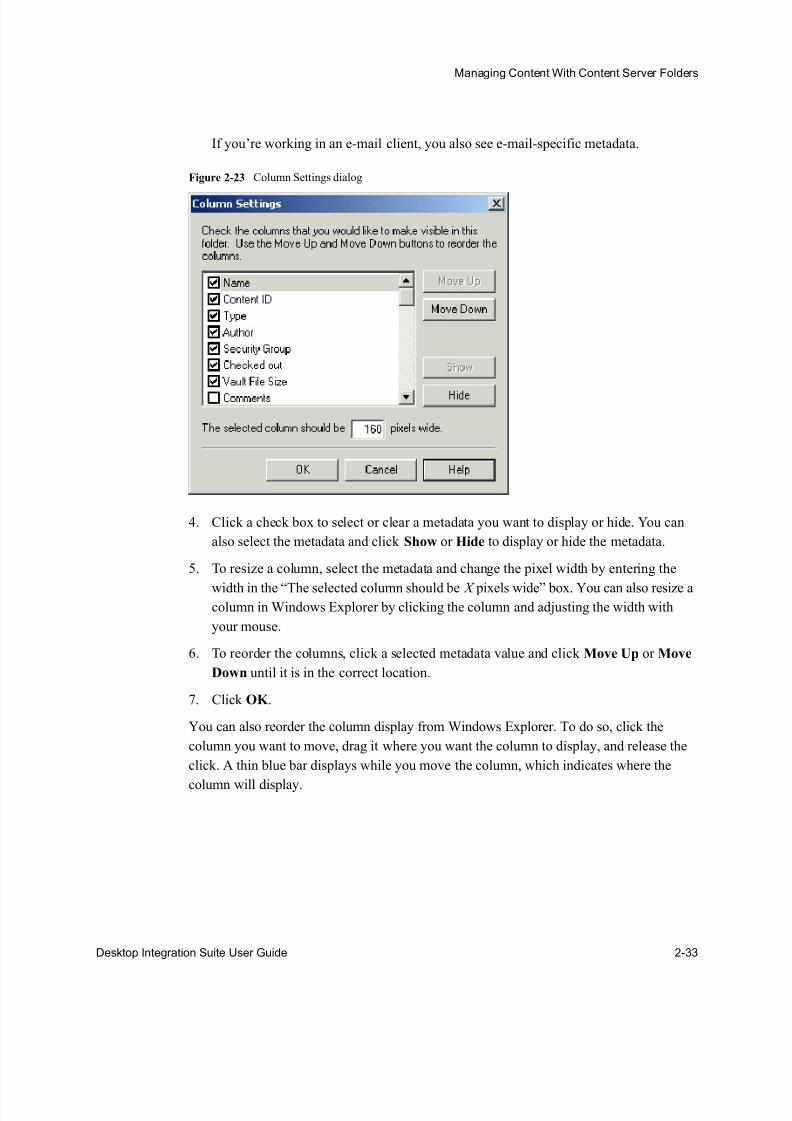
Figure 2-22 Column Settings option
3. Click Column Settings.
The Column Settings dialog box shows all of the available metadata from the content
server that you can display as column headers in Windows Explorer or your e-mail
client for content in the Content Server folder hierarchy.
7/24/2019 55439-Desktop Integration Suite User Guide
http://slidepdf.com/reader/full/55439-desktop-integration-suite-user-guide 41/120
Desktop Integration Suite User Guide 2-33
Managing Content With Content Server Folders
If you’re working in an e-mail client, you also see e-mail-specific metadata.
Figure 2-23 Column Settings dialog
4. Click a check box to select or clear a metadata you want to display or hide. You can
also select the metadata and click Show or Hide to display or hide the metadata.
5. To resize a column, select the metadata and change the pixel width by entering the
width in the “The selected column should be X pixels wide” box. You can also resize acolumn in Windows Explorer by clicking the column and adjusting the width with
your mouse.
6. To reorder the columns, click a selected metadata value and click Move Up or Move
Down until it is in the correct location.
7. Click OK .
You can also reorder the column display from Windows Explorer. To do so, click the
column you want to move, drag it where you want the column to display, and release the
click. A thin blue bar displays while you move the column, which indicates where the
column will display.

7/24/2019 55439-Desktop Integration Suite User Guide
http://slidepdf.com/reader/full/55439-desktop-integration-suite-user-guide 42/120
2-34 Desktop Integration Suite User Guide
Managing Content With Content Server Folders
Deleting Content
We do not recommend deleting a folder. If you delete one, all subfolders and all revisions
of all content items in that folder may also be deleted, which might affect everyone who
uses that content server.
To delete a content item, you must have Delete (D) permission for the security group
of that content item.
To delete a folder, you must be the owner of the folder or have Delete (D) permissionfor the folder’s security group. You must also have Delete (D) permission for the
security groups of all subfolders and content items within the folder.
If you have permission to delete, the content will be deleted. If you select multiple content
items and during the delete process the system encounters content that you do not have
permission to delete, the delete process will end at that item, and the remainder of the
content will be retained.
Viewing Content
You can quickly view a read-only copy of a content item right from your desktop in the
Content Server folder hierarchy. When you view a content item, it remains checked into
the content server and a copy is placed on your computer.
To view a content item, right-click that item and select View from the popup menu.
When you double-click a content item in the Content Server folder hierarchy, it opens in
View mode.
Copying and Pasting Between Applications
Use the menu copy and paste options (not keyboard commands) when working between
Lotus Notes and Windows Explorer. Lotus Notes has an internal clipboard and data from
that clipboard will be retained when using keyboard copy and paste.
For example, if you use the keyboard copy and paste (Ctrl+C and Ctrl+V) to copy a Lotus
Notes memo to your clipboard, paste it into the Content Server folder hierarchy, then copy
Important: When you delete a folder or a content item, it may be permanently deleted or
moved to a Trash folder depending on how the system administrator set up your content
server. For information on the Trash folder and its effect on folder and content deletion,
see the Folders and WebDAV Administration Guide.

7/24/2019 55439-Desktop Integration Suite User Guide
http://slidepdf.com/reader/full/55439-desktop-integration-suite-user-guide 43/120
Desktop Integration Suite User Guide 2-35
Managing Content With Content Server Folders
a file from Windows Explorer and attempt to paste it into the same Content Server folder,
the result is the previous Notes memo.
ATTACHING CONTENT TO AN E-MAIL MESSAGE
You can attach one or more content items to an e-mail message, and those content items
can originate from the content server, from your local file system, or from an offline
location.
This section describes all three methods:
Attaching Content From the Content Server (page 2-35)
Attaching Content From the File System (page 2-37)
Attaching Content From an Offline Location (page 2-37)
Attaching Content From the Content Server
You can attach one or more content items, or links to those content items, from the content
server to an e-mail message you are sending. You can send different versions of the
attachment or a link to the attachment.
Follow these steps to attach content from the content server:
1. Open the e-mail client (Microsoft Outlook or Lotus Notes).2. Create a new e-mail message.
3. Open the Get Attachment dialog box as follows:
In Microsoft Outlook, click the Check In Mail Item button on the toolbar.
In Lotus Notes, click Actions—Check In Mail Item.
4. Click the Server tab, if this is not already the default view. (You may be prompted to
enter your login credentials first.)
The search page of the content server displays.
5. To change to a different content server, select the server from the Server drop-downlist.
If the server you want to use is not listed, click the Server icon ( ) and follow the
steps in Adding a Server Connection (page 4-8). You may be prompted again to enter
your login credentials.

7/24/2019 55439-Desktop Integration Suite User Guide
http://slidepdf.com/reader/full/55439-desktop-integration-suite-user-guide 44/120
2-36 Desktop Integration Suite User Guide
Managing Content With Content Server Folders
6. From the Action drop-down list, select the attachment option you would like to use
(see description below).
If you select a native or web-viewable file, the e-mail recipient will receive the current
revision of the file at the time you selected it. If you select a URL, the most recent
revision that exists in the content server always displays when the e-mail recipientclicks the link.
7. Search the content server for the desired item or items.
8. Click the selection button ( ) next to the item that you want to attach to your
message.
Or, to select a particular revision of the content item, click the Info button ( ) next
to it. On the content information page, select the desired revision.
To attach multiple content items from the content server, repeat steps 3 through 8 for
each item.
9. You will return to the new message window in the e-mail client.
Author the e-mail message and send it in the usual way.
If you use Microsoft Word as your e-mail editor in Outlook 2000 or 2002, you will not be
able to use the E-Mail Client Integration’s attachment feature. To use this feature, you
need to use Outlook’s HTML or text editor.
Type Description
Attach native file Attaches the file in its native format.
Attach native file URL Attaches the URL to a file in its native format
Attach alternate file Attaches the alternate file.
Attach alternate file URL Attaches the URL to the alternate file
Attach weblayout file Attaches the file in a web-viewable format.
Attach weblayout file URL Attaches the URL to the file in a web-viewable
format
Attach content information
page URL
Attaches the URL to the content information
page for that file
Attach HTML Rendition Attaches the HTML rendition of the file

7/24/2019 55439-Desktop Integration Suite User Guide
http://slidepdf.com/reader/full/55439-desktop-integration-suite-user-guide 45/120
Desktop Integration Suite User Guide 2-37
Managing Content With Content Server Folders
Attaching Content From the File System
You can attach one or more content items from your local file system to an e-mail message
you are sending. You can still attach files using your e-mail client’s native file attachment
feature.
Follow these steps to attach content from the file system:
1. Open the e-mail client (Microsoft Outlook or Lotus Notes).
2. Create a new e-mail message.
3. Open the Get Attachment dialog box as follows:
In Microsoft Outlook, click the Get Attachment button on the toolbar.
In Lotus Notes, place your cursor in the body of the message and then click
Actions—Get Attachment.
4. Click the Folders tab, if this is not already the default view.
5. Use the Look In drop-down box to locate the folder that contains the file.
6. Select the file and click OK .
You will return to the new message window in the e-mail client with the file attached.
7. Author the e-mail message and send it in the usual way.
Attaching Content From an Offline LocationYou can attach one or more content items from an offline location to an e-mail message
you are sending. Offline content includes:
New files that you saved but did not check into the content server (when you closed
the file)
Read-only files that you obtained from the content server for viewing purposes
Files checked out of the content server that you are still working on
Follow these steps to attach content from an offline location:
1. Open the e-mail client (Microsoft Outlook or Lotus Notes).
2. Create a new e-mail message.
7/24/2019 55439-Desktop Integration Suite User Guide
http://slidepdf.com/reader/full/55439-desktop-integration-suite-user-guide 46/120
2-38 Desktop Integration Suite User Guide
Managing Content With Content Server Folders
3. Open the Get Attachment dialog box as follows:
In Microsoft Outlook, click the Get Attachment button on the toolbar.
In Lotus Notes, place your cursor in the body of the message and then clickActions—Get Attachment.
4. Click the Offline Content tab, if this is not already the default view.
5. Select the file and click OK .
You will return to the new message window in the e-mail client with the file attached.
6. Author the e-mail message and send it in the usual way.
WORKING WITH SHORTCUTS
You can create a shortcut to a folder, content, or a project so you can quickly access
information that you use often. When you create a shortcut, the location of the item
remains the same, and the shortcut to the item is placed on your desktop.
You can move the shortcut from your desktop to another location if you wish by cutting
the shortcut and pasting it in a new location.
When you click a shortcut to a folder or a project, the contents are displayed in a browser
window. When you click a shortcut to a content item, the content is checked out of the
content server (if it is available and if you have permission to check it out).
To create a shortcut, right-click the item and click Create Shortcut on the popup menu.
The shortcut is automatically placed on your desktop.
To delete a shortcut, click the shortcut and press the Delete key on your keyboard. When
you delete a shortcut, only the shortcut is deleted. The item the shortcut references remains
intact.
S YNDICATING CONTENT
You may want to view a read-only copy of content that is checked into Content Server
while you are disconnected from the server. You can do this by using the syndication
feature.
About Syndication (page 2-39)
Marking Content for Syndication (page 2-39)

7/24/2019 55439-Desktop Integration Suite User Guide
http://slidepdf.com/reader/full/55439-desktop-integration-suite-user-guide 47/120
Desktop Integration Suite User Guide 2-39
Managing Content With Content Server Folders
Downloading the Most Recent Revision of Syndicated Content (page 2-40)
Managing Content Available for Offline Use (page 2-41)
Opening the Offline Content Manager (page 2-43)
Working Offline (page 2-44)
About Syndication
Syndication lets you view a read-only copy of a content item that is checked into Content
Server while you are disconnected from the server.
For example, you may need read-only access to a report for a presentation you are giving
when you do not have access to the content server. With syndication, you obtain a copy of
the current version of that report before you disconnect from the server and have read-onlyaccess to that file while working offline.
Syndicating content entails:
Marking Content for Syndication (page 2-39)
Downloading the Most Recent Revision of Syndicated Content (page 2-40)
Managing Content Available for Offline Use (page 2-41)
Marking Content for Syndication
You can syndicate any folder, project, or content item you have access to in the content
server. Once you syndicate the content, you can view a read-only copy when you do not
have access to it in the content server.
You can syndicate individual content items, or you can syndicate an entire folder or
project as well. If you do so, when you choose the Work Offline option, a read-only copy
of the content within the folder or project is available for your use.
Important: Syndicated content is read-only. Because it can be accessed only through the
Content Server folder hierarchy, the content remains synchronized with the content server.
When online, you can update a syndicated content item by right-clicking the item and
clicking Refresh Syndication on the popup menu that appears. The content item will then
be overwritten by the most recent revision of that file in the content server. Be careful not
to overwrite a read-only file with a writable one. For example, if you create a writable
copy of a syndicated file and make changes to that, which you want to keep, this will result
in synchronization problems.

7/24/2019 55439-Desktop Integration Suite User Guide
http://slidepdf.com/reader/full/55439-desktop-integration-suite-user-guide 48/120
2-40 Desktop Integration Suite User Guide
Managing Content With Content Server Folders
Follow these steps to select content for syndication:
1. Connect to a server in the Content Server folder hierarchy. See Connecting to a
Content Server (page 2-19) for details.2. Navigate to and select the folder, project or content item to syndicate.
3. Right-click and select Syndicate from the popup menu.
A green mark in the lower right-hand corner of an icon ( ) indicates the item is currently
syndicated.
After you syndicate content items, the read-only content is available to you when you
select the Work Offline option, described in Working Offline (page 2-44).
Before you go offline, you may want to refresh the content to ensure you have the most
recent copy of a content item or the most recent folder hierarchy downloaded on your
computer, described in Downloading the Most Recent Revision of Syndicated Content
(page 2-40).
Downloading the Most Recent Revision ofSyndicated Content
When you syndicate a folder, project, or content item, the content becomes available in
read-only form when you work offline. Another feature of syndication is to ensure you
have the most current revision of content before you disconnect from the content server to
work offline.
Follow these steps to check for the most recent revision of syndicated content:
1. Right-click the top-level folder in the Content Server folder hierarchy and select
Offline Content Manager from the popup menu.
2. In the Offline Content Manager dialog box, highlight the content or folder you are
currently syndicating and wish to check to ensure you have the most recent revision
or, in the case of folders, the most recent hierarchy on your computer.
3. Click Refresh.
The most recent revision of syndicated content is downloaded to your system if the
version in the content server does not match the version on your computer.
Note: This option is only available at the top folder level, not at lower folder levels.

7/24/2019 55439-Desktop Integration Suite User Guide
http://slidepdf.com/reader/full/55439-desktop-integration-suite-user-guide 49/120
Desktop Integration Suite User Guide 2-41
Managing Content With Content Server Folders
You can also navigate to and right-click the content or folder and select Refresh
Syndicated Content from the popup menu. It is recommended that you use the Offline
Content Manager as described above to manage the content that is available for offline
use, because it is a convenient way to manage all of the content and folders you interact
with through the Content Server folder hierarchy.
For more information on the Offline Content Manager, see Managing Content Available
for Offline Use (page 2-41).
Managing Content Available for Offline Use
The Offline Content Manager offers a convenient way for you to view and manage the
content you interact through the Content Server folder hierarchy.
You can view all of the content you have checked out and syndicated using the Offline
Content Manager. You can also view offline content, which occurs when you syndicate a
folder and the folder hierarchy is replicated for you. Within the folder you syndicate,
content items in that hierarchy are available to you in a read-only format when you enter
the offline mode.
You can perform the following tasks:
Customizing the Offline Content Manager Display (page 2-41)
Checking the Status (page 2-42)
Viewing Syndicated Content (page 2-42)
Refreshing Syndicated Content (page 2-42)
Unsyndicating Content and Folders (page 2-43)
Checking in an Offline Content Item (page 2-43)
Viewing Properties of Offline Content (page 2-43)
The options described below are also available in a popup menu when you right-click a
content item or a folder in the Offline Content Manager dialog box.
Customizing the Offline Content Manager DisplayYou can view all checked out, syndicated, or offline content for any server in the Content
Server folder hierarchy. Or, you can view only a subset of what is available, such as
viewing only the syndicated content items for a particular server.

7/24/2019 55439-Desktop Integration Suite User Guide
http://slidepdf.com/reader/full/55439-desktop-integration-suite-user-guide 50/120
2-42 Desktop Integration Suite User Guide
Managing Content With Content Server Folders
Follow these steps to customize the display of offline content:
1. From the Offline Content Manager, click Filter. The View Options dialog box
displays.2. Select what you would like to display.
3. Click OK .
Checking the Status
You can check the synchronization status of a content item or a folder with that item in the
content server at any time by checking the status. Doing so can help you determine, for
example, if the server is properly connected and if the content item or folder still exists in
the content server.
To check the status of a content item or a folder, highlight the content item or folder and
click Check Status.
Viewing Syndicated Content
When you have syndicated or checked out a content item, you can view a read-only copy
of that item from the Offline Content Manager. When you view a read-only copy, the
content item remains checked into the content server.
To view a read-only copy of a content item, highlight it and click View.
Refreshing Syndicated Content
When you have syndicated a folder, a project, or a content item, the information you
syndicated becomes available to you in read-only form. You can ensure you have the most
current revision of a folder hierarchy or content item before you go offline and disconnect
from the content server. (You go offline when you are ready to disconnect and view your
syndicated content and folder structure. See Working Offline on page 2-44.)
To refresh syndicated content, highlight it and click Refresh.
You now have the most recent revision of the current folder hierarchy or syndicated
content. If a more recent revision of a content item exists on the content server, it has beendownloaded to your computer.

7/24/2019 55439-Desktop Integration Suite User Guide
http://slidepdf.com/reader/full/55439-desktop-integration-suite-user-guide 51/120
Desktop Integration Suite User Guide 2-43
Managing Content With Content Server Folders
Unsyndicating Content and Folders
When you no longer want to syndicate a folder or content item, you can unsyndicate it.
Then, the read-only copy of the content or folder hierarchy is removed from yourcomputer and is no longer displayed in the Offline Content Manager dialog
To unsyndicate a folder or content item, highlight it and click Unsyndicate.
When you unsyndicate a folder, the read-only copies of offline content items are also
removed. Any syndicated content items or folders within that folder remain syndicated.
Checking in an Offline Content Item
You can check in content that you have checked out of the content server by highlighting
the file and clicking Check In on the right-click popup menu.
When you check in the content item, a new revision is created in the content server and
the content item no longer displays in the Offline Content Manager dialog box (unless it is
syndicated or available for offline use).
Viewing Properties of Offline Content
To view the properties of a folder or content item, including the name, URL, and server,
highlight the item and click Properties.
From here, you can reference the item’s name, URL, and server.
Opening the Offline Content Manager
The Offline Content Manager offers a convenient way to manage the offline content you
interact with using the Content Server folder hierarchy. See Managing Content Available
for Offline Use (page 2-41) for more information.
Follow these steps to open the Offline Content Manager:
1. Right-click the top-level folder in the Content Server folder hierarchy.
2. Click Offline Content Manager on the popup menu.

7/24/2019 55439-Desktop Integration Suite User Guide
http://slidepdf.com/reader/full/55439-desktop-integration-suite-user-guide 52/120
2-44 Desktop Integration Suite User Guide
Managing Content With Content Server Folders
Working Offline
When you syndicate folders or content items, you can access read-only copies of them
before you disconnect from the content server by selecting the “Work Offline” option
through the Content Server folder hierarchy. Selecting this option is used only in
conjunction with syndication, which provides read-only access to content and folders.
Follow these steps to work offline:
1. Right-click the server for which you want to work offline and access syndicated
content.
2. Click Work Offline from the popup menu.
A red circle with a line through it displays on the server icon when it is offline:
Figure 2-24 Offline indicator
Also, there is a check mark to the left of the Work Offline option in the popup menu that
displays when you right-click the server.
When you have finished working offline and are ready to reconnect to a server, right-click
the server and click Work Offline from the popup menu so the check mark no longer
displays.
The Offline Content Manager Filter
Use the View Options dialog box to determine the information that displays in the Offline
Content Manager dialog box. This dialog box displays when you click Filter from the
Offline Content Manager dialog.

7/24/2019 55439-Desktop Integration Suite User Guide
http://slidepdf.com/reader/full/55439-desktop-integration-suite-user-guide 53/120
Desktop Integration Suite User Guide 2-45
Managing Content With Content Server Folders
Figure 2-25 View Options dialog
You can choose to display any combination of the following:
Show Checked Out Content —Select to display content that you have checked out of
the content server from the Content Server folder hierarchy.
Syndicated Content —Select the appropriate check box to display folders or
syndicated files in the Content Server folder hierarchy. Syndicated folders and files
display with a green overlay in the bottom, right-hand corner of the icon.
Offline Content —Select the appropriate check box to display folders or files that are
available for offline use. When you syndicate a folder, the folder hierarchy is placed
on your computer. You can then view a read-only copy of the offline files on your
computer. Although these files are available for offline use, they are not syndicated.
When you unsyndicate a folder, the offline folders and files may no longer reside on
your computer. Offline content displays with a clear overlay in the bottom, right-hand
corner of the icon.
Show the Following Servers —Click the check box for one or more servers to display
those servers regarding content that is available for offline use.

7/24/2019 55439-Desktop Integration Suite User Guide
http://slidepdf.com/reader/full/55439-desktop-integration-suite-user-guide 54/120
2-46 Desktop Integration Suite User Guide
Managing Content With Content Server Folders
Offline PropertiesDialog Box
You can view the properties of a folder or a content item from the Offline Content
Manager dialog box. The properties consist of the name, URL, and server of the folder orcontent item.
In the Offline Content Manager dialog box, right-click the folder or content item and click
Properties to open the Properties dialog box.

7/24/2019 55439-Desktop Integration Suite User Guide
http://slidepdf.com/reader/full/55439-desktop-integration-suite-user-guide 55/120
Desktop Integration Suite User Guide 3-1
C h a p t e r
3.MANAGING CONTENT THROUGH
THE COMMON DIALOGS INTERFACE
OVERVIEW
Integrating Content Server with your desktop applications improves your ability
to manage content on the server. It provides a simplified interface for managing files in a
common way from all of your desktop applications.
You can continue to access files on the content server through your browser, or you can
work with files on your file system through the “common dialogs” that the integration
provides.
Managing files from your desktop consists of:
The User Interface (page 3-2)
Understanding Metadata (page 3-3)
Managing Your Server Connections (page 3-4)
Adding a Server Connection (page 3-5)
Determining the Server CGI URL Path (page 3-7)
Editing a Server Connection (page 3-7)
Creating a New File (page 3-9)
Checking a New File Into the Content Server (page 3-10)
Checking an Existing File Into the Content Server (page 3-11)
Checking a File Out of the Content Server (page 3-12)

7/24/2019 55439-Desktop Integration Suite User Guide
http://slidepdf.com/reader/full/55439-desktop-integration-suite-user-guide 56/120
3-2 Desktop Integration Suite User Guide
Managing Content Through the Common Dialogs Interface
Viewing a File That Is in the Content Server (page 3-12)
Opening a Previous Revision (page 3-13)
Saving a New File to the Local File System (page 3-14)
Opening a File From the Local File System (page 3-14)
Working With Content Offline (page 3-14)
Setting the Authentication Method (page 3-16)
Setting the Server to Remember Metadata (page 3-17)
THE USER INTERFACE
When you integrate Content Server, a series of “common dialogs” is layered into your
desktop applications. The Windows commands New, Open, Save, and Save As on the File
menu now provide access to the Select Content dialog box which provides access to other
dialog boxes that let you configure the content server and manage content.
Figure 3-1 Select Content dialog
Note: Depending on your exact Windows operating system (2000, XP, or Vista), the
screenshots in this guide may look slightly different from what you are seeing on your
computer.

7/24/2019 55439-Desktop Integration Suite User Guide
http://slidepdf.com/reader/full/55439-desktop-integration-suite-user-guide 57/120
Desktop Integration Suite User Guide 3-3
Managing Content Through the Common Dialogs Interface
The Select Content dialog box has three tabs:
Server —On this tab you check items into and out of the servers you are using to store
content. You also configure connections to those servers. Folders —On this tab you can view the local file system, save files to it, and open
documents from it.
Offline Content —This tab summarizes three types of content: new files in cache that
have not been checked into the content server; read-only copies of files obtained from
the content server; files checked out of the content server.
The Select Content dialog box displays as the Save dialog box when you save a document
for the first time.
The three tabs (Server, Folders, and Offline Content) may not always appear. For example,
when you click OK in the Desktop—New Document dialog box to save a document to thecontent server, only the Server tab is available.
UNDERSTANDING METADATA
Metadata is “data about data.” When you check a file into the content server, you associate
information with the file that uniquely identifies it so that you can easily locate the file in
the content server at any time.
Content Server uses three types of metadata: default, optional, and custom. The specific
metadata fields used will depend on how your system administrator has configured the
server. (If you are checking in e-mail messages and attachments from your e-mail client,
you may also be using a fourth type of metadata, which is designed specifically for
e-mail.)
Default metadata fields are preconfigured for the software and include the content ID and
primary file. The content ID is a unique identifier and is usually automatically assigned
and filled in. (If this is the case, you should not change it.) If the system was set up to
allow you to enter a content ID, the field will display without any information.
The primary file is the path name to the native or original file being checked in.
(For more information on metadata, open the Help system from the Content Serverweb browser interface.)
The content server can “remember” the metadata values used at check-in and
automatically populate metadata fields each time you check in a content item. See Setting
the Server to Remember Metadata (page 3-17).

7/24/2019 55439-Desktop Integration Suite User Guide
http://slidepdf.com/reader/full/55439-desktop-integration-suite-user-guide 58/120
3-4 Desktop Integration Suite User Guide
Managing Content Through the Common Dialogs Interface
MANAGING YOUR SERVER CONNECTIONS
You manage all server connections on the client machine from the Edit Server List dialog box. Here, you can add and delete servers, as well as edit the server connections you have
created.
Follow these steps to manage your server connections:
1. Click File—Open to open the Select Server dialog box.
2. Click Server to open that tab.
3. Click the Server icon ( ) opposite the Server drop-down list.
The Edit Server List dialog box opens.
Figure 3-2 Edit Server List dialog
4. To add a server, click New. (See Adding a Server Connection on page 3-5.)
5. To edit a server, select the server and click Edit to open the Edit Server dialog box.
(See Editing a Server Connection on page 3-7.)
6. To delete a server, select the server and click Delete.
7. Click OK .

7/24/2019 55439-Desktop Integration Suite User Guide
http://slidepdf.com/reader/full/55439-desktop-integration-suite-user-guide 59/120
Desktop Integration Suite User Guide 3-5
Managing Content Through the Common Dialogs Interface
ADDING A SERVER CONNECTION
Once you have integrated Content Server with your desktop applications and have set upmetadata for the content server, you are ready to connect each client machine to that
server. You can connect to multiple servers, if you wish.
Follow these steps to add a new server connection:
1. Click File—Open to open the Select Content dialog box.
2. Click Server to open that tab.
3. Click the Server icon ( ) opposite the Server drop-down list. The Edit Server List
dialog box opens.
Figure 3-3 Edit Server List dialog
4. Click New to open the Add Server dialog box.

7/24/2019 55439-Desktop Integration Suite User Guide
http://slidepdf.com/reader/full/55439-desktop-integration-suite-user-guide 60/120
3-6 Desktop Integration Suite User Guide
Managing Content Through the Common Dialogs Interface
Figure 3-4 Add Server dialog
In the Server Name text box, enter a name for the server you are about to
configure (you can use any user-friendly name).
In the text box under Server WebDAV URL, enter the web server URL.
A URL is automatically inserted using the name you specified in the Server Name
text box. You can also copy and paste one of the sample URLs provided.
If you are using a regular content server, in the text box under Oracle CGI URL,
enter the CGI URL.
5. Click OK .
The new server connection will appear in all of the applications you use to interact with
the content server. It also appears in Windows Explorer and your e-mail clients.
Note: A URL is automatically inserted using the name you specified in the Server Name
text box. You can also copy and paste one of the sample URLs provided. (If you’re not
sure about the CGI URL, see Determining the Server CGI URL Path on page 3-7 for more
information.)

7/24/2019 55439-Desktop Integration Suite User Guide
http://slidepdf.com/reader/full/55439-desktop-integration-suite-user-guide 61/120
Desktop Integration Suite User Guide 3-7
Managing Content Through the Common Dialogs Interface
DETERMINING THE SERVER CGI URL PATH
When you integrate Content Server with your desktop applications, you need to know theCGI URL path for the server connections you make.
Follow these steps to determine the server CGI URL path:
1. Navigate to the search page in Content Server using your web browser.
2. In the browser Address or Location field, select and copy the Search page URL from
the beginning up to, but not including, the question mark (?). This is the CGI URL
path.
3. Paste this URL into the Oracle CGI URL field in the Add Server dialog box.
(See Adding a Server Connection on page 3-5.)
EDITING A SERVER CONNECTION
Once you have connected a client machine to one or more content servers, you can edit the
server connections at any time.
Follow these steps to edit an existing server connection:
1. Click File—Open to open the Select Content dialog box.
2. Click Server to open that tab.
3. Click the Server icon ( ) opposite the Server drop-down list. The Edit Server List
dialog box opens.
4. Under Servers, select the server you want to edit. Click Edit to open the Edit Servers
dialog box.

7/24/2019 55439-Desktop Integration Suite User Guide
http://slidepdf.com/reader/full/55439-desktop-integration-suite-user-guide 62/120
3-8 Desktop Integration Suite User Guide
Managing Content Through the Common Dialogs Interface
Figure 3-5 Edit Servers dialog
In the Server Name text box, enter a new name for the server you want to edit
(it can be any user-friendly name).
In the text box under Server WebDAV URL, enter the web server URL path.
You can cut and paste one of the samples shown in the panel and then replace
“server” with the HTTP address of your server.
In the text box under Oracle CGI URL, enter the CGI URL path.
You can cut and paste one of the samples shown in the panel and then replace
“server” with the HTTP address of your server. If you’re not sure about the CGI
URL path, see Determining the Server CGI URL Path (page 3-7).
5. Click OK .
You should only edit the WebDAV URL or CGI URL path if it was originally enteredincorrectly. You should not create a new server connection by editing an existing one.
Rather, you should add and delete server connections.

7/24/2019 55439-Desktop Integration Suite User Guide
http://slidepdf.com/reader/full/55439-desktop-integration-suite-user-guide 63/120
Desktop Integration Suite User Guide 3-9
Managing Content Through the Common Dialogs Interface
CREATING A NEW FILE
Once you have configured one or more content servers, and have set the metadata that will be associated with files checked into those servers, you can begin managing your files in
the content server from your desktop application.
Follow these steps to create a new file:
1. Click File—Save. The Desktop – New Document dialog box opens.
Figure 3-6 New Document dialog
2. Enter a title for the document in the text box. This title will automatically be used for
the Title metadata in the content server.
3. If you have the option to save the file under a different format and wish to do so, click
Select Format to open the Save File As Type dialog box.
4. Select the file format from the drop-down list and click OK .
5. In the New Document dialog box, click OK to return to your desktop application.
6. Click File—Close to save the new document to the content server for the first time.
Note: The title you entered in the text box now displays in the Title bar of the file that is
open in your desktop application. However, at this stage the file has been saved to cache
only. You must formally close the file to save it to the content server for the first time.

7/24/2019 55439-Desktop Integration Suite User Guide
http://slidepdf.com/reader/full/55439-desktop-integration-suite-user-guide 64/120
3-10 Desktop Integration Suite User Guide
Managing Content Through the Common Dialogs Interface
CHECKING A NEW FILE INTO THE CONTENT SERVER
When you save a file for the first time in your desktop application using the Desktop – New Document dialog box, the file is initially saved to cache (see Creating a New File on
page 3-9). You are not prompted to check the file into the content server until you click
Close.
Follow these steps to check a new file into the content server:
1. With the file open and saved in your desktop application, click File—Close.
The Save dialog box opens. (This is the same as the Select Content dialog box, except
that only the Server and Folders tabs are available.)
2. Click Server to open that tab dialog. The content check-in form is displayed for the
last content server you used.
If you have configured multiple content servers and want to check the file into another
server, select that server from the Server drop-down list.
Figure 3-7 Sample content check-in form

7/24/2019 55439-Desktop Integration Suite User Guide
http://slidepdf.com/reader/full/55439-desktop-integration-suite-user-guide 65/120
Desktop Integration Suite User Guide 3-11
Managing Content Through the Common Dialogs Interface
3. Complete the content check-in form by entering required and other metadata.
The metadata fields you see in the content check-in form are the default and other
metadata your system administrator has set up for the content server.4. Click the Check In button at the bottom of the screen to check the document into the
content server.
If you cancel out of the Select Content dialog box before checking the file into the content
server, the file will be saved to cache, instead. In that event, you can open the file in the
future from the Offline Content tab. The file will be listed as “Unmanaged” in the Status
column.
CHECKING AN EXISTING FILE INTO THE CONTENT SERVER
Once a new file has been checked into the content server, the file is associated with a
specific content server and with the metadata associated with the file at the original
check-in. Thereafter, you can check the file in and out of the content server at any time.
Each time you check in a file, the file is automatically checked into the same content
server, with the previously assigned metadata. (You can change the metadata at check-in.)
Also, a new revision of the file is created each time.
When you save a file that is open in your desktop application, the file is saved to cache.
It is not formally saved in the server until you close the file and check it into the content
server.
Follow these steps to check an existing file into the content server:
1. With the file open in your desktop application, click File—Close.
2. If the file contains new content that has not been saved, you are prompted to save the
changes to the file. Click OK .
3. The Save dialog box opens, showing the content check-in form. Change the metadata,
if you want.
4. Click Check In.
If you cancel out of the Save dialog box without checking the file in, the file will be saved
to cache, instead. You will see the file listed in the Offline Content tab and can open it
from there the next time you want to work on the file.

7/24/2019 55439-Desktop Integration Suite User Guide
http://slidepdf.com/reader/full/55439-desktop-integration-suite-user-guide 66/120
3-12 Desktop Integration Suite User Guide
Managing Content Through the Common Dialogs Interface
CHECKING A FILE OUT OF THE CONTENT SERVER
Once a new file has been checked into a particular content server, the file can be checkedout at any time.
Follow these steps to check a file out of the content server:
1. Click File—Open.
2. In the Select Content dialog box, click the Server tab.
3. From the Server drop-down list, select the content server you want to check the file
out of.
4. On the search page, enter the content ID, if you know it. Otherwise, enter appropriate
search criteria, and then click Search. The Search Results table displays a list of
content items that most closely match the search criteria.
5. From the Action drop-down list of the Select Content dialog box, click Edit.
6. Click the Select button for the file you want to check out.
7. Click OK .
The content item is automatically downloaded and opens in your desktop application.
It will remain in cache and can be opened from the Offline Content tab until youformally check it back into the content server.
VIEWING A FILE THAT IS IN THE CONTENT SERVER
You can view a read-only version of a file at any time.
Follow these steps to view a file in the content server:
1. Click File—Open.
2. In the Select Content dialog box, click the Server tab.3. From the Server drop-down list, select the content server you want to check the file
out of.
4. On the search page, enter the search criteria, and then click Search. The Search
Results table displays with a list of content that most closely match the search criteria.
Note: If the Edit option does not display, the content item is checked out by another user.
You can select View to open a read-only copy or a new copy.

7/24/2019 55439-Desktop Integration Suite User Guide
http://slidepdf.com/reader/full/55439-desktop-integration-suite-user-guide 67/120
Desktop Integration Suite User Guide 3-13
Managing Content Through the Common Dialogs Interface
5. From the Action drop-down list in the Select Content dialog box, select View.
6. Click Select for the file you want to view.
7. Click OK .
A read-only version of the content item is automatically downloaded and opens in
your desktop application. The Title bar displays [Read Only] immediately following
the file name.
Once you obtain a read-only copy of a file from the content server, it can be opened in the
future from the Offline Content tab in the Select Content dialog box. See Working With
Content Offline (page 3-14).
OPENING A PREVIOUS REVISIONYou can open a previous version of a content item, which is especially useful if you want
to compare a previous version to the current version to identify changes between the two
documents.
You can only obtain a read-only version of a previous revision.
Follow these steps to open a previous revision:
1. Click File—Open.
2. In the Select Content dialog box, click the Server tab.
3. From the Server drop-down list, select the content server that contains the file you
want to check out.
4. On the search page, enter the search criteria, and then click Search. The Search
Results table displays a list of contents that most closely match the search criteria.
5. Locate the file you are interested in and click the Info button to open the Content
Information page.
6. From the list of revisions at the bottom of the page, click the revision you want to
open.
7. Click the Select button to open a read-only version of the file in your desktopapplication.
When you close the file, it will be saved to cache. You can open this read-only copy of the
file in the future from the Offline Content tab in the Select Content dialog box.

7/24/2019 55439-Desktop Integration Suite User Guide
http://slidepdf.com/reader/full/55439-desktop-integration-suite-user-guide 68/120
3-14 Desktop Integration Suite User Guide
Managing Content Through the Common Dialogs Interface
SAVING A NEW FILE TO THE LOCAL FILE S YSTEM
When you create a new file in your desktop, you have the option of saving it to the localfile system instead of the content server.
Follow these steps to save a new file to the local file system:
1. Click File—Save. The Desktop – New Document dialog box opens.
2. Enter a title in the text box.
3. Click Save Locally. The Select Content dialog box opens.
4. Click Folders to open that tab dialog.
5. Navigate in Windows Explorer to the folder where you want to save the file to.
6. Select the folder and click Save.
7. Click OK .
OPENING A FILE FROM THE LOCAL FILE S YSTEM
With Content Server integrated with your desktop applications, you can continue to save
files to the local file system, if you prefer, and to open them from there at any time.
Follow these steps to open a file from the local file system:
1. Choose File—Open.
2. In the Select Content dialog box, click Folders to display the file system.
3. Use the Look In drop-down box to locate the folder that contains the file.
4. Select the file and click OK . The file opens in your desktop application.
WORKING WITH CONTENT OFFLINE
The Offline Content tab of the Select Server dialog box summarizes three types of files:
New —Files you saved but did not check into the content server when you closed the
file.
Read-only —Files you have obtained from the content server for viewing purposes.
Checked out —Files you have checked out of the content server and are currently
working on.

7/24/2019 55439-Desktop Integration Suite User Guide
http://slidepdf.com/reader/full/55439-desktop-integration-suite-user-guide 69/120
Desktop Integration Suite User Guide 3-15
Managing Content Through the Common Dialogs Interface
Figure 3-8 Offline Content tab
This section covers the following topics:
New Files (page 3-15)
Read-Only Files (page 3-16)
Checked-Out Files (page 3-16)
New Files
When you create a new document in your desktop application, you initially name the file
in the Desktop – New Document dialog box. If you plan to save the file to the content
server, you click OK (rather than Save Locally). The file is then saved to cache. Only
later, when you click Close, are you prompted to check the file into the content server.
Then, the Save dialog box appears (the Select Content dialog box with only the Server tab
available). If you choose to close the dialog box without actually checking the file into the
content server, the file will remain in cache and will be listed as “Unmanaged” (under
Status) in the Offline Content tab. It can be opened from that tab at any time.

7/24/2019 55439-Desktop Integration Suite User Guide
http://slidepdf.com/reader/full/55439-desktop-integration-suite-user-guide 70/120
3-16 Desktop Integration Suite User Guide
Managing Content Through the Common Dialogs Interface
Read-Only Files
You can obtain a read-only copy of a file from the content server at any time. You may
want to do this if you anticipate being disconnected from the server and would like to at
least have a viewable version of the file available.
See Viewing a File That Is in the Content Server (page 3-12).
Checked-Out Files
When you formally check files out of the content server, these files are also listed in the
Offline Content tab. In this case, they are identified by the server (and folder) you have
checked them out of. These files remain in cache until you formally check them back into
the content server.
SETTING THE AUTHENTICATION METHOD
When you create a connection to a server, your server options include the ability to set an
authentication method by which users can log on.
Typically, the authentication method is set up by the system administrator and should not
be changed.
Follow these steps to set the authentication method:
1. Click File—Open to open the Select Content dialog box.
2. Click Server to open that tab.
3. Click the Server icon ( ) opposite the Server drop-down list. The Edit Server List
dialog box opens.
4. Select the server you want to set the authentication method for and click Options.
5. In the Server Options dialog box, click the Authentication tab.

7/24/2019 55439-Desktop Integration Suite User Guide
http://slidepdf.com/reader/full/55439-desktop-integration-suite-user-guide 71/120
Desktop Integration Suite User Guide 3-17
Managing Content Through the Common Dialogs Interface
Figure 3-9 Authentication tab
6. Select the authentication method you want to use.
7. Click OK .
SETTING THE SERVER TO REMEMBER METADATA
You can have the content server “remember” the metadata values you use at check-in and
populate the metadata fields with those values at the next check-in. Any time you change
one or more values at check-in, the new values are retained until you change them again.
You can select which metadata fields are to be remembered in this way.
Note: The default setting is whatever has been set up for your content server. If you selectMicrosoft Login (NTLM), you are using NTLM security. In that event, your user name
and password are automatically supplied when you click the server, so you may not be
prompted for login information.

7/24/2019 55439-Desktop Integration Suite User Guide
http://slidepdf.com/reader/full/55439-desktop-integration-suite-user-guide 72/120
3-18 Desktop Integration Suite User Guide
Managing Content Through the Common Dialogs Interface
Follow these steps to set the server to remember metadata:
1. Click File—Open to open the Select Content dialog box.
2. Click Server to open that tab.
3. Click the Server icon ( ) opposite the Server drop-down list. The Edit Server List
dialog box opens.
4. Select the server you want to set the authentication method for and click Options.
5. In the Server Options dialog box, click the Remember Metadata fields tab.
6. Click Remember Last Entered Metadata Fields. The Available Metadata Fields text
box now lists the metadata available on the content server.
Figure 3-10 Available metadata fields
7. Under Available Metadata Fields, select the specific metadata fields you want to be
remembered and click the right arrow button to move those fields under Selected
Metadata Fields.

7/24/2019 55439-Desktop Integration Suite User Guide
http://slidepdf.com/reader/full/55439-desktop-integration-suite-user-guide 73/120
Desktop Integration Suite User Guide 3-19
Managing Content Through the Common Dialogs Interface
8. Click OK to return to the Server dialog box.
The values you enter at the next check-in of a content item will be remembered for future
check-ins. Each time you change a value, the new value will be remembered until you
change it again.
Note: If you do not want a selected metadata field to be remembered anymore, select the
field under Selected Metadata Fields and click the left arrow button to move the field
under Available Metadata Fields.
7/24/2019 55439-Desktop Integration Suite User Guide
http://slidepdf.com/reader/full/55439-desktop-integration-suite-user-guide 74/120
3-20 Desktop Integration Suite User Guide
Managing Content Through the Common Dialogs Interface

7/24/2019 55439-Desktop Integration Suite User Guide
http://slidepdf.com/reader/full/55439-desktop-integration-suite-user-guide 75/120
Desktop Integration Suite User Guide 4-1
C h a p t e r
4.MANAGING CONTENT THROUGH
YOUR E-MAIL CLIENT
OVERVIEW
E-Mail client integration allows you to integrate Microsoft Outlook or Lotus Notes with
Content Server. As a result, you can check e-mail messages and their attachments into or
out of the content server directly through your e-mail client and share them with others in
your organization.
The following components are available:
EmailMetadata component —Extracts information from Microsoft Outlook
messages (MSG) and Internet Mail Messages (EML) and populates e-mail-specific
fields in the content server. This happens when users check in files using the Content
Server Folders functionality in Microsoft Outlook, Lotus Notes, or Windows Explorer.
This also happens when checking in MSG or EML files using the web browser
interface.
Records Management Email component —Enables you to check distribution lists
into the content server using Microsoft Outlook or Lotus Notes.
Once you have integrated your e-mail client with the content server, you need to set up
metadata on the content server that will be used to store the e-mail messages and
attachments, and then connect each client machine to that server.

7/24/2019 55439-Desktop Integration Suite User Guide
http://slidepdf.com/reader/full/55439-desktop-integration-suite-user-guide 76/120
4-2 Desktop Integration Suite User Guide
Managing Content Through Your E-Mail Client
This section covers the following topics:
Setting Up Metadata on a Content Server (page 4-2)
Managing Your Server Connections (page 4-8)
Checking In Content (page 4-15)
Showing Content Server Folders in Lotus Notes (page 4-19)
Working With Distribution Lists (page 4-19)
Attaching Content to an E-Mail Message (page 4-26)
Any server connection you add through one integrated application applies to all integrated
applications. If you have already connected to a content server through another
application, you do not need to add a separate connection through the e-mail client.
SETTING UP METADATA ON A CONTENT SERVER
After integrating the e-mail client with Content Server, the next step is to set up the
metadata on each content server you plan to use for storing e-mail messages and
attachments.
Metadata is information about a content item that helps to define that content item when it
is stored in the content server. Metadata is automatically associated with each content item
you check into the content server. It uniquely identifies that item and simplifies searches in
the server.
Four types of metadata can be used with the e-mail client: default, optional, custom, and
e-mail:
Note: Depending on your exact Windows operating system (2000, XP, or Vista), the
screenshots in this guide may look slightly different from what you are seeing on your
computer.
Metadata Comment
Default Also known as standard or predefined metadata: Content ID, Title,Type, Author, Security Group, Primary File, Release Date, and
Revision. Required for every instance of the server and associated
with every content item checked into the server.

7/24/2019 55439-Desktop Integration Suite User Guide
http://slidepdf.com/reader/full/55439-desktop-integration-suite-user-guide 77/120
Desktop Integration Suite User Guide 4-3
Managing Content Through Your E-Mail Client
For more information on default, optional, and custom metadata, see the Content Server
Help system. For more information on e-mail metadata, see the Desktop Integration Suite
Installation Guide.
Once metadata has been set up for the content server, you can connect each client machine
to the content server.
This section covers the following topics:
E-Mail Specific Metadata (page 4-3)
Configuring the Server to Remember Metadata (page 4-4)
Configuring Your E-Mail Check-In Settings (page 4-7)
E-Mail Specific Metadata
Six e-mail specific metadata fields are available for use with the e-mail client: EmailFrom,
EmailTo, EmailCC, EmailSubject, PublicationDate and ReceiveDate. These optional
fields are not required for the e-mail client to function with the content server. (They are
installed automatically with the Records Management Email component; otherwise, they
must be installed manually.) If used, these metadata fields are pre-populated with available
values when you check an e-mail or attachment into the content server.
Optional Available for the content server but do not display automatically atcheck-in: Account, Alternative File, and Expiration Date. These can
be enabled by your system administrator.
Custom Created specifically for your company. They can be anything you
want. Examples: Project, Part Number, Deadline Date, Project
Status, Department, and Location.
E-mail Special metadata for use with the e-mail client: EmailFrom,
EmailCC, EmailSubject, EmailTo, PublicationDate, and
ReceiveDate.
Metadata Comment

7/24/2019 55439-Desktop Integration Suite User Guide
http://slidepdf.com/reader/full/55439-desktop-integration-suite-user-guide 78/120
4-4 Desktop Integration Suite User Guide
Managing Content Through Your E-Mail Client
The following metadata field names with possible labels might be used on the server.
Configuring the Server to Remember Metadata
When you connect each client machine to the content server, you have the option of
identifying metadata to be “remembered” each time you check in an e-mail or attachment.
If you designate a metadata field to be remembered, whatever you populate that metadata
field with for the check-in of a particular item will display the same value when you check
in a content item. Each time you change a value at check-in, it is remembered and
automatically used during the following check-in.
Follow these steps to specify the metadata to be remembered:
1. Open the e-mail client (Microsoft Outlook or Lotus Notes).
2. Open the Email Checkin Settings dialog box as follows:
In Microsoft Outlook, click Tools—Email Client Integration Settings.
In Lotus Notes, click Actions—Email Client Integration Settings.
The Email Checkin settings dialog is displayed.
Metadata Field Name Label in Content Server
EmailFrom Author or Originator
EmailTo Addressee(s)
EmailCC Other Addressee(s)
EmailSubject Email Subject
PublicationDate Publication Date
ReceiveDate Received Date

7/24/2019 55439-Desktop Integration Suite User Guide
http://slidepdf.com/reader/full/55439-desktop-integration-suite-user-guide 79/120
Desktop Integration Suite User Guide 4-5
Managing Content Through Your E-Mail Client
Figure 4-1 Email Checkin settings dialog
The “Show Folders” option is a Lotus Notes feature (see Showing Content Server
Folders in Lotus Notes on page 4-19).
3. Click Edit Server List.
4. In the Edit Server List dialog box, under Servers, select the content server that you
want to edit.
5. Click Edit to open the Edit Server dialog box.
6. Click Options to open the Server Options dialog box.

7/24/2019 55439-Desktop Integration Suite User Guide
http://slidepdf.com/reader/full/55439-desktop-integration-suite-user-guide 80/120
4-6 Desktop Integration Suite User Guide
Managing Content Through Your E-Mail Client
Figure 4-2 Server Options dialog
7. On the Remember Metadata Fields tab, click Remember Last Entered Metadata
Fields. The metadata fields available in the content server display in the Available
Metadata Fields list.
8. Select the metadata fields that you want to be remembered in the content server each
time you check in a content item.
To use one or more metadata, select each one under “Available Metadata Fields”
and click the right arrow.
Each metadata you select displays under “Selected Metadata Fields.”
To no longer use one or more selected metadata fields, select each field under
“Selected Metadata Fields” and click the left arrow.
Each field you selected displays under “Available Metadata Fields.”
9. Click OK to close the Server Options dialog box, click OK to close the Edit Server
dialog box, click Close to close the Edit Server List dialog box, and lastly, click OK to
close the Email Checkin Settings dialog box.
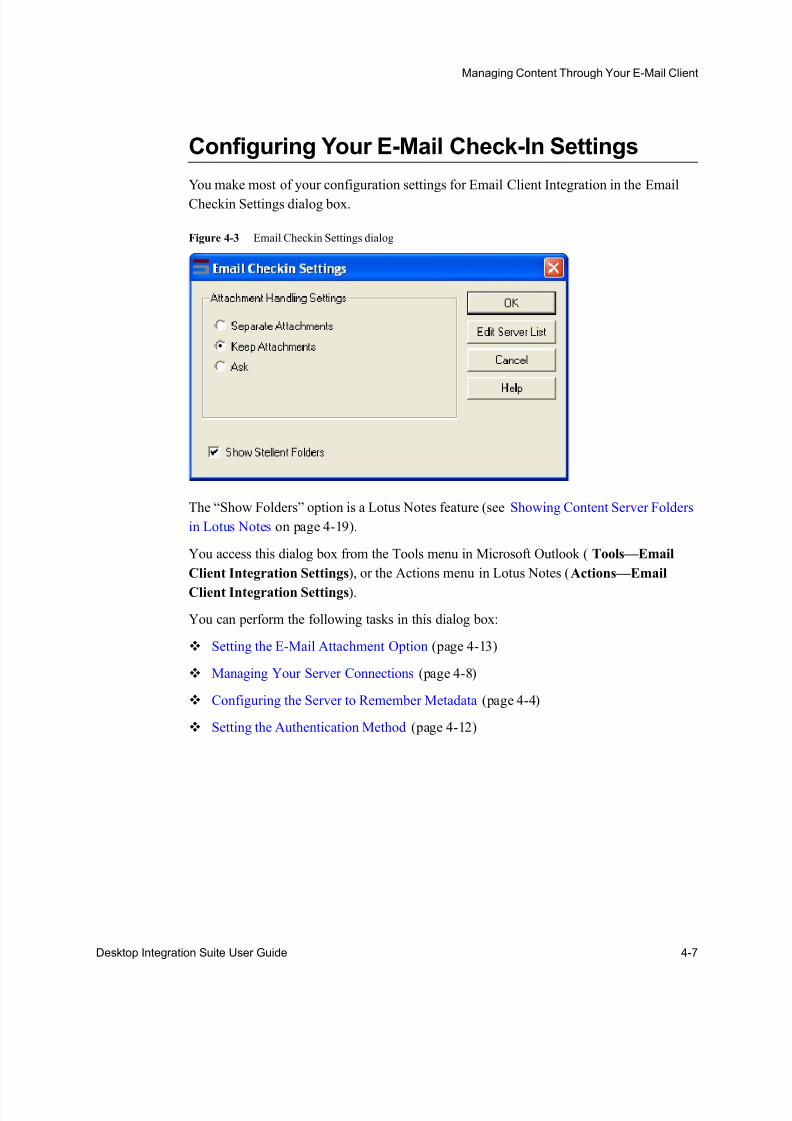
7/24/2019 55439-Desktop Integration Suite User Guide
http://slidepdf.com/reader/full/55439-desktop-integration-suite-user-guide 81/120
Desktop Integration Suite User Guide 4-7
Managing Content Through Your E-Mail Client
Configuring Your E-Mail Check-In Settings
You make most of your configuration settings for Email Client Integration in the Email
Checkin Settings dialog box.
Figure 4-3 Email Checkin Settings dialog
The “Show Folders” option is a Lotus Notes feature (see Showing Content Server Folders
in Lotus Notes on page 4-19).
You access this dialog box from the Tools menu in Microsoft Outlook ( Tools—Email
Client Integration Settings), or the Actions menu in Lotus Notes (Actions—Email
Client Integration Settings).
You can perform the following tasks in this dialog box:
Setting the E-Mail Attachment Option (page 4-13)
Managing Your Server Connections (page 4-8)
Configuring the Server to Remember Metadata (page 4-4)
Setting the Authentication Method (page 4-12)
7/24/2019 55439-Desktop Integration Suite User Guide
http://slidepdf.com/reader/full/55439-desktop-integration-suite-user-guide 82/120
4-8 Desktop Integration Suite User Guide
Managing Content Through Your E-Mail Client
MANAGING YOUR SERVER CONNECTIONS
You can add, edit, or delete a server connection at any time, as explained in the followingtopics:
Adding a Server Connection (page 4-8)
Viewing the Server CGI URL Path (page 4-11)
Editing a Server Connection (page 4-11)
Removing a Server Connection (page 4-12)
Setting the Authentication Method (page 4-12)
Setting the E-Mail Attachment Option (page 4-13)
Adding a Server Connection
Once you have installed the e-mail client integration and have set up metadata for the
content server, you can connect one or more client machines to the content server.
Follow these steps to add a new server connection:
1. Open the e-mail client (Microsoft Outlook or Lotus Notes).
2. Open the Email Checkin Settings dialog box as follows:
In Microsoft Outlook, click Tools—Email Client Integration Settings.
In Lotus Notes, click Actions—Email Client Integration Settings.
The Email Checkin Settings dialog is displayed.

7/24/2019 55439-Desktop Integration Suite User Guide
http://slidepdf.com/reader/full/55439-desktop-integration-suite-user-guide 83/120
Desktop Integration Suite User Guide 4-9
Managing Content Through Your E-Mail Client
Figure 4-4 Email Checkin Settings dialog
The “Show Folders” option is a Lotus Notes feature (see Showing Content Server
Folders in Lotus Notes on page 4-19).
3. Click Edit Server List.
4. In the Edit Server List dialog box, click New.
5. In the Add Server dialog box, enter a value for the Server Name (you can use a
user-friendly name).

7/24/2019 55439-Desktop Integration Suite User Guide
http://slidepdf.com/reader/full/55439-desktop-integration-suite-user-guide 84/120
4-10 Desktop Integration Suite User Guide
Managing Content Through Your E-Mail Client
Figure 4-5 Add Server dialog
In the text box under Server WebDAV URL, enter the web server URL.
If you are using a regular content server, in the text box under Oracle CGI URL,
enter the CGI URL.
6. Click OK to close the Add Server dialog box, click Close to close the Edit Server List
dialog box, and then click OK to close the Email Checkin Settings dialog box.The new server connection will appear in all of the applications you use to interact with
the content server (Windows Explorer, e-mail clients, and other integrated applications).
Note: A URL is automatically inserted using the name you specified in the Server Name
text box. You can also cut and paste one of the samples provided.
Note: A URL is automatically inserted using the name you specified in the Server Name
text box. You can also cut and paste one of the samples provided. (If you’re not sure about
the CGI URL, see Determining the Server CGI URL Path on page 3-7 for more
information.)

7/24/2019 55439-Desktop Integration Suite User Guide
http://slidepdf.com/reader/full/55439-desktop-integration-suite-user-guide 85/120
Desktop Integration Suite User Guide 4-11
Managing Content Through Your E-Mail Client
Viewing the Server CGI URL Path
Integrating an e-mail client with Content Server entails configuring the content server.
If you are using a regular server, you will use the CGI URL path for the server.
Follow these steps to view the server CGI URL path:
1. Navigate to the search page in Content Server using your web browser.
2. In the browser Address or Location field, select and copy the Search page URL from
the beginning up to, but not including, the question mark (?). This is the CGI URL
path.
3. Paste this URL into the CGI URL field in the Add Server dialog box.
Editing a Server Connection
Once you have created a server connection from a client machine to a content server,
you can edit that connection at any time.
Follow these steps to edit an existing server connection:
1. Open the e-mail client (Microsoft Outlook or Lotus Notes).
2. Open the Email Checkin Settings dialog box as follows:
In Microsoft Outlook, click Tools—Email Client Integration Settings.
In Lotus Notes, click Actions—Email Client Integration Settings.
3. Click Edit Server List.
4. In the Edit Server List dialog box, highlight the server connection and click Edit.
5. In the Edit Server dialog box, change the value for Server Name and Server
WebDAV URL (if using a WebDAV server) or CGI URL (if using a regular content
server).
You can cut and paste one of the samples shown in the panel and then replace “server”
with the HTTP address of your server. (If you’re not sure about the CGI URL, see
Determining the Server CGI URL Path on page 3-7 for more information.)
6. Click OK to close the Edit Server dialog box, click Close to close the Edit Server List
dialog box, and then click OK to close the Email Checkin Settings dialog box.

7/24/2019 55439-Desktop Integration Suite User Guide
http://slidepdf.com/reader/full/55439-desktop-integration-suite-user-guide 86/120
4-12 Desktop Integration Suite User Guide
Managing Content Through Your E-Mail Client
Removing a Server Connection
Once you have created a server connection from a client machine to a content server,
you can remove that connection at any time.
Follow these steps to remove a server connection:
1. Open the e-mail client (Microsoft Outlook or Lotus Notes).
2. Open the Email Checkin Settings dialog box as follows:
In Microsoft Outlook, click Tools—Email Client Integration Settings.
In Lotus Notes, click Actions—Email Client Integration Settings.
3. Click Edit Server List.
4. In the Edit Server List dialog box, highlight the server connection and click Delete.
The Confirm Server Removal dialog box displays.
5. Click OK to confirm the deletion.
6. Click Close to close the Edit Server List dialog box, and then click OK to close the
Email Checkin Settings dialog box.
This removes the server connection from all of the applications you use to interact with the
content server (Windows Explorer, e-mail clients, and other integrated applications).
Setting the Authentication MethodWhen connecting each client machine to the content server you are using to store e-mail
messages and attachments, you can decide how users are to log in to the server.
Follow these steps to edit the login from a client machine:
1. Open the e-mail client (Microsoft Outlook or Lotus Notes).
2. Open the Email Checkin Settings dialog box as follows:
In Microsoft Outlook, click Tools—Email Client Integration Settings.
In Lotus Notes, click Actions—Email Client Integration Settings.
The Email Checkin Settings dialog is displayed.

7/24/2019 55439-Desktop Integration Suite User Guide
http://slidepdf.com/reader/full/55439-desktop-integration-suite-user-guide 87/120
Desktop Integration Suite User Guide 4-13
Managing Content Through Your E-Mail Client
Figure 4-6 Email Settings dialog
The “Show Folders” option is a Lotus Notes feature (see Showing Content Server
Folders in Lotus Notes on page 4-19).
3. Click Edit Server List.
4. In the Edit Server List dialog box, under Servers, select the content server that you
want to edit.
5. Click Edit to open the Edit Server dialog box.
6. Click Options to open the Server Options dialog box.
7. Click the Authentication tab.
8. Select the login authentication that you want to use.
Don’t specify (Default) means the standard Content Server login will apply. If you
select Microsoft Login (NTLM), you are using NTLM security. In that event, the
username and password are automatically supplied when you access the server, so you
may not be prompted for login information.
9. Click OK to close the Server Options dialog box, click OK to close the Edit Server
dialog box, click Close to close the Edit Server List dialog box, and lastly, click OK to
close the Email Checkin Settings dialog box.
Setting the E-Mail Attachment Option
When you check e-mail messages with attachments into the content server, you have the
option of checking in an attachment separately from its e-mail message or checking in
both as a single content item. You can set this to be handled automatically. If you prefer,

7/24/2019 55439-Desktop Integration Suite User Guide
http://slidepdf.com/reader/full/55439-desktop-integration-suite-user-guide 88/120
4-14 Desktop Integration Suite User Guide
Managing Content Through Your E-Mail Client
you can, instead, be prompted to make the choice when you check each e-mail message
with an attachment into the server.
1. Open the e-mail client (Microsoft Outlook or Lotus Notes).
2. Open the Email Checkin Settings dialog box as follows:
In Microsoft Outlook, click Tools—Email Client Integration Settings.
In Lotus Notes, click Actions—Email Client Integration Settings.
The Email Checkin settings dialog is displayed.
The “Show Folders” option is a Lotus Notes feature (see Showing Content Server
Folders in Lotus Notes on page 4-19).
3. Select the option you want to use for handling e-mail attachments:
Separate Attachments – The attachment will be checked into the content server
separately, with its own content ID.
Keep Attachments – The attachment will be embedded in the e-mail message
and both will be checked in as a single content item with a single content ID.
Ask – Each time you check in an e-mail item with an attachment, you will be
prompted with the following message:
Figure 4-7 Email prompt message
The attachment(s) are listed in the text box. Select the check box before the file name
for each attachment you want to embed in the e-mail message. Clear the check box for
any attachment you want to check into the server separately, with its own content ID.
Note: An “attachment” is any file formally attached to an e-mail.

7/24/2019 55439-Desktop Integration Suite User Guide
http://slidepdf.com/reader/full/55439-desktop-integration-suite-user-guide 89/120
Desktop Integration Suite User Guide 4-15
Managing Content Through Your E-Mail Client
4. Click OK to close the Email Checkin Settings dialog box
The attachment will be checked in first, followed by the e-mail message. You can check in
an attachment by itself. After the attachment is checked in, simply cancel the contentcheck-in form when it reappears for the e-mail check-in.
CHECKING IN CONTENT
Once you have integrated your e-mail client with the content server, configured the
metadata on the server, and connected client machines to the server, you are ready to use
the content server for storing e-mail and attachments and sharing them with others in your
organization.
The integration of an e-mail client with a content server allows you to contribute e-mailand attachments to the server for sharing with others. (With the Records Management
Email component, you can also check in distribution lists. See Working With Distribution
Lists on page 4-19.) However, you cannot check them out using the e-mail client. Instead,
you need to access the server using your browser, and then open them from there to view
using your e-mail program.
This section covers the following topics:
Checking In an E-Mail Message (page 4-15)
Checking In an E-Mail Message With Attachments (page 4-17)
Checking In an E-Mail Message
You can check e-mail messages into the content server using your e-mail client at any
time.
If you have chosen to “remember” the metadata used for the last check-in of an e-mail or
attachment, these fields will be pre-populated so that you can immediately check in a new
item using the same metadata as before (see Configuring the Server to Remember
Metadata on page 4-4).
Follow these steps to check an e-mail message into the content server:
1. Open the e-mail client (Microsoft Outlook or Lotus Notes).
2. Select the e-mail message you want to check in.

7/24/2019 55439-Desktop Integration Suite User Guide
http://slidepdf.com/reader/full/55439-desktop-integration-suite-user-guide 90/120
4-16 Desktop Integration Suite User Guide
Managing Content Through Your E-Mail Client
You can select multiple messages, if you like. In Outlook, use the Ctrl or Shift key to
select multiple messages, and in Lotus Notes, click your mouse beside each message
until you see a check mark beside it.
3. Check in the e-mail message as follows:
In Microsoft Outlook, click the Check In Mail Item button on the toolbar.
In Lotus Notes, click Actions—Check In Mail Item.
This opens the Save dialog box with the content server’s content check-in form
displaying. (You may be prompted to enter your login credentials first.)
4. From the Server drop-down list, select the server you want to check the e-mail
message into.
If the server you want to use is not listed, click the Server icon ( ) and follow the
steps in Adding a Server Connection (page 4-8). (Again, you may be prompted to
enter your login credentials.)
5. Fill out the content check-in form and click Check In when you are done.
If you selected metadata fields to be remembered, then the values you entered for the
last item you checked in will already be populating the fields (see Configuring the
Server to Remember Metadata on page 4-4).
The metadata that is displayed on the content check-in form varies, depending on how
your content server is set up. If the content server is set up to use the e-mail-specific
metadata (EmailFrom, EmailCC, EmailTo, EmailSubject, PublicationDate, and
ReceiveDate fields), the information for those fields is automatically placed in the content
check-in form, if available. (With e-mail-specific metadata set up, the subject line of an
e-mail message appears in two metadata fields: Title and Email Subject.)
As an alternative to checking in e-mail messages this way, you can use your mouse and
drag-and-drop each message into the desired folder of the Content Server folder hierarchy.
In Outlook, you simply drag the message onto the desired folder. In Lotus Notes, however,
you need to click in the column beside the message to place a checkmark there and then
drag the message onto the desired folder.

7/24/2019 55439-Desktop Integration Suite User Guide
http://slidepdf.com/reader/full/55439-desktop-integration-suite-user-guide 91/120
Desktop Integration Suite User Guide 4-17
Managing Content Through Your E-Mail Client
Checking In an E-Mail Message WithAttachments
You can check e-mail messages and their attachments into the content server using your
e-mail client at any time.
If you have chosen to remember the metadata used for the last check-in of an e-mail or
attachment, these fields will already be populated when you open the content check-in
form (assuming the values are available) so that you can immediately check in the item
using the same metadata as before (see Configuring the Server to Remember Metadata on
page 4-4).
You can change the metadata, if you wish. The new metadata values you enter will be
remembered the next time you check in a content item.
When you view an e-mail that is checked into the content server that contains one or more
attachments, the URL to the Info page for the most recent revision of each attachment
displays at the bottom of the message. (If you are using the RM Email component,
however, the URL to the Info page always Heading Text + Pages to the first revision,
regardless of whether the content item has newer revisions.) Also, Outlook VCard (.vcf)
files are not checked into the content server.
Follow these steps to check an e-mail message and its attachments into the content server:
1. Open the e-mail client (Microsoft Outlook or Lotus Notes).
2. Select the e-mail message with attachments that you want to check in.
3. Check in the e-mail message as follows:
In Microsoft Outlook, click the Check In Mail Item button on the toolbar.
In Lotus Notes, click Actions—Check In Mail Item.
4. If you selected the Ask option for handling e-mail attachments (see Setting the E-Mail
Attachment Option on page 4-13), the Attachment Options dialog box displays with a
list of the attachments.
5. Select the attachments you want to check in with the e-mail message as a single
content item. Any attachments not selected will be checked in separately from the
e-mail message. Click OK .
Note: You can select multiple messages, if you like. In Outlook, use the Ctrl or Shift key
to select multiple messages, and in Lotus Notes, click your mouse beside each message
until you see a check mark beside it.
7/24/2019 55439-Desktop Integration Suite User Guide
http://slidepdf.com/reader/full/55439-desktop-integration-suite-user-guide 92/120
4-18 Desktop Integration Suite User Guide
Managing Content Through Your E-Mail Client
6. This opens the Save dialog box with the content server’s content check-in form
displaying. (You may be prompted to enter your login credentials first.)
If you selected “Separate Attachments” or “Keep Attachments” as your option forhandling attachments (see Setting the E-Mail Attachment Option on page 4-13), then
you would bypass the Attachment Options dialog box and go straight to the Save
dialog box.
7. From the Server drop-down list, select the server you want to check the e-mail
message into.
If the server you want to use is not listed, click the Server icon ( ) and follow the
steps in Adding a Server Connection (page 4-8). (Again, you may be prompted to
enter your login credentials.)
8. Fill out the content check-in form (this will be for the attachment) and click Check In.If you selected metadata fields to be remembered, then the values you entered for the
last item you checked in will already be populating the fields (see Configuring the
Server to Remember Metadata on page 4-4).
9. The content check-in form appears again, and it will apply to the next attachment
(if there is more than one). If not, it applies to the e-mail message itself.
10. Fill out the form and click Check In.
The metadata that is displayed on the content check-in form depend on how your content
server is set up. If you are using the e-mail specific metadata (EmailFrom, EmailCC,
EmailTo, EmailSubject, PublicationDate, and ReceiveDate fields), the information forthose metadata fields will have been automatically entered in the content check-in form.
(With e-mail specific metadata set up, the subject line of an e-mail message appears in two
metadata fields: Title and Email Subject.)
As an alternative to checking in e-mail messages this way, you can use your mouse and
drag-and-drop each message into the desired folder of the Content Server folder hierarchy.
In Outlook, you simply drag the message onto the desired folder. In Lotus Notes, however,
you need to click in the column beside the message to place a checkmark there and then
drag the message onto the desired folder.

7/24/2019 55439-Desktop Integration Suite User Guide
http://slidepdf.com/reader/full/55439-desktop-integration-suite-user-guide 93/120
Desktop Integration Suite User Guide 4-19
Managing Content Through Your E-Mail Client
SHOWING CONTENT SERVER FOLDERS IN LOTUS NOTES
As you work in Lotus Notes, you can choose to show or hide Content Server folders in the
hierarchy that appears in the lower left pane and in the right pane of the screen. You do this
in the Email Checkin Settings dialog box.
This option is only available if you have design rights to the Notes database. For more
information, contact your Lotus Notes Administrator.
Follow these steps to show or hide Content Server Folders in Lotus Notes:
1. Open Lotus Notes.
2. ClickActions—Oracle Email Client Integration Settings
to open the Email
Checkin Settings dialog box.
3. Perform one of the following:
Check the box Show Folders to show Content Server Folders in Lotus Notes.
Uncheck the box Show Folders to hide Content Server Folders in Lotus Notes.
4. Click OK to return to Lotus Notes.
WORKING WITH DISTRIBUTION LISTS
A distribution list is a collection of e-mail addresses grouped under a common name.
Any message addressed to the group name is sent to everyone on the list.
If your content server uses the RM Email component, you can check distribution lists into
the content server: ones that already exist in a Microsoft Outlook address book or new
ones you create. Once the distribution list is checked in, you can edit it, as needed.
This feature requires the Records Management (RM) Email component.
You work with distribution lists from the Checkin Distribution List dialog box.
On the Outlook Menu bar, click Tools—Check In Distribution List.
On the Lotus Notes Menu bar, click Actions—Check In Distribution List.

7/24/2019 55439-Desktop Integration Suite User Guide
http://slidepdf.com/reader/full/55439-desktop-integration-suite-user-guide 94/120
4-20 Desktop Integration Suite User Guide
Managing Content Through Your E-Mail Client
Figure 4-8 Distribution List screen
This dialog box is used for:
Checking In a Distribution List (page 4-20)
Editing a Distribution List (page 4-23)
Deleting a Distribution List (page 4-26)
Checking In a Distribution List
You can create a new distribution list and then check that list into the content server.
You can also check into the content server a distribution list that already exists in yourMicrosoft Outlook Address Book.
Follow these steps to check in a distribution list:
1. Open the e-mail client (Microsoft Outlook or Lotus Notes).
2. Open the Distribution List Checkin dialog box as follows:
In Microsoft Outlook, click Tools——Check In Distribution List.
In Lotus Notes, click Actions—Check In Distribution List.
The Distribution List Checkin dialog box appears.

7/24/2019 55439-Desktop Integration Suite User Guide
http://slidepdf.com/reader/full/55439-desktop-integration-suite-user-guide 95/120
Desktop Integration Suite User Guide 4-21
Managing Content Through Your E-Mail Client
Figure 4-9 Distribution List Checkin dialog
The Address Book button appears if you are using Microsoft Outlook.
3. Click Add to open the Edit Distribution List dialog box.
4. Beside List Name, enter the name of the new distribution list you are creating.
5. Beside Name, enter the person’s name as you would like it to display in the
distribution list.
6. Beside Address, enter the person’s e-mail address.
7. Click Add.
Repeat steps 4 to 6 for each new member you are adding to the distribution list.
8. When you finish adding the names and addresses for the distribution list, click OK .
This opens the content check-in form.
9. Assign the appropriate metadata to the distribution list and click Check In.
10. Click OK to the confirmation message and then click Close to close the Distribution
List Checkin dialog box.
Checking In a Distribution List From Outlook Address Book
Follow these steps to check in a distribution list from a Microsoft Outlook address book:
1. Open Microsoft Outlook.
2. Click Tools—Check In Distribution List.
This opens the Distribution List Checkin dialog box.

7/24/2019 55439-Desktop Integration Suite User Guide
http://slidepdf.com/reader/full/55439-desktop-integration-suite-user-guide 96/120
4-22 Desktop Integration Suite User Guide
Managing Content Through Your E-Mail Client
Figure 4-10 Distribution List Checkin dialog
3. Click Address Book to open the Checkin Distribution List from Address Book dialog
box.
Figure 4-11 Address book dialog
4. From the Show lists from drop-down list, select the group in Outlook that contains
the distribution list you are checking into the content server.
5. From that group, select the distribution list that you want to check in.
If you wish, click Details to open the Properties dialog box and view properties for thedistribution list, including the list of addressees.
Note: This dialog box is the same one that displays in Microsoft Outlook for viewing the
details of a distribution list. To modify the properties, follow the instructions in Microsoft
Outlook Help.
7/24/2019 55439-Desktop Integration Suite User Guide
http://slidepdf.com/reader/full/55439-desktop-integration-suite-user-guide 97/120
Desktop Integration Suite User Guide 4-23
Managing Content Through Your E-Mail Client
6. Click Check In and log onto the content server (if prompted).
7. On the content check-in form, set the metadata for the distribution list and click
Check In.Once the distribution list is checked into the content server, it displays on the Checkin
Distribution List dialog box for that server.
If you use Microsoft Word as your e-mail editor in Outlook 2000 or 2002, you will not be
able to check in a distribution list. To use this feature, you need to switch to Outlook’s
HTML or text editor.
Editing a Distribution List
Once you check a distribution list into the content server, you can modify the list by
adding, changing, or removing information. Also, you can clear the information in the
Name and Address field by clicking Reset.
This section covers the following topics:
Adding a New Member to a Distribution List (page 4-23)
Changing the Name or Address of a Member (page 4-25)
Deleting a Member from a Distribution List (page 4-25)
Adding a New Member to a Distribution List
Follow these steps to add a new member to a distribution list:
1. Open the e-mail client (Microsoft Outlook or Lotus Notes).
2. Open the Distribution List Checkin dialog box as follows:
In Microsoft Outlook, click Tools—Check In Distribution List.
In Lotus Notes, click Actions—Check In Distribution List.
The Distribution List dialog is displayed.
Important: Changes you make to the list are reflected only in the version checked into the
content server. If the list is also used in Microsoft Outlook, that version remains unedited.
When you edit a distribution list that is checked into the content server, you can create a
new revision or a new content item when you save the list.

7/24/2019 55439-Desktop Integration Suite User Guide
http://slidepdf.com/reader/full/55439-desktop-integration-suite-user-guide 98/120
4-24 Desktop Integration Suite User Guide
Managing Content Through Your E-Mail Client
Figure 4-12 Distribution List dialog
This dialog box includes an Address Book button when used in Microsoft Outlook.
3. Highlight the list that you want to change and click Edit.
4. In the Edit Distribution List dialog box, enter a new name in the Name, and Address
fields
When you first open this dialog box, you see the Name and Address fields already
populated (with the details of the first member in the list). To add a new member,
simply overwrite these values with the name and address of the new member. This
will not remove the original addressee from the list.
5. Click Add and then click OK to close the Edit Distribution List dialog box.
A message appears, prompting you to either check the distribution list in as a new
content item or as a revision to the existing item.
6. To check the distribution list in as a new content item, choose Yes. Then, in the New
Checkin Name dialog box, enter a new name for the distribution list and click OK.
To check the distribution list in as a revision to the existing content item, choose No.
Then, on the content check-in form, modify the metadata, if necessary, and click
Check In.
7. Set the metadata for the distribution list on the content check-in form and click
Check In.
See the Content Server user help for more information on the content check-in form.

7/24/2019 55439-Desktop Integration Suite User Guide
http://slidepdf.com/reader/full/55439-desktop-integration-suite-user-guide 99/120
Desktop Integration Suite User Guide 4-25
Managing Content Through Your E-Mail Client
Changing the Name or Address of a Member
Follow these steps to change the name or address of a member of a distribution list:
1. Open the e-mail client (Microsoft Outlook or Lotus Notes).
2. Open the Distribution List Checkin dialog box as follows:
In Microsoft Outlook, click Tools—Check In Distribution List.
In Lotus Notes, click Actions—Check In Distribution List.
3. Highlight the list that you want to change and click Edit.
4. In the Edit Distribution List dialog box, change the value for the Name and Address
fields, if necessary.
5. Click OK to close the Edit Distribution List dialog box.
6. Choose Yes to check the distribution list in as a new content item and enter a new
name for the distribution list in the New Checkin Name dialog box. Then click OK.
Or, choose No to check the distribution list in as a revision to the existing content item
and on the content Check In Form, modify the metadata (if necessary), and click
Check In.
7. Set the metadata for the distribution list on the content check-in form and click
Check In.
See the Content Server user help for more information on the content check-in form.
Deleting a Member from a Distribution List
Follow these steps to delete a member from a distribution list:
1. Open the e-mail client (Microsoft Outlook or Lotus Notes).
2. Open the Distribution List Checkin dialog box as follows:
In Microsoft Outlook, click Tools—Check In Distribution List.
In Lotus Notes, click Actions—Check In Distribution List.
3. Highlight the list that you want to change (remove a member from) and click Edit.
4. In the Edit Distribution List dialog box, highlight the member to delete and click
Delete.
5. Click OK to close the Edit Distribution List dialog box.
6. Choose Yes to check the distribution list in as a new content item and enter a new
name for the distribution list in the New Checkin Name dialog box. Then click OK.

7/24/2019 55439-Desktop Integration Suite User Guide
http://slidepdf.com/reader/full/55439-desktop-integration-suite-user-guide 100/120
4-26 Desktop Integration Suite User Guide
Managing Content Through Your E-Mail Client
Or, choose No to check the distribution list in as a revision to the existing content item
and on the content check-in form, modify the metadata (if necessary), and click
Check In.
7. Set the metadata for the distribution list on the content check-in form and click
Check In.
If you use Microsoft Word as your e-mail editor in Outlook 2000 or 2002, you will not be
able to check in a distribution list. To use this feature, you need to switch to Outlook’s
HTML or text editor.
Deleting a Distribution List
You can delete a distribution list from the content server. When you do so, all revisions
of that distribution list will be removed. If the list is also used in Microsoft Outlook, it
remains unchanged and is still available through Microsoft Outlook.
Follow these steps to delete a distribution list:
1. Open the e-mail client (Microsoft Outlook or Lotus Notes).
2. Open the Distribution List Checkin dialog box as follows:
In Microsoft Outlook, click Tools—Check In Distribution List.
In Lotus Notes, click Actions—Check In Distribution List.
3. Highlight the list that you want to delete and click Delete.
The distribution list is removed from the content server.
4. Click Close to close the Distribution List Checkin dialog box.
ATTACHING CONTENT TO AN E-MAIL MESSAGE
You can attach one or more content items to an e-mail message, and those content items
can originate from the content server, from your local file system, or from an offline
location:
Attaching Content From the Content Server (page 4-27)
Attaching Content From the File System (page 4-28)
Attaching Content From an Offline Location (page 4-29)

7/24/2019 55439-Desktop Integration Suite User Guide
http://slidepdf.com/reader/full/55439-desktop-integration-suite-user-guide 101/120
Desktop Integration Suite User Guide 4-27
Managing Content Through Your E-Mail Client
Attaching Content From the Content Server
You can attach one or more content items, or links to those content items, from the content
server to an e-mail message you are sending. You can send different versions of the
attachment or a link to the attachment.
Follow these steps to attach content from the content server:
1. Open the e-mail client (Microsoft Outlook or Lotus Notes).
2. Create a new e-mail message.
3. Open the Get Attachment dialog box as follows:
In Microsoft Outlook, click the Check In Mail Item button on the toolbar.
In Lotus Notes, click Actions—Check In Mail Item.
4. Click the Server tab, if this is not already the default view. You may be prompted to
enter your login credentials first.
The search page of the content server displays.
5. To change to a different content server, select the server from the Server drop-down
list.
If the server you want to use is not listed, click the Server icon ( ) and follow the
steps in Adding a Server Connection (page 4-8). (You may be prompted to enter your
login credentials.)
6. From the Action drop-down list, select the attachment option you would like to use.
Type Description
Attach native file Attaches the file in its native format.
Attach native file URL Attaches the URL to a file in its native format
Attach alternate file Attaches the alternate file.
Attach alternate file URL Attaches the URL to the alternate file
Attach weblayout file Attaches the file in a web-viewable format.
Attach weblayout file URL Attaches the URL to the file in a web-viewable
format

7/24/2019 55439-Desktop Integration Suite User Guide
http://slidepdf.com/reader/full/55439-desktop-integration-suite-user-guide 102/120
4-28 Desktop Integration Suite User Guide
Managing Content Through Your E-Mail Client
If you select a native or web-viewable file, the e-mail recipient will receive the current
revision of the file at the time you selected it. If you select a URL, the most recent
revision that exists in the content server always displays when the e-mail recipient
clicks the link.
7. Search the content server for the desired item or items.
8. Click the selection button ( ) next to the item that you want to attach to your
message.
Or, to select a particular revision of the content item, click the Info button ( ) next
to it. On the content information page, select the desired revision.
To attach multiple content items from the content server, repeat steps 3 through 8
for each item.
9. You will return to the new message window in the e-mail client.
Author the e-mail message and send it in the usual way.
If you use Microsoft Word as your e-mail editor in Outlook 2000 or 2002, you will not be
able to use the Email Client Integration’s attachment feature. To use this feature, you need
to switch to Outlook’s HTML or text editor.
Attaching Content From the File System
You can attach one or more content items from your local file system to an e-mail message
you are sending. (Alternatively, you can still attach files using your e-mail client’s native
file attachment feature.)
Follow these steps to attach content from the file system:1. Open the e-mail client (Microsoft Outlook or Lotus Notes).
2. Create a new e-mail message.
3. Open the Get Attachment dialog box as follows:
In Microsoft Outlook, click the Get Attachment button on the toolbar.
Attach content information page URL
Attaches the URL to the Content Information page for that file
Attach HTML Rendition Attaches the HTML rendition of the file
Type Description

7/24/2019 55439-Desktop Integration Suite User Guide
http://slidepdf.com/reader/full/55439-desktop-integration-suite-user-guide 103/120
Desktop Integration Suite User Guide 4-29
Managing Content Through Your E-Mail Client
In Lotus Notes, place your cursor in the body of the message and then click
Actions—Get Attachment.
4. Click the Folders tab, if this is not already the default view.5. Use the Look In drop-down box to locate the folder that contains the file.
6. Select the file and click OK .
You will return to the new message window in the e-mail client with the file attached.
7. Author the e-mail message and send it in the usual way.
Attaching Content From an Offline Location
You can attach one or more content items from an offline location to an e-mail message
you are sending. Offline content includes:
New files that you saved but did not check into the content server (when you closed
the file)
Read-only files that you obtained from the content server for viewing purposes
Files checked out of the content server that you are still working on
For more information, see Chapter 3 ( Managing Content Through the Common Dialogs
Interface).
Follow these steps to attach content from an offline location:
1. Open the e-mail client (Microsoft Outlook or Lotus Notes).
2. Create a new e-mail message.
3. Open the Get Attachment dialog box as follows:
In Microsoft Outlook, click the Get Attachment button on the toolbar.
In Lotus Notes, place your cursor in the body of the message and then click
Actions—Get Attachment.
4. Click the Offline Content tab, if this is not already the default view.
5. Select the file and click OK .
You will return to the new message window in the e-mail client with the file attached.
6. Author the e-mail message and send it in the usual way.
7/24/2019 55439-Desktop Integration Suite User Guide
http://slidepdf.com/reader/full/55439-desktop-integration-suite-user-guide 104/120
4-30 Desktop Integration Suite User Guide
Managing Content Through Your E-Mail Client

7/24/2019 55439-Desktop Integration Suite User Guide
http://slidepdf.com/reader/full/55439-desktop-integration-suite-user-guide 105/120
Desktop Integration Suite User Guide A-1
A p p e n d i x
A.THIRD PARTY LICENSES
OVERVIEW
This appendix includes a description of the Third Party Licenses for all the third party
products included with this product.
Apache Software License (page A-1)
W3C® Software Notice and License (page A-2)
Zlib License (page A-4)
General BSD License (page A-5)
General MIT License (page A-5)
Unicode License (page A-6)
Miscellaneous Attributions (page A-7)
APACHE SOFTWARE LICENSE
* Copyright 1999-2004 The Apache Software Foundation.
* Licensed under the Apache License, Version 2.0 (the "License");
* you may not use this file except in compliance with the License.
* You may obtain a copy of the License at
* http://www.apache.org/licenses/LICENSE-2.0
*
7/24/2019 55439-Desktop Integration Suite User Guide
http://slidepdf.com/reader/full/55439-desktop-integration-suite-user-guide 106/120
A-2 Desktop Integration Suite User Guide
Third Party Licenses
* Unless required by applicable law or agreed to in writing, software
* distributed under the License is distributed on an "AS IS" BASIS,
* WITHOUT WARRANTIES OR CONDITIONS OF ANY KIND, either express or implied.
* See the License for the specific language governing permissions and
* limitations under the License.
W3C® SOFTWARE NOTICE AND LICENSE
* Copyright © 1994-2000 World Wide Web Consortium,
* (Massachusetts Institute of Technology, Institut National de
* Recherche en Informatique et en Automatique, Keio University).
* All Rights Reserved. http://www.w3.org/Consortium/Legal/
*
* This W3C work (including software, documents, or other related items) is
* being provided by the copyright holders under the following license. By
* obtaining, using and/or copying this work, you (the licensee) agree that
* you have read, understood, and will comply with the following terms and
* conditions:
*
* Permission to use, copy, modify, and distribute this software and its
* documentation, with or without modification, for any purpose and without
* fee or royalty is hereby granted, provided that you include the following
* on ALL copies of the software and documentation or portions thereof,
* including modifications, that you make:
*
* 1. The full text of this NOTICE in a location viewable to users of the
* redistributed or derivative work.
*
* 2. Any pre-existing intellectual property disclaimers, notices, or terms

7/24/2019 55439-Desktop Integration Suite User Guide
http://slidepdf.com/reader/full/55439-desktop-integration-suite-user-guide 107/120
Desktop Integration Suite User Guide A-3
Third Party Licenses
* and conditions. If none exist, a short notice of the following form
* (hypertext is preferred, text is permitted) should be used within the
* body of any redistributed or derivative code: "Copyright ©
* [$date-of-software] World Wide Web Consortium, (Massachusetts
* Institute of Technology, Institut National de Recherche en
* Informatique et en Automatique, Keio University). All Rights
* Reserved. http://www.w3.org/Consortium/Legal/"
*
* 3. Notice of any changes or modifications to the W3C files, including the
* date changes were made. (We recommend you provide URIs to the location
* from which the code is derived.)
*
* THIS SOFTWARE AND DOCUMENTATION IS PROVIDED "AS IS," AND COPYRIGHT HOLDERS
* MAKE NO REPRESENTATIONS OR WARRANTIES, EXPRESS OR IMPLIED, INCLUDING BUT
* NOT LIMITED TO, WARRANTIES OF MERCHANTABILITY OR FITNESS FOR ANY PARTICULAR
* PURPOSE OR THAT THE USE OF THE SOFTWARE OR DOCUMENTATION WILL NOT INFRINGE
* ANY THIRD PARTY PATENTS, COPYRIGHTS, TRADEMARKS OR OTHER RIGHTS.
*
* COPYRIGHT HOLDERS WILL NOT BE LIABLE FOR ANY DIRECT, INDIRECT, SPECIAL OR
* CONSEQUENTIAL DAMAGES ARISING OUT OF ANY USE OF THE SOFTWARE OR
* DOCUMENTATION.
*
* The name and trademarks of copyright holders may NOT be used in advertising
* or publicity pertaining to the software without specific, written prior
* permission. Title to copyright in this software and any associated
* documentation will at all times remain with copyright holders.
*

7/24/2019 55439-Desktop Integration Suite User Guide
http://slidepdf.com/reader/full/55439-desktop-integration-suite-user-guide 108/120
A-4 Desktop Integration Suite User Guide
Third Party Licenses
ZLIB LICENSE
* zlib.h -- interface of the 'zlib' general purpose compression library
version 1.2.3, July 18th, 2005
Copyright (C) 1995-2005 Jean-loup Gailly and Mark Adler
This software is provided 'as-is', without any express or implied
warranty. In no event will the authors be held liable for any damages
arising from the use of this software.
Permission is granted to anyone to use this software for any purpose,
including commercial applications, and to alter it and redistribute it
freely, subject to the following restrictions:
1. The origin of this software must not be misrepresented; you must not
claim that you wrote the original software. If you use this software
in a product, an acknowledgment in the product documentation would be
appreciated but is not required.
2. Altered source versions must be plainly marked as such, and must not be
misrepresented as being the original software.
3. This notice may not be removed or altered from any source distribution.
Jean-loup Gailly [email protected]
Mark Adler [email protected]

7/24/2019 55439-Desktop Integration Suite User Guide
http://slidepdf.com/reader/full/55439-desktop-integration-suite-user-guide 109/120
Desktop Integration Suite User Guide A-5
Third Party Licenses
GENERAL BSD LICENSE
Copyright (c) 1998, Regents of the University of CaliforniaAll rights reserved.
Redistribution and use in source and binary forms, with or without modification,
are permitted provided that the following conditions are met:
"Redistributions of source code must retain the above copyright notice, this
list of conditions and the following disclaimer.
"Redistributions in binary form must reproduce the above copyright notice, this
list of conditions and the following disclaimer in the documentation and/or other
materials provided with the distribution.
"Neither the name of the <ORGANIZATION> nor the names of its contributors may be
used to endorse or promote products derived from this software without specific
prior written permission.
THIS SOFTWARE IS PROVIDED BY THE COPYRIGHT HOLDERS AND CONTRIBUTORS "AS IS" AND ANY
EXPRESS OR IMPLIED WARRANTIES, INCLUDING, BUT NOT LIMITED TO, THE IMPLIED
WARRANTIES OF MERCHANTABILITY AND FITNESS FOR A PARTICULAR PURPOSE ARE DISCLAIMED.
IN NO EVENT SHALL THE COPYRIGHT OWNER OR CONTRIBUTORS BE LIABLE FOR ANY DIRECT,
INDIRECT, INCIDENTAL, SPECIAL, EXEMPLARY, OR CONSEQUENTIAL DAMAGES (INCLUDING, BUT
NOT LIMITED TO, PROCUREMENT OF SUBSTITUTE GOODS OR SERVICES; LOSS OF USE, DATA, OR
PROFITS; OR BUSINESS INTERRUPTION) HOWEVER CAUSED AND ON ANY THEORY OF LIABILITY,
WHETHER IN CONTRACT, STRICT LIABILITY, OR TORT (INCLUDING NEGLIGENCE OR OTHERWISE)
ARISING IN ANY WAY OUT OF THE USE OF THIS SOFTWARE, EVEN IF ADVISED OF THE
POSSIBILITY OF SUCH DAMAGE.
GENERAL MIT LICENSE
Copyright (c) 1998, Regents of the Massachusetts Institute of Technology
Permission is hereby granted, free of charge, to any person obtaining a copy of this
software and associated documentation files (the "Software"), to deal in theSoftware without restriction, including without limitation the rights to use, copy,
modify, merge, publish, distribute, sublicense, and/or sell copies of the Software,
and to permit persons to whom the Software is furnished to do so, subject to the
following conditions:

7/24/2019 55439-Desktop Integration Suite User Guide
http://slidepdf.com/reader/full/55439-desktop-integration-suite-user-guide 110/120
A-6 Desktop Integration Suite User Guide
Third Party Licenses
The above copyright notice and this permission notice shall be included in all
copies or substantial portions of the Software.
THE SOFTWARE IS PROVIDED "AS IS", WITHOUT WARRANTY OF ANY KIND, EXPRESS OR IMPLIED,INCLUDING BUT NOT LIMITED TO THE WARRANTIES OF MERCHANTABILITY, FITNESS FOR A
PARTICULAR PURPOSE AND NONINFRINGEMENT. IN NO EVENT SHALL THE AUTHORS OR COPYRIGHT
HOLDERS BE LIABLE FOR ANY CLAIM, DAMAGES OR OTHER LIABILITY, WHETHER IN AN ACTION OF
CONTRACT, TORT OR OTHERWISE, ARISING FROM, OUT OF OR IN CONNECTION WITH THE SOFTWARE
OR THE USE OR OTHER DEALINGS IN THE SOFTWARE.
UNICODE LICENSE
UNICODE, INC. LICENSE AGREEMENT - DATA FILES AND SOFTWARE
Unicode Data Files include all data files under the directories
http://www.unicode.org/Public/, http://www.unicode.org/reports/, and
http://www.unicode.org/cldr/data/ . Unicode Software includes any source code
published in the Unicode Standard or under the directories
http://www.unicode.org/Public/, http://www.unicode.org/reports/, and
http://www.unicode.org/cldr/data/.
NOTICE TO USER: Carefully read the following legal agreement. BY DOWNLOADING,
INSTALLING, COPYING OR OTHERWISE USING UNICODE INC.'S DATA FILES ("DATA FILES"),
AND/OR SOFTWARE ("SOFTWARE"), YOU UNEQUIVOCALLY ACCEPT, AND AGREE TO BE BOUND BY,
ALL OF THE TERMS AND CONDITIONS OF THIS AGREEMENT. IF YOU DO NOT AGREE, DO NOT
DOWNLOAD, INSTALL, COPY, DISTRIBUTE OR USE THE DATA FILES OR SOFTWARE.
COPYRIGHT AND PERMISSION NOTICE
Copyright © 1991-2006 Unicode, Inc. All rights reserved. Distributed under the
Terms of Use in http://www.unicode.org/copyright.html.
Permission is hereby granted, free of charge, to any person obtaining a copy of the
Unicode data files and any associated documentation (the "Data Files") or Unicode
software and any associated documentation (the "Software") to deal in the Data
Files or Software without restriction, including without limitation the rights to
use, copy, modify, merge, publish, distribute, and/or sell copies of the Data Files
or Software, and to permit persons to whom the Data Files or Software are furnished
to do so, provided that (a) the above copyright notice(s) and this permission notice
appear with all copies of the Data Files or Software, (b) both the above copyright
notice(s) and this permission notice appear in associated documentation, and (c)
there is clear notice in each modified Data File or in the Software as well as in

7/24/2019 55439-Desktop Integration Suite User Guide
http://slidepdf.com/reader/full/55439-desktop-integration-suite-user-guide 111/120
Desktop Integration Suite User Guide A-7
Third Party Licenses
the documentation associated with the Data File(s) or Software that the data or
software has been modified.
THE DATA FILES AND SOFTWARE ARE PROVIDED "AS IS", WITHOUT WARRANTY OF ANY KIND,EXPRESS OR IMPLIED, INCLUDING BUT NOT LIMITED TO THE WARRANTIES OF MERCHANTABILITY,
FITNESS FOR A PARTICULAR PURPOSE AND NONINFRINGEMENT OF THIRD PARTY RIGHTS. IN NO
EVENT SHALL THE COPYRIGHT HOLDER OR HOLDERS INCLUDED IN THIS NOTICE BE LIABLE FOR
ANY CLAIM, OR ANY SPECIAL INDIRECT OR CONSEQUENTIAL DAMAGES, OR ANY DAMAGES
WHATSOEVER RESULTING FROM LOSS OF USE, DATA OR PROFITS, WHETHER IN AN ACTION OF
CONTRACT, NEGLIGENCE OR OTHER TORTIOUS ACTION, ARISING OUT OF OR IN CONNECTION WITH
THE USE OR PERFORMANCE OF THE DATA FILES OR SOFTWARE.
Except as contained in this notice, the name of a copyright holder shall not be used
in advertising or otherwise to promote the sale, use or other dealings in these Data
Files or Software without prior written authorization of the copyright holder.
________________________________________Unicode and the Unicode logo are trademarks
of Unicode, Inc., and may be registered in some jurisdictions. All other trademarks
and registered trademarks mentioned herein are the property of their respective
owners
MISCELLANEOUS ATTRIBUTIONS
Adobe, Acrobat, and the Acrobat Logo are registered trademarks of Adobe Systems
Incorporated.
FAST Instream is a trademark of Fast Search and Transfer ASA.
HP-UX is a registered trademark of Hewlett-Packard Company.
IBM, Informix, and DB2 are registered trademarks of IBM Corporation.
Jaws PDF Library is a registered trademark of Global Graphics Software Ltd.
Kofax is a registered trademark, and Ascent and Ascent Capture are trademarks of
Kofax Image Products.
Linux is a registered trademark of Linus Torvalds.
Mac is a registered trademark, and Safari is a trademark of Apple Computer, Inc.
Microsoft, Windows, and Internet Explorer are registered trademarks of Microsoft
Corporation.
MrSID is property of LizardTech, Inc. It is protected by U.S. Patent No. 5,710,835.
Foreign Patents Pending.

7/24/2019 55439-Desktop Integration Suite User Guide
http://slidepdf.com/reader/full/55439-desktop-integration-suite-user-guide 112/120
A-8 Desktop Integration Suite User Guide
Third Party Licenses
Oracle is a registered trademark of Oracle Corporation.
Portions Copyright © 1994-1997 LEAD Technologies, Inc. All rights reserved.
Portions Copyright © 1990-1998 Handmade Software, Inc. All rights reserved.
Portions Copyright © 1988, 1997 Aladdin Enterprises. All rights reserved.
Portions Copyright © 1997 Soft Horizons. All rights reserved.
Portions Copyright © 1995-1999 LizardTech, Inc. All rights reserved.
Red Hat is a registered trademark of Red Hat, Inc.
Sun is a registered trademark, and Sun ONE, Solaris, iPlanet and Java are trademarks
of Sun Microsystems, Inc.
Sybase is a registered trademark of Sybase, Inc.
UNIX is a registered trademark of The Open Group.
Verity is a registered trademark of Autonomy Corporation plc

7/24/2019 55439-Desktop Integration Suite User Guide
http://slidepdf.com/reader/full/55439-desktop-integration-suite-user-guide 113/120
Desktop Integration Suite User Guide G-1
G l o s s a r y
GLOSSARY
default
A choice made by an application unless the user specifies otherwise. Applications have
default settings built into them for certain values or options that are required for the
program to function.
file name
The name of a content item, such as “my_content.doc.” In Content Server, it is acceptable
for multiple content items to have the same original file name. However, in WebDAV
clients such as Windows Explorer, file names need to be unique. Because of this
requirement, when working in the Content Server folder hierarchy, if you add content to a
folder that already contains a content item with the same name, the content is checked in
as a new revision to the existing content item.
folder
The name of a storage area on a computer's disk drive that contains a collection of content,
other folders, or both.
When using Content Server’s Folders functionality, you view and interact with the content
server through folders. With folders you can create a hierarchical folder structure. Each
folder contains the content items that have the same Collection ID value, which is
assigned when you check it into the folder.
Folders component
A component that provides a hierarchical folder interface to content in Content Server.The component is required for integrating Content Server with Windows Explorer.
Folders hierarchy
The interface to the content server through Windows Explorer. When you integrate
Content Server with Windows Explorer, a top-level Content Server folder is added to

7/24/2019 55439-Desktop Integration Suite User Guide
http://slidepdf.com/reader/full/55439-desktop-integration-suite-user-guide 114/120
G-2 Desktop Integration Suite User Guide
Windows Explorer. When you open or expand this folder, you can view the servers that
you are connected to.
Idoc script
A proprietary scripting language used to create dynamic web pages in Content Server.
Idoc Script provides the ability to reference variables, conditionally include content in
HTML pages, loop over results returned from queries, and more. Idoc Script is primarily
used to present HTML templates. Idoc Script pages may contain a number of different file
extensions (usually .idoc, .hcsp, or .hcst) depending on its use.
metadata
“Data about data.” The metadata you view for folders and content in the Content Server
folder hierarchy will vary, based on what is available in the content server. Metadata you
will typically use includes security group, content ID, and version number.
Project folder
A folder that may display through the Content Folders hierarchy. When you view a
Projects folder in this hierarchy, the folder has additional security assigned to the content
within it. Projects display when the Collaboration Manager is enabled on the content
server.
server
A computer that offers services on a network.
shortcut
A type of link to an item. With Content Server’s Folders functionality, you can create a
shortcut to a folder, content, a server, or the top folder level in the folders hierarchy so you
can quickly access information that you use often.
system folder
You may view a different number of folders for each server through the Content Server
folder hierarchy, depending on how each server you are connected to is set up. There is
one top-level system folder, “Contribution Folders,” which may display.
While the folder may have been renamed, the Contribution Folder represents the contentserver.
In addition to the top-level system folder, you can have other top-level folders in the
folders hierarchy, such as a Projects folder. The top level is set up by the system
administrator. You can add new folders to a top-level folder (which become subfolders),
assuming you have permissions in the content server to do so.

7/24/2019 55439-Desktop Integration Suite User Guide
http://slidepdf.com/reader/full/55439-desktop-integration-suite-user-guide 115/120
Desktop Integration Suite User Guide G-3
Each top-level folder has a unique icon, so you can easily differentiate between top-level
folders, no matter how they are named.
web browser
Software that is used to request information from the Internet, interpret HTML markup,
and display web pages to the user. Some commonly used web browsers include Microsoft
Internet Explorer, Mozilla, and Firefox.
web browser interface
In Desktop Integration Suite documentation, this refers to the web interface of Content
Server and its Folders functionality. This term is used to distinguish the interface from the
Folders hierarchy, which you view through Windows Explorer.
WebDAV
An extension to the HTTP/1.1 protocol that allows clients to perform remote web content
authoring operations. The WebDAV protocol is specified by RFC 2518. See the WebDAV
Resources Page at http://www.webdav.org for more information.
When Content Server is integrated with Windows Explorer, Windows Explorer serves as
an alternate user interface to the native files in the content repository. The same versioning
and security controls apply, whether an author uses the Content Server web browser
interface or the Content Server folder hierarchy.
WebDAV client
A WebDAV-compliant “client” application, such as Microsoft Word 2000 or 2002, that
can send requests and receive responses by using WebDAV protocol.
WebDAV server
A server that can receive requests and send responses using the WebDAV protocol and
can provide authoring and versioning capabilities. Because WebDAV requests are sent
over HTTP protocol, a WebDAV server typically is built as an add-on component to a
standard web server.
In Content Server, the WebDAV server is used only as an interpreter between clients and
Content Server; the content server controls versioning and access to the content.

7/24/2019 55439-Desktop Integration Suite User Guide
http://slidepdf.com/reader/full/55439-desktop-integration-suite-user-guide 116/120

7/24/2019 55439-Desktop Integration Suite User Guide
http://slidepdf.com/reader/full/55439-desktop-integration-suite-user-guide 117/120
Desktop Integration Suite User Guide Index-1
I n d e x
Aaccessing a content server
through Oracle Folders, 2-19
accessing Oracle Folders
through Lotus Notes Mail, 2-7
through Microsoft Outlook, 2-7
through Windows Explorer, 2-6
Add Server dialog box, 3-5
adding a server connection, 3-5
attaching content to an e-mail message, 2-35, 4-26
from a content server, 2-35, 4-27
from the file system, 2-37, 4-28
offline content, 2-37, 4-29
attachment
adding to an e-mail message, 2-35, 4-26
attachments
in Lotus Notes Mail, 4-13
in Microsoft Outlook, 4-13
setting the e-mail attachment option, 4-13
authentication
e-mail integration to content server, 4-12
authentication method
Email Checkin Settings, 4-12
authentication method, setting, 3-16
CCGI URL, 3-6
CGI URL, finding through your e-mail client, 4-11
changing the column display, 2-32Checkin Distribution List dialog box, 4-19
checking in
attachments, 4-17
distribution lists, 4-20
e-mail messages, 4-15, 4-17
e-mail with attachments, 4-17
offline content items, 2-43
checking in content
duplicate file names, 2-3
Offline Content Manager, 2-41
options in Oracle Folders, 2-27
through Oracle Folders, 2-27
checking out content
Offline Content Manager, 2-41
options in Oracle Folders, 2-28
through Oracle Folders, 2-28
checking synchronization status, 2-42
Column Display, 2-32
changing, 2-32
Column Settings dialog box, 2-32
common dialogs, 3-2
connecting to a content server, 3-5
through Lotus Notes Mail, 4-8
through Microsoft Outlook, 4-8
content
checking in through Oracle Folders, 2-27
checking out through Oracle Folders, 2-28
copying and pasting in Oracle Folders, 2-27, 2-29
deleting in Oracle Folders, 2-34
dragging and dropping in Oracle Folders, 2-27
popup menu options, 2-14
renaming through Oracle Folders, 2-32
unsyndicating, 2-43
viewing in Oracle Folders, 2-34
content information page
opening, 2-15
Content Properties
viewing in Oracle Folders, 2-31content server
checking in a new file, 3-10
creating a new file, 3-9
logging on, 2-11
opening a previous revision of a file, 3-13
popup menu options, 2-11
viewing a read-only copy of a file, 3-12
viewing properties in Oracle Folders, 2-21
7/24/2019 55439-Desktop Integration Suite User Guide
http://slidepdf.com/reader/full/55439-desktop-integration-suite-user-guide 118/120
Index-2 Desktop Integration Suite User Guide
Index
Content Server integration
Lotus Notes, 4-1
Microsoft Outlook, 4-1
content servers
connecting to through Oracle Folders, 2-19logging off through Oracle Folders, 2-22
removing a connection through Oracle Folders, 2-23
searching, 2-21
copying and pasting
between applications, 2-34
content in Oracle Folders, 2-29
folders, 2-24
issues, 2-34
Customize Columns, 2-32
customizing Offline Content Manager, 2-41
Ddefault metadata
in Oracle Folders, 2-3
deleting, 2-26
deleting a distribution list, 4-26
deleting content in Oracle Folders, 2-34
Desktop integration
configuring Lotus Notes, 4-1
configuring Microsoft Outlook, 4-1
dialog boxes
Add Server, 3-5
Edit Server List, 3-5, 3-7
Select Content, 3-2
distribution lists, 4-19
adding members to, 4-23changing the address of a member, 4-25
changing the name of a member, 4-25
checking in, 4-19, 4-20
deleting, 4-26
deleting a member, 4-25
editing, 4-23
downloading most recent syndicated content, 2-40
duplicate filenames, 2-3
Ee-mail
metadata, 4-3e-mail attachment
adding from a content server, 2-35, 4-27
adding from an offline location, 2-37, 4-29
adding from the file system, 2-37, 4-28
e-mail client integration, 4-1
e-mail messages
checking in, 4-15, 4-17
Edit Server List dialog box, 3-5, 3-7
editing a distribution list, 4-23
editing a server connection, 3-7through your e-mail client, 4-11
Email Checkin Settings
authentication, 4-12
e-mail attachments, 4-13
exploring Oracle Folders, 2-8
Ffile
checking into the content server, 3-10
creating, 3-9
opening a previous revision, 3-13
opening from the local file system, 3-14read-only, 3-16
saving to the file system, 3-14
unmanaged, 3-15
file names, 2-3
file system
creating a new file, 3-9
opening a file from, 3-14
saving a new file, 3-14
filtering
Offline Content Manager, 2-44
folder
deleting, 2-26
inheriting metadata, 2-4
renaming, 2-25folders
copying and pasting, 2-24
popup menu options, 2-12
popup menu options (with nothing selected), 2-13
Llogging in
controlling access through Lotus Notes Mail, 4-12
controlling access through Microsoft Outlook, 4-12
logging in with SiteMinder, 2-21
logging off a content server, 2-11
logging on to a content server, 2-11logging on to a server, 3-16
Lotus Notes Email
editing a server connection, 4-11
Lotus Notes Mail
connecting to a content server, 4-8
managing content, 2-1
using Oracle Folders, 2-1

7/24/2019 55439-Desktop Integration Suite User Guide
http://slidepdf.com/reader/full/55439-desktop-integration-suite-user-guide 119/120
Desktop Integration Suite User Guide Index-3
Index
Mmanaging content
in Lotus Notes Mail, 2-1
in Microsoft Outlook, 2-1in Windows Explorer, 2-1
through Oracle Folders, 2-1
managing server connections
through Oracle Folders, 2-17
marking content for syndication, 2-39
metadata, 3-3
changing desktop display, 2-32
custom, 4-2
default, 4-2
e-mail, 4-2
e-mail specific, 4-3
EmailCC, 4-3
EmailFrom, 4-3
EmailSubject, 4-3
EmailTo, 4-3
for individual e-mail messages, 4-15, 4-17
inheriting in new folders, 2-4
inheriting in Oracle Folders, 2-4
optional, 4-2
PublicationDate, 4-3
ReceiveDate, 4-3
remembering, 4-4
remembering at check-in, 3-17
setting up on a content server, 4-2
types, 3-3, 4-2
Metadata Propagation function, 2-4, 2-4
Microsoft Outlook
connecting to a content server, 4-8
editing a server connection, 4-11
managing content, 2-1
using Oracle Folders, 2-1
NNetegrity SiteMinder, logging in with, 2-21
Ooffline content
viewing properties, 2-43offline content items
checking in, 2-43
Offline Content Manager, 2-41, 2-43
filter, 2-44
opening, 2-43
offline option for syndication, 2-44
offline Properties dialog box, 2-46
opening a previous revision, 3-13
opening Oracle Folders
in Lotus Notes Mail, 2-7
in Microsoft Outlook, 2-7
in Windows Explorer, 2-6Oracle Folders, 2-2
about, 2-2
accessing through Lotus Notes Mail, 2-7
accessing through Microsoft Outlook, 2-7
accessing through Windows Explorer, 2-6
adding a server connection, 2-18
changing or viewing the name of a content item, 2-31
changing the display name of a server, 2-21
checking in content, 2-27
checking out content, 2-28
connecting to a content server, 2-19
copy-and-paste, 2-27
copying and pasting content, 2-29
directory structure, 2-8
drag-and-drop, 2-27
exploring, 2-8
finding the URL of a content item, 2-31
inheriting metadata, 2-4
logging off a server, 2-22
managing content through, 2-1
managing server connections, 2-17
overview, 2-5
popup menu options, 2-9
popup menus, 2-9
removing a server connection, 2-23
searching content servers, 2-21
security, 2-5
terms and concepts, 2-2
using in Lotus Notes Mail, 2-1
using in Microsoft Outlook, 2-1
using in Windows Explorer, 2-1
working with shortcuts, 2-38
Oracle Folders metadata, 2-3
about, 2-3
default, 2-3
Ppopup menu options
content, 2-14
content server, 2-11folders, 2-12
folders (nothing selected), 2-13
Oracle Folders, 2-9
popup menus
available options, 2-9
in Oracle Folders, 2-9

7/24/2019 55439-Desktop Integration Suite User Guide
http://slidepdf.com/reader/full/55439-desktop-integration-suite-user-guide 120/120
Index
previous revision of a file, opening, 3-13
properties, 2-26
Rread-only files, opening, 3-16
refreshing syndicated content, 2-42
remembering metadata, 4-4
Removing a server connection
through Lotus Notes Mail, 4-12
through Microsoft Outlook, 4-12
renaming a folder, 2-25
renaming content in Oracle Folders, 2-32
S
searching a content server in Oracle Folders, 2-21
security
in Oracle Folders, 2-5
Select Content dialog box, 3-2
Folders tab, 3-3
Offline Content tab, 3-3
Server tab, 3-3
server connection
adding, 3-5
editing, 3-7
server connections
adding in Oracle Folders, 2-18
editing in Lotus Notes Email, 4-11
editing in Microsoft Outlook, 4-11removing through your e-mail client, 4-12
server name, changing, 4-11
server properties
content server URL 2 21
Tterms and concepts
Oracle Folders, 2-2
trash folder, 2-26
Uunmanaged files, 3-15
unsyndicating content, 2-43
URL, 2-26
CGI, 3-6
viewing in Content Properties, 2-31
WebDAV server, 3-6
URL of a content server
finding in Oracle Folders, 2-21
user interface, 3-2
Vviewing a file in the content server, 3-12
viewing content in Oracle Folders, 2-34
viewing content properties
in Oracle Folders, 2-31
viewing folder properties, 2-26
viewing Oracle Folders
in Lotus Notes Mail, 2-7
in Microsoft Outlook, 2-7
in Windows Explorer, 2-6
viewing properties
offline content, 2-43viewing server properties
in Oracle Folders, 2-21
viewing syndicated content, 2-42