5000 SERIES PRIVACYTRACKING - Fabtex, Inc. · 5000-01 Carrier with Hook Carrier is constructed of a...
29
5000 SERIES PRIVACYTRACKING
Transcript of 5000 SERIES PRIVACYTRACKING - Fabtex, Inc. · 5000-01 Carrier with Hook Carrier is constructed of a...

5000 SERIES
PRIVACYTRACKING

REV0717
CUBICLE TRACKING AND PARTS DESCRIPTIONS
5000 SERIES GENERAL DESCRIPTIONS
Cubicle Track Cubicle track system Fabtex Model Number 5000 complete with 1.125” x 0.75” extruded aluminum track channel, carriers, end stops, and other required accessories for a complete and operational track system. Track channel available either curved or straight in continuous lengths up to 20 feet. Bends will have an approximate 12” radius (305mm). Track is coated with a clear commercial grade anodized finish.
COMPONENT DESCRIPTIONS
5000-01 Carrier with Hook Carrier is constructed of a natural nylon body with nickel plated steel loop and nickel plated steel hook for curtain attachment. The carrier body is supported from two natural nylon wheels fastened by plated steel rivet. 5000-01BA Break Away Carrier Carrier is constructed from 100% plastic molded in two pieces. The wheeled portion incorporates a socket and the hooked portion incorporates a ball. Together this ball and socket combination provide a breaking point rated at 7 lbs. of pull force. 5000-03 End Stop Finishes the end of a track and keeps carriers and curtain on the track. The End Stop body is made from 0.032” sheet aluminum die-formed and coated with a clear commercial grade anodized finish. Recommended to be used in conjunction with a 5000-04 End Stop with Pull-Out.
5000-04 End Stop with Pull-Out Finishes the end of a track and keeps carriers and curtain on the track while allowing access to carriers via built in pull-out. End Stop body and pullout cap is made from 0.032” sheet aluminum die-formed and coated with a clear commercial grade anodized finish. A plated machine screw retains and permits removal of pull-out for access to track carriers. Recommended to be used in conjunction with a 5000-03 End Stop.

REV0717
CUBICLE TRACKING AND PARTS DESCRIPTIONS
5000 SERIES COMPONENT DESCRIPTIONS (CONTINUED)
5000-05 Splice Allows cubicle track to be spliced together quickly and effectively. Splice is made from extruded 6063-T5 aluminum and is coated with a clear commercial grade anodized finish. 5000-06 Ceiling Bracket – Suspension Mount Attaches suspension tubing to the ceiling. A Ceiling Bracket is constructed of sheet aluminum top and extruded 6063-T5 “U” channel. All aluminum parts are coated with a clear commercial grade anodized finish. 5000-07 Track End Wall Bracket – Suspension Mount Part of a suspension mounting system, the Track End Wall Brackets replace endcaps and allow direct attachment of the track to the wall. Made of extruded 6063-T5 aluminum and coated with a clear commercial grade anodized finish. 5000-08 Track Bracket – Suspension Mount Secures suspension tubing to the tracking system. Track brackets are made from extruded 6063-T5 aluminum and coated with a clear commercial grade anodized finish. 5000-11 P.V.C. 16” Drop Used in lieu of mesh, PVC drops are constructed of .085” x .350” extruded white P.V.C. with attachment holes at each end. One end is provided with nickel plated steel hook for curtain attachment.
5000-17 Radius Connector – Suspension Mount Radius connector shall be made from heavy gauge nickel steel with attachment holes throughout the center.
5000-ST Suspension Tubing Suspension tubing shall be made from ¾” x ¾” x .063” extruded 6063-T5 aluminum with commercial clear anodized finish.
REV0717
CUBICLE TRACKING ASSEMBLY INSTRUCTIONS
5000 SERIES Ceiling Mounted Cut track to length and attach end stops (use End Stops in pairs: one with a pull-out, and one without). Secure track to ceiling or wall (see installation instructions). Once track is securely mounted, remove pull-out from end stop, insert the required number of carriers, and reinsert pull-out into the end stop. To install the cubicle curtain, carefully slide the grommets, located at the top of the cubicle curtain, over the hooks of the carriers. For smoother operation, lightly spray the inside of the track with an aerosol silicone lubricant. Depending upon environment, clean and re-lubricate as necessary. Suspension Mounted Cut track to length and attach end stops (use End Stops in pairs: one with a pull-out, and one without). If either of the track ends will be butting directly into a wall, replace the necessary End Stop(s) with a Track End Wall Bracket as shown in Option #2 above. For details, refer to Track End Wall Bracket assembly instructions. Attach suspension tubing ceiling brackets to the ceiling (see installation instructions) then attach suspension tubing and track brackets. Position suspension tubing assemblies along path of the track at 24” to 36” intervals. Once the suspension tubing is securely mounted to the ceiling, attach the track to the suspension tubing. Refer to the Suspension Mount Radius Connector and Suspension Mount Wall Bracket assembly instructions for additional assembly details. Once the track is secured, remove pull-out from end stop, insert the required number of carriers, and re-insert pull-out into the end stop. To install the cubicle curtain, carefully slide the grommets, located at the top of the cubicle curtain, over the hooks of the carriers. For smoother operation, lightly spray the inside of the track with an aerosol silicone lubricant. Depending upon environment, clean and re-lubricate as necessary.

CONFIDENTIAL Project:
All materials disclosed in this
document are proprietary to
Fabtex, Inc. The Holder agrees
to maintain it in confidence
and must not replicate or
reveal this information in any
manner.
5000 Series Tracking
System Assembly
Date:
15-AUG-2016
Scale:
DO NOT SCALE
Dimensions:
Inches/Feet
By:
C. Johnson(800) 778-2791 www.fabtex.com
END STOP
W/ PULL-OUT
#5000-04
END STOP
#5000-03
HOOKED
CARRIERS
#5000-01
5000 SERIES TRACK

CONFIDENTIAL Project:
All materials disclosed in this
document are proprietary to
Fabtex, Inc. The Holder agrees
to maintain it in confidence
and must not replicate or
reveal this information in any
manner.
5000 Series Suspended Tracking
System Assembly
Date:
15-AUG-2016
Scale:
DO NOT SCALE
Dimensions:
Inches/Feet
By:
C. Johnson(800) 778-2791 www.fabtex.com
END STOP
W/ PULL-OUT
#5000-04
END STOP
#5000-03
OPTION #1
HOOKED
CARRIERS
#5000-01
5000 SERIES TRACK
SUSPENSION TUBING
#5000-ST
TRACK BRACKET
#5000-08
CEILING BRACKET
#5000-06
SUSPENSION TUBING
#5000-ST
TRACK BRACKET
#5000-08
CEILING BRACKET
#5000-06
TRACK END
WALL BRACKET
#5000-07
OPTION #2

REV0717
CUBICLE TRACKING ASSEMBLY INSTRUCTIONS
5000 SERIES CUBICLE TRACK – SUSPENSION MOUNT RADIUS CONNECTOR A radius connector (part #5000-17) is used to attach the end of a suspension mounted track to the bend (radius) of another track. By tying the track configurations together, this bracket greatly enhances the integrity of a suspension mounted cubicle tracking system and is virtually required when many configurations are ganged together, as illustrated below.
Instructions: 1. Once the first suspended track
system is in place, layout of the second track begins. At this time, connect the tracks using the radius connector. Slide the radius connector over the end of the first track and over the bend (radius) of the second track. Note the positioning of the tracks in radius connector. Typically End Stops cannot be used with a radius connector. When this is the case, use a self-tapping metal screw inserted ½” from the end of the first track as the carrier stop. Leave this screw just flush with the bottom of the track to allow it to effectively stop the carriers.
2. Upon final positioning of the
second track system, secure the radius connector into place by running two screws up from the bottom of the track, through the top of the radius connector.

REV0717
CUBICLE TRACKING ASSEMBLY INSTRUCTIONS
5000 SERIES CUBICLE TRACK – TRACK END WALL BRACKET A Track End Wall Bracket (part #5000-07) is used to attach the ends of suspension mounted tracks to the wall and acts as a closed end stop. This mounting greatly enhances the integrity of a suspension mounted cubicle tracking system.
Instructions: 3. Once the suspended track system is in place,
locate the track ends and mark their position on the wall. Loosen the track and swing it out of the way. Measure and attach the Wall Bracket to the wall using the appropriate mounting method (drywall & stud method illustrated here).
4. Slide the end of the track over the Wall
Bracket. 5. Secure track to the Wall Bracket using a self-tapping
screw. Run the screw through the side of the track and through the slot in the Wall Bracket.

REV0717
CARE INSTRUCTIONS
CUBICLE TRACKING SYSTEMS Cubicle tracks are designed as robust commercial systems and require very little maintenance. However, from time to time, it is recommended to inspect and clean your tracking system to ensure many years of trouble free use. Scheduled Maintenance Recommended to be performed every 5 years. Remove cubicle curtains from hooks and set aside. Locate and remove the pullout from one endstop, and remove carriers from the track. Carefully inspect the carriers for signs of excessive wear, i.e. chipped or cracked wheels, split hook rings, or excessive corrosion on the metallic parts. Next, using a small brush and vacuum, clean the track along its entire length. Small brushed vacuum attachments are recommended for maximum effectiveness. Lightly spray the inside of the cubicle track with a light duty silicone spray and install the carriers. Be sure to go very lightly on the spray and to wipe up any run-off/dripping that may occur to prevent from soiling the cubicle curtain that will be attached later. Once you have verified that the carriers are operating correctly and smoothly, reinstall the pullout into the endstop. Gather up the cubicle curtain by the mesh, and starting from the carrier furthest from the endstop, hook carriers through the cubicle curtain grommets one by one. Carrier Binding If carriers do not move smoothly, check the track for binding. If the track is clear of debris, spray the inside of the track with a light coating of silicone spray. Be careful not to spray the curtains and wipe any excess spray from the track.

REV0717
CUBICLE TRACKING INSTALLATION INSTRUCTIONS
5000 SERIES – DROP CEILING GRID INSTALLATION The tools and materials that are required to install cubicle track will vary depending upon the ceiling type. Fabtex does not provide the fasteners or the tools that are required to install cubicle track. Fabtex does not assume liability on any installation method. The techniques listed here are merely industry recommendations. 1. Place the privacy track on the floor. Lay out the configurations to ensure that the track is positioned
exactly where it is desired. 2. Begin on one end of the track; and mark the holes on the ceiling. Repeat this process on the track as
well. Note: track should be secured at 24”- 30” intervals beginning on one end of the track. 3. Decide which end of the track will receive the end stop with pull-out. 4. Pre-drill the track. Anchor track via a 2” #8 self-tapping screw hex head or pan head recommended.
Track will be anchored directly to the drop ceiling grid. 5. If the track is spliced, check to ensure that there are no obstructions. Then place the track splice over
one end of the track and secure via the steps listed above. Slide the other side of the track into the splice and secure with a fastener. This will ensure that the carriers will not bind at this location.
6. Make sure that both ends of the tracks and the end stops are secured to the ceiling. 7. Remove the pull-out and begin assembly (refer to assembly instructions).

CONFIDENTIAL Project:
All materials disclosed in this
document are proprietary to
Fabtex, Inc. The Holder agrees
to maintain it in confidence
and must not replicate or
reveal this information in any
manner.
5000 Series Tracking System
Drop Ceiling Installation
Date:
15-AUG-2016
Scale:
DO NOT SCALE
Dimensions:
Inches/Feet
By:
C. Johnson(800) 778-2791 www.fabtex.com
#8 X 1.5” SELF TAPPING
SCREWS AT 24” O.C.
CURTAIN TRACK
MAIN RUNNER
ACOUSTIC CEILING
PANELS

REV0717
CUBICLE TRACKING INSTALLATION INSTRUCTIONS
5000 SERIES – DROP CEILING GRID WITH CHANNEL BACKING INSTALLATION The tools and materials that are required to install cubicle track will vary depending upon the ceiling type. Fabtex does not provide the fasteners or the tools that are required to install cubicle track. Fabtex does not assume liability on any installation method. The techniques listed here are merely industry recommendations. 1. Place the privacy track on the floor. Lay out the configurations to ensure that the track is positioned
exactly where it is desired. 2. Begin on one end of the track; and mark the holes on the ceiling. Repeat this process on the track as
well. Note: track should be secured at 24” on center intervals beginning on one end of the track. 3. Decide which end of the track will receive the end stop with pull-out. 4. Pre-drill the track. 5. Decide where the 1 ½” channel will be laid flat directly above the track. 6. Attach 12 gauge hangar wires at 48” intervals on center. 7. Secure hangar wire to the 1 ½” channel backing with three tight turns. Turns should be completed
within 1 ½”. 8. Anchor track via a 2 ½” #8 self-tapping screw hex head or pan head recommended. Track will be
anchored directly to the 1 ½” channel. Track must be secured at 24” intervals on center to the 1 ½” channel.
9. If the track is spliced, check to ensure that there are no obstructions. Then place the track splice over
one end of the track and secure via the steps listed above. Slide the other side of the track into the splice and secure with a fastener. This will ensure that the carriers will not bind at this location.
10. Make sure that both ends of the tracks and the end stops are secured to the ceiling. 11. Remove the pull-out and begin assembly (refer to assembly instructions).

CONFIDENTIAL Project:
All materials disclosed in this
document are proprietary to
Fabtex, Inc. The Holder agrees
to maintain it in confidence
and must not replicate or
reveal this information in any
manner.
5000 Series Tracking System
Drop Ceiling with Backing Installation
Date:
15-AUG-2016
Scale:
DO NOT SCALE
Dimensions:
Inches/Feet
By:
C. Johnson(800) 778-2791 www.fabtex.com
#8 X 2.5” SELF TAPPING
SCREWS AT 24” O.C.
ACOUSTIC
TILE SPACER
CURTAIN TRACK
MAIN RUNNER
1.5” STEEL CHANNEL
12 GA. HANGER WIRE AT 48” O.C.
FOR ATTACHMENT TO HARD LID
3 TIGHT TURNS
ACOUSTIC CEILING
PANELS
1.5“

REV0717
CUBICLE TRACKING INSTALLATION INSTRUCTIONS
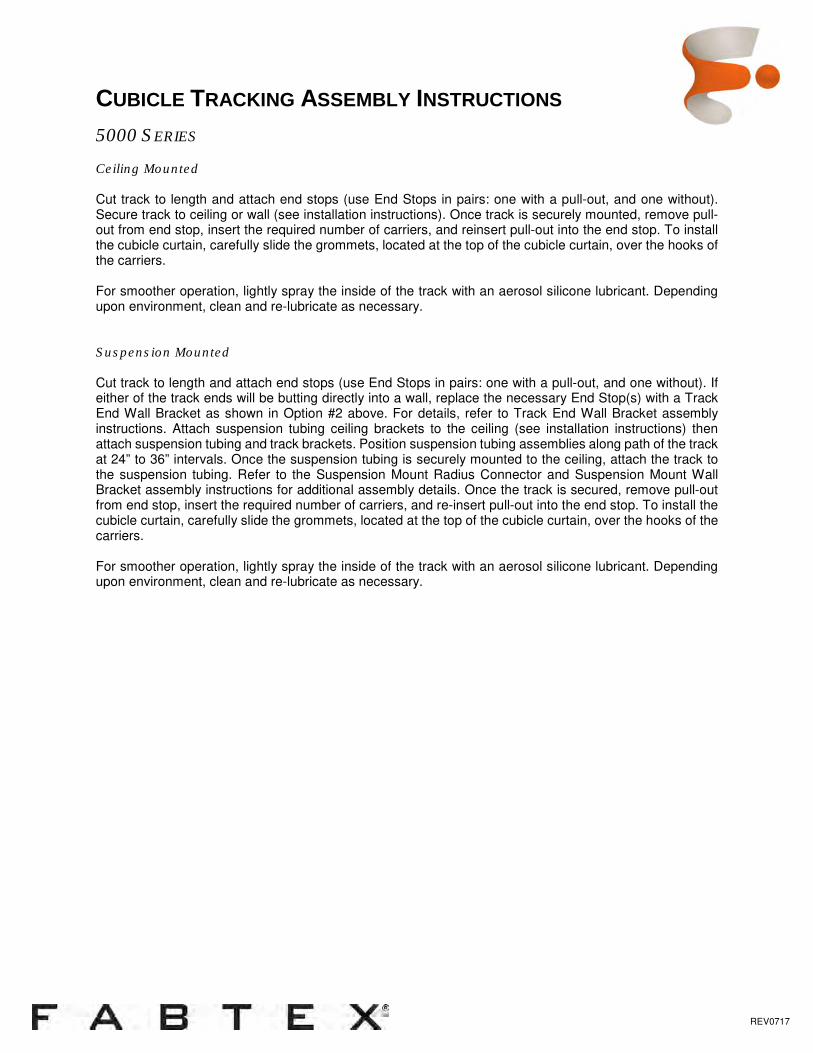
5000 SERIES – SHEETROCK (DRYWALL) INSTALLATION The tools and materials that are required to install cubicle track will vary depending upon the ceiling type. Fabtex does not provide the fasteners or the tools that are required to install cubicle track. Fabtex does not assume liability on any installation method. The techniques listed here are merely industry recommendations. 1. Place the privacy track on the floor. Lay out the configurations to ensure that the track is positioned
exactly where it is desired. 2. Begin on one end of the track; and mark the holes on the ceiling. Repeat this process on the track as
well. Note: track should be secured at 24”- 30” intervals beginning on one end of the track. 3. Decide which end of the track will receive the end stop with pull-out. 4. Pre-drill the ceiling. 5. Pre-drill the track. Anchor track via a 3” hex head bolt and wings. Toggle will be 1/8” in diameter.
Slotted hex head or Robertson head is recommended. 6. If the track is spliced, check to ensure that there are no obstructions. Then place the track splice over
one end of the track and secure via the steps listed above. Slide the other side of the track into the splice and secure with a fastener. This will ensure that the carriers will not bind at this location.
7. Make sure that both ends of the tracks and the end stops are secured to the ceiling. 8. Remove the pull-out and begin assembly (refer to assembly instructions).
CONFIDENTIAL Project:
All materials disclosed in this
document are proprietary to
Fabtex, Inc. The Holder agrees
to maintain it in confidence
and must not replicate or
reveal this information in any
manner.
5000 Series Tracking System
Sheetrock Installation
Date:
15-AUG-2016
Scale:
DO NOT SCALE
Dimensions:
Inches/Feet
By:
C. Johnson(800) 778-2791 www.fabtex.com
SHEETROCK
CURTAIN TRACK
#8 X 2.5” TOGGLE BOLT

REV0717
CUBICLE TRACKING INSTALLATION INSTRUCTIONS
5000 SERIES – SHEETROCK (DRYWALL) WALL INSTALLATION The tools and materials that are required to install drapery track will vary depending upon the wall type. Fabtex does not provide the fasteners or the tools that are required to install drapery track. Fabtex does not assume liability on any installation method. The techniques listed here are merely industry recommendations. 1. Place the drapery track on the floor. Lay out the configurations to ensure that the track is positioned
exactly where it is desired. 2. Begin on one end of the track; and mark the holes on the wall. Repeat this process on the track as well.
Note: track should be secured at 24”- 30” intervals beginning on one end of the track. 3. Pre-drill the wall and anchor 2x2 Wall Brackets (part #5000-31) via a 3” hex head bolt and wings.
Toggle will be 1/8” in diameter. Slotted hex head or Robertson head is recommended. 4. Pre-drill the track. Anchor track via a 1/2” #8 self-tapping screw hex head or pan head recommended. 5. If the track is spliced, check to ensure that there are no obstructions. Then place the track splice over
one end of the track and secure via the steps listed above. Slide the other side of the track into the splice and secure with a fastener. This will ensure that the carriers will not bind at this location.
6. Make sure that both ends of the tracks and the end stops are secured to the wall.

CONFIDENTIAL Project:
All materials disclosed in this
document are proprietary to
Fabtex, Inc. The Holder agrees
to maintain it in confidence
and must not replicate or
reveal this information in any
manner.
5000 Series Tracking System
Sheertrock Wall Mount Installation
Date:
15-AUG-2016
Scale:
DO NOT SCALE
Dimensions:
Inches/Feet
By:
C. Johnson(800) 778-2791 www.fabtex.com
SHEETROCK
CURTAIN TRACK
#8 X 0.5” SELF
TAPPING SCREW
#8 X 2.5” TOGGLE BOLTS
WALL BRACKET

REV0717
CUBICLE TRACKING INSTALLATION INSTRUCTIONS
5000 SERIES – WOOD INSTALLATION The tools and materials that are required to install cubicle track will vary depending upon the ceiling type. Fabtex does not provide the fasteners or the tools that are required to install cubicle track. Fabtex does not assume liability on any installation method. The techniques listed here are merely industry recommendations. 1. Place the privacy track on the floor. Lay out the configurations to ensure that the track is positioned
exactly where it is desired. 2. Begin on one end of the track; and mark the holes on the ceiling. Repeat this process on the track as
well. Note: track should be secured at 24”- 30” intervals beginning on one end of the track.
3. Decide which end of the track will receive the end stop with pull-out. 4. Pre-drill the track. Anchor track via a 2” #8 self-tapping screw hex head or pan head recommended.
Track will be anchored directly to the drop ceiling grid. 5. If the track is spliced, check to ensure that there are no obstructions. Then place the track splice over
one end of the track and secure via the steps listed above. Slide the other side of the track into the splice and secure with a fastener. This will ensure that the carriers will not bind at this location.
6. Make sure that both ends of the tracks and the end stops are secured to the ceiling. 7. Remove the pull-out and begin assembly (refer to assembly instructions).

CONFIDENTIAL Project:
All materials disclosed in this
document are proprietary to
Fabtex, Inc. The Holder agrees
to maintain it in confidence
and must not replicate or
reveal this information in any
manner.
5000 Series Tracking System
Wood Stud Installation
Date:
15-AUG-2016
Scale:
DO NOT SCALE
Dimensions:
Inches/Feet
By:
C. Johnson(800) 778-2791 www.fabtex.com
SHEETROCK
#8 X 2.5” WOOD SCREW
WOOD STUD
CURTAIN TRACK

REV0717
CUBICLE TRACKING INSTALLATION INSTRUCTIONS
5000 SERIES – WOOD WALL INSTALLATION The tools and materials that are required to install drapery track will vary depending upon the wall type. Fabtex does not provide the fasteners or the tools that are required to install drapery track. Fabtex does not assume liability on any installation method. The techniques listed here are merely industry recommendations. 1. Place the drapery track on the floor. Lay out the configurations to ensure that the track is positioned
exactly where it is desired. 2. Begin on one end of the track; and mark the holes on the wall. Repeat this process on the track as well.
Note: track should be secured at 24”- 30” intervals beginning on one end of the track. 3. Pre-drill the wall and anchor 2x2 Wall Brackets (part #5000-31) via two 2” #8 self-tapping screw hex
heads or pan heads recommended. 4. Pre-drill the track. Anchor track via a 1/2” #8 self-tapping screw hex head or pan head recommended. 5. If the track is spliced, check to ensure that there are no obstructions. Then place the track splice over
one end of the track and secure via the steps listed above. Slide the other side of the track into the splice and secure with a fastener. This will ensure that the carriers will not bind at this location.
6. Make sure that both ends of the tracks and the end stops are secured to the wall.

CONFIDENTIAL Project:
All materials disclosed in this
document are proprietary to
Fabtex, Inc. The Holder agrees
to maintain it in confidence
and must not replicate or
reveal this information in any
manner.
5000 Series Tracking System
Wall Mount Installation
Date:
15-AUG-2016
Scale:
DO NOT SCALE
Dimensions:
Inches/Feet
By:
C. Johnson(800) 778-2791 www.fabtex.com
SHEETROCK
CURTAIN TRACK
#8 X 0.5” SELF
TAPPING SCREW
#8 X 2.5” WOOD SCREWS
WOOD STUD
WALL BRACKET
REV0717
CUBICLE TRACKING INSTALLATION INSTRUCTIONS
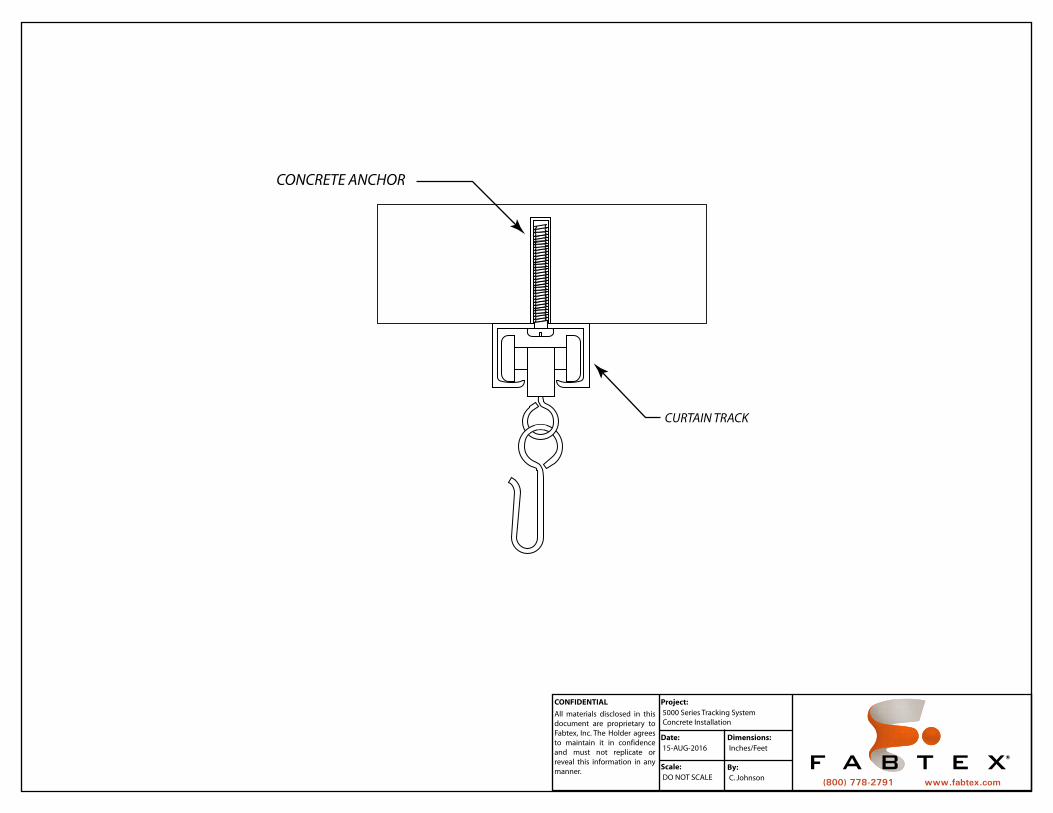
5000 SERIES – CONCRETE INSTALLATION The tools and materials that are required to install cubicle track will vary depending upon the ceiling type. Fabtex does not provide the fasteners or the tools that are required to install cubicle track. Fabtex does not assume liability on any installation method. The techniques listed here are merely industry recommendations. 1. Place the privacy track on the floor. Lay out the configurations to ensure that the track is positioned
exactly where it is desired. 2. Begin on one end of the track; and mark the holes on the ceiling. Repeat this process on the track as
well. Note: track should be secured at 24”- 30” intervals beginning on one end of the track. 3. Decide which end of the track will receive the end stop with pull-out. 4. Pre-drill the ceiling. Insert a 1 ¼” concrete anchor.
5. Pre-drill the track. Anchor track via a 1 ¼” #8 self-tapping screw hex head or pan head recommended. 6. If the track is spliced, check to ensure that there are no obstructions. Then place the track splice over
one end of the track and secure via the steps listed above. Slide the other side of the track into the splice and secure with a fastener. This will ensure that the carriers will not bind at this location.
7. Make sure that both ends of the tracks and the end stops are secured to the ceiling. 8. Remove the pull-out and begin assembly (refer to assembly instructions).
CONFIDENTIAL Project:
All materials disclosed in this
document are proprietary to
Fabtex, Inc. The Holder agrees
to maintain it in confidence
and must not replicate or
reveal this information in any
manner.
5000 Series Tracking System
Concrete Installation
Date:
15-AUG-2016
Scale:
DO NOT SCALE
Dimensions:
Inches/Feet
By:
C. Johnson(800) 778-2791 www.fabtex.com
CONCRETE ANCHOR
CURTAIN TRACK

REV0717
CUBICLE TRACKING INSTALLATION INSTRUCTIONS
5000 SERIES – CONCRETE WALL INSTALLATION The tools and materials that are required to install drapery track will vary depending upon the wall type. Fabtex does not provide the fasteners or the tools that are required to install drapery track. Fabtex does not assume liability on any installation method. The techniques listed here are merely industry recommendations. 1. Place the drapery track on the floor. Lay out the configurations to ensure that the track is positioned
exactly where it is desired. 2. Begin on one end of the track; and mark the holes on the wall. Repeat this process on the track as well.
Note: track should be secured at 24”- 30” intervals beginning on one end of the track. 3. Pre-drill the wall. Insert a 1 ¼” concrete anchor. 4. Anchor 2x2 Wall Bracket (part #5000-31) via a 1 ¼” #8 self-tapping screw hex head or pan head
recommended. 5. Pre-drill the track. Anchor track via a 1/2” #8 self-tapping screw hex head or pan head recommended. 6. If the track is spliced, check to ensure that there are no obstructions. Then place the track splice over
one end of the track and secure via the steps listed above. Slide the other side of the track into the splice and secure with a fastener. This will ensure that the carriers will not bind at this location.
7. Make sure that both ends of the tracks and the end stops are secured to the wall.

CONFIDENTIAL Project:
All materials disclosed in this
document are proprietary to
Fabtex, Inc. The Holder agrees
to maintain it in confidence
and must not replicate or
reveal this information in any
manner.
5000 Series Tracking System
Concrete Wall Mount Installation
Date:
15-AUG-2016
Scale:
DO NOT SCALE
Dimensions:
Inches/Feet
By:
C. Johnson(800) 778-2791 www.fabtex.com
CURTAIN TRACK
#8 X 0.5” SELF
TAPPING SCREW
CONCRETE ANCHORS
CONCRETE
WALL BRACKET

REV0717
CUBICLE TRACKING SPECIFICATIONS – 5000 SERIES
DIVISION 10190 Part 1 – General 1.1 Summary
A. Work included in this Section: Provision of cubicle curtains and tracks. B. Related Work Not Included in this Section: Backing for cubicle curtain tracks.
1.2 System Description A. Performance Requirements
1. Provide cubicle curtains that conform to the following requirements of regulatory agencies and the quality control of the Fabtex, Inc.
B. Fire Performance Characteristics 1. Provide curtains that conform to NFPA 701 (Fire Tests for Flame and Resistant Textiles and
Films) and California Title 19 regulations. 1.3 Submittals
A. Product Data 1. Manufacturer’s printed product data for each type of cubicle curtain specified.
B. Fabric Samples 1. Swatch cards of fabric (memo) samples illustrating fabric color and weave.
C. Track Samples 1. Verification samples of cubicle track, 6 inch (153mm) long, in full size with carriers and end
stops. 1.4 Delivery, Storage and Handling
A. Deliver and store packaged products in original containers with seals unbroken and labels intact until time of use.
B. Inspect materials at delivery to assure that specified products have been received. C. Store delivered products inside in a clean, safe and dry environment.
1.5 Warranty A. Standard Fabtex Limited Warranty against material and manufacturing defects for a period of 1
year from the date of the installation. Part 2 – Products 2.1 Fabtex 5000 Series Cubicle Track
A. Description: Ceiling mounted cordless aluminum track with matching splices; carriers with hooks; cordless hand traverse operations.
B. Acceptable manufacturer 1. Fabtex Inc., (800) 778-2791 in accordance with specifications, drawings, and contract
documents. C. Substitutions: Not Permitted D. Provide all cubicle tracks from a single source. E. Track Material
1. Cubicle Tracking System: Fabtex 5000 Series heavy duty extruded clear anodized aluminum cubicle track systems.
2. Track to be delivered in straight lengths up to 20 feet (6.1m). 3. Configuration Sections: Provide illustrations of bends.
a. Standard Bends i. 90 degree bend with a 12 inch (305mm) radius ii. 45 degree bend with a 12 inch (305mm) radius iii. 180 degree bend with a 60 inch (1524mm) radius iv. 90 degree bend with a 60 inch (1524mm) radius
b. Custom Bends i. Provide drawing with dimensions. Template may be required
4. Suspension Tubing System (optional)

REV0717
CUBICLE TRACKING SPECIFICATIONS – 5000 SERIES
DIVISION 10190 Part 2 – Products (continued)
a. ¾” Square Aluminum Tubing color: Clear Anodized b. Length of Suspension tubing should be 18” minimum c. A complete suspension tube assembly should be anchored every 24”
i. 5000-ST Suspension Tubing – cut to drop length ii. 5000-06 Ceiling Bracket – attaches tube to ceiling iii. 5000-08 Track Bracket – attaches tube to track
d. Where track ends meet a wall, 5000-07 Track End Wall Brackets are required for proper anchoring
e. Multiple configuration bends require a 5000-17 radius connector on each bend. 2.1 Cubicle Curtains
A. Description: 100% polyester cubicle curtains. Fabric is to be opaque, washed, flame retardant and closely woven.
B. Acceptable Manufacturer:
1. Fabtex Inc., (800) 778-2791 in accordance with specifications, drawings, and contract
documents. C. Substitutions: Not Permitted D. Provide all cubicle curtains from a single source. E. Construction:
1. Height of curtains to be from 18 inches (457mm) below ceiling mounted track to a distance of not more than 10-12 inches (254-308mm) from the floor.
F. Curtains to have 110 percent fullness, width to be determined by length of track to ensure proper enclosure.
G. Form top and bottom hems by a triple fold securely sewn with edges and panels seams 1 inch (25mm) overlapped lock stitched.
H. Provide flat washed nickel-plated ½ inch (12.7mm) brass eyelets inserted in the top hem at 6 inches (152mm) on center.
I. Sew a Fabtex identification label and cleaning instructions on the top hem of each curtain to identify the width of the curtain.
J. Fabricate curtains with a 20 inch (508mm) mesh cloth with ½ inch (12.7mm) holes. Mesh is to be flame retardant, washable, and dry cleanable.
K. Fabric railroading 1. Vertical striped patterns are to be railroaded. All other patterns will be pattern matched and
sewn with vertical seams. L. Plaids
1. Cut plaid pattern materials utilizing a straight edge; thread pulling to mark cutting line is not an acceptable method.
M. Fabric 1. Select solid or patterned fabric from manufacturer’s selection.
N. Mesh (optional) 1. Mesh is not required when utilizing the 5000-ST suspension tubing system 2. Mesh Selection
a. 100% nylon mesh with ½” diameter holes. b. Mesh is to be opaque, washable, flame retardant and woven. c. Integrated Header and Selvage d. Minimum of 3.3 ounces per square yard
3. Acceptable Manufacturer: a. Fabtex Inc., (800) 778-2791 in accordance with specifications, drawings, and contract
documents. 4. Substitutions: Not Permitted 5. Provide all cubicle curtain mesh from a single source.

REV0717
CUBICLE TRACKING SPECIFICATIONS – 5000 SERIES
DIVISION 10190 Part 2 – Products (continued)
6. Construction a. Size: 20” (51cm) b. Top Integral Header: 1.75” (45mm) c. Bottom Integral Selvage: 0.5” (13mm)
7. Color (select one) a. Snow White, Earth, or Tusk
8. Attachment (mesh to fabric) a. Standard
i. Over lock attachment folded over and ¼” double needed stitched. b. Snap Attach
i. Mesh designed as one piece with nickel plated brass snaps located along the bottom edge, spaced top match snaps on fabric panel(s)
ii. Fabric
• Made as one piece with snaps along top edge spaced every 6” (152mm) on center.
• Made in 68” overlapping panels with snaps along top edge and double snaps on each leading panel edge.
c. Hook and Loop Attach i. Hook tape sewn long bottom edge of mesh and Loop tape sewn along top edge of
fabric O. Attachment Method (curtain to track)
1. Nickel-plated brass grommets, size #0, spaced every 6” (152mm) on center. a. Color: Silver
2. Hook and Loop tape sewn along the top edge of the mesh. Part 3 – Execution 3.1 Preparation
A. Coordinate details with other work supporting, adjoining, or otherwise contacting items as required to ensure proper installation.
B. Verify that surfaces and above ceiling supports/backing are installed by the general contractor and are ready to receive work.
3.2 Examination A. Examine construction to support, adjoin, or otherwise contact and verify that:
1. Dimensions are correct. 2. Backing is available and installed where required. 3. Exposed finishes have been applied, and setting conditions are dry, clean, and otherwise
proper for installation. B. Do not install items until unsatisfactory conditions have been corrected.
3.3 Installation A. Install track in accordance with approved Fabtex, Inc. recommendations and reviewed Shop
Drawings. B. Typical Fastenings: Use machine screws or bolts to metal backing. C. Drill and tap mounting surfaces for mounting hardware as required. D. Install track in one piece when less than 14 feet (6.1m) long and with no more than one splice for
each additional 14 feet (6.1m). E. Form corner bends with 12 inch (308mm) radius. F. Butt Joints
1. Secure with splices.

REV0717
CUBICLE TRACKING SPECIFICATIONS – 5000 SERIES
DIVISION 10190 Part 3 – Execution (continued)
G. Carriers 1. Furnish one carrier per every 4 inches (102mm) of track plus 10 percent extra for each track
length. H. End Stops
1. Provide at both ends with removable pull-out at one end of each track length. I. Furnish tag designating proper size curtain at curtain stacking end of runs.
3.4 Cleaning A. At completion of installation, remove any debris and clean surfaces in accordance with the Fabtex,
Inc. clean-up and maintenance instructions.