5 Mar 2018 World’s best prices on eBikes red wire connects to the "+" pin, the black to the "-"...
93
World’s best prices on eBikes www.leitner.com.au Dear Valued Customer, Congratulations on owning your new Leitner electric bicycle! Up to now electric bikes have been far too expensive for everyday use, except for some hobby enthusiasts – the Leitner electric bike range has changed that. Now everyone can ride an eBike, no license or registration required. The Leitner eBike makes transportation on an electric bike fun, cheap and easy. Like us on Facebook for exclusive specials, newest products, and big giveaways! www.facebook.com/LeitnerDirect For early access to specials subscribe to our newsletter at www.leitner.com.au Leitner is one of Australia’s fastest growing electric bike brands, investing large amounts of time and resources into service and continual improvement and therefore we highly value Your feedback. Please contact us with any feedback. Review us on www.productreview.com.au Leitner is 100% Australian owned. Thanks for shopping with Leitner! Kind Regards, Ephraem Leitner and the Leitner team ------------------------------------------------------------------------------- Leitner Pty Ltd ABN 40608178310 ph: 1300 856 725 email: [email protected] IMPORTANT NOTICE Read manual, Instructions and Terms carefully before use. It is the buyer’s responsibility to make sure the electric bicycle is safe to ride. If necessary ask for help at any good local bicycle store. Please keep the invoice. By purchasing and using a product from Leitner, the customer accepts the terms and conditions and warranty published at www.leitner.com.au including www.leitner.com.au/terms-and-conditions/ and www.leitner.com.au/warranty. It is the customers' responsibility to service and maintain the products regularly and to make sure that the product is safe to use before each ride. Contact customer support at [email protected] or 1300 856 725 for any questions and in case repairs are needed. Leitner does not accept claims for repairs which were performed without our approval. Leitner does not assume any product liability to the extent permitted by the law. 27 Mar 2018
-
Upload
truongtram -
Category
Documents
-
view
215 -
download
2
Transcript of 5 Mar 2018 World’s best prices on eBikes red wire connects to the "+" pin, the black to the "-"...

World’s best prices on eBikes
www.leitner.com.au
Dear Valued Customer,
Congratulations on owning your new Leitner electric bicycle! Up to now electric bikes have been far too expensive for everyday use, except for some hobby enthusiasts – the Leitner electric bike
range has changed that. Now everyone can ride an eBike, no license or registration required. The Leitner eBike makes transportation on an electric bike fun, cheap and easy.
Like us on Facebook for exclusive specials, newest products, and big
giveaways! www.facebook.com/LeitnerDirect
For early access to specials subscribe to our newsletter at www.leitner.com.au
Leitner is one of Australia’s fastest growing electric bike brands, investing large amounts of time and resources into service and continual improvement and therefore we highly value Your
feedback. Please contact us with any feedback.
Review us on www.productreview.com.au
Leitner is 100% Australian owned.
Thanks for shopping with Leitner!
Kind Regards,
Ephraem Leitner and the Leitner team -------------------------------------------------------------------------------
Leitner Pty Ltd ABN 40608178310 ph: 1300 856 725 email: [email protected]
IMPORTANT NOTICE Read manual, Instructions and Terms carefully before use. It is the buyer’s responsibility to make sure the electric bicycle is safe to ride. If necessary ask for help at any good local bicycle store. Please keep the invoice. By purchasing and using a product from Leitner, the customer accepts the terms and conditions and warranty published at www.leitner.com.au includingwww.leitner.com.au/terms-and-conditions/ and www.leitner.com.au/warranty. It is the customers' responsibility to service and maintain the products regularly and to make sure that the product is safe to use before each ride. Contact customer support at [email protected] or 1300 856 725 for any questions and in case repairs are needed. Leitner does not accept claims for repairs which were performed without our approval. Leitner does not assume any product liability to the extent permitted by the law.
27 Mar 2018

© Leitner 2016
Battery Care & Storage Charge battery after every ride. It is not necessary to fully discharge battery before charging. Lithium batteries do not have any memory effect, so you can charge them at any time. Lithium batteries must not be stored if fully discharged. If your battery is fully discharged, charge it as soon as possible. Storing the battery if fully discharged for long periods will damage the battery. It is recommend to store the batteries fully charged and then charge it at least every two months. It is not necessary to leave the charger connected to the battery if stored for long periods. Just top the charge up every two months. If batteries are not charged at least every two months, the battery may be damaged and such damage is unfortunately not covered under manufacturer's fault warranty.

Safety WarningsRiding a bike can result in serious injury or death. It is important to read the manual carefully, wear safety equipment, including a helmet and always ride carefully.It is important that you check all nuts, screws, and spokes are tight before each ride and to make sure that the tyres are inflated and that all brakes work. If you are not confident about doing this yourself, make sure you get someone competent to do it for you. We do not always tighten parts before we send the bicycle to you. It is your responsibility to make sure that the bike is safe to ride before each ride. Please read the safety warnings in the printed manufacturer manual. Do not ride the bike in the rain and store undercover. Make sure the bike stand is always retracted before riding and clear of obstacles. Do not sit on bike and put weight on stand. Only ride on flat surfaces. Do not ride down curbs or similar obstacles. Hitting the stand against obstacles while riding may cause damage to frame and such damage is not covered by warranty against manufacturer's fault. Minimum recommended rider age 18 years. It is the users responsibility to comply with local road rules.
Switch off pedal assist when you are riding in tight situations, e.g. turns, because pedal assist can turn on suddenly and momentarily accelerate the bike, taking you by surprise. The PAS (Pedal Activation System) is designed for safety so the motor does not get power until the pedals are turned. However if the throttle is turned on by pressing the red button in on the right side of the handle bar, then the bike will move immediately when the throttle is twisted. So to avoid accidentally twisting the throttle we recommend you turn off the key immediately when you park the bike before you dismount. Protection against rust: Bikes must not be in contact with sea water. Living close to the sea increases risk of corrosion and it is recommended to treat parts like spokes and forks with commercial rust protector available from hardware stores. Do not apply any lubricants to brake parts as it will reduce brake performance.Assembly instructions
If you need any support please contact us on 1300 856 725 or [email protected] Please also refer to the detailed assembly guide with pictures below.
We believe eBikes make the world a better place and we believe they should be affordable for
everyone. Shipping them directly from our warehouse to you makes it possible for us to offer
them at the lowest prices, not like brick and mortar eBike stores which sell similar models for
twice the price. Smaller packaging means a lower shipping cost, that is why some parts of
Leitner eBikes need assembly. Please use the following instructions and the provided manual
and multi-tool to help you assemble the eBike. There may be slight variations between the
different models. If you need help contact us or have the eBike assembled at any good local
bicycle store.
It is recommended to remove the bike from the box on a rug so the bike will not get scratched.
Lay the box down and drag the bike out horizontally. The current packaging consists of the seat, a cardboard box (with manual, charger, and parts) and the eBike. Carefully remove the
protective packaging from the bike. The handle bar is attached to the frame by the brake, gear, and electrical cables.
The following parts need assembly:
1)Front mudguard & headlight2)Front wheel
3)Handle bar 4)Rear rack 5)Pedals
6)Seat
1) Front mudguard & headlight. Remove the protector from the front fork where you willlater install the front wheel. The front fork is bent towards the bottom which should face forward. Install the headlight and the front mudguard with the same bolt on top of the fork.
Arrange headlight bracket on bolt first, then the mudguard, then tighten the bolt.
There are two bolts on the lower part of the fork, one on each side, to fix the support arms of the mudguard to the fork. The electrical connectors to the headlight are delicate.

the red wire connects to the "+" pin, the black to the "-" pin. The "+" and "-" symbols are small and you need to look carefully to identify them. If that does not work try reversing them. If youhave a small cable tie, secure the cable to the support bracket so it won’t get accidently snagged. You may also use duct tape to help keep the cables in position.
2) Install the front wheel. Check for loose spokes, also on the back wheel, and take thewheels to a bike mechanic if they need to be tightened. The quick release axle is usually tied to
the spokes. Remove the quick release axle. Remove the nut and one spring and insert the quick release axle through the hole in the center of the wheel. Sometimes there are small plastic parts
inside the whole and you need to push them out carefully. Keep a spring on each side of the wheel. The springs are there just to make gaps to make it easier to install the wheel in the forks. Screw the nut on the axle a little and then position the wheel between the forks. Position the
wheel so that the disc of the disc brake goes into the slot in the front brake caliper housing. Keep your eye aligned with the brake slot. If you can see a brake pad blocking the disc then use
an Allen Key on the tool to screw the pad back out of the way. Be patient, you can do it! Adjust the quick release axle nuts so you can clip it tight with the quick fit lever. NOTE: Brake pads may not be installed on your bike. Check that the brakes work when you have finished installing
the wheel(s). If the brakes do not work you must install the pads. The discs may make a noise when passing the brake pads. This is normal and will go away after a few weeks. You may fine-
tune the pad position by correcting the inner and outer brake pads using an allen key. Make sure the brake pads allow the wheel to turn freely.
3)Install the handle bar in the jaw of the stem. Keep your eye out for a small part that will beloose when you open the jaw. Insert the handle bar and align it in the center. Make sure thecables from the handle bar are not tangled up and the steering can be turned to the full extent. Double check every single bolt and screw is tight on the handlebar so nothing can happen when you are riding. Don’t over tighten the bolts as it may damage the ball bearings.
4)Rear Rack: The Rear rack has two support arms to fix onto the frame behind the battery.Loosen the nuts of the support arms, one on each side, pull the support arms out and fix them
to the bike frame with the nuts and bolts which sit there already. Make sure the rack sits tight before use.
5)Pedals: Have a look at the pedals’ threads, there should be a “L” for left and an “R” for right pedal. Lubricate the threads with appropriate bike lube and screw them into the crank. The “L”
pedal screws in the opposite direction of normal threads.
6)Seat: insert the seat into the seat bar, make sure it’s inserted to at least the minimum length and that it is tight. Adjust the quick fit mechanimsm by turning the bolt until it’s tight.
Functions of turning the key on the battery: All the way clockwise: ON. Turn it back anti-clockwise: OFF. Turn it back again anti-clockwise and push in: Battery can be removed. The battery charging socket is on the opposite side of the battery. The socket protector can be flipped sideways to expose socket.
What if the Pedalling Assistance mode doesn’t work? The pedalling sensor may not be set up correctly: When using Pedalling Assistance mode, it will use the disc that is about 6 cm in diameter on the right pedal side of the pedals-axle at the bottom of the bike's frame. That disc has several little magnets in it. When the pedals are turned the magnets go past a little sensor which is hanging from the frame under the pedals-axle. The sensor tells the controller (under the battery) how fast you are turning the pedals. The tip of the sensor has to be about 1 mmfrom the disk. Make sure it is that close by either sliding the disk along the pedals-axle (or bending the sensor bracket towards the disk). The bike [pedal assist] will not go if the sensor is not close enough to the disc!
Folding bikes Before riding a folding bike make sure the frame and handle bar quick folding
mechanism is closed tightly and it is safe to ride the bike. If the frame makes squeaking noises during riding tighten the nut of the frame quick folding mechanism. How to fold the bike frame:
open quick fix lever, turn bolt to the left then push bolt up. It may be necessary to jiggle the bolt while pushing up for the first few times. To close the frame complete the steps in reverse order.
Tyre pressure Please check the recommendation on the tyres and inflate accordingly. The current model’s pressure recommendation is between 40 and 65 psi. We recommend 50.
Adjusting the derailleur Refer to the manual for details. In many cases turning the barrel
adjuster corrects shifting issues. Please also check out the video link in the addon.
How to reduce vibration Tighten the screw on the rear light with a Philips screw driver.
Turning the pedals makes noise The chainguard may rub on the chain. Observe where the
rubbing occurs. If it’s the chainguard try to increase the distance of the chainguard from the chain by bending the metal clip which holds the chainguard.
Fuse specifications (Fuse is located on battery next to lock) Please check engraving on fuse to confirm.
Finally, perform a safety check on the tightness of all nuts, bolts, spokes, and screws. Ask your local bicycle shop for a chain lubricant.
Enjoy your eBike!
Kind Regards,
Ephraem Leitner and the Leitner team -------------------------------------------------------------------------------
Leitner Pty Ltd ABN 40608178310ph: 1300 856 725 email: [email protected]

Terms and Conditions
Please refer to our website www.leitner.com.au for Terms and Conditions including Warranty http://www.leitner.com.au/terms-and-conditions/
http://www.leitner.com.au/warranty/

World’s best prices on eBikes
Manual add-on:
Assembly instructions with pictures Dear Customer,
Please find below an add-on to the assembly instructions with pictures.
It provides additional information about:
- Installation of front wheel, front mudguard, headlights and handlestem
- Adjustment of disc-brakes
- Installation of pedals
- Functions of the battery
- How to fold the seat for battery removal
- How to use the controls (throttle and pedal assist mode)
- How to fold the frame (folding models only)
- Removing and re-installing the rear wheel
- Tuning the rear derailleur of shimano gears (youtube video link)
If you need any help please don’t hesitate to call us on 1300 856 725 or email
Important Notice: It is the buyers responsibility to make sure the electric bicycle is safe to ride.
If necessary also ask for help at any good local bicycle store.
© Leitner 2016v28Jul2015.com.au

© Leitner 2016
Before you start:
Check the bike for damage or missing parts
• Please note that eBikes are fragile items. Although we are
using first class courier services and the bikes are
professionally packed it may happen that they get damaged
during transit. Please check the bike for damage upon arrival
and let us know immediately. We will then work with you on a
solution.
• If there are any missing parts please also let us know
immediately and we will send a replacement part as soon as
possible.

Saddle
Box with Charger
and Parts
Contents
© Leitner 2016
eBike

Remove black protective bar
From front fork
© Leitner 2016
Installation of front wheel, headlights
and front mudguard
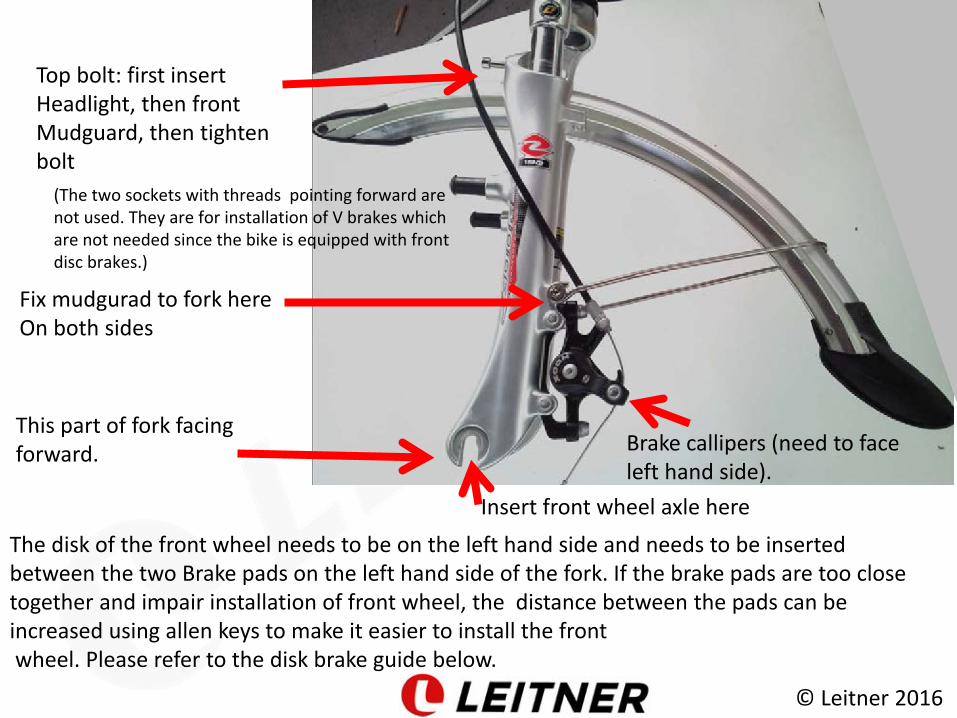
Insert front wheel axle here
This part of fork facing forward.
Fix mudgurad to fork here On both sides
Top bolt: first insert Headlight, then front Mudguard, then tighten bolt
The disk of the front wheel needs to be on the left hand side and needs to be inserted between the two Brake pads on the left hand side of the fork. If the brake pads are too close together and impair installation of front wheel, the distance between the pads can be increased using allen keys to make it easier to install the front wheel. Please refer to the disk brake guide below.
© Leitner 2016
Brake callipers (need to face left hand side).
(The two sockets with threads pointing forward are not used. They are for installation of V brakes which are not needed since the bike is equipped with front disc brakes.)

Pull out black protector of threads from front wheel .Please note there may plastic residues inside the axle hole. You may have to push
the Residues out carefully when inserting the axle.
© Leitner 2016

Nut, spring spring, quick release
One side of
the front wheel Other side of the front wheel
© Leitner 2016

Prepare the quick release axle for installation of front wheel. Remove the spring and the nut.
© Leitner 2016

nx
Carefully place front wheel threads into fork. make sure the disc goes between the two break
Pads of the disc brake. Refer to disc brake section for further help.
Disc
Disc brake pads
© Leitner

Insert axle. Sometimes there may be plastic residues inside the axle hole which need
To be pushed out with the axle. Don’t use extreme force.
© Leitner 2016

Insert axle until it’s visible from the other side
Insert one spring onto axle threads on this side and fasten nut until the wheel is
securely tightened when you close the quick fit lever on the other side.
© Leitner 2016
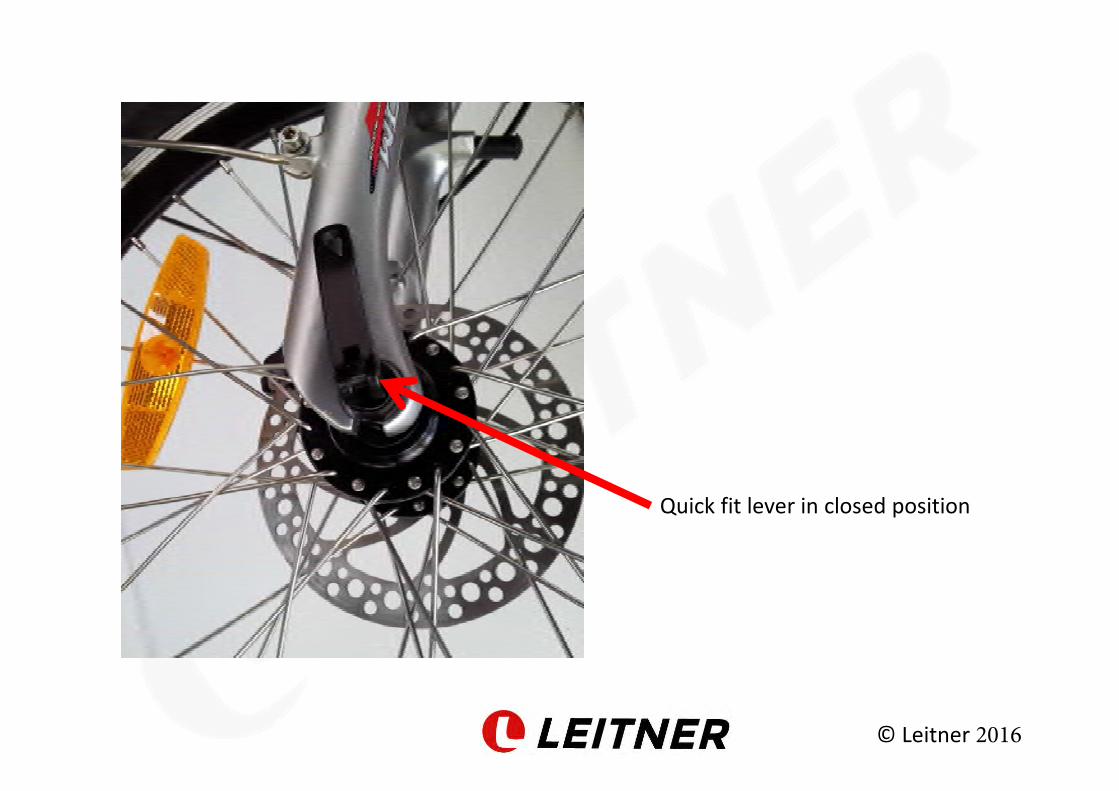
Quick fit lever in closed position
© Leitner 2016

© Leitner 2016
Connecting the front light:Model HL 1900
Connect red wire at the “+” pole
Connect black wire at the “-” pole Mount the light using the bolt and mudguard at the front fork as shown above. (models Libelle, Tirol, Berlin, Venice )
Installation of pedals
Attention! Read this guide before installing the pedals! Don’t use force when inserting the pedals into the threads! The threads on the crank arms will be damaged (stripped) if the pedals are installed incorrectly (using force) and replacement parts need to be purchased at the cost of the customer if that occurs.
© Leitner 2016

© Leitner 2016
• Step 1: Look closelyto identify the leftand right pedal.They have differentthreads! It can be abit tricky to see the“L” or the “R”, butit’s very importantto pick the correctpedal.
• “L “ for Left pedal
• “R” for right pedal

© Leitner 2016
• Step 2: Lubricatethe thread of thepedals withlubricant (availablefrom bike shops)

© Leitner 2016
• Step 3: Carefully position the pedal at a 90 degree angle (straight) to thecrank arm. Use your hands. Don’t use a tool. Don’t use force!The left pedal needs to be turned anti-clockwise into the crank arm on theLEFT side of the bike ,The right pedal needs to be turned clock-wise into the crank arm on the
RIGHT side of the bike
The pedal will screw in without resistance if it’s placed correctly into the thread. If you feel resistance, don’t continue! Un-screw the pedal and start again.
90 Degrees (straight)

© Leitner 2016
Step 4: Use your hands to screw the pedal all the way in, so that the thread is not visible anymore. Once it’s all the way in, use a spanner (red arrow) and tighten the pedal up very firmly so that it won’t come off while riding. Remember : clock-wise for the right pedal and anti-clockwise for the left pedal. It is necessary to check that the pedalsare tight regularly as they may loosen up over time.

Crank arms
© Leitner 2015
Check the allen bolt at the centre of both crank arms, left and right hand side. (right arm shown in picture). If the arms are loose, tighten the bolt with a large allen key (key not supplied). Don’t overtighten. It is necessary to check the crank arms regularly as they may get loose over time.

© Leitner 2016
The hinge at the base of the handle stem of the Libelle and Tirol is at 45 degree angle. This makes it possible to fold the stem down nicely on the side of the bike.
Handle stem hinge on Libelle and Tirol

© Leitner 2016
Handle Stem for Tirol and Libelle Folding bikes The base of the handle stem of the folding bikes Tirol and Libelle is at an angle (red lines) of about 45 degrees. This is normal. It makes it possible to fold the handle-stem towards the side of the bike (see next page).

© Leitner 2016
Open the quick-release of the folding handle-stem and fold the handlebars to the side of the bike. Make sure that the bolt (red arrow) in the centre of the handle-stem is tight, and that the bike is safe to ride, however don’t over-tighten it.
Magnification of handle-stem base when folded.
© Leitner 2016
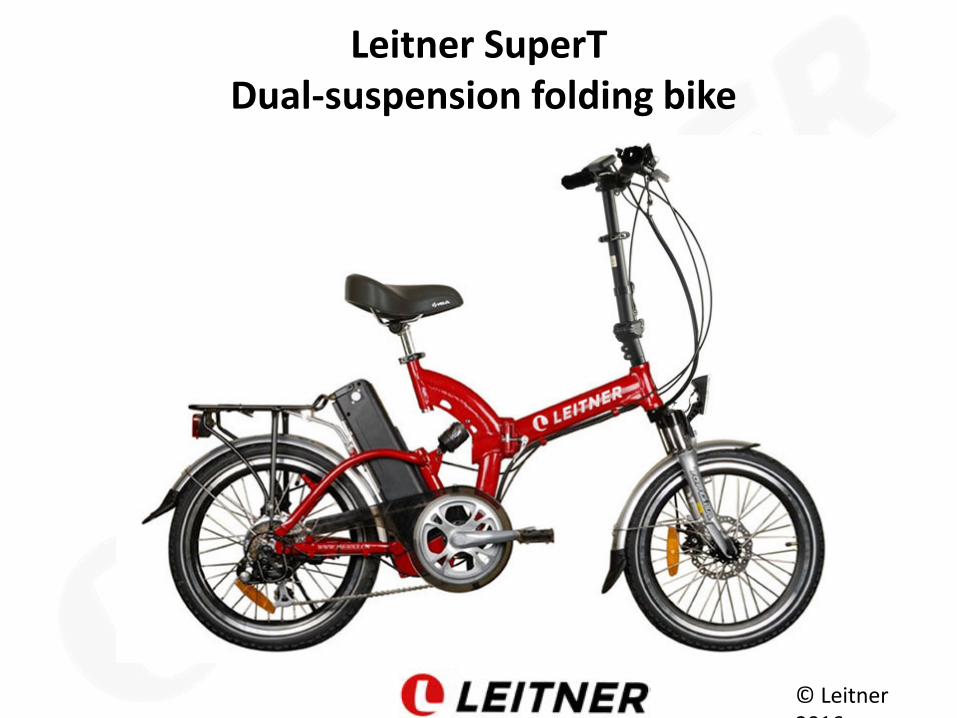
Leitner SuperT Dual-suspension folding bike

© Leitner 2016
Before riding the SuperT make sure that there is sufficient room between the seat pole (P) and the centre suspension (S). The seat pole MUST NOT TOUCH the centre suspension. A distance of at least 5mm is recommended. If the seat pole is lowered too much it may touch the suspension. Raise it and make sure that it won’t touch the suspension when riding.
Leitner SuperT Distance of seat pole from centre suspension
MUST NOT TOUCH!
S
P

© Leitner 2016
Leitner SuperT Foldable Handle-Stem
Before riding the SuperT make sure that the handle-stem is installed properly and that It’s safe for riding. The quick-release must be closed and hold the handle-stem hinge in place safely. The loop of the quick release must be secured by the black round clip and held in place in an upright-position. First, close the quick-release, move the loop into an upright position, then turn the black round clip and use it to secure the loop.
Black round clip
Loop of quick-release

© Leitner 2016
Zoom Handle-stem on Cruisers Models

© Leitner 2016
Attention! Make sure the handle stem & handle bar are installed safely before riding the bike. If unsure feel free to contact us or ask for help at a local bicycle store.

• T
© Leitner 2016
Insert the handle-stem into the frame. Tighten the bolt (red arrow) securely with the large hex key. Don’t over tighten.
Top-view, tighten the bolt (red arrow)

• T
© Leitner 2016
To change the position of the handle-bar, first loosen the bolts (redarrows) on the top (left picture). To change the position of the handle-STEM loosen the bolt on the bottom (right picture) with an allen key.
Top-view Bottom-view

© Leitner 2016
Once the handle-stem and handle-bar are in the desired position, tighten up all bolts.
Put the front wheel between your knees and test if the handle-stem moves when turning the handlebar. It should not move easily and it needs to be stable when riding the bike. It is ok for the handle-bar to move when you are using force.
Don’t over tighten.

Important information about disc brakes
Disc brakes are considered to perform better than standard v-brakes, especially in wet conditions. Please note that brand new disc brakes need “braking in”. This means it may take a few weeks until they perform optimally. Ride your bike very carefully and allow plenty of time for braking. Please find below a guide on how to adjust the disc-brakes. You may have to re-adjust them several times during the brake-in period. Brakes need to be re-adjusted regularly, also after the brake-in period. This is normal as brake pads will wear down. Before each ride, make sure that both front and rear brakes work well and follow the guide below to maintain the brakes. If you need any help, please contact us on 1300 856 725 or ask your local bike shop for help. It is your responsibility to make sure the brakes are maintained correctly before each ride and that the bike is safe to use.
© Leitner

Adjusting the disk brakes
• Simply put, a disc brake consists of a disc which is between
two brake pads (inner and outer brake pad). See picture
below.
• Pushing the brake lever will push the outer pad against the
disk and the inner pad. The friction will cause the bike to slow
down.
• The pads need to be adjusted to be as close to the disc as
possible without rubbing much. Slight rubbing is normal
initially and will get better after the break-in phase.
© Leitner 2016

disk
I: Inner brake pad
O: Outer brake pad
Frontal view of disk brake
The distance between the brake
pads and the disk should be as small
as possible without causing rubbing
of the pads against the disk.
The tiny gap can be best seen
against white background
Red box: see magnification on next
page
I O
© Leitner 2016

I O
I: Inner brake pad
O: Outer brake pad
Red arrows: point at tiny gap between pads
and disk
Disk: blue arrow
Adjust to make the gap as small as possible without
rubbing
Magnification
© Leitner 2016
To check if the brakes are rubbing lift the wheel, spin it and
listen for rubbing sound. Brake pads can be moved very
close to the disc for best performance. This may cause
slight rubbing which is normal. If there is a lot of rubbing
and the wheel is slowed down without braking, increase
the brake pad distance.

Brake cable
3) Turn here to fine tune cable tension
2) Loosen this allen bolt, adjust cable
tension, then tighten bolt. The more
tension on the cable, the smaller the
distance between the brake pad and
the disc.
How to adjust the outer brake pads
© Leitner 2016
1) Before adjusting the brakes, push
and release the brake lever 10 times.
This tightens the brake cables. They
may loosen up again in time and you
may have to repeat this step.
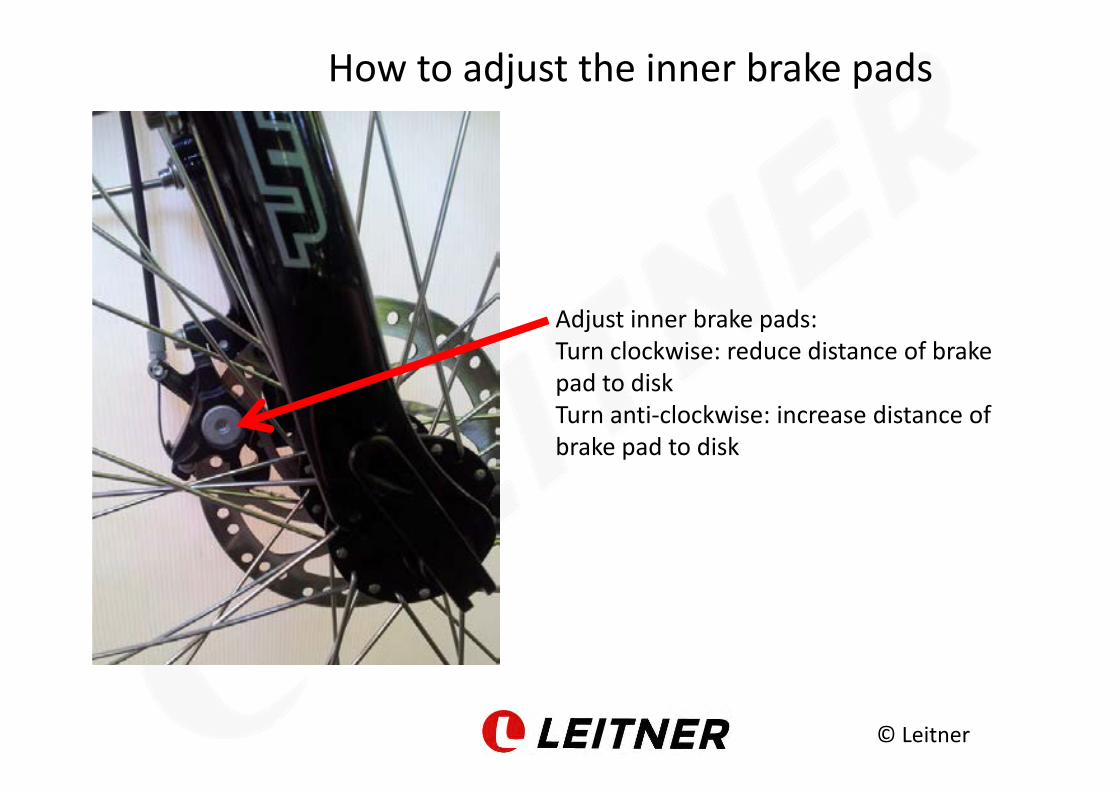
Adjust inner brake pads:
Turn clockwise: reduce distance of brake
pad to disk
Turn anti-clockwise: increase distance of
brake pad to disk
© Leitner
How to adjust the inner brake pads

© Leitner 2016
Before you turn the keys: Align Battery correctly
The round metal bolt (black arrow) of the battery lock needs to be aligned correctly with the opening in the silver metal bar. Push the battery down or lift the battery up to align the bolt with the opening. If it’s not aligned correctly, the bolt will hit the silver metal bar and you can’t turn the key and the bolt won’t come through the hole.

1) Off, battery can beremoved (push key in when turning towards 2)2) Off, battery locked intoframe (push in when turning to "1")3) ON, battery locked intoframe
Attention. PUSH THE KEY INTO THE LOCK GENTLY when turning between positions 1 and 2! When turning between 2) and 3) DON't push the key into the lock, just turn normally.
Functions of battery & lock (insert key and turn)
© Leitner 2016
Attention! Always handle the battery lock with care. Never use force! Battery needs to be in the "ON" position when pushing the white button on top to check battery charge (2 green lights, full, 1 green light, battery discharging, red light only: charge battery soon).
1)2)3)

Aluminium rail which holds battery
© Leitner 2016
The silver aluminium rail which holds the battery is attached to the frame with a screw. Use a Phillips screw driver to tighten the screw. The battery should be inserted along the aluminium rail with care. Don’t use force. Don’t bend the aluminium rail.
Charging the battery
© Leitner 2016
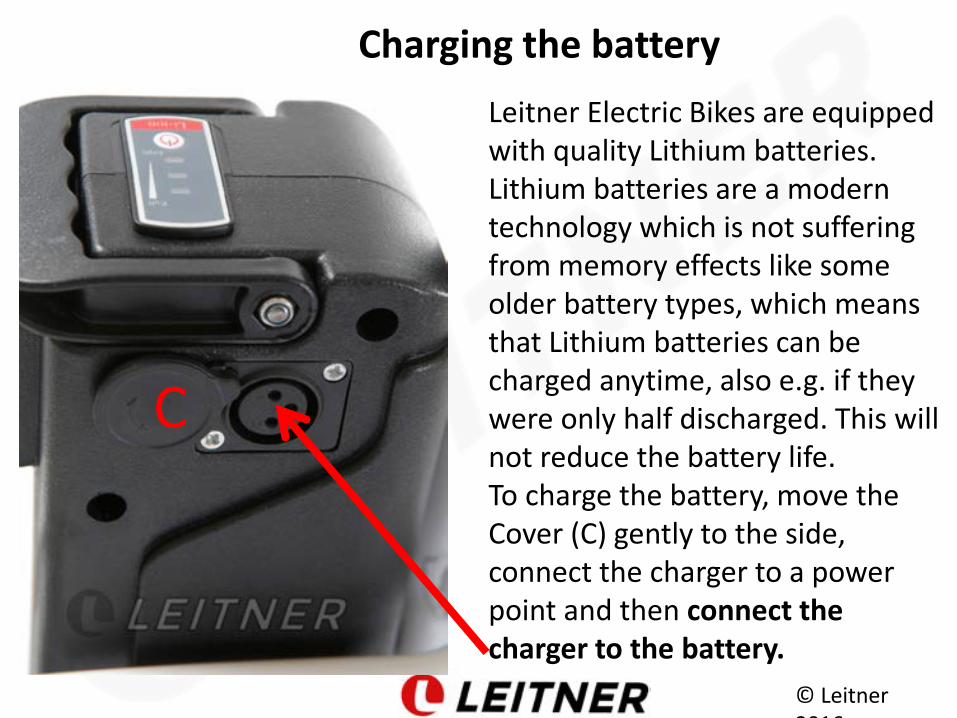
Leitner Electric Bikes are equipped with quality Lithium batteries. Lithium batteries are a modern technology which is not suffering from memory effects like some older battery types, which means that Lithium batteries can be charged anytime, also e.g. if they were only half discharged. This will not reduce the battery life. To charge the battery, move the Cover (C) gently to the side, connect the charger to a power point and then connect the charger to the battery.
C
Charging the battery
© Leitner 2016
The chargers are smart chargers, which means they will automatically stop charging when the battery is full. There are two charger types. Charger Type A) Has ONE LIGHT on the charger. If it’s RED, it means it’s charging the battery. If it’s GREEN, it means the battery is fully charged. Charger Type B) Has TWO LIGHTS on the charger. If BOTH LIGHTS are RED, it means it’s charging the battery. If ONE LIGHT is GREEN and ONE LIGHT is RED, it means the battery is fully charged. ATTENTION: the charger can get very hot while charging. Always keep it away from material which can catch fire.

Charging the battery
© Leitner 2016
The battery takes about 5 hours to charge if It’s completely discharged. If it’s not fully discharged it will take less time to charge. It is recommended to switch the battery OFF while charging.
© Leitner 2016
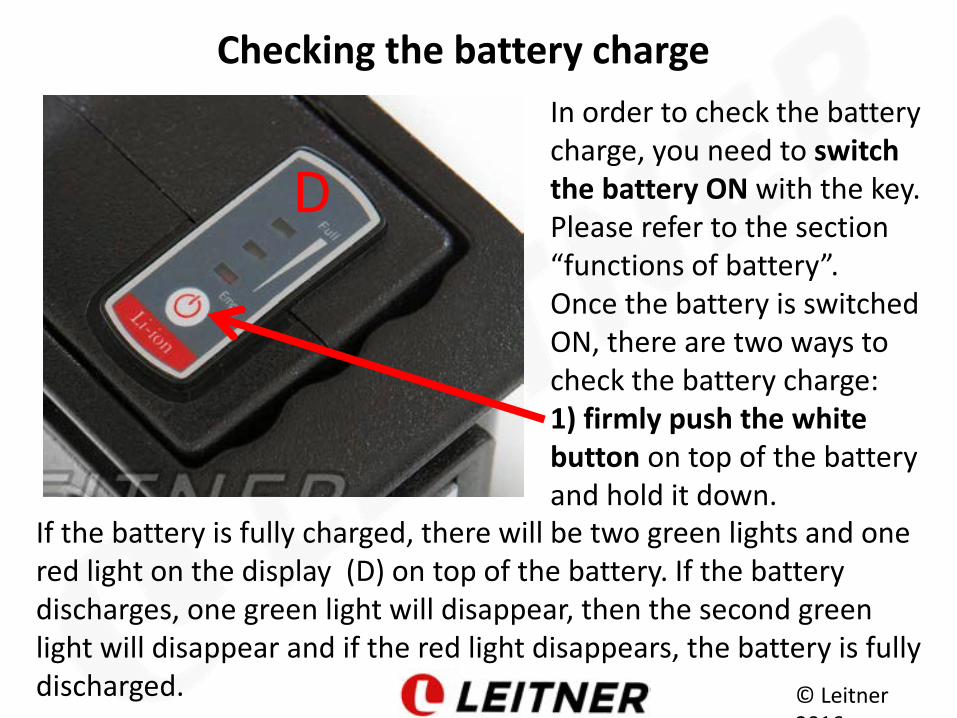
Checking the battery charge In order to check the battery charge, you need to switch the battery ON with the key. Please refer to the section “functions of battery”. Once the battery is switched ON, there are two ways to check the battery charge: 1) firmly push the whitebutton on top of the battery and hold it down.
If the battery is fully charged, there will be two green lights and one red light on the display (D) on top of the battery. If the battery discharges, one green light will disappear, then the second green light will disappear and if the red light disappears, the battery is fully discharged.
D

© Leitner 2016
Voltage Display
2) The battery Voltage is displayed on the on the left hand side of the handle bar.
There are 4 red lights ranging from L (low) to H (high, refer to arrow)The more red lights are lit, the higher the voltage. Please note the voltage may drop when bike is being ridden and the voltage may be lower as the battery is discharging. Voltage may not drop in a linear fashion and it is only an estimate of remaining battery charge. To check battery charge, please refer to previous page.
D

© Leitner 2016
Battery Care & Storage Charge battery after every ride. It is not necessary to fully discharge battery before charging. Lithium batteries do not have any memory effect, so you can charge them at any time. Lithium batteries must not be stored if fully discharged. If your battery is fully discharged, charge it as soon as possible. Storing the battery if fully discharged for long periods will damage the battery. It is recommend to store the batteries fully charged and then charge it at least every two months. It is not necessary to leave the charger connected to the battery if stored for long periods. Just top the charge up every two months. If batteries are not charged at least every two months, the battery may be damaged and such damage is unfortunately not covered under manufacturer's fault warranty.

© Leitner 2016
How to use the controls
The motor of the bike can be activated with the controls of the bike.
The throttle is located at the right hand side of the handlebar. Twisting the
throttle accelerates the bike. The current models’ top speed using the throttle
is 6km/h (walking speed). The throttle only provides a small "push" at take-off. To achieve higher speeds, please use the Pedal Assist Mode and RELEASE THE THROTTLE. The throttle overrides the PAS, which means if you keep the throttle twisted all the way down, the bike won't go faster than 6km/h. The throttle can be upgraded to go 25km/h whithout pedalling (off-road use only). Please refer to the end of this manual for instructions around page 80.
The Pedal Assist Mode controls are located at the left hand side of the handle bar.
It will activate the motor when you are pedalling. The current models’ top speed
using pedal assist mode is 25 km/h.
In order to use the bike as a push bike, push the “-” button until there won’t be
any lights on the Pedal Assist Display.
Please find more details on the following pages
Attention! When going around corners it is recommended NOT to use the electric motor as it may cause you to fall due to the sudden acceleration . It is recommended NOT to use the throttle and NOT to pedal if the pedal assist mode (PAS) is on, when going around corners.

© Leitner 2016
Battery Voltage Display L:Low H:High
Battery Voltage varies during a ride, e.g. it is lower uphill. It can be used to read the battery
charge on flat terrain using pedal assist mode. An easy way to check the battery charge is
to push the button on top of the battery (The key must be in the "ON" position). 2
green lights: full. 1 green light: medium charge. red light: low charge: connect battery to
charger.
Pedal Assistance display
One light: low motor assistance
Two lights: medium motor assistance
Three lights: high motor assistance
No lights: no motor assistance (push bike mode)
Push “+” and “-” buttons to change level of motor assistance
A
“A” head and rear-lights
ON/OFF button
Left hand: Pedal Assist control and voltage display

© Leitner 2016
Twist and go throttle
Twist down to accelerate
Release to stop acceleration
Throttle ON/OFF button
Right hand: throttle

How to fold up the seat for battery removal
(different seat model shown) (SuperT does NOT have folding sesat.)
Push up quick release…
© Leitner 2016

… Fold seat up
© Leitner 2016
Note: The battery on the SuperT folding bike can be removed by opening the seat quick-release and twisting the seat. There is no folding seat post on the SuperT model.

• The seat can be lowered by changing the wayit’s attached to the seat post and also bycutting the seat tube (frame).Only lower the seat if you are comfortablewith these instructions and always make surethat the seat is mounted safely in order toavoid injury. If necessary ask for help at a localbike shop.
© Leitner 2016
Lowering the seat

© Leitner 2016
Lowering the seat attachment
Tools needed: wrench (1/2 imperial or adjustable wrench) Loosen the nuts (one on each side) with a wrench
Nut

• Carefullyremove one nutand remove thebolt slowly torelease thebrackets. Thereare twobrackets oneach side of theseat. The seatcan now betaken off theseat post.
© Leitner 2016
Brackets
© Leitner 2016
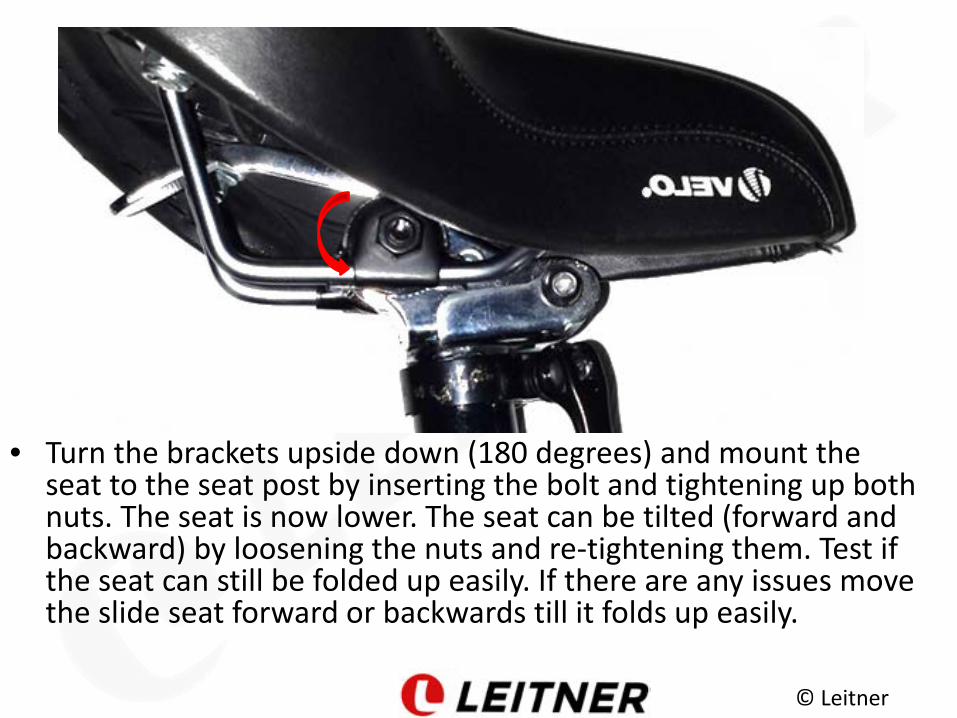
• Turn the brackets upside down (180 degrees) and mount theseat to the seat post by inserting the bolt and tightening up bothnuts. The seat is now lower. The seat can be tilted (forward andbackward) by loosening the nuts and re-tightening them. Test ifthe seat can still be folded up easily. If there are any issues movethe slide seat forward or backwards till it folds up easily.
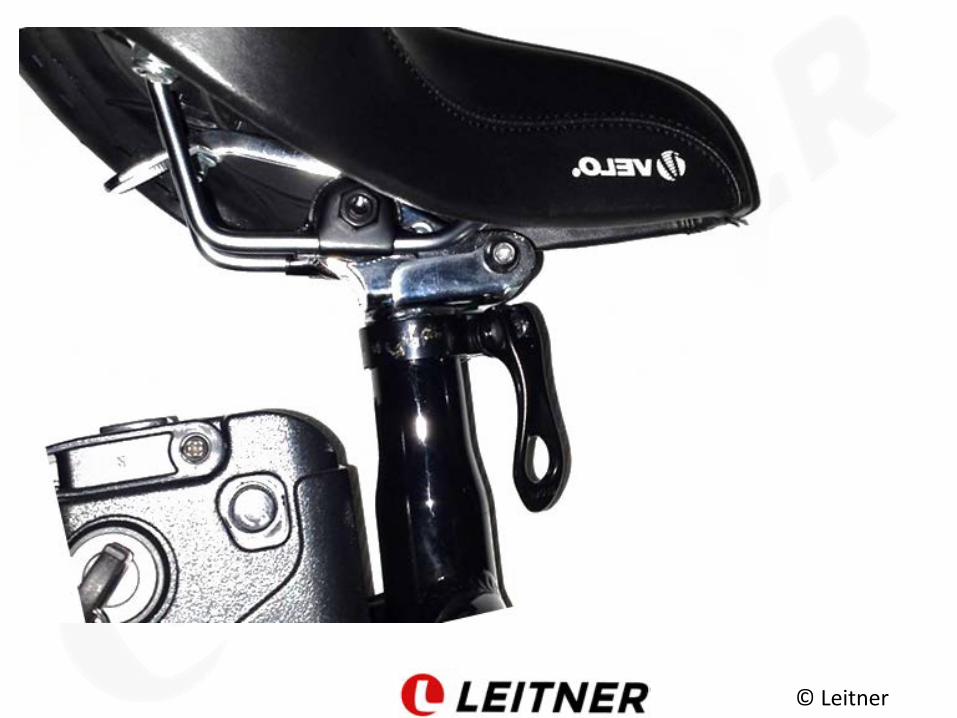
© Leitner

The seat tube (red) can be cut by about 2 cm to lower the seat, using e.g. a hacksaw to cut the aluminium alloy. Remove the black quick release ring before cutting. It is recommended not to cut off more than 2cm as the seat tube will lose flexibility and it may not be possible to tighten the black quick release ring in order to keep the seat in position when the seat is raised. Use a file to soften any sharp edges to avoid injury. Use a bit of lubricant to protect the fresh cut from corrosion.
© Leitner 2016
Cutting the seat tube
2 cm
Cut here
Please note that any damage caused by cutting the seat tube is not covered by the warranty of the frame.

© Leitner 2016
Installing the rear rack
Install the rear rack as shown in the picture above. You may have to loosen the nut (or allen bolt), red arrow, to move the support arms. Make sure the rack is stable and safe before using it.

Folding the frame (folding models only)
© Leitner 2016
Fold your eBike in seconds: 1) open the quick-release. 2) turn left. 3) push up and
wiggle until you hear the “click”. Fold the frame.

Fold the frame and fold the handlebar. Folding bikes fit into most car boots. The handle-stem folds towards the RIGHT side of the bike.
© Leitner 2016

© Leitner 2016
Tuning of the gears (rear derailleur)
If the gears don’t switch smoothly, they need adjustment. It is recommended to lubricate the chain to insure optimal performance. The gears can be adjusted in most cases by turning the barrel (red circle) by hand anti-clockwise in half turns until the gears switch smoothly. If that doesn’t help, it may be necessary to turn it clock wise. If that doesn’t help please refer to the detailed tuning video below.
Tuning of rear derailleur
Follow below link for an excellent youtube video about rear
derailleur adjustment
http://www.youtube.com/watch?v=wQncKmddahk
© Leitner
Servicing the bike and regular maintenance
Have the bike serviced by your local bike shop after assembling it to make sure it's safe to ride and tension and true all spokes before starting to ride the bike.It is necessary to service the bike regularly and have all parts including the spokes, brakes and gears adjusted regularly. The electric parts don't need to be serviced, therefore servicing can be done at a push-bike shop.

© Leitner 2016
If you need any help please don’t hesitate to call us on 1300 856 725
or email [email protected]
Enjoy your eBike ☺☺☺☺

w
© Leitner 2016
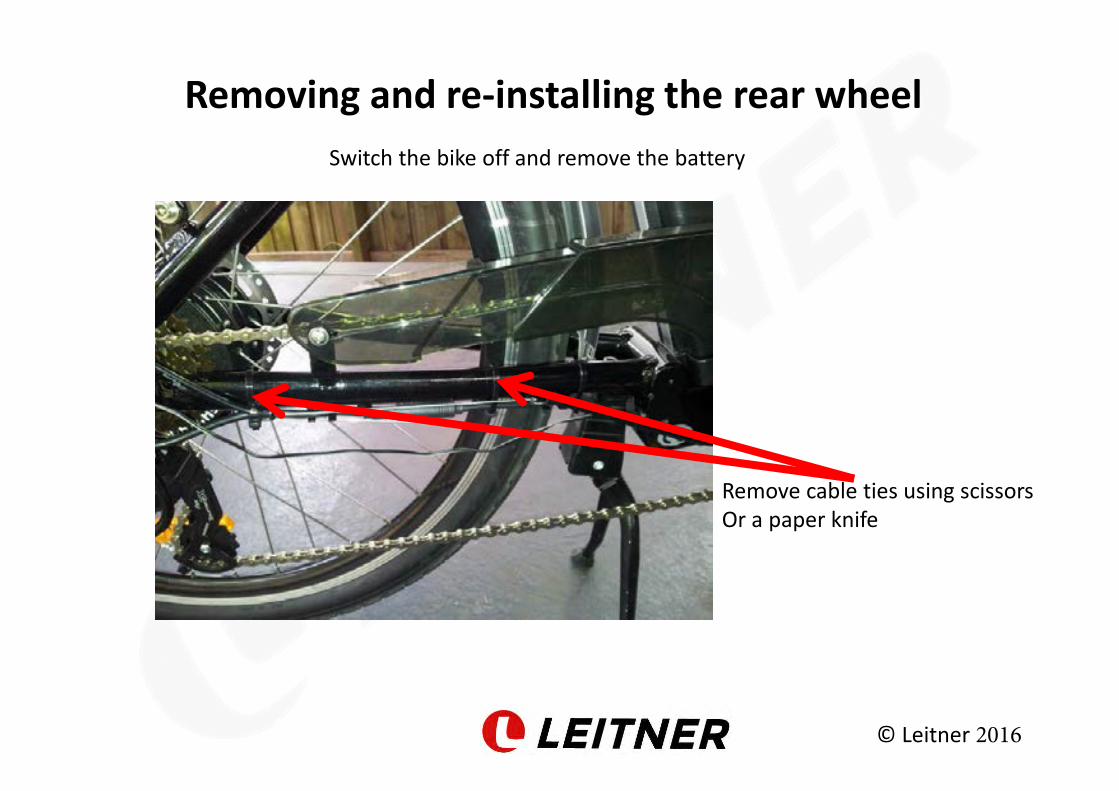
Removing and re-installing the rear wheel
Summary:
Removing the rear wheel
1)Switch the bike off and remove the battery
2)Remove cable ties and disconnect motor cable
3) Remove black caps on both side of axle and loosen bolts with wrench
Putting the rear wheel back on
1) Fit axle back into openings making sure that the tooth of the washer is at the
opening and making sure that the disc of the disc brakes is between the disc
brake calipers
2) Tighten up bolts until the rear wheel is securely fit and put black caps back on
3) re-connect the motor wire to the female connector, making sure both arrows
point at each other. Use cable ties to secure cable to frame
w
© Leitner 2016
Removing and re-installing the rear wheel
Remove cable ties using scissors
Or a paper knife
Switch the bike off and remove the battery

© Leitner 2016
1) Hold on to the male and female end
of the cable and pull them apart into the
direction of the red arrows. 2) The rear wheel motor cable is
now disconnected

© Leitner
Remove cable from the clip (push back,
Bring forward through the middle of the
clip)

© Leitner 2016
Loosen black cap and expose nut
If you can’t access the nut with a wrench remove the two screws holding
the rear mud-guard and derailleur protector.

© Leitner 2016
Use a wrench to loosen the nut (anti-clock wise).

© Leitner
Do the same on the other side: remove black cap, expose nut

© Leitner 2016
Use wrench and loosen
nut(anti-clockwise)

© Leitner 2016
The wheel can now be removed

© Leitner
When putting the wheel back, make sure the tooth of the metal washer is in the
opening where the wheel axle is inserted. This is true for both sides of the
wheel. Make sure the disc of the disc brake goes in between the brake callipers.
This view is from the bottom of the bike.
Opening for wheel
axle insertion

© Leitner 2016
Bottom-up view at the other nut. Note the tooth of the washer is in the opening for the axle.

© Leitner 2016
Tighten up both nuts until the wheel is safely installed, cover with black caps, re-install
the derailleur protector and reconnect the motor wire to the female end: both arrows
need to point to each other (see inside red box). Use cable-ties to secure the cable to
the frame. Cable ties are available at your local hardware store, e.g. Masters or
Bunnings.
Activating the 25km/h throttle
© Leitner 2016
v10December2014

© Leitner 2016
Important legal note! Leitner electric bikes are built to strictly comply with Australian road rules. For 250 watt bikes, this means that the throttle speed is limited to “walking speed”, under 6km/h in the factory setting, in order to comply with the normcalled EN15194. It is the European Ebike Norm which was adapted by Australia. Please find more info here: http://www.bicycles.net.au/2012/05/australian-
government-clarifies-ebik e-import-laws/
Many customers were asking for a throttle which allows the bike to go 25km/h without pedalling. We have now included a feature in Leitner electric bike models from December 2014 onwards to unlock the throttle. It involves opening the controller box under the battery and unclipping the grey wires (see instructions below).
Please note that after unlocking the throttle your eBike will no longer comply with the EN15194 standard and may be illegal in your state for use on roads. Therefore the bike should NOT be used on public roads if the throttle is unlocked to go 25km/h. The bikes should only be used OFF ROAD.
Although there are very few reports of the law being enforced, you may receive heavy fines for riding “a motorbike without registration and license”. We would like you to be aware of this and Leitner Electric Bikes does under no circumstances take any liability for any issues involving riding a 25km/h throttle bike illegally.

The controller The controller of the eBike is the “brain” of the bike. All wires are connected to it and it controls all functions of the bike including the speed limits. Leitner eBike models from Dec 2014 onwards have a grey wire loop which can be unclipped in order to activate the 25 km/h throttle. It takes less then 5 minutes. Models before December 2014 can be upgraded to 25km/h throttles by replacing the controller.
Before you access the controller, switch the bike OFF and remove the battery.
Wear personal protective equipment like safety glasses. Always take care and never use force. You may brake wires or damage parts. Only access the controllers with the permission of Leitner eBikes otherwise the warranty will be voided.
If you don’t feel comfortable to work with the controller or if you need help contact us on [email protected] or 1300 856 725 for help or ask a localebike technician.
Tools required: -Philips screw driver

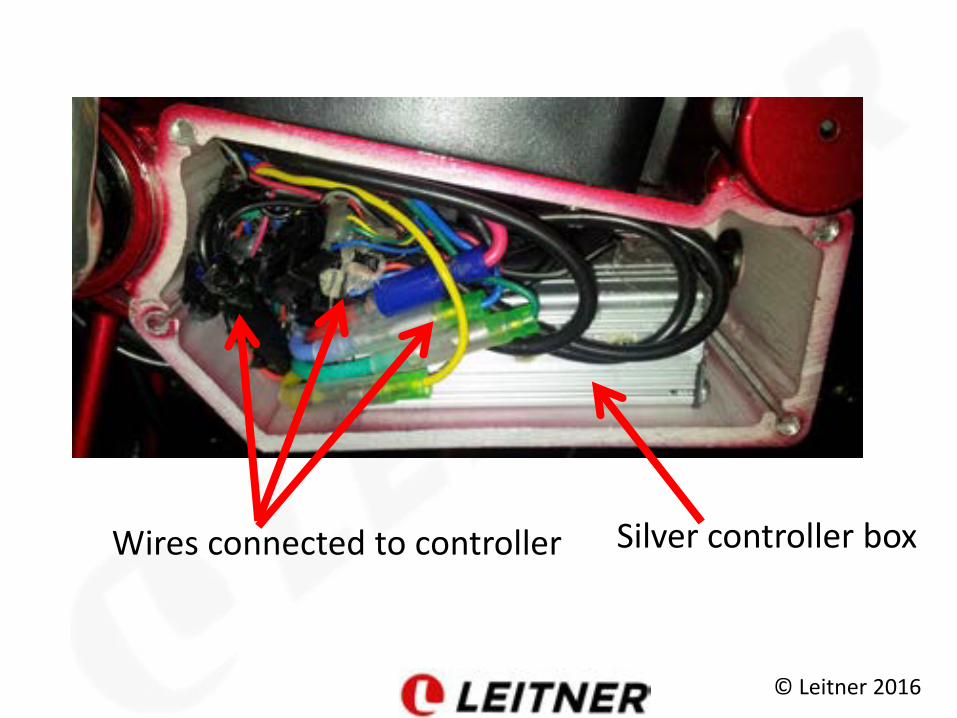
Accessing the controller
Location of controller Magnification
Remove 4 screws and remove the cover to access the controller
© Leitner 2016
© Leitner 2016
Silver controller box Wires connected to controller
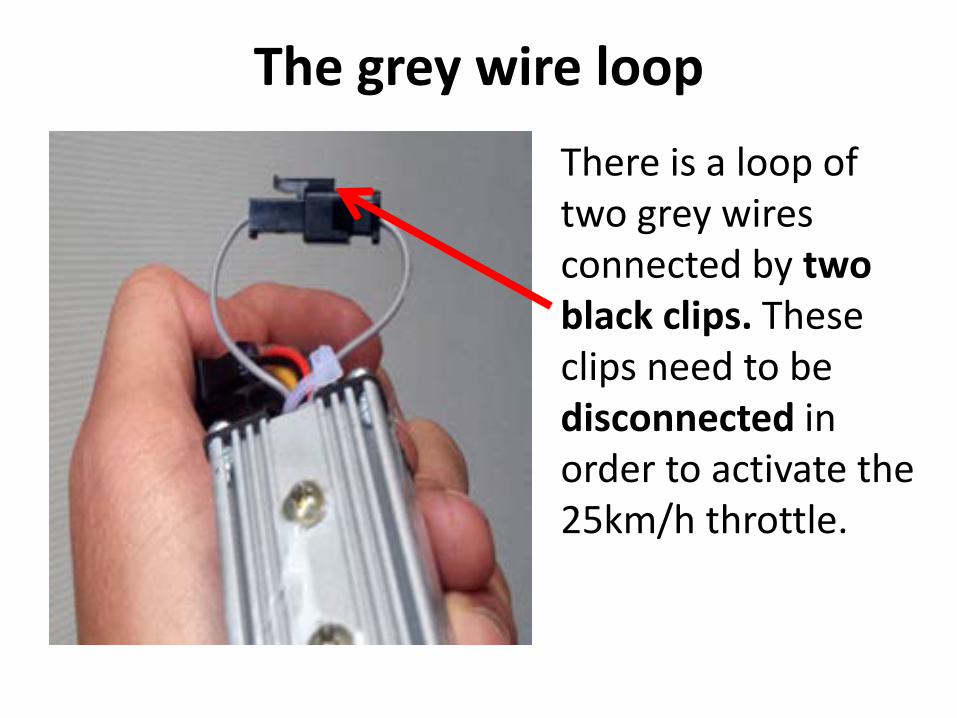
The grey wire loop
There is a loop of two grey wires connected by two black clips. These clips need to be disconnected in order to activate the 25km/h throttle.
© Leitner 2016
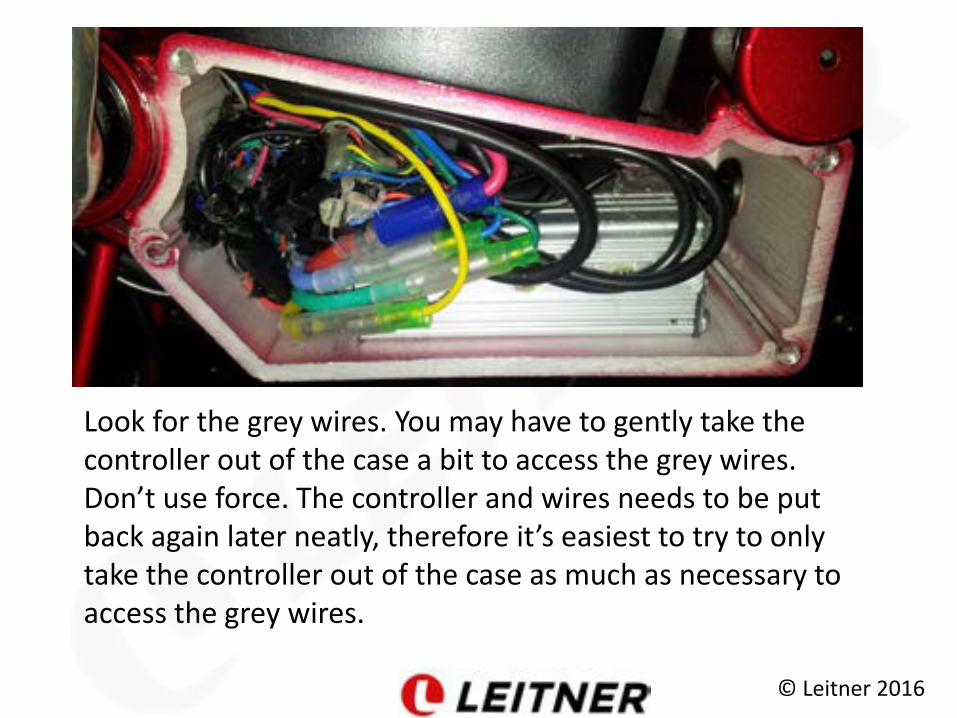
Look for the grey wires. You may have to gently take the controller out of the case a bit to access the grey wires. Don’t use force. The controller and wires needs to be put back again later neatly, therefore it’s easiest to try to only take the controller out of the case as much as necessary to access the grey wires.
© Leitner 2016
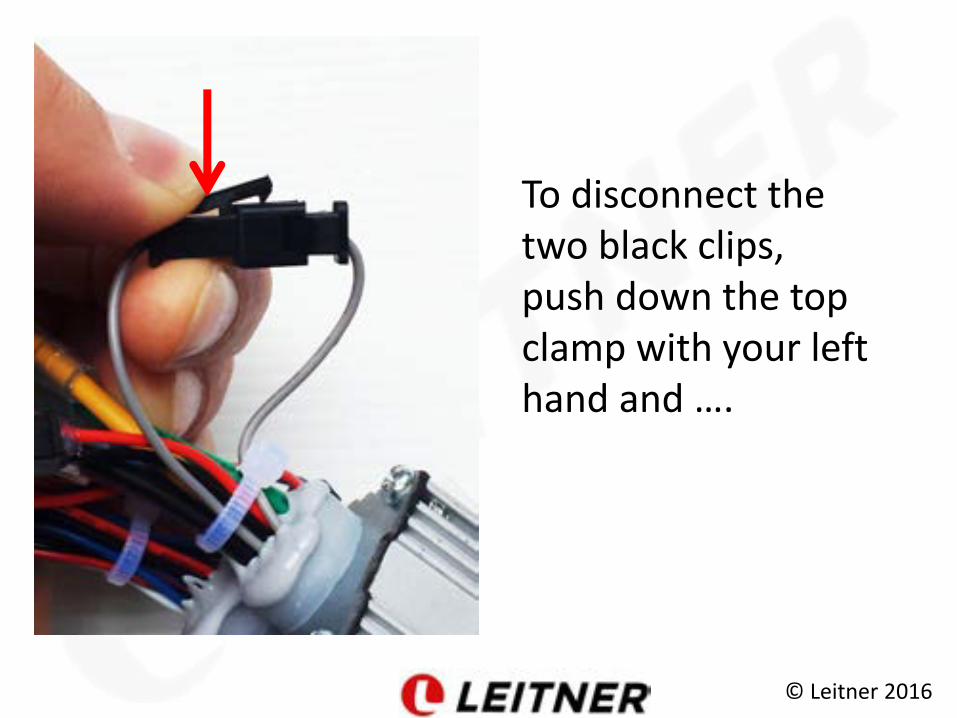
To disconnect the two black clips, push down the top clamp with your left hand and ….
© Leitner 2016
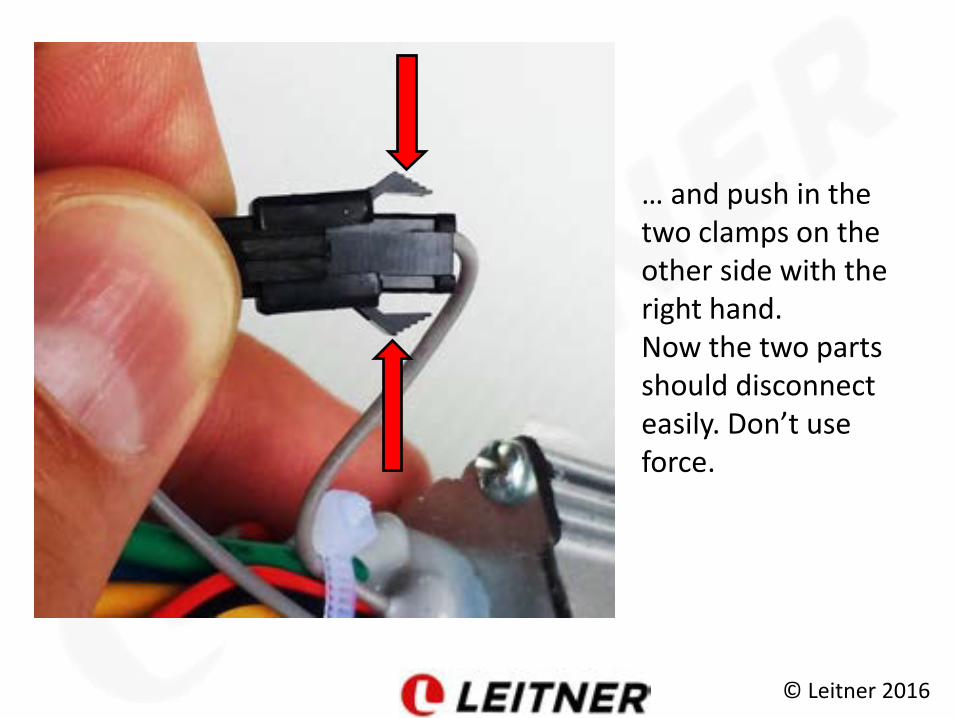
… and push in thetwo clamps on the other side with the right hand. Now the two parts should disconnect easily. Don’t use force.

© Leitner 2016
Once the grey loop is disconnected, the throttle is able to go 25 km/h without pedalling. Before putting the controller and wires back into the case make sure that there are no metal parts of the wires and connections exposed, which may have happened during moving the controller. If there are any exposed metal parts, insulate them with duct tape. Make sure all connections are tight.
© Leitner 2016
After the controller and wires are put back in the case neatly, put the battery back and switch the bike on. Always protect your eyes in the case of a problem. Check if there is a short circuit. Plastic smell is an indicator. If everything seems fine, carefully test the throttle, the light switch and the PAS mode.

Putting the controller back
© Leitner 2016
Carefully place the controller and wires back into the frame and close the cover. When screwing the cover back on make sure that the wires are not jammed between the cover and the frame. It may damage the wires.
Carefully place the controller and wires back into the frame and close the cover. When screwing the cover back on make sure that the wires are not jammed between the cover and the frame. It may damage the wires.

© Leitner 2016
Carefully test-ride the bike for a few minutes. Check if there is a burning smell coming out of the controller box below the battery. It may indicate a short circuit.
If you have any issues please contact us at [email protected] or call us on 1300 856 725
Enjoy your eBike with the new 25km/h throttle (OFF-ROAD USE ONLY!)