4L30E TECHNIQUE #1 - VehiCROSS · 2009-06-12 · 4L30E TECHNIQUE #1 This is the first technique I...
11
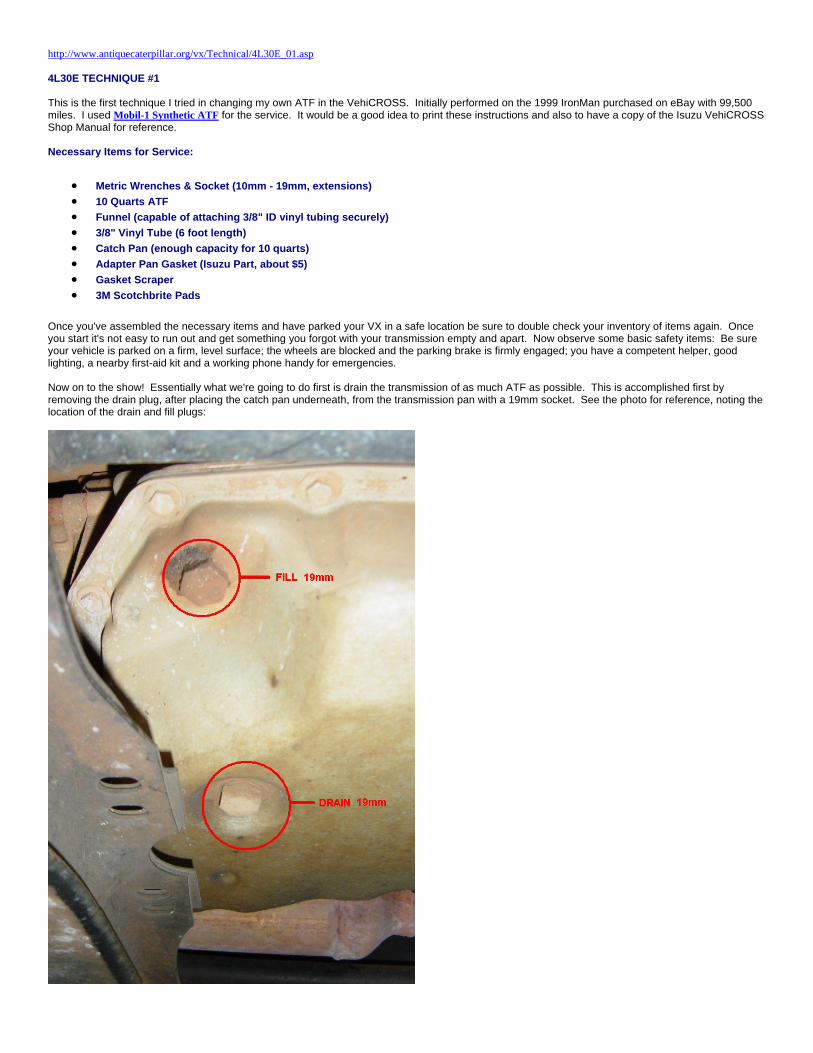
http://www.antiquecaterpillar.org/vx/Technical/4L30E_01.asp 4L30E TECHNIQUE #1 This is the first technique I tried in changing my own ATF in the VehiCROSS. Initially performed on the 1999 IronMan purchased on eBay with 99,500 miles. I used Mobil-1 Synthetic ATF for the service. It would be a good idea to print these instructions and also to have a copy of the Isuzu VehiCROSS Shop Manual for reference. Necessary Items for Service: • Metric Wrenches & Socket (10mm - 19mm, extensions) • 10 Quarts ATF • Funnel (capable of attaching 3/8" ID vinyl tubing securely) • 3/8" Vinyl Tube (6 foot length) • Catch Pan (enough capacity for 10 quarts) • Adapter Pan Gasket (Isuzu Part, about $5) • Gasket Scraper • 3M Scotchbrite Pads Once you've assembled the necessary items and have parked your VX in a safe location be sure to double check your inventory of items again. Once you start it's not easy to run out and get something you forgot with your transmission empty and apart. Now observe some basic safety items: Be sure your vehicle is parked on a firm, level surface; the wheels are blocked and the parking brake is firmly engaged; you have a competent helper, good lighting, a nearby first-aid kit and a working phone handy for emergencies. Now on to the show! Essentially what we're going to do first is drain the transmission of as much ATF as possible. This is accomplished first by removing the drain plug, after placing the catch pan underneath, from the transmission pan with a 19mm socket. See the photo for reference, noting the location of the drain and fill plugs:
Transcript of 4L30E TECHNIQUE #1 - VehiCROSS · 2009-06-12 · 4L30E TECHNIQUE #1 This is the first technique I...
http://www.antiquecaterpillar.org/vx/Technical/4L30E_01.asp 4L30E TECHNIQUE #1 This is the first technique I tried in changing my own ATF in the VehiCROSS. Initially performed on the 1999 IronMan purchased on eBay with 99,500 miles. I used Mobil-1 Synthetic ATF for the service. It would be a good idea to print these instructions and also to have a copy of the Isuzu VehiCROSS Shop Manual for reference. Necessary Items for Service:
• Metric Wrenches & Socket (10mm - 19mm, extensions) • 10 Quarts ATF • Funnel (capable of attaching 3/8" ID vinyl tubing securely) • 3/8" Vinyl Tube (6 foot length) • Catch Pan (enough capacity for 10 quarts) • Adapter Pan Gasket (Isuzu Part, about $5) • Gasket Scraper • 3M Scotchbrite Pads
Once you've assembled the necessary items and have parked your VX in a safe location be sure to double check your inventory of items again. Once you start it's not easy to run out and get something you forgot with your transmission empty and apart. Now observe some basic safety items: Be sure your vehicle is parked on a firm, level surface; the wheels are blocked and the parking brake is firmly engaged; you have a competent helper, good lighting, a nearby first-aid kit and a working phone handy for emergencies. Now on to the show! Essentially what we're going to do first is drain the transmission of as much ATF as possible. This is accomplished first by removing the drain plug, after placing the catch pan underneath, from the transmission pan with a 19mm socket. See the photo for reference, noting the location of the drain and fill plugs:
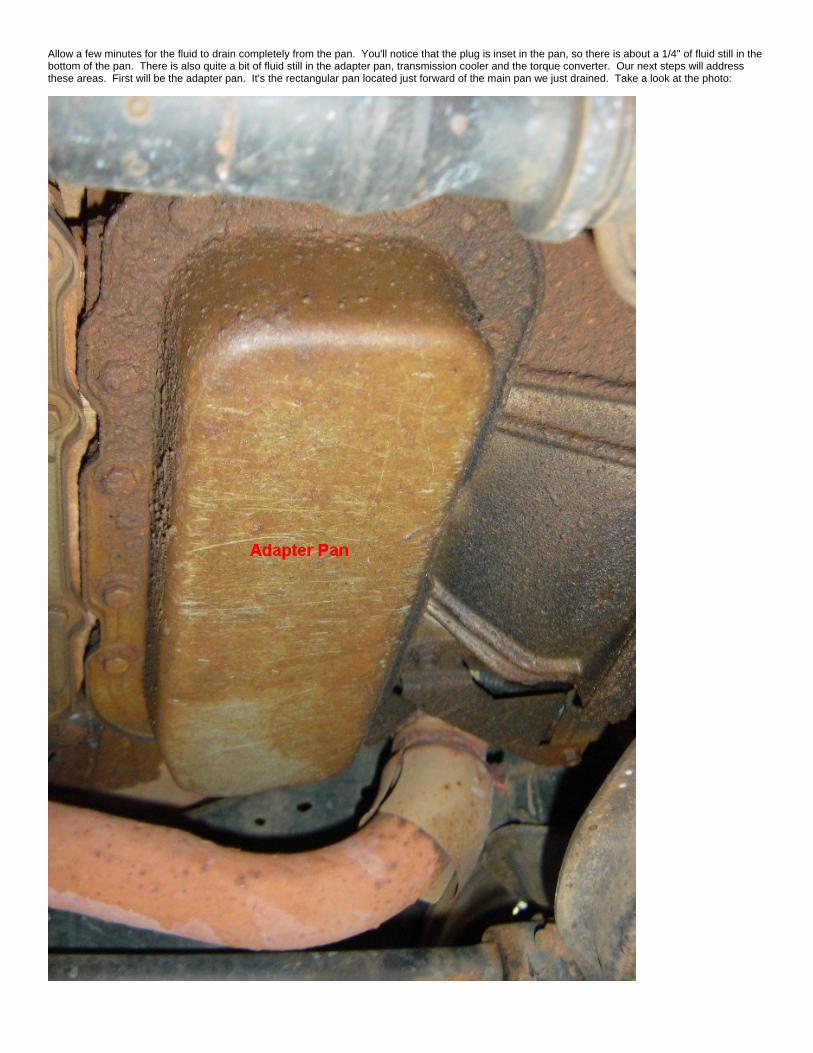
Allow a few minutes for the fluid to drain completely from the pan. You'll notice that the plug is inset in the pan, so there is about a 1/4" of fluid still in the bottom of the pan. There is also quite a bit of fluid still in the adapter pan, transmission cooler and the torque converter. Our next steps will address these areas. First will be the adapter pan. It's the rectangular pan located just forward of the main pan we just drained. Take a look at the photo:
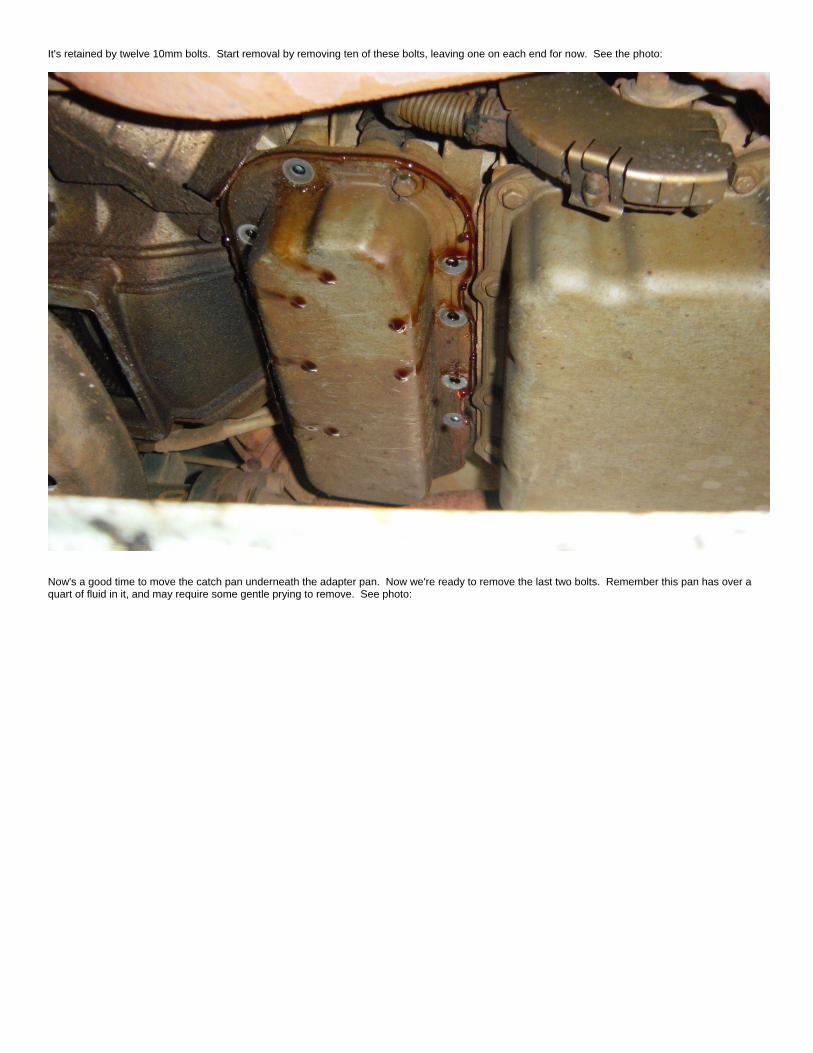
It's retained by twelve 10mm bolts. Start removal by removing ten of these bolts, leaving one on each end for now. See the photo:
Now's a good time to move the catch pan underneath the adapter pan. Now we're ready to remove the last two bolts. Remember this pan has over a quart of fluid in it, and may require some gentle prying to remove. See photo:

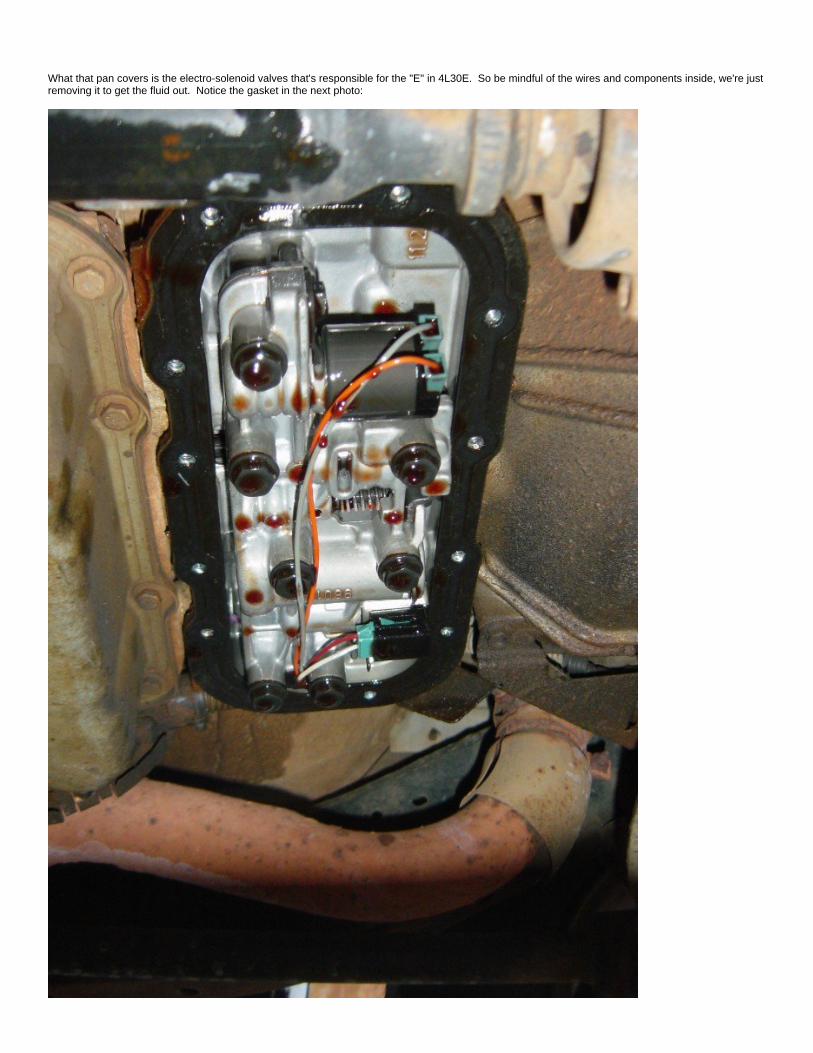
What that pan covers is the electro-solenoid valves that's responsible for the "E" in 4L30E. So be mindful of the wires and components inside, we're just removing it to get the fluid out. Notice the gasket in the next photo:
It's entirely up to you to replace the gasket or not. In theory you should be able to replace the pan after a good cleaning and not worry about leakage, but removing/replacing a gasket is cheap insurance to be sure. So if you remove the old gasket be careful to not damage the wires while scraping. Don't replace the pan just yet though, we're going to move our catch pan a bit forward to the transmission cooler lines at the radiator. See the photo:
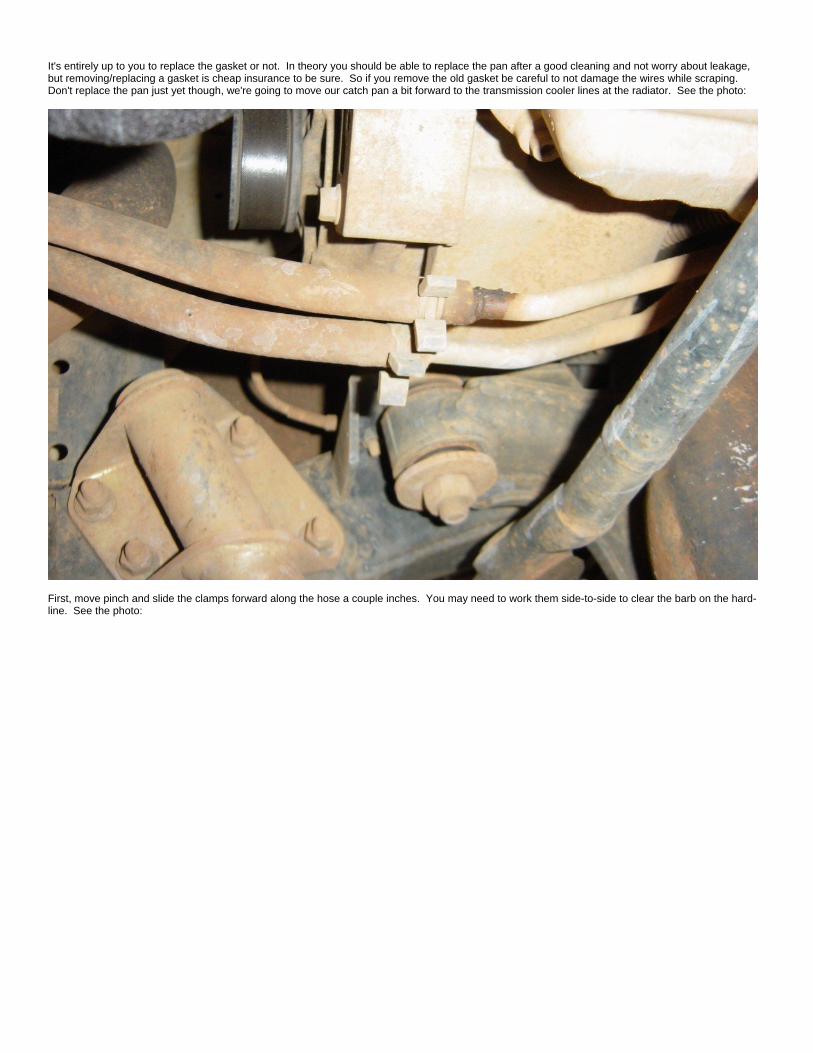
First, move pinch and slide the clamps forward along the hose a couple inches. You may need to work them side-to-side to clear the barb on the hard-line. See the photo:
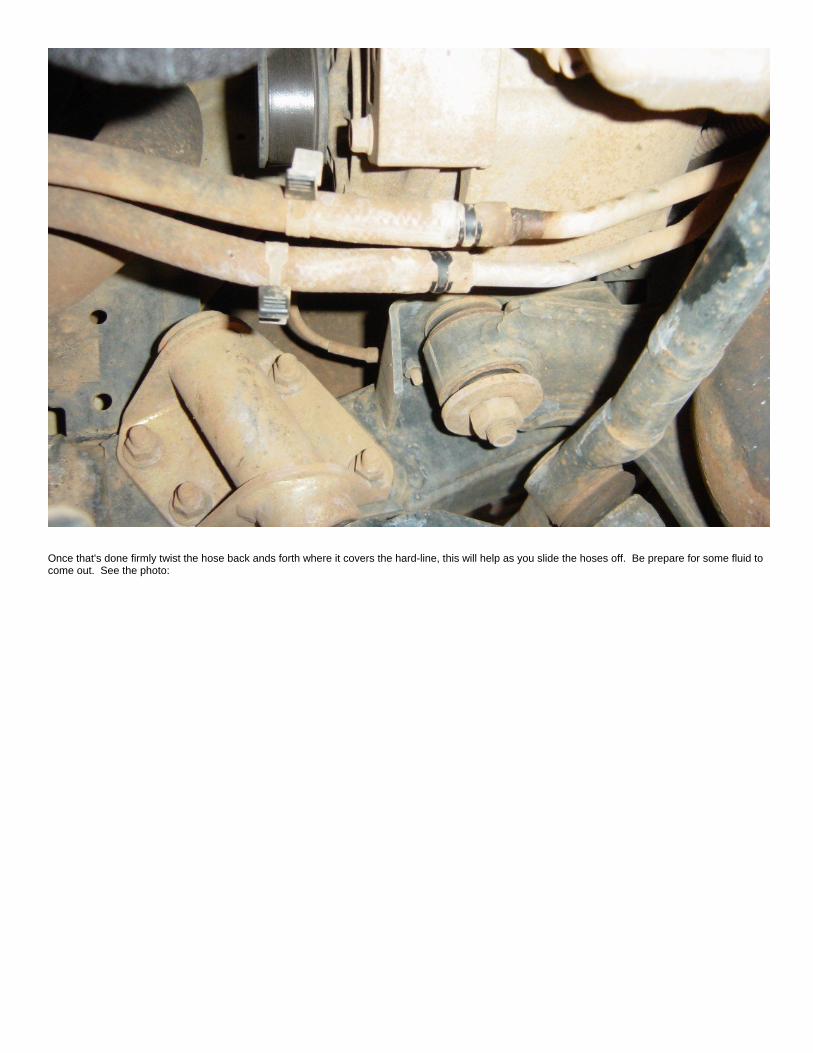
Once that's done firmly twist the hose back ands forth where it covers the hard-line, this will help as you slide the hoses off. Be prepare for some fluid to come out. See the photo:
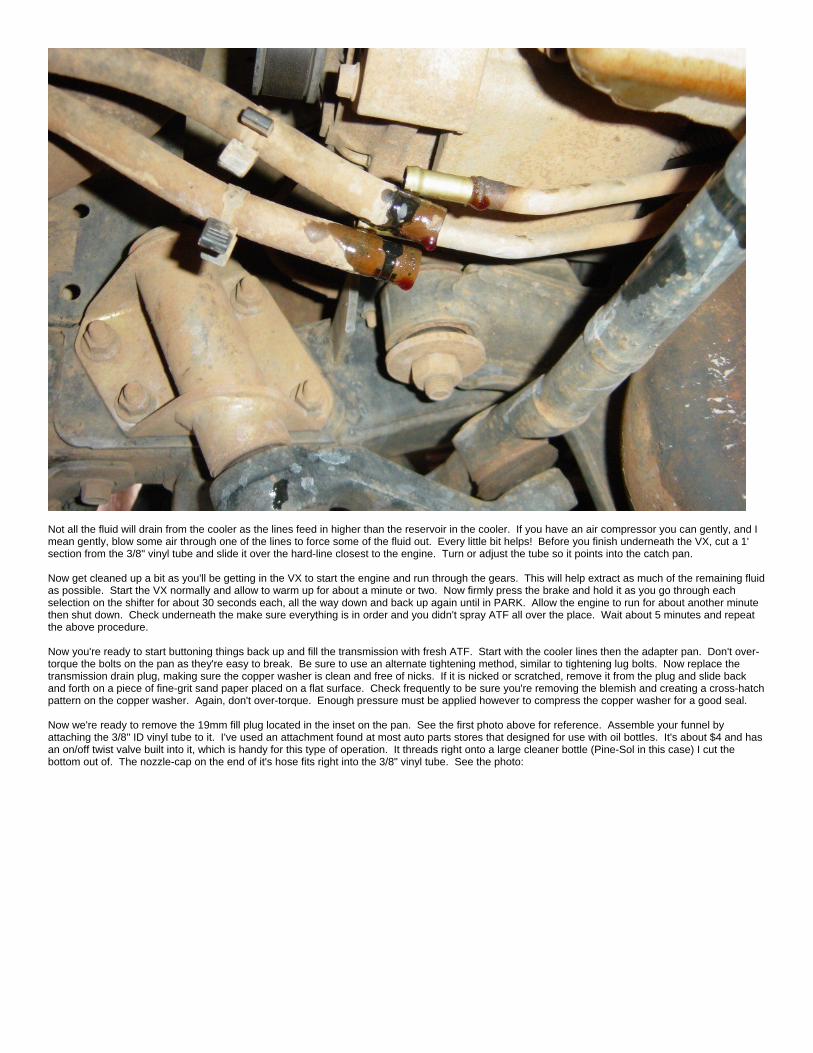
Not all the fluid will drain from the cooler as the lines feed in higher than the reservoir in the cooler. If you have an air compressor you can gently, and I mean gently, blow some air through one of the lines to force some of the fluid out. Every little bit helps! Before you finish underneath the VX, cut a 1' section from the 3/8" vinyl tube and slide it over the hard-line closest to the engine. Turn or adjust the tube so it points into the catch pan. Now get cleaned up a bit as you'll be getting in the VX to start the engine and run through the gears. This will help extract as much of the remaining fluid as possible. Start the VX normally and allow to warm up for about a minute or two. Now firmly press the brake and hold it as you go through each selection on the shifter for about 30 seconds each, all the way down and back up again until in PARK. Allow the engine to run for about another minute then shut down. Check underneath the make sure everything is in order and you didn't spray ATF all over the place. Wait about 5 minutes and repeat the above procedure. Now you're ready to start buttoning things back up and fill the transmission with fresh ATF. Start with the cooler lines then the adapter pan. Don't over-torque the bolts on the pan as they're easy to break. Be sure to use an alternate tightening method, similar to tightening lug bolts. Now replace the transmission drain plug, making sure the copper washer is clean and free of nicks. If it is nicked or scratched, remove it from the plug and slide back and forth on a piece of fine-grit sand paper placed on a flat surface. Check frequently to be sure you're removing the blemish and creating a cross-hatch pattern on the copper washer. Again, don't over-torque. Enough pressure must be applied however to compress the copper washer for a good seal. Now we're ready to remove the 19mm fill plug located in the inset on the pan. See the first photo above for reference. Assemble your funnel by attaching the 3/8" ID vinyl tube to it. I've used an attachment found at most auto parts stores that designed for use with oil bottles. It's about $4 and has an on/off twist valve built into it, which is handy for this type of operation. It threads right onto a large cleaner bottle (Pine-Sol in this case) I cut the bottom out of. The nozzle-cap on the end of it's hose fits right into the 3/8" vinyl tube. See the photo:


Have your ATF ready at hand, preferably with the caps off and ready to pour. This part can be done by one person, especially if you have a way to hang your funnel. The idea is to place the other end of the 3/8" vinyl tube into the fill opening on the pan as the friction of the threads will hold it pretty securely. If you have a helper, they can pour while you monitor the flow and make sure the hose stays in place. Otherwise you can do this by checking in between re-fills. The funnel must be held high enough to force the fluid into the fill opening. See the photo:

You should have a pretty good idea of how much fluid you got out from what's in your catch pan, so fill within a quart of that amount. When I did this the amount drained was about 7.5 quarts. Once you have the initial fill in, make sure the tube is firmly in the fill opening. Now get in the VX, place your foot firmly on the brake and go through the start and gear selection procedure. This will help get the fluid through the transmission and purge air from the system. With the vehicle in PARK, add the remaining fluid to the funnel then move the catch pan underneath the fill opening. There will probably be ATF still in the tube at the fill opening. If so, pinch the tube as close as possible to the fill opening then gently work the tube from the opening until fluid starts the drip from the hole. If hardly any fluid comes out you will need to add additional fluid as you may have been low before the service. If a lot starts to come out work the tube back into the hole. Lower the funnel and drain any extra ATF into a suitable container then get the fill plug handy. Be sure to check the copper washer as mentioned previously for the drain plug. Have the fill plug in one hand as you work the vinyl tube from the fill opening with the other, then as the tube is clear immediately thread the fill plug into the opening. Tighten then clean the plugs and surrounding pan area with a shop rag, as this will make follow-up inspection easier to check for leaks and such. Shut down the VX and collect your tools and supplies for clean-up. You're done! Note how the VX drives and shifts over the next few days and possibly check the fluid level about a week after the service. Add as necessary, but you shouldn't need to. If so, less than a quart wouldn't be unusual. Any more than that and you should check for leaks.