4.4-i SEDIMENT TRAP - Tahoe BMP 4/4.4/i_SedTrp.pdfSumps should be a minimum of feet deep2er than the...
6
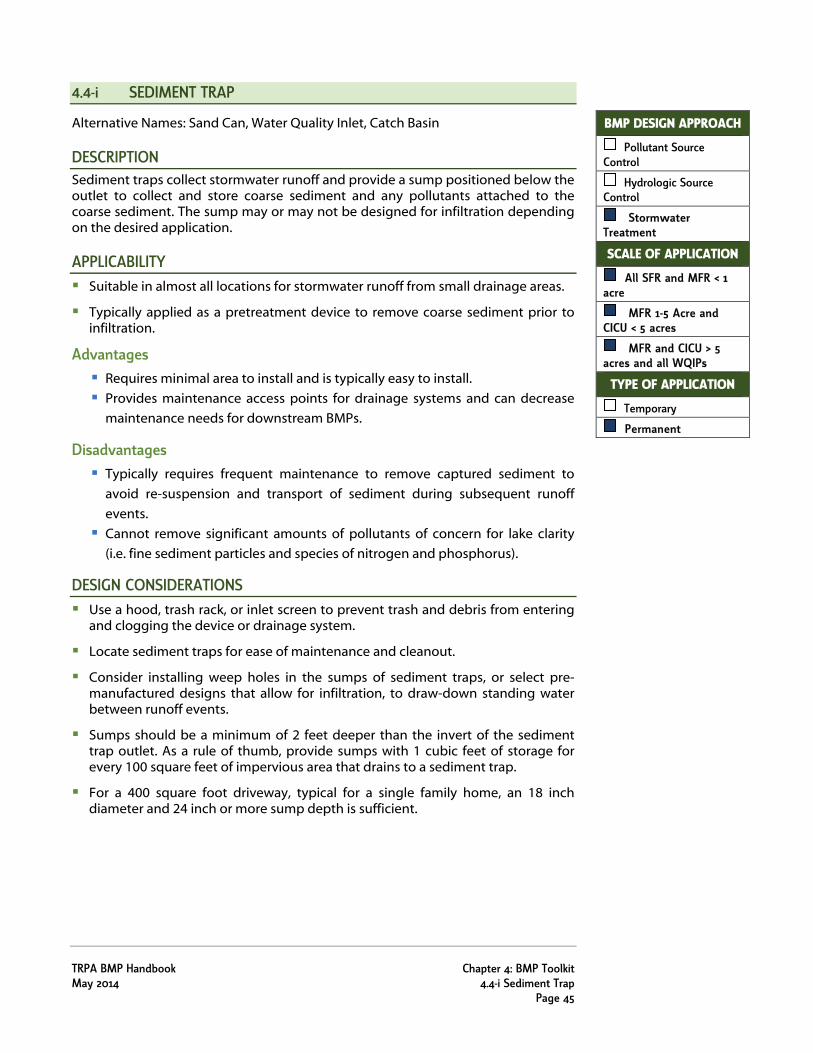
TRPA BMP Handbook Chapter 4: BMP Toolkit May 2014 4.4-i Sediment Trap Page 45 4.4-i SEDIMENT TRAP Alternative Names: Sand Can, Water Quality Inlet, Catch Basin DESCRIPTION Sediment traps collect stormwater runoff and provide a sump positioned below the outlet to collect and store coarse sediment and any pollutants attached to the coarse sediment. The sump may or may not be designed for infiltration depending on the desired application. APPLICABILITY Suitable in almost all locations for stormwater runoff from small drainage areas. Typically applied as a pretreatment device to remove coarse sediment prior to infiltration. Advantages Requires minimal area to install and is typically easy to install. Provides maintenance access points for drainage systems and can decrease maintenance needs for downstream BMPs. Disadvantages Typically requires frequent maintenance to remove captured sediment to avoid re-suspension and transport of sediment during subsequent runoff events. Cannot remove significant amounts of pollutants of concern for lake clarity (i.e. fine sediment particles and species of nitrogen and phosphorus). DESIGN CONSIDERATIONS Use a hood, trash rack, or inlet screen to prevent trash and debris from entering and clogging the device or drainage system. Locate sediment traps for ease of maintenance and cleanout. Consider installing weep holes in the sumps of sediment traps, or select pre- manufactured designs that allow for infiltration, to draw-down standing water between runoff events. Sumps should be a minimum of 2 feet deeper than the invert of the sediment trap outlet. As a rule of thumb, provide sumps with 1 cubic feet of storage for every 100 square feet of impervious area that drains to a sediment trap. For a 400 square foot driveway, typical for a single family home, an 18 inch diameter and 24 inch or more sump depth is sufficient. BMP DESIGN APPROACH Pollutant Source Control Hydrologic Source Control Stormwater Treatment SCALE OF APPLICATION All SFR and MFR < 1 acre MFR 1-5 Acre and CICU < 5 acres MFR and CICU > 5 acres and all WQIPs TYPE OF APPLICATION Temporary Permanent
Transcript of 4.4-i SEDIMENT TRAP - Tahoe BMP 4/4.4/i_SedTrp.pdfSumps should be a minimum of feet deep2er than the...
TRPA BMP Handbook Chapter 4: BMP Toolkit May 2014 4.4-i Sediment Trap Page 45
4.4-i SEDIMENT TRAP
Alternative Names: Sand Can, Water Quality Inlet, Catch Basin
DESCRIPTION Sediment traps collect stormwater runoff and provide a sump positioned below the outlet to collect and store coarse sediment and any pollutants attached to the coarse sediment. The sump may or may not be designed for infiltration depending on the desired application.
APPLICABILITY Suitable in almost all locations for stormwater runoff from small drainage areas.
Typically applied as a pretreatment device to remove coarse sediment prior to infiltration.
Advantages Requires minimal area to install and is typically easy to install.
Provides maintenance access points for drainage systems and can decrease
maintenance needs for downstream BMPs.
Disadvantages Typically requires frequent maintenance to remove captured sediment to
avoid re-suspension and transport of sediment during subsequent runoff
events.
Cannot remove significant amounts of pollutants of concern for lake clarity
(i.e. fine sediment particles and species of nitrogen and phosphorus).
DESIGN CONSIDERATIONS Use a hood, trash rack, or inlet screen to prevent trash and debris from entering
and clogging the device or drainage system.
Locate sediment traps for ease of maintenance and cleanout.
Consider installing weep holes in the sumps of sediment traps, or select pre-manufactured designs that allow for infiltration, to draw-down standing water between runoff events.
Sumps should be a minimum of 2 feet deeper than the invert of the sediment trap outlet. As a rule of thumb, provide sumps with 1 cubic feet of storage for every 100 square feet of impervious area that drains to a sediment trap.
For a 400 square foot driveway, typical for a single family home, an 18 inch diameter and 24 inch or more sump depth is sufficient.
BMP DESIGN APPROACH
Pollutant Source Control
Hydrologic Source Control
Stormwater Treatment
SCALE OF APPLICATION
All SFR and MFR < 1 acre
MFR 1-5 Acre and CICU < 5 acres
MFR and CICU > 5 acres and all WQIPs
TYPE OF APPLICATION
Temporary
Permanent
Chapter 4: BMP Toolkit TRPA BMP Handbook 4.4-i Sediment Trap May 2014 Page 46
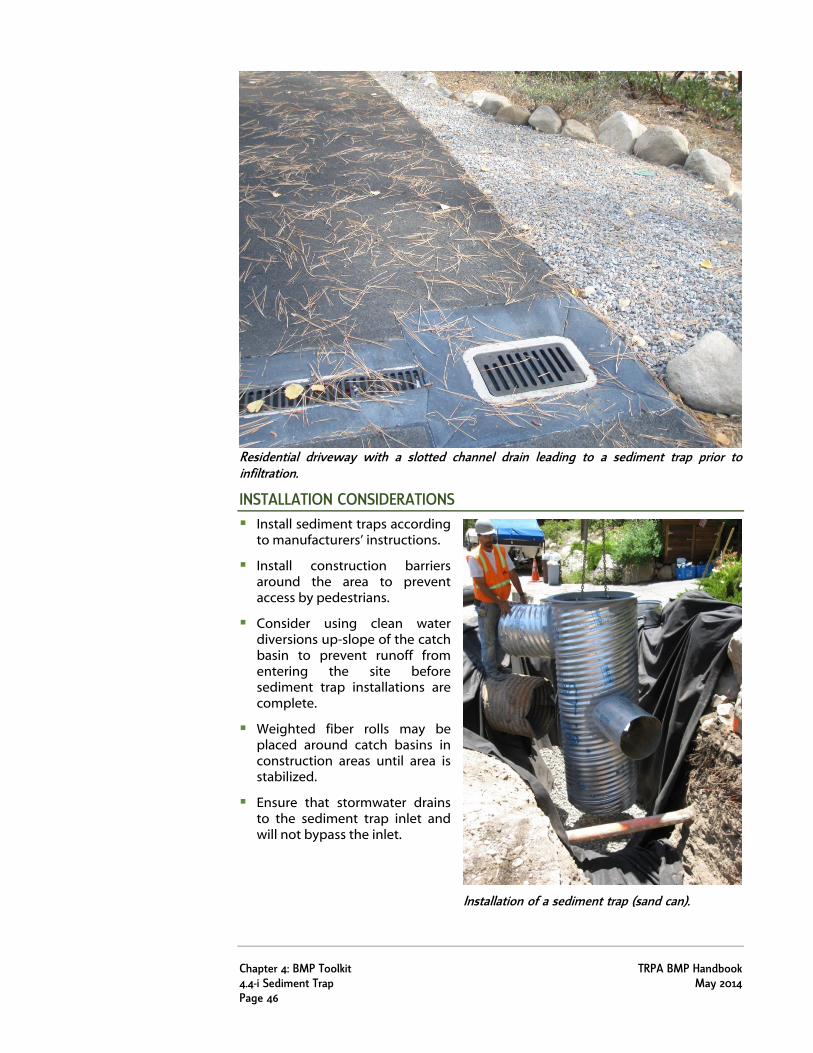
Residential driveway with a slotted channel drain leading to a sediment trap prior to infiltration.
INSTALLATION CONSIDERATIONS Install sediment traps according
to manufacturers’ instructions.
Install construction barriers around the area to prevent access by pedestrians.
Consider using clean water diversions up-slope of the catch basin to prevent runoff from entering the site before sediment trap installations are complete.
Weighted fiber rolls may be placed around catch basins in construction areas until area is stabilized.
Ensure that stormwater drains to the sediment trap inlet and will not bypass the inlet.
Installation of a sediment trap (sand can).
TRPA BMP Handbook Chapter 4: BMP Toolkit May 2014 4.4-i Sediment Trap Page 47
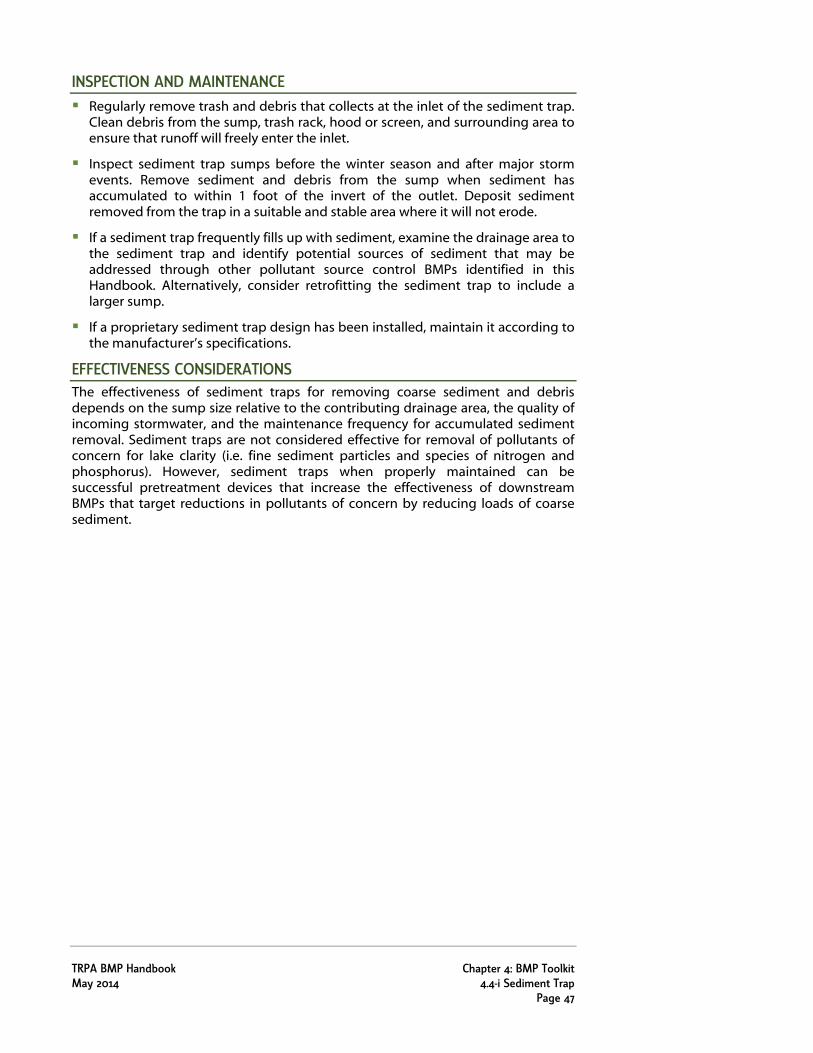
INSPECTION AND MAINTENANCE Regularly remove trash and debris that collects at the inlet of the sediment trap.
Clean debris from the sump, trash rack, hood or screen, and surrounding area to ensure that runoff will freely enter the inlet.
Inspect sediment trap sumps before the winter season and after major storm events. Remove sediment and debris from the sump when sediment has accumulated to within 1 foot of the invert of the outlet. Deposit sediment removed from the trap in a suitable and stable area where it will not erode.
If a sediment trap frequently fills up with sediment, examine the drainage area to the sediment trap and identify potential sources of sediment that may be addressed through other pollutant source control BMPs identified in this Handbook. Alternatively, consider retrofitting the sediment trap to include a larger sump.
If a proprietary sediment trap design has been installed, maintain it according to the manufacturer’s specifications.
EFFECTIVENESS CONSIDERATIONS The effectiveness of sediment traps for removing coarse sediment and debris depends on the sump size relative to the contributing drainage area, the quality of incoming stormwater, and the maintenance frequency for accumulated sediment removal. Sediment traps are not considered effective for removal of pollutants of concern for lake clarity (i.e. fine sediment particles and species of nitrogen and phosphorus). However, sediment traps when properly maintained can be successful pretreatment devices that increase the effectiveness of downstream BMPs that target reductions in pollutants of concern by reducing loads of coarse sediment.
Chapter 4: BMP Toolkit TRPA BMP Handbook 4.4-i Sediment Trap May 2014 Page 48
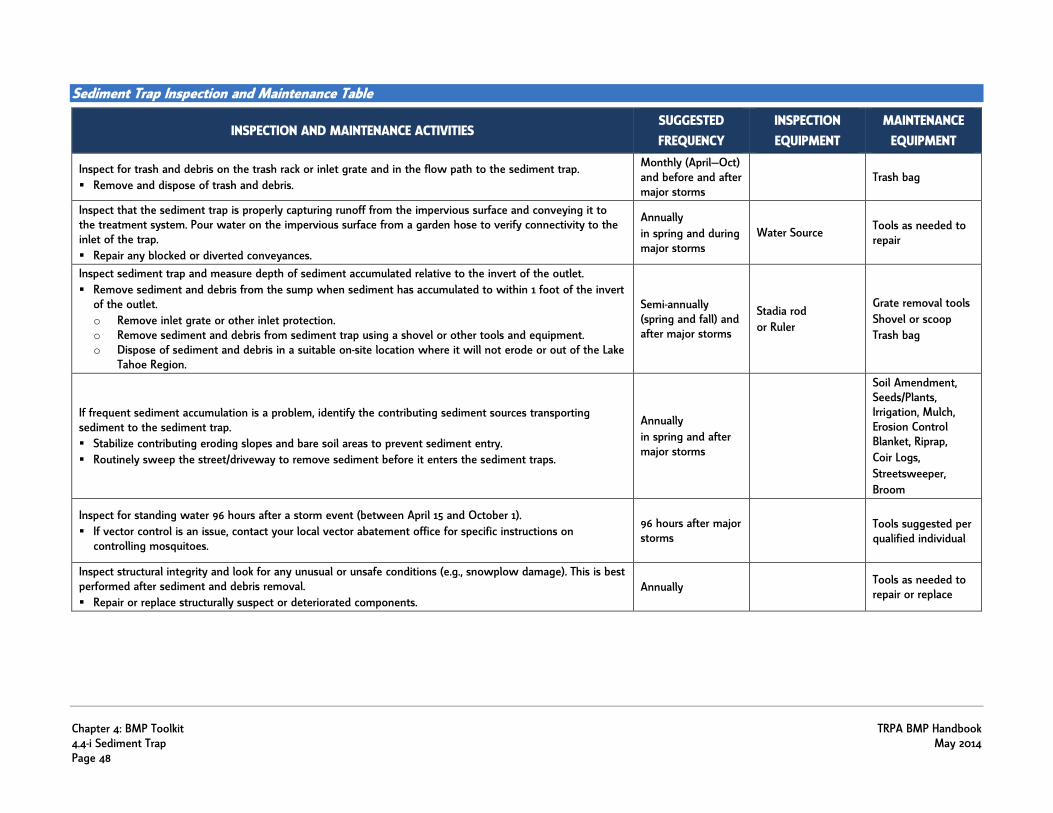
Sediment Trap Inspection and Maintenance Table
INSPECTION AND MAINTENANCE ACTIVITIES SUGGESTED FREQUENCY
INSPECTION EQUIPMENT
MAINTENANCE EQUIPMENT
Inspect for trash and debris on the trash rack or inlet grate and in the flow path to the sediment trap. Remove and dispose of trash and debris.
Monthly (April—Oct) and before and after major storms
Trash bag
Inspect that the sediment trap is properly capturing runoff from the impervious surface and conveying it to the treatment system. Pour water on the impervious surface from a garden hose to verify connectivity to the inlet of the trap. Repair any blocked or diverted conveyances.
Annually in spring and during major storms
Water Source Tools as needed to repair
Inspect sediment trap and measure depth of sediment accumulated relative to the invert of the outlet. Remove sediment and debris from the sump when sediment has accumulated to within 1 foot of the invert
of the outlet. o Remove inlet grate or other inlet protection. o Remove sediment and debris from sediment trap using a shovel or other tools and equipment. o Dispose of sediment and debris in a suitable on-site location where it will not erode or out of the Lake
Tahoe Region.
Semi-annually (spring and fall) and after major storms
Stadia rod or Ruler
Grate removal tools Shovel or scoop Trash bag
If frequent sediment accumulation is a problem, identify the contributing sediment sources transporting sediment to the sediment trap. Stabilize contributing eroding slopes and bare soil areas to prevent sediment entry. Routinely sweep the street/driveway to remove sediment before it enters the sediment traps.
Annually in spring and after major storms
Soil Amendment, Seeds/Plants, Irrigation, Mulch, Erosion Control Blanket, Riprap, Coir Logs, Streetsweeper, Broom
Inspect for standing water 96 hours after a storm event (between April 15 and October 1). If vector control is an issue, contact your local vector abatement office for specific instructions on
controlling mosquitoes.
96 hours after major storms
Tools suggested per qualified individual
Inspect structural integrity and look for any unusual or unsafe conditions (e.g., snowplow damage). This is best performed after sediment and debris removal. Repair or replace structurally suspect or deteriorated components.
Annually Tools as needed to repair or replace
TRPA BMP Handbook Chapter 4: BMP Toolkit May 2014 4.4-i Sediment Trap Page 49
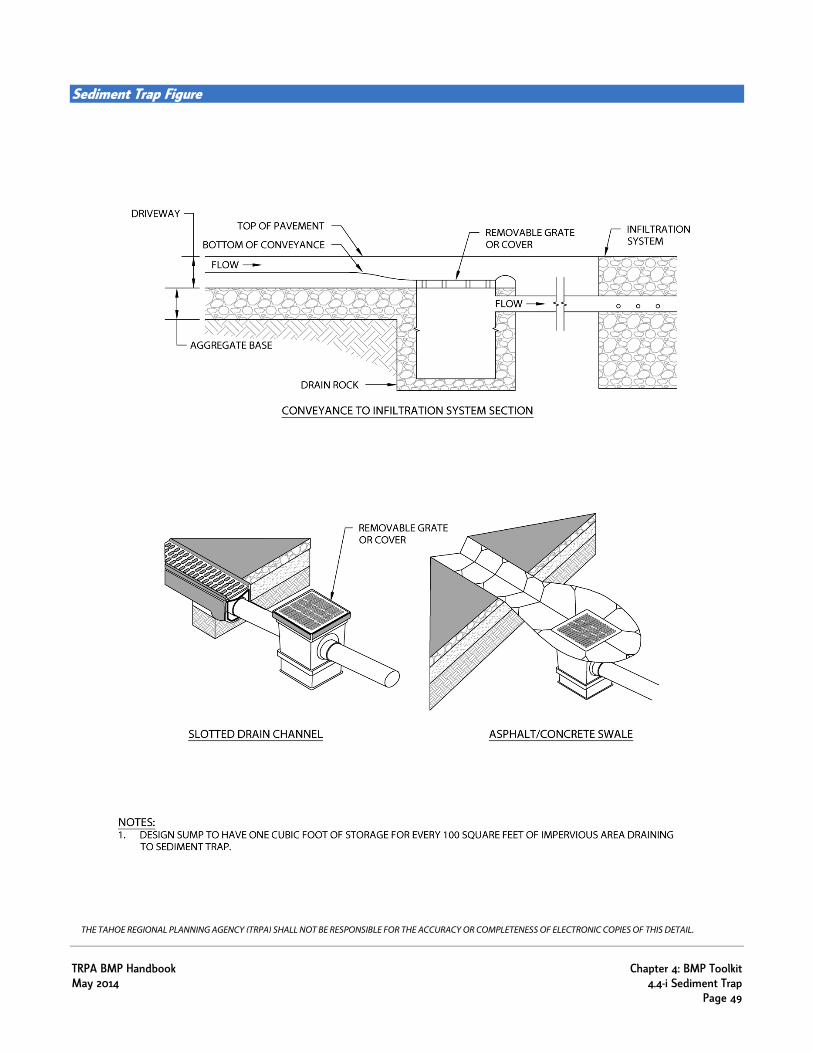
Sediment Trap Figure
THE TAHOE REGIONAL PLANNING AGENCY (TRPA) SHALL NOT BE RESPONSIBLE FOR THE ACCURACY OR COMPLETENESS OF ELECTRONIC COPIES OF THIS DETAIL.
Chapter 4: BMP Toolkit TRPA BMP Handbook 4.4-i Sediment Trap May 2014 Page 50
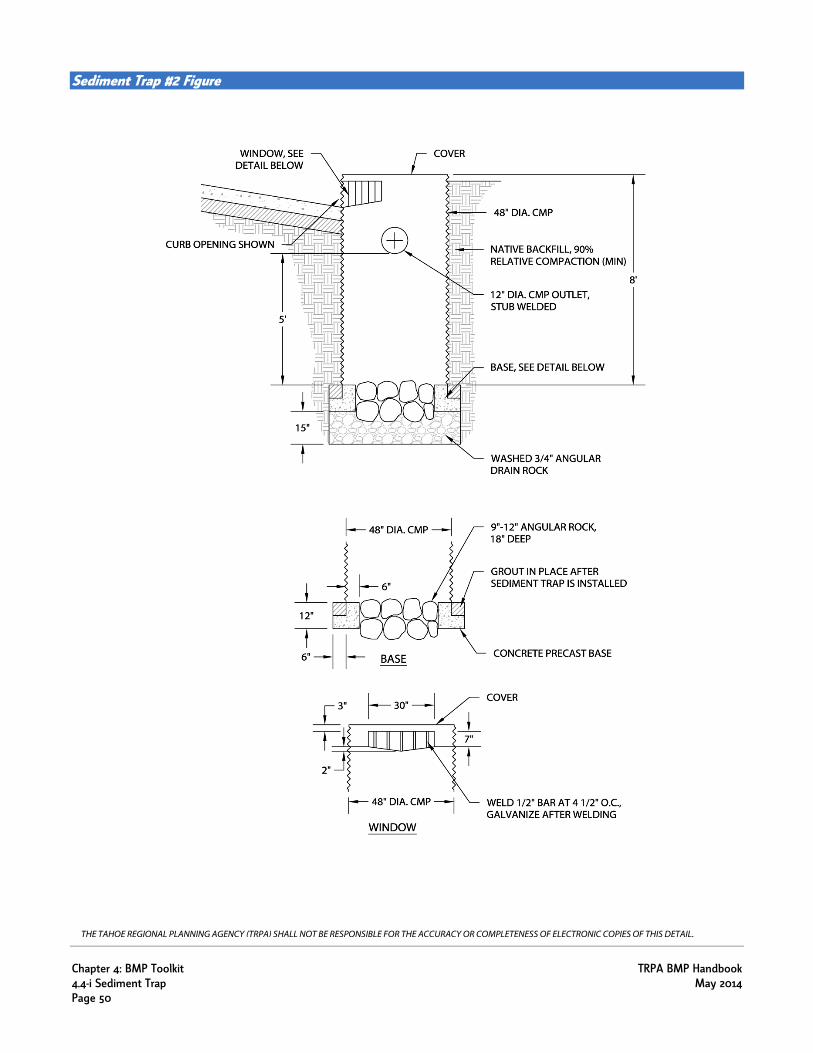
Sediment Trap #2 Figure
THE TAHOE REGIONAL PLANNING AGENCY (TRPA) SHALL NOT BE RESPONSIBLE FOR THE ACCURACY OR COMPLETENESS OF ELECTRONIC COPIES OF THIS DETAIL.