40923-R5 Parts List Version 2 40923-R5 Parts List Front Bow Assy. (1) Rear Bow Assy. (1) Small Mount...
15
1 40923-R5 Parts List Front Bow Assy. (1) Rear Bow Assy. (1) Small Mount Foot (2) Large Mount Foot (2) Ladder Hook (2) Ladder Stop (2) Load Plate (2) Short Mounting Rail (2) Long Mounting Rail (2) Torque Tube (1) Ladder Pan Stiffener (1) Handle Assy. (1) Version 2
Transcript of 40923-R5 Parts List Version 2 40923-R5 Parts List Front Bow Assy. (1) Rear Bow Assy. (1) Small Mount...

1
40923-R5 Parts List
Front Bow Assy. (1)
Rear Bow Assy. (1)
Small Mount Foot (2) Large Mount Foot (2) Ladder Hook (2) Ladder Stop (2) Load Plate (2) Short Mounting Rail (2)
Long Mounting Rail (2)
Torque Tube (1)
Ladder Pan Stiffener (1)
Handle Assy. (1)
Version 2
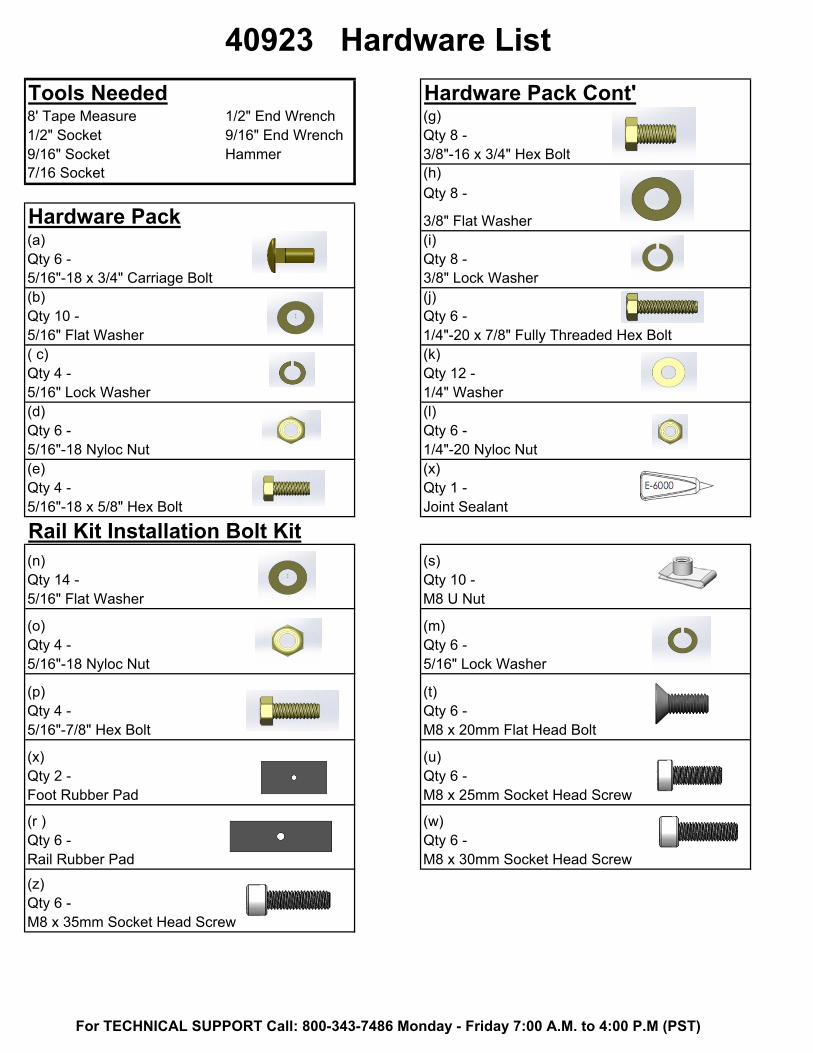
Tools Needed Hardware Pack Cont'8' Tape Measure 1/2" End Wrench (g)1/2" Socket 9/16" End Wrench Qty 8 - 9/16" Socket Hammer 3/8"-16 x 3/4" Hex Bolt7/16 Socket (h)
Qty 8 -
Hardware Pack 3/8" Flat Washer(a) (i)Qty 6 - Qty 8 - 5/16"-18 x 3/4" Carriage Bolt 3/8" Lock Washer(b) (j)Qty 10 - Qty 6 - 5/16" Flat Washer 1/4"-20 x 7/8" Fully Threaded Hex Bolt( c) (k)Qty 4 - Qty 12 - 5/16" Lock Washer 1/4" Washer(d) (l)Qty 6 - Qty 6 - 5/16"-18 Nyloc Nut 1/4"-20 Nyloc Nut(e) (x)Qty 4 - Qty 1 -5/16"-18 x 5/8" Hex Bolt Joint Sealant
Rail Kit Installation Bolt Kit(n) (s)Qty 14 - Qty 10 -5/16" Flat Washer M8 U Nut
(o) (m)Qty 4 - Qty 6 - 5/16"-18 Nyloc Nut 5/16" Lock Washer
(p) (t)Qty 4 - Qty 6 -5/16"-7/8" Hex Bolt M8 x 20mm Flat Head Bolt
(x) (u)Qty 2 - Qty 6 -Foot Rubber Pad M8 x 25mm Socket Head Screw
(r ) (w)Qty 6 - Qty 6 -Rail Rubber Pad M8 x 30mm Socket Head Screw
(z)Qty 6 -M8 x 35mm Socket Head Screw
40923 Hardware List
For TECHNICAL SUPPORT Call: 800-343-7486 Monday - Friday 7:00 A.M. to 4:00 P.M (PST)
2
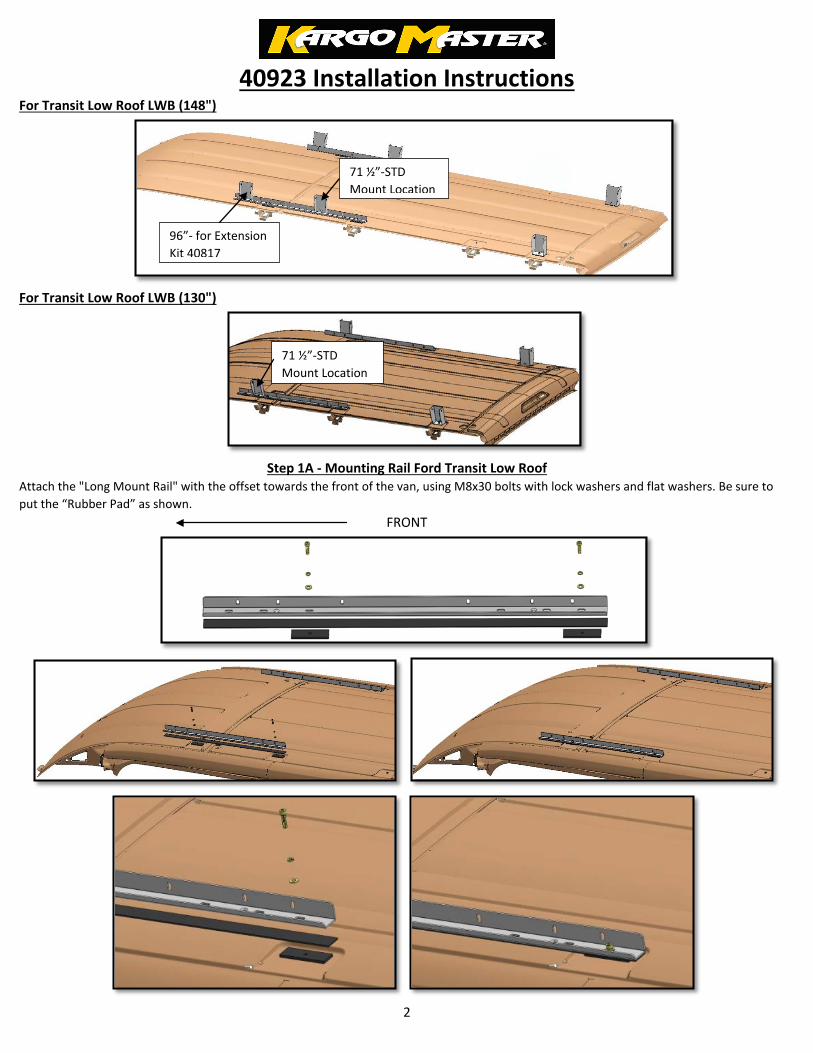
40923 Installation Instructions For Transit Low Roof LWB (148")
For Transit Low Roof LWB (130")
Step 1A - Mounting Rail Ford Transit Low Roof
Attach the "Long Mount Rail" with the offset towards the front of the van, using M8x30 bolts with lock washers and flat washers. Be sure to put the “Rubber Pad” as shown.
FRONT
96”- for Extension Kit 40817
71 ½”-STD Mount Location
71 ½”-STD Mount Location
3
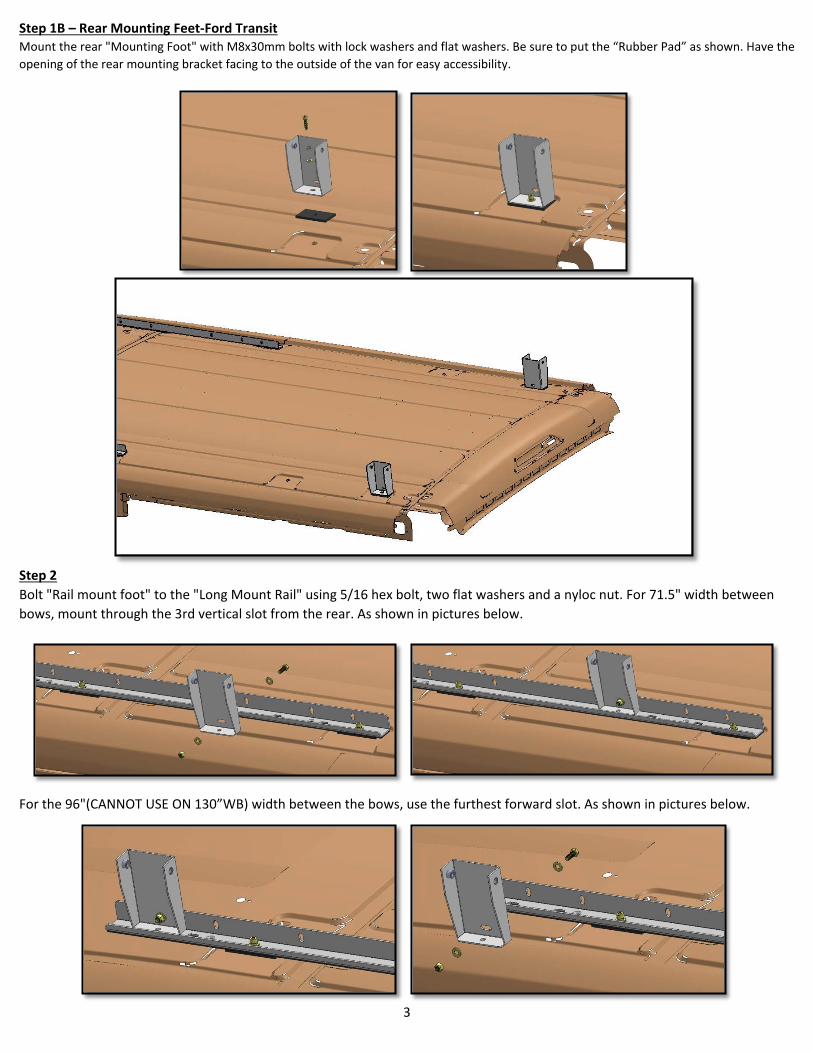
Step 1B – Rear Mounting Feet-Ford Transit Mount the rear "Mounting Foot" with M8x30mm bolts with lock washers and flat washers. Be sure to put the “Rubber Pad” as shown. Have the opening of the rear mounting bracket facing to the outside of the van for easy accessibility.
Step 2 Bolt "Rail mount foot" to the "Long Mount Rail" using 5/16 hex bolt, two flat washers and a nyloc nut. For 71.5" width between bows, mount through the 3rd vertical slot from the rear. As shown in pictures below.
For the 96"(CANNOT USE ON 130”WB) width between the bows, use the furthest forward slot. As shown in pictures below.

4
Transit Low Roof MWB (130") Attach the "Long Mount Rail" with the offset towards the front of the van, using M8x30 bolts with lock washers and flat washers. Be sure to put the “Rubber Pad” as shown. The 130"WB uses the same mounting locations on the front rail as the 148"WB, the 130"WB CANNOT be set at 96"bow mounting location. For 71.5" width between bows, mount through the 2nd vertical slot from the rear. As shown in pictures below.
Nissan NV Low Roof Step 1
Place Long mounting rail to rear of the roof as shown. Slide U-Clip over mounts in roof as shown. There will be 3 pairs of mounting locations, use the most rear, skip the middle and use the 3rd from the rear. *TIGHTEN
71 ½”-STD Mount Location
130"WB
FRONT
FRONT

5
Step 2A Mounting with a 71.5" spread between bow assemblies. Place Short mounting rail in the next mounting location as shown.

6
Slide U-Clips into position. Bolt with the flat head screw to the front. Use the M8 socket head, lock washer and flat washer towards the rear. *TIGHTEN Step 2B Mounting with a 96" spread between bow assemblies (40817 optional).
Slide U-Clips into position. Bolt with the flat head screw to the rear. Use the M8 socket head, lock washer and flat washer towards the front. *TIGHTEN
7
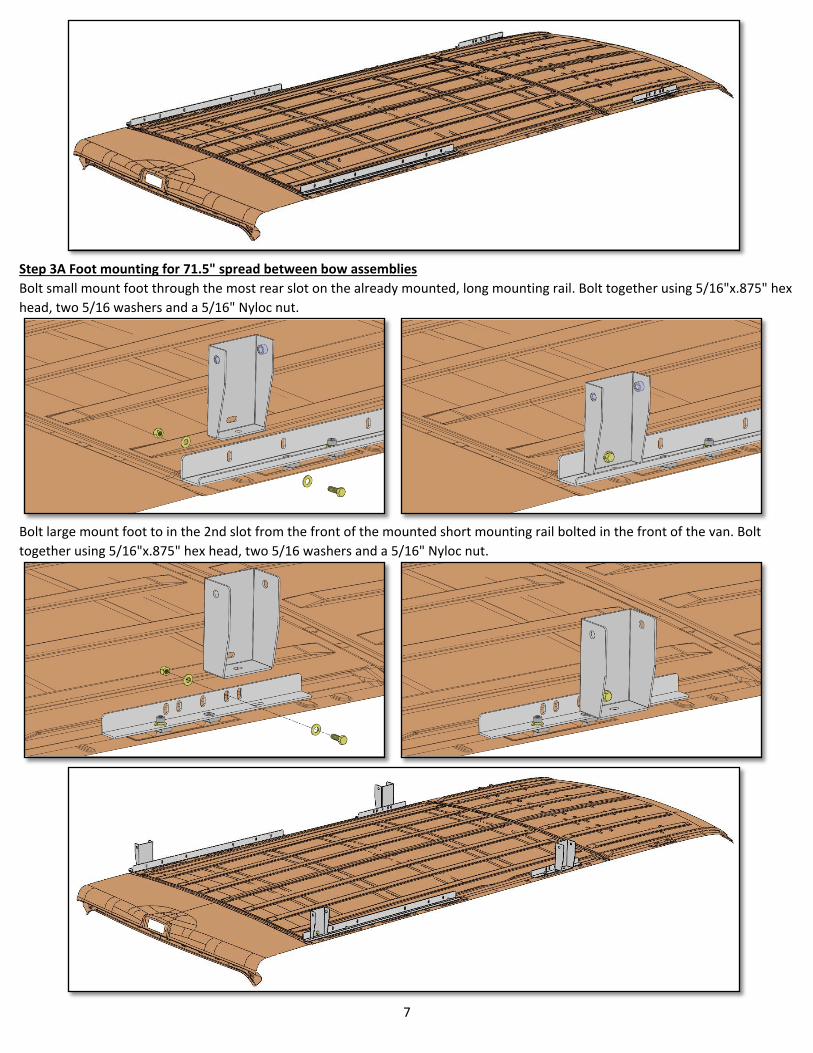
Step 3A Foot mounting for 71.5" spread between bow assemblies Bolt small mount foot through the most rear slot on the already mounted, long mounting rail. Bolt together using 5/16"x.875" hex head, two 5/16 washers and a 5/16" Nyloc nut.
Bolt large mount foot to in the 2nd slot from the front of the mounted short mounting rail bolted in the front of the van. Bolt together using 5/16"x.875" hex head, two 5/16 washers and a 5/16" Nyloc nut.
8
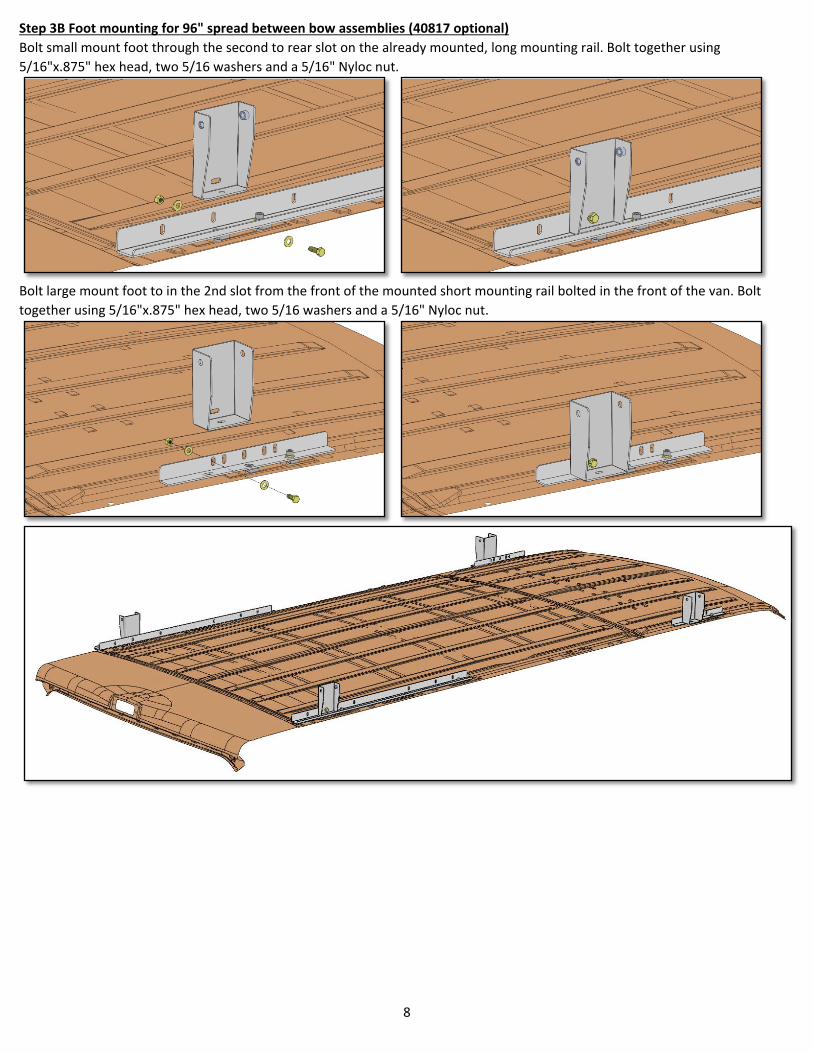
Step 3B Foot mounting for 96" spread between bow assemblies (40817 optional) Bolt small mount foot through the second to rear slot on the already mounted, long mounting rail. Bolt together using 5/16"x.875" hex head, two 5/16 washers and a 5/16" Nyloc nut.
Bolt large mount foot to in the 2nd slot from the front of the mounted short mounting rail bolted in the front of the van. Bolt together using 5/16"x.875" hex head, two 5/16 washers and a 5/16" Nyloc nut.
9
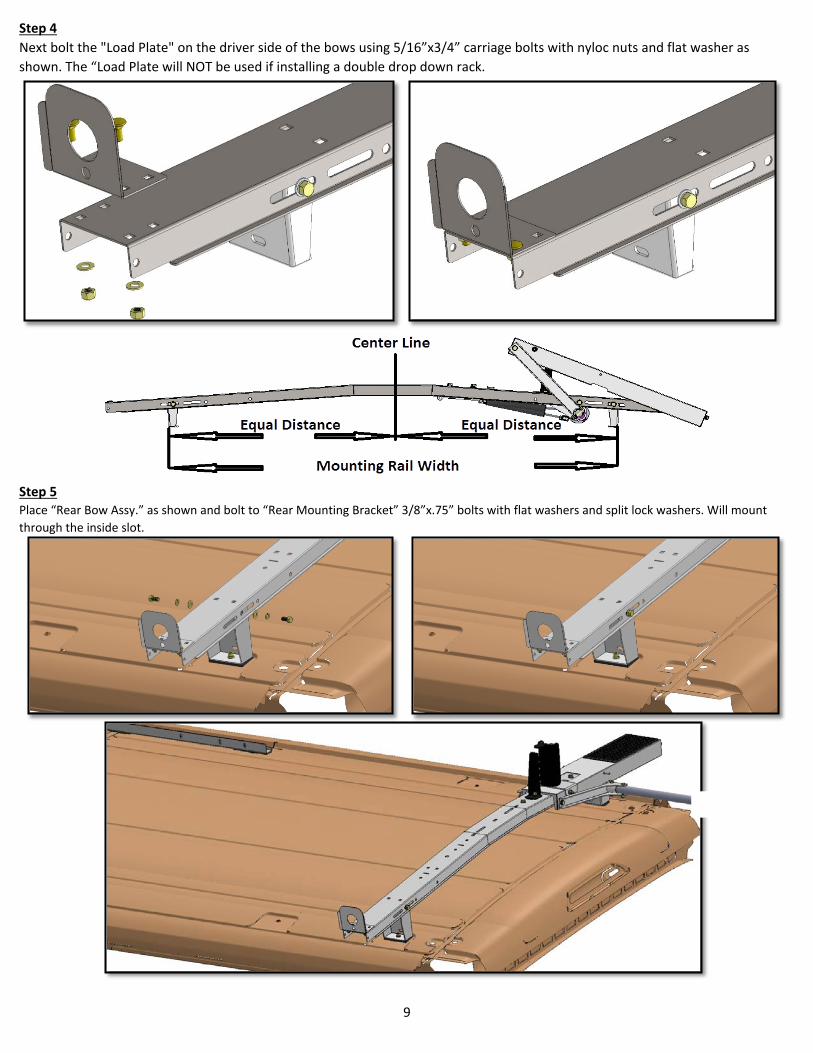
Step 4 Next bolt the "Load Plate" on the driver side of the bows using 5/16”x3/4” carriage bolts with nyloc nuts and flat washer as shown. The “Load Plate will NOT be used if installing a double drop down rack.
Step 5 Place “Rear Bow Assy.” as shown and bolt to “Rear Mounting Bracket” 3/8”x.75” bolts with flat washers and split lock washers. Will mount through the inside slot.

10
Step 6 Repeat with the front bow.
71.5" bow separation shown on 148"WB
Step 7 Attach torque tube using ¼” bolts with flat washers and nyloc nuts. Check distance between feet on both driver and passenger side, they must be EXACTLY the same to insure the bow assemblies are parallel.
96”- for Extension Kit 40817
71 ½”-STD Mount Location
11
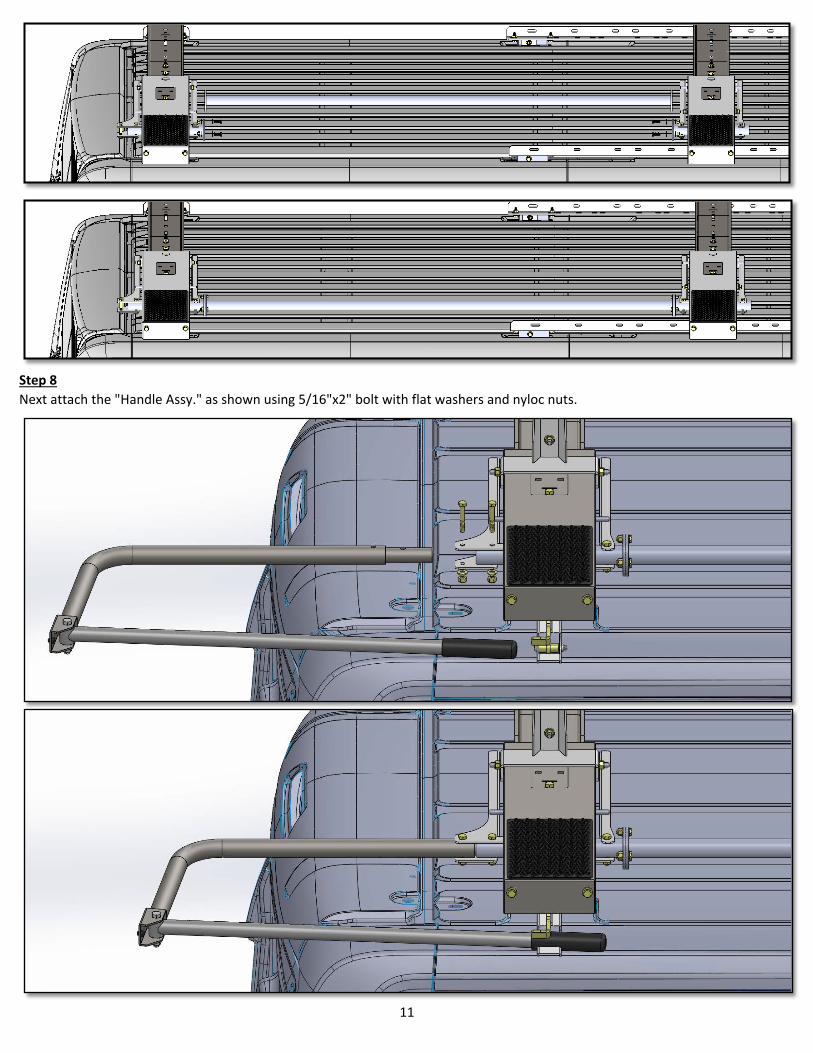
Step 8 Next attach the "Handle Assy." as shown using 5/16"x2" bolt with flat washers and nyloc nuts.
12
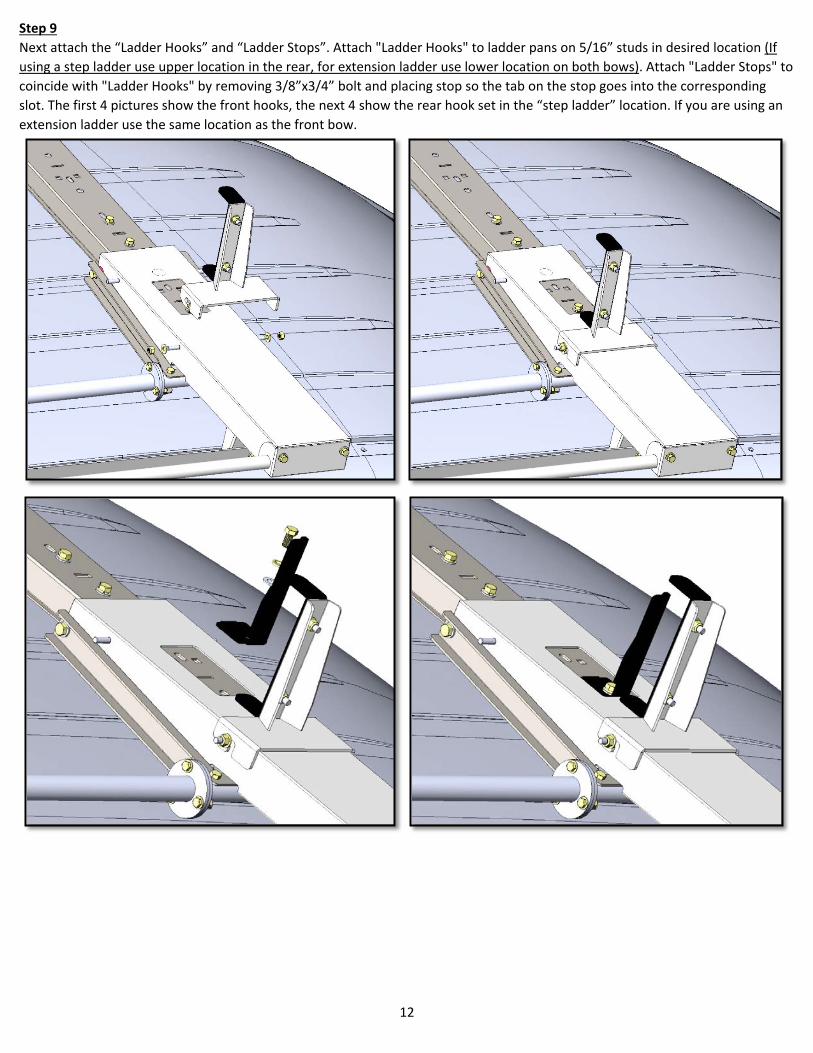
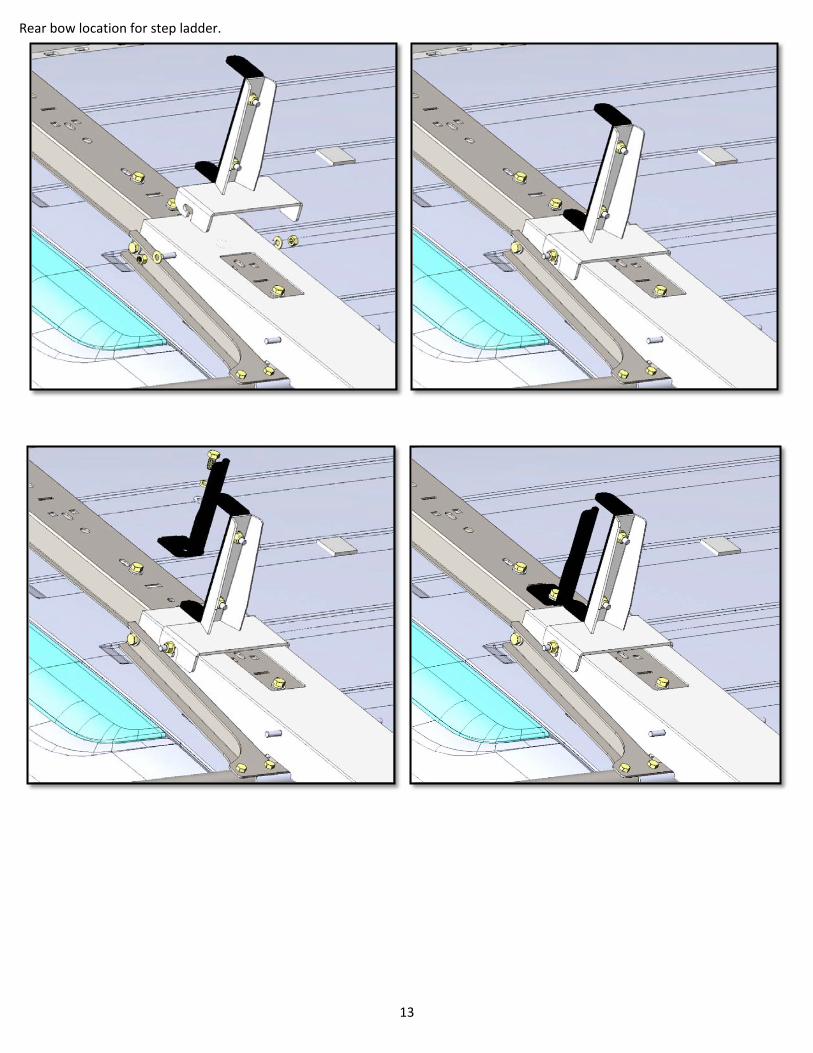
Step 9 Next attach the “Ladder Hooks” and “Ladder Stops”. Attach "Ladder Hooks" to ladder pans on 5/16” studs in desired location (If using a step ladder use upper location in the rear, for extension ladder use lower location on both bows). Attach "Ladder Stops" to coincide with "Ladder Hooks" by removing 3/8”x3/4” bolt and placing stop so the tab on the stop goes into the corresponding slot. The first 4 pictures show the front hooks, the next 4 show the rear hook set in the “step ladder” location. If you are using an extension ladder use the same location as the front bow.
13
Rear bow location for step ladder.

14
Step 10 Attach “Ladder Pan Stiffener”, in the closed position, using 5/16”x5/8” bolts with lock and flat washers. Confirm that distance between passenger side feet and driver side feet are still EXACTLY the same. Now you can tighten the feet for the front and rear bow assembly. The installation is complete.


![Rights / License: Research Collection In Copyright - Non ...40923/eth-40923-01.pdf · methanofullerene carboxylic acid and amino[2B.2.2]cryptand, followed by metal ion complexation.](https://static.fdocuments.us/doc/165x107/5bda49ee09d3f2cc6e8c6480/rights-license-research-collection-in-copyright-non-40923eth-40923-01pdf.jpg)