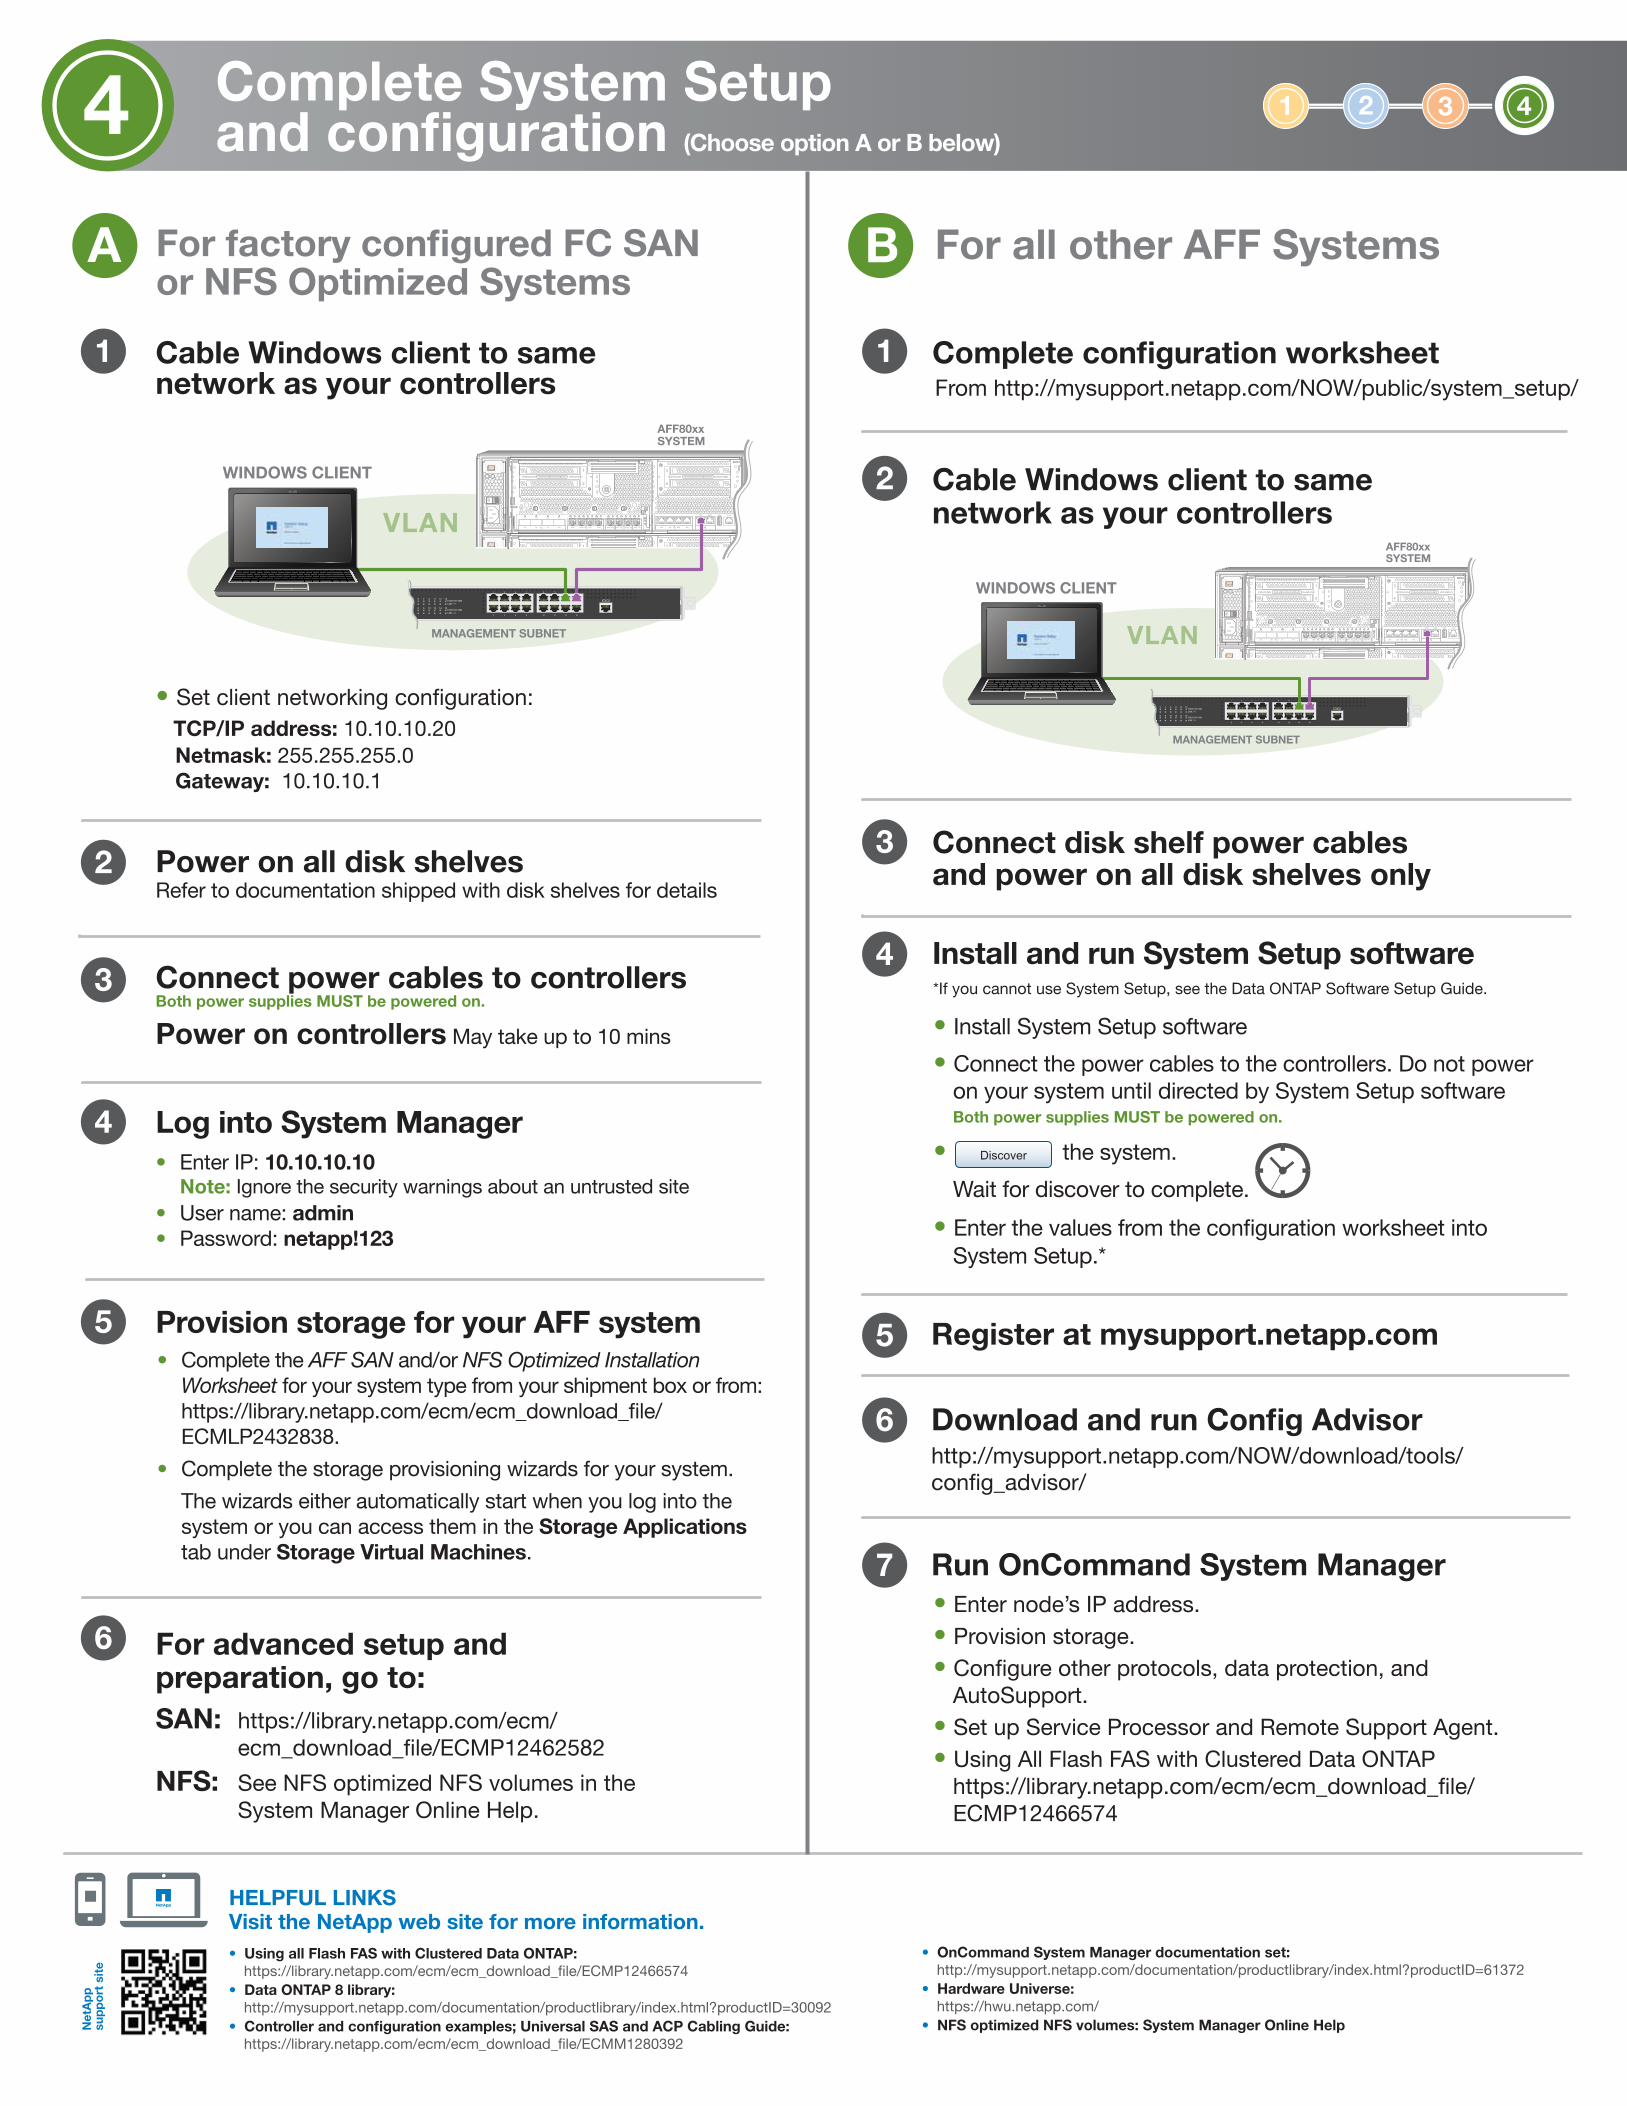
4 and configuration Complete System Setup
4
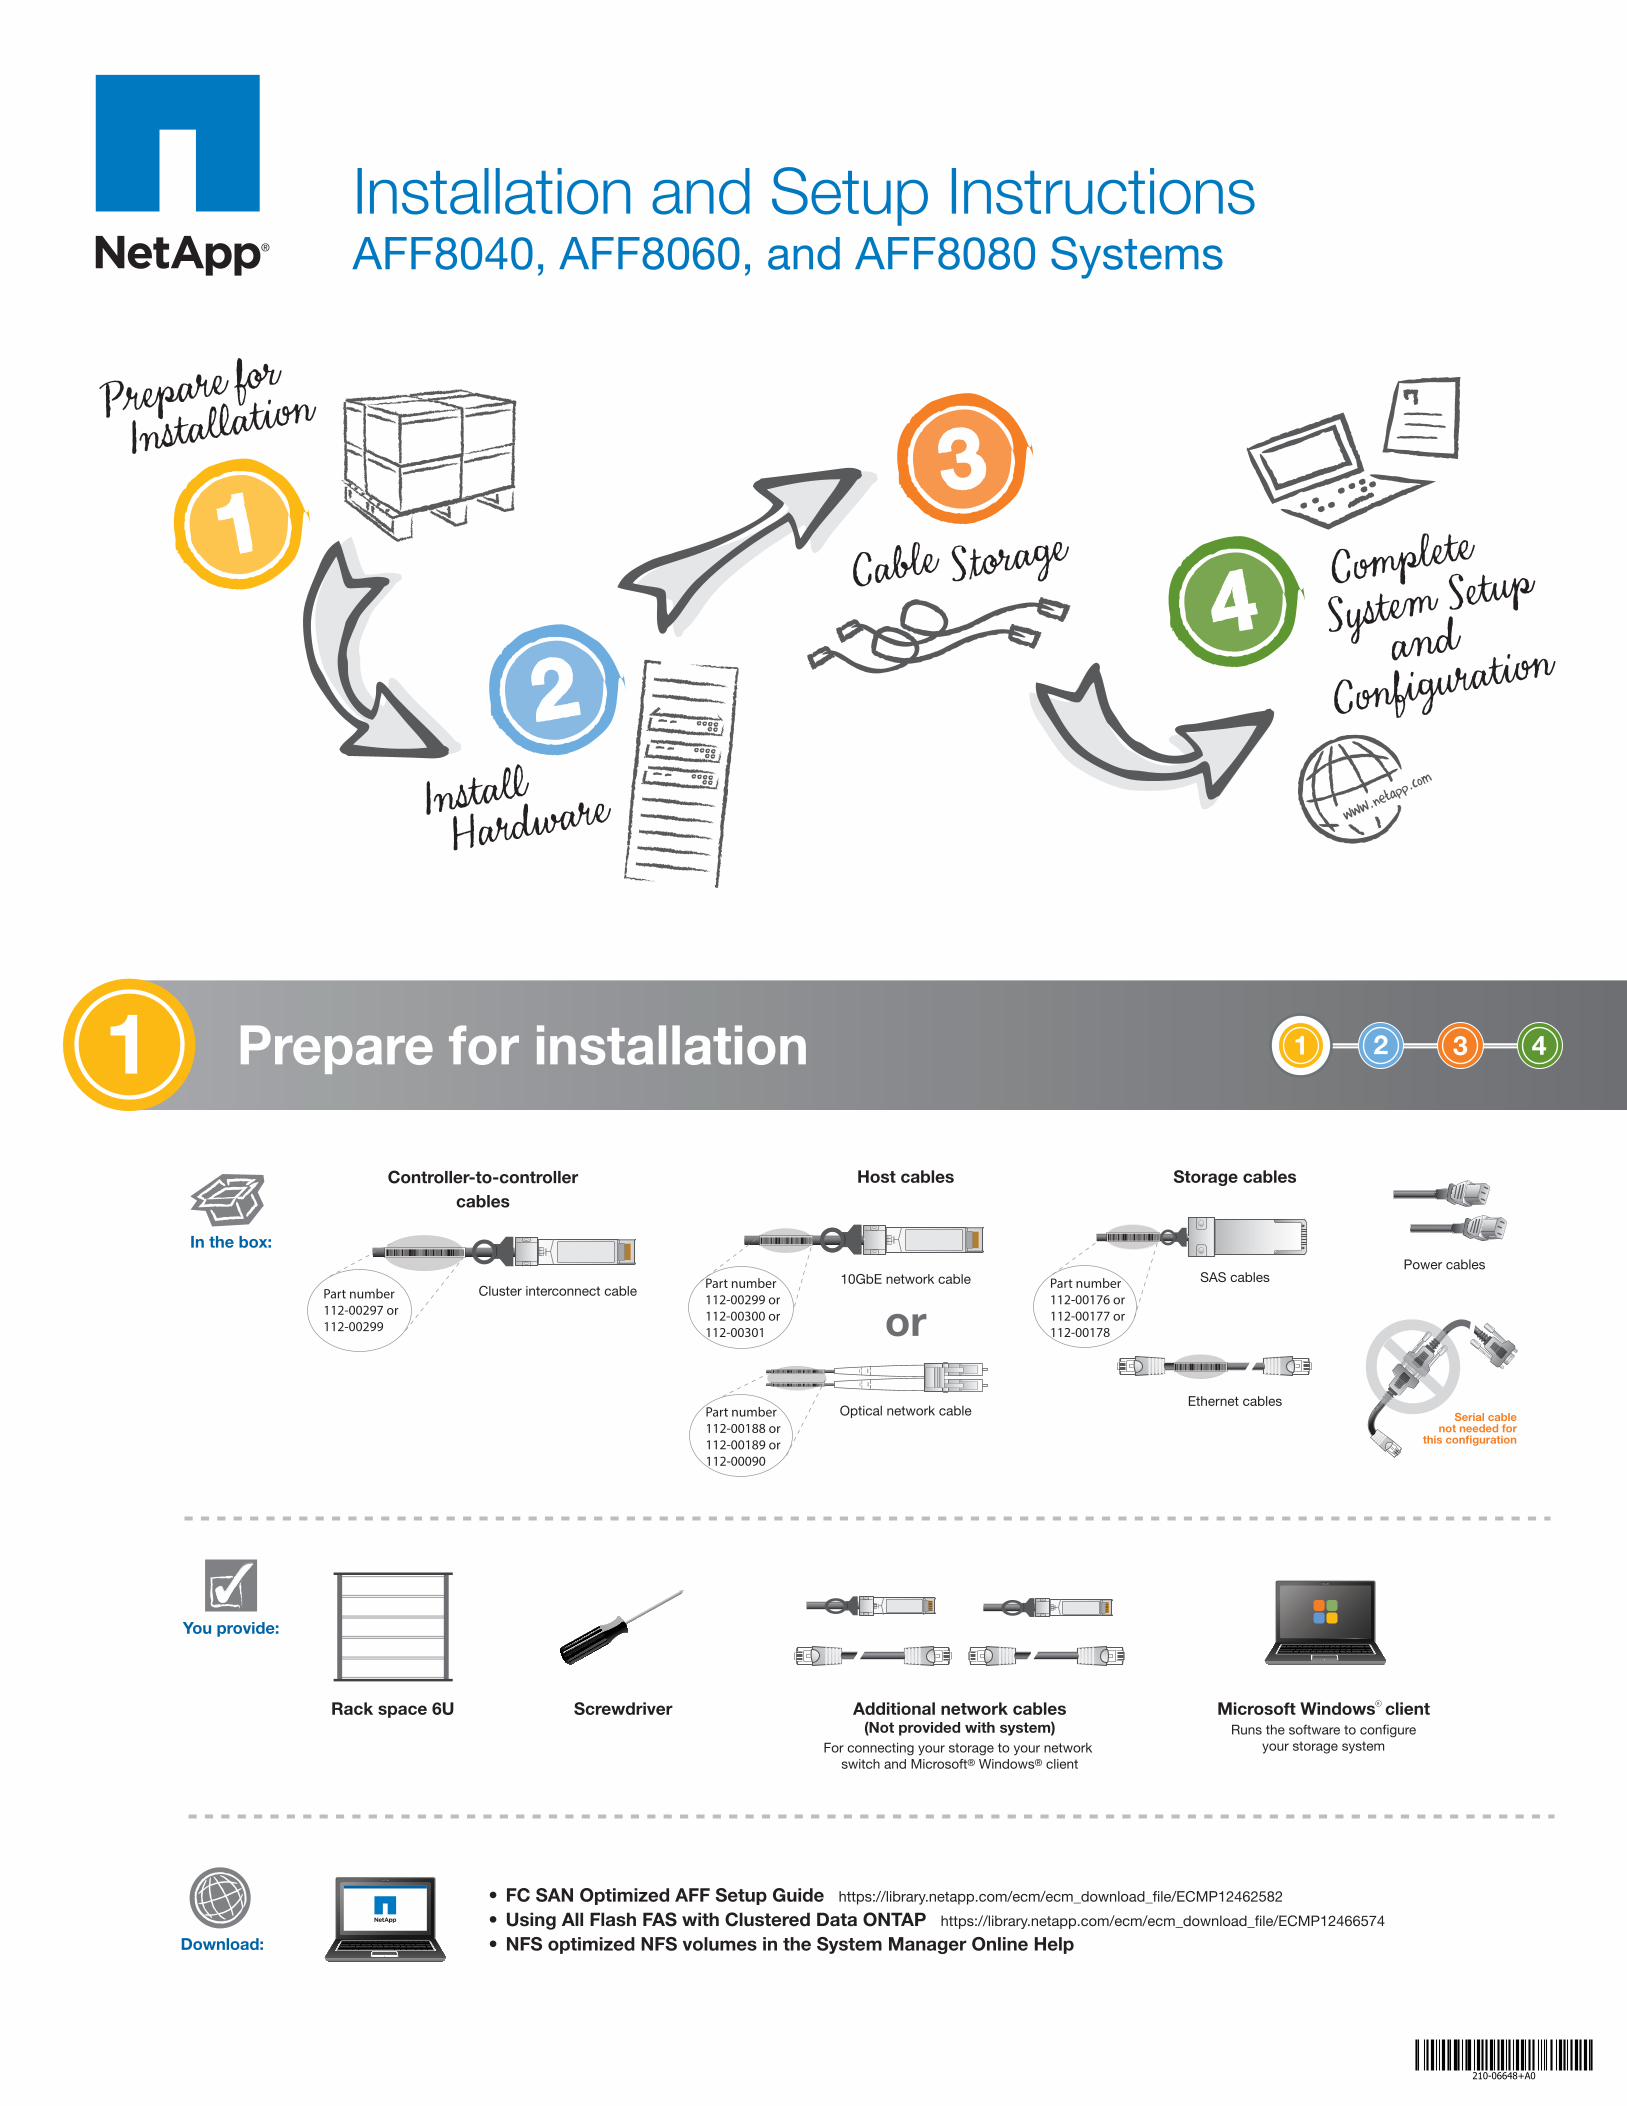
Prepare for installation 1 4 1 2 3 Installation and Setup Instructions AFF8040, AFF8060, and AFF8080 Systems • FC SAN Optimized AFF Setup Guide https://library.netapp.com/ecm/ecm_download_file/ECMP12462582 • Using All Flash FAS with Clustered Data ONTAP https://library.netapp.com/ecm/ecm_download_file/ECMP12466574 • NFS optimized NFS volumes in the System Manager Online Help In the box: Download: Microsoft Windows client Runs the software to configure your storage system Power cables SAS cables Ethernet cables Optical network cable Storage cables Screwdriver Additional network cables (Not provided with system) For connecting your storage to your network switch and Microsoft ® Windows ® client Rack space 6U You provide: 10GbE network cable or Host cables Part number 112-00299 or 112-00300 or 112-00301 Part number 112-00176 or 112-00177 or 112-00178 Part number 112-00188 or 112-00189 or 112-00090 R Cluster interconnect cable Controller-to-controller cables Part number 112-00297 or 112-00299 Serial cable not needed for this configuration 210-06648+A0
Transcript of 4 and configuration Complete System Setup
HELPFUL LINKSVisit the NetApp web site for more information.
Complete System Setupand configuration (Choose option A or B below)
4 1 2 3 4
Net
Ap
p
sup
po
rt s
ite
2
1
3
6
For factory configured FC SAN or NFS Optimized Systems
• Set client networking configuration: TCP/IP address: 10.10.10.20 Netmask: 255.255.255.0 Gateway: 10.10.10.1
A
Cable Windows client to samenetwork as your controllers
2 4 6 8
1 3 5 7
10 12 14 16
9 11 13 15
12
11
14
13
16
15
6
5
8
7
10
9
2
1
4
31000/100/10MLNK /
1000/100/10MLNK /
MANAGEMENT SUBNET
WINDOWS CLIENT
VLAN
AFF80xxSYSTEM
NVLNKLNKLNKLNKLNKLNKLNKLNKLNKLNKLNKLNK
e0i e0j e0k e0le0g 0g e0h 0he0f 0fe0e 0ee0de0ce0be0a0a 0b 0c 0d
1
2
3
4
NVLNKLNKLNKLNKLNKLNKLNKLNKLNKLNKLNKLNK
e0i e0j e0k e0le0g 0g e0h 0he0f 0fe0e 0ee0de0ce0be0a0a 0b 0c 0d
1
2
3
4
Connect power cables to controllersBoth power supplies MUST be powered on.
Power on controllers May take up to 10 mins
4 Log into System Manager
Power on all disk shelves Refer to documentation shipped with disk shelves for details
3
4
Register at mysupport.netapp.com5
• Enter node’s IP address.• Provision storage.• Configure other protocols, data protection, and AutoSupport.• Set up Service Processor and Remote Support Agent.• Using All Flash FAS with Clustered Data ONTAP https://library.netapp.com/ecm/ecm_download_file/ ECMP12466574
Run OnCommand System Manager 7
Download and run Config Advisor http://mysupport.netapp.com/NOW/download/tools/config_advisor/
6
2
1
• Install System Setup software
• Connect the power cables to the controllers. Do not power on your system until directed by System Setup software Both power supplies MUST be powered on.
• the system.
Wait for discover to complete.
• Enter the values from the configuration worksheet into System Setup.*
Complete configuration worksheet From http://mysupport.netapp.com/NOW/public/system_setup/
Install and run System Setup software*If you cannot use System Setup, see the Data ONTAP Software Setup Guide.
Connect disk shelf power cables and power on all disk shelves only
For all other AFF SystemsB
Cable Windows client to same network as your controllers
2 4 6 8
1 3 5 7
10 12 14 16
9 11 13 15
12
11
14
13
16
15
6
5
8
7
10
9
2
1
4
31000/100/10MLNK /
1000/100/10MLNK /
MANAGEMENT SUBNET
WINDOWS CLIENT
VLAN
AFF80xxSYSTEM
NVLNKLNKLNKLNKLNKLNKLNKLNKLNKLNKLNKLNK
e0i e0j e0k e0le0g 0g e0h 0he0f 0fe0e 0ee0de0ce0be0a0a 0b 0c 0d
1
2
3
4
NVLNKLNKLNKLNKLNKLNKLNKLNKLNKLNKLNKLNK
e0i e0j e0k e0le0g 0g e0h 0he0f 0fe0e 0ee0de0ce0be0a0a 0b 0c 0d
1
2
3
4
Prepare for installation1 41 2 3
Installation and Setup InstructionsAFF8040, AFF8060, and AFF8080 Systems
• FC SAN Optimized AFF Setup Guide https://library.netapp.com/ecm/ecm_download_file/ECMP12462582
• Using All Flash FAS with Clustered Data ONTAP https://library.netapp.com/ecm/ecm_download_file/ECMP12466574
• NFS optimized NFS volumes in the System Manager Online Help
In the box:
Download:
Microsoft Windows clientRuns the software to configure
your storage system
Power cablesSAS cables
Ethernet cablesOptical network cable
Storage cables
Screwdriver Additional network cables(Not provided with system)
For connecting your storage to your network switch and Microsoft® Windows® client
Rack space 6U
You provide:
10GbE network cable
or
Host cables
Part number112-00299 or112-00300 or112-00301
Part number112-00176 or112-00177 or112-00178
Part number112-00188 or112-00189 or112-00090
R
Cluster interconnect cable
Controller-to-controllercables
Part number112-00297 or 112-00299
Serial cablenot needed for
this configuration
• Using all Flash FAS with Clustered Data ONTAP: https://library.netapp.com/ecm/ecm_download_file/ECMP12466574• Data ONTAP 8 library: http://mysupport.netapp.com/documentation/productlibrary/index.html?productID=30092• Controller and configuration examples; Universal SAS and ACP Cabling Guide: https://library.netapp.com/ecm/ecm_download_file/ECMM1280392
• OnCommand System Manager documentation set: http://mysupport.netapp.com/documentation/productlibrary/index.html?productID=61372• Hardware Universe: https://hwu.netapp.com/• NFS optimized NFS volumes: System Manager Online Help
For advanced setup andpreparation, go to:SAN: https://library.netapp.com/ecm/ ecm_download_file/ECMP12462582
NFS: See NFS optimized NFS volumes in the System Manager Online Help.
• Enter IP: 10.10.10.10 Note: Ignore the security warnings about an untrusted site• User name: admin• Password: netapp!123
210-06648+A0
5 Provision storage for your AFF system• Complete the AFF SAN and/or NFS Optimized Installation Worksheet for your system type from your shipment box or from: https://library.netapp.com/ecm/ecm_download_file/ ECMLP2432838.
• Complete the storage provisioning wizards for your system.
The wizards either automatically start when you log into the system or you can access them in the Storage Applications tab under Storage Virtual Machines.

X2067AX2067A
LNK LNKIOM6
IOM6
LNK LNKIOM6
IOM6
1
2
AC AC
LNK LNKIOM6
IOM6
LNK LNKIOM6
IOM6
1
2
AC AC
LNK LNKIOM6
IOM6
LNK LNKIOM6
IOM6
1
2
AC AC
LNK LNKIOM6
IOM6
LNK LNKIOM6
IOM6
1
2
AC AC
X2067AX2067A
LNK LNKIOM6
IOM6
LNK LNKIOM6
IOM6
1
2
AC AC
LNK LNKIOM6
IOM6
LNK LNKIOM6
IOM6
1
2
AC AC
X2067AX2067A
Two stacks with one disk shelf each
Cable storage (Choose option A or B below) 3
A
For additional configurations, see HELPFUL LINKS.
Ethernet cables (ACP)
1
2
3
Cable onboard SAS ports
Cable SAS card ports
Cable the ACP port on each controller to the disk shelves
1 2
41 2 3
Stack 1
Stack 1
Stack 2
Stack 2
Latch releasefaces up on
controller SAS ports
SAS cablesPN 112-00176 or 112-00177 or 112-00178
Two stacks with two disk shelves each
B
Ethernet cables (ACP)
2
1
3
4
Cable the SAS shelf-to-shelf ports
Cable onboard SAS ports
Cable SAS card ports
1 2 3
Cable ACP port on each controller to the disk shelves and shelf-to-shelf ACP ports
SAS cablesPN 112-00176 or 112-00177 or 112-00178
Latch releasefaces down on disk shelf SAS ports
Insert SAS cable UP or DOWN and gently push into place until it clicks
Install hardware2
2See your network administrator for help connecting to your switches.
Cable controller to switches
41 2 3
Two node switchless cluster, clustered Data ONTAP
Connect wrench ports to the management switches (for cluster and node mgmt. LIFs).
Connect e0i ports to the management switches (for SVM mgmt. LIFs).
Cable the cluster interconnect e0a to e0a and e0c to e0c ports on both controllers.
2
1
BACK VIEW OF SYSTEM
NVLNKLNKLNKLNKLNKLNKLNKLNKLNKLNKLNKLNK
e0i e0j e0k e0le0g 0g e0h 0he0f 0fe0e 0ee0de0ce0be0a0a 0b 0c 0d
1
2
3
4
NVLNKLNKLNKLNKLNKLNKLNKLNKLNKLNKLNKLNK
e0i e0j e0k e0le0g 0g e0h 0he0f 0fe0e 0ee0de0ce0be0a0a 0b 0c 0d
1
2
3
4
NVLNKLNKLNKLNKLNKLNKLNKLNKLNKLNKLNKLNK
e0i e0j e0k e0le0g 0g e0h 0he0f 0fe0e 0ee0de0ce0be0a0a 0b 0c 0d
1
2
3
4
NVLNKLNKLNKLNKLNKLNKLNKLNKLNKLNKLNKLNK
e0i e0j e0k e0le0g 0g e0h 0he0f 0fe0e 0ee0de0ce0be0a0a 0b 0c 0d
1
2
3
4
NVLNKLNKLNKLNKLNKLNKLNKLNKLNKLNKLNKLNK
e0i e0j e0k e0le0g 0g e0h 0he0f 0fe0e 0ee0de0ce0be0a0a 0b 0c 0d
1
2
3
4
10 Gigabit Ethernet ports (e0a-e0d)
10 GbE ports (e0e-e0h) orFiber Channel ports (0e-0h) (SFP dependent)
Controller attention LED
NVRAMLED
SAS ports (4)
Gigabit Ethernet ports (e0i-e0l)FRONT VIEW OF SYSTEM
A B
BezelPower LED
Attention LED
A B
Controller A and B activity LEDs
A B
Console port (Setting: 9600 N-8-1)
Remote/Node Management port(wrench icon)
ACP port(locked wrench icon)
Slots for adapter cards
Connect ports e0e|0e and e0g|0g to data switches.
Optional - e0f|0f and e0h|0hto the data switches.
3
Optical network cablePN 112-00188 or 112-00189 or 112-00090
Strap the cables to the cable management tray. (Not shown)
4
1
2
TO MANAGEMENTNETWORK SWITCHES
Cluster interconnect cablePN 112-00297 or 112-00299
Ethernet cables
10GbE network cablePN 112-00299 or 112-00300 or 112-00301
or
3
TO DATA NETWORKSWITCHES
DO NOT install power cables at this point.
Unpack and install system1 OPTIONAL 2-POST MID-MOUNT BRACKETS
HANDLES ANDCABLE MANAGEMENT DEVICE
LIFTING HAZARDCAUTION
125 lbs. (57 kg)• Unpack all boxes and inventory contents. • Install rail kits, as needed, using the enclosed
installation instructions.• Install system components on rails or in a system cabinet per installation instructions. • Attach cable management tray.• Place the bezel on the front of the system.
For additional configurations, see HELPFUL LINKS.
X2067AX2067A
NVLNKLNKLNKLNKLNKLNKLNKLNKLNKLNKLNKLNK
e0i e0j e0k e0le0g 0g e0h 0he0f 0fe0e 0ee0de0ce0be0a0a 0b 0c 0d
1
2
3
4
Slots for adapter cards

X2067AX2067A
LNK LNKIOM6
IOM6
LNK LNKIOM6
IOM6
1
2
AC AC
LNK LNKIOM6
IOM6
LNK LNKIOM6
IOM6
1
2
AC AC
LNK LNKIOM6
IOM6
LNK LNKIOM6
IOM6
1
2
AC AC
LNK LNKIOM6
IOM6
LNK LNKIOM6
IOM6
1
2
AC AC
X2067AX2067A
LNK LNKIOM6
IOM6
LNK LNKIOM6
IOM6
1
2
AC AC
LNK LNKIOM6
IOM6
LNK LNKIOM6
IOM6
1
2
AC AC
X2067AX2067A
Two stacks with one disk shelf each
Cable storage (Choose option A or B below)3
A
For additional configurations, see HELPFUL LINKS.
Ethernet cables (ACP)
1
2
3
Cable onboard SAS ports
Cable SAS card ports
Cable the ACP port on each controller to the disk shelves
1 2
41 2 3
Stack 1
Stack 1
Stack 2
Stack 2
Latch releasefaces up on
controller SAS ports
SAS cablesPN 112-00176 or 112-00177 or 112-00178
Two stacks with two disk shelves each
B
Ethernet cables (ACP)
2
1
3
4
Cable the SAS shelf-to-shelf ports
Cable onboard SAS ports
Cable SAS card ports
1 2 3
Cable ACP port on each controller to the disk shelves and shelf-to-shelf ACP ports
SAS cablesPN 112-00176 or 112-00177 or 112-00178
Latch releasefaces down on disk shelf SAS ports
Insert SAS cable UP or DOWN and gently push into place until it clicks
Install hardware2
2See your network administrator for help connecting to your switches.
Cable controller to switches
41 2 3
Two node switchless cluster, clustered Data ONTAP
Connect wrench ports to the management switches (for cluster and node mgmt. LIFs).
Connect e0i ports to the management switches (for SVM mgmt. LIFs).
Cable the cluster interconnect e0a to e0a and e0c to e0c ports on both controllers.
2
1
BACK VIEW OF SYSTEM
NVLNKLNKLNKLNKLNKLNKLNKLNKLNKLNKLNKLNK
e0i e0j e0k e0le0g 0g e0h 0he0f 0fe0e 0ee0de0ce0be0a0a 0b 0c 0d
1
2
3
4
NVLNKLNKLNKLNKLNKLNKLNKLNKLNKLNKLNKLNK
e0i e0j e0k e0le0g 0g e0h 0he0f 0fe0e 0ee0de0ce0be0a0a 0b 0c 0d
1
2
3
4
NVLNKLNKLNKLNKLNKLNKLNKLNKLNKLNKLNKLNK
e0i e0j e0k e0le0g 0g e0h 0he0f 0fe0e 0ee0de0ce0be0a0a 0b 0c 0d
1
2
3
4
NVLNKLNKLNKLNKLNKLNKLNKLNKLNKLNKLNKLNK
e0i e0j e0k e0le0g 0g e0h 0he0f 0fe0e 0ee0de0ce0be0a0a 0b 0c 0d
1
2
3
4
NVLNKLNKLNKLNKLNKLNKLNKLNKLNKLNKLNKLNK
e0i e0j e0k e0le0g 0g e0h 0he0f 0fe0e 0ee0de0ce0be0a0a 0b 0c 0d
1
2
3
4
10 Gigabit Ethernet ports (e0a-e0d)
10 GbE ports (e0e-e0h) orFiber Channel ports (0e-0h) (SFP dependent)
Controller attention LED
NVRAMLED
SAS ports (4)
Gigabit Ethernet ports (e0i-e0l)FRONT VIEW OF SYSTEM
A B
BezelPower LED
Attention LED
A B
Controller A and B activity LEDs
A B
Console port (Setting: 9600 N-8-1)
Remote/Node Management port(wrench icon)
ACP port(locked wrench icon)
Slots for adapter cards
Connect ports e0e|0e and e0g|0g to data switches.
Optional - e0f|0f and e0h|0hto the data switches.
3
Optical network cablePN 112-00188 or 112-00189 or 112-00090
Strap the cables to the cable management tray. (Not shown)
4
1
2
TO MANAGEMENTNETWORK SWITCHES
Cluster interconnect cablePN 112-00297 or 112-00299
Ethernet cables
10GbE network cablePN 112-00299 or 112-00300 or 112-00301
or
3
TO DATA NETWORKSWITCHES
DO NOT install power cables at this point.
Unpack and install system1 OPTIONAL 2-POST MID-MOUNT BRACKETS
HANDLES ANDCABLE MANAGEMENT DEVICE
LIFTING HAZARDCAUTION
125 lbs. (57 kg)• Unpack all boxes and inventory contents.• Install rail kits, as needed, using the enclosed
installation instructions.• Install system components on rails or in a
system cabinet per installation instructions.• Attach cable management tray.• Place the bezel on the front of the system.
For additional configurations, see HELPFUL LINKS.
X2067AX2067A
NVLNKLNKLNKLNKLNKLNKLNKLNKLNKLNKLNKLNK
e0i e0j e0k e0le0g 0g e0h 0he0f 0fe0e 0ee0de0ce0be0a0a 0b 0c 0d
1
2
3
4
Slots for adapter cards
HELPFUL LINKSVisit the NetApp web site for more information.
Complete System Setupand configuration (Choose option A or B below)
4 1 2 3 4N
etA
pp
su
pp
ort
sit
e
2
1
3
6
For factory configured FC SAN or NFS Optimized Systems
• Set client networking configuration:TCP/IP address: 10.10.10.20Netmask: 255.255.255.0Gateway: 10.10.10.1
A
Cable Windows client to samenetwork as your controllers
2 4 6 8
1 3 5 7
10 12 14 16
9 11 13 15
12
11
14
13
16
15
6
5
8
7
10
9
2
1
4
31000/100/10MLNK /
1000/100/10MLNK /
MANAGEMENT SUBNET
WINDOWS CLIENT
VLAN
AFF80xxSYSTEM
NVLNKLNKLNKLNKLNKLNKLNKLNKLNKLNKLNKLNK
e0i e0j e0k e0le0g 0g e0h 0he0f 0fe0e 0ee0de0ce0be0a0a 0b 0c 0d
1
2
3
4
NVLNKLNKLNKLNKLNKLNKLNKLNKLNKLNKLNKLNK
e0i e0j e0k e0le0g 0g e0h 0he0f 0fe0e 0ee0de0ce0be0a0a 0b 0c 0d
1
2
3
4
Connect power cables to controllersBoth power supplies MUST be powered on.
Power on controllers May take up to 10 mins
4 Log into System Manager
Power on all disk shelves Refer to documentation shipped with disk shelves for details
3
4
Register at mysupport.netapp.com5
• Enter node’s IP address.• Provision storage.• Configure other protocols, data protection, and
AutoSupport.• Set up Service Processor and Remote Support Agent.• Using All Flash FAS with Clustered Data ONTAP
https://library.netapp.com/ecm/ecm_download_file/ECMP12466574
Run OnCommand System Manager 7
Download and run Config Advisor http://mysupport.netapp.com/NOW/download/tools/config_advisor/
6
2
1
• Install System Setup software
• Connect the power cables to the controllers. Do not poweron your system until directed by System Setup softwareBoth power supplies MUST be powered on.
• the system.
Wait for discover to complete.
• Enter the values from the configuration worksheet intoSystem Setup.*
Complete configuration worksheet From http://mysupport.netapp.com/NOW/public/system_setup/
Install and run System Setup software*If you cannot use System Setup, see the Data ONTAP Software Setup Guide.
Connect disk shelf power cables and power on all disk shelves only
For all other AFF SystemsB
Cable Windows client to same network as your controllers
2 4 6 8
1 3 5 7
10 12 14 16
9 11 13 15
12
11
14
13
16
15
6
5
8
7
10
9
2
1
4
31000/100/10MLNK /
1000/100/10MLNK /
MANAGEMENT SUBNET
WINDOWS CLIENT
VLAN
AFF80xxSYSTEM
NVLNKLNKLNKLNKLNKLNKLNKLNKLNKLNKLNKLNK
e0i e0j e0k e0le0g 0g e0h 0he0f 0fe0e 0ee0de0ce0be0a0a 0b 0c 0d
1
2
3
4
NVLNKLNKLNKLNKLNKLNKLNKLNKLNKLNKLNKLNK
e0i e0j e0k e0le0g 0g e0h 0he0f 0fe0e 0ee0de0ce0be0a0a 0b 0c 0d
1
2
3
4
Prepare for installation1 41 2 3
Installation and Setup InstructionsAFF8040, AFF8060, and AFF8080 Systems
• FC SAN Optimized AFF Setup Guide https://library.netapp.com/ecm/ecm_download_file/ECMP12462582
• Using All Flash FAS with Clustered Data ONTAP https://library.netapp.com/ecm/ecm_download_file/ECMP12466574
• NFS optimized NFS volumes in the System Manager Online Help
In the box:
Download:
Microsoft Windows clientRuns the software to configure
your storage system
Power cablesSAS cables
Ethernet cablesOptical network cable
Storage cables
Screwdriver Additional network cables(Not provided with system)
For connecting your storage to your network switch and Microsoft® Windows® client
Rack space 6U
You provide:
10GbE network cable
or
Host cables
Part number112-00299 or112-00300 or112-00301
Part number112-00176 or112-00177 or112-00178
Part number112-00188 or112-00189 or112-00090
R
Cluster interconnect cable
Controller-to-controllercables
Part number112-00297 or 112-00299
Serial cablenot needed for
this configuration
• Using all Flash FAS with Clustered Data ONTAP:https://library.netapp.com/ecm/ecm_download_file/ECMP12466574
• Data ONTAP 8 library:http://mysupport.netapp.com/documentation/productlibrary/index.html?productID=30092
• Controller and configuration examples; Universal SAS and ACP Cabling Guide:https://library.netapp.com/ecm/ecm_download_file/ECMM1280392
• OnCommand System Manager documentation set:http://mysupport.netapp.com/documentation/productlibrary/index.html?productID=61372
• Hardware Universe:https://hwu.netapp.com/
• NFS optimized NFS volumes: System Manager Online Help
For advanced setup andpreparation, go to:SAN: https://library.netapp.com/ecm/
ecm_download_file/ECMP12462582
NFS: See NFS optimized NFS volumes in theSystem Manager Online Help.
• Enter IP: 10.10.10.10Note: Ignore the security warnings about an untrusted site
• User name: admin• Password: netapp!123
210-06648+A0
5 Provision storage for your AFF system• Complete the AFF SAN and/or NFS Optimized Installation
Worksheet for your system type from your shipment box or from:https://library.netapp.com/ecm/ecm_download_file/ECMLP2432838.
• Complete the storage provisioning wizards for your system.
The wizards either automatically start when you log into thesystem or you can access them in the Storage Applicationstab under Storage Virtual Machines.