3D Lace & Fabric Santa - emblibrary.com · fabric Santa design, you will find ... software,...
14
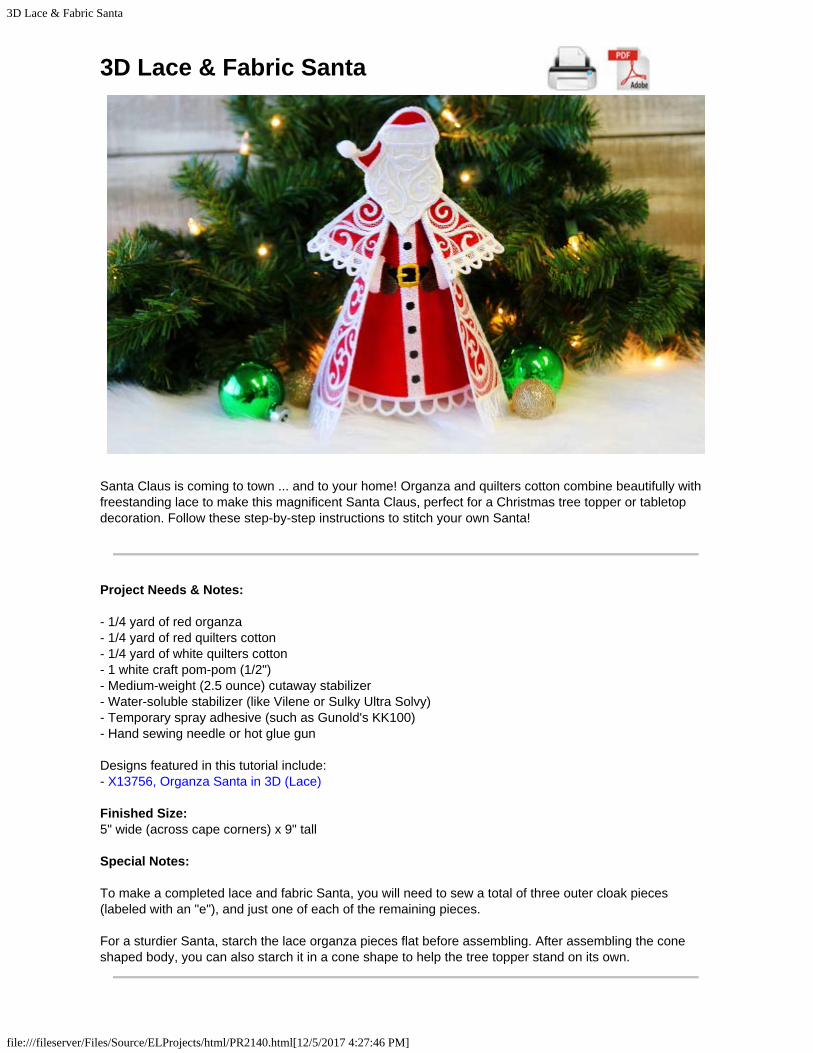
3D Lace & Fabric Santa file:///fileserver/Files/Source/ELProjects/html/PR2140.html[12/5/2017 4:27:46 PM] 3D Lace & Fabric Santa Santa Claus is coming to town ... and to your home! Organza and quilters cotton combine beautifully with freestanding lace to make this magnificent Santa Claus, perfect for a Christmas tree topper or tabletop decoration. Follow these step-by-step instructions to stitch your own Santa! Project Needs & Notes: - 1/4 yard of red organza - 1/4 yard of red quilters cotton - 1/4 yard of white quilters cotton - 1 white craft pom-pom (1/2") - Medium-weight (2.5 ounce) cutaway stabilizer - Water-soluble stabilizer (like Vilene or Sulky Ultra Solvy) - Temporary spray adhesive (such as Gunold's KK100) - Hand sewing needle or hot glue gun Designs featured in this tutorial include: - X13756, Organza Santa in 3D (Lace) Finished Size: 5" wide (across cape corners) x 9" tall Special Notes: To make a completed lace and fabric Santa, you will need to sew a total of three outer cloak pieces (labeled with an "e"), and just one of each of the remaining pieces. For a sturdier Santa, starch the lace organza pieces flat before assembling. After assembling the cone shaped body, you can also starch it in a cone shape to help the tree topper stand on its own.
Transcript of 3D Lace & Fabric Santa - emblibrary.com · fabric Santa design, you will find ... software,...
3D Lace & Fabric Santa
file:///fileserver/Files/Source/ELProjects/html/PR2140.html[12/5/2017 4:27:46 PM]
3D Lace & Fabric Santa
Santa Claus is coming to town ... and to your home! Organza and quilters cotton combine beautifully withfreestanding lace to make this magnificent Santa Claus, perfect for a Christmas tree topper or tabletopdecoration. Follow these step-by-step instructions to stitch your own Santa!
Project Needs & Notes:
- 1/4 yard of red organza- 1/4 yard of red quilters cotton- 1/4 yard of white quilters cotton- 1 white craft pom-pom (1/2")- Medium-weight (2.5 ounce) cutaway stabilizer- Water-soluble stabilizer (like Vilene or Sulky Ultra Solvy)- Temporary spray adhesive (such as Gunold's KK100)- Hand sewing needle or hot glue gun
Designs featured in this tutorial include: - X13756, Organza Santa in 3D (Lace)
Finished Size:5" wide (across cape corners) x 9" tall
Special Notes:
To make a completed lace and fabric Santa, you will need to sew a total of three outer cloak pieces(labeled with an "e"), and just one of each of the remaining pieces.
For a sturdier Santa, starch the lace organza pieces flat before assembling. After assembling the coneshaped body, you can also starch it in a cone shape to help the tree topper stand on its own.

3D Lace & Fabric Santa
file:///fileserver/Files/Source/ELProjects/html/PR2140.html[12/5/2017 4:27:46 PM]
When you download the lace andfabric Santa design, you will finda total of twenty files.
Eight of the files are embroideryfiles and, the other twelve aredieline files marked with theletters DL. Dielines are used tocut the fabric to the right shapeand size.
Open each dieline file with anembroidery software, and print it.If you do not have embroiderysoftware, Wilcom's TrueSizer is afree program to use.
For the cotton pieces (a, b, c, andd), cut the pieces out of thedieline printout, spray the backswith temporary adhesive, andsmooth them on top of the redand/or white cotton fabric.
Then cut pieces of cutawaystabilizer that are slightly biggerthan the fabric pieces.
Spray the stabilizer withtemporary adhesive, and smoothit onto the backside of the fabric.
Cut out the shapes, and repeatfor all fabric pieces, making sureto always add cutaway stabilizerto the back of the fabric.
If desired, the paper can be lefton and labeled, so they don't getmixed up.

3D Lace & Fabric Santa
file:///fileserver/Files/Source/ELProjects/html/PR2140.html[12/5/2017 4:27:46 PM]
For the organza pieces there isalways a front and a back dieline(pieces e, f, g, and h).
Cut out the shapes and repeat forall the front and back organzapieces.
For organza, it is good to leavethe paper on until it's time toplace the pieces in the hoop.
For easy removal later, fold backjust one corner of the paper. Itcan also be helpful to label eachpiece.
This design has been speciallydigitized for water-solublestabilizer.
After the stabilizer is removed,beautiful fabric-accented laceremains.

3D Lace & Fabric Santa
file:///fileserver/Files/Source/ELProjects/html/PR2140.html[12/5/2017 4:27:46 PM]
There are a couple of differentkinds of water-soluble stabilizer.One is clear and plastic, and thatbrand is Sulky Ultra Solvy. Theother is soft and fibrous, calledVilene. Both will work very well.Vilene is used in thisdemonstration.
Use a size 11 or 75/11 sharpsewing needle. A sharp sewingneedle has a smaller, finer pointthan an embroidery needle. Thatmeans it will make smaller holesin the stabilizer.
Hoop the water-soluble stabilizerfirmly. Make sure it is nice andtight with no wrinkles.
First, start by sewing the cottonfiles (a, b, c, and d). In thistutorial, we are stitching out file"c" first to show the multipleapplique pieces.
Load the embroidery file labeledwith an "c" onto the machine (notthe dieline), and embroider thedesign.
The first thing to embroider willbe a dieline, or outline stitch forthe hat. This marks the area onthe stabilizer where we'll placethe first two fabric pieces.

3D Lace & Fabric Santa
file:///fileserver/Files/Source/ELProjects/html/PR2140.html[12/5/2017 4:27:46 PM]
Remove the hoop from themachine, but do not unhoop thestabilizer.
Spray the back of the two hatpieces with temporary adhesive.Place them right inside the sewndielines (after removing the paperdieline).
>
Reattach the hoop to themachine and continue with thedesign.
A tack down will sew next. Thisbinds the fabric pieces in placefor the remainder of the design.
Watch the color change sheet,and stop the machine beforesewing "head tack down".
Remove the hoop from themachine, but do not unhoop thestabilizer. Spray the backside ofthe head piece with temporaryadhesive, and place it inside thesewn dieline.

3D Lace & Fabric Santa
file:///fileserver/Files/Source/ELProjects/html/PR2140.html[12/5/2017 4:27:46 PM]
Place the hoop back on themachine, and embroider the tackdown.
Next, all of the inner elements willsew, followed by the satin edgesand lace borders. Some of theembroidery files only have onefabric piece to place.
Follow the color change sheetscarefully, and always place thefabric piece before sewing itstack down.
The lace organza files (e, f, g,and h) can be seen from bothsides, so wind a bobbin with thesame thread that you're using inthe needle.
Hoop a piece of water-solublestabilizer, and load embroideryfile "e" onto the machine (not thedieline file).
Begin to embroider the design,and the dieline (or outline) of thefabric piece will embroider ontothe stabilizer.

3D Lace & Fabric Santa
file:///fileserver/Files/Source/ELProjects/html/PR2140.html[12/5/2017 4:27:46 PM]
Once the dieline has sewn,remove the hoop from themachine.
Spray the backside of the frontorganza piece with temporaryadhesive, and place it inside ofthe sewn dieline.
Then place the hoop back ontothe machine, and embroidery the"front piece tack down."
Before sewing the "back piecetack down" step, stop themachine.
Remove the hoop, but do notunhoop the stabilizer. Lay thehoop and stabilizer on the tablewith the backside facing up.
Spray the backside of the backdieline with temporary adhesive,and place it on the back of thestabilizer and inside the sewnoutline.
Place the hoop back on themachine, and embroider the restof the design.
A tack down will sew first,followed by the inner details,finishing borders, and lace.

3D Lace & Fabric Santa
file:///fileserver/Files/Source/ELProjects/html/PR2140.html[12/5/2017 4:27:46 PM]
After the embroidery hasfinished, cut the excess stabilizeraway for both the cotton andorganza pieces.
The stabilizer's packaging shouldgive instructions for removing theexcess.
For Vilene, soak the organza andcotton pieces for a few moments.
Let the piece air dry, then pressall pieces using a pressing cloth.

3D Lace & Fabric Santa
file:///fileserver/Files/Source/ELProjects/html/PR2140.html[12/5/2017 4:27:46 PM]
Repeat the previous steps toprepare and embroider the lacecotton and organza pieces.
Make sure to sew file "c" out atotal of three times, so there arethree identical pieces to make theouter cloak.
Once all the pieces areembroidered, it is time toassemble the Santa.
First, take the two body pieces (aand b), and line up the straightedges with the wrong sides of thepieces together.
Hand sew the two piecestogether along one side from thetop corners to the bottom fabriccorners.
Then repeat and sew theopposite sides together, creatingthe base cone.

3D Lace & Fabric Santa
file:///fileserver/Files/Source/ELProjects/html/PR2140.html[12/5/2017 4:27:46 PM]
Next take one of the outer cloakpieces (piece "e"), and fold it inhalf along the center dart.
Make sure it is folded so that thewrong sides of the lace aretogether.
Hand stitch the dart closed fromthe point to the bottom corner ofthe lace border.
Repeat the previous step to sewthe dart on all three outer cloakpieces.
Then lay them side by side, andmatch up the straight edges.Make sure the right sides are allfacing up, and sew themtogether.
This step can be either sewn byhand or on a machine using azigzag stitch.
Next take the back shoulderpiece (piece "h"), and fold it inhalf with the wrong sidestouching.
Hand sew the dart closed fromthe point to the bottom corner ofthe fabric piece.

3D Lace & Fabric Santa
file:///fileserver/Files/Source/ELProjects/html/PR2140.html[12/5/2017 4:27:46 PM]
Then take the front shoulderpieces (f and g), and match thecurved edges with the backshoulder piece ("h").
Make sure the wrong sides of thepieces are together. Hand stitchstarting at the bottom corner,sewing up and around the curveuntil you get to where the frontshoulder pieces end.
Now take the outer cloak pieces(the three "e" pieces), and placethem inside of the shoulderpieces (f, g, and h).
Make sure the right side of theouter cloak is against the wrongside of the shoulder pieces (sothey both face out).
Match up the top corner of oneside of the outer cloak to the topcorner of the front shoulderpiece.
Sew them together along thestraight edge until you get to thebottom corner of the lace border.Repeat for the opposite side.
Find the center back of the outercloak piece along the top edge.Match that spot up with the pointof the dart on the shoulders.
Hand tack them together with aneedle and thread or some glue.This will keep the two sectionssecurely together and help themkeep their shape.

3D Lace & Fabric Santa
file:///fileserver/Files/Source/ELProjects/html/PR2140.html[12/5/2017 4:27:46 PM]
Next, place the body cone onto abottle of glue or soda, and drapethe outer cloak around the cone.
Line the two pieces up until thecloak is resting right on the top ofthe cone.
Then, close the cloak around thecone until the top edges of theshoulders meet the sides of thewhite stripe. Hand tack themtogether on both sides at the topof the cone.
Take the two head pieces (c andd), and match them up back toback with the wrong sides of thepieces together. Locate thewidest point on the beard.
Start on one side and sew thepieces together from the widestpoint up over the top of the hat,and then sew down until you getto the widest point of the beardon the opposite side. Leave thebottom edges open.
Then open up the bottom of thehead pieces, and place themover the shoulders.
Make sure the shoulders are upbetween the two head pieces.
Use a hand sewing needle andthread or glue to tack the beardto the shoulder on both sides.

3D Lace & Fabric Santa
file:///fileserver/Files/Source/ELProjects/html/PR2140.html[12/5/2017 4:27:46 PM]
Line up the center back of thebody cone and the center back ofthe outer cloak, and hand tackthem together at the very bottomof the lace pieces. This will keepSanta standing up tall.
Finally, glue a tiny craft pom-pomto the tip of Santa's hat to finishoff this jolly holiday decoration.
This project is featured on theEmbroidery Library Pinterestpage.
Pin it yourself using the "Pin It"button on this page.

3D Lace & Fabric Santa
file:///fileserver/Files/Source/ELProjects/html/PR2140.html[12/5/2017 4:27:46 PM]
Questions or comments? Let us know! Send an email to us; the address is [email protected].