3d game engine
25
Luis Vazquez Page 1 of 25 3D Game Engine Workflow Introduction I have been tasked with the creation of a playable video game level in Unity, which I will accomplish by using a variety of techniques and assets, some of which will be provided standard with the Unity game engine, and others will be personally made by me for the purpose of using with this project. Standard Assets and Layout When I create the new Unity project to work from, I need to anticipate what varieties of assets I will need to use in the project and import them from storage into the project. This is done via the drop down menus, selecting “Assets > Import New Assets >” and then the appropriate package. For example, I intend to import the Character Controller, Skyboxes, Terrain Assets, Tree Creator, and Water (Basic) packages. After the package has been selected, a series of windows appear in sequence, showing the user that the package is being imported into the project:
-
Upload
luisfvazquez1 -
Category
Technology
-
view
45 -
download
0
Transcript of 3d game engine

Luis Vazquez
Page 1 of 25
3D Game Engine Workflow
Introduction
I have been tasked with the creation of a playable video game level in Unity, which I will accomplish by using a
variety of techniques and assets, some of which will be provided standard with the Unity game engine, and
others will be personally made by me for the purpose of using with this project.
Standard Assets and Layout
When I create the new Unity project to work from, I need to anticipate what varieties of assets I will need to
use in the project and import them from storage into the project. This is done via the drop down menus,
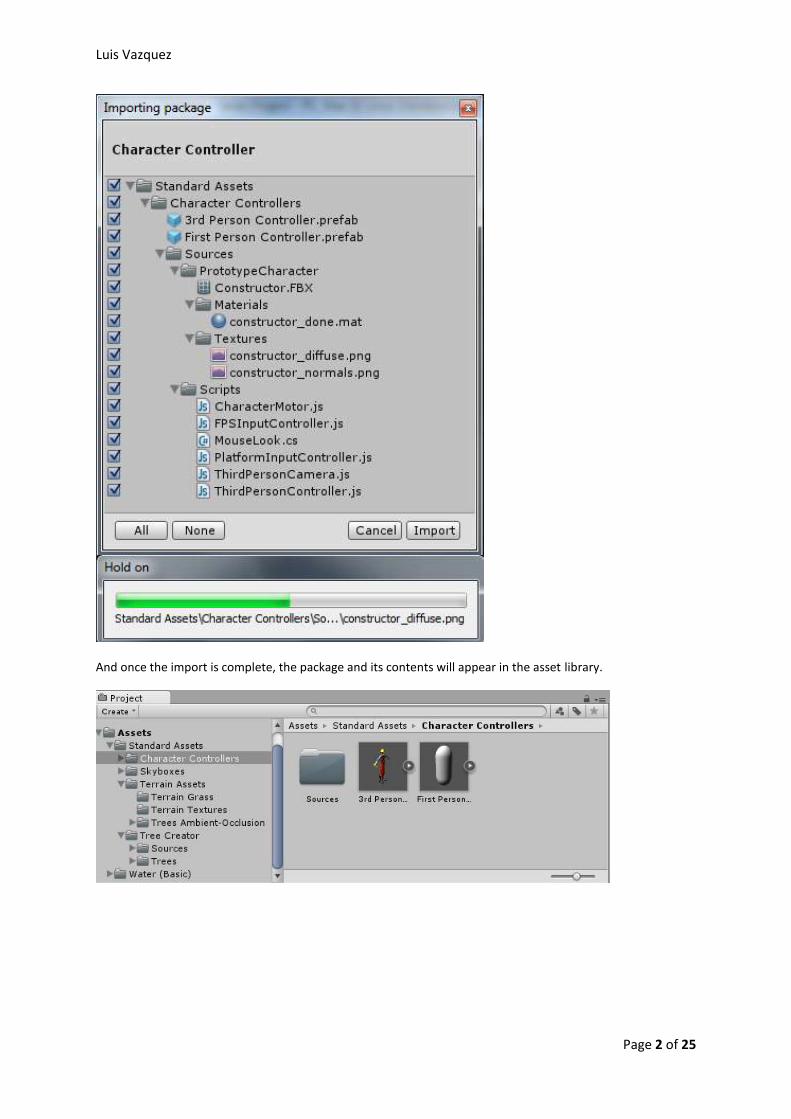
selecting “Assets > Import New Assets >” and then the appropriate package. For example, I intend to import
the Character Controller, Skyboxes, Terrain Assets, Tree Creator, and Water (Basic) packages.
After the package has been selected, a series of windows appear in sequence, showing the user that the
package is being imported into the project:
Luis Vazquez
Page 2 of 25
And once the import is complete, the package and its contents will appear in the asset library.

Luis Vazquez
Page 3 of 25
Terrain Creation + Modification
The first part of creating my own level is to create a terrain asset that will form the environment of
the game level that the player can move around. To do this, I select on the drop down menu
“GameObject > Other > Terrain”.
When this is selected, the terrain is created:
Luis Vazquez
Page 4 of 25
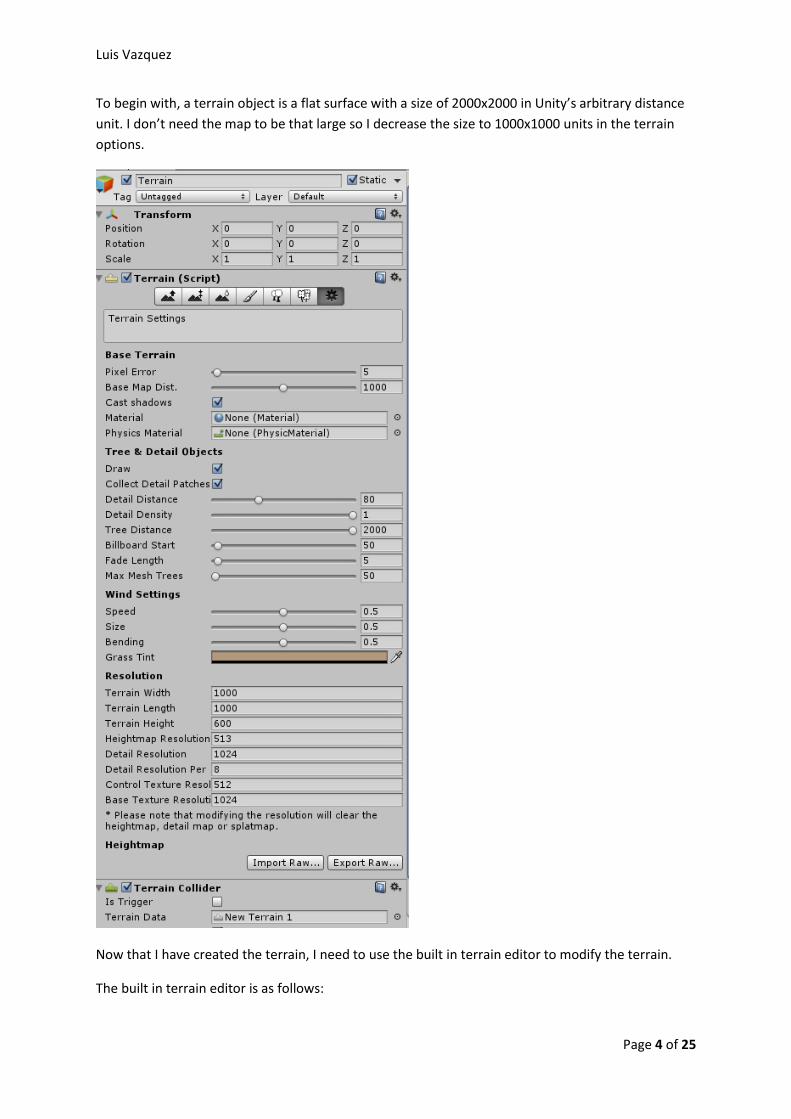
To begin with, a terrain object is a flat surface with a size of 2000x2000 in Unity’s arbitrary distance
unit. I don’t need the map to be that large so I decrease the size to 1000x1000 units in the terrain
options.
Now that I have created the terrain, I need to use the built in terrain editor to modify the terrain.
The built in terrain editor is as follows:
Luis Vazquez
Page 5 of 25
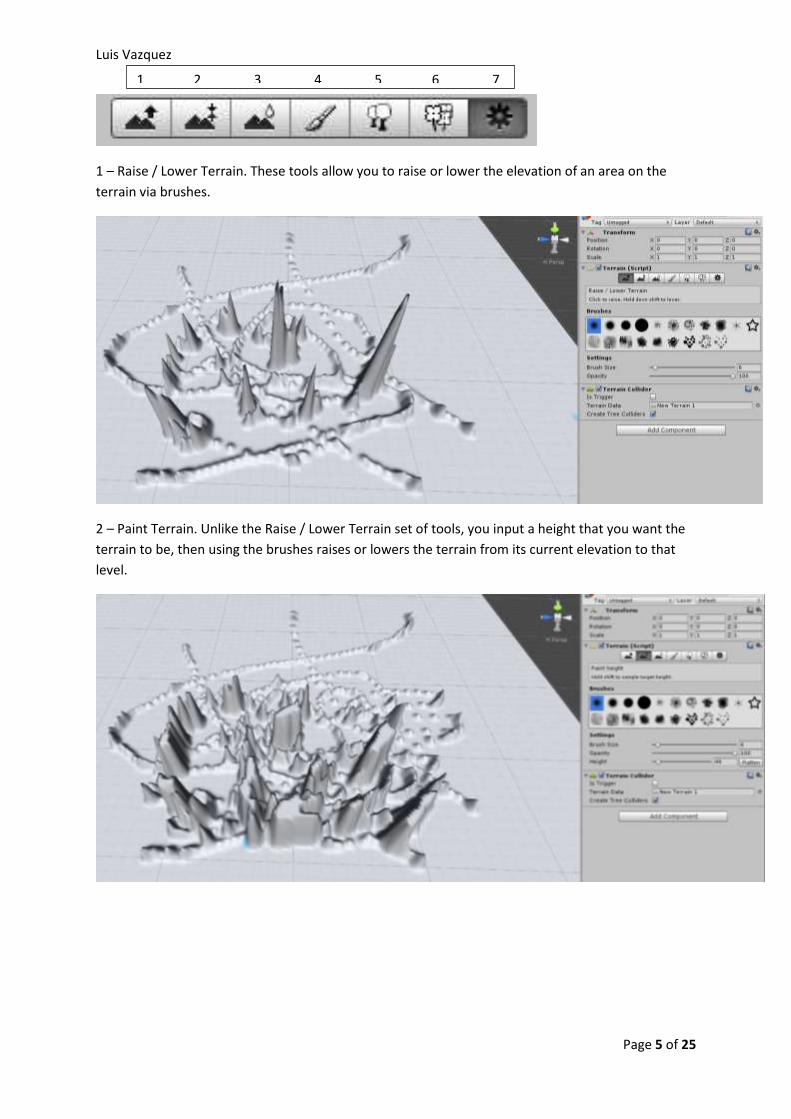
1 – Raise / Lower Terrain. These tools allow you to raise or lower the elevation of an area on the
terrain via brushes.
2 – Paint Terrain. Unlike the Raise / Lower Terrain set of tools, you input a height that you want the
terrain to be, then using the brushes raises or lowers the terrain from its current elevation to that
level.
1 2 3 4 5 6 7
Luis Vazquez
Page 6 of 25
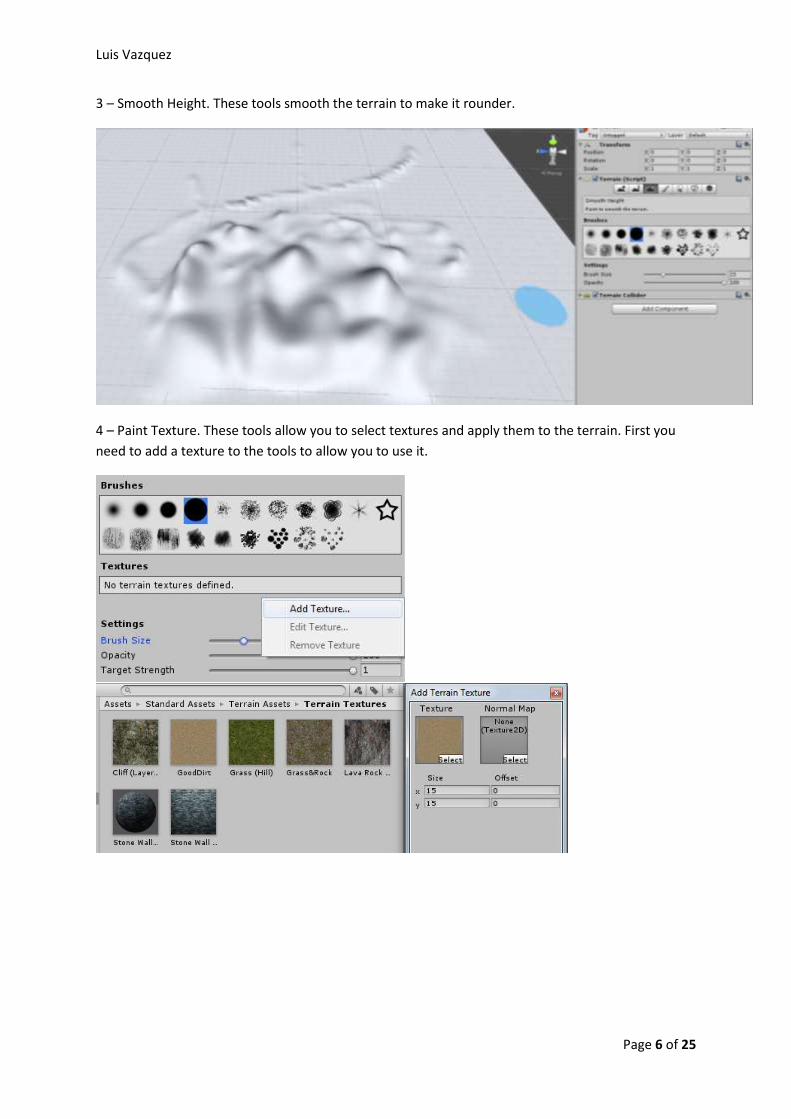
3 – Smooth Height. These tools smooth the terrain to make it rounder.
4 – Paint Texture. These tools allow you to select textures and apply them to the terrain. First you
need to add a texture to the tools to allow you to use it.
Luis Vazquez
Page 7 of 25
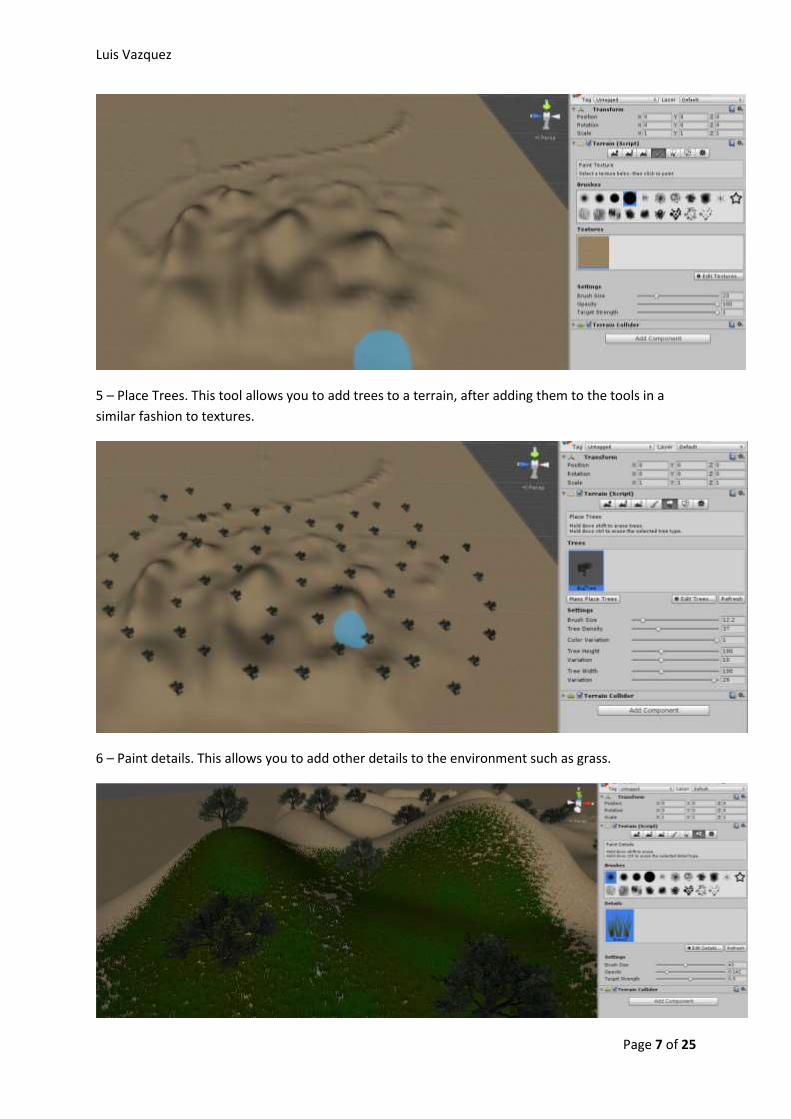
5 – Place Trees. This tool allows you to add trees to a terrain, after adding them to the tools in a
similar fashion to textures.
6 – Paint details. This allows you to add other details to the environment such as grass.

Luis Vazquez
Page 8 of 25
7 – Terrain Settings. This menu includes various options to change the properties of the terrain
object.
Adding Skyboxes + Water + Lighting
Now, to make the game level more immersive I need to add some larger details that the player can
recognise, such as the sky and water.
Luis Vazquez
Page 9 of 25
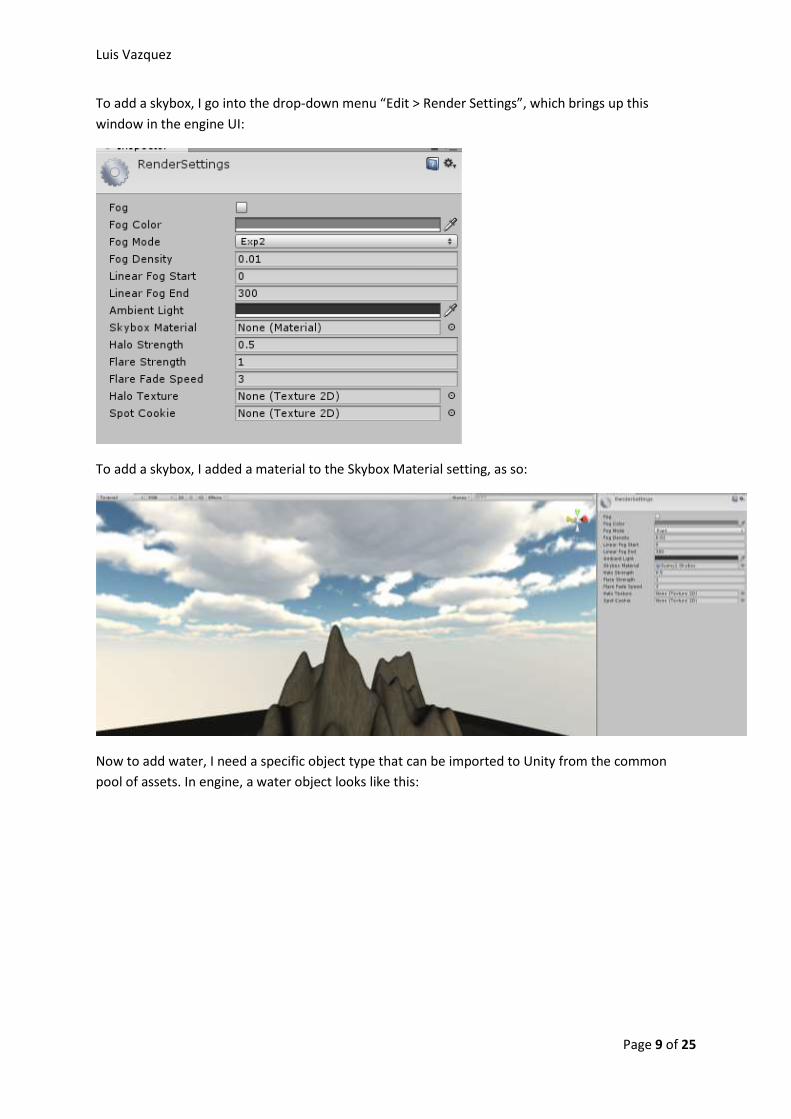
To add a skybox, I go into the drop-down menu “Edit > Render Settings”, which brings up this
window in the engine UI:
To add a skybox, I added a material to the Skybox Material setting, as so:
Now to add water, I need a specific object type that can be imported to Unity from the common
pool of assets. In engine, a water object looks like this:

Luis Vazquez
Page 10 of 25
This object is essentially a flat texture with an animated normal map, so it appears to be constantly
moving despite being completely still. The object can be edited in the same ways as other objects, so
I increase the water objects size to cover the level below the ground level.
In game, the water and skybox look like this:
Now I need to add lighting to the level, so that the player can see the level clearly (and appropriately
to the amount of light that is apparently coming from the sky).
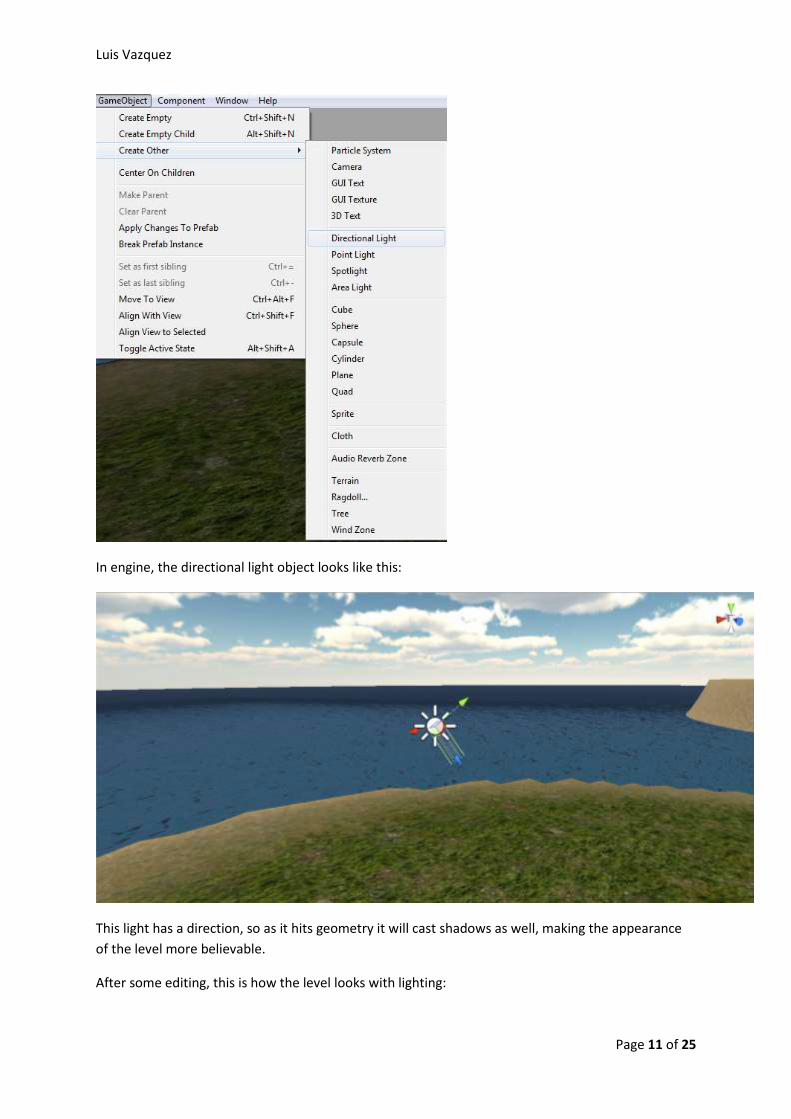
The object I want to create is a directional light, which is created by selecting the following menu:
Luis Vazquez
Page 11 of 25
In engine, the directional light object looks like this:
This light has a direction, so as it hits geometry it will cast shadows as well, making the appearance
of the level more believable.
After some editing, this is how the level looks with lighting:

Luis Vazquez
Page 12 of 25
Creating and Modifying Game Objects
To create my level, I will want to use a number of objects to decorate the level and give it some
visual flair, as well as use it for practical purposes such as making geometry. Unity has options to
create a number of basic objects of this type.
For example, to create a simple cube object, I can select Game Object on the game menu, and select
‘GameObject > Create Other > Cube’.

Luis Vazquez
Page 13 of 25
Another way to create one of the default objects to select ‘create’ on the hierarchy menu and select
the appropriate object, such as ‘Create > Cube’.
Once either method has been selected, a default cube object will spawn in the scene, like so:

Luis Vazquez
Page 14 of 25
Every game object can be modified in a number of ways, not just the default objects.
First, there are the object movement tools:
Clicking and holding on one of the arrows will allow you to move the object along the plane of that
arrow. For example, if you click and drag the red arrow, it will move the object along the X axis. The
green arrow affects Y, and the blue arrow affects Z.
Clicking and holding on one of the squares shown at right angles to the arrows allows you to move
the object freely along two of the three planes, while keeping one consistent. For example, using the
red square will keep X consistent while Y and Z are changed.
Next are the rotation tools:
The coloured curves will rotate the object in a particular direction, based on the side of the object
that the curve is over.
The grey lines will always rotate the object based on the direction that you are looking at the object
from.
Finally, there are the scale tools:
Luis Vazquez
Page 15 of 25
Using the coloured tools will ‘stretch’ the object in the direction of the coloured line selected, while
the grey cube will increase or decrease the scale of each dimension of the object at the same rate,
simultaneously.
Creating and Applying Textures
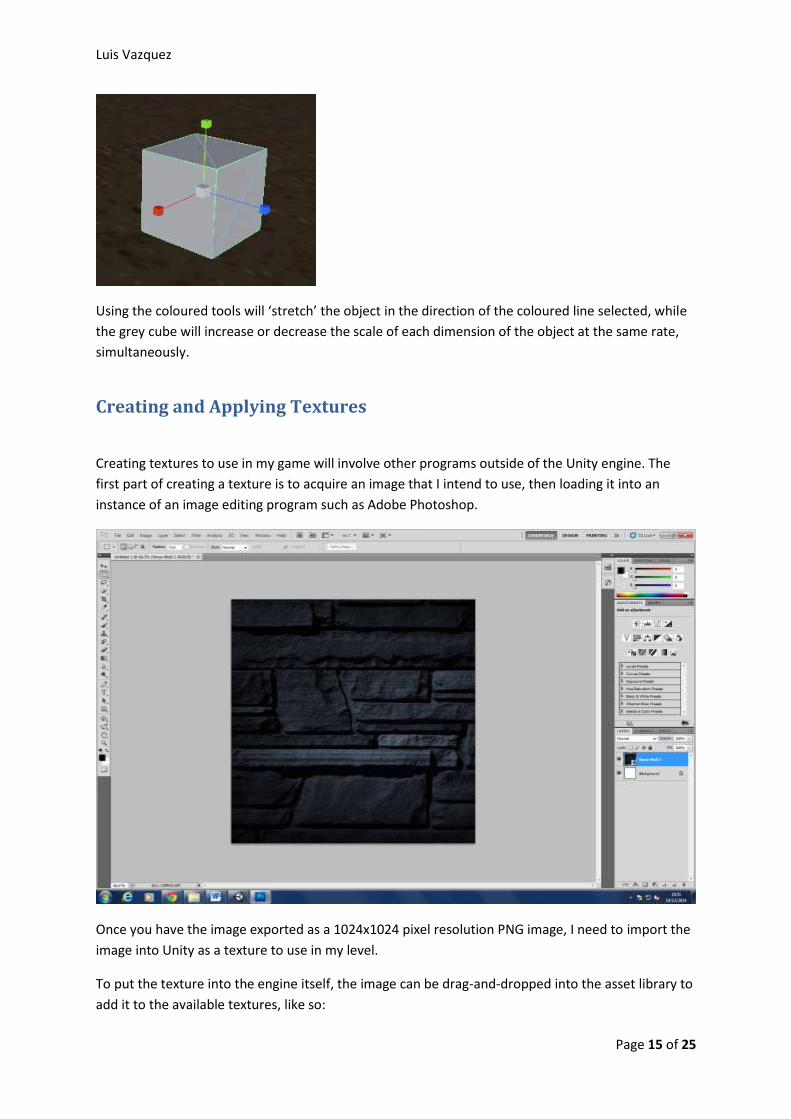
Creating textures to use in my game will involve other programs outside of the Unity engine. The
first part of creating a texture is to acquire an image that I intend to use, then loading it into an
instance of an image editing program such as Adobe Photoshop.
Once you have the image exported as a 1024x1024 pixel resolution PNG image, I need to import the
image into Unity as a texture to use in my level.
To put the texture into the engine itself, the image can be drag-and-dropped into the asset library to
add it to the available textures, like so:

Luis Vazquez
Page 16 of 25
Once the texture is in the engine, it can be used in two ways. It can be added to the terrain using the
above method in Terrain Creation + Modification, or it can be applied directly to models.

Luis Vazquez
Page 17 of 25
Importing From the Unity Asset Store
The assets available by default in the Unity engine cover a variety of uses and are generally quite
versatile, but are also somewhat generic and are difficult to apply to specialised use. For more
specific objects, it is generally better to use custom made models and textures. However, in this
project I am not tasked with creating the assets for use in the engine, so I will gather resources from
other places.
One example of a place where assets are available for free use is the Unity Asset Store
(https://www.assetstore.unity3d.com/en/).
On this website, users upload content that can either be downloaded for use in Unity for free or for
a paid fee. As an example, I will download a free furniture pack, which is done by finding it on the
website-

Luis Vazquez
Page 18 of 25
-Selecting “Open in Unity”-
-Which will open a window in the Unity engine (if you have the application open)-
Luis Vazquez
Page 19 of 25
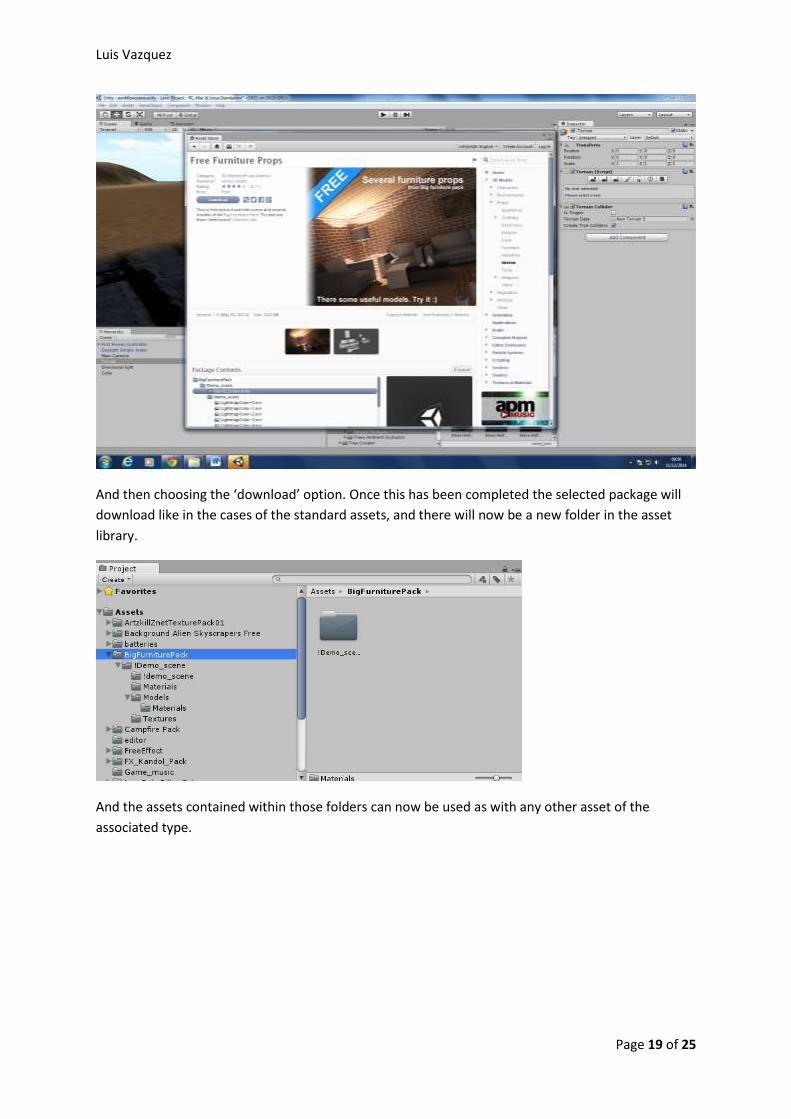
And then choosing the ‘download’ option. Once this has been completed the selected package will
download like in the cases of the standard assets, and there will now be a new folder in the asset
library.
And the assets contained within those folders can now be used as with any other asset of the
associated type.
Luis Vazquez
Page 20 of 25
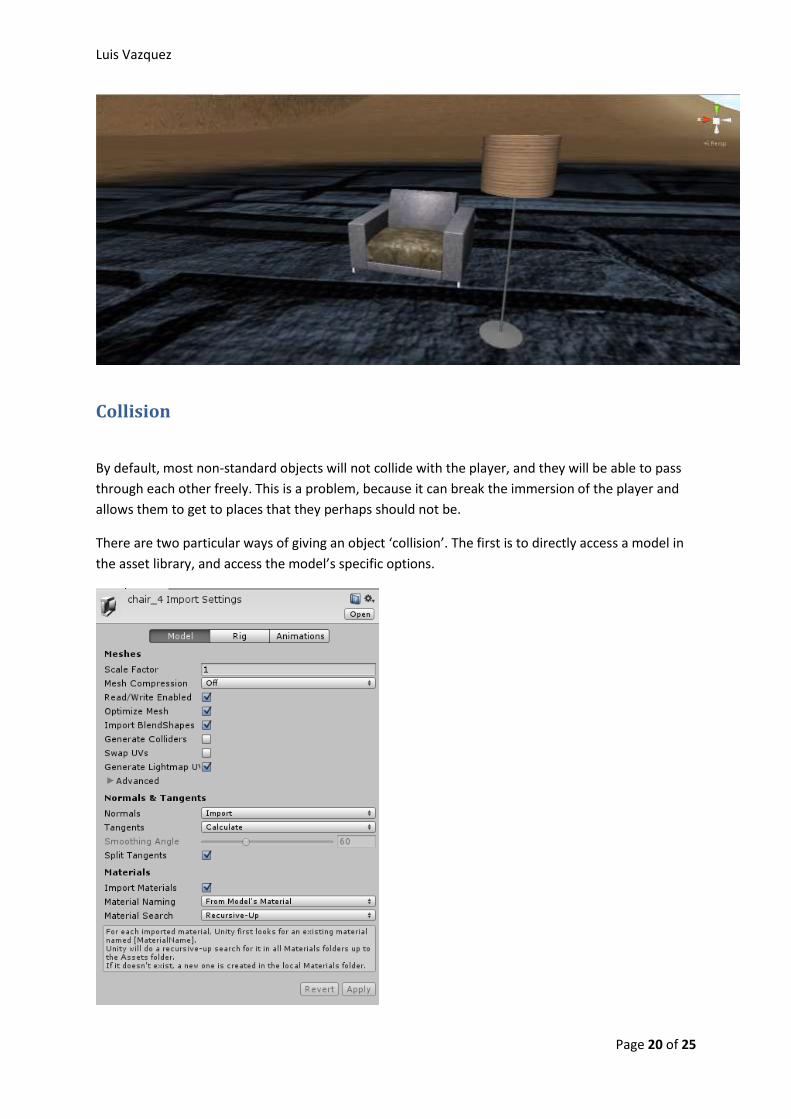
Collision
By default, most non-standard objects will not collide with the player, and they will be able to pass
through each other freely. This is a problem, because it can break the immersion of the player and
allows them to get to places that they perhaps should not be.
There are two particular ways of giving an object ‘collision’. The first is to directly access a model in
the asset library, and access the model’s specific options.
Luis Vazquez
Page 21 of 25
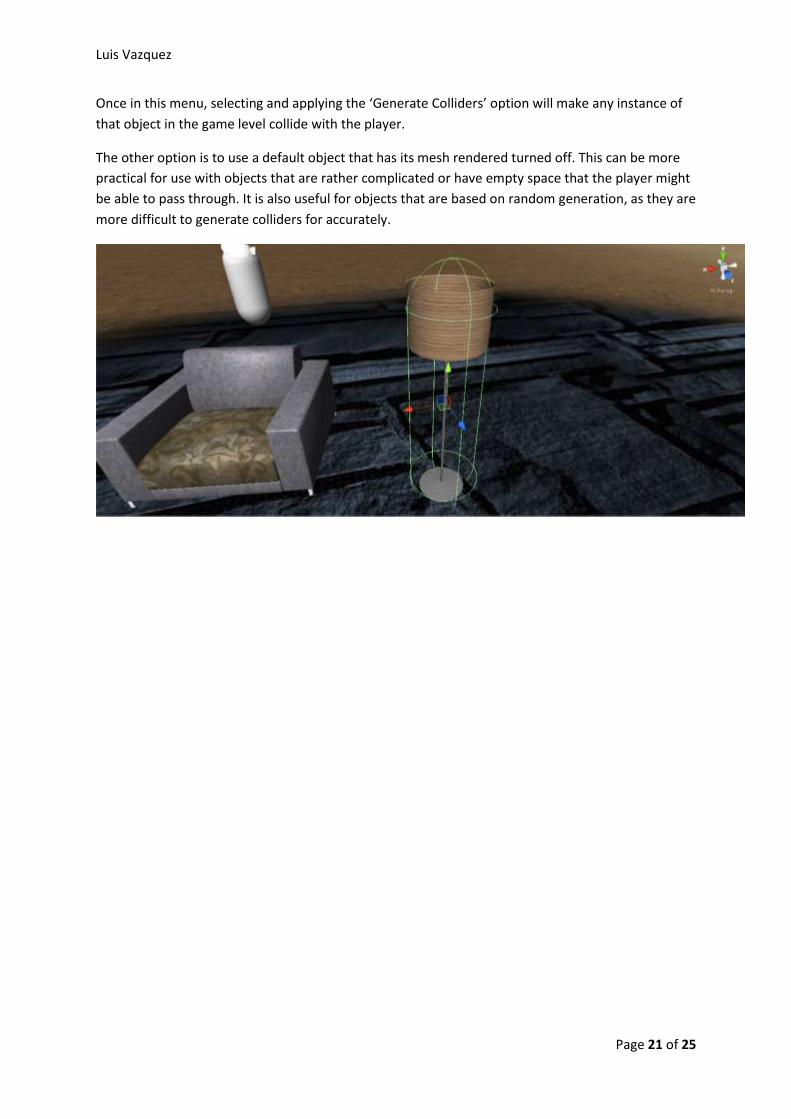
Once in this menu, selecting and applying the ‘Generate Colliders’ option will make any instance of
that object in the game level collide with the player.
The other option is to use a default object that has its mesh rendered turned off. This can be more
practical for use with objects that are rather complicated or have empty space that the player might
be able to pass through. It is also useful for objects that are based on random generation, as they are
more difficult to generate colliders for accurately.

Luis Vazquez
Page 22 of 25
Teleporters
In order to provide me with more creative freedom, I wanted to create a number of ‘teleporters’
that will allow me to move the player between disconnected areas in the level. For this I need two
components: the script and the objects.
The script I used is a page file of C# code that looks like this:
Once I have this code, I can attach it to an object, which in this case is an invisible cube object
framed by visible cube objects.

Luis Vazquez
Page 23 of 25
In the object options, the script has added a few options that I can adjust. For this case, I wanted a
two-way teleporter object, so the exit is another teleporter that connects back to this object.
Now, when the player collides with the teleporter object, they will be moved to the location of the
other teleporter in game.

Luis Vazquez
Page 24 of 25
Music
As an additional feature, I wanted to add music to the game that the player will hear as they explore
the game level.
First I added the music files to the asset library via the Unity Asset Store, and then I will need to add
an audio source to the Main Camera object attached to the player controller.
Once the camera has an audio source, the music can be drag-and-dropped into the appropriate
location, and once the game is started, the player will hear the music.
The audio source function has a few properties attached to it that I will need to have edited in order
to help the audio serve its purpose. In this case, I want the audio file to function as music, so I will
want the audio to have ‘looping’ turned on, and also have as few audio effects such as reverb and
the Doppler effect as possible.

Luis Vazquez
Page 25 of 25