
375, 375XL ¾”-1”
16
375, 375XL 375, 375XL ¾”-1” ¾”-1”
-
Upload
cooper-delaney -
Category
Documents
-
view
27 -
download
0
description
375, 375XL ¾”-1”. Modification Overview. Production of the ¾”-1” 375 began in 2004 and is current. The lead free version 375XL was introduced in 2010. Housing Removal. The plastic housing (vessel) must be removed for service. There is no spring load. - PowerPoint PPT Presentation
Transcript of 375, 375XL ¾”-1”

375, 375XL375, 375XL¾”-1”¾”-1”

Modification OverviewModification Overview
Production of the ¾”-1” 375 began in 2004 Production of the ¾”-1” 375 began in 2004 and is current.and is current.
The lead free version 375XL was The lead free version 375XL was introduced in 2010.introduced in 2010.

Housing Removal Housing Removal
The plastic housing The plastic housing (vessel) must be (vessel) must be removed for service.removed for service.
There is no spring There is no spring load.load.
Housing is held in Housing is held in place by a wedge and place by a wedge and o-ring sealed on both o-ring sealed on both ends.ends.
Remove wedge Remove wedge screws.screws.
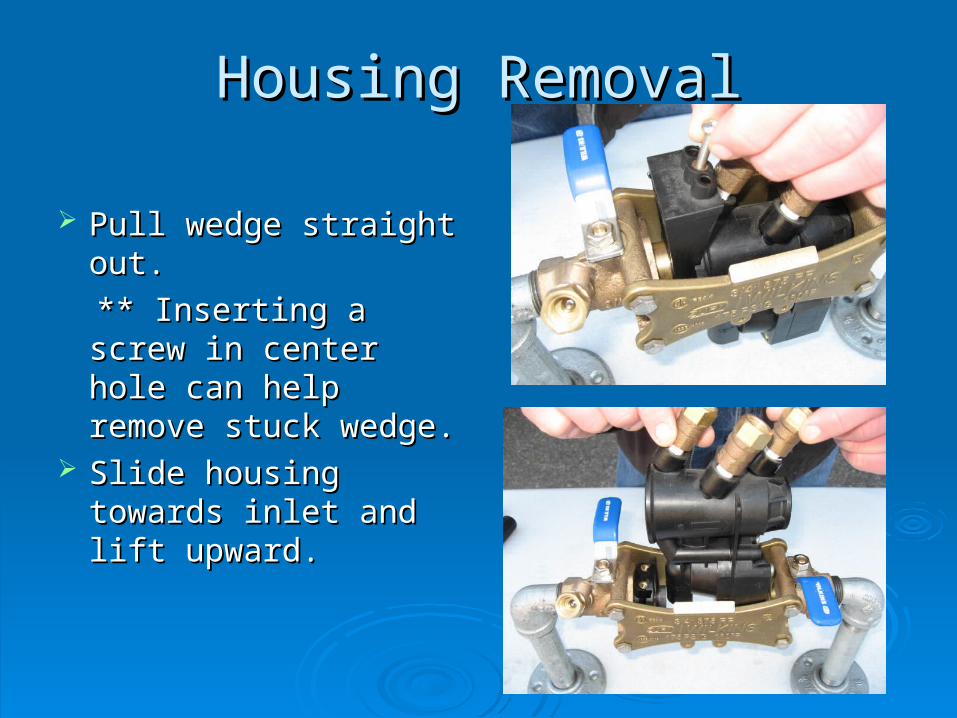
Housing Removal Housing Removal
Pull wedge straight Pull wedge straight out.out.
** Inserting a screw in ** Inserting a screw in center hole can help center hole can help remove stuck wedge.remove stuck wedge.
Slide housing towards Slide housing towards inlet and lift upward.inlet and lift upward.

Check Valve Removal Check Valve Removal
Check valve modules.Check valve modules. Modules are located Modules are located
inside the housing.inside the housing. Modules are sealed Modules are sealed
by o-rings.by o-rings. Both modules slide Both modules slide
out of the body inlet.out of the body inlet.

Disassemble Check Module Disassemble Check Module
Modules are spring Modules are spring loaded.loaded.
Holding firmly, twist Holding firmly, twist spring retainer spring retainer counter clockwise.counter clockwise.

Check Seat Removal Check Seat Removal
Check seat is free Check seat is free once the module has once the module has been disassembled.been disassembled.
If the seat is If the seat is damaged, the entire damaged, the entire module must be module must be replaced.replaced.

Check Disc Replacement Check Disc Replacement
Remove screw, disc Remove screw, disc retainer, and disc.retainer, and disc.

Check Valve Reassembly NotesCheck Valve Reassembly Notes
Lubricate o-rings on Lubricate o-rings on modules.modules.
Drop #2 module in Drop #2 module in body. Then drop #1 body. Then drop #1 module in and turn module in and turn until #1 spring until #1 spring retainer lines up with retainer lines up with #2 seat.#2 seat.
Push both modules Push both modules into housing.into housing.

RV Cover Removal RV Cover Removal
RV cover is sealed by RV cover is sealed by the diaphragm.the diaphragm.
There is a slight There is a slight spring load on cover.spring load on cover.
Hold cover firmly Hold cover firmly while removing while removing screws.screws.

RV Stem Removal RV Stem Removal
Gently pull the RV Gently pull the RV stem out of the stem out of the housing.housing.
Spring is free once Spring is free once the stem is removed.the stem is removed.

RV Seat Removal RV Seat Removal
RV seat is o-ring RV seat is o-ring sealed.sealed.
Pull seat straight out Pull seat straight out of housing.of housing.

Disassemble RV Stem Disassemble RV Stem
Remove RV retaining Remove RV retaining screw.screw.
Pull plunger and disc Pull plunger and disc holder apart.holder apart.

RV Rubber Replacement RV Rubber Replacement
The RV disc and The RV disc and diaphragm are free diaphragm are free once the stem has once the stem has been disassembled.been disassembled.
Reassemble in Reassemble in reverse order.reverse order.

RV Reassembly Notes RV Reassembly Notes Lubricate plunger Lubricate plunger
o-ring on stem.o-ring on stem. Insert RV stem into Insert RV stem into
cover.cover. Place spring in Place spring in
position over seat.position over seat. Make sure sensing Make sure sensing
o-ring is in position.o-ring is in position. Insert cover and stem Insert cover and stem
into housing.into housing.

Housing Replacement Notes Housing Replacement Notes
Lubricate o-rings on Lubricate o-rings on inlet and outlet of inlet and outlet of housing.housing.
Place housing Place housing between struts.between struts.
Slide retaining sleeve Slide retaining sleeve downstream against downstream against housing.housing.
Replace wedge and Replace wedge and wedge screws.wedge screws.


