357556 Tiller Handle Kit Non Touch Troll 75-90-115 HP.fm · PDF filethe Engine Management...
18
1 of 18 *357556* Printed in the United States. © 2014 BRP US Inc. All rights reserved. TM, ® and the BRP logo are registered trademarks of Bombardier Recreational Products Inc. or its affiliates. Outboard Engines TILLER HANDLE KITS - P/N’s 5009250, 5009252, 5007557, 5007558, 5009546 INSTALLATION INSTRUCTIONS SAFETY INFORMATION The following symbols and/or signal words may be used in this document: These safety alert signal words mean: ATTENTION! BECOME ALERT! YOUR SAFETY IS INVOLVED! For safety reasons, this kit must be installed by an authorized Evinrude ® dealer. This instruction sheet is not a substitute for work experience. Ad- ditional helpful information may be found in other service literature. DO NOT perform any work until you have read and understood these instructions completely. Torque wrench tightening specifications must strictly be adhered to. Should removal of any locking fastener (lock tabs, locknuts, or patch screws) be required, al- ways replace with a new one. When replacement parts are required, use Evin- rude/Johnson ® Genuine Parts or parts with equivalent characteristics, including type, strength and material. Use of substandard parts could result in injury or product malfunction. Always wear EYE PROTECTION AND APPRO- PRIATE GLOVES when using power tools. Unless otherwise specified, engine must be OFF (not running) when performing this work. Always be aware of parts that can move, such as flywheels, propellers, etc. Some components may be HOT. Always wait for engine to cool down before performing work. If you use procedures or service tools that are not recommended in this instruction sheet, YOU ALONE must decide if your actions might injure people or damage the outboard. This instruction sheet may be translated into oth- er languages. In the event of any discrepancy, the English version shall prevail. TO THE INSTALLER: Give this sheet and the operating instructions to the owner. Advise the owner of any special operation or maintenance information contained in the instructions. TO THE OWNER: Save these instructions in your owner’s kit. This sheet contains information important for the use and maintenance of your engine. DANGER Indicates a hazardous situation which, if not avoided, will result in death or serious injury. WARNING Indicates a hazardous situation which, if not avoided, could result in death or serious injury CAUTION Indicates a hazardous situation which, if not avoided, could result in minor or moderate personal injury. NOTICE Indicates an instruction which, if not fol- lowed, could severely damage engine com- ponents or other property.
Transcript of 357556 Tiller Handle Kit Non Touch Troll 75-90-115 HP.fm · PDF filethe Engine Management...

Outboard Engines
TILLER HANDLE KITS - P/N’s 5009250, 5009252, 5007557, 5007558, 5009546INSTALLATION INSTRUCTIONS
SAFETY INFORMATIONThe following symbols and/or signal words maybe used in this document:
These safety alert signal words mean:
ATTENTION!
BECOME ALERT!
YOUR SAFETY IS INVOLVED!
For safety reasons, this kit must be installed byan authorized Evinrude® dealer. This instructionsheet is not a substitute for work experience. Ad-ditional helpful information may be found in otherservice literature.
DO NOT perform any work until you have readand understood these instructions completely.
Torque wrench tightening specifications muststrictly be adhered to.
Should removal of any locking fastener (locktabs, locknuts, or patch screws) be required, al-ways replace with a new one.
When replacement parts are required, use Evin-rude/Johnson® Genuine Parts or parts withequivalent characteristics, including type,strength and material. Use of substandard partscould result in injury or product malfunction.
Always wear EYE PROTECTION AND APPRO-PRIATE GLOVES when using power tools.
Unless otherwise specified, engine must be OFF(not running) when performing this work.
Always be aware of parts that can move, such asflywheels, propellers, etc.
Some components may be HOT. Always wait forengine to cool down before performing work.
If you use procedures or service tools that arenot recommended in this instruction sheet, YOUALONE must decide if your actions might injurepeople or damage the outboard.
This instruction sheet may be translated into oth-er languages. In the event of any discrepancy,the English version shall prevail.
TO THE INSTALLER: Give this sheet and theoperating instructions to the owner. Advise theowner of any special operation or maintenanceinformation contained in the instructions.
TO THE OWNER: Save these instructions inyour owner’s kit. This sheet contains informationimportant for the use and maintenance of yourengine.
� DANGERIndicates a hazardous situation which, if notavoided, will result in death or seriousinjury.
� WARNINGIndicates a hazardous situation which, if notavoided, could result in death or seriousinjury
� CAUTIONIndicates a hazardous situation which, if notavoided, could result in minor or moderatepersonal injury.
NOTICEIndicates an instruction which, if not fol-lowed, could severely damage engine com-ponents or other property.
1 of 18
*357556*Printed in the United States.© 2014 BRP US Inc. All rights reserved.TM, ® and the BRP logo are registered trademarks of Bombardier Recreational Products Inc. or its affiliates.

2 o
APPLICATIONUse this instruction sheet when installing the tiller handle kits on Evinrude E-TEC 75-90 HP AFA orprior model outboards and Evinrude E-TEC 115 HP outboards. Do NOT install on any other models.
� WARNINGDo not install this kit unless you have the ability to communicate with the engine using Evin-rude E-TEC® Diagnostics Software. Complete installation of this kit requires reprogrammingthe Engine Management Module (EMM) to provide start-in-gear protection.
1
2
5
17
4
18
6
7
8
8910
11
12
13 14
41
15
16
19
20,21
22
24
26
3
23
27
2930
282930
31
35
36,37
42
43
44 4546
47
50
5152 53
54
555658
59
62 63
64
48
49
100
60
57
61
101
25
99
48
49
6566,67,68To Remote SystemCheck Harness
66,67,68To Engine Key
Switch Connector
66,67,71Sealing Cap
69,70,71Sealing Plug
69,70,72To Remote Key Switch
69,70,72To Engine SystemCheck
Connector
73,74,72Stop Switch
73,74,72Start Switch
75,76,72Trim Switch
77,78,68To RemoteTrim Gauge
75,76,71Sealing Plug
75,76,72To Engine Trim
Connector
79,80Tiller Key Switch
Switched 12 VFor CANbus
82
929190898887
95
9697
98
8685
83
84
9394
81
107
106
105
102
103
104
108
32
38
3940
40a
357556-01
357556-01
f 18

5009250 – Blue 75–90 HP 5007557 – Blue 115 HP 5009546 – Graphite 115 HP5009252 – White 75–90 HP 5007558 – White 115 HPRef P/N Name of Part Qty Ref P/N Name of Part Qty
1 N/A STEERING HANDLE 1 56 203470 RETAINER CLIP 12 397001 STEERING HANDLE, Inner 1 57 325729 SCREW, Bracket to steering arm 13 332089 *RETAINER CLIP 1 58 320397 WASHER 14 N/A BRACKET, Steering handle 1 59 325452 BUSHING, Steering handle to brkt. 25 352673 HANDLE, Shift 1 60 352625 PLATE, Angle adjustment 16 329885 SCREW, Shift handle mount 1 61 315077 NUT, Steering bracket 27 313607 LUBE FITTING 1 62 5005800 SWITCH, Ignition & key assy 18 327400 WASHER, Shift handle 2 63 127251 SPACER 19 334815 BUSHING, Shift handle 1 64 127237 NUT, Keyswitch 110 318626 BALL 1 65 587290 HARNESS, Tiller handle 111 327178 GUIDE 1 66 514688 *CONNECTOR, 6 pin receptacle 312 309247 SPRING 1 67 514684 *LOCKWEDGE 313 351932 PIN, Shift handle to cable 1 68 514679 *PIN, Terminal 1514 303049 COTTER PIN 1 69 514687 *CONNECTOR, 6 Socket plug 315 351995 RETAINER, Shift cable 1 70 514683 *LOCKWEDGE 316 336481 SCREW. Retainer 2 71 514690 *SEAL PLUG 1517 352293 COVER, Steering Handle 1 72 514680 *SOCKET, Terminal 2218 336481 SCREW. Cover 7 73 176295 *CONNECTOR, 2 Socket plug 219 333499 CLIP, Emergency stop 1 74 127287 *LOCKWEDGE 220 586936 STOP SWITCH Assy 1 75 514685 *CONNECTOR, 3 Socket plug 321 514679 *PIN, Terminal 6 76 514681 *LOCKWEDGE 3NS 514696 CONNECTOR, 2 pin receptacle 1 77 514686 *CONNECTOR, 3 Pin receptacle 1NS 514697 LOCKWEDGE, 2 pin receptacle 1 78 514682 *LOCKWEDGE 122 336481 SCREW. Stop switch 3 79 910446 *SOCKET, Terminal 623 398602 CLIP & LANYARD Assy 1 80 126908 *SLEEVE 624 336481 SCREW. Inner handle retaining 1 81 5007322 STEERING FRICTION KIT 125 121497 WASHER 1 82 353244 *ROD, Steering friction 126 174741 THROTTLE FRICTION CONTROL 1 83 328743 *WASHER 227 339722 HELIX, Twist grip 2 84 327969 *LOCKNUT 128 329880 PIN 1 85 353245 *LINK, Steering friction 129 329879 GUIDE 2 86 345348 *NUT 130 329881 ROLLER, Helix to cable 2 87 351206 *SCREW 131 352104 GUIDE, Wire 1 88 319453 *WASHER 132 353409 TWIST GRIP, Assy 1 89 353247 *ROD END 135 352270 SWITCH, Trim & Tilt 1 90 127386 *WASHER 136 514686 CONNECTOR, Trim & Tilt 1 91 553766 *WASHER, Spring 137 514682 LOCKWEDGE, 3 pin receptacle 1 92 353248 *SPACER 138 586935 START SWITCH Assy 1 93 126023 *SET SCREW 139 514679 *PIN, Terminal 2 94 328702 *WASHER 1NS 514696 CONNECTOR, 2 pin receptacle 1 95 353243 *KNOB 1NS 514697 LOCKWEDGE, 2 pin receptacle 1 96 353241 *CLAMP, Steering friction 140 327805 NUT, Start switch 1 97 353242 *BUSHING 140a 324041 RING, Retaining 1 98 305650 *COTTER PIN 141 5006160 CABLE, Shift 1 99 353028 SUPPORT, grommet A 142 333774 RETAINER CLIP 1 100 5007144 THROTTLE CAM A 143 328702 WASHER 1 101 352859 BRACKET, Neutral safety A 144 5006159 CABLE, Throttle 1 102 586780 SWITCH, Neutral A/B 145 334083 ANCHOR, Throttle cable 1 103 431908 LEVER, Neutral switch A/B 146 328739 WASHER, Anchor to bracket 1 104 513134 BRACKET, Neutral switch A/B 147 329160 SCREW, Anchor to bracket 1 105 333749 SPRING, Neutral switch A/B 148 351209 ANCHOR BRACKET, 75–90 HP 1 106 513811 BRACKET, Neutral switch slider A/B 148 352839 ANCHOR BRACKET A 1 107 331404 PIN, Neutral switch A/B 149 909386 SCREW, Anchor bracket, 75–90 HP 1 108 357491 PLUG, Handle 149 333710 SCREW, Anchor bracket A 1 NS 335299 DECAL, Emergency stop clip 150 334153 CONNECTOR, Throttle cable 1 NS 330575 DECAL, Start warning (white) 151 350989 SCREW, Steering handle to bracket 1 NS 333978 DECAL, Start warning (blue) 152 328733 WASHER, Spring 1 NS 330713 DECAL, Gear shift (white) 153 307160 LOCKNUT, Steering handle screw 1 NS 333979 DECAL, Gear shift (blue) 154 313607 LUBE FITTING 1 NS 320107 TIE STRAP 1555 352295 THUMBSCREW, Height adjustment 1 NS 317893 TIE STRAP 2
A 115 HP OnlyNS Not Shown B 2008 and newer models
3 of 18

4 o
INSPECTION
Before installation, check boat for obstructionsthat could interfere with free movement of tillerhandle when steering or tilting outboard.
INSTALLATION
IMPORTANT: An optional MWS harness maybe added to this tiller kit to allow installation of re-mote SystemCheck™ gauges or trim control.Before installing tiller on outboard, refer to onp. 12.
Remote gauges may also be added through anNMEA 2000 network.
Disconnect the battery cables at the battery.
Remove any screws from steering arm holes.Make sure all paint or locking material is cleanedfrom threads.
Remove grommet from lower motor cover.
Install steering friction clamp on tilt tube as far asit will go, then back off into position shown.Tighten set screw no more than 60 to 84 in. lbs(7 to 9.5 N·m).
� WARNINGImproper installation of this kit could resultin personal injury due to loss of boat con-trol.
A boat designed for remote steering mighthave a lower maximum rated horsepowerfor a tiller-steered outboard than shown onthe certification plate. To avoid overpower-ing a boat designed and rated for remotesteering, contact boat manufacturer for til-ler-steered maximum rated horsepower.
To prevent accidental starting while servic-ing, disconnect battery leads from battery.Twist and remove all spark plug leads.
To prevent injury from contact with a rotat-ing propeller, remove propeller before ser-vicing and when running outboard on aflushing device
Nautical Orientation
� CAUTIONTo avoid damaging the tiller handle whentilting the outboard up, position the out-board to clear obstacles in the motor welland boat.
V4 Models1. Grommet retaining bracket
003694
1. Steering friction clamp2. Set screw
006323
1
1
2
f 18

Apply a light coat of Triple-Guard grease tosteering friction rod and install through clampand tilt tube. Be sure that plastic bushing is inplace inside clamp.
Place angle adjustment plate in pocket ofsteering arm bracket.
The steering arm can be positioned straight, orangled 15° port or starboard by moving theadjustment plate.
Assemble drag link parts as shown:
Insert steering arm screws, with washers,through plate and bracket.
Place tiller bracket on steering arm from thebottom. Thread steering arm screws intosteering arm and tighten to a torque of 18 to 20ft. lbs. (25 to 27 N·m).
IMPORTANT: Be sure that wires are notpinched.
Install locknuts on screws on top of steering arm.Hold screws with a wrench and tighten locknutsto 18 to 20 ft. lbs. (25 to 27 N·m).
006324
1. Plate adjustment for tiller in CENTER position. 005083
1. Plate adjustment for tiller in PORT position. 005084
1. Plate adjustment for tiller in STARBOARD position. 005085
1
1
1
1. Spacer2. Spring washer3. Washer4. Rod end5. Washer6. Drag link screw
006363
1. Steering arm screws and washers 006361
1. Locknuts 006362
123456
1
1
5 of 18

6 o
CONTROL CABLE INSTALLATION
75 – 90 HP
IMPORTANT: DO NOT complete final attach-ment of cables to shift and throttle levers until allcables, wires, and hoses have been routed andgrommet has been placed into the lower enginecover.
Remove cable retainer from anchor block.
Remove grommet from lower engine cover andinsert shift cable through opening.
Pull firmly on shift cable casing to removebacklash. With outboard and tiller handle shiftlever in NEUTRAL, place the cable trunnion intothe lower anchor pocket. Adjust the trunnion nutso the casing fits onto the shift lever pin.
Use Ball Socket Installer tool, P/N 342225, tosnap throttle cable connector onto throttle lever.(Use Remover tool, P/N 342226, to removecable.)
Place throttle cable in upper anchor pocket.Install cable retainer and anchor bracket,P/N 351209, on anchor block using screwsupplied with kit. Tighten screw 60 to 84 in. lbs.(7 to 9 N·m).
Hold twist grip in full SLOW position. Pull firmlyon cable to remove backlash.
Adjust cable anchor so throttle cam is againstidle stop when anchor screw aligns with throttlebody boss. Then, rotate anchor four turns towardthe end of the cable.
Install washer, cable anchor, and cable anchorscrew on anchor bracket. Tighten screwsecurely.
1. Cable retainer 002099
1. Shift lever pin2. Trunnion nut
002100
1
21
1. Installer tool 005106
1. Throttle cable connector2. Cable retainer3. Anchor bracket4. Cable anchor
005096
1
2
3
4
1
f 18

IMPORTANT: Rotate twist grip. Make surethrottle cam goes to full throttle without exces-sive cable preload, and still returns to IDLE stop.
Apply soapy water to the inside surfaces ofgrommet and install cables and fuel line asshown:
Place the grommet into position in the lowermotor cover.When grommet is in place and allcables have been installed, tighten a tie strap,P/N 500081, around the outside of the grommetto form a seal around the cables.
Secure shift cable to the shift lever pin. Forproper installation, review the following steps:• Place washer on pin.• Position retainer clip with straight section on
the bottom and angled section on the top.• Use long nose pliers to insert straight section
of clip into linkage pin hole.
• Push the clip towards the hole while lifting onthe curved end with the pliers.
• Be sure retainer clip fully engages the pin.• Lock the retainer by moving the angled sec-
tion behind the straight section.
1. Idle stop 005111
1. Turn anchor four turns toward cable end. 006564
1. Throttle cable2. Shift cable3. Wiring harnesses4. Battery cable5. Fuel line
001998
1
1
3
4
5
1
2
1. Tie strap 006563
1. Straight section2. Angled section
DP0818DP0817
Locked Retainer Clip1. Angled section behind straight section
DP0817a
1
12
1
7 of 18

8 o
CONTROL CABLE INSTALLATION
115 HP
Neutral Switch Installation2008 and Newer Models
Remove starboard lower cover. Refer to ServiceManual for specific instructions.
Remove clip and washer from shift lever andshaft. Disconnect link from lever. Remove screwfrom shift rod lever. Remove shift lever and shaftfrom crankcase.
Assemble neutral switch components on the shiftlever and shaft in the order shown.
Apply Triple-Guard grease to the shaft of the shiftlever/switch assembly. Guide shaft throughexisting washers and bushings in crankcase.
Install shift rod lever and tighten screw to atorque of 60 to 84 in. lbs. (7 to 9.5 N·m).
Connect link to pin and secure with clip andwasher.
Install switch connector to existing engineharness connector. The harness wires are blackand black/yellow.
All 115 HP Models
Remove trunnion bracket from powerhead andinstall neutral safety bracket above and behindexisting shift switch. Reinstall trunnion bracket.Apply Nut Lock™ to threads and tighten screws72 to 96 in. lbs. (8 to 11 N·m).
1. Clip and washer2. Link3. Screw, shift rod lever
006529
1. Shift lever and shaft2. Pin3. Sliding bracket4. Spring5. Switch bracket6. Switch
006530
1
3
2
2
3
46
1
5
1. Washer2. Bushing3. Screw, shift rod lever
006532
1. Neutral switch assembly2. Harness connector
006531
1. Trunnion bracket2. Neutral safety bracket3. Neutral switch
005127
3
1 2 2 1
1
2
2
1
23
f 18

IMPORTANT: Neutral safety bracket is adjust-able. When tiller kit installation is complete, testthat outboard will not start when control is inFORWARD or REVERSE. If necessary, movebracket up or down to activate switch when out-board is in gear.
Remove throttle cam from powerhead and installnew throttle cam from kit. Apply Nut Lock tothreads of shoulder screw and tighten 120 to 144in. lbs. (14 to 16 N·m).
Remove cable retainers from trunnion bracket.
Install all cables and hoses through grommetand place grommet into position in lower cover.
Push and pull on the shift cable and position thecasing guide in the center of the slack.
With outboard and tiller handle shift lever inNEUTRAL, place the cable trunnion into thelower anchor pocket. Adjust the trunnion nut sothe casing fits onto the shift lever pin.
Secure shift cable to the shift lever pin. Forproper installation, review the following steps:• Place washer on pin.• Position retainer clip with straight section on
the bottom and angled section on the top.• Use long nose pliers to insert straight section
of clip into linkage pin hole.
• Push the clip towards the hole while lifting onthe curved end with the pliers.
• Be sure retainer clip fully engages the pin.• Lock the retainer by moving the angled sec-
tion behind the straight section.
1. Replacement throttle cam 005128
1. Cable retainer 004955
1
1
1. Shift lever pin2. Trunnion nut
006330
1. Straight section2. Angled section
DP0818DP0817
Locked Retainer Clip1. Angled section behind straight section
DP0817a
21
12
1
9 of 18

10
Use Ball Socket Installer tool, P/N 342225, tosnap throttle cable connector onto throttle campin. (Use Remover tool, P/N 342226, to removecable.)
Place throttle cable in upper anchor pocket.Install cable retainer and anchor bracket,P/N 352839, on trunnion bracket using screwsupplied with kit. Tighten screw 60 to 84 in. lbs.(7 to 9 N·m).
With throttle cam against idle stop, adjust cableanchor so anchor screw aligns with anchorbracket when twist grip is at IDLE. Then, rotateanchor four turns toward the end of the cable.
Install washer, cable anchor, and cable anchorscrew on anchor bracket. Tighten screwsecurely.
IMPORTANT: Rotate twist grip. Make surethrottle cam goes to full throttle without exces-sive cable preload, and still returns to IDLE stop.
Place support in grommet with arrow facinginside of motor cover. Secure grommet withbracket
1. Installer tool 005130
1. Throttle cable connector2. Trunnion retainer3. Anchor bracket4. Cable anchor
006331
1
3
2
4
1
1. Idle stop 005125
1. Turn anchor four turns toward cable end. 006564
1. Support\ 006578
1
1
1
of 18

ELECTRICAL CONNECTIONS
75 – 90 HP
Remove electrical cover.
Route wiring harnesses from tiller handlethrough channel in flywheel cover.
Apply Electrical Grease to connector seals, thenconnect tiller handle wiring harness to engineharness.
Arrange connectors in flywheel cover, as shown,and install electrical cover.
Use tie strap to secure harness to throttle bodybracket.
IMPORTANT: Route and secure all wires toavoid contact with moving parts.
Use Evinrude E-TEC Diagnostics Software toreprogram Engine Management Module (EMM)for Tiller Model start-in-gear protection.
1. Electrical cover 002421
1. Seal 42079a
1. Trim and tilt harness2. SystemCheck connector3. Start/stop harness
001999
1
1
1
2
3
1. Bracket 006327
1. Tiller mode setting 008564
� WARNINGAfter installation, dealer must use EvinrudeE-TEC Diagnostics Software to reprogramEngine Management Module (EMM) to pro-vide start-in-gear protection. Failure to pro-vide start-in-gear protection could create arisk of personal injury or property damage.
1
1
11 of 18
12
ELECTRICAL CONNECTIONS
115 HP
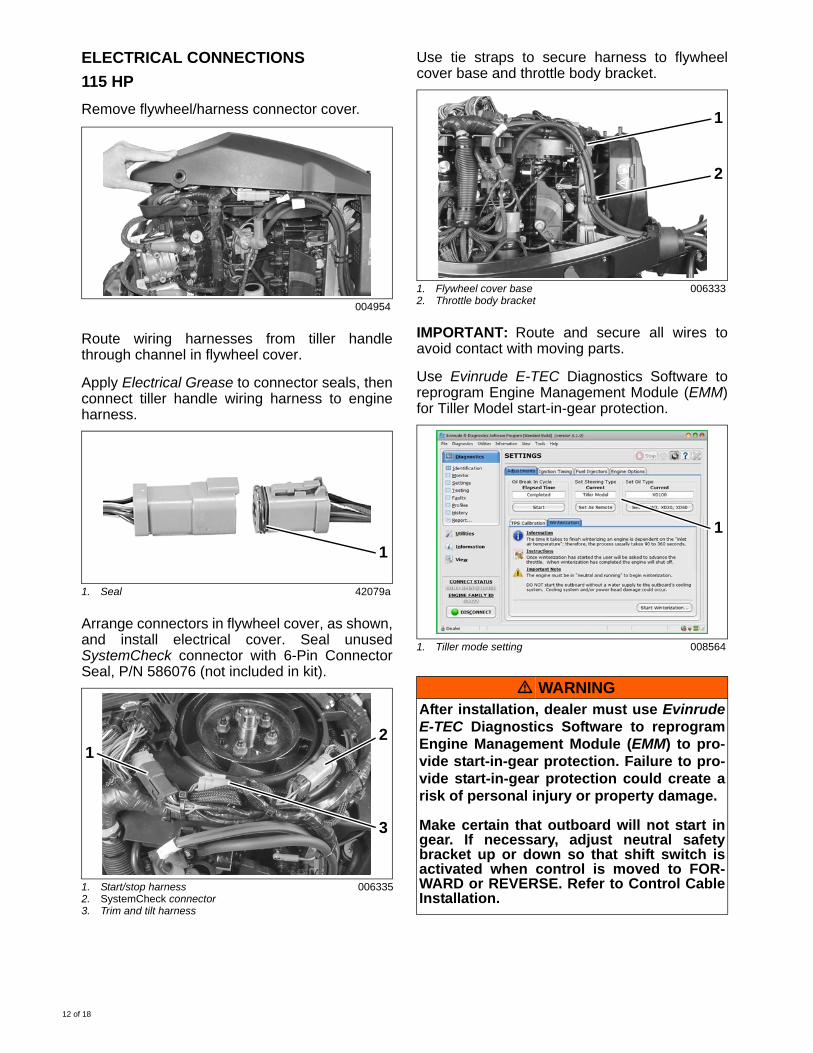
Remove flywheel/harness connector cover.
Route wiring harnesses from tiller handlethrough channel in flywheel cover.
Apply Electrical Grease to connector seals, thenconnect tiller handle wiring harness to engineharness.
Arrange connectors in flywheel cover, as shown,and install electrical cover. Seal unusedSystemCheck connector with 6-Pin ConnectorSeal, P/N 586076 (not included in kit).
Use tie straps to secure harness to flywheelcover base and throttle body bracket.
IMPORTANT: Route and secure all wires toavoid contact with moving parts.
Use Evinrude E-TEC Diagnostics Software toreprogram Engine Management Module (EMM)for Tiller Model start-in-gear protection.
004954
1. Seal 42079a
1. Start/stop harness2. SystemCheck connector3. Trim and tilt harness
006335
1
2
3
1
1. Flywheel cover base2. Throttle body bracket
006333
1. Tiller mode setting 008564
� WARNINGAfter installation, dealer must use EvinrudeE-TEC Diagnostics Software to reprogramEngine Management Module (EMM) to pro-vide start-in-gear protection. Failure to pro-vide start-in-gear protection could create arisk of personal injury or property damage.
Make certain that outboard will not start ingear. If necessary, adjust neutral safetybracket up or down so that shift switch isactivated when control is moved to FOR-WARD or REVERSE. Refer to Control CableInstallation.
1
2
1
of 18

OPTIONAL MODULAR WIRING SYSTEM
(MWS) HARNESS INSTALLATION
Remove seven screws and bottom cover of tillerhandle.
Remove tie straps, disconnect tiller handle wiringharness connections, and remove sealing caps.
Insert MWS Harness through the top of the tillerhandle, to the port side of the existing cables.
Install harness trim/tilt and SystemCheckconnectors. First, place trim/tilt connector under
shift cable. Then, place SystemCheck connectorinto handle as shown.
Install harness key switch connector and tillerhandle trim/tilt connector. Place connectors asshown.
Install tiller handle stop switch connector andstart button connector.
Route cables and install tie strap as shown.Make sure that wiring cannot interfere withmoving parts of shift cable.
Install bottom cover. Tighten screws 24 to 36 in.lbs (2.7 to 2.9 N·m).
1. Cover screw 006566
006567
1. MWS Harness 006568
1
1
1. Trim/Tilt connector2. SystemCheck connector
006569
1. Harness key switch connector2. Tiller handle trim/tilt connector
006570
1. Tie straps 006571
1
2
1
2
11
13 of 18

14
OPERATING INSTRUCTIONSIMPORTANT: Store these instructions on boardthe boat with the operator’s guide.
SAFETY INFORMATION
ENGINE STARTING
Refer to the Routine Inspection Checklist inthe Evinrude E-TEC Operator’s Guide forpre-launch checks before using your outboard.
You MUST supply water to the engine beforestarting. Engine damage can occur quickly.
Connect the clip to the emergency stop switch.Snap the lanyard to a secure place on theoperator’s clothing or life vest — not where itmight tear away instead of activating the stopswitch.
IMPORTANT: The operator should always usethe clip and lanyard anytime the engine is run-ning.
� DANGERDO NOT run the engine indoors or withoutadequate ventilation or permit exhaustfumes to accumulate in confined areas.Engine exhaust contains carbon monoxidewhich, if inhaled, can cause serious braindamage or death.
Contact with a rotating propeller is likely toresult in serious injury or death. Assure theengine and prop area is clear of people andobjects before starting engine or operatingboat. Do not allow anyone near a propeller,even when the engine is off. Blades can besharp and the propeller can continue to turneven after the engine is off. Always shut offthe engine when near people in the water.
� WARNINGThe engine cover is a machinery guard. DONOT operate your outboard with the coveroff unless you are performing maintenanceor emergency starting, and then be carefulto keep hands, hair, and clothing clear of allmoving parts. Contact with moving partscould cause injury.
Always shut off the outboard when yourboat is near people who are in the water.
Be familiar with the waters you areoperating in. The gearcase of this outboardextends below the water surface and couldpotentially come in contact with underwaterobstructions. Contact with underwaterobstructions may result in loss of controland personal injury.
1. Clip2. Emergency stop switch3. Lanyard
005099
� WARNINGAlways use the safety lanyard when operat-ing your boat to help prevent a runawayboat and reduce the risk of personal injuryor death.
Avoid knocking or pulling the clip off thestop switch during normal boating. Theresulting unexpected loss of forwardmotion can throw occupants forward, caus-ing injury.
Your emergency stop switch can be effec-tive only when in good working condition.At each outing, inspect clip and lanyard forcuts, breaks, or wear. Replace worn or dam-aged parts.
Keep the lanyard free from obstructions andentanglements.
21
3
of 18

If clip and lanyard should be lost overboard, aspare clip can be found on the bottom of the tillerhandle.
IMPORTANT: Spare clip is for emergency useonly. Clip with lanyard should always be at-tached to operator during normal operation.
Move the shift lever to NEUTRAL. Refer toShifting and Speed Control.
Twist throttle grip to slowest IDLE position. Referto Speed Control.
Key Switch
While seated, turn the key switch fully clockwiseto the START position. Crank the engine nolonger than 20 seconds.
IMPORTANT: The starter motor can be dam-aged if operated continuously for more than 20seconds.
Upon start-up, release the key.
If the engine did not start, release the keymomentarily, then try again.
IMPORTANT: Engine will not start if outboard isin gear.
� WARNINGAt each outing, test the system’s operation.With the engine running, remove the clipfrom the switch by pulling the lanyard. If theengine does not stop running, see yourDealer.
1. Spare emergency clip 005105
1. NEUTRAL 005100
� WARNINGAlways shift to NEUTRAL before startingthe outboard to prevent sudden boat move-ment, which can cause injury.
1
1
1. SHIFT position 005101
DO NOT advance the throttle before start-up.Advancing the throttle overrides the electronicidle control system. After the engine starts, theengine management module (EMM) willautomatically increase idle speed slightly. Idlespeed will decrease as the engine warms up.
If the outboard is started at wide open throttle,twist the throttle grip back to IDLE beforeshifting.
006334
1
15 of 18

16
Start Button
While seated, press the start button. (Key switchmust be in the ON position.) Crank the engine nolonger than 20 seconds.
IMPORTANT: The starter motor can be dam-aged if operated continuously for more than 20seconds.
Upon start-up, release the start button.
If the engine did not start, release the start buttonmomentarily, then try again.
IMPORTANT: Engine will not start if outboard isin gear, if lanyard is not in place, or if key switchis in OFF position.
After Engine Starts
Check the water pump indicator. A steadystream of water indicates the water pump isworking. If a steady stream of water from thewater pump indicator is not visible, stop theengine. Refer to Engine Overheating in theEvinrude E-TEC Operator’s Guide.
ENGINE STOPPING
Twist the throttle grip to IDLE position.
Move shift lever to NEUTRAL.
Outboard may be stopped by turning the keyswitch to the OFF position, or by pressing theSTOP button until the outboard stops running.
IMPORTANT: Be sure to turn key OFF whenoutboard is not in use to avoid discharging thebattery.
SHIFTING AND SPEED CONTROL
IMPORTANT: Carefully check the function of allcontrol and engine systems before leaving thedock. DO NOT shift the outboard into FOR-WARD or REVERSE while it is shut OFF.
Shifting
With engine running, twist the throttle grip toIDLE position.
Move the shift lever briskly and decisively toFORWARD or REVERSE.
1. Start button2. NEUTRAL
005104
Water Pump Indicator drc4952a
1
1. STOP button 005099
1. Shift lever2. FORWARD3. REVERSE
005100
1
3 2
1
of 18

IMPORTANT: When shifting from FORWARDto REVERSE or from REVERSE to FORWARD,pause at NEUTRAL until the engine is at idlespeed and the boat has slowed.
Speed Control
With the outboard running, twist throttle grip:• Clockwise to decrease speed; or• Counterclockwise to increase speed.
Tiller is equipped with a throttle frictionadjustment knob. Tighten the knob to reduce theeffort required to hold a throttle setting.
TRIM CONROL
Tiller includes a handle mounted trim/tilt switch.
STEERING FRICTION ADJUSTMENT
A slight drag should be felt when turning theoutboard with the steering handle. If adjustmentis necessary, turn the steering friction knob:• Clockwise to increase friction; or• Counter-clockwise to decrease friction.
1. Decrease speed2. Increase speed
005101
1. Throttle friction knob 005099
� WARNINGTighten knob only enough to hold throttle ata constant engine speed. Over tighteningwill prevent quick throttle change in case ofemergency.
1
2
1
1. Trim/tilt switch 005107
1. Steering friction knob 006328
� WARNINGSteering friction device is not intended tohold boat on a set course. DO NOT over-tightened steering friction screw for“hands-off” steering. Reduced control ofthe boat could result in loss of control bythe operator, creating a risk of personalinjury or property damage.
1
1
17 of 18

18
TILLER HEIGHT
The angle of the tiller handle can be raised orlowered by adjusting a thumbscrew under thehandle.
STORAGE (WINTERIZATION)
You can winterize your outboard either in thewater or on a trailer. DO NOT start the outboardonce winterization is completed.
In the Water
Prepare your outboard for the off-season byfollowing these steps:1) Make sure that the throttle is in NEUTRALand the water intake screens are completelysubmerged.
2) Add 2+4® Fuel Conditioner to the fuel tankand fill it with fuel.
3) Advance the throttle to 1/2 throttle positionand start the outboard. The outboard will run atidle speed.
4) After approximately 15 seconds, move thethrottle to IDLE position. Run the outboard atidle for another 15 seconds, then advance thethrottle again to 1/2 throttle position.
5) The outboard will automatically go to fast idleand fog itself. Allow the outboard to run until itshuts itself off (about one minute).
6) Top off the oil reservoir and inspect the fuelfilter. If there is debris in the fuel filter, it must bereplaced.
IMPORTANT: When finished, leave the out-board in a vertical position long enough to com-pletely drain the water from the powerhead.
7) If equipped, disconnect the speedometerpickup at the upper connection and blow allwater out of the hose using air pressure of 25psi (172 kPa) or less. Reconnect the speedome-
ter pickup after all of the water has beenremoved.
On a Trailer
Prepare your outboard for the off-season byfollowing these steps:1) Make sure that the throttle is in NEUTRAL.Remove the propeller.
2) Add 2+4® Fuel Conditioner to the fuel tankand fill it with fuel.
3) Attach a garden hose to the flushing port andturn on the water.
4) Advance the throttle to 1/2 throttle positionand start the outboard. The outboard will run atidle speed.
5) After approximately 15 seconds, move thethrottle to IDLE position. Run the outboard atidle for another 15 seconds, then advance thethrottle again to 1/2 throttle position.
6) The outboard will automatically go to fast idleand fog itself. Allow the outboard to run until itshuts itself off (about one minute).
7) After the outboard shuts itself off, detach gar-den hose.
8) Top off the oil reservoir and inspect the fuelfilter. If there is debris in the fuel filter, it must bereplaced.
9) Apply the recommended lubricant to the pro-peller shaft splines, then install the propeller.
IMPORTANT: When finished, leave the out-board in a vertical position long enough to com-pletely drain the water from the powerhead.
10) If equipped, disconnect the speedometerpickup at the upper connection and blow allwater out of the hose using air pressure of 25psi (172 kPa) or less. Reconnect the speedome-ter pickup after all of the water has beenremoved.
When using this winterization procedure, engineoil may appear on the skeg below the gearcasearea. This is normal. Avoid potential oil stainsby placing a shop towel or suitable containerunder the propeller and skeg for the duration ofthe storage.
1. Height adjustment screw 005108
1
� WARNINGTo prevent injury from contact with rotatingpropeller, remove the propeller before ser-vicing and when running the outboard witha flushing device.
of 18