3.5 USB 2.0 to SATA Enclosure Quick Installation Guide ... · Click Safely remove USB Mass Strorage...
12
1 3.5" USB 2.0 to SATA Enclosure Quick Installation Guide 04-0653B Introducing the USB 2.0 3.5" Enclosure The 3.5" USB 2.0 to SATA Enclosure is designed to support USB equipped computers. This enclosure provides large capacity mobile storage using 3.5" SATA hard disk drives through Hi-Speed USB 2.0, hot-swapping interface. Key Features and Benefits • Quickly adds more storage space to your USB-enabled PC • No driver installation required. Simply install a 3.5" SATA (3Gb/s or 1.5Gb/s) hard disk into the enclosure then connect to a USB port • Supports Hi-Speed USB 2.0 data transfer rate up to 480Mb/s • Compliant with Universal Serial Bus 2.0 Specification
Transcript of 3.5 USB 2.0 to SATA Enclosure Quick Installation Guide ... · Click Safely remove USB Mass Strorage...

1
3.5" USB 2.0 to SATAEnclosureQuick Installation Guide
04-0653B
Introducing the USB 2.0 3.5" EnclosureThe 3.5" USB 2.0 to SATA Enclosure is designed tosupport USB equipped computers. This enclosureprovides large capacity mobile storage using 3.5"SATA hard disk drives through Hi-Speed USB2.0, hot-swapping interface.
Key Features and Benefits• Quickly adds more storage space to your
USB-enabled PC• No driver installation required. Simply
install a 3.5" SATA (3Gb/s or 1.5Gb/s)hard disk into the enclosure then connect toa USB port
• Supports Hi-Speed USB 2.0 data transferrate up to 480Mb/s
• Compliant with Universal Serial Bus 2.0Specification
2
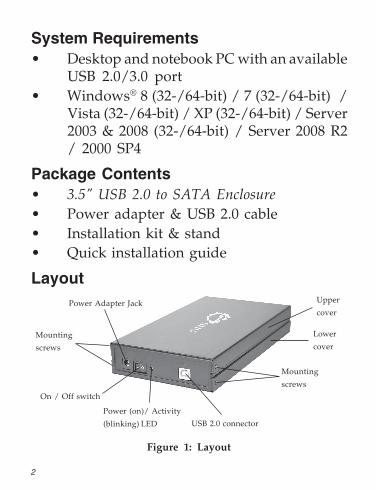
System Requirements• Desktop and notebook PC with an available
USB 2.0/3.0 port• Windows® 8 (32-/64-bit) / 7 (32-/64-bit) /
Vista (32-/64-bit) / XP (32-/64-bit) / Server2003 & 2008 (32-/64-bit) / Server 2008 R2/ 2000 SP4
Package Contents• 3.5" USB 2.0 to SATA Enclosure• Power adapter & USB 2.0 cable• Installation kit & stand• Quick installation guide
Layout
Figure 1: Layout
Upper cover
Power Adapter Jack
On / Off switch
Power (on)/ Activity
(blinking) LED
Mounting
screws
USB 2.0 connector
Mounting
screws
Upper
cover
Lower
cover

3
Hardware InstallationThe following section guides you through theinstallation of your drive kit.
Installing a 3.5" Hard Drive1. Remove the 2 screws in each side, see Figure
2. Slide the top cover out of the case, thenslide the lower cover out of the case, seeFigure 3.
Figure 3
Screws
Screws
Figure 2
4
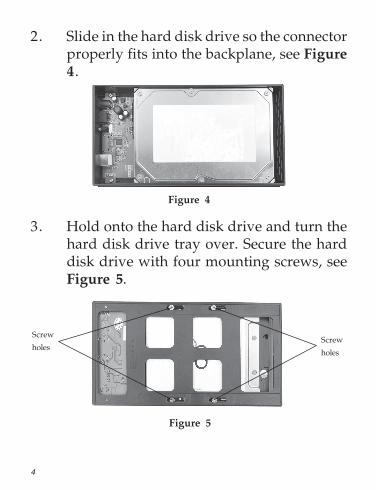
2. Slide in the hard disk drive so the connectorproperly fits into the backplane, see Figure4.
Figure 4
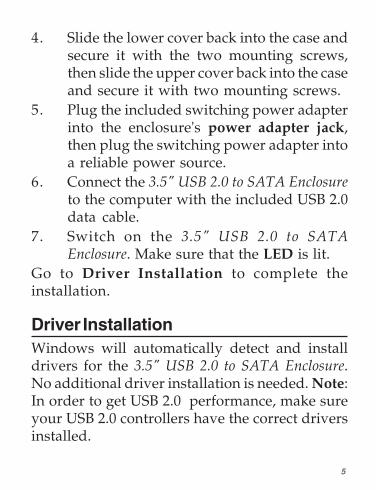
3. Hold onto the hard disk drive and turn thehard disk drive tray over. Secure the harddisk drive with four mounting screws, seeFigure 5.
Figure 5
Screw
holesScrew
holes
5
4. Slide the lower cover back into the case andsecure it with the two mounting screws,then slide the upper cover back into the caseand secure it with two mounting screws.
5. Plug the included switching power adapterinto the enclosure's power adapter jack,then plug the switching power adapter intoa reliable power source.
6. Connect the 3.5" USB 2.0 to SATA Enclosureto the computer with the included USB 2.0data cable.
7. Switch on the 3.5" USB 2.0 to SATAEnclosure. Make sure that the LED is lit.
Go to Driver Installation to complete theinstallation.
Driver InstallationWindows will automatically detect and installdrivers for the 3.5" USB 2.0 to SATA Enclosure.No additional driver installation is needed. Note:In order to get USB 2.0 performance, make sureyour USB 2.0 controllers have the correct driversinstalled.
6
Using the 3.5" USB 2.0 to SATAEnclosureAn additional drive icon will appear in MyComputer or Computer when the enclosure isplugged into a USB port. The drive acts just likea conventional hard drive in your system.
Disconnecting From The ComputerBefore unplugging the 3.5" USB 2.0 to SATAEnclosure from the computer, follow the stepsbelow for your version of Windows. The samerule applies when turning off the Enclosure. Notfollowing the instructions may result in datacorruption or damage to the hard drive.
Windows 8 / 7 / 2008 R21. Verify that the LED is not flashing before
proceeding.2. Click the Safely Remove Hardware and
Eject Media icon located in the system trayby the system clock. Note: If you can't findthe Safely Remove Hardware and EjectMedia icon in the system tray, click Showhidden icons to bring it out.
7
3. Click Eject USB to Serial-ATA brigde.4. You can now unplug or turn off the 3.5"
USB 2.0 to SATA Enclosure.
Windows Vista / Server 20081. Verify that the LED is not flashing before
proceeding.2. Click the Safely Remove Hardware icon in
the system tray by the system clock.3. Click Safely remove USB Mass Strorage
Device, then click OK.4. You can now unplug or turn off the 3.5"
USB 2.0 to SATA Enclosure.
Windows XP / Server 20031. Verify that the LED is not flashing before
proceeding.2. Double click the Safely Remove Hardware
icon in the system tray by the system clock.3. Highlight Mass Storage Device, click Stop,
OK, OK then Close.4. You can now unplug or turn off the 3.5"
USB 2.0 to SATA Enclosure.
8
Windows 2000 SP41. Verify that the HDD LED is ON or not
blinking.2. Double click the Unplug or Eject Hardware
icon located in the system tray by the systemclock.
3. Highlight USB Mass Storage Device, clickStop, OK, OK, then click Close.
4. You can now unplug or turn off the 3.5"USB 2.0 to SATA Enclosure.

9
Blank Page

10
Blank Page
11
Technical Support and WarrantyQUESTIONS? SIIG’s Online Support has answers! Simply visit our web site atwww.siig.com and click Support. Our online support database is updated daily withnew drivers and solutions. Answers to your questions could be just a few clicks away.You can also submit questions online and a technical support analyst will promptlyrespond.
SIIG offers a 5-year manufacturer warranty with this product. This warranty covers theoriginal purchaser and guarantees the product to be free of any defects in materials orworkmanship for five (5) years from the date of purchase of the product.
SIIG will, at our discretion, repair or replace (with an identical product or producthaving similar features and functionality) the product if defective in materials orworkmanship. This warranty gives you specific legal rights, and you may also have otherrights which vary from state to state. Please see our web site for more warranty details.
If you encounter any problems with this product, please follow the procedures below.A) If it is within the store's return policy period, please return the product to the storewhere you purchased from.
B) If your purchase has passed the store's return policy period, please follow the stepsbelow to have the product repaired or replaced.
Step 1: Submit your RMA request.Go to www.siig.com, click Support, then REQUEST A PRODUCT REPLACEMENTto submit a request to SIIG RMA or fax a request to 510-657-5962. Your RMA requestwill be processed, if the product is determined to be defective, an RMA number willbe issued.
Step 2: After obtaining an RMA number, ship the product.• Properly pack the product for shipping. All accessories that came with the
original package must be included.• Clearly write your RMA number on the top of the returned package. SIIG will
refuse to accept any shipping package, and will not be responsible for a productreturned without an RMA number posted on the outside of the shippingcarton.
• You are responsible for the cost of shipping to SIIG. Ship the product to thefollowing address:SIIG, Inc.6078 Stewart AvenueFremont, CA 94538-3152, USARMA #:
• SIIG will ship the repaired or replaced product via Ground in the U.S. andInternational Economy outside of the U.S. at no cost to the customer.
PRODUCT NAME3.5" USB 2.0 to SATA Enclosure
FCC RULES: TESTED TO COMPLY WITH FCC PART 15, CLASS BOPERATING ENVIRONMENT: FOR HOME OR OFFICE USE
FCC COMPLIANCE STATEMENT:
This device complies with part 15 of the FCC Rules. Operation is subjectto the following two conditions: (1) This device may not cause harmfulinterference, and (2) this device must accept any interference received,including interference that may cause undesired operation.
THE PARTY RESPONSIBLE FOR PRODUCT COMPLIANCE
SIIG, Inc.6078 Stewart AvenueFremont, CA 94538-3152, USAPhone: 510-657-8688
About SIIG, Inc.Founded in 1985, SIIG, Inc. is a leading manufacturer of IT connectivitysolutions (including Serial ATA and Ultra ATA Controllers, FireWire, USB,and legacy I/O adapters) that bridge the connection between Desktop/Notebook systems and external peripherals. SIIG continues to grow by addingA/V and Digital Signage connectivity solutions to our extensive portfolio.SIIG products offer comprehensive user manuals, many user-friendly features,and are backed by an extensive manufacturer warranty. High quality controlstandards are evident by the overall ease of installation and compatibility ofour products, as well as one of the lowest defective return rates in the industry.SIIG products can be found in computer retail stores, mail order catalogs,through major distributors, system integrators, and VARs in the Americas andthe UK, and through e-commerce sites.
3.5" USB 2.0 to SATA Enclosure is a trademark of SIIG, Inc. SIIG and the SIIG logo areregistered trademarks of SIIG, Inc. Microsoft and Windows are registered trademarks ofMicrosoft Corporation. All other names used in this publication are for identification onlyand may be trademarks of their respective owners.
October, 2012 Copyright © 2012 by SIIG, Inc. All rights reserved.