30 Days to a More Enjoyable Shave
42
1
description
How to get a better, more enjoyable shave in less than 30 days by learning the (simple) skills of traditional wet shaving.
Transcript of 30 Days to a More Enjoyable Shave

1

Sharpologist’s 30 Days To A More Enjoyable ShaveBy Mark H
(AKA “Mantic59”)
Table Of ContentsTHE CHALLENGE PLAN
"Homework" For The Shave Prep ChallengeWEEK 1: PREPARATION
Cleansing and RinsingWhat About PreShave Oils?Homework For The Shave Lather Challenge
The Single Most Important Item For An Enjoyable Shave? How To Buy A ShavingBrush
Mantic59’s “Best” Shaving BrushesA Note About Natural Hair Shaving Brushes
WEEK 2: LATHERThe Mysteries Of Shave LatherBefore You LatherUsing "Canned Goo" (Products From Pressurized Cans)Using Brushless Cream Or Gel (From A Squeeze Tube)Using Lathering Cream Or Soap Applied With A BrushThe Lathering Process
"Classic" Lather"Creamy" Lather
Whatever Method You TrySome Tips If You Are Having Trouble
"Superlather""Uberlather"Distilled Water
Homework For The Shave Technique ChallengeCartridge Razors?
So Which Is Best?Double Edge Razors?
Mantic59's "Best" DE RazorsA Further Caution To The Beginner: BladesExtending Blade or Cartridge LifeStraight Razors?
Straight Razor BasicsBuying A Straight RazorWhat About Replaceable Blade Straight Razors?
2

What About "Kamisori" Razors?WEEK 3: SHAVE TECHNIQUE
Essential Razor Technique #1: The Importance Of "Grain"Essential Razor Technique #2: Reduction By PassesEssential Razor Technique #3: No PressureEssential Razor Technique #4: Proper Blade AngleEssential Razor Technique #5: A Sharp Blade Or CartridgePutting It All TogetherFinishingShaving With A Straight Razor
StroppingShavingAfter Shaving
Homework For After The Shave Challenge"Aftershaves"“Good” vs. “Bad” Ingredients
WEEK 4: FINISHING UPAfter The Shave
Oops!Spot TreatmentsFull Face Treatments
Applying Aftershave ProductsTHE ENDFURTHER READING
Copyright © 2014 Sharpologist.com LLC. This revision produced 5 March 2014.Permission is hereby granted to share or distribute this document as long as it is withoutcost and the content is unmodified.
3

You are probably unhappy with some aspect of your shave. Maybe you’re prone to razorburn and ingrown hairs. Or you get lots of nicks and cuts. Or you’re unhappy with the costof razor cartridges. How would you like to consider shaving as a pleasant diversion ratherthan a painful chore? I’ve written this guide to show you how to not only get a better shave,but also to get a more enjoyable shave! Then be sure to follow Sharpologist for moregreat content on shaving, grooming, and even some “guy stuff.”
THE CHALLENGE PLAN
For the next 30 days I want you to devote just ten minutes per day for the challenge. Youmay not need all ten minutes but let's carve them out of your schedule anyway. So set youralarm so you rise ten minutes earlier than usual in the morning, assuming your shave in themorning. Or devote ten extra minutes before going to bed if you shave in the evening. Ifyou're a morning shaver and constantly pressed for time due to work or family, considermoving to a night shave for a while. In any case, start the routine this Saturday even thoughyou won't have anything to do just yet: I want you to get used to it.
How will you spend that extra ten minutes? It will be different each week for the next fourweeks:
Week One will concentrate on preparing for a shave; Week Two will discuss shave lather in all its intricacies; Week Three is reserved for shave technique; and Week Four will finish up with after the shave tips and products.
"Homework" For The Shave Prep ChallengeNext week we will concentrate on preparing for a shave. The essence of that preparationis cleaning your face (or whatever you are going to shave) correctly, with the right kind ofproduct.
Your homework in preparation of next week is to obtain a skin cleaning product meantspecifically for the face. No "deodorant" or "body" bars here (we'll get into the reasons whylater)! Look in your grocery store, drug store, or megamart "personal care" aisle. You willprobably find a glycerinbased bar of soap or liquid wash from a number of differentbrands. If you want to "step up your game" consider getting something like Musgo RealGlycerin Lime Oil Soap , Lucky Tiger Face Wash, Pacific Shaving PreShave Wash,Neutrogena Men Skin Clearing Face Wash, or even a Savon De Marseille soap. The
4

Musgo Real soap is a personal favorite of mine. Also, several noted shaving aficionadoshave suggested a doityourself solution of:
onequarter cup Dr. Bronner's Liquid Soap (any fragrancemy personal preferenceis Hemp Lavender. However be aware that it contains lanolin, which some peopleare allergic to);
2 tsp skinfriendly oil (such as Emu Oil, Jojoba Oil, Almond Oil often used intherapeutic massageor Grape Seed Oil). Even olive oil will do in a pinch).
Combine in a pump bottle and shake well before using.
The takeaway is to find a gentle facecleaning product (even it you are not going toshave the face), ideally one with a scent you find pleasant.
5

WEEK 1: PREPARATION
I asked you to set aside ten minutes per day for the challenge. Luckily you probably won'tneed that much for this assignment: I want you to spend about five minutes on preparation.
First things first: thoroughly wash your hands with whatever product you have selectedand plenty of warm water before you do anything else! If your hands are dirtyor worse,contaminatedyou are just making it that much tougher to clean the area to be shaved.
The next step in preparation is to begin rinsing the area to be shaved with generousamounts of warmtohot water (hot but not uncomfortable to you). If you are going to beshaving your face be sure to pay close attention to your neck area as well! Doctors tell meit takes about three minutes to properly hydrate the skin for shaving. Spend at least oneminute just rinsing thoroughly before lathering up the area with your soap.
Cleansing and RinsingSpend the next two minutes (at least) to wash and rinse the area to be shaved. If you wantto integrate this preparation into your shower routine, feel free to do so! Don't bother dryingit off.
After your preparation is complete, shave as you have been normally doing (you may bechanging that next week though). Be sure to apply these concepts all week!
What About Pre-Shave Oils?I'm not a big fan of preshave oils as a part of preparation. They do nothing for cleaning theskin, and although they may help with lubrication during the shave, I think that if you usegood products you won't need them anyway. But if you do incorporate a preshave oil aspart of your shave preparation, apply it after cleansing.
Homework For The Shave Lather ChallengeHomework for next week's challenge topic is a two part assignment. First, determine whatkinds of scents you enjoy. Reviewing THIS Sharpologist article might help. Then searchfor shaving products that meet that scent profile. If you have taken to "old school" shaving,using a brush and lather cream or soap, this might be a nobrainer. If you have been usingthe typical "goo in a can" a whole new world may be opening up for you! Be sure to checkSharpologist’s shaving product reviews as a guide. You may also want to search thevarious shaving blogs and forums for scent descriptions and product recommendations.
6

If you still prefer to go "brushless" at least upgrade your productnothing out of apressurized can! And it still may help to find a brushless product that is "brush friendly" soif you decide to make the transition later you will have some options open to you. A couplerelatively common "brush friendly" products to consider include Kiss My Face Moisture(KMF) Shave (such as Lavender and Shea or Patchouli. You might be surprised howdownright masculine some of the scents can be. KMF is available at many health foodstores and large groceries that have a "natural products" section) and Cremo Cream (witha kind of "pina colada" scent, now becoming more widely available in US drugstore chainsand "megamarts"). Other "brush friendly" options include Billy Jealousy Hydroplane ShaveCream, Pacific Shaving All Natural Shaving Cream, and (especially) Truefitt & Hill No 10Shaving Cream. I have found that William Neumann's shaving creams, though meant foruse with a brush, work extremely well brushless too.
The Single Most Important Item For An Enjoyable Shave? How To Buy A ShavingBrushYou may think they’re old fashioned or foppish but the truth is using a shaving brush canmake a huge difference in the quality of your shave. Unfortunately selecting and using ashaving brush can be a little confusing to the uninitiated. So lets try to make a little senseout of the options.
The most obvious selection criterion is price. You should be able to find a brush withvirtually any budget so set yourself a maximum price and stick to it. Bear in mind that manyshavers who use shaving brushes eventually get another brush after they have used one fora while and have decided they have a preference for a particular aspect or type of brush.
The next criterion of selection is brush size and shape. Brush dimensions are typicallyexpressed in millimeters and are often divided into three sections: loft, knot, and overallheight. The loft is the length of the actual hair from the top of the handle to the tip of thehair. The knot is an indication of the amount of hair packed into the handle. By the way,the knot dimension can be a little sketchy because hair can be packed in tightly or loosely.Finally the length of the handle is factored in to determine the overall height of the brush.Very generally speaking larger brushes tend to work better lathering large areas morequickly while smaller brushes offer more control. Brush sizes cover a very wide range but Ithink its safe to say that the average loft is about 50 millimeters and the average knot isabout 20 millimeters.
Two additional factors of brush size and shape are a little more ambiguous. The first is thetips of the loft can be shaped into a fanlike shape or into a bulblike shape. Each style hastheir advocates who claim one shape is better than the other but there’s no real agreement
7

about it. The second is the size and shape of the handle. Size and shape is yet anotherpersonal preference, but in the absence of knowing what you want I suggest measuring thedistance from the palm of your hand to the pad of your thumb and let that be the maximumlength of the handle.
The final criterion is the type of hair in the brush. Shaving brushes generally comein one of four types of bristle: boar hair, badger hair, horse hair, or synthetic hair.
Boar hair brushesoften called “natural bristle” brushesare the most commonly seen inmass market outlets such as drug stores and groceries. Most of these brushes are notvery well constructed and tend to require more work to get a decent lather out of as well.However that is not to say that all boar hair brushes are substandard. Quite the contrary, awellmade boar hair brush will provide years of service and work quite well after a breakinperiod. They work particularly well with shaving soaps, though you can use them withshaving creams as well. Sometimes these brushes are dyed to look like badger hairbrushes.
Badger hair brushes are generally regarded as the preferred material for shavingbrushes and they can generally make a lather more quickly, and retain more heat andwater than brushes of other types. However there are a number of different grades of hair,and unfortunately there is no standardized grading process between manufacturers.But there are some general guidelines you can use.
The lowest grade of badger hair is generally referred to as pure. This grade ischaracterized by a dark color and thick, relatively stiff, coarselooking hair. Somemanufacturers will bleach the hair slightly to give it the look of a higher grade but the hairitself will still look coarse.
The next step up is usually called super or fine. These brushes are generally betterconstructed and the hair is finerlooking, softer, and lighter in color. Super badger brushesretain water and heat noticeably bettersometimes dramatically betterthan lower grades,and can make a better lather, more quickly.
The highest grade of badger hair is generally labelled silvertip. These brushes are usuallymade to the highest standard, often with handcrafted workmanship, commanding thehighest prices. Silvertip hair is often cream colored on top with darker bands of colorbelow and very fine but still fairly flexible hairs. These brushes will retain even more waterand heat than super badger brushes, but is a less dramatic improvement.
8

Horse hair shaving brushes are just now returning to the market after a hiatus of nearly100 years due to an anthrax scare around World War 1. They generally performsomewhere between boar and badger.
Finally there are synthetic brushes. These can range from brushes with nylon bristlesthose with more specialized synthetic material. Their price and performance usually fallbetween those of boar and badger brushes. However a new generation of synthetic hairmaterial is beginning to appear, significantly closing the gapwith some performing almostas well as silvertip badger hair!
A few additional thoughts about brush hair. First, because boar hair and horse hair retainless water than badger hair, selecting a boar hair or horse hair brush with a higher loft willhelp compensate for water retention. Second, boars and badgers are killed to harvesttheir meat and hair so if that is a concern you will want to select a brush with synthetic orhorse hair (by the way, almost all of the badger hair used in shaving brushes come fromChina, where the badger is considered a pest and controlled under license). Third,shaving brushes are made to use with traditional shaving soaps and creams. But somepeople use them with brushless creams and gels as well. Bear in mind that the ingredientsof some brushless products may damage a brush’s natural hair so if you are unsure of theingredient reaction consider using a brush with synthetic hair.
Mantic59’s “Best” Shaving BrushesThere is a very wide variety of brushes available, for almost any budget. Here are what Iconsider very good brushes in several different categories (these are my opinions and Ihave not been paid for these “endorsements.”). This is based on:
My own experience; the experience of other users as read on various internet forums and blogs; reputation of the manufacturer; length of time on the market; brush’s general availability and popularity; brush’s overall value (quality vs. price).
Low Cost Brush: Ecotools “Kabuki” Finishing Brush (this is actually a makeup brush butsomeone discovered it works great as a shaving brush!). Honorable Mention:Tweezerman Men’s Shaving Brush, Escali Pure Badger Shaving Brush.
“Value” Brush: Parker
9

MidGrade Badger Brush: Vulfix 660 Honorable Mention: Edwin Jagger
“Silvertip” Badger Brush: WSP “Monarch”
Horse Hair Brush: Vie Long
Boar Hair Brush: Omega Pro 48
Synthetic Hair Brush: Muhle Synthetic Honorable Mention: Frank Shaving
A Note About Natural Hair Shaving BrushesSince boar, badger, and horse hair shaving brushes are made from animals, they can be prettysmelly (in a bad way) when they are initially used (though some brush makers will treat them toget rid of the “funk” most do not). So before you use an animal hair brush for the first time youmay want to give it a good washing with pet shampoo. Alternatively you can try soaking it in adiluted solution of one part distilled white vinegar to nine parts hot water, soaking for about tenminutes, agitating the brush occasionally. For particularly tough cases you can try soaking thebrush then lathering it with a stronglyscented shaving soap or cream. Then leave it on thecounter overnight. In all of these cases be sure to rinse the brush thoroughly and dry itcompletely before use. The good news is that any unpleasant scent should fade quickly withuse: most funky smells are gone within about two weeks.
The key takeaway here is to find a product that not only performs well but alsosmells good to you and to seriously consider getting a shaving brush.
WEEK 2: LATHER
The Mysteries Of Shave LatherSharpologist as covered some of the mysteries of shave lather before, from the anatomy ofshave creams to some of our favorite shaving creams and soaps. This week's challenge isto make the most enjoyable lather with the product(s) you have selected to use based onlast week's homework. The point here is to make applying and using shave lathersomething that appeals to your senses of touch and scent.
10

Before You LatherBe sure to prepare the area as discussed in the previous section. You may have found thatyou don't need all the time that was setaside to do it, which is fine! Personally, I only needabout a minute's worth of washing and rinsing, but it can take longer, depending on theperson...that's OK too.
Using "Canned Goo" (Products From Pressurized Cans)Don't. Just don't. There may be a couple canned shaving products that performreasonably well (Aveeno Therapeutic Shave Gel with Natural Colloidal Oatmeal issometimes mentioned as one of the better canned products) but all things being equalputting canned shaving product on your skin is the least acceptable method of shaving. Itusually does not smell good (if it smells like anything), it is not as good for the skin (thepropellants will dry out the skin so manufacturers have to add additional artificiallubricants), and it's really just as messy as other methods of lather. You may be savingyourself 90 seconds of building an amazing, enjoyable lather, but it is not worth the timesaved.
Using Brushless Cream Or Gel (From A Squeeze Tube)Still probably not the best option for a truly enjoyable shave but using a "brushless" creamor gel, applied with your fingers, can certainly give you a good shave. Hopefully you'vefound a brushless product with a scent you enjoy.
Applying a brushless product is reasonably straightforward but a lot of people just don'tspend the time to do it correctly. Here's where your ten minute setaside will come in. Likelast week, you probably won't need all that time. After you have prepared the area:
1. Wet the area to be shaved with warm water (remember to pay close attention to theneck if you are shaving your face!).
2. Wet your hands with warm water.3. Squeeze a generous dollop of cream or gel into the palm of one hand then rub
hands together to distribute evenly.4. Massage the product onto the skin with relatively slow, circular motions. Do this for
at least 30 seconds. Enjoy the scent of the shaving lather. Pay attention to it.Concentrate on it! Feel it on the skin.
5. Wet hands again (don't wash off any remaining lather from your hands, just get themwet again).
6. Continue to massage product into the skin for another 15 seconds.7. Wait 30 seconds. Use this time to wash your hands, tidy up the area, and admire
your good looks.
11

Now shave as you have been. If you shave in passes, lathering for each pass, you don'tneed to wait 30 seconds before shaving on later passes, just the first one. But be sure tobriefly rinse between passes to keep the skin wet.
Using Lathering Cream Or Soap Applied With A BrushHere is your best opportunity to truly enjoy yourshave. Not just a good shavean enjoyableshave. Lathering cream or soap offers a hugevariety of scents: woods, spices, colognes..."real"scents that can evoke memories or scenes in yourmind, not just the smell of the latest body spray orunderarm deodorant (ewwww...). And the bonus isyou can gently warm the lather to give it an extradimension. Does it take (a little) longer to make,compared with other types of lather? Yes, but it isworth the trouble.
The Lathering ProcessThere are some variations on how to make a good lather with different products, and it cantake a little practice to get right, but the payoff can be a dramatically better shave. Thereare two general schools of thought on making traditional shaving lather, differentiatedmostly on how water is integrated into the mix. The classic method of lathermaking startswith minimal water on the brush, adding water until you get the lather consistency you arelooking for. The other school of thought, sometimes called "creamy" (vs. "frugal")lathermaking starts out with much more water on the shaving brush, letting overflow spillout unused. Neither method is "right" nor "wrong." Try both methods to see what worksbest for you (or discover your own method!). You may need to use most of your ten minutesetaside time to experiment if you are not versed in the art of lathermaking. Don't worrythoughonce you get the hang of it you can cut that time way down.
(By the way, you can usually use a classic lathering shaving cream "brushless" as well. Youjust need to use a lot more product than you would use with a brush.)
"Classic" LatherMaking shaving lather the "classic" way starts with soaking both the brush and the cream orsoap in water.
12

Fill a sink with warmtohot water and place the shaving brush in the sink. How long thebrush needs to be soaked is dependent on the type of brush: boar hair, horse hair, and lowgrades of badger hair (such as "pure black") need to soak longer (probably severalminutes) than higher grades of badger (perhaps less than a minute). Synthetic brushes donot need to be soaked at all, just thoroughly wetted.
If you are using a puck of shaving soap put it in the sink as well (or if it is in a container orbowl put the hot water in that). If you have a jar of shaving cream that has been used for awhile it is probably worth pouring in a little water as well. The key point in thesecircumstances is to loosen the outer "skin" of the product to make loading easier. More onthat shortly.
After soaking dump the water out of the container of soap or cream and shake the brushthree or four times to get rid of the excess. Now you are going to load your brush:If you have a shave soap puck or a jar of shave cream, spin the brush onto it, pressingdown slightly, to coat the brush's bristles with product (an alternative for the jar is to scoopsome out with a small utensil and place it directly into the center of the brush). You arelooking for more than just a light foam on the bristlesyou want a relatively thick coat.
If you are using a tube of shave cream, squeeze out an almondsize amount directly into thecenter of the brush.
Now you're going to build lather. You can do it in an empty bowl of some kind or directlyonto the face. An advantage of using a bowl is that you can get a better idea of how thebrush is generating lather. And if you gently heat the bowl beforehand you can get awarmed lather than can feel...well...really great. On the other hand building lather directly tothe face can save some time.
Start massage the brush into the bowl or on the face using circular motions and pressingthe brush down slightly. Some advocate using a painting motion vs. a circular motion butlet's start off with circular. Massage for about 30 seconds then dip the tips of the brush inwater and repeat. It may take a several minutes for the lather to build on the brush to theright consistency, depending on the type of brush, the type of product used, and the mineralcontent of the water. Whether you're building in a bowl or to the face, you are looking for ashiny, somewhat "loose" consistency (runnier than what might come out of a can orbrushless tube) with soft "peaks" (like a cake batter) without any bubbles. Once again,while you are doing this, enjoy the scent of the shaving lather. Pay attention to it.Concentrate on it! Feel it on the skin.
13
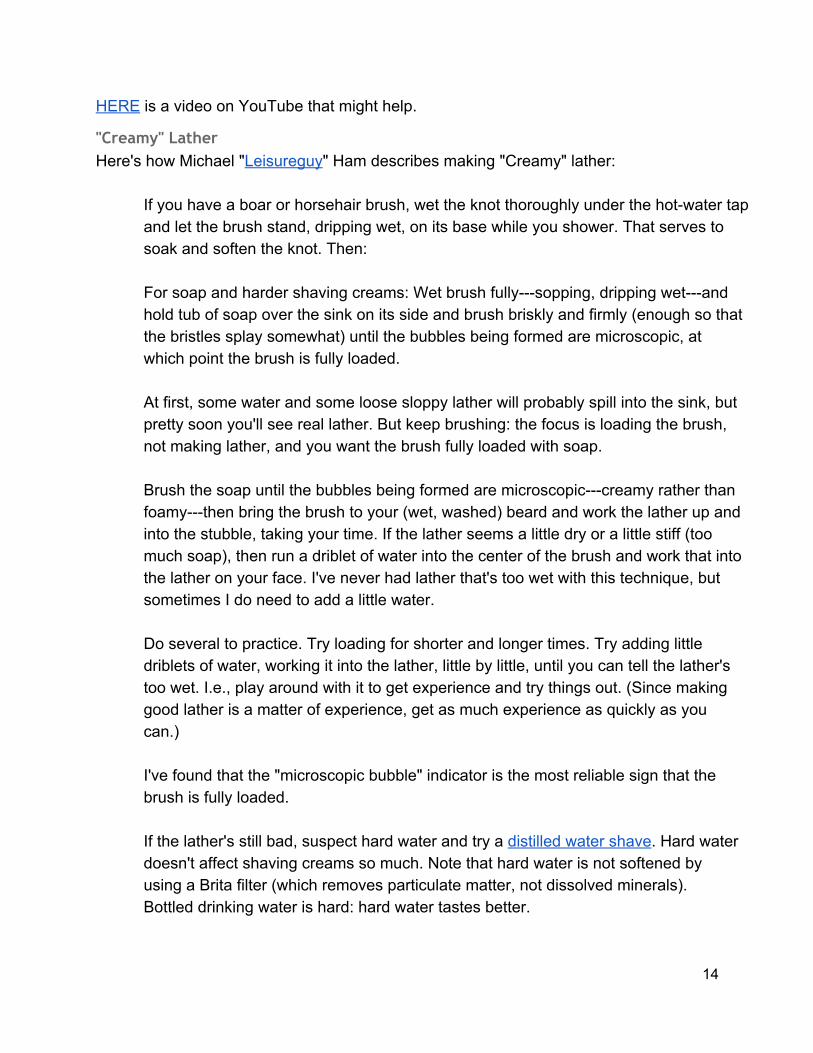
HERE is a video on YouTube that might help.
"Creamy" LatherHere's how Michael "Leisureguy" Ham describes making "Creamy" lather:
If you have a boar or horsehair brush, wet the knot thoroughly under the hotwater tapand let the brush stand, dripping wet, on its base while you shower. That serves tosoak and soften the knot. Then:
For soap and harder shaving creams: Wet brush fullysopping, dripping wetandhold tub of soap over the sink on its side and brush briskly and firmly (enough so thatthe bristles splay somewhat) until the bubbles being formed are microscopic, atwhich point the brush is fully loaded.
At first, some water and some loose sloppy lather will probably spill into the sink, butpretty soon you'll see real lather. But keep brushing: the focus is loading the brush,not making lather, and you want the brush fully loaded with soap.
Brush the soap until the bubbles being formed are microscopiccreamy rather thanfoamythen bring the brush to your (wet, washed) beard and work the lather up andinto the stubble, taking your time. If the lather seems a little dry or a little stiff (toomuch soap), then run a driblet of water into the center of the brush and work that intothe lather on your face. I've never had lather that's too wet with this technique, butsometimes I do need to add a little water.
Do several to practice. Try loading for shorter and longer times. Try adding littledriblets of water, working it into the lather, little by little, until you can tell the lather'stoo wet. I.e., play around with it to get experience and try things out. (Since makinggood lather is a matter of experience, get as much experience as quickly as youcan.)
I've found that the "microscopic bubble" indicator is the most reliable sign that thebrush is fully loaded.
If the lather's still bad, suspect hard water and try a distilled water shave. Hard waterdoesn't affect shaving creams so much. Note that hard water is not softened byusing a Brita filter (which removes particulate matter, not dissolved minerals).Bottled drinking water is hard: hard water tastes better.
14

For soft shaving creams: If it's a firm, hard cream (like Figaro, for example, orTabula Rasa, or Coate's Limited Edition or Dr. Selby's 3x Concentrated ShavingCream), make lather as if for a soap, as described above. If it's a relatively softcream (AlsShaving.com shaving cream, TOBS Avocado, Castle Forbes, or thelike): wet brush well, shake it a couple of times, and twirl the tips in the tub. (If thecream's in a tube, squeeze out a little and put it on the brush or smear it on your wetbeard on your cheeks.)
Then use the brush to spread the cream over your entire beard, so that your beard iscoated with a thin layer of almost pure shaving cream. Run a driblet of water into thecenter of the brush, and brush your beard to work the water into the shaving cream.Repeat as needed until you get the lather where you want it.
Again, play around: keep adding little bits of water until the lather's too wet, testing itperhaps along the way between thumb and forefinger to see how slick it is.Slickness will increase, and then when the lather's too wet, slickness will fall offsharply.
The more you play around with test lathers, the faster you learn to make good lather.
Whatever Method You TryNow shave as you normally have. But remember, however you build lather, making theexperience enjoyable is a key point to getting an enjoyable overall shave.
HERE is a YouTube video on tips for a more enjoyable lather.
Some Tips If You Are Having TroubleIt's safe to say everyone has experienced trouble making traditional shaving lather at onetime or another. Here are 3 shortcuts to making a better, more stable lather, more quickly.
15

"Superlather"
Priming the brush with a shave soap then adding shave cream (AKA "Superlather") can bean effective (albeit perhaps a bit messy) way to get a stable lather. Loading a fairly wetshaving brush with shave soap (or even a gentle glycerinbased facial soap) will "trap"water and hold it where it needs to be. Then adding a shaving cream will fully hydrate thelather and also create a really slick cushion to work with. HERE is a YouTube video of theprocess.
"Uberlather"A trick similar to "Superlather" is "Uberlather." Uberlather is the process of adding a fewdrops of pure glycerin to the shaving brush before lathering with shaving cream or soap.The extra glycerin will create a more stable, longlasting lather. Glycerin can be found fairlyeasily: look for it at your local megamart, drug store, or large grocery store. It is usually ineither the skin care or first aid area.
Distilled WaterSometimes lather is not very good because the water is not very good, with too manyminerals or contaminants (e.g. "hard" water). If you have hard water try using distilledwater. Just heat some up (not to boiling!) and pour into your sink (with the stopper closed,of course).
16

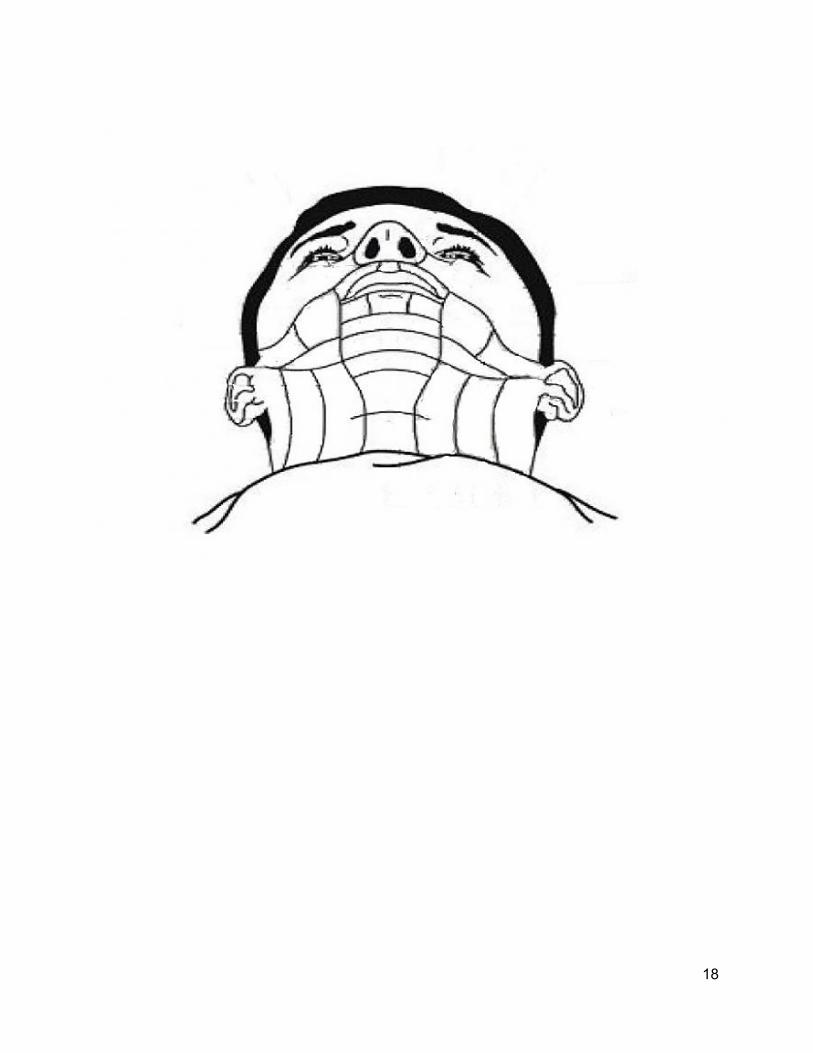
Homework For The Shave Technique ChallengeNext week we go into razors and shave technique! Before we tackle that however I wantyou to carefully map the direction(s) the hair grows in the area you are going to shave, andreview the razor you are now using and determine whether it is right for you. Assuming youare shaving your face, here is an image you can print off and use:
17
18

Let the hair grow out for a day or so then with a mirror (magnifying if possible) gently rubyour fingers along the skin from different directions. The direction where the skin feelsleast rough is the "grain" of the stubble. We will use this information next week.
The key point is to determine how the hair grows and whether the shaving toolused is appropriate for your circumstances.
Cartridge Razors?Anyone who reads Sharpologist knows we're all about the single blade razor. Classicdoubleedge, singleedge (Injector, GEM), straight razor...it's all good to us. But even wewill admitgrudginglythat modern cartridge razors have their place. Cartridges areconvenient. They're widely available. The blade pivot can provide a quicker, moreconsistent shave in some cases.
Sharpologist, with a little help from our friends over at Razorpedia, took a look at theGillette Fusion Proglide and seven competitors (for our purposes we're taking a look atrazors primarily targeted to the US. Yes, we know there are some good cartridge razors inother parts of the worldwe're looking at you, Raz*War and King Of Shavesbut this articlewill concentrate on the US market).
The Gillette Fusion is a fivebladed razor released in 2006. The Fusion cartridge has fiveblades on the front, and a sixth blade on the rear for trimming. There are a number ofvariations (with some handles incompatible with each other) but the latest incarnation is theFusion Proglide. The Proglide features a lowerresistance coating on thinner blades. It isgenerally acknowledged that the Proglide design improves on previous Fusion models.And for most of us the Proglide does provide very good shavesbetter than the previousversions of the Fusionand by most accounts they have a respectable cartridge life thatdegrades gracefully, which lowers the pershave cost (we do think that a cartridge lastingan entire month, as their marketing campaign claims, is a stretch. But two weeks seemedto be easily achievable).
Cartridge prices are easily the highest in the industry: $5 per cartridge (in a four cartridgepack) down to a slightlymoremanageable $3 range for a bulk pack (1416 cartridges)from a warehouse like Sam’s or Costco. You may be tempted to try the steeplydiscountedcartridges found on various internet auction sites but be aware there are counterfeits on themarket.
19

Schick, the perennial number 2 of the razor wars in the US, released their Hydro line in2010. They have both a three blade cartridge and a five blade cartridge: we'll stick to thefive blade for this article. They distinguish themselves by having a "lubrication reservoir" onthe cartridge and "skin guards" between the blades to reduce friction. Our testingsuggests that the shave is better than their previous Quattro four blade razor (which had anotorious reputation of an overlyaggressive blade angle), though not as good as theFusion. It has a very good cartridge lifemaybe better than the Proglide'swith most of usgetting a solid two weeks per cartridge (and a couple of us managed three weeks).However, many reported an unpleasant "gooeyness" of the lubrication system when usingcertain types of gels and creams, and particularly traditional lathering soaps or creams.
Cartridge prices ranged from $3.37 per cartridge in small quantities at retail outlets to$1.87 per cartridge in bulk (15 carts).
Harry's is going for style. One of the cofounders of the trendy Warby Parker eyeglassretailer, Jeff Raider, wants to do for razors what Warby Parker does for glasses: make arazor for a "more discerning" consumer with both style and a lower price than the dominantplayers, Gillette and Schick. THIS Wired.com article goes into more detail. And we thinktheir handles (initially two, "Truman" and "Winston") are certainly more stylish than thetypical handlethey look more like a custom pen than a razor. Both handles take the samekind of 5 blade cartridge. The cartridges can be purchased in packs of four, eight, twelve,and sixteen (with a costpercartridge ranging between $2 plus shipping and $1.56 withshipping).
Our testers got a fine shave, though perhaps not quite as close as some others on this list.And the cartridges had a durability that could only be described as averagea week or so.
800razors.com differentiates themselves from other competitors by offering a "burn free"guarantee: "no skin burn, wallet burn, or American jobloss burn" or they will provide a fullrefund. They offer both three blade and five blade cartridges (as well as a woman's razor):the five blade cartridges come in four, eight, sixteen, and twenty cartridge packs, with acostpercartridge ranging from $2.50 to $1.95 with shipping.
Our testers thought the 800razors cartridges were set to an extremely mild blade angle(perhaps this is part of the "burn free" motto?). Reactions tended to be on the oppositesides of the spectrum: those with light beards or very sensitive skin thought it was acomfortable shave, while others thought the razor was too mild and the shave not nearlyclose enough. Cartridge life was about average, a week or so.
20

My Shaving Club offers a razor with 5 blade cartridges via subscription. You can get twocartridges per month or per alternating month for $5.99; or three cartridges per month oralternating month for $8.49. That amounts to a range of $3 to $2.83 per cartridge withshipping.
Our testers thought the shaves from My Shaving Club razors were excellent: close andcomfortable, with a graceful blade degradation and a very good cartridge life (most testersgot at least 10 days out of a cartridge).
Manpacks is another subscription service, offering a razor with a set of four, fivebladecartridges for $9/mo ($2.25 per cartridge) including shipping. We assume that theyassume that the typical shaver will go through one cartridge per week. Our testers wereable to consistently get more than a week, and excellent shaves to boot. Some testers didnote that cartridge degradation did drop off a little more quickly than other razor cartridges.
ShaveMOB boasts "save 70% on premium shaving razors." No membership, nosubscription. They offer three, four, or sixbladed cartridges. The six blade cartridges havea version with a trimmer on the back and one that doesn't. If we look at the most expensiveversion (six blade with trimmer) the cartridge prices range from $3.25 to $1.67 dependingon quantity (all include shipping). Of course, different cartridges in their line will be lowercost.
Once again our testers got excellent shaves out of the ShaveMOB razor, and the cartridgeslasted over a week and degraded gracefully.
Interestingly, ShaveMOB and Manpack razors share the same cartridge connector on therazor handle. But the cartridge designs appear to be slightly different so they may ormaynot be interchangeable!
Dorco razors are also used by Dollar Shave Club (HERE is our review of DSC). Ofcourse, DSC works on the subscription model and will send you four, sixblade cartridgesper month for $9 (including shipping). That works about to $2.25 per cartridge.
Dorco's 6 blade cartridge have trimmer and no trimmer versions: the trimmer version isslightly more expensive. Percartridge prices range from about $1.69 to $1.22 dependingon quantity.
Our testers found the Dorco shaves to be very comfortable but just adequately close. Acartridge typically lasted 78 shaves but then degraded quickly.
21

We suspect that Dorco is the original equipment manufacturer (OEM) of some of the otherrazors on our list.
So Which Is Best?Well...that depends. :) If you're looking for bottomdollar, Dorco has the lowest cartridgeprice (in quantity), with Harry's and ShaveMOB coming in not too far behind. Butremember that the number (and quality!) of shaves you get from each cartridge effects thepershave cost so don't judge by price alone. The razor from 800razors.com is somethingto consider if you have fine hair or very sensitive skin; however you may not get as close ashave as another alternative. If you want to buy your razor cartridges under a "set it andforget it" subscription, myshavingclub.com offers flexible terms.
The bottom line here is we think the shave quality of all these alternatives will get very closeto that of the Proglideclose enough that you probably won't have a problem trading shavefor cartridge price. But is a cartridge razor really want you want to use?
Double Edge Razors?
Unlike razors with multiblade, pivoted cartridges that are manufactured to a very narrowset of specifications, doubleedge (DE) razors (and blades) have a wide variety of optionsto choose from. Lets look at some of the variables and give some product examples.
Price Range
22

Probably the most obvious factor is going to be price. There's no sense looking forsomething you can't afford. I have seen new DE razor prices range from under $5 to wellover $200.
There are some acceptable inexpensive DE razors. They probably will not becomeheirlooms for the grandkids but they should be acceptable to get started with if you are on abudget. Sharpologist ran a post a while back about a couple inexpensive razors for under$15. The $15 to $30 range offers some additional alternatives, including the all plasticWilkinson Sword, the mostlyplastic Feather Popular, and the all (light) metal Weishi. Youwill also find some promising newcomers such as the Matador (open combmore on thatlater), Cadet, and Black Tie (which incidentally all come from the same manufacturingfacility in India). Maggard razors, another relative newcomer, are also wellregarded andinexpensive.
The $30$40 price range is where you will start seeing the more popular, bettermaderazors. Probably the most recognized models in this range are the Edwin Jagger (EJ)DE8x series and many Parker razors, as well as the low end of the Merkur line (includingtheir popular 180/23C, and 33C) will be in this range too.
The $40$50 range is where you will find the enormously popular Merkur Heavy Duty (AKA"Heavy Classic" or 34C) and Edwin Jagger DE89lbl.
Above this price point is where you will find razors that are popular for reasons other than(or in addition to) performance. Different head styles (such as the Merkur 37C "Slant " orthe Muhle R41 ), materials (like the Feather AllStainless Steel , the Above The Tie 7 PieceRazor System, or the Pils), special features (including the Merkur adjustablerazorsProgress , Futur , and Vision ) or special handle designs or materials areexamples of this category.
New vs. Used vs. VintageThe next factor for finding the "best" razor is whether it is new, used, or vintage. A newrazor is just that: in production, for sale, and not previously used. A used razor is one that iscurrently in production but has been used before. A vintage razor is one that is out ofproduction (both used and "new old stock"). The previous section described popular newrazors. You can get used versions of these same razors for probably around 75% of theirnew pricethey generally hold their value pretty well. Vintage prices can be "all over theroad" depending on condition and the seller's knowledge (or lack of knowledge).
23

There are a number of sources for used or vintage razors, including local antique storesand flea markets, internet auction sites, and buy/sell/trade (B/S/T) sections of the internetshaving forums. Maybe even a forgotten razor in an older relative's bathroom? Localstores have the advantage of having something you can see and feelyou are more likelyto know to what you are getting. Internet auction sites can be useful if you know what you'redoing and are looking for something very specific...though there is always the danger ofseller shenanigans. The B/S/T areas on shaving forums are probably the place most likelyto get a decent razor for a fair price. These areas sometimes have "PIF" offers as well: auser wanting to "Pay It Forward " by offering a razor at little or no cost to a new shaver, amember of the armed forces, or for some other reason. You can find a list of shavingforums at the bottom of the page here on Sharpologist (under "Resources").
Two excellent "vintage" DE razors include the Schick Krona and various versions of theGillette SuperSpeed (particularly the "Toggle")see this Sharpologist post for moreinformation. Vintage specialty singleblade razors such as the GEM have their fans aswell.
Open Comb vs. Safety Bar
Double edge razors have heads that can be divided into two general groups: Open Comband Safety Bar. Open Comb's have obvious "teeth" that help guide heavy stubble and
24

shaving cream into channels. Safety Bars have a solid (or scalloped) bar that providessome additional protection to the skin from the blade. Generally, Open Comb razors will notbe as gentle on the skin as safety bar razors (the Muhle R41 notoriously so!), though thereare exceptions (such as the Goodfella, a surprisingly mild Open Comb manufactured inNew Zealand). Most older vintage razors will have an Open Comb.
Three Piece vs. Two Piece vs. One Piece ("Twist To Open")
DE razors are typically constructed in one of three ways. Three piece are the classic" (andeasiest to manufacture) type, consisting of a handle, a base plate, and a head or cap. Anadvantage of a three piece design is that you can sometimes "mix and match" the threepieces from different manufacturers, creating entirely new razors (you'll sometimes see thisreferred to as a "frankenrazor" after Frankenstein's monster). Two piece have the baseplate permanently mounted to the handle. A one piece "twist to open" (TTO) razor is thetype most common just before the advent of cartridge razors: the Gillette SuperSpeed isthe classic TTO.
Set Gap vs. Adjustable
25

Generally speaking, Open Comb razors expose more of the blade to the skin, making for amore "aggressive" shave. But even razors with a Safety Bar can be aggressive: it's allabout the amount of blade exposed to the skin. The vast majority of razors have a set gapsize: the amount of the gap distance is determined by the manufacturer for a particularmodel of razor. However "adjustable" razors can change the gap to make them moregentle or more aggressive. There are only three adjustable razors currently made, all fromMerkur and mentioned earlier. There were also some vintage adjustable razors. There areseveral lists that rate razors on a scale of the amount of blade gap or blade exposure. Seethe bottom of the Sharpologist page under "Resources" for one such list.
Mantic59's "Best" DE RazorsHere are what I consider the "best" razors in several different categories (these are myopinions and I have not been paid for these “endorsements.”). This is based on:
My own experience; the experience of other users as read on various internet forums and blogs; reputation of the manufacturer; length of time on the market; razor's general availability and popularity; razor's overall value (quality vs. price).
26

Remember the old adage, "Your Mileage May Vary!"
Best Low Cost Razor: Lord L6 three piece safety bar
Best "Value" Razor: Parker 92R TTO safety bar
Best "Popular" Razor (tie): Merkur "Heavy Classic" 34c two piece safety bar, EdwinJagger DE89lbl three piece safety bar
Best Open Comb Razor: Goodfella three piece (note that this is a fairly gentle razor.(Honorable Mention: Muhle R41 with the 2013 head a much more aggressive razor).
Best Adjustable Razor: Merkur Progress two piece safety bar (this is admittedly apersonal favorite!)
Best Vintage Razor: Gillette SuperSpeed, circa 1950 (Honorable Mention: Gillette"Toggle" Adjustable TTO safety bar)
Best "Price Is No Object" Razor: Above The Tie 7 Piece Stainless Steel Razor System(Honorable Mention: Feather ASD2 All Stainless Steel)
A Further Caution To The Beginner: BladesNo discussion about DE razors would be complete without mentioning blades. Manybeginners think "a blade is a blade" and while DE blades may all look similar there canactually be fairly significant differences in the way a blade is made. Metallurgy (the metal orcombination of metals used to make the blade), coatings, and grinding specifications (theblade's "sharpness") can all play a part in the production process. So take the time to try anumber of different blade brands to find the one(s) that work best for the razor you're using(your skin, the mineral content of the water you're using, and the shave lather you're usingplay parts too). Even if you are already using a DE razor you may need to do someadditional blade experimentation if you buy another DE. Some shaving vendors sell"sample packs" or "blade samplers " to make the process easier: you get a few blades ofmany different types. After you decide which one(s) work best you can then buy yourfavorites in bulk, saving a ton of money!
Extending Blade or Cartridge LifeIt seems like everyone is unhappy with the cost of razor blades. Here are some ways that canmake a blade last longer.
First lets correct a common misconception, that you can resharpen a razor blade
27

cartridge. It is impossible to resharpen a cartridge razor blade. Why? Because to trulysharpen a blade you must have access to both sides of the edge. Even sharpening adoubleedge blade would be very difficult because the blade is so thin that keeping thecorrect angle without flexing the metal would be almost impossible without some kind ofmachine. Some products play word games with dictionary definitions, but if you askanyone who sharpens knives or razors for a living you will get the truth.
But that is not to say that a blade’s life cannot be extended. On the contrary, there are anumber of strategies and products that can prolong the useful life of a razor blade byslowing down the dulling process. Exactly how much depends on a number of variables,including the metallurgy of the blade, the mineral content of water used for shaving andcleaning the razor, the type of hair being shaved, and even the ingredients of the latherused to shave. However, in my own research for this video I was able to at least double thelife of my blades using any of the techniques or products I’m about to describe.
It seems like the best way to extend the life of a blade is to keep it clean, dry, and awayfrom air. This keeps tiny particles picked up from the skin off the blade and slows oxidationwhich eventually creates chips along the blade edge. Cleaning and drying actions can becombined by rinsing the razor in hot water, then wiping it in the opposite direction fromshaving. I use a dry towel but I have seen others do it on denim or even the skin of theforearm. Wiping the blade like this is a form of stropping. By the way, stropping is notreally sharpening, its more like polishing off tiny bits of shaving residue from the bladeedge and realigning the blade edge somewhat. Of course, in the case of a multibladerazor you’re only stropping one side, but one side is better than nothing.
There are some products that claim to make this cleaning process a little more effective.Razorpit uses a rubberlike surface to clean the blade edge like a squeegee on a glasswindow. You use a little leftover lather as a cleanser, running the razor over the surface.Then you rinse and dry. Xtendablade is another product that uses a treated material topolish the blade surface, though in this case the blade should be dry before using.
Another strategy to slow the oxidizing of the blade is by coating the blades with a thin layerof skinfriendly oil. Mineral oils and cooking oils are commonly used. I happen to like oliveoil: its widely available, cheap, and sticks to the blade reasonably well. You can apply athin layer with a cotton swab or you can immerse the whole razor head in a glass of oil.One less messy alternative is Pacific Shaving’s Blade Oil, a combination of oils that stickwell to the blade’s surface.
28

Straight Razors?
Straight Razor Basics
First lets look at the major parts of a straight razor and the basics of their design. Thereare some variations, mostly in vintage razors, but here are the most common thingsyou’ll find.
The major parts of a straight razor include the scales, the razor’s blade edge, the point, thespine, the shank, and the tang. You may see some differences in labellinglike where thetang is but these seem to be the most common descriptions.
29
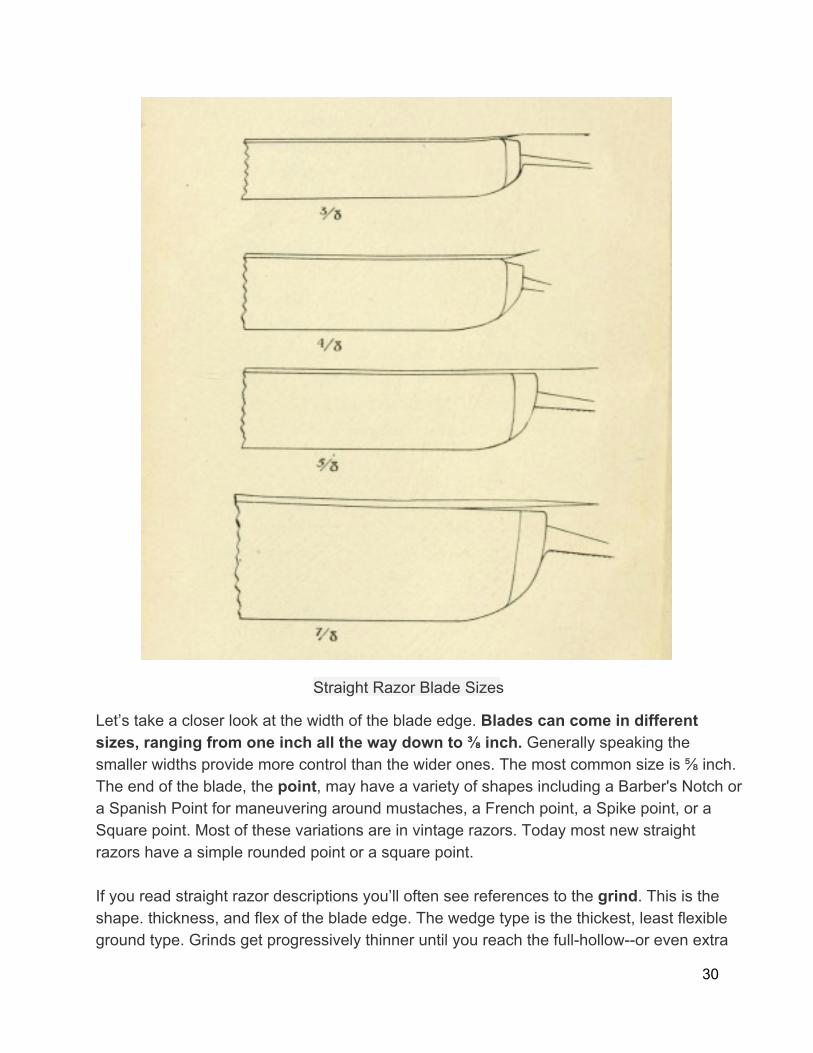
Straight Razor Blade Sizes
Let’s take a closer look at the width of the blade edge. Blades can come in differentsizes, ranging from one inch all the way down to ⅜ inch. Generally speaking thesmaller widths provide more control than the wider ones. The most common size is ⅝ inch.The end of the blade, the point, may have a variety of shapes including a Barber's Notch ora Spanish Point for maneuvering around mustaches, a French point, a Spike point, or aSquare point. Most of these variations are in vintage razors. Today most new straightrazors have a simple rounded point or a square point.
If you read straight razor descriptions you’ll often see references to the grind. This is theshape. thickness, and flex of the blade edge. The wedge type is the thickest, least flexibleground type. Grinds get progressively thinner until you reach the fullhollowor even extra
30

hollowtype. Some say that thicker grinds such as a quarter hollow are easier for the newuser to shave with as it is more stable. On the other hand it provides less feedback to theshaver which could nicks or cuts more likely. Thinner grinds such as extra hollow providemore tactile feedback and some say the are easier to resharpen, but they also can bendor spring more easily, making a consistent shave harder to accomplish.
Next lets talk about metallurgy. The two most common metals used in straight razorsare carbon steel and stainless steel. Carbon steel is more flexible but can rust if it’s notproperly maintained. Stainless steel is easier to care for and might hold a cutting edge abit longer.
Selecting a straight razor is to strike a balance between control, stability, andtactile feedback.
Buying A Straight Razor
Do yourself a favor and buy your first straight razor from an established, reputablesource. Use your favorite search engine to look for discussions and reviews and you willsoon find them. And be sure you look for a razor that is labeled as "shave ready". If youdon’t see that term assume that it’s not (contact the seller for clarification if you areinterested): trust me, you don’t want to go about learning to sharpen razors yetthat’s awhole different animal. Count on spending at least $75 for a new, sharpened straight razor.Anything less and the odds are you’re buying a razorshaped letter opener. Be aware thatrazors produced in Pakistan and China tend to be poorly made, with soft metals that won'thold an edge, though Gold Dollar and Double Arrow razors (both made in China) have theirfans.
What About Replaceable Blade Straight Razors?
You may have seen razors that look like a straight razor but use replaceable blades. Theseare often termed “shavette’s” after the Dovo Shavette and while they seem like a lessexpensive option and don’t require sharpening or stropping, they may not give you thestraight razor experience you’re looking forthey just don’t have the weight andbalance of a real straight razor. But they’re popular with barbers because there is no blademaintenance, and state or local law may require them anyway. Shaving with one of theserazors may actually be more difficult than shaving with a genuine straight razor.Plastic models like the Shavette are very light and don’t provide the heft and balance of areal straight razor. Many of these razors use a DE blade cut in half. That can make theblade edge unstable (not to mention uneven blade exposure) and overly flexible. Modelsthat have the ability to use stiffer custom blades may help a bit.
31
Metal models like the Parker may help a little more, with better weight and balance. Thismodel is also getting popular with barbers.Finally, allmetal models with specially made blades like the Feather Artist Club may comereasonably close to a straight razor experience but the price will approachor evensurpassthat of a regular straight razor.
What About "Kamisori" Razors?
Kamisori razors are Japanesestyle straight razors. They're out of the scope of this articlebut if you want to learn more take a look at THIS Sharpologist article.
WEEK 3: SHAVE TECHNIQUELet's assume you'll be shaving your face, though the concepts apply to shaving pretty muchanywhere. Last week's homework was to carefully map how the grain on your skin growsand you were given a facial diagram to map with. Now it is time to put that map to work.
Essential Razor Technique #1: The Importance Of "Grain"Knowing how the hair grows is essential to a comfortable (and hence, more enjoyable)shave because it allows you to remove more hair per stroke with less chance of irritation,providing more beard reduction more quickly. Understanding beard growth is essentialwhen using a multiblade razor! It is less essential when using a single blade razor but stillimportantmore on that later.
Grain is also important to know so that if you decide to pull the skin taut to shave you canknow which direction to pull. Overstretching the skin makes the possibility of irritation oringrown hairs much more likely.
Essential Razor Technique #2: Reduction By PassesNo matter what kind of razor you use, an essential razor technique is to shave in passes,with each pass progressively removing hair more closely to the skin. Even multibladerazors with their "lift and cut" theory (though some might say it's more like "yank and hack")follow this technique, along with the "grain."
Essential Razor Technique #3: No PressurePutting too much pressure on the razor creates a "valley" for the blade, not only reducingthe efficiency of the blade but also making irritation more likely. Modern cartridge razorsthat pivot can partly compensate for too much pressure but don't rely on it. Hold the razorby the bottom of the handle, tilt your head to one side, and let the head of the razor rest onyour cheek. Feel that? That's the most amount of pressure you want to use.
32

Essential Razor Technique #4: Proper Blade AngleIf you are not using a razor with a replaceable blade cartridge, you will have to beconcerned with the angle where the blade meets the skin. Blade cartridges set this anglefor you, with some engineer (or marketer!) deciding what is best for everyone. If you areusing a classic doubleedge or single edge blade (including a straight razor) you must setthis angle yourself.
Essential Razor Technique #5: A Sharp Blade Or CartridgeIt may seem obvious but a good, enjoyable shave needs a good, sharp blade to shavewith. That means not using a blade or cartridge that is beyond it's prime.
Putting It All TogetherIn some ways the actual shave is almost anticlimactic, as preparation and lathering maybe more important to an enjoyable shave. But part of getting an enjoyable shave is that theshave is comfortable and as close as you like, which requires a blade! Here is where youcan experiment to find the intersection of close, comfortable, and enjoyable.
Razor technique with your first pass should always be with the grain and almostleisurely in it's accomplishment. Don't worry about getting every last strand of hair orgo over the same spot again and again during the same pass: your goal is toreduce the stubble, not eliminate it.
Use your ten minute schedule to try some or all of these experiments, to see what works foryou:
If you are using a single blade without a cartridge (i.e. the classic doubleedgerazor, a singleedge razor like the "Injector" style, or a straight razor) you might beable to "cheat" the grain a little: rest the razor head (or blade) against the cheek andslowly rock the razor downward until the blade edge just makes contact with theskin, then go just a bit more. Then lock your wrist and shave straight downward,regardless of the "grain." The angle between the blade edge and the skin should besomewhere between 30 and 45 degrees.
Relather and repeat the first pass. This razor technique is especially useful forthose who are learning singleblade shaving.
Reduce stubble more slowly. After the first pass relather and shave across the grain(the direction 90 degrees away from the grain). Relather and shave across thegrain from the opposite direction. Relather then shave against the grain. Then onsuccessive shaves start experimenting with the final passes (is not shaving against
33

the grain acceptable? Do you need both acrossgrain passes?) and gauge itseffects.
Segment the area to be shaved into its flattest parts. Take shorter (maybe evenmuch shorter) strokes on curved areas like the chin. Rinse the blade betweensegments so that you always have a "clean" blade on each part.
Listen to the shave. Many people consider the sound of shaving to be one of itsmost enjoyable aspects. You may not hear much using a cartridge razor but manysingle blade razors produce a deep, satisfying sound and many who use a straightrazor listen for a "singing" sound of the razor. In any case, with some experienceyou should be able to determine the sound the razor makes when it is cuttingproperly.
FinishingEven multiple passes with great lather and careful razor technique may still result in smallrough areas. Your first goal before going any further is to determine whether it's really hairstubble or just a rough (or loose) patch of skin. One way to find out is to simply move on towhatever you do after shaving and an hour or two later check the area. If it feels smooth itis probably because you have a loose area of skin in that area: after the skin returned to itsnormal muscle tone the skin smoothed out.
On the other hand, if the skin still feels rough a "finishing" razor technique might benecessary on your next shave. This might include an "oil pass," a "water pass," or usingsome advanced razor techniques in specific areas.
Some advocate various blends of oils to make a very thin coating for "polishing" therough spots. Leisureguy has an article that goes into much more detail about the oilpass, HERE.
I have seen a few people use just water for a "touch and cut" of an area. Howeverbecause water is so "volatile" for shaving purposes it can easily lead to razor burn.Something a little safer to try would be a little additional shave cream applieddirectly to the area. Others rub a little shaving soap on the area (without lathering).
Advanced razor techniques for finishing a shave are better shown than described.HERE is a video on YouTube showing some advanced techniques.
Shaving With A Straight Razor
While you are learning the skills necessary to shave with a straight razor you will reallybenefit from paying close attention to what you do before the shave starts. You will want to
34

prepare your face really well and make the best lather possiblethis is not the time toskimp on preparations! Take a long shower before beginning and take extra timethoroughly applying lather. No canned shave cream here, please! Don’t shave with athick growth of stubble or you will only make it harder on yourself. One or two day’sgrowth will be more than enough to start with.
You will most likely be spending much more than ten extra minutes when you arelearning to shave with a straight razor!
StroppingStropping does not sharpen a razor. It helps keep the cutting edge of the blade alignedand polishes the edge, removing tiny amounts of lather residue and some mineraldeposits. Most shavers strop their blade before every use, though this may not be strictlynecessarysome strop their blades the night before the shave and some find that theydon't need to strop before each use but rather everyotheruse.
Stropping is usually done on a piece of specially prepared leather. The leather can besecured on one end and held taut (a "hanging strop") or mounted on a flat surface (a"paddle strop"). Rest the blade of the razor flat onto the leather by the shank (or tangdepending on how it's termed) and, without pressing down, draw the razor in the oppositeside of the blade edge. Then roll the razor on its back over to the other side and repeat thedraw in the opposite direction. You’ll want to do about 50 of these fullforwardandback cycles.
The width of the leather can vary as well, from two inches to three inches. If the width of theleather is less than the width of the blade you will have to move the razor from sidetosideas it is drawn forward and back. This “X Pattern” will ensure the entire blade edge isprepared.
Shaving
35

Hold the razor with your dominant hand. If you need to reposition your fingers slightly that’sfine, just make sure you can hold the razor firmly but comfortably. Start shaving on thesame side of the face you are holding the razor with, so if you’re righthanded you willbe shaving the right side of the face first.
Stretch the area you are going to shave flat and taut in the direction opposite ofshaving with the other hand, then rest the blade so its almost flat on the skin. Roll therazor slightly while moving the blade down, until you find the angle that is most comfortableto shave with. Be sure to lock your wrist and move the blade and your arm as a single unit.The classic movement is to shave downward. But if you need to you can change directionslightly to better follow the grain of your stubble.
36

As you maneuver around your face try to envision it as a diamond, with you shaving thefacets and avoiding the corners whenever possible. But remember you’re going to have toadjust the position of the razor in your hand to match the angle needed to shave each facet.One of the key skills you will have to develop is holding the blade firmly while still being ableto rotate it slightly and maintaining the correct pressure on the skin, all at the same time. It’sa balancing act that can take some concentration.
Once you finish the dominant side of the face you can move to the opposite side. Herethere is a choice on how to grip the razor. One way is to continue to hold the razor in thedominant hand with the end is facing the nose. The other way is to simply switch the razorto the other hand and use it just like the dominant hand. Try it both ways to see what is mostcomfortable to you.
Shaving the center of the face can be the most challenging because of the many curves inthe area and the generally tougher stubble that usually grows there. You may have tochange razor positions several times to finish that area.
While you are learning to shave with a straight razor it is probably best to stop atthis point and use a razor you’re more familiar with to clean up remaining stubble. Lateryou may want to try relathering and repeating this pass for a slightly closer shave.Remember that it may take some time to develop the skill necessary for a good, consistentshave so it’s best to do it in stages.
When you’re ready for a closer shave, add an upward pass. You will need to grip the razorslightly differently and use a slightly shallower angle. For this pass I find it more comfortableto start on the side opposite that of your dominant hand.
After ShavingA straight razor needs some attention after the shave too, to maintain its condition.Carefully wipe the blade clean with a dry tissue or towel. Don’t forget to dry the inside of thescales as well, so water doesn’t get to the blade when the razor is in its closed position.Then store the razor for its next use. If you're not going to use the razor for a while you maywant to coat the blade with a thin coating of light oil (baby oil will work fine) or evenpetroleum jelly to help prevent corrosion.
Homework For After The Shave ChallengeIn preparation for next week I want you to determine your skin type and find an aftershaveappropriate for that type. How do you know what type of skin you have?
37

Dry skin appears rough, dull or cracked and is prone to peeling, lines and wrinkles. Besure to use a gentle face wash and only use a facial scrub once a week. Make sure youdrink plenty of water and moisturise twice daily with a good moisturiser.
Oily skin looks shiny, particularly on the TZone (forehead, nose and chin) and feels, well,oily to the touch. The skin appears to have large or open pores and is it prone toblackheads, whiteheads, spots and pimples, and even acne. Oily skin attracts dust anddirt so it might be useful to use a facial cleanser twice daily, a facial scrub 2 or 3 times aweek and use an oilfree moisturiser.
Sensitive skin will itch, sting or break out in a rash when you use certain shaving andskincare products. You’ll need to try to use products specifically made for sensitive skin.
Combination skin will have a central greasy area around the forehead, nose & chin butdry around the cheeks. Its also prone to blackheads, especially around the nose. The bestway of dealing with combination skin is either to use products designed specifically forcombination skin, or to simply apply the relevant products to the relevant area of your face dry skin products for the dry areas, and oilfree products for the TZone.
Normal skin appears evenlytextured, smooth, clear and healthy, with barely visible poresand without blemishes or spots. To maintain clear skin use a good quality facial wash andlightweight moisturiser every day, punctuated with a facial scrub once or twice a week.
"Aftershaves"What about after the shave? There is a surprising amount of variety in aftershave products,and many widely available aftershaves are pretty goodprobably because many widelyavailable razors and shave creams are so bad. But that wide variety of aftershave productscan be confusing, especially with all the different terminology that gets spewed out withoutmuch explanation. It all kind of makes you wonder who’s in charge.... So lets look at ageneral overview of aftershaves with some rules of thumb.
But first let’s clarify “aftershave” means. because it can mean different things to differentpeople. I’m not talking about products you might use after shaving that are mostly alcoholand some kind of scent component, almost like a cologne. I am talking about the productsthat are applied immediately after shaving to provide some combination of irritation relief,skin moisturizing, and protection from the elements. Select an aftershave based how thatcombination addresses the needs of your skin.
38

Aftershaves can be divided into two broad categories, balms and splashes. Balms areheavierfeeling on the skin and typically provide more irritation relief and moremoisturization to the skin, particularly in cold or dry climates. Splashes are more wateryfeeling and generally contain a combination of toners, astringents, and hydrosols tocleanse and provide a degree of antiseptic or antibacterial protection to the skin. They’remore popular with those with oily skin or in hot, humid climates. Both balms and splashesoften use some kind of humectant to increase the effectiveness of other ingredients. Thereare also some other “crossover” ingredients that might be used in a balm or a splash. Bythe way, I’m often asked whether a moisturizer is the same as an aftershave balm. No, anaftershave balm contains additional ingredients.
Humectants are ingredients used to increase the skin penetration and activity time ofanother ingredient. They’re also used to minimize the dehydrating effect of some otheractive ingredient. Examples of humectants include glycerol, propylene glycol, sorbitol,lactic acid or urea.
Moisturizers are ingredients specially designed to make the external layers of the skinsofter and more pliable by increasing the skin’s water content. It does that not by puttingwater into the skin, but by reducing evaporation. A moisturizer is not a single ingredient buta combination of ingredients like oils and humectants working together
Toners and astringents are designed to cleanse the skin and shrink the appearance ofpores. Astringents are the strongest form of toner, containing a high proportion of alcohol,2060%. Mild astringent solutions are used in the relief of minor skin irritations likesuperficial cuts, rash from allergies, insect bites, or fungal infections like athlete's foot. Theycan also help heal scars. They are commonly recommended for oily skin as they aredrying, but keep in mind that the removal of oil from the skin can lead to excess oilproduction as the skin tries to compensate and prevent moisture loss. Topically appliedastringents cause mild coagulation of skin proteins and will dry, harden, and protect theskin. Astringents are best applied only to problem areas of skin to prevent excessivedrying.
Some common ingredients include alum, oatmeal, acacia, yarrow, witch hazel, distilledvinegar, and alcohol. Astringent preparations include silver nitrate, potassiumpermanganate, zinc oxide, zinc sulfate.
Hydrosols are the product of essential oils usually obtained by steam distillation fromaromatic plants. Hydrosols go by other names including floral water, herbal distillates,hydrolate, herbal water and essential water. Hydrosols are produced in the same manner
39

as essential oils but essential oils will float to the top of the distillate where they areremoved, leaving behind the watery distillate. In the past, hydrosols were considered abyproduct of distillation, but now they’re considered an important coproduct. The scienceof distillation is based on the fact that different substances vaporize at differenttemperatures.
Hydrosols contain diluted essential oils. Because hydrosols are produced at hightemperatures and are somewhat acidic, they tend to inhibit bacterial growth but they’re notsterile. Hydrosols can also help the skin get back a normal pH by being more acidic, whereshaving soaps and creams may be more alkaline. The traditional hydrosols mostassociated with shaving are rose and lavender. Rose distillates are known to be mildlyantibacterial, while lavender distillates are mildly antiseptic. By the way, its a good idea tokeep hydrosols refrigerated, like milk. They’ll last longer, and they can feel nice in the heatof the summer.
“Good” vs. “Bad” IngredientsIngredients to look for: aloe vera, chamomile, tea tree oil, calendula, witch hazel, lavender,jojoba oil, grapefruit seed extract, rose oil distillate, and various vitamins
Ingredients to avoid: high concentrations of alcohol, camphor, or eucalyptus; grapefruit (ifyou're going to be outdoors a lot), and lemon oil (if you have sensitive skin).
Your goal is to find an aftershave product that is appropriate for your skin and hasa scent you enjoy.
40

WEEK 4: FINISHING UP
After The ShaveAfter you have shaved you should rinse the area well to remove any lather residue that mayhave been left behind. Rinse with warm water first. Some people will soak a cotton padwith Witch Hazel and wipe the area clean as an additional measure. Then rinse with coolwater.
Want to "ramp up" the enjoyment of your aftertheshave routine? Try this: wet a hand towelwith water, ring out the excess, and place it in your freezer. After you have shaved andrinsed grab the towel, sprinkle on a few drops of your favorite cologne, and place it on thefreshlyshaved area. This has the effect of helping to constrict your pores, disinfect thearea (from the alcohol in the cologne), and it smells great!
Oops!Even the best, most careful shaver can occasionally get a nick or cut. Here are some strategiesto deal with it.
Spot TreatmentsThe classic way to treat a shaving nick or cut is with a styptic pencil. A styptic stopsbleeding by contracting skin tissue to seal injured blood vessels. A classic styptic (like thisone from Clubman ) is made of aluminum sulfate. Aluminum sulfate is not an aluminummetal but rather a naturally occurring mineral. You wet it then rub it against the nick or cut.Yes, it usually stings. Its typically a solid though some products like this one add additionalingredients like aloe vera to make a liquid which is then applied using a roller ball. Andhere is set of singleuse styptics in the shape of a matchbook (this example from TheLegends Of London).
Another common spot nick treatment ingredient is aluminum chloride or one of its cousinslike aluminum chlorohydrate. It is again used with additional ingredients to make a moreskin friendly, convenient product. Pacific Shaving's Nick Stick is also is applied with a rollerball. And Proraso Styptic Gel is in gel form. It works really well for me and I’ve found a tinybit goes a long way.
A few other "in a pinch" ideas for spot treatment of nicks or cuts when nothing else isavailable include a bit of petroleum jelly or even lip balm. Aluminum chlorohydrate is used incommercial antiperspirants so rubbing your finger on an antiperspirant stick then onto thenick could help.
41

Full Face TreatmentsWhat about solutions that are used on the entire face? These aren’t meant specifically as anick or cut treatment but are useful for them anyway. The classic face treatment for aftershaving is using an alum block, like this one or this one. Alum block is made up ofpotassium alum, another naturally occurring mineral. It was primarily used for its antisepticproperties back in the day, but it is a mild astringent too so it’s useful for those little shavingweepers. You wet the block and rub it all over your moist face. If you have not nickedyourself you may experience a cold tingle. As is goes over a nick you may get a bit of asting though. Allow the face to dry briefly then rinse off with cool wateryou don’t want tokeep the mineral on your face due to it’s salty properties )by the way, Alum Blocks can alsobe used as an anti perspirant. And viceversa, some of the crystalline deodorant blocksyou see at the supermarket might be useful for the face. Just be sure the main ingredient islabeled as either potassium alum or potash alum).
Applying Aftershave ProductsAfter you have addressed any “oops” issues it is time to apply your aftershave product.Aftershave products (particularly balms) are best applied onto wet skin with wet hands. Itdoes not have to be “dripping wet” but applying this way will ensure even coverage with theappropriate amount of product. Using more than one product? Apply the product with thethinnest consistency first followed by the thicker product.
THE ENDAnd we have come to the end of our 30 days! I hope you are enjoying your shave morenow. Be sure to read Sharpologist regularly for more tips and techniques. If you have anyadditional ways of enjoying your shave, be sure to share them!
FURTHER READING
Leisureguy’s Guide To The Gourmet Shave If you crave even more information aboutshaving, this book will satisfy it. The Alpha and Omega of all things wet shaving. Highlyrecommended.Lynn Abrams’ World Of The Straight Razor DVD If you have an interest specifically instraight razors, you should watch this DVD. Lynn is one of the foremost authorities on thestraight razor and it’s accessories.
42