3,' &RQWUROOHU )RU /HJR 0LQGVWRUPV 5RERWV...
14
A PID Controller For Lego Mindstorms Robots A PID Controller is a common technique used to control a wide variety of machinery including vehicles, robots and even rockets. The complete mathematical description of a PID Controller is fairly complex but a much simpler understanding is really all that is needed to use a PID effectively. This document is a description of how to create a PID Controller for use with Lego Mindstorms Robots using the NXT-G programming language. It will be easier if we have an actual task in mind so I will describe how to create a PID to do line following. Once created, the same PID can be used, with only minor modifications, with any other Mindstorms application such as getting a robot that can drive as straight as possible, or even for a robot that can balance with nothing but 2 wheels touching the ground like a Segway. A PID is really pretty straight forward and the typical description of a PID is easily understood by anyone that has had Calculus. This document is targeted towards First Lego League kids in third through eighth grade. Since there aren't many kids that have had Calculus I'll try to build the whole concept up from a very simple starting point without using any Calculus. So lets start with the basic layout of a robot that would be suitable for line following. At the right is a simplified drawing of a top view of the robot with all the details we need. The robot is a differential steer robot with two motors, each connected to one of the wheels A and C. The robot has a light sensor mounted at the front that points straight down so it sees nothing but the mat (floor, ground, table top, whatever the robot is on). The red circle represents the fairly small spot on the mat that the light sensor can actually "see". The rest of the robot is the large rectangle with an arrow, the arrow shows the normal direction of travel. Our goal is to get the robot to follow the fat black line. Line following is a basic robotic behavior and is often one of the first things people learn. A mobile device that can follow a line displays all the characteristics of a true robot. It uses sensor to gather information about the world around it and changes it's behavior depending upon that information. Line followers can be built with one light sensor, or two, or a dozen or however many you happen to have. In general, the more light sensors you have the better you can follow a line. Here we'll limit ourselves to a single Mindstorms light sensor. Even with a single sensor we should be able to build a robot that can track the line very precisely even if the line has curves in it. The thing you usually loose with a single sensor is the ability to follow the line while moving fast. Often, the more sensors you have the faster the robot can move while it follows the line. The first trick we'll use, which is unrelated to a PID, is that we won't try to actually follow the line. Instead, we'll try to follow the edge of the line. Why? Because if we follow the line itself (the black) then when the robot drifts off the line and the sensor "sees white" we don't know which side of the line we are on. Are we left or right of the line? If we follow the line's edge then we can tell which way we are off the edge as the robot drifts off the line. If the light sensor "sees white" then we know it is left of the line's edge (and the line). If it "sees black" then we know it is to the right of the line's edge (and on the line). This is called a "left hand line follower" since it is following the line's left edge. We need to know what values the light sensor returns when it "sees white" and when it "sees black". A typical uncalibrated sensor might give a "white" reading of 50 and a "black" reading of 40 (uncalibrated, on a 0 to 100 scale). It is convenient to draw the values on a simple number line to help visualize how we convert light sensor values into changes in the robot's movement. Below are our made up light values for white and black. We'll just divide the range into two equal pieces and say that if the light level is less than 45 we want the robot to turn left. If it is greater than 45 we want to turn right. I won't go into how exactly the turns should be done. I'll just say that gentle turns work well for a fairly straight line. A line with lots of curves usually needs to be making sharper turns. For gentle PID Controller For Lego Mindstorms Robots http://www.inpharmix.com/jps/PID_Controller_For_Lego_Mindstorms... 1 of 14 1/8/2016 5:19 PM
-
Upload
nguyendung -
Category
Documents
-
view
222 -
download
0
Transcript of 3,' &RQWUROOHU )RU /HJR 0LQGVWRUPV 5RERWV...

A PID Controller For Lego Mindstorms Robots
A PID Controller is a common technique used to control a wide variety of machinery
including vehicles, robots and even rockets. The complete mathematical description of aPID Controller is fairly complex but a much simpler understanding is really all that isneeded to use a PID effectively.
This document is a description of how to create a PID Controller for use with LegoMindstorms Robots using the NXT-G programming language.
It will be easier if we have an actual task in mind so I will describe how to create a PID to
do line following. Once created, the same PID can be used, with only minor modifications,with any other Mindstorms application such as getting a robot that can drive as straight aspossible, or even for a robot that can balance with nothing but 2 wheels touching theground like a Segway.
A PID is really pretty straight forward and the typical description of a PID is easilyunderstood by anyone that has had Calculus. This document is targeted towards First
Lego League kids in third through eighth grade. Since there aren't many kids that havehad Calculus I'll try to build the whole concept up from a very simple starting point withoutusing any Calculus.
So lets start with the basic layout of a robot that wouldbe suitable for line following. At the right is a simplifieddrawing of a top view of the robot with all the details
we need. The robot is a differential steer robot withtwo motors, each connected to one of the wheels Aand C. The robot has a light sensor mounted at thefront that points straight down so it sees nothing butthe mat (floor, ground, table top, whatever the robot is
on). The red circle represents the fairly small spot onthe mat that the light sensor can actually "see". Therest of the robot is the large rectangle with an arrow,the arrow shows the normal direction of travel.
Our goal is to get the robot to follow the fat black line.Line following is a basic robotic behavior and is often one of the first things people learn. Amobile device that can follow a line displays all the characteristics of a true robot. It usessensor to gather information about the world around it and changes it's behaviordepending upon that information.
Line followers can be built with one light sensor, or two, or a dozen or however many you
happen to have. In general, the more light sensors you have the better you can follow aline. Here we'll limit ourselves to a single Mindstorms light sensor. Even with a singlesensor we should be able to build a robot that can track the line very precisely even if theline has curves in it. The thing you usually loose with a single sensor is the ability to followthe line while moving fast. Often, the more sensors you have the faster the robot can
move while it follows the line.
The first trick we'll use, which is unrelated to a PID, is that we won't try to actually followthe line. Instead, we'll try to follow the edge of the line. Why? Because if we follow the lineitself (the black) then when the robot drifts off the line and the sensor "sees white" we don'tknow which side of the line we are on. Are we left or right of the line? If we follow the line'sedge then we can tell which way we are off the edge as the robot drifts off the line. If the
light sensor "sees white" then we know it is left of the line's edge (and the line). If it "seesblack" then we know it is to the right of the line's edge (and on the line). This is called a"left hand line follower" since it is following the line's left edge.
We need to know what values the light sensor returns when it "sees white" and when it"sees black". A typical uncalibrated sensor might give a "white" reading of 50 and a "black"reading of 40 (uncalibrated, on a 0 to 100 scale). It is convenient to draw the values on a
simple number line to help visualize how we convert light sensor values into changes inthe robot's movement. Below are our made up light values for white and black.
We'll just divide the range into two equal pieces and say that if the light level is less than45 we want the robot to turn left. If it is greater than 45 we want to turn right. I won't go intohow exactly the turns should be done. I'll just say that gentle turns work well for a fairlystraight line. A line with lots of curves usually needs to be making sharper turns. For gentle
PID Controller For Lego Mindstorms Robots http://www.inpharmix.com/jps/PID_Controller_For_Lego_Mindstorms...
1 of 14 1/8/2016 5:19 PM

turns you might use Power levels of 50% on the fast wheel and 20% on the slow wheel.For sharper turns on a curvy line you might need to use 30% power for the fast wheel and
coast or brake the slow wheel. Whatever power levels you use the numbers will be thesame for the two turns, you just switch which motor gets the big number and which get thesmaller number (or a stop command).
This type of a line follower will follow a line but it isn't very pretty. It looks OK on a straightline with with the motors programmed for gentle turns. But if the line has any curves then
you have tell the robot to use sharper turns to follow line. That makes the robot swing backand forth across the line. The robot only "knows" how to do two things; turn left and turnright. This approach can be made to work but it is not very fast or accurate and looksterrible.
In the above approach the robot never drives straight, even if it is perfectly aligned withline's edge and the line is straight. That doesn't seem very efficient does it?
Lets try to fix that. Instead of dividing our light value number line into two regions lets
divide it into three.
So now if the light level is less than 43 we want the robot to turn left. If the light value isbetween 44 and 47 we want it to go straight (zoom zoom). If the light level is greater than47 we want to turn right. This can be easily be implemented in Mindstorms NXT-G with a
switch (yes/no) within a switch. You actually only have to do two tests not three.
This approach works better than the first one. At least now the robot is sometimes movingstraight forward. As with the first approach you still have to decide what kinds of turns youneed and that usually depends on the characteristics of the line you are following. Therobot will probably still hunt back a forth a fair amount.
The astute reader will probably have thought "well if three light ranges are better than twothan what about adding even more?" That is the beginning of a PID.
The "P" in "PID": Proportion(al) is the key
So what will happen if we add more divisions to our light scale line? Well the first thing wehave to deal with is what does "turn" mean with more than three light ranges? In our firstapproach the robot could do just two things, turn left or right. The turns were always thesame just in opposite directions. In the second approach we added the "go straight" to thetwo turns. If we have more than three ranges then we need more "kinds" of turns.
To help understand "more kinds of turns" we will redo or number line a bit and convert it
into a graph. Our X-axis (horizontal) will be our light values just like on the number lines.The Y-axis (vertical) well be our "turn" axis.
On the left is our original two level setup expressed on a graph. The robot can only do twothings (shown by the blue lines), turn right or left and the turns are always the sameexcept for their direction. In the center is the three level follower. The added center range
is where the robot drives straight (Turn=0). The turns are the same as before. On the rightis a Proportional line follower. In a proportional line follower the turn varies smoothlybetween two limits. If the light sensor reading says we are close to the line then we do asmall turn. If we are far from the line then we do a big turn. Proportional is an importantconcept. Proportional means there is a linear relationship between two variables. To put it
even simpler, proportional means a graph of the variables against each other produces a
PID Controller For Lego Mindstorms Robots http://www.inpharmix.com/jps/PID_Controller_For_Lego_Mindstorms...
2 of 14 1/8/2016 5:19 PM

straight line (as in the right hand graph above).
As you may know, the equation of a straight line is:
y = mx + b
Where y is the distance up (or down) the Y-axis, x the distance on the X-axis, m is the
slope of the line and b is the Y intercept, the point where the line crosses the Y-axis whenx is zero. The slope of the line is defined as the change in the y value divided by thechange in the x value using any pair of points on the line.
If you don't know much about lines (or have forgotten what you once new) I'll expand a bitand make some simplifications to our graph and equation. First, we will shift the center ofour light number line (the X-axis) to zero. That's easy to do. For our 40 and 50 light value
range we just subtract 45 (that's the average of 40 and 50, (40+50)/2 ) from all of our lightreadings. We will call that result the error. So, if the light value is 47 we subtract 45 andget an error=2. The error tells us how far off the line's edge we are. If the light sensor isexactly on the line's edge our error is zero since the light value is 45 and we subtract 45from all of our readings. If the sensor is all the way out into the white our error is +5. All
the way into the black the error is -5.
In the above graph I have shifted the axis by converting it to an error scale. Since the line
now crosses the Y-axis at zero that mens b is is zero and the equation for the line is a bitsimpler;
y = mx
or using our labels
Turn = m*error
We haven't yet defined what the turn axis means so for now we will just say the turnsrange from -1 (hard turn to the left) to +1 (hard turn to the right) and a zero turn means weare going straight. The slope of the line in the graph above can be calculated using thetwo points marked in red (any two points on the line will work);
slope = m = (change in y)/(change in x) = ( 1- (-1)) / (-5 - 5 ) = 2/-10 = -0.2
The slope is a proportionality constant and is the factor that you have to multiply the
error (x value) by to convert it into a Turn (y value). That's an important thing toremember.
The "slope" has a couple names that all mean the same thing, at least in this context. Inthe PID literature slopes (proportionality constants, m in the equation of a line) are called"K" (from misspelling of the word "constant"?). Various Ks show up all over the PIDliterature and are a very important. You can think of a K (or m or slope or proportionality
constant) as a conversion factor. You use K to convert a number that means one thing(light values or error in our case) into something else like a turn. That's all that a K does.Very simple and very powerful.
So using these new names for our variables the equation of the line is;
Turn = K*(error)
In words that's "take the error and multiply it by the proportionality constant K to get theneeded turn. The value Turn is the output of our P controller and is called the "P term"
since this is only a proportional controller.
You may have noticed that in the last graph the line does not extend outside the errorrange of -5 to +5. Outside the range of -5 to +5 we can't tell how far the sensor is from theline. All "white" looks the same once the sensor can't see any black at all. Remember that
PID Controller For Lego Mindstorms Robots http://www.inpharmix.com/jps/PID_Controller_For_Lego_Mindstorms...
3 of 14 1/8/2016 5:19 PM

this range is arbitrary, your range will be determined by you light sensor setup, the colorsof the mat etc. Once the light sensor gets too far from the line edge it starts to give a
constant reading, that means the light sensor reading is no longer proportional to theerror. We can only judge how far the sensor is from the line's edge when the sensor isactually pretty close to it. Over that narrow range the light sensor reading is proportional tothe distance. So our sensor setup has a limited range over which it gives proportionalinformation. Outside that range it tells us the correct direction but the magnitude (size) is
wrong. The light sensor reading, or the error, is smaller than it should be and doesn't giveas good an idea of what the turn should be to fix the error.
In the PID literature the range over which the sensor gives a proportional response iscalled the "proportional range" (go figure :D ). The proportional range is another veryimportant concept in PIDs. In our line follower the proportional range for the light sensor is40 to 50, for the error it is -5 to +5. Our motors also have a proportional range, from -100
(full power backwards) to +100 (full power forwards). I'll just say a couple things about itthe importance of the proportional range:
(1) You want the proportional range to be as wide as possible. Our light sensor'sproportional range is pretty small, that is, the sensor has to be pretty close to the line edgeto get proportional information. Exactly how wide the range is depends mostly on how high
the sensors is above the mat. If the sensor is very close to the mat, say 1/16 inch, thenthe sensor is seeing a very small circle on the mat. A small side to side movement of thelight sensor will swing the error from -5 to +5, that's all the way through our proportionalrange. You might say the sensor has "tunnel vision" and it can only see a very small partof the mat. The sensor has to be very close to the line edge to get a reading that isn't
either "white" or "black". If the sensor is moved higher off the mat then it sees a largercircle on the mat. At a height of about 1/2 inch the light sensor appears to be looking at acircle on the mat that is about 1/2 inch across. With the sensor up this high theproportional range is much wider, since the light sensor only needs to stay within +/- 1/2inch of the line edge to maintain a proportional output. Unfortunately, there are two
drawbacks to a high light sensor. First, a high light sensor "sees", and responds to, theroom lights much more than a low sensor. A high sensor also has less difference betweenblack and white than a low sensor. At a sufficiently large distance black and white will givethe same reading.
(2) Outside the proportional range the controller will move things in the correct directionbut it will tend to under correct. The controller's proportional response is limited by the
proportional range.
From P to actual motor power levels
How can we implement the turns? What should the actual motor power levels be? Oneway to do the turns is to define a "Target power level", which I'll call "Tp". Tp is the powerlevel of both motors when the robot is supposed to go straight ahead, which it does whenthe error=0. When the error is not zero we use the equation Turn = K*(error) to calculate
how to change the power levels for the two motors. One motor will get a power level ofTp+Turn, the other motor will get a power level of Tp-Turn. Note that since our error is -5to +5 that means Turn can be either positive or negative which corresponds to turns inopposite directions. It turns out that that is exactly what we want since it will automaticallyset the correct motor as the fast motor and the other one as the slow motor. One motor
(we'll assume it is the motor on the left of the robot plugged into port A) will always get theTp+Turn value as it's power level. The other motor (right side of robot, port C) will alwaysget Tp-Turn as it's power level. If error is positive then Turn is positive and Tp+Turn isgreater than Tp and the left motor speeds up while the right motor slows down . If theerror changes sign and becomes negative (meaning we have crossed over the line's edge
and are "seeing black") then Tp+Turn is now less than Tp and the left motor slows downand the right motor speeds up since Tp-Turn is greater than Tp. (Remember that thenegative of a negative is a positive). Simple eh? Hopefully it'll be a bit clearer as we go on.
Pseudo Code for a P Controller
First we need to measure the values the light sensor returns for white and black. Fromthose two number we can calculate the offset, that is, how much to subtract from a raw
light reading to convert it to an error value. The offset is just the average of the white andblack readings. For simplicity I'll assume that the offset has already been measured andstored in a variable called offset. (A nice upgrade would be to have the robot measure thewhite and black levels and calculate the offset.)
We will also need a storage location for the K constant, we'll call that Kp (the Konstant for
the proportional controller). And, an initial guess as to what Kp should be. There are a lotof ways to get that first Kp value. You can guess and then refine it by trial and error. Or,you can try to estimate a value based on the characteristics of the sensor and robot. We'lldo the latter. We will use a Tp (target power) of 50, when the error is zero both motors willrun at power level 50. The error ranges from -5 to +5. We'll guess that we want the power
to go from 50 to 0 when the error goes from 0 to -5. That means the Kp (the sloperemember, the change in y divided by the change in x) is;
Kp = (0 - 50)/(-5 - 0) = 10.
PID Controller For Lego Mindstorms Robots http://www.inpharmix.com/jps/PID_Controller_For_Lego_Mindstorms...
4 of 14 1/8/2016 5:19 PM

We will use the Kp=10 value to convert an error value into a turn value. In words ourconversion is "for every 1 unit change in the error we will increase the power of one motor
by 10". The other motor's power gets decreased by 10.
So, in pseudo code ("pseudo code" means this isn't actual NXT-G, or any other type ofprogram code, instead it is just a detailed listing of what we want the program to do):
Kp = 10 ! Initialize our three variablesoffset = 45Tp = 50Loop forever LightValue = read light sensor ! what is the current light reading? error = LightValue - offset ! calculate the error by subtracting the offset Turn = Kp * error ! the "P term", how much we want to change the motors' power powerA = Tp + Turn ! the power level for the A motor powerC = Tp - Turn ! the power level for the C motor MOTOR A direction=forward power=powerA ! issue the command with the new power level in a MOTOR block MOTOR C direction=forward power=powerC ! same for the other motor but using the other power levelend loop forever ! done with this loop, go back to the beginning and do it again
That's it, well almost. There is a subtle problem that should be corrected. But give it a tryanyway. If your robot appears to avoid the line edge, instead of trying to find it, the most
likely cause is that you have swapped the turn directions. Change Kp to -10 and see whathappens. If that fixes the turn directions then change Kp back to +10 and change the signsin the two power lines to;
powerA = Tp - TurnpowerC = Tp + Turn
There are two "tunable parameters" and one constant in this P controller. The constant isthe offset value (the average of white and black light sensor readings). You'll need to write
a short program to measure the light levels on your mat with your robot. You need a"black" and a "white" value. Calculate the average and put it into the P controller programin the offset variable. Almost all line followers require that you (or code written by you andexecuted by the robot) do this step.
The Kp value and the target power Tp are the tunable parameters. A tunable parameter
has to be determined by trial and error. Kp controls how fast the controller will try to getback to the line edge when it has drifted away from it. Tp controls how fast the robot ismoving along the line.
If the line is pretty straight you can use a large Tp to get the robot running at high speedand a small Kp so the turns (corrections) are gentle.
If the line has curves, especially sharp ones, there will be a maximum Tp value that willwork. If Tp is bigger than that maximum it won't matter what Kp is, the robot will loose the
line when it encounters a curve because it is moving too fast. If Tp is really small thenalmost any Kp value will work since the robot will be moving very slowly. The goal is to getthe robot moving as fast as possible while still being able to follow the line of interest.
We had guesstimated a starting value for Kp of 10. For Tp you might start at even lowerthan suggested above, perhaps 15 (the robot will be moving pretty slow). Try it and seehow it works. If you loose the line because the robot seems to turn sluggishly then
increase Kp by a couple and try again. If you loose the line because the robot seemshyperactive in hunting back and forth for the line then decrease Kp. If the robot seems tofollow the line pretty well then increase Tp and see if you can follow the line at the fasterspeed. For each new Tp you will need to determine a new Kp, though Kp usually won'tchange too much.
Following a straight line is usually pretty easy. Following a line with gentle curves is a bitharder. Following a line with sharp curves is the hardest. If the robot is moving slowenough then almost any line can be followed, even with a very basic controller. We want toget good line following, good speed and the ability to handle gentle corners. (Lines withsharp corners usually take more specialized line followers.)
It is likely that the best P controller will be different for each kind of line (line width,
sharpness of curves etc.) and for different robots. In other words, a P controller (or a PIDcontroller for that matter) is tuned for a particular kind of line and robot and will notnecessarily work well for other lines or robots. The code will work for many robots (andmany tasks) but the parameters, Kp, Tp and offset, have to be tuned for each robot andeach application.
Doing math on a computer that doesn't know what adecimal point is causes some problems
NOTE: This work was done using NXT-G version 1.1 which only supports integers. NXT-Gversion 2 supports floating point numbers so the following may not be needed if you have
version 2 or later.
In the process of tuning the P controller you will be tweaking the Kp value up and down.
PID Controller For Lego Mindstorms Robots http://www.inpharmix.com/jps/PID_Controller_For_Lego_Mindstorms...
5 of 14 1/8/2016 5:19 PM

The expected range of values that Kp might be depends on exactly what the P controlleris doing. How big is the input range and how big is the output range? For our line follower
P controller the input range is about 5 light units, and the output range is 100 power units,so it seems likely that Kp will be in the vicinity of 100/5=20. In some cases the expectedKp won't be that big. What happens if the expected Kp is one? Since variables in NXT-Gare limited to integers, when you try to tune the Kp value all you can try is ...-2, -1, 0, 1, 2,3, ... . You can't enter 1.3 so you can't try Kp=1.3. You can't use any number with a
decimal point! But there will probably be a large difference in the robot behavior when youchange the Kp by the smallest possible change of 1 to 2. With Kp=2 the robot tries twiceas hard to correct the error compared to Kp=1. The motor power level changes twice asmuch for the same change in the light levels. We really would like to have finer control ofKp.
It is pretty easy to fix this problem. All we will do is multiply the Kp by a power of ten to
increase the useable range within the integer restriction. If it is expected that Kp might benear 1 then a value of 100 as the multiplier would be a good bet. Indeed, it is probablybest to just go ahead and always use 100*Kp as the number you actually enter into theprogram. Once Kp has been multiplied by 100 we can now enter what would have been1.3 as 130. 130 has no decimal point so NXT-G is happy with the number.
But doesn't that trash the calculation? Yes it does but it is easy to fix. Once we havecalculated the P term we will divide by 100 to remove our multiplier. Remember ourequation that defines the P controller from earlier;
Turn = Kp*(error)
We will multiply Kp by 100, which means our calculated Turn is 100 times bigger than itshould be. Before we use Turn we must divide it by 100 to fix that.
So, our new and improved pseudo code for a line following P controller is:
Kp = 1000 ! REMEMBER we are using Kp*100 so this is really 10 !offset = 45 ! Initialize the other two variablesTp = 50Loop forever LightValue = read light sensor ! what is the current light reading? error = LightValue - offset ! calculate the error by subtracting the offset Turn = Kp * error ! the "P term", how much we want to change the motors' power
Turn = Turn/100 ! REMEMBER to undo the affect of the factor of 100 in Kp ! powerA = Tp + Turn ! the power level for the A motor powerC = Tp - Turn ! the power level for the C motor MOTOR A direction=forward power=powerA ! actually issue the command in a MOTOR block MOTOR C direction=forward power=powerC ! same for the other motor but using the other power levelend loop forever ! done with loop, go back and do it again.
Wait, what was the "Subtle Problem" you mentioned with thefirst version of the P controller?
There are always subtle problems. Sometime they matter and sometimes they don't. ;)
In this case, one problem is that when we calculate the motor power level (e.g.,powerC=Tp-Turn) it is possible to get a negative number for the power. We want anegative number to mean that the motor should reverse direction. But the data port on aNXT-G MOTOR block doesn't understand that. The power level is always a numberbetween 0 and +100. The motor's direction is controlled by a different input port. To get the
motor to react correctly when the power is negative you'll need to handle it in the program.Here is one way to do that;
If powerA > 0 then ! positive motor power is no problem MOTOR A direction=forward power=powerA else powerA = powerA * (-1) ! negative motor power needs to be made into MOTOR A direction=reverse power=powerA ! a positive number and the motor direction end If ! needs to be reversed on the control panel
The MOTOR block receives the power (powerA for the A motor) via a data wire. Thedirection is set with the check boxes in the motor's parameter window.
You will need a similar chunk of code for the C motor. Now when the calculated powergoes negative the motors will be properly controlled. One thing this does is allow the Pcontroller to go all the way to a "zero turning radius turn" and the robot can spin in place if
needed. Of course, that may not actually help.
There are a couple other things that might be subtle problems. What happens when yousend a power level that is greater than 100 to the motor? It turns out that the motor justtreats the number as 100. That is good for the program but not the best thing to havehappen in a P (or PID) controller. You would really prefer that the controller never tries to
ask the motors to do something they can't. If the requested power isn't too far above 100(or below -100) then you are probably OK. If the requested power is a lot bigger than 100
PID Controller For Lego Mindstorms Robots http://www.inpharmix.com/jps/PID_Controller_For_Lego_Mindstorms...
6 of 14 1/8/2016 5:19 PM

(or a lot less than -100) then it often means the controller is spiraling out of control. So,make sure you have a fire extinguisher handy!
P Controller Summary
Hopefully you've picked up enough to understand a P (proportional) controller. It is prettysimple. Use a sensor to measure something that you are trying to control. Convert thatmeasurement to an error. For the line follower we did that by subtracting the average ofblack and white light values. Multiply the error by a scaling factor called Kp. The result is
a correction for the system. In our line follower example the correction is applied as anincrease/decrease in the power level of the motors. The scaling factor Kp is determinedusing a bit of educated guessing and then fine tuned by trial and error.
P controllers can handle a surprising wide range of control problems, not just following aline with a Lego robot. In general, P controllers work very well when a few conditions aremet.
The sensor needs to have wide dynamic range (which unfortunately is not true
for our line following robot).
1.
The thing being controlled (motors in our case) should also have a widedynamic range, that is they should have a wide range of "power" levels withindividual "power" levels that are close together (the NXT motors are prettygood in this respect).
2.
Both the sensor and the thing being controlled must respond quickly. "Quick" inthis case is "much faster than anything else that is happening in the system".Often when you are controlling motors it isn't possible to get "quick" responsesince motors take time to react to a change in power. It can take a few tenthsof a second for Lego motors to react to a change in power levels. That means
the robot's actions are lagging behind the P controller's commands. Thatmakes accurate control difficult with a P controller.
3.
Adding "I" To The Controller: The PI Controller("I": what have you done for me lately?)
To improve the response of our P controller we will add a new term to the equation. Thisterm is called the integral, the "I" in PID. Integrals are a very important part of advancedmathematics, fortunately the part we need is pretty straight forward.
The integral is the running sum of the error.
Yep, it's that simple. There are a few subtle issues we'll skip for the moment.
Each time we read the light sensor and calculate an error we will add that error to a
variable we will call integral (clever eh?).
integral = integral + error
That equation might look a little odd, and it is. It isn't written as a mathematical statement,it is written in a common form used in programming to add up a series of values.Mathematically it doesn't make any sense. In computer programming the equals sign hasa somewhat different meaning than in math. (I'll use the same typewriter font I used for thepseudo code examples to highlight that it is a programming form and not a proper
mathematical form.) The "=" means do the math on the right and save the result in thevariable named on the left. We want the computer to get the old value of integral, add theerror to it then save the result back in integral.
Next, just like the P term, we will multiply the integral by a proportionality constant, that'sanother K. Since this proportionality constant goes with the integral term we will call it Ki.Just like the proportional term we multiply the integral by the constant (Ki) to get a
correction. For our line following robot it is an addition to our Turn variable.
Turn = Kp*(error) + Ki*(integral)
The above is the basic equation for a PI controller. Turn is our correction for the motors.The proportional term is Kp*(error) and the integral term is Ki*(integral).
What exactly does the integral term do for us? If the error keeps the same sign for severalloops the integral grows bigger and bigger. For example, if we check the light sensor andcalculate that the error is 1, then a short time later we check the sensor again and the the
error is 2, then the next time the error is 2 again, then the integral will be 1+2+2=5. Theintegral is 5 but the error at this particular step is only 2. The integral can be a largefactor in the correction but it usually takes a while for the integral to build up to the pointwhere it starts to contribute.
Another thing that the integral does is it helps remove small errors. If in our line followerthe light sensor is pretty close to the line's edge, but not exactly on it, then the error will be
small and it will only take a small correction to fix. You might be able to fix that small errorby changing Kp in the proportional term but that will often lead to a robot that oscillates(wobbles back and forth). The integral term is perfect for fixing small errors. Since the
PID Controller For Lego Mindstorms Robots http://www.inpharmix.com/jps/PID_Controller_For_Lego_Mindstorms...
7 of 14 1/8/2016 5:19 PM

integral adds up the errors, several consecutive small errors eventually makes theintegral big enough to make a difference.
One way to think about the integral term is that it is the controller's "memory". Theintegral is the cumulative history of the error and gives the controller a method to fixerrors that persist for a long time.
Some subtle issues with the integral
Yep, the integral has more detail. Fortunately they aren't too painful.
I glossed over a minor issue (OK, it really isn't minor but we are going to make it so), thetime. The integral is really the sum of the error*(delta time). Delta time (dT) is the time
between the last time we checked the sensor and the time of the most recent check of thesensor;
integral = integral + error*(dT)
So every time we add to integral the thing we should add is the error times the dT. It isfairly easy to have the robot measure the dT. We would just read a timer each time weread the light sensor. If we subtract the last time from the current time we get the time
since the last reading dT. (There are better ways to do this but I'll skip'm since they are notneeded.) But wouldn't it be nice if didn't have to measure the dT and do the multiplication?Well, what if the dT is always the same? Every time we add to integral we have that samedT term. So we can take that factor of dT out of error*(dT) and just do the summing theway we did before;
integral = integral + error
Only when we want to do another calculation with integral do we actually need to multiply
by dT. But wait there's more...
We can do even more to hide the time term. The integral term in the PI controller equationis Ki*(integral)*dT. But Ki is a parameter that we have to fine tune (just like Kp) so whynot just replace the Ki*dT part with a new Ki? The new Ki is different from the original butsince we don't know either one it doesn't really matter which one we use or what we callit. No matter what we call it or what it represents we still have to find the correct value
largely by trial and error.
So we have completely removed the time element for the integral term with the restrictionthat all the times steps, dTs, are the same (or about the same).
The integral has a memory like an elephant
One last detail should be mentioned about the integral. Usually the integral can only bemoved towards zero, where it doesn't contribute anything to the controller, by having error
values added that are the opposite sign of most of the ones that we have already collectedin integral. For example, if over several cycles through the loop the errors are 1,2,2,3,2,1that adds up to an integral of 11. But the error at the last data point is only 1, which ismuch smaller than the integral at that point. The only way for the integral to movetowards zero is to get a string of negative errors to counter balance the earlier string of
positive errors to "wind down" the integral. For example, if the next few errors are -2,-2,-3then the integral will drop from 11 to 4 and we would still need more negative errors to getthe integral down to zero. In addition, the integral wants the total error to be evenlydistributed between positive and negative errors.
If something happens that pushes our line following robot to the left of the line's edge theintegral term not only wants to get back to the line's edge it also wants to overshoot the
edge to the right by as much as the original disturbance was the left. So the integral tendsto "wind-up" if there are large errors that persist for a while. This can cause problems withcontrollers that include an integral term. Sometimes this tendency of the integral term towant to overshoot when it tries to correct the error is a big enough problem that theprogrammer must do something to the integral term so it won't cause problems. If
integral wind-up is a problem two common solutions are (1) zero the integral, that is setthe variable integral equal to zero, every time the error is zero or the error changes sign. (2) "Dampen" the integral by multiplying the accumulated integral by a factor less thanone when a new integral is calculated. For example;
integral = (2/3)*integral + error
This reduces the previous integral value by 1/3 each time through the loop. If you think of
the integral term as the controllers "memory" then this damping is forcing it to become forgetful of things that happened a "long" time ago.
Pseudo code for the PI controller
To add the integral term to the controller we need to add a new variable for Ki and one forthe integral itself. And don't forget that we are multiplying our Ks by 100 to help with theinteger math restrictions.
Kp = 1000 ! REMEMBER we are using Kp*100 so this is really 10 !Ki = 100 ! REMEMBER we are using Ki*100 so this is really 1 !
PID Controller For Lego Mindstorms Robots http://www.inpharmix.com/jps/PID_Controller_For_Lego_Mindstorms...
8 of 14 1/8/2016 5:19 PM
offset = 45 ! Initialize the variablesTp = 50integral = 0 ! the place where we will store our integralLoop forever LightValue = read light sensor ! what is the current light reading? error = LightValue - offset ! calculate the error by subtracting the offset integral = integral + error ! our new integral term
Turn = Kp*error + Ki*integral ! the "P term" and the "I term" Turn = Turn/100 ! REMEMBER to undo the affect of the factor of 100 in Kp ! powerA = Tp + Turn ! the power level for the A motor powerC = Tp - Turn ! the power level for the C motor MOTOR A direction=forward power=powerA ! actually issue the command in a MOTOR block MOTOR C direction=forward power=powerC ! actually issue the command in a MOTOR block end loop forever ! done with this loop, go back to the beginning and do it again.
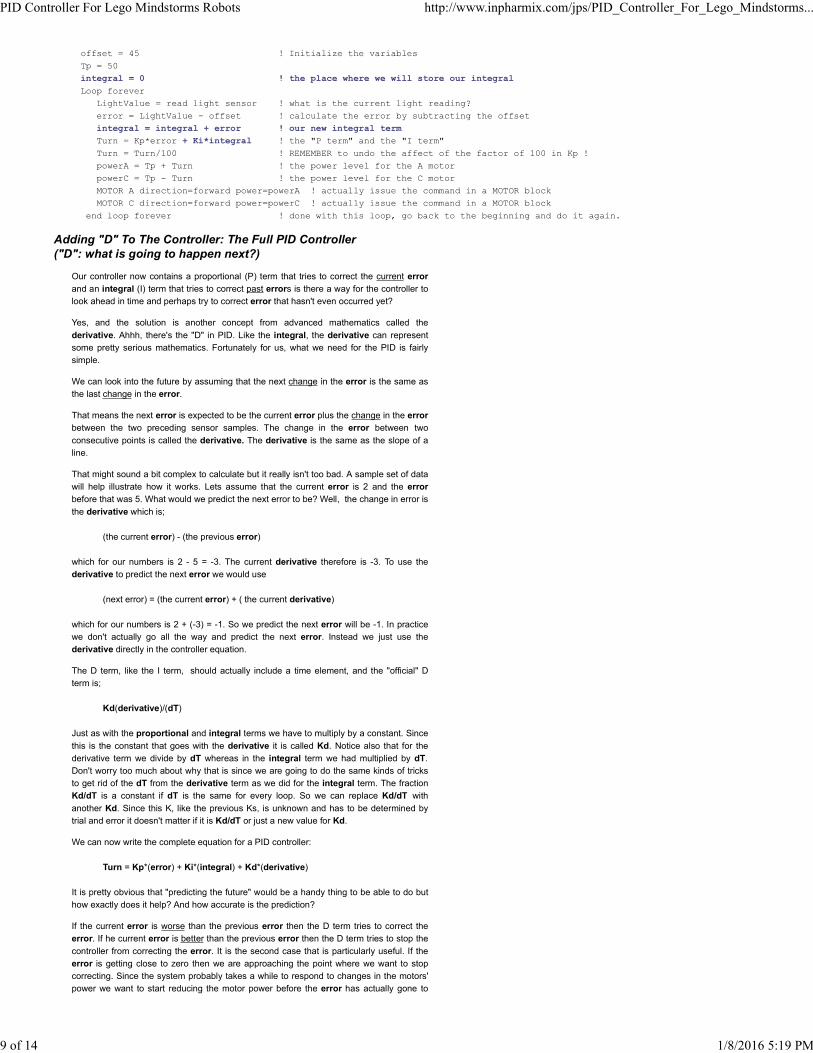
Adding "D" To The Controller: The Full PID Controller("D": what is going to happen next?)
Our controller now contains a proportional (P) term that tries to correct the current errorand an integral (I) term that tries to correct past errors is there a way for the controller tolook ahead in time and perhaps try to correct error that hasn't even occurred yet?
Yes, and the solution is another concept from advanced mathematics called the
derivative. Ahhh, there's the "D" in PID. Like the integral, the derivative can representsome pretty serious mathematics. Fortunately for us, what we need for the PID is fairlysimple.
We can look into the future by assuming that the next change in the error is the same asthe last change in the error.
That means the next error is expected to be the current error plus the change in the errorbetween the two preceding sensor samples. The change in the error between two
consecutive points is called the derivative. The derivative is the same as the slope of aline.
That might sound a bit complex to calculate but it really isn't too bad. A sample set of datawill help illustrate how it works. Lets assume that the current error is 2 and the errorbefore that was 5. What would we predict the next error to be? Well, the change in error is
the derivative which is;
(the current error) - (the previous error)
which for our numbers is 2 - 5 = -3. The current derivative therefore is -3. To use thederivative to predict the next error we would use
(next error) = (the current error) + ( the current derivative)
which for our numbers is 2 + (-3) = -1. So we predict the next error will be -1. In practicewe don't actually go all the way and predict the next error. Instead we just use thederivative directly in the controller equation.
The D term, like the I term, should actually include a time element, and the "official" Dterm is;
Kd(derivative)/(dT)
Just as with the proportional and integral terms we have to multiply by a constant. Since
this is the constant that goes with the derivative it is called Kd. Notice also that for thederivative term we divide by dT whereas in the integral term we had multiplied by dT.Don't worry too much about why that is since we are going to do the same kinds of tricksto get rid of the dT from the derivative term as we did for the integral term. The fractionKd/dT is a constant if dT is the same for every loop. So we can replace Kd/dT with
another Kd. Since this K, like the previous Ks, is unknown and has to be determined bytrial and error it doesn't matter if it is Kd/dT or just a new value for Kd.
We can now write the complete equation for a PID controller:
Turn = Kp*(error) + Ki*(integral) + Kd*(derivative)
It is pretty obvious that "predicting the future" would be a handy thing to be able to do buthow exactly does it help? And how accurate is the prediction?
If the current error is worse than the previous error then the D term tries to correct theerror. If he current error is better than the previous error then the D term tries to stop the
controller from correcting the error. It is the second case that is particularly useful. If theerror is getting close to zero then we are approaching the point where we want to stopcorrecting. Since the system probably takes a while to respond to changes in the motors'power we want to start reducing the motor power before the error has actually gone to
PID Controller For Lego Mindstorms Robots http://www.inpharmix.com/jps/PID_Controller_For_Lego_Mindstorms...
9 of 14 1/8/2016 5:19 PM

zero, otherwise we will overshoot. When put that way it might seem that the equation forthe D term would have to be more complex than it is, but it isn't. The only thing you have
to worry about is doing the subtraction in the correct order. The correct order for this typeof thing is "current" minus "previous". So to calculate the derivative we take the currenterror and subtract the previous error.
Pseudo code for the PID controller
To add the derivative term to the controller we need to add a new variable for Kd and a
variable to remember the last error. And don't forget that we are multiplying our Ks by 100to help with the integer math.
Kp = 1000 ! REMEMBER we are using Kp*100 so this is really 10 !Ki = 100 ! REMEMBER we are using Ki*100 so this is really 1 !Kd = 10000 ! REMEMBER we are using Kd*100 so this is really 100!offset = 45 ! Initialize the variablesTp = 50 integral = 0 ! the place where we will store our integrallastError = 0 ! the place where we will store the last error valuederivative = 0 ! the place where we will store the derivativeLoop forever LightValue = read light sensor ! what is the current light reading? error = LightValue - offset ! calculate the error by subtracting the offset integral = integral + error ! calculate the integral
derivative = error - lastError ! calculate the derivative Turn = Kp*error + Ki*integral + Kd*derivative ! the "P term" the "I term" and the "D term" Turn = Turn/100 ! REMEMBER to undo the affect of the factor of 100 in Kp, Ki and Kd! powerA = Tp + Turn ! the power level for the A motor powerC = Tp - Turn ! the power level for the C motor MOTOR A direction=forward power=PowerA ! actually issue the command in a MOTOR block MOTOR C direction=forward power=PowerC ! same for the other motor but using the other power level
lastError = error ! save the current error so it can be the lastError next time aroundend loop forever ! done with loop, go back and do it again.
We now have the pseudo code for our complete PID controller for a line following robot.Now comes what is often the tricky part, "tuning" the PID. Tuning is the process of findingthe best, or at least OK, values for Kp, Ki and Kd.
Tuning A PID Controller Without Complex Math(but we still have to do some math)
Very smart people have already figured out how to tune a PID controller. Since I'm notnearly as smart as they are, I'll use what they learned. It turns out that measurement of
couple of parameters for the system allows you to calculate "pretty good" values for Kp, Kiand Kd. It doesn't matter much what the exact system is that is being controlled the tuningequations almost always work pretty well. There are several techniques to calculate theKs, one of is called the "Ziegler–Nichols Method" which is what we will use. A googlesearch will locate many web pages that describe this technique in all it's gory detail. The
version that I'll use is almost straight from the Wiki page on PID Controllers (the sametreatment is found in many other places). I'll just make one small change by including theloop time (dT) in the calculations shown in the table below.
To tune your PID controller you follow these steps:
Set the Ki and Kd values to zero, which turns those terms off and makes thecontroller act like a simple P controller.
1.
Set the Tp term to a smallish one. For our motors 25 might be a good place to
start.
2.
Set the Kp term to a "reasonable" value. What is "reasonable"?3.
I just take the maximum value we want to send to the motor'spower control (100) and divide by the maximum useable errorvalue. For our line following robot we've assumed themaximum error is 5 so our guess at Kp is 100/5=20. When the
error is +5 the motor's power will swing by 100 units. When theerror is zero the motor's power will sit at the Tp level.
1.
Or, just set Kp to 1 (or 100) and see what happens.2. If you have implemented that the K's are all entered as 100times their actual value you have to take that into account here.
1 is entered as 100, 20 as 2000, 100 as 10000.
3.
Run the robot and watch what it does. If it can't follow the line and wanders offthen increase Kp. If it oscillates wildly then decrease Kp. Keep changing theKp value until you find one that follows the line and gives noticeable oscillationbut not really wild ones. We will call this Kp value "Kc" ("critical gain" in the PIDliterature).
4.
Using the Kc value as Kp, run the robot along the line and try to determine howfast it is oscillating. This can be tricky but fortunately the measurement doesn'thave to be all that accurate. The oscillation period (Pc) is how long it takes the
5.
PID Controller For Lego Mindstorms Robots http://www.inpharmix.com/jps/PID_Controller_For_Lego_Mindstorms...
10 of 14 1/8/2016 5:19 PM

robot to swing from one side of the line to the other then back to the side whereit started. For typical Lego robots Pc will probably be in the range of about 0.5
seconds to a second or two.You also need to know how fast the robot cycles through it's control loop. I justset the loop to a fixed number of steps (like 10,000) and time how long therobot takes to finish (or have the robot do the timing and display the result.)The time per loop (dT) is the measured time divided by the number of loops.
For a full PID controller, written in NXT-G, without any added buzzes orwhistles, the dT will be in the range of 0.015 to 0.020 seconds per loop.
6.
Use the table below to calculate a set of Kp, Ki, and Kc values. If you just wanta P controller then use the line in the table marked P to calculate the "correct"Kp (Ki' and Kd' are both zero). If you want a PI controller then use the next
line. The full PID controller is the bottom line.
7.
If you have implemented that the K's are all entered as 100 times their actualvalue you don't have to take that into account in these calculations. That factorof 100 is already take into account in the Kp = Kc value you determined.
8.
Run the robot and see how it behaves.9.
Tweak the Kp, Ki and Kd values to get the best performance you can. You canstart with fairly big tweaks, say 30% then try smaller tweaks to get the optimal(or at least acceptable) performance.
10.
Once you have a good set of K's try to boost the Tp value, which controls therobot's straight speed.
11.
Re-tweak the K's or perhaps even go back to step 1 and repeat the entireprocess for the new Tp value.
12.
Keep repeating until the robot's behavior is acceptable.13.
Ziegler–Nichols method giving K' values(loop times considered to be constant and equal to dT)
Control Type Kp Ki' Kd'
P 0.50Kc 0 0
PI 0.45Kc 1.2KpdT/ Pc 0
PD 0.80Kc 0 KpPc /(8dT)
PID 0.60Kc 2KpdT / Pc KpPc / (8dT)
The primes (apostrophes) on the Ki' and Kd' are just to remind you that they arecalculated assume dT is constant and dT has been rolled into the K values.
Here are the values I measured for my test robot (the one in the video linked later on). Kcwas 300 and when Kp=Kc the robot oscillated at about 0.8 seconds per oscillation so Pcis 0.8. I measured Pc by just counting out loud every time the robot swung fully in aparticular direction. I then compared my perception of how fast I was counting with
"1-potato -- 2-potato -- 3-potato ...". That's hardly "precision engineering" but it works wellenough so we'll call it "practical engineering". The loop time, dT, is 0.014 seconds/loopdetermined by simply running the program for 10,000 loops and having the NXT displaythe run time. Using the table above for a PID controller we get;
Kp = (0.60)(Kc) = (0.60)(300) = 180Ki = 2(Kp)(dT) / (Pc) = 2(180)(0.014) / (0.8) = 6.3 (which is rounded to 6)Kd = (Kp)(Pc) / ((8)(dT)) = (180)(0.8) / ((8)(0.014)) = 1286
After further trial and error tuning the final values were 220, 7, and 500 for Kp, Ki and Kdrespectively. Remember that all of my K's are entered as 100x their actual value so the actual values are 2.2, 0.07 and 5.
How changes in Kp, Ki, and Kd affect the robots behavior
The table and method described above is a good starting point for optimizing your PID.
Sometimes it helps to have a better idea of what the result will be of increasing (ordecreasing) one of the three Ks. The table below is available from many web sites. Thisparticular version is from the Wiki on PID controllers.
Effects of increasing parameters
Parameter Rise time Overshoot Settling timeError at
equilibrium
Kp Decrease Increase Small change Decrease
Ki Decrease Increase Increase Eliminate
Kd
Indefinite(small decrease
or increase)Decrease Decrease None
The "Rise Time" is how fast the robot tries to fix an error. In our sample case it is how fast
PID Controller For Lego Mindstorms Robots http://www.inpharmix.com/jps/PID_Controller_For_Lego_Mindstorms...
11 of 14 1/8/2016 5:19 PM

the robot tries to get back to the line edge after it has drifted off of it. The rise time ismostly controlled by Kp. A larger Kp will make the robot try to get back faster and
decreases the rise time. If Kp is too large the robot will overshoot.
The "Overshoot" is how far past the line edge the robot tends to go as it is responding toan error. For example, if the overshoot is small then the robot doesn't swing to the right ofthe line as it is trying to fix being to the left of the line. If the overshoot is large then therobot swings well past the line edge as it tries to correct an error. Overshoot is largely
controlled by the Kd term but is strongly affected by the Ki and Kp terms. Usually tocorrect for too much overshoot you will want to increase Kd. Remember our first verysimple line follower, the one that could do nothing but turn right or left? That line followerhas very bad overshoot. Indeed that is about all it does.
The "settling time" is how long the robot takes to settle back down when it encounters alarge change. In our line following case a large change occurs when the robot encounters
a turn. As the robot responds to the curve it will correct the error and then overshoot bysome amount. It then needs to correct the overshoot and might overshoot back the otherway. It then needs to correct the overshoot ... well, you get the idea. As the robot isresponding to an error it will tend to oscillate around the desired position. The "settlingtime" is how long that oscillation takes to dampen out to zero. The settling time responds
strongly to both the Ki and Kd terms. Bigger Ki gives longer settling times. Bigger Kdgives shorter settling time.
"Error at Equilibrium" is the error remaining as the system operates without beingdisturbed. For our line follower it would be the offset from the line as the robot follows along straight line. Often P and PD controllers will end up with this kind of error. It can bereduced by increasing Kp but that may make the robot oscillate. Including an I term and
increasing Ki will often fix a P or PD controller that has a constant error at equilibrium.(This assumes you even care about a small remaining error as the robot follows the line. Itjust means it is offset to one side or the other by a small amount.)
How well does it work?
Here's a short video of a basic Lego Mindstorms robot following the line on the test mat
that comes with the set. The video quality isn't very good.
The light sensor is about 1/2" above the mat and offset to one side of the robot's centerline. The Tp (target power) was set at 70%. The robot averages about 8 inchesper second on this course. The robot is a left hand line follower and is following the insideedge of the oval. The inside edge is a bit harder to follow than the outside edge.
MPEG4 - MP4 (644KB) QuickTime - MOV (972KB)
Overall the line follower appears to work pretty well. If you watch the video closely you'll
see the robot "wag its tail" a bit as it comes off the corners. That's the PID oscillating alittle. When the robot is running towards the camera you can see the red spot on the matfrom the light sensor's LED. It looks to be tracking the line's edge pretty well.
The basic PID controller should work for many different control problems, and of coursecan be used as a P or PI controller instead of a PID. You would need to come up with anew definition of the error and the PID would have to be tuned for the particular task.
So where's the code?
I could give it to you but then I'd have to kill you.
Since this document is targeted at older FLL kids, I really don't want to give'm the code.They should be able to write their own.
The pseudo code has pretty much everything you need for the PID itself. You may have toadd some setup code and perhaps a suitable way of stopping the line follower loop.
As a little bit of help here's a MyBlock that takes two inputs, the target power Tp and the
PID Controller For Lego Mindstorms Robots http://www.inpharmix.com/jps/PID_Controller_For_Lego_Mindstorms...
12 of 14 1/8/2016 5:19 PM

Turn value, and controls the two motors. This MyBlock also properly deals with negativepower levels. It even beeps when a motor reverses directions, which is handy for tuning. A
properly tuned line following PID should rarely have to reverse motor directions.
PID_LF_MotorControl.rbt is the RBT file for NXT-G v1.1. A screen shot of the program isat PID_LF_MotorControld.png
If you would really like to get my PID NXT-G code send me an email.
Random stuff that might be stuffed into this document someplace
For an excellent example of another PID controller on a Mindstorms robot see Philos
balancing segway like robot. The PID is written in NQC ("not quite C"). Balancing is amuch trickier control problem than is following a line. ( I know because I've tried it! )
A PID (or PI or P) controller is an example of a feedback loop. Feedback is the greatestthing since sliced pickles.
There are advanced methods for tuning a PID controller. Usually it requires hardwareand/or software that a Lego robot builder doesn't have.
Some PID controllers are much easier to tune than others. For example, a PID controlleris often used to control the temperature in an oven. This is a fairly easy tuning job since
the oven is pretty stable, though it may be far from it's target temperature, even when thePID is poorly tuned. PID controllers are also used to control balancing robots. That ismuch more difficult to tune since the PID has to be tuned pretty well otherwise the robotjust falls over. It is hard to tune the PID if the robot promptly falls over every time it isturned on.
There are variants of the Ziegler–Nichols method and other methods for tuning a PID.
There are controllers that are more complex than a PID.
PIDs have been around for a long time and preceded computer control. A PID can, andoften has, been implemented in purely mechanical systems. That is, no computer or evenany electrical parts.
It would be interesting to have the NXT-G program write data to a file while the PID isrunning. You would then transfer the data back to the PC for analysis. This would be agreat way to determine Pc. I believe version 2.0 of NXT-G can transfer data back to the
PC in real time for graphing. Writing to a data file (or sending the data via Bluetooth) doeshave some problems when used with a PID. Writing to a file is a pretty slow process sothe PID's loop time will increase, I would think transmitting anything via Bluetooth is alsopretty slow. That means the PID takes longer to loop and you are measuring the error andupdating the motors less often. Another problem with writing to a file is that periodically the
file write routine takes a big chunk of time (as much as 0.1 seconds) to do some"housekeeping". This can be avoided by "pre-extending" the file to the limit when the file isfirst opened. A NXT-G file can be as big as 32K if you have that much free space on theNXT-G. If you try to pre-extend the data file and you don't have enough memory theNXT-G gives no indication that there was a problem. If you use a method like this then the
Pc value you obtain is relevant only to the particular dT that the "PID with logging"program has. If you want to measure the Pc and then remove the data logging code fromthe program to make it loop faster, the Pc is no longer valid. One partial solution is to forceall loops of the PID to take the same amount of time. At the beginning of the loop set atimer to zero. At the end of the loop WAIT for a length of time longer than the loop's
normal dT. You can use this technique to keep the loop times constant even if you add orremove large chunks of code (like data logging). Of course, that means you always havethe PID looping slower than it could be, and you are wasting time in each loop cycle.
I've fiddled a bit with writing data to a file while the PID is running. It is handy to start thedata file with a listing of the Tp, offset, Kp, Ki and Kd values. Good data to log each timethe PID loop is executed is the time, error, PID output and the angle of one of the motor
axles. From that data you can reconstruct the integral and derivative so they don't need tobe logged.
It is unclear to me just how fast the PID needs to cycle, that is how small dT needs to be,to get a good controller. I suspect that the PID needs to cycle faster than the responsetime of the motors. Perhaps several times faster. Cycling the PID much faster than thatprobably doesn't help much since things are not changing that fast. The response time of
the NXT motors, when they are actually moving a robot, is in the range of a couple oftenths of a second. The PID should probably cycle in say 1/5 to 1/10th that time, or about0.010 to 0.030 seconds per loop. The basic PID program described above has a dT ofabout 0.015 seconds, which should be fast enough. If the the program also logs data as itruns then the dT rises to about 0.030 seconds per loop.
Using raw light values (0 to 1023 scale), instead of uncalibrated light values, mightincrease the dynamic range of the light sensors. For our example light values black wouldbe 400 and white 500. The offset would be 450 with a range of +/-50 instead of +/-5. Theraw light values is available from a data port on the light sensor block. If you calibrate yourlight sensor under your lighting conditions and use the calibrated values then white will be
PID Controller For Lego Mindstorms Robots http://www.inpharmix.com/jps/PID_Controller_For_Lego_Mindstorms...
13 of 14 1/8/2016 5:19 PM

about 100 and black will be about 0. This is another way to increase the proportionalrange of the light sensor. In both the raw and calibrated modes the light values probably
are not accurate in the last digit but hopefully the values are somewhat more precise thanusing a light value range of just 10 or so.
When creating a PID controller there is often a couple different ways to define the error.For our line follower the error is proportional to how far the sensor is from the line's edge.The derivative is how fast the sensor is moving towards, or away from, the line's edge.
The integral is sum of the distances from the line's edge, which really doesn't have muchphysical significance (though it does still help the controller). There are other ways to dothings. We could define the error as how fast we are moving towards or away from thelines edge. In other words, the error is now what was the derivative in our line follower. Forthis new definition of error, the derivative becomes how fast we are accelerating towards,or away from, the line's edge. The integral becomes how far we are from the line's edge,
which does make physical sense. Which method works best often depends on howaccurate you can measure the error and how much noise (random fluctuation) there is. Ifwe use the velocity as the error, it has to be calculated from the light reading and is thederivative of the light reading. To get the derivative for the PID we have to take thederivative of a derivative. The derivative of a derivative probably won't work very well with
our limited proportional range of light values.
For the "three level line follower" the three ranges don't need to be the same size. If thistype of follower is good enough then it is often better to make the center range larger thanthe two outer ranges. Something like 42 to 47 perhaps for our example values. The onlything you have to worry about is that this becomes pretty sensitive to small changes in the
room lighting. The three even ranges (and the original two range approach) are fairlyinsensitive to changes in the room lighting. If you make the center range too large you runthe risk of having a small change in room lighting move your light range outside what youexpected. The light sensor might never return numbers in either the lowest or highestrange and the robot will never turn in one of the two directions.
Some realities of PIDs.
When the error goes out of the proportional range the derivative goes to zero.1. The derivative is sensitive to noise.2. The derivative works best when the error precision is high. For our line followerthe error is an integer between -5 and +5. That's pretty poor precision. Perhapsuse the derivative of the motors' axle velocity instead?
3.
Copyright ©2009,2013,2014 J. SlukaSend me an email at:
Lego at InPharmix dot com
PID Controller For Lego Mindstorms Robots http://www.inpharmix.com/jps/PID_Controller_For_Lego_Mindstorms...
14 of 14 1/8/2016 5:19 PM


![PRODUCT CATALOG SIT TO STAND - Medicaleshop Inc.cdn.medicaleshop.com/media/pdfs/easystand/brochure/evolv-brochure… · - SH[) HJR / 75. 9 LTV]HISL-SH[) HJR / Width range from center](https://static.fdocuments.us/doc/165x107/5aea3dd47f8b9ae5318c2b1a/product-catalog-sit-to-stand-medicaleshop-inccdn-sh-hjr-75-9-ltvhisl-sh.jpg)