3 Masters
5
1 of 4 ADOBE PAGEMAKER 6.5 TUTORIALS Applying Multiple Master Pages A master page provides a common background for a set of pages. When seve ral pages contain the same set of design elements, setting them up on a master page lets you instantly apply the design to any page in the publication. The publication you will use in this tutorial is a 15-page online catalog f or a school. The publication is divided into five sections. Each section uses a different master page that con- tains the button graphics and background for that section. The last two sections of the publi- cation are not finished. Y ou will learn to view and edit master pages, and then you will complete the publication by applying master pages. A master page p rovides a common background for multiple pages. 1 Start Adobe PageMaker 6.5, and then insert the Adobe PageMaker 6.5 CD-ROM. In Page- Maker , choose File > Open. Select the Mpages .t65 file in the following location on the CD-ROM: Tour Adobe PageMaker 6.5 > Tutorials > 3Masters. Click OK (Macintosh) or Open (Windows). The file is an untitled template, so now you will save it with a name. 2 Choose File > Save As, and type Catalog.p65 . Specify a location on your hard disk, and then click Save. 3 Before you begin making changes, click the page icons at the bottom left corner of the pub- lication window to examine the current layout of the publication and to see how common backgrounds identify each section visually. 4 Pages 1-3 use the master page named Docu- ment Master. To view the Document Master, click and hold the mouse button (Macintosh) or click the right mouse button ( Windows) on the master page icon in the lower left corner of the publication w indow. Choose Document Master from the master pages pop-up menu. Master page
Transcript of 3 Masters

7/29/2019 3 Masters
http://slidepdf.com/reader/full/3-masters 1/4
1 of 4
ADOBE PAGEMAKER 6.5 TUTORIALS
Applying Multiple Master Pages
A master page provides a common background
for a set of pages. When several pages contain
the same set of design elements, setting them
up on a master page lets you instantly apply
the design to any page in the publication.
The publication you will use in this tutorial is
a 15-page online catalog for a school. The
publication is divided into five sections. Each
section uses a different master page that con-
tains the button graphics and background for
that section. The last two sections of the publi-
cation are not finished.
You will learn to view and edit master pages,
and then you will complete the publication by
applying master pages.
A master page provides a common background for multiple pages.
1
Start Adobe PageMaker 6.5, and then insertthe Adobe PageMaker 6.5 CD-ROM. In Page-
Maker, choose File > Open. Select the Mpages.t65
file in the following location on the CD-ROM:
Tour Adobe PageMaker 6.5 >
Tutorials >
3Masters. Click OK (Macintosh) or Open
(Windows).
The file is an untitled template, so now you
will save it with a name.
2
Choose File > Save As, and type Catalog.p65
.
Specify a location on your hard disk, and then
click Save.
3
Before you begin making changes, click the
page icons at the bottom left corner of the pub-
lication window to examine the current layoutof the publication and to see how common
backgrounds identify each section visually.
4
Pages 1-3 use the master page named Docu-
ment Master. To view the Document Master,
click and hold the mouse button (Macintosh)
or click the right mouse button (Windows) on
the master page icon in the lower left corner of
the publication window. Choose Document
Master from the master pages pop-up menu.
Master page

7/29/2019 3 Masters
http://slidepdf.com/reader/full/3-masters 2/4
2 of 4
Applying Multiple Master Pages
Choosing a master page from this pop-up
menu lets you view or edit a master page with-
out changing the page you were previously
viewing. You can’t use this pop-up menu to
apply a master page to a publication page—
you will do that in a later step.
5
Choose View > Show Guides to see the
guide, column, and margin layout for this
master page.
Page 3 is designed around the Document Mas-
ter guides, but doesn’t need to use the Docu-
ment Master elements. You will hide the masterpage items so that they don’t display or print.
6
Click the page 3 icon at the bottom left cor-
ner of the publication window. Choose View >
Display Master Items to deselect the menu
item and hide the master items.
Master page elements on Master page elements off
Now you will finish the last sections of this
catalog. First, you will apply an existing mas-
ter page to pages 10 and 11.
7
If the Master Pages palette is not open,
choose Window > Show Master Pages.
Use the Master Pages palette to manage the list
of master pages and apply them to pages. [None]
and [Document Master] appear by default
and cannot be deleted. Because the Master
Pages palette sorts items alphanumerically, the
designer of this catalog chose to begin the
names of the other master pages with numbers
to keep them in the same order as the sections
to which they belong.
8
To apply a master page to page 10, go to page
10, and then click 3-Faculty in the Master
Pages palette.
Before After
9
Page 11 is part of this section, so go to page
11 and apply the 3-Faculty master page as you
did in step 8.
Before After
Palette menu
Delete master page
New master page
7/29/2019 3 Masters
http://slidepdf.com/reader/full/3-masters 3/4
3 of 4
Applying Multiple Master Pages
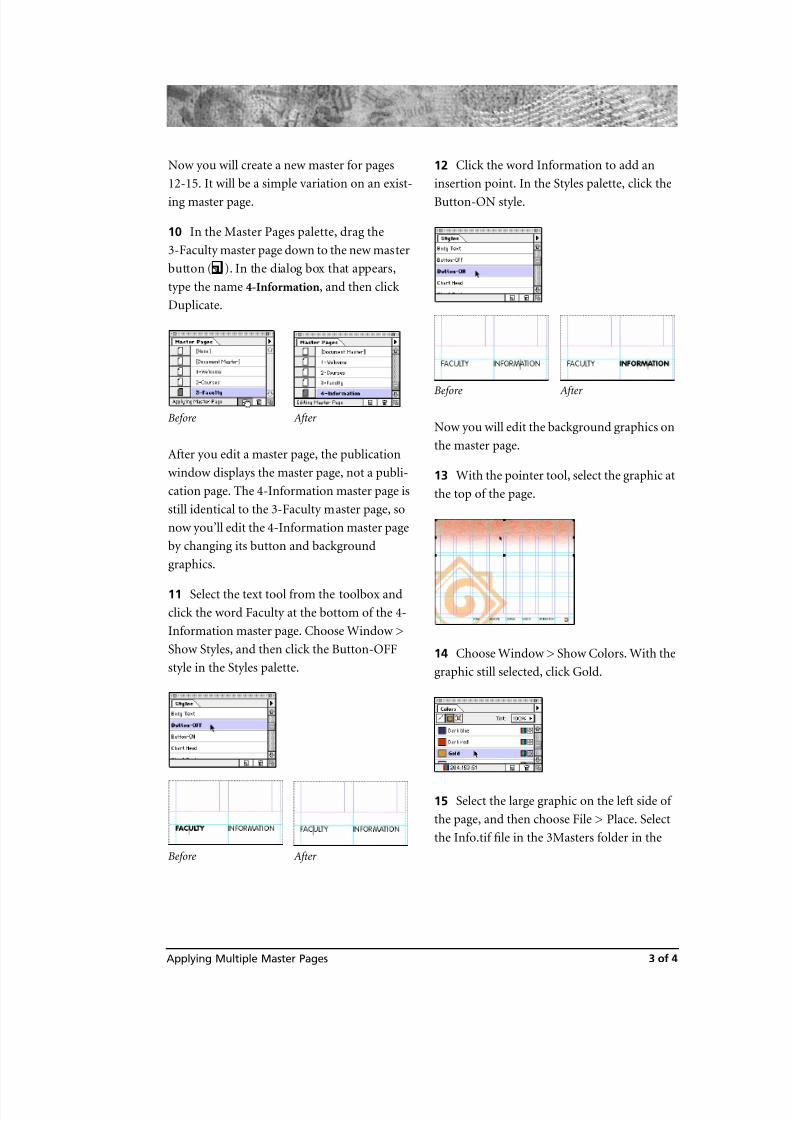
Now you will create a new master for pages
12-15. It will be a simple variation on an exist-
ing master page.
10
In the Master Pages palette, drag the
3-Faculty master page down to the new master
button ( ). In the dialog box that appears,
type the name 4-Information
, and then click
Duplicate.
Before After
After you edit a master page, the publication
window displays the master page, not a publi-
cation page. The 4-Information master page is
still identical to the 3-Faculty master page, so
now you’ll edit the 4-Information master page
by changing its button and background
graphics.
11
Select the text tool from the toolbox and
click the word Faculty at the bottom of the 4-
Information master page. Choose Window >
Show Styles, and then click the Button-OFF
style in the Styles palette.
Before After
12
Click the word Information to add an
insertion point. In the Styles palette, click the
Button-ON style.
Before After
Now you will edit the background graphics on
the master page.
13
With the pointer tool, select the graphic at
the top of the page.
14
Choose Window > Show Colors. With the
graphic still selected, click Gold.
15
Select the large graphic on the left side of
the page, and then choose File > Place. Select
the Info.tif file in the 3Masters folder in the

7/29/2019 3 Masters
http://slidepdf.com/reader/full/3-masters 4/4
4 of 4
Applying Multiple Master Pages
Tutorials folder. Select Replacing Entire
Graphic, and then click OK (Macintosh) or
Open (Windows).
Before After
16
Make sure the Info.tif graphic is selected.
In the Colors palette, click Light Gold.
17
Go to page 12. In the Master Pages palette,
select 4-Information. To apply this master to a
range of pages, choose Apply from the Master
Pages palette menu.
18
In the Apply Master dialog box, type 13-15
in the Page Range option, and then click Apply.
Examine pages 12 to 15 and see how the
changes to the 4-Information master page
affected them, without disturbing the rest of
the pages.
By duplicating, modifying, and applying mas-
ter pages, you were able to apply a consistent
design to six pages very quickly, and without
affecting the rest of the publication.
19
Choose File > Save. Congratulations!
You’ve completed this tutorial.
Adobe, the Adobe logo and PageMaker are trademarks
of Adobe Systems Incorporated. All rights reserved.


![Metal masters[3]](https://static.fdocuments.us/doc/165x107/5568fd33d8b42aff2e8b50e7/metal-masters3.jpg)