
2D Game Engine Tutorial - NeboMusic
18
Creating a 2D Game Engine for Android OS Introduction This tutorial will lead you through the foundations of creating a 2D animated game for the Android Operating System. The goal here is not to create a complex, multilevel game. Rather, the goal is to create and understand within the elements of the Control-Model-View method of game software design. In addition, we will create this engine from “scratch” – meaning that we will code every aspect of the game in Java with Eclipse to gain a deeper understanding to the interplay between classes in a game simulation. Once you have built this engine, you may add deeper layers of complexity, characters, scenes, and game logic. Resources Needed: Eclipse IDE and Java installed on your system. Android SDK installed within Eclipse with Emulator Software Android Device (optional, but highly recommended) Graphics Resources: (You may download these at http://www.nebomusic.net/androidlessons/gameimages) (Save these in a folder on your desktop) Vocabulary: Control-Model-View XML Layout Frame Based Animation X and Y coordinate System (0,0 in upper left corner) Emulator Java: Class Constructor Public Private Void Data Types: int float String Function Android SDK Terms: Gesture Detector Handler Runnable View onDraw() invalidate() Canvas Bitmap
Transcript of 2D Game Engine Tutorial - NeboMusic
Creating a 2D Game Engine for Android OS Introduction This tutorial will lead you through the foundations of creating a 2D animated game for the Android Operating System. The goal here is not to create a complex, multilevel game. Rather, the goal is to create and understand within the elements of the Control-Model-View method of game software design. In addition, we will create this engine from “scratch” – meaning that we will code every aspect of the game in Java with Eclipse to gain a deeper understanding to the interplay between classes in a game simulation. Once you have built this engine, you may add deeper layers of complexity, characters, scenes, and game logic. Resources Needed: Eclipse IDE and Java installed on your system. Android SDK installed within Eclipse with Emulator Software Android Device (optional, but highly recommended) Graphics Resources: (You may download these at http://www.nebomusic.net/androidlessons/gameimages) (Save these in a folder on your desktop) Vocabulary: Control-Model-View XML Layout Frame Based Animation X and Y coordinate System (0,0 in upper left corner) Emulator Java:
Class Constructor Public Private Void Data Types:
int float String
Function Android SDK Terms:
Gesture Detector Handler Runnable View onDraw() invalidate() Canvas Bitmap
BitmapDrawable Resources Activity
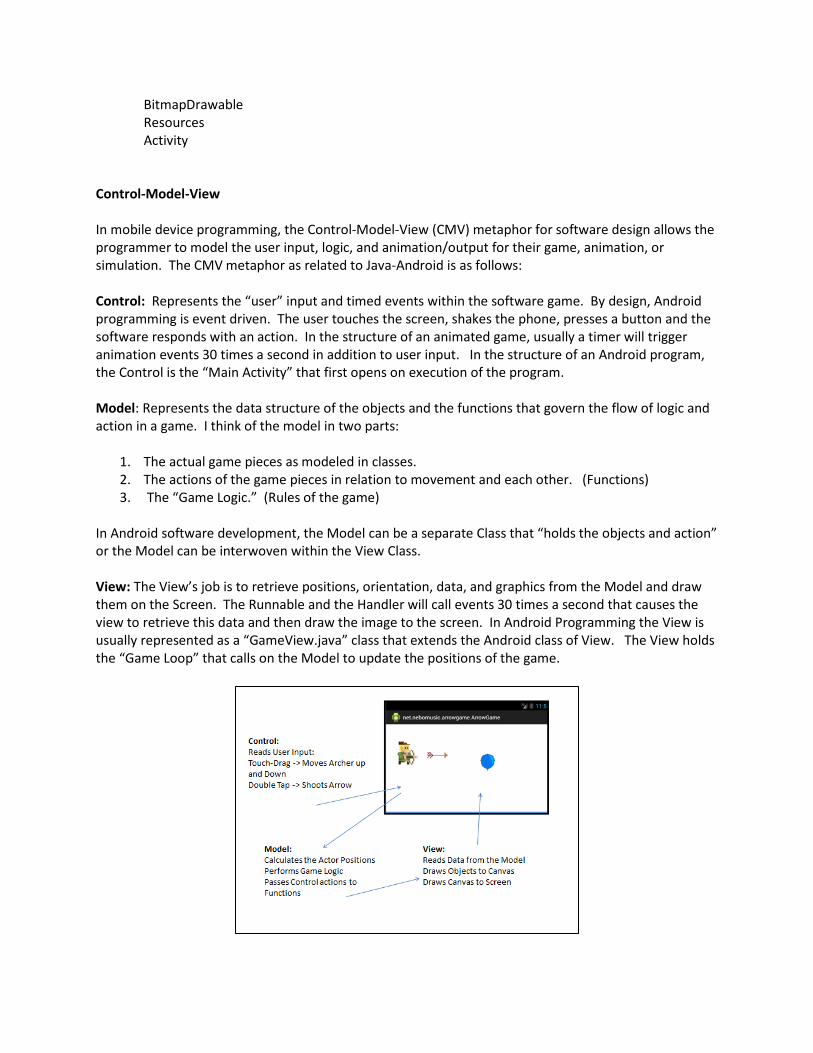
Control-Model-View In mobile device programming, the Control-Model-View (CMV) metaphor for software design allows the programmer to model the user input, logic, and animation/output for their game, animation, or simulation. The CMV metaphor as related to Java-Android is as follows: Control: Represents the “user” input and timed events within the software game. By design, Android programming is event driven. The user touches the screen, shakes the phone, presses a button and the software responds with an action. In the structure of an animated game, usually a timer will trigger animation events 30 times a second in addition to user input. In the structure of an Android program, the Control is the “Main Activity” that first opens on execution of the program. Model: Represents the data structure of the objects and the functions that govern the flow of logic and action in a game. I think of the model in two parts:
1. The actual game pieces as modeled in classes. 2. The actions of the game pieces in relation to movement and each other. (Functions) 3. The “Game Logic.” (Rules of the game)
In Android software development, the Model can be a separate Class that “holds the objects and action” or the Model can be interwoven within the View Class. View: The View’s job is to retrieve positions, orientation, data, and graphics from the Model and draw them on the Screen. The Runnable and the Handler will call events 30 times a second that causes the view to retrieve this data and then draw the image to the screen. In Android Programming the View is usually represented as a “GameView.java” class that extends the Android class of View. The View holds the “Game Loop” that calls on the Model to update the positions of the game.
Structure of Our Sample Engine: ArrowGame.java -> Holds the Control. Listens to the Gestures from the screen and then calls methods from the View to update Actor Positions Data Elements: Private Instance of ArrowGameView arrowGameView Instance of Gesture Detector Private inner class of SimpleOnGestureListener ArrowGameView.java -> Holds the View and the Game Logic Loop. Also Holds the “cast” of Actor instances that will take part in the Game. Data Elements: Public Instance of Actor archer Public Instance of Actor arrow Public Instance of Actor balloon Private Handler h Private constant int FRAME_RATE = 30 Actor.java -> This data structure will model the “characters” in the game. Data Elements: Private Context context Private int x Private int y Private String name Private int costume Private int currentCostume Private Array BitMapDrawable[] graphic res/drawable: Holds the .png files that will make up the game (available at: www.nebomusic.net/androidlessons/gameimages) archer.png arrow.png blueballoon.png drwho.png popballoon.png tardis.png activity_arrow_game.xml: Holds the XML code that will control the layout of the View
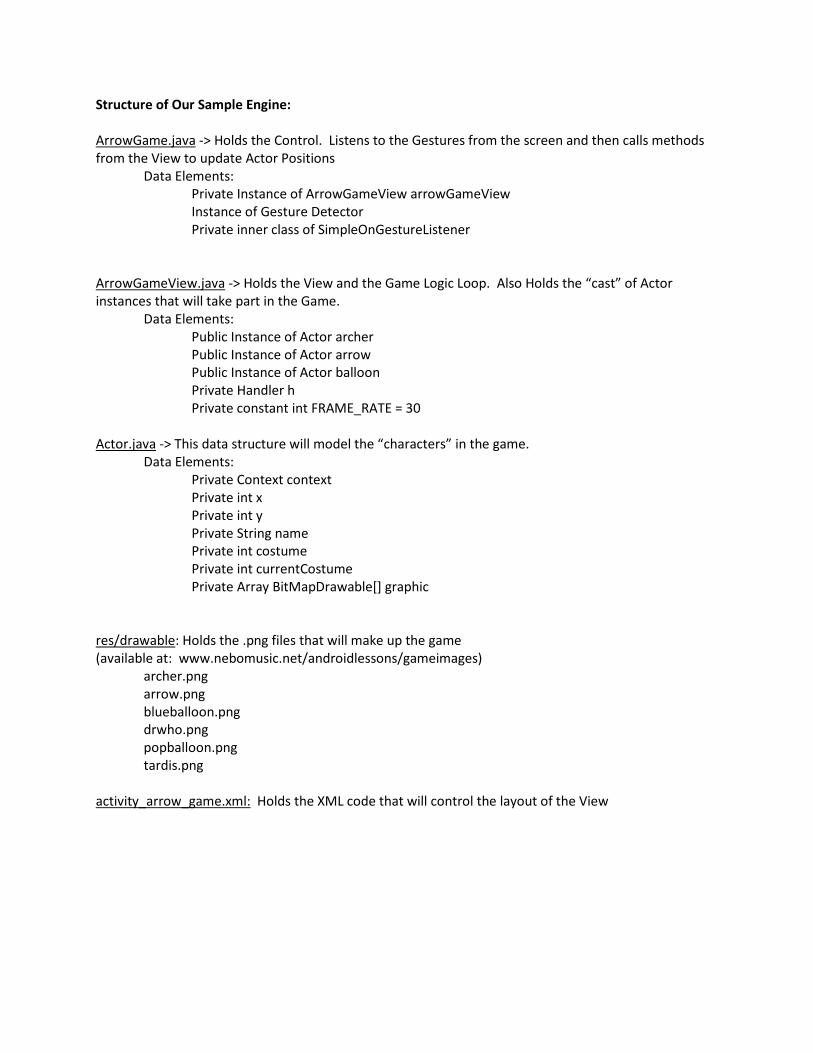
Building The Engine Process: Phase 1: Setup ArrowGame Project on Eclipse
1. Start Eclipse and select “Android Application Project”
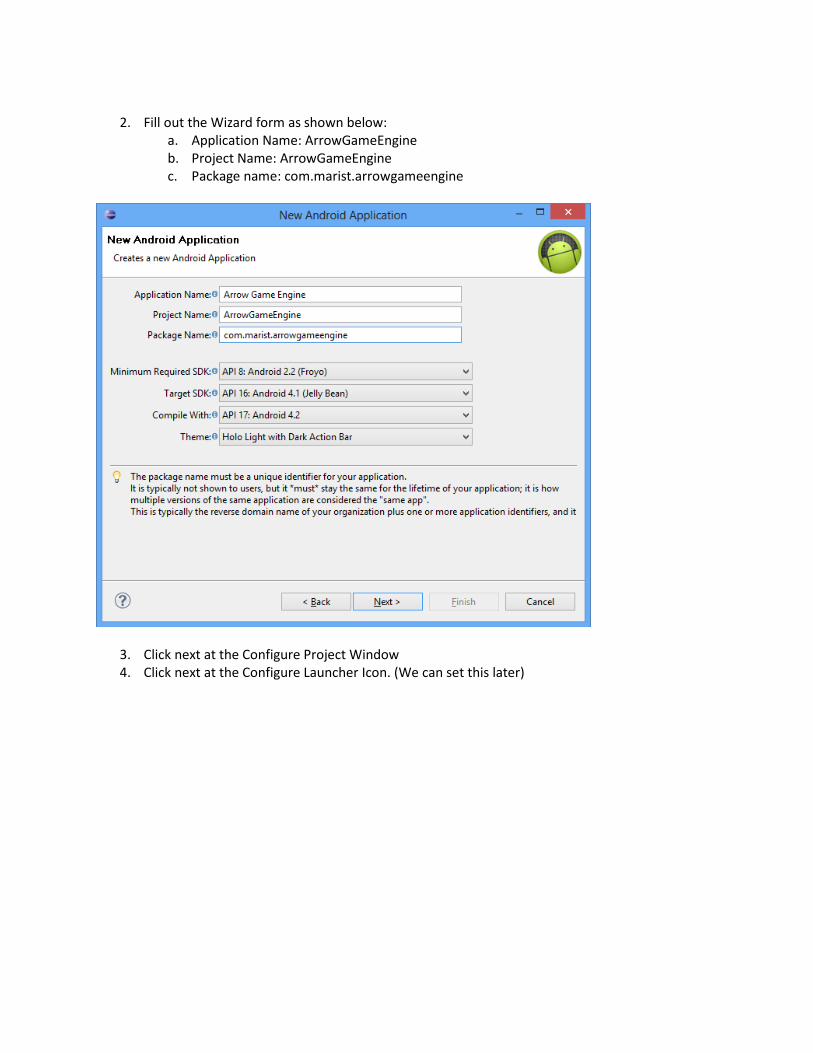
2. Fill out the Wizard form as shown below:
a. Application Name: ArrowGameEngine b. Project Name: ArrowGameEngine c. Package name: com.marist.arrowgameengine
3. Click next at the Configure Project Window 4. Click next at the Configure Launcher Icon. (We can set this later)
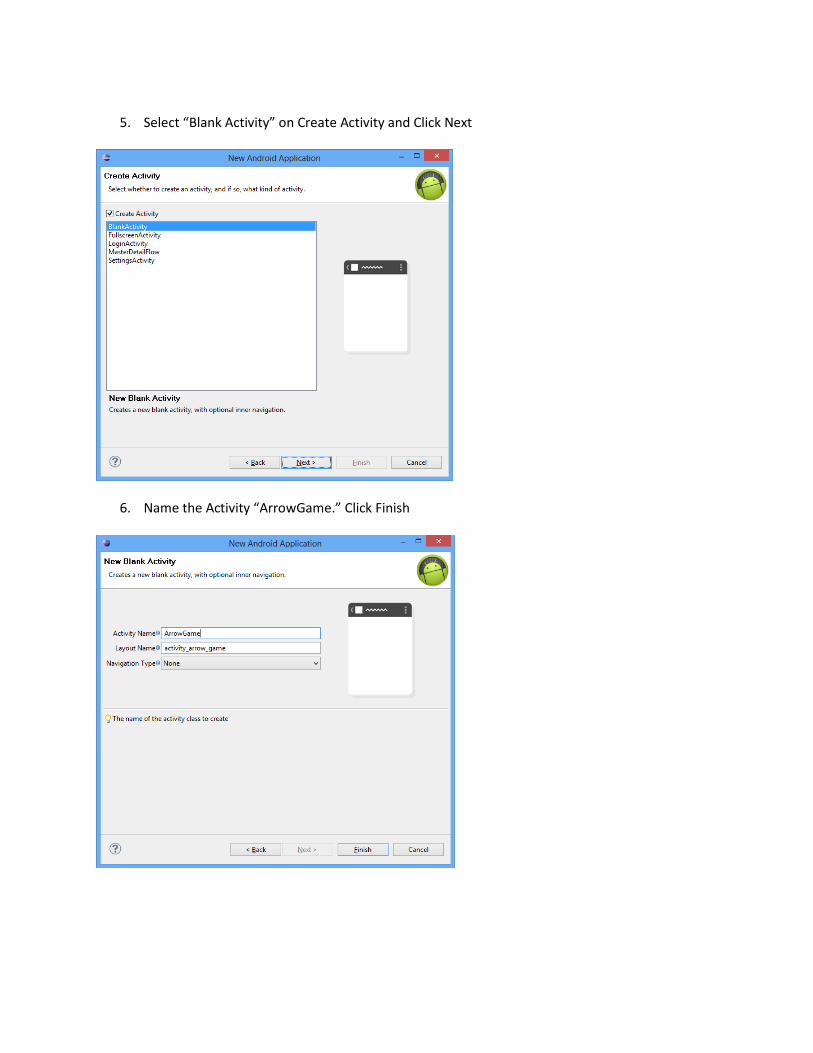
5. Select “Blank Activity” on Create Activity and Click Next
6. Name the Activity “ArrowGame.” Click Finish
Phase 2: Define the Classes and Import the Graphics
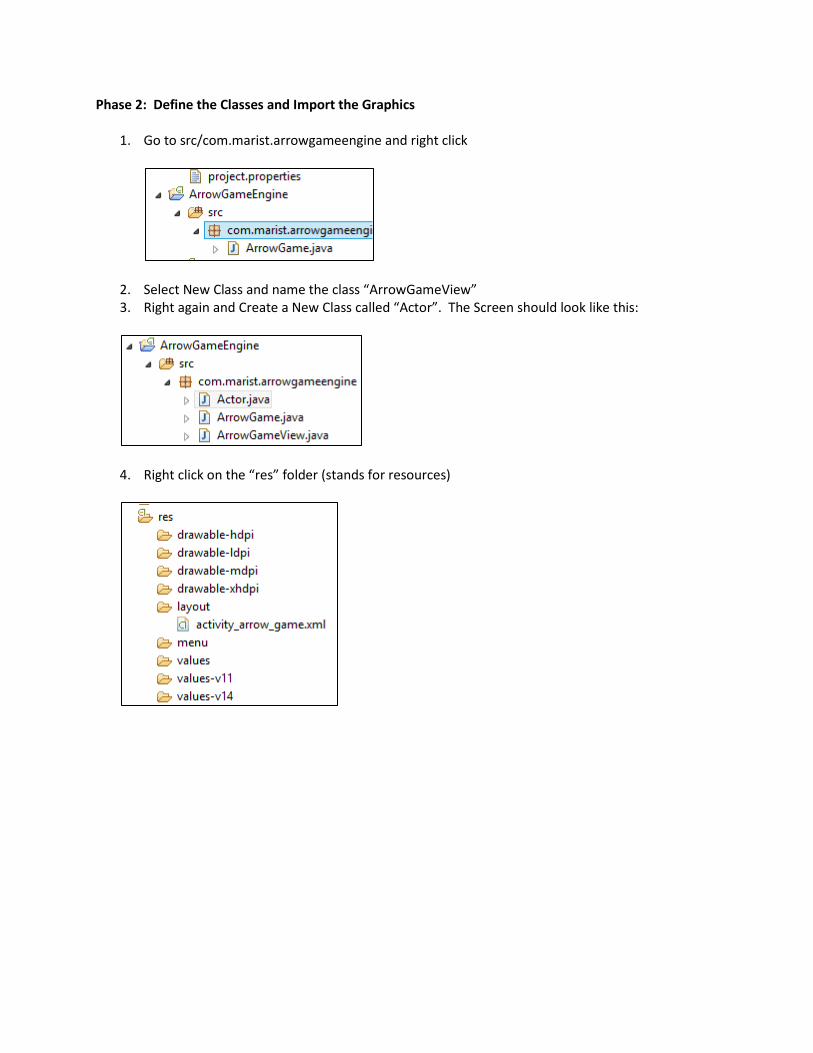
1. Go to src/com.marist.arrowgameengine and right click
2. Select New Class and name the class “ArrowGameView” 3. Right again and Create a New Class called “Actor”. The Screen should look like this:
4. Right click on the “res” folder (stands for resources)
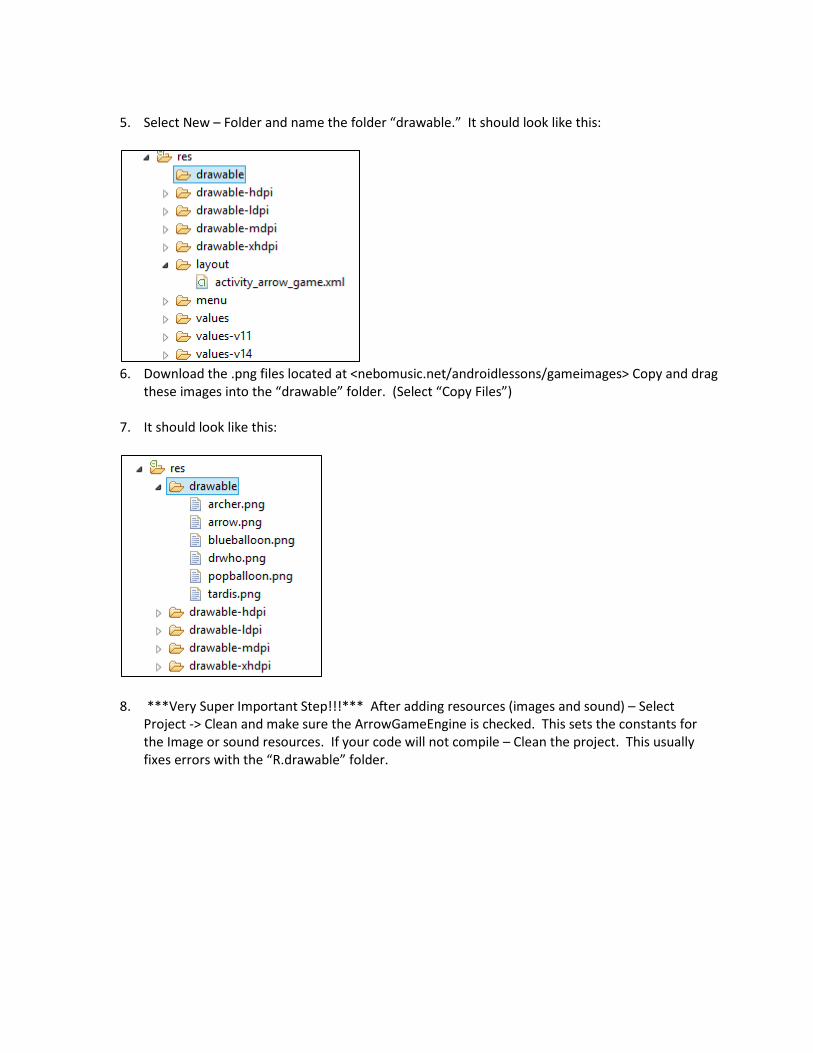
5. Select New – Folder and name the folder “drawable.” It should look like this:
6. Download the .png files located at <nebomusic.net/androidlessons/gameimages> Copy and drag
these images into the “drawable” folder. (Select “Copy Files”)
7. It should look like this:
8. ***Very Super Important Step!!!*** After adding resources (images and sound) – Select
Project -> Clean and make sure the ArrowGameEngine is checked. This sets the constants for the Image or sound resources. If your code will not compile – Clean the project. This usually fixes errors with the “R.drawable” folder.
Phase 3: Setup the XML for the Main View
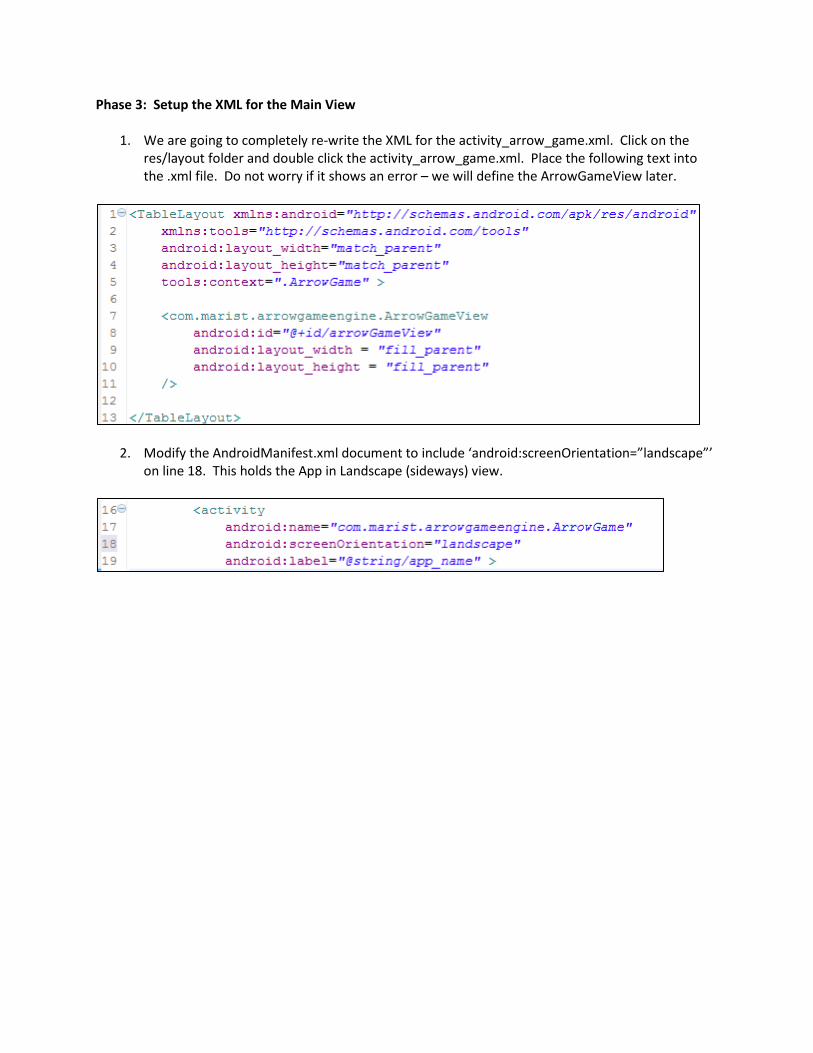
1. We are going to completely re-write the XML for the activity_arrow_game.xml. Click on the res/layout folder and double click the activity_arrow_game.xml. Place the following text into the .xml file. Do not worry if it shows an error – we will define the ArrowGameView later.
2. Modify the AndroidManifest.xml document to include ‘android:screenOrientation=”landscape”’ on line 18. This holds the App in Landscape (sideways) view.
Phase 4: Define the Actor Class We will develop the Code classes “Backwards” – working from the Actor.java to ArrowGameView.java and then the ArrowGame.java. Don’t worry right away if the code shows errors. Many times errors will arise when we refer to functions or objects we have not defined yet. If you define an Android object, often you can hover over the error and Eclipse will suggest you import the Android library – follow these directives.
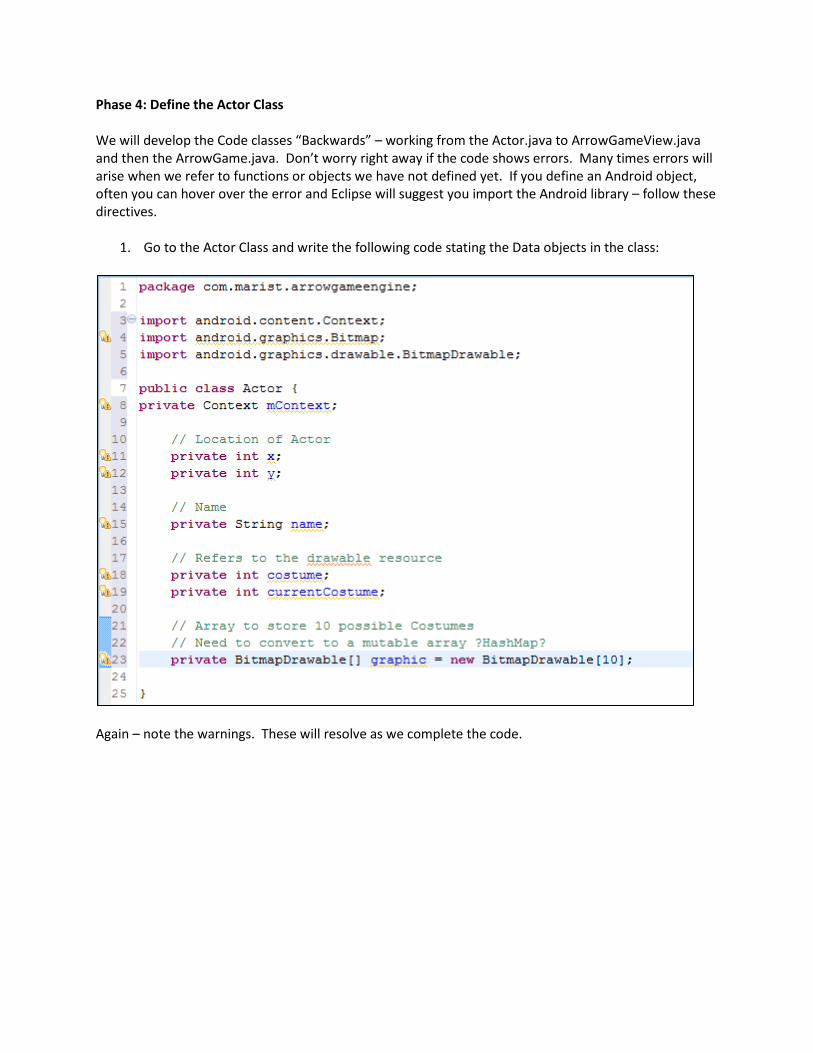
1. Go to the Actor Class and write the following code stating the Data objects in the class:
Again – note the warnings. These will resolve as we complete the code.
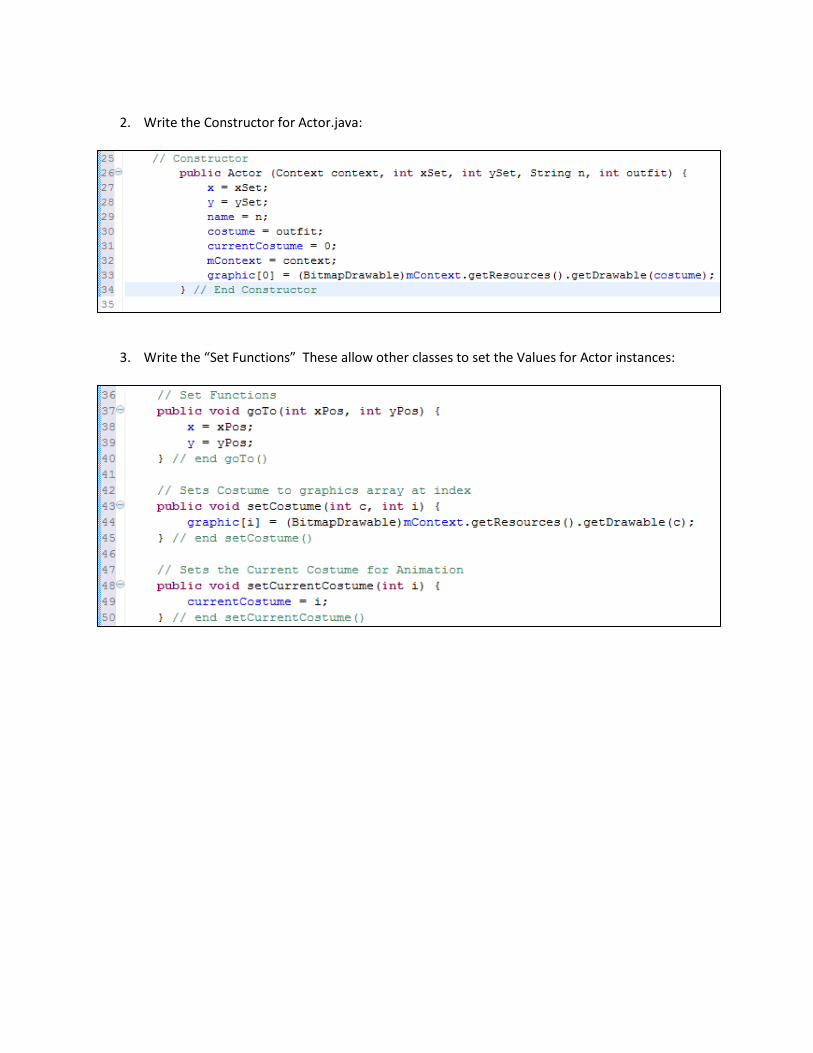
2. Write the Constructor for Actor.java:
3. Write the “Set Functions” These allow other classes to set the Values for Actor instances:
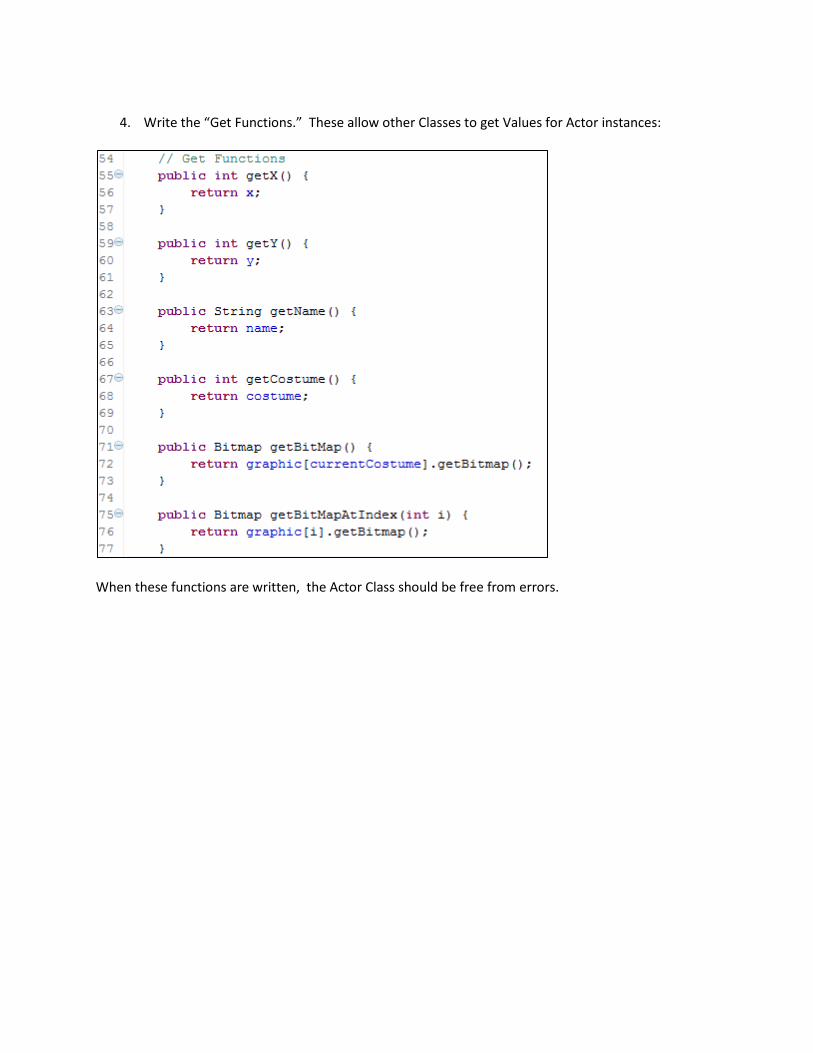
4. Write the “Get Functions.” These allow other Classes to get Values for Actor instances:
When these functions are written, the Actor Class should be free from errors.
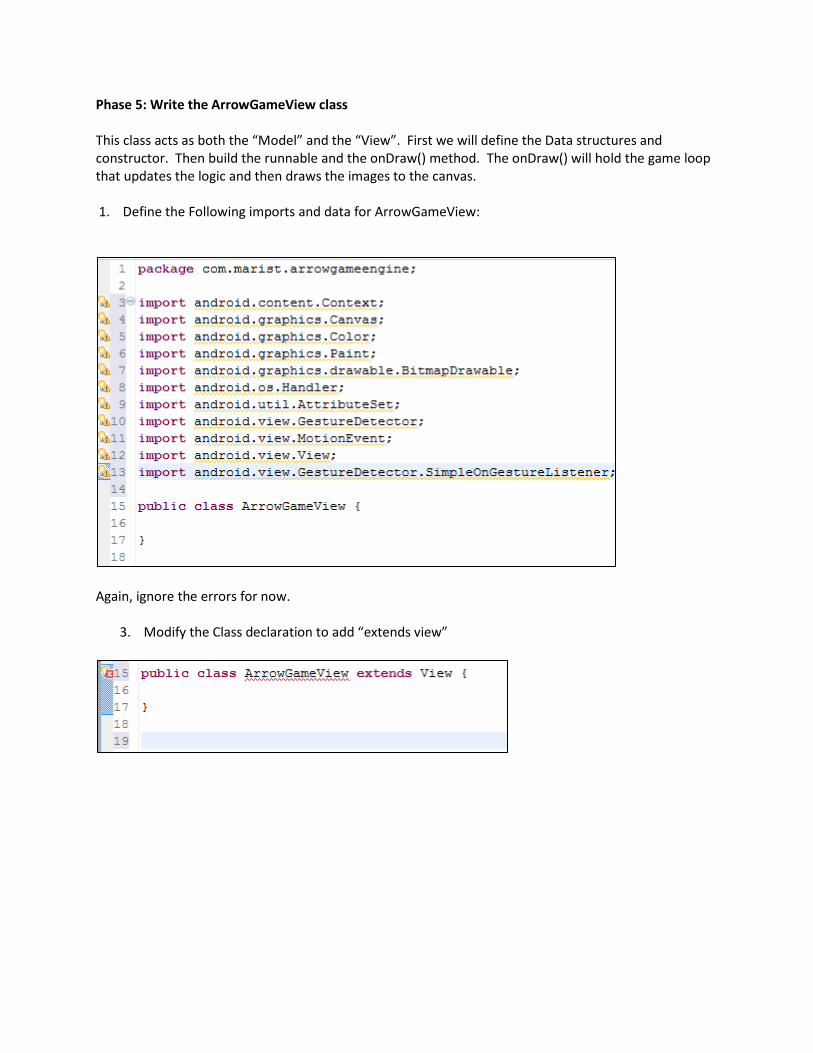
Phase 5: Write the ArrowGameView class This class acts as both the “Model” and the “View”. First we will define the Data structures and constructor. Then build the runnable and the onDraw() method. The onDraw() will hold the game loop that updates the logic and then draws the images to the canvas. 1. Define the Following imports and data for ArrowGameView:
Again, ignore the errors for now.
3. Modify the Class declaration to add “extends view”
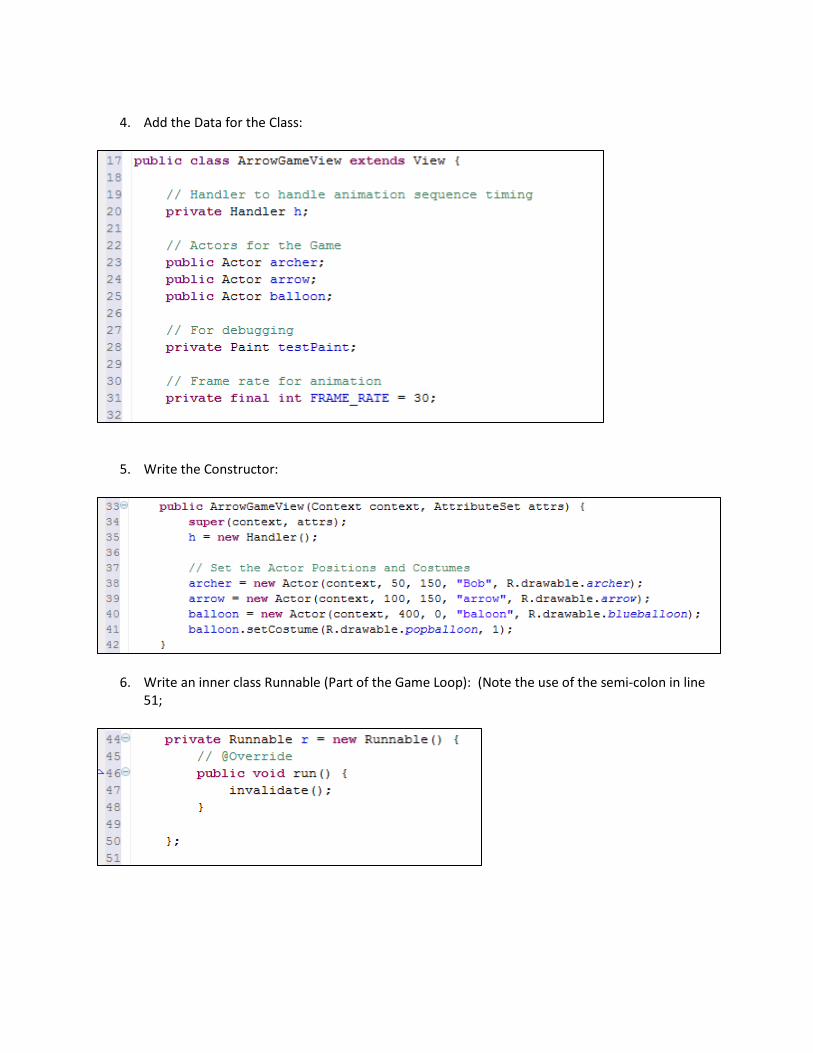
4. Add the Data for the Class:
5. Write the Constructor:
6. Write an inner class Runnable (Part of the Game Loop): (Note the use of the semi-colon in line 51;

7. Write the First part of the onDraw() function. This contains the Game logic (as it is – very minimal now). This represents the model.
8. Finish the onDraw function with the commands to draw the graphics to the screen:
9. The Class is finished. You will see a few warnings for unused elements at the top of the class. Do not worry about those now. In the refactoring process, you can go through and eliminate unused objects.
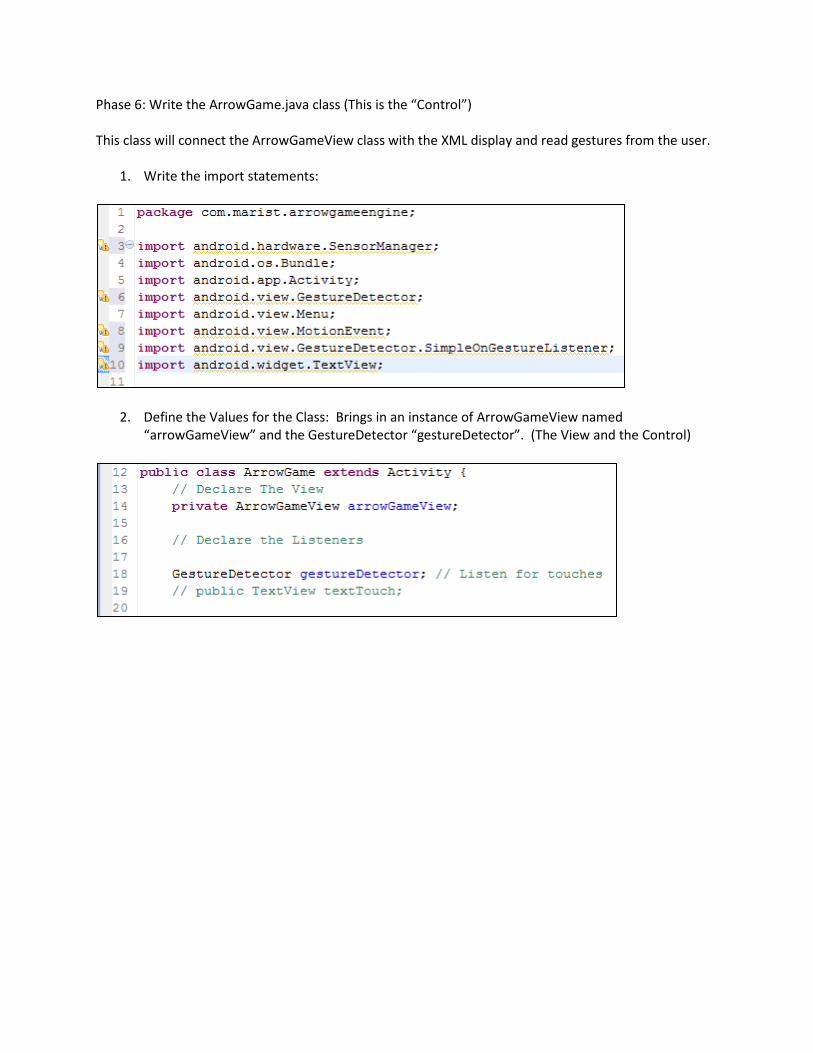
Phase 6: Write the ArrowGame.java class (This is the “Control”) This class will connect the ArrowGameView class with the XML display and read gestures from the user.
1. Write the import statements:
2. Define the Values for the Class: Brings in an instance of ArrowGameView named “arrowGameView” and the GestureDetector “gestureDetector”. (The View and the Control)
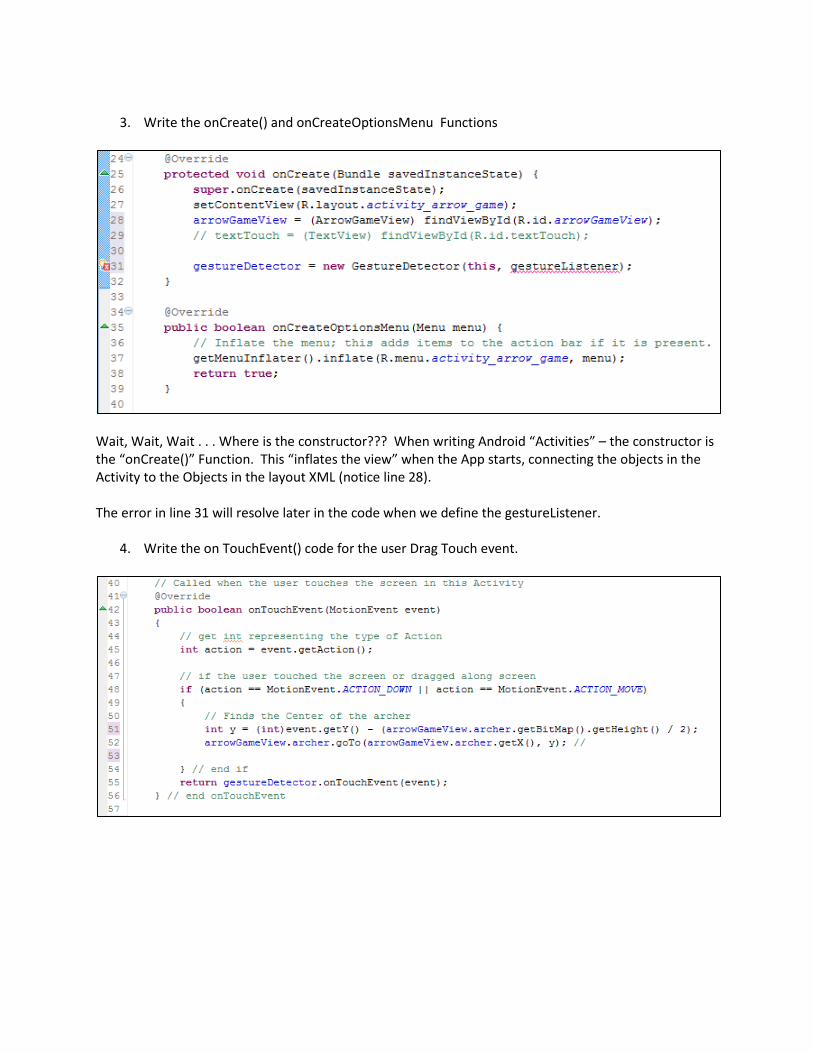
3. Write the onCreate() and onCreateOptionsMenu Functions
Wait, Wait, Wait . . . Where is the constructor??? When writing Android “Activities” – the constructor is the “onCreate()” Function. This “inflates the view” when the App starts, connecting the objects in the Activity to the Objects in the layout XML (notice line 28). The error in line 31 will resolve later in the code when we define the gestureListener.
4. Write the on TouchEvent() code for the user Drag Touch event.
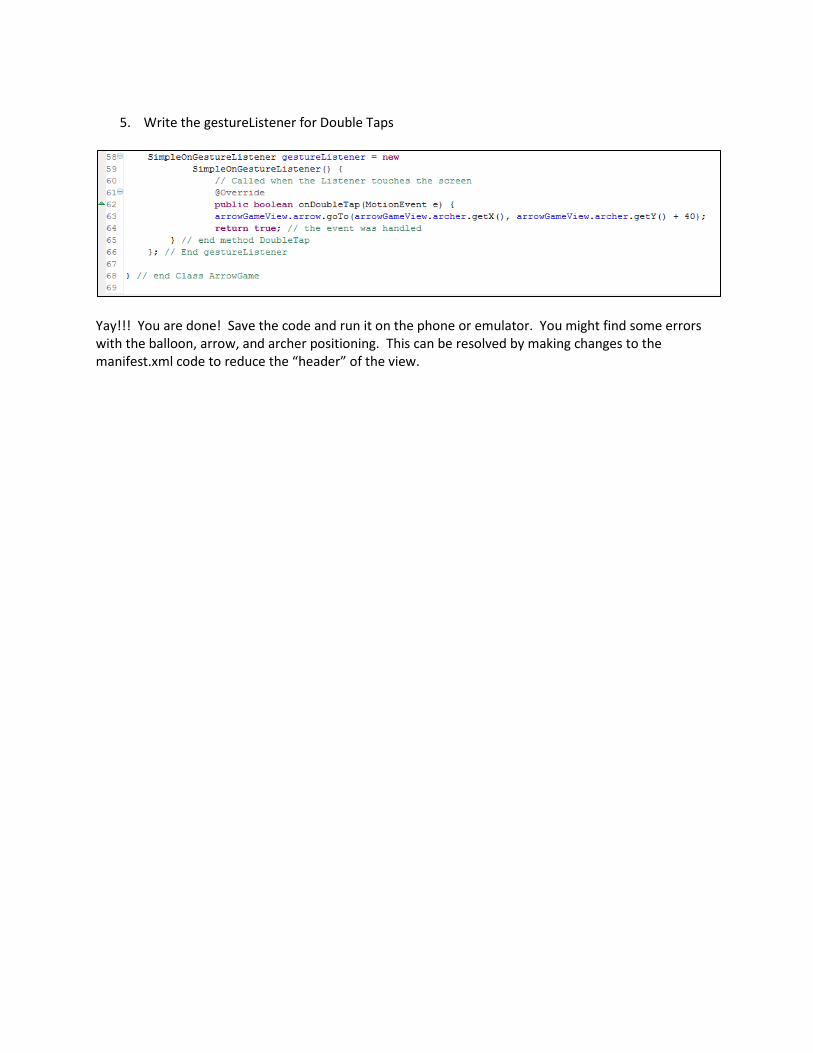
5. Write the gestureListener for Double Taps
Yay!!! You are done! Save the code and run it on the phone or emulator. You might find some errors with the balloon, arrow, and archer positioning. This can be resolved by making changes to the manifest.xml code to reduce the “header” of the view.


