29 | P a g e Identifying Walls
24
29 | Page Module: 2 Identifying Walls
Transcript of 29 | P a g e Identifying Walls

29 | P a g e
Module: 2
Identifying Walls

30 | P a g e
This module will introduce you to a wide range of information concerning walls, their materials and
construction. You will begin by learning about the construction of exterior walls. A brief guide to
constructing block walls comes first, followed by an introduction to wooden walls and wood framing. A
variety of alternative wall building methods will be briefly explained, before the section concludes with
a comparison of garden and retaining wall materials. Following on, you will learn about building interior
walls, with instructions for the wood frame method and a brief overview of alternative interior wall
construction methods. Section 2.3 will focus on knocking down interior walls, with discussions about
loadbearing and other considerations, before an instruction section. The module will finish with brief
instructions for repairing plaster and lath and installing drywall.
2.1 Building exterior walls
2.2 Building interior walls
2.3 Knocking down walls
2.4 Plasterwork and drywall
2.1 Building exterior walls
A DIY or home improvement enthusiast might want to build exterior walls in order to construct an
extension on a house, or even to build a new house from scratch. They might also want to build
walls for a garage or other outbuilding. This section covers building exterior walls from bricks and

31 | P a g e
blocks, using wood, and using alternative building methods. Some information on garden and
retaining walls finishes the section.
It is important to understand whether a wall will be loadbearing or non-loadbearing, as this will
have implications on construction.A loadbearing wall is a wall that carries the weight of a load to the
foundation. A non-loadbearing wall carries only its own weight. It is wise to consult a building
engineer before construction to ensure the walls proposed can carry any load that weighs on them.

32 | P a g e
2.1.1 Block walls
The following 8 step procedure can be used to build block walls:
1. Determine how many blocks you need by measuring the width and height of your desired wall.
Including gaps for mortar, regular 8” concrete blocks measure 8” wide, 8” tall and 8” long. Divide
your wall measurements by the block measurements to find out how many blocks you need. It is a
good idea to get a few more blocks than you think you will need.
2. Prepare the footing in the subsoil. The footing should be at least as deep as the height of one block,
and twice the width. This means that a footing for 8” blocks should be at least 8” deep and 16” wide.
Bricks will later be laid in the middle of the 16” width, leaving a gap of 4” each side. A concrete
footing can be poured by using oiled wooden boards as forms in the subsoil. These should be
stabilized with horizontal rebar.
3. Once the concrete is dry, lay a test run of blocks without using mortar, and mark corners and edges
using chalk or other non-permanent marker. Remove blocks.
4. Mix mortar and use a piece of wet plywood as a mortarboard. Spread mortar for the corner block and
first three blocks. Use a trowel to draw a line, called a furrow, through the center of the mortar, to
push the mortar toward where the edges of the blocks will be laid.
5. Lay blocks, applying mortar to the ends of the blocks and the concrete footing as you go. Setting up
guidelines between corners using string will help you keep blocks straight and level.

33 | P a g e
6. Use a level to check that the blocks are aligned and the wall is straight. Scrape off excess mortar
between blocks with a trowel.
7. Continue to lay blocks in a running bond pattern.
8. Insert reinforcing rods in the gaps between the blocks and pour a mixture of cement and gravel into
the gaps.

34 | P a g e
2.1.2 Wooden walls and wood framing
Wooden walls and wood framing are often formed on the ground and then raised into place and secured.
An exterior wooden wall or framing is attached to the concrete foundation when lifted into place. The
horizontal section of framing that sits on the concrete foundation is called a sill plate or sill and is
attached to it with anchor bolts.
The studs, the vertical boards which form the house, are attached to the sill at regular intervals. The
spacing is determined by local building codes. Studs are usually 2x4” boards. These are connected at the
top with a horizontal top plate.
Blocking boards are 2x4” sections cut short in order to fit between the studs at a 90 degree angle. They
start from approximately 4” from the sill plate and are staggered. These are likely to be omitted if
building a wooden wall. Instead, boards are laid horizontally and nailed to the outside edges of the studs.
Rough openings are the spaces where windows are doors will go when finishing, and consist of
a header, a piece of wood that runs over the top of the opening and cripples, the studs that the
head
er is attached to.
Exterior sheathing is then added to wood frame to strengthen, insulate and serve as a nailing point
for the siding. Exterior sheathing could be plywood, wafer board, polystyrene, or fiberboard, for
example. Siding or wall cladding is the material attached to the exterior of the walls. These are
commonly wood, stone or plastic.
35 | P a g e
2.1.3 Alternative wall building methods
Earthbags – This method of construction, inspired by military buildings, uses polypropylene sacks
filled with an earth mix, laid in running bond courses, and tamped together. Secured with barbed
wire between the courses, rebar rammed through bags and a bond beam, this type of construction is
favored due to its low cost, low environmental impact and its ability to withstand earthquakes and
floods. Earthbag building can be carried out using unskilled labor and costs are estimated at around
$10 per square foot. These buildings are mostly set on rubble trench foundations, trenches filled
with rubble, stone or gravel, further saving costs. They are then plastered with concrete or earth
plaster.
Cob – This method of construction uses subsoil, water, organic material such as straw, sand, and
often lime, to build walls. Also known as unburned clay masonry, this method is favored due to its
low cost and thermal mass. One drawback its long construction time, as walls need to be left to set
and dry. Walls are usually 18 to 24” inches thick and are built in successive layers from a masonry
plinth.
36 | P a g e
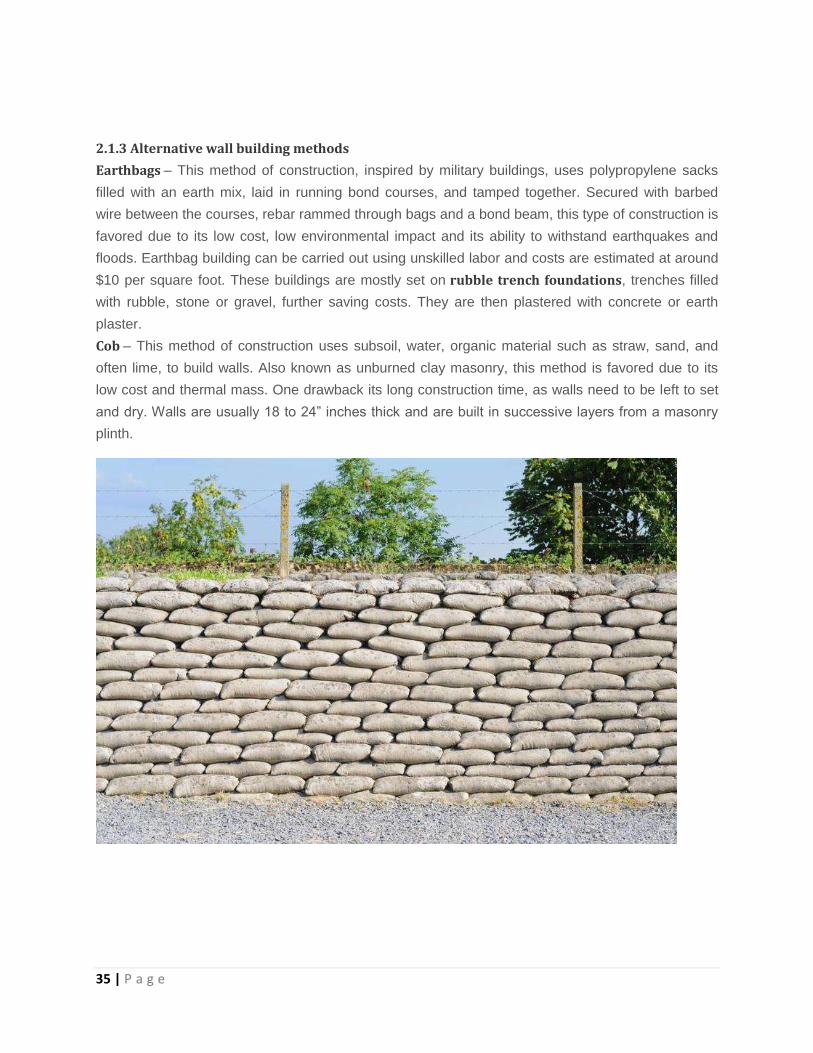
Rammed earth – This method of construction uses temporary formwork to support wall building.
Damp soil is placed between the forms in layers 4 to 6” deep and rammed down to construct walls 12 to
18” thick. This is continued until walls are completed and formwork is then removed. As with all earthen
methods, this is often chosen due to its low cost.
Adobe – This method uses an earth and straw mixed which is placed in moulds or a machine to make
bricks. These are then dried out and used with regular bricklaying techniques to create walls.
Strawbale – This method uses bales of straw, usually oat, rice, rye or wheat, to construct walls. It is
chosen for its sustainability, low cost, easy availability and high insulation value. Drawbacks include the
fact that it is subject to rot. This method was used historically in Nebraska, as well as in Germany and the
African plains. Buildings are constructed by laying straw bales in running bonds on a raised foundation,
then plastered or stuccoed.

37 | P a g e
Garden walls are built for a large number of reasons. They can be used to keep pets or children safe
while in the garden, to keep intruders out, for aesthetic reasons, or to increase garden privacy, for
example. Retaining walls are built to hold back earth, particularly when different levels are desired in
the garden. Retaining walls are often used to create step beds and to differentiate between lawn and
patio areas.
Some popular materials and methods for garden and retaining wall construction include:
Stone
o Natural cut stone – by far the most expensive method, natural stone is cut and brought to site to be laid
with lime-based mortar.
o Reconstituted stone – a mixture of natural stone fragments and cement is poured and shaped to
produce blocks and other shapes. These are then used to construct walls.

38 | P a g e
o Natural stone
Slipform – wooden forms are set up. Natural stones are placed at the edge of one form and concrete is
poured into the other side to create a wall that with one smooth concrete face and one stone face.
Freehand – natural stones and mortar are used to construct a wall
Dry stone method – a wall is constructed with stones without the use of mortar. Interlocking stones are
selected.
Brick – a wall is built as described in 2.1.1
Concrete
o Poured – concrete is poured into oiled forms and left to set
o Block – a wall is built as described in 2.1.1
2.2 Building interior walls
2.2.1 Wood frame method
Interior walls can be constructed by following these 8 steps:
1. Check your walls, floor and ceiling to ensure you will be able to attach the wall to them securely. The
best place for an interior wall is vertically under a ceiling joist and in line with an existing wall stud. If
it is not possible to construct in line with joists and studs, nailing blocks should be added in the
ceiling and wall where you want to construct the new wall. Depending on your floor type you may
have to excavate or peel back sections. Where this is not possible, the sill plate will anchor to a
concrete floor using a drill and screws or expanding metal bolts.
39 | P a g e
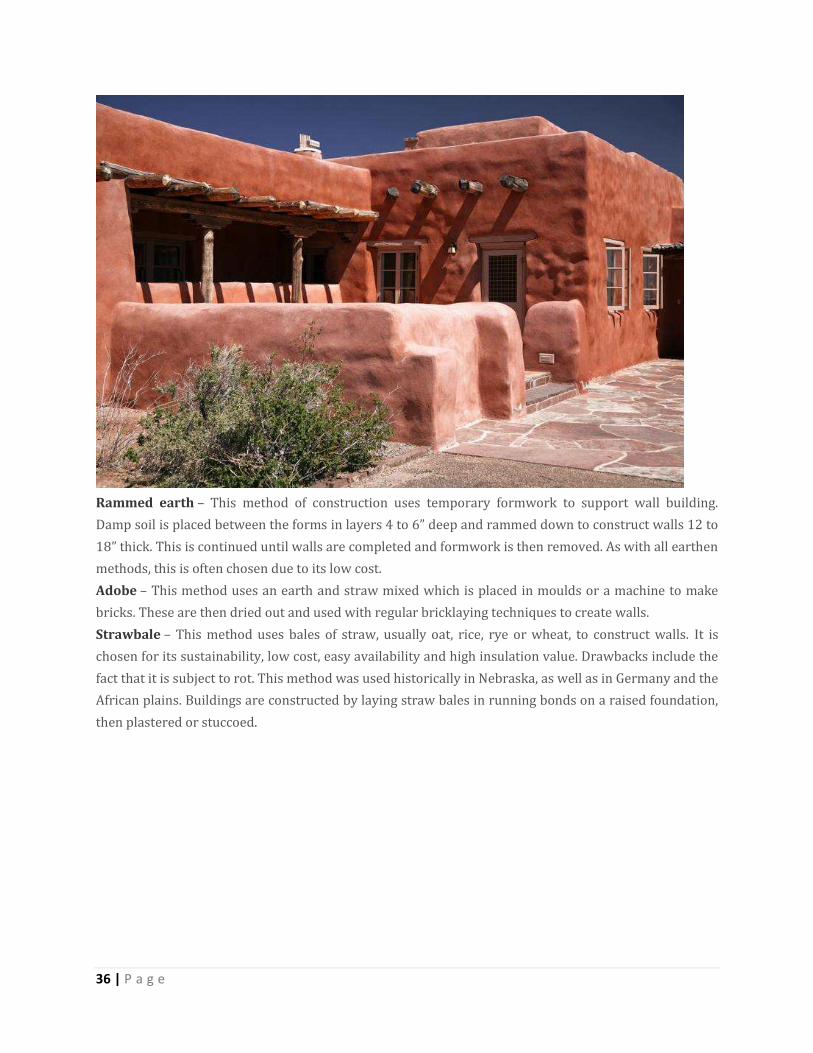
2. Using chalk, mark where the new wall’s top plate will be on the ceiling. The top plate should be a
2x4” (as with all boards used for this project) so two lines 4” apart must be made the entire length of
the new wall. N.B. 2x6” is often used for walls that contain plumbing work.
3. Mark a chalk line for a stud at each end. Mark along the wall at approximately 16” intervals.
4. Lay the sill plate and top plate together and copy the marks for wall studs from the ceiling onto them
with chalk.
5. Install the top plate by holding it to the marks made on the ceiling and nailing into the joists or
installed nailing blocks.
6. Install the sill plate parallel to the top plate. Secure to the floor with nails, screws or bolts.
7. Attach wall studs to the sill and top plates using nails with stud-framing clips or the
diagonal toenail technique. Attach two studs where walls meet.
8. Attaching drywall or plastering will be discussed in section 2.4.

40 | P a g e
2.2.2 Other interior wall types
Cob – cob walls, as discussed in section 2.1.3, are mouldable in different shapes and patterns. As
interior walls they can be as thick as 5” and offer excellent sound dampening.
Insulated concrete formwork – polystyrene blocks are fitted together like bricks, then poured with
concrete. Polystyrene provides insulation for the wall as well as serving as a construction material.
Masonry or brick – exposed and unfinished or painted, a brick or masonry wall often serves as a
character feature and can add value to property.

41 | P a g e
2.3 Knocking down walls
DIY and home improvement enthusiasts may choose to knock down interior walls. This could be to
change the flow of a house, to create feelings of light and space, or to create a modern, open-plan
look. It can be one of the cheapest ways to transform a property.

42 | P a g e
2.3.1 Loadbearing or non-loadbearing
It is important to understand whether the wall you intend to knock down is loadbearing or non-
loadbearing. It is a common mistake to assume that a wood or metal frame wall is non-loadbearing and a
solid masonry wall is loadbearing. Both of these types of wall could be loadbearing or non-loadbearing.
A wall is considered loadbearing if it supports any of the below:
Floor loadings – floor joists could be supported by an internal wall. To determine the location of floor
joists, examine any floorboard nails. Joists usually run counter to the floorboards.
Upper wall loadings – walls might continue from downstairs to upstairs. If walls are connected in this
way, an upper wall could fail if a lower wall is knocked through. If the upper walls are supported by a
beam or are stud walls, the lower wall would not be considered loadbearing on account of the upper
wall.

43 | P a g e
Roof loadings – roofs constructed before around 1970 may rely on an internal wall for their stability.
Other wall loadings – in some older houses, internal walls were used to support the adjoining walls
and keep them together. Knocking through such a wall could cause other walls to fall down.
These concerns are particularly relevant if you live in an apartment or other shared building, as any
works you undertake might have a structural effect on the entire building.
If you are unsure whether a wall is fundamental to the house’s structure or is simply used to divide
up interior space, call in a structural engineer or building surveyor. They can determine whether the
wall is loadbearing and an engineer can design a supporting structure to make sure any remaining
loads are safely held.
Also check if you need any kind of consents from building regulators as you make a structural
alteration. Inspection may also be required.

44 | P a g e

45 | P a g e
2.3.2 Other considerations
Other things to consider when removing a wall include:
Flooring – floors in different rooms are likely to be at different levels. This will require floor levelling
work or for a small slope or step to be installed.
Dust – knocking through a wall creates a great deal of dust. It is important that the room is cleared as far
as possible and dust screens and sheets are erected.
Plastering – wall surfaces that are exposed when a wall is knocked through may need plastering and
finishing.
Repositioning – switches, electricals, plumbing and radiators might need to be repositioned. Consider
the cost of electricians, rewiring etc., before committing to any work.
Skirting boards – ensure that skirting boards are removed carefully and saved so that they can be
added in if necessary.

46 | P a g e
2.3.3 How to knock down a wall
After seeking guidance from engineers and building authorities about the characteristics of your wall,
and taking other considerations into account, knocking through the wall can be completed as follows:
1. Use a hammer to make a hole in the wall just below-eye level.
2. Use work gloves to pull off enough drywall until you can look inside. Check for plumbing, pipes or
other obstructions in the wall.
3. If there are no obstructions, go ahead and use a sledgehammer to knock out the remaining drywall.
4. Saw into the vertical studs and pull out as much as you can.
5. Saw up to sill and top plates to remove the entire length of the studs.
6. Remove sill and top plates with a wrecking bar. Pull out nails from the ceiling and floor.
7. Remove and dispose of the old wood and drywall.
8. Patch the floor and ceiling to match the rest of the room. Fill any holes in the ceiling with drywall
screwed to thin strips of wood.
9. Add a slope or stairs to level the floor if necessary.
10. Redecorate if necessary.

47 | P a g e
2.4 Plasterwork and drywall
2.4.1 Plaster and lath

48 | P a g e
Plaster and lath was the most common method used to finish interior walls in the U.S. until the 1950s
and is still a feature in many homes built before that period. It has now been replaced in most instances
by drywall, which will be discussed in section 2.4.2. Plaster and lath can be used to create unusual
shapes, curves and ornamental surfaces, which drywall cannot. When used with a lime-based plaster it
provides better sound-proofing qualities than drywall.
Though plaster and lath is little-used now, there is nothing unsafe about the method or materials used
and there is no need to replace existing plaster and lath.
Repair plaster and lath
If you have damage to the plaster and lath in your walls or ceiling, there are a number of repair
options.
Plasterboard - Cutting back plaster and lath to the studs either side of a hole can allow you to fix a
portion of plasterboard to the studs with plasterboard nails. The gaps between the plasterboard and
the existing wall can be filled with a flexible filler. Add PVA adhesive to the edges of the plasterboard
and existing wall, then plaster with skim plaster.
EML – This is the preferred method as it offers a similar finish to traditional plaster and lath. EML
(Expanded Metal Lathing) is a galvanized mesh. This is nailed taut between the studs, cut with tin
snips and plastered over.

49 | P a g e
2.4.2 Drywall
Drywall is a panel that is used to make ceilings and interior walls. It has replaced plaster and lath
because it is quicker, less labor-intensive, and cheaper to install. It is also known as gypsum board,
plasterboard, or sheetrock, and it is made out of gypsum plaster that has been pressed between two
heavy sheets of paper.
Drywall comes in various different thicknesses. Check your local building codes to ensure you have
the right thickness for the intended room and purpose. A standard ¼” drywall is only good for
covering cracks, while water resistant thicknesses of ½” and 3/8” are good as bases for tiles on
bathroom walls and ceilings respectively.

50 | P a g e
Installing drywall:
If you are installing on both walls and ceiling, begin with the ceiling. Use the largest sheet
available to cover the surface. Mark where all ceiling joists are on the wall’s top plate. Also ensure
that you remember where electric cables are so you do not pierce them with a drywall screw. Steel
protection plates can also be installed over cables at this point, if extra protection is desired.
Lift the sheet up to the ceiling (you will need at least one helper for this task). Use a drill to attach
the drywall to the ceiling joists with drywall screws at regular intervals. Repeat the same process for
the walls along the studs.
Once the drywall is in place, perimeter seams must be taped. Lay a thin layer of compound along
seams with a wide knife and cover with paper tape. This is followed by two more layers of
compound, sanding, then one or two following layers of compound.

51 | P a g e
2.4.3 Alternatives
Several alternatives to drywall are available. These include:
Veneer plaster – This is a combination of plaster and drywall. ½” drywall is screwed to the studs
first, then a thin coat of plaster is added. This creates stronger walls than simply using drywall.
N-Wall – This is advertised as a green, ecologically friendly material made of fiberboard and metal-
framed. It is 3.5” thick and can be cut for electrical and window needs.
Wood wall paneling– These panels of up to an inch thick come with very thin exotic wood veneers
such as zebrawood or mahogany.
Plywood – These sheets of wood are suitable for workspaces and sheds that require walls resistant
to scuffing and scraping.

52 | P a g e