23: Manage Case Assignment - Missouri Guide... · Manage Case Assignment Virtual OneStop – Staff...
22
Virtual OneStop – Staff Services User Guide 23-1 V18.0 R1 – 01/2018 23: Manage Case Assignment Chapter Contents Individual Case Assignment........................................................................................................................ 23-1 Staff Permissions................................................................................................................................................ 23-2 Create and Manage Groups ................................................................................................................................ 23-2 Manage Groups ............................................................................................................................................. 23-3 Create a Group .............................................................................................................................................. 23-3 Staff Group Assignment ..................................................................................................................................... 23-3 Individual Assignment ....................................................................................................................................... 23-5 Assign Staff .................................................................................................................................................. 23-6 Assign Group ................................................................................................................................................ 23-6 Case Assignment within Program Forms (In Context)..................................................................................... 23-7 Individual Case Un Assignment ......................................................................................................................... 23-7 Temporary Assignment ...................................................................................................................................... 23-9 Create a Temporary Assignment .................................................................................................................... 23-9 Remove a Temporary Assignment................................................................................................................ 23-10 Case Reassignment........................................................................................................................................... 23-11 Group Reassignment ........................................................................................................................................ 23-12 View Case Load ............................................................................................................................................... 23-14 Case Assignment History ................................................................................................................................. 23-16 Employer Case Assignment ...................................................................................................................... 23-17 Employer Case Assignment ............................................................................................................................. 23-17 Employer Location Case Assignment ........................................................................................................... 23-18 Employers Case Reassignment......................................................................................................................... 23-19 Employers Case Temporary Assignment ......................................................................................................... 23-20 Employers View Case Load ............................................................................................................................. 23-20 This chapter explains how staff assign case managers to individuals and employers. For Individual Case Assignment, the system allows supervisors or other authorized users to assign staff members to unique groups of case managers (for example, groups that manage specific programs). The system also allows staff to assign a specific case manager or case management group to individuals. For Employer Case Assignment, the system allows supervisors or other authorized users to assign staff members to employers as their case managers. This assignment is made from the General Information tab of the employer’s account. Once case managers are assigned, their assignments can be reassigned to another staff member. Case managers also can be reassigned temporarily from one staff member to another staff member. Individual Case Assignment The system allows supervisors or other authorized users to assign staff members to unique groups of case managers (for example, groups that manage specific programs, e.g., Wagner-Peyser, Workforce Innovation and Opportunity Act (WIOA), or Trade Adjustment Act (TAA)). Groups may be created according to LWIA or office designation. By design, a particular case manager or a case management group may be assigned to individuals. Select the Individual Case Assignment option in the Services for Workforce Staff menu (on the Navigation pane) to open the Individual Case Assignment menu screen (as shown in the following figure).
Transcript of 23: Manage Case Assignment - Missouri Guide... · Manage Case Assignment Virtual OneStop – Staff...

Virtual OneStop – Staff Services User Guide 23-1 V18.0 R1 – 01/2018
23: Manage Case Assignment
Chapter Contents Individual Case Assignment........................................................................................................................ 23-1
Staff Permissions ................................................................................................................................................ 23-2 Create and Manage Groups ................................................................................................................................ 23-2
Manage Groups ............................................................................................................................................. 23-3 Create a Group .............................................................................................................................................. 23-3
Staff Group Assignment ..................................................................................................................................... 23-3 Individual Assignment ....................................................................................................................................... 23-5
Assign Staff .................................................................................................................................................. 23-6 Assign Group ................................................................................................................................................ 23-6 Case Assignment within Program Forms (In Context) ..................................................................................... 23-7
Individual Case Un Assignment ......................................................................................................................... 23-7 Temporary Assignment ...................................................................................................................................... 23-9
Create a Temporary Assignment .................................................................................................................... 23-9 Remove a Temporary Assignment................................................................................................................ 23-10
Case Reassignment ........................................................................................................................................... 23-11 Group Reassignment ........................................................................................................................................ 23-12 View Case Load ............................................................................................................................................... 23-14 Case Assignment History ................................................................................................................................. 23-16
Employer Case Assignment ...................................................................................................................... 23-17 Employer Case Assignment ............................................................................................................................. 23-17
Employer Location Case Assignment ........................................................................................................... 23-18 Employers Case Reassignment......................................................................................................................... 23-19 Employers Case Temporary Assignment ......................................................................................................... 23-20 Employers View Case Load ............................................................................................................................. 23-20
This chapter explains how staff assign case managers to individuals and employers. For Individual Case Assignment, the system allows supervisors or other authorized users to assign staff members to unique groups of case managers (for example, groups that manage specific programs). The system also allows staff to assign a specific case manager or case management group to individuals. For Employer Case Assignment, the system allows supervisors or other authorized users to assign staff members to employers as their case managers. This assignment is made from the General Information tab of the employer’s account. Once case managers are assigned, their assignments can be reassigned to another staff member. Case managers also can be reassigned temporarily from one staff member to another staff member.
Individual Case Assignment The system allows supervisors or other authorized users to assign staff members to unique groups of case managers (for example, groups that manage specific programs, e.g., Wagner-Peyser, Workforce Innovation and Opportunity Act (WIOA), or Trade Adjustment Act (TAA)). Groups may be created according to LWIA or office designation. By design, a particular case manager or a case management group may be assigned to individuals. Select the Individual Case Assignment option in the Services for Workforce Staff menu (on the Navigation pane) to open the Individual Case Assignment menu screen (as shown in the following figure).

Manage Case Assignment
Virtual OneStop – Staff Services User Guide 23-2 V18.0 R1 – 01/2018
Manage Individual Case Assignment Screen
Staff Permissions The following describes staff permissions associated with case assignment:
• Manage Groups – Supervisors must create case management groups to utilize all Individual Case Assignment service options.
• Staff Group Assignment – Supervisors must assign staff members to case assignment groups to use the Individual Assignment, Case Re-Assignment, and Temporary Assignment options. For more information, refer to the section “Staff Group Assignment.”
Staff members who belong to a particular LWIA/region may only manage groups, staff, and individuals for that region.
The Manage Groups and Staff Group Assignment subcomponents are reserved for staff with Local Admin or State Admin privileges only.
Create and Manage Groups The Manage Groups option is used to create, edit, and delete groups and group privileges. This will be the first step to manage the case assignment effort, as groups must be created before staff can assign case managers to those groups. Note: The local administrator will set up the security and access rights for certain staff to use this
functionality. Only staff with administrator privileges may utilize this function.
To open the Manage Groups screen, click Manage Case AssignmentIndividual Case AssignmentManage Groups on the Navigation Menu.
Manage Groups Screen
Manage Case Assignment
Virtual OneStop – Staff Services User Guide 23-3 V18.0 R1 – 01/2018
Manage Groups From the Manage Groups screen, staff can perform the following tasks:
• View – Select a radio button at the top of the list to view Active, Inactive or all groups. • Details – Click a link in the Group Name column to perform staff group assignment. For details,
refer to the Staff Group Assignment topic that follows. • Edit – Click the Edit link in the Action column to edit the group name, program name, location
type, location, or group description. • Activate/Inactivate – Click the Inactivate link in the Action column to remove the group from the
list. To view groups that have been inactivated, select the Inactive radio button at the top of the screen. Staff then can click the Activate link to reactivate the group.
• New – Click the Create New Group button to add a new group.
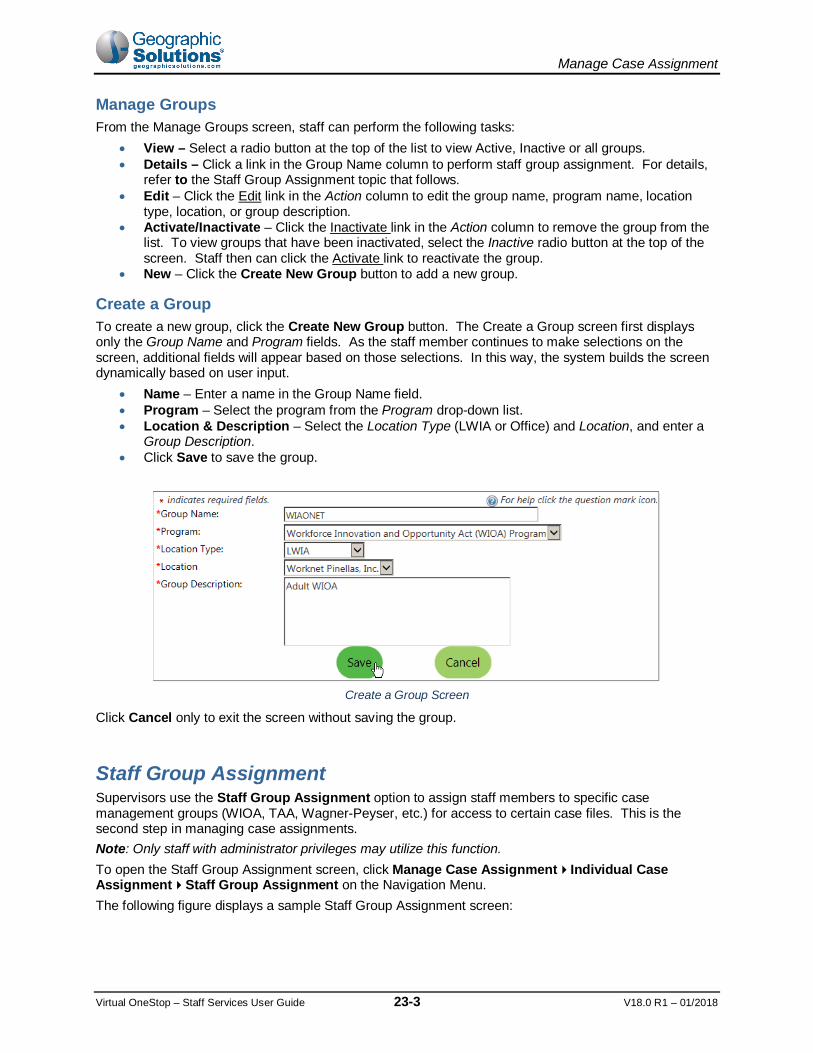
Create a Group To create a new group, click the Create New Group button. The Create a Group screen first displays only the Group Name and Program fields. As the staff member continues to make selections on the screen, additional fields will appear based on those selections. In this way, the system builds the screen dynamically based on user input.
• Name – Enter a name in the Group Name field. • Program – Select the program from the Program drop-down list. • Location & Description – Select the Location Type (LWIA or Office) and Location, and enter a
Group Description. • Click Save to save the group.
Create a Group Screen
Click Cancel only to exit the screen without saving the group.
Staff Group Assignment Supervisors use the Staff Group Assignment option to assign staff members to specific case management groups (WIOA, TAA, Wagner-Peyser, etc.) for access to certain case files. This is the second step in managing case assignments. Note: Only staff with administrator privileges may utilize this function. To open the Staff Group Assignment screen, click Manage Case AssignmentIndividual Case AssignmentStaff Group Assignment on the Navigation Menu. The following figure displays a sample Staff Group Assignment screen:

Manage Case Assignment
Virtual OneStop – Staff Services User Guide 23-4 V18.0 R1 – 01/2018
Staff Group Assignment Screen
On the Staff Group Assignment screen, click the Group Name link to access a screen displaying a list of eligible staff members who can be assigned to this group:
Note: Only active staff members who have privileges to work within a specific program (WIOA, TAA, Wagner-Peyser, etc.) for the selected group, and who belong to the group’s geographic location, will display in the list.
The following figure displays a sample Group Assignment List screen.
Staff Group Assignment List Screen
• To filter the list of staff, select an option (Active, Inactive or All) from the Show Staff as drop-down list.
• To assign a staff member to the group, click the desired check box in the Assign column. Staff must assign one person as the group lead by selecting one check box in the Group Lead column. If staff select more than one group lead, the system will display a warning message and will not save the assignments until only one group lead is selected.
• If the staff members that should be assigned are not on the list, click the Select a Different Group link to return to the Staff Group Assignment screen.

Manage Case Assignment
Virtual OneStop – Staff Services User Guide 23-5 V18.0 R1 – 01/2018
• After selecting all the users to assign to the group, click the Assign Users to Group button. The Staff Group Assignment screen will redisplay.
Individual Assignment The Individual Assignment option is used to assign a primary case manager or a case management group to an individual. Staff may use this feature to assign case managers or case management groups to unassigned cases. Staff will use the Re-assignment function to work with cases already assigned (as explained in the Case Reassignment section later in this chapter).
To assign a case manager or group to an individual, click Manage Case AssignmentIndividual Case AssignmentIndividual Assignment on the Navigation Menu. The first screen that opens allows staff to search for an individual to be assigned a case manager or group. The following figure displays a sample Individual Case Assignment Search screen.
Individual Case Assignment Search Screen
To search for the individual, enter as much information as needed to perform the search. The Program and LWIA/Region must be selected; all other fields are optional.
Select a program to which the individual belongs. To narrow the search to only individuals who are not yet assigned, select the “Assigned” Case Status radio button. To access a specific individual, enter the First and Last Name, and/or the last four digits of the Social Security number (SSN) and click Search.
Note: If Wagner-Peyser is selected, additional check boxes will appear to allow staff to search by veteran status.
After clicking Search on the Individual Assignment – Search screen, the system displays the Case Selection screen.

Manage Case Assignment
Virtual OneStop – Staff Services User Guide 23-6 V18.0 R1 – 01/2018
Case Selection Screen
To assign a case manager or group to an individual, click the check box in the Assign column and click the Assign Staff or Assign Group button. For details on both options, refer to the applicable topics that follow.
Assign Staff After clicking the Assign Staff button on the Case Selection screen, the system displays a list of eligible case managers.
Individual Case Staff Assignment Screen
Case managers may belong to more than one case management group, so be certain to select the appropriate Username associated with the correct Group Name when selecting a case manager. Note: Only active staff members who have privileges to work within a specific program (WIOA, TAA,
Wagner-Peyser, etc.) for the selected group, and who belong to the group’s geographic location, can be selected.
To select a case manager to assign, click the Username link. The assignment will be completed, and the system will redisplay the Case Assignment Options screen.
Assign Group After clicking the Assign Group button on the Case Selection screen, the system displays a list of eligible case management groups.

Manage Case Assignment
Virtual OneStop – Staff Services User Guide 23-7 V18.0 R1 – 01/2018
Individual Case Group Assignment Screen
To select a case management group to assign, click the desired link in the Action column. The assignment will be completed, and the system will redisplay the Case Assignment Options screen. Note: When a group is assigned, the system automatically assigns the case to the group lead. To reassign the case to another group member, use the Case Reassignment function described in a later section of this chapter.
Case Assignment within Program Forms (In Context) In addition to using the Manage Case Assignment options, as described within this chapter, staff may also use a case manager link in many program forms (e.g., the WIOA Application form, TAA Activity Enrollment form, WP Outcome form, etc.) to perform case assignments. The system will display the appropriate case assignment options based on the staff member’s Profile. An example of the case manager link is shown in the following figure:
Case Assignment Links on WIOA Enrollment Screen
The system checks to ensure that the staff member has the necessary program privileges to manage this individual (if Assign Me is selected), that at least one case assignment group is active for this program, and at least one staff person has been assigned to that group (Assign Case Manager).
Individual Case Un Assignment The Individual Case Un-Assign option is used to remove one staff member's assigned cases. It lets staff select and view the individuals assigned for one specific staff member, and then select individuals and remove their case assignments (i.e., un-assign them). To un-assign a individuals for a specific case manager:
• Click Manage Case AssignmentIndividual Assignment from the Navigation Menu. • Select the link for the Individual Case Un-Assign option.
The first screen that opens lets the user select a staff member and search for their assigned cases (as shown in the next figure).

Manage Case Assignment
Virtual OneStop – Staff Services User Guide 23-8 V18.0 R1 – 01/2018
Individual Case Un-Assign Search Screen (for Staff Member)
• Select the LWIA/Region, Office (optional), and Staff Status (defaulted to Active). • Use the Staff Name drop-down list to select the staff member (a list is based on the previous
choices). • Click Search to see all the staff member’s case assignments. • Select the individuals to be unassigned (check boxes in the last column). • Click the Remove Case Assignment(s) button.
The screen will redisplay with the unassigned individuals removed.
Manage Case Assignment
Virtual OneStop – Staff Services User Guide 23-9 V18.0 R1 – 01/2018
Temporary Assignment Staff can use the Temporary Assignment option to remove cases from one case manager and assign them to another on a temporary basis. This feature is helpful if a case manager is away on medical leave or vacation. To open the Temporary Assignment menu, click Manage Case AssignmentIndividual Case AssignmentTemporary Assignment on the Navigation menu. There are two menu options – create or remove a temporary assignment.
Temporary Assignment Options Screen
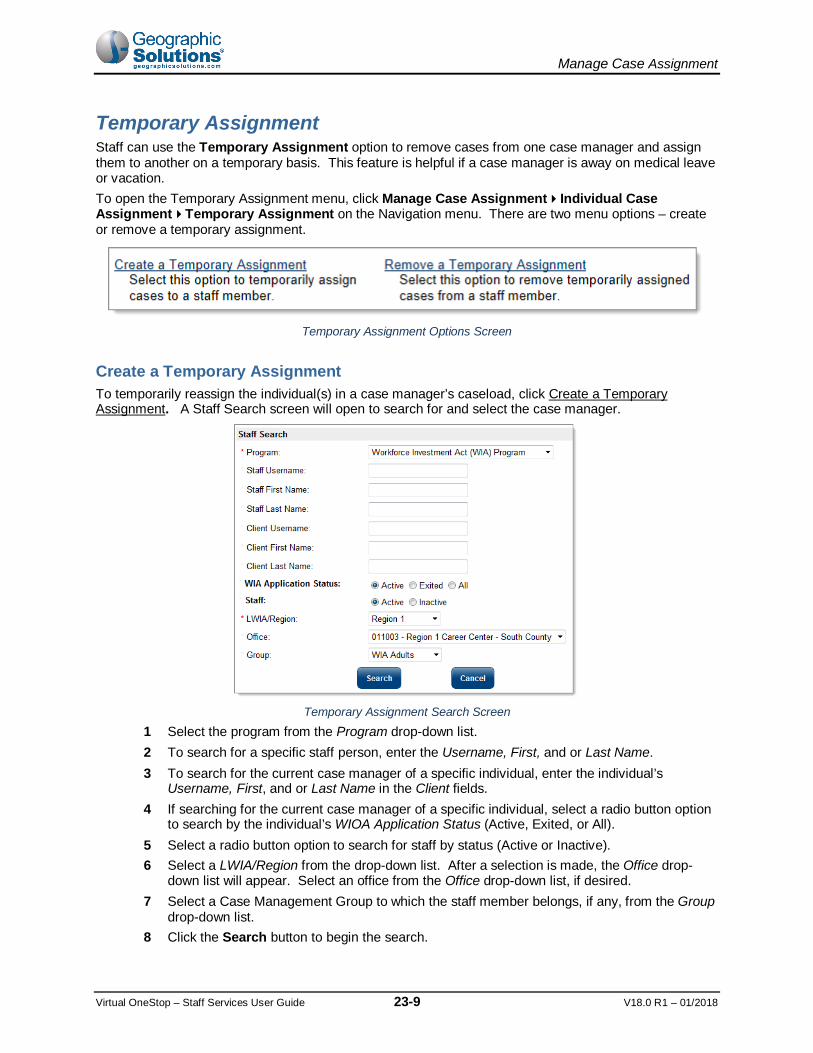
Create a Temporary Assignment To temporarily reassign the individual(s) in a case manager’s caseload, click Create a Temporary Assignment. A Staff Search screen will open to search for and select the case manager.
Temporary Assignment Search Screen
1 Select the program from the Program drop-down list. 2 To search for a specific staff person, enter the Username, First, and or Last Name. 3 To search for the current case manager of a specific individual, enter the individual’s
Username, First, and or Last Name in the Client fields. 4 If searching for the current case manager of a specific individual, select a radio button option
to search by the individual’s WIOA Application Status (Active, Exited, or All). 5 Select a radio button option to search for staff by status (Active or Inactive). 6 Select a LWIA/Region from the drop-down list. After a selection is made, the Office drop-
down list will appear. Select an office from the Office drop-down list, if desired. 7 Select a Case Management Group to which the staff member belongs, if any, from the Group
drop-down list. 8 Click the Search button to begin the search.

Manage Case Assignment
Virtual OneStop – Staff Services User Guide 23-10 V18.0 R1 – 01/2018
9 On the Search Results screen, click the link in the Staff Username column to select the staff person.
Temporary Assignment – Staff Search Results Screen
The system will display a list of cases currently assigned to the selected staff member.
Temporary Assignment – Client Selection Screen
10 Click the Re-Assign checkbox for all cases to be reassigned to another case manager. Click the Temporarily assign to staff button to view a list of eligible staff persons, as shown in the following figure.
Temporary Assignment – New (Temporary) Case Manager Selection Screen
11 From this screen, select the staff member who will temporarily assume case responsibility by clicking the desired Username link. The system will return to the Case Assignment Options screen.
Remove a Temporary Assignment To reassign clients to their former case manager after they were temporarily assigned to a backup case manager, click Temporary Assignment > Remove a Temporary Assignment. The same Staff Search screen that is used to create a temporary assignment will open. When searching for the current (temporary) case manager, the system will display a prompt to alert staff to the fact that the case manager has a temporary assignment (as shown in the figure below).
Manage Case Assignment
Virtual OneStop – Staff Services User Guide 23-11 V18.0 R1 – 01/2018
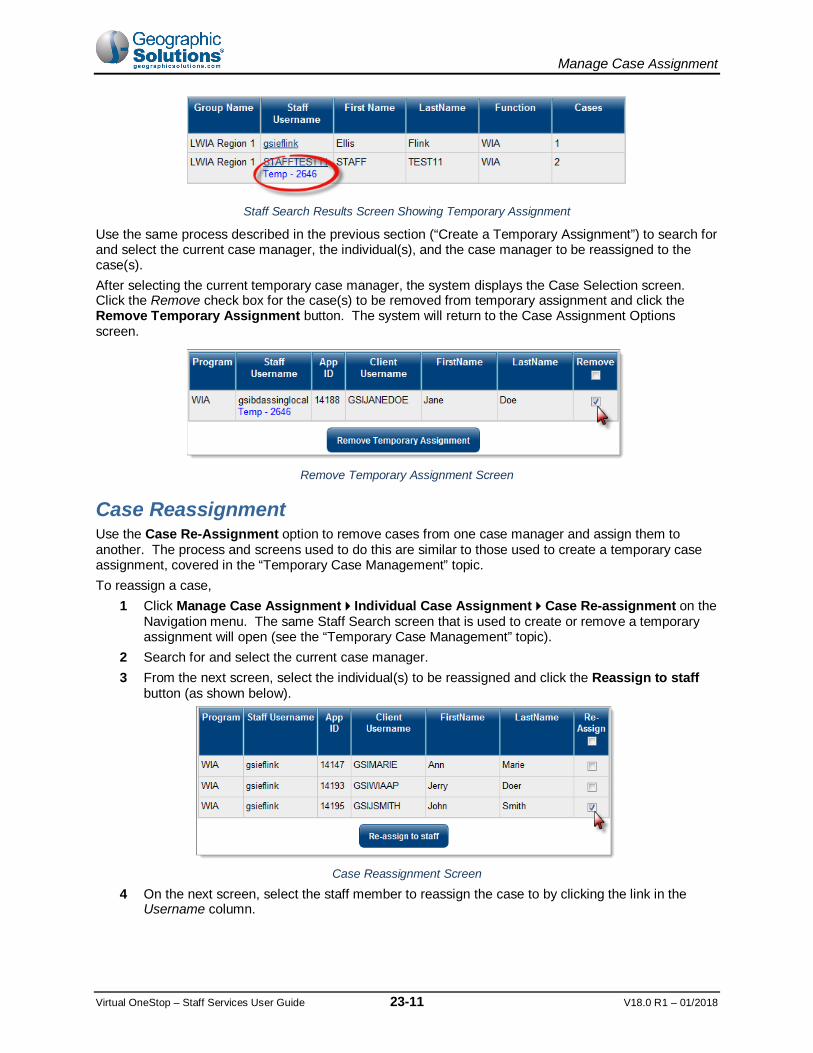
Staff Search Results Screen Showing Temporary Assignment
Use the same process described in the previous section (“Create a Temporary Assignment”) to search for and select the current case manager, the individual(s), and the case manager to be reassigned to the case(s). After selecting the current temporary case manager, the system displays the Case Selection screen. Click the Remove check box for the case(s) to be removed from temporary assignment and click the Remove Temporary Assignment button. The system will return to the Case Assignment Options screen.
Remove Temporary Assignment Screen
Case Reassignment Use the Case Re-Assignment option to remove cases from one case manager and assign them to another. The process and screens used to do this are similar to those used to create a temporary case assignment, covered in the “Temporary Case Management” topic. To reassign a case,
1 Click Manage Case AssignmentIndividual Case AssignmentCase Re-assignment on the Navigation menu. The same Staff Search screen that is used to create or remove a temporary assignment will open (see the “Temporary Case Management” topic).
2 Search for and select the current case manager. 3 From the next screen, select the individual(s) to be reassigned and click the Reassign to staff
button (as shown below).
Case Reassignment Screen
4 On the next screen, select the staff member to reassign the case to by clicking the link in the Username column.

Manage Case Assignment
Virtual OneStop – Staff Services User Guide 23-12 V18.0 R1 – 01/2018
New Case Manager Selection Screen
The individual is now reassigned to another case manager. The system will return to the Case Assignment Options screen.
Note: The Case Manager Selection screen displays separate rows for the same case manager’s regular assignments and their temporarily-assigned cases (as shown in the figure below).
Case Reassignment Selection Screen
Group Reassignment Staff can use the Group Re-assignment option to remove cases from one case management group and assign them to another group. To reassign case management groups,
1 On the Navigation menu, click Manage Case AssignmentIndividual Case AssignmentGroup Re-assignment. The first Group Reassignment screen initially displays only the Program field. As the staff member continues to make selections on the screen, additional fields will appear based on those selections. In this way, the system builds the screen dynamically based on user input.
2 Program – Select the program from the Program drop-down list. The Location Type field will appear.
Location Type – Select the Location Type (LWIA or Office). The Location field will appear.
Location – Select the location from the Location drop-down list. 3 Click the Next button to proceed.
Group Reassignment – Program Selection Screen
A Case Manager may have both regular and temporary assignments.
A Case Manager can be in multiple groups
Manage Case Assignment
Virtual OneStop – Staff Services User Guide 23-13 V18.0 R1 – 01/2018
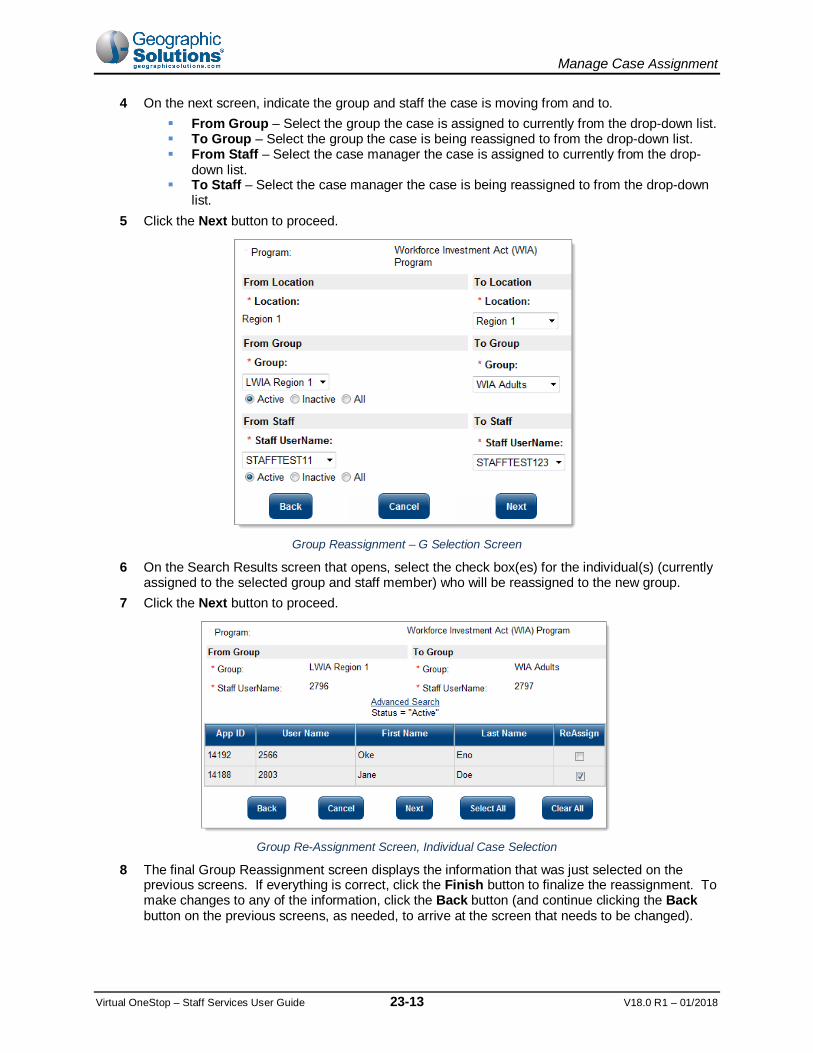
4 On the next screen, indicate the group and staff the case is moving from and to. From Group – Select the group the case is assigned to currently from the drop-down list. To Group – Select the group the case is being reassigned to from the drop-down list. From Staff – Select the case manager the case is assigned to currently from the drop-
down list. To Staff – Select the case manager the case is being reassigned to from the drop-down
list. 5 Click the Next button to proceed.
Group Reassignment – G Selection Screen
6 On the Search Results screen that opens, select the check box(es) for the individual(s) (currently assigned to the selected group and staff member) who will be reassigned to the new group.
7 Click the Next button to proceed.
Group Re-Assignment Screen, Individual Case Selection
8 The final Group Reassignment screen displays the information that was just selected on the previous screens. If everything is correct, click the Finish button to finalize the reassignment. To make changes to any of the information, click the Back button (and continue clicking the Back button on the previous screens, as needed, to arrive at the screen that needs to be changed).

Manage Case Assignment
Virtual OneStop – Staff Services User Guide 23-14 V18.0 R1 – 01/2018
Group Reassignment Summary and Confirmation Screen
9 After clicking the Finish button, a pop-up box will confirm reassignment. Click OK to confirm.
View Case Load The View Case Load screen displays staff members’ caseload statistics. From this screen, staff can drill down to the individuals handled by each case manager and from there, open the individual’s Profile. To open the View Case Load screen, on the Navigation menu, click Manage Case AssignmentIndividual Case AssignmentView Case Load.
Note: Staff members whose LWIA/Region is set to “State” in the Administration system can view all caseloads; those whose LWIA/Region is set to anything other than “State” will see only caseloads for groups to which they belong.
Filter To filter the list on the View Case Load screen,
1 Click the + Show Filter Criteria link to open the filter fields: Group – Select a group from the drop-down list to display only individuals in that case
management group. Case Status – Select the case status to display (All or Only Active) by selecting the
appropriate Cases Displayed radio button. Case Manager – Select whose cases to display (All or Yours) by selecting the
appropriate Display radio button. Closed, Never Enrolled – Select whether or not to display only individuals with closed
applications (who never enrolled) by selecting the appropriate radio button. Staff Status – Select to show active or inactive (or both) by selecting the appropriate
Show Staff as: radio button. 2 Click the Filter button to set the filter.
Case Load Filters

Manage Case Assignment
Virtual OneStop – Staff Services User Guide 23-15 V18.0 R1 – 01/2018
The following figure displays an example of the Case Load Staff Selection screen. The screen displays general data on the cases assigned to all case managers and groups (and the staff user’s own cases), as determined by the filters selected at the top of the screen (if any).
Case Load – Staff Selection Screen
The Case Load screen displays the following data: • Active Cases – This is the number of active cases, i.e., the number not “exited” (by hard or soft
exit). • Closed Cases – This is the number of cases where the staff closed cases. • Exit Cases – This is the number of cases where the individual has formally exited the program. • Follow-up Cases – This is the number of cases where the follow-up dates have expired. • Temporary Assignments – This is the number of cases temporarily assigned to this case
manager. • Apps Closed Never Enrolled – This is the number of individuals under assignment to that case
manager who were never enrolled and whose applications were closed. • Active Staff – This column indicates whether the staff member is active or inactive.
To view a case manager’s caseload, click the link in the Staff column. This will open the Case Load screen for that case manager (as shown in the figure below).
Case Load Screen
A Case Manager’s Temporary assignments will appear on the Case Load screen.
This is the individual’s permanent Case Manager (prior to being temporarily assigned.

Manage Case Assignment
Virtual OneStop – Staff Services User Guide 23-16 V18.0 R1 – 01/2018
The Case Load screen displays the individuals in the selected case manager’s caseload, the programs in which they are enrolled, and any exit date for follow-up that applies. Click the link in the Name column to open the individual’s Staff’s Profile screen from which staff can access the General Information, Case Management, and Report profiles, etc.
Case Assignment History The Case Assignment History menu option lets a staff member, with the necessary privileges, view all changes or reassignments that he or she made to individuals’ initial case assignments. The Case Assignment History link opens a case assignment history table. Each time a case is assigned to a different case manager, or reassigned, the system writes a record to the case assignment history table. When the staff member views this history, all assignment changes in the history table, made by that staff member, can be displayed. To open the Case Assignment History screen, on the Navigation Menu, click Manage Case Assignment >Individual Case Assignment > Case Assignment History. The screen initially displays a table with four columns of information – the staff member’s Username, the date the record was edited, the action taken, and the IP Address from which the action was taken.
Case Assignment History Screen – Initial View (Partial)
Staff can select additional columns to view. To add a column of information to the table, click on an item in the Select fields to view field and click the right arrow to select it. The item will move into the box on the right. Continue selecting items to view, as needed. To select multiple items, hold the Control key down while selecting.
Case Assignment History – Column Selection
The table will refresh, showing the additional columns of information (as shown below). File changes are displayed in bold.
Case Assignment History (Partial)

Manage Case Assignment
Virtual OneStop – Staff Services User Guide 23-17 V18.0 R1 – 01/2018
Employer Case Assignment The system allows supervisors or authorized staff to assign a case manager to employers through the employer’s General Information tab. Once a case manager is assigned, the Employer Case Assignment menu option allows staff to reassign the case to other another staff member, either temporarily or permanently. The menu also includes an option to view case managers’ caseloads.
Note: Staff members whose LWIA/Region is set to “State” in the Administration system can work with all caseloads; those whose LWIA/Region is set to anything other than “State” can work with only caseloads for their own region.
Employer Case Assignment Screen
Employer Case Assignment The system allows supervisors or authorized staff to assign a case manager to employers through the employer’s General Information tab. To open the employer’s Profile,
1 Assist the employer by selecting Manage Employers > Assist an Employer from the Navigation pane. Select the employer and open the General Information tab.
2 In the Staff Information section, click the Case Assignment link.
Employer General Information Tab – Case Assignment Link
3 On the following screen, click the Create New Assignment link (as shown in the figure below).
Create New Assignment Link
Manage Case Assignment
Virtual OneStop – Staff Services User Guide 23-18 V18.0 R1 – 01/2018
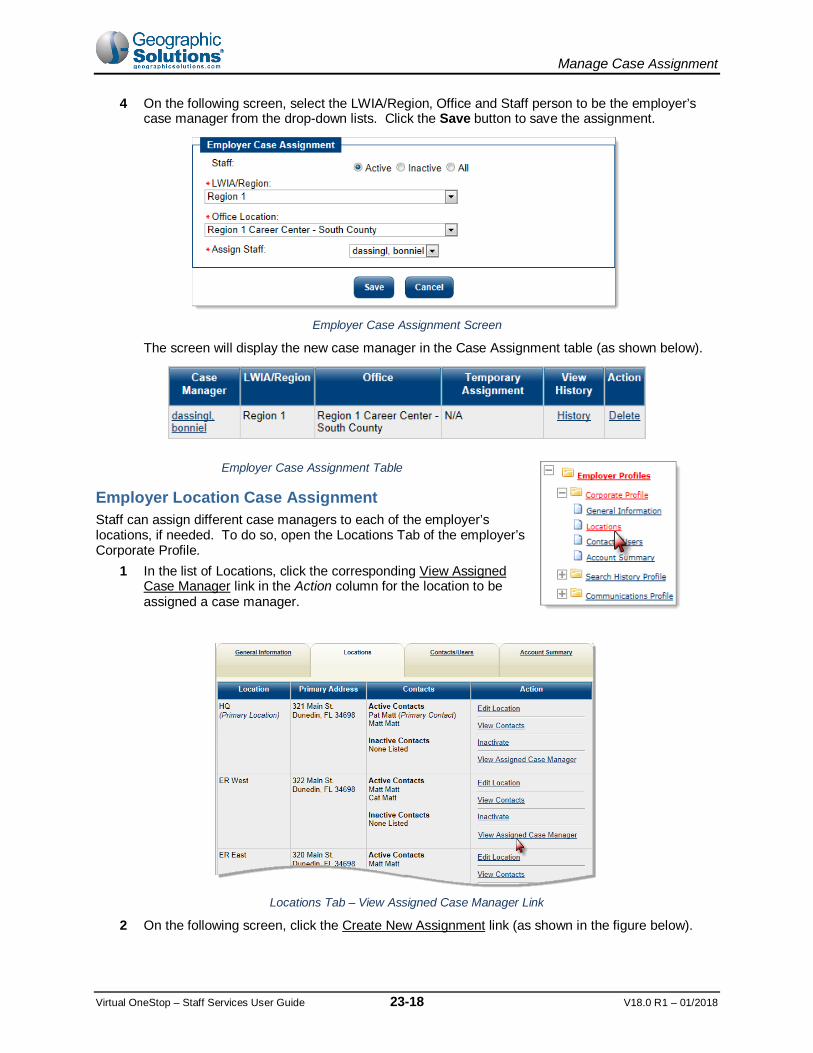
4 On the following screen, select the LWIA/Region, Office and Staff person to be the employer’s case manager from the drop-down lists. Click the Save button to save the assignment.
Employer Case Assignment Screen
The screen will display the new case manager in the Case Assignment table (as shown below).
Employer Case Assignment Table
Employer Location Case Assignment Staff can assign different case managers to each of the employer’s locations, if needed. To do so, open the Locations Tab of the employer’s Corporate Profile.
1 In the list of Locations, click the corresponding View Assigned Case Manager link in the Action column for the location to be assigned a case manager.
Locations Tab – View Assigned Case Manager Link
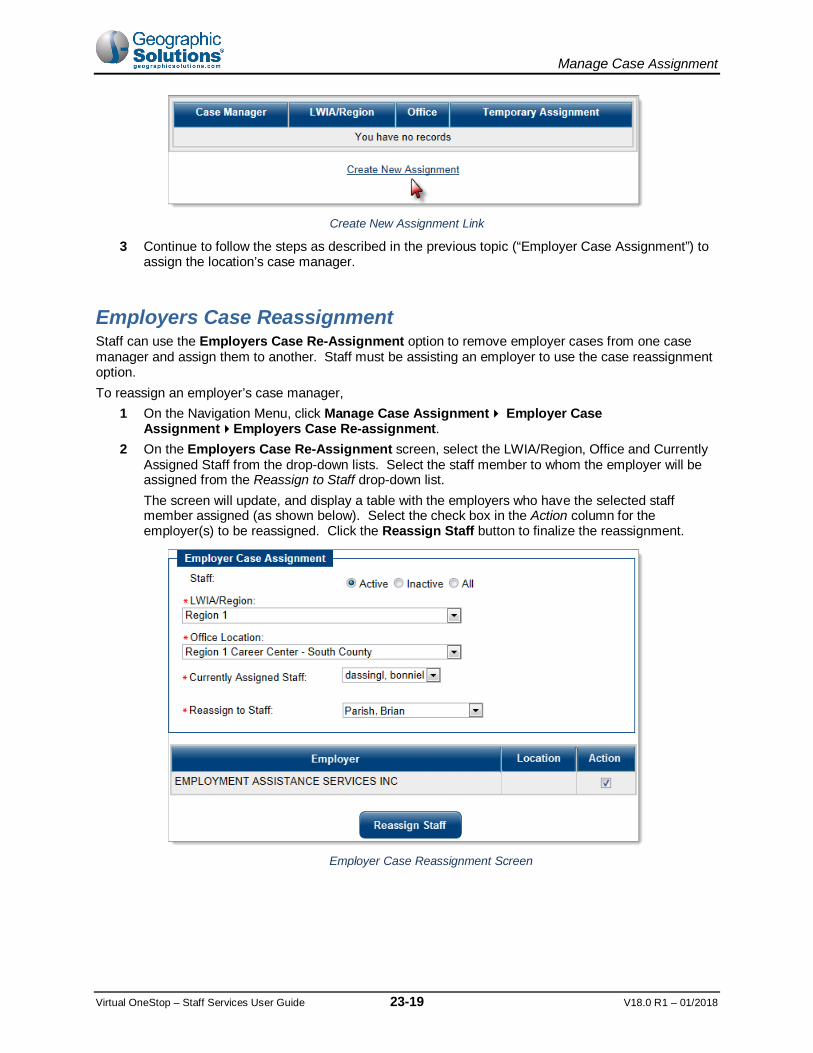
2 On the following screen, click the Create New Assignment link (as shown in the figure below).
Manage Case Assignment
Virtual OneStop – Staff Services User Guide 23-19 V18.0 R1 – 01/2018
Create New Assignment Link
3 Continue to follow the steps as described in the previous topic (“Employer Case Assignment”) to assign the location’s case manager.
Employers Case Reassignment Staff can use the Employers Case Re-Assignment option to remove employer cases from one case manager and assign them to another. Staff must be assisting an employer to use the case reassignment option. To reassign an employer’s case manager,
1 On the Navigation Menu, click Manage Case Assignment Employer Case AssignmentEmployers Case Re-assignment.
2 On the Employers Case Re-Assignment screen, select the LWIA/Region, Office and Currently Assigned Staff from the drop-down lists. Select the staff member to whom the employer will be assigned from the Reassign to Staff drop-down list. The screen will update, and display a table with the employers who have the selected staff member assigned (as shown below). Select the check box in the Action column for the employer(s) to be reassigned. Click the Reassign Staff button to finalize the reassignment.
Employer Case Reassignment Screen

Manage Case Assignment
Virtual OneStop – Staff Services User Guide 23-20 V18.0 R1 – 01/2018
Employers Case Temporary Assignment The Employers Case Temporary Assignment option is used to remove cases from one case manager and assign them to another on a temporary basis. This feature is helpful if a case manager is away on medical leave or vacation. The Employers Case Temporary Assignment features work similarly to the reassignment feature in the Employers Case Reassignment topic. To temporarily reassign an employer’s case manager, on the Navigation Menu, click Manage Case Assignment Employer Case Assignment Employers Case Temporary Assignment. On the Employers Case Temporary Assignment screen:
1 Select the LWIA/Region, Office and Currently Assigned Staff from the drop-down lists. 2 Select the staff member to whom the employer will be assigned temporarily from the Temporarily
Assign to Staff drop-down list. 3 Enter the first and last date the employer will be assigned to the temporary case manager by
entering the Temporary Start and End dates. The screen will update and display a table with the employers who have the selected staff member assigned (as shown below).
4 Select the checkbox in the Action column for the employer(s) to be reassigned. 5 Click the Reassign Staff button to finalize the reassignment.
Case Temporary Assignment Screen, Step 1
Employers View Case Load The Employers View Case Load option displays staff members’ caseload statistics. From this screen, staff can drill down to the employers handled by each case manager and, from there, open the employer’s Profile. To open the Employers Case Load screen, on the Navigation menu, click Manage Case Assignment Employer Case Assignment Employers View Case Load.
Note: Staff members whose LWIA/Region is set to “State” in the Administration system can view all caseloads; those whose LWIA/Region is set to anything other than “State” will see only caseloads for groups to which they belong.

Manage Case Assignment
Virtual OneStop – Staff Services User Guide 23-21 V18.0 R1 – 01/2018
The following figure displays an example of the Employer Case Load Staff Selection screen. The screen displays statistics on the cases assigned to all case managers and group.
• Current Cases – This is the total number of employer cases currently assigned to the case manager.
• Temporarily Assigned In (Temp In) – This is the number of employer cases that are assigned temporarily to this case manager.
• Temporarily Assigned Out (Temp Out) – This is the number of employer cases for this case manager that are assigned temporarily to another case manager.
• Total Cases – This is the total of the case manager’s Current and Temp In cases, minus the Temp Out cases.
Employers View Case Load - Select Staff Screen
To view a case manager’s caseload, click the case manager’s name link in the Staff column. This will open the Case Load screen for that case manager (as shown in the figure below).
Case Load Screen
The Case Load screen displays the employers in the selected case manager’s caseload with information on any temporary case assignments that may apply. If the employer has multiple locations that are assigned to the case manager, the locations will show in separate rows (as shown in the figure above). Click the link in the User ID column to open the employer’s Employer Profile screen, from which staff can access the General Information, Case Management, and Report profiles, etc.

Manage Case Assignment
Virtual OneStop – Staff Services User Guide 23-22 V18.0 R1 – 01/2018
[This page intentionally left blank.]


![System 1* v17.1 Machinery Condition Monitoring · 2019-06-04 · System 1 Package Ordering (Perpetual License) Premium [Highly Critical] 3071/10 System 1 Software Premium Package](https://static.fdocuments.us/doc/165x107/5f68fdcd725cee698b43e1f6/system-1-v171-machinery-condition-monitoring-2019-06-04-system-1-package-ordering.jpg)