
2120_ig
6
Installation Guide v1.0 AXIS 2120 ■ English ■ French ■ Spanish ■ German Net work Camera
-
Upload
leonardlapatrat -
Category
Documents
-
view
2 -
download
0
description
axis4
Transcript of 2120_ig

Installation Guide v1.0
AX
IS
21
20
■ English ■ French ■ Spanish ■ German
NetworkCamera

AXIS 2120 Installation Guide - English Page 1 of 5
Installing Your Camera to a NetworkFollow the guide below to quickly install your AXIS 2120 to an Ethernet network:
Important!
� Note the Serial number on the underside of the unit. You need to know this to set the IP address:
� Using an appropriate method for your operating system, assign your AXIS 2120 with a unique IP Address from a computer on your network, as follows:
‘Request timed out...’ messages are now repeatedly returned within the DOS window.
• For details on how to install the AXIS 2120 to a modem, see section Installing Your Camera to a Modem.• If you are using your AXIS 2120 in an outdoor application, the unit must be housed in outdoor enclosure.
Please refer to Axis’ Website at: http://www.axis.com for suppliers details.
00-40-8c-10-00-86
Serial number same asEthernet number; e.g.00408c100086 =
Windows 95/98 & NT only - Start a DOS window and type these commands:
Syntax:
arp -s <Server IP address> <Ethernet address> <my PC IP address>
ping <Server IP address> -t
Example:
arp -s 172.21.1.200 00-40-8c-10-00-86 172.21.1.193
ping 172.21.1.200 -t
UNIX only - Type these commands in your command line:
Syntax:
arp -s <IP address> <Ethernet address> temp ping <IP address>
Example:
arp -s 172.21.1.200 00:40:8c:10:00:86 tempping 172.21.1.200
�Connect an Ethernet cable to your AXIS 2120 and attach it to the network.
�Attach the external Power Supply to the unit and connect it to your local mains supply.
RJ-45 Connector
Network Connector
Network IndicatorPower Indicator
�Press Control-C to exit ping. The installation is now complete, and you are now ready to access the AXIS 2120 from your Web browser, as described in the next section...
�Approximately 10-15 seconds after connecting the power supply, the message ‘Reply from
172.21.1.200...’ - or similar, is returned within the DOS window. Ensure that the Power Indicator is permanently lit and that the Network Indicator flashes intermittently.
Power SupplyConnector
2120ig_master.fm Page 1 Monday, July 3, 2000 4:33 PM

AXIS 2120 Installation Guide - English Page 2 of 5
Verifying the Installation From Your Browser...
To access the AXIS 2120 Home Page, start your Web browser and enter the IP address in the location/address field, e.g 171.21.1.200.
Click the Installation Wizard button. The wizard guides your through the remaining installation procedures and will help you configure your application. Detailed information on how to use the various product functions is conveniently provided in the on-line help, available from configuration pages.
Installing Your Camera to a ModemThe information in this section describes how to connect the AXIS 2120 to a serial modem for transmitting images over a normal Dial-up connection.
Important!
Connecting Your Computer Using the Null Modem Cable...
Follow the steps below to configure a serial modem connection for your AXIS 2120:
• The information and screen examples featured within this section are specific to Windows NT. And, although similar to the Dial-up implementations in Windows 95, 98, and 2000, small deviations in the dialog instructions for other operating systems should be expected. Refer to your system information for further information on creating a Dial-up modem connection if you are using any other operating system.
• Windows Dial-up Networking and TCP/IP must be correctly installed prior to commencing with the modem cable connection. Detailed information on how to check this is provided in the Microsoft Windows Help.
�Connect the supplied Null modem cable between the Serial Connector on the AXIS 2120 and the serial port on your computer.
�From the Start menu, open the Control Panel and double click the Modems icon.
Select the serial port to which your AXIS 2120 is now connected via the Null Modem cable.Click Next>.
A Standard 28800 modem connection is now available for the AXIS 2120. Click Finish to close the Install New Modem wizard.
�If a Standard Modem is already set up and displayed in the Modem Properties dialog (see right) you should proceed directly to step 8.
�Select the Standard 28800 modem from the displayed list of modems. Click Next>.
Click the Properties button to finally check that the displayed Communications Port is set correctly; that is, set to the same port as you have connected the AXIS 2120. Click OK.
� Connect the power supply to the camera server and check that the Power Indicator is lit.
Click Close.
�Check the dialog:Don’t detect my modem, I will select it from a list. Click Next>.
7
8
9
10
2120ig_master.fm Page 2 Monday, July 3, 2000 4:33 PM

AXIS 2120 Installation Guide - English Page 3 of 5
Creating a Dial-up Networking Connection...
Follow the steps below to create a dedicated Dial-up networking connection to your AXIS 2120:
�Double click My Computer and then double click the Dial-Up Networking icon. �Double click the Make
New Connection icon.
�From the drop down dialog, select the Standard Modem previously created for the AXIS 2120 as the selected device. Click Configure...
�To significantly improve the performance of your AXIS 2120 when using the Null-Modem cable, set the Maximum Speed to 115200.
You have now successfully created your dedicated Dial Up Networking connection for your AXIS 2120.Click Finish.
The telephone numbers requested in the following dialog are not required for use in the logical connection to your camera. To bypass the wizard error correction, simply enter any dummy number into the Area code, Telephone number and Country code fields. Click Next>.
�Click OK to return to the Make New Connection dialog.Click Next>.
The Dial-up Network connection is now displayed. You are now ready to refine the Dial-Up networking properties, as described in the next section...
�Provide the connection with a name (AxisCamera is the name used in the subsequent examples).
7
8
2120ig_master.fm Page 3 Monday, July 3, 2000 4:33 PM

AXIS 2120 Installation Guide - English Page 4 of 5
Refining the Dial-up Networking Properties...
Having created the Dial-up connection for your AXIS 2120, follow the steps below to refine the connection properties:
Initiating the Dial-up Connection...
Important!
Please ensure that the Null Modem Cable is correctly installed and that the relative connection properties are cor-rectly configured prior to initiating a Dial-up connection. Step-by-step instructions on how to do this are provided on the preceding pages of this section
�Click the Server Types tag. From the drop-down dialog, select PPP as the Type of Dial-Up Server.
�From the Dial-up Networking dialog, right click the dedicated Dial-up connection previously created for you camera (AxisCamera was the connection created used in this and previous examples). Select Properties.
�In the Advanced options field, check Enable software compression. All other checkboxes should remain unchecked.
�In the Allowed network protocols field, check the TCP/IP checkbox. NetBEUI and IPX/SPX checkboxes should remain unchecked.
�Check the Use IP header compression and Use default gateway on a remote network checkboxes. Click OK.
Click the Scripting tag and ensure that the Start terminal screen minimized checkbox is checked. Click OK to exit Dial-Up Networking Properties.
�Click TCP/IP settings and then check the Server assigned IP address, and Server assigned name server addresses radio buttons.
7
�Double click the Dial-Up connection icon that was previously created for your AXIS 2120. AxisCamera was used in this and previous examples.
�Double click My Computer and then double click the Dial-Up Networking dialog.
�Enter a Username and Password using the default root and pass respectively.
�Click Connect to initiate the Dial-Up connection.
2120ig_master.fm Page 4 Monday, July 3, 2000 4:33 PM
AXIS 2120 Installation Guide - English Page 5 of 5
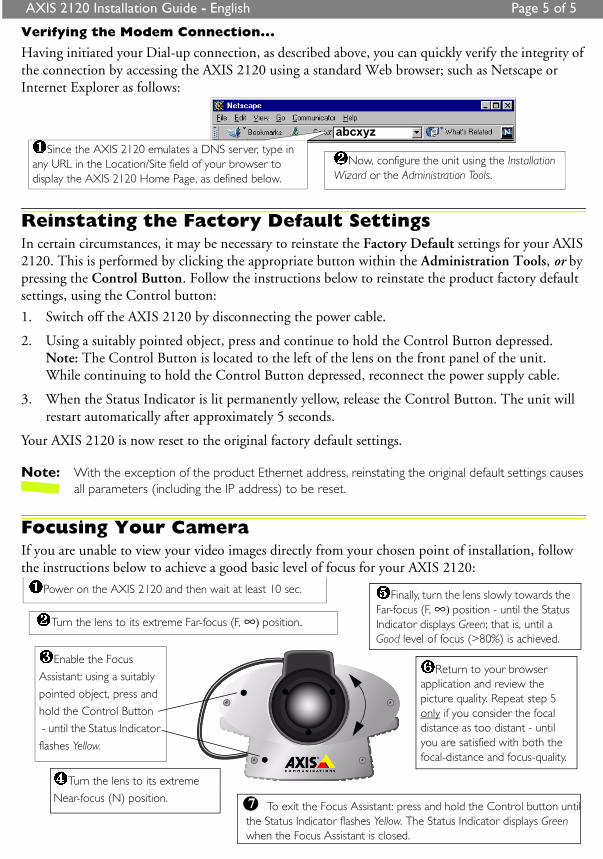
Verifying the Modem Connection...
Having initiated your Dial-up connection, as described above, you can quickly verify the integrity of the connection by accessing the AXIS 2120 using a standard Web browser; such as Netscape or Internet Explorer as follows:
Reinstating the Factory Default SettingsIn certain circumstances, it may be necessary to reinstate the Factory Default settings for your AXIS 2120. This is performed by clicking the appropriate button within the Administration Tools, or by pressing the Control Button. Follow the instructions below to reinstate the product factory default settings, using the Control button:
1. Switch off the AXIS 2120 by disconnecting the power cable.
2. Using a suitably pointed object, press and continue to hold the Control Button depressed.Note: The Control Button is located to the left of the lens on the front panel of the unit.While continuing to hold the Control Button depressed, reconnect the power supply cable.
3. When the Status Indicator is lit permanently yellow, release the Control Button. The unit will restart automatically after approximately 5 seconds.
Your AXIS 2120 is now reset to the original factory default settings.
Note: With the exception of the product Ethernet address, reinstating the original default settings causes all parameters (including the IP address) to be reset.
Focusing Your CameraIf you are unable to view your video images directly from your chosen point of installation, follow the instructions below to achieve a good basic level of focus for your AXIS 2120:
�Since the AXIS 2120 emulates a DNS server, type in any URL in the Location/Site field of your browser to display the AXIS 2120 Home Page, as defined below.
�Now, configure the unit using the Installation Wizard or the Administration Tools.
abcxyz
�Finally, turn the lens slowly towards the Far-focus (F, ∞)=position - until the Status Indicator displays Green; that is, until a Good level of focus (>80%) is achieved.
To exit the Focus Assistant: press and hold the Control button until the Status Indicator flashes Yellow. The Status Indicator displays Green when the Focus Assistant is closed.
�Turn the lens to its extreme Far-focus (F, ∞)=position.=
�Enable the Focus
Assistant: using a suitably
pointed object, press and
hold the Control Button
- until the Status Indicator
flashes Yellow.
�Turn the lens to its extreme
Near-focus (N) position.
�Power on the AXIS 2120 and then wait at least 10 sec.
�Return to your browser application and review the picture quality. Repeat step 5 only if you consider the focal distance as too distant - until you are satisfied with both the focal-distance and focus-quality.
7
2120ig_master.fm Page 5 Monday, July 3, 2000 4:33 PM


