
2.1 Channel Soundbar with Wireless Subwoofer - BAUHN€¦ · 2.1 Channel Soundbar with Wireless...
28
USER MANUAL Model Number: ASBWS-0719 2.1 Channel Soundbar with Wireless Subwoofer 1300 886 649 Model: ASBWS-0719 Product Code: 10177 07/2019 www.tempo.org AUS
Transcript of 2.1 Channel Soundbar with Wireless Subwoofer - BAUHN€¦ · 2.1 Channel Soundbar with Wireless...
U S E R M A N U A L
Model Number: ASBWS-0719
2.1 Channel Soundbar with Wireless Subwoofer
1300 886 649 Model: ASBWS-0719 Product Code: 10177 07/2019
www.tempo.org
AUS

2 1300 886 649 Model: ASBWS-0719 Product Code: 10177 07/2019
www.tempo.org
AUS
Congratulations on choosing to buy a BAUHN® product. All products brought to you by BAUHN® are manufactured to the highest standards of performance and safety and, as part of our philosophy of customer service and satisfaction, are backed by our comprehensive 1 Year Warranty. We hope you will enjoy using your purchase for many years to come.
Welcome

31300 886 649 Model: ASBWS-0719 Product Code: 10177 07/2019
www.tempo.org
AUS
ContentsWelcome 2
General Safety Instructions 4
Warranty Details 6
Remote Control 7
Parts List 10
Product Overview 11
Controls and Connections 12
Installation 16
Instructions 19
Troubleshooting 23
Other Useful Information 24
Repair and Refurbished Goods or Parts Notice 26

4 1300 886 649 Model: ASBWS-0719 Product Code: 10177 07/2019
www.tempo.org
AUS
General Safety Instructions
Electrical safety and cord handling• Protect from moisture: Do not expose this equipment, the power supply cord and plug to
rain or moisture. Do not use it anywhere near water or where water splashes or drips, such as a bathroom or near a swimming pool. Do not touch the power plug with wet hands.
• Voltage: Before connecting this equipment to the mains power supply, make sure your outlet voltage corresponds to the voltage stated on the appliance rating label.
• Mains power connection: When connecting this equipment to the mains power supply, only use cord and plug supplied. Align the plug properly and insert it fully. Do not overload the power outlet.
• Damaged cord: When the power cord is damaged, it must be replaced by the manufacturer or similarly qualified personnel in order to avoid a hazard.
• Protect the power cord: Do not let the cord hang over the edge of a table or counter, or touch any hot surface. Do not allow anything to rest on or roll over the power cord. Run any cords so no one steps on or trips over them. Do not run the cord near heat-producing appliances such as radiators or stoves.
• Disconnect: Switch off and unplug the unit during lightning storms, and when it is not going to be used for a while. Grasp the plug, not the cord, when disconnecting.
• Disconnect device: This unit must be unplugged for complete disconnection from the mains power supply. Ensure the mains plug remains readily accessible for disconnection.
Read this manual thoroughly before first use and keep it in a safe place for future reference, along with the warranty card, purchase receipt and carton. The safety precautions enclosed herein reduce the risk of fire, electric shock and injury when correctly adhered to. Follow all instructions and take notice of all warnings to reduce the risk of fire or electric shock.This product complies with Australian Safety standard AS/NZS 60065 to ensure the safety of the product.
Important Warnings and Cautions
This products subwoofer is a Class II or double insulated electrical appliance. It has been designed in such a way that it does not require connection to electrical earth.
The RCM is a visible indication of a product’s compliance with all applicable ACMA regulatory arrangements, including all technical and record-keeping requirements.
The lightning flash with an arrowhead symbol within an equilateral triangle is intended to alert you to the presence of non-insulated dangerous voltage within the product’s enclosure that may be of sufficient magnitude to constitute a risk of electric shock to persons.
The exclamation point within an equilateral triangle is intended to alert you to the presence of important operating and maintenance (servicing) instructions in the literature accompanying the product.
To reduce the risk of electric shock, do not remove the cover (or back).
This unit contains no user-serviceable parts inside. Refer all servicing to qualified service personnel only.

51300 886 649 Model: ASBWS-0719 Product Code: 10177 07/2019
www.tempo.org
AUS
Usage conditions and restrictions• Instructions: Follow the instructions in this manual when installing and adjusting this
equipment. Only adjust those controls that are covered in this user manual, as improper adjustment of other controls may result in damage. If this happens, unplug the equipment and have it serviced by appropriately qualified personnel.
• Location: When using the equipment, make sure to place it:• In a well ventilated area, keeping a clearance of at least 20cm above and 5cm on each
side of the unit to ensure proper ventilation. • Away from heat sources such as radiators, heat registers, stoves or other equipment
(including amplifiers) that produce heat.• Away from areas with high temperatures, high humidity or direct sunlight.• Away from excess dirt and dust.• Away from strong magnetic fields.
• Accessories: Only use attachments/accessories specified by the manufacturer or sold with the apparatus. Use of the soundbar with accessories that are not recommended in this manual may cause injury or damage, and will void the warranty.
• Usage restriction: The equipment is not intended for use by persons (including children) with reduced physical, sensory or mental capabilities, or lack of experience and knowledge, unless they have been given supervision or instruction concerning use of the appliance by a person responsible for their safety.
• Children: Supervise young children to ensure they do not play with the equipment. Close supervision is always necessary when an appliance is used by or near children.
• Protect the equipment: Prevent metal objects falling onto the equipment. Do not place heavy objects on top of the equipment or step on it. Do not place objects filled with water (such as vases), or naked flame sources (such as candles), on or near the equipment. If liquid or metal parts enter the system, unplug the power cable immediately and call our After Sales Support centre to arrange a service before further use.
• Ventilation: Openings on the cabinet are provided for ventilation and to protect the unit from overheating. To ensure proper operation, do not cover them with things such as newspapers, tablecloths, curtains etc.
• Transporting: Unpack the appliance and keep the original packaging carton and materials in a safe place. It will help prevent any damage if the product needs to be transported in the future, and you can use it to store the appliance when it is not in use.
• Storage: When the soundbar is not in use, disconnect it from the power source and store in a cool, dry and well ventilated location out of direct sunlight. Ensure that it is not subject to humidity.
• Cleaning: Unplug the equipment from the power outlet before cleaning. Clean the equipment only with a clean, dry or slightly damp cloth. Do not use liquid or aerosol cleaners or volatile solvents.
• Service: Refer all servicing to qualified personnel. Servicing is required when the apparatus has been damaged in any way, such as when the power supply cord or plug is damaged, liquid has been spilled or objects have fallen into the unit, it has been exposed to rain or moisture, does not operate normally, or has been dropped.
• Liability: We accept no liability for any damage caused by non-compliance with these instructions or mishandling of the equipment.
General Safety Instructions (Cont.)

6 1300 886 649 Model: ASBWS-0719 Product Code: 10177 07/2019
www.tempo.org
AUS
2.1 Channel Soundbar with Wireless Subwoofer
Warranty Details
The product is guaranteed to be free from defects in workmanship and parts for a period of 12 months from the date of purchase. Defects that occur within this warranty period, under normal use and care, will be repaired, replaced or refunded at our discretion. The benefits conferred by this warranty are in addition to all rights and remedies in respect of the product that the consumer has under the Competition and Consumer Act 2010 and similar state and territory laws.Our goods come with guarantees that cannot be excluded under the Australian Consumer Law. You are entitled to a replacement or refund for a major failure and to compensation for any other reasonably foreseeable loss or damage. You are also entitled to have the goods repaired or replaced if the goods fail to be of acceptable quality and the failure does not amount to a major failure.
Register your purchase at www.aldi.com.au/en/about-aldi/product-registration to stay updated with important product information

71300 886 649 Model: ASBWS-0719 Product Code: 10177 07/2019
www.tempo.org
AUS
Remote Control
1 POWER: Switch the unit between on and standby mode.2 MODE: Select the input source mode.3 VOL+ / VOL-: Increase/decrease the volume level.4 / : In Bluetooth or USB mode, skip to the previous/next audio file.5 : In Bluetooth or USB mode, start or pause playback.6 PAIR: In Bluetooth mode, press and hold to activate the pairing function
and disconnect the existing paired Bluetooth device.7 MUTE: Mute or resume the sound.8 EQ: Select a preset sound effect.
1 2
3 4
5
6 7
8
2.1 Channel Soundbar with Wireless Subwoofer

8 1300 886 649 Model: ASBWS-0719 Product Code: 10177 07/2019
www.tempo.org
AUS
Remote control batteryThe remote control comes with a CR2025 3V button cell pre-installed.
First time use• To activate the battery and use the remote control, pull out the plastic tab that
separates the battery from the contacts inside the compartment.
Battery replacement• If the remote control unit is no longer working even when it is operated near the
soundbar, you will need to replace the battery with a new battery of the same type. • Remove the screw and push in the tab and pull out the battery tray. Remove the
old battery.• Insert a fresh CR2025 battery with the (+) marking facing upwards. Then push the
battery tray with the battery back into the slot and re-install the screw.
Remote Control (Cont.)
WARNING!Keep batteries out of reach of children. Swallowing may lead to serious injury or death in as little as 2 hours due to internal burns. If swallowed, go straight to a hospital emergency room. Dispose of used batteries immediately.

91300 886 649 Model: ASBWS-0719 Product Code: 10177 07/2019
www.tempo.org
AUS
Using the remote control• The remote control has a range of up to 3 metres from the soundbar. Point the
remote control directly towards the sensor at the front of the soundbar. • Make sure no obstacles are blocking its path. The remote control will not operate
if its path is blocked.• Handle the remote control with care. Do not drop, apply shock or step on the
remote control. Do not spill water on the unit.• Do not use the remote control while simultaneously operating a remote control
unit of any another unit, which may result in interference.• If the remote control is operated near other products which generate infra-red
rays, or if other remote control devices using infra-red rays are used near the unit, it may operate incorrectly. Conversely, the other products may operate incorrectly.
• If you do not intend to use the remote control for an extended period of time (more than a month), remove the battery to prevent possible damage from battery leakage and corrosion.
Battery precautions• Do not use any other battery than specified. • Danger of explosion if battery is incorrectly replaced. Replace only with the same or
equivalent type.• Do not carry or store batteries with other metallic objects. Doing so could cause
batteries to short-circuit, leak or explode. • Do not expose the battery to excessive heat such as sunshine, fire or the like.• Do not attempt to short-circuit, disassemble or throw batteries into a fire. • Never recharge a battery unless it is confirmed to be a rechargeable type.• Dispose of batteries promptly and properly, observing any local hazardous waste
regulations. Do not burn or bury them.
Remote Control (Cont.)
WARNING!
Do not ingest battery - chemical burn hazard!This product contains a coin/button cell battery. If swallowed, it can cause severe internal burns in just 2 hours and can lead to death.
Keep new and used batteries away from children.
If the battery compartment does not close securely, stop using the product and keep it away from children. If you think batteries might have been swallowed or placed inside any part of the body, seek immediate medical attention.

10 1300 886 649 Model: ASBWS-0719 Product Code: 10177 07/2019
www.tempo.org
AUS
Parts List
1 Soundbar2 Wireless Subwoofer 3 Remote Control 4 Wall Bracket (2)5 Stands (2)6 RCA to 3.5mm AUX Cable 7 3.5mm to 3.5mm AUX Cable8 AC Power Adaptor9 Rubber Feet (3)
1
4
7
2
5
8
3
6
9

111300 886 649 Model: ASBWS-0719 Product Code: 10177 07/2019
www.tempo.org
AUS
1 NFC (Near Field Communication) Sensor2 Speakers3 Power button/Mode: Press to turn on. Press to select your preferred input source.
Press and hold to put it in Standby mode.4 PAIR / : Press to pair your Bluetooth device. Press to select the play or pause
function (in Bluetooth / USB mode only).5 LED indicators
• Red indicator: in STANDBY mode • White indicator flashing: in HDMI (ARC) mode • Orange indicator lights up: in AUX mode • White indicator: in OPTICAL mode • Orange indicator flashes: in USB mode (when USB drive is connected) • Blue indicator: (Bluetooth indicator solid blue: Bluetooth connected) (Bluetooth indicator flashing quickly: in Bluetooth pairing mode) • Indicator flashes: adjust the volume / select a preset sound effect
6 VOL+/ : Press and hold to increase the volume. Press once to skip to the next track (Bluetooth / USB mode only). VOL-/ : Press and hold to decrease the volume. Press once to skip to the previous track (Bluetooth / USB mode only).
7 Remote control sensor8 Stand
Product OverviewMain Unit (right speaker)
1
2
3
4
5
6
7
8
9
10
11
12
13
14
Front View Rear View
9 USB port10 PAIR button: Press to pair the
soundbar to the subwoofer (when manual pairing is necessary).
11 AUX In socket12 OPTICAL S/PDIF socket13 HDMI (ARC) socket14 AC power socket

12 1300 886 649 Model: ASBWS-0719 Product Code: 10177 07/2019
www.tempo.org
AUS
Controls and Connections
HDMI (ARC) socketThe ARC (Audio Return Channel) function allows you to send audio input from an ARC-compliant TV to an ARC-compliant audio device (e.g. soundbar) without the need for an additional audio cable connection.
To enjoy the ARC function, make sure the soundbar main unit's HDMI (ARC) socket is connected via HDMI cable (not included) to the HDMI (ARC) socket of your ARC-compliant TV. Then just use your TV remote control to adjust the volume output (VOL +/– and MUTE) of the connected audio device. In the TV settings menu, turn on the ARC and CEC function (when CEC is turned on, the soundbar will turn on/off automatically when the TV is turned on/off).
NOTE:• Your TV must support the HDMI-CEC and ARC, and the HDMI-CEC and ARC
must be set to On. (For some TVs, there is also a third option called "device auto power off" setting that needs to be turn on if you want the soundbar turn on and off automatically with the TV.)
• When HDMI ARC is connected to the TV (or other devices) and the CEC function is turned on, the soundbar and the subwoofer will switch on/off automatically when the TV is turned on/off.
• The setting method of HDMI-CEC and ARC may differ depending on the TV. For details about ARC function, please refer to the TV's instruction manual.
• Make sure the HDMI cable you use can support the ARC function.• HDMI-CEC will be called different names by different manufacturers. Please refer
to your TV's instruction manual for details on setting up HDMI-CEC and ARC.
131300 886 649 Model: ASBWS-0719 Product Code: 10177 07/2019
www.tempo.org
AUS
Controls and Connections (Cont.)
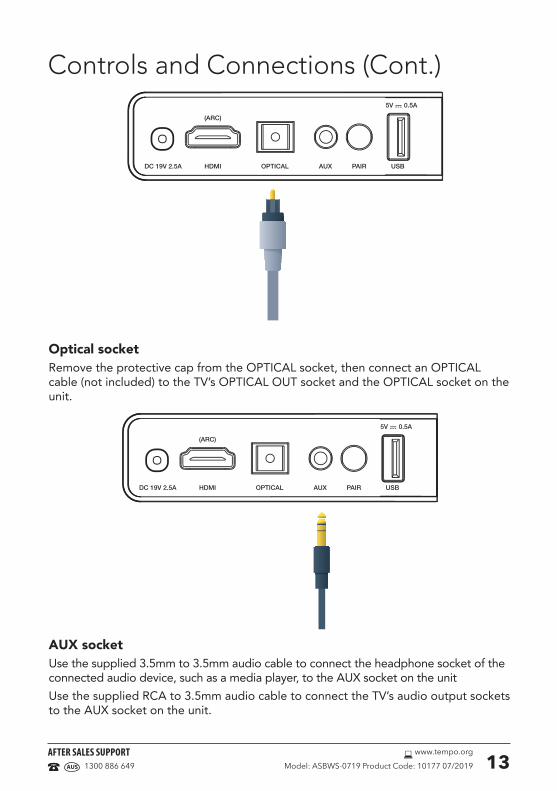
AUX socketUse the supplied 3.5mm to 3.5mm audio cable to connect the headphone socket of the connected audio device, such as a media player, to the AUX socket on the unitUse the supplied RCA to 3.5mm audio cable to connect the TV’s audio output sockets to the AUX socket on the unit.
Optical socketRemove the protective cap from the OPTICAL socket, then connect an OPTICAL cable (not included) to the TV’s OPTICAL OUT socket and the OPTICAL socket on the unit.

14 1300 886 649 Model: ASBWS-0719 Product Code: 10177 07/2019
www.tempo.org
AUS
Controls and Connections (Cont.)USB portThis soundbar can play audio files that are stored on a USB stick. Connect yourUSB stick (not included) to the USB socket for playback.
Power connection• Before connecting the AC adapter, ensure you have completed all other
connections.• Risk of product damage! Ensure that the power supply voltage corresponds to the
voltage printed on the back or the underside of the AC adapter.• Connect the adapter to the main unit and a mains socket.

151300 886 649 Model: ASBWS-0719 Product Code: 10177 07/2019
www.tempo.org
AUS
Controls and Connections (Cont.)Wireless Subwoofer Pair Indicator: Solid light when pairing is successful. Pair Button: Connect to the main unit. Power cord: Connect to power.
Pairing the Wireless Subwoofer With the Main Unit Automatic pairingThe subwoofer and soundbar will automatically pair when both units are plugged into the mains sockets and turned on. No cable is needed for connecting the two units.• When the subwoofer is pairing with the main unit, the Pair Indicator will flash fast.• When the subwoofer is paired with the main unit, the Pair Indicator will light up.NOTE: • Do not press the Pair button on the rear of the subwoofer, except for manual
pairing. • If the automatic pairing fails, pair the subwoofer with the main unit manually.Manual Pairing1. Ensure that all the cables are connected and both the Soundbar and Subwoofer
are on.2. Press and hold the PAIR buttons on the back of the soundbar and the subwoofer
for 2 seconds - they will clear the pairing status, and the subwoofer Pair Indicator will blink quickly.
3. Press the PAIR button on the back of the soundbar, and the soundbar will then auto-search for the subwoofer.
4. Once the soundbar and subwoofer are successfully paired, the subwoofer Pair Indicator LED will illuminate.
NOTE: If the pair indicator LED blinks, it indicates that the connection has failed. Unplug the cable of the subwoofer and reconnect after 3 mins. Repeat steps 1-4.NOTE: • If the wireless connection fails again, check if there is conflict or strong
interference (for example,interference from an electronic device) around your location. Remove these conflicts or strong interferences and repeat the above procedures.
• The subwoofer should be within 6m of the soundbar in an open area.• If the main unit is not connected with the subwoofer and it is in On mode, the
POWER Indicator will flash. Follow steps 1- 4 above to pair the subwoofer to the main unit.

16 1300 886 649 Model: ASBWS-0719 Product Code: 10177 07/2019
www.tempo.org
AUS
InstallationThis soundbar unit can be used either as a single soundbar or as 2-piece tube speakers. Installation options include:
Option A: Two tube speakers installed on stands
Option B: Single soundbar mounted
horizontally with rubber feet
Option C: Single soundbar wall-mounted
Stand mounting (if using option A)Attach a stand to each of the two separate pieces and twist to secure, as illustrated below.

171300 886 649 Model: ASBWS-0719 Product Code: 10177 07/2019
www.tempo.org
AUS
Horizontal mountingAlign the two separate pieces and twist to secure, as illustrated below.
Rubber feet installation (if using option B)You can extend the height of the unit, if required. To do so, attach the supplied rubber feet as follows.
• Ensure the surface of the soundbar is clean prior to attaching the rubber feet.• Turn the unit upside down.• Remove the backing paper from the rubber feet.
• Stick the rubber feet to the bottom of the unit, as illustrated below.
Installation (Cont.)

18 1300 886 649 Model: ASBWS-0719 Product Code: 10177 07/2019
www.tempo.org
AUS
Installation (Cont.)Wall mounting (if using option C)• Wall-mounted installation must be carried out by qualified personnel only.
Incorrect assembly can result in severe personal injury and property damage! (If you intend to install this product yourself, you must check for installations such as electrical wiring and plumbing, which may be hidden inside or behind the wall.)
• It is the installer’s responsibility to verify and confirm that the wall will safely support the total load of the unit and wall brackets.
• Additional tools (not included) are required for the installation.• Do not overtighten screws.• Use an electronic stud finder to check the wall type before drilling and mounting.
* Only install this soundbar on a strong, structurally sound wall.
Recommendation *

191300 886 649 Model: ASBWS-0719 Product Code: 10177 07/2019
www.tempo.org
AUS
General OperationStandby/ON• When you first connect the main unit to the mains socket via the AC adapter, the main
unit will be in Standby mode.• Press the POWER button on the unit or on the remote control to switch the unit
ON.• Press and hold the POWER button again to switch the unit back to Standby mode.
The power indicator will light up red.• Disconnect the AC adapter from the mains socket if you want to switch the unit OFF
completely.• When there is no input signal (or weak input signal) in HDMI, AUX, Optical and
Bluetooth mode (Stop or Pause) for more than 15 minutes, the unit will automatically switch to Standby mode.
Mode Selection• Press the MODE button repeatedly on the unit or the button on the remote control to
switch between HDMI (ARC), AUX, USB, Optical and Bluetooth modes.• In AUX mode: the status indicator lights up orange.• In USB mode (when USB drive is connected) the status indicator flashes orange.• In HDMI (ARC) mode: the status indicator flashes white.• In Optical mode: the status indicator lights up white.• In Bluetooth mode: the status indicator flashes when the unit is in pairing mode, then
turns to solid blue when the Bluetooth device is connected.
Volume Adjustment• Press and hold the VOL+ / VOL- buttons on the unit or press the VOL+ / VOL-
buttons on the remote control to adjust the volume.• If you wish to turn the sound off, press the MUTE button on the remote control. Press
this button again or press the VOL+ / VOL- buttons to resume normal listening.• If you adjust the volume, the status indicator flashes once.
Preset Sound Effect Selection• Press the EQ button on the remote control to select between preset equalisers:
Standard, Movie (recommended for viewing movies), Music (recommended for listening to music).
Instructions

20 1300 886 649 Model: ASBWS-0719 Product Code: 10177 07/2019
www.tempo.org
AUS
HDMI (ARC) / AUX / Optical Operation• Ensure that the unit is connected to a TV or audio device.• While in ON mode, press the MODE button repeatedly on the unit or on the remote
control to select HDMI (ARC), AUX or Optical mode.• Operate your audio device directly for playback features.• Press the VOL +/– buttons on the remote to adjust the volume to your desired level.
Tip: When in optical mode, if there is no sound is coming out of the unit, make sure the audio setting of your source player (e.g. DVD player, game player, TV) is set to PCM with optical output.
Playing Bluetooth® Enabled DevicesYou can listen to tracks from a media device if connected to the unit via Bluetooth wireless technology.
Pairing Bluetooth® Enabled DevicesThe first time you connect your Bluetooth device to the soundbar, you need to pair it with your device.1. During ON mode, press the MODE button repeatedly on the unit or the remote
control to select Bluetooth mode. The blue indicator will flash quickly, indicating that the system has entered pairing mode.
2. Alternatively, press and hold the PAIR button on the remote control or the PAIR/ button on the unit for 2 seconds to make the unit searchable. The blue indicator will flash fast, and the unit will clear the pairing status and enter pairing mode.
3. Activate your Bluetooth enabled device and select the search mode. “ASBWS-0719” will appear on your Bluetooth device list.
4. Select “ASBWS-0719” from the pairing list. The blue indicator will light up solidly if pairing succeeds.
5. To disconnect the Bluetooth function, switch to another function on the unit or disable the function from your Bluetooth enabled device. The blue indicator will flash slowly.
Important notes• The operational range between this soundbar and a Bluetooth device is
approximately 8m (without any object between the Bluetooth enabled device and the unit). Any obstacle between the devices can reduce the operational range.
• Before you connect a Bluetooth enabled device to this unit, ensure you know the device’s capabilities. Compatibility with all Bluetooth devices is not guaranteed.
• If the signal strength is weak, your Bluetooth receiver may disconnect, but it will re-enter pairing mode automatically.
Instructions (Cont.)

211300 886 649 Model: ASBWS-0719 Product Code: 10177 07/2019
www.tempo.org
AUS
TIPS• If you are prompted for a password, enter "0000".• If there is an existing connection, press and hold the PAIR button on the remote
control to re-activate the pairing mode, the connection will be interrupted. The blue indicator will flash quickly.
• Bluetooth will be disconnected when your device is moved beyond the operational range.
• To reconnect your device to the soundbar, place it within the operational range.• If the device is moved beyond the operational range, when it is brought back,
please check if the device is still connected to the soundbar.• If the connection is lost, follow the instructions above to pair your device to the
soundbar again.
Music playback from Bluetooth® Enabled Devices1. Pair and connect your Bluetooth enabled device with the soundbar.2. Play audio on your Bluetooth enabled device.
3. Use the remote control to control playback.
Important notes• To stream audio via Bluetooth wireless technology, the playback device must
support A2DP (Advanced Audio Distribution Profile).• To use the playback buttons ( / , VOL +/–, ) on the remote control, the
playback device must support AVRCP (Audio Video Remote Control Profile).
Instructions (Cont.)

22 1300 886 649 Model: ASBWS-0719 Product Code: 10177 07/2019
www.tempo.org
AUS
NFC (Near Field Communication) OperationPair your NFC enabled mobile device directly with this unit with just a single tap.1. Activate NFC on your mobile device.2. Switch the soundbar to Bluetooth mode.3. Tap the mobile device on the icon of the
unit.4. Confirm the Bluetooth connection.5. To disconnect, tap the mobile device
on the icon of the unit to disconnect or disable NFC from your mobile device.
NOTE: This NFC function only works with mobile devices that support NFC technology.
TIPS:Some NFC enabled mobile devices cannot pair directly with the unit via NFC. In such a case, please try either one of the solutions below:• Please download the App “Tap-and- Pair” from Google Play Store (https://play.
Google. com) and install.• Pair with the unit manually first, then touch again on the NFC sensing area.
Instructions (Cont.)

231300 886 649 Model: ASBWS-0719 Product Code: 10177 07/2019
www.tempo.org
AUS
To keep the warranty valid, never try to repair the system yourself. If you encounter problems when using this unit, check the following points before requesting service.
Troubleshooting
Problem Solution
No power
Ensure that the AC adapter of the apparatus is properly connected.
Ensure that there is power at the AC outlet.
Press the POWER button to turn the unit on.
Remote control does not work
Reduce the distance between the remote control and the unit.
Insert the battery with its polarities (+/-) aligned as indicated. Please check the battery is installed correctly (refer to page iii).
Replace the battery.
Aim the remote control directly at the sensor on the front of the unit.
No response from the unit Disconnect and reconnect the AC adapter, then turn the unit on again.
Unable to find the soundbar in the Bluetooth device list when pairing
Ensure you have paired the unit with your Bluetooth enabled device.
Ensure the Bluetooth function is activated on your Bluetooth enabled device.
No connection beween the main unit and the Subwoofer
Ensure the main cables of the main unit and the subwoofer are both connected securely to the mains power socket.
Pair the main unit with the subwoofer manually. Please refer to "Pairing the Wireless Subwoofer with the Main Unit" above.
To Reset the SoundbarIf the Soundbar is not working properly, you can reset the unit to its original factory status. To do this, press and hold the volume + and volume - buttons at the same time for 3 seconds.

24 1300 886 649 Model: ASBWS-0719 Product Code: 10177 07/2019
www.tempo.org
AUS
Technical Specifications
Other Useful Information
AC adapter – input power rating AC 100-240V 50/60Hz
AC adapter – output power rating DC 19V 2.5A
Subwoofer – input power rating AC 100-240V 50/60Hz
Subwoofer – power consumption 65W
Remote control operation range – distance, angle 3m, 30 degrees
Soundbar & Subwoofer operation range – distance 6m
Bluetooth pairing operation range – distance 8m
Soundbar – Rated power output 20W/Ch. x 2, 6 ohm
Subwoofer – Rated power output 60W, 4 ohm
Bluetooth pairing name ASBWS-0719
Bluetooth pairing password 0000
USB power rating 5V 500mA
Media codecs supported in USB mode MP3
Distance between 2 wall mounting points 667mm
Dimensions (W x H x D) – Soundbar 80cm x 6cm x 6.5cm (when L& R speakers are joined together)
Dimensions (W x H x D) – Subwoofer 47cm x 14.1cm x 26cm
Weight – Soundbar 1.5kg
Weight - Subwoofer 4kg

251300 886 649 Model: ASBWS-0719 Product Code: 10177 07/2019
www.tempo.org
AUS
Other Useful Information (Cont.)The Bluetooth® word mark and logos are registered trademarks owned by Bluetooth SIG, Inc., and any use of such marks by Hands (IP) Holdings Pty Ltd is under license. Other trademarks and trade names are those of their respective owners.
The N Mark is a trademark or registered trademark of NFC Forum, Inc. in the United States and in other countries.
Responsible disposal of the packagingThe packaging of this product has been selected from environmentally friendly materials and can usually be recycled. Please ensure these are disposed of correctly. Plastic wrapping can be a suffocation hazard for babies and young children, please ensure all packaging materials are out of reach and are safely disposed of. Please ensure they are offered for recycling rather than throwing these materials away.
Responsible disposal of the productAt the end of its working life, do not throw this product out with your household rubbish. An environmentally friendly method of disposal will ensure that valuable raw materials can be recycled. Contact your local authority for your nearest recycling centre. Electrical and electronic items contain materials and substances which, if handled or disposed of incorrectly, could potentially be hazardous to the environment and human health.
ClimateIf moving the apparatus from one location to another, for example from a cold environment to a warm one. Allow sufficient time for the apparatus to acclimatise to the new location before switching on. In tropical climates keep the air surrounding the unit sufficiently dry to avoid condensation forming.
Version number Date
1.0 07/2019

26 1300 886 649 Model: ASBWS-0719 Product Code: 10177 07/2019
www.tempo.org
AUS
2.1 Channel Soundbar with Wireless Subwoofer
Repair and RefurbishedGoods or Parts Notice
Unfortunately, from time to time, faulty products are manufactured which need to be returned to the supplier for repair.
Please be aware that if your product is capable of retaining user-generated data (such as files stored on a computer hard drive, telephone numbers stored on a mobile telephone, songs stored on a portable media player, games saved on a games console or files stored on a USB memory stick) during the process of repair, some or all of your stored data may be lost. We recommend you save this data elsewhere prior to sending the product for repair.
You should also be aware that rather than repairing goods, we may replace them with refurbished goods of the same type or use refurbished parts in the repair process.
Please be assured though, refurbished parts or replacements are only used where they meet ALDI’s stringent quality specifications.
If at any time you feel your repair is being handled unsatisfactorily, you may escalate your complaint. Please telephone us on 1300 886 649 or write to us at:
Tempo (Aust) Pty Ltd ABN 70 106 100 252 PO Box 6056 Frenchs Forest, NSW 2086, Australia Tempo Help Desk: 1300 886 649 (Aust) (Operating Hours: Monday-Friday 8:30am-6pm; Saturday 9am-6pm AEST) Email: [email protected]

271300 886 649 Model: ASBWS-0719 Product Code: 10177 07/2019
www.tempo.org
AUS
This page has been left blank intentionally.

Warranty returnsShould you for any reason need to return this product for a warranty claim, make sure to include all accessories with the product.
Product does not work?If you encounter problems with this product, or if it fails to perform to your expectations, make sure to contact our After Sales Support Centre on 1300 886 649 before returning it to the store for a refund.


