2016 F-Series Super Duty Class A Motorhome and Commercial ... · 2016 F-Series Super Duty Class A...
154
2016 F-Series Super Duty Class A Motorhome and Commercial Chassis Owner’s Manual owner.ford.com ford.ca GU9J 19A321 AA May 2015 First Printing Owner’s Manual Motorhome Litho in U.S.A.
Transcript of 2016 F-Series Super Duty Class A Motorhome and Commercial ... · 2016 F-Series Super Duty Class A...
2016 F-Series Super Duty Class A Motorhome and Commercial Chassis Owner’s Manual
owner.ford.com ford.ca
GU9J 19A321 AA
May 2015First Printing
Owner’s ManualMotorhome
Litho in U.S.A.

The information contained in this publication was correct at the time of going to print. In the interest ofcontinuous development, we reserve the right to change specifications, design or equipment at any timewithout notice or obligation. No part of this publication may be reproduced, transmitted, stored in aretrieval system or translated into any language in any form by any means without our written permission.Errors and omissions excepted.© Ford Motor Company 2015
All rights reserved.Part Number: 20150407164420

IntroductionAbout This Manual...........................................3Symbols Glossary.............................................3California Proposition 65...............................5Perchlorate..........................................................5Ford Credit...........................................................5Replacement Parts
Recommendation........................................6Special Notices.................................................6Mobile Communications
Equipment.......................................................7Export Unique Options...................................7
EnvironmentProtecting the Environment.........................8
Steering WheelAdjusting the Steering Wheel......................9Cruise Control....................................................9
Wipers and WashersWindshield Wipers.........................................10Windshield Washers......................................10
LightingLighting Control................................................11Instrument Lighting Dimmer........................11Daytime Running Lamps..............................12Direction Indicators.........................................12
Instrument ClusterGauges.................................................................13Warning Lamps and Indicators..................15Audible Warnings and Indicators...............17
Information DisplaysGeneral Information.......................................18Information Messages..................................19
Starting and Stopping theEngine
General Information......................................22Ignition Switch.................................................22Starting a Gasoline Engine.........................22Engine Block Heater......................................24
Fuel and RefuelingSafety Precautions........................................25Fuel Quality......................................................26Running Out of Fuel......................................26Refueling............................................................27Fuel Consumption.........................................28Emission Control System............................29
TransmissionAutomatic Transmission.............................32
BrakesGeneral Information......................................35Hints on Driving With Anti-Lock
Brakes.............................................................35Parking Brake...................................................36
Cruise ControlPrinciple of Operation...................................37Using Cruise Control......................................37
Load CarryingLoad Limit.........................................................38
TowingTowing a Trailer...............................................44Recommended Towing Weights..............45Essential Towing Checks.............................47Transporting the Vehicle.............................49Towing the Vehicle on Four Wheels.......50
1
Motorhome (TY3) , enUSA, First Printing
Table of Contents
Driving HintsBreaking-In........................................................51Reduced Engine Performance...................51Economical Driving.........................................51Driving Through Water..................................52
Roadside EmergenciesRoadside Assistance.....................................53Hazard Warning Flashers............................54Jump Starting the Vehicle...........................54
Customer AssistanceGetting the Services You Need..................57In California (U.S. Only)...............................58The Better Business Bureau (BBB) Auto
Line Program (U.S. Only)........................59Utilizing the Mediation/Arbitration
Program (Canada Only).........................59Getting Assistance Outside the U.S. and
Canada..........................................................60Ordering Additional Owner's
Literature........................................................61Reporting Safety Defects (U.S.
Only)................................................................61Reporting Safety Defects (Canada
Only)...............................................................62
FusesFuse Specification Chart.............................63Changing a Fuse............................................80
MaintenanceGeneral Information.......................................81Under Hood Overview..................................82Engine Oil Dipstick.........................................83Engine Oil Check............................................83Oil Change Indicator Reset.........................83Engine Coolant Check..................................84Automatic Transmission Fluid
Check..............................................................87Brake Fluid Check..........................................88
Power Steering Fluid Check.......................90Fuel Filter............................................................91Changing the 12V Battery.............................91Changing the Engine Air Filter...................93
Vehicle CareGeneral Information.....................................94Cleaning the Exterior....................................94Cleaning the Engine......................................94Cleaning the Alloy Wheels.........................95Vehicle Storage...............................................95
Wheels and TiresTire Care............................................................98Using Snow Chains.......................................113Changing a Road Wheel.............................114Technical Specifications.............................117
Capacities and Specific-ations
Engine Specifications..................................118Motorcraft Parts.............................................118Vehicle Identification Number.................120Vehicle Certification Label........................120Transmission Code Designation..............121Capacities and Specifications.................122
Extended Service Plan(ESP)
Extended Service Plan (ESP)..................126
Scheduled MaintenanceGeneral Maintenance Information.........128Normal Scheduled Maintenance.............131Special Operating Conditions Scheduled
Maintenance...............................................133Scheduled Maintenance Record............135
2
Motorhome (TY3) , enUSA, First Printing
Table of Contents
ABOUT THIS MANUALThank you for choosing Ford. Werecommend that you take some time toget to know your vehicle by reading thismanual. The more that you know aboutyour vehicle, the greater the safety andpleasure you will get from driving it.
WARNINGDriving while distracted can result inloss of vehicle control, crash andinjury. We strongly recommend that
you use extreme caution when using anydevice that may take your focus off theroad. Your primary responsibility is the safeoperation of your vehicle. We recommendagainst the use of any handheld devicewhile driving and encourage the use ofvoice-operated systems when possible.Make sure you are aware of all applicablelocal laws that may affect the use ofelectronic devices while driving.
Note: This manual describes productfeatures and options available throughoutthe range of available models, sometimeseven before they are generally available. Itmay describe options that are not on yourvehicle.Note: Some of the illustrations in thismanual may show features as used indifferent models, so they may appeardifferently to you on your vehicle.Note: Always use and operate your vehiclein line with all applicable laws andregulations.Note: Pass on this manual when sellingyour vehicle. It is an integral part of thevehicle.
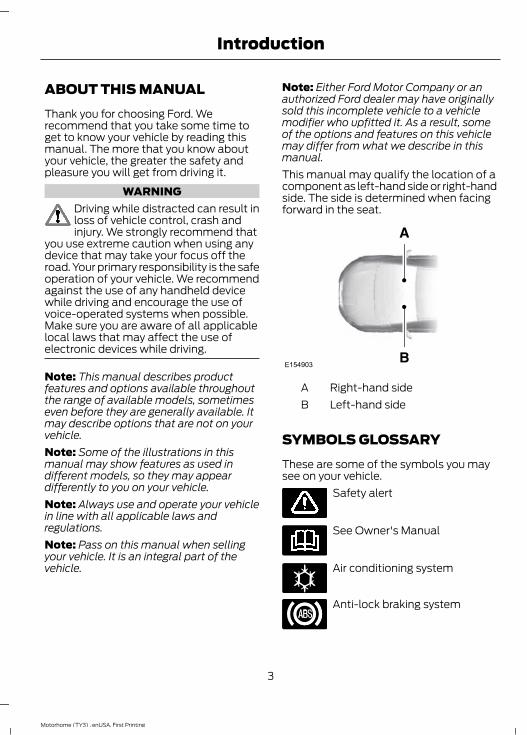
Note: Either Ford Motor Company or anauthorized Ford dealer may have originallysold this incomplete vehicle to a vehiclemodifier who upfitted it. As a result, someof the options and features on this vehiclemay differ from what we describe in thismanual.This manual may qualify the location of acomponent as left-hand side or right-handside. The side is determined when facingforward in the seat.
E154903
Right-hand sideALeft-hand sideB
SYMBOLS GLOSSARYThese are some of the symbols you maysee on your vehicle.
Safety alert
See Owner's Manual
E162384
Air conditioning system
Anti-lock braking system
3
Motorhome (TY3) , enUSA, First Printing
Introduction
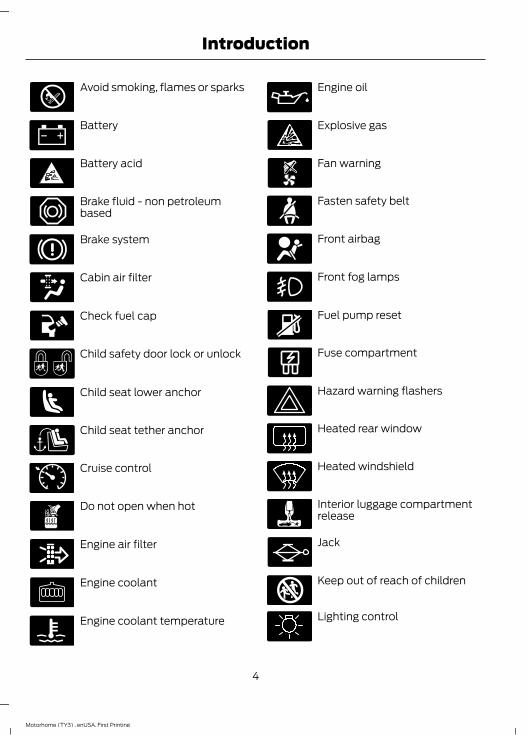
Avoid smoking, flames or sparks
Battery
Battery acid
Brake fluid - non petroleumbased
Brake system
Cabin air filter
Check fuel cap
Child safety door lock or unlock
Child seat lower anchor
Child seat tether anchor
E71340
Cruise control
Do not open when hot
Engine air filter
Engine coolant
Engine coolant temperature
Engine oil
Explosive gas
Fan warning
Fasten safety belt
Front airbag
Front fog lamps
Fuel pump reset
Fuse compartment
Hazard warning flashers
Heated rear window
Heated windshield
Interior luggage compartmentrelease
Jack
E161353
Keep out of reach of children
Lighting control
4
Motorhome (TY3) , enUSA, First Printing
Introduction
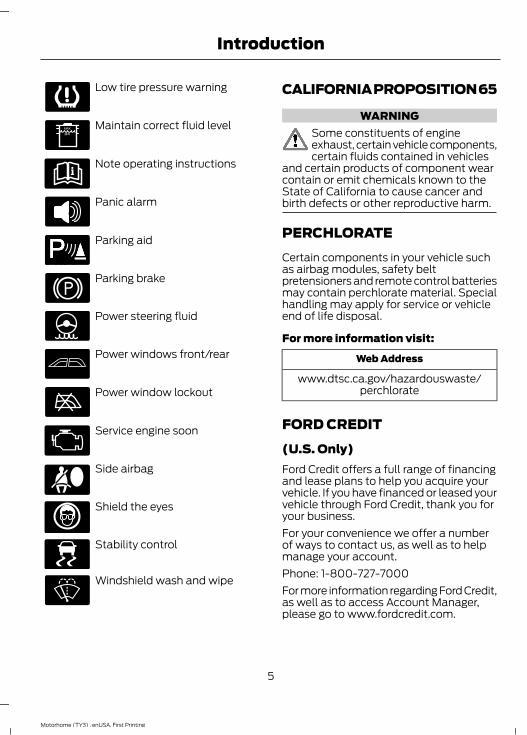
Low tire pressure warning
Maintain correct fluid level
Note operating instructions
Panic alarm
E139213
Parking aid
Parking brake
Power steering fluid
Power windows front/rear
Power window lockout
Service engine soon
Side airbag
E167012
Shield the eyes
E138639
Stability control
Windshield wash and wipe
CALIFORNIA PROPOSITION 65
WARNINGSome constituents of engineexhaust, certain vehicle components,certain fluids contained in vehicles
and certain products of component wearcontain or emit chemicals known to theState of California to cause cancer andbirth defects or other reproductive harm.
PERCHLORATECertain components in your vehicle suchas airbag modules, safety beltpretensioners and remote control batteriesmay contain perchlorate material. Specialhandling may apply for service or vehicleend of life disposal.
For more information visit:
Web Address
www.dtsc.ca.gov/hazardouswaste/perchlorate
FORD CREDIT(U.S. Only)Ford Credit offers a full range of financingand lease plans to help you acquire yourvehicle. If you have financed or leased yourvehicle through Ford Credit, thank you foryour business.For your convenience we offer a numberof ways to contact us, as well as to helpmanage your account.Phone: 1-800-727-7000For more information regarding Ford Credit,as well as to access Account Manager,please go to www.fordcredit.com.
5
Motorhome (TY3) , enUSA, First Printing
Introduction
REPLACEMENT PARTSRECOMMENDATIONYour vehicle has been built to the higheststandards using quality parts. Werecommend that you demand the use ofgenuine Ford and Motorcraft partswhenever your vehicle requires scheduledmaintenance or repair. You can clearlyidentify genuine Ford and Motorcraft partsby looking for the Ford, FoMoCo orMotorcraft branding on the parts or theirpackaging.
Scheduled Maintenance andMechanical RepairsOne of the best ways for you to make surethat your vehicle provides years of serviceis to have it maintained in line with ourrecommendations using parts thatconform to the specifications detailed inthis Owner’s Manual. Genuine Ford andMotorcraft parts meet or exceed thesespecifications.
Collision RepairsWe hope that you never experience acollision, but accidents do happen. GenuineFord replacement collision parts meet ourstringent requirements for fit, finish,structural integrity, corrosion protectionand dent resistance. During vehicledevelopment we validate these partsdeliver the intended level of protection asa whole system. A great way to know forsure you are getting this level of protectionis to use genuine Ford replacementcollision parts.
Warranty on Replacement PartsGenuine Ford and Motorcraft replacementparts are the only replacement parts thatbenefit from a Ford Warranty. Damagecaused to your vehicle as a result of thefailure of non-Ford parts may not becovered by the Ford Warranty. Foradditional information, refer to the termsand conditions of the Ford Warranty.
SPECIAL NOTICESNew Vehicle Limited WarrantyFor a detailed description of what iscovered and what is not covered by yourvehicle’s New Vehicle Limited Warranty,refer to the Warranty Manual that isprovided to you along with your Owner’sManual.
Special InstructionsFor your added safety, your vehicle is fittedwith sophisticated electronic controls.
WARNINGSYou risk death or serious injury toyourself and others if you do notfollow the instruction highlighted by
the warning symbol. Failure to follow thespecific warnings and instructions couldresult in personal injury.
Front seat mounted rear-facing childor infant seats should NEVER beplaced in front of an active
passenger airbag.
On-board Diagnostics (OBD-II)Your vehicle’s On-board Diagnostics(OBD-II) system has a data port fordiagnostics, repair and reprogrammingservices with diagnostic scan tools.Installing a non-Ford-approvedaftermarket OBD plug-in device that usesthe port during normal driving, for example
6
Motorhome (TY3) , enUSA, First Printing
Introduction
remote insurance company monitoring,remote vehicle diagnostics, telematics orengine reprogramming, may causeinterference or damage to vehicle systems.We do not recommend or endorse the useof any non-Ford-approved aftermarketOBD plug-in devices. The vehicle Warrantymay not cover damage caused by anynon-Ford-approved aftermarket OBDplug-in device.
MOBILE COMMUNICATIONSEQUIPMENTUsing mobile communications equipmentis becoming increasingly important in theconduct of business and personal affairs.However, you must not compromise yourown or others’ safety when using suchequipment. Mobile communications canenhance personal safety and security whenappropriately used, particularly inemergency situations. Safety must beparamount when using mobilecommunications equipment to avoidnegating these benefits. Mobilecommunication equipment includes, butis not limited to, cellular phones, pagers,portable email devices, text messagingdevices and portable two-way radios.
WARNINGDriving while distracted can result inloss of vehicle control, crash andinjury. We strongly recommend that
you use extreme caution when using anydevice that may take your focus off theroad. Your primary responsibility is the safeoperation of your vehicle. We recommendagainst the use of any hand-held devicewhile driving and encourage the use ofvoice-operated systems when possible.Make sure you are aware of all applicablelocal laws that may affect the use ofelectronic devices while driving.
EXPORT UNIQUE OPTIONSFor your particular global region, yourvehicle may be equipped with features andoptions that are different from the featuresand options that are described in thisOwner’s Manual. A market uniquesupplement may be supplied thatcomplements this book. By referring to themarket unique supplement, if provided,you can properly identify those features,recommendations and specifications thatare unique to your vehicle. This Owner’sManual is written primarily for the U.S. andCanadian Markets. Features or equipmentlisted as standard may be different on unitsbuilt for Export. Refer to this Owner’sManual for all other requiredinformation and warnings.
7
Motorhome (TY3) , enUSA, First Printing
Introduction
PROTECTING THEENVIRONMENTYou must play your part in protecting theenvironment. Correct vehicle usage andthe authorized disposal of waste, cleaningand lubrication materials are significantsteps toward this aim.
8
Motorhome (TY3) , enUSA, First Printing
Environment
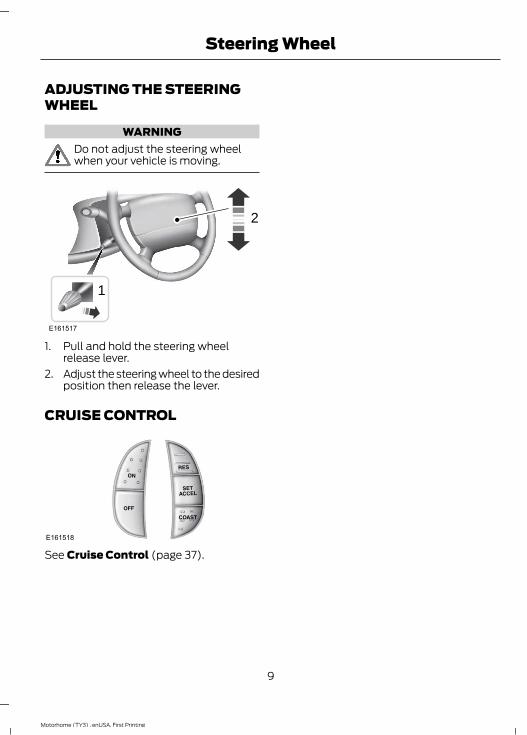
ADJUSTING THE STEERINGWHEEL
WARNINGDo not adjust the steering wheelwhen your vehicle is moving.
E161517
1
2
1. Pull and hold the steering wheelrelease lever.
2. Adjust the steering wheel to the desiredposition then release the lever.
CRUISE CONTROL
E161518
See Cruise Control (page 37).
9
Motorhome (TY3) , enUSA, First Printing
Steering Wheel
WINDSHIELD WIPERSNote: Fully defrost the windshield beforeswitching on the windshield wipers.Note: Make sure the windshield wipers areswitched off before entering a car wash.Note: Clean the windshield and wiperblades if they begin to leave streaks orsmears. If that doesn't resolve the issue,install new wiper blades.Note: Do not operate the wipers on a drywindshield. This may scratch the glass,damage the wiper blades or cause the wipermotor to burn out. Always use thewindshield washers before wiping a drywindshield.
E161461
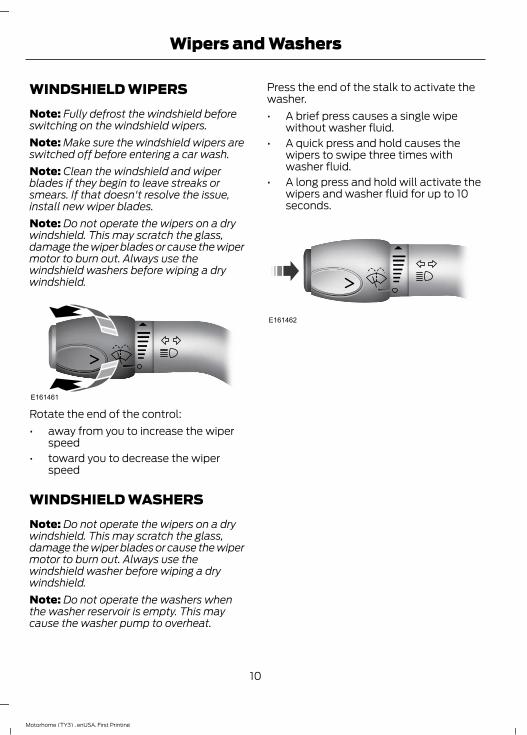
Rotate the end of the control:• away from you to increase the wiper
speed• toward you to decrease the wiper
speed
WINDSHIELD WASHERSNote: Do not operate the wipers on a drywindshield. This may scratch the glass,damage the wiper blades or cause the wipermotor to burn out. Always use thewindshield washer before wiping a drywindshield.Note: Do not operate the washers whenthe washer reservoir is empty. This maycause the washer pump to overheat.
Press the end of the stalk to activate thewasher.• A brief press causes a single wipe
without washer fluid.• A quick press and hold causes the
wipers to swipe three times withwasher fluid.
• A long press and hold will activate thewipers and washer fluid for up to 10seconds.
E161462
10
Motorhome (TY3) , enUSA, First Printing
Wipers and Washers
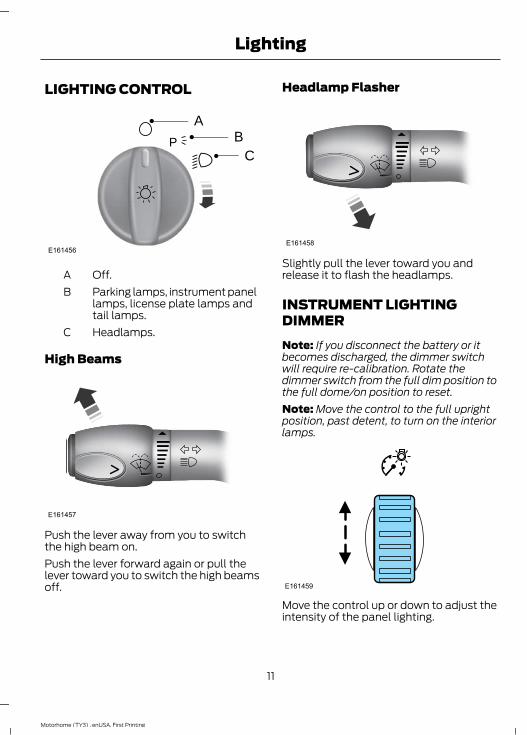
LIGHTING CONTROL
E161456
AB
CP
Off.AParking lamps, instrument panellamps, license plate lamps andtail lamps.
B
Headlamps.C
High Beams
E161457
Push the lever away from you to switchthe high beam on.Push the lever forward again or pull thelever toward you to switch the high beamsoff.
Headlamp Flasher
E161458
Slightly pull the lever toward you andrelease it to flash the headlamps.
INSTRUMENT LIGHTINGDIMMERNote: If you disconnect the battery or itbecomes discharged, the dimmer switchwill require re-calibration. Rotate thedimmer switch from the full dim position tothe full dome/on position to reset.Note: Move the control to the full uprightposition, past detent, to turn on the interiorlamps.
E161459
Move the control up or down to adjust theintensity of the panel lighting.
11
Motorhome (TY3) , enUSA, First Printing
Lighting
DAYTIME RUNNING LAMPS (If
Equipped)
WARNINGThe daytime running lamps systemdoes not activate the rear lamps andmay not provide adequate lighting
during low visibility driving conditions. Also,the autolamps switch position may notactivate the headlamps in all low visibilityconditions, such as daytime fog. Make surethe headlamps are switched to auto or on,as appropriate, during all low visibilityconditions. Failure to do so may result in acrash.
The system switches the low beamheadlamps on at a reduced intensity indaylight conditions.To switch the system on, switch theignition on, and switch the lighting controlto the off or parking lamp position.
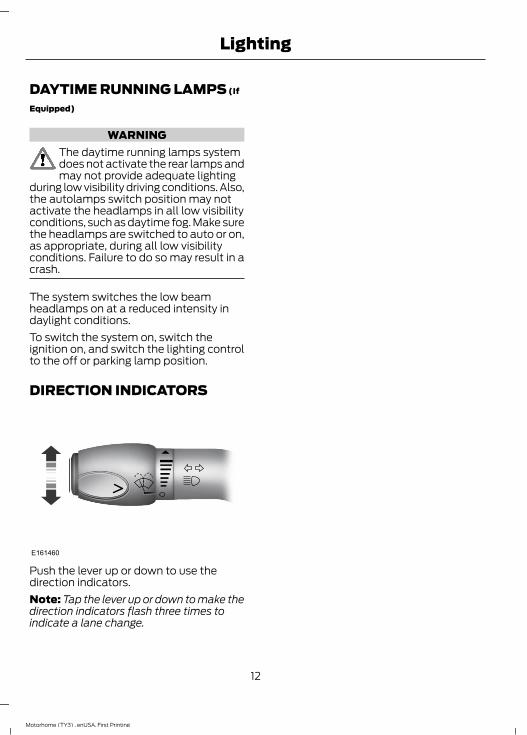
DIRECTION INDICATORS
E161460
Push the lever up or down to use thedirection indicators.Note: Tap the lever up or down to make thedirection indicators flash three times toindicate a lane change.
12
Motorhome (TY3) , enUSA, First Printing
Lighting
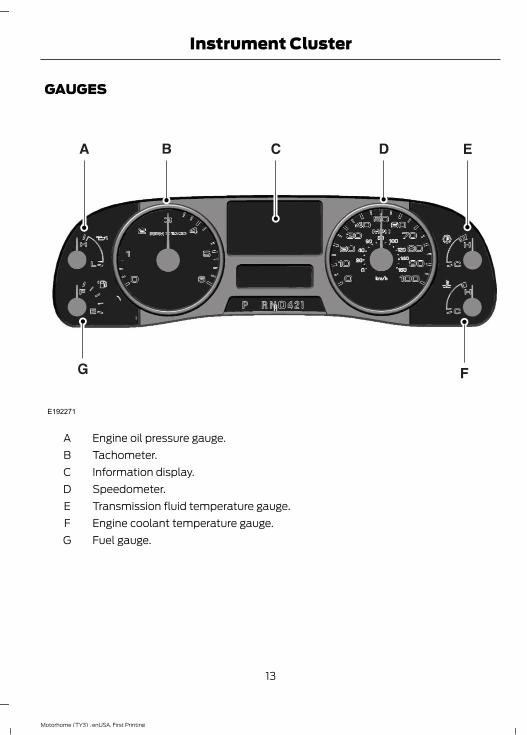
GAUGES
E192271
Engine oil pressure gauge.ATachometer.BInformation display.CSpeedometer.DTransmission fluid temperature gauge.EEngine coolant temperature gauge.FFuel gauge.G
13
Motorhome (TY3) , enUSA, First Printing
Instrument Cluster
Engine Oil Pressure GaugeIndicates engine oil pressure. The needleshould stay in the normal operating range(between L and H). If the needle fallsbelow the normal range, stop the vehicle,turn off the engine and check the engineoil level. Add oil if needed. If the oil level iscorrect, have your vehicle checked by yourauthorized dealer.
SpeedometerIndicates vehicle speed. Vehicle speed islimited to either 65 mph (105 km/h) or 75mph (120 km/h).
Transmission Fluid TemperatureGaugeNormal areaThe transmission fluid is within the normaloperating temperature (between H andC).
Yellow areaThe transmission fluid is higher thannormal operating temperature. This canbe caused by special operation conditions(i.e. snowplowing, towing or off-road use).Operating the transmission for extendedperiods of time with the gauge in theyellow area may cause internaltransmission damage. Altering the severityof the driving conditions is recommendedto lower the transmission temperature intothe normal range.
Red areaThe transmission fluid is overheating. Stopthe vehicle to allow the temperature toreturn to normal range.
If the gauge is operating in the yellow orred area, stop the vehicle and verify theairflow is not restricted such as snow ordebris blocking airflow through the grill. Ifthe gauge continues to show hightemperatures, see your authorized dealer.
Engine Coolant TemperatureGauge
WARNINGNever remove the coolant reservoircap while the engine is running or hot.
At normal operating temperature, theneedle will remain in the center section.Note: Do not restart the engine until thecause of overheating has been resolved.If the needle enters the red section, theengine is overheating. Stop the engine,switch the ignition off and determine thecause once the engine has cooled down.
Fuel GaugeNote: The fuel gauge may vary slightlywhen your vehicle is moving or on a slope.Switch the ignition on. The fuel gaugeindicates approximately how much fuelyou have left in the fuel tank. The arrowadjacent to the fuel pump symbolindicates on which side of your vehicle thefuel filler door is located.The needle should move toward F whenyou refuel your vehicle. If the needle pointsto E after adding fuel, have an authorizeddealer check the system soon.After refueling, some variability in theposition of the needle is normal:
14
Motorhome (TY3) , enUSA, First Printing
Instrument Cluster
• It may take a short time for the needleto reach F after leaving the gas station.This is normal and depends upon theslope of the pavement at the gasstation.
• The fuel amount dispensed into thetank is a little less or more than thegauge indicated. This is normal anddepends upon the slope of thepavement at the gas station.
• If the gas station nozzle shuts offbefore the tank is full, try a differentgas pump nozzle.
• There is a small reserve left in the tankwhen the fuel gauge reaches empty.
Low Fuel ReminderA low fuel reminder triggers when the fuelgauge needle is at one-sixteenth or about50 miles (80 km) to empty, whicheveroccurs first.
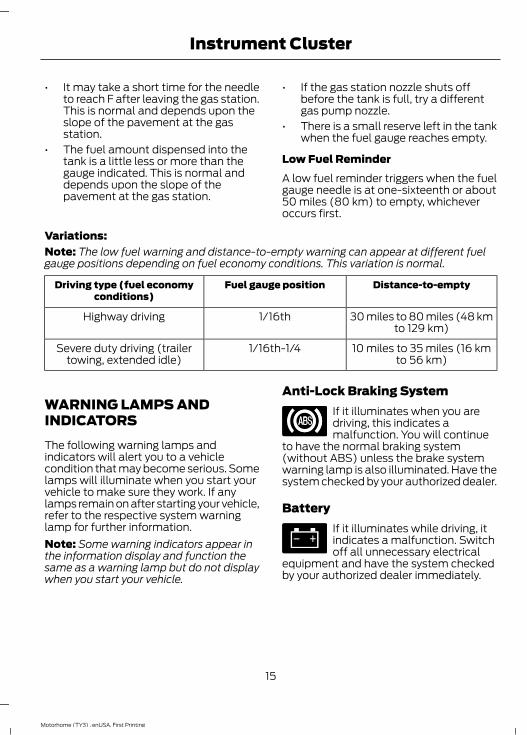
Variations:Note: The low fuel warning and distance-to-empty warning can appear at different fuelgauge positions depending on fuel economy conditions. This variation is normal.
Distance-to-emptyFuel gauge positionDriving type (fuel economyconditions)
30 miles to 80 miles (48 kmto 129 km)
1/16thHighway driving
10 miles to 35 miles (16 kmto 56 km)
1/16th-1/4Severe duty driving (trailertowing, extended idle)
WARNING LAMPS ANDINDICATORSThe following warning lamps andindicators will alert you to a vehiclecondition that may become serious. Somelamps will illuminate when you start yourvehicle to make sure they work. If anylamps remain on after starting your vehicle,refer to the respective system warninglamp for further information.Note: Some warning indicators appear inthe information display and function thesame as a warning lamp but do not displaywhen you start your vehicle.
Anti-Lock Braking SystemIf it illuminates when you aredriving, this indicates amalfunction. You will continue
to have the normal braking system(without ABS) unless the brake systemwarning lamp is also illuminated. Have thesystem checked by your authorized dealer.
BatteryIf it illuminates while driving, itindicates a malfunction. Switchoff all unnecessary electrical
equipment and have the system checkedby your authorized dealer immediately.
15
Motorhome (TY3) , enUSA, First Printing
Instrument Cluster
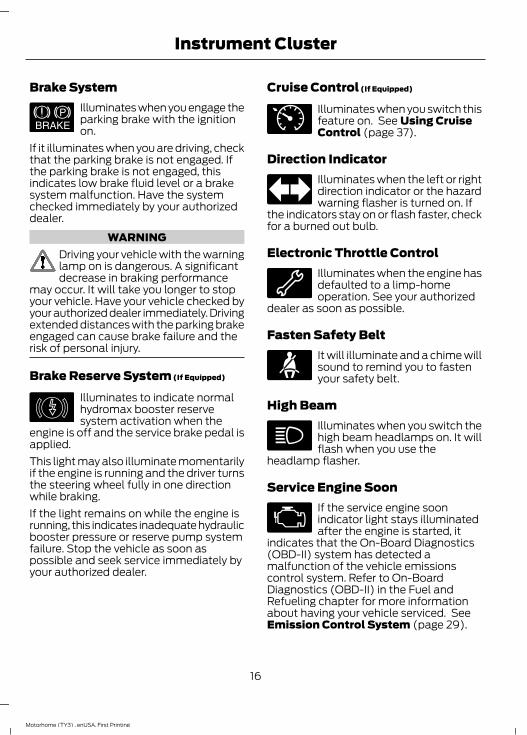
Brake System
E144522
Illuminates when you engage theparking brake with the ignitionon.
If it illuminates when you are driving, checkthat the parking brake is not engaged. Ifthe parking brake is not engaged, thisindicates low brake fluid level or a brakesystem malfunction. Have the systemchecked immediately by your authorizeddealer.
WARNINGDriving your vehicle with the warninglamp on is dangerous. A significantdecrease in braking performance
may occur. It will take you longer to stopyour vehicle. Have your vehicle checked byyour authorized dealer immediately. Drivingextended distances with the parking brakeengaged can cause brake failure and therisk of personal injury.
Brake Reserve System (If Equipped)
E146190
Illuminates to indicate normalhydromax booster reservesystem activation when the
engine is off and the service brake pedal isapplied.This light may also illuminate momentarilyif the engine is running and the driver turnsthe steering wheel fully in one directionwhile braking.If the light remains on while the engine isrunning, this indicates inadequate hydraulicbooster pressure or reserve pump systemfailure. Stop the vehicle as soon aspossible and seek service immediately byyour authorized dealer.
Cruise Control (If Equipped)
E71340
Illuminates when you switch thisfeature on. See Using CruiseControl (page 37).
Direction IndicatorIlluminates when the left or rightdirection indicator or the hazardwarning flasher is turned on. If
the indicators stay on or flash faster, checkfor a burned out bulb.
Electronic Throttle ControlIlluminates when the engine hasdefaulted to a limp-homeoperation. See your authorized
dealer as soon as possible.
Fasten Safety BeltIt will illuminate and a chime willsound to remind you to fastenyour safety belt.
High BeamIlluminates when you switch thehigh beam headlamps on. It willflash when you use the
headlamp flasher.
Service Engine SoonIf the service engine soonindicator light stays illuminatedafter the engine is started, it
indicates that the On-Board Diagnostics(OBD-II) system has detected amalfunction of the vehicle emissionscontrol system. Refer to On-BoardDiagnostics (OBD-II) in the Fuel andRefueling chapter for more informationabout having your vehicle serviced. SeeEmission Control System (page 29).
16
Motorhome (TY3) , enUSA, First Printing
Instrument Cluster
If the light is blinking, engine misfire isoccurring which could damage yourcatalytic converter. Drive in a moderatefashion (avoid heavy acceleration anddeceleration) and have your vehicleserviced immediately.
WARNINGUnder engine misfire conditions,excessive exhaust temperaturescould damage the catalytic
converter, the fuel system, interior floorcoverings or other vehicle components,possibly causing a fire. Have your vehicleserviced immediately.
The service engine soon indicator lightilluminates when the ignition is first turnedon prior to engine start to check the bulband to indicate whether the vehicle is readyfor Inspection/Maintenance (I/M) testing.Normally, the service engine soon light willstay on until the engine is cranked, thenturn itself off if no malfunctions arepresent. However, if after 15 seconds theservice engine soon light blinks eight times,it means that the vehicle is not ready forI/M testing. See Emission ControlSystem (page 29).
Transmission Tow/Haul (If Equipped)
E161509
Illuminates when the tow/haulfeature has been activated. If thelight flashes steadily, have the
system serviced immediately, damage tothe transmission could occur.
AUDIBLE WARNINGS ANDINDICATORSFail-Safe Cooling Warning ChimeSounds when the coolant gauge pointerhas moved to hot. There are three stagesof chimes:
• Stage 1 is a single chime when theengine temperature begins to overheat.
• Stage 2 is multiple chimes and enginepower becomes limited in order to helpcool the engine.
• Stage 3 is multiple chimes and theengine will shut down.
Headlamps On Warning ChimeSounds when you remove the key from theignition and open the driver's door and youhave left the headlamps or parking lampson.
Key in Ignition Warning ChimeSounds when you open the driver's doorand you have left the key in the ignition.
Parking Brake On Warning ChimeSounds when you have left the parkingbrake on and drive your vehicle. If thewarning chime remains on after you havereleased the parking brake, have thesystem checked by your authorized dealerimmediately.
Shift to Park Warning ChimeSounds when you open the driver's doorand your vehicle is not in park.
17
Motorhome (TY3) , enUSA, First Printing
Instrument Cluster
GENERAL INFORMATION
WARNINGDriving while distracted can result inloss of vehicle control, crash andinjury. We strongly recommend that
you use extreme caution when using anydevice that may take your focus off theroad. Your primary responsibility is the safeoperation of your vehicle. We recommendagainst the use of any hand-held devicewhile driving and encourage the use ofvoice-operated systems when possible.Make sure you are aware of all applicablelocal laws that may affect the use ofelectronic devices while driving.
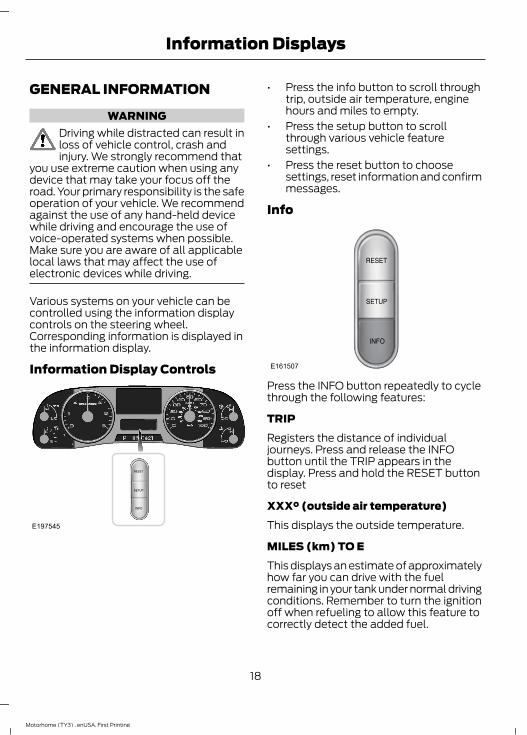
Various systems on your vehicle can becontrolled using the information displaycontrols on the steering wheel.Corresponding information is displayed inthe information display.
Information Display Controls
E197545
• Press the info button to scroll throughtrip, outside air temperature, enginehours and miles to empty.
• Press the setup button to scrollthrough various vehicle featuresettings.
• Press the reset button to choosesettings, reset information and confirmmessages.
Info
E161507
Press the INFO button repeatedly to cyclethrough the following features:
TRIPRegisters the distance of individualjourneys. Press and release the INFObutton until the TRIP appears in thedisplay. Press and hold the RESET buttonto reset
XXX° (outside air temperature)This displays the outside temperature.
MILES (km) TO EThis displays an estimate of approximatelyhow far you can drive with the fuelremaining in your tank under normal drivingconditions. Remember to turn the ignitionoff when refueling to allow this feature tocorrectly detect the added fuel.
18
Motorhome (TY3) , enUSA, First Printing
Information Displays
The DTE function will display a messagein the information display when you haveapproximately 50 miles (80 km), to empty.Press RESET to clear this warningmessage. It will return at approximately 25miles (40 km), 10 miles (16 km) and 0miles (0 km) miles to empty.DTE is calculated using a running averagefuel economy, which is based on yourrecent driving history of 500 miles (800km).
ENG HRSRegisters the accumulated time the enginehas been running.
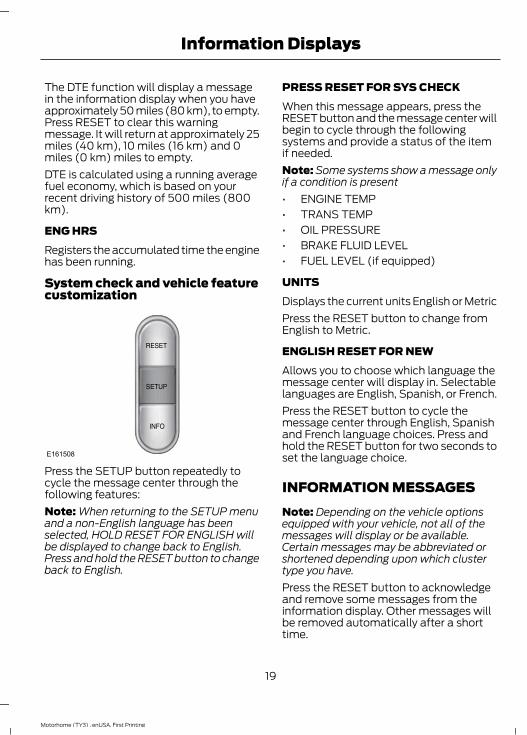
System check and vehicle featurecustomization
E161508
Press the SETUP button repeatedly tocycle the message center through thefollowing features:Note: When returning to the SETUP menuand a non-English language has beenselected, HOLD RESET FOR ENGLISH willbe displayed to change back to English.Press and hold the RESET button to changeback to English.
PRESS RESET FOR SYS CHECKWhen this message appears, press theRESET button and the message center willbegin to cycle through the followingsystems and provide a status of the itemif needed.Note: Some systems show a message onlyif a condition is present• ENGINE TEMP• TRANS TEMP• OIL PRESSURE• BRAKE FLUID LEVEL• FUEL LEVEL (if equipped)
UNITSDisplays the current units English or MetricPress the RESET button to change fromEnglish to Metric.
ENGLISH RESET FOR NEWAllows you to choose which language themessage center will display in. Selectablelanguages are English, Spanish, or French.Press the RESET button to cycle themessage center through English, Spanishand French language choices. Press andhold the RESET button for two seconds toset the language choice.
INFORMATION MESSAGESNote: Depending on the vehicle optionsequipped with your vehicle, not all of themessages will display or be available.Certain messages may be abbreviated orshortened depending upon which clustertype you have.Press the RESET button to acknowledgeand remove some messages from theinformation display. Other messages willbe removed automatically after a shorttime.
19
Motorhome (TY3) , enUSA, First Printing
Information Displays
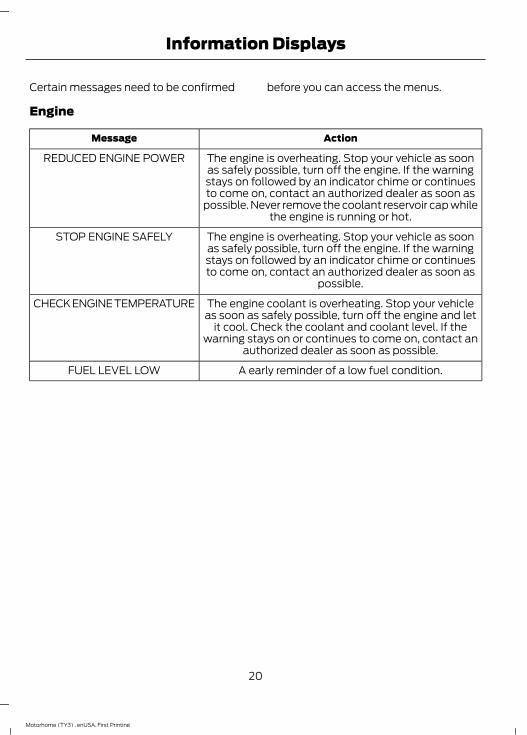
Certain messages need to be confirmed before you can access the menus.
Engine
ActionMessage
The engine is overheating. Stop your vehicle as soonas safely possible, turn off the engine. If the warningstays on followed by an indicator chime or continuesto come on, contact an authorized dealer as soon as
possible. Never remove the coolant reservoir cap whilethe engine is running or hot.
REDUCED ENGINE POWER
The engine is overheating. Stop your vehicle as soonas safely possible, turn off the engine. If the warningstays on followed by an indicator chime or continuesto come on, contact an authorized dealer as soon as
possible.
STOP ENGINE SAFELY
The engine coolant is overheating. Stop your vehicleas soon as safely possible, turn off the engine and let
it cool. Check the coolant and coolant level. If thewarning stays on or continues to come on, contact an
authorized dealer as soon as possible.
CHECK ENGINE TEMPERATURE
A early reminder of a low fuel condition.FUEL LEVEL LOW
20
Motorhome (TY3) , enUSA, First Printing
Information Displays
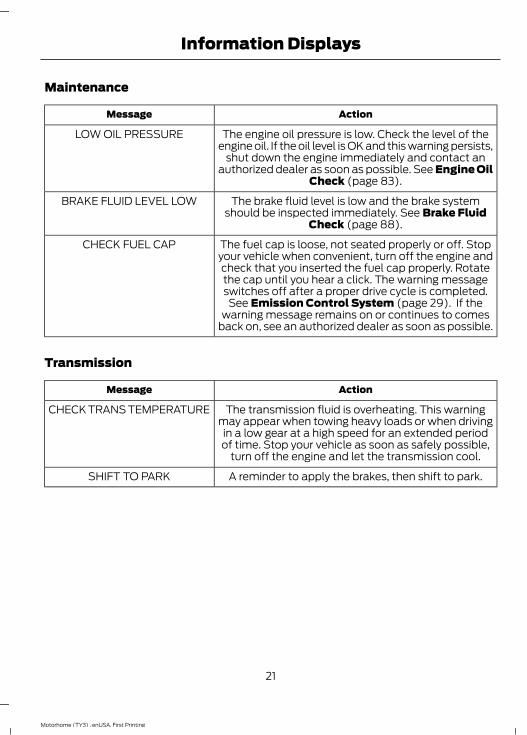
Maintenance
ActionMessage
The engine oil pressure is low. Check the level of theengine oil. If the oil level is OK and this warning persists,
shut down the engine immediately and contact anauthorized dealer as soon as possible. See Engine Oil
Check (page 83).
LOW OIL PRESSURE
The brake fluid level is low and the brake systemshould be inspected immediately. See Brake Fluid
Check (page 88).
BRAKE FLUID LEVEL LOW
The fuel cap is loose, not seated properly or off. Stopyour vehicle when convenient, turn off the engine andcheck that you inserted the fuel cap properly. Rotatethe cap until you hear a click. The warning messageswitches off after a proper drive cycle is completed.See Emission Control System (page 29). If the
warning message remains on or continues to comesback on, see an authorized dealer as soon as possible.
CHECK FUEL CAP
Transmission
ActionMessage
The transmission fluid is overheating. This warningmay appear when towing heavy loads or when drivingin a low gear at a high speed for an extended periodof time. Stop your vehicle as soon as safely possible,
turn off the engine and let the transmission cool.
CHECK TRANS TEMPERATURE
A reminder to apply the brakes, then shift to park.SHIFT TO PARK
21
Motorhome (TY3) , enUSA, First Printing
Information Displays
GENERAL INFORMATION
WARNINGSExtended idling at high enginespeeds can produce very hightemperatures in the engine and
exhaust system, creating the risk of fire orother damage.
Do not park, idle or drive your vehicleon dry grass or other dry groundcover. The emission system heats up
the engine compartment and exhaustsystem, creating the risk of fire.
Do not start the engine in a closedgarage or in other enclosed areas.Exhaust fumes can be toxic. Always
open the garage door before you start theengine.
If you smell exhaust fumes insideyour vehicle, have your vehiclechecked by an authorized dealer
immediately. Do not drive your vehicle ifyou smell exhaust fumes.
If you disconnect the battery, your vehiclemay exhibit some unusual drivingcharacteristics for approximately 5 miles(8 kilometers) after you reconnect it. Thisis because the engine management systemmust realign itself with the engine. You candisregard any unusual drivingcharacteristics during this period.The powertrain control system meets allCanadian interference-causing equipmentstandard requirements regulating theimpulse electrical field or radio noise.When you start the engine, avoid pressingthe accelerator pedal before and duringoperation. Only use the accelerator pedalwhen you have difficulty starting theengine.
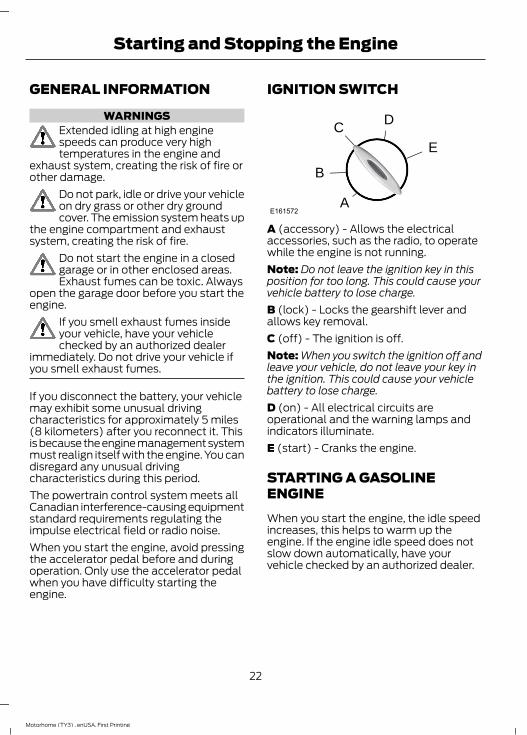
IGNITION SWITCH
E161572
D
EC
B
A
A (accessory) - Allows the electricalaccessories, such as the radio, to operatewhile the engine is not running.Note: Do not leave the ignition key in thisposition for too long. This could cause yourvehicle battery to lose charge.B (lock) - Locks the gearshift lever andallows key removal.C (off) - The ignition is off.Note: When you switch the ignition off andleave your vehicle, do not leave your key inthe ignition. This could cause your vehiclebattery to lose charge.D (on) - All electrical circuits areoperational and the warning lamps andindicators illuminate.E (start) - Cranks the engine.
STARTING A GASOLINEENGINEWhen you start the engine, the idle speedincreases, this helps to warm up theengine. If the engine idle speed does notslow down automatically, have yourvehicle checked by an authorized dealer.
22
Motorhome (TY3) , enUSA, First Printing
Starting and Stopping the Engine
Before starting the engine check thefollowing:• Make sure all occupants have fastened
their safety belts.• Make sure the headlamps and
electrical accessories are off.• Make sure the parking brake is on.• Make sure the transmission is in park
(P) or neutral (N).• Turn the ignition key to the on position.Note: Do not touch the accelerator pedal.1. Fully press the brake pedal.2. Turn the key to the start position to
start the engine. Release the key whenthe engine starts.
Note: The engine may continue crankingfor up to 15 seconds or until it starts.Note: If you cannot start the engine on thefirst try, wait for a short period and try again.
Failure to StartIf you cannot start the engine after threeattempts, wait 10 seconds and follow thisprocedure:1. Fully press the brake pedal.2. Fully press the accelerator pedal and
hold it there.3. Start the engine.
Stopping the Engine When YourVehicle is Stationary1. Shift into park (P) or neutral (N).2. Turn the key to the off position.3. Apply the parking brake.
Stopping the Engine When YourVehicle is Moving
WARNINGSwitching off the engine when thevehicle is still moving will result in aloss of brake and steering assistance.
The steering will not lock, but higher effortwill be required. When the ignition isswitched off, some electrical circuits,including air bags, warning lamps andindicators may also be off. If the ignitionwas turned off accidentally, you can shiftinto neutral (N) and re-start the engine.
1. Put the transmission into neutral (N)and use the brakes to bring your vehicleto a safe stop.
2. When your vehicle has stopped, shiftinto park (P) or neutral (N) and switchthe ignition off.
3. Apply the parking brake.
Guarding Against Exhaust FumesWARNING
If you smell exhaust fumes insideyour vehicle, have your vehiclechecked by your authorized dealer
immediately. Do not drive your vehicle ifyou smell exhaust fumes. Carbonmonoxide is present in exhaust fumes.Take precautions to avoid its dangerouseffects.
Important Ventilating InformationIf you stop your vehicle and then leave theengine idling for long periods of time, werecommend that you do one of thefollowing:• Open the windows at least 1 in (3 cm).• Set your climate control to outside air.
23
Motorhome (TY3) , enUSA, First Printing
Starting and Stopping the Engine

ENGINE BLOCK HEATER (If
Equipped)
WARNINGSFailure to follow engine block heaterinstructions could result in propertydamage or serious personal injury.Do not use your heater withungrounded electrical systems ortwo-pronged adapters. There is a risk
of electrical shock.Do not fully close the hood, or allowit to drop under its own weight whenusing the engine block heater. This
could damage the power cable and maycause an electrical short resulting in fire,injury and property damage.
Note: The heater is most effective whenoutdoor temperatures are below 0°F(-18°C).The heater acts as a starting aid bywarming the engine coolant. This allowsthe climate control system to respondquickly. The equipment includes a heaterelement (installed in the engine block) anda wire harness. You can connect thesystem to a grounded 120-volt ACelectrical source.We recommend that you do the followingfor a safe and correct operation:• Use a 16-gauge outdoor extension cord
that is product certified byUnderwriter’s Laboratory (UL) orCanadian Standards Association(CSA). This extension cord must besuitable for use outdoors, in cold
temperatures, and be clearly markedSuitable for Use with OutdoorAppliances. Do not use an indoorextension cord outdoors. This couldresult in an electric shock or become afire hazard.
• Use as short an extension cord aspossible.
• Do not use multiple extension cords.• Make sure that when in operation, the
extension cord plug and heater cordplug connections are free and clear ofwater. This could cause an electricshock or fire.
• Make sure your vehicle is parked in aclean area, clear of combustibles.
• Make sure the heater, heater cord andextension cord are firmly connected.
• Check for heat anywhere in theelectrical hookup once the system hasbeen operating for approximately 30minutes.
• Make sure the system is unplugged andproperly stowed before starting anddriving your vehicle. Make sure theprotective cover seals the prongs of theblock heater cord plug when not in use.
• Make sure the heater system ischecked for proper operation beforewinter.
Using the Engine Block HeaterMake sure the receptacle terminals areclean and dry prior to use. Clean them witha dry cloth if necessary.The heater uses 0.4 to 1.0 kilowatt-hoursof energy per hour of use. The system doesnot have a thermostat. It achievesmaximum temperature afterapproximately three hours of operation.Using the heater longer than three hoursdoes not improve system performance andunnecessarily uses electricity.
24
Motorhome (TY3) , enUSA, First Printing
Starting and Stopping the Engine
SAFETY PRECAUTIONS
WARNINGSDo not overfill the fuel tank. Thepressure in an overfilled tank maycause leakage and lead to fuel spray
and fire.The fuel system may be underpressure. If you hear a hissing soundnear the fuel filler door (Easy Fuel
capless fuel system), do not refuel untilthe sound stops. Otherwise, fuel may sprayout, which could cause serious personalinjury.
Automotive fuels can cause seriousinjury or death if misused ormishandled.Flow of fuel through a fuel pumpnozzle can produce static electricity.This can cause a fire if you are filling
an ungrounded fuel container.Fuel ethanol and gasoline maycontain benzene, which is acancer-causing agent.When refueling always shut theengine off and never allow sparks oropen flames near the filler neck.
Never smoke or use a cell phone whilerefueling. Fuel vapor is extremelyhazardous under certain conditions. Avoidinhaling excess fumes.
Observe the following guidelines whenhandling automotive fuel:• Extinguish all smoking materials and
any open flames before refueling yourvehicle.
• Always turn off the vehicle beforerefueling.
• Automotive fuels can be harmful orfatal if swallowed. Fuel such asgasoline is highly toxic and ifswallowed can cause death orpermanent injury. If fuel is swallowed,call a physician immediately, even if nosymptoms are immediately apparent.The toxic effects of fuel may not bevisible for hours.
• Avoid inhaling fuel vapors. Inhaling toomuch fuel vapor of any kind can leadto eye and respiratory tract irritation.In severe cases, excessive or prolongedbreathing of fuel vapor can causeserious illness and permanent injury.
• Avoid getting fuel liquid in your eyes. Iffuel is splashed in the eyes, removecontact lenses (if worn), flush withwater for 15 minutes and seek medicalattention. Failure to seek propermedical attention could lead topermanent injury.
• Fuels can also be harmful if absorbedthrough the skin. If fuel is splashed onthe skin, clothing or both, promptlyremove contaminated clothing andwash skin thoroughly with soap andwater. Repeated or prolonged skincontact with fuel liquid or vapor causesskin irritation.
• Be particularly careful if you are taking“Antabuse” or other forms of disulfiramfor the treatment of alcoholism.Breathing gasoline vapors, or skincontact could cause an adversereaction. In sensitive individuals, seriouspersonal injury or sickness may result.If fuel is splashed on the skin, promptlywash skin thoroughly with soap andwater. Consult a physician immediatelyif you experience an adverse reaction.
25
Motorhome (TY3) , enUSA, First Printing
Fuel and Refueling
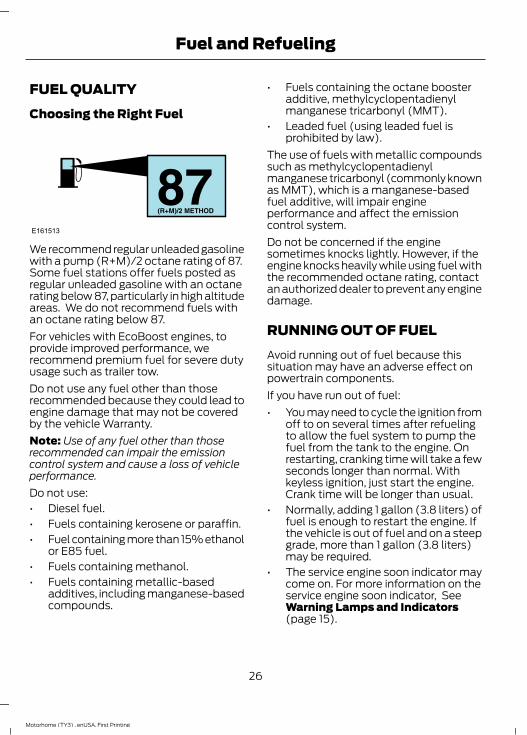
FUEL QUALITYChoosing the Right Fuel
E161513
We recommend regular unleaded gasolinewith a pump (R+M)/2 octane rating of 87.Some fuel stations offer fuels posted asregular unleaded gasoline with an octanerating below 87, particularly in high altitudeareas. We do not recommend fuels withan octane rating below 87.For vehicles with EcoBoost engines, toprovide improved performance, werecommend premium fuel for severe dutyusage such as trailer tow.Do not use any fuel other than thoserecommended because they could lead toengine damage that may not be coveredby the vehicle Warranty.Note: Use of any fuel other than thoserecommended can impair the emissioncontrol system and cause a loss of vehicleperformance.Do not use:• Diesel fuel.• Fuels containing kerosene or paraffin.• Fuel containing more than 15% ethanol
or E85 fuel.• Fuels containing methanol.• Fuels containing metallic-based
additives, including manganese-basedcompounds.
• Fuels containing the octane boosteradditive, methylcyclopentadienylmanganese tricarbonyl (MMT).
• Leaded fuel (using leaded fuel isprohibited by law).
The use of fuels with metallic compoundssuch as methylcyclopentadienylmanganese tricarbonyl (commonly knownas MMT), which is a manganese-basedfuel additive, will impair engineperformance and affect the emissioncontrol system.Do not be concerned if the enginesometimes knocks lightly. However, if theengine knocks heavily while using fuel withthe recommended octane rating, contactan authorized dealer to prevent any enginedamage.
RUNNING OUT OF FUELAvoid running out of fuel because thissituation may have an adverse effect onpowertrain components.If you have run out of fuel:• You may need to cycle the ignition from
off to on several times after refuelingto allow the fuel system to pump thefuel from the tank to the engine. Onrestarting, cranking time will take a fewseconds longer than normal. Withkeyless ignition, just start the engine.Crank time will be longer than usual.
• Normally, adding 1 gallon (3.8 liters) offuel is enough to restart the engine. Ifthe vehicle is out of fuel and on a steepgrade, more than 1 gallon (3.8 liters)may be required.
• The service engine soon indicator maycome on. For more information on theservice engine soon indicator, SeeWarning Lamps and Indicators(page 15).
26
Motorhome (TY3) , enUSA, First Printing
Fuel and Refueling
REFUELING
WARNINGSFuel vapor burns violently and a fuelfire can cause severe injuries.Read and follow all the instructionson the pump island.Turn off your engine when you arerefueling.Do not smoke if you are near fuel orrefueling your vehicle.Keep sparks, flames and smokingmaterials away from fuel.Stay outside your vehicle and do notleave the fuel pump unattendedwhen refueling your vehicle. This is
against the law in some places.Keep children away from the fuelpump; never let children pump fuel.Do not use personal electronicdevices while refueling.Wait at least 10 seconds beforeremoving the fuel pump nozzle toallow any residual fuel to drain into
the fuel tank.Stop refueling after the fuel pumpnozzle automatically shuts off for thesecond time. Failure to follow this
will fill the expansion space in the fuel tankand could lead to fuel overflowing.
Do not remove the fuel pump nozzlefrom its fully inserted position whenrefueling.
Use the following guidelines to avoidelectrostatic charge build-up when fillingan ungrounded fuel container:• Place approved fuel container on the
ground.• Do not fill a fuel container while it is in
the vehicle (including the cargo area).• Keep the fuel pump nozzle in contact
with the fuel container while filling.• Do not use a device that would hold
the fuel pump handle in the fill position.
Fuel Filler CapWARNINGS
The fuel system may be underpressure. If you hear a hissing soundnear the fuel filler door, do not refuel
until the sound stops. Otherwise, fuel mayspray out, which could cause seriouspersonal injury.
If you do not use the proper fuel fillercap, excessive pressure or vacuumin the fuel tank may damage the fuel
system or cause the fuel cap to disengagein a collision, which may result in possiblepersonal injury.
Note: If you must replace the fuel filler cap,replace it with a fuel filler cap that isdesigned for your vehicle. The customerwarranty may be void for any damage to thefuel tank or fuel system if the correctgenuine Ford, Motorcraft or other certifiedfuel filler cap is not used.Your fuel tank filler cap has an indexeddesign with a 1/4th turn on and off feature.When fueling your vehicle:1. Put your vehicle in park (P).2. Switch the engine off.3. Carefully turn the filler cap
counterclockwise until it spins off.4. Pull to remove the cap from the fuel
filler pipe.
27
Motorhome (TY3) , enUSA, First Printing
Fuel and Refueling
5. To install the cap, align the tabs on thecap with the notches on the filler pipe.
6. Turn the filler cap clockwise 1/4 of aturn clockwise until it clicks at leastonce.
If the Check Fuel Cap light or a Check FuelCap message appears in the instrumentcluster and stays on after you start theengine, you may not have installed the fuelfiller properly.If the fuel cap light remains on, at the nextopportunity, safely pull off of the road,remove the fuel filler cap, align the capproperly and reinstall it. The check fuel caplight or Check fuel cap message may notreset immediately. It may take severaldriving cycles for the indicators to turn off.A driving cycle consists of an enginestart-up (after four or more hours with theengine off) followed by normal city andhighway driving.
FUEL CONSUMPTIONEmpty reserve is the amount of fuelremaining in the tank after the fuel gaugeindicates empty. The amount of usablefuel in the empty reserve varies and shouldnot be relied upon to increase driving range.• The usable capacity of the fuel tank is
the amount of fuel that can be addedinto the tank after the gauge indicatesempty
• The advertised capacity is the total fueltank size. See Capacities andSpecifications (page 118). It is thecombined usable capacity plus theempty reserve.
• Due to the empty reserve, you may notbe able to refuel the full amount of theadvertised capacity of the fuel tankeven when the fuel gauge reads empty.
Filling the TankFor consistent results when filling the fueltank:• Turn the ignition off before fueling; an
inaccurate reading results if the engineis left running.
• Use the same fill rate(low-medium-high) each time the tankis filled.
• Allow no more than two automaticclick-offs when filling.
Results are most accurate when the fillingmethod is consistent.
Calculating Fuel EconomyDo not measure fuel economy during thefirst 1000 miles (1600 kilometers) ofdriving (this is your engine’s break-inperiod); a more accurate measurement isobtained after 2000 miles - 3000 miles(3200 kilometers - 4800 kilometers). Also,fuel expense, frequency of fill ups or fuelgauge readings are not accurate ways tomeasure fuel economy.1. Fill the fuel tank completely and record
the initial odometer reading.2. Each time you fill the tank, record the
amount of fuel added.3. After at least 3 to 5 tank fill ups, fill the
fuel tank and record the currentodometer reading.
4. Subtract your initial odometer readingfrom the current odometer reading.
5. Calculate fuel economy by dividingmiles traveled by gallons used (ForMetric: Multiply liters used by 100, thendivide by kilometers traveled).
28
Motorhome (TY3) , enUSA, First Printing
Fuel and Refueling
Keep a record for at least 1 month andrecord the type of driving (city or highway).This provides an accurate estimate of thevehicle’s fuel economy under currentdriving conditions. Additionally, keepingrecords during summer and winter showhow temperature impacts fuel economy.In general, lower temperatures mean lowerfuel economy.
Conditions• Heavily loading a vehicle or towing a
trailer may reduce fuel economy at anyspeed.
• Carrying unnecessary weight mayreduce fuel economy (approximately1 mpg [0.4 km/L] is lost for every 400pounds [180 kilograms] of weightcarried).
• Adding certain accessories to yourvehicle (for example bug deflectors,rollbars/light bars, running boards, skiracks) may reduce fuel economy.
• Using fuel blended with alcohol maylower fuel economy.
• Fuel economy may decrease with lowertemperatures during the first 8–10miles (12–16 kilometers) of driving.
• Driving on flat terrain offers improvedfuel economy as compared to drivingon hilly terrain.
• Transmissions give their best fueleconomy when operated in the topcruise gear and with steady pressureon the gas pedal.
• Close windows for high speed driving.
EMISSION CONTROL SYSTEM
WARNINGSDo not park, idle, or drive your vehiclein dry grass or other dry ground cover.The emission system heats up the
engine compartment and exhaust system,which can start a fire.
Exhaust leaks may result in entry ofharmful and potentially lethal fumesinto the passenger compartment. If
you smell exhaust fumes inside yourvehicle, have your dealer inspect yourvehicle immediately. Do not drive if yousmell exhaust fumes.
Your vehicle is equipped with variousemission control components and acatalytic converter that will enable yourvehicle to comply with applicable exhaustemission standards. To make sure that thecatalytic converter and other emissioncontrol components continue to workproperly:• Use only the specified fuel listed.• Avoid running out of fuel.• Do not turn off the ignition while your
vehicle is moving, especially at highspeeds.
• Have the items listed in scheduledmaintenance information performedaccording to the specified schedule.
The scheduled maintenance items listedin scheduled maintenance information areessential to the life and performance ofyour vehicle and to its emissions system.If you use parts other than Ford, Motorcraftor Ford-authorized parts for maintenancereplacements, or for service ofcomponents affecting emission control,such non-Ford parts should be theequivalent to genuine Ford Motor Companyparts in performance and durability.
29
Motorhome (TY3) , enUSA, First Printing
Fuel and Refueling
Illumination of the service engine soonindicator, charging system warning light orthe temperature warning light, fluid leaks,strange odors, smoke or loss of enginepower could indicate that the emissioncontrol system is not working properly.An improperly operating or damagedexhaust system may allow exhaust toenter the vehicle. Have a damaged orimproperly operating exhaust systeminspected and repaired immediately.Do not make any unauthorized changes toyour vehicle or engine. By law, vehicleowners and anyone who manufactures,repairs, services, sells, leases, tradesvehicles, or supervises a fleet of vehiclesare not permitted to intentionally removean emission control device or prevent itfrom working. Information about yourvehicle’s emission system is on the VehicleEmission Control Information Decallocated on or near the engine. This decalalso lists engine displacementPlease consult your warranty informationfor complete details.
On-Board Diagnostics (OBD-II)Your vehicle has a computer known as theon-board diagnostics system (OBD-II) thatmonitors the engine’s emission controlsystem. The system protects theenvironment by making sure that yourvehicle continues to meet governmentemission standards. The OBD-II systemalso assists a service technician in properlyservicing your vehicle.
When the service engine soonindicator illuminates, the OBD-IIsystem has detected a
malfunction. Temporary malfunctions maycause the service engine soon indicator toilluminate.
Examples of temporary malfunctions are:
• the vehicle has run out of fuel—theengine may misfire or run poorly
• poor fuel quality or water in thefuel—the engine may misfire or runpoorly
• the fuel fill inlet may not have closedproperly. See Refueling (page 27).
• driving through deep water—theelectrical system may be wet.
You can correct these temporarymalfunctions by filling the fuel tank withgood quality fuel, properly closing the fuelfill inlet or letting the electrical system dryout. After three driving cycles without theseor any other temporary malfunctionspresent, the service engine soon indicatorshould stay off the next time you start theengine. A driving cycle consists of a coldengine startup followed by mixedcity/highway driving. No additional vehicleservice is required.If the service engine soon indicator remainson, have your vehicle serviced at the firstavailable opportunity. Although somemalfunctions detected by the OBD-II maynot have symptoms that are apparent,continued driving with the service enginesoon indicator on can result in increasedemissions, lower fuel economy, reducedengine and transmission smoothness, andlead to more costly repairs.
Readiness forInspection/Maintenance (I/M)TestingSome state/provincial and localgovernments may haveInspection/Maintenance (I/M) programsto inspect the emission control equipmenton your vehicle. Failure to pass thisinspection could prevent you from gettinga vehicle registration.
30
Motorhome (TY3) , enUSA, First Printing
Fuel and Refueling
If the service engine soonindicator is on or the bulb doesnot work, you may need to have
the vehicle serviced. See On-BoardDiagnostics (OBD-II).
Your vehicle may not pass the I/M test ifthe service engine soon indicator is on ornot working properly (bulb is burned out),or if the OBD-II system has determinedthat some of the emission control systemshave not been properly checked. In thiscase, your vehicle is not ready for I/Mtesting.If the vehicle’s engine or transmission hasjust been serviced, or the battery hasrecently run down or been replaced, theOBD-II system may indicate that thevehicle is not ready for I/M testing. Todetermine if the vehicle is ready for I/Mtesting, turn the ignition key to the onposition for 15 seconds without crankingthe engine. If the service engine soonindicator blinks eight times, it means thatthe vehicle is not ready for I/M testing; ifthe service engine soon indicator stays onsolid, it means that the vehicle is ready forI/M testing.The OBD-II system monitors the emissioncontrol system during normal driving. Acomplete check may take several days. Ifthe vehicle is not ready for I/M testing, youmay need to perform the following drivingcycle consisting of mixed city and highwaydriving:Drive on an expressway or highway for asteady 15 minutes, followed by 20 minutesof stop-and-go driving with at least four30-second idle periods.
Allow the vehicle to sit for at least eighthours without starting the engine. Then,start the engine and complete the abovedriving cycle. The engine must warm up toits normal operating temperature. Oncestarted, do not turn off the engine until theabove driving cycle is complete. If thevehicle is still not ready for I/M testing, youwill have to repeat the above driving cycle.
31
Motorhome (TY3) , enUSA, First Printing
Fuel and Refueling
AUTOMATIC TRANSMISSION
WARNINGSAlways set the parking brake fullyand latch the gearshift in park (P).Turn the ignition to the off position
and remove the key whenever you leaveyour vehicle.
Do not apply the brake pedal andaccelerator pedal simultaneously.Applying both pedals simultaneously
for more than three seconds will limitengine rpm, which may result in difficultymaintaining speed in traffic and could leadto serious injury.
Understanding the Positions ofYour Automatic Transmission
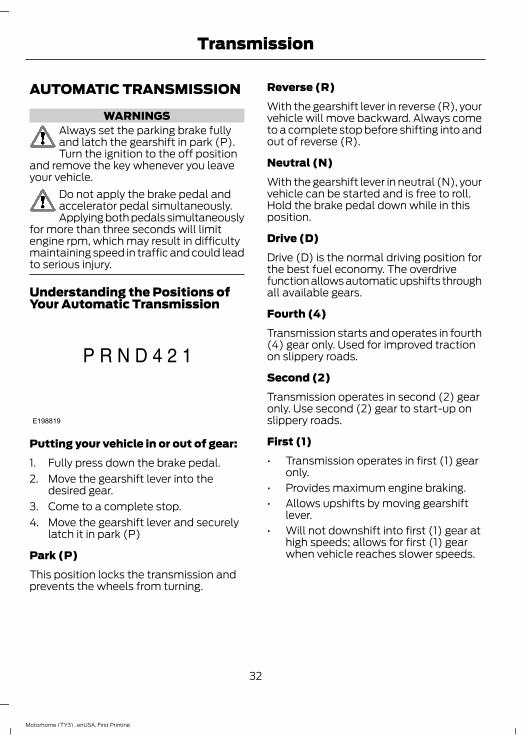
E198819
Putting your vehicle in or out of gear:1. Fully press down the brake pedal.2. Move the gearshift lever into the
desired gear.3. Come to a complete stop.4. Move the gearshift lever and securely
latch it in park (P)
Park (P)This position locks the transmission andprevents the wheels from turning.
Reverse (R)With the gearshift lever in reverse (R), yourvehicle will move backward. Always cometo a complete stop before shifting into andout of reverse (R).
Neutral (N)With the gearshift lever in neutral (N), yourvehicle can be started and is free to roll.Hold the brake pedal down while in thisposition.
Drive (D)Drive (D) is the normal driving position forthe best fuel economy. The overdrivefunction allows automatic upshifts throughall available gears.
Fourth (4)Transmission starts and operates in fourth(4) gear only. Used for improved tractionon slippery roads.
Second (2)Transmission operates in second (2) gearonly. Use second (2) gear to start-up onslippery roads.
First (1)• Transmission operates in first (1) gear
only.• Provides maximum engine braking.• Allows upshifts by moving gearshift
lever.• Will not downshift into first (1) gear at
high speeds; allows for first (1) gearwhen vehicle reaches slower speeds.
32
Motorhome (TY3) , enUSA, First Printing
Transmission
Tow/Haul Mode
WARNINGDo not use the tow/haul featurewhen driving in icy or slipperyconditions as the increased engine
braking can cause the wheels to slide andyour vehicle to swing around with thepossible loss of vehicle control.
E161510
E161509
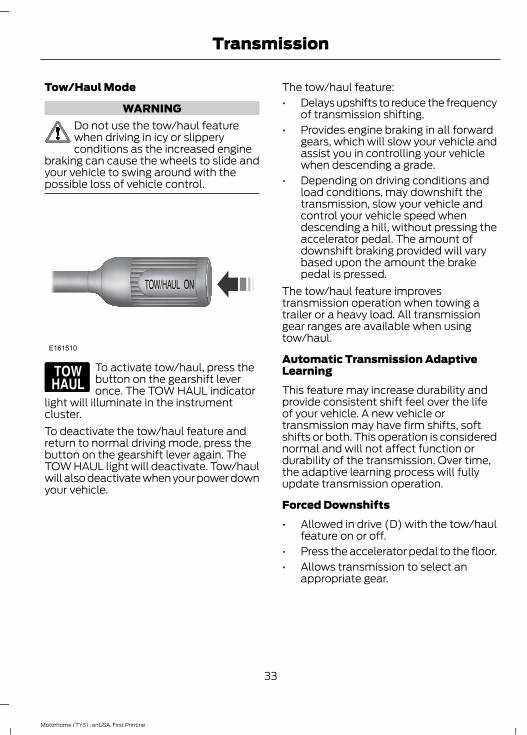
To activate tow/haul, press thebutton on the gearshift leveronce. The TOW HAUL indicator
light will illuminate in the instrumentcluster.To deactivate the tow/haul feature andreturn to normal driving mode, press thebutton on the gearshift lever again. TheTOW HAUL light will deactivate. Tow/haulwill also deactivate when your power downyour vehicle.
The tow/haul feature:• Delays upshifts to reduce the frequency
of transmission shifting.• Provides engine braking in all forward
gears, which will slow your vehicle andassist you in controlling your vehiclewhen descending a grade.
• Depending on driving conditions andload conditions, may downshift thetransmission, slow your vehicle andcontrol your vehicle speed whendescending a hill, without pressing theaccelerator pedal. The amount ofdownshift braking provided will varybased upon the amount the brakepedal is pressed.
The tow/haul feature improvestransmission operation when towing atrailer or a heavy load. All transmissiongear ranges are available when usingtow/haul.
Automatic Transmission AdaptiveLearningThis feature may increase durability andprovide consistent shift feel over the lifeof your vehicle. A new vehicle ortransmission may have firm shifts, softshifts or both. This operation is considerednormal and will not affect function ordurability of the transmission. Over time,the adaptive learning process will fullyupdate transmission operation.
Forced Downshifts• Allowed in drive (D) with the tow/haul
feature on or off.• Press the accelerator pedal to the floor.• Allows transmission to select an
appropriate gear.
33
Motorhome (TY3) , enUSA, First Printing
Transmission
Brake-Shift InterlockWARNINGS
Do not drive your vehicle until youverify that the brake lamps areworking.If your brake lamps are not workingproperly or if you have disconnectedthe vehicle battery cables, the
vehicle brake lamps and hazard flashersmay not properly warn traffic of a vehiclebreakdown or approaching danger, whichcan increase the risk of serious injury ordeath. To minimize the risk of serious injuryor death, be aware of your surroundings,use other hazard signaling devices ifavailable, and move the vehicle to a safelocation away from traffic as soon aspossible.
When doing this procedure, you willbe taking the vehicle out of parkwhich means the vehicle can roll
freely. To avoid unwanted vehiclemovement, always fully set the parkingbrake prior to doing this procedure. Usewheel chocks if appropriate.
If the parking brake is fully released,but the brake warning lamp remainsilluminated, the brakes may not be
working properly. See your authorizeddealer.
Your vehicle is equipped with a brake-shiftinterlock feature that prevents moving thegearshift lever from park (P) when theignition is in the on position and the brakepedal is not pressed.If you cannot move the gearshift lever outof park (P) position with the ignition in theon position and the brake pedal pressed,a malfunction may have occurred. It ispossible that a fuse has blown or yourvehicle’s brake lamps are not operatingproperly. See Fuse Specification Chart(page 63).
If the fuse is not blown and the brakelamps are working properly, the followingprocedure will allow you to move thegearshift lever from park (P):1. Apply the parking brake. Turn key to
the lock position, and then remove thekey.
2. Disconnect the negative (black)battery cable from the battery.
3. Insert the key and turn to the offposition. Shift the transmission toneutral (N).
4. Reconnect the negative (black) batterycable to the battery.
5. Start the vehicle.Note: See your authorized dealer as soonas possible if this procedure is used.
If Your Vehicle Gets Stuck In Mudor SnowNote: Do not rock your vehicle if the engineis not at normal operating temperature ordamage to the transmission may occur.Note: Do not rock your vehicle for morethan a minute or damage to thetransmission and tires may occur, or theengine may overheat.If your vehicle gets stuck in mud or snow,you may rock it out by shifting betweenforward and reverse gears, stoppingbetween shifts in a steady pattern. Presslightly on the accelerator in each gear.
34
Motorhome (TY3) , enUSA, First Printing
Transmission
GENERAL INFORMATIONNote: Occasional brake noise is normal. Ifa metal-to-metal, continuous grinding orcontinuous squeal sound is present, thebrake linings may be worn-out and shouldbe inspected by an authorized dealer. If thevehicle has continuous vibration or shudderin the steering wheel while braking, thevehicle should be inspected by anauthorized dealer.Note: Brake dust may accumulate on thewheels, even under normal drivingconditions. Some dust is inevitable as thebrakes wear and does not contribute tobrake noise. See Cleaning the AlloyWheels (page 95).
E144522
See the Instrument Clusterchapter for information on thebrake system warning light.
Wet brakes result in reduced brakingefficiency. Gently press the brake pedal afew times when driving from a car wash orstanding water to dry the brakes.
Brake Over AcceleratorIn the event the accelerator pedalbecomes stuck or entrapped, apply steadyand firm pressure to the brake pedal toslow the vehicle and reduce engine power.If you experience this condition, apply thebrakes and bring your vehicle to a safestop. Turn the engine off, shift thetransmission into park (P), apply theparking brake, and then inspect theaccelerator pedal for any interferences. Ifnone are found and the condition persists,have your vehicle towed to the nearestauthorized dealer.
Hydraulic brake booster system(Hydroboost or Hydromax)The Hydroboost and Hydromax systemsreceive fluid pressure from the powersteering pump to provide power assistduring braking.The Hydromax booster receives backuppressure from the reserve system electricpump whenever the fluid in the powersteering system is not flowing. When theengine is off, the pump will turn on if thebrake pedal is applied, or if the ignition isturned to the on position.The sound of the pump operating may beheard by the driver, but this is a normalcharacteristic of the system.The reserve system provides reducedbraking power, so the vehicle should beoperated under these conditions withcaution, and only to seek service repair andremove the vehicle from the roadway.Note: For Hydromax-equipped vehiclesoperating under normal conditions, the noiseof the fluid flowing through the booster maybe heard whenever the brake is applied. Thiscondition is normal. Vehicle service is notrequired.If braking performance or pedal responsebecomes very poor, even when the pedalis strongly pressed, it may indicate thepresence of air in the hydraulic system orleakage of fluid. Stop the vehicle safely assoon as possible and seek serviceimmediately.
HINTS ON DRIVING WITHANTI-LOCK BRAKESNote: When the system is operating, thebrake pedal will pulse and may travelfurther. Maintain pressure on the brakepedal. You may also hear a noise from thesystem. This is normal.
35
Motorhome (TY3) , enUSA, First Printing
Brakes
The anti-lock braking system will noteliminate the risks when:• You drive too closely to the vehicle in
front of you.• Your vehicle is hydroplaning.• You take corners too fast.• The road surface is poor.
PARKING BRAKE
WARNINGAlways set the parking brake fullyand make sure the transmissionselector lever is placed in park (P).
Failure to set the parking brake and engagepark could result in vehicle roll-away,property damage or bodily injury. Turn theignition to the lock position and removethe key whenever you leave your vehicle.
Apply the parking brake whenever yourvehicle is parked.• For vehicles equipped with a foot
operated parking brake, press the pedaldownward to set the parking brake.
• For vehicle equipped with a handoperated parking brake, pull theparking brake lever up to set theparking brake.
E144522
The brake warning lamp in theinstrument cluster illuminateswhen the ignition is turned on
and the parking brake is applied.
The parking brake is not recommended tostop a moving vehicle. However, if thenormal brakes fail, the parking brake canbe used to stop your vehicle in anemergency. Your vehicle's stoppingdistance will increase greatly and thehandling of your vehicle will be adverselyaffected.
To release the parking brake:• For vehicles equipped with a foot
operated parking brake, pull theparking brake release lever.
• For vehicles equipped with a handoperated parking brake, push theparking brake lever down.
36
Motorhome (TY3) , enUSA, First Printing
Brakes
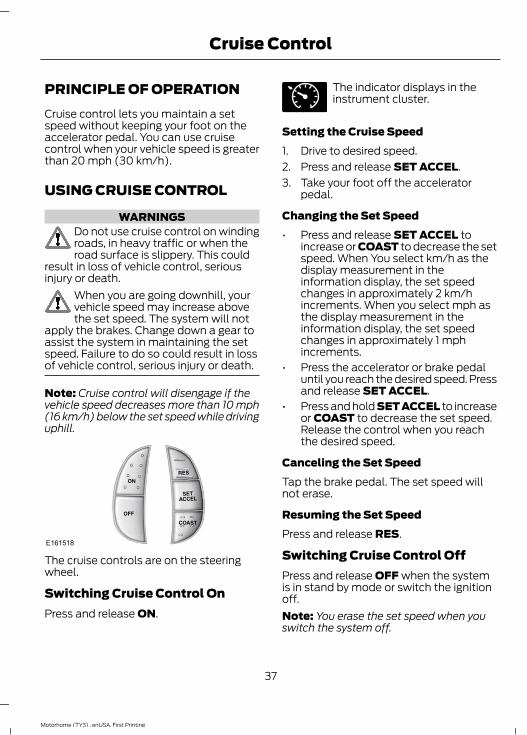
PRINCIPLE OF OPERATIONCruise control lets you maintain a setspeed without keeping your foot on theaccelerator pedal. You can use cruisecontrol when your vehicle speed is greaterthan 20 mph (30 km/h).
USING CRUISE CONTROL
WARNINGSDo not use cruise control on windingroads, in heavy traffic or when theroad surface is slippery. This could
result in loss of vehicle control, seriousinjury or death.
When you are going downhill, yourvehicle speed may increase abovethe set speed. The system will not
apply the brakes. Change down a gear toassist the system in maintaining the setspeed. Failure to do so could result in lossof vehicle control, serious injury or death.
Note: Cruise control will disengage if thevehicle speed decreases more than 10 mph(16 km/h) below the set speed while drivinguphill.
E161518
The cruise controls are on the steeringwheel.
Switching Cruise Control OnPress and release ON.
E71340
The indicator displays in theinstrument cluster.
Setting the Cruise Speed1. Drive to desired speed.2. Press and release SET ACCEL.3. Take your foot off the accelerator
pedal.
Changing the Set Speed• Press and release SET ACCEL to
increase or COAST to decrease the setspeed. When You select km/h as thedisplay measurement in theinformation display, the set speedchanges in approximately 2 km/hincrements. When you select mph asthe display measurement in theinformation display, the set speedchanges in approximately 1 mphincrements.
• Press the accelerator or brake pedaluntil you reach the desired speed. Pressand release SET ACCEL.
• Press and hold SET ACCEL to increaseor COAST to decrease the set speed.Release the control when you reachthe desired speed.
Canceling the Set SpeedTap the brake pedal. The set speed willnot erase.
Resuming the Set SpeedPress and release RES.
Switching Cruise Control OffPress and release OFF when the systemis in stand by mode or switch the ignitionoff.Note: You erase the set speed when youswitch the system off.
37
Motorhome (TY3) , enUSA, First Printing
Cruise Control
LOAD LIMIT
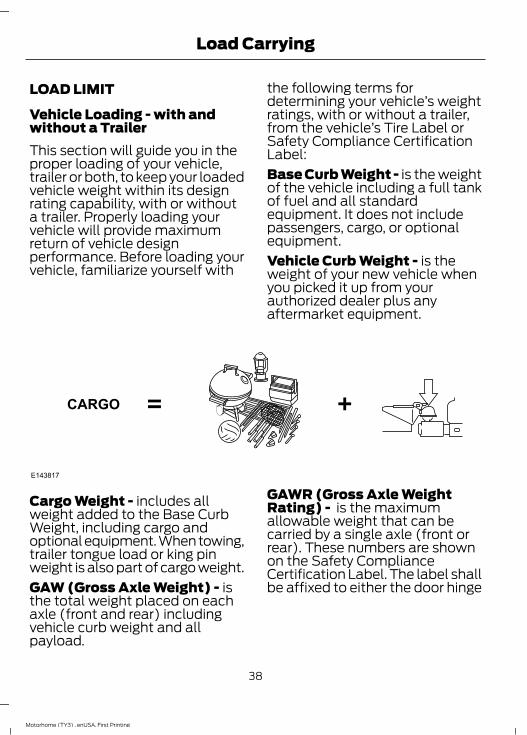
Vehicle Loading - with andwithout a TrailerThis section will guide you in theproper loading of your vehicle,trailer or both, to keep your loadedvehicle weight within its designrating capability, with or withouta trailer. Properly loading yourvehicle will provide maximumreturn of vehicle designperformance. Before loading yourvehicle, familiarize yourself with
the following terms fordetermining your vehicle’s weightratings, with or without a trailer,from the vehicle’s Tire Label orSafety Compliance CertificationLabel:Base Curb Weight - is the weightof the vehicle including a full tankof fuel and all standardequipment. It does not includepassengers, cargo, or optionalequipment.Vehicle Curb Weight - is theweight of your new vehicle whenyou picked it up from yourauthorized dealer plus anyaftermarket equipment.
E143817
CARGO
Cargo Weight - includes allweight added to the Base CurbWeight, including cargo andoptional equipment. When towing,trailer tongue load or king pinweight is also part of cargo weight.GAW (Gross Axle Weight) - isthe total weight placed on eachaxle (front and rear) includingvehicle curb weight and allpayload.
GAWR (Gross Axle WeightRating) - is the maximumallowable weight that can becarried by a single axle (front orrear). These numbers are shownon the Safety ComplianceCertification Label. The label shallbe affixed to either the door hinge
38
Motorhome (TY3) , enUSA, First Printing
Load Carrying
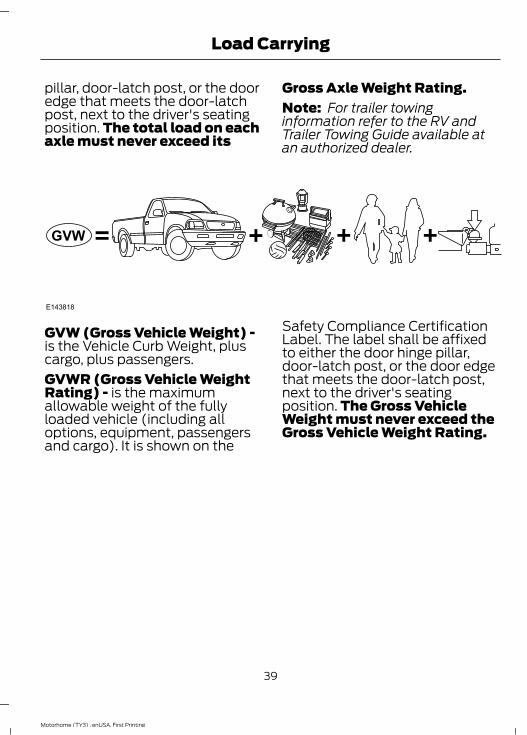
pillar, door-latch post, or the dooredge that meets the door-latchpost, next to the driver's seatingposition. The total load on eachaxle must never exceed its
Gross Axle Weight Rating.Note: For trailer towinginformation refer to the RV andTrailer Towing Guide available atan authorized dealer.
E143818
GVW
GVW (Gross Vehicle Weight) -is the Vehicle Curb Weight, pluscargo, plus passengers.GVWR (Gross Vehicle WeightRating) - is the maximumallowable weight of the fullyloaded vehicle (including alloptions, equipment, passengersand cargo). It is shown on the
Safety Compliance CertificationLabel. The label shall be affixedto either the door hinge pillar,door-latch post, or the door edgethat meets the door-latch post,next to the driver's seatingposition. The Gross VehicleWeight must never exceed theGross Vehicle Weight Rating.
39
Motorhome (TY3) , enUSA, First Printing
Load Carrying
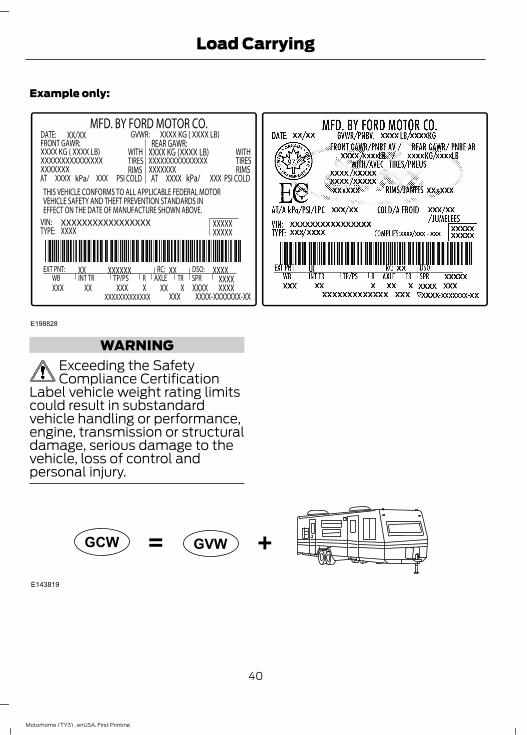
Example only:
E198828
WARNINGExceeding the SafetyCompliance Certification
Label vehicle weight rating limitscould result in substandardvehicle handling or performance,engine, transmission or structuraldamage, serious damage to thevehicle, loss of control andpersonal injury.
E143819
GCW GVW
40
Motorhome (TY3) , enUSA, First Printing
Load Carrying
GCW (Gross Combined Weight)- is the Gross Vehicle Weight plusthe weight of the fully loadedtrailer.GCWR (Gross CombinedWeight Rating) - is the maximumallowable weight of the vehicleand the loaded trailer, includingall cargo and passengers, that thevehicle can handle without riskingdamage. (Important: The towingvehicle’s braking system is ratedfor operation at Gross VehicleWeight Rating, not at GrossCombined Weight Rating.)Separate functional brakes shouldbe used for safe control of towedvehicles and for trailers where theGross Combined Weight of thetowing vehicle plus the trailerexceed the Gross Vehicle WeightRating of the towing vehicle. TheGross Combined Weight mustnever exceed the GrossCombined Weight Rating.Maximum Loaded TrailerWeight - is the highest possibleweight of a fully loaded trailer thevehicle can tow. It assumes avehicle with mandatory options,driver and front passenger weight(150 pounds [68 kilograms]each), no cargo weight (internalor external) and a tongue load of10–15% (conventional trailer).Consult an authorized dealer (orthe RV and Trailer Towing Guideavailable at an authorized dealer)for more detailed information.
WARNINGSDo not exceed the GVWR orthe GAWR specified on the
Safety Compliance CertificationLabel.
Do not use replacement tireswith lower load carrying
capacities than the original tiresbecause they may lower thevehicle’s GVWR and GAWRlimitations. Replacement tireswith a higher limit than the originaltires do not increase the GVWRand GAWR limitations.
Exceeding any vehicle weightrating limitation could result
in serious damage to the vehicleand/or personal injury.
Steps for determining thecorrect load limit:1. Determine the combined weightof the driver and passengers thatwill be riding in your vehicle.2. Subtract the combined weightof the driver and passengers fromXXX kg or XXX lb.3. The resulting figure equals theavailable amount of cargo andluggage load capacity. Forexample, if the “XXX” amountequals 1,400 lb. and there will befive 150 lb. passengers in yourvehicle, the amount of availablecargo and luggage load capacityis 650 lb. (1400-750 (5 x 150) =650 lb.)
41
Motorhome (TY3) , enUSA, First Printing
Load Carrying
4. Determine the combined weightof luggage and cargo being loadedon the vehicle. That weight maynot safely exceed the availablecargo and luggage load capacitycalculated in Step 3.5. If your vehicle will be towing atrailer, load from your trailer willbe transferred to your vehicle.Consult this manual to determinehow this reduces the availablecargo and luggage load capacityof your vehicle.The following gives you a fewexamples on how to calculate theavailable amount of cargo andluggage load capacity:*Suppose your vehicle has a1400-pound (635-kilogram) cargoand luggage capacity. You decideto go golfing. Is there enough loadcapacity to carry you, four of yourfriends and all the golf bags? Youand four friends average 220pounds (99 kilograms) each andthe golf bags weigh approximately30 pounds (13.5 kilograms) each.The calculation would be: 1400 -(5 x 220) - (5 x 30) = 1400 - 1100- 150 = 150 pounds. Yes, you haveenough load capacity in yourvehicle to transport four friendsand your golf bags. In metric units,the calculation would be: 635kilograms - (5 x 99 kilograms) -(5 x 13.5 kilograms) = 635 - 495 -67.5 = 72.5 kilograms.
*Suppose your vehicle has a1400-pound (635-kilogram) cargoand luggage capacity. You andone of your friends decide to pickup cement from the local homeimprovement store to finish thatpatio you have been planning forthe past two years. Measuring theinside of the vehicle with the rearseat folded down, you have roomfor twelve 100-pound(45-kilogram) bags of cement. Doyou have enough load capacity totransport the cement to yourhome? If you and your friend eachweigh 220 pounds (99 kilograms),the calculation would be: 1400 -(2 x 220) - (12 x 100) = 1400 - 440- 1200 = - 240 pounds. No, you donot have enough cargo capacityto carry that much weight. Inmetric units, the calculation wouldbe: 635 kilograms - (2 x 99kilograms) - (12 x 45 kilograms) =635 - 198 - 540 = -103 kilograms.You will need to reduce the loadweight by at least 240 pounds(104 kilograms). If you removethree 100-pound (45-kilogram)cement bags, then the loadcalculation would be:1400 - (2 x220) - (9 x 100) = 1400 - 440 -900 = 60 pounds. Now you havethe load capacity to transport thecement and your friend home. Inmetric units, the calculation wouldbe: 635 kilograms - (2 x 99kilograms) - (9 x 45 kilograms) =635 - 198 - 405 = 32 kilograms.
42
Motorhome (TY3) , enUSA, First Printing
Load Carrying
The above calculations alsoassume that the loads arepositioned in your vehicle in amanner that does not overloadthe Front or the Rear Gross AxleWeight Rating specified for yourvehicle on the Safety ComplianceCertification Label. The label shallbe affixed to either the door hingepillar, door-latch post, or the dooredge that meets the door-latchpost, next to the driver's seatingposition.Special Loading Instructionsfor Owners of Pick-up Trucksand Utility-type Vehicles
WARNINGLoaded vehicles may handledifferently than unloaded
vehicles. Extra precautions, suchas slower speeds and increasedstopping distance, should betaken when driving a heavilyloaded vehicle.
Your vehicle can haul more cargoand people than most passengercars. Depending upon the typeand placement of the load,hauling cargo and people mayraise the center of gravity of thevehicle.
43
Motorhome (TY3) , enUSA, First Printing
Load Carrying
TOWING A TRAILER
WARNINGSDo not exceed the GVWR orthe GAWR specified on the
certification label.Towing trailers beyond themaximum recommended
gross trailer weight exceeds thelimit of the vehicle and couldresult in engine damage,transmission damage, structuraldamage, loss of vehicle control,vehicle rollover and personalinjury.
Your vehicle may have electricalitems, such as fuses or relays,related to towing. See the Fuseschapter.Your vehicle's load capacitydesignation is by weight, not byvolume, so you cannot necessarilyuse all available space whenloading a vehicle or trailer.Towing a trailer places an extraload on your vehicle's engine,transmission, axle, brakes, tiresand suspension. Inspect thesecomponents periodically during,and after, any towing operation.
Load PlacementTo help minimize how trailermovement affects your vehiclewhen driving:• Load the heaviest items closest
to the trailer floor.• Load the heaviest items
centered between the left andright side trailer tires.
• Load the heaviest items abovethe trailer axles or just slightlyforward toward the trailertongue. Do not allow the finaltrailer tongue weight to goabove or below 10-15% of theloaded trailer weight.
• Select a tow bar with thecorrect rise or drop. When boththe loaded vehicle and trailerare connected, the trailer frameshould be level, or slightlyangled down toward yourvehicle, when viewed from theside.
When driving with a trailer orpayload, a slight takeoff vibrationor shudder may be present due tothe increased payload weight.Additional information regardingproper trailer loading and settingyour vehicle up for towing islocated in another chapter of thismanual. See Load Limit (page38).You can also find information inthe RV & Trailer Towing Guideavailable at your authorizeddealer, or online.
44
Motorhome (TY3) , enUSA, First Printing
Towing
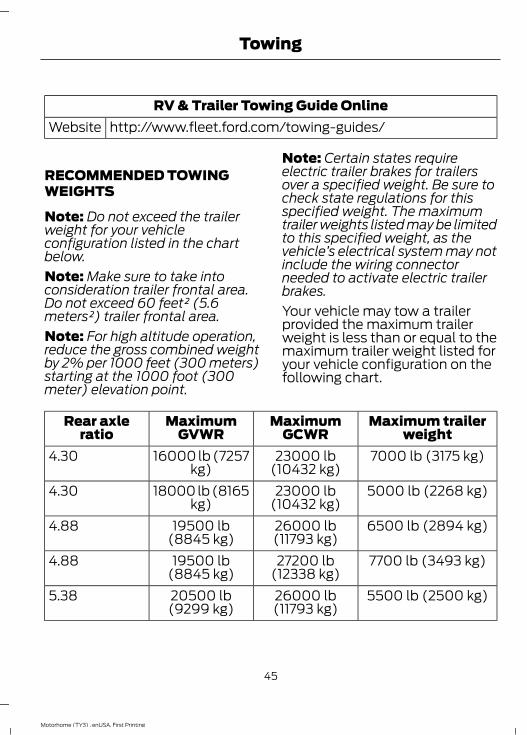
RV & Trailer Towing Guide Onlinehttp://www.fleet.ford.com/towing-guides/Website
RECOMMENDED TOWINGWEIGHTS
Note: Do not exceed the trailerweight for your vehicleconfiguration listed in the chartbelow.Note: Make sure to take intoconsideration trailer frontal area.Do not exceed 60 feet² (5.6meters²) trailer frontal area.Note: For high altitude operation,reduce the gross combined weightby 2% per 1000 feet (300 meters)starting at the 1000 foot (300meter) elevation point.
Note: Certain states requireelectric trailer brakes for trailersover a specified weight. Be sure tocheck state regulations for thisspecified weight. The maximumtrailer weights listed may be limitedto this specified weight, as thevehicle’s electrical system may notinclude the wiring connectorneeded to activate electric trailerbrakes.Your vehicle may tow a trailerprovided the maximum trailerweight is less than or equal to themaximum trailer weight listed foryour vehicle configuration on thefollowing chart.
Maximum trailerweight
MaximumGCWR
MaximumGVWR
Rear axleratio
7000 lb (3175 kg)23000 lb(10432 kg)
16000 lb (7257kg)
4.30
5000 lb (2268 kg)23000 lb(10432 kg)
18000 lb (8165kg)
4.30
6500 lb (2894 kg)26000 lb(11793 kg)
19500 lb(8845 kg)
4.88
7700 lb (3493 kg)27200 lb(12338 kg)
19500 lb(8845 kg)
4.88
5500 lb (2500 kg)26000 lb(11793 kg)
20500 lb(9299 kg)
5.38
45
Motorhome (TY3) , enUSA, First Printing
Towing
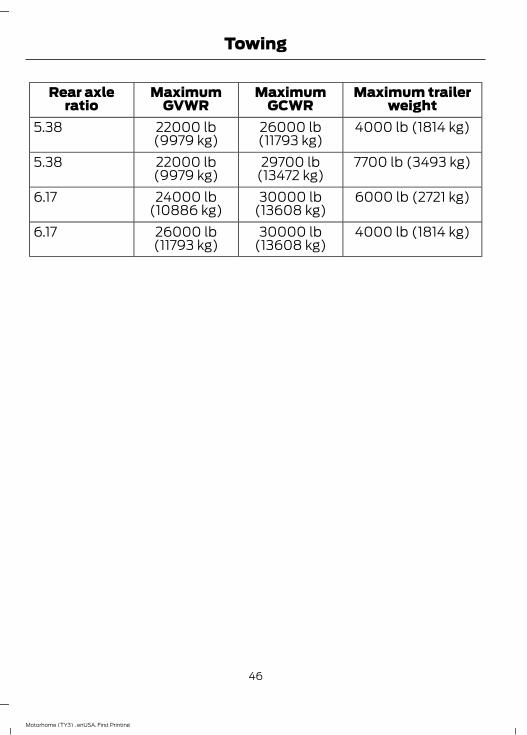
Maximum trailerweight
MaximumGCWR
MaximumGVWR
Rear axleratio
4000 lb (1814 kg)26000 lb(11793 kg)
22000 lb(9979 kg)
5.38
7700 lb (3493 kg)29700 lb(13472 kg)
22000 lb(9979 kg)
5.38
6000 lb (2721 kg)30000 lb(13608 kg)
24000 lb(10886 kg)
6.17
4000 lb (1814 kg)30000 lb(13608 kg)
26000 lb(11793 kg)
6.17
46
Motorhome (TY3) , enUSA, First Printing
Towing
ESSENTIAL TOWING CHECKSFollow these guidelines for safe towing:• Do not tow a trailer until you drive your
vehicle at least 1,000 mi (1,600 km).• Consult your local motor vehicle laws
for towing a trailer.• See the instructions included with
towing accessories for the properinstallation and adjustmentspecifications.
• Service your vehicle more frequently ifyou tow a trailer. See your scheduledmaintenance information.
• If you use a rental trailer, follow theinstructions the rental agency givesyou.
Another chapter of this manual containsload specification terms found on the tirelabel and Safety Compliance label andinstructions on calculating your vehicle'sload. See Load Limit (page 38).Remember to account for the trailertongue weight as part of your vehicle loadwhen calculating the total vehicle weight.
HitchesDo not use a hitch that either clamps ontothe bumper or attaches to the axle.Distribute the trailer load so 10-15% of thetotal trailer weight is on the tongue.
Weight-Distributing Hitches
WARNINGDo not adjust a weight-distributinghitch to any position where the rearbumper of the vehicle is higher than
it was before attaching the trailer. Doingso will defeat the function of theweight-distributing hitch, which may causeunpredictable handling, and could resultin serious personal injury.
When hooking-up a trailer using aweight-distributing hitch, always use thefollowing procedure:1. Park the loaded vehicle, without the
trailer, on a level surface.2. Measure the height to the top of your
vehicle’s front wheel opening on thefender. This is H1.
3. Securely attach the loaded trailer toyour vehicle without theweight-distributing bars connected.
4. Measure the height to the top of yourvehicle’s front wheel opening on thefender a second time. This is H2.
5. Install and adjust the tension in theweight-distributing bars so that theheight of your vehicle’s front wheelopening on the fender is approximatelyhalfway between H1 and H2.
6. Check that the trailer is level or slightlynose down toward your vehicle. If not,adjust the ball height accordingly andrepeat Steps 1-6.
7. Lock the bar tension adjuster in place.8. Check that the trailer tongue securely
attaches and locks onto the hitch.9. Install safety chains, lighting and trailer
brake controls as required by law or thetrailer manufacturer.
Safety ChainsNote: Never attach safety chains to thebumper.Always connect the safety chains to thehook retainers of your vehicle hitch.To connect the safety chains, cross themunder the trailer tongue and allow enoughslack for turning tight corners. Do not allowthe chains to drag on the ground.
47
Motorhome (TY3) , enUSA, First Printing
Towing
Trailer BrakesWARNING
Do not connect a trailer's hydraulicbrake system directly to yourvehicle's brake system. Your vehicle
may not have enough braking power andyour chances of having a collision greatlyincrease.
Electric brakes and manual, automatic orsurge-type trailer brakes are safe if youinstall them properly and adjust them tothe manufacturer's specifications. Thetrailer brakes must meet local and federalregulations.The rating for the tow vehicle's brakingsystem operation is at the gross vehicleweight rating, not the gross combinedweight rating.Separate functioning brake systemsare required for safe control of towedvehicles and trailers weighing morethan 1500 pounds (680 kilograms)when loaded.
Trailer LampsWARNING
Never connect any trailer lamp wiringto the vehicle's tail lamp wiring; thismay damage the electrical system
resulting in fire. Contact your authorizeddealer as soon as possible for assistancein proper trailer tow wiring installation.Additional electrical equipment may berequired.
Trailer lamps are required on most towedvehicles. Make sure all running lights, brakelights, direction indicators and hazard lightsare working.
Before Towing a TrailerPractice turning, stopping and backing upto get the feel of your vehicle-trailercombination before starting on a trip.When turning, make wider turns so thetrailer wheels clear curbs and otherobstacles.
When Towing a Trailer• Do not drive faster than 70 mph
(113 km/h) during the first 500 mi(800 km).
• Do not make full-throttle starts.• Check your hitch, electrical connections
and trailer wheel lug nuts thoroughlyafter you have traveled 50 mi (80 km).
• When stopped in congested or heavytraffic during hot weather, place thegearshift in park (P) to aid engine andtransmission cooling and to help airconditioning performance.
• Switch off the speed control withheavy loads or in hilly terrain. Thespeed control may turn offautomatically when you are towing onlong, steep grades.
• Shift to a lower gear when driving downa long or steep hill. Do not apply thebrakes continuously, as they mayoverheat and become less effective.
• If your transmission is equipped with aGrade Assist or Tow/Haul feature, usethis feature when towing. This providesengine braking and helps eliminateexcessive transmission shifting foroptimum fuel economy andtransmission cooling.
• Allow more distance for stopping witha trailer attached. Anticipate stops andbrake gradually.
• Avoid parking on a grade. However, ifyou must park on a grade:
1. Turn the steering wheel to point yourvehicle tires away from traffic flow.
48
Motorhome (TY3) , enUSA, First Printing
Towing
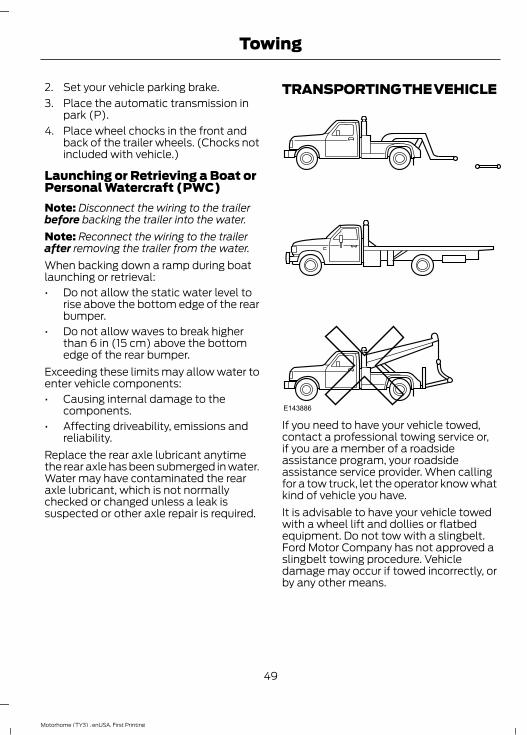
2. Set your vehicle parking brake.3. Place the automatic transmission in
park (P).4. Place wheel chocks in the front and
back of the trailer wheels. (Chocks notincluded with vehicle.)
Launching or Retrieving a Boat orPersonal Watercraft (PWC)Note: Disconnect the wiring to the trailerbefore backing the trailer into the water.Note: Reconnect the wiring to the trailerafter removing the trailer from the water.When backing down a ramp during boatlaunching or retrieval:• Do not allow the static water level to
rise above the bottom edge of the rearbumper.
• Do not allow waves to break higherthan 6 in (15 cm) above the bottomedge of the rear bumper.
Exceeding these limits may allow water toenter vehicle components:• Causing internal damage to the
components.• Affecting driveability, emissions and
reliability.Replace the rear axle lubricant anytimethe rear axle has been submerged in water.Water may have contaminated the rearaxle lubricant, which is not normallychecked or changed unless a leak issuspected or other axle repair is required.
TRANSPORTING THE VEHICLE
E143886
If you need to have your vehicle towed,contact a professional towing service or,if you are a member of a roadsideassistance program, your roadsideassistance service provider. When callingfor a tow truck, let the operator know whatkind of vehicle you have.It is advisable to have your vehicle towedwith a wheel lift and dollies or flatbedequipment. Do not tow with a slingbelt.Ford Motor Company has not approved aslingbelt towing procedure. Vehicledamage may occur if towed incorrectly, orby any other means.
49
Motorhome (TY3) , enUSA, First Printing
Towing
Do not exceed a maximum distance of 50miles (80 kilometers) and maximumspeed of 35 mph (56 km/h) when towingyour vehicle from the front with the rearwheels on the ground. If you must exceedthe maximum distance or speed, aqualified technician must remove thedriveshaft. This prevents transmissiondamage.
TOWING THE VEHICLE ONFOUR WHEELSEmergency TowingIf your vehicle becomes inoperable(without access to wheel dollies,car-hauling trailer, or flatbed transportvehicle), it can be flat-towed (all wheelson the ground, regardless of the powertrainand transmission configuration) under thefollowing conditions:• Your vehicle is facing forward for
towing in a forward direction.• Place the transmission in position N. If
you cannot move the transmission intoN, you may need to override it.
• Maximum speed is 35 mph (56 km/h).• Maximum distance is 50 miles (80
kilometers).
50
Motorhome (TY3) , enUSA, First Printing
Towing
BREAKING-INYou need to break in new tires forapproximately 300 miles (480kilometers). During this time, your vehiclemay exhibit some unusual drivingcharacteristics.Avoid driving too fast during the first 1000miles (1600 kilometers). Vary your speedfrequently and change up through thegears early. Do not labor the engine.Do not tow during the first 1000 miles(1600 kilometers).
REDUCED ENGINEPERFORMANCE
WARNINGContinued operation will increase theengine temperature and cause theengine to shut down completely.
If the engine coolant temperature gaugeneedle moves to the upper limit position,the engine is overheating. See Gauges(page 13).You must only drive your vehicle for a shortdistance if the engine overheats. Thedistance you can travel depends onambient temperature, vehicle load andterrain. The engine will continue to operatewith limited power for a short time.If the engine temperature continues to rise,the fuel supply to the engine will reduce.The air conditioning will switch off and theengine cooling fan will operate continually.1. Reduce your speed gradually and stop
your vehicle as soon as it is safe to doso.
2. Switch the engine off immediately toprevent severe engine damage.
3. Wait for the engine to cool down.
4. Check the coolant level. See EngineCoolant Check (page 84).
5. Have your vehicle checked by anauthorized dealer as soon as possible.
ECONOMICAL DRIVINGYour fuel economy is affected by severalthings, such as how you drive, theconditions you drive under, and how youmaintain your vehicle.You may improve your fuel economy bykeeping these things in mind:• Accelerate and slow down in a smooth,
moderate fashion.• Drive at steady speeds without
stopping.• Anticipate stops; slowing down may
eliminate the need to stop.• Combine errands and minimize
stop-and-go driving.• Close the windows for high-speed
driving.• Drive at reasonable speeds (traveling
at 55 mph [88 km/h] uses 15% lessfuel than traveling at 65 mph [105km/h]).
• Keep the tires properly inflated and useonly the recommended size.
• Use the recommended engine oil.• Perform all regularly scheduled
maintenance.Avoid these actions; they reduce your fueleconomy:• Sudden accelerations or hard
accelerations.• Revving the engine before turning it off.• Idle for periods longer than one minute.• Warm up your vehicle on cold
mornings.• Use the air conditioner or front
defroster.
51
Motorhome (TY3) , enUSA, First Printing
Driving Hints
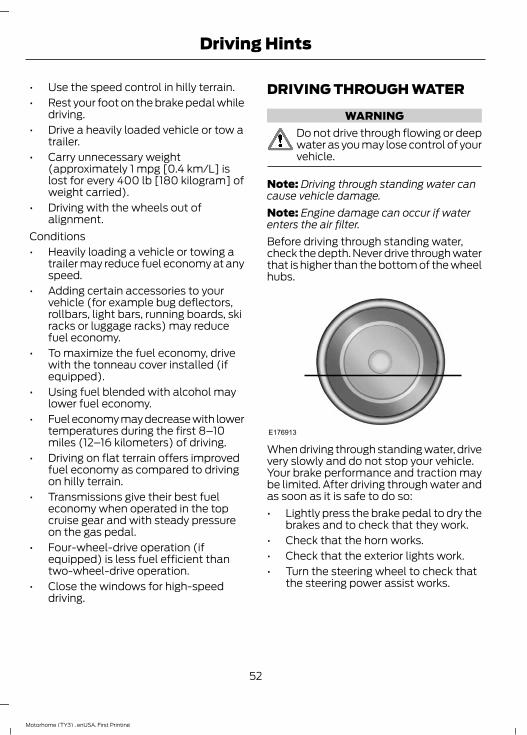
• Use the speed control in hilly terrain.• Rest your foot on the brake pedal while
driving.• Drive a heavily loaded vehicle or tow a
trailer.• Carry unnecessary weight
(approximately 1 mpg [0.4 km/L] islost for every 400 lb [180 kilogram] ofweight carried).
• Driving with the wheels out ofalignment.
Conditions• Heavily loading a vehicle or towing a
trailer may reduce fuel economy at anyspeed.
• Adding certain accessories to yourvehicle (for example bug deflectors,rollbars, light bars, running boards, skiracks or luggage racks) may reducefuel economy.
• To maximize the fuel economy, drivewith the tonneau cover installed (ifequipped).
• Using fuel blended with alcohol maylower fuel economy.
• Fuel economy may decrease with lowertemperatures during the first 8–10miles (12–16 kilometers) of driving.
• Driving on flat terrain offers improvedfuel economy as compared to drivingon hilly terrain.
• Transmissions give their best fueleconomy when operated in the topcruise gear and with steady pressureon the gas pedal.
• Four-wheel-drive operation (ifequipped) is less fuel efficient thantwo-wheel-drive operation.
• Close the windows for high-speeddriving.
DRIVING THROUGH WATER
WARNINGDo not drive through flowing or deepwater as you may lose control of yourvehicle.
Note: Driving through standing water cancause vehicle damage.Note: Engine damage can occur if waterenters the air filter.Before driving through standing water,check the depth. Never drive through waterthat is higher than the bottom of the wheelhubs.
E176913
When driving through standing water, drivevery slowly and do not stop your vehicle.Your brake performance and traction maybe limited. After driving through water andas soon as it is safe to do so:• Lightly press the brake pedal to dry the
brakes and to check that they work.• Check that the horn works.• Check that the exterior lights work.• Turn the steering wheel to check that
the steering power assist works.
52
Motorhome (TY3) , enUSA, First Printing
Driving Hints
ROADSIDE ASSISTANCEVehicles Sold in the United States:Getting Roadside AssistanceTo fully assist you should you have avehicle concern, Ford Motor Companyoffers a complimentary roadsideassistance program. This program isseparate from the New Vehicle LimitedWarranty. The service is available:• 24 hours a day, seven days a week.• For the coverage period listed on the
Roadside Assistance Card included inyour Owner's Manual portfolio.
Roadside Assistance covers:• A flat tire change with a good spare, if
provided with the vehicle (exceptvehicles supplied with a tire inflationkit).
• Battery jump start.• Lock-out assistance (key replacement
cost is the customer's responsibility).• Fuel delivery — independent service
contractors, if not prohibited by state,local or municipal law, shall deliver upto 2 gal (7.6 L) of gasoline or 5 gal(18.9 L) of diesel fuel to a disabledvehicle. Roadside Assistance limits fueldelivery service to two no-chargeoccurrences within a 12-month period.
• Winch out — available within 100 ft(30.5 m) of a paved or countymaintained road, no recoveries.
• Towing — independent servicecontractors, if not prohibited by state,local or municipal law, shall tow Fordeligible vehicles to an authorized dealerwithin 35 mi (56 km) of thedisablement location or to the nearest
authorized dealer. If a memberrequests a tow to an authorized dealerthat is more than 35 mi (56 km) fromthe disablement location, the membershall be responsible for any mileagecosts in excess of 35 mi (56 km).
Roadside Assistance includes up to $200for a towed trailer if the disabled eligiblevehicle requires service at the nearestauthorized dealer. If the towing vehicle isoperational but the trailer is not, then thetrailer does not qualify for any roadsideservices.
Vehicles Sold in the United States:Using Roadside AssistanceComplete the roadside assistanceidentification card and place it in yourwallet for quick reference. This card is inthe owner's information portfolio in theglove compartment.United States Ford vehicle customers whorequire Roadside Assistance, call1-800-241-3673.If you need to arrange roadside assistancefor yourself, Ford Motor Companyreimburses a reasonable amount fortowing to the nearest dealership within35 mi (56 km). To obtain reimbursementinformation, United States Ford vehiclecustomers call 1-800-241-3673.Customers need to submit their originalreceipts.
Vehicles Sold in Canada: GettingRoadside AssistanceCanadian customers who require roadsideassistance, call 1-800-665-2006.
Vehicles Sold in Canada: UsingRoadside AssistanceFor your convenience, you may completethe roadside assistance identification cardfound in the centerfold of your warrantyguide and retain for future reference.
53
Motorhome (TY3) , enUSA, First Printing
Roadside Emergencies
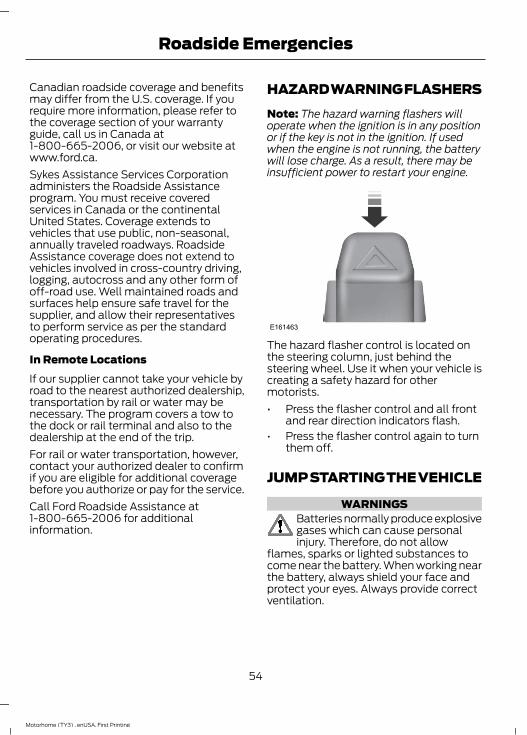
Canadian roadside coverage and benefitsmay differ from the U.S. coverage. If yourequire more information, please refer tothe coverage section of your warrantyguide, call us in Canada at1-800-665-2006, or visit our website atwww.ford.ca.Sykes Assistance Services Corporationadministers the Roadside Assistanceprogram. You must receive coveredservices in Canada or the continentalUnited States. Coverage extends tovehicles that use public, non-seasonal,annually traveled roadways. RoadsideAssistance coverage does not extend tovehicles involved in cross-country driving,logging, autocross and any other form ofoff-road use. Well maintained roads andsurfaces help ensure safe travel for thesupplier, and allow their representativesto perform service as per the standardoperating procedures.
In Remote LocationsIf our supplier cannot take your vehicle byroad to the nearest authorized dealership,transportation by rail or water may benecessary. The program covers a tow tothe dock or rail terminal and also to thedealership at the end of the trip.For rail or water transportation, however,contact your authorized dealer to confirmif you are eligible for additional coveragebefore you authorize or pay for the service.Call Ford Roadside Assistance at1-800-665-2006 for additionalinformation.
HAZARD WARNING FLASHERSNote: The hazard warning flashers willoperate when the ignition is in any positionor if the key is not in the ignition. If usedwhen the engine is not running, the batterywill lose charge. As a result, there may beinsufficient power to restart your engine.
E161463
The hazard flasher control is located onthe steering column, just behind thesteering wheel. Use it when your vehicle iscreating a safety hazard for othermotorists.• Press the flasher control and all front
and rear direction indicators flash.• Press the flasher control again to turn
them off.
JUMP STARTING THE VEHICLE
WARNINGSBatteries normally produce explosivegases which can cause personalinjury. Therefore, do not allow
flames, sparks or lighted substances tocome near the battery. When working nearthe battery, always shield your face andprotect your eyes. Always provide correctventilation.
54
Motorhome (TY3) , enUSA, First Printing
Roadside Emergencies
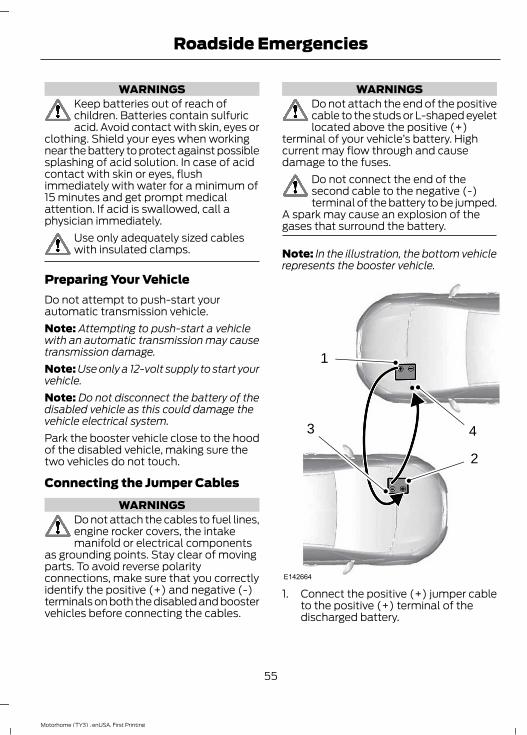
WARNINGSKeep batteries out of reach ofchildren. Batteries contain sulfuricacid. Avoid contact with skin, eyes or
clothing. Shield your eyes when workingnear the battery to protect against possiblesplashing of acid solution. In case of acidcontact with skin or eyes, flushimmediately with water for a minimum of15 minutes and get prompt medicalattention. If acid is swallowed, call aphysician immediately.
Use only adequately sized cableswith insulated clamps.
Preparing Your VehicleDo not attempt to push-start yourautomatic transmission vehicle.Note: Attempting to push-start a vehiclewith an automatic transmission may causetransmission damage.Note: Use only a 12-volt supply to start yourvehicle.Note: Do not disconnect the battery of thedisabled vehicle as this could damage thevehicle electrical system.Park the booster vehicle close to the hoodof the disabled vehicle, making sure thetwo vehicles do not touch.
Connecting the Jumper CablesWARNINGS
Do not attach the cables to fuel lines,engine rocker covers, the intakemanifold or electrical components
as grounding points. Stay clear of movingparts. To avoid reverse polarityconnections, make sure that you correctlyidentify the positive (+) and negative (-)terminals on both the disabled and boostervehicles before connecting the cables.
WARNINGSDo not attach the end of the positivecable to the studs or L-shaped eyeletlocated above the positive (+)
terminal of your vehicle’s battery. Highcurrent may flow through and causedamage to the fuses.
Do not connect the end of thesecond cable to the negative (-)terminal of the battery to be jumped.
A spark may cause an explosion of thegases that surround the battery.
Note: In the illustration, the bottom vehiclerepresents the booster vehicle.
4
2
1
3
E142664
1. Connect the positive (+) jumper cableto the positive (+) terminal of thedischarged battery.
55
Motorhome (TY3) , enUSA, First Printing
Roadside Emergencies
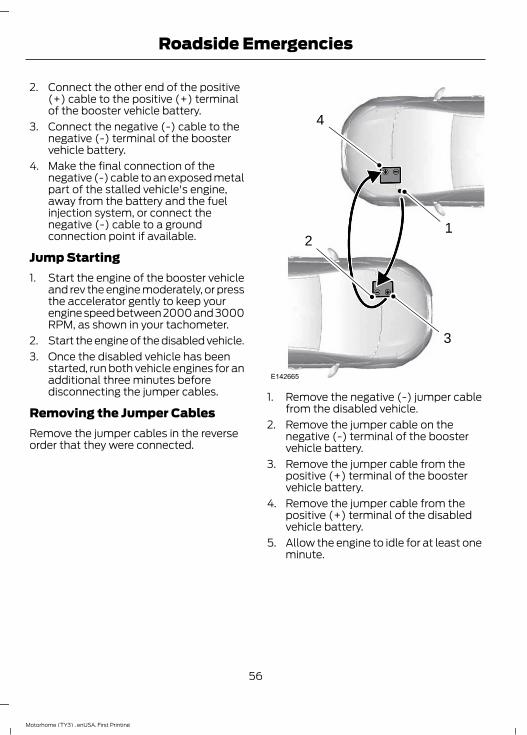
2. Connect the other end of the positive(+) cable to the positive (+) terminalof the booster vehicle battery.
3. Connect the negative (-) cable to thenegative (-) terminal of the boostervehicle battery.
4. Make the final connection of thenegative (-) cable to an exposed metalpart of the stalled vehicle's engine,away from the battery and the fuelinjection system, or connect thenegative (-) cable to a groundconnection point if available.
Jump Starting1. Start the engine of the booster vehicle
and rev the engine moderately, or pressthe accelerator gently to keep yourengine speed between 2000 and 3000RPM, as shown in your tachometer.
2. Start the engine of the disabled vehicle.3. Once the disabled vehicle has been
started, run both vehicle engines for anadditional three minutes beforedisconnecting the jumper cables.
Removing the Jumper CablesRemove the jumper cables in the reverseorder that they were connected.
4
1
3
2
E142665
1. Remove the negative (-) jumper cablefrom the disabled vehicle.
2. Remove the jumper cable on thenegative (-) terminal of the boostervehicle battery.
3. Remove the jumper cable from thepositive (+) terminal of the boostervehicle battery.
4. Remove the jumper cable from thepositive (+) terminal of the disabledvehicle battery.
5. Allow the engine to idle for at least oneminute.
56
Motorhome (TY3) , enUSA, First Printing
Roadside Emergencies
GETTING THE SERVICES YOUNEEDWarranty repairs to your vehicle must beperformed by an authorized dealer. Whileany authorized dealer handling your vehicleline will provide warranty service, werecommend you return to your sellingauthorized dealer who wants to ensureyour continued satisfaction.Please note that certain warranty repairsrequire special training and equipment, sonot all authorized dealers are authorizedto perform all warranty repairs. This meansthat, depending on the warranty repairneeded, you may have to take your vehicleto another authorized dealer.A reasonable time must be allowed toperform a repair after taking your vehicleto the authorized dealer. Repairs will bemade using Ford or Motorcraft® parts, orremanufactured or other parts that areauthorized by Ford.
Away From HomeIf you are away from home when yourvehicle needs service, contact the FordCustomer Relationship Center or use theonline resources listed below to find thenearest authorized dealer.In the United States:Mailing addressFord Motor CompanyCustomer Relationship CenterP.O. Box 6248Dearborn, MI 48121Telephone1-800-392-3673 (FORD)(TDD for the hearing impaired:1-800-232-5952)OnlineAdditional information and resources areavailable online at www.fordowner.com
These are some of the items that can befound online:• U.S. dealer locator by Dealer Name,
City/State or Zip Code.• Owner Manuals.• Maintenance Schedules.• Recalls.• Ford Extended Service Plans.• Ford Genuine Accessories.• Service specials and promotions.In Canada:Mailing addressCustomer Relationship CentreFord Motor Company of Canada, LimitedP.O. Box 2000Oakville, Ontario L6K 0C8Telephone1-800-565-3673 (FORD)Onlinewww.ford.caTwitter@FordServiceCA (English Canada)@FordServiceQC (Quebec)
Additional AssistanceIf you have questions or concerns, or areunsatisfied with the service you arereceiving, follow these steps:1. Contact your Sales Representative or
Service Advisor at your selling/servicingauthorized dealer.
2. If your inquiry or concern remainsunresolved, contact the Sales Manager,Service Manager or Customer RelationsManager.
3. If you require assistance or clarificationon Ford Motor Company policies,please contact the Ford CustomerRelationship Center.
57
Motorhome (TY3) , enUSA, First Printing
Customer Assistance
In order to help us serve you better, pleasehave the following information availablewhen contacting a Customer RelationshipCenter:• Vehicle Identification Number.• Your telephone number (home and
business).• The name of the authorized dealer and
city where located.• The vehicle’s current odometer reading.In some states, you must directly notifyFord in writing before pursuing remediesunder your state’s warranty laws. Ford isalso allowed a final repair attempt in somestates.In the United States, a warranty disputemust be submitted to the BBB AUTO LINEbefore taking action under theMagnuson-Moss Warranty Act, or to theextent allowed by state law, beforepursuing replacement or repurchaseremedies provided by certain state laws.This dispute handling procedure is notrequired prior to enforcing state createdrights or other rights which are independentof the Magnuson-Moss Warranty Act orstate replacement or repurchase laws.
IN CALIFORNIA (U.S. ONLY)California Civil Code Section 1793.2(d)requires that, if a manufacturer or itsrepresentative is unable to repair a motorvehicle to conform to the vehicle’sapplicable express warranty after areasonable number of attempts, themanufacturer shall be required to eitherreplace the vehicle with one substantiallyidentical or repurchase the vehicle andreimburse the buyer in an amount equal tothe actual price paid or payable by theconsumer (less a reasonable allowancefor consumer use). The consumer has theright to choose whether to receive a refundor replacement vehicle.
California Civil Code Section 1793.22(b)presumes that the manufacturer has hada reasonable number of attempts toconform the vehicle to its applicableexpress warranties if, within the first 18months of ownership of a new vehicle orthe first 18000 miles (29 000 km),whichever occurs first:1. Two or more repair attempts are made
on the same non-conformity likely tocause death or serious bodily injury OR
2. Four or more repair attempts are madeon the same nonconformity (a defector condition that substantially impairsthe use, value or safety of the vehicle)OR
3. The vehicle is out of service for repairof nonconformities for a total of morethan 30 calendar days (not necessarilyall at one time).
In the case of 1 or 2 above, the consumermust also notify the manufacturer of theneed for the repair of the nonconformityat the following address:Ford Motor Company16800 Executive Plaza DriveMail Drop 3NE-BDearborn, MI 48126You are required to submit your warrantydispute to BBB AUTO LINE before assertingin court any rights or remedies conferredby California Civil Code Section 1793.22(b).You are also required to use BBB AUTOLINE before exercising rights or seekingremedies created by the FederalMagnuson-Moss Warranty Act, 15 U.S.C.sec. 2301 et seq. If you choose to seekredress by pursuing rights and remediesnot created by California Civil Code Section1793.22(b) or the Magnuson-MossWarranty Act, resort to BBB AUTO LINE isnot required by those statutes.
58
Motorhome (TY3) , enUSA, First Printing
Customer Assistance
THE BETTER BUSINESSBUREAU (BBB) AUTO LINEPROGRAM (U.S. ONLY)Your satisfaction is important to FordMotor Company and to your dealer. If awarranty concern has not been resolvedusing the three-step procedure outlinedearlier in this chapter in the Getting theServices you need section, you may beeligible to participate in the BBB AUTOLINE program.The BBB AUTO LINE program consists oftwo parts – mediation and arbitration.During mediation, a representative of theBBB will contact both you and Ford MotorCompany to explore options for settlementof the claim. If an agreement is not reachedduring mediation or you do not want toparticipate in mediation, and if your claimis eligible, you may participate in thearbitration process. An arbitration hearingwill be scheduled so that you can presentyour case in an informal setting before animpartial person. The arbitrator willconsider the testimony provided and makea decision after the hearing.Disputes submitted to the BBB AUTO LINEprogram are usually decided within fortydays after you file your claim with the BBB.You are not bound by the decision, andmay reject the decision and proceed tocourt where all findings of the BBB AutoLine dispute, and decision, are admissiblein the court action. Should you choose toaccept the BBB AUTO LINE decision, Fordis then bound by the decision, and mustcomply with the decision within 30 daysof receipt of your acceptance letter.BBB AUTO LINE Application: Using theinformation provided below, please call orwrite to request a program application.You will be asked for your name andaddress, general information about yournew vehicle, information about yourwarranty concerns, and any steps you have
already taken to try to resolve them. ACustomer Claim Form will be mailed thatwill need to be completed, signed andreturned to the BBB along with proof ofownership. Upon receipt, the BBB willreview the claim for eligibility under theProgram Summary Guidelines.You can get more information bycalling BBB AUTO LINE at1-800-955-5100, or writing to:BBB AUTO LINE3033 Wilson Boulevard, Suite 600Arlington, Virginia 22201BBB AUTO LINE applications can also berequested by calling the Ford MotorCompany Customer Relationship Centerat 1-800-392-3673.Note: Ford Motor Company reserves theright to change eligibility limitations, modifyprocedures, or to discontinue this processat any time without notice and withoutobligation.
UTILIZING THEMEDIATION/ARBITRATIONPROGRAM (CANADA ONLY)For vehicles delivered to authorizedCanadian dealers. In those cases whereyou continue to feel that the efforts by Fordof Canada and the authorized dealer toresolve a factory-related vehicle serviceconcern have been unsatisfactory, Ford ofCanada participates in an impartial thirdparty mediation/arbitration programadministered by the Canadian MotorVehicle Arbitration Plan (CAMVAP).The CAMVAP program is a straight forwardand relatively speedy alternative to resolvea disagreement when all other efforts toproduce a settlement have failed. Thisprocedure is without cost to you and isdesigned to eliminate the need for lengthyand expensive legal proceedings.
59
Motorhome (TY3) , enUSA, First Printing
Customer Assistance
In the CAMVAP program, impartialthird-party arbitrators conduct hearings atmutually convenient times and places inan informal environment. These impartialarbitrators review the positions of theparties, make decisions and, whenappropriate, render awards to resolvedisputes. CAMVAP decisions are fast, fair,and final as the arbitrator’s award isbinding on both you and Ford of Canada.CAMVAP services are available in allCanadian territories and provinces. Formore information, without charge orobligation, call your CAMVAP ProvincialAdministrator directly at 1-800-207-0685or visit www.camvap.ca.
GETTING ASSISTANCEOUTSIDE THE U.S. ANDCANADABefore exporting your vehicle to a foreigncountry, contact the appropriate foreignembassy or consulate. These officials caninform you of local vehicle registrationregulations and where to find unleadedfuel.If you cannot find unleaded fuel or can onlyget fuel with an anti-knock index lowerthan is recommended for your vehicle,contact our Customer Relationship Center.The use of leaded fuel in your vehiclewithout proper conversion may damagethe effectiveness of your emission controlsystem and may cause engine knocking orserious engine damage. Ford MotorCompany or Ford of Canada is notresponsible for any damage caused by useof improper fuel. Using leaded fuel mayalso result in difficulty importing yourvehicle back into the United States.
If your vehicle must be serviced while youare traveling or living in Asia-Pacific Region,Sub-Saharan Africa, U.S. Virgin Islands,Central America, the Caribbean, and Israel,contact the nearest authorized dealer. Ifthe authorized dealer cannot help you,contact:FORD MOTOR COMPANYCustomer Relationship Center1555 Fairlane DriveFairlane Business Park #3Allen Park, Michigan 48101U.S.A.Telephone: (313) 594-4857Fax: (313) 390-0804Email: [email protected] customers in Guam, theCommonwealth of the Northern MarianaIslands (CNMI), America Samoa, and theU.S. Virgin Islands, please feel free to callour Toll-Free Number: (800) 841-FORD(3673).If your vehicle must be serviced while youare traveling or living in Puerto Rico,contact the nearest authorized dealer. Ifthe authorized dealer cannot help you,contact:FORD MOTOR COMPANYCustomer Relationship Center1555 Fairlane DriveFairlane Business Park #3Allen Park, Michigan 48101U.S.A.Telephone: (800) 841-FORD (3673)FAX: (313) 390-0804Email: [email protected] your vehicle must be serviced while youare traveling or living in the Middle East,contact the nearest authorized dealer. Ifthe authorized dealer cannot help you,contact:
60
Motorhome (TY3) , enUSA, First Printing
Customer Assistance
FORD MOTOR COMPANYCustomer Relationship Center1555 Fairlane DriveFairlane Business Park #3Allen Park, Michigan 48101U.S.A.Ford: 80004443673Lincoln: 80004441067If calling from the UAE: 80004441066If calling from the Kingdom of SaudiArabia: 8008443673If calling from Kuwait: 22280384FAX: +971 4 3327266Email: [email protected] you buy your vehicle in North Americaand then relocate to any of the abovelocations, register your vehicleidentification number (VIN) and newaddress with Ford Motor Company ExportOperations & Global Growth Initiatives byemailing [email protected] you are in another foreign country,contact the nearest authorized dealer. Inthe event your inquiry is unresolved,communicate your concern with thedealership’s Sales Manager, ServiceManager or Customer Relations Manager.If you require additional assistance orclarification, please contact the respectiveCustomer Relationship Center aspreviously listed.Customers in the U.S. should call1-800-392-3673.
ORDERING ADDITIONALOWNER'S LITERATURETo order the publications in this portfolio,contact Helm, Incorporated at:HELM, INCORPORATED47911 Halyard DrivePlymouth, Michigan 48170Attention: Customer Service
Or to order a free publication catalog, calltoll free: 1-800-782-4356Monday-Friday 8:00 a.m. - 6:00 p.m. ESTHelm, Incorporated can also be reachedby their website:www.helminc.com(Items in this catalog may be purchasedby credit card, check or money order.)
Obtaining a French Owner’sManualFrench Owner’s Manual can be obtainedfrom your authorized dealer or bycontacting Helm, Incorporated using thecontact information listed previously in thissection.
REPORTING SAFETY DEFECTS(U.S. ONLY)
E142557
If you believe that your vehicle hasa defect which could cause acrash or could cause injury ordeath, you should immediatelyinform the National HighwayTraffic Safety Administration(NHTSA) in addition to notifyingFord Motor Company.
61
Motorhome (TY3) , enUSA, First Printing
Customer Assistance
If NHTSA receives similarcomplaints, it may open aninvestigation, and if it finds that asafety defect exists in a group ofvehicles, it may order a recall andremedy campaign. However,NHTSA cannot become involvedin individual problems betweenyou, your dealer, or Ford MotorCompany.To contact NHTSA, you may callthe Vehicle Safety Hotlinetoll-free at 1-888-327-4236 (TTY:1-800-424-9153); go tohttp://www.safercar.gov; or writeto:Administrator
1200 New Jersey Avenue,SoutheastWashington, D.C. 20590You can also obtain otherinformation about motor vehiclesafety fromhttp://www.safercar.gov.
REPORTING SAFETY DEFECTS(CANADA ONLY)
If you believe that your vehicle hasa defect which could cause acrash or could cause injury ordeath, you should immediatelyinform Transport Canada.
Transport Canada Contact Information
http://www.tc.gc.ca/eng/roadsafety/menu.htmWebsite
1–800–333–0510Phone
62
Motorhome (TY3) , enUSA, First Printing
Customer Assistance
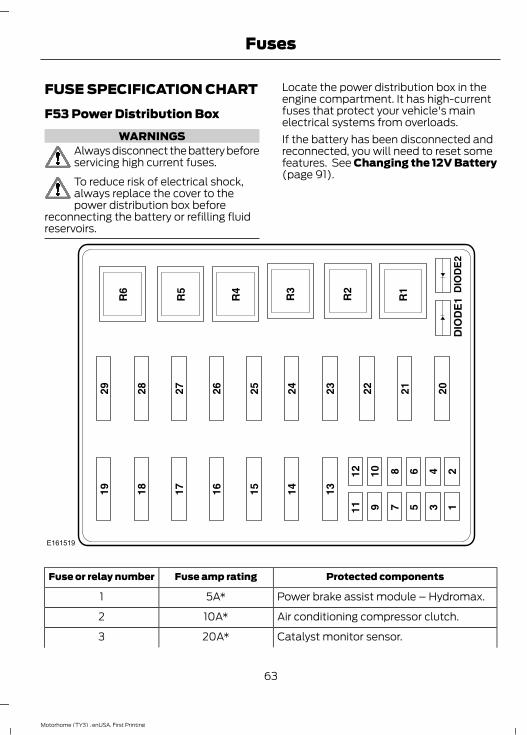
FUSE SPECIFICATION CHARTF53 Power Distribution Box
WARNINGSAlways disconnect the battery beforeservicing high current fuses.To reduce risk of electrical shock,always replace the cover to thepower distribution box before
reconnecting the battery or refilling fluidreservoirs.
Locate the power distribution box in theengine compartment. It has high-currentfuses that protect your vehicle's mainelectrical systems from overloads.If the battery has been disconnected andreconnected, you will need to reset somefeatures. See Changing the 12V Battery(page 91).
E161519
Protected componentsFuse amp ratingFuse or relay number
Power brake assist module – Hydromax.5A*1
Air conditioning compressor clutch.10A*2
Catalyst monitor sensor.20A*3
63
Motorhome (TY3) , enUSA, First Printing
Fuses
Protected componentsFuse amp ratingFuse or relay number
Engine heated exhaust gas oxygen sensor#11 and #21.Vapor management valve.
Powertrain control module memory.5A*4Powertrain control module relay coil.
Powertrain control module power.20A*5
Instrument panel dimmer module.20A*6Park lamp feeds.Trailer tow running lamp relay coil.
Ignition coils.20A*7Radio capacitors.
Hydromax – Anti-lock brake systemmodule.
30A*8
Powertrain control module.10A*9
Daytime running lamps.20A*10
Fuel pump relay coil.20A*11Powertrain control module power.Fuel pump diode.
Instrument panel - backup lamp feed.25A*12Trailer tow backup lamps feed.
Trailer tow electric brake controller feed.30A**13
Instrument panel battery feed (fuse #9, 15,21).
60A**14
Lighting primary fuse.
Trailer tow park lamps.20A**15
Anti-lock brake system module –Hydromax.
60A**16
Anti-lock brake system module – Hydro-boost.
40A**
Horn feed.20A**17
Backup lamp relay coil.20A**18A/C clutch coil.A/C demand switch.
64
Motorhome (TY3) , enUSA, First Printing
Fuses
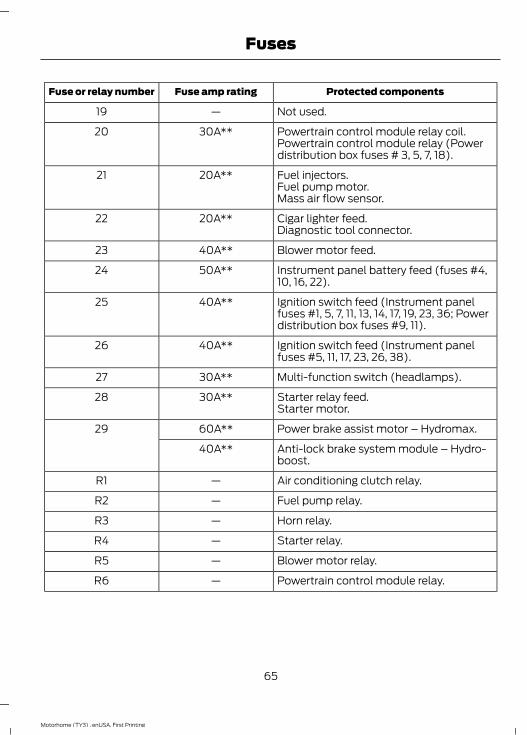
Protected componentsFuse amp ratingFuse or relay number
Not used.—19
Powertrain control module relay coil.30A**20Powertrain control module relay (Powerdistribution box fuses # 3, 5, 7, 18).
Fuel injectors.20A**21Fuel pump motor.Mass air flow sensor.
Cigar lighter feed.20A**22Diagnostic tool connector.
Blower motor feed.40A**23
Instrument panel battery feed (fuses #4,10, 16, 22).
50A**24
Ignition switch feed (Instrument panelfuses #1, 5, 7, 11, 13, 14, 17, 19, 23, 36; Powerdistribution box fuses #9, 11).
40A**25
Ignition switch feed (Instrument panelfuses #5, 11, 17, 23, 26, 38).
40A**26
Multi-function switch (headlamps).30A**27
Starter relay feed.30A**28Starter motor.
Power brake assist motor – Hydromax.60A**29
Anti-lock brake system module – Hydro-boost.
40A**
Air conditioning clutch relay.—R1
Fuel pump relay.—R2
Horn relay.—R3
Starter relay.—R4
Blower motor relay.—R5
Powertrain control module relay.—R6
65
Motorhome (TY3) , enUSA, First Printing
Fuses
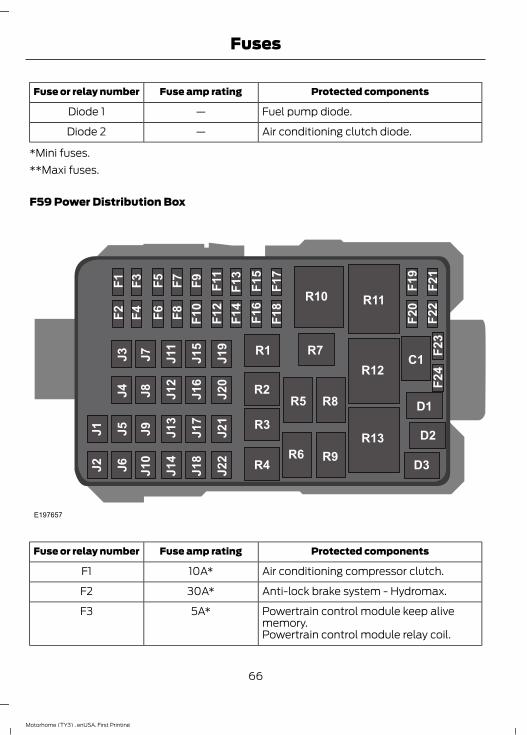
Protected componentsFuse amp ratingFuse or relay number
Fuel pump diode.—Diode 1
Air conditioning clutch diode.—Diode 2
*Mini fuses.**Maxi fuses.
F59 Power Distribution Box
E197657
Protected componentsFuse amp ratingFuse or relay number
Air conditioning compressor clutch.10A*F1
Anti-lock brake system - Hydromax.30A*F2
Powertrain control module keep alivememory.
5A*F3
Powertrain control module relay coil.
66
Motorhome (TY3) , enUSA, First Printing
Fuses
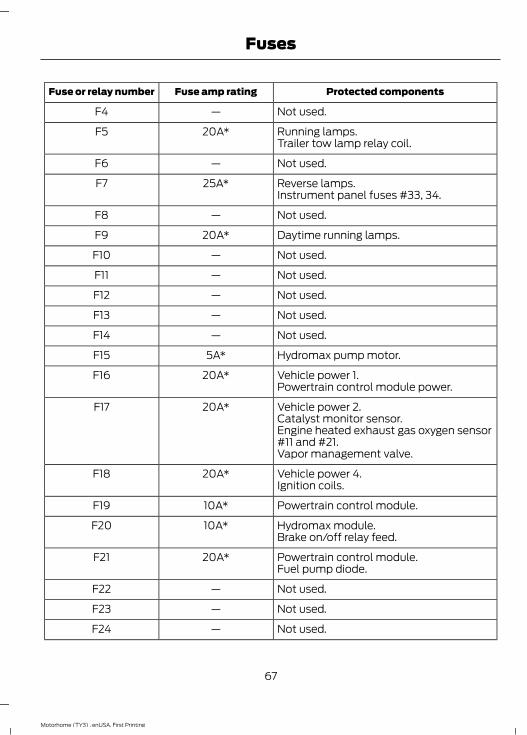
Protected componentsFuse amp ratingFuse or relay number
Not used.—F4
Running lamps.20A*F5Trailer tow lamp relay coil.
Not used.—F6
Reverse lamps.25A*F7Instrument panel fuses #33, 34.
Not used.—F8
Daytime running lamps.20A*F9
Not used.—F10
Not used.—F11
Not used.—F12
Not used.—F13
Not used.—F14
Hydromax pump motor.5A*F15
Vehicle power 1.20A*F16Powertrain control module power.
Vehicle power 2.20A*F17Catalyst monitor sensor.Engine heated exhaust gas oxygen sensor#11 and #21.Vapor management valve.
Vehicle power 4.20A*F18Ignition coils.
Powertrain control module.10A*F19
Hydromax module.10A*F20Brake on/off relay feed.
Powertrain control module.20A*F21Fuel pump diode.
Not used.—F22
Not used.—F23
Not used.—F24
67
Motorhome (TY3) , enUSA, First Printing
Fuses
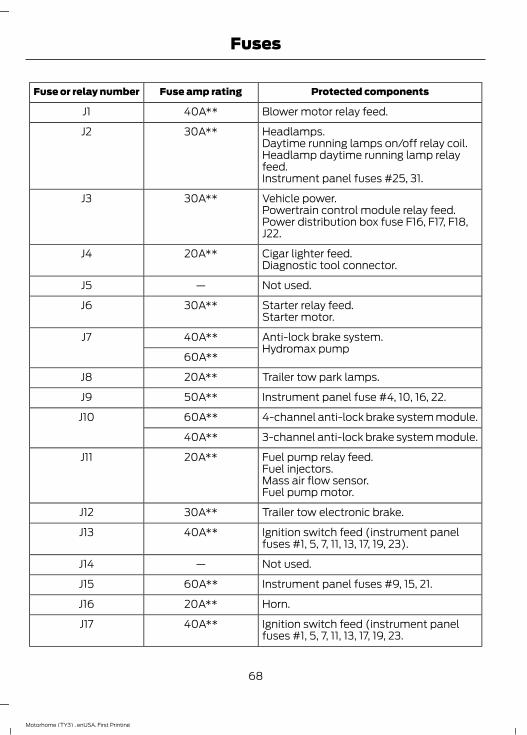
Protected componentsFuse amp ratingFuse or relay number
Blower motor relay feed.40A**J1
Headlamps.30A**J2Daytime running lamps on/off relay coil.Headlamp daytime running lamp relayfeed.Instrument panel fuses #25, 31.
Vehicle power.30A**J3Powertrain control module relay feed.Power distribution box fuse F16, F17, F18,J22.
Cigar lighter feed.20A**J4Diagnostic tool connector.
Not used.—J5
Starter relay feed.30A**J6Starter motor.
Anti-lock brake system.40A**J7Hydromax pump
60A**
Trailer tow park lamps.20A**J8
Instrument panel fuse #4, 10, 16, 22.50A**J9
4-channel anti-lock brake system module.60A**J10
3-channel anti-lock brake system module.40A**
Fuel pump relay feed.20A**J11Fuel injectors.Mass air flow sensor.Fuel pump motor.
Trailer tow electronic brake.30A**J12
Ignition switch feed (instrument panelfuses #1, 5, 7, 11, 13, 17, 19, 23).
40A**J13
Not used.—J14
Instrument panel fuses #9, 15, 21.60A**J15
Horn.20A**J16
Ignition switch feed (instrument panelfuses #1, 5, 7, 11, 13, 17, 19, 23.
40A**J17
68
Motorhome (TY3) , enUSA, First Printing
Fuses

Protected componentsFuse amp ratingFuse or relay number
Not used.—J18
Not used.—J19
Not used.—J20
Not used.—J21
Reverse lamp relay coil.20A**J22A/C clutch relay coil.A/C demand switch.
Horn relay.—R1
Fuel pump relay.—R2
Starter relay.—R3
Backup lamps relay.—R4
Brake on/off relay.—R5
Trailer tow parking lamps relay.—R6
Not used.—R7
Air conditioning clutch relay.—R8
Not used.—R9
Starter relay.—R10
Blower motor relay.—R11
Daytime running lamp/headlamp relay.—R12
Powertrain control module relay.—R13
Fuel pump diode.—D1
Air conditioning clutch diode.—D2
Not used.—D3
Not used.—C1*Mini fuses.**J-case fuse.
69
Motorhome (TY3) , enUSA, First Printing
Fuses
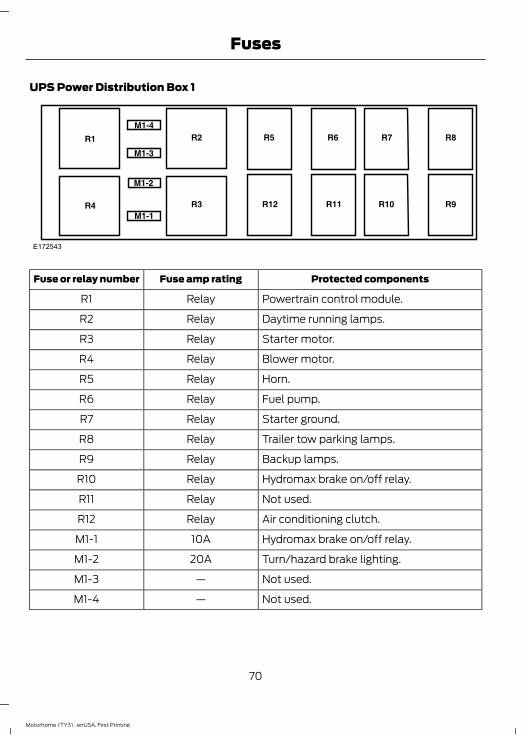
UPS Power Distribution Box 1
E172543
Protected componentsFuse amp ratingFuse or relay number
Powertrain control module.RelayR1
Daytime running lamps.RelayR2
Starter motor.RelayR3
Blower motor.RelayR4
Horn.RelayR5
Fuel pump.RelayR6
Starter ground.RelayR7
Trailer tow parking lamps.RelayR8
Backup lamps.RelayR9
Hydromax brake on/off relay.RelayR10
Not used.RelayR11
Air conditioning clutch.RelayR12
Hydromax brake on/off relay.10AM1-1
Turn/hazard brake lighting.20AM1-2
Not used.—M1-3
Not used.—M1-4
70
Motorhome (TY3) , enUSA, First Printing
Fuses
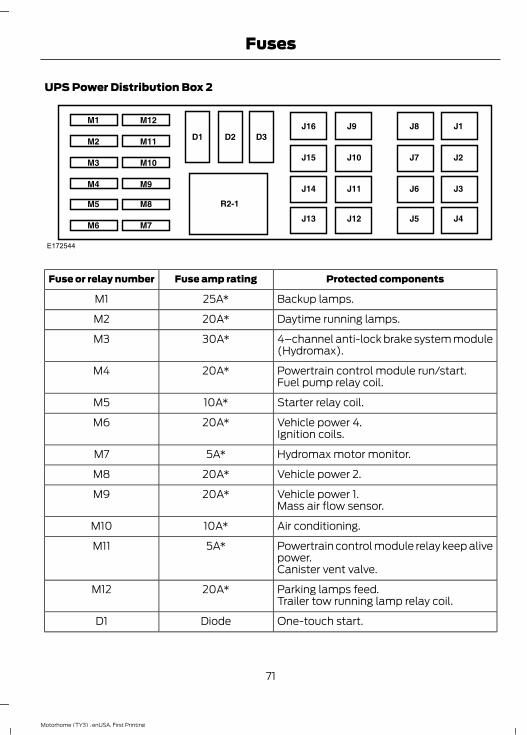
UPS Power Distribution Box 2
E172544
Protected componentsFuse amp ratingFuse or relay number
Backup lamps.25A*M1
Daytime running lamps.20A*M2
4–channel anti-lock brake system module(Hydromax).
30A*M3
Powertrain control module run/start.20A*M4Fuel pump relay coil.
Starter relay coil.10A*M5
Vehicle power 4.20A*M6Ignition coils.
Hydromax motor monitor.5A*M7
Vehicle power 2.20A*M8
Vehicle power 1.20A*M9Mass air flow sensor.
Air conditioning.10A*M10
Powertrain control module relay keep alivepower.
5A*M11
Canister vent valve.
Parking lamps feed.20A*M12Trailer tow running lamp relay coil.
One-touch start.DiodeD1
71
Motorhome (TY3) , enUSA, First Printing
Fuses
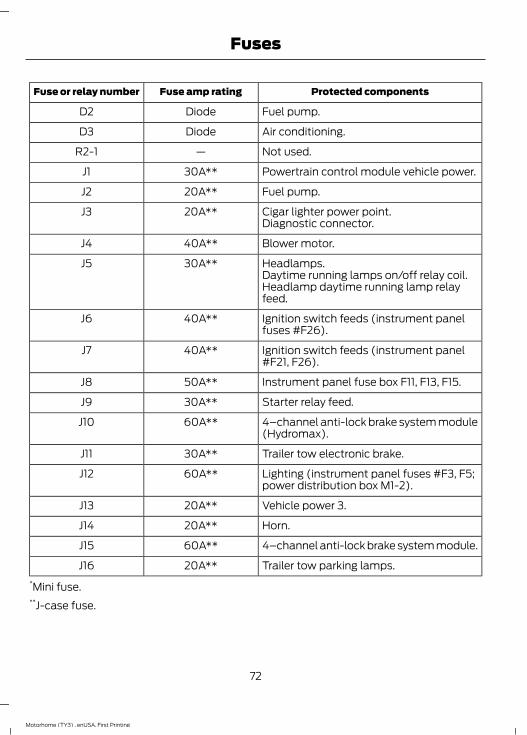
Protected componentsFuse amp ratingFuse or relay number
Fuel pump.DiodeD2
Air conditioning.DiodeD3
Not used.—R2-1
Powertrain control module vehicle power.30A**J1
Fuel pump.20A**J2
Cigar lighter power point.20A**J3Diagnostic connector.
Blower motor.40A**J4
Headlamps.30A**J5Daytime running lamps on/off relay coil.Headlamp daytime running lamp relayfeed.
Ignition switch feeds (instrument panelfuses #F26).
40A**J6
Ignition switch feeds (instrument panel#F21, F26).
40A**J7
Instrument panel fuse box F11, F13, F15.50A**J8
Starter relay feed.30A**J9
4–channel anti-lock brake system module(Hydromax).
60A**J10
Trailer tow electronic brake.30A**J11
Lighting (instrument panel fuses #F3, F5;power distribution box M1-2).
60A**J12
Vehicle power 3.20A**J13
Horn.20A**J14
4–channel anti-lock brake system module.60A**J15
Trailer tow parking lamps.20A**J16*Mini fuse.**J-case fuse.
72
Motorhome (TY3) , enUSA, First Printing
Fuses
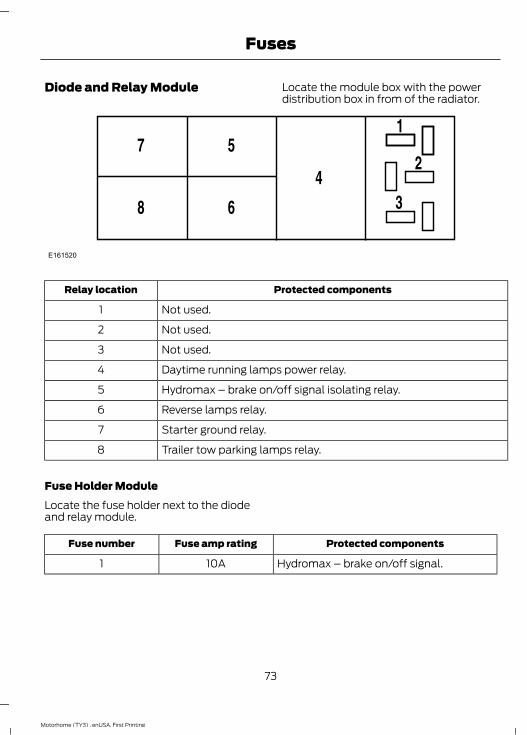
Diode and Relay Module Locate the module box with the powerdistribution box in from of the radiator.
E161520
Protected componentsRelay location
Not used.1
Not used.2
Not used.3
Daytime running lamps power relay.4
Hydromax – brake on/off signal isolating relay.5
Reverse lamps relay.6
Starter ground relay.7
Trailer tow parking lamps relay.8
Fuse Holder ModuleLocate the fuse holder next to the diodeand relay module.
Protected componentsFuse amp ratingFuse number
Hydromax – brake on/off signal.10A1
73
Motorhome (TY3) , enUSA, First Printing
Fuses
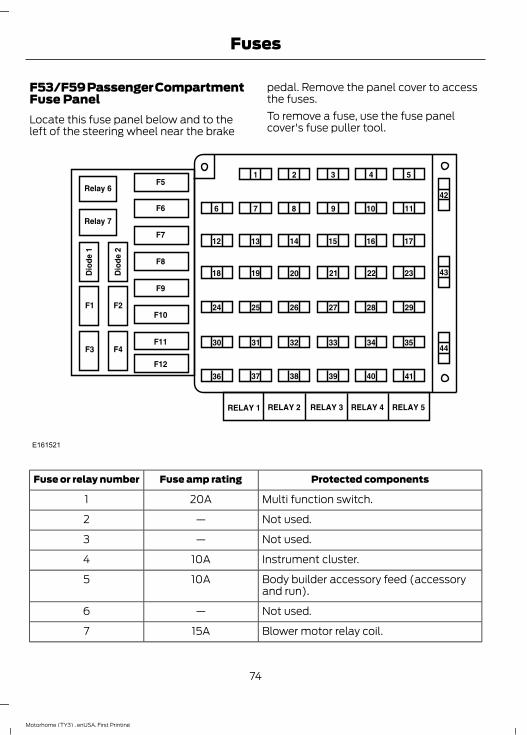
F53/F59 Passenger CompartmentFuse PanelLocate this fuse panel below and to theleft of the steering wheel near the brake
pedal. Remove the panel cover to accessthe fuses.To remove a fuse, use the fuse panelcover's fuse puller tool.
E161521
Protected componentsFuse amp ratingFuse or relay number
Multi function switch.20A1
Not used.—2
Not used.—3
Instrument cluster.10A4
Body builder accessory feed (accessoryand run).
10A5
Not used.—6
Blower motor relay coil.15A7
74
Motorhome (TY3) , enUSA, First Printing
Fuses
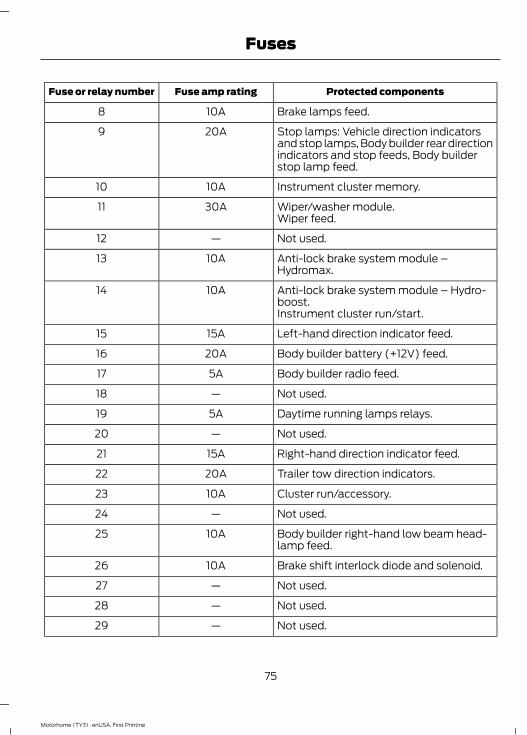
Protected componentsFuse amp ratingFuse or relay number
Brake lamps feed.10A8
Stop lamps: Vehicle direction indicatorsand stop lamps, Body builder rear directionindicators and stop feeds, Body builderstop lamp feed.
20A9
Instrument cluster memory.10A10
Wiper/washer module.30A11Wiper feed.
Not used.—12
Anti-lock brake system module –Hydromax.
10A13
Anti-lock brake system module – Hydro-boost.
10A14
Instrument cluster run/start.
Left-hand direction indicator feed.15A15
Body builder battery (+12V) feed.20A16
Body builder radio feed.5A17
Not used.—18
Daytime running lamps relays.5A19
Not used.—20
Right-hand direction indicator feed.15A21
Trailer tow direction indicators.20A22
Cluster run/accessory.10A23
Not used.—24
Body builder right-hand low beam head-lamp feed.
10A25
Brake shift interlock diode and solenoid.10A26
Not used.—27
Not used.—28
Not used.—29
75
Motorhome (TY3) , enUSA, First Printing
Fuses
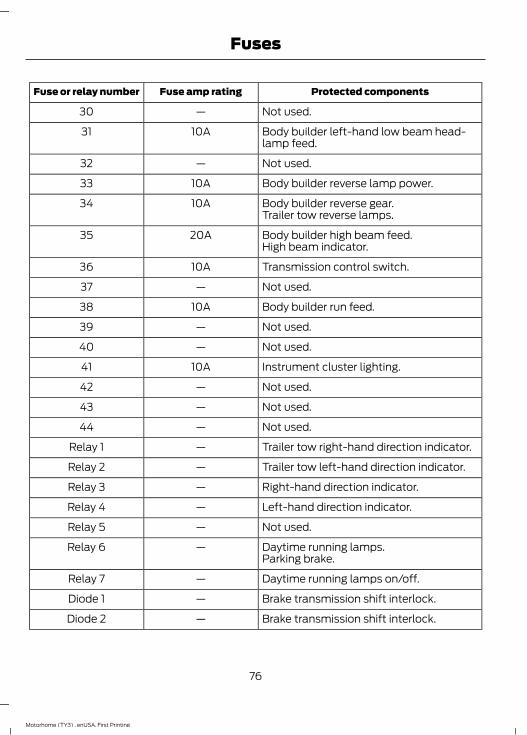
Protected componentsFuse amp ratingFuse or relay number
Not used.—30
Body builder left-hand low beam head-lamp feed.
10A31
Not used.—32
Body builder reverse lamp power.10A33
Body builder reverse gear.10A34Trailer tow reverse lamps.
Body builder high beam feed.20A35High beam indicator.
Transmission control switch.10A36
Not used.—37
Body builder run feed.10A38
Not used.—39
Not used.—40
Instrument cluster lighting.10A41
Not used.—42
Not used.—43
Not used.—44
Trailer tow right-hand direction indicator.—Relay 1
Trailer tow left-hand direction indicator.—Relay 2
Right-hand direction indicator.—Relay 3
Left-hand direction indicator.—Relay 4
Not used.—Relay 5
Daytime running lamps.—Relay 6Parking brake.
Daytime running lamps on/off.—Relay 7
Brake transmission shift interlock.—Diode 1
Brake transmission shift interlock.—Diode 2
76
Motorhome (TY3) , enUSA, First Printing
Fuses
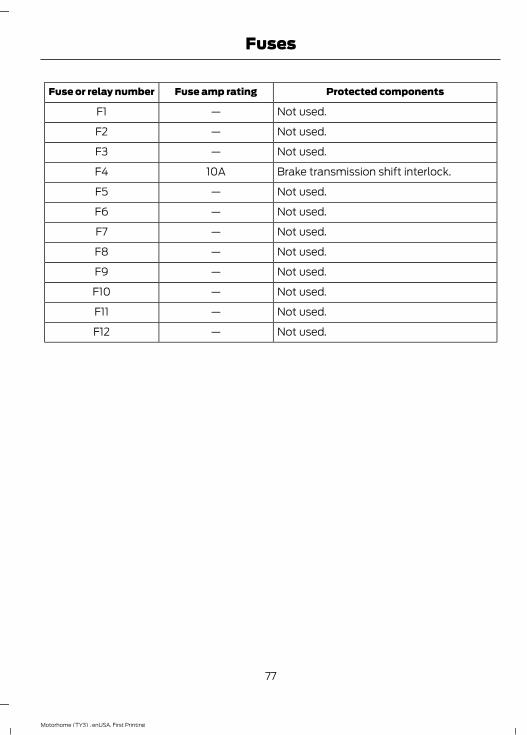
Protected componentsFuse amp ratingFuse or relay number
Not used.—F1
Not used.—F2
Not used.—F3
Brake transmission shift interlock.10AF4
Not used.—F5
Not used.—F6
Not used.—F7
Not used.—F8
Not used.—F9
Not used.—F10
Not used.—F11
Not used.—F12
77
Motorhome (TY3) , enUSA, First Printing
Fuses
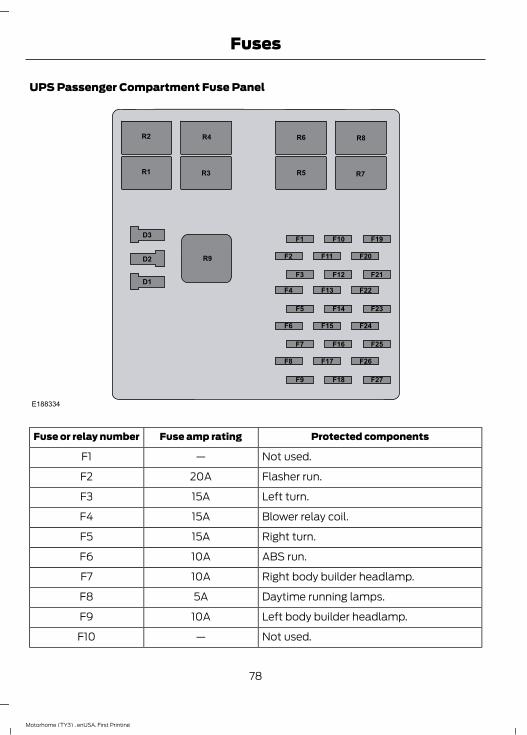
UPS Passenger Compartment Fuse Panel
E188334
Protected componentsFuse amp ratingFuse or relay number
Not used.—F1
Flasher run.20AF2
Left turn.15AF3
Blower relay coil.15AF4
Right turn.15AF5
ABS run.10AF6
Right body builder headlamp.10AF7
Daytime running lamps.5AF8
Left body builder headlamp.10AF9
Not used.—F10
78
Motorhome (TY3) , enUSA, First Printing
Fuses
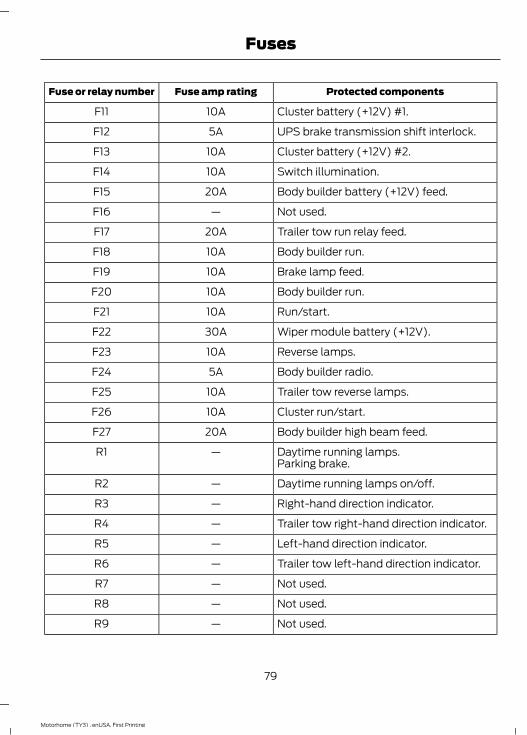
Protected componentsFuse amp ratingFuse or relay number
Cluster battery (+12V) #1.10AF11
UPS brake transmission shift interlock.5AF12
Cluster battery (+12V) #2.10AF13
Switch illumination.10AF14
Body builder battery (+12V) feed.20AF15
Not used.—F16
Trailer tow run relay feed.20AF17
Body builder run.10AF18
Brake lamp feed.10AF19
Body builder run.10AF20
Run/start.10AF21
Wiper module battery (+12V).30AF22
Reverse lamps.10AF23
Body builder radio.5AF24
Trailer tow reverse lamps.10AF25
Cluster run/start.10AF26
Body builder high beam feed.20AF27
Daytime running lamps.—R1Parking brake.
Daytime running lamps on/off.—R2
Right-hand direction indicator.—R3
Trailer tow right-hand direction indicator.—R4
Left-hand direction indicator.—R5
Trailer tow left-hand direction indicator.—R6
Not used.—R7
Not used.—R8
Not used.—R9
79
Motorhome (TY3) , enUSA, First Printing
Fuses
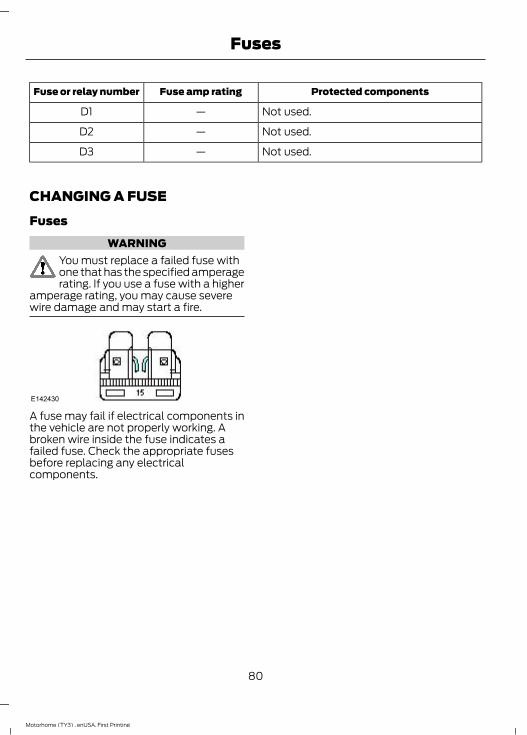
Protected componentsFuse amp ratingFuse or relay number
Not used.—D1
Not used.—D2
Not used.—D3
CHANGING A FUSEFuses
WARNINGYou must replace a failed fuse withone that has the specified amperagerating. If you use a fuse with a higher
amperage rating, you may cause severewire damage and may start a fire.
E142430
A fuse may fail if electrical components inthe vehicle are not properly working. Abroken wire inside the fuse indicates afailed fuse. Check the appropriate fusesbefore replacing any electricalcomponents.
80
Motorhome (TY3) , enUSA, First Printing
Fuses
GENERAL INFORMATIONHave your vehicle serviced regularly to helpmaintain its roadworthiness and resalevalue. There is a large network ofauthorized dealers that are there to helpyou with their professional servicingexpertise. We believe that their speciallytrained technicians are best qualified toservice your vehicle properly and expertly.They are supported by a wide range ofhighly specialized tools developedspecifically for servicing your vehicle.To help you service your vehicle, weprovide scheduled maintenanceinformation which makes tracking routineservice easy. See ScheduledMaintenance (page 128).If your vehicle requires professional service,an authorized dealer can provide thenecessary parts and service. Check yourwarranty information to find out whichparts and services are covered.Use only recommended fuels, lubricants,fluids and service parts conforming tospecifications. Motorcraft® parts aredesigned and built to provide the bestperformance in your vehicle.
Precautions• Do not work on a hot engine.• Make sure that nothing gets caught in
moving parts.• Do not work on a vehicle with the
engine running in an enclosed space,unless you are sure you have enoughventilation.
• Keep all open flames and other burningmaterial (such as cigarettes) awayfrom the battery and all fuel relatedparts.
Working with the Engine Off1. Set the parking brake and shift to park
(P).2. Switch off the engine.3. Block the wheels.
Working with the Engine OnWARNING
To reduce the risk of vehicle damageand/or personal burn injuries, do notstart your engine with the air cleaner
removed and do not remove it while theengine is running.
1. Set the parking brake and shift to park(P).
2. Block the wheels
81
Motorhome (TY3) , enUSA, First Printing
Maintenance
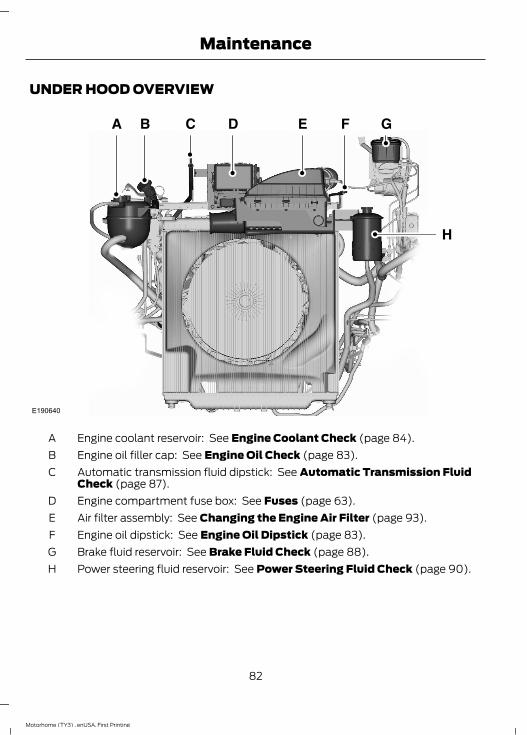
UNDER HOOD OVERVIEW
E190640
Engine coolant reservoir: See Engine Coolant Check (page 84).AEngine oil filler cap: See Engine Oil Check (page 83).BAutomatic transmission fluid dipstick: See Automatic Transmission FluidCheck (page 87).
C
Engine compartment fuse box: See Fuses (page 63).DAir filter assembly: See Changing the Engine Air Filter (page 93).EEngine oil dipstick: See Engine Oil Dipstick (page 83).FBrake fluid reservoir: See Brake Fluid Check (page 88).GPower steering fluid reservoir: See Power Steering Fluid Check (page 90).H
82
Motorhome (TY3) , enUSA, First Printing
Maintenance
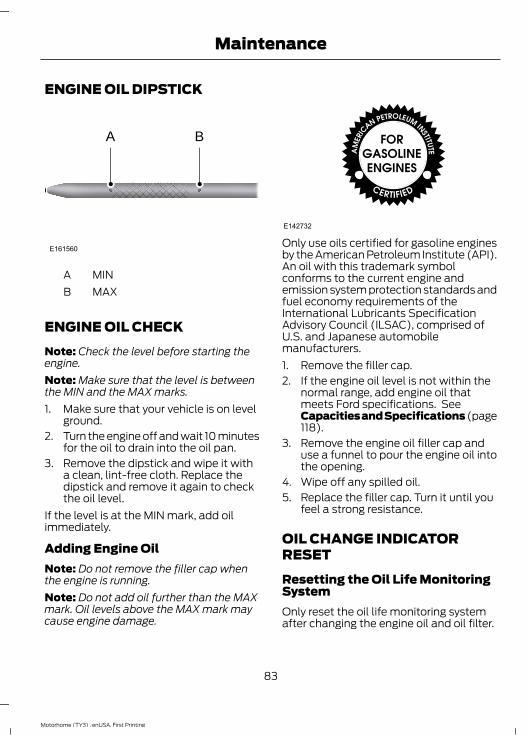
ENGINE OIL DIPSTICK
E161560
A B
MINAMAXB
ENGINE OIL CHECKNote: Check the level before starting theengine.Note: Make sure that the level is betweenthe MIN and the MAX marks.1. Make sure that your vehicle is on level
ground.2. Turn the engine off and wait 10 minutes
for the oil to drain into the oil pan.3. Remove the dipstick and wipe it with
a clean, lint-free cloth. Replace thedipstick and remove it again to checkthe oil level.
If the level is at the MIN mark, add oilimmediately.
Adding Engine OilNote: Do not remove the filler cap whenthe engine is running.Note: Do not add oil further than the MAXmark. Oil levels above the MAX mark maycause engine damage.
E142732
Only use oils certified for gasoline enginesby the American Petroleum Institute (API).An oil with this trademark symbolconforms to the current engine andemission system protection standards andfuel economy requirements of theInternational Lubricants SpecificationAdvisory Council (ILSAC), comprised ofU.S. and Japanese automobilemanufacturers.1. Remove the filler cap.2. If the engine oil level is not within the
normal range, add engine oil thatmeets Ford specifications. SeeCapacities and Specifications (page118).
3. Remove the engine oil filler cap anduse a funnel to pour the engine oil intothe opening.
4. Wipe off any spilled oil.5. Replace the filler cap. Turn it until you
feel a strong resistance.
OIL CHANGE INDICATORRESETResetting the Oil Life MonitoringSystemOnly reset the oil life monitoring systemafter changing the engine oil and oil filter.
83
Motorhome (TY3) , enUSA, First Printing
Maintenance
To reset the oil life monitoring system dothe following:1. Switch the ignition on. Do not start the
engine.2. Fully press the accelerator and brake
pedals at the same time.3. Keep the accelerator and brake pedals
fully pressed.4. After three seconds, a message
displays confirming the reset procedureis in progress.
5. After 25 seconds, a message displaysconfirming the reset procedure iscomplete.
6. Release the accelerator and brakepedals.
7. Switch the ignition off.
ENGINE COOLANT CHECK
WARNINGSDo not add engine coolant when theengine is hot. Steam and scaldingliquids released from a hot cooling
system can burn you badly. Also, spillingcoolant on hot engine parts can burn you.
Do not put engine coolant in thewindshield washer fluid container. Ifsprayed on the windshield, engine
coolant could make it difficult to seethrough the windshield.
To reduce the risk of personal injury,make sure the engine is cool beforeunscrewing the coolant pressure
relief cap. The cooling system is underpressure; steam and hot liquid can comeout forcefully when you loosen the capslightly.
Do not add coolant further than theMAX mark.
When the engine is cold, check theconcentration and level of the enginecoolant at the intervals listed in thescheduled maintenance information. SeeScheduled Maintenance (page 128).Note: Make sure that the level is betweenthe MIN and MAX marks on the coolantreservoir.Note: Coolant expands when it is hot. Thelevel may extend beyond the MAX markNote: If the level is at the MIN mark, belowthe MIN mark, or empty, add coolantimmediately. See Adding Engine Coolantin this chapter.The coolant concentration should bemaintained within 48% to 50%, whichequates to a freeze point between -30°F(-34°C) and -34°F (-37°C).Note: For best results, coolantconcentration should be tested with arefractometer such as Robinair® Coolantand Battery Refractometer 75240. We donot recommend the use of hydrometers orcoolant test strips for measuring coolantconcentrations.Note: Automotive fluids are notinterchangeable. Do not use engine coolant,antifreeze or windshield washer fluid outsideof its specified function and vehicle location.
Adding Engine CoolantNote: Do not use stop leak pellets, coolingsystem sealants, or additives as they cancause damage to the engine cooling orheating systems. Your vehicle’s warrantydoes not cover this damage.
84
Motorhome (TY3) , enUSA, First Printing
Maintenance
Note: During normal vehicle operation, theengine coolant may change color fromorange to pink or light red. As long as theengine coolant is clear and uncontaminated,this color change does not indicate theengine coolant has degraded nor does itrequire the engine coolant to be drained, thesystem to be flushed, or the engine coolantto be replaced.• Do not mix different colors or types of
coolant in your vehicle. Make sure thecorrect coolant is used. Mixing ofengine coolants may harm the engine’scooling system. The use of an impropercoolant may harm the engine andcooling system components and mayvoid the warranty. Use predilutedengine coolant meeting the Fordspecification. See Capacities andSpecifications (page 118).
• In case of emergency, you can add alarge amount of water without enginecoolant in order to reach a vehicleservice location. In this instance, youmust have the cooling system drained,chemically cleaned with MotorcraftPremium Cooling System Flush, andrefilled with engine coolant as soon aspossible. Water alone (without enginecoolant) can cause engine damagefrom corrosion, overheating or freezing.
• Do not use alcohol, methanol, brine orany engine coolants mixed with alcoholor methanol antifreeze (coolant).Alcohol and other liquids can causeengine damage from overheating orfreezing.
• Do not add extra inhibitors or additivesto the coolant. These can be harmfuland compromise the corrosionprotection of the engine coolant.
Unscrew the cap slowly. Any pressure willescape as you unscrew the cap.Add prediluted engine coolant meeting theFord specification. See Capacities andSpecifications (page 118).
Whenever you add coolant, check thecoolant level in the coolant reservoir thenext few times you drive the vehicle. Ifnecessary, add enough prediluted enginecoolant to bring the coolant level to theproper level.
Recycled Engine CoolantFord Motor Company does not recommendthe use of recycled engine coolant since aFord-approved recycling process is not yetavailable.Used engine coolant should be disposedof in an appropriate manner. Follow yourcommunity’s regulations and standardsfor recycling and disposing of automotivefluids.
Severe ClimatesIf you drive in extremely cold climates:• It may be necessary to have a Ford
authorized dealer increase the coolantconcentration above 50%.
• A coolant concentration of 60% willprovide improved freeze pointprotection. Engine coolantconcentrations above 60% willdecrease the overheat protectioncharacteristics of the engine coolantand may cause engine damage
If you drive in extremely hot climates:• It may be necessary to have a Ford
authorized dealer decrease the coolantconcentration to 40%.
• A coolant concentration of 40% willprovide improved overheat protection.Engine coolant concentrations below40% will decrease the freeze andcorrosion protection characteristics ofthe engine coolant and may causeengine damage.
85
Motorhome (TY3) , enUSA, First Printing
Maintenance
Vehicles driven year-round in non-extremeclimates should use prediluted enginecoolant for optimum cooling system andengine protection.
What you Should Know About Fail-Safe CoolingIf you deplete the engine coolant supply,this feature allows you to drive your vehicletemporarily before you incur incrementalcomponent damage. The fail-safe distancedepends on ambient temperatures, vehicleload and terrain.
How Fail-Safe Cooling WorksIf the engine begins to overheat, the enginecoolant temperature gauge will move tothe red (hot) area and:
The coolant temperaturewarning indicator will light.
The service engine soonindicator will light.If the engine reaches a preset
over-temperature condition, the enginewill automatically switch to alternatingcylinder operation. Each disabled cylinderacts as an air pump and cools the engine.
When this occurs, the vehicle will stilloperate. However:• The engine power will be limited.• This will disable the air conditioning
system.Continued operation will increase theengine temperature and the engine willcompletely shut down, causing steeringand braking effort to increase.Once the engine temperature cools, theengine can be re-started. Take your vehicleto an authorized dealer as soon as possibleto minimize engine damage.
When Fail-Safe Mode Is Activated
WARNINGSFail-safe mode is for use duringemergencies only. Operate thevehicle in fail-safe mode only as long
as necessary to bring the vehicle to rest ina safe location and seek immediate repairs.When in fail-safe mode, the vehicle willhave limited power, will not be able tomaintain high-speed operation and maycompletely shut down without warning,potentially losing engine power, powersteering assist and power brake assist,which may increase the possibility of acrash resulting in serious injury.
Never remove the coolant reservoircap while the engine is running or hot.
You have limited engine power when in thefail-safe mode, so drive the vehicle withcaution. The vehicle will not be able tomaintain high-speed operation and theengine will run rough. Remember that theengine is capable of completely shuttingdown automatically to prevent enginedamage, therefore:1. Pull off the road as soon as safely
possible and switch off the engine.2. Have your vehicle towed to an
authorized dealer.3. If this is not possible, wait a short
period for the engine to cool.4. Check the coolant level and replenish
if low.5. Re-start the engine and take your
vehicle to an authorized dealer.Note: Driving the vehicle without repairingthe engine problem increases the chance ofengine damage. Take your vehicle to anauthorized dealer as soon as possible.
86
Motorhome (TY3) , enUSA, First Printing
Maintenance
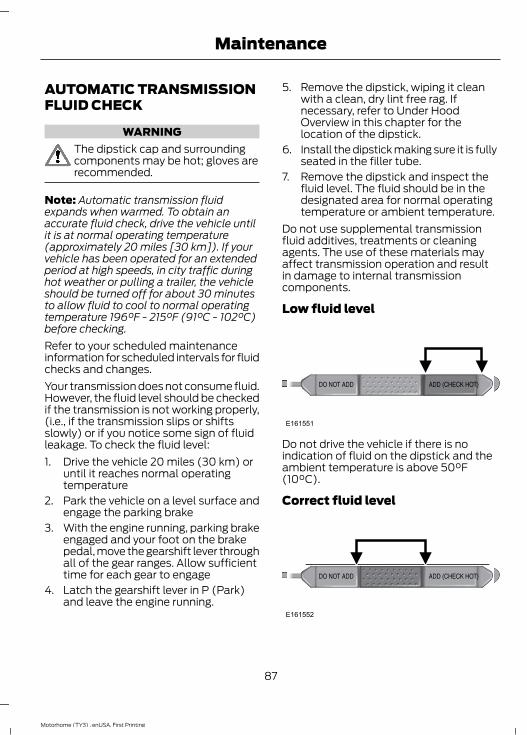
AUTOMATIC TRANSMISSIONFLUID CHECK
WARNINGThe dipstick cap and surroundingcomponents may be hot; gloves arerecommended.
Note: Automatic transmission fluidexpands when warmed. To obtain anaccurate fluid check, drive the vehicle untilit is at normal operating temperature(approximately 20 miles [30 km]). If yourvehicle has been operated for an extendedperiod at high speeds, in city traffic duringhot weather or pulling a trailer, the vehicleshould be turned off for about 30 minutesto allow fluid to cool to normal operatingtemperature 196°F - 215°F (91°C - 102°C)before checking.Refer to your scheduled maintenanceinformation for scheduled intervals for fluidchecks and changes.Your transmission does not consume fluid.However, the fluid level should be checkedif the transmission is not working properly,(i.e., if the transmission slips or shiftsslowly) or if you notice some sign of fluidleakage. To check the fluid level:1. Drive the vehicle 20 miles (30 km) or
until it reaches normal operatingtemperature
2. Park the vehicle on a level surface andengage the parking brake
3. With the engine running, parking brakeengaged and your foot on the brakepedal, move the gearshift lever throughall of the gear ranges. Allow sufficienttime for each gear to engage
4. Latch the gearshift lever in P (Park)and leave the engine running.
5. Remove the dipstick, wiping it cleanwith a clean, dry lint free rag. Ifnecessary, refer to Under HoodOverview in this chapter for thelocation of the dipstick.
6. Install the dipstick making sure it is fullyseated in the filler tube.
7. Remove the dipstick and inspect thefluid level. The fluid should be in thedesignated area for normal operatingtemperature or ambient temperature.
Do not use supplemental transmissionfluid additives, treatments or cleaningagents. The use of these materials mayaffect transmission operation and resultin damage to internal transmissioncomponents.
Low fluid level
E161551
Do not drive the vehicle if there is noindication of fluid on the dipstick and theambient temperature is above 50°F(10°C).
Correct fluid level
E161552
87
Motorhome (TY3) , enUSA, First Printing
Maintenance
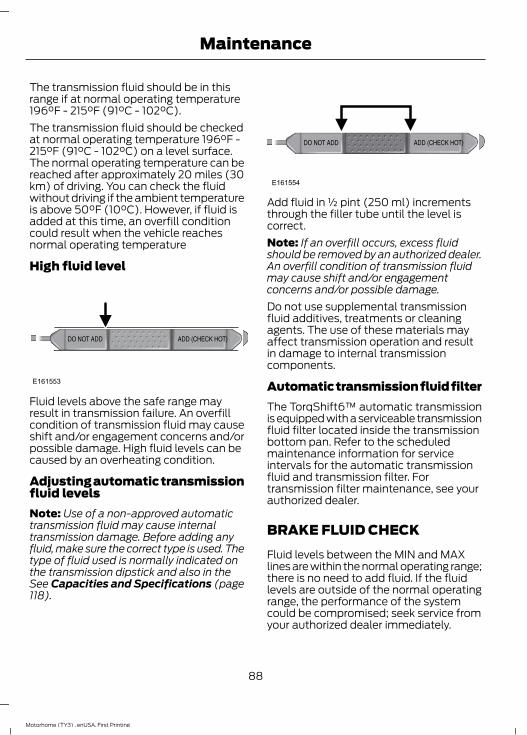
The transmission fluid should be in thisrange if at normal operating temperature196°F - 215°F (91°C - 102°C).The transmission fluid should be checkedat normal operating temperature 196°F -215°F (91°C - 102°C) on a level surface.The normal operating temperature can bereached after approximately 20 miles (30km) of driving. You can check the fluidwithout driving if the ambient temperatureis above 50°F (10°C). However, if fluid isadded at this time, an overfill conditioncould result when the vehicle reachesnormal operating temperature
High fluid level
E161553
Fluid levels above the safe range mayresult in transmission failure. An overfillcondition of transmission fluid may causeshift and/or engagement concerns and/orpossible damage. High fluid levels can becaused by an overheating condition.
Adjusting automatic transmissionfluid levelsNote: Use of a non-approved automatictransmission fluid may cause internaltransmission damage. Before adding anyfluid, make sure the correct type is used. Thetype of fluid used is normally indicated onthe transmission dipstick and also in theSee Capacities and Specifications (page118).
E161554
Add fluid in ½ pint (250 ml) incrementsthrough the filler tube until the level iscorrect.Note: If an overfill occurs, excess fluidshould be removed by an authorized dealer.An overfill condition of transmission fluidmay cause shift and/or engagementconcerns and/or possible damage.Do not use supplemental transmissionfluid additives, treatments or cleaningagents. The use of these materials mayaffect transmission operation and resultin damage to internal transmissioncomponents.
Automatic transmission fluid filterThe TorqShift6™ automatic transmissionis equipped with a serviceable transmissionfluid filter located inside the transmissionbottom pan. Refer to the scheduledmaintenance information for serviceintervals for the automatic transmissionfluid and transmission filter. Fortransmission filter maintenance, see yourauthorized dealer.
BRAKE FLUID CHECKFluid levels between the MIN and MAXlines are within the normal operating range;there is no need to add fluid. If the fluidlevels are outside of the normal operatingrange, the performance of the systemcould be compromised; seek service fromyour authorized dealer immediately.
88
Motorhome (TY3) , enUSA, First Printing
Maintenance
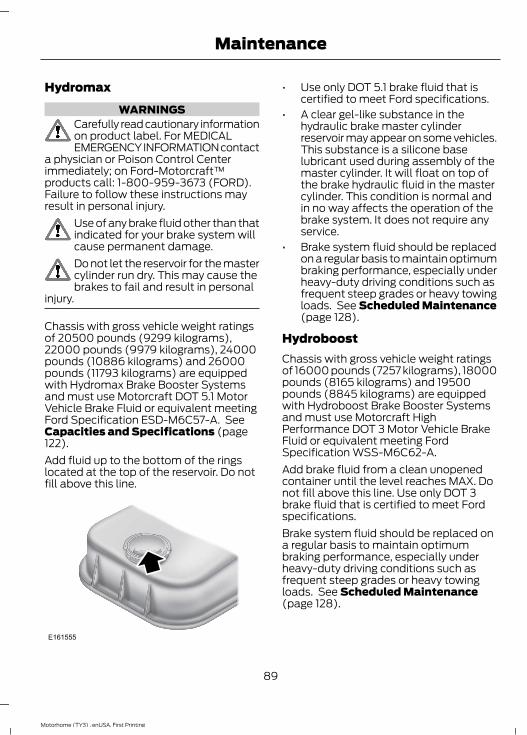
HydromaxWARNINGS
Carefully read cautionary informationon product label. For MEDICALEMERGENCY INFORMATION contact
a physician or Poison Control Centerimmediately; on Ford-Motorcraft™products call: 1-800-959-3673 (FORD).Failure to follow these instructions mayresult in personal injury.
Use of any brake fluid other than thatindicated for your brake system willcause permanent damage.Do not let the reservoir for the mastercylinder run dry. This may cause thebrakes to fail and result in personal
injury.
Chassis with gross vehicle weight ratingsof 20500 pounds (9299 kilograms),22000 pounds (9979 kilograms), 24000pounds (10886 kilograms) and 26000pounds (11793 kilograms) are equippedwith Hydromax Brake Booster Systemsand must use Motorcraft DOT 5.1 MotorVehicle Brake Fluid or equivalent meetingFord Specification ESD-M6C57-A. SeeCapacities and Specifications (page122).Add fluid up to the bottom of the ringslocated at the top of the reservoir. Do notfill above this line.
E161555
• Use only DOT 5.1 brake fluid that iscertified to meet Ford specifications.
• A clear gel-like substance in thehydraulic brake master cylinderreservoir may appear on some vehicles.This substance is a silicone baselubricant used during assembly of themaster cylinder. It will float on top ofthe brake hydraulic fluid in the mastercylinder. This condition is normal andin no way affects the operation of thebrake system. It does not require anyservice.
• Brake system fluid should be replacedon a regular basis to maintain optimumbraking performance, especially underheavy-duty driving conditions such asfrequent steep grades or heavy towingloads. See Scheduled Maintenance(page 128).
HydroboostChassis with gross vehicle weight ratingsof 16000 pounds (7257 kilograms), 18000pounds (8165 kilograms) and 19500pounds (8845 kilograms) are equippedwith Hydroboost Brake Booster Systemsand must use Motorcraft HighPerformance DOT 3 Motor Vehicle BrakeFluid or equivalent meeting FordSpecification WSS-M6C62-A.Add brake fluid from a clean unopenedcontainer until the level reaches MAX. Donot fill above this line. Use only DOT 3brake fluid that is certified to meet Fordspecifications.Brake system fluid should be replaced ona regular basis to maintain optimumbraking performance, especially underheavy-duty driving conditions such asfrequent steep grades or heavy towingloads. See Scheduled Maintenance(page 128).
89
Motorhome (TY3) , enUSA, First Printing
Maintenance
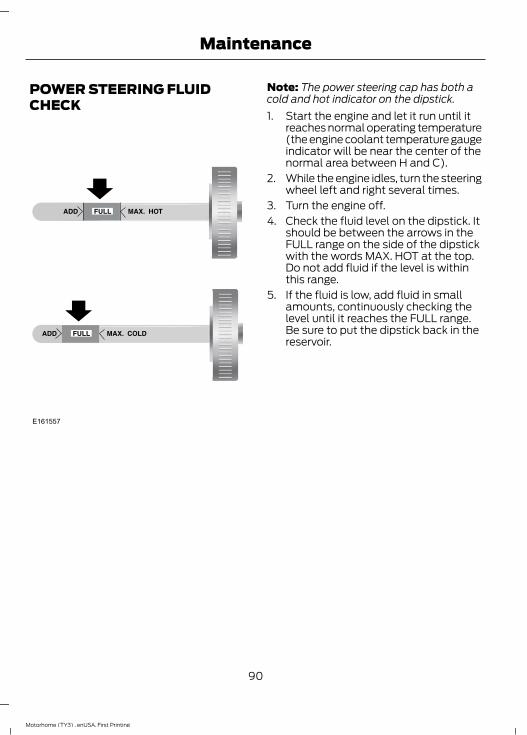
POWER STEERING FLUIDCHECK
E161557
Note: The power steering cap has both acold and hot indicator on the dipstick.1. Start the engine and let it run until it
reaches normal operating temperature(the engine coolant temperature gaugeindicator will be near the center of thenormal area between H and C).
2. While the engine idles, turn the steeringwheel left and right several times.
3. Turn the engine off.4. Check the fluid level on the dipstick. It
should be between the arrows in theFULL range on the side of the dipstickwith the words MAX. HOT at the top.Do not add fluid if the level is withinthis range.
5. If the fluid is low, add fluid in smallamounts, continuously checking thelevel until it reaches the FULL range.Be sure to put the dipstick back in thereservoir.
90
Motorhome (TY3) , enUSA, First Printing
Maintenance

Steering linkage lubrication points
E161558
A
AA
A
A
A
A
A
There are nine lubrication points on thesteering linkage shown as “A”. SeeCapacities and Specifications (page122).
FUEL FILTERYour vehicle is equipped with a lifetimefuel filter that is integrated with the fueltank. Regular maintenance or replacementis not needed.
CHANGING THE 12V BATTERY
WARNINGSBatteries normally produce explosivegases which can cause personalinjury. Therefore, do not allow
flames, sparks or lighted substances tocome near the battery. When working nearthe battery, always shield your face andprotect your eyes. Always provide properventilation.
WARNINGSWhen lifting a plastic-cased battery,excessive pressure on the end wallscould cause acid to flow through the
vent caps, resulting in personal injury anddamage to the vehicle or battery. Lift thebattery with a battery carrier or with yourhands on opposite corners.
Keep batteries out of reach ofchildren. Batteries contain sulfuricacid. Avoid contact with skin, eyes or
clothing. Shield your eyes when workingnear the battery to protect against possiblesplashing of acid solution. In case of acidcontact with skin or eyes, flushimmediately with water for a minimum of15 minutes and get prompt medicalattention. If acid is swallowed, call aphysician immediately.
Note: If your battery has a cover/shield,make sure it is reinstalled after the batteryhas been cleaned or replaced.
91
Motorhome (TY3) , enUSA, First Printing
Maintenance
Note: Battery posts, terminals and relatedaccessories contain lead and leadcompounds. Wash hands after handling.Your vehicle is equipped with aMotorcraft® maintenance-free batterywhich normally does not require additionalwater during its life of service.For longer, trouble-free operation, keep thetop of the battery clean and dry. Also,make certain the battery cables are alwaystightly fastened to the battery terminals.If you see any corrosion on the battery orterminals, remove the cables from theterminals and clean with a wire brush. Youcan neutralize the acid with a solution ofbaking soda and water.It is recommended that the negativebattery cable terminal be disconnectedfrom the battery if you plan to store yourvehicle for an extended period of time.To ensure proper operation of the batterymanagement system (BMS), any electricaldevices that are added to the vehicleshould not have their ground connectionmade directly at the negative battery post.A connection at the negative battery postcan cause inaccurate measurements ofthe battery condition and potentialincorrect system operation.Note: Electrical or electronic accessoriesor components added to the vehicle by thedealer or the owner may adversely affectbattery performance and durability and mayalso affect the performance of otherelectrical systems in the vehicle.When a battery replacement is required,the battery should only be replaced witha Ford recommended replacement batterythat matches the electrical requirementsof the vehicle.
Note: Always dispose of automotivebatteries in a responsible manner. Followyour local authorized standards for disposal.Call your local authorized recycling centerto find out more about recycling automotivebatteries.
Battery relearnWhen the battery is disconnected or a newbattery installed:• The transmission must relearn its
adaptive strategy. As a result of this,the transmission may shift firmly. Thisoperation is considered normal and willnot affect function or durability of thetransmission. Over time the adaptivelearning process will fully updatetransmission operation to its optimumshift feel.
• The clock and the preset radio stationsmust be reset once the battery isreconnected.
• Your vehicle’s engine is electronicallycontrolled by a computer, some controlconditions are maintained by powerfrom the battery, the engine mustrelearn its idle and fuel trim strategy.
When the battery is disconnected or a newbattery is installed, begin the batteryrelearn process:1. With the vehicle at a complete stop,
set the parking brake.2. Put the gearshift lever in P (Park), turn
off all accessories and start the engine.3. Run the engine until it reaches normal
operating temperature.4. Allow the engine to idle for at least one
minute.
92
Motorhome (TY3) , enUSA, First Printing
Maintenance
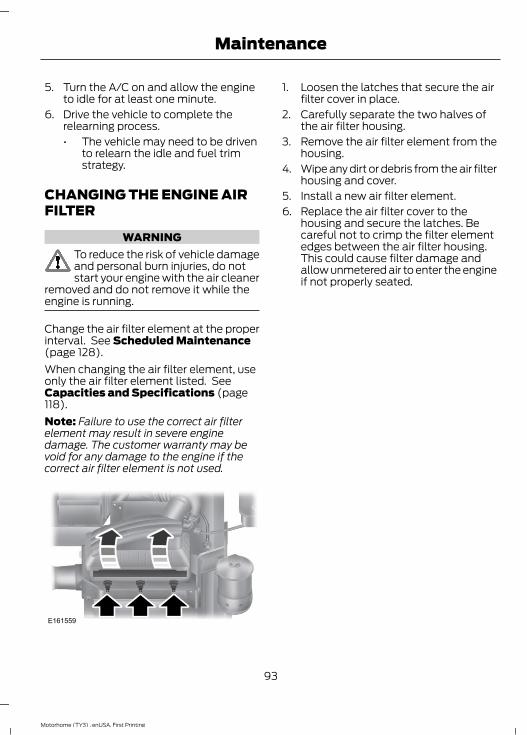
5. Turn the A/C on and allow the engineto idle for at least one minute.
6. Drive the vehicle to complete therelearning process.• The vehicle may need to be driven
to relearn the idle and fuel trimstrategy.
CHANGING THE ENGINE AIRFILTER
WARNINGTo reduce the risk of vehicle damageand personal burn injuries, do notstart your engine with the air cleaner
removed and do not remove it while theengine is running.
Change the air filter element at the properinterval. See Scheduled Maintenance(page 128).When changing the air filter element, useonly the air filter element listed. SeeCapacities and Specifications (page118).Note: Failure to use the correct air filterelement may result in severe enginedamage. The customer warranty may bevoid for any damage to the engine if thecorrect air filter element is not used.
E161559
1. Loosen the latches that secure the airfilter cover in place.
2. Carefully separate the two halves ofthe air filter housing.
3. Remove the air filter element from thehousing.
4. Wipe any dirt or debris from the air filterhousing and cover.
5. Install a new air filter element.6. Replace the air filter cover to the
housing and secure the latches. Becareful not to crimp the filter elementedges between the air filter housing.This could cause filter damage andallow unmetered air to enter the engineif not properly seated.
93
Motorhome (TY3) , enUSA, First Printing
Maintenance
GENERAL INFORMATIONYour Ford or Lincoln authorized dealer hasmany quality products available to cleanyour vehicle and protect its finishes.
CLEANING THE EXTERIORWash your vehicle regularly with cool orlukewarm water and a neutral pHshampoo, we recommend MotorcraftDetail Wash.• Never use strong household detergents
or soap, for example dish washing orlaundry liquid. These products candiscolor and spot painted surfaces.
• Never wash your vehicle when is hot tothe touch, or during strong or directsunlight.
• Dry your vehicle with a chamois or softterry cloth towel to eliminate waterspotting.
• Immediately remove fuel spillages, birddroppings, insect deposits and road tar.These may cause damage to yourvehicle’s paintwork or trim over time.We recommend Motorcraft Bug andTar Remover.
• Remove any exterior accessories, forexample antennas, before entering acar wash.
Note: Suntan lotions and insect repellentscan damage painted surfaces. If thesesubstances come in contact with yourvehicle, wash the affected area as soon aspossible.
Exterior Chrome Parts• Apply a high quality-cleaning product
to bumpers and other chrome parts.Follow the manufacturer’s instructions.We recommend Motorcraft CustomBright Metal Cleaner.
• Do not apply the cleaning product tohot surfaces. Do not leave the cleaningproduct on chrome surfaces longerthan the time recommended.
• Using other non-recommendedcleaners can result in severe andpermanent cosmetic damage.
Note: Never use abrasive materials, forexample steel wool or plastic pads as theycan scratch the chrome surface.Note: Do not use chrome cleaner, metalcleaner or polish on wheels or wheel covers.
Exterior Plastic PartsFor routine cleaning we recommendMotorcraft Detail Wash. If tar or greasespots are present, we recommendMotorcraft Bug and Tar Remover.
Stripes or Graphics (If Equipped)
Do not use a commercial or high-pressuresprayer on the surface or edge of stripesand graphics. This can damage them andcause the edges to peel away from thevehicle surface.
UnderbodyFlush the complete underside of yourvehicle frequently. Keep body and doordrain holes free of debris or foreignmaterial.
CLEANING THE ENGINEEngines are more efficient when they areclean because grease and dirt buildup keepthe engine warmer than normal.
94
Motorhome (TY3) , enUSA, First Printing
Vehicle Care
When washing:• Take care when using a power washer
to clean the engine. The high-pressurefluid could penetrate the sealed partsand cause damage.
• Do not spray a hot engine with coldwater to avoid cracking the engineblock or other engine components.
• Spray Motorcraft Engine Shampoo andDegreaser on all parts that requirecleaning and pressure rinse clean. InCanada, use Motorcraft EngineShampoo.
• Never wash or rinse the engine while itis hot or running; water in the runningengine may cause internal damage.
• Never wash or rinse any ignition coil,spark plug wire or spark plug well, orthe area in and around these locations.
• Cover the battery, power distributionbox, and air filter assembly to preventwater damage when cleaning theengine.
CLEANING THE ALLOYWHEELS (If Equipped)
Note: Do not apply a cleaning chemical towarm or hot wheel rims and covers.Note: Some automatic car washes maycause damage to the finish on your wheelrims and covers.Note: Industrial-strength or heavy-dutycleaners in combination with brush agitationto remove brake dust and dirt, could wearaway the clear coat finish over a period time.Note: Do not use hydrofluoric acid-basedor high caustic-based wheel cleaners, steelwool, fuels or strong household detergents.
Note: If you intend parking your vehicle foran extended period after cleaning thewheels with a wheel cleaner, drive yourvehicle for a few minutes before doing so.This will reduce the risk of increasedcorrosion of the brake discs.Alloy wheels and wheel covers are coatedwith a clear coat paint finish. To maintaintheir condition we recommend that you:• Clean the wheels weekly using
Motorcraft Wheel and Tire Cleaner.Apply using manufacturer'sinstructions.
• Use a sponge to remove heavydeposits of dirt and brake dustaccumulation.
• Rinse thoroughly with a strong streamof water when you have completed thecleaning process.
• To remove tar and grease, useMotorcraft Bug and Tar Remover.
VEHICLE STORAGEIf you plan on storing your vehicle for 30days or more, read the followingmaintenance recommendations to makesure your vehicle stays in good operatingcondition.We engineer and test all motor vehiclesand their components for reliable, regulardriving. Under various conditions,long-term storage may lead to degradedengine performance or failure unless youuse specific precautions to preserve enginecomponents.
General• Store all vehicles in a dry, ventilated
place.• Protect from sunlight, if possible.• If vehicles are stored outside, they
require regular maintenance to protectagainst rust and damage.
95
Motorhome (TY3) , enUSA, First Printing
Vehicle Care
Body• Wash your vehicle thoroughly to
remove dirt, grease, oil, tar or mud fromexterior surfaces, rear-wheel housingand the underside of front fenders.
• Periodically wash your vehicle if it isstored in exposed locations.
• Touch-up exposed or primed metal toprevent rust.
• Cover chrome and stainless steel partswith a thick coat of auto wax to preventdiscoloration. Re-wax as necessarywhen you wash your vehicle.
• Lubricate all hood, door and luggagecompartment hinges and latches witha light grade oil.
• Cover interior trim to prevent fading.• Keep all rubber parts free from oil and
solvents.
Engine• Change the engine oil and filter prior to
storage because used engine oilcontains contaminates which maycause engine damage.
• Start the engine every 15 days for aminimum of 15 minutes. Run at fast idlewith the climate controls set to defrostuntil the engine reaches normaloperating temperature.
• With your foot on the brake, shiftthrough all the gears while the engineis running.
• We recommend that you change theengine oil before you use your vehicleagain.
Fuel system• Fill the fuel tank with high-quality fuel
until the first automatic shutoff of thefuel pump nozzle.
Cooling system• Protect against freezing temperatures.• When removing your vehicle from
storage, check coolant fluid level.Confirm that there are no coolingsystem leaks and that fluid is at therecommended level.
Battery• Check and recharge as necessary. Keep
connections clean.• If storing your vehicle for more than 30
days without recharging the battery,we recommend that you disconnectthe battery cables to maintain batterycharge for quick starting.
Note: It is necessary to reset memoryfeatures if battery cables are disconnected.
Brakes• Make sure the brakes and parking brake
release fully.
Tires• Maintain recommended air pressure.
Miscellaneous• Make sure all linkages, cables, levers
and pins under your vehicle are coveredwith grease to prevent rust.
• Move vehicles at least 25 ft (7.5 m)every 15 days to lubricate working partsand prevent corrosion.
Removing Vehicle From StorageWhen your vehicle is ready to come out ofstorage, do the following:• Wash your vehicle to remove any dirt
or grease film build-up on windowsurfaces.
• Check windshield wipers for anydeterioration.
96
Motorhome (TY3) , enUSA, First Printing
Vehicle Care
• Check under the hood for any foreignmaterial that may have collectedduring storage such as mice or squirrelnests.
• Check the exhaust for any foreignmaterial that may have collectedduring storage.
• Check tire pressures and set tireinflation per the Tire Label.
• Check brake pedal operation. Driveyour vehicle 15 ft (4.5 m) back andforth to remove rust build-up.
• Check fluid levels (including coolant,oil and gas) to make sure there are noleaks, and fluids are at recommendedlevels.
• If you remove the battery, clean thebattery cable ends and check fordamage.
Contact an authorized dealer if you haveany concerns or issues.
97
Motorhome (TY3) , enUSA, First Printing
Vehicle Care

TIRE CARE
Information About UniformTire Quality Grading
E142542
Tire Quality Grades apply to newpneumatic passenger car tires.The Quality grades can be foundwhere applicable on the tiresidewall between tread shoulderand maximum section width. Forexample: Treadwear 200Traction AA Temperature A.These Tire Quality Grades aredetermined by standards that theUnited States Department ofTransportation has set.Tire Quality Grades apply to newpneumatic passenger car tires.They do not apply to deep tread,winter-type snow tires,space-saver or temporary usespare tires, light truck or LT typetires, tires with nominal rimdiameters of 10 to 12 inches orlimited production tires as definedin Title 49 Code of FederalRegulations Part 575.104 (c)(2).
U.S. Department ofTransportation Tire qualitygrades: The U.S. Department ofTransportation requires FordMotor Company to give you thefollowing information about tiregrades exactly as the governmenthas written it.TreadwearThe treadwear grade is acomparative rating based on thewear rate of the tire when testedunder controlled conditions on aspecified government test course.For example, a tire graded 150would wear 1 ½ times as well onthe government course as a tiregraded 100. The relativeperformance of tires dependsupon the actual conditions of theiruse, however, and may departsignificantly from the norm due tovariations in driving habits, servicepractices, and differences in roadcharacteristics and climate.Traction AA A B C
WARNINGThe traction grade assignedto this tire is based on
straight-ahead braking tractiontests, and does not includeacceleration, cornering,hydroplaning or peak tractioncharacteristics.
98
Motorhome (TY3) , enUSA, First Printing
Wheels and Tires
The traction grades, from highestto lowest are AA, A, B, and C. Thegrades represent the tire’s abilityto stop on wet pavement asmeasured under controlledconditions on specifiedgovernment test surfaces ofasphalt and concrete. A tiremarked C may have poor tractionperformance.Temperature A B C
WARNINGThe temperature grade forthis tire is established for a
tire that is properly inflated andnot overloaded. Excessive speed,underinflation, or excessiveloading, either separately or incombination, can cause heatbuildup and possible tire failure.
The temperature grades are A(the highest), B and C,representing the tire’s resistanceto the generation of heat and itsability to dissipate heat whentested under controlled conditionson a specified indoor laboratorytest wheel. Sustained hightemperature can cause thematerial of the tire to degenerateand reduce tire life, and excessivetemperature can lead to suddentire failure. The grade Ccorresponds to a level ofperformance which all passengercar tires must meet under the
Federal Motor Vehicle SafetyStandard No. 139. Grades B and Arepresent higher levels ofperformance on the laboratorytest wheel than the minimumrequired by law.Glossary of Tire Terminology*Tire label: A label showing theoriginal equipment tire sizes,recommended inflation pressureand the maximum weight thevehicle can carry.*Tire Identification Number: Anumber on the sidewall of eachtire providing information aboutthe tire brand and manufacturingplant, tire size and date ofmanufacture. Also referred to asDOT code.*Inflation pressure: A measureof the amount of air in a tire.*Standard load: A class ofP-metric or Metric tires designedto carry a maximum load at setpressure. For example: ForP-metric tires 35 psi (2.4 bar) or36 (2.5 bar) depending on tire sizeand for Metric tires 36 psi (2.5bar). Increasing the inflationpressure beyond this pressure willnot increase the tire’s loadcarrying capability.*Extra load: A class of P-metricor Metric tires designed to carry aheavier maximum load at 42 psi(2.9 bar). Increasing the inflationpressure beyond this pressure willnot increase the tire’s loadcarrying capability.
99
Motorhome (TY3) , enUSA, First Printing
Wheels and Tires
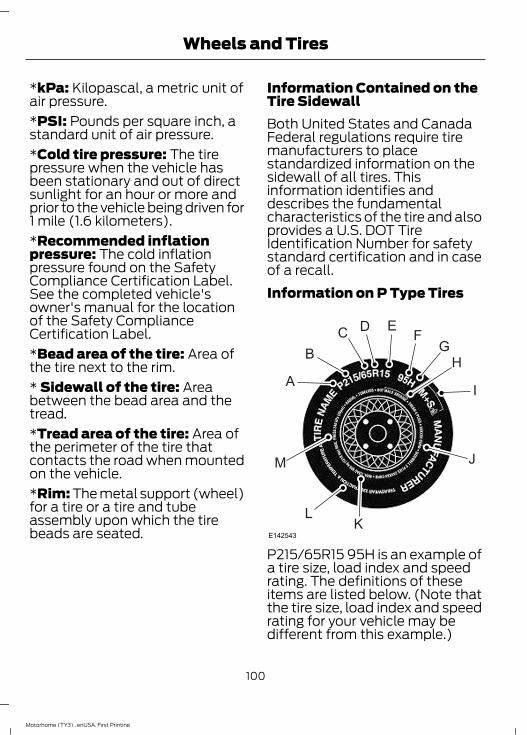
*kPa: Kilopascal, a metric unit ofair pressure.*PSI: Pounds per square inch, astandard unit of air pressure.*Cold tire pressure: The tirepressure when the vehicle hasbeen stationary and out of directsunlight for an hour or more andprior to the vehicle being driven for1 mile (1.6 kilometers).*Recommended inflationpressure: The cold inflationpressure found on the SafetyCompliance Certification Label.See the completed vehicle'sowner's manual for the locationof the Safety ComplianceCertification Label.*Bead area of the tire: Area ofthe tire next to the rim.* Sidewall of the tire: Areabetween the bead area and thetread.*Tread area of the tire: Area ofthe perimeter of the tire thatcontacts the road when mountedon the vehicle.*Rim: The metal support (wheel)for a tire or a tire and tubeassembly upon which the tirebeads are seated.
Information Contained on theTire SidewallBoth United States and CanadaFederal regulations require tiremanufacturers to placestandardized information on thesidewall of all tires. Thisinformation identifies anddescribes the fundamentalcharacteristics of the tire and alsoprovides a U.S. DOT TireIdentification Number for safetystandard certification and in caseof a recall.Information on P Type Tires
H
I
J
KL
M
A
BC D E
FG
E142543
P215/65R15 95H is an example ofa tire size, load index and speedrating. The definitions of theseitems are listed below. (Note thatthe tire size, load index and speedrating for your vehicle may bedifferent from this example.)
100
Motorhome (TY3) , enUSA, First Printing
Wheels and Tires
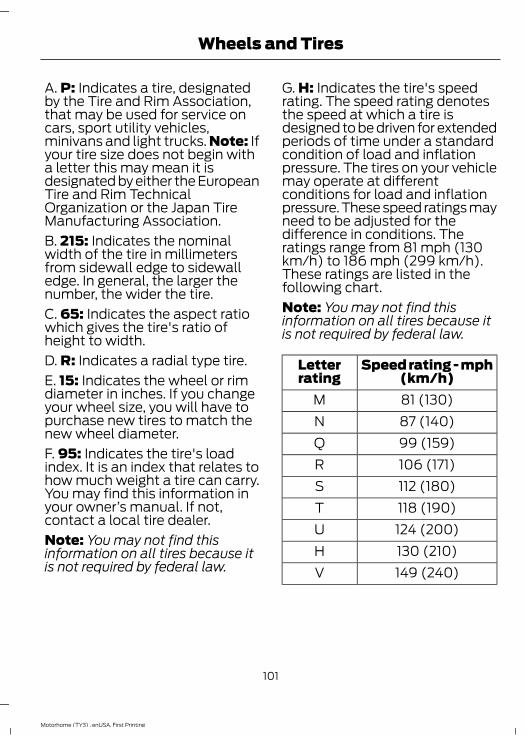
A. P: Indicates a tire, designatedby the Tire and Rim Association,that may be used for service oncars, sport utility vehicles,minivans and light trucks. Note: Ifyour tire size does not begin witha letter this may mean it isdesignated by either the EuropeanTire and Rim TechnicalOrganization or the Japan TireManufacturing Association.B. 215: Indicates the nominalwidth of the tire in millimetersfrom sidewall edge to sidewalledge. In general, the larger thenumber, the wider the tire.C. 65: Indicates the aspect ratiowhich gives the tire's ratio ofheight to width.D. R: Indicates a radial type tire.E. 15: Indicates the wheel or rimdiameter in inches. If you changeyour wheel size, you will have topurchase new tires to match thenew wheel diameter.F. 95: Indicates the tire's loadindex. It is an index that relates tohow much weight a tire can carry.You may find this information inyour owner’s manual. If not,contact a local tire dealer.Note: You may not find thisinformation on all tires because itis not required by federal law.
G. H: Indicates the tire's speedrating. The speed rating denotesthe speed at which a tire isdesigned to be driven for extendedperiods of time under a standardcondition of load and inflationpressure. The tires on your vehiclemay operate at differentconditions for load and inflationpressure. These speed ratings mayneed to be adjusted for thedifference in conditions. Theratings range from 81 mph (130km/h) to 186 mph (299 km/h).These ratings are listed in thefollowing chart.Note: You may not find thisinformation on all tires because itis not required by federal law.
Speed rating - mph(km/h)
Letterrating
81 (130)M87 (140)N99 (159)Q106 (171)R112 (180)S118 (190)T124 (200)U130 (210)H149 (240)V
101
Motorhome (TY3) , enUSA, First Printing
Wheels and Tires
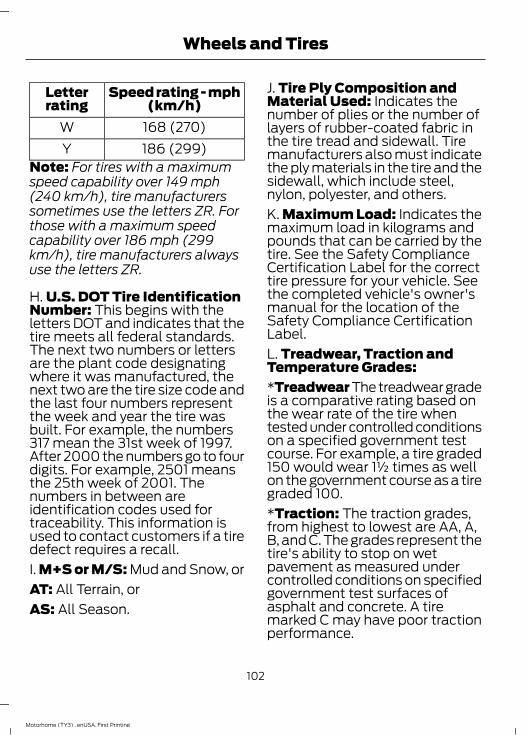
Speed rating - mph(km/h)
Letterrating
168 (270)W186 (299)Y
Note: For tires with a maximumspeed capability over 149 mph(240 km/h), tire manufacturerssometimes use the letters ZR. Forthose with a maximum speedcapability over 186 mph (299km/h), tire manufacturers alwaysuse the letters ZR.
H. U.S. DOT Tire IdentificationNumber: This begins with theletters DOT and indicates that thetire meets all federal standards.The next two numbers or lettersare the plant code designatingwhere it was manufactured, thenext two are the tire size code andthe last four numbers representthe week and year the tire wasbuilt. For example, the numbers317 mean the 31st week of 1997.After 2000 the numbers go to fourdigits. For example, 2501 meansthe 25th week of 2001. Thenumbers in between areidentification codes used fortraceability. This information isused to contact customers if a tiredefect requires a recall.I. M+S or M/S: Mud and Snow, orAT: All Terrain, orAS: All Season.
J. Tire Ply Composition andMaterial Used: Indicates thenumber of plies or the number oflayers of rubber-coated fabric inthe tire tread and sidewall. Tiremanufacturers also must indicatethe ply materials in the tire and thesidewall, which include steel,nylon, polyester, and others.K. Maximum Load: Indicates themaximum load in kilograms andpounds that can be carried by thetire. See the Safety ComplianceCertification Label for the correcttire pressure for your vehicle. Seethe completed vehicle's owner'smanual for the location of theSafety Compliance CertificationLabel.L. Treadwear, Traction andTemperature Grades:*Treadwear The treadwear gradeis a comparative rating based onthe wear rate of the tire whentested under controlled conditionson a specified government testcourse. For example, a tire graded150 would wear 1½ times as wellon the government course as a tiregraded 100.*Traction: The traction grades,from highest to lowest are AA, A,B, and C. The grades represent thetire's ability to stop on wetpavement as measured undercontrolled conditions on specifiedgovernment test surfaces ofasphalt and concrete. A tiremarked C may have poor tractionperformance.
102
Motorhome (TY3) , enUSA, First Printing
Wheels and Tires
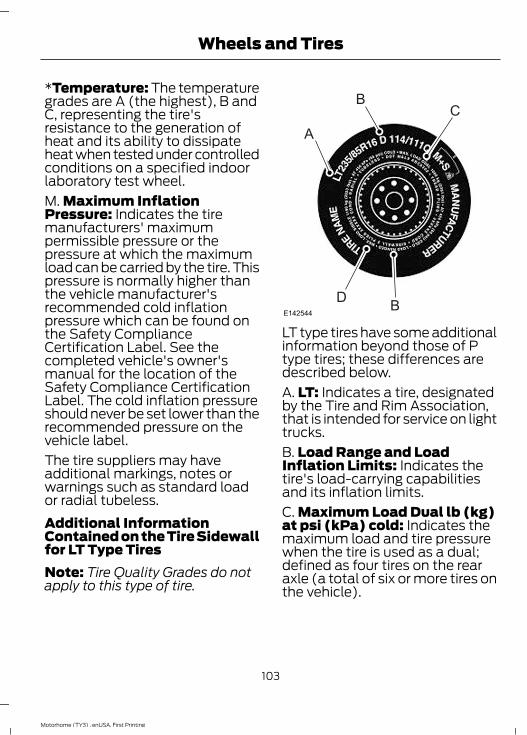
*Temperature: The temperaturegrades are A (the highest), B andC, representing the tire'sresistance to the generation ofheat and its ability to dissipateheat when tested under controlledconditions on a specified indoorlaboratory test wheel.M. Maximum InflationPressure: Indicates the tiremanufacturers' maximumpermissible pressure or thepressure at which the maximumload can be carried by the tire. Thispressure is normally higher thanthe vehicle manufacturer'srecommended cold inflationpressure which can be found onthe Safety ComplianceCertification Label. See thecompleted vehicle's owner'smanual for the location of theSafety Compliance CertificationLabel. The cold inflation pressureshould never be set lower than therecommended pressure on thevehicle label.The tire suppliers may haveadditional markings, notes orwarnings such as standard loador radial tubeless.Additional InformationContained on the Tire Sidewallfor LT Type TiresNote: Tire Quality Grades do notapply to this type of tire.
A
BC
BDE142544
LT type tires have some additionalinformation beyond those of Ptype tires; these differences aredescribed below.A. LT: Indicates a tire, designatedby the Tire and Rim Association,that is intended for service on lighttrucks.B. Load Range and LoadInflation Limits: Indicates thetire's load-carrying capabilitiesand its inflation limits.C. Maximum Load Dual lb (kg)at psi (kPa) cold: Indicates themaximum load and tire pressurewhen the tire is used as a dual;defined as four tires on the rearaxle (a total of six or more tires onthe vehicle).
103
Motorhome (TY3) , enUSA, First Printing
Wheels and Tires
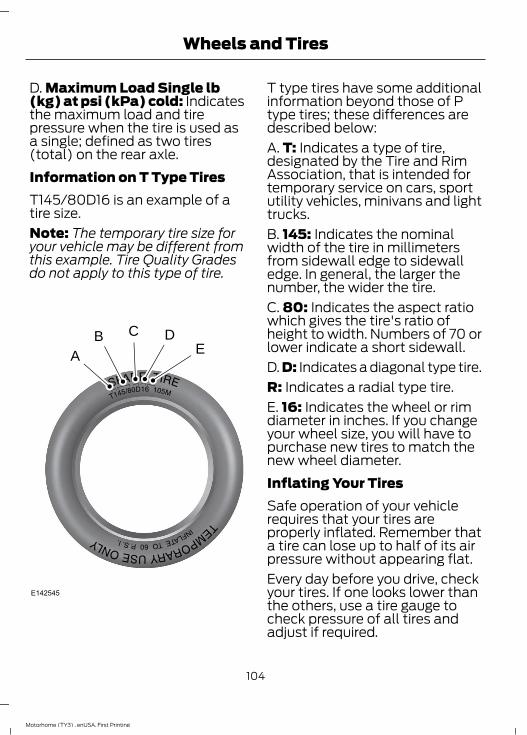
D. Maximum Load Single lb(kg) at psi (kPa) cold: Indicatesthe maximum load and tirepressure when the tire is used asa single; defined as two tires(total) on the rear axle.Information on T Type TiresT145/80D16 is an example of atire size.Note: The temporary tire size foryour vehicle may be different fromthis example. Tire Quality Gradesdo not apply to this type of tire.
AB C D
E
E142545
T type tires have some additionalinformation beyond those of Ptype tires; these differences aredescribed below:A. T: Indicates a type of tire,designated by the Tire and RimAssociation, that is intended fortemporary service on cars, sportutility vehicles, minivans and lighttrucks.B. 145: Indicates the nominalwidth of the tire in millimetersfrom sidewall edge to sidewalledge. In general, the larger thenumber, the wider the tire.C. 80: Indicates the aspect ratiowhich gives the tire's ratio ofheight to width. Numbers of 70 orlower indicate a short sidewall.D. D: Indicates a diagonal type tire.R: Indicates a radial type tire.E. 16: Indicates the wheel or rimdiameter in inches. If you changeyour wheel size, you will have topurchase new tires to match thenew wheel diameter.Inflating Your TiresSafe operation of your vehiclerequires that your tires areproperly inflated. Remember thata tire can lose up to half of its airpressure without appearing flat.Every day before you drive, checkyour tires. If one looks lower thanthe others, use a tire gauge tocheck pressure of all tires andadjust if required.
104
Motorhome (TY3) , enUSA, First Printing
Wheels and Tires
At least once a month and beforelong trips, inspect each tire andcheck the tire pressure with a tiregauge (including spare, ifequipped). Inflate all tires to theinflation pressure recommendedby Ford Motor Company.You are strongly urged to buy areliable tire pressure gauge, asautomatic service station gaugesmay be inaccurate. Fordrecommends the use of a digitalor dial-type tire pressure gaugerather than a stick-type tirepressure gauge.Use the recommended coldinflation pressure for optimum tireperformance and wear.Under-inflation or over-inflationmay cause uneven treadwearpatterns
WARNINGUnder-inflation is the mostcommon cause of tire failures
and may result in severe tirecracking, tread separation orblowout, with unexpected loss ofvehicle control and increased riskof injury. Under-inflation increasessidewall flexing and rollingresistance, resulting in heatbuildup and internal damage tothe tire. It also may result inunnecessary tire stress, irregularwear, loss of vehicle control andaccidents. A tire can lose up tohalf of its air pressure and notappear to be flat!
Always inflate your tires to theFord recommended inflationpressure even if it is less than themaximum inflation pressureinformation found on the tire. TheFord recommended tire inflationpressure is found on the SafetyCompliance Certification Label orTire Label. See the completedvehicle's owner's manual for thelocation of the Safety ComplianceCertification Label or Tire Label.Failure to follow the tire pressurerecommendations can causeuneven treadwear patterns andadversely affect the way yourvehicle handlesMaximum Inflation Pressure isthe tire manufacturer's maximumpermissible pressure and thepressure at which the maximumload can be carried by the tire. Thispressure is normally higher thanthe manufacturer’s recommendedcold inflation pressure which canbe found on the SafetyCompliance Certification Label orTire Label. See the completedvehicle's owner's manual for thelocation of the Safety ComplianceCertification Label or Tire Label.The cold inflation pressure shouldnever be set lower than therecommended pressure on theSafety Compliance CertificationLabel or Tire Label.
105
Motorhome (TY3) , enUSA, First Printing
Wheels and Tires
When weather temperaturechanges occur, tire inflationpressures also change. A 10°F(6°C) temperature drop cancause a corresponding drop of 1psi (7 kPa) in inflation pressure.Check your tire pressuresfrequently and adjust them to theproper pressure which can befound on the Safety ComplianceCertification Label or Tire Label.To check the pressure in yourtire(s):1. Make sure the tires are cool,
meaning they are not hot fromdriving even a mile.
Note: If you are checking tirepressure when the tire is hot, (forexample, driven more than 1 mile[1.6 kilometers]), never bleed orreduce air pressure. The tires arehot from driving and it is normal forpressures to increase aboverecommended cold pressures. Ahot tire at or below recommendedcold inflation pressure could besignificantly under-inflated.Note: If you have to drive adistance to get air for your tire(s),check and record the tire pressurefirst and add the appropriate airpressure when you get to thepump. It is normal for tires to heatup and the air pressure inside to goup as you drive.2. Remove the cap from the valve
on one tire, then firmly pressthe tire gauge onto the valveand measure the pressure.
3. Add enough air to reach therecommended air pressure.
Note: If you overfill the tire, releaseair by pressing on the metal stemin the center of the valve. Thenrecheck the pressure with your tiregauge.4. Replace the valve cap.5. Repeat this procedure for each
tire, including the spare.Note: Some spare tires operate ata higher inflation pressure than theother tires. For T type mini-sparetires, see the Dissimilar spare wheeland tire assembly information fora description. Store and maintainat 60 psi (4.15 bar). For full-sizeand dissimilar spare tires, see theDissimilar spare wheel and tireassembly information for adescription. Store and maintain atthe higher of the front and rearinflation pressure as shown on theSafety Compliance CertificationLabel or Tire Label.6. Visually inspect the tires to
make sure there are no nails orother objects embedded thatcould poke a hole in the tireand cause an air leak.
7. Check the sidewalls to makesure there are no gouges, cutsor bulges.
106
Motorhome (TY3) , enUSA, First Printing
Wheels and Tires
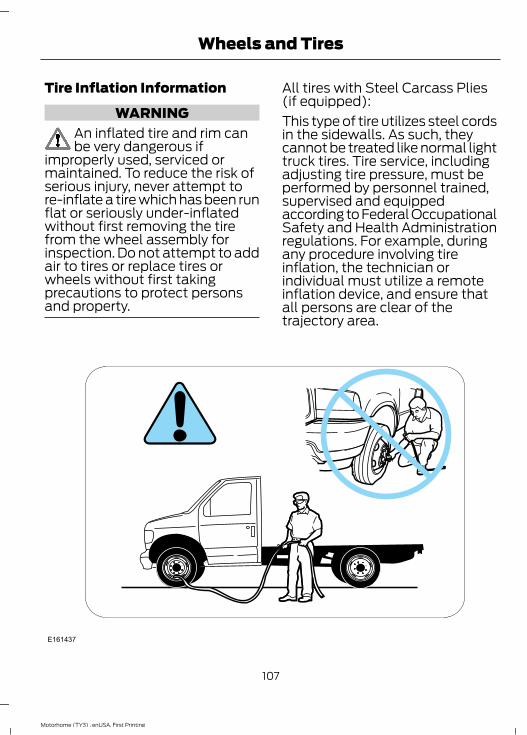
Tire Inflation Information
WARNINGAn inflated tire and rim canbe very dangerous if
improperly used, serviced ormaintained. To reduce the risk ofserious injury, never attempt tore-inflate a tire which has been runflat or seriously under-inflatedwithout first removing the tirefrom the wheel assembly forinspection. Do not attempt to addair to tires or replace tires orwheels without first takingprecautions to protect personsand property.
All tires with Steel Carcass Plies(if equipped):This type of tire utilizes steel cordsin the sidewalls. As such, theycannot be treated like normal lighttruck tires. Tire service, includingadjusting tire pressure, must beperformed by personnel trained,supervised and equippedaccording to Federal OccupationalSafety and Health Administrationregulations. For example, duringany procedure involving tireinflation, the technician orindividual must utilize a remoteinflation device, and ensure thatall persons are clear of thetrajectory area.
E161437
107
Motorhome (TY3) , enUSA, First Printing
Wheels and Tires
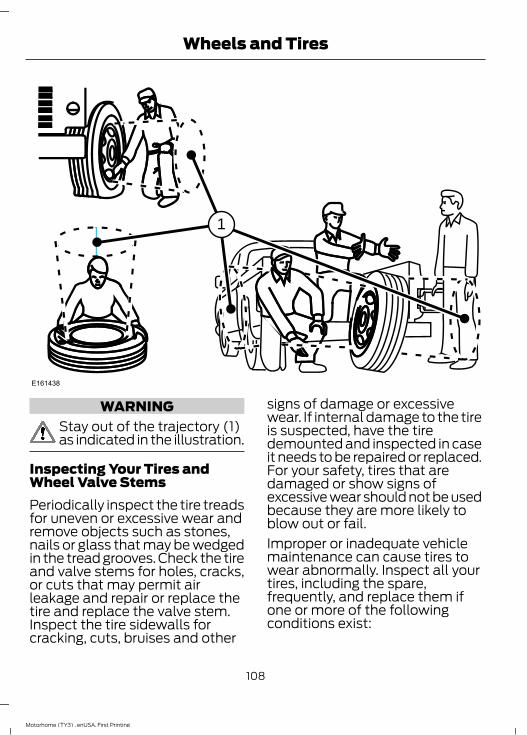
E161438
1
WARNINGStay out of the trajectory (1)as indicated in the illustration.
Inspecting Your Tires andWheel Valve StemsPeriodically inspect the tire treadsfor uneven or excessive wear andremove objects such as stones,nails or glass that may be wedgedin the tread grooves. Check the tireand valve stems for holes, cracks,or cuts that may permit airleakage and repair or replace thetire and replace the valve stem.Inspect the tire sidewalls forcracking, cuts, bruises and other
signs of damage or excessivewear. If internal damage to the tireis suspected, have the tiredemounted and inspected in caseit needs to be repaired or replaced.For your safety, tires that aredamaged or show signs ofexcessive wear should not be usedbecause they are more likely toblow out or fail.Improper or inadequate vehiclemaintenance can cause tires towear abnormally. Inspect all yourtires, including the spare,frequently, and replace them ifone or more of the followingconditions exist:
108
Motorhome (TY3) , enUSA, First Printing
Wheels and Tires
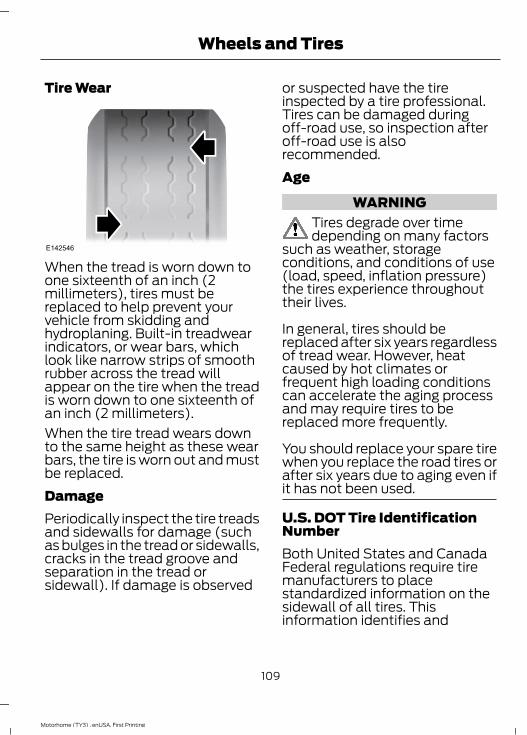
Tire Wear
E142546
When the tread is worn down toone sixteenth of an inch (2millimeters), tires must bereplaced to help prevent yourvehicle from skidding andhydroplaning. Built-in treadwearindicators, or wear bars, whichlook like narrow strips of smoothrubber across the tread willappear on the tire when the treadis worn down to one sixteenth ofan inch (2 millimeters).When the tire tread wears downto the same height as these wearbars, the tire is worn out and mustbe replaced.DamagePeriodically inspect the tire treadsand sidewalls for damage (suchas bulges in the tread or sidewalls,cracks in the tread groove andseparation in the tread orsidewall). If damage is observed
or suspected have the tireinspected by a tire professional.Tires can be damaged duringoff-road use, so inspection afteroff-road use is alsorecommended.Age
WARNINGTires degrade over timedepending on many factors
such as weather, storageconditions, and conditions of use(load, speed, inflation pressure)the tires experience throughouttheir lives.
In general, tires should bereplaced after six years regardlessof tread wear. However, heatcaused by hot climates orfrequent high loading conditionscan accelerate the aging processand may require tires to bereplaced more frequently.
You should replace your spare tirewhen you replace the road tires orafter six years due to aging even ifit has not been used.
U.S. DOT Tire IdentificationNumberBoth United States and CanadaFederal regulations require tiremanufacturers to placestandardized information on thesidewall of all tires. Thisinformation identifies and
109
Motorhome (TY3) , enUSA, First Printing
Wheels and Tires
describes the fundamentalcharacteristics of the tire and alsoprovides a U.S. DOT TireIdentification Number for safetystandard certification and in caseof a recall.This begins with the letters DOTand indicates that the tire meetsall federal standards. The nexttwo numbers or letters are theplant code designating where itwas manufactured, the next twoare the tire size code and the lastfour numbers represent the weekand year the tire was built. Forexample, the numbers 317 meanthe 31st week of 1997. After 2000the numbers go to four digits. Forexample, 2501 means the 25thweek of 2001. The numbers inbetween are identification codesused for traceability. Thisinformation is used to contactcustomers if a tire defect requiresa recall.Tire ReplacementRequirementsYour vehicle is equipped with tiresdesigned to provide a safe rideand handling capability.
WARNINGSOnly use replacement tiresand wheels that are the same
size, load index, speed rating andtype (such as P-metric versusLT-metric or all-season versusall-terrain) as those originallyprovided by Ford. Therecommended tire and wheel size
WARNINGSmay be found on either the SafetyCompliance Certification Label orthe Tire Label. If this informationis not found on these labels thenyou should contact yourauthorized dealer as soon aspossible. Use of any tire or wheelnot recommended by Ford canaffect the safety and performanceof your vehicle, which could resultin an increased risk of loss ofvehicle control, vehicle rollover,personal injury and death.Additionally the use ofnon-recommended tires andwheels could cause steering,suspension, axle, transfer case orpower transfer unit failure. If youhave questions regarding tirereplacement, contact yourauthorized dealer as soon aspossible.
To reduce the risk of seriousinjury, when mounting
replacement tires and wheels, youshould not exceed the maximumpressure indicated on the sidewallof the tire to set the beads withoutadditional precautions listedbelow. If the beads do not seat atthe maximum pressure indicated,re-lubricate and try again
110
Motorhome (TY3) , enUSA, First Printing
Wheels and Tires
WARNINGSWhen inflating the tire formounting pressures up to 20 psi(1.38 bar) greater than themaximum pressure on the tiresidewall, the followingprecautions must be taken toprotect the person mounting thetire:
1. Make sure that you have thecorrect tire and wheel size.
2. Lubricate the tire bead andwheel bead seat area again.
3. Stand at a minimum of 12 feet(3.6 meters) away from the wheeland tire assembly.
4. Use both eye and earprotection.
For a mounting pressure morethan 20 psi (1.38 bar) greater thanthe maximum pressure, a Forddealer or other tire serviceprofessional should do themounting.
Always inflate steel carcass tireswith a remote air fill with theperson inflating standing at aminimum of 12 feet (3.6 meters)away from the wheel and tireassembly
Important: Remember to replacethe wheel valve stems when theroad tires are replaced on yourvehicle
It is recommended that the twofront tires or two rear tiresgenerally be replaced as a pair.Replacing a Tire That isGreenhouse Gas CertifiedThe tires installed on this vehicleat the factory as originalequipment are certified forGreenhouse Gas and FuelEfficiency regulations.Replacement tires must be ofequal or lower rolling resistancelevel (TRRL or Crr). Consult withyour tire supplier(s) forappropriate replacement tires.Safety Practices
WARNINGSIf your vehicle is stuck insnow, mud, or sand, do not
rapidly spin the tires; spinning thetires can tear the tire and causean explosion. A tire can explode inas little as three to five seconds.
Do not spin the wheels atover 35 mph (56 km/h). The
tires may fail and injure apassenger or bystander.
Driving habits have a great dealto do with your tire mileage andsafety.*Observe posted speed limits*Avoid fast starts, stops and turns*Avoid potholes and objects onthe road
111
Motorhome (TY3) , enUSA, First Printing
Wheels and Tires
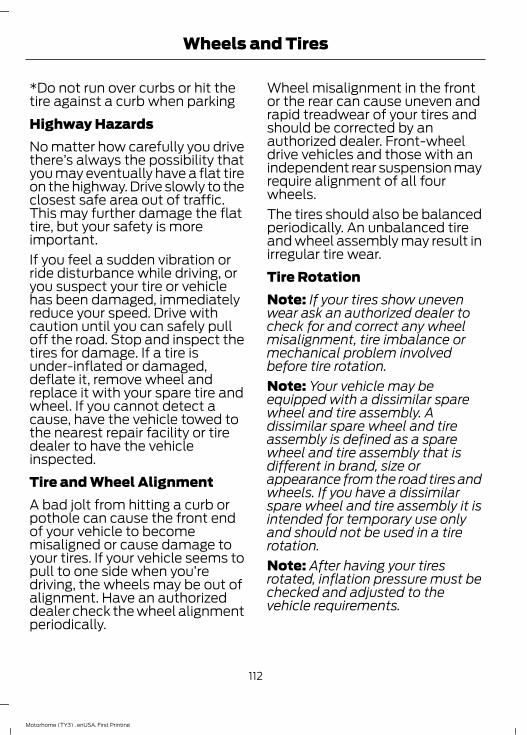
*Do not run over curbs or hit thetire against a curb when parkingHighway HazardsNo matter how carefully you drivethere’s always the possibility thatyou may eventually have a flat tireon the highway. Drive slowly to theclosest safe area out of traffic.This may further damage the flattire, but your safety is moreimportant.If you feel a sudden vibration orride disturbance while driving, oryou suspect your tire or vehiclehas been damaged, immediatelyreduce your speed. Drive withcaution until you can safely pulloff the road. Stop and inspect thetires for damage. If a tire isunder-inflated or damaged,deflate it, remove wheel andreplace it with your spare tire andwheel. If you cannot detect acause, have the vehicle towed tothe nearest repair facility or tiredealer to have the vehicleinspected.Tire and Wheel AlignmentA bad jolt from hitting a curb orpothole can cause the front endof your vehicle to becomemisaligned or cause damage toyour tires. If your vehicle seems topull to one side when you’redriving, the wheels may be out ofalignment. Have an authorizeddealer check the wheel alignmentperiodically.
Wheel misalignment in the frontor the rear can cause uneven andrapid treadwear of your tires andshould be corrected by anauthorized dealer. Front-wheeldrive vehicles and those with anindependent rear suspension mayrequire alignment of all fourwheels.The tires should also be balancedperiodically. An unbalanced tireand wheel assembly may result inirregular tire wear.Tire RotationNote: If your tires show unevenwear ask an authorized dealer tocheck for and correct any wheelmisalignment, tire imbalance ormechanical problem involvedbefore tire rotation.Note: Your vehicle may beequipped with a dissimilar sparewheel and tire assembly. Adissimilar spare wheel and tireassembly is defined as a sparewheel and tire assembly that isdifferent in brand, size orappearance from the road tires andwheels. If you have a dissimilarspare wheel and tire assembly it isintended for temporary use onlyand should not be used in a tirerotation.Note: After having your tiresrotated, inflation pressure must bechecked and adjusted to thevehicle requirements.
112
Motorhome (TY3) , enUSA, First Printing
Wheels and Tires
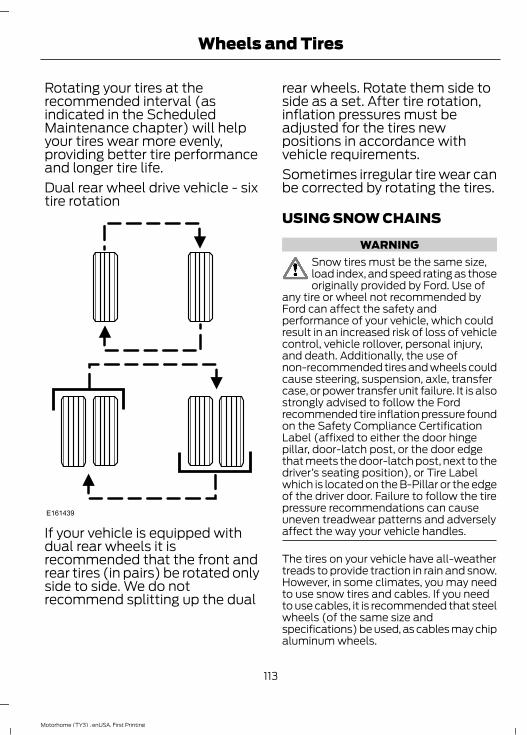
Rotating your tires at therecommended interval (asindicated in the ScheduledMaintenance chapter) will helpyour tires wear more evenly,providing better tire performanceand longer tire life.Dual rear wheel drive vehicle - sixtire rotation
E161439
If your vehicle is equipped withdual rear wheels it isrecommended that the front andrear tires (in pairs) be rotated onlyside to side. We do notrecommend splitting up the dual
rear wheels. Rotate them side toside as a set. After tire rotation,inflation pressures must beadjusted for the tires newpositions in accordance withvehicle requirements.Sometimes irregular tire wear canbe corrected by rotating the tires.
USING SNOW CHAINS
WARNINGSnow tires must be the same size,load index, and speed rating as thoseoriginally provided by Ford. Use of
any tire or wheel not recommended byFord can affect the safety andperformance of your vehicle, which couldresult in an increased risk of loss of vehiclecontrol, vehicle rollover, personal injury,and death. Additionally, the use ofnon-recommended tires and wheels couldcause steering, suspension, axle, transfercase, or power transfer unit failure. It is alsostrongly advised to follow the Fordrecommended tire inflation pressure foundon the Safety Compliance CertificationLabel (affixed to either the door hingepillar, door-latch post, or the door edgethat meets the door-latch post, next to thedriver’s seating position), or Tire Labelwhich is located on the B-Pillar or the edgeof the driver door. Failure to follow the tirepressure recommendations can causeuneven treadwear patterns and adverselyaffect the way your vehicle handles.
The tires on your vehicle have all-weathertreads to provide traction in rain and snow.However, in some climates, you may needto use snow tires and cables. If you needto use cables, it is recommended that steelwheels (of the same size andspecifications) be used, as cables may chipaluminum wheels.
113
Motorhome (TY3) , enUSA, First Printing
Wheels and Tires
Note: The suspension insulation andbumpers help prevent vehicle damage. Donot remove these components from yourvehicle when using snow tires and chains.Follow these guidelines when using snowtires and chains:• If possible, avoid fully loading your
vehicle.• Use only SAE Class S chains.• Install chains securely, verifying that
the chains do not touch any wiring,brake lines or fuel lines.
• Drive cautiously. If you hear the chainsrub or bang against your vehicle, stopand retighten the chains. If this doesnot work, remove the chains to preventdamage to your vehicle.
• Remove the tire chains when they areno longer needed. Do not use tirechains on dry roads.
If you have any questions regarding snowchains or cables, please contact yourauthorized dealer.
CHANGING A ROAD WHEELIf you get a flat tire while driving, do notapply the brake heavily. Instead, graduallydecrease your speed. Hold the steeringwheel firmly and slowly move to a safeplace on the side of the road.
Dissimilar Spare Wheel and TireAssembly Information
WARNINGFailure to follow these guidelinescould result in an increased risk ofloss of vehicle control, injury or death.
If you have a dissimilar spare wheel andtire, then it is intended for temporary useonly. This means that if you need to use it,you should replace it as soon as possiblewith a road wheel and tire assembly thatis the same size and type as the road tiresand wheels that were originally providedby Ford. If the dissimilar spare tire or wheelis damaged, it should be replaced ratherthan repaired.A dissimilar spare wheel and tire assemblyis defined as a spare wheel and tireassembly that is different in brand, size orappearance from the road tires and wheelsand can be one of three types:1. T-type mini-spare: This spare tirebegins with the letter T for tire size andmay have Temporary Use Only molded inthe sidewall.2. Full-size dissimilar spare with labelon wheel: This spare tire has a label onthe wheel that states: THIS WHEEL ANDTIRE ASSEMBLY FOR TEMPORARY USEONLY.When driving with one of the dissimilarspare tires listed above, do not:• Exceed 50 mph (80 km/h).• Load the vehicle beyond maximum
vehicle load rating listed on the SafetyCompliance Label.
• Tow a trailer.• Use snow chains on the end of the
vehicle with the dissimilar spare tire.• Use more than one dissimilar spare tire
at a time.• Use commercial car washing
equipment.• Try to repair the dissimilar spare tire.
114
Motorhome (TY3) , enUSA, First Printing
Wheels and Tires
Use of one of the dissimilar spare tireslisted above at any one wheel location canlead to impairment of the following:• Handling, stability and braking
performance.• Comfort and noise.• Ground clearance and parking at curbs.• Winter weather driving capability.• Wet weather driving capability.• All-wheel driving capability.3. Full-size dissimilar spare withoutlabel on wheelWhen driving with the full-size dissimilarspare wheel and tire assembly, do not:• Exceed 70 mph (113 km/h).• Use more than one dissimilar spare
wheel and tire assembly at a time.• Use commercial car washing
equipment.• Use snow chains on the end of the
vehicle with the dissimilar spare wheeland tire assembly.
The usage of a full-size dissimilar sparewheel and tire assembly can lead toimpairment of the following:• Handling, stability and braking
performance.• Comfort and noise.• Ground clearance and parking at curbs.• Winter weather driving capability.• Wet weather driving capability.• All-wheel driving capability.When driving with the full-size dissimilarspare wheel and tire assembly additionalcaution should be given to:• Towing a trailer.• Driving vehicles equipped with a
camper body.• Driving vehicles with a load on the
cargo rack.
Drive cautiously when using a full-sizedissimilar spare wheel and tire assemblyand seek service as soon as possible.
Tire Change ProcedureWARNINGS
When one of the front wheels is offthe ground, the transmission alonewill not prevent the vehicle from
moving or slipping off the jack, even if thetransmission is in park (P).
To help prevent the vehicle frommoving when you change a tire, besure to place the transmission in park
(P), set the parking brake and block (inboth directions) the wheel that isdiagonally opposite (other side and end ofthe vehicle) to the tire being changed.
Never get underneath a vehicle thatis supported only by a jack. If thevehicle slips off the jack, you or
someone else could be seriously injured.Do not attempt to change a tire onthe side of the vehicle close tomoving traffic. Pull far enough off the
road to avoid the danger of being hit whenoperating the jack or changing the wheel.
Always use the jack provided asoriginal equipment with your vehicle.If using a jack other than the one
provided as original equipment with yourvehicle, make sure the jack capacity isadequate for the vehicle weight, includingany vehicle cargo or modifications.
1. Park on a level surface, set the parkingbrake and activate the hazard flashers.
2. Place the transmission in park (P) andturn the engine off.
115
Motorhome (TY3) , enUSA, First Printing
Wheels and Tires
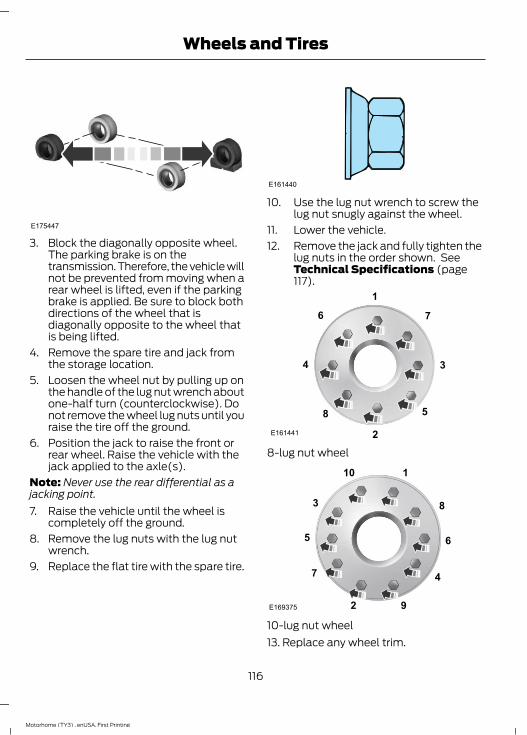
E175447
3. Block the diagonally opposite wheel.The parking brake is on thetransmission. Therefore, the vehicle willnot be prevented from moving when arear wheel is lifted, even if the parkingbrake is applied. Be sure to block bothdirections of the wheel that isdiagonally opposite to the wheel thatis being lifted.
4. Remove the spare tire and jack fromthe storage location.
5. Loosen the wheel nut by pulling up onthe handle of the lug nut wrench aboutone-half turn (counterclockwise). Donot remove the wheel lug nuts until youraise the tire off the ground.
6. Position the jack to raise the front orrear wheel. Raise the vehicle with thejack applied to the axle(s).
Note: Never use the rear differential as ajacking point.7. Raise the vehicle until the wheel is
completely off the ground.8. Remove the lug nuts with the lug nut
wrench.9. Replace the flat tire with the spare tire.
E161440
10. Use the lug nut wrench to screw thelug nut snugly against the wheel.
11. Lower the vehicle.12. Remove the jack and fully tighten the
lug nuts in the order shown. SeeTechnical Specifications (page117).
E161441
1
34
2
76
58
8-lug nut wheel
1
2
3
4
5 6
7
8
9
10
E169375
10-lug nut wheel13. Replace any wheel trim.
116
Motorhome (TY3) , enUSA, First Printing
Wheels and Tires
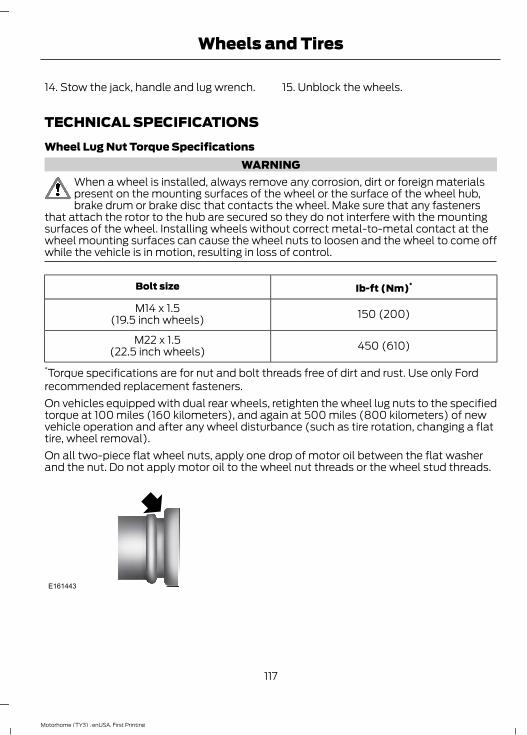
14. Stow the jack, handle and lug wrench. 15. Unblock the wheels.
TECHNICAL SPECIFICATIONSWheel Lug Nut Torque Specifications
WARNINGWhen a wheel is installed, always remove any corrosion, dirt or foreign materialspresent on the mounting surfaces of the wheel or the surface of the wheel hub,brake drum or brake disc that contacts the wheel. Make sure that any fasteners
that attach the rotor to the hub are secured so they do not interfere with the mountingsurfaces of the wheel. Installing wheels without correct metal-to-metal contact at thewheel mounting surfaces can cause the wheel nuts to loosen and the wheel to come offwhile the vehicle is in motion, resulting in loss of control.
Ib-ft (Nm)*Bolt size
150 (200)M14 x 1.5(19.5 inch wheels)
450 (610)M22 x 1.5(22.5 inch wheels)
*Torque specifications are for nut and bolt threads free of dirt and rust. Use only Fordrecommended replacement fasteners.On vehicles equipped with dual rear wheels, retighten the wheel lug nuts to the specifiedtorque at 100 miles (160 kilometers), and again at 500 miles (800 kilometers) of newvehicle operation and after any wheel disturbance (such as tire rotation, changing a flattire, wheel removal).On all two-piece flat wheel nuts, apply one drop of motor oil between the flat washerand the nut. Do not apply motor oil to the wheel nut threads or the wheel stud threads.
E161443
117
Motorhome (TY3) , enUSA, First Printing
Wheels and Tires
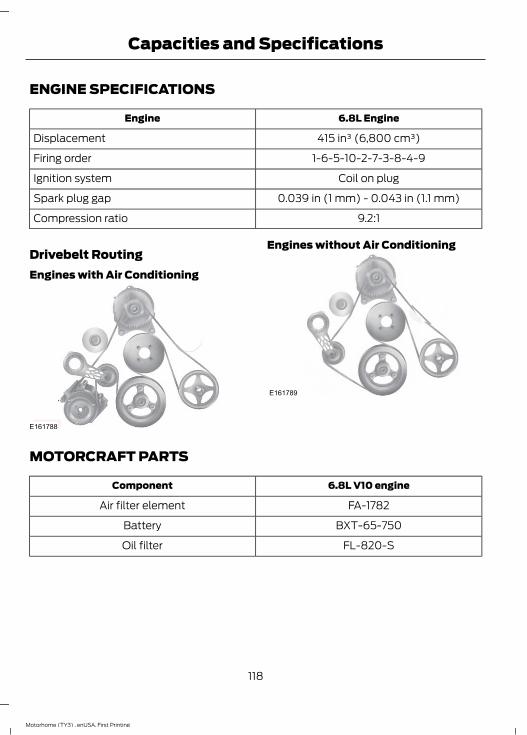
ENGINE SPECIFICATIONS
6.8L EngineEngine
415 in³ (6,800 cm³)Displacement
1-6-5-10-2-7-3-8-4-9Firing order
Coil on plugIgnition system
0.039 in (1 mm) - 0.043 in (1.1 mm)Spark plug gap
9.2:1Compression ratio
Drivebelt RoutingEngines with Air Conditioning
E161788
Engines without Air Conditioning
E161789
MOTORCRAFT PARTS
6.8L V10 engineComponent
FA-1782Air filter element
BXT-65-750Battery
FL-820-SOil filter
118
Motorhome (TY3) , enUSA, First Printing
Capacities and Specifications
6.8L V10 engineComponent
SP-509Spark plugs
FT-180Transmission fluid filter
We recommend Motorcraft replacement parts available at your Ford dealer or atfordparts.com for scheduled maintenance. These parts meet or exceed Ford MotorCompany’s specifications and are engineered for your vehicle. Use of other parts mayimpact vehicle performance, emissions and durability. Your warranty may be void for anydamage related to use of other parts.If a Motorcraft oil filter is not available, use an oil filter that meets industry performancespecification SAE/USCAR-36.For spark plug replacement, contact an authorized dealer. Replace the spark plugs at theappropriate intervals. See Scheduled Maintenance (page 128).
119
Motorhome (TY3) , enUSA, First Printing
Capacities and Specifications
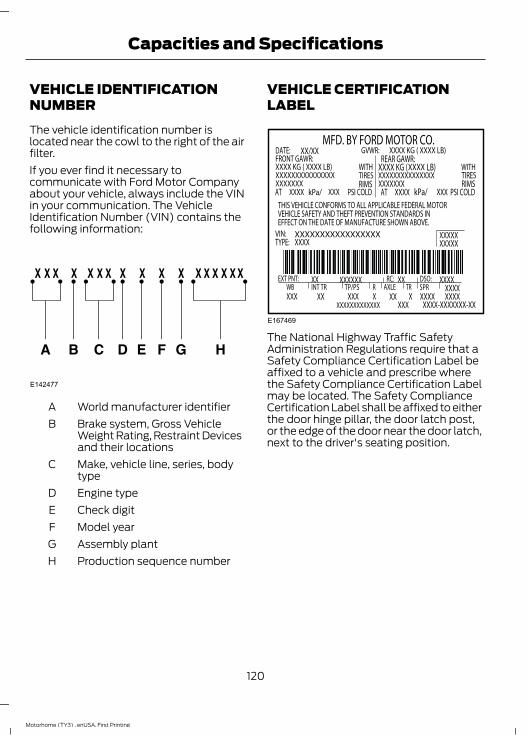
VEHICLE IDENTIFICATIONNUMBERThe vehicle identification number islocated near the cowl to the right of the airfilter.If you ever find it necessary tocommunicate with Ford Motor Companyabout your vehicle, always include the VINin your communication. The VehicleIdentification Number (VIN) contains thefollowing information:
E142477
World manufacturer identifierABrake system, Gross VehicleWeight Rating, Restraint Devicesand their locations
B
Make, vehicle line, series, bodytype
C
Engine typeDCheck digitEModel yearFAssembly plantGProduction sequence numberH
VEHICLE CERTIFICATIONLABEL
E167469
The National Highway Traffic SafetyAdministration Regulations require that aSafety Compliance Certification Label beaffixed to a vehicle and prescribe wherethe Safety Compliance Certification Labelmay be located. The Safety ComplianceCertification Label shall be affixed to eitherthe door hinge pillar, the door latch post,or the edge of the door near the door latch,next to the driver's seating position.
120
Motorhome (TY3) , enUSA, First Printing
Capacities and Specifications
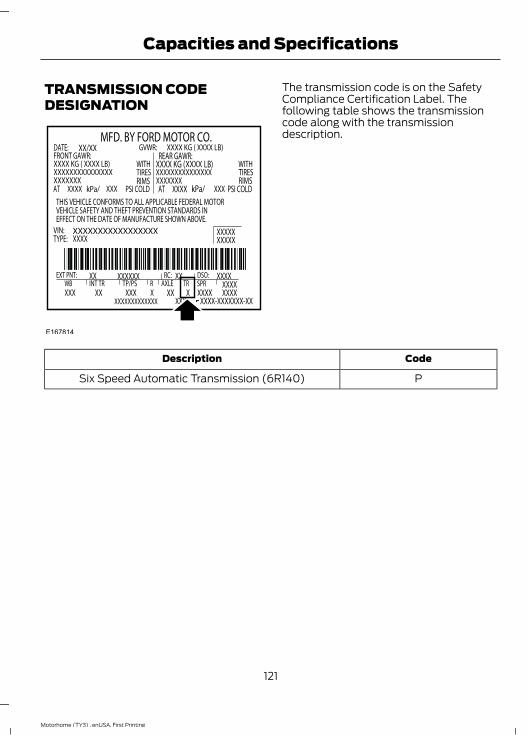
TRANSMISSION CODEDESIGNATION
E167814
The transmission code is on the SafetyCompliance Certification Label. Thefollowing table shows the transmissioncode along with the transmissiondescription.
CodeDescription
PSix Speed Automatic Transmission (6R140)
121
Motorhome (TY3) , enUSA, First Printing
Capacities and Specifications
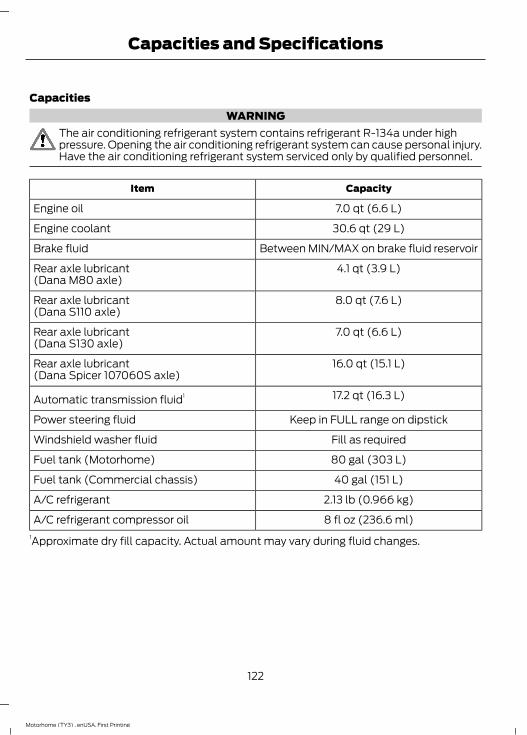
CapacitiesWARNING
The air conditioning refrigerant system contains refrigerant R-134a under highpressure. Opening the air conditioning refrigerant system can cause personal injury.Have the air conditioning refrigerant system serviced only by qualified personnel.
CapacityItem
7.0 qt (6.6 L)Engine oil
30.6 qt (29 L)Engine coolant
Between MIN/MAX on brake fluid reservoirBrake fluid
4.1 qt (3.9 L)Rear axle lubricant(Dana M80 axle)
8.0 qt (7.6 L)Rear axle lubricant(Dana S110 axle)
7.0 qt (6.6 L)Rear axle lubricant(Dana S130 axle)
16.0 qt (15.1 L)Rear axle lubricant(Dana Spicer 107060S axle)
17.2 qt (16.3 L)Automatic transmission fluid1
Keep in FULL range on dipstickPower steering fluid
Fill as requiredWindshield washer fluid
80 gal (303 L)Fuel tank (Motorhome)
40 gal (151 L)Fuel tank (Commercial chassis)
2.13 lb (0.966 kg)A/C refrigerant
8 fl oz (236.6 ml)A/C refrigerant compressor oil1Approximate dry fill capacity. Actual amount may vary during fluid changes.
122
Motorhome (TY3) , enUSA, First Printing
Capacities and Specifications
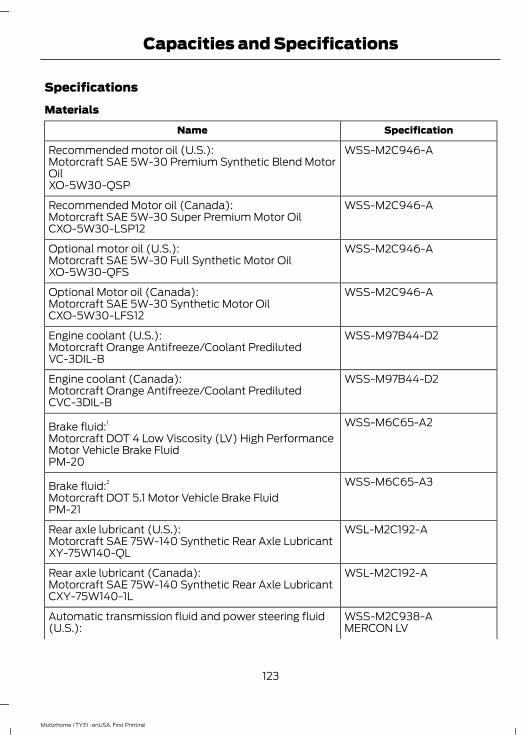
SpecificationsMaterials
SpecificationName
WSS-M2C946-ARecommended motor oil (U.S.):Motorcraft SAE 5W-30 Premium Synthetic Blend MotorOilXO-5W30-QSP
WSS-M2C946-ARecommended Motor oil (Canada):Motorcraft SAE 5W-30 Super Premium Motor OilCXO-5W30-LSP12
WSS-M2C946-AOptional motor oil (U.S.):Motorcraft SAE 5W-30 Full Synthetic Motor OilXO-5W30-QFS
WSS-M2C946-AOptional Motor oil (Canada):Motorcraft SAE 5W-30 Synthetic Motor OilCXO-5W30-LFS12
WSS-M97B44-D2Engine coolant (U.S.):Motorcraft Orange Antifreeze/Coolant PredilutedVC-3DIL-B
WSS-M97B44-D2Engine coolant (Canada):Motorcraft Orange Antifreeze/Coolant PredilutedCVC-3DIL-B
WSS-M6C65-A2Brake fluid:1
Motorcraft DOT 4 Low Viscosity (LV) High PerformanceMotor Vehicle Brake FluidPM-20
WSS-M6C65-A3Brake fluid:2
Motorcraft DOT 5.1 Motor Vehicle Brake FluidPM-21
WSL-M2C192-ARear axle lubricant (U.S.):Motorcraft SAE 75W-140 Synthetic Rear Axle LubricantXY-75W140-QL
WSL-M2C192-ARear axle lubricant (Canada):Motorcraft SAE 75W-140 Synthetic Rear Axle LubricantCXY-75W140-1L
WSS-M2C938-AAutomatic transmission fluid and power steering fluid(U.S.): MERCON LV
123
Motorhome (TY3) , enUSA, First Printing
Capacities and Specifications
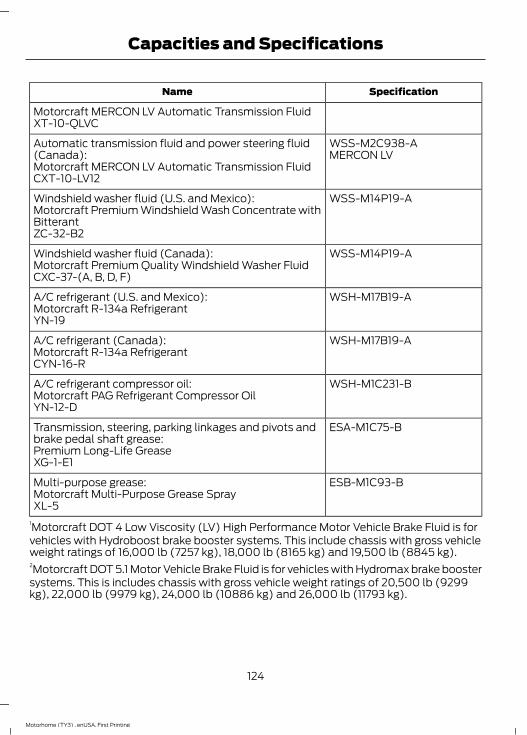
SpecificationName
Motorcraft MERCON LV Automatic Transmission FluidXT-10-QLVC
WSS-M2C938-AAutomatic transmission fluid and power steering fluid(Canada): MERCON LVMotorcraft MERCON LV Automatic Transmission FluidCXT-10-LV12
WSS-M14P19-AWindshield washer fluid (U.S. and Mexico):Motorcraft Premium Windshield Wash Concentrate withBitterantZC-32-B2
WSS-M14P19-AWindshield washer fluid (Canada):Motorcraft Premium Quality Windshield Washer FluidCXC-37-(A, B, D, F)
WSH-M17B19-AA/C refrigerant (U.S. and Mexico):Motorcraft R-134a RefrigerantYN-19
WSH-M17B19-AA/C refrigerant (Canada):Motorcraft R-134a RefrigerantCYN-16-R
WSH-M1C231-BA/C refrigerant compressor oil:Motorcraft PAG Refrigerant Compressor OilYN-12-D
ESA-M1C75-BTransmission, steering, parking linkages and pivots andbrake pedal shaft grease:Premium Long-Life GreaseXG-1-E1
ESB-M1C93-BMulti-purpose grease:Motorcraft Multi-Purpose Grease SprayXL-5
1Motorcraft DOT 4 Low Viscosity (LV) High Performance Motor Vehicle Brake Fluid is forvehicles with Hydroboost brake booster systems. This include chassis with gross vehicleweight ratings of 16,000 lb (7257 kg), 18,000 lb (8165 kg) and 19,500 lb (8845 kg).2Motorcraft DOT 5.1 Motor Vehicle Brake Fluid is for vehicles with Hydromax brake boostersystems. This is includes chassis with gross vehicle weight ratings of 20,500 lb (9299kg), 22,000 lb (9979 kg), 24,000 lb (10886 kg) and 26,000 lb (11793 kg).
124
Motorhome (TY3) , enUSA, First Printing
Capacities and Specifications

If you use oil and fluids that do not meetthe defined specification and viscositygrade, this may lead to:• Component damage which is not
covered by the vehicle warranty.• Longer engine cranking periods.• Increased emission levels.• Reduced engine performance.• Reduced fuel economy.• Degraded brake performance.We recommend Motorcraft motor oil foryour vehicle. If Motorcraft oil is notavailable, use motor oils of therecommended viscosity grade that meetAPI SN requirements and display the APICertification Mark for gasoline engines. Donot use oil labeled with API SN servicecategory unless the label also displays theAPI certification mark.
E142732
An oil that displays this symbol conformsto current engine, emission system andfuel economy performance standards ofthe International Lubricants SpecificationAdvisory Council (ILSAC).Do not use supplemental engine oiladditives because they are unnecessaryand could lead to engine damage that maynot be covered by your vehicle warranty.
Note: Ford recommends using DOT 4 LowViscosity (LV) High Performance Brake Fluidor equivalent meeting WSS-M6C65-A2. Useof any fluid other than the recommendedfluid may cause degraded brakeperformance and not meet the Fordperformance standards. Keep brake fluidclean and dry. Contamination with dirt,water, petroleum products or othermaterials may result in brake systemdamage and possible failure.Note: Automatic transmissions that requireMERCON LV transmission fluid should onlyuse MERCON LV transmission fluid. Theuse of any other fluid may causetransmission damage.
125
Motorhome (TY3) , enUSA, First Printing
Capacities and Specifications
PROTECT YOURSELF FROM THE RISINGCOST OF VEHICLE REPAIRS WITH A FORDEXTENDED SERVICE PLAN.
SERVICE PLANS (U.S. Only)More than 32 million Ford owners havediscovered the powerful protection of FordExtended Service Plan. It is the extendedservice plan backed by Ford MotorCompany, and provides peace of mindprotection beyond the New Vehicle LimitedWarranty coverage.
Ford ESP Can Quickly Pay for ItselfOne service bill – the cost of parts andlabor – can easily exceed the price of yourFord Extended Service Plan. With Ford ESPyou minimize your risk for unexpectedrepair bills and rising repair costs.
Up to 1,000+ Covered VehicleComponentsThere are four core Extended Service Planswith different levels of coverage. Ask yourauthorized dealer for details.1. PremiumCARE - Our most
comprehensive coverage. With over1,000 covered components, this planis so complete that we generally onlydiscuss what’s not covered.
2. ExtraCARE - Covers 113 components,and includes many high-tech items.
3. BaseCARE - Covers 84 components.4. PowertrainCARE - Covers 29 critical
components.Ford Extended Service Plan is honored byall authorized Ford dealers in the U.S.,Canada and Mexico. It is the extendedservice plan authorized and backed by FordMotor Company.
That means you get:• Reliable, quality service at any Ford or
Lincoln dealership• Repairs performed by factory trained
technicians, using genuine parts
Rental Car Reimbursement
1st day Rental BenefitYou take advantage of replacementtransportation if your vehicle is at yourauthorized dealer for same day coveredrepairs.
Extended Rental BenefitsIf your vehicle is kept overnight for coveredrepairs, you are eligible for rental carcoverage, including bumper to bumperwarranty repairs, and Field Service Actions.
Roadside AssistanceExclusive 24/7 roadside assistance,including:• Towing, flat-tire change and battery
jump starts• Out of fuel and lock-out assistance.• Travel expense reimbursement for
lodging, meals and rental car.• Destination assistance for taxi, shuttle,
rental car coverage and emergencytransportation.
Transferable CoverageIf you sell your vehicle before your FordExtended Service Plan coverage expires,you can transfer any remaining coverageto the new owner. Whenever you sell yourvehicle, prospective buyers may have ahigher degree of confidence that vehiclewas properly maintained with Ford ESP,thereby improving resale value.
126
Motorhome (TY3) , enUSA, First Printing
Extended Service Plan (ESP)
Avoid the Rising Cost of ProperlyMaintaining Your Vehicle!Ford Extended Service Plan also offers aPremium Maintenance Plan that covers allscheduled maintenance, and selectedwear items. The coverage is prepaid, soyou never have to worry about affordingyour vehicle’s maintenance. It coversregular checkups, routine inspections,preventive care and replacement of selectitems that require periodic attention fornormal wear:• Windshield wiper blades.• Spark plugs.• The clutch disc.• Brake pads and linings.• Shock absorbers.• Struts.• Engine Belts.• Engine coolant hoses, clamps and
o-rings.• Diesel exhaust fluid replenishment.
Interest Free Finance OptionsAvailableTake advantage of our interest freeinstallment payment plan. Just a 10%down payment will provide you with anaffordable, no interest, no fee paymentprogram allowing you all the security andbenefits Ford ESP has to offer while payingover time. You are pre-approved with nocredit checks, no hassles! To learn more,call our Ford ESP specialists at800-367-3377.Ford ESPP.O. Box 321067Detroit, MI 48232
SERVICE PLANS (CANADA ONLY)You can get more protection for yourvehicle by purchasing a Ford ExtendedService Plan. Ford Extended Service Planis the only service contract backed by FordMotor Company of Canada, Limited.Depending on the plan you purchase, FordExtended Service Plan provides benefitssuch as:• Rental reimbursement.• Coverage for certain maintenance and
wear items.• Protection against repair costs after
your New Vehicle Limited WarrantyCoverage expires.
• Roadside Assistance benefits.There are several Ford Extended ServicePlans available in various time, distanceand deductible combinations. Each planis tailored to fit your own driving needs,including reimbursement for towing andrental. When you purchase Ford ExtendedService Plan, you receive addedpeace-of-mind protection throughoutCanada, the United States and Mexico,provided by a network of participatingauthorized Ford Motor Company dealers.Note: Repairs performed outside ofCanada, the United States and Mexico arenot eligible for Ford Extended Service Plancoverage.This information is subject to change. Formore information, visit your local Ford ofCanada dealer or www.ford.ca to find theFord Extended Service Plan that is right foryou.
127
Motorhome (TY3) , enUSA, First Printing
Extended Service Plan (ESP)
GENERAL MAINTENANCEINFORMATIONWhy Maintain Your Vehicle?Carefully following the maintenanceschedule helps protect against major repairexpenses resulting from neglect orinadequate maintenance and may help toincrease the value of your vehicle whenyou sell or trade it. Keep all receipts forcompleted maintenance with your vehicle.We have established regular maintenanceintervals for your vehicle based uponrigorous testing. It is important that youhave your vehicle serviced at the propertimes. These intervals serve two purposes;one is to maintain the reliability of yourvehicle and the second is to keep your costof owning your vehicle down.It is your responsibility to have allscheduled maintenance performed and tomake sure that the materials used meetthe specifications identified in this owner'smanual. See Capacities andSpecifications (page 118).Failure to perform scheduled maintenanceinvalidates warranty coverage on partsaffected by the lack of maintenance.
Why Maintain Your Vehicle at YourDealership?Factory-trained TechniciansService technicians participate in extensivefactory-sponsored certification training tohelp them become experts on theoperation of your vehicle. Ask yourdealership about the training andcertification their technicians havereceived.
Genuine Ford and MotorcraftReplacement PartsDealerships stock Ford, Motorcraft andFord-authorized branded re-manufacturedreplacement parts. These parts meet orexceed our specifications. Parts installedat your dealership carry a nationwide24-month or unlimited mile (kilometer)parts and labor limited warranty.If you do not use Ford authorized parts theymay not meet our specifications anddepending on the part, it could affectemissions compliance.
ConvenienceMany dealerships have extended eveningand Saturday hours to make your servicevisit more convenient and they offer onestop shopping. They can perform anyservices that are required on your vehicle,from general maintenance to collisionrepairs.Note: Not all dealers have extended hoursor body shops. Please contact your dealerfor details.
Protecting Your InvestmentMaintenance is an investment that paysdividends in the form of improvedreliability, durability and resale value. Tomaintain the proper performance of yourvehicle and its emission control systems,make sure you have scheduledmaintenance performed at the designatedintervals.Your vehicle is very sophisticated and builtwith multiple, complex, performancesystems. Every manufacturer developsthese systems using differentspecifications and performance features.That is why it is important to rely upon yourdealership to properly diagnose and repairyour vehicle.
128
Motorhome (TY3) , enUSA, First Printing
Scheduled Maintenance

Ford Motor Company has recommendedmaintenance intervals for various partsand component systems based uponengineering testing. Ford Motor Companyrelies upon this testing to determine themost appropriate mileage for replacementof oils and fluids to protect your vehicle atthe lowest overall cost to you andrecommends against maintenanceschedules that deviate from the scheduledmaintenance information.We strongly recommend the use of onlygenuine Ford, Motorcraft orFord-authorized re-manufacturedreplacement parts engineered for yourvehicle.
Additives and ChemicalsThis owner's manual and the FordWorkshop Manual list the recommendedadditives and chemicals for your vehicle.We do not recommend using chemicals oradditives not approved by us as part ofyour vehicle’s normal maintenance. Pleaseconsult your warranty information.
Oils, Fluids and FlushingIn many cases, fluid discoloration is anormal operating characteristic and, byitself, does not necessarily indicate aconcern or that the fluid needs to bechanged. However, a qualified expert, suchas the factory-trained technicians at yourdealership, should inspect discolored fluidsthat also show signs of overheating orforeign material contaminationimmediately.Make sure to change your vehicle’s oils andfluids at the specified intervals or inconjunction with a repair. Flushing is aviable way to change fluid for many vehiclesub-systems during scheduledmaintenance. It is critical that systems areflushed only with new fluid that is the sameas that required to fill and operate thesystem or using a Ford-approved flushingchemical.
Owner Checks and ServicesMake sure you perform the following basicmaintenance checks and inspections everymonth or at six-month intervals.
Check every month
Engine oil level.
Function of all interior and exterior lights.
Tires (including spare) for wear and proper pressure.
Windshield washer fluid level.
Check every six months
Battery connections. Clean if necessary.
Body and door drain holes for obstructions. Clean if necessary.
Cooling system fluid level and coolant strength.
Door weatherstrips for wear. Lubricate if necessary.
129
Motorhome (TY3) , enUSA, First Printing
Scheduled Maintenance
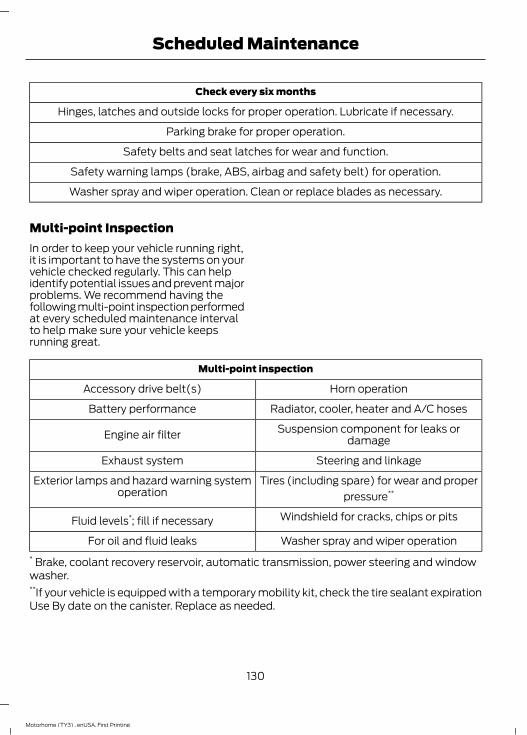
Check every six months
Hinges, latches and outside locks for proper operation. Lubricate if necessary.
Parking brake for proper operation.
Safety belts and seat latches for wear and function.
Safety warning lamps (brake, ABS, airbag and safety belt) for operation.
Washer spray and wiper operation. Clean or replace blades as necessary.
Multi-point InspectionIn order to keep your vehicle running right,it is important to have the systems on yourvehicle checked regularly. This can helpidentify potential issues and prevent majorproblems. We recommend having thefollowing multi-point inspection performedat every scheduled maintenance intervalto help make sure your vehicle keepsrunning great.
Multi-point inspection
Horn operationAccessory drive belt(s)
Radiator, cooler, heater and A/C hosesBattery performance
Suspension component for leaks ordamageEngine air filter
Steering and linkageExhaust system
Tires (including spare) for wear and properpressure**
Exterior lamps and hazard warning systemoperation
Windshield for cracks, chips or pitsFluid levels*; fill if necessary
Washer spray and wiper operationFor oil and fluid leaks* Brake, coolant recovery reservoir, automatic transmission, power steering and windowwasher.**If your vehicle is equipped with a temporary mobility kit, check the tire sealant expirationUse By date on the canister. Replace as needed.
130
Motorhome (TY3) , enUSA, First Printing
Scheduled Maintenance
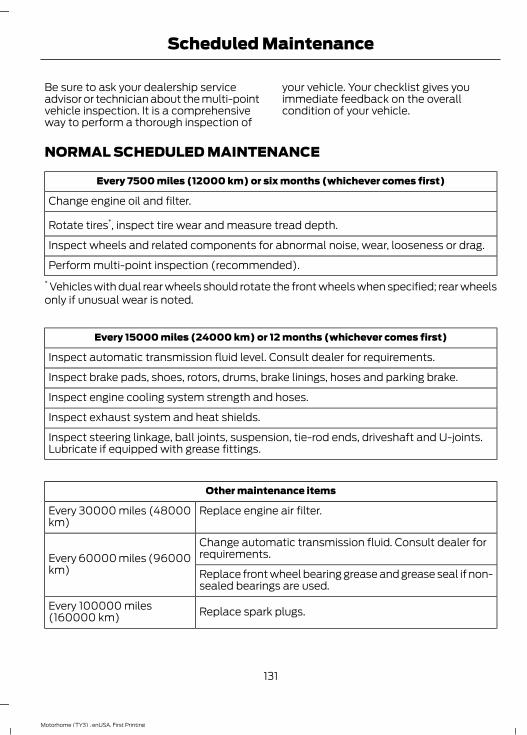
Be sure to ask your dealership serviceadvisor or technician about the multi-pointvehicle inspection. It is a comprehensiveway to perform a thorough inspection of
your vehicle. Your checklist gives youimmediate feedback on the overallcondition of your vehicle.
NORMAL SCHEDULED MAINTENANCE
Every 7500 miles (12000 km) or six months (whichever comes first)
Change engine oil and filter.
Rotate tires*, inspect tire wear and measure tread depth.
Inspect wheels and related components for abnormal noise, wear, looseness or drag.
Perform multi-point inspection (recommended).* Vehicles with dual rear wheels should rotate the front wheels when specified; rear wheelsonly if unusual wear is noted.
Every 15000 miles (24000 km) or 12 months (whichever comes first)
Inspect automatic transmission fluid level. Consult dealer for requirements.
Inspect brake pads, shoes, rotors, drums, brake linings, hoses and parking brake.
Inspect engine cooling system strength and hoses.
Inspect exhaust system and heat shields.
Inspect steering linkage, ball joints, suspension, tie-rod ends, driveshaft and U-joints.Lubricate if equipped with grease fittings.
Other maintenance items
Replace engine air filter.Every 30000 miles (48000km)
Change automatic transmission fluid. Consult dealer forrequirements.Every 60000 miles (96000
km) Replace front wheel bearing grease and grease seal if non-sealed bearings are used.
Replace spark plugs.Every 100000 miles(160000 km)
131
Motorhome (TY3) , enUSA, First Printing
Scheduled Maintenance
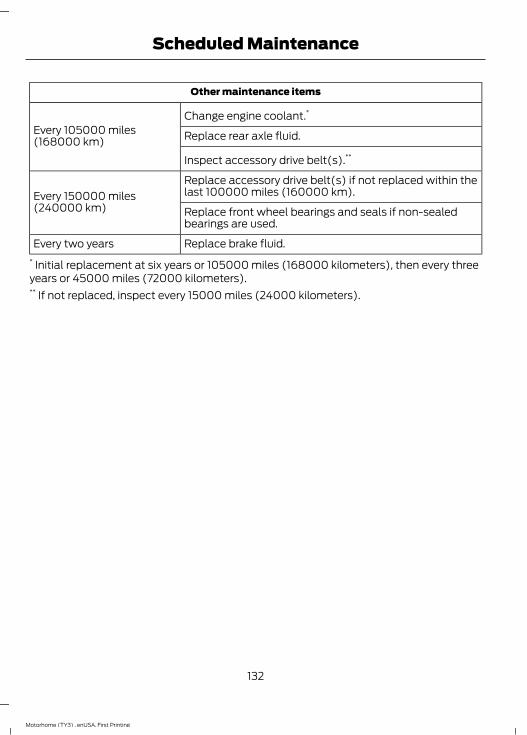
Other maintenance items
Change engine coolant.*
Every 105000 miles(168000 km) Replace rear axle fluid.
Inspect accessory drive belt(s).**
Replace accessory drive belt(s) if not replaced within thelast 100000 miles (160000 km).Every 150000 miles
(240000 km) Replace front wheel bearings and seals if non-sealedbearings are used.
Replace brake fluid.Every two years* Initial replacement at six years or 105000 miles (168000 kilometers), then every threeyears or 45000 miles (72000 kilometers).** If not replaced, inspect every 15000 miles (24000 kilometers).
132
Motorhome (TY3) , enUSA, First Printing
Scheduled Maintenance
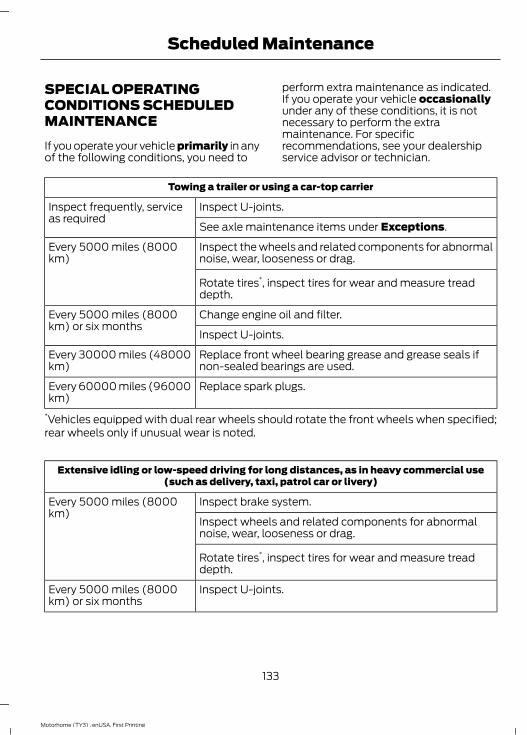
SPECIAL OPERATINGCONDITIONS SCHEDULEDMAINTENANCEIf you operate your vehicle primarily in anyof the following conditions, you need to
perform extra maintenance as indicated.If you operate your vehicle occasionallyunder any of these conditions, it is notnecessary to perform the extramaintenance. For specificrecommendations, see your dealershipservice advisor or technician.
Towing a trailer or using a car-top carrier
Inspect U-joints.Inspect frequently, serviceas required
See axle maintenance items under Exceptions.
Inspect the wheels and related components for abnormalnoise, wear, looseness or drag.
Every 5000 miles (8000km)
Rotate tires*, inspect tires for wear and measure treaddepth.
Change engine oil and filter.Every 5000 miles (8000km) or six months
Inspect U-joints.
Replace front wheel bearing grease and grease seals ifnon-sealed bearings are used.
Every 30000 miles (48000km)
Replace spark plugs.Every 60000 miles (96000km)
*Vehicles equipped with dual rear wheels should rotate the front wheels when specified;rear wheels only if unusual wear is noted.
Extensive idling or low-speed driving for long distances, as in heavy commercial use(such as delivery, taxi, patrol car or livery)
Inspect brake system.Every 5000 miles (8000km)
Inspect wheels and related components for abnormalnoise, wear, looseness or drag.
Rotate tires*, inspect tires for wear and measure treaddepth.
Inspect U-joints.Every 5000 miles (8000km) or six months
133
Motorhome (TY3) , enUSA, First Printing
Scheduled Maintenance
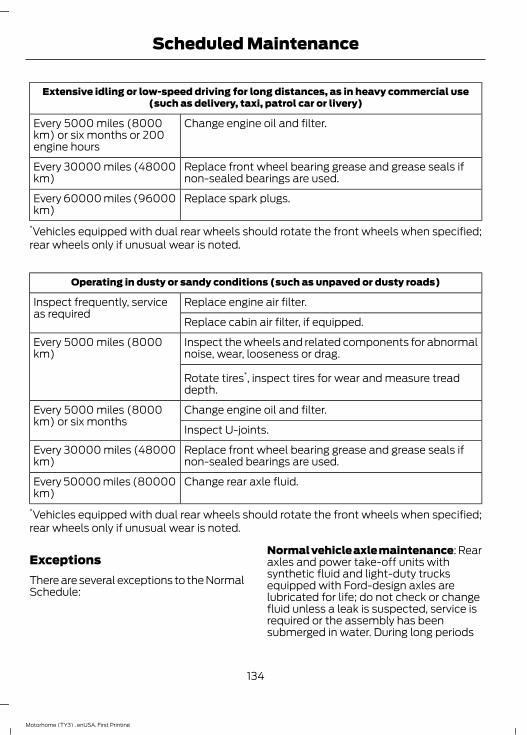
Extensive idling or low-speed driving for long distances, as in heavy commercial use(such as delivery, taxi, patrol car or livery)
Change engine oil and filter.Every 5000 miles (8000km) or six months or 200engine hours
Replace front wheel bearing grease and grease seals ifnon-sealed bearings are used.
Every 30000 miles (48000km)
Replace spark plugs.Every 60000 miles (96000km)
*Vehicles equipped with dual rear wheels should rotate the front wheels when specified;rear wheels only if unusual wear is noted.
Operating in dusty or sandy conditions (such as unpaved or dusty roads)
Replace engine air filter.Inspect frequently, serviceas required
Replace cabin air filter, if equipped.
Inspect the wheels and related components for abnormalnoise, wear, looseness or drag.
Every 5000 miles (8000km)
Rotate tires*, inspect tires for wear and measure treaddepth.
Change engine oil and filter.Every 5000 miles (8000km) or six months
Inspect U-joints.
Replace front wheel bearing grease and grease seals ifnon-sealed bearings are used.
Every 30000 miles (48000km)
Change rear axle fluid.Every 50000 miles (80000km)
*Vehicles equipped with dual rear wheels should rotate the front wheels when specified;rear wheels only if unusual wear is noted.
ExceptionsThere are several exceptions to the NormalSchedule:
Normal vehicle axle maintenance: Rearaxles and power take-off units withsynthetic fluid and light-duty trucksequipped with Ford-design axles arelubricated for life; do not check or changefluid unless a leak is suspected, service isrequired or the assembly has beensubmerged in water. During long periods
134
Motorhome (TY3) , enUSA, First Printing
Scheduled Maintenance

of trailer towing with outside temperaturesabove 70°F (21°C) and at wide-openthrottle for long periods above 45 mph (72km/h), change non-synthetic rear axle fluidevery 3000 miles (4800 kilometers) orthree months, whichever comes first. Thisinterval can be waived if the axle is filledwith 75W140 synthetic gear fluid meetingFord specification WSL-M2C192-A, partnumber F1TZ-19580-B, or equivalent. Addfriction modifier XL-3 (EST-M2C118-A) orequivalent for complete refill ofTraction-Lok rear axles. See Capacitiesand Specifications (page 118).California fuel filter replacement: If youregister your vehicle in California, theCalifornia Air Resources Board hasdetermined that the failure to perform thismaintenance item does not nullify theemission warranty or limit recall liabilitybefore the completion of your vehicle'suseful life. Ford Motor Company, however,urges you to have all recommendedmaintenance services performed at thespecified intervals and to record all vehicleservice.
Hot climate oil change intervals:Vehicles operating in the Middle East,North Africa, Sub-Saharan Africa orlocations with similar climates using anAmerican Petroleum Institute (API)Certified for Gasoline Engines (Certificationmark) oil of SM or SN quality, the normaloil change interval is 5000 miles (8000kilometers).If the available API SM or SN oils are notavailable, then the oil change interval is3000 miles (4800 kilometers).Engine air filter and cabin air filterreplacement: The life of the engine airfilter and cabin air filter is dependent onexposure to dusty and dirty conditions.Vehicles operated in these conditionsrequire frequent inspection andreplacement of the engine air filter andcabin air filter.
SCHEDULED MAINTENANCE RECORD
E146852
Repair Order #:
Distance:
Engine hours (optional):
Multi-point inspection (recommended):Signature:
Dealer stamp
135
Motorhome (TY3) , enUSA, First Printing
Scheduled Maintenance
E146852
Repair Order #:
Distance:
Engine hours (optional):
Multi-point inspection (recommended):Signature:
Dealer stamp
E146852
Repair Order #:
Distance:
Engine hours (optional):
Multi-point inspection (recommended):Signature:
Dealer stamp
136
Motorhome (TY3) , enUSA, First Printing
Scheduled Maintenance

E146852
Repair Order #:
Distance:
Engine hours (optional):
Multi-point inspection (recommended):Signature:
Dealer stamp
E146852
Repair Order #:
Distance:
Engine hours (optional):
Multi-point inspection (recommended):Signature:
Dealer stamp
137
Motorhome (TY3) , enUSA, First Printing
Scheduled Maintenance

E146852
Repair Order #:
Distance:
Engine hours (optional):
Multi-point inspection (recommended):Signature:
Dealer stamp
E146852
Repair Order #:
Distance:
Engine hours (optional):
Multi-point inspection (recommended):Signature:
Dealer stamp
138
Motorhome (TY3) , enUSA, First Printing
Scheduled Maintenance

E146852
Repair Order #:
Distance:
Engine hours (optional):
Multi-point inspection (recommended):Signature:
Dealer stamp
E146852
Repair Order #:
Distance:
Engine hours (optional):
Multi-point inspection (recommended):Signature:
Dealer stamp
139
Motorhome (TY3) , enUSA, First Printing
Scheduled Maintenance

E146852
Repair Order #:
Distance:
Engine hours (optional):
Multi-point inspection (recommended):Signature:
Dealer stamp
E146852
Repair Order #:
Distance:
Engine hours (optional):
Multi-point inspection (recommended):Signature:
Dealer stamp
140
Motorhome (TY3) , enUSA, First Printing
Scheduled Maintenance

E146852
Repair Order #:
Distance:
Engine hours (optional):
Multi-point inspection (recommended):Signature:
Dealer stamp
E146852
Repair Order #:
Distance:
Engine hours (optional):
Multi-point inspection (recommended):Signature:
Dealer stamp
141
Motorhome (TY3) , enUSA, First Printing
Scheduled Maintenance

E146852
Repair Order #:
Distance:
Engine hours (optional):
Multi-point inspection (recommended):Signature:
Dealer stamp
E146852
Repair Order #:
Distance:
Engine hours (optional):
Multi-point inspection (recommended):Signature:
Dealer stamp
142
Motorhome (TY3) , enUSA, First Printing
Scheduled Maintenance
E146852
Repair Order #:
Distance:
Engine hours (optional):
Multi-point inspection (recommended):Signature:
Dealer stamp
E146852
Repair Order #:
Distance:
Engine hours (optional):
Multi-point inspection (recommended):Signature:
Dealer stamp
143
Motorhome (TY3) , enUSA, First Printing
Scheduled Maintenance

E146852
Repair Order #:
Distance:
Engine hours (optional):
Multi-point inspection (recommended):Signature:
Dealer stamp
E146852
Repair Order #:
Distance:
Engine hours (optional):
Multi-point inspection (recommended):Signature:
Dealer stamp
144
Motorhome (TY3) , enUSA, First Printing
Scheduled Maintenance
E146852
Repair Order #:
Distance:
Engine hours (optional):
Multi-point inspection (recommended):Signature:
Dealer stamp
145
Motorhome (TY3) , enUSA, First Printing
Scheduled Maintenance

146
Motorhome (TY3) , enUSA, First Printing
AAbout This Manual...........................................3ABS
See: Brakes.............................................................35ABS driving hints
See: Hints on Driving With Anti-LockBrakes..................................................................35
AccessoriesSee: Replacement Parts
Recommendation..............................................6Adjusting the Steering Wheel......................9Audible Warnings and Indicators...............17
Fail-Safe Cooling Warning Chime...................17Headlamps On Warning Chime.......................17Key in Ignition Warning Chime..........................17Parking Brake On Warning Chime...................17Shift to Park Warning Chime.............................17
Automatic Transmission.............................32Brake-Shift Interlock...........................................34If Your Vehicle Gets Stuck In Mud or
Snow....................................................................34Understanding the Positions of Your
Automatic Transmission...............................32Automatic Transmission Fluid
Check...............................................................87Adjusting automatic transmission fluid
levels....................................................................88Automatic transmission fluid filter...............88Correct fluid level..................................................87High fluid level.......................................................88Low fluid level........................................................87
BBrake Fluid Check..........................................88
Hydroboost............................................................89Hydromax...............................................................89
Brakes.................................................................35General Information............................................35
Breaking-In........................................................51
CCalifornia Proposition 65...............................5Capacities and Specifications.................122
Specifications.......................................................123
Car WashSee: Cleaning the Exterior................................94
Changing a Fuse............................................80Fuses........................................................................80
Changing a Road Wheel.............................114Dissimilar Spare Wheel and Tire Assembly
Information.......................................................114Tire Change Procedure......................................115
Changing the 12V Battery.............................91Battery relearn.......................................................92
Changing the Engine Air Filter...................93Cleaning the Alloy Wheels.........................95Cleaning the Engine......................................94Cleaning the Exterior....................................94
Exterior Chrome Parts........................................94Exterior Plastic Parts..........................................94Stripes or Graphics..............................................94Underbody..............................................................94
Coolant CheckSee: Engine Coolant Check..............................84
Cruise Control....................................................9Principle of Operation.........................................37
Cruise controlSee: Using Cruise Control..................................37
Customer Assistance....................................57
DDaytime Running Lamps..............................12Direction Indicators.........................................12Driving Hints......................................................51Driving Through Water..................................52DRL
See: Daytime Running Lamps..........................12
EEconomical Driving.........................................51Emission Control System............................29
On-Board Diagnostics (OBD-II).....................30Readiness for Inspection/Maintenance
(I/M) Testing.....................................................30Engine Block Heater......................................24
Using the Engine Block Heater........................24
147
Motorhome (TY3) , enUSA, First Printing
Index
Engine Coolant Check..................................84Adding Engine Coolant......................................84Recycled Engine Coolant..................................85Severe Climates....................................................85What you Should Know About Fail-Safe
Cooling................................................................86Engine Oil Check............................................83
Adding Engine Oil.................................................83Engine Oil Dipstick.........................................83Engine Specifications..................................118
Drivebelt Routing.................................................118Environment.......................................................8Essential Towing Checks.............................47
Before Towing a Trailer......................................48Hitches......................................................................47Launching or Retrieving a Boat or Personal
Watercraft (PWC)..........................................49Safety Chains.........................................................47Trailer Brakes.........................................................48Trailer Lamps.........................................................48When Towing a Trailer.......................................48
Export Unique Options...................................7Extended Service Plan (ESP)..................126
SERVICE PLANS (CANADA ONLY)..............127SERVICE PLANS (U.S. Only)..........................126
FFord Credit...........................................................5
(U.S. Only).................................................................5Fuel and Refueling.........................................25Fuel Consumption.........................................28
Calculating Fuel Economy................................28Filling the Tank......................................................28
Fuel Filter............................................................91Fuel Quality......................................................26
Choosing the Right Fuel....................................26Fuses...................................................................63Fuse Specification Chart.............................63
Diode and Relay Module....................................73F53/F59 Passenger Compartment Fuse
Panel.....................................................................74F53 Power Distribution Box..............................63
GGauges.................................................................13
Engine Coolant Temperature Gauge.............14Engine Oil Pressure Gauge................................14Fuel Gauge...............................................................14Speedometer..........................................................14Transmission Fluid Temperature
Gauge....................................................................14General Maintenance Information.........128
Multi-point Inspection......................................130Owner Checks and Services...........................129Protecting Your Investment............................128Why Maintain Your Vehicle?..........................128Why Maintain Your Vehicle at Your
Dealership?......................................................128Getting Assistance Outside the U.S. and
Canada...........................................................60Getting the Services You Need..................57
Away From Home.................................................57
HHandbrake
See: Parking Brake...............................................36Hazard Warning Flashers............................54Hints on Driving With Anti-Lock
Brakes..............................................................35
IIgnition Switch.................................................22In California (U.S. Only)...............................58Information Displays......................................18
General Information.............................................18Information Messages..................................19
Engine.......................................................................20Maintenance...........................................................21Transmission...........................................................21
Instrument Cluster..........................................13Instrument Lighting Dimmer........................11Introduction........................................................3
148
Motorhome (TY3) , enUSA, First Printing
Index
JJump Starting the Vehicle...........................54
Connecting the Jumper Cables.......................55Jump Starting........................................................56Preparing Your Vehicle.......................................55Removing the Jumper Cables.........................56
LLighting Control................................................11
Headlamp Flasher..................................................11High Beams..............................................................11
Lighting.................................................................11Load Carrying..................................................38Load Limit.........................................................38
Vehicle Loading - with and without aTrailer...................................................................38
Lug NutsSee: Changing a Road Wheel.........................114
MMaintenance.....................................................81
General Information.............................................81Message Center
See: Information Displays..................................18Mobile Communications Equipment.........7Motorcraft Parts.............................................118
NNormal Scheduled Maintenance.............131
OOil Change Indicator Reset.........................83
Resetting the Oil Life MonitoringSystem................................................................83
Oil CheckSee: Engine Oil Check.........................................83
Ordering Additional Owner'sLiterature.........................................................61Obtaining a French Owner’s Manual.............61
PParking Brake...................................................36
Perchlorate..........................................................5Power Steering Fluid Check.......................90
Steering linkage lubrication points.................91Protecting the Environment.........................8
RRecommended Towing Weights..............45Reduced Engine Performance...................51Refueling............................................................27
Fuel Filler Cap.........................................................27Replacement Parts
Recommendation.........................................6Collision Repairs......................................................6Scheduled Maintenance and Mechanical
Repairs...................................................................6Warranty on Replacement Parts......................6
Reporting Safety Defects (CanadaOnly)................................................................62
Reporting Safety Defects (U.S.Only).................................................................61
Roadside Assistance.....................................53Vehicles Sold in Canada: Getting Roadside
Assistance..........................................................53Vehicles Sold in Canada: Using Roadside
Assistance..........................................................53Vehicles Sold in the United States: Getting
Roadside Assistance......................................53Vehicles Sold in the United States: Using
Roadside Assistance......................................53Roadside Emergencies................................53Running-In
See: Breaking-In.....................................................51Running Out of Fuel......................................26
SSafety Precautions........................................25Scheduled Maintenance Record............135Scheduled Maintenance............................128Snow Chains
See: Using Snow Chains...................................113Special Notices.................................................6
New Vehicle Limited Warranty..........................6On-board Diagnostics (OBD-II)........................6Special Instructions...............................................6
149
Motorhome (TY3) , enUSA, First Printing
Index
Special Operating Conditions ScheduledMaintenance................................................133Exceptions.............................................................134
Speed ControlSee: Cruise Control...............................................37
Starter SwitchSee: Ignition Switch.............................................22
Starting a Gasoline Engine.........................22Failure to Start.......................................................23Guarding Against Exhaust Fumes..................23Important Ventilating Information.................23Stopping the Engine When Your Vehicle is
Moving.................................................................23Stopping the Engine When Your Vehicle is
Stationary...........................................................23Starting and Stopping the Engine............22
General Information............................................22Steering Wheel..................................................9Symbols Glossary.............................................3
TTechnical Specifications
See: Capacities and Specifications..............118The Better Business Bureau (BBB) Auto
Line Program (U.S. Only).........................59Tire Care............................................................98
Glossary of Tire Terminology...........................99Information About Uniform Tire Quality
Grading...............................................................98Information Contained on the Tire
Sidewall............................................................100Temperature A B C..............................................99Traction AA A B C.................................................98Treadwear...............................................................98
TiresSee: Wheels and Tires.......................................98
Towing a Trailer...............................................44Load Placement...................................................44
Towing the Vehicle on Four Wheels.......50Emergency Towing..............................................50
Towing................................................................44Transmission Code Designation..............121Transmission....................................................32Transmission
See: Transmission................................................32Transporting the Vehicle.............................49
UUnder Hood Overview..................................82Using Cruise Control......................................37
Switching Cruise Control Off............................37Switching Cruise Control On............................37
Using Snow Chains.......................................113Utilizing the Mediation/Arbitration
Program (Canada Only)...........................59
VVehicle Care.....................................................94
General Information............................................94Vehicle Certification Label........................120Vehicle Identification Number.................120Vehicle Storage...............................................95
Battery.....................................................................96Body..........................................................................96Brakes.......................................................................96Cooling system.....................................................96Engine......................................................................96Fuel system............................................................96General.....................................................................95Miscellaneous.......................................................96Removing Vehicle From Storage....................96Tires..........................................................................96
VINSee: Vehicle Identification Number.............120
WWarning Lamps and Indicators..................15
Anti-Lock Braking System.................................15Battery.......................................................................15Brake Reserve System.........................................16Brake System..........................................................16Cruise Control.........................................................16Direction Indicator................................................16Electronic Throttle Control................................16Fasten Safety Belt................................................16High Beam...............................................................16Service Engine Soon............................................16Transmission Tow/Haul......................................17
WashersSee: Cleaning the Exterior................................94See: Wipers and Washers..................................10
150
Motorhome (TY3) , enUSA, First Printing
Index
Wheel NutsSee: Changing a Road Wheel.........................114
Wheels and Tires...........................................98Technical Specifications...................................117
Windshield Washers......................................10Windshield Wipers.........................................10Wipers and Washers......................................10Wrecker Towing
See: Transporting the Vehicle.........................49
151
Motorhome (TY3) , enUSA, First Printing
Index