2015 HYUNDAI GENESIS - T-Rex Grilles
3
51499/54499/56499 51499/54499/56499 2015 HYUNDAI 2015 HYUNDAI GENESIS GENESIS 2015 HYUNDAI GENESIS Upper Class Main Grille TOOLS REQUIRED: PARTS LIST: Plastic Pry Bar Phillips Screwdriver 8mm 10mm Socket Ratchet and Extensions Small Flat Head Screwdriver (6) 1/2’’ L-Brackets (4) #10 screw 1.5” (6) 6-32 Nylon Lock Nuts (6) #10 Flat Washers PLEASE READ AND UNDERSTAND ALL INSTRUCTIONS BEFORE INSTALLATION. Auto maker’s offer varied models to each vehicle and occasionally manufacture more than one body style of the same model. To assure your part is correct; our tech department can be contacted at [email protected] to verify fitment or assist with tech questions. All other inquires can be directed to [email protected]. In the event you do not have internet access please call 1-800-287-5900. Step 1 Removal of Radiator Plastic Shroud Open the hood and remove the plastic push clips securing the plastic radiator shroud to the radiator core. Carefully use a small flat head screwdriver to push in the clips, you can now remove the clips. Once all clips have been removed the plastic radiator shroud can be removed. Step 2 Unmounting of Bumper- Top Section Using the 10mm socket and ratchet remove the 10mm bolts securing the bumper. Then use a Philips screwdriver and remove the plastic screws.
Transcript of 2015 HYUNDAI GENESIS - T-Rex Grilles

51499/54499/56499 51499/54499/56499 2015 HYUNDAI 2015 HYUNDAI
GENESIS GENESIS
2015 HYUNDAI GENESIS Upper Class Main Grille
TOOLS REQUIRED: PARTS LIST: Plastic Pry Bar
Phillips Screwdriver
8mm 10mm Socket
Ratchet and Extensions
Small Flat Head Screwdriver
(6) 1/2’’ L-Brackets
(4) #10 screw 1.5”
(6) 6-32 Nylon Lock Nuts (6) #10 Flat Washers
PLEASE READ AND UNDERSTAND ALL INSTRUCTIONS BEFORE INSTALLATION. Auto maker’s offer varied models
to each vehicle and occasionally manufacture more than one body style of the same model. To assure your part is correct; our tech
department can be contacted at [email protected] to verify fitment or assist with tech questions. All other inquires can be directed
to [email protected]. In the event you do not have internet access please call 1-800-287-5900.
Step 1 Removal of Radiator Plastic Shroud Open the hood and remove the plastic push clips securing the plastic radiator shroud to the radiator core. Carefully use a small
flat head screwdriver to push in the clips, you can now remove the clips. Once all clips have been removed the plastic radiator
shroud can be removed.
Step 2 Unmounting of Bumper- Top Section Using the 10mm socket and ratchet remove the 10mm bolts securing the bumper. Then use a Philips screwdriver and remove the
plastic screws.

Step 3 Inner Fender Well Bumper Screws Removal Using the 10mm socket and ratchet remove the 8mm bolt securing the bumper in the fender well. Now take a Philips screwdriver
and remove the inner screws.
Step 4 Bottom Section Screws Removals Using a Phillips screw driver remove the plastic screws in the bottom of the bumper trim.
Step 5 Removal of the Bumper cover Slightly open the sides of the bumper cover to where it’s free when you pull it upwards. Next slightly pull up the bumper from the top section
and pull the entire bumper out but first unclip the headlamp harness.
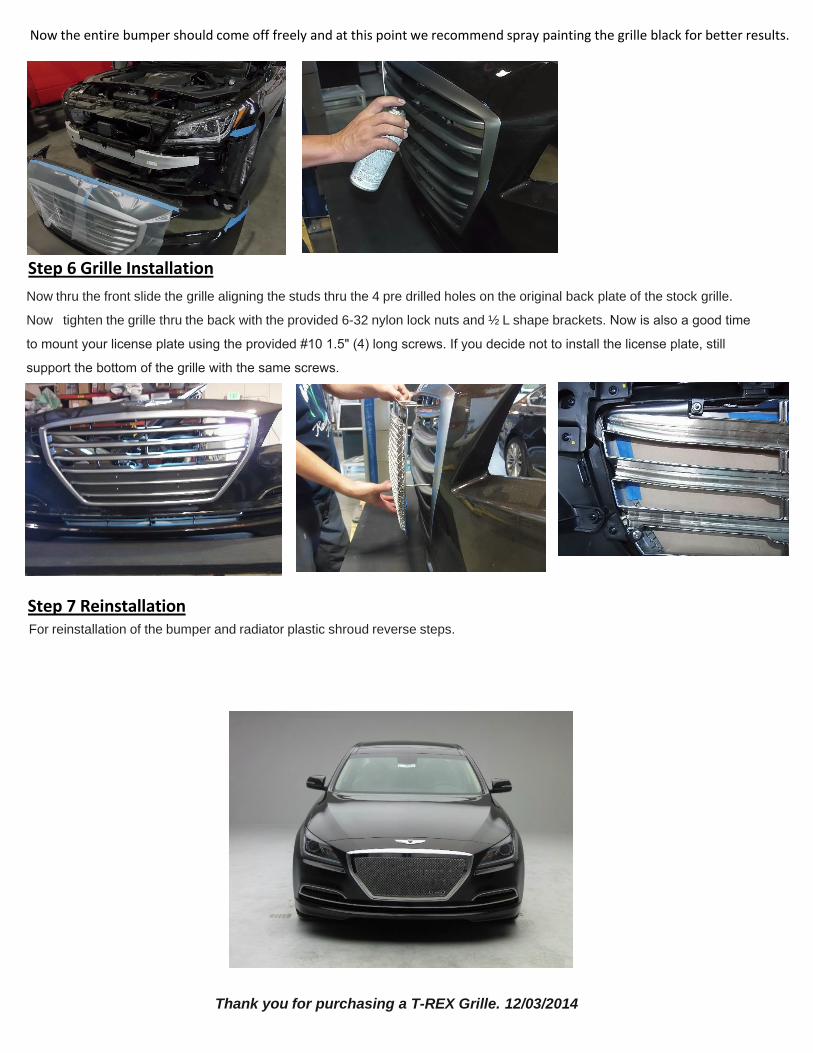
Now the entire bumper should come off freely and at this point we recommend spray painting the grille black for better results.
Step 6 Grille Installation
Now thru the front slide the grille aligning the studs thru the 4 pre drilled holes on the original back plate of the stock grille.
Now tighten the grille thru the back with the provided 6-32 nylon lock nuts and ½ L shape brackets. Now is also a good time
to mount your license plate using the provided #10 1.5" (4) long screws. If you decide not to install the license plate, still
support the bottom of the grille with the same screws.
Step 7 Reinstallation For reinstallation of the bumper and radiator plastic shroud reverse steps.
Thank you for purchasing a T-REX Grille. 12/03/2014