2011 Chevrolet Acadia Nav Owners
78
2011 Acadia, Acadia Denali, Enclave, Traverse, Lucerne Navigation System M Infotainment System ...... 3 Introduction ................. 3 Overview ....................... 4 Radio ....................... 14 AM-FM Radio ................. 14 Satellite Radio ................ 20 Audio Players ............. 20 CD/DVD Player ............... 20 Auxiliary Devices .............. 34 Navigation ................. 35 Using the Navigation System ...................... 35 Maps .......................... 37 Navigation Symbols ........... 39 Destination .................... 44 Configure Menu ............... 57 Global Positioning System (GPS) ............... 68 Vehicle Positioning ............ 69 Problems with Route Guidance .................... 70 If the System Needs Service ...................... 70 Ordering Map DVDs .......... 70 Database Coverage Explanations ................. 71 Voice Recognition ........ 71 Index ..................... i-1
-
Upload
marie-van-deusen -
Category
Documents
-
view
19 -
download
3
Transcript of 2011 Chevrolet Acadia Nav Owners
Black plate (1,1)Acadia, Acadia Denali, Enclave, Traverse, Lucerne Navigation System - 2011
2011 Acadia, Acadia Denali, Enclave, Traverse, LucerneNavigation System M
Infotainment System . . . . . . 3
Introduction . . . . . . . . . . . . . . . . . 3Overview . . . . . . . . . . . . . . . . . . . . . . . 4
Radio . . . . . . . . . . . . . . . . . . . . . . . 14AM-FM Radio . . . . . . . . . . . . . . . . . 14Satellite Radio . . . . . . . . . . . . . . . . 20
Audio Players . . . . . . . . . . . . . 20CD/DVD Player . . . . . . . . . . . . . . . 20Auxiliary Devices . . . . . . . . . . . . . . 34
Navigation . . . . . . . . . . . . . . . . . 35Using the NavigationSystem . . . . . . . . . . . . . . . . . . . . . . 35
Maps . . . . . . . . . . . . . . . . . . . . . . . . . . 37Navigation Symbols . . . . . . . . . . . 39Destination . . . . . . . . . . . . . . . . . . . . 44Configure Menu . . . . . . . . . . . . . . . 57Global PositioningSystem (GPS) . . . . . . . . . . . . . . . 68
Vehicle Positioning . . . . . . . . . . . . 69Problems with RouteGuidance . . . . . . . . . . . . . . . . . . . . 70
If the System NeedsService . . . . . . . . . . . . . . . . . . . . . . 70
Ordering Map DVDs . . . . . . . . . . 70Database CoverageExplanations . . . . . . . . . . . . . . . . . 71
Voice Recognition . . . . . . . . 71
Index . . . . . . . . . . . . . . . . . . . . . i-1

Black plate (2,1)Acadia, Acadia Denali, Enclave, Traverse, Lucerne Navigation System - 2011
Black plate (3,1)Acadia, Acadia Denali, Enclave, Traverse, Lucerne Navigation System - 2011
Infotainment System 3
Introduction GENERAL MOTORS, GM, theGM Emblem, CHEVROLET, theCHEVROLET Emblem, BUICK,the BUICK Emblem, GMC andthe GMC Truck Emblem, and thename LUCERNE are registeredtrademarks. The names ACADIA,ACADIA DENALI, ENCLAVE, andTRAVERSE are trademarks ofGeneral Motors LLC.
Manufactured under license underU.S. Patent #'s: 5,451,942;5,956,674; 5,974,380; 5,978,762;6,487,535 & other U.S. andworldwide patents issued &pending. DTS and DTS Digital
Surround are registered trademarksand the DTS logos and Symbolare trademarks of DTS, Inc.© 1996-2010 DTS, Inc. All RightsReserved.
Manufactured under license fromDolby Laboratories. Dolby and thedouble-D symbol are trademarksof Dolby Laboratories. Copyright1992-2010 Dolby Laboratories. Allrights reserved.
The information in this manualsupplements the owner manual.
Litho in U.S.A.Part No. 25986869 B Second Printing ©2010 General Motors LLC. All Rights Reserved.
Black plate (4,1)Acadia, Acadia Denali, Enclave, Traverse, Lucerne Navigation System - 2011
4 Infotainment System
This manual describes features thatmay or may not be on your specificvehicle either because they areoptions that you did not purchaseor due to changes subsequent tothe printing of this owner manual.Please refer to the purchasedocumentation relating to yourspecific vehicle to confirm each ofthe features found on your vehicle.For vehicles first sold in Canada,substitute the name “GeneralMotors of Canada Limited” for BuickMotor Division, Chevrolet MotorDivision, or GMC wherever itappears in this manual.
Keep this manual with the ownermanual in the vehicle, so it will bethere if it is needed. If the vehicle issold, leave this manual in thevehicle.
Canadian Vehicle Owners(Propriétaires des VéhiculesCanadiens)
A French language copy of thismanual can be obtained fromyour dealer or from:
On peut obtenir un exemplaire dece guide en français auprès duconcessionnaire ou à l'adressesuivante:
Helm, IncorporatedP.O. Box 07130Detroit, MI 48207
1-800-551-4123Numéro de poste 6438 de languefrançaisewww.helminc.com
OverviewRead this manual thoroughly tobecome familiar with how thenavigation system operates.
The navigation system includesnavigation and audio functions.
While entering the vehicle or whenturning the vehicle off, some DVDMap Disc noise is normal.
Keeping your eyes on the road andyour mind on the drive is importantfor safe driving. The navigationsystem has built-in featuresintended to help keep your eyes onthe road and mind on the drive.Some features may be disabledwhile driving. Note that thesefunctions will be grayed-out.A grayed-out function indicates it isnot available when the vehicle ismoving.. Become familiar with the
navigation system operation,buttons on the faceplate, andtouch-sensitive screen buttons ofthe navigation system.
. Set up the audio by presettingfavorite stations, setting thetone, and adjusting thespeakers.
Black plate (5,1)Acadia, Acadia Denali, Enclave, Traverse, Lucerne Navigation System - 2011
Infotainment System 5
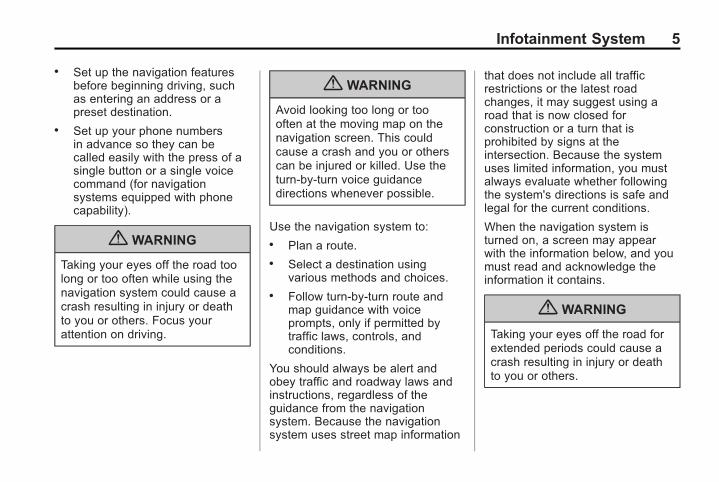
. Set up the navigation featuresbefore beginning driving, suchas entering an address or apreset destination.
. Set up your phone numbersin advance so they can becalled easily with the press of asingle button or a single voicecommand (for navigationsystems equipped with phonecapability).
{ WARNING
Taking your eyes off the road toolong or too often while using thenavigation system could cause acrash resulting in injury or deathto you or others. Focus yourattention on driving.
{ WARNING
Avoid looking too long or toooften at the moving map on thenavigation screen. This couldcause a crash and you or otherscan be injured or killed. Use theturn-by-turn voice guidancedirections whenever possible.
Use the navigation system to:. Plan a route.. Select a destination using
various methods and choices.. Follow turn-by-turn route and
map guidance with voiceprompts, only if permitted bytraffic laws, controls, andconditions.
You should always be alert andobey traffic and roadway laws andinstructions, regardless of theguidance from the navigationsystem. Because the navigationsystem uses street map information
that does not include all trafficrestrictions or the latest roadchanges, it may suggest using aroad that is now closed forconstruction or a turn that isprohibited by signs at theintersection. Because the systemuses limited information, you mustalways evaluate whether followingthe system's directions is safe andlegal for the current conditions.
When the navigation system isturned on, a screen may appearwith the information below, and youmust read and acknowledge theinformation it contains.
{ WARNING
Taking your eyes off the road forextended periods could cause acrash resulting in injury or deathto you or others.
Black plate (6,1)Acadia, Acadia Denali, Enclave, Traverse, Lucerne Navigation System - 2011
6 Infotainment System
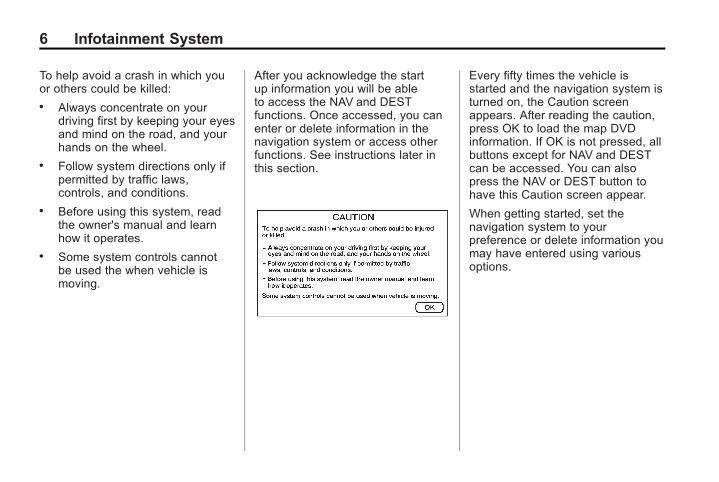
To help avoid a crash in which youor others could be killed:. Always concentrate on your
driving first by keeping your eyesand mind on the road, and yourhands on the wheel.
. Follow system directions only ifpermitted by traffic laws,controls, and conditions.
. Before using this system, readthe owner's manual and learnhow it operates.
. Some system controls cannotbe used the when vehicle ismoving.
After you acknowledge the startup information you will be ableto access the NAV and DESTfunctions. Once accessed, you canenter or delete information in thenavigation system or access otherfunctions. See instructions later inthis section.
Every fifty times the vehicle isstarted and the navigation system isturned on, the Caution screenappears. After reading the caution,press OK to load the map DVDinformation. If OK is not pressed, allbuttons except for NAV and DESTcan be accessed. You can alsopress the NAV or DEST button tohave this Caution screen appear.
When getting started, set thenavigation system to yourpreference or delete information youmay have entered using variousoptions.
Black plate (7,1)Acadia, Acadia Denali, Enclave, Traverse, Lucerne Navigation System - 2011
Infotainment System 7
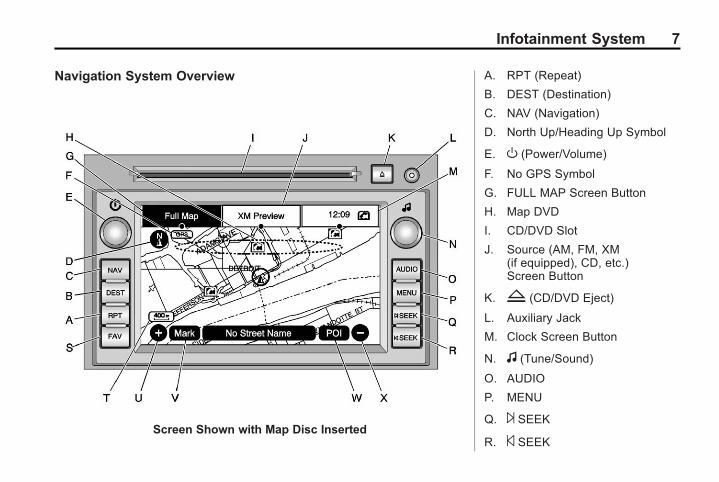
Navigation System Overview
Screen Shown with Map Disc Inserted
A. RPT (Repeat)
B. DEST (Destination)
C. NAV (Navigation)
D. North Up/Heading Up Symbol
E. O (Power/Volume)
F. No GPS Symbol
G. FULL MAP Screen Button
H. Map DVD
I. CD/DVD Slot
J. Source (AM, FM, XM(if equipped), CD, etc.)Screen Button
K. Z (CD/DVD Eject)
L. Auxiliary Jack
M. Clock Screen Button
N. f (Tune/Sound)
O. AUDIO
P. MENU
Q. ¨ SEEK
R. © SEEK
Black plate (8,1)Acadia, Acadia Denali, Enclave, Traverse, Lucerne Navigation System - 2011
8 Infotainment System
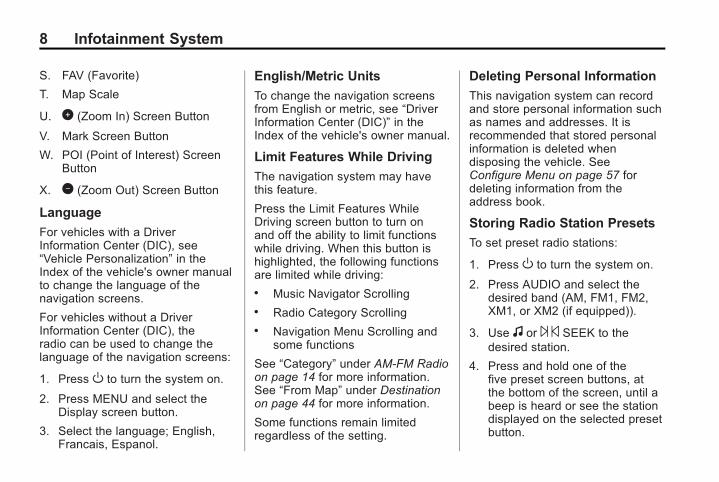
S. FAV (Favorite)
T. Map Scale
U. 0 (Zoom In) Screen Button
V. Mark Screen Button
W. POI (Point of Interest) ScreenButton
X. 1 (Zoom Out) Screen Button
Language
For vehicles with a DriverInformation Center (DIC), see“Vehicle Personalization” in theIndex of the vehicle's owner manualto change the language of thenavigation screens.
For vehicles without a DriverInformation Center (DIC), theradio can be used to change thelanguage of the navigation screens:
1. Press O to turn the system on.
2. Press MENU and select theDisplay screen button.
3. Select the language; English,Francais, Espanol.
English/Metric Units
To change the navigation screensfrom English or metric, see “DriverInformation Center (DIC)” in theIndex of the vehicle's owner manual.
Limit Features While Driving
The navigation system may havethis feature.
Press the Limit Features WhileDriving screen button to turn onand off the ability to limit functionswhile driving. When this button ishighlighted, the following functionsare limited while driving:. Music Navigator Scrolling. Radio Category Scrolling. Navigation Menu Scrolling and
some functions
See “Category” under AM-FM Radioon page 14 for more information.See “From Map” under Destinationon page 44 for more information.
Some functions remain limitedregardless of the setting.
Deleting Personal Information
This navigation system can recordand store personal information suchas names and addresses. It isrecommended that stored personalinformation is deleted whendisposing the vehicle. SeeConfigure Menu on page 57 fordeleting information from theaddress book.
Storing Radio Station Presets
To set preset radio stations:
1. Press O to turn the system on.
2. Press AUDIO and select thedesired band (AM, FM1, FM2,XM1, or XM2 (if equipped)).
3. Use f or ¨ © SEEK to thedesired station.
4. Press and hold one of thefive preset screen buttons, atthe bottom of the screen, until abeep is heard or see the stationdisplayed on the selected presetbutton.
Black plate (9,1)Acadia, Acadia Denali, Enclave, Traverse, Lucerne Navigation System - 2011
Infotainment System 9
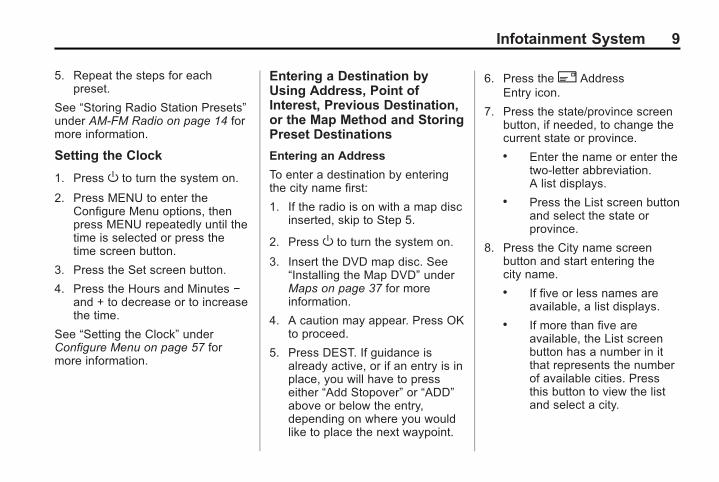
5. Repeat the steps for eachpreset.
See “Storing Radio Station Presets”under AM-FM Radio on page 14 formore information.
Setting the Clock
1. Press O to turn the system on.
2. Press MENU to enter theConfigure Menu options, thenpress MENU repeatedly until thetime is selected or press thetime screen button.
3. Press the Set screen button.
4. Press the Hours and Minutes −and + to decrease or to increasethe time.
See “Setting the Clock” underConfigure Menu on page 57 formore information.
Entering a Destination byUsing Address, Point ofInterest, Previous Destination,or the Map Method and StoringPreset Destinations
Entering an Address
To enter a destination by enteringthe city name first:
1. If the radio is on with a map discinserted, skip to Step 5.
2. Press O to turn the system on.
3. Insert the DVD map disc. See“Installing the Map DVD” underMaps on page 37 for moreinformation.
4. A caution may appear. Press OKto proceed.
5. Press DEST. If guidance isalready active, or if an entry is inplace, you will have to presseither “Add Stopover” or “ADD”above or below the entry,depending on where you wouldlike to place the next waypoint.
6. Press the2 AddressEntry icon.
7. Press the state/province screenbutton, if needed, to change thecurrent state or province.. Enter the name or enter the
two-letter abbreviation.A list displays.
. Press the List screen buttonand select the state orprovince.
8. Press the City name screenbutton and start entering thecity name.. If five or less names are
available, a list displays.. If more than five are
available, the List screenbutton has a number in itthat represents the numberof available cities. Pressthis button to view the listand select a city.
Black plate (10,1)Acadia, Acadia Denali, Enclave, Traverse, Lucerne Navigation System - 2011
10 Infotainment System
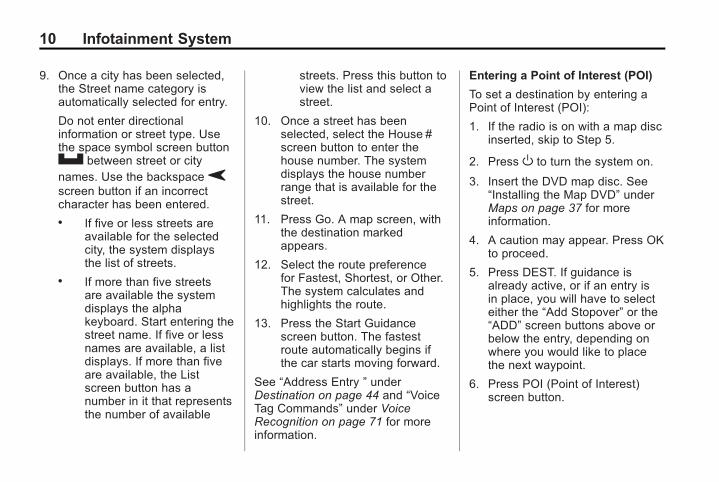
9. Once a city has been selected,the Street name category isautomatically selected for entry.
Do not enter directionalinformation or street type. Usethe space symbol screen buttonU between street or citynames. Use the backspaceVscreen button if an incorrectcharacter has been entered.. If five or less streets are
available for the selectedcity, the system displaysthe list of streets.
. If more than five streetsare available the systemdisplays the alphakeyboard. Start entering thestreet name. If five or lessnames are available, a listdisplays. If more than fiveare available, the Listscreen button has anumber in it that representsthe number of available
streets. Press this button toview the list and select astreet.
10. Once a street has beenselected, select the House #screen button to enter thehouse number. The systemdisplays the house numberrange that is available for thestreet.
11. Press Go. A map screen, withthe destination markedappears.
12. Select the route preferencefor Fastest, Shortest, or Other.The system calculates andhighlights the route.
13. Press the Start Guidancescreen button. The fastestroute automatically begins ifthe car starts moving forward.
See “Address Entry ” underDestination on page 44 and “VoiceTag Commands” under VoiceRecognition on page 71 for moreinformation.
Entering a Point of Interest (POI)
To set a destination by entering aPoint of Interest (POI):
1. If the radio is on with a map discinserted, skip to Step 5.
2. Press O to turn the system on.
3. Insert the DVD map disc. See“Installing the Map DVD” underMaps on page 37 for moreinformation.
4. A caution may appear. Press OKto proceed.
5. Press DEST. If guidance isalready active, or if an entry isin place, you will have to selecteither the “Add Stopover” or the“ADD” screen buttons above orbelow the entry, depending onwhere you would like to placethe next waypoint.
6. Press POI (Point of Interest)screen button.
Black plate (11,1)Acadia, Acadia Denali, Enclave, Traverse, Lucerne Navigation System - 2011
Infotainment System 11
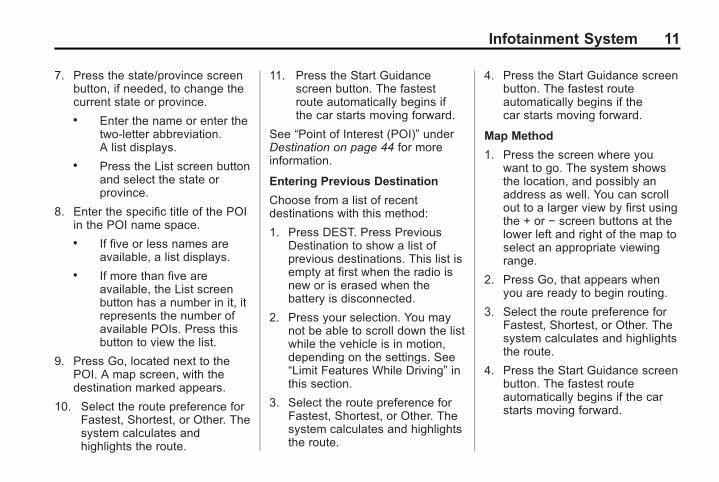
7. Press the state/province screenbutton, if needed, to change thecurrent state or province.. Enter the name or enter the
two-letter abbreviation.A list displays.
. Press the List screen buttonand select the state orprovince.
8. Enter the specific title of the POIin the POI name space.. If five or less names are
available, a list displays.. If more than five are
available, the List screenbutton has a number in it, itrepresents the number ofavailable POIs. Press thisbutton to view the list.
9. Press Go, located next to thePOI. A map screen, with thedestination marked appears.
10. Select the route preference forFastest, Shortest, or Other. Thesystem calculates andhighlights the route.
11. Press the Start Guidancescreen button. The fastestroute automatically begins ifthe car starts moving forward.
See “Point of Interest (POI)” underDestination on page 44 for moreinformation.
Entering Previous Destination
Choose from a list of recentdestinations with this method:
1. Press DEST. Press PreviousDestination to show a list ofprevious destinations. This list isempty at first when the radio isnew or is erased when thebattery is disconnected.
2. Press your selection. You maynot be able to scroll down the listwhile the vehicle is in motion,depending on the settings. See“Limit Features While Driving” inthis section.
3. Select the route preference forFastest, Shortest, or Other. Thesystem calculates and highlightsthe route.
4. Press the Start Guidance screenbutton. The fastest routeautomatically begins if thecar starts moving forward.
Map Method
1. Press the screen where youwant to go. The system showsthe location, and possibly anaddress as well. You can scrollout to a larger view by first usingthe + or − screen buttons at thelower left and right of the map toselect an appropriate viewingrange.
2. Press Go, that appears whenyou are ready to begin routing.
3. Select the route preference forFastest, Shortest, or Other. Thesystem calculates and highlightsthe route.
4. Press the Start Guidance screenbutton. The fastest routeautomatically begins if the carstarts moving forward.
Black plate (12,1)Acadia, Acadia Denali, Enclave, Traverse, Lucerne Navigation System - 2011
12 Infotainment System
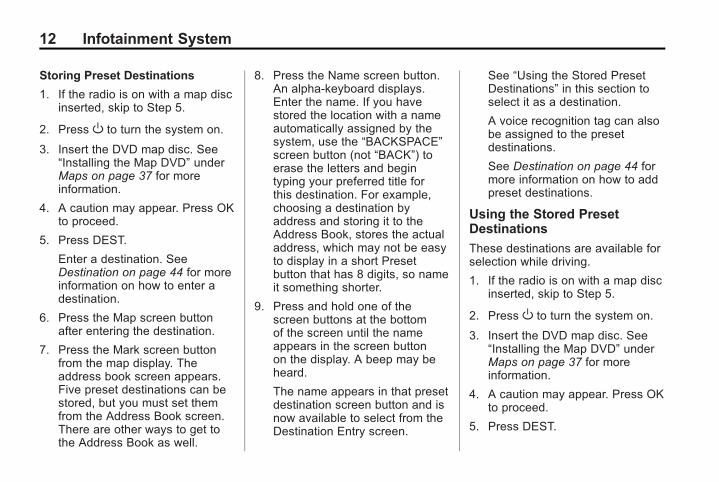
Storing Preset Destinations
1. If the radio is on with a map discinserted, skip to Step 5.
2. Press O to turn the system on.
3. Insert the DVD map disc. See“Installing the Map DVD” underMaps on page 37 for moreinformation.
4. A caution may appear. Press OKto proceed.
5. Press DEST.
Enter a destination. SeeDestination on page 44 for moreinformation on how to enter adestination.
6. Press the Map screen buttonafter entering the destination.
7. Press the Mark screen buttonfrom the map display. Theaddress book screen appears.Five preset destinations can bestored, but you must set themfrom the Address Book screen.There are other ways to get tothe Address Book as well.
8. Press the Name screen button.An alpha-keyboard displays.Enter the name. If you havestored the location with a nameautomatically assigned by thesystem, use the “BACKSPACE”screen button (not “BACK”) toerase the letters and begintyping your preferred title forthis destination. For example,choosing a destination byaddress and storing it to theAddress Book, stores the actualaddress, which may not be easyto display in a short Presetbutton that has 8 digits, so nameit something shorter.
9. Press and hold one of thescreen buttons at the bottomof the screen until the nameappears in the screen buttonon the display. A beep may beheard.
The name appears in that presetdestination screen button and isnow available to select from theDestination Entry screen.
See “Using the Stored PresetDestinations” in this section toselect it as a destination.
A voice recognition tag can alsobe assigned to the presetdestinations.
See Destination on page 44 formore information on how to addpreset destinations.
Using the Stored PresetDestinations
These destinations are available forselection while driving.
1. If the radio is on with a map discinserted, skip to Step 5.
2. Press O to turn the system on.
3. Insert the DVD map disc. See“Installing the Map DVD” underMaps on page 37 for moreinformation.
4. A caution may appear. Press OKto proceed.
5. Press DEST.
Black plate (13,1)Acadia, Acadia Denali, Enclave, Traverse, Lucerne Navigation System - 2011
Infotainment System 13
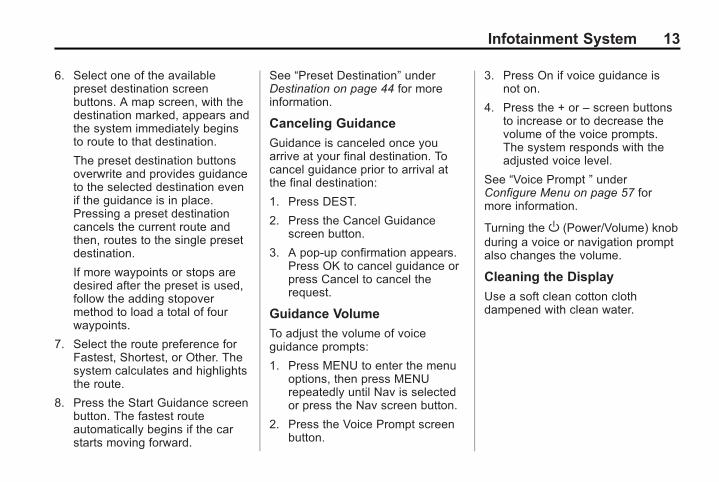
6. Select one of the availablepreset destination screenbuttons. A map screen, with thedestination marked, appears andthe system immediately beginsto route to that destination.
The preset destination buttonsoverwrite and provides guidanceto the selected destination evenif the guidance is in place.Pressing a preset destinationcancels the current route andthen, routes to the single presetdestination.
If more waypoints or stops aredesired after the preset is used,follow the adding stopovermethod to load a total of fourwaypoints.
7. Select the route preference forFastest, Shortest, or Other. Thesystem calculates and highlightsthe route.
8. Press the Start Guidance screenbutton. The fastest routeautomatically begins if the carstarts moving forward.
See “Preset Destination” underDestination on page 44 for moreinformation.
Canceling Guidance
Guidance is canceled once youarrive at your final destination. Tocancel guidance prior to arrival atthe final destination:
1. Press DEST.
2. Press the Cancel Guidancescreen button.
3. A pop-up confirmation appears.Press OK to cancel guidance orpress Cancel to cancel therequest.
Guidance Volume
To adjust the volume of voiceguidance prompts:
1. Press MENU to enter the menuoptions, then press MENUrepeatedly until Nav is selectedor press the Nav screen button.
2. Press the Voice Prompt screenbutton.
3. Press On if voice guidance isnot on.
4. Press the + or – screen buttonsto increase or to decrease thevolume of the voice prompts.The system responds with theadjusted voice level.
See “Voice Prompt ” underConfigure Menu on page 57 formore information.
Turning the O (Power/Volume) knobduring a voice or navigation promptalso changes the volume.
Cleaning the Display
Use a soft clean cotton clothdampened with clean water.
Black plate (14,1)Acadia, Acadia Denali, Enclave, Traverse, Lucerne Navigation System - 2011
14 Infotainment System
Radio
AM-FM RadioNotice: Before adding any soundequipment to the vehicle, suchas an audio system, CD player,CB radio, mobile telephone,or two-way radio, make sure thatit can be added by checking withyour dealer. Also, check federalrules covering mobile radio andtelephone units. If soundequipment can be added, it isvery important to do it properly.Added sound equipment caninterfere with the operation of thevehicle's engine, radio, or othersystems, and even damage them.The vehicle's systems caninterfere with the operation ofsound equipment that has beenadded.
Notice: The chime signals relatedto safety belts, parking brake, andother functions of the vehicleoperate through the navigationsystem. If that equipment is
replaced or additional equipmentis added to the vehicle, thechimes may not work. Make surethat replacement or additionalequipment is compatible with thevehicle before installing it. See“Accessories and Modifications”in the vehicle's owner manual.
Playing the Radio
O (Power/Volume):. Press to turn the audio system
on and off.. Turn to increase or to decrease
the volume.. Press and hold for more than
two seconds to turn off thenavigation system, the RearSeat Entertainment (RSE) videoscreen, and Rear Seat Audio(RSA). If the vehicle has notbeen turned off, the RSE andthe RSA can be turned back onby pressing this knob. The lastactive source resumes playing.
f (Tuning/Tone):. Turn to go to the next or
previous frequency.. Press to go to the Sound menu.
AUDIO:. Press to display the audio
screen.. Press to switch between AM,
FM, or XM (if equipped), DISC,AUX (Auxiliary), or press thescreen button. Read throughthis section, Satellite Radio onpage 20 (if equipped), CD/DVDPlayer on page 20, or AuxiliaryDevices on page 34 for moreinformation.
Finding a Station
There are three ways to find/changestations:. If viewing a full map screen, use¨ © SEEK or f. Preset stationscannot be directly changed fromthe full map screen, but can beselected by using the steering
Black plate (15,1)Acadia, Acadia Denali, Enclave, Traverse, Lucerne Navigation System - 2011
Infotainment System 15
wheel controlw orx buttons.The station will display at the topfor the screen.
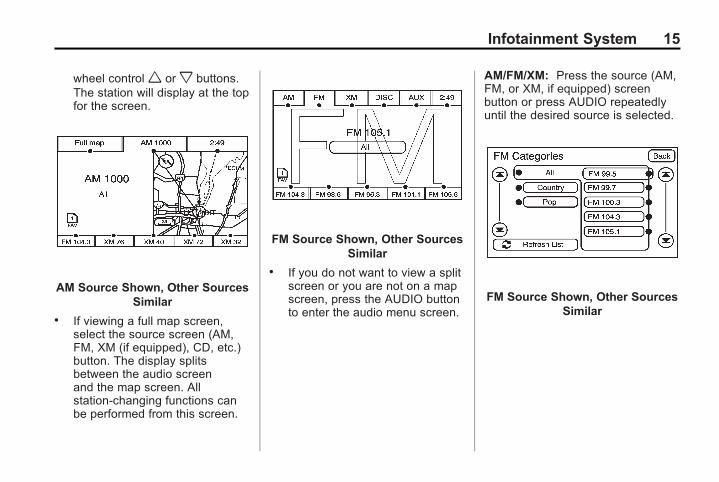
AM Source Shown, Other SourcesSimilar
. If viewing a full map screen,select the source screen (AM,FM, XM (if equipped), CD, etc.)button. The display splitsbetween the audio screenand the map screen. Allstation-changing functions canbe performed from this screen.
FM Source Shown, Other SourcesSimilar
. If you do not want to view a splitscreen or you are not on a mapscreen, press the AUDIO buttonto enter the audio menu screen.
AM/FM/XM: Press the source (AM,FM, or XM, if equipped) screenbutton or press AUDIO repeatedlyuntil the desired source is selected.
FM Source Shown, Other SourcesSimilar
Black plate (16,1)Acadia, Acadia Denali, Enclave, Traverse, Lucerne Navigation System - 2011
16 Infotainment System
Category:
1. Press the screen button, locatedin the middle of the screen, toreceive a list of all of theselected band stations inthe area.
2. Use the up and down arrowscreen buttons to scroll thefrequencies.
3. Select the desired frequency.
XM (if equipped) lists also contain acategory to select and the stationsor channels that pertain to thecategory. For XM, select the leftand right arrow screen buttons tochange categories. The stationinformation displays. See “RadioMenu” in this section to add andremove XM categories from thecategory list. When listening to XMstations, all of the categories can beselected when using the right andleft arrow screen buttons on themain audio screen. Categoriescannot be selected from thecategory list screen when theyhave been removed.
FM lists may contain a category toselect if stations in the area supportRadio Data Systems (RDS).
2 Refresh List: Select this screenbutton to refresh the list of stations.
When viewing a map screen thename of the station or channeldisplays in the top center tab.
¨ SEEK / © SEEK: To seekstations, press the right or leftarrows to go to the next or previousstation.
This function is also available onthe steering wheel controls. See“Steering Wheel Controls” in theindex of the vehicle's owner manualfor more information.
To scan stations, press and holdeither arrow for more thantwo seconds. The radio goes to astation, plays for a few seconds,then goes on to the next station. Tostop scanning, press either arrowagain.
Storing Radio Station Presets
This feature allows up to 30 presetstations (six FAV pages) to bestored. You can mix AM, FM, andXM (if equipped). To store presets:
1. Press O to turn the system on.
2. If viewing a map screen, pressthe source screen button, pressthe AUDIO or FAV (favorite)button. The number of presets isdetermined by your selection ofhow many FAV pages you haveselected. See more informationon “Number of Preset Pages” inthis section.
3. Select the band.
4. Seek, scan, or tune to thedesired station.
5. Press and hold one of the presetscreen buttons for more thantwo seconds or until a beep isheard.
6. Repeat the steps for eachpreset.
Black plate (17,1)Acadia, Acadia Denali, Enclave, Traverse, Lucerne Navigation System - 2011
Infotainment System 17
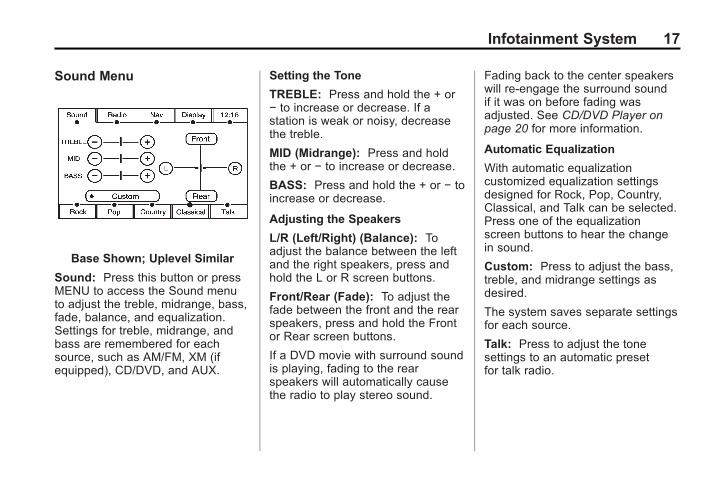
Sound Menu
Base Shown; Uplevel Similar
Sound: Press this button or pressMENU to access the Sound menuto adjust the treble, midrange, bass,fade, balance, and equalization.Settings for treble, midrange, andbass are remembered for eachsource, such as AM/FM, XM (ifequipped), CD/DVD, and AUX.
Setting the Tone
TREBLE: Press and hold the + or− to increase or decrease. If astation is weak or noisy, decreasethe treble.
MID (Midrange): Press and holdthe + or − to increase or decrease.
BASS: Press and hold the + or − toincrease or decrease.
Adjusting the Speakers
L/R (Left/Right) (Balance): Toadjust the balance between the leftand the right speakers, press andhold the L or R screen buttons.
Front/Rear (Fade): To adjust thefade between the front and the rearspeakers, press and hold the Frontor Rear screen buttons.
If a DVD movie with surround soundis playing, fading to the rearspeakers will automatically causethe radio to play stereo sound.
Fading back to the center speakerswill re-engage the surround soundif it was on before fading wasadjusted. See CD/DVD Player onpage 20 for more information.
Automatic Equalization
With automatic equalizationcustomized equalization settingsdesigned for Rock, Pop, Country,Classical, and Talk can be selected.Press one of the equalizationscreen buttons to hear the changein sound.
Custom: Press to adjust the bass,treble, and midrange settings asdesired.
The system saves separate settingsfor each source.
Talk: Press to adjust the tonesettings to an automatic presetfor talk radio.
Black plate (18,1)Acadia, Acadia Denali, Enclave, Traverse, Lucerne Navigation System - 2011
18 Infotainment System
Rear Seat Audio (RSA)
With this feature, if the Rear SeatAudio (RSA) system has beenturned on, it can be turned off byselecting the Rear Seat Audio Offscreen button. See “Rear SeatAudio (RSA)” in the Index of yourvehicles owner manual.
If a DVD movie with surround soundis active, turning RSA on will force astereo downmix of the audio. SomeDVDs do not contain downmixinformation. In this case, no soundthrough RSA headphones mayoccur.
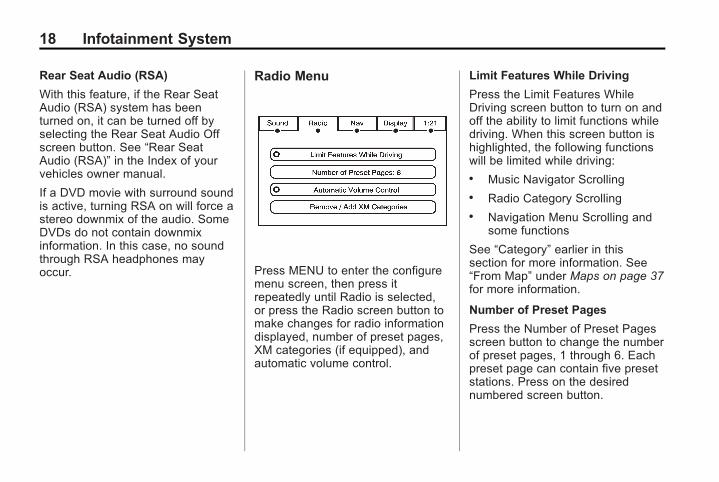
Radio Menu
Press MENU to enter the configuremenu screen, then press itrepeatedly until Radio is selected,or press the Radio screen button tomake changes for radio informationdisplayed, number of preset pages,XM categories (if equipped), andautomatic volume control.
Limit Features While Driving
Press the Limit Features WhileDriving screen button to turn on andoff the ability to limit functions whiledriving. When this screen button ishighlighted, the following functionswill be limited while driving:. Music Navigator Scrolling. Radio Category Scrolling. Navigation Menu Scrolling and
some functions
See “Category” earlier in thissection for more information. See“From Map” under Maps on page 37for more information.
Number of Preset Pages
Press the Number of Preset Pagesscreen button to change the numberof preset pages, 1 through 6. Eachpreset page can contain five presetstations. Press on the desirednumbered screen button.
Black plate (19,1)Acadia, Acadia Denali, Enclave, Traverse, Lucerne Navigation System - 2011
Infotainment System 19
Automatic Volume Control
With automatic volume control, theaudio system adjusts automaticallyto make up for road and wind noisewhile driving.
To use Automatic Volume Control:
1. Set the volume at the desiredlevel.
2. Press MENU to enter the menuscreen, then press it repeatedlyuntil Radio is selected, or pressthe Radio screen button.
3. Press the Automatic VolumeControl screen button.
4. Press the LOW, MEDIUM,or HIGH screen buttons. Eachhigher setting allows for morecompensation at faster vehiclespeeds.
Then, as the vehicle is beingdriven, automatic volume controlautomatically increases the volume,as necessary, to overcome noise atany speed. The volume level shouldalways sound consistent while
driving. To turn automatic volumecontrol off, press the OFF screenbutton.
Remove/Add XM Categories(If Equipped)
1. Press the Remove/Add XMCategories screen button toremove or add XM categorieswhen selecting from thecategory list screen. The list ofXM categories appear on thescreen.
2. Use the up and down arrowscreen buttons to scroll throughthe list. The categories toremove highlights and thecategories to add are dark incolor.
3. Select the category that youwould like to add or remove.
4. Press the Restore All Categoriesscreen button to add allcategories that have beenremoved.
Radio Data System (RDS)
The audio system has a Radio DataSystem (RDS). RDS features areavailable for use only on FMstations that broadcast RDSinformation. With RDS, theradio can:. Receive announcements
concerning local and nationalemergencies
. Display messages from radiostations
This system relies on receivingspecific information from thesestations and only work when theinformation is available. In rarecases, a radio station maybroadcast incorrect information thatcan cause the radio features to workimproperly. If this happens, contactthe radio station.
Black plate (20,1)Acadia, Acadia Denali, Enclave, Traverse, Lucerne Navigation System - 2011
20 Infotainment System
The RDS system is always on.When information is broadcast fromthe FM station you are listening to,the station name or call lettersdisplay on the audio screen. RDSmay provide a program type (PTY)for current programming and thename of the program beingbroadcast.
Satellite Radio
XM™ Satellite Radio Service
XM is a satellite radio service that isbased in the 48 contiguous UnitedStates and 10 Canadian provinces.XM Satellite Radio has a widevariety of programming andcommercial-free music,coast-to-coast, and in digital-qualitysound. During the trial or when yousubscribe, you will get unlimitedaccess to XM Radio Online forwhen you are not in the vehicle.
A service fee is required to receivethe XM service. For moreinformation, contact XM atwww.xmradio.com or call1-800-929-2100 in the U.S. andwww.xmradio.ca or call1-877-438-9677 in Canada.
When XM is active, the channelname and number, song title, andartist displays on the screen.
XM Radio Messages
See “XM Radio Messages” in thevehicle's owner manual for a list ofpossible XM messages.
Audio Players
CD/DVD Player
Playing a CD
The player can be used for CDswith conventional CD audio, MP3,or WMA compressed files and mayhave the capability to play DVDaudio and DVD video. See “Playinga Audio DVD and/or DVD Video”later in this section for moreinformation about DVD audioand video.
With the ignition on, insert a CDpartway into the slot, label sideup. The player pulls it in andthe CD should begin playing. Thenavigation system can be usedwhile playing a CD.
When a CD is inserted, the CD tabdisplays. If an equalization setting isselected for the CD, it is activatedeach time a CD is played.
Black plate (21,1)Acadia, Acadia Denali, Enclave, Traverse, Lucerne Navigation System - 2011
Infotainment System 21
If the ignition or radio is turned offwith a CD in the player, it stays inthe player. When the ignition orradio is turned on, the CD startsplaying where it stopped, if it wasthe last selected audio source.
As each new track starts to play, thetrack number displays.
If an error displays, see “CD/DVDMessages” in this section.
If viewing a map screen, press theCD screen button or the NAVbutton. The display splits betweenthe audio screen and the mapscreen. If you do not want to view asplit screen or you are not on a mapscreen, press AUDIO, then pressAUDIO again, repeatedly until CD isselected or press the CD screenbutton.
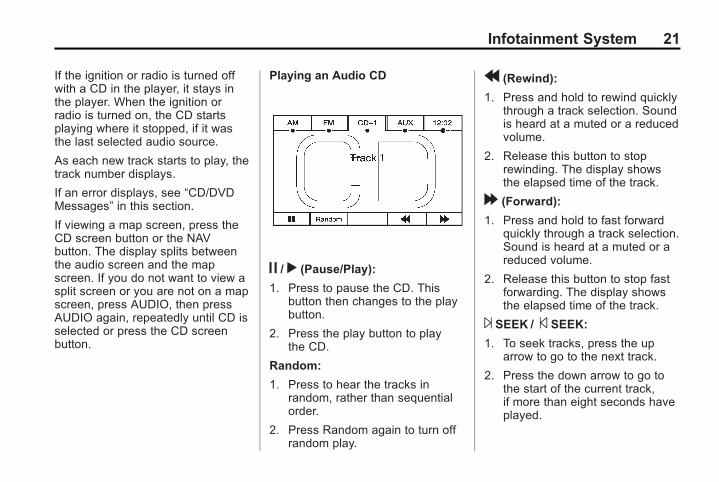
Playing an Audio CD
j / r (Pause/Play):
1. Press to pause the CD. Thisbutton then changes to the playbutton.
2. Press the play button to playthe CD.
Random:
1. Press to hear the tracks inrandom, rather than sequentialorder.
2. Press Random again to turn offrandom play.
r (Rewind):
1. Press and hold to rewind quicklythrough a track selection. Soundis heard at a muted or a reducedvolume.
2. Release this button to stoprewinding. The display showsthe elapsed time of the track.
[ (Forward):
1. Press and hold to fast forwardquickly through a track selection.Sound is heard at a muted or areduced volume.
2. Release this button to stop fastforwarding. The display showsthe elapsed time of the track.
¨ SEEK / © SEEK:
1. To seek tracks, press the uparrow to go to the next track.
2. Press the down arrow to go tothe start of the current track,if more than eight seconds haveplayed.
Black plate (22,1)Acadia, Acadia Denali, Enclave, Traverse, Lucerne Navigation System - 2011
22 Infotainment System
3. If either arrow is pressed morethan once, the player continuesmoving backward or forwardthrough the CD. The soundmutes while seeking.
f (Tuning Knob):
1. Turn counterclockwise one notchto go to the start of the currenttrack, turn it again to go to theprevious track.
2. Turn clockwise to go to the nexttrack.
While playing an audio CD the rearseat operator can power on theRSE video screen and use theremote control to navigate throughthe tracks on the CD.
Using a Compressed AudioCD/DVD
Compressed Audio CD/DVDFormat
There are guidelines that must bemet, when creating an MP3, WMA,or mixed disc. If the guidelines arenot met when recording a burneddisc, the disc may not play. Theguidelines are:. ID3 tag information is displayed
by the radio if it is available.The radio supports ID3 taginformation v1.0, v1.1, and v2.0.The radio displays a filename,song name, artist name, albumname, and directory name.
. Maximum 32 characters,including spaces, in a file orfolder name.
. The recommended maximumnumber of folders is 100 witha maximum hierarchy of threefolders.
. Create a folder structure thatmakes it easy to find songswhile driving. Organize songsby albums using one folder foreach album.
. All playlist files (.m3u or .pls)must be removed from disccontents. Playlists are notsupported.
. It is recommended that there is amaximum of 192 files on aCD-R(W) disc.
. It is recommended that thereis a maximum of 200 files ona DVD+R(W) disc.
. The files can be recorded on aCD-R(W) or DVD+R(W).
. Copy protected WMA files arenot supported.
Black plate (23,1)Acadia, Acadia Denali, Enclave, Traverse, Lucerne Navigation System - 2011
Infotainment System 23
Scanning Compressed Audio Disc
Scanning a compressed audio disccategorizes and allows sorting ofsongs by folder artist or album.. Press center folder/artist/album
screen button to initiatescanning mode. The radio playsand a progress bar displays.
. Background scanning occurswith the radio on and thecompressed audio disc insertedbut not being played.
. Only the first 200 songs appearsin the compressed audio musicnavigator.
. Scanning time varies dependingon the number of files andfolders on the disc.
Root Directory
The root directory is treated as afolder. If the root directory hascompressed audio files, thedirectory is displayed as ROOT.
All files contained directly under theroot directory is accessed prior toany root directory folders.
Empty Directory or Folder
If a root directory or a folder existssomewhere in the file structure thatcontains only folders/subfoldersand no compressed files directlybeneath them, the player advancesto the next folder in the file structurethat contains compressed audiofiles and the empty folder isdisplayed or numbered.
No Folder
When the disc contains onlycompressed files, the files arelocated under the root folder. Thenext and previous folder functionshave no function on a disc that wasrecorded without folders. Whendisplaying the name of the folderthe radio displays ROOT.
Order of Play
Tracks are played in the followingorder:. The radio does not support
playlist files.. Order of play differs depending if
the compressed audio disc isfully scanned or unscanned. See“Scanning Compressed AudioDisc” previously in this section.
. When playing an unscanneddisc, the next and previousscreen buttons may be requiredto switch away from the currentfolder when quickly seekingrather than allowing the lastsong of a folder to play tocompletion.
. Play begins from the first trackunder the root directory. Whenall tracks from the root directoryhave been played, playcontinues from files according totheir numerical listing. Afterplaying the last track from the
Black plate (24,1)Acadia, Acadia Denali, Enclave, Traverse, Lucerne Navigation System - 2011
24 Infotainment System
last folder, play begins again atthe first track of the first folder orroot directory.
. A scanned compressed audiodisc in artist/album modes onlyplay songs within the currentcategory. The next and previousscreen buttons change todifferent artists or albums.
When play enters a new folder, thedisplay does not automatically showthe new folder name. The new trackname displays.
File System and Naming
The song name that displays is thename that is contained in the ID3tag. If the song name is not presentin the ID3 tag, then the radiodisplays the file name without theextension (such as .mp3) as thetrack name.
Track names longer than32 characters or four pages areshortened. The display does notshow parts of words on the lastpage of text and the extension ofthe filename does not display.
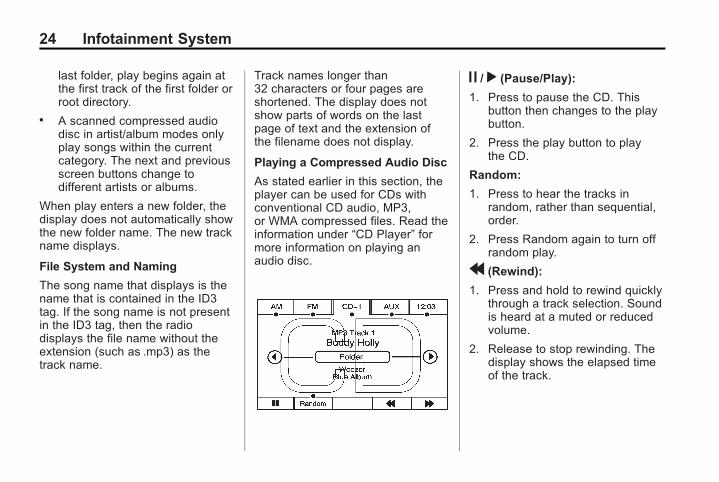
Playing a Compressed Audio Disc
As stated earlier in this section, theplayer can be used for CDs withconventional CD audio, MP3,or WMA compressed files. Read theinformation under “CD Player” formore information on playing anaudio disc.
j / r (Pause/Play):
1. Press to pause the CD. Thisbutton then changes to the playbutton.
2. Press the play button to playthe CD.
Random:
1. Press to hear the tracks inrandom, rather than sequential,order.
2. Press Random again to turn offrandom play.
r (Rewind):
1. Press and hold to rewind quicklythrough a track selection. Soundis heard at a muted or reducedvolume.
2. Release to stop rewinding. Thedisplay shows the elapsed timeof the track.
Black plate (25,1)Acadia, Acadia Denali, Enclave, Traverse, Lucerne Navigation System - 2011
Infotainment System 25
[ (Forward):
1. Press and hold to fast forwardquickly through a track selection.Sound is heard at a muted orreduced volume.
2. Release to stop fast forwarding.The display shows the elapsedtime of the track.
q r (Folder/Artist/Album):
1. Press the left or right arrow to goto the previous or next folder,artist, or album on the disc.
2. Press the middle screen button,with the folder, artist, or albumname, to sort the compressedaudio file by folder, artist,or album. It may take a fewminutes for the system to sortthe compressed audio files. See“Scanning Compressed AudioDisc” previously in this section.
¨ SEEK / © SEEK:
1. Press ¨ SEEK to go to the nexttrack.
2. Press © SEEK to go to the startof the current track, if more thaneight seconds have played.
3. If either arrow is pressed morethan once, the player continuesmoving backward or forwardthrough the CD. The soundmutes while seeking.
f (Tuning Knob):
1. Turn counterclockwise one notchto go to the start of the currenttrack, turn it again to go to theprevious track.
2. Turn clockwise to go to the nexttrack.
Vehicles with Rear Seat Audio(RSA) can use RSA to changetracks/chapters. Vehicles withRSE can use the remote controlto change tracks/chapters.
Playing a DVD Video
The player can be used for DVDvideo.
With this feature, movies/picturesdo not appear on the navigationscreen, unless the vehicle is inP (Park). It operates on the RearSeat Entertainment (RSE) screenwhile the vehicle is moving. TheRSE video screen starts play of theDVD when a DVD is inserted intothe navigation system. The DVDplayer can be controlled by thebuttons on the navigation system,the Rear Seat Audio (RSA) system,and the remote control. The DVDplayer can also be used for the rearseat passengers with the radio off.The rear seat passengers canpower on the video screen and usethe remote control to navigate thedisc. See “Rear Seat EntertainmentSystem” in the Index of yourvehicle's owner manual for moreinformation.
Black plate (26,1)Acadia, Acadia Denali, Enclave, Traverse, Lucerne Navigation System - 2011
26 Infotainment System
The DVD player is only compatiblewith DVDs of the appropriate regioncode that is printed on the jacket ofmost DVDs.
The DVD slot is compatible withmost audio CDs, CD-R, CD-RW,DVD-Video, DVD+R/RW singlelayer media along with MP3 andWMA formats. DVD Audio, DVD-R,DVD-RW, and DVD+R dual layermedia is not supported.
If an error displays, see “CD/DVDMessages” later in this section.
Navigation DVD Radio withBose® Surround SoundSystem (If Equipped)
If the vehicle has a Rear SeatEntertainment (RSE) system, it hasa radio capable of playing both CDand DVD discs. See “Rear SeatEntertainment” in the Index of thevehicle's owner manual.
The CD/DVD player is the top sloton the radio faceplate. The playeris capable of reading the DTSprogrammed DVD-Audio or
DVD-Video media. DTS andDTS 2.0 are trademarks of DigitalTheater Systems, Inc. AC-3 is DolbyDigital Surround technology.
The system is optimized to use5.1 audio surround sound beforestereo tracks. Stereo modes aretypically available if manuallyselected. Press the Options screenbutton, then the Audio button orDVD main or top menu.
Playing a DVD
There are three ways to playa DVD:. Once a DVD is inserted, the
system automatically starts playof the DVD up to the DVD topmenu. The r (play) button mustbe pressed to start the moviefrom the DVD's menu screen.
. If you are on a map screen,select the DVD screen button.
. Press AUDIO, then select theDVD screen button.
. The r (play) button must bepressed for the movie to resumeplay when the vehicle has beenturned OFF and then back ON.
When a DVD is loaded, the rearseat passengers can turn the RSEvideo screen power on and use theremote control to navigate throughthe DVD.
O (Power/Volume):
1. Press to turn the system onand off.
2. Turn to increase or decrease thevolume of the audio system.
3. Press and hold for more thantwo seconds to turn off thenavigation system, RSE videoscreen, and RSA. If the vehiclehas not been tuned off, the RSEand the RSA can be turned backon by pressing this knob andcontinues play of the last activesource.
Black plate (27,1)Acadia, Acadia Denali, Enclave, Traverse, Lucerne Navigation System - 2011
Infotainment System 27
DVD Menu Options
Once a DVD starts to play, themenu options and cursor screenbuttons automatically appear. Todisplay the menu Options screenbutton while a DVD is playing, touchanywhere on the screen.
Options: Press to view themenu option screen buttons. Menuoptions are available when they arehighlighted. Some menu options areonly available when the DVD is notplaying.
Cursor: Press to access the cursormenu. The arrows and other cursoroptions let you navigate the DVDmenu options. The cursor menuoptions are only available if a DVDhas a menu. Use the cursor menuto start a DVD video from the discmain menu.
q,Q, r,R (Arrow Buttons): Usethese arrows to navigate throughthe DVD menu.
Enter: Press to choose thehighlighted option.
Return: Press to go back to theprevious DVD menu.
Back: Press to go back to the mainDVD display screen.
Move: Press to move the cursorbuttons back and forth from thebottom-right corner to the top-leftcorner of the screen.
j / r (Pause/Play):
1. Press to pause the DVD. Thisbutton then changes to the playbutton.
2. Press the play button to playthe DVD.
3. Press this button in a DVD discmain menu to start the DVD.
c (Stop):
1. Press to stop play of the DVD.
2. Press the play button to continueplaying the DVD from where theDVD was stopped.
3. Press this button twice to returnto the beginning of the DVD.
r (Rewind):
1. Press and release to rewindthrough the scene, chapters,and titles.
2. Press again to increase therewinding speed.
3. Press the play button to stoprewinding. This button may notwork when the DVD is playingthe copyright information or thepreviews.
[ (Forward):
1. Press and release to advancerapidly through the scene,chapters, and titles.
2. Press again to increase the fastforwarding speed.
3. Press the play button to stop fastforwarding. This button may notwork when the DVD is playingthe copyright information or thepreviews.
Black plate (28,1)Acadia, Acadia Denali, Enclave, Traverse, Lucerne Navigation System - 2011
28 Infotainment System
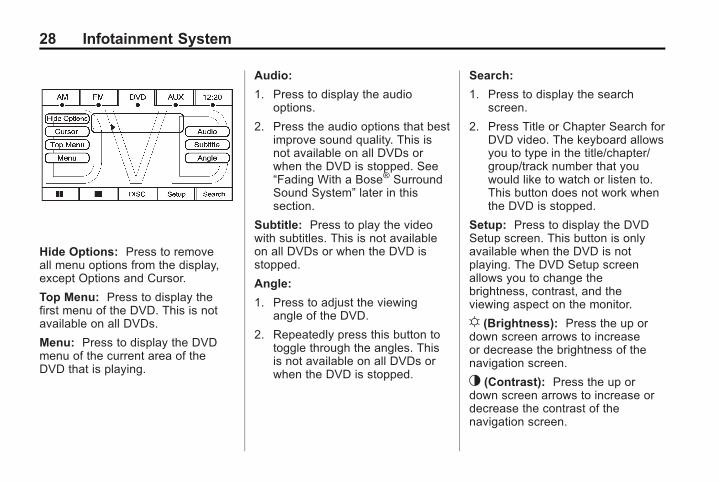
Hide Options: Press to removeall menu options from the display,except Options and Cursor.
Top Menu: Press to display thefirst menu of the DVD. This is notavailable on all DVDs.
Menu: Press to display the DVDmenu of the current area of theDVD that is playing.
Audio:
1. Press to display the audiooptions.
2. Press the audio options that bestimprove sound quality. This isnot available on all DVDs orwhen the DVD is stopped. See“Fading With a Bose® SurroundSound System” later in thissection.
Subtitle: Press to play the videowith subtitles. This is not availableon all DVDs or when the DVD isstopped.
Angle:
1. Press to adjust the viewingangle of the DVD.
2. Repeatedly press this button totoggle through the angles. Thisis not available on all DVDs orwhen the DVD is stopped.
Search:
1. Press to display the searchscreen.
2. Press Title or Chapter Search forDVD video. The keyboard allowsyou to type in the title/chapter/group/track number that youwould like to watch or listen to.This button does not work whenthe DVD is stopped.
Setup: Press to display the DVDSetup screen. This button is onlyavailable when the DVD is notplaying. The DVD Setup screenallows you to change thebrightness, contrast, and theviewing aspect on the monitor.
! (Brightness): Press the up ordown screen arrows to increaseor decrease the brightness of thenavigation screen.
_ (Contrast): Press the up ordown screen arrows to increase ordecrease the contrast of thenavigation screen.
Black plate (29,1)Acadia, Acadia Denali, Enclave, Traverse, Lucerne Navigation System - 2011
Infotainment System 29
Monitor: From the DVD Setupscreen, press to adjust the aspectratio of the DVD on the navigationscreen. This is not available on allDVDs. This button is not availablefor DVD audio.
Presse to close the screen in fromthe left and right sides.
PressJ to fill the screen on theleft and right sides.
Pressd to fill the screen on thetop and bottom.
SEEK ¨ (Next Track/Chapter):Press to go to the next track orchapter if the time elapsed isgreater than 10 seconds. Thisbutton may not work when the DVDis playing the copyright informationor the previews.
© SEEK (Previous Track/Chapter):
1. Press to return to the start of thecurrent track or chapter.
2. Press again to go to theprevious track or chapter. Thisbutton may not work when theDVD is playing the copyrightinformation or the previews.
f (Tuning Knob):
1. Turn counterclockwise one notchto go to the start of the currentchapter/track, turn it again to goto the previous chapter/track.
2. Turn clockwise to go to the nextchapter/track.
Fading With a Bose® SurroundSound System (If Equipped)
If the Rear Seat Audio (RSA) isturned on, the radio disables fadeand mutes the rear speakers.
The following methods allow forswitching surround sound into a2 channel stereo mode:. Select a stereo or 2 channel
mode using the DVD-Videotop menu. Most commercialDVD-Video top menus containaudio configuration settings.
. While the movie is playing,select Options to show allavailable DVD options, thenpress the Audio screen buttonto switch between the multipleaudio sources on the DVD.
. Fade the radio two steps to therear. When returning to thecenter area, the surround trackwill turn on again if it was onbefore the rear speakers werefaded.
Press AUDIO to change currentDVD audio track.
Some DVD-Video discs only containDolby Digital 5.1 (AC-3) or DTS 5.1audio tracks and may not allowconversions into stereo modes.
Black plate (30,1)Acadia, Acadia Denali, Enclave, Traverse, Lucerne Navigation System - 2011
30 Infotainment System
CD/DVD Messages
If Disc Read Error displays and/orthe CD/DVD comes out, it could befor one of the following reasons:. A disc was inserted with an
invalid or unknown format.. The map CD/DVD disc is not
from a correct region.. The map DVD disc was installed
into the CD slot. See “Installingthe Map DVD” under Maps onpage 37.
. It is very hot. When thetemperature returns to normal,the CD/DVD should play.
. The vehicle is being driven on avery rough road. When the roadbecomes smoother, the CD/DVDshould play.
. The CD/DVD is dirty, scratched,wet, or upside down.
. The air is very humid. If so, waitabout an hour and try again.
. There may have been a problemwhile burning a CD/DVD.
. The label may be caught in theCD/DVD player.
If any error occurs repeatedly or ifan error cannot be corrected,contact your dealer.
If playing recorded media such asa CD or DVD, the sound qualitymay be reduced due to CD or DVDquality, the method of recording, thequality of the music that has beenrecorded, recording speed, maxmedia recording speed, and the waythe CD or DVD has been handled.There may be an increase inskipping, difficulty in finding tracks,and/or difficulty in loading andejecting. If these problems occur,check the bottom surface of the CDor DVD. If the surface is damaged,such as cracked, broken, orscratched, it will not play properly.
If the surface is soiled, see “Care ofYour CDs and DVDs” in the Index ofthe vehicle's owner manual.
If there is no apparent damage, try aknown good CD or DVD.
Notice: If a label is added to a CDor DVD, or more than one CD orDVD is inserted into the slot at atime, or an attempt is made toplay scratched or damaged CDsor DVDs, the player could bedamaged. While using the CD orDVD player, use only CDs orDVDs in good condition withoutany label, load one CD or DVD ata time, and keep the player andthe loading slot free of foreignmaterials, liquids, and debris.
Do not add any label to a CD orDVD, it could get caught in theplayer. If a CD or DVD is recordedon a personal computer and adescription label is needed, trylabeling the top of the recorded CDor DVD with a soft marker.
Black plate (31,1)Acadia, Acadia Denali, Enclave, Traverse, Lucerne Navigation System - 2011
Infotainment System 31
Connecting a USB StorageDevice or iPod®
If the vehicle has a USB Port, it canbe used to control an iPod or a USBstorage device.
To avoid connection problems,extension cords are notrecommended. Use only thecable that came with the device.
To connect a USB storage device,connect the device to the USB portlocated in the center console.
To connect an iPod, connect oneend of the USB cable that camewith the iPod to the iPod’s dockconnector and connect the otherend to the USB port. If the vehicle ison and the USB connection works,“OK to disconnect” and a GM logomay appear on the iPod and iPodappears on the radio's display. TheiPod music appears on the radio’sdisplay and begins playing.
The iPod charges while it isconnected to the vehicle if thevehicle is in the ACC/ACCESSORYor ON/RUN position. When thevehicle is turned off, the iPodautomatically powers off and willnot charge or draw power from thevehicle's battery.
If you have an older iPod model thatis not supported, it can still be usedby connecting it to the AuxiliaryInput Jack using a standard 3.5 mm(1/8 in) stereo cable. See AuxiliaryDevices on page 34 for moreinformation.
USB Supported File and FolderStructure
The guidelines that must be metwhile using USB supported files andfolders are:. Up to 700 folders.. Up to 8 folders in depth.. Up to 65,535 files.. Folder and file names up to
64 bytes.
. Files with an .mp3 or .wma fileextension.
. AAC files stored on an iPod.
. FAT16
. FAT32
. m3u or pls playlists aresupported with compatibleUSB devices.
Using the Navigation AudioSystem to Control a USBStorage Device or iPod
If the navigation audio system has aUSB storage device or an iPod, itcan be controlled by using the radioscreens and steering wheelcontrols.
1. Press the center screen buttonto enter the music navigationmain screen.
Black plate (32,1)Acadia, Acadia Denali, Enclave, Traverse, Lucerne Navigation System - 2011
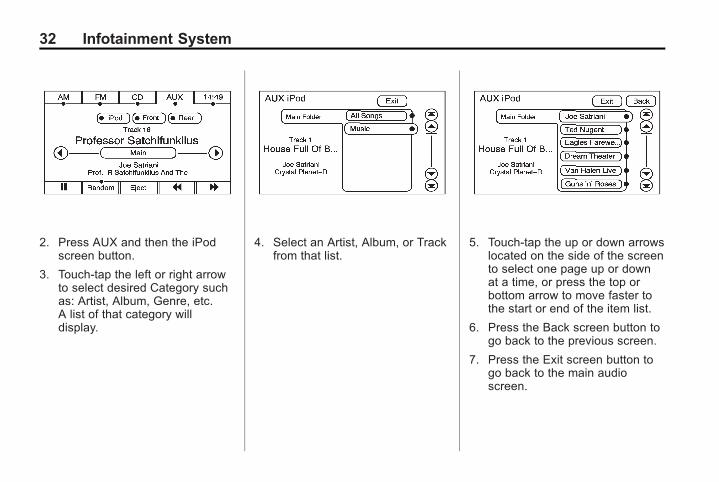
32 Infotainment System
2. Press AUX and then the iPodscreen button.
3. Touch-tap the left or right arrowto select desired Category suchas: Artist, Album, Genre, etc.A list of that category willdisplay.
4. Select an Artist, Album, or Trackfrom that list.
5. Touch-tap the up or down arrowslocated on the side of the screento select one page up or downat a time, or press the top orbottom arrow to move faster tothe start or end of the item list.
6. Press the Back screen button togo back to the previous screen.
7. Press the Exit screen button togo back to the main audioscreen.
Black plate (33,1)Acadia, Acadia Denali, Enclave, Traverse, Lucerne Navigation System - 2011
Infotainment System 33
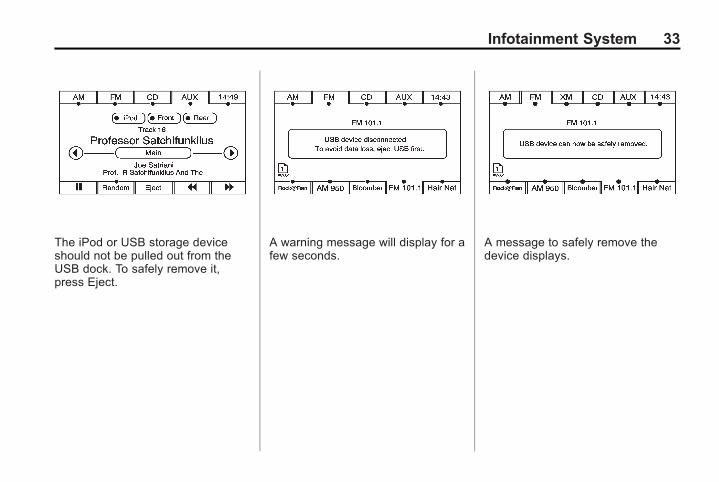
The iPod or USB storage deviceshould not be pulled out from theUSB dock. To safely remove it,press Eject.
A warning message will display for afew seconds.
A message to safely remove thedevice displays.
Black plate (34,1)Acadia, Acadia Denali, Enclave, Traverse, Lucerne Navigation System - 2011
34 Infotainment System
Auxiliary DevicesThe vehicle may have a RearEntertainment System (RSE). TheRSE has RCA jacks that are colorcoded as:. White (left). Red (right). Yellow (composite video)
The RCA jacks let you connectauxiliary devices. The audio canbe heard through the speakersor through the wireless or wiredheadphones. See “Audio/VideoJacks” under “Rear SeatEntertainment System” in the Indexof the vehicle's owner manual formore information.
Drivers are encouraged to setup any auxiliary device whilethe vehicle is in P (Park). See“Defensive Driving” in the Index ofthe vehicle's owner manual for moreinformation on driver distraction.
To switch the RSE system to use anauxiliary device:
1. Connect the auxiliary device tothe RSE system, or to the frontjack on the radio faceplate.
2. Press AUDIO. Then pressAUDIO again, repeatedly untilAUX (auxiliary) is selected,or press the AUX screen button.A front auxiliary device must beconnected before the frontauxiliary device can be selected.The rear auxiliary device can beselected by pressing the REARAUX screen button.
The rear auxiliary device systemrequires all video and audioinputs to be connected to ensureproper audio fidelity of the rearauxiliary device.
The rear seat passengers can alsouse the remote control to changethe functions of the RSE. See “RearSeat Entertainment System” in theIndex of the vehicle's owner manualfor more information.
Using the USB Port
Radio's with a USB port can controla USB storage device or an iPodusing the radio buttons and knobs.See “Using the Radio to Control aUSB Storage Device or iPod” earlierfor information about how to connectand control a USB storage device oran iPod.
Black plate (35,1)Acadia, Acadia Denali, Enclave, Traverse, Lucerne Navigation System - 2011
Infotainment System 35
USB Support
The USB connector is in the centerconsole and uses the USB 2.0standard.
USB Supported Devices. USB Flash Drives. Portable USB Hard Drives. Fifth generation or later iPod. iPod nano. iPod touch. iPod classic
Not all iPod or USB mass storagedevices are compatible with theinfotainment system.
Make sure the iPod has the latestfirmware from Apple® for properoperation. iPod firmware can beupdated using the latest iTunes®
application. See www.apple.com/itunes.
For help with identifying your iPod,go to www.apple.com/support.
Navigation
Using the NavigationSystemThis section includes basicinformation to operate thenavigation system.
Use the buttons and the touchscreen buttons on the navigationscreen to operate the system. SeeOverview on page 4 for moreinformation.
Once the vehicle is moving, somefunctions become disabled toreduce driver distractions.
Navigation Buttons
O (Power/Volume): Press to turnthe system on and off.
. Turn O to increase or decreasethe volume to the audio system.
. Press and hold O for more thantwo seconds to turn off thenavigation system, the RearSeat Entertainment (RSE), and
Rear Seat Audio (RSA). If thevehicle has not been turned off,the RSE and the RSA can beturned back on by pressing Oand continues playback of thelast active source.
f (Tune/Speaker Adjustment):Press to access the Sound screento adjust bass, midrange, treble,and equalization.
. Turn f to go to the next orprevious radio station. SeeAM-FM Radio on page 14 andSatellite Radio on page 20 (ifequipped) for more information.
Z (CD/DVD Eject): Press to ejectCDs and DVDs.
NAV (Navigation): Press to viewthe vehicle's current position on themap screen.. Press NAV multiple times to
cycle through Full Map with thetab that displays the currentaudio source (AM, FM, CD, etc.).
Black plate (36,1)Acadia, Acadia Denali, Enclave, Traverse, Lucerne Navigation System - 2011
36 Infotainment System
Split screen displays half audioand half Nav, and the XM Trafficlist (if equipped and withsubscription).
. Press the audio tab to split thescreen between the map screenand the current audio sourcescreen menu. See AM-FM Radioon page 14 and Satellite Radioon page 20 (if equipped) formore information.
DEST (Destination): Press toaccess the Destination Entryscreen to plan a destination. SeeDestination on page 44 for moreinformation.
RPT (Navigation Repeat): Pressto repeat the last voice guidanceprompt.
FAV (Favorite): Press to access upto six pages of preset stations. See“Storing Radio Station Presets”under AM-FM Radio on page 14 formore information.
AUDIO: Press to access the fullAudio screen to change AM, FM,XM (if equipped), CD, DVD, ifequipped, and auxiliary input. SeeCD/DVD Player on page 20 formore information.
MENU: Press to adjust features forsound, radio, navigation, the display,and for adjusting the time. SeeConfigure Menu on page 57 formore information.
¨ SEEK / © SEEK: Press eitherarrow to seek and scan radiostations, to seek tracks on a CD,or to seek chapters on a DVD,if equipped. See AM-FM Radio onpage 14 or CD/DVD Player onpage 20 for more information.
Touch Screen Buttons
These buttons are located on thescreen. When selected, a beepsounds. Screen buttons arehighlighted when a feature isavailable.
Alpha-Numeric Keyboard
Letters of the alphabet, symbols,punctuation, and numbers, whenavailable, display on the navigationscreen as an alpha or numerickeyboard. The alpha keyboarddisplays when the system requiresentry of a city or street name.
All characters are touch screenbuttons. Press a character toselect it.
A-Y (Accent Alphabet): Select toget letters with accent symbols. Thisbutton may toggle to A-Z.
A-Z (Alphabet): Select to getletters from the alphabet. Thisbutton may toggle to A-Y.
0-9 (Numbers): Select to getnumbers and punctuation marks.
U (Space): Select to enter aspace between characters or thewords of a name.
Backspace: Select if an incorrectcharacter has been entered.
Black plate (37,1)Acadia, Acadia Denali, Enclave, Traverse, Lucerne Navigation System - 2011
Infotainment System 37
To make name selections easier,the system only highlights thecharacters that can follow the lastone entered. For example, if a Z isentered, a T may not be availablefor selection.
If a name does not display afterentry, it may need to be entereddifferently or the map DVD disc maynot contain that information. SeeDatabase Coverage Explanationson page 71 for more information.
MapsThis section includes basicinformation about the mapdatabase.
Map Coverage
The maps are stored on a DVD.Some regions are contained onone disc; others may need morethan one.
Refer to the “Navigation SystemMap Disc” manual for a detailedexplanation of map coverage anddetailed city lists in each region.
This manual is in the map DVDcase when the vehicle is deliveredfrom the factory.
Installing the DVD Map Disc
Your dealer may have installed themap DVD. If the map DVD was notinstalled, do the following to load it:
Read the following steps completely.
1. Start the vehicle to perform themap updating. The vehicle mustbe in P (Park) to perform thisoperation.
2. Press O to turn the navigationsystem on.
3. Press NAV.
4. Press the Insert Map Discscreen button. The screen opensto access the map DVD slot.
5. Load the map DVD partway intothe slot. The system pulls it in.
The screen cannot be closeduntil a double beep is heard.
Notice: Pressing directly on thenavigation screen may causedamage. Repairs would not becovered by the vehicle's warranty.Do not press directly on thenavigation screen.
6. To close the screen, slightlypush up on the two outercorners until the screen is inposition. Then push the screenin by pushing on the four outercorners until a click is heard.
Black plate (38,1)Acadia, Acadia Denali, Enclave, Traverse, Lucerne Navigation System - 2011
38 Infotainment System
Ejecting the DVD Map Disc
The navigation portion of the systemcannot be used if the DVD map discis not loaded.
1. Press MENU to enter the Menuoptions, then press it repeatedlyuntil Nav is selected or press theNav screen button.
2. Press the Map DatabaseInformation screen button.
3. Press the Eject Map Discscreen button. The screen tilts,exposing the map DVD slot.
4. Press eject, located next to theDVD map disc slot, and the discejects. Pull the disc out.
The screen cannot be closeduntil a double beep is heard.
Notice: Pressing directly on thenavigation screen may causedamage. Repairs would not becovered by the vehicle's warranty.Do not press directly on thenavigation screen.
5. To close the screen, slightlypush up on the two outercorners until the screen is inposition. Then push the screenin by pushing on the four outercorners until a click is heard.
Handling the DVD Map Disc
To properly handle the DVDmap disc:. Handle the disc very carefully
to avoid contamination or flaws.Signals may not read outproperly if the disc getscontaminated or flawed.
. Do not use photographic recordcleaner, solvents, or othercleaners if the disc gets soiled.Use a soft cloth to gently wipe itout from the center of the disc tothe outside.
. Do not use the disc to rest onwhile writing or drawing with anywriting utensil. Do not attach aseal to the disc.
. Do not keep the disc in directsunlight, high temperatures,or humidity.
. After using the disc, place itback into the original case.
Map Adjustments
The scale of view on the map canbe adjusted. While driving, the mapscrolls automatically based on thedirection of travel.
Map Scales
0 / 1 (Zoom In/Zoom Out): Pressthe zoom in or out screen buttons orthe scale on the bar to change thelevel of map detail. The scaleappears on the screen once thezoom in or zoom out screen buttonsare selected.. The system adjusts the map
accordingly. The scale of a mapcan range from 50m (1/32 mi) to400 km (256mi).
Black plate (39,1)Acadia, Acadia Denali, Enclave, Traverse, Lucerne Navigation System - 2011
Infotainment System 39
. See “Driver Information Center(DIC)” in the Index of yourvehicle's owner manual tochange between English ormetric.
Scrolling the Map
Press anywhere on the map screenand the scroll symbol appears. Usethis feature to scroll across the map.. Move your finger in any direction
on the map screen and the mapcontinues to scroll in thatdirection.
‐ If scrolling while the vehicle isin P (Park), the system initiallyscrolls at a slower rate. Thescroll speed increases if youcontinue pressing on the mapscreen.
‐ If scrolling while the vehicle isin motion, there is one scrollspeed and the distance islimited. Keep pressing on themap screen to scroll for alonger distance.
. Press NAV to return to thecurrent vehicle location on themap if the vehicle icondisappears from the screen.
. Use the scroll feature on themap to set a destination. See“From Map” under Destinationon page 44 for more information.
. Press Go to calculate the routefrom the current position to thedestination mark, while scrollingon the map without a plannedroute.
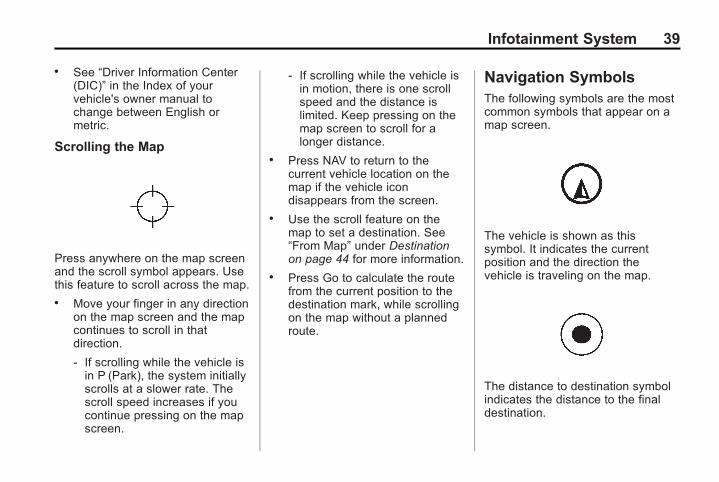
Navigation SymbolsThe following symbols are the mostcommon symbols that appear on amap screen.
The vehicle is shown as thissymbol. It indicates the currentposition and the direction thevehicle is traveling on the map.
The distance to destination symbolindicates the distance to the finaldestination.
Black plate (40,1)Acadia, Acadia Denali, Enclave, Traverse, Lucerne Navigation System - 2011
40 Infotainment System
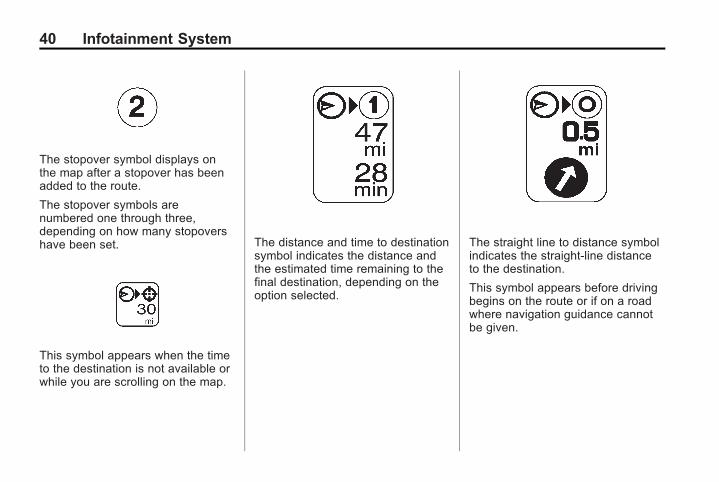
The stopover symbol displays onthe map after a stopover has beenadded to the route.
The stopover symbols arenumbered one through three,depending on how many stopovershave been set.
This symbol appears when the timeto the destination is not available orwhile you are scrolling on the map.
The distance and time to destinationsymbol indicates the distance andthe estimated time remaining to thefinal destination, depending on theoption selected.
The straight line to distance symbolindicates the straight-line distanceto the destination.
This symbol appears before drivingbegins on the route or if on a roadwhere navigation guidance cannotbe given.
Black plate (41,1)Acadia, Acadia Denali, Enclave, Traverse, Lucerne Navigation System - 2011
Infotainment System 41
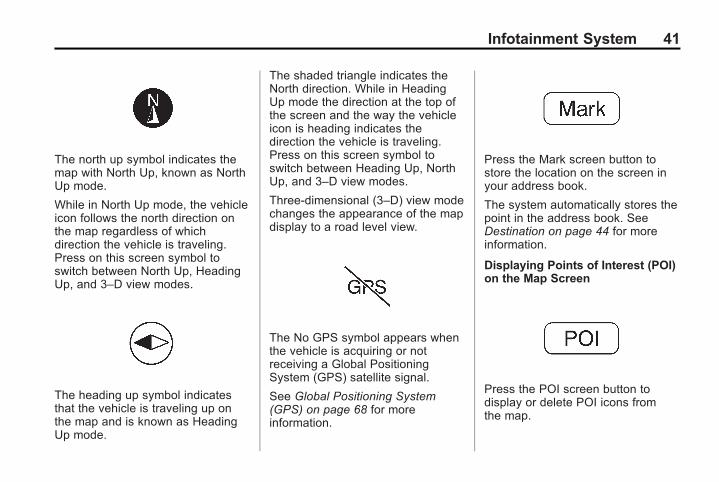
The north up symbol indicates themap with North Up, known as NorthUp mode.
While in North Up mode, the vehicleicon follows the north direction onthe map regardless of whichdirection the vehicle is traveling.Press on this screen symbol toswitch between North Up, HeadingUp, and 3–D view modes.
The heading up symbol indicatesthat the vehicle is traveling up onthe map and is known as HeadingUp mode.
The shaded triangle indicates theNorth direction. While in HeadingUp mode the direction at the top ofthe screen and the way the vehicleicon is heading indicates thedirection the vehicle is traveling.Press on this screen symbol toswitch between Heading Up, NorthUp, and 3–D view modes.
Three-dimensional (3–D) view modechanges the appearance of the mapdisplay to a road level view.
The No GPS symbol appears whenthe vehicle is acquiring or notreceiving a Global PositioningSystem (GPS) satellite signal.
See Global Positioning System(GPS) on page 68 for moreinformation.
Press the Mark screen button tostore the location on the screen inyour address book.
The system automatically stores thepoint in the address book. SeeDestination on page 44 for moreinformation.
Displaying Points of Interest (POI)on the Map Screen
Press the POI screen button todisplay or delete POI icons fromthe map.
Black plate (42,1)Acadia, Acadia Denali, Enclave, Traverse, Lucerne Navigation System - 2011
42 Infotainment System
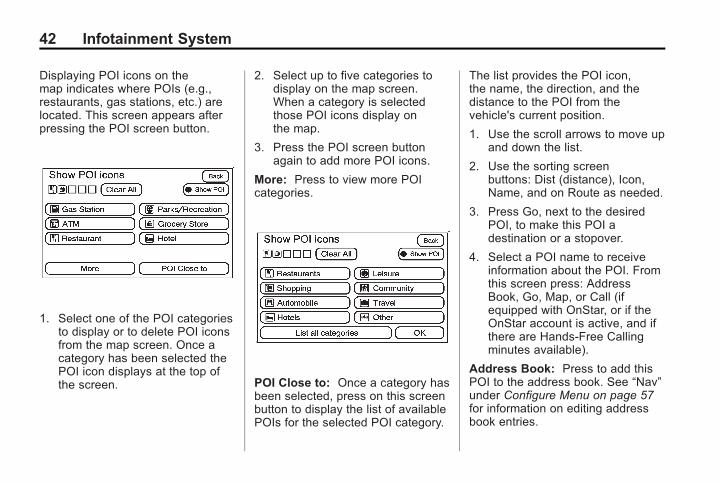
Displaying POI icons on themap indicates where POIs (e.g.,restaurants, gas stations, etc.) arelocated. This screen appears afterpressing the POI screen button.
1. Select one of the POI categoriesto display or to delete POI iconsfrom the map screen. Once acategory has been selected thePOI icon displays at the top ofthe screen.
2. Select up to five categories todisplay on the map screen.When a category is selectedthose POI icons display onthe map.
3. Press the POI screen buttonagain to add more POI icons.
More: Press to view more POIcategories.
POI Close to: Once a category hasbeen selected, press on this screenbutton to display the list of availablePOIs for the selected POI category.
The list provides the POI icon,the name, the direction, and thedistance to the POI from thevehicle's current position.
1. Use the scroll arrows to move upand down the list.
2. Use the sorting screenbuttons: Dist (distance), Icon,Name, and on Route as needed.
3. Press Go, next to the desiredPOI, to make this POI adestination or a stopover.
4. Select a POI name to receiveinformation about the POI. Fromthis screen press: AddressBook, Go, Map, or Call (ifequipped with OnStar, or if theOnStar account is active, and ifthere are Hands-Free Callingminutes available).
Address Book: Press to add thisPOI to the address book. See “Nav”under Configure Menu on page 57for information on editing addressbook entries.
Black plate (43,1)Acadia, Acadia Denali, Enclave, Traverse, Lucerne Navigation System - 2011
Infotainment System 43
Go: Press to make this POI adestination or a stopover.
Map: Press to display the mapshowing the location of the POI.
Call (If Equipped): Select to dialthe phone number for the POI usingthe OnStar Hands-Free system. TheCall button is only available if:. OnStar (if equipped) Hands-Free
Calling is activated and callingminutes are available.
. A paired Bluetooth phone isconnected. For moreinformation, see OnStar (ifequipped) and Bluetooth in theindex of the vehicle's ownermanual.
OK: Press to display the mapscreen.
Show POI: Press to display orremove the POI icons from the mapscreen.
List all Categories: Press to list allPOIs sorted alphabetically.
Delete: To delete a specific POIcategory, select the category.
Clear All: Press this screen buttonto clear all selected POI categories.
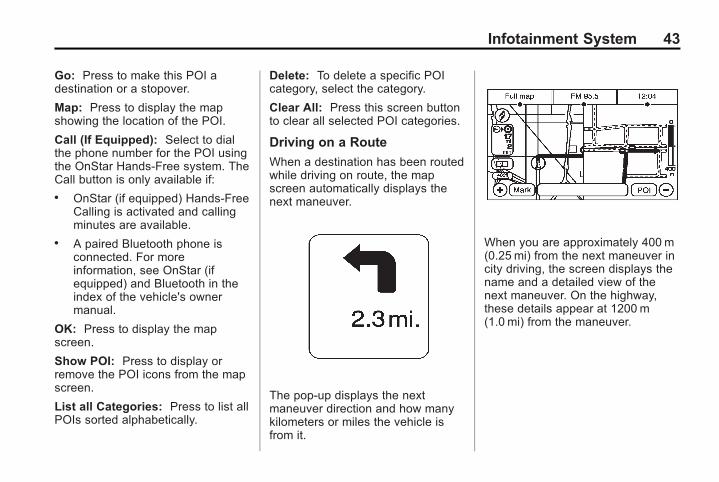
Driving on a Route
When a destination has been routedwhile driving on route, the mapscreen automatically displays thenext maneuver.
The pop-up displays the nextmaneuver direction and how manykilometers or miles the vehicle isfrom it.
When you are approximately 400 m(0.25 mi) from the next maneuver incity driving, the screen displays thename and a detailed view of thenext maneuver. On the highway,these details appear at 1200 m(1.0 mi) from the maneuver.
Black plate (44,1)Acadia, Acadia Denali, Enclave, Traverse, Lucerne Navigation System - 2011
44 Infotainment System
3–D Lane Guidance
Some major metropolitan areas mayinclude a 3–D lane guidance featurefor highway exits and junctions.This feature gives a more detailedrepresentation of the exits andjunctions on the route. Cities thatinclude this feature are New York,Los Angeles, Chicago, Detroit,and San Francisco, and may alsoinclude Philadelphia, WashingtonD.C., and other major highwayjunctions.
Dual Mode
This dual screen symbol displayswhen the screen is in dual mode.
Dual mode displays the route(map) on half of the screen and amaneuver or turn list on the otherhalf. Press this screen button toswitch between dual screen and fullscreen which displays the entireroute. On the highway, this screenbutton turns the exit informationfeature on and off.
Auto Reroute
When the destination is set andyou are off the planned route, thesystem automatically plans a newroute and begins to reroute. Thenew route is highlighted on thescreen.
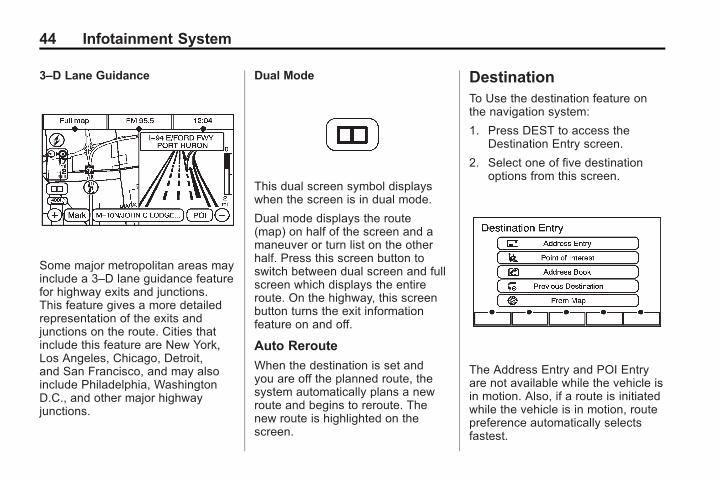
DestinationTo Use the destination feature onthe navigation system:
1. Press DEST to access theDestination Entry screen.
2. Select one of five destinationoptions from this screen.
The Address Entry and POI Entryare not available while the vehicle isin motion. Also, if a route is initiatedwhile the vehicle is in motion, routepreference automatically selectsfastest.
Black plate (45,1)Acadia, Acadia Denali, Enclave, Traverse, Lucerne Navigation System - 2011
Infotainment System 45
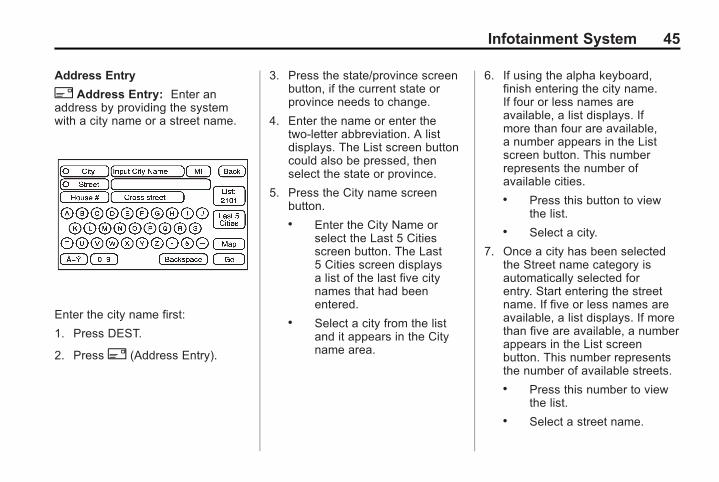
Address Entry
2 Address Entry: Enter anaddress by providing the systemwith a city name or a street name.
Enter the city name first:
1. Press DEST.
2. Press2 (Address Entry).
3. Press the state/province screenbutton, if the current state orprovince needs to change.
4. Enter the name or enter thetwo-letter abbreviation. A listdisplays. The List screen buttoncould also be pressed, thenselect the state or province.
5. Press the City name screenbutton.. Enter the City Name or
select the Last 5 Citiesscreen button. The Last5 Cities screen displaysa list of the last five citynames that had beenentered.
. Select a city from the listand it appears in the Cityname area.
6. If using the alpha keyboard,finish entering the city name.If four or less names areavailable, a list displays. Ifmore than four are available,a number appears in the Listscreen button. This numberrepresents the number ofavailable cities.. Press this button to view
the list.. Select a city.
7. Once a city has been selectedthe Street name category isautomatically selected forentry. Start entering the streetname. If five or less names areavailable, a list displays. If morethan five are available, a numberappears in the List screenbutton. This number representsthe number of available streets.. Press this number to view
the list.. Select a street name.
Black plate (46,1)Acadia, Acadia Denali, Enclave, Traverse, Lucerne Navigation System - 2011
46 Infotainment System
8. Once a street has beenselected, press the House #screen button to enter the housenumber. The system displaysthe house number range that isavailable for the street. Select ahouse number. There is also aCross Street screen option atthis point.
9. Press Go. The map screendisplays with the destinationmarked.
10. Select the route preferencefor Fastest, Shortest, or Other.The system calculates andhighlights the route.
11. Press the Start Guidancescreen button. The routecan now be started.
See “Getting Started on YourRoute” later in this section formore information.
To enter a destination by enteringthe street name first:
1. Press DEST.
2. Press2 (Address Entry).
3. Press the state/province screenbutton, if the current state orprovince needs to change.
4. Enter the name or enter thetwo-letter abbreviation. A listdisplays. The List screen buttoncould also be pressed, thenselect the state or province.
5. Once a city has been selected,the street name category isautomatically selected for entry.. Select a street from the list
and it appears in the Streetname area.
6. If using the alpha keyboard,finish entering the streetname. If five or less names areavailable, a list displays. If morethan five are available, a numberappears in the List screenbutton. This represents thenumber of available streets.. Press this button to view
the list.. Select a street.
Do not enter N forNorth or S for South inthe street name. This willautomatically show later forselection if required, afterthe street address numberentry.
7. Once a street has beenselected, press the House #screen button to enter the housenumber. The system displays thehouse number range that isavailable for the street. Selectthe house number.
Black plate (47,1)Acadia, Acadia Denali, Enclave, Traverse, Lucerne Navigation System - 2011
Infotainment System 47
8. Press Go. The map screendisplays with the destinationmarked.
9. Once the house number isselected, the city nameautomatically populates. If thereis more than one city availablefor selection, a list of citiesdisplays. Select the city.
10. Press the route preference forFastest, Shortest, or Other.The system calculates andhighlights the route.
11. Press the Start Guidancescreen button. The routecan now be started.
See “Getting Started on YourRoute” later in this section formore information.
To enter a destination by entering across street:
1. Press DEST.
2. Press2 (Address Entry).
3. Press the state/province screenbutton, if needed, to change thecurrent state or province.
4. Enter the name or enter thetwo-letter abbreviation. A listdisplays. The List screen buttoncould also be pressed, thenselect the state or province.
5. Select the City or Street screenbutton.
The Last 5 Cities or Streetsscreen button displays a list ofthe last five city or street namesthat had been entered. Select acity or street from the list and itappears in the City or Streetname area.
If using the alpha keyboard,finish entering the city or streetname. If five or less names areavailable, a list displays. If morethan five are available, a numberappears in the List screenbutton. This represents thenumber of available cities orstreets.. Press this button to view
the list.. Select a city or street.
6. Once a city and a street havebeen selected, press the CrossStreet screen button and startentering the cross street name.If five or less names areavailable, a list displays. If morethan five are available, a numberappears in the List screenbutton. This represents thenumber of available streets.. Press this button to view
the list.. Select a street.
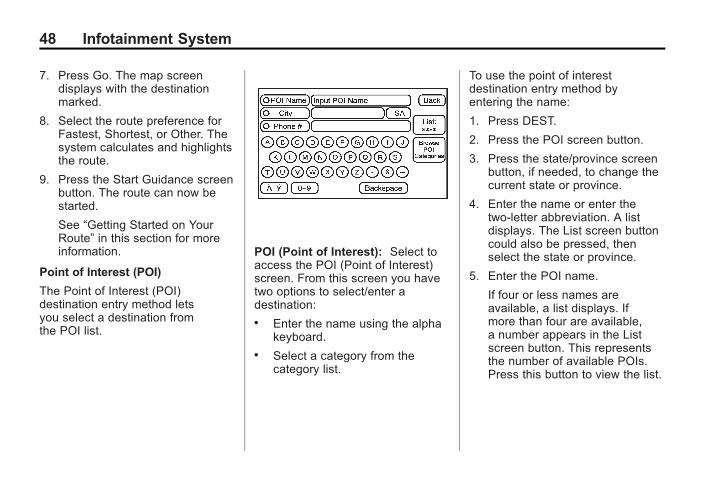
Black plate (48,1)Acadia, Acadia Denali, Enclave, Traverse, Lucerne Navigation System - 2011
48 Infotainment System
7. Press Go. The map screendisplays with the destinationmarked.
8. Select the route preference forFastest, Shortest, or Other. Thesystem calculates and highlightsthe route.
9. Press the Start Guidance screenbutton. The route can now bestarted.
See “Getting Started on YourRoute” in this section for moreinformation.
Point of Interest (POI)
The Point of Interest (POI)destination entry method letsyou select a destination fromthe POI list.
POI (Point of Interest): Select toaccess the POI (Point of Interest)screen. From this screen you havetwo options to select/enter adestination:. Enter the name using the alpha
keyboard.. Select a category from the
category list.
To use the point of interestdestination entry method byentering the name:
1. Press DEST.
2. Press the POI screen button.
3. Press the state/province screenbutton, if needed, to change thecurrent state or province.
4. Enter the name or enter thetwo-letter abbreviation. A listdisplays. The List screen buttoncould also be pressed, thenselect the state or province.
5. Enter the POI name.
If four or less names areavailable, a list displays. Ifmore than four are available,a number appears in the Listscreen button. This representsthe number of available POIs.Press this button to view the list.
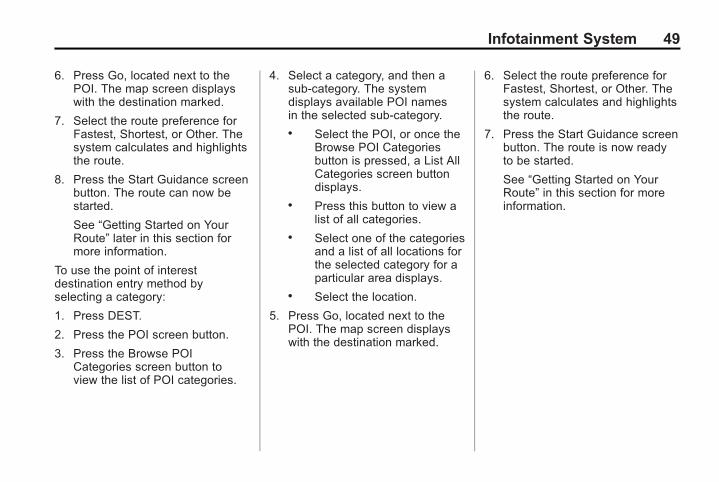
Black plate (49,1)Acadia, Acadia Denali, Enclave, Traverse, Lucerne Navigation System - 2011
Infotainment System 49
6. Press Go, located next to thePOI. The map screen displayswith the destination marked.
7. Select the route preference forFastest, Shortest, or Other. Thesystem calculates and highlightsthe route.
8. Press the Start Guidance screenbutton. The route can now bestarted.
See “Getting Started on YourRoute” later in this section formore information.
To use the point of interestdestination entry method byselecting a category:
1. Press DEST.
2. Press the POI screen button.
3. Press the Browse POICategories screen button toview the list of POI categories.
4. Select a category, and then asub-category. The systemdisplays available POI namesin the selected sub-category.. Select the POI, or once the
Browse POI Categoriesbutton is pressed, a List AllCategories screen buttondisplays.
. Press this button to view alist of all categories.
. Select one of the categoriesand a list of all locations forthe selected category for aparticular area displays.
. Select the location.
5. Press Go, located next to thePOI. The map screen displayswith the destination marked.
6. Select the route preference forFastest, Shortest, or Other. Thesystem calculates and highlightsthe route.
7. Press the Start Guidance screenbutton. The route is now readyto be started.
See “Getting Started on YourRoute” in this section for moreinformation.
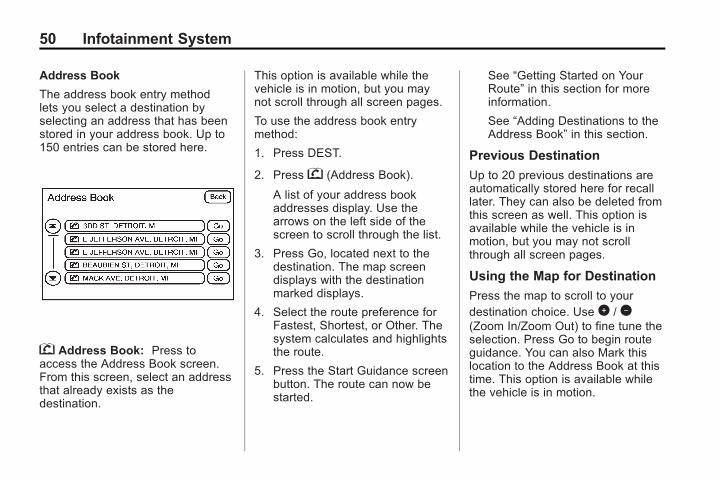
Black plate (50,1)Acadia, Acadia Denali, Enclave, Traverse, Lucerne Navigation System - 2011
50 Infotainment System
Address Book
The address book entry methodlets you select a destination byselecting an address that has beenstored in your address book. Up to150 entries can be stored here.
g Address Book: Press toaccess the Address Book screen.From this screen, select an addressthat already exists as thedestination.
This option is available while thevehicle is in motion, but you maynot scroll through all screen pages.
To use the address book entrymethod:
1. Press DEST.
2. Pressg (Address Book).
A list of your address bookaddresses display. Use thearrows on the left side of thescreen to scroll through the list.
3. Press Go, located next to thedestination. The map screendisplays with the destinationmarked displays.
4. Select the route preference forFastest, Shortest, or Other. Thesystem calculates and highlightsthe route.
5. Press the Start Guidance screenbutton. The route can now bestarted.
See “Getting Started on YourRoute” in this section for moreinformation.
See “Adding Destinations to theAddress Book” in this section.
Previous Destination
Up to 20 previous destinations areautomatically stored here for recalllater. They can also be deleted fromthis screen as well. This option isavailable while the vehicle is inmotion, but you may not scrollthrough all screen pages.
Using the Map for Destination
Press the map to scroll to yourdestination choice. Use 0 / 1(Zoom In/Zoom Out) to fine tune theselection. Press Go to begin routeguidance. You can also Mark thislocation to the Address Book at thistime. This option is available whilethe vehicle is in motion.
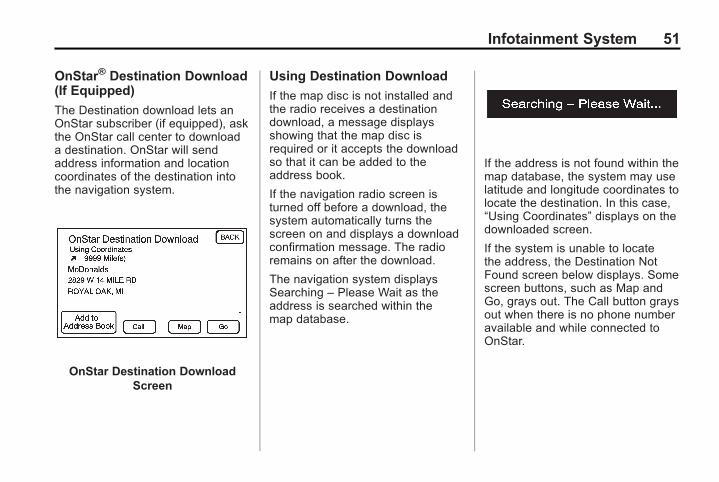
Black plate (51,1)Acadia, Acadia Denali, Enclave, Traverse, Lucerne Navigation System - 2011
Infotainment System 51
OnStar® Destination Download(If Equipped)
The Destination download lets anOnStar subscriber (if equipped), askthe OnStar call center to downloada destination. OnStar will sendaddress information and locationcoordinates of the destination intothe navigation system.
OnStar Destination DownloadScreen
Using Destination Download
If the map disc is not installed andthe radio receives a destinationdownload, a message displaysshowing that the map disc isrequired or it accepts the downloadso that it can be added to theaddress book.
If the navigation radio screen isturned off before a download, thesystem automatically turns thescreen on and displays a downloadconfirmation message. The radioremains on after the download.
The navigation system displaysSearching – Please Wait as theaddress is searched within themap database.
If the address is not found within themap database, the system may uselatitude and longitude coordinates tolocate the destination. In this case,“Using Coordinates” displays on thedownloaded screen.
If the system is unable to locatethe address, the Destination NotFound screen below displays. Somescreen buttons, such as Map andGo, grays out. The Call button graysout when there is no phone numberavailable and while connected toOnStar.
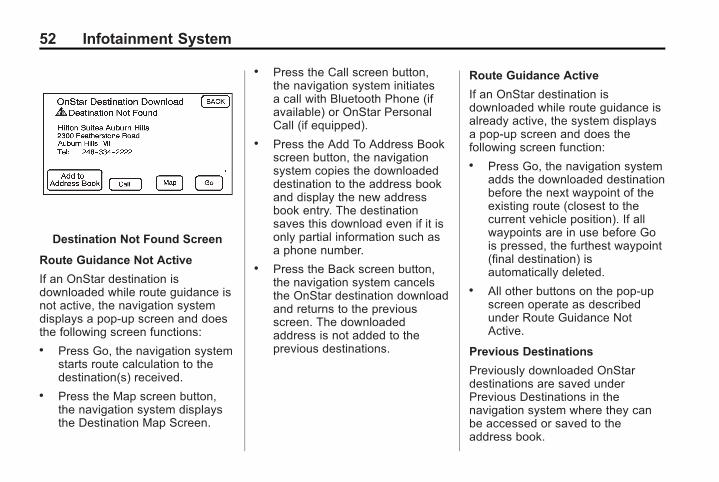
Black plate (52,1)Acadia, Acadia Denali, Enclave, Traverse, Lucerne Navigation System - 2011
52 Infotainment System
Destination Not Found Screen
Route Guidance Not Active
If an OnStar destination isdownloaded while route guidance isnot active, the navigation systemdisplays a pop-up screen and doesthe following screen functions:. Press Go, the navigation system
starts route calculation to thedestination(s) received.
. Press the Map screen button,the navigation system displaysthe Destination Map Screen.
. Press the Call screen button,the navigation system initiatesa call with Bluetooth Phone (ifavailable) or OnStar PersonalCall (if equipped).
. Press the Add To Address Bookscreen button, the navigationsystem copies the downloadeddestination to the address bookand display the new addressbook entry. The destinationsaves this download even if it isonly partial information such asa phone number.
. Press the Back screen button,the navigation system cancelsthe OnStar destination downloadand returns to the previousscreen. The downloadedaddress is not added to theprevious destinations.
Route Guidance Active
If an OnStar destination isdownloaded while route guidance isalready active, the system displaysa pop-up screen and does thefollowing screen function:. Press Go, the navigation system
adds the downloaded destinationbefore the next waypoint of theexisting route (closest to thecurrent vehicle position). If allwaypoints are in use before Gois pressed, the furthest waypoint(final destination) isautomatically deleted.
. All other buttons on the pop-upscreen operate as describedunder Route Guidance NotActive.
Previous Destinations
Previously downloaded OnStardestinations are saved underPrevious Destinations in thenavigation system where they canbe accessed or saved to theaddress book.
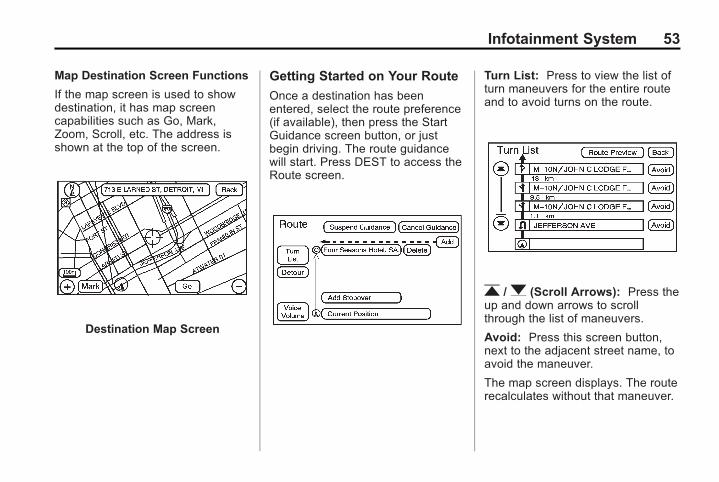
Black plate (53,1)Acadia, Acadia Denali, Enclave, Traverse, Lucerne Navigation System - 2011
Infotainment System 53
Map Destination Screen Functions
If the map screen is used to showdestination, it has map screencapabilities such as Go, Mark,Zoom, Scroll, etc. The address isshown at the top of the screen.
Destination Map Screen
Getting Started on Your Route
Once a destination has beenentered, select the route preference(if available), then press the StartGuidance screen button, or justbegin driving. The route guidancewill start. Press DEST to access theRoute screen.
Turn List: Press to view the list ofturn maneuvers for the entire routeand to avoid turns on the route.
r /q (Scroll Arrows): Press theup and down arrows to scrollthrough the list of maneuvers.
Avoid: Press this screen button,next to the adjacent street name, toavoid the maneuver.
The map screen displays. The routerecalculates without that maneuver.
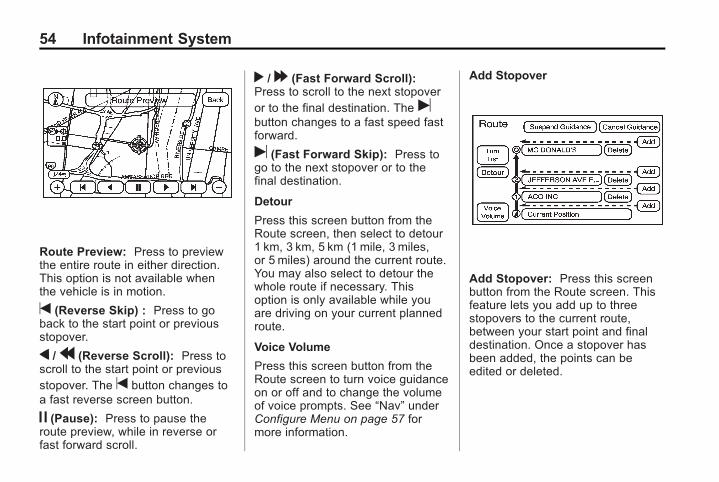
Black plate (54,1)Acadia, Acadia Denali, Enclave, Traverse, Lucerne Navigation System - 2011
54 Infotainment System
Route Preview: Press to previewthe entire route in either direction.This option is not available whenthe vehicle is in motion.
t (Reverse Skip) : Press to goback to the start point or previousstopover.
q /r (Reverse Scroll): Press toscroll to the start point or previousstopover. The t button changes toa fast reverse screen button.
j (Pause): Press to pause theroute preview, while in reverse orfast forward scroll.
r /[ (Fast Forward Scroll):Press to scroll to the next stopoveror to the final destination. The ubutton changes to a fast speed fastforward.
u (Fast Forward Skip): Press togo to the next stopover or to thefinal destination.
Detour
Press this screen button from theRoute screen, then select to detour1 km, 3 km, 5 km (1 mile, 3 miles,or 5 miles) around the current route.You may also select to detour thewhole route if necessary. Thisoption is only available while youare driving on your current plannedroute.
Voice Volume
Press this screen button from theRoute screen to turn voice guidanceon or off and to change the volumeof voice prompts. See “Nav” underConfigure Menu on page 57 formore information.
Add Stopover
Add Stopover: Press this screenbutton from the Route screen. Thisfeature lets you add up to threestopovers to the current route,between your start point and finaldestination. Once a stopover hasbeen added, the points can beedited or deleted.

Black plate (55,1)Acadia, Acadia Denali, Enclave, Traverse, Lucerne Navigation System - 2011
Infotainment System 55
To add a stopover:
1. Press DEST.
2. Press the Add or Add Stopoverscreen button. This button onlyappears if a route has beencalculated.
3. Using the desired method ofentering a destination, enterthe stopover. See “Destination”previously for more information.
4. Select the route preference forFastest, Shortest, or Other. Thesystem calculates and highlightsthe route.
5. Press the Start Guidance screenbutton. The route can now bestarted.
6. To add the second and thirdstopovers, press DEST, thenpress the Add screen button,where the next stopover shoulddisplay on the route.
7. Select the route preference forFastest, Shortest, or Other. Thesystem calculates and highlightsthe route.
8. Press the Start Guidance screenbutton. The route can now bestarted.
To delete a stopover from thecurrent route:
Delete a Stopover From theCurrent Route
1. Press DEST.
2. Press the Delete screen buttonfor a stopover to be deleted.
3. The system displays a pop-upconfirmation message. Press OKto delete the stopover; press theCancel screen button to cancelthis operation.
4. Select the route preference forFastest, Shortest, or Other. Thesystem calculates and highlightsthe route.
5. Press the Start Guidance screenbutton. The route can now bestarted.
Suspend Guidance
Press this screen button from theRoute screen to put the currentroute on hold.
Resume Guidance
Press this screen button from theRoute screen to resume guidanceon the current route.
Cancel Guidance
Press this screen button from theRoute screen to cancel the currentroute.
Adding Destinations to theAddress Book
There are two ways to add adestination to the address book:. To add the current final
destination to the address book,select the Mark screen buttonfrom the map screen. Thesystem automatically saves thefinal destination information inthe address book.
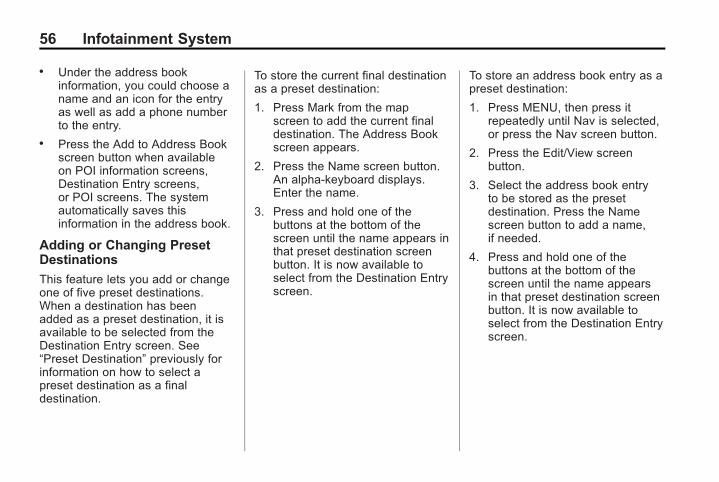
Black plate (56,1)Acadia, Acadia Denali, Enclave, Traverse, Lucerne Navigation System - 2011
56 Infotainment System
. Under the address bookinformation, you could choose aname and an icon for the entryas well as add a phone numberto the entry.
. Press the Add to Address Bookscreen button when availableon POI information screens,Destination Entry screens,or POI screens. The systemautomatically saves thisinformation in the address book.
Adding or Changing PresetDestinations
This feature lets you add or changeone of five preset destinations.When a destination has beenadded as a preset destination, it isavailable to be selected from theDestination Entry screen. See“Preset Destination” previously forinformation on how to select apreset destination as a finaldestination.
To store the current final destinationas a preset destination:
1. Press Mark from the mapscreen to add the current finaldestination. The Address Bookscreen appears.
2. Press the Name screen button.An alpha-keyboard displays.Enter the name.
3. Press and hold one of thebuttons at the bottom of thescreen until the name appears inthat preset destination screenbutton. It is now available toselect from the Destination Entryscreen.
To store an address book entry as apreset destination:
1. Press MENU, then press itrepeatedly until Nav is selected,or press the Nav screen button.
2. Press the Edit/View screenbutton.
3. Select the address book entryto be stored as the presetdestination. Press the Namescreen button to add a name,if needed.
4. Press and hold one of thebuttons at the bottom of thescreen until the name appearsin that preset destination screenbutton. It is now available toselect from the Destination Entryscreen.
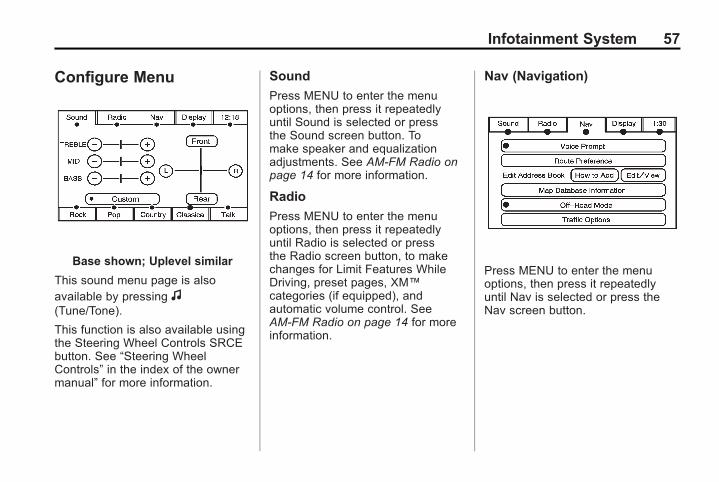
Black plate (57,1)Acadia, Acadia Denali, Enclave, Traverse, Lucerne Navigation System - 2011
Infotainment System 57
Configure Menu
Base shown; Uplevel similar
This sound menu page is alsoavailable by pressing f(Tune/Tone).
This function is also available usingthe Steering Wheel Controls SRCEbutton. See “Steering WheelControls” in the index of the ownermanual” for more information.
Sound
Press MENU to enter the menuoptions, then press it repeatedlyuntil Sound is selected or pressthe Sound screen button. Tomake speaker and equalizationadjustments. See AM-FM Radio onpage 14 for more information.
Radio
Press MENU to enter the menuoptions, then press it repeatedlyuntil Radio is selected or pressthe Radio screen button, to makechanges for Limit Features WhileDriving, preset pages, XM™categories (if equipped), andautomatic volume control. SeeAM-FM Radio on page 14 for moreinformation.
Nav (Navigation)
Press MENU to enter the menuoptions, then press it repeatedlyuntil Nav is selected or press theNav screen button.
Black plate (58,1)Acadia, Acadia Denali, Enclave, Traverse, Lucerne Navigation System - 2011
58 Infotainment System
Off-Road Mode
To turn the Off-Road Mode on or off:
1. Press MENU.
2. Press the Nav screen button.
3. Press the Off-Road Mode screenbutton. The active button will behighlighted.
When the off-road mode isturned on, the navigation systemwill show the path being traveledby the vehicle when not on amarked road. This path will bea simulation since the mapdatabase coverage will not havethese roads on the DVD. Thispath will be stored in thenavigation system's memory,see “Previous Destination” underDestination on page 44 for moreinformation.
Voice Prompt
Voice Prompt: Press to changethe volume of the voice prompts orto turn voice guidance on and off.
Volume: Press + or − to increaseor to decrease the volume of thevoice prompts. The system respondwith the adjusted voice level.
Voice Guidance: Press On or Offto turn voice instructions on and offwhile traveling on a planned route.
Route Preference
Press this screen button to changeroute options when the systemcalculates a route.
Allow Major Roads: Major roadsare used when calculating aplanned route.
Allow toll road: Toll roads areused when calculating a plannedroute.
Allow ferry: Ferries are used whencalculating a planned route.
Allow time and seasonalrestricted road: Time restrictedand seasonal roads are used whencalculating a planned route.
Edit Address Book — How to Add
To add an address to the addressbook, see “Adding Destinations tothe Address Book” underDestination on page 44.
Edit Address Book — Edit/View
To edit the name of anaddress book:
1. Press MENU, then press itrepeatedly until Nav is selectedor press the Nav screen button.
2. Press the Edit/View AddressBook screen button.
3. Select the Address book entry.

Black plate (59,1)Acadia, Acadia Denali, Enclave, Traverse, Lucerne Navigation System - 2011
Infotainment System 59
4. Press the Name screen buttonand use the alpha-keyboard toedit or add the name.
5. Press OK to save changes.
To add or change the phone numberof an address book entry:
1. Press MENU, then press itrepeatedly until Nav is selected,or press the Nav screen button.
2. Press the Edit/View AddressBook screen button.
3. Select the address book entry tochange.
4. Press the Phone # screen buttonand use the numeric keyboard toenter or change the phonenumber.
5. Press OK to save the changes.
To change the map icon of anaddress book entry:
1. Press MENU then press itrepeatedly until Nav is selected,or press the Nav screen button.
2. Press the Edit/View AddressBook screen button.
3. Select the address book entry tochange.
4. Press the Icon screen button.
5. Select an icon from the list.
To add a voice tag to an addressbook entry:
1. Press MENU, then press itrepeatedly until Nav is selected,or press the Nav screen button.
2. Press the Edit/View AddressBook screen button.
3. Press the Add Voice Tag screenbutton.
4. The system asks you to statethe name. You havefour seconds to do this. Thesystem repeats the name.
To delete an address book entry:
1. Press MENU, then press itrepeatedly until Nav is selected,or press the Nav screen button.
2. Press the Edit/View AddressBook screen button.
3. Select the address book entry todelete.
4. Press the Delete screen buttonto delete the address book entry.
5. A confirmation pop-up displays.Press the OK screen button todelete; press No to cancel theoperation.
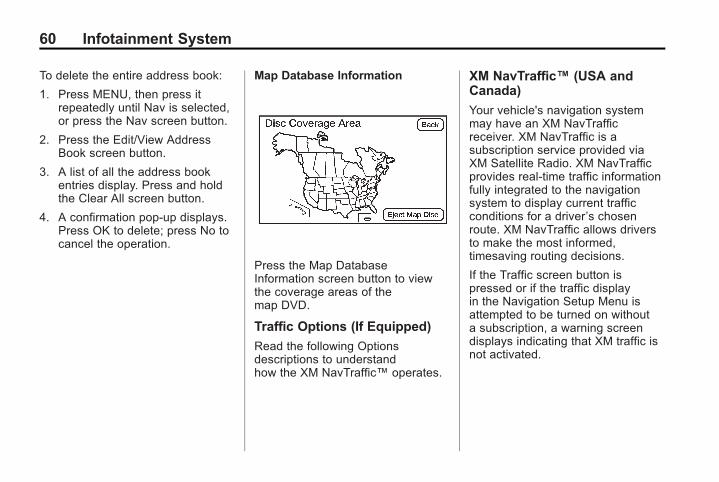
Black plate (60,1)Acadia, Acadia Denali, Enclave, Traverse, Lucerne Navigation System - 2011
60 Infotainment System
To delete the entire address book:
1. Press MENU, then press itrepeatedly until Nav is selected,or press the Nav screen button.
2. Press the Edit/View AddressBook screen button.
3. A list of all the address bookentries display. Press and holdthe Clear All screen button.
4. A confirmation pop-up displays.Press OK to delete; press No tocancel the operation.
Map Database Information
Press the Map DatabaseInformation screen button to viewthe coverage areas of themap DVD.
Traffic Options (If Equipped)
Read the following Optionsdescriptions to understandhow the XM NavTraffic™ operates.
XM NavTraffic™ (USA andCanada)
Your vehicle's navigation systemmay have an XM NavTrafficreceiver. XM NavTraffic is asubscription service provided viaXM Satellite Radio. XM NavTrafficprovides real-time traffic informationfully integrated to the navigationsystem to display current trafficconditions for a driver’s chosenroute. XM NavTraffic allows driversto make the most informed,timesaving routing decisions.
If the Traffic screen button ispressed or if the traffic displayin the Navigation Setup Menu isattempted to be turned on withouta subscription, a warning screendisplays indicating that XM traffic isnot activated.
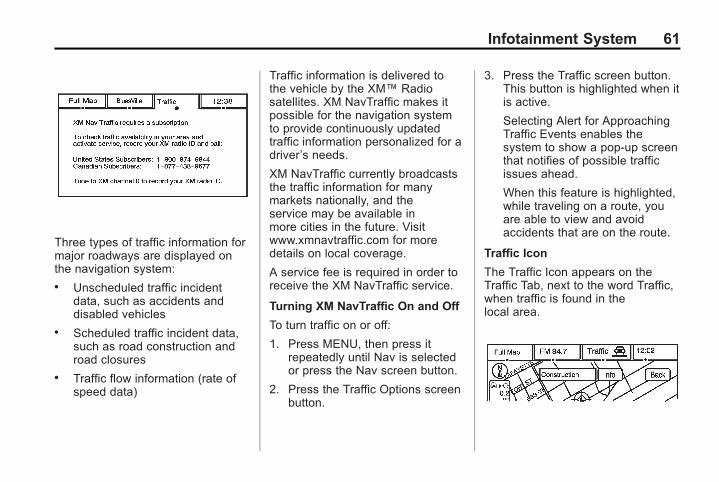
Black plate (61,1)Acadia, Acadia Denali, Enclave, Traverse, Lucerne Navigation System - 2011
Infotainment System 61
Three types of traffic information formajor roadways are displayed onthe navigation system:. Unscheduled traffic incident
data, such as accidents anddisabled vehicles
. Scheduled traffic incident data,such as road construction androad closures
. Traffic flow information (rate ofspeed data)
Traffic information is delivered tothe vehicle by the XM™ Radiosatellites. XM NavTraffic makes itpossible for the navigation systemto provide continuously updatedtraffic information personalized for adriver’s needs.
XM NavTraffic currently broadcaststhe traffic information for manymarkets nationally, and theservice may be available inmore cities in the future. Visitwww.xmnavtraffic.com for moredetails on local coverage.
A service fee is required in order toreceive the XM NavTraffic service.
Turning XM NavTraffic On and Off
To turn traffic on or off:
1. Press MENU, then press itrepeatedly until Nav is selectedor press the Nav screen button.
2. Press the Traffic Options screenbutton.
3. Press the Traffic screen button.This button is highlighted when itis active.
Selecting Alert for ApproachingTraffic Events enables thesystem to show a pop-up screenthat notifies of possible trafficissues ahead.
When this feature is highlighted,while traveling on a route, youare able to view and avoidaccidents that are on the route.
Traffic Icon
The Traffic Icon appears on theTraffic Tab, next to the word Traffic,when traffic is found in thelocal area.

Black plate (62,1)Acadia, Acadia Denali, Enclave, Traverse, Lucerne Navigation System - 2011
62 Infotainment System
The Traffic Icon has three different condition displays. These are:
Condition Traffic Status Icon
. No XM NavTraffic™subscription.
. No Traffic is found in thelocal area.
. The Traffic Feature is turned off.
Traffic events are in the area, butnone are on route.
Traffic events are on route.
Locations and Information ofTraffic Conditions
The system may take some timeto sort the information. The list oftraffic conditions display in the orderof distance from the vehicle, for upto approximately 240 km (150mi).If traveling on a planned route, thelist can be filtered to see trafficconditions along the planned route.Not all traffic conditions may belisted.
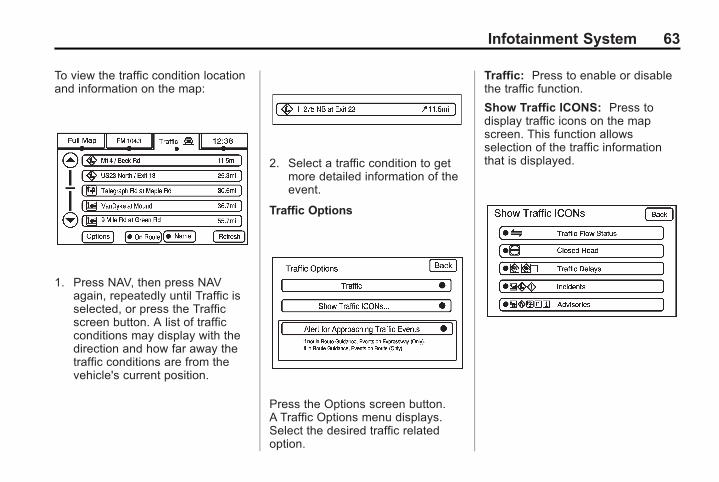
Black plate (63,1)Acadia, Acadia Denali, Enclave, Traverse, Lucerne Navigation System - 2011
Infotainment System 63
To view the traffic condition locationand information on the map:
1. Press NAV, then press NAVagain, repeatedly until Traffic isselected, or press the Trafficscreen button. A list of trafficconditions may display with thedirection and how far away thetraffic conditions are from thevehicle's current position.
2. Select a traffic condition to getmore detailed information of theevent.
Traffic Options
Press the Options screen button.A Traffic Options menu displays.Select the desired traffic relatedoption.
Traffic: Press to enable or disablethe traffic function.
Show Traffic ICONS: Press todisplay traffic icons on the mapscreen. This function allowsselection of the traffic informationthat is displayed.
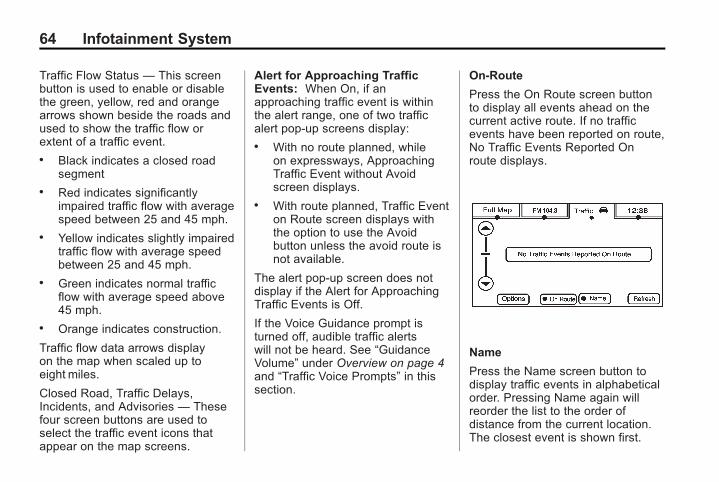
Black plate (64,1)Acadia, Acadia Denali, Enclave, Traverse, Lucerne Navigation System - 2011
64 Infotainment System
Traffic Flow Status — This screenbutton is used to enable or disablethe green, yellow, red and orangearrows shown beside the roads andused to show the traffic flow orextent of a traffic event.. Black indicates a closed road
segment. Red indicates significantly
impaired traffic flow with averagespeed between 25 and 45 mph.
. Yellow indicates slightly impairedtraffic flow with average speedbetween 25 and 45 mph.
. Green indicates normal trafficflow with average speed above45 mph.
. Orange indicates construction.
Traffic flow data arrows displayon the map when scaled up toeight miles.
Closed Road, Traffic Delays,Incidents, and Advisories — Thesefour screen buttons are used toselect the traffic event icons thatappear on the map screens.
Alert for Approaching TrafficEvents: When On, if anapproaching traffic event is withinthe alert range, one of two trafficalert pop-up screens display:. With no route planned, while
on expressways, ApproachingTraffic Event without Avoidscreen displays.
. With route planned, Traffic Eventon Route screen displays withthe option to use the Avoidbutton unless the avoid route isnot available.
The alert pop-up screen does notdisplay if the Alert for ApproachingTraffic Events is Off.
If the Voice Guidance prompt isturned off, audible traffic alertswill not be heard. See “GuidanceVolume” under Overview on page 4and “Traffic Voice Prompts” in thissection.
On-Route
Press the On Route screen buttonto display all events ahead on thecurrent active route. If no trafficevents have been reported on route,No Traffic Events Reported Onroute displays.
Name
Press the Name screen button todisplay traffic events in alphabeticalorder. Pressing Name again willreorder the list to the order ofdistance from the current location.The closest event is shown first.
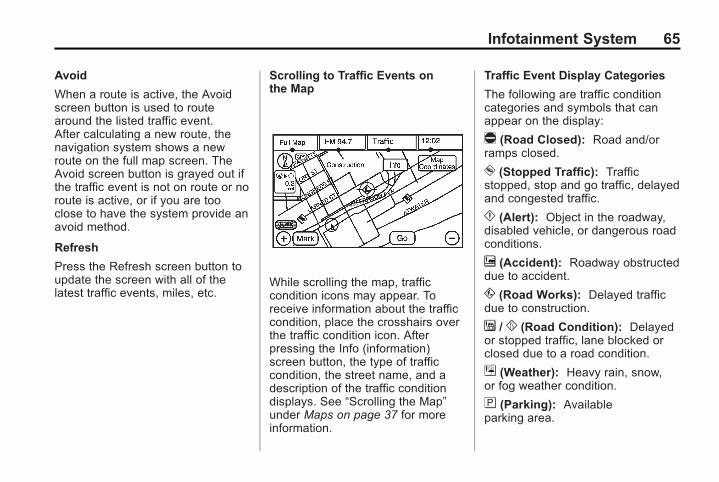
Black plate (65,1)Acadia, Acadia Denali, Enclave, Traverse, Lucerne Navigation System - 2011
Infotainment System 65
Avoid
When a route is active, the Avoidscreen button is used to routearound the listed traffic event.After calculating a new route, thenavigation system shows a newroute on the full map screen. TheAvoid screen button is grayed out ifthe traffic event is not on route or noroute is active, or if you are tooclose to have the system provide anavoid method.
Refresh
Press the Refresh screen button toupdate the screen with all of thelatest traffic events, miles, etc.
Scrolling to Traffic Events onthe Map
While scrolling the map, trafficcondition icons may appear. Toreceive information about the trafficcondition, place the crosshairs overthe traffic condition icon. Afterpressing the Info (information)screen button, the type of trafficcondition, the street name, and adescription of the traffic conditiondisplays. See “Scrolling the Map”under Maps on page 37 for moreinformation.
Traffic Event Display Categories
The following are traffic conditioncategories and symbols that canappear on the display:
q (Road Closed): Road and/orramps closed.
o (Stopped Traffic): Trafficstopped, stop and go traffic, delayedand congested traffic.
p (Alert): Object in the roadway,disabled vehicle, or dangerous roadconditions.
t (Accident): Roadway obstructeddue to accident.
s (Road Works): Delayed trafficdue to construction.
j / r (Road Condition): Delayedor stopped traffic, lane blocked orclosed due to a road condition.
k (Weather): Heavy rain, snow,or fog weather condition.
m (Parking): Availableparking area.
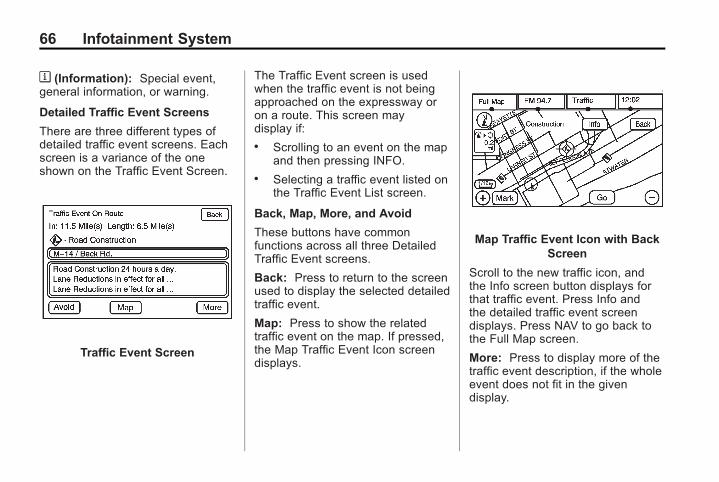
Black plate (66,1)Acadia, Acadia Denali, Enclave, Traverse, Lucerne Navigation System - 2011
66 Infotainment System
l (Information): Special event,general information, or warning.
Detailed Traffic Event Screens
There are three different types ofdetailed traffic event screens. Eachscreen is a variance of the oneshown on the Traffic Event Screen.
Traffic Event Screen
The Traffic Event screen is usedwhen the traffic event is not beingapproached on the expressway oron a route. This screen maydisplay if:. Scrolling to an event on the map
and then pressing INFO.. Selecting a traffic event listed on
the Traffic Event List screen.
Back, Map, More, and Avoid
These buttons have commonfunctions across all three DetailedTraffic Event screens.
Back: Press to return to the screenused to display the selected detailedtraffic event.
Map: Press to show the relatedtraffic event on the map. If pressed,the Map Traffic Event Icon screendisplays.
Map Traffic Event Icon with BackScreen
Scroll to the new traffic icon, andthe Info screen button displays forthat traffic event. Press Info andthe detailed traffic event screendisplays. Press NAV to go back tothe Full Map screen.
More: Press to display more of thetraffic event description, if the wholeevent does not fit in the givendisplay.
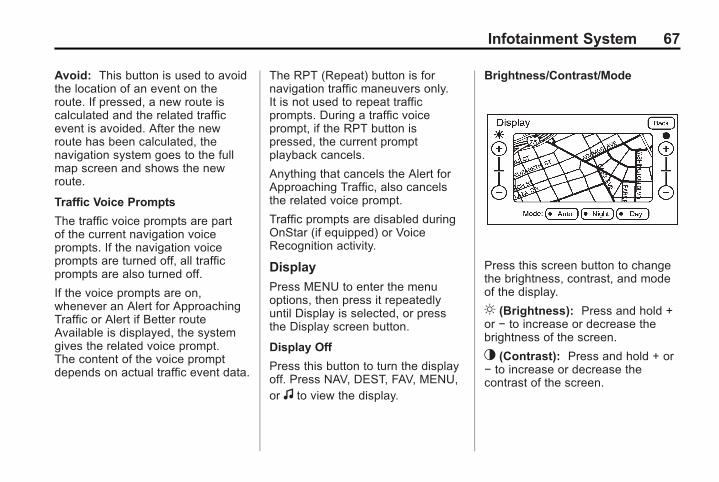
Black plate (67,1)Acadia, Acadia Denali, Enclave, Traverse, Lucerne Navigation System - 2011
Infotainment System 67
Avoid: This button is used to avoidthe location of an event on theroute. If pressed, a new route iscalculated and the related trafficevent is avoided. After the newroute has been calculated, thenavigation system goes to the fullmap screen and shows the newroute.
Traffic Voice Prompts
The traffic voice prompts are partof the current navigation voiceprompts. If the navigation voiceprompts are turned off, all trafficprompts are also turned off.
If the voice prompts are on,whenever an Alert for ApproachingTraffic or Alert if Better routeAvailable is displayed, the systemgives the related voice prompt.The content of the voice promptdepends on actual traffic event data.
The RPT (Repeat) button is fornavigation traffic maneuvers only.It is not used to repeat trafficprompts. During a traffic voiceprompt, if the RPT button ispressed, the current promptplayback cancels.
Anything that cancels the Alert forApproaching Traffic, also cancelsthe related voice prompt.
Traffic prompts are disabled duringOnStar (if equipped) or VoiceRecognition activity.
Display
Press MENU to enter the menuoptions, then press it repeatedlyuntil Display is selected, or pressthe Display screen button.
Display Off
Press this button to turn the displayoff. Press NAV, DEST, FAV, MENU,or f to view the display.
Brightness/Contrast/Mode
Press this screen button to changethe brightness, contrast, and modeof the display.
] (Brightness): Press and hold +or − to increase or decrease thebrightness of the screen.
_ (Contrast): Press and hold + or− to increase or decrease thecontrast of the screen.
Black plate (68,1)Acadia, Acadia Denali, Enclave, Traverse, Lucerne Navigation System - 2011
68 Infotainment System
Auto (Automatic): Press thisscreen button so the system canautomatically adjust the screenbackground depending on exteriorlighting conditions.
Night: Press to make the mapbackground darker.
Day: Press to make the mapbackground brighter.
Rear Vision Camera Options(If Equipped)
The vehicle may be equipped with aRear Vision Camera system and/ora Rear Park Assist to enhanceawareness of what is behind yourvehicle. These systems engage onlywhen the transmission shift positionis in R (Reverse). See “Rear VisionCamera” and/or “Park Assist” in theindex of the vehicle's owner manualfor more information.
VIDEO (for camera) and AUDIO(Park Assist) screen buttons maydisplay. Press either screen buttonto turn these features on or off. Bothfeatures are defaulted to on.
Eject Map Disc
This screen option is available whenthe map disc has to be ejected forreplacement. The map disc shouldonly be access when updating withan annual update or when and if amap disc read error displays duringnormal use. See “Ejecting the DVDMap Disc” in this section for moreinformation.
Language
To change the language of thenavigation screens, see “VehiclePersonalization” in the Index of thevehicle's owner manual.
Setting the Clock
Press the time screen button, thenpress the Set screen button.
Hours: Press and hold − or + todecrease or increase the hours.
Minutes: Press and hold − or + todecrease or increase the minutes.
12/24 Format: Press the 12 screenbutton for standard time; press the24 screen button for military time.
Global PositioningSystem (GPS)The navigation system determinesthe position of the vehicle by usingsatellite signals, various vehiclesignals, and map data.
At times, other interferences suchas the satellite condition, roadconfiguration, the condition of thevehicle and/or other circumstancescan interfere with the navigationsystem's ability to determine theaccurate position of the vehicle.
The GPS shows the current positionof the vehicle using signals sent bythe GPS Satellites of the UnitedStates Department of Defense.When the vehicle is not receivingsignals from the satellites, a symbolappears on the map screen. Referto Navigation Symbols on page 39.
Black plate (69,1)Acadia, Acadia Denali, Enclave, Traverse, Lucerne Navigation System - 2011
Infotainment System 69
This system may not be available orinterferences may occur if any of thefollowing is true:. Signals are obstructed by tall
buildings, trees, large trucks,or a tunnel.
. Objects are located on the rearshelf of the vehicle.
. Satellites are being repaired orimproved.
. After-market glass tinting hasbeen applied to the vehicle'srear windshield.
Notice: Do not apply after-marketglass tinting to the vehicle'swindows. Glass tinting interfereswith the system's ability toreceive GPS signals and causesthe system to malfunction.The window might have to bereplaced to correct the problem.This would not be covered by thewarranty.
For more information if the GPSis not functioning properly, seeProblems with Route Guidance onpage 70 and If the System NeedsService on page 70.
Vehicle PositioningAt times, the position of the vehicleon the map may be inaccurate dueto one or more of the followingreasons:. The road system has changed.. The vehicle is driving on slippery
road surfaces such as in sand,gravel, and/or snow.
. The vehicle is traveling onwinding roads.
. The vehicle is on a longstraight road.
. The vehicle is approaching a tallbuilding or a large vehicle.
. The surface streets run parallelto a freeway.
. The vehicle has just beentransferred by a vehicle carrieror a ferry.
. The current position calibrationis set incorrectly.
. The vehicle is traveling at highspeed.
. The vehicle changes directionsmore than once, or when thevehicle is turning on a turn tablein a parking lot.
. The vehicle is entering and/orexiting a parking lot, garage, or alot with a roof.
. The GPS signal is not received.
. A roof carrier is installed on yourvehicle.
. The vehicle is being driven withtire chains.
. The tires are replaced.
. The tire pressure for your tires isincorrect.
. The tires are worn.
Black plate (70,1)Acadia, Acadia Denali, Enclave, Traverse, Lucerne Navigation System - 2011
70 Infotainment System
. The first time the map DVD isinserted.
. The battery is disconnected forseveral days.
. The vehicle is driving in heavytraffic where driving is at lowspeeds, and the vehicle isstopped and started repeatedly.
If problems are experienced with thenavigation system, see your dealer.
Problems with RouteGuidanceInappropriate route guidance couldoccur under one or more of thefollowing conditions:. You have not turned onto the
road indicated.. Route guidance may not be
available when using automaticrerouting for the next right orleft turn.
. The route may not be changedwhen using automatic rerouting.
. There is no route guidance whenturning at an intersection.
. Plural names of places may beannounced occasionally.
. It may take a long time tooperate automatic reroutingduring high-speed driving.
. Automatic rerouting may displaya route returning to the setstopover if traveling to adestination without passingthrough a set stopover.
. The route prohibits the entry of avehicle due to a regulation bytime or season or any otherregulation which may be given.
. Some routes may not besearched.
. The route to the destination maynot be shown if there are newroads, if roads have recentlychanged, or if certain roadsare not listed on the map DVD.See Database CoverageExplanations on page 71.
If the System NeedsServiceIf the navigation system needsservice and the steps listed herehave been followed but there arestill problems, see your dealer forassistance.
Ordering Map DVDsThe map DVD in the vehicle isthe most up-to-date informationavailable when the vehicle wasproduced. The map DVD is updatedperiodically, provided that the mapinformation has changed.
For any questions about theoperation of the navigation systemor the update process, contactthe GM Nav Disc Center toll‐freephone number, 1‐877‐NAV‐DISC(1‐877‐628‐3472) or go tothe center's website,www.gmnavdisc.com. For anyupdates or replacements, call theGM Nav Disc Center or order a newdisc online. Have the Vehicle
Black plate (71,1)Acadia, Acadia Denali, Enclave, Traverse, Lucerne Navigation System - 2011
Infotainment System 71
Identification Number (VIN)available when ordering to ensurethe correct and most up-to-dateDVD map disc for the vehicle issent. See “Vehicle IdentificationNumber (VIN)” in the Index of thevehicle's owner manual for moreinformation.
After receiving the updateddisc, replace the old disc in thenavigation system. See “Installingthe DVD Map Disc” and “Ejectingthe DVD Map Disc” under Maps onpage 37. Dispose of the old disc toavoid confusion about which disc isthe most current.
Database CoverageExplanationsCoverage area depends upon themap detail available. Some areashave greater map detail than others.The navigation system works onlyas well as the information providedon the map disc. See Ordering MapDVDs on page 70 on how to obtainupdated map information.
Voice RecognitionThe navigation system's voicerecognition allows for hands-freeoperation of navigation and audiosystem features. Voice recognitioncan be used when the ignition is onor in ACC/ACCESSORY or whenRetained Accessory Power (RAP) isactive.
The radio commands feature onlyworks if the map DVD is inserted.Bluetooth® and OnStar functions (ifequipped) will work without the mapDVD inserted. See Bluetooth andOnStar in the index of the vehicle'sowner manual.
The system may not hear you ormay hear the incorrect word with thewindows open or the convertible topdown due to background noise.
To use radio voice recognition:
1. Push and hold SRCE (source)on the steering wheel controls,if equipped, or AUDIO on theradio faceplate. A beep will beheard and the audio systemmutes.
2. Clearly state one of thecommands listed on thefollowing pages. For example,say “Radio Select FM” or justsay, “Radio FM.”
3. The system tells you thecommand being implemented.For example, the system says“Radio Select FM” and changesthe audio system to the FMsource.
You may end voice recognition bynot speaking any commands or bypressing SRCE again. After aboutfive seconds of silence, the systemautomatically cancels voicerecognition.
Black plate (72,1)Acadia, Acadia Denali, Enclave, Traverse, Lucerne Navigation System - 2011
72 Infotainment System
At times, the system may notunderstand a spoken command.If this happens, try again. If aspoken command is not available,the system provides feedbackbased on availability.
While using voice recognition, makesure to keep interior noise levels toa minimum. Otherwise, the systemmight not recognize voicecommands.
The system recognizes commandsspoken in English, Spanish, orFrench depending on the globallanguage setting in the vehicle. Seethe vehicle's owner manual fordetails about changing languages.
Voice Recognition Commands
The following list shows all of thevoice commands available for thenavigation system with a briefdescription of each. The commandsare listed with the optional wordsin brackets. To use the voicecommands, refer to the instructionslisted previously.
Voice Tag Commands
The following are voice tagcommands that can be accessedby clearly stating the commandsexactly as they are written. Therecan be up to 40 voice tag entries fordestinations.
Navigation go to [destination],navigation select: Thesecommands instruct the system toselect a destination saved underthe stored voice tag. The systemprompts for a destination name thenwaits for the name to be stated.
If you are not currently driving ona route, the system automaticallycreates the voice tag destinationas the final destination. If you arecurrently driving on a route, thesystem automatically creates thevoice tag destination as a stopover.Up to three stopovers can becreated.
Storing Voice Tags
From the address book entryinformation page, press the AddVoice tag screen button. Thesystem responds “Name Please?”and you will have four seconds torecord a name. The system asks forconfirmation of the name beforesaving it as a voice tag. Up to40 destination voice tag entriescan be stored.
Navigation Help
Navigation Help: This commandinstructs the system to assist withnavigation commands.
Display Commands
To set the display mode:
Display [set] day [mode]: Sets thedisplay to daytime mode.
Display [set] night [mode]: Setsthe display to night mode.
Display [set] auto [mode]: Setsthe display to automatic mode. Thesystem changes between day andnight mode automatically.
Black plate (73,1)Acadia, Acadia Denali, Enclave, Traverse, Lucerne Navigation System - 2011
Infotainment System 73
System help: This commandinstructs the system to assistwith display commands.
Radio Commands
The following are radio commandscan be accessed by clearly statingthe commands exactly as written.
Radio [band] [select] AM, radio[band] [select] FM, radio [band][select] XM, radio [band] [select]satellite: Instructs the system togo to either the AM, FM, or XM(if equipped).
Radio [select] (frequency) AM,radio [select] (frequency) FM:Instructs the system to go to aspecific frequency on eitherAM or FM.
Radio [select] (channel) XM, radio[select] (channel) satellite:Instructs the system to go to aspecific channel on the XM band(if equipped).
Radio help: This commandinstructs the system to assistwith radio commands.
CD Commands
The following are CD, MP3, andDVD commands that can beaccessed by clearly stating thecommands exactly as written.
CD, DVD, Disc: Selects a CD,DVD, or disc that is currentlyloaded.
CD, DVD, Disc, [select] track (one,two, three, etc.): Instructs thesystem to select a specific tracknumber. (May not be availableduring DVD movie play).
CD, DVD, Disc select nextfolder: Selects the next folder onthe MP3 or audio DVD.
CD, DVD, Disc select previousfolder: Selects the previous folderon the MP3 or audio DVD.
CD help, DVD help, Disc help:Instructs the system to assist withCD and DVD commands.
Auxiliary Commands
The following auxiliary commandscan be accessed by clearly statingthe commands exactly as written.The commands are available whenthe auxiliary source is available.
Aux, Auxiliary: Selects theauxiliary device, when a deviceis connected.
OnStar Command (If Equipped)
OnStar: Instructs the system toconnect to OnStar. The OnStarvoice recognition system must beentered. Refer to your OnStar userguide for more information.
Voice Help
Voice help: Provides a descriptionof help commands that can be used.
Black plate (74,1)Acadia, Acadia Denali, Enclave, Traverse, Lucerne Navigation System - 2011
74 Infotainment System
2 NOTES
Black plate (1,1)Acadia, Acadia Denali, Enclave, Traverse, Lucerne Navigation System - 2011
INDEX i-1
AAdding Destinations to theAddress Book . . . . . . . . . . . . . . . . . . 55
Adding or Changing PresetDestinations . . . . . . . . . . . . . . . . . . . . 56
Alpha-Numeric Keyboard . . . . . . . . 36AM-FM Radio . . . . . . . . . . . . . . . . . . . . 14Audio PlayersCD/DVD . . . . . . . . . . . . . . . . . . . . . . . .20
Auto Reroute . . . . . . . . . . . . . . . . . . . . 44Auxiliary Devices . . . . . . . . . . . . . . . . 34
CCanadian Vehicle Owners(Propriétaires des VéhiculesCanadiens) . . . . . . . . . . . . . . . . . . . . . . 4
Canceling Guidance . . . . . . . . . . . . . 13CD/DVD Messages . . . . . . . . . . . . . . 30CD/DVD Player . . . . . . . . . . . . . . . . . . 20Cleaning the Display . . . . . . . . . . . . . 13Configure Menu . . . . . . . . . . . . . . . . . 57Connecting a USB StorageDevice or iPod® . . . . . . . . . . . . . . . . 31
DDatabase CoverageExplanations . . . . . . . . . . . . . . . . . . . 71
Deleting Personal Information . . . . 8Destination, Navigation . . . . . . . . . . 44Devices, Auxiliary . . . . . . . . . . . . . . . 34Display . . . . . . . . . . . . . . . . . . . . . . . . . . 67Driving on a Route . . . . . . . . . . . . . . . 43DVD Menu Options . . . . . . . . . . . . . . 27DVD/CD Player . . . . . . . . . . . . . . . . . . 20
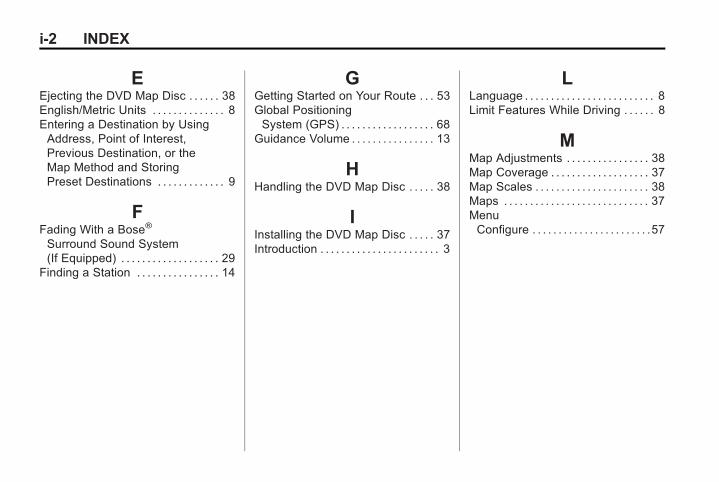
Black plate (2,1)Acadia, Acadia Denali, Enclave, Traverse, Lucerne Navigation System - 2011
i-2 INDEX
EEjecting the DVD Map Disc . . . . . . 38English/Metric Units . . . . . . . . . . . . . . 8Entering a Destination by UsingAddress, Point of Interest,Previous Destination, or theMap Method and StoringPreset Destinations . . . . . . . . . . . . . 9
FFading With a Bose®
Surround Sound System(If Equipped) . . . . . . . . . . . . . . . . . . . 29
Finding a Station . . . . . . . . . . . . . . . . 14
GGetting Started on Your Route . . . 53Global PositioningSystem (GPS) . . . . . . . . . . . . . . . . . . 68
Guidance Volume . . . . . . . . . . . . . . . . 13
HHandling the DVD Map Disc . . . . . 38
IInstalling the DVD Map Disc . . . . . 37Introduction . . . . . . . . . . . . . . . . . . . . . . . 3
LLanguage . . . . . . . . . . . . . . . . . . . . . . . . . 8Limit Features While Driving . . . . . . 8
MMap Adjustments . . . . . . . . . . . . . . . . 38Map Coverage . . . . . . . . . . . . . . . . . . . 37Map Scales . . . . . . . . . . . . . . . . . . . . . . 38Maps . . . . . . . . . . . . . . . . . . . . . . . . . . . . 37MenuConfigure . . . . . . . . . . . . . . . . . . . . . . .57
Black plate (3,1)Acadia, Acadia Denali, Enclave, Traverse, Lucerne Navigation System - 2011
INDEX i-3
NNav (Navigation) . . . . . . . . . . . . . . . . . 57NavigationDestination . . . . . . . . . . . . . . . . . . . . .44Symbols . . . . . . . . . . . . . . . . . . . . . . . .39Using the System . . . . . . . . . . . . . . .35
Navigation Buttons . . . . . . . . . . . . . . 35Navigation DVD Radio withBose® Surround SoundSystem (If Equipped) . . . . . . . . . . . 26
Navigation System Overview . . . . . 7
OOnStar® DestinationDownload (If Equipped) . . . . . . . . 51
OrderingMap DVDs . . . . . . . . . . . . . . . . . . . . . .70
Overview, Infotainment System . . . 4
PPlaying a CD . . . . . . . . . . . . . . . . . . . . 20Playing a DVD . . . . . . . . . . . . . . . . . . . 26Playing a DVD Video . . . . . . . . . . . . 25Playing the Radio . . . . . . . . . . . . . . . . 14Previous Destination . . . . . . . . . . . . . 50Problems with RouteGuidance . . . . . . . . . . . . . . . . . . . . . . 70
RRadio . . . . . . . . . . . . . . . . . . . . . . . . . . . . 57Radio Data System (RDS) . . . . . . . 19Radio Menu . . . . . . . . . . . . . . . . . . . . . 18RadiosAM-FM Radio . . . . . . . . . . . . . . . . . . .14CD/DVD Player . . . . . . . . . . . . . . . . .20Satellite . . . . . . . . . . . . . . . . . . . . . . . . .20
Black plate (4,1)Acadia, Acadia Denali, Enclave, Traverse, Lucerne Navigation System - 2011
i-4 INDEX
SSatellite Radio . . . . . . . . . . . . . . . . . . . 20Scrolling the Map . . . . . . . . . . . . . . . . 39Setting the Clock . . . . . . . . . . . . . .9, 68Sound . . . . . . . . . . . . . . . . . . . . . . . . . . . 57Sound Menu . . . . . . . . . . . . . . . . . . . . . 17Storing Radio StationPresets . . . . . . . . . . . . . . . . . . . . . . .8, 16
Symbols, Navigation . . . . . . . . . . . . . 39System Needs Service, If . . . . . . . . 70
TTouch Screen Buttons . . . . . . . . . . . 36Traffic Options (If Equipped) . . . . . 60
UUsing a Compressed AudioCD/DVD . . . . . . . . . . . . . . . . . . . . . . . . 22
Using Destination Download . . . . . 51Using the Map for Destination . . . 50Using the Navigation AudioSystem to Control a USBStorage Device or iPod . . . . . . . . 31
Using the Stored PresetDestinations . . . . . . . . . . . . . . . . . . . . 12
Using the USB Port . . . . . . . . . . . . . . 34
VVehiclePositioning . . . . . . . . . . . . . . . . . . . . .69
Voice Recognition . . . . . . . . . . . . . . . 71Voice Recognition Commands . . . 72
XXM NavTraffic™ (USA andCanada) . . . . . . . . . . . . . . . . . . . . . . . . 60
XM™ Satellite Radio Service . . . . 20