2010 Corvette
471
2010 Chevrolet Corvette Owner Manual M In Brief ...................... ................. ..... 1-1 Instrument Panel ................................. 1-2 Initial Drive Information ...... . .. .. ...... . .. . ..... . 1-4 Vehicle Features . .. ...... .. .. ...... .. .. ...... .. . 1-16 Performance and Maintenance ....... . . . . ....... 1-21 Seats and Restraint System ....... ..... ...... .... 2-1 Front Seats ........ .. ... ........... .. .. .. ........ . 2-2 Safety Belts ...... .. .. ........ .. ...... .. .. ...... .. 2-9 Child Restraints . ...... .. .. ...... .. .. ........ .. .. 2-26 Airbag System . . . . . . . .... . . . . ..... . . . . ..... . . . . . 2-44 Restraint System Check ......................... 2-60 Features and Controls ....... .................... . 3-1 Keys ............................................. 3-3 Doors and Locks ................................ 3-10 Windows . .... ...... ... ... ...... ... ... ...... ... .. 3-16 Theft-Deterrent Systems ........................ 3-19 Starting and Operating Your Vehicle ....... . . . . . . 3-21 Mirrors .......................................... 3-39 Uni versal Home Remote System . . . . . . . .... . . . . . 3-42 Storage Areas ................................... 3-50 Roof Panel ... .. .. .......... .. .. ........ .. .. .... . 3-54 Convertible Top .. .. .... .. .. ...... .. .. .. .. .. .. .. . 3-59 Instrument Panel ................................ . 4-1 Instrument Panel Overview . .. . . . . ..... . . . ...... . . 4-3 Climate Controls ................................ 4-22 Warning Lights, Gauges, and Indicators . . . . ... . . 4-29 Dri ver Information Center (DIC) . . . . ... . . . ... . . .. 4-47 Audio System(s) . . . . ..... . . . ..... . . . . .... . . . . ... 4-80 Driving Your Vehicle .............................. 5-1 Your Driving, the Road, and the Vehicle . . . . .. . . .. 5-2 Towing .... ......... ... ...... ... ... ...... ... ... .. 5-33 2010 Chevrolet Corvette Owner Manual M Service and Appearance Care .......... ... ... ... 6-1 Service ........................................... 6-3 Fuel ..... ..... .... ......... ..... ..... .... ..... .... 6-6 Checking Things Under the Hood . . . . . .... . . .... 6-12 Rear Axle . ... ... ..... ... ...... ... ... ...... ... ... 6-55 Headlamp Aiming ............................... 6-55 Bulb Replacement . .... .. ...... . ...... .. ...... .. 6-56 Windshield Replacement ........................ 6-59 Windshield Wiper Blade Replacement ........... 6-59 Tires ..... .... ........ .... ........ .... .... .... ... 6-62 Appearance Care . . . . ..... . . . . ..... . . . . .... . . . . . 6-90 Vehicle Identification .. .. . . .. ..... . . . ..... . . . .... 6-99 Electrical System .. .. .. ...... .. .. .... .. ...... .. 6-100 Capacities and Speci fi cati ons . . ....... . . . ...... 6-108 Maintenance Schedule .......... ...... ...... ..... 7-1 Maintenance Schedule ........................... 7-2 Customer Assistance Information .......... .... . 8-1 Customer Assistance and Information . . . . .. . . .... 8-2 Reporting Safety Defects .. .. . .......... . . .. . .... 8-15 Vehicle Data Recording and Privacy . .... . . . . . . . . 8-18 Index . . . . . . . . . . . . . . . . . . . . . . . . . . . . . . . . . . . . i-1
Transcript of 2010 Corvette

7/31/2019 2010 Corvette
http://slidepdf.com/reader/full/2010-corvette 1/471
2010 Chevrolet Corvette Owner Manual M
In Brief . . . . . . . . . . . . . . . . . . . . . . . . . . . . . . . . . . . . . . . . . . . . 1-1I n s t r u m e n t P a n e l . . . . . . . . . . . . . . . . . . . . . . . . . . . . . . . . . 1 - 2Initial Drive Information . . . . . . . . . . . . . . . . . . . . . . . . . . . 1-4
Vehicle Features . . . . . . . . . . . . . . . . . . . . . . . . . . . . . . . . 1 -16Performance and Maintenance . . . . . . . . . . . . . . . . . . 1-21
Seats and Restraint System . . . . . . . . . . . . . . . . . . . . . . 2-1Front Seats . . . . . . . . . . . . . . . . . . . . . . . . . . . . . . . . . . . . . . . 2-2Safety Belts . . . . . . . . . . . . . . . . . . . . . . . . . . . . . . . . . . . . . . 2-9Child Restraints . . . . . . . . . . . . . . . . . . . . . . . . . . . . . . . . . 2-26 Airbag System . . . . . . . . . . . . . . . . . . . . . . . . . . . . . . . . . . 2-44Re s tra in t Sy s te m Ch e c k . . . . . . . . . . . . . . . . . . . . . . . . . 2 -6 0
Features and Controls . . . . . . . . . . . . . . . . . . . . . . . . . . . . 3-1K e y s . . . . . . . . . . . . . . . . . . . . . . . . . . . . . . . . . . . . . . . . . . . . . 3 - 3D o o r s a n d L o c k s . . . . . . . . . . . . . . . . . . . . . . . . . . . . . . . . 3 - 1 0Windows . . . . . . . . . . . . . . . . . . . . . . . . . . . . . . . . . . . . . . . . 3-16T h e ft-De te rre n t Sy s te ms .. . . . . . . . . . . . . . . . . . . . . . . 3 -1 9
Starting and Operating Your Vehicle . . . . . . . . . . . . . 3-21M i r r o r s . . . . . . . . . . . . . . . . . . . . . . . . . . . . . . . . . . . . . . . . . . 3 - 3 9Universal Home Remote System . . . . . . . . . . . . . . . . 3-42
S t o r a g e A r e a s . . . . . . . . . . . . . . . . . . . . . . . . . . . . . . . . . . . 3 - 5 0Roof Panel . . . . . . . . . . . . . . . . . . . . . . . . . . . . . . . . . . . . . . 3-54Convertible Top . . . . . . . . . . . . . . . . . . . . . . . . . . . . . . . . . 3-59
Instrument Panel . . . . . . . . . . . . . . . . . . . . . . . . . . . . . . . . . 4-1Instrument Panel Overview . . . . . . . . . . . . . . . . . . . . . . . 4-3C l i m a t e C o n t r o l s . . . . . . . . . . . . . . . . . . . . . . . . . . . . . . . . 4 - 2 2Warning Lights, Gauges, and Indicators . . . . . . . . . 4-29Driver Information Center (DIC) . . . . . . . . . . . . . . . . . 4-47 Audio System(s) . . . . . . . . . . . . . . . . . . . . . . . . . . . . . . . . 4-80
Driving Your Vehicle . . . . . . . . . . . . . . . . . . . . . . . . . . . . . . 5 - 1Your Driving, the Road, and the Vehicle . . . . . . . . . . 5-2Towing . . . . . . . . . . . . . . . . . . . . . . . . . . . . . . . . . . . . . . . . . . 5-33

7/31/2019 2010 Corvette
http://slidepdf.com/reader/full/2010-corvette 2/471
2010 Chevrolet Corvette Owner Manual M
Service and Appearance Care . . . . . . . . . . . . . . . . . . . 6-1S e r v i c e . . . . . . . . . . . . . . . . . . . . . . . . . . . . . . . . . . . . . . . . . . . 6 - 3Fuel . . . . . . . . . . . . . . . . . . . . . . . . . . . . . . . . . . . . . . . . . . . . . . 6-6
Checking Things Under the Hood . . . . . . . . . . . . . . . 6-12Rear Axle . . . . . . . . . . . . . . . . . . . . . . . . . . . . . . . . . . . . . . . 6-55H e a d l a m p A i m i n g . . . . . . . . . . . . . . . . . . . . . . . . . . . . . . . 6 - 5 5Bulb Replacement . . . . . . . . . . . . . . . . . . . . . . . . . . . . . . 6-56W in d s h ie ld Re p la c e me n t . . . . . . . . . . . . . . . . . . . . . . . . 6 -5 9Windshield Wiper Blade Replacement ........... 6-59Tires . . . . . . . . . . . . . . . . . . . . . . . . . . . . . . . . . . . . . . . . . . . . 6-62 Appearance Care . . . . . . . . . . . . . . . . . . . . . . . . . . . . . . . 6-90
Vehicle Identification . . . . . . . . . . . . . . . . . . . . . . . . . . . . 6-99Electrical System . . . . . . . . . . . . . . . . . . . . . . . . . . . . . . 6-100Capacities and Specifications . . . . . . . . . . . . . . . . . . 6-108
Maintenance Schedule . . . . . . . . . . . . . . . . . . . . . . . . . . . 7-1M a i n t e n a n c e S c h e d u l e . . . . . . . . . . . . . . . . . . . . . . . . . . . 7 - 2
Customer Assistance Information . . . . . . . . . . . . . . . 8-1Customer Assistance and Information . . . . . . . . . . . . 8-2Reporting Safety Defects . . . . . . . . . . . . . . . . . . . . . . . . 8-15Vehicle Data Recording and Privacy . . . . . . . . . . . . . 8-18
Index . . . . . . . . . . . . . . . . . . . . . . . . . . . . . . . . . . . . i-1

7/31/2019 2010 Corvette
http://slidepdf.com/reader/full/2010-corvette 3/471
GENERAL MOTORS, GM, the GM Emblem,CHEVROLET, the CHEVROLET Emblem, the namesCORVETTE, Z06, ZR1, CORVETTE GRAND SPORTand the CORVETTE Emblem are registered trademarksof General Motors.
This manual describes features that may or maynot be on your specific vehicle either because they are
options that you did not purchase or due to changessubsequent to the printing of this owner manual. Pleaserefer to the purchase documentation relating to your specific vehicle to confirm each of the features foundon your vehicle. For vehicles first sold in Canada,substitute the name “General Motors of CanadaLimited” for Chevrolet Motor Division wherever itappears in this manual.
Keep this manual the vehicle for quick reference.
Canadian Owners
Propriétaires Canadiens
A French language copy of this manual can be obtainedfrom your dealer/retailer or from:
On peut obtenir un exemplaire de ce guide en françaisauprès du concessionnaire ou à l'adresse suivante:
Helm, IncorporatedP.O. Box 07130Detroit, MI 48207
1-800-551-4123
Numéro de poste 6438 de langue française
www.helminc.com
Index
To quickly locate information about the vehicle, use theindex in the back of the manual. It is an alphabetical listof what is in the manual and the page number where itcan be found.
Litho in U.S.A.Part No. 25895343 B Second Printing © 2009 General Motors. All Rights Reserved.

7/31/2019 2010 Corvette
http://slidepdf.com/reader/full/2010-corvette 4/471
Safety Warnings and Symbols
Warning messages found on vehicle labels and in thismanual describe hazards and what to do to avoid or reduce them.
Danger indicates a hazard with a high level of risk
which will result in serious injury or death.Warning or Caution indicates a hazard that could resultin injury or death.
{ WARNING:
These mean there is something that could hurtyou or other people.
Notice: This means there is something that couldresult in property or vehicle damage. This would notbe covered by the vehicle's warranty.
A circle with a slashthrough it is a safetysymbol which means“Do Not,” “Do not do this,”
or “Do not let thishappen.”
Vehicle Symbols
The vehicle has components and labels that usesymbols instead of text. Symbols are shown along withthe text describing the operation or information relatingto a specific component, control, message, gauge,or indicator.
M : This symbol is shown when you need to see your owner manual for additional instructions or information.
* : This symbol is shown when you need to see aservice manual for additional instructions or information.
iv

7/31/2019 2010 Corvette
http://slidepdf.com/reader/full/2010-corvette 5/471
Vehicle Symbol Chart
Here are some additional symbols that may be found onthe vehicle and what they mean. For more informationon the symbol, refer to the index.
9 : Airbag Readiness Light
# : Air Conditioning! : Antilock Brake System (ABS)
g : Audio Steering Wheel Controls or OnStar ®
$ : Brake System Warning Light
" : Charging System
I : Cruise Control
B : Engine Coolant Temperature
O : Exterior Lamps
# : Fog Lamps
. : Fuel Gauge
+ : Fuses
i : Headlamp High/Low-Beam Changer
j : LATCH System Child Restraints
* : Malfunction Indicator Lamp
: : Oil Pressure
} : Power
/ : Remote Vehicle Start
> : Safety Belt Reminders
7 : Tire Pressure Monitor
F : Traction Control
M : Windshield Washer Fluid

7/31/2019 2010 Corvette
http://slidepdf.com/reader/full/2010-corvette 6/471
2 NOTES
vi
7/31/2019 2010 Corvette
http://slidepdf.com/reader/full/2010-corvette 7/471
Section 1 In Brief
Instrument Panel . . . . . . . . . . . . . . . . . . . . . . . . . . . . . . . . . . . 1 - 2
Initial Drive Information . . . . . . . . . . . . . . . . . . . . . . . . . . . 1 - 4Remote Keyless Entry (RKE) System . . . . . . . . . . . 1-4
Door Locks . . . . . . . . . . . . . . . . . . . . . . . . . . . . . . . . . . . . . 1-5Trunk Release . . . . . . . . . . . . . . . . . . . . . . . . . . . . . . . . . . 1-6Windows . . . . . . . . . . . . . . . . . . . . . . . . . . . . . . . . . . . . . . . . 1-6Seat Adjustment . . . . . . . . . . . . . . . . . . . . . . . . . . . . . . . . 1-7Safety Belt . . . . . . . . . . . . . . . . . . . . . . . . . . . . . . . . . . . . . . 1-9Sensing System for Passenger Airbag . . . . . . . . . 1-10M i r r o r A d j u s t m e n t . . . . . . . . . . . . . . . . . . . . . . . . . . . . . . 1 - 1 1Steering Wheel Adjustment .................... 1-12Interior Lighting . . . . . . . . . . . . . . . . . . . . . . . . . . . . . . . . 1-13
Exterior Lighting . . . . . . . . . . . . . . . . . . . . . . . . . . . . . . . 1-13Windshield Wiper/Washer ...................... 1-14Climate Controls . . . . . . . . . . . . . . . . . . . . . . . . . . . . . . . 1-15Transmission . . . . . . . . . . . . . . . . . . . . . . . . . . . . . . . . . . 1-15
Vehicle Features . . . . . . . . . . . . . . . . . . . . . . . . . . . . . . . . . . 1 - 1 6Radio(s) . . . . . . . . . . . . . . . . . . . . . . . . . . . . . . . . . . . . . . . 1-16S a t e l l i t e R a d i o . . . . . . . . . . . . . . . . . . . . . . . . . . . . . . . . . 1 - 1 7
Po rta b le Au d io De v ic e s . . . . . . . . . . . . . . . . . . . . . . . . 1 -1 8Ste e rin g W h e e l Co n tro ls . . . . . . . . . . . . . . . . . . . . . . . 1 -1 8Bluetooth® . . . . . . . . . . . . . . . . . . . . . . . . . . . . . . . . . . . . . 1 - 1 8
N a v i g a t i o n S y s t e m . . . . . . . . . . . . . . . . . . . . . . . . . . . . . 1 - 1 9Driver Information Center (DIC) ................ 1-19Cruise Control . . . . . . . . . . . . . . . . . . . . . . . . . . . . . . . . . 1-20Power Outlets . . . . . . . . . . . . . . . . . . . . . . . . . . . . . . . . . 1-21Roof Panel . . . . . . . . . . . . . . . . . . . . . . . . . . . . . . . . . . . . 1-21C o n v e r t i b l e . . . . . . . . . . . . . . . . . . . . . . . . . . . . . . . . . . . . 1 - 2 1
Performance and Maintenance . . . . . . . . . . . . . . . . . . 1-21Traction Control System (TCS) . . . . . . . . . . . . . . . . 1-21Towing . . . . . . . . . . . . . . . . . . . . . . . . . . . . . . . . . . . . . . . . . 1-22
Tire Pressure Monitor . . . . . . . . . . . . . . . . . . . . . . . . . . 1-22Z06, Z16, and ZR1 Features ................... 1-23Engine Oil Life System . . . . . . . . . . . . . . . . . . . . . . . . 1-24Driving for Better Fuel Economy . . . . . . . . . . . . . . . 1-24Battery . . . . . . . . . . . . . . . . . . . . . . . . . . . . . . . . . . . . . . . . . 1-24Roadside Assistance Program . . . . . . . . . . . . . . . . . 1-25OnStar ® . . . . . . . . . . . . . . . . . . . . . . . . . . . . . . . . . . . . . . . 1-25
1-

7/31/2019 2010 Corvette
http://slidepdf.com/reader/full/2010-corvette 8/471
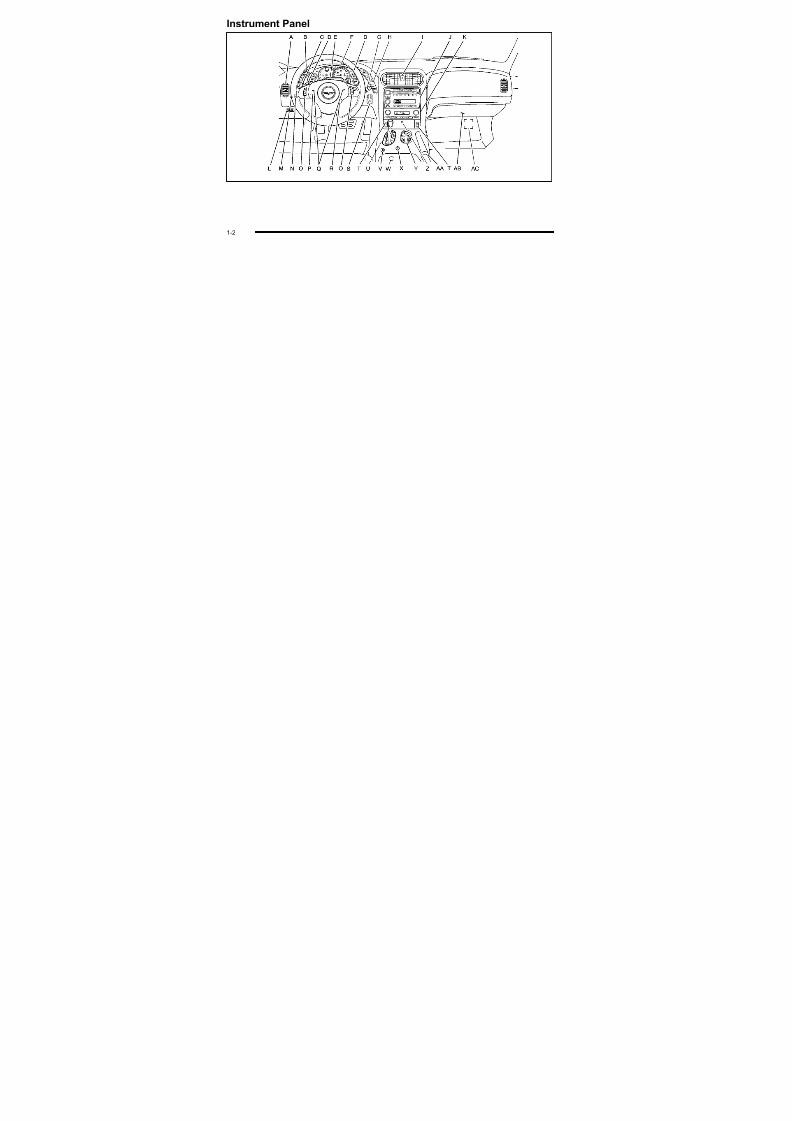
Instrument Panel
1-2

7/31/2019 2010 Corvette
http://slidepdf.com/reader/full/2010-corvette 9/471
A. Outlet Adjustment on page 4‑ 27 .
B. Head-Up Display (HUD) on page 4‑ 16 (If Equipped).
C. Turn Signal/Multifunction Lever o n p a g e 4 ‑ 4 .Cruise Control o n p a g e 4 ‑ 7 . Fog Lamps on pag e 4‑ 13 . Exterior Lamps on page 4‑ 11.
D. Manual Shift Paddles (If Equipped). See Automatic Transmission Operation on page 3 ‑ 26 .
E. Driver Information Center (DIC) on page 4‑ 47 .
F. Instrument Panel Cluster on page 4‑ 30 .
G. Windshield Wipers o n p a g e 4 ‑ 6 and Windshield Washer on page 4‑ 6 .
H. DIC Operation and Displays on page 4‑ 47 .
I. Hazard Warning Flashers on page 4‑ 3 .
J. Audio System(s) on page 4‑ 80 .
K. Dual Automatic Climate Control System on pag e 4‑ 22 .
L. Fuel Door Release Button. See Filling theTank o n p a g e 6 ‑ 9 . Hatch/Trunk Release Button.See “Hatch/Trunk Lid Release” under Hatch on pag e 3 ‑ 14.
M. Instrument Panel Brightness on page 4‑ 15 .
N. Power Folding Top Switch (If Equipped).See Convertible Top (Manual) on page 3 ‑ 59or Convertible Top (Power) on page 3 ‑ 66 .
O. Bluetooth® on page 4‑ 96 (If Equipped). Audio Steering Wheel Controls on page 4‑ 107 (If Equipped).
P. Tilt Wheel on page 4‑ 3 .
Q. Horn on page 4‑ 3 .
R. Telescopic Wheel Button (If Equipped).See Tilt Wheel on page 4
‑ 3 .
S. Ignition Positions on page 3 ‑ 23 .
T. Heated Seats o n p a g e 2 ‑ 4 (If Equipped).
U. Shift Lever (Automatic Shown). See Automatic Transmission Operation on page 3 ‑ 26 or Manual Transmission Operation on page 3 ‑ 32 .
V. Active Handling System on page 5 ‑ 8 .
W. Accessory Power Outlet(s) on page 4‑ 20 .
X. Selective Ride Control on page 5 ‑ 14.
Y. Cupholders on page 3 ‑ 50 .
Z. Ashtray(s) and Cigarette Lighter on page 4‑ 21.
AA. Parking Brake on page 3 ‑ 34.
AB. Glove Box on page 3 ‑ 50 .
AC. Instrument Panel Fuse Block on page 6 ‑ 101.
1-
7/31/2019 2010 Corvette
http://slidepdf.com/reader/full/2010-corvette 10/471
Initial Drive InformationThis section provides a brief overview about some of the important features that may or may not be on your specific vehicle.
For more detailed information, refer to each of the
features which can be found later in this owner manual.
Remote Keyless Entry (RKE) System
The keyless access transmitter is used to lock andunlock the doors from up to 30 m (100 feet) away fromthe vehicle.
PressK to unlock the
driver door. Press againwithin five seconds tounlock both doors.
Press Q to lock all doors.
Press and hold} for approximately one second to
open the hatch/trunk.PressL to sound the horn. Press any other button on
the keyless access transmitter to stop it.
Press the button (A) to remove the key. The key can beused to lock and unlock the glove box and to open thehatch/trunk lid if power to the vehicle is lost. See Hatchon page 3 ‑ 14 for more information.
See Keys o n p a g e 3 ‑ 3 and Keyless Access System
Operation on page 3 ‑ 5 .
1-4

7/31/2019 2010 Corvette
http://slidepdf.com/reader/full/2010-corvette 11/471
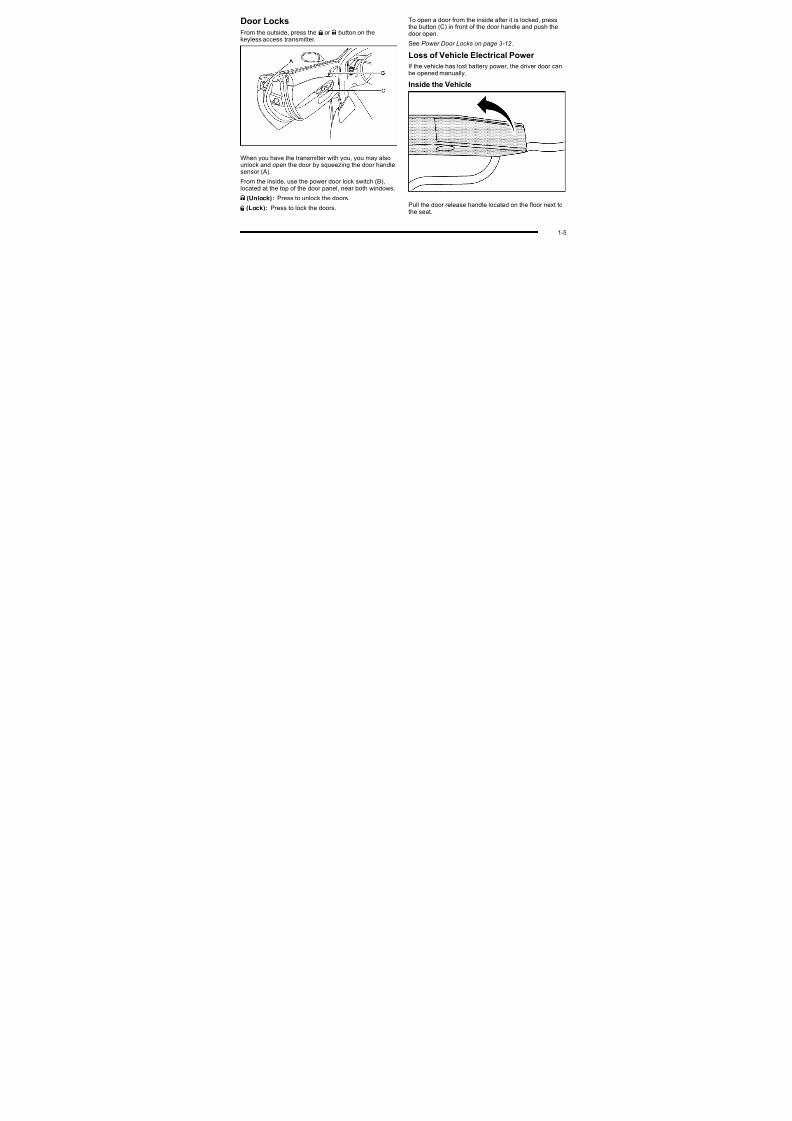
Door Locks
From the outside, press the Q or K button on thekeyless access transmitter.
When you have the transmitter with you, you may alsounlock and open the door by squeezing the door handlesensor (A).
From the inside, use the power door lock switch (B),located at the top of the door panel, near both windows.
K (Unlock) : Press to unlock the doors.
Q (Lock): Press to lock the doors.
To open a door from the inside after it is locked, pressthe button (C) in front of the door handle and push thedoor open.
See Power Door Locks on page 3 ‑ 12 .
Loss of Vehicle Electrical Power
If the vehicle has lost battery power, the driver door canbe opened manually.
Inside the Vehicle
Pull the door release handle located on the floor next tothe seat.
1-
7/31/2019 2010 Corvette
http://slidepdf.com/reader/full/2010-corvette 12/471
Trunk Release
Opening and Closing the Hatch/Trunk
There are three ways to open the hatch/trunk:
. Touch the button located above the license plate.The Keyless Access transmitter must be within
three feet of the button.
. Press the V button located to the left of the
steering wheel.
. Press the } button on the Keyless Access
transmitter.
For more information see Hatch on page 3 ‑ 14.
Windows
The power window switches are located on each door.
Pull up or press down on the front of the switch to raiseor lower the window.
For more information, see Power Windows on pag e 3 ‑ 17 .
1-6
7/31/2019 2010 Corvette
http://slidepdf.com/reader/full/2010-corvette 13/471
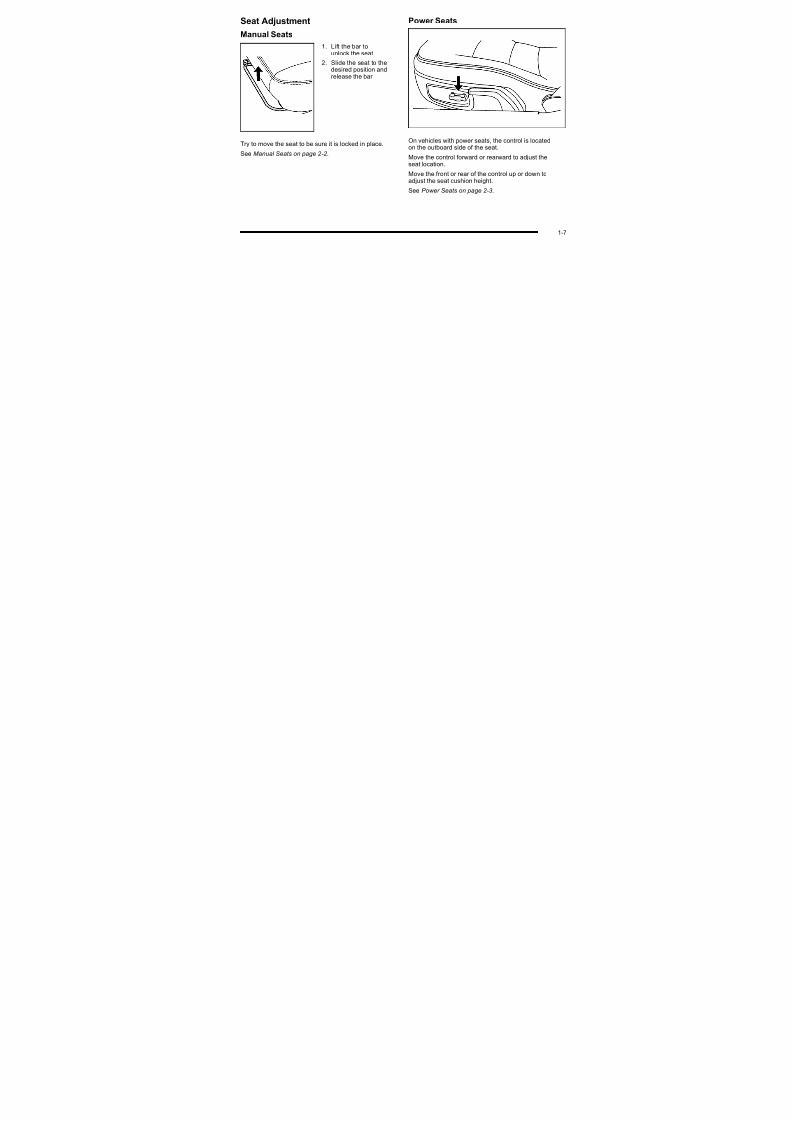
Seat Adjustment
Manual Seats
1. Lift the bar tounlock the seat.
2. Slide the seat to thedesired position andrelease the bar.
Try to move the seat to be sure it is locked in place.
See Manual Seats on page 2 ‑ 2 .
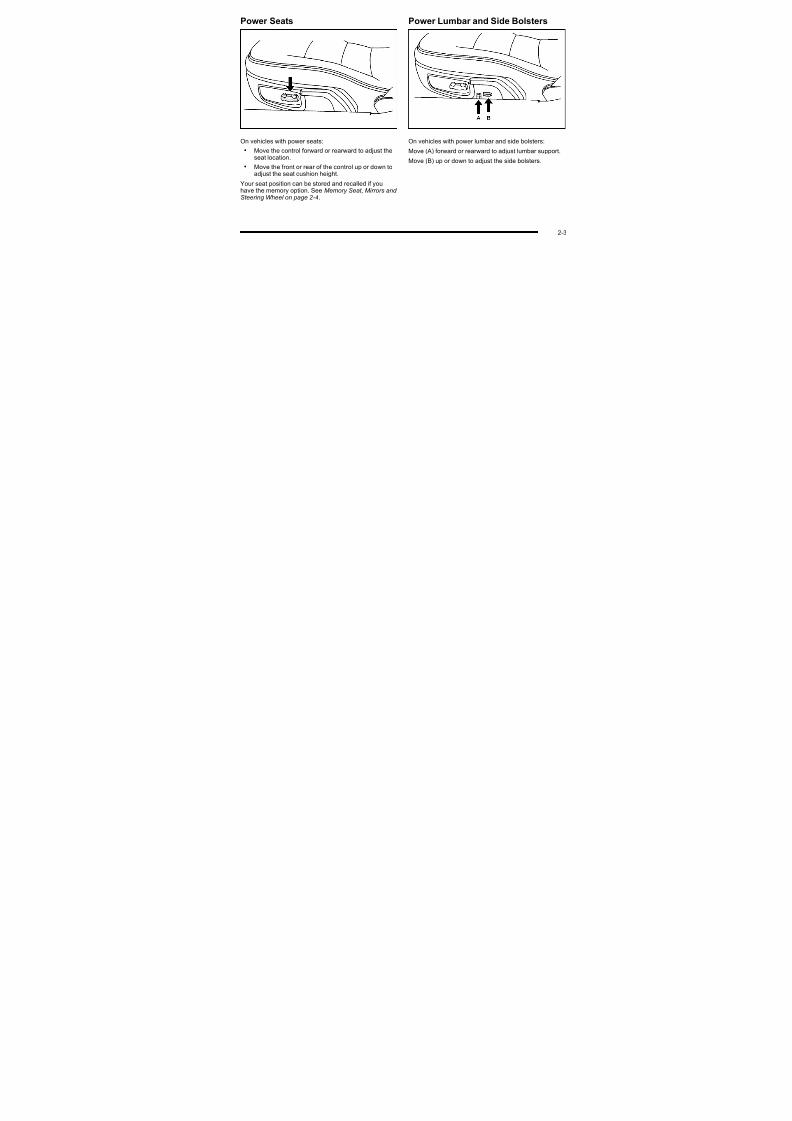
Power Seats
On vehicles with power seats, the control is locatedon the outboard side of the seat.
Move the control forward or rearward to adjust theseat location.
Move the front or rear of the control up or down toadjust the seat cushion height.
See Power Seats on page 2 ‑ 3 .
1-

7/31/2019 2010 Corvette
http://slidepdf.com/reader/full/2010-corvette 14/471
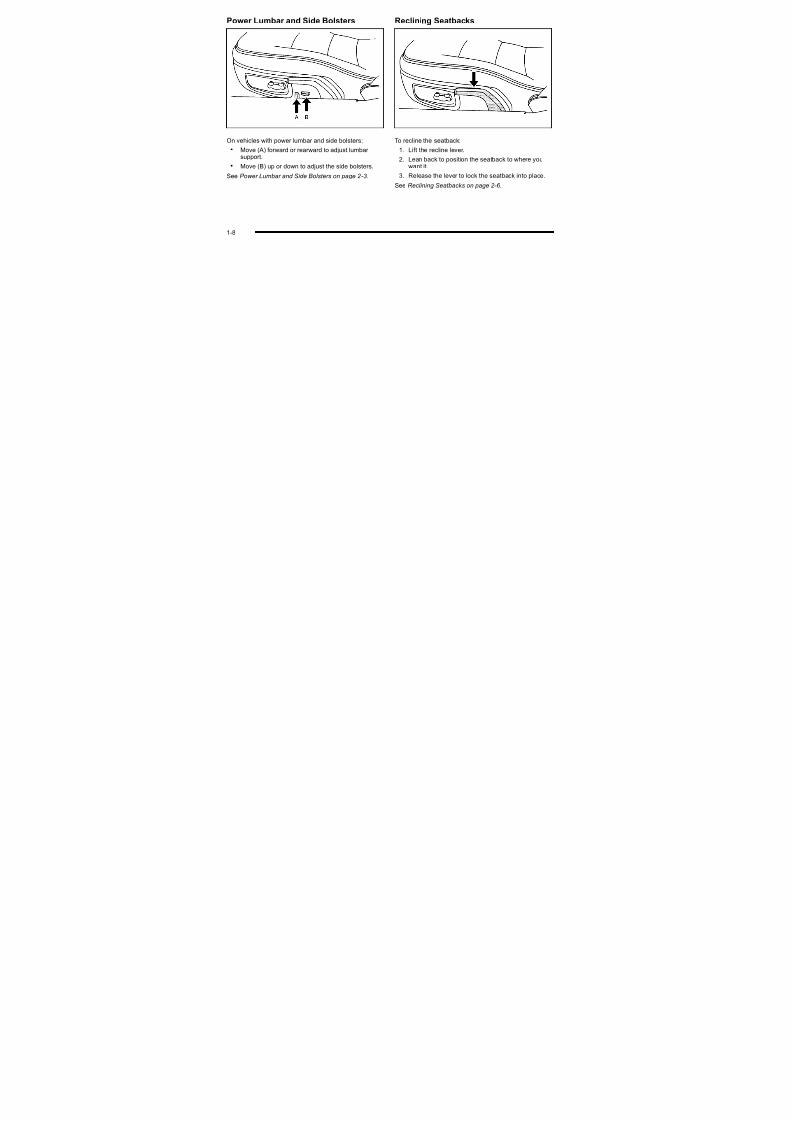
Power Lumbar and Side Bolsters
On vehicles with power lumbar and side bolsters:
. Move (A) forward or rearward to adjust lumbar support.
. Move (B) up or down to adjust the side bolsters.
See Power Lumbar and Side Bolsters on page 2 ‑ 3 .
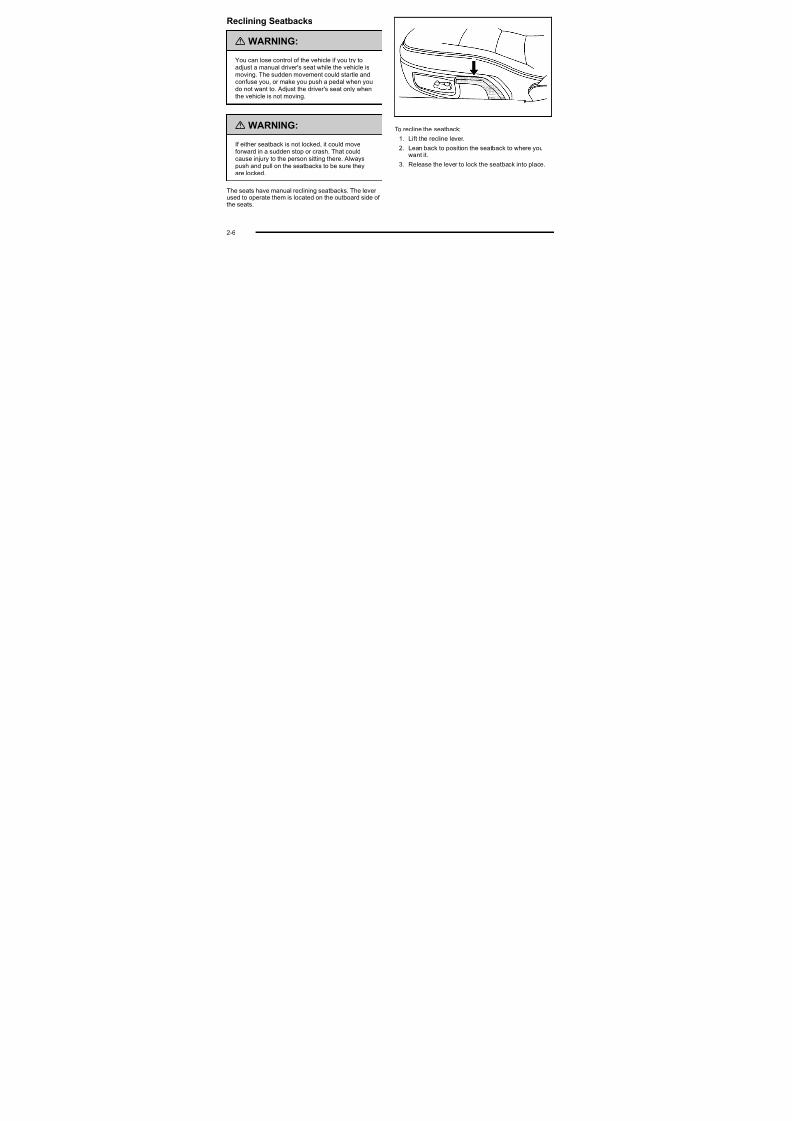
Reclining Seatbacks
To recline the seatback:
1. Lift the recline lever.
2. Lean back to position the seatback to where youwant it.
3. Release the lever to lock the seatback into place.
See Reclining Seatbacks on page 2 ‑ 6 .
1-8

7/31/2019 2010 Corvette
http://slidepdf.com/reader/full/2010-corvette 15/471
Heated Seats
On vehicles with heated seats, the buttons are locatedon the center console. The ignition must be on for thisfeature to work.
L : Press to turn the seat on at the high setting.
Press again to turn it to the low setting9 : Press to turn the system off.
Safety Belt
Refer to the following sections for important informationon how to use safety belts properly.
. Safety Belts: They Are for Everyone on page 2 ‑ 9.
. How to Wear Safety Belts Properly on page 2 ‑ 14.
. Lap-Shoulder Belt on page 2 ‑ 23 .
. Lower Anchors and Tethers for Children (LATCH)(Coupe and Convertible Models Only) on
page 2 ‑ 35 or Lower Anchors and Tethers for
Children (LATCH) (Z06 and ZR1 Models Only) on page 2 ‑ 36 .
1-

7/31/2019 2010 Corvette
http://slidepdf.com/reader/full/2010-corvette 16/471
Sensing System for Passenger Airbag
The passenger sensing system will turn off the rightfront passenger frontal airbag and seat‐mounted sideimpact airbag under certain conditions. The driver airbags are not affected by this.
The passenger airbag status indicator will be visible inthe rearview mirror when the vehicle is started.
United States
Canada
See Passenger Sensing System on page 2 ‑ 53 for important information.
1-10

7/31/2019 2010 Corvette
http://slidepdf.com/reader/full/2010-corvette 17/471
Mirror Adjustment
Exterior Mirrors
Controls for the outside power mirrors are located onthe driver door.
1. Move the top control to the left or right to selecteither the driver or passenger mirror.
2. Use the arrows located on the four-way control padto move the mirror in the desired direction.
Keep the control in the center position when notadjusting either outside mirror.
Manually fold the mirrors inward to prevent damagewhen going through an automatic car wash. To fold, pullthe mirror toward the vehicle. Push the mirror outward,to return it to the original position.
Interior Mirror Vehicles with an automatic dimming rearview mirror willautomatically reduce headlamp glare coming fromvehicles that are traveling behind you.
See Automatic Dimming Rearview Mirror on page 3 ‑ 39.
1-1

7/31/2019 2010 Corvette
http://slidepdf.com/reader/full/2010-corvette 18/471
Steering Wheel Adjustment
The lever is located on the left side of the steeringcolumn. To adjust the steering wheel:
1. Pull the lever toward you.
2. Move the steering wheel up or down into acomfortable position.
3. Release the lever to lock the steering wheel inplace.
See Tilt Wheel on page 4‑ 3 .
Telescopic Steering Column
For vehicles with thisfeature, the telescopicsteering column switch islocated on the right sideof the steering column.
To adjust the telescopic steering column:
1. Push the switch forward to move the wheel awayfrom you.
2. Pull the switch toward you to move the wheelcloser to you.
The telescopic steering column position can be storedwith your memory settings. See Memory Seat, Mirrorsand Steering Wheel o n p a g e 2 ‑ 4 for moreinformation.
See Tilt Wheel on page 4‑ 3 .
1-12

7/31/2019 2010 Corvette
http://slidepdf.com/reader/full/2010-corvette 19/471
Interior Lighting
Courtesy Lamps
When any door or the hatch/trunk lid is opened, theinterior lamps will go on, unless it is bright outside.
The courtesy lamps can also be turned on and off by
pressing the instrument panel brightness knob.
Reading Lamps
The inside rearview mirror includes two reading lamps.The lamps go on when a door is opened. When thedoors are closed, press the lamp buttons to turn oneach lamp.
Interior Light Control
To adjust the brightness of the interior lights, turn andhold the instrument panel brightness control knoblocated on the left side of the instrument panel.Push the knob in to turn the lights on or off.
For more information on interior lighting, see:
. Instrument Panel Brightness on page 4‑ 15 .
. Entry/Exit Lighting on page 4‑ 15 .
Exterior Lighting
Exterior Lamps
The exterior lamp control is located to the left of thesteering wheel, on the multifunction lever.
O : Turn the band with this symbol on it to operate theexterior lamps.
O : Turns off all lamps.
AUTO: Sets the exterior lamps to automatic mode. AUTO mode turns the exterior lamps on and off depending on how much light is available outsidethe vehicle.
1-1
7/31/2019 2010 Corvette
http://slidepdf.com/reader/full/2010-corvette 20/471
; : Manual operation of the parking lamps and other exterior lamps.
5 : Manual operation of the headlamps and other exterior lamps.
Turn and Lane-Change Signal
The turn signal lever has two upward and downwardpositions to signal a lane change or a turn.
. For a lane change, raise or lower the lever.The signal automatically flashes three times.
. For a turn, raise or lower the lever all of the way upor down. The turn signal will stop flashing when theturn is completed.
For more information, see:
.
Exterior Lamps on page 4‑
11.. Turn and Lane-Change Signals (Auto Signal) on
page 4‑ 5 .
Windshield Wiper/Washer
The windshield wiper lever is located on the right side of the steering column.
1 : Fast wipes.
6 : Slow wipes.
& : Use to set a delay between wipes.
x : Use for a delayed wiping cycle. Turn theintermittent adjust band down for a longer delayor up for a shorter delay.
9 : Turns off the windshield wipers.
8 : Use for a for a single wiping cycle. For more wipes,hold the band longer.
Windshield Washer : Press the button at the end of thelever until the washers begin.
See Windshield Wipers o n p a g e 4‑ 6 and Windshield Washer on page 4‑ 6 .
1-14

7/31/2019 2010 Corvette
http://slidepdf.com/reader/full/2010-corvette 21/471
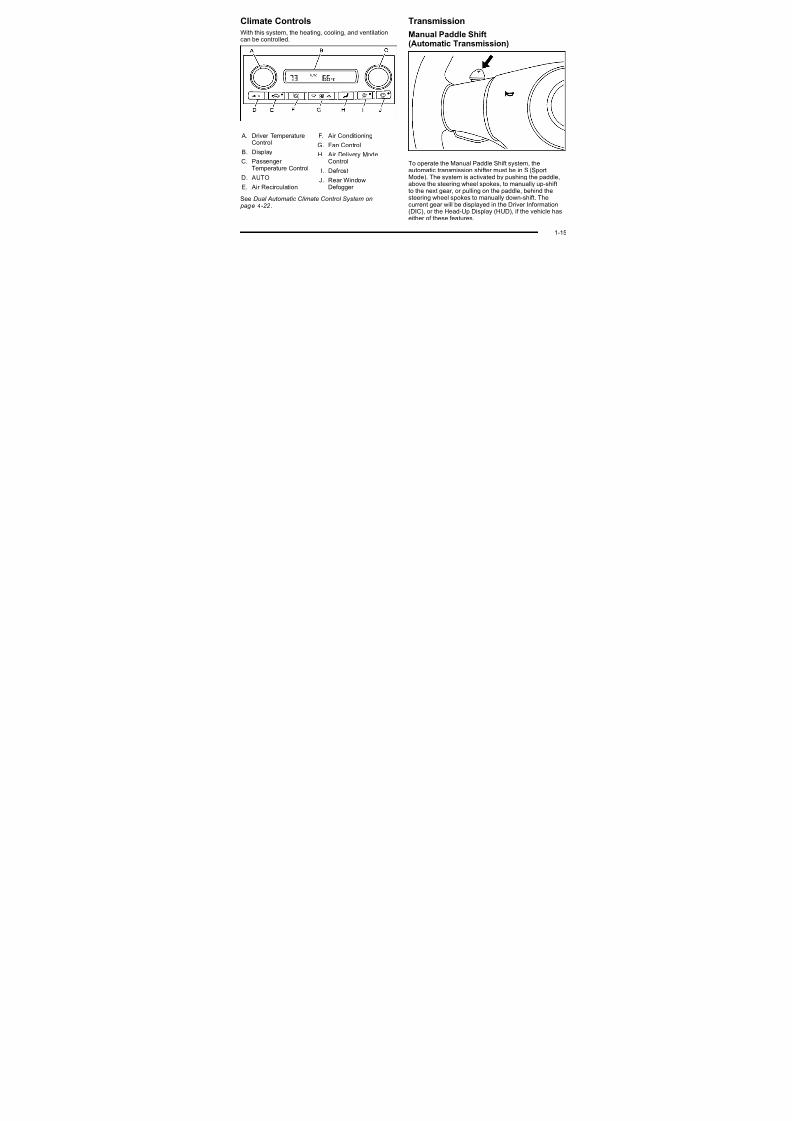
Climate Controls
With this system, the heating, cooling, and ventilationcan be controlled.
A. Driver TemperatureControl
B. Display
C. Passenger Temperature Control
D. AUTO
E. Air Recirculation
F. Air Conditioning
G. Fan Control
H. Air Delivery ModeControl
I. Defrost
J. Rear WindowDefogger
See Dual Automatic Climate Control System on pag e 4‑ 22 .
Transmission
Manual Paddle Shift(Automatic Transmission)
To operate the Manual Paddle Shift system, theautomatic transmission shifter must be in S (SportMode). The system is activated by pushing the paddle,above the steering wheel spokes, to manually up-shiftto the next gear, or pulling on the paddle, behind the
steering wheel spokes to manually down-shift. Thecurrent gear will be displayed in the Driver Information(DIC), or the Head-Up Display (HUD), if the vehicle haseither of these features.
1-1

7/31/2019 2010 Corvette
http://slidepdf.com/reader/full/2010-corvette 22/471
The Manual Paddle Shift system can be deactivatedby moving the shifter from S (Sport Mode) back toD (Drive), or by holding the up‐shift button for morethan one second.
The Manual Paddle Shift system will not allow either anup-shift or a down-shift, if the vehicle speed is too fastor too slow, nor will it allow a start from 4 (Fourth) or higher gear
See Automatic Transmission Operation on page 3 ‑ 26 .
One to Four Shift Light(Manual Transmission)
On vehicles with a manualtransmission, when thislight comes on, you can
only shift from 1 (First)to 4 (Fourth) instead of 1 (First) to 2 (Second).
For more information about shifting for the best fueleconomy, see Manual Transmission Operation on page 3 ‑ 32 .
Vehicle Features
Radio(s)
Radio with CD
Top Knob (Power/Volume) : Press to turn the systemon and off. Turn to increase or decrease the volume.
BAND : Press to switch between FM1, FM2, AM, and if equipped, XM1 and XM2.
1-16

7/31/2019 2010 Corvette
http://slidepdf.com/reader/full/2010-corvette 23/471
O e : Turn to select radio stations.
t SEEKu : Press to seek stations.
t SCANu : Press and hold to scan stations.
4 : Press to change the information that shows onthe display while listening to the radio.
For more information about these and other radiofeatures, see Audio System(s) on page 4‑ 80 andRadio(s) on page 4‑ 81.
Setting Preset Stations
Up to 30 stations (six FM1, six FM2, and six AM, and if equipped, six XM1, and six XM2) can be programmed.
To program presets:
1. Turn the radio on.
2. Press BAND to select FM1, FM2, AM, or XM1or XM2.
3. Tune in the desired station.
4. Press AUTO EQ to select the equalization.
5. Press and hold one of the six numberedpushbuttons until the radio beeps once.
6. Repeat the steps for each pushbutton.
See Radio(s) on page 4‑ 81.
Setting the Clock
To set the clock:
1. Press and hold H until the correct hour displays.
2. Press and hold M until the correct minute displays.
See Setting the Clock on page 4‑ 80 .
Satellite Radio
XM is a satellite radio service that is based in the48 contiguous United States and 10 Canadianprovinces. XM satellite radio has a wide varietyof programming and commercial-free music,coast-to-coast, and in digital-quality sound.
A fee is required to receive the XM service.
For more information, refer to:. www.xmradio.com or call 1-800-929-2100 (U.S.)
. www.xmradio.ca or call 1-877-438-9677 (Canada)
See “XM Satellite Radio Service” under Radio(s) on page 4‑ 81.
1-1
7/31/2019 2010 Corvette
http://slidepdf.com/reader/full/2010-corvette 24/471
Portable Audio Devices
This vehicle may have an auxiliary input jack, locatedon the audio faceplate. External devices such as iPod® ,MP3 players, etc. can be connected to the auxiliaryinput jack using a 3.5 mm (1/8 in) input jack cable.
See “Using the Auxiliary Input Jack” under Radio(s) on
page 4‑ 81.
Steering Wheel Controls
For vehicles with steering wheel controls, some audio
controls can be adjusted at the steering wheel.
b g : Press to turn on and off the vehicle speakers.Press and hold longer than two seconds to interact withthe OnStar ® or Bluetooth systems.
c : Press to reject an incoming call, or to end a call.
e + / e − : Increases or decreases volume.
w / x : Press to change radio stations or select trackson a CD.
1 to 6 (Preset Pushbuttons) : Press to play stationsthat are programmed on the radio preset pushbuttons.
For more information, see Audio Steering Wheel Controls on page 4‑ 107 .
Bluetooth ®
For vehicles with an in-vehicle Bluetooth system, itallows users with a Bluetooth enabled cell phone tomake and receive hands-free calls using the vehicle ’saudio system and controls.
The Bluetooth enabled cell phone must be paired withthe in-vehicle Bluetooth system before it can be usedin the vehicle. Not all phones will support all functions.For more information visit www.gm.com/bluetooth.
For more information, see Bluetooth® on page 4‑ 96 .
1-18

7/31/2019 2010 Corvette
http://slidepdf.com/reader/full/2010-corvette 25/471
Navigation System
The vehicle's navigation system provides detailedmaps of most major freeways and roads throughout theUnited States and Canada. After a destination has beenset, the system provides turn-by-turn instructions for reaching the destination. In addition, the system can
help locate a variety of points of interest (POI), suchas banks, airports, restaurants, and more.
See the vehicle's Navigation System manual for moreinformation.
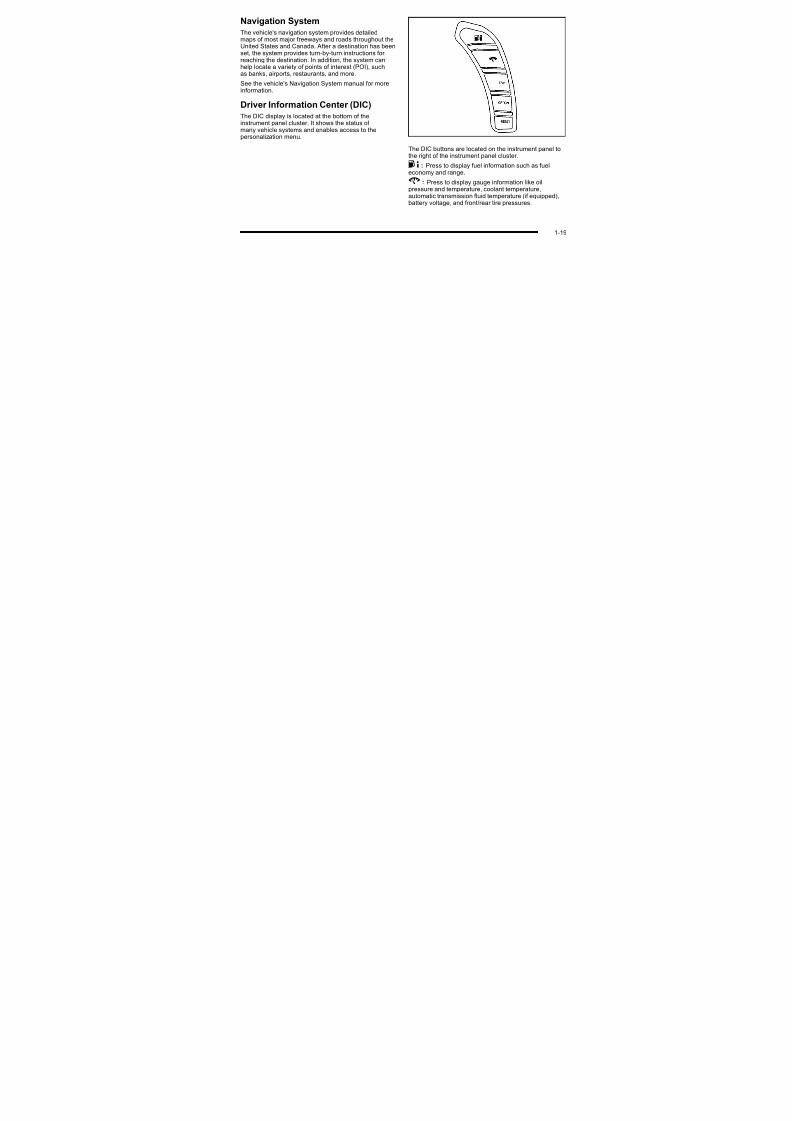
Driver Information Center (DIC)
The DIC display is located at the bottom of theinstrument panel cluster. It shows the status of many vehicle systems and enables access to thepersonalization menu.
The DIC buttons are located on the instrument panel tothe right of the instrument panel cluster.
. 4 : Press to display fuel information such as fueleconomy and range.
2 : Press to display gauge information like oilpressure and temperature, coolant temperature,
automatic transmission fluid temperature (if equipped),battery voltage, and front/rear tire pressures.
1-1

7/31/2019 2010 Corvette
http://slidepdf.com/reader/full/2010-corvette 26/471
TRIP: Press to display your total and trip distancedriven, the elapsed time function, your average speed,and the engine oil life.
OPTION: Press to choose personal options that areavailable on your vehicle, depending on the optionsyour vehicle is equipped with, such as door locks, easyentry seats, and language.
RESET: Press, along with the other buttons, to resetsystem functions, select personal options, and turn off or acknowledge messages on the DIC.
For more information, see Driver Information Center (DIC) on page 4‑ 47 .
Vehicle Personalization
Some vehicle features can be programmed by using
the DIC buttons on the left side of the steering wheel.The features that can be programmed include:
. Units
. Memory Features
. Lighting Features
. Lock and Unlock Feedback
. Door Lock and Unlock Settings
.
Language. Personalization Name
See DIC Vehicle Personalization on page 4‑ 71.
Cruise Control
The cruise controls arelocated at the end of themultifunction lever.
9 : Turns the system off.
R : Turns the system on.
+ : Use to make the vehicle accelerate or resume apreviously set speed.
T : Press the button at the end of the lever to setthe speed.
See Cruise Control on page 4‑ 7 .
1-20

7/31/2019 2010 Corvette
http://slidepdf.com/reader/full/2010-corvette 27/471
Power Outlets
The accessory power outlet can be used to connectelectrical equipment, such as a cellular phone.
The accessory power outlet is located inside the center console storage compartment, on the forward left side.
To use the outlet, remove the tethered cap.See Accessory Power Outlet(s) on page 4‑ 20 .
Roof Panel
On vehicles with a removable roof panel, there arethree release latches. Two are located on the front of the roof panel and the other is located on the back of the roof panel. See Removing the Roof Panel on pag e 3 ‑ 54.
Until you are sure you can remove the roof panel byyourself, have someone help you. Once removed, theroof panel should always be stored properly in the rear storage compartment.
For more information, see:
. Storing the Roof Panel on page 3 ‑ 56 .
. Installing the Roof Panel on page 3 ‑ 58 .
Convertible
If equipped, the convertible top can be lowered andstowed under the tonneau cover behind the seats.For step-by-step instructions, see Convertible Top(Manual) on page 3 ‑ 59 or Convertible Top (Power) on page 3 ‑ 66 .
Performance and Maintenance
Traction Control System (TCS)
The traction control system limits wheel spin.The system turns on automatically every time thevehicle is started.
. To turn off traction control, press and release d on
the console. d illuminates and the appropriate
DIC message displays. See DIC Warnings and Messages on page 4‑ 52 .
. Press and release the button again to turn ontraction control.
See Traction Control System (TCS) on page 5 ‑ 6 .
The vehicle has an Active Handling System that helpsmaintain directional control of the vehicle in difficult
driving conditions. See Active Handling System on page 5 ‑ 8 .
1-2

7/31/2019 2010 Corvette
http://slidepdf.com/reader/full/2010-corvette 28/471
The vehicle may have Competitive Driving Mode(except ZR1), Performance Traction Management(ZR1), and Launch Control systems designed toallow increased performance while accelerating andcornering. See Competitive Driving Mode on page 5 ‑ 9.
Towing
The vehicle was neither designed nor intended to betowed with any of its wheels on the ground.
See Towing Your Vehicle on page 5 ‑ 33 andRecreational Vehicle Towing on page 5 ‑ 33 .
Tire Pressure Monitor
This vehicle may have a Tire Pressure Monitor System (TPMS).
The Tire Pressure Monitor alerts you when asignificant reduction inpressure occurs in one or more of the vehicle’s tiresby illuminating the low tirepressure warning light onthe instrument cluster.
The warning light will remain on until the tire pressure iscorrected. The proper tire pressures for your vehicle arelisted on the Tire and Loading Information label locatedon the driver side center pillar (B pillar). See Loading the Vehicle on page 5 ‑ 28 .
You may notice during cooler conditions that the low tire
pressure warning light will appear when the vehicle isfirst started and then turn off as you drive. This may bean early indicator that your tire pressures are gettinglow and the tires need to be inflated to the proper pressure.
Note: The Tire Pressure Monitor can alert you aboutlow tire pressure, but it does not replace normal monthlytire maintenance. It is the driver ’s responsibility tomaintain correct tire pressures.
See Tire Pressure Monitor System on page 6 ‑ 72 and
Tire Pressure Monitor Operation on page 6 ‑ 74.
1-22

7/31/2019 2010 Corvette
http://slidepdf.com/reader/full/2010-corvette 29/471
Z06, Z16, and ZR1 Features
Checking Engine Oil
ZO6, Z16 (Grand Sport), and ZR1 models have a highperformance dry sump lubrication system. This systemoperates differently than a standard engine lubricationsystem. See Engine Oil on page 6 ‑ 19.
You should check the oil level only after the engine hasbeen thoroughly warmed up and then shut off for atleast five minutes. This ensures that the oil levelreading obtained will be accurate.
Jump Starting the Battery
The battery of ZO6, Z16 (Grand Sport), andZR1 models is in the rear of the vehicle. You do not
need to access the battery for jump starting. There areremote positive (+) and negative (−) terminals under thehood for this purpose. See Battery on page 6 ‑ 49 andJump Starting on page 6 ‑ 50 .
Brake Noise
Under certain weather or operating conditions,occasional brake noise might be heard with thevehicle's performance braking system. This brakesystem is designed for superior fade resistance andconsistent operation using high performance brakepads. Brake noise is normal and does not affect systemperformance. See Braking on page 5
‑ 4.
Car Wash Guidelines
Automatic car washes are not recommended for thisvehicle. Some car washes cause damage to thevehicle, the wheels, and the convertible top, if thevehicle is so equipped.
If you drive the vehicle through an automatic
car wash that does not have enough clearance for the undercarriage and/or wide rear tires and wheels,you could damage the vehicle. Verify with the manager of the car wash that the vehicle will fit before enteringthe car wash or use a touchless car wash. SeeWashing Your Vehicle on page 6 ‑ 94.
1-2
. Always follow posted speed limits or drive more

7/31/2019 2010 Corvette
http://slidepdf.com/reader/full/2010-corvette 30/471
Engine Oil Life System
The engine oil life system calculates engine oil lifebased on vehicle use and displays a DIC messagewhen it is necessary to change the engine oil and filter.The oil life system should be reset to 100% onlyfollowing an oil change.
Resetting the Oil Life System1. Press the TRIP button so the OIL LIFE percentage
is displayed.
2. Press RESET and hold for two seconds.OIL LIFE REMAINING 100% will appear.
See Engine Oil Life System on page 6 ‑ 25 .
Driving for Better Fuel Economy
Driving habits can affect fuel mileage. Here are somedriving tips to get the best fuel economy possible.
. Avoid fast starts and accelerate smoothly.
. Brake gradually and avoid abrupt stops.
. Avoid idling the engine for long periods of time.
. When road and weather conditions areappropriate, use cruise control, if equipped.
. Always follow posted speed limits or drive moreslowly when conditions require.
. Keep vehicle tires properly inflated.
. Combine several trips into a single trip.
. Replace the vehicle's tires with the sameTPC Spec number molded into the tire's
sidewall near the size.. Follow recommended scheduled maintenance.
Premium Fuel
This vehicle's engine was designed to use premiumunleaded gasoline. See Gasoline Octane on page 6 ‑ 7 .
Battery
This vehicle has a maintenance free battery. SeeBattery on page 6 ‑ 49 and Jump Starting on page 6 ‑ 50 .
For ZO6, ZR1, and Grand Sport models the battery islocated in the rear hatch/trunk area. Access to thebattery is not necessary to jump start the vehicle.There are positive (+) and negative (−) terminals inthe engine compartment.
1-24
R d id A i t P O St ®

7/31/2019 2010 Corvette
http://slidepdf.com/reader/full/2010-corvette 31/471
Roadside Assistance Program
U.S.: 1-800-CHEV-USA (1-800-243-8872)
TTY Users: 1-888-889-2438
Canada: 1-800-268-6800
As the owner of a new Chevrolet, you are automatically
enrolled in the Roadside Assistance program. Thisprogram provides technically trained advisors who areavailable 24 hours a day, 365 days a year, minor repair information or towing arrangements.
Roadside Assistance and OnStar
If you have a current OnStar subscription, press theOnStar button and the current GPS location will be sentto an OnStar Advisor who will assess your problem,
contact Roadside Assistance, and relay exact locationto get you the help you need.
Online Owner Center
The Online Owner Center is a complimentary servicethat includes online service reminders, vehiclemaintenance tips, online owner manual, specialprivileges and more.
Sign up today at:
www.gmownercenter.com/chevrolet (U.S.) or www.gm.ca (Canada).
OnStar ®
OnStar ® uses several innovative technologies and liveadvisors to provide a wide range of safety, security,navigation, diagnostics, and calling services.
Automatic Crash Response
In a crash, built in sensors can automatically alert an
OnStar advisor who is immediately connected to thevehicle to see if you need help.
1-2
H O St S i W k O St i t k l th hi l i i

7/31/2019 2010 Corvette
http://slidepdf.com/reader/full/2010-corvette 32/471
How OnStar Service Works
Q : This blue button connects you to a speciallytrained OnStar advisor to verify your accountinformation and to answer questions.
] : Push this red emergency button to get priorityhelp from specially trained OnStar emergency advisors.
X : Push this button for hands‐free, voice‐activatedcalling and to give voice commands for turn‐by‐turnnavigation.
Crisis Assist, Stolen Vehicle Assistance, VehicleDiagnostics, Remote Door Unlock, Roadside Assistance, Turn‐by‐Turn Navigation and Hands‐FreeCalling are available on most vehicles. Not all OnStar services are available on all vehicles. For moreinformation see the OnStar Owner's Guide or visit
www.onstar.com (U.S.) or www.onstar.ca (Canada),contact OnStar at 1-888-4-ONSTAR (1‐888‐466‐7827)
or TTY 1‐877‐248‐2080, or pressQ to speak with an
OnStar advisor 24 hours a day, 7 days a week.
For a full description of OnStar services and systemlimitations, see the OnStar Owner's Guide in theglove box.
OnStar service is subject to the OnStar terms and
conditions included in the OnStar Subscriber Information.
OnStar service cannot work unless the vehicle is in aplace where OnStar has an agreement with a wirelessservice provider for service in that area. OnStar servicealso cannot work unless the vehicle is in a place wherethe wireless service provider OnStar has hired for thatarea has coverage, network capacity and receptionwhen the service is needed, and technology that is
compatible with the OnStar service. Not all services areavailable everywhere, particularly in remote or enclosedareas, or at all times.
The OnStar system can record and transmit vehicleinformation. This information is automatically sent to an
OnStar call center whenQ is pressed, ] is pressed,
or if the airbags or ACR system deploy. This informationusually includes the vehicle's GPS location and, in theevent of a crash, additional information regarding the
crash that the vehicle was involved in (e.g. the directionfrom which the vehicle was hit). When the virtualadvisor feature of OnStar hands-free calling is used, thevehicle also sends OnStar the vehicle's GPS locationso they can provide services where it is located.
1-26
Location information about the vehicle is only available Your Responsibility

7/31/2019 2010 Corvette
http://slidepdf.com/reader/full/2010-corvette 33/471
Location information about the vehicle is only availableif the GPS satellite signals are unobstructed andavailable.
The vehicle must have a working electrical system,including adequate battery power, for the OnStar equipment to operate. There are other problems OnStar cannot control that may prevent OnStar from providing
OnStar service at any particular time or place. Someexamples are damage to important parts of the vehiclein a crash, hills, tall buildings, tunnels, weather or wireless phone network congestion.
OnStar Steering Wheel Controls
This vehicle may have a Talk/Mute button that canbe used to interact with OnStar hands-free calling.See Audio Steering Wheel Controls on page 4‑ 107 for
more information.On some vehicles, the mute button can be used to dialnumbers into voice mail systems, or to dial phoneextensions. See the OnStar Owner's Guide for moreinformation.
Your Responsibility
Increase the volume of the radio if the OnStar advisor cannot be heard.
If the light next to the OnStar buttons is red, the system
may not be functioning properly. PressQ and request a
vehicle diagnostic. If the light appears clear (no light is
appearing), your OnStar subscription has expired andall services have been deactivated. Press Q to confirm
that the OnStar equipment is active.
1-2
2 NOTES

7/31/2019 2010 Corvette
http://slidepdf.com/reader/full/2010-corvette 34/471
2 NOTES
1-28

7/31/2019 2010 Corvette
http://slidepdf.com/reader/full/2010-corvette 35/471
Front Seats If the vehicle has a manual seat it can be moved
7/31/2019 2010 Corvette
http://slidepdf.com/reader/full/2010-corvette 36/471
Front Seats
Manual Seats
{ WARNING:
You can lose control of the vehicle if you try toadjust a manual driver's seat while the vehicle ismoving. The sudden movement could startle andconfuse you, or make you push a pedal when youdo not want to. Adjust the driver's seat only whenthe vehicle is not moving.
If the vehicle has a manual seat, it can be movedforward or rearward.
1. Lift the bar tounlock the seat.
2. Slide the seat to thedesired position and
release the bar.
Try to move the seat with your body to be sure the seatis locked in place.
2-2
Power Seats Power Lumbar and Side Bolsters

7/31/2019 2010 Corvette
http://slidepdf.com/reader/full/2010-corvette 37/471
Power Seats
On vehicles with power seats:
. Move the control forward or rearward to adjust theseat location.
. Move the front or rear of the control up or down toadjust the seat cushion height.
Your seat position can be stored and recalled if youhave the memory option. See Memory Seat, Mirrors and Steering Wheel on page 2 ‑ 4.
Power Lumbar and Side Bolsters
On vehicles with power lumbar and side bolsters:
Move (A) forward or rearward to adjust lumbar support.
Move (B) up or down to adjust the side bolsters.
2-
Heated Seats The numbers on the back of the keyless access

7/31/2019 2010 Corvette
http://slidepdf.com/reader/full/2010-corvette 38/471
Heated Seats
On vehicles with heated seats, the buttons are locatedon the center console.
The ignition must be on for this feature to work.
L : Press to turn the seat on at the high setting.
Press again to turn it to the low setting9 : Press to turn the system off.
Memory Seat, Mirrors and SteeringWheel
On vehicles with the memory package, the controls arelocated on the driver's door.
1 : Saves the seating position for driver 1.
2 : Saves the seating position for driver 2.
B : Recalls the easy exit position.
ytransmitters correspond to the numbers on thememory buttons.
To save seating positions in the memory:
1. Adjust the driver's seat, both outside mirrors, andthe telescopic steering column to a comfortabledriving position.
2. Press and hold button 1 until two beeps let youknow that the position has been stored in thememory.
A second seating, mirror, and telescopic steeringcolumn position can be set by repeating the abovesteps and pressing button 2.
2-4
To recall a memory position: Easy Exit Seat
7/31/2019 2010 Corvette
http://slidepdf.com/reader/full/2010-corvette 39/471
y p
. On vehicles with an automatic transmission, pressand release the desired button.
If the vehicle is in P (Park), a single beep soundsand the memory position is recalled after a brief delay.
If the vehicle is not in P (Park), three beeps soundand the memory position is not recalled.
. On vehicles with a manual transmission, when thevehicle is on, the parking brake needs to be set torecall the memory position. Press and release thedesired button.
A single beep sounds and the memory position isrecalled after a brief delay.
If the vehicle is on and the parking brake is not set,
three beeps sound and the memory position is notrecalled.
For vehicles with the Auto Memory Recall, see “ AutoMemory Recall” under DIC Vehicle Personalization on
pag e 4‑ 71 for more information.
To stop recall movement of the memory feature, pressone of the power seat controls, power mirror or memorybuttons, or the telescopic steering column switch.
Easy Exit Seat
B (Easy Exit Seat) : This button is used to programand recall the desired driver's seat exit position.
To program an exit position:
1. Recall the desired driving position by pressingbutton 1.
2. Adjust the seat and the telescopic steering columnposition to a comfortable exit position.
3. Press and hold the exit button until two beepssound to let you know that the exit position isnow programmed.
A second exit position can be programmed by repeatingthe above steps and pressing button 2.
To recall an exit position:
. On vehicles with an automatic transmission, thevehicle needs to be in P (Park).
. On vehicles with a manual transmission, theparking brake must be set.
B : Press to recall an exit position.
One beep will sound and the exit position for thecurrently identified driver will be recalled.
For vehicles with the Auto Exit Recall, see“ Auto ExitRecall” under DIC Vehicle Personalization on
page 4‑ 71 for more information.
2-
Reclining Seatbacks

7/31/2019 2010 Corvette
http://slidepdf.com/reader/full/2010-corvette 40/471
Reclining Seatbacks
{ WARNING:
You can lose control of the vehicle if you try toadjust a manual driver's seat while the vehicle ismoving. The sudden movement could startle andconfuse you, or make you push a pedal when youdo not want to. Adjust the driver's seat only whenthe vehicle is not moving.
{ WARNING:
If either seatback is not locked, it could moveforward in a sudden stop or crash. That couldcause injury to the person sitting there. Alwayspush and pull on the seatbacks to be sure theyare locked.
The seats have manual reclining seatbacks. The lever used to operate them is located on the outboard side of the seats.
To recline the seatback:
1. Lift the recline lever.
2. Lean back to position the seatback to where youwant it.
3. Release the lever to lock the seatback into place.
2-6
{

7/31/2019 2010 Corvette
http://slidepdf.com/reader/full/2010-corvette 41/471
{ WARNING:
Sitting in a reclined position when your vehicle isin motion can be dangerous. Even if you buckleup, your safety belts cannot do their job when you
are reclined like this.The shoulder belt cannot do its job. In a crash,you could go into it, receiving neck or other injuries.
The lap belt cannot do its job either. In a crash thebelt could go up over your abdomen. The beltforces would be there, not at your pelvic bones.This could cause serious internal injuries.
For proper protection when the vehicle is inmotion, have the seatback upright. Then sit wellback in the seat and wear your safety beltproperly.
Do not have a seatback reclined if your vehicleis moving.
2-
Seatback Latches To return the seatback upright, lift up on the latch andh th tb k d Th tb k t b

7/31/2019 2010 Corvette
http://slidepdf.com/reader/full/2010-corvette 42/471
To fold a seatback forward, lift the latch located on topof the backside of the seat. The seatback locks whenfolded down.
push the seatback rearward. The seatback must belocked in place.
{ WARNING:
If either seatback is not locked, it could moveforward in a sudden stop or crash. That couldcause injury to the person sitting there. Alwayspush and pull on the seatbacks to be sure theyare locked.
2-8
Safety Belts{ WARNING
7/31/2019 2010 Corvette
http://slidepdf.com/reader/full/2010-corvette 43/471
y
Safety Belts: They Are for Everyone
This section of the manual describes how to use safetybelts properly. It also describes some things not to dowith safety belts.
{ WARNING:
Do not let anyone ride where a safety belt cannotbe worn properly. In a crash, if you or your passenger(s) are not wearing safety belts, theinjuries can be much worse. You can hit thingsinside the vehicle harder or be ejected from the
vehicle. You and your passenger(s) can beseriously injured or killed. In the same crash, youmight not be, if you are buckled up. Always fastenyour safety belt, and check that your passenger(s)are restrained properly too.
{ WARNING:
It is extremely dangerous to ride in a cargo area,inside or outside of a vehicle. In a collision,people riding in these areas are more likely to
be seriously injured or killed. Do not allow peopleto ride in any area of your vehicle that is notequipped with seats and safety belts. Be sureeveryone in your vehicle is in a seat and using asafety belt properly.
This vehicle has indicators as a reminder to buckle thesafety belts. See Safety Belt Reminders on page 4‑ 32 for additional information.
2-
In most states and in all Canadian provinces, the lawrequires wearing safety belts Here is why:
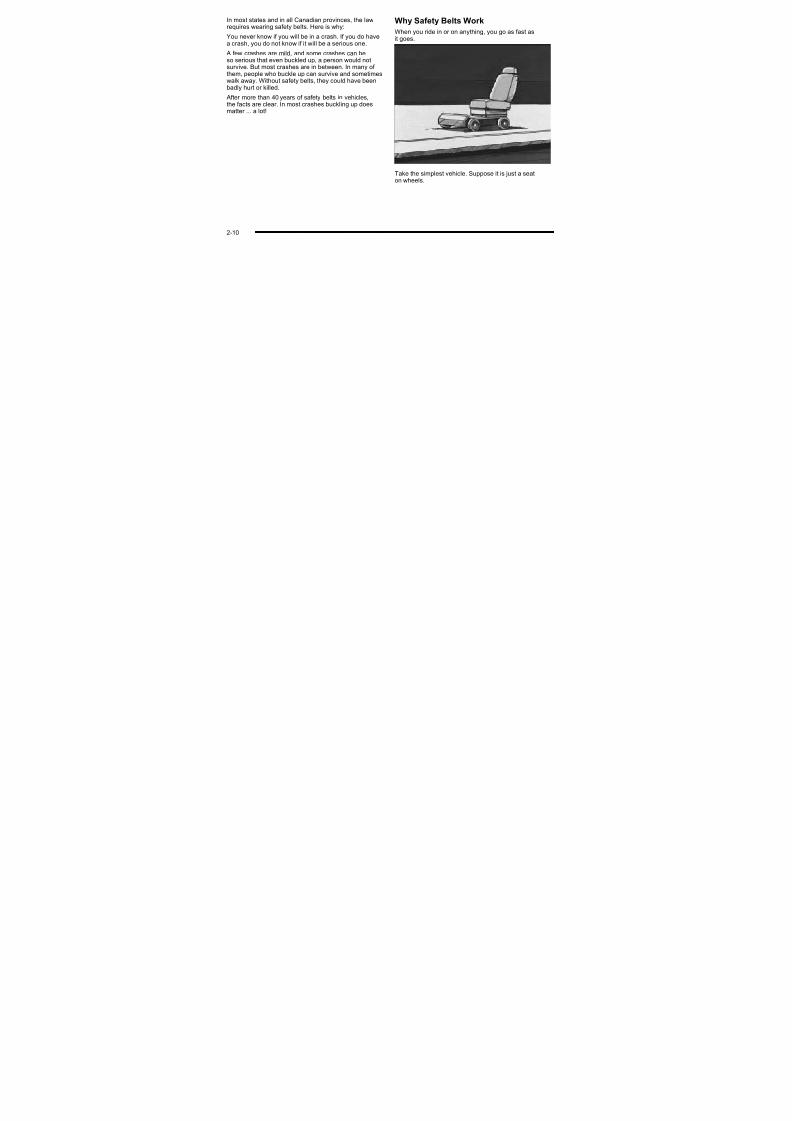
Why Safety Belts Work

7/31/2019 2010 Corvette
http://slidepdf.com/reader/full/2010-corvette 44/471
requires wearing safety belts. Here is why:
You never know if you will be in a crash. If you do havea crash, you do not know if it will be a serious one.
A few crashes are mild, and some crashes can beso serious that even buckled up, a person would notsurvive. But most crashes are in between. In many of
them, people who buckle up can survive and sometimeswalk away. Without safety belts, they could have beenbadly hurt or killed.
After more than 40 years of safety belts in vehicles,the facts are clear. In most crashes buckling up doesmatter ... a lot!
When you ride in or on anything, you go as fast asit goes.
Take the simplest vehicle. Suppose it is just a seaton wheels.
2-10

7/31/2019 2010 Corvette
http://slidepdf.com/reader/full/2010-corvette 45/471
Put someone on it. Get it up to speed. Then stop the vehicle. The rider does not stop.
2-1

7/31/2019 2010 Corvette
http://slidepdf.com/reader/full/2010-corvette 46/471
The person keeps going until stopped by something.In a real vehicle, it could be the windshield...
or the instrument panel...
2-12
Questions and Answers AboutS f t B lt

7/31/2019 2010 Corvette
http://slidepdf.com/reader/full/2010-corvette 47/471
or the safety belts!
With safety belts, you slow down as the vehicle does.You get more time to stop. You stop over more distance,and your strongest bones take the forces. That is whysafety belts make such good sense.
Safety Belts
Q: Will I be trapped in the vehicle after a crash if I am wearing a safety belt?
A: You could be — whether you are wearing a safety
belt or not. But your chance of being consciousduring and after an accident, so you can unbuckleand get out, is much greater if you are belted. Andyou can unbuckle a safety belt, even if you areupside down.
Q: If my vehicle has airbags, why should I have towear safety belts?
A: Airbags are supplemental systems only; so they
work with safety belts—
not instead of them.Whether or not an airbag is provided, all occupantsstill have to buckle up to get the most protection.That is true not only in frontal collisions, butespecially in side and other collisions.
2-1
Q: If I am a good driver, and I never drive far fromhome, why should I wear safety belts?
How to Wear Safety Belts Properly

7/31/2019 2010 Corvette
http://slidepdf.com/reader/full/2010-corvette 48/471
home, why should I wear safety belts?
A: You may be an excellent driver, but if you are in acrash — even one that is not your fault — you andyour passenger(s) can be hurt. Being a good driver does not protect you from things beyond your control, such as bad drivers.
Most accidents occur within 25 miles (40 km)of home. And the greatest number of seriousinjuries and deaths occur at speeds of less than40 mph (65 km/h).
Safety belts are for everyone.
This section is only for people of adult size.
Be aware that there are special things to know aboutsafety belts and children. And there are different rulesfor smaller children and infants. If a child will be riding inthe vehicle, see Older Children on page 2 ‑ 26 or Infants
and Young Children on page 2 ‑
29. Follow those rulesfor everyone's protection.
It is very important for all occupants to buckle up.Statistics show that unbelted people are hurt more oftenin crashes than those who are wearing safety belts.
Occupants who are not buckled up can be thrown out of the vehicle in a crash. And they can strike others in thevehicle who are wearing safety belts.
First, before you or your passenger(s) wear a safetybelt, there is important information you should know.
2-14
In a crash, this applies force to the strong pelvic bonesand you would be less likely to slide under the lap belt.

7/31/2019 2010 Corvette
http://slidepdf.com/reader/full/2010-corvette 49/471
Sit up straight and always keep your feet on the floor in front of you. The lap part of the belt should beworn low and snug on the hips, just touching the thighs.
y y pIf you slid under it, the belt would apply force on your abdomen. This could cause serious or even fatalinjuries. The shoulder belt should go over the shoulder and across the chest. These parts of the body are bestable to take belt restraining forces.
The shoulder belt locks if there is a sudden stopor crash.
2-1
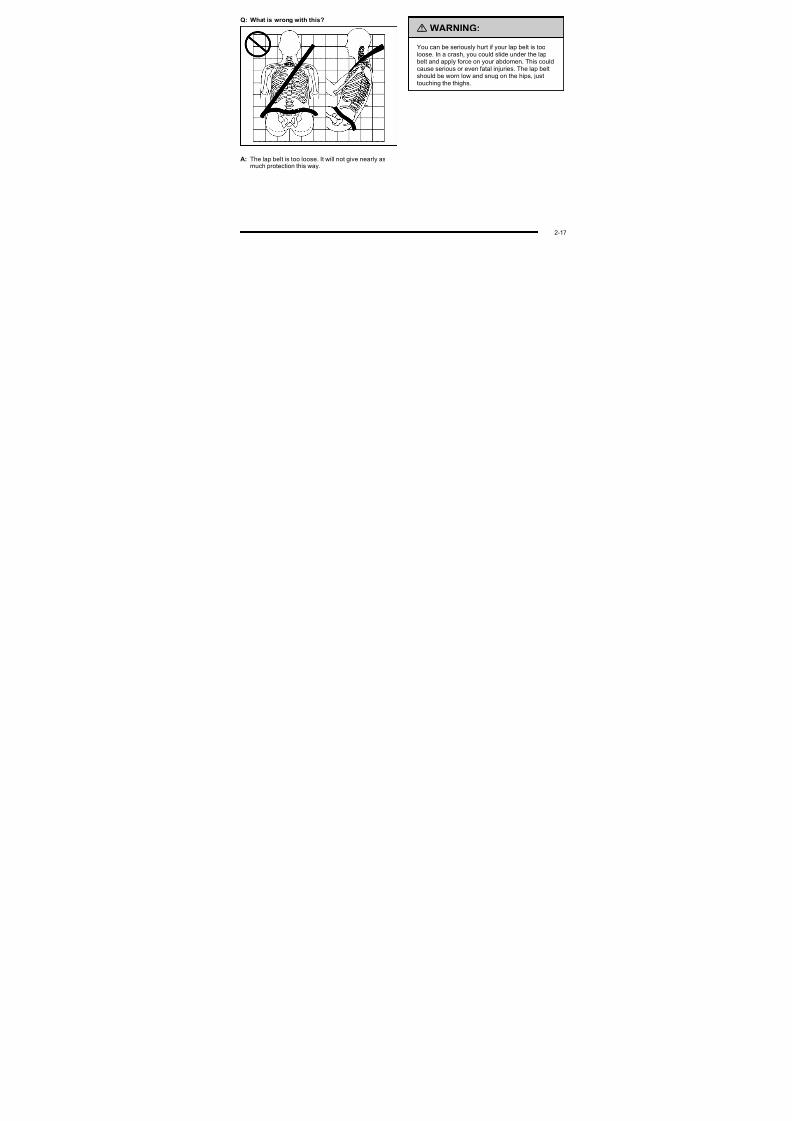
Q: What is wrong with this?
{ WARNING:
7/31/2019 2010 Corvette
http://slidepdf.com/reader/full/2010-corvette 50/471
A: The shoulder belt is too loose. It will not give asmuch protection this way.
{ WARNING:
You can be seriously hurt if your shoulder belt istoo loose. In a crash, you would move forward toomuch, which could increase injury. The shoulder belt should fit snugly against your body.
2-16
Q: What is wrong with this?
{ WARNING:

7/31/2019 2010 Corvette
http://slidepdf.com/reader/full/2010-corvette 51/471
A: The lap belt is too loose. It will not give nearly asmuch protection this way.
{ WARNING:
You can be seriously hurt if your lap belt is tooloose. In a crash, you could slide under the lapbelt and apply force on your abdomen. This couldcause serious or even fatal injuries. The lap beltshould be worn low and snug on the hips, justtouching the thighs.
2-1
Q: What is wrong with this?
{ WARNING:

7/31/2019 2010 Corvette
http://slidepdf.com/reader/full/2010-corvette 52/471
A: The belt is buckled in the wrong buckle.
{ WARNING:
You can be seriously injured if your belt is buckledin the wrong place like this. In a crash, the beltwould go up over your abdomen. The belt forceswould be there, not on the pelvic bones. Thiscould cause serious internal injuries. Alwaysbuckle your belt into the buckle nearest you.
2-18
Q: What is wrong with this?
{ WARNING:
7/31/2019 2010 Corvette
http://slidepdf.com/reader/full/2010-corvette 53/471
A: The belt is over an armrest.
You can be seriously injured if your belt goes over an armrest like this. The belt would be much toohigh. In a crash, you can slide under the belt. Thebelt force would then be applied on the abdomen,not on the pelvic bones, and that could causeserious or fatal injuries. Be sure the belt goesunder the armrests.
2-1
Q: What is wrong with this?
{ WARNING:

7/31/2019 2010 Corvette
http://slidepdf.com/reader/full/2010-corvette 54/471
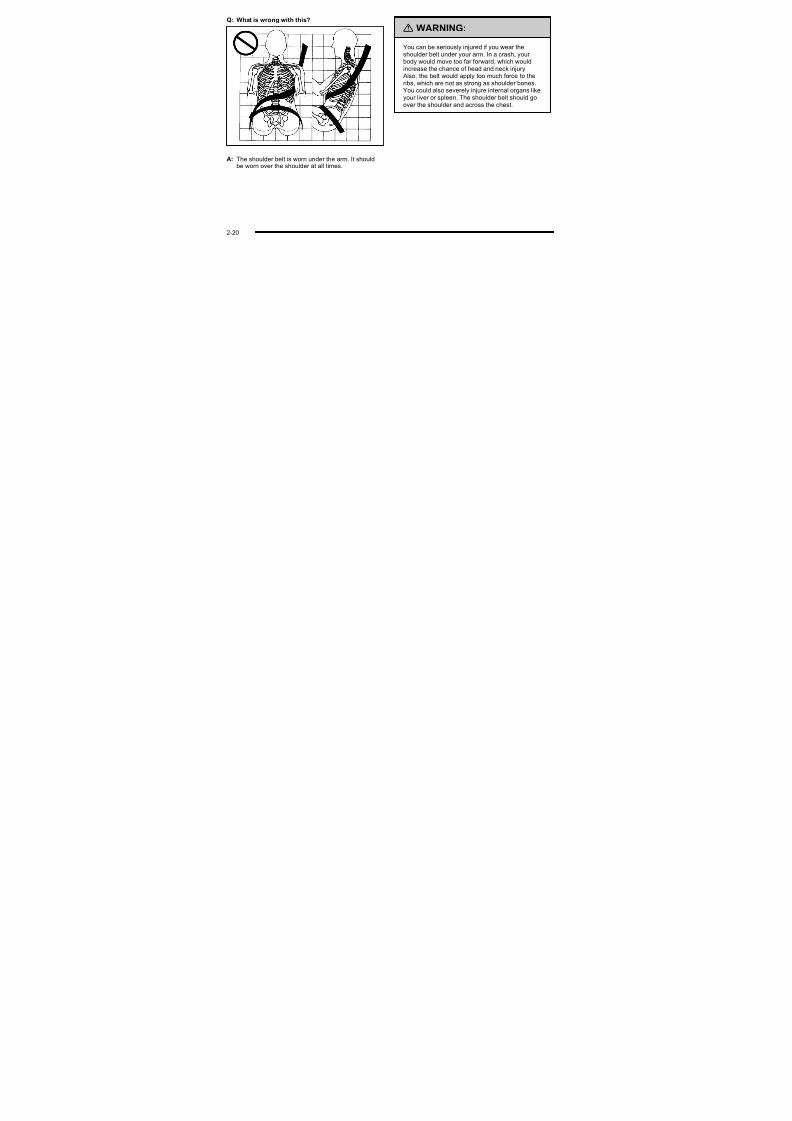
A: The shoulder belt is worn under the arm. It shouldbe worn over the shoulder at all times.
You can be seriously injured if you wear theshoulder belt under your arm. In a crash, your body would move too far forward, which wouldincrease the chance of head and neck injury. Also, the belt would apply too much force to theribs, which are not as strong as shoulder bones.You could also severely injure internal organs likeyour liver or spleen. The shoulder belt should goover the shoulder and across the chest.
2-20
Q: What is wrong with this?
{ WARNING:
7/31/2019 2010 Corvette
http://slidepdf.com/reader/full/2010-corvette 55/471
A: The belt is behind the body.
You can be seriously injured by not wearing thelap-shoulder belt properly. In a crash, you wouldnot be restrained by the shoulder belt. Your bodycould move too far forward increasing the chance
of head and neck injury. You might also slideunder the lap belt. The belt force would then beapplied right on the abdomen. That could causeserious or fatal injuries. The shoulder belt shouldgo over the shoulder and across the chest.
2-2
Q: What is wrong with this?
{ WARNING:

7/31/2019 2010 Corvette
http://slidepdf.com/reader/full/2010-corvette 56/471
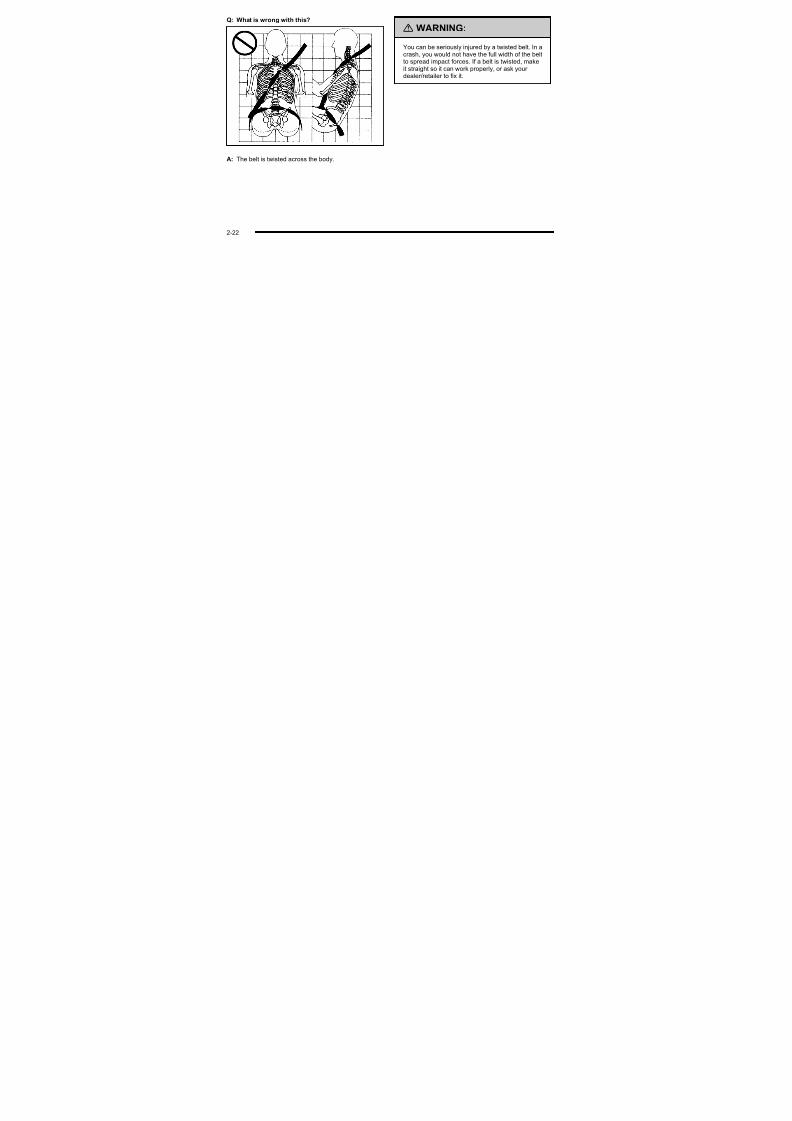
A: The belt is twisted across the body.
You can be seriously injured by a twisted belt. In acrash, you would not have the full width of the beltto spread impact forces. If a belt is twisted, makeit straight so it can work properly, or ask your
dealer/retailer to fix it.
2-22
Lap-Shoulder Belt
All seating positions in the vehicle have a

7/31/2019 2010 Corvette
http://slidepdf.com/reader/full/2010-corvette 57/471
All seating positions in the vehicle have alap-shoulder belt.
The following instructions explain how to wear alap-shoulder belt properly.
1. Adjust the seat, if the seat is adjustable, so you
can sit up straight. To see how, see“Seats
”inthe Index.
2. Pick up the latch plate and pull the belt across you.Do not let it get twisted.
The lap-shoulder belt may lock if you pull the beltacross you very quickly. If this happens, let the beltgo back slightly to unlock it. Then pull the beltacross you more slowly.
If the shoulder portion of a passenger belt is pulledout all the way, the child restraint locking featuremay be engaged. If this happens, let the belt goback all the way and start again.
Engaging the child restraint locking feature inthe right front seating position may affect thepassenger sensing system. See Passenger Sensing System on page 2 ‑ 53 for moreinformation.
3. Push the latch plate into the buckle until it clicks.
Pull up on the latch plate to make sure it is secure.If the belt is not long enough, see Safety Belt Extender on page 2 ‑ 26 .
Position the release button on the buckle sothat the safety belt could be quickly unbuckledif necessary.
2-2
7/31/2019 2010 Corvette
http://slidepdf.com/reader/full/2010-corvette 58/471
4. To make the lap part tight, pull up on the
shoulder belt.It may be necessary to pull stitching on the safetybelt through the latch plate to fully tighten the lapbelt on smaller occupants.
To unlatch the belt, push the button on the buckle.
The belt should return to its stowed position.Before a door is closed, be sure the safety belt isout of the way. If a door is slammed against asafety belt, damage can occur to both the safetybelt and the vehicle.
2-24
Safety Belt Pretensioners
This vehicle has safety belt pretensioners for the

7/31/2019 2010 Corvette
http://slidepdf.com/reader/full/2010-corvette 59/471
front outboard occupants. Although the safety beltpretensioners cannot be seen, they are part of thesafety belt assembly. They can help tighten the safetybelts during the early stages of a moderate to severefrontal and near frontal crash if the threshold conditions
for pretensioner activation are met. And, for vehicleswith side impact airbags, safety belt pretensioners canhelp tighten the safety belts in a side crash.
Pretensioners work only once. If the pretensionersactivate in a crash, they will need to be replaced, andprobably other new parts for the vehicle's safety beltsystem. See Replacing Restraint System Parts After aCrash on page 2 ‑ 61.
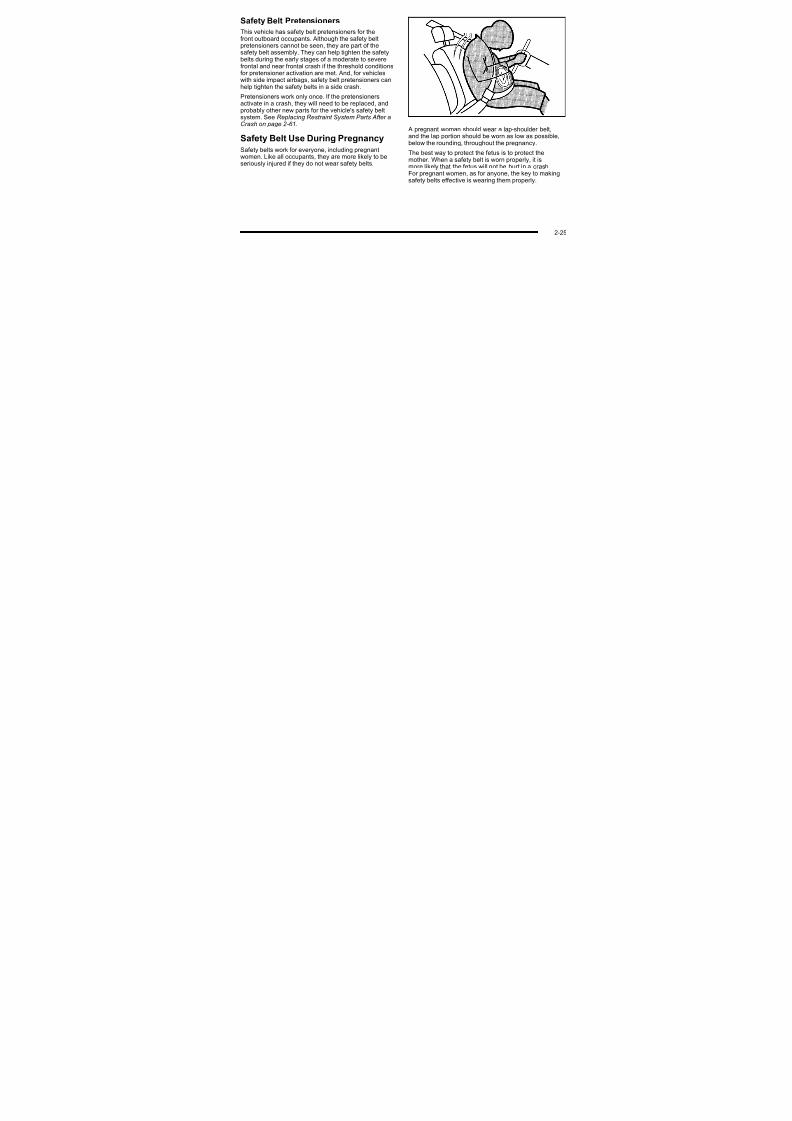
Safety Belt Use During PregnancySafety belts work for everyone, including pregnantwomen. Like all occupants, they are more likely to beseriously injured if they do not wear safety belts.
A pregnant woman should wear a lap-shoulder belt,and the lap portion should be worn as low as possible,below the rounding, throughout the pregnancy.
The best way to protect the fetus is to protect themother. When a safety belt is worn properly, it ismore likely that the fetus will not be hurt in a crash.For pregnant women, as for anyone, the key to makingsafety belts effective is wearing them properly.
2-2
Safety Belt Extender
If the vehicle's safety belt will fasten around you,
Child Restraints
Old Child

7/31/2019 2010 Corvette
http://slidepdf.com/reader/full/2010-corvette 60/471
you should use it.
But if a safety belt is not long enough, your dealer/ retailer will order you an extender. When you go in toorder it, take the heaviest coat you will wear, so theextender will be long enough for you. To help avoidpersonal injury, do not let someone else use it, and useit only for the seat it is made to fit. The extender hasbeen designed for adults. Never use it for securing childseats. To wear it, attach it to the regular safety belt.For more information, see the instruction sheet thatcomes with the extender.
Older Children
Older children who have outgrown booster seats shouldwear the vehicle's safety belts.
2-26
The manufacturer's instructions that come with thebooster seat, state the weight and height limitations for that booster. Use a booster seat with a lap-shoulder belt
Q: What is the proper way to wear safety belts?
A: An older child should wear a lap-shoulder belt andget the additional restraint a shoulder belt can

7/31/2019 2010 Corvette
http://slidepdf.com/reader/full/2010-corvette 61/471
puntil the child passes the below fit test:
. Sit all the way back on the seat. Do the kneesbend at the seat edge? If yes, continue. If no,return to the booster seat.
.
Buckle the lap-shoulder belt. Does the shoulder belt rest on the shoulder? If yes, continue. If no,then return to the booster seat.
. Does the lap belt fit low and snug on the hips,touching the thighs? If yes, continue. If no, returnto the booster seat.
. Can proper safety belt fit be maintained for thelength of the trip? If yes, continue. If no, return tothe booster seat.
get the additional restraint a shoulder belt canprovide. The shoulder belt should not cross the faceor neck. The lap belt should fit snugly below thehips, just touching the top of the thighs. This appliesbelt force to the child's pelvic bones in a crash.It should never be worn over the abdomen, whichcould cause severe or even fatal internal injuriesin a crash.
According to accident statistics, children and infants aresafer when properly restrained in rear seating positionsthan in the front seating positions.
In a crash, children who are not buckled up can strikeother people who are buckled up, or can be thrown outof the vehicle. Older children need to use safety belts
properly.
2-2
{ WARNING: { WARNING:

7/31/2019 2010 Corvette
http://slidepdf.com/reader/full/2010-corvette 62/471
Never do this.
Never allow two children to wear the same safetybelt. The safety belt can not properly spread the
impact forces. In a crash, the two children can becrushed together and seriously injured. A safetybelt must be used by only one person at a time.
Never do this.
Never allow a child to wear the safety belt with theshoulder belt behind their back. A child can be
seriously injured by not wearing the lap-shoulder belt properly. In a crash, the child would not berestrained by the shoulder belt. The child couldmove too far forward increasing the chance of head and neck injury. The child might also slideunder the lap belt. The belt force would then beapplied right on the abdomen. That could causeserious or fatal injuries. The shoulder belt shouldgo over the shoulder and across the chest.
2-28
{ WARNING:

7/31/2019 2010 Corvette
http://slidepdf.com/reader/full/2010-corvette 63/471
Infants and Young Children
Everyone in a vehicle needs protection! This includesinfants and all other children. Neither the distancetraveled nor the age and size of the traveler changesthe need, for everyone, to use safety restraints. In fact,the law in every state in the United States and in everyCanadian province says children up to some age mustbe restrained while in a vehicle.
Children can be seriously injured or strangled if ashoulder belt is wrapped around their neck andthe safety belt continues to tighten. Never leavechildren unattended in a vehicle and never allow
children to play with the safety belts.
Airbags plus lap‐shoulder belts offer protection for adults and older children, but not for young children andinfants. Neither the vehicle's safety belt system nor itsairbag system is designed for them. Every time infantsand young children ride in vehicles, they should havethe protection provided by appropriate child restraints.
Children who are not restrained properly can strikeother people, or can be thrown out of the vehicle.
2-2
{ WARNING:

7/31/2019 2010 Corvette
http://slidepdf.com/reader/full/2010-corvette 64/471
Never do this.
Never hold an infant or a child while riding in avehicle. Due to crash forces, an infant or a childwill become so heavy it is not possible to hold itduring a crash. For example, in a crash at only40 km/h (25 mph), a 5.5 kg (12 lb) infant willsuddenly become a 110 kg (240 lb) force on aperson's arms. An infant should be secured inan appropriate restraint.
2-30
{ WARNING:

7/31/2019 2010 Corvette
http://slidepdf.com/reader/full/2010-corvette 65/471
Never do this.
Children who are up against, or very close to, anyairbag when it inflates can be seriously injured or killed. Never put a rear-facing child restraint inthe right front seat. Secure a rear-facing childrestraint in a rear seat. It is also better to secure aforward-facing child restraint in a rear seat. If youmust secure a forward-facing child restraint in theright front seat, always move the front passenger seat as far back as it will go.
2-3
Q: What are the different types of add-on childrestraints?
A: Add-on child restraints, which are purchased by the{ WARNING:

7/31/2019 2010 Corvette
http://slidepdf.com/reader/full/2010-corvette 66/471
vehicle's owner, are available in four basic types.Selection of a particular restraint should take intoconsideration not only the child's weight, height,and age but also whether or not the restraint will becompatible with the motor vehicle in which it willbe used.
For most basic types of child restraints, there aremany different models available. When purchasing achild restraint, be sure it is designed to be used in amotor vehicle. If it is, the restraint will have a labelsaying that it meets federal motor vehicle safetystandards.
The restraint manufacturer's instructions that comewith the restraint state the weight and heightlimitations for a particular child restraint. In addition,there are many kinds of restraints available for children with special needs.
To reduce the risk of neck and head injury duringa crash, infants need complete support. This isbecause an infant's neck is not fully developedand its head weighs so much compared with
the rest of its body. In a crash, an infant in arear-facing child restraint settles into the restraint,so the crash forces can be distributed across thestrongest part of an infant's body, the back andshoulders. Infants should always be secured inrear-facing child restraints.
2-32
{ WARNING:Child Restraint Systems
A rear-facing infantseat (A) provides restraint
7/31/2019 2010 Corvette
http://slidepdf.com/reader/full/2010-corvette 67/471
A young child's hip bones are still so small thatthe vehicle's regular safety belt may not remainlow on the hip bones, as it should. Instead, it maysettle up around the child's abdomen. In a crash,
the belt would apply force on a body area that isunprotected by any bony structure. This alonecould cause serious or fatal injuries. To reducethe risk of serious or fatal injuries during a crash,young children should always be secured inappropriate child restraints.
seat (A) provides restraintwith the seating surfaceagainst the back of the infant.
The harness system holds the infant in place and, in acrash, acts to keep the infant positioned in the restraint.
A forward-facing childseat (B) provides restraintfor the child's body withthe harness.
2-3
Securing an Add-On Child Restraint inthe Vehicle

7/31/2019 2010 Corvette
http://slidepdf.com/reader/full/2010-corvette 68/471
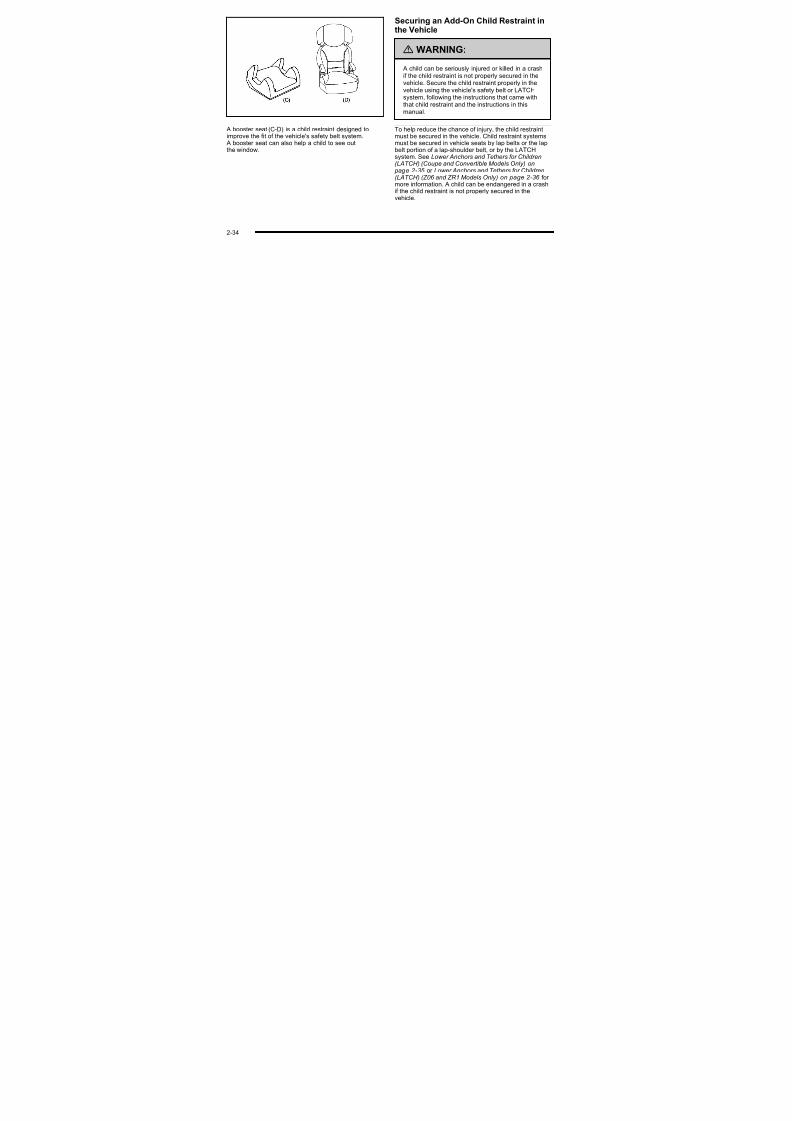
A booster seat (C-D) is a child restraint designed toimprove the fit of the vehicle's safety belt system.
A booster seat can also help a child to see outthe window.
{ WARNING:
A child can be seriously injured or killed in a crash
if the child restraint is not properly secured in thevehicle. Secure the child restraint properly in thevehicle using the vehicle's safety belt or LATCHsystem, following the instructions that came withthat child restraint and the instructions in thismanual.
To help reduce the chance of injury, the child restraintmust be secured in the vehicle. Child restraint systems
must be secured in vehicle seats by lap belts or the lapbelt portion of a lap-shoulder belt, or by the LATCHsystem. See Lower Anchors and Tethers for Children(LATCH) (Coupe and Convertible Models Only) on
pag e 2 ‑ 35 or Lower Anchors and Tethers for Children(LATCH) (Z06 and ZR1 Models Only) on page 2 ‑ 36 for more information. A child can be endangered in a crashif the child restraint is not properly secured in thevehicle.
2-34
When securing an add-on child restraint, refer to theinstructions that come with the restraint which may beon the restraint itself or in a booklet, or both, and to thismanual The child restraint instructions are important
Lower Anchors and Tethers for Children (LATCH) (Coupe andConvertible Models Only)

7/31/2019 2010 Corvette
http://slidepdf.com/reader/full/2010-corvette 69/471
manual. The child restraint instructions are important,so if they are not available, obtain a replacement copyfrom the manufacturer.
Keep in mind that an unsecured child restraint canmove around in a collision or sudden stop and injure
people in the vehicle. Be sure to properly secure anychild restraint in the vehicle — even when no child isin it.
Securing the Child Within the ChildRestraint
{ WARNING:
A child can be seriously injured or killed in a crashif the child is not properly secured in the childrestraint. Secure the child properly following theinstructions that came with that child restraint.
Convertible Models Only)
Some child restraints have a LATCH system. As part of the LATCH system, your child restraint may have lower attachments and/or a top tether. The LATCH system
can help hold the child restraint in place during drivingor in a crash. Some vehicles have lower and/or toptether anchors designed to secure a child restraint withlower attachments and/or a top tether.
Some child restraints with a top tether are designedto be used whether the top tether is anchored or not.Other child restraints require that the top tether beanchored. A national or local law may require thatthe top tether be anchored.
In Canada, the law requires that forward-facing childrestraints have a top tether, and that the tether beattached.
2-3
Your vehicle does not have lower anchors or top tether anchors to secure a child restraint with the LATCHsystem. If a national or local law requires that your top tether be anchored, do not use a child restraint in
Your vehicle does not have lower anchors toaccommodate lower attachments. Your vehicle doeshave a top tether anchor. If your child restraint has atop tether, make sure your child restraint is properly

7/31/2019 2010 Corvette
http://slidepdf.com/reader/full/2010-corvette 70/471
top tether be anchored, do not use a child restraint inthis vehicle because a top tether cannot be properlyanchored. You must use the safety belts to secure your child restraint in this vehicle, unless a national or locallaw requires that the top tether be anchored. Refer to
your child restraint instructions and instructions in thismanual for securing a child restraint using the vehicle'ssafety belts. See Securing a Child Restraint in the Right Front Seat Position on page 2 ‑ 40 .
Lower Anchors and Tethersfor Children (LATCH)(Z06 and ZR1 Models Only)
Some child restraints have a LATCH system. As part of the LATCH system, your child restraint may have lower attachments and/or a top tether. The LATCH systemcan help hold the child restraint in place during drivingor in a crash. Some vehicles have lower and/or toptether anchors designed to secure a child restraint withlower attachments and/or a top tether.
top tether, make sure your child restraint is properlyinstalled using the top tether anchor and the vehicle'ssafety belt. A child restraint must never be installedusing only the top tether and anchor. Refer to your childrestraint instructions and see Securing a Child Restraint
in the Right Front Seat Position on page 2 ‑ 40 for
instructions on securing your child restraint using thevehicle's safety belts.
In order to use the top tether anchors in your vehicle,you need a child restraint equipped with a top tether.The child restraint manufacturer will provide you withinstructions on how to use the child restraint and itstop tether. The following explains how to attach a childrestraint with the top tether in your vehicle.
2-36
Your child restraint may have a single tether (A) or adual tether (C). Either will have a single attachment (B)to secure the top tether to the anchor.
Some top tether equipped child restraints are designed
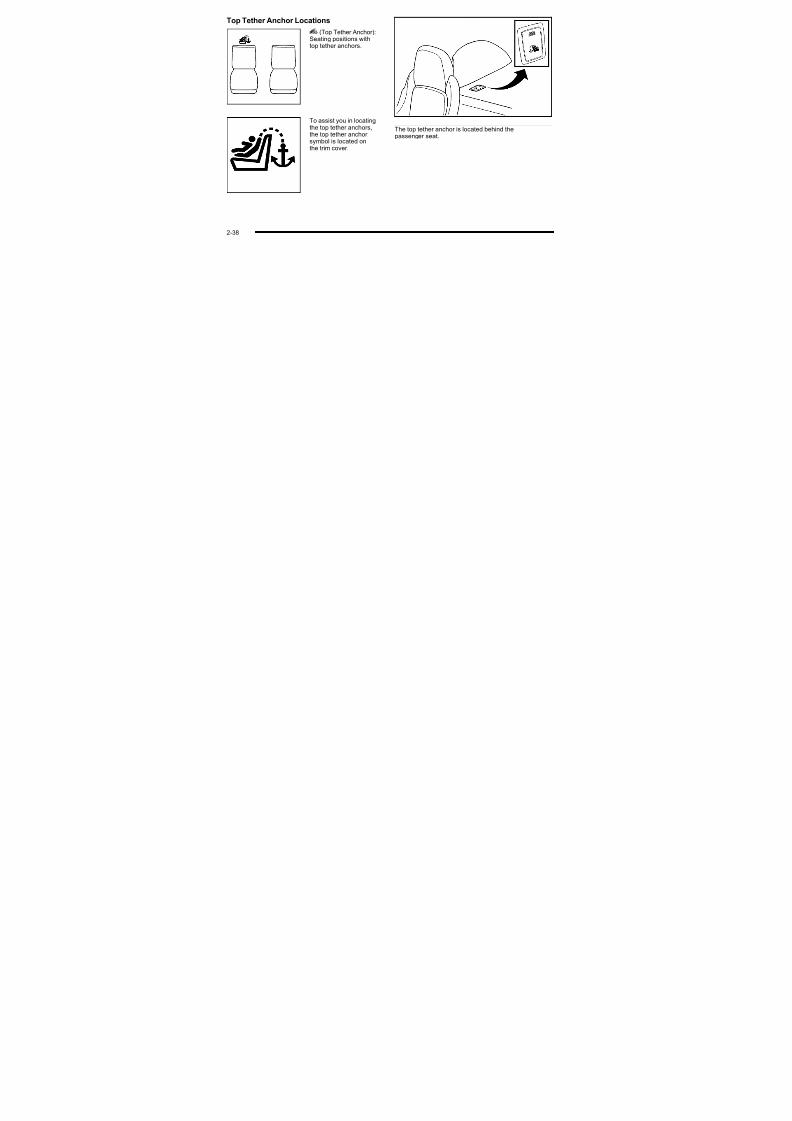
7/31/2019 2010 Corvette
http://slidepdf.com/reader/full/2010-corvette 71/471
A top tether (A, C) anchors the top of the child restraintto the vehicle. A top tether anchor is built into the
vehicle. The top tether attachment (B) on the childrestraint connects to the top tether anchor in the vehiclein order to reduce the forward movement and rotation of the child restraint during driving or in a crash.
Some top tether-equipped child restraints are designedfor use with or without the top tether being attached.Others require the top tether always to be attached.In Canada, the law requires that forward-facing childrestraints have a top tether, and that the tether be
attached. Be sure to read and follow the instructionsfor your child restraint.
If the child restraint does not have a top tether, one canbe obtained, in kit form, for many child restraints. Askthe child restraint manufacturer whether or not a kit isavailable.
2-3
Top Tether Anchor Locations
i (Top Tether Anchor):Seating positions witht t th h

7/31/2019 2010 Corvette
http://slidepdf.com/reader/full/2010-corvette 72/471
top tether anchors.
To assist you in locatingthe top tether anchors,the top tether anchor
symbol is located onthe trim cover.
The top tether anchor is located behind thepassenger seat.
2-38
Securing a Child Restraint with aTop Tether
{ G
2. If the child restraint manufacturer recommends thatthe top tether be attached, attach and tighten thetop tether to the top tether anchor, if equipped.Refer to the child restraint instructions and the

7/31/2019 2010 Corvette
http://slidepdf.com/reader/full/2010-corvette 73/471
{ WARNING:
If a LATCH-type child restraint is not attached to
anchors, the child restraint will not be able toprotect the child correctly. In a crash, the childcould be seriously injured or killed. Install aLATCH-type child restraint properly using theanchors, or use the vehicle's safety belts tosecure the restraint, following the instructions thatcame with the child restraint and the instructionsin this manual.
1. Secure the child restraint using the vehicle's safetybelt. See Securing a Child Restraint in the Right Front Seat Position on page 2 ‑ 40 .
following steps:
2. 1. Find the top tether anchor.
2. 2. Press the ribbed area of the trim cover toopen the cover and expose the anchor.
2. 3. Route, attach and tighten the top tether according to your child restraint instructionsand the following instructions:
If the position youare using has a fixedheadrest or head restraintand you are using asingle tether, route the
tether over the headrestor head restraint.
2-3
If the position youare using has a fixedheadrest or head restraintand you are using a dual
{ WARNING:
A hild i f i hild t i t b

7/31/2019 2010 Corvette
http://slidepdf.com/reader/full/2010-corvette 74/471
tether, route the tether around the headrest or head restraint.
3. Push and pull the child restraint in differentdirections to be sure it is secure.
Securing a Child Restraint in theRight Front Seat Position
This vehicle has airbags. In addition, the vehiclehas a passenger sensing system which is designed toturn off the right front passenger frontal airbag andseat-mounted side impact airbag (if equipped) under certain conditions. See Passenger Sensing System on
page 2 ‑ 53 and Passenger Airbag Status Indicator on page 4‑ 34 for more information, including importantsafety information.
A label on the sun visor says,“Never put a rear-facingchild seat in the front.” This is because the risk to the
rear-facing child is so great, if the airbag deploys.
A child in a rear-facing child restraint can beseriously injured or killed if the right frontpassenger airbag inflates. This is because theback of the rear-facing child restraint would be
very close to the inflating airbag. A child in aforward-facing child restraint can be seriouslyinjured or killed if the right front passenger airbaginflates and the passenger seat is in a forwardposition.
Even if the passenger sensing system has turnedoff the right front passenger frontal airbag, nosystem is fail-safe. No one can guarantee thatan airbag will not deploy under some unusual
circumstance, even though it is turned off.
Secure rear-facing child restraints in a rear seat, even if the airbag is off. If you secure aforward-facing child restraint in the right front seat,always move the front passenger seat as far backas it will go. It is better to secure the child restraintin a rear seat.
See Passenger Sensing System on page 2 ‑ 53
for additional information.
2-40
Rear-facing child restraints should not be installed inthe vehicle, even if the airbag(s) are off.
If the child restraint has the LATCH system, see Lower Anchors and Tethers for Children (LATCH) (Coupe and
You will be using the lap-shoulder belt to secure thechild restraint in this position. Follow the instructionsthat came with the child restraint.
1. Move the seat as far back as it will go before

7/31/2019 2010 Corvette
http://slidepdf.com/reader/full/2010-corvette 75/471
( ) ( pConvertible Models Only) on page 2 ‑ 35 or Lower Anchors and Tethers for Children (LATCH) (Z06 and ZR1 Models Only) on page 2 ‑ 36 for how and where toinstall the child restraint using LATCH. If a child restraint
is secured using a safety belt and it uses a top tether,see Lower Anchors and Tethers for Children (LATCH)(Coupe and Convertible Models Only) on page 2 ‑ 35 or Lower Anchors and Tethers for Children (LATCH)(Z06 and ZR1 Models Only) on page 2 ‑ 36 for toptether anchor locations.
Do not secure a child seat in a position without a toptether anchor if a national or local law requires that thetop tether be anchored, or if the instructions that come
with the child restraint say that the top strap must beanchored.
In Canada, the law requires that forward-facing childrestraints have a top tether, and that the tether beattached.
gsecuring the forward-facing child restraint.
When the passenger sensing system has turnedoff the right front passenger frontal airbag andseat-mounted side impact airbag (if equipped),the off indicator on the passenger airbag statusindicator should light and stay lit when you start thevehicle. See Passenger Airbag Status Indicator on
page 4‑ 34.
2. Put the child restraint on the seat.
3. Pick up the latch plate, and run the lap andshoulder portions of the vehicle’s safety beltthrough or around the restraint. The child restraint
instructions will show you how.
2-4

7/31/2019 2010 Corvette
http://slidepdf.com/reader/full/2010-corvette 76/471
4. Push the latch plate into the buckle until it clicks.
Position the release button on the buckle so thatthe safety belt could be quickly unbuckled if necessary.
5. Pull the rest of the shoulder belt all the way out of
the retractor to set the lock.
2-42
7. If the child restraint has a top tether, follow thechild restraint manufacturer's instructions regardingthe use of the top tether. See Lower Anchors and Tethers for Children (LATCH) (Coupe and Convertible Models Only) on page 2 35 or

7/31/2019 2010 Corvette
http://slidepdf.com/reader/full/2010-corvette 77/471
6. To tighten the belt, push down on the childrestraint, pull the shoulder portion of the belt totighten the lap portion of the belt and feed theshoulder belt back into the retractor. Wheninstalling a forward-facing child restraint, you mayfind it helpful to use your knee to push down on thechild restraint as you tighten the belt.
Convertible Models Only) on page 2 ‑ 35 or Lower Anchors and Tethers for Children (LATCH)(Z06 and ZR1 Models Only) on page 2 ‑ 36 for more information.
8. Push and pull the child restraint in differentdirections to be sure it is secure.
If the airbag or airbags are off, the off indicator in thepassenger airbag status indicator will come on and stayon when the vehicle is started.
If a child restraint has been installed and the onindicator is lit, see “If the On Indicator is Lit for a ChildRestraint ” under Passenger Sensing System on
page 2 ‑ 53 for more information.
To remove the child restraint, unbuckle the vehiclesafety belt and let it return to the stowed position.
2-4
Airbag SystemThe vehicle has the following airbags:
. A frontal airbag for the driver.
Here are the most important things to know about theairbag system:
{ WARNING:

7/31/2019 2010 Corvette
http://slidepdf.com/reader/full/2010-corvette 78/471
. A frontal airbag for the right front passenger.
. A seat-mounted side impact airbag for the driver.
. A seat-mounted side impact airbag for the right
front passenger.
All of the airbags in the vehicle will have the word AIRBAG embossed in the trim or on an attached labelnear the deployment opening.
For frontal airbags, the word AIRBAG will appear on themiddle part of the steering wheel for the driver and onthe instrument panel for the right front passenger.
With seat-mounted side impact airbags, the word
AIRBAG will appear on the side of the seatback closestto the door.
Airbags are designed to supplement the protectionprovided by safety belts. Even though today's airbagsare also designed to help reduce the risk of injury fromthe force of an inflating bag, all airbags must inflate veryquickly to do their job.
{ WARNING:
You can be severely injured or killed in a crash if you are not wearing your safety belt — even if you
have airbags. Airbags are designed to work withsafety belts, but do not replace them. Also,airbags are not designed to deploy in everycrash. In some crashes safety belts are your onlyrestraint. See When Should an Airbag Inflate? on
page 2 ‑ 48 .
Wearing your safety belt during a crash helpsreduce your chance of hitting things inside thevehicle or being ejected from it. Airbags are“supplemental restraints” to the safety belts.Everyone in your vehicle should wear a safety beltproperly — whether or not there is an airbag for that person.
2-44
{ WARNING:
Airbags inflate with great force faster than the
WARNING: (Continued)
protection for adults and older children but not for

7/31/2019 2010 Corvette
http://slidepdf.com/reader/full/2010-corvette 79/471
Airbags inflate with great force, faster than theblink of an eye. Anyone who is up against, or very close to, any airbag when it inflates can beseriously injured or killed. Do not sit unnecessarily
close to the airbag, as you would be if you weresitting on the edge of your seat or leaning forward.Safety belts help keep you in position before andduring a crash. Always wear your safety belt,even with airbags. The driver should sit as far back as possible while still maintaining control of the vehicle.
Occupants should not lean on or sleep against thedoor or side windows in seating positions with
seat-mounted airbags.
{ WARNING:
Children who are up against, or very close to, anyairbag when it inflates can be seriously injured or
killed. Airbags plus lap-shoulder belts offer (Continued)
protection for adults and older children, but not for young children and infants. Neither the vehicle'ssafety belt system nor its airbag system isdesigned for them. Young children and infants
need the protection that a child restraint systemcan provide. Always secure children properly inyour vehicle. To read how, see Older Children on
page 2 ‑ 26 or Infants and Young Children on page 2 ‑ 29.
There is an airbagreadiness light on the
instrument panel, whichshows the airbag symbol.
The system checks the airbag electrical system for malfunctions. The light tells you if there is an electricalproblem. See Airbag Readiness Light on page 4‑ 33 for
more information.
2-4
Where Are the Airbags?

7/31/2019 2010 Corvette
http://slidepdf.com/reader/full/2010-corvette 80/471
The driver frontal airbag is in the middle of thesteering wheel.
The right front passenger frontal airbag is in theinstrument panel on the passenger's side.
2-46
{ WARNING:
If something is between an occupant and an

7/31/2019 2010 Corvette
http://slidepdf.com/reader/full/2010-corvette 81/471
Driver Side shown, Passenger Side similar
The seat-mounted side impact airbags for the driver andright front passenger are in the side of the seatbacksclosest to the door.
g pairbag, the airbag might not inflate properly or itmight force the object into that person causingsevere injury or even death. The path of an
inflating airbag must be kept clear. Do not putanything between an occupant and an airbag,and do not attach or put anything on the steeringwheel hub or on or near any other airbagcovering.
Do not use seat accessories that block theinflation path of a seat-mounted side impactairbag.
2-4
When Should an Airbag Inflate?
Frontal airbags are designed to inflate in moderate tosevere frontal or near-frontal crashes to help reducethe potential for severe injuries mainly to the driver's or
Frontal airbags may inflate at different crash speeds.For example:
. If the vehicle hits a stationary object, the airbagscould inflate at a different crash speed than if thevehicle hits a moving object

7/31/2019 2010 Corvette
http://slidepdf.com/reader/full/2010-corvette 82/471
right front passenger's head and chest. However, theyare only designed to inflate if the impact exceeds apredetermined deployment threshold. Deploymentthresholds are used to predict how severe a crash islikely to be in time for the airbags to inflate and helprestrain the occupants.
Whether the frontal airbags will or should deploy is notbased on how fast your vehicle is traveling. It dependslargely on what you hit, the direction of the impact, andhow quickly your vehicle slows down.
vehicle hits a moving object.
. If the vehicle hits an object that deforms, theairbags could inflate at a different crash speedthan if the vehicle hits an object that does
not deform.. If the vehicle hits a narrow object (like a pole),
the airbags could inflate at a different crash speedthan if the vehicle hits a wide object (like a wall).
. If the vehicle goes into an object at an angle, theairbags could inflate at a different crash speedthan if the vehicle goes straight into the object.
2-48
Thresholds can also vary with specific vehicle design.
Frontal airbags are not intended to inflate during vehiclerollovers, rear impacts, or in many side impacts.
In addition, your vehicle has dual-stage frontal airbags.
Your vehicle may or may not have seat-mounted sideimpact airbags. See Airbag System on page 2 ‑ 44.Seat-mounted side impact airbags are intendedto inflate in moderate to severe side crashes.Seat-mounted side impact airbags will inflate if

7/31/2019 2010 Corvette
http://slidepdf.com/reader/full/2010-corvette 83/471
Dual-stage airbags adjust the restraint according tocrash severity. Your vehicle has electronic frontalsensors, which help the sensing system distinguishbetween a moderate frontal impact and a more severefrontal impact. For moderate frontal impacts, dual-stageairbags inflate at a level less than full deployment.For more severe frontal impacts, full deploymentoccurs.
Your vehicle may have one or two seat positionsensors, depending on what model you have.The seat position sensor(s) enable the sensing systemto monitor the position of the driver seat (all modelsexcept Z06 and ZR1) and the right front passenger seat
(all models). Seat position sensor(s) provide informationthat is used to determine if the airbags should deploy ata reduced level or at full deployment.
p gthe crash severity is above the system's designedthreshold level. The threshold level can vary withspecific vehicle design.
Seat-mounted side impact airbags are not intended toinflate in frontal impacts, near-frontal impacts, rollovers,or rear impacts. A seat-mounted side impact airbag isintended to deploy on the side of the vehicle thatis struck.
In any particular crash, no one can say whether anairbag should have inflated simply because of thedamage to a vehicle or because of what the repair costs were. For seat-mounted side impact airbags,
deployment is determined by the location andseverity of the side impact.
2-4
What Makes an Airbag Inflate?
In a deployment event, the sensing system sends anelectrical signal triggering a release of gas from theinflator. Gas from the inflator fills the airbag causing theb t b k t f th d d l Th i fl t
How Does an Airbag Restrain?
In moderate to severe frontal or near frontal collisions,even belted occupants can contact the steering wheelor the instrument panel. In moderate to severe side
lli i b lt d t t t th i id

7/31/2019 2010 Corvette
http://slidepdf.com/reader/full/2010-corvette 84/471
bag to break out of the cover and deploy. The inflator,the airbag, and related hardware are all part of theairbag module.
Frontal airbag modules are located inside thesteering wheel and instrument panel. For vehicleswith seat-mounted side impact airbags, there are airbagmodules in the side of the front seatbacks closest tothe door.
collisions, even belted occupants can contact the insideof the vehicle.
Airbags supplement the protection provided by safety
belts. Frontal airbags distribute the force of the impactmore evenly over the occupant's upper body, stoppingthe occupant more gradually. Seat-mounted side impactairbags distribute the force of the impact more evenlyover the occupant's upper body.
But airbags would not help in many types of collisions,primarily because the occupant's motion is not towardthose airbags. See When Should an Airbag Inflate? on
pag e 2 ‑ 48 for more information.
Airbags should never be regarded as anything morethan a supplement to safety belts.
2-50
What Will You See After an AirbagInflates?
After the frontal and seat-mounted side impact airbagsinflate, they quickly deflate, so quickly that some people
{ WARNING:
When an airbag inflates, there may be dust in thef

7/31/2019 2010 Corvette
http://slidepdf.com/reader/full/2010-corvette 85/471
, y q y , q y p pmay not even realize the airbags inflated. Somecomponents of the airbag module may be hot for several minutes. For location of the airbag modules,
see What Makes an Airbag Inflate? on page 2 ‑ 50 .
The parts of the airbag that come into contact with youmay be warm, but not too hot to touch. There may besome smoke and dust coming from the vents in thedeflated airbags. Airbag inflation does not prevent thedriver from seeing out of the windshield or being ableto steer the vehicle, nor does it prevent people fromleaving the vehicle.
air. This dust could cause breathing problems for people with a history of asthma or other breathingtrouble. To avoid this, everyone in the vehicle
should get out as soon as it is safe to do so.If you have breathing problems but cannot get outof the vehicle after an airbag inflates, then getfresh air by opening a window or a door. If youexperience breathing problems following an airbagdeployment, you should seek medical attention.
The vehicle has a feature that may automatically unlockthe doors, turn the interior lamps on, turn on the hazard
warning flashers, and shut off the fuel system after the
2-5
airbags inflate. You can lock the doors, turn the interior lamps off, and turn the hazard warning flashers off byusing the controls for those features.
{ WARNING:
In many crashes severe enough to inflate the airbag,windshields are broken by vehicle deformation. Additional windshield breakage may also occur fromthe right front passenger airbag.
. Airbags are designed to inflate only once. After an
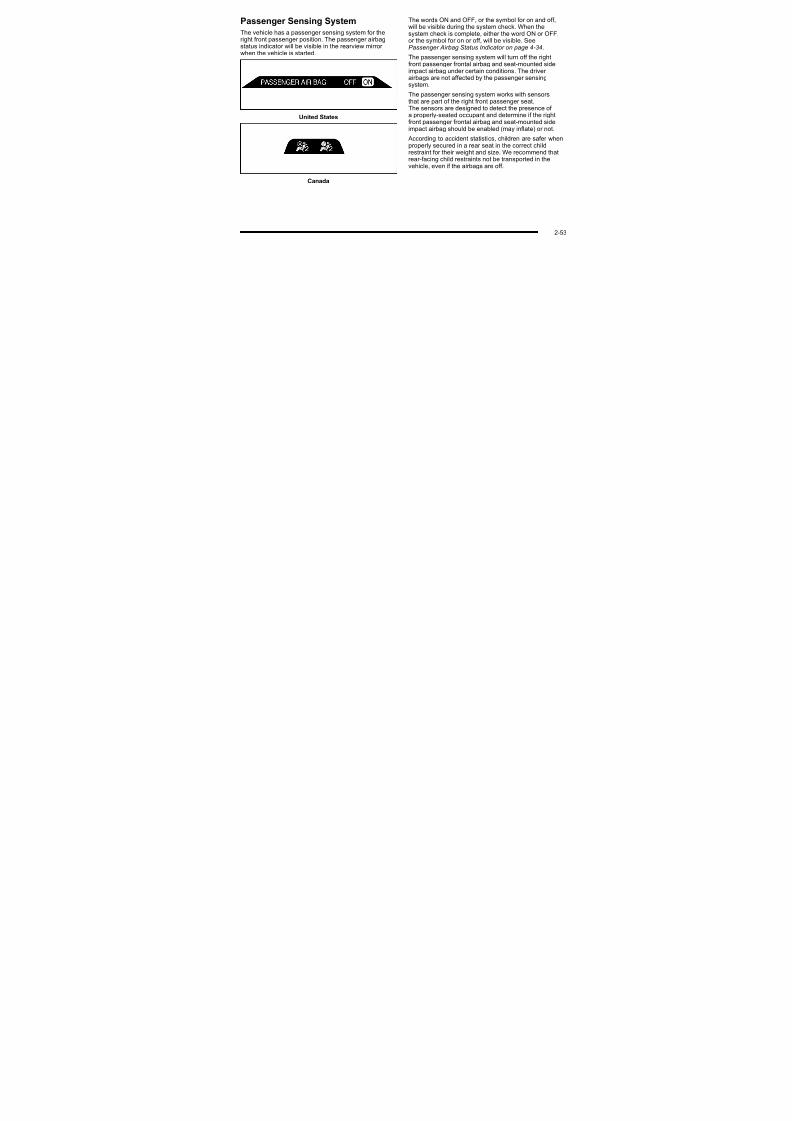
7/31/2019 2010 Corvette
http://slidepdf.com/reader/full/2010-corvette 86/471
{ WARNING:
A crash severe enough to inflate the airbags may
have also damaged important functions in thevehicle, such as the fuel system, brake andsteering systems, etc. Even if the vehicle appearsto be drivable after a moderate crash, there maybe concealed damage that could make it difficultto safely operate the vehicle.
Use caution if you should attempt to restart theengine after a crash has occurred.
g g yairbag inflates, you will need some new parts for the airbag system. If you do not get them, theairbag system will not be there to help protect you
in another crash. A new system will include airbagmodules and possibly other parts. The servicemanual for your vehicle covers the need to replaceother parts.
. The vehicle has a crash sensing and diagnosticmodule which records information after a crash.See Vehicle Data Recording and Privacy on
page 8 ‑ 18 and Event Data Recorders on page 8 ‑ 18 .
. Let only qualified technicians work on the airbagsystem. Improper service can mean that the airbagsystem will not work properly. See your dealer/ retailer for service.
2-52
Passenger Sensing System
The vehicle has a passenger sensing system for theright front passenger position. The passenger airbagstatus indicator will be visible in the rearview mirror when the vehicle is started
The words ON and OFF, or the symbol for on and off,will be visible during the system check. When thesystem check is complete, either the word ON or OFF,or the symbol for on or off, will be visible. SeePassenger Airbag Status Indicator on page 4‑ 34.

7/31/2019 2010 Corvette
http://slidepdf.com/reader/full/2010-corvette 87/471
when the vehicle is started.
United States
Canada
The passenger sensing system will turn off the rightfront passenger frontal airbag and seat-mounted sideimpact airbag under certain conditions. The driver
airbags are not affected by the passenger sensingsystem.
The passenger sensing system works with sensorsthat are part of the right front passenger seat.The sensors are designed to detect the presence of a properly-seated occupant and determine if the rightfront passenger frontal airbag and seat-mounted sideimpact airbag should be enabled (may inflate) or not.
According to accident statistics, children are safer when
properly secured in a rear seat in the correct childrestraint for their weight and size. We recommend thatrear-facing child restraints not be transported in thevehicle, even if the airbags are off.
2-5
A label on the sun visor says, “Never put a rear-facingchild seat in the front.” This is because the risk to therear-facing child is so great, if the airbag deploys.
{ WARNING:
WARNING: (Continued)
always move the front passenger seat as far backas it will go It is better to secure the child restraint

7/31/2019 2010 Corvette
http://slidepdf.com/reader/full/2010-corvette 88/471
{ WARNING:
A child in a rear-facing child restraint can be
seriously injured or killed if the right frontpassenger airbag inflates. This is because theback of the rear-facing child restraint would bevery close to the inflating airbag. A child in aforward-facing child restraint can be seriouslyinjured or killed if the right front passenger airbaginflates and the passenger seat is in a forwardposition.
Even if the passenger sensing system has turned
off the right front passenger frontal airbag andseat-mounted side impact airbag (if equipped),no system is fail-safe. No one can guarantee thatan airbag will not deploy under some unusualcircumstance, even though the airbag(s) are off.
Secure rear-facing child restraints in a rear seat,even if the airbag(s) are off. If you secure aforward-facing child restraint in the right front seat,
(Continued)
as it will go. It is better to secure the child restraintin a rear seat.
The passenger sensing system is designed to turnoff the right front passenger frontal airbag andseat-mounted side impact airbag if:
. The right front passenger seat is unoccupied.
. The system determines that an infant is present ina rear-facing infant seat.
. The system determines that a small child ispresent in a child restraint.
. The system determines that a small child ispresent in a booster seat.
. A right front passenger takes his/her weight off of the seat for a period of time.
. The right front passenger seat is occupied by asmaller person, such as a child who has outgrownchild restraints.
. Or, if there is a critical problem with the airbag
system or the passenger sensing system.
2-54
When the passenger sensing system has turned off theright front passenger frontal airbag and seat-mountedside impact airbag, the off indicator will light and stay litto remind you that the airbag(s) are off. See Passenger Airbag Status Indicator on page 4‑ 34.
depending upon the person's seating posture and bodybuild. Everyone in the vehicle who has outgrown childrestraints should wear a safety belt properly — whether or not there is an airbag for that person.

7/31/2019 2010 Corvette
http://slidepdf.com/reader/full/2010-corvette 89/471
The passenger sensing system is designed to turn on(may inflate) the right front passenger frontal airbag andseat-mounted side impact airbag anytime the system
senses that a person of adult size is sitting properly inthe right front passenger seat.
When the passenger sensing system has allowedthe airbag(s) to be enabled, the on indicator will lightand stay lit to remind you that the airbag or airbagsare active.
For some children who have outgrown child restraintsand for very small adults, the passenger sensingsystem may or may not turn off the right front passenger
frontal airbag and seat-mounted side impact airbag,
{ WARNING:
If the airbag readiness light ever comes on andstays on, it means that something may be wrongwith the airbag system. To help avoid injury toyourself or others, have the vehicle serviced rightaway. See Airbag Readiness Light on page 4‑ 33
for more information, including important safetyinformation.
2-5
If the On Indicator is Lit for a ChildRestraint
If a child restraint has been installed and the onindicator is lit:
1 T th hi l ff
If the Off Indicator is Lit for anAdult-Size Occupant

7/31/2019 2010 Corvette
http://slidepdf.com/reader/full/2010-corvette 90/471
1. Turn the vehicle off.
2. Remove the child restraint from the vehicle.
3. Remove any additional items from the seat such asblankets, cushions, seat covers, seat heaters,or seat massagers.
4. Reinstall the child restraint following the directionsprovided by the child restraint manufacturer andrefer to Securing a Child Restraint in the Right Front Seat Position on page 2 ‑ 40 .
5. If, after reinstalling the child restraint and restartingthe vehicle, the on indicator is still lit, turn the
vehicle off. Then slightly recline the vehicleseatback and adjust the seat cushion, if adjustable,to make sure that the vehicle seatback is notpushing the child restraint into the seat cushion.
6. Restart the vehicle.
If the on indicator is still lit, do not install a childrestraint in this vehicle and check with your dealer/ retailer.
If a person of adult-size is sitting in the right frontpassenger seat, but the off indicator is lit, it could bebecause that person is not sitting properly in the seat.
2-56
If this happens, use the following steps to allow thesystem to detect that person and enable the right frontpassenger frontal airbag and seat-mounted side impactairbag:
1. Turn the vehicle off.
Additional Factors Affecting SystemOperation
Safety belts help keep the passenger in position on theseat during vehicle maneuvers and braking, which helpsthe passenger sensing system maintain the passenger

7/31/2019 2010 Corvette
http://slidepdf.com/reader/full/2010-corvette 91/471
2. Remove any additional material from the seat,such as blankets, cushions, seat covers, seatheaters, or seat massagers.
3. Place the seatback in the fully upright position.
4. Have the person sit upright in the seat, centeredon the seat cushion, with legs comfortablyextended.
5. Restart the vehicle and have the person remain inthis position for two to three minutes after the onindicator is lit.
the passenger sensing system maintain the passenger airbag status. See “Safety Belts” and “Child Restraints”in the Index for additional information about theimportance of proper restraint use.
If the shoulder portion of the belt is pulled out all theway, the child restraint locking feature will be engaged.This may unintentionally cause the passenger sensingsystem to turn the airbag(s) off for some adult sizeoccupants. If this happens, let the belt go back all theway and start again.
2-5
A thick layer of additional material, such as ablanket or cushion, or aftermarket equipment such asseat covers, seat heaters, and seat massagers canaffect how well the passenger sensing system operates.We recommend that you not use seat covers or other aftermarket equipment except when approved by
Servicing Your Airbag-EquippedVehicle
Airbags affect how the vehicle should be serviced.There are parts of the airbag system in several placesaround the vehicle Your dealer/retailer and the service

7/31/2019 2010 Corvette
http://slidepdf.com/reader/full/2010-corvette 92/471
aftermarket equipment except when approved byGM for your specific vehicle. See Adding Equipment toYour Airbag-Equipped Vehicle on page 2 ‑ 59 for moreinformation about modifications that can affect how the
system operates.
{ WARNING:
Stowing of articles under the passenger seator between the passenger seat cushion andseatback may interfere with the proper operationof the passenger sensing system.
around the vehicle. Your dealer/retailer and the servicemanual have information about servicing the vehicleand the airbag system. To purchase a service manual,
see Service Publications Ordering Information on pag e 8 ‑ 16 .
{ WARNING:
For up to 10 seconds after the ignition is turned off and the battery is disconnected, an airbag can stillinflate during improper service. You can be injured
if you are close to an airbag when it inflates. Avoidyellow connectors. They are probably part of theairbag system. Be sure to follow proper serviceprocedures, and make sure the person performingwork for you is qualified to do so.
2-58
Adding Equipment to Your Airbag-Equipped Vehicle
Q: Is there anything I might add to or change aboutthe vehicle that could keep the airbags from
also interfere with the operation of the passenger sensing system. This could either prevent proper deployment of the passenger airbag(s) or preventthe passenger sensing system from properly turningoff the passenger airbag(s). See Passenger SensingSystem on page 2 ‑ 53 .

7/31/2019 2010 Corvette
http://slidepdf.com/reader/full/2010-corvette 93/471
p gworking properly?
A: Yes. If you add things that change your vehicle's
frame, bumper system, height, front end or sidesheet metal, they may keep the airbag system fromworking properly. Changing or moving any parts of the front seats, safety belts, the airbag sensing anddiagnostic module, steering wheel, instrument panel,the inside review mirror, front sensors, or airbagwiring can affect the operation of the airbag system.
In addition, the vehicle has a passenger sensingsystem for the right front passenger position, whichincludes sensors that are part of the passenger seat.The passenger sensing system may not operateproperly if the original seat trim is replaced withnon-GM covers, upholstery or trim, or withGM covers, upholstery or trim designed for adifferent vehicle. Any object, such as an aftermarketseat heater or a comfort enhancing pad or device,installed under or on top of the seat fabric, could
y p g
If you have any questions about this, you shouldcontact Customer Assistance before you modify
your vehicle. The phone numbers and addressesfor Customer Assistance are in Step Two of theCustomer Satisfaction Procedure in this manual.See Customer Satisfaction Procedure on page 8 ‑ 2 .
Q: Because I have a disability, I have to get myvehicle modified. How can I find out whether thiswill affect my airbag system?
A: If you have questions, call Customer Assistance.
The phone numbers and addresses for Customer Assistance are in Step Two of the Customer Satisfaction Procedure in this manual. SeeCustomer Satisfaction Procedure on page 8 ‑ 2 .
Your dealer/retailer and the service manual haveinformation about the location of the airbag sensors,sensing and diagnostic module and airbag wiring.
2-5
Restraint System Check
Checking the Restraint Systems
Safety Belts
Airbags
The airbag system does not need regularly scheduledmaintenance or replacement. Make sure the airbagreadiness light is working. See Airbag Readiness Light on page 4‑ 33 for more information.

7/31/2019 2010 Corvette
http://slidepdf.com/reader/full/2010-corvette 94/471
Now and then, check that the safety belt reminder light,safety belts, buckles, latch plates, retractors, andanchorages are all working properly.
Look for any other loose or damaged safety belt systemparts that might keep a safety belt system from doingits job. See your dealer/retailer to have it repaired.Torn or frayed safety belts may not protect you in acrash. They can rip apart under impact forces.If a belt is torn or frayed, get a new one right away.
Make sure the safety belt reminder light is working.See Safety Belt Reminders on page 4‑ 32 for more
information.Keep safety belts clean and dry. See Care of Safety Belts on page 6 ‑ 93 .
Notice: If an airbag covering is damaged, opened,or broken, the airbag may not work properly. Do notopen or break the airbag coverings. If there are anyopened or broken airbag covers, have the airbagcovering and/or airbag module replaced. For thelocation of the airbag modules, see What Makes an Airbag Inflate? on page 2 ‑ 50 . See your dealer/ retailer for service.
2-60
Replacing Restraint System PartsAfter a Crash
{ WARNING:
If the vehicle has been in a crash, do you need newsafety belts or LATCH system (if equipped) parts?
After a very minor crash, nothing may be necessary.But the safety belt assemblies that were used duringany crash may have been stressed or damaged. Seeyour dealer/retailer to have the safety belt assemblies

7/31/2019 2010 Corvette
http://slidepdf.com/reader/full/2010-corvette 95/471
A crash can damage the restraint systems in your
vehicle. A damaged restraint system may notproperly protect the person using it, resulting inserious injury or even death in a crash. To helpmake sure your restraint systems are workingproperly after a crash, have them inspected andany necessary replacements made as soonas possible.
your dealer/retailer to have the safety belt assembliesinspected or replaced.
If the vehicle has the LATCH system and it was being
used during a crash, you may need new LATCH systemparts.
New parts and repairs may be necessary even if thesafety belt or LATCH system (if equipped), was notbeing used at the time of the crash.
If an airbag inflates, you will need to replace airbagsystem parts. See the part on the airbag system earlier in this section.
Have the safety belt pretensioners checked if thevehicle has been in a crash, if the airbag readiness lightstays on after the vehicle is started, or while you aredriving. See Airbag Readiness Light on page 4‑ 33 .
2-6
2 NOTES

7/31/2019 2010 Corvette
http://slidepdf.com/reader/full/2010-corvette 96/471
2-62
Section 3 Features and Controls
Keys . . . . . . . . . . . . . . . . . . . . . . . . . . . . . . . . . . . . . . . . . . . . . . . . 3-3Keyless Access System . . . . . . . . . . . . . . . . . . . . . . . . . 3-5Keyless Access System Operation 3-5
Starting and Operating Your Vehicle . . . . . . . . . . . . 3-21New Vehicle Break-In . . . . . . . . . . . . . . . . . . . . . . . . . . 3-21Front Air Dam 3-22

7/31/2019 2010 Corvette
http://slidepdf.com/reader/full/2010-corvette 97/471
Keyless Access System Operation .............. 3-5
Doors and Locks . . . . . . . . . . . . . . . . . . . . . . . . . . . . . . . . . 3-10Door Locks . . . . . . . . . . . . . . . . . . . . . . . . . . . . . . . . . . . . 3-10
Power Door Locks . . . . . . . . . . . . . . . . . . . . . . . . . . . . . 3-12 Automatic Door Lock . . . . . . . . . . . . . . . . . . . . . . . . . . 3-13Programmable Automatic Door Unlock . . . . . . . . 3-13L o c k o u t P r o t e c t i o n . . . . . . . . . . . . . . . . . . . . . . . . . . . . . 3 - 1 3H a t c h . . . . . . . . . . . . . . . . . . . . . . . . . . . . . . . . . . . . . . . . . . 3 - 1 4
Windows . . . . . . . . . . . . . . . . . . . . . . . . . . . . . . . . . . . . . . . . . . 3-16Power Windows . . . . . . . . . . . . . . . . . . . . . . . . . . . . . . . 3-17Sun Visors . . . . . . . . . . . . . . . . . . . . . . . . . . . . . . . . . . . . . 3-18
Theft-Deterrent Systems . . . . . . . . . . . . . . . . . . . . . . . . . 3-19
T h e ft-De te rre n t Sy s te m .. . . . . . . . . . . . . . . . . . . . . . . 3 -1 9Immobilizer . . . . . . . . . . . . . . . . . . . . . . . . . . . . . . . . . . . . 3-20Immobilizer Operation . . . . . . . . . . . . . . . . . . . . . . . . . 3-20
Front Air Dam . . . . . . . . . . . . . . . . . . . . . . . . . . . . . . . . . . 3-22Ignition Positions . . . . . . . . . . . . . . . . . . . . . . . . . . . . . . 3-23Retained Accessory Power (RAP) . . . . . . . . . . . . . 3-24
Starting the Engine . . . . . . . . . . . . . . . . . . . . . . . . . . . . 3-24 Automatic Transmission Operation . . . . . . . . . . . . . 3-26Manual Transmission Operation . . . . . . . . . . . . . . . 3-32Parking Brake . . . . . . . . . . . . . . . . . . . . . . . . . . . . . . . . . 3-34Shifting Into Park (Automatic Transmission) . . . 3-35S h i f t i n g O u t o f P a r k . . . . . . . . . . . . . . . . . . . . . . . . . . . . 3 - 3 6Parking the Vehicle (Manual Transmission) . . . . 3-36Parking Over Things That Burn . . . . . . . . . . . . . . . . 3-37Engine Exhaust . . . . . . . . . . . . . . . . . . . . . . . . . . . . . . . . 3-37Running the Vehicle While Parked . . . . . . . . . . . . . 3-38
Mirrors . . . . . . . . . . . . . . . . . . . . . . . . . . . . . . . . . . . . . . . . . . . . 3-39 Automatic Dimming Rearview Mirror . . . . . . . . . . . 3-39Compass . . . . . . . . . . . . . . . . . . . . . . . . . . . . . . . . . . . . . . 3-39Outside Power Mirrors . . . . . . . . . . . . . . . . . . . . . . . . . 3-41Outside Automatic Dimming Mirror . . . . . . . . . . . . . 3-41Outside Convex Mirror . . . . . . . . . . . . . . . . . . . . . . . . . 3-42Outside Heated Mirrors . . . . . . . . . . . . . . . . . . . . . . . . 3-42
3-
Section 3 Features and Controls
Universal Home Remote System . . . . . . . . . . . . . . . . 3-42Universal Home Remote System Operation . . . . 3-43
Storage Areas 3 50
Roof Panel . . . . . . . . . . . . . . . . . . . . . . . . . . . . . . . . . . . . . . . . 3-54Removing the Roof Panel . . . . . . . . . . . . . . . . . . . . . . 3-54Storing the Roof Panel 3-56

7/31/2019 2010 Corvette
http://slidepdf.com/reader/full/2010-corvette 98/471
Storage Areas . . . . . . . . . . . . . . . . . . . . . . . . . . . . . . . . . . . . 3-50Glove Box . . . . . . . . . . . . . . . . . . . . . . . . . . . . . . . . . . . . . 3-50C u p h o l d e r s . . . . . . . . . . . . . . . . . . . . . . . . . . . . . . . . . . . . 3 - 5 0
Center Console Storage . . . . . . . . . . . . . . . . . . . . . . 3-50Floor Mats . . . . . . . . . . . . . . . . . . . . . . . . . . . . . . . . . . . . . 3-50Rear Storage Area . . . . . . . . . . . . . . . . . . . . . . . . . . . . . 3-51Convenience Net . . . . . . . . . . . . . . . . . . . . . . . . . . . . . . 3-52Cargo Cover . . . . . . . . . . . . . . . . . . . . . . . . . . . . . . . . . . . 3-52
Storing the Roof Panel . . . . . . . . . . . . . . . . . . . . . . . . . 3 56Installing the Roof Panel . . . . . . . . . . . . . . . . . . . . . . . 3-58
Convertible Top . . . . . . . . . . . . . . . . . . . . . . . . . . . . . . . . . . . 3 - 5 9
Convertible Top (Manual) . . . . . . . . . . . . . . . . . . . . . . 3-59Convertible Top (Power) . . . . . . . . . . . . . . . . . . . . . . . 3-66
3-2
Keys
{ WARNING:
Leaving children in a vehicle with the keyless

7/31/2019 2010 Corvette
http://slidepdf.com/reader/full/2010-corvette 99/471
Leaving children in a vehicle with the keylessaccess transmitter is dangerous for manyreasons, children or others could be badly injured
or even killed. They could operate the power windows or other controls or even make thevehicle move. The windows will function with thekeyless access transmitter in the vehicle and theycould be seriously injured or killed if caught inthe path of a closing window. Do not leave thekeyless access transmitter in a vehicle withchildren.
3-
The key, located insidethe keyless accesstransmitter, can be usedto lock and unlock theglove box and to openthe hatch/trunk lid if power to the vehicle is lost See
Press the button (A) near the bottom of the keylessaccess transmitter toremove the key. Never pull the key out withoutpressing the button.

7/31/2019 2010 Corvette
http://slidepdf.com/reader/full/2010-corvette 100/471
to the vehicle is lost. SeeHatch on page 3 ‑ 14 for more information.
This vehicle has a keyless access system withpushbutton start. See Ignition Positions on page 3 ‑ 23 for information on starting the vehicle.
Notice: If you ever lose your transmitter(s) and/or key, it could be difficult to get into your vehicle. You may even have to damage your vehicle to getin. Be sure you have a spare transmitter and/or key.
If you are locked out of the vehicle, contact Roadside Assistance. See Roadside Assistance Program o n p ag e 8 ‑ 7 .
3-4
Keyless Access System
See Radio Frequency Statement on page 8 ‑ 20 for information regarding Part 15 of the FederalCommunications Commission (FCC) Rules andRSS-210/211 of Industry Canada.
Changes or modifications to this system by other than
Keyless Access System Operation
The Keyless Access System transmitter functions workup to 30 m (100 feet) away from the vehicle.
Keyless Unlocking
Press the door handle sensor to unlock and open the

7/31/2019 2010 Corvette
http://slidepdf.com/reader/full/2010-corvette 101/471
Changes or modifications to this system by other thanan authorized service facility could void authorization touse this equipment.
If there is a decrease in the RKE operating range,try this:
. Check the distance. The transmitter may be toofar from the vehicle. Stand closer during rainy or snowy weather.
. Check the location. Other vehicles or objects maybe blocking the signal. Take a few steps to the leftor right, hold the transmitter higher, and try again.
. Check the transmitter's battery. See “BatteryReplacement” later in this section.
. If the transmitter is still not working correctly, seeyour dealer/retailer or a qualified technician for service.
Press the door handle sensor to unlock and open thedoors if the keyless access transmitter is within range.See Door Locks on page 3 ‑ 10 and “Passive Door
Unlock” under DIC Vehicle Personalization on page 4‑ 71 for additional information.
Keyless Locking
The doors lock after several seconds if all doors areclosed and at least one keyless access transmitter has been removed from the interior of the vehicle.To customize whether the doors automatically lockwhen exiting the vehicle, see “Passive Door Locking”
under DIC Vehicle Personalization on page 4‑
71 for additional information.
3-
Keyless Trunk Opening
Press the hatch/trunk release button located on the rear of the hatch/trunk lid above the license plate to open thetrunk if the keyless access transmitter is within range.See Hatch on page 3 ‑ 14 for additional information.
There are other conditions that can affect the
K (Unlock): Press once to unlock only the driver door.
PressK twice within five seconds to unlock both doors.
The interior lamps may come on.
PressingK also recalls the memory settings.
See Memory Seat, Mirrors and Steering Wheel o np ag e 2 4 for more information
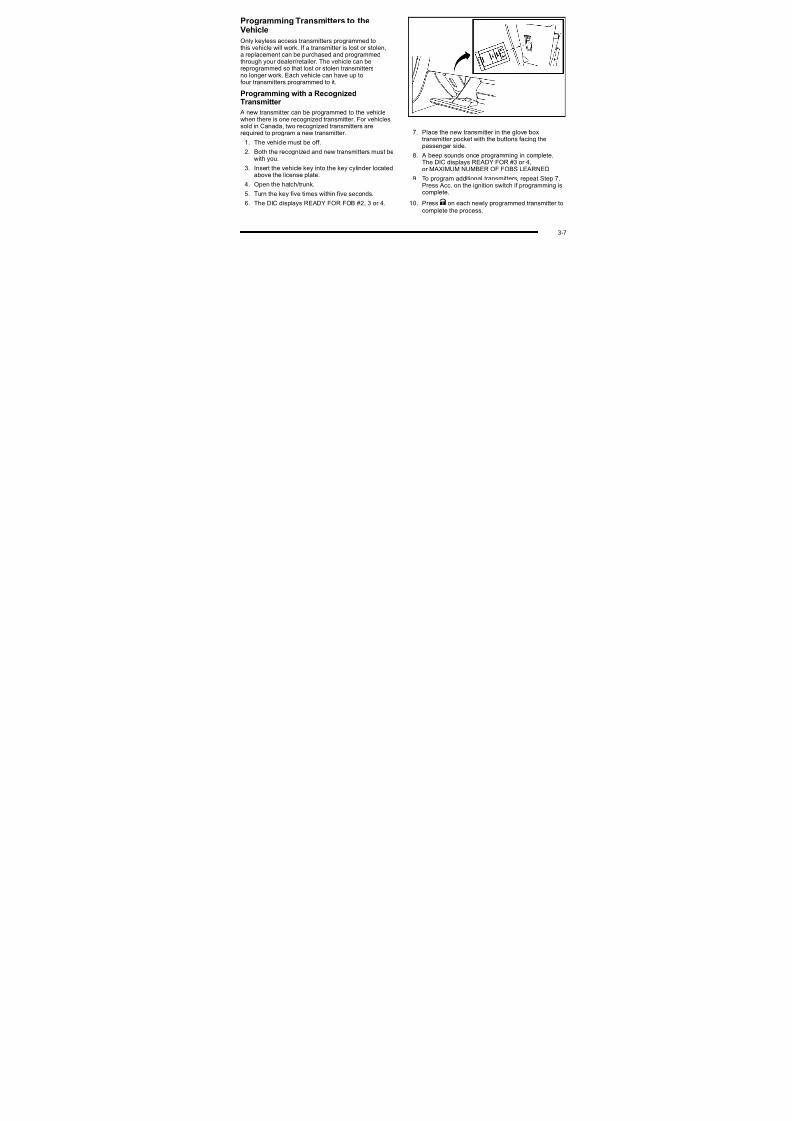
7/31/2019 2010 Corvette
http://slidepdf.com/reader/full/2010-corvette 102/471
There are other conditions that can affect theperformance of the transmitter. See Keyless AccessSystem o n p a g e 3 ‑ 5 Keyless Access System.
This vehicle comes withtwo transmitters.
Q (Lock): Press once to lock the doors. When Q ispressed twice, the lights flash and the horn sounds toconfirm locking.
p ag e 2 ‑ 4 for more information.
} (Hatch/Trunk): Press and hold for about
one second to unlock the hatch/trunk. If the engineis running, the shift lever must be in P (Park) for anautomatic transmission. For a manual transmission,the shift lever must be in NEUTRAL with the parkingbrake set.
L (Panic): Press to sound the horn. Press any other button on the keyless access transmitter to stop it.
The vehicle comes with two transmitters. Eachtransmitter will have a number on top of it, “1” or “2”.
These numbers correspond to the driver of the vehicle.For example, the memory seat position for driver 1 willbe recalled when using the transmitter labeled “1”,if enabled through the DIC. See Memory Seat, Mirrorsand Steering Wheel o n p a g e 2 ‑ 4 and DIC VehiclePersonalization on page 4‑ 71 for more information.
3-6
Programming Transmitters to theVehicle
Only keyless access transmitters programmed tothis vehicle will work. If a transmitter is lost or stolen,a replacement can be purchased and programmedthrough your dealer/retailer. The vehicle can be

7/31/2019 2010 Corvette
http://slidepdf.com/reader/full/2010-corvette 103/471
through your dealer/retailer. The vehicle can bereprogrammed so that lost or stolen transmittersno longer work. Each vehicle can have up to
four transmitters programmed to it.
Programming with a RecognizedTransmitter
A new transmitter can be programmed to the vehiclewhen there is one recognized transmitter. For vehiclessold in Canada, two recognized transmitters arerequired to program a new transmitter.
1. The vehicle must be off.
2. Both the recognized and new transmitters must bewith you.
3. Insert the vehicle key into the key cylinder locatedabove the license plate.
4. Open the hatch/trunk.
5. Turn the key five times within five seconds.
6. The DIC displays READY FOR FOB #2, 3 or 4.
7. Place the new transmitter in the glove boxtransmitter pocket with the buttons facing the
passenger side.8. A beep sounds once programming in complete.
The DIC displays READY FOR #3 or 4,or MAXIMUM NUMBER OF FOBS LEARNED.
9. To program additional transmitters, repeat Step 7.Press Acc. on the ignition switch if programming iscomplete.
10. PressK on each newly programmed transmitter to
complete the process.
3-
Programming without a RecognizedTransmitter
This procedure requires three ten minutes cycles tocomplete the programming process. United Statesowners are permitted to program a new transmitter to their vehicle when a recognized transmitter is not

7/31/2019 2010 Corvette
http://slidepdf.com/reader/full/2010-corvette 104/471
available. The Canadian immobilizer standard requiresthat Canadian owners see their dealer/retailer for
programming new transmitters when two recognizedtransmitters are not available.
1. The vehicle must be off.
2. Place the new transmitter in the glove boxtransmitter pocket with the buttons facing the
passenger side.3. Insert the vehicle key into the key cylinder located
above the license plate.
4. Open the hatch/trunk.
5. Turn the key five times within five seconds.
6. The DIC message displays OFF-ACCESSORY TOLEARN.
7. Press Acc. on the ignition switch.
3-8
8. The DIC reads WAIT 10 MINUTES and countsdown to zero.
9. The DIC displays OFF-ACCESSORY TO LEARNagain.
10. Press Acc. on the ignition switch.
11. Steps 8, 9 and 10 will be repeated two more times.
14. Press Acc. on the ignition switch if programming iscomplete.
15. PressK on each newly programmed transmitter to
complete the process.
Starting the Vehicle with a Low Transmitter Battery

7/31/2019 2010 Corvette
http://slidepdf.com/reader/full/2010-corvette 105/471
p , p
12. A beep sounds and the DIC reads READY FORFOB #1. All previously known transmitter programming has been erased.
13. A beep sounds once programming in complete.The DIC displays READY FOR FOB #2.
To program additional transmitters, take transmitter 1 out of the transmitter pocket and placetransmitter 2 in the pocket. Up to four transmitterscan be programmed. The DIC then displaysMAXIMUM NUMBER OF FOBS LEARNED
and exits the programming mode.Press Acc. on the ignition switch to complete theprocess.
Transmitter Battery
If the transmitter battery is weak, the DIC may display
NO FOBS DETECTED when trying to start the vehicle.To start the vehicle, place the transmitter in the glovebox transmitter pocket with the buttons facing thepassenger side. Then, with the vehicle in P (Park)for an automatic transmission, press the brake pedal
and /. If the vehicle has a manual transmission, press
the clutch and /. Replace the transmitter battery as
soon as possible. Change the transmitter battery if theDIC displays FOB BATTERY LOW.
3-
Battery Replacement
Notice: When replacing the battery, do not touchany of the circuitry on the transmitter. Static fromyour body could damage the transmitter.
Doors and Locks
Door Locks
{ WARNING:
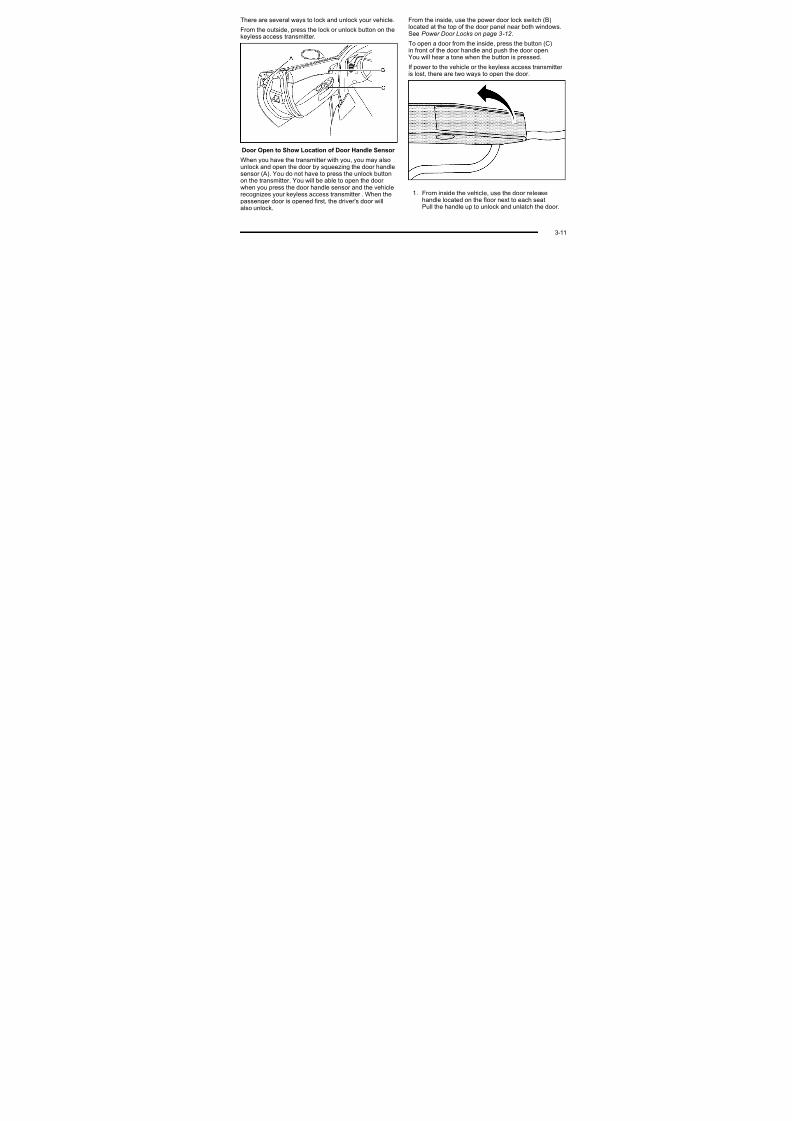
7/31/2019 2010 Corvette
http://slidepdf.com/reader/full/2010-corvette 106/471
1. Separate the transmitter with a flat, thin objectinserted into the slot on the side or back of thetransmitter.
2. Remove the old battery. Do not use a metal object.
3. Insert the new battery, positive side facing down.Replace with a CR2032 or equivalent battery.
4. Reassemble the transmitter.
Unlocked doors can be dangerous.
. Passengers — especially children — caneasily open the doors and fall out of a movingvehicle. When a door is locked it will not open.You increase the chance of being thrown outof the vehicle in a crash if the doors are notlocked. So, wear safety belts properly andlock the doors whenever you drive.
. Young children who get into unlocked vehicles
may be unable to get out. A child can beovercome by extreme heat and can suffer permanent injuries or even death from heatstroke. Always lock your vehicle whenever you leave it.
. Outsiders can easily enter through anunlocked door when you slow down or stopyour vehicle. Locking your doors can helpprevent this from happening.
3-10
There are several ways to lock and unlock your vehicle.
From the outside, press the lock or unlock button on thekeyless access transmitter.
From the inside, use the power door lock switch (B)located at the top of the door panel near both windows.See Power Door Locks on page 3 ‑ 12 .
To open a door from the inside, press the button (C)in front of the door handle and push the door open.You will hear a tone when the button is pressed.
If t th hi l th k l t itt

7/31/2019 2010 Corvette
http://slidepdf.com/reader/full/2010-corvette 107/471
Door Open to Show Location of Door Handle Sensor
When you have the transmitter with you, you may alsounlock and open the door by squeezing the door handlesensor (A). You do not have to press the unlock buttonon the transmitter. You will be able to open the door when you press the door handle sensor and the vehiclerecognizes your keyless access transmitter . When thepassenger door is opened first, the driver's door willalso unlock.
If power to the vehicle or the keyless access transmitter is lost, there are two ways to open the door.
1. From inside the vehicle, use the door releasehandle located on the floor next to each seat.Pull the handle up to unlock and unlatch the door.
3-1
Power Door Locks
The power door lock switches are located on the doors.
There is an indicator light on the rear of the door near the window.
K (Unlock) : Press to unlock the doors.
Wh d b d If h d i l d h

7/31/2019 2010 Corvette
http://slidepdf.com/reader/full/2010-corvette 108/471
2. From outside the vehicle, use the key in thecylinder above the license plate to open the hatch.
Then, use the door release tab (A), located onthe carpet inside the hatch on the driver's sideof the vehicle. Pull the tab to unlock and unlatchthe driver's door. See Keys o n p a g e 3 ‑ 3 for information on opening the hatch during a lossof power.
When pressed, a beep sounds. If the door is closed, thelight blinks twice. If the door is open, the light flashes.
Q (Lock) : Press to lock the doors.
When pressed, a beep sounds. If the door is closedwhen pressed, the light comes on for a few seconds,then turns off. If the door is open when pressed, thelight stays on.
3-12
Automatic Door Lock
The vehicle is programmed so that, when the doors areclosed, the ignition is on and the shift lever is movedout of P (Park)for automatic transmissions, or whenvehicle speed becomes faster than 8 mph (13 km/h)for manual transmissions, both doors will lock.
With the vehicle stopped and the engine running, door unlocking can be programmed through the Driver Information Center (DIC). This allows the driver tochoose various unlock settings. For programminginformation, see DIC Vehicle Personalization on
page 4‑ 71.
Lockout Protection

7/31/2019 2010 Corvette
http://slidepdf.com/reader/full/2010-corvette 109/471
Use the power door unlock switch to unlock the door when the vehicle is not in P (Park). When the door is
closed again, the doors will lock either when your foot isremoved from the brake or the vehicle speed becomesfaster than 8 mph (13 km/h).
Programmable Automatic Door Unlock
The vehicle is programmed so that when the shift lever is moved into P (Park) for automatic transmission
vehicles or when the ignition is turned OFF or isin Retained Accessory Power (RAP) for manualtransmission vehicles, both doors will unlock.
Lockout Protection
Your vehicle can be programmed to sound the hornthree times and unlock the driver door when both doorsare closed and there is a keyless access transmitter inside the vehicle. When the driver door is opened, areminder chime will sound continuously. The vehicle willremain locked only when at least one transmitter hasbeen removed from the vehicle and both doors areclosed. See DIC Vehicle Personalization on page 4‑ 71.
3-1
Hatch
{ WARNING:
Exhaust gases can enter the vehicle if it is drivenwith the liftgate trunk/hatch open or with any
WARNING: (Continued)
. Adjust the Climate Control system to a settingthat brings in only outside air and set the fanspeed to the highest setting. See ClimateControl System in the Index

7/31/2019 2010 Corvette
http://slidepdf.com/reader/full/2010-corvette 110/471
with the liftgate, trunk/hatch open, or with anyobjects that pass through the seal between the
body and the trunk/hatch or liftgate. Engineexhaust contains Carbon Monoxide (CO) whichcannot be seen or smelled. It can causeunconsciousness and even death.
If the vehicle must be driven with the liftgate,or trunk/hatch open:
. Close all of the windows.
. Fully open the air outlets on or under the
instrument panel.(Continued)
Control System in the Index.
. If the vehicle is equipped with a power liftgate,disable the power liftgate function.
For more information about carbon monoxide, seeEngine Exhaust on page 3 ‑ 37 .
Notice: Closing the hatch/trunk lid forcefully or from the sides can cause damage to the glass, thedefogger or the weather stripping. Be sure objectswill fit in the hatch/trunk area before closing the
hatch/trunk lid. When closing the hatch/trunk lid,gently pull down from the center.
Notice: Do not store heavy or sharp objects inthe rear storage compartments located in thehatch/trunk area. The objects could damage theunderbody.
3-14
Hatch/Trunk Lid Release
There are several ways to release the hatch/trunk lid.If your vehicle has an automatic transmission, the shiftlever must be in P (Park). For manual transmissionvehicles, the parking brake must be set when theignition is started for the hatch/trunk release to operate.The parking brake does not need to be set when the

7/31/2019 2010 Corvette
http://slidepdf.com/reader/full/2010-corvette 111/471
The parking brake does not need to be set when theignition is off for the hatch/trunk release to operate.
See Parking Brake on page 3 ‑
34. V (Hatch/Trunk) : Press the hatch/trunk lid releasebutton, located on the instrument panel to the left of thesteering wheel. The theft-deterrent alarm system mustnot be armed.
} (Hatch/Trunk) : Press the hatch/trunk lid releasebutton on the keyless access transmitter. See Keyless Access System on page 3 ‑ 5 .
Press the hatch/trunk release button located on the rear of the hatch/trunk lid above the license plate, as long asyou have your transmitter with you.
If your vehicle has lost battery power, open thehatch/trunk using the vehicle key. See Keys o n
p ag e 3 ‑ 3 for more information. The key lock cylinder
is located on the rear of the hatch/trunk lid above thelicense plate. Turn the vehicle key clockwise in the lock.
Closing the Rear Compartment(Except Convertible)
To close the rear compartment lid of your coupe, pulldown on the rear edge of the lid. Lower it until thepower pull down latch feature activates and it will closethe rest of the way and latch automatically.
3-1
Emergency Trunk Release Handle(Coupe)
Windows
{ WARNING:
Leaving children, helpless adults, or pets in avehicle with the windows closed is dangerous

7/31/2019 2010 Corvette
http://slidepdf.com/reader/full/2010-corvette 112/471
Notice: Do not use the emergency trunk releasehandle as a tie-down or anchor point when securingitems in the trunk as it could damage the handle.The emergency trunk release handle is onlyintended to aid a person trapped in a latched trunk,enabling them to open the trunk from the inside.
There is a glow-in-the-dark emergency trunk releasehandle located on the rear wall of the trunk below thelatch. This handle will glow following exposure to light.
Pull the release handle down to open the trunk from theinside.
vehicle with the windows closed is dangerous.They can be overcome by the extreme heat and
suffer permanent injuries or even death from heatstroke. Never leave a child, a helpless adult, or apet alone in a vehicle, especially with the windowsclosed in warm or hot weather.
3-16
Power Windows

7/31/2019 2010 Corvette
http://slidepdf.com/reader/full/2010-corvette 113/471
The power window switches are located on each door.
Pull up or press down on the front of the switch to raiseor lower the window.
Retained Accessory Power (RAP) allows you to usethe power windows when the ignition is off. For moreinformation, see Retained Accessory Power (RAP) on
page 3 ‑ 24.
3-1
Express-Down Window Press the front of the switch to the second position toactivate the express-down feature. If you want to stopthe window as it is lowering, press the switch again.
Window Indexing
This feature automatically lowers the window a small
Power Window Initialize After a power reconnect such as battery replacement,the window index‐up feature will not function until thesystem is initialized.
Once power is restored:
1. Close the door.

7/31/2019 2010 Corvette
http://slidepdf.com/reader/full/2010-corvette 114/471
This feature automatically lowers the window a smallamount when the door is opened. When the door is
closed, the window will raise to its full up position.If either window does not index properly, it could be dueto loss of power. Before returning to your dealer/retailer for service, perform the power window initializeprocedure.
2. Raise the window and hold the switch up for
three seconds after the window is closed.3. Release the switch, then hold the switch up again
for three seconds and release.
Sun Visors
Pull the visor toward you, or move it to the side to helpreduce glare.
To use the lighted mirror, lift the cover.
3-18
Theft-Deterrent SystemsVehicle theft is big business, especially in some cities.This vehicle has theft-deterrent features, however, theydo not make it impossible to steal.
Theft-Deterrent System
Arming the SystemTo arm the system:
. Press Q on the keyless access transmitter.
. Open the door and lock the door with the power door lock switch. The security light should flash.Remove the keyless access transmitter from inside

7/31/2019 2010 Corvette
http://slidepdf.com/reader/full/2010-corvette 115/471
This vehicle has a theft-deterrent alarm system.
The security light flashesif a door is open andlocked with the power door lock switch.
If this light stays on while the engine is running, thevehicle needs service.
the vehicle and close the door. The security lightstops flashing and stays on. After 30 seconds, thelight should turn off.
The vehicle can be programmed to automaticallylock the doors and arm the theft-deterrent systemwhen you exit the vehicle. See DIC VehiclePersonalization on page 4‑ 71.
If a door or the hatch/trunk is opened without using thekeyless access transmitter, the alarm goes off. The hornsounds for two minutes, then goes off to save battery
power. The vehicle will not start without a keylessaccess transmitter present.
The theft-deterrent system does not arm if the driver door is locked with the power door lock switch after thedoors are closed.
If the keyless access transmitter is removed from thevehicle while a passenger is in it, have them lock thedoors after they are closed. The alarm will not arm, sothe passenger will not set it off.
3-1
Testing the AlarmTo test the system:
1. Make sure the trunk lid/hatch is latched.
2. Lower the window on the driver door.
3. Manually arm the system.
4. Close the doors and wait 30 seconds.
Immobilizer See Radio Frequency Statement on page 8 ‑ 20 for information regarding Part 15 of the FederalCommunications Commission (FCC) Rules andRSS-210/211 of Industry Canada.
Immobilizer Operation

7/31/2019 2010 Corvette
http://slidepdf.com/reader/full/2010-corvette 116/471
4. Close the doors and wait 30 seconds.
5. Reach through the open window and manually pull
the release lever on the floor.
6. Press the unlock button on the transmitter to turnoff the alarm.
If the alarm does not sound, check to see if the hornworks. The horn fuse may be blown. See Fuses and Circuit Breakers on page 6 ‑ 101. If the horn works, butthe alarm does not go off, see your dealer/retailer.
Disarming the System
Press the unlock button on the keyless accesstransmitter or squeeze the door handle sensor whilethe transmitter is near the vehicle to unlock a door.Unlocking a door any other way sets off the alarm.If the alarm sounds, press the unlock button on thekeyless access transmitter to disarm it.
Do not leave the key or device that disarms or deactivates the theft deterrent system in the vehicle.
p
The vehicle has a passive theft-deterrent system.
The system is automatically armed when the ignition isturned off.
The immobilization system is disarmed when theignition is turned to OFF/ACCESSORY or START anda valid transmitter is found in the vehicle.
You do not have to manually arm or disarm the system.
The security light comes on if there is a problem witharming or disarming the theft-deterrent system.
The system has one or more keyless accesstransmitters that are matched to an immobilizer controlunit in the vehicle. Only a correctly matched keylessaccess transmitter starts the vehicle. The vehicle maynot start if the keyless access transmitter is damaged.
If the engine does not start and the security light comeson, there may be a problem with the immobilizer system. Press the START button again.
3-20
If the vehicle does not start and the keyless accesstransmitter appears to be undamaged, try another keyless access transmitter. Or, place the transmitter inthe transmitter pocket. See “NO FOBS DETECTED”
under DIC Warnings and Messages on page 4‑ 52 for additional information. Check the fuse. See Fuses and Circuit Breakers on page 6 ‑ 101. If the engine still doesnot start with the other transmitter, the vehicle needs
Starting and Operating Your Vehicle
New Vehicle Break-In
Follow these recommended guidelines during the first1,500 miles/2414 km of driving this vehicle. Parts have

7/31/2019 2010 Corvette
http://slidepdf.com/reader/full/2010-corvette 117/471
service. If the engine does start, the first transmitter
may be faulty. See your dealer/retailer or have a newkeyless access transmitter programmed to the vehicle.
The immobilizer system can learn new or replacementkeyless access transmitters. Up to four keylessaccess transmitters can be programmed for the vehicle.To program additional transmitters, see “Matchingtransmitter(s) to Your Vehicle” under Keyless AccessSystem Operation on page 3 ‑ 5 .
Do not leave the key or device that disarms or
deactivates the theft deterrent system in the vehicle.
a break-in period and performance will be better in the
long run.For the first 200 miles/322 km:
. To break in new tires, drive at moderatespeeds and avoid hard cornering for thefirst 200 miles/322 km.
. New brake linings also need a break-inperiod. Avoid making hard stops during thefirst 200 miles/322 km. This is recommendedevery time brake linings are replaced.
3-2
For the first 500 miles/805 km:. Avoid full throttle starts and abrupt stops.
. Do not exceed 4,000 engine rpm.
. Avoid driving at any one constant speed, fast or slow, including the use of cruise control.
. Avoid downshifting to brake or slow the vehiclewhen the engine speed will exceed 4000 RPM
Front Air DamThe vehicle is equipped with a front air dam which hasminimal ground clearance.
Vehicles with the ZR-1 package also come with asplitter made from carbon fiber.
{ WARNING

7/31/2019 2010 Corvette
http://slidepdf.com/reader/full/2010-corvette 118/471
when the engine speed will exceed 4000 RPM.
. Do not let the engine labor. Never lug theengine in high gear at low speeds. With a manualtransmission, shift to the next lower gear. This ruleapplies at all times, not just during the break-inperiod.
For the first 1,500 miles/2414 km:
. Do not participate in track events, sport drivingschools, or similar activities during the first1,500 miles/2414 km.
. Check engine oil with every refueling and add if necessary. Oil and fuel consumption may be higher than normal during the first 1,500 miles/2414 km.
{ WARNING:
The splitter in the ZR‐1 is made from carbon fiber.
When damaged, the exposed edges can be verysharp. A person could be injured by these sharpedges. Use caution when washing the vehicle,coming in contact with, or removing damagedcarbon fiber parts. See your dealer/retailer for replacement.
Under normal operation, these components willoccasionally contact some road surfaces (speedbumps, driveway ramps, etc.). This can be heard insidethe vehicle as a scraping noise. This is normal anddoes not indicate a problem.
Use care when approaching bumps or objects on roadsurfaces and avoid them when possible.
3-22
Ignition PositionsThe vehicle has anelectronic keyless ignitionwith a pushbutton start.
9 Acc. (OFF/ACCESSORY): When the engine ison or the vehicle is in accessory power mode, it isrecommended that a manual transmission be placedin R (Reverse). An automatic transmission must beplaced in P (Park). Then press the Acc. button toturn the engine off and place the vehicle in RAP.See “Retained Accessory Power (RAP)” later for moreinformation. If an automatic vehicle is not correctly

7/31/2019 2010 Corvette
http://slidepdf.com/reader/full/2010-corvette 119/471
In order to shift out of P (Park), the vehicle must berunning or in Acc. mode and the regular brake pedal
must be applied./ (START): Press this button while your foot is on thebrake for an automatic transmission, or while pressingin the clutch for a manual transmission, to start theengine. If the vehicle is in OFF or Retained AccessoryPower (RAP) mode, the keyless access transmitter must be inside the vehicle to start the engine.
placed in P (Park) a SHIFT TO PARK message will
display on the Driver Information Center (DIC).For more information, see DIC Warnings and Messageson page 4‑ 52 .
When the engine is off, press this button to place thevehicle in accessory mode. ACCESSORY MODE ONwill display on the Driver Information Center (DIC).This mode allows you to use things like the radioand the windshield wipers while the engine is off.Use accessory mode if you must have the vehicle
in motion while the engine is off, for example, if thevehicle is being pushed or towed.
After being in accessory mode for about 10 minutes, thevehicle will automatically enter RAP or OFF, dependingon if the doors are opened or closed.
3-2
Retained Accessory Power (RAP)These vehicle accessories can be used for up to10 minutes after the engine is turned off:
. Audio System
. Power Windows
These features continue to work up to 10 minutes after the engine is turned off or until either door is opened
Cell phone chargers can interfere with the operation of the Keyless Access System. Battery chargers shouldnot be plugged in when starting or turning off theengine.
To start the vehicle, do the following:
1. For vehicles with an automatic transmission,with your foot on the brake pedal, press theSTART button located on the instrument panel

7/31/2019 2010 Corvette
http://slidepdf.com/reader/full/2010-corvette 120/471
the engine is turned off or until either door is opened.
If a door is opened, the power windows and audiosystem will shut off.
Starting the Engine
Move the shift lever to P (Park) or N (Neutral) for anautomatic transmission. For a manual transmission thevehicle can be started in Neutral or any other gear aslong as the clutch pedal is pressed. To restart a vehiclewith a manual transmission when you are already
moving, use the Neutral position only. To restart avehicle with an automatic transmission when youare already moving, use N (Neutral).
Notice: Do not try to shift to P (Park) if the vehicleis moving. If you do, you could damage thetransmission. Shift to P (Park) only when thevehicle is stopped.
The keyless access transmitter must be inside thevehicle for the ignition to work.
START button located on the instrument panel.For vehicles with a manual transmission, you mustalso press in the clutch pedal while pressing theSTART button.
If there is not a keyless access transmitter inthe vehicle or if there is something causinginterference with it, the DIC will display NO FOBSDETECTED. See DIC Warnings and Messages on
page 4‑ 52 for more information.
2. When the engine begins cranking, let go of the
button and the engine cranks automatically untilit starts. If the battery in the keyless accesstransmitter is weak, the DIC displays FOBBATTERY LOW. You can still drive the vehicle.
See “Battery Replacement” under Keyless AccessSystem Operation o n p a g e 3 ‑ 5 for moreinformation. If the fob battery is dead, you need toinsert the fob into the fob slot to enable enginestarting. See “No Fobs Detected” under DIC
Warnings and Messages on page 4‑
52 .
3-24
3. Do not race the engine immediately after starting it.Operate the engine and transmission gently untilthe oil warms up and lubricates all moving parts.
4. If the engine does not start and no DIC message isdisplayed, wait 15 seconds before trying again tolet the cranking motor cool down.
If the engine does not start after 5-10 seconds,especially in very cold weather (below −18°C
The vehicle has a Computer-Controlled CrankingSystem. This feature assists in starting the engine andprotects components. Once cranking has been initiated,the engine continues cranking for a few seconds or until the vehicle starts. If the engine does not start,cranking automatically stops after 15 seconds toprevent cranking motor damage. To prevent gear damage, this system also prevents cranking if theengine is already running

7/31/2019 2010 Corvette
http://slidepdf.com/reader/full/2010-corvette 121/471
especially in very cold weather (below 18 Cor 0°F), it could be flooded with too much gasoline.Try pushing the accelerator pedal all the wayto the floor while cranking for up to 15 secondsmaximum. Wait at least 15 seconds betweeneach try, to allow the cranking motor to cool down.When the engine starts, let go of the accelerator.If the vehicle starts briefly but then stops again,repeat these steps. This clears the extra gasolinefrom the engine.
Notice: Cranking the engine for long periods of
time, by pressing the START button immediatelyafter cranking has ended, can overheat and damagethe cranking motor, and drain the battery. Wait atleast 15 seconds between each try, to allow thecranking motor to cool down.
engine is already running.
Notice: The engine is designed to work with theelectronics in the vehicle. If electrical parts or accessories are added, you could change theway the engine operates. Before adding electricalequipment, check with your dealer/retailer. If youdo not, the engine might not perform properly. Anyresulting damage would not be covered by thevehicle warranty.
3-2
Stopping the EngineIf the vehicle has an automatic transmission, movethe shift lever to P (Park) and press and hold the Acc. (Off/Accessory) button, located on the instrumentpanel, until the engine shuts off. If the shift lever is notin P (Park), the engine shuts off and the vehicle goesinto the Accessory Mode. The DIC displays SHIFTTO PARK. Once the shifter is moved to P (Park),
Automatic Transmission OperationThere are severaldifferent positions for theshift lever.

7/31/2019 2010 Corvette
http://slidepdf.com/reader/full/2010-corvette 122/471
( ),the vehicle turns off. If the vehicle has a manual
transmission, it is recommended that you move theshift lever to R (Reverse) and set the parking brakeafter you turn off the engine by pressing and holdingthe Acc. (Off/Accessory) button.
If the keyless access transmitter is not detected insidethe vehicle when it is turned to off, the DIC displaysNO FOB – OFF OR RUN?.
See DIC Warnings and Messages on page 4‑ 52 for
more information.
P (Park): This position locks the rear wheels. It is thebest position to use when starting the engine becausethe vehicle cannot move easily.
3-26
{ WARNING:
It is dangerous to get out of the vehicle if the shiftlever is not fully in P (Park) with the parking brakefirmly set. The vehicle can roll.
Do not leave the vehicle when the engine is
The vehicle has an automatic transmission shift lockcontrol system. You have to fully apply the brakes andthen press the shift lever button before you can shiftfrom P (Park) when the vehicle is running. If you cannotshift out of P (Park), ease pressure on the shift lever and push the shift lever all the way into P (Park) as youmaintain brake application. Then press the shift lever button and move the shift lever into another gear.See Shifting Out of Park on page 3‑36

7/31/2019 2010 Corvette
http://slidepdf.com/reader/full/2010-corvette 123/471
running unless you have to. If you have left the
engine running, the vehicle can move suddenly.You or others could be injured. To be sure thevehicle will not move, even when you are on fairlylevel ground, always set the parking brake andmove the shift lever to P (Park). See Shifting IntoPark (Automatic Transmission) on page 3 ‑ 35 .
Be sure the shift lever is fully in P (Park) before startingthe engine.
See Shifting Out of Park on page 3 36 .
R (Reverse): Use this gear to back up.Notice: Shifting to R (Reverse) while the vehicle ismoving forward could damage the transmission.The repairs would not be covered by the vehiclewarranty. Shift to R (Reverse) only after the vehicleis stopped.
To rock the vehicle back and forth to get out of snow,ice, or sand without damaging the transmission, seeIf Your Vehicle is Stuck in Sand, Mud, Ice, or Snow on
page 5 ‑ 27 .
3-2
N (Neutral) : In this position, the engine does notconnect with the wheels. To restart the engine whenthe vehicle is already moving, use N (Neutral) only.If the vehicle needs towing, see Towing Your Vehicle on
page 5 ‑ 33 .
{ WARNING:
D (Drive) : This position is for normal driving. It providesthe best fuel economy. If you need more power for passing, push the pedal down to achieve the desiredlevel of acceleration.
Downshifting the transmission in slippery roadconditions could result in skidding, see “Skidding”
under Loss of Control on page 5 ‑ 18 .
S (Sport Mode) : When in S (Sport Mode), the

7/31/2019 2010 Corvette
http://slidepdf.com/reader/full/2010-corvette 124/471
Shifting into a drive gear while the engine isrunning at high speed is dangerous. Unless your foot is firmly on the brake pedal, the vehicle couldmove very rapidly. You could lose control and hitpeople or objects. Do not shift into a drive gear while the engine is running at high speed.
Notice: Shifting out of P (Park) or N (Neutral) withthe engine running at high speed may damage the
transmission. The repairs would not be covered bythe vehicle warranty. Be sure the engine is notrunning at high speed when shifting the vehicle.
( p ) ( p ),transmission will work as an automatic until you usethe Manual Paddle Shift Controls, which activates driver manual gear selection. See Manual Paddle Shift later inthis section. While in S (Sport Mode), the transmissionwill have more noticeable upshifts for sportier vehicleperformance.
3-28
Manual Paddle ShiftWhile in S (Sport Mode), the paddles located on thesteering wheel can be used to manually up-shift or down-shift the transmission.
When accelerating the vehicle from a stop in snowyand icy conditions, you may want to shift to 2 (Second)or 3 (Third) gear. A higher gear allows you to gain moretraction on slippery surfaces. If traction control is active,upshifts are delayed to increase your control of thevehicle. See Traction Control System (TCS) o n
p ag e 5 ‑ 6 .
The Manual Paddle Shift system can be deactivatedby moving the shifter from S (Sport Mode) back

7/31/2019 2010 Corvette
http://slidepdf.com/reader/full/2010-corvette 125/471
The Manual Paddle Shift system is activated fromS (Sport Mode) by pushing the paddle, above thesteering wheel spokes, to up-shift to the next gear,or pulling on the paddle, behind the steering wheelspokes, to down-shift to the next gear.
by moving the shifter from S (Sport Mode) back
to D (Drive), or by holding the up‐shift button for more than one second.
While the Manual Paddle Shift gear selectionsystem is active, the transmission will automaticallydownshift through the gears as the vehicle slows.The transmission will select 2 (Second) gear as thevehicle stops. From a stop, the vehicle will start fromand hold 2 (Second) gear unless the driver manuallypaddle shifts into a different gear or selects D (Drive).
The driver can select 1 (First) gear for maximumacceleration from a stop.
3-2
When using the ManualPaddle Shift feature whilein S (Sport Mode), thecurrent gear will bedisplayed in the Driver Information (DIC), or theHead-Up Display (HUD),if the vehicle has either of these features.
When a requested shift isdenied due to the speedrestrictions shown, theDIC will momentarilyshow an X over the gear display and a chime willsound.

7/31/2019 2010 Corvette
http://slidepdf.com/reader/full/2010-corvette 126/471
If the vehicle has a Navigation system, see “Head-UpDisplay (HUD)” in the Index of the navigation manual.
The Manual Paddle Shift system will not allow either anup-shift or a down-shift if the vehicle speed is too fastor too slow, nor will it allow a start from 4 (Fourth) or higher gear
If up-shifting does not occur when needed, vehiclespeed will be limited to protect the engine.
When the transmission gear does not respond to a shiftchange, the DIC will show an X over the gear display.
If the vehicle has a HUD, and the transmission gear does not respond to a shift change, a chime will soundand the HUD will momentarily show an X over the gear display.
Manual Paddle Shift operation is available for use withCruise Control. See Cruise Control o n p a g e 4 ‑ 7 for more information.
The vehicle speeds required for Manual Paddle Shiftup-shifts depend on several vehicle inputs, which will
vary the allowed up-shift speed by a few mph (km/h).
3-30
For vehicles with a 2.56:1 Axle Ratio(RPO GM8). Up-shifts to 4 (Fourth) gear require approximately
35 km/h (22 mph).
. Up-shifts to 5 (Fifth) gear require approximately45 km/h (28 mph).
. Up-shifts to 6 (Sixth) gear require approximately65 km/h (41 mph)
For vehicles with a 2.73:1 Axle Ratio(RPO GU2). Up-shifts to 4 (Fourth) gear require approximately
31 km/h (19 mph).
. Up-shifts to 5 (Fifth) gear require approximately39 km/h (24 mph).
. Up-shifts to 6 (Sixth) gear require approximately57 km/h (35 mph)

7/31/2019 2010 Corvette
http://slidepdf.com/reader/full/2010-corvette 127/471
65 km/h (41 mph).
To prevent damage to the powertrain, Manual Paddledownshifts to a lower gear cannot be done abovecertain speeds. The maximum speed allowed for downshifting of gears 1 (First) through 4 (Fourth) are:
. Into 4 (Fourth) gear over 250 km/h (155 mph)
. Into 3 (Third) gear over 188 km/h (117 mph)
. Into 2 (Second) gear over 120 km/h (75 mph)
. Into 1 (First) gear over 68 km/h (42 mph).
57 km/h (35 mph).
To prevent damage to the powertrain, Manual Paddledownshifts to a lower gear cannot be done abovecertain speeds. The maximum speed allowed for downshifting of gears 1 (First) through 4 (Fourth) are:
. Into 4 (Fourth) gear over 234 km/h (145 mph)
. Into 3 (Third) gear over 176 km/h (109 mph)
. Into 2 (Second) gear over 113 km/h (70 mph)
. Into 1 (First) gear over 64 km/h (40 mph).
If the driver does not request an upshift as the enginespeed approaches fuel shut off RPM, the engine speedwill be limited to protect the engine. See Tachometer on
page 4‑ 32 for more information.
3-3
Manual Transmission OperationThis is the shift patternfor the six-speed manualtransmission.
3 (Third), 4 (Fourth), 5 (Fifth) and 6 (Sixth) : Shiftinto 3 (Third), 4 (Fourth), 5 (Fifth) and 6 (Sixth) the sameway you do for 2 (Second). Slowly let up on the clutchpedal as you press the accelerator pedal.
To stop, let up on the accelerator pedal and press thebrake pedal. Just before the vehicle stops, press theclutch pedal and the brake pedal, and shift to Neutral.
Neutral : Use this position when you start or idle thei Th hift l i i N t l h it i t d

7/31/2019 2010 Corvette
http://slidepdf.com/reader/full/2010-corvette 128/471
Here is how to operate the transmission:
1 (First) : Press the clutch pedal and shift into 1 (First).Then slowly let up on the clutch pedal as you press theaccelerator pedal.
You can shift into 1 (First) when you are going less than40 mph (64 km/h). If you come to a complete stop and itis hard to shift into 1 (First), put the shift lever in Neutraland let up on the clutch. Press the clutch pedal backdown. Then shift into 1 (First).
2 (Second): Press the clutch pedal as you let up on theaccelerator pedal and shift into 2 (Second). Then, slowlylet up on the clutch pedal as you press the accelerator pedal.
engine. The shift lever is in Neutral when it is centered
in the shift pattern, not in any gear.
R (Reverse): To back up, press down the clutch pedaland shift into R (Reverse). Just apply pressure to getthe lever past 5 (Fifth) and 6 (Sixth) into R (Reverse).Let up on the clutch pedal slowly while pressing theaccelerator pedal.
The six-speed manual transmission has a feature thatallows you to safely shift into R (Reverse) while the
vehicle is rolling at less than 3 mph (5 km/h). You will belocked out if you try to shift into R (Reverse) while thevehicle is moving faster than 3 mph (5 km/h).
3-32
Shift Speeds (Manual Transmission)
{ WARNING:
If you skip a gear when you downshift, you couldlose control of the vehicle. You could injureyourself or others. Do not shift down more than
t ti h d hift
If the engine speed drops below 900 rpm, or if theengine is not running smoothly, you should downshift tothe next lower gear. You may have to downshift two or more gears to keep the engine running smoothly or for good engine performance.
Notice: When shifting gears, do not move the shiftlever around unnecessarily. This may damage thetransmission. Shift directly into the next gear.

7/31/2019 2010 Corvette
http://slidepdf.com/reader/full/2010-corvette 129/471
one gear at a time when you downshift.
This chart shows when to shift to the next higher gear for the best fuel economy.
Manual Transmission RecommendedShift Speeds in mph (km/h)
Engine Acceleration Shift Speed
1 to 2 2 to 3 3 to 4 4 to 5 5 to 6
AllEngines
15 (24) 25 (40) 40 (64) 45 (72) 50 (80)
One to Four Shift Light(Manual Transmission)
When this light comes on,you can only shift from1 (First) to 4 (Fourth)instead of 1 (First) to2 (Second).
See One-to-Four Shift Light (Manual Transmission) on page 4‑ 36 for more information.
3-3
Downshifting (Manual Transmission)Do not downshift into the gear shown below at a speedgreater than shown in the table:
1 (First) 50 mph (80 km/h)
2 (Second) 74 mph (119 km/h)
3 (Third) 101 mph (163 km/h)
4 (Fourth) 130 mph (209 km/h)
Parking BrakeThe parking brake lever is located to the right of thecenter console.
To set the parking brake, hold the brake pedal down.Pull the parking brake lever up. If the ignition is on, thebrake system warning light will come on.
To release the parking brake, hold the brake pedaldown Then push the release button in as you move the

7/31/2019 2010 Corvette
http://slidepdf.com/reader/full/2010-corvette 130/471
Notice: If you skip more than one gear when youdownshift, or if you race the engine when yourelease the clutch pedal while downshifting, youcould damage the engine, clutch, driveshaft or thetransmission. Do not skip gears or race the enginewhen downshifting.
The six-speed transmission has a spring that centersthe shift lever near 3 (Third) and 4 (Fourth). Thisspring helps you know which gear you are in whenyou are shifting. Be careful when shifting from 1 (First)to 2 (Second) or downshifting from 6 (Sixth) to 5 (Fifth).The spring will try to pull the shift lever toward 4 (Fourth)and 3 (Third). Make sure you move the lever into2 (Second) or 5 (Fifth). If you let the shift lever movein the direction of the pulling, you may end up shiftingfrom 1 (First) to 4 (Fourth) or from 6 (Sixth) to 3 (Third).
down. Then push the release button in as you move the
parking brake lever all the way down.
Notice: Driving with the parking brake on canoverheat the brake system and cause prematurewear or damage to brake system parts. Make surethat the parking brake is fully released and thebrake warning light is off before driving.
3-34

7/31/2019 2010 Corvette
http://slidepdf.com/reader/full/2010-corvette 131/471
Torque Lock (Automatic Transmission)If you are parking on a hill and you do not shift thetransmission into P (Park) properly, the weight of thevehicle may put too much force on the parking pawlin the transmission. You may find it difficult to pull theshift lever out of P (Park). This is called “torque lock.”
To prevent torque lock, set the parking brake and thenshift into P (Park) properly before you leave the driver seat. To find out how, see “Shifting Into P (Park)” listed
To shift out of P (Park) use the following:1. Apply the brake pedal.
2. Press the shift lever button.
3. Move the shift lever to the desired position.
If you still are unable to shift out of P (Park):
1. Fully release the shift lever button.
2. While holding down the brake pedal, press the shift

7/31/2019 2010 Corvette
http://slidepdf.com/reader/full/2010-corvette 132/471
seat. To find out how, see Shifting Into P (Park) listed
previously in this section.
When you are ready to drive, move the shift lever outof P (Park) before you release the parking brake.
If torque lock does occur, you may need to haveanother vehicle push yours a little uphill to take someof the pressure from the transmission parking pawl, soyou can pull the shift lever out of P (Park).
Shifting Out of ParkShift lock release prevents shifting out of P (Park)unless the vehicle is running or in Accessory mode andthe brake pedal is applied.
The shift lock release is always functional except in thecase of an uncharged or low voltage (less than 9‐volt)battery. See Jump Starting on page 6 ‑ 50 for moreinformation.
lever button again.3. Move the shift lever to the desired position.
If you still cannot move the shift lever from P (Park),consult your dealer/retailer or a professional towingservice.
Parking the Vehicle(Manual Transmission)
Before you get out of the vehicle, move the shift lever into R (Reverse) and firmly apply the parking brake.Once the shift lever has been placed into R (Reverse)with the clutch pedal pressed in, you can turn theignition off and release the clutch.
3-36
Parking Over Things That Burn
{ WARNING:
Things that can burn could touch hot exhaustparts under the vehicle and ignite. Do not parkover papers, leaves, dry grass, or other things thatcan burn
WARNING: (Continued)
. The exhaust system leaks due to corrosion or damage.
. The vehicle’s exhaust system has beenmodified, damaged or improperly repaired.
. There are holes or openings in the

7/31/2019 2010 Corvette
http://slidepdf.com/reader/full/2010-corvette 133/471
can burn.
Engine Exhaust
{ WARNING:
Engine exhaust contains Carbon Monoxide (CO)which cannot be seen or smelled. Exposure to CO
can cause unconsciousness and even death.
Exhaust may enter the vehicle if:
. The vehicle idles in areas with poor ventilation(parking garages, tunnels, deep snow thatmay block underbody airflow or tail pipes).
. The exhaust smells or sounds strange or different.
(Continued)
. There are holes or openings in thevehicle body from damage or after-marketmodifications that are not completely sealed.
If unusual fumes are detected or if it is suspectedthat exhaust is coming into the vehicle:
. Drive it only with the windowscompletely down.
. Have the vehicle repaired immediately.
Never park the vehicle with the engine running inan enclosed area such as a garage or a buildingthat has no fresh air ventilation.
3-3
Running the Vehicle While ParkedIt is better not to park with the engine running. But if youever have to, here are some things to know.
{ WARNING:
Idling a vehicle in an enclosed area with poor
{ WARNING:
It can be dangerous to get out of the vehicle if theautomatic transmission shift lever is not fully inP (Park) with the parking brake firmly set. Thevehicle can roll. Do not leave the vehicle when theengine is running unless you have to. If you haveleft the engine running the vehicle can move

7/31/2019 2010 Corvette
http://slidepdf.com/reader/full/2010-corvette 134/471
ventilation is dangerous. Engine exhaust mayenter the vehicle. Engine exhaust containsCarbon Monoxide (CO) which cannot be seenor smelled. It can cause unconsciousness andeven death. Never run the engine in an enclosedarea that has no fresh air ventilation. For moreinformation, see Engine Exhaust on page 3 ‑ 37 .
left the engine running, the vehicle can movesuddenly. You or others could be injured. To besure the vehicle will not move, even when you areon fairly level ground, always set the parkingbrake and move the shift lever to P (Park).
Follow the proper steps to be sure the vehicle will notmove. See Shifting Into Park (Automatic Transmission)on page 3 ‑ 35 .
3-38
Mirrors
Automatic Dimming Rearview Mirror
The vehicle may have an automatic dimming insiderearview mirror with a compass display and/or maplamps, and OnStar ® . The mirror automatically changesto reduce glare from headlamps behind you. A timedelay feature prevents rapid changing from the day to
Map LampsIf the mirror has map lamps, they are located at thebottom of the mirror. To manually turn the lamps onor off, press the button next to each lamp.
Cleaning the Mirror
Do not spray glass cleaner directly on the mirror.Use a soft towel dampened with water.
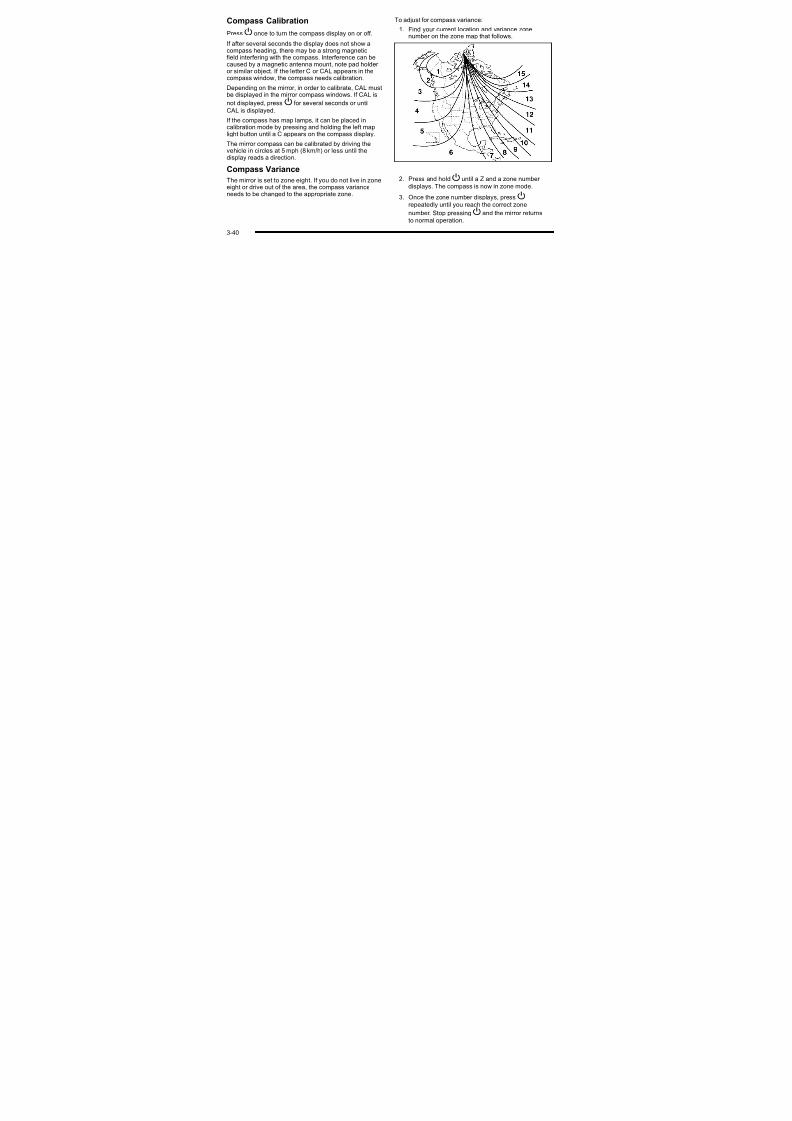
7/31/2019 2010 Corvette
http://slidepdf.com/reader/full/2010-corvette 135/471
night positions while driving under lights and throughtraffic.
If the vehicle has OnStar, there are three control buttonslocated at the bottom of the mirror. See the OnStar ®
owner's guide for more information on the servicesOnStar ® provides.
P (On/Off): The automatic dimming feature isactivated when the vehicle is started. Press and holdthis button for up to six seconds to turn this feature on
or off.T (Indicator Light): This light turns on when theautomatic dimming feature is active.
Compass
Compass Operation
With the compass feature on, each time the vehicle isstarted, the compass will take a few seconds to adjustand display the current compass heading. For example,NE is displayed for north-east.
3-3
Compass CalibrationPressP once to turn the compass display on or off.
If after several seconds the display does not show acompass heading, there may be a strong magneticfield interfering with the compass. Interference can becaused by a magnetic antenna mount, note pad holder or similar object. If the letter C or CAL appears in thecompass window, the compass needs calibration.
To adjust for compass variance:1. Find your current location and variance zone
number on the zone map that follows.
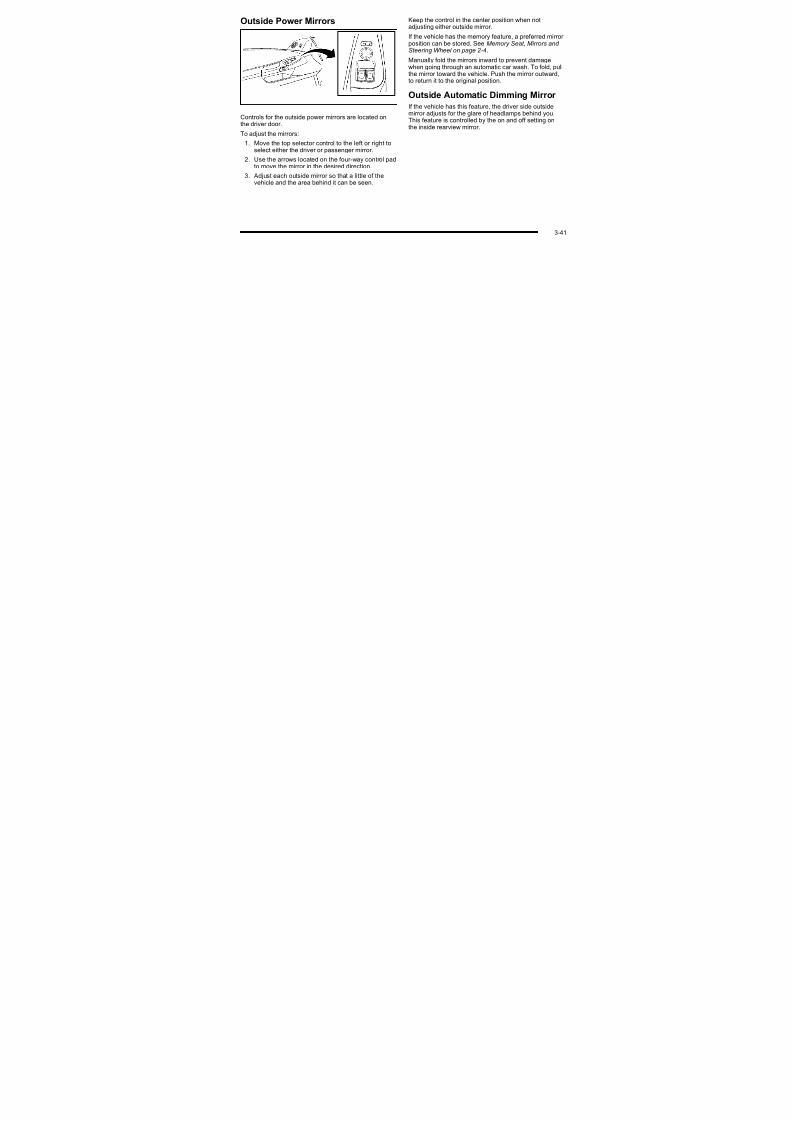
7/31/2019 2010 Corvette
http://slidepdf.com/reader/full/2010-corvette 136/471
Depending on the mirror, in order to calibrate, CAL mustbe displayed in the mirror compass windows. If CAL is
not displayed, press P for several seconds or until
CAL is displayed.
If the compass has map lamps, it can be placed incalibration mode by pressing and holding the left maplight button until a C appears on the compass display.
The mirror compass can be calibrated by driving the
vehicle in circles at 5 mph (8 km/h) or less until thedisplay reads a direction.
Compass Variance
The mirror is set to zone eight. If you do not live in zoneeight or drive out of the area, the compass varianceneeds to be changed to the appropriate zone.
2. Press and holdP until a Z and a zone number
displays. The compass is now in zone mode.
3. Once the zone number displays, pressPrepeatedly until you reach the correct zone
number. Stop pressingP and the mirror returns
to normal operation.
3-40
Outside Power Mirrors Keep the control in the center position when notadjusting either outside mirror.
If the vehicle has the memory feature, a preferred mirrorposition can be stored. See Memory Seat, Mirrors and Steering Wheel on page 2 ‑ 4.
Manually fold the mirrors inward to prevent damagewhen going through an automatic car wash. To fold, pullthe mirror toward the vehicle. Push the mirror outward,to return it to the original position.

7/31/2019 2010 Corvette
http://slidepdf.com/reader/full/2010-corvette 137/471
Controls for the outside power mirrors are located onthe driver door.
To adjust the mirrors:
1. Move the top selector control to the left or right to
select either the driver or passenger mirror.2. Use the arrows located on the four-way control pad
to move the mirror in the desired direction.
3. Adjust each outside mirror so that a little of thevehicle and the area behind it can be seen.
Outside Automatic Dimming Mirror
If the vehicle has this feature, the driver side outsidemirror adjusts for the glare of headlamps behind you.This feature is controlled by the on and off setting onthe inside rearview mirror.
3-4
Outside Convex Mirror
{ WARNING:
A convex mirror can make things, like other vehicles, look farther away than they really are.If you cut too sharply into the right lane, you couldhit a vehicle on the right. Check the inside mirror
Universal Home RemoteSystemSee Radio Frequency Statement on page 8 ‑ 20 for information regarding Part 15 of the FederalCommunications Commission (FCC) Rules andRSS-210/211 of Industry Canada.
The FCC Grant of Equipment AuthorizationCertificate number is KOBFTE05A.

7/31/2019 2010 Corvette
http://slidepdf.com/reader/full/2010-corvette 138/471
or glance over your shoulder before changinglanes.
The passenger side mirror is convex shaped. A convexmirror's surface is curved so more can be seen from thedriver seat.
Outside Heated Mirrors
< (Rear Window Defogger): Press to heat themirrors.
See “Rear Window Defogger ” under Dual Automatic Climate Control System on page 4‑ 22 for moreinformation.
The Canadian Registration ID number is 3521A-FTE05A.
3-42
Universal Home Remote SystemOperation
Be sure to keep the original remote control transmitter for use in other vehicles, as well as, for futureprogramming. Only the original remote controltransmitter is needed for Fixed Code programming.The programmed buttons should be erased whenthe vehicle is sold or the lease ends. See “ErasingUniversal Home Remote Buttons” later in this section.
Park the vehicle outside of the garage whenprogramming a garage door. Be sure that people

7/31/2019 2010 Corvette
http://slidepdf.com/reader/full/2010-corvette 139/471
On vehicles with this feature there are three roundLight Emitting Diode (LED) indicator lights above theUniversal Home Remote buttons, follow the instructionsbelow.
This system provides a way to replace up tothree remote control transmitters used to activatedevices such as garage door openers, security
systems, and home automation devices.Do not use this system with any garage door opener that does not have the stop and reverse feature. Thisincludes any garage door opener model manufacturedbefore April 1, 1982.
Read the instructions completely before attempting toprogram the transmitter. Because of the steps involved,it may be helpful to have another person assist withprogramming the transmitter.
and objects are clear of the garage door or gatethat is being programmed.
Programming Universal HomeRemote— Rolling Code
For questions or help programming the UniversalHome Remote System, call 1-866-572-2728 or go tolearcar2u.com.
Most garage door openers sold after 1996 are Rolling
Code units.
Programming a garage door opener involvestime-sensitive actions, so read the entire procedurebefore starting. Otherwise, the device will time outand the procedure will have to be repeated.
3-4
To program up to three devices:1. Press START or put the vehicle in accessory
mode. See Ignition Positions on page 3 ‑ 23 for additional information.
Programming can only occur when the vehicle isrunning or in accessory mode.

7/31/2019 2010 Corvette
http://slidepdf.com/reader/full/2010-corvette 140/471
2. From inside the vehicle, press the two outsidebuttons at the same time for one to two seconds,and immediately release them.
3. Locate in the garage, the garage door opener receiver (motor-head unit). Locate the “Learn”
or “Smart” button. It can usually be found where
the hanging antenna wire is attached to themotor-head unit and may be a colored button.Press this button. After pressing this button,complete the following steps in less than30 seconds.
3-44
4. Immediately return to the vehicle. Press and holdthe Universal Home Remote button that will beused to control the garage door until the garagedoor moves. The indicator light, above the selectedbutton, should slowly blink. This button may needto be held for up to 20 seconds.
5. Immediately, within one second, release the buttonwhen the garage door moves. The indicator lightblinks rapidly until programming is complete.
Programming Universal HomeRemote— Fixed Code
For questions or help programming the UniversalHome Remote System, call 1-866-572-2728 or go tolearcar2u.com.
Most garage door openers sold before 1996 are FixedCode units.
Programming a garage door opener involves
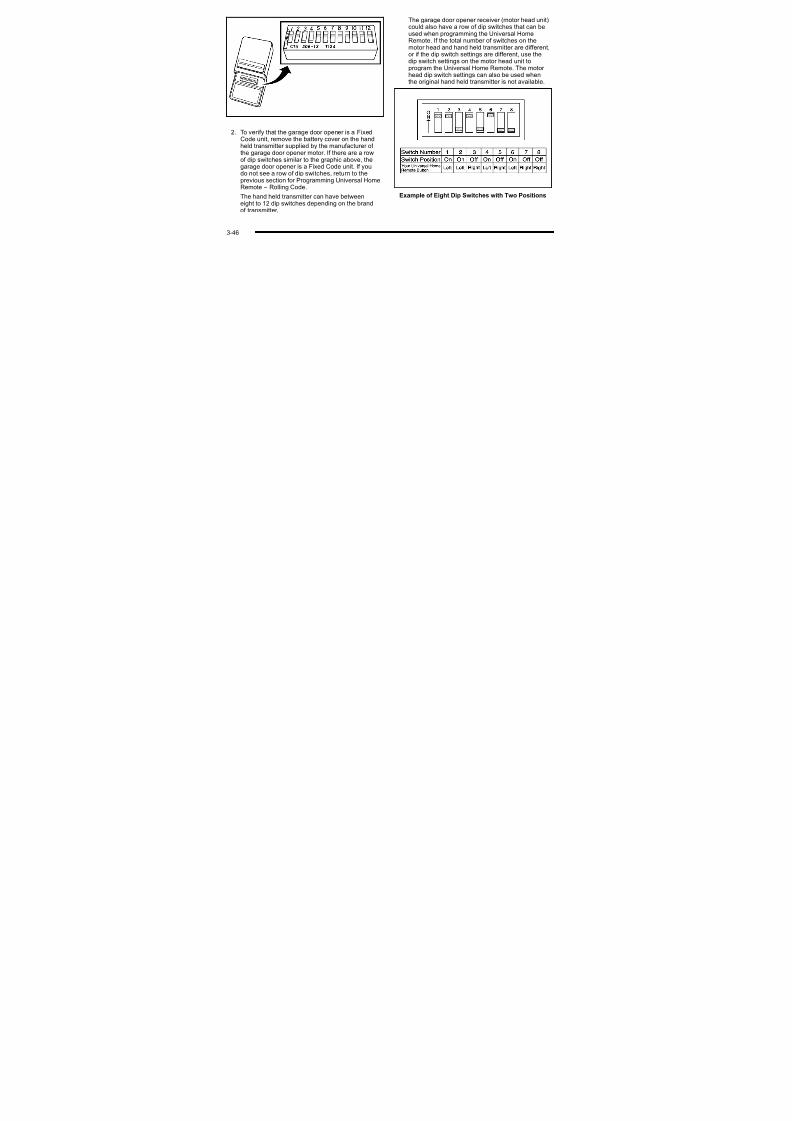
7/31/2019 2010 Corvette
http://slidepdf.com/reader/full/2010-corvette 141/471
6. Press and release the same button again.The garage door should move, confirming thatprogramming is successful and complete.
To program another Rolling Code device such as anadditional garage door opener, a security device,or home automation device, repeat Steps 1-6, choosinga different function button in Step 4 than what was usedfor the garage door opener.
If these instructions do not work, the garage door
opener is probably a Fixed Code unit. Follow theProgramming instructions that follow for a Fixed Codegarage door opener.
time-sensitive actions, so read the entire procedurebefore starting. Otherwise, the device will time out andthe procedure will have to be repeated.
To program up to three devices:
1. Press START or put the vehicle in accessorymode. See Ignition Positions on page 3 ‑ 23 for additional information.
Programming can only occur when the vehicle is
running or in accessory mode.
3-4
The garage door opener receiver (motor head unit)could also have a row of dip switches that can beused when programming the Universal HomeRemote. If the total number of switches on themotor head and hand held transmitter are different,or if the dip switch settings are different, use thedip switch settings on the motor head unit toprogram the Universal Home Remote. The motor head dip switch settings can also be used whenthe original hand held transmitter is not available.

7/31/2019 2010 Corvette
http://slidepdf.com/reader/full/2010-corvette 142/471
2. To verify that the garage door opener is a FixedCode unit, remove the battery cover on the handheld transmitter supplied by the manufacturer of
the garage door opener motor. If there are a rowof dip switches similar to the graphic above, thegarage door opener is a Fixed Code unit. If youdo not see a row of dip switches, return to theprevious section for Programming Universal HomeRemote – Rolling Code.
The hand held transmitter can have betweeneight to 12 dip switches depending on the brandof transmitter.
Example of Eight Dip Switches with Two Positions
3-46
3. Write down the eight to 12 switch settings from leftto right as follows:
. When a switch is in the up position, write “Left.”
. When a switch is in the down position, write“Right.”
. If a switch is set between the up and downposition, write “Middle.”
The switch settings written down in Step 3 now
b th b tt t k t b t d i t

7/31/2019 2010 Corvette
http://slidepdf.com/reader/full/2010-corvette 143/471
Example of Eight Dip Switches with Three Positions
The panel of switches might not appear exactly asthey do in the examples above, but they should besimilar.
The switch positions on the hand-held transmitter could be labeled, as follows:
. A switch in the up position could be labeled as“Up,” “+,” or “On.”
. A switch in the down position could be labeledas “Down,” “−,” or “Off.”
. A switch in the middle position could be labeledas “Middle,” “0,” or “Neutral.”
become the button strokes to be entered intothe Universal Home Remote in Step 5. Be sureto enter the switch settings written down inStep 3, in order from left to right, into theUniversal Home Remote, when completingStep 5.
4. From inside the vehicle, first firmly press allthree buttons at the same time for aboutthree seconds. Release the buttons to put theUniversal Home Remote into programming mode.
3-4
6. After entering all of the switch positions, again,firmly press and release all three buttons at thesame time. The indicator lights turn on.
7. Press and hold the button that will be used tocontrol the garage door until the garage door moves. The indicator light above the selectedbutton should slowly blink. This button may needto be held for up to 55 seconds.
8. Immediately release the button when the garage
d Th i di t li ht bli k idl til

7/31/2019 2010 Corvette
http://slidepdf.com/reader/full/2010-corvette 144/471
5. The indicator lights blink slowly. Enter each switchsetting from Step 3 into the vehicle's UniversalHome Remote. You have two and one-half minutes
to complete Step 5. Now press one button on theUniversal Home Remote for each switch setting asfollows:
. If you wrote “Left,” press the left button in thevehicle.
. If you wrote “Right,” press the right button inthe vehicle.
. If you wrote “Middle,” press the middle button inthe vehicle.
door moves. The indicator light blinks rapidly untilprogramming is complete.
9. Press and release the same button again.The garage door should move, confirming thatprogramming is successful and complete.
To program another Fixed Code device such as anadditional garage door opener, a security device,or home automation device, repeat Steps 1-9, choosinga different button in Step 7 than what was used for the
garage door opener.
3-48
Using Universal Home RemotePress and hold the appropriate button for at leasthalf of a second. The indicator light comes on whilethe signal is being transmitted.
Operation can occur:
. If the vehicle is in accessory mode.
. If the vehicle is in running.
. If the vehicle is in Retained Accessory Mode
(RAP) S R t i d A P (RAP)
Erasing Universal Home RemoteButtons
The programmed buttons should be erased when thevehicle is sold or the lease ends.
To erase either Rolling Code or Fixed Code on theUniversal Home Remote device:
1. Press and hold the two outside buttons at thesame time for approximately 20 seconds, until the
i di t li ht l t d di tl b th b tt

7/31/2019 2010 Corvette
http://slidepdf.com/reader/full/2010-corvette 145/471
(RAP). See Retained Accessory Power (RAP) on pag e 3 ‑ 24 for more information.
. Up to an additional 10 minutes after RAP finishes.
. Up to 10 minutes after any door is opened.
Reprogramming Universal HomeRemote Buttons
Any of the three buttons can be reprogrammed by
repeating the instructions.
indicator lights, located directly above the buttons,begin to blink rapidly.
2. Once the indicator lights begin to blink, releaseboth buttons. The codes from all buttons areerased.
For help or information on the Universal Home RemoteSystem, call the customer assistance phone number under Customer Assistance Offices on page 8 ‑ 6 .
3-4
Storage AreasGlove Box
Open the glove box by lifting up on the lever. Use thekey to lock and unlock the lighted glove box.
Cupholders
Two cupholders are located on the center console next
to the shift lever Slide the handle from the left to the
How to Remove and Replace theFloor Mats
To remove the floor mats,pull up on the rear of themat to disconnect fromthe locator hooks.

7/31/2019 2010 Corvette
http://slidepdf.com/reader/full/2010-corvette 146/471
to the shift lever. Slide the handle from the left to theright side to access the lid.
Center Console Storage
To use this storage area, pull the cover up on thedriver side front edge of the console and swing it tothe passenger side.
Floor MatsThe floor mats are specially designed to remain inposition under your feet and out of reach of theaccelerator pedal. The driver's side floor mat is heldin place by two locator hooks and the passenger'sside is held in place by one.
Be sure that the driver's side floor mat is properlyplaced on the floor so that it does not block themovement of the accelerator pedal.
To reinstall the floor mats, line up the openings in thefloor mat over the locator hooks and push down intoplace.
3-50
Rear Storage AreaTwo rear storage compartments are located in the floor of the rear hatch/trunk area.
For Z06, ZR1 and Grand Sport models, the right rear compartment stores the battery and cannot be used for storage.
Notice: Do not store heavy or sharp objects inthe rear storage compartments located in thehatch/trunk area. The objects could damage theunderbody.
Rear Trunk Partition
For vehicles with the power convertible top option only
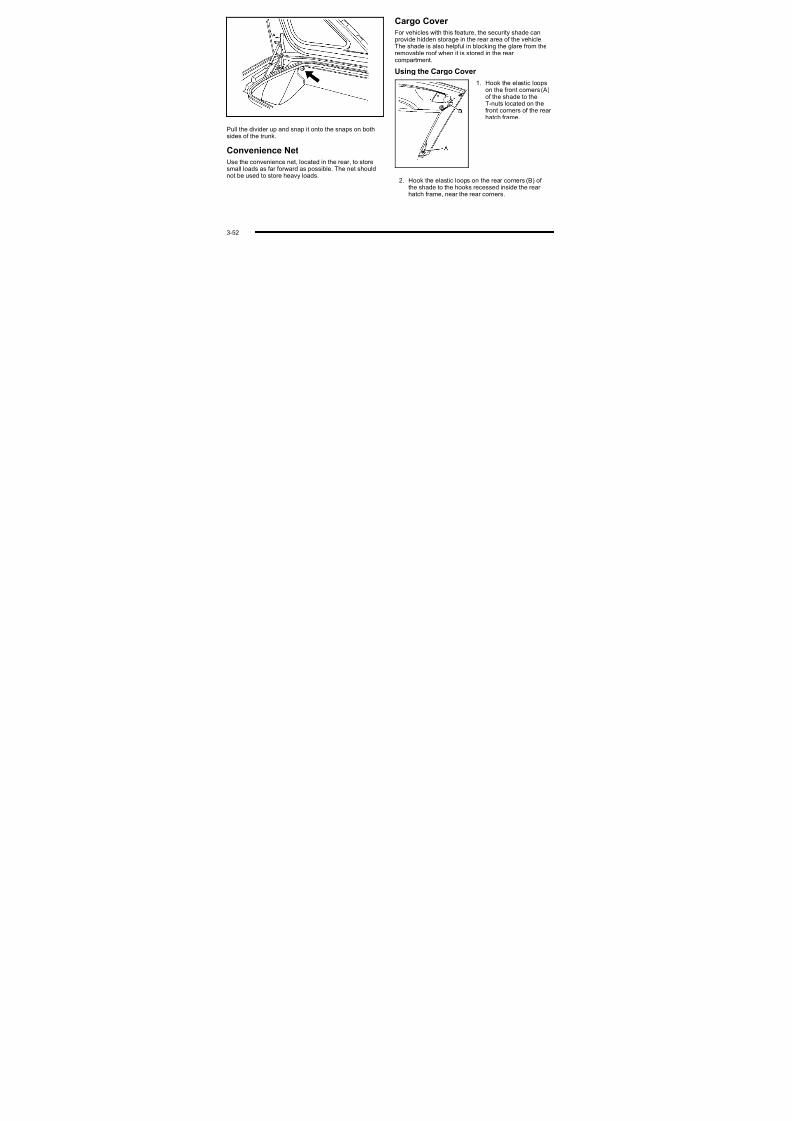
7/31/2019 2010 Corvette
http://slidepdf.com/reader/full/2010-corvette 147/471
Convertible shown, Coupe similar To access a storage compartment, pull up to open thecover. The covers cannot be removed.
For vehicles with the power convertible top option only,there is a trunk partition to keep cargo from getting inthe way of the convertible top. The trunk partition mustbe in place for the convertible top to move. If the trunkpartition is not properly in place the ATTACH TRUNKPARTITION Driver Information Center (DIC) messagedisplays. See DIC Warnings and Messages on
page 4‑ 52 for more information.
The trunk partition is a flat carpeted board with a
horizontal flap that can be attached to the top of thetrunk to divide the storage compartment or it stores flatwhen not in use.
3-5
Cargo Cover For vehicles with this feature, the security shade canprovide hidden storage in the rear area of the vehicle.The shade is also helpful in blocking the glare from theremovable roof when it is stored in the rear compartment.
Using the Cargo Cover
1. Hook the elastic loops
on the front corners (A)

7/31/2019 2010 Corvette
http://slidepdf.com/reader/full/2010-corvette 148/471
Pull the divider up and snap it onto the snaps on bothsides of the trunk.
Convenience NetUse the convenience net, located in the rear, to storesmall loads as far forward as possible. The net shouldnot be used to store heavy loads.
on the front corners (A)of the shade to theT-nuts located on thefront corners of the rear hatch frame.
2. Hook the elastic loops on the rear corners (B) of the shade to the hooks recessed inside the rear hatch frame, near the rear corners.
3-52
4. Push the loop to thetop of the striker (base plate).

7/31/2019 2010 Corvette
http://slidepdf.com/reader/full/2010-corvette 149/471
3. Grasp the loop at the rear center of the shade andwrap it around the striker assembly.
3-5
Roof PanelOn vehicles with a removable roof panel, follow theprocedures when removing or installing it.
Removing the Roof Panel
{ WARNING:
D t t t f l hil th hi l
Until you are sure you can remove the panel alone,have someone help you.
Notice: If you drop or rest a roof panel on its edges,the roof panel, paint and/or weatherstripping maybe damaged. Always place the roof panel in thestowage receivers after removing it from thevehicle.
1. Park on a level surface and set the parking brake.Shift an automatic transmission into P (Park).
Shift a manual transmission into N (Neutral)

7/31/2019 2010 Corvette
http://slidepdf.com/reader/full/2010-corvette 150/471
Do not try to remove a roof panel while the vehicleis moving. Trying to remove the roof panel whilethe vehicle is moving could cause an accident.The panel could fall into the vehicle and causeyou to lose control, or it could fly off and strikeanother vehicle. You or others could be injured.Remove the roof panel only when the vehicle isparked.
Shift a manual transmission into N (Neutral).2. Make sure the ignition is off.
3. Lower both sun visors.
4. Open the rear hatch and remove any items thatmay interfere with proper storage of the roof panel.
5. Lower the windows.
There are two release latches on the front of theroof panel and one rear release latch on the back
of the roof panel.
3-54

7/31/2019 2010 Corvette
http://slidepdf.com/reader/full/2010-corvette 151/471
6. To unlock the release latches on the front of theroof panel, grasp each handle and pull it outward.
The driver's side handle moves toward the driver'sdoor. The passenger's side handle moves towardthe passenger's door.
3-5
7. To unlock the rear of the roof panel's rear release latch, pressthe back of the releasehandle (B). Then pressthe button on the frontof the releasehandle (A).
8. Stand on one side of the vehicle, and if necessary,have someone stand on the other side. Together,carefully lift the front edge of the roof panel up andforward.
9. When the roof panel is loosened from the vehicle,one person should grasp the roof panel as closeto the center as possible and lift it away from thevehicle.
Storing the Roof Panel

7/31/2019 2010 Corvette
http://slidepdf.com/reader/full/2010-corvette 152/471
Pull down the latch lever.
Storing the Roof Panel
{ WARNING:
If a roof panel is not stored properly, it could bethrown about the vehicle in a crash or suddenmaneuver. People in the vehicle could be injured.Whenever you store a roof panel in the vehicle,
always be sure that it is stored securely in theproper location.
3-56
Notice: If you drop or rest a roof panel on its edges,the roof panel, paint and/or weatherstripping maybe damaged. Always place the roof panel in thestowage receivers after removing it from thevehicle.
1. Turn the roof panel so that the front edge of thepanel is facing the storage area.
2. Insert the roof panel sothat the outside front
edges line up betweenthe receiver covers
3. Gently place the roof panel down so that theback pins on the roof panel drop into thereceivers in the backof the storage area.

7/31/2019 2010 Corvette
http://slidepdf.com/reader/full/2010-corvette 153/471
g pthe receiver covers.Push forward on theroof panel until it stops.
Press down firmly to seat the pins in the receivers.
3-5
Installing the Roof Panel
{ WARNING:
An improperly attached roof panel may fall into or fly off the vehicle. You or others could be injured. After installing the roof panel, always check that itis firmly attached by pushing up on the underside
of the panel. Check now and then to be sure theroof panel is firmly in place
In most cases, it makes it easier if two people install the
roof panel.
1. Park on a level surface and set the parking brake.Shift an automatic transmission into P (Park). Shifta manual transmission into N (Neutral).
2. Check that the front release latches and the rear release latch on the vehicle's roof opening are intheir opened positions before attempting to installthe roof panel.
3. To remove the roof panel from the rear storagearea of the vehicle pull up on the rear edge and

7/31/2019 2010 Corvette
http://slidepdf.com/reader/full/2010-corvette 154/471
proof panel is firmly in place.
Notice: If you drop or rest a roof panel on its edges,the roof panel, paint and/or weatherstripping maybe damaged. Always place the roof panel in thestowage receivers after removing it from thevehicle.
p garea of the vehicle, pull up on the rear edge andremove it from the storage area.
4. Carefully place the roof panel over the top of thevehicle.
5. Position the rear edge of the roof panel to theweatherstrip on the back of the roof opening.Then align and fit the pins at the rear of the roof panel inside the openings in the rear overhead
weatherstrip. Gently lower the front edge of theroof panel to the front of the roof opening.
3-58
6. Turn the front releasehandles inward so thatthey latch to the closedposition.
Convertible TopConvertible Top (Manual)
For care and cleaning of the convertible top, seeConvertible Top on page 6 ‑ 97 under “Service and Appearance Care”. High pressure car washes maycause water to enter the vehicle.
If the vehicle has this feature, the following
procedures explain the proper operation of themanual convertible top.
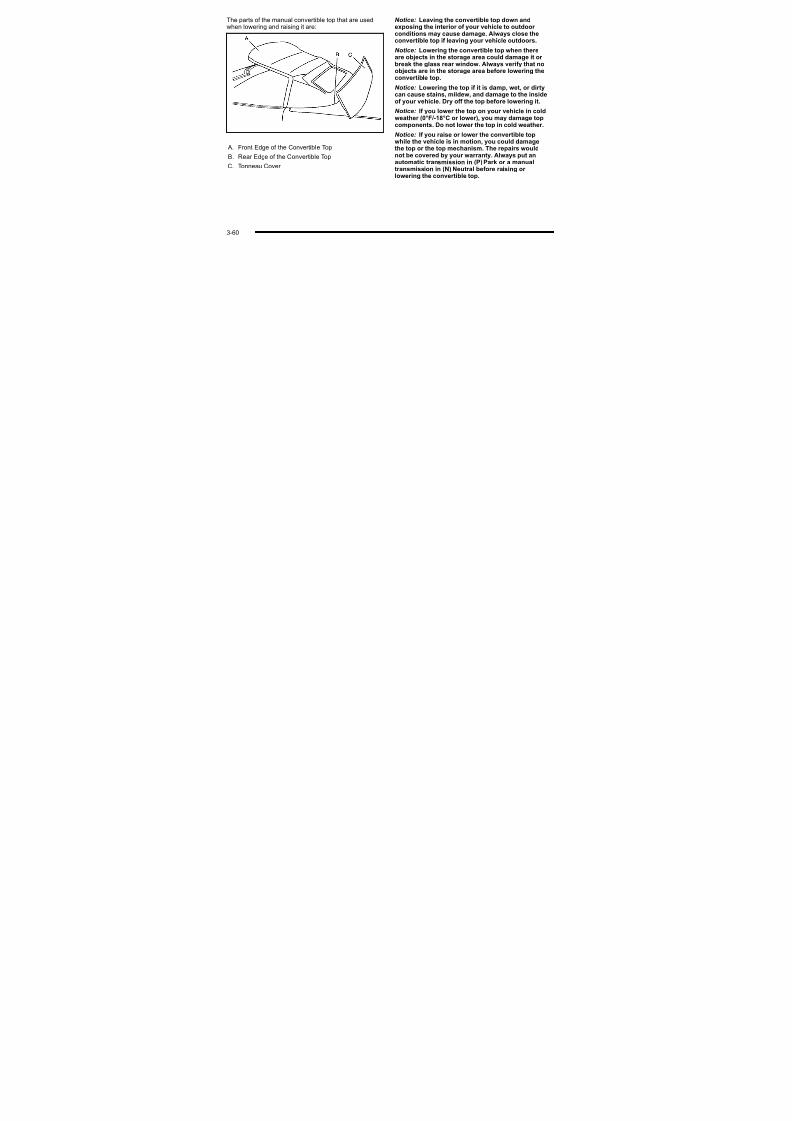
7/31/2019 2010 Corvette
http://slidepdf.com/reader/full/2010-corvette 155/471
7. Push up on the handle of the rear roof releasehandle to latch its hook in the closed position.
8. Push and pull the roof panel up and down andside-to-side to ensure the roof panel is securelyinstalled.
p p p p pmanual convertible top.
3-5
The parts of the manual convertible top that are used
when lowering and raising it are:
Notice: Leaving the convertible top down and
exposing the interior of your vehicle to outdoor conditions may cause damage. Always close theconvertible top if leaving your vehicle outdoors.
Notice: Lowering the convertible top when thereare objects in the storage area could damage it or break the glass rear window. Always verify that noobjects are in the storage area before lowering theconvertible top.
Notice:Lowering the top if it is damp, wet, or dirtycan cause stains, mildew, and damage to the inside
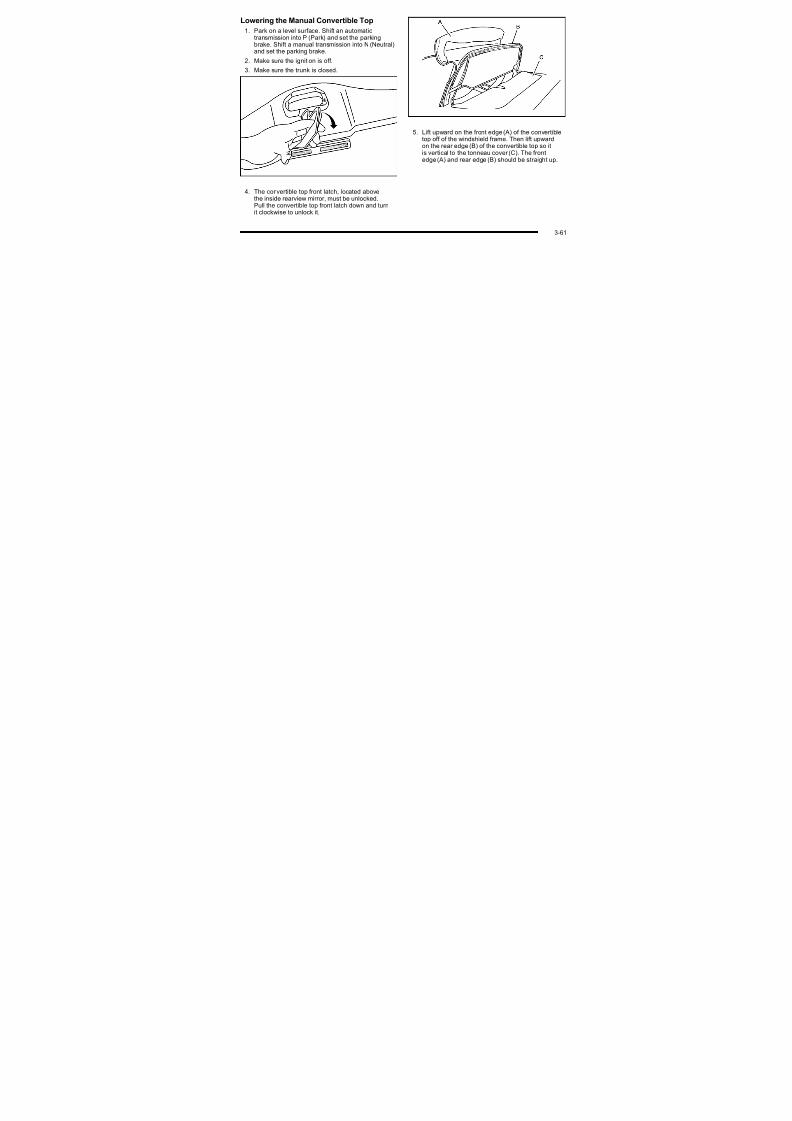
7/31/2019 2010 Corvette
http://slidepdf.com/reader/full/2010-corvette 156/471
A. Front Edge of the Convertible Top
B. Rear Edge of the Convertible Top
C. Tonneau Cover
ca cause sta s, de , a d da age to t e s deof your vehicle. Dry off the top before lowering it.
Notice: If you lower the top on your vehicle in coldweather (0°F/-18°C or lower), you may damage topcomponents. Do not lower the top in cold weather.
Notice: If you raise or lower the convertible topwhile the vehicle is in motion, you could damagethe top or the top mechanism. The repairs would
not be covered by your warranty. Always put anautomatic transmission in (P) Park or a manualtransmission in (N) Neutral before raising or lowering the convertible top.
3-60
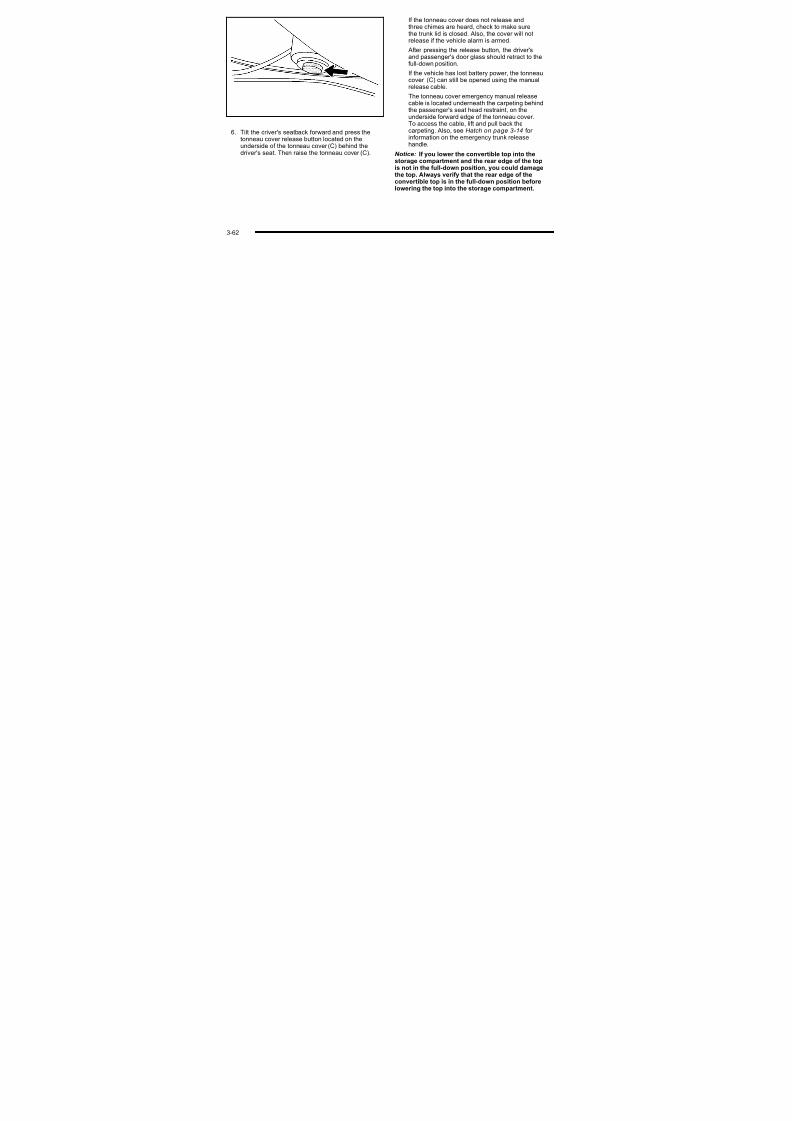
7/31/2019 2010 Corvette
http://slidepdf.com/reader/full/2010-corvette 157/471
If the tonneau cover does not release and
three chimes are heard, check to make surethe trunk lid is closed. Also, the cover will notrelease if the vehicle alarm is armed.
After pressing the release button, the driver'sand passenger's door glass should retract to thefull-down position.
If the vehicle has lost battery power, the tonneaucover (C) can still be opened using the manualrelease cable.
The tonneau cover emergency manual release

7/31/2019 2010 Corvette
http://slidepdf.com/reader/full/2010-corvette 158/471
6. Tilt the driver's seatback forward and press thetonneau cover release button located on theunderside of the tonneau cover (C) behind the
driver's seat. Then raise the tonneau cover (C).
The tonneau cover emergency manual releasecable is located underneath the carpeting behindthe passenger's seat head restraint, on theunderside forward edge of the tonneau cover.To access the cable, lift and pull back thecarpeting. Also, see Hatch on page 3 ‑ 14 for information on the emergency trunk releasehandle.
Notice: If you lower the convertible top into thestorage compartment and the rear edge of the topis not in the full-down position, you could damagethe top. Always verify that the rear edge of theconvertible top is in the full-down position beforelowering the top into the storage compartment.
3-62
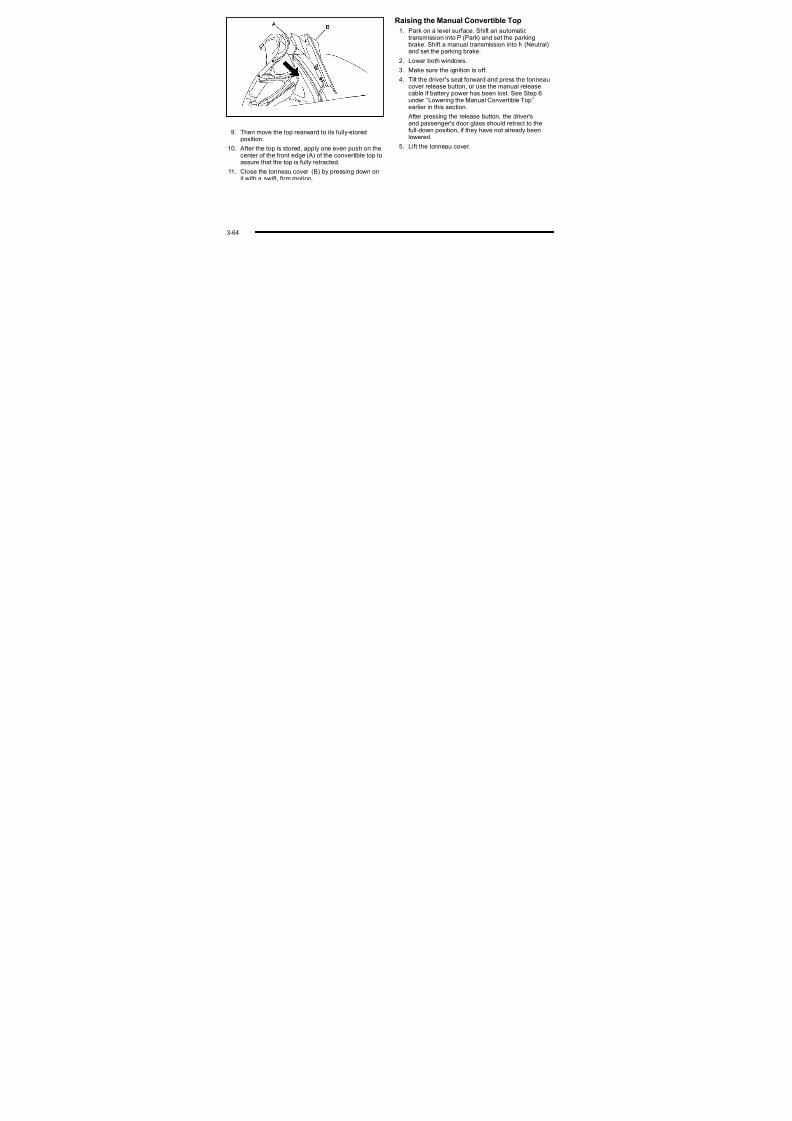
7/31/2019 2010 Corvette
http://slidepdf.com/reader/full/2010-corvette 159/471
7. Pull the cable to release the tonneau cover. 8. Push forward on the front edge(A) of theconvertible top to allow the rear edge (B) of theconvertible top to be moved to its full-down
position.
3-6
Raising the Manual Convertible Top
1. Park on a level surface. Shift an automatictransmission into P (Park) and set the parkingbrake. Shift a manual transmission into N (Neutral)and set the parking brake.
2. Lower both windows.
3. Make sure the ignition is off.
4. Tilt the driver's seat forward and press the tonneaucover release button, or use the manual releasecable if battery power has been lost. See Step 6under “Lowering the Manual Convertible Top”
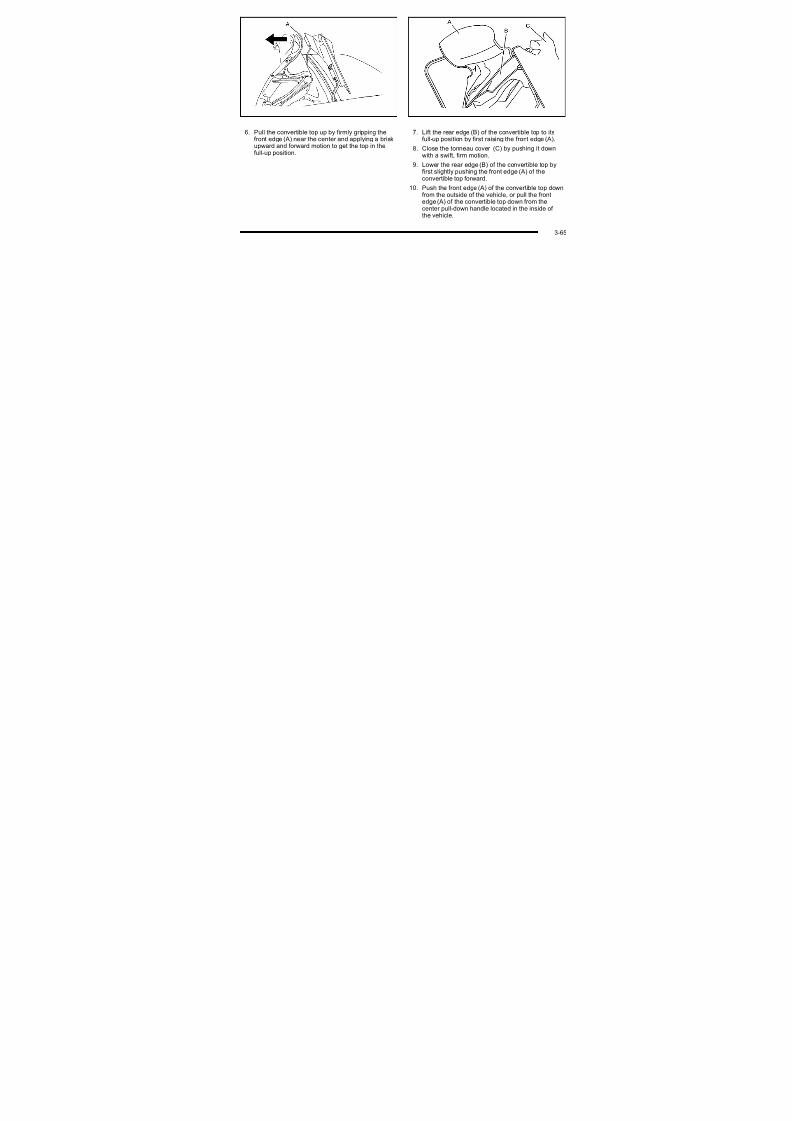
7/31/2019 2010 Corvette
http://slidepdf.com/reader/full/2010-corvette 160/471
9. Then move the top rearward to its fully-storedposition.
10. After the top is stored, apply one even push on the
center of the front edge (A) of the convertible top toassure that the top is fully retracted.
11. Close the tonneau cover (B) by pressing down onit with a swift, firm motion.
under “Lowering the Manual Convertible Top”
earlier in this section.
After pressing the release button, the driver'sand passenger's door glass should retract to thefull-down position, if they have not already beenlowered.
5. Lift the tonneau cover.
3-64

7/31/2019 2010 Corvette
http://slidepdf.com/reader/full/2010-corvette 161/471
6. Pull the convertible top up by firmly gripping thefront edge (A) near the center and applying a briskupward and forward motion to get the top in thefull-up position.
7. Lift the rear edge (B) of the convertible top to itsfull-up position by first raising the front edge (A).
8. Close the tonneau cover (C) by pushing it down
with a swift, firm motion.9. Lower the rear edge (B) of the convertible top by
first slightly pushing the front edge (A) of theconvertible top forward.
10. Push the front edge (A) of the convertible top downfrom the outside of the vehicle, or pull the frontedge (A) of the convertible top down from thecenter pull-down handle located in the inside of the vehicle.
3-6
Convertible Top (Power)
For care and cleaning of the convertible top seeConvertible Top on page 6 ‑ 97 under “Service and Appearance Care”. High pressure car washes maycause water to enter the vehicle.
To operate the power convertible top use thefollowing steps.
Notice: Leaving the convertible top down andexposing the interior of your vehicle to outdoor
conditions may cause damage. Always close theconvertible top if leaving your vehicle outdoors

7/31/2019 2010 Corvette
http://slidepdf.com/reader/full/2010-corvette 162/471
11. Pull the top front latch handle down and turn itcounterclockwise to lock the convertible top.
convertible top if leaving your vehicle outdoors.
Notice: Lowering the convertible top when there areobjects in the storage area could damage it or breakthe glass rear window. Always verify that no objectsare in the storage area before lowering theconvertible top.
3-66
Notice: Lowering the top if it is damp, wet, or dirty
can cause stains, mildew, and damage to the insideof your vehicle. Dry off the top before lowering it.
Notice: If you lower the top on your vehicle in coldweather (0°F/-18°C or lower), you may damage topcomponents. Do not lower the top in cold weather.
Notice: If you raise or lower the convertible topwhile the vehicle is in motion, you could damagethe top or the top mechanism. The repairs wouldnot be covered by your warranty. Always put anautomatic transmission in (P) Park or a manualtransmission in (N) Neutral before raising or

7/31/2019 2010 Corvette
http://slidepdf.com/reader/full/2010-corvette 163/471
transmission in (N) Neutral before raising or lowering the convertible top.
Lowering the Power Convertible Top
1. Park on a level surface. Start the engine. Shift anautomatic transmission into P (Park) and set theparking brake. Shift a manual transmission intoN (Neutral), and set the parking brake.
2. Make sure the trunk is closed and the rear trunkpartition in the rear storage area is in the fastenedupright position, and that no objects are forward of the divider. See “Rear Trunk Partition” under Rear Storage Area on page 3 ‑ 51.
3. Release the convertible top front latch, locatedabove the inside rearview mirror, by pulling andturning it clockwise toward the driver's door. Pushupward on the front edge. The windows willautomatically lower.
3-6
4. Push and hold the
bottom of the power convertible top button,located to the left of thesteering wheel, on theinstrument panel.
Raising the Power Convertible Top
Notice: If you raise or lower the convertible topwhile the vehicle is in motion, you could damagethe top or the top mechanism. The repairs wouldnot be covered by your warranty. Always put anautomatic transmission in (P) Park or a manualtransmission in (N) Neutral before raising or lowering the convertible top.
1. Park on a level surface. Start the engine. Shift an
automatic transmission into P (Park) and set theparking brake. Shift a manual transmission intoN (Neutral) and set the parking brake

7/31/2019 2010 Corvette
http://slidepdf.com/reader/full/2010-corvette 164/471
The windows will automatically lower and theconvertible top will lower into the rear of the vehicle. A chime will sound when the convertible top haslowered completely. If the radio is on the sound maybe muted for a brief time due to a new audio systemequalization being loaded.
If the convertible top is operated multiple times, the
engine should be running to prevent drain on thevehicle's battery. Under certain conditions, the Driver Information Center (DIC) may display a messageregarding the power convertible top. See DIC Warningsand Messages on page 4‑ 52 for more information.
N (Neutral) and set the parking brake.
2. Make sure the trunk lid is closed and the rear trunkpartition in the rear storage area is in the fastenedupright position, and that no objects are forward of the divider. See “Rear Trunk Partition” under Rear Storage Area on page 3 ‑ 51.
3. Push and hold the top of the power convertible top
button. The top will raise and the windows willlower if they were in the raised position. A chimewill sound when the top is raised completely.
4. After the convertible top is completely raised,release the power convertible top button.
5. Pull the convertible front top latch down and turn itcounterclockwise to lock the convertible top.
3-68
If the vehicle has lost power, the convertible top can still
be raised by releasing pressure on the hydraulic pump,located under the passenger's side of the tonneaucover, by using the following steps. The carpet liner onthe passenger's side must be pulled back to access thehydraulic pump.
Manual operation of the power convertible top cannotbe attempted for five minutes from the last time theconvertible top button was pressed if the top is notcompletely stowed, with the top down and the tonneau
latched, or closed, with the front top latch locked inplace, at the time the convertible top button was
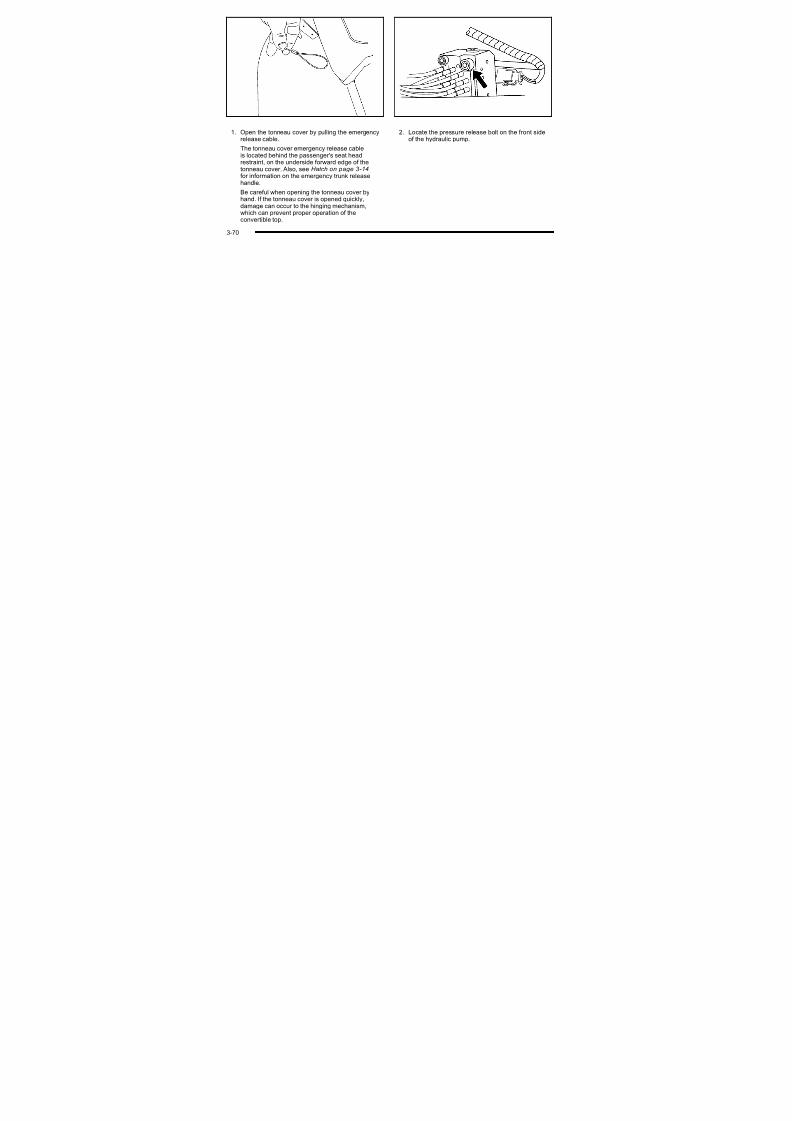
7/31/2019 2010 Corvette
http://slidepdf.com/reader/full/2010-corvette 165/471
If the radio is on the sound may be muted for a brief time due to a new audio system equalization beingloaded.
released.
3-6

7/31/2019 2010 Corvette
http://slidepdf.com/reader/full/2010-corvette 166/471
1. Open the tonneau cover by pulling the emergencyrelease cable.
The tonneau cover emergency release cable
is located behind the passenger's seat headrestraint, on the underside forward edge of thetonneau cover. Also, see Hatch on page 3 ‑ 14for information on the emergency trunk releasehandle.
Be careful when opening the tonneau cover byhand. If the tonneau cover is opened quickly,damage can occur to the hinging mechanism,which can prevent proper operation of the
convertible top.
2. Locate the pressure release bolt on the front sideof the hydraulic pump.
3-70
3. Use the wrench, located in the console, and
turn the pressure release bolt counterclockwiseone revolution, to relieve pressure to the hydraulicpump. This will allow you to manually raise theconvertible top.
4. Then follow the steps under raising the manualconvertible top. See “Convertible Top (Manual)”
under Convertible Top (Manual) on page 3 ‑ 59 or Convertible Top (Power) on page 3 ‑ 66
When power is restored to the vehicle, the hydraulic
bolt must be tightened, by turning it clockwise.The power convertible top button can then be
If the power convertible top is operated multiple times,
the engine should be running to prevent drain on thevehicle's battery. Under certain conditions, the Driver Information Center (DIC) may display a messageregarding the power top. See DIC Warnings and Messages on page 4‑ 52 for more information.
If the battery has been disconnected, the power windows must be initialized for the power top tooperate. See Power Windows on page 3 ‑ 17 for more information.

7/31/2019 2010 Corvette
http://slidepdf.com/reader/full/2010-corvette 167/471
p pused to lower or raise the convertible top.
3-7
2 NOTES

7/31/2019 2010 Corvette
http://slidepdf.com/reader/full/2010-corvette 168/471
3-72
Section 4 Instrument PanelInstrument Panel Overview . . . . . . . . . . . . . . . . . . . . . . . . 4 - 3
Ha z a rd W a rn in g F la s h e rs . . . . . . . . . . . . . . . . . . . . . . . 4 -3Horn . . . . . . . . . . . . . . . . . . . . . . . . . . . . . . . . . . . . . . . . . . . . 4-3Tilt Wheel . . . . . . . . . . . . . . . . . . . . . . . . . . . . . . . . . . . . . . . 4-3Turn Signal/Multifunction Lever .................. 4-4Turn and Lane-Change Signals (Auto Signal) . . . 4-5Headlamp High/Low-Beam Changer . . . . . . . . . . . . 4-5
Flash-to-Pass . . . . . . . . . . . . . . . . . . . . . . . . . . . . . . . . . . . 4-5Windshield Wipers . . . . . . . . . . . . . . . . . . . . . . . . . . . . . . 4-6Wi d hi ld W h 4 6
Climate Controls . . . . . . . . . . . . . . . . . . . . . . . . . . . . . . . . . . 4 - 2 2Dual Automatic Climate Control System . . . . . . . 4-22O u t l e t A d j u s t m e n t . . . . . . . . . . . . . . . . . . . . . . . . . . . . . . 4 - 2 7Passenger Compartment Air Filter . . . . . . . . . . . . . 4-28
Warning Lights, Gauges, and Indicators . . . . . . . . 4-29Instrument Panel Cluster . . . . . . . . . . . . . . . . . . . . . . . 4-30Speedometer and Odometer ................... 4-32Tachometer . . . . . . . . . . . . . . . . . . . . . . . . . . . . . . . . . . . . 4-32Safety Belt Reminders . . . . . . . . . . . . . . . . . . . . . . . . . 4-32

7/31/2019 2010 Corvette
http://slidepdf.com/reader/full/2010-corvette 169/471
Windshield Washer . . . . . . . . . . . . . . . . . . . . . . . . . . . . . 4-6Cruise Control . . . . . . . . . . . . . . . . . . . . . . . . . . . . . . . . . . 4 -7Exterior Lamps . . . . . . . . . . . . . . . . . . . . . . . . . . . . . . . . . 4-11Wiper Activated Headlamps . . . . . . . . . . . . . . . . . . . 4-12Headlamps on Reminder . . . . . . . . . . . . . . . . . . . . . . 4-12Daytime Running Lamps (DRL) . . . . . . . . . . . . . . . . 4-12Fog Lamps ...... . . . . . . . . . . . . . . . . . . . . . . . . . . . . . . 4 - 1 3Twilight Sentinel® . . . . . . . . . . . . . . . . . . . . . . . . . . . . . . 4-14Exterior Lighting Battery Saver ................. 4-15Instrument Panel Brightness ................... 4-15C o u r t e s y L a m p s . . . . . . . . . . . . . . . . . . . . . . . . . . . . . . . 4 - 1 5E n t r y / E x i t L i g h t i n g . . . . . . . . . . . . . . . . . . . . . . . . . . . . . 4 - 1 5R e a d i n g L a m p s . . . . . . . . . . . . . . . . . . . . . . . . . . . . . . . . 4 - 1 5Battery Run-Down Protection .................. 4-16Head-Up Display (HUD) . . . . . . . . . . . . . . . . . . . . . . . 4-16 Accessory Power Outlet(s) . . . . . . . . . . . . . . . . . . . . . 4-20 Ashtray(s) and Cigarette Lighter . . . . . . . . . . . . . . . 4-21
y Airbag Readiness Light . . . . . . . . . . . . . . . . . . . . . . . . 4-33Passenger Airbag Status Indicator . . . . . . . . . . . . . 4-34Voltmeter Gauge . . . . . . . . . . . . . . . . . . . . . . . . . . . . . . . 4-35One-to-Four Shift Light (Manual
T r a n s m i s s i o n ) . . . . . . . . . . . . . . . . . . . . . . . . . . . . . . . 4 - 3 6Brake System Warning Light ................... 4-36 Antilock Brake System (ABS)
W a r n i n g L i g h t . . . . . . . . . . . . . . . . . . . . . . . . . . . . . . . 4 - 3 7Traction Control System (TCS)Warning Light . . . . . . . . . . . . . . . . . . . . . . . . . . . . . . . . 4-38
Active Handling System Light . . . . . . . . . . . . . . . . . . 4-39Engine Coolant Temperature Gauge . . . . . . . . . . . 4-40Tire Pressure Light . . . . . . . . . . . . . . . . . . . . . . . . . . . . 4-40Malfunction Indicator Lamp .. . . . . . . . . . . . . . . . . . . 4-41Engine Oil Pressure Gauge . . . . . . . . . . . . . . . . . . . . 4-44Security Light . . . . . . . . . . . . . . . . . . . . . . . . . . . . . . . . . . 4-45
4-
Section 4 Instrument PanelF o g L a m p L i g h t . . . . . . . . . . . . . . . . . . . . . . . . . . . . . . . . 4 - 4 5Lights On Reminder . . . . . . . . . . . . . . . . . . . . . . . . . . . 4-45Highbeam On Light . . . . . . . . . . . . . . . . . . . . . . . . . . . . 4-45Fuel Gauge . . . . . . . . . . . . . . . . . . . . . . . . . . . . . . . . . . . . 4-46Boost Gauge (ZR1 Only) . . . . . . . . . . . . . . . . . . . . . . 4-47
Driver Information Center (DIC) . . . . . . . . . . . . . . . . . . 4-47DIC Operation and Displays . . . . . . . . . . . . . . . . . . . 4-47DIC Warnings and Messages .................. 4-52O t h e r M e s s a g e s . . . . . . . . . . . . . . . . . . . . . . . . . . . . . . . 4 - 7 0
Audio System(s) . . . . . . . . . . . . . . . . . . . . . . . . . . . . . . . . . . 4 - 8 0Setting the Clock . . . . . . . . . . . . . . . . . . . . . . . . . . . . . . 4 -80Radio(s) . . . . . . . . . . . . . . . . . . . . . . . . . . . . . . . . . . . . . . . 4-81Using an MP3 . . . . . . . . . . . . . . . . . . . . . . . . . . . . . . . . . 4-92X M R a d i o M e s s a g e s . . . . . . . . . . . . . . . . . . . . . . . . . . . 4 - 9 5Navigation/Radio System . . . . . . . . . . . . . . . . . . . . . . 4-96Bluetooth® . . . . . . . . . . . . . . . . . . . . . . . . . . . . . . . . . . . . . 4 - 9 6
T h e ft-De te rre n t F e a tu re . . . . . . . . . . . . . . . . . . . . . . 4 -1 0 6 Audio Steering Wheel Controls . . . . . . . . . . . . . . . 4-107R a d i o R e c e p t i o n 4 1 0 8

7/31/2019 2010 Corvette
http://slidepdf.com/reader/full/2010-corvette 170/471
DIC Vehicle Personalization ................... 4-71 R a d i o R e c e p t i o n . . . . . . . . . . . . . . . . . . . . . . . . . . . . . . 4 - 1 0 8Diversity Antenna System . . . . . . . . . . . . . . . . . . . . 4-109XM™ Satellite Radio Antenna System . . . . . . . . 4-109
4-2
Instrument Panel Overview
Hazard Warning Flashers
The hazard warning flashers warns others that youhave a problem. The button is located near the center of the instrument panel.
| : Press to make the front and rear turn signal lampsflash on and off. Press again to turn the flashers off.
The hazard warning flashers work no matter what modethe ignition is in, even if the ignition is turned off.
When the hazard warning flashers are on the turn
Tilt Wheel

7/31/2019 2010 Corvette
http://slidepdf.com/reader/full/2010-corvette 171/471
When the hazard warning flashers are on, the turnsignals will not work.
Horn
Press near or on the horn symbols on the steeringwheel pad to sound the horn.
The lever is located on the left side of the steeringcolumn. To adjust the steering wheel:
1. Pull the lever toward you.2. Move the steering wheel up or down into a
comfortable position.
3. Release the lever to lock the steering wheel inplace.
4-

7/31/2019 2010 Corvette
http://slidepdf.com/reader/full/2010-corvette 172/471
Turn and Lane-Change Signals(Auto Signal)
An arrow on theinstrument panel cluster flashes in the direction of the turn or lane change.
Move the the lever all the way up or down to signal
Turn Signal on Chime
A chime sounds if the turn signal has been on for morethan three‐quarters of a mile (1.2 km) of driving.
If you need to leave the turn signal on for more thanthree‐quarters of a mile (1.2 km), turn off the signal andthen turn it back on.
Headlamp High/Low-Beam Changer
To change the headlamps from low beam to high, push
the turn signal lever all the way forward. To change fromhigh to low beam, pull the lever rearward.
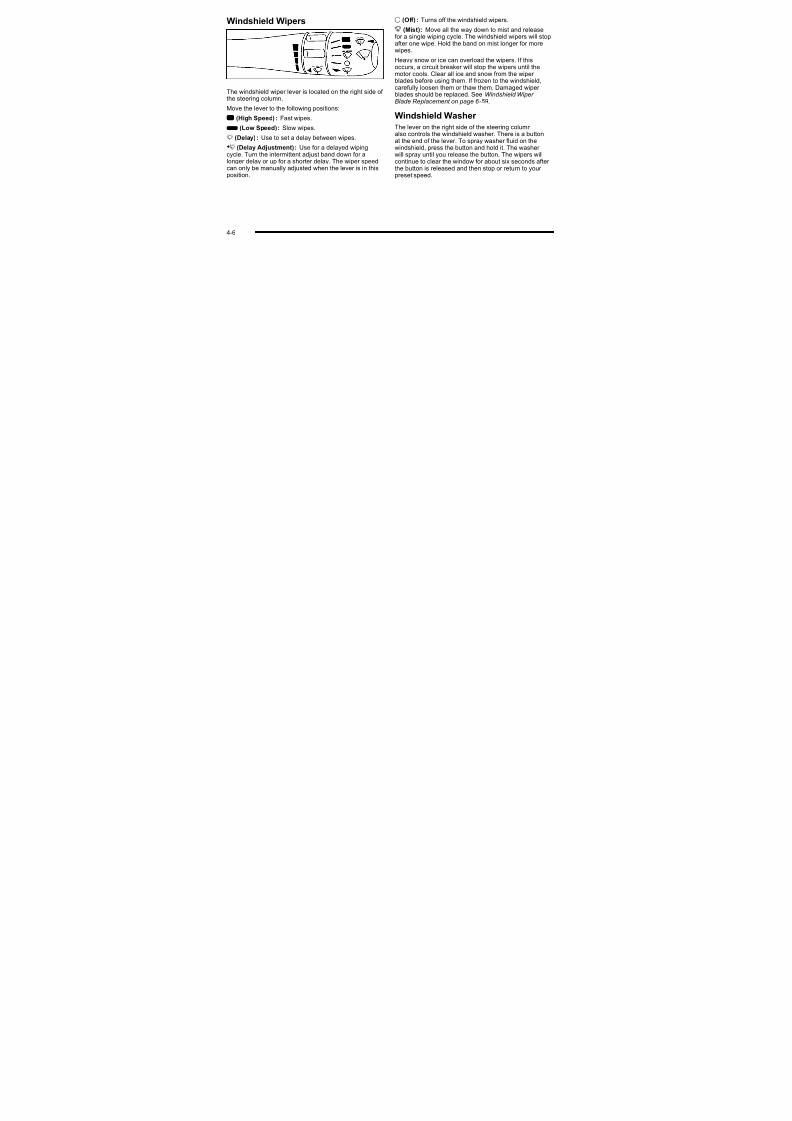
7/31/2019 2010 Corvette
http://slidepdf.com/reader/full/2010-corvette 173/471
Move the the lever all the way up or down to signala turn.
Raise or lower the lever until the arrow starts to flash tosignal a lane change. Release the lever and the turnsignal automatically flashes three times. If more flashesare desired, continue to hold the lever.
The lever returns to its starting position when it is
released.
If after signaling a turn or lane change the arrows flashrapidly or do not come on, a signal bulb may beburned out.
Have the bulbs replaced. If the bulb is not burned out,check the fuse. See Fuses and Circuit Breakers on
page 6 ‑ 101.
While the high beamsare on, this light on theinstrument panel cluster will also be lit.
Flash-to-Pass
To use the flash-to-pass feature, briefly pull the turnsignal lever toward you. The high-beam indicator flashes to indicate to the other driver that you intend topass. If the low-beam headlamps are off and the foglamps are on, the fog lamps flash.
4-

7/31/2019 2010 Corvette
http://slidepdf.com/reader/full/2010-corvette 174/471
{ WARNING:
In freezing weather, do not use your washer untilthe windshield is warmed. Otherwise the washer fluid can form ice on the windshield, blocking your vision.
If the fluid in the windshield washer fluid reservoir is low,
the message CHECK WASHER FLUID will appear onthe Driver Information Center (DIC) display. It will take15 seconds after the bottle is refilled for this message to
{ WARNING:
Cruise control can be dangerous where youcannot drive safely at a steady speed. So, do notuse the cruise control on winding roads or inheavy traffic.
Cruise control can be dangerous on slipperyroads. On such roads, fast changes in tire traction
can cause excessive wheel slip, and you couldlose control. Do not use cruise control on slipperyroads

7/31/2019 2010 Corvette
http://slidepdf.com/reader/full/2010-corvette 175/471
15 seconds after the bottle is refilled for this message toturn off. For information on the correct washer fluid touse, see Windshield Washer Fluid on page 6 ‑ 42 andRecommended Fluids and Lubricants on page 7 ‑ 10 .
Cruise Control
With cruise control, a speed of about 40 km/h (25 mph)
or more can be maintained without keeping your foot onthe accelerator. Cruise control does not work at speedsbelow about 40 km/h (25 mph).
Cruise control will not work if the parking brake is set,or if the master cylinder brake fluid level is low.
roads.
If the vehicle is in cruise control, and has the TractionControl System (TCS), and it begins to limit wheelspin, the cruise control automatically disengages.See Traction Control System (TCS) o n p a g e 5 ‑ 6 .When road conditions allow the cruise control to be
safely used again, it can be turned back on.
4-
The vehicle has cruise
control.
9 (Off): Turns the system off.
Setting Cruise Control
{ WARNING:
If you leave your cruise control on when you arenot using cruise, you might hit a button and gointo cruise when you do not want to. You could bestartled and even lose control. Keep the cruisecontrol switch off until you want to use cruise
control.

7/31/2019 2010 Corvette
http://slidepdf.com/reader/full/2010-corvette 176/471
R (On): Turns the system on.
+ (Resume/Accelerate): Use to make the vehicleaccelerate or resume a previously set speed.
T (Set): Press this button at the end of the lever toset the speed.
1. Move the cruise control switch to on.
2. Get up to the speed desired.
3. PressT at the end of the lever and release it.
4. Take your foot off the accelerator pedal.
When the cruise control is engaged, the CRUISE
SET TO XX MPH message displays on the Driver Information Center (DIC). See Other Messages on
pag e 4‑ 70 .
4-8
Resuming a Set Speed
If the cruise control is set at a desired speed and thenthe brakes are applied, the cruise control is disengaged.But it does not need to be reset.
Once the vehicle is going about 40 km/h (25 mph) or more, you can move the cruise control switch briefly
from R to S .
The vehicles goes back up to your chosen speed andstays there.
If the switch is held at resume/accelerate the vehiclekeeps going faster until the switch is released or thebrake is applied Do not hold the switch at resume/
. Move the cruise switch from R to S . Hold it there
until desired speed is reached, and then releasethe switch. To increase the vehicle speed in small
amounts, move the switch briefly to S . Each time
this is done, the vehicle goes about 1.6 km/h(1 mph) faster.
Reducing Speed While Using CruiseControl. Press and hold the set button until the lower speed
desired is reached, then release it.. To slow down in small amounts, briefly press J .
E h ti thi i d th hi l b t

7/31/2019 2010 Corvette
http://slidepdf.com/reader/full/2010-corvette 177/471
brake is applied. Do not hold the switch at resume/ accelerate, unless you want the vehicle to go faster.
Increasing Speed While Using CruiseControl
There are two ways to go to a higher speed:
.
Use the accelerator pedal to get to the higher speed. PressJ at the end of the lever, then
release the button and the accelerator pedal.The vehicle now cruises at the higher speed. If theaccelerator pedal is held longer than 60 seconds,cruise control will turn off.
Each time this is done, the vehicle goes about1.6 km/h (1 mph) slower.
Passing Another Vehicle While UsingCruise Control
Use the accelerator pedal to increase the vehicle's
speed. When you take your foot off the pedal, thevehicle slows down to the cruise control speed setearlier.
4-
Using Cruise Control on Hills
How well the cruise control works on hills depends uponthe vehicle's speed, load, and the steepness of the hills.When going up steep hills, you might want to step onthe accelerator pedal to maintain the vehicle's speed.When going downhill, you might have to brake or shiftto a lower gear to keep the vehicle's speed down. Whenthe brakes are applied the cruise control turns off.
Cruise Control in Sport and Manual Paddle
Shift Gear SelectionWhen the vehicle is in S (Sport) and the manual paddleshift controls are not being used cruise control
. If driving in hilly terrain, cruise control may not beable to maintain vehicle speed if an up-shift or down-shift is not selected by the driver. Whiledriving on hilly terrain and cruise control is activewith a manual paddle shift gear selection, thedriver must select the proper gear for the terrain or select D (Drive) on the gear range selector for fullautomatic transmission operation.
Ending Cruise Control
To end a cruise control session, step lightly on the
brake pedal. If the vehicle has a manual transmission,lightly tapping the clutch will also end a cruise controlsession

7/31/2019 2010 Corvette
http://slidepdf.com/reader/full/2010-corvette 178/471
shift controls are not being used, cruise controloperates in the same manner as D (Drive).
When the vehicle is in S (Sport) and the manual paddleshift controls are being used, cruise control operates asfollows:
. If cruise control is active and a gear is selected
with the manual paddle shift controls, the vehiclespeed is maintained in the driver selected gear and will not automatically up-shift or down-shiftthe transmission while the driver ’s gear selectionis active.
session.
Move the cruise control switch to 9 to turn the system
completely off.
When cruise control is disengaged, the CRUISEDISENGAGED message displays on the Driver Information Center (DIC). See DIC Warnings and
Messages on page 4‑ 52 .
Erasing Speed Memory
The cruise control set speed memory is erased whenthe cruise control or the ignition is turned off.
4-10
Exterior Lamps To override AUTO mode, turn the control to off.
To reset to AUTO mode turn the control to exterior lamps and then back to AUTO. Automatic mode alsoresets when the vehicle is turned off and then back onagain if the control is left in the AUTO position.
; (Parking Lamp) : Turns on the parking lampstogether with the following:
. Sidemarker Lamps
. Taillamps
. License Plate Lamps
. Instrument Panel Lights

7/31/2019 2010 Corvette
http://slidepdf.com/reader/full/2010-corvette 179/471
The exterior lamp control is located to the left of thesteering wheel on the multifunction lever.
O (Exterior Lamp Control) : Turn the band with thissymbol on it to operate the exterior lamps.
The exterior lamp band has four positions:
O (Off) : Turns off all lamps.
AUTO (Automatic) : Sets the exterior lamps toautomatic mode. AUTO mode turns the exterior lampson and off depending on how much light is availableoutside the vehicle.
The parking brake indicator light comes on and stays onwhen the parking lamps are on with the engine off andthe ignition to ACC/ACCESSORY.
5 (Headlamps) : Turns on the headlamps, together with the previously listed lamps and lights.
4-1
Wiper Activated Headlamps
This feature activates the headlamps and parkinglamps after the windshield wipers have been in use for approximately 15 seconds and deactivates and returnsto ambient lighting conditions 15 seconds after thewipers are turned off.
If the exterior lamp control has been turned off or is inthe parking lamp position while the wiper control isactive in any position, the HEADLAMPS SUGGESTEDmessage appears on the Driver Information Center (DIC). See DIC Warnings and Messages on page 4
‑ 52 .
When the ignition is turned off, the wiper-activatedh dl ill i di l ff
Daytime Running Lamps (DRL)
Daytime Running Lamps (DRL) can make it easier for others to see the front of your vehicle during the day.Fully functional daytime running lamps are required onall vehicles first sold in Canada.
The DRL system makes the front turn signal lampscome on when the following conditions are met:
. It is still daylight and the ignition is on.
. The exterior lamp control is in the AUTO position.
. The transmission is not in P (Park) or the parkingbrake is off.

7/31/2019 2010 Corvette
http://slidepdf.com/reader/full/2010-corvette 180/471
headlamps will immediately turn off.
Headlamps on Reminder
A warning chime will sound if the exterior lamp controlis left on in either the headlamp or parking lamp positionand the driver's door is opened with the ignition off.
. The parking brake is off or the vehicle speed isgreater than 8 mph (13 km/h).
When DRL are on, only the front turn signal lamps willbe on. The parking lamps, taillamps, instrument panellights, or other exterior lamps will not be on when theDRL are being used.
When it is dark enough outside, the front turn signallamps turn off and the normal low-beam headlampsturn on.
4-12

7/31/2019 2010 Corvette
http://slidepdf.com/reader/full/2010-corvette 181/471
Twilight Sentinel ®
Twilight Sentinel® can turn the lamps on and off for you. A light sensor on top of the instrument panel makes theTwilight Sentinel® work, so be sure it is not covered.
With Twilight Sentinel® , the following will happen:
. When it is dark enough outside, the front turnsignal lamps (DRL) will go off, and the headlampsand parking lamps will come on. The other lampsthat come on with headlamps will also come on.
. When it is bright enough outside, the headlampswill go off, and the front turn signal lamps (DRL)will come on, as long as the exterior lamp switch is
After starting the vehicle, turn the exterior lamp control
band on the multifunction lever to off and then releaseit. The lamps will remain off until the control band isturned to off again.
Twilight Sentinel® also provides exterior illumination asyou leave the vehicle. If Twilight Sentinel® has turnedon the lamps when you turn off the ignition, the lampswill remain on until:
. The exterior lamp switch is moved from off to theparking lamp position, or
. A delay time that you select has elapsed.
See “Personal Options” under DIC VehiclePersonalization on page 4 71 to select the delay time

7/31/2019 2010 Corvette
http://slidepdf.com/reader/full/2010-corvette 182/471
in the AUTO position.
If the vehicle is started in a dark garage, the automaticheadlamp system come on immediately. Once thevehicle leaves the garage, it takes about one minute for the automatic headlamp system to change to DRL if itis light outside. During that delay, the instrument panel
cluster may not be as bright as usual. Make sure theinstrument panel brightness control is in full brightposition. See Instrument Panel Brightness on
page 4‑ 15 .
You can idle the vehicle with the lamps off, even whenit is dark outside.
Personalization on page 4‑ 71 to select the delay timethat you want. You can also select no delay time.
If you turn off the ignition with the exterior lamp switchin the parking lamp or headlamp position, the TwilightSentinel® delay will not occur. The lamps will turn off assoon as the switch is turned off.
The regular headlamp system should be turned onwhen needed.
4-14
Exterior Lighting Battery Saver
If the manual parking lamps or headlamps have beenleft on, the exterior lamps will turn off as soon as theignition is turned off or Retained Accessory Power (RAP) is active. This protects against draining thebattery in case you have accidentally left the headlampsor parking lamps on. The battery saver does not work if the headlamps are turned on after the ignition switch isturned to off.
If you need to leave the lamps on, use the exterior lampcontrol to turn the lamps back on.
Instrument Panel Brightness
Be sure not to have this knob turned all the way
down with the lamps on during the day. Your Driver Information Center (DIC) may not be visible.
Courtesy Lamps
When any door or the hatch/trunk lid is opened, theinterior lamps will go on unless it is bright outside.
You can also turn the courtesy lamps on and off bypressing the instrument panel brightness knob.
Entry/Exit LightingWith entry lighting, the interior lamps will come on when
t i th hi l Th i t i l ill f

7/31/2019 2010 Corvette
http://slidepdf.com/reader/full/2010-corvette 183/471
Instrument Panel Brightness
The knob for this featureis located on the left sideof the instrument panel.
Push the knob in to turn on the interior lights.
Turn and hold the knob clockwise to brighten the lightsor counterclockwise to dim them. During the day, thisknob will adjust the instrument panel brightness and atnight will adjust all interior lighting.
entering the vehicle. The interior lamps will come on for about 20 seconds when the engine is off.
You can turn exit and entry lighting off by quickly turningthe courtesy lamps on and off.
Reading Lamps
The inside rearview mirror includes two reading lamps.The lamps will go on when a door is opened. When thedoors are closed, press each lamp switch to turn themon individually.
4-1
Battery Run-Down Protection
This vehicle has a feature to help prevent the batteryfrom being drained in case any of the following lampsare left on; the underhood lamp, if your vehicle hasthis feature, vanity mirror lamps, cargo lamps, readinglamps, console or glove box lamps. If any of theselamps are left on, they will automatically time-out after about 10 minutes. To reset it, all of the above lampsmust be turned off or the ignition key on.
Head-Up Display (HUD)
{ WARNING:
The information may be displayed in English or metric
units and appears as an image focused out toward thefront of the vehicle. The HUD consists of the followinginformation:
. Speedometer
. Turn Signal Indicators
. High-Beam Indicator Symbol
. Tachometer
. Manual Paddle Shift Gear Indicator (If Equipped)
These displays on the HUD are for use whenusing the manual paddle shift controls to shiftthe transmission. See “Manual Paddle Shift” in

7/31/2019 2010 Corvette
http://slidepdf.com/reader/full/2010-corvette 184/471
{ WARNING:
If the HUD image is too bright, or too high in your field of view, it may take you more time to seethings you need to see when it is dark outside.Be sure to keep the HUD image dim and placedlow in your field of view.
For vehicles with the Head-Up Display (HUD), you cansee some of the driver information that appears on theinstrument panel cluster.
Automatic Transmission Operation on page 3 ‑ 26 .
. Shift Light
This light is used for performance driving toindicate that the vehicle's best performance levelhas been reached to shift the transmission into the
next higher gear. An arrow pointing up will light upon the display just prior to reaching the engine fuelcut-off mode. This cut-off is about 6,500 RPM for the LS3 engine, 6,600 RPM for the LS9 & ZR1engines and 7,000 RPM for the LS7 engine.
. Check Gauges Warning
. Engine Coolant Temperature Gauge
4-16
. Transmission Fluid Temperature Gauge,(Automatic Transmission Vehicles Only)
. Engine Oil Temperature Gauge
. Engine Oil Pressure Gauge
. G-Force Gauge
. Boost Gauge (If Equipped)
. Audio Functions, Street Mode Only
. Navigation, Only with Navigation Radio,Turn-by-Turn Guidance
There are three HUD modes that can be viewed in theHUD display. Press the MODE button to scroll throughthese modes in the following order:
Track Mode 1 supports
the G-Force gauge andminor gauges with acircular tachometer.
Track Mode 2 supportsG-Force gauges, boostgauge w/ZR1, and minor gauges with a linear tachometer.

7/31/2019 2010 Corvette
http://slidepdf.com/reader/full/2010-corvette 185/471
g
Street Mode supportsaudio and navigationfunctions with your choiceof tachometer settings. When the desired HUD display has been selected,
release the MODE button.
4-1
Within each mode, the display, can be further
customized by pressing the PAGE button. Pressing thisbutton in each mode will turn off and on the following:
. Street Mode — No tachometer, circular tachometer, and linear tachometer.
. Track Modes 1 and 2 — No minor gauge, coolanttemperature, transmission oil temperature, engineoil temperature, engine oil pressure, and boostgauge.
While in Track Mode 1 or 2, the maximum G value
achieved during the current ignition cycle can bedisplayed by pressing and holding the PAGEbutton. The maximum G display will be shown
til th PAGE b tt i l d Th i
Be sure to continue scanning the displays, controls anddriving environment just as you would in a vehicle

7/31/2019 2010 Corvette
http://slidepdf.com/reader/full/2010-corvette 186/471
until the PAGE button is released. The maximumG value display will be identical to the normalG value display, except the maximum G gaugedigits (X.XX G) and corresponding G gauge bar will overwrite the current G value.
without HUD. If you never look at the instrument panelcluster, you may miss something important, such as awarning light. Under important warning conditions, theCHECK GAGES warning will illuminate in the HUD.View your Driver Information Center (DIC) for moreinformation.
4-18
The HUD controls are
located to the left of thesteering wheel.
It is possible for sunlight to enter the HUD makingit difficult to see the image. The display will returnto normal when the sunlight is no longer enteringthe HUD.
2. Adjust the seat to a comfortable driving position.If your seat position changes, the HUD may needto be re-adjusted.
3. Press the up or down arrows to center the HUDimage in your view.
The HUD image can only be adjusted up and
down, not side-to-side.
4. Press the dimmer control downward until the HUDimage is no brighter than necessary.

7/31/2019 2010 Corvette
http://slidepdf.com/reader/full/2010-corvette 187/471
To adjust the HUD so it can be seen properly, do thefollowing:
1. Start the engine and press the HUD dimmer control all the way up by pressing the (+) button.
The brightness of the HUD image is determined by
the light conditions in the direction the vehicle isfacing and where you have the HUD dimmer control set. If you are facing a dark object or aheavily shaded area, the HUD may anticipate thatyou are entering a dark area and may beginto dim.
To turn HUD off, press and hold the ( –) button until theHUD display turns off.
If the sun comes out or it becomes cloudy, the HUDbrightness may need to be adjusted again using thedimmer control. Polarized sunglasses could make the
HUD image harder to see.The HUD information can be displayed in one of sixlanguages including English, Spanish, French, German,Italian or Japanese. The speedometer can be displayedin either English or Metric units.
4-1
To change the language and unit selections, see“OPTION” under DIC Operation and Displays on
page 4‑
47 .
Clean the inside of the windshield as needed to removeany dirt or film that reduces the sharpness or clarity of the HUD image.
To clean the HUD, spray household glass cleaner on asoft, clean cloth. Wipe the HUD lens gently, then dry it.Do not spray cleaner directly on the lens because thecleaner could leak into the unit.
If the ignition is on and the HUD image cannot be seen,check to see if:
. Something is covering the HUD unit.
Accessory Power Outlet(s)
The accessory power outlet can be used to connectelectrical equipment, such as a cellular phone.
The accessory power outlet is located inside the center console storage compartment, on the forward left side.
To use the outlet, remove the tethered cap. When notusing it, always cover the outlet with the protective cap.
Notice: Leaving electrical equipment plugged in for an extended period of time while the vehicle is off
will drain the battery. Power is always supplied tothe outlets. Always unplug electrical equipmentwhen not in use and do not plug in equipment thatexceeds the maximum 20 ampere rating

7/31/2019 2010 Corvette
http://slidepdf.com/reader/full/2010-corvette 188/471
g g
. The HUD dimmer control is adjusted properly.
. The HUD image is adjusted to the proper height.
. Ambient light is low, in the direction the vehicle isfacing.
.
A fuse is blown. See Fuses and Circuit Breakerson page 6 ‑ 101.
Keep in mind that the windshield is part of the HUDsystem. See Windshield Replacement on page 6 ‑ 59.
exceeds the maximum 20 ampere rating.
Certain electrical accessories may not be compatiblewith the accessory power outlet and could result inblown vehicle or adapter fuses. If you experiencea problem, see your dealer/retailer for additionalinformation on accessory power outlets.
4-20
Notice: Adding any electrical equipment to thevehicle can damage it or keep other componentsfrom working as they should. The repairs would notbe covered by the vehicle warranty. Do not useequipment exceeding maximum amperage rating of 20 amperes. Check with your dealer/retailer beforeadding electrical equipment.
When adding electrical equipment, be sure to follow theinstallation instructions included with the equipment.
We recommend that you see a qualified technician or
your dealer/retailer for the proper installation of your equipment.
Notice: Improper use of the power outlet can causedamage not covered by the vehicle warranty Do not
Ashtray(s) and Cigarette Lighter
The ashtray and cigarette lighter are located on theinstrument panel, in front of the shift lever. To use theashtray, press on the indentation at the top of the door.
Notice: If papers, pins, or other flammable items areput in the ashtray, hot cigarettes or other smokingmaterials could ignite them and possibly damagethe vehicle. Never put flammable items in theashtray.
Loose objects, such as paper clips, can lodge behindand beneath the ashtray lid and prevent movement of the lid. You should avoid putting small, loose objectsnear the ashtray.

7/31/2019 2010 Corvette
http://slidepdf.com/reader/full/2010-corvette 189/471
damage not covered by the vehicle warranty. Do nothang any type of accessory or accessory bracketfrom the plug because the power outlets aredesigned for accessory power plugs only.
y
To use the cigarette lighter, push it in all the way and letgo. When it is ready, it will pop back out by itself.
Notice: Holding a cigarette lighter in while it isheating does not let the lighter back away fromthe heating element when it is hot. Damage from
overheating can occur to the lighter or heatingelement, or a fuse could be blown. Do not hold acigarette lighter in while it is heating.
4-2
Climate Controls
Dual Automatic ClimateControl System
With this system the heating, cooling, and ventilationcan be controlled.
When the vehicle is first started, the display shows thedriver's temperature setting, the outside temperature,the fan speed and the air delivery, for about10 seconds.
The outside temperature is shown in the center of thedisplay. The digital display will show the readings inFahrenheit or Celsius. See “Personal Options” under DIC Vehicle Personalization on page 4‑ 71 for information on changing your display.
Automatic Operation
AUTO (Automatic) : Press the AUTO button toplace the entire system in the automatic mode. Whenautomatic operation is active, the system automatically

7/31/2019 2010 Corvette
http://slidepdf.com/reader/full/2010-corvette 190/471
A. Driver TemperatureControls
B. Display
C. Passenger TemperatureControl
D. AUTO
E. Recirculation
F. Air Conditioning
G. Fan Control
H. Air Delivery ModeControl
I. Defrost
J. Rear WindowDefogger
controls the inside temperature, the air delivery mode,and the fan speed.
After a ten second display of the current settings,the word AUTO, the driver's temperature settingand the outside temperature will be shown.
4-22
The system operates to reach the set temperatureas quickly as possible. The AUTO control systemworks best with the windows up and the removableroof installed or the convertible top up.
1. Press the AUTO button.
2. Adjust the temperature to a comfortable settingbetween 16°C (60°F) and 32°C (90°F). Choosingthe coldest or warmest temperature setting willnot cause the system to heat or cool any faster. A setting of 23°C (73°F) is suggested.
In cold weather, the system will start at reducedfan speeds to avoid blowing cold air into your vehicle until warmer air is available. The systemstarts out blowing air at the floor but may change
Manual Operation
Driver Power/Temperature : Press the driver temperature knob to turn the climate control system off.This is the only setting that completely shuts off the fan.The digital display shows only the outside temperature.The driver and the passenger set temperature and theair intake mode can still be adjusted when the climatecontrol is off.
Passenger Power/Temperature : Press the passenger temperature knob to turn the passenger's climate
control system on or off. Turn the knob to increase or decrease the temperature for the passenger. If thepassenger's climate control system is off, the driver'stemperature knob will control the temperature for the

7/31/2019 2010 Corvette
http://slidepdf.com/reader/full/2010-corvette 191/471
starts out blowing air at the floor but may changemodes automatically as the vehicle warms up tomaintain the chosen temperature setting. Thelength of time needed for warm up depends on theoutside temperature and the length of time that haselapsed since the vehicle was last driven.
3. Wait for the system to regulate. This may take from10 to 30 minutes. Then adjust the temperature,if necessary.
Do not cover the solar sensor located in the center of the instrument panel, near the windshield. For moreinformation on the solar sensor, see “Sensor ” later inthis section.
temperature knob will control the temperature for theentire vehicle.
x 9 w (Fan) : Press to increase or decrease the fanspeed. The fan speed setting will appear in the display.
Pressing the arrows will delete AUTO from the digitaldisplay. The fan graphics with the fan speed bars will beshown. The AUTO button must be pressed to return tothe automatic fan control.
If the airflow seems low when the fan speed is at thehighest setting, the passenger compartment air filter may need to be replaced. For more information, seePassenger Compartment Air Filter on page 4‑ 28 andScheduled Maintenance on page 7 ‑ 3 .
4-2
N (Air Delivery Mode Control) : Press this button tomanually lock in the current air delivery setting and to
stop the automatic mode control. Pressing N deletes
AUTO from the digital display and the mode graphics
will be shown. To change the setting, press N again.
The AUTO button must be pressed to return to theautomatic mode selection.
To change the current mode, select one of the following:
H (Vent) : Air is directed to the instrument panel outlets,with some air directed to the floor outlets.
% (Bi-Level) : Air is divided between the instrumentpanel and floor outlets.
6 (Floor) : Air is directed to the floor outlets with some
1(Defrost) : This mode clears the windows of fog or frost more quickly. Air is directed to the windshield,with a small amount directed to the side window outlets.The indicator light comes on and the digital display willshow the defrost mode symbol and fan speed when thefront defrost mode is being used. In this mode, thesystem automatically turns off the recirculation andruns the air-conditioning compressor, unless theoutside temperature is at or below freezing.Recirculation cannot be selected while in the defrost
mode. Pressing1 again will return the system to the
last operating mode.
For severe ice conditions, turn the driver's temperatureknob to 32°C (90°F) while in defrost mode.

7/31/2019 2010 Corvette
http://slidepdf.com/reader/full/2010-corvette 192/471
6 (Floor) : Air is directed to the floor outlets, with someair directed to the windshield and side window defogger outlets.
- (Floor/Defog) : This mode clears the windows of fogor moisture. Air is directed to the windshield and thefloor outlets, with a small amount to the side window
outlets. In this mode, the system automatically turnsoff the recirculation and runs the air-conditioningcompressor unless the outside temperature is at or below freezing. The recirculation mode cannot beselected while in the defog mode.
Do not drive the vehicle until all the windows are clear.
^ (Air Conditioning Off) : Press to turn the air conditioning compressor off. Press AUTO to returnto automatic operation. When in AUTO, the air conditioning compressor comes on automatically,
as needed. Air conditioning does not operate at temperatures belowabout 2°C to 4°C (35°F to 40°F). In temperatures above4°C (40°F), the air conditioning cannot be turned off indefrost and defog, as it helps to remove moisture fromthe vehicle. It also helps to keep the windows clear.
4-24
You may notice a slight change in engine performancewhen the air-conditioning compressor shuts off andturns on again. This is normal. The system is designedto make adjustments to help with fuel economy whilestill maintaining the selected temperature.
On hot days, open the windows to let hot inside air escape; then close them. This helps to reduce the timeit takes for the vehicle to cool down. It also helps thesystem to operate more efficiently.
For quick cool down on hot days press the AUTO
button and adjust the temperature to a cool, comfortablesetting. To achieve maximum cool down, do thefollowing:
1 SelectH mode
Using these settings together for long periods of timemay cause the air inside of your vehicle to become toodry. To prevent this from happening, after the air in thevehicle has cooled, turn the recirculation mode off.
The air conditioning system removes moisture from theair, so a small amount of water might drip under thevehicle while idling or after turning off the engine.This is normal.
? (Recirculation) : Press to turn the recirculationmode on or off. An indicator light comes on to show
that recirculation is on. This mode prevents outside air from entering your vehicle. It can be used to preventoutside air and odors from entering your vehicle andto help cool the air inside your vehicle more quickly.R i l ti d i t il bl i d f t

7/31/2019 2010 Corvette
http://slidepdf.com/reader/full/2010-corvette 193/471
1. SelectH mode.
2. Press? .
3. Select the a/c on.
4. Select the coolest temperature.
5. Select the highest fan speed.
Recirculation mode is not available in defrost or defog mode.
4-2
Sensors
The solar sensor on the vehicle monitors the solar heat and uses the information to maintain the selectedtemperature when operating in AUTO mode byautomatically adjusting the temperature, fan speedand air delivery system. The system may also supplycooler air to the side of the vehicle facing the sun.The recirculation mode will also be activated, asnecessary. Do not cover the solar sensor locatedon the top of the instrument panel near the windshield
or the system will not work properly.There is also a sensor located behind the front bumper.This sensor reads the outside air temperature and helpsto maintain the temperature inside the vehicle. Any
These delays prevent false readings. If the temperaturegoes down, the outside temperature will be shown whenyou start the vehicle. If it has been turned off for lessthan three hours, the temperature will be recalled fromthe previous vehicle operation.
There is also an inside temperature sensor located tothe left of the ignition switch. The automatic climatecontrol system uses this sensor to receive information,so if you block or cover it, the system will not functionproperly.
Rear Window Defogger The rear window defogger uses a warming grid toremove fog or frost from the rear window.

7/31/2019 2010 Corvette
http://slidepdf.com/reader/full/2010-corvette 194/471
p ycover on the front of the vehicle could give a falsereading in the temperature.
If the outside temperature goes up, the displayedtemperature will not change until:
. The vehicle's speed is above 19 km/h (12 mph) for
five minutes.
. The vehicle's speed is above 52 km/h (32 mph) for two and a half minutes.
The rear window defogger only works when the engineis running.
=(Rear Window Defogger) : Press to turn therear window defogger on or off. Be sure to clear as much snow from the rear window as possible.
An indicator light comes on to show that the rear window defogger is on.
4-26
The rear window defogger turns off about 10 minutesafter the button is pressed when traveling less than48 km/h (30 mph). If turned on again, the defogger only runs for about five minutes before turning off.The defogger can also be turned off by turning off the engine.
The vehicle has heated outside rearview mirrors.The mirrors will heat to help clear fog or frost from thesurface of the mirrors when the rear window defogger button is pressed.
For vehicles with a power convertible top, the rear window defogger and heated mirrors are automaticallydisabled when the power convertible top is movingor down.
Outlet Adjustment
Use the tab located on the air outlets to change thedirection of the airflow.
Operation Tips. Clear away any ice, snow or leaves from the air
inlets at the base of the windshield that may blockthe flow of air into your vehicle.
. Use of non-GM approved hood deflectors mayadversely affect the performance of the system.
. Keep the area around the base of the instrumentpanel console and air path under the seats clear of objects to help circulate the air inside of your vehicle more effectively

7/31/2019 2010 Corvette
http://slidepdf.com/reader/full/2010-corvette 195/471
Notice: Do not use anything sharp on the inside of the rear window. If you do, you could cut or damagethe warming grid, and the repairs would not becovered by the vehicle warranty. Do not attach atemporary vehicle license, tape, a decal or anything
similar to the defogger grid.
vehicle more effectively.
4-2
Passenger Compartment Air Filter
The passenger compartment air filter removes certainparticles from the air including pollen and dust particles.Reductions in airflow, which may occur more often industy areas, indicate that the filter may need to bereplaced. See Scheduled Maintenance o n p a g e 7 ‑ 3 for information on how often to replace the filter.
Notice: Driving without a passenger compartmentair filter in place can cause water and smallparticles, like paper and leaves, to be pulled into
your climate control system which may causedamage to it. Make sure you always replace theold filter with a new one.
The passenger compartment air filter is located on the
To check or replace the air filter:
1. Remove the cover retainer clips (A) from the

7/31/2019 2010 Corvette
http://slidepdf.com/reader/full/2010-corvette 196/471
The passenger compartment air filter is located on thepassenger side of the engine compartment near thebattery. See Engine Compartment Overview on
page 6 ‑ 14.
passenger compartment air filter cover.
2. Remove the cover.
4-28
3. Remove the filter and install the new air filter.
4. Replace the filter cover.
Warning Lights, Gauges, and
IndicatorsWarning lights and gauges can signal that something iswrong before it becomes serious enough to cause anexpensive repair or replacement. Paying attention tothe warning lights and gauges could prevent injury.
Warning lights come on when there might be or thereis a problem with one of the vehicle's functions. Somewarning lights come on briefly when the engine is
started to indicate they are working.Gauges can indicate when there might be or thereis a problem with one of the vehicle's functions. Oftengauges and warning lights work together to indicate a
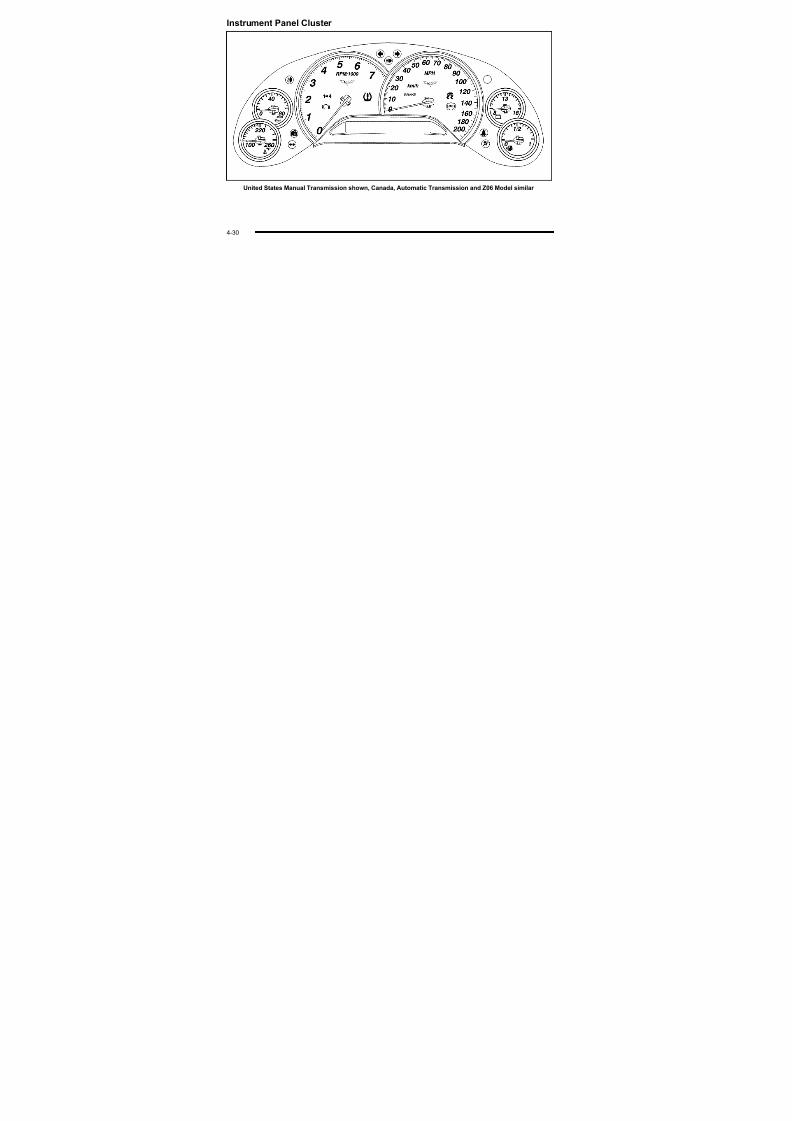
7/31/2019 2010 Corvette
http://slidepdf.com/reader/full/2010-corvette 197/471
5. Attach the retainer clips.g g g g gproblem with the vehicle.
When one of the warning lights comes on and stays onwhile driving, or when one of the gauges shows therecould be a problem, check the section that explainswhat to do. Follow this manual's advice. Waiting to do
repairs can be costly and even dangerous.
4-2
Instrument Panel Cluster

7/31/2019 2010 Corvette
http://slidepdf.com/reader/full/2010-corvette 198/471
United States Manual Transmission shown, Canada, Automatic Transmission and Z06 Model similar
4-30

7/31/2019 2010 Corvette
http://slidepdf.com/reader/full/2010-corvette 199/471
ZR1 – United States shown Canada similar
4-3
Speedometer and Odometer
The speedometer shows the speed in either kilometersper hour (km/h) or miles per hour (mph). For moreinformation see “Personal Options” under DIC VehiclePersonalization on page 4‑ 71.
To read the odometer with the ignition off, turn on theparking lamps.
If the vehicle needs a new odometer installed, themileage total of the new odometer will be set to theoriginal kilometers (miles) of the old odometer. See your dealer/retailer if the odometer must be replaced in thevehicle.
Tachometer
Safety Belt Reminders
Safety Belt Reminder LightWhen the engine is started, a chime sounds for severalseconds to remind a driver to fasten the safety belt,unless the driver safety belt is already buckled.
The safety belt lightcomes on and stays onfor several seconds, thenflashes for several more.

7/31/2019 2010 Corvette
http://slidepdf.com/reader/full/2010-corvette 200/471
Tachometer
The tachometer displays the engine speed in thousandsof revolutions per minute (rpm).
Notice: Fuel shuts off at about 6500 rpm for the base model, 7000 rpm for the Z06 model, and
6600 rpm for the ZR1 model. If the vehicle continuesto be driven at the fuel shut off rpm, the enginecould be damaged. Be sure to operate the vehiclebelow the fuel shut off rpm or reduce the vehicle'srpm quickly when the fuel shuts off.
This chime and light are repeated if the driver remainsunbuckled and the vehicle is in motion. If the driver safety belt is already buckled, neither the chime nor the light comes on.
4-32
Airbag Readiness Light
The system checks the airbag's electrical system for possible malfunctions. If the light stays on it indicatesthere is an electrical problem. The system checkincludes the airbag sensor, the pretensioners, theairbag modules, the wiring and the crash sensing anddiagnostic module. For more information on the airbagsystem, see Airbag System on page 2 ‑ 44.
The airbag readiness lightflashes for a few seconds
when the engine isstarted. If the light doesnot come on then, haveit fixed immediately.
{ WARNING:If the airbag readiness light stays on after thevehicle is started or comes on while driving, itmeans the airbag system might not be workingproperly. The airbags in the vehicle might notinflate in a crash, or they could even inflatewithout a crash. To help avoid injury, have thevehicle serviced right away.
If there is a problem with the airbag system, an airbagDriver Information Center (DIC) message can alsocome on. See DIC Warnings and Messages on
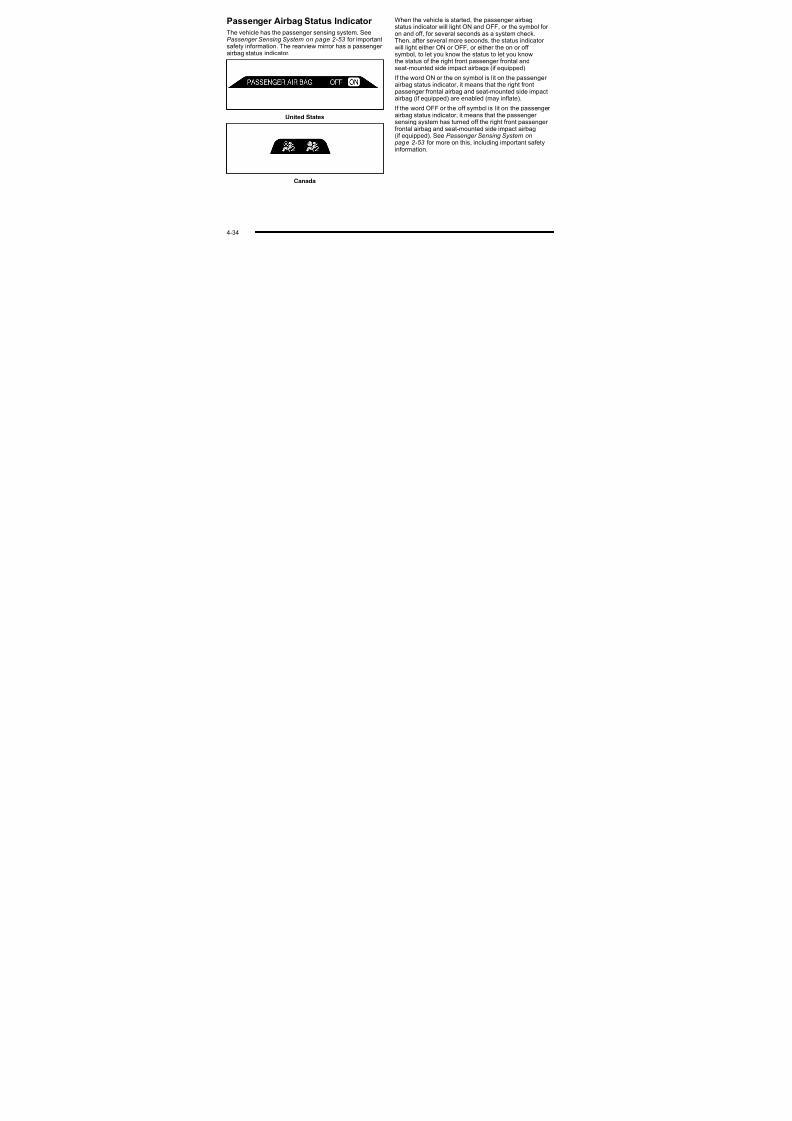
7/31/2019 2010 Corvette
http://slidepdf.com/reader/full/2010-corvette 201/471
g g page 4‑ 52 for more information.
4-3
Passenger Airbag Status Indicator
The vehicle has the passenger sensing system. SeePassenger Sensing System on page 2 ‑ 53 for importantsafety information. The rearview mirror has a passenger airbag status indicator.
United States
When the vehicle is started, the passenger airbagstatus indicator will light ON and OFF, or the symbol for
on and off, for several seconds as a system check.Then, after several more seconds, the status indicator will light either ON or OFF, or either the on or off symbol, to let you know the status to let you knowthe status of the right front passenger frontal andseat-mounted side impact airbags (if equipped).
If the word ON or the on symbol is lit on the passenger airbag status indicator, it means that the right frontpassenger frontal airbag and seat-mounted side impact
airbag (if equipped) are enabled (may inflate).
If the word OFF or the off symbol is lit on the passenger airbag status indicator, it means that the passenger sensing system has turned off the right front passenger

7/31/2019 2010 Corvette
http://slidepdf.com/reader/full/2010-corvette 202/471
Canada
frontal airbag and seat-mounted side impact airbag(if equipped). See Passenger Sensing System on
pag e 2 ‑ 53 for more on this, including important safetyinformation.
4-34
If, after several seconds, both status indicator lightsremain on, or if there are no lights at all, there may be
a problem with the lights or the passenger sensingsystem. See your dealer/retailer for service.
{ WARNING:
If the airbag readiness light ever comes on andstays on, it means that something may be wrongwith the airbag system. To help avoid injury to
yourself or others, have the vehicle serviced rightaway. See Airbag Readiness Light on page 4‑ 33
for more information, including important safetyinformation.
Voltmeter Gauge
Base and Z06
The voltmeter shows thevoltage output of thebattery. It shows thevoltage output of thecharging system whilethe engine is running.
The reading changes as the rate of charge changes

7/31/2019 2010 Corvette
http://slidepdf.com/reader/full/2010-corvette 203/471
The reading changes as the rate of charge changes(with engine speed, for example), but if the voltmeter reads at 9 volts or below, the instrument panel cluster and other systems may shut down. The Driver Information Center (DIC) reads BATTERY VOLTAGELOW when the vehicle is at 10 volts or below. Have itchecked right away. Driving with the voltmeter readingat 10 volts or below could drain the battery and disablethe vehicle.
4-3
One-to-Four Shift Light
(Manual Transmission)When this light comes on,the vehicle can only beshifted from 1 (First) to4 (Fourth) instead of 1 (First) to 2 (Second).
The shift must be completed into 4 (Fourth) to turn off this feature. This helps the vehicle get the best possiblefuel economy.
Aft hifti t 4 (F th) th hi l b
This light comes on when:
. The engine coolant temperature is higher than 169°F (76°C),
. The vehicle is going 15 to 19 mph(24 to 31 km/h) and
. The vehicle 21 percent throttle or less.
Brake System Warning Light
The vehicle's hydraulic brake system is divided into twoparts. If one part is not working, the other part can stillwork and stop the vehicle. For good braking both partsneed to be working well.

7/31/2019 2010 Corvette
http://slidepdf.com/reader/full/2010-corvette 204/471
After shifting to 4 (Fourth), the vehicle can bedownshifted to a lower gear.
Notice: Forcing the shift lever into any gear except4 (Fourth) when the 1 TO 4 SHIFT light comes onmay damage the transmission. Shift only from1 (First) to 4 (Fourth) when the light comes on.
United States Canada
4-36
This light comes on briefly while starting the engine. If itdoes not come on, have it fixed so it is ready to warn if there is a problem.
{ WARNING:
The brake system might not be working properly if the brake system warning light is on. Driving withthe brake system warning light on can lead to a
crash. If the light is still on after the vehicle hasbeen pulled off the road and carefully stopped,have the vehicle towed for service.
If this warning light stays on after the engine is started
Antilock Brake System (ABS)
Warning LightFor vehicles with the Antilock Brake System(ABS), this light comes onbriefly when the engine isstarted.
If it does not, have the vehicle serviced by your dealer/ retailer. If the system is working normally the indicator light then goes off.
If th ABS li ht t t th i iti ff If th li ht

7/31/2019 2010 Corvette
http://slidepdf.com/reader/full/2010-corvette 205/471
If this warning light stays on after the engine is started,the parking brake may still be set or there could be abrake problem. Refer to Parking Brake on page 3 ‑ 34 tosee if it is set. If the parking brake is not set, have thebrake system inspected right away.
If the light comes on while driving and a CHECKBRAKE FLUID message shows on the DIC, pull off theroad and stop carefully. The pedal may be harder topush or the pedal may go closer to the floor. It may takelonger to stop. If the light is still on, have the vehicletowed for service. See Towing Your Vehicle on
pag e 5 ‑ 33 and DIC Warnings and Messages on pag e 4‑ 52 for more information.
If the ABS light stays on, turn the ignition off. If the lightcomes on while driving, stop as soon as it is safelypossible and turn the ignition off. Then start the engineagain to reset the system. If the ABS light stays on,or comes on again while driving, the vehicle needs
service. If the regular brake system warning light is noton, the vehicle still has brakes, but not antilock brakes.If the regular brake system warning light is also on, thevehicle does not have antilock brakes and there is aproblem with the regular brakes. See Brake SystemWarning Light on page 4‑ 36 .
For vehicles with a Driver Information Center (DIC), seeDIC Warnings and Messages on page 4‑ 52 for allbrake related DIC messages.
4-3
Traction Control System (TCS)
Warning LightThe Traction ControlSystem (TCS) Warninglight comes on brieflywhen the engine isstarted.
If the light does not,have the vehicle servicedby your dealer/retailer.If the system is workingnormally the light thengoes off.
When the TCS is turned off, this light comes on and aTRACTION SYSTEM OFF message displays on the
DIC. When this light is on, the TCS system does notlimit wheel spin.
When the TCS is turned back on, this light turns off and a TRACTION SYSTEM ON message displays onthe DIC.
This light also comes on while the vehicle is in theCompetitive Driving Mode.
See Traction Control System (TCS) o n p a g e 5 ‑ 6 and
DIC Warnings and Messages on page 4‑ 52 for more
information.
See Active Handling System o n p a g e 5 ‑ 8 for more information on Competitive Driving Modeand Performance Traction Mode

7/31/2019 2010 Corvette
http://slidepdf.com/reader/full/2010-corvette 206/471
If the light stays on, or comes on while driving and aSERVICE TRACTION SYSTEM message displays inthe Driver Information Center (DIC), the vehicle needsservice.
and Performance Traction Mode.
4-38
Active Handling System Light
The Active HandlingSystem light comes onbriefly as the engine isstarted. If the light doesnot, have the vehicleserviced by your dealer/ retailer. If the system isworking normally the lightgoes off.
If the light stays on or comes on while driving, a chimesounds and a SERVICE ACTIVE HANDLING SYSTEM
For the ZR1 this light comes on when PerformanceTraction mode is activated, along with DIC messages
for the five traction modes.
When the Active Handling System is turned off, thelight comes on, a chime sounds, and the TRACTIONSYSTEM AND ACTIVE HANDLING – OFF messagedisplays in the DIC. The Traction Control System is off and the Active Handling System does not assist withcontrolling the vehicle.
When the Active Handling System is turned back on,the light turns off, a chime sounds and the TRACTIONSYSTEM AND ACTIVE HANDLING – ON messagedisplays in the DIC.
See DIC Warnings and Messages on page 4‑ 52 for more information.

7/31/2019 2010 Corvette
http://slidepdf.com/reader/full/2010-corvette 207/471
sounds and a SERVICE ACTIVE HANDLING SYSTEMmessage appears on the DIC and the vehicle needservice.
This light also comes on while the vehicle is in theCompetitive Driving Mode.
4-3
Engine Coolant Temperature Gauge
United States Canada
Thi h th i l t t t
Tire Pressure Light
For vehicles with a tirepressure monitoringsystem, this light comeson briefly when the engineis started. It providesinformation about tirepressures and the TirePressure MonitoringSystem.
When the Light is On SteadyThis indicates that one or more of the tires issignificantly underinflated.
A tire pressure message in the Driver Information

7/31/2019 2010 Corvette
http://slidepdf.com/reader/full/2010-corvette 208/471
This gauge shows the engine coolant temperature.If the gauge pointer moves into the shaded area, theengine is too hot.
This means that the engine coolant has overheated.
If the vehicle has been operating under normal drivingconditions, pull off the road, stop the vehicle and turn off the engine as soon as possible.
See Engine Overheating on page 6 ‑ 38 for moreinformation.
Center (DIC), can accompany the light. See Driver Information Center (DIC) on page 4‑ 47 for moreinformation. Stop and check the tires as soon as it issafe to do so. If underinflated, inflate to the proper pressure. See Inflation - Tire Pressure on page 6 ‑ 70 for more information.
4-40
When the Light Flashes First and Then isOn Steady
This indicates that there may be a problem with the TirePressure Monitor System. The light flashes for about aminute and stays on steady for the remainder of theignition cycle. This sequence repeats with every ignitioncycle. See Tire Pressure Monitor Operation on
pag e 6 ‑ 74 for more information.
Malfunction Indicator Lamp
Check Engine Light A computer system called OBD II (On-BoardDiagnostics-Second Generation) monitors operationof the fuel, ignition, and emission control systems.
If the check engine light comes on and stays on, whilethe engine is running, this indicates that there is anOBD II problem and service is required.
Malfunctions often are indicated by the system beforeany problem is apparent. Being aware of the light canprevent more serious damage to the vehicle. Thissystem assists the service technician in correctlydiagnosing any malfunction.
Notice: If the vehicle is continually driven with thislight on, after a while, the emission controls might
not work as well, the vehicle's fuel economy mightnot be as good, and the engine might not run assmoothly. This could lead to costly repairs thatmight not be covered by the vehicle warranty.
Notice: Modifications made to the engine,

7/31/2019 2010 Corvette
http://slidepdf.com/reader/full/2010-corvette 209/471
It makes sure that emissions are at acceptable levelsfor the life of the vehicle, helping to produce a cleaner environment.
This comes on briefly
while starting the engine.If it does not come on,have the vehicle servicedby your dealer/retailer.
ot ce od cat o s ade to t e e g e,transmission, exhaust, intake, or fuel system of the vehicle or the replacement of the original tireswith other than those of the same Tire PerformanceCriteria (TPC) can affect the vehicle's emission
controls and can cause this light to come on.Modifications to these systems could lead tocostly repairs not covered by the vehicle warranty.This could also result in a failure to pass a requiredEmission Inspection/Maintenance test. See Accessories and Modifications on page 6 ‑ 3 .
4-4
This light comes on during a malfunction in one of two ways:
Light Flashing: A misfire condition has been detected. A misfire increases vehicle emissions and coulddamage the emission control system on the vehicle.Diagnosis and service might be required.
The following can prevent more serious damage to thevehicle:
. Reduce vehicle speed.
. Avoid hard accelerations.
. Avoid steep uphill grades.
If the light continues to flash, when it is safe to do so,stop the vehicle. Find a safe place to park the vehicle.Turn off the ignition, wait at least 10 seconds, and
t t th i If th li ht i till fl hi f ll th
An emission system malfunction might be corrected bydoing the following:
. Make sure the fuel cap is fully installed. See Filling the Tank o n p a g e 6 ‑ 9 . The diagnostic systemcan determine if the fuel cap has been left off or improperly installed. A loose or missing fuel capallows fuel to evaporate into the atmosphere. A fewdriving trips with the cap properly installed shouldturn the light off.
. If the vehicle has been driven through a deeppuddle of water, the vehicle's electrical system
might be wet. The condition is usually correctedwhen the electrical system dries out. A few drivingtrips should turn the light off.
. Make sure to fuel the vehicle with quality fuel.Poor fuel quality causes the engine not to run as

7/31/2019 2010 Corvette
http://slidepdf.com/reader/full/2010-corvette 210/471
restart the engine. If the light is still flashing, follow theprevious steps and see your dealer/retailer for serviceas soon as possible.
Light On Steady : An emission control system
malfunction has been detected on the vehicle.Diagnosis and service might be required.
Poor fuel quality causes the engine not to run asefficiently as designed and may cause: stallingafter start-up, stalling when the vehicle is changedinto gear, misfiring, hesitation on acceleration,or stumbling on acceleration. These conditions
might go away once the engine is warmed up.
If one or more of these conditions occurs, changethe fuel brand used. It will require at least one fulltank of the proper fuel to turn the light off.
See Gasoline Octane on page 6 ‑ 7 .
4-42
If none of the above have made the light turn off, your dealer/retailer can check the vehicle. The dealer/retailer
has the proper test equipment and diagnostic tools to fixany mechanical or electrical problems that might havedeveloped.
Emissions Inspection and MaintenancePrograms
Some state/provincial and local governments haveor might begin programs to inspect the emissioncontrol equipment on the vehicle. Failure to pass this
inspection could prevent getting a vehicle registration.
Here are some things to know to help the vehicle passan inspection:
. The vehicle will not pass this inspection if theh k i li ht i ith th i i
button down for five seconds. The instrumentpanel, including the check engine light, will light up
and the ignition will be on, but the engine will notstart — press the bottom of the Acc. button onlybriefly, less than five seconds, the accessorypower mode will be turned on, but not the ignition. After the bulb check, press and release the Acc.button again to turn the ignition off and avoiddraining the vehicle's battery.
. The vehicle will not pass this inspection if theOBD II (on-board diagnostic) system determines
that critical emission control systems have notbeen completely diagnosed by the system.The vehicle would be considered not ready for inspection. This can happen if the battery hasrecently been replaced or if the battery has rundo n The diagnostic s stem is designed to

7/31/2019 2010 Corvette
http://slidepdf.com/reader/full/2010-corvette 211/471
check engine light is on with the engine running.
To perform a check engine light bulb check withthe keyless ignition, make sure the transmitter fobis in the passenger compartment. See Ignition
Positions on page 3 ‑
23 . Press the bottom of the Acc. button on the instrument panel and hold the
down. The diagnostic system is designed toevaluate critical emission control systems duringnormal driving. This can take several days of routine driving. If this has been done and thevehicle still does not pass the inspection for lackof OBD II system readiness, your dealer/retailer can prepare the vehicle for inspection.
4-4
Engine Oil Pressure Gauge
United States Canada
{ WARNING:
Do not keep driving if the oil pressure is low.The engine can become so hot that it catches fire.Someone could be burned. Check the oil as soonas possible and have the vehicle serviced.
Notice: Lack of proper engine oil maintenancecan damage the engine. The repairs would not be
covered by the vehicle warranty. Always follow themaintenance schedule in this manual for changingengine oil.
The engine oil pressure gauge shows the engineoil pressure in psi (pounds per square inch) or

7/31/2019 2010 Corvette
http://slidepdf.com/reader/full/2010-corvette 212/471
United States — Z06 andZR1 Models
Canada — Z06 and ZR1Models
oil pressure in psi (pounds per square inch) or kPa (kilopascals) when the engine is running.
Oil pressure should be 140 to 550 kPa (20 to 80 psi).In certain situations such as long, extended idles onhot days, it could read as low as 40 kPa (6 psi) and stillbe considered normal. It may vary with engine speed,outside temperature and oil viscosity, but readingsabove the shaded area show the normal operatingrange. Readings in the shaded area tell you that theengine is low on oil, or that you might have someother oil problem. See Engine Oil on page 6 ‑ 19.
4-44
The engine oil pressure can also be displayed using theGAGES button on the Driver Information Center (DIC).
See Driver Information Center (DIC) on page 4‑ 47 .
Security Light
For information regardingthis light and the vehicle'ssecurity system, seeTheft-Deterrent Systemon page 3 ‑ 19.
Fog Lamp Light
The fog lamp light comes
Lights On Reminder
This light comes onwhenever the parkinglamps are on.
See Headlamps on Reminder on page 4‑ 12 for moreinformation.
Highbeam On Light
This light comes on when

7/31/2019 2010 Corvette
http://slidepdf.com/reader/full/2010-corvette 213/471
The fog lamp light comeson when the fog lampsare in use.
The light goes out when the fog lamps are turned off.See Fog Lamps on page 4‑ 13 for more information.
gthe high-beam headlampsare in use.
See Headlamp High/Low-Beam Changer o n p a g e 4‑ 5for more information.
4-4
Fuel Gauge
The fuel gauge showshow much fuel the vehiclehas left while the engineis on.
An arrow on the fuel gauge indicates the side of thevehicle the fuel door is on.
Here are five things that some owners ask about. All these things are normal and do not indicate that
anything is wrong with the fuel gauge.. At the service station, the gas pump shuts off
before the gauge reads the full.
. It takes a little more or less fuel to fill up than thegauge indicated. For example, the gauge mayhave indicated half full, but it took a little more or less than half of the tank's capacity to fill the tank.
. The gauge pointer may move while cornering,braking or speeding up.
. The gauge may not indicate the tank is emptywhen the ignition is turned off.
. The gauge reading may change slightly within thefirst several minutes after starting the vehicle.

7/31/2019 2010 Corvette
http://slidepdf.com/reader/full/2010-corvette 214/471
When the needle approaches the low fuel symbol, achime sounds and LOW FUEL appears on the Driver Information Center (DIC) display. There is still a little fuelleft, but the vehicle's fuel tank should be filled soon.
Press the RESET button to acknowledge a DICmessage(s). Pressing the RESET button also turns off aDIC message but the LOW FUEL message comes onagain in 10 minutes if fuel is not added to the vehicle.
See DIC Operation and Displays on page 4‑ 47 for more information.
4-46
Boost Gauge (ZR1 Only)
United States Canada
For vehicles that have this gauge, it is located near the
Driver Information Center (DIC)
The Driver Information Center (DIC) display is locatedon the instrument panel cluster and shows driver personalization features and warning/status messages.The DIC buttons are located on the instrument panel, tothe right of the cluster.
The DIC comes on when the ignition is turned on. After displaying CORVETTE BY CHEVROLET, the DICshows the information that was last displayed before theengine was turned off.
If a problem is detected, a warning message appearson the DIC display. See DIC Warnings and Messageson page 4‑ 52 for more information.
DIC Operation and Displays

7/31/2019 2010 Corvette
http://slidepdf.com/reader/full/2010-corvette 215/471
g g ,driver side of the instrument panel cluster.
This gauge indicates vacuum during light to moderatethrottle and boost under heavier throttle.
It displays the air pressure level in the intake manifoldbefore it enters the engine's combustion chamber.
The gauge is automatically centered at zero everytime the engine is started. Actual vacuum or boost isdisplayed from this zero point. Changes in ambientpressure, such as driving in mountains and changingweather, will slightly change the zero reading.
p p y
Depending on the features on the vehicle, the drivegear may display on the DIC. See “Manual Paddle Shift”under Automatic Transmission Operation on page 3 ‑ 26 and “Head-Up Display (HUD)” in the index of theNavigation system manual for more information.
The Driver Information Center (DIC) has differentmodes which can be accessed by pressing thefollowing buttons located on the instrument panel,to the right of the instrument panel cluster.
4-4
TRIP: Press this button to display your total and tripdistance driven, the elapsed time function, your average
speed, and the engine oil life.OPTION : Press this button to choose personal optionsthat are available on your vehicle, depending on theoptions your vehicle is equipped with, such as door locks, easy entry seats, and language.
RESET: Press this button, used along with the other buttons, to reset system functions, select personaloptions, and turn off or acknowledge messages onthe DIC.
FUEL Button
The fuel button displays average fuel economy andinstantaneous fuel economy, calculated for your specificdriving conditions, and range information.

7/31/2019 2010 Corvette
http://slidepdf.com/reader/full/2010-corvette 216/471
. 4 (Fuel): Press this button to display fuel informationsuch as fuel economy and range.
2 (Gauges): Press this button to display gaugeinformation like oil pressure and temperature, coolanttemperature, automatic transmission fluid temperature,if equipped, battery voltage, and front/rear tirepressures.
g g
Average Fuel Economy : The average fuel economy isviewed as a long-term approximation of your overalldriving conditions. You should reset the average fueleconomy display every time you refuel. If you press theRESET button in this mode while you are driving, thesystem will reset this display and begin figuring fueleconomy from that point in time.
4-48
Press the fuel button to display average fuel economy,such as:
. AVERAGE FUEL ECONOMY 11.7 L/100 km or
. AVERAGE FUEL ECONOMY 20.1 MPG
Instantaneous Fuel Economy : Instantaneous fueleconomy reflects only the fuel economy that the vehiclehas right now and will change frequently as drivingconditions change. Unlike average fuel economy, thismenu item cannot be reset.
Press the fuel button again to display instantaneous fuel
economy, such as:. INSTANT FUEL ECONOMY 11.7 L/100 km or
. INSTANT FUEL ECONOMY 20.1 MPG
Fuel Range : The range calculates the remainingdistance you can drive without refueling It is based
The fuel economy data used to determine fuel range isan average of recent driving conditions. As your driving
conditions change, this data is gradually updatedautomatically.
If the vehicle has been idling for a long time, therange displayed on the DIC could be abnormally low.The vehicle must be driven 8 –16 km (5 –10 miles) toget an accurate reading.
GAGES Button
The gauges button displays oil pressure, oil
temperature, coolant temperature, transmission fluidtemperature for automatic transmission vehicles only,battery voltage, and tire pressure information.
Oil Pressure : This display shows the oil pressure.
Press the gauges button to display the oil pressure

7/31/2019 2010 Corvette
http://slidepdf.com/reader/full/2010-corvette 217/471
distance you can drive without refueling. It is basedon fuel economy and the fuel remaining in the tank.
Press the fuel button again to display the range,such as:
. RANGE 48 km or
. RANGE 30 MI
If the LOW FUEL warning is displayed or if RANGE isless than 64 km (40 miles), the display will readRANGE LOW.
Press the gauges button to display the oil pressure,such as:
. OIL PRESSURE 276 kPa or
. OIL PRESSURE 40 PSI
Oil Temperature : This display shows the oiltemperature.
Press the gauges button again to display the oiltemperature, such as:
. OIL TEMPERATURE 112°C or
. OIL TEMPERATURE 234°F
4-4
If the oil temperature is low, the display will show OILTEMPERATURE LOW. If the oil temperature is high, the
display will show OIL TEMPERATURE HIGH.Coolant Temperature : This display shows the enginecoolant temperature.
Press the gauges button again to display the coolanttemperature, such as:
. COOLANT TEMPERATURE 51°C or
. COOLANT TEMPERATURE 123°F
If the coolant temperature is low, the display will show
COOLANT TEMPERATURE LOW. If the coolanttemperature is high, the display will show COOLANTTEMPERATURE HIGH.
Transmission Fluid Temperature : If you have anautomatic transmission vehicle, this display shows the
If the transmission fluid temperature is low, thedisplay will show TRANS FLUID TEMP LOW. If the
transmission fluid temperature is high, the displaywill show TRANS FLUID TEMP HIGH.
Battery Voltage : This display shows the currentbattery voltage.
Press the gauges button again to display the batteryvoltage, such as:
. BATTERY VOLTAGE 13.5 VOLTS
Tire Pressure : This display shows the tire pressure for
each tire.Press the gauges button again to display the tirepressure for the front tires, such as:
. FRONT TIRE PRESSURES L 234 kPaR 228 kPa or

7/31/2019 2010 Corvette
http://slidepdf.com/reader/full/2010-corvette 218/471
, p yautomatic transmission fluid temperature.
Press the gauges button again to display the automatictransmission fluid temperature, such as:
. TRANS FLUID TEMP 51°C or
. TRANS FLUID TEMP 123°F
. FRONT TIRE PRESSURES L 34 PSI R 33 PSI
Press the gauges button again to display the tirepressure for the rear tires, such as:
. REAR TIRE PRESSURES L 234 kPa R 228 kPa or
. REAR TIRE PRESSURES L 34 PSI R 33 PSI
4-50
TRIP Button
The TRIP button displays the odometer, trip distance,elapsed time, average speed, and oil life remaininginformation.
Odometer : The odometer shows how far your vehiclehas been driven in either kilometers or miles. Press theTRIP button to display odometer readings, such as:
. ODOMETER 20008 km or
. ODOMETER 12345 MI
You can also display the odometer by turning on theparking lamps.
Trip Odometers : There are two trip odometers.Press the TRIP button to display TRIP ODOMETER Areadings and press the button again to display TRIPODOMETER B readings such as:
There is also a miles since last ignition feature thatdisplays the number of kilometers (miles) driven since
you last started the vehicle. Press and hold the RESETbutton for three seconds, then release it. The kilometers(miles) since the last ignition cycle will be set into thetrip odometer.
Elapsed Timer : Press the TRIP button until ELAPSEDTIMER is displayed, such as ELAPSED TIMER .00.
When the ignition is in on, the DIC can be used as astopwatch. The display can show hours, minutes andseconds. The elapsed time indicator will record up to
23 hours, 59 minutes and 59 seconds, then it will resetto zero and continue counting. The display appears asELAPSED TIMER .00 in the elapsed time function.
You can start or stop the elapsed time by pressing theRESET button. To reset the elapsed time to zero, press
S f

7/31/2019 2010 Corvette
http://slidepdf.com/reader/full/2010-corvette 219/471
ODOMETER B readings, such as:
. TRIP ODOMETER A 209.9 km or
. TRIP ODOMETER A 130.5 MI
.
TRIP ODOMETER B 483.5 km or . TRIP ODOMETER B 300.5 MI
Both of the trip odometers can be used simultaneously.The trip odometers can be reset by pressing the RESETbutton on the DIC.
the RESET button for three seconds while the timer isdisplayed.
Pressing and holding the RESET button for at least10 seconds will reset the timer display to the time sincelast ignition cycle.
Average Speed : Press the TRIP button until theaverage speed is displayed, such as:
. AVERAGE SPEED 100 km/h or
. AVERAGE SPEED 62 MPH
4-5
Press and hold the RESET button to reset to0.0 km/h (mph).
Engine Oil Life : Press the TRIP button until the engineoil life is displayed, such as OIL LIFE REMAINING 89%.
This is an estimate of the engine oil's remaining usefullife. It will show 100% when the system is reset after an oil change. It will alert you to change the oil on aschedule consistent with your driving conditions.
When the remaining oil life is low, the system will alertyou with the message CHANGE ENGINE OIL.
Remember, you must reset the engine oil life systemyourself after each oil change. It will not reset itself.To reset the system, see Engine Oil Life System on
page 6 ‑ 25 . Be careful not to reset the engine oil lifesystem accidentally at any time other than when the oilhas just been changed. It cannot be reset accurately
RESET Button
The RESET button, used along with other buttons, willreset system functions and turn off or acknowledgemessages on the DIC.
DIC Warnings and Messages
Messages are displayed on the DIC to notify the driver that the status of the vehicle has changed and thatsome action may be needed by the driver to correct thecondition. Multiple messages may appear one after
another. You can scroll through the messages thatmay have been sent at the same time. The DIC iscontinuously updated with the vehicle performancestatus.
Some messages may not require immediate action, butyou can press the RESET button to acknowledge that

7/31/2019 2010 Corvette
http://slidepdf.com/reader/full/2010-corvette 220/471
has just been changed. It cannot be reset accuratelyuntil the next oil change.
See Scheduled Maintenance o n p a g e 7 ‑ 3 and EngineOil on page 6 ‑ 19 for more information.
OPTION Button
The OPTION button allows you to access thePERSONAL OPTIONS menu and customize thepersonalization settings on your vehicle. See DIC Vehicle Personalization on page 4‑ 71 for moreinformation.
you can press the RESET button to acknowledge thatyou received the messages and to clear them from thedisplay.
Some messages cannot be cleared from the DIC
display because they are more urgent. Thesemessages require action before they can be cleared.You should take any messages that appear on thedisplay seriously and remember that clearing themessages will only make the messages disappear,not correct the problem.
The following are the possible messages that can bedisplayed and some information about them.
4-52
ABS (Antilock Brake System) ACTIVE
This message displays when the Antilock Brake System(ABS) is adjusting brake pressure to help avoid abraking skid.
Slippery road conditions may exist if this messageis displayed, so adjust your driving accordingly. Themessage stays on for a few seconds after the systemstops adjusting brake pressure. See Antilock BrakeSystem (ABS) o n p a g e 5 ‑ 5 for more information.
ACTIVE HANDLING
This message displays when the Active HandlingSystem is operating. The Active Handling System is acomputer controlled system that assists the driver incontrolling the vehicle in difficult driving conditions.You may feel or hear the system working and see the
ACTIVE HANDLING READY
This message displays when the functional checkof the Active Handling System has been completed.See Active Handling System o n p a g e 5 ‑ 8 for moreinformation.
ATTACH TRUNK PARTITION
If the vehicle has a power convertible top, this messagedisplays and a sound will be heard if the trunk partitionis not in place. Open the hatch/trunk and make sure thetrunk partition is secure and no objects are on the trunk
partition. See Rear Storage Area on page 3 ‑ 51 for
more information.
BATTERY SAVER ACTIVE
This message displays when the vehicle hasd t t d th t th b tt lt i d i b d

7/31/2019 2010 Corvette
http://slidepdf.com/reader/full/2010-corvette 221/471
ACTIVE HANDLING message displayed in the DIC.This message stays on for a few seconds following theactive handling event. This is normal when the systemis operating. See Active Handling System o n p a g e 5 ‑ 8
and Braking on page 5 ‑ 4.
detected that the battery voltage is dropping beyonda reasonable point. The battery saver system startsreducing certain features of the vehicle that you maybe able to notice. At the point that features are disabled
this message is displayed. It means that the vehicleis trying to save the charge in the battery. Turn off unnecessary accessories to allow the battery torecharge.
4-5
BUCKLE PASSENGER
This message reminds you to buckle the passenger'ssafety belt.
This message displays and a sound will be heard whenthe ignition is on, the driver's safety belt is buckled, thepassenger's safety belt is unbuckled with the passenger airbag enabled, and the vehicle is in motion. You shouldhave the passenger buckle their safety belt.
The reminder will be repeated if the ignition is on, thevehicle is in motion, the driver is buckled and the
passenger is still unbuckled, and the passenger airbagis enabled. If the passenger's safety belt is alreadybuckled, this message will not come on.
BUCKLE SEATBELT
This message reminds you to buckle the driver's
This message is an additional reminder to the safetybelt reminder light in the instrument panel cluster.
See Safety Belt Reminders on page 4‑
32 for moreinformation.
CHANGE BRAKE PADS
On vehicles with electronic brake pad wear sensors,this message will be displayed when the pads are worn.See your dealer/retailer for service.
CHANGE ENGINE OIL
This message displays when the life of the engineoil has expired. See Scheduled Maintenance on pag e 7 ‑ 3 . After an oil change, the engine oil lifesystem must be reset. See “Engine Oil Life” under DIC Operation and Displays on page 4‑ 47 . Also, seeEngine Oil on page 6 ‑ 19 and Engine Oil Life System

7/31/2019 2010 Corvette
http://slidepdf.com/reader/full/2010-corvette 222/471
This message reminds you to buckle the driver ssafety belt.
This message displays and a sound will be heard whenthe ignition is on, the driver's safety belt is unbuckled,
and the vehicle is in motion. You should buckle your safety belt.
If the driver remains unbuckled when the ignition ison and the vehicle is in motion, the reminder will berepeated. If the driver's safety belt is already buckled,this message will not come on.
on page 6 ‑ 25 for more information.
CHECK BRAKE FLUID
This message displays, a sound will be heard, and thebrake system warning light on the instrument panelcluster turns on if the ignition is on to inform the driver that the brake fluid level is low. See Brake SystemWarning Light on page 4‑ 36 . Have the brake systemserviced by your dealer/retailer as soon as possible.See Brakes on page 6 ‑ 43 .
4-54
CHECK COOLANT LEVEL
This message displays when the engine coolant level islow. Have the cooling system serviced by your dealer/ retailer as soon as possible. See Engine Coolant on
pag e 6 ‑ 34.
CHECK GAS CAP
This message displays if the fuel cap has not been fullytightened. Check the fuel cap to make sure that it is onproperly. Once tightened, it takes at least one overnightpark to reset or clear this message. If both the CHECK
GAS CAP message and the malfunction indicator lampin the instrument panel cluster are on, you may need tosee your dealer/retailer for service. See MalfunctionIndicator Lamp on page 4‑ 41 for more information.
CHECK OIL LEVEL
CLOSE TRUNK TO MOVE TOP
This message displays and a sound will be heard if the trunk is open while you are trying to operate theconvertible top. Make sure the trunk is closed beforeoperating the convertible top. See Convertible Top(Manual) on page 3 ‑ 59 or Convertible Top (Power) on
page 3 ‑ 66 .
COMPETITIVE DRIVING MODE
This message displays and a sound will be heardwhen the Competitive Driving mode is selected.
The instrument panel cluster light will be on whenthe Competitive Driving mode is selected. If your vehicle is equipped with a manual transmission,Launch Control is available when this mode selected.The Traction Control System (TCS) will not be operatingwhile in the Competitive Driving mode. Adjust your

7/31/2019 2010 Corvette
http://slidepdf.com/reader/full/2010-corvette 223/471
On some vehicles, this message displays and twochimes sound if the oil level in the vehicle is low. Oncethe vehicle senses a change in the engine oil level, the
light remains off.
If this message appears after starting the engine, theengine oil level may be too low. You may need to addoil. See Engine Overheating on page 6 ‑ 38 .
To acknowledge the message, press the RESET button.The message reappears every 10 minutes until thiscondition changes.
while in the Competitive Driving mode. Adjust your driving accordingly. This system is available on allmodels except ZR1. See Competitive Driving Mode on pag e 5 ‑ 9 , including the “Launch Control” information,
and Racing or Other Competitive Driving on page 5 ‑
19for more information.
4-5
COOLANT OVER TEMPERATURE
This message displays and a sound will be heard if theengine coolant exceeds 124°C (255°F). If you havebeen operating the vehicle under normal drivingconditions, pull off the road, stop the vehicle, andturn off the engine as soon as possible.
You can monitor the coolant temperature with thegauges button on the DIC or the engine coolanttemperature gauge on the instrument panel cluster.See Engine Overheating on page 6 ‑ 38 , DIC Operationand Displays on page 4‑ 47 , and Engine Coolant
Temperature Gauge on page 4‑ 40 .
To acknowledge the message, press the RESET button.The message and sound will come back on until thiscondition changes. If you do not press the RESETbutton, the message remains on until the condition
h
ENGINE DRAG CONTROL ACTIVE
This message displays when engine drag control isactive. When driving in a lower gear in rainy, snowy,or icy conditions and then letting up on the accelerator or downshifting, the rear wheels may begin to slip andthis message displays. This message stays on for a fewseconds following the engine drag control event.
ENGINE OVERHEATED – STOP ENGINE
This message displays and a sound will be heard whenthe engine has overheated. Stop and turn the engine
off immediately to avoid severe engine damage.See Engine Overheating on page 6 ‑ 38 .
ENGINE PROTECTION REDUCEENGINE RPM
Thi di l if th i il t t

7/31/2019 2010 Corvette
http://slidepdf.com/reader/full/2010-corvette 224/471
changes.
CRUISE DISENGAGED
This message displays briefly when you disengagethe cruise control system by stepping on the brake onan automatic transmission vehicle or the clutch on amanual transmission vehicle, or by turning off the cruisecontrol switch. See Cruise Control o n p a g e 4 ‑ 7 for more information.
This message displays if the engine oil temperatureexceeds 160°C (320°F). Check the engine coolanttemperature and engine oil level. If the engine istoo hot, see Engine Overheating on page 6 ‑ 38 .The vehicle may need service, so see your dealer/ retailer.
You can monitor the oil temperature with the gaugesbutton on the DIC. See DIC Operation and Displays on
pag e 4‑ 47 .
4-56
Multiple chimes sound when this message is displayed.This message remains displayed and active until the
issue is resolved.HEADLAMPS SUGGESTED
This message displays if it is dark enough outside andthe headlamps and the Twilight Sentinel® controls areoff. This message informs the driver that turning on theexterior lamps is recommended. It has become darkenough outside to require the headlamps and/or other exterior lamps.
HIGH TIRE PRESSUREThis message may be displayed when one or more of the tires is over-inflated. This message also displaysLEFT FRONT, RIGHT FRONT, LEFT REAR, or RIGHT REAR to indicate which tire is affected.You can receive more than one tire pressure message
To acknowledge the message, press the RESET button. A message reappears every 10 minutes until the
condition is corrected.HOT ENGINE AIR CONDITIONING OFF
This message displays when the engine coolantbecomes hotter than the normal operating temperature.To avoid added strain on a hot engine, the air conditioning compressor is automatically turned off.When the coolant temperature returns to normal,the A/C operation automatically resumes. You cancontinue to drive the vehicle. If this message continuesto appear, have the system repaired by your dealer/ retailer as soon as possible to avoid compressor damage.
ICE POSSIBLE
This message displays when the outside air

7/31/2019 2010 Corvette
http://slidepdf.com/reader/full/2010-corvette 225/471
You can receive more than one tire pressure messageat a time. To read other messages that may have beensent at the same time, press the RESET button . If a tirepressure message appears on the DIC, stop as soon as
you can. Have the tire pressures checked and set tothose shown on the Tire Loading Information label. SeeRun-Flat Tires on page 6 ‑ 69, Loading the Vehicle on
pag e 5 ‑ 28 , Inflation - Tire Pressure on page 6 ‑ 70 , andTire Pressure Monitor System on page 6 ‑ 72 . The DICalso shows the tire pressure values. See DIC Operationand Displays on page 4‑ 47 .
This message displays when the outside air temperature is cold enough to create icy roadconditions. Adjust your driving accordingly.
LOW FUELThis message displays when the fuel tank is less than10 percent full and the display is turned off. A soundwill be heard when this message is displayed. Refill thefuel tank as soon as possible. See Fuel Gauge on
page 4‑ 46 .
4-5
LOW OIL PRESSURE
This message displays if low oil pressure levels occur.
If this message appears while the engine is running,stop the engine and do not operate it until the cause of low oil pressure is corrected. Severe damage to theengine can result. A sound will be heard when thismessage is displayed. See Engine Oil on page 6 ‑ 19.
LOW TIRE PRESSURE or TIRE LOW ADD AIR TO TIRE
{ WARNING:
When the LOW TIRE PRESSURE or TIRE FLATmessage is displayed on the Driver InformationCenter your vehicle's handling capabilities will be
This message displays when one or more of thetires is under-inflated. This message also displays
LEFT FRONT, RIGHT FRONT, LEFT REAR, or RIGHT REAR to indicate which tire is affected.Multiple chimes sound and the tire pressure light onthe instrument panel cluster turns on when thismessage is displayed. See Tire Pressure Light on
pag e 4‑ 40 . You can receive more than one tirepressure message at a time. To read other messagesthat may have been sent at the same time, press theRESET button. If a tire pressure message appearson the DIC, stop as soon as you can. Have the tire
pressures checked and set to those shown on theTire Loading Information label. See Run-Flat Tires on
pag e 6 ‑ 69, Loading the Vehicle on page 5 ‑ 28 ,Inflation - Tire Pressure on page 6 ‑ 70 , and TirePressure Monitor System on page 6 ‑ 72 . The DICalso shows the tire pressure values. See DIC Operation

7/31/2019 2010 Corvette
http://slidepdf.com/reader/full/2010-corvette 226/471
Center, your vehicle s handling capabilities will bereduced during severe maneuvers. The activehandling system will be affected. See ActiveHandling System o n p a g e 5 ‑ 8 . If you drive
too fast, you could lose control of your vehicle.You or others could be injured. Do not driveover 55 mph (90 km/h) when the LOW TIREPRESSURE or TIRE FLAT message is displayed.Drive cautiously and check your tire pressures assoon as you can.
and Displays on page 4‑ 47 .
To acknowledge the message, press the RESET button. A message reappears every 10 minutes until the
condition is corrected.
4-58
MAXIMUM SPEED 129 km/h (80 MPH)
This message displays when a malfunction is present in
the Selective Ride Control system. The vehicle speedwill be limited to a value determined by the vehiclewhen the shock absorber system has failed and theshocks are in their full soft mode. Have the vehicleserviced by your dealer/retailer as soon as possible.
To acknowledge the message, press the RESET button.The message reappears every 10 minutes until thiscondition changes.
NO FOBS DETECTEDThis message displays if the vehicle does not detect thepresence of a keyless access transmitter when youhave attempted to start the vehicle or a vehicle door has just closed. The following conditions may cause thismessage to appear:
keyless access transmitter. Do not carry thekeyless access transmitter in the same pocket or
bag as these devices.. The vehicle is experiencing Electromagnetic
Interference (EMI). Some locations, such asairports, automatic toll booths, and some gasstations have EMI fields which may interferewith the keyless access transmitter.

7/31/2019 2010 Corvette
http://slidepdf.com/reader/full/2010-corvette 227/471
message to appear:
. Driver-added equipment plugged into theaccessory power outlet on the center consoleis causing interference. Examples of thesedevices are cell phones and cell phone chargers,two-way radios, power inverters, or similar items.Try moving the keyless access transmitter awayfrom these devices when starting the vehicle.In addition, PDA devices and remote garage andgate openers may also generate ElectromagneticInterference (EMI) that may interfere with the
If moving the transmitter to different locationswithin the vehicle does not help, place thetransmitter in the glove box transmitter pocketwith the buttons facing to the right and thenpress the START button.
. The vehicle's battery voltage is low. The batteryvoltage must be above 10 volts for the keylessaccess transmitter to be detected properly.
4-5
NO FOB - OFF OR RUN?
This message displays when the keyless access
transmitter is not detected inside the vehicle while youare trying to turn the ignition off. The vehicle may benear a strong radio antenna signal causing the keylessaccess system to be jammed. The vehicle will remainin ACCESSORY until the vehicle is turned off or isrestarted, or five minutes has expired. If you turn theignition off and you cannot find the keyless accesstransmitter, you will not be able to restart the vehicle.The keyless access transmitter needs to be inside of
the vehicle in order for the vehicle to start. See Starting the Engine on page 3 ‑ 24 for more information.
OPTIONS UNAVAILABLE
This message displays for a few seconds if a keylessaccess transmitter that is not labelled 1 or 2 is used and
t t li th f t th hi l b
PERF TRAC 1 – WET ACTIVEHANDLING ON
This message displays and a sound will be heardwhen this Performance Traction Management modeis selected. The instrument panel cluster light will alsobe on when this mode is selected. Launch Control isavailable when this mode selected. In this mode theTraction Control and Active Handling System areavailable but intended for use on wet race trackconditions. Adjust your driving accordingly. This systemis available only on ZR1 models. See “Performance
Traction Management” and “Launch Control” under Competitive Driving Mode o n p a g e 5 ‑ 9 and Racing or Other Competitive Driving on page 5 ‑ 19 for moreinformation about the use of this mode.
PERF TRAC 2 – DRY ACTIVEHANDLING ON

7/31/2019 2010 Corvette
http://slidepdf.com/reader/full/2010-corvette 228/471
you try to personalize the features on the vehicle bypressing the OPTION button. The personalizationsystem will not recognize the transmitter and the DIC
will not display the current driver number or the menusused to set personalizations. The personalizationfeatures will then be set to the default states. See DIC Vehicle Personalization on page 4‑ 71 for moreinformation.
HANDLING ON
This message displays and a sound will be heardwhen this Performance Traction Management mode is
selected. The instrument panel cluster light will alsobe on when this mode is selected. Launch Control isavailable when this mode selected. In this mode theTraction Control and Active Handling System areavailable but intended for use on dry race trackconditions. Adjust your driving accordingly.
4-60
This system is available only on ZR1 models. See“Performance Traction Management” and “LaunchControl” under Competitive Driving Mode o n p a g e 5 ‑ 9and Racing or Other Competitive Driving on page 5 ‑ 19for more information about the use of this mode.
PERF TRAC 3 – SPORT ACTIVEHANDLING ON
This message displays and a sound will be heardwhen this Performance Traction Management modeis selected. The instrument panel cluster light will also
be on when this mode is selected. Launch Control isavailable when this mode selected. In this mode theTraction Control and Active Handling System areavailable but intended for use on dry race trackconditions. Adjust your driving accordingly. This systemis available only on ZR1 models. See “PerformanceTraction Management” and “Launch Control” under
PERF TRAC 4 – SPORT ACTIVEHANDLING OFF
This message displays and a sound will be heardwhen this Performance Traction Management modeis selected. The instrument panel cluster light will alsobe on when this mode is selected. Launch Control isavailable when this mode selected. In this mode theTraction Control is available but intended for use on dryrace track conditions. The Active Handling System isdisabled when this mode is selected. This mode willrequire more driver skill than modes 1-3. Adjust your
driving accordingly. This system is available only onZR1 models. See “Performance Traction Management”and “Launch Control” under Competitive Driving Modeo n p a g e 5 ‑ 9 and Racing or Other Competitive Driving on page 5 ‑ 19 for more information about the use of this mode.

7/31/2019 2010 Corvette
http://slidepdf.com/reader/full/2010-corvette 229/471
Traction Management and Launch Control under Competitive Driving Mode o n p a g e 5 ‑ 9 and Racing or Other Competitive Driving on page 5 ‑ 19 for moreinformation about the use of this mode.
4-6
PERF TRAC 5 – RACE ACTIVEHANDLING OFF
This message displays and a sound will be heardwhen this Performance Traction Management modeis selected. The instrument panel cluster light will alsobe on when this mode is selected. Launch Control isavailable when this mode selected. In this mode theTraction Control is available but intended for use on dryrace track conditions. The Active Handling System isdisabled when this mode is selected. This mode willrequire more driver skill than modes 1-4. Adjust your
driving accordingly. This system is available only onZR1 models. See “Performance Traction Management”and “Launch Control” under Competitive Driving Modeo n p a g e 5 ‑ 9 and Racing or Other Competitive Driving on page 5 ‑ 19 for more information about the use of this mode.
REDUCED ENGINE POWER
If this message displays and the check engine light
comes on, a noticeable reduction in the vehicle'sperformance may occur. If the REDUCED ENGINEPOWER message is displayed, but there is noreduction in performance, proceed to your destination.The performance may be reduced the next time thevehicle is driven.
The vehicle may be driven at a reduced speed while theREDUCED ENGINE POWER message is displayed, butacceleration and speed may be reduced. Anytime the
check engine light stays on, the vehicle should be takento your dealer/retailer as soon as possible for diagnosisand repair. See Malfunction Indicator Lamp on
pag e 4‑ 41 for more information.
Multiple chimes sound when this message is displayed.
To acknowledge the message press the RESET button

7/31/2019 2010 Corvette
http://slidepdf.com/reader/full/2010-corvette 230/471
PRESS BRAKE TO START ENGINE(Automatic Transmission Only)
This message displays if you try to start the engine bypressing the keyless ignition start button without havingthe brake pressed. The brake needs to be pressedwhen starting the engine. See Ignition Positions on
page 3 ‑ 23 for more information.
To acknowledge the message, press the RESET button.The message reappears every five minutes until thiscondition changes.
If the REDUCED ENGINE POWER message isdisplayed in combination with the COOLANT OVERTEMPERATURE message, see Engine Overheating on
pag e 6 ‑ 38 .
4-62
SERVICE ACTIVE HANDLING SYSTEM
This message displays if there is a problem with the
Active Handling System and the vehicle needs service.The active handling system light on the instrumentpanel cluster also turns on and a sound will be heard.See your dealer/retailer. When this message isdisplayed, the system is not working. Adjust your drivingaccordingly. See Active Handling System o n p a g e 5 ‑ 8 for more information.
SERVICE AIR CONDITIONING
This message displays when the electronic sensorsthat control the air conditioning and heating systemsare no longer working. Have the climate control systemserviced by your dealer/retailer if you notice a drop inheating and air conditioning efficiency.
SERVICE ANTILOCK BRAKES
If the antilock brake system (ABS) warning light is onand the regular brake system warning light is not on,you still have brakes, but do not have ABS. If theregular brake system warning light is also on, you donot have ABS and there is a problem with the brakes.See Antilock Brake System (ABS) Warning Light on
page 4‑ 37 and Brake System Warning Light on page 4‑ 36 .
If this message is displayed, the Traction ControlSystem (TCS) and the Active Handling System willalso be disabled. The DIC will scroll three messages:SERVICE ANTILOCK BRAKES, SERVICE TRACTIONSYSTEM, and SERVICE ACTIVE HANDLING, and theinstrument panel cluster lights will come on along with asound. When the service message is displayed, thecomputer controlled systems will not assist the driver.Have the system repaired by your dealer/retailer assoon as possible. Adjust your driving accordingly.

7/31/2019 2010 Corvette
http://slidepdf.com/reader/full/2010-corvette 231/471
SERVICE ANTILOCK BRAKES
If this message displays while you are driving, stop assoon as possible and turn the ignition off. Then start the
engine again to reset the system. If the message stayson, or comes back on again while you are driving, thevehicle is in need of service. See your dealer/retailer.
To acknowledge these messages, press the RESETbutton.
4-6
SERVICE CHARGING SYSTEM
If this message displays while you are driving, there
may be a problem with the electrical charging system.It could mean that there is a loose or broken drive beltor that there is another electrical problem. Have thevehicle checked right away by your dealer/retailer.Driving while this message is on could drain the battery.
If you must drive a short distance with the message on,be certain to turn off the vehicle's accessories, such asthe radio and air conditioner.
Multiple chimes sound when this message is displayed.To acknowledge the message, press the RESET button.The message reappears every 10 minutes until thiscondition changes.
SERVICE ELECTRICAL SYSTEM
Thi di l if l t i l bl h
SERVICE RIDE CONTROL
This message displays when the Selective Ride Control
system has detected a malfunction and the systemmust be serviced. See your dealer/retailer. If a fault ispresent in the Selective Ride Control system whichcauses the shocks to be in their full soft condition, themessages SERVICE RIDE CONTROL, SHOCKSINOPERATIVE, and MAXIMUM SPEED 129 km/h(80 MPH) will display together. See Selective RideControl on page 5 ‑ 14 for more information.
SERVICE TIRE MONITORThis message displays if a part on the Tire PressureMonitor System (TPMS) is not working properly. The tirepressure light also flashes and then remains on duringthe same ignition cycle. See Tire Pressure Light on
pag e 4‑ 40 . Several conditions may cause this messageto appear See Tire Pressure Monitor Operation on

7/31/2019 2010 Corvette
http://slidepdf.com/reader/full/2010-corvette 232/471
This message displays if an electrical problem hasoccurred within the Powertrain Control Module (PCM).Have the vehicle serviced by your dealer/retailer.
SERVICE FUEL SYSTEM
This message displays if the Powertrain Control Module(PCM) has detected a problem within the fuel system.Have the vehicle serviced by your dealer/retailer. Thismessage also displays when the cluster is not gettingfuel information from the PCM.
to appear. See Tire Pressure Monitor Operation on pag e 6 ‑ 74 for more information. If the warning comeson and stays on, there may be a problem with theTPMS. See your dealer/retailer.
4-64
SERVICE TRACTION SYSTEM
If this message displays when you are driving, there is a
problem with the Traction Control System (TCS) and thevehicle is in need of service. See your dealer/retailer.When this message is displayed, the system will notlimit wheel spin. Adjust your driving accordingly.
The traction control system (TCS) warning light on theinstrument panel cluster will also turn on and a soundwill be heard.
When this message is displayed, the computer controlled systems will not assist the driver in controllingthe vehicle. Have the system repaired by your dealer/ retailer as soon as possible. Adjust your drivingaccordingly. See Traction Control System (TCS) on pa ge 5 ‑ 6 for more information.
To acknowledge the message, press the RESET button.
SET PARK BRAKE FOR SEAT RECALL
If the vehicle has a manual transmission, this message
displays if you try to recall the memory positions whenthe ignition is on and the parking brake is not set. If thevehicle is on, you must set the parking brake in order for the memory positions to recall. See Memory Seat,Mirrors and Steering Wheel o n p a g e 2 ‑ 4 for moreinformation.
SET PARK BRAKE TO MOVE TOP
If the vehicle has a manual transmission, this message
displays and a sound will be heard if you try to operatethe power convertible top without first setting theparking brake. Set the parking brake before trying tooperate the power convertible top. See Convertible Top(Manual) on page 3 ‑ 59 or Convertible Top (Power) on
page 3 ‑ 66 for more information.

7/31/2019 2010 Corvette
http://slidepdf.com/reader/full/2010-corvette 233/471
SERVICE TRANSMISSION
This message displays when there is a problem with the
transmission. See your dealer/retailer for service.
SERVICE VEHICLE SOON
This message displays and a sound will be heard whenthere may be an electrical or another system problemwith the vehicle. Have your vehicle checked by your dealer/retailer if this message keeps appearing.
SHIFT TO PARK
If the vehicle has an automatic transmission, this
message displays if the vehicle is not in P (Park) whenthe engine is being turned off. The vehicle will be in ACCESSORY Once the shift lever is moved to P (Park),the vehicle will turn off.
4-6
The vehicle will remain in ACCESSORY, without the20 minute time-out period, until the shift lever is movedto P (Park) or until the driver presses the pushbutton torestart the vehicle. See Ignition Positions on page 3
‑ 23
for more information.
SHIFT TO PARK OR SET PARK BRAKEFOR TOP
If the vehicle has an automatic transmission, thismessage displays and a sound will be heard if youtry to operate the power convertible top without firstshifting into P (Park) or setting the parking brake.Either shift the vehicle into P (Park) or set the parkingbrake before trying to operate the power convertibletop. See Convertible Top (Manual) on page 3 ‑ 59 or Convertible Top (Power) on page 3 ‑ 66 for moreinformation.
SHOCKS INOPERATIVE
TIRE FLAT
{ WARNING:
When the LOW TIRE PRESSURE or TIRE FLATmessage is displayed on the Driver InformationCenter, your vehicle's handling capabilities willbe reduced during severe maneuvers. If you drivetoo fast, you could lose control of your vehicle.You or others could be injured. Do not drive
over 55 mph (90 km/h) when the LOW TIREPRESSURE or TIRE FLAT message is displayed.Drive cautiously and check your tire pressures assoon as you can.
This message displays when one or more of the tires is

7/31/2019 2010 Corvette
http://slidepdf.com/reader/full/2010-corvette 234/471
SHOCKS INOPERATIVE
This message displays when a malfunction is present inthe Selective Ride Control system which is causing theshocks to be in their full soft mode. This is a warning tothe driver that the vehicle handling may be affected.Have the vehicle serviced by your dealer/retailer assoon as possible.
To acknowledge the message, press the RESET button.The message reappears every 10 minutes until thiscondition changes.
flat. This message also displays LEFT FRONT, RIGHTFRONT, LEFT REAR, or RIGHT REAR to indicatewhich tire is affected. Multiple chimes sound and the tire
pressure light on the instrument panel cluster comes onwhen this message is displayed. See Tire PressureLight on page 4‑ 40 .
4-66
This message is followed by the MAXIMUMSPEED 90 km/h (55 MPH) message, and then bythe REDUCED HANDLING message. The ActiveHandling System will intervene more quickly when a flattire has been detected. Adjust your driving accordingly.
You can receive more than one tire pressure messageat a time. To read other messages that may have beensent at the same time, press the RESET button. If a tirepressure message appears on the DIC, stop as soon asyou can. Have the tire pressures checked and set tothose shown on the Tire Loading Information label. SeeRun-Flat Tires on page 6 ‑ 69, Loading the Vehicle on
pag e 5 ‑
28 , Inflation - Tire Pressure on page 6 ‑ 70 , and
Tire Pressure Monitor System on page 6 ‑ 72 . The DICalso shows the tire pressure values. See DIC Operationand Displays on page 4‑ 47 .
To acknowledge the message, press the RESET button. A message reappears every 10 minutes until the
TOP MOTOR OVER TEMPERATURE
This message displays and a sound will be heard when
the power convertible top button is pressed and thepower convertible top pump motor temperature is over 105°C (221°F). Wait for the power convertible top pumpmotor to cool down before using the power convertible top.
TOP NOT SECURE
This message displays and a sound will be heard whenthe power convertible top button is released before the
top open or close operation is complete or if the top isclosed without the header latch engaged. Press andhold the convertible top button to fully open or close thetop, and make sure that the header latch is engagedafter the top is closed.
TRACTION SYSTEM ACTIVE

7/31/2019 2010 Corvette
http://slidepdf.com/reader/full/2010-corvette 235/471
condition is corrected.
TOO COLD TO MOVE TOP
This message displays and a sound will be heard whenthe power convertible top button is pressed and thepower convertible top pump motor temperature isbelow −20°C (−4°F). Wait for the power convertibletop pump motor to warm up before using the power convertible top.
This message displays when the Traction ControlSystem (TCS) is limiting wheel spin. Slippery road
conditions may exist if this message is displayed, soadjust your driving accordingly. The message stays onfor a few seconds after the TCS stops limiting wheelspin. See Traction Control System (TCS) o n p a g e 5 ‑ 6 for more information.
4-6
TRACTION SYSTEM AND ACTIVEHANDLING – OFF
This message displays, the instrument panel cluster light turns on, and a sound will be heard when theTraction Control System (TCS) and Active HandlingSystem are turned off by pressing the Active HandlingSystem button on the console for five seconds. The Antilock Brake System (ABS) remains on with the TCSand Active Handling System off. Adjust your drivingaccordingly. See Traction Control System (TCS) on page 5 ‑ 6 and Active Handling System o n p a g e 5 ‑ 8
for more information.To acknowledge this message, press the RESETbutton.
TRACTION SYSTEM AND ACTIVEHANDLING – ON
TRACTION SYSTEM – OFF
This message displays and stays on, a sound will be
heard, and the traction control system (TCS) warninglight on the instrument panel cluster turns on when theTCS is turned off by pressing the Active HandlingSystem button on the console. See Traction Control System (TCS) Warning Light on page 4‑ 38 . SeeTraction Control System (TCS) o n p a g e 5 ‑ 6 for moreinformation.
To acknowledge the message, press the RESET button.
TRACTION SYSTEM–
ONThis message displays and a sound will be heard whenthe Traction Control System (TCS) is turned on bypressing the Active Handling System button on theconsole. This message automatically clears from theDIC display on its own. See Traction Control System(TCS) o n p a g e 5 6 for more information

7/31/2019 2010 Corvette
http://slidepdf.com/reader/full/2010-corvette 236/471
If the Traction Control System (TCS) and ActiveHandling System are off, this message displays briefly,the instrument panel cluster light turns off, and a soundwill be heard when the TCS and Active HandlingSystem are turned on by briefly pressing the ActiveHandling System button on the console. See TractionControl System (TCS) o n p a g e 5 ‑ 6 and ActiveHandling System o n p a g e 5 ‑ 8 for more information.
(TCS) o n p a g e 5 ‑ 6 for more information.
4-68
TRANSMISSION HOT IDLE ENGINE
This message displays and four chimes sound if the
transmission fluid temperature rises above 132°C(270°F) or rises rapidly. The transmission may shiftgears or apply the torque converter clutch to reduce thefluid temperature. Driving aggressively or driving onlong hills can cause the transmission fluid temperatureto be higher than normal. If this message appears, youmay continue to drive at a slower speed. Monitor thetransmission fluid temperature and allow it to cool to atleast 110°C (230°F). The transmission fluid temperature
can be monitored with the gauges button on the DIC.See DIC Operation and Displays on page 4‑ 47 and Automatic Transmission Fluid on page 6 ‑ 31. Alsocheck the engine coolant temperature. If it is also hot,see Engine Overheating on page 6 ‑ 38 .
If this message is displayed during normal vehicleoperation on flat roads, the vehicle may need service.
To acknowledge the message, press the RESET button.The message reappears every 10 minutes until thiscondition changes. If you do not press the RESETbutton, the message remains on the display until thecondition changes.
TURN SIGNAL ON
This message displays and a sound will be heard if aturn signal is left on for 1.2 km (three-quarters of a mile)Move the turn signal/multifunction lever to the off position.
To acknowledge this message, press the RESETbutton.
UNLATCH HEADER TO MOVE TOP
This message displays and a sound will be heard if youtry to lower the convertible top without first unlockingthe top. Move the latch handle to unlock the convertible

7/31/2019 2010 Corvette
http://slidepdf.com/reader/full/2010-corvette 237/471
p , ySee your dealer/retailer for an inspection.
If driving in a performance or competitive manner, the
use of (S) Sport Automatic Mode or (S) Sport ManualPaddle Shift gear selection is recommended. See Automatic Transmission Operation on page 3 ‑ 26 for more information.
top. See Convertible Top (Manual) on page 3 ‑ 59 or Convertible Top (Power) on page 3 ‑ 66 .
4-6
Other Messages
Here are more messages that you can receive on your
Driver Information Center (DIC). To acknowledge amessage and read another message that may havecome on at the same time, press the RESET button.
. ACCESSORY MODE ON
. BATTERY VOLTAGE HIGH
See Voltmeter Gauge on page 4‑ 35 .
. BATTERY VOLTAGE LOW
See Voltmeter Gauge on page 4‑ 35 .
. CHECK WASHER FLUID
See Windshield Washer Fluid on page 6 ‑ 42 .
. CRUISE SET TO XXX MPH (XXX km/h)
See Cruise Control on page 4‑ 7 .
. DRIVER DOOR AJAR
. INTRUSION SENSOR OFF, if your vehicle has thisfeature
. INTRUSION SENSOR ON, if your vehicle has thisfeature
. KNOWN FOB
See “Matching Transmitter(s) to Your Vehicle”
under Keyless Access System Operation on pag e 3 ‑ 5 .
. MAXIMUM NUMBER OF FOBS LEARNED
See “Matching Transmitter(s) to Your Vehicle”
under Keyless Access System Operation on pag e 3
‑ 5 .
. OFF – ACCESSORY TO LEARN
See “Matching Transmitter(s) to Your Vehicle”
under Keyless Access System Operation on pag e 3 ‑ 5 .
. PASSENGER DOOR AJAR

7/31/2019 2010 Corvette
http://slidepdf.com/reader/full/2010-corvette 238/471
DRIVER DOOR AJAR
. FOB AUTOLEARN WAIT XX MINUTES
See“Matching Transmitter(s) to Your Vehicle
”
under Keyless Access System Operation on pa ge 3 ‑ 5 .
. FOB BATTERY LOW
See “Battery Replacement” under Keyless AccessSystem Operation on page 3 ‑ 5 .
. HATCH AJAR (Coupe)
. PASSENGER DOOR AJAR
. READY FOR FOB #X
See“Matching Transmitter(s) to Your Vehicle
”
under Keyless Access System Operation on pag e 3 ‑ 5 .
. TONNEAU AJAR (Convertible)
. TRUNK AJAR (Convertible)
. UPSHIFT NOW
See Manual Transmission Operation on page 3 ‑ 32 .
4-70
DIC Vehicle Personalization
Many features on your vehicle can be personalized.
This means that the operation of these features can beset to operate differently depending on who is drivingthe vehicle. See “Personal Options” later in this sectionfor the features that you can personalize.
The personalization settings for other features areautomatically updated and saved as the driver adjuststhem. These include the following settings and presets:
. The radio presets, tone, volume, fade, balance,equalization (EQ) settings and source (radioor CD)
. The last climate control setting
. The Head-Up Display (HUD) position and dimminglevel, if your vehicle has this feature
. The instrument panel cluster dimming level andlast selected DIC display
The current driver's preferences are recalled when oneof the following occurs:
.
The lock or unlock button on the keyless accesstransmitter, labelled 1 or 2, is pressed.
. The appropriate memory button, 1 or 2, located onthe driver's door is pressed. See Memory Seat,Mirrors and Steering Wheel o n p a g e 2 ‑ 4 for more information.
. A valid keyless access transmitter is detected uponopening the driver's door.
If more than one valid keyless access transmitter is
detected upon opening the driver's door, the driver preferences for the lowest driver number will berecalled.
If a keyless access transmitter that is not labelled1 or 2 is used, the personalization system will notrecognize the transmitter. The Driver InformationC t (DIC) ill t di l t d i b

7/31/2019 2010 Corvette
http://slidepdf.com/reader/full/2010-corvette 239/471
last selected DIC display
Separate personalization settings are saved for twodifferent drivers. One of the keyless access transmittersis assigned to driver 1. The other is assigned to driver 2.The back of the keyless access transmitters arelabelled 1 or 2 to correspond to each driver.
Center (DIC) will not display a current driver number and the features that are normally programmed throughthe DIC will be set to the default states. Also, if the
OPTION button is pressed, the DIC does not displaythe menus used to set personalizations, but insteaddisplays OPTIONS UNAVAILABLE for a few seconds.
4-7
Entering the Personal Options Menu
To enter the personal options menu, use the following
steps:1. If you have an automatic transmission vehicle, turn
the vehicle on with the shift lever in P (Park).
If you have a manual transmission vehicle, turn thevehicle on with the parking brake set.
To avoid excessive drain on the battery, it isrecommended that the headlamps are turned off.
2. Press the OPTION button and you will enter the
PERSONAL OPTIONS menu.The DIC will display the current driver number (1 or 2) for a few seconds and then willdisplay instructions on which buttons to use for setting the personalizations. The RESET buttonis used to select a setting for a particular feature.The OPTION button is used to move to the next
Personal Options
The following options are available for programming:
Display Units : This option allows you to choose themeasurement units.
Press the OPTION button until DISPLAY UNITSappears on the display, then press the RESET buttonto scroll through the following modes:
. ENGLISH (default)
. METRIC
If you choose ENGLISH, all information will bedisplayed in English units.
If you choose METRIC, all information will be displayedin metric units.
When the mode you want is selected, press theOPTION button to set your choice and advance to thenext personal option.

7/31/2019 2010 Corvette
http://slidepdf.com/reader/full/2010-corvette 240/471
feature.
3. Press the OPTION button while the instruction
screen is displayed to enter the firstpersonalization menu item.
4. Once you have cycled through all of the personaloptions, pressing the OPTION button a final timeexits the personal options menu. In addition, if nobutton is pressed within 45 seconds, the DIC willexit the personal options menu.
p p
Auto Memory Recall (Automatic Transmissiononly) : If your automatic transmission vehicle has the
memory package, you may have this option. This optionallows the driver's seat, the telescopic steering column,if your vehicle has this feature, and the outside rearviewmirrors to automatically move to the current driver's setposition when the engine starts.
4-72
Press the OPTION button until AUTO MEMORYRECALL appears on the display, then press the RESETbutton to scroll through the following modes:
. YES
. NO (default)
If you choose YES, the driver's seat, the outsiderearview mirrors and the telescopic steering column,if your vehicle has this feature, positions are recalledwhen you turn the ignition on.
If you choose NO, this option will turn off.
When the mode you want is selected, press theOPTION button to set your choice and advanceto the next personal option.
Auto Exit Recall : If your vehicle has the memorypackage, you may have this option. This option allowsthe driver's seat and telescopic steering column, if your vehicle has this feature, to automatically move to the
In order for the Auto Exit Recall feature to work on anautomatic transmission vehicle, the vehicle must be inP (Park). On a manual transmission vehicle, the parking
brake must be set.
Press the OPTION button until AUTO EXIT RECALLappears on the display, then press the RESET button toscroll through the following modes:
. YES
. NO (default)
If you choose YES, when you turn the ignition off andopen the driver's door or press the unlock button on thekeyless access transmitter, the seat and the telescopicsteering wheel, if your vehicle has this feature, willreturn to their stored exit positions for an easy exitor an easy entrance when returning to the vehicle.
The seat and steering wheel will only return to thestored driving position if you press the appropriatememory button or activate the auto memory recall

7/31/2019 2010 Corvette
http://slidepdf.com/reader/full/2010-corvette 241/471
ycurrent driver's exit position when one of the followingoccurs:
. The vehicle is turned off or in Retained AccessoryPower (RAP) or accessory mode and the driver'sdoor is opened.
. The vehicle is turned off or in RAP and the unlockbutton on the keyless access transmitter ispressed.
memory button or activate the auto memory recallfeature.
If you choose NO, this option will turn off.When the mode you want is selected, press theOPTION button to set your choice and advanceto the next personal option.
4-7
Approach Lights : This option briefly turns on theparking lamps, the high-beam headlamps and theback-up lamps during low light periods when the
keyless access transmitter is used to unlock the vehicle.
Press the OPTION button until APPROACH LIGHTSappears on the display, then press the RESET button toscroll through the following modes:
. OFF
. ON (default)
If you choose OFF, this option will turn off.
If you choose ON, the parking lamps, the high-beamheadlamps, and the back-up lamps will come on for 20 seconds during low light periods when all of thefollowing occurs:
. You press the unlock button on the keyless accesstransmitter.
. Both of the doors are closed.
When the mode you want is selected, press theOPTION button to set your choice and advance tothe next personal option.
Twilight Delay : This option allows you to set theamount of time you want the parking lamps andhigh-beam headlamps to remain on after you exit thevehicle. This will occur when the vehicle is off or inRAP and the headlamps are on due to the automaticheadlamp system. The parking lamps and high-beamheadlamps will remain on until the driver selected timeexpires, the exterior lamp control is activated or thevehicle is no longer off or in RAP.
Press the OPTION button until TWILIGHT DELAYappears on the display, then press the RESET button toscroll through the following modes:
. OFF
. 15 S
. 30 S (default)

7/31/2019 2010 Corvette
http://slidepdf.com/reader/full/2010-corvette 242/471
Both of the doors are closed.
. The vehicle is off or in RAP.
The lamps remain on for 20 seconds or until a door is opened, the lock button on the keyless accesstransmitter is pressed or the vehicle is no longer off or in RAP.
See Keyless Access System o n p a g e 3 ‑ 5 for moreinformation.
30 S (default)
. 90 S
If you choose OFF, this option will turn off.If you choose 15 S, the twilight delay time will be set to15 seconds.
If you choose 30 S, the twilight delay time will be set to30 seconds.
4-74
If you choose 90 S, the twilight delay time will be set to90 seconds.
When the mode you want is selected, press theOPTION button to set your choice and advance to thenext personal option.
Flash at Unlock : This option activates the front andrear turn signals for two short flashes when the unlockor hatch/trunk button on the keyless access transmitter is pressed. This will only occur when the vehicle is off.
Press the OPTION button until FLASH AT UNLOCKappears on the display, then press the RESET button to
scroll through the following modes:. YES (default)
. NO
If you choose YES, the front and rear turn signals willflash twice when you press the unlock button or thehatch/trunk button on the keyless access transmitter.
Flash at Lock : This option activates the front and rear turn signals for one long flash when the lock button onthe keyless access transmitter is pressed. This will only
occur when the vehicle is off. If the lock button on thekeyless access transmitter is pressed again withinfive seconds, the horn will sound regardless of whichsetting you have selected.
Press the OPTION button until FLASH AT LOCKappears on the display, then press the RESET buttonto scroll through the following modes:
. YES (default)
.
NOIf you choose YES, the front and rear turn signals willflash once when you press the lock button on thekeyless access transmitter.
If you choose NO, this option will turn off.
When the mode you want is selected, press theOPTION b tt t t h i d d t

7/31/2019 2010 Corvette
http://slidepdf.com/reader/full/2010-corvette 243/471
If you choose NO, this option will turn off.
When the mode you want is selected, press theOPTION button to set your choice and advance tothe next personal option.
OPTION button to set your choice and advance tothe next personal option.
4-7
FOB Reminder : This option sounds the horn threetimes when the driver's door is closed and there is akeyless access transmitter inside the interior of the
vehicle. This will only occur when the vehicle is off.
Press the OPTION button until FOB REMINDERappears on the display, then press the RESET button toscroll through the following modes:
. YES
. NO (default)
If you choose YES, the horn will sound three timeswhen a keyless access transmitter is inside of the
vehicle while the ignition is turned off and the driver'sdoor is closed.
If you choose NO, this option will turn off.
When the mode you want is selected, press theOPTION button to set your choice and advance to thenext personal option.
For example, if there are two keyless accesstransmitters in the vehicle and one is removed, theother will be locked in. The keyless access transmitter
locked in the vehicle can still be used to start thevehicle or unlock the doors, if needed. A personapproaching the outside of the locked vehicle withoutan authorized keyless access transmitter, however, willnot be able to open the door, even with a transmitter inthe vehicle.
You may temporarily disable the passive door lockingfeature by pressing the door unlock switch for three seconds on an open door. Passive door locking
will then remain disabled until a door lock switch ispressed or until the power mode transitions from theoff power mode.
Press the OPTION button until PASSIVE DOORLOCKING appears on the display, then press theRESET button to scroll through the following modes:
. OFF (default)

7/31/2019 2010 Corvette
http://slidepdf.com/reader/full/2010-corvette 244/471
Passive Door Locking : This option allows you toselect whether the doors automatically lock during
normal vehicle exit. When the ignition is turned off andall doors become closed, the vehicle will determine howmany keyless access transmitters remain in the vehicleinterior. If at least one keyless access transmitter hasbeen removed from the interior of the vehicle, the doorswill lock after a short delay.
. OFF (default)
. SILENT
. HORN
If you choose OFF, this option will turn off.
If you choose SILENT, the doors will automaticallylock a short time after you remove a keyless accesstransmitter from the interior of the vehicle and closeboth doors.
4-76
If you choose HORN, the doors will automatically lockand the horn will sound a short time after you remove akeyless access transmitter from the interior of the
vehicle and close both doors.
If you are parking in a quiet area and do not want thehorn to sound when the doors lock, press the lockbutton on the keyless access transmitter immediatelyafter removing it from the interior and closing the doors.This will lock the doors and cancel the passive lockingfor this ignition cycle.
When the mode you want is selected, press theOPTION button to set your choice and advance to thenext personal option.
Passive Door Unlock : This option allows you toselect which doors will automatically unlock when youapproach and open the driver's door with the keylessaccess transmitter. See Door Locks on page 3 ‑ 10 for more information.
If you choose BOTH, both doors will automaticallyunlock when you approach and open the driver's door with the keyless access transmitter.
Auto Unlock : This option allows you to selectwhether the driver's door, both doors or neither door automatically unlocks when the shift lever is moved intoP (Park) for automatic transmission vehicles or whenthe ignition is turned off or is in RAP for manualtransmission vehicles.
Press the OPTION button until AUTO UNLOCK appearson the display, then press the RESET button to scrollthrough the following modes:
. OFF
. DRIVER
. BOTH (default)
If you choose OFF, this option will turn off.
If you choose DRIVER, on automatic transmission

7/31/2019 2010 Corvette
http://slidepdf.com/reader/full/2010-corvette 245/471
Press the OPTION button until PASSIVE DOORUNLOCK appears on the display, then press the
RESET button to scroll through the following modes:. DRIVER
. BOTH (default)
If you choose DRIVER, only the driver's door willautomatically unlock when you approach and openthe driver's door with the keyless access transmitter.
yvehicles, the driver's door will automatically unlockwhen the shift lever is moved into P (Park). On
manual transmission vehicles, the driver's door willautomatically unlock when the ignition is turnedoff or is in RAP.
If you choose BOTH, on automatic transmissionvehicles, both doors will automatically unlock whenthe shift lever is moved into P (Park). On manualtransmission vehicles, both doors will automaticallyunlock when the ignition is turned off or is in RAP.
4-7
When the mode you want is selected, press theOPTION button to set your choice and advance to thenext personal option.
Language : This option allows you to select thelanguage the DIC, the Head-Up Display (HUD), if your vehicle has this feature, and the radio uses to displaymessages. Each language mode will be displayed in itsown language. For example, English will be displayedas ENGLISH, Spanish as ESPANOL, etc. If your vehiclehas the navigation system, you will not have theJapanese language mode.
Press the OPTION button until LANGUAGE appears onthe display, then press the RESET button to scrollthrough the following modes:
. ENGLISH (default)
. DEUTSCH (German)
. FRANCAIS (French)
. ITALIANO (Italian)
When the mode you want is selected, press theOPTION button to set your choice and advanceto the next personal option.
Personalize Name : This option allows you to typein a name or greeting that will appear on the DICdisplay whenever the corresponding keyless accesstransmitter (1 or 2) is used or one of the memorybuttons (1 or 2) located on the driver's door is pressed.
Press the OPTION button until PERSONALIZE NAMEappears on the display, then press the RESET button toscroll through the following modes:
.
YES. NO (default)
If you choose YES, you can type in a name that willappear on the DIC display.
To program a name, use the following procedure:
1. Enter the PERSONAL OPTIONS menu and select

7/31/2019 2010 Corvette
http://slidepdf.com/reader/full/2010-corvette 246/471
. ITALIANO (Italian)
. ESPANOL (Spanish)
If you choose a language that you do not understand,press the OPTION and RESET buttons for five seconds. The DIC will begin displaying all of thevarious languages one by one for as long as thebuttons are pressed. When the desired language isdisplayed, release the buttons and the DIC will set tothis language.
the driver number (1 or 2) that you would like toprogram by following the instructions listed
previously under “Entering the PersonalOptions Menu”.
2. Press the OPTION button until the PERSONALIZENAME option appears on the display.
3. Select YES under PERSONALIZE NAME bypressing the RESET button.
4-78
4. Press the OPTION button and a cursor will displaywhere you can insert a letter.
5. Press the OPTION button again until the letter youwant is displayed. To scroll through the lettersfaster and without a beeping noise, keep theOPTIONS button depressed. There are alpha/ numeric characters and a blank space available.
6. Then press the RESET button to select the letter of your choice and proceed on to the next space tothe right.
If you make a mistake and would like to clear or
replace a letter, perform the following steps:6. 1. Press the RESET button to reach the letter
you would like to change.
6. 2. Press the OPTION button to scroll throughthe letter choices.
6. 3. Press the RESET button to select the letter and proceed on to the next space to the right.
7. Repeat Steps 5 and 6 until the name or greetingyou want is complete. After the name or greeting iscomplete, keep pressing the RESET button until
the display turns blank and exits out of this option.You can program up to 20 characters.
If you choose NO, this option will turn off.
If a customized name or greeting is not programmed,the DIC display will show Driver 1 or Driver 2 tocorrespond with either the number on the back of thekeyless access transmitter (1 or 2) that is being usedor to the memory button (1 or 2) that is pressed.
PERSONALIZE NAME is the last option available toprogram in the PERSONAL OPTIONS menu. Pressingthe OPTION button after this setting will exit you fromthe PERSONAL OPTIONS menu. The last item youwere in prior to entering PERSONAL OPTIONS willthen display on the DIC.

7/31/2019 2010 Corvette
http://slidepdf.com/reader/full/2010-corvette 247/471
and proceed on to the next space to the right.
4-7
Audio System(s)Determine which radio the vehicle has and read the
following pages to become familiar with its features.
{ WARNING:
Taking your eyes off the road for extended periodscould cause a crash resulting in injury or death toyou or others. Do not give extended attention toentertainment tasks while driving.
This system provides access to many audio and nonaudio listings.
To minimize taking your eyes off the road while driving,do the following while the vehicle is parked:
. Become familiar with the operation and controls of
Notice: Contact your dealer/retailer before addingany equipment.
Adding audio or communication equipment couldinterfere with the operation of the vehicle's engine,radio, or other systems, and could damage them.Follow federal rules covering mobile radio andtelephone equipment.
The vehicle has Retained Accessory Power (RAP). WithRAP, the audio system can be played even after theignition is turned off. See Retained Accessory Power (RAP) on page 3 ‑ 24 for more information.
Setting the ClockTo set the clock:
1. Press and hold H until the correct hour displays.
2. Press and hold M until the correct minute displays.
The clock mode automatically times out with theh d di l f t t th t d f lt

7/31/2019 2010 Corvette
http://slidepdf.com/reader/full/2010-corvette 248/471
the audio system.
. Set up the tone, speaker adjustments, and presetradio stations.
For more information, see Defensive Driving on page 5 ‑ 2 .
changed display format set as the current defaultsetting.
4-80
Radio(s)
Single CD Radio shown, Six-Disc CD Radio similar
The vehicle has one of these radios as its audiosystem.
Playing the Radio
Top Knob (Power/Volume) : Press to turn the system
on and off. Turn to increase or decrease the volume.MUTE: Press to silence the system. Press again to turnthe sound on.
This button is not available on the Six-Disc CD Radio.
4 (Information): Press until the desired display isshown, then hold for two seconds until radio beepsonce to change the default display. The selected displayis now the default.
For RDS:
Press 4 to change the display. The display options are
station name, RDS station frequency, PTY, and thename of the program (if available).
For XM™:
Press 4 to retrieve four different categories of

7/31/2019 2010 Corvette
http://slidepdf.com/reader/full/2010-corvette 249/471
system.
An indicator light on the upper left side of the radio
flashes when the ignition is off, to indicate the theftdeterrent feature is set. For more information, seeTheft-Deterrent Feature on page 4‑ 106 .
g
information related to the current song or channel: Artist, Song Title, Category or PTY, ChannelNumber/Channel Name.
4-8
Audio Settings
Press and hold O e when no tone or speaker control
is displayed to adjust all tone and speaker controls tothe middle position. AUDIO SETTINGS CENTEREDdisplays.
Adjusting the Tone (Bass/Treble)
O e (Bass/Treble): To adjust the Bass or Treble:
Press and release O e until BASS or TREBLE
displays.
. Turn the O e knob to increase or to decreasethe level.
. Press and hold the O e knob until the level
changes to the middle position.
Adjusting the Speakers (Balance/Fade)
O e (Balance/Fade): To adjust the Balance:
To adjust the Fade:
Press and release O e until FADE displays
. Turn the O e knob to move the sound toward thefront or the rear speakers.
. Press and hold the O e knob until the level
changes to the middle position.
AUTO EQ (Automatic Equalization) : The radio savesseparate AUTO EQ settings for each preset and source.
For vehicles without the Bose® sound system:
.
Press AUTO EQ to select equalization settingsdesigned for CLASSICAL, POP, ROCK, JAZZ,TALK, and COUNTRY.
. Selecting CUSTOM or changing bass or treble,returns the EQ to the manual bass and treblesettings.
For vehicles with the Bose® sound system:

7/31/2019 2010 Corvette
http://slidepdf.com/reader/full/2010-corvette 250/471
O e (Balance/Fade): To adjust the Balance:
Press and release O e until BALANCE displays.
. Turn the O e knob to move the sound toward the
right or the left speakers.
. Press and hold the O e knob until the level
changes to the middle position.
. Press AUTO EQ to select equalization settingsfrom EQ1 through EQ6.
. Selecting CUSTOM or changing bass or treble,returns the EQ to the manual bass and treblesettings.
4-82
AUTOn (Automatic Volume): Automatic volume
automatically adjusts the audio system to make up for road and wind noise, by increasing the volume as
vehicle speed increases.
For vehicles without the Bose® sound system:
1. Set the volume at the desired level.
2. Press AUTOn to select AUTO VOLUME MIN
(minimum), AUTO VOLUME MED (medium),or AUTO VOLUME MAX (maximum). Each higher setting provides more volume compensation atfaster vehicle speeds.
3. Press AUTOn until AUTO VOLUME OFF
displays to turn automatic volume off.
For vehicles with the Bose® sound system:
Vehicles with the Bose® sound system include Bose®
AudioPilot® noise compensation technology. AudioPilot®
continuously adjusts the audio system equalizationto compensate for background noise. This feature ismost effective at lower radio volume settings wherebackground noise can affect how well the audio isheard. At higher volume settings, there may be littleor no adjustments by AudioPilot® . For additionalinformation on AudioPilot® , visit bose.com/audiopilot.
To use AudioPilot® :
1. Set the volume at the desired level.2. Press AUTOn until AUTO VOLUME ON
displays.
3. Press AUTOn until AUTO VOLUME OFF
displays to turn off AudioPilot® .

7/31/2019 2010 Corvette
http://slidepdf.com/reader/full/2010-corvette 251/471
4-8
Using the Radio
Radio Data System (RDS)
RDS features are available for use only on FM stationsthat broadcast RDS information. The station name or call letters display while the radio is tuned to an RDSstation.
This system relies upon receiving specific informationfrom these stations and works only when theinformation is available. In rare cases, a radio stationcan broadcast incorrect information that causes theradio features to work improperly. If this happens,contact the radio station.
With RDS, the radio can:
. Seek to stations broadcasting the selected type of programming.
. Receive announcements concerning local andnational emergencies.
XM™ Satellite Radio Service
XM is a satellite radio service that is based in the
48 contiguous United States and 10 Canadianprovinces. XM Satellite Radio has a wide varietyof programming and commercial-free music,coast-to-coast, and in digital-quality sound. A servicefee is required to receive the XM service. For moreinformation, contact XM at xmradio.com or call1-800-929-2100 in the U.S. and xmradio.ca or call1-877-438-9677 in Canada.
Finding an FM/AM/XM Station
BAND : Press to switch between FM1, FM2, AM, XM1or XM2.
O e (Tune): Turn to select radio stations.
t SEEKu : Press to go to the previous or to the nextstation and stay there.
The radio only stops at stations with a strong signal.
t u t u

7/31/2019 2010 Corvette
http://slidepdf.com/reader/full/2010-corvette 252/471
. Display messages from radio stations.
.
Seek to stations with traffic announcements.. Provide the time of day.
. Provide a program type (PTY) for currentprogramming.
. Provide the name of the program being broadcast.
t SCANu : Press and hold t or u for two secondsuntil FREQUENCY SCAN displays. The radio goes to astation, plays for a few seconds, then goes on to the
next station. Press t or u again to stop scanning.
4-84
To scan preset stations:
Press and hold t or u for four seconds until PRESET
SCAN displays. The radio goes to the next presetstation, plays for a few seconds, then goes to the next
preset station. Press t or u again or one of the
pushbuttons to stop scanning presets.
The radio only scans stations with a strong signal.
1-6 (Preset Pushbuttons) : Press to play stations thatare programmed to the radio preset pushbuttons.
Setting Preset Stations
Up to 30 stations (six FM1, six FM2, and six AM,six XM1 and six XM2), and equalization settings for each station can be programmed on the six numberedpushbuttons.
To set presets:
1. Turn the radio on.
2 P BAND t l t FM1 FM2 AM XM1
4. Press AUTO EQ to select the equalization.
5. Press and hold one of the six numberedpushbuttons until the radio beeps once.
6. Repeat the steps for each pushbutton.
Finding a Category (CAT) Station(XM Satellite Radio Service Only)
To select an XM station by category:
1. Press CAT. The last selected category displays.
2. Turn theO e knob to select a category.
3. Presst or u to go to a category's station.SEEKING CATEGORY displays.
4. To go to another station within that category, pressthe CAT button to display the category, then presst or u to go to another station.
If the radio cannot find the desired category, NONEdisplays and the radio returns to the last station tuned.

7/31/2019 2010 Corvette
http://slidepdf.com/reader/full/2010-corvette 253/471
2. Press BAND to select FM1, FM2, AM, or XM1or XM2.
3. Tune in the desired station.
p y
4-8
SCAN: To scan the stations within a category:
1. Press CAT. The last selected category displays.
2. Turn theO e knob to select a category.
3. Press and holdt or u until a beep sounds and
SCAN CATEGORY displays. The radio beginsscanning the stations in the category.
4. Press t or u to stop scanning.
Radio Messages
CAL ERR (Calibration Error) : Displays if the
radio is no longer configured properly for the vehicle.The vehicle must be returned to your dealer/retailer for service.
LOC (Locked) : Displays when the THEFTLOCK®
system has locked up. The vehicle must be returned toyour dealer/retailer for service.
If any error occurs repeatedly or cannot be corrected,t t d l / t il
RDS Messages
ALERT!: Alert warns of local or national emergencies.
When an alert announcement comes on the currentradio station, ALERT! displays. The announcementis heard, even if the volume is low or a CD is playing.If a CD is playing, play stops during the announcement. Alert announcements cannot be turned off.
ALERT! is not affected by tests of the emergencybroadcast system. This feature is not supported by allRDS stations.
4 (Information): If the current station has a message,
INFO (information) displays. Press 4 to see themessage. The message can display the artist, songtitle, call in phone numbers, etc.
If the entire message is not displayed, parts of themessage appears every three seconds. To scroll
through the message, press and release 4 . A new
group of words display after every press of the button.

7/31/2019 2010 Corvette
http://slidepdf.com/reader/full/2010-corvette 254/471
contact your dealer/retailer. Once the complete message has displayed, INFOdisappears from the display until another new messageis received. The last message can be displayed bypressing this button. The last message until a newmessage is received or the radio is tuned to a differentstation.
NO INFO displays when a message is not availablefrom a station.
4-86
TRAF (Traffic) : TA (traffic) displays when the stationbroadcasts traffic announcements, the announcementwill be played.
Press TRAF and the radio seeks to a station thatbroadcasts traffic announcements. When a stationis found, the radio stops seeking and TA displays.NO TRAFFIC INFO displays if a station that broadcaststraffic announcements can not be found.
Press TRAF to turn off the traffic announcements if TAis on the display.
The radio plays the traffic announcement even if the
volume is low. The radio interrupts the play of a CD if the last tuned station broadcasts traffic announcements.
This function does not apply to XM Satellite RadioService.
Radio Messages for XM Only
See XM Radio Messages on page 4‑ 95 XM RadioMessages later in this section for further detail.
Loading a CD
Single CD Radio:
Insert the CD partway into the slot, label side up, untilthe player pulls the CD in. The CD begins playingautomatically.
The CD symbol displays when a CD is inserted, andthe track number displays when each new track startsto play.
Six-Disc CD Radio:
If more than one CD has been loaded, a number for
each CD displays.M (Load): Press to load CDs into the CD player.
To insert one CD:
1. PressM .
2. Load a CD and insert the CD partway into theslot, label side up when INSERT CD # displays.The player pulls the CD in

7/31/2019 2010 Corvette
http://slidepdf.com/reader/full/2010-corvette 255/471
essages ate t s sect o o u t e deta
Using the CD Player The CD player can play smaller 3 inch (8 cm) singleCDs with an adapter ring.
A CD in the player it stays in the player when theignition is turned off. When the ignition or radio is turnedon, the CD starts to play where it stopped, if it was thelast selected audio source.
The player pulls the CD in.
4-8
To insert multiple CDs:
1. Press and holdM for two seconds. Two beeps
sound and LOAD ALL DISCS displays.2. Load a CD and insert the CD partway into the slot,
label side up when INSERT CD # displays.The player pulls the CD in.
3. Wait for INSERT CD # to display after theprevious CD is loaded, then load the next CD.The CD player takes up to six CDs.
To load more than one CD but less than six, completeSteps 1 through 3. When finished loading CDs, press
the M button to cancel the loading function. The radio
begins to play the last CD loaded.
Playing a CD
O e (Tune): Turn to go to the next or previous track.
{ (Reverse): Press and hold to reverse within thecurrent track.
t SCANu : To scan one CD, press and hold either arrow for more than two seconds until SCAN displaysand a beep sounds. The radio goes to the next track,
plays for 10 seconds, then goes to the next track.Press either arrow again, to stop scanning.
To scan all loaded CDs, press and hold either arrowfor more than four seconds until SCAN displays and abeep sounds. Use this feature to listen to 10 seconds of the first track of each loaded CD. Press either arrowagain, to stop scanning.
AUTO EQ (Automatic Equalization) : Press toselect the equalization setting while playing a CD.The equalization is stored when a CD is played. For more information on AUTO EQ, see “ AUTO EQ” listedpreviously in this section.
BAND : Press to listen to the radio when a CD isplaying. The inactive CD(s) remains inside the radio for future listening.
CD AUX (Auxiliary) : Press to play a CD when listening

7/31/2019 2010 Corvette
http://slidepdf.com/reader/full/2010-corvette 256/471
| (Fast Forward): Press and hold to fast forward
through the current track.
t SEEKu : Press the left arrow to go to the start of the current track if more than eight seconds haveplayed. Press the right arrow to go to the start of thenext track. If either arrow is held or pressed more thanonce, the player continues moving backward or forwardthrough the CD.
( y) p y gto the radio. CD displays when a CD is in the player.
If your system has a remote playback device, pressingthis button a second time allows the remote deviceto play.
X (Eject): Press to eject a CD from the Single CDRadio and the Six‐Disc CD Radio.
Single CD Radio: Press X to eject a CD.
4-88
Six-Disc CD Radio:
Press X to eject the CD that is currently playing.
To eject multiple CDs:1. Press and holdX for two seconds. A beep sounds
and EJECT ALL displays.
2. The ejected CD can be removed when REMOVEDISC displays.
To stop ejecting the CDs, press the M or X .
The CD is automatically pulled back into the player if the CD is not removed after 25 seconds. Pushing a CD
back into the player, before the 25 second time period iscomplete causes the player to sense an error and theCD player tries to eject the CD several times beforestopping.
Wait for the timer to expire before pressing X again.
Pressing X repeatedly after trying to push a CD in
manually causes the CD players 25-second eject timer t t
Six-Disc CD Radio:
. Press RPT until REPEAT displays to repeat atrack.
. Press RPT until REPEAT ONE DISC displays torepeat an entire CD
. Press RPT until REPEAT OFF displays to turn off repeat.
RDM (Random) : Press to hear the tracks in random,rather than sequential order, on one CD or all of theloaded CDs.
Single CD Radio:
Press and release RDM, until RANDOM DISC PLAYdisplays. Press and release the RDM until RANDOMOFF displays to turn off random play.
Six-Disc CD Radio:
. Press and release RDM until RANDOM DISCPLAY displays to play the tracks on one CD inrandom order Once all tracks on this disc have

7/31/2019 2010 Corvette
http://slidepdf.com/reader/full/2010-corvette 257/471
to reset.
RPT (Repeat) : Press to hear a track or an entire CDover again.
Single CD Radio:
Press RPT to hear a track over again, REPEATdisplays. Press again to turn off repeat, REPEAT OFFdisplays.
random order. Once all tracks on this disc haveplayed, RANDOM DISC PLAY will repeat.
. Press and release RDM until RANDOM ALLDISCS displays to play the tracks on all of the CDsthat are loaded in random order.
. Press and release RDM until RANDOM OFFdisplays to turn off random play.
4-8
R (Song List): The Song List feature can save20 track selections.
To save tracks:
1. If S-LIST is displayed, pressR to turn it off.
2. Select the desired CD by pressing the numbered
pushbutton and then useu or O e knob to
select the track to be saved.
3. Press and holdR until a beep sounds and
ADDED SONG displays.
4. Repeat Steps 2 and 3 to save other selections.
SONGLIST FULL displays if more than 20 selectionsare stored.
To play tracks:
1. Press R . One beep sounds and S-LIST displays.
The recorded tracks begin to play in the order theywere saved
u
To delete tracks:
1. Press R to turn song list on. S-LIST displays.
2. Press t or u , use the O e knob to select thedesired track to be deleted.
3. Press and holdR until SONG REMOVED
displays.
After a track has been deleted, the remaining tracks aremoved up the list. When another track is added to thesong list, the track is added to the end of the list.
To delete the entire song list:
1. PressR to turn song list on. S-LIST displays.
2. Press and holdR for more than four seconds.
One beep sounds and SONGLIST EMPTYdisplays to confirm that the song list has beendeleted.
If a CD is ejected, and the song list contains savedtracks from that CD those tracks are automatically

7/31/2019 2010 Corvette
http://slidepdf.com/reader/full/2010-corvette 258/471
2. Press t or u to go back or forward within the
saved tracks.
tracks from that CD, those tracks are automaticallydeleted from the song list. Any tracks saved to the songlist again are added to the bottom of the list.
To end song list mode, press R . One beep sounds
and S-LIST is removed from the display.
4-90
Care of CDs and the CD Player
Care of CDs
Store CD(s) in their original cases or other protectivecases and away from direct sunlight and dust. The CDplayer scans the bottom of the disc. If the bottom of aCD is damaged it may not play properly or at all. Do nottouch the bottom of a CD while handling it. Pick up CDsby grasping the outer edges or the edge of the hole andthe outer edge.
If the surface of a CD is dirty, take a soft, lint freecloth or dampen a clean, soft cloth in a mild, neutral
detergent solution mixed with water, and clean it. Makesure the wiping process starts from the center tothe edge.
Care of the CD Player
Do not add labels to a CD, it could get caught in theCD player. Use a marking pen to write on the top of theCD if a description is needed.
Notice: If a label is added to a CD, or more than oneCD is inserted into the slot at a time, or an attemptis made to play scratched or damaged CDs, the CD
player could be damaged. While using the CDplayer, use only CDs in good condition without anylabel, load one CD at a time, and keep the CD player and the loading slot free of foreign materials,liquids, and debris.
If an error displays, see “CD Messages” later in thissection.
Using the Auxiliary Input Jack
The radio system has an auxiliary input jack located onthe right side of the faceplate. This is not an audiooutput; do not plug the headphone set into the frontauxiliary input jack. An external audio device can beconnected to the auxiliary input jack for use as another source for audio listening.
Drivers are encouraged to set up any auxiliary devicewhile the vehicle is in P (Park). See Defensive Driving

7/31/2019 2010 Corvette
http://slidepdf.com/reader/full/2010-corvette 259/471
p
Do not use CD lens cleaners, they could damage theCD player.
( ) go n p a g e 5 ‑ 2 .
4-9
Connect a 3.5 mm (1/8 in.) cable to the radio’s frontauxiliary input jack to use a portable audio player.The radio displays AUX INPUT DEVICE when a device
is connected and begins playing audio from that device.Top Knob (Power/Volume) : Turn to increase or decrease the volume of the portable player. Additionalvolume adjustments can be made from the portabledevice.
BAND: Press to listen to the radio while a portableaudio device is playing. The portable audio devicecontinues playing.
CD/AUX (CD/Auxiliary) : Press to play a CD while aportable audio device is playing. Press again and thesystem begins playing audio from the connectedportable audio player. If a portable audio player isconnected, AUX INPUT DEVICE displays. If a portableaudio player is not connected, AUX INPUT DEVICEdoes not display.
Using an MP3
MP3 Format
Radios with the MP3 feature can only play CD-R discs.Do not mix standard audio and MP3 files on thesame disc.
Supported File Structure
Radios with the MP3 feature support up to:
. 50 folders.
. 11 folders in depth.
. 50 playlists.
. 255 files.
. 10 sessions.
Root Directory:
The root directory is treated as a folder. Files are storedin the root directory when the disc or storage devicedoes not contain folders Files accessed from the root

7/31/2019 2010 Corvette
http://slidepdf.com/reader/full/2010-corvette 260/471
does not contain folders. Files accessed from the rootdirectory display as F1 ROOT.
Empty Folder:
Folders that do not contain files are skipped, and theplayer advances to the next folder that contains files.
4-92
Supported Bit Rates
The following bit rates are supported: 32 kbps,40 kbps, 56 kbps, 64 kbps, 80 kbps, 96 kbps, 112 kbps,128 kbps, 160 kbps, 192 kbps, 224 kbps, 256 kbps,and 320 kbps or a variable bit rate.
File Naming
ID3v1 and ID3v2 tags are supported. The track namecontained in the ID3 tag is shown on the display. Thedisplay only shows up to 32 characters for track and filenames.
If the track name is not contained in the ID3 tag, thedisplay shows the file name without the file extension.
Playlists
Playlists that do not have a .m3u or .wpl extension maynot work.
Preprogrammed playlists created by WinAmp™,MusicMatch™, or Real Jukebox™ software aresupported and they cannot be edited using the radio
Playing an MP3
Insert a CD partway into the slot, label side up.The player pulls it in, and READING displays. The CDshould begin playing and the CD symbol displays.
If the ignition or radio is turned off with a CD-R in theplayer, it stays in the player. When the ignition or radiois turned on, the CD-R starts to play where it stopped,if it was the last selected audio source.
As each new track starts to play, the track number displays.
Order of PlayTracks are played sequentially in the following order:
1. Playlists.
2. Files contained in the root directory.
3. Files contained in folders.
O / e (Tune): Turn to go to the next or previous track
{ (Previous Folder): Press to go to the first track in

7/31/2019 2010 Corvette
http://slidepdf.com/reader/full/2010-corvette 261/471
supported and they cannot be edited using the radio. { (Previous Folder): Press to go to the first track inthe previous folder. Press and hold to reverse throughthe current track.
4-9
| (Next Folder): Press to go to the first track in thenext folder. Press and hold to fast forward the currenttrack.
RDM (Random) : Press to hear the tracks in random,rather than sequential order, on one CD, one folder,or all of the loaded CDs.
Press and release RDM until:
. RANDOM DISC PLAY displays to play the trackson the CD in random order.
. RANDOM FOLDER displays to play the tracks inthe folder in random order.
. RANDOM ALL DISCS displays to play the trackson all of the CDs that are loaded in random order.
. RANDOM OFF displays to turn off random play.
RPT (Repeat) : Press to hear a track, CD, or a folder over again.
Press and release RPT until:
. REPEAT displays to repeat a track.
. REPEAT ONE DISC displays to repeat a CD.
. REPEAT FOLDER displays to repeat a folder.
. REPEAT OFF displays to turn off repeated play.
t SEEKu : Press t to go to the start of the currenttrack, if more than eight seconds have played.
Pressu to go to the next track. Press t or u more
than once to continue moving backward or forwardthrough the CD.
4 (Information): Press to display the artist name andalbum contained in the ID3 tag.
BAND : Press to listen to the radio when a CD isplaying. The inactive CD remains inside the radio for future listening.
CD AUX (Auxiliary) : Press to play a CD when listening

7/31/2019 2010 Corvette
http://slidepdf.com/reader/full/2010-corvette 262/471
CD AUX (Auxiliary) : Press to play a CD when listening
to the radio. The CD symbol displays when a CD isloaded.
4-94
XM Radio Messages
XL (Explicit Language Channels) : Thesechannels, or any others, can be blocked by calling1-800-852-XMXM (9696).
Updating: The encryption code in the receiver is beingupdated, and no action is required. This process shouldtake no longer than 30 seconds.
No Signal : The system is functioning correctly, but thevehicle is in a location that is blocking the XM signal.When the vehicle is moved into an open area, thesignal should return.
Loading XM : The audio system is acquiring andprocessing audio and text data. No action is needed.This message should disappear shortly.
CH Off Air : This channel is not currently in service.Tune in to another channel.
CH Unauth : This channel is blocked or cannot bereceived with your XM Subscription package.
No Info : No artist, song title, category, or textinformation is available at this time on this channel.The system is working properly.
Not Found : There are no channels available for theselected category. The system is working properly.
XM Locked : The XM receiver in the vehicle mayhave previously been in another vehicle. For securitypurposes, XM receivers cannot be swapped betweenvehicles. If this message is received after having thevehicle serviced, check with your dealer/retailer.
Radio ID : If tuned to channel 0, this message willalternate with the XM Radio 8 digit radio ID label.This label is needed to activate the service.
Unknown : If this message is received when tuned tochannel 0, there may be a receiver fault. Consult withyour dealer/retailer.
Chk XMRcvr : If this message does not clear within ashort period of time, the receiver may have a fault.Consult with your dealer/retailer.

7/31/2019 2010 Corvette
http://slidepdf.com/reader/full/2010-corvette 263/471
CH Unavail : This previously assigned channel is no
longer assigned. Tune to another station. If this stationwas one of the presets, choose another station for thatpreset button.
4-9
Navigation/Radio System
For vehicles with a navigation radio system, see theseparate Navigation System manual.
Bluetooth ®
Vehicles with a Bluetooth system can use a Bluetoothcapable cell phone with a Hands Free Profile to makeand receive phone calls. The system can be used whilethe key is in ON/RUN or ACC/ACCESSORY position.The range of the Bluetooth system can be up to9.1 m (30 ft). Not all phones support all functions,
and not all phones are guaranteed to work withthe in-vehicle Bluetooth system. See www.gm.com/ bluetooth for more information on compatible phones.
Voice Recognition
The Bluetooth system uses voice recognition tointerpret voice commands to dial phone numbers andname tags.
N i K i t i i l l t i i
Audio System
When using the in‐vehicle Bluetooth system, soundcomes through the vehicle's front audio systemspeakers and over ‐rides the audio system. Use theaudio system volume knob, during a call, to changethe volume level. The adjusted volume level remainsin memory for later calls. To prevent missed calls, aminimum volume level is used if the volume is turneddown too low.
Bluetooth Controls
Use the buttons located on the steering wheel to
operate the in‐vehicle Bluetooth system. See AudioSteering Wheel Controls on page 4‑ 107 for moreinformation.
b g (Push To Talk) : Press to answer incoming calls,to confirm system information, and to start speechrecognition.
c (Phone On Hook): Press to end a call, reject acall or to cancel an operation

7/31/2019 2010 Corvette
http://slidepdf.com/reader/full/2010-corvette 264/471
Noise : Keep interior noise levels to a minimum.
The system may not recognize voice commandsif there is too much background noise.
When to Speak : A short tone sounds after the systemresponds indicating when it is waiting for a voicecommand. Wait until the tone and then speak.
How to Speak : Speak clearly in a calm and naturalvoice.
call, or to cancel an operation.
4-96
Pairing
A Bluetooth enabled cell phone must be paired to thein‐vehicle Bluetooth system first and then connected tothe vehicle before it can be used. See the cell phonemanufacturers user guide for Bluetooth functions beforepairing the cell phone. If a Bluetooth phone is notconnected, calls will be made using OnStar ® Hands‐Free Calling, if available. Refer to the OnStar owner'sguide for more information.
Pairing Information:
. Up to five cell phones can be paired to the
in‐vehicle Bluetooth system.
. The pairing process is disabled when the vehicle ismoving.
. The in‐vehicle Bluetooth system automatically linkswith the first available paired cell phone in theorder the phone was paired.
. Only one paired cell phone can be connected tothe in‐vehicle Bluetooth system at a time.
Pairing a Phone
1. Press and hold b g for two seconds. The system
responds with “Ready” followed by a tone.
2. Say “Bluetooth”. The system responds with“Bluetooth ready” followed by a tone.
3. Say “Pair ”. The system responds with instructionsand a four digit PIN number. The PIN number willbe used in Step 4.
4. Start the Pairing process on the cell phone that willbe paired to the vehicle. Reference the cell phonemanufacturers user guide for information on this
process.
Locate the device named “General Motors” in thelist on the cellular phone and follow the instructionson the cell phone to enter the four digit PINnumber that was provided in Step 3.
5. The system prompts for a name for the phone. Usea name that best describes the phone. This namewill be used to indicate which phone is connected.

7/31/2019 2010 Corvette
http://slidepdf.com/reader/full/2010-corvette 265/471
.
Pairing should only need to be completed once,unless changes to the pairing information havebeen made or the phone is deleted.
To link to a different paired phone, see Linking to aDifferent Phone later in this section.
pThe system then confirms the name provided.
6. The system responds with “<Phone name> hasbeen successfully paired” after the pairing processis complete.
7. Repeat Steps 1 through 7 for additional phones tobe paired.
4-9
Listing All Paired and Connected Phones
1. Press and holdb g for two seconds. The system
responds with “Ready” followed by a tone.
2. Say “Bluetooth”. The system responds with“Bluetooth ready” followed by a tone.
3. Say “List”. The system lists all the paired Bluetoothdevices. If a phone is connected to the vehicle, thesystem will say “Is connected” after the connectedphone.
Deleting a Paired Phone
1. Press and holdb g for two seconds. The systemresponds with “Ready” followed by a tone.
2. Say “Bluetooth”. The system responds with“Bluetooth ready” followed by a tone.
3. Say “Delete”. The system asks which phone todelete followed by a tone.
4. Say the name of the phone to be deleted. If thephone name is unknown use the “List” command
Linking to a Different Phone
1. Press and holdb g for two seconds. The system
responds with “Ready” followed by a tone.
2. Say “Bluetooth”. The system responds with“Bluetooth ready” followed by a tone.
3. Say “Change phone”. The system responds with“Please wait while I search for other phones”.
. If another phone is found, the response willbe “<Phone name> is now connected”.
. If another phone is not found, the originalphone remains connected.
Storing Name Tags
The system can store up to thirty phone numbers asname tags that are shared between the Bluetooth andOnStar systems.
The system uses the following commands to store andretrieve phone numbers:
St

7/31/2019 2010 Corvette
http://slidepdf.com/reader/full/2010-corvette 266/471
phone name is unknown, use the List command
for a list of all paired phones. The system respondswith “Would you like to delete <phone name>? Yesor No” followed by a tone
5. Say “Yes” to delete the phone. The systemresponds with “OK, deleting <phone name>”.
. Store
. Digit Store
. Directory
4-98
Using the Store Command
The store command allows a phone number to bestored without entering the digits individually.
1. Press and holdb g for two seconds. The system
responds with “Ready” followed by a tone.
2. Say “Store”. The system responds with “Store,number please” followed by a tone.
3. Say the complete phone number to be stored atonce with no pauses.
. If the system recognizes the number itresponds with “OK, Storing” and repeats thephone number.
. If the system is unsure it recognizes the phonenumber, it responds with “Store” and repeatsthe number followed by “Please say yes or no”.If the number is correct, say “Yes”. If thenumber is not correct, say “No”. The systemwill ask for the number to be re‐entered.
4. After the system stores the phone number, itresponds with “Please say the name tag” followedby a tone.
5. Say a name tag for the phone number. The nametag is recorded and the system responds with“ About to store <name tag>. Does thatsound OK?”.
. If the name tag does not sound correct, say“No” and repeat Step 5.
. If the name tag sounds correct, say “Yes” andthe name tag is stored. After the number isstored the system returns to the main menu.
Using the Digit Store Command
The digit store command allows a phone number to bestored by entering the digits individually.
1. Press and hold b g for two seconds. The system
responds with “Ready” followed by a tone.
2. Say “Digit Store”. The system responds with“Please say the first digit to store” followed by

7/31/2019 2010 Corvette
http://slidepdf.com/reader/full/2010-corvette 267/471
Please say the first digit to store followed by
a tone.
4-9
3. Say the first digit to be stored. The system willrepeat back the digit it heard followed by a tone.Continue entering digits until the number to be
stored is complete.. If an unwanted number is recognized by the
system, say “Clear ” at any time to clear the lastnumber.
. To hear all of the numbers recognized by thesystem, say “Verify” at any time and the systemwill repeat them.
4. After the complete number has been entered, say“Store”. The system responds with “Please say the
name tag” followed by a tone.
5. Say a name tag for the phone number. The nametag is recorded and the system responds with“ About to store <name tag>. Does thatsound OK?”.
. If the name tag does not sound correct, say“No” and repeat Step 5.
. If the name tag sounds correct say “Yes” and
Using the Directory Command
The directory command lists all of the name tags storedby the system. To use the directory command:
1. Press and holdb g for two seconds. The system
responds with “Ready” followed by a tone.
2. Say “Directory”. The system responds with“Directory” and then plays back all of the storedname tags. When the list is complete, the systemreturns to the main menu.
Deleting Name Tags
The system uses the following commands to deletename tags:
. Delete
. Delete all name tags
Using the Delete Command
The delete command allows specific name tags to bedeleted.

7/31/2019 2010 Corvette
http://slidepdf.com/reader/full/2010-corvette 268/471
If the name tag sounds correct, say Yes and
the name tag is stored. After the number isstored the system returns to the main menu.
To use the delete command:
1. Press and holdb g for two seconds. The system
responds with “Ready” followed by a tone.
2. Say “Delete”. The system responds with “Delete,please say the name tag” followed by a tone.
4-100
3. Say the name tag to be deleted. The systemresponds with “Would you like to delete,<name tag>? Please say yes or no”.
.
If the name tag is correct, say “Yes” to deletethe name tag. The system responds with“OK, deleting <name tag>, returning to themain menu.”
. If the name tag is incorrect, say “No”. Thesystem responds with “No. OK, let's try again,please say the name tag.”
Using the Delete All Name Tags Command
The delete all name tags command deletes all storedphone book name tags and route name tags for OnStar (if present).
To use the delete all name tags command:
1. Press and holdb g for two seconds. The system
responds with “Ready” followed by a tone.
2. Say “Delete all name tags”. The system respondswith “You are about to delete all name tags stored
Making a Call
Calls can be made using the following commands:
.
Dial. Digit Dial
. Call
. Re‐dial
Using the Dial Command
1. Press and hold b g for two seconds. The system
responds with “Ready” followed by a tone.
2. Say “Dial”. The system responds with “Dial using<phone name>. “Number please” followed bya tone.
3. Say the entire number without pausing.
. If the system recognizes the number, itresponds with “OK, Dialing” and dials thenumber.
. If the system does not recognize the number,

7/31/2019 2010 Corvette
http://slidepdf.com/reader/full/2010-corvette 269/471
with You are about to delete all name tags stored
in your phone directory and your route destinationdirectory. Are you sure you want to do this? Pleasesay yes or no.”
. Say “Yes” to delete all name tags.
. Say “No” to cancel the function and return tothe main menu.
y g ,
it confirms the numbers followed by a tone.If the number is correct, say “Yes”. The systemresponds with “OK, Dialing” and dials thenumber. If the number is not correct, say “No”.The system will ask for the number to bere‐entered.
4-10
Using the Digit Dial Command
1. Press and holdb g for two seconds. The system
responds with “Ready” followed by a tone.
2. Say “Digit Dial”. The system responds with “Digitdial using <phone name>, please say the first digitto dial” followed by a tone.
3. Say the digit to be dialed one at a time. Followingeach digit, the system will repeat back the digit itheard followed by a tone.
4. Continue entering digits until the number to bedialed is complete. After the whole number has
been entered, say “Dial”. The system respondswith “OK, Dialing” and dials the number.
. If an unwanted number is recognized by thesystem, say “Clear ” at any time to clear the lastnumber.
. To hear all of the numbers recognized by thesystem, say “Verify” at any time and the systemwill repeat them.
Using the Call Command
1. Press and holdb g for two seconds. The system
responds with “Ready” followed by a tone.
2. Say “Call”. The system responds with “Call using<phone name>. Please say the name tag” followedby a tone.
3. Say the name tag of the person to call.
. If the system clearly recognizes the name tag itresponds with “OK, calling, <name tag>” anddials the number.
. If the system is unsure it recognizes the rightname tag, it confirms the name tag followed bya tone. If the name tag is correct, say “Yes”.The system responds with “OK, calling, <nametag>” and dials the number. If the name tag isnot correct, say “No”. The system will ask for the name tag to be re‐entered.
Once connected, the person called will be heardthrough the audio speakers.

7/31/2019 2010 Corvette
http://slidepdf.com/reader/full/2010-corvette 270/471
4-102
Using the Re‐dial Command
1. Press and holdb g for two seconds. The system
responds with “Ready” followed by a tone.
2. After the tone, say “Re‐dial”. The system respondswith “Re‐dial using <phone name>” and dials thelast number called from the connected Bluetoothphone.
Once connected, the person called will be heardthrough the audio speakers.
Receiving a Call
When an incoming call is received, the audio systemmutes and a ring tone is heard in the vehicle.
. Press b g and begin speaking to answer the call.
. Press c to ignore a call.
Call Waiting
Call waiting must be supported on the Bluetooth phoneand enabled by the wireless service carrier to work.
. Press b g to answer an incoming call when
another call is active. The original call is placedon hold.
. Press b g again to return to the original call.
. To ignore the incoming call, continue with theoriginal call with no action.
. Press c to disconnect the current call and switch
to the call on hold.
Three‐Way Calling
Three‐Way Calling must be supported on the Bluetoothphone and enabled by the wireless service carrier to work.
1. While on a call press b g . The system responds
with “Ready” followed by a tone.

7/31/2019 2010 Corvette
http://slidepdf.com/reader/full/2010-corvette 271/471
2. Say “Three‐way call”. The system responds with“Three‐way call, please say dial or call”.
3. Use the dial or call command to dial the number of the third party to be called.
4. Once the call is connected, press b g to link all
the callers together.
4-10
Ending a Call
Press c to end a call.
Muting a CallDuring a call, all sounds from inside the vehicle can bemuted so that the person on the other end of the callcannot hear them.
To Mute a call
1. Press b g . The system responds with “Ready”
followed by a tone.
2. Say “Mute Call”. The system responds with“Call muted”.
To Cancel Mute
1. Press b g . The system responds with “Ready”
followed by a tone.
2. After the tone, say “Mute Call”. The systemresponds with “Resuming call”.
To Transfer Audio to the Cell Phone
During a call with the audio in the vehicle:
1. Pressb g . The system responds with
“Ready
”
followed by a tone.
2. Say “Transfer Call.” The system responds with“Transferring call” and the audio will switch fromthe vehicle to the cell phone.
To Transfer Audio to the In-VehicleBluetooth System
The cellular phone must be paired and connected with
the Bluetooth system before a call can be transferred.The connection process can take up to two minutesafter the key is turned to the ON/RUN or ACC/ ACCESSORY position.
During a call with the audio on the cell phone,
press b g for more than two seconds. The audio
switches from the cell phone to the vehicle.

7/31/2019 2010 Corvette
http://slidepdf.com/reader/full/2010-corvette 272/471
Transferring a Call Audio can be transferred between the in‐vehicleBluetooth system and the cell phone.
4-104
Voice Pass-Thru
Voice Pass‐Thru allows access to the voice recognitioncommands on the cell phone. See the cell phone
manufacturers user guide to see if the cell phonesupports this feature. This feature can be used toverbally access contacts stored in the cell phone.
1. Press and holdb g for two seconds. The system
responds with “Ready” followed by a tone.
2. Say “Bluetooth”. The system responds with“Bluetooth ready” followed by a tone.
3. Say “Voice”. The system responds with
“OK, accessing <phone name>”.. The cell phone's normal prompt messages will
go through its cycle according to the phone'soperating instructions.
Dual Tone Multi-Frequency(DTMF) Tones
The in‐vehicle Bluetooth system can send numbers and
Sending a Number During a Call
1. Press b g . The system responds with “Ready”
followed by a tone.
2. Say “Dial”. The system responds with “Say anumber to send tones” followed by a tone.
3. Say the number to send.
. If the system clearly recognizes the number itresponds with “OK, Sending Number ” and thedial tones are sent and the call continues.
. If the system is not sure it recognized thenumber properly, it responds “Dial Number,
Please say yes or no?” followed by a tone.If the number is correct, say “Yes”. The systemresponds with “OK, Sending Number ” and thedial tones are sent and the call continues.

7/31/2019 2010 Corvette
http://slidepdf.com/reader/full/2010-corvette 273/471
numbers stored as name tags during a call. This is usedwhen calling a menu driven phone system. Accountnumbers can be programmed into the phonebook for retrieval during menu driven calls.
4-10
Sending a Stored Name Tag During a Call
1. Press b g . The system responds with “Ready”
followed by a tone.
2. Say “Send name tag.” The system responds with“Say a name tag to send tones” followed by a tone.
3. Say the name tag to send.
. If the system clearly recognizes the name tag itresponds with “OK, Sending <name tag>” andthe dial tones are sent and the call continues.
. If the system is not sure it recognized the nametag properly, it responds “Dial <name tag>,
Please say yes or no?” followed by a tone.If the name tag is correct, say “Yes”. Thesystem responds with “OK, Sending <nametag>” and the dial tones are sent and the callcontinues.
Clearing the System
Unless information is deleted out of the in‐vehicleBluetooth system, it will be retained indefinitely. This
includes all saved name tags in the phonebook andphone pairing information. For information on how todelete this information, see the above sections onDeleting a Paired Phone and Deleting Name Tags.
Other Information
The Bluetooth® word mark and logos are owned by theBluetooth® SIG, Inc. and any use of such marks byGeneral Motors is under license. Other trademarks and
trade names are those of their respective owners.See Bluetooth® on page 4‑ 96 for FCC information.
Theft-Deterrent Feature
THEFTLOCK® is designed to discourage theft of thevehicle's radio by learning a portion of the VehicleIdentification Number (VIN). The radio does not operateand LOCKED displays if the radio is stolen or moved to

7/31/2019 2010 Corvette
http://slidepdf.com/reader/full/2010-corvette 274/471
a different vehicle.When the when the ignition is in the off position, ablinking red light on the upper left side of the radioindicates that THEFTLOCK® is armed.
4-106
Audio Steering Wheel Controls
For vehicles with steering wheel controls, some audiocontrols can be adjusted at the steering wheel.
b g (Mute/Push to Talk): Press to silence the vehiclespeakers only. Press again to turn the sound on.
For vehicles with Bluetooth or OnStar ® systems press
and hold b g for longer than two seconds to interact
c (Phone On Hook): Press to reject an incomingcall, or end a current call.
wx (Next/Previous) : Press to change radio stations
or select tracks on a CD.
To change radio stations:
. Press w or x to go to the next or to the previous
radio station and stay there. The radio only seeksstations with a strong signal that are in theselected band.
. Press and hold w or x for two seconds until
SCAN displays and a beep sounds to scanstations. The radio goes to a station, plays for a few seconds, then goes to the next station.Press again to stop scanning.
. Press and hold w or x for four seconds until
PRESET SCAN displays and a beep sounds toscan presets. The radio goes to a station, plays for a few seconds, then goes to the next station. Pressagain to stop scanning.

7/31/2019 2010 Corvette
http://slidepdf.com/reader/full/2010-corvette 275/471
g
with those systems. See Bluetooth® on page 4‑
96 andthe OnStar Owner's Guide for more information.
4-10
To select tracks on a CD:
. Press w or x to go to the next or to the previous
track when a CD is playing.
. Press and hold w or x for more than
two seconds to scan the current CD. The CDgoes to the next track, plays the first 10 seconds,then goes to the next track. Press again to stopscanning.
. Press and hold w or x for more than
four seconds to scan all of the CDs loaded. TheCD goes to the next CD, plays the first 10 seconds
of each track, then goes to the next CD. Pressagain to stop scanning.
+ e − e (Volume): Press to increase or to decrease
the radio volume.
1 to 6 (Preset Pushbuttons) : Press to play stationsthat are programmed on the radio preset pushbuttons.
Radio Reception
Frequency interference and static can occur duringnormal radio reception if items such as cell phone
chargers, vehicle convenience accessories, andexternal electronic devices are plugged into theaccessory power outlet. If there is interference or static,unplug the item from the accessory power outlet.
AM
The range for most AM stations is greater than for FM,especially at night. The longer range can cause stationfrequencies to interfere with each other. For better radio
reception, most AM radio stations boost the power levels during the day, and then reduce these levelsduring the night. Static can also occur when things likestorms and power lines interfere with radio reception.When this happens, try reducing the treble on the radio.
FM Stereo
FM signals only reach about 10 to 40 miles(16 to 65 km). Although the radio has a built-in electronic

7/31/2019 2010 Corvette
http://slidepdf.com/reader/full/2010-corvette 276/471
circuit that automatically works to reduce interference,some static can occur, especially around tall buildingsor hills, causing the sound to fade in and out.
4-108
XM™ Satellite Radio Service
XM Satellite Radio Service gives digital radio receptionfrom coast-to-coast in the 48 contiguous United States,
and in Canada. Just as with FM, tall buildings or hillscan interfere with satellite radio signals, causing thesound to fade in and out. In addition, traveling or standing under heavy foliage, bridges, garages,or tunnels may cause loss of the XM signal for aperiod of time.
Cellular Phone Usage
Cellular phone usage may cause interference
with the vehicle's radio. This interference may occur when making or receiving phone calls, charging thephone's battery, or simply having the phone on. Thisinterference causes an increased level of static whilelistening to the radio. If static is received while listeningto the radio, unplug the cellular phone and turn it off.
Diversity Antenna System
The AM-FM antenna is a hidden self tuning system.It optimizes the AM and FM signals relative to
the vehicle's position and radio station source.No maintenance or adjustments are needed.
XM™ Satellite Radio AntennaSystem
For vehicles with XM Satellite Radio Service, theantenna is located on the roof or on the trunk lid of thevehicle. Keep the antenna clear of obstructions for clear
radio reception.

7/31/2019 2010 Corvette
http://slidepdf.com/reader/full/2010-corvette 277/471
4-10
2 NOTES

7/31/2019 2010 Corvette
http://slidepdf.com/reader/full/2010-corvette 278/471
4-110
Section 5 Driving Your Vehicle
Your Driving, the Road, and the Vehicle . . . . . . . . . . 5-2Defensive Driving . . . . . . . . . . . . . . . . . . . . . . . . . . . . . . . 5-2Drunk Driving . . . . . . . . . . . . . . . . . . . . . . . . . . . . . . . . . . . 5-2Control of a Vehicle . . . . . . . . . . . . . . . . . . . . . . . . . . . . . 5-3B r a k i n g . . . . . . . . . . . . . . . . . . . . . . . . . . . . . . . . . . . . . . . . . 5 - 4 Antilock Brake System (ABS) . . . . . . . . . . . . . . . . . . . 5-5Braking in Emergencies . . . . . . . . . . . . . . . . . . . . . . . . . 5-6Traction Control System (TCS) . . . . . . . . . . . . . . . . . . 5-6 Active Handling System . . . . . . . . . . . . . . . . . . . . . . . . . 5-8Competitive Driving Mode . . . . . . . . . . . . . . . . . . . . . . . 5-9Limited-Slip Rear Axle . . . . . . . . . . . . . . . . . . . . . . . . . 5-14Selective Ride Control . . . . . . . . . . . . . . . . . . . . . . . . . 5-14Steering . . . . . . . . . . . . . . . . . . . . . . . . . . . . . . . . . . . . . . . 5-16Off-Road Recovery . . . . . . . . . . . . . . . . . . . . . . . . . . . . 5-17Passing . . . . . . . . . . . . . . . . . . . . . . . . . . . . . . . . . . . . . . . . 5-18Loss of Control . . . . . . . . . . . . . . . . . . . . . . . . . . . . . . . . 5-18
Racing or Other Competitive Driving . . . . . . . . . . . 5-19D r i v i n g a t N i g h t . . . . . . . . . . . . . . . . . . . . . . . . . . . . . . . . 5 - 2 2Driving in Rain and on Wet Roads . . . . . . . . . . . . . 5-22Before Leaving on a Long Trip . . . . . . . . . . . . . . . . . 5-23Highway Hypnosis . . . . . . . . . . . . . . . . . . . . . . . . . . . . . 5-24Hil l a n d Mo u n ta in Ro a d s . . . . . . . . . . . . . . . . . . . . . . . 5 -2 4Winter Driving . . . . . . . . . . . . . . . . . . . . . . . . . . . . . . . . . 5-25If Your Vehicle is Stuck in Sand, Mud, Ice,
or Snow . . . . . . . . . . . . . . . . . . . . . . . . . . . . . . . . . . . . . 5-27Rocking Your Vehicle to Get It Out . . . . . . . . . . . . . 5-28Loading the Vehicle . . . . . . . . . . . . . . . . . . . . . . . . . . . . 5-28
Towing . . . . . . . . . . . . . . . . . . . . . . . . . . . . . . . . . . . . . . . . . . . . 5-33Towing Your Vehicle . . . . . . . . . . . . . . . . . . . . . . . . . . . 5-33Recreational Vehicle Towing . . . . . . . . . . . . . . . . . . . 5-33Towing a Trailer . . . . . . . . . . . . . . . . . . . . . . . . . . . . . . . . 5-33

7/31/2019 2010 Corvette
http://slidepdf.com/reader/full/2010-corvette 279/471
5-
Your Driving, the Road, andthe Vehicle
Defensive Driving
Defensive driving means “always expect theunexpected.” The first step in driving defensively is towear your safety belt — See Safety Belts: They Are for Everyone on page 2 ‑ 9.
{ WARNING:
Assume that other road users (pedestrians,bicyclists, and other drivers) are going to becareless and make mistakes. Anticipate what theymight do and be ready. In addition:
. Allow enough following distance between youand the driver in front of you.
. Focus on the task of driving.
Drunk Driving
{WARNING:
Drinking and then driving is very dangerous.Your reflexes, perceptions, attentiveness, and judgment can be affected by even a small amountof alcohol. You can have a serious — or evenfatal — collision if you drive after drinking. Do notdrink and drive or ride with a driver who has beendrinking. Ride home in a cab; or if you are with a
group, designate a driver who will not drink.
Death and injury associated with drinking and driving isa global tragedy.
Alcohol affects four things that anyone needs to drive avehicle: judgment, muscular coordination, vision, andattentiveness.
Police records show that almost 40 percent of all motor

7/31/2019 2010 Corvette
http://slidepdf.com/reader/full/2010-corvette 280/471
Driver distraction can cause collisions resulting ininjury or possible death. These simple defensivedriving techniques could save your life.
vehicle-related deaths involve alcohol. In most cases,these deaths are the result of someone who wasdrinking and driving. In recent years, more than17,000 annual motor vehicle-related deaths have beenassociated with the use of alcohol, with about250,000 people injured.
5-2
For persons under 21, it is against the law in everyU.S. state to drink alcohol. There are good medical,psychological, and developmental reasons for these laws.
The obvious way to eliminate the leading highwaysafety problem is for people never to drink alcohol andthen drive.
Medical research shows that alcohol in a person'ssystem can make crash injuries worse, especiallyinjuries to the brain, spinal cord, or heart. This meansthat when anyone who has been drinking — driver or passenger — is in a crash, that person's chance of
being killed or permanently disabled is higher than if the person had not been drinking.
Control of a Vehicle
The following three systems help to control the vehiclewhile driving — brakes, steering, and accelerator. At
times, as when driving on snow or ice, it is easy to askmore of those control systems than the tires and roadcan provide. Meaning, you can lose control of thevehicle. See Traction Control System (TCS) on
page 5 ‑ 6 and Active Handling System on page 5 ‑ 8 .
Adding non‐dealer/non‐retailer accessories can affectvehicle performance. See Accessories and Modifications on page 6 ‑ 3 .

7/31/2019 2010 Corvette
http://slidepdf.com/reader/full/2010-corvette 281/471
5-
Braking
See Brake System Warning Light on page 4‑ 36 .
Braking action involves perception time and reactiontime. Deciding to push the brake pedal is perceptiontime. Actually doing it is reaction time.
Average reaction time is about three‐fourths of asecond. But that is only an average. It might be lesswith one driver and as long as two or three secondsor more with another. Age, physical condition, alertness,coordination, and eyesight all play a part. So do alcohol,drugs, and frustration. But even in three‐fourths of asecond, a vehicle moving at 100 km/h (60 mph) travels20 m (66 feet). That could be a lot of distance in anemergency, so keeping enough space between thevehicle and others is important.
And, of course, actual stopping distances vary greatlywith the surface of the road, whether it is pavement or gravel; the condition of the road, whether it is wet, dry,or icy; tire tread; the condition of the brakes; the weightof the vehicle; and the amount of brake force applied.
The brakes might not have time to cool between hardstops. The brakes will wear out much faster with a lot of heavy braking. Keeping pace with the traffic andallowing realistic following distances eliminates a lot of
unnecessary braking. That means better braking andlonger brake life.
If the engine ever stops while the vehicle is beingdriven, brake normally but do not pump the brakes.If the brakes are pumped, the pedal could get harder topush down. If the engine stops, there will still be somepower brake assist but it will be used when the brake isapplied. Once the power assist is used up, it can takelonger to stop and the brake pedal will be harder
to push.
Under certain weather or operating conditions,occasional brake squeak, squeal, or other noise mightbe heard with the vehicle's performance brakingsystem. This brake system is designed for superior faderesistance and consistent operation using highperformance brake pads. Brake noise and brake dustare normal and do not affect system performance.
Adding non‐dealer/non‐retailer accessories can affect

7/31/2019 2010 Corvette
http://slidepdf.com/reader/full/2010-corvette 282/471
Avoid needless heavy braking. Some people drive inspurts, heavy acceleration followed by heavy braking,rather than keeping pace with traffic. This is a mistake.
gvehicle performance. See Accessories and Modifications on page 6 ‑ 3 .
5-4
Antilock Brake System (ABS)
This vehicle has the Antilock Brake System (ABS), anadvanced electronic braking system that helps prevent
a braking skid.
When the engine is started and the vehicle begins todrive away, ABS checks itself. A momentary motor or clicking noise might be heard while this test is going on,and it might even be noticed that the brake pedalmoves a little. This is normal.
If there is a problem with ABS, this warning light
stays on. See Antilock Brake System (ABS)Warning Light on
page 4‑ 37 .
Let us say the road is wet and you are driving safely.Suddenly, an animal jumps out in front of you. You slamon the brakes and continue braking. Here is what
ABS can change the brake pressure to each wheel, asrequired, faster than any driver could. This can help thedriver steer around the obstacle while braking hard.
As the brakes are applied, the computer keepsreceiving updates on wheel speed and controls brakingpressure accordingly.
Remember: ABS does not change the time needed toget a foot up to the brake pedal or always decreasestopping distance. If you get too close to the vehicle infront of you, there will not be enough time to apply thebrakes if that vehicle suddenly slows or stops. Alwaysleave enough room up ahead to stop, even with ABS.
Using ABSDo not pump the brakes. Just hold the brake pedaldown firmly and let antilock work. A motor or clickingnoise might be heard and the brake pedal might be feltto move a little during a stop, but this is normal.

7/31/2019 2010 Corvette
http://slidepdf.com/reader/full/2010-corvette 283/471
happens with ABS:
A computer senses that the wheels are slowing down.If one of the wheels is about to stop rolling, thecomputer will separately work the brakes at each wheel.
5-
Braking in Emergencies
ABS allows the driver to steer and brake at the sametime. In many emergencies, steering can help more
than even the very best braking.
Brake Assist
This vehicle has a brake assist feature that responds toemergency braking by generating additional pressureand engaging the ABS. When this happens, the brakepedal will feel easier to push. Just hold the brake pedaldown firmly and let the system work for you. You mightfeel the brakes vibrate or notice some noise, but this is
normal. The brakes will return to normal operation after the brake pedal is released.
Brake assist cannot compensate for unsafe drivingpractices and braking effectiveness, itself, depends onthe condition of the road, tires, and brakes andvehicle mass.
Traction Control System (TCS)
The vehicle has a Traction Control System (TCS) thatlimits wheel spin. This is especially useful in slippery
road conditions. The system operates only if it sensesthat the rear wheels are spinning too much or arebeginning to lose traction. When this happens, thesystem works the rear brakes and reduces enginepower (by closing the throttle and managing enginespark) to limit wheel spin.
The TRACTION SYSTEM ACTIVE message displayson the Driver Information Center (DIC) when TCS islimiting wheel spin. See DIC Warnings and Messages
on page 4‑ 52 . The system may be heard or felt while it
is working, but this is normal.
If cruise control is being used when TCS begins to limitwheel spin, the cruise control will automaticallydisengage. Cruise control may be reengaged whenroad conditions allow. See Cruise Control on page 4‑ 7 .

7/31/2019 2010 Corvette
http://slidepdf.com/reader/full/2010-corvette 284/471
5-6
The SERVICETRACTION SYSTEMmessage and theTCS warning light will
come on if there is aproblem with TCS.See DIC Warnings and Messages on page 4‑ 52 .
When this light and the SERVICE TRACTION SYSTEMmessage are on, the system will not limit wheel spin. Adjust your driving accordingly.
TCS automatically comes on whenever the vehicle isstarted. To limit wheel spin, especially in slippery roadconditions, the system should always be left on.TCS can be turned off if needed.
To turn the system off,press the button locatedon the console.
The system can be turned on or off at any time bypressing the ACTIVE HANDLING button. The DIC willdisplay the appropriate message when the buttonis pushed.
Notice: When traction control is turned off,or Competitive Driving Mode is active, it is possibleto lose traction. If you attempt to shift with the drivewheels spinning with a loss of traction, it ispossible to cause damage to the transmission.Do not attempt to shift when the drive wheels do noth t ti D d b i f th

7/31/2019 2010 Corvette
http://slidepdf.com/reader/full/2010-corvette 285/471
have traction. Damage caused by misuse of thevehicle is not covered. See the warranty book for additional information.
Adding non‐dealer/non-retailer accessories can affectthe vehicle's performance. See Accessories and Modifications o n p a g e 6 ‑ 3 for more information.
5-
Active Handling System
The Active Handling System is a computer controlledsystem that helps the driver maintain directional control
of the vehicle in difficult driving conditions. This isaccomplished by selectively applying any one of thevehicle's brakes.
The ACTIVE HANDLING message will come onwhen the system is operating. See DIC Warnings and Messages on page 4‑ 52 for more information.The system may be heard or felt while it is working.This is normal.
The SERVICE ACTIVEHANDLING SYSTEMmessage is displayed, theinstrument cluster lightcomes on, and a sound isheard if there is a problemwith the system.
When this light and the SERVICE ACTIVE HANDLINGSYSTEM message are on, the system is notoperational. Adjust your driving accordingly.
The Active Handling System comes on automaticallywhenever the vehicle is started. To help maintaindirectional control of the vehicle, the system shouldalways be left on. The system can be turned off needed. If the Active Handling System is turned off,the Traction Control System will also be turned off. Adjust your driving accordingly.
To turn the system off,press the Active Handling
button on the console untilTRACTION SYSTEM AND ACTIVE HANDLINGSYSTEM — OFF isdisplayed.

7/31/2019 2010 Corvette
http://slidepdf.com/reader/full/2010-corvette 286/471
See DIC Warnings and Messages on page 4‑ 52 for more information.
The system can be turned back on at any time bypressing the button. The DIC will display the appropriatemessage when the button is pushed.
5-8
If the Tire Pressure Monitor (TPM) system detects a flattire and the Driver Information Center (DIC) displaysTIRE FLAT, or if the TPM system is malfunctioning andthe DIC displays SERVICE TIRE MONITOR, the Active
Handling System will be affected as follows:. The Active Handling System cannot be turned off
by the driver.
. If the Active Handling System is off, it will beturned on automatically.
. Competitive Driving Mode or Performance TractionManagement is unavailable.
. The Active Handling System will feel different in
aiding and maintaining directional control.
Competitive Driving Mode
Competitive Driving Mode, Performance TractionManagement, and Launch Control are systemsdesigned to allow increased performance whileaccelerating and/or cornering. This is accomplished byregulating and optimizing the engine, brakes, andsuspension performance. These modes are for use at a
closed course race track and are not intended for useon public roads. They will not compensate for a driver ’sinexperience or lack of familiarity with the race track.Drivers who prefer to allow the system to have more
control of the engine, brake, and suspension areadvised to turn the normal traction control and activehandling systems on. See Racing or Other CompetitiveDriving on page 5 ‑ 19 for more information.
Notice: Do not attempt to shift when the drivewheels are spinning and do not have traction. Thismay cause damage to the transmission. Damagecaused by misuse of the vehicle is not covered bythe vehicle warranty. See the warranty book for
additional information.
Competitive Driving Mode (Except ZR1)
Competitive Driving Mode allows full engine power while the Active Handling System helps maintaindirectional control of the vehicle by selective brakeapplication. In this mode, TCS is off and Launch Controlis available. Adjust your driving style to account for theavailable engine power. See Launch Control later in
this section

7/31/2019 2010 Corvette
http://slidepdf.com/reader/full/2010-corvette 287/471
this section.
5-
This light is on whenthe vehicle is in theCompetitive Driving Mode.
This optional handling mode can be selected bypressing the ACTIVE HANDLING button on the consolequickly two times. COMPETITIVE DRIVING MODEdisplays in the Driver Information Center (DIC).See DIC Warnings and Messages on page 4‑ 52 for more information.
When the ACTIVE HANDLING button is pressed again,the Active Handling and TCS systems are on. TheTRACTION SYSTEM AND ACTIVE HANDLING-ONmessage displays briefly in the DIC and a chimeis heard
Performance TractionManagement (ZR1)
Performance Traction Management integrates the
Traction Control, Active Handling and Selective RideControl systems to provide improved and consistentperformance when cornering. The amount of availableengine power is based on the mode selected, trackconditions, driver skill, and the radius of each corner.
This light is on whenthe vehicle is in thePerformance TractionManagement Mode.
This optional handling mode can be selected bypressing the ACTIVE HANDLING button on the console

7/31/2019 2010 Corvette
http://slidepdf.com/reader/full/2010-corvette 288/471
is heard. pressing the ACTIVE HANDLING button on the consolequickly two times. PERF TRAC 1 - WET ACTIVEHANDLING ON displays in the DIC.
5-10
To experience the performance benefit of thissystem, after entering a curve and at the point wherethe driver would normally start to increase acceleration,the accelerator pedal can be fully pressed. The
Performance Traction Management system will modifythe level of engine power for a smooth and consistentcorner exit.
To select a mode while inPerformance TractionManagement, turn theknob located on theconsole.
The Performance Traction Management systemcontains five modes. These modes are selected byturning the Selective Ride Control/Performance TractionManagement knob on the center console The driver
The following is a DIC display description and therecommended usage of each mode:
PERF TRAC 1 – WET ACTIVE
HANDLING ON. Intended for all driver skill levels
. Wet or damp conditions only — not intended for use in heavy rain or standing water
. Active Handling is on and engine power is reducedbased on conditions
PERF TRAC 2 – DRY ACTIVE
HANDLING ON. For use by less experienced drivers or while
learning a new track
. Dry conditions only
. Active Handling is on and engine power isslightly reduced

7/31/2019 2010 Corvette
http://slidepdf.com/reader/full/2010-corvette 289/471
Management knob on the center console. The driver scrolls up or down through modes 1-5 by rotating theknob to the right or left.
5-1
PERF TRAC 3 – SPORT ACTIVEHANDLING ON. For use by drivers who are familiar with the track
. Dry conditions only
. Requires more driving skill than mode 2
. Active Handling is on and more engine power isavailable than in mode 2
PERF TRAC 4 – SPORT ACTIVEHANDLING OFF. For use by drivers who are familiar with the track
. Dry conditions only
. Requires more driving skill than modes 2 or 3
. Active Handling is off and available engine power is the same as mode 3
PERF TRAC 5 – RACE ACTIVEHANDLING OFF. For use by experienced drivers who are familiar
with the track. Dry conditions only
. Requires more driving skill than in other modes
. Active Handling is off and engine power isavailable for maximum cornering speed
Press and release the ACTIVE HANDLING buttonto turn off Performance Traction Management andreturn to the Active Handling and Traction Control
Systems. The TRACTION SYSTEM AND ACTIVEHANDLING-ON message displays briefly in the DICand a chime is heard.

7/31/2019 2010 Corvette
http://slidepdf.com/reader/full/2010-corvette 290/471
5-12
Launch Control
A Launch Control feature is available, withinCompetitive Driving Mode (except ZR1) or Performance
Traction Management (ZR1), on vehicles with a manualtransmission to allow the driver to achieve high levels of vehicle acceleration in a straight line. Launch Control isa form of traction control that manages tire spin whilelaunching the vehicle. This feature is intended for useduring closed course race events where consistentzero to sixty and quarter mile times are desirable.
Launch Control is only available when the followingcriteria are met:
. Competitive Driving Mode is selected (except ZR1)or any of the Performance Traction Managementmodes are selected (ZR1). The TCS light comeson the instrument panel and the appropriateDIC message displays.
. The vehicle is not moving.
. The steering wheel is pointing straight.
. The clutch is pressed and the vehicle is in
first gear
The Launch Control feature will initially limit enginespeed as the driver rapidly applies the accelerator pedato wide open throttle. A smooth, quick release of theclutch, while maintaining the fully pressed accelerator
pedal, will manage wheel slip. Complete shifts asdescribed in Manual Transmission Operation on
page 3 ‑ 32 .
After the vehicle is launched, the system continues inCompetitive Mode (except ZR1) or PerformanceTraction Management (ZR1).
Competitive Driving Mode, Performance TractionManagement, and Launch Control are systemsdesigned for a closed course race track and notintended for use on public roads. The systems are notintended to compensate for lack of driver experience or familiarity with the race track.

7/31/2019 2010 Corvette
http://slidepdf.com/reader/full/2010-corvette 291/471
first gear.. The accelerator pedal is rapidly applied to wide
open throttle.
5-1
Limited-Slip Rear Axle
Vehicles with a limited-slip rear axle can give moretraction on snow, mud, ice, sand or gravel. It works like
a standard axle most of the time, but when traction islow, this feature allows the drive wheel with the mosttraction to move the vehicle.
Selective Ride Control
The vehicle may have a ride control system calledMagnetic Selective Ride Control. The system providesthe following performance benefits:
. Reduced Impact Harshness
. Improved Road Isolation
. Improved High-Speed Stability
. Improved Handling Response
. Better Control of Body Ride Motions
Except ZR1
This knob is located onthe center console. Turn it
to select the suspensionof your choice.
TOUR : Use for normal city and highway driving.This setting provides a smooth, soft ride.
SPORT: Use where road conditions or personalpreference demand more control. This setting providesmore “feel”, or response to the road conditions.
The setting can be changed at any time. Based on roadconditions, steering wheel angle and the vehicle speed,the system automatically adjusts to provide the best
handling while providing a smooth ride. The Tour and

7/31/2019 2010 Corvette
http://slidepdf.com/reader/full/2010-corvette 292/471
handling while providing a smooth ride. The Tour andSport modes will feel similar on a smooth road. Select anew setting whenever driving conditions change.
5-14
Three Driver Information Center (DIC) messages(SERVICE RIDE CONTROL, SHOCKS INOPERATIVEand MAXIMUM SPEED 80 MPH (129 KM/H) displaywhen a malfunction occurs with the Selective Ride
Control system . Refer to DIC Warnings and Messageson page 4‑ 52 for more information.
ZR1
This knob is located onthe center console. Turn itto select the suspensionof your choice. The knobwill return to the center
position when released.The switch will illuminatethe current suspensionsetting.
TOUR : Use for normal city and highway driving.This setting provides a smooth, soft ride.
SPORT: Use where road conditions or personal
The setting can be changed at any time. Based on roadconditions, steering wheel angle and the vehicle speed,the system automatically adjusts to provide the besthandling while providing a smooth ride. The Tour and
Sport modes will feel similar on a smooth road. Select anew setting whenever driving conditions change.
The Selective Ride knob will not display theTour or Sport setting when the Performance TractionManagement mode is selected. When this mode isselected, turning the Selective Ride knob will changethe Performance Traction Management mode and thesuspension setting will be determined automatically.See Competitive Driving Mode o n p a g e 5 ‑ 9 for
more information.Three Driver Information Center (DIC) messages(SERVICE RIDE CONTROL, SHOCKS INOPERATIVEand MAXIMUM SPEED 80 MPH (129 KM/H) displaywhen a malfunction occurs with the Selective RideControl system . Refer to DIC Warnings and Messageson page 4‑ 52 for more information.

7/31/2019 2010 Corvette
http://slidepdf.com/reader/full/2010-corvette 293/471
S O Use e e oad co d t o s o pe so apreference demand more control. This setting providesmore “feel”, or response to the road conditions.
5-1
Steering
Power Steering
If power steering assist is lost because the engine stopsor the system is not functioning, the vehicle can besteered but it will take more effort.
Magnetic Speed Variable AssistSteering System
This system continuously adjusts the effort felt whensteering at all vehicle speeds. It provides ease whenparking, yet a firm, solid feel at highway speeds.
Steering Tips
It is important to take curves at a reasonable speed.
Traction in a curve depends on the condition of the tiresand the road surface, the angle at which the curve isbanked, and vehicle speed. While in a curve, speed isthe one factor that can be controlled.
If there is a need to reduce speed, do it before enteringthe curve, while the front wheels are straight.
Try to adjust the speed so you can drive through thecurve. Maintain a reasonable, steady speed. Wait toaccelerate until out of the curve, and then accelerategently into the straightaway.
Steering in Emergencies
There are times when steering can be more effectivethan braking. For example, you come over a hill andfind a truck stopped in your lane, or a car suddenly pullsout from nowhere, or a child darts out from betweenparked cars and stops right in front of you. Theseproblems can be avoided by braking — if you can stopin time. But sometimes you cannot stop in time because
there is no room. That is the time for evasiveaction — steering around the problem.
The vehicle can perform very well in emergencieslike these. First apply the brakes. See Braking on
page 5 ‑ 4 . It is better to remove as much speed aspossible from a collision. Then steer around theproblem, to the left or right depending on thespace available.
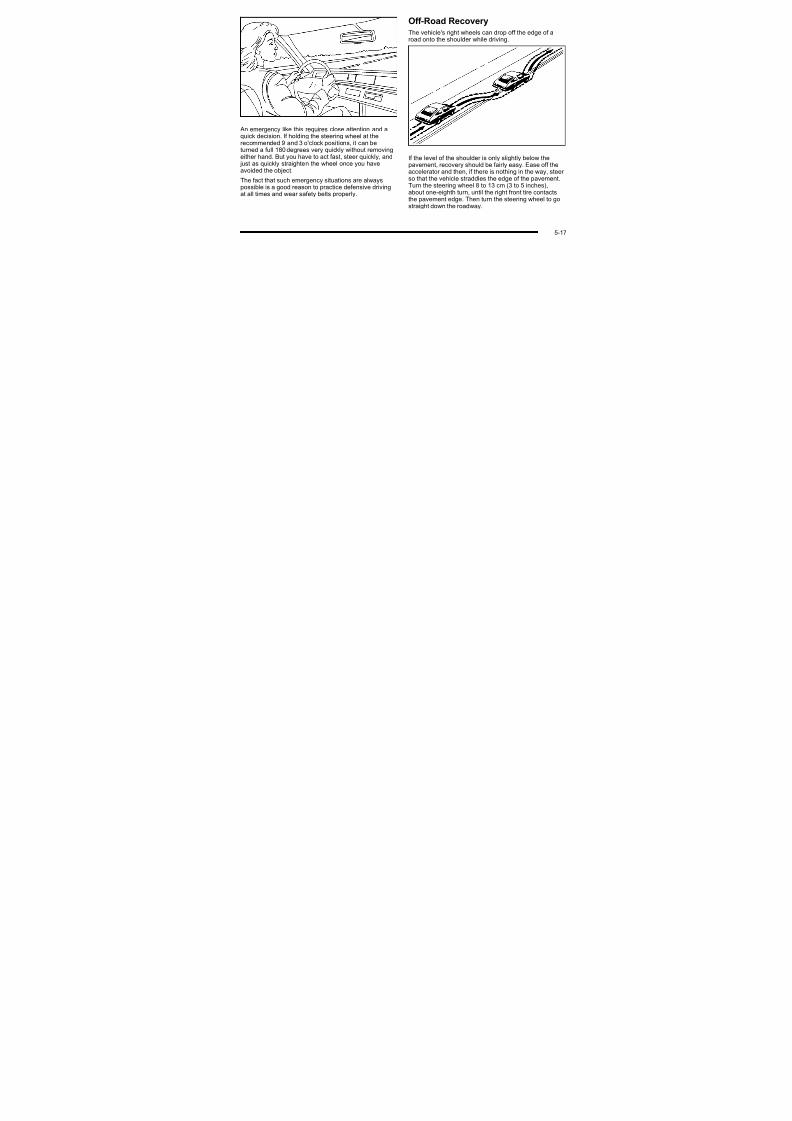
7/31/2019 2010 Corvette
http://slidepdf.com/reader/full/2010-corvette 294/471
5-16
An emergency like this requires close attention and aquick decision. If holding the steering wheel at therecommended 9 and 3 o'clock positions, it can beturned a full 180 degrees very quickly without removingeither hand. But you have to act fast, steer quickly, and just as quickly straighten the wheel once you haveavoided the object.
The fact that such emergency situations are always
Off-Road Recovery
The vehicle's right wheels can drop off the edge of aroad onto the shoulder while driving.
If the level of the shoulder is only slightly below thepavement, recovery should be fairly easy. Ease off theaccelerator and then, if there is nothing in the way, steer
so that the vehicle straddles the edge of the pavement.T th t i h l 8 t 13 (3 t 5 i h )

7/31/2019 2010 Corvette
http://slidepdf.com/reader/full/2010-corvette 295/471
g y ypossible is a good reason to practice defensive drivingat all times and wear safety belts properly.
g pTurn the steering wheel 8 to 13 cm (3 to 5 inches),about one-eighth turn, until the right front tire contactsthe pavement edge. Then turn the steering wheel to gostraight down the roadway.
5-1
Passing
Passing another vehicle on a two-lane road can bedangerous. To reduce the risk of danger while passing:
. Look down the road, to the sides, and tocrossroads for situations that might affect asuccessful pass. If in doubt, wait.
. Watch for traffic signs, pavement markings, andlines that could indicate a turn or an intersection.Never cross a solid or double‐solid line on your side of the lane.
. Do not get too close to the vehicle you want topass. Doing so can reduce your visibility.
. Wait your turn to pass a slow vehicle.
. When you are being passed, ease to the right.
Loss of Control
Let us review what driving experts say about whathappens when the three control systems — brakes,
steering, and acceleration—
do not have enoughfriction where the tires meet the road to do what thedriver has asked.
In any emergency, do not give up. Keep trying tosteer and constantly seek an escape route or area of less danger.
Skidding
In a skid, a driver can lose control of the vehicle.
Defensive drivers avoid most skids by takingreasonable care suited to existing conditions, andby not overdriving those conditions. But skids arealways possible.
The three types of skids correspond to the vehicle'sthree control systems. In the braking skid, the wheelsare not rolling. In the steering or cornering skid, toomuch speed or steering in a curve causes tires to slipand lose cornering force. And in the acceleration skid,
too much throttle causes the driving wheels to spin.

7/31/2019 2010 Corvette
http://slidepdf.com/reader/full/2010-corvette 296/471
Remember: Any traction control system helps avoidonly the acceleration skid. If the traction control systemis off, then an acceleration skid is best handled byeasing your foot off the accelerator pedal.
5-18
If the vehicle starts to slide, ease your foot off theaccelerator pedal and quickly steer the way you wantthe vehicle to go. If you start steering quickly enough,the vehicle may straighten out. Always be ready for a
second skid if it occurs.Of course, traction is reduced when water, snow, ice,gravel, or other material is on the road. For safety, slowdown and adjust your driving to these conditions. It isimportant to slow down on slippery surfaces becausestopping distance will be longer and vehicle controlmore limited.
While driving on a surface with reduced traction, tryyour best to avoid sudden steering, acceleration,
or braking, including reducing vehicle speed by shiftingto a lower gear. Any sudden changes could cause thetires to slide. You may not realize the surface is slipperyuntil the vehicle is skidding. Learn to recognize warningclues — such as enough water, ice, or packed snow onthe road to make a mirrored surface — and slow downwhen you have any doubt.
Remember: Antilock brakes help avoid only thebraking skid.
Racing or Other Competitive Driving
Racing or competitive driving may affect the vehiclewarranty. See the warranty book before using the
vehicle for racing or other competitive driving.Notice: If you use the vehicle for racing or other competitive driving, the engine may use more oilthan it would with normal use. Low oil levels candamage the engine. For information on how to addoil, see Engine Oil on page 6 ‑ 19 .
Z06, ZR1, and Grand Sport Only: Be sure to checkthe oil level often during racing or other competitivedriving and keep the level at or near the upper mark
that shows the proper operating range on theengine oil dipstick.
Except Z06, ZR1, and Grand Sport: Be sure to checkthe oil level often during racing or other competitivedriving and keep the level at or near 1 L (1 quart)above the upper mark that shows the proper operating range on the engine oil dipstick. After thecompetitive driving, remove excess oil so that thelevel on the dipstick is not above the upper mark
that shows the proper operating range.

7/31/2019 2010 Corvette
http://slidepdf.com/reader/full/2010-corvette 297/471
Z06, ZR1, and Grand Sport Only: For racing or competitive driving, it is recommended that the brakefluid be replaced with a high performance brake fluidthat has a dry boiling point greater than 279°C (534°F).
5-1
After conversion to the high performance brake fluid,follow the brake fluid service recommendations outlinedby the fluid manufacturer. Do not use silicone or DOT‐5 brake fluids.
If the vehicle is a Z06, ZR1, or Grand Sport model, ithas greaseable outer ends on both of the rear toe ‐links.Under normal use, lubrication should be performed asdescribed in the maintenance schedule. See Scheduled Maintenance o n p a g e 7 ‑ 3 and Recommended Fluidsand Lubricants on page 7 ‑ 10 . If using the vehicle for racing, lubrication should be performed at the end of each racing day. See your dealer/retailer for lubricationand make sure any needed repairs are made at once.
Proper procedures for performing these services can befound in the service manual. See Service PublicationsOrdering Information on page 8 ‑ 16 .
If the vehicle is used for racing or other competitivedriving, the rear axle fluid temperatures may be higher than would occur in normal driving. We recommend thatthe rear axle fluid be drained and refilled with new fluidafter every 24 hours of racing or competitive driving.See Recommended Fluids and Lubricants on
page 7 ‑
10 for what fluid to use.
ZR1 Brake Burnish Procedure
Notice: These procedures are specific to the ZR1with ceramic brake rotors. These procedures should
not be run on other Corvette models as damagemay result.
Notice: The new vehicle break‐in period should becompleted before performing the brake burnishprocedure or damage may occur to the powertrain/ engine. See New Vehicle Break-In on page 3 ‑ 21.
When performed as instructed, these procedures willnot damage the brakes. During the burnishingprocedure, the brake pads will smoke and produce an
odor. The braking force and pedal travel may increase. After the procedure is complete, the brake pads mayappear white at the rotor contact.

7/31/2019 2010 Corvette
http://slidepdf.com/reader/full/2010-corvette 298/471
5-20
Street High Performance Brake BurnishingProcedure
Run this procedure in a safe manner and in compliance
with all local and state ordinances/laws regarding motor vehicle operation. Run this procedure only on drypavement.
1. From a stop, accelerate as rapidly as possiblewithout activating traction control to a speedof 97 kph (60 mph).
2. Use enough pedal force to completely stop thevehicle in 4 to 5 seconds. If ABS activates, brakingis too hard.
3. Repeat steps 1 and 2, 50 times. This should takeabout 10 minutes.
4. After completing the 50 stops, cool the brakes bydriving for 8 km (5 miles) at 97 kph (60 mph).
As with all high performance brake systems, someamount of brake squeal is normal.
Racing/Track Brake Burnish Procedure
To prepare the ZR1 brake system for track events andracing, the Street High Performance Brake Burnish asdescribed previously should be completed.
In addition to completing the Street High PerformanceBrake Burnishing Procedure, the following additionalprocedure needs to be completed to make theZR1 brake system ready for track events and racing.
This procedure should only be run on a track and onlyon dry pavement.
Notice: Brake pedal fade will occur during this trackburnish procedure and can cause brake pedal travel
and force to increase. This could extend stoppingdistance until the brakes are fully burnished.
1. Drive a normal first lap and not too aggressive.
2. Laps 2 and 3 should be gradually driven faster andmore aggressive, while allowing for reduced brakeoutput and increased stopping distance due tobrake fade.
3. Lap 4 as near to full speed, while allowing for
reduced brake output and increased stoppingdistance due to brake fade.

7/31/2019 2010 Corvette
http://slidepdf.com/reader/full/2010-corvette 299/471
distance due to brake fade.
4. Laps 5 and 6 should be cool down laps
5. Lap 7 should be normal driving or an easy out lap.
5-2
Driving at Night
Night driving is more dangerous than day drivingbecause some drivers are likely to be impaired — by
alcohol or drugs, with night vision problems, or byfatigue.
Night driving tips include:
. Drive defensively.
. Do not drink and drive.
. Reduce headlamp glare by adjusting the insiderearview mirror.
. Slow down and keep more space between you and
other vehicles because headlamps can only lightup so much road ahead.
. Watch for animals.
. When tired, pull off the road.
. Do not wear sunglasses.
. Avoid staring directly into approaching headlamps.
. Keep the windshield and all glass on your vehicleclean — inside and out.
. Keep your eyes moving, especially during turns
Driving in Rain and on Wet Roads
Rain and wet roads can reduce vehicle traction andaffect your ability to stop and accelerate. Always drive
slower in these types of driving conditions and avoiddriving through large puddles and deep‐standing or flowing water.
{ WARNING:
Wet brakes can cause crashes. They might notwork as well in a quick stop and could cause
pulling to one side. You could lose control of the vehicle.
After driving through a large puddle of water or acar/vehicle wash, lightly apply the brake pedaluntil the brakes work normally.
Flowing or rushing water creates strong forces.Driving through flowing water could cause your vehicle to be carried away. If this happens, youand other vehicle occupants could drown. Do notignore police warnings and be very cautious about

7/31/2019 2010 Corvette
http://slidepdf.com/reader/full/2010-corvette 300/471
p y y g, p y gor curves.
No one can see as well at night as in the daytime.But, as we get older, these differences increase. A 50-year-old driver might need at least twice as muchlight to see the same thing at night as a 20-year-old.
trying to drive through flowing water.
5-22
Hydroplaning
Hydroplaning is dangerous. Water can build up under your vehicle's tires so they actually ride on the water.This can happen if the road is wet enough and you aregoing fast enough. When your vehicle is hydroplaning, ithas little or no contact with the road.
There is no hard and fast rule about hydroplaning.The best advice is to slow down when the road is wet.
Other Rainy Weather Tips
Besides slowing down, other wet weather driving tipsinclude:
. Allow extra following distance.
. Pass with caution.
. Keep windshield wiping equipment in good shape.
. Keep the windshield washer fluid reservoir filled.
. Have good tires with proper tread depth. See Tireson page 6 ‑ 62 .
. Turn off cruise control.
Before Leaving on a Long Trip
To prepare your vehicle for a long trip, consider havingit serviced by your dealer/retailer before departing.
Things to check on your own include:. Windshield Washer Fluid: Reservoir full? Windows
clean — inside and outside?
. Wiper Blades: In good shape?
. Fuel, Engine Oil, Other Fluids: All levels checked?
. Lamps: Do they all work and are lenses clean?
. Tires: Are treads good? Are tires inflated torecommended pressure?
. Weather and Maps: Safe to travel? Haveup-to-date maps?

7/31/2019 2010 Corvette
http://slidepdf.com/reader/full/2010-corvette 301/471
5-2
Highway Hypnosis
Always be alert and pay attention to your surroundingswhile driving. If you become tired or sleepy, find a safe
place to park your vehicle and rest.Other driving tips include:
. Keep the vehicle well ventilated.
. Keep interior temperature cool.
. Keep your eyes moving — scan the road aheadand to the sides.
. Check the rearview mirror and vehicleinstruments often.
Hill and Mountain Roads
Driving on steep hills or through mountains is differentthan driving on flat or rolling terrain. Tips for driving in
these conditions include:. Keep the vehicle serviced and in good shape.
. Check all fluid levels and brakes, tires, coolingsystem, and transmission.
. Going down steep or long hills, shift to alower gear.
{ WARNING:
If you do not shift down, the brakes could get sohot that they would not work well. You would thenhave poor braking or even none going down a hill.You could crash. Shift down to let the engineassist the brakes on a steep downhill slope.

7/31/2019 2010 Corvette
http://slidepdf.com/reader/full/2010-corvette 302/471
5-24
{ WARNING:
Coasting downhill in N (Neutral) or with theignition off is dangerous. The brakes will have todo all the work of slowing down and they couldget so hot that they would not work well. Youwould then have poor braking or even none goingdown a hill. You could crash. Always have theengine running and the vehicle in gear whengoing downhill.
. Stay in your own lane. Do not swing wide or cutacross the center of the road. Drive at speeds thatlet you stay in your own lane.
. Top of hills: Be alert — something could be in your lane (stalled car, accident).
. Pay attention to special road signs (falling rocksarea, winding roads, long grades, passing or no-passing zones) and take appropriate action.
Winter Driving
Driving on Snow or Ice
Drive carefully when there is snow or ice between thetires and the road, creating less traction or grip. Wet icecan occur at about 0°C (32°F) when freezing rainbegins to fall, resulting in even less traction. Avoiddriving on wet ice or in freezing rain until roads can betreated with salt or sand.
Drive with caution, whatever the condition. Accelerategently so traction is not lost. Accelerating too quicklycauses the wheels to spin and makes the surface underthe tires slick, so there is even less traction.
Try not to break the fragile traction. If you accelerate toofast, the drive wheels will spin and polish the surfaceunder the tires even more.
The Traction Control System (TCS) o n p a g e 5 ‑ 6 improves the ability to accelerate on slippery roads,but slow down and adjust your driving to the roadconditions. The Active Handling System o n p a g e 5 ‑ 8 might also activate. When driving through deep snow,
turn off the traction control system to help maintainvehicle motion at lower speeds.

7/31/2019 2010 Corvette
http://slidepdf.com/reader/full/2010-corvette 303/471
5-2
The Antilock Brake System (ABS) o n p a g e 5 ‑ 5 improves vehicle stability during hard stops on aslippery roads, but apply the brakes sooner than whenon dry pavement.
Allow greater following distance on any slippery roadand watch for slippery spots. Icy patches can occur onotherwise clear roads in shaded areas. The surfaceof a curve or an overpass can remain icy when thesurrounding roads are clear. Avoid sudden steeringmaneuvers and braking while on ice.
Turn off cruise control, if equipped, on slippery surfaces.
Blizzard Conditions
Being stuck in snow can be in a serious situation.Stay with the vehicle unless there is help nearby.If possible, use the Roadside Assistance Program on
page 8 ‑ 7 . To get help and keep everyone in thevehicle safe:
. Turn on the Hazard Warning Flashers on page 4‑ 3 .
. Tie a red cloth to an outside mirror.
{ WARNING:
Snow can trap engine exhaust under the vehicle.This may cause exhaust gases to get inside.Engine exhaust contains carbon monoxide (CO)which cannot be seen or smelled. It can causeunconsciousness and even death.
If the vehicle is stuck in the snow:
. Clear away snow from around the base of your vehicle, especially any that is blockingthe exhaust pipe.
. Check again from time to time to be suresnow does not collect there.
. Open a window about 5 cm (two inches) onthe side of the vehicle that is away from thewind to bring in fresh air.
. Fully open the air outlets on or under theinstrument panel.
. Adjust the Climate Control system to a settingthat circulates the air inside the vehicle and

7/31/2019 2010 Corvette
http://slidepdf.com/reader/full/2010-corvette 304/471
set the fan speed to the highest setting.See Climate Control System in the Index.
(Continued)
5-26
WARNING: (Continued)
For more information about carbon monoxide, seeEngine Exhaust on page 3 ‑ 37 .
Snow can trap exhaust gases under your vehicle.This can cause deadly CO (carbon monoxide) gasto get inside. CO could overcome you and kill you.You cannot see it or smell it, so you might notknow it is in your vehicle. Clear away snow fromaround the base of your vehicle, especially anythat is blocking the exhaust.
Run the engine for short periods only as needed tokeep warm, but be careful.
To save fuel, run the engine for only short periods asneeded to warm the vehicle and then shut the engineoff and close the window most of the way to save heat.Repeat this until help arrives but only when you feelreally uncomfortable from the cold. Moving about tokeep warm also helps.
If it takes some time for help to arrive, now and then
If Your Vehicle is Stuck in Sand,Mud, Ice, or Snow
Slowly and cautiously spin the wheels to free the
vehicle when stuck in sand, mud, ice, or snow.See Rocking Your Vehicle to Get It Out on page 5 ‑ 28 .
If the vehicle has a traction system, it can often helpto free a stuck vehicle. Refer to the vehicle's tractionsystem in the Index. If stuck too severely for the tractionsystem to free the vehicle, turn the traction system off and use the rocking method.
{ WARNING:If the vehicle's tires spin at high speed, theycan explode, and you or others could be injured.The vehicle can overheat, causing an enginecompartment fire or other damage. Spin thewheels as little as possible and avoid going above55 km/h (35 mph) as shown on the speedometer.
For information about using tire chains on the vehicle,see Tire Chains on page 6 84

7/31/2019 2010 Corvette
http://slidepdf.com/reader/full/2010-corvette 305/471
when you run the engine, push the accelerator pedalslightly so the engine runs faster than the idle speed.This keeps the battery charged to restart the vehicleand to signal for help with the headlamps. Do this aslittle as possible to save fuel.
see Tire Chains on page 6 ‑ 84.
5-2
Rocking Your Vehicle to Get It Out
Turn the steering wheel left and right to clear the areaaround the front wheels. Turn the traction controlsystem off. Shift back and forth between R (Reverse)and a forward gear, spinning the wheels as little aspossible. For a manual transmission, shift slowlybetween either 1 (First) or 2 (Second) and R (Reverse),allowing the wheels to stop before shifting into gear.To prevent transmission wear, wait until the wheels stopspinning before shifting gears. Release the accelerator pedal while shifting, and press lightly on the accelerator pedal when the transmission is in gear. Slowly spinningthe wheels in the forward and reverse directions causes
a rocking motion that could free the vehicle. If that doesnot get the vehicle out after a few tries, it might need tobe towed out. If the vehicle does need to be towed out,see Towing Your Vehicle on page 5 ‑ 33 .
Loading the Vehicle
It is very important to know how much weight your vehicle can carry. This weight is called the vehicle
capacity weight and includes the weight of alloccupants, cargo and all nonfactory‐installedoptions. Two labels on your vehicle showhow much weight it may properly carry, theTire and Loading Information label and theCertification label.
{ WARNING:
Do not load the vehicle any heavier thanthe Gross Vehicle Weight Rating (GVWR),or either the maximum front or rear Gross
Axle Weight Rating (GAWR). If you do, partson the vehicle can break, and it can changethe way the vehicle handles. These couldcause you to lose control and crash.
Also, overloading can shorten the lifeof the vehicle.

7/31/2019 2010 Corvette
http://slidepdf.com/reader/full/2010-corvette 306/471
5-28
Tire and Loading Information Label
Label Example
A vehicle specific Tire and Loading Informationlabel is attached to the center pillar (B-pillar) of your vehicle. With the driver's door open, youwill find the label attached below the door latch.This label shows the number of occupant seatingpositions (A), and the maximum vehicle capacityweight (B) in kilograms and pounds
The Tire and Loading Information label alsoshows the size of the original equipment tires (C)and the recommended cold tire inflationpressures (D). For more information on tires and
inflation see Tires on page 6 ‑ 62 and Inflation - Tire
Pressure on page 6 ‑ 70 .
There is also important loading information on thevehicle Certification label. It tells you the GrossVehicle Weight Rating (GVWR) and the Gross
Axle Weight Rating (GAWR) for the front and rear axle. See “Certification Label” later in this section.
Steps for Determining Correct Load Limit
1. Locate the statement “The combined weightof occupants and cargo should never exceedXXX kg or XXX lbs” on your vehicle's placard.
2. Determine the combined weight of thedriver and passengers that will be riding inyour vehicle.
3. Subtract the combined weight of the driver
and passengers from XXX kg or XXX lbs.

7/31/2019 2010 Corvette
http://slidepdf.com/reader/full/2010-corvette 307/471
weight (B) in kilograms and pounds.
5-2
4. The resulting figure equals the availableamount of cargo and luggage load capacity.For example, if the “XXX” amount equals1400 lbs and there will be five 150 lb
passengers in your vehicle, the amount of available cargo and luggage load capacity is650 lbs (1400 − 750 (5 x 150) = 650 lbs).
5. Determine the combined weight of luggageand cargo being loaded on the vehicle.That weight may not safely exceed theavailable cargo and luggage load capacitycalculated in Step 4.
6. If your vehicle will be towing a trailer, the loadfrom your trailer will be transferred to your vehicle. Consult this manual to determinehow this reduces the available cargo andluggage load capacity of your vehicle.
Your vehicle is neither designed nor intendedto tow a trailer.
Example 1
Item Description Total
AVehicle CapacityWeight for Example 1 =
400 lbs (181 kg)
BSubtract OccupantWeight @ 150 lbs(68 kg) x 1 =
150 lbs (68 kg)
CAvailable Occupant
and Cargo Weight =
250 lbs (113 kg)
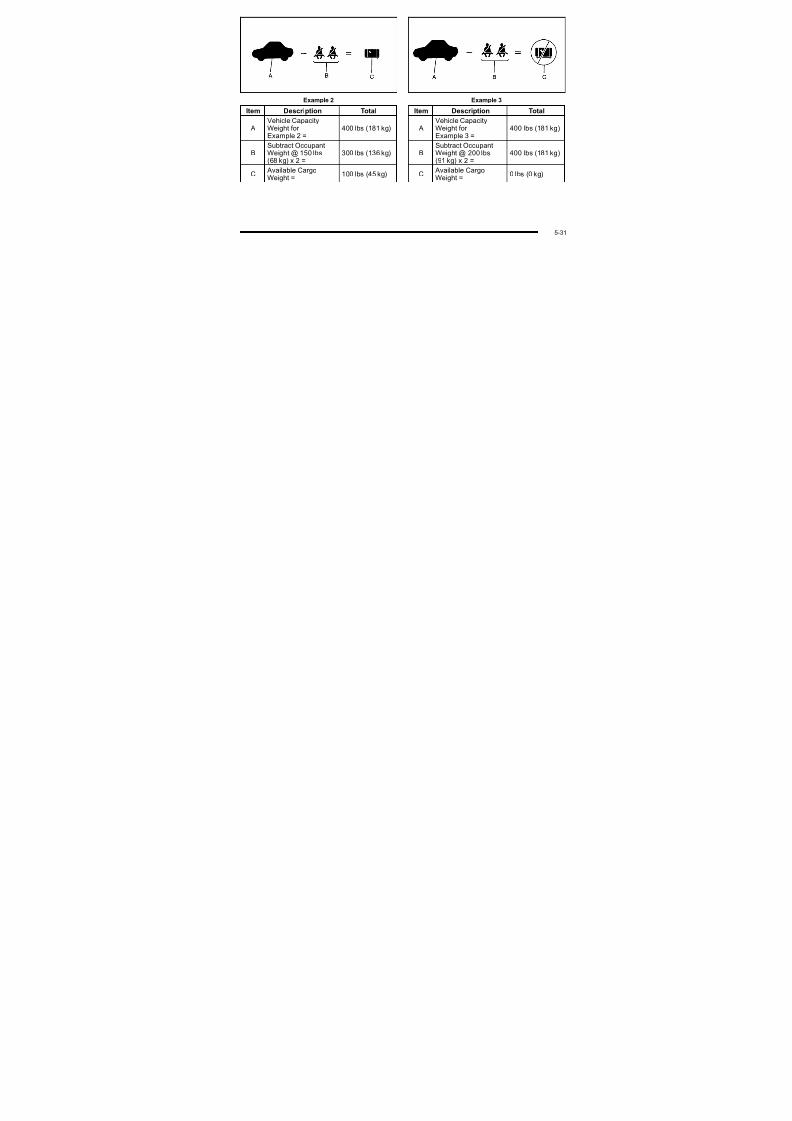
7/31/2019 2010 Corvette
http://slidepdf.com/reader/full/2010-corvette 308/471
5-30
Example 2
Item Description Total
AVehicle CapacityWeight for Example 2 =
400 lbs (181 kg)
BSubtract OccupantWeight @ 150 lbs(68 kg) x 2 =
300 lbs (136 kg)
CAvailable Cargo
Weight =
100 lbs (45 kg)
Example 3
Item Description Total
AVehicle CapacityWeight for Example 3 =
400 lbs (181 kg)
BSubtract OccupantWeight @ 200 lbs(91 kg) x 2 =
400 lbs (181 kg)
CAvailable Cargo
Weight =
0 lbs (0 kg)

7/31/2019 2010 Corvette
http://slidepdf.com/reader/full/2010-corvette 309/471
5-3
Refer to your vehicle's Tire and LoadingInformation label for specific information aboutyour vehicle's capacity weight and seatingpositions. The combined weight of the driver,
passengers and cargo should never exceed your vehicle's capacity weight.
Certification Label
A vehicle specific Certification label is attachedto the rear edge of the dri er's door It tells o
The GVWR includes the weight of the vehicle, alloccupants, fuel and cargo. Never exceed theGVWR for your vehicle, or the Gross Axle WeightRating (GAWR) for either the front or rear axle.
Do not load your vehicle with more weight than itwas designed to carry. See “Steps for DeterminingCorrect Load Limit” earlier in this section.
{ WARNING:
Do not load the vehicle any heavier than the
Gross Vehicle Weight Rating (GVWR),or either the maximum front or rear Gross Axle Weight Rating (GAWR). If you do, partson the vehicle can break, and it can changethe way the vehicle handles. These couldcause you to lose control and crash.
Also, overloading can shorten the life of the vehicle.
Notice : Overloading the vehicle may causedamage Repairs would not be covered by the

7/31/2019 2010 Corvette
http://slidepdf.com/reader/full/2010-corvette 310/471
to the rear edge of the driver's door. It tells youthe gross weight capacity of your vehicle,called the Gross Vehicle Weight Rating (GVWR).
damage. Repairs would not be covered by thevehicle warranty. Do not overload the vehicle.
5-32
If you put things inside your vehicle — likesuitcases, tools, packages or anythingelse — they will go as fast as the vehicle goes.If you have to stop or turn quickly, or if there is
a crash, they will keep going.
{ WARNING:
Things you put inside your vehicle can strikeand injure people in a sudden stop or turn,or in a crash.
.
Put things in the rear area of your vehicle. Try to spread the weight evenly.
. Never stack heavier things, likesuitcases, inside the vehicle so that someof them are above the tops of the seats.
. Do not leave an unsecured child restraintin your vehicle.
. When you carry something inside thevehicle, secure it whenever you can.
Towing
Towing Your Vehicle
To avoid damage, the disabled vehicle should betowed with all four wheels off the ground. Consult your dealer/retailer or a professional towing service if thedisabled vehicle must be towed. See Roadside Assistance Program on page 8 ‑ 7 .
Recreational Vehicle Towing
Notice: Dolly towing or dinghy towing the vehiclemay cause damage because of reduced ground
clearance. Always put the vehicle on a flatbed truckor trailer.
The vehicle was neither designed nor intended to betowed with any of its wheels on the ground. If thevehicle must be towed, see “Towing Your Vehicle”earlier in this section.
Towing a Trailer
The vehicle is neither designed nor intended totow a trailer.

7/31/2019 2010 Corvette
http://slidepdf.com/reader/full/2010-corvette 311/471
5-3
2 NOTES

7/31/2019 2010 Corvette
http://slidepdf.com/reader/full/2010-corvette 312/471
5-34
Section 6 Service and Appearance Care
Service . . . . . . . . . . . . . . . . . . . . . . . . . . . . . . . . . . . . . . . . . . . . . 6-3
Accessories and Modifications . . . . . . . . . . . . . . . . . . 6-3California Proposition 65 Warning ............... 6-4California Perchlorate Materials
R e q u i r e m e n t s . . . . . . . . . . . . . . . . . . . . . . . . . . . . . . . . . 6 - 4Doing Your Own Service Work .................. 6-5 Adding Equipment to the Outside of the
Vehicle . . . . . . . . . . . . . . . . . . . . . . . . . . . . . . . . . . . . . . . . 6-5
Fuel . . . . . . . . . . . . . . . . . . . . . . . . . . . . . . . . . . . . . . . . . . . . . . . . . 6-6G a s o l i n e O c t a n e . . . . . . . . . . . . . . . . . . . . . . . . . . . . . . . . 6 - 7
Ga s o lin e Sp e c if ic a t io n s . . . . . . . . . . . . . . . . . . . . . . . . . 6 -7California Fuel . . . . . . . . . . . . . . . . . . . . . . . . . . . . . . . . . . 6-7 Additives . . . . . . . . . . . . . . . . . . . . . . . . . . . . . . . . . . . . . . . . 6-8Fuels in Foreign Countries . . . . . . . . . . . . . . . . . . . . . . 6-9Filling the Tank . . . . . . . . . . . . . . . . . . . . . . . . . . . . . . . . . . 6 -9Filling a Portable Fuel Container ............... 6-12
Checking Things Under the Hood . . . . . . . . . . . . . . . 6 - 1 2Hood Release . . . . . . . . . . . . . . . . . . . . . . . . . . . . . . . . . 6-13Engine Compartment Overview . . . . . . . . . . . . . . . . 6-14
Engine Oil . . . . . . . . . . . . . . . . . . . . . . . . . . . . . . . . . . . . . 6-19Engine Oil Life System . . . . . . . . . . . . . . . . . . . . . . . . 6-25Engine Air Cleaner/Fi lter . . . . . . . . . . . . . . . . . . . . . . . 6-27
Cooling System (Intercooler) . . . . . . . . . . . . . . . . . . . 6-33
E n g i n e C o o l a n t . . . . . . . . . . . . . . . . . . . . . . . . . . . . . . . . 6 - 3 4Engine Overheating . . . . . . . . . . . . . . . . . . . . . . . . . . . 6-38Overheated Engine Protection
O p e r a t i n g M o d e . . . . . . . . . . . . . . . . . . . . . . . . . . . . . 6 - 4 1P o w e r S t e e r i n g F l u i d . . . . . . . . . . . . . . . . . . . . . . . . . . 6 - 4 1W in d s h ie ld W a s h e r F lu id . . . . . . . . . . . . . . . . . . . . . . 6 -4 2Brakes . . . . . . . . . . . . . . . . . . . . . . . . . . . . . . . . . . . . . . . . . 6-43Battery . . . . . . . . . . . . . . . . . . . . . . . . . . . . . . . . . . . . . . . . . 6-49J u m p S t a r t i n g . . . . . . . . . . . . . . . . . . . . . . . . . . . . . . . . . . 6 - 5 0
Rear Axle . . . . . . . . . . . . . . . . . . . . . . . . . . . . . . . . . . . . . . . . . 6-55Headlamp Aiming . . . . . . . . . . . . . . . . . . . . . . . . . . . . . . . . 6-55
Bulb Replacement . . . . . . . . . . . . . . . . . . . . . . . . . . . . . . . . 6 - 5 6High Intensity Discharge (HID) Lighting . . . . . . . . 6-56Halogen Bulbs . . . . . . . . . . . . . . . . . . . . . . . . . . . . . . . . . 6-56Headlamps, Front Turn Signal, and Parking
L a m p s . . . . . . . . . . . . . . . . . . . . . . . . . . . . . . . . . . . . . . . 6 - 5 6Taillamps, Turn Signal, and Stoplamps . . . . . . . . 6-58R e p l a c e m e n t B u l b s . . . . . . . . . . . . . . . . . . . . . . . . . . . . 6 - 5 8
Windshield Replacement . . . . . . . . . . . . . . . . . . . . . . . . . 6-59Windshield Wiper Blade Replacement . . . . . . . . . . . 6-59

7/31/2019 2010 Corvette
http://slidepdf.com/reader/full/2010-corvette 313/471
g Automatic Transmission Fluid . . . . . . . . . . . . . . . . . . 6-31Manual Transmission Fluid . . . . . . . . . . . . . . . . . . . . 6-31Hydraulic Clutch . . . . . . . . . . . . . . . . . . . . . . . . . . . . . . . 6-31Co o lin g Sy s te m (En g in e ) . . . . . . . . . . . . . . . . . . . . . . 6 -3 2
Tires . . . . . . . . . . . . . . . . . . . . . . . . . . . . . . . . . . . . . . . . . . . . . . . 6 - 6 2Winter Tires . . . . . . . . . . . . . . . . . . . . . . . . . . . . . . . . . . . . 6-63Tire Sidewall Labeling . . . . . . . . . . . . . . . . . . . . . . . . . 6-64Tire Terminology and Definitions . . . . . . . . . . . . . . . 6-66
6-
Section 6 Service and Appearance Care
Run-Flat Tires . . . . . . . . . . . . . . . . . . . . . . . . . . . . . . . . . 6-69
In f la t io n - T ire Pre s s u re . . . . . . . . . . . . . . . . . . . . . . . . 6 -7 0High-Speed Operation . . . . . . . . . . . . . . . . . . . . . . . . . 6-72Tire Pressure Monitor System . . . . . . . . . . . . . . . . . 6-72Tire Pressure Monitor Operation . . . . . . . . . . . . . . . 6-74Tire Inspection and Rotation ................... 6-76When It Is Time for New Tires . . . . . . . . . . . . . . . . . 6-76Buying New Tires . . . . . . . . . . . . . . . . . . . . . . . . . . . . . . 6-77Different Size Tires and Wheels . . . . . . . . . . . . . . . 6-79Uniform Tire Quality Grading . . . . . . . . . . . . . . . . . . . 6-79
Wheel Alignment and Tire Balance . . . . . . . . . . . . 6-81W h e e l R e p l a c e m e n t . . . . . . . . . . . . . . . . . . . . . . . . . . . 6 - 8 1Tire Chains . . . . . . . . . . . . . . . . . . . . . . . . . . . . . . . . . . . . 6-84L i f t i n g t h e V e h i c l e . . . . . . . . . . . . . . . . . . . . . . . . . . . . . . 6 - 8 4If a Tire Goes Flat . . . . . . . . . . . . . . . . . . . . . . . . . . . . . 6-89
Appearance Care . . . . . . . . . . . . . . . . . . . . . . . . . . . . . . . . . 6-90Interior Cleaning . . . . . . . . . . . . . . . . . . . . . . . . . . . . . . 6 -90F a b r i c / C a r p e t . . . . . . . . . . . . . . . . . . . . . . . . . . . . . . . . . . 6 - 9 1Coated Moldings . . . . . . . . . . . . . . . . . . . . . . . . . . . . . . . 6-92Leather . . . . . . . . . . . . . . . . . . . . . . . . . . . . . . . . . . . . . . . . 6-92
Instrument Panel, Vinyl, and Other PlasticS u r f a c e s . . . . . . . . . . . . . . . . . . . . . . . . . . . . . . . . . . . . . 6 - 9 3
Cargo Cover and Convenience Net 6 93
Cleaning Exterior Lamps/Lenses . . . . . . . . . . . . . . 6-94
F i n i s h C a r e . . . . . . . . . . . . . . . . . . . . . . . . . . . . . . . . . . . . 6 - 9 5Windshield and Wiper Blades . . . . . . . . . . . . . . . . . . 6-96Removable Roof Panel . . . . . . . . . . . . . . . . . . . . . . . . 6-96Convertible Top . . . . . . . . . . . . . . . . . . . . . . . . . . . . . . . . 6-97 Aluminum or Chrome-Plated Wheels
and Trim . . . . . . . . . . . . . . . . . . . . . . . . . . . . . . . . . . . . . 6-97T i r e s . . . . . . . . . . . . . . . . . . . . . . . . . . . . . . . . . . . . . . . . . . . 6 - 9 8Finish Damage . . . . . . . . . . . . . . . . . . . . . . . . . . . . . . . . 6-98Un d e rb o d y Ma in te n a n c e . . . . . . . . . . . . . . . . . . . . . . . 6 -9 8
Fiberglass Springs (Composite Springs) . . . . . . . 6-99Ch e mic a l Pa in t Sp o tt in g . . . . . . . . . . . . . . . . . . . . . . . 6 -9 9
Vehicle Identification . . . . . . . . . . . . . . . . . . . . . . . . . . . . . 6-99Vehicle Identification Number (VIN) . . . . . . . . . . . . 6-99Service Parts Identification Label . . . . . . . . . . . . . 6-100
Electrical System . . . . . . . . . . . . . . . . . . . . . . . . . . . . . . . . 6-100 Add-On Electrical Equipment . . . . . . . . . . . . . . . . . 6-100Headlamp Wiring . . . . . . . . . . . . . . . . . . . . . . . . . . . . . 6-100Windshield Wiper Fuses . . . . . . . . . . . . . . . . . . . . . . 6-100
Power Windows and Other Power Options . . . 6-100Fuses and Circuit Breakers ................... 6-101Instrument Panel Fuse Block . . . . . . . . . . . . . . . . . 6-101

7/31/2019 2010 Corvette
http://slidepdf.com/reader/full/2010-corvette 314/471
Cargo Cover and Convenience Net . . . . . . . . . . . . 6-93Care of Safety Belts . . . . . . . . . . . . . . . . . . . . . . . . . . . 6-93W e a t h e r s t r i p s . . . . . . . . . . . . . . . . . . . . . . . . . . . . . . . . . . 6 - 9 3Washing Your Vehicle . . . . . . . . . . . . . . . . . . . . . . . . . 6-94
Engine Compartment Fuse Block . . . . . . . . . . . . . 6-104
Capacities and Specifications . . . . . . . . . . . . . . . . . . 6-108
6-2
ServiceFor service and parts needs, visit your dealer/retailer.You will receive genuine GM parts and GM-trained andsupported service people.
Genuine GM parts have one of these marks:
Accessories and Modifications
When non‐dealer/non‐retailer accessories are addedto the vehicle, they can affect vehicle performanceand safety, including such things as airbags, braking,
stability, ride and handling, emissions systems,aerodynamics, durability, and electronic systemslike antilock brakes, traction control, and stabilitycontrol. Some of these accessories could evencause malfunction or damage not covered by thevehicle warranty.

7/31/2019 2010 Corvette
http://slidepdf.com/reader/full/2010-corvette 315/471
6-
Damage to vehicle components resulting from theinstallation or use of non‐GM certified parts, includingcontrol module modifications, is not covered under theterms of the vehicle warranty and may affect remainingwarranty coverage for affected parts.
GM Accessories are designed to complement andfunction with other systems on the vehicle. Your GMdealer/retailer can accessorize the vehicle usinggenuine GM Accessories. When you go to your GM dealer/retailer and ask for GM Accessories,you will know that GM-trained and supported servicetechnicians will perform the work using genuine GM Accessories.
Also, see Adding Equipment to Your Airbag-Equipped Vehicle on page 2 ‑ 59.
California Proposition 65 Warning
Most motor vehicles, including this one, contain and/or emit chemicals known to the State of California tocause cancer and birth defects or other reproductive
harm. Engine exhaust, many parts and systems, manyfluids, and some component wear by-products containand/or emit these chemicals.
California Perchlorate MaterialsRequirements
Certain types of automotive applications, such asairbag initiators, seat belt pretensioners, and lithium
batteries contained in remote keyless transmitters,may contain perchlorate materials. Special handlingmay be necessary. For additional information, seewww.dtsc.ca.gov/hazardouswaste/perchlorate.

7/31/2019 2010 Corvette
http://slidepdf.com/reader/full/2010-corvette 316/471
6-4
Doing Your Own Service Work
{ WARNING:
You can be injured and the vehicle could bedamaged if you try to do service work on a vehiclewithout knowing enough about it.
. Be sure you have sufficient knowledge,experience, the proper replacement parts,and tools before attempting any vehiclemaintenance task.
.
Be sure to use the proper nuts, bolts, andother fasteners. English and metric fastenerscan be easily confused. If the wrong fastenersare used, parts can later break or fall off.You could be hurt.
If doing some of your own service work, use the proper service manual. It tells you much more about how toservice the vehicle than this manual can. To order the proper service manual, see Service PublicationsOrdering Information on page 8 ‑ 16 .
This vehicle has an airbag system. Before attemptingto do your own service work, see Servicing Your Airbag-Equipped Vehicle on page 2 ‑ 58 .
Keep a record with all parts receipts and list themileage and the date of any service work performed.See Maintenance Record on page 7 ‑ 14.
Adding Equipment to the Outside of
the VehicleThings added to the outside of the vehicle can affectthe airflow around it. This can cause wind noise andcan affect fuel economy and windshield washer performance. Check with your dealer/retailer beforeadding equipment to the outside of the vehicle.

7/31/2019 2010 Corvette
http://slidepdf.com/reader/full/2010-corvette 317/471
6-
FuelUse of the recommended fuel is an important partof the proper maintenance of this vehicle. To helpkeep the engine clean and maintain optimum vehicleperformance, we recommend the use of gasolineadvertised as TOP TIER Detergent Gasoline.
Look for the TOP TIER label on the fuel pump toensure gasoline meets enhanced detergency standardsdeveloped by auto companies. A list of marketersproviding TOP TIER Detergent Gasoline can be foundat www.toptiergas.com.
The 8th digit of the Vehicle Identification Number (VIN)shows the code letter or number that identifies thevehicle's engine. The VIN is at the top left of theinstrument panel. See Vehicle Identification Number (VIN) on page 6 ‑ 99.

7/31/2019 2010 Corvette
http://slidepdf.com/reader/full/2010-corvette 318/471
6-6
Gasoline Octane
If the vehicle has the 6.2L V8 engine (VIN Code W), usepremium unleaded gasoline with a posted octane ratingof 91 or higher. You can also use regular unleaded
gasoline rated at 87 octane or higher, but the vehicle'sacceleration could be slightly reduced, and a slightaudible knocking noise, commonly referred to as sparkknock, might be heard. If the octane is less than 87,a heavy knocking noise might be heard when driving.If this occurs, use a gasoline rated at 87 octane or higher as soon as possible. Otherwise, you coulddamage the engine. If heavy knocking is heard whenusing gasoline rated at 87 octane or higher, the engine
needs service.If the vehicle has the 6.2L V8 engine (VIN Code T)or the 7.0L V8 engine (VIN Code E), use premiumunleaded gasoline with a posted octane rating of 91or higher. For best performance, use premium unleadedgasoline with a posted octane rating of 93. In anemergency, you can use regular unleaded gasolinewith an octane rating of 87 or higher. If 87 octane fuel isused, do not perform any aggressive driving maneuvers
such as wide open throttle applications. You might alsohear audible spark knock during acceleration. Refill thetank with premium fuel as soon as possible to avoidd i th i If h k ki i h d h
Gasoline Specifications
At a minimum, gasoline should meet ASTMspecification D 4814 in the United States or CAN/CGSB‐3.5 or 3.511 in Canada. Some gasolines
contain an octane-enhancing additive calledmethylcyclopentadienyl manganese tricarbonyl (MMT).We recommend against the use of gasolines containingMMT. See Additives o n p a g e 6 ‑ 8 for additionalinformation.
California Fuel
If the vehicle is certified to meet California EmissionsStandards, it is designed to operate on fuels thatmeet California specifications. See the underhoodemission control label. If this fuel is not available instates adopting California emissions standards, thevehicle will operate satisfactorily on fuels meetingfederal specifications, but emission control systemperformance might be affected. The malfunctionindicator lamp could turn on and the vehicle might faila smog‐check test. See Malfunction Indicator Lamp on
page 4‑ 41. If this occurs, return to your authorized
dealer/retailer for diagnosis. If it is determined that thecondition is caused by the type of fuel used, repairsmight not be covered by the vehicle warranty.

7/31/2019 2010 Corvette
http://slidepdf.com/reader/full/2010-corvette 319/471
damaging the engine. If heavy knocking is heard whenusing gasoline rated at 91 octane or higher, the engineneeds service.
g y y
6-
Additives
To provide cleaner air, all gasolines in the United Statesare now required to contain additives that help preventengine and fuel system deposits from forming, allowing
the emission control system to work properly. In mostcases, nothing should have to be added to the fuel.However, some gasolines contain only the minimumamount of additive required to meet U.S. EnvironmentalProtection Agency regulations. To help keep fuelinjectors and intake valves clean, or if the vehicleexperiences problems due to dirty injectors or valves,look for gasoline that is advertised as TOP TIERDetergent Gasoline.
For customers who do not use TOP TIER DetergentGasoline regularly, one bottle of GM Fuel SystemTreatment PLUS, added to the fuel tank at every engineoil change, can help clean deposits from fuel injectorsand intake valves. GM Fuel System Treatment PLUSis the only gasoline additive recommended by GeneralMotors.
Also, your dealer/retailer has additives that will helpcorrect and prevent most deposit‐related problems.
Gasolines containing oxygenates, such as ethersand ethanol, and reformulated gasolines might beavailable in your area. We recommend that you usethese gasolines, if they comply with the specificationsdescribed earlier. However, E85 (85% ethanol) andother fuels containing more than 10% ethanol mustnot be used in vehicles that were not designed for those fuels.
Notice: This vehicle was not designed for fuelthat contains methanol. Do not use fuel containingmethanol. It can corrode metal parts in the fuelsystem and also damage plastic and rubber parts.That damage would not be covered under thevehicle warranty.
Some gasolines that are not reformulated for lowemissions can contain an octane-enhancing additivecalled methylcyclopentadienyl manganese tricarbonyl(MMT); ask the attendant where you buy gasolinewhether the fuel contains MMT. We recommend againstthe use of such gasolines. Fuels containing MMT canreduce the life of spark plugs and the performanceof the emission control system could be affected.The malfunction indicator lamp might turn on. If this
occurs, return to your dealer/retailer for service.

7/31/2019 2010 Corvette
http://slidepdf.com/reader/full/2010-corvette 320/471
6-8
Fuels in Foreign Countries
If you plan on driving in another country outside theUnited States or Canada, the proper fuel might be hardto find. Never use leaded gasoline or any other fuel
not recommended in the previous text on fuel. Costlyrepairs caused by use of improper fuel would not becovered by the vehicle warranty.
To check the fuel availability, ask an auto club,or contact a major oil company that does businessin the country where you will be driving.
Filling the Tank
{ WARNING:
Fuel vapor burns violently and a fuel fire cancause bad injuries. To help avoid injuries to youand others, read and follow all the instructionson the fuel pump island. Turn off the enginewhen refueling. Do not smoke near fuel or when
refueling the vehicle. Do not use cellular phones.Keep sparks, flames, and smoking materials awayfrom fuel. Do not leave the fuel pump unattended
h f li th hi l Thi i i t th l
WARNING: (Continued)
in some places. Do not re-enter the vehicle while
pumping fuel. Keep children away from the fuelpump; never let children pump fuel.
The tethered fuel cap is located behind a hinged fueldoor on the driver side of the vehicle.

7/31/2019 2010 Corvette
http://slidepdf.com/reader/full/2010-corvette 321/471
when refueling the vehicle. This is against the law
(Continued)
6-
The fuel door releasebutton is located on theinstrument panel to theleft of the steering wheel.Push the button to releasethe fuel door.
There is also a manualfuel door release tab.It is located against theupper trim in the rear compartment on the driver side of the vehicle. Pullthe tab to release thefuel door.
To remove the fuel cap, turn it slowly counterclockwise.
While refueling, let the cap hang by the tether below thefuel fill opening.

7/31/2019 2010 Corvette
http://slidepdf.com/reader/full/2010-corvette 322/471
6-10

7/31/2019 2010 Corvette
http://slidepdf.com/reader/full/2010-corvette 323/471
Filling a Portable Fuel Container
{ WARNING:
Never fill a portable fuel container while it is inthe vehicle. Static electricity discharge from thecontainer can ignite the fuel vapor. You can bebadly burned and the vehicle damaged if thisoccurs. To help avoid injury to you and others:
. Dispense fuel only into approved containers.
. Do not fill a container while it is inside a
vehicle, in a vehicle's trunk, pickup bed,or on any surface other than the ground.
. Bring the fill nozzle in contact with the insideof the fill opening before operating the nozzle.Contact should be maintained until the filling iscomplete.
. Do not smoke while pumping fuel.
. Do not use a cellular phone while
pumping fuel.
Checking Things Under the Hood
{ WARNING:
An electric fan under the hood can start up andinjure you even when the engine is not running.Keep hands, clothing, and tools away from anyunderhood electric fan.
{ WARNING:
Things that burn can get on hot engine parts andstart a fire. These include liquids like fuel, oil,coolant, brake fluid, windshield washer and other fluids, and plastic or rubber. You or others couldbe burned. Be careful not to drop or spill thingsthat will burn onto a hot engine.

7/31/2019 2010 Corvette
http://slidepdf.com/reader/full/2010-corvette 324/471
6-12
Hood Release
To open the hood:
1. Pull the hood release
lever with this symbolon it. It is locatedinside the vehiclebelow the instrumentpanel on thedriver side.
2. Go to the side of the vehicle and pull up on therear edge of the hood, near the windshield.
Before closing the hood, be sure all the filler caps areon properly. Then, just pull the hood down and close itfirmly.

7/31/2019 2010 Corvette
http://slidepdf.com/reader/full/2010-corvette 325/471
6-1
Engine Compartment Overview
If the vehicle has the 6.2 L LS3 V8 engine (without the dry sump engine oil tank) and you are facing the front of thevehicle, when the hood is opened:

7/31/2019 2010 Corvette
http://slidepdf.com/reader/full/2010-corvette 326/471
6-14
A. Clutch Master Cylinder Reservoir (If Equipped).See Hydraulic Clutch on page 6 ‑ 31.
B. Windshield Washer Fluid Reservoir. See “ AddingWasher Fluid” under Windshield Washer Fluid on
pag e 6 ‑
42 .
C. Brake Fluid Reservoir. See “Brake Fluid” under Brakes on page 6 ‑ 43 .
D. Coolant Surge Tank and Pressure Cap.See Engine Coolant on page 6 ‑ 34.
E. Engine Air Cleaner/Filter on page 6 ‑ 27 .
F. Power Steering Fluid Reservoir. See Power Steering Fluid on page 6 ‑ 41.
G. Engine Oil Fill Cap. See “When to Add Engine Oil”under Engine Oil on page 6 ‑ 19.
H. Engine Oil Dipstick. See “Checking Engine Oil”under Engine Oil on page 6 ‑ 19.
I. Engine Compartment Fuse Block on page 6 ‑ 104.
J. Passenger Compartment Air Filter (Out of View).See Passenger Compartment Air Filter on
page 4‑ 28 .
K. Battery on page 6 ‑ 49.

7/31/2019 2010 Corvette
http://slidepdf.com/reader/full/2010-corvette 327/471
6-1
If the vehicle has the 6.2 L LS9 Supercharged V8 engine and you are facing the front of the vehicle, when the hoodis opened:

7/31/2019 2010 Corvette
http://slidepdf.com/reader/full/2010-corvette 328/471
6-16
A. Intercooler. See Cooling System (Engine) on pag e 6 ‑ 32 or Cooling System (Intercooler) on pag e 6 ‑ 33 .
B. Engine Air Cleaner/Filter on page 6 ‑ 27 .
C. Power Steering Fluid Reservoir and Cap.See Power Steering Fluid on page 6 ‑ 41.
D. Coolant Surge Tank and Pressure Cap.See Engine Coolant on page 6 ‑ 34.
E. Windshield Washer Fluid Reservoir. See “ AddingWasher Fluid” under Windshield Washer Fluid on
pag e 6 ‑ 42 .
F. Clutch Master Cylinder Reservoir (If Equipped).See Hydraulic Clutch on page 6 ‑ 31.
G. Brake Fluid Reservoir. See “Brake Fluid” under Brakes on page 6 ‑ 43 .
H. Passenger Compartment Air Filter (Out of View).See Passenger Compartment Air Filter on
page 4‑ 28 .
I. Engine Oil Fill Cap. See “When to Add Engine Oil”under Engine Oil on page 6 ‑ 19.
J. Dry Sump Engine Oil Tank. See “Changing EngineOil and Filter ” Engine Oil on page 6 ‑ 19.
K. Engine Oil Dipstick. See “Checking Engine Oil”under Engine Oil on page 6 ‑ 19.
L. Remote Positive (+) Terminal (Out of View).See Jump Starting on page 6 ‑ 50 .
M. Engine Compartment Fuse Block on page 6 ‑ 104.

7/31/2019 2010 Corvette
http://slidepdf.com/reader/full/2010-corvette 329/471
6-1
If the vehicle has the 6.2 L LS3 V8 engine with the manual transmission (with the dry sump engine oil tank) or the7.0 L LS7 V8 engine and you are facing the driver side of the vehicle, when the hood is opened:

7/31/2019 2010 Corvette
http://slidepdf.com/reader/full/2010-corvette 330/471
6-18
A. Engine Air Cleaner/Filter on page 6 ‑ 27 .
B. Power Steering Fluid Reservoir. See Power Steering Fluid on page 6 ‑ 41.
C. Engine Compartment Fuse Block on page 6 ‑ 104.
D. Remote Positive (+) Terminal (Out of View).See Jump Starting on page 6 ‑ 50 .
E. Engine Oil Dipstick. See “Checking Engine Oil”under Engine Oil on page 6 ‑ 19.
F. Dry Sump Engine Oil Tank. See “Changing EngineOil and Filter ” Engine Oil on page 6 ‑ 19.
G. Engine Oil Fill Cap. See “When to Add Engine Oil”under Engine Oil on page 6 ‑ 19.
H. Coolant Surge Tank and Pressure Cap.See Engine Coolant on page 6 ‑ 34.
I. Windshield Washer Fluid Reservoir. See “ AddingWasher Fluid” under Windshield Washer Fluid on
pag e 6 ‑ 42 .
J. Brake Fluid Reservoir. See “Brake Fluid” under Brakes on page 6 ‑ 43 .
K. Clutch Master Cylinder Reservoir. See Hydraulic
Clutch on page 6 ‑ 31.
Engine Oil
Checking Engine Oil(Except ZO6, ZR1, and Grand Sport)
If the CHECK OIL LEVEL message displays on theDriver Information Center (DIC), check the engine oillevel right away. For more information, see Driver Information Center (DIC) on page 4‑ 47 . Check theengine oil level regularly; this is an added reminder.
It is a good idea to check the engine oil level at eachfuel fill. In order to get an accurate reading, the oil mustbe warm and the vehicle must be on level ground.
The engine oil dipstick handle is a yellow loop.See Engine Compartment Overview on page 6
‑ 14
for the location of the engine oil dipstick.
1. Turn off the engine and give the oil a few minutesto drain back into the oil pan. If this is not done,the oil dipstick might not show the actual level.
2. Pull out the dipstick and clean it with a lint‐freepaper towel or a cloth, then push it back in allthe way.
3. Remove the dipstick again, keeping the tip downand read the level on the cross‐hatched area.Oil levels that fall in the cross‐hatched area arenormal

7/31/2019 2010 Corvette
http://slidepdf.com/reader/full/2010-corvette 331/471
normal.
4. Push the dipstick back in all the way.
6-1
When to Add Engine Oil(Except ZO6, ZR1, and Grand Sport)
If the oil is below the cross-hatched area at the tipof the dipstick, add at least one liter/quart of therecommended oil. This section explains what kind
of oil to use. For engine oil crankcase capacity,see Capacities and Specifications on page 6 ‑ 108 .
See Racing or Other Competitive Driving on page 5 ‑ 19for additional information on engine oil.
Notice: Do not add too much oil. If the enginehas so much oil that the oil level gets above thecross-hatched area that shows the proper operatingrange, the engine could be damaged.
See Engine Compartment Overview on page 6 ‑ 14for the location of theengine oil fill cap.
Add enough oil to put the level somewhere in the proper operating range. Push the dipstick all the way back inwhen through.

7/31/2019 2010 Corvette
http://slidepdf.com/reader/full/2010-corvette 332/471
6-20
Checking Engine Oil (ZO6, ZR1, andGrand Sport)
A. Engine Oil Dipstick
B. Engine Oil Fill Cap
It is a good idea to check the engine oil level at eachfuel fill. In order to get an accurate reading, the oil must
be warm and the vehicle must be on level ground.
The engine oil dipstick handle is a yellow loop.The dipstick is located on the dry sump engine oil tank.See Engine Compartment Overview on page 6 ‑ 14 for the location of the dry sump engine oil tank.
These vehicles have a racetrack‐ready dry sumpengine lubrication system. This high‐performancesystem operates differently than a standard enginelubrication system and requires a special procedurewhen checking the engine oil level. Follow thisprocedure closely when checking the engine oil level.
The engine oil level must be checked when theengine is warm. Cold oil level in the dry sump tankmay not indicate the actual amount of oil in the system.With this system, engine oil is contained in an externaltank, separate from the engine. Under normal operatingconditions, the oil pan under the engine does not storeany oil. If the vehicle has been parked for an extendedperiod without the engine being started, some oil willseep back into the oil pan, reducing the amount of oilheld in the dry sump tank and there could be no engineoil at all showing on the dipstick. This is normal sincethe dipstick is designed to read engine oil level onlyafter the engine has run long enough to reach normal
operating temperature. Do not add engine oil based on

7/31/2019 2010 Corvette
http://slidepdf.com/reader/full/2010-corvette 333/471
6-2
cold engine dipstick readings. The engine oil level onthe dipstick will also be inaccurate if checked while theengine is running.
1. To obtain an accurate engine oil level reading,warm up the engine to at least 80°C (175°F).Cold oil will not give a correct oil level reading.
2. Once the engine is warm, turn off the engine.Checking the oil while the engine is running willresult in an incorrect oil level reading.
3. Wait at least five minutes (but not more than20 minutes) to allow oil to drain and settle in theengine.
4. Remove the dipstick from the external engine oil
tank and clean it with a lint‐free paper towel or acloth. Re‐insert the dipstick into the external oiltank, pushing it all the way in until it stops.
5. Remove the dipstick from the oil tank and read thelevel on the cross‐hatched area. Oil levels that fallin the cross‐hatched area are normal.
When to Add Engine Oil(ZO6, ZR1, and Grand Sport)
If the oil is below the cross-hatched area at the tipof the dipstick, add at least one liter/quart of therecommended oil through the oil fill cap opening in the
oil tank. This section explains what kind of oil to use.For engine oil crankcase capacity, see Capacities and Specifications on page 6 ‑ 108 .
See Racing or Other Competitive Driving on page 5 ‑ 19for additional information on engine oil.
Notice: Do not add too much oil. If the enginehas so much oil that the oil level gets above thecross-hatched area that shows the proper operatingrange, the engine could be damaged.
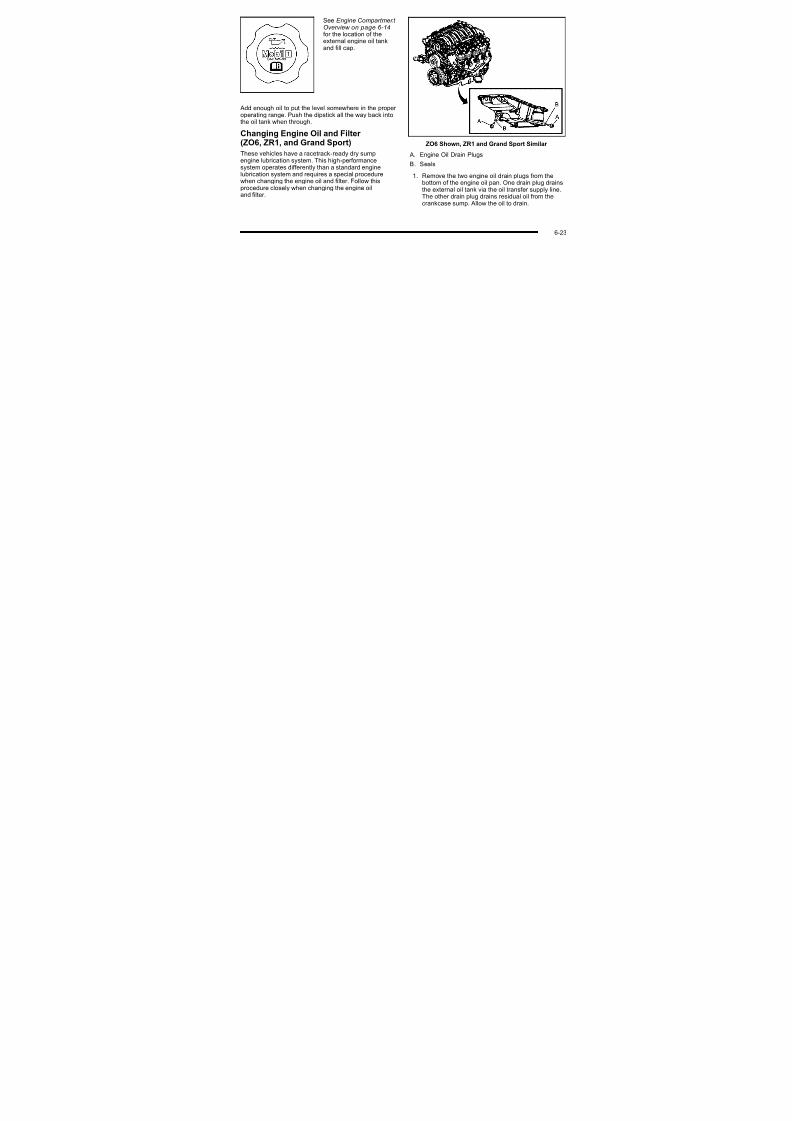
7/31/2019 2010 Corvette
http://slidepdf.com/reader/full/2010-corvette 334/471
6-22
See Engine Compartment Overview on page 6 ‑ 14for the location of theexternal engine oil tankand fill cap.
Add enough oil to put the level somewhere in the proper operating range. Push the dipstick all the way back into
the oil tank when through.
Changing Engine Oil and Filter (ZO6, ZR1, and Grand Sport)
These vehicles have a racetrack‐ready dry sumpengine lubrication system. This high‐performancesystem operates differently than a standard enginelubrication system and requires a special procedurewhen changing the engine oil and filter. Follow thisprocedure closely when changing the engine oiland filter.
ZO6 Shown, ZR1 and Grand Sport Similar
A. Engine Oil Drain Plugs
B. Seals
1. Remove the two engine oil drain plugs from the
bottom of the engine oil pan. One drain plug drainsthe external oil tank via the oil transfer supply line.The other drain plug drains residual oil from thecrankcase sump. Allow the oil to drain.

7/31/2019 2010 Corvette
http://slidepdf.com/reader/full/2010-corvette 335/471
6-2
2. Once the oil has been drained from the engine,remove the engine oil filter and allow the oil todrain.
3. Re‐install both drain plugs and tighten them to25Y (18 lb ft).
4. Replace the oil filter and tighten it to 30Y(22 lb ft). See Maintenance Replacement Parts on
pag e 7 ‑ 12 for the correct filter.
5. Oil is filled through the opening in the top of theexternal engine oil tank. Remove the oil fill cap.
6. Add 9.9 L (10.5 quarts) of oil to the oil tank.See Capacities and Specifications on page 6 ‑ 108 .
7. Install the oil fill cap and insert the dipstick,
if removed.
8. Start the engine and let it run at idle for at least15 seconds. This will circulate the fresh engine oilthrough the lubrication system.
9. Shut off the engine and check the oil level asdescribed under “Checking Engine Oil (ZO6, ZR1,and Grand Sport).”
What Kind of Engine Oil to Use
Look for three things:
. GM4718M
This vehicle's engine requires a special oilmeeting GM Standard GM4718M. Oils meetingthis standard may be identified as synthetic.However, not all synthetic oils will meet thisGM standard. Use only an oil that meets GMStandard GM4718M.
Notice: Using oils that do not have the GM4718MStandard designation can cause engine damage notcovered by the vehicle warranty.
.
SAE 5W-30SAE 5W-30 is best for the vehicle. These numberson an oil container show its viscosity, or thickness.Do not use other viscosity oils such asSAE 20W-50.
. American Petroleum Institute (API) starburstsymbol

7/31/2019 2010 Corvette
http://slidepdf.com/reader/full/2010-corvette 336/471
6-24
Oils meeting theserequirements should havethe starburst symbol onthe container. This symbolindicates that the oil has
been certified by the American PetroleumInstitute (API).
This vehicle's engine was filled at the factory with aMobil 1® synthetic oil meeting all requirements for this
vehicle.Substitute Engine Oil: When adding oil to maintainengine oil level, oil meeting GM Standard GM4718Mmight not be available. You can add substitute oildesignated SAE 5W-30 with the starburst symbol at alltemperatures. Substitute oil not meeting GM StandardGM4718M should not be used for an oil change.
Engine Oil Additives / Engine OilFlushes
Do not add anything to the oil. The recommendedoils with the starburst symbol that meet GM Standard
GM4718M are all that is needed for good performanceand engine protection.
Engine oil system flushes are not recommended andcould cause engine damage not covered by the vehiclewarranty.
Engine Oil Life System
When to Change Engine Oil
This vehicle has a computer that indicates when tochange the engine oil and filter. This is based onengine revolutions and engine temperature, and noton mileage. Based on driving conditions, the mileage atwhich an oil change is indicated can vary considerably.For the oil life system to work properly, the system mustbe reset every time the oil is changed.

7/31/2019 2010 Corvette
http://slidepdf.com/reader/full/2010-corvette 337/471
6-2
Z06, ZR1, and Grand Sport models have aracetrack‐ready dry sump engine lubrication system.This high‐performance system operates differentlythan a standard engine lubrication system and requiresa special procedure when changing the engine oil and
filter. See Engine Oil on page 6 ‑ 19.
When the system has calculated that oil life has beendiminished, it indicates that an oil change is necessary. A CHANGE ENGINE OIL message comes on. Changethe oil as soon as possible within the next 1 000 km(600 miles). It is possible that, if driving under the bestconditions, the oil life system might not indicate thatan oil change is necessary for over a year. However,the engine oil and filter must be changed at least once
a year and at this time the system must be reset.Your dealer/retailer has trained service people whowill perform this work using genuine parts and resetthe system. It is also important to check the oil regularlyand keep it at the proper level.
If the system is ever reset accidentally, the oil must bechanged at 5 000 km (3,000 miles) since the last oilchange. Remember to reset the oil life systemwhenever the oil is changed.
How to Reset the Engine Oil LifeSystem
The Engine Oil Life System calculates when tochange the engine oil and filter based on vehicle use.
Whenever the oil is changed, reset the system so itcan calculate when the next oil change is required.If a situation occurs where the oil is changed prior toa CHANGE ENGINE OIL message being turned on,reset the system.
To reset the CHANGE ENGINE OIL message after anoil change:
1. Press the TRIP button so the OIL LIFE percentageis displayed.
2. Press RESET and hold for two seconds.OIL LIFE REMAINING 100% will appear.
If the CHANGE ENGINE OIL message comes back onwhen the vehicle is started, the engine oil life systemhas not reset. Repeat the procedure.

7/31/2019 2010 Corvette
http://slidepdf.com/reader/full/2010-corvette 338/471
6-26
What to Do with Used Oil
Used engine oil contains certain elements that can beunhealthy for your skin and could even cause cancer.Do not let used oil stay on your skin for very long. Clean
your skin and nails with soap and water, or a good handcleaner. Wash or properly dispose of clothing or ragscontaining used engine oil. See the manufacturer'swarnings about the use and disposal of oil products.
Used oil can be a threat to the environment. If youchange your own oil, be sure to drain all the oil from thefilter before disposal. Never dispose of oil by putting it inthe trash, pouring it on the ground, into sewers, or intostreams or bodies of water. Recycle it by taking it to a
place that collects used oil.
Engine Air Cleaner/Filter
See Engine Compartment Overview on page 6 ‑ 14 for the location of the engine air cleaner/filter.
Notice: If you spray water into the engine air cleaner/filter intake and water enters the engineair cleaner/filter housing, you could damage your vehicle's engine. The repairs would not be covered
by your warranty. Do not spray water into theengine air cleaner/filter intake and/or housing.
If you are cleaning the vehicle with the hood open, takecare not to spray water directly near the filter opening ofthe air cleaner, as shown in the illustration, as this coulddamage the vehicle's engine.
When to Inspect the Engine Air Cleaner/ Filter
Inspect the air cleaner/filter at the Maintenance II
intervals and replace them at the first oil change after each 80 000 km (50,000 mile) interval. See Scheduled Maintenance o n p a g e 7 ‑ 3 for more information. If youare driving in dusty/dirty conditions, inspect the filter ateach engine oil change.
How to Inspect the Engine Air Cleaner/ Filter
To inspect the air cleaner/filter, remove the filter fromthe vehicle and lightly shake the filter to release loosedust and dirt. If the filter remains caked with dirt, a newfilter is required.
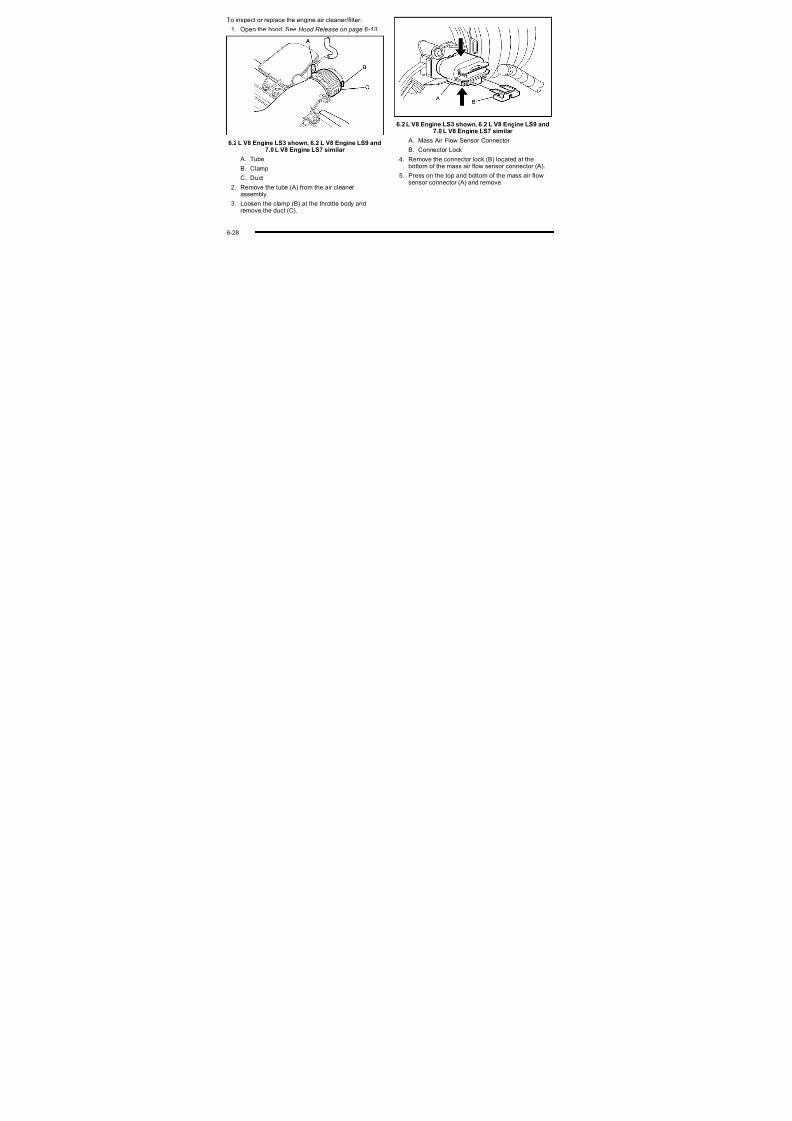
7/31/2019 2010 Corvette
http://slidepdf.com/reader/full/2010-corvette 339/471
6-2
To inspect or replace the engine air cleaner/filter:
1. Open the hood. See Hood Release on page 6 ‑ 13 .
6.2 L V8 Engine LS3 shown, 6.2 L V8 Engine LS9 and7.0 L V8 Engine LS7 similar
A. Tube
B. Clamp
C. Duct
2. Remove the tube (A) from the air cleaner assembly.
3. Loosen the clamp (B) at the throttle body andremove the duct (C).
6.2 L V8 Engine LS3 shown, 6.2 L V8 Engine LS9 and7.0 L V8 Engine LS7 similar
A. Mass Air Flow Sensor Connector
B. Connector Lock
4. Remove the connector lock (B) located at thebottom of the mass air flow sensor connector (A).
5. Press on the top and bottom of the mass air flowsensor connector (A) and remove.

7/31/2019 2010 Corvette
http://slidepdf.com/reader/full/2010-corvette 340/471
remove the duct (C).
6-28
6.2 L V8 Engine LS3 6.2 L V8 Engine LS9 shown, 7.0 L V8 Engine LS7similar
6. To access the air filter element, gently pull the air cleaner assembly upward until the fasteners arereleased from the retainer pins in the upper radiator support.
The LS3 engine has three retainer pins and theLS7 and LS9 engines have two.
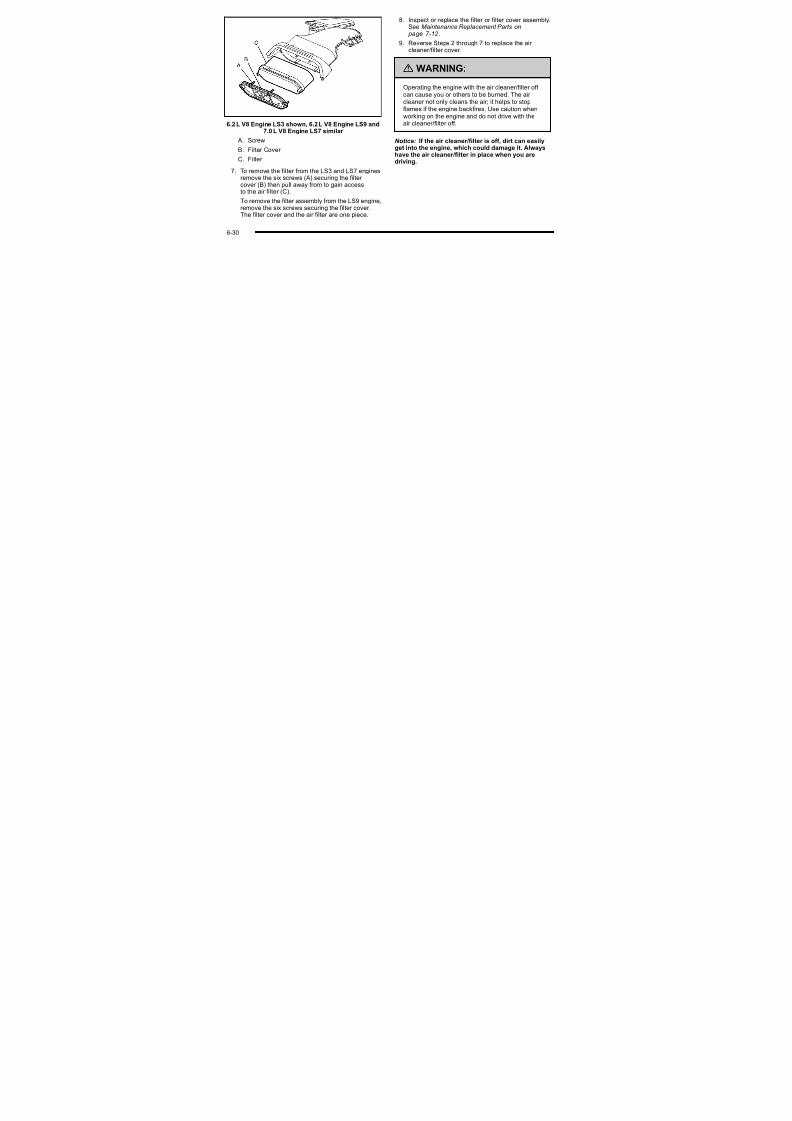
7/31/2019 2010 Corvette
http://slidepdf.com/reader/full/2010-corvette 341/471
6-2
6.2 L V8 Engine LS3 shown, 6.2 L V8 Engine LS9 and7.0 L V8 Engine LS7 similar
A. Screw
B. Filter Cover
C. Filter
7. To remove the filter from the LS3 and LS7 engines,remove the six screws (A) securing the filter
cover (B) then pull away from to gain accessto the air filter (C).
To remove the filter assembly from the LS9 engine,remove the six screws securing the filter cover.Th filt d th i filt i
8. Inspect or replace the filter or filter cover assembly.See Maintenance Replacement Parts on
page 7 ‑ 12 .
9. Reverse Steps 2 through 7 to replace the air cleaner/filter cover.
{ WARNING:
Operating the engine with the air cleaner/filter off can cause you or others to be burned. The air cleaner not only cleans the air; it helps to stopflames if the engine backfires. Use caution whenworking on the engine and do not drive with theair cleaner/filter off.
Notice: If the air cleaner/filter is off, dirt can easilyget into the engine, which could damage it. Alwayshave the air cleaner/filter in place when you aredriving.

7/31/2019 2010 Corvette
http://slidepdf.com/reader/full/2010-corvette 342/471
The filter cover and the air filter are one piece.
6-30
Automatic Transmission Fluid
How to Check Automatic TransmissionFluid
It is not necessary to check the transmission fluid level. A transmission fluid leak is the only reason for fluidloss. If a leak occurs, take the vehicle to your dealer/ retailer service department and have it repaired as soonas possible.
There is a special procedure for checking and changingthe transmission fluid. Because this procedure isdifficult, you should have this done at your dealer/ retailer service department. Contact your dealer/retailer
for additional information or the procedure can be foundin the service manual. To purchase a service manual,see Service Publications Ordering Information on
pag e 8 ‑ 16 .
Notice: Use of the incorrect automatic transmissionfluid may damage the vehicle, and the damages maynot be covered by the vehicle's warranty. Alwaysuse the automatic transmission fluid listed inRecommended Fluids and Lubricants on page 7 ‑ 10 .
Change the fluid and filter at the intervals listed inScheduled Maintenance o n p a g e 7 ‑ 3 , and be sureto use the fluid listed in Recommended Fluids and Lubricants on page 7 ‑ 10 .
Manual Transmission FluidIt is not necessary to check the manual transmissionfluid level. A transmission fluid leak is the only reasonfor fluid loss. If a leak occurs, take the vehicle to your dealer/retailer service department and have it repairedas soon as possible. See Recommended Fluids and Lubricants on page 7 ‑ 10 for the proper fluid to use.
Hydraulic Clutch
It is not necessary to regularly check clutch fluid unlessyou suspect there is a leak in the system. Adding fluidwill not correct a leak. A fluid loss in this system couldindicate a problem. Have the system inspected andrepaired.

7/31/2019 2010 Corvette
http://slidepdf.com/reader/full/2010-corvette 343/471
6-3
When to Check and What to Use
The hydraulic clutch fluidreservoir cap has thissymbol on it. See Engine
Compartment Overview on page 6 ‑ 14 for reservoir location.
Refer to the Maintenance Schedule for the proper fluid to use. See Recommended Fluids and Lubricantson page 7 ‑ 10 . The fluid requires changing everytwo years. See Scheduled Maintenance on page 7 ‑ 3 .
How to Check and Add Fluid
Visually check the clutch fluid reservoir to make surethe fluid level is at the MIN (minimum) line on the sideof the reservoir. The hydraulic clutch fluid system
should be closed and sealed.Do not remove the cap to check the fluid level or totop‐off the fluid level. Remove the cap only whennecessary to add the proper fluid until the levelreaches the MIN line
Cooling System (Engine)
The cooling system allows the engine to maintain thecorrect working temperature.
7.0L Engine shown, 6.2L Engine similar
A. Electric Engine Cooling Fan
B. Coolant Surge Tank with Pressure Cap

7/31/2019 2010 Corvette
http://slidepdf.com/reader/full/2010-corvette 344/471
reaches the MIN line.
6-32
{ WARNING:
An electric engine cooling fan under the hood can
start up even when the engine is not running andcan cause injury. Keep hands, clothing, and toolsaway from any underhood electric fan.
{ WARNING:
Heater and radiator hoses, and other engineparts, can be very hot. Do not touch them.If you do, you can be burned.
Do not run the engine if there is a leak. If you runthe engine, it could lose all coolant. That couldcause an engine fire, and you could be burned.Get any leak fixed before you drive the vehicle.
Notice: Using coolant other than DEX-COOL ® cancause premature engine, heater core, or radiator corrosion. In addition, the engine coolant couldrequire changing sooner, at 50 000 km (30,000 miles)or 24 months, whichever occurs first. Any repairs
would not be covered by the vehicle warranty.Always use DEX-COOL ® (silicate-free) coolantin the vehicle.
Cooling System (Intercooler)
The 6.2L LS9 supercharged V8 engine has anintercooler cooling system. See Engine Compartment Overview on page 6 ‑ 14 for location of the intercooler.
The intercooler cooling system has a special procedurefor draining and adding coolant. Because this procedureis difficult, see your dealer/retailer for service if theintercooler is low on coolant. The procedure can alsobe found in the service manual. To purchase a servicemanual, see Service Publications Ordering Informationon page 8 ‑ 16 .

7/31/2019 2010 Corvette
http://slidepdf.com/reader/full/2010-corvette 345/471
6-3
Checking Coolant
1. Verify that the engine and intercooler are nolonger hot.
2. Place a cloth to absorb possible coolant loss under the driver's side bleeder valve (A).
3. Loosen, but do not completely unscrew the bleeder valve to check for coolant in the system.
4. Tighten the bleeder valve if there is coolant flowingout of the bleeder valve.
5. If there is no coolant flowing out of the bleeder valve, there could be a leak in the system. Tightenthe bleeder valve and contact your dealer/retailer for service.
Engine Coolant
The cooling system in the vehicle is filled withDEX-COOL® engine coolant. This coolant is designedto remain in the vehicle for five years or 240 000 km
(150,000 miles), whichever occurs first.The following explains the cooling system and howto check and add coolant when it is low. If there isa problem with engine overheating, see EngineOverheating on page 6 ‑ 38 .

7/31/2019 2010 Corvette
http://slidepdf.com/reader/full/2010-corvette 346/471
6-34
What to Use
{ WARNING:
Adding only plain water to the cooling systemcan be dangerous. Plain water, or some other liquid such as alcohol, can boil before the proper coolant mixture will. The vehicle's coolant warningsystem is set for the proper coolant mixture.With plain water or the wrong mixture, the enginecould get too hot but would not get the overheatwarning. The engine could catch fire and you or others could be burned. Use a 50/50 mixture of clean, drinkable water and DEX-COOL® coolant.
Use a 50/50 mixture of clean, drinkable water andDEX-COOL® coolant. If using this mixture, nothing elseneeds to be added. This mixture:
. Gives freezing protection down to −37°C (−34°F),outside temperature.
. Gives boiling protection up to 129°C (265°F),
engine temperature.. Protects against rust and corrosion.
. Will not damage aluminum parts.
. Helps keep the proper engine temperature
Notice: If an improper coolant mixture is used,the engine could overheat and be badly damaged.The repair cost would not be covered by the vehiclewarranty. Too much water in the mixture can freezeand crack the engine, radiator, heater core, and
other parts.Notice: If extra inhibitors and/or additives are usedin the vehicle's cooling system, the vehicle could bedamaged. Use only the proper mixture of the enginecoolant listed in this manual for the cooling system.See Recommended Fluids and Lubricants on
page 7 ‑ 10 for more information.
Checking Coolant
The vehicle must be on a level surface when checkingthe coolant level.
Check to see if coolant is visible in the coolant surgetank. If the coolant inside the coolant surge tank isboiling, do not do anything else until it cools down.If coolant is visible but the coolant level is not at or above the FULL COLD mark, add a 50/50 mixture of clean, drinkable water and DEX-COOL coolant at thecoolant recovery tank, but be sure the cooling system
is cool before this is done. See Engine Coolant on page 6 ‑ 34 for more information.

7/31/2019 2010 Corvette
http://slidepdf.com/reader/full/2010-corvette 347/471
. Helps keep the proper engine temperature.
6-3
The engine coolant surgetank is located towardthe rear of the enginecompartment on thedriver side of the vehicle.
See Engine Compartment Overview on page 6 ‑ 14for more information onlocation.
When the engine is cold, the coolant level should be atthe FULL COLD mark on the coolant surge tank.
When the engine is hot, the level could be higher than the FULL COLD line. If the coolant is below theFULL COLD line when the engine is hot, there couldbe a leak in the cooling system.
If the coolant is low, add the coolant or take the vehicleto a dealer/retailer for service.
How to Add Coolant to the CoolantSurge Tank
{ WARNING:
You can be burned if you spill coolant on hotengine parts. Coolant contains ethylene glycoland it will burn if the engine parts are hot enough.Do not spill coolant on a hot engine.
{ WARNING:
Steam and scalding liquids from a hot coolingsystem can blow out and burn you badly. They areunder pressure, and if you turn the coolant surgetank pressure cap — even a little — they can comeout at high speed. Never turn the cap when thecooling system, including the coolant surge tankpressure cap, is hot. Wait for the cooling system
and coolant surge tank pressure cap to cool if youever have to turn the pressure cap.
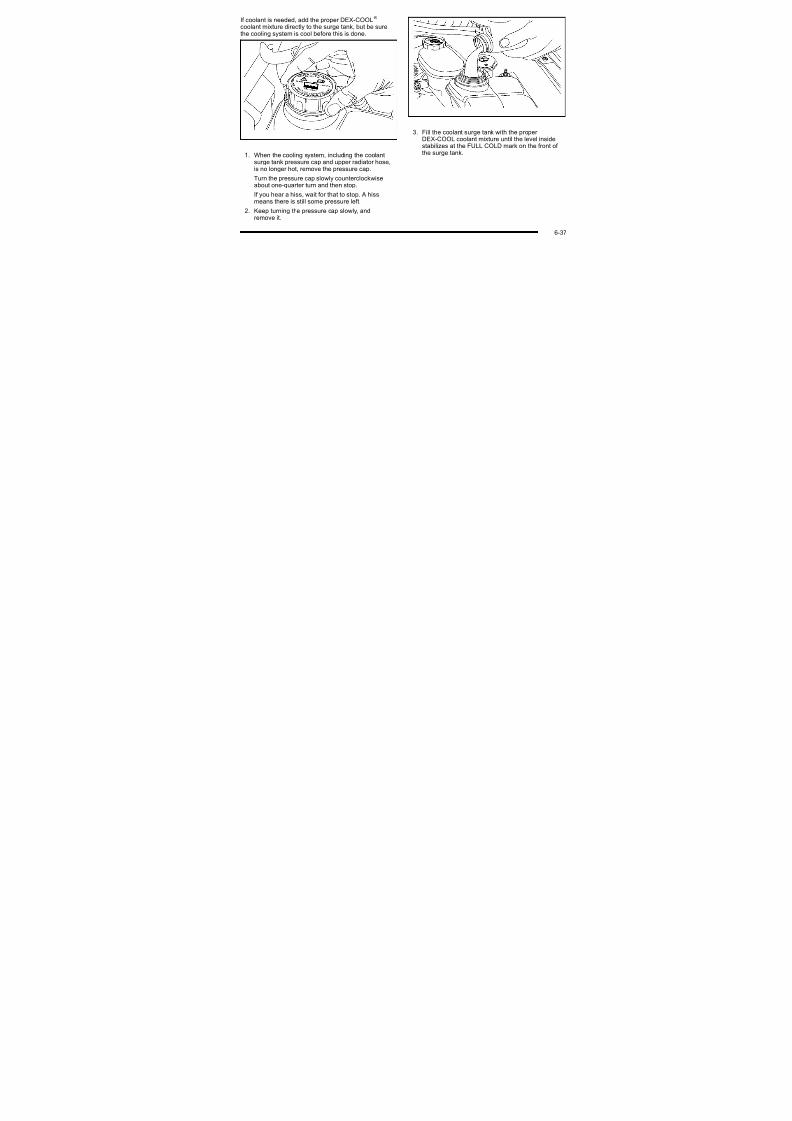
7/31/2019 2010 Corvette
http://slidepdf.com/reader/full/2010-corvette 348/471
6-36
If coolant is needed, add the proper DEX-COOL®
coolant mixture directly to the surge tank, but be surethe cooling system is cool before this is done.
1. When the cooling system, including the coolantsurge tank pressure cap and upper radiator hose,is no longer hot, remove the pressure cap.
Turn the pressure cap slowly counterclockwise
about one-quarter turn and then stop.If you hear a hiss, wait for that to stop. A hissmeans there is still some pressure left.
2. Keep turning the pressure cap slowly, andremove it
3. Fill the coolant surge tank with the proper DEX-COOL coolant mixture until the level insidestabilizes at the FULL COLD mark on the front of the surge tank.

7/31/2019 2010 Corvette
http://slidepdf.com/reader/full/2010-corvette 349/471
remove it.
6-3
4. With the coolant surge tank pressure cap off, startthe engine and let it run until you can feel theupper radiator hose getting hot. Any time duringthis procedure, watch out for the enginecooling fan.
By this time, the coolant level inside the coolantsurge tank may be lower. If the level is lower, addmore of the proper mixture to the coolant surgetank until the level stabilizes at the FULL COLDmark on the coolant surge tank.
5. Replace the pressure cap. Be sure the pressurecap is hand-tight and fully seated.
Check the level in the surge tank when the systemhas cooled down. If the coolant is not at the proper level, repeat Steps 1 through 4, then reinstall the
pressure cap. If the coolant is not at the proper level when the system cools down again, see your dealer/retailer.
Notice: If the pressure cap is not tightly installed,coolant loss and possible engine damage mayoccur. Be sure the cap is properly and tightlysecured.
Engine Overheating
The vehicle has several indicators to warn of engineoverheating.
There is an engine coolant temperature gauge onthe instrument panel cluster. See Engine Coolant Temperature Gauge on page 4‑ 40 . The vehicle mayalso display a COOLANT OVER TEMPERATUREmessage on the Driver Information Center (DIC).See DIC Warnings and Messages on page 4‑ 52
for more information.You may decide not to lift the hood but to get servicehelp right away. See Roadside Assistance Program on
page 8 ‑ 7 .

7/31/2019 2010 Corvette
http://slidepdf.com/reader/full/2010-corvette 350/471
6-38
If you do decide to lift the hood , make sure the vehicleis parked on a level surface.
Then check to see if the engine cooling fan is running.If the engine is overheating, the fan should be running.If it is not, do not continue to run the engine and have
the vehicle serviced.Notice: Engine damage from running your enginewithout coolant is not covered by your warranty.See Overheated Engine Protection Operating Modeon page 6 ‑ 41 for information on driving to a safeplace in an emergency.
Notice: If the engine catches fire while drivingwith no coolant, the vehicle can be badly damaged.The costly repairs would not be covered by thevehicle warranty. See Overheated Engine ProtectionOperating Mode on page 6 ‑ 41 for information ondriving to a safe place in an emergency.
If Steam Is Coming From Your Engine
{ WARNING:
Steam from an overheated engine can burn youbadly, even if you just open the hood. Stay awayfrom the engine if you see or hear steam comingfrom it. Turn it off and get everyone away fromthe vehicle until it cools down. Wait until thereis no sign of steam or coolant before you openthe hood.
If you keep driving when the vehicles engine is
overheated, the liquids in it can catch fire. You or others could be badly burned. Stop the engine if it overheats, and get out of the vehicle until theengine is cool.
See Overheated Engine Protection Operating Mode on page 6 ‑ 41 for information on driving toa safe place in an emergency.

7/31/2019 2010 Corvette
http://slidepdf.com/reader/full/2010-corvette 351/471
6-3
If No Steam Is Coming From Your Engine
If an engine overheat warning is displayed but no steamcan be seen or heard, the problem may not be too
serious. Sometimes the engine can get a little too hotwhen the vehicle:
. Climbs a long hill on a hot day.
. Stops after high-speed driving.
. Idles for long periods in traffic.
If the overheat warning is displayed with no sign of steam:
1. Turn the air conditioning off.
2. Turn the heater on to the highest temperature andto the highest fan speed. Open the windows asnecessary.
3. If in a traffic jam, shift to N (Neutral) while stopped.If it is safe to do so, pull off the road, shift toP (Park) or N (Neutral) and let the engine idle.
If the temperature overheat gauge is no longer inthe overheat zone or an overheat warning no longer displays, the vehicle can be driven. Continue to drivethe vehicle slow for about 10 minutes. Keep a safevehicle distance from the car in front of you. If the
warning does not come back on, continue to drivenormally.
If the warning continues, pull over, stop, and park thevehicle right away.
If there is no sign of steam, idle the engine for three minutes while parked. If the warning is stilldisplayed, turn off the engine until it cools down. Also, see “Overheated Engine Protection OperatingMode” next in this section.

7/31/2019 2010 Corvette
http://slidepdf.com/reader/full/2010-corvette 352/471
6-40
Overheated Engine ProtectionOperating Mode
This emergency operating mode lets the vehiclebe driven to a safe place, up to 50 miles (80 km),
in an emergency situation. If an overheated enginecondition exists and the messages COOLANT OVERTEMPERATURE and REDUCED ENGINE POWERare displayed, along with the check engine light, anoverheat protection mode which alternates firing groupsof cylinders helps prevent engine damage. In thismode, there is a significant loss in power and engineperformance.
Driving extended distances in the overheat protection
mode should be avoided.Notice: After driving in the overheated engineprotection operating mode, to avoid engine damage,allow the engine to cool before attempting anyrepair. The engine oil will be severely degraded.Repair the cause of coolant loss, change the oiland reset the oil life system. See Engine Oil on
page 6 ‑ 19 .
Power Steering Fluid
See Engine CompartmentOverview on page 6 ‑ 14for reservoir location.
When to Check Power Steering FluidIt is not necessary to regularly check power steeringfluid unless you suspect there is a leak in the system or you hear an unusual noise. A fluid loss in this systemcould indicate a problem. Have the system inspectedand repaired.

7/31/2019 2010 Corvette
http://slidepdf.com/reader/full/2010-corvette 353/471
6-4
How to Check Power Steering Fluid
To check the power steering fluid:
1. Turn the ignition off and let the enginecompartment cool down.
2. Wipe the cap and the top of the reservoir clean.3. Unscrew the cap and wipe the dipstick with a
clean rag.
4. Replace the cap and completely tighten it.
5. Remove the cap again and look at the fluid levelon the dipstick. There are markings on both sidesof the dipstick.
The level should be at the FULL COLD mark.
If necessary, add only enough fluid to bring thelevel up to the mark.
When the enginecompartment is hot, thelevel should be at theHOT mark. When theengine compartment iscool, the level should beat the FULL COLD mark.
What to Use
To determine what kind of fluid to use, seeRecommended Fluids and Lubricants on page 7 ‑ 10 . Always use the proper fluid.
Notice: Use of the incorrect fluid may damage thevehicle and the damages may not be covered bythe vehicle's warranty. Always use the correct fluidlisted in Recommended Fluids and Lubricants on
page 7 ‑ 10 .
Windshield Washer Fluid
What to Use
When the vehicle needs windshield washer fluid, besure to read the manufacturer's instructions before use.If the vehicle will be operating in an area where thetemperature may fall below freezing, use a fluid thathas sufficient protection against freezing.

7/31/2019 2010 Corvette
http://slidepdf.com/reader/full/2010-corvette 354/471
6-42
Adding Washer Fluid
Open the cap with thewasher symbol on it. Add washer fluid until thetank is full. See EngineCompartment Overview on page 6 ‑ 14 for reservoir location.
Notice:
. When using concentrated washer fluid,follow the manufacturer's instructions for adding water.
. Do not mix water with ready-to-use washer fluid. Water can cause the solution to freezeand damage the washer fluid tank and other parts of the washer system. Also, water doesnot clean as well as washer fluid.
. Fill the washer fluid tank only three-quartersfull when it is very cold. This allows for fluidexpansion if freezing occurs, which could
damage the tank if it is completely full.. Do not use engine coolant (antifreeze) in
the windshield washer. It can damage thevehicle's windshield washer system andpaint.
Brakes
Brake Fluid
The brake master cylinderreservoir is filled withDOT 3 brake fluid. SeeEngine Compartment Overview on page 6 ‑ 14for the location of thereservoir.
There are only two reasons why the brake fluid level inthe reservoir might go down:
. The brake fluid level goes down because of normal brake lining wear. When new linings areinstalled, the fluid level goes back up.
. A fluid leak in the brake hydraulic system can alsocause a low fluid level. Have the brake hydraulic
system fixed, since a leak means that sooner or later the brakes will not work well.

7/31/2019 2010 Corvette
http://slidepdf.com/reader/full/2010-corvette 355/471
p
6-4
Do not top off the brake fluid. Adding fluid does notcorrect a leak. If fluid is added when the linings areworn, there will be too much fluid when new brakelinings are installed. Add or remove brake fluid, asnecessary, only when work is done on the brakehydraulic system.
{ WARNING:
If too much brake fluid is added, it can spill onthe engine and burn, if the engine is hot enough.You or others could be burned, and the vehiclecould be damaged. Add brake fluid only when
work is done on the brake hydraulic system.See “Checking Brake Fluid” in this section.
Refer to the Maintenance Schedule to determine whento check the brake fluid. See Scheduled Maintenanceo n p a g e 7 ‑ 3 .
Checking Brake Fluid
Check brake fluid by looking at the brake fluid reservoir.See Engine Compartment Overview on page 6 ‑ 14.
The fluid level should be above the MIN mark on the
reservoir. If it is not, have the brake hydraulic systemchecked to see if there is a leak.
After work is done on the brake hydraulic system, makesure the level is between the MIN and MAX marks.
What to Add
Use only new DOT 3 brake fluid from a sealedcontainer. See Recommended Fluids and Lubricants on
pag e 7 ‑ 10 .
Always clean the brake fluid reservoir cap and the areaaround the cap before removing it. This helps keep dirtfrom entering the reservoir.
{ WARNING:
With the wrong kind of fluid in the brake hydraulicsystem, the brakes might not work well. This could
cause a crash. Always use the proper brake fluid.

7/31/2019 2010 Corvette
http://slidepdf.com/reader/full/2010-corvette 356/471
6-44
Notice:
. Using the wrong fluid can badly damagebrake hydraulic system parts. For example, just a few drops of mineral-based oil, suchas engine oil, in the brake hydraulic system
can damage brake hydraulic system partsso badly that they will have to be replaced.Do not let someone put in the wrong kindof fluid.
. If brake fluid is spilled on the vehicle'spainted surfaces, the paint finish can bedamaged. Be careful not to spill brakefluid on the vehicle. If you do, wash it off immediately. See Washing Your Vehicle on
page 6 ‑ 94 .
Brake Wear (Except ZR1)
This vehicle has disc brakes. Disc brake pads havebuilt-in wear indicators that make a high-pitchedwarning sound when the brake pads are worn and newpads are needed. The sound can come and go or beheard all the time the vehicle is moving, except whenapplying the brake pedal firmly.
{ WARNING:
The brake wear warning sound means that soonthe brakes will not work well. That could lead toan accident. When the brake wear warning soundis heard, have the vehicle serviced.
Notice: Continuing to drive with worn-out brakepads could result in costly brake repair.
Some driving conditions or climates can cause a brakesqueal when the brakes are first applied or lightlyapplied. This does not mean something is wrong
with the brakes.
Brake linings should always be replaced as completeaxle sets.
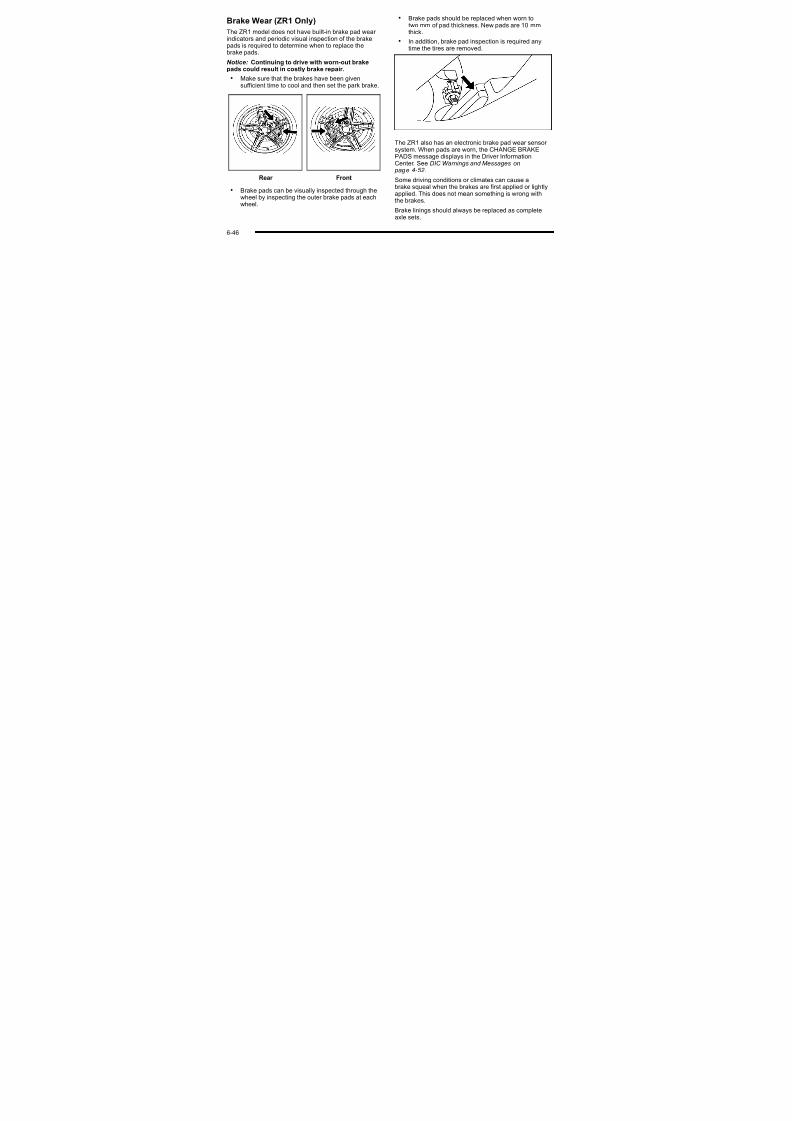
7/31/2019 2010 Corvette
http://slidepdf.com/reader/full/2010-corvette 357/471
6-4
Brake Wear (ZR1 Only)
The ZR1 model does not have built-in brake pad wear indicators and periodic visual inspection of the brakepads is required to determine when to replace thebrake pads.
Notice: Continuing to drive with worn-out brakepads could result in costly brake repair.
. Make sure that the brakes have been givensufficient time to cool and then set the park brake.
Rear Front
. Brake pads can be visually inspected through thewheel by inspecting the outer brake pads at eachwheel.
. Brake pads should be replaced when worn totwo mm of pad thickness. New pads are 10 mmthick.
. In addition, brake pad inspection is required anytime the tires are removed.
The ZR1 also has an electronic brake pad wear sensor system. When pads are worn, the CHANGE BRAKEPADS message displays in the Driver InformationCenter. See DIC Warnings and Messages on
pag e 4‑ 52 .
Some driving conditions or climates can cause a
brake squeal when the brakes are first applied or lightlyapplied. This does not mean something is wrong withthe brakes.
Brake linings should always be replaced as completeaxle sets.

7/31/2019 2010 Corvette
http://slidepdf.com/reader/full/2010-corvette 358/471
6-46
Brake Rotor Wear
ZR1 models have ceramic brake rotors. Rotors shouldbe visually inspected whenever the brake pads arereplaced. Rotors also need to be weighed before brakepads are replaced to confirm that the rotor mass is
greater than the wear ‐out mass printed on the rotor.The rotor can be reused if the weight of the rotor isabove the mass limit. Rotor inspection and weighingmethods can be found in the service manual. SeeService Publications Ordering Information on
pag e 8 ‑ 16 .
Brake Rotor Protector
{ WARNING:
Ceramic rotors will be very hot after operation andtouching them may cause burns. Be sure brakesystem is completely cool prior to installation of protector, or coming in contact with them.
Notice: Rotors may be chipped if hard contact ismade with the wheel during wheel installation or removal. Always use the rotor protectors. Be sureto carefully follow wheel removal and installationinstructions.

7/31/2019 2010 Corvette
http://slidepdf.com/reader/full/2010-corvette 359/471
6-4
A rotor protector should always be installed beforeany wheel removal. The protector can be installed byfeeding it through the wheel spokes and slipping it over the outer edge of the rotor. Leave the protector in place,over the rotor edge, until the wheel is re‐installed. Rotor protectors are available through your dealer/retailer.
Brake Pedal Travel
See your dealer/retailer if the brake pedal does notreturn to normal height, or if there is a rapid increase inpedal travel. This could be a sign that brake servicemight be required.
Brake Adjustment
Every brake stop, the disc brakes automatically adjustfor wear.
Replacing Brake System Parts
The braking system on a vehicle is complex. Its manyparts have to be of top quality and work well together if the vehicle is to have really good braking. The vehiclewas designed and tested with top-quality brake parts.When parts of the braking system are replaced — for example, when the brake linings wear down and newones are installed — be sure to get new approvedreplacement parts. If this is not done, the brakes mightnot work properly. For example, if someone puts in
brake linings that are wrong for the vehicle, the balancebetween the front and rear brakes can change — for theworse. The braking performance expected can changein many other ways if the wrong replacement brakeparts are installed.

7/31/2019 2010 Corvette
http://slidepdf.com/reader/full/2010-corvette 360/471
6-48
Battery
Refer to the replacement number on the original batterylabel when a new battery is needed.
For battery replacement, see your dealer/retailer
or the service manual. To purchase a service manual,see Service Publications Ordering Information on pag e 8 ‑ 16 .
{ DANGER:
Battery posts, terminals, and related accessoriescontain lead and lead compounds, chemicals
known to the State of California to cause cancer and reproductive harm. Wash hands after handling.
Vehicle Storage
{ WARNING:
Batteries have acid that can burn you and gasthat can explode. You can be badly hurt if youare not careful. See Jump Starting on page 6 ‑ 50
for tips on working around a battery withoutgetting hurt.
Infrequent Usage: Remove the black, negative (−) cablefrom the battery to keep the battery from running down.
See“Power Window Initialization
”in Power Windows on
page 3 ‑ 17 .
Extended Storage: Remove the black, negative (−)cable from the battery or use a battery trickle charger.

7/31/2019 2010 Corvette
http://slidepdf.com/reader/full/2010-corvette 361/471
6-4
Jump Starting
If your battery has run down, you may want to useanother vehicle and some jumper cables to start your vehicle. Be sure to use the following steps to do itsafely.
{ WARNING:
Batteries can hurt you. They can be dangerousbecause:
. They contain acid that can burn you.
. They contain gas that can explode or ignite.
. They contain enough electricity to burn you.
If you do not follow these steps exactly, some or all of these things can hurt you.
Notice: If you try to start your vehicle by pushing or pulling it, you could damage your vehicle. Do notpush or pull your vehicle to start it; instead, use the jump starting procedure in this manual to start your
vehicle when the battery has run down.
1. Check the other vehicle. It must have a 12-voltbattery with a negative ground system.
Notice: If the other vehicle's system is not a 12-voltsystem with a negative ground, both vehicles canbe damaged. Only use vehicles with 12-volt systemswith negative grounds to jump start your vehicle.
2. Get the vehicles close enough so the jumper
cables can reach, but be sure the vehicles are nottouching each other. If they are, it could cause aground connection you do not want. You wouldnot be able to start your vehicle, and the badgrounding could damage the electrical systems.
To avoid the possibility of the vehicles rolling, setthe parking brake firmly on both vehicles involvedin the jump start procedure. Put an automatictransmission in P (Park) or a manual transmission
in Neutral before setting the parking brakes.Notice: If you leave the radio or other accessorieson during the jump starting procedure, they couldbe damaged. The repairs would not be covered bythe warranty. Always turn off the radio and other accessories when jump starting the vehicle.
3. Turn off the ignition on both vehicles. Unplugunnecessary accessories plugged into thecigarette lighter or the accessory power outlet.
Turn off the radio and all lamps that are notneeded. This will avoid sparks and help saveboth batteries. And it could save the radio!

7/31/2019 2010 Corvette
http://slidepdf.com/reader/full/2010-corvette 362/471
6-50
4. Open the hoods and locate the positive (+) andnegative (−) terminal locations on each vehicle.
6.2 L LS3 shown, 7.0 L LS7 and 6.2 L LS9 similar
Your vehicle has a remote positive (+) terminal (A)and a remote negative (−) terminal (B), as shown inthe illustration, which should be used to jump startyour vehicle.
The remote positive (+) terminal (A) can beaccessed by opening the cover of the enginecompartment fuse block.
The remote negative (−) terminal (B) is locatedunderneath the engine cover, below the engine oil
fill cap.See Engine Compartment Overview on page 6 ‑ 14for the location of the engine compartment fuseblock and engine oil fill cap.
You will not need to access the battery for jumpstarting. The remote terminals are for that purpose.
{ WARNING:
An electric fan can start up even when the engineis not running and can injure you. Keep hands,clothing and tools away from any underhoodelectric fan.

7/31/2019 2010 Corvette
http://slidepdf.com/reader/full/2010-corvette 363/471
6-5
{ WARNING:
Using an open flame near a battery can causebattery gas to explode. People have been
hurt doing this, and some have been blinded.Use a flashlight if you need more light.
Be sure the battery has enough water. You do notneed to add water to the battery installed in your new vehicle. But if a battery has filler caps, besure the right amount of fluid is there. If it is low,add water to take care of that first. If you do not,explosive gas could be present.
Battery fluid contains acid that can burn you.Do not get it on you. If you accidentally get it inyour eyes or on your skin, flush the place withwater and get medical help immediately.
{ WARNING:
Fans or other moving engine parts can injure youbadly. Keep your hands away from moving parts
once the engine is running.
5. Check that the jumper cables do not have looseor missing insulation. If they do, you could get ashock. The vehicles could be damaged too.
Before you connect the cables, here are somebasic things you should know. Positive (+) willgo to positive (+) or to a remote positive (+)
terminal if the vehicle has one. Negative (−
) willgo to a heavy, unpainted metal engine part or to aremote negative (−) terminal if the vehicle has one.
Do not connect positive (+) to negative (−) or youwill get a short that would damage the battery andmaybe other parts too. And do not connect thenegative (−) cable to the negative (−) terminal onthe dead battery because this can cause sparks.

7/31/2019 2010 Corvette
http://slidepdf.com/reader/full/2010-corvette 364/471
6-52
6. Connect the red positive (+) cable to thepositive (+) terminal of the dead battery. Use aremote positive (+) terminal if the vehicle has one.
7. Do not let the other end touch metal. Connect it tothe positive (+) terminal of the good battery. Use a
remote positive (+) terminal if the vehicle has one.8. Now connect the black negative (−) cable to the
negative (−) terminal of the good battery. Use aremote negative (−) terminal if the vehicle has one.
Do not let the other end touch anything until thenext step. The other end of the negative (−) cabledoes not go to the dead battery. It goes to a heavy,unpainted metal engine part or to a remotenegative (−) terminal on the vehicle with the dead
battery.
9. Connect the other end of the negative (−) cableat least 18 inches (45 cm) away from the deadbattery, but not near engine parts that move.The electrical connection is just as good there,and the chance of sparks getting back to thebattery is much less.
Your vehicle has a remote negative (−) terminal for this purpose.
10. Now start the vehicle with the good battery and runthe engine for a while.
11. Try to start the vehicle that had the dead battery.If it will not start after a few tries, it probably needsservice.

7/31/2019 2010 Corvette
http://slidepdf.com/reader/full/2010-corvette 365/471
6-5
Notice: If the jumper cables are connected or removed in the wrong order, electrical shortingmay occur and damage the vehicle. The repairswould not be covered by the vehicle warranty.Always connect and remove the jumper cables inthe correct order, making sure that the cables do
not touch each other or other metal.
Jumper Cable Removal
A. Heavy, Unpainted Metal Engine Part or RemoteNegative (
−) Terminal
B. Good Battery or Remote Positive (+) andNegative (−) Terminals
C. Dead Battery or Remote Positive (+) Terminal
To disconnect the jumper cables from both vehicles, dothe following:
1. Disconnect the black negative (−) cable from thevehicle that had the dead battery.
2. Disconnect the black negative (−) cable from the
vehicle with the good battery.3. Disconnect the red positive (+) cable from the
vehicle with the good battery.
4. Disconnect the red positive (+) cable from the other vehicle.
5. Return the engine fuse block cover to its originalposition.
6. You may also need to initialize the power windows.
See “Power Window Initialize” under Power Windows on page 3 ‑ 17 for more information.

7/31/2019 2010 Corvette
http://slidepdf.com/reader/full/2010-corvette 366/471
6-54
Rear Axle
When to Check Lubricant
It is not necessary to regularly check rear axle fluidunless you suspect there is a leak or you hear an
unusual noise. A fluid loss could indicate a problem.Have it inspected and repaired.
How to Check Lubricant
To get an accurate reading, the vehicle should be on alevel surface.
If the level is below the bottom of the filler plug hole,you will need to add some lubricant. Add enoughlubricant to raise the level to the bottom of the filler plug hole.
What to Use
To add lubricant when the level is low, use Dexron LSGear Oil 75W-90 (GM Part No. US. 88862624, inCanada 88862625) meeting GM Specification 9986290.To completely refill after draining, see Recommended Fluids and Lubricants on page 7 ‑ 10 . Then fill to thebottom of the filler plug hole with the Synthetic Gear Lubricant.
Headlamp AimingHeadlamp aim has been preset at the factory andshould need no further adjustment.
However, if your vehicle is damaged in a crash, theheadlamp aim may be affected. Aim adjustment to thelow-beam headlamps may be necessary if oncomingdrivers flash their high-beam headlamps at you (for vertical aim).
If the headlamps need to be re-aimed, it isrecommended that you take the vehicle to your dealer/ retailer for service.
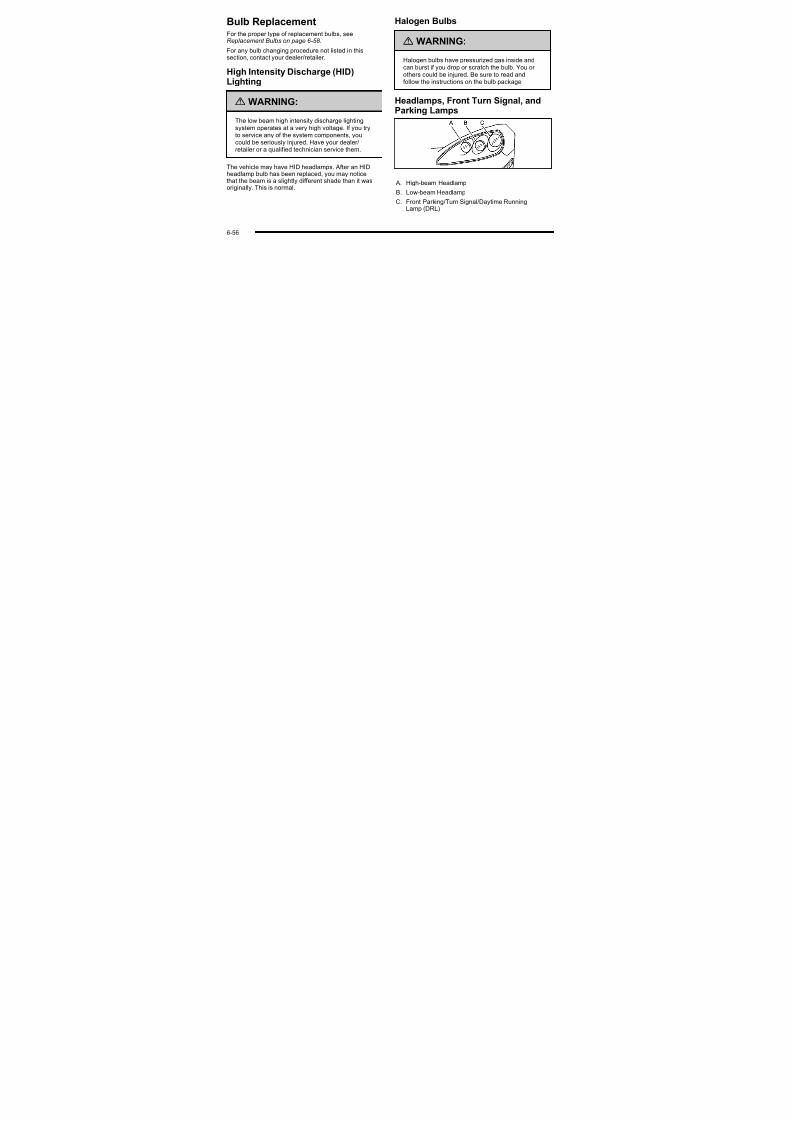
7/31/2019 2010 Corvette
http://slidepdf.com/reader/full/2010-corvette 367/471
6-5
Bulb ReplacementFor the proper type of replacement bulbs, seeReplacement Bulbs on page 6 ‑ 58 .
For any bulb changing procedure not listed in this
section, contact your dealer/retailer.
High Intensity Discharge (HID)Lighting
{ WARNING:
The low beam high intensity discharge lightingsystem operates at a very high voltage. If you tryto service any of the system components, youcould be seriously injured. Have your dealer/ retailer or a qualified technician service them.
The vehicle may have HID headlamps. After an HIDheadlamp bulb has been replaced, you may noticethat the beam is a slightly different shade than it was
originally. This is normal.
Halogen Bulbs
{ WARNING:
Halogen bulbs have pressurized gas inside andcan burst if you drop or scratch the bulb. You or others could be injured. Be sure to read andfollow the instructions on the bulb package.
Headlamps, Front Turn Signal, andParking Lamps
A. High-beam Headlamp
B. Low-beam Headlamp
C. Front Parking/Turn Signal/Daytime RunningLamp (DRL)
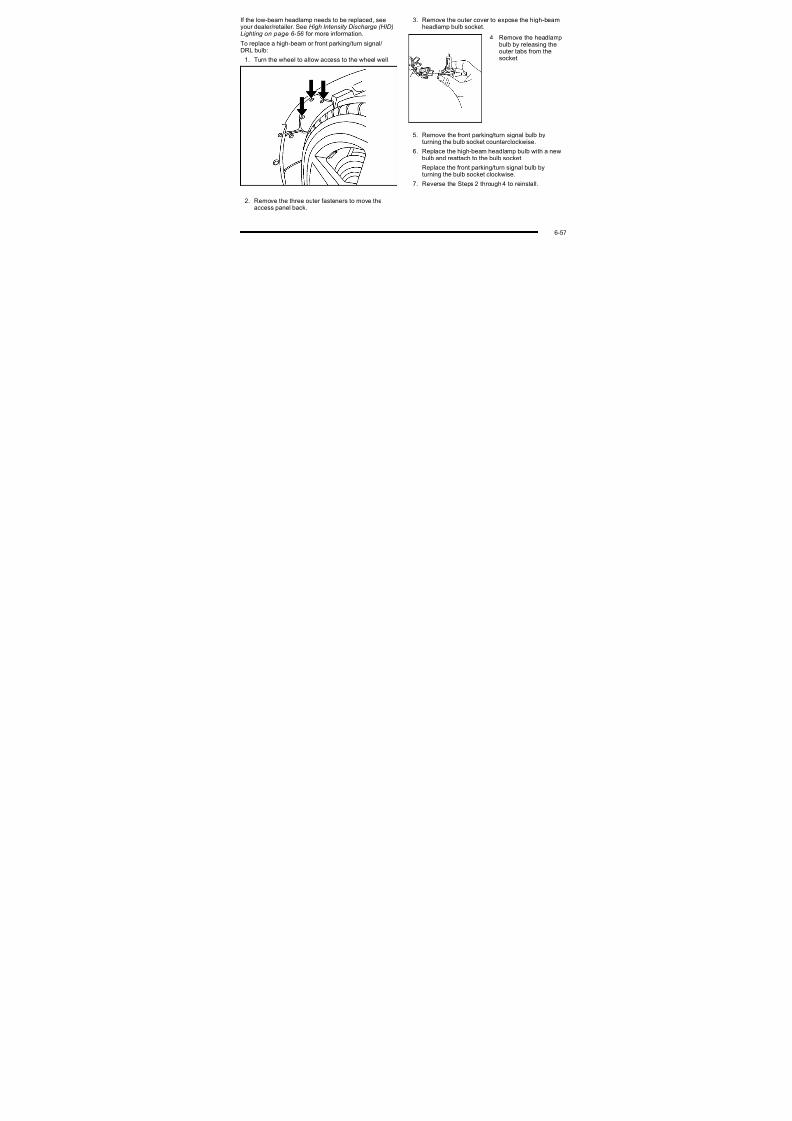
7/31/2019 2010 Corvette
http://slidepdf.com/reader/full/2010-corvette 368/471
6-56
If the low-beam headlamp needs to be replaced, seeyour dealer/retailer. See High Intensity Discharge (HID)Lighting on page 6 ‑ 56 for more information.
To replace a high-beam or front parking/turn signal/ DRL bulb:
1. Turn the wheel to allow access to the wheel well.
2. Remove the three outer fasteners to move theaccess panel back.
3. Remove the outer cover to expose the high-beamheadlamp bulb socket.
4. Remove the headlampbulb by releasing theouter tabs from the
socket.
5. Remove the front parking/turn signal bulb byturning the bulb socket counterclockwise.
6. Replace the high-beam headlamp bulb with a newbulb and reattach to the bulb socket.
Replace the front parking/turn signal bulb byturning the bulb socket clockwise.
7. Reverse the Steps 2 through 4 to reinstall.
6 5
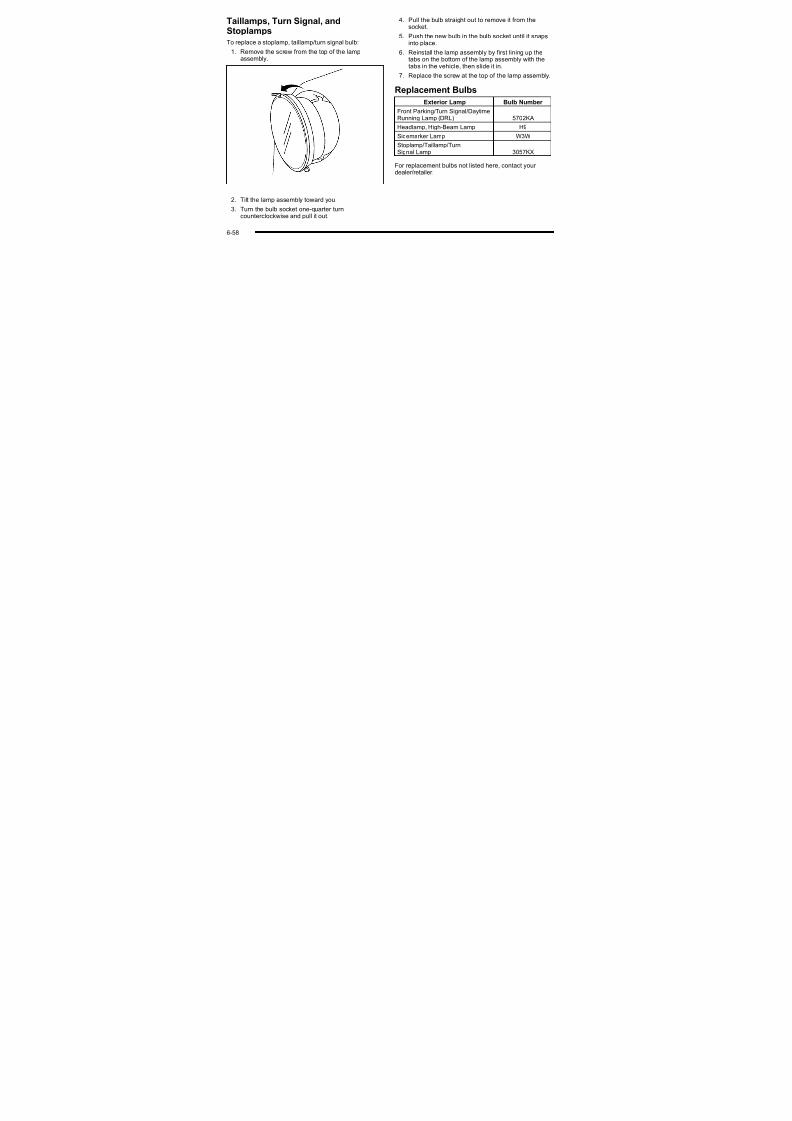
7/31/2019 2010 Corvette
http://slidepdf.com/reader/full/2010-corvette 369/471
6-5
Taillamps, Turn Signal, andStoplamps
To replace a stoplamp, taillamp/turn signal bulb:
1. Remove the screw from the top of the lamp
assembly.
2. Tilt the lamp assembly toward you.
3. Turn the bulb socket one-quarter turncounterclockwise and pull it out.
4. Pull the bulb straight out to remove it from thesocket.
5. Push the new bulb in the bulb socket until it snapsinto place.
6. Reinstall the lamp assembly by first lining up the
tabs on the bottom of the lamp assembly with thetabs in the vehicle, then slide it in.
7. Replace the screw at the top of the lamp assembly.
Replacement Bulbs
Exterior Lamp Bulb Number
Front Parking/Turn Signal/DaytimeRunning Lamp (DRL) 5702KA
Headlamp, High‐Beam Lamp H9
Sidemarker Lamp W3W
Stoplamp/Taillamp/TurnSignal Lamp 3057KX
For replacement bulbs not listed here, contact your dealer/retailer.
6 58

7/31/2019 2010 Corvette
http://slidepdf.com/reader/full/2010-corvette 370/471
6-58
Windshield ReplacementThe windshield is part of the Head-Up Display (HUD)system. If you ever have to get the windshield replaced,get one that is designed for HUD or the HUD imagemay look out of focus.
Windshield Wiper BladeReplacementWindshield wiper blades should be inspected for wear and cracking. See Scheduled Maintenance on
page 7 ‑ 3 for more information.
Replacement blades come in different types and are
removed in different ways. For the proper type andlength, see Maintenance Replacement Parts on pag e 7 ‑ 12 .
It is a good idea to clean or replace the wiper bladeassembly every six months. Allowing the wiper bladearm to touch the windshield when no wiper blade isinstalled could damage the windshield. Any damagethat occurs would not be covered by the vehicle'swarranty. Do not allow the wiper blade arm to touch
the windshield.
To remove the wiper blade assembly:
1. Open the hood to gain access to the windshieldwipers.
2. Lift the wiper arm away from the windshield.
6 5

7/31/2019 2010 Corvette
http://slidepdf.com/reader/full/2010-corvette 371/471
6-5
A. Blade Assembly
B. Arm Assembly
C. Locking Tab
D. Blade Pivot
E. Hook Slot
F. Arm Hook
3. Press down on the blade assembly pivot lockingtab (C). Pull down on the blade assembly (A) torelease it from the wiper arm hook (F).
4. Remove the insert from the blade assembly (A).
The insert has two notches at one end that are
locked by the bottom claws of the blade assembly. At the notch end, pull the insert from the bladeassembly.
6 60
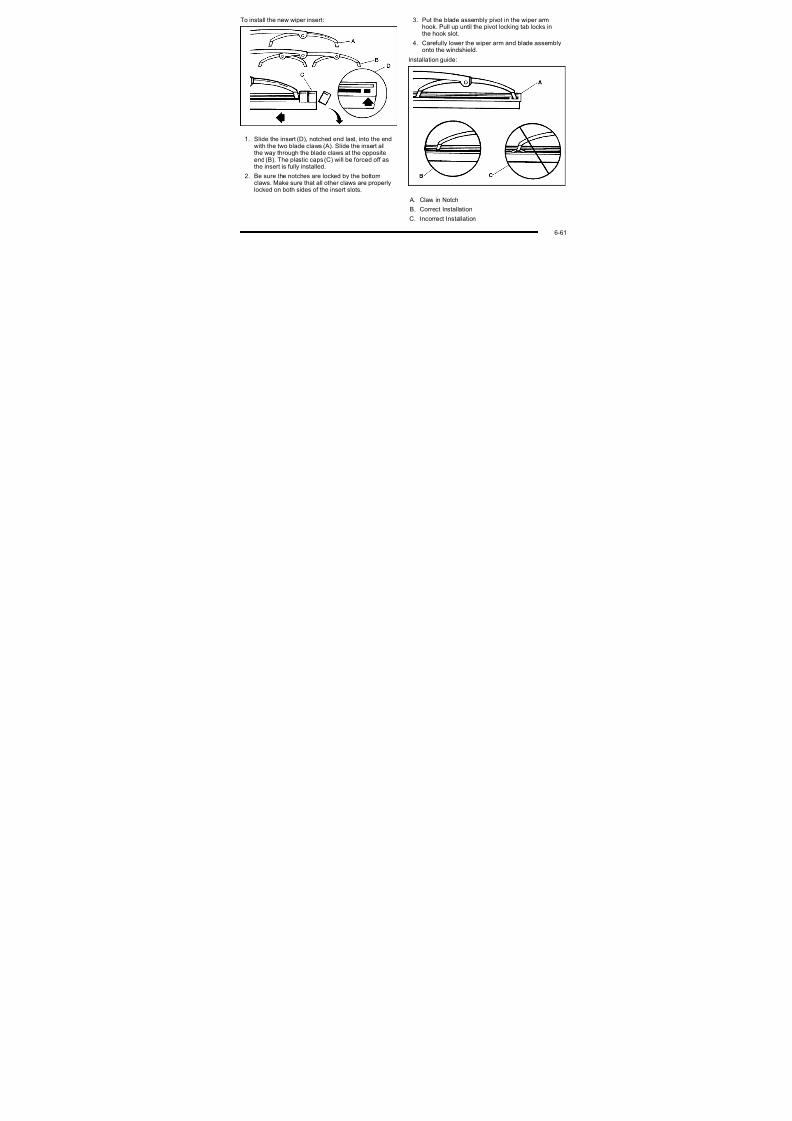
7/31/2019 2010 Corvette
http://slidepdf.com/reader/full/2010-corvette 372/471
6-60
To install the new wiper insert:
1. Slide the insert (D), notched end last, into the endwith the two blade claws (A). Slide the insert allthe way through the blade claws at the oppositeend (B). The plastic caps (C) will be forced off asthe insert is fully installed.
2. Be sure the notches are locked by the bottomclaws. Make sure that all other claws are properly
locked on both sides of the insert slots.
3. Put the blade assembly pivot in the wiper armhook. Pull up until the pivot locking tab locks inthe hook slot.
4. Carefully lower the wiper arm and blade assemblyonto the windshield.
Installation guide:
A. Claw in Notch
B. Correct Installation
C. Incorrect Installation
6-6

7/31/2019 2010 Corvette
http://slidepdf.com/reader/full/2010-corvette 373/471
6-6
TiresYour new vehicle comes with high-quality tiresmade by a leading tire manufacturer. If you ever have questions about your tire warranty andwhere to obtain service, see your vehicleWarranty booklet for details. For additionalinformation refer to the tire manufacturer.
{ WARNING:
. Poorly maintained and improperly usedtires are dangerous.
. Overloading your tires can causeoverheating as a result of too muchflexing. You could have an air-out anda serious accident. SeeLoading theVehicle on page 5 ‑ 28 .
(Continued)
WARNING: (Continued)
. Underinflated tires pose the samedanger as overloaded tires. The resulting
accident could cause serious injury.Check all tires frequently to maintain therecommended pressure. Tire pressureshould be checked when your tires arecold. See Inflation - Tire Pressure on
page 6 ‑ 70 .
. Overinflated tires are more likely to becut, punctured, or broken by a sudden
impact—
such as when you hit apothole. Keep tires at the recommendedpressure.
. Worn, old tires can cause accidents.If your tread is badly worn, or if your tireshave been damaged, replace them.
See High-Speed Operation on page 6 ‑ 72 for inflation pressure adjustment for high speed
driving.
6-62

7/31/2019 2010 Corvette
http://slidepdf.com/reader/full/2010-corvette 374/471
6 62
Low ‐Profile Performance Tire
The original equipment tires on your vehicle areclassified as low‐profile performance tires. Thesetires are designed for very responsive driving onwet or dry pavement. You may also notice more
road noise with low‐profile tires and that they tendto wear faster.
Notice: If the vehicle has low ‐profile tires, theyare more susceptible to damage from roadhazards or curb impact than standard profiletires. Tire and/or wheel assembly damage canoccur when coming into contact with roadhazards like, potholes, or sharp edged objects,
or when sliding into a curb. The vehiclewarranty does not cover this type of damage.Keep tires set to the correct inflation pressureand, when possible avoid contact with curbs,potholes, and other road hazards.
Winter TiresIf you expect to drive on snow or ice covered roads
often, you may want to get winter tires for your vehicle. All season tires provide good overall performance onmost surfaces but they may not offer the traction youwould like or the same level of performance as winter tires on snow or ice covered roads.
Winter tires, in general, are designed for increasedtraction on snow and ice covered roads. With winter tires, there may be decreased dry road traction,increased road noise, and shorter tread life. After switching to winter tires, be alert for changes invehicle handling and braking.
See your dealer/retailer for details regarding winter tireavailability and proper tire selection. Also, see Buying New Tires on page 6 ‑ 77 .
If you choose to use winter tires:
. Use tires of the same brand and tread type on allfour wheel positions.
. Use only radial ply tires of the same size, loadrange, and speed rating as the original equipment
tires.
Winter tires with the same speed rating as your originalequipment tires may not be available for H, V, W, Y, andZR speed rated tires. If you choose winter tires with alower speed rating, never exceed the tire's maximumspeed capability.
6-6
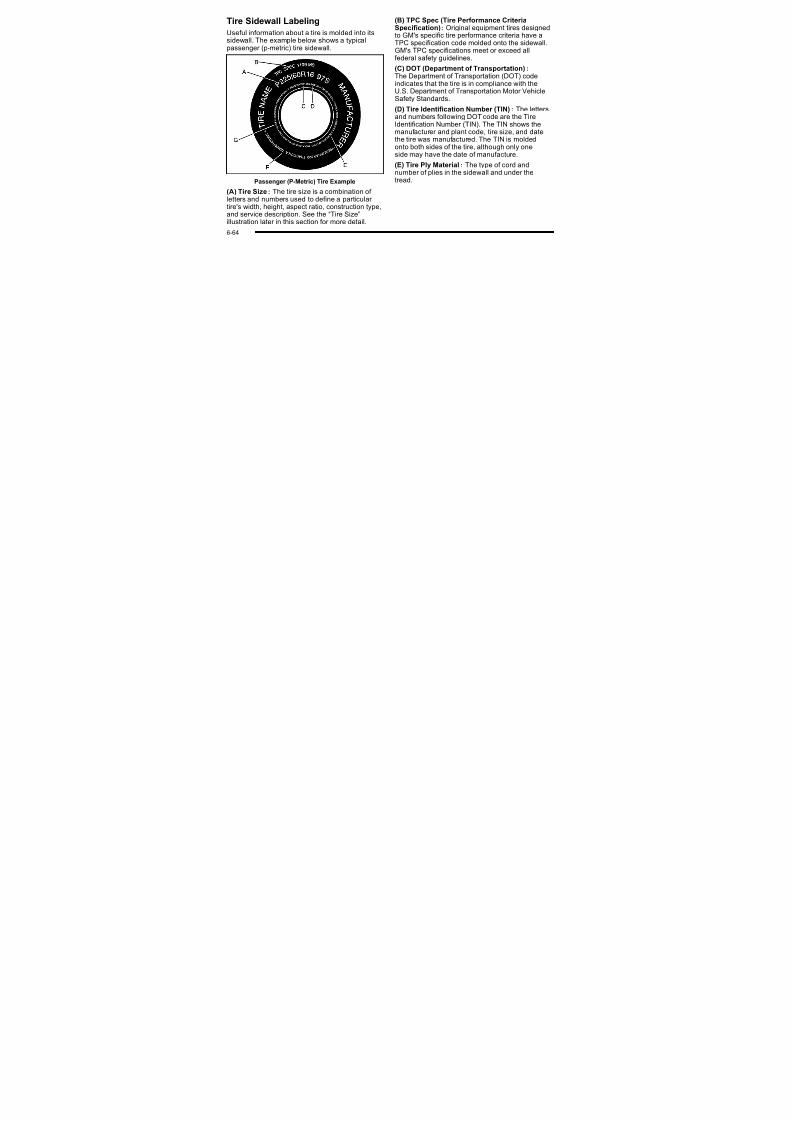
7/31/2019 2010 Corvette
http://slidepdf.com/reader/full/2010-corvette 375/471
6 6
Tire Sidewall Labeling
Useful information about a tire is molded into itssidewall. The example below shows a typicalpassenger (p‐metric) tire sidewall.
Passenger (P‐Metric) Tire Example
(A) Tire Size : The tire size is a combination of letters and numbers used to define a particular tire's width, height, aspect ratio, construction type,and service description. See the “Tire Size”illustration later in this section for more detail.
(B) TPC Spec (Tire Performance CriteriaSpecification) : Original equipment tires designedto GM's specific tire performance criteria have aTPC specification code molded onto the sidewall.GM's TPC specifications meet or exceed all
federal safety guidelines.(C) DOT (Department of Transportation) :
The Department of Transportation (DOT) codeindicates that the tire is in compliance with theU.S. Department of Transportation Motor VehicleSafety Standards.
(D) Tire Identification Number (TIN) : The lettersand numbers following DOT code are the Tire
Identification Number (TIN). The TIN shows themanufacturer and plant code, tire size, and datethe tire was manufactured. The TIN is moldedonto both sides of the tire, although only oneside may have the date of manufacture.
(E) Tire Ply Material : The type of cord andnumber of plies in the sidewall and under thetread.
6-64

7/31/2019 2010 Corvette
http://slidepdf.com/reader/full/2010-corvette 376/471
6 6
(F) Uniform Tire Quality Grading (UTQG) : Tiremanufacturers are required to grade tires basedon three performance factors: treadwear, tractionand temperature resistance. For more informationsee Uniform Tire Quality Grading on page 6 ‑ 79.
(G) Maximum Cold Inflation Load Limit :Maximum load that can be carried and themaximum pressure needed to support that load.
Tire Size
The following illustration shows an example of atypical passenger (p‐metric) vehicle tire size.
(A) Passenger (P‐Metric) Tire : The UnitedStates version of a metric tire sizing system.
The letter P as the first character in the tire sizemeans a passenger vehicle tire engineeredto standards set by the U. S. Tire and Rim
Association.
(B) Tire Width : The three‐digit number indicatesthe tire section width in millimeters from sidewallto sidewall.
(C) Aspect Ratio : A two‐digit number thatindicates the tire height‐to‐width measurements.
For example, if the tire size aspect ratio is 60, asshown in item C of the illustration, it would meanthat the tire's sidewall is 60 percent as high as itis wide.
(D) Construction Code : A letter code is usedto indicate the type of ply construction in the tire.The letter R means radial ply construction; theletter D means diagonal or bias ply construction;
and the letter B means belted‐bias plyconstruction.
(E) Rim Diameter : Diameter of the wheel ininches.
(F) Service Description : These charactersrepresent the load index and speed rating of thetire. The load index represents the load carrycapacity a tire is certified to carry. The speed
rating is the maximum speed a tire is certifiedto carry a load.
6-6

7/31/2019 2010 Corvette
http://slidepdf.com/reader/full/2010-corvette 377/471
Tire Terminology and Definitions
Air Pressure : The amount of air inside the tirepressing outward on each square inch of the tire.
Air pressure is expressed in pounds per squareinch (psi) or kilopascal (kPa).
Accessory Weight : This means the combinedweight of optional accessories. Some examples of optional accessories are, automatic transmission,power steering, power brakes, power windows,power seats, and air conditioning.
Aspect Ratio : The relationship of a tire's heightto its width.
Belt : A rubber coated layer of cords that islocated between the plies and the tread. Cordsmay be made from steel or other reinforcingmaterials.
Bead : The tire bead contains steel wires wrappedby steel cords that hold the tire onto the rim.
Bias Ply Tire : A pneumatic tire in which the pliesare laid at alternate angles less than 90 degrees
to the centerline of the tread.
Cold Tire Pressure : The amount of air pressurein a tire, measured in pounds per square inch (psi)or kilopascals (kPa) before a tire has built up heatfrom driving. See Inflation - Tire Pressure on
page 6 ‑ 70 .
Curb Weight : The weight of a motor vehicle withstandard and optional equipment including themaximum capacity of fuel, oil, and coolant, butwithout passengers and cargo.
DOT Markings : A code molded into the sidewallof a tire signifying that the tire is in compliancewith the U.S. Department of Transportation (DOT)motor vehicle safety standards. The DOT code
includes the Tire Identification Number (TIN), analphanumeric designator which can also identifythe tire manufacturer, production plant, brand, anddate of production.
GVWR : Gross Vehicle Weight Rating.See Loading the Vehicle on page 5 ‑ 28 .
GAWR FRT: Gross Axle Weight Rating for thefront axle. See Loading the Vehicle on page 5 ‑ 28 .
GAWR RR : Gross Axle Weight Rating for the rear axle. See Loading the Vehicle on page 5 ‑ 28 .
6-66

7/31/2019 2010 Corvette
http://slidepdf.com/reader/full/2010-corvette 378/471
Intended Outboard Sidewall : The side of anasymmetrical tire, that must always face outwardwhen mounted on a vehicle.
Kilopascal (kPa) : The metric unit for air pressure.
Light Truck (LT‐Metric) Tire : A tire used on lightduty trucks and some multipurpose passenger vehicles.
Load Index : An assigned number ranging from1 to 279 that corresponds to the load carryingcapacity of a tire.
Maximum Inflation Pressure : The maximumair pressure to which a cold tire can be inflated.The maximum air pressure is molded onto thesidewall.
Maximum Load Rating : The load rating for a tireat the maximum permissible inflation pressure for that tire.
Maximum Loaded Vehicle Weight : The sum of curb weight, accessory weight, vehicle capacity
weight, and production options weight.
Normal Occupant Weight : The number of occupants a vehicle is designed to seat multipliedby 150 lbs (68 kg). See Loading the Vehicle on
page 5 ‑ 28 .
Occupant Distribution : Designated seating
positions.Outward Facing Sidewall : The side of anasymmetrical tire that has a particular sidethat faces outward when mounted on a vehicle.The side of the tire that contains a whitewall,bears white lettering, or bears manufacturer,brand, and/or model name molding that is higher or deeper than the same moldings on the other
sidewall of the tire.Passenger (P-Metric) Tire : A tire used onpassenger cars and some light duty trucks andmultipurpose vehicles.
Recommended Inflation Pressure : Vehiclemanufacturer's recommended tire inflationpressure as shown on the tire placard.See Inflation - Tire Pressure on page 6 ‑ 70
and Loading the Vehicle on page 5 ‑ 28 .
6-6

7/31/2019 2010 Corvette
http://slidepdf.com/reader/full/2010-corvette 379/471
Radial Ply Tire : A pneumatic tire in which theply cords that extend to the beads are laid at90 degrees to the centerline of the tread.
Rim : A metal support for a tire and upon whichthe tire beads are seated.
Sidewall : The portion of a tire between the treadand the bead.
Speed Rating : An alphanumeric code assignedto a tire indicating the maximum speed at which atire can operate.
Traction : The friction between the tire and theroad surface. The amount of grip provided.
Tread : The portion of a tire that comes intocontact with the road.
Treadwear Indicators : Narrow bands, sometimescalled wear bars, that show across the treadof a tire when only 1/16 inch (1.6 mm) of treadremains. See When It Is Time for New Tires on
page 6 ‑ 76 .
UTQGS (Uniform Tire Quality GradingStandards) : A tire information system thatprovides consumers with ratings for a tire'straction, temperature, and treadwear. Ratingsare determined by tire manufacturers usinggovernment testing procedures. The ratings aremolded into the sidewall of the tire. See UniformTire Quality Grading on page 6 ‑ 79.
Vehicle Capacity Weight : The number of designated seating positions multiplied by 150 lbs(68 kg) plus the rated cargo load. See Loading theVehicle on page 5 ‑ 28 .
Vehicle Maximum Load on the Tire : Load on an
individual tire due to curb weight, accessoryweight, occupant weight, and cargo weight.
Vehicle Placard : A label permanently attachedto a vehicle showing the vehicle's capacityweight and the original equipment tire size andrecommended inflation pressure. See “Tire andLoading Information Label” under Loading theVehicle on page 5 ‑ 28 .
6-68

7/31/2019 2010 Corvette
http://slidepdf.com/reader/full/2010-corvette 380/471
Run-Flat Tires
This vehicle, when new, had run-flat tires. There is nospare tire, no tire changing equipment, and no place tostore a tire in the vehicle. Run-flat tires perform so wellwithout any air that a Tire Pressure Monitor System
(TPMS) is used to alert you if a tire has lost pressure.
{ WARNING:
When the low tire warning light is displayed onthe instrument panel cluster, your vehicle'shandling capabilities will be reduced duringsevere maneuvers. If you drive too fast, you could
lose control of your vehicle. You or others couldbe injured. Do not drive over 55 mph (90 km/h)when the low tire warning light is displayed.Drive cautiously and check your tire pressuresas soon as you can.
If a tire goes flat, you will not need to stop on the sideof the road to change the tire. You can just keep ondriving. The shorter the distance you drive and the
slower the speed, the greater the chance that the tire
will not have to be replaced. If you drive on a deflatedrun-flat tire for 25 miles (40 km) or less and at speeds of55 mph (90 km/h) or less, there is a good chance thatthe tire can be repaired. The tires on coupe, convertibleand Z06 models can operate effectively with no air pressure for up to 100 miles (160 km) at speeds up
to 55 mph (90 km/h), but the tire would then have tobe replaced. The tires on ZR1 models can operateeffectively with no air pressure for up to 50 miles(80 km) at speeds up to 55 mph (90 km/h), but the tirewould then have to be replaced. When a tire is filledwith air, it provides a cushion between the road and thewheel. Because you will not have this cushion whendriving on a deflated tire, try to avoid potholes that coulddamage your wheel and require replacement of it.
Some road hazards can damage a tire beyond repair.This damage could occur even before you have drivenon the tire in a deflated condition. When a tire hasbeen damaged, or if you have driven any distance ona run-flat tire, check with an authorized run-flat tireservice center to determine whether the tire can berepaired or should be replaced. To maintain your vehicle's run-flat feature, all replacement tires mustbe self-supporting tires. As soon as possible,contact the nearest authorized GM or run-flat servicing
facility for inspection and repair or replacement.
6-6

7/31/2019 2010 Corvette
http://slidepdf.com/reader/full/2010-corvette 381/471
To locate the nearest GM or run-flat servicing facility,call Roadside Assistance. For phone numbers andRoadside Service details see Roadside AssistanceProgram o n p a g e 8 ‑ 7 .
{ WARNING:Run-flat tires are constructed differently than other tires and could explode during improper service.You or others could be injured or killed if youattempt to repair, replace, dismount, or mounta run-flat tire. Let only an authorized run-flatservice center repair, replace, dismount, andmount run-flat tires.
The valve stems on your run-flat tires have sensors thatare part of the Tire Pressure Monitor System (TPMS).See Tire Pressure Monitor System on page 6 ‑ 72 .These sensors contain batteries which are designedto last for 10 years under normal driving conditions. Seeyour dealer/retailer if you ever need to have a wheelreplaced, or if the sensors ever need replacement.
Notice: Using liquid sealants can damage the tirevalves and tire pressure monitor sensors in thevehicle's run-flat tires. This damage would not becovered by warranty. Do not use liquid sealants inthe vehicle's run-flat tires.
Inflation - Tire Pressure
Tires need the correct amount of air pressure tooperate effectively.
Notice: Do not let anyone tell you thatunder ‐inflation or over ‐inflation is all right.It is not. If your tires do not have enough air (under ‐inflation), you can get the following:
. Too much flexing
. Too much heat
. Tire overloading
. Premature or irregular wear
. Poor handling
. Reduced fuel economy
If your tires have too much air (over ‐inflation),you can get the following:
. Unusual wear
. Poor handling
.
Rough ride. Needless damage from road hazards
6-70

7/31/2019 2010 Corvette
http://slidepdf.com/reader/full/2010-corvette 382/471
A vehicle specific Tire and Loading Informationlabel is attached to your vehicle. This label showsyour vehicle's original equipment tires and thecorrect inflation pressures for your tires when theyare cold. The recommended cold tire inflationpressure, shown on the label, is the minimumamount of air pressure needed to support your vehicle's maximum load carrying capacity.
For additional information regarding how muchweight your vehicle can carry, and an exampleof the Tire and Loading Information label, seeLoading the Vehicle on page 5 ‑ 28 . How youload your vehicle affects vehicle handling andride comfort. Never load your vehicle with more
weight than it was designed to carry.
When to Check
Check your tires once a month or more.
How to Check
Use a good quality pocket-type gauge to checktire pressure. You cannot tell if your tires areproperly inflated simply by looking at them.Radial tires may look properly inflated even
when they are under ‐inflated. Check the tire'sinflation pressure when the tires are cold.Cold means your vehicle has been sitting for at least three hours or driven no more than1 mile (1.6 km).
Remove the valve cap from the tire valve stem.Press the tire gauge firmly onto the valve to get apressure measurement. If the cold tire inflation
pressure matches the recommended pressure onthe Tire and Loading Information label, no further adjustment is necessary. If the inflation pressureis low, add air until you reach the recommendedamount.
If you overfill the tire, release air by pushing onthe metal stem in the center of the tire valve.Re‐check the tire pressure with the tire gauge.
Be sure to put the valve caps back on the valvestems. They help prevent leaks by keeping out dirand moisture.
6-7

7/31/2019 2010 Corvette
http://slidepdf.com/reader/full/2010-corvette 383/471
High-Speed Operation
{ WARNING:
Driving at high speeds, 160 km/h (100 mph)or higher, puts an additional strain on tires.Sustained high-speed driving causes excessiveheat build up and can cause sudden tire failure.You could have a crash and you or others couldbe killed. Some high-speed rated tires requireinflation pressure adjustment for high speedoperation. When speed limits and road conditionsare such that a vehicle can be driven at high
speeds, make sure the tires are rated for highspeed operation, in excellent condition, and setto the correct cold tire inflation pressure for thevehicle load.
If you will be driving your vehicle at speeds of 175 mph (282 km/h) or higher, where it is legal,set the cold inflation pressure to the maximum inflationpressure shown on the tire sidewall, or 38 psi (265 kPa),
whichever is lower. See the example following. Whenyou end this high-speed driving, return the tires to thecold inflation pressure shown on the Tire and LoadingInformation label. See Loading the Vehicle on
page 5 ‑ 28 .
Example:
You will find the maximum load and inflation pressuremolded on the tire's sidewall, in small letters, near therim flange. It will read something like this: Maximumload 690 kg (1521 lbs) 300 kPa (44 psi) Max. Press.
For this example, you would set the inflation pressurefor high‐speed driving at 38 psi (265 kPa).
Racing or other competitive driving may affect thewarranty coverage of your vehicle. See your warrantybooklet for more information.
Tire Pressure Monitor System
The Tire Pressure Monitor System (TPMS) uses radioand sensor technology to check tire pressure levels.The TPMS sensors monitor the air pressure in your vehicle's tires and transmit tire pressure readings to areceiver located in the vehicle.
Each tire, including the spare (if provided), should bechecked monthly when cold and inflated to the inflationpressure recommended by the vehicle manufacturer on the vehicle placard or tire inflation pressure label.(If your vehicle has tires of a different size than the sizeindicated on the vehicle placard or tire inflation pressure
label, you should determine the proper tire inflationpressure for those tires.)
6-72

7/31/2019 2010 Corvette
http://slidepdf.com/reader/full/2010-corvette 384/471
As an added safety feature, your vehicle has beenequipped with a tire pressure monitoring system(TPMS) that illuminates a low tire pressure telltale whenone or more of your tires is significantly under ‐inflated.
Accordingly, when the low tire pressure telltaleilluminates, you should stop and check your tires
as soon as possible, and inflate them to the proper pressure. Driving on a significantly under ‐inflated tirecauses the tire to overheat and can lead to tire failure.Under ‐inflation also reduces fuel efficiency and tiretread life, and may affect the vehicle's handling andstopping ability.
Please note that the TPMS is not a substitute for proper tire maintenance, and it is the driver's responsibility tomaintain correct tire pressure, even if under ‐inflation
has not reached the level to trigger illumination of theTPMS low tire pressure telltale.
Your vehicle has also been equipped with a TPMSmalfunction indicator to indicate when the system isnot operating properly. The TPMS malfunction indicator is combined with the low tire pressure telltale. Whenthe system detects a malfunction, the telltale will flashfor approximately one minute and then remaincontinuously illuminated. This sequence will continue
upon subsequent vehicle start‐ups as long as themalfunction exists.
When the malfunction indicator is illuminated, thesystem may not be able to detect or signal low tirepressure as intended. TPMS malfunctions may occur for a variety of reasons, including the installation of replacement or alternate tires or wheels on the vehiclethat prevent the TPMS from functioning properly.
Always check the TPMS malfunction telltale after replacing one or more tires or wheels on your vehicleto ensure that the replacement or alternate tires andwheels allow the TPMS to continue to function properly.
See Tire Pressure Monitor Operation on page 6 ‑ 74 for additional information.
Federal Communications Commission(FCC) and Industry Canada
See Radio Frequency Statement on page 8 ‑ 20
for information regarding Part 15 of the FederalCommunications Commission (FCC) Rules andRSS-210/211 of Industry Canada.
6-7

7/31/2019 2010 Corvette
http://slidepdf.com/reader/full/2010-corvette 385/471
Tire Pressure Monitor Operation
This vehicle may have a Tire Pressure Monitor System(TPMS). The TPMS is designed to warn the driver whena low tire pressure condition exists. TPMS sensors aremounted onto each tire and wheel assembly on your
vehicle. The TPMS sensors monitor the air pressurein the vehicle's tires and transmits the tire pressurereadings to a receiver located in the vehicle.
When a low tire pressurecondition is detected,the TPMS illuminatesthe low tire pressurewarning light, locatedin the instrument panel
cluster.
At the same time a message to check the pressure in aspecific tire appears on the Driver Information Center (DIC) display. The low tire pressure warning light andthe DIC warning message appear at each ignitioncycle until the tires are inflated to the correct inflationpressure. Using the DIC, tire pressure levels can beviewed by the driver. For additional information and
details about the DIC operation and displays see DIC Operation and Displays on page 4‑ 47 and DIC Warnings and Messages on page 4‑ 52 .
The low tire pressure warning light may come on in coolweather when the vehicle is first started, and then turnoff as you start to drive. This could be an early indicator that the air pressure in the tire(s) are getting low andneed to be inflated to the proper pressure.
A Tire and Loading Information label, attached to
your vehicle, shows the size of your vehicle's originalequipment tires and the correct inflation pressure for your vehicle's tires when they are cold. See Loading theVehicle on page 5 ‑ 28 , for an example of the Tire andLoading Information label and its location on your vehicle. Also see Inflation - Tire Pressure on page 6 ‑ 70 for additional information.
Your vehicle's TPMS can warn you about a low tirepressure condition but it does not replace normal tire
maintenance. See Tire Inspection and Rotation on pag e 6 ‑ 76 , When It Is Time for New Tires on pag e 6 ‑ 76 , and Tires on page 6 ‑ 62 .
Notice: Liquid tire sealants could damage theTire Pressure Monitor System (TPMS) sensors.Sensor damage caused by using a tire sealant isnot covered by your warranty. Do not use liquidtire sealants.
6-74

7/31/2019 2010 Corvette
http://slidepdf.com/reader/full/2010-corvette 386/471
TPMS Malfunction Light and Message
The TPMS will not function properly if one or more of the TPMS sensors are missing or inoperable. When thesystem detects a malfunction, the low tire warning lightflashes for about one minute and then stays on for theremainder of the ignition cycle. A DIC warning messageis also displayed. The low tire warning light and DICwarning message come on at each ignition cycle untilthe problem is corrected. Some of the conditions thatcan cause the malfunction light and DIC message tocome on are:
. The TPMS sensor matching process was not doneor not completed successfully. The DIC messageshould go off after successfully completing thesensor matching process.
. One or more TPMS sensors are missing or damaged. Under these conditions the TPMSmalfunction light (low tire warning light) comeson, and at the same time the DIC messageis displayed. The DIC message and TPMSmalfunction light should go off once the TPMSsensors are installed and the sensor matchingprocess is performed successfully.
. Replacement tires or wheels do not match your vehicle's original equipment tires or wheels.Tires and wheels other than those recommendedfor your vehicle could prevent the TPMS fromfunctioning properly. See Buying New Tires on
page 6 ‑ 77 .
.
Operating electronic devices or being near facilitiesusing radio wave frequencies similar to the TPMScould cause the TPMS sensors to malfunction.
If the TPMS is not functioning it cannot detect or signala low tire condition. See your dealer/retailer for serviceif the TPMS malfunction light and DIC message comeson and stays on.
TPMS Sensor Matching Process
Each TPMS sensor has a unique identification code. Any time you replace one or more of the TPMS sensorsor rotate your vehicle's tires, the identification codeswill need to be matched to the new tire/wheel position.The sensors are matched to the tire/wheel positions inthe following order: driver side front tire, passenger sidefront tire, passenger side rear tire, and driver side rear tire using a TPMS diagnostic tool. See your dealer/ retailer for service.
6-7

7/31/2019 2010 Corvette
http://slidepdf.com/reader/full/2010-corvette 387/471
Tire Inspection and Rotation
We recommend that you regularly inspect your vehicle's tires for signs of wear or damage Alsocheck for damaged wheels. See When It Is Timefor New Tires on page 6 ‑ 76 and Wheel
Replacement on page 6 ‑ 81.
The tires on your vehicle are different sizes frontto rear. Due to this, the tires should not be rotated.Each tire and wheel should be used only in theposition it is in.
When It Is Time for New Tires
Various factors, such as maintenance, temperatures,driving speeds, vehicle loading, and road conditions,influence when you need new tires.
One way to tell when it is
time for new tires is tocheck the treadwear indicators, which willappear when your tireshave only 1/16 inch(1.6 mm) or less of tread remaining.
6-76

7/31/2019 2010 Corvette
http://slidepdf.com/reader/full/2010-corvette 388/471
You need a new tire if any of the following statementsare true:
. You can see the indicators at three or more placesaround the tire.
. You can see cord or fabric showing through the
tire's rubber.. The tread or sidewall is cracked, cut or snagged
deep enough to show cord or fabric.
. The tire has a bump, bulge or split.
. The tire has a puncture, cut or other damage thatcannot be repaired well because of the size or location of the damage.
The rubber in tires degrades over time, even if they
are not being used. This is also true for the spare tire,if your vehicle has one. Multiple conditions affect howfast this aging takes place, including temperatures,loading conditions, and inflation pressure maintenance.With proper care and maintenance tires will typicallywear out before they degrade due to age. If you areunsure about the need to replace your tires as they getolder, consult the tire manufacturer for more information.
Buying New Tires
GM has developed and matched specific tires for your vehicle. The original equipment tires installed on your vehicle, when it was new, were designed to meetGeneral Motors Tire Performance Criteria Specification(TPC Spec) system rating. If you need replacementtires, GM strongly recommends that you get tires withthe same TPC Spec rating. This way, your vehicle willcontinue to have tires that are designed to give thesame performance and vehicle safety, during normaluse, as the original tires.
GM's exclusive TPC Spec system considers over adozen critical specifications that impact the overallperformance of your vehicle, including brake systemperformance, ride and handling, traction control, andtire pressure monitoring performance. GM's TPC Specnumber is molded onto the tire's sidewall near the tiresize. If the tires have an all‐season tread design, theTPC Spec number will be followed by an MS for mudand snow. See Tire Sidewall Labeling on page 6 ‑ 64,for additional information.
6-7

7/31/2019 2010 Corvette
http://slidepdf.com/reader/full/2010-corvette 389/471
GM recommends replacing tires in sets of four. This isbecause uniform tread depth on all tires will help keepyour vehicle performing most like it did when the tireswere new. Replacing less than a full set of tires canaffect the braking and handling performance of your vehicle. See Tire Inspection and Rotation on page 6 ‑ 76 .
Winter tires with the same speed rating as your originalequipment tires may not be available for H, V, W, Y andZR speed rated tires. If you choose snow tires with alower speed rating, never exceed the tire's maximumspeed capability.
{ WARNING:
Mixing tires could cause you to lose control whiledriving. If you mix tires of different sizes (other than those originally installed on your vehicle),brands, or types (radial and bias-belted tires), thevehicle may not handle properly, and you couldhave a crash. Using tires of different sizes (other than those originally installed on your vehicle),brands or types, may also cause damage to your vehicle. Be sure to use the correct size, brand,
and type tires on all four wheels.
{ WARNING:
If you use bias-ply tires on the vehicle, thewheel rim flanges could develop cracks
after many miles of driving. A tire and/or wheel could fail suddenly, causing a crash.Use only radial-ply tires with the wheels onthe vehicle.
If you must replace your vehicle's tires with thosethat do not have a TPC Spec number, make surethey are the same size, load range, speed rating,and construction type (radial and bias‐belted tires)
as your vehicle's original tires.
Vehicles that have a tire pressure monitoring systemcould give an inaccurate low‐pressure warning if non‐TPC Spec rated tires are installed on it. Non‐TPCSpec rated tires may give a low‐pressure warning thatis higher or lower than the proper warning level youwould get with TPC Spec rated tires. See Tire PressureMonitor System on page 6 ‑ 72 .
Your vehicle's original equipment tires are listed on theTire and Loading Information label. See Loading theVehicle on page 5 ‑ 28 , for more information about theTire and Loading Information label and its location onyour vehicle.
6-78

7/31/2019 2010 Corvette
http://slidepdf.com/reader/full/2010-corvette 390/471
Different Size Tires and Wheels
If you add wheels or tires that are a different size thanyour original equipment wheels and tires, this mayaffect the way your vehicle performs, including itsbraking, ride and handling characteristics, stability,and resistance to rollover . Additionally, if your vehiclehas electronic systems such as, antilock brakes,traction control, and electronic stability control, theperformance of these systems can be affected.
{ WARNING:
If you add different sized wheels, your vehiclemay not provide an acceptable level of performance and safety if tires not recommendedfor those wheels are selected. You may increasethe chance that you will crash and suffer seriousinjury. Only use GM specific wheel and tiresystems developed for your vehicle, and havethem properly installed by a GM certifiedtechnician.
See Buying New Tires on page 6 ‑ 77 and Accessories
and Modifications o n p a g e 6 ‑ 3 for additionalinformation.
Uniform Tire Quality Grading
Quality grades can be found where applicableon the tire sidewall between tread shoulder andmaximum section width. For example:
Treadwear 200 Traction AATemperature A
The following information relates to the systemdeveloped by the United States NationalHighway Traffic Safety Administration (NHTSA),which grades tires by treadwear, traction, andtemperature performance. This applies only tovehicles sold in the United States. The grades
are molded on the sidewalls of most passenger car tires. The Uniform Tire Quality Grading(UTQG) system does not apply to deep tread,winter-type snow tires, space-saver, or temporaryuse spare tires, tires with nominal rim diametersof 10 to 12 inches (25 to 30 cm), or to somelimited-production tires.
6-7

7/31/2019 2010 Corvette
http://slidepdf.com/reader/full/2010-corvette 391/471
While the tires available on General Motorspassenger cars and light trucks may vary withrespect to these grades, they must also conformto federal safety requirements and additionalGeneral Motors Tire Performance Criteria (TPC)standards.
All Passenger Car Tires Must Conform to FederalSafety Requirements In Addition To TheseGrades.
Treadwear
The treadwear grade is a comparative ratingbased on the wear rate of the tire when testedunder controlled conditions on a specified
government test course. For example, a tiregraded 150 would wear one and a half (1½)times as well on the government course as a tiregraded 100. The relative performance of tiresdepends upon the actual conditions of their use,however, and may depart significantly from thenorm due to variations in driving habits, servicepractices and differences in road characteristicsand climate.
Traction – AA, A, B, C
The traction grades, from highest to lowest,are AA, A, B, and C. Those grades representthe tire's ability to stop on wet pavement asmeasured under controlled conditions on
specified government test surfaces of asphaltand concrete. A tire marked C may have poor traction performance. Warning: The traction gradeassigned to this tire is based on straight-aheadbraking traction tests, and does not includeacceleration, cornering, hydroplaning, or peaktraction characteristics.
6-80

7/31/2019 2010 Corvette
http://slidepdf.com/reader/full/2010-corvette 392/471
Temperature – A, B, C
The temperature grades are A (the highest), B,and C, representing the tire's resistance to thegeneration of heat and its ability to dissipateheat when tested under controlled conditions
on a specified indoor laboratory test wheel.Sustained high temperature can cause thematerial of the tire to degenerate and reducetire life, and excessive temperature can lead tosudden tire failure. The grade C corresponds toa level of performance which all passenger car tires must meet under the Federal Motor SafetyStandard No. 109. Grades B and A representhigher levels of performance on the laboratory
test wheel than the minimum required by law.Warning: The temperature grade for this tire isestablished for a tire that is properly inflated andnot overloaded. Excessive speed, underinflation,or excessive loading, either separately or incombination, can cause heat buildup and possibletire failure.
Wheel Alignment and Tire Balance
The tires and wheels on your vehicle were aligned andbalanced carefully at the factory to give you the longesttire life and best overall performance. Adjustmentsto wheel alignment and tire balancing will not benecessary on a regular basis. However, if you noticeunusual tire wear or your vehicle pulling to one sideor the other, the alignment might need to be checked.If you notice your vehicle vibrating when driving ona smooth road, the tires and wheels might need tobe rebalanced. See your dealer/retailer for proper diagnosis.
Wheel Replacement
Replace any wheel that is bent, cracked, or badlyrusted or corroded. If wheel nuts keep coming loose,the wheel, wheel bolts, and wheel nuts should bereplaced. If the wheel leaks air, replace it (except somealuminum wheels, which can sometimes be repaired).See your dealer/retailer if any of these conditions exist.
Your dealer/retailer will know the kind of wheelyou need.
Each new wheel should have the same load-carrying
capacity, diameter, width, offset, and be mounted thesame way as the one it replaces.
6-8

7/31/2019 2010 Corvette
http://slidepdf.com/reader/full/2010-corvette 393/471
If you need to replace any of your wheels, wheel boltsor wheel nuts, replace them only with new GM originalequipment parts. This way, you will be sure to havethe right wheel, wheel bolts, and wheel nuts for your vehicle.
{ WARNING:
Using the wrong replacement wheels, wheel bolts,or wheel nuts on your vehicle can be dangerous.It could affect the braking and handling of your vehicle, make your tires lose air and make youlose control. You could have a collision in whichyou or others could be injured. Always use the
correct wheel, wheel bolts, and wheel nuts for replacement.
{ WARNING:
Putting a used wheel on the vehicle is dangerous.You cannot know how it has been used or howfar it has been driven. It could fail suddenly andcause a crash. If you have to replace a wheel,use a new GM original equipment wheel.
Notice: The wrong wheel can also cause problemswith bearing life, brake cooling, speedometer or odometer calibration, headlamp aim, bumper height,vehicle ground clearance, and tire clearance to thebody and chassis.
{ WARNING:
Rust or dirt on a wheel, or on the parts towhich it is fastened, can make wheel nutsbecome loose after a time. The wheel couldcome off and cause a crash. When youchange a wheel, remove any rust or dirt fromplaces where the wheel attaches to the
vehicle. In an emergency, you can use acloth or a paper towel to do this; but be sureto use a scraper or wire brush later, if youneed to, to get all the rust or dirt off.
6-82

7/31/2019 2010 Corvette
http://slidepdf.com/reader/full/2010-corvette 394/471
Tightening Wheel Lug Nuts
{ WARNING:
Never use oil or grease on studs or the threads of
the wheel nuts. If you do, the wheel nuts mightcome loose and the wheel could fall off, causinga crash.
{ WARNING:
Incorrect wheel nuts or improperly tightened wheelnuts can cause the wheel to become loose andeven come off. This could lead to a crash. Be sureto use the correct wheel nuts. If you have toreplace them, be sure to get new GM originalequipment wheel nuts.
Notice: Improperly tightened wheel nuts can leadto brake pulsation and rotor damage. To avoidexpensive brake repairs, evenly tighten the wheelnuts in the proper sequence and to the proper torque specification.
Tighten the wheel lug nuts
firmly in a crisscrosssequence as shown.
6-8

7/31/2019 2010 Corvette
http://slidepdf.com/reader/full/2010-corvette 395/471
Tire Chains
{ WARNING:
Do not use tire chains. There is not enoughclearance. Tire chains used on a vehicle withoutthe proper amount of clearance can causedamage to the brakes, suspension, or other vehicle parts. The area damaged by the tirechains could cause you to lose control of thevehicle and you or others may be injured in acrash. Use another type of traction device onlyif its manufacturer recommends it for use onthe vehicle and tire size combination androad conditions. Follow that manufacturer'sinstructions. To help avoid damage to the vehicle,drive slowly, re‐adjust or remove the device if it is contacting the vehicle, and do not spin thewheels. If you do find traction devices that will fit,install them on the rear tires.
Lifting the Vehicle
{ WARNING:
Lifting a vehicle can cause an injury. The vehiclecan slip off the jack and roll over you or other people. You and they could be badly injured.Find a level place to lift your vehicle. To helpprevent the vehicle from moving:
1. Set the parking brake firmly.
2. Put an automatic transmission shift lever inP (Park), or shift a manual transmission to1 (First) or R (Reverse).
3. Turn off the engine.
To be even more certain the vehicle won't move,you can put blocks in front of and behind thewheels.
6-84

7/31/2019 2010 Corvette
http://slidepdf.com/reader/full/2010-corvette 396/471
{ WARNING:
Getting under a vehicle when it is jacked up isdangerous. If the vehicle slips off the jack, you
could be badly injured or killed. Never get under avehicle when it is supported only by a jack.
{ WARNING:
Raising the vehicle with the jack improperlypositioned can damage the vehicle or the vehicle
may fall and cause your or others injury.
If you ever use a jack to lift your vehicle, follow theinstructions that came with the jack, and be sure to usethe correct lifting points to avoid damaging your vehicle.
Notice: Lifting your vehicle improperly can damageyour vehicle and result in costly repairs not coveredby your warranty. To lift your vehicle properly,follow the advice in this part.
To help prevent vehicle damage:
. Be sure to place a block or pad between the jack and the vehicle.
. Make sure the jack you are using spans atleast two crossmember ribs.
. Lift only in the areas shown in the followingpictures.
For additional information, see your dealer/retailer and the Chevrolet Corvette service manual.
6-8
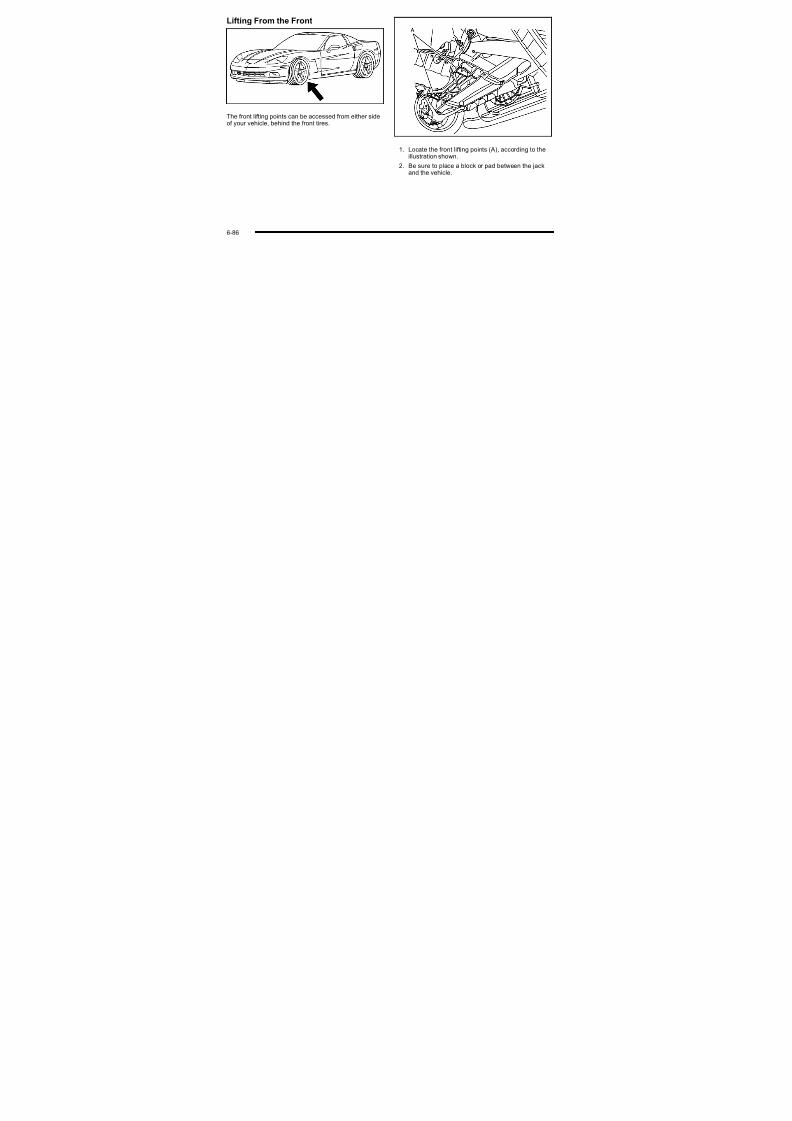
7/31/2019 2010 Corvette
http://slidepdf.com/reader/full/2010-corvette 397/471
Lifting From the Front
The front lifting points can be accessed from either sideof your vehicle, behind the front tires.
1. Locate the front lifting points (A), according to theillustration shown.
2. Be sure to place a block or pad between the jackand the vehicle.
6-86

7/31/2019 2010 Corvette
http://slidepdf.com/reader/full/2010-corvette 398/471
3. Lift the vehicle with the jack, making sure the jackspans at least two of the crossmember ribs (B).
Lifting From the Rear
The rear lifting points can be accessed from the rear of the vehicle, on either the driver's or passenger's side.
6-8

7/31/2019 2010 Corvette
http://slidepdf.com/reader/full/2010-corvette 399/471
1. Locate the rear lifting points (A), according to theillustration shown.
2. Be sure to place a block or pad between the jackand the vehicle.
3. Lift the vehicle with the jack, making sure the jackspans at least two of the crossmember ribs (B).
For more information, see Doing Your Own ServiceWork on page 6 ‑ 5 .
6-88

7/31/2019 2010 Corvette
http://slidepdf.com/reader/full/2010-corvette 400/471
If a Tire Goes Flat
It is unusual for a tire to blow out while you are driving,especially if you maintain the tires properly. If air goesout of a tire, it is much more likely to leak out slowly.See Tires on page 6 ‑ 62 for additional information.But if you should ever have a blowout, here are a few
tips about what to expect and what to do:
If a front tire fails, the flat tire creates a drag that pullsthe vehicle toward that side. Take your foot off theaccelerator pedal and grip the steering wheel firmly.Steer to maintain lane position, and then gently braketo a stop well out of the traffic lane.
A rear blowout, particularly on a curve, acts much like askid and may require the same correction you would
use in a skid. In any rear blowout remove your foot fromthe accelerator pedal. Get the vehicle under control bysteering the way you want the vehicle to go. It may bevery bumpy and noisy, but you can still steer. Gentlybrake to a stop, well off the road if possible.
The vehicle has no spare tire, no tire changingequipment, and no place to store a tire.
The vehicle, when new, had run-flat tires. This type of tire can operate effectively with no air pressure, so youwill not need to stop on the side of the road to changea flat tire. You can just keep on driving. The shorter the distance you drive and the slower the speed, thegreater the chance that the run-flat tire will not have tobe replaced. Run-flat tires perform so well without anyair that a Tire Pressure Monitor System (TPMS) is usedto alert you if a tire has lost pressure. See Run-Flat Tires on page 6 ‑ 69 and Tire Pressure Monitor Systemon page 6 ‑ 72 .
{ WARNING:
Special tools and procedures are required toservice a run-flat tire. If these special tools andprocedures are not used you or others couldbe injured and the vehicle could be damaged. Always be sure the proper tools and procedures,as described in the service manual, are used.
To order a service manual, see Service PublicationsOrdering Information on page 8 ‑ 16 .
6-8

7/31/2019 2010 Corvette
http://slidepdf.com/reader/full/2010-corvette 401/471
Appearance Care
Interior Cleaning
The vehicle's interior will continue to look its best if it is cleaned often. Although not always visible, dust
and dirt can accumulate on the upholstery. Dirt candamage carpet, fabric, leather, and plastic surfaces.Regular vacuuming is recommended to removeparticles from the upholstery. It is important to keepthe upholstery from becoming and remaining heavilysoiled. Soils should be removed as quickly as possible.The vehicle's interior may experience extremes of heatthat could cause stains to set rapidly.
Lighter colored interiors may require more frequent
cleaning. Use care because newspapers and garmentsthat transfer color to home furnishings may also transfer color to the vehicle's interior.
When cleaning the vehicle's interior, only use cleanersspecifically designed for the surfaces being cleaned.Permanent damage may result from using cleanerson surfaces for which they were not intended. Useglass cleaner only on glass. Remove any accidentalover-spray from other surfaces immediately. To prevent
over-spray, apply cleaner directly to the cleaning cloth.
Notice: Using abrasive cleaners when cleaningglass surfaces on the vehicle, could scratch theglass and/or cause damage to the rear window defogger. When cleaning the glass on the vehicle,use only a soft cloth and glass cleaner.
Many cleaners contain solvents that may become
concentrated in the vehicle's breathing space.Before using cleaners, read and adhere to all safetyinstructions on the label. While cleaning the vehicle'sinterior, maintain adequate ventilation by opening thevehicle's doors and windows.
Dust may be removed from small buttons and knobsusing a small brush with soft bristles.
Products that remove odors from the vehicle'supholstery and clean the vehicle's glass can be
obtained from your dealer/retailer.
6-90

7/31/2019 2010 Corvette
http://slidepdf.com/reader/full/2010-corvette 402/471
Do not clean the vehicle using:
. A knife or any other sharp object to remove a soilfrom any interior surface.
. A stiff brush. It can cause damage to the vehicle'sinterior surfaces.
. Heavy pressure or aggressive rubbing with acleaning cloth. Use of heavy pressure can damagethe interior and does not improve the effectivenessof soil removal.
. Laundry detergents or dishwashing soaps withdegreasers can leave residue that streaks andattracts dirt. For liquid cleaners, about 20 dropsper gallon (3.78 L) of water is a good guide.Use only mild, neutral-pH soaps.
.
Too much cleaner that saturates the upholstery.. Organic solvents such as naptha, alcohol, etc. that
can damage the vehicle's interior.
Fabric/Carpet
Use a vacuum cleaner with a soft brush attachmentfrequently to remove dust and loose dirt. A canister vacuum with a beater bar in the nozzle may only beused on floor carpet and carpeted floor mats. For anysoil, always try to remove it first with plain water or club
soda. Before cleaning, gently remove as much of thesoil as possible using one of the following techniques:
. For liquids: gently blot the remaining soil with apaper towel. Allow the soil to absorb into the paper towel until no more can be removed.
. For solid dry soils: remove as much as possibleand then vacuum.
6-9

7/31/2019 2010 Corvette
http://slidepdf.com/reader/full/2010-corvette 403/471
To clean:
1. Saturate a lint-free, clean white cloth with water or club soda.
2. Wring the cloth to remove excess moisture.
3. Start on the outside edge of the soil and gently rubtoward the center. Continue cleaning, using a cleanarea of the cloth each time it becomes soiled.
4. Continue to gently rub the soiled area until thecleaning cloth remains clean.
5. If the soil is not completely removed, use a mildsoap solution and repeat the cleaning process thatwas used with plain water.
If any of the soil remains, a commercial fabric cleaner or spot lifter may be necessary. When a commercial
upholstery cleaner or spot lifter is to be used, test asmall hidden area for colorfastness first. If the locallycleaned area gives any impression that a ring formationmay result, clean the entire surface.
After the cleaning process has been completed, a paper towel can be used to blot excess moisture from thefabric or carpet.
Coated Moldings
These moldings are around the hatch opening in therear area.
. When lightly soiled, wipe with a sponge or softlint-free cloth dampened with water.
.
When heavily soiled, use warm soapy water.
Leather
A soft cloth dampened with water can be used toremove dust. If a more thorough cleaning is necessary,a soft cloth dampened with a mild soap solution canbe used. Allow the leather to dry naturally. Do not useheat to dry. Never use steam to clean leather. Never use spot lifters or spot removers on leather. Many
commercial leather cleaners and coatings that aresold to preserve and protect leather may permanentlychange the appearance and feel of the leather and arenot recommended. Do not use silicone or wax-basedproducts, or those containing organic solvents to cleanthe vehicle's interior because they can alter theappearance by increasing the gloss in a non-uniformmanner. Never use shoe polish on leather.
6-92

7/31/2019 2010 Corvette
http://slidepdf.com/reader/full/2010-corvette 404/471
Instrument Panel, Vinyl, and Other Plastic Surfaces
A soft cloth dampened with water may be used toremove dust. If a more thorough cleaning is necessary,a clean soft cloth dampened with a mild soap solution
can be used to gently remove dust and dirt. Never use spot lifters or removers on plastic surfaces.Many commercial cleaners and coatings that aresold to preserve and protect soft plastic surfaces maypermanently change the appearance and feel of theinterior and are not recommended. Do not use siliconeor wax-based products, or those containing organicsolvents to clean the vehicle's interior because theycan alter the appearance by increasing the gloss ina non-uniform manner.
Some commercial products may increase gloss on theinstrument panel. The increase in gloss may causeannoying reflections in the windshield and even makeit difficult to see through the windshield under certainconditions.
Cargo Cover and Convenience Net
Wash with warm water and mild detergent, rinse with
cold water and tumble dry on low. Do not use chlorinebleach.
Care of Safety Belts
Keep belts clean and dry.
{ WARNING:
Do not bleach or dye safety belts. It may severelyweaken them. In a crash, they might not be ableto provide adequate protection. Clean safety beltsonly with mild soap and lukewarm water.
Weatherstrips
Silicone grease on weatherstrips will make them last
longer, seal better, and not stick or squeak. Applysilicone grease with a clean cloth. During very cold,damp weather frequent application may be required.See Recommended Fluids and Lubricants on
page 7 ‑ 10 .
6-9

7/31/2019 2010 Corvette
http://slidepdf.com/reader/full/2010-corvette 405/471
Washing Your Vehicle
The best way to preserve your vehicle's finish is to keepit clean by washing it often.
Notice: Certain cleaners contain chemicals that candamage the emblems or nameplates on the vehicle.Check the cleaning product label. If it states that itshould not be used on plastic parts, do not use it onthe vehicle or damage may occur and it would notbe covered by the warranty.
Do not wash the vehicle in direct sunlight. Use a car washing soap. Do not use cleaning agents that arepetroleum based or that contain acid or abrasives, asthey can damage the paint, metal or plastic on your vehicle. Approved cleaning products can be obtainedfrom your dealer/retailer. Follow all manufacturers'directions regarding correct product usage, necessarysafety precautions and appropriate disposal of anyvehicle care product.
Rinse the vehicle well, before washing and after toremove all cleaning agents completely. If they areallowed to dry on the surface, they could stain.
Dry the finish with a soft, clean chamois or an all-cottontowel to avoid surface scratches and water spotting.
Notice: If you drive the vehicle through anautomatic car wash that does not have enoughclearance for the wide rear tires and wheels, youcould damage the vehicle. Verify with the manager
of the car wash that the vehicle will fit beforeentering the car wash or use a touchless car wash.
High pressure car washes may cause water to enter thevehicle. Avoid using high pressure washes closer than12 inches (30 cm) to the surface of the vehicle. Use of power washers exceeding 1,200 psi (8 274 kPa) canresult in damage or removal of paint and decals.
Cleaning Exterior Lamps/Lenses
Use only lukewarm or cold water, a soft cloth and acar washing soap to clean exterior lamps and lenses.Follow instructions under Washing Your Vehicle on
pag e 6 ‑ 94.
6-94

7/31/2019 2010 Corvette
http://slidepdf.com/reader/full/2010-corvette 406/471
Finish Care
Occasional waxing or mild polishing of the vehicle byhand may be necessary to remove residue from thepaint finish. Approved cleaning products can beobtained from your dealer/retailer.
If the vehicle has a basecoat/clearcoat paint finish, theclearcoat gives more depth and gloss to the coloredbasecoat. Always use waxes and polishes that arenon-abrasive and made for a basecoat/clearcoat paintfinish.
Notice: Machine compounding or aggressivepolishing on a basecoat/clearcoat paint finishmay damage it. Use only non-abrasive waxes andpolishes that are made for a basecoat/clearcoatpaint finish on the vehicle.
Foreign materials such as calcium chloride and other salts, ice melting agents, road oil and tar, tree sap,bird droppings, chemicals from industrial chimneys,etc., can damage the vehicle's finish if they remainon painted surfaces. Wash the vehicle as soon aspossible. If necessary, use non-abrasive cleanersthat are marked safe for painted surfaces to removeforeign matter.
Exterior painted surfaces are subject to aging, weather and chemical fallout that can take their toll over a periodof years. To help keep the paint finish looking new, keepthe vehicle garaged or covered whenever possible.
Protecting Exterior Bright Metal Parts
Bright metal parts should be cleaned regularly to keeptheir luster. Washing with water is all that is usuallyneeded. However, chrome polish may be used onchrome or stainless steel trim, if necessary.
Use special care with aluminum trim. To avoid
damaging protective trim, never use auto or chromepolish, steam or caustic soap to clean aluminum. A coating of wax, rubbed to high polish, isrecommended for all bright metal parts.
ZR1 Carbon Fiber Panels
Carbon fiber panels can be washed and waxed like anyother panels.
Use a clear or black pigmented wax on the inner hoodcarbon fiber panel.
ZR1 Hood Window
The hood window on the ZR1 can be cleaned in thesame manner as the headlamp lenses. See Cleaning Exterior Lamps/Lenses on page 6 ‑ 94 for moreinformation.
6-9

7/31/2019 2010 Corvette
http://slidepdf.com/reader/full/2010-corvette 407/471
Windshield and Wiper Blades
Clean the outside of the windshield with glass cleaner.
Clean the rubber blades using a lint free cloth or paper towel soaked with windshield washer fluid or a milddetergent. Wash the windshield thoroughly whencleaning the blades. Bugs, road grime, sap, and abuildup of vehicle wash/wax treatments may causewiper streaking. Replace the wiper blades if they areworn or damaged.
Wipers can be damaged by:
. Extreme dusty conditions
. Sand and salt
. Heat and sun
.
Snow and ice, without proper removal
Removable Roof Panel
Notice: If you use a glass treatment and/or conditioner that contains ethyl alcohol or ethylsulfate on the roof panel, you could damage thepanel. The repairs would not be covered by your warranty. Only use a GM-approved glass cleaner
on the roof panel.
Special care is necessary when cleaning, removing,and/or storing the roof panel.
. Flush with water to remove dust and dirt, then drythe panel.
. Clean a transparent roof panel with GM GlassCleaner. Leave the cleaner on the panel for one minute, then wipe the panel with a soft,
lint-free cloth. Do not use glass cleaner on apainted roof panel.
. Do not use abrasive cleaning materials on either type of panel.
If water drops are frequently allowed to dry on the roof panel, impurities in the water will adhere to the top.These impurities may etch or mar the finish. When thepanel gets wet, dry it off.
6-96

7/31/2019 2010 Corvette
http://slidepdf.com/reader/full/2010-corvette 408/471
Convertible Top
The vehicle's convertible top should be cleaned often.However, high pressure car washes may cause water toenter your vehicle.
When you hand wash the top, do it in partial shade.Use a mild soap, lukewarm water and a soft sponge. A chamois or cloth may leave lint on the top, and abrush can chafe the threads in the top fabric. Do notuse detergents, harsh cleaners, solvents or bleachingagents.
Wet the entire vehicle and wash the top evenly to avoidspots or rings. Let the soap remain on the fabric for afew minutes. When the top is really dirty, use a mildfoam-type cleaner. Thoroughly rinse the entire vehicle,then let the top dry in direct sunlight.
To protect the convertible top:
. After you wash the vehicle, make sure the top iscompletely dry before you lower it.
. Do not get any cleaner on the vehicle's paintedfinish; it could leave streaks.
. If you decide to go through an automatic car wash,ask the manager if the equipment could damageyour top.
Aluminum or Chrome-Plated Wheelsand Trim
The vehicle may have either aluminum or chrome-plated wheels.
Keep the wheels clean using a soft clean cloth with mild
soap and water. Rinse with clean water. After rinsingthoroughly, dry with a soft clean towel. A wax may thenbe applied.
Notice: Chrome wheels and other chrome trimmay be damaged if the vehicle is not washedafter driving on roads that have been sprayedwith magnesium, calcium or sodium chloride.These chlorides are used on roads for conditionssuch as ice and dust. Always wash the vehicle's
chrome with soap and water after exposure.Notice: Using strong soaps, chemicals, abrasivepolishes, cleaners, brushes, or cleaners that containacid on aluminum or chrome-plated wheels, coulddamage the surface of the wheel(s). The repairswould not be covered by the vehicle warranty.Use only approved cleaners on aluminum or chrome-plated wheels.
The surface of these wheels is similar to the painted
surface of the vehicle. Do not use strong soaps,chemicals, abrasive polishes, abrasive cleaners,
6-9

7/31/2019 2010 Corvette
http://slidepdf.com/reader/full/2010-corvette 409/471
cleaners with acid, or abrasive cleaning brushes onthem because they could damage the surface. Do notuse chrome polish on aluminum wheels.
Notice: Using chrome polish on aluminum wheelscould damage the wheels. The repairs would not becovered by the vehicle warranty. Use chrome polish
on chrome wheels only.Use chrome polish only on chrome-plated wheels, butavoid any painted surface of the wheel, and buff off immediately after application.
Notice: Driving the vehicle through an automaticcar wash that has silicone carbide tire cleaningbrushes, could damage the aluminum or chrome-plated wheels. The repairs would not becovered by the vehicle warranty. Never drive a
vehicle that has aluminum or chrome-plated wheelsthrough an automatic car wash that uses siliconecarbide tire cleaning brushes.
Tires
To clean the tires, use a stiff brush with tire cleaner.
Notice: Using petroleum-based tire dressingproducts on the vehicle may damage the paint finish
and/or tires. When applying a tire dressing, alwayswipe off any overspray from all painted surfaces onthe vehicle.
Finish Damage
Any stone chips, fractures or deep scratches in thefinish should be repaired right away. Bare metal willcorrode quickly and may develop into major repair expense.
Minor chips and scratches can be repaired withtouch-up materials available from your dealer/retailer.Larger areas of finish damage can be corrected in your dealer's/retailer's body and paint shop.
Underbody Maintenance
Chemicals used for ice and snow removal and dustcontrol can collect on the underbody. If these arenot removed, corrosion and rust can develop on the
underbody parts such as fuel lines, frame, floor pan,and exhaust system even though they have corrosionprotection.
At least every spring, flush these materials from theunderbody with plain water. Clean any areas wheremud and debris can collect. Dirt packed in close areasof the frame should be loosened before being flushed.Your dealer/retailer or an underbody car washingsystem can do this.
6-98

7/31/2019 2010 Corvette
http://slidepdf.com/reader/full/2010-corvette 410/471

7/31/2019 2010 Corvette
http://slidepdf.com/reader/full/2010-corvette 411/471
Service Parts Identification Label
This label, on the inside of the glove box, has thefollowing information:
. Vehicle Identification Number (VIN)
. Model designation
. Paint information
. Production options and special equipment
Do not remove this label from the vehicle.
Electrical System
Add-On Electrical Equipment
Notice: Do not add anything electrical to the vehicleunless you check with your dealer/retailer first.Some electrical equipment can damage the vehicleand the damage would not be covered by thevehicle's warranty. Some add-on electricalequipment can keep other components fromworking as they should.
Add-on equipment can drain the vehicle battery, even if the vehicle is not operating.
The vehicle has an airbag system. Before attemptingto add anything electrical to the vehicle, see Servicing Your Airbag-Equipped Vehicle on page 2 ‑ 58 and Adding Equipment to Your Airbag-Equipped Vehicle on pag e 2 ‑ 59.
Headlamp Wiring
The headlamp wiring is protected by fuses in the fuseblock. An electrical overload will cause the lamps to turnoff. If this happens, have the headlamp wiring checkedright away.
Windshield Wiper Fuses
The windshield wiper motor is protected by a circuitbreaker and a fuse. If the motor overheats due to heavy
snow, etc., the wiper will stop until the motor cools.If the overload is caused by some electrical problem,have it fixed.
Power Windows and Other Power Options
Circuit breakers protect the power seats, power windows, and other power accessories. When the
current load is too heavy, the circuit breaker opens andcloses, protecting the circuit until the problem is fixedor goes away.
6-100

7/31/2019 2010 Corvette
http://slidepdf.com/reader/full/2010-corvette 412/471
Fuses and Circuit Breakers
The wiring circuits in the vehicle are protected fromshort circuits by a combination of J-Case fuses,mini-fuses and circuit breakers. This greatly reducesthe chance of fires caused by electrical problems.
Look at the silver-colored band inside the fuse. If theband is broken or melted, replace the fuse. Be sure youreplace a bad fuse with a new one of the identical sizeand rating.
If you ever have a problem on the road and do nothave a spare fuse, you can borrow one that hasthe same amperage. Just pick some feature of thevehicle that you can get along without – like theradio or cigarette lighter – and use its fuse, if it is thecorrect amperage. Replace it as soon as you can.
Vehicles with the ZR –1 package have an intercooler relay located on the fan shroud. See your dealer/ retailer.
Vehicles with the ZR –1 package also have a fuelsystem mini-fuse. It is located near the battery in thebattery storage compartment in the rear of the vehicle.
Instrument Panel Fuse Block
The instrument panel fuse block is located on thepassenger side of the vehicle, under the instrumentpanel and under the toe-board.
Remove the carpet and toe-board covering to accessthe fuse block by pulling at the top of each corner of thepanel. Open the fuse block cover to access the fuses.
You can remove fuses using the fuse puller.
6-10

7/31/2019 2010 Corvette
http://slidepdf.com/reader/full/2010-corvette 413/471
Fuses Usage
BCK/UP LAMP Reverse Lamps
BLANK Not UsedBLANK Not Used
Fuses Usage
BTSI SOL/STRWHL LCK
Brake Transmission Shift Interlock,Steering Wheel Column Lock
CLSTR/HUD Cluster, Heads‐Up Display
CRUISESWITCH
Cruise Control Switch
6-102

7/31/2019 2010 Corvette
http://slidepdf.com/reader/full/2010-corvette 414/471
Fuses Usage
CTSY/LAMP Courtesy Lamp
DR LCK Door Locks
DRIV DRSWITCH
Driver Door Switch
ECM Engine Control Module (ECM)
EXH MDLExhaust Module (Z06 & ZR1),Spare (Coupe and Convertible)
GM LANRUN/CRNK
GM LAN Devices
HTD SEAT/ WPR RLY
Heated Seat, Wiper Relays
HVAC/ PWR SND
Heating. Ventilation/Air Conditioning,Power Sounder
IGN SWTCH/ INTR SNSR
Ignition Switch, Intrusion Sensor
ISRVM/HVACElectric Inside Rearview Mirror,Heating, Ventilation, Air Conditioning
ONSTAR OnStar ®
RDO/S‐BAND Radio, S‐Band
REAR FOG/ ALDL/TOPSWTCH
Rear Fog Lamp, Assembly LineDiagnostic Link Connector,Convertible Top Switch
REVERSELAMPS
Reverse Lamps
Fuses Usage
RUN CRNK Run/Crank Relay
SDM/AOSSWTCH
AIRBAG
Sensing and Diagnostic Module, Automatic Occupant Sensing Module, Airbag
SPARE Spare
SPARE Spare
SPARE Spare
SPARE Spare
STOP LAMP Stop Lamp
SWC DM Steering Wheel Dimming
TELESWTCH/MSM
Telescope Switch, Memory SeatModule
TONNEAURELSE
Tonneau Release
TPA Tonneau Pulldown Actuator
Fuses Usage
BLANK Blank
BLANK Blank
FUEL DR
RELSE Fuel Door Release
6-10

7/31/2019 2010 Corvette
http://slidepdf.com/reader/full/2010-corvette 415/471
Fuses Usage
REAR/FOG Rear Fog Lamps
TONNEAURELSE
Tonneau Release
TRUNK RELSE Trunk Release
Fuses Usage
AUX PWR Auxiliary Power
BLANK Not Used
BLANK Not Used
BLANK Not Used
BLANK Not Used
BLANK Not Used
BLANK Not Used
BLANK Not Used
DRVRHTD SEAT
Driver Heated Seat
LTR Cigarette Lighter
Fuses Usage
PASSHTD SEAT
Passenger Heated Seat
PWRSEATS MSM
Power Seats, Memory Seat Module
PWR/ WNDWS/
TRUNK/FUELRELSE
Power Windows, Trunk, Fuel Door Release
TRUNK RELSE Trunk Release
WPR DWELL Wiper Dwell
WPR/WSW Windshield Wiper/Washer
Engine Compartment Fuse Block
There is one fuse block in the engine compartmentlocated on the passenger side of the vehicle.See Engine Compartment Overview on page 6 ‑ 14for more information on location.
Notice: Spilling liquid on any electrical componentson the vehicle may damage it. Always keep thecovers on any electrical component.
6-104

7/31/2019 2010 Corvette
http://slidepdf.com/reader/full/2010-corvette 416/471
For ZR1 models, the Fuel System fuse is located at thebattery.
Fuse Usage
1Transmission Control Module/ Transmission
2 Horn, Alternator Sense
Fuse Usage
3Antilock Braking System (ABS)/RealTime Damping
4 Wiper
5 Stoplamps/Back-Up Lamps
6-10

7/31/2019 2010 Corvette
http://slidepdf.com/reader/full/2010-corvette 417/471
Fuse Usage
6 Oxygen Sensor
7 Battery Main 5
8 Parking Lamps
9Powertrain Relay Input/Electronic
Throttle Control10 Manual Transmission Solenoids
11 Antilock Braking System
12 Odd Numbered Fuel Injectors
13Electronic Suspension Control(Option)
14Canister Purge Solenoid,Mass Air Flow Sensor
15 Air Condit ioner Compressor 16 Even Numbered Fuel Injectors
17 Windshield Washer
18 Headlamp Washer
19 Passenger Side Low-Beam Headlamp
20 Fuel Pump (except ZR1)
21 Driver Side Low-Beam Headlamp
22 Front Fog Lamp
23Passenger Side High-BeamHeadlamp
Fuse Usage
24 Driver Side High-Beam Headlamp
56Engine Control Module (ECM)/ Transmission Control Module (TCM)/ Easy Key Module
J-Style Fuses Usage
25 Cooling Fan
26 Battery Main 3
27 Antilock Brake System
28Heating/Ventilation/Air ConditioningBlower
29 Battery Main 2
30 Starter 31 Audio Amplifier
32 Intercooler Pump
33 Battery Main 1
Micro-Relays Usage
34 Horn
35 Air Conditioning Compressor
36 Windshield Washer
37 Parking Lamps, Foglamps
6-106

7/31/2019 2010 Corvette
http://slidepdf.com/reader/full/2010-corvette 418/471
Micro-Relays Usage
38 Front Fog Lamp
39 High-Beam Headlamp
46 Headlamp Washer
55 Fuel Pump (except ZR1)
Mini-Relays Usage
40 Rear Defog
41 Windshield Wiper High/Low
42 Windshield Wiper Run/Accessory
43 Crank
44 Powertrain Ignition 1
45 Windshield Wiper On/Off
47 Low-Beam Headlamp
Spare Fuses Usage
48 Spare
49 Spare
50 Spare
51 Spare
52 Spare53 Spare
54 Fuse Puller
Diodes Usage
§ Diode 1
§ Wiper
§ Diode 2
6-10

7/31/2019 2010 Corvette
http://slidepdf.com/reader/full/2010-corvette 419/471
Capacities and SpecificationsThe following approximate capacities are given in English and metric conversions.
See Recommended Fluids and Lubricants on page 7 ‑ 10 for more information.
ApplicationCapacities
Metric English
Air Conditioning Refrigerant R134a
For the air conditioning system refrigerant chargeamount, see the refrigerant caution label locatedunder the hood. See your dealer/retailer for more
information.
Cooling System
6.2L LS3 V8 Engine 11.3 L 11.9 qt
6.2L LS9 V8 Supercharged Engine– Cooling System 12.0 L 12.7 qt
6.2L LS9 V8 Supercharged Engine–
Supercharger Intercooler Cooling System 4.9 L 5.2 qt
7.0L LS7 V8 Engine 11.3 L 11.9 qt
Engine Oil with Filter
6.2L LS3 V8 5.7 L 6.0 qt
6.2L LS3 V8 with Z52 Dry Sump Oil System 9.9 L 10.5 qt
6.2L LS9 V8 Supercharged Engine 9.9 L 10.5 qt
7.0L LS7 V8 Engine 9.9 L 10.5 qt
Fuel Tank 68.0 L 18.0 gal
6-108

7/31/2019 2010 Corvette
http://slidepdf.com/reader/full/2010-corvette 420/471
ApplicationCapacities
Metric English
Transmission Fluid
Automatic Transmission (Pan Removal and Filter Replacement)
6.2 L 6.5 qt
Manual Transmission–
Base 3.5 L 3.6 qtManual Transmission – Z16 4.0 L 4.2 qt
Manual Transmission – Z06 4.3 L 4.5 qt
Manual Transmission – ZR1 4.3 L 4.5 qt
Wheel Nut Torque 140Y 100 lb ft
All capacities are approximate. When adding, be sure to fill to the approximate level, as recommended in this manual.Recheck fluid level after filling
Engine Specifications
Engine VIN Code Transmission Spark Plug Gap Firing Order
6.2L LS3 V8 WAutomatic
Manual1.016 mm (0.040 in) 1 –8 –7 –2 –6 –5 –4 –3
6.2L LS9 V8 T Manual 1.016 mm (0.040 in) 1 –8 –7 –2 –6 –5 –4 –3
7.0L LS7 V8 E Manual 1.016 mm (0.040 in) 1 –8 –7 –2 –6 –5 –4 –3
6-10

7/31/2019 2010 Corvette
http://slidepdf.com/reader/full/2010-corvette 421/471
Engine Data
Engine Horsepower Torque Displacement Compression Ratio
6.2L LS3 V8 withoutoption NPP
430 @ 5900 rpm 424 lb ft @ 4600 rpm 6.2L 10.69:1
6.2L LS3 V8 withoption NPP
436 @ 5900 rpm 428 lb ft @ 4600 rpm 6.2L 10.69:1
6.2L LS9 V8Supercharged
638 @ 6500 rpm 604 lb ft @ 3800 rpm 6.2L 9.10:1
7.0L LS7 V8 505 @ 6300 rpm 470 lb ft @ 4800 rpm 7.0L 11.00:1
6-110

7/31/2019 2010 Corvette
http://slidepdf.com/reader/full/2010-corvette 422/471
Section 7 Maintenance Schedule
Maintenance Schedule . . . . . . . . . . . . . . . . . . . . . . . . . . . . 7 - 2I n t r o d u c t i o n . . . . . . . . . . . . . . . . . . . . . . . . . . . . . . . . . . . . . 7 - 2Scheduled Maintenance . . . . . . . . . . . . . . . . . . . . . . . . 7-3Owner Checks and Services . . . . . . . . . . . . . . . . . . . . 7-8
Recommended Fluids and Lubricants . . . . . . . . . . 7-10Maintenance Replacement Parts . . . . . . . . . . . . . . 7-12En g in e Driv e Be lt Ro u tin g . . . . . . . . . . . . . . . . . . . . . 7 -1 3Maintenance Record . . . . . . . . . . . . . . . . . . . . . . . . . . . 7-14
7-

7/31/2019 2010 Corvette
http://slidepdf.com/reader/full/2010-corvette 423/471
Maintenance Schedule
Introduction
Notice: Maintenance intervals, checks, inspections,recommended fluids, and lubricants are necessaryto keep this vehicle in good working condition.
Damage caused by failure to follow scheduledmaintenance might not be covered by the vehiclewarranty.
Proper vehicle maintenance helps to keep the vehicle ingood working condition, improves fuel economy, andreduces vehicle emissions for better air quality.
Because of all the different ways people use vehicles,maintenance needs vary. The vehicle might need
more frequent checks and services. Please read theinformation under Scheduled Maintenance. To keep thevehicle in good condition, see your dealer/retailer.
The maintenance schedule is for vehicles that:
. carry passengers and cargo within recommendedlimits on the Tire and Loading Information label.See Loading the Vehicle on page 5 ‑ 28 .
. are driven on reasonable road surfaces within legaldriving limits.
. use the recommended fuel. See Gasoline Octaneo n p a g e 6 ‑ 7 .
{ WARNING:
Performing maintenance work on a vehicle can bedangerous. In trying to do some jobs, you can beseriously injured. Do your own maintenance work
only if you have the required know-how and theproper tools and equipment for the job. If youhave any doubt, see your dealer/retailer to have aqualified technician do the work. See Doing Your Own Service Work on page 6 ‑ 5 .
At your General Motors dealer/retailer, you can becertain that you will receive the highest level of serviceavailable. Your dealer/retailer has specially trained
service technicians, uses genuine GM replacementparts, as well as, up to date tools and equipment toensure fast and accurate diagnostics.
The proper replacement parts, fluids, and lubricants touse are listed in Recommended Fluids and Lubricantson page 7 ‑ 10 and Maintenance Replacement Parts on
pag e 7 ‑ 12 . We recommend the use of genuine partsfrom your dealer/retailer.
7-2

7/31/2019 2010 Corvette
http://slidepdf.com/reader/full/2010-corvette 424/471
Scheduled Maintenance
When the Change Engine Oil MessageDisplays
Change engine oil and filter. See Engine Oil on pag e 6 ‑ 19. An Emission Control Service.
When the Change Engine Oil message displays,service is required for the vehicle as soon as possible,within the next 1 000 km/600 miles. If driving under thebest conditions, the engine oil life system might notindicate the need for vehicle service for more than ayear. The engine oil and filter must be changed at leastonce a year and the oil life system must be reset. Your dealer/retailer has trained service technicians who willperform this work and reset the system. If the engine
oil life system is reset accidentally, service the vehiclewithin 5 000 km/3,000 miles since the last service.Reset the oil life system whenever the oil is changed.See Engine Oil Life System on page 6 ‑ 25 .
When the Change Engine Oil message displays,certain services, checks, and inspections arerequired. The services described for Maintenance I
should be performed at every engine oil change.The services described for Maintenance II shouldbe performed when:
. Maintenance I was performed the last time the
engine oil was changed.. It has been 10 months or more since the Change
Engine Oil message has displayed or since the lastservice.
Maintenance I
. Change engine oil and filter. See Engine Oil on page 6 ‑ 19. An Emission Control Service.
.
Engine coolant level check. See Engine Coolant on page 6 ‑ 34.
. Windshield washer fluid level check. SeeWindshield Washer Fluid on page 6 ‑ 42 .
. Tire inflation check. See Inflation - Tire Pressureon page 6 ‑ 70 .
7-
. Tire wear inspection See Tire Inspection and . Body hinges and latches key lock cylinders any

7/31/2019 2010 Corvette
http://slidepdf.com/reader/full/2010-corvette 425/471
. Tire wear inspection. See Tire Inspection and Rotation on page 6 ‑ 76 .
. Fluids visual leak check (or every 12 months,whichever occurs first). A leak in any system mustbe repaired and the fluid level checked.
. Engine air cleaner filter inspection (vehiclesdriven in dusty conditions only). See Engine Air
Cleaner/Filter on page 6 ‑ 27 .
. Brake system inspection (or every 12 months,whichever occurs first).
Maintenance II
. Perform all services described in Maintenance I.
. Steering and suspension inspection. Visualinspection for damaged, loose, or missing parts
or signs of wear.. Engine cooling system inspection. Visual
inspection of hoses, pipes, fittings, and clampsand replacement, if needed.
. Windshield wiper blade inspection for wear,cracking, or contamination and windshield andwiper blade cleaning, if contaminated. SeeWindshield and Wiper Blades on page 6 ‑ 96 .Worn or damaged wiper blade replacement.
See Windshield Wiper Blade Replacement on pag e 6 ‑ 59.
. Body hinges and latches, key lock cylinders, anyfolding seat hardware, and rear compartment,hood, and console door hinges and latcheslubrication. See Recommended Fluids and Lubricants on page 7 ‑ 10 . More frequentlubrication may be required when vehicle isexposed to a corrosive environment. Applying
silicone grease on weatherstrips with a clean clothmakes them last longer, seal better, and not stickor squeak.
. Restraint system component check. See Checking the Restraint Systems on page 2 ‑ 60 .
. Engine air cleaner filter inspection. See Engine Air Cleaner/Filter on page 6 ‑ 27 .
. Passenger compartment air filter replacement(or every 12 months, whichever occurs first). More
frequent replacement may be required if vehicle isdriven regularly under dusty conditions.
Additional Required Services
At Each Fuel Stop. Engine oil level check. See Engine Oil on
page 6 ‑ 19.
. Engine coolant level check. See Engine Coolant
on page 6 ‑
34.. Windshield washer fluid level check. See
Windshield Washer Fluid on page 6 ‑ 42 .
7-4
O M th. Exhaust system and nearby heat shields

7/31/2019 2010 Corvette
http://slidepdf.com/reader/full/2010-corvette 426/471
Once a Month. Tire inflation check. See Inflation - Tire Pressure
on page 6 ‑ 70 .
. Tire wear inspection. See Tire Inspection and Rotation on page 6 ‑ 76 .
Once a Year . Starter switch check. See Owner Checks and
Services on page 7 ‑ 8 .
. Parking brake and automatic transmission P (Park)mechanism check. See Owner Checks and Services on page 7 ‑ 8 .
. Automatic transmission shiftlock control systemcheck. See Owner Checks and Services on
page 7 ‑ 8 .
. Engine cooling system and pressure cap pressurecheck. Radiator and air conditioning condenser outside cleaning. See Cooling System (Engine) on
pag e 6 ‑ 32 or Cooling System (Intercooler) on pag e 6 ‑ 33 .
. Exhaust system and nearby heat shieldsinspection for loose or damaged components.
. Accelerator pedal check for damage, high effort,or binding. Replace if needed.
Once Every Two Years. Clutch hydraulic system drain, flush, and refill.
Service at a regular service interval (I or II) everytwo years. This service can be complex; have your dealer/retailer perform this service. See Hydraulic Clutch on page 6 ‑ 31.
First Engine Oil Change After Every40 000 km/25,000 Miles. Fuel system inspection for damage or leaks.
. ZR1 Only: Engine air cleaner filter replacement.
See Engine Air Cleaner/Filter on page 6 ‑ 27 .
7-
Fi t E i Oil Ch Aft E Fi t E i Oil Ch Aft E

7/31/2019 2010 Corvette
http://slidepdf.com/reader/full/2010-corvette 427/471
First Engine Oil Change After Every80 000 km/50,000 Miles. Engine air cleaner filter replacement. See Engine
Air Cleaner/Filter on page 6 ‑ 27 .
. Automatic transmission fluid change (severeservice) for vehicles mainly driven in heavy city
traffic in hot weather, in hilly or mountainousterrain, when frequently towing a trailer, or usedfor taxi, police, or delivery service. See Automatic Transmission Fluid on page 6 ‑ 31.
First Engine Oil Change After Every160 000 km/100,000 Miles. Automatic transmission fluid change (normal
service). See Automatic Transmission Fluid on
pag e 6 ‑ 31.
. Spark plug replacement and spark plug wiresinspection. An Emission Control Service.
First Engine Oil Change After Every240 000 km/150,000 Miles. Engine cooling system drain, flush, and refill,
cooling system and cap pressure check, andcleaning of outside of radiator and air conditioningcondenser (or every 5 years, whichever occursfirst). See Engine Coolant on page 6 ‑ 34. AnEmission Control Service.
. ZR1 Only: Intercooler system drain, flush, and refill(or every 5 years, whichever occurs first). SeeEngine Coolant on page 6 ‑ 34.
. Engine accessory drive belt inspection for fraying,excessive cracks, or obvious damage andreplacement, if needed. An Emission Control Service.
7-6
Sched led Maintenance

7/31/2019 2010 Corvette
http://slidepdf.com/reader/full/2010-corvette 428/471
Scheduled Maintenance
Service Maintenance I Maintenance II
Change engine oil and filter. Reset oil life system. • •
Engine coolant level check. • •
Windshield washer fluid level check. • •
Tire inflation pressures check. • •
Tire wear inspection. • •
Fluids visual leak check. • •
Engine air cleaner filter inspection (vehicles driven in dusty conditions only). • •
Brake system inspection. • •
Steering and suspension inspection. •
Engine cooling system inspection. •
Windshield wiper blades inspection. •
Body components lubrication. •
Restraint system components check. •
Engine air cleaner filter inspection (vehicles not driven in dusty conditions). •
Passenger compartment air filter replacement. •
7-
Owner Checks and Services The vehicle should start only when the clutch

7/31/2019 2010 Corvette
http://slidepdf.com/reader/full/2010-corvette 429/471
Owner Checks and Services
Starter Switch Check
{ WARNING:
When you are doing this inspection, the vehiclecould move suddenly. If the vehicle moves, you or others could be injured.
1. Before starting this check, be sure there is enoughroom around the vehicle.
2. Firmly apply both the parking brake and the regular brake. See Parking Brake on page 3 ‑ 34.
Do not use the accelerator pedal, and be ready toturn off the engine immediately if it starts.
3. For automatic transmission vehicles, try to start theengine in each gear. The vehicle should start onlyin P (Park) or N (Neutral). If the vehicle starts inany other position, contact your dealer/retailer for service.
For manual transmission vehicles, put the
shift lever in Neutral, push the clutch pedaldown halfway, and try to start the engine.
The vehicle should start only when the clutchpedal is pushed down all the way to the floor. If thevehicle starts when the clutch pedal is not pushedall the way down, contact your dealer/retailer for service.
Automatic Transmission Shift Lock
Control System Check
{ WARNING:
When you are doing this inspection, the vehiclecould move suddenly. If the vehicle moves, you or others could be injured.
1. Before starting this check, be sure there is enoughroom around the vehicle. It should be parked on alevel surface.
2. Firmly apply the parking brake. See Parking Brakeon page 3 ‑ 34.
Be ready to apply the regular brake immediately if the vehicle begins to move.
3. With the engine off and without applying the
regular brake, try to move the shift lever out of P (Park) with normal effort. If the shift lever movesout of P (Park), contact your dealer/retailer for service.
7-8
Parking Brake and Automatic Park on a fairly steep hill with the vehicle facing

7/31/2019 2010 Corvette
http://slidepdf.com/reader/full/2010-corvette 430/471
Parking Brake and AutomaticTransmission P (Park) MechanismCheck
{ WARNING:
When you are doing this check, the vehicle couldbegin to move. You or others could be injured andproperty could be damaged. Make sure there isroom in front of the vehicle in case it begins toroll. Be ready to apply the regular brake at onceshould the vehicle begin to move.
Park on a fairly steep hill, with the vehicle facingdownhill. Keeping your foot on the regular brake, setthe parking brake.
. To check the parking brake's holding ability: Withthe engine running and the transmission inN (Neutral), slowly remove foot pressure from theregular brake pedal. Do this until the vehicle is held
by the parking brake only.. To check the P (Park) mechanism's holding ability:
With the engine running, shift to P (Park). Thenrelease the parking brake followed by the regular brake.
Contact your dealer/retailer if service is required.
7-
Recommended Fluids and Usage Fluid/Lubricant

7/31/2019 2010 Corvette
http://slidepdf.com/reader/full/2010-corvette 431/471
Recommended Fluids andLubricants
Fluids and lubricants identified below by name, partnumber, or specification can be obtained from your dealer/retailer.
Usage Fluid/Lubricant
Engine Oil
The engine requires a special engineoil meeting GM Standard GM4718M.Oils meeting this standard can beidentified as synthetic, and shouldalso be identified with the AmericanPetroleum Institute (API) Certified for Gasoline Engines starburst symbol.However, not all synthetic API oilswith the starburst symbol will meet
this GM standard. Look for and useonly an oil that meets GM StandardGM4718M. For the proper viscosity,see Engine Oil on page 6 ‑ 19.
Engine Coolant
50/50 mixture of clean, drinkablewater and use only DEX-COOL®
Coolant. See Engine Coolant on
pa ge 6 ‑ 34 .
Usage Fluid/Lubricant
ZR1 Only:Intercooler
System
50/50 mixture of clean, drinkablewater and use only DEX-COOL®
Coolant. See Engine Coolant on
pa ge 6 ‑ 34 .
Hydraulic Brake
System
DOT 3 Hydraulic Brake Fluid
(GM Part No. U.S. 88862806,in Canada 88862807).
WindshieldWasher
Optikleen® Washer Solvent.
Hydraulic ClutchSystem
Hydraulic Clutch Fluid. Use onlyGM Part No. U.S. 88958860,in Canada 88901244,Super DOT-4 brake fluid.
Power SteeringSystem
GM Power Steering Fluid
(GM Part No. U.S. 89021184,in Canada 89021186).
ChassisLubrication
(Rear Toe‐LinkOuter Ends with
ZO6, ZR1,or Z51 Option)
Chassis Lubricant(GM Part No. U.S. 12377985, inCanada 88901242) or lubricantmeeting requirements of NLGI #2,Category LB or GC-LB.
7-10
Usage Fluid/Lubricant Usage Fluid/Lubricant

7/31/2019 2010 Corvette
http://slidepdf.com/reader/full/2010-corvette 432/471
Usage Fluid/Lubricant
ManualTransmission
Manual Transmission Fluid(GM Part No. U.S. 88861800,in Canada 88861801).
AutomaticTransmission
DEXRON® -VI Automatic TransmissionFluid.
Key LockCylinders
Multi-Purpose Lubricant, Superlube(GM Part No. U.S. 12346241,in Canada 10953474).
Rear Axle(Limited-SlipDifferential)
DEXRON® LS Gear Oil. See Rear Axle on page 6 ‑ 55 .
Hood Latch Assembly,Secondary
Latch, Pivots,Spring
Anchor, andRelease Pawl
Lubriplate Lubricant Aerosol(GM Part No. U.S. 12346293,
in Canada 992723) or lubricantmeeting requirements of NLGI #2,Category LB or GC-LB.
Usage Fluid/Lubricant
Hood and Door Hinges
Multi-Purpose Lubricant, Superlube(GM Part No. U.S. 12346241,in Canada 10953474).
WeatherstripConditioning
Weatherstrip Lubricant(GM Part No. U.S. 3634770,
in Canada 10953518) or Dielectric Silicone Grease(GM Part No. U.S. 12345579,in Canada 992887).
7-1
Maintenance Replacement Parts

7/31/2019 2010 Corvette
http://slidepdf.com/reader/full/2010-corvette 433/471
Maintenance Replacement Parts
Replacement parts identified below by name, part number, or specification can be obtained from your dealer/retailer.
Part GM Part Number ACDelco Part Number
Engine Air Cleaner/Filter
6.2L LS3 V8 and 7.0L LS7 V8 Engines 15776148 A3077C
6.2L LS9 V8 Supercharged Engine 25940997 A3107C
Engine Oil Filter
6.2L LS3 V8 Engine 89017524 PF48
6.2L LS3 V8 Engine with Z52 Dry Sump Oil System 12626224 UPF-48R
6.2L LS9 V8 Supercharged Engine 12626224 UPF-48R
7.0L LS7 V8 Engine 12626224 UPF-48R
Passenger Compartment Air Filter Element 15848592 CF139
Spark Plug
6.2L LS3 V8 Engine 12621258 41-110
6.2L LS9 V8 Supercharged Engine 12571165 41-104
7.0L LS7 V8 Engine 12571165 41-104
Wiper Blades — 52.5 cm (20.7 in)
Driver Side 12335960 —
Passenger Side 12335961 —
7-12
Engine Drive Belt Routing

7/31/2019 2010 Corvette
http://slidepdf.com/reader/full/2010-corvette 434/471
Engine Drive Belt Routing
6.2L LS3 V8, 7.0L LS7 V8 Engines
6.2L LS9 V8 Engine
7-1
Maintenance Record

7/31/2019 2010 Corvette
http://slidepdf.com/reader/full/2010-corvette 435/471
Maintenance Record
After the scheduled services are performed, record the date, odometer reading, who performed the service, and thetype of services performed in the boxes provided. Retain all maintenance receipts.
Maintenance Record
DateOdometer
Reading
Serviced By Services Performed
7-14
Maintenance Record (cont'd)

7/31/2019 2010 Corvette
http://slidepdf.com/reader/full/2010-corvette 436/471
Maintenance Record (cont d)
DateOdometer
ReadingServiced By Services Performed
7-1
Maintenance Record (cont'd)

7/31/2019 2010 Corvette
http://slidepdf.com/reader/full/2010-corvette 437/471
a te a ce eco d (co t d)
DateOdometer
ReadingServiced By Services Performed
7-16
Section 8 Customer Assistance Information

7/31/2019 2010 Corvette
http://slidepdf.com/reader/full/2010-corvette 438/471
Section 8 Customer Assistance Information
Customer Assistance and Information . . . . . . . . . . . 8-2Customer Satisfaction Procedure . . . . . . . . . . . . . . . 8-2Online Owner Center . . . . . . . . . . . . . . . . . . . . . . . . . . . . 8 -5Customer Assistance for Text Telephone (TTY)
Users . . . . . . . . . . . . . . . . . . . . . . . . . . . . . . . . . . . . . . . . . 8-6Customer Assistance Offices . . . . . . . . . . . . . . . . . . . 8-6GM Mobility Reimbursement Program . . . . . . . . . . . 8-7Roadside Assistance Program .................. 8-7Scheduling Service Appointments . . . . . . . . . . . . . 8-10Courtesy Transportation Program . . . . . . . . . . . . . . 8-10Coll is ion Damage Repair . . . . . . . . . . . . . . . . . . . . . . 8-12
Reporting Safety Defects . . . . . . . . . . . . . . . . . . . . . . . . 8-15Reporting Safety Defects to the United States
Government . . . . . . . . . . . . . . . . . . . . . . . . . . . . . . . . . 8-15Reporting Safety Defects to the Canadian
Government . . . . . . . . . . . . . . . . . . . . . . . . . . . . . . . . . 8-16Reporting Safety Defects to General Motors . . . 8-16Service Publications Ordering Information . . . . . 8-16
Vehicle Data Recording and Privacy . . . . . . . . . . . . . 8-18Event Data Recorders . . . . . . . . . . . . . . . . . . . . . . . . . 8-18OnStar ® . . . . . . . . . . . . . . . . . . . . . . . . . . . . . . . . . . . . . . . 8-19N a v i g a t i o n S y s t e m . . . . . . . . . . . . . . . . . . . . . . . . . . . . . 8 - 1 9Radio Frequency Identification (RFID) . . . . . . . . . 8-20Radio Frequency Statement ................... 8-20
8-
Customer Assistance and STEP TWO : If after contacting a member of dealershipmanagement it appears your concern cannot be

7/31/2019 2010 Corvette
http://slidepdf.com/reader/full/2010-corvette 439/471
Information
Customer Satisfaction Procedure
Your satisfaction and goodwill are important to your dealer and to Chevrolet. Normally, any concerns withthe sales transaction or the operation of the vehiclewill be resolved by the dealer's sales or servicedepartments. Sometimes, however, despite the bestintentions of all concerned, misunderstandings canoccur. If your concern has not been resolved to your satisfaction, the following steps should be taken:
STEP ONE : Discuss your concern with a member of dealership management. Normally, concerns canbe quickly resolved at that level. If the matter hasalready been reviewed with the sales, service, or partsmanager, contact the owner of the dealership or thegeneral manager.
management, it appears your concern cannot beresolved by the dealership without further help, in theU.S., call the Chevrolet Customer Assistance Center at 1-800-222-1020. In Canada, call General Motorsof Canada Customer Communication Centre at1-800-263-3777 (English), or 1-800-263-7854 (French).
We encourage you to call the toll-free number in order to give your inquiry prompt attention. Have the followinginformation available to give the Customer AssistanceRepresentative:
. Vehicle Identification Number (VIN). This isavailable from the vehicle registration or title, or the plate at the top left of the instrument panel
and visible through the windshield.
. Dealership name and location.
. Vehicle delivery date and present mileage.
When contacting Chevrolet, remember that your concern will likely be resolved at a dealer's facility.That is why we suggest following Step One first.
8-2
STEP THREE — U.S. Owners : Both General Motorsand your dealer are committed to making sure you are
You may contact the BBB Auto Line Program using thetoll free telephone number or write them at the following

7/31/2019 2010 Corvette
http://slidepdf.com/reader/full/2010-corvette 440/471
and your dealer are committed to making sure you arecompletely satisfied with your new vehicle. However,if you continue to remain unsatisfied after following theprocedure outlined in Steps One and Two, you can filewith the Better Business Bureau (BBB) Auto LineProgram to enforce your rights.
The BBB Auto Line Program is an out of court programadministered by the Council of Better Business Bureausto settle automotive disputes regarding vehicle repairsor the interpretation of the New Vehicle LimitedWarranty. Although you may be required to resort tothis informal dispute resolution program prior to filing acourt action, use of the program is free of charge andyour case will generally be heard within 40 days. If youdo not agree with the decision given in your case, youmay reject it and proceed with any other venue for relief available to you.
toll-free telephone number or write them at the followingaddress:
BBB Auto Line ProgramCouncil of Better Business Bureaus, Inc.4200 Wilson BoulevardSuite 800
Arlington, VA 22203-1838Telephone: 1-800-955-5100dr.bbb.org/goauto
This program is available in all 50 states and theDistrict of Columbia. Eligibility is limited by vehicle age,mileage, and other factors. General Motors reserves theright to change eligibility limitations and/or discontinueits participation in this program.
8-
STEP THREE — Canadian Owners : In the event thatyou do not feel your concerns have been addressed
For further information concerning eligibility in theCanadian Motor Vehicle Arbitration Plan (CAMVAP)

7/31/2019 2010 Corvette
http://slidepdf.com/reader/full/2010-corvette 441/471
you do not feel your concerns have been addressedafter following the procedure outlined in Steps 1 and 2,General Motors of Canada Limited wants you to beaware of its participation in a no-charge Mediation/
Arbitration Program. General Motors of Canada Limitedhas committed to binding arbitration of owner disputesinvolving factory-related vehicle service claims. Theprogram provides for the review of the facts involvedby an impartial third party arbiter, and may include aninformal hearing before the arbiter. The program isdesigned so that the entire dispute settlement process,from the time you file your complaint to the finaldecision, should be completed in about 70 days.We believe our impartial program offers advantagesover courts in most jurisdictions because it is informal,quick, and free of charge.
Canadian Motor Vehicle Arbitration Plan (CAMVAP),call toll-free 1-800-207-0685, or call the General MotorsCustomer Communication Centre, 1-800-263-3777(English), 1-800-263-7854 (French), or write to:
The Mediation/Arbitration Programc/o Customer Communication Centre
General Motors of Canada LimitedMail Code: CA1-163-0051908 Colonel Sam DriveOshawa, Ontario L1H 8P7
Your inquiry should be accompanied by the VehicleIdentification Number (VIN).
8-4
Online Owner Center My GM Canada (Canada) — www.gm.ca

7/31/2019 2010 Corvette
http://slidepdf.com/reader/full/2010-corvette 442/471
Online Owner Center (U.S.) —www.gmownercenter.com/chevrolet
Information and services customized for your specificvehicle — all in one convenient place.
.
Digital owner manual, warranty information,and more
. Online service and maintenance records
. Find Chevrolet dealers for service nationwide
. Exclusive privileges and offers
. Recall notices for your specific vehicle
. OnStar ® and GM Cardmember Services Earningssummaries
Other Helpful Links:
Chevrolet — www.chevrolet.com
Chevrolet Merchandise — www.chevymall.com
Help Center — www.chevrolet.com/helpcenter
. FAQ
. Contact Us
My GM Canada is a password-protected section of www.gm.ca where you can save information on GMvehicles, get personalized offers, and use handy toolsand forms with greater ease.
Here are a few of the valuable tools and services you
will have access to:. My Showroom: Find and save information on
vehicles and current offers in your area.
. My Dealers/Retailers: Save details such asaddress and phone number for each of your preferred GM dealers/retailers.
. My Driveway: Access quick links to parts andservice estimates, check trade-in values,or schedule a service appointment by adding
the vehicles you own to your driveway profile.. My Preferences: Manage your profile and use tools
and forms with greater ease.
To sign up, visit the My GM Canada section withinwww.gm.ca.
8-
Customer Assistance for TextT l h (TTY) U
From Puerto Rico:
1 800 496 9992 (English)

7/31/2019 2010 Corvette
http://slidepdf.com/reader/full/2010-corvette 443/471
Telephone (TTY) Users
To assist customers who are deaf, hard of hearing,or speech-impaired and who use Text Telephones(TTYs), Chevrolet has TTY equipment available at itsCustomer Assistance Center. Any TTY user in the
U.S. can communicate with Chevrolet by dialing:1-800-833-CHEV (2438). (TTY users in Canada candial 1-800-263-3830.)
Customer Assistance Offices
Chevrolet encourages customers to call the toll-freenumber for assistance. However, if a customer wishesto write or e-mail Chevrolet, the letter should beaddressed to:
United States — Customer Assistance
Chevrolet Motor DivisionChevrolet Customer Assistance Center P.O. Box 33170Detroit, MI 48232-5170Chevrolet.com
1-800-222-10201-800-833-2438 (For Text Telephone
devices (TTYs))Roadside Assistance: 1-800-CHEV-USA (243-8872)
1-800-496-9992 (English)1-800-496-9993 (Spanish)
From U.S. Virgin Islands:
1-800-496-9994
Canada — Customer Assistance
General Motors of Canada LimitedCustomer Communication Centre, CA1-163-0051908 Colonel Sam DriveOshawa, Ontario L1H 8P7gmcanada.com
1-800-263-3777 (English)1-800-263-7854 (French)1-800-263-3830 (For Text Telephone
devices (TTYs))Roadside Assistance: 1-800-268-6800
Overseas — Customer Assistance
Please contact the local General Motors Business Unit.
8-6
Mexico, Central America and CaribbeanIslands/Countries (Except Puerto Rico
The offer is available for a very limited period of timefrom the date of vehicle purchase/lease. For more

7/31/2019 2010 Corvette
http://slidepdf.com/reader/full/2010-corvette 444/471
Islands/Countries (Except Puerto Ricoand U.S. Virgin Islands) — Customer Assistance
General Motors de Mexico, S. de R.L. de C.V.Customer Assistance Center
Paseo de la Reforma # 2740Col. Lomas de BezaresC.P. 11910, Mexico, D.F.
01-800-508-0000Long Distance: 011-52-53 29 0 800
GM Mobility ReimbursementProgram
This program, available to qualified applicants,
can reimburse you up to $1,000 of the cost of eligible aftermarket adaptive equipment requiredfor your vehicle, such as hand controls or awheelchair/scooter lift.
pdetails, or to determine your vehicle's eligibility, visitgmmobility.com or call the GM Mobility AssistanceCenter at 1-800-323-9935. Text telephone (TTY) users,call 1-800-833-9935.
General Motors of Canada also has a Mobility Program.
Call 1-800-GM-DRIVE (463-7483) for details. TTY userscall 1-800-263-3830.
Roadside Assistance Program
For U.S. purchased vehicles, call 1‐800‐CHEV‐USA(1‐800‐243‐8872); (Text telephone (TTY):1‐888‐889‐2438).
For Canadian purchased vehicles, call 1-800-268-6800.
Service is available 24 hours a day, 365 days a year.
Calling for Assistance
When calling Roadside Assistance, have the followinginformation ready:
. Your name, home address, and home telephonenumber
. Telephone number of your location
.
Location of the vehicle. Model, year, color, and license plate number of the
vehicle
8-
. Odometer reading, Vehicle Identification Number (VIN), and delivery date of the vehicle
Services Provided
E F l D li D li f h

7/31/2019 2010 Corvette
http://slidepdf.com/reader/full/2010-corvette 445/471
. Description of the problem
Coverage
Services are provided up to 5 years/100,000 miles(160 000 km), whichever comes first.
In the U.S., anyone driving the vehicle is covered. InCanada, a person driving the vehicle without permissionfrom the owner is not covered.
Roadside Assistance is not a part of the New VehicleLimited Warranty. Chevrolet and General Motors of Canada Limited reserve the right to make any changesor discontinue the Roadside Assistance program at anytime without notification.
Chevrolet and General Motors of Canada Limitedreserve the right to limit services or payment to anowner or driver if they decide the claims are made toooften, or the same type of claim is made many times.
. Emergency Fuel Delivery: Delivery of enoughfuel for the vehicle to get to the nearest servicestation.
. Lock‐Out Service: Service is provided to unlockthe vehicle if you are locked out. A remote unlockmay be available if you have OnStar ® . For securityreasons, the driver must present identificationbefore this service is given.
. Emergency Tow From a Public Road or Highway: Tow to the nearest Chevrolet dealer for warranty service, or if the vehicle was in acrash and cannot be driven. Assistance is alsogiven when the vehicle is stuck in the sand, mud,or snow.
.
Flat Tire Change: Service is provided to changea flat tire with the spare tire. The spare tire,if equipped, must be in good condition andproperly inflated. It is the owner's responsibilityfor the repair or replacement of the tire if it is notcovered by the warranty.
. Battery Jump Start: Service is provided to jumpstart a dead battery.
8-8
Services Not Included in RoadsideAssistance
. Trip Interruption Benefits and Assistance: Mustbe over 250 km from where your trip was started to
lif G l M t f C d Li it d i

7/31/2019 2010 Corvette
http://slidepdf.com/reader/full/2010-corvette 446/471
Assistance. Impound towing caused by violation of any laws.
. Legal fines.
. Mounting, dismounting or changing of snow tires,chains, or other traction devices.
. Towing or services for vehicles driven on anon-public road or highway.
Services Specific to CanadianPurchased Vehicles. Fuel delivery: Reimbursement is approximately
$5 Canadian. Diesel fuel delivery may berestricted. Propane and other fuels are notprovided through this service.
. Lock-Out Service: Vehicle registration isrequired.
. Trip Routing Service: Detailed maps of North America are provided when requested either withthe most direct route or the most scenic route.There is a limit of six requests per year. Additionaltravel information is also available. Allow threeweeks for delivery.
qualify. General Motors of Canada Limited requirespre-authorization, original detailed receipts, and acopy of the repair orders. Once authorization hasbeen received, the Roadside Assistance advisor will help you make arrangements and explain howto receive payment.
. Alternative Service: If assistance cannot beprovided right away, the Roadside Assistanceadvisor may give you permission to get localemergency road service. You will receive payment,up to $100, after sending the original receipt toRoadside Assistance. Mechanical failures may becovered, however any cost for parts and labor for repairs not covered by the warranty are the owner responsibility.
8-
Scheduling Service Appointments
Wh hi l i t i t t
Several courtesy transportation options are available toassist in reducing your inconvenience when warranty

7/31/2019 2010 Corvette
http://slidepdf.com/reader/full/2010-corvette 447/471
When your vehicle requires warranty service, contactyour dealer/retailer and request an appointment. Byscheduling a service appointment and advising your service consultant of your transportation needs, your dealer/retailer can help minimize your inconvenience.
If your vehicle cannot be scheduled into the servicedepartment immediately, keep driving it until it canbe scheduled for service, unless, of course, theproblem is safety-related. If it is, please call your dealership/retailer, let them know this, and ask for instructions.
If the dealer/retailer requests you to bring the vehicle for service, you are urged to do so as early in the work dayas possible to allow for the same day repair.
Courtesy Transportation Program
To enhance your ownership experience, we and our participating dealers are proud to offer CourtesyTransportation, a customer support program for vehicleswith the New Vehicle Limited Warranty (Base WarrantyCoverage period in Canada) and extended powertrain,and hybrid specific warranty in both the U.S. andCanada.
repairs are required.
Courtesy Transportation is not a part of the New VehicleLimited Warranty. A separate booklet entitled “Warrantyand Owner Assistance Information” furnished with eachnew vehicle provides detailed warranty coverage
information.Transportation Options
Warranty service can generally be completed whileyou wait. However, if you are unable to wait, GMhelps to minimize your inconvenience by providingseveral transportation options. Depending on thecircumstances, your dealer can offer you one of thefollowing:
Shuttle ServiceShuttle service is the preferred means of offeringCourtesy Transportation. Dealers may provide youwith shuttle service to get you to your destinationwith minimal interruption of your daily schedule. Thisincludes one‐way or round trip shuttle service withinreasonable time and distance parameters of thedealer's area.
8-10
Public Transportation or FuelReimbursement
This requires that you sign and complete a rentalagreement and meet state/provincial, local, and rental
hi l id i t R i t d

7/31/2019 2010 Corvette
http://slidepdf.com/reader/full/2010-corvette 448/471
If your vehicle requires overnight warranty repairs, andpublic transportation is used instead of the dealer'sshuttle service, the expense must be supported byoriginal receipts and can only be up to the maximumamount allowed by GM for shuttle service. In addition,
for U.S. customers, should you arrange transportationthrough a friend or relative, limited reimbursement for reasonable fuel expenses may be available. Claimamounts should reflect actual costs and be supportedby original receipts. See your dealer for informationregarding the allowance amounts for reimbursement of fuel or other transportation costs.
Courtesy Rental Vehicle
Your dealer may arrange to provide you with acourtesy rental vehicle or reimburse you for a rentalvehicle that you obtain if your vehicle is kept for anovernight warranty repair. Rental reimbursement willbe limited and must be supported by original receipts.
vehicle provider requirements. Requirements vary andmay include minimum age requirements, insurancecoverage, credit card, etc. You are responsible for fuelusage charges and may also be responsible for taxes,levies, usage fees, excessive mileage, or rental usagebeyond the completion of the repair.
It may not be possible to provide a like-vehicle as acourtesy rental.
Additional Program Information
All program options, such as shuttle service, may notbe available at every dealer. Please contact your dealer for specific information about availability. All CourtesyTransportation arrangements will be administered byappropriate dealer personnel.
General Motors reserves the right to unilaterally modify,change or discontinue Courtesy Transportation at any time and to resolve all questions of claim eligibility pursuant to the terms and conditions described hereinat its sole discretion.
8-1
Collision Damage Repair
If your vehicle is involved in a collision and it is
Such parts are not covered by your GM New VehicleLimited Warranty, and any related failures are notco ered b that arrant

7/31/2019 2010 Corvette
http://slidepdf.com/reader/full/2010-corvette 449/471
If your vehicle is involved in a collision and it isdamaged, have the damage repaired by a qualifiedtechnician using the proper equipment and qualityreplacement parts. Poorly performed collision repairsdiminish your vehicle's resale value, and safetyperformance can be compromised in subsequent
collisions.
Collision Parts
Genuine GM Collision parts are new parts made withthe same materials and construction methods as theparts with which your vehicle was originally built.Genuine GM Collision parts are your best choice toensure that your vehicle's designed appearance,durability, and safety are preserved. The use of
Genuine GM parts can help maintain your GM NewVehicle Warranty.
Recycled original equipment parts may also be used for repair. These parts are typically removed from vehiclesthat were total losses in prior crashes. In most cases,the parts being recycled are from undamaged sectionsof the vehicle. A recycled original equipment GM part,may be an acceptable choice to maintain your vehicle'soriginally designed appearance and safety performance,
however, the history of these parts is not known.
covered by that warranty.
Aftermarket collision parts are also available. These aremade by companies other than GM and may not havebeen tested for your vehicle. As a result, these partsmay fit poorly, exhibit premature durability/corrosion
problems, and may not perform properly in subsequentcollisions. Aftermarket parts are not covered by your GM New Vehicle Limited Warranty, and any vehiclefailure related to such parts are not covered by thatwarranty.
Repair Facility
We recommend that you choose a collision repair facility that meets your needs before you ever needcollision repairs. Your dealer/retailer may have acollision repair center with GM-trained technicians andstate of the art equipment, or be able to recommend acollision repair center that has GM-trained techniciansand comparable equipment.
8-12
Insuring Your Vehicle
Protect your investment in your GM vehicle with
If a Crash Occurs
Here is what to do if you are involved in a crash

7/31/2019 2010 Corvette
http://slidepdf.com/reader/full/2010-corvette 450/471
Protect your investment in your GM vehicle withcomprehensive and collision insurance coverage.There are significant differences in the quality of coverage afforded by various insurance policy terms.Many insurance policies provide reduced protection toyour GM vehicle by limiting compensation for damage
repairs by using aftermarket collision parts. Someinsurance companies will not specify aftermarketcollision parts. When purchasing insurance, werecommend that you assure your vehicle will berepaired with GM original equipment collision parts.If such insurance coverage is not available from your current insurance carrier, consider switching to another insurance carrier.
If your vehicle is leased, the leasing company may
require you to have insurance that assures repairs withGenuine GM Original Equipment Manufacturer (OEM)parts or Genuine Manufacturer replacement parts. Readyour lease carefully, as you may be charged at the endof your lease for poor quality repairs.
Here is what to do if you are involved in a crash.
. Check to make sure that you are all right. If youare uninjured, make sure that no one else in your vehicle, or the other vehicle, is injured.
. If there has been an injury, call emergency
services for help. Do not leave the scene of acrash until all matters have been taken care of.Move your vehicle only if its position puts you indanger or you are instructed to move it by a policeofficer.
. Give only the necessary and requested informationto police and other parties involved in the crash.Do not discuss your personal condition, mentalframe of mind, or anything unrelated to the crash.
This will help guard against post-crash legal action. If you need roadside assistance, call GM Roadside
Assistance. See Roadside Assistance Program on page 8 ‑ 7 for more information.
8-1
. If your vehicle cannot be driven, know where thetowing service will be taking it. Get a card from thetow truck operator or write down the driver's name,
. If possible, call your insurance company from thescene of the crash. They will walk you throughthe information they will need. If they ask for a

7/31/2019 2010 Corvette
http://slidepdf.com/reader/full/2010-corvette 451/471
tow truck operator or write down the driver s name,the service's name, and the phone number.
. Remove any valuables from your vehicle beforeit is towed away. Make sure this includes your insurance information and registration if you keepthese items in your vehicle.
. Gather the important information you will need fromthe other driver. Things like name, address, phonenumber, driver's license number, vehicle licenseplate, vehicle make, model and model year,Vehicle Identification Number (VIN), insurancecompany and policy number, and a generaldescription of the damage to the other vehicle.
the information they will need. If they ask for apolice report, phone or go to the police departmentheadquarters the next day and you can get acopy of the report for a nominal fee. In somestates/provinces with “no fault” insurance laws, areport may not be necessary. This is especially
true if there are no injuries and both vehicles aredriveable.
. Choose a reputable collision repair facility for your vehicle. Whether you select a dealer/retailer or a private collision repair facility to fix thedamage, make sure you are comfortable withthem. Remember, you will have to feel comfortablewith their work for a long time.
. Once you have an estimate, read it carefully and
make sure you understand what work will beperformed on your vehicle. If you have a question,ask for an explanation. Reputable shops welcomethis opportunity.
8-14
Managing the Vehicle Damage Repair Process
Reporting Safety Defects

7/31/2019 2010 Corvette
http://slidepdf.com/reader/full/2010-corvette 452/471
In the event that your vehicle requires damage repairs,GM recommends that you take an active role in itsrepair. If you have a pre-determined repair facility of choice, take your vehicle there, or have it towed there.Specify to the facility that any required replacement
collision parts be original equipment parts, either newGenuine GM parts or recycled original GM parts.Remember, recycled parts will not be covered by your GM vehicle warranty.
Insurance pays the bill for the repair, but you mustlive with the repair. Depending on your policy limits,your insurance company may initially value therepair using aftermarket parts. Discuss this with your repair professional, and insist on Genuine GM parts.
Remember if your vehicle is leased you may beobligated to have the vehicle repaired with GenuineGM parts, even if your insurance coverage does notpay the full cost.
If another party's insurance company is paying for the repairs, you are not obligated to accept a repair valuation based on that insurance company's collisionpolicy repair limits, as you have no contractual limitswith that company. In such cases, you can have control
of the repair and parts choices as long as cost stayswithin reasonable limits.
Reporting Safety Defects to theUnited States Government
If you believe that your vehicle has a defect whichcould cause a crash or could cause injury or
death, you should immediately inform the NationalHighway Traffic Safety Administration (NHTSA) inaddition to notifying General Motors.
If NHTSA receives similar complaints, it may openan investigation, and if it finds that a safety defectexists in a group of vehicles, it may order a recalland remedy campaign. However, NHTSA cannotbecome involved in individual problems between
you, your dealer, or General Motors.To contact NHTSA, you may call the VehicleSafety Hotline toll-free at 1-888-327-4236(TTY: 1-800-424-9153); go tohttp://www.safercar.gov ; or write to:
Administrator, NHTSA1200 New Jersey Avenue, S.E.Washington, D.C. 20590
You can also obtain other information about motor vehicle safety from http://www.safercar.gov .
8-1
Reporting Safety Defects to theCanadian Government
In Canada, call 1-800-263-3777 (English) or 1-800-263-7854 (French), or write:
G l M t f C d Li it d

7/31/2019 2010 Corvette
http://slidepdf.com/reader/full/2010-corvette 453/471
If you live in Canada, and you believe that your vehicle has a safety defect, notify Transport Canadaimmediately, in addition to notifying General Motors of Canada Limited. Call them at 1-800-333-0510 or write to:
Transport CanadaRoad Safety Branch2780 Sheffield RoadOttawa, Ontario K1B 3V9
Reporting Safety Defects to GeneralMotors
In addition to notifying NHTSA (or Transport Canada) ina situation like this, please notify General Motors.
Call 1-800-222-1020, or write:
Chevrolet Motor DivisionChevrolet Customer Assistance Center P.O. Box 33170Detroit, MI 48232-5170
General Motors of Canada LimitedCustomer Communication Centre, CA1-163-0051908 Colonel Sam DriveOshawa, Ontario L1H 8P7
Service Publications OrderingInformation
Service Manuals
Service Manuals have the diagnosis and repair information on engines, transmission, axle suspension,brakes, electrical, steering, body, etc.
Service Bulletins
Service Bulletins give additional technical serviceinformation needed to knowledgeably serviceGeneral Motors cars and trucks. Each bulletin containsinstructions to assist in the diagnosis and service of your vehicle.
8-16
Owner Information
Owner publications are written specifically for owners
Current and Past Model Order Forms
Technical Service Bulletins and Manuals are available

7/31/2019 2010 Corvette
http://slidepdf.com/reader/full/2010-corvette 454/471
and intended to provide basic operational informationabout the vehicle. The owner manual includes theMaintenance Schedule for all models.
In-Portfolio: Includes a Portfolio, Owner Manual, andWarranty Booklet.
RETAIL SELL PRICE: $35.00 (U.S.) plus processing fee
Without Portfolio: Owner Manual only.
RETAIL SELL PRICE: $25.00 (U.S.) plus processing fee
for current and past model GM vehicles. To request anorder form, specify year and model name of the vehicle.
ORDER TOLL FREE: 1-800-551-4123Monday-Friday 8:00 AM - 6:00 PM
Eastern TimeFor Credit Card Orders Only(VISA-MasterCard-Discover), visit Helm, Inc. on theWorld Wide Web at: helminc.com
Or you can write to:
Helm, IncorporatedP.O. Box 07130Detroit, MI 48207
Prices are subject to change without notice and withoutincurring obligation. Allow ample time for delivery.
Note to Canadian Customers: All listed prices arequoted in U.S. funds. Canadian residents are to makechecks payable in U.S. funds.
8-1
Vehicle Data Recording andPrivacy
Event Data Recorders
This vehicle has an Event Data Recorder (EDR).

7/31/2019 2010 Corvette
http://slidepdf.com/reader/full/2010-corvette 455/471
PrivacyYour GM vehicle has a number of sophisticatedcomputers that record information about the vehicle ’sperformance and how it is driven. For example, your vehicle uses computer modules to monitor and control
engine and transmission performance, to monitor theconditions for airbag deployment and deploy airbags ina crash and, if so equipped, to provide antilock brakingto help the driver control the vehicle. These modulesmay store data to help your dealer/retailer technicianservice your vehicle. Some modules may also storedata about how you operate the vehicle, such as rate of fuel consumption or average speed. These modulesmay also retain the owner ’s personal preferences, suchas radio pre-sets, seat positions, and temperature
settings.
The main purpose of an EDR is to record, in certaincrash or near crash-like situations, such as an airbagdeployment or hitting a road obstacle, data that willassist in understanding how a vehicle's systemsperformed. The EDR is designed to record data related
to vehicle dynamics and safety systems for a shortperiod of time, typically 30 seconds or less. The EDRin this vehicle is designed to record such data as:
. How various systems in your vehicle wereoperating
. Whether or not the driver and passenger safetybelts were buckled/fastened
. How far, if at all, the driver was pressing theaccelerator and/or brake pedal
. How fast the vehicle was traveling
This data can help provide a better understanding of thecircumstances in which crashes and injuries occur.
8-18
Important: EDR data is recorded by your vehicle only if a non-trivial crash situation occurs; no data is recordedby the EDR under normal driving conditions and no
Data that GM collects or receives may also be used for GM research needs or may be made available to othersfor research purposes, where a need is shown and the

7/31/2019 2010 Corvette
http://slidepdf.com/reader/full/2010-corvette 456/471
y gpersonal data (e.g., name, gender, age, and crashlocation) is recorded. However, other parties, such aslaw enforcement, could combine the EDR data with thetype of personally identifying data routinely acquiredduring a crash investigation.
To read data recorded by an EDR, special equipmentis required, and access to the vehicle or the EDR isneeded. In addition to the vehicle manufacturer, other parties, such as law enforcement, that have the specialequipment, can read the information if they have accessto the vehicle or the EDR.
GM will not access this data or share it with othersexcept: with the consent of the vehicle owner or, if thevehicle is leased, with the consent of the lessee; inresponse to an official request of police or similar government office; as part of GM's defense of litigationthrough the discovery process; or, as required by law.
p pdata is not tied to a specific vehicle or vehicle owner.
OnStar ®
If the vehicle has OnStar and you subscribe to the
OnStar services, please refer to the OnStar Terms andConditions for information on data collection and use.
Navigation System
If your vehicle has a navigation system, use of thesystem may result in the storage of destinations,addresses, telephone numbers, and other tripinformation. Refer to the navigation system operatingmanual for information on stored data and for deletion
instructions.
8-1
Radio FrequencyIdentification (RFID)
Radio Frequency Statement
This vehicle has systems that operate on a radiof th t l ith P t 15 f th F d l

7/31/2019 2010 Corvette
http://slidepdf.com/reader/full/2010-corvette 457/471
RFID technology is used in some vehicles for functionssuch as tire pressure monitoring and ignition systemsecurity, as well as in connection with conveniencessuch as key fobs for remote door locking/unlocking andstarting, and in-vehicle transmitters for garage door
openers. RFID technology in GM vehicles does not useor record personal information or link with any other GMsystem containing personal information.
frequency that comply with Part 15 of the FederalCommunications Commission (FCC) Rules and withRSS-210/211 of Industry Canada.
Operation is subject to the following two conditions:
1. The device may not cause interference.2. The device must accept any interference received,
including interference that may cause undesiredoperation of the device.
Changes or modifications to any of these systems byother than an authorized service facility could voidauthorization to use this equipment.
8-20
A Accessories and Modifications . . . . . . . . . . . . . . . . . . . . . . .6-3
A P 3 24
Antenna
Diversity . . . . . . . . . . . . . . . . . . . . . . . . . . . . . . . . . . . . . . . . .4-109
Antenna, XM™ Satellite Radio Antenna

7/31/2019 2010 Corvette
http://slidepdf.com/reader/full/2010-corvette 458/471
Accessory Power . . . . . . . . . . . . . . . . . . . . . . . . . . . . . . . . . . 3-24
Accessory Power Outlets . . . . . . . . . . . . . . . . . . . . . . . . . . 4-20
Active Handling System . . . . . . . . . . . . . . . . . . . . . . . . . . . . .5-8
Active Handling System Light . . . . . . . . . . . . . . . . . . . . . . 4-39
Add-On Electrical Equipment . . . . . . . . . . . . . . . . . . . . . 6-100
Additives, Fuel . . . . . . . . . . . . . . . . . . . . . . . . . . . . . . . . . . . . . . .6-8 Air Cleaner/Filter, Engine . . . . . . . . . . . . . . . . . . . . . . . . . . 6-27
Air Dam, Front . . . . . . . . . . . . . . . . . . . . . . . . . . . . . . . . . . . . . 3-22
Air Filter, Passenger Compartment . . . . . . . . . . . . . . . . 4-28
Airbag
Adding Equipment to Your Airbag-Equipped
Vehicle . . . . . . . . . . . . . . . . . . . . . . . . . . . . . . . . . . . . . . . . . .2-59
Airbag System
How Does an Airbag Restrain? . . . . . . . . . . . . . . . . . . . 2-50
Passenger Sensing System . . . . . . . . . . . . . . . . . . . . . . 2-53
Servicing Your Airbag-Equipped Vehicle . . . . . . . . . . 2-58
What Makes an Airbag Inflate? . . . . . . . . . . . . . . . . . . . 2-50
What Will You See After an Airbag Inflates? . . . . . . 2-51
When Should an Airbag Inflate? . . . . . . . . . . . . . . . . . . 2-48
Where Are the Airbags? . . . . . . . . . . . . . . . . . . . . . . . . . . 2-46
Airbags
Passenger Status Indicator . . . . . . . . . . . . . . . . . . . . . . . 4-34
Readiness Light . . . . . . . . . . . . . . . . . . . . . . . . . . . . . . . . . .4-33System Check . . . . . . . . . . . . . . . . . . . . . . . . . . . . . . . . . . . .2-44
Antenna, XM Satellite Radio Antenna
System . . . . . . . . . . . . . . . . . . . . . . . . . . . . . . . . . . . . . . . . . . 4-109
Antilock Brake System (ABS) . . . . . . . . . . . . . . . . . . . . . . . .5-5
Warning Light . . . . . . . . . . . . . . . . . . . . . . . . . . . . . . . . . . . . .4-37
Appearance Care
Aluminum or Chrome-Plated Wheels . . . . . . . . . . . . . 6-97Care of Safety Belts . . . . . . . . . . . . . . . . . . . . . . . . . . . . . .6-93
Cargo Cover and Convenience Net . . . . . . . . . . . . . . . 6-93
Chemical Paint Spotting . . . . . . . . . . . . . . . . . . . . . . . . . . 6-99
Cleaning Exterior Lamps/Lenses . . . . . . . . . . . . . . . . . 6-94
Coated Moldings . . . . . . . . . . . . . . . . . . . . . . . . . . . . . . . . .6-92
Convertible Top . . . . . . . . . . . . . . . . . . . . . . . . . . . . . . . . . . .6-97
Fabric/Carpet . . . . . . . . . . . . . . . . . . . . . . . . . . . . . . . . . . . . .6-91
Fiberglass Springs . . . . . . . . . . . . . . . . . . . . . . . . . . . . . . . .6-99
Finish Care . . . . . . . . . . . . . . . . . . . . . . . . . . . . . . . . . . . . . . .6-95Finish Damage . . . . . . . . . . . . . . . . . . . . . . . . . . . . . . . . . . .6-98
Instrument Panel, Vinyl, and Other Plastic
Surfaces . . . . . . . . . . . . . . . . . . . . . . . . . . . . . . . . . . . . . . . .6-93
Interior Cleaning . . . . . . . . . . . . . . . . . . . . . . . . . . . . . . . . . .6-90
Leather . . . . . . . . . . . . . . . . . . . . . . . . . . . . . . . . . . . . . . . . . . .6-92
Removable Roof Panel . . . . . . . . . . . . . . . . . . . . . . . . . . . 6-96
Tires . . . . . . . . . . . . . . . . . . . . . . . . . . . . . . . . . . . . . . . . . . . . . .6-98
Underbody Maintenance . . . . . . . . . . . . . . . . . . . . . . . . . .6-98
Washing Your Vehicle . . . . . . . . . . . . . . . . . . . . . . . . . . . .6-94Weatherstrips . . . . . . . . . . . . . . . . . . . . . . . . . . . . . . . . . . . . .6-93
Windshield and Wiper Blades . . . . . . . . . . . . . . . . . . . . . 6-96
i - 1
Ashtray . . . . . . . . . . . . . . . . . . . . . . . . . . . . . . . . . . . . . . . . . . . . 4-21
Assistance Program, Roadside . . . . . . . . . . . . . . . . . . . . . .8-7
Audio System . . . . . . . . . . . . . . . . . . . . . . . . . . . . . . . . . . . . . . 4-80
Brakes . . . . . . . . . . . . . . . . . . . . . . . . . . . . . . . . . . . . . . . . . . . . . 6-43
Antilock . . . . . . . . . . . . . . . . . . . . . . . . . . . . . . . . . . . . . . . . . . . . 5-5
Parking . . . . . . . . . . . . . . . . . . . . . . . . . . . . . . . . . . . . . . . . . . .3-34

7/31/2019 2010 Corvette
http://slidepdf.com/reader/full/2010-corvette 459/471
Audio System . . . . . . . . . . . . . . . . . . . . . . . . . . . . . . . . . . . . . . 4 80
Audio Steering Wheel Controls . . . . . . . . . . . . . . . . . .4-107
Navigation/Radio System, see Navigation
Manual . . . . . . . . . . . . . . . . . . . . . . . . . . . . . . . . . . . . . . . . . .4-96
Radio Reception . . . . . . . . . . . . . . . . . . . . . . . . . . . . . . . . .4-108
Setting the Clock . . . . . . . . . . . . . . . . . . . . . . . . . . . . . . . . .4-80Theft-Deterrent Feature . . . . . . . . . . . . . . . . . . . . . . . . . .4-106
XM™ Satellite Radio Antenna System . . . . . . . . . . .4-109
Audio System(s) . . . . . . . . . . . . . . . . . . . . . . . . . . . . . . . . . . . 4-81
Automatic Door Lock . . . . . . . . . . . . . . . . . . . . . . . . . . . . . . 3-13
Automatic Transmission
Fluid . . . . . . . . . . . . . . . . . . . . . . . . . . . . . . . . . . . . . . . . . . . . . .6-31
Operation . . . . . . . . . . . . . . . . . . . . . . . . . . . . . . . . . . . . . . . . .3-26
Axle, Rear . . . . . . . . . . . . . . . . . . . . . . . . . . . . . . . . . . . . . . . . . 6-55
BBattery . . . . . . . . . . . . . . . . . . . . . . . . . . . . . . . . . . . . . . . . . . . . 6-49
Exterior Lighting Battery Saver . . . . . . . . . . . . . . . . . . . 4-15
Run-Down Protection . . . . . . . . . . . . . . . . . . . . . . . . . . . . .4-16
Belt Routing, Engine . . . . . . . . . . . . . . . . . . . . . . . . . . . . . . . 7-13
Bluetooth® . . . . . . . . . . . . . . . . . . . . . . . . . . . . . . . . . . . . . . . . . 4-96
Boost Gauge . . . . . . . . . . . . . . . . . . . . . . . . . . . . . . . . . . . . . . 4-47
BrakeEmergencies . . . . . . . . . . . . . . . . . . . . . . . . . . . . . . . . . . . . . . 5-6
Parking . . . . . . . . . . . . . . . . . . . . . . . . . . . . . . . . . . . . . . . . . . .3 34
System Warning Light . . . . . . . . . . . . . . . . . . . . . . . . . . . .4-36
Braking . . . . . . . . . . . . . . . . . . . . . . . . . . . . . . . . . . . . . . . . . . . . . .5-4
Braking in Emergencies . . . . . . . . . . . . . . . . . . . . . . . . . . . . .5-6
Break-In, New Vehicle . . . . . . . . . . . . . . . . . . . . . . . . . . . . . 3-21
Bulb Replacement . . . . . . . . . . . . . . . . . . . . . . . . . . . . . . . . . 6-58Fog Lamps . . . . . . . . . . . . . . . . . . . . . . . . . . . . . . . . . . . . . . .4-13
Halogen Bulbs . . . . . . . . . . . . . . . . . . . . . . . . . . . . . . . . . . . .6-56
Headlamp Aiming . . . . . . . . . . . . . . . . . . . . . . . . . . . . . . . . .6-55
Headlamps . . . . . . . . . . . . . . . . . . . . . . . . . . . . . . . . . . . . . . .6-56
Headlamps, Front Turn Signal, and Parking
Lamps . . . . . . . . . . . . . . . . . . . . . . . . . . . . . . . . . . . . . . . . . .6-56
High Intensity Discharge (HID) Lighting . . . . . . . . . . . 6-56
Taillamps, Turn Signal and Stoplamps . . . . . . . . . . . . 6-58
Buying New Tires . . . . . . . . . . . . . . . . . . . . . . . . . . . . . . . . . . 6-77
CCalibration . . . . . . . . . . . . . . . . . . . . . . . . . . . . . . . . . . . . . . . . . 3-39
California
Perchlorate Materials Requirements . . . . . . . . . . . . . . . 6-4
Warning . . . . . . . . . . . . . . . . . . . . . . . . . . . . . . . . . . . . . . . . . . . 6-4
California Fuel . . . . . . . . . . . . . . . . . . . . . . . . . . . . . . . . . . . . . . .6-7
Canadian Owners . . . . . . . . . . . . . . . . . . . . . . . . . . . . . . . . . . . . iiiCapacities and Specifications . . . . . . . . . . . . . . . . . . . . . 6-108
i - 2
Carbon Monoxide . . . . . . . . . . . . . . . . . . . . . . . . . . . . . . . . . . 3-14
Engine Exhaust . . . . . . . . . . . . . . . . . . . . . . . . . . . . . . . . . . .3-37
Winter Driving . . . . . . . . . . . . . . . . . . . . . . . . . . . . . . . . . . . .5-25
Cleaning (cont.)Fabric/Carpet . . . . . . . . . . . . . . . . . . . . . . . . . . . . . . . . . . . . .6-91
Fiberglass Springs . . . . . . . . . . . . . . . . . . . . . . . . . . . . . . . .6-99

7/31/2019 2010 Corvette
http://slidepdf.com/reader/full/2010-corvette 460/471
g
Care of
Safety Belts . . . . . . . . . . . . . . . . . . . . . . . . . . . . . . . . . . . . . .6-93
Cargo Cover . . . . . . . . . . . . . . . . . . . . . . . . . . . . . . . . . . . . . . . 3-52
CD, MP3 . . . . . . . . . . . . . . . . . . . . . . . . . . . . . . . . . . . . . . . . . . 4-92
Center Console Storage . . . . . . . . . . . . . . . . . . . . . . . . . . . 3-50Chains, Tire . . . . . . . . . . . . . . . . . . . . . . . . . . . . . . . . . . . . . . . 6-84
Check
Engine Lamp . . . . . . . . . . . . . . . . . . . . . . . . . . . . . . . . . . . . .4-41
Checking Things Under the Hood . . . . . . . . . . . . . . . . . . 6-12
Chemical Paint Spotting . . . . . . . . . . . . . . . . . . . . . . . . . . . 6-99
Child Restraints
Infants and Young Children . . . . . . . . . . . . . . . . . . . . . . . 2-29
Lower Anchors and Tethers for Children . . . . 2-35, 2-36
Older Children . . . . . . . . . . . . . . . . . . . . . . . . . . . . . . . . . . . .2-26Securing a Child Restraint in the Right Front
Seat Position . . . . . . . . . . . . . . . . . . . . . . . . . . . . . . . . . . . .2-40
Systems . . . . . . . . . . . . . . . . . . . . . . . . . . . . . . . . . . . . . . . . . .2-33
Cigarette Lighter . . . . . . . . . . . . . . . . . . . . . . . . . . . . . . . . . . . 4-21
Circuit Breakers . . . . . . . . . . . . . . . . . . . . . . . . . . . . . . . . . . 6-101
Cleaning
Aluminum or Chrome-Plated Wheels . . . . . . . . . . . . . 6-97
Cargo Cover and Convenience Net . . . . . . . . . . . . . . . 6-93
Coated Moldings . . . . . . . . . . . . . . . . . . . . . . . . . . . . . . . . .6-92Convertible Top . . . . . . . . . . . . . . . . . . . . . . . . . . . . . . . . . . .6-97
Exterior Lamps/Lenses . . . . . . . . . . . . . . . . . . . . . . . . . . . 6-94
g p g
Finish Care . . . . . . . . . . . . . . . . . . . . . . . . . . . . . . . . . . . . . . .6-95
Instrument Panel, Vinyl, and Other Plastic
Surfaces . . . . . . . . . . . . . . . . . . . . . . . . . . . . . . . . . . . . . . . .6-93
Interior . . . . . . . . . . . . . . . . . . . . . . . . . . . . . . . . . . . . . . . . . . . .6-90
Leather . . . . . . . . . . . . . . . . . . . . . . . . . . . . . . . . . . . . . . . . . . .6-92Removable Roof Panel . . . . . . . . . . . . . . . . . . . . . . . . . . . 6-96
Tires . . . . . . . . . . . . . . . . . . . . . . . . . . . . . . . . . . . . . . . . . . . . . .6-98
Underbody Maintenance . . . . . . . . . . . . . . . . . . . . . . . . . .6-98
Washing Your Vehicle . . . . . . . . . . . . . . . . . . . . . . . . . . . .6-94
Weatherstrips . . . . . . . . . . . . . . . . . . . . . . . . . . . . . . . . . . . . .6-93
Windshield and Wiper Blades . . . . . . . . . . . . . . . . . . . . . 6-96
Climate Control System
Outlet Adjustment . . . . . . . . . . . . . . . . . . . . . . . . . . . . . . . .4-27
Climate Control SystemsDual Automatic . . . . . . . . . . . . . . . . . . . . . . . . . . . . . . . . . . .4-22
Climate Controls . . . . . . . . . . . . . . . . . . . . . . . . . . . . . . . . . . . 1-15
Clock, Setting . . . . . . . . . . . . . . . . . . . . . . . . . . . . . . . . . . . . . 4-80
Clutch, Hydraulic . . . . . . . . . . . . . . . . . . . . . . . . . . . . . . . . . . 6-31
Collision Damage Repair . . . . . . . . . . . . . . . . . . . . . . . . . . 8-12
Compass . . . . . . . . . . . . . . . . . . . . . . . . . . . . . . . . . . . . . . . . . . 3-39
Competitive Driving Mode . . . . . . . . . . . . . . . . . . . . . . . . . . .5-9
Competitive Driving, Racing or Other . . . . . . . . . . . . . . 5-19
Control of a Vehicle . . . . . . . . . . . . . . . . . . . . . . . . . . . . . . . . . .5-3Convenience Net . . . . . . . . . . . . . . . . . . . . . . . . . . . . . . . . . . 3-52
Convertible Top . . . . . . . . . . . . . . . . . . . . . . . . . . . . . . 3-59, 3-66
i - 3
Coolant
Engine . . . . . . . . . . . . . . . . . . . . . . . . . . . . . . . . . . . . . . . . . . . .6-34
Engine Temperature Gauge . . . . . . . . . . . . . . . . . . . . . . 4-40
Door
Automatic Door Lock . . . . . . . . . . . . . . . . . . . . . . . . . . . . . 3-13
Locks . . . . . . . . . . . . . . . . . . . . . . . . . . . . . . . . . . . . . . . . . . . . .3-10

7/31/2019 2010 Corvette
http://slidepdf.com/reader/full/2010-corvette 461/471
g p g
Cooling System . . . . . . . . . . . . . . . . . . . . . . . . . . . . . . 6-32, 6-33
Courtesy Lamps . . . . . . . . . . . . . . . . . . . . . . . . . . . . . . . . . . . 4-15
Courtesy Transportation Program . . . . . . . . . . . . . . . . . . 8-10
Cruise Control . . . . . . . . . . . . . . . . . . . . . . . . . . . . . . . . . . . . . . .4-7
Cupholders . . . . . . . . . . . . . . . . . . . . . . . . . . . . . . . . . . . . . . . . 3-50Customer Assistance . . . . . . . . . . . . . . . . . . . . . . . . . . . . . . . .8-6
Offices . . . . . . . . . . . . . . . . . . . . . . . . . . . . . . . . . . . . . . . . . . . . . 8-6
Text Telephone (TTY) Users . . . . . . . . . . . . . . . . . . . . . . . 8-6
Customer Information
Service Publications Ordering Information . . . . . . . . 8-16
Customer Satisfaction Procedure . . . . . . . . . . . . . . . . . . . .8-2
DDamage Repair, Collision . . . . . . . . . . . . . . . . . . . . . . . . . . 8-12
Data Recorders, Event . . . . . . . . . . . . . . . . . . . . . . . . . . . . 8-18
Daytime Running Lamps (DRL) . . . . . . . . . . . . . . . . . . . . 4-12
Defensive Driving . . . . . . . . . . . . . . . . . . . . . . . . . . . . . . . . . . . .5-2
Disc, MP3 . . . . . . . . . . . . . . . . . . . . . . . . . . . . . . . . . . . . . . . . . 4-92
Displays
Head-Up . . . . . . . . . . . . . . . . . . . . . . . . . . . . . . . . . . . . . . . . . .4-16
Diversity Antenna System . . . . . . . . . . . . . . . . . . . . . . . . 4-109
Doing Your Own Service Work . . . . . . . . . . . . . . . . . . . . . . .6-5
Power Locks . . . . . . . . . . . . . . . . . . . . . . . . . . . . . . . . . . . . . .3-12
Programmable Automatic Door Unlock . . . . . . . . . . . 3-13
Driver Information Center (DIC) . . . . . . . . . . . . . . . . . . . . 4-47
DIC Operation and Displays . . . . . . . . . . . . . . . . . . . . . . 4-47
DIC Vehicle Personalization . . . . . . . . . . . . . . . . . . . . . . 4-71DIC Warnings and Messages . . . . . . . . . . . . . . . . . . . . . 4-52
Other Messages . . . . . . . . . . . . . . . . . . . . . . . . . . . . . . . . . .4-70
Driving
At Night . . . . . . . . . . . . . . . . . . . . . . . . . . . . . . . . . . . . . . . . . . .5-22
Before a Long Trip . . . . . . . . . . . . . . . . . . . . . . . . . . . . . . . .5-23
Competitive . . . . . . . . . . . . . . . . . . . . . . . . . . . . . . . . . . . . . . . . 5-9
Defensive . . . . . . . . . . . . . . . . . . . . . . . . . . . . . . . . . . . . . . . . . . 5-2
Drunk . . . . . . . . . . . . . . . . . . . . . . . . . . . . . . . . . . . . . . . . . . . . . . 5-2
Highway Hypnosis . . . . . . . . . . . . . . . . . . . . . . . . . . . . . . . .5-24Hill and Mountain Roads . . . . . . . . . . . . . . . . . . . . . . . . . . 5-24
In Rain and on Wet Roads . . . . . . . . . . . . . . . . . . . . . . . . 5-22
Loss of Control . . . . . . . . . . . . . . . . . . . . . . . . . . . . . . . . . . .5-18
Off-Road Recovery . . . . . . . . . . . . . . . . . . . . . . . . . . . . . . .5-17
Rocking Your Vehicle to Get it Out . . . . . . . . . . . . . . . . 5-28
Winter . . . . . . . . . . . . . . . . . . . . . . . . . . . . . . . . . . . . . . . . . . . .5-25
Driving for Better Fuel Economy . . . . . . . . . . . . . . . . . . . 1-24
Dual Automatic Climate Control System . . . . . . . . . . . 4-22
i - 4
EEDR . . . . . . . . . . . . . . . . . . . . . . . . . . . . . . . . . . . . . . . . . . . . . . . 8-18
Electrical Equipment Add-On 6-100
Engine Oil
Life System . . . . . . . . . . . . . . . . . . . . . . . . . . . . . . . . . . . . . . .6-25
Entry/Exit Lighting . . . . . . . . . . . . . . . . . . . . . . . . . . . . . . . . . 4-15

7/31/2019 2010 Corvette
http://slidepdf.com/reader/full/2010-corvette 462/471
Electrical Equipment, Add On . . . . . . . . . . . . . . . . . . . . 6 100
Electrical System
Engine Compartment Fuse Block . . . . . . . . . . . . . . . .6-104
Fuses and Circuit Breakers . . . . . . . . . . . . . . . . . . . . . .6-101
Headlamp Wiring . . . . . . . . . . . . . . . . . . . . . . . . . . . . . . . .6-100
Instrument Panel Fuse Block . . . . . . . . . . . . . . . . . . . .6-101Power Windows and Other Power Options . . . . . .6-100
Windshield Wiper Fuses . . . . . . . . . . . . . . . . . . . . . . . . .6-100
Engine
Air Cleaner/Filter . . . . . . . . . . . . . . . . . . . . . . . . . . . . . . . . .6-27
Check and Service Engine Soon Lamp . . . . . . . . . . . 4-41
Compartment Overview . . . . . . . . . . . . . . . . . . . . . . . . . . . 6-14
Coolant . . . . . . . . . . . . . . . . . . . . . . . . . . . . . . . . . . . . . . . . . . .6-34
Coolant Temperature Gauge . . . . . . . . . . . . . . . . . . . . . . 4-40
Cooling System . . . . . . . . . . . . . . . . . . . . . . . . . . . . . 6-32, 6-33
Drive Belt Routing . . . . . . . . . . . . . . . . . . . . . . . . . . . . . . . .7-13
Exhaust . . . . . . . . . . . . . . . . . . . . . . . . . . . . . . . . . . . . . . . . . .3-37
Oil . . . . . . . . . . . . . . . . . . . . . . . . . . . . . . . . . . . . . . . . . . . . . . . .6-19
Oil Pressure Gauge . . . . . . . . . . . . . . . . . . . . . . . . . . . . . .4-44
Overheated Protection Operating Mode . . . . . . . . . . 6-41
Overheating . . . . . . . . . . . . . . . . . . . . . . . . . . . . . . . . . . . . . .6-38
Starting . . . . . . . . . . . . . . . . . . . . . . . . . . . . . . . . . . . . . . . . . . .3-24
Event Data Recorders . . . . . . . . . . . . . . . . . . . . . . . . . . . . . 8-18
Extender, Safety Belt . . . . . . . . . . . . . . . . . . . . . . . . . . . . . . 2-26
Exterior Lamps . . . . . . . . . . . . . . . . . . . . . . . . . . . . . . . . . . . . 4-11
Exterior Lighting Battery Saver . . . . . . . . . . . . . . . . . . . . 4-15
FFilter
Engine Air Cleaner . . . . . . . . . . . . . . . . . . . . . . . . . . . . . . .6-27
Finish Damage . . . . . . . . . . . . . . . . . . . . . . . . . . . . . . . . . . . . 6-98
Flash-to-Pass . . . . . . . . . . . . . . . . . . . . . . . . . . . . . . . . . . . . . . . .4-5
Flashers, Hazard Warning . . . . . . . . . . . . . . . . . . . . . . . . . . .4-3
Flat Tire . . . . . . . . . . . . . . . . . . . . . . . . . . . . . . . . . . . . . . . . . . . 6-89
Floor Mats . . . . . . . . . . . . . . . . . . . . . . . . . . . . . . . . . . . . . . . . . 3-50
Fluid Automatic Transmission . . . . . . . . . . . . . . . . . . . . . . . . . .6-31
Power Steering . . . . . . . . . . . . . . . . . . . . . . . . . . . . . . . . . . .6-41
Windshield Washer . . . . . . . . . . . . . . . . . . . . . . . . . . . . . . .6-42
Fog Lamps
Bulb Replacement . . . . . . . . . . . . . . . . . . . . . . . . . . . . . . . .4-13
Light . . . . . . . . . . . . . . . . . . . . . . . . . . . . . . . . . . . . . . . . . . . . . .4-45
Front Air Dam . . . . . . . . . . . . . . . . . . . . . . . . . . . . . . . . . . . . . 3-22
i - 5
Fuel . . . . . . . . . . . . . . . . . . . . . . . . . . . . . . . . . . . . . . . . . . . . . . . . .6-6
Additives . . . . . . . . . . . . . . . . . . . . . . . . . . . . . . . . . . . . . . . . . . 6-8
California Fuel . . . . . . . . . . . . . . . . . . . . . . . . . . . . . . . . . . . . . 6-7
Gauges
Boost . . . . . . . . . . . . . . . . . . . . . . . . . . . . . . . . . . . . . . . . . . . . .4-47
Engine Coolant Temperature . . . . . . . . . . . . . . . . . . . . . 4-40

7/31/2019 2010 Corvette
http://slidepdf.com/reader/full/2010-corvette 463/471
Filling a Portable Fuel Container . . . . . . . . . . . . . . . . . . 6-12
Filling the Tank . . . . . . . . . . . . . . . . . . . . . . . . . . . . . . . . . . . . 6-9
Fuels in Foreign Countries . . . . . . . . . . . . . . . . . . . . . . . . . 6-9
Gasoline Octane . . . . . . . . . . . . . . . . . . . . . . . . . . . . . . . . . . . 6-7
Gasoline Specifications . . . . . . . . . . . . . . . . . . . . . . . . . . . . 6-7Gauge . . . . . . . . . . . . . . . . . . . . . . . . . . . . . . . . . . . . . . . . . . . .4-46
Fuel Economy
Driving for Better . . . . . . . . . . . . . . . . . . . . . . . . . . . . . . . . .1-24
Fuses
Engine Compartment Fuse Block . . . . . . . . . . . . . . . .6-104
Fuses and Circuit Breakers . . . . . . . . . . . . . . . . . . . . . .6-101
Instrument Panel Fuse Block . . . . . . . . . . . . . . . . . . . .6-101
Windshield Wiper . . . . . . . . . . . . . . . . . . . . . . . . . . . . . . . .6-100
GGages
Engine Oil Pressure . . . . . . . . . . . . . . . . . . . . . . . . . . . . . .4-44
Garage Door Opener . . . . . . . . . . . . . . . . . . . . . . . . . . . . . . 3-42
Gasoline
Octane . . . . . . . . . . . . . . . . . . . . . . . . . . . . . . . . . . . . . . . . . . . . 6-7
Specifications . . . . . . . . . . . . . . . . . . . . . . . . . . . . . . . . . . . . . . 6-7
Fuel . . . . . . . . . . . . . . . . . . . . . . . . . . . . . . . . . . . . . . . . . . . . . .4-46
Speedometer . . . . . . . . . . . . . . . . . . . . . . . . . . . . . . . . . . . . .4-32
Tachometer . . . . . . . . . . . . . . . . . . . . . . . . . . . . . . . . . . . . . . .4-32
Voltmeter Gauge . . . . . . . . . . . . . . . . . . . . . . . . . . . . . . . . .4-35
Glove Box . . . . . . . . . . . . . . . . . . . . . . . . . . . . . . . . . . . . . . . . . 3-50GM Mobility Reimbursement Program . . . . . . . . . . . . . . .8-7
HHalogen Bulbs . . . . . . . . . . . . . . . . . . . . . . . . . . . . . . . . . . . . . 6-56
Hatch/Trunk . . . . . . . . . . . . . . . . . . . . . . . . . . . . . . . . . . . . . . . 3-14
Hazard Warning Flashers . . . . . . . . . . . . . . . . . . . . . . . . . . . .4-3
Head-Up Display (HUD) . . . . . . . . . . . . . . . . . . . . . . . . . . . 4-16
Headlamp Wiring . . . . . . . . . . . . . . . . . . . . . . . . . . . . . . . . . 6-100
Headlamps Aiming . . . . . . . . . . . . . . . . . . . . . . . . . . . . . . . . . . . . . . . . . . . .6-55
Bulb Replacement . . . . . . . . . . . . . . . . . . . . . . . . . . . . . . . .6-56
Daytime Running Lamps (DRL) . . . . . . . . . . . . . . . . . . . 4-12
Exterior Lamps . . . . . . . . . . . . . . . . . . . . . . . . . . . . . . . . . . . 4-11
Flash-to-Pass . . . . . . . . . . . . . . . . . . . . . . . . . . . . . . . . . . . . . . 4-5
Headlamps, Front Turn Signal, and Parking
Lamps . . . . . . . . . . . . . . . . . . . . . . . . . . . . . . . . . . . . . . . . . .6-56
High Intensity Discharge (HID) Lighting . . . . . . . . . . . 6-56
i - 6
Headlamps (cont.)High/Low Beam Changer . . . . . . . . . . . . . . . . . . . . . . . . . . 4-5
On Reminder . . . . . . . . . . . . . . . . . . . . . . . . . . . . . . . . . . . . .4-12
Wi A ti t d 4 12
Instrument Panel Cluster . . . . . . . . . . . . . . . . . . . . . . . . . . 4-30
Integrated Trailer Brake Control System (ITBC) . . . . 5-33
Introduction . . . . . . . . . . . . . . . . . . . . . . . . . . . . . . . . . . . . . . . . . .7-2

7/31/2019 2010 Corvette
http://slidepdf.com/reader/full/2010-corvette 464/471
Wiper Activated . . . . . . . . . . . . . . . . . . . . . . . . . . . . . . . . . . .4-12
Heated Seats . . . . . . . . . . . . . . . . . . . . . . . . . . . . . . . . . . . . . . . .2-4
High-Speed Operation, Tires . . . . . . . . . . . . . . . . . . . . . . 6-72
Highbeam On Light . . . . . . . . . . . . . . . . . . . . . . . . . . . . . . . . 4-45
Highway Hypnosis . . . . . . . . . . . . . . . . . . . . . . . . . . . . . . . . . 5-24Hill and Mountain Roads . . . . . . . . . . . . . . . . . . . . . . . . . . . 5-24
Hood
Checking Things Under . . . . . . . . . . . . . . . . . . . . . . . . . . . 6-12
Release . . . . . . . . . . . . . . . . . . . . . . . . . . . . . . . . . . . . . . . . . .6-13
Horn . . . . . . . . . . . . . . . . . . . . . . . . . . . . . . . . . . . . . . . . . . . . . . . . .4-3
How to Wear Safety Belts Properly . . . . . . . . . . . . . . . . 2-14
Hydraulic Clutch . . . . . . . . . . . . . . . . . . . . . . . . . . . . . . . . . . . 6-31
IIgnition Positions . . . . . . . . . . . . . . . . . . . . . . . . . . . . . . . . . . 3-23
Immobilizer . . . . . . . . . . . . . . . . . . . . . . . . . . . . . . . . . . . . . . . . 3-20
Infants and Young Children, Restraints . . . . . . . . . . . . 2-29
Inflation - Tire Pressure . . . . . . . . . . . . . . . . . . . . . . . . . . . . 6-70
Installing the Roof Panel . . . . . . . . . . . . . . . . . . . . . . . . . . . 3-58
Instrument Panel
Brightness . . . . . . . . . . . . . . . . . . . . . . . . . . . . . . . . . . . . . . . .4-15
JJump Starting . . . . . . . . . . . . . . . . . . . . . . . . . . . . . . . . . . . . . . 6-50
KKeyless Access System . . . . . . . . . . . . . . . . . . . . . . . . . . . . .3-5
Keyless Access System, Operation . . . . . . . . . . . . . . . . . .3-5
Keys . . . . . . . . . . . . . . . . . . . . . . . . . . . . . . . . . . . . . . . . . . . . . . . . .3-3
LLabeling, Tire Sidewall . . . . . . . . . . . . . . . . . . . . . . . . . . . . . 6-64
Lamps
Courtesy . . . . . . . . . . . . . . . . . . . . . . . . . . . . . . . . . . . . . . . . . .4-15Daytime Running (DRL) . . . . . . . . . . . . . . . . . . . . . . . . . .4-12
Exterior Lighting Battery Saver . . . . . . . . . . . . . . . . . . . 4-15
Malfunction Indicator . . . . . . . . . . . . . . . . . . . . . . . . . . . . . 4-41
Reading . . . . . . . . . . . . . . . . . . . . . . . . . . . . . . . . . . . . . . . . . .4-15
Twilight Sentinel® . . . . . . . . . . . . . . . . . . . . . . . . . . . . . . . . .4-14
Lap-Shoulder Belt . . . . . . . . . . . . . . . . . . . . . . . . . . . . . . . . . 2-23
LATCH System for Child Restraints . . . . . . . . . . 2-35, 2-36
i - 7
Latches, Seatback . . . . . . . . . . . . . . . . . . . . . . . . . . . . . . . . . . .2-8
Lifting the Vehicle, Tires . . . . . . . . . . . . . . . . . . . . . . . . . . . 6-84
Lighting
E t /E it 4 15
Locks
Automatic Door Lock . . . . . . . . . . . . . . . . . . . . . . . . . . . . . 3-13
Door . . . . . . . . . . . . . . . . . . . . . . . . . . . . . . . . . . . . . . . . . . . . . .3-10
L k t P t ti 3 13

7/31/2019 2010 Corvette
http://slidepdf.com/reader/full/2010-corvette 465/471
Entry/Exit . . . . . . . . . . . . . . . . . . . . . . . . . . . . . . . . . . . . . . . . .4-15
Lights
Active Handling System . . . . . . . . . . . . . . . . . . . . . . . . . . 4-39
Airbag Readiness . . . . . . . . . . . . . . . . . . . . . . . . . . . . . . . . .4-33
Antilock Brake System (ABS) Warning . . . . . . . . . . . . 4-37Brake System Warning . . . . . . . . . . . . . . . . . . . . . . . . . . . 4-36
Exterior Lamps . . . . . . . . . . . . . . . . . . . . . . . . . . . . . . . . . . . 4-11
Flash-to-Pass . . . . . . . . . . . . . . . . . . . . . . . . . . . . . . . . . . . . . . 4-5
Fog Lamps . . . . . . . . . . . . . . . . . . . . . . . . . . . . . . . . . . . . . . .4-45
High/Low Beam Changer . . . . . . . . . . . . . . . . . . . . . . . . . . 4-5
Highbeam On . . . . . . . . . . . . . . . . . . . . . . . . . . . . . . . . . . . . .4-45
Lights On Reminder . . . . . . . . . . . . . . . . . . . . . . . . . . . . . .4-45
On Reminder . . . . . . . . . . . . . . . . . . . . . . . . . . . . . . . . . . . . .4-12
One-to-Four Shift . . . . . . . . . . . . . . . . . . . . . . . . . . . . . . . . .4-36Passenger Airbag Status Indicator . . . . . . . . . . . . . . . . 4-34
Safety Belt Reminders . . . . . . . . . . . . . . . . . . . . . . . . . . . .4-32
Security . . . . . . . . . . . . . . . . . . . . . . . . . . . . . . . . . . . . . . . . . .4-45
Tire Pressure . . . . . . . . . . . . . . . . . . . . . . . . . . . . . . . . . . . . .4-40
Traction Control System (TCS) Warning . . . . . . . . . . 4-38
Limited-Slip Rear Axle . . . . . . . . . . . . . . . . . . . . . . . . . . . . . 5-14
Loading Your Vehicle . . . . . . . . . . . . . . . . . . . . . . . . . . . . . . 5-28
Lockout Protection . . . . . . . . . . . . . . . . . . . . . . . . . . . . . . . .3-13
Power Door . . . . . . . . . . . . . . . . . . . . . . . . . . . . . . . . . . . . . . .3-12
Programmable Automatic Door Unlock . . . . . . . . . . . 3-13
Loss of Control . . . . . . . . . . . . . . . . . . . . . . . . . . . . . . . . . . . . 5-18
Lower Anchors and Tethers for Children . . . . . 2-35, 2-36Lumbar
Power and Side Bolsters . . . . . . . . . . . . . . . . . . . . . . . . . . 2-3
MMaintenance Schedule
Maintenance Record . . . . . . . . . . . . . . . . . . . . . . . . . . . . . 7-14
Maintenance Replacement Parts . . . . . . . . . . . . . . . . . 7-12
Owner Checks and Services . . . . . . . . . . . . . . . . . . . . . . . 7-8
Recommended Fluids and Lubricants . . . . . . . . . . . . 7-10Scheduled Maintenance . . . . . . . . . . . . . . . . . . . . . . . . . . . 7-3
Malfunction Indicator Lamp . . . . . . . . . . . . . . . . . . . . . . . . 4-41
Manual Seats . . . . . . . . . . . . . . . . . . . . . . . . . . . . . . . . . . . . . . . .2-2
Manual Transmission
Fluid . . . . . . . . . . . . . . . . . . . . . . . . . . . . . . . . . . . . . . . . . . . . . .6-31
Operation . . . . . . . . . . . . . . . . . . . . . . . . . . . . . . . . . . . . . . . . .3-32
i - 8
Memory Seat, Mirrors, Steering Wheel Controls . . . . .2-4
Message
DIC Warnings and Messages . . . . . . . . . . . . . . . . . . . . . 4-52
Mirrors
One-to-Four Shift Light . . . . . . . . . . . . . . . . . . . . . . . . . . . . 4-36
Online Owner Center . . . . . . . . . . . . . . . . . . . . . . . . . . . . . . . .8-5
OnStar, Privacy . . . . . . . . . . . . . . . . . . . . . . . . . . . . . . . . . . . . 8-19
OnStar® System 1 25

7/31/2019 2010 Corvette
http://slidepdf.com/reader/full/2010-corvette 466/471
Mirrors
Automatic Dimming Rearview . . . . . . . . . . . . . . . . . . . . . 3-39
Outside Automatic Dimming Mirror . . . . . . . . . . . . . . . . 3-41
Outside Convex Mirror . . . . . . . . . . . . . . . . . . . . . . . . . . . .3-42
Outside Heated Mirrors . . . . . . . . . . . . . . . . . . . . . . . . . . .3-42Outside Power Mirrors . . . . . . . . . . . . . . . . . . . . . . . . . . . .3-41
MP3 . . . . . . . . . . . . . . . . . . . . . . . . . . . . . . . . . . . . . . . . . . . . . . . 4-92
NNavigation System, Privacy . . . . . . . . . . . . . . . . . . . . . . . . 8-19
Navigation/Radio System, see Navigation
Manual . . . . . . . . . . . . . . . . . . . . . . . . . . . . . . . . . . . . . . . . . . . 4-96
Net, Convenience . . . . . . . . . . . . . . . . . . . . . . . . . . . . . . . . . 3-52
New Vehicle Break-In . . . . . . . . . . . . . . . . . . . . . . . . . . . . . . 3-21
OOdometer . . . . . . . . . . . . . . . . . . . . . . . . . . . . . . . . . . . . . . . . . . 4-32
Off-Road
Recovery . . . . . . . . . . . . . . . . . . . . . . . . . . . . . . . . . . . . . . . . .5-17
Oil
Engine . . . . . . . . . . . . . . . . . . . . . . . . . . . . . . . . . . . . . . . . . . . .6-19
Engine Oil Life System . . . . . . . . . . . . . . . . . . . . . . . . . . . 6-25Engine Oil Pressure Gauge . . . . . . . . . . . . . . . . . . . . . . . 4-44
Older Children, Restraints . . . . . . . . . . . . . . . . . . . . . . . . . 2-26
OnStar ® System . . . . . . . . . . . . . . . . . . . . . . . . . . . . . . . . . . . 1-25
Operation, Universal Home Remote System . . . . . . . 3-43
Outlet Adjustment . . . . . . . . . . . . . . . . . . . . . . . . . . . . . . . . . 4-27
Outlets
Accessory Power . . . . . . . . . . . . . . . . . . . . . . . . . . . . . . . . .4-20Outside
Automatic Dimming Mirror . . . . . . . . . . . . . . . . . . . . . . . . 3-41
Convex Mirror . . . . . . . . . . . . . . . . . . . . . . . . . . . . . . . . . . . .3-42
Heated Mirrors . . . . . . . . . . . . . . . . . . . . . . . . . . . . . . . . . . . .3-42
Power Mirrors . . . . . . . . . . . . . . . . . . . . . . . . . . . . . . . . . . . .3-41
Overheated Engine Protection Operating Mode . . . . 6-41
Owner Checks and Services . . . . . . . . . . . . . . . . . . . . . . . . .7-8
Owners, Canadian . . . . . . . . . . . . . . . . . . . . . . . . . . . . . . . . . . . . ii
PPaint, Damage . . . . . . . . . . . . . . . . . . . . . . . . . . . . . . . . . . . . . 6-98
Panel, Roof . . . . . . . . . . . . . . . . . . . . . . . . . . . . . . . . . . . . . . . . 3-54
Park
Shifting Into . . . . . . . . . . . . . . . . . . . . . . . . . . . . . . . . . . . . . . .3-35
Shifting Out of . . . . . . . . . . . . . . . . . . . . . . . . . . . . . . . . . . . .3-36
Parking
Brake . . . . . . . . . . . . . . . . . . . . . . . . . . . . . . . . . . . . . . . . . . . . .3-34
Over Things That Burn . . . . . . . . . . . . . . . . . . . . . . . . . . . 3-37
Parking Your Vehicle . . . . . . . . . . . . . . . . . . . . . . . . . . . . . . 3-36
i - 9
Passenger Airbag Status Indicator . . . . . . . . . . . . . . . . . 4-34
Passenger Compartment Air Filter . . . . . . . . . . . . . . . . . 4-28
Passenger Sensing System . . . . . . . . . . . . . . . . . . . . . . . 2-53
Passing 5 18
RRacing or Other Competitive Driving . . . . . . . . . . . . . . . 5-19
Radio Frequency

7/31/2019 2010 Corvette
http://slidepdf.com/reader/full/2010-corvette 467/471
Passing . . . . . . . . . . . . . . . . . . . . . . . . . . . . . . . . . . . . . . . . . . . . 5-18
Perchlorate Materials Requirements, California . . . . . .6-4
Phone
Bluetooth® . . . . . . . . . . . . . . . . . . . . . . . . . . . . . . . . . . . . . . . .4-96
Power Door Locks . . . . . . . . . . . . . . . . . . . . . . . . . . . . . . . . . . . . . . .3-12
Electrical System . . . . . . . . . . . . . . . . . . . . . . . . . . . . . . . .6-100
Lumbar and Side Bolsters . . . . . . . . . . . . . . . . . . . . . . . . . 2-3
Retained Accessory (RAP) . . . . . . . . . . . . . . . . . . . . . . . 3-24
Seat . . . . . . . . . . . . . . . . . . . . . . . . . . . . . . . . . . . . . . . . . . . . . . . 2-3
Steering Fluid . . . . . . . . . . . . . . . . . . . . . . . . . . . . . . . . . . . . .6-41
Windows . . . . . . . . . . . . . . . . . . . . . . . . . . . . . . . . . . . . . . . . .3-17
Pregnancy, Using Safety Belts . . . . . . . . . . . . . . . . . . . . . 2-25
Privacy . . . . . . . . . . . . . . . . . . . . . . . . . . . . . . . . . . . . . . . . . . . . 8-18Navigation System . . . . . . . . . . . . . . . . . . . . . . . . . . . . . . . .8-19
OnStar . . . . . . . . . . . . . . . . . . . . . . . . . . . . . . . . . . . . . . . . . . .8-19
Radio Frequency Identification (RFID) . . . . . . . . . . . . 8-20
Program
Courtesy Transportation . . . . . . . . . . . . . . . . . . . . . . . . . . 8-10
Programmable Automatic Door Unlock . . . . . . . . . . . . 3-13
Proposition 65 Warning, California . . . . . . . . . . . . . . . . . . .6-4
Identification (RFID) . . . . . . . . . . . . . . . . . . . . . . . . . . . . . .8-20
Statement . . . . . . . . . . . . . . . . . . . . . . . . . . . . . . . . . . . . . . . .8-20
Radio(s) . . . . . . . . . . . . . . . . . . . . . . . . . . . . . . . . . . . . . . . . . . . 4-81
Radios
Navigation/Radio System, see NavigationManual . . . . . . . . . . . . . . . . . . . . . . . . . . . . . . . . . . . . . . . . . .4-96
Reception . . . . . . . . . . . . . . . . . . . . . . . . . . . . . . . . . . . . . . .4-108
Setting the Clock . . . . . . . . . . . . . . . . . . . . . . . . . . . . . . . . .4-80
Theft-Deterrent . . . . . . . . . . . . . . . . . . . . . . . . . . . . . . . . . .4-106
Reading Lamps . . . . . . . . . . . . . . . . . . . . . . . . . . . . . . . . . . . . 4-15
Rear Axle . . . . . . . . . . . . . . . . . . . . . . . . . . . . . . . . . . . . . . . . . . 6-55
Limited-Slip . . . . . . . . . . . . . . . . . . . . . . . . . . . . . . . . . . . . . . .5-14
Rear Storage . . . . . . . . . . . . . . . . . . . . . . . . . . . . . . . . . . . . . . 3-51
Rearview Mirrors Automatic Dimming . . . . . . . . . . . . . . . . . . . . . . . . . . . . . . .3-39
Reclining Seatbacks . . . . . . . . . . . . . . . . . . . . . . . . . . . . . . . . .2-6
Recommended Fluids and Lubricants . . . . . . . . . . . . . 7-10
Recreational Vehicle Towing . . . . . . . . . . . . . . . . . . . . . . . 5-33
Reimbursement Program, GM Mobility . . . . . . . . . . . . . . .8-7
Remote, Keyless Access System . . . . . . . . . . . . . . . . . . . .3-5
Removing the Roof Panel . . . . . . . . . . . . . . . . . . . . . . . . . 3-54
i - 1 0
Replacement Bulbs . . . . . . . . . . . . . . . . . . . . . . . . . . . . . . . . 6-58
Replacement Parts
Maintenance . . . . . . . . . . . . . . . . . . . . . . . . . . . . . . . . . . . . . .7-12
Reporting Safety Defects
SSafety Belts
Care of . . . . . . . . . . . . . . . . . . . . . . . . . . . . . . . . . . . . . . . . . . .6-93

7/31/2019 2010 Corvette
http://slidepdf.com/reader/full/2010-corvette 468/471
Reporting Safety Defects
Canadian Government . . . . . . . . . . . . . . . . . . . . . . . . . . . . 8-16
General Motors . . . . . . . . . . . . . . . . . . . . . . . . . . . . . . . . . . .8-16
U.S. Government . . . . . . . . . . . . . . . . . . . . . . . . . . . . . . . . .8-15
Restraint System CheckChecking the Restraint Systems . . . . . . . . . . . . . . . . . . 2-60
Replacing Restraint System Parts After a
Crash . . . . . . . . . . . . . . . . . . . . . . . . . . . . . . . . . . . . . . . . . . .2-61
Retained Accessory Power (RAP) . . . . . . . . . . . . . . . . . 3-24
Ride Control Systems
Active Handling . . . . . . . . . . . . . . . . . . . . . . . . . . . . . . . . . . . . 5-8
Limited Slip Rear Axle . . . . . . . . . . . . . . . . . . . . . . . . . . . .5-14
Selective . . . . . . . . . . . . . . . . . . . . . . . . . . . . . . . . . . . . . . . . .5-14
Roadside Assistance Program . . . . . . . . . . . . . . . . . . . . . . .8-7Rocking Your Vehicle to Get it Out . . . . . . . . . . . . . . . . . 5-28
Roof Panel . . . . . . . . . . . . . . . . . . . . . . . . . . . . . . . . . . . . . . . . 3-54
Installing the Roof Panel . . . . . . . . . . . . . . . . . . . . . . . . . . 3-58
Removing the Roof Panel . . . . . . . . . . . . . . . . . . . . . . . . 3-54
Storing the Roof Panel . . . . . . . . . . . . . . . . . . . . . . . . . . . 3-56
Run-Flat Tires . . . . . . . . . . . . . . . . . . . . . . . . . . . . . . . . . . . . . 6-69
Running the Vehicle While Parked . . . . . . . . . . . . . . . . . 3-38
Extender . . . . . . . . . . . . . . . . . . . . . . . . . . . . . . . . . . . . . . . . . .2-26
How to Wear Safety Belts Properly . . . . . . . . . . . . . . . 2-14
Lap-Shoulder Belt . . . . . . . . . . . . . . . . . . . . . . . . . . . . . . . .2-23
Reminders . . . . . . . . . . . . . . . . . . . . . . . . . . . . . . . . . . . . . . . .4-32
Safety Belts Are for Everyone . . . . . . . . . . . . . . . . . . . . . 2-9Use During Pregnancy . . . . . . . . . . . . . . . . . . . . . . . . . . . .2-25
Safety Defects Reporting
Canadian Government . . . . . . . . . . . . . . . . . . . . . . . . . . . .8-16
General Motors . . . . . . . . . . . . . . . . . . . . . . . . . . . . . . . . . . .8-16
U.S. Government . . . . . . . . . . . . . . . . . . . . . . . . . . . . . . . . .8-15
Safety Warnings and Symbols . . . . . . . . . . . . . . . . . . . . . . . . iv
Scheduled Maintenance . . . . . . . . . . . . . . . . . . . . . . . . . . . . .7-3
Scheduling Appointments . . . . . . . . . . . . . . . . . . . . . . . . . . 8-10
Seatback Latches . . . . . . . . . . . . . . . . . . . . . . . . . . . . . . . . . . .2-8Seats
Heated Seats . . . . . . . . . . . . . . . . . . . . . . . . . . . . . . . . . . . . . . 2-4
Memory, Mirrors . . . . . . . . . . . . . . . . . . . . . . . . . . . . . . . . . . . 2-4
Power Lumbar and Side Bolsters . . . . . . . . . . . . . . . . . . 2-3
Power Seats . . . . . . . . . . . . . . . . . . . . . . . . . . . . . . . . . . . . . . . 2-3
Reclining Seatbacks . . . . . . . . . . . . . . . . . . . . . . . . . . . . . . . 2-6
i-11
Securing a Child Restraint
Right Front Seat Position . . . . . . . . . . . . . . . . . . . . . . . . .2-40
Security
Light 4-45
Storage Areas
Center Console . . . . . . . . . . . . . . . . . . . . . . . . . . . . . . . . . . .3-50
Convenience Net . . . . . . . . . . . . . . . . . . . . . . . . . . . . . . . . .3-52
Cupholders 3-50

7/31/2019 2010 Corvette
http://slidepdf.com/reader/full/2010-corvette 469/471
Light . . . . . . . . . . . . . . . . . . . . . . . . . . . . . . . . . . . . . . . . . . . . . .4 45
Selective Ride Control . . . . . . . . . . . . . . . . . . . . . . . . . . . . . 5-14
Service . . . . . . . . . . . . . . . . . . . . . . . . . . . . . . . . . . . . . . . . . . . . . .6-3
Accessories and Modifications . . . . . . . . . . . . . . . . . . . . . 6-3
Adding Equipment to the Outside of the Vehicle . . . 6-5Doing Your Own Work . . . . . . . . . . . . . . . . . . . . . . . . . . . . . 6-5
Engine Soon Lamp . . . . . . . . . . . . . . . . . . . . . . . . . . . . . . .4-41
Parts Identification Label . . . . . . . . . . . . . . . . . . . . . . . .6-100
Publications Ordering Information . . . . . . . . . . . . . . . . . 8-16
Scheduling Appointments . . . . . . . . . . . . . . . . . . . . . . . . . 8-10
Servicing Your Airbag-Equipped Vehicle . . . . . . . . . . . 2-58
Setting the Clock . . . . . . . . . . . . . . . . . . . . . . . . . . . . . . . . . . 4-80
Shifting
Out of Park . . . . . . . . . . . . . . . . . . . . . . . . . . . . . . . . . . . . . . .3-36Shifting Into Park . . . . . . . . . . . . . . . . . . . . . . . . . . . . . . . . . . 3-35
Signals, Turn and Lane-Change . . . . . . . . . . . . . . . . . . . . .4-5
Specifications and Capacities . . . . . . . . . . . . . . . . . . . . . 6-108
Speedometer . . . . . . . . . . . . . . . . . . . . . . . . . . . . . . . . . . . . . . 4-32
Starting the Engine . . . . . . . . . . . . . . . . . . . . . . . . . . . . . . . . 3-24
Steering . . . . . . . . . . . . . . . . . . . . . . . . . . . . . . . . . . . . . . . . . . . 5-16
Steering Wheel Controls, Audio . . . . . . . . . . . . . . . . . . 4-107
Steering Wheel Controls, Memory . . . . . . . . . . . . . . . . . . .2-4
Steering Wheel, Tilt Wheel . . . . . . . . . . . . . . . . . . . . . . . . . .4-3
Cupholders . . . . . . . . . . . . . . . . . . . . . . . . . . . . . . . . . . . . . . .3 50
Glove Box . . . . . . . . . . . . . . . . . . . . . . . . . . . . . . . . . . . . . . . .3-50
Rear . . . . . . . . . . . . . . . . . . . . . . . . . . . . . . . . . . . . . . . . . . . . . .3-51
Storing the Roof Panel . . . . . . . . . . . . . . . . . . . . . . . . . . . . 3-56
Stuck in Sand, Mud, Ice, or Snow . . . . . . . . . . . . . . . . . 5-27Sun Visors . . . . . . . . . . . . . . . . . . . . . . . . . . . . . . . . . . . . . . . . . 3-18
TTachometer . . . . . . . . . . . . . . . . . . . . . . . . . . . . . . . . . . . . . . . . 4-32
Taillamps
Turn Signal, and Stoplamps . . . . . . . . . . . . . . . . . . . . . . 6-58
Text Telephone (TTY) Users . . . . . . . . . . . . . . . . . . . . . . . . .8-6
Theft - Deterrent System . . . . . . . . . . . . . . . . . . . . . . . . . . 3-19
Theft-Deterrent Feature . . . . . . . . . . . . . . . . . . . . . . . . . . . 4-106Theft-Deterrent Systems . . . . . . . . . . . . . . . . . . . . . 3-19, 3-20
Immobilizer . . . . . . . . . . . . . . . . . . . . . . . . . . . . . . . . . . . . . . .3-20
Tilt Wheel . . . . . . . . . . . . . . . . . . . . . . . . . . . . . . . . . . . . . . . . . . . .4-3
Time, Setting . . . . . . . . . . . . . . . . . . . . . . . . . . . . . . . . . . . . . . 4-80
Tires . . . . . . . . . . . . . . . . . . . . . . . . . . . . . . . . . . . . . . . . . . . . . . . 6-62
Aluminum or Chrome-Plated Wheels, Cleaning . . . 6-97
Buying New Tires . . . . . . . . . . . . . . . . . . . . . . . . . . . . . . . . .6-77
Chains . . . . . . . . . . . . . . . . . . . . . . . . . . . . . . . . . . . . . . . . . . . .6-84
Cleaning . . . . . . . . . . . . . . . . . . . . . . . . . . . . . . . . . . . . . . . . . .6-98
Different Size . . . . . . . . . . . . . . . . . . . . . . . . . . . . . . . . . . . . .6-79
i - 1 2
Tires (cont.)High-Speed Operation . . . . . . . . . . . . . . . . . . . . . . . . . . . . 6-72
If a Tire Goes Flat . . . . . . . . . . . . . . . . . . . . . . . . . . . . . . . .6-89
Inflation - Tire Pressure . . . . . . . . . . . . . . . . . . . . . . . . . . .6-70
Transmission
Fluid, Automatic . . . . . . . . . . . . . . . . . . . . . . . . . . . . . . . . . .6-31
Fluid, Manual . . . . . . . . . . . . . . . . . . . . . . . . . . . . . . . . . . . . .6-31
One-to-Four Shift Light . . . . . . . . . . . . . . . . . . . . . . . . . . . 4-36

7/31/2019 2010 Corvette
http://slidepdf.com/reader/full/2010-corvette 470/471
Inflation Tire Pressure . . . . . . . . . . . . . . . . . . . . . . . . . . .6 70
Inspection and Rotation . . . . . . . . . . . . . . . . . . . . . . . . . . 6-76
Lifting the Vehicle . . . . . . . . . . . . . . . . . . . . . . . . . . . . . . . . .6-84
Pressure Light . . . . . . . . . . . . . . . . . . . . . . . . . . . . . . . . . . . .4-40
Pressure Monitor Operation . . . . . . . . . . . . . . . . . . . . . . 6-74Pressure Monitor System . . . . . . . . . . . . . . . . . . . . . . . . . 6-72
Run-Flat . . . . . . . . . . . . . . . . . . . . . . . . . . . . . . . . . . . . . . . . . .6-69
Sidewall Labeling . . . . . . . . . . . . . . . . . . . . . . . . . . . . . . . . .6-64
Terminology and Definitions . . . . . . . . . . . . . . . . . . . . . . 6-66
Uniform Tire Quality Grading . . . . . . . . . . . . . . . . . . . . . 6-79
Wheel Alignment and Tire Balance . . . . . . . . . . . . . . . 6-81
Wheel Replacement . . . . . . . . . . . . . . . . . . . . . . . . . . . . . .6-81
When It Is Time for New Tires . . . . . . . . . . . . . . . . . . . . 6-76
Winter . . . . . . . . . . . . . . . . . . . . . . . . . . . . . . . . . . . . . . . . . . . .6-63Towing
Recreational Vehicle . . . . . . . . . . . . . . . . . . . . . . . . . . . . . .5-33
Towing a Trailer . . . . . . . . . . . . . . . . . . . . . . . . . . . . . . . . . .5-33
Your Vehicle . . . . . . . . . . . . . . . . . . . . . . . . . . . . . . . . . . . . . .5-33
Traction
Active Handling System . . . . . . . . . . . . . . . . . . . . . . . . . . . 5-8
Control System (TCS) . . . . . . . . . . . . . . . . . . . . . . . . . . . . . 5-6
Control System Warning Light . . . . . . . . . . . . . . . . . . . . 4-38
Limited-Slip Rear Axle . . . . . . . . . . . . . . . . . . . . . . . . . . . .5-14Selective Ride Control . . . . . . . . . . . . . . . . . . . . . . . . . . . .5-14
One to Four Shift Light . . . . . . . . . . . . . . . . . . . . . . . . . . . 4 36
Transmission Operation, Automatic . . . . . . . . . . . . . . . . 3-26
Transmission Operation, Manual . . . . . . . . . . . . . . . . . . 3-32
Transportation Program, Courtesy . . . . . . . . . . . . . . . . . 8-10
Trunk/Hatch . . . . . . . . . . . . . . . . . . . . . . . . . . . . . . . . . . . . . . . 3-14Turn and Lane-Change Signals . . . . . . . . . . . . . . . . . . . . . .4-5
Turn Signal/Multif unction Lever . . . . . . . . . . . . . . . . . . . . . .4-4
Twilight Sentinel® . . . . . . . . . . . . . . . . . . . . . . . . . . . . . . . . . . 4-14
UUniform Tire Quality Grading . . . . . . . . . . . . . . . . . . . . . . 6-79
Universal Home Remote System . . . . . . . . . . . . . . . . . . 3-42
Operation . . . . . . . . . . . . . . . . . . . . . . . . . . . . . . . . . . . . . . . . .3-43
VVehicle
Control . . . . . . . . . . . . . . . . . . . . . . . . . . . . . . . . . . . . . . . . . . . . 5-3
Loading . . . . . . . . . . . . . . . . . . . . . . . . . . . . . . . . . . . . . . . . . . .5-28
Parking Your . . . . . . . . . . . . . . . . . . . . . . . . . . . . . . . . . . . . . .3-36
Running While Parked . . . . . . . . . . . . . . . . . . . . . . . . . . . .3-38
Symbols . . . . . . . . . . . . . . . . . . . . . . . . . . . . . . . . . . . . . . . . . . . . .iv
Vehicle Data Recording and Privacy . . . . . . . . . . . . . . . 8-18
i - 1 3
Vehicle Identification
Number (VIN) . . . . . . . . . . . . . . . . . . . . . . . . . . . . . . . . . . . . .6-99
Service Parts Identification Label . . . . . . . . . . . . . . . .6-100
Vehicle Personalization
Windows . . . . . . . . . . . . . . . . . . . . . . . . . . . . . . . . . . . . . . . . . . 3-16
Power . . . . . . . . . . . . . . . . . . . . . . . . . . . . . . . . . . . . . . . . . . . .3-17
Windshield
Replacement . . . . . . . . . . . . . . . . . . . . . . . . . . . . . . . . . . . . .6-59

7/31/2019 2010 Corvette
http://slidepdf.com/reader/full/2010-corvette 471/471
DIC . . . . . . . . . . . . . . . . . . . . . . . . . . . . . . . . . . . . . . . . . . . . . . .4-71
Ventilation Adjustment . . . . . . . . . . . . . . . . . . . . . . . . . . . . . 4-27
Visors . . . . . . . . . . . . . . . . . . . . . . . . . . . . . . . . . . . . . . . . . . . . . 3-18
Voltmeter Gauge . . . . . . . . . . . . . . . . . . . . . . . . . . . . . . . . . . 4-35
W Warning Lights, Gauges, and Indicators . . . . . . . . . . . 4-29
Warnings
DIC Warnings and Messages . . . . . . . . . . . . . . . . . . . . . 4-52
Hazard Flashers . . . . . . . . . . . . . . . . . . . . . . . . . . . . . . . . . . . 4-3
Safety and Symbols . . . . . . . . . . . . . . . . . . . . . . . . . . . . . . . . .iv
Wheels
Alignment and Tire Balance . . . . . . . . . . . . . . . . . . . . . . 6-81Different Size . . . . . . . . . . . . . . . . . . . . . . . . . . . . . . . . . . . . .6-79
Replacement . . . . . . . . . . . . . . . . . . . . . . . . . . . . . . . . . . . . .6-81
When It Is Time for New Tires . . . . . . . . . . . . . . . . . . . . . 6-76
p 5
Washer . . . . . . . . . . . . . . . . . . . . . . . . . . . . . . . . . . . . . . . . . . . . 4-6
Washer Fluid . . . . . . . . . . . . . . . . . . . . . . . . . . . . . . . . . . . . .6-42
Wiper Blade Replacement . . . . . . . . . . . . . . . . . . . . . . . . 6-59
Wiper Blades, Cleaning . . . . . . . . . . . . . . . . . . . . . . . . . . . 6-96
Wiper Fuses . . . . . . . . . . . . . . . . . . . . . . . . . . . . . . . . . . . . .6-100
Wipers . . . . . . . . . . . . . . . . . . . . . . . . . . . . . . . . . . . . . . . . . . . . . 4-6
Winter Driving . . . . . . . . . . . . . . . . . . . . . . . . . . . . . . . . . . . . . 5-25
Winter Tires . . . . . . . . . . . . . . . . . . . . . . . . . . . . . . . . . . . . . . . 6-63
Wiper Activated Headlamps . . . . . . . . . . . . . . . . . . . . . . . 4-12
XXM Radio Messages . . . . . . . . . . . . . . . . . . . . . . . . . . . . . . 4-95
XM™ Satellite Radio Antenna . . . . . . . . . . . . . . . . . . . . . . . . . . . . . . . . . . . . . . . . .4-109
i - 1 4