2007 350Z Quick Reference Guide - VoIP Lines & Hosted PBX Nissan 350Z Quick Reference Guide.pdf ·...
14
SHIFT_obsession 2007 350Z QUICK REFERENCE GUIDE
Transcript of 2007 350Z Quick Reference Guide - VoIP Lines & Hosted PBX Nissan 350Z Quick Reference Guide.pdf ·...

Shift_obsession
20
07 3
50
ZQ
UIC
K R
EF
ER
EN
CE
GU
IDE

05
02
07
0603
11
04
12
10
09
01
08
headlight and turn signal COntrOl
03instruMent Brightness COntrOl*
01
steering Wheel sWitCh FOr audiO COntrOl
04 Windshield WiPer/ Washer sWitCh
Cruise COntrOl05
triP COMPuter MOde/ setting ButtOns
02 06
Fuel-Filler dOOr release
tCs/VdC OFF sWitCh
sOFt tOP OPerating sWitCh (roadster Models)
07
08
09
hOOd release*10
steering Wheel tilt adJustMent*
11
COntrOl Panel disPlaY
12
13
14
audiO sYsteM13
CliMate COntrOls14
*See your Owner’s Manual fpr more information.
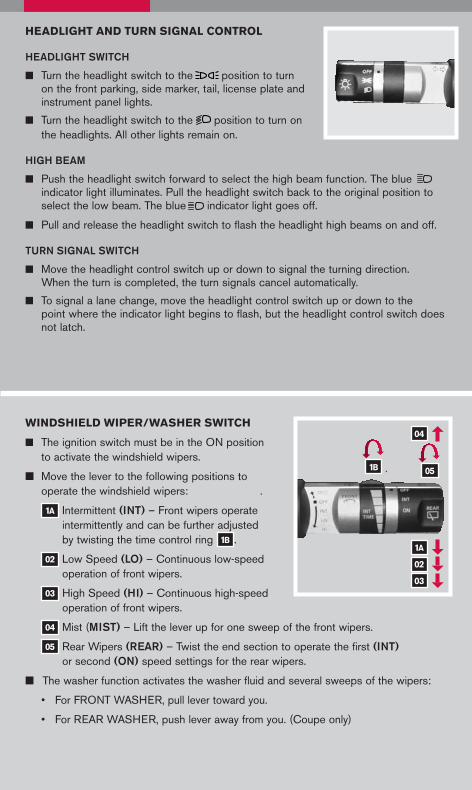
headlight and turn signal COntrOl
HEADLIGHT SWITCH
Turn the headlight switch to the position to turn on the front parking, side marker, tail, license plate and instrument panel lights.
Turn the headlight switch to the position to turn on the headlights. All other lights remain on.
HIGH BEAM
Push the headlight switch forward to select the high beam function. The blue indicator light illuminates. Pull the headlight switch back to the original position to select the low beam. The blue indicator light goes off.
Pull and release the headlight switch to flash the headlight high beams on and off.
TURN SIGNAL SWITCH
Move the headlight control switch up or down to signal the turning direction. When the turn is completed, the turn signals cancel automatically.
To signal a lane change, move the headlight control switch up or down to the point where the indicator light begins to flash, but the headlight control switch does not latch.
Windshield WiPer/Washer sWitCh
The ignition switch must be in the ON position to activate the windshield wipers.
Move the lever to the following positions to operate the windshield wipers:
1a Intermittent (INT) – Front wipers operate intermittently and can be further adjusted by twisting the time control ring 1B .
02 Low Speed (LO) – Continuous low-speed operation of front wipers.
03 High Speed (HI) – Continuous high-speed operation of front wipers.
04 Mist (MIST) – Lift the lever up for one sweep of the front wipers.
05 Rear Wipers (REAR) – Twist the end section to operate the first (INT) or second (ON) speed settings for the rear wipers.
The washer function activates the washer fluid and several sweeps of the wipers:
• For FRONT WASHER, pull lever toward you.
• For REAR WASHER, push lever away from you. (Coupe only)
1a
02
03
04
1B 05

triP COMPuter The trip computer may be used to check items such as speed, outside air temperature, distance to empty (fuel), average mileage and speed, elapsed time and distance traveled. Additionally, it can function as a stopwatch or be used to operate the RPM shift feature (REV) (Manual transmission only).
To operate the Trip Computer:
Turn the ignition switch on. Then press the side of the buttons.
Press the button 01 toward the left to scroll through each mode.
Press the button 02 toward the left to reset or adjust the various mode selections.
01
02
rPM shiFt indiCatOr (Manual transmission only)The engine RPM shift indicator light (REV) is located in the tachometer. During driving, it indicates ‘shift point’, or time to up-shift.
The shift indicator light will begin flashing about 500 RPM before a pre-set engine RPM is reached in any gear. Then, when the actual pre-set RPM is reached, the shift indicator light will stop flashing and remain on.
The engine RPM shift point may be set by the driver using the Trip Computer display. Or it may be deactivated, also using the Trip Computer display.
tire Pressure MOnitOring sYsteM (tPMs)
This system monitors tire pressure. Please remember, this system does not detect a sudden drop in tire pressure (for example, a blowout while driving). It also does not monitor the air pressure in the spare tire.
Tire pressure is affected by temperature. Low outside temperature causes lower tire pressure. This may cause the low tire pressure warning light to illuminate.
If the low tire pressure warning light illuminates, check the tire pressure in all four tires. To turn the low tire pressure warning light off, adjust the low tire pressure to the recommended COLD tire pressure shown on the Tire and Loading Information label located in the driver’s door opening.
If TPMS is not functioning properly, the low tire pressure warning light will flash for approximately 60 seconds when the key is turned on. After 60 seconds, the light will remain on. Have the system checked by a NISSAN dealer.
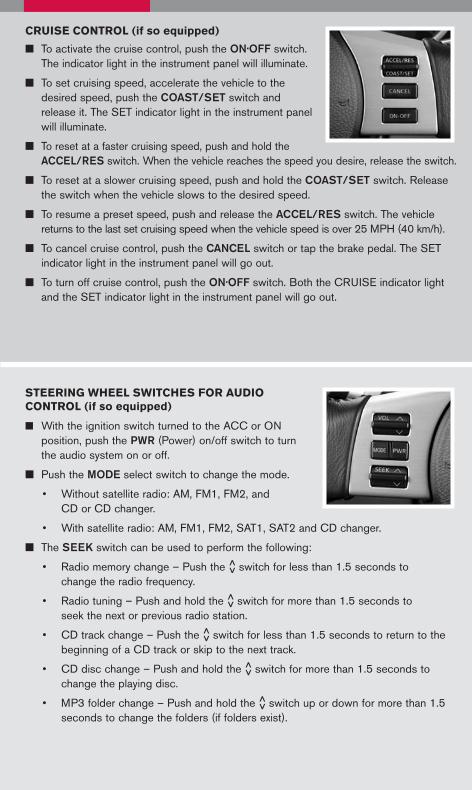
Cruise COntrOl (if so equipped)
To activate the cruise control, push the ON.OFF switch. The indicator light in the instrument panel will illuminate.
To set cruising speed, accelerate the vehicle to the desired speed, push the COAST/SET switch and release it. The SET indicator light in the instrument panel will illuminate.
To reset at a faster cruising speed, push and hold the ACCEL/RES switch. When the vehicle reaches the speed you desire, release the switch.
To reset at a slower cruising speed, push and hold the COAST/SET switch. Release the switch when the vehicle slows to the desired speed.
To resume a preset speed, push and release the ACCEL/RES switch. The vehicle returns to the last set cruising speed when the vehicle speed is over 25 MPH (40 km/h).
To cancel cruise control, push the CANCEL switch or tap the brake pedal. The SET indicator light in the instrument panel will go out.
To turn off cruise control, push the ON.OFF switch. Both the CRUISE indicator light and the SET indicator light in the instrument panel will go out.
steering Wheel sWitChes FOr audiO COntrOl (if so equipped)
With the ignition switch turned to the ACC or ON position, push the PWR (Power) on/off switch to turn the audio system on or off.
Push the MODE select switch to change the mode.
• Without satellite radio: AM, FM1, FM2, and CD or CD changer.
• With satellite radio: AM, FM1, FM2, SAT1, SAT2 and CD changer.
The SEEK switch can be used to perform the following:
• Radio memory change – Push the
< > switch for less than 1.5 seconds to
change the radio frequency.
• Radio tuning – Push and hold the
< > switch for more than 1.5 seconds to
seek the next or previous radio station.
• CD track change – Push the
< > switch for less than 1.5 seconds to return to the
beginning of a CD track or skip to the next track.
• CD disc change – Push and hold the
< > switch for more than 1.5 seconds to
change the playing disc.
• MP3 folder change – Push and hold the
< > switch up or down for more than 1.5
seconds to change the folders (if folders exist).
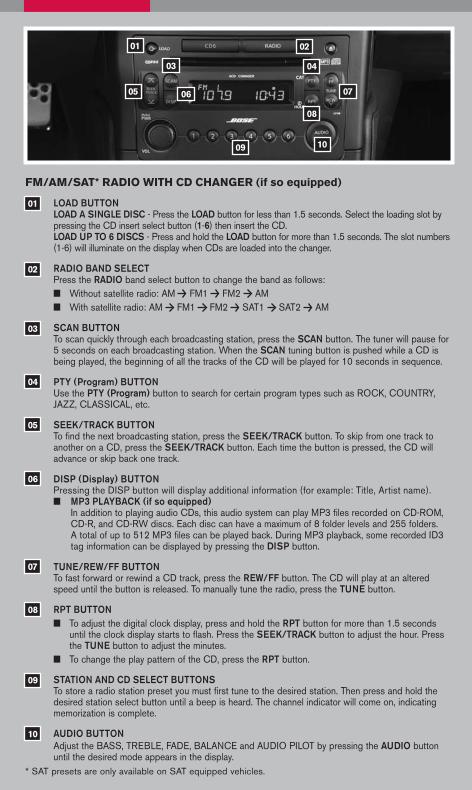
FM/aM/sat* radiO With Cd Changer (if so equipped)
09 10
0705
01
08
03
06
04
02
LOAD BUTTON LOAD A SINGLE DISC - Press the LOAD button for less than 1.5 seconds. Select the loading slot by pressing the CD insert select button (1-6) then insert the CD. LOAD UP TO 6 DISCS - Press and hold the LOAD button for more than 1.5 seconds. The slot numbers (1-6) will illuminate on the display when CDs are loaded into the changer.
RADIO BAND SELECT Press the RADIO band select button to change the band as follows: Without satellite radio: AM FM1 FM2 AM With satellite radio: AM FM1 FM2 SAT1 SAT2 AM
SCAN BUTTON To scan quickly through each broadcasting station, press the SCAN button. The tuner will pause for 5 seconds on each broadcasting station. When the SCAN tuning button is pushed while a CD is being played, the beginning of all the tracks of the CD will be played for 10 seconds in sequence.
PTY (Program) BUTTON Use the PTY (Program) button to search for certain program types such as ROCK, COUNTRY, JAZZ, CLASSICAL, etc.
SEEK/TRACK BUTTON To find the next broadcasting station, press the SEEK/TRACK button. To skip from one track to another on a CD, press the SEEK/TRACK button. Each time the button is pressed, the CD will advance or skip back one track.
DISP (Display) BUTTON Pressing the DISP button will display additional information (for example: Title, Artist name). MP3 PLAYBACK (if so equipped) In addition to playing audio CDs, this audio system can play MP3 files recorded on CD-ROM, CD-R, and CD-RW discs. Each disc can have a maximum of 8 folder levels and 255 folders. A total of up to 512 MP3 files can be played back. During MP3 playback, some recorded ID3 tag information can be displayed by pressing the DISP button.
01
02
03
04
05
06
07
08
09
10
* SAT presets are only available on SAT equipped vehicles.
TUNE/REW/FF BUTTON To fast forward or rewind a CD track, press the REW/FF button. The CD will play at an altered speed until the button is released. To manually tune the radio, press the TUNE button.
RPT BUTTON To adjust the digital clock display, press and hold the RPT button for more than 1.5 seconds
until the clock display starts to flash. Press the SEEK/TRACK button to adjust the hour. Press the TUNE button to adjust the minutes.
To change the play pattern of the CD, press the RPT button.
STATION AND CD SELECT BUTTONS To store a radio station preset you must first tune to the desired station. Then press and hold the desired station select button until a beep is heard. The channel indicator will come on, indicating memorization is complete.
AUDIO BUTTON Adjust the BASS, TREBLE, FADE, BALANCE and AUDIO PILOT by pressing the AUDIO button until the desired mode appears in the display.

0302 04
0106
05
0807
AUTO MODETurn both the fan speed control dial 04 and the air flow control dial 03 to the AUTO positions 01 . Then turn the temperature control dial 02 to the desired temperature. This will allow the fan speed, air flow distribution and temperature to be automatically maintained.
TEMPERATURE CONTROL DIALTurn the temperature control dial left for cold air or right for hot air.
AIR FLOW CONTROL DIALTurn the dial to select the following air flow outlets:
Air flows from the center and side vents.
Air flows from the center, side, and foot vents.
Air flows mainly from the foot vents.
Air flows from the defroster and foot vents.
Air flows mainly from the defroster vents.autO The air flow distribution of the passenger compartment will be maintained automatically when the control dial is turned to the AUTO position.
FAN SPEED CONTROL DIALTurn the fan speed control dial to the left (slower) or right (faster) to manually control fan speed. Turn the dial to the AUTO position to automatically control fan speed.
DEFROSTING/DEFOGGING FRONT AND SIDE WINDOWS Turn the air flow control dial to the front window defroster mode . The A/C
automatically turns on when the defroster mode is selected. Turn the temperature control dial left or right to set the desired temperature. To set the defroster on high, turn the fan speed dial all the way to the right.
DEFROSTING/DEFOGGING REAR WINDOW AND OUTSIDE HEATED MIRRORPush the rear window defroster switch on. Push the switch again to manually turn the defroster off. This function automatically turns off in approximately 15 minutes.
A/C ON/OFF BUTTONPress the A/C button to manually turn the A/C on or off.
AIR RECIRCULATION/FRESH AIR BUTTON Press the air intake button to alternate between (air recirculation) and
(fresh air). The air recirculation mode cannot be selected if the air flow control dial is in the
defrost position .
04
03
02
01
autOMatiC CliMate COntrOl
05
06
07
08
NOTE: When the center button is pressed to recirculate the interior air, the A/C will automatically turn on (if not already on). This is done to help reduce window fogging.
01

traCtiOn COntrOl sYsteM (tCs) OFF sWitCh (if so equipped)
The vehicle should be driven with the Traction Control System (TCS) on for most driving conditions. TCS reduces the engine output to reduce wheel spin. The engine speed will be reduced even if the accelerator is depressed to the floor. If maximum engine power is needed to free a stuck vehicle, such as from mud or snow, turn the TCS off.
To turn off the TCS, push the TCS OFF switch. The indicator light will illuminate.
Push the switch again or restart the engine and the system will operate normally.
FrOnt-Passenger air Bag status light
This vehicle is equipped with the Nissan Advanced Air Bag system. Under some conditions, depending on the type of occupant or object detected in the front passenger seat by the occupant classification sensor, the front-passenger air bag is designed to automatically turn OFF. When the front-passenger air bag is OFF, the front-passenger air bag status light will illuminate*. For example:
When the system detects that the front-passenger’s seat is occupied by a small adult, child or child restraint as outlined in the Owner’s Manual, the will illuminate to indicate that the front-passenger air bag is OFF and will not inflate in a crash.
When the front-passenger’s seat is occupied and the passenger meets the conditions outlined in the Owner’s Manual, the will not illuminate to indicate that the front-passenger air bag is operational.
*When the system detects that the front-passenger’s seat is unoccupied, the passenger air bag status light will not illuminate even though the front-passenger air bag is OFF.
Refer to the Owner’s Manual for detailed information regarding the Nissan Advanced Air Bag System.
seatBaCK tilt CanCel sWitCh (roadster only)
The passenger seat of the 350Z Roadster automatically tilts forward when operating the soft top. This function can be cancelled by pushing the seatback tilt cancel switch to the CANCEL position. Push the seatback tilt cancel switch to the AUTO position to reactivate the power seatback tilt switch.
If the seatback tilt cancel switch is in the CANCEL position, the seatback tilt paddle switch (located on the back of the passenger seat) will not work. In this situation, tilt the passenger seatback forward using the power seat position switch.
seat Belt Warning light and ChiMe The light and chime remind you to fasten your seat belts. The
light illuminates whenever the ignition key is turned to the ON or START position and remains illuminated until the driver’s seat belt is fastened. At the same time, the chime sounds for about 6 seconds unless the driver’s seat belt is securely fastened.
The seat belt warning light may also illuminate if the front passenger’s seat belt is not fastened when the front passenger’s seat is occupied (if so equipped). For 5 seconds after the ignition switch is in the ON position, the system does not activate the warning light for the front passenger.
Refer to the Owner’s Manual for detailed information regarding seat belt usage.
FrOnt seat adJustMents
WITH MANUAL SEATS
Pull up on the lever under the front of the seat and slide backward or forward to the desired position. Release the lever to lock the seat in position.
Lift the lever on the side of the seat to adjust your seatback backward or forward; release the lever when you have found a comfortable angle and the seat belt fits properly.
Turn either dial to adjust the angle and height of the seat cushion to the desired position.
WITH POWER SEATS (if so equipped)
Move the sliding switch 01 forward or backward to adjust the seat cushion to the desired position.
Move the reclining switch 02 forward or backward to adjust the seatback to the desired angle.
Turn either dial to adjust the angle and height of the seat cushion to the desired position.
01
02
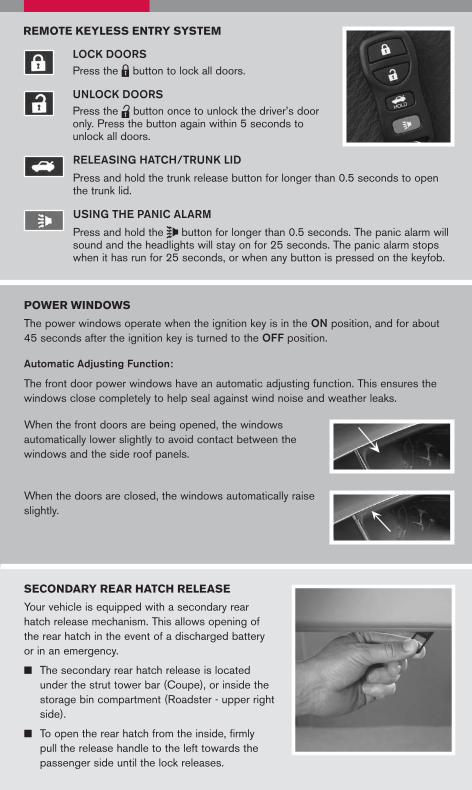
reMOte KeYless entrY sYsteM
LOCK DOORSPress the
LPD0150 button to lock all doors.
UNLOCK DOORSPress the
lpd0151 button once to unlock the driver’s door
only. Press the button again within 5 seconds to unlock all doors.
RELEASING HATCH/TRUNK LID
Press and hold the trunk release button for longer than 0.5 seconds to open the trunk lid.
USING THE PANIC ALARM
Press and hold the button for longer than 0.5 seconds. The panic alarm will sound and the headlights will stay on for 25 seconds. The panic alarm stops when it has run for 25 seconds, or when any button is pressed on the keyfob.
POWer WindOWs
The power windows operate when the ignition key is in the ON position, and for about 45 seconds after the ignition key is turned to the OFF position.
Automatic Adjusting Function:
The front door power windows have an automatic adjusting function. This ensures the windows close completely to help seal against wind noise and weather leaks.
When the front doors are being opened, the windows automatically lower slightly to avoid contact between the windows and the side roof panels.
When the doors are closed, the windows automatically raise slightly.
seCOndarY rear hatCh release
Your vehicle is equipped with a secondary rear hatch release mechanism. This allows opening of the rear hatch in the event of a discharged battery or in an emergency.
The secondary rear hatch release is located under the strut tower bar (Coupe), or inside the storage bin compartment (Roadster - upper right side).
To open the rear hatch from the inside, firmly pull the release handle to the left towards the passenger side until the lock releases.

sCreW-in reCOVerY hOOK
Your vehicle is supplied with a screw-in recovery hook for pulling the vehicle forward. For example: Pulling the vehicle onto a flat bed for towing.
The screw-in recovery hook tool is located in the right rear luggage compartment area under the cover along with the vehicle jack.
To install the recovery hook: Remove the recovery hook cover from the front
bumper.
Install the recovery hook as shown in the photo. Turn it clockwise until securely tightened.
COntrOl Panel disPlaY With naVigatiOn sYsteM (if so equipped)
INFO BUTTON
When the INFO button is pressed, the Maintenance screen will be displayed.
To set the maintenance interval for the Engine Oil or Oil Filter, choose an item using the joystick and press the ENTER button.
You can also set the display to remind you that maintenance needs to be performed.
CLOCK/SET ADJUSTMENT
Press the SETTING button, select the “Clock” key and press the ENTER button to access the following clock settings: On-screen clock – When this item is turned to ON, a clock is always displayed
in the upper right corner of the screen. The clock is automatically adjusted by the GPS system.
Clock format – Choose either the 12-hour clock display or the 24-hour clock display.
Offset adjust – Adjust the time by increasing or decreasing per minute.
Daylight Savings Time – Turn this item to ON for daylight savings time application.
Time Zone – Choose the time zone.
Refer to your Owner’s Manual and Navigation System Owner’s Manual for additional information on your navigation system.
MirrOr adJustMent
The rear view mirror has two pivot points for adjustments. Adjust the rear view mirror height at the rear pivot and tilt the mirror at the front pivot. Position the mirror to provide the best visibility through the rear window.
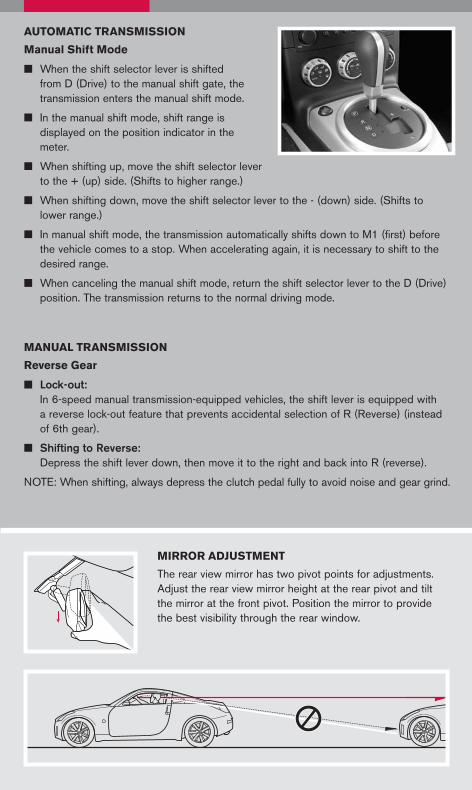
autOMatiC transMissiOn
Manual shift Mode
When the shift selector lever is shifted from D (Drive) to the manual shift gate, the transmission enters the manual shift mode.
In the manual shift mode, shift range is displayed on the position indicator in the meter.
When shifting up, move the shift selector lever to the + (up) side. (Shifts to higher range.)
When shifting down, move the shift selector lever to the - (down) side. (Shifts to lower range.)
In manual shift mode, the transmission automatically shifts down to M1 (first) before the vehicle comes to a stop. When accelerating again, it is necessary to shift to the desired range.
When canceling the manual shift mode, return the shift selector lever to the D (Drive) position. The transmission returns to the normal driving mode.
Manual transMissiOn
reverse gear
Lock-out: In 6-speed manual transmission-equipped vehicles, the shift lever is equipped with a reverse lock-out feature that prevents accidental selection of R (Reverse) (instead of 6th gear).
Shifting to Reverse: Depress the shift lever down, then move it to the right and back into R (reverse).
NOTE: When shifting, always depress the clutch pedal fully to avoid noise and gear grind.

sOFt tOP OPeratiOn
Before opening or closing your soft top, refer to the Owner’s Manual for detailed Warnings and Cautions regarding soft top operation.
Open the top:1. Make sure the area is clear of
obstructions and that there is at least 6 feet of clearance above the vehicle.
2. Apply the parking brake and make sure the transmission is in the P (Park) position (automatic transmission) or the N (Neutral) position (manual transmission).
3. Step on the brake pedal.
4. Start the engine.
5. Push the safety switch (black) located in the center of the top latch lever. Push the top latch lever (silver) forward to unlatch the top.
6. Press and hold the OPEN side of the soft top operating switch until the top is fully open and stowed and the indicator light turns off.
Close the top:1. Make sure the area is clear of obstructions and
that there is at least 6 feet of clearance above the vehicle.
2. Apply the parking brake and make sure the transmission is in the P (Park) position (automatic transmission) or the N (Neutral) position (manual transmission).
3. Step on the brake pedal.
4. Start the engine.
5. Press and hold the CLOSE side of the soft top operating switch until the top is fully closed and the indicator light begins to flash.
6. Securely latch the top with the top latch lever. The indicator light turns off.
If the top does not close when using the operating switch, refer to the Owner’s Manual for the procedure to manually close the top.

This easy-to-use Quick Reference Guide is intended to help you more fully appreciate some of the unique features and functions of your new vehicle. However, it is not intended to replace your Owner’s Manual. The Owner’s Manual contains more detailed information to help you better understand the important safety warnings, features, operation, and maintenance of your vehicle.
QR7E-0Z33U0 Printing: November 2006 (12)
Nissan, the Nissan Brand Symbol, “SHIFT_” tagline, Z and Nissan model names are Nissan trademarks. ©2006 Nissan North America, Inc.
Shift_
rear FlOOr BOX
Rear floor storage is located behind the passenger’s seat.
Fold the passenger’s seatback forward to access the rear floor box.
• Coupe – Pull up on the lever 01 .
• Roadster – Push the upper portion of the passenger power seat switch 02 .
Pull up on the lever 03 to open the rear floor box. NOTE: The rear floor storage box has additional space under the bottom plate.
Using the master key, lock the storage box (turn key to the right) or unlock the storage box (turn key to the left).
Return the passenger’s seatback to a locked position after using the rear floor box.
• Coupe – Pull up on the lever 01 to return seatback to original position.
• Roadster – Push lower portion of the passenger power seat switch 04 to return seatback to original position.
01
02
04
03