2003 Cadillac CTS Owner's Manual - GM Extended … The 2003 Cadillac CTS Owner’s Manual 1-1 Seats...
435
Transcript of 2003 Cadillac CTS Owner's Manual - GM Extended … The 2003 Cadillac CTS Owner’s Manual 1-1 Seats...

i
The 2003 Cadillac CTS Owner ’s Manual
1-1 Seats and Restraint SystemsThis section tells you how to use your seats and safety belts properly. It also explains the air bag system.
2-1 Features and ControlsThis section explains how to start and operate your vehicle.
3-1 Comfort Controls and Audio SystemsThis section tells you how to adjust the ventilation and comfort controls and how to operate your audio system.
4-1 Your Driving and the RoadHere you’ll find helpful information and tips about the road and how to drive under different conditions.
5-1 Problems on the RoadThis section tells you what to do if you have a problem while driving, such as a flat tire or overheated engine, etc.
6-1 Service and Appearance CareHere the manual tells you how to keep your vehicle running properly and looking good.
7-1 Maintenance ScheduleThis section tells you when to perform vehicle maintenance and what fluids and lubricants to use.
8-1 Customer Assistance InformationThis section tells you how to contact Cadillac for assistance and how to get service and owner publications. It also gives you information on “Reporting Safety Defects” on page 8-9.

ii
GENERAL MOTORS, GM and the GM Emblem,CADILLAC, the CADILLAC Crest & Wreath areregistered trademarks and the name CTS is a trademarkof General Motors Corporation.
This manual includes the latest information at the time itwas printed. We reserve the right to make changes afterthat time without further notice. For vehicles first sold inCanada, substitute the name “General Motors of CanadaLimited” for Cadillac Motor Car Division whenever itappears in this manual.
Please keep this manual in your vehicle, so it will be there if you ever need it when you’re on the road. If you sell the vehicle, please leave this manual in it so the new owner can use it.
We support voluntarytechnician certification.
Litho in U.S.A. �Copyright General Motors Corporation 11/12/01Part Number 25735664 A First Edition All Rights Reserved

iii
How to Use this ManualMany people read their owner’s manual from beginningto end when they first receive their new vehicle. If youdo this, it will help you learn about the features andcontrols for your vehicle. In this manual, you’ll find that pictures and words work together to explain things quickly.
Safety Warnings and SymbolsYou will find a number of safety cautions in this book.We use a box and the word CAUTION to tell you about things that could hurt you if you were to ignorethe warning.
CAUTION:
These mean there is something that could hurtyou or other people.
In the caution area, we tell you what the hazard is. Then we tell you what to do to help avoid or reduce the hazard. Please read these cautions. If you don’t, you or others could be hurt.
You will also find a circlewith a slash through it inthis book. This safetysymbol means “Don’t,”“Don’t do this” or “Don’tlet this happen.”

iv
Vehicle Damage WarningsAlso, in this book you will find these notices:
NOTICE:
These mean there is something that could damageyour vehicle.
In the notice area, we tell you about something that candamage your vehicle. Many times, this damage wouldnot be covered by your warranty, and it could be costly.But the notice will tell you what to do to help avoid the damage.
When you read other manuals, you might see CAUTION and NOTICE warnings in different colors or in different words.
You’ll also see warning labels on your vehicle. They use the same words, CAUTION or NOTICE.
Vehicle SymbolsYour vehicle may be equipped with components andlabels that use symbols instead of text. Symbols, used on your vehicle, are shown along with the textdescribing the operation or information relating to aspecific component, control, message, gage or indicator.
If you need help figuring out a specific name of acomponent, gage or indicator reference the followingtopics in the Index:
� “Engine Compartment Overview”� “Instrument Panel”� “Comfort Controls”� “Audio Systems”
Also see “Warning Lights and Gages” in the Index.

v
These are some examples of vehicle symbols you may find on your vehicle:

1-1-1
Section 1 Seats and Restraint Systems
Here you’ll find information about the seats in your vehicle and how to use your safety belts properly. You can alsolearn about some things you should not do with air bags and safety belts.
1-2 Seats and Seat Controls1-10 Safety Belts: They’re for Everyone1-15 Here Are Questions Many People Ask About
Safety Belts -- and the Answers1-16 How to Wear Safety Belts Properly1-16 Driver Position1-22 Safety Belt Use During Pregnancy1-23 Right Front Passenger Position1-24 Air Bag Systems1-35 Safety Belt Pretensioners
1-36 Rear Seat Passengers1-39 Rear Safety Belt Comfort Guides for Children
and Small Adults1-41 Children1-45 Restraint Systems for Children1-58 Older Children1-61 Safety Belt Extender1-61 Checking Your Restraint Systems1-62 Replacing Restraint System Parts After
a Crash

1-2
Seats and Seat ControlsThis section tells you about the power seats -- how toadjust them, and also about the reclining front seatbacks,memory seats, lumbar adjustments and heated seats.
Two-Way Manual Passenger Seat
Lift the bar under the front of the seat to unlock it. Slidethe seat to where you want it and release the bar. Try tomove the seat back and forth with your body to be surethe seat is locked in place.
Six-Way Power Seats (If Equipped)
If your vehicle is equipped with power seats, thecontrols are located on the outboard sides of the frontseat cushions.� Move the front of the horizontal control up or down
to adjust the front portion of the cushion.� Move the rear of the horizontal control up or down
to adjust the rear portion of the cushion.� Lift up or push down on the center of the horizontal
control to move the entire seat up or down.
� To move the seat forward or rearward, slide thehorizontal control forward or rearward.

1-3
Memory Seat and Mirrors (If Equipped)This feature allows you to program and recall memorysettings for the driver’s seating and outside rearviewmirror driving positions for up to two drivers.
The buttons for this featureare located on the driver’sdoor armrest.
Use the following steps to program the buttons:
1. Adjust the driver’s seat including the seatbackrecliner and both outside mirrors.
2. Press and hold button 1 for at least three seconds.
Two beeps will sound to confirm that the seat andmirror positions have been saved.
3. Repeat the procedure for a second driver using button 2.
If your vehicle has an automatic transmission, thevehicle must be in PARK (P) to recall the stored drivingpositions. If your vehicle has a manual transmission andthe engine is running, the parking brake must be set torecall the memory seat driving positions. The storeddriving positions can be recalled without setting theparking brake if the vehicle is off.
Press one of the numbered memory buttons to recall thestored setting. Each time a memory button is pressed, asingle beep will sound.
Three chimes will sound and the setting will not berecalled if you press button 1 or 2 while the engine isrunning and the vehicle is not in PARK (P) on anautomatic transmission or the parking brake is not set on a manual transmission.
If you would like the stored driving positions to berecalled when unlocking your vehicle with the remotekeyless entry transmitter or when you place the key inthe ignition, see “Vehicle Programming andPersonalization Features” in the Index.
To stop recall movement of the memory feature at anytime, press one of the power seat or mirror controls.

1-4
Two personalized exit positions can also beprogrammed. Use the following steps to program exit positions:
1. Press memory seat button 1 or the button with the unlock symbol on the remote keyless entrytransmitter with the number 1 on the back to recallthe drive position.
2. Adjust the driver’s seat to the desired exit position.
3. Press and hold the exit button located above buttons 1 and 2 on the driver’s door armrest for at least three seconds.
Two beeps will sound to confirm that the exitposition has been saved.
4. Repeat the procedure for a second driver usingmemory seat button 2 or the remote keyless entrytransmitter with the number 2 on the back.
To recall the stored exit positions, press and release theexit button. One beep will sound, and the seat will moveto the previously stored exit position for the currentlyidentified driver. If an exit position has not been storedfor this driver, the seat will move all the way back. Theposition of the outside mirrors is not stored or recalledfor the exit position.
If your vehicle has an automatic transmission, thevehicle must be in PARK (P) to recall the exit positions.For a manual transmission, the parking brake must be set if the engine is running to recall the stored exit positions.
Three chimes will sound and the exit setting will not berecalled if you press the exit button while the engine isrunning and the vehicle is not in PARK (P) on anautomatic transmission or the parking brake is not set ona manual transmission.
If you would like your stored exit position to be recalledwhen unlocking the vehicle with the remote keylessentry transmitter or when the ignition is turned off andthe driver’s door is opened, see “Vehicle Programmingand Personalization Features” in the Index.

1-5
Heated Front Seats (If Equipped)
If your vehicle is equippedwith heated front seats, thebuttons are located on theclimate control panel.
There is a button for the driver and one for the frontpassenger. Each button has the following three settings:LO, HI and off. The active setting appears on theclimate control panel display. The LO setting warms theseatback and cushion until the seat approximates normalbody temperature. The HI setting has a slightly highertemperature.
To turn on the heated seats, press the button once. Theseat will heat to the HI setting. Press the button again toswitch to the LO setting. Pressing the button a third timeturns the system off.
The heated seats can only be used when the ignition isturned on. When the vehicle is turned off, the heatedseats automatically turn off. If you wish to have theheated seats on once the vehicle is restarted, press thebutton again.

1-6
Reclining Front Seatbacks
Manual Recliner
If your vehicle has manual reclining front seatbacks, the levers are located on the outboard sides of the front seats.
Lift the lever to release the seatback, then move theseatback to where you want it. Release the lever to lockthe seatback in place. To return the seatback to theupright position, pull up on the lever without pushing onthe seatback.
Power Recliner
If your vehicle has power reclining front seatbacks, the controls are located on the outboard sides of thefront seats.
Press the top of the vertical control forward or rearwardto adjust the seatback angle.

1-7
But don’t have a seatback reclined if your vehicle is moving.
CAUTION:
Sitting in a reclined position when your vehicle isin motion can be dangerous. Even if you buckleup, your safety belts can’t do their job whenyou’re reclined like this.The shoulder belt can’t do its job. In a crash youcould go into it, receiving neck or other injuries.The lap belt can’t do its job either. In a crash thebelt could go up over your abdomen. The beltforces would be there, not at your pelvic bones.This could cause serious internal injuries.For proper protection when the vehicle is inmotion, have the seatback upright. Then sit wellback in the seat and wear your safety beltproperly.

1-8
Head Restraints
Adjust your head restraint so that the top of the restraintis closest to the top of your head. This position reducesthe chance of a neck injury in a crash.
The front seat head restraints move up and down. Pressthe button located at the bottom of the head restraint toraise or lower the head restraint. The head restraints tiltforward and rearward, also.
The rear seat head restraints tilt forward and rearward,but do not move up and down.
Split Folding Rear Seat (If Equipped)The split folding rear seat allows you to carry long cargoby folding down part or all of the rear seat. Before youcan fold the rear seatback, you need to unlatch the centerseatbelt buckle.
Use the following steps to lower one or both of the rearseatbacks:
1. Insert a tool with a smalltip into the slot as shownto unlatch the seatbeltbuckle. Then move thebelt to the side so it isnot in your way.

1-9
2. There is a tab located onthe outboard sides of theseatback. Pull forwardon the tab to unlock theseatback.
3. Fold the seatback down. This will allow you directaccess to the trunk.
4. Repeat Steps 2 and 3 to fold down the otherseatback.
CAUTION:
If the seatback isn’t locked, it could moveforward in a sudden stop or crash. That couldcause injury to the person sitting there. Alwayspress rearward on the seatback to be sure it is locked.
CAUTION:
A safety belt that is improperly routed, notproperly attached, or twisted won’t provide theprotection needed in a crash. The person wearingthe belt could be seriously injured. After raisingthe rear seatback, always check to be sure thatthe safety belts are properly routed and attached,and are not twisted.

1-10
To return the seatback to the upright position, do thefollowing:
1. Lift the seatback up and push it back into place.
2. Reconnect the centersafety belt latch plate tothe buckle as shown.
3. Make sure the seatback is locked into place bypushing and pulling on it.
4. Repeat Steps 1 and 3 for the other seatback.
When the seatback is not in use, it should be kept in theupright, locked position.
Safety Belts: They’re for EveryoneThis part of the manual tells you how to use safety beltsproperly. It also tells you some things you should not dowith safety belts.
And it explains the air bag system.
CAUTION:
Don’t let anyone ride where he or she can’t weara safety belt properly. If you are in a crash andyou’re not wearing a safety belt, your injuriescan be much worse. You can hit things inside thevehicle or be ejected from it. You can be seriouslyinjured or killed. In the same crash, you mightnot be if you are buckled up. Always fasten yoursafety belt, and check that your passengers’ beltsare fastened properly too.

1-11
CAUTION:
It is extremely dangerous to ride in a cargo area,inside or outside of a vehicle. In a collision,people riding in these areas are more likely to beseriously injured or killed. Do not allow people toride in any area of your vehicle that is notequipped with seats and safety belts. Be sureeveryone in your vehicle is in a seat and using asafety belt properly.
Your vehicle has a light that comes on as a reminderto buckle up. See “SafetyBelt Reminder Light” in the Index.
In most states and Canadian provinces, the law says towear safety belts. Here’s why: They work.
You never know if you’ll be in a crash. If you do have acrash, you don’t know if it will be a bad one.
A few crashes are mild, and some crashes can be soserious that even buckled up a person wouldn’t survive.But most crashes are in between. In many of them,people who buckle up can survive and sometimes walkaway. Without belts they could have been badly hurt or killed.
After more than 30 years of safety belts in vehicles, the facts are clear. In most crashes buckling up doesmatter ... a lot!

1-12
Why Safety Belts WorkWhen you ride in or on anything, you go as fast as it goes.
Take the simplest vehicle. Suppose it’s just a seat on wheels.
Put someone on it.

1-13
Get it up to speed. Then stop the vehicle. The riderdoesn’t stop.
The person keeps going until stopped by something.
In a real vehicle, it could be the windshield ...

1-14
or the instrument panel ... or the safety belts!
With safety belts, you slow down as the vehicle does.You get more time to stop. You stop over more distance,and your strongest bones take the forces. That’s whysafety belts make such good sense.

1-15
Here Are Questions Many People AskAbout Safety Belts -- and the AnswersQ: Won’t I be trapped in the vehicle after an
accident if I’m wearing a safety belt?
A: You could be -- whether you’re wearing a safetybelt or not. But you can unbuckle a safety belt,even if you’re upside down. And your chance ofbeing conscious during and after an accident, soyou can unbuckle and get out, is much greater ifyou are belted.
Q: If my vehicle has air bags, why should I have towear safety belts?
A: Air bags are in many vehicles today and will be inmost of them in the future. But they aresupplemental systems only; so they work withsafety belts -- not instead of them. Every air bagsystem ever offered for sale has required the use ofsafety belts. Even if you’re in a vehicle that has airbags, you still have to buckle up to get the mostprotection. That’s true not only in frontal collisions,but especially in side and other collisions.
Q: If I’m a good driver, and I never drive far fromhome, why should I wear safety belts?
A: You may be an excellent driver, but if you’re in anaccident -- even one that isn’t your fault -- you and your passengers can be hurt. Being a gooddriver doesn’t protect you from things beyond yourcontrol, such as bad drivers.
Most accidents occur within 25 miles (40 km) of home. And the greatest number of seriousinjuries and deaths occur at speeds of less than 40 mph (65 km/h).
Safety belts are for everyone.

1-16
How to Wear Safety Belts ProperlyAdultsThis part is only for people of adult size.
Be aware that there are special things to know aboutsafety belts and children. And there are different rulesfor smaller children and babies. If a child will be ridingin your vehicle, see the part of this manual called“Children.” Follow those rules for everyone’sprotection.
First, you’ll want to know which restraint systems yourvehicle has.
We’ll start with the driver position.
Driver PositionThis part describes the driver’s restraint system.
Lap-Shoulder BeltThe driver has a lap-shoulder belt. Here’s how to wear itproperly.
1. Close and lock the door.
2. Adjust the seat so you can sit up straight. To seehow, see “Seats” in the Index.
3. Pick up the latch plate and pull the belt across you.Don’t let it get twisted.
The shoulder belt may lock if you pull the belt acrossyou very quickly. If this happens, let the belt go backslightly to unlock it. Then pull the belt across youmore slowly.

1-17
4. Push the latch plate into the buckle until it clicks.
Pull up on the latch plate to make sure it is secure. If the belt isn’t long enough, see “Safety BeltExtender” at the end of this section.
Make sure the release button on the buckle ispositioned so you would be able to unbuckle thesafety belt quickly if you ever had to.
5. To make the lap part tight, pull down on the buckleend of the belt as you pull up on the shoulder belt.
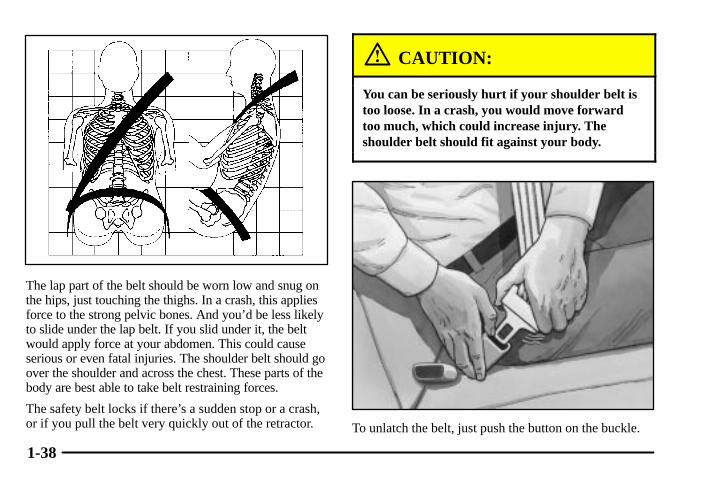
The lap part of the belt should be worn low and snug onthe hips, just touching the thighs. In a crash, this appliesforce to the strong pelvic bones. And you’d be less likelyto slide under the lap belt. If you slid under it, the beltwould apply force at your abdomen. This could causeserious or even fatal injuries. The shoulder belt should goover the shoulder and across the chest. These parts of thebody are best able to take belt restraining forces.
The safety belt locks if there’s a sudden stop or crash, orif you pull the belt very quickly out of the retractor.

1-18
Q: What’s wrong with this?
A: The shoulder belt is too loose. It won’t give nearlyas much protection this way.
CAUTION:
You can be seriously hurt if your shoulder belt istoo loose. In a crash, you would move forwardtoo much, which could increase injury. Theshoulder belt should fit against your body.
1-19
Q: What’s wrong with this?
A: The belt is buckled in the wrong place.
CAUTION:
You can be seriously injured if your belt isbuckled in the wrong place like this. In a crash,the belt would go up over your abdomen. Thebelt forces would be there, not at the pelvicbones. This could cause serious internal injuries.Always buckle your belt into the buckle nearest you.

1-20
Q: What’s wrong with this?
A: The shoulder belt is worn under the arm. It shouldbe worn over the shoulder at all times.
CAUTION:
You can be seriously injured if you wear theshoulder belt under your arm. In a crash, yourbody would move too far forward, which wouldincrease the chance of head and neck injury.Also, the belt would apply too much force to theribs, which aren’t as strong as shoulder bones.You could also severely injure internal organslike your liver or spleen.

1-21
Q: What’s wrong with this?
A: The belt is twisted across the body.
CAUTION:
You can be seriously injured by a twisted belt. Ina crash, you wouldn’t have the full width of thebelt to spread impact forces. If a belt is twisted,make it straight so it can work properly, or askyour dealer to fix it.

1-22
To unlatch the belt, just push the button on the buckle.The belt should go back out of the way.
Before you close the door, be sure the belt is out of theway. If you slam the door on it, you can damage both thebelt and your vehicle.
Safety Belt Use During PregnancySafety belts work for everyone, including pregnantwomen. Like all occupants, they are more likely to beseriously injured if they don’t wear safety belts.
A pregnant woman should wear a lap-shoulder belt, andthe lap portion should be worn as low as possible, belowthe rounding, throughout the pregnancy.

1-23
The best way to protect the fetus is to protect themother. When a safety belt is worn properly, it’s morelikely that the fetus won’t be hurt in a crash. Forpregnant women, as for anyone, the key to makingsafety belts effective is wearing them properly.
Right Front Passenger PositionTo learn how to wear the right front passenger’s safetybelt properly, see “Driver Position” earlier in thissection.
The right front passenger’s safety belt works the sameway as the driver’s safety belt -- except for one thing. If the belt stops before it reaches the buckle, tilt the latchplate and keep pulling until you can buckle the belt.

1-24
Air Bag SystemsThis part explains the frontal and side impact air bagsystems.
Your vehicle has six air bags:
� A frontal air bag for the driver and another frontal airbag for the right front passenger,
� a seat-mounted side impact air bag for the driver andanother for the right front passenger,
� a roof-mounted side impact air bag for the driver andpassenger directly behind the driver, and
� a roof-mounted side impact air bag for the right frontpassenger and the person seated directly behind thatpassenger.
Frontal air bags are designed to help reduce the risk ofinjury from the force of an inflating frontal air bag. Butthese air bags must inflate very quickly to do their joband comply with federal regulations.
Here are the most important things to know about the airbag systems:
CAUTION:
You can be severely injured or killed in a crash ifyou aren’t wearing your safety belt -- even if youhave air bags. Wearing your safety belt during acrash helps reduce your chance of hitting thingsinside the vehicle or being ejected from it. Airbags are “supplemental restraints” to the safetybelts. All air bags are designed to work withsafety belts but don’t replace them.
CAUTION: (Continued)

1-25
CAUTION: (Continued)
Frontal air bags for the driver and right frontpassenger are designed to work only in moderateto severe crashes where the front of your vehiclehits something. They aren’t designed to inflate atall in rollover, rear or low -speed frontal crashes,or in many side crashes. And, for unrestrainedoccupants, frontal air bags may provide lessprotection in frontal crashes than more forcefulair bags have provided in the past. Theseat-mounted side impact air bags androof-mounted side impact air bags are designedto inflate only in moderate to severe crasheswhere something hits the side of your vehicle.They aren’t designed to inflate in frontal, inrollover or in rear crashes. Everyone in your vehicle should wear a safety belt properly -- whether or not there’s an air bag for that person.
CAUTION:
Both frontal and side impact air bags inflate withgreat force, faster than the blink of an eye. Ifyou’re too close to an inflating air bag, as youwould be if you were leaning forward, it couldseriously injure you. Safety belts help keep you inposition for air bag inflation before and during acrash. Always wear your safety belt, even withfrontal air bags. The driver should sit as far backas possible while still maintaining control of thevehicle. Occupants should not lean on or sleepagainst the door.

1-26
CAUTION:
Anyone who is up against, or very close to, anyair bag when it inflates can be seriously injuredor killed. Air bags plus lap-shoulder belts offerthe best protection for adults, but not for youngchildren and infants. Neither the vehicle’s safetybelt system nor its air bag system is designed forthem. Young children and infants need theprotection that a child restraint system canprovide. Always secure children properly in yourvehicle. To read how, see the part of this manualcalled “Children.”
There is an air bagreadiness light on the instrument panel,which shows the airbag symbol.
The system checks the air bag electrical system formalfunctions. The light tells you if there is an electricalproblem. See “Air Bag Readiness Light” in the Indexfor more information.

1-27
How the Air Bag Systems Work
Where are the air bags?
The driver’s frontal air bag is in the middle of thesteering wheel.
The right front passenger’s frontal air bag is in theinstrument panel on the passenger’s side.

1-28
The driver’s seat-mounted side impact air bag is in theside of the driver’s seatback closest to the door.
The right front passenger’s seat-mounted side impact airbag is in the side of the passenger’s seatback closest tothe door.

1-29
The side impact air bag for the driver and the personseated directly behind the driver is in the ceiling abovethe side windows.
The side impact air bag for the right front passenger andthe person seated directly behind that passenger is in theceiling above the side windows

1-30
CAUTION:
If something is between an occupant and an airbag, the bag might not inflate properly or itmight force the object into that person causingsevere injury or even death. The path of aninflating air bag must be kept clear. Don’t putanything between an occupant and an air bag,and don’t attach or put anything on the steeringwheel hub or on or near any other air bagcovering. And, because your vehicle has sideimpact air bags, never secure anything to the roofof your vehicle by routing the rope or tiedownthrough any door or window opening. If you do,the path of an inflating side impact air bag willbe blocked. The path of an inflating air bag mustbe kept clear.
When should an air bag inflate?
The driver’s and right front passenger’s frontal air bagsare designed to inflate in moderate to severe frontal ornear-frontal crashes. But they are designed to inflateonly if the impact speed is above the system’s designed“threshold level.”
In addition, your vehicle has “dual stage” frontal airbags, which adjust the amount of restraint according tocrash severity. For moderate frontal impacts, these airbags inflate at a level less than full deployment. Formore severe frontal impacts, full deployment occurs. If the front of your vehicle goes straight into a wall that doesn’t move or deform, the threshold level for the reduced deployment is about 12 to 16 mph (19 to26 km/h) and the threshold level for a full deployment is about 18 to 24 mph (29 to 38.5 km/h).
The threshold level can vary, however, with specificvehicle design, so that it can be somewhat above orbelow this range.

1-31
If your vehicle strikes something that will move ordeform, such as a parked car, the threshold level will behigher. The driver’s and right front passenger’s frontalair bags are not designed to inflate in rollovers, rearimpacts, or in many side impacts because inflationwould not help the occupant.
The side impact air bags are designed to inflate inmoderate to severe side crashes. A side impact air bagwill inflate if the crash severity is above the system’sdesigned “threshold level.” The threshold level can varywith specific vehicle design. Side impact air bags are notdesigned to inflate in frontal or near-frontal impacts,rollovers or rear impacts, because inflation would nothelp the occupant. A side impact air bag will onlydeploy on the side of the vehicle that is struck.
In any particular crash, no one can say whether an airbag should have inflated simply because of the damageto a vehicle or because of what the repair costs were. Forfrontal air bags, inflation is determined by the angle ofthe impact and how quickly the vehicle slows down infrontal and near-frontal impacts. For side impact airbags, inflation is determined by the location and severityof the impact.
What makes an air bag inflate?
In an impact of sufficient severity, the air bag sensingsystem detects that the vehicle is in a crash. For bothfrontal and side impact air bags, the sensing systemtriggers a release of gas from the inflator, which inflatesthe air bag. The inflator, air bag and related hardwareare all part of the air bag modules inside the steeringwheel, instrument panel, the side of the front seatbacksclosest to the door and the ceiling of the vehicle, nearthe side windows.

1-32
How does an air bag restrain?
In moderate to severe frontal or near frontal collisions,even belted occupants can contact the steering wheel orthe instrument panel. In moderate to severe sidecollisions, even belted occupants can contact the insideof the vehicle. The air bag supplements the protectionprovided by safety belts. Air bags distribute the force ofthe impact more evenly over the occupant’s upper body,stopping the occupant more gradually. But the frontal airbags would not help you in many types of collisions,including rollovers, rear impacts, and many sideimpacts, primarily because an occupant’s motion is nottoward the air bag. Side impact air bags would not helpyou in many types of collisions, including frontal ornear frontal collisions, rollovers, and rear impacts,primarily because an occupant’s motion is not towardthose air bags. Air bags should never be regarded asanything more than a supplement to safety belts, andthen only in moderate to severe frontal or near-frontalcollisions for the driver’s and right front passenger’sfrontal air bags, and only in moderate to severe sidecollisions for the side impact air bags.
What will you see after an air bag inflates?
After an air bag inflates, it quickly deflates, so quicklythat some people may not even realize the air baginflated. Some components of the air bag module -- thesteering wheel hub for the driver’s air bag, theinstrument panel for the right front passenger’s bag, theside of the seatback closest to the door for theseat-mounted side impact air bags and the area along theceiling of your vehicle near the side windows -- will behot for a short time. The parts of the bag that come intocontact with you may be warm, but not too hot to touch.There will be some smoke and dust coming from thevents in the deflated air bags. Air bag inflation doesn’tprevent the driver from seeing or being able to steer thevehicle, nor does it stop people from leaving the vehicle.

1-33
CAUTION:
When an air bag inflates, there is dust in the air.This dust could cause breathing problems forpeople with a history of asthma or otherbreathing trouble. To avoid this, everyone in thevehicle should get out as soon as it is safe to do so.If you have breathing problems but can’t get outof the vehicle after an air bag inflates, then getfresh air by opening a window or a door.
Your vehicle has a feature that will automatically unlockthe doors and turn the interior lamps on when the airbags inflate (if battery power is available). You can lockthe doors again and turn the interior lamps off by usingthe door lock and interior lamp controls. The hazardwarning flashers will also come on when the air bagsdeploy. If you want to turn them off, press the hazardwarning flasher button twice.
In many crashes severe enough to inflate an air bag,windshields are broken by vehicle deformation.Additional windshield breakage may also occur from theright front passenger air bag.
� Air bags are designed to inflate only once. After anair bag inflates, you’ll need some new parts for yourair bag system. If you don’t get them, the air bagsystem won’t be there to help protect you in anothercrash. A new system will include air bag modulesand possibly other parts. The service manual for yourvehicle covers the need to replace other parts.
� Your vehicle is equipped with an electronic frontalsensor, which helps the sensing system distinguishbetween a moderate frontal impact and a moresevere frontal impact. Your vehicle is also equippedwith a crash sensing and diagnostic module, whichrecords information about the frontal air bag system.The module records information about the readinessof the system, when the system commands air baginflation and driver’s safety belt usage at deploymentor in a near-deployment crash. The module alsorecords speed, engine rpm, brake and throttle data.
� Let only qualified technicians work on your air bag systems. Improper service can mean that an air bag system won’t work properly. See your dealerfor service.

1-34
NOTICE:
If you damage the covering for the driver’s or theright front passenger’s air bag, or the air bagcovering on the driver’s and right frontpassenger’s seatback, or the side impact air bagcovering on the ceiling near the side windows, thebag may not work properly. You may have toreplace the air bag module in the steering wheel,both the air bag module and the instrumentpanel for the right front passenger’s air bag, theair bag module and seatback for the driver’s andright front passenger’s seat-mounted side impactair bags, or side impact air bag module andceiling covering for the roof-mounted side impactair bag. Do not open or break the air bagcoverings.
Servicing Your Air Bag-Equipped VehicleAir bags affect how your vehicle should be serviced.There are parts of the air bag systems in several placesaround your vehicle. Your dealer and the service manualhave information about servicing your vehicle and theair bag systems. To purchase a service manual, see“Service and Owner Publications” in the Index.
CAUTION:
For up to 10 seconds after the ignition key isturned off and the battery is disconnected, an airbag can still inflate during improper service. Youcan be injured if you are close to an air bag whenit inflates. Avoid wires wrapped with yellow tape,yellow coverings or yellow connectors. They areprobably part of the air bag systems. Be sure tofollow proper service procedures, and make surethe person performing work for you is qualifiedto do so.
The air bag systems do not need regular maintenance.

1-35
Adding Equipment to Your AirBag-Equipped Vehicle
Q: If I add a luggage carrier or sunroof to the roofof my vehicle, will it keep the roof-mounted sideimpact air bags from working properly?
A: As long as the luggage carrier or sunroof isproperly installed so that the vehicle’s basicstructure isn’t changed, it’s not likely to keep theroof-mounted side impact air bags from workingproperly in a crash.
Safety Belt PretensionersYour vehicle has safety belt pretensioners. You’ll findthem on the buckle end of the safety belts for the driverand right front passenger. They help the safety beltsreduce a person’s forward movement in a moderate tosevere crash in which the front of the vehicle hitssomething.
Pretensioners work only once. If they activate in a crash,you’ll need to get new ones, and probably other newparts for your safety belt system. See “ReplacingRestraint System Parts After a Crash” in the Index.

1-36
Rear Seat PassengersIt’s very important for rear seat passengers to buckle up!Accident statistics show that unbelted people in the rearseat are hurt more often in crashes than those who arewearing safety belts.
Rear passengers who aren’t safety belted can be thrownout of the vehicle in a crash. And they can strike othersin the vehicle who are wearing safety belts.
Rear Seat Passenger Positions
Lap-Shoulder Belt
All rear seating positions have lap-shoulder belts. Here’s how to wear one properly.
1. Pick up the latch plate and pull the belt across you.Don’t let it get twisted.
The shoulder belt may lock if you pull the belt acrossyou very quickly. If this happens, let the belt go backslightly to unlock it. Then pull the belt across youmore slowly.

1-37
2. Push the latch plate into the buckle until it clicks.
If the belt stops before it reaches the buckle, tilt thelatch plate and keep pulling until you can buckle it.
Pull up on the latch plate to make sure it is secure.
If the belt is not long enough, see “Safety BeltExtender” at the end of this section. Make sure therelease button on the buckle is positioned so youwould be able to unbuckle the safety belt quickly ifyou ever had to.
3. To make the lap part tight, pull down on the buckleend of the belt as you pull up on the shoulder part.
1-38
The lap part of the belt should be worn low and snug onthe hips, just touching the thighs. In a crash, this appliesforce to the strong pelvic bones. And you’d be less likelyto slide under the lap belt. If you slid under it, the beltwould apply force at your abdomen. This could causeserious or even fatal injuries. The shoulder belt should goover the shoulder and across the chest. These parts of thebody are best able to take belt restraining forces.
The safety belt locks if there’s a sudden stop or a crash,or if you pull the belt very quickly out of the retractor.
CAUTION:
You can be seriously hurt if your shoulder belt istoo loose. In a crash, you would move forwardtoo much, which could increase injury. Theshoulder belt should fit against your body.
To unlatch the belt, just push the button on the buckle.

1-39
Rear Safety Belt Comfort Guides forChildren and Small AdultsRear shoulder belt comfort guides will provide addedsafety belt comfort for older children who haveoutgrown booster seats and for small adults. Wheninstalled on a shoulder belt, the comfort guide betterpositions the belt away from the neck and head.
There is one guide for each outboard passenger positionin the rear seat. To provide added safety belt comfort forchildren who have outgrown child restraints and boosterseats and for smaller adults, the comfort guides may beinstalled on the shoulder belts. Here’s how to install acomfort guide and use the safety belt:
1. Pull the elastic cord out from between the edge ofthe seatback and the interior body to remove theguide from its storage clip.

1-40
2. Slide the guide under and past the belt. The elasticcord must be under the belt. Then, place the guideover the belt, and insert the two edges of the belt intothe slots of the guide.
3. Be sure that the belt is not twisted and it lies flat. The elastic cord must be under the belt with theguide on top.

1-41
4. Buckle, position and release the safety belt asdescribed in “Rear Seat Passenger Positions” earlierin this section. Make sure that the shoulder beltcrosses the shoulder.
To remove and store the comfort guides, squeeze thebelt edges together so that you can take them out of theguides. Pull the guide upward to expose its storage clip,and then slide the guide onto the clip. Turn the guideand the clip inward and insert it in between the seatbackand the interior body, leaving only the loop of elasticcord exposed.
ChildrenEveryone in a vehicle needs protection! This includesinfants and all other children. Neither the distancetraveled nor the age and size of the traveler changes theneed, for everyone, to use safety restraints. In fact, thelaw in every state in the United States and in everyCanadian province says children up to some age must berestrained while in a vehicle.
Infants and Young ChildrenEvery time infants and young children ride in vehicles,they should have the protection provided by theappropriate restraint. Young children should not use thevehicle’s safety belts, unless there is no other choice.

1-42
CAUTION:
People should never hold a baby in their armswhile riding in a vehicle. A baby doesn’t weighmuch -- until a crash. During a crash a baby willbecome so heavy it is not possible to hold it. Forexample, in a crash at only 25 mph (40 km/h), a12-lb. (5.5 kg) baby will suddenly become a240-lb. (110 kg) force on a person’s arms. A babyshould be secured in an appropriate restraint.

1-43
CAUTION:
Children who are up against, or very close to, anyair bag when it inflates can be seriously injuredor killed. Air bags plus lap-shoulder belts offeroutstanding protection for adults and olderchildren, but not for young children and infants.Neither the vehicle’s safety belt system nor its airbag system is designed for them. Young childrenand infants need the protection that a childrestraint system can provide.

1-44
Q: What are the different types of add-on childrestraints?
A: Add-on child restraints, which are purchased by thevehicle’s owner, are available in four basic types.Selection of a particular restraint should take intoconsideration not only the child’s weight, heightand age but also whether or not the restraint will becompatible with the motor vehicle in which it willbe used.
For most basic types of child restraints, there aremany different models available. When purchasinga child restraint, be sure it is designed to be used ina motor vehicle. If it is, the restraint will have alabel saying that it meets federal motor vehiclesafety standards.
The restraint manufacturer’s instructions that comewith the restraint state the weight and heightlimitations for a particular child restraint. Inaddition, there are many kinds of restraintsavailable for children with special needs.
CAUTION:
Newborn infants need complete support,including support for the head and neck. This isnecessary because a newborn infant’s neck isweak and its head weighs so much compared withthe rest of its body. In a crash, an infant in arear-facing seat settles into the restraint, so thecrash forces can be distributed across thestrongest part of an infant’s body, the back andshoulders. Infants always should be secured inappropriate infant restraints.

1-45
CAUTION:
The body structure of a young child is quiteunlike that of an adult or older child, for whomthe safety belts are designed. A young child’s hipbones are still so small that the vehicle’s regularsafety belt may not remain low on the hip bones,as it should. Instead, it may settle up around thechild’s abdomen. In a crash, the belt would applyforce on a body area that’s unprotected by anybony structure. This alone could cause serious orfatal injuries. Young children always should besecured in appropriate child restraints.
Restraint Systems for Children
An infant car bed (A), a special bed made for use in amotor vehicle, is an infant restraint system designed torestrain or position a child on a continuous flat surface.Make sure that the infant’s head rests toward the centerof the vehicle.

1-46
A rear-facing infant seat (B) provides restraint with theseating surface against the back of the infant. Theharness system holds the infant in place and, in a crash,acts to keep the infant positioned in the restraint.
A forward-facing child seat (C-E) provides restraint forthe child’s body with the harness and also sometimeswith surfaces such as T-shaped or shelf-like shields.

1-47
A booster seat (F-G) is a child restraint designed toimprove the fit of the vehicle’s safety belt system. Somebooster seats have a shoulder belt positioner, and somehigh-back booster seats have a five-point harness. Abooster seat can also help a child to see out the window.
Q: How do child restraints work?
A: A child restraint system is any device designed foruse in a motor vehicle to restrain, seat, or positionchildren. A built-in child restraint system is apermanent part of the motor vehicle. An add-onchild restraint system is a portable one, which ispurchased by the vehicle’s owner.
For many years, add-on child restraints have usedthe adult belt system in the vehicle. To help reducethe chance of injury, the child also has to besecured within the restraint. The vehicle’s beltsystem secures the add-on child restraint in thevehicle, and the add-on child restraint’s harnesssystem holds the child in place within the restraint.
One system, the three-point harness, has straps thatcome down over each of the infant’s shoulders andbuckle together at the crotch. The five-pointharness system has two shoulder straps, two hipstraps and a crotch strap. A shield may take theplace of hip straps. A T-shaped shield has shoulderstraps that are attached to a flat pad which rests lowagainst the child’s body. A shelf- or armrest-typeshield has straps that are attached to a wide,shelf-like shield that swings up or to the side.

1-48
When choosing a child restraint, be sure the childrestraint is designed to be used in a vehicle. If it is, itwill have a label saying that it meets federal motorvehicle safety standards.
Then follow the instructions for the restraint. You mayfind these instructions on the restraint itself or in abooklet, or both. These restraints use the belt system inyour vehicle, but the child also has to be secured withinthe restraint to help reduce the chance of personal injury.When securing an add-on child restraint, refer to theinstructions that come with the restraint which may beon the restraint itself or in a booklet, or both, and to thismanual. The child restraint instructions are important, soif they are not available, obtain a replacement copy fromthe manufacturer.
Where to Put the RestraintAccident statistics show that children are safer if theyare restrained in the rear rather than the front seat.General Motors, therefore, recommends that childrestraints be secured in the rear seat including an infantriding in a rear-facing infant seat, a child riding in aforward-facing child seat and an older child riding in abooster seat. Never put a rear-facing child restraint inthe front passenger seat. Here’s why:
CAUTION:
A child in a rear-facing child restraint can beseriously injured or killed if the right frontpassenger’s air bag inflates. This is because theback of the rear-facing child restraint would bevery close to the inflating air bag. Always securea rear-facing child restraint in a rear seat.You may secure a forward-facing child restraintin the right front seat, but before you do, alwaysmove the front passenger seat as far back as itwill go. It’s better to secure the child restraint ina rear seat.
Wherever you install it, be sure to secure the childrestraint properly.
Keep in mind that an unsecured child restraint can movearound in a collision or sudden stop and injure people inthe vehicle. Be sure to properly secure any childrestraint in your vehicle -- even when no child is in it.

1-49
Top StrapSome child restraints have a top strap, or “top tether.” Itcan help restrain the child restraint during a collision.For it to work, a top strap must be properly anchored tothe vehicle. Some top strap-equipped child restraints aredesigned for use with or without the top strap beinganchored. Others require the top strap always to beanchored. Be sure to read and follow the instructions foryour child restraint. If yours requires that the top strapbe anchored, don’t use the restraint unless it is anchoredproperly.
If the child restraint does not have a top strap, one canbe obtained, in kit form, for many child restraints. Ask the child restraint manufacturer whether or not a kit is available.
In Canada, the law requires that forward-facing childrestraints have a top strap, and that the strap beanchored. In the United States, some child restraints alsohave a top strap. If your child restraint has a top strap, itshould be anchored.

1-50
Anchor the top strap to one of the following anchorpoints. Be sure to use an anchor point located on thesame side of the vehicle as the seating position wherethe child restraint will be placed. If you have anadjustable head restraint, route the top strap under it.
Once you have the top strap anchored, you’ll be ready tosecure the child restraint itself. Tighten the top strapwhen and as the child restraint manufacturer’sinstructions say.
The top strap anchors are located on the filler panelbehind the rear seat head restraints. In order to accessthe anchors, you’ll have to open the covers.

1-51
Lower Anchorages and Top Tethers forChildren (LATCH System)Your vehicle has the LATCH system. You’ll findanchors (A) in the rear seat outboard passengerpositions.
To assist you in locating the lower anchors for this childrestraint system, each seating position with the LATCHsystem will have the LATCH symbol on the seatbacksabove the anchors.
In order to use the system, you need either aforward-facing child restraint that has attachingpoints (B) at its base and a top tether anchor (C), or arear-facing child restraint that has attaching points (B),as shown here.
A. Vehicle anchor
B. LATCH system attachment points
C. Top strap

1-52
A. Vehicle anchor
B. LATCH system attachment points
With this system, use the LATCH system instead of thevehicle’s safety belts to secure a child restraint.
CAUTION:
If a LATCH -type child restraint isn’t attached toits anchorage points, the restraint won’t be ableto protect a child sitting there. In a crash, thechild could be seriously injured or killed. Makesure that a LATCH-type child restraint isproperly installed using the anchorage points, oruse the vehicle’s safety belts to secure therestraint. See “Child Restraints” in the Index forinformation on how to secure a child restraint inyour vehicle using the vehicle’s safety belts.

1-53
Securing a Child Restraint Designed for the LATCH System
1. Find the anchors for the seating position you want touse, where the bottom of the seatback meets the backof the seat cushion.
2. Put the child restraint on the seat.
3. Attach the anchor points on the child restraint to theanchors in the vehicle. The child restraintinstructions will show you how.
4. If the child restraint is forward-facing, attach the topstrap to the top strap anchor. See “Top Strap” in theIndex. Tighten the top strap according to the childrestraint instructions.
5. Push and pull the child restraint in differentdirections to be sure it is secure.
To remove the child restraint, simply unhook the topstrap from the top tether anchor and then disconnect the anchor points.
Securing a Child Restraint in a Rear Seat Position
If your child restraint is equipped with the LATCHsystem, see “Lower Anchorages and Top Tethers forChildren (LATCH)” in the Index.
You’ll be using the lap-shoulder belt. See the earlier partabout the top strap if the child restraint has one. Be sureto follow the instructions that came with the childrestraint. Secure the child in the child restraint when andas the instructions say.
1. Put the restraint on the seat.
2. Pick up the latch plate, and run the lap and shoulderportions of the vehicle’s safety belt through oraround the restraint. The child restraint instructionswill show you how.

1-54
Tilt the latch plate to adjust the belt if needed.
If the shoulder belt goes in front of the child’s face orneck, put it behind the child restraint.
3. Buckle the belt. Make sure the release button ispositioned so you would be able to unbuckle thesafety belt quickly if you ever had to.

1-55
4. To tighten the belt, pull up on the shoulder belt whileyou push down on the child restraint. If you’re usinga forward-facing child restraint, you may find ithelpful to use your knee to push down on the childrestraint as you tighten the belt.
5. Push and pull the child restraint in differentdirections to be sure it is secure.
To remove the child restraint, just unbuckle the vehicle’ssafety belt and let it go back all the way. The safety beltwill move freely again and be ready to work for an adultor larger child passenger.

1-56
Securing a Child Restraint in the RightFront Seat Position
If your child restraint is equipped with the LATCHsystem, see “Lower Anchorages and Top Tethers forChildren (LATCH)” in the Index.
Your vehicle has a right front passenger air bag. Neverput a rear-facing child restraint in this seat. Here’s why:
CAUTION:
A child in a rear-facing child restraint can beseriously injured or killed if the right frontpassenger’s air bag inflates. This is because theback of the rear-facing child restraint would bevery close to the inflating air bag. Always securea rear-facing child restraint in the rear seat.
Although a rear seat is a safer place, you can secure aforward-facing child restraint in the right front seat.
You’ll be using the lap-shoulder belt. See the earlier partabout the top strap if the child restraint has one. Be sureto follow the instructions that came with the childrestraint. Secure the child in the child restraint when andas the instructions say.
1. Because your vehicle has a right front passenger airbag, always move the seat as far back as it will gobefore securing a forward-facing child restraint. See “Seats” in the Index.
2. Put the restraint on the seat.
3. Pick up the latch plate, and run the lap and shoulderportions of the vehicle’s safety belt through oraround the restraint. The child restraint instructionswill show you how.
Tilt the latch plate to adjust the belt if needed.

1-57
If the shoulder belt goes in front of the child’s face orneck, put it behind the child restraint.
4. Buckle the belt. Make sure the release button ispositioned so you would be able to unbuckle thesafety belt quickly if you ever had to.
5. To tighten the belt, pull up on the shoulder belt whileyou push down on the child restraint. You may find ithelpful to use your knee to push down on the childrestraint as you tighten the belt.
6. Push and pull the child restraint in differentdirections to be sure it is secure.
To remove the child restraint, just unbuckle the vehicle’ssafety belt and let it go back all the way. The safety beltwill move freely again and be ready to work for an adultor larger child passenger.

1-58
Older Children
Older children who have outgrown booster seats shouldwear the vehicle’s safety belts.
Q: What is the proper way to wear safety belts?
A: If possible, an older child should wear alap-shoulder belt and get the additional restraint ashoulder belt can provide. The shoulder belt shouldnot cross the face or neck. The lap belt should fitsnugly below the hips, just touching the top of thethighs. It should never be worn over the abdomen,which could cause severe or even fatal internalinjuries in a crash.
Accident statistics show that children are safer if theyare restrained in the rear seat.
In a crash, children who are not buckled up can strikeother people who are buckled up, or can be thrown out of the vehicle. Older children need to use safetybelts properly.

1-59
CAUTION:
Never do this.Here two children are wearing the same belt. Thebelt can’t properly spread the impact forces. In acrash, the two children can be crushed togetherand seriously injured. A belt must be used byonly one person at a time.
Q: What if a child is wearing a lap-shoulder belt,but the child is so small that the shoulder belt isvery close to the child’s face or neck?
A: If the child is sitting in a seat next to a window,move the child toward the center of the vehicle. Ifthe child is sitting in the center rear seat passengerposition, move the child toward the safety beltbuckle. In either case, be sure that the shoulder beltstill is on the child’s shoulder, so that in a crash thechild’s upper body would have the restraint thatbelts provide. If the child is sitting in a rear seatoutside position, see “Rear Safety Belt ComfortGuides” in the Index.
1-60
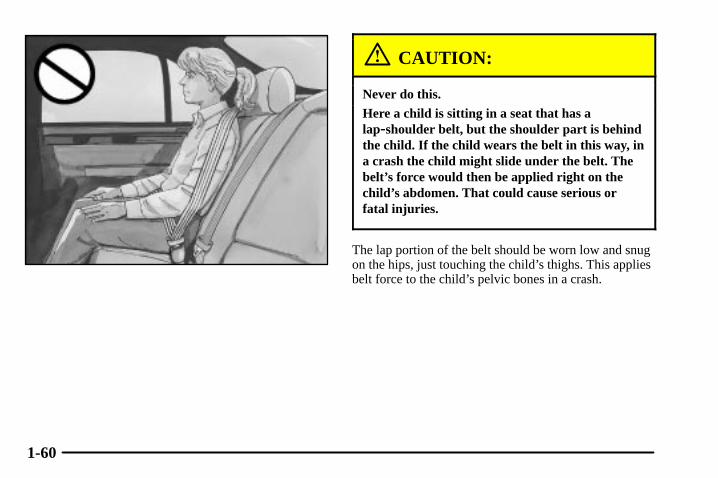
CAUTION:
Never do this.Here a child is sitting in a seat that has alap-shoulder belt, but the shoulder part is behindthe child. If the child wears the belt in this way, ina crash the child might slide under the belt. Thebelt’s force would then be applied right on thechild’s abdomen. That could cause serious orfatal injuries.
The lap portion of the belt should be worn low and snugon the hips, just touching the child’s thighs. This appliesbelt force to the child’s pelvic bones in a crash.

1-61
Safety Belt ExtenderIf the vehicle’s safety belt will fasten around you, youshould use it.
But if a safety belt isn’t long enough to fasten, yourdealer will order you an extender. It’s free. When you goin to order it, take the heaviest coat you will wear, so theextender will be long enough for you. The extender willbe just for you, and just for the seat in your vehicle thatyou choose. Don’t let someone else use it, and use itonly for the seat it is made to fit. To wear it, just attach itto the regular safety belt.
Checking Your Restraint SystemsNow and then, make sure the safety belt reminder lightand all your belts, buckles, latch plates, retractors andanchorages are working properly. Look for any otherloose or damaged safety belt system parts. If you seeanything that might keep a safety belt system fromdoing its job, have it repaired.
Torn or frayed safety belts may not protect you in acrash. They can rip apart under impact forces. If a belt istorn or frayed, get a new one right away.
Also look for any opened or broken air bag covers, andhave them repaired or replaced. (The air bag systemdoes not need regular maintenance.)

1-62
Replacing Restraint System PartsAfter a Crash
CAUTION:
A crash can damage the restraint systems in yourvehicle. A damaged restraint system may notproperly protect the person using it, resulting inserious injury or even death in a crash. To helpmake sure your restraint systems are workingproperly after a crash, have them inspected andany necessary replacements made as soon aspossible.
If you’ve had a crash, do you need new belts or LATCHsystem parts?
After a very minor collision, nothing may be necessary.But if the belts were stretched, as they would be if wornduring a more severe crash, then you need new parts.
If the LATCH system was being used during a moresevere crash, you may need new LATCH system parts.
If belts are cut or damaged, replace them. Collisiondamage also may mean you will need to have LATCHsystem, safety belt or seat parts repaired or replaced.New parts and repairs may be necessary even if the beltor LATCH system wasn’t being used at the time of thecollision.
If an air bag inflates, you’ll need to replace air bagsystem parts. See the part on the air bag system earlier inthis section.
If the frontal air bags inflate, you’ll also need to replacethe driver’s and right front passenger’s safety beltbuckle assembly. Be sure to do so. Then the new buckleassembly will be there to help protect you in a collision.

2-2-1
Section 2 Features and Controls
Here you can learn about the many standard and optional features on your vehicle, and information on starting,shifting and braking. Also explained are the instrument panel and the warning systems that tell you if everything isworking properly -- and what to do if you have a problem.
2-2 Windows2-5 Keys2-7 Door Locks2-10 Remote Keyless Entry System2-16 Trunk Lid2-19 Theft2-21 Immobilizer2-24 New Vehicle “Break-In”2-24 Ignition Positions2-27 Starting Your Engine2-28 Engine Coolant Heater (If Equipped)2-30 Automatic Transmission Operation2-37 Manual Transmission Operation2-38 Parking Brake2-40 Shifting Into PARK (P)
(Automatic Transmission Only)2-42 Shifting Out of PARK (P)
(Automatic Transmission Only)2-42 Parking Your Vehicle
(Manual Transmission Only)
2-43 Parking Over Things That Burn2-44 Engine Exhaust2-44 Running Your Engine While You’re Parked
(Automatic Transmission)2-46 Turn Signal/Multifunction Lever2-56 Exterior Lamps2-59 Interior Lamps2-60 Mirrors2-70 OnStar� System (If Equipped)2-74 Sunroof (Option)2-75 HomeLink� Transmitter (If Equipped)2-80 The Instrument Panel -- Your
Information System2-85 Warning Lights, Gages and Indicators2-99 Driver Information Center (DIC)2-130 Vehicle Programming and
Personalization Features2-153 Navigation (Option)

2-2
Windows
CAUTION:
Leaving children in a vehicle with the windowsclosed is dangerous. A child can be overcome bythe extreme heat and can suffer permanentinjuries or even death from heat stroke. Neverleave a child alone in a vehicle, especially with thewindows closed in warm or hot weather.

2-3
Power Windows
The power window switches are located on the armrestnear each window. Press the up or down arrows on theswitches to raise or lower the windows.
Your vehicle has Retained Accessory Power (RAP) thatallows you to use the power windows once the ignitionhas been turned off for up to 10 minutes. For moreinformation, see “Retained Accessory Power (RAP)” inthe Index.
Express-Down Window
This feature is on all the power windows. Press thedown arrow on the switch to the second position toactivate the express-down feature. If you want to stopthe window as it is lowering, press the down arrow onthe switch again.
Express-Up Window
This feature is on both front power windows. Press theup arrow on the switch to the second position to activatethe express-up feature. If you want to stop the windowas it is raising, press the up arrow on the switch again.

2-4
Anti -Pinch Feature
If a hand, an arm or another object is above the middleof the window and is in the path of the window whenthe express-up feature is active, the window will stop at the obstruction and express-open to a preset factory position.
CAUTION:
Pressing and holding the power window controlwill turn off the anti -pinch feature. If thishappens, a power window won’t stop ifsomething gets in the way. You or others could be injured, and your window could be damaged.Be careful not to press and hold the powerwindow control.
Window Lockout
This feature allows you to disable the passenger windowswitches.
The rear window lockoutbutton is located below thepower window switches onthe driver’s door armrest.
Press the button to disable the passenger windowcontrols. The light on the button will illuminate,indicating that the feature is in use. The passengerwindows still can be raised or lowered using the driver’swindow switches when the lockout feature is active.
To restore power to the passenger windows, press thebutton again. The light on the button will go out.
You can program this feature to disable all passengerwindows or only the rear passenger windows. See“Vehicle Programming and Personalization” features atthe end of this section for more information.

2-5
Keys
CAUTION:
Leaving children in a vehicle with the ignitionkey is dangerous for many reasons. A child orothers could be badly injured or even killed.
They could operate the power windows or othercontrols or even make the vehicle move. Don’tleave the keys in a vehicle with children.

2-6
One key works all of the lock cylinders on the vehicle.
Your vehicle has an Immobilizer vehicle theft system.The key has a transponder in the key head that matchesa decoder in the vehicle’s steering column. If areplacement key or any additional key is needed, youmust purchase it from your dealer. The key will havePK3+ stamped on it. Keep the bar code tag that camewith the original keys. Give this tag to your dealer if youneed a new key made.
NOTICE:
Your vehicle has a number of new features thatcan help prevent theft. You can have a lot oftrouble getting into your vehicle if you ever lock your keys inside. You may even have todamage your vehicle to get in. So be sure youhave extra keys.
In an emergency, contact Cadillac Roadside Assistance.See “Roadside Assistance” in the Index.
If your vehicle is equipped with the OnStar system withan active subscription and you lock your keys inside thevehicle, OnStar may be able to send a command tounlock your vehicle. See “OnStar” in the Index for moreinformation.

2-7
Door Locks
CAUTION:
Unlocked doors can be dangerous.
� Passengers -- especially children -- caneasily open the doors and fall out of amoving vehicle. When a door is locked, thehandle won’t open it. You increase thechance of being thrown out of the vehicle ina crash if the doors aren’t locked. So, wearsafety belts properly and lock the doorswhenever you drive.
� Young children who get into unlockedvehicles may be unable to get out. A childcan be overcome by extreme heat and cansuffer permanent injuries or even deathfrom heat stroke. Always lock your vehiclewhenever you leave it.
� Outsiders can easily enter through anunlocked door when you slow down or stopyour vehicle. Locking your doors can helpprevent this from happening.
There are several ways to lock and unlock your vehicle.
Because your vehicle has the theft-deterrent system, youmust unlock the doors with the key or remote keylessentry transmitter to avoid setting off the alarm. If thewindows are down and the doors are locked, don’t reachin to manually unlock the vehicle because you will setoff the alarm.
From the outside, use either the key or the remotekeyless entry transmitter.
From the inside, use the manual lock leverslocated on the door panelsnear the windows.
Push down on the manual lock lever to lock the door. To unlock the door, pull up on the lever.

2-8
Central Door Unlocking SystemYour vehicle has a central door unlocking feature. Whenunlocking the driver’s door, you can unlock the otherdoors by holding the key in the turned position for a few seconds or by quickly turning the key twice in thelock cylinder.
Power Door Locks
The power door lockswitches are located on the front door panels.
Press the bottom part of the power door lock switch to lock or the top of the switch to unlock all the doors at once.
The rear doors do not have power door lock switches.You must use the manual levers to lock and unlock therear doors when riding in the rear seat.
Last Door Closed Locking FeatureWith this feature, you can delay the actual locking of the doors.
When the power door lock switch or the lock button onthe remote keyless entry transmitter is pressed when thekey is not in the ignition and the driver’s door is opened,a chime will sound three times indicating that last doorclosed feature is active.
When all the doors are closed, the doors will lockautomatically after five seconds. If a door is reopenedbefore five seconds have elapsed, the five second timerwill reset itself once all the doors are closed again.
You can press the door lock switch or the lock button onthe remote keyless entry transmitter again to overridethis feature and lock the doors immediately.
You can turn this feature off using the DriverInformation Center (DIC). When the last door closedlocking feature is off, the doors will lock immediatelywhen you press the power door lock switch or the lockbutton on the remote keyless entry transmitter. See“Vehicle Programming and Personalization Features” inthe Index for more information.
2-9
Automatic Door LocksIf your vehicle has an automatic transmission, yourvehicle is programmed so that when the doors areclosed, the ignition is on and the shift lever is moved outof PARK (P), all the doors will lock. The doors willunlock every time you stop the vehicle and move theshift lever back into PARK (P).
If your vehicle has a manual transmission, the doors will lock automatically after the vehicle speed reaches5 mph (8 km). The doors will not automatically unlockuntil the ignition is turned off and the key is removedfrom the ignition switch.
If someone needs to exit the vehicle once the doors havelocked, have that person use the manual lever or powerdoor lock switch. When the door is closed again, it willnot lock automatically. Use the manual lever or powerlock switch to lock the door.
Programmable Automatic Door LocksThe power door locks can be programmed throughprompts displayed on the Driver Information Center(DIC). These prompts allow you to choose various lock and unlock settings. For more information onprogramming, see “Vehicle Programming andPersonalization Features” in the Index.
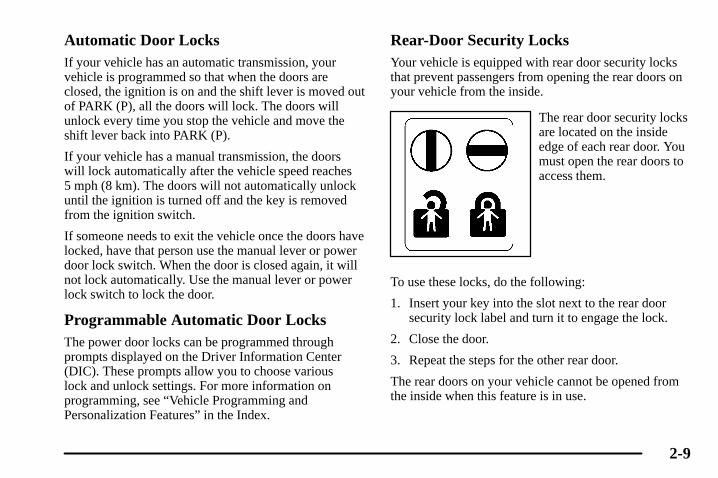
Rear-Door Security LocksYour vehicle is equipped with rear door security locksthat prevent passengers from opening the rear doors onyour vehicle from the inside.
The rear door security locksare located on the insideedge of each rear door. Youmust open the rear doors toaccess them.
To use these locks, do the following:
1. Insert your key into the slot next to the rear doorsecurity lock label and turn it to engage the lock.
2. Close the door.
3. Repeat the steps for the other rear door.
The rear doors on your vehicle cannot be opened fromthe inside when this feature is in use.

2-10
When you want to open a rear door when the securitylock is on, do the following:
1. Unlock the door using the remote keyless entrytransmitter, the front door power lock switch or bylifting the rear door manual lock.
2. Then open the door from the outside.
To cancel the rear door security lock, do the following:
1. Unlock the door and open it from the outside.
2. Insert your key into the slot next to the rear doorsecurity lock label and turn it to disengage the lock.
3. Repeat the steps for the other lock.
The rear door locks will now work normally.
Anti-Lockout FeatureThe power door lock switches will not work if the key isin the ignition, the engine is off, a door is open anddelayed locking is turned off. If you press the powerdoor lock switch, all the doors will lock and only thedriver’s door will unlock. If you close the doors, you canlock them using the remote keyless entry transmitter. Besure to remove the key from the ignition when lockingyour vehicle.
The anti-lockout feature can be overridden by pressingthe lock button on the remote keyless entry transmitter.
Leaving Your VehicleIf you are leaving your vehicle, open the door, lock thevehicle from the inside; then get out and close the door.
Remote Keyless Entry SystemWith this feature, you can lock and unlock the doors orthe trunk and turn on your vehicle’s interior lamps fromabout 10 feet (3 m) away using the remote keyless entrytransmitter supplied with your vehicle.
Your remote keyless entry system operates on a radiofrequency subject to Federal CommunicationsCommission (FCC) Rules and with Industry Canada.
This device complies with Part 15 of the FCC Rules.Operation is subject to the following two conditions: (1) this device may not cause harmful interference, and(2) this device must accept any interference received,including interference that may cause undesiredoperation.
This device complies with RSS-210 of Industry Canada.Operation is subject to the following two conditions: (1) this device may not cause interference, and (2) thisdevice must accept any interference received, includinginterference that may cause undesired operation of the device.

2-11
Changes or modifications to this system by other than anauthorized service facility could void authorization touse this equipment.
At times you may notice a decrease in range. This isnormal for any remote keyless entry system. If thetransmitter does not work or if you have to stand closerto your vehicle for the transmitter to work, try this:
� Check the distance. You may be too far from yourvehicle. You may need to stand closer during rainyor snowy weather.
� Check the location. Other vehicles or objects may beblocking the signal. Take a few steps to the left orright, hold the transmitter higher, and try again.
� Check to determine if battery replacement isnecessary. See the instructions that follow.
� If you’re still having trouble, see your dealer or aqualified technician for service.
Operation
(Lock): When you pressthis symbol on the remotekeyless entry transmitter,the doors on the vehicle willlock. This also arms thetheft-deterrent system.
You can program your vehicle so that the exterior lampswill flash and/or the horn will sound when you lock thedoors with the remote keyless entry transmitter. See“Vehicle Programming and Personalization Features” in the Index for more information on programming this feature.
If your vehicle is programmed for remote confirmation,the doors must be closed for this feature to work. If adoor is open, remote confirmation will be canceled.

2-12
(Unlock): When you press this symbol on theremote keyless entry transmitter, the driver’s door willunlock. This also disarms the theft-deterrent system.Press the button again to unlock the rest of the doors.
You can program your vehicle so that the exterior lampswill flash when you unlock the doors with the remotekeyless entry transmitter. See “Vehicle Programmingand Personalization Features” in the Index for moreinformation on programming this feature.
If your vehicle is programmed for remote confirmation,the doors must be closed for this feature to work. If adoor is open, remote confirmation will be canceled.
(Panic Alarm): The remote keyless entrytransmitter comes equipped with an instant panic alarm.To use the alarm, press the horn symbol when theignition is turned off. The horn will sound and theexterior lamps will flash for up to 30 seconds. To stopthe instant panic alarm, press the symbol again or turnthe ignition to ON.
(Trunk): Press this button to open the trunk.
The remote keyless entry transmitter can be used torecall the memory settings for up to two drivers. Formore information, see “Vehicle Programming andPersonalization Features” and “Memory Seat andMirrors” in the Index.
Matching Transmitter(s) to Your VehicleEach remote keyless entry transmitter is coded toprevent another transmitter from unlocking your vehicle.If a transmitter is lost or stolen, a replacement can bepurchased through your dealer. Remember to bring anyremaining transmitters with you when you go to yourdealer. When the dealer matches the replacementtransmitter to your vehicle, any remaining transmittersmust also be matched. Once your dealer has coded thenew transmitter, the lost transmitter will not unlock yourvehicle. Each vehicle can have a maximum of fourtransmitters matched to it.

2-13
Battery ReplacementUnder normal use, the battery in your remote keylessentry transmitter should last about four years.
You can tell the battery is weak if the transmitter won’twork at the normal range in any location. If you have toget close to your vehicle before the transmitter works,it’s probably time to change the battery.
NOTICE:
When replacing the battery, use care not to touchany of the circuitry. Static from your bodytransferred to these surfaces may damage thetransmitter.
1. Use a flat thin object to pry open the transmitter.
2. Once the transmitter is separated, use a pencil orsimilar object to remove the old battery. Do not use a metal object.

2-14
3. Insert the new battery as the instructions under thecover indicate.
4. Snap the transmitter back together tightly to be sureno moisture can enter.
5. Press any button on the remote keyless entrytransmitter to resynchronize the transmitter.
6. Check the operation of the transmitter.
Reconfigurable Steering WheelControls (SWC)This feature allows you to customize the four steeringwheel controls to work with the OnStar�, the climatecontrol, audio and traction control systems.
The controls for this featureare located on the left spokeof the steering wheel.
To program one of these controls, use one of thefollowing procedures:
If your vehicle is equipped with the Base audio system,do the following:
1. Access the main menu of the audio system bypressing the TUNE/SEL knob located at the lowerright of the audio system.

2-15
2. Scroll through the menu by turning the knob.
3. When SETUP appears on the display, press the knobonce to select it.
4. Scroll through the SETUP menu by turning the knob.
5. When CONFIGURE SWC KEYS appears on thedisplay, press the knob once to select it.
6. Scroll through the buttons (1, 2, 3 or 4). When youreach the control you wish to program, press theknob once to select it.
7. Choose a new function for the control by scrollingthrough the list of available functions.
8. Once you’ve highlighted your choice, press the knobonce to select it.
The control you selected is now programmed withthe function you selected.
9. Press the BACK button to exit each menu. If you desire to program another control, repeat the procedure.
If your vehicle is equipped with the Navigation system,do the following:
1. Press the MAIN button located to the lower left ofthe display.
2. Press the multi-function button next to the Setupprompt at the right of the display.
3. Turn the TUNE/SEL knob located to the lower rightof the display to scroll through the Setup menu.
4. When Program SWC appears on the display, pressthe knob once to select it.
5. Turn the knob to scroll through the availablefunctions.
6. Once the function desired is highlighted, press andhold the multi-function button next to the controlyou wish to program (1, 2, 3 or 4). The buttons arelocated at the right of the display.
When a control is successfully programmed, thefunction you selected will appear next to the numberof the control at the right of the display.
7. Press the multi-function button next to the Backprompt to exit each menu. If you desire to programanother control, repeat the procedure.
Each function can only be used once. When youprogram a control with a function, that function isremoved from the list of functions available. It willreturn to the list if you remove it from the SWC it isprogrammed to by programming another function to that control.

2-16
Trunk Lid
CAUTION:
It can be dangerous to drive with the trunk lidopen because carbon monoxide (CO) gas cancome into your vehicle. You can’t see or smellCO. It can cause unconsciousness and even death.If you must drive with the trunk lid open or ifelectrical wiring or other cable connections mustpass through the seal between the body and thetrunk lid:� Make sure all other windows are shut.� Turn the fan on your heating or cooling
system to its highest speed and select thecontrol setting that will force outside airinto your vehicle. See “Comfort Controls”in the Index.
� If you have air outlets on or under theinstrument panel, open them all the way.
See “Engine Exhaust” in the Index.
Remote Trunk Release Button
The remote trunk releasebutton is located on thelower portion of the driver’s door.
To use this feature, an automatic transmission must be in PARK (P) or NEUTRAL (N) and your manualtransmission must be in NEUTRAL with the parkingbrake set.
Press the button to open the trunk. You can also pressthe button with the trunk symbol on the remote keylessentry transmitter to open the trunk.
When the trunk lid opens, a light inside the trunk will come on. The light will go out when the trunk lid is closed.

2-17
If your vehicle is ever without power, you can stillaccess the trunk area. Use one of the followingprocedures to open the trunk manually.
If your vehicle is equipped with the rear seatpass-through door, do the following:
1. Fold the rear armrest down and open thepass-through door. See “Rear Seat Pass-ThroughDoor” following for more information.
2. Reach upward through the opening to locate thetrunk release handle.
3. Pull down on the trunk release handle to open thetrunk lid.
If your vehicle is equipped with the split folding rearseat, do the following:
1. Fold down the rear seatback. See “Split Folding RearSeat” in the Index for more information.
2. Reach upward through the opening to locate thetrunk release handle.
3. Pull down on the trunk release handle to open thetrunk lid.
Rear Seat Pass-Through Door (If Equipped)This feature allows you to access the trunk withoutopening the trunk lid. This is especially useful whentransporting long items such as skis.
To open the door, pull down the rear seat armrest. Thenpull up on the lever to release the door. Pull it all theway down.
To close the panel, push the door up and back into place.Then try to open the door without pulling up on thelever to make sure it is locked into place.

2-18
Emergency Trunk Release HandleNOTICE:
The trunk release handle was not designed to beused to tie down the trunk lid or as an anchorpoint when securing items in the trunk. Improperuse of the trunk release handle could damage it.
There is a glow-in-the-dark emergency trunk releasehandle located on the back wall of the trunk. This handlewill glow following exposure to light. Pull the releasehandle down to open the trunk from the inside.

2-19
TheftVehicle theft is big business, especially in some cities.Although your vehicle has a number of theft-deterrentfeatures, we know that nothing we put on it can make it impossible to steal. However, there are ways you can help.
Key in the IgnitionIf you leave your vehicle with the keys inside, it’s aneasy target for joy riders or professional thieves -- sodon’t do it.
When you park your vehicle and open the driver’s door,you’ll hear a chime reminding you to remove your keyfrom the ignition and take it with you. Always do this.Your steering wheel will be locked, and so will yourignition and transmission. And remember to lock the doors.
Parking at NightPark in a lighted spot, close all windows and lock yourvehicle. Remember to keep your valuables out of sight.Put them in a storage area, or take them with you.
Parking LotsEven if you park in a lot where someone will bewatching your vehicle, it’s still best to lock it up andtake your keys. But what if you have to leave your key?
� If possible, park in a busy, well-lit area.
� Put your valuables in a storage area, like your trunkor glove box.
� Be sure to close and lock the storage area.
� Close all windows.
� Lock the glove box.

2-20
Theft-Deterrent SystemThe security light is locatedon the instrument panelcluster.
If the ignition is off and a door is open, the security lightwill flash, reminding you to arm the theft-deterrentsystem.
To arm the system, do the following:
1. Open the door.
2. Lock the door using the remote keyless entrytransmitter or the power door lock switch. Thesecurity light should come on and stay on.
3. Close all the doors. The security light should go offwithin approximately 30 seconds.
If a door or a trunk is opened without a key or a remotekeyless entry transmitter, the horn will sound and thelamps will flash for up to 30 seconds.
The theft-deterrent system won’t arm if you lock thedoors with a key or use the manual door lock. Itactivates only if you use the remote keyless entrytransmitter.
To avoid activating the alarm by accident do thefollowing:
� The vehicle should be locked with the door key orthe manual door lock after the doors are closed ifyou don’t want to arm the theft-deterrent system.
� Always unlock a door with a key or use the remotekeyless entry transmitter. Pressing the unlock buttonon the remote keyless entry transmitter disables thetheft-deterrent system. Unlocking a door any otherway will activate the alarm when a door or the trunkis opened.
If you activate the alarm by accident, unlock the driver’sdoor with your key. You can also turn off the alarm byusing the unlock button on the remote keyless entrytransmitter, or by starting the vehicle with a valid key.

2-21
Testing the Alarm1. From inside the vehicle, roll down the window, then
get out of the vehicle, keeping the door open.
2. From outside of the vehicle, with the door open, lockthe vehicle using the power door lock switch or theremote keyless entry transmitter and close the door.Wait approximately 30 seconds until the securitylight goes off.
3. Reach in and unlock the door using the manual lockand open the door. The horn will sound and theexterior lamps will flash.
You can turn off the alarm by unlocking the driver’sdoor with your key, using the unlock button on theremote keyless entry transmitter or by starting the carwith a valid key.
If the alarm does not sound when it should, check to seeif the horn works. The horn fuse may be blown. Toreplace the fuse, see “Fuses and Circuit Breakers” in theIndex. If the fuse does not need to be replaced, you mayneed to have your vehicle serviced.
To reduce the possibility of theft, always arm thetheft-deterrent system when leaving your vehicle.
ImmobilizerYour vehicle is equippedwith a passivetheft-deterrent system.
This device complies with Part 15 of the FCC Rules.Operation is subject to the following two conditions: (1) this device may not cause harmful interference, and(2) this device must accept any interference received,including interference that may cause undesiredoperation.

2-22
This device complies with RSS-210 of Industry Canada.Operation is subject to the following two conditions: (1) this device may not cause interference, and (2) thisdevice must accept any interference received, includinginterference that may cause undesired operation of the device.
Changes or modifications to this system by other than anauthorized service facility could void authorization touse this equipment.
The system works when you turn the key to ON (II).The key uses a transponder that matches an immobilizercontrol unit in your vehicle. The correct key will startthe vehicle.
Your vehicle has a special key that works with thetheft-deterrent system. There is a transponder in the keyhead. If the key is ever damaged, you may not be able tostart your vehicle.
When trying to start the vehicle, if the engine does not start and the security light comes on, the key mayhave a damaged transponder. Turn the ignition off andtry again.
If the engine still does not start, and the key appears tobe undamaged, try another ignition key. At this time,you may also want to check the fuse. See “Fuses andCircuit Breakers” in the Index. If the engine still doesnot start with the other key, your vehicle needs service.If your vehicle does start, the first key may be faulty.See your dealer who can service the theft-deterrentsystem to have a new key made.
It is possible for the theft-deterrent system decoder to learn the transponder value of a new or replacementkey. Up to 10 additional keys may be programmed forthe vehicle. This procedure is for learning additionalkeys only.

2-23
Canadian Owners: If you lose or damage your keys,only a GM dealer can service the theft-deterrent systemto have new keys made. To program additional keys youwill require two current driver’s keys. You must add astep to the following procedure. After Step 2, repeatSteps 1 and 2 with the second current driver’s key. Then continue with Step 3.
To program a new key do the following:
1. Verify that the new key has PK3+ stamped on it.
2. Insert the current driver’s key in the ignition andstart the engine. If the engine will not start see yourdealer for service.
3. After the engine has started, turn the key to OFF, andremove the key.
4. Insert the key to be programmed and turn it to ONwithin ten seconds of removing the previous key.
5. The security light will turn off once the key has beenprogrammed. It may not be apparent that the securitylight went on due to how quickly the key isprogrammed.
6. Repeat the Steps 1 through 4 if additional keys are tobe programmed.
If you are ever driving and the security light comes onand stays on, you will be able to restart your engine ifyou turn it off. The theft-deterrent system, however, isnot working properly and must be serviced by yourdealer. Your vehicle is not protected by thetheft-deterrent system at this time.
In an emergency, contact Cadillac Roadside Assistance.See “Roadside Assistance” in the Index.

2-24
New Vehicle “Break-In”
NOTICE:
Your vehicle doesn’t need an elaborate“break -in.” But it will perform better in the long run if you follow these guidelines for thefirst 500 miles (805 km):� Don’t drive at any one speed -- fast or slow.� Do not exceed 70 mph (113 km/h).� Don’t make full -throttle starts, also refrain
from using the full throttle while driving.If these procedures are not followed your engine,axle or other parts could be damaged.� Avoid making hard stops for the first
200 miles (322 km) or so. During this timeyour new brake linings aren’t yet brokenin. Hard stops with new linings can meanpremature wear and earlier replacement.Follow this breaking-in guideline everytime you get new brake linings.
Don’t tow a trailer during break -in. See “Towinga Trailer” in the Index for more information.
Ignition PositionsWith the key in the ignition switch, you can turn the keyto four different positions.

2-25
NOTICE:
If your key seems stuck in OFF and you can’tturn it, be sure you are using the correct key; ifso, is it all the way in? If it is, then turn thesteering wheel left and right while you turn thekey hard. Turn the key only with your hand.Using a tool to force it could break the key or theignition switch. If none of this works, then yourvehicle needs service.
A (OFF): This is the only position in which you caninsert or remove the key. This position locks theignition, steering wheel and transmission. It’s atheft-deterrent feature.
B (ACCESSORY): This position allows you to usethings like the radio and the windshield wipers when theengine is off. This position will allow you to turn off theengine, but still turn the steering wheel.
C (ON): This position is for driving. If your vehicle hasan automatic transmission and you turn off the engine, thetransmission will lock. If you need to shift the transmissionout of PARK (P), the ignition key has to be in ON.
D (START): This position starts the engine.
Key Release Button (Manual Transmission)
The key cannot be removed from the ignitionof manual transmissionvehicle unless the keyrelease button is used.
To remove the key, do the following:
1. Turn the key to ACCESSORY.
2. Press the button and turn the key to OFF.
Do not hold the button in while turning the key to OFF.
3. Pull the key straight out of the ignition switch.

2-26
Steering Column Ignition Lock Release(Automatic Transmission Only)If your vehicle has a dead battery or a battery with lowvoltage, you can still release the ignition lock andremove the key. Use the following procedure to releasethe shift lever:
1. Locate the plastic screw head on the underside of theplastic cover for the steering column.
2. Insert a flat, thin object into the slot and turn it until the plastic piece detaches from the steeringcolumn cover.
3. Insert a narrow, pointed object into the hole in thesteering column cover and press the spring.
4. Then, turn the ignition switch to OFF and removethe key.

2-27
Retained Accessory Power (RAP)The following accessories on your vehicle may be usedfor up to 10 minutes after the ignition key is turned fromON to OFF:
� Radio
� Power Windows
� Audio Steering Wheel Controls (if programmed)
� Sunroof (Option)
Power to these accessories stops after 10 minutes or if a door is opened. If you want power for another10 minutes, close all the doors and turn the ignition key to ON and then back to OFF.
Starting Your EngineAutomatic TransmissionMove your shift lever to PARK (P) or NEUTRAL (N).Your engine won’t start in any other position -- that’s asafety feature. To restart when you’re already moving,use NEUTRAL (N) only.
NOTICE:
Don’t try to shift to PARK (P) if your vehicle is moving. If you do, you could damage thetransmission. Shift to PARK (P) only when your vehicle is stopped.

2-28
Manual TransmissionThe gear selector should be in neutral and the parkingbrake engaged. Hold the clutch pedal to the floor andstart the engine. Your vehicle won’t start if the clutchpedal is not all the way down -- that’s a safety feature.
1. With your foot off the accelerator pedal, turn yourignition key to START. Then, just let go of the key;the engine starts automatically. The idle speed willgo down as your engine gets warm.
2. If your engine won’t start (or starts but then stops), it could be flooded with too much gasoline. Trypushing your accelerator pedal all the way to thefloor and holding it there as you turn the key toSTART. If the vehicle starts briefly but then stopsagain, do the same thing.
NOTICE:
Your engine is designed to work with theelectronics in your vehicle. If you add electricalparts or accessories, you could change the waythe engine operates. Before adding electricalequipment, check with your dealer. If you don’t,your engine might not perform properly.
Engine Coolant Heater (If Equipped)
In very cold weather, 0�F (-18�C) or colder, the enginecoolant heater can help. You’ll get easier starting andbetter fuel economy during engine warm-up. Usually,the coolant heater should be plugged in a minimum offour hours prior to starting your vehicle. At temperaturesabove 32�F (0�C), use of the coolant heater is not required.

2-29
To Use the Engine Coolant Heater1. Turn off the engine.
2. Open the hood and unwrap the electrical cord. Thecord is located on the driver’s side of the enginecompartment near the engine oil dipstick. See“Engine Compartment Overview” in the Index formore information on location.
You must remove the plastic cap to access the plug.
3. Plug it into a normal, grounded 110-volt AC outlet.
CAUTION:
Plugging the cord into an ungrounded outletcould cause an electrical shock. Also, the wrongkind of extension cord could overheat and causea fire. You could be seriously injured. Plug thecord into a properly grounded three-prong110-volt AC outlet. If the cord won’t reach, use aheavy-duty three-prong extension cord rated forat least 15 amps.
4. Before starting the engine, be sure to unplug and store the cord as it was before to keep it awayfrom moving engine parts. If you don’t, it could be damaged.
How long should you keep the coolant heater pluggedin? The answer depends on the outside temperature, thekind of oil you have, and some other things. Instead oftrying to list everything here, we ask that you contactyour dealer in the area where you’ll be parking yourvehicle. The dealer can give you the best advice for thatparticular area.

2-30
Automatic Transmission OperationThe automatic transmission shift lever is located on thecenter console between the front seats.
There are several different positions for the shift lever.
PARK (P): This position locks the rear wheels. It’s thebest position to use when you start the engine becauseyour vehicle can’t move easily.
CAUTION:
It is dangerous to get out of your vehicle if theshift lever is not fully in PARK (P) with theparking brake firmly set. Your vehicle can roll.
Don’t leave your vehicle when the engine isrunning unless you have to. If you have left theengine running, the vehicle can move suddenly.You or others could be injured. To be sure yourvehicle won’t move, even when you’re on fairlylevel ground, always set your parking brake andmove the shift lever to PARK (P).
See “Shifting Into PARK (P)” in the Index.
If you’re pulling a trailer, see “Towing a Trailer”in the Index.

2-31
Ensure the shift lever is fully in PARK (P) beforestarting the engine. Your vehicle has an automatictransmission shift lock control system. You must fullyapply your regular brakes before you can shift fromPARK (P) when the ignition key is in ON. If you cannotshift out of PARK (P), ease pressure on the shift lever.Push the shift lever all the way into PARK (P) whilepressing the button on the shift lever as you maintainbrake application. Then move the shift lever into thegear you wish. See “Shifting Out of PARK (P)” in the Index.
NOTICE:
Shifting to REVERSE (R) while your vehicle ismoving forward could damage yourtransmission. Shift to REVERSE (R) only afteryour vehicle has stopped.
REVERSE (R): Use this gear to back up.
At low vehicle speeds, you can also use REVERSE (R)to rock your vehicle back and forth to get out of snow,ice or sand without damaging your transmission. See“Stuck in Sand, Mud, Ice or Snow” in the Index foradditional information.
NEUTRAL (N): In this position, the engine doesn’tconnect with the wheels. To restart when you’re alreadymoving, use NEUTRAL (N) only. You can also useNEUTRAL (N) when your vehicle is being towed.
CAUTION:
Shifting into a drive gear while your engine is“racing” (running at high speed) is dangerous.Unless your foot is firmly on the brake pedal,your vehicle could move very rapidly. You couldlose control and hit people or objects. Don’t shiftinto a drive gear while your engine is racing.
NOTICE:
Damage to your transmission caused by shiftingout of PARK (P) or NEUTRAL (N) with theengine racing isn’t covered by your warranty.

2-32
AUTOMATIC OVERDRIVE (D): This position is for normal driving. If you need more power for passing,and you’re:
� Going less than 35 mph (55 km/h), push theaccelerator pedal about halfway down.
� Going about 35 mph (55 km/h) or more, push theaccelerator all the way down.
The transmission will shift down to a lower gear andhave more power.
NOTICE:
If your vehicle seems to start up rather slowly, orif it doesn’t seem to shift gears as you accelerate,something may be wrong with a transmissionsystem sensor. If you drive very far that way,your vehicle can be damaged. So if this happens,have your vehicle serviced right away. Until then,you can use FOURTH (4) when you are drivingless than 35 mph (55 km/h) and AUTOMATICOVERDRIVE (D) for higher speeds.
FOURTH (4): This position is also used for normaldriving, however, it offers more power and lower fueleconomy than AUTOMATIC OVERDRIVE (D).
Here are examples for using FOURTH (4) instead ofAUTOMATIC OVERDRIVE (D).
� When driving on hilly, winding roads.
� When going down a steep hill.
THIRD (3): This position gives you more power. Youcan use THIRD (3) on hills. It can help control yourspeed as you go down steep mountain roads, but thenyou would also want to use your brakes off and on.
If the shift lever is put into THIRD (3), the transmissionwon’t shift into THIRD (3) until the vehicle is movingslowly enough.

2-33
SECOND (2): This position gives you even more power than THIRD (3). You can use it on very steephills, or in deep snow or mud. (If the shift lever is put in SECOND (2), the transmission won’t shift intoSECOND (2) until the vehicle is going slowly enough).
NOTICE:
If the vehicle’s wheels can’t turn, don’t try todrive. This might happen if you were stuck invery deep sand or mud or were up against a solidobject. You could damage your transmission.Also, if you stop when going uphill, don’t holdyour vehicle there with only the acceleratorpedal. This could cause overheating and damagethe transmission. Use your brakes to hold yourvehicle in position on a hill.
Shift Lock Release (Automatic Transmission Only)If your vehicle has a dead battery or a battery with lowvoltage, you can still shift the vehicle into PARK (P) andremove the ignition key. Use the following procedure torelease the shift lever:
1. Pull up on the rear part of the leather boot thatsurrounds the shift lever.
2. Fold the boot upward to expose the mechanismbeneath the shift lever.

2-34
3. Locate and remove the small oval cap near theforward, right side of the shifter mechanism.
4. Using a narrow, pointed tool, press down on themechanism under the cap so that you can move theshift lever.

2-35
Sport Mode Button (Automatic Transmission Only)This button allows you to change the driving mode ofthe vehicle from the normal driving mode to a sportierdriving mode. In sport mode the vehicle will have firmershifting and increased performance.
The sport mode button islocated on the centerconsole near thetransmission shift lever.
Press the button once to turn on the sport mode. Press the button again to return to normal driving mode.
This light located on theinstrument panel cluster will come on when the sportmode is active.
When you turn off the ignition while driving in sportmode, the vehicle will remain in sport mode. Press thesport mode button again to turn off the feature andreturn to normal driving mode.

2-36
Winter Driving Mode Button (Automatic Transmission Only)This feature provides more traction during slipperyconditions by using THIRD (3) gear instead ofSECOND (2) when you begin to accelerate from astopped position.
The winter driving modebutton is located on thecenter console near thetransmission shift lever.
Press this button once to turn on the winter drivingmode feature. Press it again to turn the feature off. The winter driving mode feature works when the vehicleis in any gear except SECOND (2).
This light on the instrumentpanel cluster will come onwhen the winter drivingmode is active.
When you turn off the ignition while using this feature,winter mode is automatically turned off. The vehiclewill return to normal driving mode. You must reselectthe winter driving mode feature each time you restart thevehicle if you wish to use the feature.
The transmission will be in THIRD (3) gear when thevehicle begins to move. Once the vehicle is moving, thevehicle will upshift normally.
The transmission will downshift when the acceleratorpedal is pressed and held for more than two seconds.
This feature is not intended for continuous use or for use when the vehicle is stuck in sand, mud, ice, snow orgravel. If your vehicle becomes stuck, see “RockingYour Vehicle” in the Index for more information on how to free it.

2-37
Manual Transmission OperationThe following explains how to operate your vehicle’smanual transmission.
This is the shift pattern for your vehicle.
FIRST (1): Press the clutch and shift into FIRST (1).Then, slowly let up on the clutch pedal as you press theaccelerator pedal.
You can shift into FIRST (1) when you’re going lessthan 20 mph (32 km/h). If you’ve come to a completestop and it’s hard to shift into FIRST (1), put the shiftlever in NEUTRAL and let up on the clutch. Press theclutch pedal back down. Then try shifting intoFIRST (1) again.
SECOND (2): Press the clutch pedal to the floor as you let up on the accelerator pedal and shift intoSECOND (2). Then, slowly let up on the clutch pedal as you press the accelerator pedal.
THIRD (3), FOURTH (4), and FIFTH (5): Shift intoTHIRD (3), FOURTH (4) and FIFTH (5) the same wayyou do for SECOND (2). Slowly let up on the clutchpedal as you press the accelerator pedal.
To stop, let up on the accelerator pedal and press thebrake pedal. Before the vehicle comes to a completestop, press the clutch pedal and brake pedal, and shiftinto NEUTRAL.
NEUTRAL: Use this position when you idle the engine.
REVERSE (R): Use this gear to back up. Press theclutch pedal and shift into REVERSE (R). Slowly let upon the clutch pedal as you press the accelerator pedal.
Use REVERSE (R), along with the parking brake, whenyou park your vehicle. See “Parking Your Vehicle(Manual Transmission Only)” later in this section formore information.
If your vehicle has a manual transmission, in order foryou to remove the key from the ignition, you must pressthe key release button on the ignition switch. See “KeyRelease Button” in the Index for more information.

2-38
Shift Speeds
CAUTION:
If you skip a gear when you downshift, you couldlose control of your vehicle. You could injureyourself or others. Don’t shift down more thanone gear at a time when you downshift.
NOTICE:
If you skip more than one gear when youdownshift, or if you race the engine when yourelease the clutch pedal while downshifting, youcould damage the clutch or the transmission.
If the vehicle speed drops below 20 mph (32 km/h), or if the engine is not running smoothly, you shoulddownshift to the next lower gear. You may have todownshift two or more gears to keep the engine runningsmoothly or for good performance.
Parking BrakeThe parking brake pedal is located on the lowerportion of the instrumentpanel to the left of thesteering wheel.
To set the parking brake, hold the regular brake pedaldown with your right foot and push the parking brakepedal down with your left foot.

2-39
To release the parking brake, pull the release leverlocated to the left of the steering wheel on theinstrument panel.
If the ignition is on, the brake system warning light on the instrument panel cluster should come on. If itdoesn’t, you need to have your vehicle serviced. See“Brake System Warning Light” in the Index for moreinformation.
NOTICE:
Do not drive your vehicle with the parking brakeon. Driving with the parking brake engaged cancause your vehicle’s rear brakes to overheat. Youmay have to replace them, and you could alsodamage other parts of your vehicle.
A warning chime will sound if the parking brake is set,the ignition is on and the vehicle begins to move. Tostop the chime, fully release the parking brake.
If you are towing a trailer and parking on a hill, see“Towing a Trailer” in the Index for more information.

2-40
Shifting Into PARK (P) (Automatic Transmission Only)
CAUTION:
It can be dangerous to get out of your vehicle ifthe shift lever is not fully in PARK (P) with theparking brake firmly set. Your vehicle can roll. Ifyou have left the engine running, the vehicle canmove suddenly. You or others could be injured.To be sure your vehicle won’t move, even whenyou’re on fairly level ground, use the steps thatfollow. If you’re pulling a trailer, see “Towing aTrailer” in the Index.
To shift into PARK (P), use the following steps:
1. Hold the brake pedal down with your right foot.
2. Move the shift lever into PARK (P) like this:
� Press the button on the front of the shift lever as youpush the shift lever all the way toward the front ofyour vehicle into PARK (P). Release the button.
� With your right foot still holding the brake pedaldown, set the parking brake with your left foot. See“Parking Brake” in the Index for more information.
3. Turn the key to OFF.
4. Remove the key from the ignition switch and take itwith you. If you can leave your vehicle with the keyin your hand, the vehicle is in PARK (P).

2-41
Leaving Your Vehicle With the EngineRunning (Automatic Transmission Only)
CAUTION:
It can be dangerous to leave your vehicle with theengine running. Your vehicle could movesuddenly if the shift lever is not fully in PARK (P)with the parking brake firmly set. And, if youleave the vehicle with the engine running, it couldoverheat and even catch fire. You or others couldbe injured. Don’t leave your vehicle with theengine running unless you have to.
If you have to leave your vehicle with the enginerunning, be sure your vehicle is in PARK (P) and yourparking brake is firmly set before you leave it. Afteryou’ve moved the shift lever into PARK (P), hold theregular brake pedal down. Then, see if you can move theshift lever away from PARK (P) without first pushingthe button on the shift lever. If you can, it means that theshift lever wasn’t fully locked into PARK (P).
Torque Lock (Automatic Transmission)If you are parking on a hill and you don’t shift yourtransmission into PARK (P) properly, the weight of thevehicle may put too much force on the parking pawl inthe transmission. You may find it difficult to pull theshift lever out of PARK (P). This is called “torque lock.”To prevent torque lock, set the parking brake and thenshift into PARK (P) properly before you leave thedriver’s seat. To find out how, see “Shifting IntoPARK (P)” in the Index.
If torque lock does occur, you may need to have anothervehicle push yours a little uphill to take some of thepressure from the parking pawl in the transmission, soyou can pull the shift lever out of PARK (P).

2-42
Shifting Out of PARK (P) (Automatic Transmission Only)Your vehicle has an automatic transmission shift lockcontrol system. You have to fully apply your regularbrakes before you can shift from PARK (P) when theignition is in ON. See “Automatic Transmission” in the Index.
If you cannot shift out of PARK (P), ease the pressureon the shift lever. Push the shift lever all the way intoPARK (P) while pushing the button on the shift lever asyou maintain brake application. Then move the shiftlever into the gear you want. If you ever hold the pedaldown but still can’t shift out of PARK (P), try thefollowing:
1. Turn the ignition key to ACCESSORY. Open andclose the driver’s door to turn off the RAP feature.
2. Apply and hold the brake until the end of Step 4.
3. Shift to NEUTRAL (N).
4. Start the vehicle and then shift to the drive gear you want.
5. Have the vehicle fixed as soon as you can.
Parking Your Vehicle (Manual Transmission Only)Before you get out of your vehicle firmly apply theparking brake. Turn the ignition key to OFF, press therelease button and remove the key. See “ManualTransmission Key Release Button” in the Index formore information.
If you are towing a trailer, see “Towing a Trailer” in the Index.

2-43
Parking Over Things That BurnCAUTION:
Things that can burn could touch hot exhaustparts under your vehicle and ignite. Don’t parkover papers, leaves, dry grass or other things thatcan burn.

2-44
Engine Exhaust
CAUTION:
Engine exhaust can kill. It contains the gascarbon monoxide (CO), which you can’t see orsmell. It can cause unconsciousness and death.
You might have exhaust coming in if:� Your exhaust system sounds strange
or different.� Your vehicle gets rusty underneath.� Your vehicle was damaged in a collision.� Your vehicle was damaged when driving over
high points on the road or over road debris.� Repairs weren’t done correctly.� Your vehicle or exhaust system had been
modified improperly.If you ever suspect exhaust is coming into your vehicle:� Drive it only with all the windows down to
blow out any CO; and� Have your vehicle fixed immediately.
Running Your Engine While You’reParked (Automatic Transmission)It’s better not to park with the engine running. But if youever have to, here are some things to know.
CAUTION:
Idling the engine with the climate control systemoff could allow dangerous exhaust into yourvehicle. See the earlier Caution under “EngineExhaust.”Also, idling in a closed-in place can let deadlycarbon monoxide (CO) into your vehicle even if the fan is at the highest setting. One place this can happen is a garage. Exhaust -- with CO -- can come in easily. NEVER park in agarage with the engine running.Another closed-in place can be a blizzard. See “Blizzard” in the Index.

2-45
CAUTION:
It can be dangerous to get out of your vehicle ifthe shift lever is not fully in PARK (P) with theparking brake firmly set. Your vehicle can roll.Don’t leave your vehicle when the engine isrunning unless you have to. If you’ve left theengine running, the vehicle can move suddenly.You or others could be injured. To be sure yourvehicle won’t move, even when you’re on fairlylevel ground, always set your parking brake afteryou move the shift lever to PARK (P).
Follow the proper steps to be sure your vehicle won’tmove. See “Shifting Into PARK (P)” in the Index.
If you are parking on a hill and if you’re pulling atrailer, also see “Towing a Trailer” in the Index.
HornPress on the pad near the horn symbols to sound the horn.
Tilt WheelA tilt wheel allows you to adjust the steering wheelbefore you drive. You can raise it to the highest level to give your legs more room when you exit and enter the vehicle.
The lever that allows you to tilt the steering wheel islocated on the left side of the steering column.
To tilt the wheel, hold the steering wheel and pull thelever. Then move the steering wheel to a comfortableposition and release the lever to lock the wheel in place.

2-46
Turn Signal/Multifunction Lever
The lever on the left side of the steering columnincludes the following:
� Turn and Lane-Change Signals
� Headlamps
� Headlamp High/Low Beam-Changer
� Flash-To-Pass Feature
� Fog Lamps
For more information on the exterior lamps, see“Exterior Lamps” later in this section.
Turn and Lane-Change SignalsTo signal a turn, move the lever all the way up or down.The lever returns automatically when the turn iscomplete.
Arrows on the instrumentpanel cluster flash in thedirection of the turn or lane change.
Raise or lower the lever until the arrow starts to flash tosignal a lane change. Hold it there until the lane changeis complete. The lever returns to its original positionwhen it’s released.
Arrows that flash rapidly when signaling for a turn orlane change may be caused by a burned-out signal bulb.Other driver’s won’t see the signal.
Replace burned-out bulbs to help avoid possibleaccidents. Check the fuse and for burned-out bulbs if thearrow fails to work when signaling a turn. See “Fusesand Circuit Breakers” in the Index for more information.

2-47
Turn Signal On Chime
If the turn signal is left on for approximately 1 mile(1.61 km), a warning chime will sound and the Turn Signal On message will appear on the DriverInformation Center (DIC) display. See “Turn Signal On Message” later in this section for more information.
HeadlampsThe exterior lamp control is located at the end of theturn signal/multifunction lever.
: Turn the control with this symbol on it to operatethe exterior lamps.
The exterior lamp control has three positions:
: Turning the control to this position turns off alllamps except the Daytime Running Lamps (DRL).
: Turning the control to this position turns on theparking lamps together with the following:
� Sidemarker Lamps
� Taillamps
� License Plate Lamps
� Instrument Panel Lights
: Turning the control to this position turns on theheadlamps, together with the previously listed lamps and lights.
AUTO (Automatic): Turning the control to thisposition puts the headlamps in automatic mode. AUTOmode will turn the exterior lamps on and off dependingupon how much light is available outside of the vehicle.
Wiper-Activated Headlamps
This feature activates the headlamps and parking lampsafter the windshield wipers have been in use forapproximately six seconds. For this feature to work, theexterior lamp control must be in AUTO.
When the exterior lamp control is off or in the parkinglamp position and the windshield wiper control is in anyposition except off, the Headlamps Suggested messagewill appear on the DIC display. See “HeadlampsSuggested Message” later in this section for moreinformation.
When the ignition is turned to OFF, the wiper-activatedheadlamps will immediately turn off. They will also turnoff if the windshield wiper control is turned off.

2-48
Headlamp High/Low-Beam ChangerPush forward on the turn signal/multifunction lever tochange the headlamps from low to high beam. Pull thelever back and then release it to change from high to low beam.
This light on the instrumentpanel cluster will be on,indicating high-beam usage.
Lamps On ReminderA warning chime will sound if the exterior lamp controlis left on in either the headlamp or parking lampposition and the driver’s door is opened with the ignition off.
Flash-To-Pass FeatureThis feature allows you to use the high-beam headlampsto signal the driver in front of you that you want to pass.
Pull and hold the turn signal/multifunction lever towardyou to use. When you do, the following will occur:
� If the headlamps are either off, in low-beam or inDaytime Running Lamps (DRL) mode, thehigh-beam headlamps will turn on. They’ll stay onas long as you hold the lever there. Release the leverto turn them off.
� If the headlamps are in high-beam mode, they willswitch to low beam. To return to high-beam, pushthe lever away from you.

2-49
Fog LampsUse the fog lamps for better vision in foggy or misty conditions.
The fog lamp control is located on the turnsignal/multifunction lever to the left of the steering column.
The parking lamps must be on for the fog lamps to work.
To turn the fog lamps on, turn the band on the lever upto the fog lamp symbol and release it. The band willreturn to its original position.
To turn the fog lamps off, turn the band up to the foglamp symbol and release it. The band will return to itsoriginal position, and the fog lamps will turn off. If youturn on the high-beam headlamps, the fog lamps willalso turn off. They’ll turn back on again when youswitch back to low-beam headlamps.

2-50
Windshield Wipers
The lever on the right side of the steering columnoperates the windshield wipers.
(Mist): Pull the lever down and release it for asingle wiping cycle. The lever will return to its originalposition. For more cycles, hold the lever down beforereleasing it.
(Off): Put the lever in this position to turn off the wipers.
(Delay): Put the lever in this position to set a delaybetween wipes. Turn the delay adjustment band to setthe length of the delay.
(Delay Adjustment): Use this band to set thelength of the delay between wipes when using the delayfeature. The closer you move the band toward mist, thelonger the delay. The windshield wiper lever must be indelay for this feature to work.
(Low Speed): Put the lever in this position forslow, steady wiping cycles.
(High Speed): Put the lever in this position forrapid wiping cycles.

2-51
If the windshield wipers are in use for approximatelysix seconds while you are driving, the exterior lampswill come on automatically if the exterior lamp controlis in AUTO. See “Wiper-Activated Headlamps” listedpreviously for more information.
Be sure to clear ice and snow from the wiper bladesbefore using them. If they’re frozen to the windshield,gently loosen or thaw them. If the blades do becomedamaged, install new blades or blade inserts. For moreinformation, see “Wiper Blade Replacement” in the Index.
Heavy snow or ice can overload the wiper motor. Acircuit breaker will stop the motor until it cools down.Clear away snow or ice to prevent an overload.
Headlamp Washers (If Equipped)If your vehicle has the optional high-intensity discharge(HID) headlamps, your vehicle will also have headlampwashers. The headlamp washers clear the headlamplenses so that you can get the maximum visibility andbrightness from your headlamps.
The headlamp washers arelocated on the inboard sideof the headlamp lenses.
The headlamps must be on in order to be washed. If theheadlamps are off, only the windshield will be washedwhen the washer button is pressed.
To wash the headlamps, press the washer button locatedat the end of the windshield wiper lever. Both theheadlamps and the windshield will be washed.
See “Windshield Washer” following for more information.

2-52
Windshield Washer
CAUTION:
In freezing weather, don’t use your washer untilthe windshield is warmed. Otherwise the washerfluid can form ice on the windshield, blockingyour vision.
The windshield washer button is located at the end ofthe windshield wiper lever.
(Washer Fluid): Press the button with thissymbol located at the end of the windshield washer leverto wash the windshield. Washer fluid will squirt onto thewindshield and the wipers will run for a few cycles toclear the windshield. For more wash cycles, press andhold the button.
If your vehicle is low on washer fluid, the CheckWasher Fluid message will appear on the DriverInformation Center (DIC) display. See “DriverInformation Center (DIC) Messages” listed later in thissection for more information.
If the headlamps are on when you wash the windshield,the headlamp washers (if equipped) will turn on. Boththe windshield and the headlamps will be washed. See“Headlamp Washers” listed previously in this section formore information.

2-53
Cruise Control
: On/Off
+: Resume/Accelerate, Set
-: Coast/Decelerate, Set
The buttons used to operate cruise control are located atthe bottom of the steering wheel.
With cruise control, you can maintain a speed ofapproximately 25 mph (40 km/h) or more withoutkeeping your foot on the accelerator. This is helpful onlong trips. Cruise control does not work at speeds belowabout 25 mph (40 km/h).
When you apply your brakes, the cruise control shuts off.
CAUTION:
� Cruise control can be dangerous where youcan’t drive safely at a steady speed. So,don’t use your cruise control on windingroads or in heavy traffic.
� Cruise control can be dangerous onslippery roads. On such roads, fast changesin tire traction can cause needless wheelspinning, and you could lose control. Don’tuse cruise control on slippery roads.
If your vehicle is in cruise control when the tractioncontrol system begins to limit wheel spin, the cruisecontrol will automatically disengage. See “TractionControl System” and “Stabilitrak System” in the Index.When road conditions allow you to safely use it again,you may turn the cruise control back on.

2-54
Setting Cruise Control
CAUTION:
If you leave your cruise control switch on whenyou’re not using cruise, you might hit a buttonand go into cruise when you don’t want to. Youcould be startled and even lose control. Keep thecruise control switch off until you want to usecruise control.
1. Press the cruise control on/off button to turn cruisecontrol on. An indicator light will come on to showthat the cruise control is on.
2. Accelerate to the speed you want.
3. Press either the plus or minus button and release it.This will set the cruise control.
4. Remove your foot from the accelerator pedal.
This light on the instrumentpanel cluster will come onwhen cruise control is on. It will go out when cruisecontrol is turned off.
Resuming a Set Speed
Suppose you set your cruise control at a desired speedand then you apply the brake. This shuts off the cruisecontrol. But you don’t need to reset it.
Once the vehicle is traveling approximately 25 mph(40 km/h) or more, you can press the resume/acceleratebutton to return to your desired preset speed. The cruisecontrol light will be displayed again.
The vehicle will return to and stay at your preset speed.If you press and hold the resume/accelerate button, thevehicle speed will increase until you release the buttonor apply the brake. Unless you want to go faster, do notpress and hold the resume/accelerate button.

2-55
Increasing Speed While Using Cruise Control
There are two ways to go to a higher speed:
� Use the accelerator pedal to get to the higher speed.Press either the plus or minus button, then release thebutton and the accelerator pedal. You will now cruiseat the higher speed.
� Press the resume/accelerate button. Hold it thereuntil you get up to the speed that you want, and thenrelease the button. To increase your speed in verysmall amounts, briefly press the resume/acceleratebutton and then release it. Each time you do this, your vehicle will speed up approximately 1 mph (1.6 km/h).
The accelerate feature will only work after you have set the cruise control speed by pressing one of the set buttons.
Reducing Speed While Using Cruise Control
There are two ways to reduce your speed while usingcruise control:
� Press the coast/decelerate button until you reach thelower speed you want, then release it.
� To slow down in very small amounts, push thecoast/decelerate button briefly. Each time you do this, the vehicle will slow down approximately1 mph (1.6 km/h).
Passing Another Vehicle While Using Cruise Control
Use the accelerator pedal to increase your speed. Whenyou take your foot off the pedal, your vehicle will slowdown to the cruise control speed you set earlier.

2-56
Using Cruise Control on Hills
How well your cruise control will work on hills dependsupon your speed, load and the steepness of the hills.When going up steep hills, you may have to step on theaccelerator pedal to maintain your speed. When goingdownhill, you may have to brake or shift to a lower gearto keep your speed down. Applying the brake or shiftinginto a lower gear will take you out of cruise control. Ifyou need to apply the brake or shift to a lower gear dueto the grade of the downhill slope, you may not want toattempt to use your cruise control feature.
Ending Cruise Control
To turn off the cruise control, step lightly on the brakepedal, or press the cruise control on/off button on thesteering wheel.
Erasing Speed Memory
When you turn off the cruise control or the ignition,your cruise control set speed memory is erased.
Exterior LampsHeadlampsSee “Turn Signal/Multifunction Lever” listed previouslyin this section for more information on the headlamps.

2-57
Daytime Running LampsDaytime Running Lamps (DRL) can make it easier forothers to see the front of your vehicle during the day.DRL can be helpful in many different drivingconditions, but they can be especially helpful in theshort periods after dawn and before sunset. Fullyfunctional daytime running lamps are required on allvehicles first sold in Canada.
The DRL system will make the turn signal lamps comeon when the following conditions are met:
� It is still daylight and the ignition is in ON or START,
� the exterior lamp control is in OFF or AUTO withthe headlamps off, and
� an automatic transmission is not in PARK (P) or theparking brake is not set on a manual transmission.
When DRL are on, only your turn signal lamps will be on.No other exterior lamps will be on when the DRL arebeing used. Your instrument panel won’t be lit up either.
When the exterior lamp control is in AUTO and it’s darkenough outside, the DRL will turn off and the low-beamheadlamps will turn on. When it’s bright enoughoutside, the low-beam headlamps will go off, and theDRL will turn back on.
If it’s dark enough outside and the exterior lamp controlis in OFF, a Headlamps Suggested message will appearon the Driver’s Information Center (DIC) display. Thismessage informs the driver that turning on the exteriorlamps is recommended even though the DRL are stillilluminated. Turning the exterior lamp control to AUTOor to the low-beam headlamp position will turn off theDRL and cancel the Headlamps Suggested message. If the parking lamps or the fog lamps were turned oninstead, the DRL will still turn off and the HeadlampsSuggested message will be displayed. You can turn it offby pressing the OK button if you have the Navigationaudio system or the CLR button if you have the baseaudio system.
To operate your vehicle with the DRL off, turn theexterior lamp control to OFF. Then turn on the foglamps or parking lamps, and the DRL will turn off. The Headlamps Suggested message will appear on theDIC display. This will work regardless of gear positionand whether or not the parking brake is set.
As with any vehicle, you should turn on the regularheadlamp system when you need it.

2-58
Light Sensor
The light sensor for the DRL and AUTO headlampfeature is located on top of the instrument panel. If youcover the sensor, it will read dark, and the exterior lampsor the Headlamps Suggested message will appear on theDIC whenever the ignition is on.
Exterior Lighting Battery SaverIf the parking lamps or headlamps have been left on, theexterior lamps will turn off approximately 10 minutesafter the ignition is turned to OFF. This protects againstdraining the battery in case you have accidentally leftthe headlamps or parking lamps on. The battery saverdoes not work if the headlamps are turned on after theignition is turned to OFF.
If you need to leave the lamps on for more than10 minutes, use the exterior lamp control to turn the lamps back on.

2-59
Interior LampsInstrument Panel Brightness LeverThis feature controls the brightness of the instrumentpanel lights.
The lever for this feature is located on the overhead console.
Slide the lever toward the symbol to brighten the lightsor away from it to dim them.
If you slide the lever all the way toward the symbol pastthe resistance point, the interior lamps will come on. Toturn them off, slide the lever back toward the minimumbrightness setting.
Illuminated EntryThe illuminated entry system turns on the reading anddome lamps and the backlighting to the exterior lampcontrol when a door is opened or if you press the remotekeyless entry transmitter unlock button. If activated bythe transmitter, the lighting will remain active for about25 seconds. The illuminated entry system uses the lightsensor, it must be dark outside in order for the lamps toturn on. The lamps turn off approximately 25 secondsafter the last door is closed. They will dim to off if theignition key is placed in ON, or immediately deactivateif the power locks are activated.
Parade DimmingThis feature prohibits dimming of the instrument paneldisplays and backlighting during daylight hours whenthe key is in the ignition and the headlamps are on. This feature operates with the light sensor and is fullyautomatic. When the light sensor reads darkness outsideand the parking lamps are active, the instrument paneldisplays can be adjusted by sliding the instrument panelbrightness lever toward the symbol to brighten or awayfrom the symbol to dim the lighting.

2-60
Reading LampsThe reading lamps are located on the overhead console.These lamps come on automatically when any door is opened.
For manual operation, press the button next to eachlamp to turn them on. Press it again to turn them off.
If the reading lamps are left on, they automatically shutoff 10 minutes after the ignition has been turned off.
MirrorsElectrochromic Day/Night Rearview Mirrorwith OnStar� SystemYour vehicle has an electrochromic inside rearviewmirror. The mirror also contains OnStar controls. For more information about OnStar, see “OnStar” in the Index.
(On/Off): This is the on/off button, located on thelower left side of the mirror for the electrochromicfunctions of the rearview mirror.
Mirror Operation
The automatic dimming feature is active each time thevehicle is started.
To turn the automatic dimming feature on or off, pressand hold the on/off button for about three seconds. Theindicator light will illuminate when this feature is active.
Cleaning the Mirror
When cleaning the mirror, use a paper towel or similarmaterial dampened with glass cleaner. Do not sprayglass cleaner directly on the mirror as that may cause theliquid cleaner to enter the mirror housing.

2-61
Electrochromic Day/Night Rearview Mirror with Compass and OnStar� System(If Equipped)Your vehicle may have an electrochromic insiderearview mirror with a compass. The mirror alsocontains OnStar controls. For more information aboutOnStar, see “OnStar” in the Index.
The mirror has an eight-point compass display in theupper right corner of the mirror face. When on, thecompass automatically calibrates as the vehicle isdriven.
(On/Off): This is the on/off button, located on thelower left side of the mirror for the electrochromicfunctions of the rearview mirror.
Mirror Operation
The electrochromic feature on the mirror functionsexactly the same as the base electrochromic mirror. See “Electrochromic Day/Night Rearview Mirror withOnStar� System” listed previously in this section formore information.
Compass Operation
Press the on/off button once to turn the compass on or off.
When the ignition and the compass feature are on, the compass will show two character boxes forapproximately two seconds. After two seconds, themirror will display the current compass heading.
Compass Calibration
If after two seconds the display does not show acompass heading (N for North for example), there maybe a strong magnetic field interfering with the compass.Such interference may be caused by a magnetic antennamount, note pad holder or similar object. If the letter Cshould ever appear in the compass window, the compassmay need calibration.
The mirror can be calibrated by driving the vehicle incircles at 5 mph (8 km/h) or less until the display reads a direction.
The compass can be placed in calibration mode bypressing and holding the on/off button until a C is shown in the compass display.

2-62
Compass Variance
Compass variance is the difference between earth’smagnetic north and true geographic north. If the mirroris not adjusted for compass variance, your compasscould give false readings.
The mirror is set in zone eight upon leaving the factory.It will be necessary to adjust the compass to compensatefor compass variance if you live outside zone eight.Under certain circumstances, such as a long distance,cross-country trip, it will be necessary to adjust thecompass variance.
To adjust for compass variance, do the following:
1. Find your current location and variance zone numberon the zone map that follows.
2. Press and hold the on/off button until a zone numberappears on the display.
3. Once the zone number appears on the display, pressthe on/off button quickly until you reach the correctzone number. Stop pressing the button and the mirrorwill return to normal operation. If C appears in thecompass window, the compass may need calibration.See “Compass Calibration” listed previously.

2-63
Cleaning the Mirror
When cleaning the mirror, use a paper towel or similarmaterial dampened with glass cleaner. Do not sprayglass cleaner directly on the mirror as that may cause theliquid cleaner to enter the mirror housing.
Power Outside Rearview Mirrors
The control on the driver’s door armrest operates bothoutside rearview mirrors.
Press the left mirror symbol on the selector switch tochoose the driver’s side mirror or the right mirrorsymbol to choose the passenger’s side mirror. The centerposition is off and will not move the mirrors if thecontrol pad is touched.
Once you select the mirror you want to adjust, use thearrows on the control pad to move the mirror in thedirection you want the mirror to go. Adjust each mirrorso you can see the side of your vehicle and the areabehind your vehicle.
The mirrors can be manually folded inward to preventdamage when going through an automatic car wash. Tofold, push the mirror toward the vehicle. To return themirror to its original position, push outward. Be sure toreturn both mirrors to their original unfolded positionbefore driving.
The mirrors can also be programmed for personalizationand the curb view assist feature if you have the optionalmemory package. For more information, see “MemorySeat and Mirrors” and “Vehicle Programming andPersonalization Features” in the Index.

2-64
Curb View Assist Mirror (If Equipped)If your vehicle is equipped with the memory seat andmirrors, it will also be capable of performing the curbview assist mirror feature. This feature will cause thepassenger’s mirror to tilt to a preselected position whenthe vehicle is shifted into REVERSE (R). Use thisfeature to view the curb when you are parallel parking.
When the vehicle is shifted out of REVERSE (R) and afive-second delay has occurred, the passenger’s mirrorwill return to its original position.
If further adjustment is needed after the mirror is tilted, the mirror controls can be used. See “PowerOutside Rearview Mirrors” listed previously for more information.
This feature can be enabled/disabled through the DIC.See “Vehicle Programming and PersonalizationFeatures” in the Index for more information.
Convex Outside MirrorYour passenger’s side mirror is convex. A convexmirror’s surface is curved so you can see more from thedriver’s seat.
CAUTION:
A convex mirror can make things (like othervehicles) look farther away than they really are.If you cut too sharply into the right lane, youcould hit a vehicle on your right. Check yourinside mirror or glance over your shoulder beforechanging lanes.
Heated Outside Rearview MirrorsWhen you operate the rear window defogger, it alsowarms both outside rearview mirrors to help clear themof fog or ice. See “Rear Window Defogger” in the Indexfor more information.

2-65
Storage CompartmentsGlove BoxThe glove box is located in front of the passenger’s seaton the instrument panel. To lock the glove box door,insert your key into the lock cylinder and turn itclockwise. Turn the key counterclockwise to unlock the door.
Map PocketsThe map/storage pockets are located on each door aswell as on the back of the front seatbacks.
Center Console Storage and CupholdersThe center console has a storage tray, a storagecompartment for CDs or cassette tapes, a dual cupholderwith a removable rubber liner and an armrest. To accessthe storage area, pull up on the latch located at the frontof the armrest.
Rear Seat CupholdersThere are two cupholders located in the rear seat centerarmrest. Pull the armrest down to access the cupholders.
Convenience NetThe convenience net attaches to the floor and back wallof the trunk using eight anchor points. Put small loads,like grocery bags, behind the net. It can help keep themfrom falling over during sharp turns or quick starts and stops.
The net is not for larger, heavier loads. Store them in thetrunk as far forward as you can. When not using the net,hook the net to the tabs securing it to the sill plate.

2-66
Roof Rack Provisions
CAUTION:
If you try to carry something on top of yourvehicle that is longer or wider than the luggagecarrier -- like paneling, plywood, a mattress, andso forth -- the wind can catch it as you drivealong. This can cause you to lose control. Whatyou are carrying could be violently torn off, andthis could cause you or other drivers to have acollision, and of course damage your vehicle. Youmay be able to carry something like this inside.But, never carry something longer or wider thanthe luggage carrier on top of your vehicle.
Your vehicle is equipped with mounting locations forthe installation of a roof rack or luggage carrier. Themounting locations are located on the roof rail. Youmust open the doors to access them. The threaded nutsare covered with a plastic cap that must be removedbefore use.
For more information on purchasing the rack/carrier aswell as installation information, contact your dealer.
Ashtrays and Cigarette Lighter(Option)
NOTICE:
Don’t put papers or other flammable items into your ashtrays. Hot cigarettes or othersmoking materials could ignite them, causing a damaging fire.
Front AshtrayThe front ashtray is located under the climate controlpanel on the center console. Press on the door to releasethe ashtray.
To empty the ashtray, remove it from the center consoleby gripping the edges and pulling straight out. Toreinstall, push the tray back into place.
Rear AshtrayRear seat ashtrays are not available on this vehicle.
2-67
Cigarette Lighter
NOTICE:
Don’t hold a cigarette lighter in with your handwhile it is heating. If you do, it won’t be able toback away from the heating element when it’sready. That can make it overheat, damaging thelighter and the heating element.
The cigarette lighter is located next to the ashtray. Thevehicle does not have any cigarette lighters for the rearseat passengers.
Press the lighter all the way in and release it. It will popback out by itself once the element has heated for use.
Cigarette lighters can be used to provide power toaccessories. See “Accessory Power Outlets” in the Index for more information.
Sun VisorsSwing down the primary visor to block out glare. It canalso be detached from the center mount and moved tothe side to block glare from that direction.
The driver’s sunshade may also have buttons for abuilt-in garage door opener and a recording device. See“HomeLink� Transmitter” and “Travel Note Recorder”later in this section for more information.
Lighted Visor Vanity MirrorPull the visor down and lift the cover. The light willautomatically come on. The light will go out when youclose the cover.

2-68
Accessory Power OutletsWith accessory power outlets, you can plug in auxiliaryelectrical equipment such as a cellular telephone or CB radio.
The front accessory power outlet is located in theashtray on the instrument panel below the climatecontrol system. The outlet will have a cigarette lighter if your vehicle has this option. Remove the cigarettelighter to access the outlet.
The rear accessory power outlet is located on the back ofthe center console.
Your vehicle may have a small cap that must beremoved to access the accessory power outlet. If it does,when not using the outlet be sure to cover it with theprotective cap.
The accessory power outlet will only operate when theignition is in ACCESSORY or ON and for 10 minutesafter turning the ignition OFF. If you would like theaccessory power outlet to operate regardless of ignitionposition, and for extended periods of time, see yourdealer for more information.
NOTICE:
When using accessory power outlets:� Maximum load of any electrical equipment
should not exceed the maximum amperagefor the outlet.
� Be sure to turn off any electrical equipmentwhen not in use. Leaving electricalequipment on for extended periods candrain the battery.

2-69
Certain electrical accessories may not be compatiblewith the accessory power outlet and could result inblown vehicle or adapter fuses. If you experience aproblem see your dealer for additional information onaccessory power outlets.
NOTICE:
Adding some electrical equipment to your vehiclecan damage it or keep other things from workingas they should. This wouldn’t be covered by yourwarranty. Check with your dealer before addingelectrical equipment, and never use anything thatexceeds the amperage rating.
When adding electrical equipment, be sure to follow theproper installation instructions included with theelectrical equipment you install.
NOTICE:
Power outlets are designed for accessory plugsonly. Do not hang any type of accessory oraccessory bracket from the plug. Improper use ofthe accessory power outlets can cause damage notcovered by your warranty.

2-70
OnStar� System (If Equipped)OnStar is a vehicle communications system that offers avariety of services and provides a one-touch hands-freecommunication link between you and the OnStar Center.To receive OnStar services, a service subscriptionagreement is required and an additional fee may berequired. Services are available 24 hours a day, 7 days aweek. For more information, call 1-888-ONSTAR-7(1-888-667-8277).
OnStar Services Button: Press this button once tocontact an advisor who will be able to assist you withthese services. If you are not quickly connected, thesystem will automatically reset and redial. This ensuresconnection to the center; there is no additional actionrequired. Press the Communication button to cancel theautomatic redial.
Emergency Button: In an emergency situation,press the emergency service button. Upon receiving thecall, an advisor at the center will locate your vehicle andassess the situation. If necessary, the advisor will alertthe nearest emergency service provider.
Communication Button: Press this button at the end of a call. Also press this button to answer a call from the center, or cancel a call if one of the otherbuttons is accidentally pressed. This button is also usedto access OnStar Personal Calling and Virtual Advisorservices. See the OnStar owner package for moreinformation.
Volume Control: You can control the volume of theOnStar System using the steering wheel controls.

2-71
Telltale Light: This light will indicate the status ofthe system. A solid green light will come on when youstart the vehicle to let you know that the system is onand is ready to make or receive calls.
If the light blinks green it means that an incoming oroutgoing call is in progress. Press the Communicationbutton if you notice the light blinking and you are not on a call.
The light will be red in the event of an OnStar systemmalfunction. If this occurs press the OnStar Servicesbutton to attempt to contact an advisor. If the connectionis made, the advisor will assist you with steps to take tomake sure that the system is functioning properly. If youcannot contact the advisor, take your vehicle to yourdealership as soon as possible for assistance.
Cellular AntennaThe cellular antenna on the outside of your vehicle iscritical to effective communication using the OnStarsystem. Optimum cellular reception can be obtainedwhen the mast is straight up.
OnStar ServicesThe following services are available within OnStarservice plans. Your vehicle comes with a specificone-year service plan that allows use of some or all ofthe following services.
Automatic Notification of Air Bag Deployment: If anair bag deploys, a priority emergency signal isautomatically sent to the center. An advisor will locateyour vehicle’s position, try to contact you and assist youin the situation. If the center is unable to contact you, anemergency service provider will be contacted.
Stolen Vehicle Tracking: Call the center at1-888-4-ONSTAR (1-888-466-7827) to report your vehicle stolen. The system can then attempt tolocate and track your vehicle and the advisor will assistthe proper authorities.
Roadside Assistance with Location: For vehiclebreakdowns, press the OnStar Services button. Anadvisor will contact the appropriate help.

2-72
Remote Diagnostics: If an instrument panel light comeson, press the OnStar Services button. An advisor canperform a check of the engine on-board computer, andrecommend what action needs to be taken.
OnStar MED-NET: Med-Net can store your personalmedical history and provide it to emergency personnel ifnecessary. (Requires activation and additional fee).
Accident Assist: An advisor can provide step-by-stepguidance following an accident.
Remote Door Unlock: To contact the center, call1-888-4-ONSTAR. You will be required to provide yoursecurity information. An advisor will send a commandto your vehicle to unlock itself. The advisor can delayunlocking your vehicle. Remote Door Unlock isdisabled 48 hours after the vehicle is parked to maintainthe battery charge.
Vehicle Locator Service: To contact the center, call1-888-4-ONSTAR. You will be required to provide yoursecurity information. An advisor will send a commandto your vehicle to sound the horn and/or flash the lamps.
Route Support: An advisor can provide directions orguidance to most places you want to go. In addition,they can help you locate gas stations, rest areas, ATMs,hospitals, hotels, stores, eateries and more.
Ride Assist: An advisor can locate transportation in theevent that you are unable to drive.
Concierge Services: The concierge advisor can obtaintickets, reservations, or help with vacation/trip planningand other unique items and services.

2-73
OnStar System LimitationsComplete limitations can be found on the SubscriberServices Agreement.
In order to provide you with excellent service, calls withthe OnStar Center may be monitored or recorded.
OnStar service is:
� available in the 48 contiguous United States, Alaska,Hawaii and Canada;
� available when the vehicle is within the operatingrange of a cellular provider;
� subject to limitations caused by atmosphericconditions, such as severe weather or topographicalconditions, such as mountainous terrain;
� subject to cellular carrier equipment limitations.
Global positioning locating capabilities will not beavailable if satellite signals are obstructed.
OnStar will not function if the vehicle’s battery isdischarged or disconnected. It may also be inoperative ifthe vehicle is in an accident and the OnStar or vehicleelectrical system components are damaged.
OnStar is the communication link between you andexisting governmental emergency and roadside serviceproviders. OnStar will receive your call and usereasonable effort to contact an appropriate provider.OnStar cannot promise that the providers will respond ina timely manner or at all.
OnStar Steering Wheel ControlsYou can use the steering wheel controls to interact withthe OnStar system. See the OnStar manual providedwith your vehicle for more information. Some steeringwheel controls can be programmed to interact withOnStar. See “Reconfigurable Steering Wheel Controls”in the Index for more information.
Assist HandlesThe assist handles are located above the rear doors. Usethem to help you enter and exit the vehicle.
Garment HooksThe garment hooks are part of the assist handles locatedabove the rear doors.

2-74
Sunroof (Option)The sunroof controls are located on the overhead console.
(Half Open): Turn the control clockwise to this position to open the glass panel half-way open. The sunshade will open with the glass panel, or it can beopened manually.
(Comfort Stop): Turn the control clockwiseto this position to open the glass panel about threequarters of the way open. The sunshade will open withthe glass panel, or it can be opened manually.
This is called the comfort stop position. It provides lesswind noise than the full-open position.
(Full Open): Turn the control clockwise to this position to open the glass panel all the way. Thesunshade will open with the glass panel, or it can beopened manually.
(Vent): Turn the control counterclockwise tothis position to use the vent feature. The glass panel willtilt upward from the vehicle. The sunshade must beopened manually.
(Close): Turn the control to this position toclose the sunroof. The sunshade must be closedmanually.

2-75
HomeLink� Transmitter (If Equipped)
A. HomeLinkTransmitterButtons
B. Travel NoteRecorder Buttons(If Equipped)
This device complies with Part 15 of the FCC Rules.Operation is subject to the following two conditions: (1) this device may not cause harmful interference, and(2) this device must accept any interference received,including interference that may cause undesiredoperation.
This device complies with RSS-210 of Industry Canada.Operation is subject to the following two conditions: (1) this device may not cause interference, and (2) thisdevice must accept any interference, including interferencethat may cause undesired operation of the device.
Changes and modifications to this system by other thanan authorized service facility could void authorization touse this equipment.
Programming the HomeLink TransmitterDo not use the HomeLink Transmitter with any garagedoor opener that does not have the “stop and reverse”feature. This includes any garage door opener modelmanufactured before April 1, 1982.
Be sure that people and objects are clear of the garagedoor you are programming.
It is recommended that a new battery be installed inyour hand-held transmitter for quicker and moreaccurate transmission of the radio frequency.
Your vehicle’s engine should be turned off whileprogramming the transmitter. Follow these steps toprogram up to three channels:
1. Decide which one of the three channels (one of theHomeLink buttons) you want to program.
2. Press and hold the desired button on HomeLinkthrough Step 3.

2-76
3. When the HomeLink indicator light begins to blinkslowly (this may take up to 30 seconds), hold thehand-held transmitter about 1 to 3 inches (3 to 8 cm)away from HomeLink and then press and hold thetransmit button on the hand-held transmitter.Continue to hold both buttons until the indicatorlight on HomeLink begins to flash rapidly (this maytake up to 90 seconds).
If you have trouble programming HomeLink, make surethat you have followed the directions exactly asdescribed and that the battery in the hand-heldtransmitter is not weak. If you still cannot program it,move the hand-held transmitter to the left or right orforward or backward or flip it upside down. HomeLinkmay not work with older garage door openers that donot meet current Federal Consumer Safety Standards. If you cannot program the transmitter after repeatedattempts, refer to “Training a Garage Door Opener witha ‘Rolling Code’ Feature” next in this section or contactthe manufacturer of HomeLink at 1-800-355-3515, oron the internet at www.homelink.com.
Be sure to keep the original hand-held transmitter incase you need to erase and reprogram HomeLink.
Training a Garage Door Opener with a“Rolling Code” Feature (If Equipped)If you have not previously programmed the hand-heldtransmitter to HomeLink, see “Programming theHomeLink Transmitter” listed previously. If you havecompleted this programming already, you now need totrain the garage door opener motor head unit torecognize HomeLink.
1. Find the “Learn” or “Smart” button on the garagedoor opener motor head unit. The exact location andcolor will vary by garage door opener brand. If youhave difficulty finding the Learn or Smart button,refer to your garage door opener owner’s manual orcontact the manufacturer of HomeLink at1-800-355-3515, or on the internet atwww.homelink.com.
Because of the steps involved, it may be helpful tohave another person assist in programming thetransmitter.

2-77
2. Press the Learn or Smart button on the garage door opener motor head unit. An indicator light willbegin to flash when the motor head unit enters thetraining mode.
Following this step, you have 30 seconds to start Step 3.
3. Return to HomeLink in your vehicle and firmly press and release the programmed HomeLink buttonthree times.
The rolling-code garage door opener should nowrecognize HomeLink. You may either use HomeLink orthe hand-held transmitter to open the garage door.
If after following these instructions, you still haveproblems training the garage door opener, contact themanufacturer of HomeLink at 1-800-355-3515, or onthe internet at www.homelink.com.
Canadian ProgrammingCanadian Owners: During programming, the hand-heldtransmitter may automatically stop transmitting after two seconds. In this case, you should press and hold the HomeLink button (see Steps 2 and 3 under“Programming the HomeLink Transmitter”) while youpress and re-press (cycle) your hand-held transmitterevery two seconds until HomeLink is trained.
Operating the HomeLink TransmitterPress and hold the appropriate button on HomeLink forat least half of a second. The indicator light will comeon while the signal is being transmitted.
Erasing ChannelsTo erase all three programmed channels, hold down thetwo outside buttons until the indicator light begins toflash (approximately 20 seconds). Release both buttons.

2-78
Resetting DefaultsTo reset HomeLink to default settings, hold down thetwo outside buttons until the indicator light begins toflash (approximately 20 seconds). Continue to hold bothbuttons until the HomeLink indicator light turns off andthen release both buttons.
AccessoriesAccessories for the HomeLink Transmitter are availablefrom the manufacturer of the unit. If you would likeadditional information, please contact the manufacturerof HomeLink at 1-800-355-3515, or on the internet at www.homelink.com.
Travel Note Recorder (If Equipped)The HomeLink transmitter module may also have atravel note recorder that allows you to record shortmessages for later review. You can record approximately80 messages or four minutes of continuous recordedinformation, whichever comes first.
A. HomeLinkTransmitterButtons
B. Travel NoteRecorder Buttons
The buttons that operate this feature are located on thedriver’s side sun visor.

2-79
� (Record): To record a message, press this button andbegin speaking. Press the button again to stop recording.
If you prefer, you can press and hold this button whileyou record a message. The unit will begin recordingwhen you press the button and stop recording when yourelease the button.
While a message is being recorded, the red light on thetravel note recorder will be lit. The light will go outwhen recording has stopped.
(Play): Press this button to play back a recordedmessage.
To listen to all the recorded messages, press and hold thebutton for at least one second.
To skip a message, press the play button while amessage is playing. This will advance the recorder to thenext recorded message and begin playing it.
The green light on the unit will be lit while the messagesare playing.
(Delete): Press this button to delete recordedmessages.
To delete an individual message, press the delete buttonwhile a message is playing or within five seconds after amessage has ended.
To delete all stored messages on the travel note recorder,press the record and play buttons at the same time.
If you exceed the space limit, an error tone will soundwhen you try to record another message, the light on theunit will come on, and the message will not be recorded.To remedy this, delete all unnecessary messages to freesome space for new messages.
If your vehicle has the optional Navigation System,there is a memo recorder built into the system. See“Voice Memo” in the Index of the NavigationSupplement for more information.

2-80
The Instrument Panel -- Your Information System

2-81
The main components of the instrument panel are the following:
A. Air Outlets
B. Turn Signal/Multifunction Lever
C. Reconfigurable Steering Wheel Controls
D. Instrument Panel Cluster
E. Cruise Control Buttons
F. Audio Mute Button (Base Radio) or VoiceRecognition Button (Navigation System)
G. Audio Volume Knob and Source Button
H. Windshield Wiper Lever
I. Storage Compartment or Ashtray (Option)
J. Hazard Warning Flasher Button
K. Transmission Shift Lever
L. Accessory Power Outlet or Cigarette Lighter (Option)
M. Climate Control System
N. Audio/Navigation System (Option)
O. Glove Box

2-82
Instrument Panel ClusterThe instrument panel cluster is designed to let you know at a glance how your vehicle is running. You’ll know howfast you’re going, how much fuel you’re using and many of the other things you’ll need to know to drive safely and economically.
United States version shown, Canada similar

2-83
Speedometer and OdometerThe speedometer lets you see your speed in both milesper hour (mph) and kilometers per hour (km/h). Theodometer shows how far your vehicle has been driven,in either miles (used in the United States) or kilometers(used in Canada).You may wonder what happens if a vehicle has to have anew odometer installed. The new one may read thecorrect mileage. This is because your vehicle’s computerhas stored the mileage in memory.
Trip OdometerThe trip odometer can record the number of miles orkilometers traveled for up to two trips.
The trip odometer is part of the Driver InformationCenter (DIC). To access the trip odometer, use one ofthe following procedures:
Using the base audio system, do the following:1. Press the INFO (Information) button located to the
right of the screen to access the DIC menu.2. Scroll through the menu using the up or down arrows
on the INFO button until you reach Trip Odometer Aor Trip Odometer B.
The selected trip odometer (A or B) will bedisplayed at the top of the screen with theaccumulated mileage.
3. Repeat the steps to view the other trip odometer.
You can reset the selected trip odometer by pressingCLR (Clear) located in the center of the INFO button tothe right of the screen. The mileage for that tripodometer will return to zero. Each trip odometer mustbe reset individually.
Using the Navigation audio system, do the following:
1. Press the INFO button located on the left side of thescreen to access the Vehicle Information menu.
2. Scroll through the menu using the TUNE/SEL knoblocated to the lower right of the screen until youreach Trip Odometer A or Trip Odometer B.
3. Select the menu item by pressing the TUNE/SELknob once.
The selected trip odometer (A or B) will bedisplayed at the top of the screen with theaccumulated mileage.
4. Repeat the steps to view the other trip odometer.
You can reset the selected trip odometer by pressingmulti-function button next to Reset in the upper rightcorner of the screen. The mileage for that trip odometerwill return to zero. Each trip odometer must be resetindividually.

2-84
Tachometer
This gage indicates theengine speed in revolutionsper minute (rpm).
NOTICE:
Do not operate the engine with the tachometer inthe shaded area or engine damage may occur.
Engine Speed Limiter
This feature prevents the engine from operating at toomany revolutions per minute (rpm). When the engine’srpm are too high, the fuel supply to the engine will belimited. When the rpms return to normal, the fuel supplywill return to normal. This helps prevent damage to the engine.
ClockYour vehicle has an analog clock on the instrumentpanel cluster. For more information on setting the time,see “Setting the Clock” in the Index. If your vehicle has the optional Navigation/audio system, see“Adjusting, Clock” in the Index of the CTSEntertainment and Navigation System Supplementsupplied with the vehicle.

2-85
Warning Lights, Gages andIndicatorsThis part describes the warning lights and gages thatmay be on your vehicle. The pictures will help youlocate them.
Warning lights and gages can signal that something iswrong before it becomes serious enough to cause anexpensive repair or replacement. Paying attention toyour warning lights and gages could also save you orothers from injury.
Warning lights come on when there may be or is aproblem with one of your vehicle’s functions. As youwill see in the details on the next few pages, somewarning lights come on briefly when you start theengine just to let you know they’re working. If you arefamiliar with this section, you should not be alarmedwhen this happens.
Gages can indicate when there may be or is a problemwith one of your vehicle’s functions. Often gages andwarning lights work together to let you know whenthere’s a problem with your vehicle.
When one of the warning lights comes on and stays onwhen you are driving, or when one of the gages showsthere may be a problem, check the section that tells youwhat to do about it. Please follow this manual’s advice.Waiting to do repairs can be costly -- and evendangerous. So please get to know your warning lightsand gages. They’re a big help.
Your vehicle also has a Driver Information Center (DIC)that works along with the warning lights and gages. See“Driver Information Center (DIC)” later in this sectionfor more information.

2-86
Safety Belt Reminder LightWhen the key is turned to ON or START, a chime willcome on for several seconds to remind people to fastentheir safety belts, unless the driver’s safety belt isalready buckled.
The safety belt light willalso come on and stay onfor several seconds, then itwill flash for several more.
If the driver’s belt is already buckled, neither the chimenor the light will come on.
Air Bag Readiness LightThere is an air bag readiness light on the instrumentpanel, which shows the air bag symbol. The systemchecks the air bag’s electrical system for malfunctions.The light tells you if there is an electrical problem. Thesystem check includes the air bag sensors, the air bagmodules, the wiring and the diagnostic module. Formore information on the air bag system, see “Air Bag”in the Index.
This light will come onwhen you start your vehicle,and it will flash for a fewseconds. Then the lightshould go out. This meansthe system is ready.
If the air bag readiness light stays on after you start thevehicle or comes on when you are driving, your air bagsystem may not work properly. Have your vehicleserviced right away.

2-87
CAUTION:
If the air bag readiness light stays on after youstart your vehicle, it means the air bag systemmay not be working properly. The air bags inyour vehicle may not inflate in a crash, or theycould even inflate without a crash. To help avoidinjury to yourself or others, have your vehicleserviced right away if the air bag readiness lightstays on after you start your vehicle.
The air bag readiness light should flash for a fewseconds when you turn the ignition key to ON. If thelight doesn’t come on then, have it fixed so it will beready to warn you if there is a problem.
If there is a problem with the air bag system in yourvehicle, the Service Air Bag message will appear on theDIC display. See “Service Air Bag Message” later inthis section for more information.
Charging System Light
When you turn the key toON or START, this lightwill come on briefly toshow that the generator andbattery charging systems areworking properly.
If this light stays on, your vehicle needs service. Youshould take your vehicle to the dealer at once. To saveyour battery until you get there, turn off all accessories.

2-88
Brake System Warning LightYour vehicle’s hydraulic brake system is divided intotwo parts. If one part isn’t working, the other part canstill work and stop you. For good braking, though, youneed both parts working well.
If the warning light comes on, there is a brake problem.Have your brake system inspected right away.
United States Canada
This light should come on briefly when you turn the ignition key to ON. If it doesn’t come on then, have it fixed so it will be ready to warn you if there’s a problem.
When the ignition is on, the brake system warning lightwill also come on when you set your parking brake. Thelight will stay on if your parking brake doesn’t releasefully. If it stays on after your parking brake is fullyreleased, it means you have a brake problem.
If the light comes on while you are driving, pull off theroad and stop carefully. You may notice that the pedal isharder to push. Or, the pedal may go closer to the floor.It may take longer to stop. If the light is still on, have thevehicle towed for service. See “Towing Your Vehicle” inthe Index.
CAUTION:
Your brake system may not be working properlyif the brake system warning light is on. Drivingwith the brake system warning light on can leadto an accident. If the light is still on after you’vepulled off the road and stopped carefully, havethe vehicle towed for service.

2-89
Anti-Lock Brake System Warning Light
With the anti-lock brakesystem, the light(s) willcome on when your engineis started and may stay on for several seconds.That’s normal.
If the ABS warning light comes on and stays on, theremay be a problem with the antilock portion of the brakesystem. If the red BRAKE light is not on, you still havebrakes, but you don’t have antilock brakes. See “BrakeSystem Warning Light” earlier in this section.
If the light stays on, turn the ignition to OFF. Or, if thelight comes on when you’re driving, stop as soon aspossible and turn the ignition off. Then start the engineagain to reset the system. If the light still stays on, orcomes on again while you’re driving, your vehicle needsservice. If the regular brake system warning light isn’ton, you still have brakes, but you don’t have anti-lockbrakes. If the regular brake system warning light is alsoon, you don’t have anti-lock brakes and there’s aproblem with your regular brakes. See “Brake SystemWarning Light” earlier in this section.
The anti-lock brake system warning light will come onbriefly when you turn the ignition key to ON. This isnormal. If the light doesn’t come on then, have it fixedso it will be ready to warn you if there is a problem.
If the ABS light stays on or comes on while you aredriving, pull off the road as soon as possible and stopcarefully. Try resetting the system by turning theignition off then back on. If the ABS light still stays onor comes back on again while you are driving, yourvehicle needs service. Have the anti-lock brake systeminspected as soon as possible.

2-90
Traction Control System Warning (TRAC OFF) Light
If the TRAC OFFwarning light comes onand stays on, there maybe a problem with thetraction control system.
The TRAC OFF light will come on briefly when youturn the ignition to ON. If it doesn’t come on then, have it fixed so it will be ready to warn you if there is a problem.
The light will also come on if you turn the tractioncontrol system OFF using the Traction On/Off button.The traction control TC button is located in the glove box.
If the TRAC OFF light stays on or comes on while youare driving, pull off the road as soon as possible and stopcarefully. Try resetting the system by turning theignition off then back on. If the light still stays on orcomes back on again while you are driving, your vehicleneeds service. Have the traction control systeminspected as soon as possible. See “Traction ControlSystem” in the Index.

2-91
Engine Coolant Temperature Warning Light
This light tells you that yourengine has overheated.
This light will come on when you first start the vehicleas a check to let you know that the light is working. Itwill go out after a few seconds. If the light does notcome on, the bulb may be burned out. See your dealerfor assistance in changing the bulb.
If the light does not go out or if the light comes on andstays on while you are driving, your vehicle may have aproblem with the cooling system. You should stop thevehicle and turn off the engine as soon as possible toavoid damage to the engine. A warning chime willsound when this light is on, also.
See “Engine Overheating” in the Index.
Malfunction Indicator Lamp (Check Engine Light)
Your vehicle is equippedwith a computer whichmonitors operation of thefuel, ignition and emissioncontrol systems.
This system is called OBD II (On-BoardDiagnostics-Second Generation) and is intended toassure that emissions are at acceptable levels for the lifeof the vehicle, helping to produce a cleanerenvironment. The CHECK ENGINE light comes on toindicate that there is a problem and service is required.Malfunctions often will be indicated by the systembefore any problem is apparent. This may prevent moreserious damage to your vehicle. This system is alsodesigned to assist your service technician in correctlydiagnosing any malfunction.

2-92
NOTICE:
If you keep driving your vehicle with this lighton, after a while, your emission controls may notwork as well, your fuel economy may not be asgood and your engine may not run as smoothly.This could lead to costly repairs that may not becovered by your warranty.
NOTICE:
Modifications made to the engine, transmission,exhaust, intake or fuel system of your vehicle orthe replacement of the original tires with otherthan those of the same Tire Performance Criteria(TPC) can affect your vehicle’s emission controlsand may cause this light to come on.Modifications to these systems could lead tocostly repairs not covered by your warranty. Thismay also result in a failure to pass a requiredEmission Inspection/Maintenance test.
This light should come on, as a check to show you it isworking, when the ignition is on and the engine is notrunning. If the light doesn’t come on, have it repaired.This light will also come on during a malfunction in oneof two ways:
� Light Flashing -- A misfire condition has beendetected. A misfire increases vehicle emissions andmay damage the emission control system on yourvehicle. Dealer or qualified service center diagnosisand service may be required.
� Light On Steady -- An emission control systemmalfunction has been detected on your vehicle.Dealer or qualified service center diagnosis andservice may be required.

2-93
If the Light Is Flashing
The following may prevent more serious damage toyour vehicle:
� Reducing vehicle speed.
� Avoiding hard accelerations.
� Avoiding steep uphill grades.
� If you are towing a trailer, reduce the amount ofcargo being hauled as soon as it is possible.
If the light stops flashing and remains on steady, see “If the Light Is On Steady” following.
If the light continues to flash, when it is safe to do so,stop the vehicle. Find a safe place to park your vehicle.Turn the key off, wait at least 10 seconds and restart theengine. If the light remains on steady, see “If the LightIs On Steady” following. If the light is still flashing,follow the previous steps, and drive the vehicle to yourdealer or qualified service center for service.
If the Light Is On Steady
You may be able to correct the emission systemmalfunction by considering the following:
Did you recently put fuel into your vehicle?
If so, reinstall the fuel cap, making sure to fully installthe cap. See “Filling Your Tank” in the Index. Thediagnostic system can determine if the fuel cap has beenleft off or improperly installed. A loose or missing fuelcap will allow fuel to evaporate into the atmosphere. Afew driving trips with the cap properly installed shouldturn the light off.
Did you just drive through a deep puddle of water?
If so, your electrical system may be wet. The conditionwill usually be corrected when the electrical systemdries out. A few driving trips should turn the light off.
Are you low on fuel?
As your engine starts to run out of fuel, your engine maynot run as efficiently as designed since small amounts ofair are sucked into the fuel line causing a misfire. Thesystem can detect this. Adding fuel should correct thiscondition. Make sure to install the fuel cap properly. See“Filling Your Tank” in the Index. It will take a fewdriving trips to turn the light off.

2-94
Have you recently changed brands of fuel?
If so, be sure to fuel your vehicle with quality fuel. See“Fuel” in the Index. Poor fuel quality will cause yourengine not to run as efficiently as designed. You maynotice this as stalling after start-up, stalling when youput the vehicle into gear, misfiring, hesitation onacceleration or stumbling on acceleration. (Theseconditions may go away once the engine is warmed up.)This will be detected by the system and cause the lightto turn on.
If you experience one or more of these conditions,change the fuel brand you use. It will require at least onefull tank of the proper fuel to turn the light off.
If none of the above steps have made the light turn off,have your dealer or qualified service center check thevehicle. Your dealer has the proper test equipment anddiagnostic tools to fix any mechanical or electricalproblems that may have developed.
Emissions Inspection and Maintenance Programs
Some state/provincial and local governments have ormay begin programs to inspect the emission controlequipment on your vehicle. Failure to pass thisinspection could prevent you from getting a vehicleregistration.
Here are some things you need to know in order to helpyour vehicle pass an inspection:
Your vehicle will not pass this inspection if the CHECKENGINE light is on or not working properly.
Your vehicle will not pass this inspection if the OBD(on-board diagnostic) system determines that criticalemission control systems have not been completelydiagnosed by the system. The vehicle would beconsidered not ready for inspection. This can happen ifyou have recently replaced your battery or if yourbattery has run down. The diagnostic system is designedto evaluate critical emission control systems duringnormal driving. This may take several days of routinedriving. If you have done this and your vehicle still doesnot pass the inspection for lack of OBD systemreadiness, see your dealer or qualified service center toprepare the vehicle for inspection.
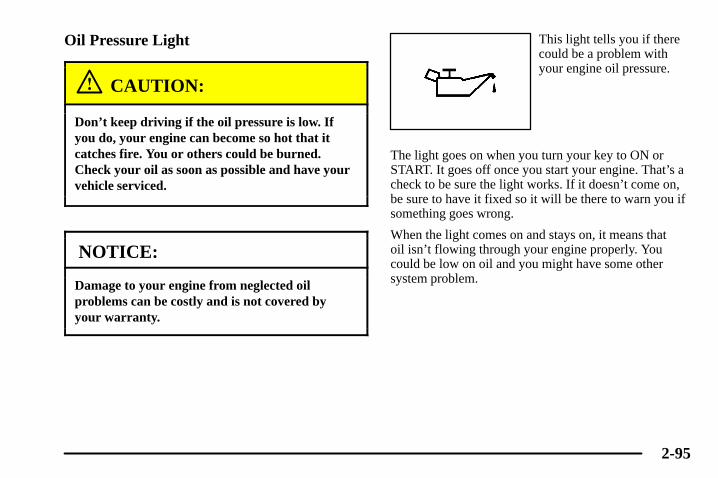
2-95
Oil Pressure Light
CAUTION:
Don’t keep driving if the oil pressure is low. Ifyou do, your engine can become so hot that itcatches fire. You or others could be burned.Check your oil as soon as possible and have yourvehicle serviced.
NOTICE:
Damage to your engine from neglected oilproblems can be costly and is not covered by your warranty.
This light tells you if therecould be a problem withyour engine oil pressure.
The light goes on when you turn your key to ON orSTART. It goes off once you start your engine. That’s acheck to be sure the light works. If it doesn’t come on,be sure to have it fixed so it will be there to warn you ifsomething goes wrong.
When the light comes on and stays on, it means that oil isn’t flowing through your engine properly. Youcould be low on oil and you might have some othersystem problem.

2-96
Sport Mode Light (If Equipped)
This light will come onwhen the sport mode is in use.
When you turn off the sport mode, the light will go out.If it stays on, your vehicle may need service. See yourdealer. See “Sport Mode” listed previously in thissection for more information.
Winter Driving Mode Light (If Equipped)
This light will come onwhen the winter drivingmode feature is in use.
When you turn off the winter driving mode feature, thelight will go out. If it stays on, your vehicle may needservice. See your dealer. See “Winter Driving Mode”listed previously in this section for more information.
Security Light
For information regardingthis light, see “TheftDeterrent-System” listedpreviously in this section.
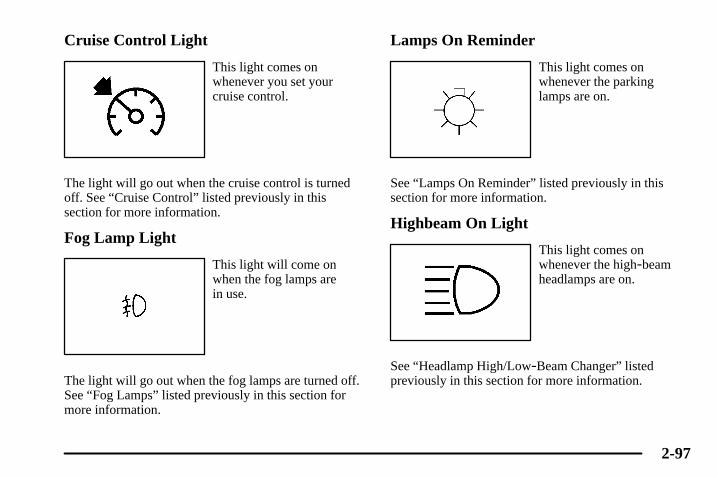
2-97
Cruise Control Light
This light comes onwhenever you set yourcruise control.
The light will go out when the cruise control is turnedoff. See “Cruise Control” listed previously in thissection for more information.
Fog Lamp Light
This light will come onwhen the fog lamps are in use.
The light will go out when the fog lamps are turned off.See “Fog Lamps” listed previously in this section formore information.
Lamps On Reminder
This light comes onwhenever the parking lamps are on.
See “Lamps On Reminder” listed previously in thissection for more information.
Highbeam On Light
This light comes onwhenever the high-beamheadlamps are on.
See “Headlamp High/Low-Beam Changer” listedpreviously in this section for more information.

2-98
Fuel Gage
The fuel gage showsapproximately how muchfuel is in the tank. It worksonly when the ignition is in ON.
If the fuel supply gets low, the Fuel Level Low messagewill appear on the DIC and a single chime will sound.
Here are a few concerns some owners have had aboutthe fuel gage. All of these situations are normal and donot indicate that anything is wrong with the fuel gage:
� At the gas station the gas pump shuts off before thegage reads full.
� The gage may change when you turn, stop quickly oraccelerate quickly.
� It takes a little more or less fuel to fill the tank thanthe gage indicated. For example, the gage may haveindicated that the tank was half full, but it actuallytook a little more or less than half the tank’s capacityto fill the tank.

2-99
Driver Information Center (DIC)The DIC gives you the status of many of your vehicle’ssystems. It is also used to display driver personalizationfeatures and warning/status messages. All messages willappear on the audio system display which is also thedisplay for the optional Navigation system.
System Controls
Base Audio System
If you have the base audio system, use the following tooperate the DIC:
INFO (Information): Use the up or down arrows onthis button to scroll through the system statusinformation.
CLR (Clear): Press this button to clear DIC messagesand to reset DIC items to zero. See “Driver InformationCenter (DIC) Messages” and “Status Menu ItemDescriptions” later in this section for more information.
TUNE/SEL (Select) Knob: Once a menu is displayed,use the knob located to the lower right of the display toscroll through the menu items and/or select them. Toscroll through the menu items, turn the knob. Once anitem is highlighted, press the knob once to select it.
BACK: Press this button to exit a menu.

2-100
Navigation/Audio System
If you have the optional Navigation system, use thefollowing to operate the DIC:
INFO (Information): Use this button to access theVehicle Information menu that provides the status ofvarious vehicle systems. See “Vehicle Info (Information)Menu Navigation System” later in this section for moreinformation.
TUNE/SEL (Select) Knob: See the information listedpreviously on this knob. It is equivalent to theTUNE/SEL knob on the base audio system and islocated in the same place.
�: Press the button with this symbol on it when it isnext to a menu item or a prompt on the right side of thedisplay to select the menu item or acknowledge theprompt. See “Status Menu Item Descriptions” later inthis section for more information.
Status of Vehicle SystemsYou can view the status of several vehicle systems usingthe DIC. Depending upon whether or not your vehiclehas the optional Navigation system, the menu items willvary slightly.

2-101
Vehicle Information Menu (Base Audio System)
To access this menu using the base audio system, pressthe up or down arrow on the INFO button located to theright of the display.
The following items are available:
� BLANK LINE
� OUTSIDE TEMP
� MI TRIP A*
� MI TRIP B*
� FUEL RANGE*
� MPG AVG*
� MPG INST
� GAL FUEL USED*
� AVG MPH*
� TIMER*
� BATTERY VOLTS
� ENGINE OIL LIFE*
� TRANS FLUID LIFE* (Automatic Transmission Only)
*These items can be reset. Each one must be resetindividually. For a detailed description of the menuitems and how to reset them, see “Status Menu ItemDescriptions” later in this section.
You can view any of these items at any time, but onlyone item can be displayed at a time.
2-102
Vehicle Info (Information) Menu (Navigation System)
To access the Vehicle Info menu using the Navigationsystem, press the INFO button to the left of the screen.You can also access this menu through the Setup menu.See “Setup Menu” in the Index of the Navigationsupplement.
The following submenu appears when Vehicle Info is selected:
� Outside Air Temperature
� Trip Odometer A*
� Trip Odometer B*
� Fuel Range
� Average Fuel Economy*
� Instantaneous Fuel Economy
� Fuel Used*
� Average Vehicle Speed*
� Timer*
� Battery Voltage
� Engine Oil Life*
� Transmission Fluid Life* (Automatic Transmission Only)
� Blank Display
*These items can be reset. Each one must be resetindividually. For a detailed description of the menuitems and how to reset them, see “Status Menu ItemDescriptions” following.
You can view any of these submenu items at any time byselecting them using the TUNE/SEL knob. Thecurrently selected item is displayed at the top of thescreen. Only one item can be displayed at a time.

2-103
Status Menu Item Descriptions
The following paragraphs contain a more detaileddescription of each menu item:
BLANK LINE/Blank Display: If you select this item,nothing is displayed at the top of the screen.
OUTSIDE TEMP/Outside Temperature: If you selectthis item, the current outside temperature is displayed atthe top of the screen. It will be in either degreesFahrenheit or degrees Celsius depending upon whetherthe system is set for English or metric units. If you wishto change the units, see “English/Metric Units” in theIndex.
MI TRIP A and B/Trip Odometer A and B: Forinformation on the trip odometers, see “Trip Odometer”listed previously in this section.
MPG AVG/Average Fuel Economy: If you select thisitem, the approximate average miles per gallon (mpg) orkilometers per liter (km/L) is displayed. This number iscalculated based on the number of mpg (km/L) recordedsince the last time this menu item was reset.
To reset the MPG AVG using the base audio system,press the CLR button located in the center of the INFObutton to the right of the screen. The display will returnto zero.
To reset the Average Fuel Economy using theNavigation system, press and hold the multi-functionbutton that corresponds to the Reset prompt in the upperright of the display. The display will return to zero.
MPG INST/Instantaneous Fuel Economy: If youselect this item, the current fuel economy is displayed.This number reflects only the fuel economy that thevehicle has right now and will change frequently asdriving conditions change. Unlike average fueleconomy, this menu item cannot be reset.
GAL FUEL USED/Fuel Used: If you select this item,the number of gallons of fuel used since the last reset ofthis menu item is displayed.
To reset GAL FUEL USED using the base audio system,press the CLR button located in the center of the INFObutton to the right of the screen. The display will returnto zero.
To reset Fuel Used using the Navigation system, pressand hold the multi-function button that corresponds tothe Reset prompt in the upper right of the display. Thedisplay will return to zero.

2-104
MILES RANGE/Fuel Range: If you select this item,the approximate number of remaining miles orkilometers you can drive without refueling is displayed.This estimate is based on the current driving conditionsand will change if the driving conditions change. Forexample, if you are driving in traffic making frequentstops, the display may read one number, but if you enterthe freeway, the number may change even though youstill have the same amount of gas in the gas tank. This isbecause different driving conditions produce differentfuel economies. Generally, freeway driving producesbetter fuel economy than city driving.
If your vehicle is low on fuel, the Low Fuel Levelmessage will be displayed. See “Low Fuel LevelMessage” in the Index for more information.
AVG MPH/Average Vehicle Speed: If you select thisitem, the average speed of the vehicle is displayed inmiles per hour (mph) or kilometers per hour (km/h).This average is calculated based on the various vehiclespeeds recorded since the last reset of this menu item.
To reset AVG MPH using the base audio system, pressthe CLR button located in the center of the INFO buttonto the right of the screen. The display will return to zero.
To reset the Average Vehicle Speed using the Navigationsystem, press and hold the multi-function button thatcorresponds to the Reset prompt in the upper right of thedisplay. The display will return to zero.
TIMER/Timer: If you select this item, a timing featureis displayed. The timer functions like a stopwatch in thatyou can record the time it takes to travel from one pointto another.
To use the timer, you must first turn it on. To turn on thetimer using the base audio system, press the CLR buttonlocated in the center of the INFO button to the right ofthe screen once. To turn on the timer using theNavigation system, press the multi-function button nextto the On/Off menu item in the upper right of thedisplay. The display for both systems will read 00:00:00TIMER ON and begin counting.
Press the button(s) again to turn the timer off. When thetimer is off, the display will show the timer value andTIMER OFF. The timing feature will stop.
To reset the timer using the base audio system, turn offthe timer and then press and hold the CLR button. Thedisplay will return to zero.
To reset the timer using the Navigation system press and holdthe multi-function button next to the Reset prompt in theupper right of the display. The display will return to zero.

2-105
Battery Voltage/BATTERY VOLTS: If you select thisitem, the current battery voltage is displayed. If thevoltage is in the normal range, the display will have OKafter it. For example, the display may read 13.2 BatteryVolts OK.
If there is a problem with the battery charging system,there are four possible DIC messages that may bedisplayed. See “Driver Information Center (DIC)Messages” later in this section for more information.
Engine Oil Life/ENGINE OIL LIFE: If you select this item, the percentage of remaining oil life isdisplayed. If you see 99% Oil Life on the display, thatmeans that 99% of the current oil life remains.
When the oil life is depleted, the Change Engine Oilmessage will appear on the display. You should changethe engine oil as soon as possible within 200 miles. Besure to keep a written record of the mileage and date ofthe oil change so you will have it for future reference.
When you reset the Change Engine Oil message byclearing it from the display, you still must reset theengine oil life monitor separately. For more informationon resetting the engine oil life monitor, see “Oil LifeMonitor, How to Reset” in the Index.
The engine oil life monitor does not check the amountof oil your vehicle has, so you should check the oil levelperiodically. See “Engine Oil” in the Index for moreinformation.
Transmission Fluid Life/TRANS FLUID LIFE(Automatic Transmission Only): If you select thisitem, the percentage of remaining transmission fluid lifeis displayed. If you see 99% Trans Fluid Life on thedisplay, that means that 99% of the current transmissionfluid life remains.
When the transmission fluid life is depleted, the ChangeTransmission Fluid message will appear on the display.You should change the engine oil as soon as possiblewithin 200 miles. Be sure to keep a written record of themileage and date of the oil change so you will have itfor future reference.
When you reset the Change Transmission Fluid messageby clearing it from the display, you still must reset thetransmission fluid life monitor separately. For moreinformation on resetting the engine oil life monitor, see“Transmission Fluid Life Monitor, How to Reset” in the Index.

2-106
DIC MessagesThese messages will appear if there is a problem sensedin one of your vehicle’s systems. The text messages arethe same for both the base audio and Navigation systemsunless otherwise indicated. The symbols, however,appear only on the Navigation system display.
You must acknowledge a message to clear it from thescreen for further use. To clear a message, do one of thefollowing:
� Using the Base audio system, press CLR.
� Using the Navigation system, press themulti-function button next to the OK prompt.
Be sure to take any message that appears on the screenseriously and remember that clearing the message willonly make the message disappear, not the problem.
Battery Not Charging
This symbol appears with the Battery NotCharging message.
When this message appears on the display, there is aproblem with the generator and battery chargingsystems. Have the electrical system checked by yourdealer as soon as possible.

2-107
Battery Saver Active
This symbol appears with the Battery SaverActive message.
This message appears when the system detects that thebattery voltage is dropping beyond a reasonable level.The battery saver system will start reducing certainfeatures of the vehicle that you may not be able tonotice. At the point that the features are disabled, thismessage is displayed. It means that the vehicle is tryingto save the charge in the battery.
Turn off all unnecessary accessories to allow the batteryto recharge.
The normal battery voltage range is 11.5 to 15.5 volts.You can monitor battery voltage on the DIC by pressingthe INFO button until you find BATTERY VOLTS (base audio system) or by selecting Battery Voltage from the Vehicle Info menu (Navigation system).
Battery Voltage High
This symbol appears with the Battery VoltageHigh message.
This message indicates that the electrical chargingsystem is overcharging the battery. When the systemdetects that the battery voltage is above approximately16 volts, this message will be displayed.
To reduce the charging overload, use the vehicle’saccessories. Turn on the exterior lamps and radio, set theclimate control on AUTO and the fan speed on thehighest setting, and turn the rear window defogger on.
The normal battery voltage range is 11.5 to 15.5 voltswhen the engine is running. You can monitor batteryvoltage on the DIC by pressing the INFO button untilyou find BATTERY VOLTS (base audio system) or byselecting Battery Voltage from the Vehicle Info menu(Navigation system).

2-108
Battery Voltage Low
This symbol appears with the Battery VoltageLow message.
This message will appear when the electrical system is charging less than 10 volts or if the battery has been drained.
If this message appears immediately after starting, it ispossible that the generator can still recharge the battery.The battery should recharge while driving but may takea few hours to do so. Consider using an auxiliarycharger (be sure to follow the manufacturer’sinstructions) to boost the battery after returning home orto a final destination.
If this message appears while driving or after startingyour vehicle and stays on, have it checked immediatelyto determine the cause of this problem.
To help the generator recharge the battery quickly, youcan reduce the load on the electrical system by turningoff the accessories.
The normal battery voltage range is 11.5 to 15.5 volts.You can monitor battery voltage on the DIC by pressingthe INFO button until you find BATTERY VOLTS (base audio system) or by selecting Battery Voltage from the Vehicle Info menu (Navigation system).
Change Engine Oil
This symbol appears with the Change Engine Oil message.
This message indicates that the life of the engine oil hasexpired and it should be changed within 200 miles. See“Engine Oil” in the Index for more information.
When you reset the Change Engine Oil message byclearing it from the display, you still must reset theengine oil life monitor separately. For more informationon resetting the engine oil life monitor, see “Oil LifeMonitor, How to Reset” in the Index.

2-109
Change Trans (Transmission) Fluid
This symbol appears with the Change Trans Fluid message.
This message indicates that the life of the transmissionfluid has expired and it should be changed within200 miles. See “Maintenance Schedule” and“Recommended Fluids and Lubricants” in the Index for the proper fluid and change intervals.
When you reset the Change Trans Fluid message byclearing it from the display, you still must reset thetransmission fluid life monitor separately. For moreinformation on resetting the transmission fluid lifemonitor, see “Transmission Fluid Life Monitor, How toReset” in the Index.
Check Brake Fluid
This symbol appears with the Check Brake Fluid message.
This message will display if the ignition is in ON toinform the driver that the brake fluid level is low. Havethe brake system serviced by a technician as soon aspossible. See “Brake System Warning Light” in the Index.

2-110
Check Coolant Level
This symbol appears with the Check CoolantLevel message.
This message will appear when there is a low level ofengine coolant. Have the cooling system serviced by atechnician as soon as possible. See “Engine Coolant” inthe Index for more information.
Check Gas Cap
This symbol appears with the Check Gas Cap message.
When this message appears on the display, the gas caphas not been fully tightened. You should recheck the gascap to ensure that it’s on and tightened properly.
Check Washer Fluid
This symbol appears with the Check WasherFluid message.
When this message appears on the display, it means thatyour vehicle is low on windshield washer fluid. Youshould refill the tank as soon as possible. See“Windshield Washer Fluid” in the Index for moreinformation.
Driver Door Ajar
This symbol appears with the Driver Door Ajar message.
When this message appears on the display, it means thatthe driver’s door was not closed completely. You shouldmake sure that the driver’s door is closed completely.

2-111
Engine Coolant Hot -- Idle Engine
This symbol appears with the Engine CoolantHot -- Idle Engine message.
This message will appear when the engine coolanttemperature is too hot. Stop and allow the vehicle to idleuntil it cools down.
NOTICE:
If the Engine Coolant Hot -- Idle Engine messageappears on the DIC display, stop the vehicle assoon as possible. Do not increase the engine speedabove normal idling speed. Severe engine damagecan result from driving a vehicle with anoverheated engine. See “Engine Overheating” inthe Index for more information.
Engine Coolant Hot -- AC (Air Conditioning) Off
This symbol appears with the Engine Hot -- ACOff message.
This message displays when the engine coolant becomeshotter than the normal operating temperature. To avoidadded strain on a hot engine, the air conditioningcompressor is automatically turned off. When thecoolant temperature returns to normal, the airconditioning compressor will turn back on. You cancontinue to drive your vehicle.
If this message continues to appear, have the systemrepaired as soon as possible to avoid compressordamage.

2-112
Engine Overheated -- Stop Engine
This symbol appears with the Engine Overheated -- Stop Engine message.
This message will appear when the engine hasoverheated. Stop the vehicle and turn the engine offimmediately to avoid severe engine damage. See“Engine Overheating” in the Index. A chime will alsosound when this message is displayed.
NOTICE:
Severe engine damage can result from driving avehicle with an overheated engine. See “EngineOverheating” in the Index for more information.
Engine Power Reduced
This symbol appears with the Engine PowerReduced message.
This message informs you that the vehicle is reducingengine power because the transmission is being placedin gear under conditions that may cause damage to thevehicle’s engine or transmission. This also can affect thevehicle’s ability to accelerate.

2-113
Fuel Level Low
This symbol appears with the Fuel Level Low message.
When this message appears on the display, it means thatyour vehicle is low on fuel. You should refill the tank assoon as possible. A single chime will sound when thismessage is displayed.
Headlamps Suggested
This symbol appears with the HeadlampsSuggested message.
This message will appear when the amount of availablelight outside the vehicle is low and the exterior lampcontrol is off. This message informs the driver thatturning on the exterior lamps is recommended eventhough the DRL are still illuminated and it has becomedark enough outside to require the headlamps and/orother exterior lamps.
This message will also appear when the windshieldwipers have been on for more than six seconds and the exterior lamp control is off or in the parking lamp position.

2-114
Ice Possible
This symbol appears withthe Ice Possible message.
This message appears when the outside temperature iscold enough to create icy road conditions.
Left Rear Door Ajar
This symbol appears with the Left Rear DoorAjar message.
When this message appears on the display, it means thatthe driver’s side rear door was not closed completely.You should make sure that the door is closed completely.
Oil Pressure Low -- Stop Engine
This symbol appears with the Oil Pressure Low -- Stop Enginemessage. A multiple chimewill sound when thismessage is displayed.
NOTICE:
If the Oil Pressure Low -- Stop Engine messageappears on the display, stop the vehicleimmediately. Do not drive the vehicle until thecause of the low oil pressure is corrected. Severeengine damage can result from driving a vehiclewith low oil pressure. See “Engine Oil” in theIndex for more information.

2-115
Passenger Door Ajar
This symbol appears with the Passenger DoorAjar message.
When this message appears on the display, it means that the passenger’s side front door was not closedcompletely. You should make sure that the door is closed completely.
Personalization Off/Driver Identification (Navigation System Only)
This symbol appears with the Personalization Off message.
When this message appears, the personalization featurespreviously stored are turned off. If you want yourcustomized settings to be automatically recalled whenyou use the remote keyless entry transmitter or whenyou remove the key from the ignition, you must enablethem in the DIC. See “Vehicle Programming andPersonalization Features” later in this section for moreinformation.
This message is also used to identify the driver (1, 2 or 3) on the Navigation system.

2-116
Right Rear Door Ajar
This symbol appears with the Right Rear DoorAjar message.
When this message appears on the display, the right reardoor it means that the passenger’s side rear door was notclosed completely. You should check to make sure thatthe door is closed completely.
Service AC (Air Conditioning) System
This symbol appears with the Service AC System message.
This message appears when the electronic sensors thatcontrol the air conditioning and heating systems are nolonger working. Have the climate control systemserviced if you notice a drop in heating and airconditioning efficiency.

2-117
Service Air Bag
This symbol appears with the Service Air Bag message.
There is a problem with the air bag system when thismessage appears. Have your vehicle serviced by aqualified technician at your dealership immediately. See “Air Bag Readiness Light” in the Index for moreinformation.
Service Charging System
This symbol appears withthe Service ChargingSystem message.
This message will display when a problem with thecharging system has been detected. Have your vehicleserviced at your dealership.
Service Electrical System
This symbol appears withthe Service ElectricalSystem message.
This message will display if an electrical problem hasoccurred within the Powertrain Control Module (PCM)or the ignition switch. Have your vehicle serviced byyour dealership.
Service Fuel System
This symbol appears with the Service FuelSystem message.
The Powertrain Control Module (PCM) has detected aproblem within the fuel system when this messageappears. Have your vehicle serviced by your dealership.

2-118
Service Idle Control
This symbol appears with the Service IdleControl message.
A problem with the idle control has occurred when thismessage displays. Have your vehicle serviced by yourdealership.
Service Stability Sys Message
This symbol appears with the Service StabilitySystem message.
Your vehicle may be equipped with a vehicle stabilityenhancement system called Stabilitrak.
See “Stabilitrak” in the Index. The Service Stability Sysmessage will be displayed if there has been a problemdetected with Stabilitrak (if equipped).
If the Service Stability Sys message comes on while youare driving, pull off the road as soon as possible and stopcarefully. Try resetting the system by turning theignition off then back on. If the Service Stability Sysmessage still stays on or comes back on again while youare driving, your vehicle needs service. Have theStabilitrak system inspected as soon as possible.

2-119
Stability Sys Engaged Message
This symbol appears withthe Stability SystemEngaged message.
The Stability Sys Engaged message will be displayedany time Stabilitrak (if equipped) is actively assistingyou with directional control of the vehicle. Slippery roadconditions may exist when this message is displayed, soadjust your driving accordingly. This message may stayon for a few seconds after Stabilitrak stops assisting youwith directional control of the vehicle.
Stability Sys Off Message
This symbol appears with the Stability System Off message.
The Stability Sys Off message will be displayed anytime you turn off Stabilitrak (if equipped) using theTraction On/Off button. When this message has beendisplayed, Stabilitrak is no longer available to assist youwith directional control of the vehicle. Adjust yourdriving accordingly.

2-120
Stability Sys Ready Message
This symbol appears with the Stability SystemReady message.
The Stability Sys Ready message will be displayed anytime you turn back on Stabilitrak (if equipped) using theTraction On/Off button. When this message has beendisplayed, Stabilitrak is ready to assist you withdirectional control of the vehicle if needed.
Service Steering System
This symbol appears with the Service SteeringSystem message.
Your vehicle may be equipped with a speed variableassist steering system. See “Speed Variable AssistSteering” in the Index.
The Service Steering System message will be displayedif a problem is detected with the speed variable assiststeering system. When this message is displayed, youmay notice that the effort required to steer the vehicleincreases or feels “heavier,” but you will still be able tosteer the vehicle.

2-121
Service Suspension System
This symbol appears withthe Service SuspensionSystem message.
This message is displayed to indicate that the suspensionsystem is not operating properly. Have your vehicleserviced at your dealership.
Service Theft System
This symbol appears with the Service TheftSystem message.
This message means there is a problem with theImmobilizer. A fault has been detected in the systemwhich means that the system is disabled and is notprotecting the vehicle. The vehicle usually restarts,however, you may want to take your vehicle to yourdealer before turning off the engine.

2-122
Service Transmission
This symbol appears with the ServiceTransmission message.
There is a problem with the transmission of yourvehicle. Have your vehicle serviced at your dealership.
Service Vehicle Soon
This symbol appears with the Service VehicleSoon message.
This message is displayed when a non-emissions relatedpowertrain malfunction occurs. Have your vehicleserviced at your dealership as soon as possible.
Starting Disabled -- Remove Key
This symbol appears with the Starting Disabled -- Remove Key message.
This message will appear when the vehicletheft-deterrent system detects that an improper ignitionkey is being used to try to start the vehicle. Check theignition key for damage. If it is damaged, it may need tobe replaced. If it is not damaged, remove the key and tryto start the vehicle again. If it still does not start, tryanother ignition key or have your vehicle serviced atyour dealership.

2-123
Starting Disabled -- Throttle Problem
This symbol appears with the Starting Disabled -- ThrottleProblem message.
This message appears when your vehicle’s throttlesystem is not functioning properly. Have your vehicleserviced at your dealership.
Theft Attempted
This symbol appears with the Theft Attempted message.
This message is displayed if the content theft-deterrentsystem has detected a break-in attempt while you wereaway from your vehicle.
Top Speed -- Fuel Cut Off
This symbol appears withthe Top Speed -- Fuel CutOff message.
This message will appear when the Engine ControlModule (ECM) detects that the maximum speed foryour vehicle has been reached. Your vehicle’s top speedis based on the top speed rating of the tires. This ensuresthat your vehicle stays in a safe operating range for the tires.

2-124
Traction Engaged
This symbol appears with the Traction Engaged message.
This message will appear when the traction controlsystem is actively limiting wheel spin. Slippery roadconditions may exist if this message is displayed, soadjust your driving accordingly. The message will stayon for a few seconds after the traction control systemstops limiting wheel spin. See “Traction ControlSystem” in the Index for more information.
Traction Suspended
This symbol appears with the Traction Suspended message.
This message will appear when the traction controlsystem has been temporarily shut off because yourvehicle’s brakes have overheated. This message does notindicate a problem with your vehicle’s traction controlsystem. See “Traction Control System” in the Index formore information.

2-125
Trans (Transmission) Hot -- Idle Engine
This symbol appears with the Trans Hot --IdleEngine message.
This message indicates that the transmission fluid inyour vehicle is too hot. Stop the vehicle and allow it toidle until the transmission cools down or until thismessage is removed.
Trunk Open
This symbol appears withthe Trunk Open message.
When this message appears on the display, it means thatthe trunk lid of your vehicle was not closed completely.You should make sure that the trunk lid is closedcompletely.
Turn Signal On
This symbol appears with the Turn Signal On message.
If you drive your vehicle for more than approximately1 mile (1.6 km) with a turn signal on, this message will appear as a reminder to turn off the turn signal. A multiple chime will sound when this message isdisplayed.

2-126
Accessing the DIC Main Menu (Base Audio System)There are two different procedures for accessing theDIC main menu depending upon whether or not yourvehicle has the optional Navigation system.
To access the main menu of the DIC, do one of thefollowing:
� Using the base audio system, press the TUNE/SELknob once. Turn the knob clockwise orcounterclockwise to scroll through the menu items.
� Refer to the Navigation Supplement supplied withyour vehicle for more information on the accessingDIC main menu and descriptions of the menu itemsfor the Navigation system.
DIC Main MenuThe DIC main menu for the base audio system consistsof the following menu items:
� BASS - MID - TREBLE
� EQ
� DSP
� AVC
� H/A
� AUTO STORE
� PTY
� TA
� RDS MSG
� AF
� SEEK LOCAL/DISTANT
� ENGLISH UNITS/METRIC UNITS
� TCS
� SET CLOCK
� SETUP
2-127
DIC Main Menu Item Descriptions (Base Audio System)
The following descriptions are for the base audiosystem. For information pertaining to the Navigationaudio system, see “Audio System” in the Index of theNavigation Supplement supplied with your vehicle.
BASS - MID (Midrange) - TREBLE: This menu item allows you to adjust the levels for the bass,midrange, treble, balance, and fader features of theaudio system. For more information, see “AudioSystems” in the Index.
EQ (Equalizer): This menu item allows you tochoose among five preset equalizations for the audiosystem. See “Equalizer” in the Index for moreinformation.
DSP (Digital Signal Processing): This menu itemallows you to select the DSP type that you want on theaudio system. You may choose Normal, Talk, Spacious,Rear Seat or Driver Seat. Press the TUNE/SEL knob toscroll through these choices. Once the desired choice isdisplayed, turn the knob to set your DSP choice andcontinue scrolling through the main menu.
See “DSP” in the Index for more information.
AVC (Automatic Volume Compensation): This menuitem allows you to turn the AVC feature on and off.Press the TUNE/SEL knob once to turn AVC on and off.When AVC is on, an X will be in the box next to AVCon the menu. The X disappears when AVC is off.
See “AVC” in the Index for more information.
H/A (Home/Away Preset Stations): This menu itemallows you to switch back and forth between your homeand away preset radio stations. Press the TUNE/SELknob to switch between home and away.
See “Home and Away Preset Stations” in the Index formore information.
AUTOSTORE: This menu item allows you toautomatically store radio stations with the strongestsignals as presets. See “Audio Systems” in the Index formore information.
PTY (Program-Type Mode): This menu item allowsyou to select radio stations based on presetprogram-types. To turn the PTY feature on, press theTUNE/SEL knob once. When PTY is on, an X will be inthe box next to PTY on the menu. The X disappearswhen PTY is off.
See “Audio Systems” in the Index for more information.

2-128
TA (Traffic Announcement): This menu item allowsyou to turn the TA feature on and off. To turn the TAfeature on, press the TUNE/SEL knob once. When TA is on, an X will be in the box next to TA on the menu.The X disappears when TA is off.
See “RDS Messages” in the Index for more information.
RDS (Radio Data System) MSG (Message): Thismenu item allows you to view an RDS radio stationmessage broadcast by a radio station. To view themessage, press the TUNE/SEL knob once. The messagewill appear on the screen.
See “RDS Messages” in the Index for more information.
AF (Alternate Frequency): This menu item allows youto turn the AF feature on and off. To turn on AF, pressthe TUNE/SEL knob once. When AF is on, an X will bein the box next to TA on the menu. The X disappearswhen AF is off.
See “Using RDS” in the Index for more information.
SEEK LOCAL/DISTANT: This feature instructs theaudio system to seek only local radio stations with thestrongest signal or to seek all radio stations with a strongsignal in a large area. Use LOCAL when you are inurban areas where there are several strong radio stationsignals and you want to limit the number of stations to
those with the strongest signals only. Use DISTANTwhen you are in rural areas where there are fewer radiostation signals available.
To switch between LOCAL and DISTANT, press theTUNE/SEL knob. Your choice will be set when youpress BACK and return to the main menu.
English/Metric Units
Use this menu item to adjustthe measurement units.
You can choose between ENGLISH UNITS andMETRIC UNITS. To switch between the two, press theTUNE/SEL knob. Once your choice is displayed, turnthe knob to set your choice and continue scrollingthrough the main menu.
The measurement units that you choose will be reflectedon all the vehicle system displays, not just the DICinformation. For example, the climate control panel willdisplay degrees Celsius if you choose METRIC UNITS.

2-129
TCS (Traction Control System): You can enable or disable the traction control system using this menuitem. Press the TUNE/SEL knob to switch between onand off.
You can also turn the traction control system off usingthe traction control button located in the glove box or by programming one of the steering wheel controls (1, 2, 3 or 4) or audio system softkeys to enable/disablethe TCS. See “Reconfigurable Steering Wheel Controls”and “Configurable Radio Display Keys” in the Index formore information.
When you disable the traction control system, theTraction Suspended message will appear on the DIC andthe traction control system warning light on theinstrument panel cluster will come on. See “DriverInformation (DIC) Messages” and “Traction ControlSystem Warning Light” listed previously in this sectionfor more information.
SET CLOCK
Use this menu item to set the time on the vehicle’s clock.
See “Setting the Clock” in the Index for moreinformation.
SETUP: When you select this menu item, the followingsubmenu is available:
� Personalization
� Configure Display Keys
� Configure SWC (Steering Wheel Control) Keys
� Clear Tape Hours
You can use the items on this submenu to customizeyour vehicle’s audio system and optional memoryfeatures. See “Vehicle Programming and PersonalizationFeatures,” “Reconfigurable Steering Wheel Controls”and “Care of Your Cassette Tape Player” in the Index formore information on these menu items.

2-130
Vehicle Programming andPersonalization FeaturesYour vehicle is equipped with personalization thatallows you to program certain features to a preferredsetting for up to two people. The number ofprogrammable features varies depending upon whichmodel of the vehicle is purchased.
On all vehicles, features such as climate control settings,radio preset settings, exterior lighting at unlock, remotelock and unlock confirmation, and automatic door lockshave already been programmed for your convenience.
Some vehicles are equipped with additional features thatcan be programmed including the seat and outsiderearview mirror position. The optional navigationsystem screen preferences will remain at the last setposition.
If your vehicle is equipped with the ability to programadditional personalization features, the driver’spreferences are recalled by pressing the unlock buttonon the remote keyless entry transmitter, 1 or 2, or by pressing the appropriate memory button, 1 or 2,located on the driver’s door. Certain features can beprogrammed not to recall until the key is placed in theignition. To change feature preferences you must useone of the following procedures.
Entering the Personalization MenuTo enter the feature programming mode, use one of thefollowing procedures:
Base Audio System
1. Turn the ignition to ON, but do not start the engine.Make sure an automatic transmission is in PARK (P)or a manual transmission has the parking brake set.
2. If your vehicle has memory settings, press theappropriate memory button, 1 or 2, located on the driver’sdoor armrest. The DIC display will show either Driver 1or 2 depending on which button was selected.
3. Press the TUNE/SEL knob once to access the mainmenu of the DIC.
4. Turn the TUNE/SEL knob until SETUP is highlighted.
5. Press the TUNE/SEL knob once to access theSETUP menu.
6. Scroll to the feature you want to change, and pressthe TUNE/SEL knob to turn the feature on or off. If the feature is turned on, a check mark will appearnext to the feature name.
If none of the personalization items are turned on,turn on the personalization menu by pressing theTUNE/SEL knob. The list of features will thenappear, and you can repeat Step 6.

2-131
Navigation System
1. Turn the ignition to ON without the engine running.Make sure an automatic transmission is in PARK (P)or a manual transmission has the parking brake set.
2. Turn on the Navigation/audio system by pressing thePWR/VOL knob located to the lower left of thedisplay once.
3. Access the DIC main menu by pressing the MAINbutton located to the lower left of the display.
4. Press the multi-function button next to Feat Prog toaccess the Feature Programming menu.
5. Press the TUNE/SEL knob to turn on thePersonalization features. An X will appear in the boxto the left when Personalization is turned on.
Personalization FeaturesThe following choices are available for programmingusing both the Base audio and Navigation systemsunless otherwise indicated.
Personalization Name
This feature allows you to type in a name that willappear on the DIC display whenever the correspondingremote keyless entry transmitter is used or one of thebuttons on the driver’s door armrest (1 or 2) is pressed.
If a customized name is not programmed, the systemwill show Driver 1 or Driver 2 to correspond with thenumbers on the back of the remote keyless entrytransmitters.
To program a name, use one of the followingprocedures:

2-132
To customize the name using the Base audio system, dothe following:
1. Select the PERSONALIZATION NAME menu itemby pressing the TUNE/SEL knob once.
You will see a cursor on the screen.
2. Turn the TUNE/SEL knob until you reach the firstletter you want to highlight it. There is a completealphabet with both upper and lower case letters andthe numbers zero through nine. Also included arespaces and other non-letter characters such as theampersand (&).
3. Press the TUNE/SEL knob once to select the letter.The letter will then appear on the display.
If you make a mistake, press the Back key. This willexit the menu. You can then go back into the menuand edit the name. You can also press the TUNE/SELknob repeatedly to cycle through all the charactersuntil you reach the character you wish to change.
4. Repeat Steps 2 and 3 until the name you want iscomplete. You can program up to 16 characters.
5. Press the BACK button located to the lower right ofthe display to exit and set your choice or let thescreen time out and return to the main screen.
To customize the name using the Navigation system, dothe following:
1. Press the multi-function button located to the right ofthe display that is next to the EDIT prompt.
This will open the EDIT menu. You will see an alphabetat the bottom of the display and a blank line with ablinking cursor. Also included here are spaces and othernon-letter characters such as the ampersand (&).
2. Scroll to the first letter you want to highlight it.
3. Press the TUNE/SEL knob once to select the letter. The letter will then appear on the line above the alphabet.
4. Repeat Steps 2 and 3 until the name you want iscomplete. You can program up to 26 characters.
If you make a mistake, press the multi-functionbutton located to the right of the display that is nextto the Delete prompt. This will delete the last letteryou typed so you can input a different letter.
5. Press the multi-function button located to the right ofthe display that is next to the Back prompt to exitand set your choice.
The name you selected is now set. You can either exitthe programming mode by following the instructionslater in this section or program the next feature availableon your vehicle.

2-133
Configure Display Keys (Base Audio System Only)
This feature allows you to customize the functions of the four soft keys located to the left and right of theaudio display. Most of the available functions areaudio-system related. See “Audio Systems” in the Index for more information.
Remote Recall Memory/Recall Driving Positions (If Equipped)
This feature recalls any previously programmed seat andmirror controls when the unlock button on the remotekeyless entry transmitter is pressed.
Programmable Modes
Mode 1: ON
Mode 2: OFF
Before your vehicle was shipped from the factory, it wasprogrammed to Mode 2. The mode to which the vehiclewas programmed may have been changed since it leftthe factory. To determine the mode to which the vehicleis programmed or to program the vehicle to a differentmode, use one of the following procedures:
To change the mode using the Base audio system, do thefollowing:
1. Enter the personalization portion of the SETUPmenu following the instructions listed previously.
2. Scroll to REMOTE RECALL MEMORY tohighlight it.
3. Press the TUNE/SEL knob to switch back and forthbetween on and off.
When the mode is turned on, a check mark willappear next to the feature name.
To change the mode using the Navigation system, do thefollowing:
1. Enter the Personalization menu following theinstructions listed previously.
2. Scroll to Remote Keyless Options to highlight it.
3. Press the TUNE/SEL knob to view the modes.
4. Scroll to Recall Driving Positions and press the knobonce to select it.
When the mode is turned on, an X will appear in thebox to the left.
If Remote Exit Recall or Key In Recall Memory were turnedon previously, selecting Remote Recall Memory/RecallDriving Positions will override that choice.
The mode you selected is now set. You can either exitthe programming mode by following the instructionslater in this section or program the next feature availableon your vehicle.

2-134
Remote Exit Recall (If Equipped)
This feature allows any previously programmed exitposition for the driver’s seat to be recalled when theunlock button on the remote keyless entry transmitter ispressed.
Programmable Modes
Mode 1: ON
Mode 2: OFF
Before your vehicle was shipped from the factory, it wasprogrammed to Mode 2. The mode to which the vehiclewas programmed may have been changed since it leftthe factory. To determine the mode to which the vehicleis programmed or to program the vehicle to a differentmode, use one of the following procedures:
To change the mode using the Base audio system, do thefollowing:
1. Enter the personalization portion of the SETUPmenu following the instructions listed previously.
2. Scroll to REMOTE EXIT RECALL to highlight it.
3. Press the TUNE/SEL knob to switch back and forthbetween on and off.
When the mode is turned on, a check mark willappear next to the feature name.
To change the mode using the Navigation system, do thefollowing:
1. Enter the Personalization menu following theinstructions listed previously.
2. Scroll to Remote Keyless Options to highlight it.
3. Press the TUNE/SEL knob to view the modes.
4. Scroll to Remote Exit Recall and press the knob onceto select it.
When the mode is turned on, an X will appear in thebox to the left.
If Remote Recall Memory/Recall Driving Positions wasturned on previously, selecting Remote Exit Recall willoverride that choice.
The mode you selected is now set. You can either exitthe programming mode by following the instructionslater in this section or program the next feature availableon your vehicle.

2-135
Key in Recall Memory (If Equipped)
This feature recalls any previously programmed seat and mirror positions when the key is inserted into theignition.
Programmable Modes
Mode 1: ON
Mode 2: OFF
Before your vehicle was shipped from the factory, it wasprogrammed to Mode 2. The mode to which the vehiclewas programmed may have been changed since it leftthe factory. To determine the mode to which the vehicleis programmed or to program the vehicle to a differentmode, use one of the following procedures:
To change the mode using the Base audio system, do thefollowing:
1. Enter the personalization portion of the SETUPmenu following the instructions listed previously.
2. Scroll to KEY IN RECALL MEMORY to highlight it.
3. Press the TUNE/SEL knob to switch back and forthbetween on and off.
When the mode is turned on, a check mark willappear next to the feature name.
To change the mode using the Navigation system, do thefollowing:
1. Enter the Personalization menu following theinstructions listed previously.
2. Scroll to Remote Keyless Options to highlight it.
3. Press the TUNE/SEL knob to view the modes.
4. Scroll to Key In Recall Memory and press the knobonce to select it.
When the mode is turned on, an X will appear in thebox to the left.
If Remote Recall Memory/Recall Driving Positions wasturned on previously, selecting Key In Recall Memorywill override that choice.
The mode you selected is now set. You can either exitthe programming mode by following the instructionslater in this section or program the next feature availableon your vehicle.

2-136
Auto Exit Seat (If Equipped)
This feature allows any previously programmed exitposition for the driver’s seat to be recalled when the keyis removed from the ignition.
Programmable Modes
Mode 1: ON
Mode 2: OFF
Before your vehicle was shipped from the factory, it wasprogrammed to Mode 2. The mode to which the vehiclewas programmed may have been changed since it leftthe factory. To determine the mode to which the vehicleis programmed or to program the vehicle to a differentmode, use one of the following procedures:
To change the mode using the Base audio system, do thefollowing:
1. Enter the personalization portion of the SETUPmenu following the instructions listed previously.
2. Scroll to AUTO EXIT SEAT using the TUNE/SELknob to highlight it.
3. Press the TUNE/SEL knob to switch back and forthbetween on and off.
When the mode is turned on, an check mark willappear in the box next to the feature name.
To change the mode using the Navigation system, do thefollowing:
1. Enter the Personalization menu following theinstructions listed previously.
2. Scroll to Auto Exit Seat using the TUNE/SEL knobto highlight it.
3. Press the TUNE/SEL knob to switch back and forthbetween on and off.
When the mode is turned on, an X will appear in thebox to the left.
The mode you selected is now set. You can either exitthe programming mode by following the instructionslater in this section or program the next feature availableon your vehicle.

2-137
Twilight Delay
This feature allows you to set the amount of time youwant the exterior lamps to remain on after you exit thevehicle.
Programmable Modes
Mode 1: 0:00 seconds
Mode 2: 0:15 seconds
Mode 3: 0:30 seconds
Mode 4: 1:00 minute
Mode 5: 1:30 minutes
Mode 6: 2:00 minutes
Mode 7: 2:30 minutes
Mode 8: 3:00 minutes
Before your vehicle was shipped from the factory, it wasprogrammed with this feature turned off. This may havebeen changed since the vehicle left the factory. Todetermine the mode to which the vehicle is programmedor to program the vehicle to a different mode, use one ofthe following procedures:
To change the mode using the Base audio system, do thefollowing:
1. Enter the personalization portion of the SETUPmenu following the instructions listed previously.
2. Scroll to TWILIGHT DELAY using the TUNE/SELknob to highlight it.
3. Press the TUNE/SEL knob to turn Twilight Delay onor off. If the feature is turned off, the exterior lampswill not illuminate at all when you exit the vehicle.
Once the feature is turned on, the modes listed abovewill appear on the display, and the currently selectedtime delay will have a check mark next to it.
4. Turn the TUNE/SEL knob until you reach thedesired time delay.
5. Press the TUNE/SEL knob once to select your choice.
When a time is selected, a check mark will appearnext to the time delay you chose. Only one mode can be selected at a time.

2-138
To change the mode using the Navigation system, do thefollowing:
1. Enter the Personalization menu following theinstructions listed previously.
2. Scroll to Twilight Delay using the TUNE/SEL knobto highlight it.
3. Press the TUNE/SEL knob to turn Twilight Delay onor off. If the feature is turned off, the exterior lampswill not illuminate at all when you exit the vehicle.
Once the feature is turned on, the modes listed abovewill appear on the display, and the currently selectedtime delay will have an X in the box to the left.
4. Turn the TUNE/SEL knob until you reach thedesired time delay.
5. Press the TUNE/SEL knob once to select your choice.
When a time is selected, an X will appear next to thetime delay you chose. Only one mode can beselected at a time.
The mode you selected is now set. You can either exitthe programming mode by following the instructionslater in this section or program the next feature availableon your vehicle.
Lights Flash at Unlock
This feature turns on the exterior lamps when the remotekeyless entry transmitter is used to unlock the vehicle.The lamps will remain on for approximately 20 secondsunless a door is opened, the ignition is turned toACCESSORY, ON or START or the remote keylessentry transmitter is used to lock the vehicle.
Programmable Modes
Mode 1: ON
Mode 2: OFF
Before your vehicle was shipped from the factory, it wasprogrammed to Mode 1. The mode to which the vehiclewas programmed may have been changed since it leftthe factory. To determine the mode to which the vehicleis programmed or to program the vehicle to a differentmode, use one of the following procedures:
To change the mode using the Base audio system, do thefollowing:
1. Enter the personalization portion of the SETUPmenu following the instructions listed previously.
2. Scroll to LIGHTS FLASH AT UNLOCK tohighlight it.
2-139
3. Press the TUNE/SEL knob to switch back and forthbetween on and off.
When the mode is turned on, a check mark willappear next to the feature name.
To change the mode using the Navigation system, do thefollowing:
1. Enter the Personalization menu following theinstructions listed previously.
2. Scroll to Remote Keyless Options to highlight it.
3. Press the TUNE/SEL knob to view the modes.
4. Scroll to Lights Flash At Unlock and press the knobonce to select it.
When the mode is turned on, an X will appear in thebox to the left.
The mode you selected is now set. You can either exitthe programming mode by following the instructionslater in this section or program the next feature availableon your vehicle.
Lights Flash at Lock
This feature allows the exterior lamps to flash oncewhen the remote keyless entry transmitter is used to lockthe vehicle. All doors must be closed for this feature towork, and the lamps will not flash if the parking lampsor headlamps are on.
Programmable Modes
Mode 1: ON
Mode 2: OFF
Before your vehicle was shipped from the factory, it wasprogrammed to Mode 1. The mode to which the vehiclewas programmed may have been changed since it leftthe factory. To determine the mode to which the vehicleis programmed or to program the vehicle to a differentmode, use one of the following procedures:
To change the mode using the Base audio system, do thefollowing:
1. Enter the personalization portion of the SETUPmenu following the instructions listed previously.
2. Scroll to LIGHTS FLASH AT LOCK to highlight it.

2-140
3. Press the TUNE/SEL knob to switch back and forthbetween on and off.
When the mode is turned on, a check mark willappear next to the feature name.
To change the mode using the Navigation system, do thefollowing:
1. Enter the Personalization menu following theinstructions listed previously.
2. Scroll to Remote Keyless Options to highlight it.
3. Press the TUNE/SEL knob to view the modes.
4. Scroll to Lights Flash At Lock and press the knobonce to select it.
When the mode is turned on, an X will appear in thebox to the left.
If Horn Sounds At Lock was previously turned on,selecting Lights Flash At Lock will override theprevious choice.
The mode you selected is now set. You can either exitthe programming mode by following the instructionslater in this section or program the next feature availableon your vehicle.
Horn Sounds at Lock
This feature sounds the horn once when the remotekeyless entry transmitter is used to lock the vehicle. All doors must be closed for this feature to work.
Programmable Modes
Mode 1: ON
Mode 2: OFF
Before your vehicle was shipped from the factory, it wasprogrammed to Mode 2. The mode to which the vehiclewas programmed may have been changed since it leftthe factory. To determine the mode to which the vehicleis programmed or to program the vehicle to a differentmode, use one of the following procedures:
To change the mode using the Base audio system, do thefollowing:
1. Enter the personalization portion of the SETUPmenu following the instructions listed previously.
2. Scroll to HORN SOUNDS AT LOCK to highlight it.
3. Press the TUNE/SEL knob to switch back and forthbetween on and off.
When the mode is turned on, a check mark willappear next to the feature name.

2-141
To change the mode using the Navigation system, do thefollowing:
1. Enter the Personalization menu following theinstructions listed previously.
2. Scroll to Remote Keyless Options to highlight it.
3. Press the TUNE/SEL knob to view the modes.
4. Scroll to Horn Sounds At Lock and press the knobonce to select it.
When the mode is turned on, an X will appear in thebox to the left.
If Lights Flash At Lock was previously turned on,selecting Horn Sounds At Lock will override theprevious choice.
The mode you selected is now set. You can either exitthe programming mode by following the instructionslater in this section or program the next feature availableon your vehicle.
Exterior Lights at Unlock
This feature turns on the exterior lamps when the remotekeyless entry transmitter is used to unlock the vehicle.The lamps will remain on for about 20 seconds unless adoor is opened, the ignition is turned to ACCESSORY,ON or START or the remote keyless entry transmitter isused to lock the vehicle.
Programmable Modes
Mode 1: ON
Mode 2: OFF
Before your vehicle was shipped from the factory, it wasprogrammed to Mode 1. The mode to which the vehiclewas programmed may have been changed since it leftthe factory. To determine the mode to which the vehicleis programmed or to program the vehicle to a differentmode, use one of the following procedures:

2-142
To change the mode using the Base audio system, do thefollowing:
1. Enter the personalization portion of the SETUPmenu following the instructions listed previously.
2. Scroll to EXT. LIGHT AT UNLOCK to highlight it.
3. Press the TUNE/SEL knob to switch back and forthbetween on and off.
When the mode is turned on, a check mark willappear next to the feature name.
To change the mode using the Navigation system, do thefollowing:
1. Enter the Personalization menu following theinstructions listed previously.
2. Scroll to Remote Keyless Options to highlight it.
3. Press the TUNE/SEL knob to view the modes.
4. Scroll to Exterior Lights At Unlock and press theknob once to select it.
When the mode is turned on, an X will appear in thebox to the left.
The mode you selected is now set. You can either exitthe programming mode by following the instructionslater in this section or program the next feature availableon your vehicle.
Doors Lock in Gear (Automatic Transmission Only)
With the ignition in ON and all the doors closed, thisfeature allows the vehicle’s doors to automatically lockwhen the driver shifts the transmission out of PARK (P).
Programmable Modes
Mode 1: ON
Mode 2: OFF
Before your vehicle was shipped from the factory, it wasprogrammed to Mode 1. The mode to which the vehiclewas programmed may have been changed since it leftthe factory. To determine the mode to which the vehicleis programmed or to program the vehicle to a differentmode, use one of the following procedures:
To change the mode using the Base audio system, do thefollowing:
1. Enter the personalization portion of the SETUPmenu following the instructions listed previously.
2. Scroll to DOORS LOCK IN GEAR to highlight it.
3. Press the TUNE/SEL knob to switch back and forthbetween on and off.
When the mode is turned on, a check mark willappear next to the feature name.

2-143
To change the mode using the Navigation system, do thefollowing:
1. Enter the Personalization menu following theinstructions listed previously.
2. Scroll to Door Lock Options to highlight it.
3. Press the TUNE/SEL knob to view the modes.
4. Scroll to Doors Lock In Gear and press the knobonce to select it.
When the mode is turned on, an X will appear in thebox to the left.
The mode you selected is now set. You can either exitthe programming mode by following the instructionslater in this section or program the next feature availableon your vehicle.
Automatic Door Lock (Manual Transmission Only)
This feature allows the vehicle’s doors to automaticallylock when the vehicle speed surpasses 5 mph (8 km/h).
Programmable Modes
Mode 1: ON
Mode 2: OFF
Before your vehicle was shipped from the factory, it wasprogrammed to Mode 1. The mode to which the vehiclewas programmed may have been changed since it leftthe factory. To determine the mode to which the vehicleis programmed or to program the vehicle to a differentmode, use one of the following procedures:
To change the mode using the Base audio system, do the following:
1. Enter the personalization portion of the SETUPmenu following the instructions listed previously.
2. Scroll to AUTOMATIC DOOR LOCK to highlight it.
3. Press the TUNE/SEL knob to switch back and forthbetween on and off.
When the mode is turned on, a check mark willappear next to the feature name.

2-144
To change the mode using the Navigation system, do thefollowing:
1. Enter the Personalization menu following theinstructions listed previously.
2. Scroll to Door Lock Options to highlight it.
3. Press the TUNE/SEL knob to view the modes.
4. Scroll to Automatic Door Lock and press the knobonce to select it.
When the mode is turned on, an X will appear in thebox to the left.
The mode you selected is now set. You can either exitthe programming mode by following the instructionslater in this section or program the next feature availableon your vehicle.
Driver Unlock in Park (Automatic Transmission Only)
The feature allows the driver’s door to automaticallyunlock when the transmission is shifted into PARK (P).
Programmable Modes
Mode 1: ON
Mode 2: OFF
Before your vehicle was shipped from the factory, it wasprogrammed to Mode 2. The mode to which the vehiclewas programmed may have been changed since it leftthe factory. To determine the mode to which the vehicleis programmed or to program the vehicle to a differentmode, use one of the following procedures:
To change the mode using the Base audio system, do thefollowing:
1. Enter the personalization portion of the SETUPmenu following the instructions listed previously.
2. Scroll to DRIVER UNLOCK IN PARK to highlight it.
3. Press the TUNE/SEL knob to switch back and forthbetween on and off.
When the mode is turned on, a check mark willappear next to the feature name.

2-145
To change the mode using the Navigation system, do thefollowing:
1. Enter the Personalization menu following theinstructions listed previously.
2. Scroll to Door Lock Options to highlight it.
3. Press the TUNE/SEL knob to view the modes.
4. Scroll to Driver Unlock In Park and press the knobonce to select it.
When the mode is turned on, an X will appear in thebox to the left.
If Driver Unlock Key Out, Doors Unlock Key Out orDoors Unlock in Park were previously turned on,selecting Driver Unlock In Park will override theprevious choice.
The mode you selected is now set. You can either exitthe programming mode by following the instructionslater in this section or program the next feature availableon your vehicle.
Driver Unlock Key Out
The feature allows the driver’s door to automaticallyunlock when the key is removed from the ignition.
Programmable Modes
Mode 1: ON
Mode 2: OFF
Before your vehicle was shipped from the factory, it wasprogrammed with these modes off. The mode to whichthe vehicle was programmed may have been changedsince it left the factory. To determine the mode to whichthe vehicle is programmed or to program the vehicle to adifferent mode, use one of the following procedures:
To change the mode using the Base audio system, do thefollowing:
1. Enter the personalization portion of the SETUPmenu following the instructions listed previously.
2. Scroll to DRIVER UNLOCK KEY OUT.
3. Press the TUNE/SEL knob to switch between on and off.
When the mode is turned on, a check mark willappear next to the feature name.
2-146
To change the mode using the Navigation system, do thefollowing:
1. Enter the Personalization menu following theinstructions listed previously.
2. Scroll to Door Lock Options to highlight it.
3. Press the TUNE/SEL knob to view the modes.
4. Scroll to Driver Unlock Key Out and press the knobonce to select it.
When the mode is turned on, an X will appear in thebox to the left.
If Doors Unlock Key Out or Doors Unlock in Park(automatic transmission only) were previously turnedon, selecting Driver Unlock Key Out will override theprevious choice.
The mode you selected is now set. You can either exitthe programming mode by following the instructionslater in this section or program the next feature availableon your vehicle.
Doors Unlock in Park (Automatic Transmission Only)
The feature allows the doors to automatically unlockwhen the transmission is shifted into PARK (P).
Programmable Modes
Mode 1: ON
Mode 2: OFF
Before your vehicle was shipped from the factory, it wasprogrammed to Mode 2. The mode to which the vehiclewas programmed may have been changed since it leftthe factory. To determine the mode to which the vehicleis programmed or to program the vehicle to a differentmode, use one of the following procedures:
To change the mode using the Base audio system, do thefollowing:
1. Enter the personalization portion of the SETUPmenu following the instructions listed previously.
2. Scroll to DOORS UNLOCK IN PARK to highlight it.
3. Press the TUNE/SEL knob to switch back and forthbetween on and off.
When the mode is turned on, a check mark willappear next to the feature name.

2-147
To change the mode using the Navigation system, do thefollowing:
1. Enter the Personalization menu following theinstructions listed previously.
2. Scroll to Door Lock Options to highlight it.
3. Press the TUNE/SEL knob to view the modes.
4. Scroll to Doors Lock In Park and press the knobonce to select it.
When a mode is turned on, an X will appear in thebox to the left.
If Doors Unlock Key Out, Driver Unlock Key Out orDriver Unlock in Park were previously turned on,selecting Doors Unlock In Park will override theprevious choice.
The mode you selected is now set. You can either exitthe programming mode by following the instructionslater in this section or program the next feature availableon your vehicle.
Doors Unlock Key Out
This feature allows the vehicle’s doors to automaticallyunlock when the key is removed from the ignition.
This feature is not available if Driver Unlock Key Outor Doors Unlock in Park (automatic transmission only)is turned on.
Programmable Modes
Mode 1: ON
Mode 2: OFF
Before your vehicle was shipped from the factory, it wasprogrammed to Mode 2. The mode to which the vehiclewas programmed may have been changed since it leftthe factory. To determine the mode to which the vehicleis programmed or to program the vehicle to a differentmode, use one of the following procedures:
To change the mode using the Base audio system, do the following:
1. Enter the personalization portion of the SETUPmenu following the instructions listed previously.
2. Scroll to DOORS UNLOCK KEY OUT.
3. Press the TUNE/SEL knob to switch between on and off.
When the mode is turned on, a check mark willappear next to the feature name.

2-148
To change the mode using the Navigation system, do thefollowing:
1. Enter the Personalization menu following theinstructions listed previously.
2. Scroll to Door Lock Options to highlight it.
3. Press the TUNE/SEL knob to view the modes.
4. Scroll to Doors Unlock Key Out and press the knobonce to select it.
When a mode is turned on, an X will appear in thebox to the left.
If Driver Unlock Key Out or Doors Unlock in Park(automatic transmission only) were previously turnedon, selecting Doors Unlock Key Out will override theprevious choice.
The mode you selected is now set. You can either exitthe programming mode by following the instructionslater in this section or program the next feature availableon your vehicle.
Delayed Locking
This feature delays the locking of the vehicle’s doors for up tofive seconds after a power door lock switch or the lock buttonon the remote keyless entry transmitter is pressed. Thefive second delay occurs after the last door is closed.
Programmable Modes
Mode 1: ON
Mode 2: OFF
Before your vehicle was shipped from the factory, it wasprogrammed to Mode 1. The mode to which the vehiclewas programmed may have been changed since it leftthe factory. To determine the mode to which the vehicleis programmed or to program the vehicle to a differentmode, use one of the following procedures:
To change the mode using the Base audio system, do thefollowing:
1. Enter the personalization portion of the SETUPmenu following the instructions listed previously.
2. Scroll to DELAYED LOCKING using theTUNE/SEL knob to highlight it.
3. Press the TUNE/SEL knob to switch back and forthbetween on and off.
When the mode is turned on, a check mark willappear next to the feature name.

2-149
To change the mode using the Navigation system, do thefollowing:
1. Enter the Personalization menu following theinstructions listed previously.
2. Scroll to Delayed Locking using the TUNE/SELknob to highlight it.
3. Press the TUNE/SEL knob to switch back and forthbetween on and off.
When the mode is turned on, an X will appear in thebox to the left.
The mode you selected is now set. You can either exitthe programming mode by following the instructionslater in this section or program the next feature availableon your vehicle.
Lock Passenger Window
This feature allows you to disable either all thepassenger window switches or the rear passengerwindow switches only. If this feature is turned on, allpassenger window switches will be disabled when thewindow lockout button is pressed. If the feature is off,only the rear passenger window switches will bedisabled. See “Power Windows” in the Index for more information.
Programmable Modes
Mode 1: ON
Mode 2: OFF
Before your vehicle was shipped from the factory, it wasprogrammed to Mode 2. The mode to which the vehiclewas programmed may have been changed since it leftthe factory. To determine the mode to which the vehicleis programmed or to program the vehicle to a differentmode, use one of the following procedures:
To change the mode using the Base audio system, do thefollowing:
1. Enter the personalization portion of the SETUPmenu following the instructions listed previously.
2. Scroll to LOCK PASS WINDOW using theTUNE/SEL knob to highlight it.
3. Press the TUNE/SEL knob to switch back and forthbetween on and off.
When the mode is turned on, a check mark willappear next to the feature name.

2-150
To change the mode using the Navigation system, do thefollowing:
1. Enter the Personalization menu following theinstructions listed previously.
2. Scroll to Lock Passenger Window using theTUNE/SEL knob to highlight it.
3. Press the TUNE/SEL knob to switch back and forthbetween on and off.
When the mode is turned on, an X will appear in thebox to the left.
The mode you selected is now set. You can either exitthe programming mode by following the instructionslater in this section or program the next feature availableon your vehicle.
Mirror to Curb in Reverse (If Equipped)
This feature will move the passenger’s outside rearviewmirror to a curb view position when the shift lever isshifted into REVERSE (R), and it will return the mirrorto the last known driving position when the shift lever ismoved out of REVERSE (R). See “Curb View AssistMirror” in the Index for more information.
Programmable Modes
Mode 1: ON
Mode 2: OFF
Before your vehicle was shipped from the factory, it wasprogrammed to Mode 2. The mode to which the vehiclewas programmed may have been changed since it leftthe factory. To determine the mode to which the vehicleis programmed or to program the vehicle to a differentmode, use one of the following procedures:
To change the mode using the Base audio system, do thefollowing:
1. Enter the personalization portion of the SETUPmenu following the instructions listed previously.
2. Scroll to MIRROR TO CURB IN REV using theTUNE/SEL knob to highlight it.
3. Press the TUNE/SEL knob to switch back and forthbetween on and off.
When the mode is turned on, a check mark willappear next to the feature name.

2-151
To change the mode using the Navigation system, do thefollowing:
1. Enter the Personalization menu following theinstructions listed previously.
2. Scroll to Mirror to Curb in Reverse using theTUNE/SEL knob to highlight it.
3. Press the TUNE/SEL knob to switch back and forthbetween on and off.
When the mode is turned on, an X will appear in thebox to the left.
The mode you selected is now set. You can either exitthe programming mode by following the instructionslater in this section or program the next feature availableon your vehicle.
Enhanced Chime Volume
This feature allows you to adjust the volume level of thevehicle’s warning chimes. The chime volume cannot beturned off, only adjusted.
Programmable Modes
Mode 1: ON
Mode 2: OFF
Before your vehicle was shipped from the factory, it wasprogrammed to Mode 1. The mode to which the vehiclewas programmed may have been changed since it leftthe factory. To determine the mode to which the vehicleis programmed or to program the vehicle to a differentmode, use one of the following procedures:
To change the mode using the Base audio system, do thefollowing:
1. Enter the personalization portion of the SETUPmenu following the instructions listed previously.
2. Scroll to ENHANCED CHIME VOLUME using theTUNE/SEL knob to highlight it.
3. Press the TUNE/SEL knob to switch back and forthbetween the normal and loud settings.
You will hear a chime as an example of the volumelevel chosen.

2-152
To change the mode using the Navigation system, do thefollowing:
1. Enter the Personalization menu following theinstructions listed previously.
2. Scroll to Enhanced Chime Volume using theTUNE/SEL knob to highlight it.
3. Press the TUNE/SEL knob to switch back and forthbetween the normal and loud settings.
You will hear a chime as an example of the volumelevel chosen.
The mode you selected is now set. You can either exitthe programming mode by following the instructionslater in this section or program the next feature availableon your vehicle.
Exiting the Personalization MenuTo exit the personalization portion of the SETUP menuusing the Base audio system, press the BACK key onceyou’ve finished making your selections. You will returnto the main audio screen.
To exit Feature Programming using the Navigationsystem, press the multi-function button next to the Backprompt once you’ve finished making your selections.You will return to the Main Menu.

2-153
Navigation (Option)
Navigation Display Controls
The display screen is located in the center on theinstrument panel.
Your vehicle may have a turn by turn navigationguidance system that includes a CD ROM map mediacovering nine regional areas throughout the contiguousUnited States and Canada. In addition, the systemincludes intersection and freeway entrances, routeplanning, a programmable address book, points ofinterest, a list of restaurants, emergency phone numbers,and a list of hotels and motels for all of the major citieson the regional CDs. The navigation system can alsocommunicate with the Radio Data System (RDS) toreceive broadcast announcements on traffic, weatherinformation and emergency alert communications. Formore information on how to use this system, see theCTS Entertainment and Navigation System Supplement.

3-3-1
Section 3 Comfort Controls and Audio Systems
In this section, you’ll find out how to operate the comfort control and audio systems offered with your vehicle. Be sure to read about the particular systems supplied with your vehicle.
3-2 Comfort Controls3-2 Climate Control System3-6 Air Conditioning3-6 Defogging and Defrosting3-6 Rear Window Defogger3-7 Ventilation System3-9 Climate Control Steering Wheel Controls3-9 Audio Systems3-10 Setting the Clock3-10 AM-FM Radio with Cassette Tape and
Compact Disc Player with Radio DataSystems (RDS) and Digital Signal Processing (DSP)
3-27 Navigation/Radio System (Option)3-27 Theft-Deterrent Feature3-28 Audio Steering Wheel Controls3-29 Understanding Radio Reception3-30 Tips About Your Audio System3-31 Care of Your Cassette Tape Player3-32 Care of Your Compact Discs3-32 Care of Your Compact Disc Player3-33 Diversity Antenna System

3-2
Comfort ControlsThis section tells you how to make your air system workfor you.
Manual operation of the system is described first,followed by automatic operation. See “AutomaticOperation” later in this section for more information.
Climate Control System
Manual Operation
To turn the system on, press the PWR button located onthe driver’s side of the climate control panel.
∨ ∧ (Mode): This switch selects the direction ofthe airflow through the vehicle. Press the up or downarrow to scroll through the available modes. The symbolfor the current mode will be displayed on the climatecontrol panel.
Regardless of the mode selected, there will be some airflowing to the outboard outlets unless you close theoutlet. See “Ventilation System” later in this section formore information.
The following modes can be selected:
� (Vent): This setting directs the airflow throughthe instrument panel outlets.
� (Bi-Level): This setting directs airflow intoyour vehicle in two ways. Cooler air is directed tothe upper portion of your body through theinstrument panel outlets while warmer air is directedto the floor ducts.

3-3
� (Floor/Defrost): This setting directs airflow tothe floor ducts and toward the windshield, with someair diverted toward the outboard outlets to defog theside windows.
� (Floor): This setting directs airflow through the floor ducts. Some air is diverted to the windshield and outboard outlets to minimize fogging.
∨ ∧ (Fan): This switch adjusts the fan speed.Press the up or down arrow to increase or decrease thefan speed.
(Recirculation): Press this button to limit theamount of outside air entering your vehicle. This ishelpful when you are trying to cool the air quickly orlimit odors entering your vehicle. Press this button againto turn off the recirculation feature. If you notice thewindows fogging, turn off the recirculation feature.Recirculation is not available in the defrost mode andwill automatically turn off after 10 minutes iffloor/defrost mode is selected.
(Defrost): Press this button to quickly remove fog or frost from the windshield. This setting sends most of the airflow to the windshield with a smallamount diverted to the outboard outlets to minimizefogging. The air conditioning compressor may operatein this mode.
A/C OFF (Air Conditioning Off): Press this button to turn off the air conditioning compressor. AC OFF willappear on the display. Press the button again to turn thecompressor back on. When the compressor is on, thesystem will cool and dehumidify the air inside thevehicle. The compressor cannot be turned off in defrost mode.
(Driver’s Temperature Switch): This switch is usedto adjust the air temperature for the driver’s side of thevehicle. To adjust the temperature, press the up or downarrow located on the PWR button. The temperature willincrease or decrease with each press of an arrow.
The driver’s set temperature is always displayed whenthe climate control system is on regardless of whether ornot the system is in AUTO. See “Automatic Operation”later in this section for more information on the AUTO button.

3-4
(Passenger’s Temperature Switch): This switch isused to increase or decrease the temperature of the airfor the passengers independent of the driver’s setting.
To turn the system on, press the PWR button located on the passenger’s side of the climate control panel. To adjust the temperature, press the up or down arrowon the PWR button. The temperature will increase ordecrease with each press of an arrow.
If the passenger’s temperature switch is off, the driver’stemperature switch controls the temperature for theentire vehicle.
The passenger’s side temperature is only displayedwhen the passenger’s side temperature switch is on.
Automatic Operation
AUTO (Automatic Climate Control): This button isused to select the automatic operation of the climatecontrol system. When the automatic operation is active,AUTO will appear next to the fan and mode settings onthe display.
There are three sensors in the climate control system.One monitors the sun’s solar radiation, another monitorstemperature of the air inside the vehicle, and a thirdmonitors the temperature outside the vehicle. Theclimate control system will vary the fan speed, airdelivery mode and use of the air conditioningcompressor to maintain the set temperature based on theinformation received from these sensors. See “Driver’sTemperature Switch” and “Passenger’s TemperatureSwitch” listed previously for more information onsetting a temperature.
To find your comfort zone, start with the 75�F (24�C)setting and allow approximately 10 to 30 minutes for thesystem to regulate. Adjust the temperature if necessary.If you choose either the lowest temperature setting,60�F (16�C), or the highest temperature setting, 90�F (32�C), the system will not cool or heat any faster, but the system will stay at that setting withoutregulating fan speed.
To avoid blowing cold air in cold weather, the systemwill start at lower fan speeds until warm air is available.The length of reduction depends on the outside airtemperature, engine coolant temperature or the timesince the engine was last started. As the engine coolantwarms up, the fan speed will gradually increase.

3-5
Interior Temperature Sensor
This sensor monitors the interiortemperature of thevehicle. It is located tothe right of thesteering wheel on theinstrument panel.
While the climate control system is in AUTO, thesystem uses both the interior temperature sensor and theelectronic solar sensor to automatically adjust thetemperature and airflow in the vehicle. See “ElectronicSolar Sensor” following for more information. Be surenot to cover the sensor with anything. If you do, theautomatic climate control system will not work properly.
Electronic Solar Sensor
This sensor monitors the sun’s solar radiation. It is locatedon top of the instrument panel near the windshield.
While the climate control system is in AUTO, the systemuses the information collected by the electronic solarsensor to automatically adjust the temperature and airflowto maintain your comfort. The climate control system maysupply cooler air to one side of your vehicle, if that side isfacing the sun. Be sure not to cover the sensor on top ofthe instrument panel. If you do, the automatic climatecontrol system will not work properly.

3-6
Air ConditioningOn hot days, open the windows long enough to let hotinside air escape. This reduces the time it takes for yourvehicle to cool down. Then keep your windows closedfor the air conditioner to work its best.
While the system is in AUTO, it will use recirculation as necessary to cool the air.
Defogging and DefrostingWhen the mode switch is set for floor/defrost or thedefrost button is pressed, outside air will be selectedautomatically. This helps clear the windshield morequickly. Adjust the temperature and set the fan speed tothe highest setting. When the windshield is clear, adjustthe fan speed for maximum defrosting to a lower settingor return to AUTO mode.
Recirculation is not available in the defrost mode, andthe air conditioning compressor cannot be turned off inthis mode.
For maximum side window defogging, turn the outboardoutlet thumbwheels to the side window defogger setting.See “Ventilation System” later in this section for moreinformation on the outlet settings.
Rear Window DefoggerWhen the rear window defogger is turned on, the rearwindow and both outside rearview mirrors are heated toremove fog from the surface of the glass.
The rear window defoggerbutton is located on theclimate control panel to theright of the defrost button.
Press the button to turn on the rear defogger. Press thebutton again to turn the system off.
The system will automatically shut off after 10 minutesunless your vehicle is traveling more than 30 mph (48 km/h). If further defogging is desired once thesystem is off, press the button again. The system willautomatically shut off after five minutes for any cyclesafter the initial activation.

3-7
Using the rear window defogger will not cancelautomatic climate control operation.
NOTICE:
Don’t use a razor blade or something else sharpon the inside of the rear window. If you do, youcould cut or damage the warming grid or theintegrated rear window antenna, and the repairswouldn’t be covered by your warranty.
Do not attach a temporary vehicle license, tape or decalsacross the defogger grid on the rear window.
Ventilation System
There are five instrument panel outlets, three in thecenter and one at each end. The outlets located at eachend of the instrument panel have a feature that the centerair outlets do not. These outlets will have air flowing tothem in all modes, including defrost, when the climatecontrol system is on.

3-8
You can adjust the directionof airflow by moving theknobs in the center of theoutlets and by turning thethumbwheel at the bottomof the outlets. You maychoose from the following positions:
(Side Window Defogger): Turn the thumbwheel to this symbol on the outboard outlets to use the sidewindow defogger feature. The air coming through theoutlets will be directed toward the side windows toprevent fogging.
(Open): Turn the thumbwheel to this symbol toopen the outlets completely and allow the maximumamount of air to enter the vehicle. A small amount of air will still be directed to the side window defogger setting.
(Closed): Turn the thumbwheel to this symbol toclose the outlets and minimize the amount of airentering the vehicle.
Ventilation Tips
� Keep the hood at the base of the windshield andfront air inlet free of ice, snow or any otherobstruction (such as leaves). The heater and defrosterwill work far better, reducing the chance of foggingthe inside of your windows.
� When you enter a vehicle in cold weather, select thehighest fan setting for a few moments before drivingoff. This helps clear the intake ducts of snow andmoisture, and reduces the chance of fogging theinside of your windows.
� Keep the air path under the front seats clear ofobjects. This helps air to circulate throughout your vehicle.

3-9
Climate Control Steering Wheel ControlsThere are four controls that can be programmed for usewith the climate control system.
The controls are located on the left spoke of thesteering wheel.
See “Reconfigurable Steering Wheel Controls” in the Index for more information on programming these controls.
Audio SystemsYour audio system has been designed to operate easilyand to give years of listening pleasure. You will get themost enjoyment out of it if you acquaint yourself with itfirst. Find out what your audio system can do and howto operate all of its controls to be sure you’re getting themost out of the advanced engineering that went into it.
Your vehicle has a feature called Retained AccessoryPower (RAP). With RAP, you can play your audiosystem even after the ignition is turned off. See“Retained Accessory Power” in the Index.

3-10
Setting the Clock1. Press the TUNE/SEL knob to enter the main menu.
2. Turn the TUNE/SEL knob until SET CLOCK is displayed.
3. Press the TUNE/SEL knob to select SET CLOCK.
4. Turn the TUNE/SEL knob to adjust the time setting.
5. Press the TUNE/SEL knob to update the time.VEHICLE TIME UPDATED will appear on thedisplay. The time on the analog clock, located in theinstrument panel cluster, will adjust.
The time of an FM station broadcasting Radio DataSystem (RDS) information will update the analog clock automatically.
AM-FM Radio with Cassette Tape andCompact Disc Player with Radio DataSystems (RDS) and Digital SignalProcessing (DSP)
Six-Disc CD Player Audio SystemShown - Single CD Player Similar

3-11
Playing the Radio
PWR (Power): Press this knob to turn the system onand off.
VOL (Volume): Turn this knob to increase or todecrease the volume.
AVC (Automatic Volume Compensation): With AVC,your audio system monitors the noise in the vehicle.AVC will adjust the volume level so that it alwayssounds the same to you. To turn AVC on and off,perform the following steps:
1. Press the TUNE/SEL knob to enter the main menu.
2. Turn the TUNE/SEL knob until AUTO VOLUMECOMP. appears on the display.
3. Press the TUNE/SEL knob to turn AVC on or off. An X will appear in the box when AVC isselected on.
4. Press the BACK button to exit the display. To returnto the original display repeatedly press the BACKbutton or wait for the display to time out.
SOURCE: Press this button to select a source, eitherradio, cassette tape or compact disc. The cassette tape orcompact disc must be loaded to select the source and toplay. Available loaded sources are shown on the displayas a disc or a cassette tape symbol. If none of the audiosources are loaded the display will not change from theradio source.
Finding a Station
BAND: Press this button to select AM, FM1 or FM2.The display will show your selection.
� SEEK �: Press the up or the down arrow to seek to the next or to the previous station and stay there.SEEK will appear on the display. The sound will mutewhile seeking.
The radio will seek only to stations that are in theselected band and only to those with a strong signal.

3-12
� SCAN: Press the SCAN button to enter scan mode.SCAN will appear on the display. Press the up arrow toscan to the next station. The radio will go to a station,play for 5 seconds, then go on to the next station. Press this button again to stop scanning.
To scan preset stations, press and hold SCAN for morethan two seconds until you hear a beep and PSCANappears on the display. The radio will go to the firstpreset station stored on your pushbuttons, play for5 seconds, then go on to the next preset station. Press SCAN again to stop scanning presets.
The radio will scan only to stations that are in theselected band and only to those with a strong signal.
LOCAL/DISTANCE Selection: With this feature youcan set the radio to search for local stations or stationsthat are further away for a larger selection. To set thisfeature to LOCAL or DISTANCE, perform thefollowing steps:
1. Press the TUNE/SEL knob to enter the main menu.
2. Turn the TUNE/SEL knob until SEEK LOCAL orSEEK DISTANCE appears on the display.
3. Press the TUNE/SEL knob to select either LOCALor DISTANCE.
4. Press the BACK button to exit the display. To returnto the original display repeatedly press the BACKbutton or wait for the display to time out.
To search for stations, press the SEEK up or downarrows. If the system is set to LOCAL, SEEK willappear in the display. If the system is set to DISTANCE,D-SEEK will appear in the display. The radio will seekto stations with a strong signal only.

3-13
Setting Preset Stations
The six numbered pushbuttons (F1 through F6) let you return to your favorite stations. You can set up to18 stations (six AM, six FM1 and six FM2). You can set your preset stations manually or automatically andpresets for home and away.
To set your preset stations manually, perform thefollowing steps:
1. Turn the radio on.
2. Press BAND to select AM, FM1 or FM2.
3. Tune in the desired station.
4. Press and hold one of the six numbered pushbuttonsfor two seconds until you hear a beep. The set presetstation number will appear on the display above thepushbutton that it is set to. Whenever you press thatnumbered pushbutton for less than two seconds, thestation you set will return.
5. Repeat the steps for each pushbutton.
To set your preset stations with an equalizationsetting, DSP setting, or a PTY setting, see each ofthese features later in this section. When a presetstation is selected, once one of these additionalsettings is selected, the preset station will remembereach setting and it will remain active, until thesetting is selected off for that preset station.
AUTOSTORE PRESETS: To set your preset stationsautomatically, perform the following steps:
1. Turn the radio on.
2. Press BAND to select AM, FM1 or FM2.
3. Press the TUNE/SEL knob to enter the main menu.
4. Turn the TUNE/SEL knob until AUTOSTOREPRESETS appears on the display.
5. Press the TUNE/SEL knob again to select.AUTOSTORE will appear on the display. The radiowill automatically search the band and select andstore the six radio stations with the strongest signal.The stations will be stored by signal strength, notsequential order. The set preset station number willappear on the display above the pushbutton that it isset to. Whenever you press that numberedpushbutton for less than two seconds, the station thatis set will return.
6. Press the BACK button to exit the display. To returnto the original display repeatedly press the BACKbutton or wait for the display to time out.
When battery power is removed and later applied, youwill not have to reset your radio presets because theyremain in the radios memory.

3-14
PRESETS HOME/AWAY: This feature gives you theability to store two different kinds of station presets.HOME can be used for stations available where you liveand AWAY can be for stations available outside of yourlocal broadcasting area. To set preset stations for homeand away perform the following steps:
1. Press the TUNE/SEL knob to enter the main menu.
2. Turn the TUNE/SEL knob until PRESETSHOME/AWAY appears on the display.
3. Press the TUNE/SEL knob to select your choice.HOME or AWAY will appear on the display.
4. Press the BACK button to exit the display. To returnto the original display repeatedly press the BACKbutton or wait for the display to time out.
Follow the manual or automatic steps previously listedfor setting your preset pushbuttons for both home and away.
Setting the Tone (Bass/Treble)
To adjust the bass, midrange, and treble, perform thefollowing steps:
1. Press the TUNE/SEL knob to enter the main menu.
2. Turn the TUNE/SEL knob until BASS -MID -TREBLE appears on the display.
3. Press the TUNE/SEL knob to enter into the tone settings.
4. Press the TUNE/SEL knob to scroll through the settings.
5. Turn the TUNE/SEL knob to increase or to decreasethe bass, midrange or treble. If a station is weak ornoisy you may want to decrease the treble.
6. Press the TUNE/SEL knob to set your adjustment.
7. Press the BACK button to exit the display. To returnto the original display repeatedly press the BACKbutton or wait for the display to time out.

3-15
AUDIO EQUALIZER: This feature allows you tochoose bass, midrange and treble equalization settings.To choose a equalization setting (EQ0 through EQ5),perform the following steps:
1. Press the TUNE/SEL knob to enter the main menu.
2. Turn the TUNE/SEL knob until EQUALIZERappears on the display.
3. Press the TUNE/SEL knob to set your equalizationsetting. The equalization setting will appear on the display.
4. Press the BACK button to exit the display. To returnto the original display repeatedly press the BACKbutton or wait for the display to time out.
The equalization settings are preset to EQ0 (Normal),EQ1 (Pop), EQ2 (Rock), EQ3 (Jazz), EQ4 (Talk), andEQ5 (Country).
Adjusting the Speakers (Balance/Fade)
To adjust the balance or fade, perform the following steps:
1. Press the TUNE/SEL knob to enter the main menu.
2. Turn the TUNE/SEL knob until BASS -MID -TREBLE appears on the display.
3. Press the TUNE/SEL knob to enter into the tone settings.
4. Press the TUNE/SEL knob to scroll to BALANCEor FADER.
5. Turn the TUNE/SEL knob to adjust the BALANCEto the right or the left speakers and the FADER to thefront or the rear speakers.
6. Press the TUNE/SEL knob to set your adjustment.
7. Press the BACK button to exit the display. To returnto the original display repeatedly press the BACKbutton or wait for the display to time out.

3-16
Using DSP
This feature is used to provide a choice of five differentlistening experiences: DSP normal, talk, spacious, rearseat and driver seat. DSP can be used while listening tothe radio, the cassette tape player or the CD player. Theradio keeps separate DSP settings for each band, presetand source. To select a DSP choice, perform thefollowing steps:
1. Press the TUNE/SEL knob to enter the main menu.
2. Turn the TUNE/SEL knob until one of the fivesettings appears on the display.
3. Press the TUNE/SEL knob to select a DSP setting.
4. Press the BACK button to exit the display. To returnto the original display repeatedly press the BACKbutton or wait for the display to time out.
DSP NORMAL: This setting enhances the stereoeffects. DSP NORMAL will not be displayed when inthis mode.
TALK: This setting should be used when listening tonon-musical material such as news, talk shows, sportsbroadcasts and books on tape. TALK makes spokenwords sound very clear.
SPACIOUS: This setting is used to make the listeningspace seem larger.
REAR SEAT: This setting adjusts the audio to give therear seat passenger(s) the best possible sound qualities.Sound quality for the front seat passengers may bedifferent when this setting is used..
DRIVER SEAT: This setting adjusts the audio to givethe driver the best possible sound qualities. Soundquality for the rear seat passengers may be differentwhen this setting is used.
OFF: When DSP is OFF, the system will provide thebest overall audio performance.

3-17
Using RDS
Your audio system is equipped with Radio Data Systems(RDS). RDS features are available for use only on FMstations that broadcast RDS information. Using thissystem, the radio can:
1. receive announcements concerning local andnational emergencies,
2. seek to stations with traffic announcements,
3. display messages from radio stations and
4. search for a stronger station when a station is tooweak for listening.
If you are tuned to a station broadcasting RDSinformation, the station’s call letters and programservice name will replace the station’s frequency on thedisplay. The program type and program type name maybe the same or different. If the radio is tuned to a stationthat is not broadcasting RDS information, the station’sfrequency will remain on the display. With RDS theradio can search for a stronger station in the networkwhen a station gets too weak for listening if alternatefrequency is on.
RDS Messages
ALERT: Alert warns of local and national emergencies.When an alert announcement comes on the current radiostation or a related network station, ALERT will appearon the display. You will hear the announcement, even ifthe volume is muted or a cassette tape or compact disc isplaying. If the cassette tape or compact disc player wasbeing used, the tape or compact disc will stay in theplayer and resume play at the point where it stoppedwhen the announcement has ended. You will not be ableto turn off alert announcements. If the radio tunes to arelated network station for the announcement, it willreturn to the original station when the announcement is finished.
The radio uses TA volume for alert announcements. To increase or to decrease volume, turn the VOL knob.The volume can not be turned completely down or off.

3-18
TA (Traffic Announcement): This feature allows theradio to receive traffic announcements even with thevolume muted, or when a CD or cassette tape is playing.
When TA is on, the radio will search for another stationwith TA if the current station is not TA capable. Duringthe search, TA will flash on the display. Once a TAstation is found, TA will appear on the display and thetraffic announcement will be played. If no stationbroadcasting traffic announcements is found, No Trafficwill appear on the display.
While a traffic announcement plays, the radio uses aspecial type of volume called TA volume. To increase orto decrease TA volume, turn the volume knob. TAvolume can not be turned completely down or off. Toturn off TA volume and stop TA announcements, youmust turn TA off.
When a traffic announcement comes on the current radiostation or a related network station, you will hear it,even if the volume is muted or a cassette tape orcompact disc is playing. If the radio tunes to a relatednetwork station for a traffic announcement, it will returnto the original station when the announcement isfinished. If the cassette tape or compact disc player wasbeing used, the tape or compact disc will stay in theplayer and resume play at the point where it stopped.
To turn TA on or off, perform the following steps:
1. Press the TUNE/SEL knob to enter the main menu.
2. Turn the TUNE/SEL knob until TRAFFICANNOUNCE appears on the display.
3. Press the TUNE/SEL knob to select ON or OFF. An X will appear in the box when TA is selected on.
4. Press the BACK button to exit the display. To returnto the original display keep pressing the BACKbutton or wait for the display to time out.
MSG (Message): If the current RDS station has amessage, MSG will appear on the display. If the wholemessage does not appear on the display, parts of themessage will appear every three seconds until themessage is completed. Once the complete message hasbeen displayed, MSG will disappear from the displayuntil another new MSG is received.
If you would like to display the message, perform thefollowing steps:
1. Press the TUNE/SEL knob to enter the main menu.
2. Turn the TUNE/SEL knob until RECALL RDSMESSAGE appears on the display.
3. Press the TUNE/SEL knob. The last messagedisplayed will be displayed again.

3-19
Activating PTY Stations
Program type (PTY) allows you to search for stationswith specific types of music. The selectable PTYs arePOP, EASY, TALK, CNTRY (Country), CLASS(Classical), and JAZZ.
To activate program types, perform the following steps:
1. Press the TUNE/SEL knob to enter the main menu.
2. Turn the TUNE/SEL knob until PROGRAM TYPEMODE appears on the display.
3. Press the TUNE/SEL knob to select ON or OFF. AnX will appear in the box when PTY is selected on.
4. Press the BACK button to exit the display. To returnto the original display repeatedly press the BACKbutton or wait for the display to time out.
Once program type is activated the PTYs will appear onthe display above the pushbuttons, in place of the presetstations (if programmed). Press the pushbutton for thePTY that you would like to listen to. Not all stationssupport PTYs and pressing the pushbutton may not takeyou to all of the stations with that music type.
AF (Alternate Frequency): Alternate frequency allowsthe radio to switch to a stronger station with the sameprogram type.
To turn AF on or off, perform the following steps:
1. Press the TUNE/SEL knob to enter the main menu.
2. Turn the TUNE/SEL knob until ALTERNATEFREQ. appears on the display.
3. Press the TUNE/SEL knob to select AF OFF, AF ONor AF REG. An X will appear in the box when AF isselected on.
4. Press the BACK button to exit the display. To returnto the original display repeatedly press the BACKbutton or wait for the display to time out.
Radio Message
LOCKED: This message is displayed when theTHEFTLOCK� system has been activated. You mustreturn to the dealership for service.

3-20
Playing a Cassette Tape
With the radio on, insert a cassette tape. The tape willbegin playing as soon as it is inserted. When one side ofyour cassette tape is done playing, auto reverse plays theother side of your cassette tape. A cassette tape may beloaded with the radio off but it will not start playinguntil the radio is on.
While the tape is playing, use the volume knob and setthe tone and DSP just as you do for the radio. Othercontrols may have different functions when a tape isinserted. The display will show a tape symbol. TAPEPLAY will appear on the display while a tape is playing, with an arrow to indicate which side of the tape is playing.
If an error appears on the display, see “Cassette TapeMessages” later in this section.
When a tape is inserted the tape functions will appear onthe display above the pushbuttons, in place of the presetstations (if programmed). The following explains whateach pushbutton and the SEEK and SCAN buttons willperform while a tape is playing:
F1 PREV (Previous): Your tape must have at leastthree seconds of silence between each selection forprevious to work. Press this pushbutton to seek to theprevious selection on the tape.
F2 NEXT: Your tape must have at least three seconds ofsilence between each selection for next to work. Pressthis pushbutton to seek to the next selection on the tape.
REV � (Rewind): Press this pushbutton to rewind thetape rapidly. The radio will play while the tape rewinds.Press this pushbutton again to return to playing speed.
FWD � (Fast Forward): Press this pushbutton to fastforward to another part of the tape. The radio will playwhile the tape advances. Press this pushbutton again toreturn to playing speed.
F5 A-B (Side): Press this pushbutton to play the otherside of the tape.
� SEEK �: Your tape must have at least three secondsof silence between each selection for the SEEK arrowsto work. Press the up or the down arrow to seek to thenext or to the previous selection on the tape.
� SCAN: Press this button to listen to selections for a few seconds. The tape will go to a selection, play for10 seconds, then go on to the next selection. Press thisbutton again to stop scanning.
(Eject): Press this button, located to the right of thecassette tape slot to stop a tape when it is playing or toeject a tape when it is not playing. Eject may beactivated with the radio off and/or the ignition off.

3-21
Cassette Tape Messages
If an error occurs while trying to play a cassette tape, itcould be that one of the following has occurred:
� The cassette tape is tight and the cassette playercannot turn the hubs of the tape. Hold the cassettetape with the open end down and try turning the righthub counterclockwise with a pencil. Flip the tapeover and repeat. If the hubs do not turn easily, yourcassette tape may be damaged and should not beused in the player. Try a new tape to be sure yourplayer is working properly.
� The cassette tape is broken. Check to see if your tapeis broken. Try a new tape.
CLEAN TAPE: If this message appears on the display,the cassette tape player needs to be cleaned. It will stillplay tapes, but you should clean it as soon as possible toprevent damage to the tapes and player. See “Care ofYour Cassette Tape Player” in the Index.
If any error occurs repeatedly or if an error can’t becorrected, contact your dealer.
Your cassette tape player automatically reducesbackground noise. Dolby Noise Reduction ismanufactured under a license from Dolby LaboratoriesLicensing Corporation. Dolby and the double-D symbolare trademarks of Dolby Laboratories LicensingCorporation.
Auto CrO2 allows the cassette tape player to adjust tothe type of cassette tape for clearer sound for CrO2cassette tapes.
Using the Single Compact Disc Player
Insert a disc partway into the slot, label side up. Theplayer will pull it in. If the ignition and the radio are onthe disc will begin playing. The display will show a CDsymbol. CD and the track number will appear on thedisplay when a CD is playing. A compact disc may beloaded with the radio off but it will not start playinguntil the radio is on.
The integral CD player can play the smaller 8 cmcompact discs with a 12 cm adapter. Full-size compactdiscs and the smaller compact discs (with the 12 cmadapter) are loaded in the same manner. See you dealerfor more information about the 12 cm adapter for using8 cm discs.

3-22
If an error appears on the display, see “Compact DiscMessages” later in this section.
When a CD is inserted the CD functions will appear onthe display above the pushbuttons, in place of the presetstations (if programmed). The following explains whateach pushbutton and the SEEK and SCAN buttons willperform when a CD is playing:
F1 PREV (Previous): Press this pushbutton to seek tothe previous track on the compact disc. Press and holdthis pushbutton to reverse the compact disc. Release it toreturn to playing speed.
F2 NEXT: Press this pushbutton to seek to the nexttrack on the compact disc. Press and hold thispushbutton to fast forward to another part of thecompact disc. Release it to return to playing speed.
F3 RDM (Random): Press this pushbutton to listen tothe tracks in random, rather than sequential, order.RANDOM will appear on the display. Press thispushbutton to turn off random play. RANDOM willdisappear from the display.
F4 RPT (Repeat): Press this pushbutton to listen to the track that you are currently listening to again.REPEAT will appear on the display. Press thispushbutton again to turn off repeat play. REPEAT will disappear from the display.
F6 DISP (Display): Press this pushbutton to display thetime of the track. Press this pushbutton again to removethe time of the track from the display.
� SEEK �: Press the up or the down arrow to seek tothe next or to the previous track on the CD.
� SCAN: Press this button to listen to each track for10 seconds. The compact disc will go to a track, play for10 seconds, then go on to the next track. Press thisbutton again to stop scanning.
(Eject): Press this button, located to the right of theCD slot, to stop a CD when it is playing or to eject a CDwhen it is not playing. Eject may be activated with theradio off and/or the ignition off.
Using the Six-Disc Compact Disc Changer
The integral CD player can play the smaller 8 cm compactdiscs with a 12 cm adapter. Full-size compact discs andthe smaller compact discs (with the 12 cm adapter) areloaded in the same manner. See you dealer for moreinformation about the 12 cm adapter for using 8 cm discs.
If an error appears on the display, see “Compact DiscMessages” later in this section.
When a CD is inserted the CD functions will appear onthe display above the pushbuttons, in place of the presetstations (if programmed).

3-23
LOAD: Press the LOAD button to load CDs into thecompact disc player. This compact disc player will holdup to six discs.
To insert one disc, do the following:
1. The ignition and the radio can be on or off.
2. Press and release the LOAD button. Please Wait willappear on the display.
3. Load the disc, when the display reads INSERT.Insert a disc partway into the slot, label side up. The player will pull the disc in.
When a disc is inserted, the CD symbol, the number ofthe CD and the track number will be displayed if theradio is on.
If the radio is on, the disc will begin to playautomatically.
To insert multiple discs, do the following:
1. The ignition and the radio can be on or off.
2. Press and hold the LOAD button for two seconds.You will hear a beep and the display will read Please Wait.
3. Once the display reads INSERT, load a disc. Insert adisc partway into the slot, label side up. The playerwill pull the disc in.
Do not load a CD until the display reads INSERT.The disc player will take up to six discs. Do not tryto load more than six. If you want to load less thansix discs, load the desired amount. The disc playerwill time out when it does not receive any more discsand the last disc loaded will begin to play.
If the radio is on, the last disc loaded will begin to playautomatically.
The following explains what each pushbutton and theSEEK and SCAN buttons will perform when a CD is playing:
F1 DISC � (Down): Press this pushbutton to seek to theprevious compact disc.
F2 DISC � (Up): Press this pushbutton to seek to thenext compact disc.
CD REV � (Reverse): Press this pushbutton to seek tothe previous track on the compact disc. Press and holdthis pushbutton to reverse the compact disc. Release it toreturn to playing speed.

3-24
CD FWD � (Forward): Press this pushbutton to seekto the next track on the compact disc. Press and hold thispushbutton to fast forward to another part of thecompact disc. Release it to return to playing speed.
F5 MODE: Press this pushbutton to select fromNORMAL, RPT TRCK (Repeat Track), RPT DISC(Repeat Disc), RDM TRK (Random Track), and RDMALL (Random All Discs).
� NORMAL: Sets the system for normal play of thecompact disc(s). NORMAL will not be displayedwhen in this mode.
� RPT TRCK (Repeat Track): Repeats the track thatyou are currently listening to again. RPT TRCK willappear on the display. Press the MODE pushbuttonagain to turn off repeat play. RPT TRCK willdisappear from the display.
� RPT DISC (Repeat Disc): Repeats the disc that youare currently listening to again. RPT DISC willappear on the display. Press the MODE pushbuttonagain to turn off repeat play. RPT DISC willdisappear from the display.
� RDM TRK (Random Track): Plays the tracks onthe current disc in random, rather than sequential,order. RDM TRK will appear on the display. Pressthe MODE pushbutton again to turn off random play.RDM TRK will disappear from the display.
� RDM ALL (Random All Discs): Plays all of the discsloaded and tracks in random, rather than sequential,order. RDM ALL will appear on the display. Press theMODE pushbutton again to turn off random play. RDMALL will disappear from the display.
F6 DISP (Display): Press this pushbutton to display thetime of the track. Press this pushbutton again to displayCD PLAY and press this pushbutton once more to clearthe display.
� SEEK �: Press the up or the down arrow to seek tothe next or to the previous track on the CD.
� SCAN: Press this button to listen to each track for10 seconds. The compact disc will go to a track, play for10 seconds, then go on to the next track. Press thisbutton again to stop scanning.
(Eject): Press and release this button, located to theright of the CD slot, to eject the CD that is currentlyplaying, or press and hold this button (you will hear abeep) to eject all of the CDs loaded. Eject may beactivated with the radio off and/or the ignition off.

3-25
Compact Disc Messages
If the disc comes out, it could be for one of thefollowing reasons:
� If you’re driving on a very rough road. When theroad becomes smooth the disc should play.
� If it’s very hot. When the temperature returns tonormal, the disc should play.
� The disc is dirty, scratched, wet or upside down.
� The air is very humid. If so, wait about an hour andtry again.
If the CD is not playing correctly, for any other reason,try a known good CD.
If any error occurs repeatedly or if an error can’t becorrected, contact your dealer.
Configurable Radio Display Keys
This feature allows you to customize the four keys thatare located on each side of the radio display to make iteasier to adjust the radio features. The following are thefeatures that can be programmed:
� Digital Signal Processing (DSP) (Bose system only),
� Automatic Volume Control (AVC) (Bose system only),
� Home or Away presets,
� Autostore presets,
� Equalization settings,
� Local/Distance Selection,
� Program Type (PTY),
� Traffic Announcements,
� Alternate frequency, and
� RDS Messages
To learn more about these features, see each one previously.

3-26
To program the configurable radio display keys, performthe following steps:
1. Press the TUNE/SEL knob to enter the main menu.
2. Turn the TUNE/SEL knob until SETUP is displayed.
3. Press the TUNE/SEL knob to enter into SETUP.
4. Turn the TUNE/SEL knob until CONFIGUREDISPLAY KEYS is displayed.
5. Press the TUNE/SEL knob to enter intoCONFIGURE DISPLAY KEYS.
6. Turn the TUNE/SEL knob to select which of thefour configurable keys you would like to change.The currently assigned feature will be shown.
7. Press the TUNE/SEL knob to select the configurablekey to change.
8. Turn the TUNE/SEL knob to find the feature thatyou would like to store to the key.
9. Press the TUNE/SEL knob when you have found thefeature to be stored. The display will update, byshowing the symbol of the feature that you selectednext to the configurable key.
10. Repeat the previous steps for each configurable key.
Once a feature is programmed to a key, the feature willnot appear on the display when programming theremaining configurable keys. The configurable keys canbe changed at any time.

3-27
Navigation/Radio System (Option)
Navigation/Radio Display and Controls
The display screen is located in the center of theinstrument panel.
Your vehicle may be equipped with an AM-FM radionavigation radio system that includes digital soundprocessing (DSP), Radio Data System (RDS) withprogram type selections (PTY) that will seek out thekind of music you want to listen to. The radio systemcan also communicate with your navigation system tobroadcast announcements on traffic, weather andemergency alert communications. For information onhow to use this system, see the “Navigation/RadioSystem” supplement.
Theft-Deterrent FeatureTHEFTLOCK� is designed to discourage theft of yourradio. Your vehicle has a “built-in” theft-deterrentfeature on each radio that is automatic -- there is noprogramming required. The radio in your vehicle cannotbe used in any other vehicle. When the radio wasoriginally installed in your vehicle at the factory, itstored the Vehicle Identification Number (VIN). Eachtime the ignition is turned on, the VIN is verified. If thevehicle’s VIN does not match the VIN stored in theradio, THEFTLOCK will be activated and the audiosystem will not play. If the radio is removed from yourvehicle, the original VIN in the radio can be used totrace the radio back to your vehicle.

3-28
Audio Steering Wheel ControlsSome audio controls can be adjusted at the steeringwheel. They include the following:
Volume: Turning the knob increases anddecreases volume.
(Band/Source): Press this button to select AM,FM1, FM2 or a source, either radio, cassette tape or CD.The cassette or CD must be loaded to play. Availableloaded sources are shown on the display as a tape or aCD symbol. (For vehicles with the six-disc changerradio - If none of the audio sources are loaded, and thisbutton is pressed, NO SOURCE LOADED will appearon the display.)
(Mute): Press this button to silence the system.Press it again to turn on the sound. If your vehicle hasthe Navigation system, this button does not have a mute function.
See “ReconfigurableSteering Wheel Controls(SWC)” in the Index formore information on this feature.

3-29
Understanding Radio Reception
AM
The range for most AM stations is greater than for FM,especially at night. The longer range, however, cancause stations to interfere with each other. AM can pickup noise from things like storms and power lines. Tryreducing the treble to reduce this noise if you ever get it.
FM Stereo
FM stereo will give you the best sound, but FM signalswill reach only about 10 to 40 miles (16 to 65 km). Tallbuildings or hills can interfere with FM signals, causingthe sound to come and go.
Cellular Phone Usage
Cellular phone usage may cause interference with yourvehicle’s radio. This interference may occur whenmaking or receiving phone calls, charging the phone’sbattery or simply having the phone “on”. Thisinterference is described as an increased level of staticwhile listening to the radio. If you notice static whilelistening to the radio, unplug the cellular phone and turn if off.

3-30
Tips About Your Audio SystemHearing damage from loud noise is almost undetectableuntil it is too late. Your hearing can adapt to highervolumes of sound. Sound that seems normal can be loudand harmful to your hearing. Take precautions byadjusting the volume control on your radio to a safesound level before your hearing adapts to it.
To help avoid hearing loss or damage do the following:
1. Adjust the volume control to the lowest setting.
2. Increase volume slowly until you hear comfortablyand clearly.
NOTICE:
Before you add any sound equipment to yourvehicle -- like a tape player, CB radio, mobiletelephone or two-way radio -- be sure you canadd what you want. If you can, it’s veryimportant to do it properly. Added soundequipment may interfere with the operation ofyour vehicle’s engine, radio or other systems, andeven damage them. Your vehicle’s systems mayalso interfere with the operation of soundequipment that has been added improperly.So, before adding sound equipment, check withyour dealer and be sure to check federal rulescovering mobile radio and telephone units.

3-31
Care of Your Cassette Tape PlayerA tape player that is not cleaned regularly can causereduced sound quality, ruined cassettes or a damagedmechanism. Cassette tapes should be stored in theircases away from contaminants, direct sunlight andextreme heat. If they aren’t, they may not operateproperly or may cause failure of the tape player.
Your tape player should be cleaned regularly after every50 hours of use. Your radio will display CLEAN TAPEto indicate that you have used your tape player for50 hours without resetting the tape clean timer. If thismessage appears on the display, your cassette tapeplayer needs to be cleaned. It will still play tapes, but you should clean it as soon as possible to preventdamage to your tapes and player. If you notice areduction in sound quality, try a known good cassette tosee if the tape or the tape player is at fault. If this othercassette has no improvement in sound quality, clean thetape player.
For best results, use a scrubbing action, non-abrasivecleaning cassette with pads which scrub the tape head asthe hubs of the cleaner cassette turn. The recommendedcleaning cassette is available through your dealer (GM Part No. 12344789).
For vehicles with the single compact disc player, use thefollowing steps:
1. Turn the ignition to ON or ACCESSORY.
2. Turn the radio on.
3. Insert the scrubbing action cleaning cassette.
4. Eject the cleaning cassette after the manufacturer’srecommended cleaning time.
For vehicles with the six-disc compact disc player, whencleaning the cassette tape player with the recommendednon-abrasive cleaning cassette, it is possible that thecassette may eject, because the cut tape detection featureon your radio may recognize it as a broken tape, in error.To prevent the cleaning cassette from being ejected, usethe following steps:
1. Turn the ignition to ON or ACCESSORY.
2. Turn the radio on.
3. Insert the scrubbing action cleaning cassette.
4. Eject the cleaning cassette after the manufacturer’srecommended cleaning time.

3-32
You may also choose a non-scrubbing action, wet-typecleaner which uses a cassette with a fabric belt to cleanthe tape head. This type of cleaning cassette will noteject on its own. A non-scrubbing action cleaner maynot clean as thoroughly as the scrubbing type cleaner.The use of a non-scrubbing action, dry-type cleaningcassette is not recommended.
After you clean the player, perform the following steps:
1. Press the TUNE/SEL knob.
2. Turn the TUNE/SEL knob until SETUP is displayed.
3. Press the TUNE/SEL knob to enter SETUP.
4. Turn the TUNE/SEL knob until CLEAR TAPEHOURS is displayed.
5. Press the TUNE/SEL knob to select. The radio will display CLEARED to show that the indicatorwas reset.
Cassettes are subject to wear and the sound quality may degrade over time. Always make sure the cassettetape is in good condition before you have your tapeplayer serviced.
Care of Your Compact DiscsHandle discs carefully. Store them in their original casesor other protective cases and away from direct sunlightand dust. If the surface of a disc is soiled, dampen aclean, soft cloth in a mild, neutral detergent solution andclean it, wiping from the center to the edge.
Be sure never to touch the side without writing whenhandling discs. Pick up discs by grasping the outer edgesor the edge of the hole and the outer edge.
Care of Your Compact Disc PlayerThe use of CD lens cleaner discs is not advised, due tothe risk of contaminating the lens of the CD optics withlubricants internal to the CD mechanism.

3-33
Diversity Antenna SystemYour AM-FM antenna is integrated with your rearwindow defogger, located in the rear window. Be surethat the inside surface of the rear window is notscratched and that the lines on the glass are notdamaged. If the inside surface is damaged, it couldinterfere with radio reception.
Do not apply aftermarket glass tinting. The metallic filmin some tinting materials will interfere with or distort theincoming radio reception.
NOTICE:
Do not try to clear frost or other material fromthe inside of the front windshield or rear windowwith a razor blade or anything else that is sharp.This may damage the grid lines and affect yourradio’s ability to pick up stations clearly. Therepairs wouldn’t be covered by your warranty.
If, when you turn on your rear window defogger, youhear static on your radio station, it could mean that adefogger grid line has been damaged. If this is true, thegrid line must be repaired.
If you choose to add an aftermarket cellular telephone toyour vehicle, and the antenna needs to be attached to theglass, be sure that you do not damage the grid lines forthe AM-FM antennas or place the cellular telephoneantenna over the grid lines.

4-4-1
Section 4 Your Driving and the Road
Here you’ll find information about driving on different kinds of roads and in varying weather conditions. We’ve alsoincluded many other useful tips on driving.
4-2 Defensive Driving4-3 Drunken Driving4-6 Control of a Vehicle4-6 Braking4-9 Traction Control System4-10 Stabilitrak� - Vehicle Stability Enhancement
System (If Equipped)4-11 Steering4-13 Off-Road Recovery4-14 Passing4-15 Loss of Control
4-16 Driving at Night4-18 Driving in Rain and on Wet Roads4-21 City Driving4-22 Freeway Driving4-23 Before Leaving on a Long Trip4-24 Highway Hypnosis4-24 Hill and Mountain Roads4-26 Winter Driving4-30 Recreational Vehicle Towing4-32 Loading Your Vehicle4-34 Towing a Trailer

4-2
Defensive DrivingThe best advice anyone can give about driving is: Drive defensively.
Please start with a very important safety device in yourvehicle: Buckle up. See “Safety Belts” in the Index.
Defensive driving really means “be ready for anything.”On city streets, rural roads or freeways, it means“always expect the unexpected.”
Assume that pedestrians or other drivers are going to becareless and make mistakes. Anticipate what they mightdo. Be ready for their mistakes.
Rear-end collisions are about the most preventable ofaccidents. Yet they are common. Allow enoughfollowing distance. It’s the best defensive drivingmaneuver, in both city and rural driving. You neverknow when the vehicle in front of you is going to brakeor turn suddenly.
Defensive driving requires that a driver concentrate on the driving task. Anything that distracts from thedriving task -- such as concentrating on a cellulartelephone call, reading, or reaching for something on thefloor -- makes proper defensive driving more difficultand can even cause a collision, with resulting injury.Ask a passenger to help do things like this, or pull off the road in a safe place to do them yourself. These simple defensive driving techniques could saveyour life.

4-3
Drunken DrivingDeath and injury associated with drinking and driving isa national tragedy. It’s the number one contributor to the highway death toll, claiming thousands of victimsevery year.
Alcohol affects four things that anyone needs to drive a vehicle:
� Judgment
� Muscular Coordination
� Vision
� Attentiveness.
Police records show that almost half of all motorvehicle-related deaths involve alcohol. In most cases,these deaths are the result of someone who was drinkingand driving. In recent years, about 16,000 annual motorvehicle-related deaths have been associated with the useof alcohol, with more than 300,000 people injured.
Many adults -- by some estimates, nearly half the adultpopulation -- choose never to drink alcohol, so theynever drive after drinking. For persons under 21, it’sagainst the law in every U.S. state to drink alcohol.There are good medical, psychological anddevelopmental reasons for these laws.
The obvious way to solve the leading highway safetyproblem is for people never to drink alcohol and thendrive. But what if people do? How much is “too much”if the driver plans to drive? It’s a lot less than manymight think. Although it depends on each person andsituation, here is some general information on theproblem.
The Blood Alcohol Concentration (BAC) of someonewho is drinking depends upon four things:
� The amount of alcohol consumed
� The drinker’s body weight
� The amount of food that is consumed before andduring drinking
� The length of time it has taken the drinker toconsume the alcohol.
According to the American Medical Association, a180-lb. (82 kg) person who drinks three 12-ounce(355 ml) bottles of beer in an hour will end up with aBAC of about 0.06 percent. The person would reach thesame BAC by drinking three 4-ounce (120 ml) glassesof wine or three mixed drinks if each had 1-1/2 ounces(45 ml) of a liquor like whiskey, gin or vodka.

4-4
It’s the amount of alcohol that counts. For example, ifthe same person drank three double martinis (3 ouncesor 90 ml of liquor each) within an hour, the person’sBAC would be close to 0.12 percent. A person whoconsumes food just before or during drinking will have a somewhat lower BAC level.
There is a gender difference, too. Women generally havea lower relative percentage of body water than men.
Since alcohol is carried in body water, this means that awoman generally will reach a higher BAC level than aman of her same body weight when each has the samenumber of drinks.
The law in an increasing number of U.S. states, andthroughout Canada, sets the legal limit at 0.08 percent.In some other countries, the limit is even lower. Forexample, it is 0.05 percent in both France and Germany.The BAC limit for all commercial drivers in the UnitedStates is 0.04 percent.
The BAC will be over 0.10 percent after three tosix drinks (in one hour). Of course, as we’ve seen, itdepends on how much alcohol is in the drinks, and howquickly the person drinks them.
But the ability to drive is affected well below a BAC of0.10 percent. Research shows that the driving skills ofmany people are impaired at a BAC approaching0.05 percent, and that the effects are worse at night. Alldrivers are impaired at BAC levels above 0.05 percent.Statistics show that the chance of being in a collisionincreases sharply for drivers who have a BAC of0.05 percent or above. A driver with a BAC level of0.06 percent has doubled his or her chance of having acollision. At a BAC level of 0.10 percent, the chance ofthis driver having a collision is 12 times greater; at alevel of 0.15 percent, the chance is 25 times greater!
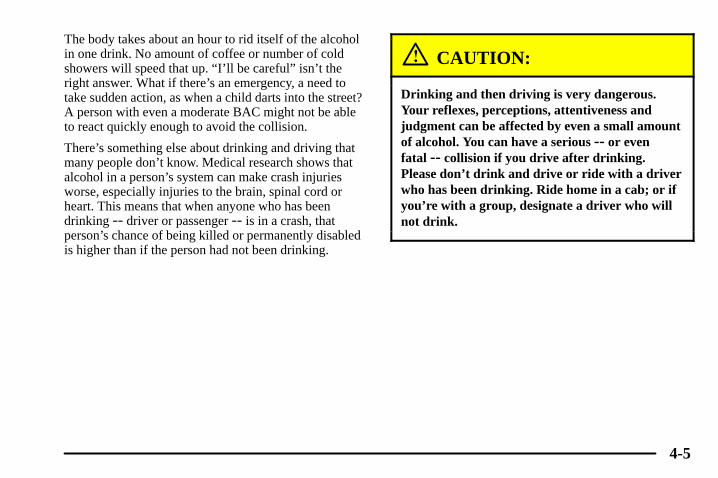
4-5
The body takes about an hour to rid itself of the alcoholin one drink. No amount of coffee or number of coldshowers will speed that up. “I’ll be careful” isn’t theright answer. What if there’s an emergency, a need totake sudden action, as when a child darts into the street?A person with even a moderate BAC might not be ableto react quickly enough to avoid the collision.
There’s something else about drinking and driving thatmany people don’t know. Medical research shows thatalcohol in a person’s system can make crash injuriesworse, especially injuries to the brain, spinal cord orheart. This means that when anyone who has beendrinking -- driver or passenger -- is in a crash, thatperson’s chance of being killed or permanently disabledis higher than if the person had not been drinking.
CAUTION:
Drinking and then driving is very dangerous.Your reflexes, perceptions, attentiveness andjudgment can be affected by even a small amountof alcohol. You can have a serious -- or even fatal -- collision if you drive after drinking.Please don’t drink and drive or ride with a driverwho has been drinking. Ride home in a cab; or ifyou’re with a group, designate a driver who willnot drink.

4-6
Control of a VehicleYou have three systems that make your vehicle go whereyou want it to go. They are the brakes, the steering andthe accelerator. All three systems have to do their workat the places where the tires meet the road.
Sometimes, as when you’re driving on snow or ice, it’seasy to ask more of those control systems than the tiresand road can provide. That means you can lose controlof your vehicle. Also see “Traction Control System” inthe Index.
BrakingBraking action involves perception time and reaction time.
First, you have to decide to push on the brake pedal.That’s perception time. Then you have to bring up yourfoot and do it. That’s reaction time.
Average reaction time is about 3/4 of a second. Butthat’s only an average. It might be less with one driverand as long as two or three seconds or more withanother. Age, physical condition, alertness, coordinationand eyesight all play a part. So do alcohol, drugs andfrustration. But even in 3/4 of a second, a vehiclemoving at 60 mph (100 km/h) travels 66 feet (20 m).That could be a lot of distance in an emergency, sokeeping enough space between your vehicle and othersis important.
And, of course, actual stopping distances vary greatlywith the surface of the road (whether it’s pavement orgravel); the condition of the road (wet, dry, icy); tiretread; the condition of your brakes; the weight of thevehicle and the amount of brake force applied.

4-7
Avoid needless heavy braking. Some people drive inspurts -- heavy acceleration followed by heavy braking -- rather than keeping pace with traffic. This is amistake. Your brakes may not have time to cool betweenhard stops. Your brakes will wear out much faster if youdo a lot of heavy braking. If you keep pace with thetraffic and allow realistic following distances, you willeliminate a lot of unnecessary braking. That meansbetter braking and longer brake life.
If your engine ever stops while you’re driving, brakenormally but don’t pump your brakes. If you do, thepedal may get harder to push down. If your enginestops, you will still have some power brake assist. Butyou will use it when you brake. Once the power assist isused up, it may take longer to stop and the brake pedalwill be harder to push.
Anti-Lock Brake System (ABS)Your vehicle has anti-lock brakes. ABS is an advancedelectronic braking system that will help prevent abraking skid.
When you start your engine and begin to drive away,your anti-lock brake system will check itself. You mayhear a momentary motor or clicking noise while this testis going on, and you may even notice that your brakepedal moves a little. This is normal.
If there’s a problem with theanti-lock brake system, thiswarning light will stay on.See “Anti-Lock BrakeSystem Warning Light” inthe Index.

4-8
Let’s say the road is wet and you’re driving safely.Suddenly, an animal jumps out in front of you. You slamon the brakes and continue braking. Here’s whathappens with ABS:
A computer senses that wheels are slowing down. If oneof the wheels is about to stop rolling, the computer willseparately work the brakes at each wheel.
The anti-lock system can change the brake pressurefaster than any driver could. The computer isprogrammed to make the most of available tire and roadconditions. This can help you steer around the obstaclewhile braking hard.
As you brake, your computer keeps receiving updates onwheel speed and controls braking pressure accordingly.

4-9
Remember: Anti-lock doesn’t change the time you needto get your foot up to the brake pedal or always decreasestopping distance. If you get too close to the vehicle infront of you, you won’t have time to apply your brakesif that vehicle suddenly slows or stops. Always leaveenough room up ahead to stop, even though you haveanti-lock brakes.
Using Anti-Lock
Don’t pump the brakes. Just hold the brake pedal downfirmly and let anti-lock work for you. You may hear theanti-lock pump or motor operate, and feel the brakepedal pulsate, but this is normal.
Braking in EmergenciesWith anti-lock, you can steer and brake at the sametime. In many emergencies, steering can help you morethan even the very best braking.
Traction Control SystemYour vehicle has a traction control system that limitswheel spin. This is especially useful in slippery roadconditions. The system operates only if it senses that oneor both of the rear wheels are spinning or beginning tolose traction. When this happens, the system brakes thespinning wheel(s) and/or reduces engine power to limitwheel spin.
You may feel or hear the system working, but this is normal.
This warning light willcome on to let you know ifthere’s a problem with yourtraction control system.
See “Traction Control System Warning Light” in theIndex. When this warning light is on, the system will notlimit wheel spin. Adjust your driving accordingly.
When the system is limiting wheel spin, the TractionControl System warning light will be blinking.
The traction control system automatically comes onwhenever you start your vehicle. To limit wheel spin,especially in slippery road conditions, you shouldalways leave the system on. But you can turn thetraction control system off if you ever need to. Youshould turn the system off if your vehicle ever gets stuckin sand, mud or snow and rocking the vehicle isrequired. See “Rocking Your Vehicle” in the Index.

4-10
To turn the system off, pressthe TC (traction control)button located in the glove box.
If you press the TC button once, the traction controlsystem will turn off and the traction control systemwarning light will come on. Press the TC button again to turn the system back on. If you press and hold the TC button for five seconds, the Stabilitrak system willturn off. Press the TC button again to turn Stabilitrakback on.
Stabilitrak � - Vehicle StabilityEnhancement System (If Equipped)Your vehicle may be equipped with a vehicle stabilityenhancement system called Stabilitrak. Stabilitrak is anadvanced computer controlled system that assists youwith directional control of the vehicle in difficult drivingconditions.
Stabilitrak has sensors that detect the direction yourvehicle is going and compares it to the direction that youare steering the vehicle. Stabilitrak activates when thecomputer senses a discrepancy between your intendedpath and the direction the vehicle is actually traveling.To assist you in returning your vehicle to the intendedpath, Stabilitrak selectively applies braking pressure atany one of the vehicle’s brakes to help steer the vehiclein the direction which you are steering.When the system activates, a STABILITY SYSENGAGED message will be displayed on the DriverInformation Center. See “Driver Information CenterMessages” in the Index. You may also hear a noise or feelvibration in the brake pedal. This is normal. Continue tosteer the vehicle in the direction you want it to go.
If there is a problem detected with Stabilitrak, aSERVICE STABILITY SYS message will be displayedon the Driver Information Center. See “DriverInformation Center Messages” in the Index. When thismessage is displayed, the system is not operational.Driving should be adjusted accordingly.Stability comes on automatically whenever you startyour vehicle. To help assist you with directional controlof the vehicle, you should always leave the system on.You can turn Stabilitrak OFF if you ever need to troughthe Traction On/Off button. See “Traction ControlSystem” in the Index.

4-11
If your vehicle is in cruise control when the Stabilitrakactivates, the cruise control will automaticallydisengage. When road conditions allow you to safelyuse it again, you may reengage the cruise control. See“Cruise Control” in the Index.
SteeringPower SteeringIf you lose power steering assist because the enginestops or the system is not functioning, you can steer but it will take much more effort.
Speed Variable Assist Steering (If Equipped)This system varies the amount of effort required to steerthe vehicle in relation to the speed of the vehicle.
The amount of steering effort required is less at slowerspeeds to make the vehicle more maneuverable andeasier to park. At faster speeds, the steering effortincreases to provide a sport-like feel to the steering.This provides maximum control and stability.
If your vehicle seems harder to steer than normal whenparking or driving slowly, there may be a problem withthe system. You will still have power steering, butsteering will be stiffer than normal at slow speeds. Seeyour dealer for service.
Steering Tips
Driving on Curves
It’s important to take curves at a reasonable speed.
A lot of the “driver lost control” accidents mentioned onthe news happen on curves. Here’s why:
Experienced driver or beginner, each of us is subject tothe same laws of physics when driving on curves. Thetraction of the tires against the road surface makes itpossible for the vehicle to change its path when you turnthe front wheels. If there’s no traction, inertia will keepthe vehicle going in the same direction. If you’ve evertried to steer a vehicle on wet ice, you’ll understand this.
The traction you can get in a curve depends on thecondition of your tires and the road surface, the angle at which the curve is banked, and your speed. Whileyou’re in a curve, speed is the one factor you can control.

4-12
Suppose you’re steering through a sharp curve. Then you suddenly accelerate. Both control systems -- steering and acceleration -- have to do their work where the tires meet the road. Adding thesudden acceleration can demand too much of thoseplaces. You can lose control. Refer to “Traction Control System” in the Index.
What should you do if this ever happens? Ease up on theaccelerator pedal, steer the vehicle the way you want itto go, and slow down.
Speed limit signs near curves warn that you shouldadjust your speed. Of course, the posted speeds arebased on good weather and road conditions. Under lessfavorable conditions you’ll want to go slower.
If you need to reduce your speed as you approach acurve, do it before you enter the curve, while your frontwheels are straight ahead.
Try to adjust your speed so you can “drive” through thecurve. Maintain a reasonable, steady speed. Wait toaccelerate until you are out of the curve, and thenaccelerate gently into the straightaway.
Steering in EmergenciesThere are times when steering can be more effectivethan braking. For example, you come over a hill andfind a truck stopped in your lane, or a car suddenly pullsout from nowhere, or a child darts out from betweenparked cars and stops right in front of you. You canavoid these problems by braking -- if you can stop in time. But sometimes you can’t; there isn’t room.That’s the time for evasive action -- steering around the problem.
Your vehicle can perform very well in emergencies likethese. First apply your brakes. See “Braking inEmergencies” earlier in this section. It is better toremove as much speed as you can from a possiblecollision. Then steer around the problem, to the left orright depending on the space available.

4-13
An emergency like this requires close attention and aquick decision. If you are holding the steering wheel atthe recommended 9 and 3 o’clock positions, you canturn it a full 180 degrees very quickly without removingeither hand. But you have to act fast, steer quickly, andjust as quickly straighten the wheel once you haveavoided the object.
The fact that such emergency situations are alwayspossible is a good reason to practice defensive driving atall times and wear safety belts properly.
Off -Road RecoveryYou may find that your right wheels have dropped off theedge of a road onto the shoulder while you’re driving.
If the level of the shoulder is only slightly below thepavement, recovery should be fairly easy. Ease off theaccelerator and then, if there is nothing in the way, steerso that your vehicle straddles the edge of the pavement.You can turn the steering wheel up to one-quarter turnuntil the right front tire contacts the pavement edge.Then turn your steering wheel to go straight down the roadway.

4-14
PassingThe driver of a vehicle about to pass another on atwo-lane highway waits for just the right moment,accelerates, moves around the vehicle ahead, then goesback into the right lane again. A simple maneuver?
Not necessarily! Passing another vehicle on a two-lanehighway is a potentially dangerous move, since thepassing vehicle occupies the same lane as oncomingtraffic for several seconds. A miscalculation, an error injudgment, or a brief surrender to frustration or anger cansuddenly put the passing driver face to face with theworst of all traffic accidents -- the head-on collision.
So here are some tips for passing:
� “Drive ahead.” Look down the road, to the sides and tocrossroads for situations that might affect your passingpatterns. If you have any doubt whatsoever aboutmaking a successful pass, wait for a better time.
� Watch for traffic signs, pavement markings and lines.If you can see a sign up ahead that might indicate aturn or an intersection, delay your pass. A brokencenter line usually indicates it’s all right to pass(providing the road ahead is clear). Never cross a solidline on your side of the lane or a double solid line,even if the road seems empty of approaching traffic.
� Do not get too close to the vehicle you want to passwhile you’re awaiting an opportunity. For one thing,following too closely reduces your area of vision,especially if you’re following a larger vehicle. Also, you won’t have adequate space if the vehicleahead suddenly slows or stops. Keep back areasonable distance.
� When it looks like a chance to pass is coming up,start to accelerate but stay in the right lane and don’tget too close. Time your move so you will beincreasing speed as the time comes to move into theother lane. If the way is clear to pass, you will have a“running start” that more than makes up for thedistance you would lose by dropping back. And ifsomething happens to cause you to cancel your pass,you need only slow down and drop back again andwait for another opportunity.
� If other cars are lined up to pass a slow vehicle, waityour turn. But take care that someone isn’t trying topass you as you pull out to pass the slow vehicle.Remember to glance over your shoulder and checkthe blind spot.

4-15
� Check your mirrors, glance over your shoulder, andstart your left lane change signal before moving outof the right lane to pass. When you are far enoughahead of the passed vehicle to see its front in yourinside mirror, activate your right lane change signaland move back into the right lane. (Remember thatyour right outside mirror is convex. The vehicle youjust passed may seem to be farther away from youthan it really is.)
� Try not to pass more than one vehicle at a time on two-lane roads. Reconsider before passing thenext vehicle.
� Don’t overtake a slowly moving vehicle too rapidly.Even though the brake lamps are not flashing, it maybe slowing down or starting to turn.
� If you’re being passed, make it easy for thefollowing driver to get ahead of you. Perhaps youcan ease a little to the right.
Loss of ControlLet’s review what driving experts say about whathappens when the three control systems (brakes, steeringand acceleration) don’t have enough friction where thetires meet the road to do what the driver has asked.
In any emergency, don’t give up. Keep trying to steer and constantly seek an escape route or area of less danger.
SkiddingIn a skid, a driver can lose control of the vehicle.Defensive drivers avoid most skids by taking reasonablecare suited to existing conditions, and by not“overdriving” those conditions. But skids are always possible.
The three types of skids correspond to your vehicle’sthree control systems. In the braking skid, your wheelsaren’t rolling. In the steering or cornering skid, toomuch speed or steering in a curve causes tires to slip andlose cornering force. And in the acceleration skid, toomuch throttle causes the driving wheels to spin.
A cornering skid is best handled by easing your foot offthe accelerator pedal.
Remember: Any traction control system helps avoidonly the acceleration skid.

4-16
If your traction control system is off, then anacceleration skid is also best handled by easing yourfoot off the accelerator pedal.
If your vehicle starts to slide, ease your foot off theaccelerator pedal and quickly steer the way you want thevehicle to go. If you start steering quickly enough, yourvehicle may straighten out. Always be ready for asecond skid if it occurs.
Of course, traction is reduced when water, snow, ice,gravel or other material is on the road. For safety, you’llwant to slow down and adjust your driving to theseconditions. It is important to slow down on slipperysurfaces because stopping distance will be longer andvehicle control more limited.
While driving on a surface with reduced traction, tryyour best to avoid sudden steering, acceleration orbraking (including engine braking by shifting to a lowergear). Any sudden changes could cause the tires to slide.You may not realize the surface is slippery until yourvehicle is skidding. Learn to recognize warning clues -- such as enough water, ice or packed snow on the road to make a “mirrored surface” -- and slowdown when you have any doubt.
Remember: Any anti-lock brake system (ABS) helpsavoid only the braking skid.
Driving at Night
Night driving is more dangerous than day driving. One reason is that some drivers are likely to be impaired -- by alcohol or drugs, with night visionproblems, or by fatigue.

4-17
Here are some tips on night driving.
� Drive defensively.
� Don’t drink and drive.
� Since you can’t see as well, you may need to slow down and keep more space between you andother vehicles.
� Slow down, especially on higher speed roads. Yourheadlamps can light up only so much road ahead.
� In remote areas, watch for animals.
� If you’re tired, pull off the road in a safe place and rest.
No one can see as well at night as in the daytime. But aswe get older these differences increase. A 50-year-olddriver may require at least twice as much light to see thesame thing at night as a 20-year-old.
What you do in the daytime can also affect your nightvision. For example, if you spend the day in brightsunshine you are wise to wear sunglasses. Your eyes willhave less trouble adjusting to night. But if you’redriving, don’t wear sunglasses at night. They may cutdown on glare from headlamps, but they also make a lotof things invisible.
You can be temporarily blinded by approachingheadlamps. It can take a second or two, or even severalseconds, for your eyes to readjust to the dark. When youare faced with severe glare (as from a driver whodoesn’t lower the high beams, or a vehicle withmisaimed headlamps), slow down a little. Avoid staringdirectly into the approaching headlamps.
Keep your windshield and all the glass on your vehicleclean -- inside and out. Glare at night is made muchworse by dirt on the glass. Even the inside of the glasscan build up a film caused by dust. Dirty glass makeslights dazzle and flash more than clean glass would,making the pupils of your eyes contract repeatedly.
Remember that your headlamps light up far less of aroadway when you are in a turn or curve. Keep youreyes moving; that way, it’s easier to pick out dimlylighted objects. Just as your headlamps should bechecked regularly for proper aim, so should your eyesbe examined regularly. Some drivers suffer from nightblindness -- the inability to see in dim light -- and aren’t even aware of it.

4-18
Driving in Rain and on Wet Roads Rain and wet roads can mean driving trouble. On a wetroad, you can’t stop, accelerate or turn as well becauseyour tire-to-road traction isn’t as good as on dry roads.And, if your tires don’t have much tread left, you’ll geteven less traction. It’s always wise to go slower and becautious if rain starts to fall while you are driving. Thesurface may get wet suddenly when your reflexes aretuned for driving on dry pavement.
The heavier the rain, the harder it is to see. Even if yourwindshield wiper blades are in good shape, a heavy raincan make it harder to see road signs and traffic signals,pavement markings, the edge of the road and evenpeople walking.
It’s wise to keep your windshield wiping equipment ingood shape and keep your windshield washer tank filledwith washer fluid. Replace your windshield wiperinserts when they show signs of streaking or missingareas on the windshield, or when strips of rubber start toseparate from the inserts.

4-19
Driving too fast through large water puddles or evengoing through some car washes can cause problems, too.The water may affect your brakes. Try to avoid puddles.But if you can’t, try to slow down before you hit them.
CAUTION:
Wet brakes can cause accidents. They won’t workas well in a quick stop and may cause pulling toone side. You could lose control of the vehicle.
After driving through a large puddle of water ora car wash, apply your brake pedal lightly untilyour brakes work normally.
HydroplaningHydroplaning is dangerous. So much water can build upunder your tires that they can actually ride on the water.This can happen if the road is wet enough and you’regoing fast enough. When your vehicle is hydroplaning,it has little or no contact with the road.
Hydroplaning doesn’t happen often. But it can if yourtires do not have much tread or if the pressure in one ormore is low. It can happen if a lot of water is standing onthe road. If you can see reflections from trees, telephonepoles or other vehicles, and raindrops “dimple” thewater’s surface, there could be hydroplaning.

4-20
Hydroplaning usually happens at higher speeds. Therejust isn’t a hard and fast rule about hydroplaning. Thebest advice is to slow down when it is raining.
Driving Through Deep Standing Water
NOTICE:
If you drive too quickly through deep puddles orstanding water, water can come in through yourengine’s air intake and badly damage yourengine. Never drive through water that is slightlylower than the underbody of your vehicle. If youcan’t avoid deep puddles or standing water, drivethrough them very slowly.
Driving Through Flowing Water
CAUTION:
Flowing or rushing water creates strong forces. Ifyou try to drive through flowing water, as youmight at a low water crossing, your vehicle can becarried away. As little as six inches of flowingwater can carry away a smaller vehicle. If thishappens, you and other vehicle occupants coulddrown. Don’t ignore police warning signs, andotherwise be very cautious about trying to drivethrough flowing water.
Some Other Rainy Weather Tips� Besides slowing down, allow some extra following
distance. And be especially careful when you passanother vehicle. Allow yourself more clear roomahead, and be prepared to have your view restrictedby road spray.
� Have good tires with proper tread depth. See “Tires”in the Index.

4-21
City Driving
One of the biggest problems with city streets is theamount of traffic on them. You’ll want to watch out forwhat the other drivers are doing and pay attention totraffic signals.
Here are ways to increase your safety in city driving:
� Know the best way to get to where you are going. Get a city map and plan your trip into anunknown part of the city just as you would for across-country trip.
� Try to use the freeways that rim and crisscross mostlarge cities. You’ll save time and energy. See thenext part, “Freeway Driving.”
� Treat a green light as a warning signal. A traffic lightis there because the corner is busy enough to need it.When a light turns green, and just before you start to move, check both ways for vehicles that have not cleared the intersection or may be running thered light.

4-22
Freeway Driving
Mile for mile, freeways (also called thruways, parkways,expressways, turnpikes or superhighways) are the safestof all roads. But they have their own special rules.
The most important advice on freeway driving is: Keepup with traffic and keep to the right. Drive at the samespeed most of the other drivers are driving. Too-fast ortoo-slow driving breaks a smooth traffic flow. Treat theleft lane on a freeway as a passing lane.
At the entrance, there is usually a ramp that leads to thefreeway. If you have a clear view of the freeway as youdrive along the entrance ramp, you should begin tocheck traffic. Try to determine where you expect toblend with the flow. Try to merge into the gap at close tothe prevailing speed. Switch on your turn signal, checkyour mirrors and glance over your shoulder as often asnecessary. Try to blend smoothly with the traffic flow.
Once you are on the freeway, adjust your speed to theposted limit or to the prevailing rate if it’s slower. Stayin the right lane unless you want to pass.
Before changing lanes, check your mirrors. Then useyour turn signal.
Just before you leave the lane, glance quickly over yourshoulder to make sure there isn’t another vehicle in your“blind” spot.
Once you are moving on the freeway, make certain youallow a reasonable following distance. Expect to moveslightly slower at night.
When you want to leave the freeway, move to the properlane well in advance. If you miss your exit, do not,under any circumstances, stop and back up. Drive on tothe next exit.
The exit ramp can be curved, sometimes quite sharply.

4-23
The exit speed is usually posted.
Reduce your speed according to your speedometer, notto your sense of motion. After driving for any distanceat higher speeds, you may tend to think you are goingslower than you actually are.
Before Leaving on a Long TripMake sure you’re ready. Try to be well rested. If youmust start when you’re not fresh -- such as after a day’swork -- don’t plan to make too many miles that first partof the journey. Wear comfortable clothing and shoes youcan easily drive in.
Is your vehicle ready for a long trip? If you keep itserviced and maintained, it’s ready to go. If it needsservice, have it done before starting out. Of course,you’ll find experienced and able service experts inCadillac dealerships all across North America. They’ll be ready and willing to help if you need it.
Here are some things you can check before a trip:
� Windshield Washer Fluid: Is the reservoir full? Are all windows clean inside and outside?
� Wiper Blades: Are they in good shape?
� Fuel, Engine Oil, Other Fluids: Have you checkedall levels?
� Lamps: Are they all working? Are the lenses clean?
� Tires: They are vitally important to a safe,trouble-free trip. Is the tread good enough forlong-distance driving? Are the tires all inflated to therecommended pressure?
� Weather Forecasts: What’s the weather outlookalong your route? Should you delay your trip a shorttime to avoid a major storm system?
� Maps: Do you have up-to-date maps?

4-24
Highway HypnosisIs there actually such a condition as “highwayhypnosis”? Or is it just plain falling asleep at the wheel?Call it highway hypnosis, lack of awareness, orwhatever.
There is something about an easy stretch of road withthe same scenery, along with the hum of the tires on theroad, the drone of the engine, and the rush of the windagainst the vehicle that can make you sleepy. Don’t let ithappen to you! If it does, your vehicle can leave theroad in less than a second, and you could crash and be injured.
What can you do about highway hypnosis? First, beaware that it can happen.
Then here are some tips:
� Make sure your vehicle is well ventilated, with acomfortably cool interior.
� Keep your eyes moving. Scan the road ahead and tothe sides. Check your rearview mirrors and yourinstruments frequently.
� If you get sleepy, pull off the road into a rest, serviceor parking area and take a nap, get some exercise, orboth. For safety, treat drowsiness on the highway asan emergency.
Hill and Mountain Roads
Driving on steep hills or mountains is different fromdriving in flat or rolling terrain.

4-25
If you drive regularly in steep country, or if you’replanning to visit there, here are some tips that can makeyour trips safer and more enjoyable.
� Keep your vehicle in good shape. Check all fluidlevels and also the brakes, tires, cooling system andtransmission. These parts can work hard onmountain roads.
� Know how to go down hills. The most importantthing to know is this: let your engine do some of theslowing down. Shift to a lower gear when you godown a steep or long hill.
CAUTION:
If you don’t shift down, your brakes could get so hot that they wouldn’t work well. You wouldthen have poor braking or even none going down a hill. You could crash. Shift down to letyour engine assist your brakes on a steepdownhill slope.
CAUTION:
Coasting downhill in NEUTRAL (N) or with theignition off is dangerous. Your brakes will have todo all the work of slowing down. They could getso hot that they wouldn’t work well. You wouldthen have poor braking or even none going downa hill. You could crash. Always have your enginerunning and your vehicle in gear when you godownhill.
� Know how to go uphill. You may want to shift downto a lower gear. The lower gears help cool your engineand transmission, and you can climb the hill better.
� Stay in your own lane when driving on two-laneroads in hills or mountains. Don’t swing wide or cutacross the center of the road. Drive at speeds that letyou stay in your own lane.
� As you go over the top of a hill, be alert. There could besomething in your lane, like a stalled car or an accident.
� You may see highway signs on mountains that warn ofspecial problems. Examples are long grades, passing orno-passing zones, a falling rocks area or windingroads. Be alert to these and take appropriate action.

4-26
Winter Driving
Here are some tips for winter driving:
� Have your vehicle in good shape for winter.
� You may want to put winter emergency supplies inyour trunk.
Include an ice scraper, a small brush or broom, a supplyof windshield washer fluid, a rag, some winter outerclothing, a small shovel, a flashlight, a red cloth and acouple of reflective warning triangles. And, if you willbe driving under severe conditions, include a small bagof sand, a piece of old carpet or a couple of burlap bagsto help provide traction. Be sure you properly securethese items in your vehicle.

4-27
Driving on Snow or IceMost of the time, those places where your tires meet theroad probably have good traction.
However, if there is snow or ice between your tires andthe road, you can have a very slippery situation. You’llhave a lot less traction or “grip” and will need to be very careful.
What’s the worst time for this? “Wet ice.” Very coldsnow or ice can be slick and hard to drive on. But wetice can be even more trouble because it may offer theleast traction of all. You can get wet ice when it’s aboutfreezing (32�F; 0�C) and freezing rain begins to fall.Try to avoid driving on wet ice until salt and sand crewscan get there.
Whatever the condition -- smooth ice, packed, blowingor loose snow -- drive with caution.
Keep your traction control system on. It improves yourability to accelerate when driving on a slippery road.Even though your vehicle has a traction control system,you’ll want to slow down and adjust your driving to theroad conditions. See “Traction Control System” in the Index.

4-28
Your anti-lock brakes improve your vehicle’s stabilitywhen you make a hard stop on a slippery road. Eventhough you have the anti-lock braking system, you’llwant to begin stopping sooner than you would on drypavement. See “Anti-Lock” in the Index.
� Allow greater following distance on any slippery road.
� Watch for slippery spots. The road might be fineuntil you hit a spot that’s covered with ice. On anotherwise clear road, ice patches may appear inshaded areas where the sun can’t reach: aroundclumps of trees, behind buildings or under bridges.Sometimes the surface of a curve or an overpass mayremain icy when the surrounding roads are clear. Ifyou see a patch of ice ahead of you, brake before youare on it. Try not to brake while you’re actually onthe ice, and avoid sudden steering maneuvers.
If You’re Caught in a Blizzard
If you are stopped by heavy snow, you could be in aserious situation. You should probably stay with yourvehicle unless you know for sure that you are near helpand you can hike through the snow. Here are somethings to do to summon help and keep yourself and yourpassengers safe:
� Turn on your hazard flashers.

4-29
� Tie a red cloth to your vehicle to alert police thatyou’ve been stopped by the snow.
� Put on extra clothing or wrap a blanket around you.If you have no blankets or extra clothing, make bodyinsulators from newspapers, burlap bags, rags, floormats -- anything you can wrap around yourself ortuck under your clothing to keep warm.
You can run the engine to keep warm, but be careful.
CAUTION:
Snow can trap exhaust gases under your vehicle.This can cause deadly CO (carbon monoxide) gasto get inside. CO could overcome you and killyou. You can’t see it or smell it, so you might notknow it is in your vehicle. Clear away snow fromaround the base of your vehicle, especially anythat is blocking your exhaust pipe. And checkaround again from time to time to be sure snowdoesn’t collect there.Open a window just a little on the side of thevehicle that’s away from the wind. This will helpkeep CO out.
Run your engine only as long as you must. This savesfuel. When you run the engine, make it go a little fasterthan just idle. That is, push the accelerator slightly. Thisuses less fuel for the heat that you get and it keeps thebattery charged. You will need a well-charged battery torestart the vehicle, and possibly for signaling later onwith your headlamps. Let the heater run for a while.

4-30
Then, shut the engine off and close the window almostall the way to preserve the heat. Start the engine againand repeat this only when you feel really uncomfortablefrom the cold. But do it as little as possible. Preserve thefuel as long as you can. To help keep warm, you can getout of the vehicle and do some fairly vigorous exercisesevery half hour or so until help comes.
Recreational Vehicle TowingRecreational vehicle towing means towing your vehicle behind another vehicle -- such as behind amotorhome. The two most common types ofrecreational vehicle towing are known as “dinghytowing” (towing your vehicle with all four wheels on the ground) and “dolly towing” (towing your vehiclewith two wheels on the ground and two wheels up on adevice known as a “dolly”).
With the proper preparation and equipment, manyvehicles can be towed in these ways. See “DinghyTowing” and “Dolly Towing,” following.
Here are some important things to consider before youdo recreational vehicle towing:
� What’s the towing capacity of the towing vehicle?Be sure you read the tow vehicle manufacturer’srecommendations.
� How far will you tow? Some vehicles haverestrictions on how far and how long they can tow.
� Do you have the proper towing equipment? See yourdealer or trailering professional for additional adviceand equipment recommendations.
� Is your vehicle ready to be towed? Just as you wouldprepare your vehicle for a long trip, you’ll want tomake sure your vehicle is prepared to be towed. See“Before Leaving on a Long Trip” in the Index.
Dinghy Towing
NOTICE:
Towing your vehicle with all four wheels on theground will damage drivetrain components.
Your vehicle was not designed to be towed with all fourwheels on the ground. If your vehicle must be towed,you should use a dolly. See “Dolly Towing” later in thissection for more information.

4-31
Dolly Towing Your vehicle can be towed using a dolly. To tow yourvehicle using a dolly, follow these steps:
1. Put the rear wheels on a dolly.
2. Put the vehicle in PARK (P) for automatictransmissions or in NEUTRAL for manualtransmissions.
3. Set the parking brake and then remove the key.
4. Clamp the steering wheel in a straight-ahead positionwith a clamping device designed for towing.
5. Release the parking brake.

4-32
Loading Your Vehicle
CAUTION:
Do not load your vehicle any heavier than theGVWR, or either the maximum front or rearGAWR. If you do, parts on your vehicle canbreak, and it can change the way your vehiclehandles. These could cause you to lose controland crash. Also, overloading can shorten the lifeof your vehicle.
NOTICE:
Your warranty does not cover parts orcomponents that fail because of overloading.
Two labels on your vehicle show how much weight itmay properly carry. The Tire-Loading Information labelfound on the rear edge of the driver’s side rear door tellsyou the proper size, speed rating and recommendedinflation pressures for the tires on your vehicle. It alsogives you important information about the number ofpeople that can be in your vehicle and the total weightthat your vehicle can carry. This weight is called theVehicle Capacity Weight and includes the weight of all occupants, cargo and all options not installed in the factory.

4-33
The other label is the Certification label, found on therear edge of the driver’s door. It tells you the grossweight capacity of your vehicle, called the GrossVehicle Weight Rating (GVWR). The GVWR includesthe weight of the vehicle, all occupants, fuel and cargo.Never exceed the GVWR for your vehicle or the GrossAxle Weight Rating (GAWR) for either the front or rear axle.
If you do have a heavy load, you should spread it out.Don’t carry more than 176 lbs. (80 kg) in the trunk.
CAUTION:
Things you put inside your vehicle can strike and injure people in a sudden stop or turn, or ina crash.
� Put things in the trunk of your vehicle. In atrunk, put them as far forward as you can.Try to spread the weight evenly.
� Never stack heavier things, like suitcases,inside the vehicle so that some of them areabove the tops of the seats.
� Don’t leave an unsecured child restraint inyour vehicle.
� When you carry something inside thevehicle, secure it whenever you can.
� Don’t leave a seat folded down unless youneed to.

4-34
Towing a Trailer
CAUTION:
If you don’t use the correct equipment and driveproperly, you can lose control when you pull atrailer. For example, if the trailer is too heavy, thebrakes may not work well -- or even at all. Youand your passengers could be seriously injured.You may also damage your vehicle; the resultingrepairs would not be covered by your warranty.Pull a trailer only if you have followed all thesteps in this section. Ask your dealer for adviceand information about towing a trailer with your vehicle.
Your vehicle can tow a trailer if it is equipped with theproper trailer towing equipment. To identify what thevehicle trailering capacity is for your vehicle, youshould read the information in “Weight of the Trailer”that appears later in this section. But trailering isdifferent than just driving your vehicle by itself.Trailering means changes in handling, durability andfuel economy. Successful, safe trailering takes correctequipment, and it has to be used properly.
That’s the reason for this part. In it are manytime-tested, important trailering tips and safety rules.Many of these are important for your safety and that ofyour passengers. So please read this section carefullybefore you pull a trailer.
Load-pulling components such as the engine,transmission, rear axle, wheel assemblies and tires areforced to work harder against the drag of the addedweight. The engine is required to operate at relativelyhigher speeds and under greater loads, generating extraheat. What’s more, the trailer adds considerably to windresistance, increasing the pulling requirements.

4-35
If You Do Decide To Pull A TrailerIf you do, here are some important points:
� There are many different laws, including speed limitrestrictions, having to do with trailering. Make sureyour rig will be legal, not only where you live butalso where you’ll be driving. A good source for thisinformation can be state or provincial police.
� Consider using a sway control. You can ask a hitchdealer about sway controls.
� Don’t tow a trailer at all during the first 1,000 miles(1 600 km) your new vehicle is driven. Your engine,axle or other parts could be damaged.
� Then, during the first 500 miles (800 km) that youtow a trailer, don’t drive over 50 mph (80 km/h) anddon’t make starts at full throttle. This helps yourengine and other parts of your vehicle wear in at theheavier loads.
� Obey speed limit restrictions when towing a trailer.Don’t drive faster than the maximum posted speedfor trailers, or no more than 55 mph (90 km/h), tosave wear on your vehicle’s parts.
Three important considerations have to do with weight:
� the weight of the trailer,
� the weight of the trailer tongue
� and the total weight on your vehicle’s tires.
Weight of the TrailerHow heavy can a trailer safely be?
It should never weigh more than 1,000 lbs. (454 kg). But even that can be too heavy.
It depends on how you plan to use your rig. For example, speed, altitude, road grades, outsidetemperature and how much your vehicle is used to pull atrailer are all important. And, it can also depend on anyspecial equipment that you have on your vehicle.
You can ask your dealer for our trailering information oradvice, or you can write us at:
Cadillac Customer Assistance CenterCadillac Motor Car DivisionP.O. Box 33169Detroit, MI 48232-5169

4-36
In Canada, write to:
General Motors of Canada LimitedCustomer Communication Centre, 163-0051908 Colonel Sam DriveOshawa, Ontario L1H 8P7
Weight of the Trailer TongueThe tongue load (A) of any trailer is an importantweight to measure because it affects the total or grossweight of your vehicle. The Gross Vehicle Weight(GVW) includes the curb weight of the vehicle, anycargo you may carry in it, and the people who will beriding in the vehicle. And if you tow a trailer, you mustadd the tongue load to the GVW because your vehiclewill be carrying that weight, too. See “Loading YourVehicle” in the Index for more information about yourvehicle’s maximum load capacity.
If you’re using a weight-carrying hitch or aweight-distributing hitch, the trailer tongue (A) should weigh 10-15 percent of the total loaded trailer weight (B).
After you’ve loaded your trailer, weigh the trailer andthen the tongue, separately, to see if the weights areproper. If they aren’t, you may be able to get them rightsimply by moving some items around in the trailer.

4-37
Total Weight on Your Vehicle’s TiresBe sure your vehicle’s tires are inflated to the upperlimit for cold tires. You’ll find these numbers on theTire-Loading Information label found on the rear edgeof the driver’s side rear door or see “Loading YourVehicle” in the Index. Then be sure you don’t go overthe GVW limit for your vehicle, including the weight ofthe trailer tongue.
HitchesIt’s important to have the correct hitch equipment.Crosswinds, large trucks going by and rough roads are afew reasons why you’ll need the right hitch. Here aresome rules to follow:
� The rear bumper on your vehicle is not intended forhitches. Do not attach rental hitches or otherbumper-type hitches to it. Use only a frame-mountedhitch that does not attach to the bumper.
� Will you have to make any holes in the body of yourvehicle when you install a trailer hitch? If you do,then be sure to seal the holes later when you removethe hitch. If you don’t seal them, deadly carbonmonoxide (CO) from your exhaust can get into yourvehicle. See “Carbon Monoxide” in the Index. Dirtand water can, too.
Safety ChainsYou should always attach chains between your vehicleand your trailer. Cross the safety chains under the tongueof the trailer so that the tongue will not drop to the roadif it becomes separated from the hitch. Instructionsabout safety chains may be provided by the hitchmanufacturer or by the trailer manufacturer. Follow themanufacturer’s recommendation for attaching safetychains and do not attach them to the bumper. Alwaysleave just enough slack so you can turn with your rig.And, never allow safety chains to drag on the ground.
Trailer BrakesBecause your vehicle has anti-lock brakes, don’t try totap into your vehicle’s hydraulic brake system. If youdo, both brake systems won’t work well, or at all.
Be sure to read and follow the instructions for the trailerbrakes so you’ll be able to install, adjust and maintainthem properly.

4-38
Driving with a TrailerTowing a trailer requires a certain amount of experience.Before setting out for the open road, you’ll want to getto know your rig. Acquaint yourself with the feel ofhandling and braking with the added weight of thetrailer. And always keep in mind that the vehicle you aredriving is now a good deal longer and not nearly asresponsive as your vehicle is by itself.
Before you start, check the trailer hitch and platform(and attachments), safety chains, electrical connector,lamps, tires and mirror adjustment. If the trailer haselectric brakes, start your vehicle and trailer moving andthen apply the trailer brake controller by hand to be surethe brakes are working. This lets you check yourelectrical connection at the same time.
During your trip, check occasionally to be sure that theload is secure, and that the lamps and any trailer brakesare still working.
Following DistanceStay at least twice as far behind the vehicle ahead as youwould when driving your vehicle without a trailer. Thiscan help you avoid situations that require heavy brakingand sudden turns.
PassingYou’ll need more passing distance up ahead whenyou’re towing a trailer. And, because you’re a good deallonger, you’ll need to go much farther beyond thepassed vehicle before you can return to your lane.
Backing UpHold the bottom of the steering wheel with one hand.Then, to move the trailer to the left, just move that handto the left. To move the trailer to the right, move yourhand to the right. Always back up slowly and, ifpossible, have someone guide you.

4-39
Making Turns
NOTICE:
Making very sharp turns while trailering couldcause the trailer to come in contact with thevehicle. Your vehicle could be damaged. Avoidmaking very sharp turns while trailering.
When you’re turning with a trailer, make wider turns than normal. Do this so your trailer won’t strike soft shoulders, curbs, road signs, trees or otherobjects. Avoid jerky or sudden maneuvers. Signal wellin advance.
Turn Signals When Towing a TrailerWhen you tow a trailer, your vehicle may need adifferent turn signal flasher and/or extra wiring. Checkwith your dealer. The arrows on your instrument panelwill flash whenever you signal a turn or lane change.Properly hooked up, the trailer lamps will also flash,telling other drivers you’re about to turn, change lanesor stop.
When towing a trailer, the arrows on your instrumentpanel will flash for turns even if the bulbs on the trailerare burned out. Thus, you may think drivers behind youare seeing your signal when they are not. It’s importantto check occasionally to be sure the trailer bulbs are still working.
Driving On GradesReduce speed and shift to a lower gear before you startdown a long or steep downgrade. If you don’t shiftdown, you might have to use your brakes so much thatthey would get hot and no longer work well.
On a long uphill grade, shift down and reduce yourspeed to around 45 mph (70 km/h) to reduce thepossibility of the engine and the transmissionoverheating.

4-40
Parking on Hills
CAUTION:
You really should not park your vehicle, with atrailer attached, on a hill. If something goeswrong, your rig could start to move. People canbe injured, and both your vehicle and the trailercan be damaged.
But if you ever have to park your rig on a hill, here’show to do it:
1. Apply your regular brakes, but don’t shift intoPARK (P) for an automatic transmission or into gearfor a manual transmission.
When parking uphill, turn your wheels away fromthe curb. When parking downhill, turn your wheelsinto the curb.
2. Have someone place chocks behind the trailer wheels.
3. When the chocks are in place, release the regularbrakes until the chocks absorb the load.
4. Reapply the regular brakes. Then apply your parkingbrake and shift into PARK (P) for an automatictransmission or REVERSE (R) for a manualtransmission.
5. Release the regular brakes.

4-41
When You Are Ready to Leave AfterParking on a Hill1. Apply your regular brakes and hold the pedal down
while you:
� start your engine,
� shift into a gear, and
� release the parking brake.
2. Let up on the brake pedal.
3. Drive slowly until the trailer is clear of the chocks.
4. Stop and have someone pick up and store the chocks.
Maintenance When Trailer TowingYour vehicle will need service more often when you’repulling a trailer. See the Maintenance Schedule for moreon this. Things that are especially important in traileroperation are automatic transmission fluid (don’toverfill), engine oil, axle lubricant, drive belt, coolingsystem and brake system. Each of these is covered inthis manual, and the Index will help you find themquickly. If you’re trailering, it’s a good idea to reviewthis information before you start your trip.
Check periodically to see that all hitch nuts and bolts are tight.
Engine Cooling When Trailer TowingYour cooling system may temporarily overheat duringsevere operating conditions. See “Engine Overheating”in the Index.
5-5-1
Section 5 Problems on the Road
Here you’ll find what to do about some problems that can occur on the road.
5-2 Hazard Warning Flashers5-3 Other Warning Devices5-3 Jump Starting5-9 Towing Your Vehicle5-9 Engine Overheating
5-12 Cooling System5-18 If a Tire Goes Flat5-19 Changing a Flat Tire5-30 Compact Spare Tire5-31 If You’re Stuck: In Sand, Mud, Ice or Snow

5-2
Hazard Warning Flashers
Your hazard warning flashers let you warn others. Theyalso let police know you have a problem. Your front andrear turn signal lamps will flash on and off.
The hazard warning buttonis located in the center ofthe instrument panel,between the two air vents.
Your hazard warning flashers work no matter whatposition your key is in, and even if the key isn’t in.
Press the button to make the front and rear turn signallamps flash on and off. The light in the center of thebutton will flash, indicating that the hazard warningflashers are on. Press the button again to turn theflashers off.
When the hazard warning flashers are on, neither yourturn signals nor your Daytime Running Lamps (DRL)will work.

5-3
Other Warning DevicesIf you carry reflective triangles, you can set one up atthe side of the road about 300 feet (100 m) behind your vehicle.
Jump StartingIf your battery has run down, you may want to useanother vehicle and some jumper cables to start yourvehicle. Be sure to follow the steps below to do it safely.
CAUTION:
Batteries can hurt you. They can be dangerousbecause:� They contain acid that can burn you.� They contain gas that can explode or ignite.� They contain enough electricity to
burn you.If you don’t follow these steps exactly, some or allof these things can hurt you.
NOTICE:
Ignoring these steps could result in costly damageto your vehicle that wouldn’t be covered by yourwarranty.
The ACDelco� battery in your vehicle has abuilt -in hydrometer. Do not charge, test or jumpstart the battery if the hydrometer looks clear orlight yellow. Replace the battery when there is aclear or light yellow hydrometer and a crankingcomplaint.Trying to start your vehicle by pushing or pullingit won’t work, and it could damage your vehicle.
1. Check the other vehicle. It must have a 12-voltbattery with a negative ground system.
NOTICE:
If the other system isn’t a 12-volt system with anegative ground, both vehicles can be damaged.

5-4
2. Get the vehicles close enough so the jumper cablescan reach, but be sure the vehicles aren’t touchingeach other. If they are, it could cause a groundconnection you don’t want. You wouldn’t be able tostart your vehicle and the bad grounding coulddamage the electrical systems.
To avoid the possibility of the vehicles rolling, setthe parking brake firmly on both vehicles involved inthe jump start procedure. Put an automatictransmission in PARK (P) or a manual transmissionin NEUTRAL before setting the parking brake.
NOTICE:
If you leave your radio on, it could be badlydamaged. The repairs wouldn’t be covered byyour warranty.
3. Turn off the ignition on both vehicles. Unplugunnecessary accessories plugged into the cigarettelighter or in the accessory power outlets. Turn off theradio and all lamps that aren’t needed. This willavoid sparks and help save both batteries. And itcould save your radio!
4. Open the hoods and locate the batteries. Find thepositive (+) and negative (-) terminal locations oneach vehicle. See “Engine Compartment Overview”in the Index for more information on location of the battery.

5-5
CAUTION:
An electric fan can start up even when the engineis not running and can injure you. Keep hands,clothing and tools away from any underhoodelectric fan.
CAUTION:
Using a match near a battery can cause batterygas to explode. People have been hurt doing this,and some have been blinded. Use a flashlight ifyou need more light.Be sure the battery has enough water. You don’tneed to add water to the ACDelco� batteryinstalled in your new vehicle. But if a battery hasfiller caps, be sure the right amount of fluid isthere. If it is low, add water to take care of thatfirst. If you don’t, explosive gas could be present.Battery fluid contains acid that can burn you.Don’t get it on you. If you accidentally get it inyour eyes or on your skin, flush the place withwater and get medical help immediately.

5-6
CAUTION:
Fans or other moving engine parts can injure youbadly. Keep your hands away from moving partsonce the engine is running.
5. Check that the jumper cables don’t have loose ormissing insulation. If they do, you could get a shock.The vehicles could also be damaged, too.
Before you connect the cables, here are some basicthings you should know. Positive (+) will go topositive (+) or to a remote positive (+) terminal if thevehicle has one. Negative (-) will go to a heavy,unpainted metal engine part or to a remotenegative (-) terminal if the vehicle has one.
Don’t connect positive (+) to the negative (-) or youwill get a short that would damage the battery andmaybe other parts, too. And don’t connect thenegative (-) cable to negative (-) terminal on thedead battery because this can cause sparks.
6. Connect the red positive (+) cable to the positive (+)terminal of the dead battery. Use a remotepositive (+) terminal if the vehicle has one.

5-7
7. Don’t let the other endtouch metal. Connect itto the positive (+)terminal of the goodbattery. Use a remotepositive (+) terminal ifthe vehicle has one.
8. Now connect theblack negative (-)cable to thenegative terminalof the good battery.Use a remotenegative (-)terminal if thevehicle has one.
Don’t let the other end touch anything until the nextstep. The other end of the negative (-) cable doesn’tgo to the dead battery. It goes to a heavy, unpaintedmetal engine part or to a remote negative (-) terminalon the vehicle with the dead battery.
9. Connect the other end of thenegative (-) cableat least 18 inches(45 cm) away fromthe dead battery,but not near engineparts that move.
The electrical connection is just as good there, andthe chance of sparks getting back to the battery ismuch less.

5-8
10. Now start the vehicle with the good battery and runthe engine for a while.
11. Try to start the vehicle that has the dead battery. If it won’t start after a few tries, it probably needs service.
NOTICE:
Damage to your vehicle may result fromelectrical shorting if jumper cables are removedincorrectly. To prevent electrical shorting, takecare that the cables don’t touch each other or anyother metal period. The repairs wouldn’t becovered by your warranty.
Jumper Cable Removal
A. Dead Battery
B. Good Battery
C. Heavy, Unpainted Metal Engine Part

5-9
To disconnect the jumper cables from both vehicles, dothe following:
1. Disconnect the black negative (-) cable the vehiclethat had the dead battery.
2. Disconnect the black negative (-) cable from thevehicle with the good battery.
3. Disconnect the red positive (+) cable from thevehicle with the good battery.
4. Disconnect the red positive (+) cable from theother vehicle.
Towing Your VehicleConsult your dealer or a professional towing service ifyou need to have your disabled vehicle towed. See“Roadside Assistance” in the Index. If you want to towyour vehicle behind another vehicle for recreationalpurposes (such as behind a motorhome), see“Recreational Vehicle Towing” in the Index.
Engine OverheatingThere are three engine hot messages that may bedisplayed in the Driver Information Center (DIC). See “Engine Hot Warning Messages” in the Index.

5-10
If Steam Is Coming From Your EngineCAUTION:
Steam from an overheated engine can burn youbadly, even if you just open the hood. Stay awayfrom the engine if you see or hear steam comingfrom it. Just turn it off and get everyone awayfrom the vehicle until it cools down. Wait untilthere is no sign of steam or coolant before youopen the hood.
If you keep driving when your engine isoverheated, the liquids in it can catch fire. You orothers could be badly burned. Stop your engine ifit overheats, and get out of the vehicle until theengine is cool.
NOTICE:
If your engine catches fire because you keepdriving with no coolant, your vehicle can bebadly damaged. The costly repairs would not becovered by your warranty.

5-11
If No Steam Is Coming From Your EngineAn overheat warning, along with a low coolant message,can indicate a serious problem. See “Low CoolantMessage” in the Index.
If you get an engine overheat warning with no lowcoolant message, but see or hear no steam, the problemmay not be too serious. Sometimes the engine can get alittle too hot when you:
� Climb a long hill on a hot day.
� Stop after high-speed driving.
� Idle for long periods in traffic.
� Tow a trailer.
If you get the overheat warning with no sign of steam,try this for a minute or so:
1. In heavy traffic, let the engine idle in neutral whilestopped. If it is safe to do so, pull off the road, shiftto park or neutral and let the engine idle.
2. Set the temperature control to the highest heat settingand open the windows, as necessary.
If you no longer have the overheat warning, you candrive. Just to be safe, drive slower for about 10 minutes.If the warning doesn’t come back on, you can drivenormally.
If the warning continues and you have not stopped, pull over, stop, and park your vehicle right away.
If there’s still no sign of steam, you can idle the enginefor three minutes while you’re parked. If you still havethe warning, turn off the engine and get everyone out ofthe vehicle until it cools down.
You may decide not to lift the hood but to get servicehelp right away.

5-12
Cooling SystemWhen you decide it’s safe to lift the hood, here’s whatyou’ll see:
A. Coolant Surge Tank and Pressure Cap
B. Electric Engine Cooling Fans
CAUTION:
An electric engine cooling fan under the hood canstart up even when the engine is not running andcan injure you. Keep hands, clothing and toolsaway from any underhood electric fan.
If the coolant inside the coolant surge tank is boiling,don’t do anything else until it cools down. The vehicleshould be parked on a level surface.

5-13
The coolant level should be at or slightly above theFULL COLD/FROID line on the side of the coolantsurge tank. If it isn’t, you may have a leak at thepressure cap or in the radiator hoses, heater hoses,radiator, water pump or somewhere else in the coolingsystem.
CAUTION:
Heater and radiator hoses, and other engineparts, can be very hot. Don’t touch them. If youdo, you can be burned.
Don’t run the engine if there is a leak. If you runthe engine, it could lose all coolant. That couldcause an engine fire, and you could be burned.Get any leak fixed before you drive the vehicle.
If there seems to be no leak, with the engine on, check tosee if the electric engine cooling fans are running. If theengine is overheating, both fans should be running. Ifthey aren’t, your vehicle needs service.
NOTICE:
Engine damage from running your enginewithout coolant isn’t covered by your warranty.
NOTICE:
When adding coolant, it is important that you useonly DEX-COOL� (silicate-free) coolant.If coolant other than DEX-COOL is added to thesystem, premature engine, heater core orradiator corrosion may result. In addition, theengine coolant will require change sooner -- at30,000 miles (50 000 km) or 24 months,whichever occurs first. Damage caused by the useof coolant other than DEX-COOL� is notcovered by your new vehicle warranty.

5-14
How to Add Coolant to the Coolant Surge TankIf you haven’t found a problem yet, check to see ifcoolant is visible in the surge tank. If coolant is visiblebut the coolant level isn’t at the FULL COLD/FROIDline on the side of the coolant surge tank, add a 50/50mixture of clean, drinkable water and DEX-COOL�
coolant at the coolant surge tank, but be sure the coolingsystem, including the coolant surge tank pressure cap, iscool before you do it. See “Engine Coolant” in the Indexfor more information.
If no coolant is visible in the surge tank, add coolant as follows:
CAUTION:
Steam and scalding liquids from a hot coolingsystem can blow out and burn you badly. Theyare under pressure, and if you turn the coolantsurge tank pressure cap -- even a little -- theycan come out at high speed.
CAUTION: (Continued)
CAUTION: (Continued)
Never turn the cap when the cooling system,including the coolant surge tank pressure cap, ishot. Wait for the cooling system and coolantsurge tank pressure cap to cool if you ever haveto turn the pressure cap.

5-15
CAUTION:
Adding only plain water to your cooling systemcan be dangerous. Plain water, or some otherliquid such as alcohol, can boil before the propercoolant mixture will. Your vehicle’s coolantwarning system is set for the proper coolantmixture. With plain water or the wrong mixture,your engine could get too hot but you wouldn’tget the overheat warning. Your engine couldcatch fire and you or others could be burned. Use a 50/50 mixture of clean, drinkable waterand DEX-COOL� coolant.
NOTICE:
In cold weather, water can freeze and crack theengine, radiator, heater core and other parts. Use the recommended coolant and the propercoolant mixture.
CAUTION:
You can be burned if you spill coolant on hotengine parts. Coolant contains ethylene glycoland it will burn if the engine parts are hotenough. Don’t spill coolant on a hot engine.

5-16
1. Park the vehicle on a level surface. You can removethe coolant surge tank pressure cap when the coolingsystem, including the coolant surge tank pressure capand upper radiator hose, is no longer hot. Turn thepressure cap slowly counterclockwise (left) aboutone-quarter turn and then stop.
If you hear a hiss, wait for that to stop. A hiss meansthere is still some pressure left.
2. Then keep turning the pressure cap slowly, andremove it.

5-17
3. Then fill the coolant surge tank with the propermixture, to slightly above the FULL COLD/FROIDline on the side of the coolant surge tank.
4. With the coolant surge tank pressure cap off, start theengine and let it run until you can feel the upperradiator hose getting hot. Watch out for the enginecooling fans.
By this time, the coolant level inside the coolantsurge tank may be lower. If the level is lower, addmore of the proper mixture to the coolant surge tankuntil the level reaches the FULL COLD/FROID lineon the side of the coolant surge tank.

5-18
5. Then replace the pressure cap. Be sure the pressurecap is hand-tight and fully seated.
Start the engine and allow it to warm up. If the CHECKCOOLANT LEVEL message does not appear on theDriver Information Center, coolant is at the proper filllevel. If a CHECK COOLANT LEVEL message doesappear, repeat Steps 1 to 3 and reinstall the pressure capor see your dealer.
If a Tire Goes FlatIt’s unusual for a tire to “blow out” while you’re driving,especially if you maintain your tires properly. If air goesout of a tire, it’s much more likely to leak out slowly.But if you should ever have a “blowout,” here are a fewtips about what to expect and what to do:
If a front tire fails, the flat tire will create a drag thatpulls the vehicle toward that side. Take your foot off theaccelerator pedal and grip the steering wheel firmly.Steer to maintain lane position, and then gently brake toa stop well out of the traffic lane.
A rear blowout, particularly on a curve, acts much like askid and may require the same correction you’d use in askid. In any rear blowout, remove your foot from theaccelerator pedal. Get the vehicle under control bysteering the way you want the vehicle to go. It may bevery bumpy and noisy, but you can still steer. Gentlybrake to a stop -- well off the road if possible.
If a tire goes flat, the next part shows how to use yourjacking equipment to change a flat tire safely.

5-19
Changing a Flat TireIf a tire goes flat, avoid further tire and wheel damageby driving slowly to a level place. Turn on your hazardwarning flashers.
CAUTION:
Changing a tire can cause an injury. The vehiclecan slip off the jack and roll over you or otherpeople. You and they could be badly injured.Find a level place to change your tire. To helpprevent the vehicle from moving:
1. Set the parking brake firmly.2. Put an automatic transmission shift lever in
PARK (P), or shift a manual transmission toFIRST (1) or REVERSE (R).
3. Turn off the engine.
To be even more certain the vehicle won’t move,you can put blocks at the front and rear of thetire farthest away from the one being changed.That would be the tire on the other side of thevehicle, at the opposite end.
The following steps will tell you how to use the jack andchange a tire.

5-20
Removing the Spare Tire and ToolsThe equipment you’ll need is in the trunk.
Instructions for changing your tires are on the inside ofthe compact spare tire cover located in your trunk.
To gain access to the instructions, spare tire and jackingequipment, do the following:
1. Turn the center nut onthe compact spare tirecover counterclockwiseto remove it. Thenremove the cover.
2. Remove the compact spare tire. See “Compact SpareTire” later in this section for more information aboutthe compact spare tire.

5-21
3. Turn the nut holding the jack counterclockwise andremove it. Then remove the jack and wheel wrench.
The tools you’ll be using include the jack (A) and thewheel wrench (B).

5-22
Removing Wheel Covers and Wheel NutCaps (If Equipped)
If your vehicle has wheel covers, use the flat end of thewheel wrench to remove the covers. Turn the wheelwrench clockwise to gently pry off the wheel cover.
Be careful not to scratch the aluminum wheel edge anddon’t try to remove the wheel cover with your hands.
If your vehicle has wheel nut caps, turn the wheelwrench counterclockwise to remove the caps.
If your vehicle has 17 inch (43.2 cm) wheels, there is acenter cap that does not need to be removed in order toremove the wheel from the vehicle.

5-23
Removing the Flat Tire and Installing theSpare Tire
A. Wheel Wrench
B. Wheel Nut
1. Place the wheel wrench securely over the wheel nut.Turn the wheel wrench counterclockwise to loosenall the wheel nuts. Don’t remove them yet.
A. Front Jacking Location
B. Rear Jacking Location
2. Find the jacking location using the diagram above and corresponding hoisting notches located in the plastic molding. The notches in the plasticmolding are marked with a triangle shape to help you find them.
The front location is 14 inches (35.6 cm) from therear edge of the front wheel well, and the rearlocation is 7 inches (17.8 cm) from the front edge ofthe rear wheel well.

5-24
CAUTION:
Getting under a vehicle when it is jacked up isdangerous. If the vehicle slips off the jack, youcould be badly injured or killed. Never get undera vehicle when it is supported only by a jack.
CAUTION:
Raising your vehicle with the jack improperlypositioned can damage the vehicle and even makethe vehicle fall. To help avoid personal injury andvehicle damage, be sure to fit the jack lift headinto the proper location before raising thevehicle.
3. Attach the wheel wrench to the jack.
4. Turn the wheel wrench counterclockwise to lowerthe jack lift head until the jack fits under the vehicle.
A. Flat Tire
B. Compact Spare Tire
5. Raise the jack by turning the wheel wrenchclockwise until the metal flanges fit firmly into thenotches in the plastic molding.
6. Put the compact spare tire near you.
7. Raise the vehicle by turning the wheel wrenchclockwise. Raise the vehicle far enough off theground for the compact spare tire to fit under the vehicle.
8. Remove all the wheel nuts and take off the flat tire.

5-25
9. Remove any rust or dirtfrom the wheel bolts,mounting surfaces andspare wheel.
CAUTION:
Rust or dirt on the wheel, or on the parts towhich it is fastened, can make the wheel nutsbecome loose after a time. The wheel could comeoff and cause an accident. When you change awheel, remove any rust or dirt from the placeswhere the wheel attaches to the vehicle. In anemergency, you can use a cloth or a paper towelto do this; but be sure to use a scraper or wirebrush later, if you need to, to get all the rust ordirt off.
CAUTION:
Never use oil or grease on studs or nuts. If youdo, the nuts might come loose. Your wheel couldfall off, causing a serious accident.
10. Place the compactspare tire on thewheel-mountingsurface.

5-26
11. Put the wheel nuts backon with the rounded endof the nuts toward thewheel. Tighten eachwheel nut by turning itclockwise with yourhand until the wheel isheld against the hub.
12. Lower the vehicle by turning the wheel wrenchcounterclockwise. Lower the jack completely.

5-27
13. Tighten the wheelnuts firmly in acrisscross sequenceas shown.
CAUTION:
Incorrect wheel nuts or improperly tightenedwheel nuts can cause the wheel to become looseand even come off. This could lead to an accident.Be sure to use the correct wheel nuts. If you haveto replace them, be sure to get new GM originalequipment wheel nuts.Stop somewhere as soon as you can and have thenuts tightened with a torque wrench to theproper torque specification. See “Capacities andSpecifications” in the Index for the wheel nuttorque specification.

5-28
NOTICE:
Improperly tightened wheel nuts can lead tobrake pulsation and rotor damage. To avoidexpensive brake repairs, evenly tighten the wheelnuts in the proper sequence and to the propertorque specification. See “Capacities andSpecifications” in the Index for the wheel nuttorque specification.
NOTICE:
Wheel covers won’t fit on your compact spare. If you try to put a wheel cover on your compactspare, you could damage the cover or the spare.
14. Don’t try to put a wheel cover on your compactspare tire. It won’t fit. Store the wheel cover in the trunk until you have the flat tire repaired or replaced.
Storing the Flat Tire and Tools
CAUTION:
Storing a jack, a tire or other equipment in thepassenger compartment of the vehicle couldcause injury. In a sudden stop or collision, looseequipment could strike someone. Store all thesein the proper place.
After you’ve put the compact spare tire on your vehicle,you’ll need to store the flat tire in your trunk.
Remove the foam support so that the flat tire will fit inthe storage area. Place the flat tire with the appearanceside face down and store the jack container in the centerof the tire. See the diagram in “Storing the Spare Tireand Tools” following for more information.

5-29
Storing the Spare Tire and Tools
CAUTION:
Storing a jack, a tire or other equipment in thepassenger compartment of the vehicle couldcause injury. In a sudden stop or collision, looseequipment could strike someone. Store all thesein the proper place.
The compact spare is for temporary use only. Replacethe compact spare tire with a full-size tire as soon as you can.
Use the following diagram as a guide for storing thecompact spare tire in the trunk: A. Compact Spare Tire
Cover Wing Nut
B. Compact Spare Tire Cover
C. Plastic Wing Nut
D. Retainer
E. Jack Container with Wheel Wrenchand Jack
F. Flat Road Tire
G. Compact Spare Tire
H. Foam Insert
I. Bolt
J. Wheel Wrench
K. Jack
L. Jack Container

5-30
Compact Spare TireAlthough the compact spare tire was fully inflated when your vehicle was new, it can lose air after a time.Check the inflation pressure regularly. It should be60 psi (420 kPa).
After installing the compact spare on your vehicle, youshould stop as soon as possible and make sure yourspare tire is correctly inflated. The compact spare ismade to perform well at speeds up to 65 mph(105 km/h) for distances up to 3,000 miles (5 000 km),so you can finish your trip and have your full-size tirerepaired or replaced where you want. Of course, it’s bestto replace your spare with a full-size tire as soon as youcan. Your spare will last longer and be in good shape incase you need it again.
NOTICE:
When the compact spare is installed, don’t takeyour vehicle through an automatic car wash withguide rails. The compact spare can get caught onthe rails. That can damage the tire and wheel,and maybe other parts of your vehicle.
Don’t use your compact spare on other vehicles.
And don’t mix your compact spare tire or wheel withother wheels or tires. They won’t fit. Keep your sparetire and its wheel together.
NOTICE:
Tire chains won’t fit your compact spare. Usingthem can damage your vehicle and can damagethe chains too. Don’t use tire chains on yourcompact spare.

5-31
If You’re Stuck: In Sand, Mud, Ice or SnowIn order to free your vehicle when it is stuck, you willneed to spin the wheels, but you don’t want to spin yourwheels too fast. The method known as “rocking” canhelp you get out when you’re stuck, but you must use caution.
CAUTION:
If you let your tires spin at high speed, they canexplode, and you or others could be injured. And,the transmission or other parts of the vehicle canoverheat. That could cause an enginecompartment fire or other damage. When you’restuck, spin the wheels as little as possible. Don’tspin the wheels above 35 mph (55 km/h) as shownon the speedometer.
NOTICE:
Spinning your wheels can destroy parts of yourvehicle as well as the tires. If you spin the wheelstoo fast while shifting your transmission backand forth, you can destroy your transmission.
For information about using tire chains on your vehicle,see “Tire Chains” in the Index.
Rocking Your Vehicle To Get It OutFirst, turn your steering wheel left and right. That willclear the area around your front wheels. You should turnyour traction control system off. See “Traction ControlSystem” in the Index. Then shift back and forth betweenREVERSE (R) and a forward gear, spinning the wheelsas little as possible. Release the accelerator pedal whileyou shift, and press lightly on the accelerator pedalwhen the transmission is in gear. By slowly spinningyour wheels in the forward and reverse directions, youwill cause a rocking motion that may free your vehicle.If that doesn’t get you out after a few tries, you mayneed to be towed out. If you do need to be towed out,see “Towing Your Vehicle” in the Index.

6-6-1
Section 6 Service and Appearance Care
Here you will find information about the care of your vehicle. This section begins with service and fuel information,and then it shows how to check important fluid and lubricant levels. There is also technical information about yourvehicle, and a part devoted to its appearance care.
6-2 Service6-3 Fuel6-5 Fuels in Foreign Countries6-6 Filling Your Tank6-8 Filling a Portable Fuel Container6-8 Checking Things Under the Hood6-11 Engine Oil6-17 Engine Air Cleaner/Filter6-19 Passenger Compartment Air Filter6-20 Automatic Transmission Fluid6-21 Manual Transmission Fluid6-23 Hydraulic Clutch6-24 Rear Axle6-25 Engine Coolant6-28 Surge Tank Pressure Cap6-29 Power Steering Fluid6-30 Windshield Washer Fluid
6-31 Brakes6-34 Battery6-35 Bulb Replacement6-39 Windshield Wiper Blade Replacement6-41 Tires6-49 Appearance Care6-50 Cleaning the Inside of Your Vehicle6-53 Cleaning the Outside of Your Vehicle6-57 GM Vehicle Care/Appearance Materials6-58 Vehicle Identification Number (VIN)6-58 Service Parts Identification Label6-59 Electrical System6-65 Removing the Rear Seat Cushion6-72 Replacement Bulbs6-72 Capacities and Specifications6-73 Normal Maintenance Replacement Parts

6-2
ServiceYour dealer knows your vehicle best and wants you tobe happy with it. We hope you’ll go to your dealer forall your service needs. You’ll get genuine GM parts andGM-trained and supported service people.
We hope you’ll want to keep your GM vehicle all GM.Genuine GM parts have one of these marks:
Doing Your Own Service WorkIf you want to do some of your own service work, you’llwant to use the proper service manual. It tells you muchmore about how to service your vehicle than this manualcan. To order the proper service manual, see “Serviceand Owner Publications” in the Index.
Your vehicle has an air bag system. Before attempting todo your own service work, see “Servicing Your AirBag-Equipped Vehicle” in the Index.
You should keep a record with all parts receipts and listthe mileage and the date of any service work youperform. See “Maintenance Record” in the Index.

6-3
CAUTION:
You can be injured and your vehicle could bedamaged if you try to do service work on avehicle without knowing enough about it.
� Be sure you have sufficient knowledge,experience, the proper replacement partsand tools before you attempt any vehiclemaintenance task.
� Be sure to use the proper nuts, bolts andother fasteners. “English” and “metric”fasteners can be easily confused. If you usethe wrong fasteners, parts can later breakor fall off. You could be hurt.
Adding Equipment to the Outside of Your VehicleThings you might add to the outside of your vehicle canaffect the airflow around it. This may cause wind noiseand affect windshield washer performance. Check withyour dealer before adding equipment to the outside ofyour vehicle.
FuelGasoline OctaneUse premium unleaded gasoline with a posted octane of91 or higher for best performance. You may also usemiddle grade or regular unleaded gasoline rated at 87octane or higher, but your vehicle’s acceleration may beslightly reduced. If the octane is less than 87, you mayget a heavy knocking noise when you drive. If it is badenough, it can damage your engine.

6-4
Gasoline SpecificationsIt is recommended that gasoline meet specificationswhich were developed by the American AutomobileManufacturers Association and endorsed by theCanadian Vehicle Manufacturers’ Association for bettervehicle performance and engine protection. Gasolinesmeeting these specifications could provide improveddriveability and emission control system performancecompared to other gasolines.
In Canada, look for the “Auto Makers’Choice” label on the pump.
Canada Only
California FuelIf your vehicle is certified to meet California EmissionStandards (see the underhood emission control label), itis designed to operate on fuels that meet Californiaspecifications. If this fuel is not available in statesadopting California emissions standards, your vehiclewill operate satisfactorily on fuels meeting federalspecifications, but emission control system performancemay be affected. The malfunction indicator lamp mayturn on (see “Malfunction Indicator Lamp” in the Index)and your vehicle may fail a smog-check test. If thisoccurs, return to your authorized GM dealer fordiagnosis. If it is determined that the condition is causedby the type of fuel used, repairs may not be covered byyour warranty.

6-5
AdditivesSome gasolines that are not reformulated for lowemissions may contain an octane-enhancing additivecalled methylcyclopentadienyl manganese tricarbonyl(MMT); ask the attendant where you buy gasolinewhether the fuel contains MMT. General Motors doesnot recommend the use of such gasolines. Fuelscontaining MMT can reduce the life of spark plugs andthe performance of the emission control system may beaffected. The malfunction indicator lamp may turn on. If this occurs, return to your authorized GM dealer for service.
To provide cleaner air, all gasolines in the United Statesare now required to contain additives that will helpprevent engine and fuel system deposits from forming,allowing your emission control system to work properly.You should not have to add anything to your fuel.Gasolines containing oxygenates, such as ethers andethanol, and reformulated gasolines may be available inyour area to contribute to clean air. General Motorsrecommends that you use these gasolines, particularly ifthey comply with the specifications described earlier.
NOTICE:
Your vehicle was not designed for fuel thatcontains methanol. Don’t use fuel containingmethanol. It can corrode metal parts in your fuelsystem and also damage plastic and rubber parts.That damage wouldn’t be covered under yourwarranty.
Fuels in Foreign CountriesIf you plan on driving in another country outside theUnited States or Canada, the proper fuel may be hard tofind. Never use leaded gasoline or any other fuel notrecommended in the previous text on fuel. Costly repairscaused by use of improper fuel wouldn’t be covered byyour warranty.
To check on fuel availability, ask an auto club, orcontact a major oil company that does business in thecountry where you’ll be driving.

6-6
Filling Your Tank
CAUTION:
Fuel vapor is highly flammable. It burnsviolently, and that can cause very bad injuries.Don’t smoke if you’re near fuel or refueling yourvehicle. Keep sparks, flames and smokingmaterials away from fuel.
The fuel cap is locatedbehind a hinged door on the passenger’s side of the vehicle.
To open the fuel door, push inward on the forward edge of the fuel door until the rear edge can be pulled outward.
While refueling, hang thefuel cap by the tether fromthe hook on the fuel door.
To remove the fuel cap, turn it slowly to the left(counterclockwise). The fuel cap has a spring in it; ifyou let go of the cap too soon, it will spring back to the right.
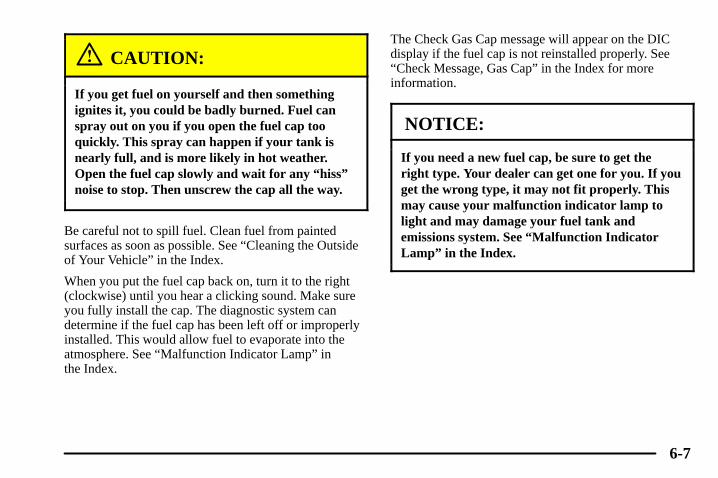
6-7
CAUTION:
If you get fuel on yourself and then somethingignites it, you could be badly burned. Fuel canspray out on you if you open the fuel cap tooquickly. This spray can happen if your tank isnearly full, and is more likely in hot weather.Open the fuel cap slowly and wait for any “hiss”noise to stop. Then unscrew the cap all the way.
Be careful not to spill fuel. Clean fuel from paintedsurfaces as soon as possible. See “Cleaning the Outsideof Your Vehicle” in the Index.
When you put the fuel cap back on, turn it to the right(clockwise) until you hear a clicking sound. Make sureyou fully install the cap. The diagnostic system candetermine if the fuel cap has been left off or improperlyinstalled. This would allow fuel to evaporate into theatmosphere. See “Malfunction Indicator Lamp” in the Index.
The Check Gas Cap message will appear on the DICdisplay if the fuel cap is not reinstalled properly. See“Check Message, Gas Cap” in the Index for moreinformation.
NOTICE:
If you need a new fuel cap, be sure to get theright type. Your dealer can get one for you. If youget the wrong type, it may not fit properly. Thismay cause your malfunction indicator lamp tolight and may damage your fuel tank andemissions system. See “Malfunction IndicatorLamp” in the Index.

6-8
Filling a Portable Fuel Container
CAUTION:
Never fill a portable fuel container while it is inyour vehicle. Static electricity discharge from thecontainer can ignite the gasoline vapor. You canbe badly burned and your vehicle damaged if thisoccurs. To help avoid injury to you and others:
� Dispense gasoline only into approvedcontainers.
� Do not fill a container while it is inside avehicle, in a vehicle’s trunk, pickup bed oron any surface other than the ground.
� Bring the fill nozzle in contact with theinside of the fill opening before operatingthe nozzle. Contact should be maintaineduntil the filling is complete.
� Don’t smoke while pumping gasoline.
Checking Things Under the Hood
CAUTION:
An electric fan under the hood can start up andinjure you even when the engine is not running.Keep hands, clothing and tools away from anyunderhood electric fan.
CAUTION:
Things that burn can get on hot engine parts andstart a fire. These include liquids like gasoline,oil, coolant, brake fluid, windshield washer andother fluids, and plastic or rubber. You or otherscould be burned. Be careful not to drop or spillthings that will burn onto a hot engine.

6-9
Hood ReleaseTo lift the hood, use the following steps:
1. Pull the lever inside the vehicle to open the hood. It is located on the lower left side of the instrument panel.
2. Then go to the front of the vehicle and find thesecondary hood release lever. The lever is locatedunder the front edge of the grille near the center.Move the release lever to the side and raise the hood.
Before closing the hood, be sure all filler caps are onproperly. Then pull the hood down and close it firmly.

6-10
Engine Compartment OverviewWhen you open the hood, you’ll see the following:
A. BatteryB. Underhood Fuse BlockC. Windshield Washer
Fluid ReservoirD. Passenger Compartment
Air Filter
E. Power Steering Fluid ReservoirF. Engine Oil Fill CapG. Engine Oil DipstickH. Engine Coolant Heater Cord
(If Equipped)I. Brake Master Cylinder Reservoir
J. Engine Air Cleaner/FilterK. Hydraulic Clutch Reservoir
(Manual Transmission Only)L. Engine Coolant Surge Tank and
Pressure Cap

6-11
Engine OilIf the oil pressure lightand/or the Oil PressureLow--Stop Engine messageon the DIC appears on theinstrument cluster, it meansyou need to check yourengine oil level right away.
For more information, see “Oil Pressure Message” and“Oil Pressure Light” in the Index.
You should check your engine oil level regularly; this isan added reminder.
Checking Engine OilIt’s a good idea to check your engine oil every time youget fuel. In order to get an accurate reading, the oil mustbe warm and the vehicle must be on level ground.
The engine oil dipstick islocated on the driver’s sideof the engine compartment,near the front of the vehicle.The dipstick handle is ayellow loop. See “EngineCompartment Overview” inthe Index for moreinformation on location.
Turn off the engine and give the oil several minutes todrain back into the oil pan. If you don’t, the oil dipstickmight not show the actual level.
Pull out the dipstick and clean it with a paper towel orcloth, then push it back in all the way. Remove it again,keeping the tip down, and check the level.

6-12
When to Add Engine OilIf the oil is at or below the lower mark, then you’ll needto add at least one quart of oil. But you must use theright kind. This part explains what kind of oil to use. For engine oil crankcase capacity, see “Capacities andSpecifications” in the Index.
NOTICE:
Don’t add too much oil. If your engine has somuch oil that the oil level gets above the uppermark that shows the proper operating range,your engine could be damaged.
The engine oil fill cap is located in the center of theengine compartment. See “Engine CompartmentOverview” in the Index for more information on location.
Be sure to fill it enough to put the level somewhere inthe proper operating range. Push the dipstick all the wayback in when you’re through.

6-13
What Kind of Engine Oil to UseOils recommended for your vehicle can be identified bylooking for the starburst symbol.
This symbol indicates that the oil has been certified bythe American Petroleum Institute (API). Do not use anyoil which does not carry this starburst symbol.
If you change your own oil, be sure you use oil that has the starburst symbol on the front of theoil container. If you haveyour oil changed for you, be sure the oil put into your engine is AmericanPetroleum Institute certifiedfor gasoline engines.
You should also use the proper viscosity oil for yourvehicle, as shown in the viscosity chart.
SAE 10W-30 is best for your vehicle. However, you canuse SAE 5W-30 if it’s going to be colder than 60�F(16�C) before your next oil change. When it’s very cold,you should use SAE 5W-30. These numbers on an oilcontainer show its viscosity, or thickness. Do not useother viscosity oils, such as SAE 20W-50.

6-14
NOTICE:
Use only engine oil with the American PetroleumInstitute Certified For Gasoline Enginesstarburst symbol. Failure to use therecommended oil can result in engine damage notcovered by your warranty.
GM Goodwrench� oil meets all the requirements foryour vehicle.
If you are in an area where the temperature falls below-20�F (-29�C), consider using either an SAE 5W-30synthetic oil or an SAE 0W-30 oil. Both will provideeasier cold starting and better protection for your engineat extremely low temperatures.
Engine Oil AdditivesDon’t add anything to your oil. The recommended oilswith the starburst symbol are all you will need for goodperformance and engine protection.
When to Change Engine Oil (GM Oil Life System�)Your vehicle has a computer system that lets you knowwhen to change the engine oil and filter. This is based on engine revolutions and engine temperature, and noton mileage. Based on driving conditions, the mileage at which an oil change will be indicated can varyconsiderably. For the oil life system to work properly,you must reset the system every time the oil is changed.
When the system has calculated that oil life has beendiminished, it will indicate that an oil change isnecessary. A Change Engine Oil message in the DICwill come on. Change your oil as soon as possiblewithin the next two times you stop for fuel. It is possiblethat, if you are driving under the best conditions, the oillife system may not indicate that an oil change isnecessary for over a year. However, your engine oil andfilter must be changed at least once a year and at thistime the system must be reset. It is also important tocheck your oil regularly and keep it at the proper level.
If the system is ever reset accidentally, you must changeyour oil at 3,000 miles (5 000 km) since your last oilchange. Remember to reset the oil life system wheneverthe oil is changed.

6-15
How to Reset the Change Engine Oil Message andthe Oil Life Indicator
The GM Oil Life System� calculates when to changeyour engine oil and filter based on vehicle use. Anytimeyour oil is changed, reset the system so it can calculatewhen the next oil change is required. If a situationoccurs where you change your oil prior to a ChangeEngine Oil message in the DIC being turned on, resetthe system.
After the oil has been changed, the Change Engine Oil message and the oil life indicator must be reset. To reset the message and indicator, use one of thefollowing procedures:
Base Audio System
Press the CLR button located to the right of the DICdisplay to acknowledge the CHANGE ENGINE OILmessage. This will clear the message from the displayand reset it.
To reset the oil life indicator, use the following steps:
1. Press the up or down arrow on the INFO buttonlocated to the right of the DIC display to access theDIC menu.
2. Once XXX% ENGINE OIL LIFE menu item ishighlighted, press and hold the CLR button.
The percentage will return to 100, and the oil lifeindicator will be reset.
3. Repeat the steps if the percentage does not return to 100.
6-16
Navigation System
Press the multi-function button, next to the OK promptin the upper right of the display, to acknowledge theChange Engine Oil message. This will clear the messagefrom the display and reset it.
To reset the oil life indicator, use the following steps:
1. Turn the system on by pressing the PWR/VOL knobonce. The PWR/VOL knob is located to the lowerleft of the DIC display.
2. Press the INFO button located to the left of the display to access the Vehicle Info(Information) menu.
3. Turn the TUNE/SEL knob located to the lower rightof the display until Engine Oil Life is highlighted.Press the knob once to select it.
4. Once XXX% Engine Oil Life is displayed, press themulti-function button next to the Reset prompt in theupper right corner of the display.
The percentage will return to 100, and the oil lifeindicator will be reset.
5. Repeat the steps if the percentage does not return to 100.
What to Do with Used OilUsed engine oil contains certain elements that may beunhealthy for your skin and could even cause cancer.Don’t let used oil stay on your skin for very long. Cleanyour skin and nails with soap and water, or a good handcleaner. Wash or properly throw away clothing or ragscontaining used engine oil. See the manufacturer’swarnings about the use and disposal of oil products.
Used oil can be a threat to the environment. If youchange your own oil, be sure to drain all the oil from thefilter before disposal. Never dispose of oil by putting itin the trash, pouring it on the ground, into sewers, orinto streams or bodies of water. Instead, recycle it bytaking it to a place that collects used oil. If you have a problem properly disposing of your used oil, ask your dealer, a service station or a local recycling centerfor help.

6-17
Engine Air Cleaner/Filter
The engine air cleaner/filter is in the enginecompartment on the driver’s side of the vehicle, near thefront. See “Engine Compartment Overview” in theIndex for more information on location.
The engine air cleaner/filter needs replacementperiodically. Use the information listed in this manual as a guide for filter replacement intervals. See “Maintenance Schedule” in the Index for moreinformation. In general, you should change the filterwhenever the indicator located on the cover turns black. See the previous photo for the exact location of the indicator.
The indicator may turn black earlier or later than thesuggested replacement intervals listed under“Maintenance Schedule” in this manual. However, youshould replace the filter and reset the indicator once theindicator turns black.
To check or replace the filter, do the following:
1. Remove the two screws located on the sides of the cover.
2. Lift the cover off.

6-18
3. Pull out the old engine air cleaner/filter.
4. Install a new engine air cleaner/filter, if needed. See“Normal Maintenance Replacement Parts” later inthis section for the correct part number for the filter.
5. If the filter is replaced, reset the indicator bypressing upward on the indicator from the bottom.
6. Reinstall the cover by reversing Steps 1 and 2.
Refer to the Maintenance Schedule to determine when toreplace the air filter.
See “Scheduled Maintenance Services” in the Index.
CAUTION:
Operating the engine with the air cleaner/filteroff can cause you or others to be burned. The aircleaner not only cleans the air, it stops flame ifthe engine backfires. If it isn’t there, and theengine backfires, you could be burned. Don’tdrive with it off, and be careful working on theengine with the air cleaner/filter off.
NOTICE:
If the air cleaner/filter is off, a backfire can cause a damaging engine fire. And, dirt can easily get into your engine, which will damage it.Always have the air cleaner/filter in place whenyou’re driving.

6-19
Passenger Compartment Air FilterThe passenger compartment air filter traps most of thepollen from the air entering your vehicle. Like yourvehicle’s engine air cleaner/filter, it needs to be changedperiodically. For how often to change the passengercompartment air filter, see “Scheduled MaintenanceServices” in the Index.
The passenger compartment air filter is locatedunderneath the hood below the windshield wiper arm onthe passenger’s side of the vehicle. See “EngineCompartment Overview” in the Index for moreinformation on location.
Use the procedure listed below to replace the passengercompartment air filter:
1. Turn the ignition to ON with the engine off.
2. Turn on the windshield wipers and turn them offagain when the wipers are in the out-wipe position.The wipers will be straight up and down on the windshield.
This will allow you access to the leaf screen under which is located the passenger compartmentair filter.
3. Open the hood to access the engine compartment.See “Hood Release” listed earlier in this section formore information.
4. Remove the four screws that hold the leaf screen inplace and lift off the screen by lifting and slidingtoward the center of the vehicle.
5. Pull out on the two tabs located on each end of thefilter cover.
6. Lift the filter cover off by pulling it straight upward.
7. Remove the old filter and insert a new one. Makesure the arrow on the filter is pointing toward thepassenger compartment.
See “Normal Maintenance Replacement Parts” later in this section for the correct part number forthe filter.
8. Reverse Steps 1 through 6 to reinstall the cover.

6-20
Automatic Transmission FluidIt is not necessary to check the transmission fluid level.A transmission fluid leak is the only reason for fluidloss. If a leak occurs, take your vehicle to the dealershipservice department and have it repaired as soon aspossible. You may also have your fluid level checked by your dealer or service center when you have your oil changed.
Change both the fluid and filter every 50,000 miles(83 000 km) if the vehicle is mainly driven under one ormore of these conditions:
� In heavy city traffic where the outside temperatureregularly reaches 90�F (32�C) or higher.
� In hilly or mountainous terrain.
� When doing frequent trailer towing.
� Uses such as found in taxi, police or delivery service.
If you do not use your vehicle under any of theseconditions, the fluid and filter do not require changing.
NOTICE:
We recommend you use only fluid labeledDEXRON�-III, because fluid with that label ismade especially for your automatic transmission.Damage caused by fluid other thanDEXRON�-III is not covered by your newvehicle warranty.

6-21
Manual Transmission FluidWhen to CheckA good time to have it checked is when the engine oil ischanged. However, the fluid in your manualtransmission doesn’t require changing.
How to CheckBecause this operation can be difficult, you may choose to have this done at your Cadillac dealershipservice department.
If you do it yourself, be sure to follow all theinstructions here, or you could get a false reading.
NOTICE:
Too much or too little fluid can damage yourtransmission. Too much can mean that some ofthe fluid could come out and fall on hot exhaustsystem parts, starting a fire. Too little fluid couldcause the transmission to overheat. Be sure to getan accurate reading if you check yourtransmission fluid.
Check the fluid level only when your engine is off, thevehicle is parked on a level place and the transmission iscool enough for you to rest your fingers on thetransmission case.
Then, follow these steps:
1. Remove the filler plug.
2. Check that the lubricant level is up to the bottom ofthe filler plug hole.
3. If the fluid level is good, install the plug and be sureit is fully seated. If the fluid level is low, add morefluid as described in the next steps.
How to Add FluidHere’s how to add fluid. Refer to the MaintenanceSchedule to determine what kind of fluid to use. See“Recommended Fluids and Lubricants” in the Index.
1. Remove the filler plug.
2. Add fluid at the filler plug hole. Add only enoughfluid to bring the fluid level up to the bottom of thefiller plug hole.
3. Install the filler plug. Be sure the plug is fully seated.

6-22
How to Reset the Change TransmissionFluid Message and the Transmission FluidIndicator (Automatic Transmission Only)After the transmission fluid has been changed, theChange Trans Fluid message and the transmission fluidlife indicator must be reset. To reset the message andindicator, use one of the following procedures:
Base Audio System
Press the CLR button located to the right of the DICdisplay to acknowledge the CHANGE TRANS FLUIDmessage. This will clear the message from the displayand reset it.
To reset the transmission fluid life indicator, use thefollowing steps:
1. Press the up or down arrow on the INFO buttonlocated to the right of the DIC display to access theDIC menu.
2. Once the XXX% TRANS FLUID LIFE menu item ishighlighted, press and hold the CLR button.
The percentage will return to 100, and thetransmission fluid life indicator will be reset.
3. Repeat the steps if the percentage does not return to 100.
Navigation System
Press the multi-function button located to the right ofthe DIC display, next to the OK prompt to acknowledgethe Change Trans Fluid message. This will clear themessage from the display and reset it.
To reset the transmission fluid life indicator, use thefollowing steps:
1. Turn the system on by pressing the PWR/VOL knobonce. The PWR/VOL knob is located to the lowerleft of the DIC display.
2. Press the INFO button located to the left of the DIC display to access the Vehicle Info(Information) menu.
3. Turn the TUNE/SEL knob located to the lower rightof the DIC display until Trans Fluid Life ishighlighted. Press the knob once to select it.
4. Once XXX% Trans Fluid Life is displayed, press themulti-function button next to the Reset prompt in theupper right corner of the display.
The percentage will return to 100, and thetransmission fluid life indicator will be reset.
5. Repeat the steps if the percentage does not return to 100.

6-23
Hydraulic ClutchIt is not necessary to regularly check clutch fluid unlessyou suspect there is a leak in the system. Adding fluidwon’t correct a leak.
A fluid loss in this system could indicate a problem.Have the system inspected and repaired.
When to Check and What to Use
The hydraulic clutch reservoir is located in the enginecompartment on the driver’s side, near the brake mastercylinder reservoir. See “Engine Compartment Overview”in the Index for more information on location.
Refer to the Maintenance Schedule to determine howoften you should check the fluid level in your clutchmaster cylinder reservoir and for the proper fluid. See“Owner Checks and Services” and “RecommendedFluids and Lubricants” in the Index.
How to Check and Add Fluid
Make sure the fluidlevel is at the MIN lineshown. If it isn’t,remove the cap andadd the proper fluiduntil the level reachesthe MIN line on theside of the reservoir.

6-24
Rear AxleWhen to Check LubricantRefer to the Maintenance Schedule to determine howoften to check the lubricant. See “Periodic MaintenanceInspections” and “Scheduled Maintenance Services” inthe Index.
How to Check Lubricant
To get an accurate reading, the vehicle should be on alevel surface.
If the level is below the bottom of the filler plug hole,you’ll need to add some lubricant. Add enough lubricantto raise the level to the bottom of the filler plug hole.
What to UseRefer to the Maintenance Schedule to determine whatkind of lubricant to use. See “Recommended Fluids andLubricants” in the Index.

6-25
Engine CoolantThe cooling system in your vehicle is filled withDEX-COOL� engine coolant. This coolant is designedto remain in your vehicle for 5 years or 150,000 miles(240 000 km), whichever occurs first, if you add onlyDEX-COOL� extended life coolant.
The following explains your cooling system and how to add coolant when it is low. If you have a problemwith engine overheating, see “Engine Overheating” in the Index.
A 50/50 mixture of clean, drinkable water andDEX-COOL� coolant will:
� Give freezing protection down to -34�F (-37�C).
� Give boiling protection up to 265�F (129�C).
� Protect against rust and corrosion.
� Help keep the proper engine temperature.
� Let the warning lights and gages work as they should.
NOTICE:
When adding coolant, it is important that you useonly DEX-COOL� (silicate-free) coolant.If coolant other than DEX-COOL is added to thesystem, premature engine, heater core orradiator corrosion may result. In addition, theengine coolant will require change sooner -- at30,000 miles (50 000 km) or 24 months,whichever occurs first. Damage caused by the use of coolant other than DEX-COOL� is notcovered by your new vehicle warranty.

6-26
What to UseUse a mixture of one-half clean, drinkable water andone-half DEX-COOL� coolant which won’t damagealuminum parts. If you use this coolant mixture, youdon’t need to add anything else.
CAUTION:
Adding only plain water to your cooling systemcan be dangerous. Plain water, or some otherliquid such as alcohol, can boil before the propercoolant mixture will. Your vehicle’s coolantwarning system is set for the proper coolantmixture. With plain water or the wrong mixture,your engine could get too hot but you wouldn’tget the overheat warning. Your engine couldcatch fire and you or others could be burned. Use a 50/50 mixture of clean, drinkable waterand DEX-COOL� coolant.
NOTICE:
If you use an improper coolant mixture, yourengine could overheat and be badly damaged.The repair cost wouldn’t be covered by yourwarranty. Too much water in the mixture canfreeze and crack the engine, radiator, heater coreand other parts.
If you have to add coolant more than four times a year,have your dealer check your cooling system.
NOTICE:
If you use the proper coolant, you don’t have toadd extra inhibitors or additives which claim toimprove the system. These can be harmful.

6-27
Checking Coolant
The coolant surge tank and pressure cap are located on the driver’s side of the vehicle, toward the rear of the engine compartment. See “Engine CompartmentOverview” in the Index for more information on location.
CAUTION:
Turning the surge tank pressure cap when theengine and radiator are hot can allow steam andscalding liquids to blow out and burn you badly.Never turn the surge tank pressure cap -- even alittle -- when the engine and radiator are hot.
The vehicle must be on a level surface. When yourengine is cold, the coolant level should be at the FULLCOLD/FROID line on the side of the surge tank. Followthe arrow from the top of the tank down the side to thehorizontal mark.
If the Check Coolant Level message in the DIC comeson and stays on, it means you’re low on engine coolant.
See “Check Message, Coolant Level” in the Index formore information.

6-28
Adding Coolant
If you need more coolant, add the proper DEX-COOL�
coolant mixture at the surge tank, but only when theengine is cool.
CAUTION:
You can be burned if you spill coolant on hotengine parts. Coolant contains ethylene glycol,and it will burn if the engine parts are hotenough. Don’t spill coolant on a hot engine.
When replacing the pressure cap, make sure it ishand-tight.
Surge Tank Pressure Cap
NOTICE:
The surge tank pressure cap is a 15 psi (103 kPa)pressure-type cap and must be tightly installed toprevent coolant loss and possible engine damagefrom overheating. Be sure the cap is hand-tightand fully seated.

6-29
Power Steering Fluid
The power steering fluid reservoir is located in thecenter of the engine compartment, toward the rear. See “Engine Compartment Overview” in the Index for more information on location.
When to Check Power Steering FluidIt is not necessary to regularly check power steeringfluid unless you suspect there is a leak in the system oryou hear an unusual noise. A fluid loss in this systemcould indicate a problem. Have the system inspected and repaired.
How to Check Power Steering FluidTurn the key off, let the engine compartment cool down,wipe the cap and the top of the reservoir clean, thenunscrew the cap and wipe the dipstick with a clean rag.Replace the cap and completely tighten it. Then removethe cap again and look at the fluid level on the dipstick.
The level should be at the FULL COLD mark. Ifnecessary, add only enough fluid to bring the level up tothe mark.
What to UseTo determine what kind of fluid to use, see“Recommended Fluids and Lubricants” in the Index.Always use the proper fluid. Failure to use the properfluid can cause leaks and damage hoses and seals.
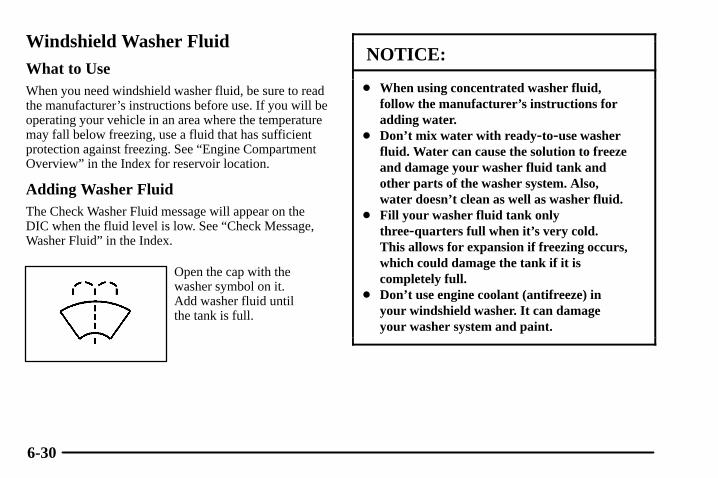
6-30
Windshield Washer FluidWhat to UseWhen you need windshield washer fluid, be sure to readthe manufacturer’s instructions before use. If you will beoperating your vehicle in an area where the temperaturemay fall below freezing, use a fluid that has sufficientprotection against freezing. See “Engine CompartmentOverview” in the Index for reservoir location.
Adding Washer FluidThe Check Washer Fluid message will appear on theDIC when the fluid level is low. See “Check Message,Washer Fluid” in the Index.
Open the cap with thewasher symbol on it. Add washer fluid until the tank is full.
NOTICE:
� When using concentrated washer fluid,follow the manufacturer’s instructions foradding water.
� Don’t mix water with ready-to-use washerfluid. Water can cause the solution to freezeand damage your washer fluid tank andother parts of the washer system. Also,water doesn’t clean as well as washer fluid.
� Fill your washer fluid tank onlythree-quarters full when it’s very cold. This allows for expansion if freezing occurs,which could damage the tank if it iscompletely full.
� Don’t use engine coolant (antifreeze) inyour windshield washer. It can damageyour washer system and paint.

6-31
BrakesBrake Fluid
Your brake master cylinder reservoir is on the driver’s sideof the engine compartment. It is filled with DOT-3 brakefluid. See “Engine Compartment Overview” in the Index.
There are only two reasons why the brake fluid level in thereservoir might go down. The first is that the brake fluidgoes down to an acceptable level during normal brakelining wear. When new linings are put in, the fluid levelgoes back up. The other reason is that fluid is leaking outof the brake system. If it is, you should have your brake
system fixed, since a leak means that sooner or later yourbrakes won’t work well, or won’t work at all.
So, it isn’t a good idea to “top off” your brake fluid.Adding brake fluid won’t correct a leak. If you add fluidwhen your linings are worn, then you’ll have too muchfluid when you get new brake linings. You should add(or remove) brake fluid, as necessary, only when work isdone on the brake hydraulic system.
CAUTION:
If you have too much brake fluid, it can spill on theengine. The fluid will burn if the engine is hotenough. You or others could be burned, and yourvehicle could be damaged. Add brake fluid onlywhen work is done on the brake hydraulic system.
If the ignition is in ON and the brake fluid is low, theCheck Brake Fluid message will be displayed in theDIC. See “Check Message, Brake Fluid” in the Indexfor more information.
When your brake fluid falls to a low level, your brakewarning light will come on. See “Brake System WarningLight” in the Index.

6-32
What to Add
When you do need brake fluid, use only DOT-3 brakefluid. Use new brake fluid from a sealed container only.See “Recommended Fluids and Lubricants” in the Index.
Always clean the brake fluid reservoir cap and the areaaround the cap before removing it. This will help keepdirt from entering the reservoir.
CAUTION:
With the wrong kind of fluid in your brakesystem, your brakes may not work well, or theymay not even work at all. This could cause acrash. Always use the proper brake fluid.
NOTICE:
� Using the wrong fluid can badly damagebrake system parts. For example, just a fewdrops of mineral-based oil, such as engineoil, in your brake system can damage brakesystem parts so badly that they’ll have to bereplaced. Don’t let someone put in thewrong kind of fluid.
� If you spill brake fluid on your vehicle’spainted surfaces, the paint finish can bedamaged. Be careful not to spill brake fluidon your vehicle. If you do, wash it offimmediately. See “Appearance Care” in the Index.

6-33
Brake WearYour vehicle has four-wheel disc brakes.
Disc brake pads have built-in wear indicators that make a high-pitched warning sound when the brakepads are worn and new pads are needed. The sound may come and go or be heard all the time your vehicle is moving (except when you are pushing on the brakepedal firmly).
CAUTION:
The brake wear warning sound means that soonyour brakes won’t work well. That could lead toan accident. When you hear the brake wearwarning sound, have your vehicle serviced.
NOTICE:
Continuing to drive with worn -out brake padscould result in costly brake repair.
Some driving conditions or climates may cause a brakesqueal when the brakes are first applied or lightlyapplied. This does not mean something is wrong withyour brakes.
Properly torqued wheel nuts are necessary to helpprevent brake pulsation. When tires are rotated, inspectbrake pads for wear and evenly tighten wheel nuts in theproper sequence to GM torque specifications.
Brake linings should always be replaced as completeaxle sets.
See “Brake System Inspection” in Section 7 of this manual under Part C “Periodic MaintenanceInspections.”
Brake Pedal TravelSee your dealer if the brake pedal does not return tonormal height, or if there is a rapid increase in pedaltravel. This could be a sign of brake trouble.
Brake AdjustmentEvery time you apply the brakes, with or without thevehicle moving, your brakes adjust for wear.

6-34
Replacing Brake System PartsThe braking system on a vehicle is complex. Its manyparts have to be of top quality and work well together ifthe vehicle is to have really good braking. Your vehiclewas designed and tested with top-quality GM brake parts.When you replace parts of your braking system -- forexample, when your brake linings wear down and youneed new ones put in -- be sure you get new approvedGM replacement parts. If you don’t, your brakes may nolonger work properly. For example, if someone puts inbrake linings that are wrong for your vehicle, the balancebetween your front and rear brakes can change -- for theworse. The braking performance you’ve come to expectcan change in many other ways if someone puts in thewrong replacement brake parts.
BatteryYour new vehicle comes with a maintenance freeACDelco� battery. When it’s time for a new battery, getone that has the replacement number shown on theoriginal battery’s label. We recommend an ACDelcobattery. See “Engine Compartment Overview” in theIndex for battery location.
WARNING: Battery posts, terminals and relatedaccessories contain lead and lead compounds, chemicalsknown to the State of California to cause cancer andreproductive harm. Wash hands after handling.
CAUTION:
Batteries have acid that can burn you and gasthat can explode. You can be badly hurt if youaren’t careful. See “Jump Starting” in the Indexfor tips on working around a battery withoutgetting hurt.
After a power loss, such as disconnecting the battery orremoving the maxi fuses in the power distribution fuseblock, the following steps must be performed tocalibrate the electronic throttle control. If this is notdone, the engine will not run properly.
1. Turn the ignition key to ON. Do not start the engine.
2. Leave the ignition in ON for at least three minutes sothat the electronic throttle control will cycle andre-learn its home position.
3. Turn the ignition to OFF.
4. Start and run the engine for at least 30 seconds.
Also, for your audio system, see “Theft-DeterrentFeature” in the Index.

6-35
Bulb ReplacementFor the proper type of replacement bulb, see“Replacement Bulbs” in the Index.
For any bulb changing procedure not listed in thissection, contact your dealer.
High Intensity Discharge (HID) Lighting (If Equipped)
CAUTION:
The low beam high intensity discharge lightingsystem operates at a very high voltage. If you tryto service any of the system components, youcould be seriously injured. Have your dealer or aqualified technician service them.
Halogen Bulbs
CAUTION:
Halogen bulbs have pressurized gas inside andcan burst if you drop or scratch the bulb. You orothers could be injured. Be sure to read andfollow the instructions on the bulb package.
HeadlampsIt is recommended that this component be replaced as aunit. See your dealer.

6-36
Front Turn Signal and Fog Lamps
A. Turn Signal Lamp
B. Fog Lamp
To replace the front turn signal or fog lamps, use thefollowing procedure:
1. Remove the protection shield located on theunderside of the front of the vehicle by pulling outthe push-pins located on the underside of theprotection shield.
2. Reach up behind the front bumper area from underthe vehicle to access the lamp housing.
3. Remove the bulb socket from the housing by turningthe bulb socket one-quarter turn counterclockwise.
4. Remove the electrical connector from the bulb bylifting the two plastic clips.
5. Pull the old bulb from the bulb socket keeping thebulb straight as you pull it out.
6. Install a new bulb.
7. Reverse the steps to reinstall the lamp assembly.
Center High-Mounted Stop Lamp (CHMSL)It is recommended that this component be replaced as aunit. See your dealer.

6-37
Rear Tail/Stop/Turn Signal andSide-Marker Lamps
A. Tail and Stop Lamps
B. Turn Signal Lamp
C. Side-Marker Lamp
To replace the tail, stop, turn signal or side-markerlamps use the following procedure:
1. Open the trunk using the trunk button on the remotekeyless entry transmitter or the trunk release buttonlocated on the lower part of the driver’s door.
2. Remove the compact spare tire cover by turning thewing nut counterclockwise.
3. Remove the four convenience net wing nuts.
4. Pull the carpet back away from the body of thevehicle on the side with the burned out bulb.
5. Remove the two mounting screws from the lamp assembly.
6. Pull out the lamp assembly to expose the bulb sockets.
7. Turn the bulb socket one-quarter turncounterclockwise and pull the bulb and socket outof the lamp reflector.
8. Pull the old bulb from the bulb socket keeping thebulb straight as you pull it out.
9. Install a new bulb.
10. Reverse the steps to reinstall the lamp assembly.

6-38
Back-Up and License Plate Lamps
A. Back-Up Lamps
B. License Plate Lamps
To replace the back-up or license plate lamps, use thefollowing procedure:
1. Open the trunk using the trunk button on the remotekeyless entry transmitter or the trunk release buttonlocated on the lower part of the driver’s door.
2. Remove the cloth cover on the trunk lid by pullingout the three push-pins located on the underside ofthe trunk lid.
3. Remove the eight mounting nuts from the undersideof the trunk lid by turning the nuts counterclockwise.
4. Pull the lamp assembly away from the vehicle toexpose the bulb sockets.
5. Turn the bulb socket one-quarter turncounterclockwise and pull the bulb and socket out ofthe lamp reflector.
6. Pull the old bulb from the bulb socket keeping thebulb straight as you pull it out.
7. Install a new bulb.
8. Reverse the steps to reinstall the lamp assembly.

6-39
Windshield Wiper BladeReplacementWindshield wiper blades should be inspected at leasttwice a year for wear or cracking. See “Wiper BladeCheck” in the Index.
It’s a good idea to clean or replace the wiper bladeassembly on a regular basis or when worn. For properwindshield wiper blade length and type, see “NormalMaintenance Replacement Parts” in the Index.
To replace the wiper blade assembly, do the following:
1. Turn the ignition to ON with the engine off.
2. Turn on the windshield wipers and turn them offagain when the wipers are in the out-wipe position.The driver’s side blade will be straight up and downon the windshield.
3. Pull the windshield wiper assembly away from the windshield.
4. Lift the wiper blade assembly up so it is in aT-shaped position. You should be able to see a tab.

6-40
NOTICE:
Do not allow the wiper blade arm to touch thewindshield when no wiper blade is installed in it.The windshield could be damaged by the sharpends of the blade assembly. Damage to thewindshield caused by an empty wiper blade armis not covered by your warranty.
5. Squeeze the tab together and pull the wiper bladeassembly down far enough to release it from theJ-hooked end of the wiper arm. Slide the assemblyaway from the arm.
6. Replace the blade with a new one.7. Reinstall the wiper blade assembly by sliding it over
the wiper arm to engage the J-hooked end. Pull upon the assembly to lock it into place.
8. Repeat the steps for the other wiper.

6-41
TiresYour new vehicle comes with high-quality tires made bya leading tire manufacturer. If you ever have questionsabout your tire warranty and where to obtain service, seeyour Cadillac Warranty booklet for details.
CAUTION:
Poorly maintained and improperly used tires are dangerous.� Overloading your tires can cause
overheating as a result of too much friction.You could have an air-out and a seriousaccident. See “Loading Your Vehicle” in the Index.
CAUTION: (Continued)
CAUTION: (Continued)
� Underinflated tires pose the same danger asoverloaded tires. The resulting accidentcould cause serious injury. Check all tiresfrequently to maintain the recommendedpressure. Tire pressure should be checkedwhen your tires are cold.
� Overinflated tires are more likely to be cut, punctured or broken by a suddenimpact -- such as when you hit a pothole.Keep tires at the recommended pressure.
� Worn, old tires can cause accidents. If yourtread is badly worn, or if your tires havebeen damaged, replace them.
See “Inflation -- Tire Pressure” in this section for inflation pressure adjustment for higherspeed driving.

6-42
Inflation -- Tire PressureThe Tire-Loading Information label, which is located onthe rear edge of the driver’s door, shows the correctinflation pressures for your tires when they’re cold.“Cold” means your vehicle has been sitting for at leastthree hours or driven no more than 1 mile (1.6 km).
NOTICE:
Don’t let anyone tell you that underinflation oroverinflation is all right. It’s not. If your tiresdon’t have enough air (underinflation), you canget the following:� Too much flexing� Too much heat� Tire overloading� Bad wear� Bad handling� Bad fuel economy
NOTICE: (Continued)
NOTICE: (Continued)
If your tires have too much air (overinflation),you can get the following:� Unusual wear� Bad handling� Rough ride� Needless damage from road hazards
When to Check
Check your tires once a month or more. Also, check thetire pressure of the spare tire.
How to Check
Use a good quality pocket-type gage to check tirepressure. You can’t tell if your tires are properly inflatedsimply by looking at them. Radial tires may lookproperly inflated even when they’re underinflated.
Be sure to put the valve caps back on the valve stems. They help prevent leaks by keeping out dirt and moisture.

6-43
Tire Inspection and RotationTires should be rotated every 7,500 miles (12 500 km).Any time you notice unusual wear, rotate your tires assoon as possible and check wheel alignment. Also checkfor damaged tires or wheels. See “When It’s Time forNew Tires” and “Wheel Replacement” later in thissection for more information.
The purpose of regular rotation is to achieve moreuniform wear for all tires on the vehicle. The firstrotation is the most important. See “ScheduledMaintenance Services” in the Index for scheduledrotation intervals.
When rotating your tires, always use the correct rotationpattern shown here. Don’t include the spare tire in yourtire rotation.
After the tires have been rotated, adjust the front andrear inflation pressures as shown on the Tire-LoadingInformation label. Make certain that all wheel nuts areproperly tightened. See “Wheel Nut Torque” in the Index.
CAUTION:
Rust or dirt on a wheel, or on the parts to whichit is fastened, can make wheel nuts become looseafter a time. The wheel could come off and causean accident. When you change a wheel, removeany rust or dirt from places where the wheelattaches to the vehicle. In an emergency, you canuse a cloth or a paper towel to do this; but besure to use a scraper or wire brush later, if youneed to, to get all the rust or dirt off. See“Changing a Flat Tire” in the Index.
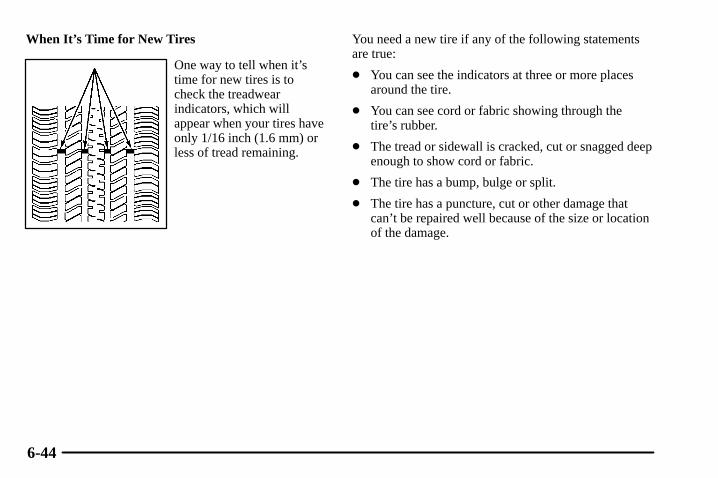
6-44
When It’s Time for New Tires
One way to tell when it’stime for new tires is tocheck the treadwearindicators, which willappear when your tires haveonly 1/16 inch (1.6 mm) orless of tread remaining.
You need a new tire if any of the following statementsare true:
� You can see the indicators at three or more placesaround the tire.
� You can see cord or fabric showing through the tire’s rubber.
� The tread or sidewall is cracked, cut or snagged deepenough to show cord or fabric.
� The tire has a bump, bulge or split.
� The tire has a puncture, cut or other damage thatcan’t be repaired well because of the size or locationof the damage.

6-45
Buying New TiresTo find out what kind and size of tires you need, look atthe Tire-Loading Information label.
The tires installed on your vehicle when it was new hada Tire Performance Criteria Specification (TPC Spec)number on each tire’s sidewall. When you get new tires,get ones with that same TPC Spec number. That wayyour vehicle will continue to have tires that are designedto give proper endurance, handling, speed rating,traction, ride and other things during normal service onyour vehicle. If your tires have an all-season treaddesign, the TPC number will be followed by an “MS”(for mud and snow).
If you ever replace your tires with those not having a TPC Spec number, make sure they are the same size, load range, speed rating and construction type(bias, bias-belted or radial) as your original tires.
CAUTION:
Mixing tires could cause you to lose control whiledriving. If you mix tires of different sizes or types(radial and bias-belted tires), the vehicle may nothandle properly, and you could have a crash.Using tires of different sizes may also causedamage to your vehicle. Be sure to use the samesize and type tires on all wheels.
CAUTION:
If you use bias-ply tires on your vehicle, thewheel rim flanges could develop cracks aftermany miles of driving. A tire and/or wheel couldfail suddenly, causing a crash. Use only radial-plytires with the wheels on your vehicle.

6-46
Uniform Tire Quality GradingQuality grades can be found where applicable on the tiresidewall between tread shoulder and maximum sectionwidth. For example:
Treadwear 200 Traction AA Temperature A
The following information relates to the systemdeveloped by the United States National HighwayTraffic Safety Administration, which grades tires by treadwear, traction and temperature performance.(This applies only to vehicles sold in the United States.)The grades are molded on the sidewalls of mostpassenger car tires. The Uniform Tire Quality Gradingsystem does not apply to deep tread, winter-type snowtires, space-saver or temporary use spare tires, tires withnominal rim diameters of 10 to 12 inches (25 to 30 cm),or to some limited-production tires.
While the tires available on General Motors passengercars and light trucks may vary with respect to thesegrades, they must also conform to federal safetyrequirements and additional General Motors TirePerformance Criteria (TPC) standards.
Treadwear
The treadwear grade is a comparative rating based onthe wear rate of the tire when tested under controlledconditions on a specified government test course. For example, a tire graded 150 would wear one and a half (1 1/2) times as well on the government course as a tire graded 100. The relative performance of tiresdepends upon the actual conditions of their use,however, and may depart significantly from the normdue to variations in driving habits, service practices anddifferences in road characteristics and climate.
Traction -- AA, A, B, C
The traction grades, from highest to lowest, are AA, A,B, and C. Those grades represent the tire’s ability to stopon wet pavement as measured under controlledconditions on specified government test surfaces ofasphalt and concrete. A tire marked C may have poortraction performance. Warning: The traction gradeassigned to this tire is based on straight-ahead brakingtraction tests, and does not include acceleration,cornering, hydroplaning, or peak traction characteristics.

6-47
Temperature -- A, B, C
The temperature grades are A (the highest), B, and C,representing the tire’s resistance to the generation ofheat and its ability to dissipate heat when tested undercontrolled conditions on a specified indoor laboratorytest wheel. Sustained high temperature can cause thematerial of the tire to degenerate and reduce tire life, andexcessive temperature can lead to sudden tire failure.The grade C corresponds to a level of performancewhich all passenger car tires must meet under theFederal Motor Vehicle Safety Standard No. 109.Grades B and A represent higher levels of performanceon the laboratory test wheel than the minimum required by law.
Warning: The temperature grade for this tire isestablished for a tire that is properly inflated and notoverloaded. Excessive speed, underinflation, orexcessive loading, either separately or in combination,can cause heat buildup and possible tire failure.
Wheel Alignment and Tire BalanceThe wheels on your vehicle were aligned and balancedcarefully at the factory to give you the longest tire lifeand best overall performance.
Scheduled wheel alignment and wheel balancing are notneeded. However, if you notice unusual tire wear oryour vehicle pulling one way or the other, the alignmentmay need to be reset. If you notice your vehiclevibrating when driving on a smooth road, your wheelsmay need to be rebalanced.
Wheel ReplacementReplace any wheel that is bent, cracked, or badly rustedor corroded. If wheel nuts keep coming loose, the wheel,wheel bolts and wheel nuts should be replaced. If thewheel leaks air, replace it (except some aluminumwheels, which can sometimes be repaired). See yourdealer if any of these conditions exist.
Your dealer will know the kind of wheel you need.

6-48
Each new wheel should have the same load-carryingcapacity, diameter, width, offset and be mounted thesame way as the one it replaces.
If you need to replace any of your wheels, wheel boltsor wheel nuts, replace them only with new GM originalequipment parts. This way, you will be sure to have theright wheel, wheel bolts and wheel nuts for your vehicle.
CAUTION:
Using the wrong replacement wheels, wheel boltsor wheel nuts on your vehicle can be dangerous.It could affect the braking and handling of yourvehicle, make your tires lose air and make youlose control. You could have a collision in whichyou or others could be injured. Always use thecorrect wheel, wheel bolts and wheel nuts forreplacement.
NOTICE:
The wrong wheel can also cause problems withbearing life, brake cooling, speedometer orodometer calibration, headlamp aim, bumperheight, vehicle ground clearance and tire or tirechain clearance to the body and chassis.
See “Changing a Flat Tire” in the Index for moreinformation.
Used Replacement Wheels
CAUTION:
Putting a used wheel on your vehicle isdangerous. You can’t know how it’s been used orhow far it’s been driven. It could fail suddenlyand cause a crash. If you have to replace a wheel,use a new GM original equipment wheel.

6-49
Tire Chains
CAUTION:
Don’t use tire chains. There’s not enoughclearance. Tire chains used on a vehicle withoutthe proper amount of clearance can causedamage to the brakes, suspension or other vehicleparts. The area damaged by the tire chains couldcause you to lose control of your vehicle and youor others may be injured in a crash.
Use another type of traction device only if itsmanufacturer recommends it for use on yourvehicle and tire size combination and roadconditions. Follow that manufacturer’sinstructions. To help avoid damage to yourvehicle, drive slowly, readjust or remove thedevice if it’s contacting your vehicle, and don’tspin your wheels.If you do find traction devices that will fit, installthem on the rear tires.
Appearance CareRemember, cleaning products can be hazardous. Someare toxic. Others can burst into flame if you strike amatch or get them on a hot part of the vehicle. Some aredangerous if you breathe their fumes in a closed space.When you use anything from a container to clean yourvehicle, be sure to follow the manufacturer’s warningsand instructions. And always open your doors orwindows when you’re cleaning the inside.
Never use these to clean your vehicle:
� Gasoline
� Benzene
� Naphtha
� Carbon Tetrachloride
� Acetone
� Paint Thinner
� Turpentine
� Lacquer Thinner
� Nail Polish Remover
They can all be hazardous -- some more than others -- and they can all damage your vehicle, too.

6-50
Don’t use any of these unless this manual says you can.In many uses, these will damage your vehicle:
� Alcohol
� Laundry Soap
� Bleach
� Reducing Agents
Cleaning the Inside of Your VehicleUse a vacuum cleaner often to get rid of dust and loosedirt. Wipe vinyl, leather, plastic and painted surfaceswith a clean, damp cloth.
Cleaning of Fabric/CarpetYour dealer has cleaners for the cleaning of fabric andcarpet. They will clean normal spots and stains verywell. You can get GM-approved cleaning products fromyour dealer. See “Appearance Care and Materials” in the Index.
Here are some cleaning tips:
� Always read the instructions on the cleaner label.
� Clean up stains as soon as you can -- before they set.
� Carefully scrape off any excess stain.
� Use a clean cloth or sponge, and change to a clean areaoften. A soft brush may be used if stains are stubborn.
� If a ring forms on fabric after spot cleaning, clean theentire area immediately or it will set.
Cleaning VinylUse warm water and a clean cloth.
� Rub with a clean, damp cloth to remove dirt. You may have to do it more than once.
� Things like tar, asphalt and shoe polish will stain if youdon’t get them off quickly. Use a clean cloth and avinyl/leather cleaner. See your dealer for this product.
Cleaning LeatherUse a soft cloth with lukewarm water and a mild soap orsaddle soap and wipe dry with a soft cloth. Then, let theleather dry naturally. Do not use heat to dry.
� For stubborn stains, use a leather cleaner. See yourdealer for this product.
� Never use oils, varnishes, solvent-based or abrasivecleaners, furniture polish or shoe polish on leather.
� Soiled or stained leather should be cleanedimmediately. If dirt is allowed to work into thefinish, it can harm the leather.

6-51
Cleaning the Top of the Instrument PanelUse only mild soap and water to clean the top surfacesof the instrument panel. Sprays containing silicones orwaxes may cause annoying reflections in the windshieldand even make it difficult to see through the windshieldunder certain conditions.
Cleaning Interior Plastic ComponentsUse only a mild soap and water solution on a soft cloth or sponge. Commercial cleaners may affect thesurface finish.
Cleaning Wood PanelsUse a clean cloth moistened in warm, soapy water (usemild dish washing soap). Dry the wood immediatelywith a clean cloth.
Cleaning Speaker CoversVacuum around a speaker cover gently, so that thespeaker won’t be damaged. Clean spots with just waterand mild soap.
Care of Safety BeltsKeep belts clean and dry.
CAUTION:
Do not bleach or dye safety belts. If you do, itmay severely weaken them. In a crash, theymight not be able to provide adequate protection.Clean safety belts only with mild soap andlukewarm water.

6-52
Cleaning Glass SurfacesGlass should be cleaned often. GM Glass Cleaner or aliquid household glass cleaner will remove normaltobacco smoke and dust films on interior glass. See“Appearance Care and Materials” in the Index.
NOTICE:
Don’t use abrasive cleaners on glass, because theymay cause scratches. Avoid placing decals on theinside rear window, since they may have to bescraped off later. If abrasive cleaners are used onthe inside of the rear window, an electricdefogger element may be damaged. Anytemporary license should not be attached acrossthe defogger grid.
Cleaning the Outside of theWindshield and Wiper BladesIf the windshield is not clear after using the windshieldwasher, or if the wiper blade chatters when running,wax, sap or other material may be on the blade or windshield.
Clean the outside of the windshield with a full-strengthglass cleaning liquid. The windshield is clean if beadsdo not form when you rinse it with water.
Grime from the windshield will stick to the wiper bladesand affect their performance. Clean the blade by wipingvigorously with a cloth soaked in full-strengthwindshield washer solvent. Then rinse the blade with water.
Check the wiper blades and clean them as necessary;replace blades that look worn.
6-53
WeatherstripsSilicone grease on weatherstrips will make them last longer, seal better, and not stick or squeak. Apply silicone grease with a clean cloth at least every six months. During very cold, damp weather more frequent application may be required. See“Recommended Fluids and Lubricants” in the Index.
Cleaning the Outside of Your VehicleThe paint finish on your vehicle provides beauty, depthof color, gloss retention and durability.
Washing Your VehicleThe best way to preserve your vehicle’s finish is to keep it clean by washing it often with lukewarm or cold water.
Don’t wash your vehicle in the direct rays of the sun.Use a car washing soap. Don’t use strong soaps orchemical detergents. Be sure to rinse the vehicle well,removing all soap residue completely. You can getGM-approved cleaning products from your dealer. See“Appearance Care and Materials” in the Index. Don’tuse cleaning agents that are petroleum based, or thatcontain acid or abrasives. All cleaning agents should beflushed promptly and not allowed to dry on the surface,or they could stain. Dry the finish with a soft, cleanchamois or an all-cotton towel to avoid surfacescratches and water spotting.
High pressure car washes may cause water to enter your vehicle.
Cleaning Exterior Lamps/LensesUse only lukewarm or cold water, a soft cloth and a carwashing soap to clean exterior lamps and lenses. Followinstructions under “Washing Your Vehicle.”

6-54
Finish CareOccasional waxing or mild polishing of your vehicle byhand may be necessary to remove residue from the paintfinish. You can get GM-approved cleaning productsfrom your dealer. See “Appearance Care and Materials”in the Index.
Your vehicle has a “basecoat/clearcoat” paint finish. The clearcoat gives more depth and gloss to the coloredbasecoat. Always use waxes and polishes that arenon-abrasive and made for a basecoat/clearcoat paint finish.
NOTICE:
Machine compounding or aggressive polishing ona basecoat/clearcoat paint finish may dull thefinish or leave swirl marks.
Foreign materials such as calcium chloride and othersalts, ice melting agents, road oil and tar, tree sap, birddroppings, chemicals from industrial chimneys, etc., candamage your vehicle’s finish if they remain on paintedsurfaces. Wash the vehicle as soon as possible. Ifnecessary, use non-abrasive cleaners that are markedsafe for painted surfaces to remove foreign matter.
Exterior painted surfaces are subject to aging, weatherand chemical fallout that can take their toll over a periodof years. You can help to keep the paint finish lookingnew by keeping your vehicle garaged or coveredwhenever possible.

6-55
Cleaning Aluminum orChrome-Plated Wheels (If Equipped)Keep your wheels clean using a soft clean cloth withmild soap and water. Rinse with clean water. Afterrinsing thoroughly, dry with a soft clean towel. A waxmay then be applied.
The surface of these wheels is similar to the paintedsurface of your vehicle. Don’t use strong soaps,chemicals, abrasive polishes, abrasive cleaners, cleanerswith acid or abrasive cleaning brushes on them becauseyou could damage the surface. Do not use chrome polishon aluminum wheels.
Use chrome polish only on chrome-plated wheels, butavoid any painted surface of the wheel, and buff offimmediately after application.
Don’t take your vehicle through an automatic car washthat has silicon carbide tire cleaning brushes. Thesebrushes can also damage the surface of these wheels.
Cleaning TiresTo clean your tires, use a stiff brush with a tire cleaner.
NOTICE:
When applying a tire dressing always take care towipe off any overspray or splash from all paintedsurfaces on the body or wheels of the vehicle.Petroleum-based products may damage the paintfinish and tires.
Sheet Metal DamageIf your vehicle is damaged and requires sheet metalrepair or replacement, make sure the body repair shopapplies anti-corrosion material to the parts repaired orreplaced to restore corrosion protection.
Original manufacturer replacement parts will providethe corrosion protection while maintaining the warranty.

6-56
Finish DamageAny stone chips, fractures or deep scratches in the finishshould be repaired right away. Bare metal will corrodequickly and may develop into a major repair expense.
Minor chips and scratches can be repaired with touch-upmaterials available from your dealer or other serviceoutlets. Larger areas of finish damage can be correctedin your dealer’s body and paint shop.
Underbody MaintenanceChemicals used for ice and snow removal and dustcontrol can collect on the underbody. If these are not removed, accelerated corrosion (rust) can occur on the underbody parts such as fuel lines, frame, floor pan and exhaust system even though they havecorrosion protection.
At least every spring, flush these materials from theunderbody with plain water. Clean any areas where mudand other debris can collect. Dirt packed in closed areasof the frame should be loosened before being flushed.Your dealer or an underbody car washing system can dothis for you.
Chemical Paint SpottingSome weather and atmospheric conditions can create achemical fallout. Airborne pollutants can fall upon andattack painted surfaces on your vehicle. This damagecan take two forms: blotchy, ringlet-shapeddiscolorations, and small irregular dark spots etched intothe paint surface.
Although no defect in the paint job causes this, Cadillacwill repair, at no charge to the owner, the surfaces ofnew vehicles damaged by this fallout condition within12 months or 12,000 miles (20 000 km) of purchase,whichever occurs first.

6-57
GM Vehicle Care/Appearance Materials

6-58
Vehicle Identification Number (VIN)
This is the legal identifier for your vehicle. It appears ona plate in the front corner of the instrument panel, on thedriver’s side. You can see it if you look through thewindshield from outside your vehicle. The VIN alsoappears on the Vehicle Certification and Service Partslabels and the certificates of title and registration.
Engine IdentificationThe 8th character in your VIN is the engine code. Thiscode will help you identify your engine, specificationsand replacement parts.
Service Parts Identification LabelYou’ll find this label in the trunk. It’s very helpful if youever need to order parts. On this label is:
� your VIN,
� the model designation,
� paint information and
� a list of all production options and specialequipment.
Be sure that this label is not removed from the vehicle.

6-59
Electrical SystemAdd-On Electrical Equipment
NOTICE:
Don’t add anything electrical to your vehicleunless you check with your dealer first. Someelectrical equipment can damage your vehicleand the damage wouldn’t be covered by yourwarranty. Some add-on electrical equipment can keep other components from working as they should.
Your vehicle has an air bag system. Before attempting toadd anything electrical to your vehicle, see “ServicingYour Air Bag-Equipped Vehicle” in the Index.
Windshield Wiper FusesThe windshield wiper motor is protected by an internalcircuit breaker. If the wiper motor overheats due toheavy snow, the wipers will stop until the motor coolsand will then restart.
Power Windows and Other Power OptionsCircuit breakers protect the power windows and powerseats. When the current load is too heavy, the circuitbreaker opens and closes, protecting the circuit until theproblem is fixed or goes away.

6-60
Fuses and Circuit BreakersThe wiring circuits in your vehicle are protected fromshort circuits by a combination of fuses and circuitbreakers. This greatly reduces the chance of fires causedby electrical problems.
Look at the silver-colored band inside the fuse. If theband is broken or melted, replace the fuse. Be sure youreplace a bad fuse with a new one of the identical sizeand rating. If a fuse blows, see your dealer for serviceimmediately.
If you ever have a problem on the road and don’t have aspare fuse, you can “borrow” one that has the sameamperage. Pick some feature of your vehicle that youcan get along without -- like the radio or cigarettelighter -- and use its fuse, if it is the correct amperage.Replace it as soon as you can.
The fuses are located in three fuse blocks, one located inthe engine compartment on the passenger’s side and theother two under the rear seat.
Underhood Fuse Block
The underhood fuse block is located in the enginecompartment on the passenger’s side of the vehicle. See“Engine Compartment Overview” in the Index for moreinformation on location.
To access the fuses, push in the two tabs located on eachside of the fuse block cover. Then lift the cover off.

6-61
Relays Usage
LO SPEED FANRELAY MINI
Low Speed Fan Motor
HI SPEED FANRELAY MINI
High Speed Fan Motor
Relays Usage
ACCESSORYRELAY MINI
Accessory Power Outlets
S/P FANRELAY MINI
Series/Parallel Fan
PARK LAMPRELAY MICRO
Parking Lamps
HORN RELAYMICRO
Horn
HI BEAMRELAY MICRO
High-Beam Headlamps
DRL RELAYMICRO - OPT
Daytime Running Lamps
LO BEAMRELAY/HIDMINI - OPT
Low-Beam HID Headlamps(Option)
HDLP WASHRELAY MINI - OPT
Headlamp Washer Motor (Option)
CIGAR RELAY MINI
Cigarette Lighter (Option)

6-62
Relays Usage
BLOWERRELAY MINI
Front Blower
FOG LAMPRELAY MICRO
Fog Lamps
MAIN RELAYMICRO
Powertrain/ECM
STARTERRELAY MINI
Starter Solenoid
CMP CLURELAY MICRO
Compressor Clutch
IGN-1 RELAYMICRO
Ignition Switch (ON)
WiringHarnesses
Usage
BODY W/H Wiring Harness Connection
BODY W/H Wiring Harness Connection
ENG W/H Engine Wiring HarnessConnection
J Cases Usage
R REAR RRPDB (Passenger’s Side RearPower Distribution Box)
R REAR RRPDB (Passenger’s Side RearPower Distribution Box)
L REAR LRPDB (Driver’s Side RearPower Distribution Box)
L REAR LRPDB (Driver’s Side RearPower Distribution Box)
HI FAN High Cooling Fan Motor
LO FAN Low Cooling Fan Motor
BLOWER PWM Fan Motor Assembly
STARTER Starter Solenoid
EBCM Electronic Brake Control Module
Mini Fuses Usage
RT PARK Passenger’s Side TaillampAssembly, Front Sidemarker andFront Parking Lamp Assembly
HORN Dual Horn Assembly
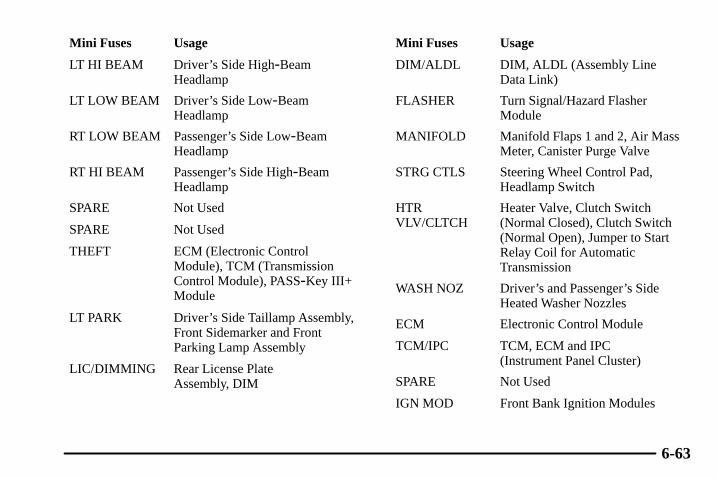
6-63
Mini Fuses Usage
LT HI BEAM Driver’s Side High-BeamHeadlamp
LT LOW BEAM Driver’s Side Low-BeamHeadlamp
RT LOW BEAM Passenger’s Side Low-BeamHeadlamp
RT HI BEAM Passenger’s Side High-BeamHeadlamp
SPARE Not Used
SPARE Not Used
THEFT ECM (Electronic ControlModule), TCM (TransmissionControl Module), PASS-Key III+Module
LT PARK Driver’s Side Taillamp Assembly,Front Sidemarker and FrontParking Lamp Assembly
LIC/DIMMING Rear License Plate Assembly, DIM
Mini Fuses Usage
DIM/ALDL DIM, ALDL (Assembly Line Data Link)
FLASHER Turn Signal/Hazard FlasherModule
MANIFOLD Manifold Flaps 1 and 2, Air MassMeter, Canister Purge Valve
STRG CTLS Steering Wheel Control Pad,Headlamp Switch
HTRVLV/CLTCH
Heater Valve, Clutch Switch(Normal Closed), Clutch Switch(Normal Open), Jumper to StartRelay Coil for AutomaticTransmission
WASH NOZ Driver’s and Passenger’s SideHeated Washer Nozzles
ECM Electronic Control Module
TCM/IPC TCM, ECM and IPC (Instrument Panel Cluster)
SPARE Not Used
IGN MOD Front Bank Ignition Modules

6-64
Mini Fuses Usage
ELEC PRNDL Electronic PRNDL
TCC/ET TCC/ET Brake Switch (ExtendedTravel), TCC/ET Brake Switch(Cruise Disable)
STOP LP SW Stop Lamp Switch
IGN SW Ignition Switch (Power to IGN-3and CRANK)
VOLT CHECK DIM (Dash Integration Module)
ECM/TCM TCM (Transmission ControlModule), ECM (ElectronicControl Module), IPC (InstrumentPanel Cluster), PASS-Key III+Module
WPR MOD Windshield Wiper ModuleAssembly
INJ Fuel Injectors
COMPCLUTCH
Compressor Clutch
WPR SW Windshield Wiper/Washer Switch
Mini Fuses Usage
FOG LAMP Fog Lamps
OUTLET Center Console Accessory Power Outlet
POST 02 Driver’s and Passenger’s SideOxygen Sensors, LRPDB (Pusher Cooling Fan Relay)
I/P OUTLET Instrument Panel Accessory Power Outlet
CCP Climate Control Panel
PRE 02 Driver’s and Passenger’s SideOxygen Sensors, TransmissionOutput Speed Sensor
SPARE Not Used
SPARE Not Used
SPARE Not Used
CircuitBreakers
Usage
HDLP WASHC/B - OPT
Headlamp Washer Motor (Option)

6-65
Removing the Rear Seat Cushion
NOTICE:
A fuse center is located under the rear seatcushion. To help avoid damage to the fuse center, be careful when removing or reinstallingthe seat cushion.
To remove the rear seat cushion, do the following:
1. Pull up on the front of the cushion to release thefront hooks.
2. Pull the cushion up and out toward the front of the vehicle.
3. Slide the cushion out one of the rear doors and set it aside.
Rear Pass-Through Seat

6-66
Split-Folding Rear Seat
CAUTION:
A safety belt that isn’t properly routed throughthe seat cushion or is twisted won’t provide theprotection needed in a crash. If the safety belthasn’t been routed through the seat cushion atall, it won’t be there to work for the nextpassenger. The person sitting in that positioncould be badly injured. After reinstalling the seatcushion, always check to be sure that the safetybelts are properly routed and are not twisted.

6-67
To reinstall the rear seat cushion, do the following:
1. Position the seat cushion so that you can route the safety belts through the proper slots in the seat cushion.
2. Slide the rear of the cushion up and under theseatback so the rear-locating guides hook into thewire loops on the back frame.
3. With the seat cushion lowered, push rearward andthen press down on the seat cushion until the seatcushion snaps into place.
4. Push and pull on the seat cushion to make sure it islocked into place.
5. Check to make sure the safety belts are properlyrouted and that no portion of any safety belt istrapped under the seat cushion.
Rear Underseat Fuse Block (Driver’s Side)
The driver’s side rear fuse block is located under therear seat on the driver’s side of the vehicle. The rear seat cushion must be removed to access the rear fuseblock. See “Removing the Rear Seat Cushion” listed previously.
To access the fuse block, push in the two tabs located ateach end of the fuse block cover. Then lift the cover off.

6-68
Relays Usage
SPARE Not Used
SPARE Not Used
SPARE Not Used
PUSHER FAN Pusher Fan (Export Only)
L POSITIONRELAY MICRO
Driver’s Side Position Lamp
R POSITIONRELAY MICRO
Passenger’s Side Position Lamp
IGN 3 RELAYMICRO
Heated Seat Modules, Air InletMotor, Shifter Assembly
STANDINGLAMP RLYMICRO
Control for Position Lamp Relays
Relays Usage
TRK DR RELSOL RELAYMICRO
Trunk Release Motor
REV LAMPRELAY MICRO
ISRVM (Inside Rearview Mirror),License Plate Lamp Assembly
Minifuses Usage
L FRT HTDSEAT MOD
Driver’s Heated Seat Module
MEM/ADAPTSEAT
Driver’s Power Seat Switch,Memory Seat Module
TRUNK DRRELEASE
Trunk Release Motor
REVERSELAMP
ISRVM (Inside Rearview Mirror),License Plate Lamp Assembly
SPARE Not Used
POSITIONLAMP
Taillamp Assemblies, FrontPosition Lamp Assemblies
SPARE Not Used
SPARE Not Used
AUDIO Radio, OnStar Module

6-69
Minifuses Usage
SPARE Not Used
REAR DR MOD Rear Door Modules
SPARE Not Used
DRIVER DRMOD
Driver’s Door Module
SPARE Not Used
HDLPLEVELING
Headlamp Leveling SystemChassis Sensors (Export Only)
EBCM EBCM (Electronic Brake Control Module)
CCP CCP (Climate Control Panel)
IGN 3 Heated Seat Modules, Air InletMotor, Shifter Assembly
J Cases Usage
AMP Audio Amplifier
PUSHER FAN Pusher Fan (Export Only)
CircuitBreakers
Usage
SEAT C/B Power Seat Switches, MemorySeat Module
Rear Underseat Fuse Block (Passenger’s Side)
The passenger’s side rear fuse block is located under therear seat on the passenger’s side of the vehicle. The rearseat cushion must be removed to access the rear fuseblock. See “Removing the Rear Seat Cushion” listed previously.
To access the fuse block, push in the two tabs located ateach end of the fuse block cover. Then lift the cover off.

6-70
Minifuses Usage
INTERIORLAMP
Hush Panel Lamps, PuddleLamps, Overhead Courtesy Lamp Assembly
PSGR DR MOD Right Front Passenger Door Module
RIM RIM (Rear Integration Module),Ignition Switch, Key LockCylinder
REAR FOG LAMP
Rear Fog Lamps (Export Only)
SPARE Not Used
NAV TV Tuner Assembly (ExportOnly), VICS (Vehicle InformationCommunication System) Module
Minifuses Usage
SPARE Not Used
SPARE Not Used
POWERSOUNDER
Power Sounder, Inclination Sensor
SPARE Not Used
TRUNK LAMP Trunk Lamp
FUEL PUMP MTR
Fuel Pump Motor
AFTERBOIL Afterboil Heater Pump
R FRT HTDSEAT MOD
Passenger’s Side Heated Seat Module
SPARE Not Used
SIR SDM (Sensing DiagnosticModule)
RIM ISRVM (Inside Rearview Mirror),Power Sounder, RIM, PassiveTrunk Release Sensor
CANISTERVENT
Canister Vent Solenoid
SPARE Not Used

6-71
CircuitBreakers
Usage
DR MOD PWR C/B
Door Modules
J Cases Usage
REAR DEFOG Rear Window Defogger Element
SUNROOFMOD
Power Sunroof Module
Relays Usage
RAP RELAY MINI
Retained Accessory Power
SPARE Not Used
REAR DEFOGRELAY MINI
Rear Window Defogger
Relays Usage
SPARE Not Used
AFTER BOIL MICRO
Afterboil Heater Pump
INT LAMPRELAY MICRO
Hush Panel Lamps, PuddleLamps, Overhead Courtesy Lamp Assembly
IGN 1 RELAYMICRO
Ignition Switch
REAR FOGLAMP RLYMICRO
Rear Fog Lamps (Export Only)
FUEL PUMPMOTOR RLYMICRO
Fuel Pump Motor

6-72
Replacement BulbsFor any bulb not listed here contact your dealer.
Application NumberFront and Rear Turn Signal Lamps 3157K. . . . . . . . . Fog Lamps 9145. . . . . . . . . . . . . . . . . . . . . . . . . . . . . Back-Up Lamps 3157K. . . . . . . . . . . . . . . . . . . . . . . . License Plate Lamps W5WLL. . . . . . . . . . . . . . . . . . Taillamps 3157K. . . . . . . . . . . . . . . . . . . . . . . . . . . . . Stop Lamps 3157K. . . . . . . . . . . . . . . . . . . . . . . . . . . Rear Sidemarker Lamps 3157K. . . . . . . . . . . . . . . . . .
Capacities and SpecificationsThe following approximate capacities are given inEnglish and metric conversions. Please refer to“Recommended Fluids and Lubricants” Index for more information.
Engine SpecificationsType 3.2 L V6. . . . . . . . . . . . . . . . . . . . . . . . . . . . . . . VIN Engine Code N. . . . . . . . . . . . . . . . . . . . . . . . . . .
Wheel Nut Torque100 lb-ft (140 N·m)
CapacitiesAutomatic
Transmission (5L40-E) 9.0 quarts (8.5 L). . . . . . . . Manual Transmission (M35) 1.3 quarts (1.3 L). . . . . Engine Oil with Filter 5.0 quarts (4.8 L). . . . . . . . . . Engine Cooling System 10.4 quarts (9.8 L). . . . . . . . Fuel Tank 17.5 U.S. gallons (66.2 L). . . . . . . . . . . . .
All capacities are approximate. When adding, be sure tofill to the approximate level, as recommended in thismanual. Recheck fluid level after filling.

6-73
Air Conditioning RefrigerantCapacityIf you do your own service work, you’ll need the properservice manual. See “Doing Your Own Service Work” inthe Index for additional information. It is recommendedthat service work on your air conditioning system beperformed by a qualified technician.
Air Conditioning Refrigerant R134a 1.3 lbs. (0.59 kg). . . . . . . . . . . . .
Use Refrigerant Oil, R134a Systems
Normal Maintenance Replacement PartsEngine Air Cleaner/Filter A2029C*. . . . . . . . . . . . . . . Passenger Compartment Air
Filter Element GM Part No. 25740404. . . . . . . . . . . Engine Oil Filter PF2245*. . . . . . . . . . . . . . . . . . . . . Spark
Plugs FGR8KQE0**. . . . . . . . . . . . . . . . . . . . . . . . (GM Part No. 24425327)
Gap: 0.060 inches (1.4 mm)Windshield Wiper Blade
(Shepherd’s Hook Type) 22 inches (56.5 cm). . . . . .
*AC Delco� part number.
**Bosch part number.

7-7-1
Section 7 Maintenance Schedule
This section covers the maintenance required for your vehicle. Your vehicle needs these services to retain its safety,dependability and emission control performance.
7-2 Introduction7-4 Part A: Scheduled Maintenance Services7-5 Scheduled Maintenance7-16 Part B: Owner Checks and Services
7-21 Part C: Periodic Maintenance Inspections7-23 Part D: Recommended Fluids and Lubricants7-25 Part E: Maintenance Record

7-2
Have you purchased the GM Protection Plan? The Plansupplements your new vehicle warranties. See yourWarranty and Owner Assistance booklet or your dealerfor details.
IntroductionYour Vehicle and the EnvironmentProper vehicle maintenance not only helps to keep yourvehicle in good working condition, but also helps theenvironment. All recommended maintenance proceduresare important. Improper vehicle maintenance can evenaffect the quality of the air we breathe. Improper fluidlevels or the wrong tire inflation can increase the levelof emissions from your vehicle. To help protect ourenvironment, and to keep your vehicle in goodcondition, please maintain your vehicle properly.
Maintenance RequirementsMaintenance intervals, checks, inspections andrecommended fluids and lubricants as prescribed in thismanual are necessary to keep your vehicle in goodworking condition. Any damage caused by failure tofollow recommended maintenance may not be coveredby warranty.

7-3
How This Section is OrganizedThis maintenance schedule is divided into five parts:
“Part A: Scheduled Maintenance Services” explainswhat to have done and how often. Some of theseservices can be complex, so unless you are technicallyqualified and have the necessary equipment, you shouldlet your dealer’s service department or another qualifiedservice center do these jobs.
CAUTION:
Performing maintenance work on a vehicle canbe dangerous. In trying to do some jobs, you canbe seriously injured. Do your own maintenancework only if you have the required know-howand the proper tools and equipment for the job.If you have any doubt, have a qualifiedtechnician do the work.
If you want to get the service information, see “Serviceand Owner Publications” in the Index.
“Part B: Owner Checks and Services” tells you whatshould be checked and when. It also explains what youcan easily do to help keep your vehicle in goodcondition.
“Part C: Periodic Maintenance Inspections” explainsimportant inspections that your dealer’s servicedepartment or another qualified service center should perform.
“Part D: Recommended Fluids and Lubricants” listssome recommended products necessary to help keepyour vehicle properly maintained. These products, ortheir equivalents, should be used whether you do thework yourself or have it done.
“Part E: Maintenance Record” is a place for you to record and keep track of the maintenanceperformed on your vehicle. Keep your maintenancereceipts. They may be needed to qualify your vehicle for warranty repairs.

7-4
Part A: Scheduled MaintenanceServicesUsing Your Maintenance ScheduleWe at General Motors want to help you keep yourvehicle in good working condition. But we don’t knowexactly how you’ll drive it. You may drive very shortdistances only a few times a week. Or you may drivelong distances all the time in very hot, dusty weather.You may use your vehicle in making deliveries. Or you may drive it to work, to do errands or in many other ways.
Because of all the different ways people use theirvehicles, maintenance needs vary. You may need morefrequent checks and replacements. So please read thefollowing and note how you drive. If you have anyquestions on how to keep your vehicle in goodcondition, see your dealer.
This part tells you the maintenance services you shouldhave done and when you should schedule them. If yougo to your dealer for your service needs, you’ll knowthat GM-trained and supported service people willperform the work using genuine GM parts.
The proper fluids and lubricants to use are listed inPart D. Make sure whoever services your vehicle uses these. All parts should be replaced and allnecessary repairs done before you or anyone else drives the vehicle.
This schedule is for vehicles that:
� carry passengers and cargo within recommendedlimits. You will find these limits on your vehicle’sTire-Loading Information label. See “Loading YourVehicle” in the Index.
� are driven on reasonable road surfaces within legaldriving limits.
� use the recommended fuel. See “Fuel” in the Index.

Scheduled Maintenance
7-5
The services shown in this schedule up to 100,000 miles(166 000 km) should be repeated after 100,000 miles(166 000 km) at the same intervals for the life of this vehicle. The services shown at 150,000 miles(240 000 km) should be repeated at the same intervalafter 150,000 miles (240 000 km) for the life of this vehicle.
See “Owner Checks and Services” and “PeriodicMaintenance Inspections” following.
Footnotes� The U.S. Environmental Protection Agency or theCalifornia Air Resources Board has determined that thefailure to perform this maintenance item will not nullifythe emission warranty or limit recall liability prior tothe completion of the vehicle’s useful life. We, however,urge that all recommended maintenance services beperformed at the indicated intervals and themaintenance be recorded.
# Failure to follow the maintenance described mayresult in a broken timing belt and cause severe enginedamage. It is important to use only genuine GM partswhen replacing the timing belt.
+ A good time to check your brakes is during tirerotation. See “Brake System Inspection” under“Periodic Maintenance Inspections” in Part C of this schedule.
** Drive axle service. See “Recommended Fluids andLubricants” in the Index for proper lubricant to use.

Scheduled Maintenance
7-6
Engine Oil Scheduled MaintenanceChange engine oil and filter as indicated by the GM Oil Life System� (or every 12 months,whichever occurs first). Reset the system.
Your vehicle has a computer system that lets you knowwhen to change the engine oil and filter. This is based onengine revolutions and engine temperature, and not onmileage. Based on driving conditions, the mileage atwhich an oil change will be indicated can varyconsiderably. For the oil life system to work properly,you must reset the system every time the oil is changed.
When the system has calculated that oil life has beendiminished, it will indicate that an oil change isnecessary. A Change Engine Oil message in the DriverInformation Center (DIC) will come on. Change your oilas soon as possible within the next two times you stopfor fuel. It is possible that, if you are driving under thebest conditions, the oil life system may not indicate thatan oil change is necessary for over a year. However,your engine oil and filter must be changed at least oncea year and at this time the system must be reset. It is alsoimportant to check your oil regularly and keep it at theproper level.
If the system is ever reset accidentally, you must changeyour oil at 3,000 miles (5 000 km) since your last oilchange. Remember to reset the oil life system wheneverthe oil is changed. See “Oil Life System” in the Indexfor information on resetting the system.
An Emission Control Service.

Scheduled Maintenance
7-7

Scheduled Maintenance
7-8

Scheduled Maintenance
7-9
7,500 Miles (12 500 km)� Rotate tires. See “Tire Inspection and Rotation” in the Index for proper
rotation pattern and additional information. (See footnote +.)
15,000 Miles (25 000 km)� Inspect engine air cleaner filter if you are driving in dusty conditions.
Replace filter if necessary. An Emission Control Service. (See footnote �.)
� Replace passenger compartment air filter. If you drive regularly under dustyconditions, the filter may require replacement more often.
� Rotate tires. See “Tire Inspection and Rotation” in the Index for properrotation pattern and additional information. (See footnote +.)
22,500 Miles (37 500 km)� Rotate tires. See “Tire Inspection and Rotation” in the Index for proper
rotation pattern and additional information. (See footnote +.)
ACTUAL SERVICED BY:MILEAGE
DATE
ACTUAL SERVICED BY:MILEAGE
DATE
ACTUAL SERVICED BY:MILEAGE
DATE

Scheduled Maintenance
7-10
30,000 Miles (50 000 km)� Replace passenger compartment air filter. If you drive regularly under dusty
conditions, the filter may require replacement more often.� Check axle fluid level and add fluid as needed. (See footnote **.) � Rotate tires. See “Tire Inspection and Rotation” in the Index for proper
rotation pattern and additional information. (See footnote +.) � Replace engine air cleaner filter.
An Emission Control Service.
37,500 Miles (62 500 km)� Rotate tires. See “Tire Inspection and Rotation” in the Index for proper
rotation pattern and additional information. (See footnote +.)
45,000 Miles (75 000 km)� Inspect engine air cleaner filter if you are driving in dusty conditions.
Replace filter if necessary. An Emission Control Service. (See footnote �.)
� Replace passenger compartment air filter. If you drive regularly under dustyconditions, the filter may require replacement more often.
� Rotate tires. See “Tire Inspection and Rotation” in the Index for properrotation pattern and additional information. (See footnote +.)
ACTUAL SERVICED BY:MILEAGE
DATE
ACTUAL SERVICED BY:MILEAGE
DATE
ACTUAL SERVICED BY:MILEAGE
DATE

Scheduled Maintenance
7-11
50,000 Miles (83 000 km)� Change automatic transmission fluid and filter if the vehicle is mainly driven
under one or more of these conditions:– In heavy city traffic where the outside temperature regularly reaches
90�F (32�C) or higher.– In hilly or mountainous terrain.– When doing frequent trailer towing.– Uses such as high performance operation.If you do not use your vehicle under any of these conditions, the fluid andfilter do not require changing.
52,500 Miles (87 500 km)� Rotate tires. See “Tire Inspection and Rotation” in the Index for proper
rotation pattern and additional information. (See footnote +.)
ACTUAL SERVICED BY:MILEAGE
DATE
ACTUAL SERVICED BY:MILEAGE
DATE

Scheduled Maintenance
7-12
60,000 Miles (100 000 km)� Replace passenger compartment air filter. If you drive regularly under dusty
conditions, the filter may require replacement more often.� Check axle fluid level and add fluid as needed. (See footnote **.) � Rotate tires. See “Tire Inspection and Rotation” in the Index for proper
rotation pattern and additional information. (See footnote +.) � Inspect engine accessory drive belt.
An Emission Control Service. � Replace engine air cleaner filter.
An Emission Control Service.
67,500 Miles (112 500 km)� Rotate tires. See “Tire Inspection and Rotation” in the Index for proper
rotation pattern and additional information. (See footnote +.)
ACTUAL SERVICED BY:MILEAGE
DATE
ACTUAL SERVICED BY:MILEAGE
DATE

Scheduled Maintenance
7-13
75,000 Miles (125 000 km)� Inspect engine air cleaner filter if you are driving in dusty conditions.
Replace filter if necessary. An Emission Control Service. (See footnote �.)
� Replace passenger compartment air filter. If you drive regularly under dustyconditions, the filter may require replacement more often.
� Rotate tires. See “Tire Inspection and Rotation” in the Index for properrotation pattern and additional information. (See footnote +.)
� Inspect engine accessory drive belt if belt has not been replaced. An Emission Control Service.
82,500 Miles (137 500 km)� Rotate tires. See “Tire Inspection and Rotation” in the Index for proper
rotation pattern and additional information. (See footnote +.)
ACTUAL SERVICED BY:MILEAGE
DATE
ACTUAL SERVICED BY:MILEAGE
DATE

Scheduled Maintenance
7-14
90,000 Miles (150 000 km)� Replace passenger compartment air filter. If you drive regularly under dusty
conditions, the filter may require replacement more often.� Check axle fluid level and add fluid as needed. (See footnote **.) � Replace engine air cleaner filter.
An Emission Control Service. � Rotate tires. See “Tire Inspection and Rotation” in the Index for proper
rotation pattern and additional information. (See footnote +.) � Inspect engine accessory drive belt if belt has not been replaced.
An Emission Control Service.
97,500 Miles (162 500 km)� Rotate tires. See “Tire Inspection and Rotation” in the Index for proper
rotation pattern and additional information. (See footnote +.)
ACTUAL SERVICED BY:MILEAGE
DATE
ACTUAL SERVICED BY:MILEAGE
DATE

Scheduled Maintenance
7-15
100,000 Miles (166 000 km)� Replace spark plugs.
An Emission Control Service.� Replace timing belt (or every 96 months, whichever occurs first).
An Emission Control Service. (See footnote #.) � Replace fuel filter.
An Emission Control Service.� Change automatic transmission fluid and filter if the vehicle is mainly driven
under one or more of these conditions:– In heavy city traffic where the outside temperature regularly reaches
90�F (32�C) or higher.– In hilly or mountainous terrain.– When doing frequent trailer towing.– Uses such as high performance operation.If you do not use your vehicle under any of these conditions, the fluid andfilter do not require changing.
150,000 Miles (240 000 km)� Drain, flush and refill cooling system (or every 60 months since last
service, whichever occurs first). See “Engine Coolant” in the Index for what to use. Inspect hoses. Clean radiator, condenser, pressure cap and neck.Pressure test the cooling system and pressure cap. An Emission Control Service.
ACTUAL SERVICED BY:MILEAGE
DATE
ACTUAL SERVICED BY:MILEAGE
DATE

7-16
Part B: Owner Checks and ServicesListed in this part are owner checks and services whichshould be performed at the intervals specified to helpensure the safety, dependability and emission controlperformance of your vehicle.
Be sure any necessary repairs are completed at once.Whenever any fluids or lubricants are added to yourvehicle, make sure they are the proper ones, as shown in Part D.
At Each Fuel FillIt is important for you or a service station attendant toperform these underhood checks at each fuel fill.
Engine Oil Level Check
Check the engine oil level and add the proper oil if necessary. See “Engine Oil” in the Index for further details.
Engine Coolant Level Check
Check the engine coolant level and add DEX-COOL�
coolant mixture if necessary. See “Engine Coolant” inthe Index for further details.
Windshield Washer Fluid Level Check
Check the windshield washer fluid level in thewindshield washer tank and add the proper fluid ifnecessary. See “Windshield Washer Fluid” in the Index for further details.
At Least Once a Month
Tire Inflation Check
Make sure tires are inflated to the correct pressures.Don’t forget to check your spare tire. See “Tires” in theIndex for further details.
Cassette Deck Service
Clean cassette deck. Cleaning should be done every50 hours of tape play. See “Audio Systems” in the Index for further details.

7-17
At Least Twice a Year
Restraint System Check
Make sure the safety belt reminder light and all yourbelts, buckles, latch plates, retractors and anchorages areworking properly. Look for any other loose or damagedsafety belt system parts. If you see anything that mightkeep a safety belt system from doing its job, have itrepaired. Have any torn or frayed safety belts replaced.
Also look for any opened or broken air bag coverings,and have them repaired or replaced. (The air bag systemdoes not need regular maintenance.)
Wiper Blade Check
Inspect wiper blades for wear or cracking. Replace bladeinserts that appear worn or damaged or that streak ormiss areas of the windshield. Also see “Wiper Blades,Cleaning” in the Index.
Weatherstrip Lubrication
Silicone grease on weatherstrips will make them lastlonger, seal better, and not stick or squeak. Applysilicone grease with a clean cloth. During very cold,damp weather more frequent application may berequired. See “Recommended Fluids and Lubricants” in the Index.
Manual Transmission Check
Check the transmission fluid level; add if needed. See“Manual Transmission Fluid” in the Index. Check forleaks. A fluid leak is the only reason for fluid loss. Havethe system inspected and repaired if needed.
Automatic Transmission Check
Check the transmission fluid level; add if needed. See“Automatic Transmission Fluid” in the Index. A fluidloss may indicate a problem. Check the system andrepair if needed.
Hydraulic Clutch System Check
Check the fluid level in the clutch reservoir. See“Hydraulic Clutch Fluid” in the Index. A fluid loss in this system could indicate a problem. Have the system inspected and repaired at once.

7-18
At Least Once a Year
Key Lock Cylinders Service
Lubricate the key lock cylinders with the lubricantspecified in Part D.
Body Lubrication Service
Lubricate all body door hinges and latches, includingthose for the hood, rear compartment, interior glove boxand console doors. Part D tells you what to use. Morefrequent lubrication may be required when exposed to acorrosive environment.
Starter Switch Check
CAUTION:
When you are doing this check, the vehicle couldmove suddenly. If it does, you or others could beinjured. Follow the steps below.
1. Before you start, be sure you have enough roomaround the vehicle.
2. Firmly apply both the parking brake and the regularbrake. See “Parking Brake” in the Index if necessary.
Do not use the accelerator pedal, and be ready to turnoff the engine immediately if it starts.
3. On automatic transmission vehicles, try to start theengine in each gear. The starter should work only inPARK (P) or NEUTRAL (N). If the starter works inany other position, your vehicle needs service.
On manual transmission vehicles, put the shift leverin NEUTRAL (N), push the clutch down halfwayand try to start the engine. The starter should workonly when the clutch is pushed down all the way tothe floor. If the starter works when the clutch isn’tpushed all the way down, your vehicle needs service.

7-19
Automatic Transmission Shift Lock Control System Check
CAUTION:
When you are doing this check, the vehicle couldmove suddenly. If it does, you or others could beinjured. Follow the steps below.
1. Before you start, be sure you have enough roomaround the vehicle. It should be parked on a level surface.
2. Firmly apply the parking brake. See “Parking Brake”in the Index if necessary.
Be ready to apply the regular brake immediately ifthe vehicle begins to move.
3. With the engine off, turn the key to the ON position,but don’t start the engine. Without applying theregular brake, try to move the shift lever out ofPARK (P) with normal effort. If the shift levermoves out of PARK (P), your vehicle needs service.
Ignition Automatic Transmission Lock Check
While parked, and with the parking brake set, try to turn the ignition key to OFF in each shift lever position.The key should turn to OFF only when the shift lever isin PARK (P).
On all vehicles, the key should come out only in OFF.

7-20
Parking Brake and Automatic TransmissionPARK (P) Mechanism Check
CAUTION:
When you are doing this check, your vehiclecould begin to move. You or others could beinjured and property could be damaged. Makesure there is room in front of your vehicle in caseit begins to roll. Be ready to apply the regularbrake at once should the vehicle begin to move.
Park on a fairly steep hill, with the vehicle facingdownhill. Keeping your foot on the regular brake, set the parking brake.
� To check the parking brake’s holding ability: Withthe engine running and transmission inNEUTRAL (N), slowly remove foot pressure fromthe regular brake pedal. Do this until the vehicle isheld by the parking brake only.
� To check the PARK (P) mechanism’s holding ability: With the engine running, shift to PARK (P).Then release the parking brake followed by theregular brake.
Underbody Flushing Service
At least every spring, use plain water to flush anycorrosive materials from the underbody. Take care toclean thoroughly any areas where mud and other debriscan collect.

7-21
Part C: Periodic MaintenanceInspectionsListed in this part are inspections and services whichshould be performed at least twice a year (for instance,each spring and fall). You should let your dealer’sservice department or other qualified service center do these jobs. Make sure any necessary repairs arecompleted at once.
Proper procedures to perform these services may befound in a service manual. See “Service and OwnerPublications” in the Index.
Steering and Suspension InspectionInspect the front and rear suspension and steeringsystem for damaged, loose or missing parts, signs ofwear or lack of lubrication. Inspect the power steeringlines and hoses for proper hook-up, binding, leaks,cracks, chafing, etc.
Exhaust System InspectionInspect the complete exhaust system. Inspect the bodynear the exhaust system. Look for broken, damaged,missing or out-of-position parts as well as open seams,holes, loose connections or other conditions which couldcause a heat build-up in the floor pan or could letexhaust fumes into the vehicle. See “Engine Exhaust” inthe Index.
Fuel System InspectionInspect the complete fuel system for damage or leaks.

7-22
Engine Cooling System InspectionInspect the hoses and have them replaced if they arecracked, swollen or deteriorated. Inspect all pipes,fittings and clamps; replace as needed. Clean the outsideof the radiator and air conditioning condenser. To helpensure proper operation, a pressure test of the coolingsystem and pressure cap is recommended at least once a year.
Brake System InspectionInspect the complete system. Inspect brake lines andhoses for proper hook-up, binding, leaks, cracks,chafing, etc. Inspect disc brake pads for wear and rotorsfor surface condition. Inspect other brake parts,including calipers, parking brake, etc. You may need tohave your brakes inspected more often if your drivinghabits or conditions result in frequent braking.

7-23
Part D: Recommended Fluids andLubricantsFluids and lubricants identified below by name, part number or specification may be obtained from your dealer.
USAGE FLUID/LUBRICANT
Engine Oil Engine oil with the AmericanPetroleum Institute Certified forGasoline Engines starburst symbolof the proper viscosity. Todetermine the preferred viscosityfor your vehicle’s engine, see“Engine Oil” in the Index.
Engine Coolant 50/50 mixture of clean, drinkablewater and use only DEX-COOL�
Coolant. See “Engine Coolant” inthe Index.
USAGE FLUID/LUBRICANT
Hydraulic BrakeSystem
Delco Supreme 11� Brake Fluidor equivalent DOT-3 brake fluid.
WindshieldWasher Solvent
GM Optikleen� Washer Solventor equivalent.
Hydraulic ClutchSystem
Hydraulic Clutch Fluid (GM Part No. U.S. 12345347, in Canada 10953517, or equivalent DOT-3 brake fluid).
Parking BrakeCable Guides
Chassis Lubricant (GM Part No. U.S. 12377985, inCanada 88901242, or equivalent)or lubricant meeting requirementsof NLGI # 2, Category LB or GC-LB.
Power SteeringSystem
DEXRON�-III AutomaticTransmission Fluid.

7-24
USAGE FLUID/LUBRICANT
ManualTransmission
DEXRON�-III AutomaticTransmission Fluid.
AutomaticTransmission
DEXRON�-III AutomaticTransmission Fluid.
Key LockCylinders
Multi -Purpose Lubricant,Superlube� (GM Part No. U.S. 12346241, in Canada 10953474, or equivalent).
Floor ShiftLinkage
Lubriplate� Lubricant Aerosol(GM Part No. U.S. 12346293, inCanada 992723, or equivalent) orlubricant meeting requirements ofNLGI # 2 Category LB or GC-LB.
USAGE FLUID/LUBRICANT
Rear Axle SAE 80W-90 GL-5 AxleLubricant (GM Part No. U.S. 12345977, in Canada 10953482, or equivalent).
Hood LatchAssembly,Secondary Latch,Pivots, SpringAnchor andRelease Pawl
Lubriplate� Lubricant Aerosol(GM Part No. U.S. 12346293, in Canada 992723, or equivalent)or lubricant meeting requirementsof NLGI # 2, Category LB or GC-LB.
Hood and DoorHinges
Multi -Purpose Lubricant,Superlube� (GM Part No. U.S. 12346241, in Canada 10953474, or equivalent).
WeatherstripConditioning
Dielectric Silicone Grease (GM Part No. U.S. 12345579, inCanada 1974984, or equivalent).

7-25
Part E: Maintenance RecordAfter the scheduled services are performed, record the date, odometer reading and who performed the service in theboxes provided after the maintenance interval. Any additional information from “Owner Checks and Services” or“Periodic Maintenance” can be added on the following record pages. Also, you should retain all maintenance receipts.Your owner information portfolio is a convenient place to store them.
Maintenance Record
DATEODOMETER
READING SERVICED BY MAINTENANCE PERFORMED

7-26
Maintenance Record
DATEODOMETER
READING SERVICED BY MAINTENANCE PERFORMED

8-8-1
Section 8 Customer Assistance Information
Here you will find out how to contact Cadillac if you need assistance. This section also tells you how to obtain servicepublications and how to report any safety defects.
8-2 Customer Satisfaction Procedure8-3 Customer Assistance for Text Telephone
(TTY) Users8-4 Customer Assistance Offices8-5 GM Mobility Program for Persons
with Disabilities8-5 Roadside Service8-6 Roadside Service for the Hearing or
Speech Impaired
8-7 Courtesy Transportation8-7 Transportation Options8-9 Reporting Safety Defects to the
United States Government8-9 Reporting Safety Defects to the
Canadian Government8-9 Reporting Safety Defects to
General Motors

8-2
Customer Satisfaction ProcedureYour satisfaction and goodwill are important to yourdealer and to Cadillac. Normally, any concerns with thesales transaction or the operation of your vehicle will beresolved by your dealer’s sales or service departments.Sometimes, however, despite the best intentions of all concerned, misunderstandings can occur. If yourconcern has not been resolved to your satisfaction, the following steps should be taken:
STEP ONE -- Discuss your concern with a member of dealership management. Normally, concerns can be quickly resolved at that level. If the matter hasalready been reviewed with the sales, service or partsmanager, contact the owner of the dealership or thegeneral manager.
STEP TWO -- If after contacting a member of dealership management, it appears your concern cannot be resolved by the dealership without further help, contact the Cadillac Customer Assistance Center, 24 hours a day, by calling1-800-458-8006. In Canada, contact GM of Canada Customer Communication Centre in Oshawa by calling 1-800-263-3777 (English) or 1-800-263-7854 (French).
We encourage you to call the toll-free number in orderto give your inquiry prompt attention. Please have thefollowing information available to give the CustomerAssistance Representative:
� Vehicle Identification Number (This is availablefrom the vehicle registration or title, or the plate at the top left of the instrument panel and visiblethrough the windshield.)
� Dealership name and location
� Vehicle delivery date and present mileage
When contacting Cadillac, please remember that yourconcern will likely be resolved at a dealer’s facility. That is why we suggest you follow Step One first if you have a concern.
8-3
STEP THREE -- Both General Motors and your dealer are committed to making sure you are completelysatisfied with your new vehicle. However, if you continueto remain unsatisfied after following the procedureoutlined in Steps One and Two, you should file with theGM/BBB Auto Line Program to enforce any additionalrights you may have. Canadian owners refer to yourWarranty and Owner Assistance Information booklet for information on the Canadian Motor VehicleArbitration Plan (CAMVAP).
The BBB Auto Line Program is an out of court programadministered by the Council of Better Business Bureausto settle automotive disputes regarding vehicle repairs orthe interpretation of the New Vehicle Limited Warranty.Although you may be required to resort to this informaldispute resolution program prior to filing a court action,use of the program is free of charge and your case willgenerally be heard within 40 days. If you do not agreewith the decision given in your case, you may reject itand proceed with any other venue for relief available to you.
You may contact the BBB using the toll-free telephonenumber or write them at the following address:
BBB Auto LineCouncil of Better Business Bureaus, Inc.4200 Wilson BoulevardSuite 800Arlington, VA 22203-1804
Telephone: 1-800-955-5100
This program is available in all 50 states and the District of Columbia. Eligibility is limited by vehicleage, mileage and other factors. General Motors reservesthe right to change eligibility limitations and/ordiscontinue its participation in this program.
Customer Assistance for TextTelephone (TTY) UsersTo assist customers who are deaf, hard of hearing, orspeech-impaired and who use Text Telephones (TTYs),Cadillac has TTY equipment available at its CustomerAssistance Center. Any TTY user can communicate with Cadillac by dialing: 1-800-833-CMCC (2622). (TTY users in Canada can dial 1-800-263-3830.)

8-4
Customer Assistance OfficesCadillac encourages customers to call the toll-freenumber for assistance. If a U.S. customer wishes towrite to Cadillac, the letter should be addressed toCadillac’s Customer Assistance Center.
United StatesCadillac Customer Assistance CenterCadillac Motor Car DivisionP.O. Box 33169Detroit, MI 48232-5169
1-800-458-80061-800-833-2622 (For Text Telephone devices (TTYs))Roadside Assistance: 1-800-882-1112
From:Puerto Rico: 1-800-496-9992 (English)
1-800-496-9993 (Spanish)
U.S. Virgin Islands: 1-800-496-9994
Fax Number: 313-381-0022
CanadaGeneral Motors of Canada LimitedCustomer Communication Centre, 163-0051908 Colonel Sam DriveOshawa, Ontario L1H 8P7
1-800-263-3777 (English)1-800-263-7854 (French)1-800-263-3830 (For Text Telephone devices (TTYs))Roadside Assistance: 1-800-882-1112
All Overseas LocationsPlease contact the local General Motors Business Unit.
Mexico, Central America and CaribbeanIslands/Countries (Except Puerto Rico andU.S. Virgin Islands)
General Motors de Mexico, S. de R.L. de C.V. Customer Assistance CenterPaseo de la Reforma # 2740Col. Lomas de BezaresC.P. 11910, Mexico, D.F.
01-800-508-0000Long Distance: 011-52 - 53 29 0 800

8-5
GM Mobility Program for Personswith Disabilities
This program, available toqualified applicants, canreimburse you up to $1,000toward aftermarket driver or passenger adaptiveequipment you may requirefor your vehicle (handcontrols, wheelchair/scooterlifts, etc.).
This program can also provide you with free resourceinformation, such as area driver assessment centers andmobility equipment installers. The program is availablefor a limited period of time from the date of vehiclepurchase/lease. See your dealer for more details or callthe GM Mobility Assistance Center at 1-800-323-9935.Text telephone (TTY) users, call 1-800-833-9935.
GM of Canada also has a Mobility Program. Call 1-800-GM-DRIVE (463-7483) for details. When calling from outside Canada, please dial1-905-644-3063. All TTY users call 1-800-263-3830.
Roadside ServiceCadillac’s exceptional Roadside Service is more than anauto club or towing service. It provides every Cadillacowner with the advantage of contacting a Cadillacadvisor and, where available, a Cadillac trained dealertechnician who can provide on-site service.
Each technician travels with a specially equipped servicevehicle complete with the necessary Cadillac parts andtools required to handle most roadside repairs.
Cadillac Roadside Service� can be reached by dialing1-800-882-1112, 24 hours a day, 365 days a year. This service is provided at no charge for anywarranty-covered situation and for a nominal charge if the Cadillac is no longer under warranty.Roadside Service is available only in the United Statesand Canada.

8-6
Cadillac Owner Privileges�Roadside Service provides several Cadillac OwnerPrivileges� at “no charge,” throughout your 2003 CadillacWarranty Period -- 48 months/ 50,000 miles (80 000 km).
Emergency Road Service is performed on site for thefollowing situations:
� Towing Service� Battery Jump Starting� Lock Out Assistance� Fuel Delivery� Flat Tire Change (Covers change only)� Trip Interruption -- If your trip is interrupted due
to a warranty failure, incidental expenses may bereimbursed during the 48 months/50,000 miles (80 000 km) warranty period. Items covered arehotel, meals and rental car.
Roadside Service AvailabilityWherever you drive in the United States or Canada, an advisor is available to assist you over the phone. A dealer technician, if available, can travel to yourlocation within a 30 mile (50 km) radius of aparticipating Cadillac dealership. If beyond this radius,we will arrange to have your car towed to the nearestCadillac dealership.
Reaching Roadside ServiceDial the toll-free Roadside Service number:1-800-882-1112. An experienced Roadside Service Advisor will assist you and request thefollowing information:
� A description of the problem
� Name, home address, home telephone number
� Location of your Cadillac and number you arecalling from
� The model year, Vehicle Identification Number (VIN), mileage and date of delivery
Roadside Service for the Hearing or Speech ImpairedRoadside Service is prepared to assist owners who havehearing difficulties or are speech impaired. Cadillac hasinstalled special telecommunication devices called TextTelephone (TTY) in the Roadside Service Center.
Any customer who has access to a (TTY) or aconventional teletypewriter can communicate withCadillac by dialing from the United States or Canada1-888-889-2438 -- daily, 24 hours.

8-7
Courtesy TransportationCadillac has always exemplified quality and value in itsoffering of motor vehicles. To enhance your ownershipexperience, we and our participating dealers are proud to offer Courtesy Transportation, a customer supportprogram for new vehicles.
The Courtesy Transportation program is offered to retail purchase/lease customers in conjunction with the Bumper-to-Bumper coverage provided by the New Vehicle Limited Warranty. Several transportationoptions are available when warranty repairs arerequired. This will reduce your inconvenience duringwarranty repairs.
Plan Ahead When PossibleWhen your vehicle requires warranty service, youshould contact your dealer and request an appointment.By scheduling a service appointment and advising yourservice consultant of your transportation needs, yourdealer can help minimize your inconvenience.
If your vehicle cannot be scheduled into the servicedepartment immediately, keep driving it until it can bescheduled for service, unless, of course, the problem is safety-related. If it is, please call your dealership, let them know this, and ask for instructions.
If the dealer requests that you simply drop the vehicleoff for service, you are urged to do so as early in thework day as possible to allow for same day repair.
Transportation OptionsWarranty service can generally be completed while youwait. However, if you are unable to wait Cadillac helpsminimize your inconvenience by providing severaltransportation options. Depending on the circumstances,your dealer can offer you one of the following:
Shuttle ServiceParticipating dealers can provide you with shuttleservice to get you to your destination with minimalinterruption of your daily schedule. This includes a one way shuttle ride to a destination up to 10 miles from the dealership.

8-8
Public Transportation or Fuel Reimbursement
If your vehicle requires overnight warranty repairs,reimbursement up to $30 per day (five days maximum)may be available for the use of public transportation such as taxi or bus. In addition, should you arrangetransportation through a friend or relative, reimbursementfor reasonable fuel expenses up to $10 per day (five daymaximum) may be available. Claim amounts shouldreflect actual costs and be supported by original receipts.
Courtesy Rental Vehicle
When your vehicle is unavailable due to warranty repairs,your dealer may arrange to provide you with a courtesyrental vehicle or reimburse you for a rental vehicle youobtained, at actual cost, up to a maximum of $37.00 perday supported by receipts. This requires that you sign andcomplete a rental agreement and meet state, local andrental vehicle provider requirements. Requirements varyand may include minimum age requirements, insurancecoverage, credit card, etc. You are responsible for fuelusage charges and may also be responsible for taxes,levies, usage fees, excessive mileage or rental usagebeyond the completion of the repair.
Generally it is not possible to provide a like-vehicle as a courtesy rental.
Additional Program InformationCourtesy Transportation is available during theBumper-to-Bumper warranty coverage period, but it is not part of the New Vehicle Limited Warranty.A separate booklet entitled “Warranty and OwnerAssistance Information” furnished with each new vehicle provides detailed warranty coverage information.
Courtesy Transportation is available only at participatingdealers and all program options, such as shuttle service,may not be available at every dealer. Please contact your dealer for specific information about availability. All Courtesy Transportation arrangements will beadministered by appropriate dealer personnel.
Canadian Vehicles: For warranty repairs during theComplete Vehicle Coverage period of the GeneralMotors of Canada New Vehicle Limited Warranty,alternative transportation may be available under theCourtesy Transportation Program. Please consult your dealer for details.
General Motors reserves the right to unilaterally modify,change or discontinue Courtesy Transportation at anytime and to resolve all questions of claim eligibilitypursuant to the terms and conditions described herein at its sole discretion.

8-9
Reporting Safety Defects to theUnited States GovernmentIf you believe that your vehicle has a defect which could cause a crash or could cause injury or death, you should immediately inform the National HighwayTraffic Safety Administration (NHTSA), in addition tonotifying General Motors.
If NHTSA receives similar complaints, it may open aninvestigation, and if it finds that a safety defect exists ina group of vehicles, it may order a recall and remedycampaign. However, NHTSA cannot become involvedin individual problems between you, your dealer orGeneral Motors.
To contact NHTSA, you may either call the Auto SafetyHotline toll-free at 1-800-424-9393 (or 366-0123 in the Washington, D.C. area) or write to:
NHTSA, U.S. Department of TransportationWashington, D.C. 20590
You can also obtain other information about motorvehicle safety from the hotline.
Reporting Safety Defects to The Canadian GovernmentIf you live in Canada, and you believe that your vehiclehas a safety defect, you should immediately notifyTransport Canada, in addition to notifying GeneralMotors of Canada Limited. You may write to:
Transport Canada330 Sparks StreetTower COttawa, Ontario K1A 0N5
Reporting Safety Defects to General MotorsIn addition to notifying NHTSA (or Transport Canada)in a situation like this, we certainly hope you’ll notify us.Please call us at 1-800-458-8006, or write:
Cadillac Customer Assistance CenterCadillac Motor Car DivisionP.O. Box 33169Detroit, MI 48232-5169
In Canada, please call us at 1-800-263-3777 (English)or 1-800-263-7854 (French). Or, write:
General Motors of Canada LimitedCustomer Communication Centre, 163-0051908 Colonel Sam DriveOshawa, Ontario L1H 8P7

8-10
SERVICE PUBLICATIONS ORDERING INFORMATIONService ManualsService Manuals have the diagnosis and repairinformation on engines, transmission, axle, suspension,brakes, electrical, steering, body, etc.RETAIL SELL PRICE: $120.00
Transmission, Transaxle, Transfer CaseUnit Repair ManualThis manual provides information on unit repair service procedures, adjustments and specifications for GM transmissions, transaxles and transfer cases.
RETAIL SELL PRICE: $50.00
Service BulletinsService Bulletins give technical service informationneeded to knowledgeably service General Motors carsand trucks. Each bulletin contains instructions to assistin the diagnosis and service of your vehicle.
In Canada, information pertaining to Product ServiceBulletins can be obtained by contacting your GeneralMotors dealer or by calling 1-800-GMDRIVE.
Owner’s InformationOwner publications are written specifically for owners and intended to provide basic operational information about the vehicle. The owner’s manual will include theMaintenance Schedule for all models.Owner’s ManualRETAIL SELL PRICE: $25.00
Current and Past Model Order FormsService Publications are available for current and past model GM vehicles. To request an order form,please specify year and model name of the vehicle.
ORDER TOLL FREE: 1-800-551-4123 – Monday-Friday 8:00 AM – 6:00 PM Eastern TimeVisit Helm, Inc. on the World Wide Web at: www.helminc.com For Credit Card Orders Only (VISA-MasterCard-Discover)
Helm, Incorporated � P.O. Box 07130 � Detroit, MI 48207
Prices are subject to change without notice and without Note to Canadian Customers: All listed prices are quoted in U.S. funds.incurring obligation. Allow ample time for delivery. Canadian residents are to make checks payable in U.S. funds.