2002 – HF User’s Manual - us-isi.comus-isi.com/pub/Support/manuals/QST 2002-HF User's...
28
QST 2002 – HF User’s Manual Integral Solutions Int'l March 31, 2010 Copyright ©2003-2010 Integral Solutions Int'l All rights reserved Integral Solutions Int'l 3000 Olcott St Santa Clara, CA 95054 Phone: (408) 653-0300 Web: http://www.us-isi.com/ Fax: (408) 653-0309 E-mail: [email protected] While every effort has been made to verify the accuracy of the information contained in this publication, this publication may contain technical and/or typographical errors. Please contact Integral Solutions Int’l to report any errors in this publication
Transcript of 2002 – HF User’s Manual - us-isi.comus-isi.com/pub/Support/manuals/QST 2002-HF User's...

QST 2002 – HF User’s Manual Integral Solutions Int'l
March 31, 2010
Copyright ©2003-2010 Integral Solutions Int'l All rights reserved
Integral Solutions Int'l 3000 Olcott St
Santa Clara, CA 95054 Phone: (408) 653-0300 Web: http://www.us-isi.com/ Fax: (408) 653-0309 E-mail: [email protected] While every effort has been made to verify the accuracy of the information contained in this publication, this publication may contain
technical and/or typographical errors. Please contact Integral Solutions Int’l to report any errors in this publication

2
Contents:
1 Introduction 3 2 Related Documentation 3 3 System Components and Physical Characteristics 4 4 Interlock System Components and Power-On Operation 5
4.1 Main Power Switch 6 4.2 EMO Button 6 4.3 Cover Door Switches 7 4.4 Service Key 8 4.5 Interlock System Testing Procedure 8 4.6 Normal Operation and Power On 8
5 Mechanical alignment and operation 9 5.1 Adjustment of Locked/Unlocked Position Hard Stops 9 5.2 Changing Orientation of the Magnet Core Field 10 5.3 ISI Pole Spacer 11 5.4 Magnet Pole Adjustment 12
6 Software tests and operation 14 6.1 High Field Transfer test 14 6.2 High Field Parameters Menu 15 6.3 Closed-Loop gain and Magnetic Field Calibration 16
7 Quasi97 17 8 Toolings 18
8.1 Hall Effect Cartridge 18 8.2 HGA Tooling 18 8.3 ESD Module – HBM, MM and CDM 18 8.4 HSA and HDA Toolings 19 8.5 1x Hotfinger – HGA Temperature Stress System 19
9 Specifications 20 Appendix A: Stray Magnetic Field Figures 22
Warning! Magnetic Field Hazard!
The High Field Magnet used on this system can disrupt pacemaker operation.
3
1 Introduction
The QST-2002HF or High Field Tester is an engineering test system for characterizing the performance of MR Heads at the Head Gimbal Assembly level at magnetic fields up to 15,000 Oe. Most of the features of the High Field tester are based on the QST-2002, and therefore for tests and tooling information, please refer to the QST-2002 manual. Tests and mechanical features specific to the High Field tester will be covered in this manual.
Low Frequency measurements include Resistance and Transfer Curve analysis. High Frequency measurements include the most advanced instability detection system available today. These measurements, performed through our unique HF channel with integrated digital scope, include Popcorn, HF Noise, and patented Spectral Maximum Amplitude Noise (SMAN). The ultra high range of the QST-2002HF allows observation of sensor characteristics such as pin layer reversal and demagnetization in extreme conditions. It is capable of resetting the hard magnetic layer at HGA and HSA level by applying an extremely high longitudinal magnetic field. Weakly pinned layers can be characterized by applying extremely high magnetic fields at different angles from 0-90 degrees. Other applications include initialization investigation and environmental robustness. The full suite of stress conditions include field up to 15000 Oe, write current to 60 mA 0-pk, bias current to 20 mA, full DFH exercise, and elevated temperature. With standard ISI open architecture design software using ActiveX™ technology, customers can develop and revise their own custom tests in minutes with Visual Basic™.
2 Related Documentation The following documentation will be helpful to read and use with this manual.
Quasi97 Software User’s Manual
Contains detailed description of all menus in Quasi97 software, along with procedures on how to set up test parameters, log data, and run the QST in production and engineering modes.
QST External Modules User’s Manual
Description of additional tests provided with the QST and Quasi97 software.
4
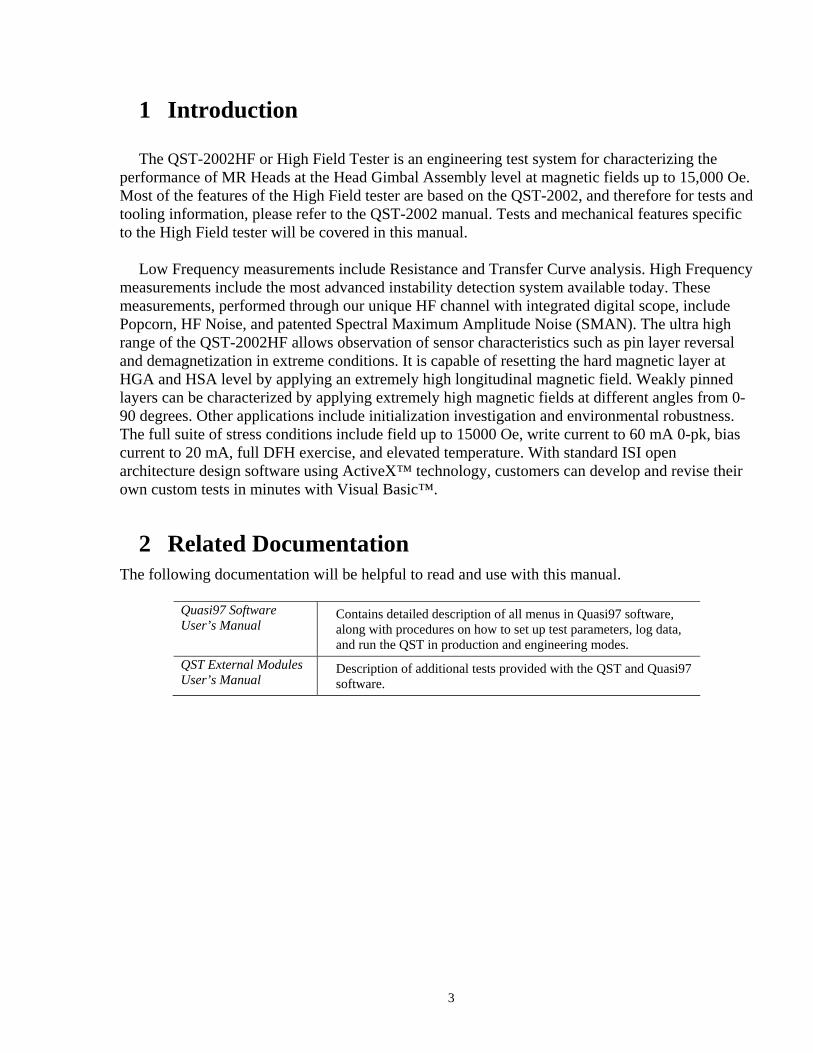
3 System Components and Physical Characteristics
The following sub-assemblies are a part of the QST-2002HF:
QST-2002E Measurement electronics of the Quasi-Static tester. QPS-1050 DC Power Supply for the QST-2002E and current driver for the High
Field Magnet. PC and Monitor
Windows XP, Microsoft Office, Quasi’97.
Interlock Box Controls power distribution throughout the QST-2002HF
QST-2002HF – Full View Contents of Lower Frame (with door open)
When planning the installation site, you need to allow sufficient clearance for tester in normal operation and for maintenance. There are two configurations with major differences in access dimensions: with monitor directly on the tester and the model with monitor stand hanging on the side (ergonomic). Nominal dimensions for the QST-2002 HF are 27”(W) x 26.5”(L) x 60”(H), weight – 500 lbs. During normal operation the tester monitor can be rotated and add as much as 4” on the right side of the tester, and if lifted, 4” in height. On the ergonomic model, the width of the tester extends by up to 16” on the left side and 10” to the front of the tester. Maintenance may require access from the front, back or the two sides of the tester. Front and rear door can add 25.5” in the length of the tester when opened. However both may be taken off using

5
2” clearance. Side Panels can be removed using 2” clearance on the two sides. When installing the tester, consider that it can be wheeled out from the production line for access on all four sides. For electrical troubleshooting allow 36" out by 30" wide space around the tester, per electrical codes.
4 Interlock System Components and Power-On Operation
The QST-2002HF unit is equipped with an interlock system, which consists of an optional protective Cover and a set of Interlock components. The control circuitry and many of the actual Interlock components of this system are enclosed in the Interlock Box, mounted to the left-hand panel inside the lower frame. The QST-2002HF systems with this equipment can be identified by the EMO mushroom switch on the upper frame panel as shown in the picture below. The Interlock System Components are shown below.
Main Power Switch
Main ON/OFF Switch, and over current circuit breaker.
EMO Button Emergency OFF button, to be pressed by the user in case of emergency to power off the tester. This will be called an EMO event.
Reset Button Reset Button which must be pressed after either an EMO event or after the Main Power Switch has been turned ON to reset system power.
Cover Door Switches
Switches mounted to the upper frame Cover to detect that either of the top Cover Doors are open. Opening the door will shut-off power to QST and the Magnet.
Maintenance Service Key
A Service Key to override the Cover Door Switches in the event that maintenance operations are required within the upper frame area.
The system should not be used if any components of the Interlock System do not work. See Interlock Box Testing Procedure later in this chapter for component verifications.
A description of the function and response of each of these Interlocks and the Hazards protected are listed below.

6
4.1 Main Power Switch The Main Power Switch disconnects power to ALL modules inside the tester downstream of the Interlock Box electronics. To turn OFF the power to the system push the switch down. To turn ON the power push the switch up and press the Reset Button. The Main Power Switch also has built-in 10Amp circuit breaker which protects the equipment in the event of excessive current draw. The software cannot detect the status of the Main Power Switch, but will be non-operational since the computer power will be off.
Warning! The Line Cord and some components within the Interlock Box will still be active even if the Main Power Switch is OFF.
4.2 EMO Button The EMO button, located on the right front side of the top frame, allows the operator to quickly disconnect the power to all components (except optionally for the PC), therefore removing any hazardous energy from the system. The EMO switch is open and accessible at any time, and is activated by pressing the button IN. Once pressed it will remain in a powered off condition until the user purposefully resets it. To reset the system to normal power rotate the EMO button clockwise until it clicks out, then press the Reset Button. All components downstream of the SWITCHED plug on the Interlock Box will be powered off by the EMO button, including the following:
• QST-1050 and QST-2002E subsequently • High Field Magnet • Chassis Ventilation Fans. • Monitor • Optionally the PC – not standard
The software detects that an EMO event has occurred. Whatever test was in progress is aborted and the software prompts operator to turn the power back on before continuing. Once the power is restored, the operator can either exit the software, or home all axes and continue normal operation.
Warning! Power to the computer and monitor may not be disconnected by the EMO switch. Also, the Line Cord and some components within the Interlock Box will still be active even if the EMO Button is pressed.

7
4.3 Cover Door Switches Door interlock override is installed by default. It means if you open or close the door nothing will happen. If you want to use the Door Cover Switch you can connect cable instead of jumper.
In case if cable connected: The Door Cover Switches are embedded into the top Cover assembly, and are engaged only when the Cover Doors are closed. When disengaged (meaning either Cover Door is opened) the power to the QPS-1050 will be disconnected, therefore stopping any current flow into the High Field Magnet. The Doors should only be opened during maintenance or normal loading of customer parts for test. The following components will be turned off directly by the Cover Door Switches:
• QPS-1050 • QST-2002E
No other components will be affected. This means the following components that will NOT be affected by the Door Cover Switches are:
• Interlock Box • Computer • Monitor • Chassis Ventilation Fans
The software will detect that either Cover Door is open through a signal from the Interlock Box. Once detected the software will abort any operation in progress, and will display a message box informing that system power is off. After closing the doors the software can be restarted.
Warning! The Cover Door Switches disconnect power to the Magnet and measurement circuitry, only if the Service Key is in normal mode or removed. If the system is in Service Mode using the Service Key (refer to Service Key section) then the Cover Door Switches will be disabled.

8
4.4 Service Key
A Service Key is provided as an override for the Cover Door Switches, if the user decides to run the system with Cover Doors opened. This mode is called Service Mode. When the key is in vertical position or removed the tester is operating in normal mode, and the Door Cover Switches are working normally. To enter Service Mode, turn the Service Key clockwise to horizontal position.
Warning! If the Service Key is turned to Service Mode the Cover Door Switches will be disabled.
4.5 Interlock System Testing Procedure The following is a procedure to confirm all Interlock System components:
1. Turn OFF the Main Power Switch. The power to all components should turn off, fans should stop working and the LED on Interlock Box should turn off.
2. Turn ON the Main Power Switch. The LED on the Interlock Box should turn on, but power should not be restored to the rest of the components of the system.
3. Push the Reset Button. The power should be restored to most of the system components (QPS-1050 and QST-2002E may stay off if a Cover Door is open).
4. Turn on the PC, then press the EMO Button. The power to all components (except the PC and monitor optionally) should shut off.
5. Twist the EMO button clockwise until it clicks out. The power should not come on. 6. Push the Reset Button. The power should be restored to most components. 7. Make sure that the Service Key is in vertical position and close the Cover Doors. The
QPS-1050 and QST-2002E should turn on. 8. Open the Left Cover Door. The QPS-1050 and QST-2002E should turn off. Close it, and
repeat with the Right Cover Door. 9. Open either or both of the Cover Doors, and confirm the QPS-1050 and QST-2002E are
off. Turn the Service Key to horizontal position. The QPS and QST should turn on again.
10. Return all Interlocks to normal operation.
4.6 Normal Operation and Power On For normal tester operation the following conditions must be met:
• The EMO switch must be un-pressed. • The Service Mode Key must be turned to vertical position and removed from the lock. • The front and rear lower frame doors must be closed and locked.

9
• If equipped with a Cover, the top Cover Doors must be closed. To power ON the system the user must perform the following:
1. Verify the above normal conditions are met. 2. Unlock and open the front lower frame door. 3. Engage the Main Power Switch on the front panel. 4. Press the Reset Button. 5. Close and lock the front lower frame door.
.
Warning! The system must only be powered ON if all Interlocks are in good working order.
5 Mechanical alignment and operation 5.1 Adjustment of Locked/Unlocked Position Hard Stops
The Locked and Unlocked Position Hard stops can be adjusted by moving the hard stop along the channel in the base plate. There are fixed limits at each end of the channel preventing the user from accidentally moving the Carriage off of the slide assembly. The Unlocked Position Hard stop does not require fine adjustment. Proper adjustment is performed if the tooling clears the Magnet Core assembly when in the Unlocked Position. Factory adjustment provides about ½” of clearance for easy removal of the head assembly. The Locked Position Hard stop must be adjusted such that the head gap is centered within the Magnetic Core field, as seen from the side (see picture below). Note: The Bias will turn on only if the carriage reached the locked position hard stop.

10
For tapered pole configuration, the Head should be positioned within 0.3” (0.76 cm) of the center of the poles.
SIDE VIEW
5.2 Changing Orientation of the Magnet Core Field The Magnet Core can easily be changed between Transverse (Hard Axis) and Longitudinal (Easy Axis) orientations. This is done by loosening the thumbscrews on the back of the Magnet Core Housing, rotating the Magnet Core Housing to the desired angle, and tightening the thumbscrews. When rotating the magnet it is recommended for the tooling to be slid out of the magnet and moved into the Unlocked Position Hard stop. For Magnet angle monitoring you can refer to the dial in the back or the ’High Field Magnet Position Dial’ feature in the Quasi’97->High Field Parameters menu.
Magnet Position Dial Window in Quasi’97
The ‘Magnet Position Dial’ window in Quasi’97 will display 0 degrees with magnet in vertical position (Transverse Field) and 90 degrees with magnet in horizontal position (Longitudinal Field).

11
The dial attached to the back of the Magnet, will show 0 in vertical position and 270 in horizontal position.
5.3 ISI Pole Spacer ISI Pole Spacers are the tools provided with the QST-2002HF, which are to be used in case of any pole gap or type modifications. The spacers preserve symmetry of the pole gap with respect to the magnet cover opening and provide default gaps of 0.2” for tapered poles and 0.85” for flat poles. One of them is inserted in between the poles of the High Field Magnet during shipping and should be removed and stored before running any tests.
12
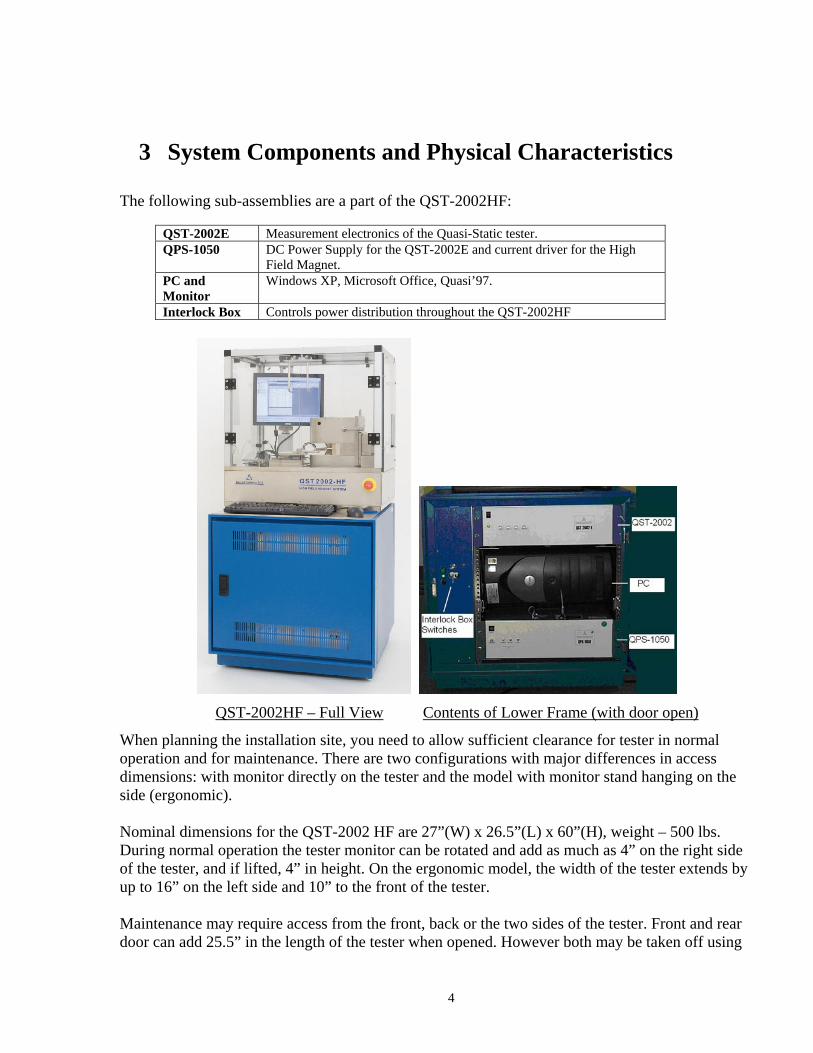
5.4 Magnet Pole Adjustment
To adjust or reverse the poles of the High Field Magnet, follow the steps in this section. First, remove back panel of the top plastic cover. Change orientation of magnet from vertical to horizontal using instruction in section 3.2. Next loosen two screws located inside of the magnet. This can be done by inserting a 10mm Allen wrench through the holes in the magnet cover into the screw and turning counter-clockwise. (Note: Do not unscrew more than 2 revolutions, as the nut for the screw may come off).
Loosening these screws may require a large amount of force. The torque value necessary is about 80 foot-pounds or 110 Newton-meters. After loosening the screws, the poles should be moveable without much resistance. Now the pole gap can be changed or the poles can be reversed.
For pole gap adjustment you need to use ISI Pole Spacer, and if you want to increase the distance use two identical shims on each side of the spacer. Poles must be symmetrical relatively to the middle of the magnet cover opening. The ISI Pole Spacer is designed to preserve such symmetry when inserted into the corresponding holes.

13
Large amount of force should be used when tightening the screws after adjusting the appropriated pole gap. The torque value necessary is about 80 foot-pounds or 110 Newton-meters.
Warning! If insufficient force is used to tighten the poles, they can slide and fall out of the magnet possibly damaging the samples being tested. Every time the pole gap and/or shape is changed, the closed-loop gain should be re-programmed, followed by calibration of the magnetic field. (Refer to section 6.3, for calibration instruction)
HIGH FIELD MAGNET POLE DISTANCE VS FIELD RANGE Magnetic Field Range (+/-Oe)
Pole Distance Tapered Poles Flat Poles 0.2” 16500* 12500 0.3” 14000 9700 0.4” 11000 8500 0.5” 9000 7300 0.6” Not uniform 6300 0.7” Not uniform 6000
0.75” Not uniform 5700 0.8” Not uniform 5300
0.85” Not uniform 5000*
1.0” Not uniform 4400 * - default configuration
Warning! Magnetic Field Hazard!
The High Field Magnet used on this system can disrupt pacemaker operation.
14
6 Software tests and operation
6.1 High Field Transfer test
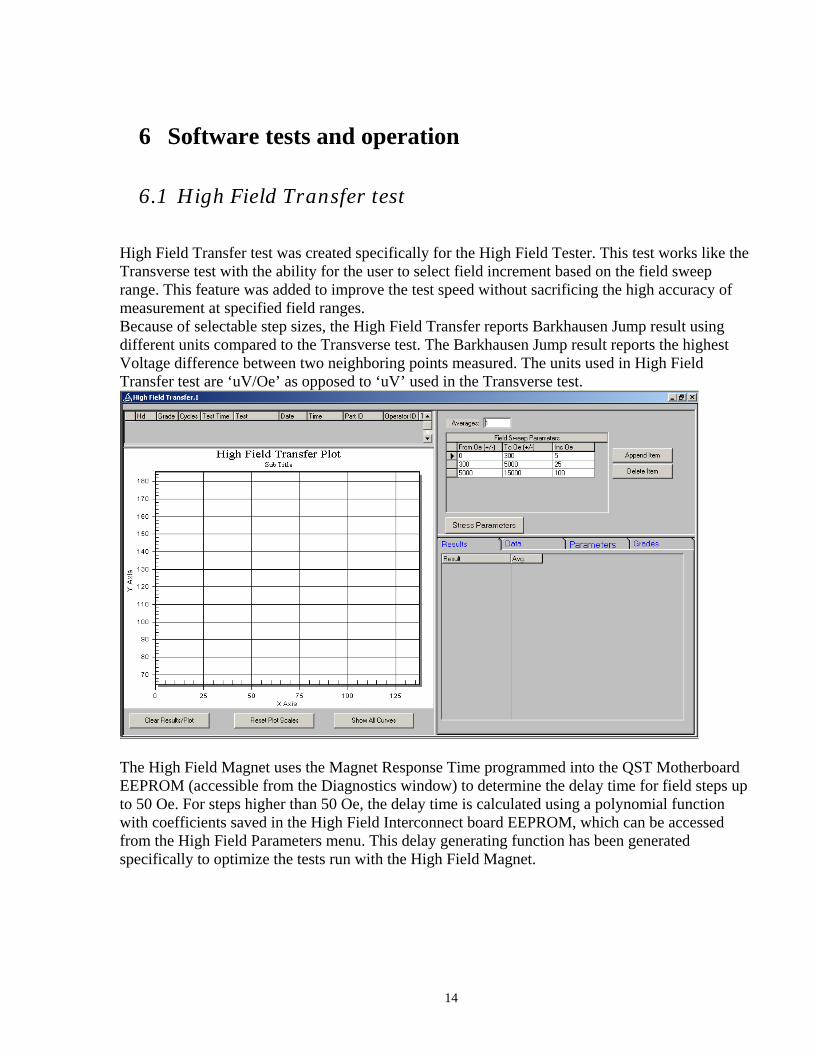
High Field Transfer test was created specifically for the High Field Tester. This test works like the Transverse test with the ability for the user to select field increment based on the field sweep range. This feature was added to improve the test speed without sacrificing the high accuracy of measurement at specified field ranges. Because of selectable step sizes, the High Field Transfer reports Barkhausen Jump result using different units compared to the Transverse test. The Barkhausen Jump result reports the highest Voltage difference between two neighboring points measured. The units used in High Field Transfer test are ‘uV/Oe’ as opposed to ‘uV’ used in the Transverse test.
The High Field Magnet uses the Magnet Response Time programmed into the QST Motherboard EEPROM (accessible from the Diagnostics window) to determine the delay time for field steps up to 50 Oe. For steps higher than 50 Oe, the delay time is calculated using a polynomial function with coefficients saved in the High Field Interconnect board EEPROM, which can be accessed from the High Field Parameters menu. This delay generating function has been generated specifically to optimize the tests run with the High Field Magnet.

15
6.2 High Field Parameters Menu
High Field Parameters Menu
High Field Parameters window can be used by the user to specify certain operational options:
- “Add Magnet Angle value as Lot ID” – will display and log the magnet angle into Lot ID field of a test (see picture below).
- “Show Magnet Angle form on Startup” – will display ’High Field Magnet Position Dial’ window each time Quasi’97 is entered.
- “Degauss Magnet” – will set positive and negative field according to peak field, followed by setting smaller positive and negative fields, for the purpose of degaussing the High Field Magnet.
- “Calibrate Field Sensor” – calibrates the closed-loop circuit, necessary only after modifying Magnet Pole type and/or gap.
- Calibrate Magnet cable – calibrates the digitized reading on the Magnet Angle. - “Save to EEPROM” – should be pressed after either of the above calibrations is
performed. - “Show High Field Magnet Position Dial” – displays Magnet Angle Dial
window. - “Show Diagnostics” – will prompt for password to enter diagnostic options. - The table on the right side shows the contents of the High Field Interconnect
board EEPROM – similar to EEPROM contents of QST boards in the Diagnostics window.

16
Magnet Angle logged into ‘Lot ID’ field
6.3 Closed-Loop gain and Magnetic Field Calibration
Note: Under normal circumstances it is not necessary to perform these calibrations. It is only required when the magnet pole geometry is changed. First, to re-program the closed-loop gain, go to High Field Parameters window and press the “Calibrate Field Sensor” button. Second, to calibrate the magnetic field, use Omega Gauss Meter and probe assembly, which is available for purchase separately.

17
Insert the ISI Pole Spacer into the magnet; insert the probe assembly into appropriate holes on the spacer. With this configuration the field sensor will be placed exactly in the middle of the magnet gap. Open calibration menu and press “Calibrate Magnetic Field” button. In the window prompt entered the magnetic field measured by the Omega Gauss Meter and press “OK”. After performing the above press “Save to EEPROM” button.
Note: The Gauss-meter tool is recommended for periodic verification and, if necessary, recalibration of the magnetic field.
7 Quasi97 All Quasi’97 tests are available on the QST-2002HF, with exception of AC noise test and Popcorn Sweep with AC field option measurement. When running Transverse Curve, the maximum field increment value is 50 Oe, and the minimum increment value will be dependent on Magnet Pole geometry. For the default magnet pole geometry (0.2” gap, tapered poles) the minimum increment value is about 3 Oe.

18
8 Toolings
8.1 Hall Effect Cartridge Hall Effect Cartridge is a verification tool for verification of the magnitude and linearity of the magnetic field. This cartridge is compatible with Gen2 2x HGA base and board assembly.
8.2 HGA Tooling
Like QST-2002, the QST-2002HF can be used to test HGA, HSA, and HDA samples. The HGA toolings designed for the High Field Tester can be used on QST-2002. The main difference between HGA tooling for the two testers is an extension piece, which has been added to make the tooling mechanically compatible with the High Field magnet.
8.3 ESD Module – HBM, MM and CDM HBM and MM ESD testing modules are fully compatible with High Field system. These modules can be used with the tapered poles configuration and at maximum magnetic field of +/- 15000 Oe. CDM module requires a rework and can operate only in the range of +/- 5000 Oe fields in the tapered poles configuration. For more information contact ISI.
19
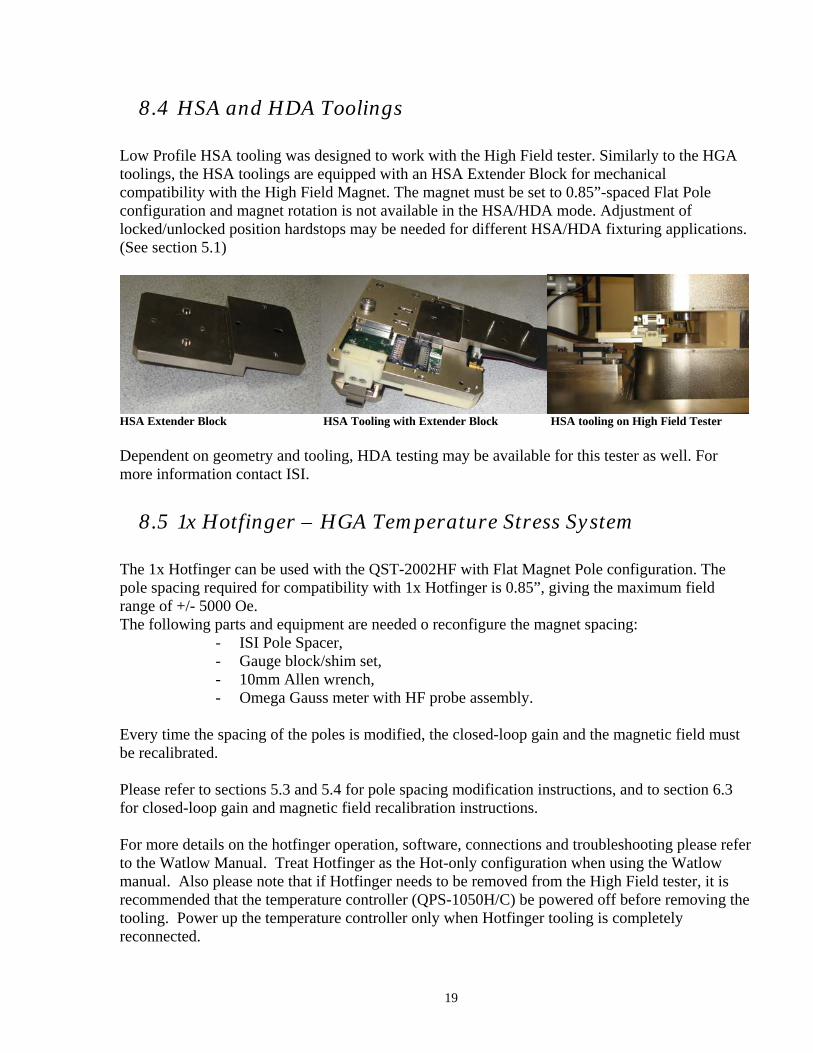
8.4 HSA and HDA Toolings Low Profile HSA tooling was designed to work with the High Field tester. Similarly to the HGA toolings, the HSA toolings are equipped with an HSA Extender Block for mechanical compatibility with the High Field Magnet. The magnet must be set to 0.85”-spaced Flat Pole configuration and magnet rotation is not available in the HSA/HDA mode. Adjustment of locked/unlocked position hardstops may be needed for different HSA/HDA fixturing applications. (See section 5.1)
HSA Extender Block HSA Tooling with Extender Block HSA tooling on High Field Tester Dependent on geometry and tooling, HDA testing may be available for this tester as well. For more information contact ISI.
8.5 1x Hotfinger – HGA Temperature Stress System The 1x Hotfinger can be used with the QST-2002HF with Flat Magnet Pole configuration. The pole spacing required for compatibility with 1x Hotfinger is 0.85”, giving the maximum field range of +/- 5000 Oe. The following parts and equipment are needed o reconfigure the magnet spacing:
- ISI Pole Spacer, - Gauge block/shim set, - 10mm Allen wrench, - Omega Gauss meter with HF probe assembly.
Every time the spacing of the poles is modified, the closed-loop gain and the magnetic field must be recalibrated. Please refer to sections 5.3 and 5.4 for pole spacing modification instructions, and to section 6.3 for closed-loop gain and magnetic field recalibration instructions. For more details on the hotfinger operation, software, connections and troubleshooting please refer to the Watlow Manual. Treat Hotfinger as the Hot-only configuration when using the Watlow manual. Also please note that if Hotfinger needs to be removed from the High Field tester, it is recommended that the temperature controller (QPS-1050H/C) be powered off before removing the tooling. Power up the temperature controller only when Hotfinger tooling is completely reconnected.
20
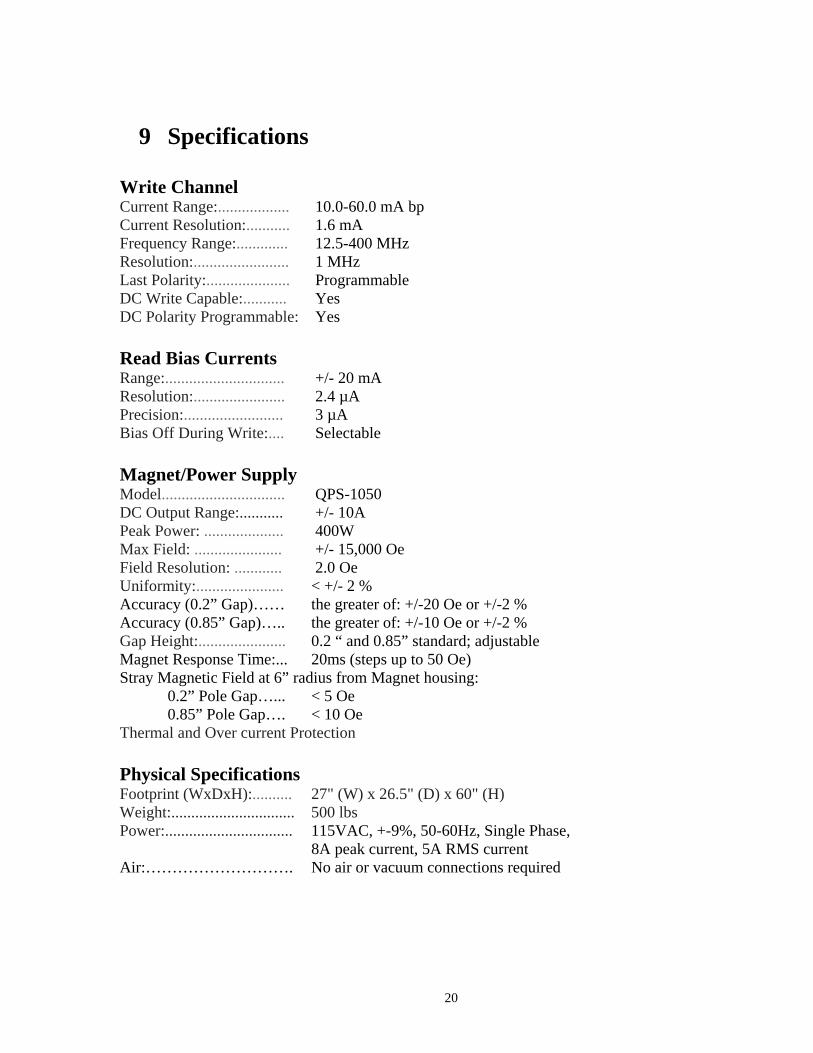
9 Specifications Write Channel Current Range:.................. 10.0-60.0 mA bp Current Resolution:........... 1.6 mA Frequency Range:............. 12.5-400 MHz Resolution:........................ 1 MHz Last Polarity:..................... Programmable DC Write Capable:........... Yes DC Polarity Programmable: Yes Read Bias Currents Range:.............................. +/- 20 mA Resolution:....................... 2.4 µA Precision:......................... 3 µA Bias Off During Write:.... Selectable Magnet/Power Supply Model............................... QPS-1050 DC Output Range:........... +/- 10A Peak Power: .................... 400W Max Field: ...................... +/- 15,000 Oe Field Resolution: ............ 2.0 Oe Uniformity:...................... < +/- 2 % Accuracy (0.2” Gap)…… the greater of: +/-20 Oe or +/-2 % Accuracy (0.85” Gap)….. the greater of: +/-10 Oe or +/-2 % Gap Height:...................... 0.2 “ and 0.85” standard; adjustable Magnet Response Time:... 20ms (steps up to 50 Oe) Stray Magnetic Field at 6” radius from Magnet housing:
0.2” Pole Gap…... < 5 Oe 0.85” Pole Gap…. < 10 Oe
Thermal and Over current Protection Physical Specifications Footprint (WxDxH):.......... 27" (W) x 26.5" (D) x 60" (H) Weight:............................... 500 lbs Power:................................ 115VAC, +-9%, 50-60Hz, Single Phase, 8A peak current, 5A RMS current Air:………………………. No air or vacuum connections required
21
DC Read Channel All Measurements have 14-bit accuracy. Bias Current :........................................ +/-10 µA Amplitude:............................................ +/- 10 µV Resistance (+/- .1V <IR< +/- 1V):........ +/- .2 % Resistance (+/- .3V <IR< +/- 3V):........ +/- .4 % Asymmetry:........................................... < 1.5 % Pk-Pk Hysteresis:............................................. < 1.5 % Pk-Pk Noise :................................................... < 5 µV RMS Max Voltage Range (across MR) :....... +/- 3V Max Amplitude Range :........................ +/- 30,000 µV Amplitude Resolution :......................... 1.22 µV AC Read Channel Analog Bandwidth :............................... 200 MHz Flatness:................................................. +/- 0.5 dB Digitizer Bandwidth :............................. 160 Mhz Digitizer Resolution :............................. 10 Bit Filter Slots :............................................ 2 Filter Type :............................................ Low Pass or Band Pass Write/Read/Delay Gates :....................... 0.1-50000 µS Gates Resolution :................................... 0.1 µS Gates Accuracy :..................................... +/- 0.1 µS Threshold Resolution :............................ 5 µV Threshold Accuracy :.............................. 10 µV Noise :..................................................... 2 nV/sq rt Hz W/R Recovery :........................................ < 2 µS

22
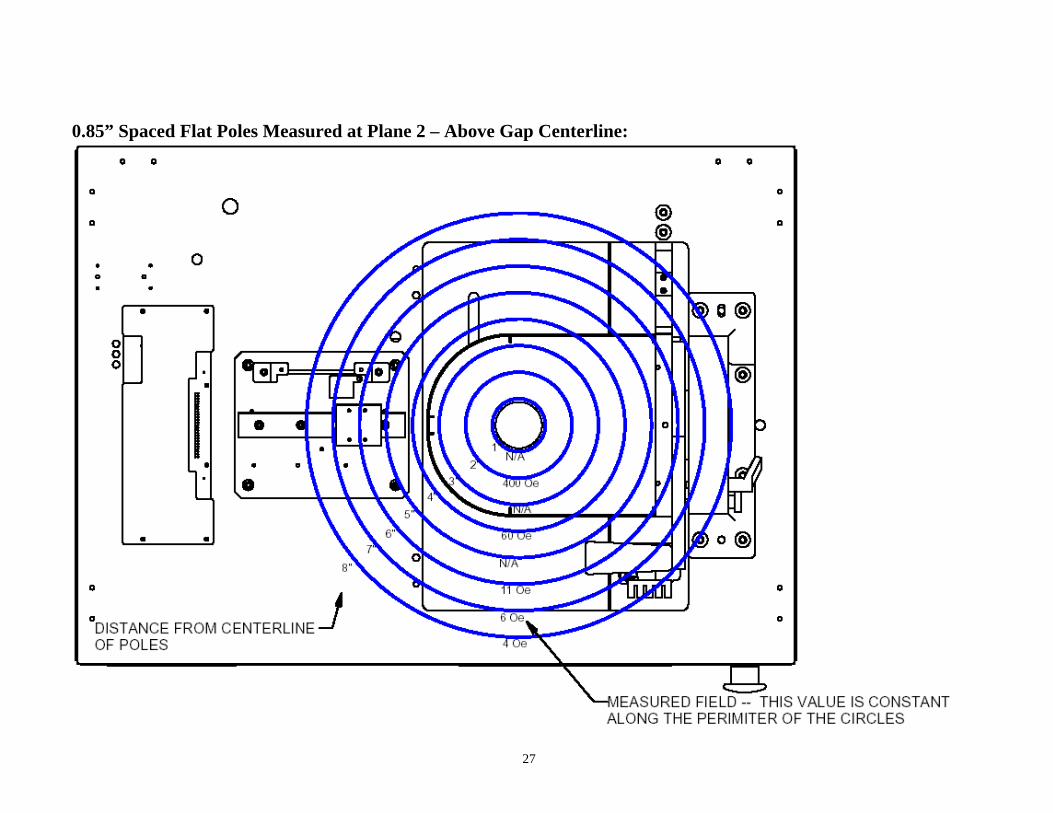
Appendix A: Stray Magnetic Field Figures The following figures represent the maximum magnitude of magnetic field measured at specified distances from the center of the Magnet Poles. The values are measured with maximum magnetic field set – 15000 Oe for 0.2”-spaced Tapered Poles, and 5000 Oe for 0.85”-spaced Flat Poles.
Horizontal Stray Field Measurement Planes

0.2” Spaced Tapered Poles Measured at Plane 1 – Center of Pole Gap:

0.2” Spaced Tapered Poles Measured at Plane 2 – Above Gap Centerline:

25
0.2” Spaced Tapered Poles Measured at Plane 3 – Below Gap Centerline:

26
0.85” Spaced Flat Poles Measured at Plane 1 – Center of Pole Gap:
27
0.85” Spaced Flat Poles Measured at Plane 2 – Above Gap Centerline:

28
0.85” Spaced Flat Poles Measured at Plane 3 – Below Gap Centerline:


![[HF] FREEWEIGHT PRODUCTS - HOIST Fitness · [hf] flat bench hf-5163 [hf] 7-position folding f.i.d. bench hf-5167 new! warranty new! warranty [hf] 7-position f.i.d. olympic bench hf-5170](https://static.fdocuments.us/doc/165x107/5b5909d87f8b9ad0048c899a/hf-freeweight-products-hoist-fitness-hf-flat-bench-hf-5163-hf-7-position.jpg)