2. Operations Procedures - Chris Custer
60
Footprint Operations Guide - DRAFT 1 2. Operations Procedures This chapter provides information on the Network Operations procedures used to administer product support for Digital Island’s suite of Footprint products and services. 2.1 Network Operations This section provides information on Network Operations roles and responsibilities for Digital Island’s suite of Footprint products. 2.1.1 Roles and Responsibilities Digital Island’s Network Operations consists of numerous departments and groups in charge of the development cycle of new products and services. Network Operations consists of Global Data Centers, Network Support, Customer Advocacy, and Network Deployment. Operations ensures that all support requirements are met through the following functions and responsibilities: • Develop PRD's (Product Requirements Documentation) for inclusion of Operations support requirements. • Communicate the product road map and product statuses to Operations Management. • Provide product development gating approvals. • Represent operational requirements in product development meetings. • Assemble Operations requirement documentation for new products, services and features. • Coordinate the participation of Operations staff, equipment and facilities in both alpha and beta testing.
Transcript of 2. Operations Procedures - Chris Custer
Footprint Operations Guide - DRAFT
2.
Operations
Procedures
This chapter provides information on the Network Operations procedures used to administer product support for Digital Island’s suite of Footprint products and services.
2.1 Network Operations
This section provides information on Network Operations roles and responsibilities for Digital Island’s suite of Footprint products.
2.1.1 Roles and Responsibilities
Digital Island’s Network Operations consists of numerous departments and groups in charge of the development cycle of new products and services. Network Operations consists of Global Data Centers, Network Support, Customer Advocacy, and Network Deployment. Operations ensures that all support requirements are met through the following functions and responsibilities:
• Develop PRD's (Product Requirements Documentation) for inclusion of Operations support requirements.
• Communicate the product road map and product statuses to Operations Management.
• Provide product development gating approvals.
• Represent operational requirements in product development meetings.
• Assemble Operations requirement documentation for new products, services and features.
• Coordinate the participation of Operations staff, equipment and facilities in both alpha and beta testing.
1

2.1 Network Operations 2. Operations Procedures
The Network Operations staff are responsible for facilitating a seamless introduction of new products, services, and major product enhancements, coordinating the Operations Management review of preliminary support documentation, and ensuring the completion of Operations documentation for any of the following:
• Product description
• Monitoring and support process
• Troubleshooting process flows
• Customer installation flows
• Deployment requirements
Network Operations also manages the launching of new products, features and services, as well as feedback, follow-up enhancements, and training to all appropriate Operations staff. Network Operations must ensure that Customer Advocacy has customer-ready information and that all groups have been offered training with a follow up on remedial training and are aware of the alpha and beta launch dates.
In addition, Network Operations manages the selection, development and deployment of support tools and processes for Operations. These are Operations-initiated, corporate-level projects that affect multiple departments and groups.
2.1.2 Available Tools
Performance SLA
The new Footprint™ Performance SLA (Service Level Agreement) guarantees that Web pages cached on Digital Island's Footprint content delivery network are served faster than any content stored on the customers’ own origin servers. The new Service Level Agreement is free of charge to Digital Island customers and guarantees the performance of the Footprint Content Delivery Service.
“Consumers expect a fast online experience every time they visit one of the e-Stores built, managed and marketed by Beyond.com, even during peak-traffic periods,” said Gordon Jones, CIO of Beyond.com. “As our network service provider, Digital Island has stepped up and delivered the Internet industry's first performance guarantee supported by third-party testing for content cached at the edge of the network.”
“Web-site performance has become a critical issue for conducting effective Internet commerce, and Keynote sets the Internet-industry benchmark for performance measurement with statistically reliable data worldwide,” said Tim Wilson, vice president of marketing at Digital Island. “The Footprint Performance SLA is yet another example of Digital Island's commitment to our customers' e-Business success, ensuring that end users always have fast and reliable access to popular content on the Internet.”
2 Footprint Operations Guide - DRAFT

2. Operations Procedures 2.1 Network Operations
Sitescope
SiteScope monitors the web server environment around the clock using over 30 standard monitors. With Sitescope’s deep monitoring enables you to know when there’s a real problem without being bothered by false alarms.
SiteScope Features include:
• centralized monitoring of large and small web server farms
• complete suite of monitors that watch critical web environment components
• a published API for the creation of custom monitors and integration of home grown tools
• escalation paths for error and warning notification multiple notification methods including e-mail, pager, SNMP trap, or execution of an error recovery script
• scheduled and on-demand management reports for trend analysis integration with enterprise management solutions
For additional information on sitescope, refer to setting up Sitescope, please refer to the sections, Sitescope Monitoring and Installing Sitescope.
Keynote
Quality of service is a critical differentiator for any business, and on the Internet the quality of service means consistent Web site performance and availability. Web Server logs and monitors are good for profiling site visitors, but the Keynote tool also measures how fast Web content reaches customers or when performance and delivery problems occur at the server or out in the Internet.
The Keynote tool measures the performance as a daily average, using Keynote measurement computers located in the U.S., Europe and Asia. If the Footprint content distributors’ response time were to fall below the performance of the customer's origin server, Digital Island will waive the entire Footprint transfer fee for that day.
The Keynote performance rating helps pinpoint the source of problems, from content or server issues to design and infrastructure concerns. When problems are identified, customers can implement both design and technology solutions to improve the performance of their Web site. Keynote measurements assure that the customer’s users reach their site all the time, and that quality of service benchmarks are achieved.
“Keynote measurements provide crucial third-party data for leading companies around the world,” said Umang Gupta, chairman and CEO of Keynote. “Digital Island recognizes the value of our measurements not only in validating its own quality of service, but also in ensuring that its customers operate the fastest and most reliable Web sites on the Internet.”
In addition, Digital Island is reselling Keynote's measurement services to DI's hosting and network service customers. Through a user-friendly Web interface, companies can monitor the
Footprint Operations Guide - DRAFT 3
2.1 Network Operations 2. Operations Procedures
performance of their Web pages and compare the response time to the Keynote Business 40 Internet Performance Index, which includes such high-volume traffic sites as Yahoo, Lycos, Microsoft and Apple. Digital Island’s new VistaWare service includes this Keynote measurement service.
Keynote helps optimize performance and assure the availability of online offerings. Keynote maximizes the quality of service provided to customers, leading to a better online experience and repeat business.
For addition information on the Keynote tool, please refer to the section Keynote Monitoring, as well as the following site:
http://www.keynote.com
NOC Page
For information on setting up the NOC Page, please refer to the section, Installing the NOC Agent.
2.1.3 The Network Operations Center
This section provides information and examples of the Network Operations Center’s roles and procedures for monitoring Digital Island’s suite of Footprint products. The focal point of Digital Island’s Application Hosting and Content Distribution Service is the Network Operations Center (NOC).
NOC’s primary duties are:
• Handling Tickets
• Opening new cases from calls and e-mails
• Monitoring its own NOC Inbox
• Moving new cases to “Working” status
• Receiving both external and internal incoming phone calls
• Checking voicemail
• Following up on all cases
The NOC’s secondary duties are:
• NMS Monitoring
• Opening new NMS cases
4 Footprint Operations Guide - DRAFT
2. Operations Procedures 2.1 Network Operations
• The NOC tools
• Hourly checks
• Call overflow
• Technical, Sales and Marketing Documentation
As a critical component for responding to problems that arise unexpectedly, the NOC functions as the command-and-control point for the network and is responsible for communication to the appropriate data centers as well as site-to-site communication.
The lead NOC is in charge of communicating all BCP-related issues and failures before and after the initial failure is reported.
NOC Roles and Responsibilities
The NOC provides worldwide technical support with a staff consisting of qualified Network Operations Technicians experienced with DI's intelligent network as well as with data communications network technology. The NOC technical staff, based in Digital Island’s Hawaiian and the United Kingdom branches, are responsible for Incident Management with the Footprint products suite.
The NOC consists of numerous departments in charge of the development cycle of new products and services, and has primary control during any incident will serve as the lead site giving the authorization to perform support actions. Incidents include system, equipment, facility and telecommunications failures and major degradations.
The NOC performance monitors consist of any number of the following positions and titles:
• Network Monitoring
• Sr. NOC Support Engineering
• Internet System Analyses
• Internet System Engineering
For additional information on these staff positions and the responsibilities they require, refer to the following section, “NOC Roles and Requirements” later in this document.
Network Monitoring
Network monitoring consists of low-level Support Engineers responsible for monitoring the network system for possible errors, receiving calls for technical support, and redirecting the calls to appropriate technical support personnel
Footprint Operations Guide - DRAFT 5
2.1 Network Operations 2. Operations Procedures
Internet System Analyst (ISA)
Internet System Analysts are Associate Support Engineers responsible for monitoring the network and handling network problems and customer issues as they arise.This involves following procedures for opening cases, troubleshooting, notifications, escalations, and resolutions. These engineers have intimate knowledge of the Digital Island network, services, customer procedures and internal contacts, and as NMS specialists they can perform in-depth troubleshooting and problem analysis.
Internet System Engineers (ISE)
Internet System Analysts are Operations Lead analysts and Sr. Support Engineers. These personnel orchestrate troubleshooting, opening of cases, mass notification, and customer contacts. The lead analyst has intimate knowledge of DI’s network, services, customers, operations procedures, and internal contacts. During the time in which his/er own shift has been designated as “primary,” the lead analyst coordinates the workflow between the Hawaii and United Kingdom NOCs. In addition to managing the communication among NOCs in ways that ensure all internal and external Service Level Agreements are met or exceeded without a duplication of efforts, the lead analyst oversees that all shift changes remain consistent in ways that guarantee continuity of service.
Note: For additional information on Network Operations roles and responsibilities, please refer to the section, “ Escalation Procedures.”
NOC Technical Support
For operations procedures, Operations Technical Services supports the Footprint suite of products and conducts performance maintenance at these three levels of support:
• Level 1 Support: NOC Performance Monitoring
• Level 2 Support: Internet System Analysis (ISA)
• Level 3 Support: Internet System Engineering (ISE)
Level 1 Support: NOC Performance Monitors
• Network Performance Monitors: Low-level support engineers are responsible for monitoring the network system for possible errors, receiving and redirecting calls for technical support, and handling network problems and customer issues as they arise.
6 Footprint Operations Guide - DRAFT

2. Operations Procedures 2.1 Network Operations
Level 2 Support: Internet System Analysis (ISA)
• Internet System Analysts (ISA): The NOC Support Analysts are responsible for monitoring the network and handling network problems and customer issues as they arise, such as following procedures for opening cases, troubleshooting, notifications, escalations, and resolutions. These engineers have intimate knowledge of the Digital Island network, services, customer procedures and internal contacts, and as NMS specialists they can perform in-depth troubleshooting and problem analysis.
Level 3 Support: Internet System Engineering (ISE)
• Internet System Engineers (ISE): Operations Lead analysts and Sr. Support Engineers orchestrates troubleshooting, opening of cases, notification and customer contacts. These engineers have intimate knowledge of the Digital Island network, services, customer procedures and internal contacts, and as NMS specialists they can perform in-depth troubleshooting and problem analysis.
Available Tools for NOC
Front Page
Front Page presents two frames. The upper “main” frame is the one that usually shows data, but initially will display a block of help text which describes some of the functionality of the page, as well as some hints for trouble-shooting problems within it.
The lower frame presents three lines of controls, but with its narrow window the lines could spill onto four or more lines. the first line is the “Network” identifier, which initially set to nothing and thus allows for configuration before the network is viewed. This control is a pull-down menu of the various network letters currently in use between engineering and the NOC. The label of each line includes both the network letter and the name of the owner or the purpose for that network. Choosing a network letter is sufficient to display data, and changing the network letter is sufficient for attempting to display data for that network
Note: These multiple networks remain from the previous version of the tool, and may not even function in this new style. For additional information, refer to How It Really Works and Perl Version.
Next to the Network pulldown is a “Port Prefix” editable field that displays the three digit prefix associated with the given network when a network letter is requested. This field may be altered, but does not need to be.
Next is the “Password” field. Each distributor is assumed to have the same password. If this field is empty, use the current hard-coded default password. That default password matches
Footprint Operations Guide - DRAFT 7

2.1 Network Operations 2. Operations Procedures
the default in the distributor code. If it is decided to use a unique password on each distributor, this simple mechanism is insufficient.
The last control on the top line is the “Time Selection” pull-down menu. This has three options: 1 minute, 5 minutes and 1 hour. Selecting 1 minute displays data from the network for the last complete minute of statistics. The 5 minutes selection shows the last 5 minutes, and 1 hour shows the last hour. Any given statistic on the 1 hour display only changes hourly. Since various statistics can all change at different times, this mode refreshes the main display every 5 minutes. The other two options refresh the main display each minute. Also, in the 1 minute mode, the total size of downloads displays in Bytes; in 5 minute, it is displayed in KB; and the 1 hour mode displays in MB. Altering the value of this pull-down causes the main display to be retrieved.
The next line of controls are a series of check boxes. The first three groups allow for any given browser to display an arbitrary mixture of the distributor, Footprint Manager and/or coserver sections. If no check boxes are selected, all are assumed checked. The fourth group of check boxes include “Hide Subscriber Traffic” and will blank out all data on both the Footprint Manager and coserver sections (if displayed). Only the total lines are left. All color coding turns to “Green.” Also in this section are the “Cluster Summary” and “Flash Red Field” boxes. The Cluster Summary is a way to compress the output of the distributor section so that a larger network can be seen on a single screen. Each cluster (where a cluster is defined as all machines whose ID numbers only differ in the least two significant digits) is shown on a line, with an indicator in the form of a square which represents an individual machine. The 'Flash Red Fields' makes any text highlighted in red flash as well. This is to aid those with certain color-blindness who could not readily (npi) differentiate the red text from the normal.
The last control on the top line is the “Time Selection” pull-down menu, which also has three options: 1 Minute, 5 Minutes and 1 Hour. Selecting the 1 minute will display data from the network for the last complete minute of statistics, 5 minutes the last 5 minutes, and 1 hour the last hour. Note that any given statistic on the 1 hour display will only changes every hour. Since various statistics can change at different times, this mode causes the main display to refresh every 5 minutes. The other two options cause the main display to refresh each minute. Also, in the 1 minute mode, the total size of downloads is displayed in Bytes; 5 minutes in KB, and 1 hour in MB. Altering the value of this pull-down causes the main display to be re-fetched.
The last line of controls has two entry fields, one for 'Per Request Overhead' and the second for 'AOL Average Resource Size (bytes)'. The first is used to compensate for our current lack of recording of HTTP headers. The value in this box (default: 0) is effectively added to the size of each resource served in the given time period, when calculating total traffic served and byte rate. This is meant to be a good approximation of the size of the HTTP headers not only on the resource served from the distributor, but also on the requests it receives. The AOL average is set to the expected average resource size served by the internal AOL distributors. It defaults to 2,000 Bytes, which was derived by a spot-check of the size of the average resources served by the rest of the network (approx. 2KB) and adjusted downward to take into consideration the smaller size of the gamesville resources, which are a large part of the current AOL traffic. This resource size is then used to replace the actual resource size total for the AOL internal distributors (those whose names are of the form 'AOL/<locn>'), when calculating total resource size served and bandwidth used. The 'Per Request Overhead' is added to this size
8 Footprint Operations Guide - DRAFT

2. Operations Procedures 2.1 Network Operations
per-request. Setting the AOL size to “0” causes the reported value to display rather than this calculated one.
To display data for the A network:
1. request the page,
2. select the required time period,
3. check the appropriate display mode options,
4. alter the overhead/AOL resource sizes (if appropriate),
5. then select the network.
Thereafter, the top frame of the page will refresh itself every 1 or 5 minutes, as described above, to show recent data. Altering the value of either the time period or network letter pull down menus will cause the main frame to be re-requested immediately. Altering the selection of check boxes will not cause an immediate request, but will take effect the next time the frame refreshes.
No changes should be made to these options when a page is being requested (as seen by the meteor shower, rotating icon etc., on the browser). otherwise unexpected results may occur. In Netscape browsers, do not resize the window or even move the frame separator when a download is in progress; wait for the page to display, before making the change.
Note: Currently, this version does not work well on MSIE browsers. The page will load, but the Footprint Manager section displaying only the first entry.
Main Display
When selections have been made with data shown, the page might contain one to four tables of data with some ancillary information at the top of the page.
The top displays the designation of the network being monitored (usually “a”), and the ID of the Master (although only with one number shown). The Data Sample Time Interval, which matches the value selected in the “Time Selection” pull down menu in the lower frame, and the “Current Time” at the NOC-tools machine when the page was generated, also display. Each data block has a “last Refresh” date. If this date does not change and turns red when more than 5 minutes old, then the data gathering has halted and needs to be investigated. (Please see to the Trouble Shooting in the New Order).
The real data is then shown in up to four tables, one for distributors, one for Footprint Managers and one for each category of CoServers. A headline for each table includes help links on certain column headings as a quick reminder on the meaning and encoding of each column. The headline for each table is itself a hyperlink that pops up in a small form
Footprint Operations Guide - DRAFT 9

2.1 Network Operations 2. Operations Procedures
containing a series of checkboxes. The check boxes denote the columns of the corresponding table, which display (if checked) or remain hidden (if unchecked), the data stored in persistent cookies.
The Manager Table
The Manager Table is a dynamically created and maintained list of Footprint Managers currently connected to the network being monitored. The last column of the table is an ’X’ link. If selected, a Footprint Manager marked as ’OffLine’ will be cleared from the page memory. If disconnected from the network, the Footprint Manager continues to display in this table, but marked as ’Offline’. If the Footprint Manager is permanently down, you need to clear it by reloading the page or selecting this ’X’. Selecting ’X’ for a live agent will not remove it from the table.
The other columns of the Footprint Manager display the Agent ID number (as found in the Reflector table), the Host Name of the Footprint Manager, the IP address of it, and the version number of the software running on it. If the Footprint Manager is running an E-patch, the version number will be in blue.
The next column is the Status column (labelled ’St’ for brevity). Typically this is blank, but if the Footprint Manager disconnects from the network, it will indicate ’OffLine’. It is the intention that in a split network situation, this column will indicate the master of the sub-network to which each Footprint Manager is connected (there have luckily been few instances where this has been tested, but I believe it works).
The next column is the start time, both date (month/day only) and time. If the Footprint Manager has restarted within the last hour, this column is in blue unless it has restarted within the last 5 minutes, in which case the start time is shown in red.
The next 2 columns show the subscriber ID number and a textual representation of that subscriber, as taken from the file NOC-tools:/opt/local/NOC/SubsciberID. This file has the format.
<name> <subID> <certificate end date>
and needs to be manually maintained (ultimately, it should get this info from a centralized customer database). The field delimiter is a TAB character.
The next column shows which distributor is the current contact distributor for this Footprint Manager.
The remaining columns show the amount of data served by and for this Footprint Manager. The first two show the total number of bytes (or KB or MB dependant on time selection) and hits served both by the Footprint Manager and by the distributor network on behalf of this Footprint Manager, combined. Next is the percentage of requests served remotely.
The remaining four columns illustrate the data served on behalf of this Footprint Manager by the distributor network. This includes the number of bytes (or KB/MB) served and the number
10 Footprint Operations Guide - DRAFT
2. Operations Procedures 2.1 Network Operations
of hits, and these two numbers display as hits per second and megabits per second, dividing the total for the period by the number of seconds in that period.
Selecting the 'Hide Subscriber Traffic' option displays all seven of these columns as “-”.
When a Footprint Manager is offline, “n/a” shows for these columns. If that Footprint Manager had been offline since this page was started, the name and subscriber information displays for it (stored in a hidden table in the lower frame). If the Footprint Manager was down since the page was loaded, however, the only information available to display for the Footprint Manager is the agent ID number, which is stored within the cookie at the browser.
If the Footprint Manager is part of a Footprint Manager set (a group of Footprint Managers that share the same HostName, for load-balancing/failover reasons), only the Footprint Manager with the lowest ID number displays with data. This is the Set-Leader, and all requests serve on only its behalf. All other Set-Members display a series of “-”
There is a total line at the bottom of the table. The total under the Start Time column notes how many are connected compared to the total listed.
The CoServer Table
The CoServers table is a cut-down version of the Footprint Manager table and is a manually maintained list of agents with the list stored in the file:
NOC-tools:/opt/local/NOC/CoServers.
That file is of the form:
<id> <name>
The name has to match the HostName of that CoServer, as found in the ReflectorTable.
Beyond the two columns that show the id and name, there are three columns showing address and subscriber information (always marked as “n/a”), data served and hits served (in the period), represented as hits-per-second and megabytes per second.
There are in fact two separate CoServer tables -- the second being labelled as 'EvalCoServers'. The intention is that the primary list are those that require NOC monitoring, whereas the Eval list is just for informational purposes for either the performance or appropriate SE.
The Distributor Section
The Distributor table contains the richest set of data driven from a static list of distributors, as defined in:
noc-tools:/opt/local/NOC/DistributorInfo.
That file has two columns:
Footprint Operations Guide - DRAFT 11

2.1 Network Operations 2. Operations Procedures
<id> <name>
Entries may be commented out of this file, using a leading ’#’ character. Only distributors listed in this file are completely monitored. If a distributor is brought online before entering it into this file, it displays only the relevant data relevant that can be extracted from the master distributor.
The first columns in the distributor table show the agent ID and the distributor name as extracted from the DistributorInfo file.
Following is the IP addresses of the distributor - both the real IP address of the machine, and the ReportedHttpName address is shown (the VIP configured within the Alteon). These are displayed as:
<aaa>.<bbb>.<ccc>.<ddd>/<eee>
where aaa-ddd are the octets for the IP address of the real IP address, and eee is the last octet of the VIP address (assuming that the real and VIP addresses are within the same class C). If these numbers differ, the Alteon failover configured at the distributor.
There is also the version number of the distributor. If this doesn’t match that of the current master, it displays in blue.
The next column shows the start time of the distributor (as reported by the master distributor). As for Footprint Managers, this is blue if within the last hour, or red if restarted within the last 5 minutes.
The next column is the Status (or ’St’) column. This is normally blank, except for primary contacts (those whose IP addresses match either the entries in the acontact.sandpiper.net or acontact<n>.sandpiper.net DNS names) in which case a blue ’C’ displays. Secondary Master candidates are noted with a blue ’m’, while the primary Master is shown as a capital ’M’. If the primary master is running as the master, this ’M’ appears blue, but if a secondary master assumes the role of master, the ’M’ appears Red. It is possible for multiple masters to be running, in which case a split network is in effect.
If a distributor is connected to a master other than the ’True’ master (possibly due to a hung primary master), the distributor will indicate the id number of the master to which it is connected in the status column. If a distributor has no master, it displays ’U’ (for unknown). The next three columns show the current sequence numbers of the LST, GRT and LCT tables. If the sequence number is 0, it shows in Red.
The next two show the number of contacts (Footprint Managers connected to this distributor) and the contact capacity (the maximum number allowed to connect their back channels to this agent). Following that are the number of bytes (or KB or MB) served in the last time period.
Next, is the client disposition within the distributor. This is displayed as three numbers separated by slashes. The first is the number of free clients, the second the number of idle and the third the number of busy. The number of busy clients indicates the number of active connections to this distributor. Idle clients are kept-alive sessions not currently processing requests but being held open for a particular client. Free clients are the number available for
12 Footprint Operations Guide - DRAFT

2. Operations Procedures 2.1 Network Operations
fresh requests. The distributor can mark itself as having ’High’ usage, based on the number of busy threads. In that situation, this column displays in Red.
The ’Cached’ column indicates the percentage of requests served by cache hits at this distributor. For meaningful numbers of requests, this percentage should be well over 95%. If the cache is disabled, an ’*’ is appended to this number with the whole column displayed in Red.
The next two columns are the hits per second and megabits per second served, based on the reported data in the preceding columns. Load and Load Capacity (’Cap’) are the last two columns. Capacity is the value of the BandwidthCapacity configuration variable for that distributor, and is meant to be indicative of the amount of traffic that can be served by it. If the cache is disabled, then this value will be reset to “0”.
Load is a measure of the number of Kilobytes per second being served by the distributor. This number is now affected by the number of hits per second and the number of busy threads when the load calculation is performed. This is done by the distributor code itself. If load exceeds capacity, it is shown in Red.
If the Distributor is down, the IP column displays the word 'OffLine'.
If it is running, being monitored but is not connected to a master, and the master doesn't think it is connected either, the line is Orange, the IP column shows 'Disconnected', the Start Time column is blank, and the Status column includes a 'U'.
If the distributor thinks it is connected to the master, but the master doesn't reciprocate, then the IP column will show 'Disconnected', the Start Time column will be blank but the Status will not show a 'U'.
Finally, if the Master thinks the agent is still connected but the distributor doesn't, then the Status column will have a 'U', but the Start Time and IP columns will show 'normal' data.
This is known to be confusing, and should be rationalized.
The total line for the distributor table shows a number of counts. The first, under the 'Name/Locn' column, indicates the total number of distributors configured. The total under 'Version' shows the number currently being monitored by the tool (since the Version string is extracted directly from each individual distributor), whereas the total under the Start Time shows the total number connected to the Master distributor.
The distributor section can also be subdivided. All Distributors can be displayed, as a single block, or just US domestic, CLAG or International distributors can be selected. Any combination of these segments can be chosen, and when they are they are shown as a continuous block. Note that the totals displayed are for those distributors on display only.
As previously mentioned, a cluster mode is also supported. In this mode, in place of a line per distributor, there is one line per cluster, where all machines at a cluster differ only in the last 2 digits of their ID number. An extra column is available in cluster mode - the Machine column. This contains one colored square per machine. The rest of the data on the line is a summary of the data from the machines at that cluster. Traffic reported is the sum for the cluster, table
Footprint Operations Guide - DRAFT 13
2.1 Network Operations 2. Operations Procedures
sequence numbers are the oldest at the cluster, and start time is the newest. The Name column is altered to remove any parentheticals, and the Status column is a grouping of the status of each host.
The color of the line is the ’worst’ color of the cluster. Yellow is not considered to be worse than Green in cluster mode.
The (somewhat raw) individual machine data can be seen by selecting the colored square. A pop up will appear, listing the data that would have been displayed in the non-cluster mode, albeit in an unpolished format.
Color Coding
Beyond the coloring of individual columns as described above, sections or entire lines may alter their color to indicate the state of information, or as an eye-catcher to indicate a problem
Lines are typically green, with every third a shade of grey to enable easier horizontal scanning - these are both considered to be Green lines. A Green field has good, current, data.
If the line or entry turns Yellow, then this indicates that the data is more than 30 seconds old. This is a fairly typical situation. If the data persists in aging, though, until the data becomes 5 minutes old, then the entry snaps to Purple This causes the connection to that remote agent to be dropped and a reconnection attempted, in the java style data gathering system.
So, lines will turn Purple if there are errors retrieving the data.
If a distributor loses it’s master, apart from the status column displaying ’U’, the line will be turned ’Orange.’ This is a logical orange - the actual color at this time being closer to a pale purple.
If a distributor is OffLine, then its line will be Red which is closer to an orange color for reasons of contrast.
Data extracted from the master can age differently from data received directly from the Distributor, and so it is possible for sections of a line to be in different colors. However, not all of this has been fully rationalized, with color coding for data from the master marks the entire line. This is deemed to be reasonable, but could be altered if required.
The new data gathering system allows for finer grain coloring, as the date of each individual piece of data is now available. Over time, some of this may be used to color code individual fields.
14 Footprint Operations Guide - DRAFT
2. Operations Procedures 2.1 Network Operations
How It Really Works
Java Version
Note: The java version is currently obsolete and thus much of the following discussion is moot. The syntax used has been basically maintained in the perl version, however, so a quick reading of this section may still be beneficial.
Access to the command port (where the data for the page comes from) of the distributor is restricted to the local IP address of each distributor machine, so there is an infrastructure in place to allow remote commands to be made.
The NOC page itself runs on the noc-tools machine, and is configured to talk to a local gateway process (the ’noc’ agent) there. Access to this NOC agent is restricted to processes on that local machine (using the same mechanism used by distributors). This local NOC agent listens for requests from the NOC page on port 1066 (left as an exercise for the reader).
The first time a request is made to the NOC agent for information about a machine (say after it is restarted, or that agent is brought online for the first time), the NOC agent will attempt to make a connection to a remote NOC agent on that distributor machine. This connection is made on port 1080, over an encrypted connection.
All subsequent requests to that distributor are then tunnelled through this connection. If multiple networks exist on the distributor machine, all requests are still tunnelled through a single NOC-channel (see below for the exception to this rule).
Requests can be made to the local NOC agent as if to the CUI of the distributor, albeit with a slightly modified syntax. Connecting to port 1066 on the local NOC agent will present the same OK: prompt.
The syntax for a command is:
{’SINGLE’|’MULTI’}:<ip addr>:<port>:<passwd>:<command>[:<opt args>]
The NOC agent takes care of converting all requests to a standard IP address, which ensures that all requests to the distributor travel down the same channel. Specifying a different address (or name) belonging to that agent will cause a separate channel to be used. This is used for connections to the master, so that better timeliness of data is achieved.
A ’SINGLE’ request (case sensitive) is a one-shot, synchronous request. A ’MULTI’ request on the other hand, will be asynchronous in nature, so the initial request will not block but typically return no data, and is then repeated every 30 seconds until the agent is shutdown. Future extensions call for both this repetition to be bounded, and for the period to be configured on a per-request basis.
Footprint Operations Guide - DRAFT 15

2.1 Network Operations 2. Operations Procedures
This MULTI mechanism allows multiple NOC pages to make requests to the NOC agent without the need for each to wait for the entire set of data to retrieved before display. The results of the MULTI requests are cached within the NOC agent, and when asked for again will be presented back together with a color coding to indicate age (Green or Yellow), or Purple to indicate no data, or a broken connection (or both). (Note: the current slowness of the NOC page refreshes are believed to be caused by the scripting of the page itself rather than the data retrieval component. The “yellowness” of the data is indicative of the time taken to retrieve the data, and yes having the MUTLI frequency be the same as the aging cutoff is not helping)
To prevent the compromising of one of these channels allowing unrestricted control over the Distributors, the remote NOC agent will only perform a restricted list of command, specified by a Dictionary at the distributor. This is read in at start time, and there currently is no mechanism to update that dictionary without restarting the remote NOC agent. There is also a file (CUIPorts.txt) restricting which CUI ports the remote NOC agent will allow connections to. Either of these files can include a line of the wildcard form “%”, which means that any is allowed. It is not recommended that this be used outside a LAN environment.
Simple commands, such as 'master' require no optional arguments, but others, such as 'list repeaters' can (whilst others require extra arguments). In that case, the entry in the Dictionary (typically found in /export/home/TOOLz/NOC and called Dictionary.txt) includes a '*' in the location where the optional arguments are inserted. An entry in the dictionary with a '*' must have the optional argument field to the request line present, otherwise the dictionary lookup will fail. The optional arguments may be blank, however, it which case a simple trailing ':' is sufficient.
Perl Version
The majority of the above description holds for the description of the perl based system, certainly as regards as the page itself and the use of the Dictionary and CUIPorts file.
The difference in the perl version, is the mechanism used to transport requests and results from the NOC-tools machine to and from the individual distributors.
This new system works without needing a connection, using 'scp' to transfer files. At each distributor, and at the NOC-tools machine, there is a script called NOC.pl which is run, and can be launched out of the `launcher` file found in:
/export/home/footprnt/TOOLz/NOC/cgi-bin/
on the distributors, and also in:
/usr/local/NOC/ on the noc-tools machine.
This script simply reads a request file (request.txt), satisfies the requests in it and writing the results into a file called 'results.txt' in the ./results/ subdirectory.
16 Footprint Operations Guide - DRAFT
2. Operations Procedures 2.1 Network Operations
The syntax of the commands understood by this script is a slightly cut-down version of the original extended CUI commands used by the java version of the NOC tool, but without the MULTI or SINGLE flag, and without the need to specify the host name--since the file is always on the local machine of the executor of the NOC.pl script.
Typically, therefore, the commands processed are for requests to be made to the CUI port of the local distributor. A new command is available, however, called ’GATHER’ which allows the NOC.pl agent to gather results files from one or more other NOC.pl scripts, running remotely. In this manner, the network can be laid out in a hierarchy, with data-gathering points harvesting result files from their near-neighbors, and then the central location has a much more manageable list of agents it needs to gather from.
The script will sleep the usual 30 seconds between request loops. It will also reload the Dictionary and CUIPorts each loop, removing the need to restart the remote agents each time a new request is to be made.
At the central location (i.e., NOC-tools), a copy of NOC.pl is therefore run which only GATHER’s data from the distributors. currently, it gathers data from all; the hierarchy support not yet being used.
Each GATHER line is treated as a unit - a single scp script child process is spawned for each line, not for each individual agent on each GATHER line. This helps to reduce the load on the host machine, at the cost of some serializing of requests.
To add a new distributor to the system, a copy of NOC.pl needs to be running on that machine, and that distributor has to be added to the DistributorInfo file as before. For data to be gathered, the distributor ID also has to be added to the list of GATHER lines for the NOC.pl instance running on NOC-tools. This file is /usr/local/NOC/cgi-bin/request.txt - the syntax is obvious from a reading of it. At some stage, this file will be automatically generated from the contents of DistributorInfo, but for now maintenance of it is a manual task.
Along with the NOC.pl script running locally, is a second script called noc_create.cgi. This can be found in the same location as NOC.pl on the NOC-tools machine.
Noc_create.cgi performs two roles. It creates and propagates request files to the remote agents, and converts the results gathered by NOC.pl into data files appropriate for delivery to the page.
The noc_create script can determine which requests need to be made, based on the contents of the DistributorInfo file (which gives it a list of active distributors), the results it retrieved previously (i.e., when it has identified the master distributor), and the list of networks to gather data for. This latter information is stored in a manually maintained file called fileList, which resides in the datafiles subdirectory under cgi-bin. This defines both the network letter and time interval to gather data for, and is currently set to get all three levels for the A network (i.e., the complete list). Syntax is one entry per line, specified as <letter><level> where ’level’ is 1 for 1 minute, 2 for 5 minute and 3 for 1 hour.
Footprint Operations Guide - DRAFT 17
2.1 Network Operations 2. Operations Procedures
Required Knowledge
Escalation Procedures
The NOC staff monitors the performance of the Footprint product for DI customers and alerts to network problems that arise at either end of the connection, that is, either the customer’s location or a DI data center. Internal problems located through daily and hourly monitoring are handled in much the same way as those identified by the customer, via phone calls or email.The NOC monitors will try to locate the problem and perform light trouble-shooting. When the NOC staff is incapable of handling a problem or error alarm, the monitors redirect and escalate the problem to Operations or Engineering.
Once the NOC monitors identify a problem, they address it with an escalation priority level depending upon origin and urgency. The escalation procedure must ensure the resolving of network issues in a timely manner and in a way that minimizes the impact to customer network services and new service installations, as agreed upon by Digital Island and its vendor carriers.
The Escalation Procedure contributes significantly to maintaining a problem free Digital Island production environment with the ability to quickly isolate and resolve network and system faults. To achieve this, the NOC staff must follow a several standard formats to ensure that issues are resolved based on their criticality, as follows:
• Problem Priority Definitions
• Escalation Process
• Circuit: P1 Escalation Process
• Change Management: P1 Escalation Process
• Installation: P1 Escalation Process
• 4.0 Production Escalation Guidelines
Problem Priority Definitions
The Escalation Procedure significantly contributes to maintaining a problem free Digital Island production environment with the ability to quickly isolate and resolve network and system faults. The NOC staff must follow a Problem Priority procedure to ensure that issues are reported in a standard format based on their criticality, as follows.
• Priority 1: An existing network is down or there is a critical impact to the customer's business operations. Digital Island Operations and Engineering organizations will commit full-time necessary resources around the clock to resolve the situation.
18 Footprint Operations Guide - DRAFT
2. Operations Procedures 2.1 Network Operations
Under 15 minutes is the immediate response time for priority level 1. Problems set at this highest priority level require an immediate resolution.
• Priority 2: The Operation of an existing network is severely degraded, or significant aspects of Digital Island customer's business operation are being negatively impacted by unacceptable network performance. Digital Island Operations and Engineering organizations will commit full-time resources during normal business hours to resolve the situation.
Under 4 hours is the necessary response time for priority level 2. Problems set at this high priority level require an immediate resolution.
• Priority 3: Operational performance of the network is impaired while most business operations remain functional. Digital Island Operations and Engineering organizations are willing to commit resources during normal business hours to restore service to satisfactory levels. Problems set at third priority level should be resolved within twenty-four hours.
Under 24 hours is the response time needed for priority level 3. Problems set at this priority level require a resolution preferably before the next day.
• Priority 4: Customer requires information or assistance on Digital Island capabilities, installation, or configuration. There is clearly little or no impact to the customer's business operation. Digital Island Operations and Engineering organizations are willing to provide resources during normal business hours to provide information or assistance as requested.
Under 72 hours is the response time needed for the fourth priority level. Problems set at this level require a resolution preferably within three business days.
Note: Priority 1 problem escalation times are measured in calendar minutes, 24 hours per day, seven days per week. Priority 2, 3, and 4 escalation times correspond with local business hours.
Escalation Process
To ensure that all problems are reported in a standard format, Digital Island has established the following production problem procedure.
P1 Escalation Process
6. The NOC will page the 2nd level “on call” ISA as well as the “on call” Neteng to report the problem.
Footprint Operations Guide - DRAFT 19
2.1 Network Operations 2. Operations Procedures
7. The 2nd level “on call” ISA will either fix the problem immediately or escalate it as follows:
• All software bugs should be escalated directly to Engineering.
• All other issues will be escalated to the 3rd level “on call” ISE who resolves the issue within an hour or escalates to Engineering.
• If the 2nd level “on call” ISA feels this is an issue that requires immediate assistance from all departments immediately, they can immediately contact all on-call department personnel to resolve the issue.
P2 Escalation Process
1. The NOC will page the 2nd level “on call” ISA within 15 if the problem is not resolved. The 2nd level “on call” ISA will either fix the problem within 1 hour or escalate to the 3rd level “on call” ISE for resolution.
2. The 3rd level “on call” ISE will either resolve the problem in 2 hours or escalate to Engineering for resolution.
3. 3rd level “on call” ISE is accessible for information or help during the escalation process.
• The NOC will page the “on call” L2OPS within 1 hour.
• L2OPS will work on the problem and will notify Neteng within 2 hours if the problem is not resolved.
• Neteng is accessible for information or help during escalation process.
P3 and P4 Escalation
• The NOC will have 8 hours to attempt to resolve or assemble the appropriate troubleshooting information before escalating to L2OPS.
• Support for performance or informational issues are Monday-Friday (0800-1700), excluding holidays.
Circuit: P1 Escalation Process
• NOC will notify L2OPS if a circuit problem is not resolved within 2.5 hours.
• Core Stratacom outages, L2OPS will FYI page the “on call” Neteng to report the problem.
• L2OPS will notify Neteng if a circuit problem is not resolved within 6 hours.
20 Footprint Operations Guide - DRAFT

2. Operations Procedures 2.2 Procedural Flowcharts
Change Management: P1 Escalation Process
• The NOC will check the OCC Meeting Minutes (www-ops.digisle.com/Oct./) to identify the engineer responsible for the change.
• The NOC will contact the engineer responsible for making the change (not the “on call” L2OPS or the “on call” Neteng).
• If unable to contact the engineer, the NOC should contact Roz Pennington for follow-up.
Installation: P1 Escalation Process
• Neteng will own and be responsible for all installations and problems related to network installation for 2 weeks after the Customer goes into Production.
• The NOC will check the Implementation tab in Vantive to confirm the status is complete, or to find the responsible installation engineer and/or CA.
• NOC will contact Neteng installation engineer; if no assignment, contact the CA.
4.0 Production Escalation Guidelines
In the event the Network Operations Center (NOC) considers a case a production issue, the NOC (Hawaii or London location) will escalate the problem based on the time frames, priorities and contacts below.
2.2 Procedural Flowcharts
The following flowcharts describe the steps and procedures used during Footprint Operations escalation process:
Footprint Operations Guide - DRAFT 21
2.2 Procedural Flowcharts 2. Operations Procedures
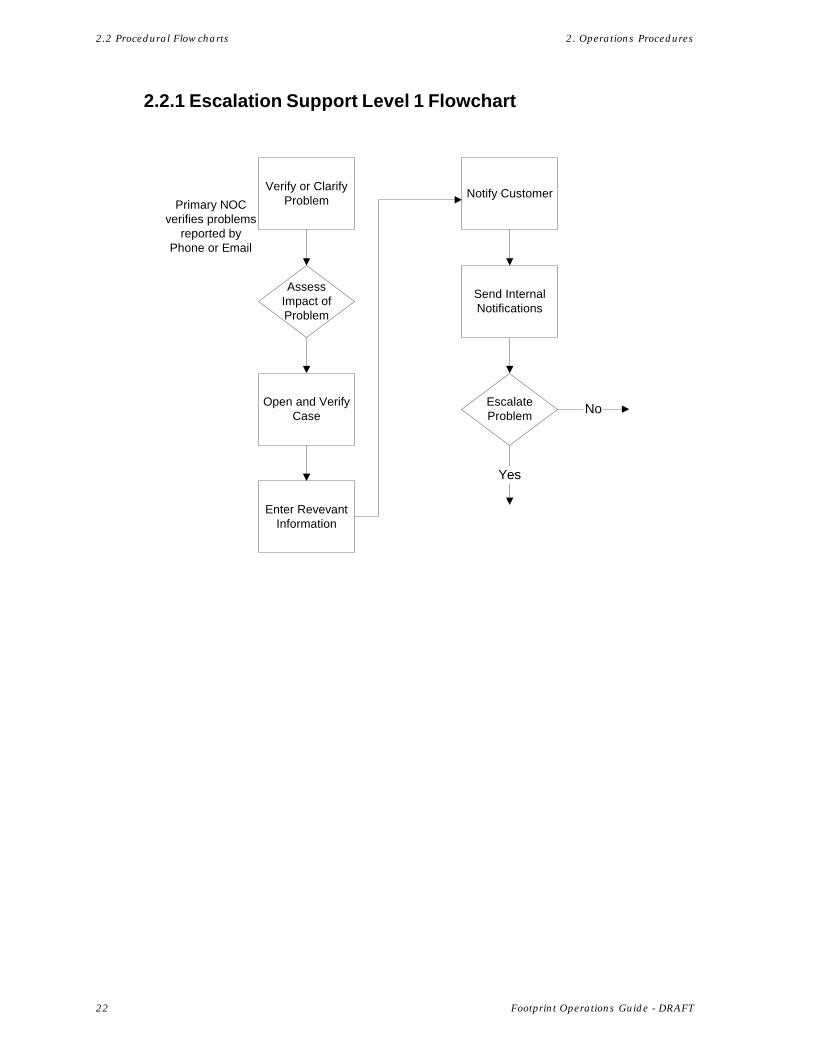
2.2.1 Escalation Support Level 1 Flowchart
Verify or ClarifyProblem
AssessImpact ofProblem
Open and VerifyCase
Enter RevevantInformation
Notify Customer
Send InternalNotifications
EscalateProblem
Yes
No
Primary NOCverifies problems
reported byPhone or Email
22 Footprint Operations Guide - DRAFT
2. Operations Procedures 2.2 Procedural Flowcharts
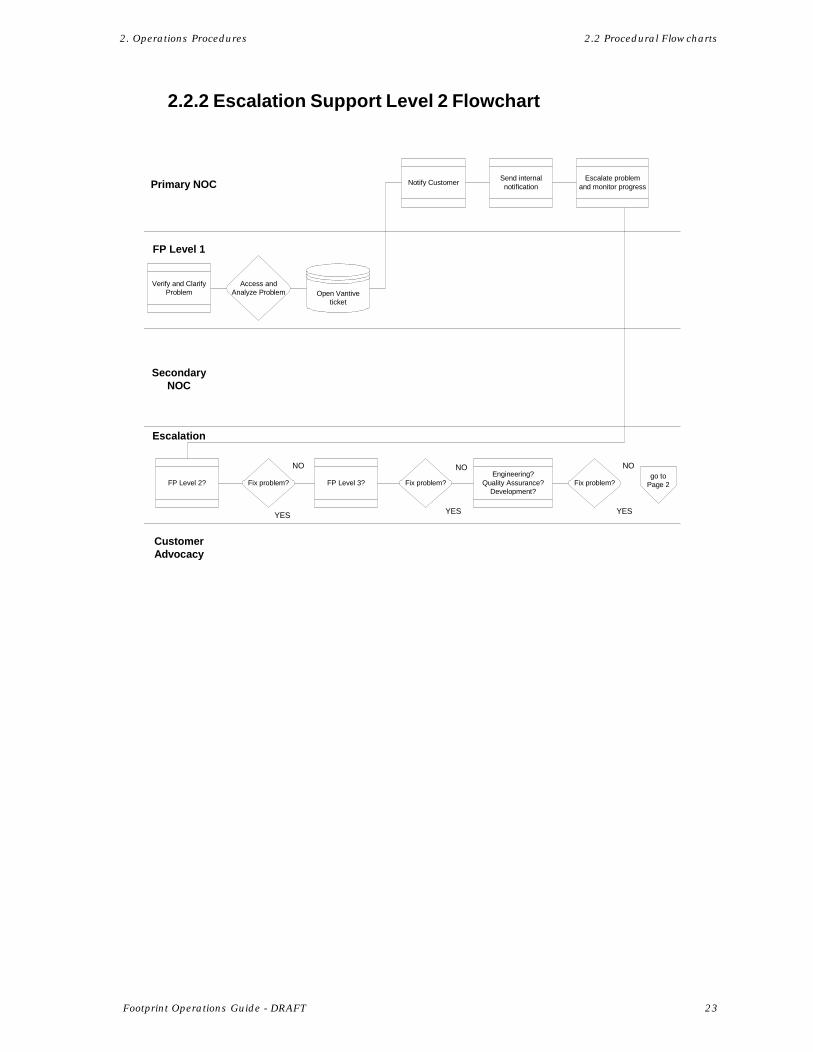
2.2.2 Escalation Support Level 2 Flowchart
CustomerAdvocacy
Escalation
SecondaryNOC
FP Level 1
Primary NOC
Verify and ClarifyProblem
Access andAnalyze Problem Open Vantive
ticket
Notify CustomerSend internalnotification
Escalate problemand monitor progress
FP Level 2? FP Level 3?Engineering?
Quality Assurance?Development?
go toPage 2Fix problem?
NO
YES
Fix problem? Fix problem?
YES YES
NO NO
Footprint Operations Guide - DRAFT 23
2.3 Expanding and Maintaining the Footprint Network 2. Operations Procedures
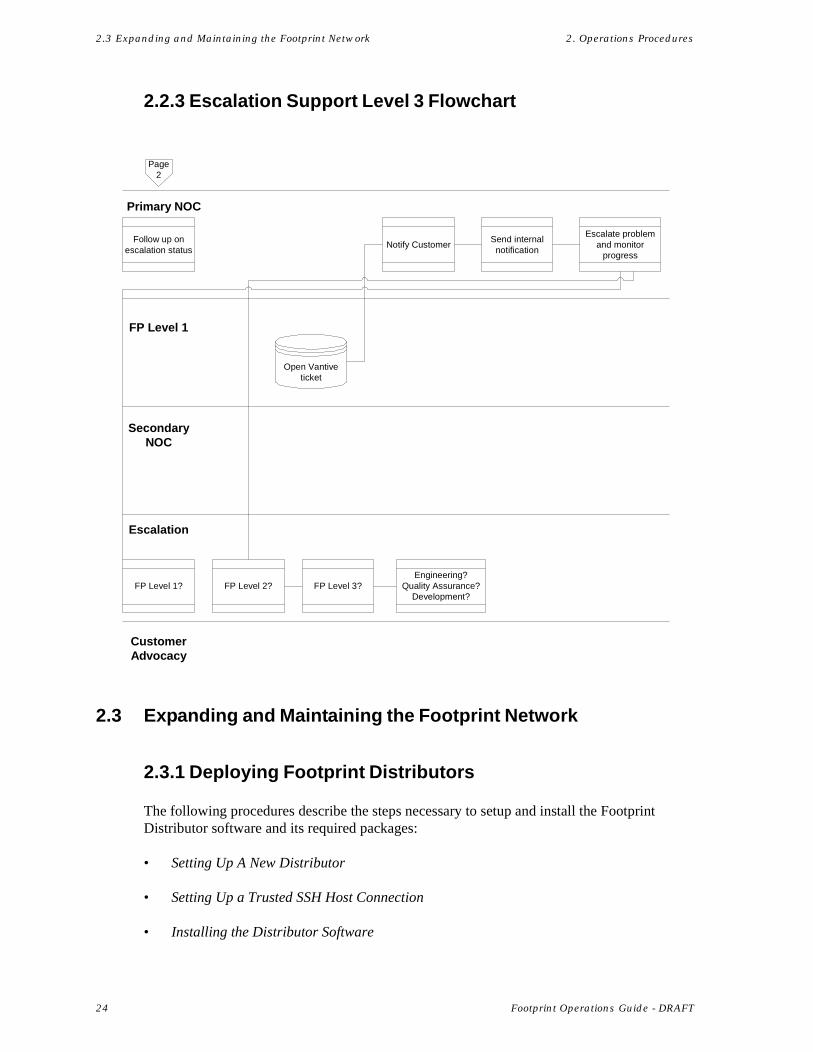
2.2.3 Escalation Support Level 3 Flowchart
2.3 Expanding and Maintaining the Footprint Network
2.3.1 Deploying Footprint Distributors
The following procedures describe the steps necessary to setup and install the Footprint Distributor software and its required packages:
• Setting Up A New Distributor
• Setting Up a Trusted SSH Host Connection
• Installing the Distributor Software
CustomerAdvocacy
Escalation
SecondaryNOC
FP Level 1
Primary NOC
Follow up onescalation status
Open Vantiveticket
Notify CustomerSend internalnotification
Escalate problemand monitor
progress
FP Level 1? FP Level 2? FP Level 3?Engineering?
Quality Assurance?Development?
Page2
24 Footprint Operations Guide - DRAFT
2. Operations Procedures 2.3 Expanding and Maintaining the Footprint Network
• Installing Required Packages for the Footprint Distributor
• Installing the NOC Agent
• Opening New Tables for a New Distributor
Setting Up A New Distributor
This procedure lists the required steps to prepare a distributor before installation of the Footprint Distributor software and its subsequent applications.
Note: These steps require root permissions with the footprint user on noc-tools.digisle.com, as well as on fatweasel.digisle.com. If you have access on noc-tools, you automagically have access to fatweasel.
Section 1: Using the ’machineCheck.pl’ Script
You can accomplish most of the steps in this procedure with the 'machineCheck.pl' script on noc-tools, located in:
/space/Repository/packages/installDistributor.
The syntax for the script is:
./machineCheck.pl -a hostname -s SNMPstring
Any questions concerning this script should be directed to Steve Hajducko at:
Section 2: Script Outline
The following procedure outlines the steps that the script runs to inform you of where to retrieve certain template files used during the process.
1. Forward DNS
This first step checks whether or not your the Forward DNS is working. Use “nslookup” to resolve the hostname. If you cannot resolve the hostname, inform whomever you told to install the entries and have him/er add the entries to the Sandpiper.net domain.
2. SSH trusted hosts
Footprint Operations Guide - DRAFT 25
2.3 Expanding and Maintaining the Footprint Network 2. Operations Procedures
Currently, distributors must allow an ’ssh w/out password’ from several locations; however, this would require inputting long, complicated strings into one file with additional information going to another file.
Instead, use the templates in the following directory:
/space/Repository/packages/installDistributor/template
The files you want are:
.shosts and known_hosts.
The .shosts file should be in:
/export/home/footprnt
The known_hosts file should be in:
/export/home/footprnt/.ssh
Once you have “scp”-ed the files, try using SSH. If you have the host key read into the system, SSH should work well.
3. Verifying root and footprint user passwords
Occasionally, we have to change the root and footprnt passwords that are on the machines in the network. Since jumpstart sometimes lags behind our installations, you need to check the root passwords from the past and see if any of them match up with your machine.
If you are unable to determine the correct root password, you must not continue until you obtain the required information from the Deployment group. Once you get the root password, you can “su” to root and proceed to change it to the correct and most current password for your machine number. Just to be sure, overwrite the old footprint password with the current password.
4. Creating the fpengr account
The engineers like to have accounts on the distributors, with which they may troubleshoot problems without disrupting their footprint accounts. Thus, they added a fpengr account. The fpengr account has its own uid and the same gid as in Footprint.
Use this command to add the fpengr account to your distributor:
useradd -u 3006 -g 113 -d /export/home/fpengr -m -s /bin/ksh fpengr
Next, change the fpengr account password to match the footprint password that you created above in step 3.
5. Checking /etc/nodename
26 Footprint Operations Guide - DRAFT

2. Operations Procedures 2.3 Expanding and Maintaining the Footprint Network
Often, distributors are sent either without host-names or without incorrect host names applied. For exampled, you will often see the following when you log in:
netra1(footprnt)>
The script above reads that the hostname is incorrect. To change this, edit the file /etc/nodname and change the netra1 to the correct hostname, rather than the full canonical name (for example: a5217, not a5217.sandpiper.net).
Note: This change will not take affect until the machine reboots.
6. Checking /etc/rc2.d/S69inet
You must ascertain that the following two lines are in /etc/rc2.d/S69inet:
/usr/sbin/ndd -set /dev/tcp tcp_slow_start_initial 3/usr/sbin/ndd -set /dev/tcp tcp_rexmit_interval_initial 1500
You should be able to locate the above two lines near the end of the file. If the last value (either “3” or “1500”) is incorrect or missing, change or add the number as needed. Your changes will take effect when your next reboot the machine.
7. Checking /etc/inetd.conf to disable telnet and ftp
For a security measure, you can disable telnet and ftp daemons from inetd. To do this, simply edit the “/etc/inetd.conf”file and make sure that the lines describing the telnet and ftp services are commented out (i.e. - begin with a #). The lines, for example, should resemble the following:
#ftp stream tcp nowait root /usr/sbin/in.ftpd in.ftpd#telnet stream tcp nowait root /usr/sbin/in.telnetd in.telnetd
If the lines are not commented out, correct them and save your work, then exit the file. You could sign up the daemon at this point, but this is not necessary, since you will need to reboot anyway.
8. Checking TCP patch 105529-08
Setting up a distributor for installation also requires installing the TCP patch 105529-08. The latest version of Jumpstart installs the patch on its own; however, you should ascertain that the patch has been installed correctly and responds accordingly.
To check for the patch, issue the following command:
showrev -p | grep 105529-08
If you do not get a response, the patch has not been installed correctly and you will need to obtain the from noc-tools, as follows:
Footprint Operations Guide - DRAFT 27

2.3 Expanding and Maintaining the Footprint Network 2. Operations Procedures
/space/Repository/packages/newDistributorInstall/packages/105529-8_tar.z
Next, scp the file to the machine and into /tmp. Unzip it, untar it, and cd it into the directory it created, as follows:
gzip -d 105529-08_tar.zuntar -xvf 105529-08_tarcd 105529-08
Now, install the patch through the following command:
./installpatch
Without intervention, the TCP patch will install itself and take effect the next time you reboot.
9. Checking /etc/sudoers
Frequently, we use “sudo” to grant people the means of using certain commands as root, rather than granting them root access.
The utility “sudo” has a configuration file, /etc/sudoers. Because Jumpstart may damage this file, you should use a template file from the following location:
/space/Repository/packages/installDistributor/template/sudoers
“Scp” the file to the machine and into /tmp. Next, edit the file and replace the following line:
Host_Alias LOCAL=HOSTNAMEHERE
with your hostname:
Host_Alias LOCAL=a5217
Once you have done this, save and exit. Before you use this file, you must change the owner and then the permissions.
Issuing the following command will change the owner:
chown root:root /tmp/sudoers:
To change the permissions, issue the following command:
chmod 0440 /tmp/sudoers
and place the permissions in: /etc. Test the changes by becoming footprnt and issuing the command: sudo –l.
You should get a list of commands available to you. If you do not get the list, or if the system informs you that you cannot use “sudo” for a user footprnt, you made a mistake and should
28 Footprint Operations Guide - DRAFT

2. Operations Procedures 2.3 Expanding and Maintaining the Footprint Network
recheck. If you still do not receive the list of commands, E-mail either Steven Hajducko or Joe Haggerty and have them help you.
10. Checking the date
Sometimes, machines deployed with an inconsistent or incorrect date. You must make sure the date is correct before the distributor is installed.
To check the date, issue the following command:
ntpdate -u ns.scruz.net clock.psu.edu
This command will update the clock to whatever is running on the two, widely known ntp servers.
11. Checking the sendmail.cf
To ascertain that sendmail is running correctly, you should issue the following command:
ps -ef -o args | grep send
The following line should appear:
/usr/lib/sendmail -bd -q15m -o OAddr=127.0.0.1
If you do not see the -o OAddr=127.0.0.1, sendmail is not running or is running incorrectly). You can try and restart the process by using the following command:
/etc/rc2.d/S88sendmail stop; /etc/rc2.d/S88sendmail start
If the above command does not accomplish the task, you should inform Steve Hajducko or Joe Haggerty and have them take a look at it.
12. Checking ntp.conf
This step uses another template file. You should copy the following files to the machine snf and into /tmp:
/space/Repository/packages/installDistributor/template/ntp.conf/space/Repository/packages/installDistributor/template/ntp.drift
Next, change the permissions and owner of them on the machine:
chown root:sys /tmp/ntp.confchown root:sys /tmp/ntp.driftchmod 644 /tmp/ntp.confchmod 644 /tmp/ntp.drift
Then, move the two files into /etc/inet. Don’t worry about signing up ntp; it will fix itself when you reboot.
Footprint Operations Guide - DRAFT 29

2.3 Expanding and Maintaining the Footprint Network 2. Operations Procedures
13. Setting up the hme1:2 interface
Since the distributors we now deploy are sent out using NAT (Network Address Translation), there are problems with certain functions that the distributor cannot perform.
Because of this, we need to add another virtual interface (VIF) to the machine. To do so, you need to know two things:
• IP address
• Netmask
You should be able to obtain this information from the person who told you to install the machine.
Note: The following machine example is a5217.sandpiper.net with an IP address of 167.216.196.102
To add the interface, use the following commands:
ifconfig hme1:2 167.216.196.102 netmask 255.255.255.0 –trailersifconfig hme1:2 up
Then, you must edit /etc/hosts and add the following line to the bottom of the file:
167.216.196.102 realvif
Next, edit /etc/netmasks and add the following line to the bottom of the file:
167.216.196.0 255.255.255.0
Finally, create the file /etc/hostname.hme1:2 and add the following line:
realvif
With the above step, you have completed setting up the machine.
14. Rebooting
Many of our changes will not take effect until you reboot the machine. A quick and efficient way to reboot is through the following command:
shutdown -i6 -g0 –y
You are now ready for the next section of this document, Installing the Footprint Distributor Software, which describes how to install the distributor software and other necessary packages.
30 Footprint Operations Guide - DRAFT
2. Operations Procedures 2.3 Expanding and Maintaining the Footprint Network
Setting Up a Trusted SSH Host Connection
This procedure defines the steps for setting up a Trusted SSH Host Connection. There are two files when concerned about making a trusted SSH connection without being prompted for a password.
You can located the following files on the machine to which you connected. In the distributor’s case, the paths/files are:
• /export/home/footprnt/.shosts
• /export/home/footprnt/.ssh/known_hosts
First, you must know which host you came from (for example, noc-tools.-digisle.com).
Secondly, you must know what account you will be using on the machine you are sshing to (for example, footprnt).
ssh to DISTRIBUTOR
Next, ssh to the distributor and add the following line to the .shosts file
noc-tools.digisle.com footprnt
Then, save and quit the file.
ADD ’host key’
Next, add the 'host key' for noc-tools.digisle.com manually to the .ssh/known_hosts file. This key is located on noc-tools in /opt/footprnt/.ssh/noc-tools.key
Note: It is ONE LONG LINE! There are no carriage returns in the line of numbers you will see.
Cut this long line and paste it at the end of the known_hosts file on the distributor.
vi known_hosts
Edit (vi) known_hosts.
a401(footprnt)> vi /export/home/footprnt/.ssh/known_hosts
Footprint Operations Guide - DRAFT 31
2.3 Expanding and Maintaining the Footprint Network 2. Operations Procedures
Go to the bottom of the file, and copy and paste the line from the file on noc-tools to the file on the distributor.
Save and quit the file.
Now, on noc-tools, you can type "ssh a401" and you won’t be asked for a password. If you are asked for a password, use the -v switch to help you figure out what is wrong.
Example: ssh -v a401
Installing the Distributor Software
This procedure explains the process of installing the Footprint Distributor software and subsequent applications. The following steps are required to install the SNIwrrp package and to configure certain files that must be brought up-to-date with the current distributor network.
Note: This procedure requires that you have completed the steps described in the previous section, “Setting Up a New Distributor.” Before beginning this procedure, make sure that you have either checked over the machine manually or have used the machineCheck.pl script.
InstProd.pl Script
As an alternate to the steps described in Section 2 below, you can use the “distributor installation script” called instProd.pl (written by Joe Haggerty), located at:
/space/Repository/packages/installDist_251.9
The syntax is as follows:
./instProd.pl -a 5217
Note: Do not use the full hostname. Instead, subtract the 'a' from it and use only the numerical part.
If you do not want to use the script, use the following procedure instead:
SNIwrrp Installation
“Scp” the SNIwrrp.tar package over to the machine into /export/home/footprnt. You can find this file in:
32 Footprint Operations Guide - DRAFT

2. Operations Procedures 2.3 Expanding and Maintaining the Footprint Network
/space/Repository/packages/newDistributorInstall/packages/SNIwrrp.tar
Copy the instpkgadmin file to /export/home/footprnt. This file is also located in:
/space/Repository/packages/installDist_251.9/instpkgadmin
Next, “cd” to /export/home/footprnt on the machine. Make sure you are the “footprnt” user before continuing.
Untar the following package:
tar -xvf SNIwrrp.tar
Then, “su” to root and install it:
Answers to “prompt” Questions
The following steps are the questions you will need to answer throughout the installation process:
1. Hostname (hostname.sandpiper.net): Use the full hostname for this (i.e. a5217.sandpiper.net, rather than a5217)
2. Enter ID number for this Content Distributor: Use agent ID (i.e. 5217, not a5217)
3. Mail server (localhost): Use default (i.e. Hit enter)
4. E-mail address: [email protected]
5. Operator Password: shazam
6. Re-enter Password: shazam
7. HTTP Port (80): Use default
8. Port Prefix (880): Use default
9. Distributor will act as a cache manager? (y): Use default Y
10. Port assignments are correct (y/n): Use default Y.
11. Make sure that the distributor is always started when the system boots (y/n): enter “Y”
12. Schedule cache log file rotation now? (y/n): Enter “y”
13. Number of cache log files to be saved before log rotation (10): Use default value
14. Log rotation with cron? (y): Use default
Footprint Operations Guide - DRAFT 33
2.3 Expanding and Maintaining the Footprint Network 2. Operations Procedures
15. Edit cron job? (n): Use default
16. Install cron job? (y): Use default
17. Do you wish to start the Footprint distributor now? (y/n): Enter “n”
The distributor installation is now complete.
Changes to the Config Files
The config files will require some changes. The first file you should change is:
/export/home/footprnt/fp/distributor/etc/squid.conf
Change the following variables to look like this:
http_port 80 8801icp_port 8809request_timeout 30 secondsmaximum_object_size 204800 KBnegative_ttl 30 secondshalf_closed_clients onmax_forwards 372max_forwards_per_host 124max_pending_forwards_per_host 15min_forwarding_queue_length 200forward_reject_percent 25
Note: If you cannot find these variables, simply add them to the bottom of the file.
Next, make sure you can find the following line:
acl purge method PURGE
If not, go to line 1044 (under acl CONNECT method CONNECT) and insert it. Next, make sure you can find this line as well:
http_access deny purge !localhost
If not, go to line 1072 (right between #@NOSATD@http_access allow localhost and http_access allow all) and insert it.
Once you have switched those variables, you can save and quit the file.
Next, open up:
/export/home/footprnt/fp/distributor/etc/FP.props
34 Footprint Operations Guide - DRAFT
2. Operations Procedures 2.3 Expanding and Maintaining the Footprint Network
Change the following variables to look like this:
MinPullDelay=60MaxPullDelay=570PullDelayThreshold=90MaxChannelAccepts=500MaxPullChannelAccepts=500BestRepeaterFocus=50.0AsyncInvalidation=1ThreadsCapacity=2000.0MaxLoadRetries=3AutoActivation=0MaxCachedResourceSize=204800BandwidthCapacity=15000RemoteMailingList=lf-support@sandpiper.netOverrideLogMaster=a2599.sandpiper.net,8807
Note: If you cannot find these variables, simply add them to the bottom of the file.
Once you have switched/added those variables, you can save and quit the file.
The last file to edit is:
/export/home/footprnt/fp/distributor/etc/http-server.props
Change the following variables to look like this:
w3c.jigsaw.request.timeout=28800000w3c.jigsaw.http.socket.SocketClientFactory.maxClients=402w3c.www.protocol.http.connections.timeout=65000w3c.www.protocol.http.connections.stale_time=300000
Note: If you cannot find these variables in the file, simply add them to the bottom of the file.
Once you have switched/added those variables, you can save and quit the file.
Now, “cd” to the tables directory:
cd /export/home/footprnt/fp/distributor/tables
“scp” the SuccessorList file from another machine, preferably the master:
scp a2707:‘pwd‘/SuccessorList .
You will get prompted for a footprnt password, that's normal.
Footprint Operations Guide - DRAFT 35

2.3 Expanding and Maintaining the Footprint Network 2. Operations Procedures
The last step to configuring the distributor software is to scp 4 more files from noc-tools to the etc directory. These files are:
client.derclient.keyserver.derserver.key
These files can be found in:
/space/Repository/packages/installDist_251.9
“scp” them to the machine:
scp *.der *.key a5217:/export/home/footprnt/fp/distributor/etc
For the next procedure in this series, refer to the following section, “Installing Required Packages for Footprint Distributor.”
Installing Required Packages for the Footprint Distributor
This procedure explains the process of installing all the required packages for the Footprint Distributor software and its subsequent applications, with which to update the current distributor network:
SNIpingd-2.0.2.pkg Installation
1. Use ssh to connect to noc-tools as Footprint, then change the directory:
cd to /space/Repository/packages/newDistributorInstall/packages
2. Next, secure a copy of the SNIpingd-2.0.2pkg to the machine, using scp as follows:
scp SNIpingd-2.0.2.pkg a201:/tmp
3. Use ssh to connect to the machine, switch user to root, and then change the directory to:
/tmp
4. Add the package, as follows:
pkgadd -d SNIpingd-2.0.2.pkg
5. Answer yes to all questions.
6. Start the daemon:
/etc/rc3.d/S95pingd start
36 Footprint Operations Guide - DRAFT

2. Operations Procedures 2.3 Expanding and Maintaining the Footprint Network
SNIrotate.tar - Installation
1. Use ssh to connect to noc-tools as footprnt, then change the directory to the following:
cd to /space/Repository/packages/newDistributorInstall/packages
2. Secure a copy of SNIrotate.tar to the machine, as follows:
SNIrotate.tar a201:/export/home/footprnt
3. Connect to the machine using ssh, then switch directory to root.
4. Untar SNIrotate.tar:
tar -xvf SNIrotate.tar
Note: Before installing this package, you must already have the Footprint Distributor installed.
5. Next, install the package with the following command:
pkgadd -d ‘pwd‘ SNIrotate
6. Answer yes to all questions.
SNIwrlog.pkg installation
1. Use ssh to connect to noc-tools as footprnt, then change the directory:
cd to /space/Repository/packages/newDistributorInstall/packages
2. Secure a copy of SNIwrlog.pkg to the machine through the following command:
scp SNIwrlog.pkg a201:/tmp
3. Use ssh to connect to the machine, then switch the user to root.
4. Remove or overwrite any old versions with the following:
pkginfo | grep SNIwrlog pkgrm SNIwrlog ( or pkgrm SNIwrlog.1 SNIwrlog.2 .3 .4 etc )
5. Answer yes to all questions.
6. Change the directory to
/tmp
7. Now, install the package with the following command:
pkgadd -d SNIwrlog.pkg
Footprint Operations Guide - DRAFT 37

2.3 Expanding and Maintaining the Footprint Network 2. Operations Procedures
8. Answer yes to all questions.
Thttpd Installation
1. Use ssh to connect to noc-tools as footprnt, then change the directory:
cd to /space/Repository/packages/newDistributorInstall/packages
2. Secure a copy of SNIthttpd.tar to the machine as follows:
scp SNIthttpd.tar a201:/export/home/footprnt
3. Use ssh to connect the machine, then switch the user to root.
4. Untar the package with the following command:
tar -xvf SNIthttpd.tar
5. Remove or replace any old versions:
pkgrm -R ‘pwd‘ SNIthttpd
6. Install the package:
pkgadd -d ‘pwd‘ SNIthttpd
7. Answer yes to all questions.
8. Check that the package is running:
ps -ef | grep thttpd
9. If it is not running, use the following command:
/etc/init.d/thttpd start
NOC Monitoring Tool Installation
1. Use ssh to connect to noc-tools as footprnt, then change the directory:
cd to /space/Repository/packages/newDistributorInstall/packages
2. Secure a copy of NOC.tar.gz to the machine:
scp NOC.tar.gz a201:/export/home/TOOLz
3. Use ssh to connect to the machine, switch the user to root, and then switch the directory:
cd to /export/home/TOOLz
4. Kill the current NOC tool
ps -ef | grep NOC.pl
38 Footprint Operations Guide - DRAFT
2. Operations Procedures 2.3 Expanding and Maintaining the Footprint Network
kill -9 <pid>
5. “rm” the NOC directory with the following command:
rm /export/home/TOOLz/NOC
6. Unzip the NOC file, then untar it with the following two commands:
/usr/local/bin/gzip -d NOC.tar.gz tar -xvf NOC.tar
7. Start the NOC tool:
cd NOC ./launcher
Installing the NOC Agent
The following procedure describes the steps required to install a Network Operations Center Agent:
1. Update DistributorInfo.S on fatweasel.digisle.com
cd /opt/di/NOCvi DistributorInfo.S
Next, add the DistributorID ISP/Location)
Save and quit the file.
2. Add distributor on request.txt
cd /opt/di/NOC/cgi-binvi request.txt
Add the distributor)
Save and quit file)
3. Install the latest NOC agent and ssh keys
ssh to s2501.sandpiper.netcd /export/home/TOOLzscp NOC.tar footprnt <Distributor>:/export/home/TOOLz
cd /export/home/footprnt/.sshscp easy.tar footprnt <Distributor>:/export/home/footprnt/.ssh
4. Untar NOC.tar & easy.tar files and start noc agent
ssh to Distributorcd /export/home/TOOLz
Footprint Operations Guide - DRAFT 39
2.3 Expanding and Maintaining the Footprint Network 2. Operations Procedures
Note: You must grep & kill the old noc agent before restarting new noc-agent.
tar -xvf NOC.tar
cd /export/home/TOOLz/NOC
./launcher
5. Check distributor access on fatweasel without footprnt password acknowledgement
ssh to fatweasel.digisle.com)
ssh -P <distributorID.sandpiper.net>
Note: This will take a few minutes. If it prompts you to login password, troubleshooting is required.
Installation is complete.
Opening New Tables for a New Distributor
The following procedure describes how to bring up new tables for a new distributor.
PINGD
1. Log into the distributor and cd to:
/opt/SNIpingd/etc.
2. View the file pingd.allow.
3. If there is an entry for triumph.fplive.net in pingd.allow, you can skip the rest of this section. If not, add a line with the address of triumph: 216.206.179.242.
4. 4. Do a ps -fade | grep pingd. Kill the pingd process and restart it.
5. 5. Log off of the distributor.
Netspray
1. Log into triumph.fplive.net and cd to /export/home/footprnt/netspray.
2. View the pingdaemons.txt file. Add a line with the IP of the new distributor.
40 Footprint Operations Guide - DRAFT

2. Operations Procedures 2.3 Expanding and Maintaining the Footprint Network
3. View the distributors.txt file and add an entry for the new distributor.
The format for a new distributor is:
<Agent ID> <IP> <AS> <REGION> <HOSTNAME>
Note: The region is always 1.
4. To find the AS for a distributor, telnet to route-views.oregon-ix.net.
5. Run the command:
show ip bgp a.b.c.d
Where a.b.c.d is the ip of the distributor.
Netmap
1. Cd to /export/home/footprnt/netmap and VIew the site.info file. Add a line for the new distributor. The format of site.info is:
<SITE ID> <ISP> <Location> <AGENT RANGE>
The Site ID is the distributor id divided by 100. For example, if a distributor has the ID 4501, it is in site 45.
The Agent Range tag is used to tell netmap how many distributors are in a site. If there is only one distributor, this should be 1. If there are two distributors, with IDs of xx01 and xx03, this tag should be 1-3, if there are three agents it should be 1-5, etc.
2. After editing site.info, run the mkdistrib program in the netmap directory.
Checking Your Work
If you want to make sure that your modifications worked, run this command:
/opt/SNInspry/bin/nscron.sh /export/home/footprnt/netspray;/export/home/footprnt/netmap/wrapper.sh
When it finishes, there will be a new GRT and LCT in /export/home/footprnt/netspray/temp. Look at the LCT and verify that the new agent ID appears in the table.
2.3.2 Maintaining the Footprint Distributor
• Installing an “E” Patch
Footprint Operations Guide - DRAFT 41
2.3 Expanding and Maintaining the Footprint Network 2. Operations Procedures
• Modifying the Alteon Failover Switch
• Installing the Cluster Summary Site
• Installing PerfectPitch
• Changing a Value in the FP.props File
• Changing the Master
• Disabling a Distributor
• Re-enabling a Distributor
Installing an “E” Patch
This section defines the Footprint Operations procedure for installing an E Patch.
An E patch is intended to fix an immediate problem without going through a “full blown” update. It usually arrives in Operations from Engineering or Quality Assurance as a tar file with the following naming convention:
Format:
patch-<FPver#>E<Epatch#>-<FPbuild#>-dist.tar
For example:
patch-2.0E16-251.3-dist.tar
is patch E16 for Footprint Version 2.0 Build 251.3.
Note: E-patches are inclusive of all older ones of the same build number. Therefore, it is correct to add 251.9E4 to a 251.9 machine.
Applying a Patch
1. Copy the patch file to the distributor.
Example:
scp <patch-file> <distid>:/export/home/footprnt/fp/distributor
2. Login to the distributor.
42 Footprint Operations Guide - DRAFT
2. Operations Procedures 2.3 Expanding and Maintaining the Footprint Network
Example:
ssh <distid>
3. Stop the distributor software.
Example:
cd fp/distributor/bin./FPstop shazam
4. su to root, untar the patch, then exit root.
Example:
sucd ..<root’s password>tar xvf <patch-file>exit
5. Restart the distributor software.
Example:
./FPstart
Modifying the Alteon Failover Switch
This section describes the steps you can take to modify and update the Alteon Failover Switch.
Obtaining a Password
Before performing the Alteon Failover test, you need an Alteon/Network password. The fastest means of getting a password is through the jumpstart database. Accessing the jumpstart database can be difficult, however, if you have not accessed it previously. Therefore, obtain the password through the following URL:
http://tilos.digisle.com/cgi-bin/db.cgi
Preliminary Alteon Checks
You should perform a preliminary check on the Alteon Switch before you run a full. Check that the Alteon Failover Switch is running smoothly. If the switch does not respond to commands, or if you cannot access distributors, you must inform the Deployment group immediately.
Footprint Operations Guide - DRAFT 43
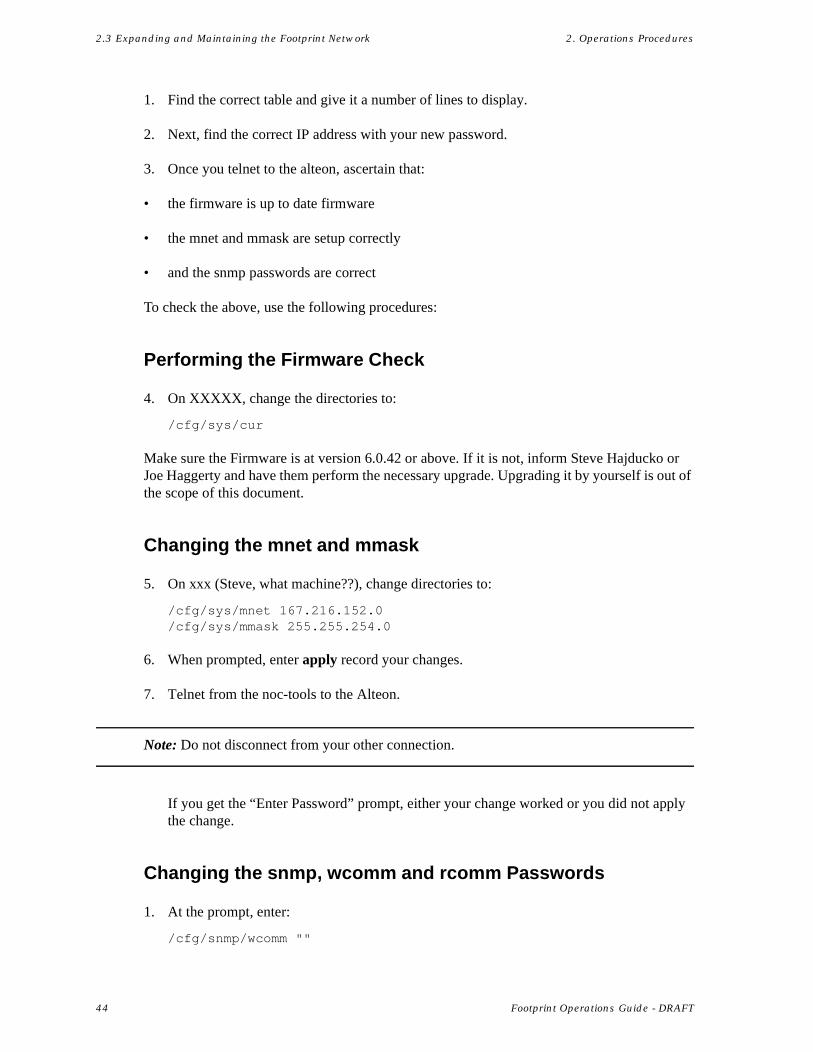
2.3 Expanding and Maintaining the Footprint Network 2. Operations Procedures
1. Find the correct table and give it a number of lines to display.
2. Next, find the correct IP address with your new password.
3. Once you telnet to the alteon, ascertain that:
• the firmware is up to date firmware
• the mnet and mmask are setup correctly
• and the snmp passwords are correct
To check the above, use the following procedures:
Performing the Firmware Check
4. On XXXXX, change the directories to:
/cfg/sys/cur
Make sure the Firmware is at version 6.0.42 or above. If it is not, inform Steve Hajducko or Joe Haggerty and have them perform the necessary upgrade. Upgrading it by yourself is out of the scope of this document.
Changing the mnet and mmask
5. On xxx (Steve, what machine??), change directories to:
/cfg/sys/mnet 167.216.152.0/cfg/sys/mmask 255.255.254.0
6. When prompted, enter apply record your changes.
7. Telnet from the noc-tools to the Alteon.
Note: Do not disconnect from your other connection.
If you get the “Enter Password” prompt, either your change worked or you did not apply the change.
Changing the snmp, wcomm and rcomm Passwords
1. At the prompt, enter:
/cfg/snmp/wcomm ""
44 Footprint Operations Guide - DRAFT
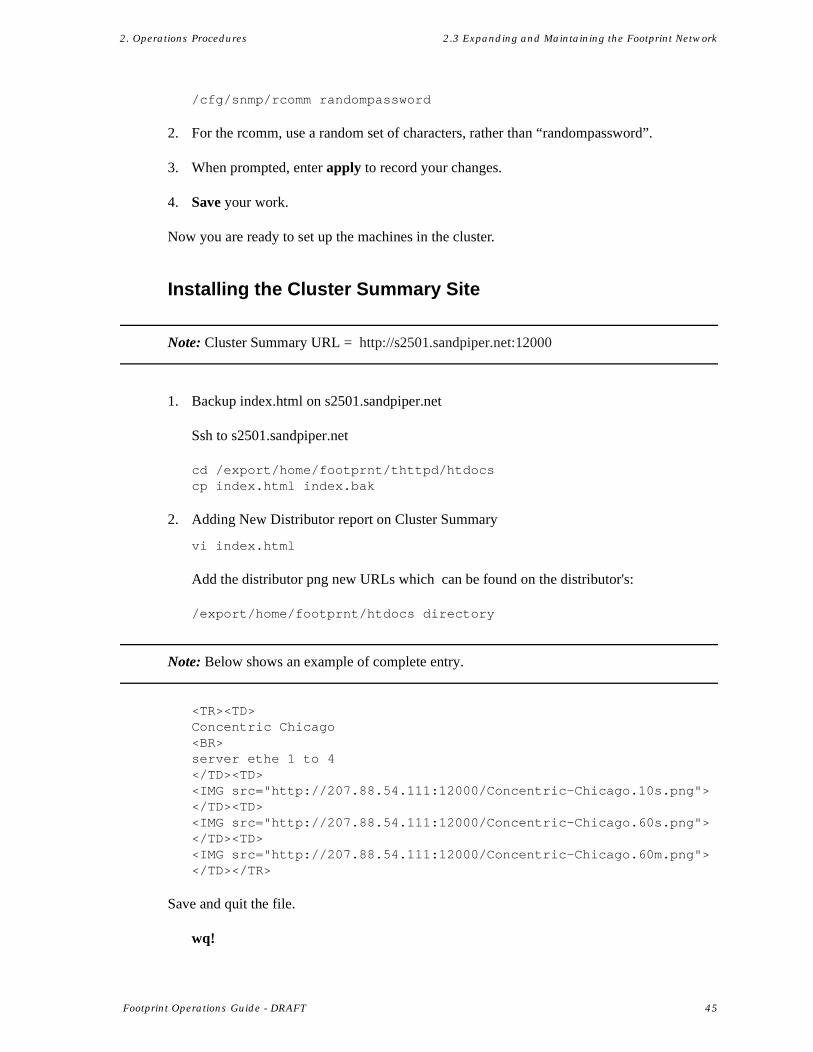
2. Operations Procedures 2.3 Expanding and Maintaining the Footprint Network
/cfg/snmp/rcomm randompassword
2. For the rcomm, use a random set of characters, rather than “randompassword”.
3. When prompted, enter apply to record your changes.
4. Save your work.
Now you are ready to set up the machines in the cluster.
Installing the Cluster Summary Site
Note: Cluster Summary URL = http://s2501.sandpiper.net:12000
1. Backup index.html on s2501.sandpiper.net
Ssh to s2501.sandpiper.net
cd /export/home/footprnt/thttpd/htdocscp index.html index.bak
2. Adding New Distributor report on Cluster Summary
vi index.html
Add the distributor png new URLs which can be found on the distributor's:
/export/home/footprnt/htdocs directory
Note: Below shows an example of complete entry.
<TR><TD>Concentric Chicago<BR>server ethe 1 to 4</TD><TD><IMG src="http://207.88.54.111:12000/Concentric-Chicago.10s.png"></TD><TD><IMG src="http://207.88.54.111:12000/Concentric-Chicago.60s.png"></TD><TD><IMG src="http://207.88.54.111:12000/Concentric-Chicago.60m.png"></TD></TR>
Save and quit the file.
wq!
Footprint Operations Guide - DRAFT 45
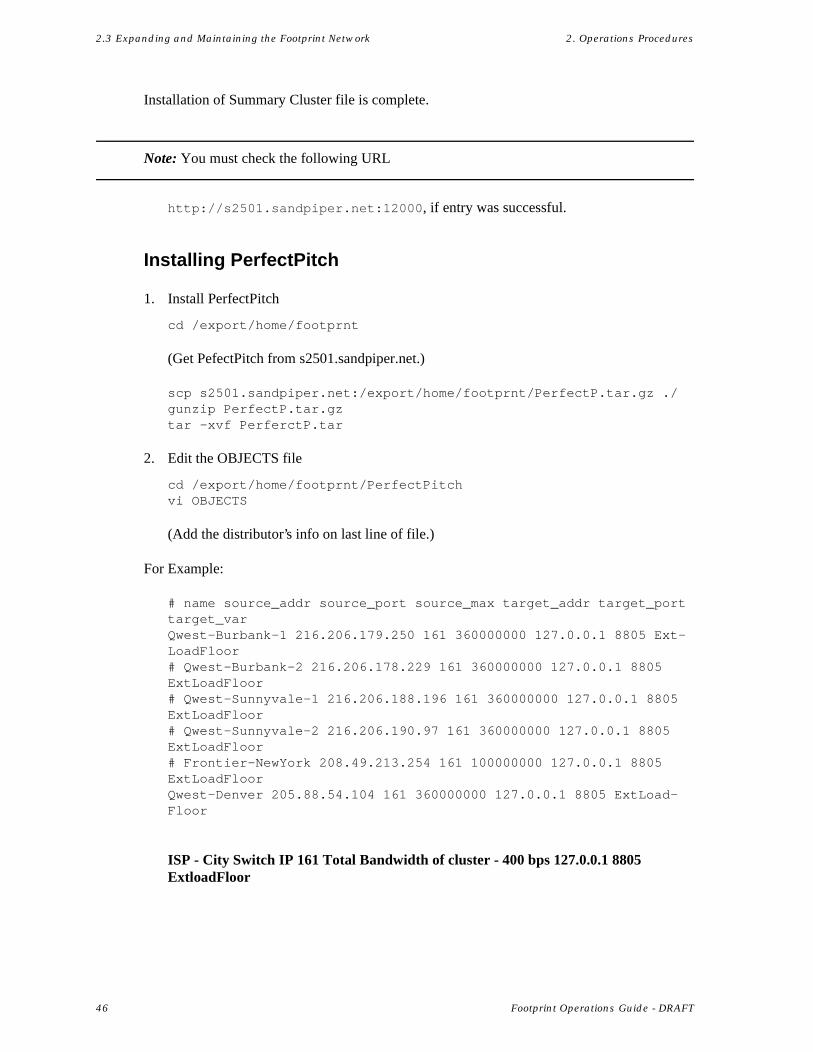
2.3 Expanding and Maintaining the Footprint Network 2. Operations Procedures
Installation of Summary Cluster file is complete.
Note: You must check the following URL
http://s2501.sandpiper.net:12000, if entry was successful.
Installing PerfectPitch
1. Install PerfectPitch
cd /export/home/footprnt
(Get PefectPitch from s2501.sandpiper.net.)
scp s2501.sandpiper.net:/export/home/footprnt/PerfectP.tar.gz ./gunzip PerfectP.tar.gztar -xvf PerferctP.tar
2. Edit the OBJECTS file
cd /export/home/footprnt/PerfectPitchvi OBJECTS
(Add the distributor’s info on last line of file.)
For Example:
# name source_addr source_port source_max target_addr target_port target_varQwest-Burbank-1 216.206.179.250 161 360000000 127.0.0.1 8805 Ext-LoadFloor# Qwest-Burbank-2 216.206.178.229 161 360000000 127.0.0.1 8805 ExtLoadFloor# Qwest-Sunnyvale-1 216.206.188.196 161 360000000 127.0.0.1 8805 ExtLoadFloor# Qwest-Sunnyvale-2 216.206.190.97 161 360000000 127.0.0.1 8805 ExtLoadFloor# Frontier-NewYork 208.49.213.254 161 100000000 127.0.0.1 8805 ExtLoadFloorQwest-Denver 205.88.54.104 161 360000000 127.0.0.1 8805 ExtLoad-Floor
ISP - City Switch IP 161 Total Bandwidth of cluster - 400 bps 127.0.0.1 8805 ExtloadFloor
46 Footprint Operations Guide - DRAFT
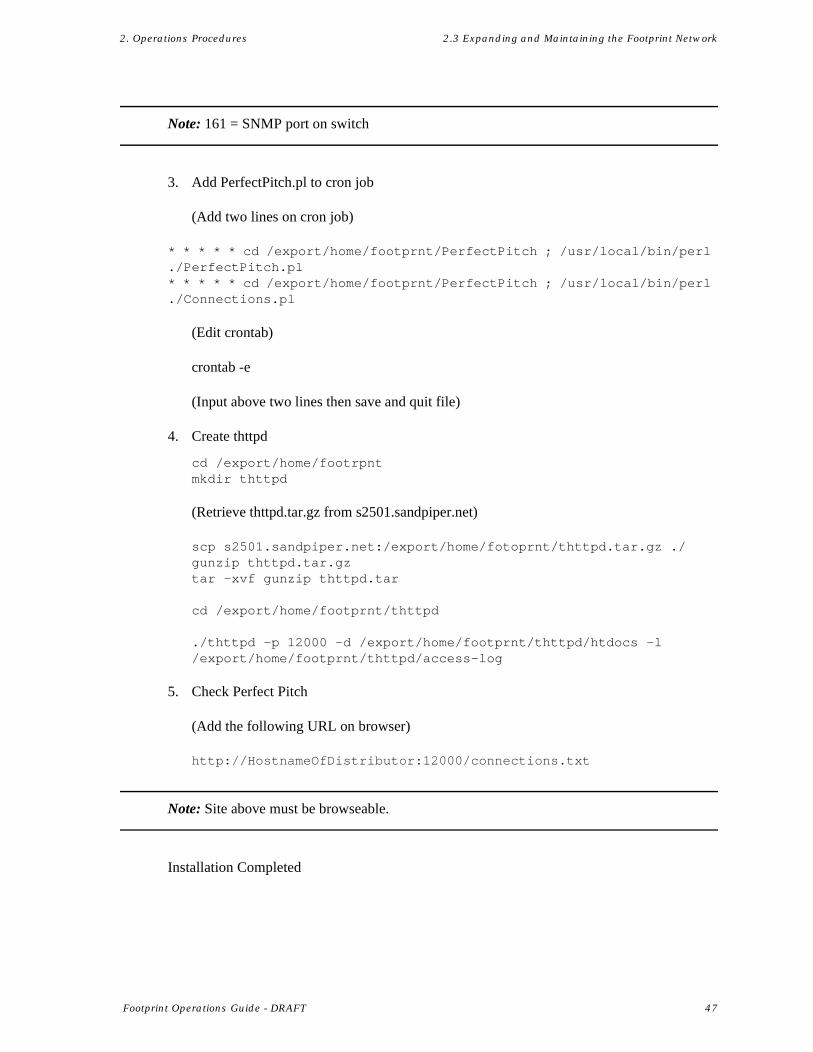
2. Operations Procedures 2.3 Expanding and Maintaining the Footprint Network
Note: 161 = SNMP port on switch
3. Add PerfectPitch.pl to cron job
(Add two lines on cron job)
* * * * * cd /export/home/footprnt/PerfectPitch ; /usr/local/bin/perl ./PerfectPitch.pl* * * * * cd /export/home/footprnt/PerfectPitch ; /usr/local/bin/perl ./Connections.pl
(Edit crontab)
crontab -e
(Input above two lines then save and quit file)
4. Create thttpd
cd /export/home/footrpntmkdir thttpd
(Retrieve thttpd.tar.gz from s2501.sandpiper.net)
scp s2501.sandpiper.net:/export/home/fotoprnt/thttpd.tar.gz ./gunzip thttpd.tar.gztar -xvf gunzip thttpd.tar
cd /export/home/footprnt/thttpd
./thttpd -p 12000 -d /export/home/footprnt/thttpd/htdocs -l /export/home/footprnt/thttpd/access-log
5. Check Perfect Pitch
(Add the following URL on browser)
http://HostnameOfDistributor:12000/connections.txt
Note: Site above must be browseable.
Installation Completed
Footprint Operations Guide - DRAFT 47
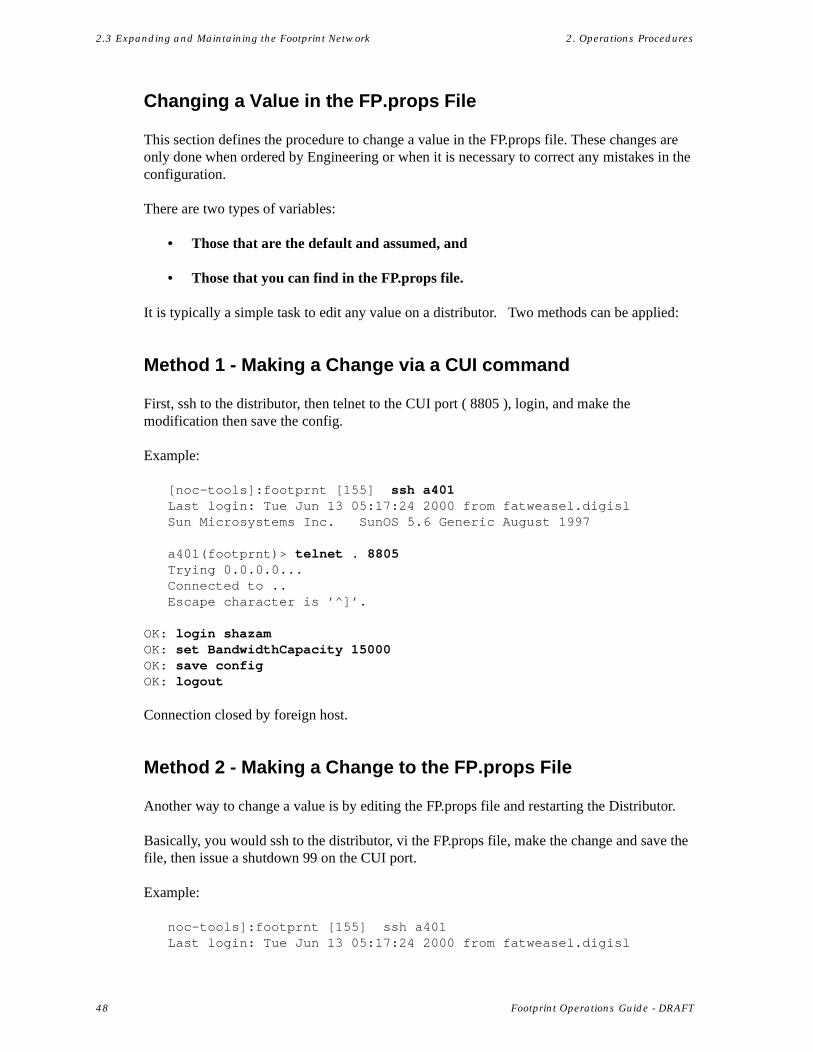
2.3 Expanding and Maintaining the Footprint Network 2. Operations Procedures
Changing a Value in the FP.props File
This section defines the procedure to change a value in the FP.props file. These changes are only done when ordered by Engineering or when it is necessary to correct any mistakes in the configuration.
There are two types of variables:
• Those that are the default and assumed, and
• Those that you can find in the FP.props file.
It is typically a simple task to edit any value on a distributor. Two methods can be applied:
Method 1 - Making a Change via a CUI command
First, ssh to the distributor, then telnet to the CUI port ( 8805 ), login, and make the modification then save the config.
Example:
[noc-tools]:footprnt [155] ssh a401Last login: Tue Jun 13 05:17:24 2000 from fatweasel.digislSun Microsystems Inc. SunOS 5.6 Generic August 1997
a401(footprnt)> telnet . 8805Trying 0.0.0.0...Connected to ..Escape character is ’^]’.
OK: login shazamOK: set BandwidthCapacity 15000OK: save configOK: logout
Connection closed by foreign host.
Method 2 - Making a Change to the FP.props File
Another way to change a value is by editing the FP.props file and restarting the Distributor.
Basically, you would ssh to the distributor, vi the FP.props file, make the change and save the file, then issue a shutdown 99 on the CUI port.
Example:
noc-tools]:footprnt [155] ssh a401Last login: Tue Jun 13 05:17:24 2000 from fatweasel.digisl
48 Footprint Operations Guide - DRAFT

2. Operations Procedures 2.3 Expanding and Maintaining the Footprint Network
Sun Microsystems Inc. SunOS 5.6 Generic August 1997
a401(footprnt)> vi FP.props
The value is just a name=value syntax. So following in the above example, if we wanted to set BandwidthCapacity, we first look for the value in the FP.props file to see if it is already in there.
If it is not, then you know it is being assumed by default. To change this, go to the bottom of the file and add the line: BandwidthCapacity=15000
Write and save the file. Finally, telnet to the CUI and restart it with a shutdown 99.
a401(footprnt)> telnet . 8805Trying 0.0.0.0...Connected to ..Escape character is ’^]’.
OK: login shazamOK: shutdown 99
Connection closed by foreign host.
OK: logout
Connection closed by foreign host.
Changing the Master
This section defines the procedure for moving the primary Master function from one master to another. This can be either a scheduled change or an unscheduled change.
Engineering is usually responsible for letting Operations know the desired order of master machines.
Note: This procedure assumes that all the steps of making a distributor a Master have already been accomplished, including the changes to the Alteon. These steps are the subject of a separate procedure. Refer to Document 201-00xx-xx.
1. Edit the SuccessorList file
If necessary, edit the SuccessorList file so that the desired new master is the secondary master. To edit:
ssh <master>cd fp/distributor/tablesvi SuccessorList
Footprint Operations Guide - DRAFT 49

2.3 Expanding and Maintaining the Footprint Network 2. Operations Procedures
<increment the second number of the 1st non-comment line>
(This is the sequence number for the file)
<change the order of the master machines listed in the file><save and quit>cd ../logs/activetail -f audit.txt # to watch the SuccessorList propagate
Wait until the network has stabilized this change. The NOC page will show this status.
2. Shutting Down the Primary Master
Shutdown the primary master to force the secondary master to assume the role of the master. Wait until the network has accepted the new master. Again, check the NOC page.
3. Edit SuccessorList file of New Master
Edit the SuccessorList file on the new master so that the secondary master, currently acting as master, now becomes the real master. The old “primary” master now becomes the secondary or ternary master.
Wait until the network has accepted the updated SuccessorList file.
4. Copy New SuccessorList to Old Master
Copy the new SuccessorList file to the old master in this manner:
ssh <new-master>cd fp/distributor/tablesscp -p SuccessorList <old-master>:‘pwd‘
5. Restart “Old” Master
Start up the old master.
Disabling a Distributor
This section describes the procedure for “disabling” a distributor on the “A” network. When you “disable” a distributor, you are shutting it down, ceasing it from restarting during reboot, and locking it from getting restarted by anyone who knows the ordinary distributor start-up commands.
Note: Disabling a distributor in no way means “uninstalling” the distributor. When you uninstall a distributor, you are closing it down and removing the program from your system, until you wish to reinstall it.
50 Footprint Operations Guide - DRAFT

2. Operations Procedures 2.3 Expanding and Maintaining the Footprint Network
To begin, you must first disable the distributor with the following command:
cd /space/Repository/packages/installDistributor./dis_disable -a dist-id -d
The script performs the following:
cd /space/Repository/packages/installDistributor/templatescp FPstart.new dist-id:/export/home/footprnt/fp/distributor/binssh dist-idcd fp/distributor/bin./FPstop shazammv FPstart FPstart.bakmv FPstart.new FPstart
In either case, the default FPstart script is moved out of the way and replaced by a script that prints a message stating that the distributor is no longer on the A network. It then exits.
Re-enabling a Distributor
This section describes the procedure for “re-enabling” a distributor on the “A” network. Re-enabling a distributor in no way means “reinstalling” it. This procedure calls for reversing the steps involved in disabling the distributor.
Note: Re-enabling a distributor in no way means “reinstalling” it. When you reinstall a distributor, you are installing the program anew.Note: If the B Network agent is running, it must be stopped.
1. Preload Tables
When bringing a distributor back on-line in a cluster that is already serving traffic, an extra step is required: preload the tables so that the distributor can start serving traffic as quickly as possible and not drag the cluster down.
To preload the tables: do the following commands:
ssh dist-idcd fp/distributor/tablesscp -p <master>:‘pwd‘/SuccessorList .scp -p <master>:‘pwd‘/ReflectorTable .scp -p <master>:‘pwd‘/SubscriberTable .scp -p <master>:‘pwd~/GroupReductionTable .scp -p <master>:‘pwd~/LinkCostTable .scp -p <master>:‘pwd~/LoadStatusTable .
2. 2.2 Re-enable the Distributor
Footprint Operations Guide - DRAFT 51
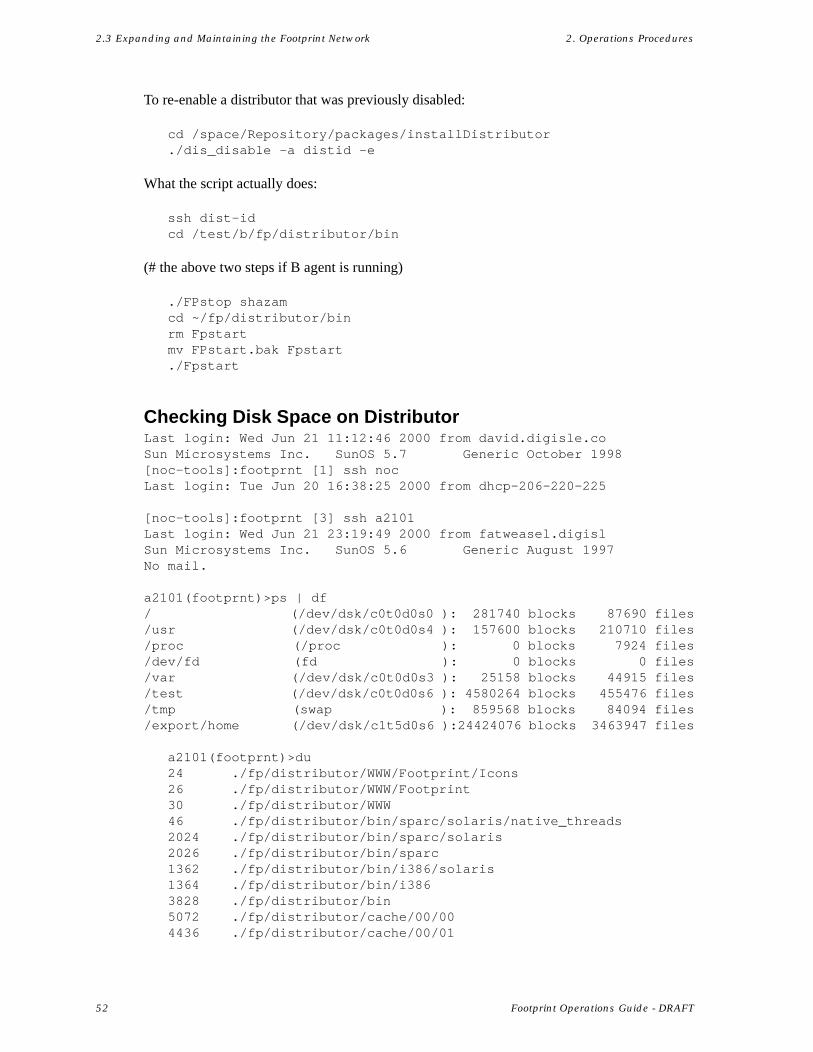
2.3 Expanding and Maintaining the Footprint Network 2. Operations Procedures
To re-enable a distributor that was previously disabled:
cd /space/Repository/packages/installDistributor./dis_disable -a distid -e
What the script actually does:
ssh dist-idcd /test/b/fp/distributor/bin
(# the above two steps if B agent is running)
./FPstop shazamcd ~/fp/distributor/binrm Fpstartmv FPstart.bak Fpstart./Fpstart
Checking Disk Space on DistributorLast login: Wed Jun 21 11:12:46 2000 from david.digisle.coSun Microsystems Inc. SunOS 5.7 Generic October 1998[noc-tools]:footprnt [1] ssh nocLast login: Tue Jun 20 16:38:25 2000 from dhcp-206-220-225
[noc-tools]:footprnt [3] ssh a2101Last login: Wed Jun 21 23:19:49 2000 from fatweasel.digislSun Microsystems Inc. SunOS 5.6 Generic August 1997No mail.
a2101(footprnt)>ps | df/ (/dev/dsk/c0t0d0s0 ): 281740 blocks 87690 files/usr (/dev/dsk/c0t0d0s4 ): 157600 blocks 210710 files/proc (/proc ): 0 blocks 7924 files/dev/fd (fd ): 0 blocks 0 files/var (/dev/dsk/c0t0d0s3 ): 25158 blocks 44915 files/test (/dev/dsk/c0t0d0s6 ): 4580264 blocks 455476 files/tmp (swap ): 859568 blocks 84094 files/export/home (/dev/dsk/c1t5d0s6 ):24424076 blocks 3463947 files
a2101(footprnt)>du24 ./fp/distributor/WWW/Footprint/Icons26 ./fp/distributor/WWW/Footprint30 ./fp/distributor/WWW46 ./fp/distributor/bin/sparc/solaris/native_threads2024 ./fp/distributor/bin/sparc/solaris2026 ./fp/distributor/bin/sparc1362 ./fp/distributor/bin/i386/solaris1364 ./fp/distributor/bin/i3863828 ./fp/distributor/bin5072 ./fp/distributor/cache/00/004436 ./fp/distributor/cache/00/01
52 Footprint Operations Guide - DRAFT

2. Operations Procedures 2.3 Expanding and Maintaining the Footprint Network
4898 ./fp/distributor/cache/00/025094 ./fp/distributor/cache/00/035232 ./fp/distributor/cache/00/045900 ./fp/distributor/cache/00/055736 ./fp/distributor/cache/00/065926 ./fp/distributor/cache/00/076086 ./fp/distributor/cache/00/085802 ./fp/distributor/cache/00/097426 ./fp/distributor/cache/00/0A4714 ./fp/distributor/cache/00/0B6786 ./fp/distributor/cache/00/0C6360 ./fp/distributor/cache/00/0D5072 ./fp/distributor/cache/00/0E5840 ./fp/distributor/cache/00/0F6088 ./fp/distributor/cache/00/105208 ./fp/distributor/cache/00/115436 ./fp/distributor/cache/00/124984 ./fp/distributor/cache/00/135608 ./fp/distributor/cache/00/145364 ./fp/distributor/cache/00/1534150 ./fp/distributor/cache/00/166548 ./fp/distributor/cache/00/176262 ./fp/distributor/cache/00/185836 ./fp/distributor/cache/00/1957876 ./fp/distributor/cache/00/1A5242 ./fp/distributor/cache/00/1B4702 ./fp/distributor/cache/00/1C6096 ./fp/distributor/cache/00/1D4532 ./fp/distributor/cache/00/1E6376 ./fp/distributor/cache/00/1F4594 ./fp/distributor/cache/00/205282 ./fp/distributor/cache/00/216276 ./fp/distributor/cache/00/224436 ./fp/distributor/cache/00/234802 ./fp/distributor/cache/00/245596 ./fp/distributor/cache/00/254706 ./fp/distributor/cache/00/265482 ./fp/distributor/cache/00/275090 ./fp/distributor/cache/00/285172 ./fp/distributor/cache/00/294638 ./fp/distributor/cache/00/2A5094 ./fp/distributor/cache/00/2B10018 ./fp/distributor/cache/00/2C4596 ./fp/distributor/cache/00/2D3984 ./fp/distributor/cache/00/2E4680 ./fp/distributor/cache/00/2F4864 ./fp/distributor/cache/00/305036 ./fp/distributor/cache/00/314436 ./fp/distributor/cache/00/325378 ./fp/distributor/cache/00/334066 ./fp/distributor/cache/00/345526 ./fp/distributor/cache/00/355284 ./fp/distributor/cache/00/363252 ./fp/distributor/cache/00/37
Footprint Operations Guide - DRAFT 53
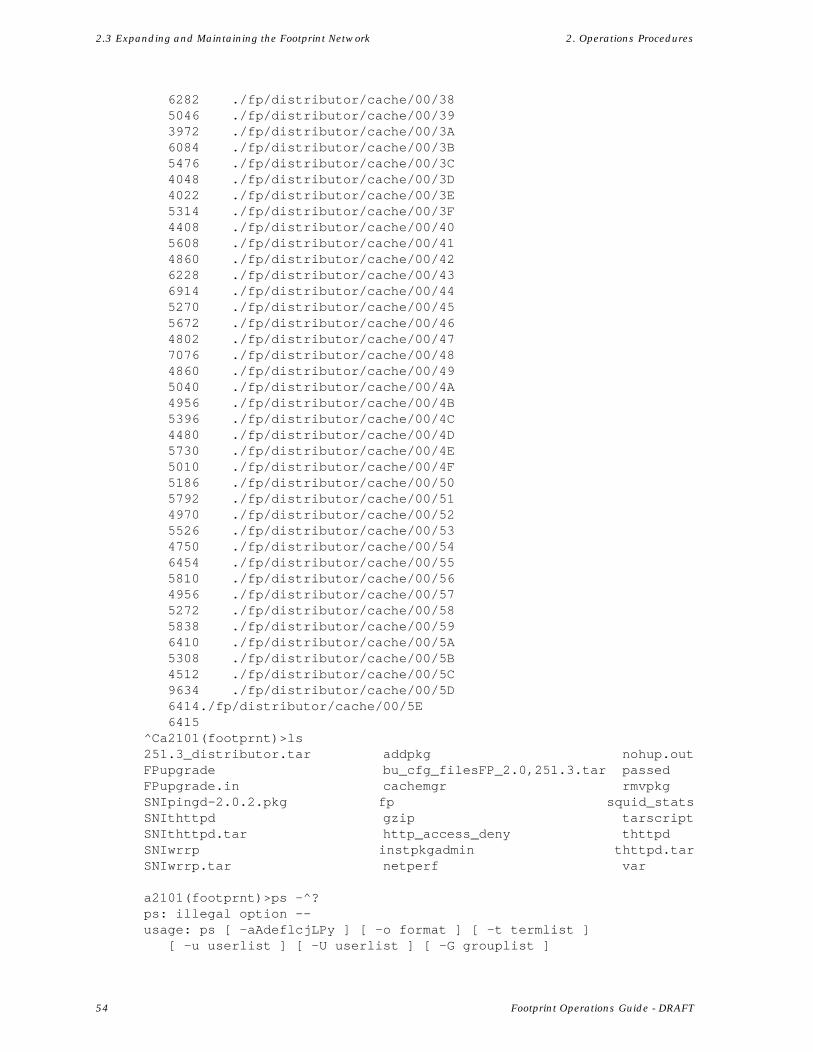
2.3 Expanding and Maintaining the Footprint Network 2. Operations Procedures
6282 ./fp/distributor/cache/00/385046 ./fp/distributor/cache/00/393972 ./fp/distributor/cache/00/3A6084 ./fp/distributor/cache/00/3B5476 ./fp/distributor/cache/00/3C4048 ./fp/distributor/cache/00/3D4022 ./fp/distributor/cache/00/3E5314 ./fp/distributor/cache/00/3F4408 ./fp/distributor/cache/00/405608 ./fp/distributor/cache/00/414860 ./fp/distributor/cache/00/426228 ./fp/distributor/cache/00/436914 ./fp/distributor/cache/00/445270 ./fp/distributor/cache/00/455672 ./fp/distributor/cache/00/464802 ./fp/distributor/cache/00/477076 ./fp/distributor/cache/00/484860 ./fp/distributor/cache/00/495040 ./fp/distributor/cache/00/4A4956 ./fp/distributor/cache/00/4B5396 ./fp/distributor/cache/00/4C4480 ./fp/distributor/cache/00/4D5730 ./fp/distributor/cache/00/4E5010 ./fp/distributor/cache/00/4F5186 ./fp/distributor/cache/00/505792 ./fp/distributor/cache/00/514970 ./fp/distributor/cache/00/525526 ./fp/distributor/cache/00/534750 ./fp/distributor/cache/00/546454 ./fp/distributor/cache/00/555810 ./fp/distributor/cache/00/564956 ./fp/distributor/cache/00/575272 ./fp/distributor/cache/00/585838 ./fp/distributor/cache/00/596410 ./fp/distributor/cache/00/5A5308 ./fp/distributor/cache/00/5B4512 ./fp/distributor/cache/00/5C9634 ./fp/distributor/cache/00/5D6414./fp/distributor/cache/00/5E6415
^Ca2101(footprnt)>ls251.3_distributor.tar addpkg nohup.outFPupgrade bu_cfg_filesFP_2.0,251.3.tar passedFPupgrade.in cachemgr rmvpkgSNIpingd-2.0.2.pkg fp squid_statsSNIthttpd gzip tarscriptSNIthttpd.tar http_access_deny thttpdSNIwrrp instpkgadmin thttpd.tarSNIwrrp.tar netperf var
a2101(footprnt)>ps -^?ps: illegal option -- usage: ps [ -aAdeflcjLPy ] [ -o format ] [ -t termlist ]
[ -u userlist ] [ -U userlist ] [ -G grouplist ]
54 Footprint Operations Guide - DRAFT
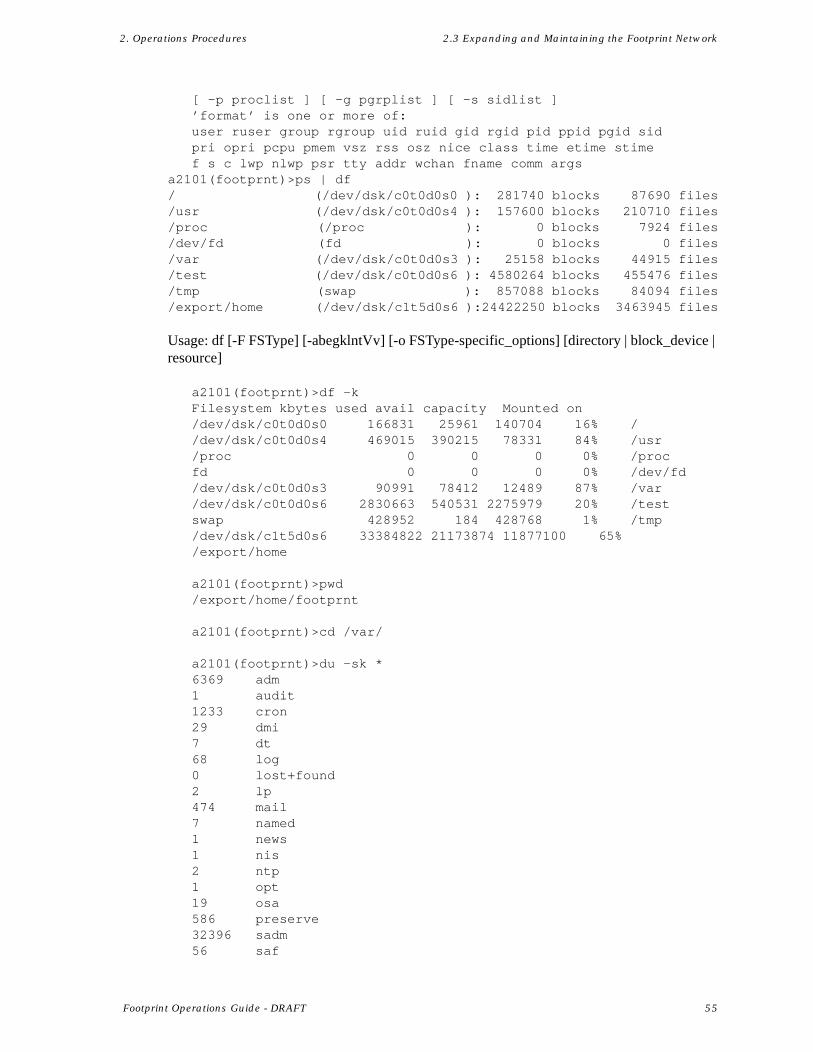
2. Operations Procedures 2.3 Expanding and Maintaining the Footprint Network
[ -p proclist ] [ -g pgrplist ] [ -s sidlist ]’format’ is one or more of:user ruser group rgroup uid ruid gid rgid pid ppid pgid sidpri opri pcpu pmem vsz rss osz nice class time etime stimef s c lwp nlwp psr tty addr wchan fname comm args
a2101(footprnt)>ps | df/ (/dev/dsk/c0t0d0s0 ): 281740 blocks 87690 files/usr (/dev/dsk/c0t0d0s4 ): 157600 blocks 210710 files/proc (/proc ): 0 blocks 7924 files/dev/fd (fd ): 0 blocks 0 files/var (/dev/dsk/c0t0d0s3 ): 25158 blocks 44915 files/test (/dev/dsk/c0t0d0s6 ): 4580264 blocks 455476 files/tmp (swap ): 857088 blocks 84094 files/export/home (/dev/dsk/c1t5d0s6 ):24422250 blocks 3463945 files
Usage: df [-F FSType] [-abegklntVv] [-o FSType-specific_options] [directory | block_device | resource]
a2101(footprnt)>df -kFilesystem kbytes used avail capacity Mounted on/dev/dsk/c0t0d0s0 166831 25961 140704 16% //dev/dsk/c0t0d0s4 469015 390215 78331 84% /usr/proc 0 0 0 0% /procfd 0 0 0 0% /dev/fd/dev/dsk/c0t0d0s3 90991 78412 12489 87% /var/dev/dsk/c0t0d0s6 2830663 540531 2275979 20% /testswap 428952 184 428768 1% /tmp/dev/dsk/c1t5d0s6 33384822 21173874 11877100 65% /export/home
a2101(footprnt)>pwd/export/home/footprnt
a2101(footprnt)>cd /var/
a2101(footprnt)>du -sk *6369 adm1 audit1233 cron29 dmi7 dt68 log0 lost+found2 lp474 mail7 named1 news1 nis2 ntp1 opt19 osa586 preserve32396 sadm56 saf
Footprint Operations Guide - DRAFT 55

2.3 Expanding and Maintaining the Footprint Network 2. Operations Procedures
131 snmp31646 spool4 statmon82 tmp4 yp5 a2101(footprnt)>cd spool
a2101(footprnt)>du -sk *7 cron1 locks10 lp1 mqueue10246 patches21378 pkg2 print
56 Footprint Operations Guide - DRAFT

2. Operations Procedures 2.4 Managing Subscriber Accounts
Audit Reports
This document defines Footprint Operations (FP Ops) procedure for the production of audit reports within the department.
Types of Audit Reports
Currently, Operations generates the following audit reports:
Location
The output of many audit reports is dropped into the following directory:
/space/Repository/packages/AuditReports
which can be accessed on the web at:
http://noc-tools.digisle.com/packages/AuditReports/index.cgi
2.4 Managing Subscriber Accounts
2.4.1 Roles of Sales Engineering, Customer Advocacy, and Operations in Setting up Subscriber Accounts
Footprint Manager Unix Directory Structure
This section describes the Footprint Manager (manager) Unix directory structure.
Table 2.1:
Report Purpose
FP.props • Compare FP.props to a template.
• Templates available for standard distributors, FPdns hosts, and SSL hosts. Template will be made for masters.
squid.conf • Compare squid.conf to a template of expected values.
• Template available for standard distributors only.
http-server.props • Compare this to a template of expected values.
• Template available for standard distributors only.
Footprint Operations Guide - DRAFT 57

2.4 Managing Subscriber Accounts 2. Operations Procedures
Note: Footprint “Manager” and “manager” are used interchangeably in this document.
Section 1: UNIX Footprint Manager Directory Structure (3-level-view)
Section 2: Directories
README.txt: Introduction file pointing customers to the correct URL for GUI help.
WWW: Contains the content for the GUI that allows you to configure your Footprint Manager from your browser.
Bin: This is a directory which has contains all of the executables for the Footprint Manager software. The following are files which are in this directory:
Bin
Table 3:
Fplog Script to process the Footprint Manager’s logs.
Fpstats Script to get statistical information from a consolidated log file.
Fpstart Script to start the Footprint Manager.
Fppublish Script that allows customers to invalidate their resources.
Fpstop Script to stop the Footprint Manager.
Sort Sort binary has a symbolic link to: /bin/sort
<os specific name i.e., i386> OS specific Footprint Manager software.
FPnetcat -> .FPnetcat_wrapper This is an interactive telnet client that is used as a utility in various scripts.
.FP.env.proto Pre-installation proto-type file.
FP.env Post-installation Footprint Manager environment file.
fp
Manager
README.txt WWW bin copyright doc etc lib logs nohup.out tables tmp
58 Footprint Operations Guide - DRAFT
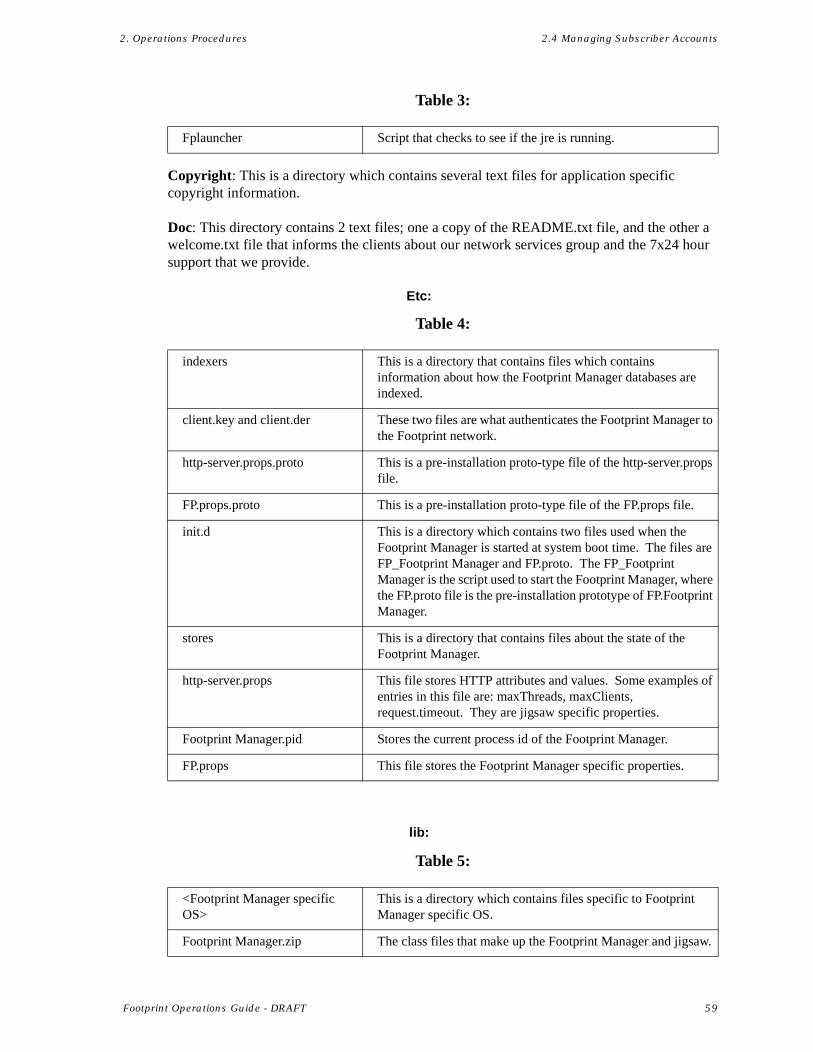
2. Operations Procedures 2.4 Managing Subscriber Accounts
Copyright: This is a directory which contains several text files for application specific copyright information.
Doc: This directory contains 2 text files; one a copy of the README.txt file, and the other a welcome.txt file that informs the clients about our network services group and the 7x24 hour support that we provide.
Etc:
lib:
Fplauncher Script that checks to see if the jre is running.
Table 4:
indexers This is a directory that contains files which contains information about how the Footprint Manager databases are indexed.
client.key and client.der These two files are what authenticates the Footprint Manager to the Footprint network.
http-server.props.proto This is a pre-installation proto-type file of the http-server.props file.
FP.props.proto This is a pre-installation proto-type file of the FP.props file.
init.d This is a directory which contains two files used when the Footprint Manager is started at system boot time. The files are FP_Footprint Manager and FP.proto. The FP_Footprint Manager is the script used to start the Footprint Manager, where the FP.proto file is the pre-installation prototype of FP.Footprint Manager.
stores This is a directory that contains files about the state of the Footprint Manager.
http-server.props This file stores HTTP attributes and values. Some examples of entries in this file are: maxThreads, maxClients, request.timeout. They are jigsaw specific properties.
Footprint Manager.pid Stores the current process id of the Footprint Manager.
FP.props This file stores the Footprint Manager specific properties.
Table 5:
<Footprint Manager specific OS>
This is a directory which contains files specific to Footprint Manager specific OS.
Footprint Manager.zip The class files that make up the Footprint Manager and jigsaw.
Table 3:
Footprint Operations Guide - DRAFT 59
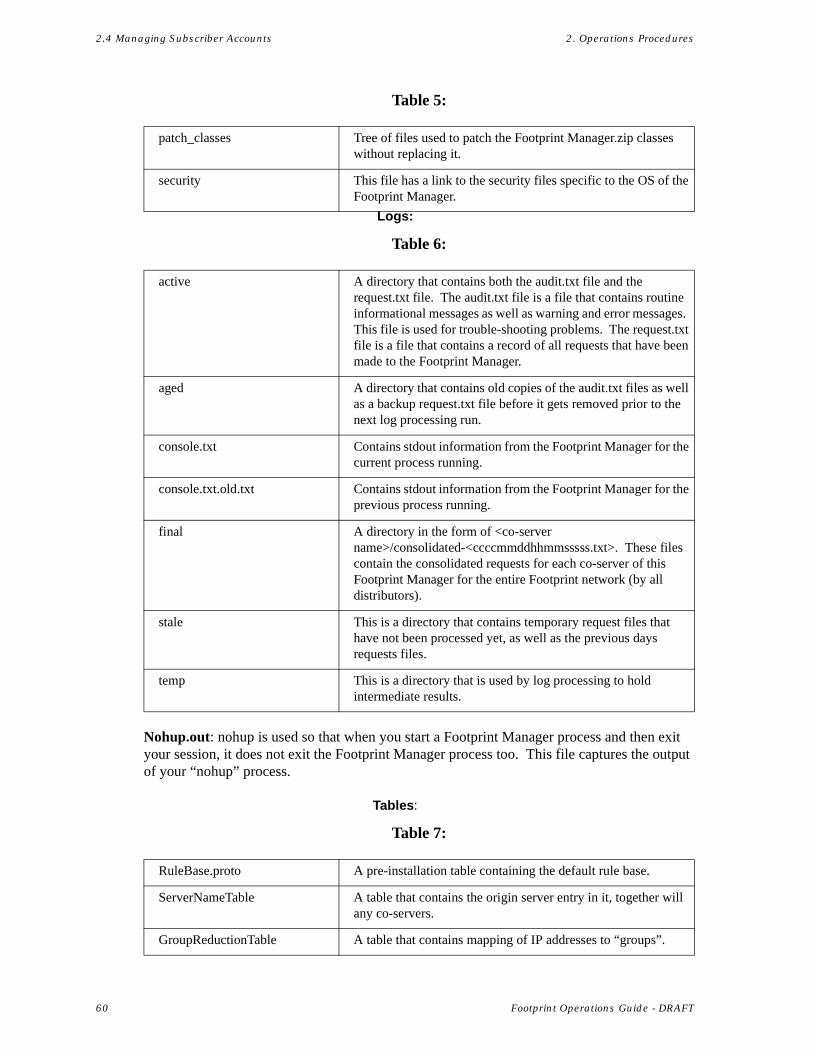
2.4 Managing Subscriber Accounts 2. Operations Procedures
Logs:
Nohup.out: nohup is used so that when you start a Footprint Manager process and then exit your session, it does not exit the Footprint Manager process too. This file captures the output of your “nohup” process.
Tables:
patch_classes Tree of files used to patch the Footprint Manager.zip classes without replacing it.
security This file has a link to the security files specific to the OS of the Footprint Manager.
Table 6:
active A directory that contains both the audit.txt file and the request.txt file. The audit.txt file is a file that contains routine informational messages as well as warning and error messages. This file is used for trouble-shooting problems. The request.txt file is a file that contains a record of all requests that have been made to the Footprint Manager.
aged A directory that contains old copies of the audit.txt files as well as a backup request.txt file before it gets removed prior to the next log processing run.
console.txt Contains stdout information from the Footprint Manager for the current process running.
console.txt.old.txt Contains stdout information from the Footprint Manager for the previous process running.
final A directory in the form of <co-server name>/consolidated-<ccccmmddhhmmsssss.txt>. These files contain the consolidated requests for each co-server of this Footprint Manager for the entire Footprint network (by all distributors).
stale This is a directory that contains temporary request files that have not been processed yet, as well as the previous days requests files.
temp This is a directory that is used by log processing to hold intermediate results.
Table 7:
RuleBase.proto A pre-installation table containing the default rule base.
ServerNameTable A table that contains the origin server entry in it, together will any co-servers.
GroupReductionTable A table that contains mapping of IP addresses to “groups”.
Table 5:
60 Footprint Operations Guide - DRAFT