'1994 - fleetwoodrv.com · If a problem occurs.which the owner believes IS covered by this...
54
'1994
-
Upload
truongkhanh -
Category
Documents
-
view
214 -
download
0
Transcript of '1994 - fleetwoodrv.com · If a problem occurs.which the owner believes IS covered by this...

'1994

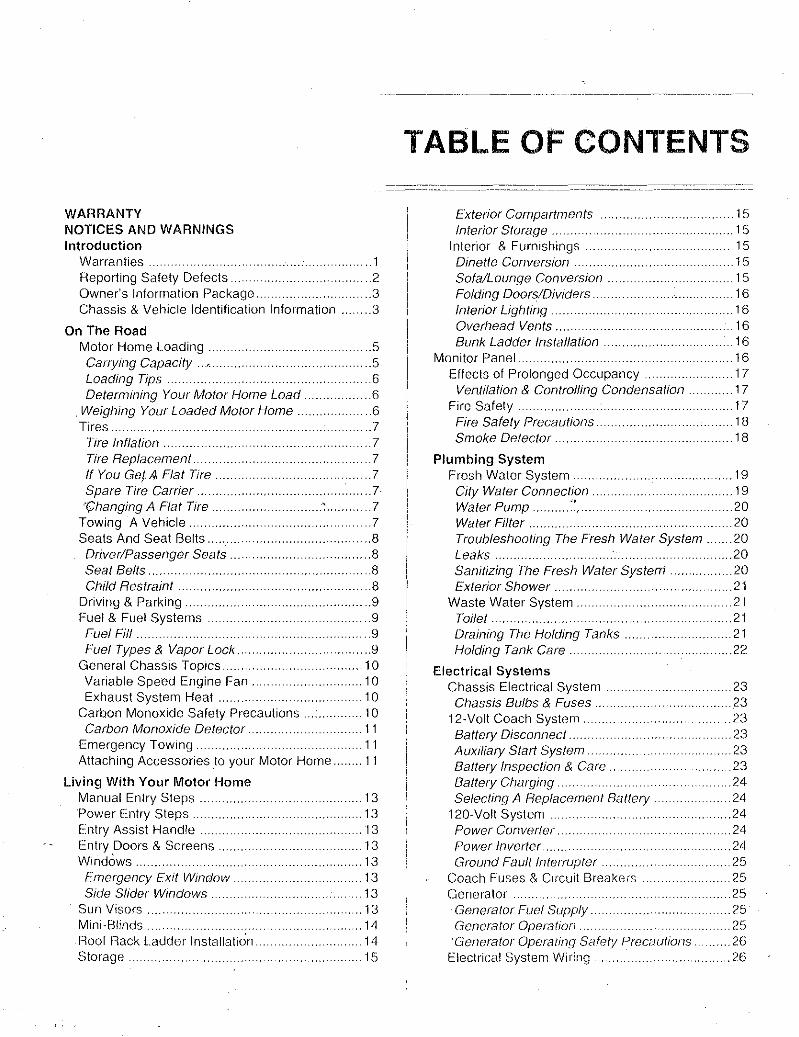
WARRANTY NOTICES AND WARNINGS Introduction
Warranties. . .. 1 Reporting Safety Defects ................................ .2 Owner's Information Package ............ 3 Chassis & Vehicle Identification Information ....... 3
On The Road Motor Home Loading... .... ............ .. ........ 5 Carrying Capacity ... < ........ 5 Loading Tips . . ................................ 6 Determining Your Motor Home Load .. 6
Weighing Your Loaded Motor Home .......... 6 n~..... ............ . ............ 7
Tire Inflation ........ 7 Tire Replacement ..... ..................... .. .. .......... .7 If You Get A Flat Tire. .. ................ . ... 7 Spare Tire Carrier .. ............ .. .................. ..7 'Changing A Flat Tire
Towing A Vehicle ............ .. Seats And Seat Belts Driver/Passenger Seats. Seat Belts. .. .......... Child Restraint .............. .
Driving & Parking
..... .7 ...... .7
...... 8 ..... 8 .. .. 8 . .. 8 ... 9
Fuel & Fuel Systems. ..9 Fuel Fill .. . ... 9 Fuel Types & Vapor Lock.. .. .... 9
General Chassis TopIcs.. ................ .. .. 1 0 Variable Speed Engine Fan ... .. 10 Exhaust System Heat ......................... 10
Carbon Monoxide Safety Precautions ....... 10 Carbon Monoxide Detector .........
Emergency Towing. . ....... 11
11 Attaching Accessories to your Motor Home ....... 11
Living With Your Motor Home Manual Entry Steps ............ .. Power Entry Steps Entry Assist Handle Entry Doors & Screens.
.. 13 .......... 13
.13
.13 Windows .............................. 13 Emergency Exit Wmdow . Side Slider Windows.
Sun Visors. Mini-Blinds. .. .......... Roof flack l.adder Installation. Storage.
.......... 13
. ......... 13 ...... 13
.. 14 .... 14
.......... 15
TABLE OF CONTENTS -----. --cc
Exterior Compartments. Interior Storage.. .. ............ .
Interior & Furnishings. Dinette Conversion. Sofa/Lounge Conversion. Folding Doors/Dividers .. Interior Lighting. .. ......... . Overhead Vents. .. .......... . Bunk Ladder Installation
.......... 15 15
...... 15 . ..................... 15
. ....... 15 ............ 16
. .16 ... 16
................... 16 Monitor Panel............. .. ...... 16
Effects of Prolonged Occupancy. .. .. 17 Ventilation & Controlling Condensation ............ 17
Fire Safety.. ............ ...... .............. ........ .. ..... 17 Fire Safety Precautions ................. 18 Smoke Detector. ............. . ...... 18
Plumbing System Fresh Water System ............... .. .................... 19 City Water Connecflon . .. ... 19 Water Pump .. ....... ::,.. .. ........... 20 Water Filter. .. ......... 20 Troubleshooting The Fresh Water System ....... 20 Leaks ... ................... .. ............... 20 Sanitizing The Fresh Water System ...... .. .... 20 Exterior Shower ...... ................... . . ........ 21
Waste Water System ................. .. .......... 21 Toilet ........... . ............... 21 Draining The Holding Tanks ................. 21 Holding Tank Care .......................................... 22
Efectrical Systems Chassis Electrical System. .. ................... 23 Chassis Bulbs & Fuses .................... 23
12-Volt Coach System. .. ................... 23 Battery Disconnect . ....................................... 23 Auxiliary Start System............ .. ................... 23 Battery Inspection & Care. .. .................. 23 Battery Charging. .. .................. 24 Selecting A Replacement Battery . ................... 24
120-Volt System. .. ............. . ...... 24 Power Converter.. . .. 24 Power Inverter......... .. ...... 24 Ground Fault Interrupter. .. ................... 25
Coach Fuses & Crrcuit Breakers. .25 C3enerator . .. .................. 25 Generator Fuel Supply ........................ 25 Generator Operation. . ................ 25 'Generator Operating Safely Precautions. .. .. 26 Electrical System Wiring ............ 26

-- -------~~.--
TABLE OF CONTENTS
LP Gas System LP Gas Safety Precautions. ................ . .......... 27 System Components. .... .... .... . ............ 27 Hoses .... .... ............... . ........ 27 LP Gas Regulator. . ..................................... 28
Using LP Gas At Low Temperatures ................. 29 Filling LP Gas Tanks .. .............. .................. 29 LP Gas System Leak Checks ... 29 LPG Leak Detector ....... .. ..................... 30 Lighting LP Gas Appliances .............. 30
Appliances Water Heater. . .......... 31 Refrigerator.. .. ........................ 31 Acrylic Refrigerator Door Panels ............. .. ... 31
Furnace. .. ,.... .. ..... 31 Range ......... ... .. ...... 31 Range Exhaust Hood ::;" .............. .. ........... 32 Air Conditioner .................. ........ .. .. 32 Entertainment Equipment. .... ......... .. ....... 32
120- Volt TV & VCR ... ..... ........ . ............. 32 120-Volt VCR .......... .. .. ........... 32 120!12-Volt TV ..... . . .... 32 TV Antenna. ...... 32 TV Ghosts & FM Flutter. .. ........... 33
Miscellaneous Appliances .................. . . ...... 33
Maintenance Exterior Stains ............................... ..
..... 35 .. ............... 35
Windows, Door, Vents & Locks ...... .. 35 ...... 36 Rubber Roof System.
Sealant Renewal ............................... 36 Door, Window. Roof & Molding Resealing . ...... 36
Interior...... ... ......... .. ....... ...... .. 36 Upholstery & Drapes ............. . Laminate Top Care ........... .. Walls & Ceiling Panels .. Bathtub & Plastic Shower Stall Floors & Carpeting Engine Access.
Maintenance Checklist
Motor Home. Storage
. ...... 36
........ 37
. ...... 37
........ 37 ...... 37
. ....... 37
....... 37
Storage Checklists ..... .......... . ................ 39 Short- Term Storage.. .............. .. .................. 39 Long- Term Storage ............. . ...... .40
Winterization ........ .............. . ....... 40 Water System Winterizing....... .. .... .40
Reactivating The Motor Horne After Storage ..... 41
Maintenance Chart ................................................ 43

FUll ONE-YEAR 115,000 MILE _oo~~_~~_ WARRANTY--
FOR MOTOR HOMES MANUFACTURED BY SUBSIDIARIES OF FLEETWOOD ENTERPRISES, INC. SOLD IN THE UNITED STATES AND CANADA
COVERAGE PROVIDED Your new molor home. Including the structure, plumbing. heailng and electrical systems, and all appliances and equipment Installed by the manufacturer, IS warranted under normal use to be free from manuiactunng defects in matenal 01" workmanship
fhe w;:}uClnty extends to the first retail purchaser a0d his transleree(sj and begins all the dale 01 original retail delivery or the date the molor home is fl(sl place mto service as a rental, commerCial or demonstrator unit (whichevor occurs first)_ TIle warranty extends for a penOd of one year from such dalr:! or untit the unit has received 15 000 total miles of use as determined by the mileage shown on Ihe odometer (whichever occurs first) Wfltlen notice 01 defects must be given to the seiling eJealer or the manufacturor not later than ten (10) days alter the expiration of the warranty period
OWNE!-l'S OBLIGATIONS The owner IS responSible lor normal mwntenance as deSCribed ;n the Owner's Manual; however, minor adjustments (such as adjuslments to the mterior or exterior doors, LP regulator pressure, cabinet latches, TV antenna. control, etc) Will be periormed by the dealer durmg the first 90 days 01 warranty coverage. Thereafter. such adjustments are the responSibility of Ihe owner as normal maintenance unless required as a direct result of repair or replacemen I of a defective part under tllis warranty
If a problem occurs.which the owner believes IS covered by this warranty, the owner shall contaci the selling dealer. or other authonzed dealer. giving him suffiCient Information to resolve the rna tIer The owner shal! deliver the motor home to the dealer or manufacturing planllocation for warranty service
DEALER'S OBLIGATIONS By agreement With the manufaciuf(lr the dealer is obligated to mamtolln the motor 110rne prior to retail safe. to perlorm a detailed predellvery inspection and to repair or replace any parts nE!cessary to correct defects 111 material or workmanship
WHEN THE DEALER DOES NOT RESOLVE THE PROBLEM If the dealer is unable or unwilling to resolve a problem which the owner IS convinced IS cove.red by the warranty, he shoutd contact the manufacturing plant at tho address listed below and provide the manufacturer Wlt!l a descnption In wfltlng of Ihe problem and attempts made to resolvo It
MANUFACTURING PL.ANT OBLIGATIONS Upon r8ceipt of nollce of a claim. where the dealer was unable or unwillmg 10 resolve the problem. Ihe rnanufacturtng plant Wilt repair or replace any parts necessary to correct defects III material or wOIkrnanship, or wltl take oHler appropflate acllon as may be reqUired
WHEN THE MANUFACTURING PLANT DOES NOT RESOLVE THE PROBl.EM If the representaltves of the manufacturillg plant are unable to resolve the problem and the owner IS convinced that It is cover.ed by this warranty, the owner should Gill tile toll-free number Ilstnd below to descnbe tho problem and tho attempts made to resolve it
WHAT IS NOT COVERED BY THE EXPRESS WARRANTY THIS WARRANTY DOES NOT COVER
THE AUTOMOTIVE SYSTEM (INCLUDING THE CHASSIS AND DRIVE TRAIN). TIRES AND BATIERIES, WHICH ARE COVERED BY THE SEPARATE WARRANTIES OF THE RESPECTIVE MANUFACTURERS OF THE:SE COMPONENTS
2 DEFECTS CAUSED BY OR RELATED TO A ABUSE. MISUSE, NEGLIGENCE, OR ACCIDEN f. B FAILURE TO COMPLY WITH INSTRUCTIONS CONTAINED IN THE OWNER'S MANUAL, C ALTERATION OR MODIFICATION OF THE MOTon HOME, D ENVIRONMENTAL CONDITIONS (SAL T, HAIL, CHEMICALS IN THE ATMOSPHERE, ETC)
3 NORMAL DETERIORATION DUE TO WEAR OR EXPOSURE, SUCH AS FADING Of FABRICS OR DRAPES, CARPET WEAR, ETC 4 NORMAL MAINTENANCE AND SERVICE ITEMS. SUCH AS LIGHT BULBS, FUSES, WIPER BLADES, l.UBRICANTS, ETC 5 MOTOR HOtvlES ON WHICH THE ODOMETER READING HAS BEEN AL fERED 6 TRANSPORTATION TO AND FROM DEALER OR MANUFACTURING PLANT LOCATION, LOSS OF TII'vlE,INCONVENIENCE, COMMERCIAL
lOSS, LOSS OF USE. TOWING CHARGES. BUS F:ARES, VEHICLE RENTAL, INCIDENTAL CHARGES SUCH AS TELEPHONE CALLS OR HOT[L BILLS. OR OTHF:Fl INCID[NT·'l,L OR CONSEOUENTIAL DAMAGES
SOME STATES 00 NOT ALLOW THE EXCLUSION OR LIMITATION OF INCIDENTAL OR CONSEQUENTtAL DAMAGES, SO THE ABOVE LlMITATtON OR EXCLUSION MAY NOT APPI.Y TO YOU
THIS WARRANTY GIVES YOU SPECtFIC LEGAL BIGHTS, AND YOU MAY ALSO HAVE OTHER RIGHTS WHICH VAHY mOM STIITE TO STATE.
THE MANUFACTUREF-IJS NOT RESPONSIBLE FOR ANY UNDERTAJ<n~G, REPRESENTATION ORWAARANTY MADE BY ANYOEALEROROnlER PERSON 8EYOND rHOSE EXPRESSLY SET FORn-I IN THIS WARRANTY
Aland r"-13me. Model
MANUFACTURING PL!lNT: CORPOFIATE HEADQUArlTERS:
Consumer At/airs Department Fleetwood Entorpnses, Inc. P.O. Box 7300 Ri'/ersidc. CA 92513· (300 (800) 854-<1-755
Serial j\)o

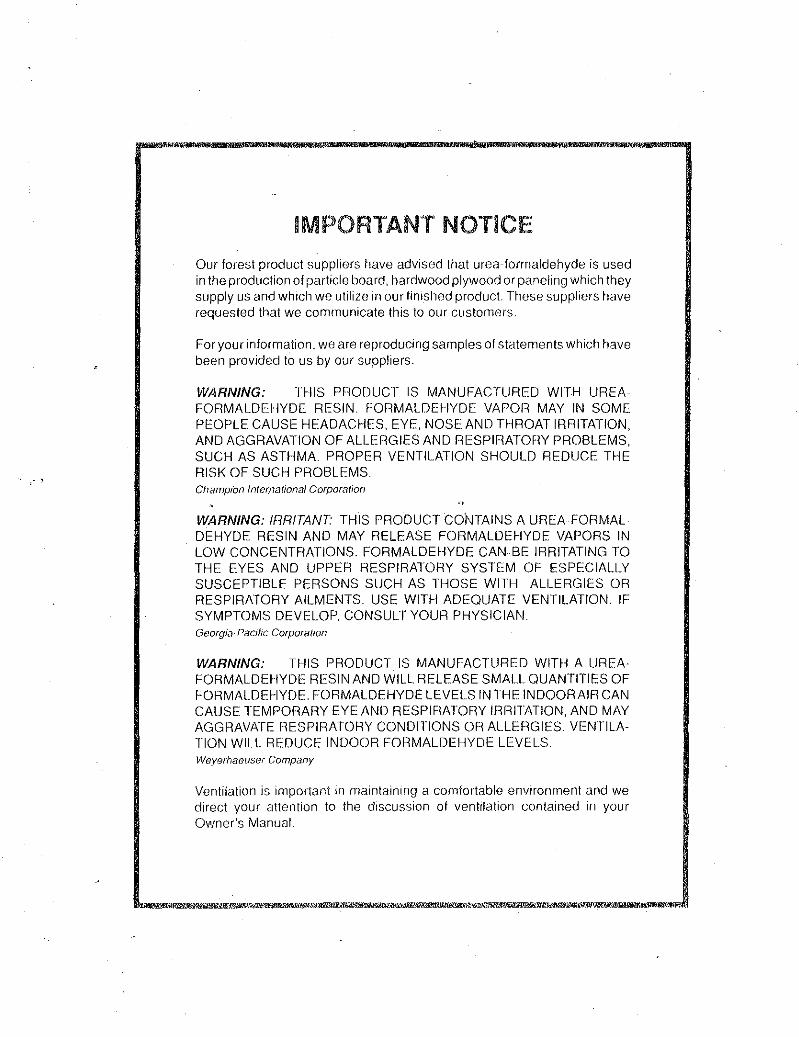
IMPORTANT NOTiCE
Our forest product suppliers have advised that urea-formaldehyde is used in the production of particle board, hardwood plywood or paneling which they supply uS and which we utilize in our finished product. These suppliers have requested that we communicate this to our customers.
For your information, we are reproducing samples of statements which have berm provided to us by our suppliers.
WARNING: THIS Pf10DUCT IS MANUFACTURED WITH UREA FORMALDEHYDE RESIN. FORMALDEHYDE VAPOfl MAY IN SOME PEOPLE CAUSE HEADACHES, EYE, NOSE AND THROAT IRRITATION, AND AGGRAVATION OF ALLERGIES AND f1ESPIRATORY PROBLEMS, SUCH AS ASTHMA PROPER VENTILATION SHOULD REDUCE THE RISK OF SUCH PROBLEMS. Champ/Oil Inler.nalional Corporation
WARNING: IRRITANT- THIS PRODUCT CONTAINS A UREA-FORMALDEHYDE RESIN AND MAY RELEASE FORMALDEHYDE VAPORS IN LOW CONCENTRATIONS FORMALDEHYDE CAN BE IRRITATING TO THE EYES AND UPPER RESPIRATORY SYSTEM OF ESPECIALI_Y SUSCEPTIBLE PERSONS SUCH AS THOSE WITH ALLERGIES OR RESPIRATORY AILMENTS. USE WITH ADEOUATE VENTILATION. IF SYMPTOMS DEVELOP, CONSULT YOUR PHYSICIAN. Georgia· Pacific Corporation
WARNING: THIS IORODUCT IS MANUFACTURED WITH A UREAFORMALDEHYDE RESIN AND WILL RELEASE SMALL QUANTITIES OF FORMALDEHYDE. FORMALDEHYDE LEVELS IN THE INDOOR AIR CAN CAUSE TEMPORARY EYE AND RESPIFIATORY IRRITATION, AND MAY AGGRAVATE RESPIRATORY CONDITIONS OFt AL.LEFtGIES. VENTILATION WILL REDUCE INDOOR f'ORMALDEHYDE LEVELS. Weyerhaeuser Company
Ventilation is important in maintainlflg a comfortable environment and we direct your attention to the discussion of ventilation contained in your Owner's Manual.

SAFETY REGULATIONS REGARDING lP GAS SYSTEMS AND LP GAS APPLIANCES .
The manufacturer of Ihis recreational vehicle is required to furnish the foHowing consumer Information as provided by the National Fife Protection Association and the American National Standards Institute. The information and warnings found here may also be found in other chapters of Ihls Owner's Manual. Please see chapters hI led '"LP GAS SYSTEM" and "APPLIANCES" for other safety and operating information.
WARNING LP GAS CONTAINERS SHALL NOT BE PLACED OR STORED INSIDE THE VEHICLE LP GAS CONTAINERS ARE EOUIPPED WITH SAFETY DEVICES WHICH RELIEVE EXCESSIVE PRESSURE BY DISCHARGING GAS TO THE ATMOSPHERE.
WARNING IT IS NOT SAFE TO USE COOKING APPLIANCES FOR COMFORT HEATING. COOKING APPLIANCES NEED FRESH AIR FOR SAFE OPERATION BEFORE OPERATION
OPEN 6VECTHEAD VENT OR TURN ON EXHAUST FAN. AND
2. OPEN WINDOW.
THIS WARNING LABEL HAS BEEN LOCATED IN THE COOKING AREA TO REMIND YOU TO PROVIDE AN ADEOUATE SUPPLY OF FRESH AIR FOR COMBUSTION. UNLIKE HOMES, THE AMOUNT OF OXYGEN SUPPL Y IS LIMITED DUE TO THE SIZE OF THE RECREATIONAL VEHICLE, AND PROPER VENTILATION WHEN USING THE COOKING APPLIANCE(S) WILL AVOID DANGERS OF ASPHYXIATION. IT IS ESPECIALLY IMPORTANT THAT COOKING APPLIANCES NOT BE USED FOR COMFORT HEATING AS THE DANGER OF ASPHYXIATION IS GR&ATER WHEN THE APPLIANCE IS USED FOR LONG PERIODS OF TIME.
WARNING PORTABLE FUEL·BURNING EQUIPMENT, INCLUDING WOOD AND CHARCOAL GRILLS AND STOVES, SHALL NOT BE USED INSIDE THIS RECREATIONAL VEHICLE. THE USE OF THIS EQUIPMENT INSIDE THE RECREA· TIONAL VEHICLE MAY CAUSE FIRES OR ASPHYXIATION
WARNING DO NOT BR,ING OR STORE LP GAS CONTAINERS, GASOLINE, OR OTHER FLAMMABLE LlOUIDS INSIDE THE VEHICLE BECAUSE A FIRE OR EXPLOSION MAY RESULT.
A warning label has been located near the LP gas container, This label reads' DO NOT FILL CONTAINER(S) TO MORE THAN 80 PERCENT OF CAPACITY.
Overfilling the LP gas container can result in uncontrolled gas flow which can cause /ire or explosion A properly filled container will contain approximately 80 percent of its volume as liquid LP gas
The following label has been placed in the vehicle near the range'
IF YOU SMEll. GAS:
1 ExtingUish any open Ilames, pilot lights and all smoking matenals.
2. Do not touch electrical switches.
3. Shut off tile gas supply al the tank valve(s) or gas supply connection.
4. Open doors and other ventilating openings.
5 Leave Hle are[l until odor clears.
6. Have the gas system checked and leakage source corrected before uS'lng aga'in.
LP gas regulators must always be InslalleeJ with the diaphragm vent lacing downward Flegulators that are not in compartments have been equipped With a protective cover. Make sure thaI regulator vent faces downward and tile cover is kept in place to minimize vent blockage which could result in excessive gas pressure causing fire or explosion

Welcome to the recreational vehicle life-style and the growing family of motor home owners. We sincerely thank you for choosing a Fleetwood motor homel
Your motor home has been designed to provide you with years of carefree, pleasant traveling and vacationing. Your motor home conforms with, or exceeds, the American National Standards Institute A 119.2, CSA Standard Z-240 (units built for Canada), and applicable Federal Motor Vehicle Safety Standards. These standards establish the plumbing, heating, electrical and other requirementsfor performance and safety. Compliance with ANSI and CSA standards is indicated by the seal attached just outside the entry door.
Like all finely crafted equipment, your motor home will require care and regular maintenance in order to deliver maximum value and performance. The·dealer will give you basic operating and maintenance instructions: however, supplement this by reading all instructional niaterial furnished with the motor home in the Owner's Information Package and Chassis Operator's Manual. This information outlines important areas of maintenance and provides a maintenance schedule for you to follow for safe, trouble free service from your motor home. Study these instructions carefully before you operate the motor home for the first time. A good working knowledge of your motor home and how to care for it will help you enjoy many miles and years of recreational living.
NOTE: This manual describes many features of your motor home and includes instructions for its safe use. This manual, includmg photographs and illustrations, is of a general nature only Some equipment and features described or shown in this manual may be optional. Be· cause 01 the continuous program of procluct improvement conducted by Fleetwood, it is possible that recent product changes may not be included. The instructions included in this manual are intended as'a guide, and in no way extend the responsibilities of the manufacturing subsldlaly, parent company or affiliates beyond the standard wntten warranty as presented in this manual.
1
INTRODUCTION
In this manual, statements preceded by the following words are of special significance:
"WARNING" means that there is the possibility of personal injury to yourself and others.
"CAUTION" means that there is the possibility of damage to the vehicle.
"NOTE" indicates points of particular interest for more efficient and convenient operation.
Please pay close attention to these statements while you read this manual.
. , NOTE: This product is designed lor recreational USB and short term occupancy only It is not designed or intended to be used as permanent housing. Use 01 this product for long term or permanent occupancy may lead to premature deterioration 01 interior finishes, fabrics, carpeting, drapes, appliances and fixtures. Damage or deterioration due to long term occupancy is not be considered normal, and will under the terms 01 the warranty constitute misuse, abuse, or neglect, thereby reducing your warranty protection. Before considering this motor home lor long term occupancy, consult the relevant sections in this manual.
If you have any questions regarding operation, maintenance, or service, please contact your dealer immediately so he can assist you. Your dealer's Service or Sales Department will handle any normal problerns which might occur.
WARRANTIES Your motor home is covered by one of the most comprehensive warranty' programs in the RV industry. Please refer to the warranty in the front of this manual. It explains your rights and obligations, as well as the rights and obligations of the dealer and manufacturer. Please
. read this section carefully You will be better informed in case you have a warranty-related prob'lem, and your dealer will be better able to get you on the road again. If you have any questions about the warranty or what it does or does not· cover, please contact your dealer.

2
The materials In your Owner's Information Package contain warranty information and operating instructions on the various appliances and components in your motor home. Warranty registration cards for these items should be filled out and mailed as soon as possible after you take delivery of your motor home. If you do not have operating instructions for a particular appliance, contact your dealer.
You will automatically receive an Ownercare Card approximately 3-4 weeks after delivery of your new motor home. This plastic card is imprinted with your name, the motor home serral number, and manufacturing subsidiary location. If your motor home ever needs warranty service, present this card to the dealer.
The motor home has been thoroughly inspected before shipment. Your dealer is responsible for performing a complete predelivery inspection of the chassis and all motor home components as specified in the predelivery checklists supplied by the motor home and chassis manufacturers. You should receive a copy of these completed checklists from your dealer when your motor home is delivered to you.
As a part of the predelivery inspection procedure, the dealer is responsible for road testing the motor home, noting and correcting any steering problems before delivery. FLEETWOOD AND ITS SUBSIDIARIES WILL NOT BE RESPONSIBLE FOR FRONT END ALIGNMENT AFTER THIS PREDELIVERY INSPECTION IS DONE.
You should return your motor home to the selling dealer for warranty service. If this is not possible, you may contact any other authorized Fleetwood motor home dealer. The service department at any of the locations listed at the back of this manual can help you find a dealer in your area.
If, for some reason, a problem is not handled to your satisfaction:
I. Discuss any warranty-related problems directly with the manager andlor owner of the dealership, giving them an opporlunity to help the service department resolve the malter for you.
2. If a problem arises that has not been resolved to your satisfaction by your local dealer, contact the manufacturing subsidiary servi.ce facility. The locations are listed in this manual. Please contact the one nearest you.
3. We sincerely believe that your dealer and the factory representative will be able to solve any problem which might arise. If their combined eHorts are not satisfactory, please send a leiter describing the circumstances to:
Fleetwood Enterprises, Inc. Consumer Affairs Department
P.O. Bo]( 7300 Riverside, CA 92513-7300
Please include the brand name and serial number of your motor home. The serial number IS located on the identification tag next to the entry door.
4. If you wish to call for assistance, please use this toll-free telephone number:
(800) 854-4755
REPORTING SAFETY DEFECTS If you believe that your vehicle has a defect which could cause a crash or could cause injury or death, you ~h9Uld immediately inform the National Highway Traffic Safety Administration (NHTSA) in addition to\notifying Fleetwobd Enterprises Consumer Affairs Department.
If NHTSA receives similar complaints, it may open an investigation, and if it finds that a safety defect exists in a group of vehicles, it may order a recall and remedy campaign. However, NHTSA cannot become involved in individual problems between you, your dealer or Fleetwood's manufacturing subsidiary.
To contact NHTSA, you may either call the Auto Safety Hotline toll-free at 1-800-424-9393 (or 366-0123 in Washington, D.C. area) or write to:
NHTSA U.S. Department of Transportation
Washington, D.C. 20590.
You can also obtain other information about motor vehicle safety from the I-Iotline.
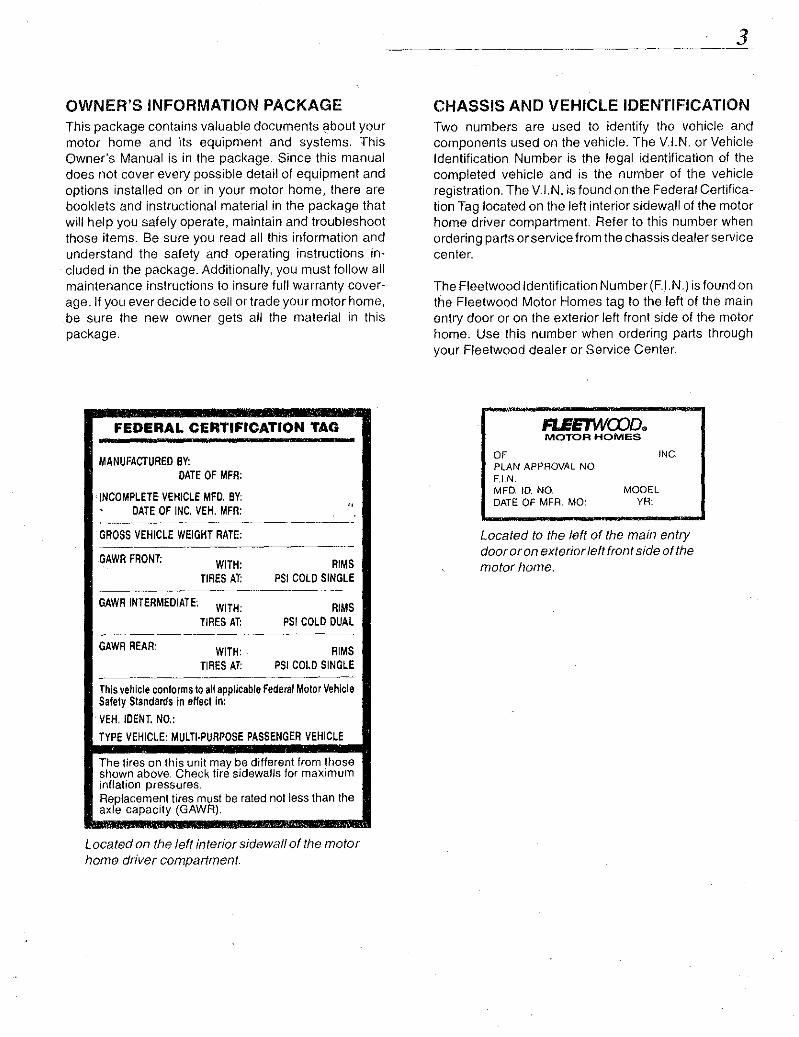
OWNER'S INFORMATION PACKAGE This package contains valuable documents about your motor home and its equipment and systems. This Owner's Manual is in the package. Since this manual does not cover every possible detail of equipment and options installed on or in your motor home, there are booklets and instructional material in the package that will help you safely operate, maintain and troubleshoot those items. Be sure you read all this information and understand the safety and operating instructions included in the package. Additionally, you must follow all maintenance instructions to insure full warranty coverage. If you ever decide to sellar trade your motor home, be sure the new owner gets all the material in this package.
FEDERAL CERTIFICATION TAG
MANUFACTURED BY: DATE OF MFR:
INCOMPLETE VEHICLE MFD. BY: DATE OF INC, VEH. MFR:
GROSS VEHICLE WEIGHT RATE:
GAWR FRONT: WITH: RIMS TIRES AT: PSI COLD SINGLE
.. --------~
GAWR INTERMEDIATE: WITH: RIMS TIRES AT: PSI COLD DUAL
._------GAWR REAR: WITH: RIMS
TIRES AT: PSI COLD SINGLE ---_._--------._---
This vehicle contorms to all applicable Federal Motor Vehicle Satety Standaras in eHect in:
VEH. IDENT. NO.:
TYPE VEHICLE: MULTI-PURPOSE PASSENGER VEHICLE
The tires on this unit may be different from those shown above. Check tire sidewalls for maximum inflation pressures. Replacement tires must be rated not less than the axle capacity (GAWR).
Located on the left interior sidewall of the motor home driver compartment.
3
CHASSIS AND VEHICLE IDENTIFICATION Two numbers are used to identify the vehicle and components used on the vehicle. The V.I.N. or Vehicle Identification Number is the legal identification of the completed vehicle and is the number of the vehicle registration. The V.I.N. is found on the Federal Certification Tag located on the left interior Sidewall of the motor horne driver compartment. Refer to this number when ordering parts or service from the chassis dealer service center.
The Fleetwood Identification Number (F.I.N.) is found on the Fleetwood Motor Homes tag to the left of the main entry door or on the exterior left front side of the motor home. Use this number when ordering parts through your Fleetwood dealer or Service Center.
FJ.EETWCDO. MOTOR HOMES
OF PLAN APPROVAL NO FLN. MFO. 10. NO. DATE OF MFA. MO:
INC.
MODEL YA:
Located to the left of the main entry dooror on exterior left front side of the motor home.


5
ON THE ROAD ------.. ----~----------- -- ~ ----- --------- --- ----
MOTon HOME LOADING Your motor home chassis is designed to carry a certain maximum load. This load includes everything: the weight of the empty motor home itself, all occupants and their belongings, fuel, fresh water, waste water and anything else that may be In or attached to the motor home.
The maximum load for which the motor home is designed IS called the GROSS VEHICLE WEIGHT RATING (GVWR). Modifications to your motor home, ie, cllanging tires or spring load capacities, will not in any way increase the GVWR.
Another critical weight factor IS the GROSS AXLE WEIGHT RATING (GAWF1). This is the maximum weight a specific axle is designed to carry. Each axle has its own GAWR. The GAWR's do not necessarily add up to "._ the GI/WR.
Tile GVWR and the GAWR for your motor home are shown on the certification tag posted on the driver's door or in the driver's compartment.
WARN!NG 00 NOT EXCEED THE RATED LOAD OF THE MOTOR HOME, OR THE RATED LOAD OF ANY AXLE_ EXCEEDING THE GVWR OR GAWR OF YOUR MOTOR HOME WILL REDUCE YOUR WARRANTY PROTECTION, CAN CAUSE UNDESIRABLE HANDLING CHARACTERISTICS AND MAY CREATE A SAFETY HAZARD.
In addition to knowing the overall weight that can be safely loaded in or attached to the motor home, you must know how to distribute the weight so that correct . amounts of weight are placed on the axles. The allowable carryinn capacity at the motor home IS found by weighing the motor horne empty. and subtracting this weight Irom the GVWR.
Carrying Capacity
DUling the design a",:1 de'lolopfnElnt of r'leetwooeJ motor homes, the nurnb?r and size of storage compartrnents, the liquid tank capacities and number of belled seating posItions are maxirnlzed for valuo and convenience. If
----------_ .. _----- -------- ------------------
you till all liquid tanks to capacity, fill all storage compartrnents and cupboards to maximum volume and till all available seating positions with passengers, the motor home will be overloaded. According to National Highway Traftic Satety Administration tigures, a vellicle occupant weighs 150 pounds. Additionally, each gallon ot gasoline weighs six pounds (6.0 Ibs.) and each gallon ot water weigh~ over eight pounds (8.3 Ibs.).
You are responsible for analyzing the conditions under which the motor home will be used for each trrp. The number of passengers and placement of cargo will affect the arnount of waier and cargo that you can carry (See "Loading Tips"). For convenience, the passenger capacity lor camping use and the passenger capacIty tOrday use are shown on a perrnanent label In the driver's area or adjacent to the rniOin entry door. The passenger capacity tor camping provides reasonable cargo capacity for tnps taking more than one day. The passenger capacity for day use provides less cargo capacity for trips or activities not involving overnight stays. For example, it may be necessary to reduce the arnount.of water carried and unload some cargo items normally carried for camping in order to provide carrying capacity for the additional day use passengers.
The nurnber at seat belt locations may be greater than the number ot passengers permitted by the label. These extra locations, if provided, are to permit a choice of seats while travelling. It is not safe to exceed the labeled passenger capacity unless the axle loadings and total weight are checked against their raflngs on a public scale. (See "Determining and Distributing Your Load").
Thoughlful consideration at the weight placed in Ihe motor horne can yield important benefits:
Greater choice of sealing and storage
Safe operation, including improved 11andllng characteristics and ride comfort
Better fuel mileage qnd reduced tire wear.

6
NOTE: Carrying capacities of your motor home are specified on a label affixed to the inside of a wardrobe door. The label includes all factory installed options. If other equipment such as leveling jacks, awnings, roof pods, etc., are installed after the motor home leaves the factory, the weight of these items must be subtracted from the total of the passenger and cargo carrying capacities. If you tow a trailer, the tongue weight of the trailer must be subtracted from the total of the passenger and cargo carrying capacities.
Loading Tips
Do not load heavy items in upper cabinets.
Secure and brace items so they won't move during travel, thereby shifting the load.
Do. not load heavy items near either end of the motor ho.me o.r on the rear bumper.
Adjust cargo storage to keep the side to side wheel loads as equal as possible.
Carry only as much water as needed for travel use or to balance the load.
Whenever possible, empty the holding tanks before traveling.
WARNING MODIFICATION OF YOUR VEHICLE BY ADDITION OF RACKS NOT SPECIFIED BY THE MANUFACTURER TO CARRY ADDI· TIONAL EQUIPMENT OR VEHICLES WILL REDUCE YOUR WARRANTY COVERAGE AND MAY CAUSE INJURY OR PROPERTY DAMAGE.
Make a loading diagram of your properly loaded motor home. It will help you locate where specific items are stored, and will help speed the loading process. Store emergency ilems in a readily accessible location. Include a fire extinguisher, tools, first aid kit, rain gear. flashlight, highway warning devices, and an electric cord with light.
WARNING DO NOT STORE OR CARRY LP GAS CONTAINERS, GASOLINE, OR OTHER FLAM· MABLE LlQUtDS INSIDE YOUR MOTOR HOME. THE CONTAINERS MAY LEAK.
Determining And Distributing Your Motor Home Load
If the loaded weight of your motor home exceeds the GVWR, you will have to remove items to bring the weight down to or below the GVWR. If the loaded axle weight on any axle exceeds the GAWR, you Will have to redistribute cargo to bring the weight down to or below the GAWR.
Weighing Your Loaded Motor Home
Refer to your local directory to locate a public weigh station. The following weighing procedure will help you determine whether your loaded motor home (complete with cargo, fluids, passengers, and driver) is within GAWR and GVWR limits. When you arrive at a weigh station, the attendant will guide you through the correct positioning of the motor home on the scales.
. Center the front wheels on the scale platform and take a reading. This is the Front Gross Axle Weight (Reading I).
, c:::J
2. Center the entire vehicle (all axles) on the scale and take a reading. This is the Gross Vehicle Weight (Reading 2).
C..J
----------_ .. _--

3. Center the rear wheels on the platform and take a reading. This reading is the Flear Gross Axle Weight (Reading 3).
C-]
"' ::i].:: 4. Compare Reading 2 with the GVWR 01 your
vehicle. II the reading exceeds the GVWR rating, you will have to reduce the total vehicle load.
5. If reading 2 is less than the GVWR of your vehicle, check Readings t and 3 to verify that each is less than its respective GAWR. If either exceeds the GAWR, redistribute the load and reweigh. "
Periodically reweigh your motor home. Loading and weight patterns will change according to use.
TIRES Your motor home is equipped with truck tires. Under normal circumstances and with proper maintenance, you should receive thousands 01 miles 01 trouble free service.
Tire Inflation
For safety and maximum tire lile, proper inflation pressure must be maintained. Properly inflated tires also contribute to overall motor home stability and safety. Refer to the tire section in your chassis operator's manual for information on maintenance, inflation pressure, and tire care.
WARNiNG FOR SAFETY AND MAXIMUM TinE LIFE, CHECK TIRE PRESSURES (INCLUDING THE SPARE) OFTEN. PAY SPECIAL ATTENTION TO INSIDE REMI DUALS. ALWAYS CHECK PRESSURE WHEN TIRES ARE COLD, AND DO NOT BLEED Am OUT OF WAHIVI TIRES. FOLl.OW THE TIFlE PBESSUBE INSTBUC .. TIONS IN THE CHASSIS OPEHATOR'S MANUAL
7 ------
NOTE: Check the wheel covers periodically. They. could worl' loose eluring driving.
Tire Replacement
Replacernent tires must be tho same size, and have at least the same weight carrying capacity as the original equipment. All tires of the same size and rating may not have the same weight carrying capacity. Consult your tire dealer. The original equipment trres supplied on your motor home have weight carrying capacities to support gross axle weight ratings (GAWR) as stated on the Federal Certification Tag located on the Sidewall near the driver's seat.
If You Get A Flat Tire
In case of sudden tire failure, avoid heavy brake application. Gradually decrease speed. Hold steering wheel firmlyand move slowly to a safe, off-road place. Park on a firm, level spot, turn off the ignition, and turn on tile hazard flasher system.
Spare Tire Carrier
On some models, the spare tire carrier is located under Ihe rear of the motor home between the frame rails.
WARNING TRUCK TIRES AND WHEELS ARE EXTREMELY HEAVY AND MAY WEIGH 100 POUNDS OR MORE. DO NOT ATTEMPT TO REMOVE THE SPARE TIRE UNl.ESS YOU ARE CAPABLE OF HANDLING THE WEIGHT.
Changing A Flat Tire
Even with good trre maintenance and normal driving, you may experience a flat tire. Sumrnon profeSSional help through your auto club or travel service, or a local truck service faCility. Consult the chaSSIS operator's manual for additional information on tire inflation and proper torque.
WARNING TO AVOID PERSONAL INJURY AND/OB PROPERTY DAMAGE IF A BLOWOUT OR OTHER TIRE DAMAGE OCCUF1S, OBTAIN EXPERT TIRE SE.RVICE HELP. DO NOT ATTEMPT TO CHANGE THE TII"lE YOURSElF.
TOWING A VEHlCLE II you expect to pull a vchicle With your motor horne, please use these guidelines when choosrng a hitch and trailer:

8
Hitch classification: Class II.
Do not use a load equalizing hitch. it could cause structural damage to the frame members.
Limit the tongue weight of trailer or towing device to a maximum of 250 pounds. Heavier tongue weights can damage your motor home rear frame and body, cause unstable driving and handling characteristics, and will restrict your rights under the Ownercare warranty.
Do not tow a vehicle weighing more than 3500 pounds, or more than recommended by the chassis manufacturer. whichever is less. Heavier vehicles can cause braking problems, damage the motor home structure or drive train, cause unstable driving or handling characteristics, and restrict your rights under the Ownercare warranty. Changing the trailer hitch will not increase the tow capacity of the motor home even if the chassis is rated at a higher level.
The Gross Combined Weight Rating (GCWR) is listed on the wardrobe door tag. The GCWR is the maxim\Jm allowable weight of both the loaded motor home and towed vehicle. Exceeding the GCWR will cause damage to your motor home drive train or chassis, unstable driving and handling characteristics, and will reduce your warranty protection.
SEATS AND SEAT BELTS Driver/Passenger Seats
The driver's and passenger's seats oHer diHerent position/comfort adjustments:
WARNING DO NOT ADJUST THE SEAT POSITION WHILE THE VEHICLE IS IN MOTION. YOU MAY LOSE CONTROL OF THE VEHICLE.
Forward/Back - The forward/back lever is located under the front left of the seat. Pull the lever toward the left outside of the seat to unlock. Release the lock lever to secure the seat position.
Swivel- The swivel lock lever is located uncler the front right of the seat. Lift the lever forward and up to swivel. The seat locks in the center, forward position. When unlocked, the seat will swivel freely around to the center positron.
Recline - The recliner lever is located on the right arm rest.
Seat Bells
Seat belts are an important safety feature of your vehicle. For your protection, always use your seat belts. The driver's seat and other seats designed to carry passengers while moving have been equipped witll seat belts.
WARNING Al.L RIDERS SHOULD USE SEAT BELTS WHILE THE VEHICLE IS IN MOTION. NEITHER SEATS WITHOUT SAFETY BELTS NOR BEDS SHOULD BE OCCUPIED WHILE THE VEHICLE IS IN MOTION.
Adjust seat belts as follows:
To fasten belt, be sure it is not twisted, then push the tongue end of one belt into the buckle of the mating belt. Be sure It latches. For greatest safety, adjust the belt snugly as Iowan the abdomen as comfort will allow.
To release the belt, depress the button in the center of the buckle and slide the tongue out of the buckle. Never use a belt for more than one person at a time.
Child Restraint
All vehicle occupants, and especially children, should be restrained whenever riding in vehicles. Holding a child in your arms is not a substitute for seat belts or a child restraint system. Child restraint systems are designed to be secured in the vehicle seats by lap belts. Children could be endangered in a crash if their child restraints are not properly secured in the vehicle.
When using any child restraint system, be sure to read and follow all instructions on installation and use that come with the system.
When securing a child restraint with a lap belt that has no retractor, pull the excess webbing through the adJustment mechanism.
If the child restraint is still not secure, use a different seating position in the vehicle and/or contact your dealer and the child restraint manufacturer for help.
DRIVING AND PARKING Once you become accustomed to the feel of the controls and the reference points from the driver's seat, you will find driving a motor home comparable to driving your

family car. Become familiar with the position of the motor home in traffic, and be cautious when maneuvering to allow for the length and width of the vehicle. Always allow extra room to corner and to change lanes. Learn to use the side mirrors to view the road behind.
Remember that your motor home is heavier than a car, making it less maneuverable and harder to stop. Also, because of it's greater side surface area, it is more easily affected by cross winds. Allow extra distances for passing and stopping, and drive at a moderate speed, particularly in traffic and in gusty wind conditions.
Driving on winding or mountain roads is not difficult if done with reasonable care. Observe proper vehicle speeds when ascending or descending hills and always operate in the proper transmission range. Downshift on hills to avoid overheating or undue engine loads. Downshift when descending grades. Engine braking power will help control vehicle speed, and relieve some of the strain on the brakes.
Mountain driving or desert temperatures can put extreme demands on drive train components -especially ttle transmission. Under extreme heat conditions you may need to turn off the vehicle 'illir conditioner to .improve engine and transrnission cooling.
Be aware of the extra height of your motor horne. Check for low hanging tree branches or other obstructions whenever you drive or park. Avoid low overhangs when pulling in for service. Always check overhead clearances of overpasses and bridges. This may be particularly irnportant if you drive with the overhead vents open or if the motor home is equipped with a roof air conditioner, roof rack, CB orTV/radio antenna. Before leaving on a trip, check your route. Some tunnels prohibit rnotor homes with LP gas systerns.
When parking parallel to a curb, be sure to allow for poles or obstructions as the front and rear portions of the motor home swing wider than an autornobile. When parking on an incline, turn the front wheel into the curb In the direction of the roll to aid the parking brake. When
. parking, always shift the transmission to PARK ("P") anel set the parking brake, if applicable.
WARNING 00 NOT PARK OR IDl.E THE MOTOR HOME OVER COMBUSTIBLE MATERIALS SUCH AS TALL GRASS OR DRIED l.EAVES. THIS IS PART1CULARLY IMPORTANT IF THE EXHAUST SYSTEM HAS NOT BEEN PHOPERLY MAINTAINED. COMBUSTIBLE MATE·· RIALS MAY CATCH FIRE FROIVI HOT EXHAUST GASES, SOOT OR SPtlRKS THAT
COULD ESCAPE THROUGH CORROSION HOLES OR CRACKS.
9
If operating, parking or idling your vehicle off-road is unavoidable, as is often the case in recreational use:
Be aware that combustible materials could catch fire frorn the veflicle's hot exhaust systern.
Keep a fire extinguisher handy.
Avoid driving your vehicle through or over combustible materials such as leaves, grass, vegetation or stubble Iligh enough to toucll, catch or collect on its hot exhaust systern.
Parking or idling should be done only in an area wllere there are no combustible materials under the vehicle.
FUEL AND FUEL SYSTEMS See the Chassis Operator's Manual in the Owner's Information Package for fuel recornmendations. The optional generator is designed to run on the same fuel as the chassis, Consult the generator operating instruc- " tions for special cautions about maintenance with different types of fuels.
Fuel Fill
The fuel filler cap is located toward the rear of the coach Modern fuel systems may build up vapor pressure within the tank as the gasoline warms during use or hot weather. Under certain conditions, sudden release of this pressure when removing the gasoline cap can cause gasoline to spray from the fill opening. creating a fire hazard.
WARNING WHEN REIVIOVING THE GASOLINE CAP, ROTATE SLOWLY ONLY FAR ENOUGH TO ALLOW PRESSURE TO flELEASE. AFTER "HISSING" SOUND STOPS, COMPLETE THE REMOVAL OF TI~E CAP.
To protect the gasoline system frorn excessive pressure or vacuum, or from sudden release of pressure, replace lost caps with caps of the same design which are available from your Fleetwood motor horne dealer.
Clean up fuel spills immediately. Raw fuel spilled on the rnotor horne could damage the exterior finish, and IS a s-orioLis fire hazard.
·Fuel Types And Vapor Lock
Today's automotive fuel and emissions systems are
10 ------------
sophisticated and highly engineered to meet Federal and State emissions standards. They are also some· times sensitive to fuel types and blends, particularly fuels blended for certain altitudes and climates. Fuel suppliers provide customers with the correct fuel for their location and seasonal conditions. Sometimes, though, fuel blended for winter is supplied during sum· mer months.
"Vapor lock" occurs when gasoline vaporizes, and vapor pockets block the flow of liquid fuel to the engine. If you experience engine stall or stutter, you may be experrencing vapor lock.
If your engine and fuel system are properly tuned and maintained, you should not experience this problem. If vapor lock occurs, the fuel itself could be the cause. If at all possible, check with the service station operator as to the fuel blend before filling your fuel tank. If you purchase your fuel from nationally recognized fuel dealers, your chances of vapor lock can be reduced. If you store your motor home during the winter months, be aware that when you take the vehicle out of storage in the spring or summer, winter fuel may cause vapor lock until it is consumed.
GENERAL CHASSIS TOPICS Variable Speed Engine Fan
When the engine is under load or requires maximum cooling, the engine fan adlusts and turns faster. The fan may become very noisy at high speed and when maximum cooling is required. High speed fan noise can sometimes be misinterpreted as transmission slippage. This is not the case. High engine speed and temperature conditions, such as pulling away from a stop after long freeway driving, can cause loud fan noise until the engine cools down. This fan noise indicates that the fan is doing what it is supposed to do. This noise is not a defect in the fan or the transmission.
Exhaust System Heat
Your motor home engine has been designed to conform to Federal and State emission requirements. To meet these requirements, engine operating temperntures are high. As a result, the engine and exhaust system radiate a great deal of heat
Special heat shields are built into your motor home too protecl wiring and other components from possible heat damage caused by the exhaust system. Do not remove these shields, modify the exhaust system, or add additional equipment, such as wiring, plumbing, or other components, wh.ich WIll be affected by exhaust system heat.
CARBON MONOXIDE SAFETY PRECAUTIONS Carbon monoxide is a colorless, tasteless, odorless gas. It is a by-product of combustion in engines. The engines in your motor home and generator system produce it constantly while they ar.e running. CArl BON MONOXIDE IS DEADLY Please read and understand the following precautions to protect yourself and others from the effects of carbon monoxide poisoning.
WARNING EXHAUST GASES ARE DEADLY. DO NOT BLOCK THE TAILPIPES OR SITUATE THE VEHICLE IN A PLACE WHERE THE EXHAUST GASES HAVE ANY POSSIBILITY OF ACCUMULATING EIH!ER OUTSIDE, UNDERNEATH, OR INSIDE YOUR VEHICLE OR ANY NEARBY VEHICLES. OUTSIDE AIR MOVEMENTS CAN CARRY EXHAUST GASES INSIDE THE VEHICLE THROUGH WINDOWS OR OTHER OPENINGS REMOTE FROM THE EXHAUST OUTLET. OPERATE THE ENGINE(S) ONLY WHEN SAFE DISPERSION OF EXHAUST GASES CAN BE ASSURED,
\' AND MONITOR OUTSIDE CONDITIONS TO BE SURE THAT EXHAUST CONTINUES TO BE DISPERSED SAFELY.
Beware of exhaust gas (carbon monoxide) poisoning symptoms:
Dizziness
Vomiting
Nausea
Muscular Twitching
Intense Headache
Throbbing in Temples
Weakness and Sleepiness
Inability to Think Coherently
If you or others experience any of these symptoms, get out into the fresh air immediately. If symptoms persist, seek medical attentron. Shut down the unit and do not operate until it has been inspected and repaired.
WARNING 00 NOT UNDER. ANY CIRCUMSTANCES OPERATE ANY ENGINE WHILE SLEEPING.
You would not be able to monitor outside conditions to assure itlat engine exhaust does not enter the interior, and you would not be alert to exhaust odors or symp' toms of carbon monoxide poisoning.

Do not operate an engine with a damaged exhaust system. Check the system frequently for damage. Do not under <'Iny circumstances modify the exhaust systems(s) in any way.
Carbon Monoxide Detector
Your motor horne is equipped with a carbon monoxide (CO) detector. Usually located in the main sleeping area, it is designed to alert you to the presence of CO gas. Test the CO detector after the motor horne has been in storage, before each trip, and at least once a week during use. Replace the sensor and battery when necessary. Do not replace the battery without replacing the sensor. Sensors may be obtained through your Fleetwood deater. Please refer to the operating instructions included in your Owner's Information Package.
EMERGENCY TOWING Consult your chassis operator's manual for information on safe and approved towing procedures. Most tow truck operators willing and able to tow motor homes will be familiar with these procedures. Be prepared to give the tow truck operator at least the following information whe n you call:
Length' and height of motor horne
Chassis manufacturer
Gross vehicle weight rating
CAUTION DO NOT TOW THE MOTOR HOME FROM THE REAR. TOWING FROM THE REAR WILL CAUSE SERIOUS OVERLOADING OF THE FRONT TIRES AND SUSPENSION, POSSI· BLY RESULTING IN TIRE OR FRONT SUS· PENSION FAILURE. THE REAR FRAME EX· TENSIONS ARE NOT DESIGNED TO WITH· STAND THE LOADS IMPOSED BY LIFTING FROM THE REAR.
The vehicle must be towed from the front, either on the rear wheels (if operational) or on a heavy duty dolly, or transported on a flat bed trailer. Consult your chassis owner's manual.
To prepare your motor horne for towing:
1. Secure any loose or protruding parts of the disabled vehicle.
2. Secure any heavy, loose items in the Interior.
3. Turn oH Lfo gas appliances and the l..P gas tank valve.
11
4. Do not allow any person to ride in the towed vehicle.
ATTACHING ACCESSORIES TO YOUR MOTOR HOME
The walls in your motor home are constructed with Vacu·bond~ lamination technology. Structral members are located specifically to mount and attach factory installed components and accessories, and may not be located to support after-market accessories not specifically designed for use on or in your motor horne.
Please consult with your dealer before attempting to install or mount accessories on the sidewalls of your motor horne. Holes drilled in the sidewall may cause damage, and may aHect portions of your warranty coverage.
ENGINE TEMPEBATURE GAUGES Engine temperature gauges have been calibrated to indicate a midrange reading as the "normal" operating temperature. The reason for this is that many owners perceive 212" F as the boiling point. However, this is not the case in an engine with a pressurized cooling system and a coolant mixture of glycol and water. As a motor horne owner, be aware that the gauge is intended to provide a warning of any rapid change in engine coolant temperature from the "normal" reading of the gauge rather t~lan an absolute temperature reading.

"
13 ~- --~--- --- -----~~-----
LIVING WITH YOUR MOTOR HOME
---~-----.. ------~--~-.-----~-----------~- .. --- .•. -
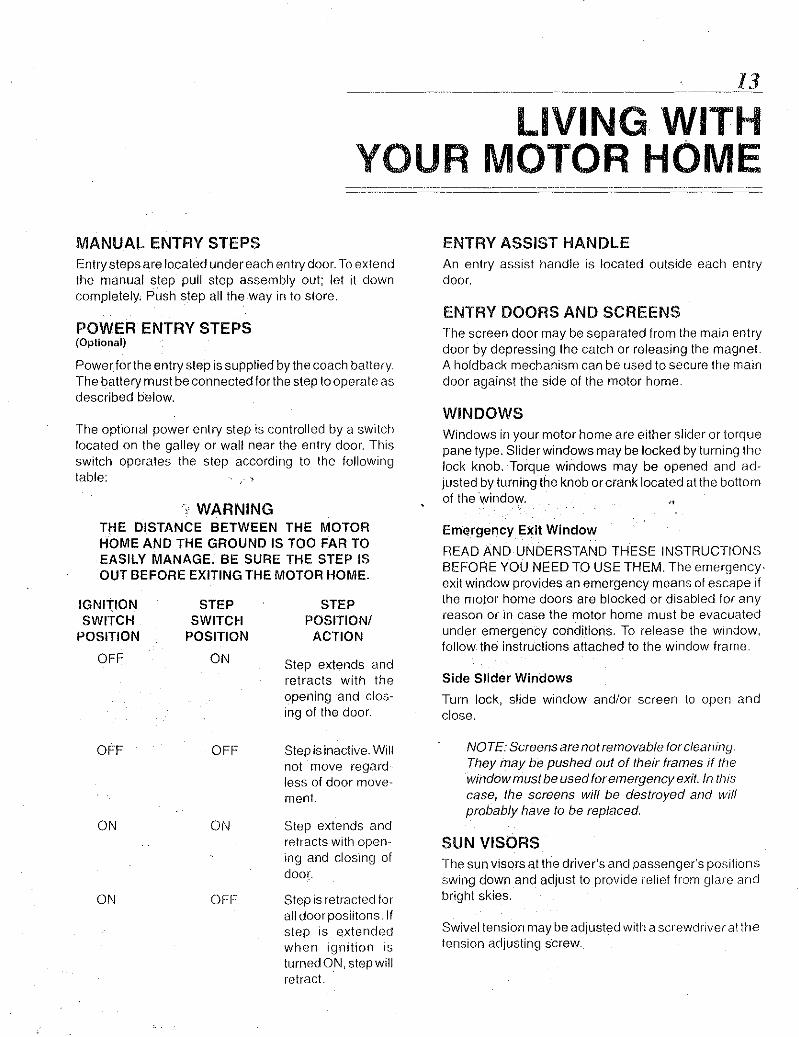
MANUAL ENTRY STEPS Entry steps are located under each entry door. To extend the manual step pull step assembly out; let it down completely. Push step all the way in to store.
POWER ENTRY STEPS (Optional)
Powerforthe entry step is supplied by the coach battery. The battery must be connected forthe step to operate as described below.
The optional power entry step is controlled by a switch located on the galley or wall near the entry door. This switch operates the step according to the following table:
•. WARNING THE DISTANCE BETWEEN THE MOTOR HOME AND THE GROUND IS TOO FAR TO EASILY MANAGE. BE SURE THE STEP IS OUT BEFORE EXITING THE MOTOR HOME.
IGNITION SWITCH
POSITION
OFF
OFF
ON
ON
STEP SWITCH
POSITION
ON
OFF
ON
OfT
STEP POSITION/
ACTION
Step extends and retracts with the opening and closing of the door.
Step is inactive. Will not move regardless of door movement.
Step extends and retracts with opening and closing of door.
Step is retracted for all door posiitons. If step is extended when ignition IS
turned ON, step Will retmc!.
ENTRY ASSIST HANDLE An entry assist handle is located outside each entry door.
ENTRY DOORS AND SCREENS The screen door may be separated from the main entry door by depressing the catch or releasing the magnet. A holdback mechanism can be used to secure the main door against the side of the rnotor home.
WINDOWS Windows in your motor home are either slider or torque pane type. Slider windows may be locked by turning the lock knob. Torque windows may be opened and adjusted by turning the knob or crank located at the bottom of the ·window. "
Eml.lrgency Exit Window
READ AND UNDERSTAND THESE INSTRUCTIONS BEFORE YOU NEED TO USE THEM. The ernergency· exit window provides an emergency means of escape if the rnotor home doors are blocked or disabled for any reason or in case the motor home must be evacuated under emergency conditions. To release the window, follow the instructions attached to the window frame.
Side Slider Windows
Turn lock, slide window andlor screen to open and close.
NOTE: Screens are not removable lore/eaning. They may be pushed out of their frames If the window must be used for emergency exif. In this case, the screens will be destroyed and will probably have to be replaced.
SUN VISORS The sun visors at the driver's and passenger's positions swing down and adjust to provide relief from glare an·j bright skies.
Swivel tension may be adjusted with a screwdriver at the tension adjusting s·crew.
14 _____ _
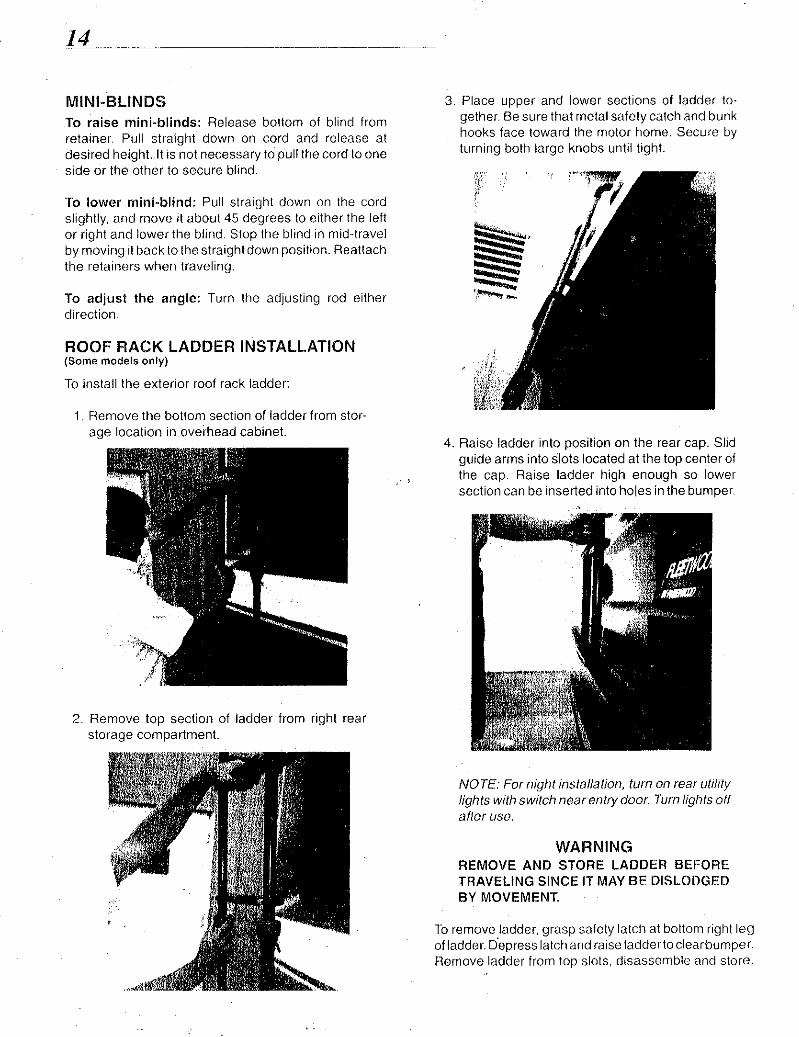
MINI-BLINDS To raise mini-blinds: Release bottom of blind from retainer. Pull straight down on cord and release at desired height. It is not necessary to pull the cord to one side or the other to secure blind.
To lower mini-blind: Pull straight down on the cord slightly, and move it about 45 degrees to either the left or right and lower the blind. Stop the blind in mid-travel by moving It back to the straight down position. Reattach the retainers when traveling.
To adjust the angle: Turn the adjusting rod either direction.
ROOF RACK LADDER INSTALLATION (Some models only)
To install the exterior roof rack ladder:
1. Rernove the bottom section of ladder from storage location in overhead cabinet.
2. Remove top section of ladder from right rear storage compartment.
3. Place upper and lower sections of ladder to· gether Be sure that rnetal safety catch and bunk hooks face toward the motor horne. Secure by turning both large knobs until tight.
4. Raise ladder into position on the rear cap. Slid guide arms into slots located at the top center of the cap. Raise ladder high enough so lower section can be inserted into holes in the bumper
NOTE: For night installation, turn on rear utility lights with switch near entry door Turn lights off after use.
WARNING REMOVE AND STORE LADDER BEFORE TRAVELING SINCE IT MAY BE DISLODGED BY MOVEMENT.
To remove ladder, grasp safety latch at bottom right leg of ladder. O'epress latch and raise ladder to clear'bumper Remove ladder from top slots. disassemble and store.
STORAGE Exterior Compartments
Exterior storage compartments maximize available space and should accommodate most of your storage needs. All of the storage compartments except the LP gas and generator compartments can be locked. Fireprevention regulations require that the LP gas and generator compartments be unlocked at all times.
Note: Your motor home could be ovorloaded or out of balance if not properly loaded. Refer 10 the "Motor Home Loading" section in this manual, and follow the loading and weighing instructions in that seclion. When storing equipment and supplies:
Always keep tools and equipment stored In areas where they will not shift while traveling.
Whenever pOSSible. place heavy articles In storage compartments which are low and in the best location for better weight distribution.
P?ck articles carefully In the storage compart.·,;'ments to minimize shifting. If necessary, use
straps to prevent movement.
Be sure liquid containers are capped and cannot :tip or spill. Secure all glass containers and dishes before traveling.
Exterior storage compartments may not be watertight in all climate conditions. Carry any articles which could be damaged by water inSide the motor home.
WARNING DO NOT STORE FLAMMABLE, VOLATILE LIQUIDS OR HAZARDOUS CHEMICALS INSIDE THE MOTOR HOME OR IN OUTSIDE STORAGE COMPARTMENTS. TOXIC FUMES FROM THESE LIQUIDS OR CHEMICALS MAY ENTER THE INTERIOR OF THE MOTOR HOME.
Interior Stora98
The closets and cabinets have friction catches or hidden latches along one edge 01 the door. Press the latch to open the door Overhead doors may havo supports to hold them open
Drawers rest in notches when they are closed. Tt) open drawers, lift up slightly, then pull open.
.------.-.------.~ ---
Closets may be equipped with 12-volt lights that may be switched to turn ON when the closet door is opened. Be sure the light goes OFF when the closet door is closed - your battery will be discharged if It stays ON. If the light stays on when the door is closed, the door switch requires adjustment. The same loading considerations apply to interior storage areas as to exterior. Consult the "Motor Home Loading" section in the "ON THE HOAD" chapter.
INTERIOH AND FURNISHINGS The materials used inside your motor home have been selected for durability and comfort. With reasonable care, these materials will stand up under years 01 recreational living. The "MAINTENANCE" chapter in this manual outlines care requirements for the various upholstery fabrics, floor, cabinet, and wall finishes.
Dinette Conversion
To convert the dinette into a bed:
Unfasten and remove cushions.
Reach under the table, either remove leg or fold up under the table top.
Raise frdnt portion of table several inches to disengage inserts from the wall supports.
Lower table top to the dinette frame to complete bed base.
Slide seat and back cushion into place over bed base.
Sofa/Lounge Conversion
To convert a sofa/lounge Into a bed:
Remove sofa bolsters.
Lift front 01 sofa frame up and out.
Push' the back of the lounge back and down.
Push the seat belts through the space between the lounge back and seat.
To restore Hlesofa/lounge:
Pull tho seat belts back up througll the space.
Uft the Itont edgce of tile sofa frame up, and push it bE1:ck. The sofa back will como up
Push the sofa into position.

16
Folding Doors/Privacy Curtain Dividers
The dividers allow you to separate areas in the motor home. They glide on oylon rollers and do nol require lubrication. They are held closed by a catch. When the dividers are open lor traveling, be sure to attach Ihe hold back straps to keep them from sliding back and lorth.
Interior Lighting
Both decorative and "utility" style 12 .. volt lighting lixtures may be used in your motor home.
Utility style fixtures may be either single or dual. A slide switch selecls either single or dual brightness. For your convenience, some lights are operated from wall switches. Clean the lenses in soapy water.
Overhead Vents
Overhead vents are located in the galley and bathroom areas lor fresh air circulation and exhausting heat, odors, and water vapor
Turn the crank in the center 01 the vent to open and adjust. Some vents may also be equipped with a 12-volt fan. A switch controls fan operation. Be sure to turn the fan OFF before closmg the vent.
Close the vents or lower them before traveling to avoid damage from wind and low overhead clearances.
The vents may be cleaned from the top of the motor home. Use soapy water on the vent cover. The screens may be vacuumed or lightly brushed to remove accumulation of leaves or other debris.
Lubricate the gears and mechanism yearly with a light, water resistant grease.
Bunk Ladder Installation
To Install the bunk ladder:
1. Remove the bunk slider from its storage position by releasing the locks on both sides. Pull the slider toward you and lock into position. Be sure slider is securely locked.
2. Remove ladder from storage area in overhead cabinet.
3. Position ladeJer hooks In slots located on the face panel of the bunk slider Pull the tadder out at the bottom to Insure that the ladder seats properly in the stots.
NOTE: It may be necessary to adjust the sWivel chair to provide clearance lor the ladder legs.
4. Remove and store the ladder when not in use. Reposition the bunk slider and lock in' the forward position.
WARNING TO PREVENT SLIDING, THE SLIDER MUST BE IN LOCKED POSITION WHEN TRAVEL .. ING. DO NOT ALLOW PASSENGERS TO RIDE IN THE UNBELTED BUNK AREA POSI .. nONS WHEN TRAVELING,
MONITOR PANEL The monitor panel allows you to convenientty check the approximate levels in tanks and to check battery condition.
Electrical probes installed in the tanks measure the levels at various points in the tanks.
To check tank levels:
Press "LP GAS," WATER" or "HOLDING TANK 1" or "2" rocker switches. HOLDING TANK 1 is the black water (toitet waste) tank, and HOLDING TANK 2 is gray water (sink and shower wastes).
The "E" or empty indicator light will always be lit when the rocker switches are depressed. If the tank is full, all lights will be on. Lights are sequentiat, and indicate the level in approxirnately 114 tank increments. If the tank selected is approximately 112-full, for example, lights "E," "1/4" and "1/2" will be on.
Erroneous tank level indications can be caused by:
a. Water with low mineral content. The level is measured by a very low level electrical signal traveling through the liquid. Some water may not conduct the signat property. This condition may be infrequent, but can exist. Check the panel reading when the fresh water tank is filled.
b. Material trapped on the sides of the hotding tanks may give a full reading when the tank is actually empty.
NOTE: II the sensor probes mounted in the tanks get coated with grease, the monitor panel may indicate falsely or not at all. Avoid pouring grease, oils or similar substances down drams or the toilet. If this is unavoidable, the holding tan/«(s) should be washed out with a soapy water solution. See your dealer lor additional information.

To check the battery charge:
1. Unplug the 120-volt AC power cord to tum the power converter off.
2. Press "BATTERY" rocker switch on the panel.
3. Tum on a light or any 12-volt appliance. The battery must be checked with a load.
4. Read battery condition on the meter Red is low, yellow is fair and green IS good.
EFFECTS OF LONG TERM OCCUPANCY Your motor home was designed primarily for recreational use and short term occupancy. If you intend to occupy the motor home for an -"xtended period, you should understand that the additional wear will cause premature deterioration of structure, ',nterior finishes, fabrics, carpeting, drapes, appliances and fixtures. You should also be prepared to deal with condensation and the humid conditions that may be encountered. The relatively small volume, and tight, compact construction of modern recreational vehicles mean that normal living activities of even a fe';' occupants will lead to rapid saturation of the
';, air, and the appearance of visible moisture, especially in . cold weather
Just as moisture collects on the outside of a glass of cold water during humid weattler, mOisture can condense on the inside surfaces of your motor home during use in cold weather when humidity of the intenor air IS high.
Water vapor will condense on the Inside of the windows and walls as moisture, or rn cold weather as frost or Ice. It may also condense out of sight within the walls or the cerling where It will manifest itself as stained panels. Appearance of these conditions indicates a condensation problem. When you recognize the signs of excessive mOisture and condensation, you should take action to minimize their effects.
Ventilation And Controlling Condensation
You can reduce or eliminate Interior condensation dunng cold weather by taking the follOWing steps:
Ventilale with Outside Air Pactially open one or more roof vents and one or more windows to provide controlled circulation of outside air into the Intenor. Willie this ventilation will Increase furnace heating load, it will greatly reduce, or eliminate, condensation. Even when it is raining or snowing, outside air will be far drier than interior air and will effectively reduce condensation.
17
Install Storm Windows (Some models only) The interior surface of tile storm window will be warmer, reducrng moisture cOAdensation. DO NOT COVER THE EMERGENCY EXIT WINDOW. This window must be left accessible at all times for emergency exit.
Fleduce Moisture Released InSide the Motor Home Run the range vent fan when cooking and the bath vent fan (or open the vent) when bathing to carry water vapor out of the motor home. Avoid making steam from excessive boiling or use of hot water. Remove water or snow from shoes before entering to avoid soaking the carpet. Avoid drying.overcoats or other clothes inside the motor home.
CAUTION Do not heat the motor home interior with the range or oven.
Open flames add moisture to the interior air, Do not use an air humidifier inside the motor home. Water put into the air by the humidifier wilt increase condensation,
Ventilate Closets and Cabinets During prolonged u'se in very cold weather, leave cabinet and closet doors partially open to warm and ventilate the interiors of storage compartments built against extenor walls. The air flow will warm the exterior wall surface, reducing or eliminating condensation and preventing possible ice formation.
Install A Dehumidifier Appliance During prolonged, continuous use, a dehumidifying appliance may be more comfortable and effective in removing excess moisture from the interior air. While use of a dehumidifier is not a "cure-all", and ventilation, storm windows, and moisture reduction continue to be important, operation of the dehumidifier will reduce the amount of outside air needed for ventilation. Heating load on the furnace will be reduced, and the interior will be less drafty.
FIRE SAFETY The hazard and possibility of fire exists in all areas of life, and the recreational life-style is no exception. Your motor home is a complex machine made up of rnany materials - some of them flammable. But like most hazards, the pOSSibility of fire can be minimized, if not totally elirnl-nated, by recognizing the danger and practiCing common sense, safety and maintenance habits. The fire extinguisher furnished with your motor home IS rated for Class B (gasoline, groase, flammable liqUids) and Class C (electncal) fires since these are the most common types of fires in vehicles F1ead the instructions on the fire extlnguisher.l<now where It IS located and how and wl1en to use it.

18
nemember that portable fire extinguishers are appliances intended for use only by the occupants of a building or area that is threatened by fire. They are most valuable when used immediately on small fires. They have a limited amount of fire-extinguishing material, and therefore must be used properly so this material is not wasted.
Fire extinguishers are pressurized, mechanical devices. They must be handled with care and treated with respect. They must be maintained as outlined an any maintenance instructions provided with the device so they are ready to operate properly and safely. Parts or internal chemicals may deteriorate in time and need replacement. Always follow maintenance and recharging instructions provided by the fire extinguisher manufacturer.
Fire Safety Precautions
Explosive fuel clouds may be present at fuel filling stations.
WARNING BEFORE REFUELING (EITHER GASOLINE, DIESEL, OR LPG) BE !;lURE TO TURN OFF ALL PIL.OT FL.AMES Ai\m APPLIANCES IN YOUR MOTOR HOME. TURNING OFF THE PROPANE AT THE TANK IS II\ISUFFICIEI\IT. PILOTLESS APPLIANCES MAY STILL. SPARK OR PILOT FLAMES MAY NOT EXTINGUISH IMMEDIATEL.Y.
Instruct occupants on what to do in case of fire, and hold fire drills periodically.
Maintain proper charge in the fire extinguisher.
If you experience a fire while traveling, MAINTAIN CONTROLOFTHE VEHICL.E UNTIL YOU CAN SAFELY STOP. EVACUATE THE VEHICLE AS QUICKLY AND SAFEL.Y AS POSSIBLE.
If you experierwe a fire while camped, EVACUATE THE VEHICLE AS QUICKLY AND SI\FELY AS POSSIBLE.
Consider the cause and severity of the fire and the fisk involved before trYing'to put it out. If the fire is major 01'
is fuel-fed, move away from the side of the LP gas tank, stand clear of Ihe vehicle and walt forthe fire department or other emergency assistance.
If your motor home is damaged by lire. do not drive or. live in it until you have had it thoroughly examined and repaired.
Smoke Detector
A battery-powered smoke detector is mounted on the wall in the living/cooking area of your motor home. Please read the smoke detector operating instructions for details on testing and caring for this important safety device.
Test the smoke delector after the motor home has been in storage, before each trip, and at least once a week during use.
The smoke detector should never be disabled due to nuisance or false alarm from cooking smoke, a dusty furnace, etc. Ventilate your motor home with fresh air and the alarm will shut off. DO NOT DISCONNECTTHE BATHoRY.
Replace the battery once a year or immediately when the low battery "beep" signal sounds.
If the smoke detector fails to operate with new batteries, replace it with a new unit, available through an authorized Fleetwood Service Center.

The plumbing systems in your motor home are constructed of thermoplastic materials. Holding tanks and piping components are strong, lightweight, and corrosion resistant.
FRESH WATER SYSTEM Fresh water is available from either an external "city water" hookup or on-board storage.
The external system is pressurized by the water system at an RV park or city water supply.
CAUTION Since water pressures at campgrounds vary,
. we recommend you install an in-line pressure regulator at the water. supply faucet. This will protect the motor home water system and your supply hose from excessively high water pressure.
City Water Connection
Connect the city water system as follows:
Open the protective door over the city water inlet (on some models only).
Connect one end of a potable water hose to park or city water supply. This will usually be a faucet or valve similar to your garden hose valve at home. "Potable water" hoses are available at RV supply stores.
Run the city water supply for a few seconds to clear the line.
Turn OFF the supply.
Connect the hose to the inlet fitting.
Tul'l1 ON the supply Open all faucets and clear the lines. Close laueets.
Disconnect the city water as follows:
Close the park or city water supply valve.
Remove the hos8 from the city water supply valve. Disconnect the hose from the inlet, coil and store it.
____ .. _______ . _______ .. _~ _ _.l!J
PLUMBING SYSTEMS
--_._--_.- ---~----~---.-.----------------
•
o
.. F.illing the Water Tank
CAUTION Overfilling the fresh water tank froril'apressurized source will cause serious damage to the water tank or structural components. Monitor water tank filling continually.
The on·board water storage tank may also be filled through a special filler cap outside the motor home. To fill the fresh water tank, open the spout, and fill the tank using a potable water hose. Check ttle rnonitor panel often to determine when tl1e tank is ful!.lf water is flowing from the top vent, your tank is overfilled. Stop filling. After filling the tank, replace vent plug and filler cap.
20
Avoid leaving water in the tank when the motor home is not in use. Turn the water pump OFF before drainln(l the water tank. Whenever possible, drain the fresh water tank before traveling. Water In the tank will reduce the carrying capacity of the motor home. See "Motor Home Loading" section of the "ON THE ROAD" chapter.
Water Pump
The on·board fresh water system is pressurized by a self'priming, 12·volt DC pump. The pump operates automatically when the pump power switch is ON and a faucet is opened. When the faucets are closed, the pump shuts off. At free flow, the pump draws approxi· mately 7 to 7·1/2 amps, and can run dry for extended periods without damage. A 15·amp fuse at the converter panel protects the pump circuit. See "H.ECTRICAL SYSTEMS" chapter.
Turn the pump master switch ON to pressurize the system. When a faucet IS opened after the initial filling of the tank, the water may sputter for a few seconds. This is normal and is not cause for concern. The water flow will become steady when all air is bled from the water lines.
Water Filter
Dirt, mineral scale, and organic matter are filtered out of the fresh water system by an in·line water filter on the inlet side of the .water pump. If you suspect a clogged filter, it is easily removed and cleaned.
Inspect the filter after the first 90 days of use, clean if necessary, and inspect annually thereafter.
Loosen the clamp at the inlet end of the filter.
Pull the water line off the filter.
Unscrew the filter from the water pump.
Turn each end of the filter and pull apart.
Flush out and clean screen.
Reverse procedure to install.
Opera!ethe water pump and cl1eck for leaks.
Troubleshooting The Fresh Water System
Water system problems usually fall into two categories: inherent system problems, and problems caused by neglect. System problems are usually tile result of road vibration and campsite water pressure variations. IJroblems of neglect usually stem from 'failure to clean filters, improper winterization, and poor battery maintenance
Most water system problems can be avoided by consci· entious maintenance.
Lea lIS
Vibration, flexing and twisting while traveling can work pipe fittings loose. Check all plumbing for leaks at least once a year. If the water pump runs when a faucet is not open, suspect a leak. Be sure the tank drain valves are tightly closed. Leaks occur most often around threaded fittings. If necessary, tighten or clean and tighten the fittings. Do not overtighten fittings. Connections at gal .. ley and lavy fixtures should not be tightened will1 a wrench. They will normally seal with hand·tightening. If a leak persists at one of the fittings, disconnect it completely and check for mineral deposits or other foreign matter at the seating surfaces. Clean the surfaces thoroughly and reinstall the fitting.
Connections at the water tank, pump and valves are made with special clamps. They can be replaced with. standard aircraft type hose clamps.
Leaks caused by freezing damage can be prevented by proper winterization of the system. See "STORAGE" chapter of this manual. FreeZing damage is usually extensive and may include a burst water tank, spilt piping, and a damaged water pump, toilet, and water heater. If you experience this type of damage, repairs can best be made by an authorized Fleetwood dealer.
Sanitizing The Fresh Water System
Sanitize the fresh water tan I< and piping approximately every three months, and whenever the motor home sits for a prolonged period. This will discourage the growth of bacteria and other organisms that can contaminate the water supply. Use a chlorine/fresh water rinse as follows:
1. Prepare a solution of 1/4·cup household liquid chlorine bleach (5% sodium hypochlorite) to one gallon of water for each 15 gallons of tank capacity.
2. Close drain valves and faucets, pour chlorine solution into the fresh water tank filler spout. and complete filling with fresh water.
3. Turn water pump switctl ON. (Be sure you have 12v(Jlt DC power.) Open all faucets indiVidually until water flows steadily, nlen turn off. This will purge any air from the lines.
4. Top off water tank with fresh water and wait three hours.
5. Drain the entire system by opening all fresh water tank valves, faucets, and plumbing line drain valves.
6. Flush the system wilh drinking quality water. Let the fresh water flow through the system for several minutes to flush out the chlorine solu· tion.
7. Mter you stop the flushing, close tile tank valve, faucets, and drain valves. You can now fill the tank with fresh water, and the system is ready to use.
Exterior Shower (Some models only)
A shower fixture is located in an exterior compartment o~ selected models. The water pump must be ON or city water pressure must be available for the shower to operate.
Please note that the special faucet al the galley is the only outlet for the purified water. Although purified water IS not available at the standard galley and lavy outlets, the waler available at these outlets is filtered by the water pump filter. Note also that this system is nol designed for or effective in removing or neutralizing bacterial contaminants.
WASTE WATER SYSTEM The waste water system in your motor home is made up of sinks. tub, shower, toilet, plumbing drain and vent lines, a "grey water" holding tank, and a "black water" holding tank. Generally, water from the sinks and shower drains into the grey water lank; the toilet drains into Ihe black water tank. The holding tanks rnake the system completely self-contained and allow you to dispose of waste water at your convenience. II flexible sewer hose is required to connect the holding lank outlet to the inlet of an approved waste water dump station or sewer system.
NOTE: Some floor plans require the shower and/or bathroom sink water to be drained into the black water tank.
The drain plumbing is similar to that used in your homo. The system is trapped and vented to prevent waste gases [rom backing up into the motor horne. The drain plumbing IS rnade of ABS plastic, and is durable and resistant to most chemicals.
Toilet .
Your motor home is equipped with a manne-type 1011et. Please follow the operatin9 instructions found in your Owner's Inforrnation Package.
21
Draining The Holding Tanks
The holding lanks terminate in a valve arrangement that permils draining each tank separately or together. The valves are called "knife valves". A blade closes the opening in the sewer drain pipes. The blade is con·· nocted to a T-handle that is pulled to release the conlerris of the tank(s). During self·containment use, the sewer line is securely capped to prevent leakage of waste material onto Ih" ground or pavement. DO NOT l"l.ILL THI= HOLDING TANK KNIFE VALVE OPEN WrIE~1 THE PROTECTIVE CAP IS INSTALLED ON THE PIPE. Always drain the tank into an acceptable sewer inlet or dump station.
WARNING HOLDING TANKS ARE ENCLOSED SEWER SVSTEMSANDAS SUCH MUST BE DRAINED INTO AN APPROVED DUMP STATION. BOTH BLACKAND GREY WATER HOLDING TANKS MUST BE DRAINED AND niOROUGHLY HINSED REGULARLV TO PREVENT ACCUMULATiON OF HARMFUL OR TOXIC MAT!:> RIALS.
Whenever possible, drain the holding tanks before t;'weling. Waste water and sewage in the holding tanks reduce the carrying capacily of the motor home. See "Motor Horne Loading" section of the "LIVING WITH YOUR MOTOn HOIVIE" ct18pter.
Drain the holding lanks only when Ihey are at least 3/4 full. If necessary, fill the tanks with water to 3/4 full. This provides sufficient water to allow complete lIushing of wasle material into the sewer line.
Durin\,! extended or semi·permanent hookups to sewage systems, waste materials will build up in the tank and cause serious plugging if the tank valves am continuously open. In -these CaSf)S, keep the valves closed until the tanks are 3/4 full, and then drain into the sewage systelTI.
The holding tank drain valve ouliet is to be usect willl a removable termination fitting that locks onlo the ouliet wilh a clockwise twist. Clamp the sewer drain hose to this fitting. A protective cap should remain in place when you are not drain.ing the tanks.
NOTE. LOCAL. OFI Eire\ FE flEGULA nONS MAY Pf10HIBIFFIICHIWA Y JRAVH UNLESS INE 110LDfNG 7ANK (JUILETIS SECUl7E:LY CAPPED.
22
To drain the holding tanks:
Attach the sewer hose to the holding tank outlet. Insert the end of. the hose into the sewer or dump station inlet, pushing it firmly far enough into the opening to be secure. In some cases, adapters may be necessary between the line and the inlet. Arrange the sewer hose so it slopes evenly.
Drain the black water holding tank first. Grasp the handle of the black water knife valve (the large one) firmly and slide the valve open with a quick, steady pull.
Aliow enough time for the tank to drain completely. Rinse and flush the tank through the toilet. When the tank is empty, push the handle in to close the valve. Run enough water into the tank to cover the bottom. This will aid the break up of solid wastes.
Black Water Tank Dumping
Grey Holding Tank D_u_m_p'--i_n.::,g'--___ J
To drain the grey water tank, repeat the steps above using the small knife valve. This tank is drained last to aid In f!ushlng the outlets and hose The grey water knife valve may be left open in a semi-permanent hookup.
Remove the sewer hose and cap the outlet.
Hinse out the sewer hose with fresh water and remove the sewer hose from the dump station.
Replace sewer or dump station covers.
PL.EASE ... PRACTICE GOOD HOUSEKEEPING WHEN DRAINING WASTES AT A CAMPSITE OR DISPOSAL STATION. LEAVE THE SITE IN GOOD ORDER. ABOVE ALL, DO NOT POLLUTE.
Holding Tank Care
Since holding tanks don't rely on any sophistrcated mechanical devices for their operation, they are virtually trouble free. The most common problem is also an unpleasant one-clogging. You can minimize the chances of clogging by keeping the following considerations in mind:
Keep the black water tank knife valve closed. Fill tank to at least 3/4 full before draining. Be sure to cover the tank bottom with water after draining.
Use only toilet tissue formulated for use in septic tank or RV sanitation systems.
Keep both knife valves closed and locked, and the drain cap tightly in place when using the system on the road.
Use only cleaners that are approved for use in septic tank or RV sanitation systems.
Use a special holding tank deodorant chemical approved for septic tank systems in the black water holding tank. These chemicals aid the breakdown of solid wastes and make the system much more pleasant to use.
Do not put facial tissue, paper, ethylene glycolbased or other automotive antifreeze, sanitary napkinsor household toilet cleaners in the holding tanks.
Do not put anything solid in either tank that could scratch or puncture the tank.
If the drain system does get clogged:
Use a hand-operated probe to loosen stubborn accumulations. Seriously clogged P-traps may require disassembly. Be careful not to overtighten when reassembling.
Do not use harsh household drain cleaners.
Do not use motorized drain augers.
Sometimes the holding tank valve will get clogged.
In this case, a hand .. operated auger may be necessary. Be ready to close the valve quickly once the clog is cleared. If the seal gets dam .. aged. it is easily replaced.
The electrical systems in your motor home are designed and built in accordance with all regulations, codes, and standards in effect at the time the motor home was built.
CHASSIS ELECTRICAL SYSTEM This is the vehicle electrical system. It includes the vehicle battery, charging system, ignition system, instrumenl panel and controls, and the headlights, taillights, turn signals. and other vehicle lights and accessories.
Chassis Bufbs And Fuses
Replace bulbs with equivalent types as marked on the bulb.
Fuses for the chassis electrical system are located under the instrument panel on the left. Additional fuses may be located under the hood. Others. may be found in the 12-volt power leads on the related equipment and accessories.
12-VOLT COACH SYSTEM All 12-volt lighting fixtures, convenience outlets, 12-volt powered vents, fresh water pump, and 12-volt accessories are included in this system.
The 12-volt power is provided by special deep-cycle, high capacity coach storage battery/ies. Power is also provided by anAC/DC power converter for use when the motor home is plugged into a 120-volt power source. Battery charge is maintained by the motor home engine alternator, or by the converter.
NOTE: All living area radios and tape decks draw from the chassis or coach battery, and extended usage when not traveling may discharge them.
Battery Disconnect (Some models only)
Some accessories or equipment such as clocks, radios, or the relrigerator may draw small amounts of current even wilen turned ·'OFF:". A relay-operated disconnect system allows you 10 disconnect either the chassis battery or tl18 coach battery or both. Disconnecting the battenes will help roduce Ihe likelih60dof battery discharge over long storage penods ..
If you plan to store the motor horne lor over ten days, press switch/os to or+. Rmnernber to press switch/es to 01\1 when the motor home is taken out 01 storage.
23
ELECTRICAL SYSTEMS
-------~--------~~-~ ---_._-----._-----------------.
WARNING DO NOT USE THE MOTOR HOME WHEN THE COACH BATTERY IS DISCONNECTED. THE POWER STEP WILL NOT OPERATE AS DESIGNED IF THE COACH BATTERY IS DIS .. CONNECTED.
Auxiliary Start System
The Auxiliary Start System permits using the ,coach battery to start the motor home engine if the chassis battery is discharged. To use the Auxiliary Start System:
1. Be sure the vehicle is stopped, shifl to "P" (PARK) and apply the parking brake.
2. Press~and hold the Auxiliary Start switch on the' instrument panel.
3. Start engine with ignition switch.
4. Release Auxiliary Start switch.
The Auxiliary Start System has no effect on the vehicle except to aid in starting the motor home engine. If the vehicle alternator is operating properly, the batteries will be recharged while driving.
Battery Inspection And Care
WARNING DISCONNECT THE 120-VOLT ELECTRIC CORD AND THE NEGATIVE TERMINAL FROM THE COACH BATTERY/IES BEFORE WORKING ON EITHER ELECTRICAL SVS· TEM..
WARNING REMOVE RINGS, METAL WATCHBANDS, AND OTHER METAL JEWELRY BEFORE WORKING AROUND A BATTERY, USE CAUTION WHEN USING METAL TOOLS. IF A TOOL CONTACTS A BATTERY TERMINAL OR METAL CONNECTED TO IT, A SHORT CIRCUIT COULD OCCUR WHICH COULD CAUSE PERSONAL INJURY on FIRE.
24
WARNING DO NOT ALLOW BATTERY ELECTROLYTE TO CONTACT SKIN, EYES, FABRICS, OR PAINTED SURFACES. THE ELECTROLYTE IS A SULFURIC ACID SOLUTION WHICH COULD CAUSE SERIOUS PERSONAL INJUFW OR PROPERTY DAMAGE. WEAR EYE PROTECTION WHEN WORKING WITH BATTERIES.
Check the external condition of the battery periodically. Look for cracks in the cover and case. Check the vent plugs and replace if they are cracked or broken. Keep the battery clean. Accumulations of acid film and din rnay permit current to flow between the terrninals and discharge the battery. .
To clean the battery, wash it with a diluted solution of baking soda and water to neutralize any acid present, then flush with clean water Foaming around terminals or on top of the battery is norrnal acid neutralrzation. Avoid getting the soda solution in the battery. Be sure the vent caps are tight. Dry the cables and terrninals. Don't use grease on the bare metal insrde the cable terrninals to prevent corrosion. Grease is an insulator. Electricity Will not flow through it. A plastiC ignition spray will protect the terrninals after you have cleaned and reinstalled Ihem.
Check the battery often. Keep the carrier and hold down hardware clean and free of corrosion and chemical accumUlation.
Battery Charging
Both sets of batteries will be kept charged by the chassis charging system while on the road. The ACIDC power converter will charge the coach battery when plugged into '120-volt service. On those occasions when the battery needs to be charged from a different charging source, please follow these guidelines:
Leaving a charger connected to a battery for an extended period of time can shorten battery life.
WARNING NEVEFl EXPOSE THE BATTEF1Y TO OPEN FU~ME OR ELECTRtC SPARK. CHEMICAL ACTION IN HIE BATTERY GENERATES HYDROGEN GAS WHICH IS FLAMMABLE tlND EXPLOSIVE. DO NOT ALLOW BATTERY ELECTROLYTE TO CONTACT SKIN, EVES, FABRICS, OR PAINTED SURFACES.
Do not smol<e near battoric)S being charged or which have been recently charged. Pleasenote that batteri'es are bCling charged while you driv8, . and while you are connected to "120-volt power 1ilrough the converter/charger clfcuil.
Do not break live Circuits at the terminals of the battery. Use care when connecting or disconnecting booster leads or cables. These actions, and poor connections, are a common cause of electrical arcs which can cause an explosion.
Check and adjust the electrolyte level before charging. Fill each cell to the Indicator with distilled water.
Always remove vent caps before charging the battery.
Do not charge the battery at a rate that causes the electrolyte to spew out.
Selecting A Replacement Battery
When the battery requires replacernent, always choose a battery with the sarne physical and electrical characteristics as the original equipment. Your dealer or an authorized Fleetwood Service Center can advise you on proper battery selection.
120-VOLT SYSTEM This systern provides grounded eleG;trical service for appliances such as air conditioners: TV, microwave ovens, etc. The 120-volt system also provides a power source for the converter.
Your motor home is equipped with a heavy duty power cord to connect to an external 120-volt, 30 amp .AC service. The cord and connector are rnolded together to forrn a weatherproof cable assembly. Do not cut or alter the cable in anyway. Do not remove the ground pin in the cable connector, or defeat the ground circuit in the motor home.
WARNING DO NOT OPERATE THE 120-VOLT ELECTRICAL SYSTEM WITHOUT A PROPER GROUND. ELECTROCUTION OR SEVERE ELECTRIC SHOCK COULD RESULT.
. Power Converter
The converter will automatically supply 12-volt power when your rnotor home is oper·ating on 120-volt power frornthe generator or a public utility. It wilralso charge the coach battery.
Power Inverter (Optional on some rnodels)
The power inverter is designed to provide power ·to a 120·volt TV and VCR. See "Entertainment Equipment" sectionin the "APPLIANCES" chapter.
Ground Fault Interrupter
Bathroom, galley and patio 120-volt electrical outlets are protected by a Ground Fault Interrupter (GFI). This device is intended to protect you against the hazards of electrical shocks possible when using electrical appliances in Ihe bathroom or galley or in damp areas. Should a circuit or appliance (electric shaver, hair dryer, etc.) develop a potential shock hazard, the GFI device is designed to disconnect the outlet (and other outlets on the same circuit), limiting your exposure time.
NOTE: If an ou/fetdoesn't work, check the GFI. Reset it if necessary. If the GFI continues to trip, have the motor home electrical system checked at an authonzed Fleetwood Service Center or by a qualified electrician.
Test tl,e GFI at least once a monlh. To test the GFI, connect to 120-volt AC.
Push the "TEST" button. The "RESET" button should pop out, indicating that the protected circuit has been disconnected.
WARNING ·IF THE "RESET" BUTTON DOES NOT -flOP OUT WHEN THE TEST BUTTON IS PUSHED, A LOSS OF GROUND FAULT PROTECTION IS INDICATED. DO NOT USE ANY ELECTRICAL OUTLETS. HAVE THE MOTOR HOME ELECTRICAL SYSTEM CHECKED AT AN AUTHORIZED FLEETWOOD SERVICE CENTER OR BY A QUALIFIED ELECTRICIAN. DO NOT USE THE SYSTEM UNTIL THE PROBLEM HAS BEEN CORRECTED.
To restore power push the "RESET" button.
Your Owner's Information Package contains a card that can be used to record test dates. Keep the card in a conspicuous place, and keep it up to date.
COACH FUSES AND CIRCUIT BREAKERS The 120-volt circuit breakers and 12-volt luses are located in the same compartment. These devices interrupt the power If the circuit IS overloaded.
The 120-volt circuit breakers include a 30 amp main breaker and several smaller breakers for individual CIrcuits. If a circuit breaker IS tripped. look for an overload on that circuit, then reset It by lurning the breaker OFF and then turning It ON. Do nol try to reset a breaker the second time without locating the overload problem.' Thel2-volt fuses protcct Individual circuits. If the Clfcuit
25
is overloaded, it will blow the fuse and the fuse rnust be replaced. Check the circuit for an overload and replace the fuse with the same type and amperage rating.
WARNING DO NOT INSTALL 12-VOLT FUSES OR 120-VOLT BHEAKERS WITH AMPERAGE RATINGS GREATER THAN THAT SPECIFIED ON THE DEVICE OR LABEL. DOING SO CONSTITUTES A FIRE HAZARD.
GENERATOR Your motor home may be equipped with a gasolinepowered generator which will provide complete electrical self-containment when regular public utility AC power is unavailable. Controls are at the generator and at a remole control panel located inside the motor horne.
With the generator operating, power is available at all of the 120-volt power outlets in the motor rlome.lust as if the cord were connected to an external source. The generator is also connected to the power converter, thus supplying 12-volt power as well.
Generator Fuel Supply
Gasoline for the generator is taken from the main luel tank through a special feeder tube which is higher in the tank than the feeder tube to the rnotor home. This arrangement prevents the generator from running the
• rnotor home fuel tank dry.
For Chevrolet Chassis only: The generator can run the fuel tank dry if it is operated while the motor home engine is running. If the motor home engine is not running, the generator will run until the tank is at approximately the 1/4-tank level.
Generator Operation
NOTE: Refer to the generator operating m· struction manual provided in your Owner's Information Package for information before starting the generator Donat start the generatorunit with a heavy power load. Always wait at least three minutes after starting generator before turning on (or plugging in) heavy electrical loads. such as the roof air conditioner.
To start Ihe generator, hold the switch in the STAFIT position until the unit starts, then release the switch. If the unit is slow to slart, DO NOT hold the switch In the START position for more than 10 seconds. Flelease the switch, wart 15seconds, then repeat. This will help avoid ovorhealing and damage to 1I1e generator slartlng system. Til stop the unit, hold the switch 10 the S'TOc' pOSition until the englno stops. If you release Iho SWitch too soon, the engine will continue to run,
.-;:
26 ------_._--
Generator Operating Safety Precautions
!lead and understand the generator operating, maintenance and safety instructions furnished in your Owner's Information Package.
Do not smoke or use an open flame near the generator unit or fuel tank.
WARNING DO NOT PLACE FLAMMABLE MATERIAL OR STORE ANY OTHER MATERIALS IN THE GENERATOR COMPARTMENT.
WARNING DO NOT BLOCK THE GENERATOR VENTILATING AIR INLETS OR OUTLETS, THE ENGINE REQUIRES A CONSTANT SUPPLY OF COOLING AIR. RESTRICTED VENTILATING AIR INLETS OR OUTLETS CAN CAUSE ENGINE FAILURE OR FIRE FROM ENGINE OVERHEATING.
Do not use generator ventilating air for heating any . ,. irterior living space. Ventilating air can contain high
concentrations of lethat gases.
Check engine fuel lines often. Fuel leakage in or around the compartment is an extreme fire hazard. Do not use the generator until fuel leaks are repaired.
WARNING , EXHAUST GASES ARE DEADLY. tNSPECT
THE GENERATOR EXHAUST SYSTEM THOROUGHLY BEFORE STARTING THE GENERATOR ENGtNE. DO NOT BLOCK THE TAIL PIPE OR SfTUATE THE MOTOR HOME IN A PLACE WHERE THE EXHAUST GASES HAVE ANY POSSIBILITY OF ACCUMULATING EITHER OUTSIDE, UNDERNEATH, OR INSIDE YOUR VEHICLE OR ANY NEARBY VEHICLES. OUTSIDE AIR MOVEMENTS CAN CARRY EXHAUST GASES INSIDE THE VEHICLE THROUGH WINDOWS OR OTHER OPENINGS REMOTE FROM THE GENERA .. TOR EXHAUST. OPERATE THE GENERATOR ONLY WHEN SAFE DISPERSION OF EXHAUST GASES CAN BE ASSURED, AND MONITOR OUTSIDE CONDITIONS TO BE SURE. THAT EXHAUST GASES CONTINUE TO BE DISPERSED SAFELY.
Be aware of exhaust gas (carbon monoxide) poisoning symptoms. Refer to section on "Carbon Monoxide Safety Precautions" in the "ON THE ROAD" chapter.
WARNING DO NOT UNDER ANY CIRCUMSTANCES OPERATE THE GENERATOR WHILE SLEEPING. YOU WOULD NOT BE ABLE TO MONITOR OUTSIDE CONDITIONS TO ASSURE THAT GENERATOR EXHAUST DOES NOT ENTER THE INTERIOR, AND YOU WOULD NOT BE ALERT TO EXHAUST ODORS OR SYMPTOMS OF CARBON MONOXIDE POI-
. SONING.
Check the generator exhaust system after every 8 hours of operation and whenever the system may have been damaged, and repair any leaks or obstructions before further operation. Disconnect the battery before performing any maintenance on the generator. Allow the generator to cool sufficiently before performing any maintenance.
WARNING DO NOT OPERATE THE GENERATOR WHEN PARjS:ED IN OR NEAR HIGH GRASS OR BRUSH. EXHAUST HEAT MAY CAUSE A FIRE.
DO NOT MODIFY TH,E GENERATOR INSTAL. LATION OR EXHAUST SYSTEM IN ANY WAY.
DO NOT USE THE GENERATOR AS AN EMERGENCY POWER SOURCE TO A GENERAL RESIDENTIAL OR INDUSTRIAL UTILITY LINE. THIS IS ILLEGAL AND MAY RESULT IN SHOCK OR ELECTROCUTION TO POWER LINE UTILITY PERSONNEL ATTEMPTING REPAIRS TO THE POWER LINES.
ELECTRICAL SYSTEM WIRING Because of the many model, floor plan and option variations available, it is beyond the scope of this manual to include all wiring diagrams possible. In certain situations, specifiC wiring diagrams may be available to help troubleshoot a problem. If you need specific wiring Information, please contact your dealer. Complete Wifing diagrams are not available.
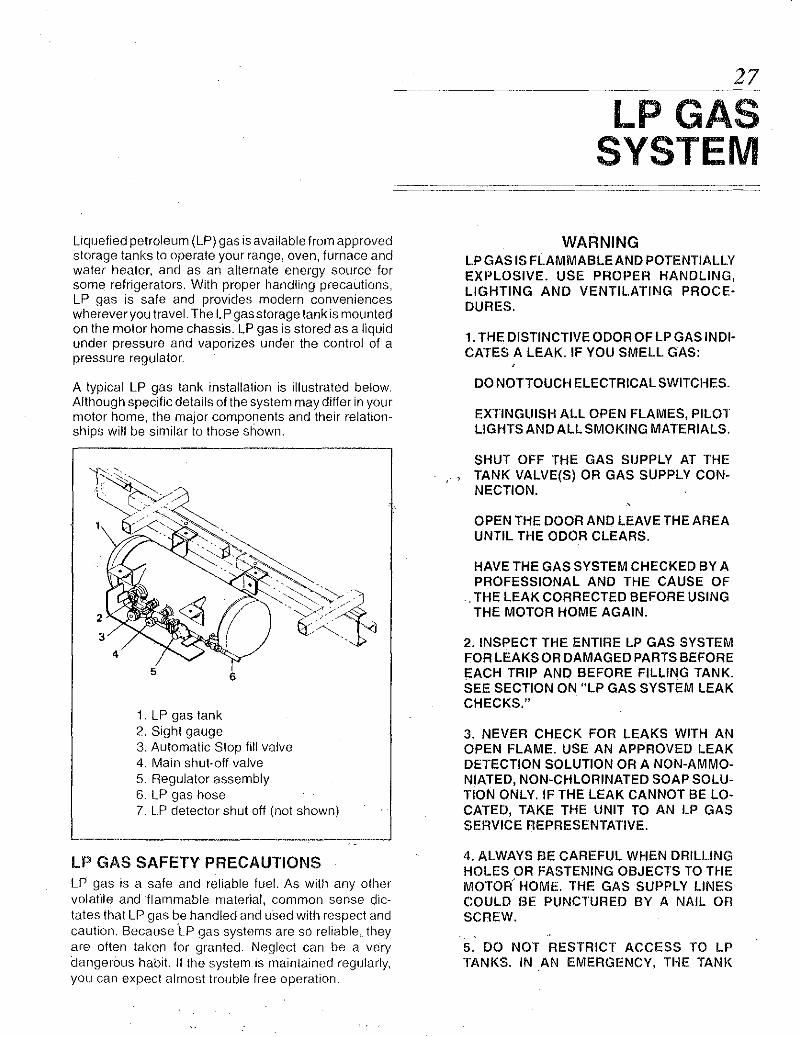
Liquefied petroleum (LP) gas is available from approved storage tanks to operate your range, oven, furnace and water heater, and as an alternate energy source for some refrigerators. With proper handling precautions, LP gas is safe and provides modern conveniences wherever you travel. The LP gas storage tank is mounted on the motor home chassis. LP gas is stored as a liquid under pressure and vaporizes under the control of a pressure regulator.
A typical LP gas tank installation is illustrated below. Although specific details of the system may differ in your motor home, the major components and their relationships will be similar to those shown. ,--------------
6
1. LP gas tank 2. Sight gauge 3. Automatic Stop fill valve 4. Main shut-off valve 5. Regulator assembly 6. LP gas hose 7. L.P detector shut off (not shown)
LP GAS SAFETY PRECAUTIONS LP gas is a safe and reliable luel. As wittl any other volatile and flammable material, common sense dictates that LP gas be handled and used with respect and caution. Because 'LP gas systems are so reliable, they are often taken for granted. Neglect can be a very dangerous habit. If the system IS maintained regularly, you can expect almo(;t trouble free operation.
27 --------_._--- -----
LPGAS SYSTEM
WARNING LP GAS IS FLAMMABLE AND POTENTIALLY EXPLOSIVE. USE PROPER HANDLING, LIGHTING AND VENTILATING PROCE· DURES.
1. THE DISTINCTIVE ODOR OF LP GAS INDI· CATES A LEAK. IF YOU SMELL GAS:
DO NOTTOUCH ELECTRICAL SWITCHES.
EXTINGUISH ALL OPEN FLAMES, PILOT LIGHTS AND ALL SMOKING MATERIALS.
SHUT OFF THE GAS SUPPLY AT THE TANK VALVE(S) OR GAS SUPPLY CON· NECTION.
OPEN HiE DOOR AND LEAVE THE AREA UNTIL THE ODOR CLEARS.
HAVE THE GAS SYSTEM CHECKED BY A PROFESSIONAL AND THE CAUSE OF
, THE LEAK CORRECTED BEFORE USING THE MOTOR HOME AGAIN.
2. INSPECT THE ENTIRE LP GAS SYSTEM FOR LEAKS OR DAMAGED PARTS BEFORE EACH TRIP AND BEFORE FILLING TANK. SEE SECTION ON "LP GAS SYSTEM LEAK CHECKS."
3. NEVER CHECK FOR LEAKS WITH AN OPEN FLAME. USE AN APPROVED LEAK DETECTION SOLUTION OR A NON·AMMO· NIATED, NON·CHLORINATED SOAP SOLU· TlON ONLY. IF THE LEAK CANNOT BE LO· CATED, TAKE THE UNIT TO AN LP GAS SERVICE REPRESENTATIVE.
4. ALWAYS BE CAREFUL WHEN DRILLING HOLES OR FASTENING OBJECTS TO THE MOTOR' HOME, THE GAS SUPPLY LINES COULD BE PUNCTURED BY A NAIL on SCREW.
5. DO NOT RESTRICT ACCESS TO LP TANKS. IN .AN EMERGENCY, THE TANK

28
SERVICE VALVE MUST BE EASILY IDENTI·· FlED AND ACCESSIBLE. THE TANK COIVI· PARTMENT DOOR MUST ALWAYS BE UNLOCKED,ANDTHE LP LABEL SHOULD BE VISIBLE.
6. DO NOT CARRY OR STORE FILLED OR EMPTY LP GAS CONiAINERS, INCLUDING ACCESSORIES SUCH AS GAS BARBECUES, IN YOUR MOTOR HOME. LP GAS CONTAINERS ARE EQUIPPED WITH A SAFETY DEVICE THAT RELIEVES E)(CESSIVE PRESSURE BY DISCHARGING GAS TO THE ATMOSPHERE. LEAKS CAN OCCUR AT VALVES AND FITTINGS. ALWAYS STORE l.P TANKS OUTSIDE WITH THE VALVES Cl.OSED AND PLUGGED.
7. DO NOT USE ANY LP GAS TANK OTHER THAN THE ONE FURNISHED WITH YOUR
. MOTOR HOME WITHOUT BEING SURE THAT ALL CONNECTING COMPONENTS ARE COMPATIBLE.
8. TURN OFF LP GAS MAIN VALVE BEFORE FILLING LP GAS TANK OFl ENTERING AN LP GAS BULK PLANT on MOTOR FUEL SERVICE STATION. TURN OFF ALL PILOT LIGHTS AND APPLIANCES INDIVIDUALLY BEFORE REFUELING OF MOTOR FUEL TANKS AND/OR LP GAS CONTAINERS. WHEN NOT INDIVIDUALLY TURNED OFF, AUTOMATIC IGNITION APPLIANCES MAY CONTINUE TO SPARK WHEN LP GAS IS TURNED OFF AT THE CONTAINER.
9. DO NOT FILL LP GAS CONTAINERS TO MORE THAN 80% CAPACITY. OVERFILLING CAN RESULT IN UNCONTROLLED GAS FLOW WHICH CAN CAUSE FIRE AND EXPl.OSION. A PROPERLY FILLED CON· TAINER HOLDS ABOUT 80% OF ITS VOLUME.AS LIQUID.
10. LP GAS REGULATORS MUST ALWAYS BE INSTALLED WITH THE DIAPHRAGM VENT FACING DOWNWi\RD. MAKE SURE THAT THE REGULATOR VENT FACES DOWNWAFlO AND THIO\1' THE COVER is KEPT II'! Pl.ACE TO MINiMIZE VENT BLOCKAGE WHICH COULD RESULT IN E)(CESSIVE GAS PFlESSURE CAUSING FIRE or~ EXPLOSION.
II. DO NOT USE A WRENCil on PLIERS TO CLOSE THE TANK SHUT-OFF VALVE. Tl-m; VALVE IS DESIGNED TO BE CLOSED LEAKTIGHT B'I HJ\~lD. IF J\ TOOL IS FlF,OUIllED
TO STOP A l.EAK, THE VAl.VE PROBABLY NEEDS REPAIR OR REPLACEMENT.
12. IF YOU DO NOT HAVE THE SPECIAL TOOLS AND TRAINING NECESSARY, DO NOT ATTEMPT TO REPAIR OR MODIFY LP GI~S SYSTEM COMPONENTS.
13. ALWAYS THINK SAFETY.
SYSTEM COMPONENTS Hoses
The hoses used in your LP gas system are UL or CSA listed, and are rated to withstand many times the pressures encountered in the system. Although they are designed for efficient and trouble free use, they can deteriorate from impurities in the air. The average life of LP hoses is two to three years. Consequently, check the hoses for weather checking or other signs of deterioration every time you have the gas tank filled or serviced . When you replace hoses, be sure that reptacements are properly rated and approved for RV use.
LP Gas Regulator
The regulator is the heart of the LP gas system. It reduces the tank pressure. which can vary from 250 psi to 7 psi, to a steady 6 ounces (11 inches of water column) to serve the appliances in the motor home. It does this in two stages for safety and efficiency.
Because the regulator is constantly "breathing". it is equipped with a vent. It is very important that the vent stays clean and free from obstruction. Clogging from corrosion, dirt, insect nests or other debris is the most common cause of regulator malfunction. Even a small piece of material that finds its way into the vent can result in improper pressure in the system ·and pOSSible damage to or failure of components. The regulator is mounted so that the vent is facing downward and is protected from water and dirt bya water-resistant cover. Be sure the cover is on at all times. If the vent becomes clogged, it can be cleaned with a toothbrush. If corrosion is evident, contact a qualified LP gas service technician for a replacement regulator.
WARNING 00 NOT ATTEMPT TO ADJUST THE REGULATOA-.· IT HAS BEEN PRESET BY THE REGULATOR MANUFACTURER. IF ANY ADJUSTMENT IS REQUIRED, IT.MUST BE MADE BY A QUALIFIED LP GAS SERVICE TECHNICIAN USING SPECIAL EOUIPMENT.
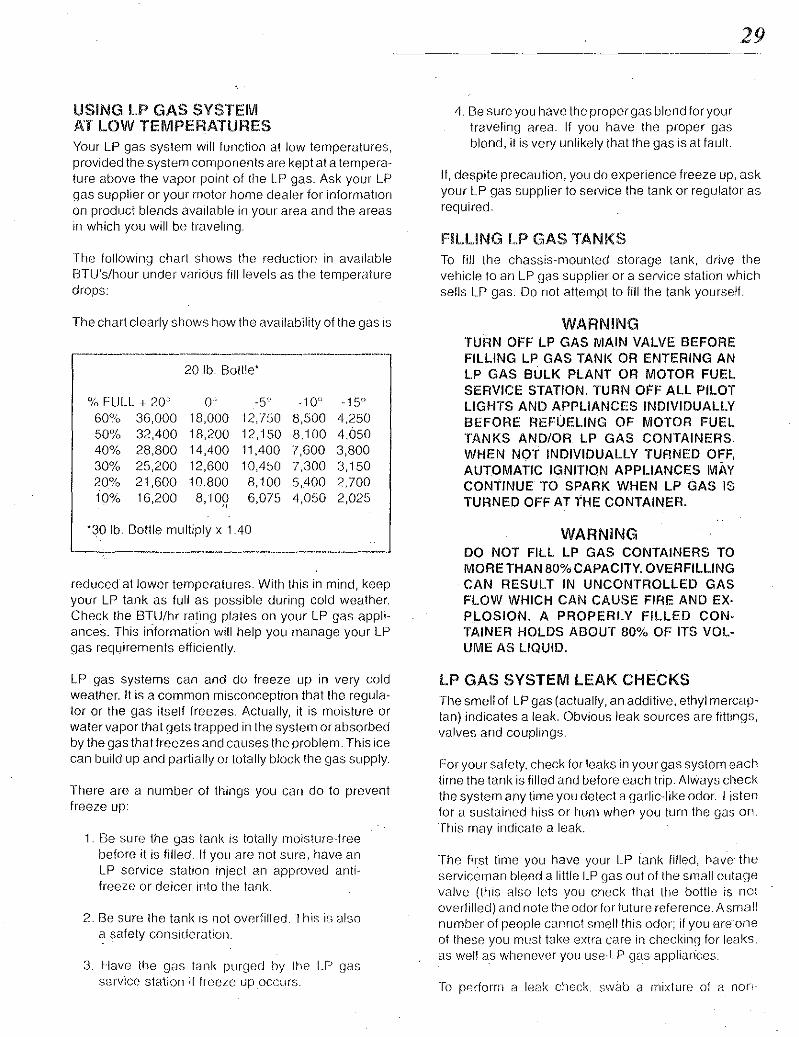
USING LP GAS SYSTEIVI AT LOW TEIVIPERATURES Your LP gas system will function at low temperatures, provided the system components are kept at a temperature above the vapor pOint of the LP gas. Ask your LP gas supplier or your motor home dealer for information on product blends available in your area and the areas In which you will be traveling.
The following chart shows the reduction in available BTU's/hour under various fill levels as the temperature drops:
The chart clearly shows how the availability of the gas is
20 lb. Bottle'
% FULL + 20' 0' -5" -10" -15 0
60~,~ 36,000 18,000 12,"150 8,500 4,250 50% 32,400 18,200 12,150 8,100 4,050 40% 28,800 14,400 11,400 1,600 3,800 30% 25,200 12,600 10,450 7,300 3,150 20~/o 21,600 10.800 8,100 5,400 2.700 l' OO/~ 16,200 8,10R 6,075 4,050 2,025
'30 Ib Bottle multiply x 1.40
reduced at lower temperatures. With this in mind, keep your LP tank as full as possible during cold weather. Check the BTU/hr rating plates on your LP gas appliances. This information will help you manage your LP gas requirements efficiently.
LP gas systems can and do freeze up in very cold weather. It is a common misconception that the regulator or the gas itself freezes. Actually, it is moisture or water vapor that gets trapped in the system or absorbed by the gas that freezes and causes the problem. This ice can burld up and partially or totally block the gas supply.
There are a number of things you can do to prevent freeze up:
1. lJe sure the gas tank IS totally moisture-free before it is filled. If you are not sure, have an LP service station inject an approved anti· freeze or deicer into the tank.
2. Be sure the tank is not overfilled. This ic; also a safety consKieration.
3. 1·laV(, the gas tank purged by the IP gas sBrvice station if freeze up .occurs.
--- .. --~-."--
4. Be sure you have the proper gas blend for your traveling area If you have the proper gas blend, it is very unlikely that the gas IS at fault.
29
If, despite precaution, you do experience freeze up, ask your LP gas supplier to service the tank or regulator as required.
Fil.LlNG LP GAS TANKS To fill the chassis-mounted storage tank, drive the vehicle to an LP gas supplier or a service station which sells l.P gas. Do not attempt to fill the tank yourself.
WARNING TURN OFF LP GAS MAIN VALVE BEFORE FILLING LP GAS TANK OR ENTERING AN L.P GAS BULK PLANT OR MOTOR FUEL SERVICE STATION. TURN OFF ALL PILOT LIGHTS AND APPLIANCES INDIVIDUALLY BEFORE REFUELING OF MOTOR FUEL TANKS AND/OR LP GAS CONTAINERS. WHEN NOT INDIVIDUALLY TURNED OFF, AUTOMATIC IGNITION APPLIANCES MAY CONTINUE TO SPARK WHEN LP GAS IS TURNED OFF AT THE CONTAINER
WARNiNG DO NOT FILL LP GAS CONTAINERS TO MORE THAN 80% CAPACITY. OVERFILLING CAN RESULT IN UNCONTROLLED GAS FLOW WHICH CAN C,£I,USE FIRE AND EXPLOSION. A PROPERLY FILLED CONTAINER HOLDS ABOUT 80% OF ITS VOLUME AS LIQUID,
LP GAS SYSTEM LEAK CHECKS The smell of LP gas (actually, an additive, ethyl mercaptan) indicates a leak. Obvious leak sources are fittings, valves and couplings.
r"or your safety, check for leaks in your gas system each time the tank is filled and before each trip. Always check the system any time you detect a garlic-like odor. Listen for a sustained hiss or hum when you turn the gas on fhis may indicate a leak.
The first time you have your LP tank filled, have the serviceman bleed a little U' gas out of the small outage valve (thiS also lE,ts you crleck that the bottle is not overfilled) and note the odor for future reference. Asmall number of people cannot smell this odor; if YOll are one of these you must take extra care in checking for leaks, as well a,s whenever you use·LP gas- appliarlces.
To p{~dorrn a leak check. swab a mixture of 3 non-
30
ammoniated, non-chlorinated soap solution or an approved leak detection solution over each fitting, Joint and connection in the system. Open the tank service valve. Inspect each joint. If even the smallest bubbles appear at any joint, this joint must be re-made. Refer repairs to an authorized Fleetwood service center or your LP gas service facility. Never attempt to repall gas piping Without proper tools and know-how.
Potential trouble spots for leaks are areas where piping runs close to chassis and frame members. Look for chafes and cracks around pipe hangers. If you find defects in any LP gas system component, have it repaired or replaced before uSing the system.
As an added precaution, do a visual check of all exposed piping and fittings after you have arrrved at a destination and before you use the LP gas system. Travel and road shocks may have caused damage to the system that you will need to repair before using the appliances.
WARNING NEVER CHECK FOR LEAKS WITH AN OPEN FLAME. DO NOT CHECK FOR LEAKS USING AMMONIATED OR CHLORINATED HOUSEHOLD TYPE DETERGENTS. THESE CAN CAUSE CRACKS TO FORM ON THE METAL TUBING AND BRASS FITTINGS. IF THE LEAK CANNOT BE LOCATED, TAKE THE UNIT TO AN LP GAS SERVICE REPRESENTATIVE.
Keep the tank valve closed and turn off all appliances if the unit is not being used.
WARNING DO NOT USE PLIERS OR A WRENCH TO TIGHTEN VALVES. fFA VALVE IS NOT LEAKTIGHT WHEN CLOSED BY HAND, SEE AN LP GAS SERVICE REPRESENTATfVE.
LP LEAK DETECTOR A permanently installed LP gas leak detector is located near the floor in the galley area. The unit contains an alarm that will sound alerting you to the presence of low levels of potentrally dangerous LP gas that may have been released due to a gas leak. The unit Will also disconnect the gas supply at the LP tank when it senses LP or similar gases such as hair spray or cleaning solvent.
The detector unit is powered by the 12 .. volt DC system .. in your motor home. A power switcll is located on the panel. A green light on the detector 'rront panel indicates that the detector has power. If the power switch is OFF, gas flow from the tank IS cut off by a special solenoid valve located at the tank.
Test the leak detector each time the motor home is relocated and set up for use.
Testing Procedure:
'Hold a butane-fueled pocket lighter near the sensor.
'Open the lighter valve without striking the flame, The leak detector should respond within a few seconds.
'Press the silence button to reset the alarm. 'Lightly fan the area around the detector to in sure complete dispersion of the gas from the lighter, and to prevent another sounding of the alarm.
A silence button allows you to temporarily quiet the alarm for 60 seconds after it has been set off or after testing,
If the alarm does not sound during a test or if the green indicator light is not visible, see your dealer or an authorized Fleetwood Senvice Center. There are no batteries or user senviceable parts inside the unit.
NOTE: Remember to turn off the detector if you are not using your motor horne. The detector draws enough current to discharge your battery.
LIGHTING LP GAS APPLIANCES Detailed operating information for the LP gas appliances can be found in your Owner's Information Package. Please read and follow these instructions
Air trapped in the gas lines may delay the initial lighting of any appliance. It could take several seconds or minutes for the gas to reach the appliance. To purge some of the air frorn the gas system, first light a burner on the range. The other appliances will then light more quickly.
We recommend lighting the pilot light at the range, if equipped, rather than individually lighting each burner. This will help prevent accidental leaks at the burner. Be sure the pilot light is extrnguished while traveling.
The firsttime the furnace or oven is operated, paints and oils used in lis manufacture may generate some srnoke and fumes. II this occurs, open doors and windows to air out the motor home, These materials should burn off after the first '15 to 20 minutes of appliance operation.
ALWAYS FOLLOW THE APPLIANCE MANUFACTURER'S LIGHTING AND OPERATING INSTRUCTIONS.

The appliances installed in your motor home are tested by independent laboratories and comply with rigid standards established by these organizations. All appliances are covered by Fleetwood's Ownercare Warranty program. Each appliance is also warranted by its manufacturer.
NOTE: The individual appliance manuals included in your Owner's Information Package contain detailed operating and maintenance instructions. Always refer to the respective manual lor the appliance in question.
WARNING THE WATER HEATER AND FURNACECQMBUSTION AIR EXHAUST PORTS MAYBE EXTREMELY HOT DURING WATER HEATER AND FURNACE OPERATION. DO NOT TOUCH THESE OUTLETS OR ALLOW ANY MATERIAL TO COME WITHIN CLOSE PROXIMITY OF EXHAUST PORTS WHILE OPERATING THE WATER HEATER AND/OR FURNACE.
WATER HEATER The water heater operates on LP gas, and is much like the one in your home. It contains an automatic shut off valve, which stops the gas supply if the water temperature rises too high. The water heater is reached through an access panel on the outside of the motor home.
CAUTION Do not light water heater until it is filled with water.
Turn on the hot water faucet at the galley sink. If wattlr flows continuously, the heater is full.
REFRIGERATOR Consult the operating instructions furnished in your Owner's Information Package. Belore operating the refrigerator when the motor horne is parked, make sure It is level. If it is not level, the refrigerant will not circulate, cooling action will stop. and the refrigeration system may be damaged.
31
APPLIANCES .. _-------------,.,---_._---------_._----------
The refrigerator uses the absorption principle of operation. If you plan to cool food or drinks in high outside temperatures, pre-cool the food, and park the motor home with the refrigerator vent door in the shade. Once the interior of the refrigerator is cool, the refrigeration systern will usually maintain this temperature. If the inside of the refrigerator is hot, the food is not precooled, and the outside temperature is high, be prepared for longer cooling times.
Acrylic Refrigerator Door Panels
Some refrigerator models are equipped with a decorative acrylic door panel. Use a cleaner speCially formulated for acrylics and a soft cloth to clean this surface. Do not use harsh or abrasive detergents or cleansers.
FURNACE' The furnace is a forced-air fueled by LP gas. All furnaces are equipped with a wall thermostat for individual temperature settings.
The furnace will not operate properly if your stored personal Items block the free flow of air at the registers or the return air to the furnace. Storage under cabinets should be done carefully so as to not crush or damage the furnace ducting.
Smoke and fumes created as a result of burning off manufacturing compounds are sometimes present the first time the furnace is used. This is normal; however, the initial light off should be done with windows and doors open and be of adequate duration to completely burn off the residue.
WARNING PORTABLE FUEL-BURNING APPLIANCES AFlE NOT SAFE FOR HEATING INSIDE THE MOTOR HOME. ASPHYXIATION OR CAFlBON MONOXIDE POISONING CAN OCCUR.
RANGE The gas oven and burners are operated with LP gas. 'The basiC operation is the same as the range III your home.

32
A warning label has been located In the cooking area to remind you to provide an adequate supply of fresh air for combustion. Unlike homes, the amount of oxygen is limited in an RV due to the size and construction of the vehicle. Proper ventilation when using the cooking appliances will prevent the dangers of asphyxiation. Refer to "Lighting LP Gas Appliances" section in the "LP GAS SYSTEM" chapter of this manual.
WARNING 00 NOT USE OPEN FLAMES TO WARM THE LIVING AREA. GAS COMBUSTION CON·· SUMES THE OXYGEN INSIDE THE MOTOR HOME.
RANGE EXHAUST HOOD The exhaust hood allows vapors and cooking odors to escape, and provides a vent forthe galley area. Switches for the fan and light are located on the front of the Ilood. The hood has a grease filter screen which requires periodic cleaning. To clean, remove the screen and wash in soapy water. Rinsewith water and let the screen dry before replacing it. The fan blades may also be cleaned with soapy water. Replace the light bulb with an equivalent type.
The range hood may also house the monitor panel. Operating instructions for the monitor panel functions are in the "LIVING WITH YOUR MOTOR HOME" chapter of this manual.
AIR CONDITIONER (Optional)
The optional roof-mounted air conditioner can operate only when the motor home IS connected to 120-volt AC power from either a publiC utility or the generator. Be sure to tum the air conditioner circuit breaker ON.
For best performance, park the motor home in the shade and close curtains. Close doors and windows and turn the temperature control knob for desired coolness. Refer to the air conditioner manufacturer's Instructions for detailed operating and preventive maintenance requirements. Rememberthat air conditioners use a large portion of your available electrical power.
ENTERTAINMENT EQUIPMENT If additional equipment requiring 12-volt power is installed in the motor home, obtain the 12-volt source from a properly fused battery circuit. Consult an authorized Fleetwood dealer before adding any additional equipmen! to your motor horne.
120-Volt Television & VCR (Optional)
The optional 120-volt TV and VCFt will operate with 120-volt power from the generator, publiC utility, or the inverter (powered by 12-volt)
To operate on 12-volt: Turn the power inverter ON at the switch on the front of the inverter. This will change 12-volt battery power to 120-volt. Turn the VCR and TV on as normal. The TV may require pushing the Power ON switch several times if the TV is cold. To protect the TV and VCR circuits, a low battery feature will turn off the inverter and illuminate a red light. The inverter will automatically start when the batterres are recharged.
Turn the inverter off when not in use or when 120-volt power is available b€cause there is a small drain on the batteries even if the TV and VCR are off. The inverter will automatically pass through 120-volt generator or public utility power when available.
120-Volt VCR (Optional)
The optiol1al 120-volt VCR can operate only when the motor home is connected to 120-volt power from either
"a public utility or the generator. '
120/i2-Volt Television (Optional)
The optional 120-voltJI2-volt television can operate from a 12-volt power source (battery) as the motor home is delivered. Care should be taken so the batteries are not drained while using the TV on 12-volt power.
The television can also be operated on 120-volt power from the generator or public utility by removing the 12-volt cord from the rear of the TV and installing the 120-volt cord. Both 120- and 12-volt cords cannot be used at the same time. To use TV on 12-volt power, the cords must be exchanged.
TV Antenna
The roof-mounted antenna is designed for reception of VHF and UHF television signals.
Before traveling, remember to lower the antenna and secure it to prevent damage to the antenna, motor home roof, or objects in the path of the antenna, such as overhead wires. DO NOT TRAVEL WITH THE ANTENNA RAISED.
NOTE. The antenna boosterpower supply must be turned off to prevent battery drain. A red indicator light will glow when the unit is on.
TV Ghosts And FM Flutter
The television and radio systems in your motor home have been chosen to provide good performance under many varied signal conditions. Occasionally, though, you may experience distorflon, i.e., "ghosts" on TV or "flutter" when listening to FM broadcasts.
If distortion becomes a nuisance, try these tips:
U·se the "park cable" TV antenna In remote areas rather than the roof antenna of your motor home if the campground provides cable hook-up.
Re-orient the television antenna. Sometimes turnIng the antenna will pick up a stronger signal. Try turning or rotating the antenna throughout its range
.,
33
With FM Stereo signals, switch the unit to MONO, if possible. Sorne of the phase and noise components of a stereo signal will disappear in MONO rnode.
Reduce the treble setting to reduce background noise. Although not Yielding the best high-fre· quency performance, at least you rnay be able to reduce the irritation of the distortion.
MISCELLANEOUS APPLIANCES You rnay have additional appliances in your unit which operate only when connected to t 20-volt power from either a public utility or the generator.
In sorne cases appliance selector switches are provided on the galley to allow you a selection of appliances yet still remain within the power capacity of the electrical system.


Your motor home has been designed to provide you with many years of use with a minimum amount of maintenance. This section will familiarize yo~with the areas of your motor home that require scheduled care. Time spent taking care of your motor home on a regular basis will pay for itself in extended service and will protect your investment. If you are mechanically inclined and regularly perform routine maintenance and repairs on your car or truck, you may want to do the mechanical work on your motor home yourself. If you prefer, your dealer can perform these services for you. His trained personnel will assure thEit your motor home IS maintained and repaired in keeping with original performance expectations.
This section is intended'to provide the owner and operator with a g.eneral overview of service and maintenance informatlol1 for the motor home. Detailed service and maintenance information may be found In the owner's/operator's ma'nuals contained in the Owner's Information Package.
While the information in this section is intended to establish proper maintenance and inspection proce· dures, there may be times when detailed diagnostic and repair procedures may be required. Consult your dealer or an authorized Fleetwood Service Center in these situations.
EXTERIOR Some exterior parts of your motor home are made of fiberglass. The finish on these parts is durable, but not indestructible. Any material and finish will deteriorate in time. Exposure to sunlight, moisture and airborne pollutants can cause dulling and fading of the finish. Generally, changes in. the finish clue to weathering are cosmetic ._, they are on the surface of the part and do not affect its. ~trength. Weathering can tal<e the form of chalking, fading and yellowing.
The best Insurance against these effects is routine maintenance. If the finish is not washed and waxed thoroughly, the surface can deteriorate very rapidly. The following maintenance guidelines can help you reduce these weathering effects:
35 ---
MAINTENANCE
1. Wash the exterior with a mild soap rnonthly, at least. Avoid strong alkaline cleaners and abrasives.
2. Wax the extenor at least orice a year - twice, If possible - with a wax formulated for fiberglass. When waxing, always read and follow the instructions and precautions on the container. Some cleaners and waxes are recommended for use on only certain types of surfaces. In some cases, a light rubbing compound may be required. Always follow rubbing compound with a high-quality wax.
Stains
Stains are generally caused by two types 01 substances - water soluble and non·water soluble. Water soluble starns can usually be washed away with water and mild detergent. Follow the washing with wax.
Non-water soluble stains are usually oil-based. Removal of this type of stain may require the use of highly flammable or poisonous solvents. Refer this type of service to your dealer or an authorized Fleetwood Service Center. Never use strong solvents or abrasives to clean plastiC surfaces.
Windows, Doors, Vents & Locks
Keep moving parts, hinges and latches adjusted and maintained. Lubricate with a light oil at least once a year. Check and tighten the screws holding the windows in place as required. Clean screens by gently wiping with a damp cloth or soft flat brush. Not all screens are removable.
Inspect the sealants around doors and Windows every three months. See "Seatant Renewal" section.
Lubricate locksets in doors and exterior storage compartments at least annually with powdered graphite. If the motor home is located at a beach or is exposed to salt air, more frequent lubrication may be required.

36
RUBBER ROOF SYSTEM
Cleaning For normal cleaning, standard household detergents or cleansers may be used. Use a non-abrasive, common household detergent and plenty of water. Be sure to keep the sidewalls wetto reduce streaking. Road tar, tree sap or other stubborn stains can be removed with a soft rag and xylene.
WARNING XYLENE IS A FLAMMABLE LIQUID, USE EXTREME CARE WHEN HANDLING AND USING, DO NOT EXPOSE TO OPEN FLAME, SPARK OR SMOKING MATERIAL. DO NOT USE IN UNVENTILATED AREA,
Care The rubber roof itself does not require annual coatings or additional sealants. Periodic washing with soap and water is all that is required.
The rubber roof materral can be cut by sharp objects. Use caul!on when loading sharp articles on the roof. If you add accessories or new equipment on the roof,be , sure the Installer is qualified to work on the rubber roof' material. This is required under the terms qf the war· ranty.
Repair kits are avaitable through your dealer. The roof requires special adhesives and material.
WARNING RUBBER ROOF MATERIAL IS SLIPPERY WHEN WET_
Sealant Renewal
rhe adhesives and sealants used in the construction of your motor home were developed to remain waterproof under sustained effects of weather and vibration. However, even the finest materials will eventually dry out and lose their effectiveness under constant heat of the sun and altack by other elements This section outlines the procedures you must follow to maintain the weatherproof integnty of your motor home. Leak damage caused by failure to follow these procedures may' aHect your warranty coverage.
Your dealer can perform the resealing inspectio~ and 'Nork for you. Your ~lealer also has current information on sealants lIsed in your motor home, and can recommend the appropriate sealants for you if you prefer to do this work YO(Jrself. A!ways use the .recommended sealants,
Door, Window, Roof Component And Molding Resealing
Inspect the sealants around windows and doors al least every throe months. Also inspect roof vents, other roof components, moldings at front and rear caps, and perimeter molding. If any 01 the follOWing defects are evident during inspection, the aHected areas must be resealed.
Excessive amount of sealant protruding from joints.
Sealant cracked or peeling.
Voids in seatant.
NO TE: Do not seal the bottom flanges of windows and doors. Sealant voids have been intentionally left in the bottom flange fo provide exterior drainage in the event of leakage.
If you find any of the above defects:
'1 Use a plastic scraper to remove excess sealant 2. Clean all areas to be reseated with mineral spirits
and clean rags. .
WARNING MINERAL SPIRITS IS A FLAMMABLE LIQUID, USE EXTREME CARE WHEN HANDLING AND USING. DO NOT EXPOSE TO OPEN FLAME, SPARKS, OR SMOKING MATERIAL DO NOT USE IN UNVENTILATED AREAS.
Make sure that all areas to be resealed are absolutely dry before new sealant is applied.
INTERIOI'~
Upholstery & Drapes
The uphotstery/decor Items are made of flame-retardant material. To retain the flame retardant nature of these fabrics, dry clean only.
Frequent vacuuming or light brushing between clean· Ings will help prevent accumulation 01 drrt and grime. Use of water-based or detergent based cleaners may cause shrinking or other fabric damage. Water stains may become permanent.
WARNING DO ,NOT USE LACQUEFl THtNNEH, NAIL POLISH FlEMOVER, CARBON TETRACHLOmOE, SPOT REMOVEFl, GASOLINE, OR NJ\PHTHII FOR ANY CLEANING PUHPOSE,
•. ,
HIESE PRODUCTS MAY CAUSE DAMAGE TO THE MATERIAL BEING CLEANED, AND MAY BE HIGHLY FLAMMABLE OR POISONOUS.
l.aminate Top Care For cleaning laminate surlaces, use a mild dishwashing liquid with warm water. Use a soft cloth for both washing· and drying.
Do not use abrasive cleaners, steel wool. or gritty cleaners or damage will occur to the surface.
Walls And Ceiling Panels
The paneling and the ceiling of your motor home may be any of several finishes and textures. Never use harsh detergents or abrasive cleaners on walls or ceilings. Most surfaces will clean with a soft cloth moistened with mild liquid detergent in warm water. Do not use large amounts of water which could saturate the material.
Bathtub And Plastic Shower Stall
Some cleaners attack the plastic causing it to discolor and become brittle. The following cleaners have been tested and approved when mixed with water: Distilled vinegar, mild dishwasher detergent, or liquid deodorizing cleaner. Avoid cleaners with any level of abrasives, acetone or MEK (methyl ethyl ketone).
Floors And Carpeting
Vinyl floollng requires only washing and periodic waxing. Vacuum carpeting regularly, and clean it with a
37 --_ .. _-----_._--
quality carpet cleaner. Do not use water or waxes mixed with water on wood floor.
Engine Access
The top of the engine may be accessed for service by removing the engine cover.
WARNING WHEN INSTAl.LlNG THE ENGINE COVER, BE SURE THE COVER IS FULLY SEATED ON THE GASKET SEAL AND SECURED BY THE COVER SCREWS OR CLAMPS. DO NOT ALLOW CARPETING, FLOOR MATS OR OTHER MATERIAL TO INTERRUPT THE SEAL BETWEEN THE COVER AND THE ENGINE COMPARTMENT. IF THE ENGINE COVER IS NOT INSTALLED CORRECTLY, ENGINE EXHAUST GASES COULD LEAK INTO THE PASSENGER COMPARTMENT CREATING A SAFETY HAZARD. IF THE ENGINE MUST BE RUN WITH THE ENGINE COVER OFF FOR MAINTENANCE PURPOSES, BE SURE THE VEHICLE INTERIOR IS ADEQUATELY VENTILATED.
MAINTENANCE CHECKLIST For your convenience, a maintenance checklist is included in this manual. This comprehensive list is the most up to date available at the time of publication. Options and accessories usually have their own owner! user manuals that often contain added maintenance instructions. Consult these manuals as required.


39
MOTOR HOME STORAGE
------ - ---- ------_. ------_0-.---------------~ ----._----------. -_._-------------------. ___ 0 ______ ---_0_----
STORAGE CHECKLISTS The following checklists will help you perform the steps necessary to prepare your motor home for storage. Use' the checklist that applies to the storage condiltons you anticipate.
These checklists do not include every detail required, and you may want to expand them to suit your needs. Contact your dealer for additional suggestions suitable to your climate and storage conditions, particularly extremes of hot and cold.
SHORT-TERM STORAGE (less than 60 days)
o Wash the motor home exterior and underside. " Hose off accumulations of mud and road salts.
[J Thoroughly clean the interior of the motor home including carpets, counter tops, lavy, tub and shower, and galley.
[I Inflate' tires to maximum rated cold pressure.
[J Park the motor home as level as possible front to rear and side to side. Block wheels front and rear and leave the parking brake OFF. '
o Check the charge in the baltery. Recharge as necessary.
o Remove battery cables. Refer to Chassis'Owner's Manual for proper removal and installation sequence. Clean terminals, top and sides of batteries and battery boxes. Reinstall cables, dress with a plastic ignition spray.
[] Use battery disconnect switchles, if equipped.
[J Drain holdlng.tanks, tOilet, and fresh water tank.
[J Turn off water pump and water heater masler switches.
'-I L_ Turn off LP gas at tank valve.
r---l
L . .J Turn off refrigeralor and furnace.
o Turn off all range and oven burner valves and pilot valves (If equipped).
LJ Rernove all perishables from refrigerator and galley cabinets. Block refrigerator open to reduce odor buildup. An open box or tray of baking soda in the refrigerator will help absorb odors.
[] Open closet doors, drawers, and cabinets so air can circulate.
o Slightly open (1/4") roof vents, atfront and rear for ventilation. If the motor home is being stored below freezing, close and cover all vents to prevent entry of snow or small animals and in-sects. "
o Close and lock all windows. Be sure vent fan and range hood fan sWitches are off.
[J Cover exterior appliance vents (water heater, furnace, range hood, refrigerator) to prevent insects from getting in. Be sure to remove all covering material before using appliances or vents.
[J Cap or close holding tank drain, city water inlet and fresh water fill spout.
o Turn off all radios, TVs, interior and exterior lighls.
[J Close curtainsandlor mini-blinds, and pull shades.
[] Disconnect the 120·voit power cord, and store in cornpartment.
o Covertires with cloth, plywood, or aftermarket tire covers.
rn--l L . .J Prepare generator (if equipped). Referto genera-
tor operating manual included in your Owner's Information Package.
lJ Run the engine for about 15 rninutes every 30 days. Turn the vehicle air conditioner ON dunng thiS run. Check engine oil, transmission fluid and coolant levels.

40
LONG-TERM STORAGE (OVER 60 DAYS)
o Perform all steps as required for short-term storage.
[] Run engine to normal operating temperature. Operate air conditioner to lubricate compressor seals. Drain engine oil, replace filter, refill engine with fresh oil.
II Remove windshield wiper blades and store inside the motor home.
[-I ~ Charge and remove both the vehicle and auxil-iary batteries. Store them in a cool, dry place, and check the charge and water level every 30 days. For batteries with non-removable vent caps, check the specific gravity of the electrolyte periodically with a hydrometer or boost charge every three months. If the specific gravity is being checked, recharge the battery when it reaches 1.220. The time it takes the battery to reach 1.220 depends on its condition and lhe temp'erature. The colder the storage area,. the slower the battery will selfdischarge. A nortnal time between charges is three months.
LJ Remove, cleanand replace air conditioner filters. Cover the air conditioner shroud(s).
[] Cover the windows on the inside with foil, cardboard, paper, etc., to reduce curtain, drape, and carpet fading.
[J Remove batteries in clocks. or other batterypowered devices.
[J During extended periods of storage, gasoline may deteriorate due to oxidation. This can damage rubber and other materials in the fuel system such as carburetor, accelerator pump, diaphragms, and carburetor inlet valves. It may also clog small orifices. Commercially available gasoline fuel stabilizers may be added whenever actual or expected storage periods exceed 60 days. Follow the additive manufacturer's instructions. Operate the vehicle regularly during the storage period to mix and circulate' the antioXidant agent throughout the fuel system.
[J Check tire inflation pressures every 30 di)ys. Maintain maximum rated cold'inflation pressure.
[l Check the sealant around all roof and 'body . seams and windows. Reseal if necessary: See
o "Sealant Renewal" section.
[] Lubricate all locks and hinges as describBd in the "MAINTENANCE" chapter.
[] Remove high grass or weed growth.
WINTERIZATION Thoughtful planning and preparation for the winter season can help eliminate equipment failures and breakdowns, and can extend the life of your motor home and its systems. Your dealer can advise you concerning specific winterization procedures and products for your climate area or the areas through which you will be traveling. Your dealer may also provide winterization service for all appliances and systems in the motor home. The following is a check list if you prefer to perform these procedures yourself:
[J Check engine coolant level and antifreeze protection. Drain and flush engine cooling system and add antifreeze to protect the system to the lowest expected storage temperature or at least -200 F.
, II Service and winterize the generator (ii'equipped) as outlined in the generator operating manual included in your Owner's Information Package.
o Winterize the LP gas system. Your LP dealer or service station will perform thiS for you.
[J Winterize all appliances as outlined In the IndiVidual operator's manuals.
[] Remove snow accumulations as often as possible.
WATER SYSTEM WINTERIZING
Read this section completely before performing winterization.
o Remove water purifier filter cartridge, if eqUipped. and install the winteriZing plug.
'-J l __
II L_~
[]
Drain the fresh water tank by opening the water tank drain valve. Leave valve open.
Turn water pump on (12-volt power must be on). Open a cold water faucet. When the flow of water stops, turn the pump oH.
Open water faucets, then open the drain valves on HOT and COLD water pipes. Leave these valves open .

[J Drain the water heater by opening the drain plug at the bottom of the heater and the safety valve at the top.
[J Flush the loilet. Operate toilet sprayer, if equipped.
o Drain the shower head by opening the valve. L.et all water drain out the tub spout. Leave the valve open.
r ] When each faucet has been drained, close all faucets, water line drain valves and the fresh water tank drain valve, install the water healer plug and close Ihe safety valve.
e] Drain the waste water system by following the normal procedure for draining the holding tanks. (See PLUMBING chapter).
I.] Apply silicone lubrication to the knife valve actua· tor rod(s).
rJ Be sure ALL water from ALL plumbing fixtures has been drained.
CAUTION DRAINING THE WATER SYSTEM ALONE WILL NOT PROVIDE ADEQUATE COLD WEATHER PROTECTION. IF THE MOTOR HOME IS TO BE UNHEATED DURING FREEZING TEMPERATURES, CONSULT YOUR DEALER FORTHE BEST WINTERIZING PROCEDURE FOR YOUR CLIMATE. YOUR DEALER CAN WINTERIZE YOUR MOTOR HOME FOR YOU OR CAN SUPPLY YOU WITH ONE OF THE SPECIAL ANTIFREEZES WHICH ARE SAFE AND APPROVED FOR USE IN RV WATER SYSTEMS. FOLLOWTHE INSTRUCTIONS FURNISHED WITH THE ANTIFREEZE.
WARNING DO NOT USE AUTOMOTIVE OR WINDSHIELD WASHEH ANTIFREEZE IN THE MOTOR HOME WATER SYSTEM. THESE SOLUTIONS MAY BE HARMFUL IF SWALLOWED.
[J Close holding tank drain valves.
Pour approximalely frve gallons of approved non· loxic antifreeze into the fresll water tanle
r-' Turn the water pump master swilch ON.
41
[] Open each cold water faucet, run the water pump and let about a cup of antifreeze solution flow conlinuously Ihrough each faucet. Close each cold water faucet.
[J Flush the toilet until the antifreeze solution flows continuously. Release flush mechanism.
[J If your vehicle is equipped with a water heater bypass. winterize the water heater according to the instructions provided wilh the water heater operating manual. If you do not have a bypass, you will have to fill the water heater with anli· freeze solution by the water pump. Winterize the hot water lines by opening each hot water faucet, allowing antifreeze solution to flow continuously, and then close each faucet. This will reguire considerably more antifreeze solution, and you may choose to do this step before winterizing the cold water lines so you can recycle the solution.
r---' LJ When filling the plumbing systems with anti
freeze, be sure to open and operate all fixtures and valves allowing the antifree.ze ,,%olution 10 flow freely. '
CJ Pour one cup of antifreeze solution down each drain.
[J Install all protective caps:
Water tank fill
City water inlet cap
Waste tank drain outlet cap
REACTIVATING THE MOTOR HOME AFTER STORAGE If the motor home was properly and carefully prepared for storage, taking it out of storage will not be difficult. The following procedure check list assumes that you stored the motor home with care. If you didn't. and extensive freeze damage or other serious deterioration has occurred, please consult your dealer or an authorized Fleetwood Service Center for advice.
f] Thoroughly inspect the outside of the vehicle. Look for animal nests in wheel wells, under .. the hood, in air cleaner or in other out of the way places.
r--l '.J Remove all appliance vents, ceiling vent and air
conditioner coverings. Be sure all furnace, watN
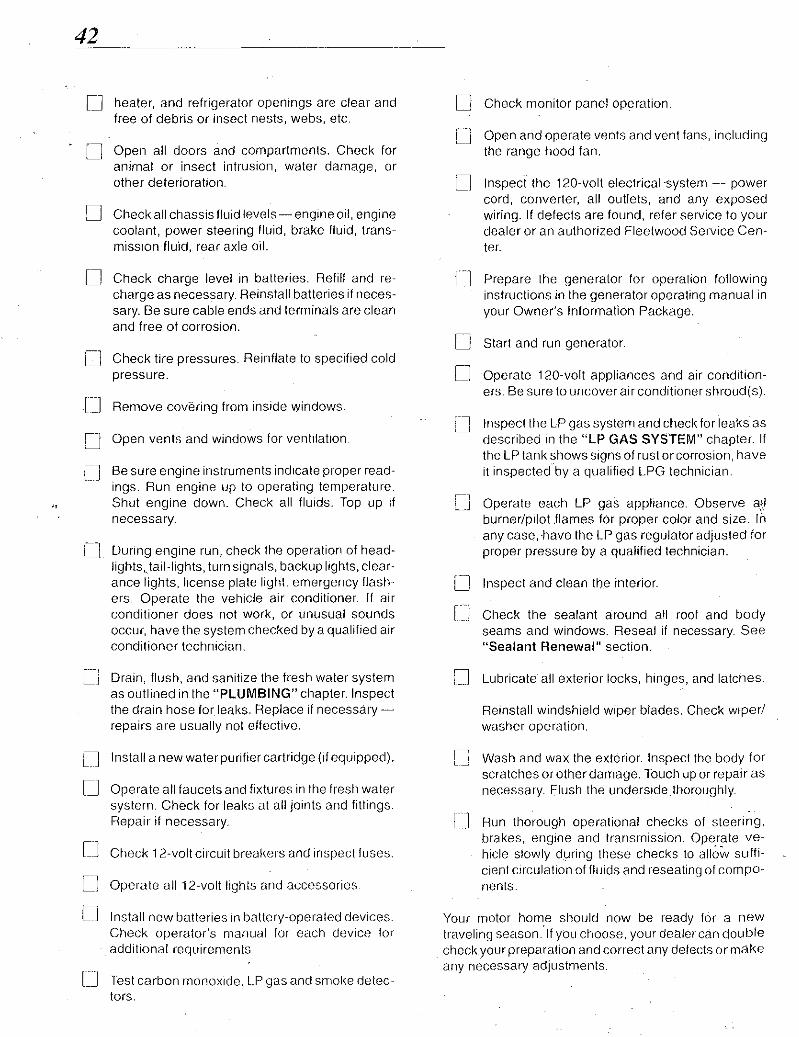
42 _._ .. _-
[J heater, and refrigerator openings are clear and free of debris or insect nests, webs, etc.
- D Open all doors and compartments. Check for animat or insect intrusion, water damage, or other deterioration.
r-, ~ Check all chassis fluid levels - engine oil, engine
coolant, power steering fluid, brake fluid, transmission fluid, rear axle oil.
D Check charge level in batteries. Refill and recharge as necessary. Reinstall batteries il necessary. Be sure cable ends and terminals are clean and free of corrosion.
D Check tire pressures. Reinflate to specified cold pressure.
. [J Remove covering from inside windows
D Open vents and windows for ventilation.
[J Be sure engine instruments indicate proper readings. Run engine up to operating temperature. Shut engine down. Check all fluids. Top up if necessary.
[] During engine run, check the operation of headlights,. tail-lights, turn Signals, backup lights, clearance lights, license plate light, emergency flashers. Operate the vehicle air conditioner. If air conditioner does not work, or unusual sounds occur, have the system checked by a qualified air conditioner technician.
CJ Drain, flush, and sanitize the fresh water system as outlined in the "PLUMBING" chapter. Inspect the drain hose for leaks. Replace if necessaryrepairs are usually not effective.
[J Install a new water purifier cartridge (If equipped).
D Operate all faucets and fixtures in the fresh water systern. Check for leal<s at all joints and fittings. Repair if necessary.
[] Check 12-volt circuit breal<ers and Inspect fuses.
,-1 c_J Operate all 12-volt lights and accessories
[J Install new batteries In battery-operated devices. Check operator's manual for each deVice for additional requirements.
[] Test carbon monoxide. l.P gas and srnoke detectors.
D Check monitor panel operation.
[J Open and operate vents and vent fans, including the range hood fan.
Cl Inspect the 120-volt electrical'system - power cord, converter, all outlets, and any exposed wiring. If defects are found, refer service to your dealer or an authorized Fleetwood Service Center.
[J Prepare the generator for operation following instructions in the generator operating manual in your Owner's Information Package.
D Start and run generator.
[] Operate 120-volt appliances and air conditioners. Be sure to uncover air conditioner shroud(s) .
[] Inspect the LP gas system and check for leaks as described in the "LP GAS SYSTEM" chapter. If the LP tank shows signs of rust or corrosion, have it inspected by a qualified LPG technician.
~-, L_J Operate each LP gas appliance. Observe aU burner/pilot Jlames for proper color and size. In any case,have the LP gas regulator adjusted for proper pressure by a qualified technician.
[] Inspect and clean the interior.
[] Check the sealant around all roof and body seams and windows. Reseal if necessary. See "Sealant Renewal" section.
:-J Lubricate all exterior locks, hrnges, and latches.
Reinstall windshield wiper blades. Check wiper/ washer operation.
Wash and wax the exterior. Inspect the body for scratches or other damage. Touch up or repair as necessary. Flush the underslde.thoroughly.
Run thol'OU9h operational checks of steering, brakes, engine and transrnission. Operate vehicle slowly during these checks to allow sufficient crrculatlon of flUids and reseating of components.
Your motor home should now be ready for a new traveling season.·lf you choose, your dealer can double checl<your preparation and correct any delects or make any necessary adjustments.

MAINTENANCE CHART
=_-=-=_= __ -"""--=-=--=--:-~s--~-e-xt:-:':=-=' = .... " =I!---,A~I ~.kI .. ~hlJ ~1=G=l~."H~=I_~J.....j ----------------------- --- --- - ---- ----- --
Wax exterior
-------------------
Lubricate and adjust exterior locks, hinges and window mechanisms
---- ----+--- - ___ i-I ___ +-0--J _____ ----- __
I • --------------- ----- ----+-- ------- ----- --
____ ~_~_~~ate power step ~~~,~~_n_is_m _______ . __ .~ _._~ ___ , u -1.--+--1-.8----Lubricate TV antenna \ j
------ -----
------------------
Check all exterior sealants, around windows, doors, sidewall seams, windshield, lamps, all exterior openings and roof components. Re-sea! if necessary.
---------------------------
Inspect and clean fuel-fired appliance vents: Water heater, refrigerator, furnace.
• - . > J-~ • ---+--1
---- ----+-_f-~+---I----I--.J--..--I-- -------
• • •• I ----------_~------------+-- --- ----+--I---j----"1----+---+---+-- --- --------
". I Inspect and test safety equipment: Fire extinguisher, LP, CO and smoke detec" tors, and GFI receptacles.
Service appliances and equipment: refrigerator, roof air conditioner, furnace, generator
• --+--+---t---c-l- ---j---+--+----
• i • -------------- ---~---- ------- -----I---I--+--~ ------ ------------
Inspect generator exhaust system • • -----------------------cJ----j--+--- -1---:----------Inspect LPG system including leak check •• ------- ---------+---+--t------f------\----'f..---J...---• .! ---j...-----
Sanitize fresh water tank
-- ----1--- - --------1--- -----+----1-----
Clean drapes and interior fabrics • • --- ---\---t------------ ---- ---+--+-- --------1---1---
Check exterior lamp operation. I • ------ --- ------------- ----- ------- ---f----r------- ----- ------
I • __ ~ _____________________ ----- ----- -- ---------+----- ---f-------- --------
I •
Re-torque U-bolts (Mor-Ryde equipped only)
Ctlassis
A - Start of Season B - Each Trip or Monthly C - Every 8 Hours D - Weekly E - Every 3 Months
---- J.,~=k==;==;'''' "'=.;;:
F - Every 6 Months G - Each Year H - End of season I - At Specified Mileage or Interval
J - At Specified Mileaae for Heavv Dutv S@y";",,
43


MAKE YOUR HOME WITH
When Fleetwood Home Owners return from the road, they feel the pride that comes from owning a stylish, graceful home that lets them pursue a carefree kind of life. Homes that reflect their lifestyle, without weighing them down with high maintenance or intimidating prices. They know their home is backed by the stability and tradition of Fleetwood's financial strength and leadersh~'p, The res,ult is comfort with-
~~ out compromise: the har-
.IJ~ mony of style, substance ~ and craftsmanship. ' ~ Fleetwc)od homes present .;y/,,' a variety of efficient-to-lux~o", floocpbo,. ,",h ,"oking
~ its-~~n dramatic statement. Ex-
.':.
US! citing features like fireplaces, cathedral ceilings, private' master bedroom suites, morning rooms, garden baths, dens and great rooms. And the kitchens can be on-the-go functional or roomfor-two gourmets! There's a reason why Fleetwood is
America's largest homebuilder: commitment to customer satisfaction and dedication to quality and value in each home built! There's a lifetime of enjoyment wait
ing for you! For complete information, contact a retailer who carries Fleetwood homes'. And be prepared for more surprises. With Fleetwood homes, you don't just. envision the dream - you live it!
\>, ,", ",' .' 1 ~.'1l I~.< ~, "' \ "'S'll~)<ill~"> ".<"'" 00·) ",\,' ", "'1','1 " ."":' .' . '. . ' ,ri\ '. '1
" '1,' j ",',~. \ ' 1', ,'_, • Ir ,(':), ~fIi»: """ I, c!, , " _ ,J" ,0. . , '" I I, " "J " II, !
For name of retailer nearest you. call 800/854-4755 or write Marketing Department, Housing Group,Fleetwood Enterprises, Inc.,
3125 Myers Street, Riverside, CA 92503-5527.