182.034 2/6/07 6:13 PM Page 34 Greene & Greene...
9
34 Greene & Greene Bedframe Greene & Greene Bedframe April 2007 Woodworker’s Journal
Transcript of 182.034 2/6/07 6:13 PM Page 34 Greene & Greene...

34
Greene & Greene BedframeGreene & Greene Bedframe
April 2007 Woodworker’s Journal
182.034 2/6/07 6:13 PM Page 34
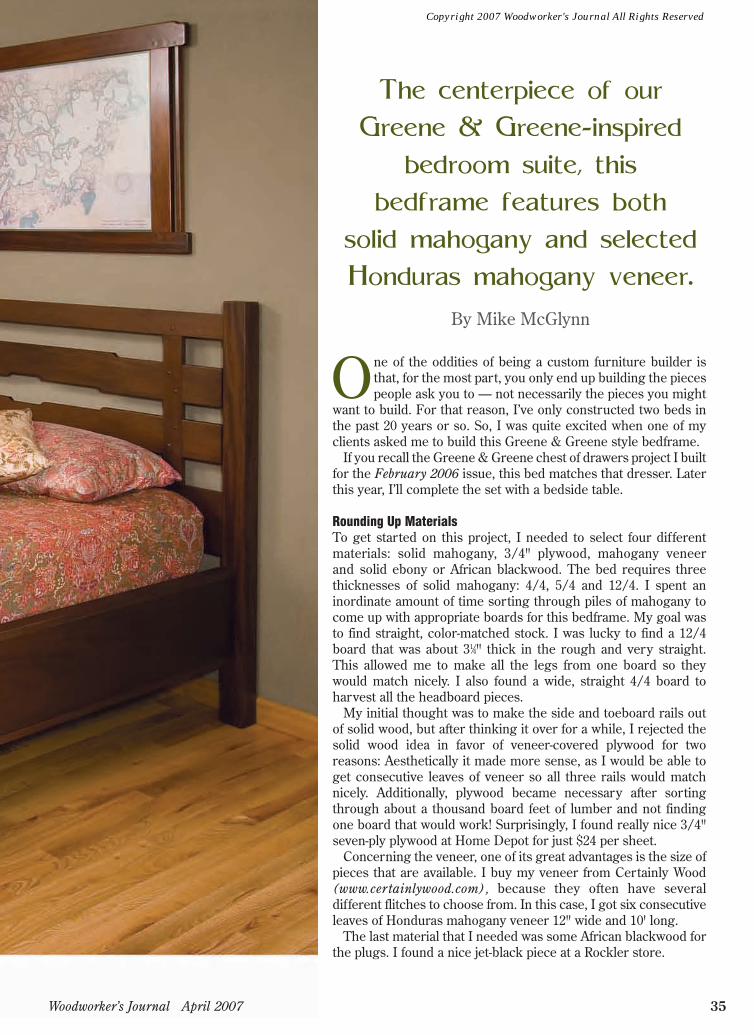
One of the oddities of being a custom furniture builder isthat, for the most part, you only end up building the piecespeople ask you to — not necessarily the pieces you might
want to build. For that reason, I’ve only constructed two beds inthe past 20 years or so. So, I was quite excited when one of myclients asked me to build this Greene & Greene style bedframe.
If you recall the Greene & Greene chest of drawers project I builtfor the February 2006 issue, this bed matches that dresser. Laterthis year, I’ll complete the set with a bedside table.
Rounding Up MaterialsTo get started on this project, I needed to select four differentmaterials: solid mahogany, 3/4" plywood, mahogany veneerand solid ebony or African blackwood. The bed requires threethicknesses of solid mahogany: 4/4, 5/4 and 12/4. I spent aninordinate amount of time sorting through piles of mahogany tocome up with appropriate boards for this bedframe. My goal wasto find straight, color-matched stock. I was lucky to find a 12/4board that was about 31⁄4" thick in the rough and very straight.This allowed me to make all the legs from one board so theywould match nicely. I also found a wide, straight 4/4 board toharvest all the headboard pieces.
My initial thought was to make the side and toeboard rails outof solid wood, but after thinking it over for a while, I rejected thesolid wood idea in favor of veneer-covered plywood for tworeasons: Aesthetically it made more sense, as I would be able toget consecutive leaves of veneer so all three rails would matchnicely. Additionally, plywood became necessary after sortingthrough about a thousand board feet of lumber and not findingone board that would work! Surprisingly, I found really nice 3/4"seven-ply plywood at Home Depot for just $24 per sheet.
Concerning the veneer, one of its great advantages is the size ofpieces that are available. I buy my veneer from Certainly Wood(www.certainlywood.com), because they often have severaldifferent flitches to choose from. In this case, I got six consecutiveleaves of Honduras mahogany veneer 12" wide and 10' long.
The last material that I needed was some African blackwood forthe plugs. I found a nice jet-black piece at a Rockler store.
Woodworker’s Journal April 2007 35
The centerpiece of our
Greene & Greene-inspired
bedroom suite, this
bedframe features both
solid mahogany and selected
Honduras mahogany veneer.
By Mike McGlynn
182.035 2/6/07 6:14 PM Page 35
Copyright 2007 Woodworker's Journal All Rights Reserved
Kicking it in Gear with Plywood Side RailsI started the project by building the plywood-core siderails. This would allow ample time for the solid wood toadjust to my shop’s humidity levels. Here’s the methodto my madness for how I constructed the rails: Cut theplywood into oversized pieces, vacuum-bag glue thepieces of plywood together, vacuum-bag the veneer tothe plywood rails, and then trim them to size.
I cut the plywood into pieces that were 1" oversize inboth directions. After cutting, I sanded all the edges andcorners to prevent the pieces from tearing holes in thevacuum bag. Use 120-grit paper for this job.
Here are a few pointers about vacuum bagging: Themost important thing is to have a dead-flat surface to workon. The second trick is to have a well-ventilated platen inthe bag. I use a piece of melamine with a 2" x 2" gridworkof shallow saw cuts on the top surface. I also recommendinstalling a reservoir tank in your system so the vacuumpump doesn’t need to run all the time. Despite the adviceto the contrary of a shelf full of books, I use blue maskingtape to hold things in place and together in the bag. Lastly,use Titebond®’s Cold Press for Veneer glue when vacuumbagging. It’s the best veneering glue I’ve tried.
One of the great things about laminating plywood orsolid wood in a vacuum bag is that I can end up with
a nice flat panel instead of the usual plywood warpage.I’m beginning to think that the Holy Grail isn’t somejewel-encrusted gold cup, but actually a truly flat sheetof plywood. My Home Depot plywood sheets were flatterthan most, but they still had 1/2" or so of curvature fromend to end. Put the two concave faces toward each otherwhen you bag the pieces together.
I probably could have vacuumed-bagged all three rails(including the footboard rail) at the same time but, beingprudent, I did them one at a time to prevent any potentialglue-up disasters. I used a roller to apply glue to bothinside faces, let the glue soak in for a minute or so andthen recoated. After the second coating, I assembled thepieces and taped their centers and corners with bluemasking tape. I put the rail into the vacuum bag, sealedit, and turned on the pump. I leave the pump on for atleast four hours. Here in the Southwest desert, wherefive percent humidity is common, with temperaturehovering around 100 degrees, my glue curing time ispretty quick. It may take longer where you live.
Once the glue cures, pull off the tape and scrape offany excess glue. With the three cores glued up, I laid outthe six leaves of veneer to decide how I wanted to cutthem to look aesthetically pleasing. To this end, I useda piece of chalk to mark what I thought was the “center”
April 2007 Woodworker’s Journal36
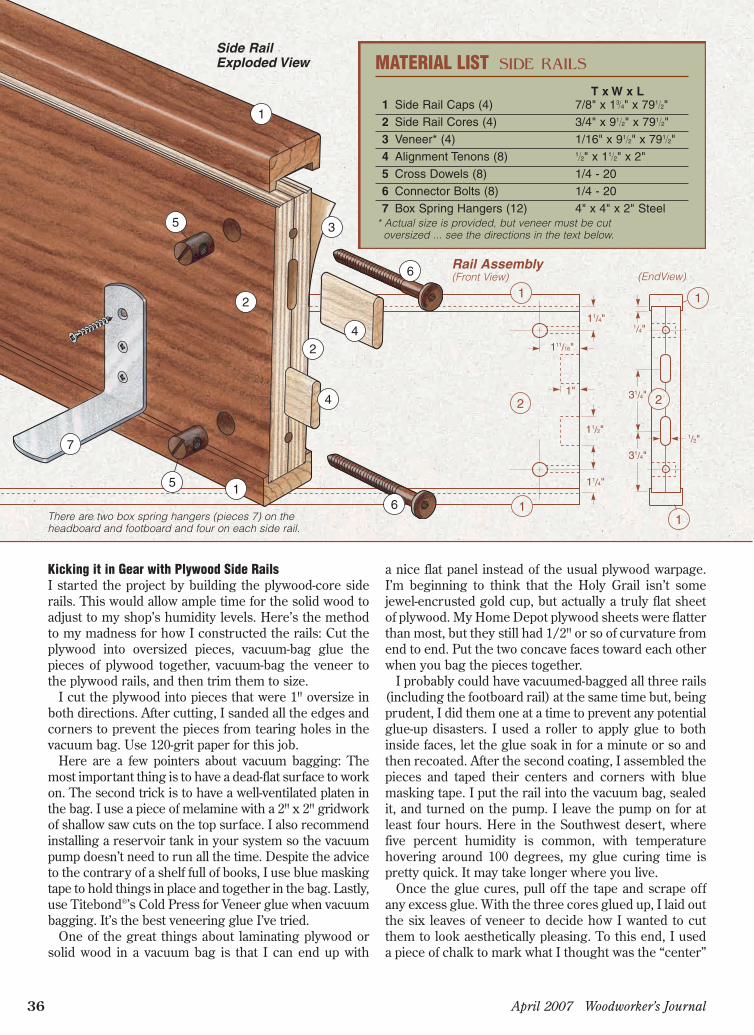
T x W x L1 Side Rail Caps (4) 7/8" x 13⁄4" x 791⁄2"2 Side Rail Cores (4) 3/4" x 91⁄2" x 791⁄2"3 Veneer* (4) 1/16" x 91⁄2" x 791⁄2"4 Alignment Tenons (8) 1⁄2" x 11⁄2" x 2"5 Cross Dowels (8) 1/4 - 206 Connector Bolts (8) 1/4 - 207 Box Spring Hangers (12) 4" x 4" x 2" Steel
MATERIAL LIST SIDE RAILS
2
11/4"
111/16"
1"
1/4"
1/2"
11/4"
31/4"
31/4"
1 1
1
2
1
11/2"
1
1
2
2
4
3
4
5
5
6
6
7
Rail Assembly(Front View) (EndView)
Side Rail Exploded View
* Actual size is provided, but veneer must be cutoversized ... see the directions in the text below.
There are two box spring hangers (pieces 7) on theheadboard and footboard and four on each side rail.
182.036 2/6/07 6:14 PM Page 36

of the pattern on each leaf of veneer. This is a prettysubjective thing, and I messed around with it for a whileuntil I was satisfied. I should note that, even though theleaves were consecutive, it wasn’t as simple as markingone leaf, measuring where my mark was, and transferringthat point to the other leaves. They were consecutiveleaves, but the grain pattern moved a surprising amountfrom one leaf to the next. Once the centers weremarked, I measured out from that point to mark out thesize of the oversize rails. Using a sharp utility knife anda straightedge, I carefully cut out each piece of veneer.Make these cuts in several light passes to prevent theknife from ripping the veneer instead of cutting it.
I glued down the veneer in much the same way asI glued the pieces of plywood together, with the additionof a couple of steps. Using the same glue roller, I appliedglue to the plywood core, let it set for a minute or so, andapplied a second coat. Don’t apply glue to the veneer, asthe water in the glue will cause the veneer to roll up intoan unmanageable mess. After laying the veneer carefullyin place, I taped it down in several places, bagged it up,and let the pump suck down moderately tight. Then I shutthe pump off. At this point, starting at the middle of thepanel, I took a rubber-headed J-roller and rolled downthe veneer and the bag. When everything lookedsmooth, I turned the pump back on and let it run. I goover the whole panel with the roller one more time afterthe pump pulls full vacuum.
While I cycled each panelthrough the veneering process,I rough-cut all my hardwoodpieces to slightly oversize dimen-sions. This futher helped thepieces adjust to my shop’sclimate, so they’d be ready tomill to final dimension. Markthem with chalk to keep theirorientation clear.
To finish the veneered rails,I used a block plane and a longstraightedge to true up one longedge on each rail. Since I wantedto keep the veneer patterncentered on each rail, I rippedequal amounts off of each edgeto reach their finished dimen-sions. Next I trimmed the endsto length — very carefully — onmy table saw.
Woodworker’s Journal April 2007 37
To continue with the rails, there are several differentjoints that needed to be cut on the end of each. I startedwith the mortises for the tenons. To avoid confusion,I carefully laid out all the mortises, bolt holes and crossdowel pockets on each rail. Marking everything out takeslonger, but I find that it prevents potentially disastrousscrewups later on. You can cut the mortises with a routerjig or chopping them out by hand.
I drilled the cross dowel pockets freehand with a drilland a Forstner bit. To do an accurate job on the connectorbolt holes, I made a drilling jig using an end cutoff fromthe rails. I clamped the jig (photo above) to the end of therails and drilled the holes with a brad-point bit.
To prevent glue squeeze-outproblems later, I cut two gluerelief grooves in the edge ofeach rail (see photo, left) on mytable saw.
Making Rail CapsOnce the rails were done, I builtthe mahogany rail caps. Noticethat there’s a shallow groove inthe caps so they’ll fit over therails. I milled these in severalpasses on the router table. It wasimportant to sneak up on thefinal fit so it wasn’t too loose ortoo tight. When you’re satisfiedwith the fit of the rail caps, cutthem to length. To prevent thethin lips from chipping outwhile crosscutting them, justslip a piece of rail cutoff into thethe groove first.
The author used a “cut-off” drilling jig held in place with end clamps tobore the connector bolt holes in the ends of the side and toeboard rails.A pair of thin scraps prevent the clamp heads from marring the veneer.
A pair of shallow relief grooves (formed on the table sawusing a standard blade) prevent glue from squeezing outwhen installing the rail caps.
182.037 2/6/07 6:14 PM Page 37
Copyright 2007 Woodworker's Journal All Rights Reserved
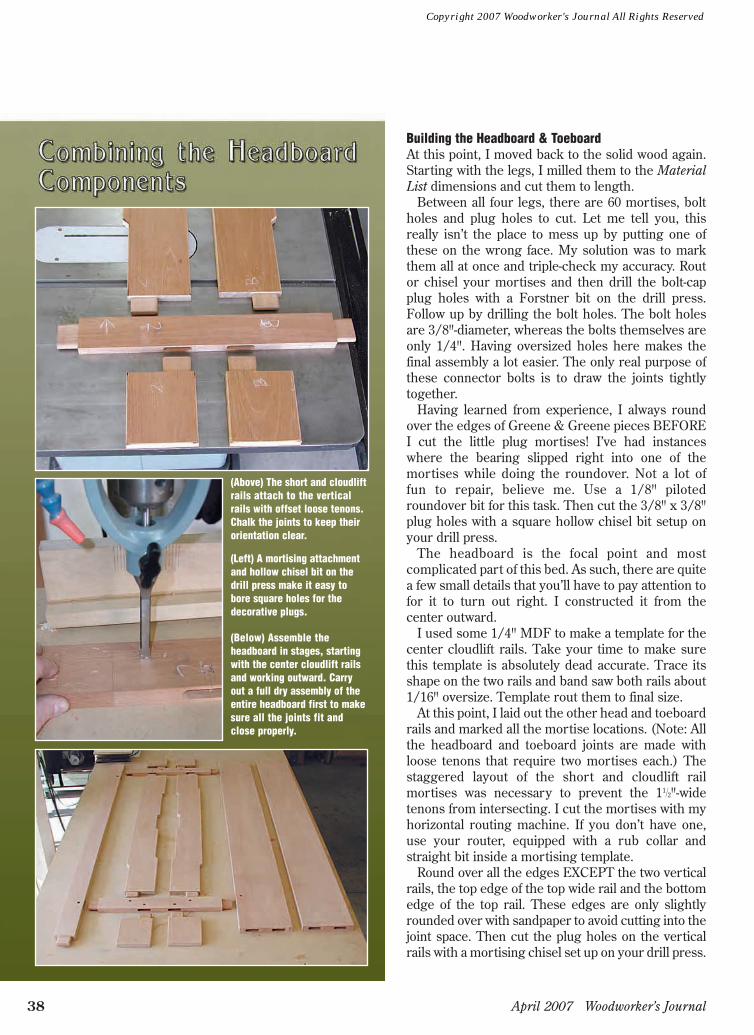
(Below) Assemble theheadboard in stages, startingwith the center cloudlift railsand working outward. Carryout a full dry assembly of theentire headboard first to makesure all the joints fit andclose properly.
April 2007 Woodworker’s Journal38
Building the Headboard & ToeboardAt this point, I moved back to the solid wood again.Starting with the legs, I milled them to the MaterialList dimensions and cut them to length.
Between all four legs, there are 60 mortises, boltholes and plug holes to cut. Let me tell you, thisreally isn’t the place to mess up by putting one ofthese on the wrong face. My solution was to markthem all at once and triple-check my accuracy. Routor chisel your mortises and then drill the bolt-capplug holes with a Forstner bit on the drill press.Follow up by drilling the bolt holes. The bolt holesare 3/8"-diameter, whereas the bolts themselves areonly 1/4". Having oversized holes here makes thefinal assembly a lot easier. The only real purpose ofthese connector bolts is to draw the joints tightlytogether.
Having learned from experience, I always roundover the edges of Greene & Greene pieces BEFOREI cut the little plug mortises! I’ve had instanceswhere the bearing slipped right into one of themortises while doing the roundover. Not a lot offun to repair, believe me. Use a 1/8" pilotedroundover bit for this task. Then cut the 3/8" x 3/8"plug holes with a square hollow chisel bit setup onyour drill press.
The headboard is the focal point and mostcomplicated part of this bed. As such, there are quitea few small details that you’ll have to pay attention tofor it to turn out right. I constructed it from thecenter outward.
I used some 1/4" MDF to make a template for thecenter cloudlift rails. Take your time to make surethis template is absolutely dead accurate. Trace itsshape on the two rails and band saw both rails about1/16" oversize. Template rout them to final size.
At this point, I laid out the other head and toeboardrails and marked all the mortise locations. (Note: Allthe headboard and toeboard joints are made withloose tenons that require two mortises each.) Thestaggered layout of the short and cloudlift railmortises was necessary to prevent the 11⁄2"-widetenons from intersecting. I cut the mortises with myhorizontal routing machine. If you don’t have one,use your router, equipped with a rub collar andstraight bit inside a mortising template.
Round over all the edges EXCEPT the two verticalrails, the top edge of the top wide rail and the bottomedge of the top rail. These edges are only slightlyrounded over with sandpaper to avoid cutting into thejoint space. Then cut the plug holes on the verticalrails with a mortising chisel set up on your drill press.
(Above) The short and cloudliftrails attach to the verticalrails with offset loose tenons.Chalk the joints to keep theirorientation clear.
(Left) A mortising attachmentand hollow chisel bit on thedrill press make it easy tobore square holes for thedecorative plugs.
182.038 2/6/07 6:14 PM Page 38
Copyright 2007 Woodworker's Journal All Rights Reserved

39
3"
2"
71/2"5"
5"
81/2"
63/4"
71/2"
31/2"
43/4"
71/4"
91/8"
113/4"
97/8"
71/4"
111/8"
33/4"
117/8"
33/4"
215/8"
251/8"
33/4"
11/4"
91/4"
3/4"
11/4"
11/8"
7"
10
8 8 8 8
9
9
11
11
12
12
13
13
T x W x L8 Headboard Legs (2) 3" x 3" x 501⁄2"9 Bottom Rails (2) 1" x 71⁄2" x 601⁄2"
10 Top Rail (1) 1" x 3" x 601⁄2"11 Vertical Rails (2) 7/8" x 21⁄2" x 181⁄2"12 Short Rails (4) 3/4" x 43⁄4" x 51⁄4"
13 Center Cloudlift Rails (2) 3/4" x 51⁄4" x 431⁄2"14 Loose Tenons (22) 1/2" x 11⁄2" x 2"15 Small Plugs (26) 3/8" x 3/8" x 1/4"16 Large Plugs (4) 7/8" x 7/8" x 1/4"17 Birch Dowels (4) 3/4" Dia. x 1/4"
MATERIAL LIST HEADBOARD
T x W x L
10
8
8
9
9
11
11
12
12 12
12
13
13 14
14
15
7
Woodworker’s Journal April 2007
Face AFace D
Face D
Face CFace B
Leg Face Orientation Detail
Headboard Elevation (Front View)Headboard Leg ElevationsVertical RailElevation
Bed
Head of bed
Headboard Exploded View
Face A
Face B
Face C
182.039 2/6/07 6:15 PM Page 39

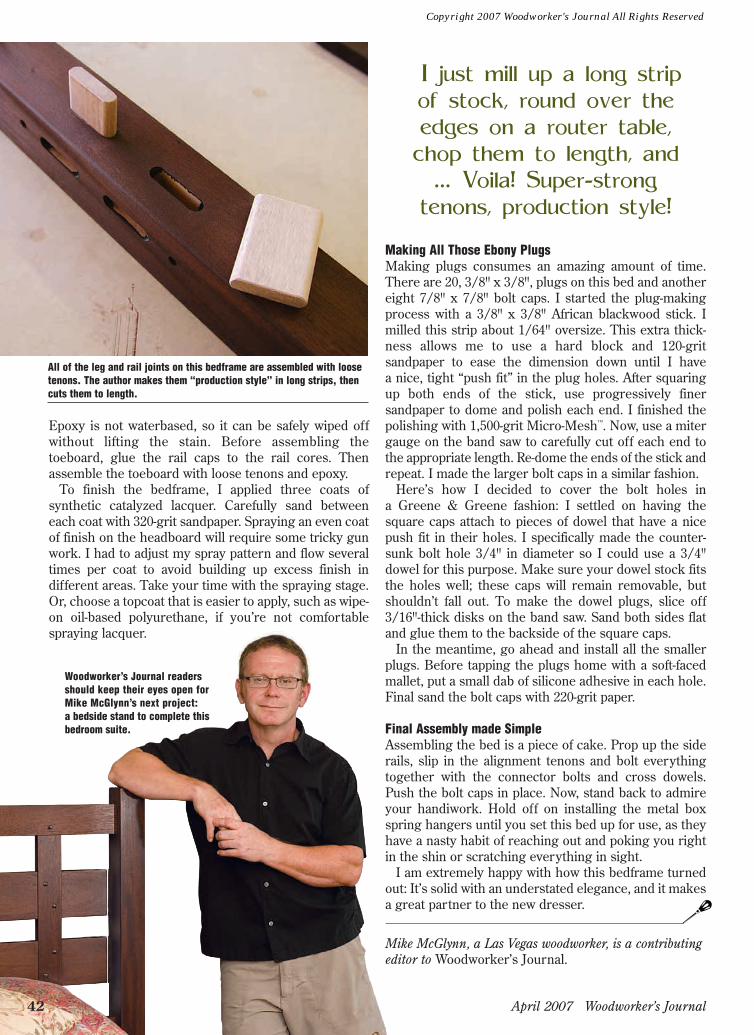
Before you move on, give all the parts a thoroughsanding and prepare for a complete dry assembly of theheadboard, toeboard and rails. You’ll need to make loosetenons to carry out this stage. Making loose tenons iseasy. I just mill up a long strip of stock that has a nice “tapfit” in the mortises, round over the edges on a routertable, chop them to length, and sand the ends a little bit.Voila! Super-strong tenons, production style.
Use clamps, connector bolts, cross dowels and loosetenons to dry-assemble the head and toeboards. I’msure you’ll feel the same sense of relief I did when itall goes together correctly. While taking apart the bed,I carefully marked each loose tenon and its correspondingmortise with a permanent marker so there would be nomisplaced parts when it came time for the glue-up.
Then I delivered the bed to the clients, and they werereally happy. Oh, did I skip the whole sanding, stainingand finishing thing? Man, I wish it was that easy in reallife, but the fact of the matter is, the sanding and stainingsteps are what can really make or break any Greene &Greene project. There’s still plenty of work left to do ...
Preparing for Dye with Careful SandingMy first step on any sanding job is to raise the grain witha sponge and warm water. This is a good step on anyproject because it opens up grain that may have beencompacted by the planer, and it makes getting rid ofplaner marks much easier. My first sanding was with120-grit paper. Use a sanding block for smaller surfaceswhere your random-orbit sander won’t reach. I also dida little detailing work that is a major — albeitsubtle — part of the Greene &
Greene “look”: eased corners. The corners on any pieceof Greene & Greene furniture are not just simpleroundovers but instead are nicely curved to makethem have a much more organic, less machine-like,look. I tackle this with a homemade sanding block thathas a piece of rubber mouse pad for a face. The softnessis perfect for contouring the corners.
After the initial sanding, I raised the grain again. Thefinal sanding now needs to be done with a very lighttouch to prevent raising more wood fibers. Use 220-gritpaper at this stage.
Moving from Sanding to Applying DyeThere is really only one way to attain the rich, dark,translucent color that typifies Greene & Greene, andthat is with waterbased aniline dye. The stain I’ve usedfor years is one part Lockwood Red Mahogany mixedwith one part Lockwood Brown Mahogany. I also adda couple of drops of dish detergent to help break anysurface tension when applying. I’ve looked at manyoriginal Greene & Greene pieces, and this mixtureseems to be pretty much dead accurate to their originalstain. Each packet of dye powder makes one quart ofstain, so I ended up with two quarts mixed. Unlikesolvent-based stains, this is approximately enough tostain the Empire State Building! It goes a long way.
There are several things to keep in mind when usingthis dye. Wear rubber gloves while staining.They will keep dye off your
18
18
19
21
20
22
23
2425
T x W x L18 Toeboard Rail Caps (1) 7/8" x 13⁄4" x 601⁄2"19 Toeboard Rails (2) 3/4" x 91⁄2" x 601⁄2"20 Veneer* (2) 1/16" x 91⁄2" x 601⁄2"21 Legs (4) 3" x 3" x 203⁄4"22 Loose Tenons (4) 1⁄2" x 11⁄2" x 2"23 Small Plugs (8) 3/8" x 3/8" x 1/4"24 Birch Dowels (4) 3/4" Dia. x 1/4"25 Large Plugs (4) 7/8" x 7/8" x 1/4"
MATERIAL LIST TOEBOARD
There is really only one way to attain the rich, dark,translucent color that typifies Greene & Greene,
and that is with waterbased aniline dye.
April 2007 Woodworker’s Journal40
NOTE: For construction details regardingthe rail core and veneer, as well asmortise and cross dowel locations, seethe Side Rail Exploded View on page 36.
The large plugs are glued toshort sections of dowels.They’re easy to remove andcover the connector bolts.
Toeboard ExplodedView
* Actual size is provided, but veneer must be cut oversized ... see the directions in the text on pages 36 and 37.
182.040 2/6/07 7:51 PM Page 40
Copyright 2007 Woodworker's Journal All Rights Reserved

41
skin, of course, as well as prevent any hand moisturefrom making a spot on the finish. My preferred methodof applying stain is to use a foam brush and then, whilethe stain is still wet, wipe down the part with a lint-freecotton cloth. If the stain is left to dry on the surfacewithout wiping, the end result will be blotchy. While I’mwiping the part, I make sure to wipe up any dye that maybe pooling in a mortise or corner so it doesn’t run outand cause a dark area. These are hard to fix later.
Let the parts dry completely overnight, then verygently buff the surfaces with a fine Scotch-Brite® pad.This buffing smoothes any minute roughness that thedye may have made and makes the final finishing easier.From this buffing stage until the final finish is on,continue to be vigilant about not getting any moisture onthe dyed surfaces. Only handle the parts with rubbergloves until the final finish seals the dye into the wood.
Assembling the Headboard & ToeboardStart the headboard assembly by gluing the four shortrails to the two vertical rails. Once these assemblies dry,glue them to the two cloudlift rails. When this centersection dries, glue it to the top and mid rails. The laststep is to glue this assembly and the bottom rail to the
legs. I used epoxy to bond all thesejoints. I don’t use Titebond for
gluing up anything stained withwaterbased aniline dye becausethe moisture in it could ruin thestain if it squeezes out of a joint.
Slip a loose tenon into the short rail mortises so you’ll have something tohold onto during staining. A spring clamp works well to hold these railsvertically while they dry.
Use strips of scrap to suspend the longer rails by their tenons when youstain them and while they dry. Don’t let the wet, stained surfaces lie flat,which could smear or blotch the dye.
Woodworker’s Journal April 2007
117/8"
31/4"
11/8"
11/2"
117/8"
31/4" 71/4"
3/4" Dia.
97/8"
11/8"
3/4"
3/8" Dia.
11/8"
1
17
18
18
19
21 21 21 21Face A
Face A
Face D
Face D
Face C
Face C
Face B
Leg Face Orientation Detail
Toeboard Leg:(Mortise and Bolt Locations)
Bed
Toeboard
Face B
Follow the diagrams at leftto locate the mortises andconnector bolt holes on thelegs. Notice in the Leg FaceOrientation Detail (below)that the rails are set backfrom the leg faces.
Toeboard Leg Elevations Toeboard Elevation(Front View)
182.041 2/6/07 7:51 PM Page 41
April 2007 Woodworker’s Journal42
Making All Those Ebony PlugsMaking plugs consumes an amazing amount of time.There are 20, 3/8" x 3/8", plugs on this bed and anothereight 7/8" x 7/8" bolt caps. I started the plug-makingprocess with a 3/8" x 3/8" African blackwood stick. Imilled this strip about 1/64" oversize. This extra thick-ness allows me to use a hard block and 120-gritsandpaper to ease the dimension down until I havea nice, tight “push fit” in the plug holes. After squaringup both ends of the stick, use progressively finersandpaper to dome and polish each end. I finished thepolishing with 1,500-grit Micro-Mesh™. Now, use a mitergauge on the band saw to carefully cut off each end tothe appropriate length. Re-dome the ends of the stick andrepeat. I made the larger bolt caps in a similar fashion.
Here’s how I decided to cover the bolt holes ina Greene & Greene fashion: I settled on having thesquare caps attach to pieces of dowel that have a nicepush fit in their holes. I specifically made the counter-sunk bolt hole 3/4" in diameter so I could use a 3/4"dowel for this purpose. Make sure your dowel stock fitsthe holes well; these caps will remain removable, butshouldn’t fall out. To make the dowel plugs, slice off3/16"-thick disks on the band saw. Sand both sides flatand glue them to the backside of the square caps.
In the meantime, go ahead and install all the smallerplugs. Before tapping the plugs home with a soft-facedmallet, put a small dab of silicone adhesive in each hole.Final sand the bolt caps with 220-grit paper.
Final Assembly made SimpleAssembling the bed is a piece of cake. Prop up the siderails, slip in the alignment tenons and bolt everythingtogether with the connector bolts and cross dowels.Push the bolt caps in place. Now, stand back to admireyour handiwork. Hold off on installing the metal boxspring hangers until you set this bed up for use, as theyhave a nasty habit of reaching out and poking you rightin the shin or scratching everything in sight.
I am extremely happy with how this bedframe turnedout: It’s solid with an understated elegance, and it makesa great partner to the new dresser.
Mike McGlynn, a Las Vegas woodworker, is a contributingeditor to Woodworker’s Journal.
Woodworker’s Journal readersshould keep their eyes open forMike McGlynn’s next project:a bedside stand to complete thisbedroom suite.
Epoxy is not waterbased, so it can be safely wiped offwithout lifting the stain. Before assembling thetoeboard, glue the rail caps to the rail cores. Thenassemble the toeboard with loose tenons and epoxy.
To finish the bedframe, I applied three coats ofsynthetic catalyzed lacquer. Carefully sand betweeneach coat with 320-grit sandpaper. Spraying an even coatof finish on the headboard will require some tricky gunwork. I had to adjust my spray pattern and flow severaltimes per coat to avoid building up excess finish indifferent areas. Take your time with the spraying stage.Or, choose a topcoat that is easier to apply, such as wipe-on oil-based polyurethane, if you’re not comfortablespraying lacquer.
All of the leg and rail joints on this bedframe are assembled with loosetenons. The author makes them “production style” in long strips, thencuts them to length.
I just mill up a long strip
of stock, round over the
edges on a router table,
chop them to length, and
... Voila! Super-strong
tenons, production style!
182.042 2/6/07 6:15 PM Page 42
Copyright 2007 Woodworker's Journal All Rights Reserved