181130 zeramex xt xt99923 user manual english usa · 2 3 If you have any questions, please contact...
23
swiss made User guide
Transcript of 181130 zeramex xt xt99923 user manual english usa · 2 3 If you have any questions, please contact...

swiss made
User guide

2 3
If you have any questions, please contact us at www.zeramex.com
ZERAMEX® XT
Dear ZERAMEX® user,
Ceramics are being used more and more often in
dental applications. For prosthetics and abutments
they have become the standard material.
ZERAMEX® makes completely metal-free
restorations possible using ceramic implants with
premium characteristics.
The ZERAMEX® XT implant is the latest innovation
of the family of two-piece, reversible screw-in
ZERAMEX® ceramic implants. The root-shaped
design of the ZERAMEX® XT implant achieves high
primary stability, and high prosthetic flexibility is
ensured thanks to the new internal connection.
4 ZERAMEX® XT System Overview
8 Treatment Planning in Five Steps
10 Indications/Contraindications
12 Tools
14 Surgery Phase
21 Provisional Restoration
22 Soft Tissue Management
23 Taking Impressions
25 Prosthetic Restoration
33 Technical Data
34 VICARBO® screws
36 Product Range
42 General Information
NOTE:ZERAMEX® XT prosthetics are NOT compatible with previous
ZERAMEX® T generations. In the event of any uncertainty,
please contact us at:001 786 622 2016
4 5
ZERAMEX® XT – System OverviewWell-known surgical protocol-flexible in restorations. The system for all common indications, particularly well suited for front tooth restorations.
Biocompatible Tools
Surgical Kit
ZERADRILL™Biocompatible reusable drills with carbon coating
Color coding and sizes
Prosthetic Kit
RB dia. 4.2mm
WB dia. 5.5mm
RB = Regular Base WB = Wide Base
T35608
T36608
T37608
ZERATAPTM
T35620
T36620
T37620
XT48850 XT48860
Endo
sseo
us
08mm
10mm
12mm
14mm
Platform dia. 4.2mm 5.5mmEndosseous dia. 4.2mm 5.5mmCollar height 1.6mm 1.6mmOptional 0.6mm 0.6mm
8 8
1.6mm0.6mmCollar height
incl. screw;Material: ZrO2 ATZ,VICARBO®
Implants
Prosthetic Platform
Material: ZrO2 ATZ
The screws for RB and WB are identical The screws for RB and WB are identical
RB36500
ZERAMEX® XT dia. 4.2mm RB ZERAMEX® XT dia. 5.5 mm WB
RB (4.2mm)
Healing Caps
Soft Tissue Management
Taking Impressions
Laboratory auxiliary parts
Abutment screws, individual
Abutments, screwed
Material: PEEK
Material: PEEK, PMMA, PEEK-CW30
Material:PEEK CW30, aluminum
Material: Aluminum, PEEK green
Material: VICARBO®
WB (5.5mm)
RB36503
XT16508 XT17508XT16510 XT17510XT16512 XT17512XT16514
RB36510
RB16501
WB37503
WB37510
WB17501
RB36520
RB16550
WB37520
RB16550
RB36553 RB36553
RB36504
RB36512
RB16502
WB37504
WB37512
WB17502
RB36530
RB36513
RB16515
WB37530
WB37513
WB17515
WB37500
8mm
10m
m
12m
m
14m
m
8mm
10m
m
12m
m

6 7
BOLT-IN TUBE The new Bolt-in Tube connection prevents traction from being exerted on the ceramic. Forces are absorbed by the VICARBO® screw which functions as a bolt.
Screw head dia. 2.8mm
VARIABLE PLACEMENT DEPTHThe ZERAMEX® XT implant is placed 1.6 mm supracrestal(optional 0.6 mm) and offers high prosthetic flexibility.
ZERAFILTM SURFACEOutstanding osseous integration with the hydrophilic blasted and etched ZERAFIL TM surface. Surface- treated up to a neck height of 0.6mm.
ZIRCONIUM DIOXIDE ATZ-HIP MATERIALInnovative material for high stress and bio-compatibility.
HIGH PRIMARY STABILITYThe thread design andcylindrical-conical implant shape achieve high primary stability.The reservoir for bone grafts at the tip of the implant simplifies implant insertion.
INTERNAL CONNECTION The four cross-shaped retaining elements provide the ideal torque on insertion so that the implant can be screwed in without stress peaks being exerted on the bone.
Four interlocksThe four interlocks provide precise anti-rotation protection. The Bolt-in Tube connection prevents force from being transmitted via the interlocks. These four retaining elements help the abutment to be securely and quickly placed in the implant.
500µm 2µm
The VICARBO® screw is a precision screw to optimally capture occlusal forces. When tightened, it grips the existing contour of the thread thanks to the significant differenthardnesses of the ceramic and screw.
The slightly beveled contact surfaceof the implant was developed to facilitate easy centering and placement of theabutment and auxiliary parts.
Root-shaped ZERAMEX® Implant with internal connection
“Bolt-in Tube” — the simple and strong ceramic connection!
THE NEW GENERATION OF CERAMIC IMPLANTSThe ZERAMEX® XT implant is the latest innovation of the family of two-piece, reversible screw-in ZERAMEX® ceramic implants. The root-shaped design of the ZERAMEX® XT implant achieves high primary stability, and high prosthetic flexibility is ensured thanks to the new internal connection.
The ZERAMEX® XT implant is made of hard and hot isostatic post-compacted (HIP) zirconium dioxide ATZ blanks. No thermal process (sintering) or finishing takes place after the final shaping of the external and internal implant geometry. This enables a high level of precision, and changes in the material structure areprevented. This manufacturing process is very complex and requires a great deal of experience and expertise.
The new “Bolt-in Tube” connection of ZERAMEX® XT implants provides certainty when taking impressions and for temporary and permanent prosthetic restorations. The design elements of this connection have been selected to provide very high stability, while taking into account the typical material properties of ceramics.
The special geometry with four interlocks and the high precision allow for quick and simple insertion and positioning of the abutment.
The core of the connection is the VICARBO® screw. This acts as a bolt that anchors the abutment in the implant. The extremely hard ceramic is combined with a very rigid, carbon-fiber-reinforced polymer. Similar to reinforced concrete, the ceramic absorbs compressive forces, while the VICARBO® screw counteracts tensile forces.

8 9
1 Preparation phaseAs with any surgical procedure, implantation also
requires proper professional preparation. Preparation includes a thorough dental and general health examination which includes taking X-ray images and a detailed discussion with the patient regarding their prior medical history. Also, treat any gum disorders in advance. The options and intentions for later prosthetic restoration (item 5) should be included in the discussion from the start.Use this baseline to work out the individual therapy plan and create a protocol. CT and DVT can be used to gather information about bone conditions which are difficult to diagnose. The bone and its quality decide ultimately on the position and number of implants.
2 Implant selectionImplant lengths and diameters are based on X-ray
images. In general, always choose the largest possible diameter. However, the vestibular wall thickness must be at least 1 mm to ensure proper perfusion. If this is not possible, bone grafting is necessary.
3Bone preparationIt is essential to follow the drilling protocol on
page 17. Constant cooling must be provided while drilling at temperatures higher than 42 degrees Celsius may alter bone structure and affect osseo-integration!
Important: Only insert the drill to the specified marking. The implant is not self-tapping; always use a thread cutter. If the cortical bone is very hard, use the ZERADRILLTM extension. Follow the corresponding drilling protocols. Replace drills after about 20 implantations or in case of reduced cutting performance.
4 Implant insertionWe recommend tightening the implant by hand
and not tightening at more than 15 rpm. The implant is placed 1.6 mm supracrestal, but can optionally be sunk deeper (0.6 mm supracrestal). The edge of the implant must be easily accessible in order to correctly tighten the abutment after the initial healing phase. Very good primary stability is important. Use a healing cap to cover the implant after the placement and close the gums. A gingiva former can be used directly inexceptional cases. The minimum required healingperiod is three months for the lower jaw and six months for the upper jaw.
Treatment Planning in Five StepsDO NOT OVER-TIGHTEN! We recommend a screw-in torque of 20–30Ncm. The maximum torque for regular and wide implants is 45Ncm. Do not exceed this torque. The required torque is ALWAYS less than the maximum torque for the particular bone quality (less torque for soft bone) and implant length (less torque for short implants).
5Prosthetic restorationA range of standard abutments is available for
prosthetic restorations. You can find further information starting on page 27: Prosthetic procedure.
Regular
Regular
Wide
Wide
3,3mm
3,7mm
1,5mm
3,5mm
1,5mm
Recommended minimum drill spacing
10 11
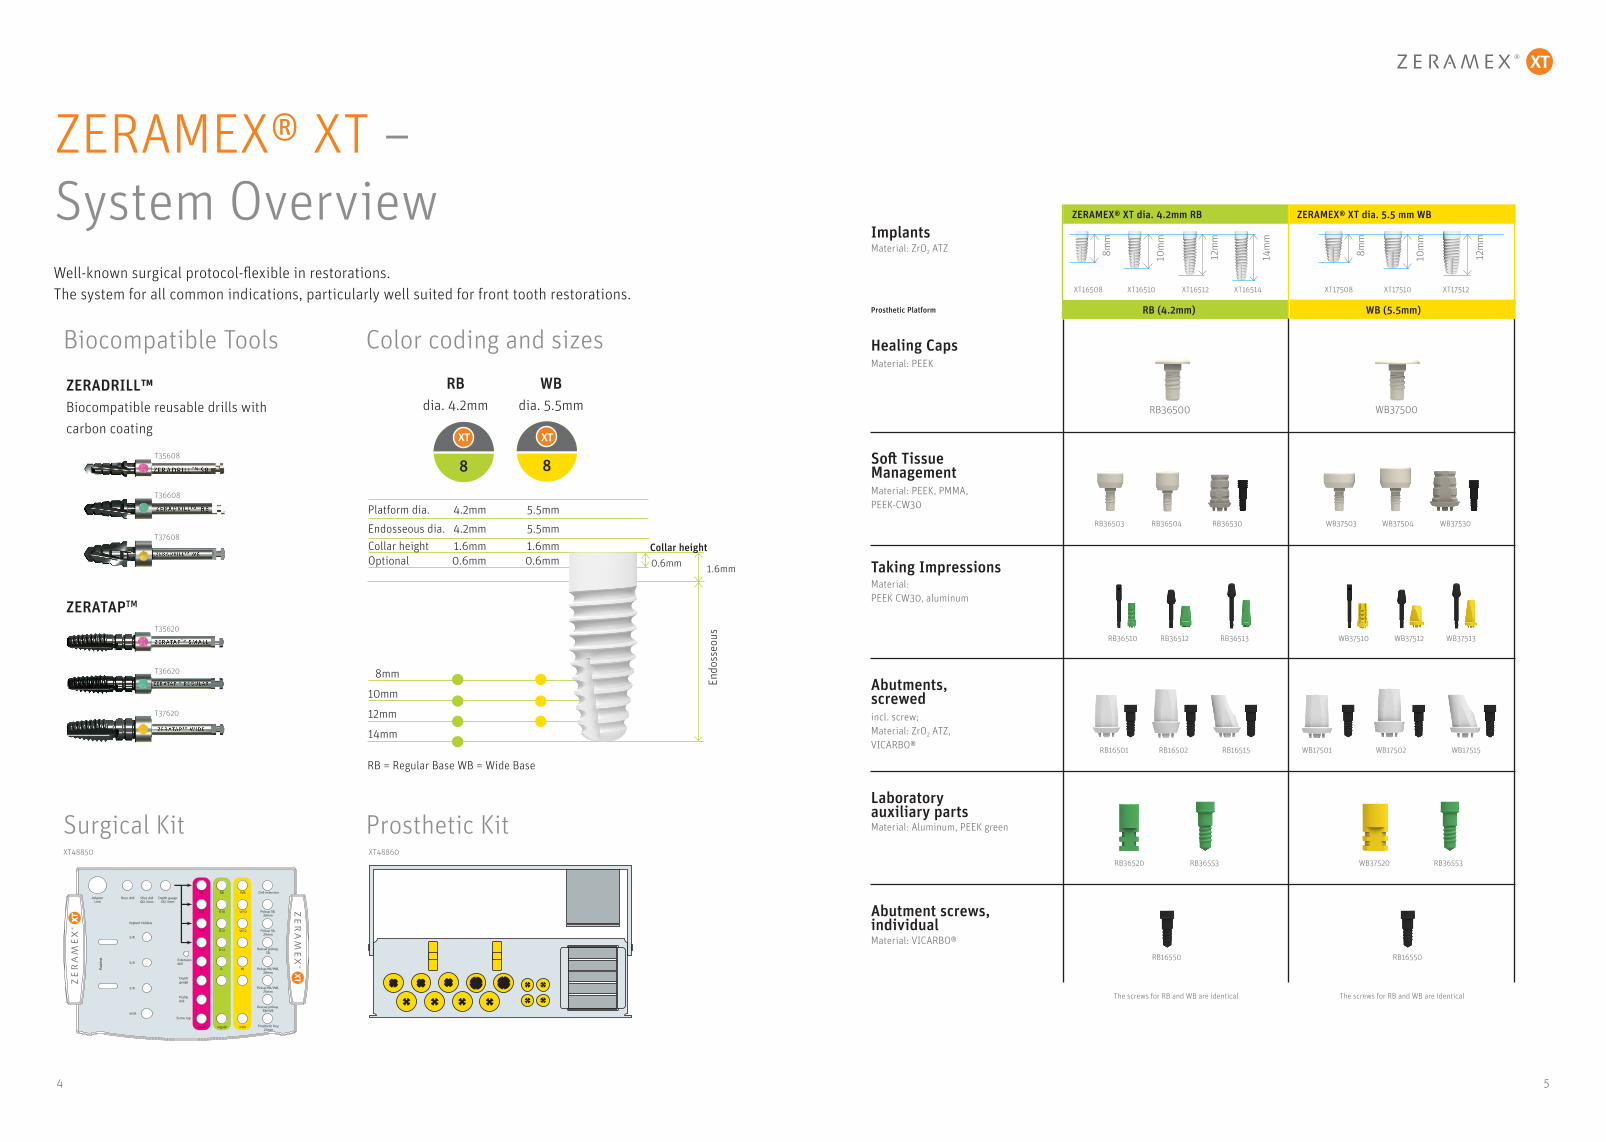
Intended useThe ZERAMEX® Dental Implant System is intended to be surgically placed in the bone of the upper and lower jaw to provide support for prosthetic devices, such as artificial teeth, in order to restore chewing function. The ZERAMEX® Dental Implant System can be used for single or multiple unit restorations.
IndicationsThe ZERAMEX® implants are intended for delayed loading. The ZERAMEX® implants are specially indicated forpatients with metal allergies/intolerances and chronic illness due to metal allergies/intolerances.
Indications/contraindications
ContraindicationsImplantation is contraindicated in the followingconditions:• Poor bone quality, i.e. if a stable fit of the implant
(primary stability) cannot be assured, even with bone grafts
• Patients with osteoporosis currently undergoing course of biphosphonates
• Patients under the age of 15• Smoking• Poorly motivated, non-cooperative patients who
cannot or will not comply with oral hygiene directions and post-operative restrictions, including patients with certain mental diseases
• Active infection• Intractable periodontitis and untreated severe
periodontal disease• Heart diseases affecting the valves, recent infarcts,
severe cardiac insufficiency, cardiomyopathy• Severe immunodeficiency, including patients with
HIV, undergoing chemotherapy, or awaiting organ transplants
• Systemic diseases, including severe blood disease (e.g. hemophilia)
• Strongly irradiated jaw bones
Relative ContraindicationsImplants may be contraindicated in patients with thefollowing conditions:• Acute or chronic infectious diseases• Sub-acute chronic jaw ostitis• Hypertension• Microvascular impairments• Myocardial infarction within past six months• Cerebral infarction and cerebral apoplexy: In cases
where the condition of the disease is serious and the patient are concurrently taking anticoagulants.
• Diabetes• Alcohol or drug abuse• Pregnant or lactating women• Chronic osteomyelitis• Bruxism• Mouth-closing disorder (temporomandibular joint
disorder, temporomandibular joint ankylosis, post-tumour resection
• Abnormal anatomical structures , e.g. maxillary sinus, inferior alveolar nerve, that may interfere with implants
NotePlease consider the general contraindications valid in the field of implantology. Parodontal problems require resto ration prior to implantation. The following specifications are an outline of the most important operational steps. They are not supposed to be a complete instruction and are not suitable for immediate application of the ZERAMEX® system. We highly recommend a briefing by an experienced user. Documentation/Traceability: The manufacturer recommends complete clinical, radiological, photographic and statistic documentation. Traceability of the implants has to be assured. Use the adhesive labels enclosed in the sphere package for documentation in the patient file.
Side effects, interactions and precautions; complications with ZERAMEX® implantsImmediately after the insertion of dental implants, activities that demand considerable physical exertion should beavoided. Information related to side effects, interactions and precautions, complications with ZERAMEX® implantsshould be provided to the patient. Possible complications following the insertion of dental implants are:Temporary symptoms: Pain, swelling, phonetic difficulties, gingival inflammation.More persistent symptoms: Chronic pain in connection with the dental implant, permanent paresthesia, dysesthesia,loss of marginal bone, osteolysis, poor or no osseointegration, localized or systemic infection, oroantral or oronasalfistulae, unfavorably affected adjacent teeth, irreversible damage to adjacent teeth, fractures of implant, jaw, boneor prosthesis, esthetic problems, nerve damage, exfoliation, hyperplasia.
WarningOne hundred percent implant success cannot be guaranteed. Failure to observe the indicated limitations of use and working steps may result in failure. Products must be secured against aspiration when handled intraorally.Aspiration of products may lead to infection or unplanned physical injury. Despite the high success rates withZERAMEX® implants1), failures cannot be excluded. Reasons are case-specific and often not obvious. They should be documented and reported to the manufacturer.
Caution/Precautionsa. Clinical useSterile handling is essential. ZERAMEX® implants and healing caps are for single use only. A previously used,non-sterile or contaminated implant or healing cap must not be used under any circumstances. Re-use of single usedevices may lead to infections, inflammations or loss of the implant.
b. Handling of storage and sterile packageThe storage package is only to be opened shortly before implantation. The sterile package has to be checked fordamages prior to opening. Any damage of the sterile package (blister) might affect sterility of the containedproducts. When taking the implant out of the package, please follow the valid instructions regarding asepticconditions. ZERAMEX® implants have to be stored in their original package and in a cool (ambient temperature) and dry environment and have to be protected against direct sunlight.
1) Jank S et al., Success Rate of Two-Piece Zirconia Implants: A Retrospective Statistical Analysis. Implant Dent. 2016 Feb 1.

12 13
ZERAMEX® XT – Tools
ZERADRILLTM
S8 (8mm)T35608
S10 (10mm)T35610
S12 (12mm)T35612
S14 (14mm)T35614
R8 (8mm)T36608
R10 (10mm)T36610
R12 (12mm)T36612
R14 (14mm)T36614
W8 (8mm)T37608
W10 (10mm)T37610
W12 (12mm)T37612
Rose drilldia. 2mmP35601
ZERADRILLTM extensionsmallT35622
ZERAMEX®TDepth gageT38650
ZERATAPTM small dia. 3.5mmT35620
regular dia. 4.2mmT36620
wide dia. 5.5mmT37620
regularT36622
wideT37622
ZERAMEX® TDepth gageT38650
ZERADRILLTM Pilot dia. 2.3mmT35602
Ratchet Adapter Unit, ShortP48932
Surgical RatchetP48935
Follow the corresponding drilling protocols. Replace drills after about 20 implantations or in case of reduced cutting performance.
Drill extensionC7650
ZERAMEX® Pick-ups
ZERAMEX® XTXT38619Prosthetic wrench19mm
XT38623Prosthetic wrench23mm
XT38628Prosthetic wrench28mm
XT36622Rescue pick-up
XT36620RB and WB 20mm
XT36625RB and WB 25mm
* These slots are reserved for system extension
*
*
*
*

14 15
SURGERY PHASE
Planning the insertion depth with the drill stopThe drill stop allows the drilling depth to be precisely controlled. The drill stopped is placed on the drill sleeve. It allows you to insert the implant 1.6mm or 0.6mm supracrestal.
Correct position for insertion depth:1.6mm supracrestal 0.6mm supracrestal
1.6mm supracrestal,without drill sleeve
Implant 1.6mm supracrestal 1.6mm supracrestal,with drill sleeve
0.6mm supracrestal,with drill sleeve
Bone level
Endosseous depth
1mm
Collar height
1mm
Depth marks
CAUTION!The drilling depth is up to
1mm deeper than the corresponding implant
The diameter is indicated on each tool by a color code.
STERILIZATION BEFORE SURGERY Surgery prep involves steam sterilizing the surgery tray (surgical instruments) at 132°C or 134°C according to online sterilization guidelines.
IMPORTANT: If the drills and instruments are used more than once, place them in the saline solution in the interim.
Example of 8mm implant 1.6mm supracrestal
1mm
Endosseous depth 8mm
ZERADRILLTM
Pilot DrillZERADRILLTM
DrillDepth gage ZERATAPTM
Screw TapZERADRILLTM
extensionOptional for hard bone
14mm implant
12mm implant
10mm implant
8mm implant 1.6mm Collar height
16 17
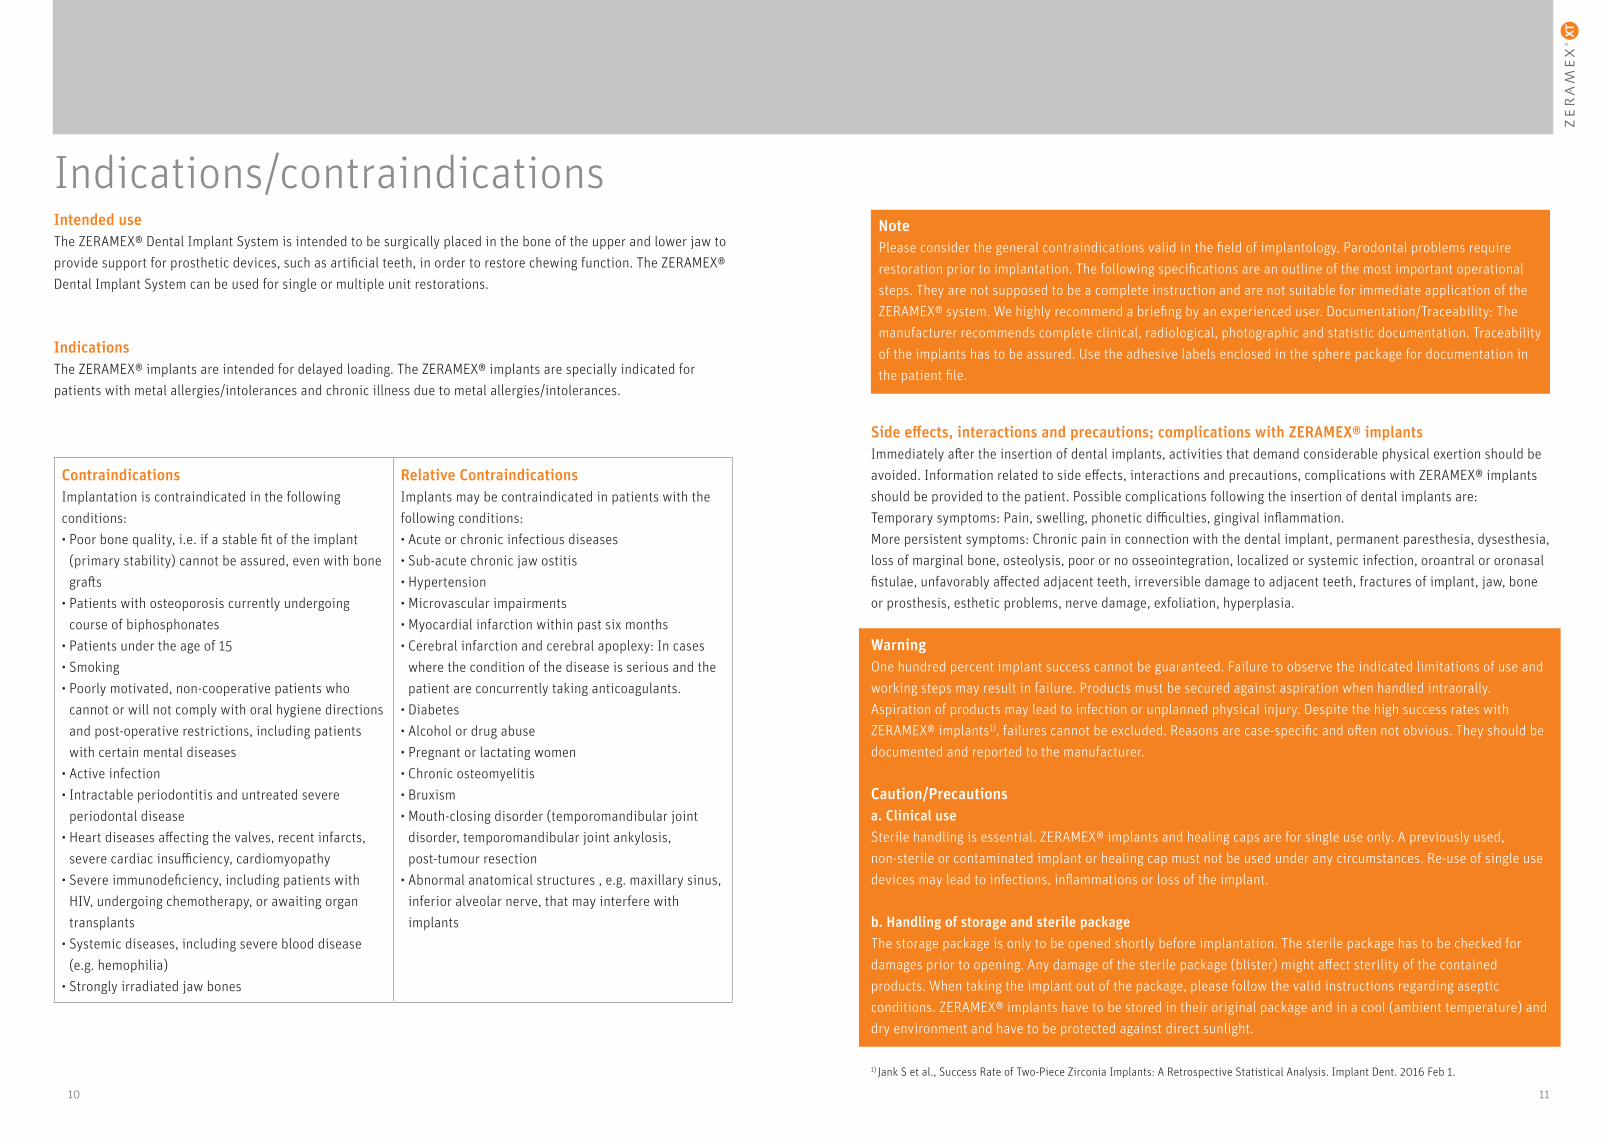
Drilling protocol dia. 4.2mm RB
Endosseousdia. 4.2mm
SURGERY PHASE
Optionally, the implant can also be positioned 0.6mm supracrestal(instead of 1.6mm). The drill and threadcutter must be drilled 1mm deeper in this case.
ZERA
DRIL
L™ S
8 (S
MAL
L 8m
m)
max
. 700
rpm
ZERA
DRIL
L™ R
8 (R
EGUL
AR 8
mm
)m
ax. 6
00rp
m
ZERA
DRIL
L™ P
ilot d
ia. 2
.3m
mm
ax. 8
00rp
m
Rose
drill
dia
. 2m
mm
ax. 8
00rp
m
ZERA
TAP™
REG
ULAR
dia
. 4.2
mm
max
. 15r
pm
Optio
nal f
or h
ard
bone
ZE
RADR
ILL™
Ext
ensi
on R
EGUL
ARm
ax. 6
00rp
m
dia. 2.3mm SMALL
Example dia. 4.2 x 8mm REGULAR Implant
1.6mmCollar height
Endosseous depth 8mm
1mm
REGULAR
NOTE: • With dia. 4.2mm implants, do not exceed a torque of 45Ncm.
RECOMMENDATION:Always precut the entire thread length.
Optionally, the implant can also be positioned 0.6mm supracrestal (instead of 1.6mm). The drill and threadcutter must be drilled 1mm deeper in this case.
Drilling protocol dia. 5.5mm WB
Endosseous dia. 5.5mm
NOTE: With dia. 5.5mm implants, do not exceed a torque of 45Ncm.
RECOMMENDATION:Always precut the entire thread length.
ZERA
TAP™
WID
E di
a. 5
.5m
mm
ax. 1
5rpm
Optio
nal f
or h
ard
bone
Z
ERAD
RILL
™ E
xten
sion
WID
Em
ax. 5
00rp
m
ZERA
DRIL
L™ S
8 (S
MAL
L 8m
m)
max
. 700
rpm
ZERA
DRIL
L™ R
8 (R
EGUL
AR 8
mm
) m
ax. 6
00rp
m
ZERA
DRIL
L™ W
8 (W
IDE
8mm
)m
ax. 5
00rp
m
ZERA
DRIL
L™ P
ilot d
ia. 2
.3m
mm
ax. 8
00rp
m
Rose
drill
dia
. 2m
mm
ax. 8
00rp
m
dia. 2.3mm SMALL REGULAR WIDE
Example dia. 5.5 x 8mm WIDE Implant
1.6mmCollar height
Endosseous depth 8mm
1mm

18 19
Planning drilling for 0.6mm supracrestal
SURGERY PHASE
Optional insertion depth up to 0.6mm supracrestal
ZERADRILLTM
Pilot DrillZERADRILLTM
DrillDepth gage ZERATAPTM
Screw TapZERADRILLTM extensionOptional for hard bone
0.6mm8mm implant
*For a length of 14mm, we recommend that the implant is not placed 0.6mm supracrestal.
Endosseous depth 9mm
Drill hole depth10mm
Collar height
Selected implant length
Reference number
8mmRB16508WB17508
9mm 9mm 9mm 10mmUp to sleeve 0.6 supracrestal
10mmRB16510WB17510
11mm 11mm 11mm 12mmUp to sleeve 0.6 supracrestal
12mmRB16512WB17512
13mm 13mm 13mm 14mmUp to sleeve 0.6 supracrestal
14mmRB16514 * * * ** *
Pilot drill Drill hole depth ZERADRILLTM extension ZERATAPTM Screw-in depth Effective hole
depth
CAUTION!The effective drilling depth isup to 1mm deeper than the
corresponding implant.
1mm
2. Open the sphere by twisting.
3. Remove the sterile secondary blisters and patient labels from the sphere.
2.
3.
Handling Required material:• RB and WB: XT36620/XT36625• Ratchet Adapter Unit (P48932)
1.
1. Box contents: Implant in a spherical packaging, matching healing cap, note: Check the required implant dimensions before opening the package.
5. Break the seal shortly before use.
4. Place the sterile primary blister on the tray. Use the compartments on the tray with the corresponding diameters.
6. Pick up the implant using the pickup tool (insert in the ratchet adapter; snap in the square socket).
6.
5.
4.
ZERAMEX® XT Implant
ø4.2x8mm RB
Dentalpoint AG
KxxxxxxXT16508

20 21
1. Slowly screw the implant into the precut drill hole. Important: Never use the rescue pickup for insertion.
5b.
5a.
4.1.
2.
3.
3. = The arrows show the possible positions of the angled abutment. Take this into account wheninserting the implant.
5a. Version 1: Closed healing (recommended).
5b. Version 2: Open healing; note closely adjacent gingiva.
4. Close the implant with the healing cap. Use the pickup (XT36620/XT36625) or prosthetic wrench (XT38619/XT38623/XT38628), and carefully tighten the healing cap (max. 5Ncm).
2. Tighten the implant with the ratchet. Recommendation: 20–30Ncm.Note: Torque is only exerted in the last two rotations due to the conical design.
max.45Ncm
Insert and seal the implant
DO NOT OVER-TIGHTEN!The maximum torque for
RB and WB implants is 45Ncm.Do not exceed this torque. The pickup has a predetermined breaking point of
approximately 50Ncm.Maximum speed: 15rpm
max.15rpm
SURGERY PHASE
3
14 2
Temporary restoration
1. Place the temporary abutments, and tighten with the prosthetic wrench (max. 15Ncm).
2. If necessary, work on the provisional extra-orally and provide it with a provisional crown.
Required material:• ZERAMEX® XT provisional RB and WB (RB36530/WB37530)
• ZERAMEX® XT prosthetic wrench (XT38619/XT38623/XT38628)
1.
2.
TEMPORARY RESTORATION
Processing the provisional: It is preferable to machine the polymer with fine-graindiamond-coated instruments at a high speed. This is done extra-orally with slight pressure and effective cooling.
General:Bear in mind that polymer prosthetic components have a different feel than metal to the user. Familiarize yourself with this beforehand.
DO NOT FORGET!The maximum wearing time of the temporary abutments is 180 days.

22 23
1a.
2.
2. To remove the gingiva former, insert the prosthetic wrench and turn counterclock-wise.
Gingiva former
DO NOT OVER-TIGHTEN!Force does not need
to be applied to insert the gingivaformer. Carefully screw
in to the full depth.
1a/b. Placement: Place the gingiva former on the prosthetic wrench and carefully screw in clockwise to the full depth under slight pressure. (max. 5Ncm).
Required material:• Gingiva former (RB36503/RB36504/WB37503/WB37504)
• Prosthetic wrench (XT38619/XT38623/XT38628)
1b.
SOFT TISSUE MANAGEMENT
6. Restoration: Select asecondary componentdepending on the prosthetic requirements and therelated procedure. Theavailable straight and angled
screwed abutments are shown from page 30 onwards.
2. Screwing tight: Tighten the lukewarm locking pin clockwise,
and check the position for a form-fit.
1. Positioning: Place thetransfer sleeve onto the implant shoulder under slight pressure while twisting until it snaps
into the cross, rests securely on the implant shoulder and can
no longer be rotated.
TAKING IMPRESSIONS
Closed tray Required material:• ZERAMEX®XT Transfer Closed Tray RB/WB (RB36512/WB37512) or (RB36513/WB37513)
• ZERAMEX®XT Implant Replica RB/WB (RB36520/WB37520)
3. Taking an impression: Prepare the impression with a closed tray
and remove. Unscrew the locking pin, remove the transfer from the implant andprovide the impression to the dentaltechnician.
5. Reposition and create a model:Reposition the transfer in the impression with the screwed-on implant replica and ensure that the seat is secure. Create a master model.
1.
6.
Impression material
Plaster model5.
2.
3.
Plaster model
In the office: In the laboratory:
Impression material
4.
4. Connecting: Place thetransfer sleeve on the replica
shoulder under slight pressure while twisting until it snaps into
the cross of the implant replica, rests securely on the shoulder and can no
longer be rotated. Screw the lukewarmlocking pin tight clockwise.
Impression material

24 25
1. Positioning: Place the transfer sleeve on the implant shoulder
under slight pressure while twisting until it snaps into the cross, rests
securely on the implant shoulder andcan no longer be rotated.
6.
6. Restoration: Select a secondary component depending on the
prosthetic needs and the preferredprocedure. Straight and angled screwedabutments are available(from page 30 onward).
5. Creating the model:Reposition the transfer with the
screwed-on implant replica, and make sure that the seat is secure.
Create a master model. Remove the locking pin before removing the impression.
4.
4. Connecting: Place thetransfer sleeve on the implant replica under slight pressure while twisting until it snaps into the cross of the implant replica, rests securely on the
shoulder and can no longer be rotated. Screw the lukewarm
locking pin tight clockwise.
Open tray
5.
1.
2.
2. Screwing tight: Screw the transfer sleeve hand-tight. Tighten the lukewarm locking pin clockwise, and check the position for a form-fit. In case of doubt, take an X-ray.
3. Taking an impression: Create the impression with an open tray. Unscrew and remove
the locking pin. Remove theimpression, and give it to the
dental technician with the locking pin.
3.
IMPORTANT: The transfer sleeves must be snapped into the inner edge and mate securely. To check,
apply a slight countermovement.
In the office: In the laboratory:
Required material:• RB (RB36510/WB37510)• ZERAMEX® XT Implant Replica RB/WB (RB36520/WB37520)
Impression material
Impression material
TAKING IMPRESSIONS
Plaster model
UseZERAMEX® XT implants are used for the followingindications: • Individual tooth restoration• Bridges over several implants• Bars over several implants • Bar/hybrid restoration in combination with Locator®
1 Preparation phaseProsthetic restoration is governed by the overall
approach for achieving the best possible results. Integral functionality, aesthetics and patient comfort are the primary considerations. The initial step is a detailed analysis (including X-rays) which includes the patient’s medical history. Therapy plan is developed with the primary considerations in mind.
2 Gingiva Management A pink appearance reflects healthy gingiva. For this
reason, any disorders must be treated beforeimplantation. Soft tissue grows well around zirconium oxide, which is of great relevance, especially in the anterior region. A natural emergence profile is individually created with a gingiva former or a provisional, and the “blacktriangle” is a thing of the past.
3 Abutment/Implant ConnectionThere are two basic options for a metal-free,
aesthetic and biologically compatible restoration:• Screwed prosthetic restoration (page 30)• Cemented prosthetic restoration (page 34)The range of metal-free prosthetics is extensive and satisfies the stringent requirements with regard toaesthetics and functionality. The ZERAMEX® XT implant with its various abutments is optimum for nearly every situation.
4 WorkflowThe ZERAMEX® XT implant system seamlessly
integrates with conventional procedure using manual, direct and indirect impressions.
Prosthetic procedure
RBdia. 4.2mm
The prosthetic parts marked green are for the RB platform (4.2mm implant)
WBdia. 5.5mm
The prosthetic parts marked yellow are for the WB platform (5.5mm implant)The exceptions are the laboratory screw for the RB platform (RB36553) and the VICARBO® screw (RB16550). These also work in the WB platform.
PROSTHETIC RESTORATION

26
ZERAMEX® XT – Prosthetic Tools
Surgical ratchetP48935
Ratchet Adapter Unit, ShortP48932
ZERAMEX® XT Ratchet
XT38619
19mm
ZERAMEX® XT Prosthetic wrench
IMPORTANT:Secure the parts against
being aspirated when they are used in the patient’s
mouth.
ZERAMEX® XT Prosthetics Kit
XT48860 Tray
XT48864 Fully equipped Tray without Ratchet
XT48865 Fully equipped Tray incl. Ratchet
XT38623
23mm
XT38628
28mm

29
28
VICARBO® screwThe high-performance carbon fiber-reinforced polymer screw.
AbutmentsStraight (in two collar heights) and angled abutments are available for the 4.2mm (RB) and 5.5mm (WB) platforms.
straight, 1mm straight, 2mm angled, 1mm
ZERAMEX® XT Screwed connection
C1. C2.
Water
SCREWED PROSTHETIC RESTORATION
The ZERAMEX® XT system offers reversible screwing into zirconium dioxide. The internal thread makes it possible to screw prosthetic parts and zirconium dioxide abutments into implants. The anti-rotation protection on the platform allows secondary parts to be securely and precisely positioned, and the laboratory screw ensures that they are firmly seated.
Everything you need for the laboratory at a glance:
• Each abutment is supplied with a VICARBO® screw.
• Each VICARBO® screw may only be tightened once to the maximum torque.
• The torque for the VICARBO® screw for the RB and WB platform is always 25Ncm.
• For work in the laboratory, we offer laboratory screws that may not be tightened more than 5Ncm.
• Adapt your approach to the ana-tomical situation and do not use over-dimensioned crowns or connections to natural teeth (hybrid restoration).
• Do not use floating crown attachments with an abutment.
• When grinding the abutment, an additional replica can be used as a holder. Counterpressure with the fingers reduces vibration.
A: Select an appropriate abutment. B: If necessary, individuallymachine the abutment. Onlyprocess the abutment undersufficient, continuous cooling with slight pressure. Use high speeds (turbines) and fine grain size(red-ring diamond, smaller than 50 μm). Note: Local overheating causes micro-fissures anddestruction of the abutment.
C1. Monolithic crowns consisting of a range of optimized polymers orzirconium dioxide.
C2. Full-ceramic crowns made of layered or pressed ceramic on a zirconium diode cap.
Plaster model
B.A.
Production of the superstructure in the laboratory
IMPORTANT: It is essential toconsider the minimum layerthickness according to themanufacturer’s instructions for the specific crown material.
C. All XT abutments are approved for the following: √ adhesion, √ milling, √ pressingYou can choose a monolithic crown (C1.) or full-ceramic crown on azirconium dioxide cap (C2.)
Tip: Use an individual positioning wrench for angled abutments or complex restorations.

30 31
Restoration with placeholders:When using placeholders, make sure that the screw channel diameter allows the VICARBO® screw to be inserted into and removed from the abutment and crown at any time, even when the crown is already tightly cemented to the abutment.
Occlusal screwed connection in the patient’s mouth
Screw channel with a reduced diameterYou can also use screw channels with a reduced diameter instead of placeholders. With this, the screw channel diameter can be reduced to less than 2.2mm. The prosthetic wrench (XT38619 / XT38623 / XT38628) can be used as a placeholder.
The diameter of the screw channel for the reduced diameter version must be less than 2.2mm.
The screw channel diameter for the VICARBO® screw must be larger than 2.8mm for the RB and WB platform.
You can make your own placeholders: RB and WB platform: 2.8mm
RB and WB platform
> 2.8 mm
IMPORTANT:• When using reduced-diameter screws, the VICARBO® screw must be
inserted in the abutment in the laboratory before the crown is secured onto the abutment.
• The VICARBO® screw cannot be screwed in or out after the crown has been cemented.
• When cementing the crown, excess cement must not enter the screw channel of an inserted screw (insert cotton wad or a similar placeholder that can be removed from the screw channel).
• If the abutment is shortened, make sure that the VICARBO® screw has sufficient vertical space to be screwed in and out.
> 2.2 mm
SCREWED PROSTHETIC RESTORATION
Required material:
• Abutment incl. VICARBO® screw (RB16501/RB16502/RB16515), (WB17501/WB17502/WB17515)
• Prosthetic wrench (XT38619/XT38623/XT38628)
1a. The cap can be veneered by pressing or layering. Use the following procedure to select the diameter of the screw channel:- RB and WB abutments: > 2.8mm- Reduced diameter: > 2.2mm*
1b. Place the abutment with the cemented crown on the implant. Apply slight pressure to fit the abutment/crown until it snaps into place in the correct position. Hold the abutment/crown and tighten the screw in the screw channel by applying pressure from the occlusal direc-tion. Use the prosthetic wrench and the torque ratchet (RB and WB: 25Ncm). Use a probe and/or X-ray to check if the abutment is correctly seated.
Occlusal screwed connection in the patient’s mouth
*IMPORTANT: When using a reduced-diameter screw, place the screw in the abutment before cementing the crown on top. Note the information on page 32.
DO NOT OVER-TIGHTEN! The maximum torque for the
VICARBO® screw is:Platform dia. 4.2mm/5.5mm
RB and WB: 25Ncm
1a.
1b.

32 33
CEMENTED PROSTHETIC RESTORATION
DO NOT OVERTIGHTEN! The one-off tightening torque for the
VICARBO® screw is:Platform dia. 4.2mm/5.5mm
RB and WB: 25Ncm
Cementing the crown in the patient’s mouth
2a. Securely insert the abutment with a screw locking device (fine groove in the screw channel). Pick up the VICARBO® S screw with the prosthetic wrench and insert it into the abutment until it locks into place («Click»). You can now use the prosthetic wrench to transfer the abutment onto the implant. Before tightening the screw, press it downward. Use the prosthetic wrench and the torque ratchet to tighten the screw (RB and WB: 25Ncm). Use a probe and/or X-ray to check if the abutment is correctly seated.
2b. The cap can be veneered by pressing or layering. Cement the finished crown onto the tightly screwed abutment, and remove any excess cement.
Required material:
• Abutment incl. VICARBO® screw (RB16501/RB16502/RB16515), (WB17501/WB17502/WB17515)
• Prosthetic wrench (XT38619/XT38623/XT38628)
If a screw channel is not possible or required, the crown can be produced in the laboratory without a screw channel.
NOTE: An individual positioning wrench may need to be made.
NOTE: There is a specific VICARBO® screw for each abutment. Note the VICARBO® datasheet.
2b.
2a.
«Click»
WB dia. 5.5mm
RB dia. 4.2mm
a b c d eWB17501 ZERAMEX® XT Abutment WB Straight, 1mm 7.0 6.0 1.0
0.7 0.6WB17502 ZERAMEX® XT Abutment WB Straight, 2mm 8.0 6.0 2.0WB17515 ZERAMEX® XT Abutment WB Angular 15°, 1mm 7.0 6.0 1.0
All dimensions are in millimeters
All dimensions are in millimeters
Material • ZrO2-ATZ-HIP• Composition:
• ZrO2: 76% • Al2O3: 20% • Y2O3: 4%
• Flexural strength: 2,000 MPa• CTE for ZrO2 ATZ: 9 x 10⁻⁶/K
Grinding the abutment• The conical part can be shortened• Only machine under good, continuous cooling
with slight pressure • Use high speed (turbines) and fine grain size
(red-ring diamond, smaller than 50μm) Final tightening torque:
• RB: 25Ncm • WB: 25Ncm
TECHNICAL DATA FOR ZERAMEX® XT ABUTMENTS
a b c d eRB16501 ZERAMEX® XT Abutment RB Straight, 1mm 7.0 5.0 1.0
0.7 0.6RB16502 ZERAMEX® XT Abutment RB Straight, 2mm 8.0 5.0 2.0
RB16515 ZERAMEX® XT Abutment RB Angular 15°, 1mm 7.0 5.0 1.0
e
d
c
a
b b
c
a

34 35
2
1
1
2.8mm
7.4m
m
2
2.8mm
7.4m
m
2
2.8mm
8.6m
m
XT VICARBO® SCREWS
RBdia. 4.2mm
WBdia. 5.5mm
Distinguishing feature RB & WB VICARBO® screw No grooves on screw head and 1 mm shorter than provisional screw Screw head diameter: 2.8mm21
VICARBO® screwRB16550Matches:RB & WB abutment straight,1mm (RB16501 & WB17501)2mm (RB16502 & WB17502) RB & WB abutment angular,1mm (RB16515 & WB17515)
RB & WB ZERABASE, for crown (incl.Screw)(RB16530 & WB17530)
RB & WB ZERABASE, for bridge/bar (RB16531 & WB17531)
Distinguishing feature: Length 7.4mm
Tightening torque: 25Ncm
Lab screw RB36553Matches:RB & WB Scanbody (RB36514 & WB37514)All RB & WB Abutments
Distinguishing feature: Length: 7.4mmGreen color
Tightening torque: 5Ncm
Material: PEEK
ATTENTION: This screw is not intended for the final supply!
Provisional screw RB36550Matches:RB & WB Provisional(RB36530 & WB37530)
Use for provisional restorations only!
Distinguishing feature: Length: 8.3mmGrooves in screw head
Tightening torque: 15Ncm
THE INNOVATIVE, METAL-FREE VICARBO® SCREW
The metal-free innovation: VICARBO® screwOur objective was to offer a 100% metal-free solution in which not only the implant but also the screw are metal-free. We therefore decided to use the high-performance material VICARBO®. VICARBO® is a carbon-fiber reinforced PEEK plastic, in which the carbon fibers are aligned with the longitudinal axis of the material. In this way, we can achieve enormous strength. Thanks to the production process developed by ZERAMEX®, the carbon fibers are not damaged during production and they retain their full function. This screw, for which a patent is pending, is unique in dental implantology!
This material has already proved its worth in other medical applications (e.g. orthopedics) and is considered to be the material of the future. Aerospace engineers also use carbon fiber reinforced components because of their enormous strength and low weight.
Technical Specifications Modulus of elasticity: >160 GPa. Flexural strength: >1,100 MPa. Tensile strength: 2,000 MPa. Sterilization: Steam sterilization at 134°C, 18 min.
Do I have to use the specified tightening torque?• The specified tightening torque must be used to compensate the reduced tension through the tight fit and
to ensure a reliable, permanent bond.
Why does the VICARBO® screw have a conical shoulder?• The conical shoulder of the screw was designed so that the fit with the abutment is as tight
as possible without generating lateral forces that could damage the abutment later.
What material is the VICARBO® made from? Why is it black?• The screw is made of PEEK plastic reinforced with longitudinally aligned carbon fibers.
The carbon fibers are responsible for the VICARBO® screw’s color.

36 37
Product Range
PRODUCT RANGE
ZERAMEX® XT Implants
ZERAMEX® XT abutments
Platform Art. No. Name Dimension Material
RB16501 ZERAMEX® XT Abutment RB Straight, 1mm (incl. Screw) dia.: 5mm, AH: 7mm, CH: 1mm ZrO2-ATZ-HIPVICARBO®RB16502 ZERAMEX® XT Abutment RB Straight, 2mm (incl. Screw) dia.: 5mm, AH: 8mm, CH: 2mm
RB16515 ZERAMEX® XT Abutment RB Angular 15°, 1mm (incl. Screw) dia.: 5mm, AH: 7mm, CH: 1mm ZrO2-ATZ-HIPVICARBO®
VICARBO® screws Art. No. Name Dimension Material
RB16550 ZERAMEX® XT RB & WB VICARBO Screw, Straight/Angular Length: 7.4mm VICARBO®
Platform Art. No. Name Dimension Material
WB17501 ZERAMEX® XT Abutment WB Straight, 1mm (incl. Screw) dia.: 6mm, AH: 7mm, CH: 1mm
ZrO2-ATZ-HIPVICARBO®
WB17502 ZERAMEX® XT Abutment WB Straight, 2mm (incl. Screw) dia.: 6mm, AH: 8mm, CH: 2mm
WB17515 ZERAMEX® XT Abutment WB Angular, 1mm (incl. Screw) dia.: 6mm, AH: 7mm, CH: 1mm
dia. 4.2mm Art. No. Name Dimension MaterialXT16508 ZERAMEX® XT Implant dia. 4.2 x 8mm RB (incl. Healing Cap) Length: 8mm
ZrO2-ATZ-HIPXT16510 ZERAMEX® XT Implant dia. 4.2 x 10mm RB (incl. Healing Cap) Length: 10mmXT16512 ZERAMEX® XT Implant dia. 4.2 x 12mm RB (incl. Healing Cap) Length: 12mmXT16514 ZERAMEX® XT Implant dia. 4.2 x 14mm RB (incl. Healing Cap) Length: 14mm
dia. 5.5mm Art. No. Name Dimension MaterialXT17508 ZERAMEX® XT Implant dia. 5.5 x 8mm WB (incl. Healing Cap) Length: 8mm
ZrO2-ATZ-HIPXT17510 ZERAMEX® XT Implant dia. 5.5 x 10mm WB (incl. Healing Cap) Length: 10mmXT17512 ZERAMEX® XT Implant dia. 5.5 x 12mm WB (incl. Healing Cap) Length: 12mm
Length
CH
dia.
AHAH: Abutment heightCH: Collar heightdia.: Diameter
WB
RB

38 39
ZERAMEX® Prosthetics – PlattformSoft tissue management Art. No. Name Dimension Material
RB36500 ZERAMEX® XT Healing Cap RB Height: 0.6mm
PEEKRB36503 ZERAMEX® XT Gingivaformer RB, 3mm Height: 3mm / dia.: 5mm
RB36504 ZERAMEX® XT Gingivaformer RB, 4mm Height: 4mm / dia.: 5mm
RB36530 ZERAMEX® XT Provisional RB (incl. Screw)AH: 7mmCH: 1mmdia.: 5mm
PEEK
Taking impressions Art. No. Name Dimension Material
RB36510 ZERAMEX® XT Transfer Open Tray RB Sleeve height: 11mmHeight incl. screw: 20mm
PEEK-CW30, Aluminum
RB36512 ZERAMEX® XT Transfer Closed Tray RB Sleeve height: 7mmHeight incl. screw: 14mm
PEEK-CW30, Aluminum
RB36513 ZERAMEX® XT Transfer Closed Tray, long RB Sleeve height: 11mmHeight incl. screw: 18mm
PEEK-CW30, Aluminum
Auxiliary parts Art. No. Name Dimension Material
RB36520 ZERAMEX® XT Implant Replica RB Length: 10mm Aluminum
RB36550 ZERAMEX® XT Provisional Screw RB & WB Length: 8.6mm PEEK-CW30
RB36553 ZERAMEX® XT Lab Screw RB & WB Length: 7.4mm PEEK
PRODUCT RANGE
AH: Abutment heightCH: Collar heightdia.: Diameter
RB ZERAMEX® Prosthetics – PlattformSoft tissue management Art. No. Name Dimension Material
WB37500 ZERAMEX® XT Healing Cap WB Height: 0.6mm
PEEKWB37503 ZERAMEX® XT Gingivaformer WB, 3mm Height: 3mm / dia.: 6mm
WB37504 ZERAMEX® XT Gingivaformer WB, 4mm Height: 4mm / dia.: 6mm
WB37530 ZERAMEX® XT Provisional WB (incl. Screw)AH: 7mmCH: 1mmdia.: 6mm
PEEK
Taking impressions Art. No. Name Dimension Material
WB37510 ZERAMEX® XT Transfer Open Tray WB Sleeve height: 11mmHeight incl. screw: 20mm
PEEK-CW30, Aluminum
WB37512 ZERAMEX® XT Transfer Closed Tray WB Sleeve height: 7mmHeight incl. screw: 14mm
PEEK-CW30, Aluminum
WB37513 ZERAMEX® XT Transfer Closed Tray, long WB Sleeve height: 11mmHeight incl. screw: 18mm
PEEK-CW30, Aluminum
Auxiliary parts Art. No. Name Dimension Material
WB37520 ZERAMEX® XT Implant Replica WB Length: 10mm Aluminum
RB36550 ZERAMEX® XT Provisional Screw RB & WB Length: 8.6mm PEEK-CW30
RB36553 ZERAMEX® XT Lab Screw RB & WB Length: 7.4mm PEEK
AH: Abutment heightCH: Collar heightdia.: Diameter
WB
0050 Note (observe accompanying documents)
Order number Expiry date:
Batch ID Follow the instructions for use
Do not reuse Manufacturing date:
Steam sterilized Manufacturer
Unsterile Do not use if packaging is damaged
w Keep away from sunlight The products of the portfolio are FDA approved
p Keep dry Rx only Prescription use only
Regular implant dia. 4,2mm RB
Wide implant dia. 5,5mm WB8
8

40 41
ZERAMEX® ToolsArt. No. Name Material
P35601 ZERAMEX® Rosedrill dia. 2mm
Stainless steel
T35602 ZERADRILL™ Pilot dia. 2.3mm
T35608 ZERADRILL™ S8 (SMALL 8mm)
Stainless steel, carbon-coated
T35610 ZERADRILL™ S10 (SMALL 10mm)
T35612 ZERADRILL™ S12 (SMALL 12mm)
T35614 ZERADRILL™ S14 (SMALL 14mm)
T35620 ZERATAP™ SMALL dia. 3.5mm
T35622 ZERADRILL™ Extension SMALL
T36608 ZERADRILL™ R8 (REGULAR 8mm)
T36610 ZERADRILL™ R10 (REGULAR 10mm)
T36612 ZERADRILL™ R12 (REGULAR 12mm)
T36614 ZERADRILL™ R14 (REGULAR 14mm)
T36620 ZERATAP™ REGULAR dia. 4.2mm
T36622 ZERADRILL™ Extension REGULAR
T37608 ZERADRILL™ W8 (WIDE 8mm)
T37610 ZERADRILL™ W10 (WIDE 10mm)
T37612 ZERADRILL™ W12 (WIDE 12mm)
T37620 ZERATAP™ WIDE dia. 5.5mm
T37622 ZERADRILL™ Extension WIDE
PRODUCT RANGE
ZERAMEX® ToolsArt. No. Name Material
C7650 Drill extension
Stainless steel
T38650 ZERAMEX®T depth gage, 4pcs.
XT38619 ZERAMEX® Prosthetic Key, 19mm
XT38623 ZERAMEX® Prosthetic Key, 23mm
XT38628 ZERAMEX® Prosthetic Key, 28mm
XT36620 ZERAMEX® Pickup, 20mm RB & WB
XT36625 ZERAMEX® Pickup, 25mm RB & WB
XT36622 ZERAMEX® Rescue Pickup RB & WB
P48932 ZERAMEX® P Ratchet Adapter Unit, Short
P48935 ZERAMEX® P Surgical Ratchet, without Adapter
XT35651 ZERAMEX® XT Drill Stop, for SMALL Drill
XT36651 ZERAMEX® XT Drill Stop, for REGULAR Drill
XT37651 ZERAMEX® XT Drill Stop, for WIDE Drill
XT48860 ZERAMEX® XT Prosthetics Kit
XT48864 ZERAMEX® XT Prosthetics Kit, without Ratchet
XT48865 ZERAMEX® XT Prosthetics Kit, incl. Ratchet
XT48850 ZERAMEX® XT Surgery Tray
XT48854 ZERAMEX® XT Surgery Tray, fully equipped, with Ratchet
XT48856 ZERAMEX® XT Surgery Tray, fully equipped, without drills
42
TrainingFor information on courses and further education for ZERAMEX® XT, please contact us at www.zeramex.com.
Material propertiesAll implants and abutments are made from hot-densified zirconium oxide ATZ-HIP® (HIP = Hot Isostatic Postcompaction). For reasons of quality and strength, the implants and abutments must be machined from solid, hard blanks usingdiamond-coated tools. Theworkpiece does not need finishing. This allows highly precise andreproducible production of implants and abutments with the necessary precise fit.
General instructionsZERAFILTM implant surface • Microstructured• Blasted and etched• Hydrophilic
ZrO2-ATZ-HIPZirconium dioxide, ATZ(alumina-toughened zirconia),radiopaque. Composition: ZrO2 76%, Al2O3 20%, Y2O3 4%Flexural strength: 2,000 MPa
PEEK ClassixPolyetheretherketone USP Class VI (not radio-opaque)
AluminumAluminum (not radiopaque)
PEEK Classix CW30 LSGShort carbon fibers (CF) in a PEEK Classix LSG matrix(not radiopaque) Composition: CF 30%, PEEK Classix LSG 70%. Flexural strength: >130 MPa
VICARBO® Unidirectional carbon fibers (CF)in a PEEK matrix. (not radiopaque)Composition:CF 60%, PEEK 40%.Flexural strength: >1,100 MPa
GuaranteeDentalpoint AG offers a lifelong guarantee for implants, and a 10 year guarantee for abutments and VICARBO® screws. Details of the guarantee can be found in the document “ZERAMEX®Guarantee”.
Delivery and packagingDeliveries are in accordance with the general terms and conditions of Dentalpoint AG. Intactdouble-sterile packaging protects the implant from externalinfluences and ensures sterile storage up to the printedexpiration date. ZERAMEX® XT implants and components must be stored dry in their originalpackaging at room temperature and protected from sunlight. Only open the packaging shortly before surgery. We recommend comprehensive clinical,radiological and statisticaldocumentation. The inside labels (patient label) allow traceability of the implants.
Exclusion of liabilityZERAMEX® XT implants are part of an overall system and may only be used with the intendedcomponents. Dentalpoint AG will not be held liable for any damage arising from improper use, or from using non-original components. The general terms and conditions of Dentalpoint AG also apply.

44
Order hotline USAEmerginnova LLC2730 SW 3rd AvenueSuite 202-1Miami, Florida 33129, USAT 001 786 622 [email protected]
Head officeDentalpoint AGBodenäckerstrasse 58957 Spreitenbach, SwitzerlandT 0041 44 388 36 36F 0041 44 388 36 39
European branchDentalpoint Germany GmbHD-79539 Lörrach, GermanyT 0049 7621 1612 749F 0049 7621 1612 780
XT99
923
2018
-12