13610 Barrett Office Dr Suite 206 St. Louis, MO 63012 nion’s Business Online Banking is a...
36
Transcript of 13610 Barrett Office Dr Suite 206 St. Louis, MO 63012 nion’s Business Online Banking is a...


Published by Murphy & Company, Inc.13610 Barrett Office DrSuite 206St. Louis, MO 63012www.mcompany.com
© 2007-2015 Murphy & Company, Inc.Microsoft, Windows, Excel, and Internet Explorer are registered trademarks of Microsoft Corporation. Firefox is a registered trademark of the Mozilla Foundation. Quicken and QuickBooks are registered trademarks of Intuit, Inc. Macintosh and Safari are registered trademarks of Apple, Inc. Chrome is a registered trademark of Google. Acrobat and Reader are registered trademarks of Adobe Systems Incorporated in the United States and/or other countries. THIS PRODUCT IS NOT ENDORSED OR SPONSORED BY ADOBE SYSTEMS INCORPORATED, PUBLISHER OF ACROBAT READER.
DisclaimerConcepts, strategies and procedures outlined in this guide can and do change and may not be applicable to all readers. The content in this guide is not warranted to offer a particular result or benefit. Neither the author/publisher, nor any other party associated with this product shall be liable for any damages arising out of the use of this guide, including but not limited to loss of profit, commercial, special, incidental or other damages. For complete product and service information, please refer to the terms, conditions and disclosures for each product and service.
Member FDIC

Union’s Business Online Banking is a sophisticated online system that
can be customized to suit any business’ banking needs. This guide is designed to help your business:
• Navigate the system• Understand features & functionality• Troubleshoot
In short, this guide is designed to help your business get the most out of banking online. Whether your business is utilizing only the online essentials, or is taking advantage of more sophisticated options, Union’s Business Online Banking really does make the distance between your business and your banking shorter.
Union’s Business Online Banking will give you an unprecedented level of control, freedom and flexibility. By utilizing Union’s system, you’ll find you are able to reduce the amount of time you spend managing your finances; freeing up time to spend managing your business.
We look forward to working with your business online!
WELCOME

4
Table of ContentsSecurity .......................................................................................................... 5Logging In .................................................................................................... 6Enhanced Login Security ........................................................................7-8
Administration Manage Users ...................................................................................... 9 Resetting a User ................................................................................ 10 My Profile .......................................................................................... 11 Security Tokens ................................................................................. 12
Account Activities & Reporting Account Summary/Account Details ............................................. 13 Manage Balance Alerts .................................................................... 14 Add a Stop Payment ........................................................................ 15 Create Reports/Run Selected Reports ........................................... 16
Payments & Transfers ACH Add a Transfer .................................................................................. 17 Add Recurring Transfer .................................................................. 18 Manage Sweeps ................................................................................ 19 ACH Overview ................................................................................. 20 Maintain Participant......................................................................... 21 Maintain Batch Template ................................................................ 22 Assign Participant to Batch ............................................................. 23 Initiate Batch ...................................................................................... 24 Approve/View ACH Activity ........................................................ 25
Federal Tax Payments Add Tax Payment ............................................................................. 26 Approve/View Payment Activity ................................................. 27
Wire Processing & Transfer Initiate Freeform ............................................................................... 28 Maintain Template ........................................................................... 29 Initiate Template ............................................................................... 30 Approve/View Wire Activity ........................................................ 31
Bill Pay Add Payee .......................................................................................... 32 Payee Maintenance/Add a Funding Account ............................. 33
Email/Help ................................................................................................ 34Contact Us .................................................................................................. 35

5
SecurityDepend on Us for Security There is nothing more important to us than knowing that your online financial transactions are private and secure. Our systems are secured with encryption, perimeter and internal firewalls, screening and filtering routers, intrusion detection, strict authentication, virus protection, and application security. Application security includes a double-blind process for issuing passwords, user lockouts due to failed login, and additional encryption of sensitive user data during sessions. Our network architecture is structured so the servers that store actual account information are not directly connected to the Internet.
ConfidentialitySecurity is strengthened by your efforts in keeping all account and login data confidential. Never share your password with anyone and never include account specific details within an unsecured email.
PasswordsThe most secure passwords are those which use a combination of both alpha and numeric characters. Avoid using easily obtained personal data within your password, such as initials and birth dates or loved ones’ names.
Enhanced Login Security In addition to password security, extra security steps to verify your identity have been installed on our system called Enhanced Login Security. Part of this identification process includes recognizing the computer you normally use to accessBusiness Online Banking. This information, coupled with your normal login details, is incorporated into your online identity profile. With these extra layers of security in place, you’ll be able to rest assured your account information is protected from a broad range of security issues.
Signing OffIf you must step away from your workstation for even a moment while using the Business Online Banking system, be sure to sign off from your session to ensure your account data is not reviewed or altered by unauthorized individuals.

6
Logging InLogging in to Business Online Banking is easy. Go to Union’s homepage at www.bankatunion.com and click on the business banking login button. You should see the following screen.
1. Enter your Company ID, User ID and Password, then click Log In.
1

7
Enhanced Login SecurityThe first time you log in to Business Online Banking the Enhanced Login Security setup will automatically launch.
1
2
3
1. You will be presented with this screen so that you can access your accounts using a temporary Security Code. Select the email address you want your Security Code sent.
2. Enter the temporary Security Code in the field provided, then click Continue. The temporary Security Code is only valid for 30 minutes or until your session times out, whichever comes first.
3. Click on the box to Enroll your computer for future use. If this box is not selected you will be required to enter another security code during your next login. Setting up security for each computer and browser is required to avoid being challenged
at each login.

8
Enhanced Login Security
4
4. You will now be prompted to change your User Password. Enter the password that the bank assigned to you as your current User Password. Select a password of your choice for
your new User Password, confirm the new password, then click Update Password.
5. You will then be directed to the Account Summary page, or the page that you have selected to be the main page under Set Main Page from the Administration menu.
5

9A
DM
INIS
TR
AT
ION
Manage UsersAn administrator can add, modify, delete end-users, assign the services and accounts a user can access. This profile includes a unique ID and secure Password, as well as permission settings that enable the user to access certain accounts and user-specific services.
q From the Administration menu, select Add/Change/Remove Users under the Manage Users submenu.
1. To add a new user, click New. To edit a user, select the name from the drop-down menu.
2. Enter or edit the User Name, User ID, Password and Email information.
3. Select the accounts and functions to grant access to this user.
4. Enter an amount here to set a limit amount for the user’s daily and transaction limits.
5. Click Update to save changes.
6. Click Reset if you wish to revert to previous information.
1
2
3
4
5 6

10A
DM
INIS
TR
AT
ION
1. Locate the Administration tab and click on Add/Change/Remove Users. Locate the appropriate User’s profile.
2. If the User is locked out of the system, a button titled Unlock User will appear as shown. Click this button to reset the User’s login.
3. If the button titled Unlock User does not appear or you have already clicked the button, enter a temporary password, confirm the temporary password under the User’s profile and click Update.
1
23
Resetting a UserIf a User has forgotten their password or is locked out of the system due to three consecutive unsuccessful logins, the Company Administrator must manually reset the User’s password.
q Note: Union only has the ability to reset the company administrator. Union has no capability to reset a User within a company.

11A
DM
INIS
TR
AT
ION
My ProfileUsers have the ability to change settings on their user profile, such as passwords and email addresses.
q From the Administration menu, click the Change My Password option under the My Profile submenu.
q From the Administration menu, click the Change Email Address option under the My Profile submenu.
1. To change your user password, enter the current password, enter the new password, confirm the new password and click on Update Password.
2. To change your email address, enter the new email address, confirm the new email address and click on Update.
1
2

12A
DM
INIS
TR
AT
ION
Security TokensSecurity Tokens provide an added layer of security for those customers utilizing Wires, ACH and Federal Tax payments.
q From the Administration menu, select the Activate Token option, under the My Profile submenu.
1. Enter your Go ID Token Serial Number (letters and numbers) from the back of your token and Token code from the front of your token.
2. Click Submit. This token will now be activated for use when conducting Wires, ACH or Federal Tax payments.
12

13A
CC
OU
NT
AC
TIV
ITIE
S &
RE
PO
RT
ING
Account Summary / Account DetailsYou can view your current checking, savings, money market and commercial loan balances, as well as view several months of transaction history for each account. This is a great reference and filing system.
q From the Account Activities & Reporting menu, click View Account Summary option under the Account Reporting submenu to view all accounts and balances.
2. Quickly view the details for another account by selecting it from the drop-down menu.
3. View specific transactions or transactions within a date range by clicking on the Advanced Search link and entering the appropriate information in the spaces provided. Click Submit.
4. Account specific data can be exported in a format compatible with your business financial software by selecting the format from the drop-down menu and clicking Export.
1. Click on a specific account for more detailed account information.
1
2
3
4
14A
CC
OU
NT
AC
TIV
ITIE
S &
RE
PO
RT
ING
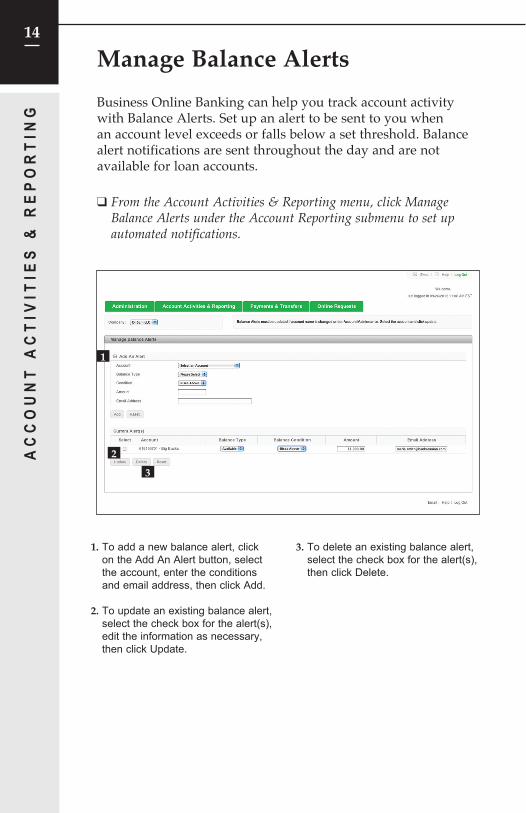
Manage Balance AlertsBusiness Online Banking can help you track account activity with Balance Alerts. Set up an alert to be sent to you when an account level exceeds or falls below a set threshold. Balance alert notifications are sent throughout the day and are not available for loan accounts.
q From the Account Activities & Reporting menu, click Manage Balance Alerts under the Account Reporting submenu to set up automated notifications.
1. To add a new balance alert, click on the Add An Alert button, select the account, enter the conditions and email address, then click Add.
2. To update an existing balance alert, select the check box for the alert(s), edit the information as necessary, then click Update.
3. To delete an existing balance alert, select the check box for the alert(s), then click Delete.
1
2
3

15A
CC
OU
NT
AC
TIV
ITIE
S &
RE
PO
RT
ING
Add a Stop PaymentA stop payment request can be submitted for a single check or a range of checks in a matter of seconds.
q From the Account Activities & Reporting menu, select the Add Stop Payment option located under the Add Stop Payments submenu.
1. Verify the contact information and edit if necessary.
2. Select the account and the reason for the stop payment.
3. Select the type of stop payment. Enter the check number, the amount, issue date and payee for an individual check. Enter the starting and ending check numbers for a range of check numbers.
4. Click Add to complete the request.
1
23
4

16A
CC
OU
NT
AC
TIV
ITIE
S &
RE
PO
RT
ING
Create ReportsThe Create Reports function lets you create, edit and delete customized settings, then save those settings with a descriptive name. The report acts as a filter for the View Account Summary screen, providing you a customized view. Once a report is created and saved, you can run the report again on future dates.
q From the Account Activities & Reporting menu, select the Create Reports option under the Account Reporting submenu.
Run Selected ReportsThe Run Selected Report option lets you display the results from your saved reports.
1. To create a new report, click New.
2. Select the accounts to include in the report.
3. Select the transactions to include in the report.
4. Assign the report a name, then click Update.
q If Make This A Favorite Report is selected this report will show every time you login.
1. Select the report to run from the drop-down menu and the results will appear in a secondary window.
1
1
2
3
4
q From the Account Activities & Reporting menu, select the Run Selected Report option under the Account Reporting submenu.
17P
AY
ME
NT
S &
TR
AN
SF
ER
S - A
CH
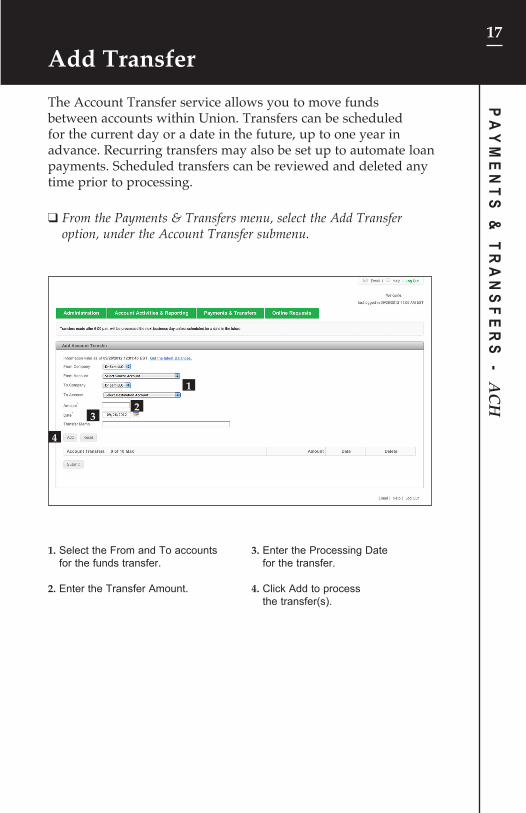
Add TransferThe Account Transfer service allows you to move funds between accounts within Union. Transfers can be scheduled for the current day or a date in the future, up to one year in advance. Recurring transfers may also be set up to automate loan payments. Scheduled transfers can be reviewed and deleted any time prior to processing.
q From the Payments & Transfers menu, select the Add Transfer option, under the Account Transfer submenu.
1. Select the From and To accounts for the funds transfer.
2. Enter the Transfer Amount.
3. Enter the Processing Date for the transfer.
4. Click Add to process the transfer(s).
1
23
4

18P
AY
ME
NT
S &
TR
AN
SF
ER
S -
AC
H
Add Recurring TransferTo automate recurring transfer transactions, create a scheduled transfer to be processed at the exact frequency you specify.
q From the Payments & Transfers menu, select the Add Recurring Transfer option from the Account Transfer submenu.
1. Select the From and To accounts for the scheduled transfer.
2. Enter the transfer Amount.
3. Enter the starting date for the recurring transfer.
4. Enter an email address for notification when this transfer is processed.
5. Select the frequency to process the funds transfer and select the detailed schedule date(s).
6. Enter the number of transfers or the ending date for the schedule.
7. Click Add to schedule the transfers.
1
23
4
5
67

19P
AY
ME
NT
S &
TR
AN
SF
ER
S - A
CH
Manage SweepsThe Sweeps function provides the ability to set up an automated funds transfer to or from internal accounts in order to keep balances within certain limits. When a limit is reached, the system transfers just enough money between the specified accounts to bring the monitored account back to the threshold level, and then sends an email message to indicate the activity.
q From the Payments & Transfers menu, select the Manage Sweeps option under the Account Transfer submenu.
1. To add a new sweep, select the Account to Check, select the Condition, the account to draw from for the adjustment, Threshold and a notification Email Address, then click Add.
1
q Note: The Sweep account’s available balance does not include any outstanding checks that may be pending for the current business day. Please take these items into consideration before setting up a sweep.

20P
AY
ME
NT
S &
TR
AN
SF
ER
S -
AC
H
ACH OverviewAn Automated Clearing House (ACH) transfer is the electronic transmission of a file which contains pertinent information to the movement of funds between accounts. An ACH transfer is commonly used to expedite direct deposit of payroll, pay bills, concentrate funds from other financial institutions or collect membership dues. An ACH transfer generally consists of multiple transactions and is referred to as a “batch”.
The steps for setting up and submitting an ACH batch are typically as follows:
1. Maintain Participant: Define individual participants.2. Maintain Batch Template: Define batch template details.3. Assign Participant to Batch: Attach participants to batch.4. Initiate Batch: Batch submittal for processing.5. (Optional) Approve/View ACH Activity: Internal approval of
batch before allowing batch release to bank for processing.6. (Optional) View ACH Activity: Comprehensive view of all
ACH activity.
The above steps are typical for an ACH user. For an ACH administrator, the main action occurs after the batch submittal. If the batch requires approval for any reason (for example, it exceeds the user’s per-transaction or daily limits), it is given a status of Pending. The administrator then uses the Approve/View ACH Activity function either to approve the batch as is or to deny it and send it back to the user for modification.
Note that a batch may be used multiple times once steps one through three are completed. You only need to complete steps one through three again when something changes. For example, you may need to add new participants or remove old ones. In typical usage, simply submitting an ACH batch will be sufficient. Note also that participants may be used in more than one batch.

21P
AY
ME
NT
S &
TR
AN
SF
ER
S - A
CH
Maintain ParticipantThe ACH participant is the individual or organization whose account may be debited or credited, such as payroll or deposit for services rendered. Each participant entry contains the participant’s financial institution information, their account and whether it will be a debit or credit. A participant may have several entries, each one using that participant’s unique ID, but indicating a different account or transaction type. If the participant has multiple accounts, or requests more than one transaction type (for example, a debit and credit on the same account or debits to two separate accounts), a participant entry must be created for each account or transaction.
q From the Payments & Transfers menu, select the Maintain Participant option under the ACH submenu.
1. To add new participants, enter each participant’s details, then click Add.
2. To update an existing participant, select the participant from the drop-down menu, edit the information as necessary, then click Update.
3. To delete an existing participant, select the participant from the drop-down menu, then click Delete.
4. To view a list of existing participants, click List Participants.
1
2
3 4

22P
AY
ME
NT
S &
TR
AN
SF
ER
S -
AC
H
Maintain Batch TemplateThe Maintain Batch Template function allows you to define the essential characteristics of the ACH batch for efficient entry. This screen allows you to create new templates and update or delete existing templates.
q From the Payments & Transfers menu, select the Maintain Batch Template option, under the ACH submenu.
1. Click Add New to create the new template. Enter the template details as required.
2. To update an existing template, select the template name from the drop-down menu. Edit the template details as required.
3. Click Delete to remove the selected template.
1
2
3 4
23P
AY
ME
NT
S &
TR
AN
SF
ER
S - A
CH
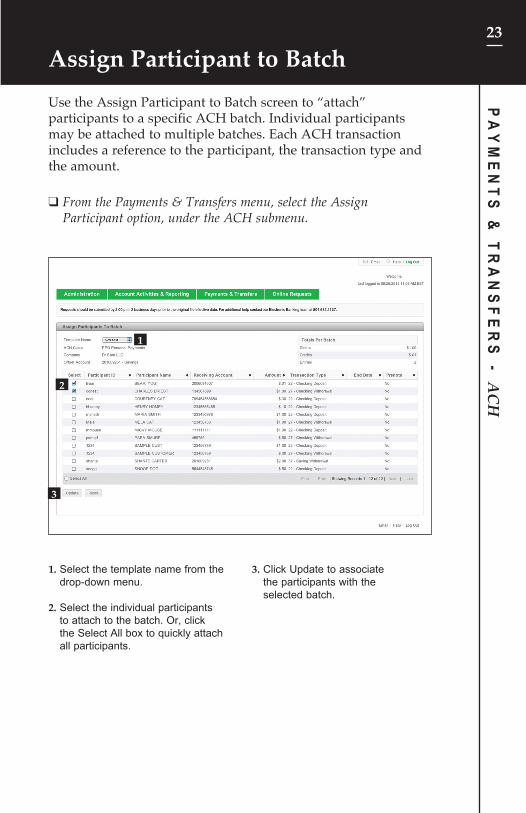
Assign Participant to BatchUse the Assign Participant to Batch screen to “attach” participants to a specific ACH batch. Individual participants may be attached to multiple batches. Each ACH transaction includes a reference to the participant, the transaction type and the amount.
q From the Payments & Transfers menu, select the Assign Participant option, under the ACH submenu.
1. Select the template name from the drop-down menu.
2. Select the individual participants to attach to the batch. Or, click the Select All box to quickly attach all participants.
3. Click Update to associate the participants with the selected batch.
1
2
3

24P
AY
ME
NT
S &
TR
AN
SF
ER
S -
AC
H
Initiate BatchThe Initiate Batch function allows you to submit a batch for processing. Multiple ACH payments can be sent. Files received after the cut off time will be processed the next business day.
q From the Payments & Transfers menu, select the Initiate Batch option, under the ACH submenu.
1. The daily transaction limit and running total displays here.
2. Select the Template Name from the drop-down menu.
3. Click the Hold check box to omit the participant from the batch.
4. Edit the batch data as necessary, including the effective date, amount value, prenote setting and addenda message, then click Initiate.
12
3
4

25P
AY
ME
NT
S &
TR
AN
SF
ER
S - A
CH
Approve/View ACH ActivityBusiness Online Banking provides all the information you need to make informed approval decisions from one convenient screen. You can verify batch details, totals, offset account and the initiator. Feature-rich approval controls include: dual approval authority, the ability to deny transactions, resubmit, and modify the effective date. Email notifications are sent to all approvers when batches are pending. You can even monitor a batch’s status after it leaves your company.
q From the Payments & Transfers menu, select the Approve/View ACH Activity option, under the ACH submenu.
1. A display of your approval limits appears at the top of the screen for your reference.
2. To approve a pending ACH submittal, check its Select box, then click Approve.
3. To deny a pending ACH submittal, check its Select box, fill in a Deny Message, then click Deny.
4. To see details for any batch listed on the screen, click its magnifying glass in the Details column. The system launches a second browser window, from which you can view or print the batch data.
1
2
3
4

26P
AY
ME
NT
S &
TR
AN
SF
ER
S -
Fed
eral
Tax
Pay
men
ts
Add Tax PaymentInitiate a tax payment to the IRS through Federal Tax Payments up to 30 days in advance from your home or office. Federal tax type is supported.
q From the Payments & Transfers menu, select the Add Tax Payment option under the Federal Tax Payments submenu.
1. Select the taxpayer name, the debit account, the payment effective date and the tax period.
2. Select the Tax Type and/or Excise Tax Type from the drop-down menus.
3. Enter the amount of the tax payment, then click Add.
1
23

27P
AY
ME
NT
S &
TR
AN
SF
ER
S - Federal Tax Paym
ents
Approve/View Payment ActivityThe Federal Tax Payment Approve/View Payment Activity function is intended for use by the Tax Payment administrators. This function adds the capability to approve or deny pending Federal Tax Payment submittals.
q From the Payments & Transfers menu, select the Approve/View Payment Activity option under the Federal Tax Payments submenu.
1. A display of your approval limits appears at the top of the screen for your reference.
2. To approve a pending Tax Payment submittal, check its Select box, then click Approve.
3. To delete a pending Tax Payment submittal, check its Select box, then click Delete.
4. To deny a pending Tax Payment submittal, check its Select box and fill in the Deny message, then click Deny.
2
1
3 4

28P
AY
ME
NT
S &
TR
AN
SF
ER
S -
Wir
e Pr
oces
sing
1. Select the debit account, enter the amount, currency type and value date.
2. Enter the beneficiary information in the fields provided. Items marked with an asterisk are required.
3. Click Initiate to process the transfer.
1
2
3
Initiate FreeformUse this feature to process a wire transfer on a one-time basis. Initiate Freeform does not require the use of a wire template. When you initiate a freeform wire, you must fill in all of the information manually that would otherwise reside in a template. Freeform information is not stored in the system and cannot be reused.
q From the Payments & Transfer menu, select the Initiate Freeform option under the Wire Processing submenu.

29P
AY
ME
NT
S &
TR
AN
SF
ER
S - W
ire Transfer
Maintain TemplateUse a template to enter wire information for wires you perform on a regular basis. The system will store your templates, saving time by defining them once and reusing them later.
q From the Payments & Transfers menu, select Maintain Template option under the Wire Transfer submenu.
1. Click Add New to clear all fields.
2. Enter transfer details. Items marked with an asterisk are required.
3. Enter the beneficiary information in the fields provided. Items marked with an asterisk are required.
4. Click Add. The new template is stored using the name in the Template Name field.
5. Approve the template by going to the Approve Template option, located under the Wire Transfer submenu.
1
2
3
4
5

30P
AY
ME
NT
S &
TR
AN
SF
ER
S -
Wir
e Pr
oces
sing
1
2
3
Initiate TemplateThe Wire Transfer service allows you to move funds between accounts within different financial institutions. Transfers can be scheduled for the current date or up to 30 days in the future. Pending transfers can be reviewed or deleted any time prior to processing.
q From the Payments & Transfers menu, select the Initiate Template option under the Wire Processing submenu.
1. Select the Wire Template, then verify the contact details.
2. Enter the Transfer Amount and date details.
3. Click Initiate to complete the wire transfer.

31P
AY
ME
NT
S &
TR
AN
SF
ER
S - W
ire Processing
Approve/View Wire ActivityThe Approve/View Wire Activity screen displays all pending, denied and completed transfers for the last ten calendar days and provides the company administrator or wire administrator with the ability to approve, delete or deny pending transfers. Wire requests must be received by our published cut off time for same day processing.
q From the Payments & Transfers menu, select the Approve/View Wire Activity option under the Wire Processing submenu.
1. A display of your approval limits appears at the top of the screen for your reference.
2. Select the Pending Item(s).
3. Click Approve to send the wire transfer(s) for processing.
4. Click Delete to remove the wire transfer(s) without processing. Deleted wires will appear in the Send Wires section with a status of Deleted.
5. Fill out the Deny Wire message and click Deny to send it back to the originator to be modified and resubmitted.
34 5
1
2

32P
AY
ME
NT
S &
TR
AN
SF
ER
S -
Bill
Pay
Add PayeeBefore you can make your first payment, you will need to set up one or more payees. A payee is any company or person that you pay. You will need a recent bill or statement to start.
q From the Payments & Transfers menu, select the Bill Pay option under the Additional Services submenu. Click the Get Started Now button to add your first payee.
1
2
3
1. Enter the Payee Name in the Pay someone new box, then click Add.
2. If your payee is already in our electronic database, you’ll just need to enter your account number and billing zip code. Click Continue to add the payee and make payments.
3. If the payee is not found in our electronic system, you will need to add the payee details manually. Click Continue when finished.

33
Payee Maintenanceq From the Payments & Transfers menu, select the Bill Pay option
under the Additional Services submenu, then click Make Payments.
Add a Funding Account
1. To make changes to a payee, change payment options (set up recurring payments) or view payment history, click on the payee and select the appropriate option from the menu.
q Note: Expedited bill pay is available (overnight payment).
1. To add an additional funding account, click on the Funding Account button from the Bill Pay menu.
2. Enter your new funding information in the space provided and click Return to Application.
* Once you have entered your information, two small deposits will be placed into your new funding account within 2-3 business days. These amounts must be entered and verified into the Bill Pay system. Once account verification is completed, your new funding account is available to use.
1
2
1
PA
YM
EN
TS
& T
RA
NS
FE
RS
- Bill Pay

34E
MA
IL/H
EL
P
EmailWe want to make communicating with us quick and easy. While online, you can send an email message to us by selecting the Email link located in the top menu of your Business Banking screen. You may also call us to speak with a customer service representative during business hours.
q Click Email in the upper right-hand corner of the screen near Log Out.
Help As you navigate the system and become familiar with the features, rest assured that assistance is always close at hand with the Online Help function.
q Click Help in the upper right-hand corner of the screen near the Log Out.
1. Enter your name and contact information in the fields provided.
2. Select your preferred method of contact.
3. Enter the subject of your message and the message content.
4. Click Submit to send your email.
q Note: Do not include sensitive information with your message.
1. Click Index to select a topic from the index, or click Search to enter your topic in the search engine.
1
2
3
4
1

35
Contact UsIf you have any additional questions or needs, feel free to give us a call or drop by your local branch.
1. Enter your City, State, or Zip Code to see a map and list of nearby branch locations, ATMs or mortgage branches.
1
CO
NT
AC
T U
S