12DaysChristmasBooklet.pdf
24
-
Upload
george-petrakos -
Category
Documents
-
view
6 -
download
0
Transcript of 12DaysChristmasBooklet.pdf


On the twelfth day of Christmas, my true love gave to me: Why 12 Days of Desserts?
Naturally, it started with that famous Christmas carol.
Overhearing it at a supermarket one day, I thought to myself that, of all the Christmas carols, I had always disliked the “The Twelve Days of Christmas” the most. As a little kid, I could never remember the items my true love had given to me, resulting in many embarrassing moments during elementary school in which I ended up lip synching the lyrics in front of a doting audience. As a grownup, it had also become clear to me that the entire concept was pretty absurd — I mean, had my true love actually given me 12 drummers, 11 pipers, 10 lords, 9 ladies and 8 maids, that would have expanded our theoretical family by 50 people... not including the 6 geese, 4 colly birds, 3 French hens, 2 doves and patridge. 50 people and 16 animals! Think of all those mouths to feed!
But Christmas has always been a time of plenty of mouths to feed. Maybe not the mouths of drummers and pipers, but that of family and friends coming together to celebrate the holiday season. Maybe it was time to update that carol with what I knew best: desserts. And not just any kind of desserts — Christmas desserts.
In this book, you’ll find recipes that pay homage to the joyful, indulgent spirit of the holiday season. Recipes filled with beloved holiday flavors like chocolate and caramel, mixed in with desserts made from bold spices like ginger and peppermint. It’s my hope that there’s something for everybody in this book, and that these desserts make your life a little easier and your Christmas a little merrier.
Happy Holidays!
12 drummers drumming11 pipers piping10 lords-a-leaping 9 ladies dancing 8 maids-a-milking 7 swans-a-swimming 6 geese-a-laying 5 golden rings 4 colly birds 3 French hens 2 turtle doves & a partridge in a pear tree.
| Page 2 | | Page 3 |

Day 1 } Chocolate Orange Cupcakes .............................................................6 Day 2 } Peppermint Bark .................................................................................10Day 3 } Salted Caramel Ice Cream with Brown Butter Crumbs ...................12Day 4 } Chocolate Crinkle Cookies ...............................................................16Day 5 } Cranberry, White Chocolate and Orange Blondies .........................18Day 6 } Chocolate Pareil Meringues ..............................................................22Day 7 } Ginger Cake with Caramel Sauce and Pumpkin Ice Cream ...........24Day 8 } Peppermint Marshmallows .................................................................28Day 9 } Spiced Creme Brulee .........................................................................30Day 10 } Gingerbread Cookies & Cream Cake .............................................32Day 11 } White Chocolate Cream Puffs .........................................................36Day 12 } Golden Cupcakes ..............................................................................40
| Page 4 | | Page 5 |

Chocolate and orange is one of my favorite flavor combinations. I have a feeling that the combination was invented by enterprising
bakers trying to make do with the limited fresh fruits available. Since citrus is best during winter, it’s only natural to combine it with chocolate, a flavor that holds well in any season. These cupcakes are a love letter to Terry’s Chocolate Orange, one of my favorite stocking stuffers.
Day 1
| Page 6 | | Page 7 |

Recipe
Preheat the oven to 350 (F), and line a muffin tin with cupcake cases.
Combine ¾ cup plus 2 tablespoons all-purpose flour, 2 ½ tablespoons unsweetened cocoa powder, ¾ cup granulated sugar, 1 ½ teaspoons baking powder, ¼ teaspoon salt, and 1 teaspoon fresh orange zest in the bowl of a freestanding electric mixer fitted with a paddle attachment. Beat on low speed until you get a sandy consistency and everything is combined.
Whisk ½ cup whole milk, 1 egg, and 1 teaspoon orange extract in a liquid measuring cup, before pouring about half the mixture into the flour mixture. Beat to combine on low speed, before turning up the mixer to high speed to get rid of any lumps.
Turn the mixer down to a slower speed and slowly pour in the remaining milk mixture until just combined. Scrape any unmixed ingredients from the sides of the bowl and the paddle, before continuing to mix on high speed for just 1 minute until the batter is smooth. Be careful not to overmix!
Spoon the batter into paper cases until two-thirds full and bake in the preheated oven for 20 to 25 minutes, or until the cupcake tops bounce back when gently poked with your finger. Let the cupcakes cool slightly in the pan, before turning out onto a wire rack to cool completely.
When the cupcakes are cold, frost each cupcake with chocolate orange frosting and garnish with fresh orange zest.
For the Chocolate Orange Cupcakes
Ingredients
• ¾ cup plus 2 tablespoons all-purpose flour• 2 ½ tablespoons unsweetened cocoa powder• ¾ cup granulated sugar• 1 ½ teaspoons baking powder• ¼ teaspoon salt• 1 teaspoon fresh orange zest• 3 tablespoons unsalted butter, at room temperature• ½ cup whole milk• 1 egg• 1 teaspoon orange extract
{Makes 12 cupcakes}
Recipe
Melt 6 ounces orange-flavored chocolate by placing the finely chopped chocolate in a medium heatproof bowl. Nestle the heatproof bowl over a saucepan filled with boiling water, making sure that the bottom of the bowl does not touch the water. Use a rubber spatula to stir around occasionally to ensure that the chocolate does not burn. Once the chocolate is fully melted, remove from heat, and set aside to cool slightly.
While the chocolate is cooling, combine ½ cup unsalted butter, 2 teaspoons unsweetened cocoa powder, and ¼ cup whole milk in the bowl of a freestanding electric mixer fitted with a paddle attachment. Beat on low speed until combined, before drizzling in the melted orange-flavored chocolate. Continue beating on low speed until combined, before adding 1⁄4 cup whole milk a tablespoon at a time until the frosting achieves a spreadable consistency. You might need one or two more tablespoons. Once the mixture seems spreadable, increase the mixer speed to high and beat for 2 to 3 minutes until light and fluffy. Use immediately.
For the Chocolate Orange Frosting
Ingredients
• 6 ounces orange-flavored chocolate (like Terry’s Chocolate Orange), finely chopped
• ½ cup (1 stick) unsalted butter, at room temperature• 1 ¼ cup confectioner’s sugar, sifted• 2 teaspoons unsweetened cocoa powder• ¼ cup whole milk, plus or minus 1 or 2 tablespoons
{Enough for 12 cupcakes}
| Page 8 | | Page 9 |
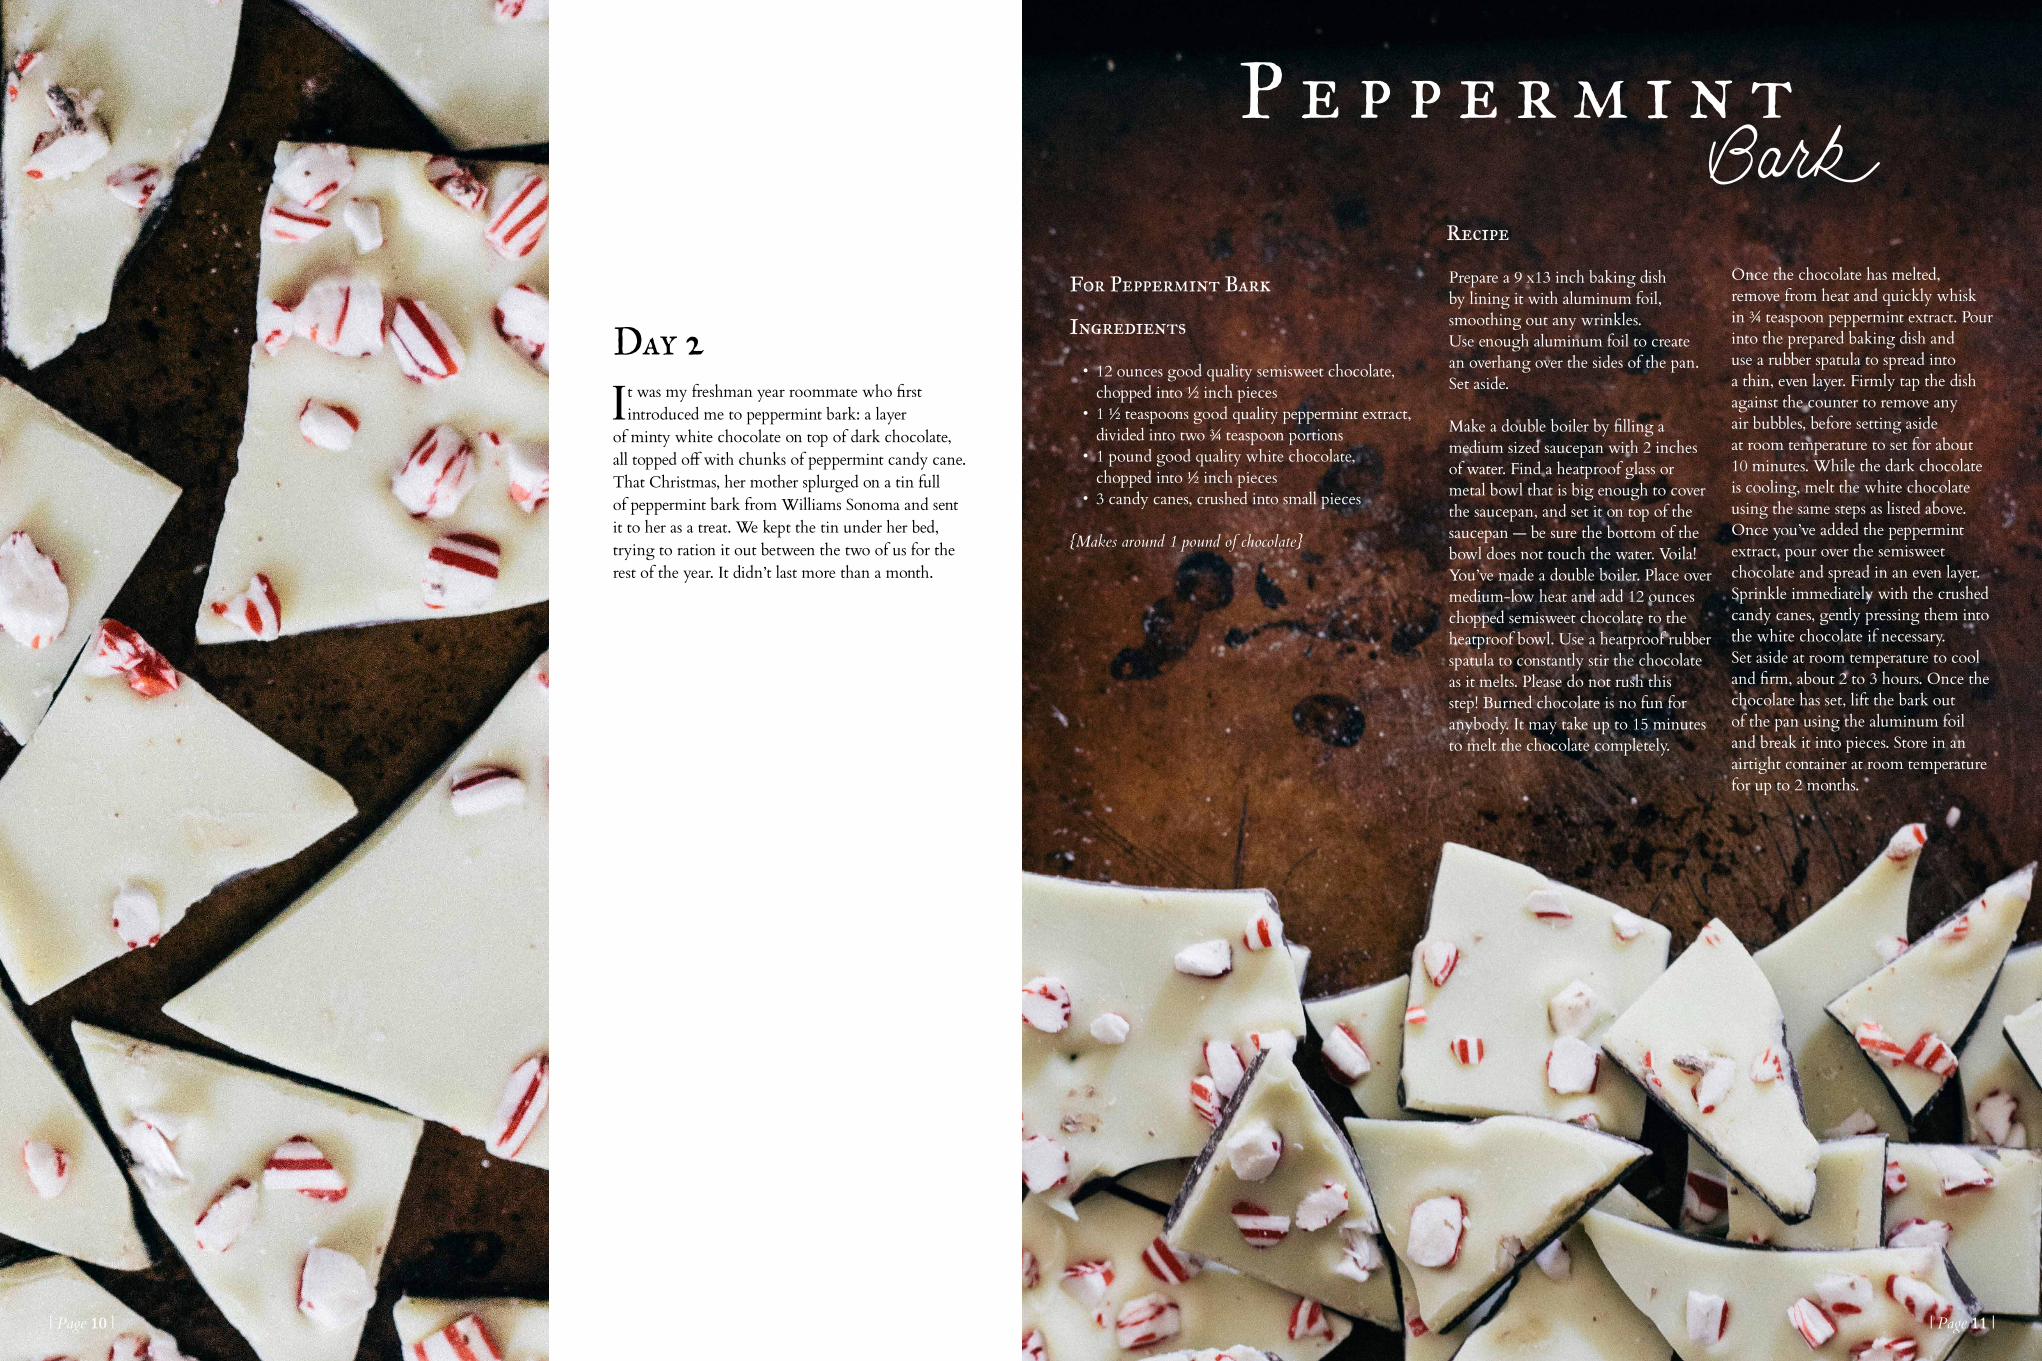
It was my freshman year roommate who first introduced me to peppermint bark: a layer
of minty white chocolate on top of dark chocolate, all topped off with chunks of peppermint candy cane. That Christmas, her mother splurged on a tin full of peppermint bark from Williams Sonoma and sent it to her as a treat. We kept the tin under her bed, trying to ration it out between the two of us for the rest of the year. It didn’t last more than a month.
Day 2
For Peppermint Bark
Ingredients
• 12 ounces good quality semisweet chocolate, chopped into ½ inch pieces
• 1 ½ teaspoons good quality peppermint extract, divided into two ¾ teaspoon portions
• 1 pound good quality white chocolate, chopped into ½ inch pieces
• 3 candy canes, crushed into small pieces
{Makes around 1 pound of chocolate}
Recipe
Prepare a 9 x13 inch baking dish by lining it with aluminum foil, smoothing out any wrinkles. Use enough aluminum foil to create an overhang over the sides of the pan. Set aside.
Make a double boiler by filling a medium sized saucepan with 2 inches of water. Find a heatproof glass or metal bowl that is big enough to cover the saucepan, and set it on top of the saucepan — be sure the bottom of the bowl does not touch the water. Voila! You’ve made a double boiler. Place over medium-low heat and add 12 ounces chopped semisweet chocolate to the heatproof bowl. Use a heatproof rubber spatula to constantly stir the chocolate as it melts. Please do not rush this step! Burned chocolate is no fun for anybody. It may take up to 15 minutes to melt the chocolate completely.
Once the chocolate has melted, remove from heat and quickly whisk in ¾ teaspoon peppermint extract. Pour into the prepared baking dish and use a rubber spatula to spread into a thin, even layer. Firmly tap the dish against the counter to remove any air bubbles, before setting aside at room temperature to set for about 10 minutes. While the dark chocolate is cooling, melt the white chocolate using the same steps as listed above. Once you’ve added the peppermint extract, pour over the semisweet chocolate and spread in an even layer. Sprinkle immediately with the crushed candy canes, gently pressing them into the white chocolate if necessary. Set aside at room temperature to cool and firm, about 2 to 3 hours. Once the chocolate has set, lift the bark out of the pan using the aluminum foil and break it into pieces. Store in an airtight container at room temperature for up to 2 months.
| Page 10 | | Page 11 |

I know that eating ice cream during the cold winter is strange, but there’s something irresistible about salted caramel ice cream. To me,
it’s the perfect dessert for a cozy night in, wrapped in warm woolen blankets. Bake the bourbon brown butter shortbread cookies first to add a wonderful, contrasting crunch to this creamy delight.
Day 3
| Page 12 | | Page 13 |

For the Salted Caramel Ice Cream
Ingredients
• 1 ½ cups (3 sticks) unsalted butter, at room temperature
• 3 ½ cups all-purpose flour• ¼ teaspoon salt• ½ cup granulated sugar• ½ cup confectioner’s sugar• 1 tablespoon pure vanilla extract• 2 ½ tablespoons bourbon
{Makes 24 3-inch rectangular cookies}
Recipe
Place 1 ½ cups unsalted butter in a medium, heavy-bottomed pot. Melt the butter over medium heat, swirling the pot occasionally to ensure that the butter is cooking evenly. As the butter melts, it will begin to foam. The color will turn from a lemon yellow to a golden, toasty brown. Once you’ve achieved that golden brown and the butter emits a nutty aroma, remove pan from heat and allow to cool completely.
Once the brown butter has cooled, combine it with ½ cup granulated sugar and ½ cup confectioner’s sugar in the bowl of a freestanding electric mixer fitted with a paddle attachment. Cream the butter and sugar on medium speed for five minutes, until light and fluffy. Add 1 tablespoon pure vanilla extract and 2 ½ tablespoons bourbon and continue mixing until well combined.
Once the mixture has come together, reduce your mixer speed to its lowest setting. Gradually add 3 ½ cups all-purpose flour and ¼ teaspoon salt until all the dry ingredients are incorporated and the dough comes together cleanly off the sides of the mixing bowl. Shape the dough into a ball, then flatten into a rectangular slab. Wrap well in plastic wrap and refrigerate for about 2 hours to chill completely.
Once the dough is chilled, preheat the oven to 350 (F). Roll out the refrigerated dough to a thickness of about half an inch. Cut cookies into 2 ½ inch rectangles and poke holes at the top of each rectangle. Bake on a baking tray lined with parchment paper for about 25 minutes, or until the top of the cookies have browned slightly. Cool on a wire rack for about 30 minutes, before using a food processor to pulverize into crumbs and sprinkle on top of the ice cream.
For the Bourbon Brown Butter Shortbread Crumbs
Ingredients
• 1 ¼ cups granulated sugar, divided into 1 cup and ¼ cup portions
• 2 ¼ cups heavy cream, divided into 1 ¼ cup and 1 cup portions
• 1 teaspoon Maldon sea salt• ½ teaspoon pure vanilla extract• 1 cup whole milk• 3 large eggs
{Makes 24 3-inch rectangular cookies}
Recipe
Pour 1 cup granulated sugar in a medium, heavy-bottomed pot. Place over medium heat and use a heatproof rubber spatula to stir the sugar until it starts to melt. Once most of the sugar has melted, continue swirling the pot until the sugar has melted evenly and is a dark amber color.
Add 1 ¼ cups heavy cream to the melted sugar (don’t worry if the mixture splatters and sizzles violently — that’s supposed to happen!) and continue to cook over medium heat, using a rubber spatula to gently stir the mixture until it turns into an even caramel. Remove from heat and stir in 1 teaspoon Maldon sea salt and ½ teaspoon pure vanilla extract, before allowing to cool completely to room temperature.
In a separate medium, heavy-bottomed pot, combine 1 cup whole milk with remaining 1 cup cream and ¼ cup granulated sugar. Bring to a boil over medium heat, using a heatproof rubber spatula to stir occasionally.
In a large bowl, whisk together 3 large eggs. Add half of the hot milk mixture in a slow stream, whisking constantly. Pour back into the heavy-bottomed pot and continue to cook over medium heat, stirring constantly with a wooden spoon, until the resulting custard coats the back of the spoon and reaches 340 (F) on an instant read thermometer. DO NOT LET THE MIXTURE BOIL; watch it carefully and stir constantly with a wooden spoon.
Once the custard reaches the appropriate temperature, pour the custard through a fine-mesh sieve over a large bowl and stir in the cooled caramel. Cover custard and chill until very cold, about 3 to 5 hours. Once the custard is chilled, freeze in an ice cream maker according to your manufacturer’s instructions and enjoy immediately. The ice cream will keep in an airtight container in the freezer for about a week.
| Page 14 | | Page 15 |

Chocolate crinkle cookies are the ultimate winter cookie, but I love them so much that I once
served them as a snack to eat during a summer party. My guests were confused by the cookie choice, but most of them were quickly won over. With a texture that’s part brownie and part cookie, they pack a serious punch! The cookies are best when they are warm from the oven, and the Hershey’s Hugs candy is still gooey and molten.
Day 4 For the Chocolate Crinkle Cookies
Ingredients
• 1²⁄₃cups all-purpose flour• ½ teaspoon baking powder• ¼ teaspoon salt• 8 ounces bittersweet chocolate (around 72%),
finely chopped • ½ cup unsalted butter• ²⁄₃ cup sugar• 3 eggs, at room temperature• 2 teaspoons vanilla extract• 1 cup confectioner’s sugar• 1 bag Hershey’s Hugs chocolate
{Makes around 4 dozen cookies}
Recipe
In a medium bowl, whisk together flour, baking powder, and salt until combined. Set aside.
Use a double boiler (or, stack a small pan into a large pot of boiling water, making sure the bottom of the small pan doesn't touch the bottom of the large pan) and heat until both the butter and chocolate melts — make sure you stir constantly so that the chocolate doesn't burn. Once the chocolate has fully melted, set aside to cool slightly.
Use a freestanding electric mixer with a paddle attachment to beat together the sugar, eggs, and vanilla on medium-high speed for at least five minutes. When the mixture is light and fluffy, lower your mixer speed to the lowest setting and stir in the chocolate and butter mixture.
Once the two mixtures have been incorporated, add the flour/baking powder/salt mixture from the first step.
Beat until just combined — do NOT overbeat or you will get tough cookies and I will cry! There should be one or two flour streaks left in the mixture. Chill the dough for 2 to 3 hours. Once the dough has been chilled, it should have the consistency of Playdough.
When the dough is ready and chilled, preheat the oven to 325 (F). Put a cup of confectioners' sugar into a shallow bowl, preferably a large tupperware with a lid. Using a tablespoon-sized cookie scoop, scoop out tablespoon-sized portions of the dough and use your hands to roll it into balls. Each ball should be rougly 1 ¼ inches in diameter. Drop the dough balls into the confectioners' sugar as you go. Once about five or six are in the bowl (I used 3 or 4 since my tupperware was smaller), cover the tupperware with a lid and shake and toss the bowl to coat the balls with the sugar. Be careful not to do this with too many balls at a time, since they have a tendency to stick together!
Place the coated dough balls on a lightly greased or parchment-lined cookie sheet, leaving about 1 ½ inches between them. Use the back of your hands to press them slightly, before gently pressing a Hershey’s Hug into each dough ball. Bake the cookies in a preheated oven for 10 - 12 minutes. As the cookies bake, they'll flatten out a little bit and acquire their distinctive "cracked" appearance. Remove the cookies from the oven, letting them rest on the baking pan for a few minutes before turning out into a wire rack to cool completely.
| Page 16 | | Page 17 |

When I was in high school, I was a sucker for Starbucks. In particular, I loved their seasonal items — the crazy sweet
pumpkin spice lattes and peppermint mochas. Since moving to Portland, I’ve transitioned to enjoy more independent coffee from the likes of Stumptown and small, local roasters like Heart and Coava. But, that being said, I still maintain my fondness for one of Starbucks’s most beloved seasonal specialty: Cranberry Bliss Bars. Although I indulge myself one bar every Christmas, I figured it was time to learn how to make it for myself. This blondie recipe is the closest I’ve come to recreating their delicious bars at home.
Day 5
| Page 18 | | Page 19 |

For the Cranberry,White Chocolate and Orange Bars
Ingredients
• ½ cup (1 stick) unsalted butter• zest from 1 small or medium orange• 1 large egg• 1 cup dark brown sugar, packed• 1 ½ teaspoons vanilla extract• 1 cup all-purpose flour• ¼ teaspoon kosher salt• ¾ cup white chocolate chips• ½ cup dried cranberries
{Makes 8 large triangles}
Recipe
Preheat the oven to 350(F), and prepare an 8 x 8-inch baking pan by lining with aluminum foil complete with an overhang and spraying generously with cooking spray. Set aside.
Place ½ cup unsalted butter in a small, heavybottomed saucepan over medium heat. Melt the butter completely, using a heatproof rubber spatula to stir the butter around so it melts evenly. Continue heating the melted butter until it starts to turn brown and foamy and develops a nutty aroma. Remove from heat immediately and set aside on a wire rack to cool slightly.
In the bowl of a freestanding electric mixer fitted with a paddle attachment, combine 1 large egg, 1 cup dark brown sugar, and 1 ½ teaspoons vanilla extract. Whisk on medium speed for 2 - 3 minutes, until the mixture is light and fluffy, before reducing the mixer to its lowest speed and adding melted, browned butter at a steady stream. Continue whisking for another minute or until the butter is just incorporated.
Remove bowl from mixer and sprinkle 1 cup all-purpose flour and ¼ teaspoon salt over the mixture, before using a heatproof rubber spatula to carefully fold in the flour and salt. Be careful not to overmix or the bars will be tough! Only fold until the flour has just been incorporated — it’s okay to have one or two small flour streaks left in the batter. Add ¾ cup white chocolate chips and ½ cup dried cranberries, and gently fold into the mixture, again taking care not to overmix.
Transfer the batter to the prepared baking pan and bake in the preheated oven for 20 to 25 minutes, or until the center is set and it edges are beginning to pull away from the pan. Allow to cool completely on a wire rack before frosting.
For the White Chocolate Cream Cheese Topping
Ingredients
• ½ cup white chocolate chips, divided into two ¼ cup portions
• 2 cups confectioner’s sugar• 4 ounces cream cheese, at room temperature• 1 teaspoon vanilla extract• ¼ cup dried cranberries
Recipe
Melt ½ cup white chocolate chips in a heatproof bowl placed over a saucepan of gently simmering water, ensuring that the bottom of the bowl does not touch the water. Watch the pot carefully — white chocolate scorches easily, so the best way to melt it is over a slow and steady heat. Use a heatproof rubber spatula to push the white chocolate chips around so that they melt evenly. Once the chocolate is fully melted and can be stirred smooth, remove the bowl from heat and set aside to cool slightly.
In the bowl of a stand mixer fitted with a paddle attachment, combine 4 ounces cream cheese, 2 cups confectioner’s sugar, 1 teaspoon vanilla extract and about half of the melted white chocolate. Mix the ingredients together on a low speed until just combined, before turning up the mixer to mix on medium-high. Mix for about 5 minutes, or until the mixture is light and fluffy.
Use an offset spatula to frost the top of the cooled blondie bars, creating a thick, even-layer on top of the bars. Sprinkle with ¼ cup dried cranberries. Transfer the remaining melted white chocolate to a piping bag (or a ziploc bag with one of the corners cut off), and drizzle over the frosting and cranberries.
| Page 20 | | Page 21 |

Here’s a little secret: meringues are one of the most beautiful desserts, but also one of the
easiest to make. All you need is a large pastry tip and some patience as meringues take a long time to bake in the oven. Once the meringues are set, dip the bottoms of each one in a bowl of melted chocolate and non pareil sprinkles to get these adorable candies. I like to divide them into individual candy bags and give them out as Christmas presents or stocking stuffers. Eat them as they are, or drop them in your hot chocolate for an extra special treat. And if you’re feeling super indulgent, use any leftover chocolate you may have to make meringue sandwich cookies!
Day 6
For the Chocolate Pareil Meringues
Ingredients
• 4 large egg whites, at room temperature• 1 cup granulated sugar• a pinch of cream of tartar• 1 teaspoon vanilla extract
Recipe
Preheat the oven to 200 (F), centering the rack in the oven.
In a medium, heatproof bowl, combine 4 large egg whites, 1 cup granulated sugar and a pinch of cream of tartar. Place the bowl over a pot of simmering water, making sure that the bottom of the bowl does not touch the water. Whisk the mixture until the sugar has dissolved and the whites are warm to the touch, testing the mixture with your fingers.
Once the mixture is warm and the sugar has dissolved, transfer the mixture to the bowl of a freestanding electric mixer fitted with the whisk attachment. Whip, starting on
low speed before gradually increasing to high speed, until soft peaks form (around 5 minutes). Add 1 teaspoon vanilla extract and continue beating until stiff peaks form.
Once the meringue is stiff, transfer to a pastry bag fitted with a ½-inch or ¾-inch star tip. Pipe ¾ to 1-inch drops onto two baking sheets each lined with parchment paper. Bake in the preheated oven for 1 ½ hours, until the meringues are crisp on the outside but soft on the inside — be careful not to overbake, or the meringues will start to brown and lose their pure white color.
Once the meringues are finished baking, turn off the oven heat and crack the oven
door to allow the meringues to cool slowly to room temperature, about 3 to 4 hours.
Once the meringues have cooled completely, melt 6 ounces bittersweet chocolate in a heatproof bowl over a pot of simmering water, using a rubber spatula to stir the chocolate around to ensure that it doesn’t burn. Remove from heat once melted completely. Working quickly, dip the bottoms of each meringue into the pot of chocolate, before dipping into a shallow bowl filled with 4 ounces non pareil sprinkles. Allow each meringue to cool completely, resting each meringue on its sprinkled side on baking trays lined with wax paper.
• 6 ounces bittersweet chocolate, chopped in small pieces
• 4 ounces white non pareil sprinkles
{Makes about 30 meringues}
| Page 22 | | Page 23 |
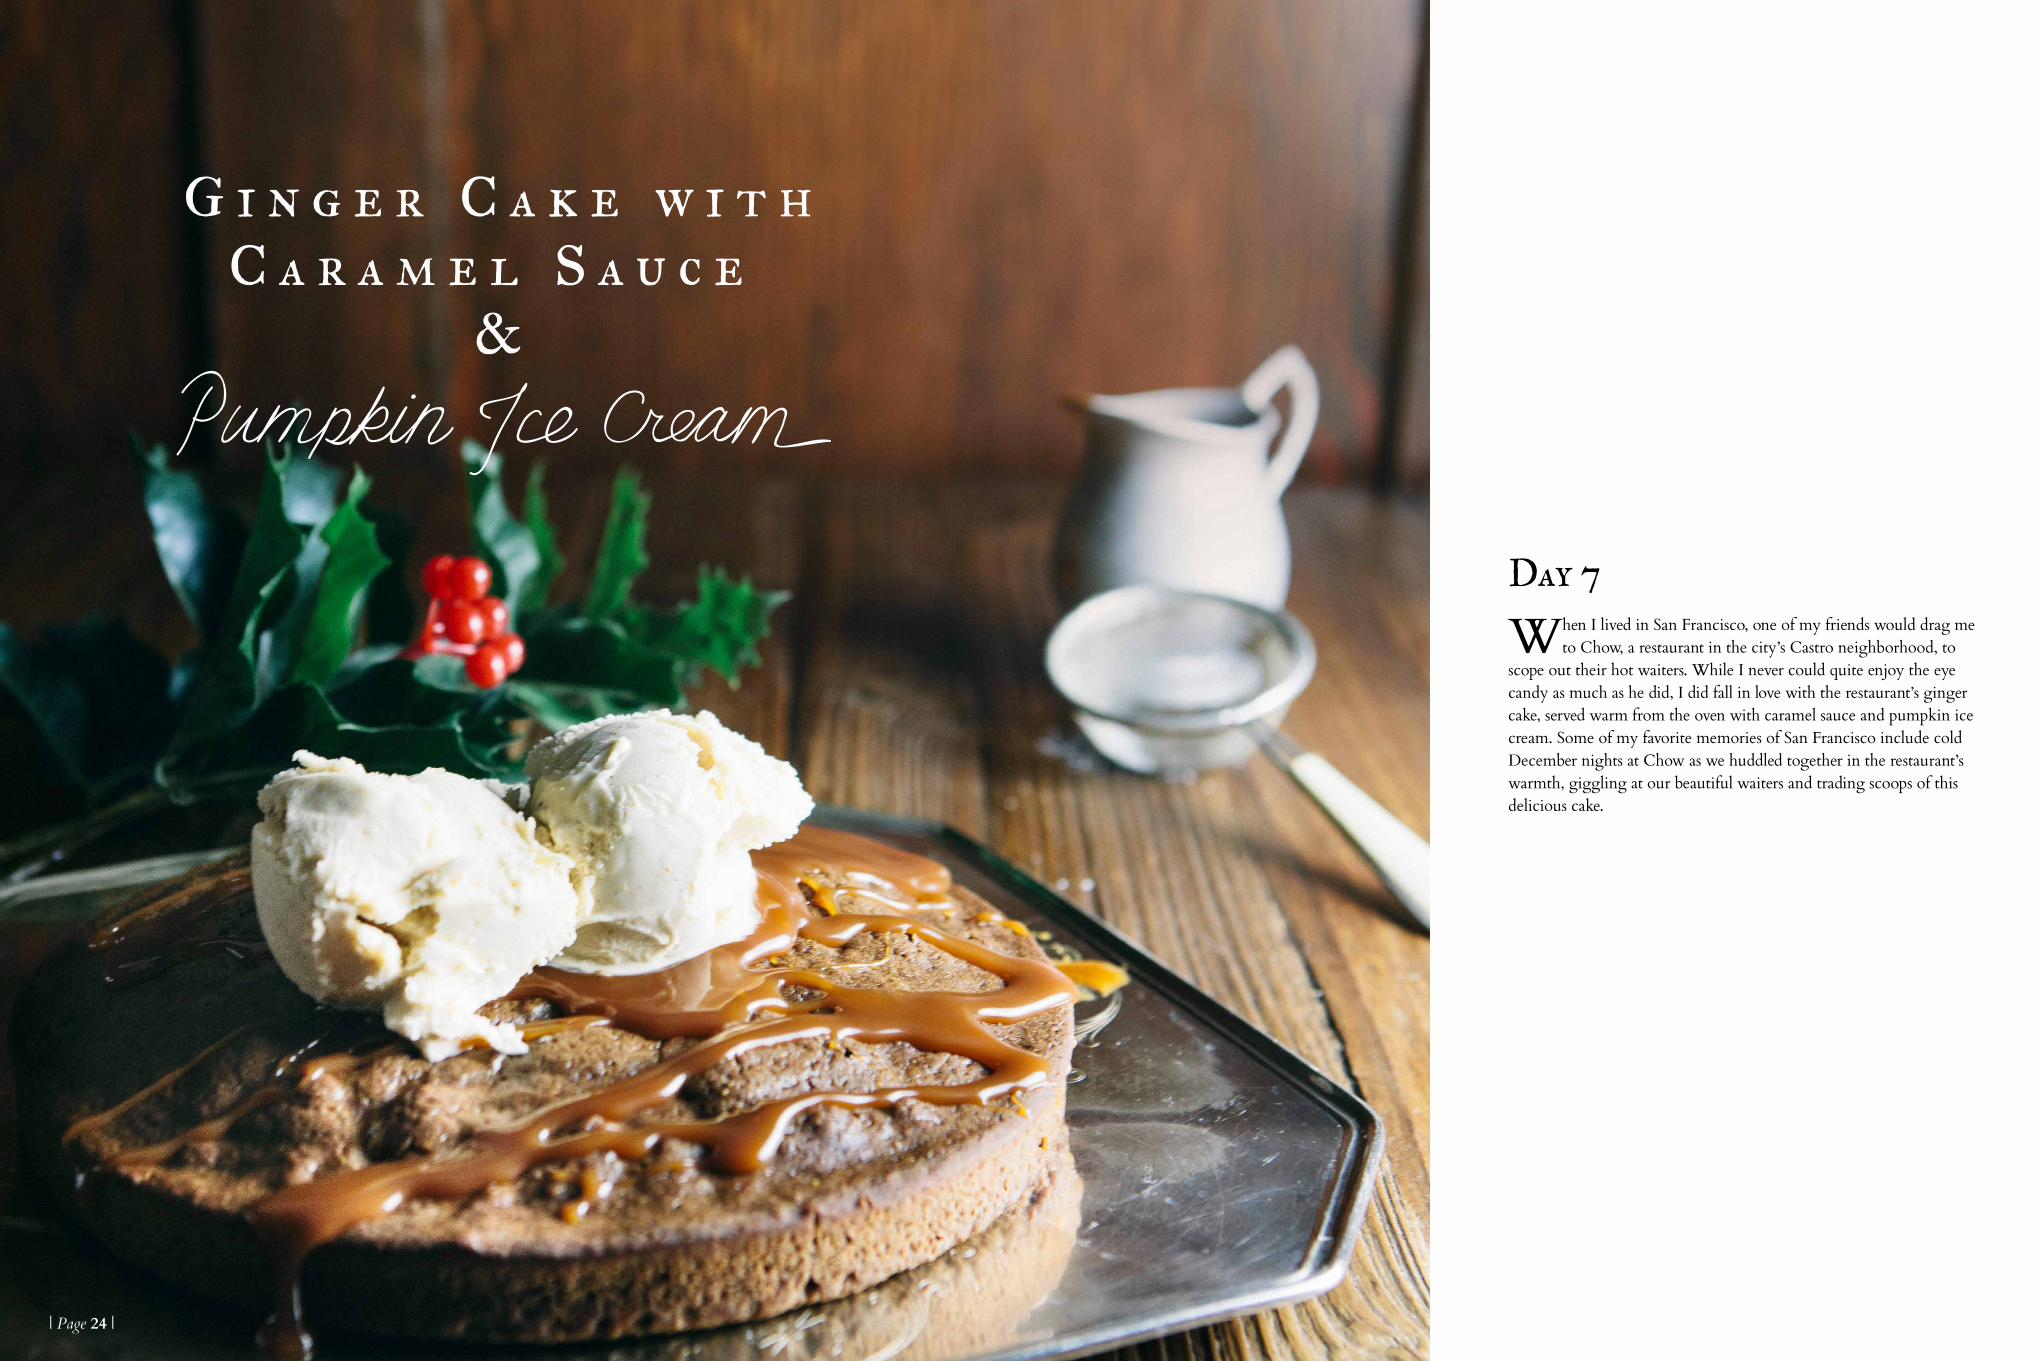
When I lived in San Francisco, one of my friends would drag me to Chow, a restaurant in the city’s Castro neighborhood, to
scope out their hot waiters. While I never could quite enjoy the eye candy as much as he did, I did fall in love with the restaurant’s ginger cake, served warm from the oven with caramel sauce and pumpkin ice cream. Some of my favorite memories of San Francisco include cold December nights at Chow as we huddled together in the restaurant’s warmth, giggling at our beautiful waiters and trading scoops of this delicious cake.
Day 7
| Page 24 | | Page 25 |

For the Ginger Cake
Ingredients
• 2 ½ cups all-purpose flour • ¾ teaspoon ground ginger • ½ teaspoon cinnamon• ½ teaspoon ground cloves• 1 tablespoon baking soda• 2 ounces fresh ginger, peeled and finely grated• ½ tablespoon water plus ¾ cup hot water, divided• 1 cup granulated sugar• ¾ cup vegetable oil• ¾ cup dark unsulfured molasses• 4 large eggs
{Makes one 9-inch cake}
Recipe
Preheat the oven to 350 (F). Lightly butter a round 9-inch cake pan and line the bottom with parchment paper.
Combine 2 ½ cups all-purpose flour, ¾ teaspoon ground ginger, ½ teaspoon cinnamon, ½ teaspoon ground cloves and 1 tablespoon baking soda in a medium bowl. Whisk together until well combined and set aside.
Combine 2 ounces peeled and grated fresh ginger, ½ tablespoon water, 1 cup granulated sugar, ¾ cup vegetable oil, ¾ dark unsulfured molasses in the bowl of a freestanding electric mixer fitted with a paddle attachment. Mix on low speed until well combined. Continue mixing on low speed and add 4 eggs, one at a time, only adding the next egg until the previous one has been fully incorporated.
Stop the mixer and scrape down the sides of the bowl. Sprinkle the dry ingredients on top of of the wet ingredients, and use a rubber spatula to fold the dry ingredients into the wet ingredients. Once the mixture only has one or two flour streaks left, return to the electric mixer and continue mixing at a low speed, streaming in ¾ cup hot water. Mix until just combined – it’s okay if the batter is slightly thin.
Pour into the prepared cake pan and bake until a toothpick comes out clean, about 40 to 45 minutes.
For the Caramel Sauce
Ingredients
• ¾ cup granulated sugar• 6 tablespoons light corn syrup• ¼ cup water• pinch of regular salt• ½ cup heavy cream• ½ teaspoon pure vanilla extract
{Makes 1 cup}
Recipe
Combine ¾ cup granulated sugar, 6 tablespoons light corn syrup, ¼ cup water and a pinch of salt in a heavy-bottomed medium saucepan over medium heat. Whisking constantly to dissolve the sugar, bring to a simmer. Let simmer for one minute before reducing the heat to low and simmer without simmer until it turns into a golden color.
Remove the saucepan from the heat, add the cream and vanilla, and whisk gently until thoroughly blended, about 1 minute. Allow the sauce to cool to room temperature. The sauce will thicken as it cools.
| Page 26 | | Page 27 |

To me, marshmallows have always seemed like a strange, otherworldly food. When I was
younger, I always imagined that they were spun up from fluffy clouds in the sky and were the snack foods of angels and aliens. I’ve since debunked that crazy fantasy in my head, mostly because I realized that marshmallows are actually incredibly simple to make. I’ve been experimenting with different flavors, and I’ve found that that a few drops of peppermint oil in my marshmallows make for a wonderful winter treat... especially when stirred into a bowl of steaming hot chocolate.
Day 8 For Peppermint Marshmallows
Ingredients
• vegetable oil cooking spray• ¼ cup cornstarch• ¼ cup confectioner’s sugar, sifted• 1 ½ cups cold water, divided into two ¾ portions• 1 ounce (or 4 packages) unflavored powdered
gelatin• 2 cups granulated sugar• 1 tablespoon light corn syrup• 1 teaspoon peppermint oil• 2 large egg whites, at room temperature• 2 teaspoons red food coloring
{Makes around 50 marshmallows}
Recipe
Prepare a 9 x13 inch baking dish by spraying it liberally with cooking spray. In a small bowl, whisk together ¼ cup cornstarch and ¼ cup confectioner’s sugar. Using a pastry brush, dust the bottom and sides of the greased pan with the cornstarch and sugar mixture. Tap off the excess powder and reserve in a small bowl. Set aside.
Sprinkle 1 ounce powdered gelatin evenly over the surface of a small bowl filled with ¾ cup cold water; set aside 5 minutes to soften and allow the gelatin to bloom. Be careful and monitor your gelatin closely throughout the 5 minutes — if it overblooms, it will be too soft and soggy and will fail to give the marshmallows its shape.
In a medium, heavy-bottomed sauce pan, combine 2 cups granulated sugar, 1 tablespoon light corn syrup, and ¾ cup water. Cook over medium heat until sugar is dissolved, using a whisk to stir continuously. Once the sugar is completely dissolved, it will look like a syrup — let this syrup come to a boil. Raise the heat to medium-high, and cook until the mixture registers 260 (F) on a candy thermometer, using a whisk to stir the mixture continuously. Once the mixture reaches 260 (F), immediately remove the syrup from the
heat and whisk in the bloomed gelatin until no lumps remain. Pour the syrup through a fine mesh sieve over a liquid measuring cup and set aside.
In the bowl of a freestanding electric mixer fitted with a whisk attachment, beat 2 large egg whites on medium speed until stiff (but not dry) peaks form. With the whisk on medium speed, gradually pour in the syrup and gelatin mixture — once the mixture is fully incorporated, turn up the mixer speed to its highest setting and continue to whisk until very thick, 10 to 12 minutes.
Once the mixture is thick, transfer it into the prepared pan. Working quickly, use an offset spatula to smoothen the top of the mixture. Drop dots of red food coloring across the surface and use a toothpick to swirl food coloring into the marshmallow to create a marbleized effect on the marshmallow surface. Let marshmallow stand, uncovered, at room temperature until firm, at least 5 hours but preferably overnight. Once the marshmallow is firm, use a serrated knife to cut into 1 ½ inch squares. Store in airtight container at room temperature for up to 2 months.
| Page 28 | | Page 29 |

Crème brûlée is my boyfriend’s favorite dessert. Even though he’s not one for sweets
(how ironic that he is dating a dessert blogger!), he’s always begging me to make him some crème brûlée. And while I love the classic vanilla flavored custard, I’ve been experimenting with different flavors throughout the years — flavors like butterscotch, pumpkin and more. However, my favorite so far has been this spiced crème brûlée, which has been infused with seasonal spices like cinnamon, nutmeg, cloves and star anise. I like to think that it tastes like Christmas in a cup.
Day 9
Special Equipment
• a chef’s torch
For the Brûlée Topping
Ingredients
• ¾ cup granulated sugar
For the Custard
Ingredients
• 4 cups heavy cream• ¾ cups granulated sugar, divided
into two equal half portions (¼ cup plus 2 tablespoons)
• 2 cinnamon sticks• 1 (whole) star anise• 7 large egg yolks• 2 teaspoons vanilla extract• ¼ teaspoon coarse salt• ¼ teaspoon ground nutmeg• ¹⁄₈ teaspoon ground cloves
{Makes 8 five-ounce ramkeins}
Recipe
Preheat the oven to 300 (F). Bring a kettle or pot of water to a boil, and place eight 5-ounce ramekins in a large roasting pan.
In a large, heatproof mixing bowl, whisk together the remaining ¼ cup plus 2 tablespoons granulated sugar, 7 large egg yolks, 2 teaspoons vanilla extract, ¼ teaspoon coarse salt, ¼ teaspoon ground nutmeg and ¹⁄₈ teaspoon ground cloves. Set aside.
In a medium saucepan, combine 4 cups heavy cream and ¼ cup plus 2 tablespoons (half of the ingredient portion) granulated sugar, whisking together. Heat over medium until the mixture starts to bubble around the edges of the pan, around 7 to 8 minutes. Be careful not to let the mixture boil — you just want it to come to a very hot but gentle simmer.
Once the cream mixture is steaming gently, remove it from heat. Temper the eggs by using a ladle to pour a small amount of the hot cream into the egg mixture, whisking the egg mixture continuously. Add two more ladles of cream mixture, one at a time, while continuing to whisk the egg mixture. Gradually whisk in the remaining cream mixture, before straining through a fine mesh sieve into a large liquid measuring cup.
Divide the custard evenly amongst the 8 ramekins. Place pan in the oven, before adding enough boiling water into the pan to come halfway up the sides of the ramekins. Bake until the custards are just set (they should be set in the sides of the ramekin, but jiggle in the center), around 30 to 40 minutes. Once the custards are set, use tongs to carefully remove dishes from their hot water bath and allowing to cool on a wire rack for 30 minutes, before covering with plastic wrap and chilling overnight to finish setting in the refrigerator.
To serve, sprinkle about 1 ½ tablespoons granulated sugar over each custard. Pass the flame of a chef’s torch in a circular motion 1 to 2 inches above the surface of each ramekin until the sugar bubbles, turns amber, and forms a smooth surface. Let rest for one minute, before serving immediately.
| Page 30 | | Page 31 |

The best desserts are the ones that not only taste good, but look beautiful and are easy to put together to boot. This Gingerbread
Cookies and Cream Cake is one of those desserts; when I first brought it out for my friends to try, they thought it was a decorative centerpiece for the Christmas table. I laughed and explained to them that the stack of cookies and cream was as delicious as it looked. The cake can be enjoyed in two ways — eating it immediately will give you a satisfying crunchy texture from the fresh cookies, but letting the cake rest overnight will allow the flavors to meld and the cookies to soften. Kudos to Baker & Spice, one of my favorite local bakeries, for the inspiration for this recipe!
Day 10
| Page 32 | | Page 33 |

For the Gingerbread Cookies
Ingredients
• 4 ¾ cups all-purpose flour• 1 tablespoon fresh orange zest• 1 tablespoon ground ginger• 1 tablespoon ground cinnamon• ¼ teaspoon ground cloves• ¾ teaspoon baking soda• ¼ teaspoon baking powder
Recipe
First, make the gingerbread cookies. In a medium bowl, whisk together 4 ¾ cups all-purpose flour, 1 tablespoon fresh orange zest, 1 tablespoon ginger, 1 tablespoon cinnamon, ¼ teaspoon cloves, ¾ teaspoon baking soda,¼ teaspoon baking powder and ½ teaspoon sea salt until well combined. The orange zest might cause some lumps in the mixture, but that’s okay for now. Set aside.
In the bowl of a freestanding electric mixer fitted with a paddle attachment, combine ¾ cups unsalted butter and ¾ cup dark brown sugar and beat together on medium speed, until well combined. Add 2 eggs one at a time, only adding the next egg before the previous one has been incorporated and scraping down the sides and bottom of the bowl between each addition. Once the eggs have been incorporated, turn the mixer to its lowest speed and slowly stream in ¾ cup blackstrap molasses, continuing to mix on low speed until fully incorporated into the mixture. Once the molasses have been incorporated, add the dry ingredients all at once and continue mixing on low speed, scraping down the bowl as needed to create a unified dough. Once the dough has come together, divide the dough into four quarters and shape each piece into a rough rectangle about an inch thick. Wrap each piece tightly in plastic wrap, and refrigerate the dough until it is firm enough to roll out (about 2 hours).
Once the dough has chilled completely, center a rack in your oven and preheat to 350 (F). Lightly flour a surface and use a rolling pin to roll out the dough until it is about ¹⁄₈ inch thick — you want to roll it out as thin as possible to get a good snap from your cookies. Use a 2 ½ inch round cookie cutter to stamp out disks, and place them an inch apart on a baking sheet lined with parchment paper or a Silpat mat. Gather up the scraps and re-roll until you have at least 70 cookies. If the dough gets too warm and hard to handle, feel free to pop it back in the freezer to chill for at least 5 to 10 minutes to firm up before continuing.
Bake the cookies in the preheated oven for around 12 to 14 minutes, or until golden around the edges and firm on top. Let the cookies cool on their baking sheets until cool enough to handle, before transferring them to a wire rack to cool completely.
• ½ teaspoon fine sea salt• ¾ cups (1 ½ sticks) unsalted butter,
at room temperature• ¾ cups dark brown sugar, firmly packed• 2 large eggs• ¾ cup unsulfured blackstrap molasses
Recipe
Once all the cookies are baked and cooled, make the cream. Place the bowl of a freestanding electric mixer and its whisk attachment in the freezer for 5 minutes to chill. Once the bowl and whisk have chilled, combine 1 pound mascarpone cheese,
1 ½ cups heavy cream and ¹⁄₃ cup granulated sugar in the bowl and whisk on low speed until well combined. Once the mixture is well combined, increase to medium speed and whip just until the cream becomes thick and fluffy and holds a stiff peak — but be careful and DO NOT OVERMIX. Overmixing will cause the cream to curdle! Once it holds a stiff peak, immediately stop mixing and add ¼ cup Grand Marnier, whisking on low speed until just incorporated.
Assembly
To assemble the cake, spread 2 tablespoons of cream on a flat serving plate or cake stand. Arrange 6 gingerbread cookies touching side by side in a circle on top of the cream, before placing 1 wafer in the middle. Spread a heaping ½ cup of cream on top of the cookies, covering them completely but leaving room at the outer edges of the cookies. Repeat with another 7 wafers and more cream, offsetting the cookies from the previous layer so they do not stack right on top of each other. Repeat until all the cookies and cream have been used up, finishing the cake with a layer of cream that will serve as its top layer. Serve immediately, or, if you prefer a softer texture from the cookies, cover loosely with plastic wrap and refrigerate overnight before serving.
For the Cream
Ingredients
• 1 pound mascarpone cheese, cold• 1 ½ cups heavy cream, cold• ¹⁄₃ cup granulated sugar• ¼ cup Grand Marnier
{Makes a 7-inch, 10-layer cake}
| Page 34 | | Page 35 |

Is there anything more elegant than a cream puff? They remind me of snow itself — so light and creamy, these delicate desserts melt in
your mouth. This recipe truly is one of my favorite Christmas desserts, as I’ve been known to eat at least three or four of these in one sitting. The cream puffs themselves aren’t that sweet, so be sure to serve each profiterole on its own platter in a puddle of white chocolate ganache.
Day 11
| Page 36 | | Page 37 |

For the Profiteroles
Ingredients
• 1 cup water• 6 tablespoons unsalted butter,
cut into 1-inch cubes• 1 tablespoon plus 1 teaspoon granulated sugar• ¹⁄₈ teaspoon salt• 1 cup all-purpose flour• 4 large eggs
{Makes sixteen 2-inch cream puffs}
Recipe
Preheat oven to 450 (F), placing oven racks in the center and upper third of the oven. Line two baking sheets with parchment paper and set aside.
In a medium saucepan, combine 1 cup water, 6 tablespoons unsalted butter, 1 tablespoon plus 1 teaspoon granulated sugar and ¹⁄₈ teaspoon salt. Bring to a simmer over medium heat, using a heatproof rubber spatula to stir gently and consistently to melt the butter. Once the butter is melted and the mixture is brought to a simmer, lower heat slightly and add 1 cup all-purpose flour all at once. Stir immediately using the heatproof rubber spatula, until the mixture thickens and pulls away from the sides of the pan. At this point, the mixture will have formed into a glossy and damp mass, and the bottom and sides of the pan should be clean. Continue cooking the dough for another 5 minutes over a low flame, allowing moisture to evaporate. When enough moisture has evaporated, the dough will steam and smell slightly nutty.
Once the dough is steaming and fragrant, immediately remove pan from heat and transfer the dough to the bowl of a freestanding electric mixer fitted with a paddle attachment. Beat on medium speed for about 1 minute to release some of the heat from the cooked dough, before turning down the mixer to its slowest speed and adding 4 eggs, one at a time, only adding the next egg until the previous one is fully incorporated. Stop the mixer between each egg addition to scrape down the bowl. After the last egg, the mixture should be glossy and thick — when scooped with a spoon, the dough should slowly pour off the spoon.
Use a 50mm (3 tablespoon) cookie dough scoop to portion out dough balls that are about 1 ½ inches across and ¾ inches tall. Space each dough ball about 1 ½ inches apart on the prepared sheet pans. Bake in the preheated oven for 10 minutes, before rotating the pan from the bottom shelf to the top shelf. Reduce the heat to 350 (F) and bake for another 15 minutes, cracking open the oven door for the first 5 minutes to allow heat to escape and the oven to cool more quickly. When the dough balls are a golden color and crisp on the outside, remove from the oven and allow to cool completely on the pans, placing each pan on a wire rack.
For the Whipped Cream Filling
Ingredients
• 1 cup heavy cream, cold• 1 tablespoon confectioner’s sugar• 1 teaspoon vanilla extract
For the White Chocolate Ganache
Ingredients
• ¾ cup heavy cream• 8 ounces white chocolate, finely chopped
Recipe
In the bowl of a freestanding electric mixer fitted with a whisk attachment, combine 1 cup heavy cream and 1 tablespoon confectioner’s sugar. Whisk on medium-high speed to incorporate, before adding 1 teaspoon vanilla extract. Beat on medium-high speed until just thick — you want the cream to be thick and hold its shape.
Transfer the cream to a pastry bag fitted with a #230 filling pastry tip. Fill each completely cooled profiterole with whipped cream, until the pastries are slightly puffier from the cream filling. Be careful not overfill or cream will ooze out from the cream puff’s cracks. Alternatively, slice each profiterole in half and spoon about a tablespoon’s worth of cream inside each pastry.
Recipe
In a small saucepan, bring ¾ cup heavy cream to a strong simmer, just under a boil. Pour over 8 ounces finely chopped chocolate and use a whisk to stir until the chocolate is melted and smooth. Transfer to the freezer for 5 minutes to cool, whisking halfway about halfway through to release some heat. The ganache will thicken as it cools. Serve each profiterole in a puddle of about ¼ cup of white chocolate ganache.
| Page 38 | | Page 39 |

Growing up, my parents would always receive a box of a dozen Ferrero Rocher chocolates for Christmas. Since neither of them
are particularly into sweets, they always passed the chocolate down to me, much to my delight. For that reason, I’ve always associated the chocolate hazelnut bonbons with Christmas. They make crowd-pleasing presents and excellent stocking stuffers, since rarely can people rarely resist the combination of chocolate and hazelnut. Similarly, these golden cupcakes are the cake version of my favorite chocolate candy: a buttery, golden cake topped off with a chocolate hazelnut ganache frosting. And let’s not forget the best part — there’s a hazelnut surprise in the center of each cupcake.
Day 12
| Page 40 | | Page 41 |

Recipe
Line a baking tray with wax paper, and carefully dole out 1 teaspoon of chocolate hazelnut spread 2 inches apart from one another. Freeze until solid, about 2 - 3 hours, preferably overnight.
Preheat the oven to 350 (F) and line a muffin tin with cupcake cases.
Combine 1 cup flour, ¾ cup granulated sugar, 1 ½ teaspoons baking powder and ¼ teaspoon salt in the bowl of a freestanding electric mixer fitted with a paddle attachment and beat on slow speed until you get a sandy consistency and everything is combined. Gradually pour in half of the milk and beat until the milk is just incorporated.
Whisk together 1 large egg, ¼ teaspoon vanilla and the remaining milk together in a liquid measuring cup, before pouring into the flour mixture and continuing to beat until just incorporated. Scrape down any unmixed ingredients from the side of the bowl and the paddle, before continuing to mix for another minute until the batter is just smooth. Be careful not to overmix!
Use a tablespoon or a tablespoon-sized cookie scoop to portion out 1 tablespoon of batter into each prepared cupcake case. Take the frozen teaspoon of chocolate hazelnut spread and place on top of each cupcake case, before topping off with another tablespoon of cupcake batter. Bake in the preheated oven for 20 to 25 minutes or until the cakes are light golden and the tops of each cupcake bounce back when touched. Let the cupcakes cool slightly in the pan, before turning out onto a wire rack to cool completely.
When the cupcakes are cold, frost each cupcake with generous amounts of chocolate hazelnut ganache frosting, topping each with a Ferrero Rocher bonbon.
For the Golden Cupcakes
Ingredients
• ¼ cup chocolate hazelnut spread (like Nutella)• 1 cup all-purpose flour• ¾ cup granulated sugar• 1 ½ teaspoons baking powder• ¼ teaspoon salt• 4 tablespoons (½ stick) unsalted butter,
at room temperature• ½ cup whole milk• 1 large egg• ¼ teaspoon vanilla extract
{Makes 12 cupcakes}
Recipe
Combine 10 ounces bittersweet chocolate and 2/3 cup confectioner's sugar in a medium, heatproof bowl.
In a small saucepan over medium, bring 3/4 cup plus 1 tablespoon heavy cream to a gentle simmer, whisking occasionally. Pour the hot cream into the medium, heatproof bowl containing the chocolate and confectioner's sugar mixture. Stir the mixture with a heatproof, rubber spatula until the sugar is dissolved.
Once the sugar has dissolved, nestle the medium, heatproof bowl over a medium saucepan of simmer water to make a double boiler — be sure that the water in the saucepan doesn't touch the bottom of your heatproof bowl. Gently cook, stirring with a rubber spatula, until all the chocolate is melted and the mixture is smooth. Remove the bowl from the heat.
In a separate, smaller heatproof bowl, whisk together 2 large egg yolks. Pour about 1/2 cup of some of the melted chocolate mixture into the yolks while whisking, to temper them. Pour the tempered mixture back into the larger, heatproof bowl containing the rest of the original mixture and whisk to combine. Add 3 tablespoons unsalted butter and whisk until smooth and completely dissolved into the mixture. Add another ¹⁄₃ cup chocolate hazelnut spread and whisk until smooth and fully incorporated.
Allow the ganache to cool for about 15 to 20 minutes, before using immediately. It’s important that you let the ganache cool before using, or it will be too liquidy and hard to work with. The ganache will thicken as it cools.
For the Chocolate Hazelnut Ganache Frosting
Ingredients
• 10 ounces bittersweet chocolate• ²⁄₃ cup confectioner’s sugar, sifted• ¾ cup plus 1 tablespoon heavy cream• 2 large egg yolks• 3 tablespoons unsalted butter• ¹⁄₃ cup chocolate hazelnut spread (like Nutella)• 12 Ferrero Rocher bonbons
{Makes 12 cupcakes}
| Page 42 | | Page 43 |

Michelle Lopez {Baker, Photographer & Author}
Michelle is a food blogger based in Portland, Oregon. Her popular blog, Hummingbird High,
was a finalist in Saveur Magazine’s 2013 Best Food Blog Awards. Michelle spends her time juggling baking with Crossfitting and her full time job
at a software company.
Currently, her favorite dessert is crème brûlée (but this rotates on an almost weekly basis).
Blog: www.hummingbirdhigh.comPortfolio: www.hhphotography.net
Sze Wa Cheung{Designer, Illustrator & Enjoyer}
Sze Wa is a visual designer based in Portland, Oregon who specializes in illustration and branding. Sze Wa spends her spare time eating, drawing and thinking
about what kind of puppy she’ll eventually get.
Though she prefers to eat savory food over sweets, her favorite dessert is tiramisu.
Blog: blog.szewacheung.comPortfolio: szewacheung.com
| Page 44 | | Page 45 |

For more recipes, visit:
Share:
| Page 46 |


![RESET/ENABLE DIAGRAM CPU, FSB [PAGE_TITLE=CPU, FSB] XENON_RETAIL 5/73 K7 12 12 12 12 12 12 12 12 12](https://static.fdocuments.us/doc/165x107/610d0b50d45ff058ad2eca90/resetenable-diagram-cpu-fsb-pagetitlecpu-fsb-xenonretail-573-k7-12-12-12.jpg)