122 Oracle Landed Cost Management
280
Oracle® Landed Cost Management Process Guide Release 12.2 Part No. E48799-02 November 2013
-
Upload
abiye-asamenew -
Category
Documents
-
view
230 -
download
4
Transcript of 122 Oracle Landed Cost Management
Oracle® Landed Cost ManagementProcess GuideRelease 12.2Part No. E48799-02
November 2013
Oracle Landed Cost Management Process Guide, Release 12.2
Part No. E48799-02
Copyright © 2013, Oracle and/or its affiliates. All rights reserved.
Primary Author: Jan Lineberry
Oracle and Java are registered trademarks of Oracle and/or its affiliates. Other names may be trademarks of their respective owners.
Intel and Intel Xeon are trademarks or registered trademarks of Intel Corporation. All SPARC trademarks are used under license and are trademarks or registered trademarks of SPARC International, Inc. AMD, Opteron, the AMD logo, and the AMD Opteron logo are trademarks or registered trademarks of Advanced Micro Devices. UNIX is a registered trademark of The Open Group.
This software and related documentation are provided under a license agreement containing restrictions on use and disclosure and are protected by intellectual property laws. Except as expressly permitted in your license agreement or allowed by law, you may not use, copy, reproduce, translate, broadcast, modify, license, transmit, distribute, exhibit, perform, publish, or display any part, in any form, or by any means. Reverse engineering, disassembly, or decompilation of this software, unless required by law for interoperability, is prohibited.
The information contained herein is subject to change without notice and is not warranted to be error-free. If you find any errors, please report them to us in writing.
If this is software or related documentation that is delivered to the U.S. Government or anyone licensing it on behalf of the U.S. Government, the following notice is applicable:
U.S. GOVERNMENT END USERS: Oracle programs, including any operating system, integrated software, any programs installed on the hardware, and/or documentation, delivered to U.S. Government end users are "commercial computer software" pursuant to the applicable Federal Acquisition Regulation and agency-specific supplemental regulations. As such, use, duplication, disclosure, modification, and adaptation of the programs, including any operating system, integrated software, any programs installed on the hardware, and/or documentation, shall be subject to license terms and license restrictions applicable to the programs. No other rights are granted to the U.S. Government.
This software or hardware is developed for general use in a variety of information management applications. It is not developed or intended for use in any inherently dangerous applications, including applications that may create a risk of personal injury. If you use this software or hardware in dangerous applications, then you shall be responsible to take all appropriate fail-safe, backup, redundancy, and other measures to ensure its safe use. Oracle Corporation and its affiliates disclaim any liability for any damages caused by use of this software or hardware in dangerous applications.
This software or hardware and documentation may provide access to or information on content, products, and services from third parties. Oracle Corporation and its affiliates are not responsible for and expressly disclaim all warranties of any kind with respect to third-party content, products, and services. Oracle Corporation and its affiliates will not be responsible for any loss, costs, or damages incurred due to your access to or use of third-party content, products, or services.

iii
Contents
Send Us Your Comments
Preface
Part 1 Understanding Oracle Landed Cost Management
1 Understanding Oracle Landed Cost ManagementOracle Landed Cost Management Overview............................................................................1-1Integration with Other Oracle Applications............................................................................ 1-5
Part 2 Setting Up Oracle Landed Cost Management
2 Setting Up Oracle Landed Cost ManagementUnderstanding the Oracle Landed Cost Management Setup Process..................................... 2-1Setting Up Inventory Organization Options............................................................................ 2-3Setting Up Location Options.....................................................................................................2-5Setting Up Receiving Options.................................................................................................. 2-7Setting Up Cost Factors............................................................................................................. 2-9Setting Up Advanced Pricing Profile Options....................................................................... 2-11Maintaining Shipment Line Types......................................................................................... 2-12Maintaining Shipment Types................................................................................................. 2-14Maintaining Rules................................................................................................................... 2-19Setting Up Landed Cost Management Options......................................................................2-35Setting Up Oracle Landed Cost Management Profile Options..............................................2-37
iv
Part 3 Managing Landed Cost
3 Understanding the Landed Cost Management WorkbenchUnderstanding the Landed Cost Management Workbench.....................................................3-1Understanding the Shipments Workbench.............................................................................. 3-3Understanding the Shipment Status.......................................................................................3-23
4 Managing Simulated Landed CostUnderstanding Simulated Landed Cost................................................................................... 4-1Creating a Landed Cost Simulation for a Purchase Order....................................................... 4-2Reviewing Landed Cost Simulations....................................................................................... 4-5Managing Landed Cost Simulations........................................................................................ 4-8Managing Charges and Simulation Details........................................................................... 4-12Creating the Estimated Landed Cost Shipment..................................................................... 4-19
5 Managing Landed Cost as a Pre-Receiving ApplicationUnderstanding Landed Cost as a Pre-Receiving Application.................................................. 5-2Creating Landed Cost Management Shipments.......................................................................5-8Entering Shipment Lines for the Shipment............................................................................5-13Updating Shipments............................................................................................................... 5-18Updating Shipment Lines....................................................................................................... 5-25Updating a Specific Shipment Line........................................................................................ 5-29Viewing Shipments................................................................................................................. 5-31Viewing Shipment Lines........................................................................................................ 5-33Viewing a Specific Shipment Line ........................................................................................ 5-35Generating Charges for the Shipment.................................................................................... 5-36Managing Charge Lines for the Shipment............................................................................. 5-37Viewing Charge Lines for the Shipment................................................................................ 5-42Managing Associations for the Shipment.............................................................................. 5-44Viewing Associations for the Shipment................................................................................. 5-47Validating the Shipment......................................................................................................... 5-49Calculating Estimated Landed Cost for the Shipment........................................................... 5-50Viewing Estimated Landed Cost for the Shipment................................................................5-52Submitting the Shipment to Receiving.................................................................................. 5-55Updating Estimated Landed Cost Information on Completed Shipments........................... 5-56Calculating and Importing Actual Landed Cost for the Shipment........................................5-57Viewing Actual Landed Cost for the Shipment..................................................................... 5-59

v
6 Managing Landed Cost as a ServiceUnderstanding Landed Cost as a Service................................................................................. 6-1Importing Estimated Landed Cost Information from Receiving............................................. 6-8Searching for Automatically Created Shipments................................................................... 6-10Viewing Estimated Landed Cost for the Shipment................................................................6-15Generating Charges for a Shipment that is Not Completed.................................................. 6-19Maintaining Charge Lines for a Shipment that is Not Completed........................................6-22Updating Associations for a Shipment that is Not Completed..............................................6-31Validating a Shipment that is Not Completed....................................................................... 6-36Calculating Estimated Landed Cost for a Shipment that is Not Completed......................... 6-41Submitting a Shipment that is Not Completed to Receiving.................................................6-45Updating Estimated Landed Cost Information on Completed Shipments........................... 6-48Calculating and Importing Actual Landed Cost for the Shipment........................................6-49Viewing Actual Landed Cost for the Shipment..................................................................... 6-51
7 Updating Estimated Landed Cost on Completed ShipmentsUnderstanding the Estimated Landed Cost Update Process.................................................... 7-1Searching for Completed Shipments........................................................................................ 7-3Updating Estimated Landed Cost Information on Shipment Lines........................................ 7-7Updating Estimated Landed Cost Information on Shipment Line Details........................... 7-10Updating Estimated Landed Cost Information on Charge Lines...........................................7-14Updating Estimated Landed Cost Information on Charge Line Details................................7-18Processing Estimated Landed Cost Updates .......................................................................... 7-22Discarding Estimated Landed Cost Updates to a Completed Shipment............................... 7-23Viewing Estimated Landed Cost Information After Updates................................................7-25
Part 4 Analyzing Landed Cost Information
8 Monitoring and Analyzing Landed Cost InformationMonitoring Daily Operations................................................................................................... 8-1Analyzing Landed Cost............................................................................................................. 8-1
A Windows/Pages and Navigation PathsOverview of Landed Cost Management Windows/Pages and Navigation Paths................... A-1Windows/Pages and Navigator Paths.......................................................................................A-1

vi
B Profile OptionsOverview of Profile Options.................................................................................................... B-1Landed Cost Management Profile Options..............................................................................B-1
Index
vii
Send Us Your Comments
Oracle Landed Cost Management Process Guide, Release 12.2Part No. E48799-02
Oracle welcomes customers' comments and suggestions on the quality and usefulness of this document. Your feedback is important, and helps us to best meet your needs as a user of our products. For example:
• Are the implementation steps correct and complete? • Did you understand the context of the procedures? • Did you find any errors in the information? • Does the structure of the information help you with your tasks? • Do you need different information or graphics? If so, where, and in what format? • Are the examples correct? Do you need more examples?
If you find any errors or have any other suggestions for improvement, then please tell us your name, the name of the company who has licensed our products, the title and part number of the documentation andthe chapter, section, and page number (if available).
Note: Before sending us your comments, you might like to check that you have the latest version of the document and if any concerns are already addressed. To do this, access the new Oracle E-Business Suite Release Online Documentation CD available on My Oracle Support and www.oracle.com. It contains the most current Documentation Library plus all documents revised or released recently.
Send your comments to us using the electronic mail address: [email protected]
Please give your name, address, electronic mail address, and telephone number (optional).
If you need assistance with Oracle software, then please contact your support representative or Oracle Support Services.
If you require training or instruction in using Oracle software, then please contact your Oracle local officeand inquire about our Oracle University offerings. A list of Oracle offices is available on our Web site at www.oracle.com.

ix
Preface
Intended AudienceWelcome to Release 12.2 of the Oracle Landed Cost Management Process Guide.
This guide is designed for users, administrators, and implementers, of the Oracle Landed Cost Management application. It assumes that you have a working knowledge of the principles and customary practices of the business area.
See Related Information Sources on page x for more Oracle E-Business Suite product information.
Documentation AccessibilityFor information about Oracle's commitment to accessibility, visit the Oracle Accessibility Program website at http://www.oracle.com/pls/topic/lookup?ctx=acc&id=docacc.
Access to Oracle SupportOracle customers have access to electronic support through My Oracle Support. For information, visit http://www.oracle.com/pls/topic/lookup?ctx=acc&id=info or visit http://www.oracle.com/pls/topic/lookup?ctx=acc&id=trs if you are hearing impaired.
Structure1 Understanding Oracle Landed Cost Management2 Setting Up Oracle Landed Cost Management3 Understanding the Landed Cost Management Workbench4 Managing Simulated Landed Cost5 Managing Landed Cost as a Pre-Receiving Application6 Managing Landed Cost as a Service7 Updating Estimated Landed Cost on Completed Shipments8 Monitoring and Analyzing Landed Cost Information
x
A Windows/Pages and Navigation PathsB Profile Options
Related Information SourcesOracle Cost Management User's Guide
Oracle Purchasing User's Guide
Oracle iProcurement Implementation and Administration Guide
Oracle Sourcing and Implementation Guide
Oracle Payables User's Guide
Oracle Inventory User's Guide
Oracle Advanced Pricing User's Guide
Oracle Process Manufacturing Cost Management User's Guide
Integration RepositoryThe Oracle Integration Repository is a compilation of information about the service endpoints exposed by the Oracle E-Business Suite of applications. It provides a complete catalog of Oracle E-Business Suite's business service interfaces. The tool lets users easily discover and deploy the appropriate business service interface for integration with any system, application, or business partner.
The Oracle Integration Repository is shipped as part of the E-Business Suite. As your instance is patched, the repository is automatically updated with content appropriate for the precise revisions of interfaces in your environment.
You can navigate to the Oracle Integration Repository through Oracle E-Business Suite Integrated SOA Gateway.
Do Not Use Database Tools to Modify Oracle E-Business Suite DataOracle STRONGLY RECOMMENDS that you never use SQL*Plus, Oracle Data Browser, database triggers, or any other tool to modify Oracle E-Business Suite data unless otherwise instructed.
Oracle provides powerful tools you can use to create, store, change, retrieve, and maintain information in an Oracle database. But if you use Oracle tools such as SQL*Plus to modify Oracle E-Business Suite data, you risk destroying the integrity of your data and you lose the ability to audit changes to your data.
Because Oracle E-Business Suite tables are interrelated, any change you make using an Oracle E-Business Suite form can update many tables at once. But when you modify Oracle E-Business Suite data using anything other than Oracle E-Business Suite, you may change a row in one table without making corresponding changes in related tables.If your tables get out of synchronization with each other, you risk retrieving erroneous

xi
information and you risk unpredictable results throughout Oracle E-Business Suite.
When you use Oracle E-Business Suite to modify your data, Oracle E-Business Suite automatically checks that your changes are valid. Oracle E-Business Suite also keeps track of who changes information. If you enter information into database tables using database tools, you may store invalid information. You also lose the ability to track whohas changed your information because SQL*Plus and other database tools do not keep arecord of changes.

Part 1Understanding Oracle Landed Cost
Management


Understanding Oracle Landed Cost Management 1-1
1Understanding Oracle Landed Cost
Management
This chapter covers the following topics:
• Oracle Landed Cost Management Overview
• Integration with Other Oracle Applications
Oracle Landed Cost Management OverviewOracle Landed Cost Management enables you to manage estimated and actual landed cost for an item purchased from a supplier. Using Oracle Landed Cost Management you can determine the "real" costs associated with acquiring items including insurance, transportation, handling, storage costs, container fees, and import or export charges. Knowledge and visibility into these trade costs help organizations better evaluate new product plans, price their items, and negotiate contracts with both suppliers and customers.
Using Oracle Landed Cost Management you can first estimate the landed costs for the items and then you can update those costs with the actual landed costs as they become known. Oracle Landed Cost Management gives you the option to determine and calculate estimated landed costs before the receipt of the items into inventory (Landed Cost as a Pre-Receiving Application) or after the receipt of the item into inventory (Landed Cost as a Service). Then when you create and match invoices against those receipts this price information is used to calculate the actual landed costs for the item. Within Oracle Landed Cost Management you can view the estimated and actual landed costs for an item side by side. This gives you valuable information about the landed costfor an item and where cost improvement can made.
During the processing of landed costs using Oracle Landed Cost Management, inventory valuations for various cost methods are maintained providing better visibilityinto individual items profitability and an organizations outstanding exposure. This dataprovides insight for item forecasting and budgeting and provides clear evidence of the detailed accumulation of expenses for regulatory requirements and reporting.
1-2 Oracle Landed Cost Management Process Guide
For more detailed information on using Oracle Landed Cost Management, see Understanding Landed Cost as a Pre-Receiving Application, page 5-2 and Understanding Landed Cost as a Service, page 6-1.
Features of Oracle Landed Cost ManagementOracle Landed Cost Management provides several features. A few of the key features are:
• Charge Management
Oracle Landed Cost Management collects an unlimited number of estimated charges and enables you to configure how theses charges are applied to a shipment line, a group of lines within a shipment, or an entire shipment. It applies these charges based on weight, volume, quantity, or the value of the items being traded. These charges can be categorized by different cost factors which will ultimately govern the behavior in how they are included in a total landed cost calculation. Once actual amounts are received, Charge Management records the new value for comparison with the earlier estimates.
• Landed Cost Calculation
The Oracle Landed Cost Management Calculation process provides the ability to calculate the estimated landed cost based on charges manually assigned and automatically allocated based on the configuration of the charge lines. It also calculates the actual landed costs by prorating the actual invoices and proportional taxes to obtain the variances between what was estimated and what was charged. Cost components summed in the calculation remain stored at the most granular level for detailed tracking of charge amounts while variances are updated to the appropriate accounts.
• Shipments Workbench
It is common that the financial flows do not mirror the physical supply chain transactional flows. Oracle Landed Cost Management helps to link these two flows together and provides visibility and traceability from one to the other. With the Oracle Landed Cost Management Shipments Workbench, companies can view the real time accrual updates for a particular receipt or shipment. They can validate the accuracy of a suppliers estimate by comparing estimated and actual costs and can view the percentage of a particular cost component for a particular item. Additionally, you can make use of all the flexible Oracle and E-Business Suite tools to meet your own customized reporting requirements.
Understanding Oracle Landed Cost Management 1-3
Benefits from Using Oracle Landed Cost Management
Operational Life Cycle
Using Oracle Landed Cost Management will provide your organization with several benefits. Oracle Landed Cost Management will help organizations:
• Maximize Profits
By illuminating "real" product costs, organizations have the opportunity to identify areas for potential cost reduction. It also helps managers more accurately monitor product performance against profitability targets and ensure estimated costs are in line with actual costs.
• Increase Competitiveness
When all of the charges, fees, duties and taxes are known, companies can more strategically source products and components from lower cost foreign locations. This also enables them to better justify contracts with vendors or potential customers. Ultimately, they can price goods with the full understanding of the charges associated with bringing an item to market.
• Increase Visibility
Itemizing and tracking all acquisition costs and material cost elements as they applyto a product enables organizations to better link their product supply flows with their financial processing and reporting. In addition, tracking estimated costs as soon as they are known gives decision makers more insight into their exposure for budgeting and reporting purposes before invoices are ever received.
1-4 Oracle Landed Cost Management Process Guide
• Ensure Compliance
Companies can feel more confident in their financial reports and their cost declarations. This includes accurately calculated taxes and consideration of those taxes whose recovery should be excluded from total cost calculations. Additionally, organizations will adhere to country specific requirements for product specific profitability documentation and income tax calculations.
Transactions Supported by Oracle Landed Cost ManagementOracle Landed Cost Management is a robust application that enables you to manage estimated and actual landed cost for an organization. The transactions (process flows) supported by release are:
• Release 12.1.1
• Support for estimated and actual landed cost calculation for item lines of the following documents:
• Standard purchase orders
• Blanket purchase releases
• Planned purchase order releases
• Support for discrete manufacturing organizations
• Support for Mobile Supply Chain Applications (MSCA) organizations
• Support for the following transactions:
• Receiving transactions: receipts and deliveries
• Corrections to receiving transactions
• Return to receiving and return to supplier
• Advanced Shipping Notice (ASN) receipts, restricted to the Landed Cost as-a-service implementation flow
• Release 12.1.2
• Included the support for process manufacturing organizations
• Release 12.1.3
• Included the support for calculation of simulated landed cost

Understanding Oracle Landed Cost Management 1-5
Integration with Other Oracle Applications
Integration with Other Oracle Applications
Oracle Landed Cost Management integrates with several other Oracle E-Business suite applications during the processing of estimated and actual landed costs for an item. TheOracle E-Business applications that integrate with Oracle Landed Cost Management are:
• Oracle Purchasing
Purchase order information is the baseline information used to itemize expected shipment or receiving lines on which extended supply chain charges will be applied. Oracle Landed Cost Management provides visibility into Oracle Purchasing purchase order data to build expected shipments for charge application and subsequent landed cost estimation calculations. When entering expected shipments the reference information provided by Oracle Purchasing saves time anddecreases errors that might occur without automated access to this information. After the purchase order information is available in Oracle Landed Cost Management, expected values received from the purchase order such as, quantity and price can be edited for estimated cost calculation purposes. Furthermore, all thenecessary data is provided to help arrive at an accurate three way match after an invoice for a purchase order line or charge is entered into Oracle Payables.
Additionally, Oracle Landed Cost Management recovers the tax lines associated to the purchase order that was originally calculated by EB-Tax, in order to include the non-recoverable amounts into the landed cost.
1-6 Oracle Landed Cost Management Process Guide
• Oracle Purchasing (Receiving)
Oracle Landed Cost Management integrates tightly with the Oracle Purchasing Receiving module. Oracle Landed Cost Management relies on the Receiving transactions to calculate the estimated landed costs for a landed cost management shipment. These estimated landed costs are then forwarded to Oracle Cost Management to update inventory valuations and accounting.
Note: Oracle Landed Cost Management currently does not support receiving of purchase orders created in one operating unit but to beshipped to another operating unit (global procurement).
• Oracle Payables
Invoices created in Oracle Payables provide the actual cost information that supports the actual landed cost calculations that occur in Landed Cost Management.
• Oracle Cost Management and Oracle Process Manufacturing (OPM) Cost Management
After actual values are received from invoices the actual landed cost is calculated in Oracle Landed Cost Management. The variances between the actual landed cost and the estimated landed cost are determined. Those variances are passed to OracleCost Management which in turn updates the proper accounts and valuation. If you are using Oracle Process Manufacturing than you must first run a concurrent program that will pass the variances to OPM Cost Management and that application will in turn update the proper accounts and valuation. Both process anddiscrete Costing applications follow similar flows: Oracle Landed Cost Management calculates the estimated and actual landed costs and the variances, which are used for costing valuation and accounting.
• Oracle Advanced Pricing (Optional)
Integration with Oracle Advanced Pricing enables you to set conditions for the automatic application of the required charges, fees, duties and taxes for a landed cost management shipment. This means that estimated charges can be applied automatically to a shipment.
Part 2Setting Up Oracle Landed Cost Management

Setting Up Oracle Landed Cost Management 2-1
2Setting Up Oracle Landed Cost Management
Understanding the Oracle Landed Cost Management Setup ProcessBefore you can use the Oracle Landed Cost Management application you must set up the application. A part of the Oracle Landed Cost Management setup occurs in other Oracle E-Business applications and then some of the setup is performed within the Oracle Landed Cost Management application itself.
Since Oracle Landed Cost Management integrates with several Oracle E-Business applications these applications need to be implemented and set up as well before you can successfully use the Oracle Landed Cost Management application. The other Oracle E-Business applications that need to be set up are:
• Oracle Inventory
• Oracle Purchasing
• Oracle Payables (required for actual landed cost calculation)
• (Conditionally Optional) Oracle Cost Management
• (Conditionally Optional) Oracle Process Manufacturing
The use of Oracle Landed Cost Management is optional for Oracle Discrete and Process manufacturing implementations.
Plus, Oracle Landed Cost Management can integrate with Oracle Advanced Pricing but it is not required. Oracle recommends that you integrate with Oracle Advanced Pricing so automatic charge calculation will occur in the processing of landed costs. Oracle Landed Cost Management also provides a hook (an object that can be modified by you) to enable you to load charges from external charge providers in the case where you are using another charge defaulting rule besides Oracle Advanced Pricing. Otherwise, you will have to enter all of the charge lines manually.
For information on customizing Oracle Landed Cost Management hooks, see Note ID:
2-2 Oracle Landed Cost Management Process Guide
1211843.1 How to proceed for customizing LCM Hooks INLPCUSB.pls in My Oracle Support.
Setting Up Oracle Landed Cost ManagementFollow this high-level process flow to set up Oracle Landed Cost Management:
1. Implement and set up all the other Oracle E-Business applications that are integrating with Landed Cost Management:
• Inventory
Using Oracle Landed Cost Management (LCM) you can optionally restrict the purchase order shipments to be integrated with LCM based on item categories. Otherwise, landed cost will be calculated for all eligible items of an LCM enabled organization. Setting up item category sets for use by LCM is optional.
For more information on defining item category sets, see the Item Setup and Control chapter in the Oracle Inventory User's Guide.
To use item category sets in LCM set up the site level system profile option (INL: Item Category Set) with the name of the category set for which landed cost will be calculated.
For more information, see Setting Up Landed Cost Profile Options, page 2-37.
• Purchasing
• Cost Management
• Process Manufacturing
• Payables
• Advanced Pricing
For more information on setting up these applications, see the specific implementation guide and user guide for each application.
2. Set up Inventory organization options.
For more information, see Setting Up Inventory Organization Options, page 2-3.
3. Set up Receiving options.
For more information, see Setting Up Receiving Options, page 2-7.
4. Set up cost factors.
For more information, see Setting Up Cost Factors, page 2-9.
5. Set up Oracle Advanced Pricing profile options.
Setting Up Oracle Landed Cost Management 2-3
For more information, see Setting Up Advanced Pricing Profile Options, page 2-11.
6. Set up shipment line types.
For more information, see Maintaining Shipment Line Types, page 2-12.
7. Set up shipment types.
For more information, see Maintaining Shipment Types, page 2-14.
8. (Optional) Set up rules.
For more information, see Maintaining Rules, page 2-19.
9. Set up Oracle Landed Cost Management Options.
For more information, see Setting Up Oracle Landed Cost Management Options, page 2-35.
10. Set up Oracle Landed Cost Management profile options.
For more information, see Setting Up Oracle Landed Cost Management Profile Options, page 2-37.
Setting Up Inventory Organization OptionsTo use Oracle Landed Cost Management you must specify the inventory organizations that you want to have use Landed Cost Management and you must specify the Landed Cost Management variance account for that organization. Use the Organization Parameters - Inventory Parameters window in Oracle Inventory to define this information.
For more information on Inventory organization options, see the Inventory Structure chapter in the Oracle Inventory User's Guide.
Use this procedure to set up Inventory organization options:
To Set Up Inventory Organization Options:1. Navigate to the Organization Parameters - Inventory Parameters window, page A-
1.
2-4 Oracle Landed Cost Management Process Guide
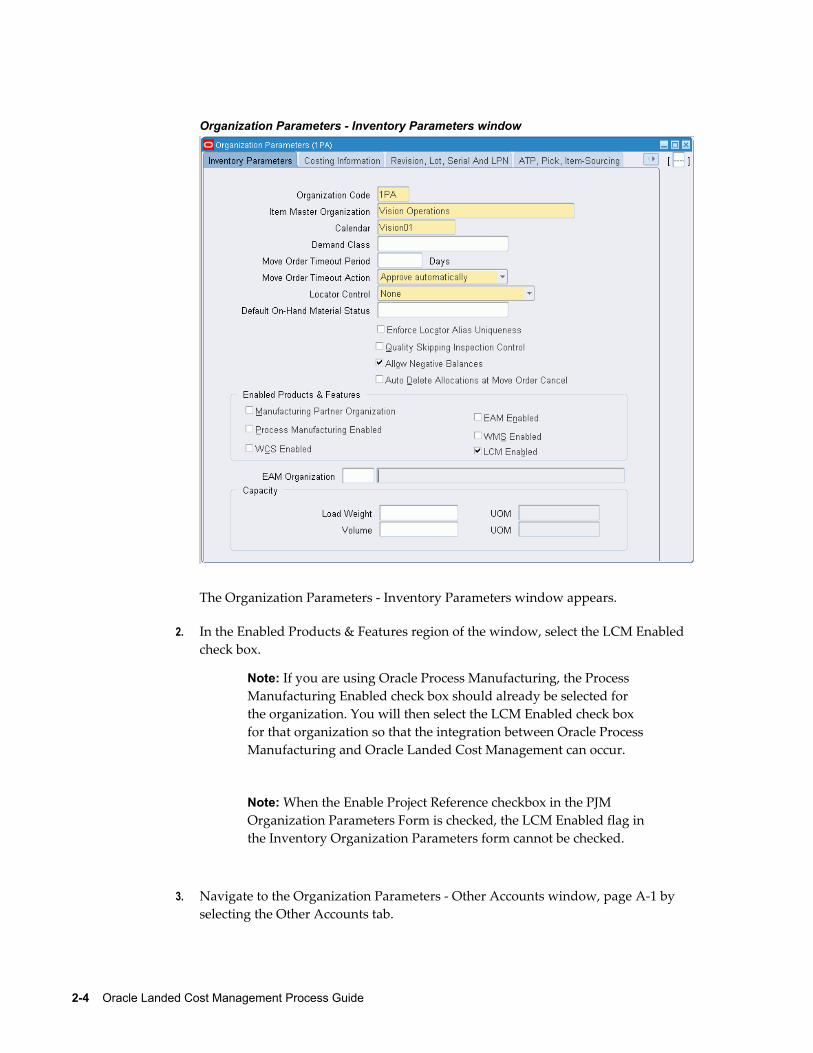
Organization Parameters - Inventory Parameters window
The Organization Parameters - Inventory Parameters window appears.
2. In the Enabled Products & Features region of the window, select the LCM Enabled check box.
Note: If you are using Oracle Process Manufacturing, the Process Manufacturing Enabled check box should already be selected for the organization. You will then select the LCM Enabled check box for that organization so that the integration between Oracle ProcessManufacturing and Oracle Landed Cost Management can occur.
Note: When the Enable Project Reference checkbox in the PJM Organization Parameters Form is checked, the LCM Enabled flag inthe Inventory Organization Parameters form cannot be checked.
3. Navigate to the Organization Parameters - Other Accounts window, page A-1 by selecting the Other Accounts tab.
Setting Up Oracle Landed Cost Management 2-5
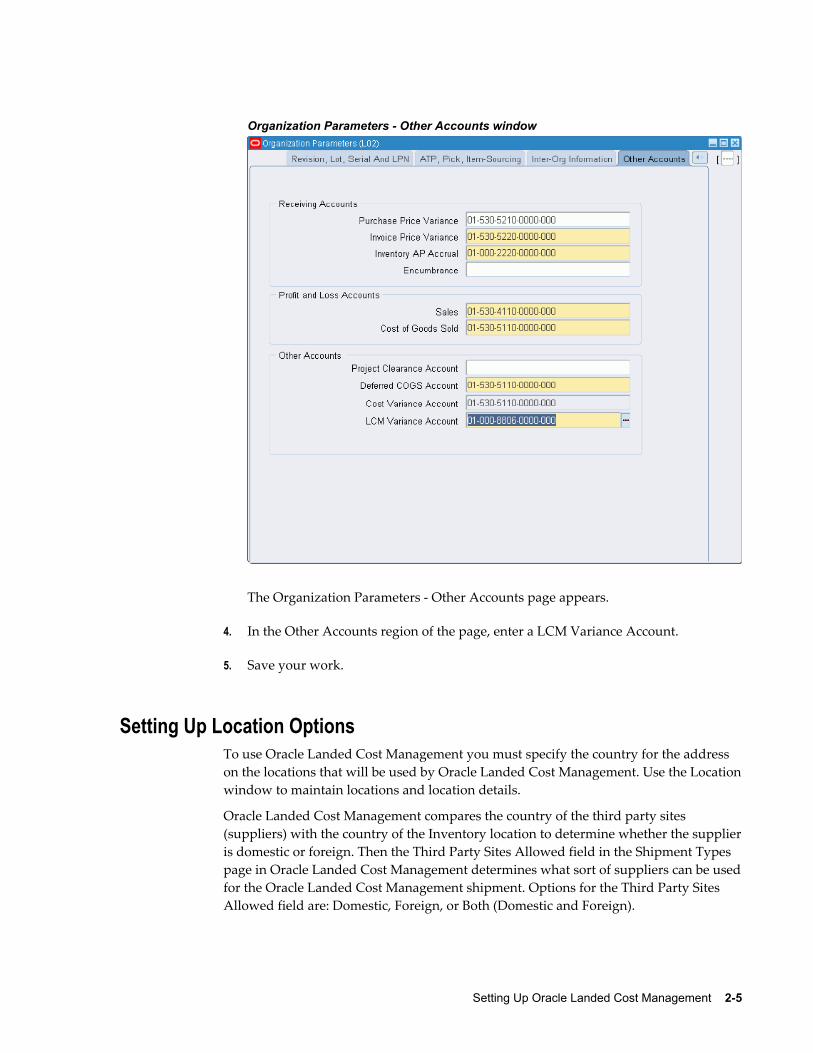
Organization Parameters - Other Accounts window
The Organization Parameters - Other Accounts page appears.
4. In the Other Accounts region of the page, enter a LCM Variance Account.
5. Save your work.
Setting Up Location OptionsTo use Oracle Landed Cost Management you must specify the country for the address on the locations that will be used by Oracle Landed Cost Management. Use the Locationwindow to maintain locations and location details.
Oracle Landed Cost Management compares the country of the third party sites (suppliers) with the country of the Inventory location to determine whether the supplieris domestic or foreign. Then the Third Party Sites Allowed field in the Shipment Types page in Oracle Landed Cost Management determines what sort of suppliers can be usedfor the Oracle Landed Cost Management shipment. Options for the Third Party Sites Allowed field are: Domestic, Foreign, or Both (Domestic and Foreign).
2-6 Oracle Landed Cost Management Process Guide
For more information on defining locations, see the Setting Up chapter in the Oracle Inventory User's Guide.
Use this procedure to set up location options:
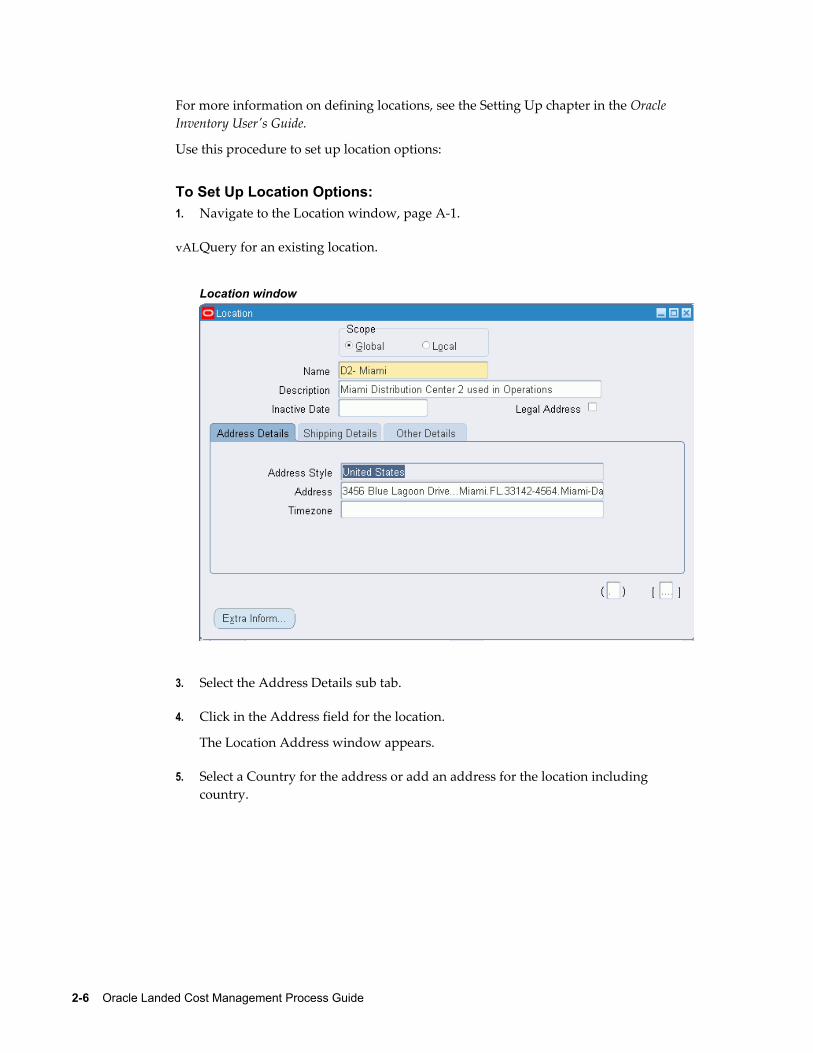
To Set Up Location Options:1. Navigate to the Location window, page A-1.
2. Query for an existing location.
Location window
3. Select the Address Details sub tab.
4. Click in the Address field for the location.
The Location Address window appears.
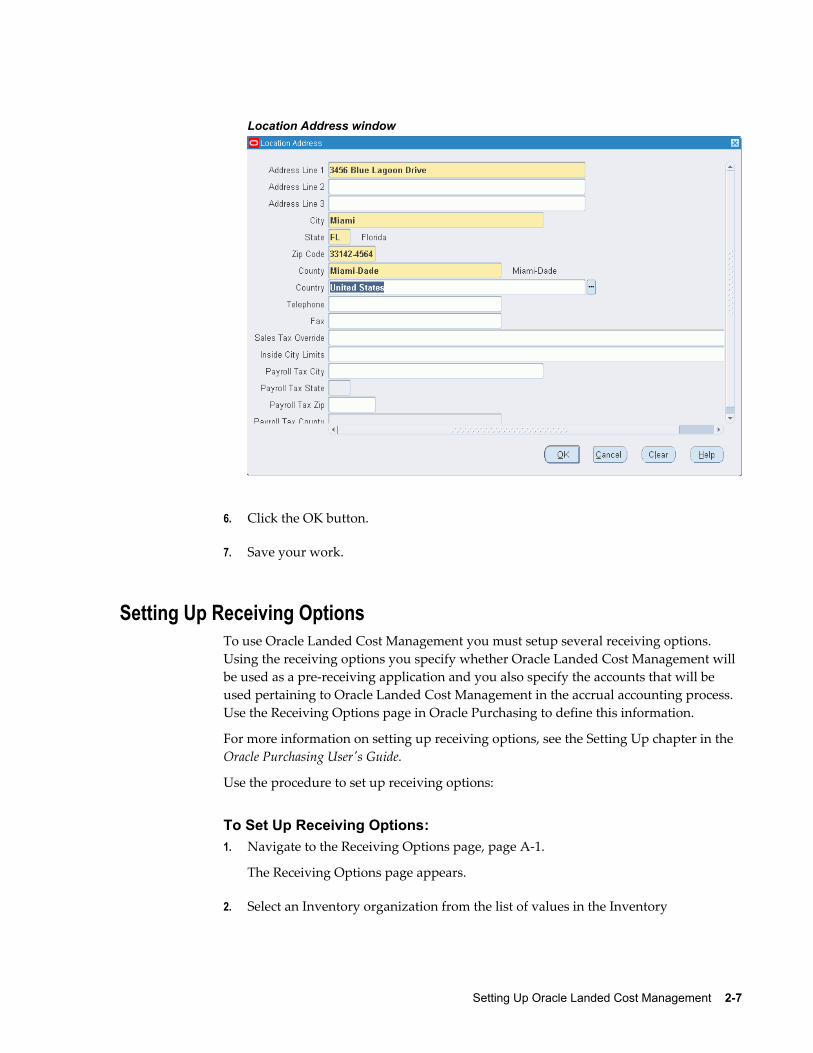
5. Select a Country for the address or add an address for the location including country.
Setting Up Oracle Landed Cost Management 2-7
Location Address window
6. Click the OK button.
7. Save your work.
Setting Up Receiving OptionsTo use Oracle Landed Cost Management you must setup several receiving options. Using the receiving options you specify whether Oracle Landed Cost Management will be used as a pre-receiving application and you also specify the accounts that will be used pertaining to Oracle Landed Cost Management in the accrual accounting process. Use the Receiving Options page in Oracle Purchasing to define this information.
For more information on setting up receiving options, see the Setting Up chapter in the Oracle Purchasing User's Guide.
Use the procedure to set up receiving options:
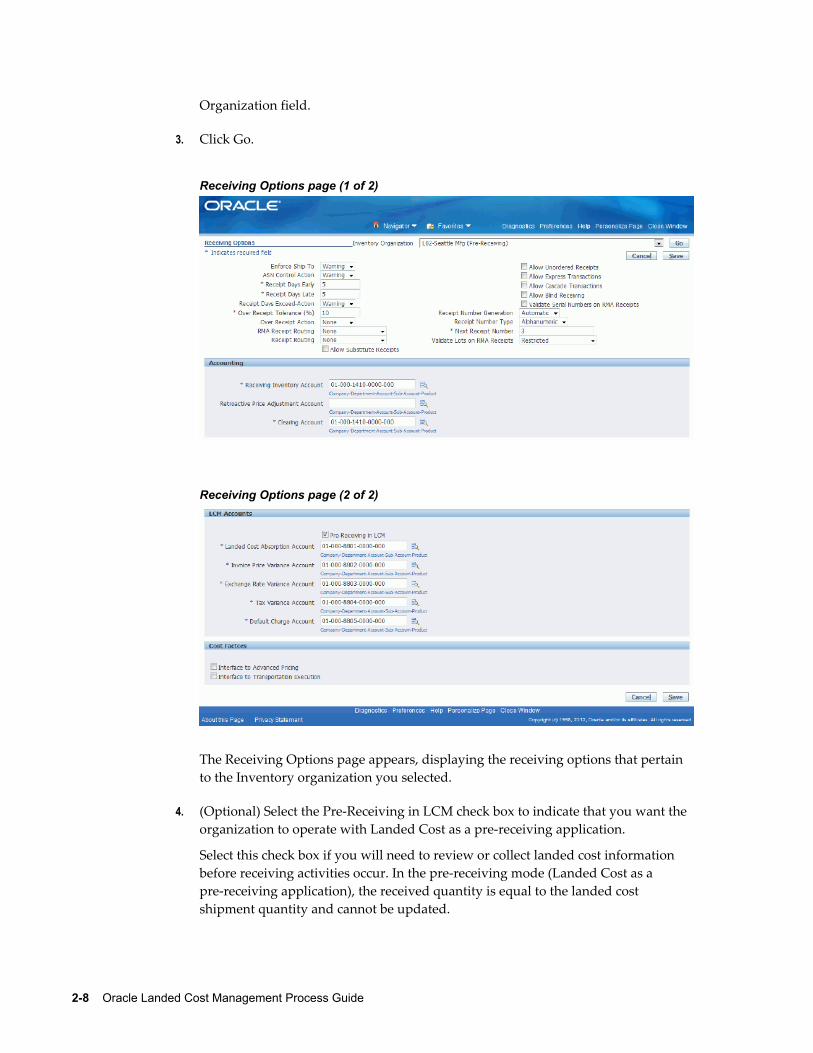
To Set Up Receiving Options:1. Navigate to the Receiving Options page, page A-1.
The Receiving Options page appears.
2. Select an Inventory organization from the list of values in the Inventory
2-8 Oracle Landed Cost Management Process Guide
Organization field.
3. Click Go.
Receiving Options page (1 of 2)
Receiving Options page (2 of 2)
The Receiving Options page appears, displaying the receiving options that pertain to the Inventory organization you selected.
4. (Optional) Select the Pre-Receiving in LCM check box to indicate that you want the organization to operate with Landed Cost as a pre-receiving application.
Select this check box if you will need to review or collect landed cost information before receiving activities occur. In the pre-receiving mode (Landed Cost as a pre-receiving application), the received quantity is equal to the landed cost shipment quantity and cannot be updated.
Setting Up Oracle Landed Cost Management 2-9
If not selected, Oracle Landed Cost Management will operate as a calculation service (Landed Cost as a Service) without any need for user intervention. In this case, the Oracle Landed Cost Management process will start in the Receiving windows but all the integration and calculation for landed costs will be performed as a calculation service using API's and concurrent programs. The create button on the Shipments Workbench will not be available.
5. Select an account from the list of values in the Landed Cost Absorption field. This account will be used during the receiving accrual accounting process.
6. Select an account from the list of values in the Invoice Price Variance field. This account will be used during the receiving accrual accounting process.
7. Select an account from the list of values in the Exchange Price Variance field. This account will be used during the receiving accrual accounting process.
8. Select an account in the Tax Price Variance field. This account will be used during the receiving accrual accounting process.
9. Select an account in the Default Charge Variance field. This account will be used during the receiving accrual accounting process.
Setting Up Cost FactorsOracle Landed Cost Management uses cost factors to define charge types. Charge types are used in Oracle Landed Cost Management when adding a new charge line in the Shipments Workbench. Use the Create Cost Factor page in Oracle Purchasing to set up cost factors.
For more information on setting up cost factors, see the Oracle Sourcing Implementation and Administration Guide.
Use this procedure to set up cost factors:
To Set Up Cost Factors:1. Navigate to the Cost Factors page, page A-1.
The Cost Factors page appears displaying all of the cost factors.
2. Click Create.
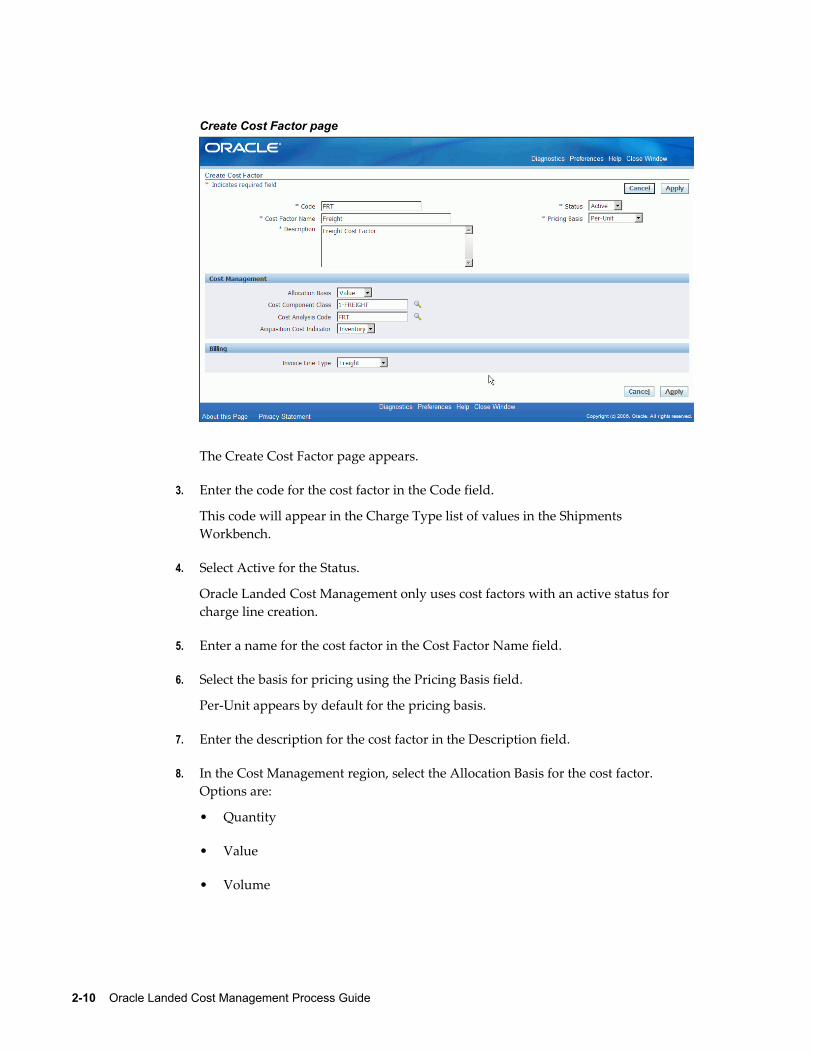
2-10 Oracle Landed Cost Management Process Guide
Create Cost Factor page
The Create Cost Factor page appears.
3. Enter the code for the cost factor in the Code field.
This code will appear in the Charge Type list of values in the Shipments Workbench.
4. Select Active for the Status.
Oracle Landed Cost Management only uses cost factors with an active status for charge line creation.
5. Enter a name for the cost factor in the Cost Factor Name field.
6. Select the basis for pricing using the Pricing Basis field.
Per-Unit appears by default for the pricing basis.
7. Enter the description for the cost factor in the Description field.
8. In the Cost Management region, select the Allocation Basis for the cost factor. Options are:
• Quantity
• Value
• Volume
Setting Up Oracle Landed Cost Management 2-11
• Weight
Oracle Landed Cost Management supports all of these basisses for allocation. The allocation basis is used to prorate the charge amounts to the items on the landed cost management shipment.
Note: If the Allocation Basis is blank, Oracle Landed Cost Management defaults the allocation basis to Value.
Setting Up Advanced Pricing Profile OptionsIf you are using Oracle Advanced Pricing to integrate with Oracle Landed Cost Management then you will want to define Advanced Pricing profile options in a manner recognized by Oracle Landed Cost Management. The Advanced Pricing application is required if you need automatic charge lines generation when using OracleLanded Cost Management.
Advanced Pricing has several profile options. The following table lists the Advanced Pricing profile options and the profile value settings that must be entered to enable the integration between Oracle Landed Cost Management and Oracle Advanced Pricing.
Profile Option Profile Value Supported Levels
QP: Blind Discount Option Yes Site and Application
QP: Licensed for Product Purchasing Application and User
QP: Pricing Perspective Request Type
Purchase Order Site and Application
QP: Pricing Transaction Entity
Procurement Site, Application, and User
QP: Source System Code Oracle Purchasing Site, Application, and User
For more detailed information on these profile options, see the Oracle Advanced Pricing Implementation Guide.
Use this procedure to set up Advanced Pricing profile options:
To Set Up Advanced Pricing Profile Options:Typically, the System Administrator is responsible for setting up and updating profile option values. For more information, see Oracle Applications System Administrator's
2-12 Oracle Landed Cost Management Process Guide
Guide, Setting User Profile Options.
1. Navigate to the System Profile Values window, page A-1.
The Find System Profile Values window appears.
2. Enter QP% in the Profile field and click Find.
The System Profile Values window appears displaying all of the Advanced Pricing (QP) profile options.
3. Locate the specific profile option and enter the appropriate profile value.
4. Click the Save icon in the tool bar.
Maintaining Shipment Line TypesSetting up shipment line types is a mandatory step before you can use Oracle Landed Cost Management. Shipment line type is a mandatory attribute of all shipment lines on a landed cost management shipment. It provides a shipment line categorization and also drives the landed cost calculation behavior. Use the Shipment Line Types pages to maintain the shipment line types.
Use these procedures to maintain shipment line types:
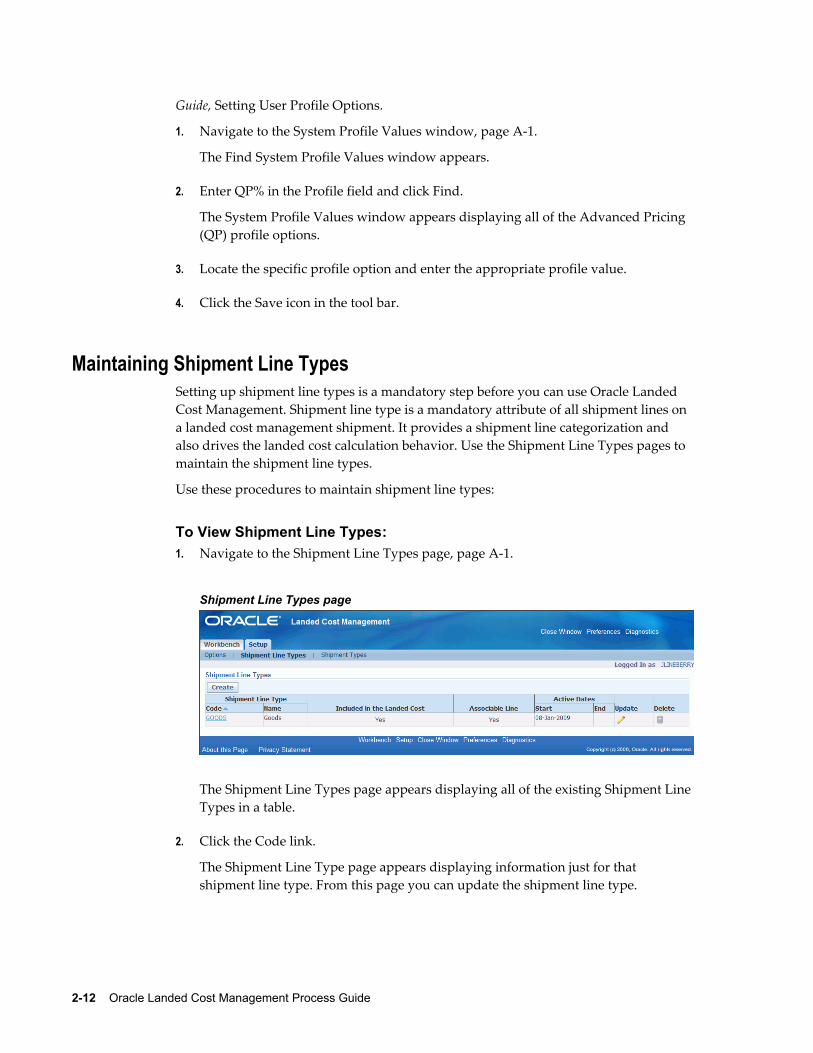
To View Shipment Line Types:1. Navigate to the Shipment Line Types page, page A-1.
Shipment Line Types page
The Shipment Line Types page appears displaying all of the existing Shipment LineTypes in a table.
2. Click the Code link.
The Shipment Line Type page appears displaying information just for that shipment line type. From this page you can update the shipment line type.
Setting Up Oracle Landed Cost Management 2-13
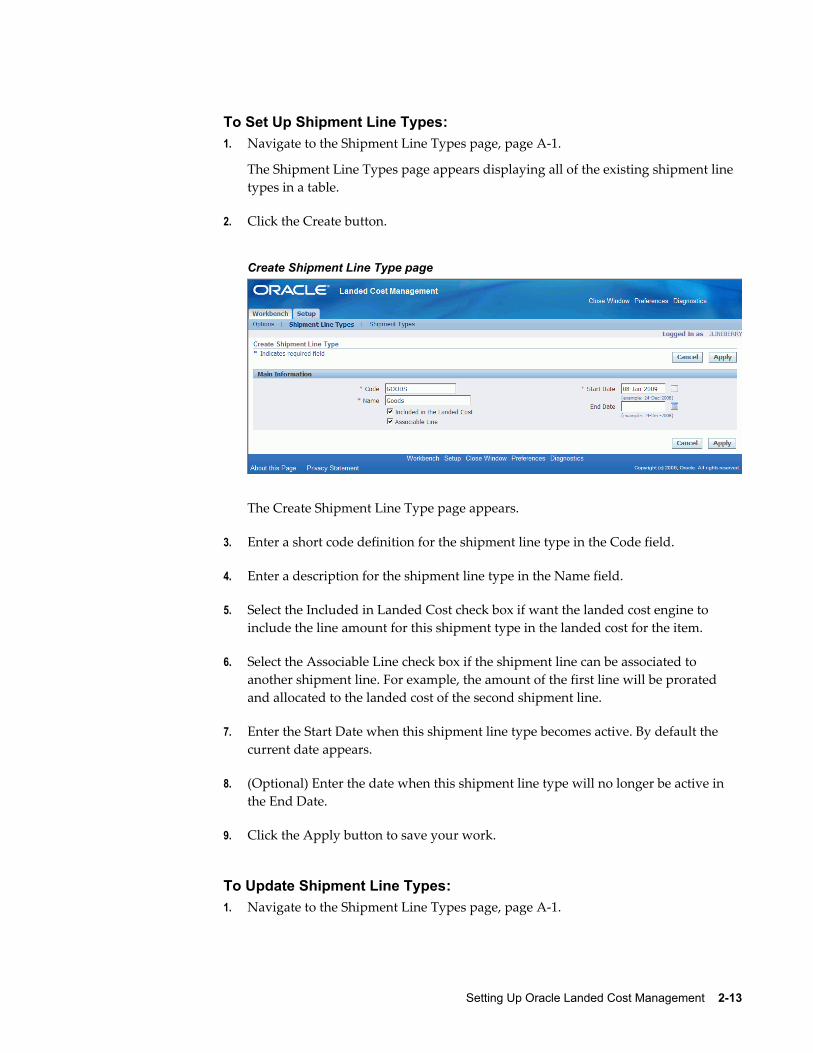
To Set Up Shipment Line Types:1. Navigate to the Shipment Line Types page, page A-1.
The Shipment Line Types page appears displaying all of the existing shipment line types in a table.
2. Click the Create button.
Create Shipment Line Type page
The Create Shipment Line Type page appears.
3. Enter a short code definition for the shipment line type in the Code field.
4. Enter a description for the shipment line type in the Name field.
5. Select the Included in Landed Cost check box if want the landed cost engine to include the line amount for this shipment type in the landed cost for the item.
6. Select the Associable Line check box if the shipment line can be associated to another shipment line. For example, the amount of the first line will be prorated and allocated to the landed cost of the second shipment line.
7. Enter the Start Date when this shipment line type becomes active. By default the current date appears.
8. (Optional) Enter the date when this shipment line type will no longer be active in the End Date.
9. Click the Apply button to save your work.
To Update Shipment Line Types:1. Navigate to the Shipment Line Types page, page A-1.
2-14 Oracle Landed Cost Management Process Guide
The Shipment Line Types page appears displaying all of the existing shipment line types in a table.
2. Click the Update icon next to the shipment line type that you want to update.
Alternate navigation: Click the Code link for a shipment line type in the table and then click the Update button.
The Update Shipment Line Type page appears.
3. Change the information you want associated with the shipment line type.
4. Click the Apply button to save your work.
To Delete a Shipment Line Type:1. Navigate to the Shipment Line Types page, page A-1.
The Shipment Line Types page appears displaying all of the existing shipment line types in a table.
2. Click the Delete icon next to the shipment line type that you want to delete.
You will receive a warning message asking if you are sure you want to delete the shipment line type.
3. Click the Yes button.
The Shipment Line Type is deleted.
Maintaining Shipment TypesBefore you can begin to use Oracle Landed Cost Management you must create shipment types. Shipment type determines the validations that will occur for a shipment. Use the Shipment Types pages to maintain shipment types.
Use these procedures to maintain shipment types:
To View Shipment Types:1. Navigate to the Shipment Types page, page A-1.
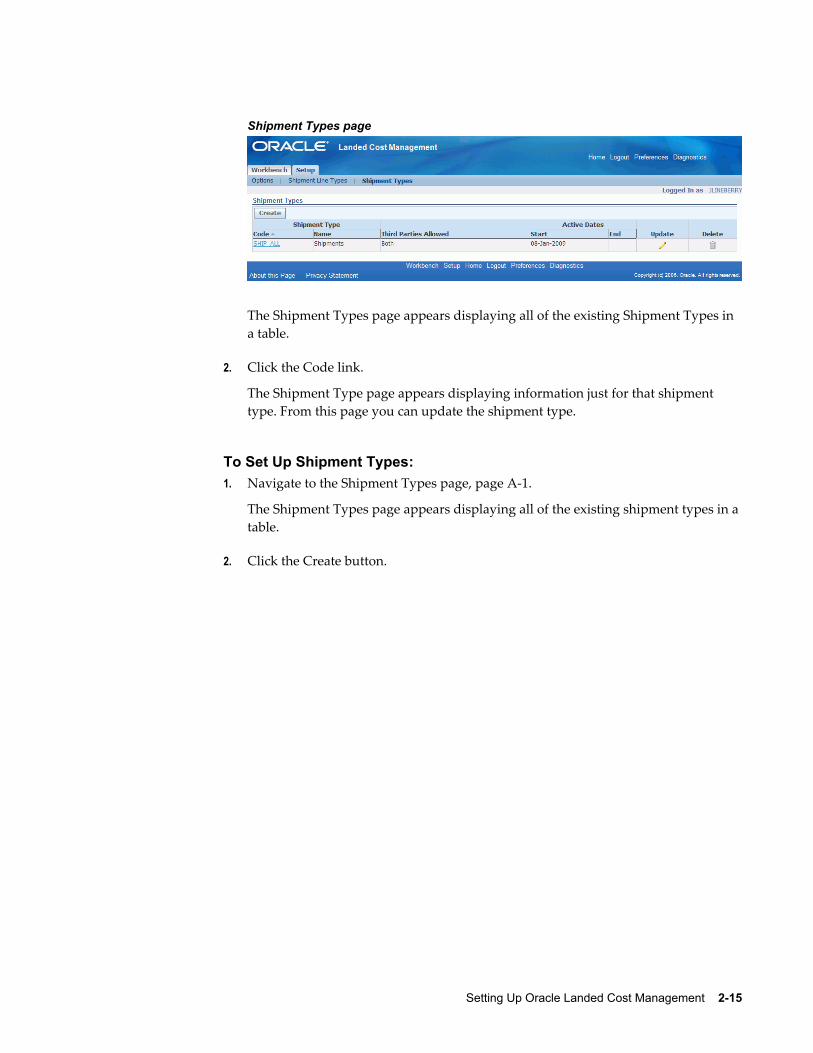
Setting Up Oracle Landed Cost Management 2-15
Shipment Types page
The Shipment Types page appears displaying all of the existing Shipment Types in a table.
2. Click the Code link.
The Shipment Type page appears displaying information just for that shipment type. From this page you can update the shipment type.
To Set Up Shipment Types:1. Navigate to the Shipment Types page, page A-1.
The Shipment Types page appears displaying all of the existing shipment types in a table.
2. Click the Create button.
2-16 Oracle Landed Cost Management Process Guide
Create Shipment Type page
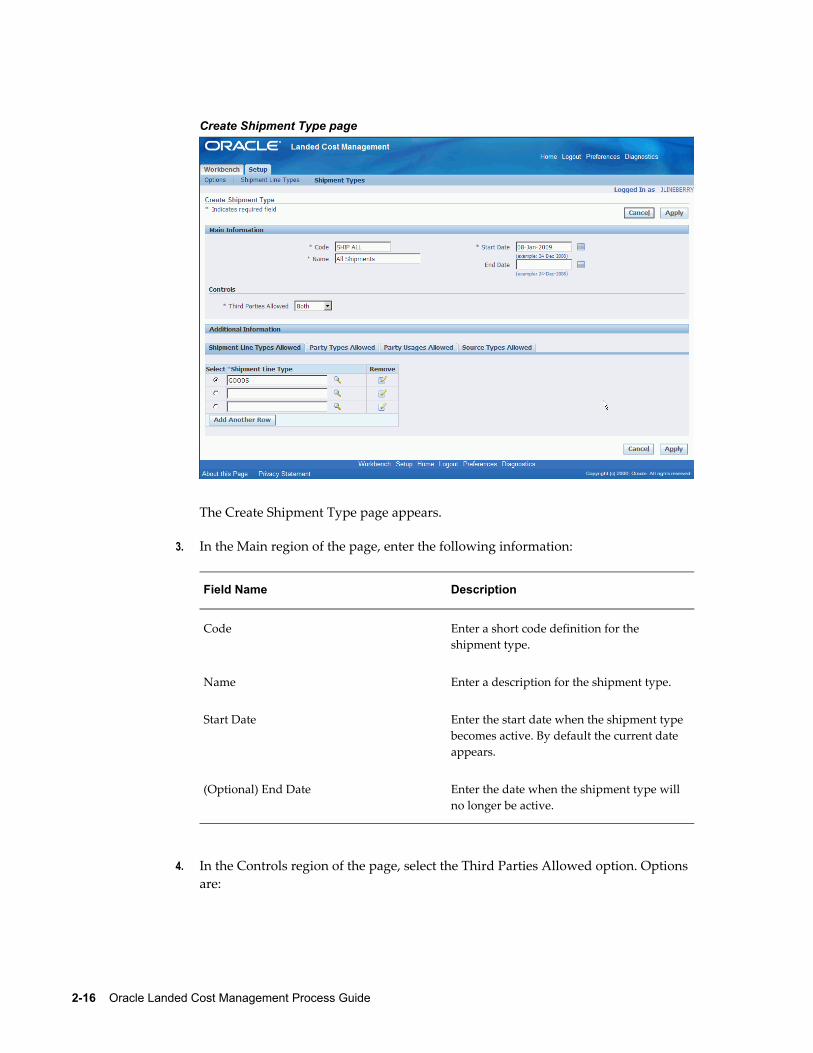
The Create Shipment Type page appears.
3. In the Main region of the page, enter the following information:
Field Name Description
Code Enter a short code definition for the shipment type.
Name Enter a description for the shipment type.
Start Date Enter the start date when the shipment type becomes active. By default the current date appears.
(Optional) End Date Enter the date when the shipment type will no longer be active.
4. In the Controls region of the page, select the Third Parties Allowed option. Options are:
Setting Up Oracle Landed Cost Management 2-17
• Both: Both Domestic and Foreign
• Domestic
• Foreign
5. Under the Shipment Line Types Allowed tab, select the shipment line types that canbe used with this shipment type.
6. Using the Select column, select the shipment line type that will be the default.
7. (Optional) To add another row for additional shipment line types, click the Add Another Row button and then select another shipment line type.
8. (Optional) To delete a shipment line type from the shipment type, click the Remove icon next to the shipment line type you wish to remove.
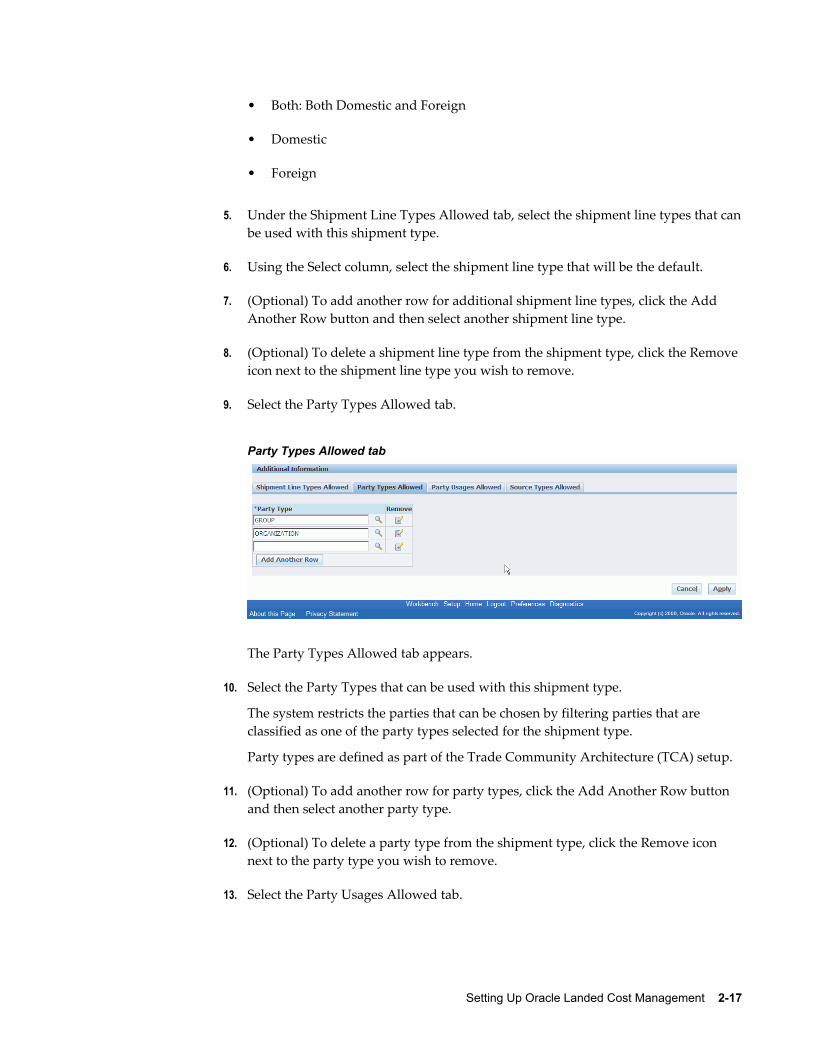
9. Select the Party Types Allowed tab.
Party Types Allowed tab
The Party Types Allowed tab appears.
10. Select the Party Types that can be used with this shipment type.
The system restricts the parties that can be chosen by filtering parties that are classified as one of the party types selected for the shipment type.
Party types are defined as part of the Trade Community Architecture (TCA) setup.
11. (Optional) To add another row for party types, click the Add Another Row button and then select another party type.
12. (Optional) To delete a party type from the shipment type, click the Remove icon next to the party type you wish to remove.
13. Select the Party Usages Allowed tab.
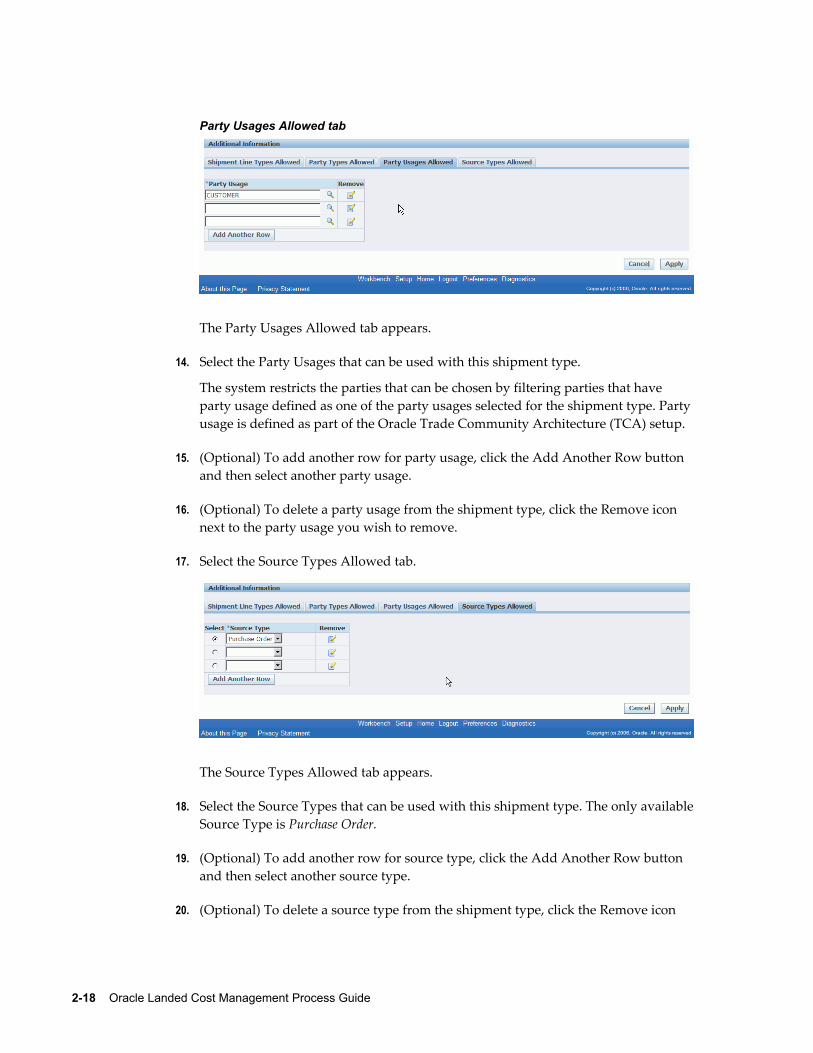
2-18 Oracle Landed Cost Management Process Guide
Party Usages Allowed tab
The Party Usages Allowed tab appears.
14. Select the Party Usages that can be used with this shipment type.
The system restricts the parties that can be chosen by filtering parties that have party usage defined as one of the party usages selected for the shipment type. Party usage is defined as part of the Oracle Trade Community Architecture (TCA) setup.
15. (Optional) To add another row for party usage, click the Add Another Row button and then select another party usage.
16. (Optional) To delete a party usage from the shipment type, click the Remove icon next to the party usage you wish to remove.
17. Select the Source Types Allowed tab.
The Source Types Allowed tab appears.
18. Select the Source Types that can be used with this shipment type. The only availableSource Type is Purchase Order.
19. (Optional) To add another row for source type, click the Add Another Row button and then select another source type.
20. (Optional) To delete a source type from the shipment type, click the Remove icon
Setting Up Oracle Landed Cost Management 2-19
next to the source type you wish to remove.
21. Click the Apply button to save your work.
To Update Shipment Types:1. Navigate to the Shipment Types page, page A-1.
The Shipment Types page appears displaying all of the existing shipment types in a table.
2. Click the Update icon next to the shipment type that you want to update.
Alternate navigation: Click the Code link for a shipment type in the table and then click the Update button.
The Update Shipment Type page appears.
3. Change the information you want associated with the shipment type.
4. Click the Apply button to save your work.
To Delete Shipment Types:1. Navigate to the Shipment Types page, page A-1.
The Shipment Types page appears displaying all of the existing shipment line typesin a table.
2. Click the Delete icon next to the shipment type that you want to delete.
You will receive a warning message asking if you are sure you want to delete the shipment type.
3. Click the Yes button.
The Shipment Line Type is deleted.
Maintaining RulesUse the Rules page in Oracle Landed Cost Management to maintain the rules that will be used by Oracle Landed Cost Management. Rules only apply to shipments that are processed when Oracle Landed Cost Management is operating as a calculation service (Landed Cost as a Service) without any need for user intervention. Using Rules is an optional step.
After you create a rule you will associate it to an Inventory organization using the Landed Cost Management Options page. If a rule is specified for an Inventory organization, then when the shipments are imported from Receiving into LCM if they match the rule criteria they will not be automatically completed. At that time, you can
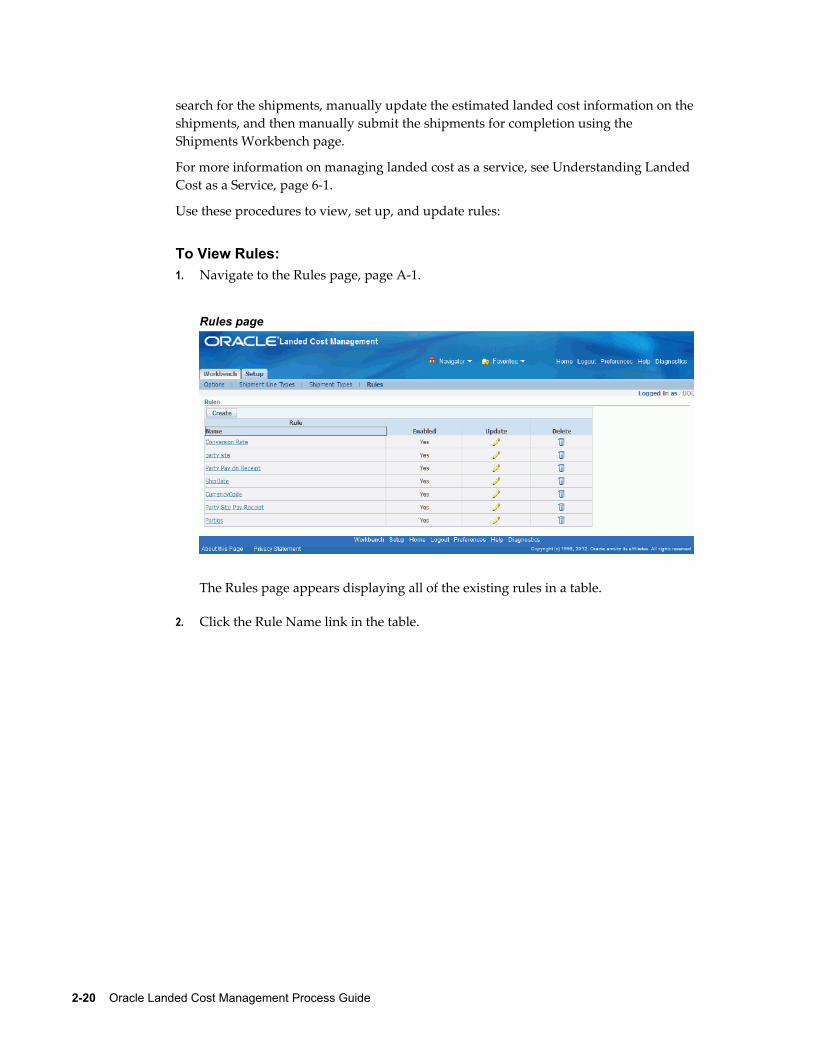
2-20 Oracle Landed Cost Management Process Guide
search for the shipments, manually update the estimated landed cost information on theshipments, and then manually submit the shipments for completion using the Shipments Workbench page.
For more information on managing landed cost as a service, see Understanding Landed Cost as a Service, page 6-1.
Use these procedures to view, set up, and update rules:
To View Rules:1. Navigate to the Rules page, page A-1.
Rules page
The Rules page appears displaying all of the existing rules in a table.
2. Click the Rule Name link in the table.

Setting Up Oracle Landed Cost Management 2-21
Rule page
The Rule detail page appears displaying the complete information for that rule.
To Set Up Rules:1. Navigate to the Rules page, page A-1.
The Rules page appears displaying all of the existing rules in a table.
2. Click the Create button.

2-22 Oracle Landed Cost Management Process Guide
Create Rule page
The Create Rule page appears.
3. Enter a name for the rule in the Name field.
4. Select Manage Charges in LCM as a service in the Usage field.
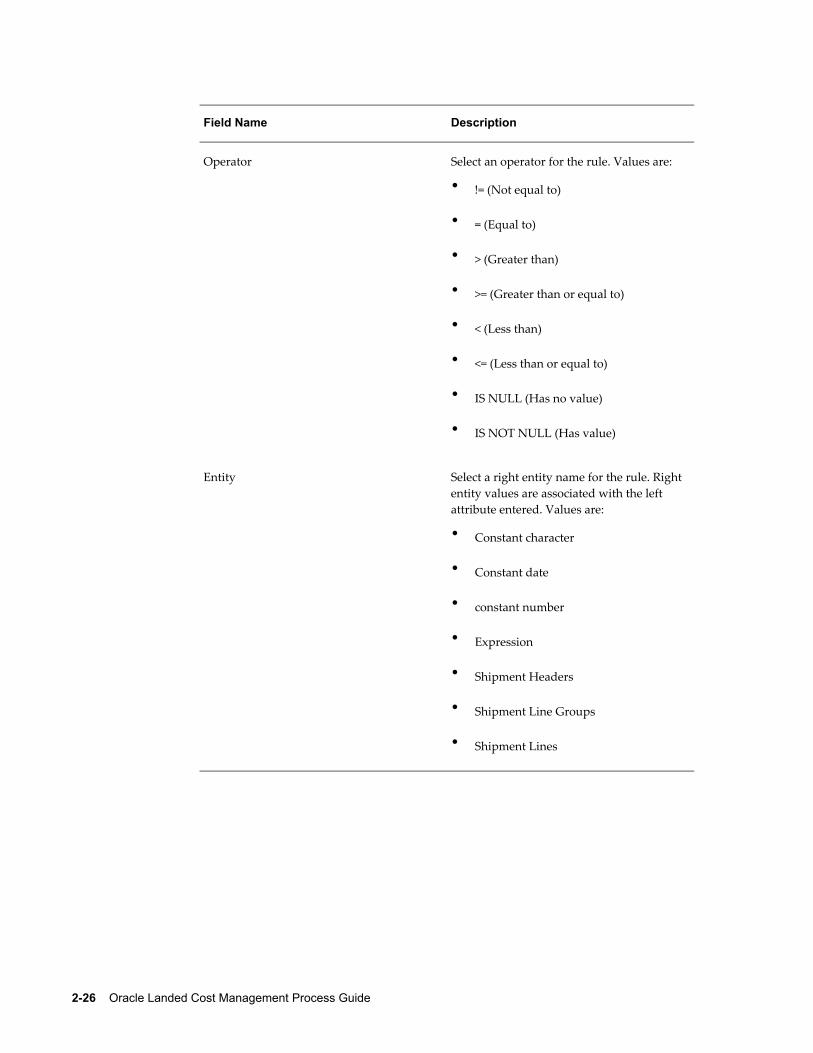
5. In the Conditions region, enter the rule definition using one or more of these fields:
Field Name Description
Seq (sequence) Enter a value for the sequence. The rule actions will be performed in the sequence order.
( (left parenthesis) (Optional) Select a left parenthesis for the rule if necessary.
Entity Select a left entity name for the rule. Values are:
• Shipment Headers
• Shipment Line Groups
• Shipment Lines

Setting Up Oracle Landed Cost Management 2-23
Field Name Description
Attribute Select an left attribute name associated with the left entity. Values are:
Shipment Headers• Attribute Category
• Attribute 1-15
• Inventory Organization Identifier
• Legal Entity Identifier
• Location Identifier
• Operating Unit Identifier
• Shipment Date
• Shipment Number
• Shipment Status Code
• Ship Type Identifier
• Simulation Identifier
• Taxation Country
Shipment Line Groups• Line Group Number
• Line Group Reference
• Party Identifier
• Party Site Identifier
• Source Type Code
Shipment Lines• Adjustment Number
• Allocation Enabled Flag
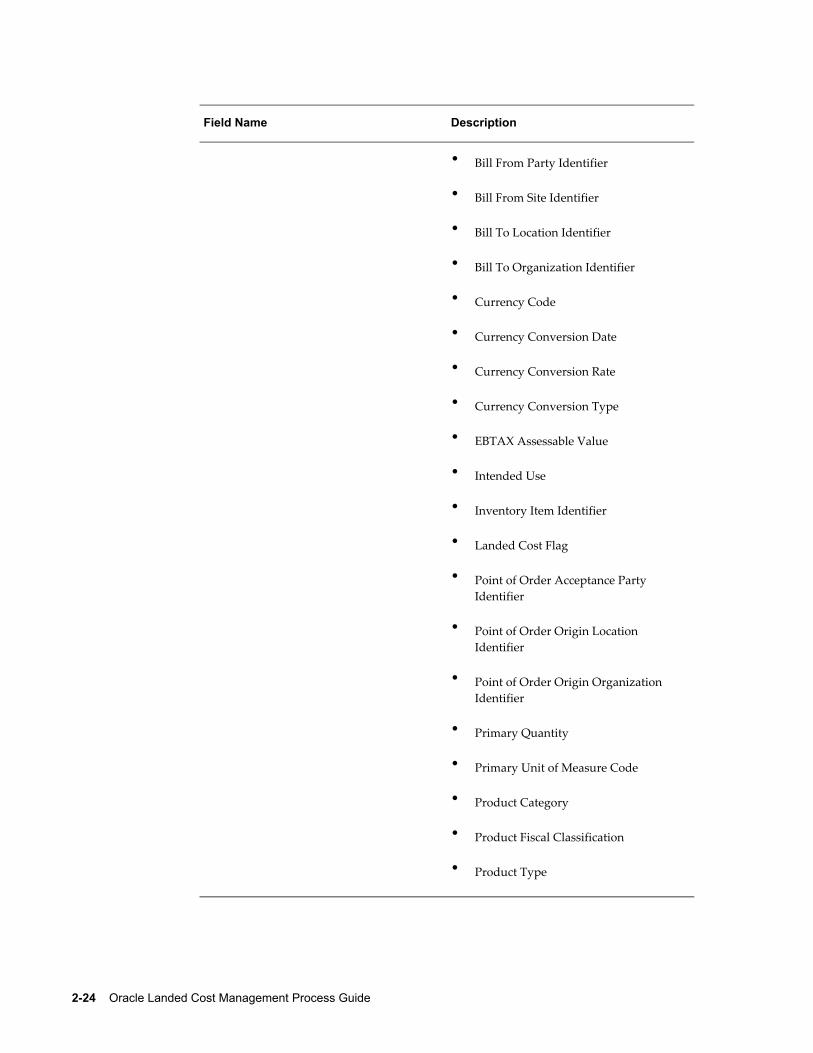
2-24 Oracle Landed Cost Management Process Guide
Field Name Description
• Bill From Party Identifier
• Bill From Site Identifier
• Bill To Location Identifier
• Bill To Organization Identifier
• Currency Code
• Currency Conversion Date
• Currency Conversion Rate
• Currency Conversion Type
• EBTAX Assessable Value
• Intended Use
• Inventory Item Identifier
• Landed Cost Flag
• Point of Order Acceptance Party Identifier
• Point of Order Origin Location Identifier
• Point of Order Origin Organization Identifier
• Primary Quantity
• Primary Unit of Measure Code
• Product Category
• Product Fiscal Classification
• Product Type
Setting Up Oracle Landed Cost Management 2-25
Field Name Description
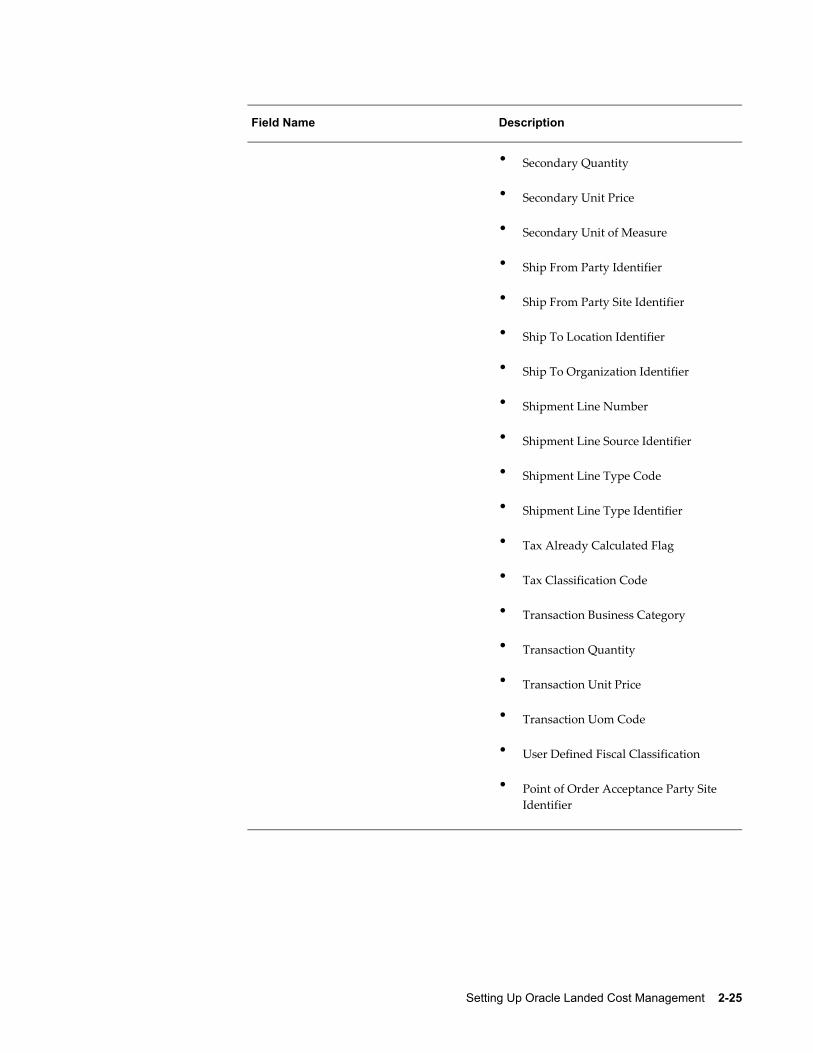
• Secondary Quantity
• Secondary Unit Price
• Secondary Unit of Measure
• Ship From Party Identifier
• Ship From Party Site Identifier
• Ship To Location Identifier
• Ship To Organization Identifier
• Shipment Line Number
• Shipment Line Source Identifier
• Shipment Line Type Code
• Shipment Line Type Identifier
• Tax Already Calculated Flag
• Tax Classification Code
• Transaction Business Category
• Transaction Quantity
• Transaction Unit Price
• Transaction Uom Code
• User Defined Fiscal Classification
• Point of Order Acceptance Party Site Identifier
2-26 Oracle Landed Cost Management Process Guide
Field Name Description
Operator Select an operator for the rule. Values are:
• != (Not equal to)
• = (Equal to)
• > (Greater than)
• >= (Greater than or equal to)
• < (Less than)
• <= (Less than or equal to)
• IS NULL (Has no value)
• IS NOT NULL (Has value)
Entity Select a right entity name for the rule. Right entity values are associated with the left attribute entered. Values are:
• Constant character
• Constant date
• constant number
• Expression
• Shipment Headers
• Shipment Line Groups
• Shipment Lines
Setting Up Oracle Landed Cost Management 2-27
Field Name Description
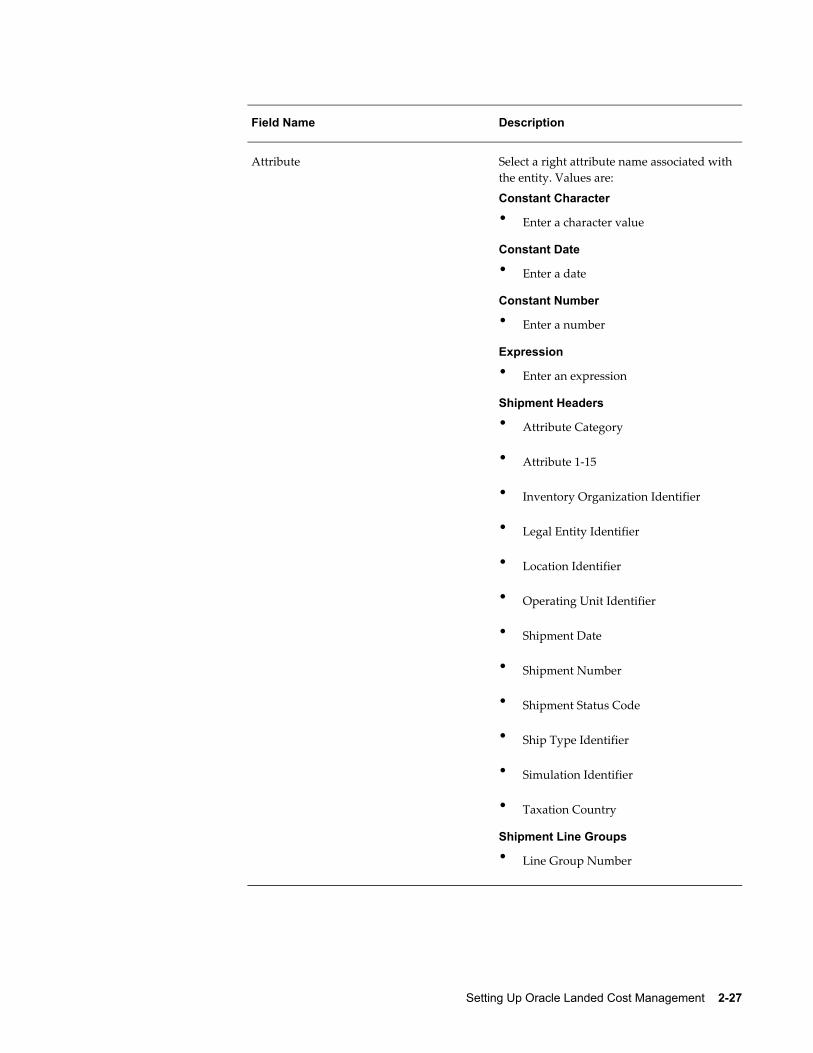
Attribute Select a right attribute name associated withthe entity. Values are:
Constant Character• Enter a character value
Constant Date• Enter a date
Constant Number• Enter a number
Expression• Enter an expression
Shipment Headers• Attribute Category
• Attribute 1-15
• Inventory Organization Identifier
• Legal Entity Identifier
• Location Identifier
• Operating Unit Identifier
• Shipment Date
• Shipment Number
• Shipment Status Code
• Ship Type Identifier
• Simulation Identifier
• Taxation Country
Shipment Line Groups• Line Group Number
2-28 Oracle Landed Cost Management Process Guide
Field Name Description
• Line Group Reference
• Party Identifier
• Party Site Identifier
• Source Type Code
Shipment Lines• Adjustment Number
• Allocation Enabled Flag
• Bill From Party Identifier
• Bill From Site Identifier
• Bill To Location Identifier
• Bill To Organization Identifier
• Currency Code
• Currency Conversion Date
• Currency Conversion Rate
• Currency Conversion Type
• EBTAX Assessable Value
• Intended Use
• Inventory Item Identifier
• Landed Cost Flag
• Point of Order Acceptance Party Identifier
• Point of Order Origin Location Identifier
Setting Up Oracle Landed Cost Management 2-29
Field Name Description
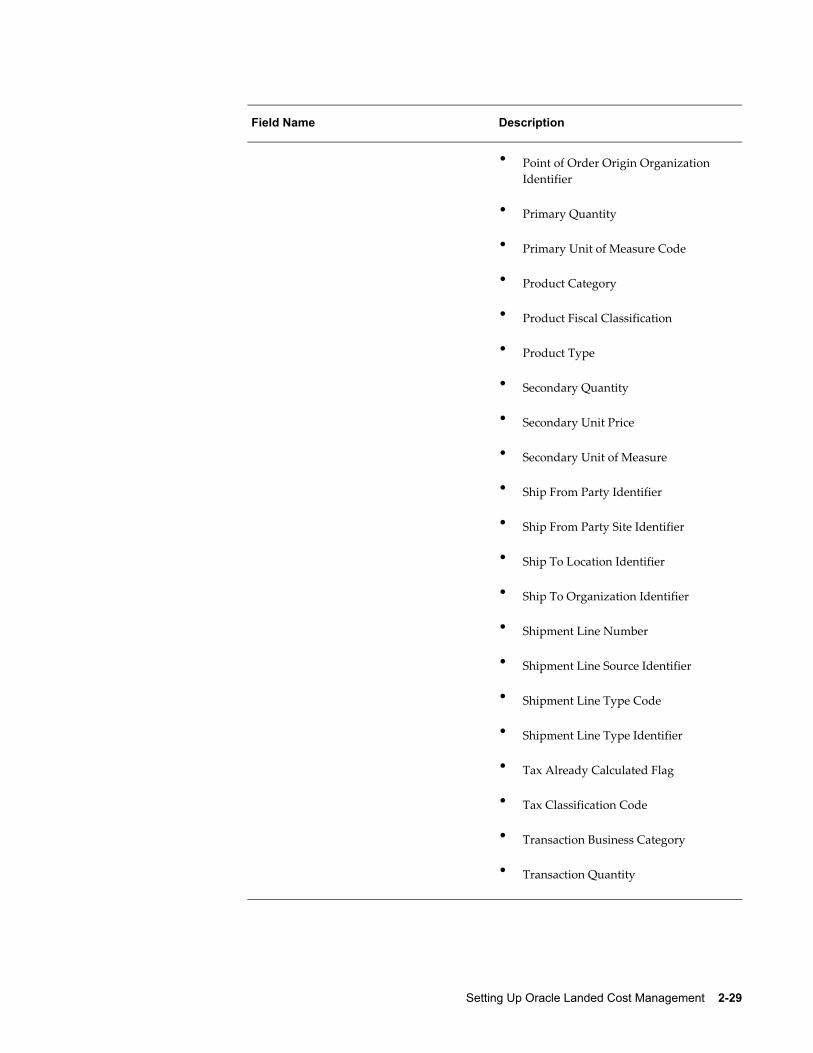
• Point of Order Origin Organization Identifier
• Primary Quantity
• Primary Unit of Measure Code
• Product Category
• Product Fiscal Classification
• Product Type
• Secondary Quantity
• Secondary Unit Price
• Secondary Unit of Measure
• Ship From Party Identifier
• Ship From Party Site Identifier
• Ship To Location Identifier
• Ship To Organization Identifier
• Shipment Line Number
• Shipment Line Source Identifier
• Shipment Line Type Code
• Shipment Line Type Identifier
• Tax Already Calculated Flag
• Tax Classification Code
• Transaction Business Category
• Transaction Quantity

2-30 Oracle Landed Cost Management Process Guide
Field Name Description
• Transaction Unit Price
• Transaction Uom Code
• User Defined Fiscal Classification
• Point of Order Acceptance Party Site Identifier
) (right parenthesis) (Optional) Select a right parenthesis for the rule if necessary.
and/or Select the and or or clause. Values are:
• AND
• OR
6. Click the Add Another Row button if necessary to add additional row for the rule.
A new row appears is the Condition table.
7. Repeat steps 5 - 6 until the complete rule is created.
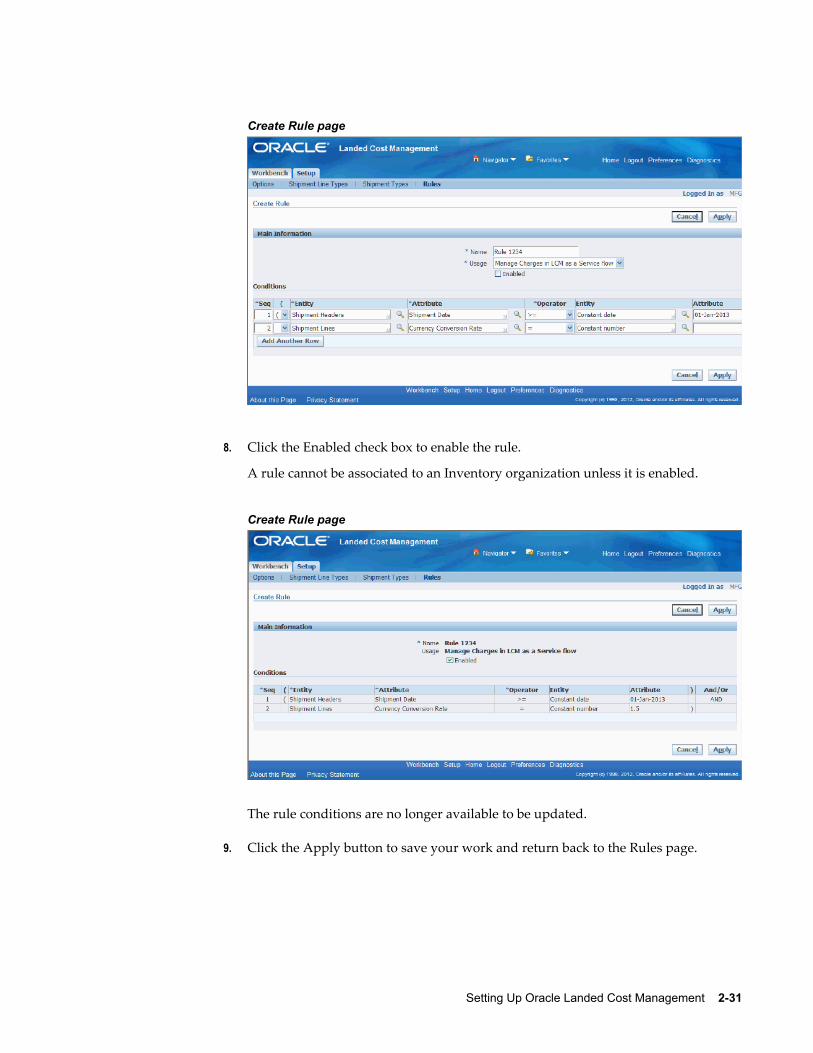
Setting Up Oracle Landed Cost Management 2-31
Create Rule page
8. Click the Enabled check box to enable the rule.
A rule cannot be associated to an Inventory organization unless it is enabled.
Create Rule page
The rule conditions are no longer available to be updated.
9. Click the Apply button to save your work and return back to the Rules page.
2-32 Oracle Landed Cost Management Process Guide
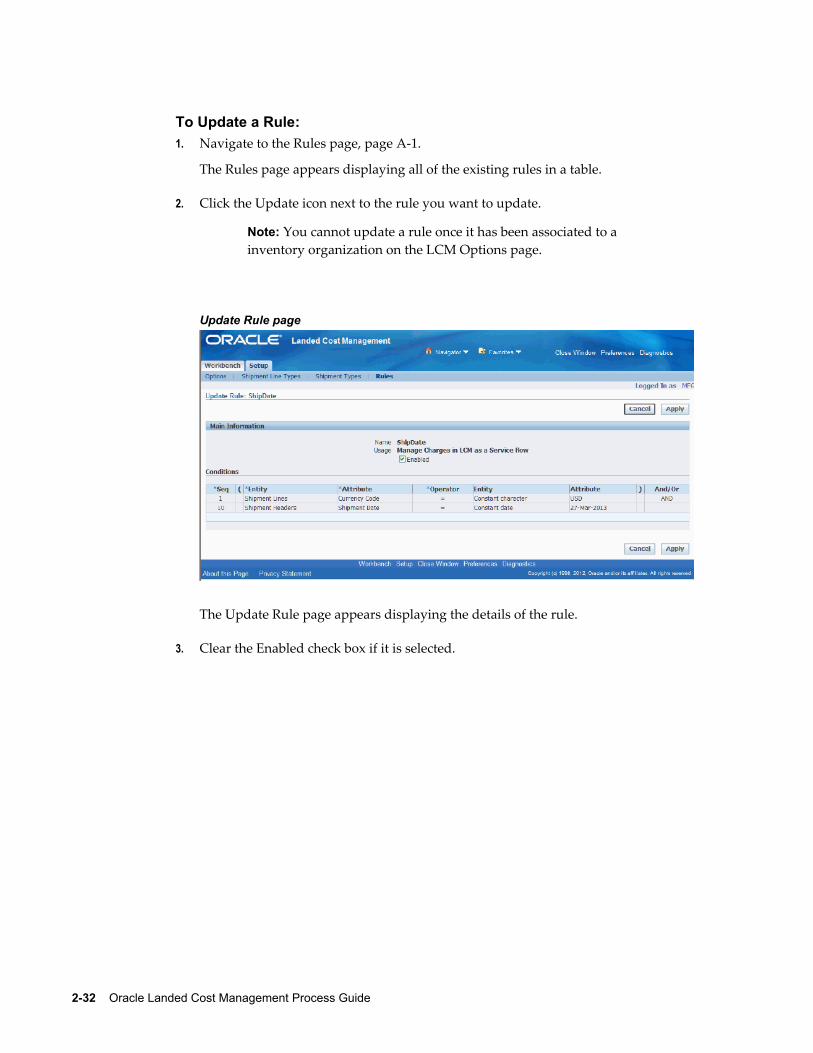
To Update a Rule:1. Navigate to the Rules page, page A-1.
The Rules page appears displaying all of the existing rules in a table.
2. Click the Update icon next to the rule you want to update.
Note: You cannot update a rule once it has been associated to a inventory organization on the LCM Options page.
Update Rule page
The Update Rule page appears displaying the details of the rule.
3. Clear the Enabled check box if it is selected.
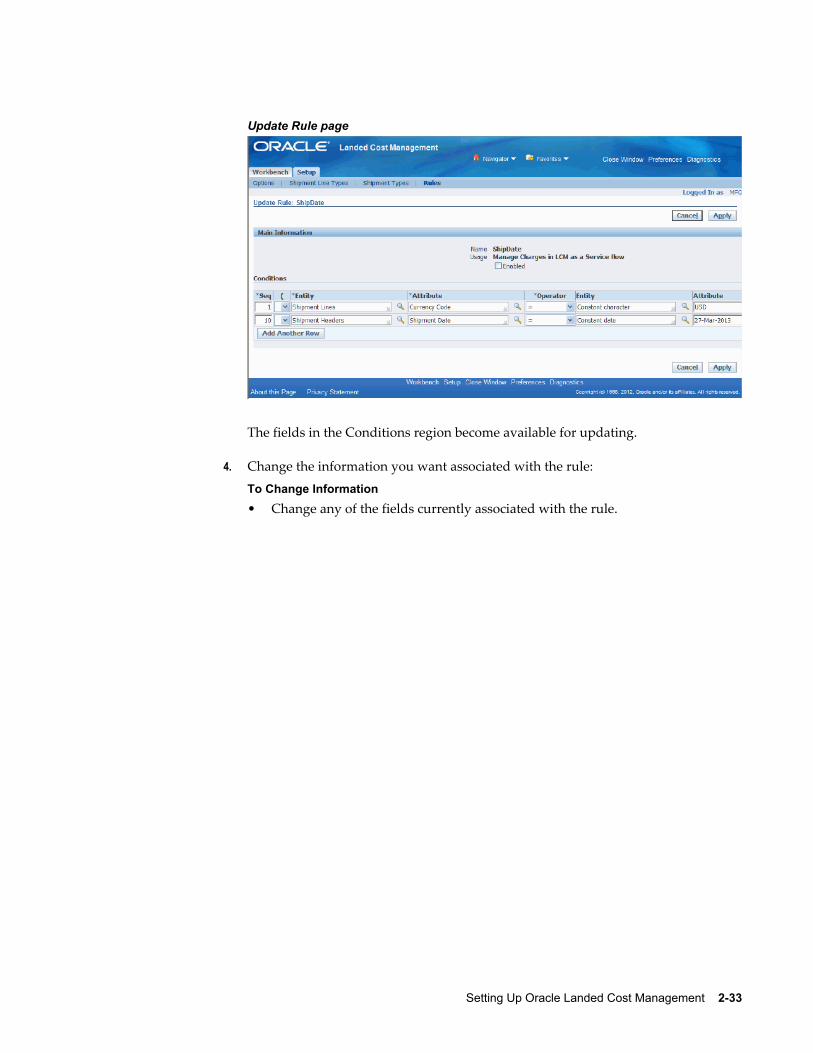
Setting Up Oracle Landed Cost Management 2-33
Update Rule page
The fields in the Conditions region become available for updating.
4. Change the information you want associated with the rule:
To Change Information• Change any of the fields currently associated with the rule.
2-34 Oracle Landed Cost Management Process Guide
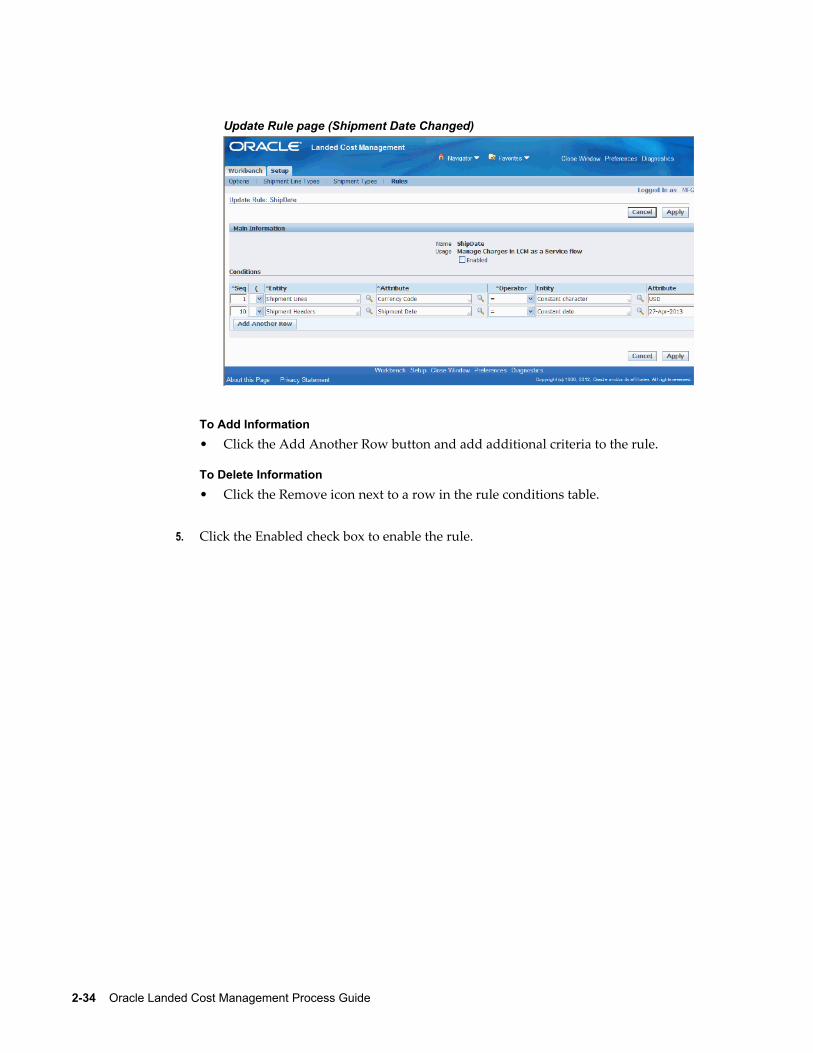
Update Rule page (Shipment Date Changed)
To Add Information• Click the Add Another Row button and add additional criteria to the rule.
To Delete Information• Click the Remove icon next to a row in the rule conditions table.
5. Click the Enabled check box to enable the rule.
Setting Up Oracle Landed Cost Management 2-35
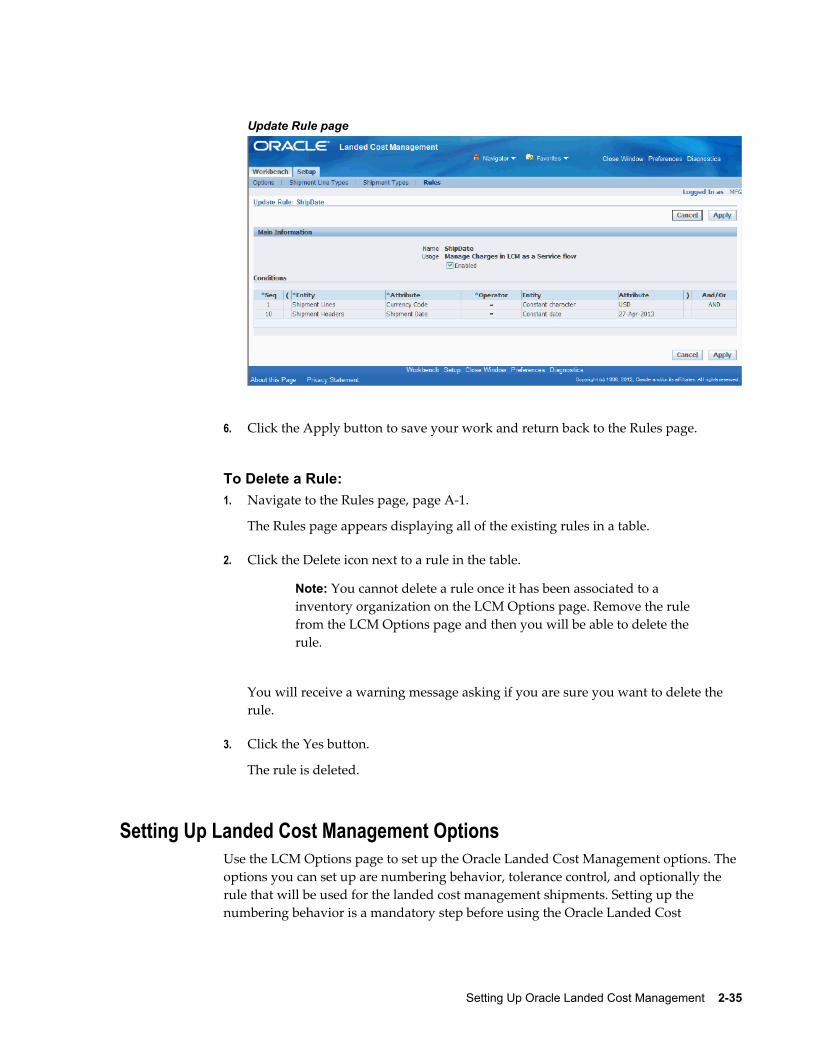
Update Rule page
6. Click the Apply button to save your work and return back to the Rules page.
To Delete a Rule:1. Navigate to the Rules page, page A-1.
The Rules page appears displaying all of the existing rules in a table.
2. Click the Delete icon next to a rule in the table.
Note: You cannot delete a rule once it has been associated to a inventory organization on the LCM Options page. Remove the rule from the LCM Options page and then you will be able to delete the rule.
You will receive a warning message asking if you are sure you want to delete the rule.
3. Click the Yes button.
The rule is deleted.
Setting Up Landed Cost Management OptionsUse the LCM Options page to set up the Oracle Landed Cost Management options. The options you can set up are numbering behavior, tolerance control, and optionally the rule that will be used for the landed cost management shipments. Setting up the numbering behavior is a mandatory step before using the Oracle Landed Cost
2-36 Oracle Landed Cost Management Process Guide
Management application. Setting up tolerance control and the rule that will be used when managing shipments as a service are optional steps.
Use this procedure to set up Landed Cost Management options:
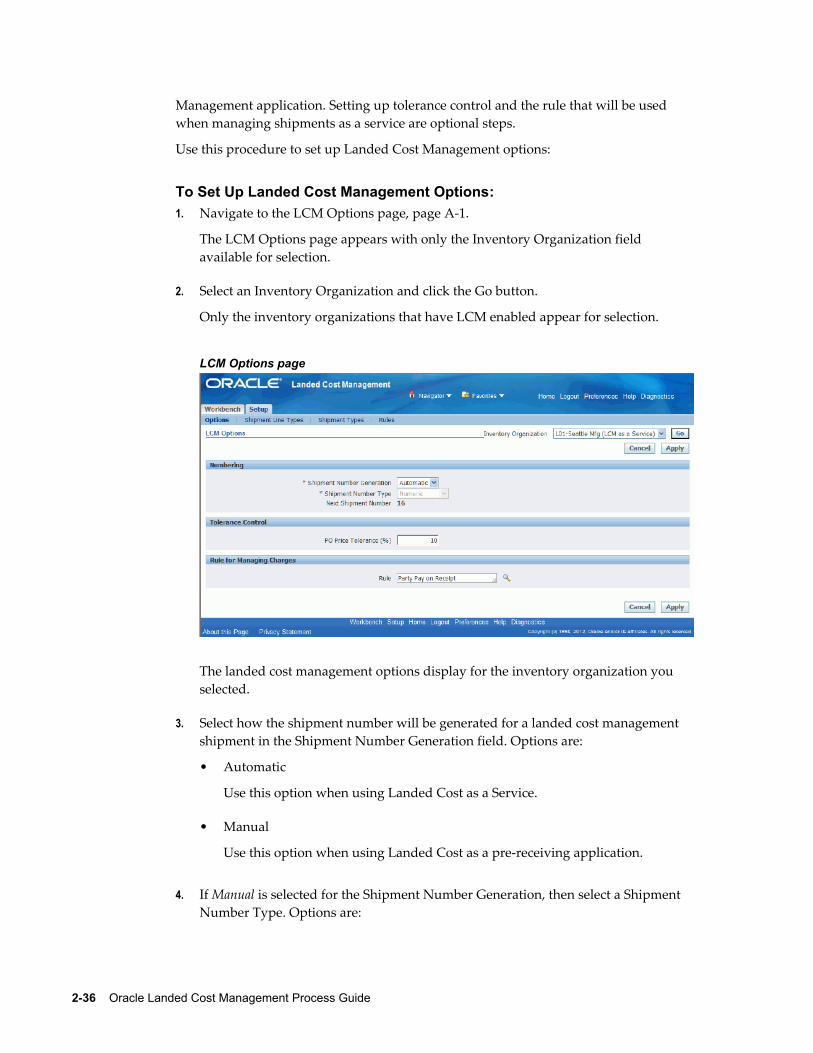
To Set Up Landed Cost Management Options:1. Navigate to the LCM Options page, page A-1.
The LCM Options page appears with only the Inventory Organization field available for selection.
2. Select an Inventory Organization and click the Go button.
Only the inventory organizations that have LCM enabled appear for selection.
LCM Options page
The landed cost management options display for the inventory organization you selected.
3. Select how the shipment number will be generated for a landed cost management shipment in the Shipment Number Generation field. Options are:
• Automatic
Use this option when using Landed Cost as a Service.
• Manual
Use this option when using Landed Cost as a pre-receiving application.
4. If Manual is selected for the Shipment Number Generation, then select a Shipment Number Type. Options are:
Setting Up Oracle Landed Cost Management 2-37
• Alphanumeric
• Numeric
The system defaults Numeric as the Shipment Number Type for automatic shipmentnumber generation.
In the case of automatic shipment number generation, the system will start the numbering at "1" and will display the next shipment number that will be created in the Next Shipment Number field.
5. Enter a price tolerance percent in the PO Price Tolerance (%) field.
Oracle Land Cost Management provides a consolidated tolerance control for the purchase price entered in Oracle Landed Cost Management (equivalent to the quantity tolerance for a receipt in Receiving). Prices out of the tolerance interval are rejected.
6. (Optional) Enter the rule that will be used when managing landed cost shipments as a service in the Rule field.
This field is only available when you select an Inventory Organization that will operate as a calculation service (managing landed cost as a service) without any need for user intervention.
For more information on rules, see Maintaining Rules, page 2-19.
7. Click the Apply button to save your work.
Setting Up Oracle Landed Cost Management Profile OptionsOracle Landed Cost Management has several profile options. Use the System Profile Values window to set up the profile options. This table describes the profile options:
Oracle Landed Cost Management Profile Options
Profile Option Profile Option Description
INL: Allow Updates to Completed Shipments This profile option determines whether you can make changes to a completed shipment or not.
For more information, see Understanding the Estimated Landed Cost Update Process, page 7-1.
2-38 Oracle Landed Cost Management Process Guide
Profile Option Profile Option Description
INL: Default Currency Code for QP Charges Generation
This profile option is used in Advanced Pricing integration with Oracle Landed Cost Management.
The system uses this profile option to determine the base currency code when integrating to Oracle Advanced Pricing. All of the shipment line amounts will be converted to the currency indicated in this profile option.
For more information see, Generating Chargesfor the Shipment, page 5-36.
INL: Default Currency Conversion Type for QP Charges Generation
This profile option is used in Advanced Pricing integration with Oracle Landed Cost Management.
The system uses this profile option to determine the currency conversion type when integrating to Oracle Advanced Pricing. All of the shipment line amounts will be converted to the currency conversion type indicated in this profile option.
For more information see, Generating Chargesfor the Shipment, page 5-36.
INL: Default Shipment Type for Open Interface
The system uses this profile option to determine the Shipment Type the landed cost management shipment headers will be createdwith, in the Managing Landed Cost as a Service flow, where landed cost management shipments are automatically created for the receipts.
For more information see, Understanding Landed Cost as a Service, page 6-1.
INL: Item Category Set (Optional) The system uses this profile option to restrict the purchase order shipments to be integrated with Oracle Landed Cost Management based on the category set entered.
For more information on defining item category sets, see the Item Setup and Control chapter in the Oracle Inventory User's Guide.
Setting Up Oracle Landed Cost Management 2-39
Profile Option Profile Option Description
INL: Number of Days Filter for Landed Cost Analysis
(Optional) The system uses this profile option as the default number of days filter for the Landed Cost Analysis page.
For more information on the Landed Cost Analysis page, see Analyzing Landed Cost, page 8-1.
Note: If Oracle Endeca is installed and licensed in your environment, then refer to the Oracle E-Business Suite Endeca Integration and System Administration Guide for detailed information about the Endeca enhancements to the product.
INL: Number of Days Filter for Monitor Daily Operations
(Optional) The system uses this profile option as the default number of days filter for the Monitor Daily Operations page.
For more information on the Monitor Daily Operations page, see Monitoring Daily Operations, page 8-1.
Note: If Oracle Endeca is installed and licensed in your environment, then refer to the Oracle E-Business Suite Endeca Integration and System Administration Guide for detailed information about the Endeca enhancements to the product.
INL: Quantity UOM Class Use this profile to indicate the class defined for each unit associated with quantity cost factors.
The system uses this profile option to drive the landed cost management cost factor UOM conversions during the Generate Charges and Calculate processes.
For more information see, Understanding Landed Cost as a Pre-Receiving Application, page 5-2 and Understanding Landed Cost asa Service, page 6-1.
2-40 Oracle Landed Cost Management Process Guide
Profile Option Profile Option Description
INL: Volume UOM Class Use this profile to indicate the class defined for each unit associated with volume cost factors.
The system uses this profile option to drive the landed cost management cost factor UOM conversions during the Generate Charges and Calculate processes.
For more information see, Understanding Landed Cost as a Pre-Receiving Application, page 5-2 and Understanding Landed Cost asa Service, page 6-1.
INL: Weight UOM Class Use this profile to indicate the class defined for each unit associated with weight cost factors.
The system uses this profile option to drive the landed cost management cost factor UOM conversions during the Generate Charges and Calculate processes.
For more information see, Understanding Landed Cost as a Pre-Receiving Application, page 5-2 and Understanding Landed Cost asa Service, page 6-1.
For more information on the Oracle Landed Cost Management Profile Options, see Overview of Profile Options, page B-1 in the Profile Options appendix.
Use this procedure to set up Oracle Landed Cost Management profile options:
Prerequisites❒ Before you can define the INL: Default Shipment Type for Open Interface profile
option you must have already set up shipment types in Oracle Landed Cost Management.
To Set Up Oracle Landed Cost Management Profile Options:Typically, the System Administrator is responsible for setting up and updating profile option values. For more information, see Oracle Applications System Administrator's Guide, Setting User Profile Options.
1. Navigate to the System Profile Values window, page A-1.
Setting Up Oracle Landed Cost Management 2-41
The Find System Profile Values window appears.
2. Enter INL% in the Profile field and click Find.
The System Profile Values window appears displaying all of the Oracle Landed Cost Management (INL) profile options.
3. Locate the specific profile option and enter the appropriate profile value.
4. Click the Save icon to save your work.

Part 3Managing Landed Cost

Understanding the Landed Cost Management Workbench 3-1
3Understanding the Landed Cost
Management Workbench
This chapter covers the following topics:
• Understanding the Landed Cost Management Workbench
• Understanding the Shipments Workbench
• Understanding the Shipment Status
Understanding the Landed Cost Management WorkbenchThe Landed Cost Management Workbench is the hub for the Oracle Landed Cost Management application.
3-2 Oracle Landed Cost Management Process Guide
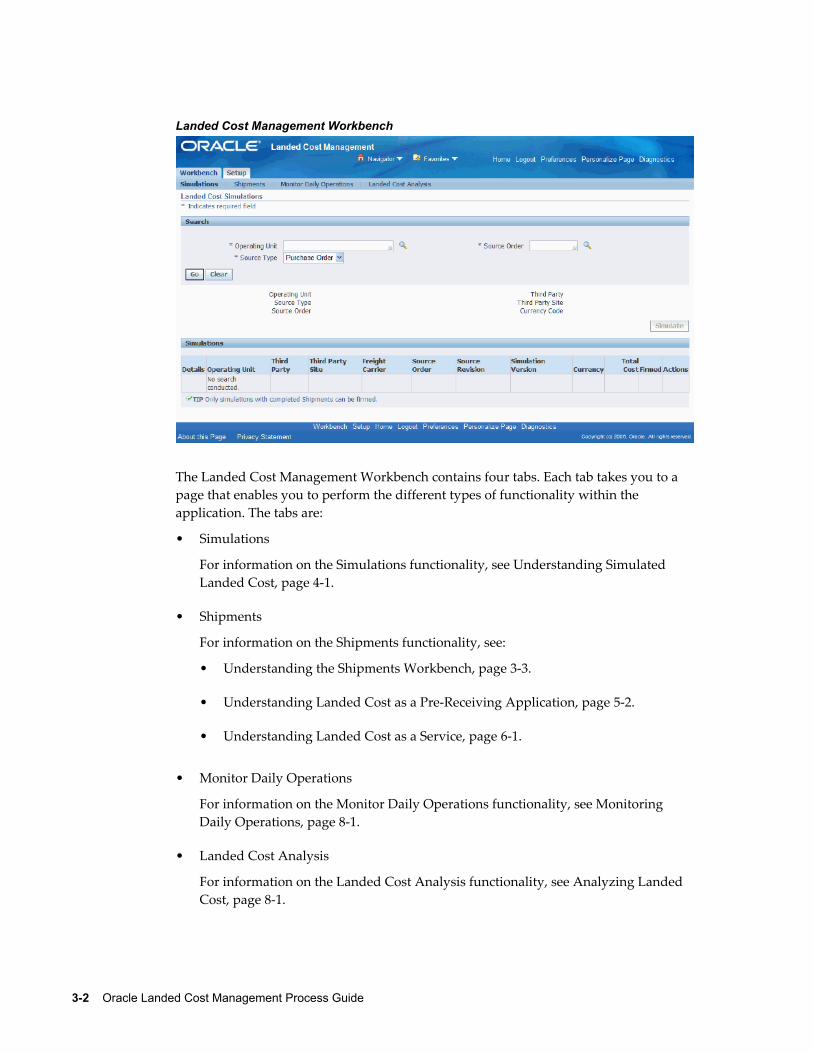
Landed Cost Management Workbench
The Landed Cost Management Workbench contains four tabs. Each tab takes you to a page that enables you to perform the different types of functionality within the application. The tabs are:
• Simulations
For information on the Simulations functionality, see Understanding Simulated Landed Cost, page 4-1.
• Shipments
For information on the Shipments functionality, see:
• Understanding the Shipments Workbench, page 3-3.
• Understanding Landed Cost as a Pre-Receiving Application, page 5-2.
• Understanding Landed Cost as a Service, page 6-1.
• Monitor Daily Operations
For information on the Monitor Daily Operations functionality, see Monitoring Daily Operations, page 8-1.
• Landed Cost Analysis
For information on the Landed Cost Analysis functionality, see Analyzing Landed Cost, page 8-1.
Understanding the Landed Cost Management Workbench 3-3
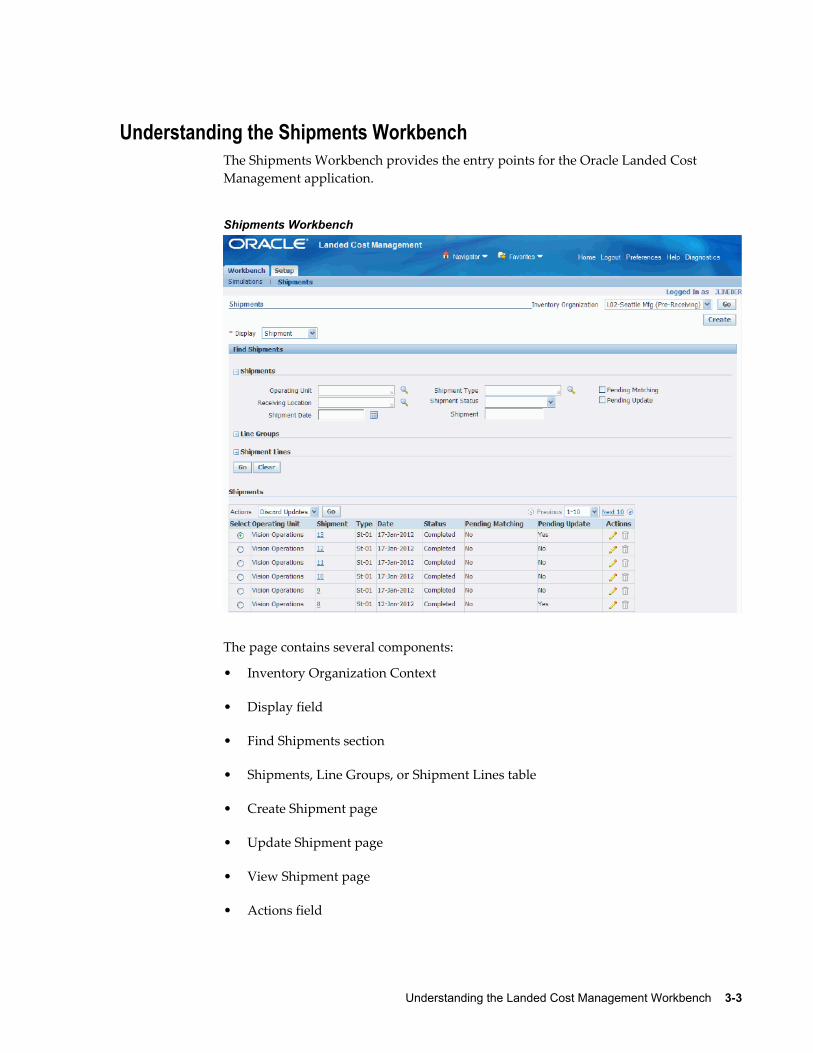
Understanding the Shipments WorkbenchThe Shipments Workbench provides the entry points for the Oracle Landed Cost Management application.
Shipments Workbench
The page contains several components:
• Inventory Organization Context
• Display field
• Find Shipments section
• Shipments, Line Groups, or Shipment Lines table
• Create Shipment page
• Update Shipment page
• View Shipment page
• Actions field
3-4 Oracle Landed Cost Management Process Guide
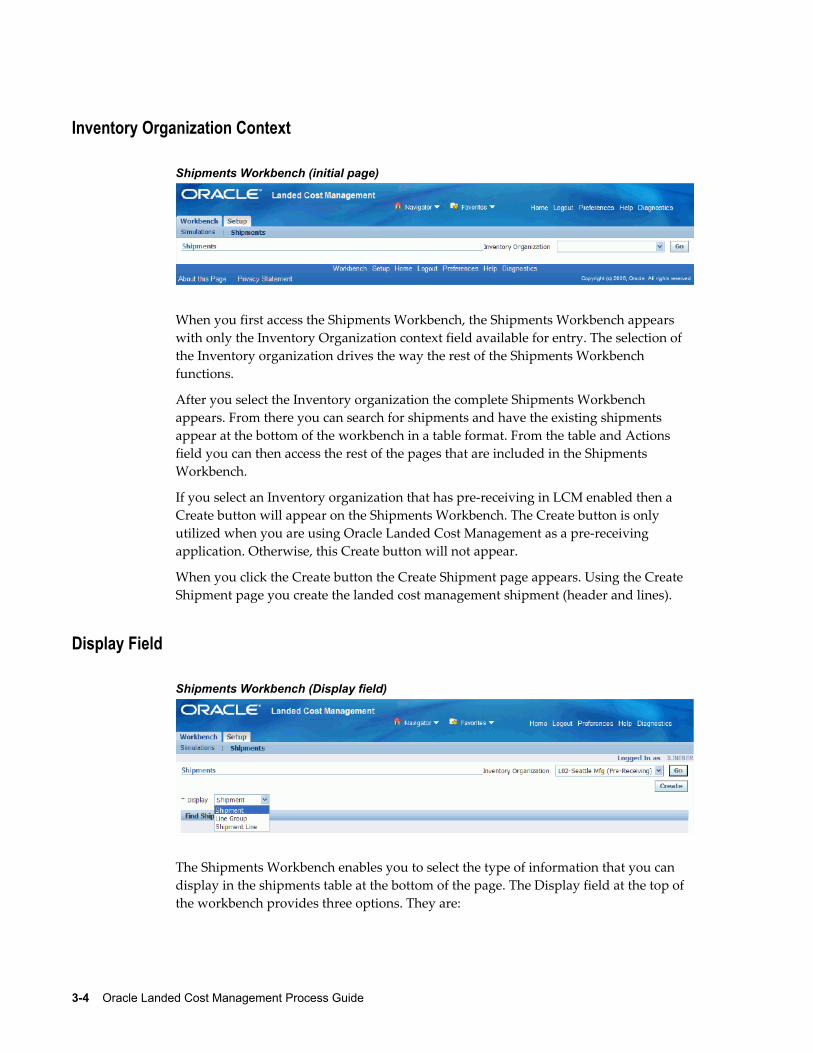
Inventory Organization Context
Shipments Workbench (initial page)
When you first access the Shipments Workbench, the Shipments Workbench appears with only the Inventory Organization context field available for entry. The selection of the Inventory organization drives the way the rest of the Shipments Workbench functions.
After you select the Inventory organization the complete Shipments Workbench appears. From there you can search for shipments and have the existing shipments appear at the bottom of the workbench in a table format. From the table and Actions field you can then access the rest of the pages that are included in the Shipments Workbench.
If you select an Inventory organization that has pre-receiving in LCM enabled then a Create button will appear on the Shipments Workbench. The Create button is only utilized when you are using Oracle Landed Cost Management as a pre-receiving application. Otherwise, this Create button will not appear.
When you click the Create button the Create Shipment page appears. Using the Create Shipment page you create the landed cost management shipment (header and lines).
Display Field
Shipments Workbench (Display field)
The Shipments Workbench enables you to select the type of information that you can display in the shipments table at the bottom of the page. The Display field at the top of the workbench provides three options. They are:
Understanding the Landed Cost Management Workbench 3-5
• Shipment
• Line Group
• Shipment Line
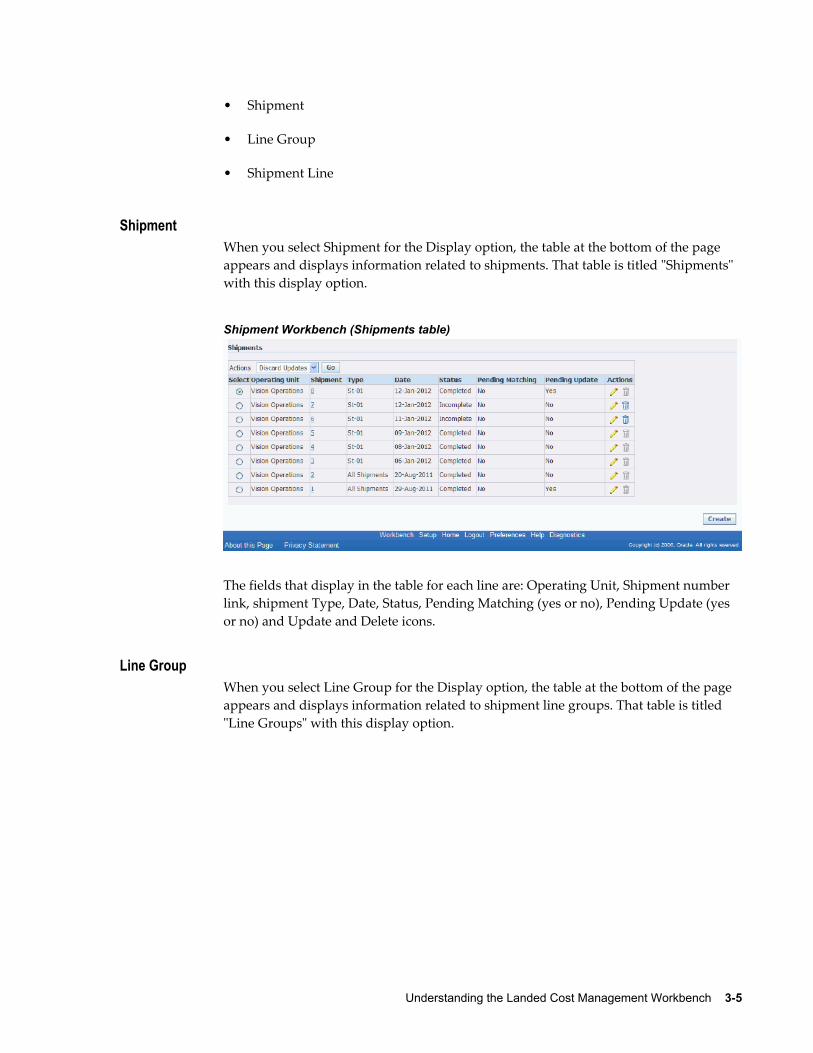
ShipmentWhen you select Shipment for the Display option, the table at the bottom of the page appears and displays information related to shipments. That table is titled "Shipments" with this display option.
Shipment Workbench (Shipments table)
The fields that display in the table for each line are: Operating Unit, Shipment number link, shipment Type, Date, Status, Pending Matching (yes or no), Pending Update (yes or no) and Update and Delete icons.
Line GroupWhen you select Line Group for the Display option, the table at the bottom of the page appears and displays information related to shipment line groups. That table is titled "Line Groups" with this display option.
3-6 Oracle Landed Cost Management Process Guide
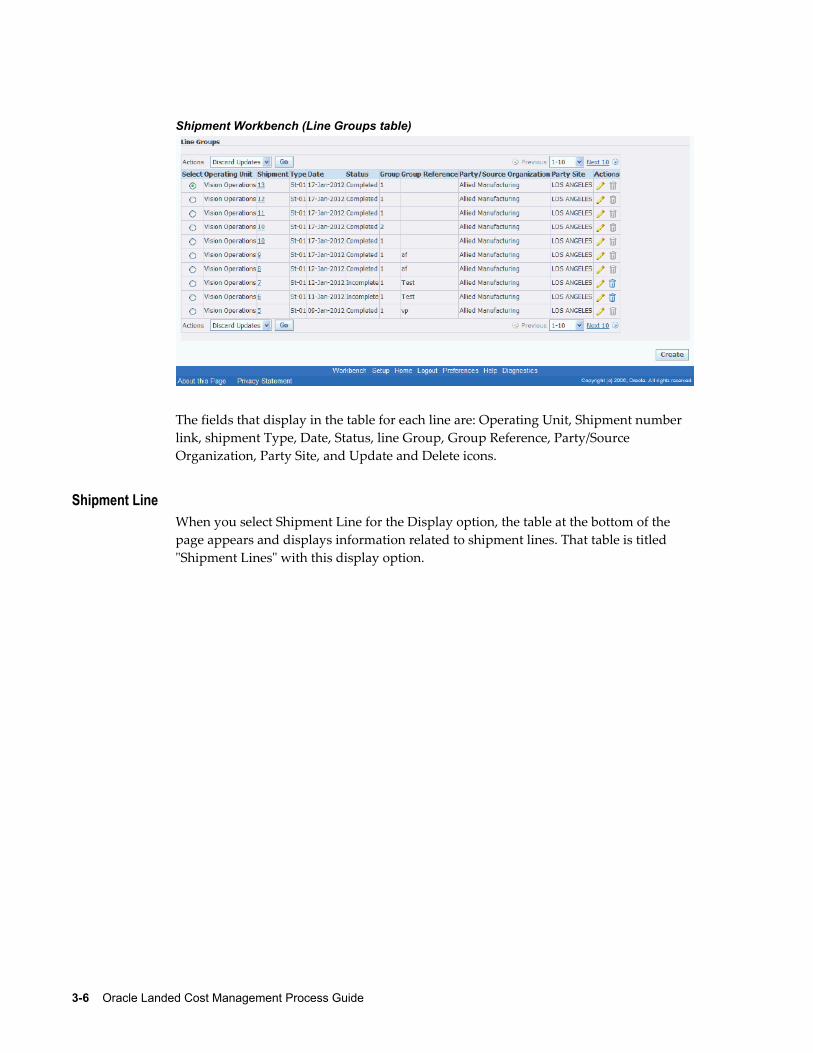
Shipment Workbench (Line Groups table)
The fields that display in the table for each line are: Operating Unit, Shipment number link, shipment Type, Date, Status, line Group, Group Reference, Party/Source Organization, Party Site, and Update and Delete icons.
Shipment LineWhen you select Shipment Line for the Display option, the table at the bottom of the page appears and displays information related to shipment lines. That table is titled "Shipment Lines" with this display option.
Understanding the Landed Cost Management Workbench 3-7
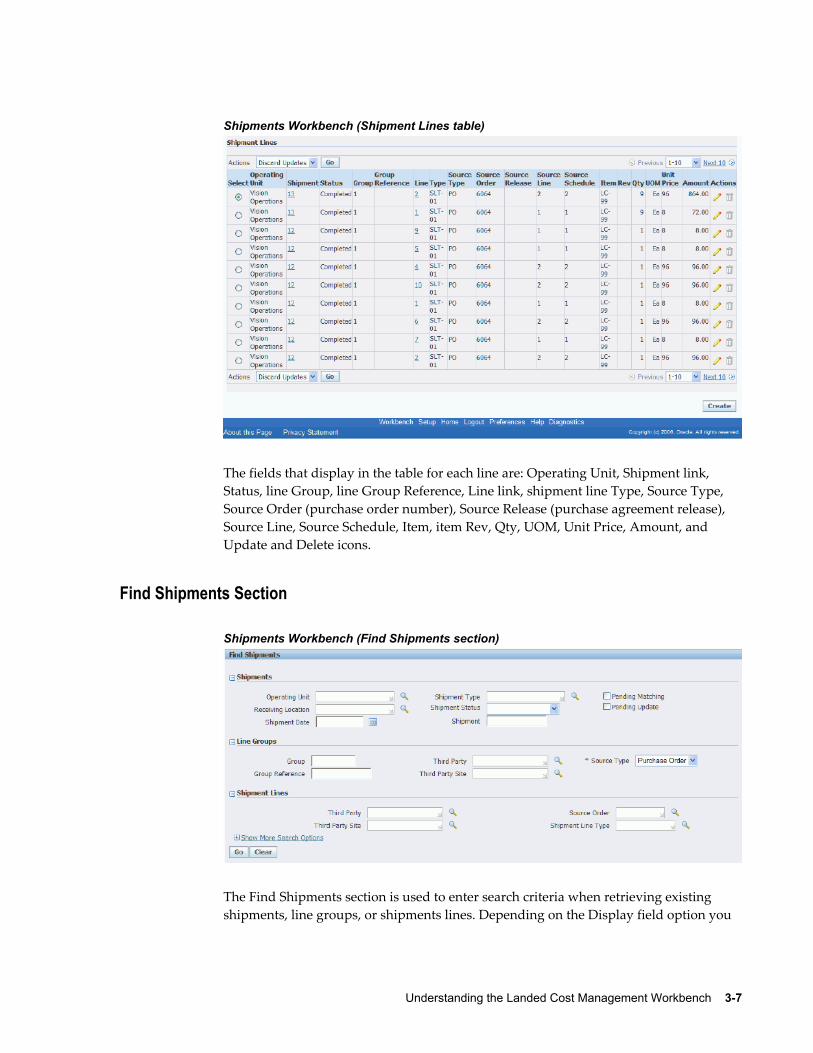
Shipments Workbench (Shipment Lines table)
The fields that display in the table for each line are: Operating Unit, Shipment link, Status, line Group, line Group Reference, Line link, shipment line Type, Source Type, Source Order (purchase order number), Source Release (purchase agreement release), Source Line, Source Schedule, Item, item Rev, Qty, UOM, Unit Price, Amount, and Update and Delete icons.
Find Shipments Section
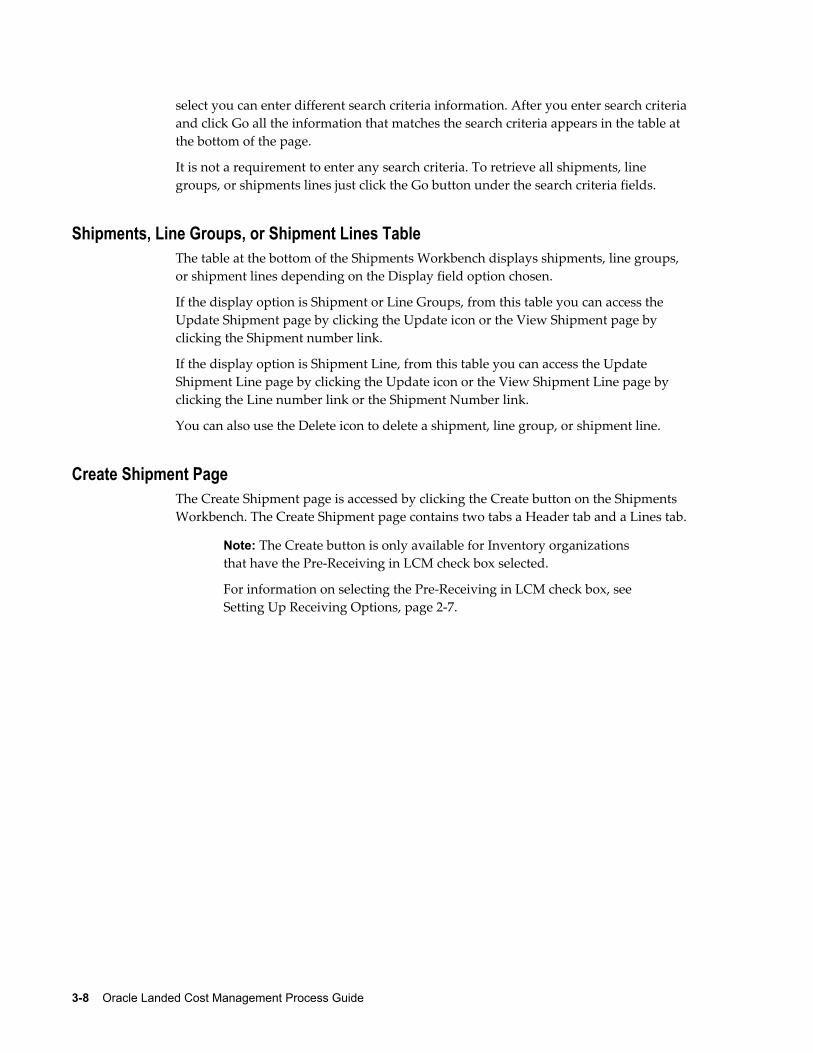
Shipments Workbench (Find Shipments section)
The Find Shipments section is used to enter search criteria when retrieving existing shipments, line groups, or shipments lines. Depending on the Display field option you
3-8 Oracle Landed Cost Management Process Guide
select you can enter different search criteria information. After you enter search criteria and click Go all the information that matches the search criteria appears in the table at the bottom of the page.
It is not a requirement to enter any search criteria. To retrieve all shipments, line groups, or shipments lines just click the Go button under the search criteria fields.
Shipments, Line Groups, or Shipment Lines TableThe table at the bottom of the Shipments Workbench displays shipments, line groups, or shipment lines depending on the Display field option chosen.
If the display option is Shipment or Line Groups, from this table you can access the Update Shipment page by clicking the Update icon or the View Shipment page by clicking the Shipment number link.
If the display option is Shipment Line, from this table you can access the Update Shipment Line page by clicking the Update icon or the View Shipment Line page by clicking the Line number link or the Shipment Number link.
You can also use the Delete icon to delete a shipment, line group, or shipment line.
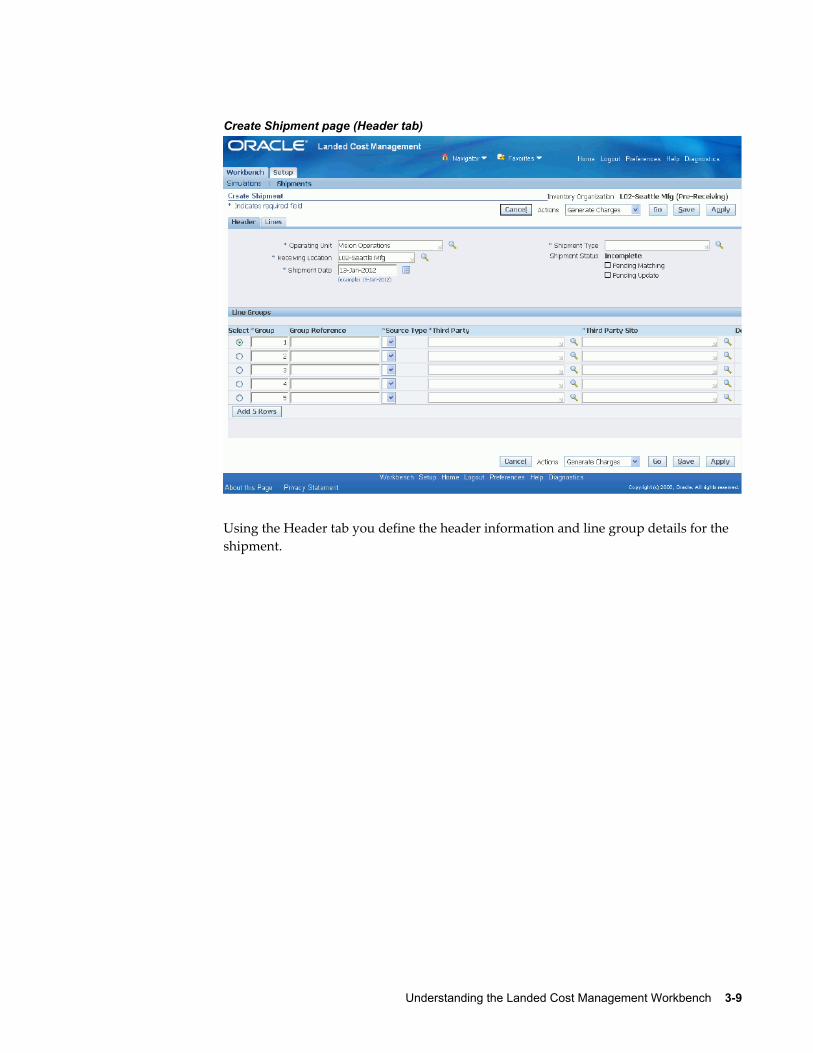
Create Shipment PageThe Create Shipment page is accessed by clicking the Create button on the Shipments Workbench. The Create Shipment page contains two tabs a Header tab and a Lines tab.
Note: The Create button is only available for Inventory organizations that have the Pre-Receiving in LCM check box selected.
For information on selecting the Pre-Receiving in LCM check box, see Setting Up Receiving Options, page 2-7.
Understanding the Landed Cost Management Workbench 3-9
Create Shipment page (Header tab)
Using the Header tab you define the header information and line group details for the shipment.
3-10 Oracle Landed Cost Management Process Guide
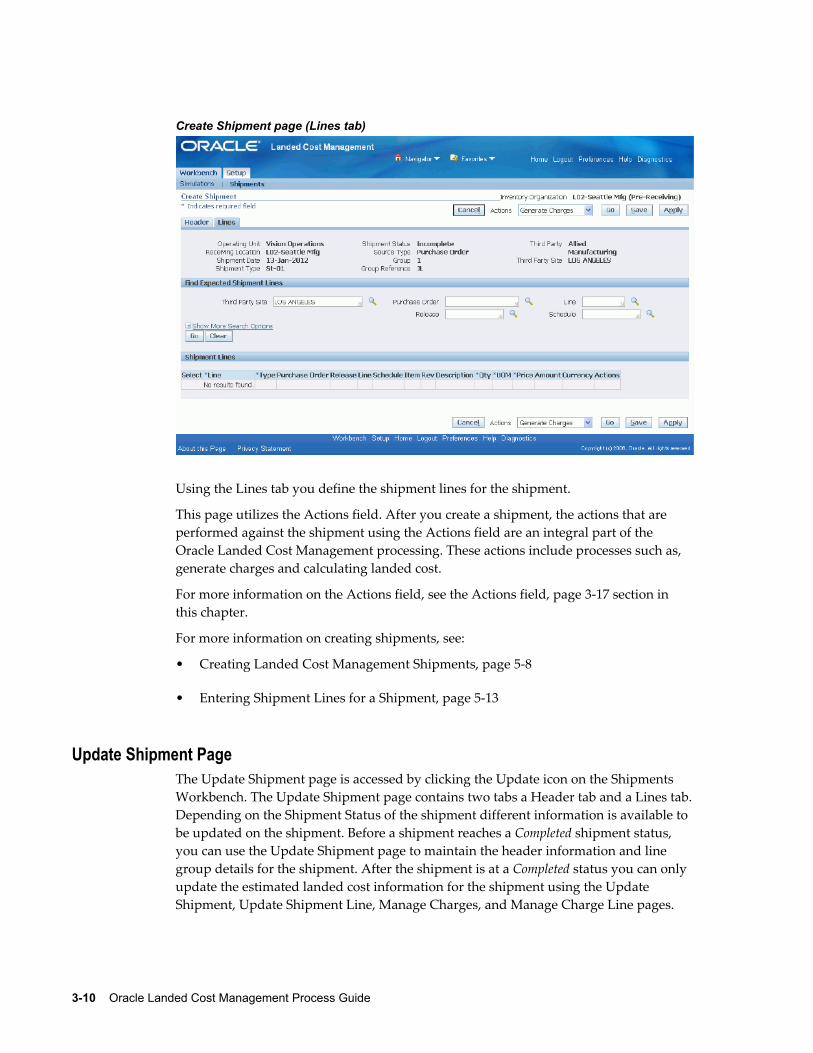
Create Shipment page (Lines tab)
Using the Lines tab you define the shipment lines for the shipment.
This page utilizes the Actions field. After you create a shipment, the actions that are performed against the shipment using the Actions field are an integral part of the Oracle Landed Cost Management processing. These actions include processes such as, generate charges and calculating landed cost.
For more information on the Actions field, see the Actions field, page 3-17 section in this chapter.
For more information on creating shipments, see:
• Creating Landed Cost Management Shipments, page 5-8
• Entering Shipment Lines for a Shipment, page 5-13
Update Shipment PageThe Update Shipment page is accessed by clicking the Update icon on the Shipments Workbench. The Update Shipment page contains two tabs a Header tab and a Lines tab.Depending on the Shipment Status of the shipment different information is available to be updated on the shipment. Before a shipment reaches a Completed shipment status, you can use the Update Shipment page to maintain the header information and line group details for the shipment. After the shipment is at a Completed status you can only update the estimated landed cost information for the shipment using the Update Shipment, Update Shipment Line, Manage Charges, and Manage Charge Line pages.
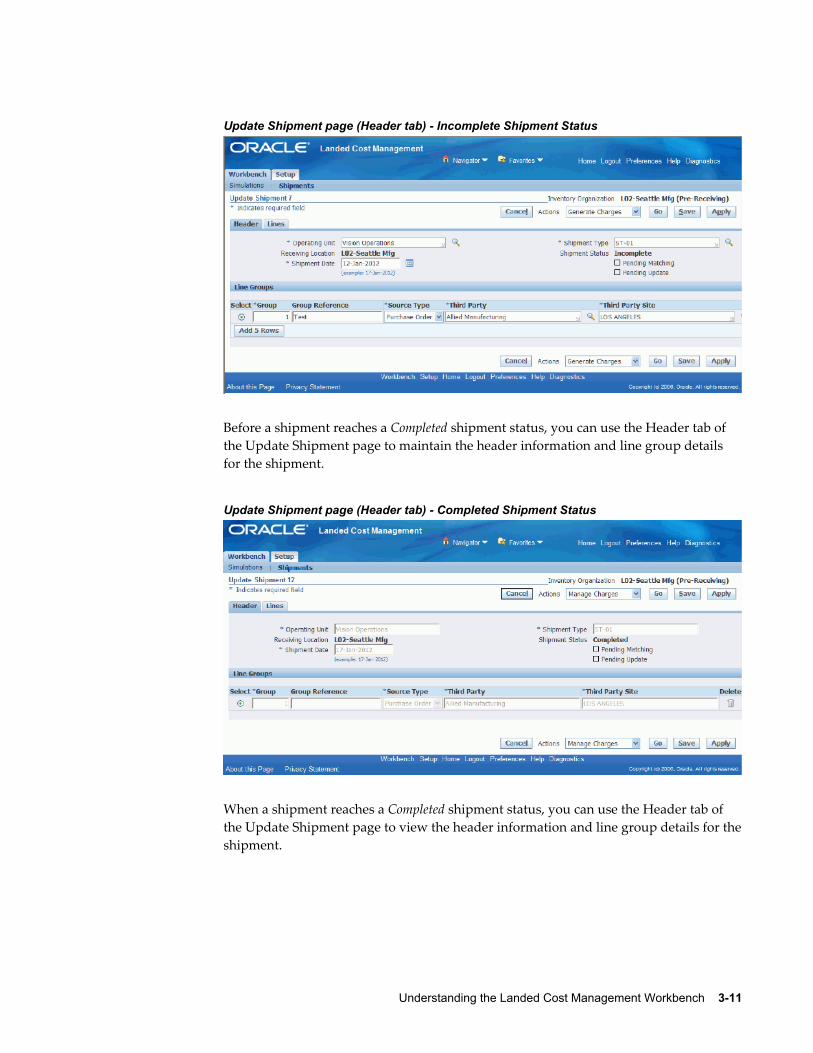
Understanding the Landed Cost Management Workbench 3-11
Update Shipment page (Header tab) - Incomplete Shipment Status
Before a shipment reaches a Completed shipment status, you can use the Header tab of the Update Shipment page to maintain the header information and line group details for the shipment.
Update Shipment page (Header tab) - Completed Shipment Status
When a shipment reaches a Completed shipment status, you can use the Header tab of the Update Shipment page to view the header information and line group details for theshipment.
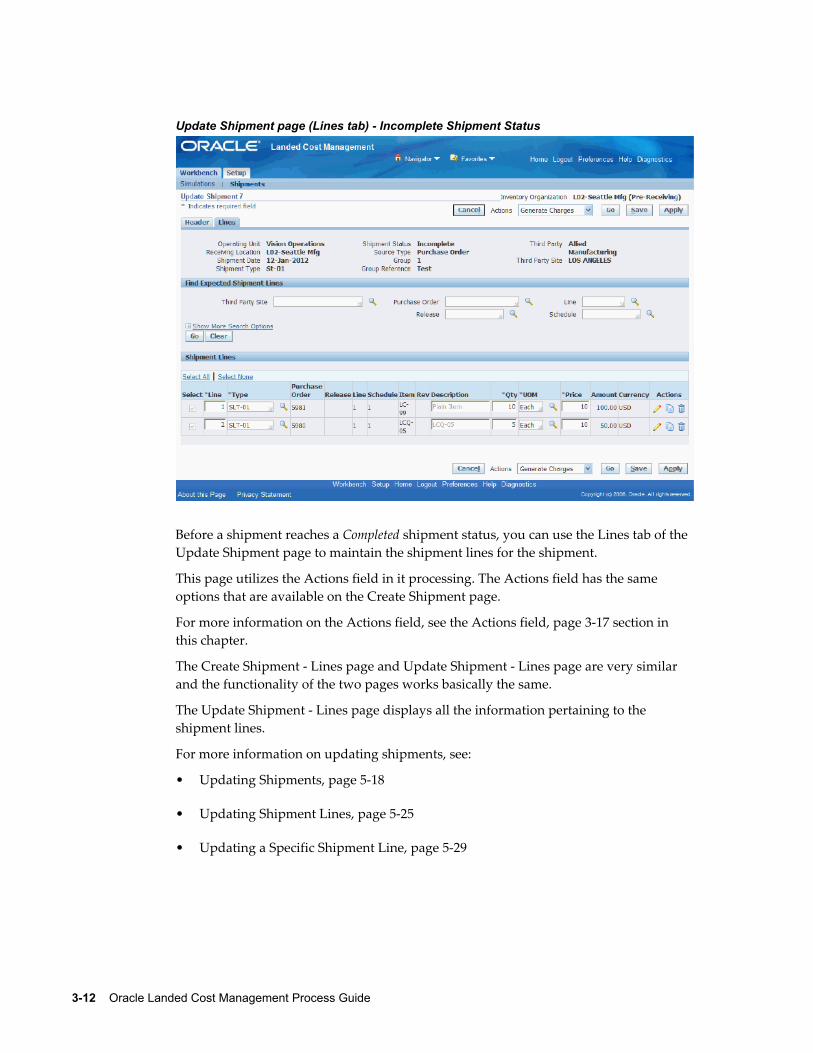
3-12 Oracle Landed Cost Management Process Guide
Update Shipment page (Lines tab) - Incomplete Shipment Status
Before a shipment reaches a Completed shipment status, you can use the Lines tab of the Update Shipment page to maintain the shipment lines for the shipment.
This page utilizes the Actions field in it processing. The Actions field has the same options that are available on the Create Shipment page.
For more information on the Actions field, see the Actions field, page 3-17 section in this chapter.
The Create Shipment - Lines page and Update Shipment - Lines page are very similar and the functionality of the two pages works basically the same.
The Update Shipment - Lines page displays all the information pertaining to the shipment lines.
For more information on updating shipments, see:
• Updating Shipments, page 5-18
• Updating Shipment Lines, page 5-25
• Updating a Specific Shipment Line, page 5-29
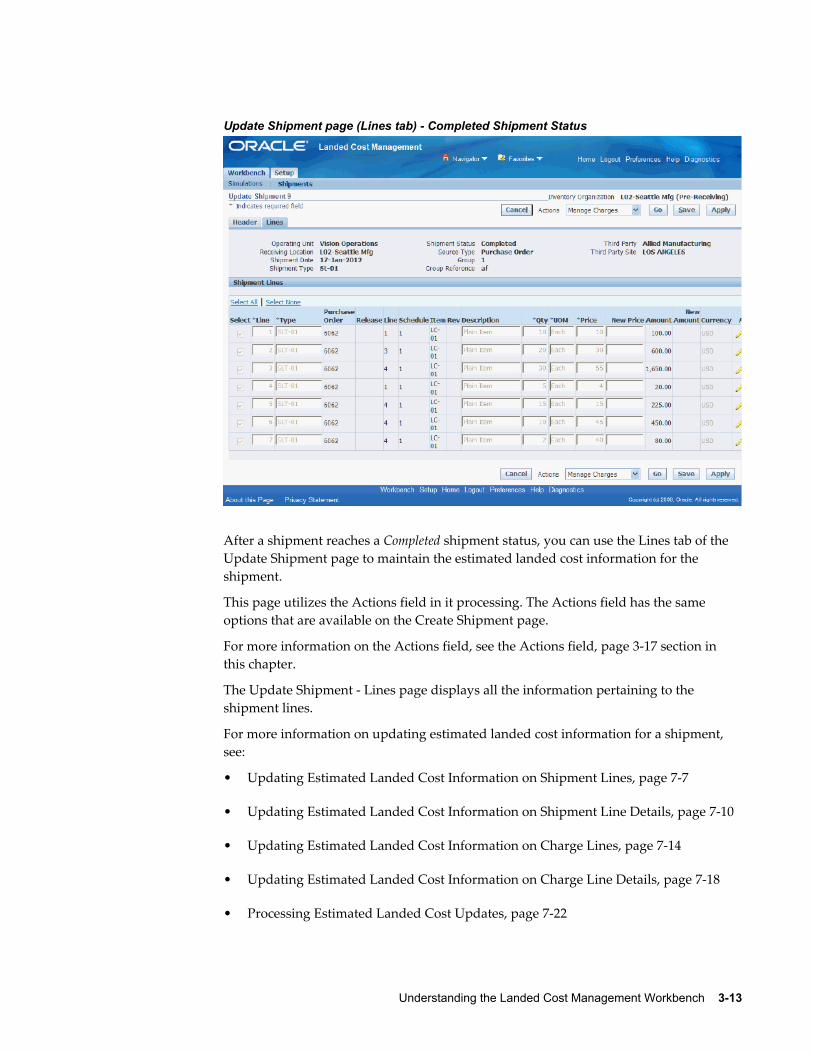
Understanding the Landed Cost Management Workbench 3-13
Update Shipment page (Lines tab) - Completed Shipment Status
After a shipment reaches a Completed shipment status, you can use the Lines tab of the Update Shipment page to maintain the estimated landed cost information for the shipment.
This page utilizes the Actions field in it processing. The Actions field has the same options that are available on the Create Shipment page.
For more information on the Actions field, see the Actions field, page 3-17 section in this chapter.
The Update Shipment - Lines page displays all the information pertaining to the shipment lines.
For more information on updating estimated landed cost information for a shipment, see:
• Updating Estimated Landed Cost Information on Shipment Lines, page 7-7
• Updating Estimated Landed Cost Information on Shipment Line Details, page 7-10
• Updating Estimated Landed Cost Information on Charge Lines, page 7-14
• Updating Estimated Landed Cost Information on Charge Line Details, page 7-18
• Processing Estimated Landed Cost Updates, page 7-22
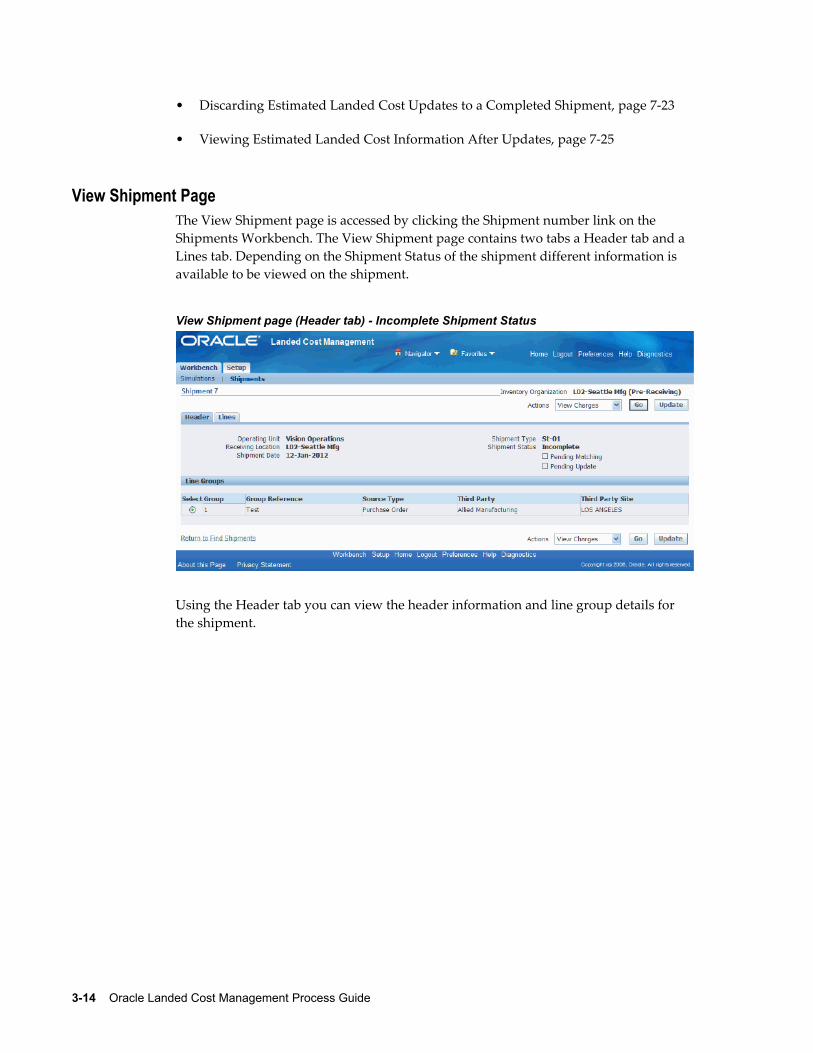
3-14 Oracle Landed Cost Management Process Guide
• Discarding Estimated Landed Cost Updates to a Completed Shipment, page 7-23
• Viewing Estimated Landed Cost Information After Updates, page 7-25
View Shipment PageThe View Shipment page is accessed by clicking the Shipment number link on the Shipments Workbench. The View Shipment page contains two tabs a Header tab and a Lines tab. Depending on the Shipment Status of the shipment different information is available to be viewed on the shipment.
View Shipment page (Header tab) - Incomplete Shipment Status
Using the Header tab you can view the header information and line group details for the shipment.
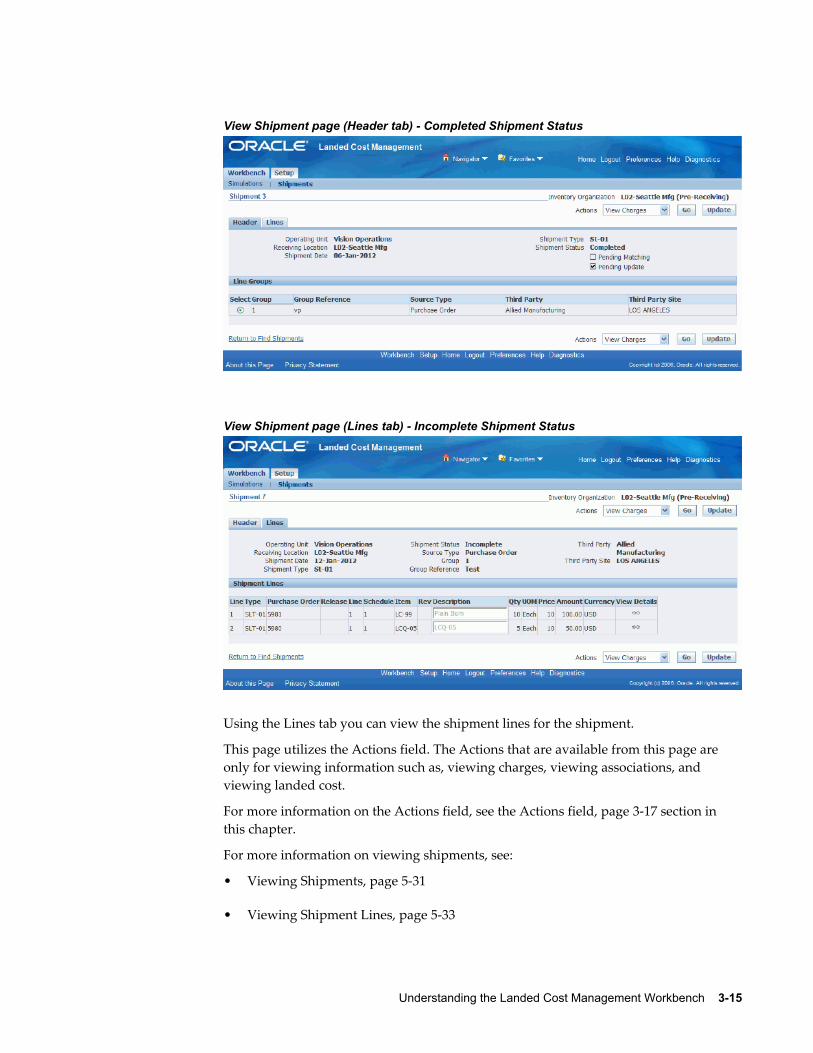
Understanding the Landed Cost Management Workbench 3-15
View Shipment page (Header tab) - Completed Shipment Status
View Shipment page (Lines tab) - Incomplete Shipment Status
Using the Lines tab you can view the shipment lines for the shipment.
This page utilizes the Actions field. The Actions that are available from this page are only for viewing information such as, viewing charges, viewing associations, and viewing landed cost.
For more information on the Actions field, see the Actions field, page 3-17 section in this chapter.
For more information on viewing shipments, see:
• Viewing Shipments, page 5-31
• Viewing Shipment Lines, page 5-33
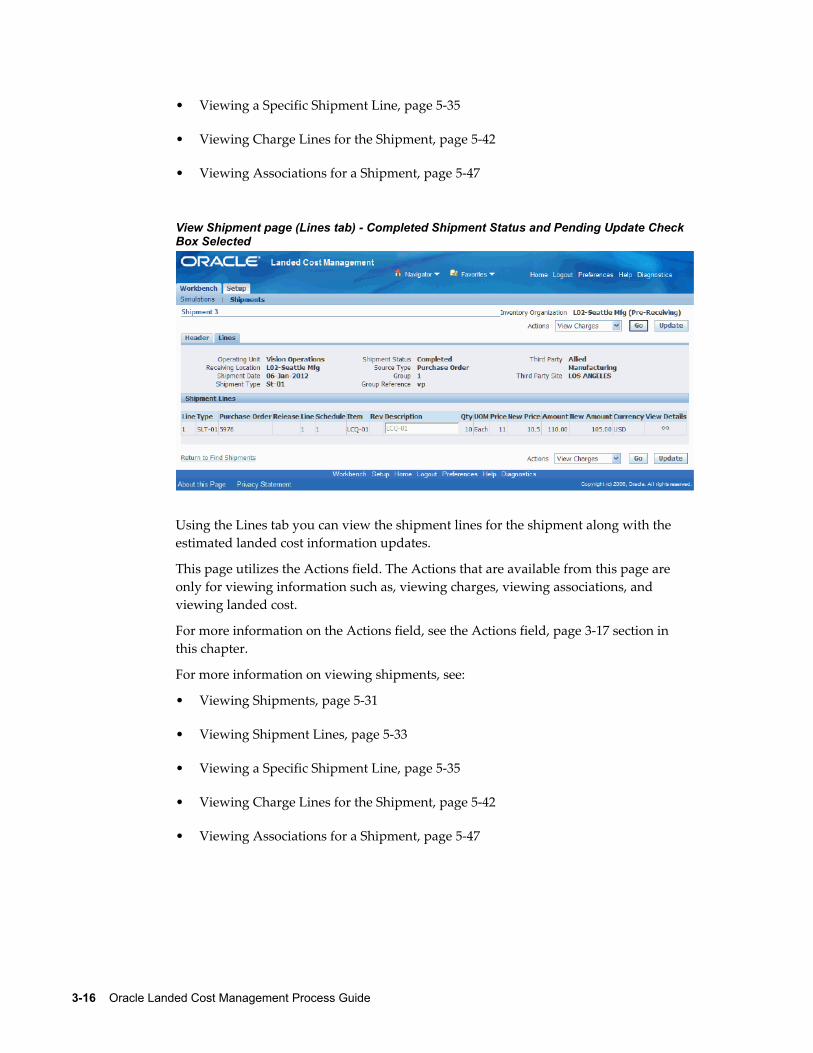
3-16 Oracle Landed Cost Management Process Guide
• Viewing a Specific Shipment Line, page 5-35
• Viewing Charge Lines for the Shipment, page 5-42
• Viewing Associations for a Shipment, page 5-47
View Shipment page (Lines tab) - Completed Shipment Status and Pending Update Check Box Selected
Using the Lines tab you can view the shipment lines for the shipment along with the estimated landed cost information updates.
This page utilizes the Actions field. The Actions that are available from this page are only for viewing information such as, viewing charges, viewing associations, and viewing landed cost.
For more information on the Actions field, see the Actions field, page 3-17 section in this chapter.
For more information on viewing shipments, see:
• Viewing Shipments, page 5-31
• Viewing Shipment Lines, page 5-33
• Viewing a Specific Shipment Line, page 5-35
• Viewing Charge Lines for the Shipment, page 5-42
• Viewing Associations for a Shipment, page 5-47
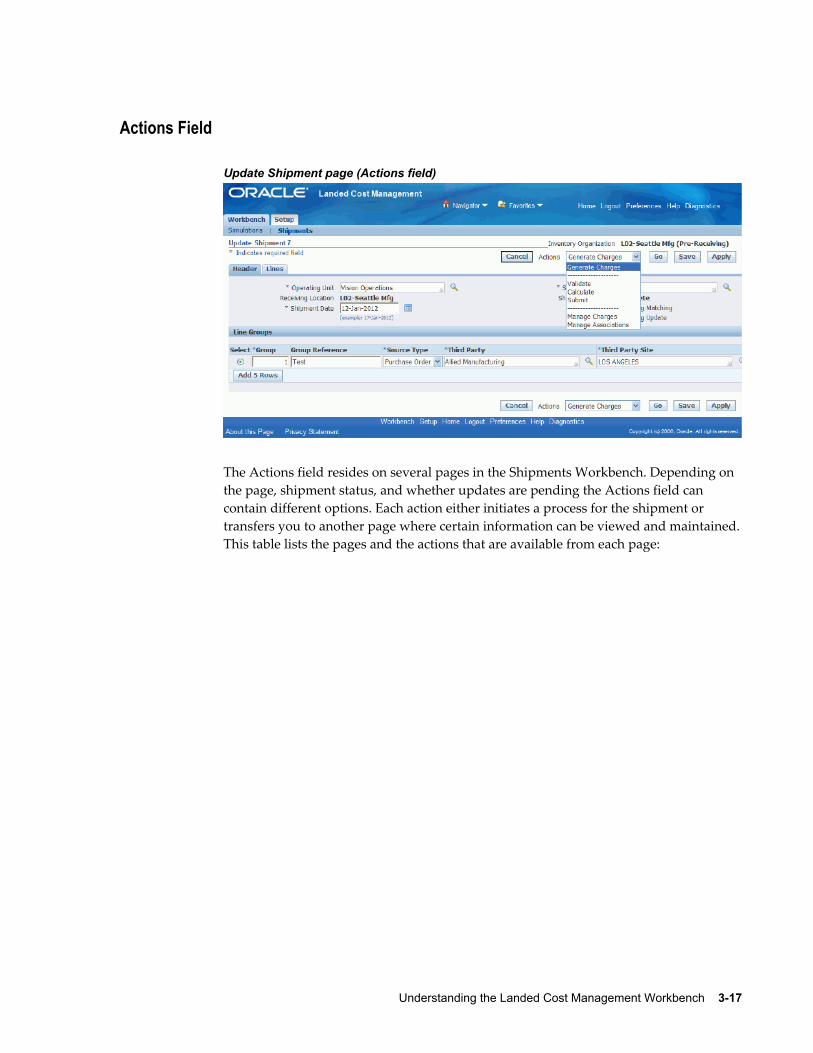
Understanding the Landed Cost Management Workbench 3-17
Actions Field
Update Shipment page (Actions field)
The Actions field resides on several pages in the Shipments Workbench. Depending on the page, shipment status, and whether updates are pending the Actions field can contain different options. Each action either initiates a process for the shipment or transfers you to another page where certain information can be viewed and maintained.This table lists the pages and the actions that are available from each page:
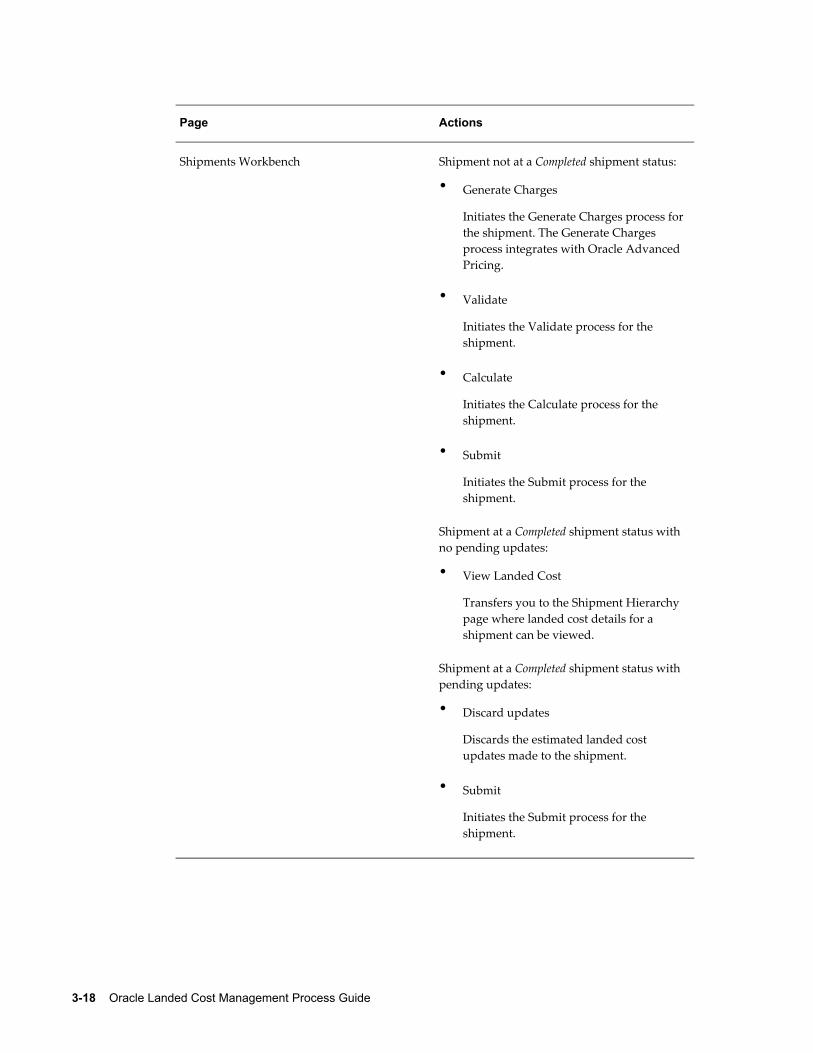
3-18 Oracle Landed Cost Management Process Guide
Page Actions
Shipments Workbench Shipment not at a Completed shipment status:
• Generate Charges
Initiates the Generate Charges process forthe shipment. The Generate Charges process integrates with Oracle Advanced Pricing.
• Validate
Initiates the Validate process for the shipment.
• Calculate
Initiates the Calculate process for the shipment.
• Submit
Initiates the Submit process for the shipment.
Shipment at a Completed shipment status with no pending updates:
• View Landed Cost
Transfers you to the Shipment Hierarchy page where landed cost details for a shipment can be viewed.
Shipment at a Completed shipment status with pending updates:
• Discard updates
Discards the estimated landed cost updates made to the shipment.
• Submit
Initiates the Submit process for the shipment.
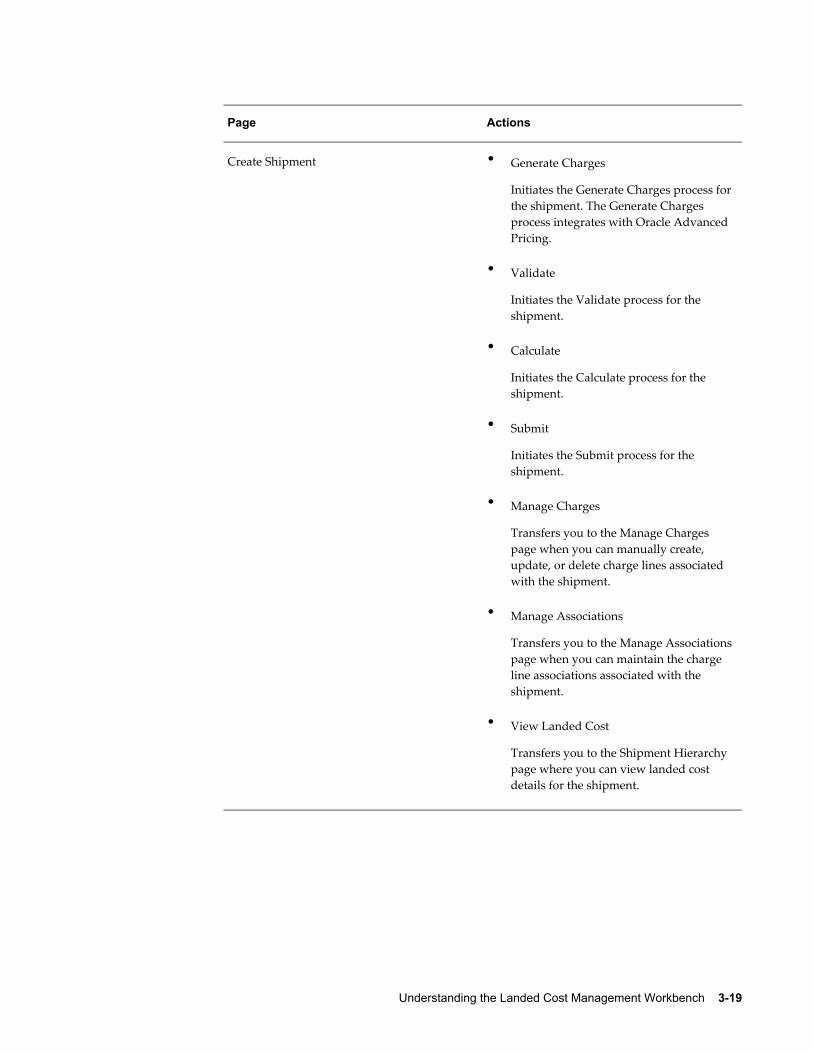
Understanding the Landed Cost Management Workbench 3-19
Page Actions
Create Shipment • Generate Charges
Initiates the Generate Charges process forthe shipment. The Generate Charges process integrates with Oracle Advanced Pricing.
• Validate
Initiates the Validate process for the shipment.
• Calculate
Initiates the Calculate process for the shipment.
• Submit
Initiates the Submit process for the shipment.
• Manage Charges
Transfers you to the Manage Charges page when you can manually create, update, or delete charge lines associated with the shipment.
• Manage Associations
Transfers you to the Manage Associationspage when you can maintain the charge line associations associated with the shipment.
• View Landed Cost
Transfers you to the Shipment Hierarchy page where you can view landed cost details for the shipment.

3-20 Oracle Landed Cost Management Process Guide
Page Actions
Update Shipment Shipment not at a Completed shipment status:
• Generate Charges
Initiates the Generate Charges process forthe shipment. The Generate Charges process integrates with Oracle Advanced Pricing.
• Validate
Initiates the Validate process for the shipment.
• Calculate
Initiates the Calculate process for the shipment.
• Submit
Initiates the Submit process for the shipment.
• Manage Charges
Transfers you to the Manage Charges page when you can manually create, update, or delete charge lines associated with the shipment.
• Manage Associations
Transfers you to the Manage Associationspage when you can maintain the charge line associations associated with the shipment.
• View Landed Cost
Transfers you to the Shipment Hierarchy page where you can view landed cost details for the shipment.
Shipment at a Completed shipment status with no pending updates:
• Manage Charges
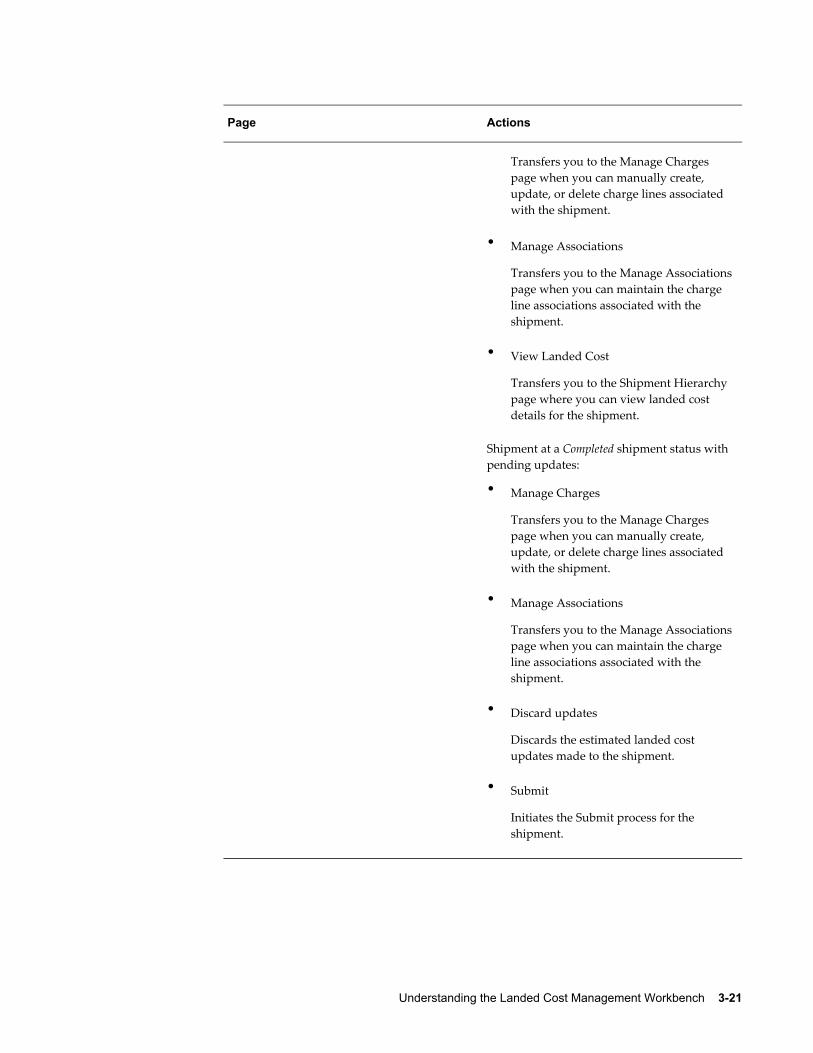
Understanding the Landed Cost Management Workbench 3-21
Page Actions
Transfers you to the Manage Charges page when you can manually create, update, or delete charge lines associated with the shipment.
• Manage Associations
Transfers you to the Manage Associationspage when you can maintain the charge line associations associated with the shipment.
• View Landed Cost
Transfers you to the Shipment Hierarchy page where you can view landed cost details for the shipment.
Shipment at a Completed shipment status with pending updates:
• Manage Charges
Transfers you to the Manage Charges page when you can manually create, update, or delete charge lines associated with the shipment.
• Manage Associations
Transfers you to the Manage Associationspage when you can maintain the charge line associations associated with the shipment.
• Discard updates
Discards the estimated landed cost updates made to the shipment.
• Submit
Initiates the Submit process for the shipment.

3-22 Oracle Landed Cost Management Process Guide
Page Actions
View Shipment • View Charges
Transfers you to the View Manage Charges page where you can view charge lines for the shipment.
• View Associations
Transfers you to the View Manage Associations page where you can view charge line associations for the shipment.
• View Landed Cost
Transfers you to the Shipment Hierarchy page where you can view landed cost details for a shipment.
For more information on how to use each one of these actions, see:
• Generating Charges for the Shipment, page 5-36
• Managing Charge Lines for the Shipment, page 5-37
• Managing Associations for the Shipment, page 5-44
• Validating the Shipment, page 5-49
• Calculating Estimated Land Cost for the Shipment, page 5-50
• Submitting the Shipment to Receiving, page 5-55
• Viewing Estimated Landed Cost for the Shipment, page 5-52
• Viewing Actual Landed Cost for the Shipment, page 5-59
• Viewing Charge Lines for the Shipment, page 5-42
• Viewing Associations for a Shipment, page 5-47
• Updating Estimated Landed Cost Information on Charge Lines, page 7-14
• Updating Estimated Landed Cost Information on Charge Line Details, page 7-18
• Processing Estimated Landed Cost Updates, page 7-22

Understanding the Landed Cost Management Workbench 3-23
• Discarding Estimated Landed Cost Updates to a Completed Shipment, page 7-23
• Viewing Estimated Landed Cost Information After Updates, page 7-25
Understanding the Shipment StatusAs a landed cost management shipment progresses through its life-cycle, the shipment status is used to indicate where the shipment is in its progression. The shipment status is a simple way to know what actions or processes have occurred against a shipment.
This table describes the shipment statuses and how they are used in Oracle Landed CostManagement:
Action/Process Shipment Status
Initial creation of a shipment in Oracle LandedCost Management
Incomplete
After the Generate Charges process is performed for a shipment
Incomplete
After the Validate process is performed for a shipment
• If validation was successful, Validated.
• If validation was not successful, On Hold
Correct the problem and run the Validate process again.
Changes are made to a validated shipment that requires validation to be performed again. For example, a change in shipment line quantity or amount.
Validation Required
After the Submit process is performed for a shipment
Completed

Managing Simulated Landed Cost 4-1
4Managing Simulated Landed Cost
This chapter covers the following topics:
• Understanding Simulated Landed Cost
• Creating a Landed Cost Simulation for a Purchase Order
• Reviewing Landed Cost Simulations
• Managing Landed Cost Simulations
• Managing Charges and Simulation Details
• Creating the Estimated Landed Cost Shipment
Understanding Simulated Landed CostSimulated Landed Cost functionality enables you to simulate the landed costs when creating a purchase order. This enables the buyer to perform better sourcing decisions by comparing the overall landed costs including all applicable charges instead of relying on the item price only. You can review the landed cost information simulations by editing the charges automatically calculated or create and delete new ones.
Note: If Oracle Endeca is installed and licensed in your environment, then refer to the Oracle E-Business Suite Endeca Integration and SystemAdministration Guide for detailed information about the Endeca enhancements to your product.
Simulated Landed Cost functionality is available for standard purchase orders as well as blanket releases.
See:
• Creating a Landed Cost Simulation for a Purchase Order, page 4-2
• Reviewing Existent Landed Cost Simulations, page 4-5
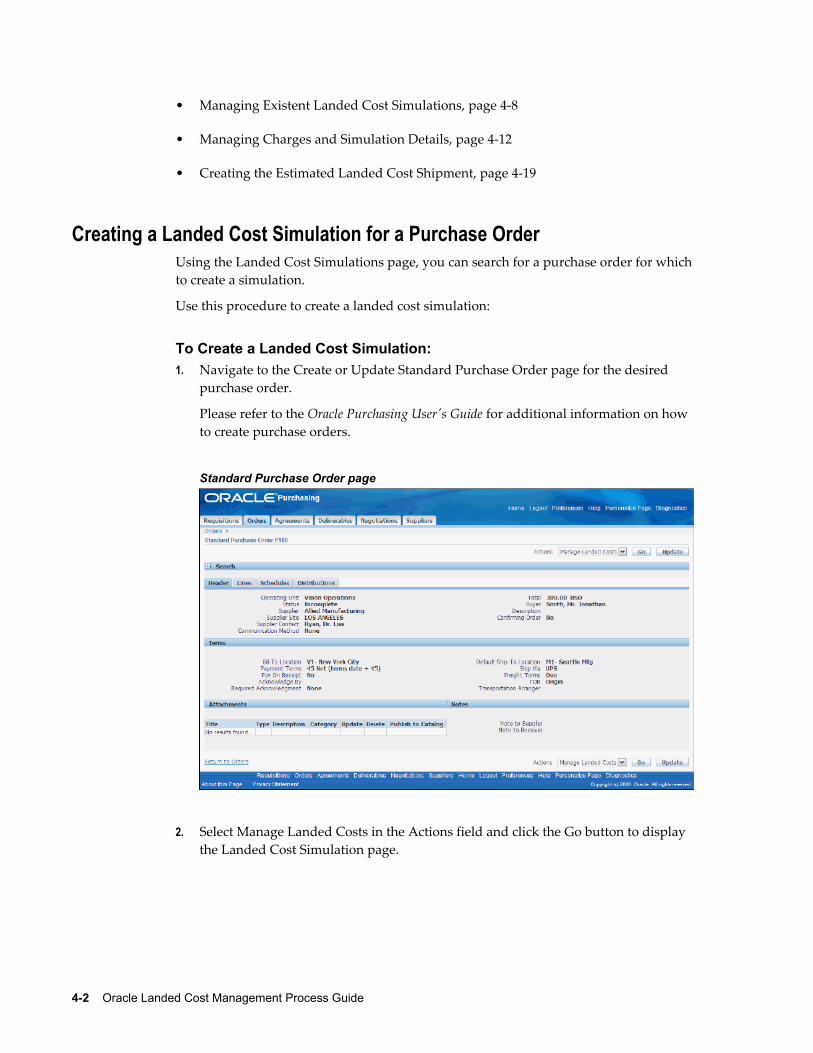
4-2 Oracle Landed Cost Management Process Guide
• Managing Existent Landed Cost Simulations, page 4-8
• Managing Charges and Simulation Details, page 4-12
• Creating the Estimated Landed Cost Shipment, page 4-19
Creating a Landed Cost Simulation for a Purchase OrderUsing the Landed Cost Simulations page, you can search for a purchase order for whichto create a simulation.
Use this procedure to create a landed cost simulation:
To Create a Landed Cost Simulation:1. Navigate to the Create or Update Standard Purchase Order page for the desired
purchase order.
Please refer to the Oracle Purchasing User's Guide for additional information on how to create purchase orders.
Standard Purchase Order page
2. Select Manage Landed Costs in the Actions field and click the Go button to display the Landed Cost Simulation page.
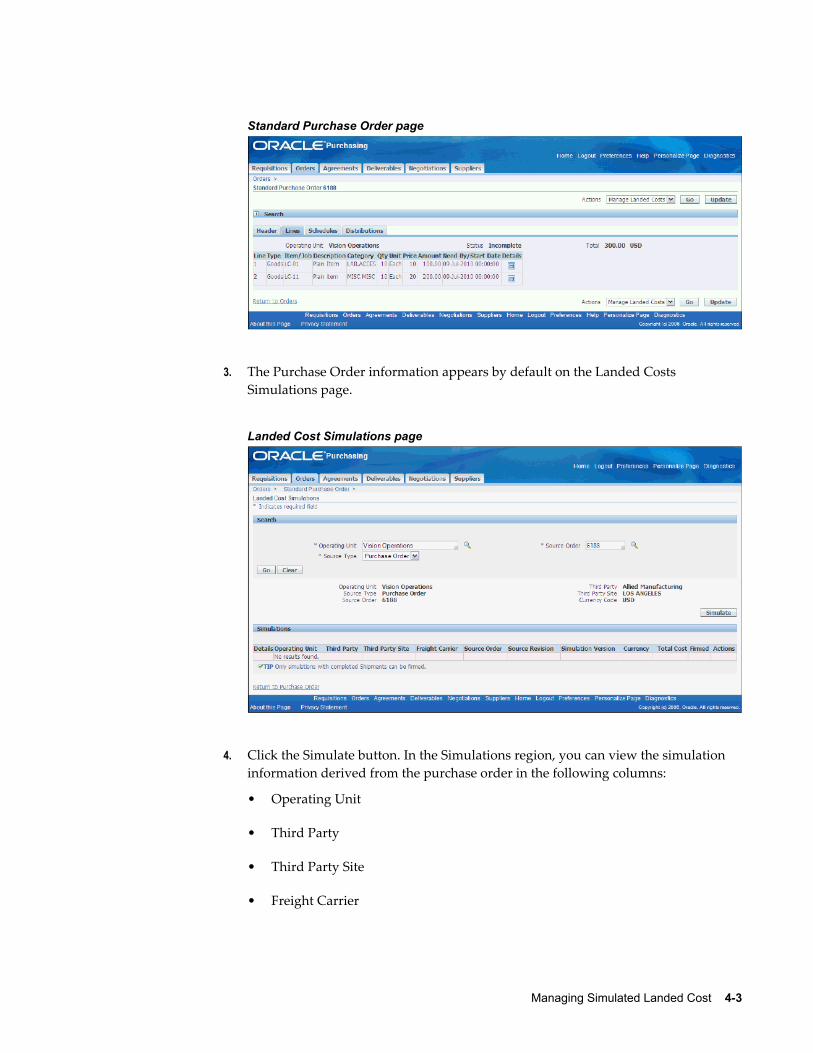
Managing Simulated Landed Cost 4-3
Standard Purchase Order page
3. The Purchase Order information appears by default on the Landed Costs Simulations page.
Landed Cost Simulations page
4. Click the Simulate button. In the Simulations region, you can view the simulation information derived from the purchase order in the following columns:
• Operating Unit
• Third Party
• Third Party Site
• Freight Carrier
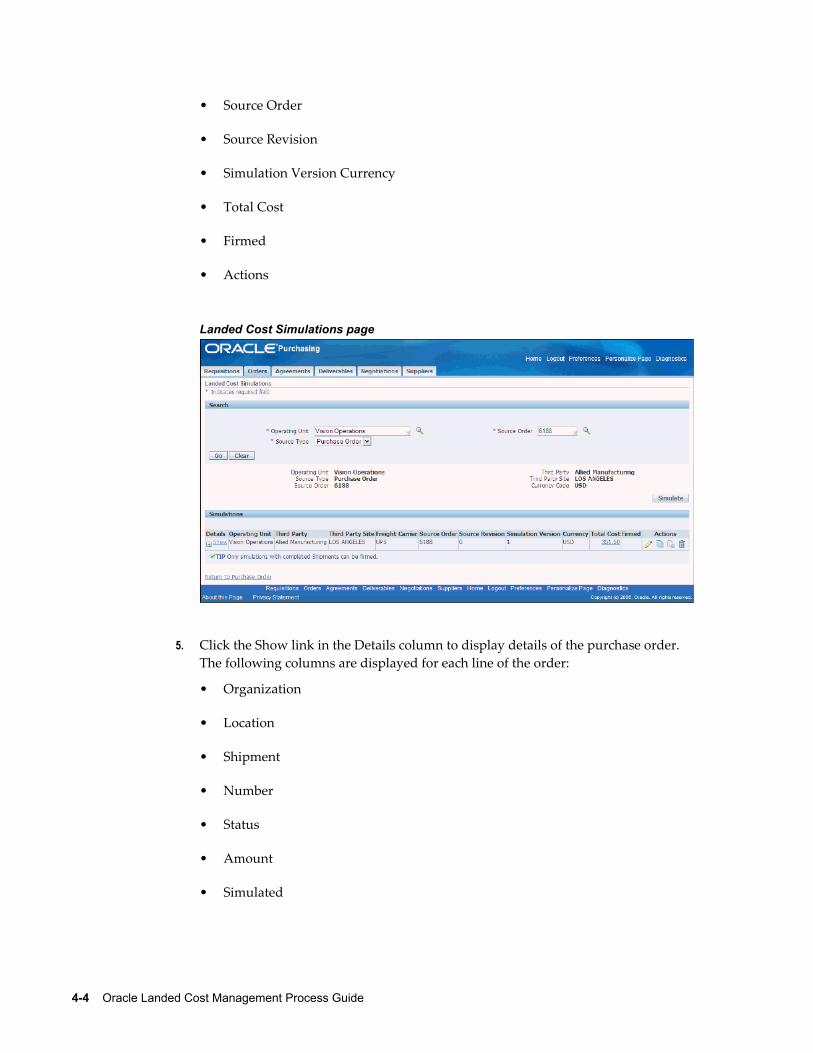
4-4 Oracle Landed Cost Management Process Guide
• Source Order
• Source Revision
• Simulation Version Currency
• Total Cost
• Firmed
• Actions
Landed Cost Simulations page
5. Click the Show link in the Details column to display details of the purchase order. The following columns are displayed for each line of the order:
• Organization
• Location
• Shipment
• Number
• Status
• Amount
• Simulated
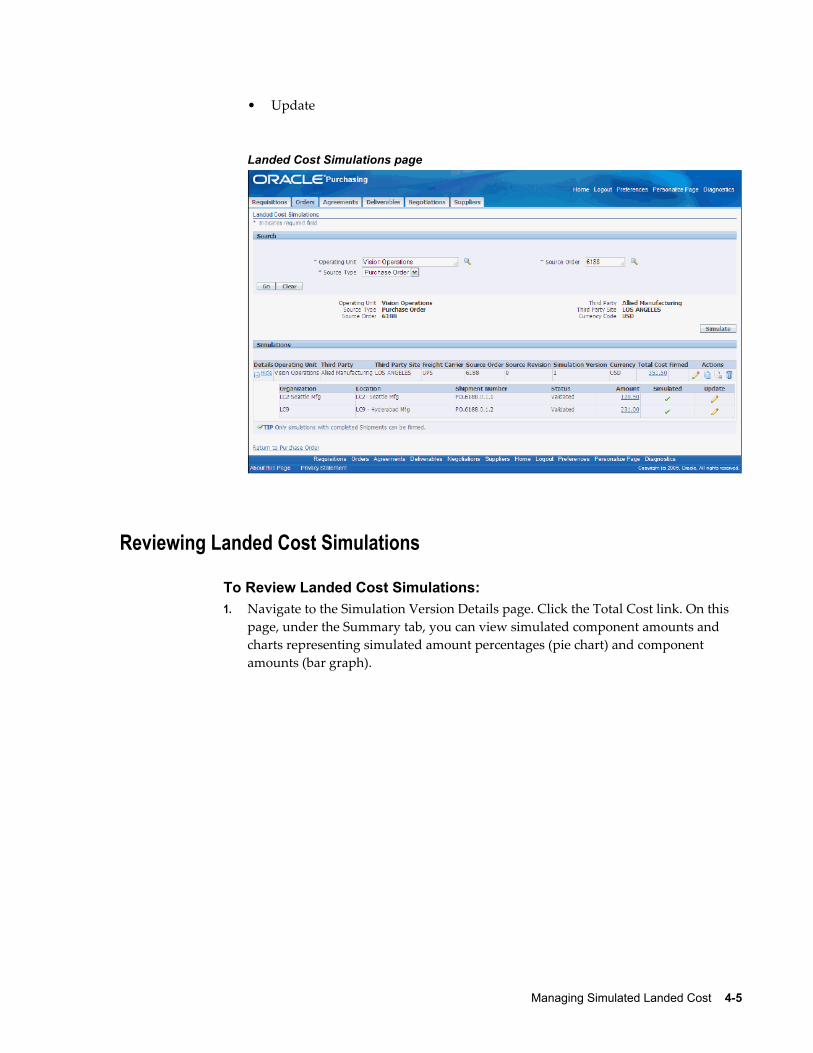
Managing Simulated Landed Cost 4-5
• Update
Landed Cost Simulations page
Reviewing Landed Cost Simulations
To Review Landed Cost Simulations:1. Navigate to the Simulation Version Details page. Click the Total Cost link. On this
page, under the Summary tab, you can view simulated component amounts and charts representing simulated amount percentages (pie chart) and component amounts (bar graph).
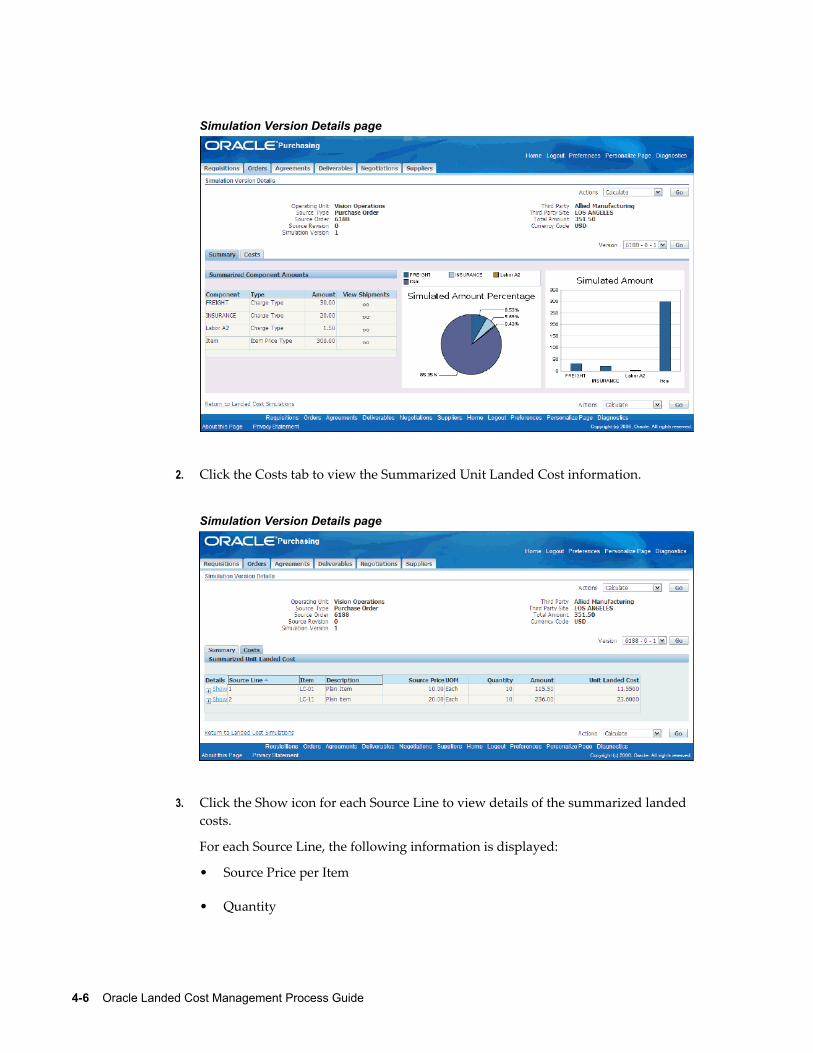
4-6 Oracle Landed Cost Management Process Guide
Simulation Version Details page
2. Click the Costs tab to view the Summarized Unit Landed Cost information.
Simulation Version Details page
3. Click the Show icon for each Source Line to view details of the summarized landed costs.
For each Source Line, the following information is displayed:
• Source Price per Item
• Quantity
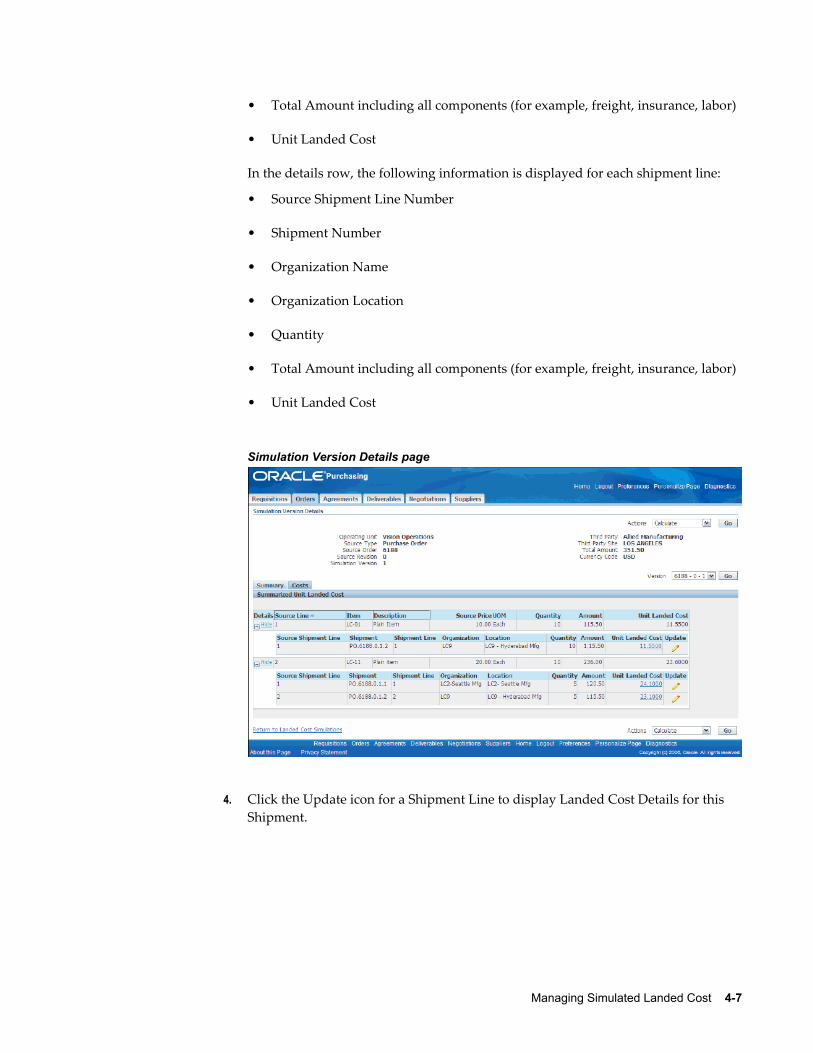
Managing Simulated Landed Cost 4-7
• Total Amount including all components (for example, freight, insurance, labor)
• Unit Landed Cost
In the details row, the following information is displayed for each shipment line:
• Source Shipment Line Number
• Shipment Number
• Organization Name
• Organization Location
• Quantity
• Total Amount including all components (for example, freight, insurance, labor)
• Unit Landed Cost
Simulation Version Details page
4. Click the Update icon for a Shipment Line to display Landed Cost Details for this Shipment.
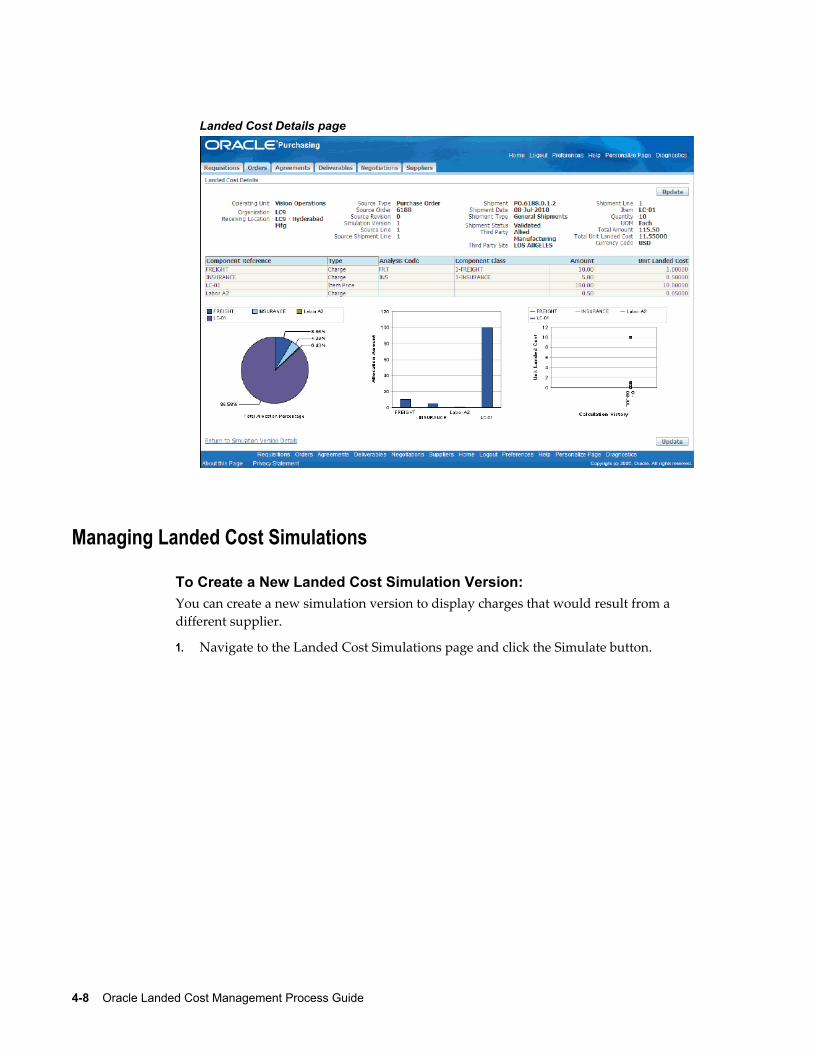
4-8 Oracle Landed Cost Management Process Guide
Landed Cost Details page
Managing Landed Cost Simulations
To Create a New Landed Cost Simulation Version:You can create a new simulation version to display charges that would result from a different supplier.
1. Navigate to the Landed Cost Simulations page and click the Simulate button.
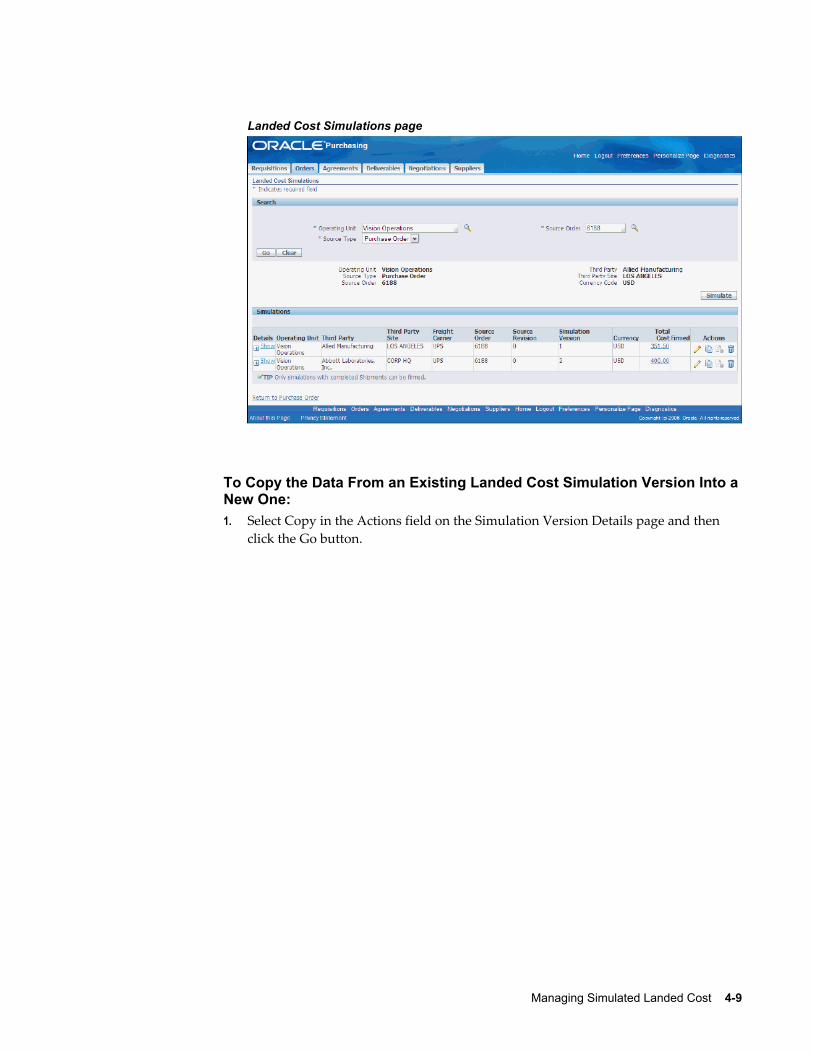
Managing Simulated Landed Cost 4-9
Landed Cost Simulations page
To Copy the Data From an Existing Landed Cost Simulation Version Into aNew One:1. Select Copy in the Actions field on the Simulation Version Details page and then
click the Go button.
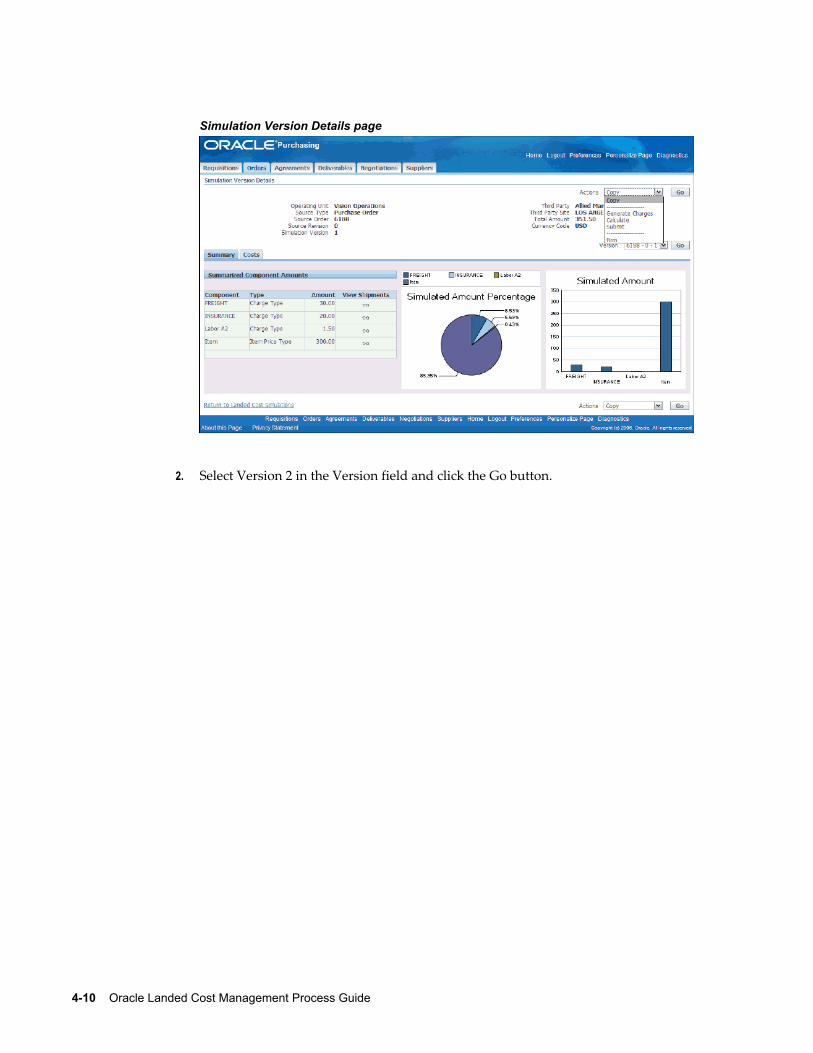
4-10 Oracle Landed Cost Management Process Guide
Simulation Version Details page
2. Select Version 2 in the Version field and click the Go button.
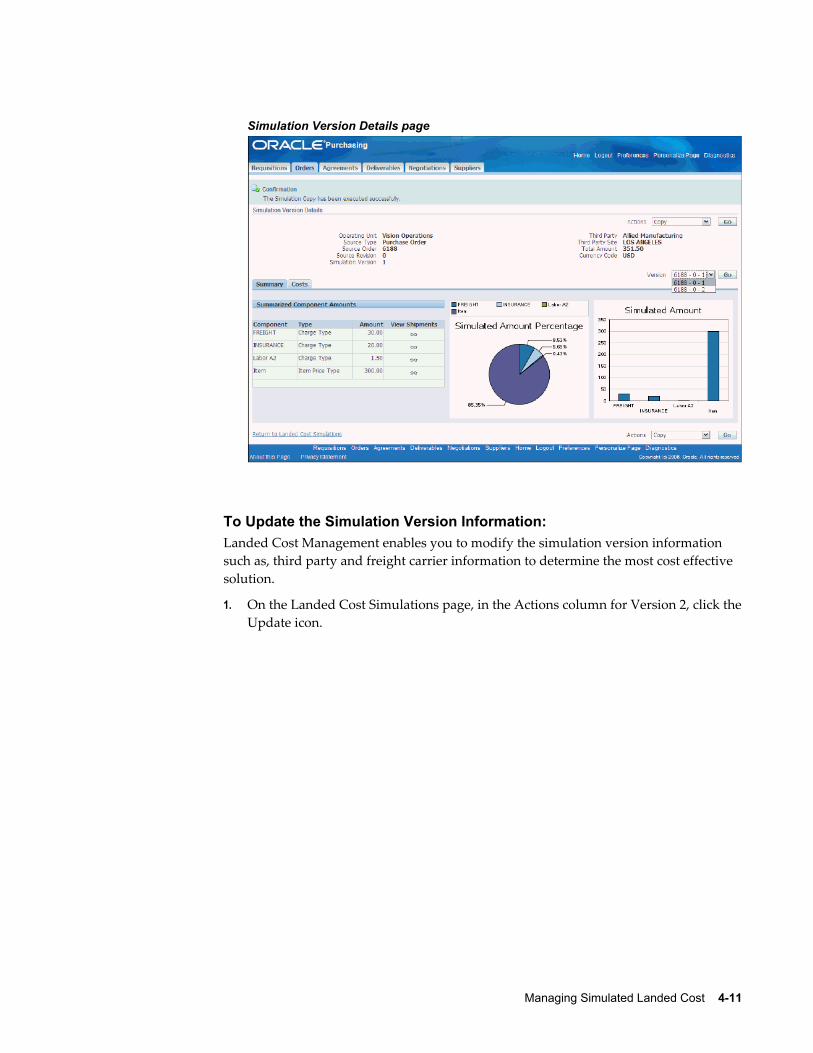
Managing Simulated Landed Cost 4-11
Simulation Version Details page
To Update the Simulation Version Information:Landed Cost Management enables you to modify the simulation version information such as, third party and freight carrier information to determine the most cost effective solution.
1. On the Landed Cost Simulations page, in the Actions column for Version 2, click theUpdate icon.
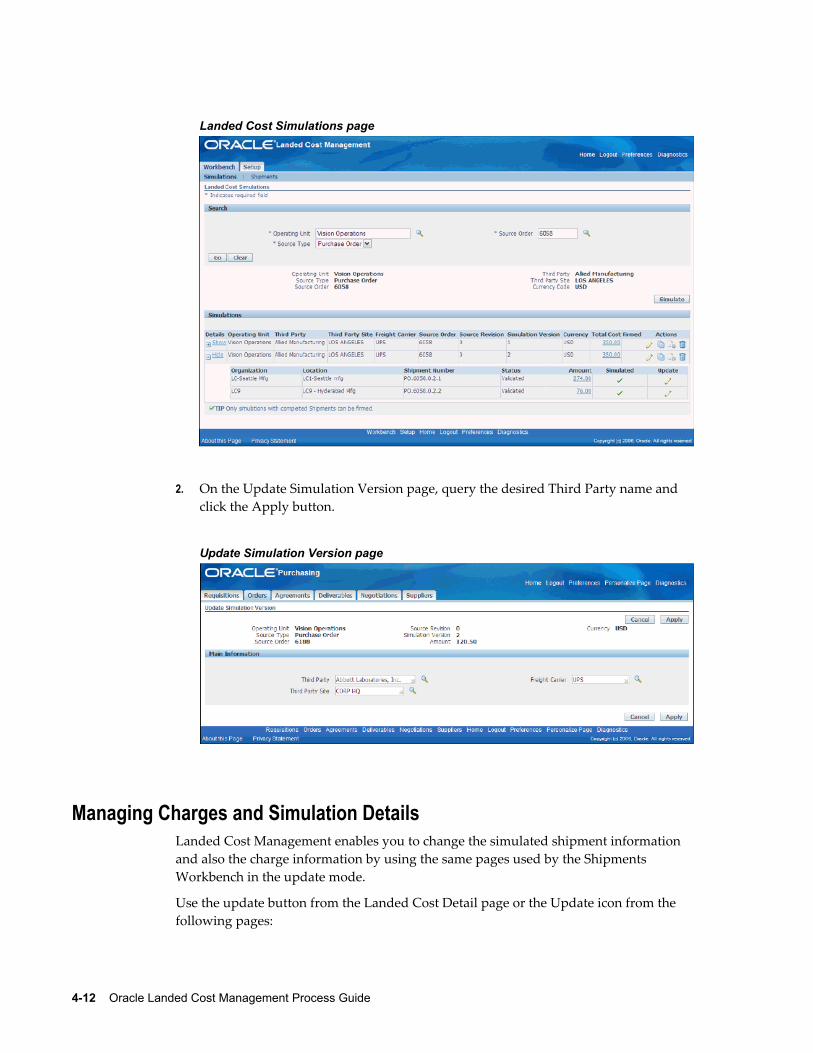
4-12 Oracle Landed Cost Management Process Guide
Landed Cost Simulations page
2. On the Update Simulation Version page, query the desired Third Party name and click the Apply button.
Update Simulation Version page
Managing Charges and Simulation DetailsLanded Cost Management enables you to change the simulated shipment information and also the charge information by using the same pages used by the Shipments Workbench in the update mode.
Use the update button from the Landed Cost Detail page or the Update icon from the following pages:
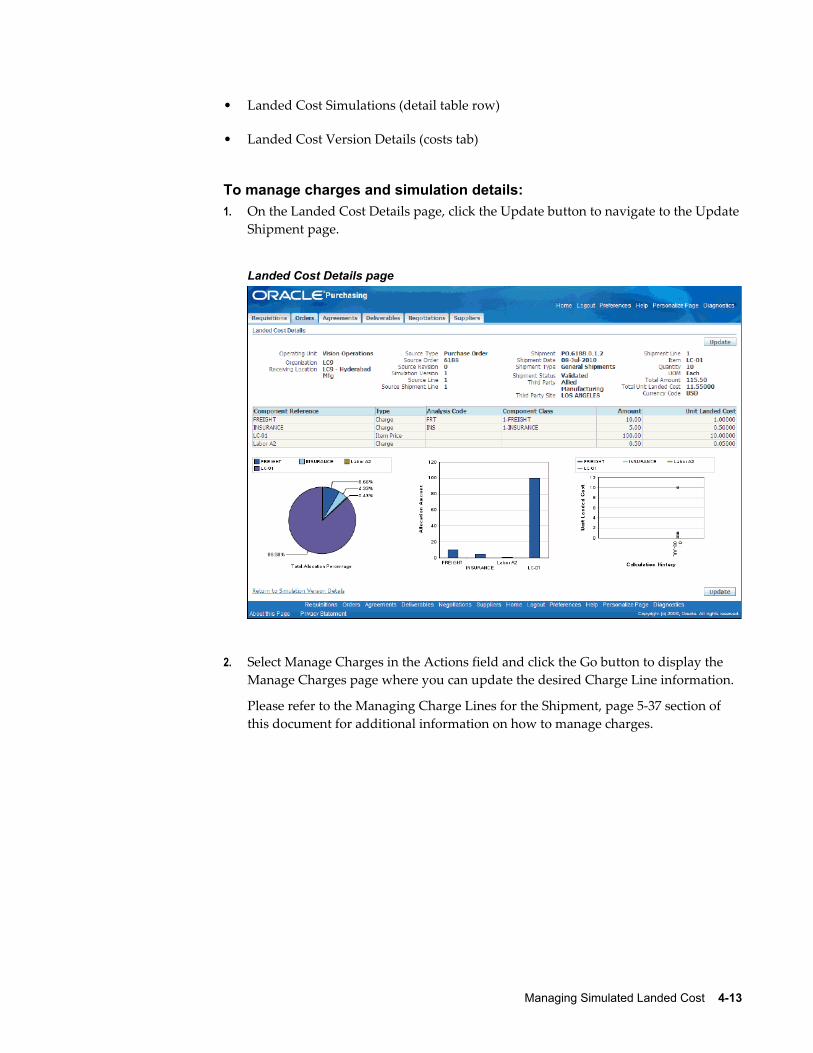
Managing Simulated Landed Cost 4-13
• Landed Cost Simulations (detail table row)
• Landed Cost Version Details (costs tab)
To manage charges and simulation details:1. On the Landed Cost Details page, click the Update button to navigate to the Update
Shipment page.
Landed Cost Details page
2. Select Manage Charges in the Actions field and click the Go button to display the Manage Charges page where you can update the desired Charge Line information.
Please refer to the Managing Charge Lines for the Shipment, page 5-37 section of this document for additional information on how to manage charges.
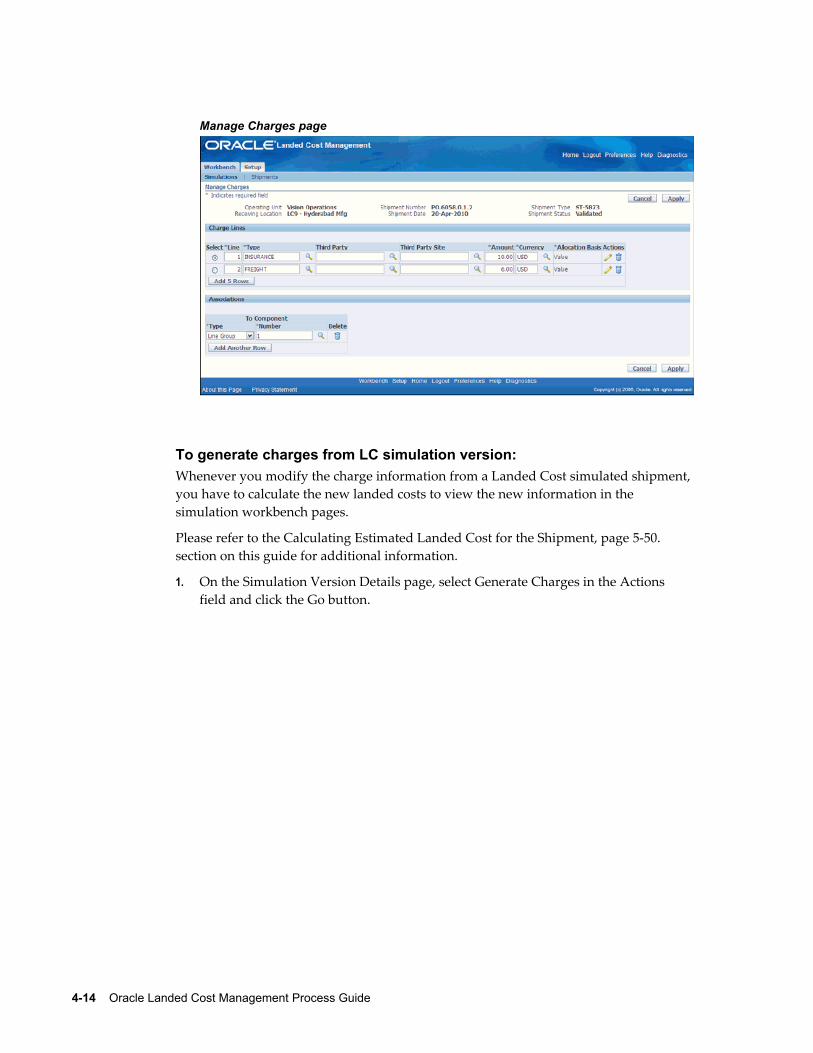
4-14 Oracle Landed Cost Management Process Guide
Manage Charges page
To generate charges from LC simulation version:Whenever you modify the charge information from a Landed Cost simulated shipment, you have to calculate the new landed costs to view the new information in the simulation workbench pages.
Please refer to the Calculating Estimated Landed Cost for the Shipment, page 5-50. section on this guide for additional information.
1. On the Simulation Version Details page, select Generate Charges in the Actions field and click the Go button.
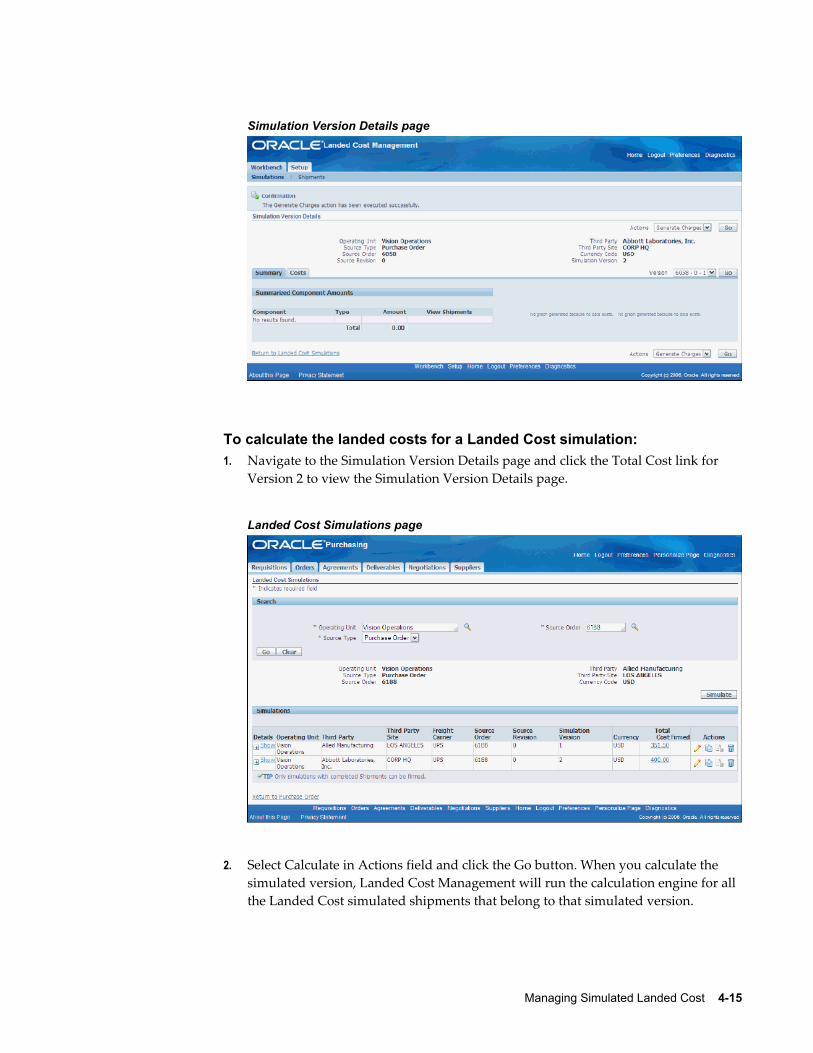
Managing Simulated Landed Cost 4-15
Simulation Version Details page
To calculate the landed costs for a Landed Cost simulation:1. Navigate to the Simulation Version Details page and click the Total Cost link for
Version 2 to view the Simulation Version Details page.
Landed Cost Simulations page
2. Select Calculate in Actions field and click the Go button. When you calculate the simulated version, Landed Cost Management will run the calculation engine for all the Landed Cost simulated shipments that belong to that simulated version.
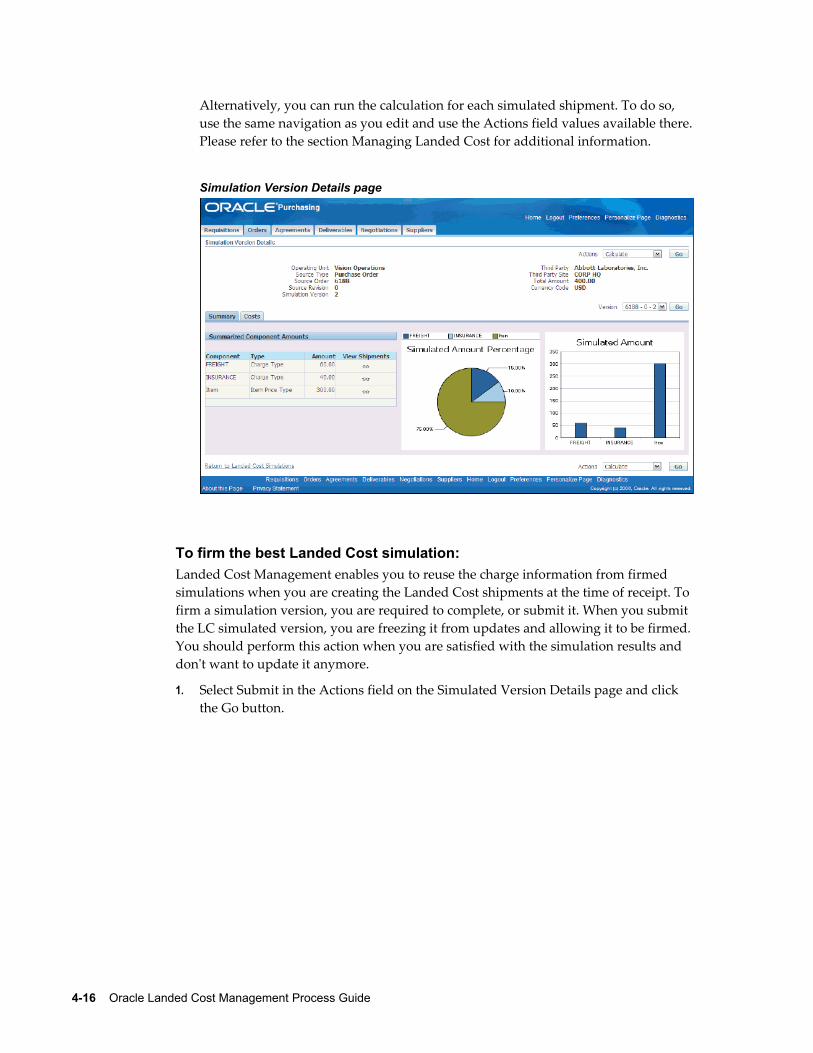
4-16 Oracle Landed Cost Management Process Guide
Alternatively, you can run the calculation for each simulated shipment. To do so, use the same navigation as you edit and use the Actions field values available there.Please refer to the section Managing Landed Cost for additional information.
Simulation Version Details page
To firm the best Landed Cost simulation:Landed Cost Management enables you to reuse the charge information from firmed simulations when you are creating the Landed Cost shipments at the time of receipt. To firm a simulation version, you are required to complete, or submit it. When you submit the LC simulated version, you are freezing it from updates and allowing it to be firmed.You should perform this action when you are satisfied with the simulation results and don't want to update it anymore.
1. Select Submit in the Actions field on the Simulated Version Details page and click the Go button.
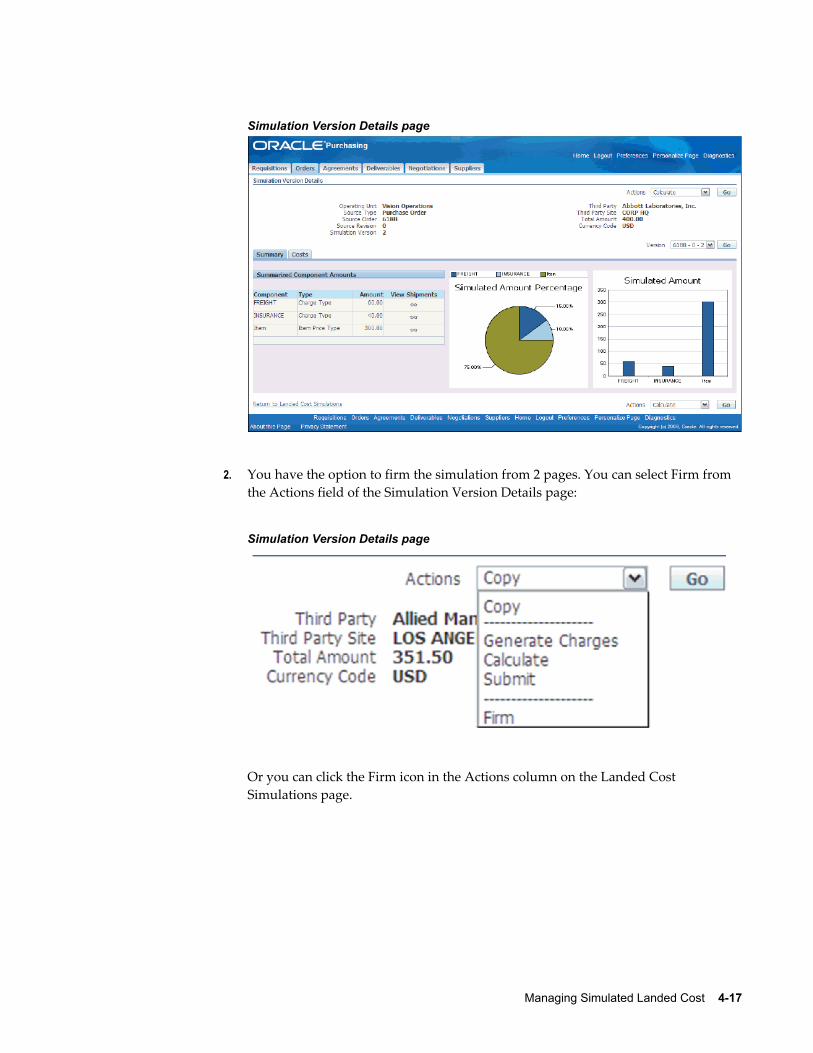
Managing Simulated Landed Cost 4-17
Simulation Version Details page
2. You have the option to firm the simulation from 2 pages. You can select Firm from the Actions field of the Simulation Version Details page:
Simulation Version Details page
Or you can click the Firm icon in the Actions column on the Landed Cost Simulations page.

4-18 Oracle Landed Cost Management Process Guide
Landed Cost Simulations page
3. On the Landed Cost Simulations page, note that Simulation Version 1 is now firmed.
Landed Cost Simulations page
During the firming process, Landed Cost Management performs a synchronized validation between the data from the simulation and the source document (for example, purchase order). When a discrepancy is recognized by the system, a warning is displayed.
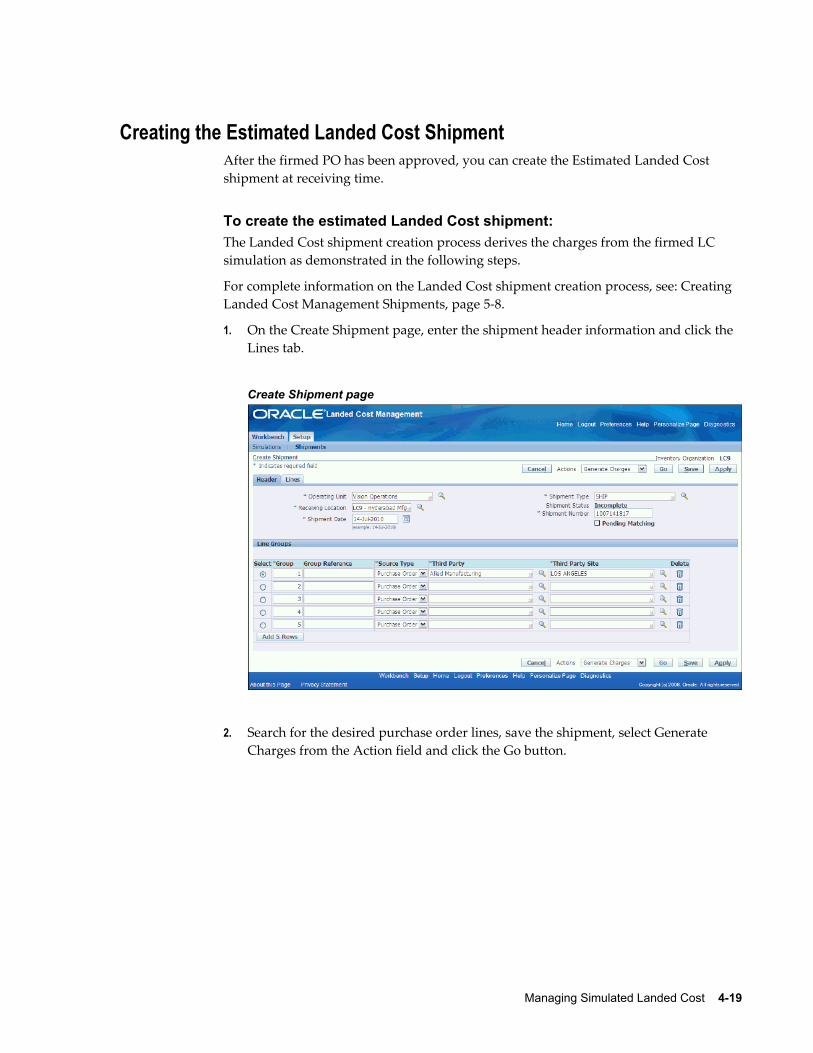
Managing Simulated Landed Cost 4-19
Creating the Estimated Landed Cost ShipmentAfter the firmed PO has been approved, you can create the Estimated Landed Cost shipment at receiving time.
To create the estimated Landed Cost shipment:The Landed Cost shipment creation process derives the charges from the firmed LC simulation as demonstrated in the following steps.
For complete information on the Landed Cost shipment creation process, see: Creating Landed Cost Management Shipments, page 5-8.
1. On the Create Shipment page, enter the shipment header information and click the Lines tab.
Create Shipment page
2. Search for the desired purchase order lines, save the shipment, select Generate Charges from the Action field and click the Go button.
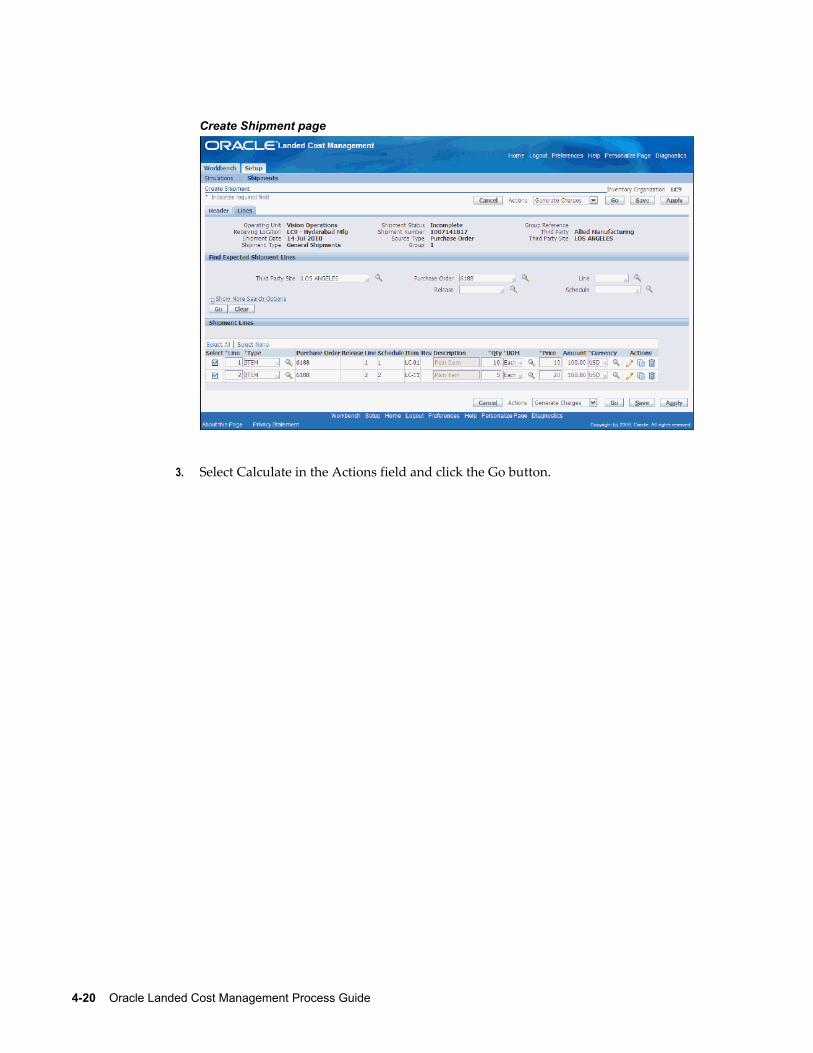
4-20 Oracle Landed Cost Management Process Guide
Create Shipment page
3. Select Calculate in the Actions field and click the Go button.
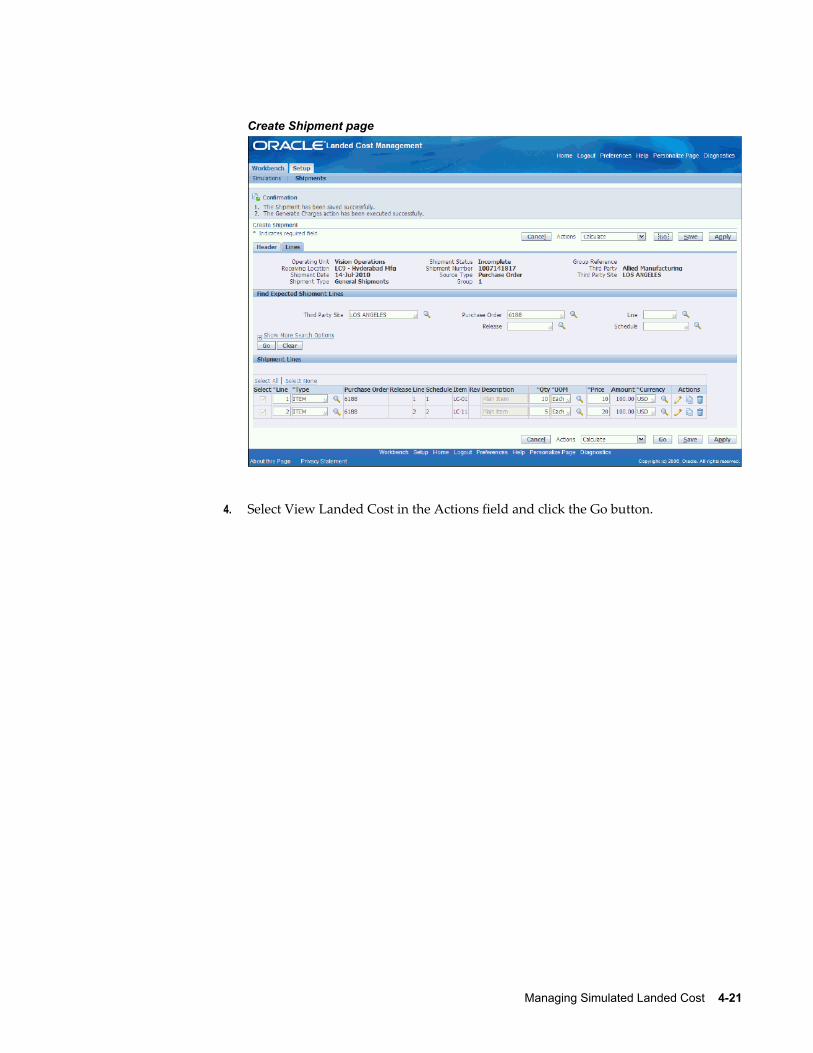
Managing Simulated Landed Cost 4-21
Create Shipment page
4. Select View Landed Cost in the Actions field and click the Go button.
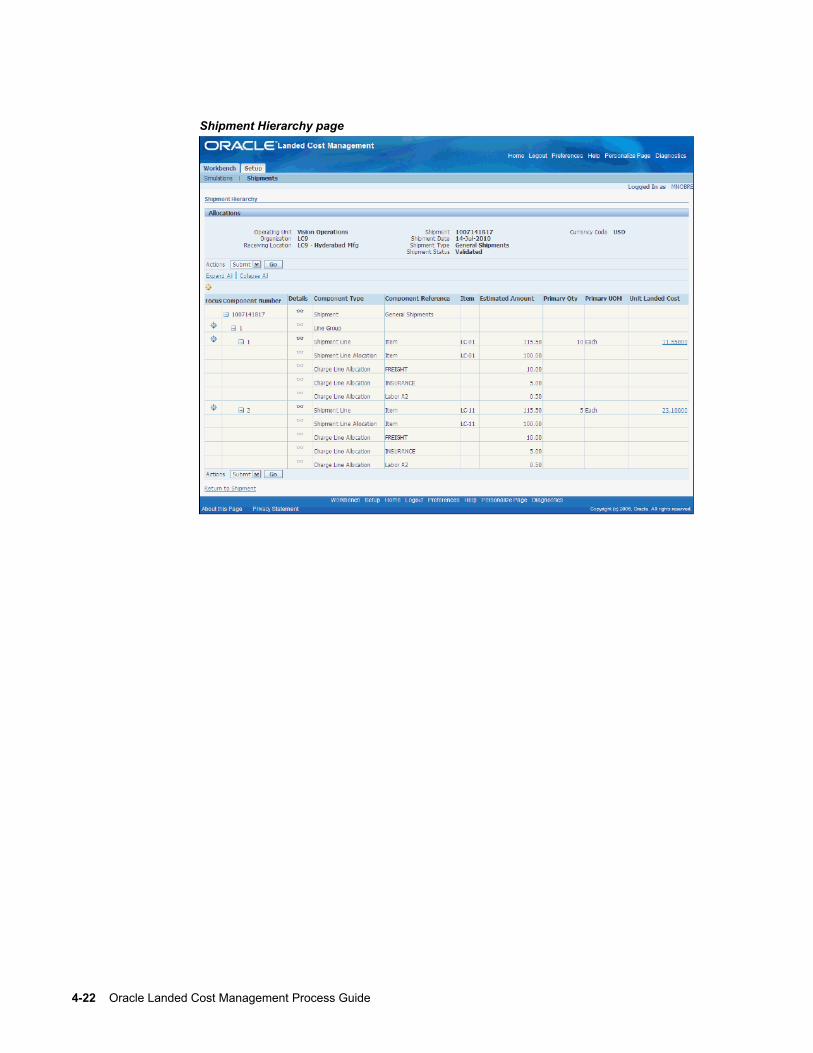
4-22 Oracle Landed Cost Management Process Guide
Shipment Hierarchy page
Managing Landed Cost as a Pre-Receiving Application 5-1
5Managing Landed Cost as a Pre-Receiving
Application
This chapter covers the following topics:
• Understanding Landed Cost as a Pre-Receiving Application
• Creating Landed Cost Management Shipments
• Entering Shipment Lines for the Shipment
• Updating Shipments
• Updating Shipment Lines
• Updating a Specific Shipment Line
• Viewing Shipments
• Viewing Shipment Lines
• Viewing a Specific Shipment Line
• Generating Charges for the Shipment
• Managing Charge Lines for the Shipment
• Viewing Charge Lines for the Shipment
• Managing Associations for the Shipment
• Viewing Associations for the Shipment
• Validating the Shipment
• Calculating Estimated Landed Cost for the Shipment
• Viewing Estimated Landed Cost for the Shipment
• Submitting the Shipment to Receiving
• Updating Estimated Landed Cost Information on Completed Shipments
• Calculating and Importing Actual Landed Cost for the Shipment
5-2 Oracle Landed Cost Management Process Guide
• Viewing Actual Landed Cost for the Shipment
Understanding Landed Cost as a Pre-Receiving Application
Landed Cost as a Pre-Receiving Application
Oracle Landed Cost Management can be used as a pre-receiving application. In this scenario, the estimation of the landed cost is required before the receipt of the item by the Receiving application by using Oracle Landed Cost Management functionality. After the estimated landed cost is finalized in Oracle Landed Cost Management that information is passed to Receiving during the receipt of the item based on the landed cost management shipment. Oracle Landed Cost Management also passes to the Receiving application the quantity received stated in the landed cost shipment line. The Receiving application doesn't allow you to change this quantity to prevent the misallocation of charges in costing. The receipt is performed using the known estimatedlanded cost.
Using Oracle Landed Cost Management the estimated landed cost is calculated for a shipment from the following:
Managing Landed Cost as a Pre-Receiving Application 5-3
• Price and taxes for the item on the associated purchase order.
• Charges generated through the integration with Oracle Advanced Pricing or manually entered in Oracle Landed Cost Management.
After invoices are created and matched to the receipt of the item in Oracle Payables that actual price information is passed to Oracle Landed Cost Management using two concurrent programs (Matches Interface Import and Submit Pending Shipments). If youare using Oracle Process Manufacturing an additional concurrent program (Landed Cost Adjustments Import Process) needs to be performed so that Oracle Process Manufacturing can obtain the estimated and actual price information from Oracle Landed Cost Management for its processing.
The Landed Cost Adjustments Import Process is a concurrent program that belongs to Oracle Process Manufacturing.
Using Oracle Landed Cost Management pages the actual landed cost for the shipment can be viewed and analyzed with the estimated landed cost information.
Landed Cost as a Pre-Receiving Application High-Level Process FlowFollowing is a basic process flow when using Oracle Landed Cost Management as a pre-receiving application:
1. Create a purchase order for an item and select a ship-to organization that has pre-receiving in LCM enabled using Oracle Purchasing.
Ensure that the Match Option field for each purchase order line is set to Receipt.
For information on creating a purchase order, see the Purchase Orders chapter in the Oracle Purchasing User's Guide.
For information on selecting the pre-receiving in LCM check box for an Inventory organization, see Setting Up Receiving Options, page 2-7.
2. Approve the purchase order.
For information on approving a purchase order, see the Approval, Security, and Control chapter in the Oracle Purchasing User's Guide.
3. Create a shipment for the items referenced on the purchase order using the Oracle Landed Cost Management Shipments Workbench.
For more information, see Creating Landed Cost Management Shipments, page 5-8.
4. Create shipment lines for the items referenced on the purchase order using the Oracle Landed Cost Management Shipments Workbench.
For more information, see Entering Shipment Lines for the Shipment, page 5-13.
5. (Optional) Generate charges for the shipment using the Oracle Landed Cost
5-4 Oracle Landed Cost Management Process Guide
Management Shipments Workbench.
For more information, see Generating Charges for the Shipment, page 5-36.
6. (Optional) Manage charges for the shipment using the Oracle Landed Cost Management Shipments Workbench.
View or change charges that were created through the generate charges process.
Add new charge lines for the shipment.
For more information, see Managing Charge Lines for the Shipment, page 5-37.
7. (Optional) Manage associations for the shipment using the Oracle Landed Cost Management Shipments Workbench.
For more information, see Managing Associations for the Shipment, page 5-44.
8. (Optional) Validate the shipment (price tolerance and so on) using the Oracle Landed Cost Management Shipments Workbench.
For more information, see Validating the Shipment, page 5-49.
9. Calculate estimated landed cost for the shipment using the Oracle Landed Cost Management Shipments Workbench.
The Calculate process performs the validation process during its processing. Hence,the Validate process does not need to be run separately.
For more information, see Calculating Estimated Landed Cost for the Shipment, page 5-50.
10. (Optional) View the estimated landed cost that was calculated using the Oracle Landed Cost Management Shipments Workbench.
For more information, see Viewing Estimated Landed Cost for the Shipment, page 5-52.
11. (Optional) Repeat steps 6- 10 until the estimated landed cost is satisfactory for the shipment.
12. Submit the estimated landed cost for the shipment using the Oracle Landed Cost Management Shipments Workbench.
For more information, see Submitting the Shipment to Receiving, page 5-55.
13. (Optional) Update estimated landed cost information on a completed shipment using the Oracle Landed Cost Management Update Shipment, Update Shipment Line, Manage Charges, Manage Charge Line, and Manage Associations pages.
For more information, see Understanding the Estimated Landed Cost Update Process, page 7-1 and the Updating Estimated Landed Cost on Completes Shipments chapter in this guide.
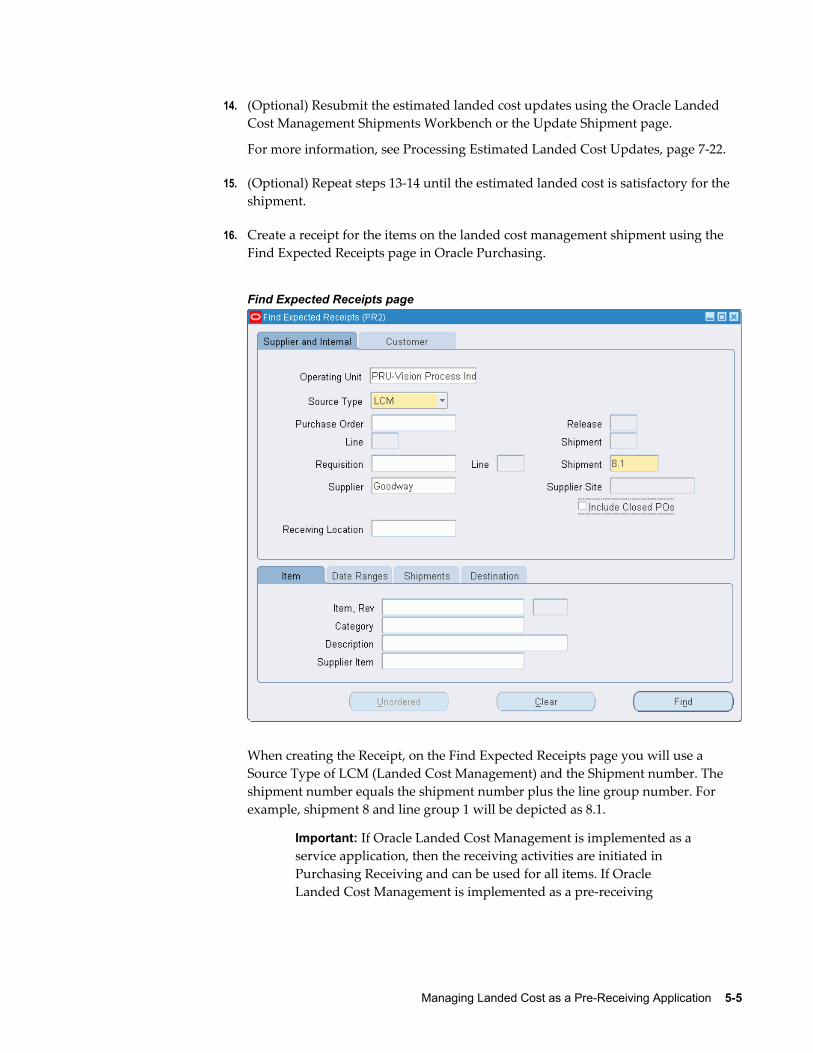
Managing Landed Cost as a Pre-Receiving Application 5-5
14. (Optional) Resubmit the estimated landed cost updates using the Oracle Landed Cost Management Shipments Workbench or the Update Shipment page.
For more information, see Processing Estimated Landed Cost Updates, page 7-22.
15. (Optional) Repeat steps 13-14 until the estimated landed cost is satisfactory for the shipment.
16. Create a receipt for the items on the landed cost management shipment using the Find Expected Receipts page in Oracle Purchasing.
Find Expected Receipts page
When creating the Receipt, on the Find Expected Receipts page you will use a Source Type of LCM (Landed Cost Management) and the Shipment number. The shipment number equals the shipment number plus the line group number. For example, shipment 8 and line group 1 will be depicted as 8.1.
Important: If Oracle Landed Cost Management is implemented as aservice application, then the receiving activities are initiated in Purchasing Receiving and can be used for all items. If Oracle Landed Cost Management is implemented as a pre-receiving
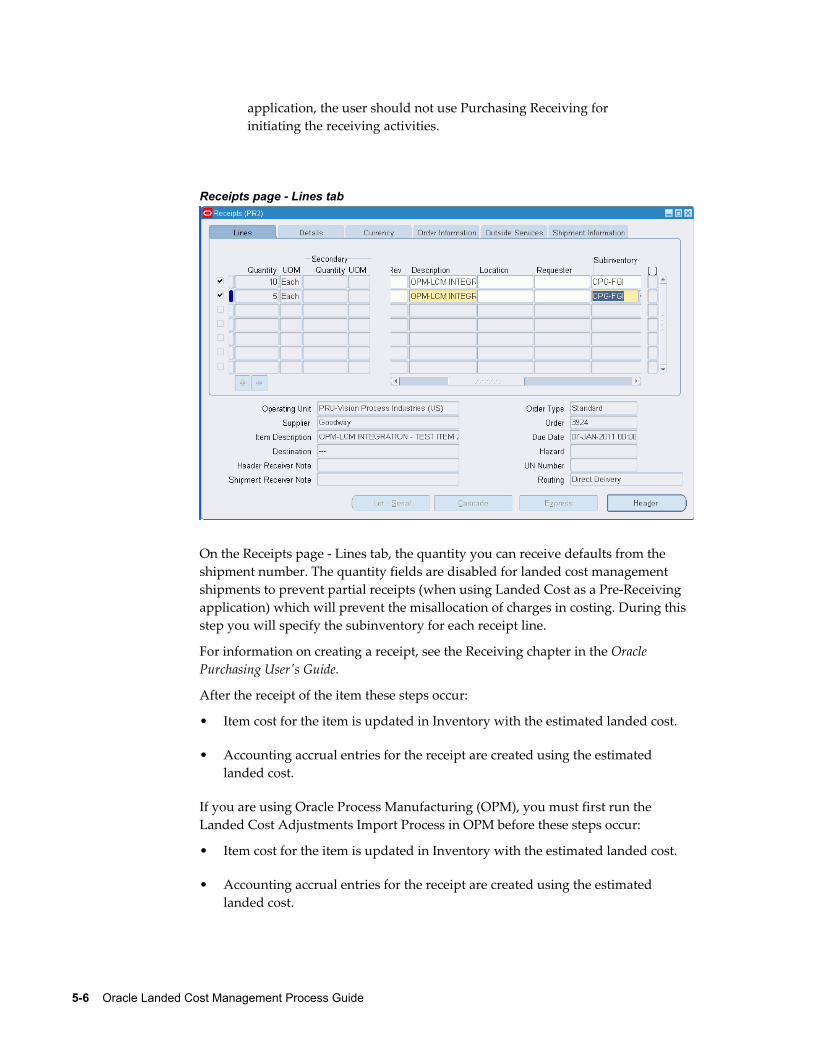
5-6 Oracle Landed Cost Management Process Guide
application, the user should not use Purchasing Receiving for initiating the receiving activities.
Receipts page - Lines tab
On the Receipts page - Lines tab, the quantity you can receive defaults from the shipment number. The quantity fields are disabled for landed cost management shipments to prevent partial receipts (when using Landed Cost as a Pre-Receiving application) which will prevent the misallocation of charges in costing. During this step you will specify the subinventory for each receipt line.
For information on creating a receipt, see the Receiving chapter in the Oracle Purchasing User's Guide.
After the receipt of the item these steps occur:
• Item cost for the item is updated in Inventory with the estimated landed cost.
• Accounting accrual entries for the receipt are created using the estimated landed cost.
If you are using Oracle Process Manufacturing (OPM), you must first run the Landed Cost Adjustments Import Process in OPM before these steps occur:
• Item cost for the item is updated in Inventory with the estimated landed cost.
• Accounting accrual entries for the receipt are created using the estimated landed cost.
Managing Landed Cost as a Pre-Receiving Application 5-7
17. Create an invoice for the receipt using Oracle Payables.
For information on creating an invoice, see the Invoices chapter in the Oracle Payables User's Guide.
18. Match the invoice to the receipts using Oracle Payables.
For information on invoice matching to receipts option, see the Invoices chapter in the Oracle Payables User's Guide.
19. Validate the invoice. After invoice validation the actual invoice information is populated into the Oracle Landed Cost Management interfaces.
For information on validating, see the Invoices chapter in the Oracle Payables User's Guide.
20. Repeat Steps 17-19 for all other invoices (freight, insurance and so on) that pertain to the shipment.
21. Run the Matches Interface Import concurrent program using Oracle Landed Cost Management.
This program imports the matched information from the Oracle Landed Cost Management interface tables into definitive tables. This process also sets the landed cost management shipments with Pending Matching field to Yes. At this time, the actual landed cost calculation has not been performed yet.
Oracle recommends that this program be scheduled to run periodically in order to not require any user intervention.
For more information, see Calculating and Importing Actual Landed Cost for the Shipment, page 5-57.
22. Run the Submit Pending Shipments concurrent program using Oracle Landed Cost Management.
This program performs the submit process again and calculates the actual landed cost for the landed cost management shipment. After this process completes successful you can view the actual landed cost using the Shipment Hierarchy and Landed Cost Detail pages in Oracle Landed Cost Management.
Oracle recommends that this program be scheduled to run periodically in order to not require any user intervention.
Important: Instead of performing Step 22, you can access the Shipments Workbench and manually perform the Submit action forthe shipment. The Submit Pending Shipments program performs the same action in a back ground process.
For more information, see Calculating and Importing Actual Landed Cost for the
5-8 Oracle Landed Cost Management Process Guide
Shipment, page 5-57.
After the actual estimated landed cost is calculated these steps occur:
• Item cost adjustments transactions are created in Oracle Cost Management (difference between estimated and actual landed cost).
• Accounting accrual adjustment entries are created (difference between estimated and actual landed cost) by Oracle Cost Management.
If you are using Oracle Process Manufacturing (OPM), you must first run the Landed Cost Adjustments Import Process in OPM before these steps occur:
• Item cost adjustments transactions are created in Oracle Process Manufacturing Cost Management (difference between estimated and actual landed cost).
• Accounting accrual adjustment entries are created (difference between estimated and actual landed cost) by Oracle Process Manufacturing Cost Management.
23. View the actual landed cost information for the shipment and compare the estimated landed cost to the actual landed cost for the shipment using the Oracle Landed Cost Management Shipments Workbench.
For more information, see Viewing Actual Landed Cost for the Shipment, page 5-59.
Creating Landed Cost Management ShipmentsA landed cost management shipment is an expected or actual delivery from a purchase order or agreement along with its related charges. A landed cost management shipmentcontains a shipment header, line groups, and shipment lines. The shipment header contains overall information for the shipment and defines the line groups associated with the shipment. The shipment lines contain the shipment lines for the shipment and match up with the delivery entity for the item. For example, a shipment may contain a one to one relationship with a purchase order and the purchase order lines.
Use the Create Shipment page to create the shipment header and the shipment lines.
Use this procedure to create a landed cost management shipment:
Prerequisites❒ A purchase order has already been created that is referencing a landed cost
management pre-receiving organization.
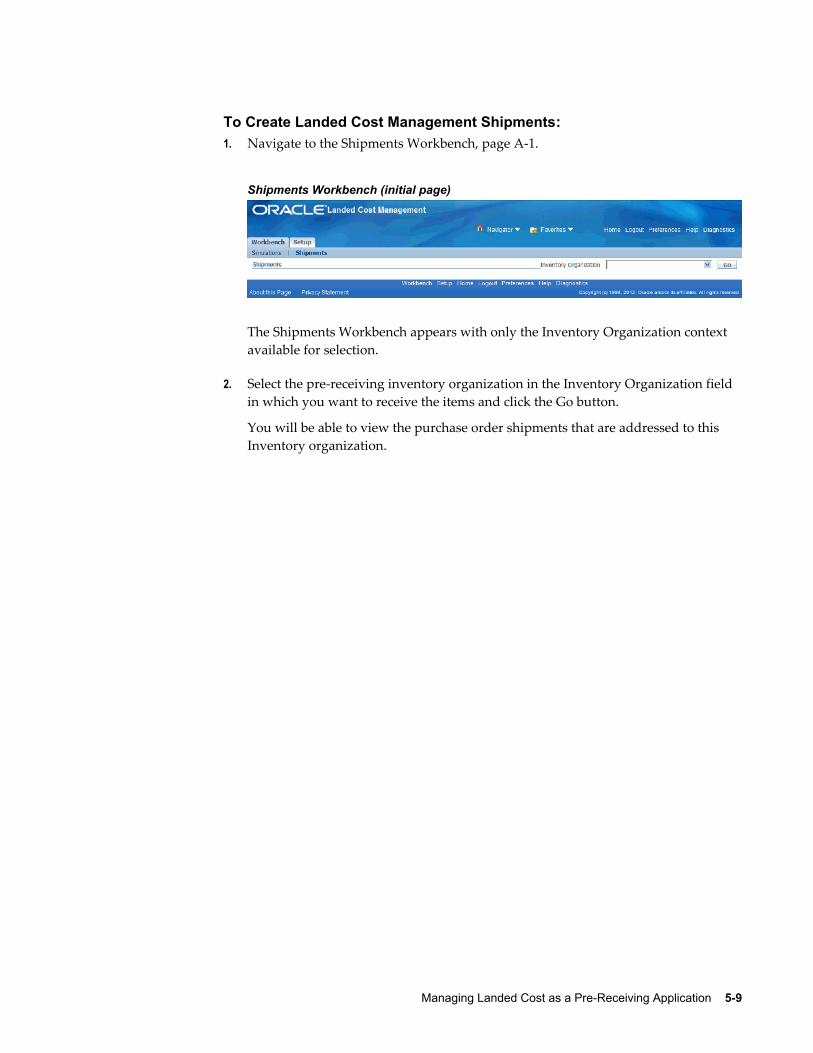
Managing Landed Cost as a Pre-Receiving Application 5-9
To Create Landed Cost Management Shipments:1. Navigate to the Shipments Workbench, page A-1.
Shipments Workbench (initial page)
The Shipments Workbench appears with only the Inventory Organization context available for selection.
2. Select the pre-receiving inventory organization in the Inventory Organization field in which you want to receive the items and click the Go button.
You will be able to view the purchase order shipments that are addressed to this Inventory organization.
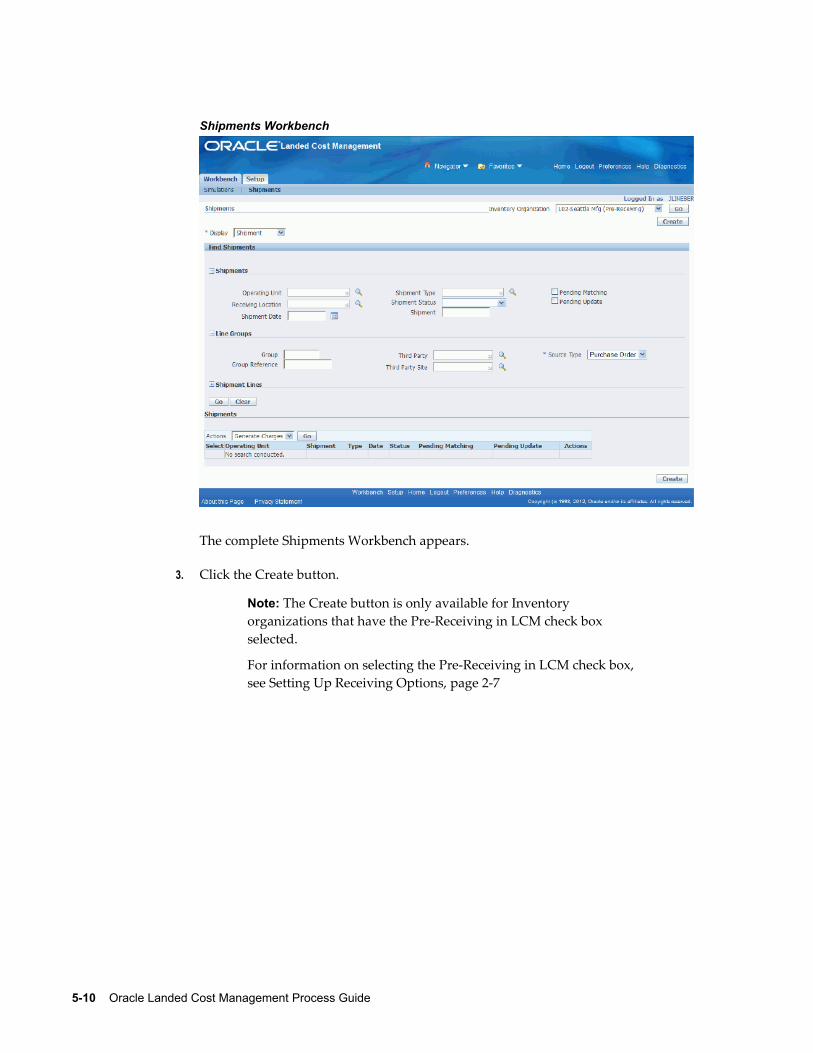
5-10 Oracle Landed Cost Management Process Guide
Shipments Workbench
The complete Shipments Workbench appears.
3. Click the Create button.
Note: The Create button is only available for Inventory organizations that have the Pre-Receiving in LCM check box selected.
For information on selecting the Pre-Receiving in LCM check box, see Setting Up Receiving Options, page 2-7
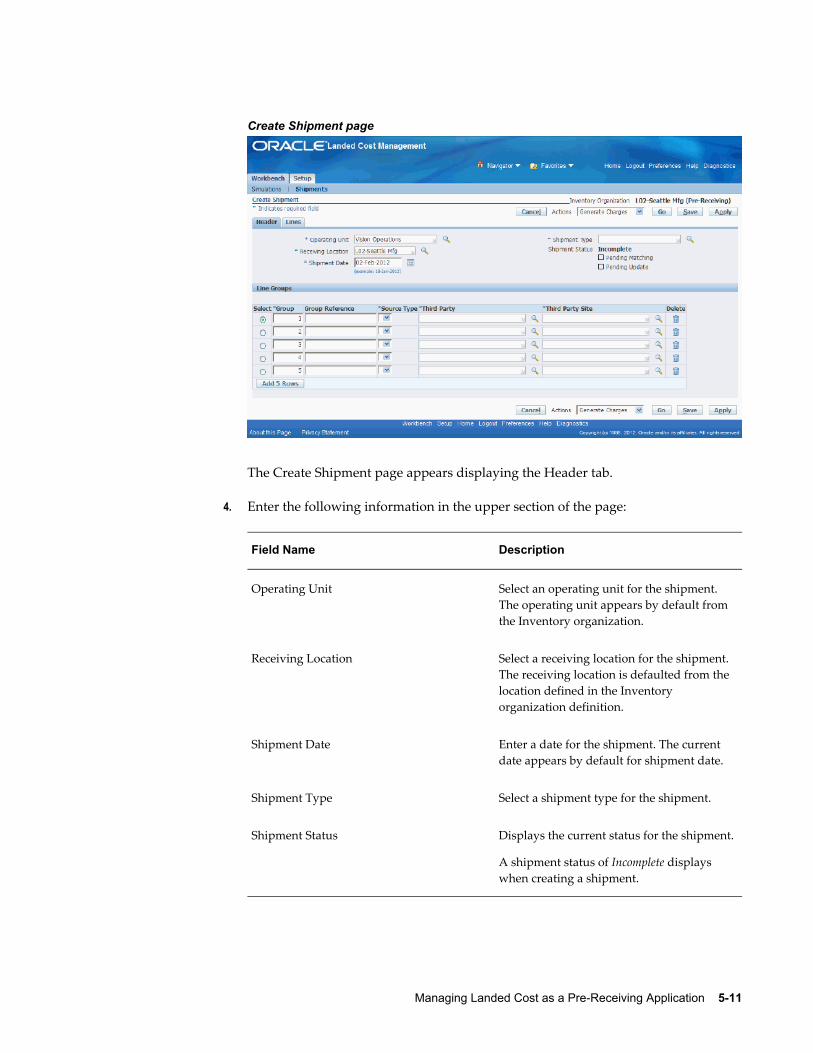
Managing Landed Cost as a Pre-Receiving Application 5-11
Create Shipment page
The Create Shipment page appears displaying the Header tab.
4. Enter the following information in the upper section of the page:
Field Name Description
Operating Unit Select an operating unit for the shipment. The operating unit appears by default from the Inventory organization.
Receiving Location Select a receiving location for the shipment. The receiving location is defaulted from the location defined in the Inventory organization definition.
Shipment Date Enter a date for the shipment. The current date appears by default for shipment date.
Shipment Type Select a shipment type for the shipment.
Shipment Status Displays the current status for the shipment.
A shipment status of Incomplete displays when creating a shipment.
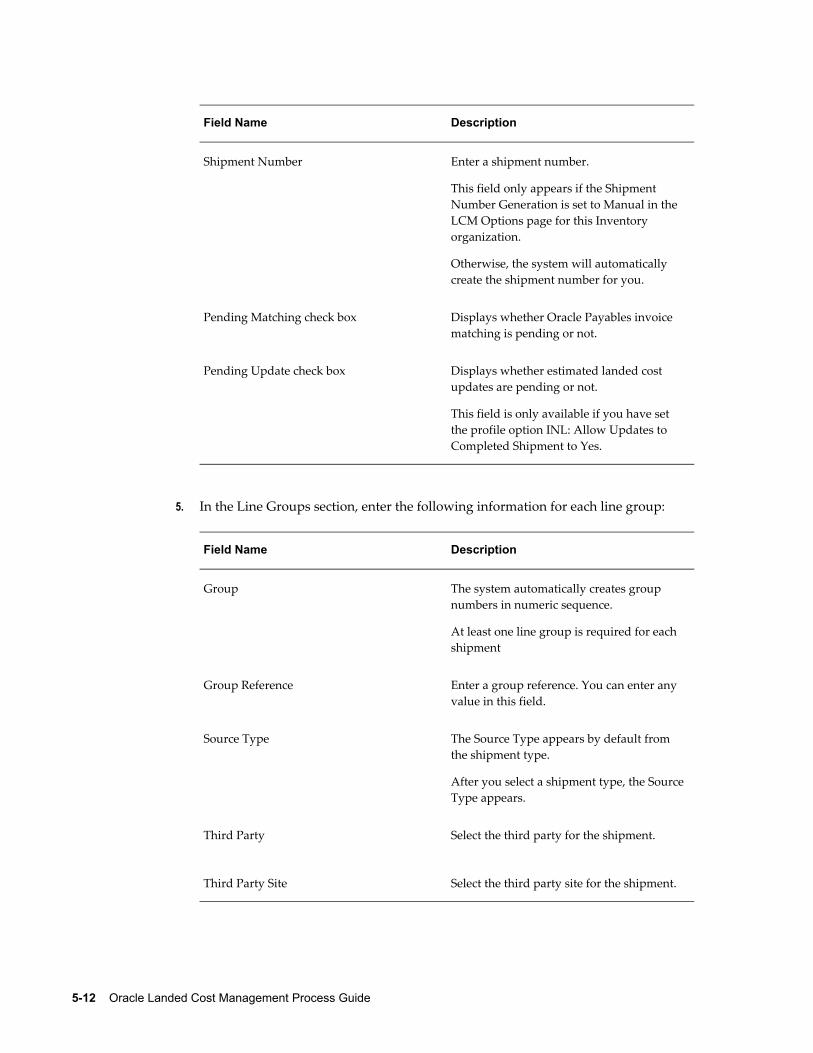
5-12 Oracle Landed Cost Management Process Guide
Field Name Description
Shipment Number Enter a shipment number.
This field only appears if the Shipment Number Generation is set to Manual in the LCM Options page for this Inventory organization.
Otherwise, the system will automatically create the shipment number for you.
Pending Matching check box Displays whether Oracle Payables invoice matching is pending or not.
Pending Update check box Displays whether estimated landed cost updates are pending or not.
This field is only available if you have set the profile option INL: Allow Updates to Completed Shipment to Yes.
5. In the Line Groups section, enter the following information for each line group:
Field Name Description
Group The system automatically creates group numbers in numeric sequence.
At least one line group is required for each shipment
Group Reference Enter a group reference. You can enter any value in this field.
Source Type The Source Type appears by default from the shipment type.
After you select a shipment type, the SourceType appears.
Third Party Select the third party for the shipment.
Third Party Site Select the third party site for the shipment.
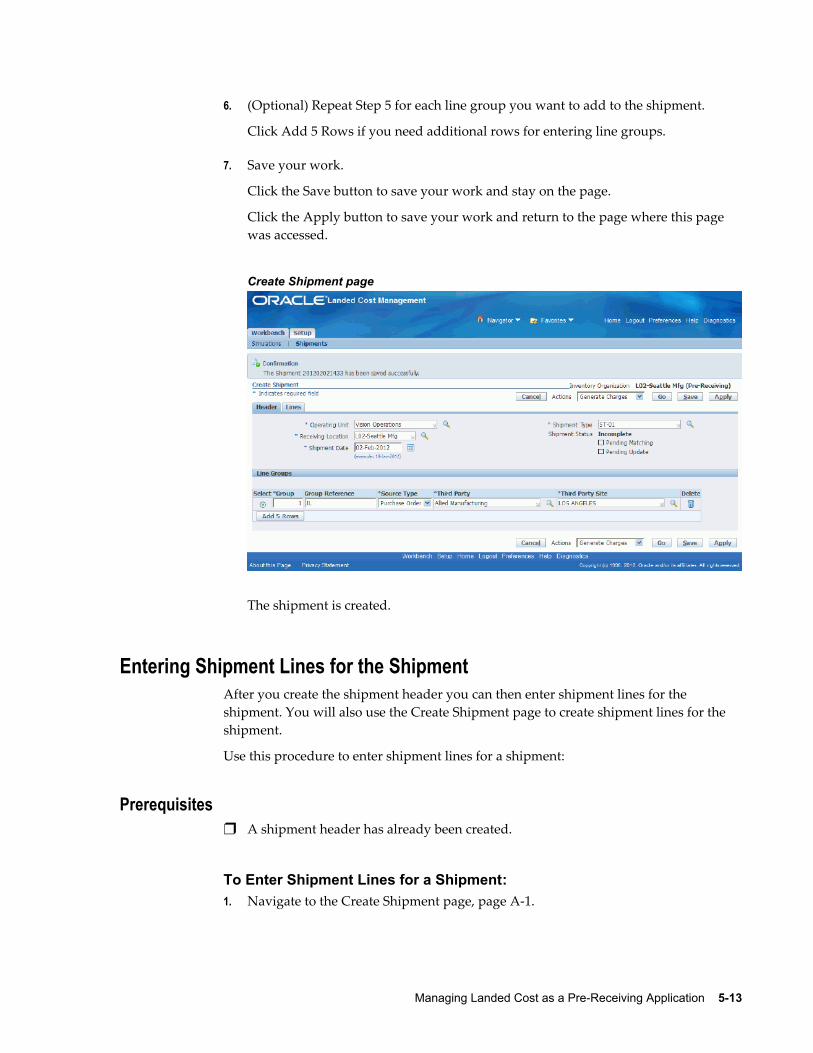
Managing Landed Cost as a Pre-Receiving Application 5-13
6. (Optional) Repeat Step 5 for each line group you want to add to the shipment.
Click Add 5 Rows if you need additional rows for entering line groups.
7. Save your work.
Click the Save button to save your work and stay on the page.
Click the Apply button to save your work and return to the page where this page was accessed.
Create Shipment page
The shipment is created.
Entering Shipment Lines for the ShipmentAfter you create the shipment header you can then enter shipment lines for the shipment. You will also use the Create Shipment page to create shipment lines for the shipment.
Use this procedure to enter shipment lines for a shipment:
Prerequisites❒ A shipment header has already been created.
To Enter Shipment Lines for a Shipment:1. Navigate to the Create Shipment page, page A-1.
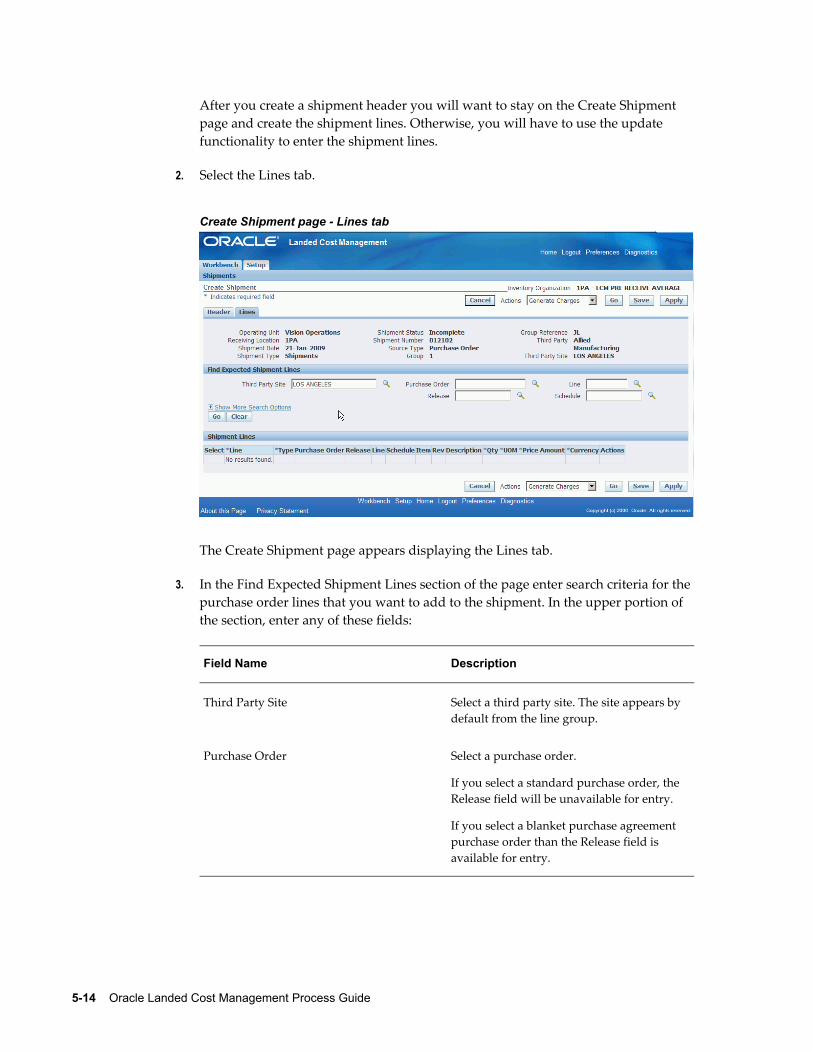
5-14 Oracle Landed Cost Management Process Guide
After you create a shipment header you will want to stay on the Create Shipment page and create the shipment lines. Otherwise, you will have to use the update functionality to enter the shipment lines.
2. Select the Lines tab.
Create Shipment page - Lines tab
The Create Shipment page appears displaying the Lines tab.
3. In the Find Expected Shipment Lines section of the page enter search criteria for the purchase order lines that you want to add to the shipment. In the upper portion of the section, enter any of these fields:
Field Name Description
Third Party Site Select a third party site. The site appears by default from the line group.
Purchase Order Select a purchase order.
If you select a standard purchase order, the Release field will be unavailable for entry.
If you select a blanket purchase agreement purchase order than the Release field is available for entry.
Managing Landed Cost as a Pre-Receiving Application 5-15
Field Name Description
Release Select a blanket purchase agreement release.
Line Select a purchase order line.
Schedule Select a purchase order schedule.
This field is not available for blanket purchase agreement purchase orders.
Otherwise, you can click the Go button without entering any search criteria and all available shipment lines will appear.
4. (Optional) Expand the Show More Search Options section and enter one or more of these fields:
Item
Field Name Description
Item Select an item number.
Description Enter an item description.
Rev (revision) Select an item revision number
Supplier Item Select a supplier item number.
Date Ranges
Field Name Description
Due By Date From and Due By Date To Enter a due by date range by entering the from and to dates.
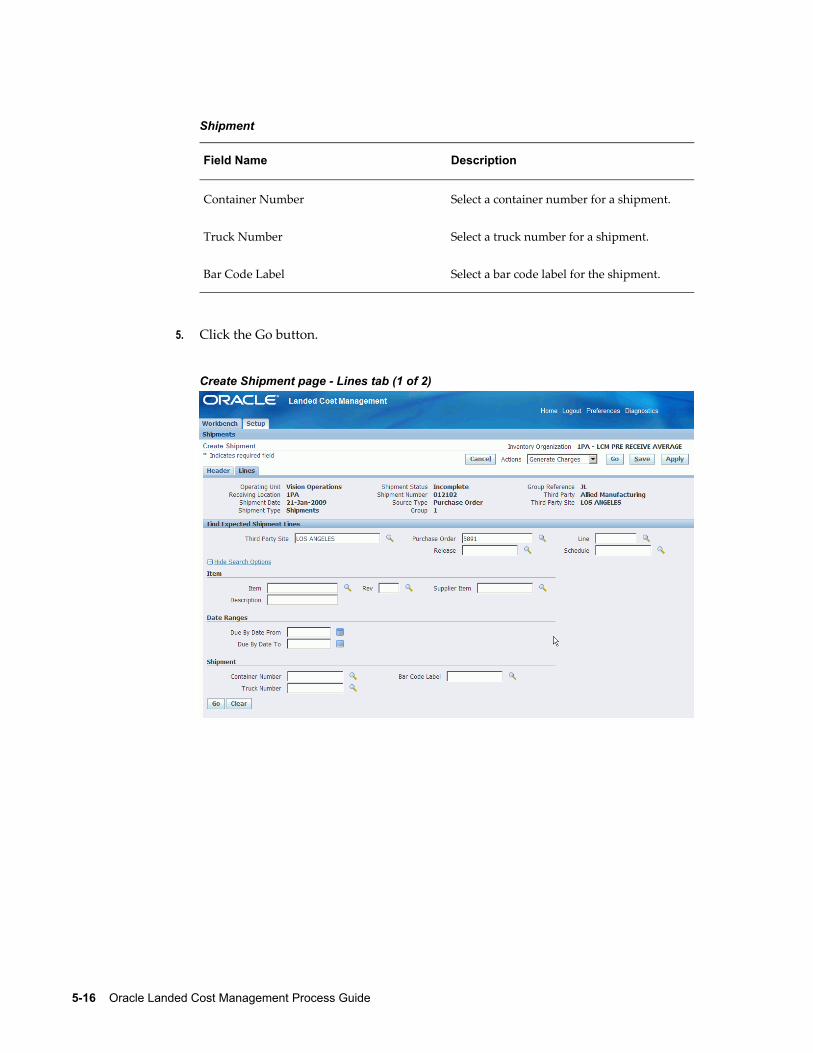
5-16 Oracle Landed Cost Management Process Guide
Shipment
Field Name Description
Container Number Select a container number for a shipment.
Truck Number Select a truck number for a shipment.
Bar Code Label Select a bar code label for the shipment.
5. Click the Go button.
Create Shipment page - Lines tab (1 of 2)
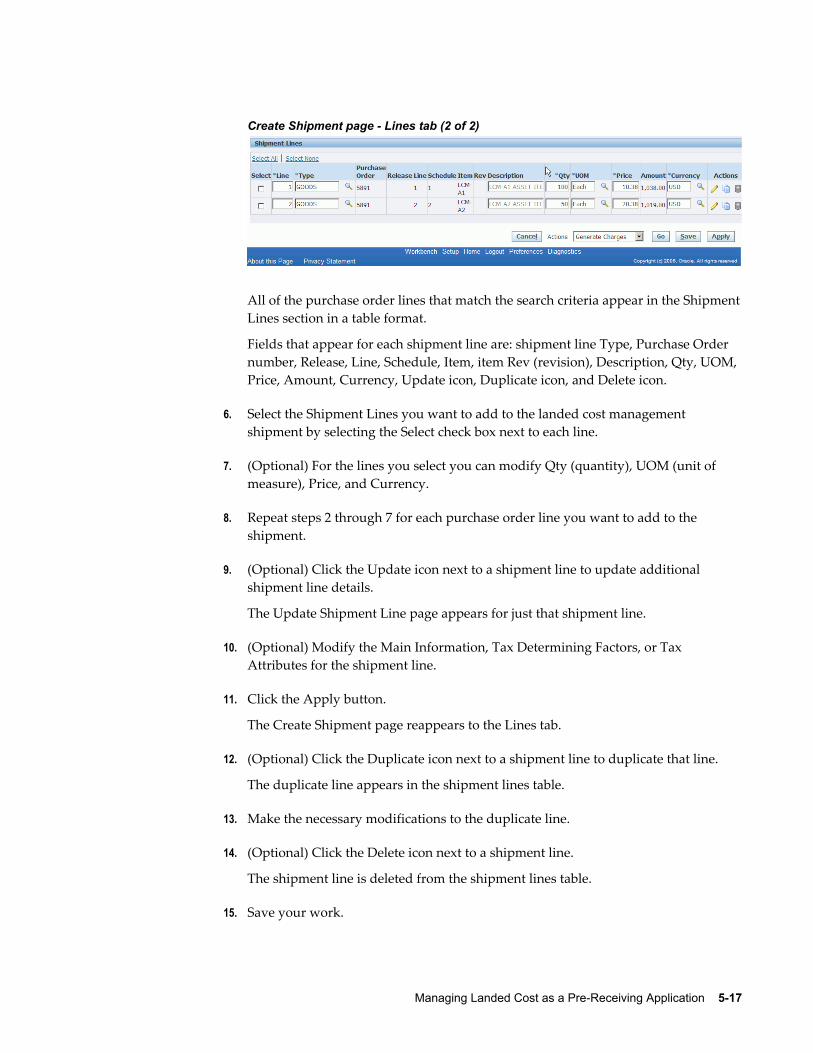
Managing Landed Cost as a Pre-Receiving Application 5-17
Create Shipment page - Lines tab (2 of 2)
All of the purchase order lines that match the search criteria appear in the ShipmentLines section in a table format.
Fields that appear for each shipment line are: shipment line Type, Purchase Order number, Release, Line, Schedule, Item, item Rev (revision), Description, Qty, UOM, Price, Amount, Currency, Update icon, Duplicate icon, and Delete icon.
6. Select the Shipment Lines you want to add to the landed cost management shipment by selecting the Select check box next to each line.
7. (Optional) For the lines you select you can modify Qty (quantity), UOM (unit of measure), Price, and Currency.
8. Repeat steps 2 through 7 for each purchase order line you want to add to the shipment.
9. (Optional) Click the Update icon next to a shipment line to update additional shipment line details.
The Update Shipment Line page appears for just that shipment line.
10. (Optional) Modify the Main Information, Tax Determining Factors, or Tax Attributes for the shipment line.
11. Click the Apply button.
The Create Shipment page reappears to the Lines tab.
12. (Optional) Click the Duplicate icon next to a shipment line to duplicate that line.
The duplicate line appears in the shipment lines table.
13. Make the necessary modifications to the duplicate line.
14. (Optional) Click the Delete icon next to a shipment line.
The shipment line is deleted from the shipment lines table.
15. Save your work.
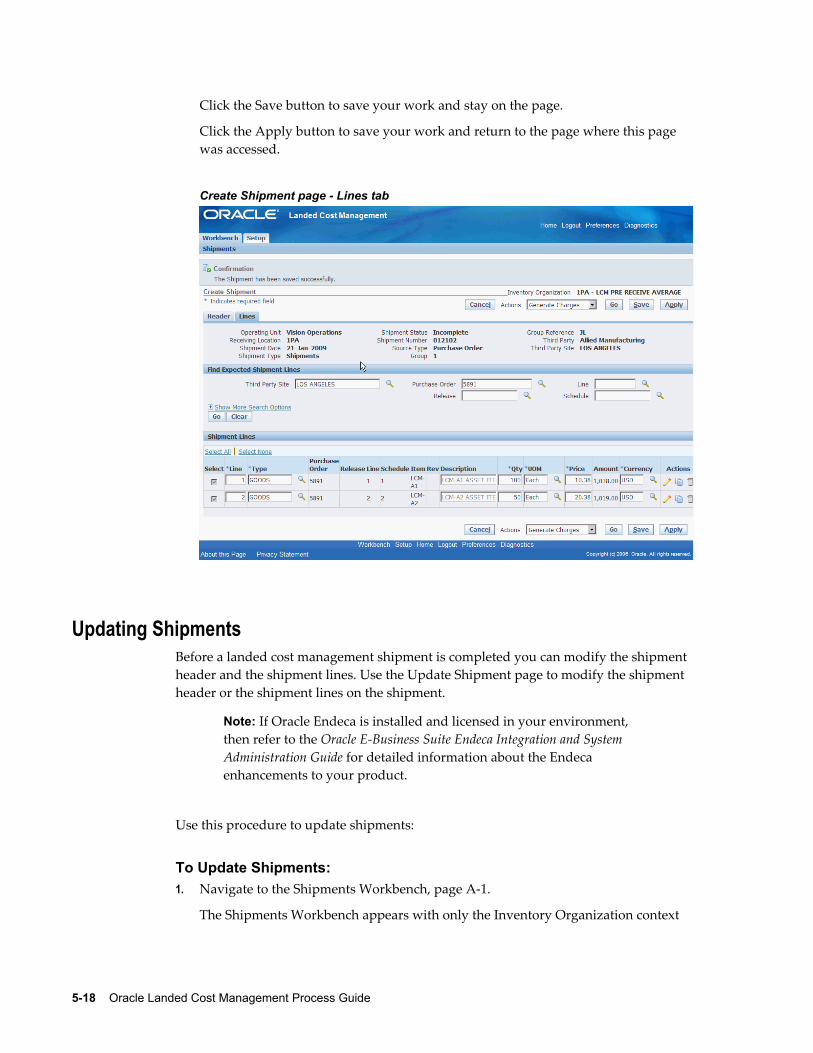
5-18 Oracle Landed Cost Management Process Guide
Click the Save button to save your work and stay on the page.
Click the Apply button to save your work and return to the page where this page was accessed.
Create Shipment page - Lines tab
Updating ShipmentsBefore a landed cost management shipment is completed you can modify the shipment header and the shipment lines. Use the Update Shipment page to modify the shipment header or the shipment lines on the shipment.
Note: If Oracle Endeca is installed and licensed in your environment, then refer to the Oracle E-Business Suite Endeca Integration and System Administration Guide for detailed information about the Endeca enhancements to your product.
Use this procedure to update shipments:
To Update Shipments:1. Navigate to the Shipments Workbench, page A-1.
The Shipments Workbench appears with only the Inventory Organization context

Managing Landed Cost as a Pre-Receiving Application 5-19
available for selection.
2. Select the pre-receiving inventory organization that pertains to the shipment that was previously created in the Inventory Organization field and click the Go button.
Shipments Workbench
The complete Shipments Workbench appears.
3. Select the type of information you want to display at the bottom of the Shipments Workbench using the Display field. Values are:
• Shipment
• Line Group
• Shipment Line
By default Shipment appears in the Display field. To update shipments you will want to select a display option of Shipment or Line Group.
Depending on the Display selection, the information that appears at the bottom of the Shipments Workbench will pertain to that display option. For example, if you select Shipment then fields related to shipments will appear in the table.
4. In the Find Shipments section, expand the Shipments section and enter the fields
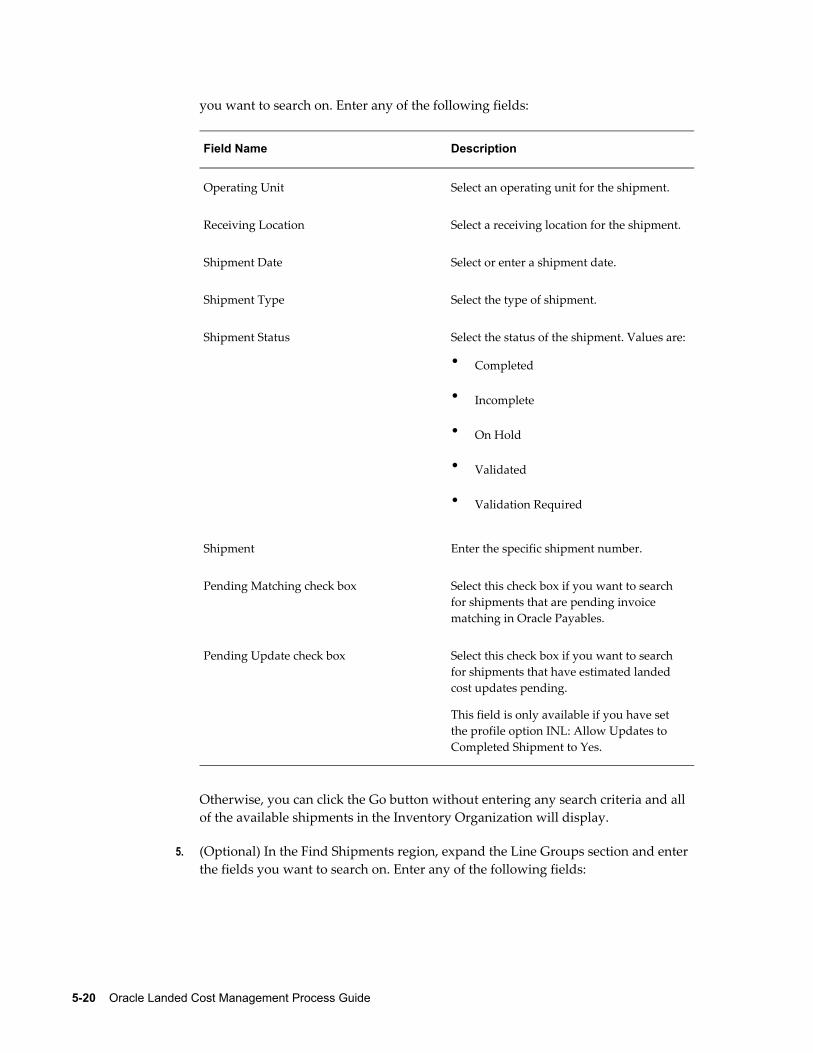
5-20 Oracle Landed Cost Management Process Guide
you want to search on. Enter any of the following fields:
Field Name Description
Operating Unit Select an operating unit for the shipment.
Receiving Location Select a receiving location for the shipment.
Shipment Date Select or enter a shipment date.
Shipment Type Select the type of shipment.
Shipment Status Select the status of the shipment. Values are:
• Completed
• Incomplete
• On Hold
• Validated
• Validation Required
Shipment Enter the specific shipment number.
Pending Matching check box Select this check box if you want to search for shipments that are pending invoice matching in Oracle Payables.
Pending Update check box Select this check box if you want to search for shipments that have estimated landed cost updates pending.
This field is only available if you have set the profile option INL: Allow Updates to Completed Shipment to Yes.
Otherwise, you can click the Go button without entering any search criteria and all of the available shipments in the Inventory Organization will display.
5. (Optional) In the Find Shipments region, expand the Line Groups section and enter the fields you want to search on. Enter any of the following fields:
Managing Landed Cost as a Pre-Receiving Application 5-21
Field Name Description
Group Enter a specific line group.
Group Reference Enter a specific group reference.
Third Party Select a third party associated with a line group.
Third Party Site Select a third party site associated with a line group.
Source Type Select a source type. Value is: Purchase Order.
6. (Optional) In the Find Shipments region, expand the Shipment Lines section and enter the fields you want to search on. Enter any of the following fields:
Field Name Description
Third Party Select a third party associated with the shipment line.
Third Party Site Select a third party site associated with the shipment line.
Source Order Select the source order (purchase order) associated with the shipment line.
Shipment Line Type Select the shipment line type associated with the shipment line.
7. (Optional) In the Shipment Lines section, expand the Show More Search Options section and enter the fields you want to search on. Enter any of the following fields:
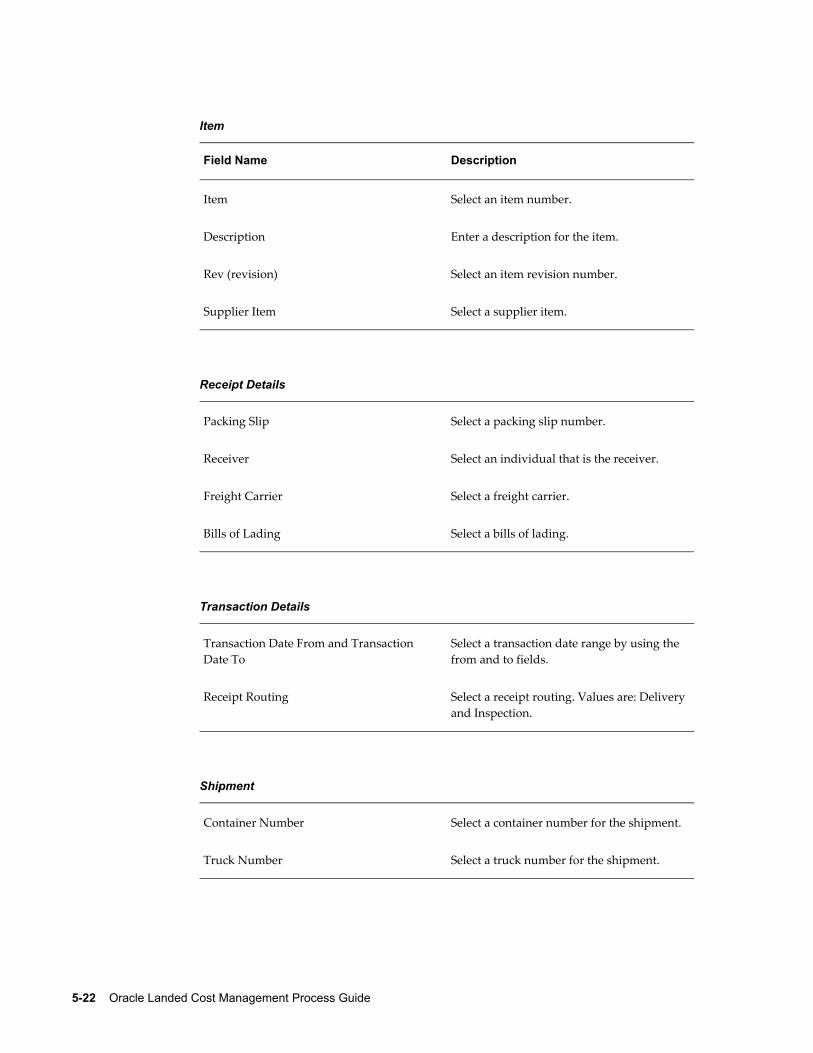
5-22 Oracle Landed Cost Management Process Guide
Item
Field Name Description
Item Select an item number.
Description Enter a description for the item.
Rev (revision) Select an item revision number.
Supplier Item Select a supplier item.
Receipt Details
Packing Slip Select a packing slip number.
Receiver Select an individual that is the receiver.
Freight Carrier Select a freight carrier.
Bills of Lading Select a bills of lading.
Transaction Details
Transaction Date From and Transaction Date To
Select a transaction date range by using the from and to fields.
Receipt Routing Select a receipt routing. Values are: Deliveryand Inspection.
Shipment
Container Number Select a container number for the shipment.
Truck Number Select a truck number for the shipment.
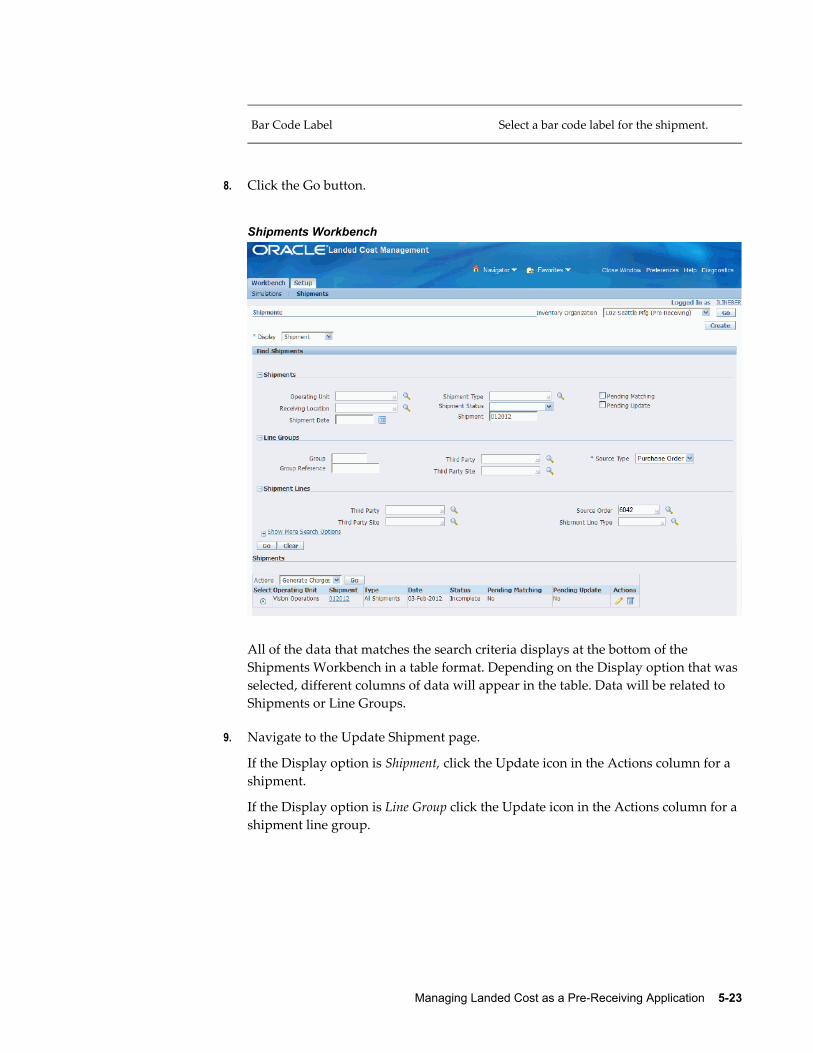
Managing Landed Cost as a Pre-Receiving Application 5-23
Bar Code Label Select a bar code label for the shipment.
8. Click the Go button.
Shipments Workbench
All of the data that matches the search criteria displays at the bottom of the Shipments Workbench in a table format. Depending on the Display option that was selected, different columns of data will appear in the table. Data will be related to Shipments or Line Groups.
9. Navigate to the Update Shipment page.
If the Display option is Shipment, click the Update icon in the Actions column for a shipment.
If the Display option is Line Group click the Update icon in the Actions column for a shipment line group.
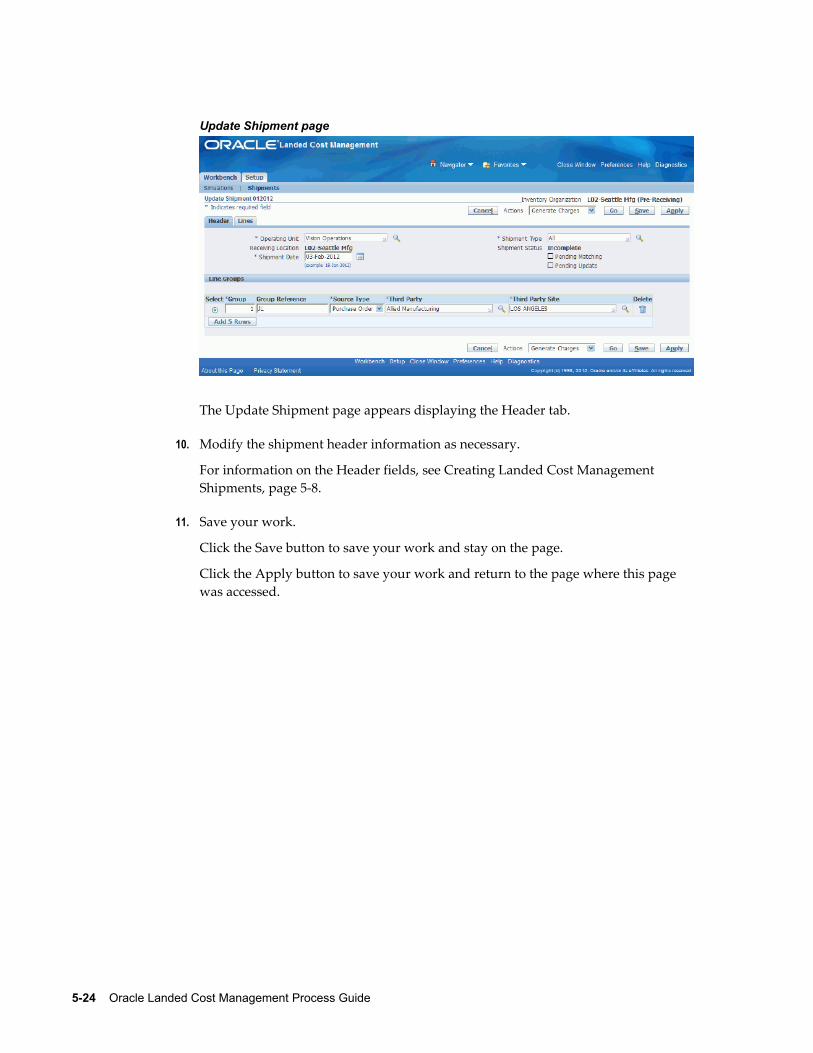
5-24 Oracle Landed Cost Management Process Guide
Update Shipment page
The Update Shipment page appears displaying the Header tab.
10. Modify the shipment header information as necessary.
For information on the Header fields, see Creating Landed Cost Management Shipments, page 5-8.
11. Save your work.
Click the Save button to save your work and stay on the page.
Click the Apply button to save your work and return to the page where this page was accessed.
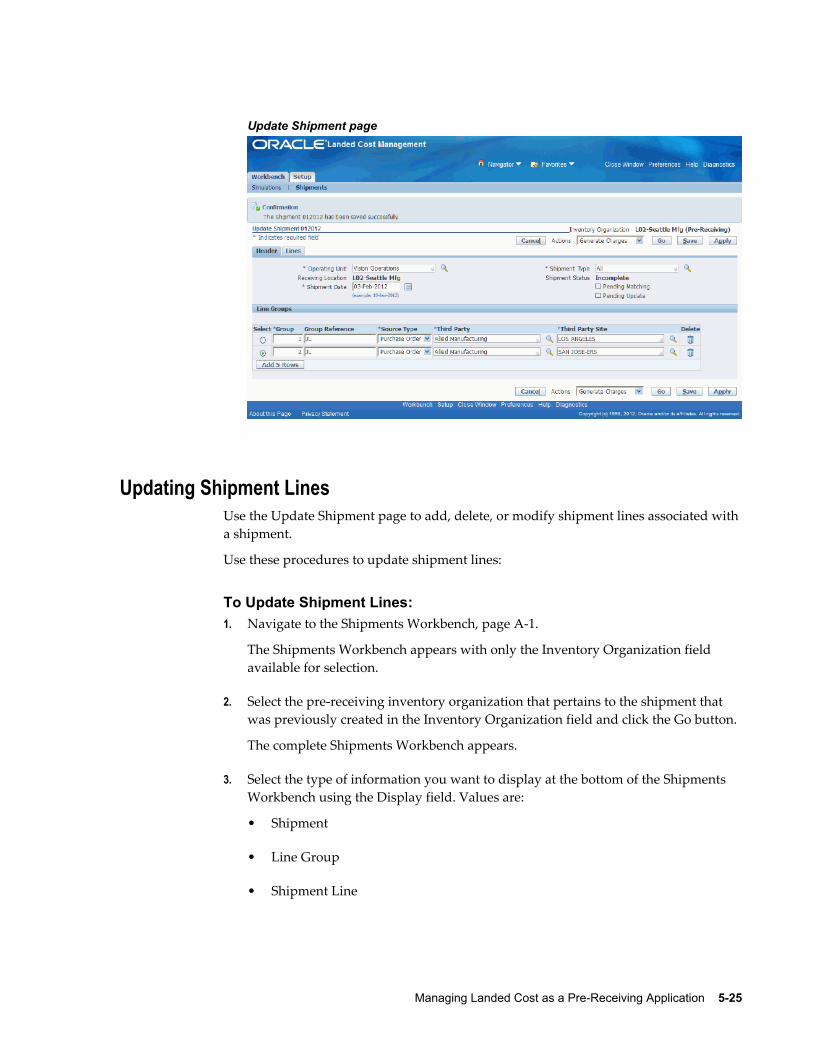
Managing Landed Cost as a Pre-Receiving Application 5-25
Update Shipment page
Updating Shipment LinesUse the Update Shipment page to add, delete, or modify shipment lines associated with a shipment.
Use these procedures to update shipment lines:
To Update Shipment Lines:1. Navigate to the Shipments Workbench, page A-1.
The Shipments Workbench appears with only the Inventory Organization field available for selection.
2. Select the pre-receiving inventory organization that pertains to the shipment that was previously created in the Inventory Organization field and click the Go button.
The complete Shipments Workbench appears.
3. Select the type of information you want to display at the bottom of the Shipments Workbench using the Display field. Values are:
• Shipment
• Line Group
• Shipment Line
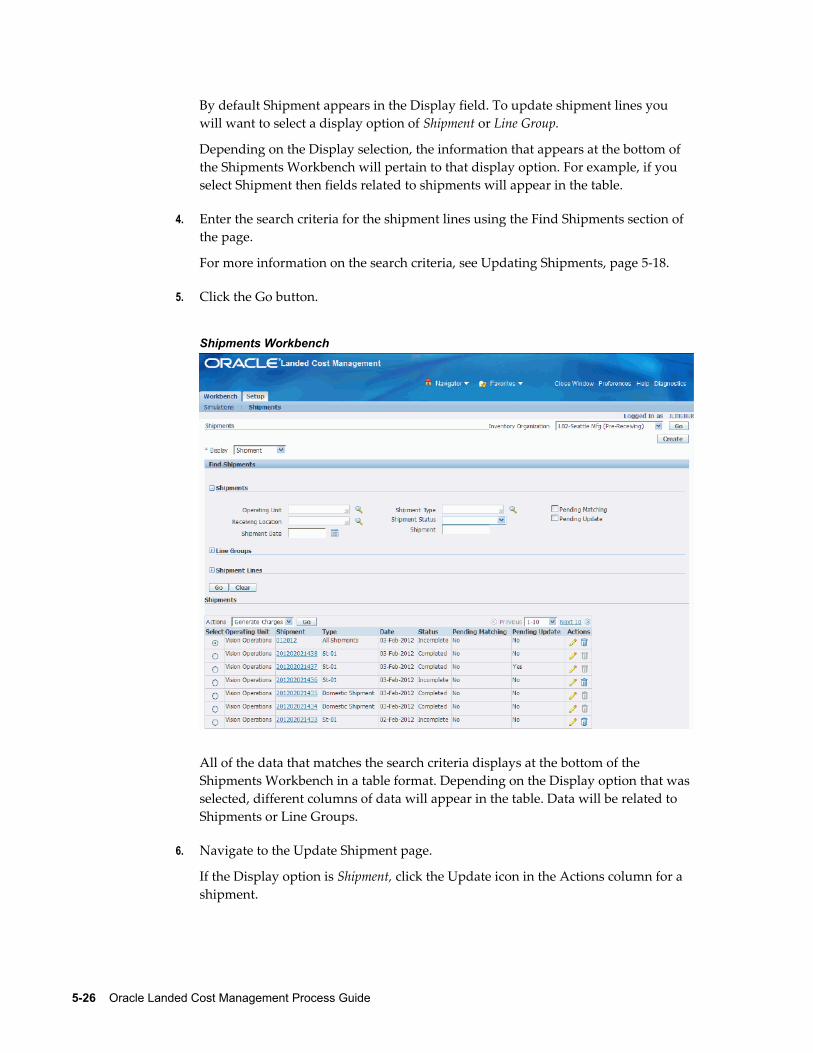
5-26 Oracle Landed Cost Management Process Guide
By default Shipment appears in the Display field. To update shipment lines you will want to select a display option of Shipment or Line Group.
Depending on the Display selection, the information that appears at the bottom of the Shipments Workbench will pertain to that display option. For example, if you select Shipment then fields related to shipments will appear in the table.
4. Enter the search criteria for the shipment lines using the Find Shipments section of the page.
For more information on the search criteria, see Updating Shipments, page 5-18.
5. Click the Go button.
Shipments Workbench
All of the data that matches the search criteria displays at the bottom of the Shipments Workbench in a table format. Depending on the Display option that was selected, different columns of data will appear in the table. Data will be related to Shipments or Line Groups.
6. Navigate to the Update Shipment page.
If the Display option is Shipment, click the Update icon in the Actions column for a shipment.
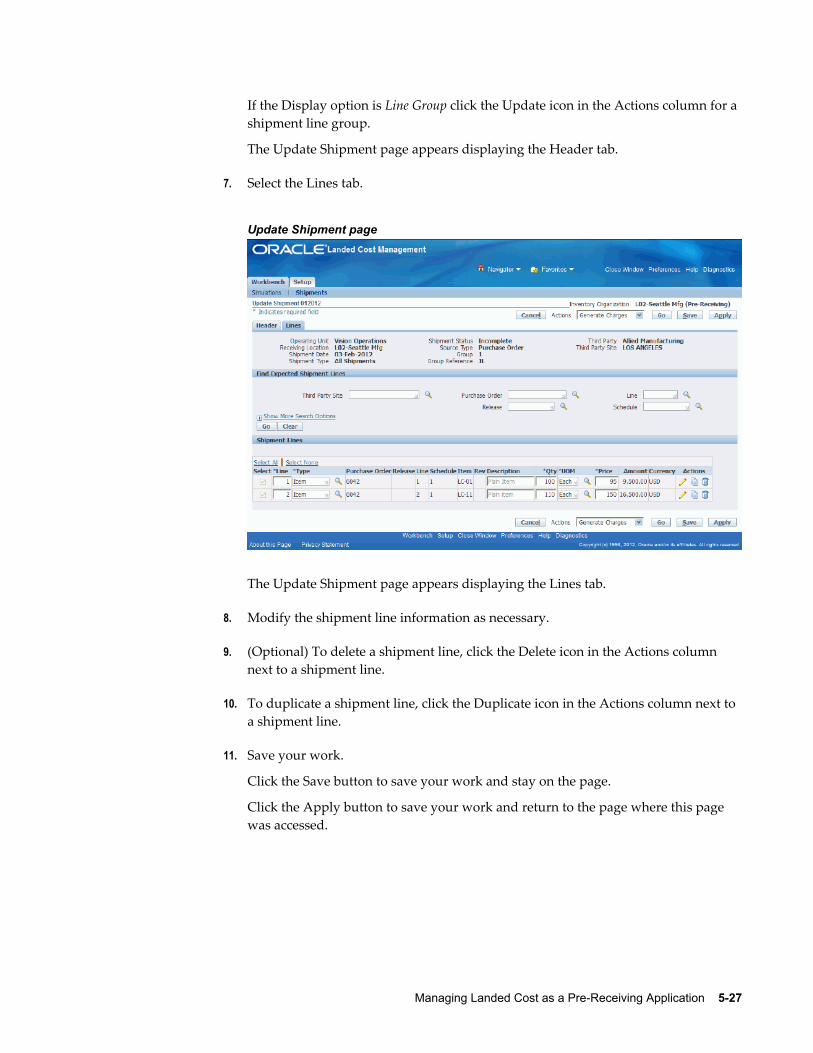
Managing Landed Cost as a Pre-Receiving Application 5-27
If the Display option is Line Group click the Update icon in the Actions column for a shipment line group.
The Update Shipment page appears displaying the Header tab.
7. Select the Lines tab.
Update Shipment page
The Update Shipment page appears displaying the Lines tab.
8. Modify the shipment line information as necessary.
9. (Optional) To delete a shipment line, click the Delete icon in the Actions column next to a shipment line.
10. To duplicate a shipment line, click the Duplicate icon in the Actions column next to a shipment line.
11. Save your work.
Click the Save button to save your work and stay on the page.
Click the Apply button to save your work and return to the page where this page was accessed.
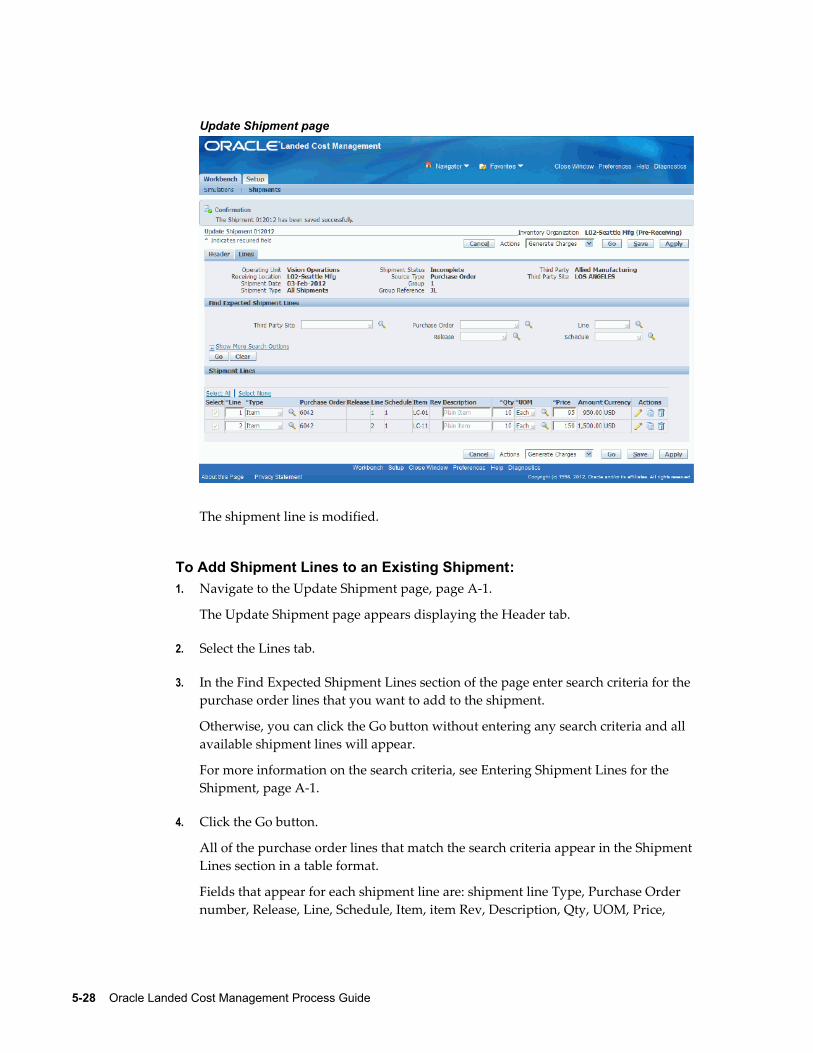
5-28 Oracle Landed Cost Management Process Guide
Update Shipment page
The shipment line is modified.
To Add Shipment Lines to an Existing Shipment:1. Navigate to the Update Shipment page, page A-1.
The Update Shipment page appears displaying the Header tab.
2. Select the Lines tab.
3. In the Find Expected Shipment Lines section of the page enter search criteria for the purchase order lines that you want to add to the shipment.
Otherwise, you can click the Go button without entering any search criteria and all available shipment lines will appear.
For more information on the search criteria, see Entering Shipment Lines for the Shipment, page A-1.
4. Click the Go button.
All of the purchase order lines that match the search criteria appear in the ShipmentLines section in a table format.
Fields that appear for each shipment line are: shipment line Type, Purchase Order number, Release, Line, Schedule, Item, item Rev, Description, Qty, UOM, Price,
Managing Landed Cost as a Pre-Receiving Application 5-29
Amount, Currency, Update icon, Duplicate icon, and Delete icon.
5. Select the Shipment Lines you want to add to the landed cost management shipment by selecting the Select check box next to each line.
6. (Optional) For the lines you select you can modify Qty (quantity), UOM (unit of measure), Price, and Currency.
7. Repeat steps 2 through 6 for each purchase order line you want to add to the shipment.
8. (Optional) Click the Update icon next to a shipment line to update additional shipment line details.
The Update Shipment Line page appears for just that shipment line.
9. (Optional) Modify the Main Information, Tax Determining Factors, or Tax Attributes for the shipment line.
10. Click the Apply button.
The Update Shipment page reappears to the Lines tab.
11. Save your work.
Click the Save button to save your work and stay on the page.
Click the Apply button to save your work and return to the page where this page was accessed.
Updating a Specific Shipment LineUse the Update Shipment Line page to modify the details for a specific shipment line.
Use this procedure to update a specific shipment line:
To Update a Specific Shipment Line:1. Navigate to the Shipments Workbench, page A-1.
The Shipments Workbench appears with only the Inventory Organization field available for selection.
2. Select the pre-receiving inventory organization that pertains to the shipment that was previously created in the Inventory Organization field and click the Go button.
The complete Shipments Workbench appears.
3. Select the type of information you want to display at the bottom of the Shipments Workbench using the Display field. Values are:
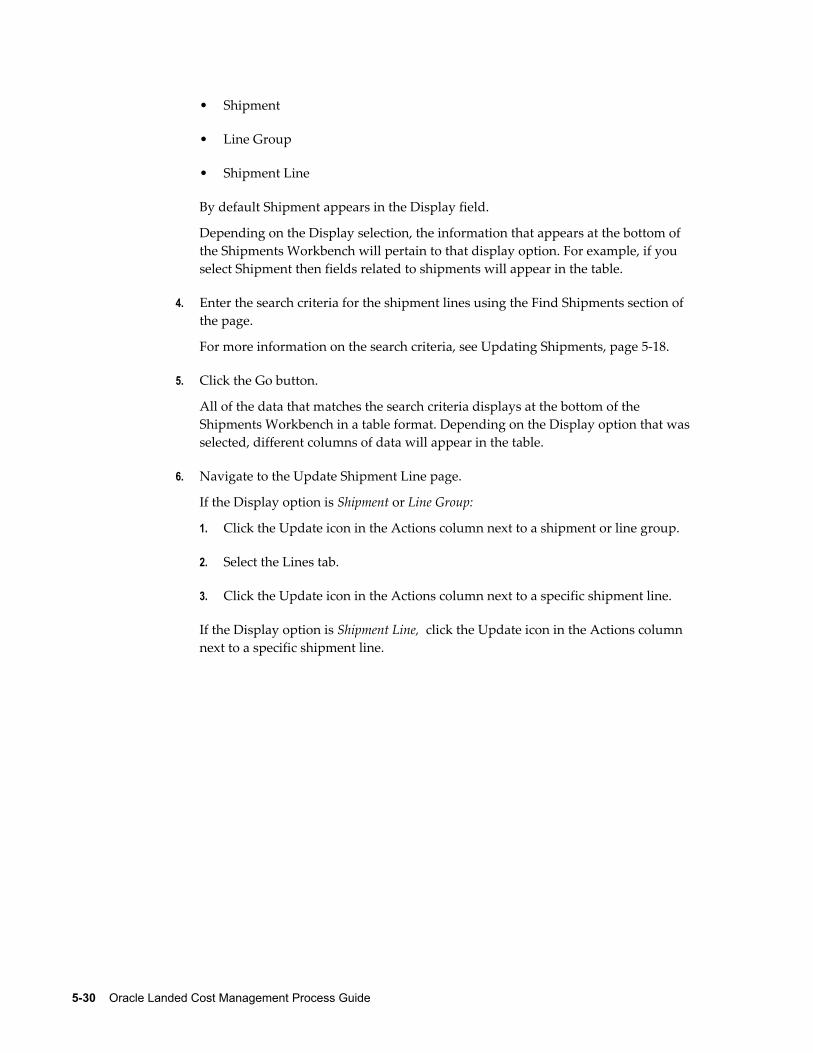
5-30 Oracle Landed Cost Management Process Guide
• Shipment
• Line Group
• Shipment Line
By default Shipment appears in the Display field.
Depending on the Display selection, the information that appears at the bottom of the Shipments Workbench will pertain to that display option. For example, if you select Shipment then fields related to shipments will appear in the table.
4. Enter the search criteria for the shipment lines using the Find Shipments section of the page.
For more information on the search criteria, see Updating Shipments, page 5-18.
5. Click the Go button.
All of the data that matches the search criteria displays at the bottom of the Shipments Workbench in a table format. Depending on the Display option that was selected, different columns of data will appear in the table.
6. Navigate to the Update Shipment Line page.
If the Display option is Shipment or Line Group:
1. Click the Update icon in the Actions column next to a shipment or line group.
2. Select the Lines tab.
3. Click the Update icon in the Actions column next to a specific shipment line.
If the Display option is Shipment Line, click the Update icon in the Actions column next to a specific shipment line.
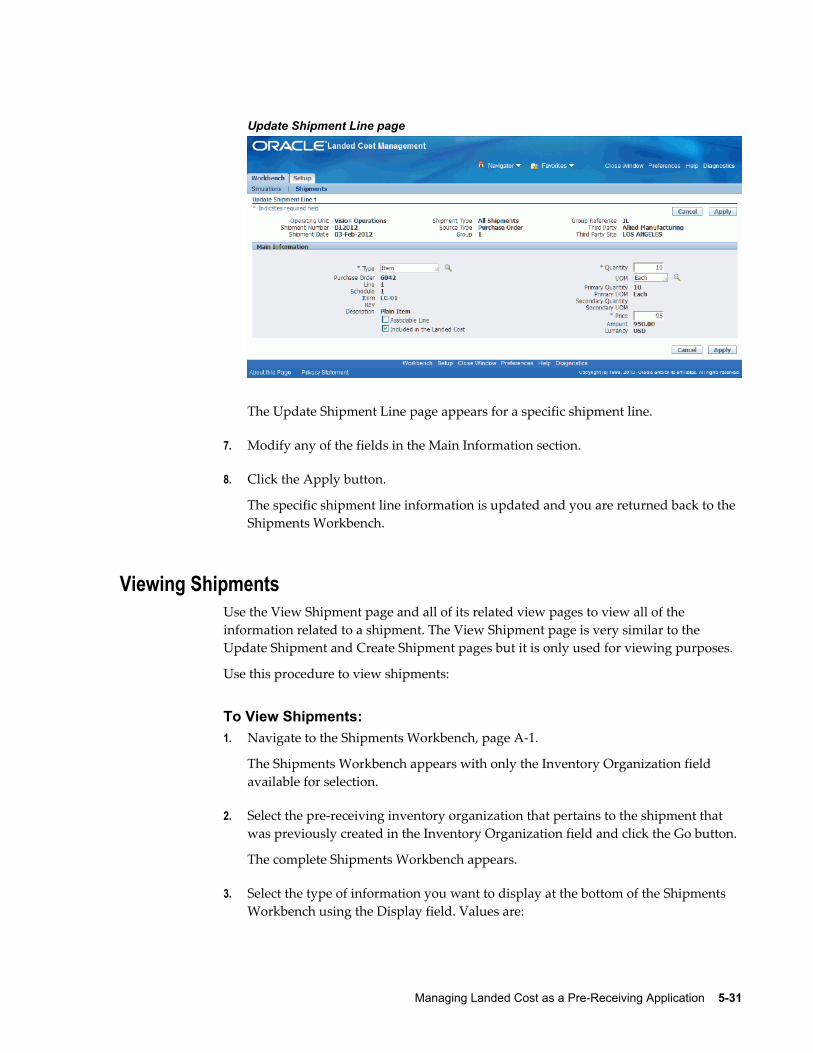
Managing Landed Cost as a Pre-Receiving Application 5-31
Update Shipment Line page
The Update Shipment Line page appears for a specific shipment line.
7. Modify any of the fields in the Main Information section.
8. Click the Apply button.
The specific shipment line information is updated and you are returned back to the Shipments Workbench.
Viewing ShipmentsUse the View Shipment page and all of its related view pages to view all of the information related to a shipment. The View Shipment page is very similar to the Update Shipment and Create Shipment pages but it is only used for viewing purposes.
Use this procedure to view shipments:
To View Shipments:1. Navigate to the Shipments Workbench, page A-1.
The Shipments Workbench appears with only the Inventory Organization field available for selection.
2. Select the pre-receiving inventory organization that pertains to the shipment that was previously created in the Inventory Organization field and click the Go button.
The complete Shipments Workbench appears.
3. Select the type of information you want to display at the bottom of the Shipments Workbench using the Display field. Values are:
5-32 Oracle Landed Cost Management Process Guide
• Shipment
• Line Group
• Shipment Line
By default Shipment appears in the Display field.
Depending on the Display selection, the information that appears at the bottom of the Shipments Workbench will pertain to that display option. For example, if you select Shipment then fields related to shipments will appear in the table.
4. Enter the search criteria for the shipments using the Find Shipments section of the page.
For more information on the search criteria, see Updating Shipments, page 5-18.
5. Click the Go button.
All of the data that matches the search criteria displays at the bottom of the Shipments Workbench in a table format. Depending on the Display option that was selected, different columns of data will appear in the table. Data will be related to Shipments, Line Groups, or Shipment Lines.
6. Navigate to the View Shipment page.
Click the Shipment link for a specific line in the table.
View Shipment page
The View Shipment page appears displaying the Header tab.
The View Shipment is almost identical to the Update Shipment page but it is intended only for the purpose of viewing the information. In addition, the Actions field only has view functionality. The Actions for this page are:
Managing Landed Cost as a Pre-Receiving Application 5-33
• View Charges
• View Associations
• View Landed Cost
7. (Optional) Select a particular Action and click the Go button.
8. (Optional) Click the Update button to navigate to the Update Shipment page where you can update the shipment or shipment lines.
Viewing Shipment LinesUse the View Shipment page and all of its related view pages to view all of the information related to a shipment. The View Shipment page is very similar to the Update Shipment and Create Shipment pages but it is only used for viewing purposes.
Use this procedure to view shipment lines:
To View Shipments Lines:1. Navigate to the Shipments Workbench, page A-1.
The Shipments Workbench appears with only the Inventory Organization field available for selection.
2. Select the pre-receiving inventory organization that pertains to the shipment that was previously created in the Inventory Organization field and click the Go button.
The complete Shipments Workbench appears.
3. Select the type of information you want to display at the bottom of the Shipments Workbench using the Display field. Values are:
• Shipment
• Line Group
• Shipment Line
By default Shipment appears in the Display field.
Depending on the Display selection, the information that appears at the bottom of the Shipments Workbench will pertain to that display option. For example, if you select Shipment then fields related to shipments will appear in the table.
4. Enter the search criteria for the shipment lines using the Find Shipments section of the page.
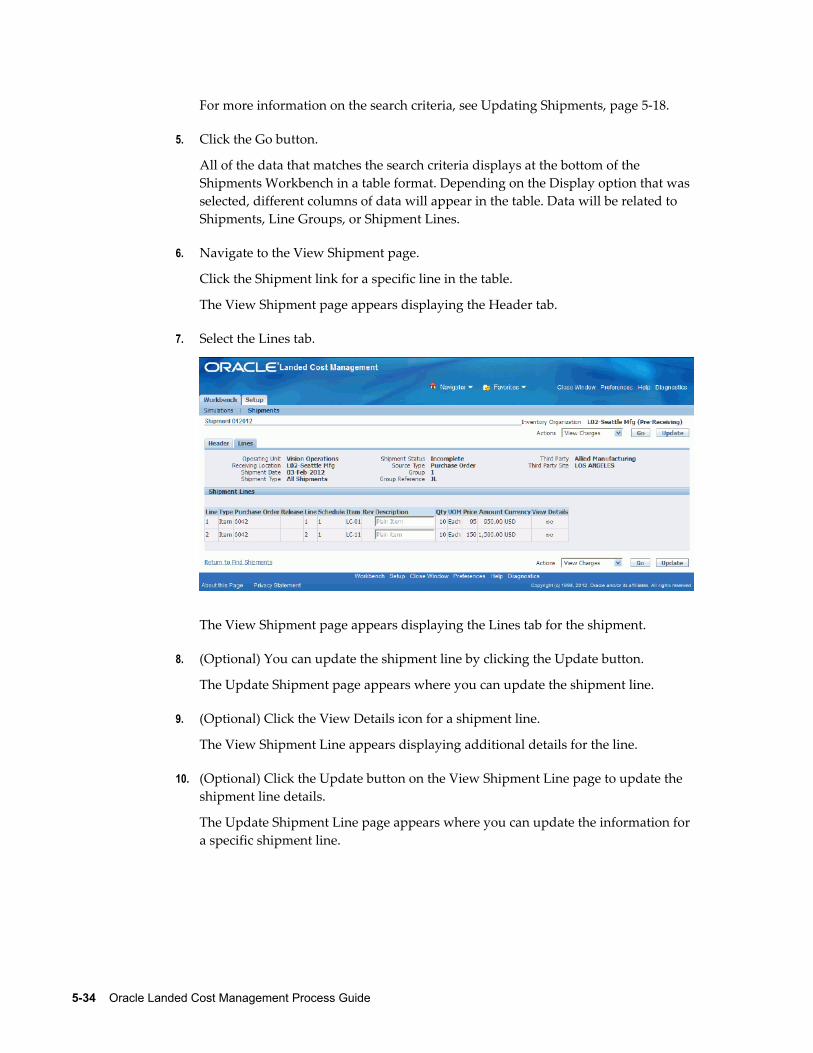
5-34 Oracle Landed Cost Management Process Guide
For more information on the search criteria, see Updating Shipments, page 5-18.
5. Click the Go button.
All of the data that matches the search criteria displays at the bottom of the Shipments Workbench in a table format. Depending on the Display option that was selected, different columns of data will appear in the table. Data will be related to Shipments, Line Groups, or Shipment Lines.
6. Navigate to the View Shipment page.
Click the Shipment link for a specific line in the table.
The View Shipment page appears displaying the Header tab.
7. Select the Lines tab.
The View Shipment page appears displaying the Lines tab for the shipment.
8. (Optional) You can update the shipment line by clicking the Update button.
The Update Shipment page appears where you can update the shipment line.
9. (Optional) Click the View Details icon for a shipment line.
The View Shipment Line appears displaying additional details for the line.
10. (Optional) Click the Update button on the View Shipment Line page to update the shipment line details.
The Update Shipment Line page appears where you can update the information for a specific shipment line.
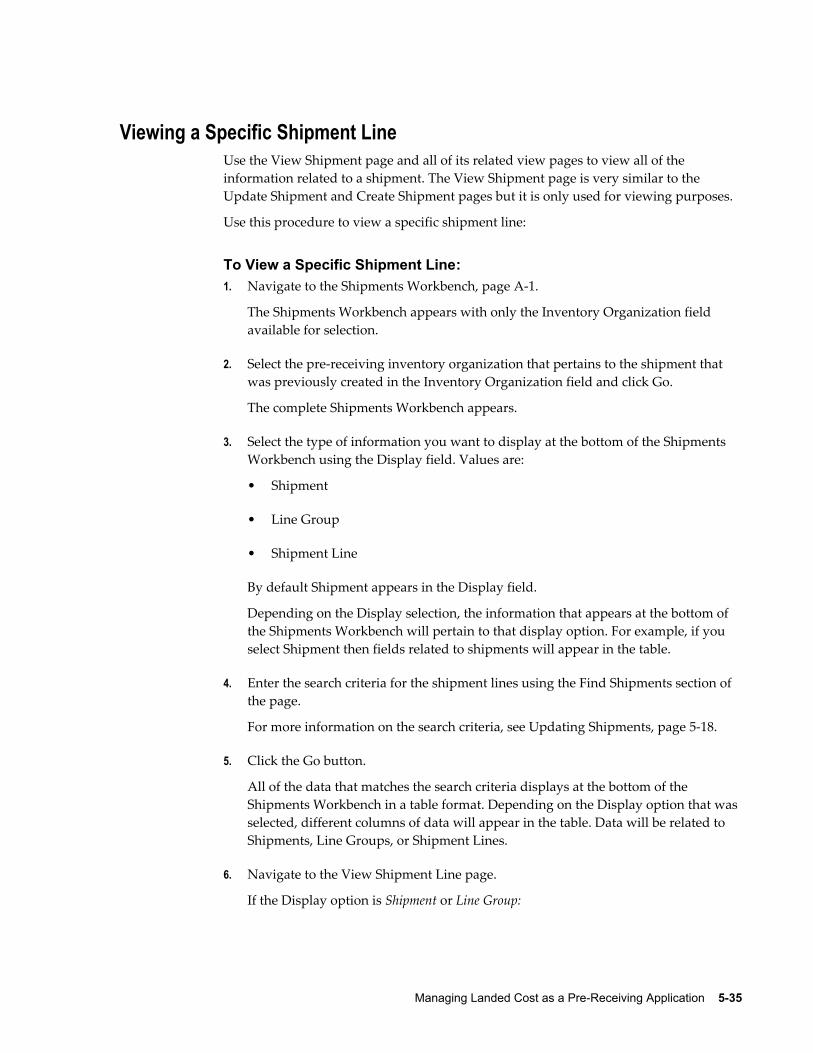
Managing Landed Cost as a Pre-Receiving Application 5-35
Viewing a Specific Shipment Line Use the View Shipment page and all of its related view pages to view all of the information related to a shipment. The View Shipment page is very similar to the Update Shipment and Create Shipment pages but it is only used for viewing purposes.
Use this procedure to view a specific shipment line:
To View a Specific Shipment Line:1. Navigate to the Shipments Workbench, page A-1.
The Shipments Workbench appears with only the Inventory Organization field available for selection.
2. Select the pre-receiving inventory organization that pertains to the shipment that was previously created in the Inventory Organization field and click Go.
The complete Shipments Workbench appears.
3. Select the type of information you want to display at the bottom of the Shipments Workbench using the Display field. Values are:
• Shipment
• Line Group
• Shipment Line
By default Shipment appears in the Display field.
Depending on the Display selection, the information that appears at the bottom of the Shipments Workbench will pertain to that display option. For example, if you select Shipment then fields related to shipments will appear in the table.
4. Enter the search criteria for the shipment lines using the Find Shipments section of the page.
For more information on the search criteria, see Updating Shipments, page 5-18.
5. Click the Go button.
All of the data that matches the search criteria displays at the bottom of the Shipments Workbench in a table format. Depending on the Display option that was selected, different columns of data will appear in the table. Data will be related to Shipments, Line Groups, or Shipment Lines.
6. Navigate to the View Shipment Line page.
If the Display option is Shipment or Line Group:
5-36 Oracle Landed Cost Management Process Guide
1. Click the Shipment link next to a shipment or line group.
2. Select the Lines tab.
3. Click the View Details icon next to a specific shipment line.
If the Display option is Shipment Line use one of these methods to navigate:
• Click the Line number link next to a shipment line.
• 1. Click the Shipment link next to a shipment line.
2. Select the Lines tab.
3. Click the View Details icon next to a specific shipment line.
View Shipment Line page
The View Shipment Line page appears displaying details for the specific shipment line.
Generating Charges for the ShipmentUse the Shipments Workbench, Create Shipment, or Update Shipment pages in Oracle Landed Cost Management to initiate the Generate Charges process. The Generate Charges process integrates with Oracle Advanced Pricing. This process is responsible for getting charges from Oracle Advanced Pricing and creating those charges in Oracle Landed Cost Management; in a way they can be associated to line groups or shipment lines, depending on the setup in Oracle Advanced Pricing. After the charge lines are generated you can manage those charges using the Manage Charges page in Oracle Landed Cost Management. The running of this process is optional if you are not
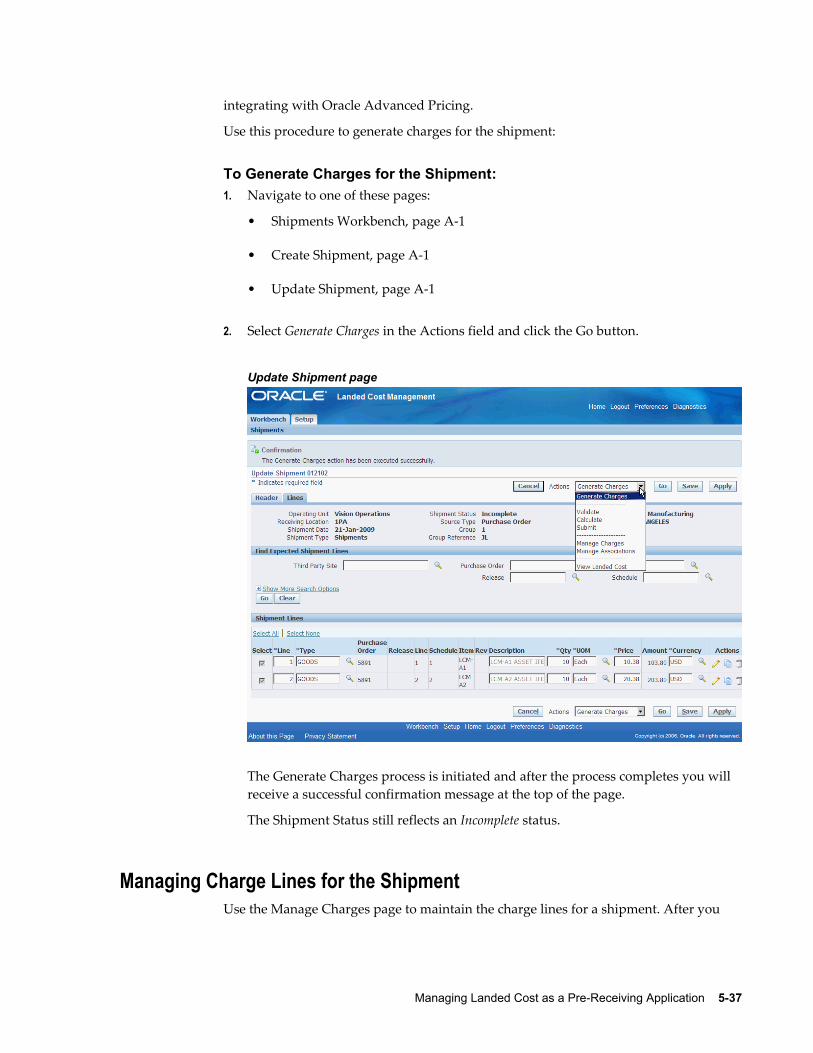
Managing Landed Cost as a Pre-Receiving Application 5-37
integrating with Oracle Advanced Pricing.
Use this procedure to generate charges for the shipment:
To Generate Charges for the Shipment:1. Navigate to one of these pages:
• Shipments Workbench, page A-1
• Create Shipment, page A-1
• Update Shipment, page A-1
2. Select Generate Charges in the Actions field and click the Go button.
Update Shipment page
The Generate Charges process is initiated and after the process completes you will receive a successful confirmation message at the top of the page.
The Shipment Status still reflects an Incomplete status.
Managing Charge Lines for the ShipmentUse the Manage Charges page to maintain the charge lines for a shipment. After you
5-38 Oracle Landed Cost Management Process Guide
run the Generate Charges process (manually or through the Shipments Interface Importprogram), the Manage Charges page displays the charge lines that were generated fromthe integration with Oracle Advanced Pricing. The generated charge lines can be modified or removed.
You can also use the Manage Charges page to manually create charge lines for a shipment. If you update the charge lines using the Manage Charges page the Manage Associations page is automatically updated and vice versa. These two pages are always in sync with each other.
Use this procedure to manage charge lines for the shipment:
Prerequisites❒ Cost Factors have been created.
❒ The Generate Charges process must have been performed for a shipment if you are integrating with Oracle Advanced Pricing.
To Manage Charge Lines for the Shipment:
To Update Charge Lines for the Shipment1. Navigate to one of these pages:
• Create Shipment, page A-1
• Update Shipment, page A-1
2. Navigate to the Manage Charges page by selecting Manage Charges in the Actions field and click the Go button.
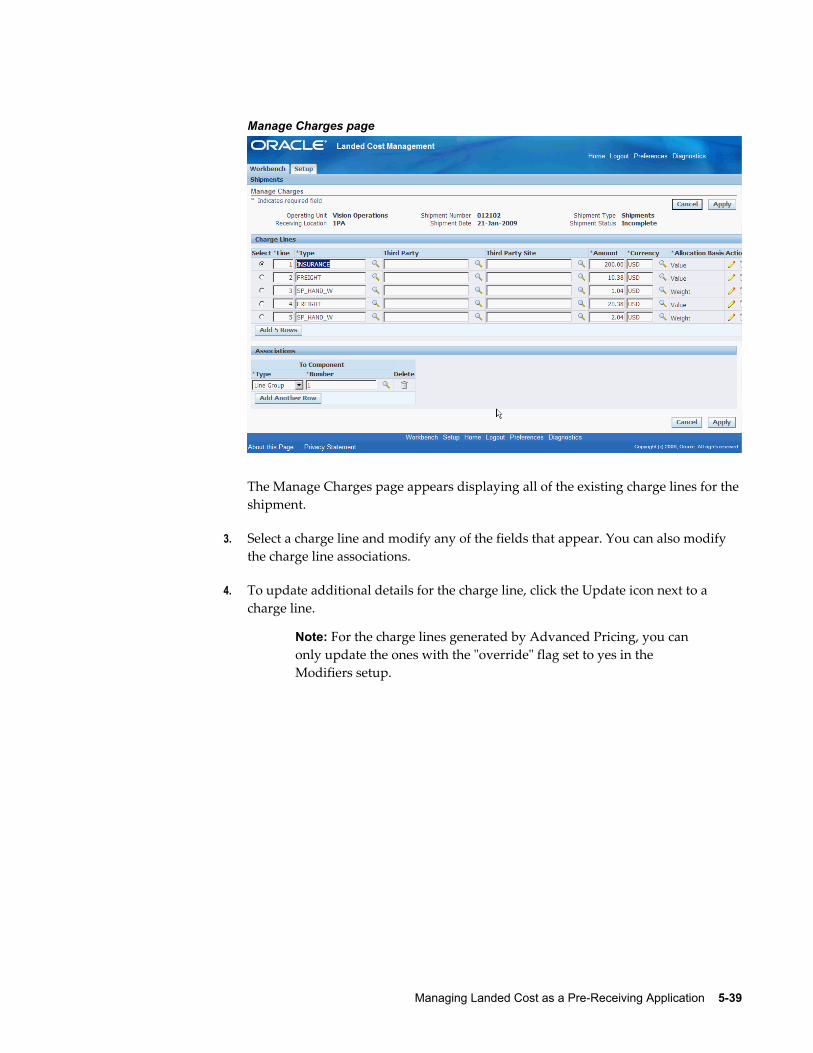
Managing Landed Cost as a Pre-Receiving Application 5-39
Manage Charges page
The Manage Charges page appears displaying all of the existing charge lines for theshipment.
3. Select a charge line and modify any of the fields that appear. You can also modify the charge line associations.
4. To update additional details for the charge line, click the Update icon next to a charge line.
Note: For the charge lines generated by Advanced Pricing, you can only update the ones with the "override" flag set to yes in the Modifiers setup.
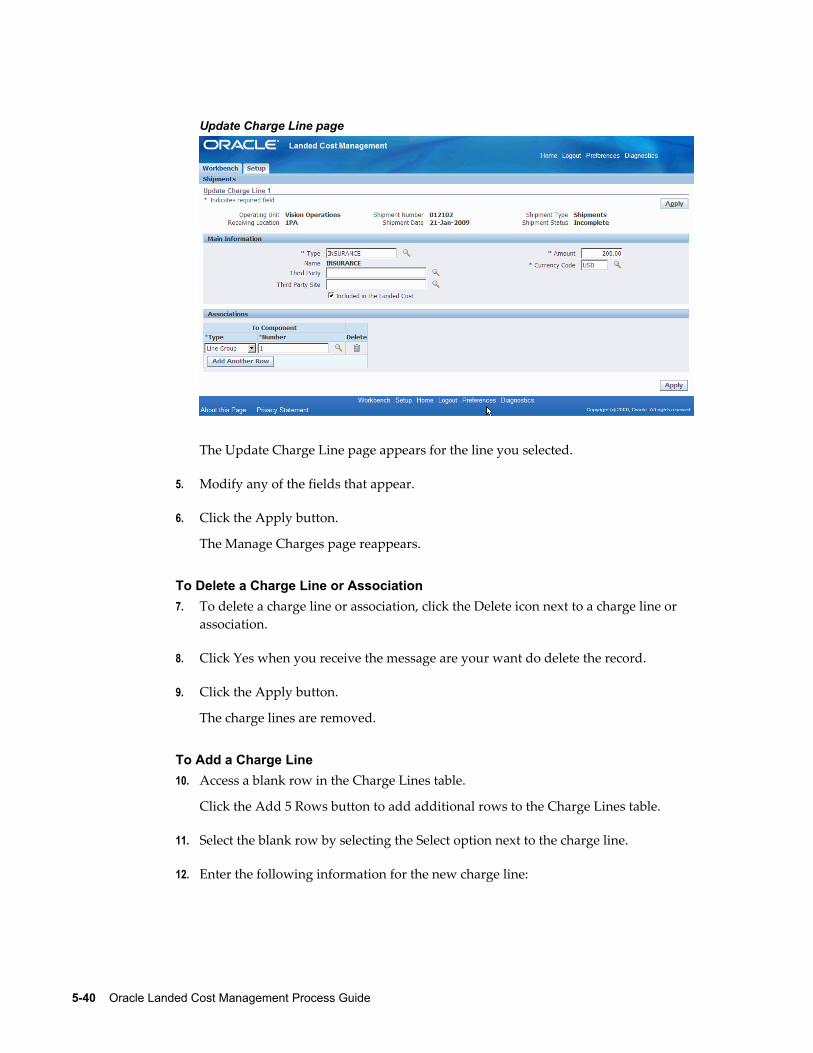
5-40 Oracle Landed Cost Management Process Guide
Update Charge Line page
The Update Charge Line page appears for the line you selected.
5. Modify any of the fields that appear.
6. Click the Apply button.
The Manage Charges page reappears.
To Delete a Charge Line or Association7. To delete a charge line or association, click the Delete icon next to a charge line or
association.
8. Click Yes when you receive the message are your want do delete the record.
9. Click the Apply button.
The charge lines are removed.
To Add a Charge Line10. Access a blank row in the Charge Lines table.
Click the Add 5 Rows button to add additional rows to the Charge Lines table.
11. Select the blank row by selecting the Select option next to the charge line.
12. Enter the following information for the new charge line:

Managing Landed Cost as a Pre-Receiving Application 5-41
Field Name Description
Type Select the type of charge line.
The Type field lists all of the cost factors available.
Third Party Select the third party for this charge line.
Third Party Site Select the third party site for this charge line.
Amount Enter the amount for the charge line.
Currency Enter the currency for the charge line.
Allocation Basis Displays the allocation basis for the charge line. Allocation Basis appears by default from the cost factor.
13. Add an association for the charge line by clicking the Add Another Row button in the Associations section of the page.
A row is added in the Associations section.
14. Select the Type of association for the charge line. Values are:
• Shipment
Select Shipment if you want the charge line amount to be prorated to all shipment lines that belong to the shipment.
• Line Group
Select Line Group if you want the charge line amount to be prorated to all shipment lines that belong to the specified shipment line group.
• Shipment Line
Select Shipment Line if you want the charge line amount to be fully allocated to the specified shipment line.
If you select Shipment, the shipment number appears in the Number field.
If you select Line Group or Shipment Line the Number field become available.
15. If you selected Line Group for the Type, select the line group in the Number field that you want to associate the charge line to.
5-42 Oracle Landed Cost Management Process Guide
16. If you selected Shipment Line for the Type, select the shipment line in the Number field that you want to associate the charge line to.
17. Click the Apply button.
The new charge line is added.
18. To update details for the charge line, click the Update icon next to the charge line.
The Update Charge Line page appears.
19. (Optional) Update the information for the charge line.
Note: You can create the charge line using this page or you can create charge lines from the Manage Charges page.
20. Indicate whether this charge line should be included in the landed cost by selecting the Included in the Landed Cost check box.
This check box appears selected by default.
21. Enter associations for the charge line.
For information, see Steps 12 through 15.
Note: You can create the charge line associations using this page or you can create associations from the Manage Charges page. The Associations section works the same in both pages.
22. Click the Apply button.
The charge line information is added and you are returned to the Manage Charges page.
23. Click the Apply button.
The charge line is added and you are returned to the previous page. In addition, theManage Associations page is updated to reflect the modifications.
Viewing Charge Lines for the ShipmentUse the View Shipment page and all of its related view pages to view all of the information related to a shipment. The View Shipment page is very similar to the Update Shipment and Create Shipment pages but it is only used for viewing purposes.
Use this procedure to view charge lines for the shipment:
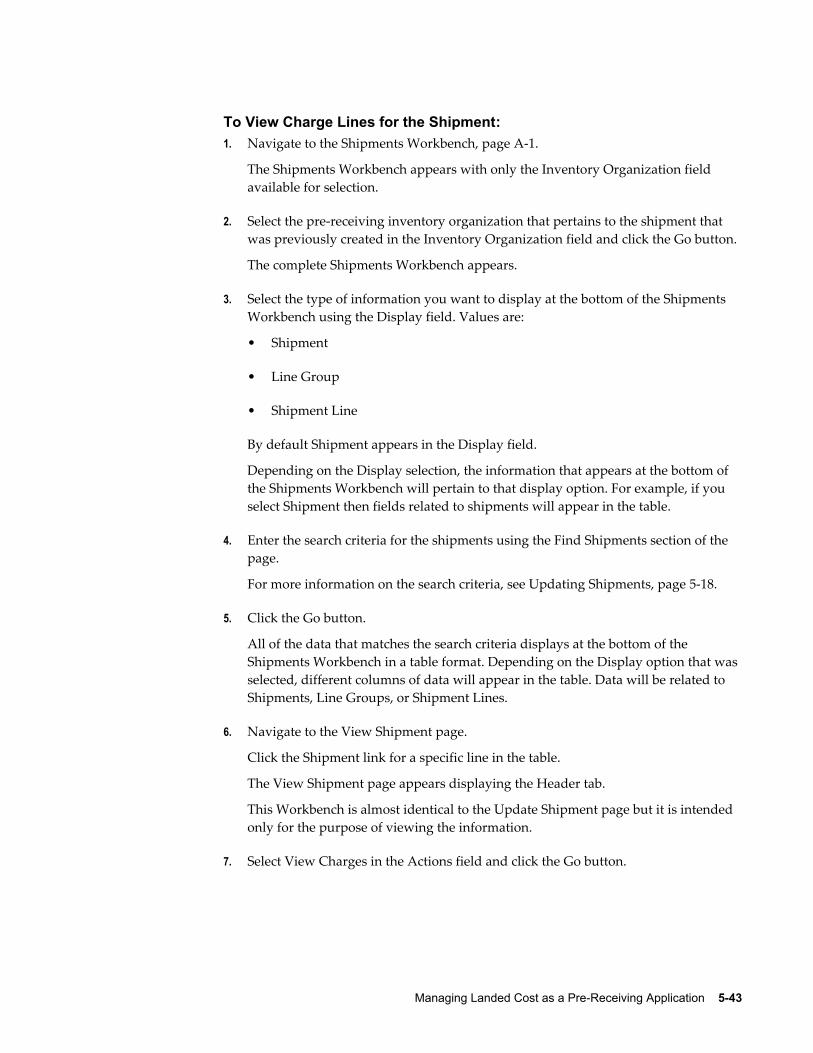
Managing Landed Cost as a Pre-Receiving Application 5-43
To View Charge Lines for the Shipment:1. Navigate to the Shipments Workbench, page A-1.
The Shipments Workbench appears with only the Inventory Organization field available for selection.
2. Select the pre-receiving inventory organization that pertains to the shipment that was previously created in the Inventory Organization field and click the Go button.
The complete Shipments Workbench appears.
3. Select the type of information you want to display at the bottom of the Shipments Workbench using the Display field. Values are:
• Shipment
• Line Group
• Shipment Line
By default Shipment appears in the Display field.
Depending on the Display selection, the information that appears at the bottom of the Shipments Workbench will pertain to that display option. For example, if you select Shipment then fields related to shipments will appear in the table.
4. Enter the search criteria for the shipments using the Find Shipments section of the page.
For more information on the search criteria, see Updating Shipments, page 5-18.
5. Click the Go button.
All of the data that matches the search criteria displays at the bottom of the Shipments Workbench in a table format. Depending on the Display option that was selected, different columns of data will appear in the table. Data will be related to Shipments, Line Groups, or Shipment Lines.
6. Navigate to the View Shipment page.
Click the Shipment link for a specific line in the table.
The View Shipment page appears displaying the Header tab.
This Workbench is almost identical to the Update Shipment page but it is intended only for the purpose of viewing the information.
7. Select View Charges in the Actions field and click the Go button.
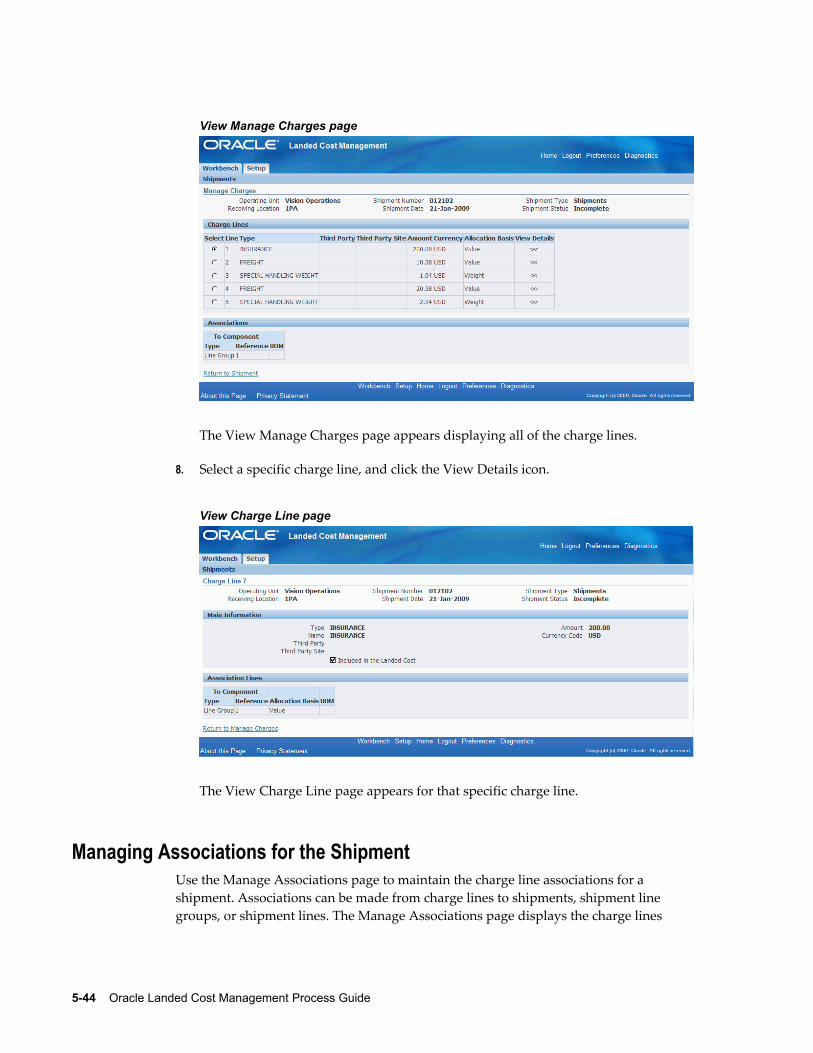
5-44 Oracle Landed Cost Management Process Guide
View Manage Charges page
The View Manage Charges page appears displaying all of the charge lines.
8. Select a specific charge line, and click the View Details icon.
View Charge Line page
The View Charge Line page appears for that specific charge line.
Managing Associations for the ShipmentUse the Manage Associations page to maintain the charge line associations for a shipment. Associations can be made from charge lines to shipments, shipment line groups, or shipment lines. The Manage Associations page displays the charge lines
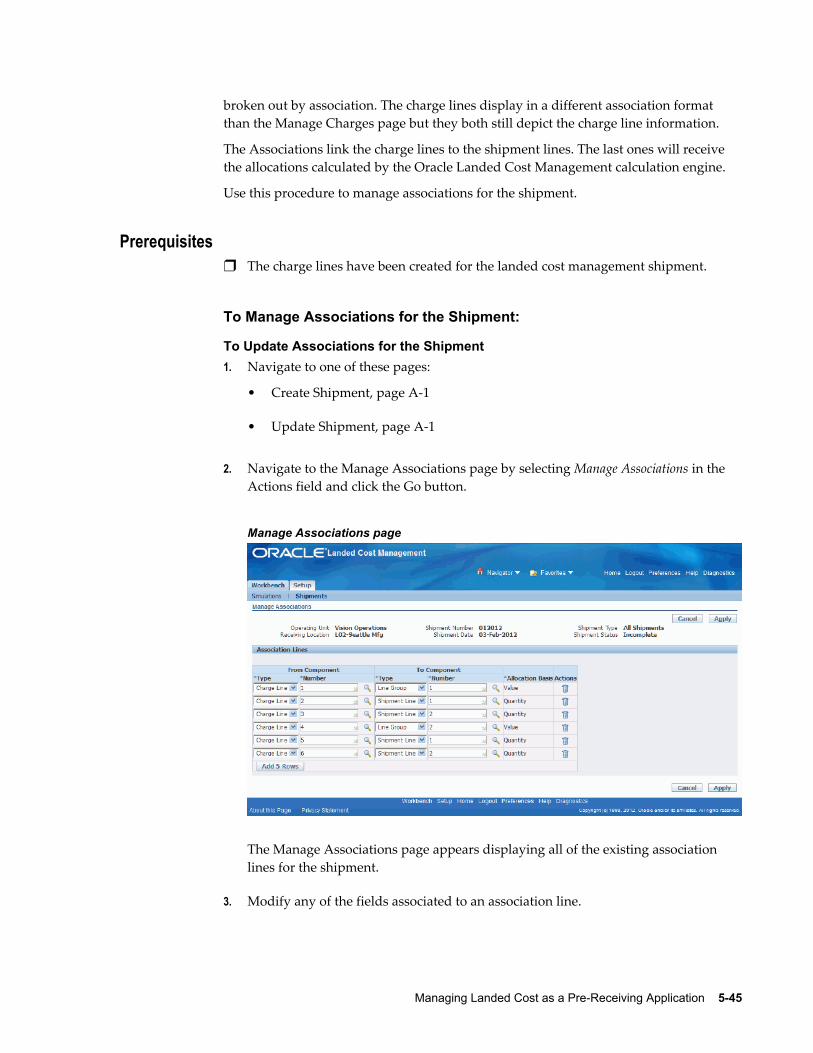
Managing Landed Cost as a Pre-Receiving Application 5-45
broken out by association. The charge lines display in a different association format than the Manage Charges page but they both still depict the charge line information.
The Associations link the charge lines to the shipment lines. The last ones will receive the allocations calculated by the Oracle Landed Cost Management calculation engine.
Use this procedure to manage associations for the shipment.
Prerequisites❒ The charge lines have been created for the landed cost management shipment.
To Manage Associations for the Shipment:
To Update Associations for the Shipment1. Navigate to one of these pages:
• Create Shipment, page A-1
• Update Shipment, page A-1
2. Navigate to the Manage Associations page by selecting Manage Associations in the Actions field and click the Go button.
Manage Associations page
The Manage Associations page appears displaying all of the existing association lines for the shipment.
3. Modify any of the fields associated to an association line.
5-46 Oracle Landed Cost Management Process Guide
4. To delete an existing association line, click the Delete icon next to the association line.
The association line is removed from the Association Lines section of the page.
Note: If you delete all the associations of a charge line, it will not appear in the Manage Charges page, because all the links to the shipment components will be lost and the charge line amount will not be considered by the Landed Cost calculation.
5. Click the Apply button.
The association line is updated and you are returned back to the previous page.
At the top of the page you will receive a successful confirmation message.
In addition, the Manage Charges page is updated to reflect the modifications.
To Add an Association Line to the Shipment6. Navigate to the Manage Associations page by selecting Manage Associations in the
Actions field.
The Manage Associations page appears displaying all of the existing association lines for the shipment.
7. Access a blank row in the Association Lines table by clicking the Add 5 Rows button to create five new association line rows in the table.
8. Enter the following information for an association line row:
Field Name Description
From Component Type Select the from charge line type. Value is: Charge Line.
From Component Number Select the from charge line number.
To Component Type Select the type of charge line. Values are: Shipment, Line Group, or Shipment Line.
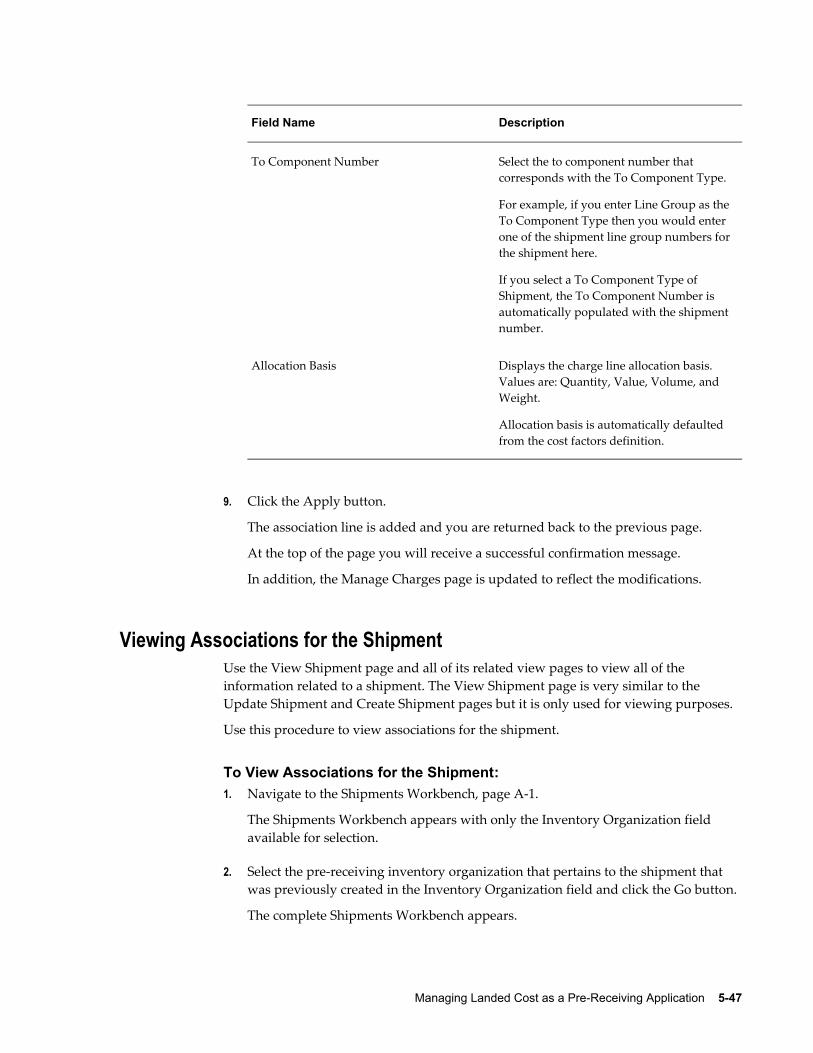
Managing Landed Cost as a Pre-Receiving Application 5-47
Field Name Description
To Component Number Select the to component number that corresponds with the To Component Type.
For example, if you enter Line Group as the To Component Type then you would enter one of the shipment line group numbers for the shipment here.
If you select a To Component Type of Shipment, the To Component Number is automatically populated with the shipment number.
Allocation Basis Displays the charge line allocation basis. Values are: Quantity, Value, Volume, and Weight.
Allocation basis is automatically defaulted from the cost factors definition.
9. Click the Apply button.
The association line is added and you are returned back to the previous page.
At the top of the page you will receive a successful confirmation message.
In addition, the Manage Charges page is updated to reflect the modifications.
Viewing Associations for the ShipmentUse the View Shipment page and all of its related view pages to view all of the information related to a shipment. The View Shipment page is very similar to the Update Shipment and Create Shipment pages but it is only used for viewing purposes.
Use this procedure to view associations for the shipment.
To View Associations for the Shipment:1. Navigate to the Shipments Workbench, page A-1.
The Shipments Workbench appears with only the Inventory Organization field available for selection.
2. Select the pre-receiving inventory organization that pertains to the shipment that was previously created in the Inventory Organization field and click the Go button.
The complete Shipments Workbench appears.
5-48 Oracle Landed Cost Management Process Guide
3. Select the type of information you want to display at the bottom of the Shipments Workbench using the Display field. Values are:
• Shipment
• Line Group
• Shipment Line
By default Shipment appears in the Display field.
Depending on the Display selection, the information that appears at the bottom of the Shipments Workbench will pertain to that display option. For example, if you select Shipment then fields related to shipments will appear in the table.
4. Enter the search criteria for the shipments using the Find Shipments section of the page.
For more information on the search criteria, seeUpdating Shipments, page 5-18.
5. Click the Go button.
All of the data that matches the search criteria displays at the bottom of the Shipments Workbench in a table format. Depending on the Display option that was selected, different columns of data will appear in the table. Data will be related to Shipments, Line Groups, or Shipment Lines.
6. Navigate to the View Shipment page.
Click the Shipment link for a specific line in the table.
The View Shipment page appears displaying the Header tab.
The View Shipment page is almost identical to the Update Shipment page but it is intended only for the purpose of viewing the information.
7. Select View Associations in the Actions field and click the Go button.
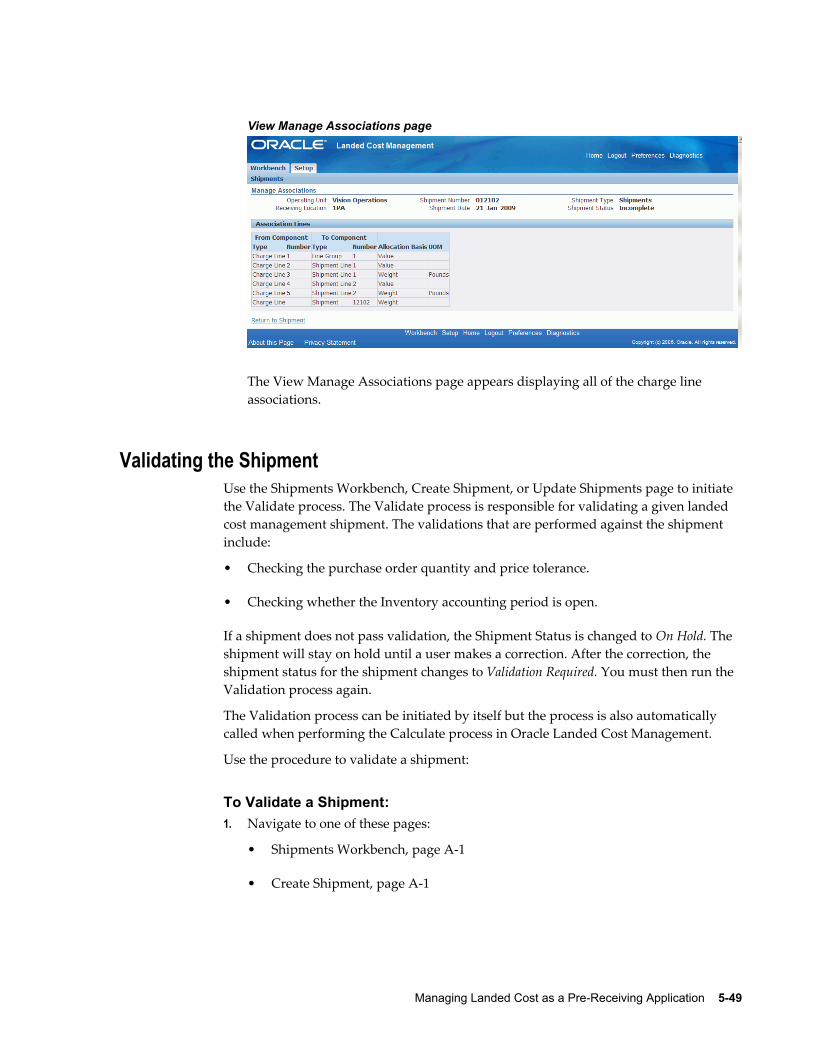
Managing Landed Cost as a Pre-Receiving Application 5-49
View Manage Associations page
The View Manage Associations page appears displaying all of the charge line associations.
Validating the ShipmentUse the Shipments Workbench, Create Shipment, or Update Shipments page to initiate the Validate process. The Validate process is responsible for validating a given landed cost management shipment. The validations that are performed against the shipment include:
• Checking the purchase order quantity and price tolerance.
• Checking whether the Inventory accounting period is open.
If a shipment does not pass validation, the Shipment Status is changed to On Hold. The shipment will stay on hold until a user makes a correction. After the correction, the shipment status for the shipment changes to Validation Required. You must then run the Validation process again.
The Validation process can be initiated by itself but the process is also automatically called when performing the Calculate process in Oracle Landed Cost Management.
Use the procedure to validate a shipment:
To Validate a Shipment:1. Navigate to one of these pages:
• Shipments Workbench, page A-1
• Create Shipment, page A-1
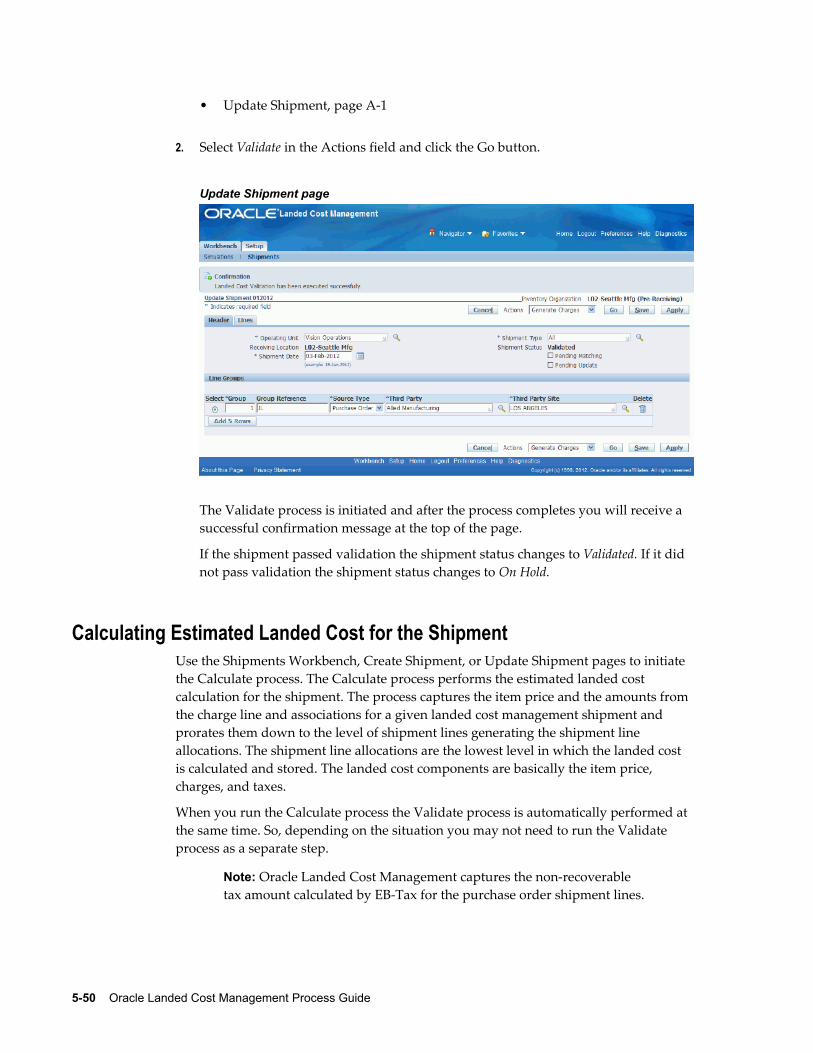
5-50 Oracle Landed Cost Management Process Guide
• Update Shipment, page A-1
2. Select Validate in the Actions field and click the Go button.
Update Shipment page
The Validate process is initiated and after the process completes you will receive a successful confirmation message at the top of the page.
If the shipment passed validation the shipment status changes to Validated. If it did not pass validation the shipment status changes to On Hold.
Calculating Estimated Landed Cost for the ShipmentUse the Shipments Workbench, Create Shipment, or Update Shipment pages to initiate the Calculate process. The Calculate process performs the estimated landed cost calculation for the shipment. The process captures the item price and the amounts from the charge line and associations for a given landed cost management shipment and prorates them down to the level of shipment lines generating the shipment line allocations. The shipment line allocations are the lowest level in which the landed cost is calculated and stored. The landed cost components are basically the item price, charges, and taxes.
When you run the Calculate process the Validate process is automatically performed at the same time. So, depending on the situation you may not need to run the Validate process as a separate step.
Note: Oracle Landed Cost Management captures the non-recoverable tax amount calculated by EB-Tax for the purchase order shipment lines.
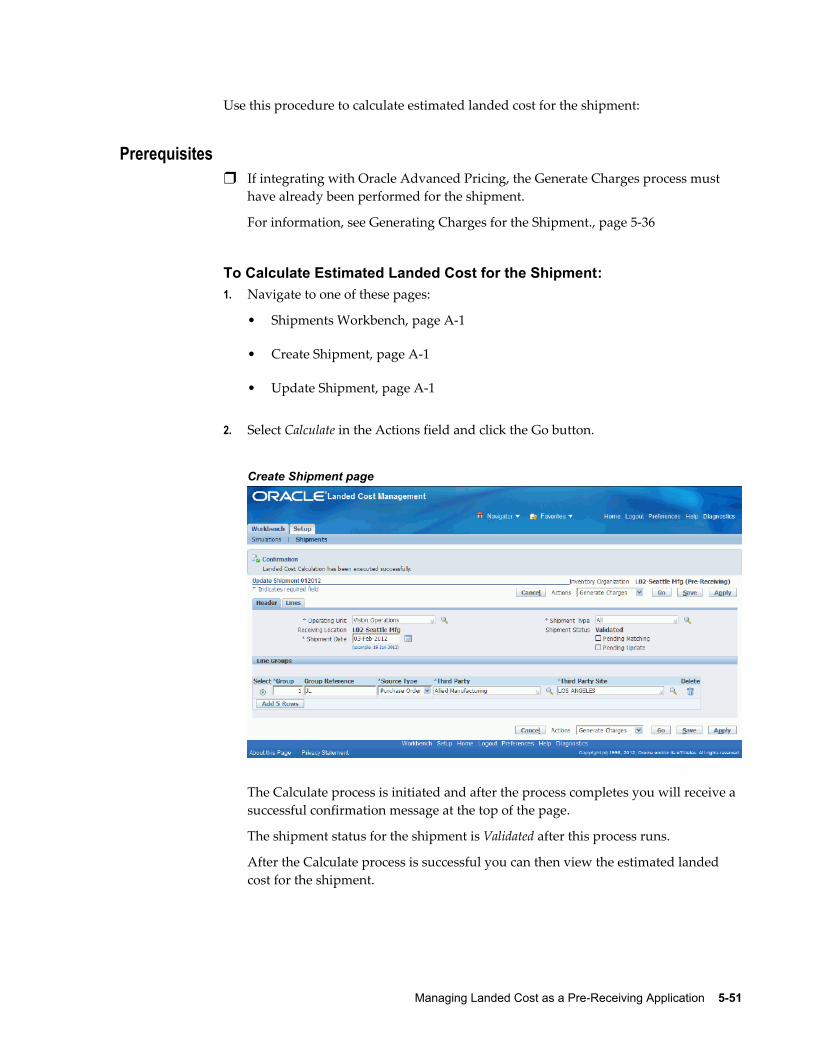
Managing Landed Cost as a Pre-Receiving Application 5-51
Use this procedure to calculate estimated landed cost for the shipment:
Prerequisites❒ If integrating with Oracle Advanced Pricing, the Generate Charges process must
have already been performed for the shipment.
For information, see Generating Charges for the Shipment., page 5-36
To Calculate Estimated Landed Cost for the Shipment:1. Navigate to one of these pages:
• Shipments Workbench, page A-1
• Create Shipment, page A-1
• Update Shipment, page A-1
2. Select Calculate in the Actions field and click the Go button.
Create Shipment page
The Calculate process is initiated and after the process completes you will receive a successful confirmation message at the top of the page.
The shipment status for the shipment is Validated after this process runs.
After the Calculate process is successful you can then view the estimated landed cost for the shipment.
5-52 Oracle Landed Cost Management Process Guide
Viewing Estimated Landed Cost for the ShipmentAfter the estimated landed cost is calculated for a shipment, you can use the Shipment Hierarchy and Landed Cost Details pages to view the estimated landed cost for the shipment. These pages itemize all of the allocation values that make up the total landed cost. Plus, you can view the proportion of each landed cost component making up the total landed cost in a Pie Chart or Bar Graph.
Use this procedure to view estimated landed cost for the shipment:
Prerequisites❒ Estimated land cost must have already been calculated for the shipment.
To View Estimated Landed Cost for the Shipment:1. Navigate to one of these pages:
• Shipments Workbench, page A-1
• View Shipment, page A-1
• Create Shipment, page A-1
• Update Shipment, page A-1
2. Select View Landed Cost in the Actions field and click the Go button.
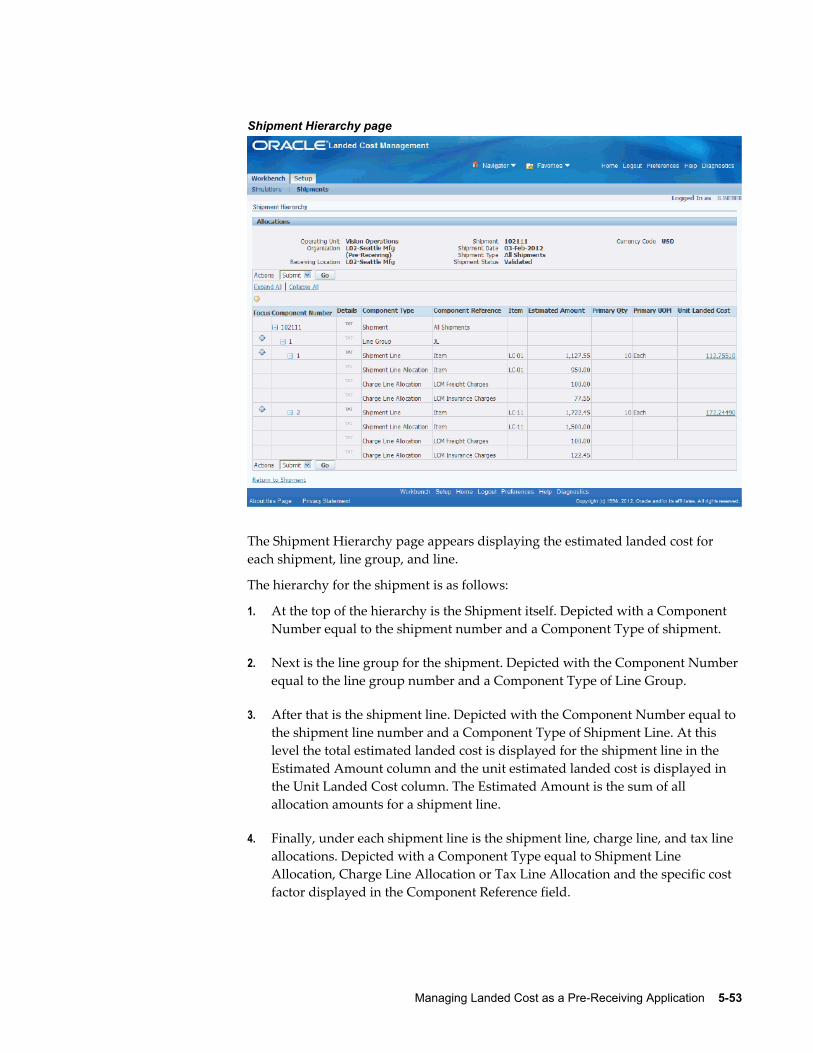
Managing Landed Cost as a Pre-Receiving Application 5-53
Shipment Hierarchy page
The Shipment Hierarchy page appears displaying the estimated landed cost for each shipment, line group, and line.
The hierarchy for the shipment is as follows:
1. At the top of the hierarchy is the Shipment itself. Depicted with a Component Number equal to the shipment number and a Component Type of shipment.
2. Next is the line group for the shipment. Depicted with the Component Number equal to the line group number and a Component Type of Line Group.
3. After that is the shipment line. Depicted with the Component Number equal to the shipment line number and a Component Type of Shipment Line. At this level the total estimated landed cost is displayed for the shipment line in the Estimated Amount column and the unit estimated landed cost is displayed in the Unit Landed Cost column. The Estimated Amount is the sum of all allocation amounts for a shipment line.
4. Finally, under each shipment line is the shipment line, charge line, and tax line allocations. Depicted with a Component Type equal to Shipment Line Allocation, Charge Line Allocation or Tax Line Allocation and the specific cost factor displayed in the Component Reference field.
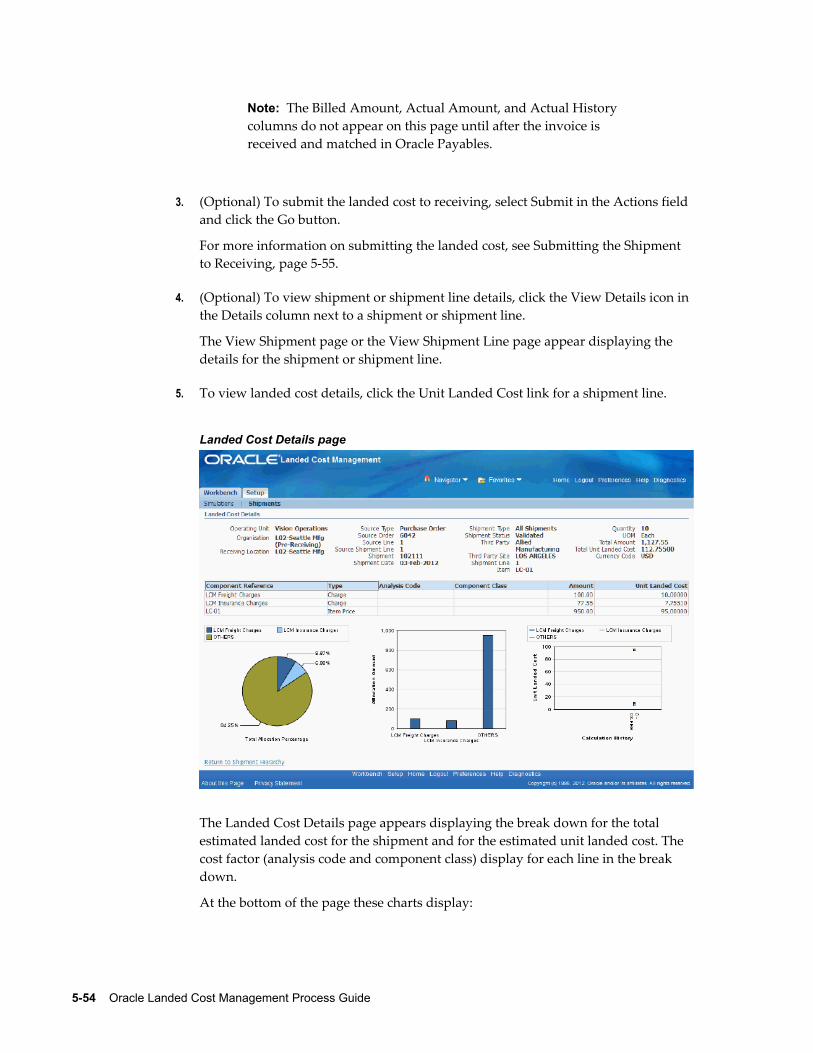
5-54 Oracle Landed Cost Management Process Guide
Note: The Billed Amount, Actual Amount, and Actual History columns do not appear on this page until after the invoice is received and matched in Oracle Payables.
3. (Optional) To submit the landed cost to receiving, select Submit in the Actions field and click the Go button.
For more information on submitting the landed cost, see Submitting the Shipment to Receiving, page 5-55.
4. (Optional) To view shipment or shipment line details, click the View Details icon in the Details column next to a shipment or shipment line.
The View Shipment page or the View Shipment Line page appear displaying the details for the shipment or shipment line.
5. To view landed cost details, click the Unit Landed Cost link for a shipment line.
Landed Cost Details page
The Landed Cost Details page appears displaying the break down for the total estimated landed cost for the shipment and for the estimated unit landed cost. The cost factor (analysis code and component class) display for each line in the break down.
At the bottom of the page these charts display:
Managing Landed Cost as a Pre-Receiving Application 5-55
• Pie Graph: The pie graph displays the total allocation percentage for each cost that make up the shipment line.
• Bar Graph: The bar graph displays the total allocation amount for each cost in the shipment line.
• Calculation History: This graph displays the landed cost adjustment calculationhistory for the unit landed cost.
When only estimated landed cost has been calculated and not updated this chart will display just as individual points on the graph. After estimated landedcost has been updated or actual landed cost is calculated, you will be able to view lines in this graph that depict the calculation history.
6. (Optional) Select another cost adjustment using the Unit Landed Cost History field.
Note: The Unit Landed Cost History field is only available when viewing estimated landed costs after estimated landed cost information has been updated on a completed shipment and processed.
The values that appear for the field are equal to the Adjustment Number from the shipment line plus the date it occurred.
The system refreshes the page displaying the details for that cost adjustment. The Pie Chart and Bar Graph refresh with the new information and the Calculation History graph will display as a line.
Submitting the Shipment to ReceivingUse the Shipments Workbench, Create Shipment page, Update Shipment page, or the Shipment Hierarchy pages to initiate the Submit process. The Submit process performs all the tasks necessary to complete a landed cost management shipment related to estimated landed costs. When managing estimated landed costs as a pre-receiving application the estimated landed cost must be submitted for a shipment before the shipment can be received using the Receiving application.
Use this procedure to submit the shipment to Receiving:
Prerequisites❒ The estimated landed cost calculation has already been performed for the shipment
and then reviewed and managed until it is reflecting the correct amounts for the shipment.
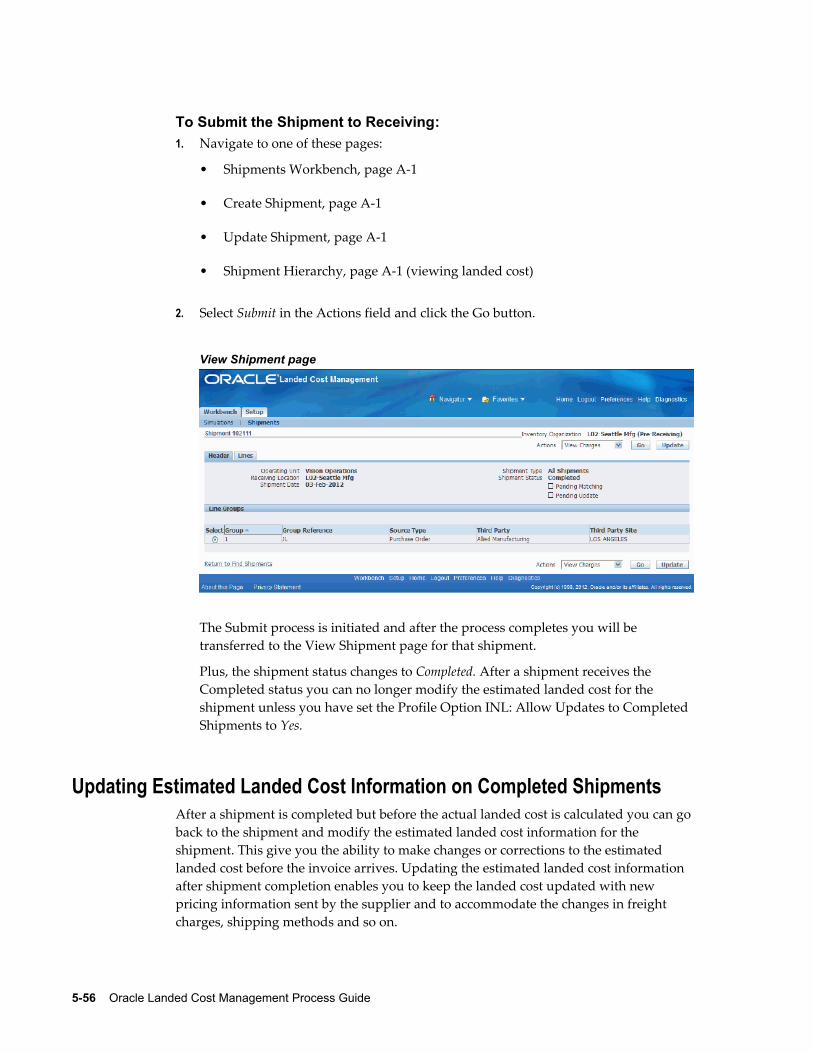
5-56 Oracle Landed Cost Management Process Guide
To Submit the Shipment to Receiving:1. Navigate to one of these pages:
• Shipments Workbench, page A-1
• Create Shipment, page A-1
• Update Shipment, page A-1
• Shipment Hierarchy, page A-1 (viewing landed cost)
2. Select Submit in the Actions field and click the Go button.
View Shipment page
The Submit process is initiated and after the process completes you will be transferred to the View Shipment page for that shipment.
Plus, the shipment status changes to Completed. After a shipment receives the Completed status you can no longer modify the estimated landed cost for the shipment unless you have set the Profile Option INL: Allow Updates to Completed Shipments to Yes.
Updating Estimated Landed Cost Information on Completed ShipmentsAfter a shipment is completed but before the actual landed cost is calculated you can goback to the shipment and modify the estimated landed cost information for the shipment. This give you the ability to make changes or corrections to the estimated landed cost before the invoice arrives. Updating the estimated landed cost information after shipment completion enables you to keep the landed cost updated with new pricing information sent by the supplier and to accommodate the changes in freight charges, shipping methods and so on.
Managing Landed Cost as a Pre-Receiving Application 5-57
For more information on updating estimated landed cost information on completed shipments, see Understanding the Estimated Landed Cost Update Process, page 7-1 and the Updating Estimated Landed Cost Information on Completed Shipments chapter in this guide.
Calculating and Importing Actual Landed Cost for the ShipmentBefore you can view the actual landed cost for a shipment in Oracle Landed Cost Management a couple of steps need to be performed. For automatic actual landed cost calculation perform these steps:
1. Enter and validate item and charge invoices in Oracle Payables.
2. Run the Matches Interface Import concurrent program.
3. Run the Submit Pending Shipments concurrent program.
For manual actual landed cost calculation perform these steps:
1. Enter and validate item and charge invoices in Oracle Payables.
2. Run the Matches Interface Import concurrent program.
3. Access the Shipments Workbench and run the Submit process again for the shipment.
Note: The item and charge invoices entered in Oracle Payables must have the match on receipt option to enable the actual landed cost calculation.
The Matches Interface Import program is responsible for importing the matched invoiceinformation from Oracle Payables into Oracle Landed Cost Management. During this program execution, all shipments that need to be resubmitted that are being impacted by the capture of actual amounts will be set as "Pending Matching" shipments. Pending landed cost management shipments must be resubmitted, so that a new landed cost canbe figured out as "actual landed cost" and the differences between estimated and actual landed costs can be posted to Oracle Cost Management.
Pending landed cost management shipments can be submitted either one by one, through the Oracle Landed Cost Management Shipments Workbench, or in batch, through the Submit Pending Shipments concurrent program. The Submit Pending Shipments program calculates actual landed cost and then performs the submit action again for the shipment. In both cases, all the routines necessary to recalculate landed costs and generate the Oracle Cost Management integration transactions are performed.
For more information on initiating the Submit process through the Oracle Landed Cost Management Shipments Workbench, see Submitting the Shipment to Receiving, page 5-55.
5-58 Oracle Landed Cost Management Process Guide
Use these procedures to calculate and import the actual landed cost:
Prerequisites❒ Invoices have already been created in Oracle Payables for the item and the other
costs (insurance, freight and so on) associated with the shipment. Plus, the invoices have been matched and successfully validated.
To Run the Matches Interface Import Program1. Navigate to the Submit Request window, page A-1.
The Submit a New Request window appears asking for the type of request you want to submit.
2. Select the Single Request option and click the OK button.
The Submit Request window appears.
3. Select Matches Interface Import in the Name field.
4. Click the Submit button.
5. Click the No button in the Decision window.
6. To see the status of the concurrent request, navigate to the Requests window, page A-1.
The Find Requests window appears.
7. Click the Find button to view the status of all the requests.
The Requests window appears displaying all of the requests.
To Run the Submit Pending Shipments Program8. Navigate to the Submit Request window, page A-1.
The Submit a New Request window appears asking for the type of request you want to submit.
Note: The shipments that require resubmitting for actual landed cost calculation will have the Pending Matching field set to Yes. The Matches Interface Import program sets this field during its processing.
9. Select the Single Request option and click the OK button.
The Submit Request window appears.
Managing Landed Cost as a Pre-Receiving Application 5-59
10. Select Submit Pending Shipments in the Name field.
The Parameters window appears.
11. (Optional) Enter an Inventory Organization or an Inventory Organization and a Shipment Number and click the OK button.
To run the program for all of the available data do not enter any parameters.
12. Click the Submit button.
The Submit Pending Shipments program will skip the shipments that have pendingupdates and will finish with a warning status.
A message is included in the log stating that the shipment has not been processed and the "Submit" or "Discard Updates" action must be performed from the Shipments Workbench.
For more information on shipments that have pending updates, see the Updating Estimated Landed Cost on Completed Shipments chapter in this guide.
13. Click the No button in the Decision window.
14. To see the status of the concurrent request, navigate to the Requests window, page A-1.
The Find Requests window appears.
15. Click the Find button to view the status of all the requests.
The Requests window appears displaying all of the requests.
To Resubmit the Shipment for Actual Landed Cost Calculation:1. Navigate to one of the Shipments Workbench, page A-1.
Note: The shipments that require resubmitting for actual landed cost calculation will have the Pending Matching field set to Yes. The Matches Interface Import program sets this field during its processing.
2. Select Submit in the Actions field and click the Go button.
The Submit process is initiated and after the process completes you will be able to view the actual landed cost for the shipment.
Viewing Actual Landed Cost for the ShipmentUse he Shipment Hierarchy and Landed Cost Details pages to view the actual landed
5-60 Oracle Landed Cost Management Process Guide
cost for a shipment. These pages itemize all of the allocation values that make up the total landed cost.
Using the Actual Matching History page you can view the detailed invoicing history forthe shipment line.
Plus, you can view the proportion of each landed cost component making up the total landed cost in a Pie Chart or Bar Graph and the unit landed cost calculations in the Calculation History graph.
Use this procedure to view actual landed cost for the shipment:
Prerequisites❒ Invoice information related to the landed cost management shipment has been
imported from Oracle Payables.
❒ Actual landed cost has been calculated for the shipment.
To View Actual Landed Cost for the Shipment:1. Navigate to one of these pages:
• Shipments Workbench, page A-1
• View Shipment, page A-1
2. Select View Landed Cost in the Actions field and click the Go button.
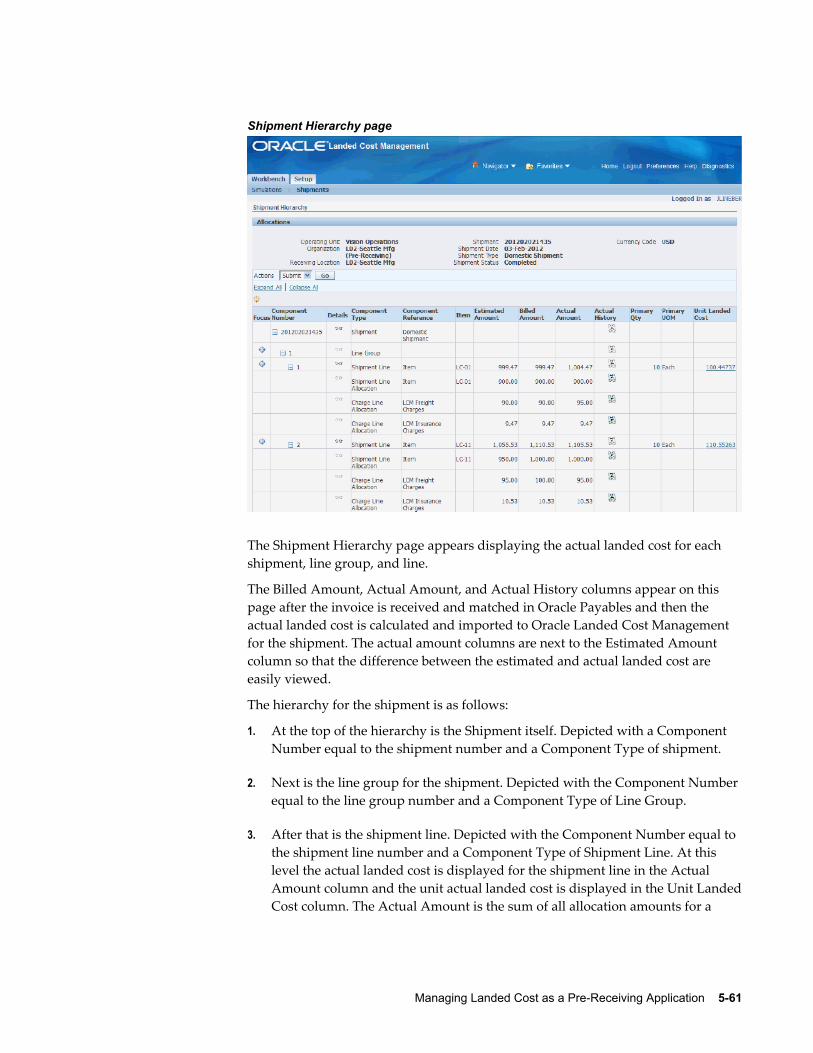
Managing Landed Cost as a Pre-Receiving Application 5-61
Shipment Hierarchy page
The Shipment Hierarchy page appears displaying the actual landed cost for each shipment, line group, and line.
The Billed Amount, Actual Amount, and Actual History columns appear on this page after the invoice is received and matched in Oracle Payables and then the actual landed cost is calculated and imported to Oracle Landed Cost Management for the shipment. The actual amount columns are next to the Estimated Amount column so that the difference between the estimated and actual landed cost are easily viewed.
The hierarchy for the shipment is as follows:
1. At the top of the hierarchy is the Shipment itself. Depicted with a Component Number equal to the shipment number and a Component Type of shipment.
2. Next is the line group for the shipment. Depicted with the Component Number equal to the line group number and a Component Type of Line Group.
3. After that is the shipment line. Depicted with the Component Number equal to the shipment line number and a Component Type of Shipment Line. At this level the actual landed cost is displayed for the shipment line in the Actual Amount column and the unit actual landed cost is displayed in the Unit LandedCost column. The Actual Amount is the sum of all allocation amounts for a
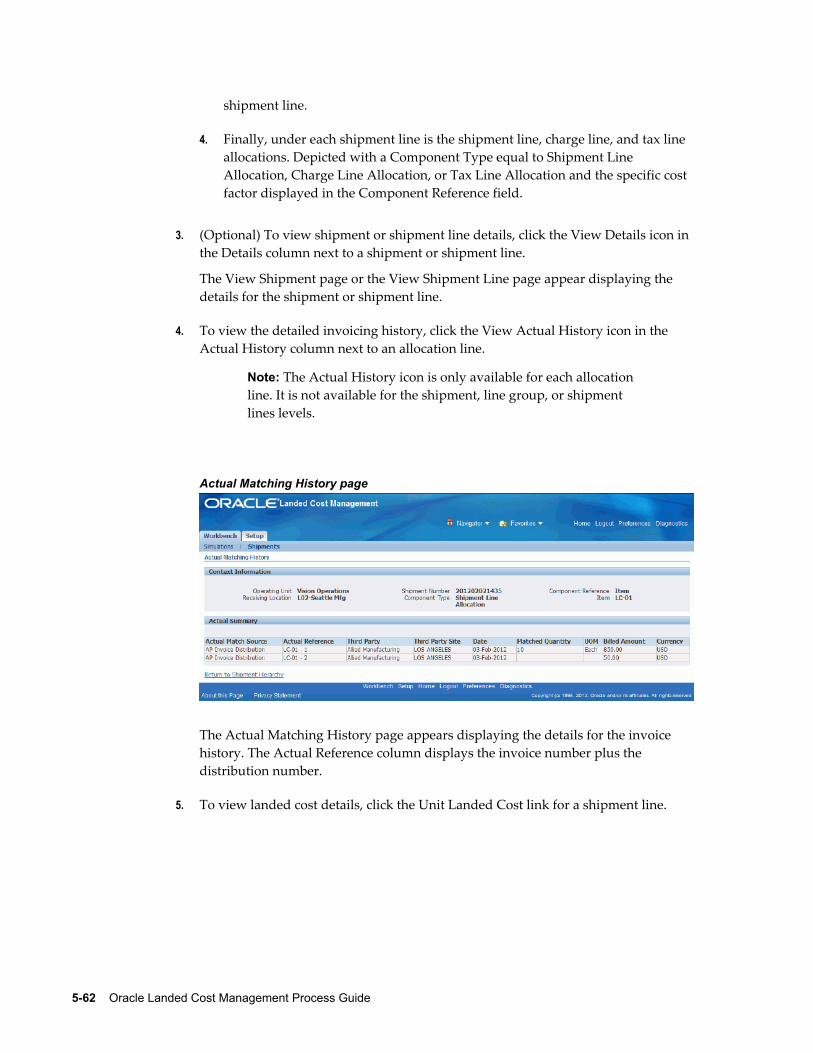
5-62 Oracle Landed Cost Management Process Guide
shipment line.
4. Finally, under each shipment line is the shipment line, charge line, and tax line allocations. Depicted with a Component Type equal to Shipment Line Allocation, Charge Line Allocation, or Tax Line Allocation and the specific cost factor displayed in the Component Reference field.
3. (Optional) To view shipment or shipment line details, click the View Details icon in the Details column next to a shipment or shipment line.
The View Shipment page or the View Shipment Line page appear displaying the details for the shipment or shipment line.
4. To view the detailed invoicing history, click the View Actual History icon in the Actual History column next to an allocation line.
Note: The Actual History icon is only available for each allocation line. It is not available for the shipment, line group, or shipment lines levels.
Actual Matching History page
The Actual Matching History page appears displaying the details for the invoice history. The Actual Reference column displays the invoice number plus the distribution number.
5. To view landed cost details, click the Unit Landed Cost link for a shipment line.
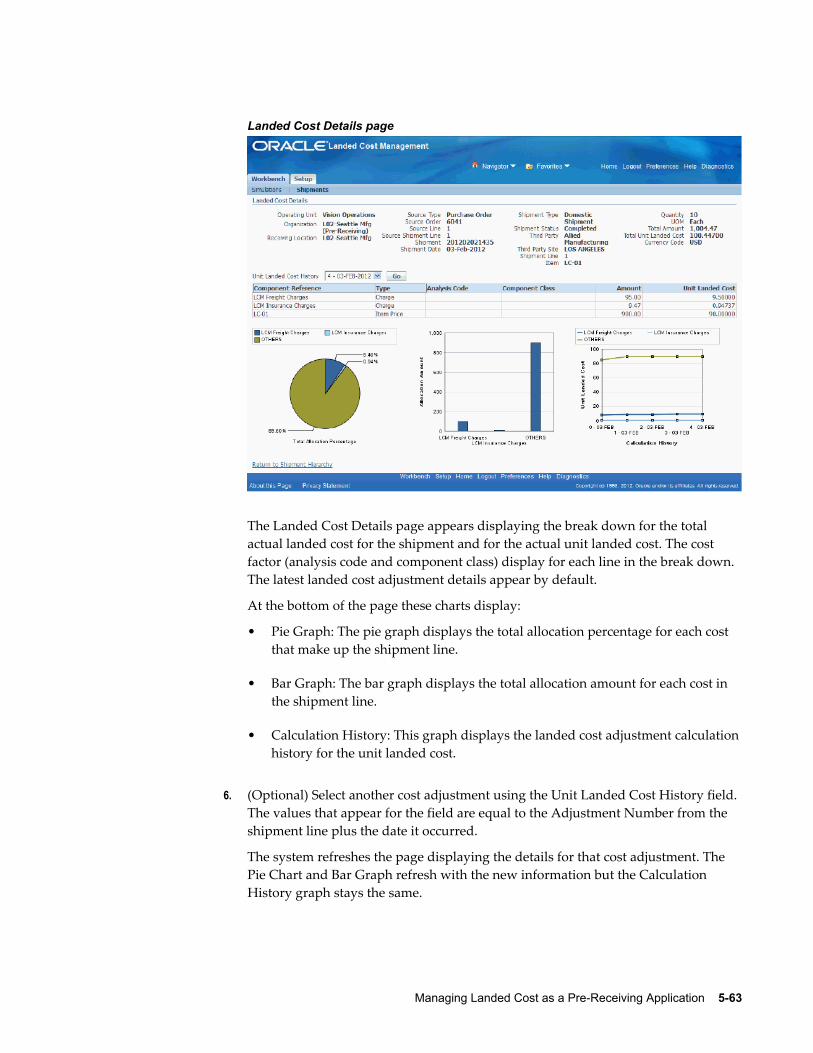
Managing Landed Cost as a Pre-Receiving Application 5-63
Landed Cost Details page
The Landed Cost Details page appears displaying the break down for the total actual landed cost for the shipment and for the actual unit landed cost. The cost factor (analysis code and component class) display for each line in the break down. The latest landed cost adjustment details appear by default.
At the bottom of the page these charts display:
• Pie Graph: The pie graph displays the total allocation percentage for each cost that make up the shipment line.
• Bar Graph: The bar graph displays the total allocation amount for each cost in the shipment line.
• Calculation History: This graph displays the landed cost adjustment calculationhistory for the unit landed cost.
6. (Optional) Select another cost adjustment using the Unit Landed Cost History field. The values that appear for the field are equal to the Adjustment Number from the shipment line plus the date it occurred.
The system refreshes the page displaying the details for that cost adjustment. The Pie Chart and Bar Graph refresh with the new information but the Calculation History graph stays the same.

Managing Landed Cost as a Service 6-1
6Managing Landed Cost as a Service
This chapter covers the following topics:
• Understanding Landed Cost as a Service
• Importing Estimated Landed Cost Information from Receiving
• Searching for Automatically Created Shipments
• Viewing Estimated Landed Cost for the Shipment
• Generating Charges for a Shipment that is Not Completed
• Maintaining Charge Lines for a Shipment that is Not Completed
• Updating Associations for a Shipment that is Not Completed
• Validating a Shipment that is Not Completed
• Calculating Estimated Landed Cost for a Shipment that is Not Completed
• Submitting a Shipment that is Not Completed to Receiving
• Updating Estimated Landed Cost Information on Completed Shipments
• Calculating and Importing Actual Landed Cost for the Shipment
• Viewing Actual Landed Cost for the Shipment
Understanding Landed Cost as a ServiceThese diagrams illustrate the use of Oracle Landed Cost Management as a Service flow without the use of rules and with the use of rules:
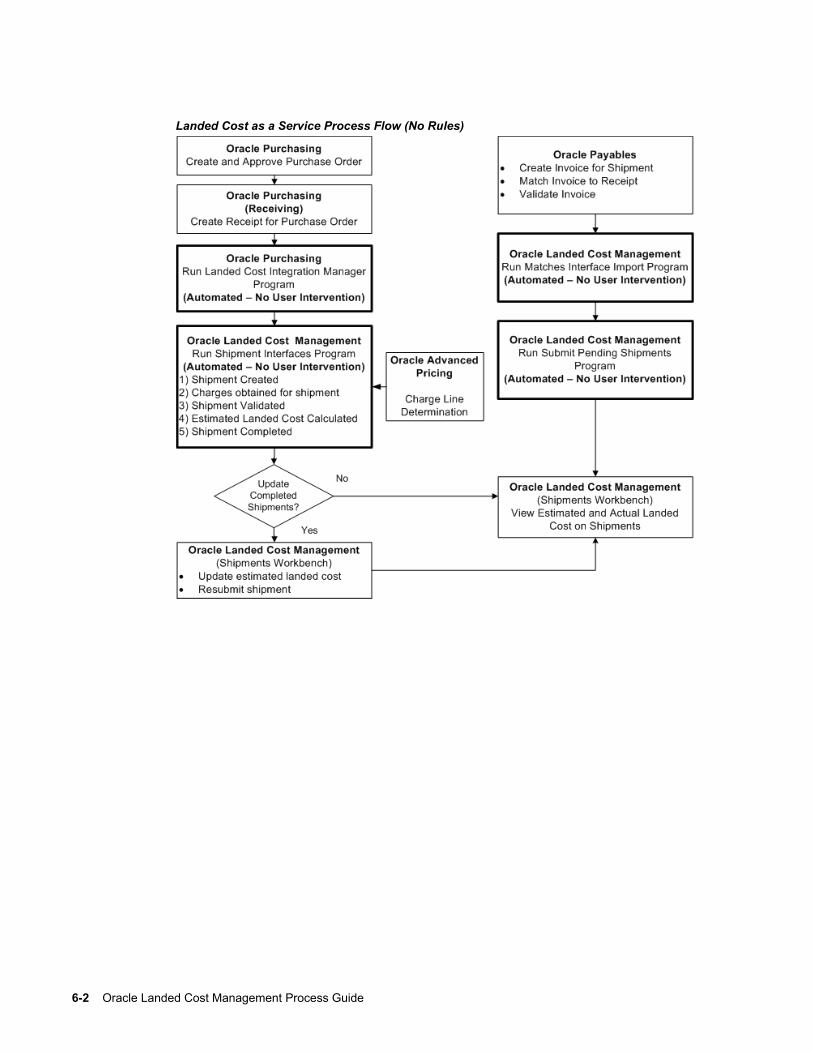
6-2 Oracle Landed Cost Management Process Guide
Landed Cost as a Service Process Flow (No Rules)
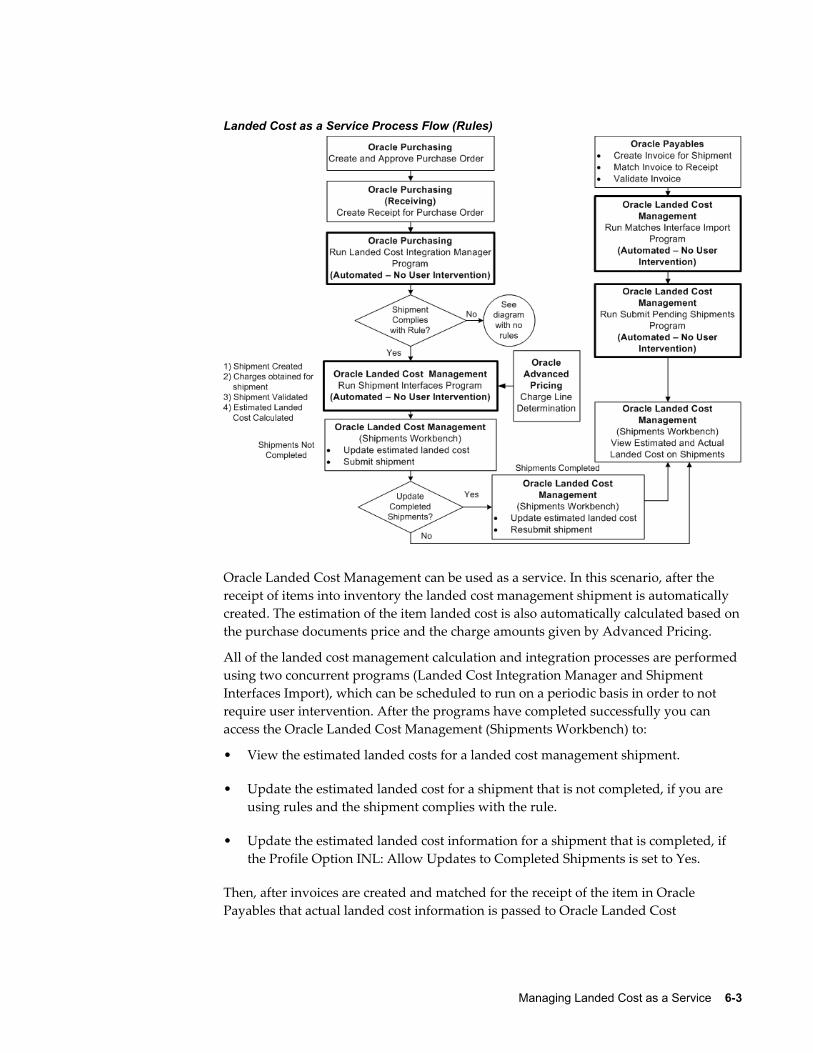
Managing Landed Cost as a Service 6-3
Landed Cost as a Service Process Flow (Rules)
Oracle Landed Cost Management can be used as a service. In this scenario, after the receipt of items into inventory the landed cost management shipment is automatically created. The estimation of the item landed cost is also automatically calculated based onthe purchase documents price and the charge amounts given by Advanced Pricing.
All of the landed cost management calculation and integration processes are performed using two concurrent programs (Landed Cost Integration Manager and Shipment Interfaces Import), which can be scheduled to run on a periodic basis in order to not require user intervention. After the programs have completed successfully you can access the Oracle Landed Cost Management (Shipments Workbench) to:
• View the estimated landed costs for a landed cost management shipment.
• Update the estimated landed cost for a shipment that is not completed, if you are using rules and the shipment complies with the rule.
• Update the estimated landed cost information for a shipment that is completed, if the Profile Option INL: Allow Updates to Completed Shipments is set to Yes.
Then, after invoices are created and matched for the receipt of the item in Oracle Payables that actual landed cost information is passed to Oracle Landed Cost
6-4 Oracle Landed Cost Management Process Guide
Management using two concurrent programs (Matches Interface Import and Submit Pending Shipments). The actual landed cost calculation is based on the information collected from Payables invoices
Finally, the Shipments Workbench can be accessed again to view the actual landed cost for the shipment after the Matches Interface Import and Submit Pending Shipments programs have completed successfully. While viewing this cost information they can analyze and compare the difference between the estimated and actual landed costs. Thisinformation provides valuable insight into the costs of items.
Landed Cost as a Service High-Level Process FlowFollowing is a basic process flow when using Oracle Landed Cost Management as a service:
1. (Optional) Create a rule for the system to follow during the processing of imported shipments from Receiving using the Oracle Landed Cost Management Rule page.
For information on creating rules, see Maintaining Rules, page 2-19.
2. (Optional) Assign the rule to an LCM as a service Inventory organization using the Oracle Landed Cost Management LCM Options page.
For information on assigning the rule, see Setting Up Oracle Landed Cost Management Options, page 2-35.
3. Create a purchase order for an item referencing an Inventory organization that doesnot have pre-receiving in LCM enabled using Oracle Purchasing.
Ensure that the Invoice Match Option field for each purchase order line is set to Receipt.
For information on creating a purchase order, see the Purchase Orders chapter in the Oracle Purchasing User's Guide.
4. Approve the purchase order in Oracle Purchasing.
For information on approving a purchase order, see the Approval, Security, and Control chapter in the Oracle Purchasing User's Guide.
5. Create a receipt for the items on the purchase order using Oracle Purchasing.
Important: If Oracle Landed Cost Management is implemented as aservice application, then the receiving activities are initiated in Receiving (Oracle Purchasing) and can be used for all items. If Oracle Landed Cost Management is implemented as a pre-receiving application, the user should not use Receiving (Oracle Purchasing) for initiating the receiving activities.
For information on creating a receipt, see the Receiving chapter in the Oracle

Managing Landed Cost as a Service 6-5
Purchasing User's Guide.
6. Run the Landed Cost Integration Manager concurrent program using Oracle Purchasing.
This program picks up purchase order receipt lines and sends them to the Oracle Landed Cost Management shipment interface tables.
Oracle recommends that this program be scheduled to run in the back ground with no user intervention required.
For more information, see Importing Estimated Landed Cost Information from Receiving, page 6-8.
7. Run the Shipments Interface concurrent program using Oracle Landed Cost Management.
The Shipments Interface program operates differently depending on whether a rule has been assigned to an Inventory organization or not. If no rule has been assigned to the Inventory organization, then this program picks up the Oracle Landed Cost Management interface lines and processes them into landed cost management shipments. This concurrent program also calls routines for charge calculation, recovering taxes calculated for the purchase order lines, validation, landed cost calculation, and submission.
If a rule has been assigned, the program picks up the Oracle Landed Cost Management interface lines and processes them into landed cost management shipments. If the shipments comply with the rule, the concurrent program will call the routines for charge calculation, recovering taxes calculated for the purchase order lines, validation, and landed cost calculation. These shipments are not submitted for completion giving you the ability to manually update the estimated landed cost information using the Shipments Workbench pages. These shipments will have a Validated shipment status. The rest of the shipments that do not comply with the rule will process as if no rule was assigned.
This concurrent program uses the same APIs as the Shipments Workbench.
Oracle recommends that this program be scheduled to run in the back ground with no user intervention required.
For more information, see Importing Estimated Landed Cost Information from Receiving, page 6-8.
8. View the estimated landed cost that was calculated from the receipt information using the Oracle Landed Cost Management Shipments Workbench.
For more information, see Viewing Estimated Landed Cost for the Shipment, page 6-15.
9. Generate charges for a shipment that is not completed using the Oracle Landed Cost Management Shipments Workbench or the Update Shipment page.
6-6 Oracle Landed Cost Management Process Guide
This step is only available if you are using a rule, and the shipment complies with the rule.
For more information, see Generating Charges for a Shipment that is Not Completed, page 6-19.
10. Maintain charge lines for a shipment that is not completed using the Oracle Landed Cost Management Manage Charges and the Update Charge Line pages.
This step is only available if you are using a rule, and the shipment complies with the rule.
For more information, see Maintaining Charge Lines for a Shipment that is Not Completed, page 6-22.
11. Update associations for a shipment that is not completed using the Oracle Landed Cost Management Manage Charges, Update Charge Line, or Manage Associations pages.
This step is only available if you are using a rule, and the shipment complies with the rule.
For more information, see Updating Associations for a Shipment that is Not Completed, page 6-31.
12. Validate a shipment that is not completed using the Oracle Landed Cost Management Shipments Workbench or the Update Shipment page.
This step is only available if you are using a rule, and the shipment complies with the rule.
For more information, see Validating a Shipment that is Not Completed, page 6-36.
13. Calculate estimated landed cost information for a shipment that is not completed using the Oracle Landed Cost Management Shipments Workbench or the Update Shipment page.
This step is only available if you are using a rule, and the shipment complies with the rule.
For more information, see Calculating Estimated Landed Cost Information for a Shipment that is Not Completed, page 6-41.
14. Repeat steps 10-14 or a combinations of those steps until the estimated landed cost is satisfactory for the shipment that is not completed.
15. Submit a shipment that is not completed using the Oracle Landed Cost Management Shipments Workbench or the Update Shipment page.
This step is only available if you are using a rule, and the shipment complies with the rule.
For more information, see Submitting a Shipment that is Not Completed, page 6-45
Managing Landed Cost as a Service 6-7
.
16. (Optional) Update estimated landed cost information on a completed shipment using the Oracle Landed Cost Management Update Shipment, Update Shipment Line, Manage Charges, Manage Charge Line, and Manage Associations pages.
For more information, see Understanding the Estimated Landed Cost Update Process, page 7-1 and the Updating Estimated Landed Cost on Completes Shipments chapter in this guide.
17. (Optional) Resubmit the estimated landed cost updates using the Oracle Landed Cost Management Shipments Workbench or the Update Shipment page.
For more information, see Processing Estimated Landed Cost Updates, page 7-22.
18. (Optional) Repeat steps 16-17 until the estimated landed cost is satisfactory for the shipment.
19. Create an invoice for the receipt using Oracle Payables.
For information on creating an invoice, see the Invoices chapter in the Oracle Payables User's Guide.
20. Match the invoice to the receipts using Oracle Payables.
For information on invoice matching to receipts option see, the Invoices chapter in the Oracle Payables User's Guide.
21. Validate the invoices using Oracle Payables. After validation the actual invoice information is interfaced to the Oracle Landed Cost Management interface tables.
For information on validating see, the Invoices chapter in the Oracle Payables User's Guide.
22. Repeat Steps 19 - 21 for all other invoices (freight, insurance and so on) that pertain to the shipment.
23. Run the Matches Interface Import concurrent program using Oracle Landed Cost Management.
This program moves the matched information from Oracle Payables into the Oracle Landed Cost Management integration tables. This process also sets the landed cost management shipments with Pending Matching field to Yes. At this time, the actuallanded cost calculation has not been performed yet.
Oracle recommends that this program be scheduled to run in the back ground with no user intervention required.
For more information see, Calculating and Importing Actual Landed Cost for the Shipment, page 6-49.
6-8 Oracle Landed Cost Management Process Guide
24. Run the Submit Pending Shipments concurrent program using Oracle Landed Cost Management.
This program performs the submit process again and calculates the actual landed cost for the landed cost management shipment. After this process completes successful you can view the actual landed cost using the Shipment Hierarchy and Landed Cost Detail pages in Oracle Landed Cost Management.
Oracle recommends that this program be scheduled to run in the back ground with no user intervention required.
For more information see, Calculating and Importing Actual Landed Cost for the Shipment, page 6-49.
After the actual estimated landed cost is calculated these steps occur:
• Item cost adjustments for the item are created in Oracle Cost Management (difference between estimated and actual landed cost).
• Accounting adjustment entries are created (difference between estimated and actual landed cost) by Oracle Cost Management.
If you are using Oracle Process Manufacturing (OPM), you must first run the Landed Cost Adjustments Import Process in OPM before these steps occur:
• Item cost adjustments for the item are created in Oracle Process Manufacturing Cost Management (difference between estimated and actual landed cost).
• Accounting adjustment entries are created (difference between estimated and actual landed cost) by Oracle Process Manufacturing Cost Management.
25. View the actual landed cost information for the shipment and compare the estimated landed cost to the actual landed cost for the shipment using the Oracle Landed Cost Management Shipments Workbench.
For more information see, Viewing Actual Landed Cost for the Shipment, page 6-51.
Importing Estimated Landed Cost Information from ReceivingIn the Managing Landed Cost as Service flow the creation of landed cost shipments from purchase order receipts and the calculation of estimated landed cost for those shipments is performed by two concurrent programs (Landed Cost Integration Manager and Shipments Interface Import). These concurrent programs can be scheduled to run automatically in the back ground without user intervention. The Landed Cost Integration Manager program needs to be run first and then the ShipmentsInterface Import Program.
The Landed Cost Integration Manager concurrent program picks up purchase order receipt lines with a status of LC PENDING and sends them to the Oracle Landed Cost
Managing Landed Cost as a Service 6-9
Management shipment interface tables and changes the status from LC PENDING to LC INTERFACED.
The Landed Cost Integration Manager concurrent program is owned by Oracle Purchasing and should be run by the appropriate responsibility in that application.
For more information on the Landed Cost Integration Manager, see the Oracle Purchasing User's Guide.
The Shipments Interface Import program picks up the pending Oracle Landed Cost Management interface lines and processes them into landed cost management shipments. This program operates differently depending on whether a rule has been assigned to the Inventory organization or not in Oracle Landed Cost Management. If a rule has not been assigned to the Inventory organization, the Shipment Interface Import concurrent program will pick up the pending Oracle Landed Cost Management interface lines and process them into landed cost management shipments. This concurrent program will also call the routines for charges calculation, recovering taxes calculated for the purchase order lines, validation, landed cost calculation, and submission. By default, the records are created in the Oracle Landed Cost Management Shipments Header interface table in a way that all tasks (get charges, get taxes, perform validation, calculate landed cost, and submit) are automatically performed for the interfaced data. If imported landed cost management shipments do not pass the validation routine you will need to fix them through the use of the Shipments Workbench. These shipments will have an On Hold Shipment Status.
If a rule has been assigned to the Inventory organization, then the Shipments Interface Import concurrent program will also pick up the pending Oracle Landed Cost Management interface lines and process them into landed cost management shipments. If the shipments comply with the rule, this concurrent program will also call the routines for charges calculation, recovering taxes calculated for the purchase order lines, validation, and landed cost calculation. The shipments that do comply with the rule are not submitted for completion giving you the ability to manually update the estimated landed cost information using the Shipments Workbench. These shipments will have a Validated shipment status. By default, the records are created in the Oracle Landed Cost Management Shipments Header interface table in a way that all tasks (get charges, get taxes, perform validation, and calculate landed cost) are automatically performed for the interfaced data. The rest of the shipments that do not comply with the rule will process as if no rule was assigned. Again, if imported landed cost management shipments do not pass the validation routine you will need to fix them through the use of the Shipments Workbench. These shipments will have an On Hold Shipment Status.
The Shipments Interface Import concurrent program is owned by Oracle Landed Cost Management and should be run by the appropriate responsibility in that application.
For more information on re-validating a shipment that is on hold, see Manually Re-Validating a Non Completed Shipment.
6-10 Oracle Landed Cost Management Process Guide
Prerequisites❒ Receipts have been created for the items on a purchase order.
❒ The Landed Cost Integration Manager concurrent program has been run.
To Run the Shipments Interface Import Program:1. Navigate to the Submit Request window, page A-1.
The Submit a New Request window appears asking for the type of request you want to submit.
2. Select the Single Request option and click the OK button.
The Submit Request window appears.
3. Select Shipments Interface Import in the Name field.
The Parameters window appears.
4. (Optional) Enter a transaction Group ID and select an associated Operating Unit and click the OK button.
To run the program for all of the available data do not enter any parameters.
5. Click the Submit button.
6. Click the No button in the Decision window.
7. To see the status of the concurrent request, navigate to the Requests window, page A-1.
The Find Requests window appears.
8. Click the Find button to view the status of all the requests.
The Requests window appears displaying all of the requests.
Searching for Automatically Created ShipmentsUse the Shipments Workbench to search for shipments that were automatically created by the Shipments Interface Import program. After the estimated landed cost information is imported from Receiving and the shipment is automatically created you can then search for the shipment and view the estimated landed cost or update the estimated landed cost if the shipment complies with the rule.
The Group Reference field is automatically populated in the database with the Receipt Number in the case of using Landed Cost Management as a Service. Plus, if a rule is not
Managing Landed Cost as a Service 6-11
being used or if a shipment does not comply with the rule, the Shipments Interface Import program will assign a Completed shipment status to the shipment. If a rule is being used and the shipment does comply with the rule, the Shipments Interface Importprogram will assign a Validated shipment status to the shipment.
Use this procedure to search for automatically created shipments:
Prerequisites❒ You have already imported the estimated landed cost information from Receiving.
To Search for Automatically Created Shipments:1. Navigate to the Shipments Workbench, page A-1.
The Shipments Workbench appears with just the Inventory Organization field available for selection.
2. Select a Inventory Organization that does not have pre-receiving in LCM selected for it.
3. Click the Go button.
The complete Shipments Workbench appears.
4. Select the type of information you want to display at the bottom of the Shipments Workbench using the Display field. Values are:
• Shipment
• Line Group
• Shipment Line
By default Shipment appears in the Display field.
Depending on the Display selection, the information that appears at the bottom of the Shipments Workbench will pertain to that display option. For example, if you select Shipment then fields related to shipments will appear in the table.
5. In the Find Shipments region, expand the Shipments section and enter the fields you want to search on. Enter any of the following fields:
Field Name Description
Operating Unit Select a operating unit for the shipment.
6-12 Oracle Landed Cost Management Process Guide
Field Name Description
Receiving Location Select a receiving location for the shipment.
Shipment Date Enter a shipment date.
Shipment Type Select the type of shipment.
Shipment Status Select the status of the shipment. Values are:
• Completed
• Incomplete
• On Hold
• Validated
• Validation Required
Shipment Enter the specific shipment number.
Pending Matching Select this check box if you want to search for shipments that are pending invoice matching in Oracle Payables.
Pending Update Select this check box if you want to search for shipments that have estimated landed cost updates pending.
This field is only available if you have set the profile option INL: Allow Updates to Completed Shipment to Yes.
Otherwise, you can click the go button without entering any search criteria and all of the available shipments in the Inventory Organization will display.
6. In the Find Shipments region, expand the Line Groups section and enter the fields you want to search on. Enter any of the following fields:
Field Name Description
Group Enter a specific line group.
Managing Landed Cost as a Service 6-13
Field Name Description
Group Reference/Receipt Number When using Landed Cost as Service, enter the receipt number.
Third Party Select a third party associated with the line group.
Third Party Site Select a third party site associated with the line group.
Source Type Select a source type. Value is: Purchase Order
7. In the Find Shipments region, expand the Shipment Lines section and enter the fields you want to search on. Enter any of the following fields:
Field Name Description
Third Party Select a third party associated with the shipment line.
Third Party Site Select a third party site associated with the shipment line.
Source Order Select the source order (purchase order) associated with the shipment line.
Shipment Line Type Select the shipment type for the line.
8. In the Shipment Lines section, expand the Show More Search Options section and enter the fields you want to search on. Enter any of the following fields:
Item
Field Name Description
Item Select an item number.
6-14 Oracle Landed Cost Management Process Guide
Field Name Description
Description Enter a description for the item.
Rev (revision) Select an item revision number.
Supplier Item Select a supplier item.
Receipt Details
Packing Slip Select a packing slip number.
Receiver Select an individual that is the receiver.
Freight Carrier Select a freight carrier.
Bills of Lading Select a bills of lading.
Transaction Details
Transaction Date From and Transaction Date To
Select a transaction date range by using the from and to fields.
Receipt Routing Select a receipt routing. Values are: Deliveryand Inspection.
Shipment
Container Number Select a container number for the shipment.
Truck Number Select a truck number for the shipment.
Bar Code Label Select a bar code label for the shipment.
9. Click the Go button.
All of the data that matches the search criteria displays at the bottom of the
Managing Landed Cost as a Service 6-15
Shipments Workbench in a table format. Depending on the Display option that was selected, different columns of data will appear in the table. Data will be related to Shipments, Line Groups, or Shipment Lines.
Viewing Estimated Landed Cost for the ShipmentUse the Shipment Hierarchy and Landed Cost Details pages to view the estimated landed cost for a shipment. After the shipment is automatically created you can view the estimated landed cost for the shipment.
Use this procedure to view estimated landed cost:
To View Estimated Landed Cost for the Shipment:1. Navigate to the Shipments Workbench, page A-1.
The Shipments Workbench appears.
2. Search for shipments that were automatically created.
For more information, see Searching for Automatically Created Shipments, page 6-10.
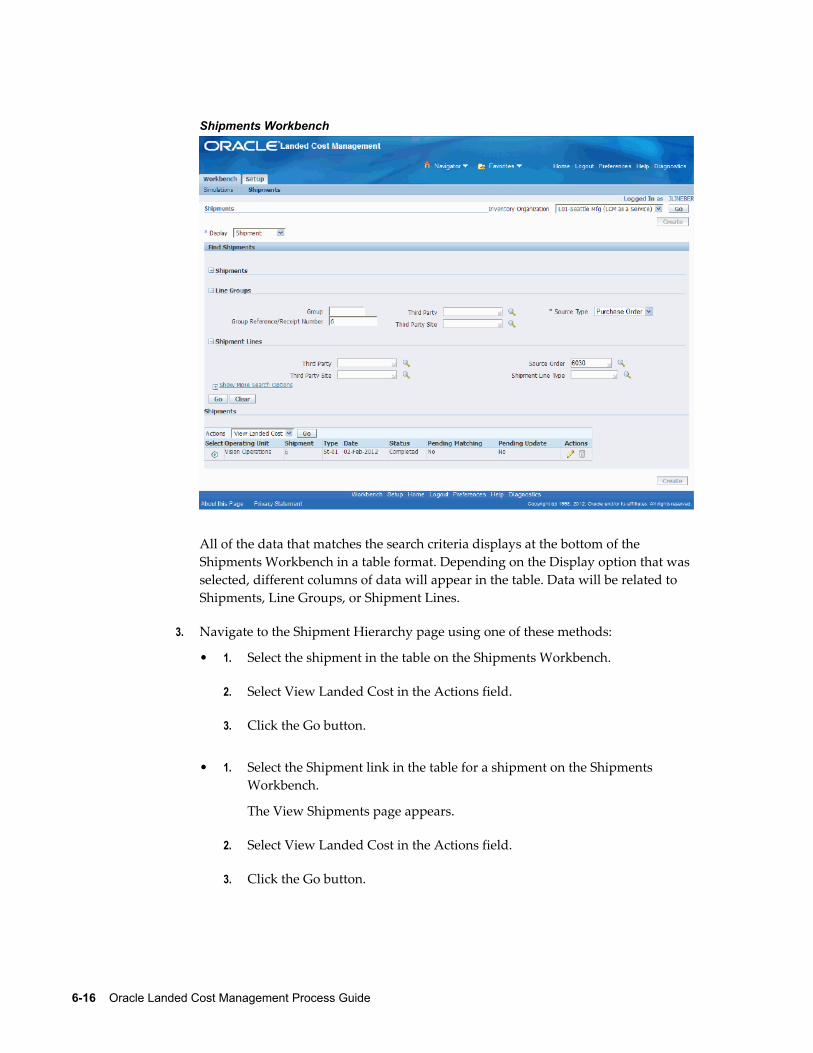
6-16 Oracle Landed Cost Management Process Guide
Shipments Workbench
All of the data that matches the search criteria displays at the bottom of the Shipments Workbench in a table format. Depending on the Display option that was selected, different columns of data will appear in the table. Data will be related to Shipments, Line Groups, or Shipment Lines.
3. Navigate to the Shipment Hierarchy page using one of these methods:
• 1. Select the shipment in the table on the Shipments Workbench.
2. Select View Landed Cost in the Actions field.
3. Click the Go button.
• 1. Select the Shipment link in the table for a shipment on the Shipments Workbench.
The View Shipments page appears.
2. Select View Landed Cost in the Actions field.
3. Click the Go button.
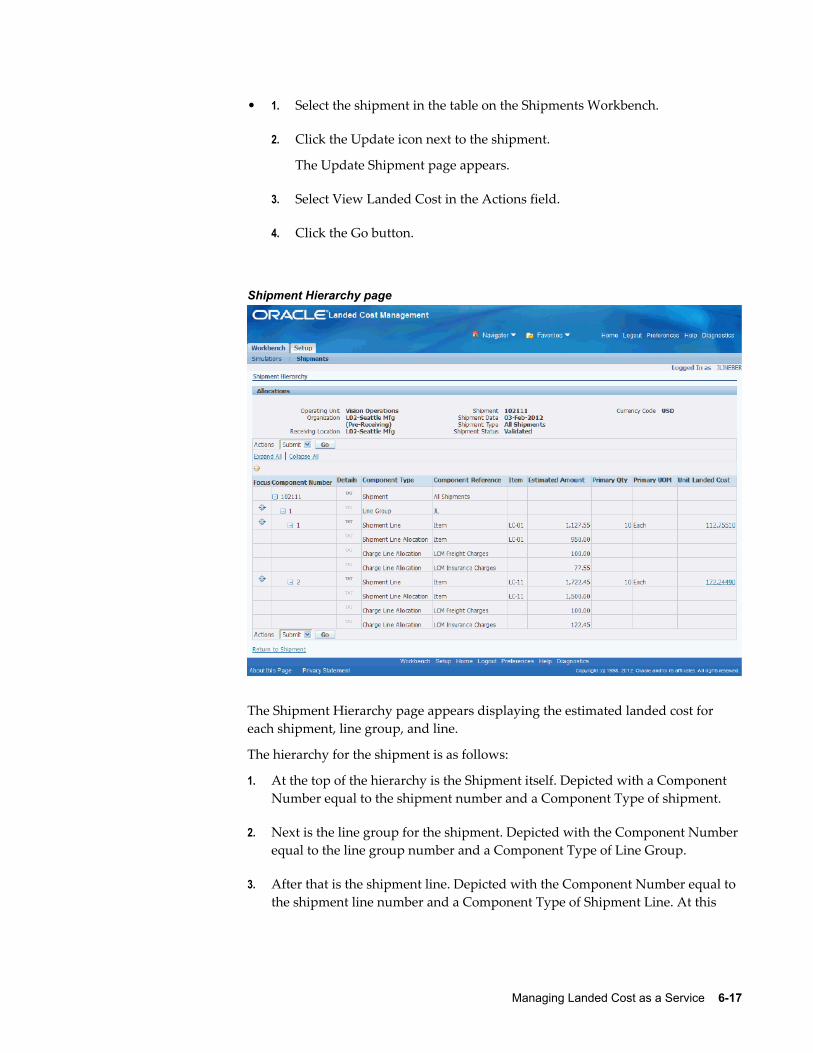
Managing Landed Cost as a Service 6-17
• 1. Select the shipment in the table on the Shipments Workbench.
2. Click the Update icon next to the shipment.
The Update Shipment page appears.
3. Select View Landed Cost in the Actions field.
4. Click the Go button.
Shipment Hierarchy page
The Shipment Hierarchy page appears displaying the estimated landed cost for each shipment, line group, and line.
The hierarchy for the shipment is as follows:
1. At the top of the hierarchy is the Shipment itself. Depicted with a Component Number equal to the shipment number and a Component Type of shipment.
2. Next is the line group for the shipment. Depicted with the Component Number equal to the line group number and a Component Type of Line Group.
3. After that is the shipment line. Depicted with the Component Number equal to the shipment line number and a Component Type of Shipment Line. At this
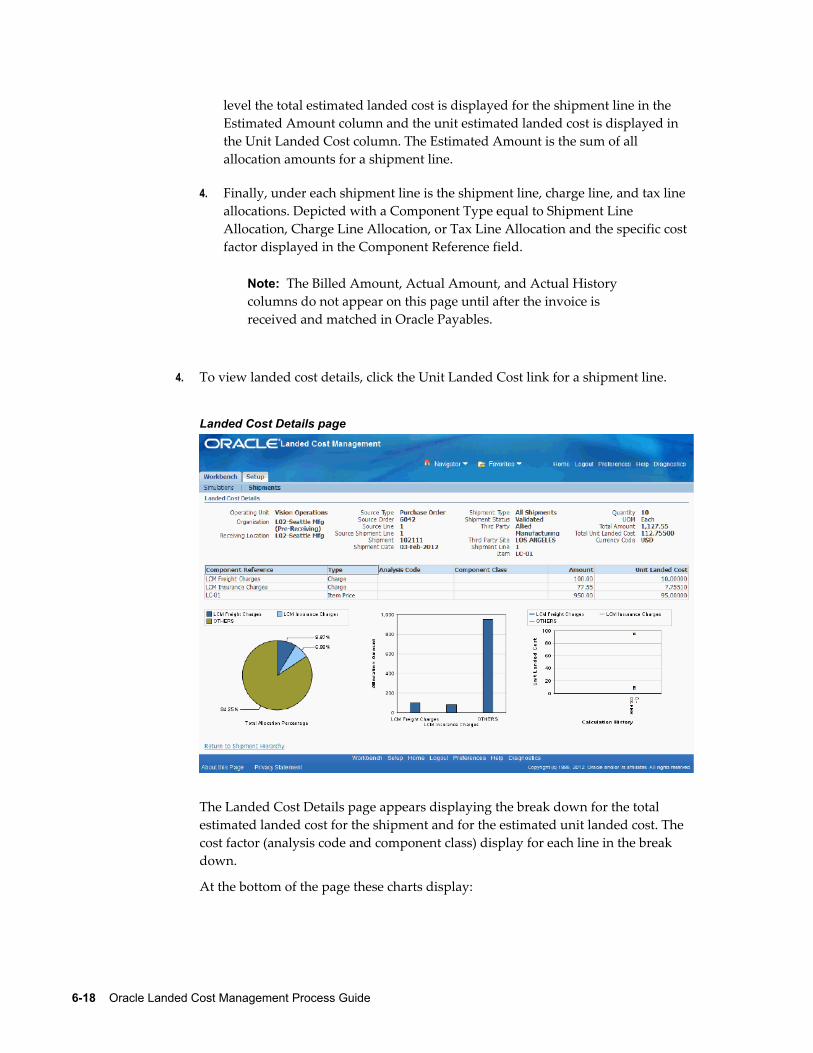
6-18 Oracle Landed Cost Management Process Guide
level the total estimated landed cost is displayed for the shipment line in the Estimated Amount column and the unit estimated landed cost is displayed in the Unit Landed Cost column. The Estimated Amount is the sum of all allocation amounts for a shipment line.
4. Finally, under each shipment line is the shipment line, charge line, and tax line allocations. Depicted with a Component Type equal to Shipment Line Allocation, Charge Line Allocation, or Tax Line Allocation and the specific cost factor displayed in the Component Reference field.
Note: The Billed Amount, Actual Amount, and Actual History columns do not appear on this page until after the invoice is received and matched in Oracle Payables.
4. To view landed cost details, click the Unit Landed Cost link for a shipment line.
Landed Cost Details page
The Landed Cost Details page appears displaying the break down for the total estimated landed cost for the shipment and for the estimated unit landed cost. The cost factor (analysis code and component class) display for each line in the break down.
At the bottom of the page these charts display:

Managing Landed Cost as a Service 6-19
• Pie Graph: The pie graph displays the total allocation percentage for each cost that make up the shipment line.
• Bar Graph: The bar graph displays the total allocation amount for each cost in the shipment line.
• Calculation History: This graph displays the landed cost adjustment calculationhistory for the unit landed cost.
When only estimated landed cost has been calculated and not updated this chart will display just as individual points on the graph. After estimated landedcost has been updated or actual landed cost is calculated, you will be able to view lines in this graph that depict the calculation history.
5. (Optional) Select another cost adjustment using the Unit Landed Cost History field.
Note: The Unit Landed Cost History field is only available when viewing estimated landed costs after estimated landed cost information has been updated on a completed shipment and processed.
The values that appear for the field are equal to the Adjustment Number from the shipment line plus the date it occurred.
The system refreshes the page displaying the details for that cost adjustment. The Pie Chart and Bar Graph refresh with the new information and the Calculation History graph will display as a line.
Generating Charges for a Shipment that is Not CompletedUse the Shipments Workbench or the Update Shipment page in Oracle Landed Cost Management to generate the charges associated with the shipment. For shipments that are not completed you can initiate the generate charges process.
The Generate Charges process integrates with Oracle Advanced Pricing and is responsible for getting charges from Advanced Pricing and creating those charges in Landed Cost Management; in a way they can be associated to line groups or shipment lines, depending on the setup in Advanced Pricing. After the charge lines are generated you can manage those charges using the Manage Charges page in Oracle Landed Cost Management.
The running of this process is optional if you are not integrating with Oracle Advanced Pricing.
Use this procedure to manually generate charges for a shipment that is not completed:
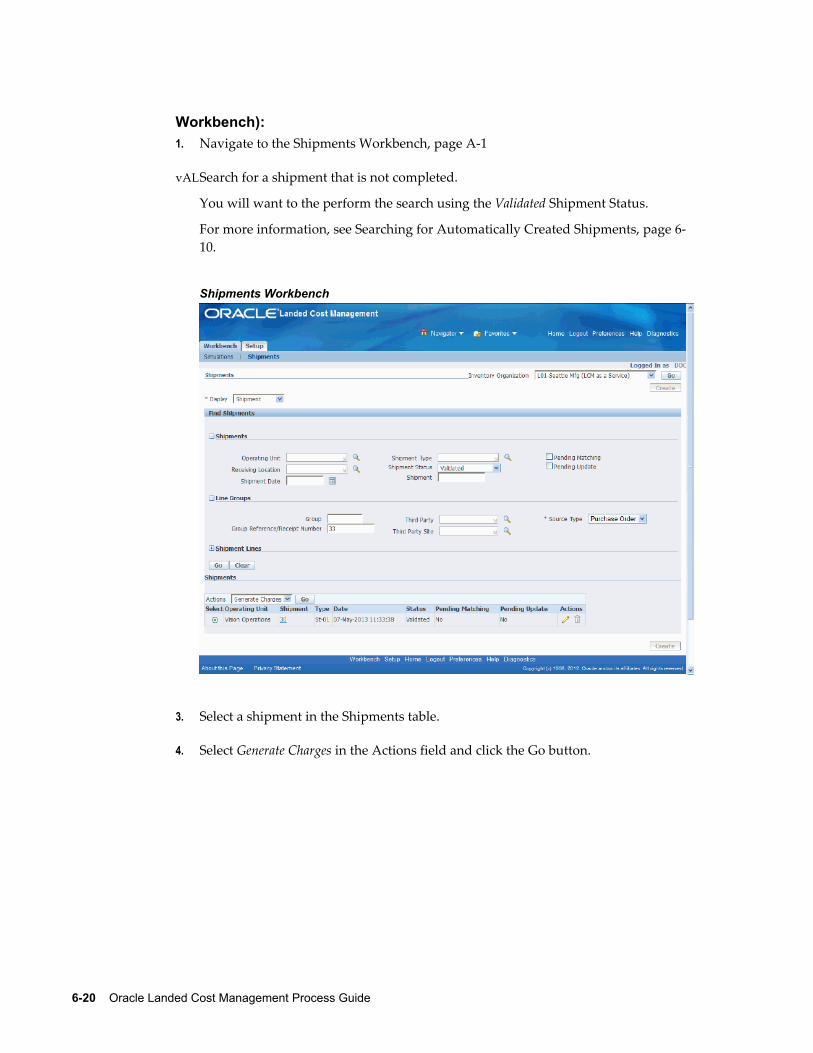
6-20 Oracle Landed Cost Management Process Guide
Workbench):1. Navigate to the Shipments Workbench, page A-1
2. Search for a shipment that is not completed.
You will want to the perform the search using the Validated Shipment Status.
For more information, see Searching for Automatically Created Shipments, page 6-10.
Shipments Workbench
3. Select a shipment in the Shipments table.
4. Select Generate Charges in the Actions field and click the Go button.
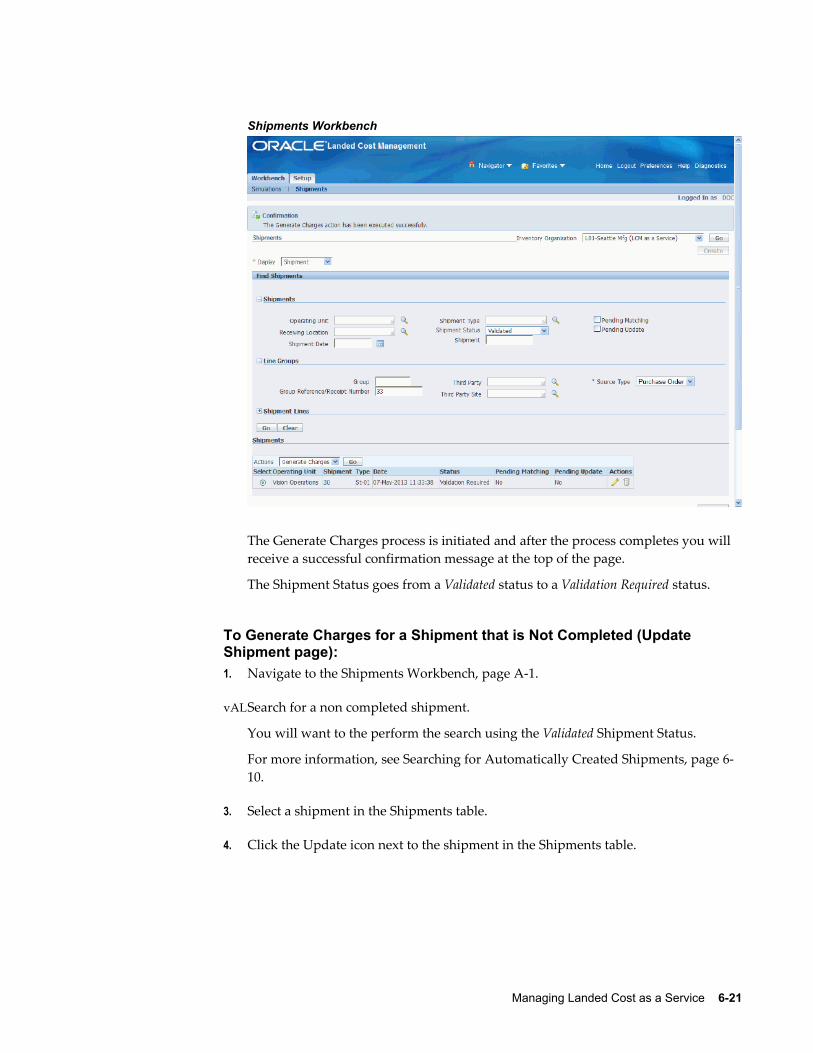
Managing Landed Cost as a Service 6-21
Shipments Workbench
The Generate Charges process is initiated and after the process completes you will receive a successful confirmation message at the top of the page.
The Shipment Status goes from a Validated status to a Validation Required status.
To Generate Charges for a Shipment that is Not Completed (Update Shipment page):1. Navigate to the Shipments Workbench, page A-1.
2. Search for a non completed shipment.
You will want to the perform the search using the Validated Shipment Status.
For more information, see Searching for Automatically Created Shipments, page 6-10.
3. Select a shipment in the Shipments table.
4. Click the Update icon next to the shipment in the Shipments table.
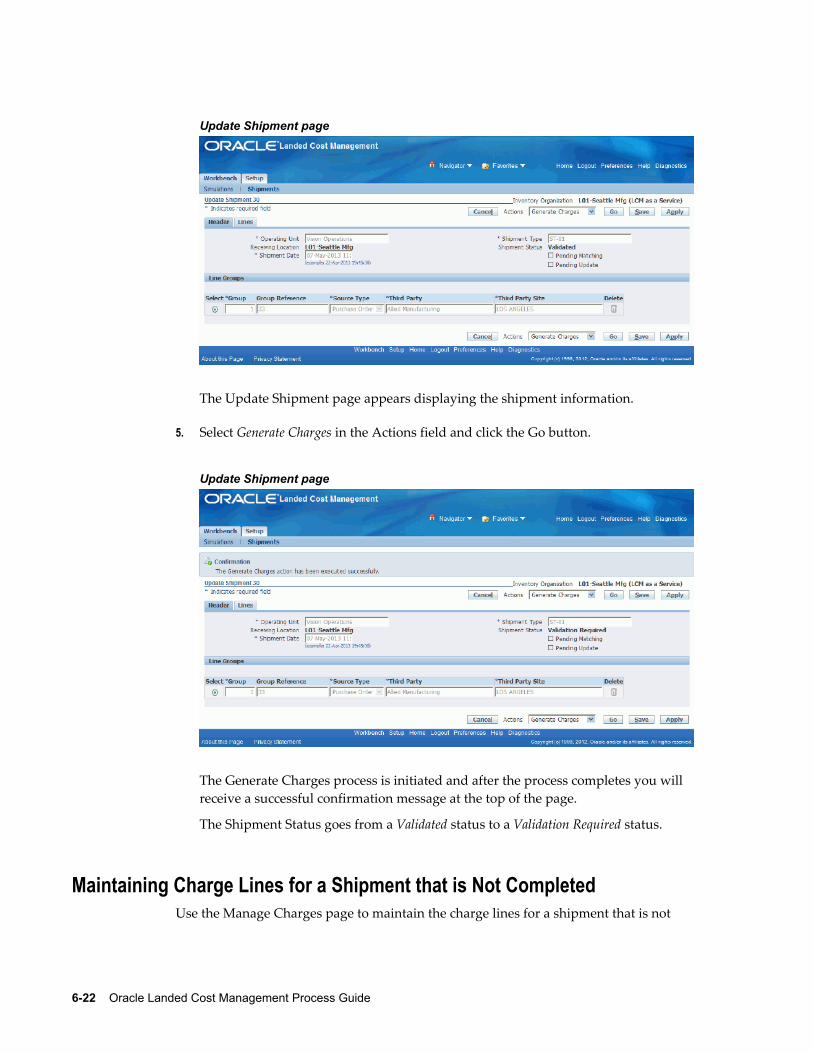
6-22 Oracle Landed Cost Management Process Guide
Update Shipment page
The Update Shipment page appears displaying the shipment information.
5. Select Generate Charges in the Actions field and click the Go button.
Update Shipment page
The Generate Charges process is initiated and after the process completes you will receive a successful confirmation message at the top of the page.
The Shipment Status goes from a Validated status to a Validation Required status.
Maintaining Charge Lines for a Shipment that is Not CompletedUse the Manage Charges page to maintain the charge lines for a shipment that is not
Managing Landed Cost as a Service 6-23
completed.
After you run the Generate Charges process, the Manage Charges page displays the charge lines that were generated from the integration with Oracle Advanced Pricing. The generated charge lines can be modified or removed.
You can also use the Manage Charges page to manually create charge lines for a shipment.
If you update the charge lines using the Manage Charges page the Manage Associationspage is automatically updated and vice versa. These two pages are always in sync with each other.
Use this procedure to manually maintain charge lines for a shipment that is not completed:
Prerequisites❒ Cost factors have been created.
❒ The Generate Charges process must have been performed for a shipment if you are integrating with Oracle Advanced Pricing.
To Maintain Charge Lines for a Shipment that is Not Completed:
To Update Charge Lines for a Shipment that is Not Completed1. Navigate to the Shipments Workbench, page A-1.
2. Search for a shipment that is not completed.
You will want to search for shipments using a Shipment Status of Validated.
For more information, see Searching for Automatically Created Shipments, page 6-10.
3. Select a shipment in the Shipments table.
4. Click the Update icon next to the shipment in the Shipments table.
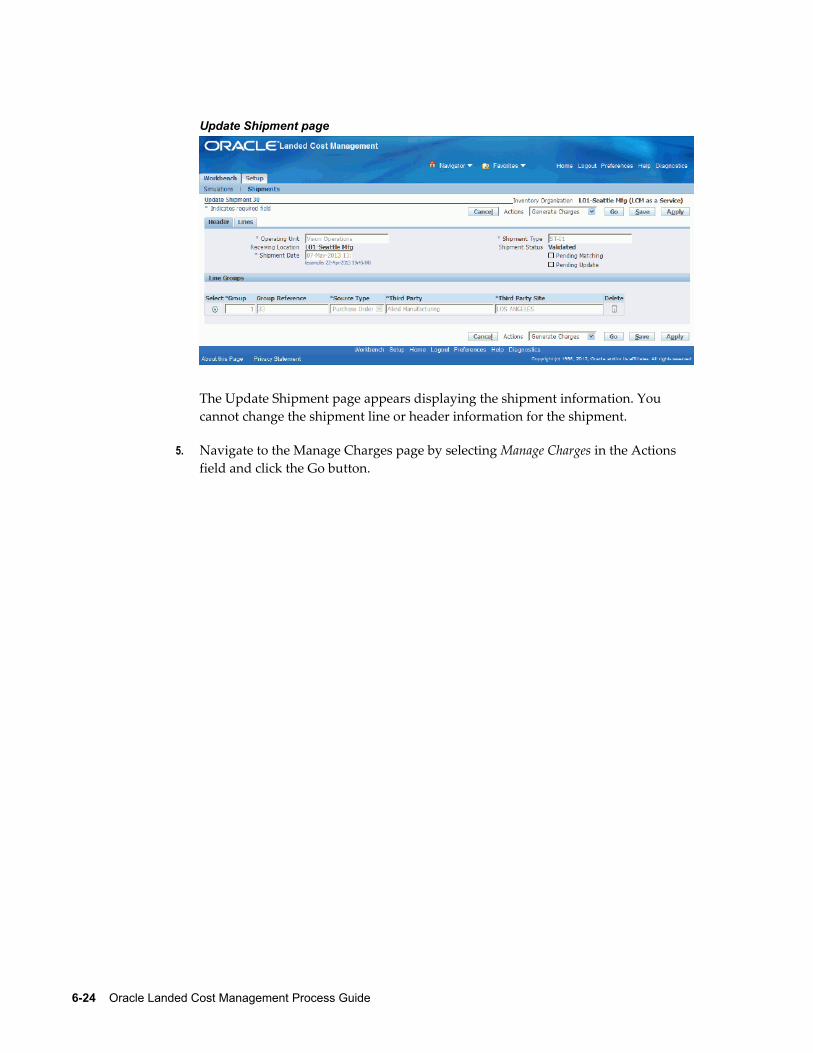
6-24 Oracle Landed Cost Management Process Guide
Update Shipment page
The Update Shipment page appears displaying the shipment information. You cannot change the shipment line or header information for the shipment.
5. Navigate to the Manage Charges page by selecting Manage Charges in the Actions field and click the Go button.
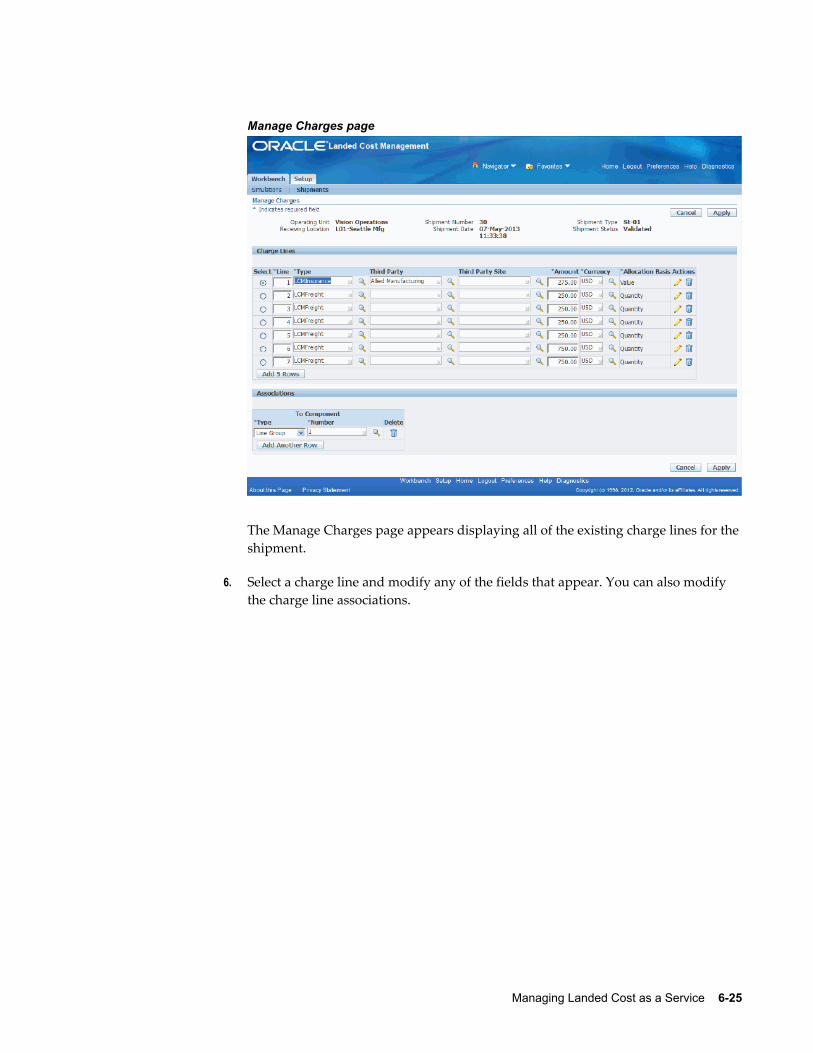
Managing Landed Cost as a Service 6-25
Manage Charges page
The Manage Charges page appears displaying all of the existing charge lines for theshipment.
6. Select a charge line and modify any of the fields that appear. You can also modify the charge line associations.
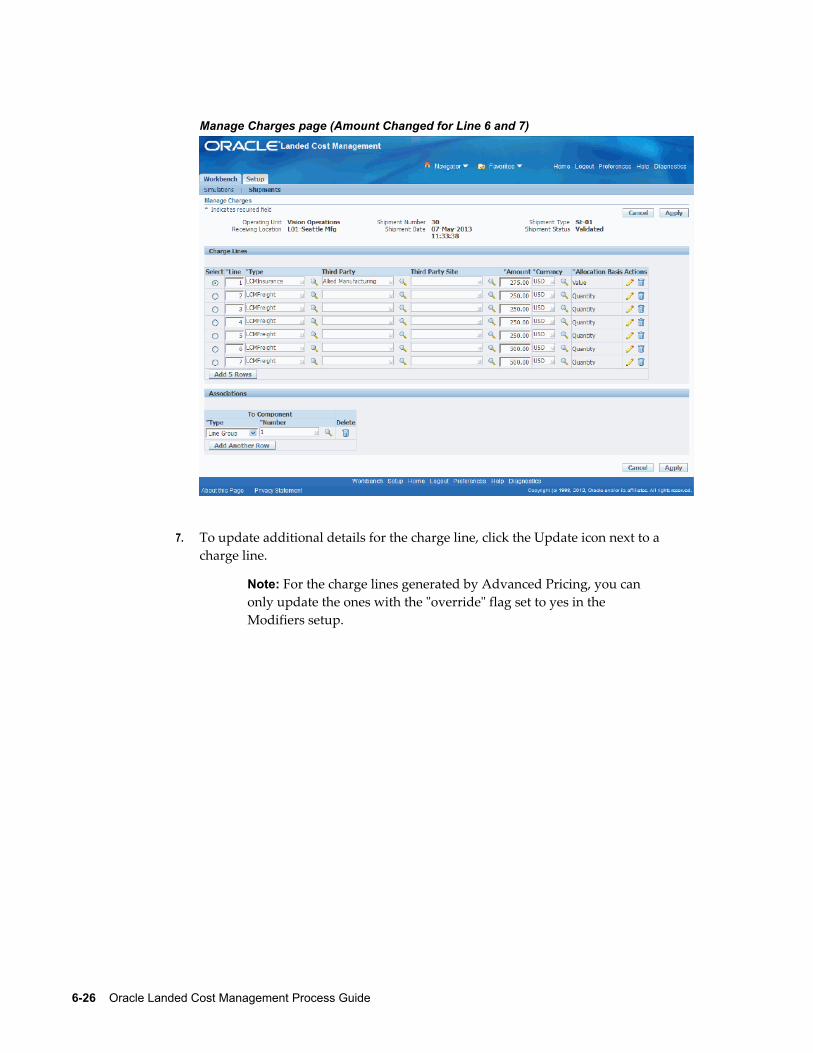
6-26 Oracle Landed Cost Management Process Guide
Manage Charges page (Amount Changed for Line 6 and 7)
7. To update additional details for the charge line, click the Update icon next to a charge line.
Note: For the charge lines generated by Advanced Pricing, you can only update the ones with the "override" flag set to yes in the Modifiers setup.
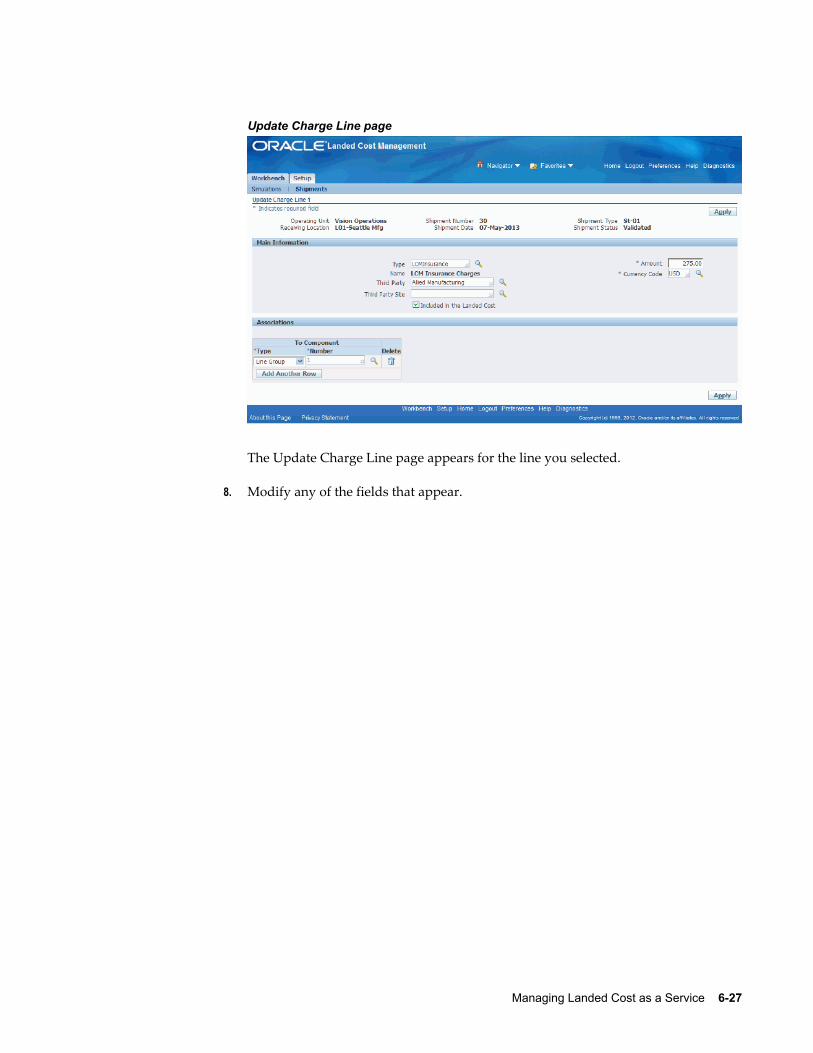
Managing Landed Cost as a Service 6-27
Update Charge Line page
The Update Charge Line page appears for the line you selected.
8. Modify any of the fields that appear.
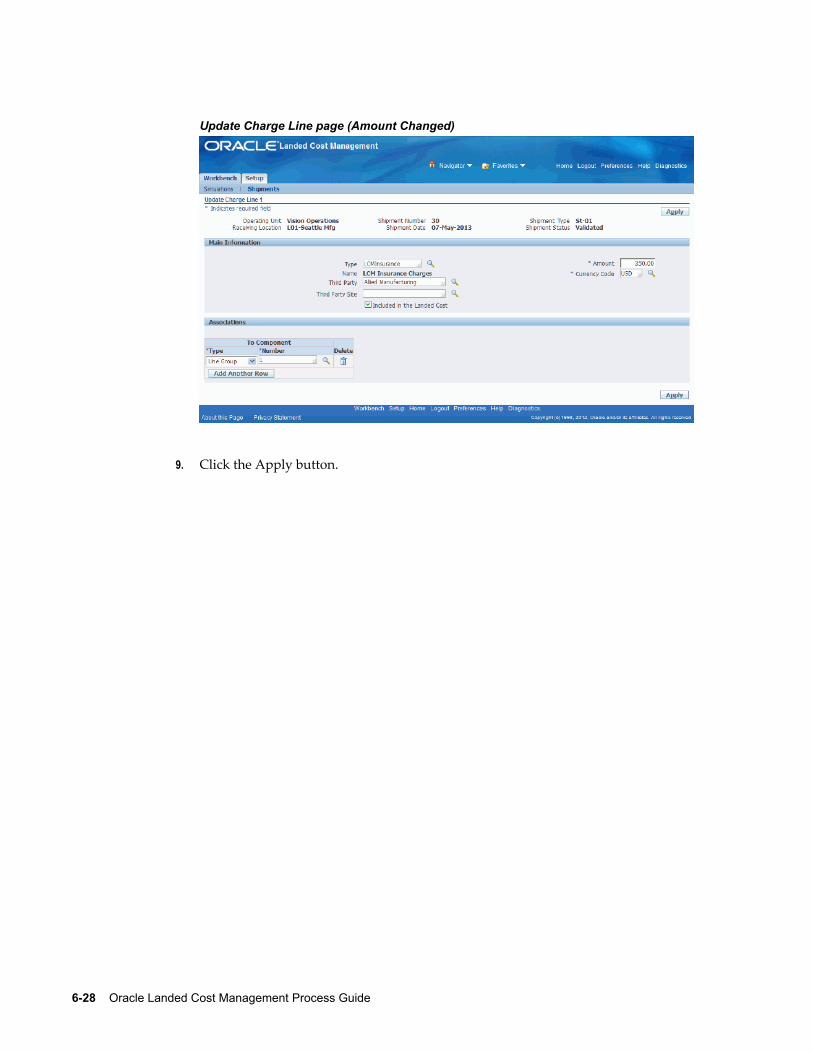
6-28 Oracle Landed Cost Management Process Guide
Update Charge Line page (Amount Changed)
9. Click the Apply button.
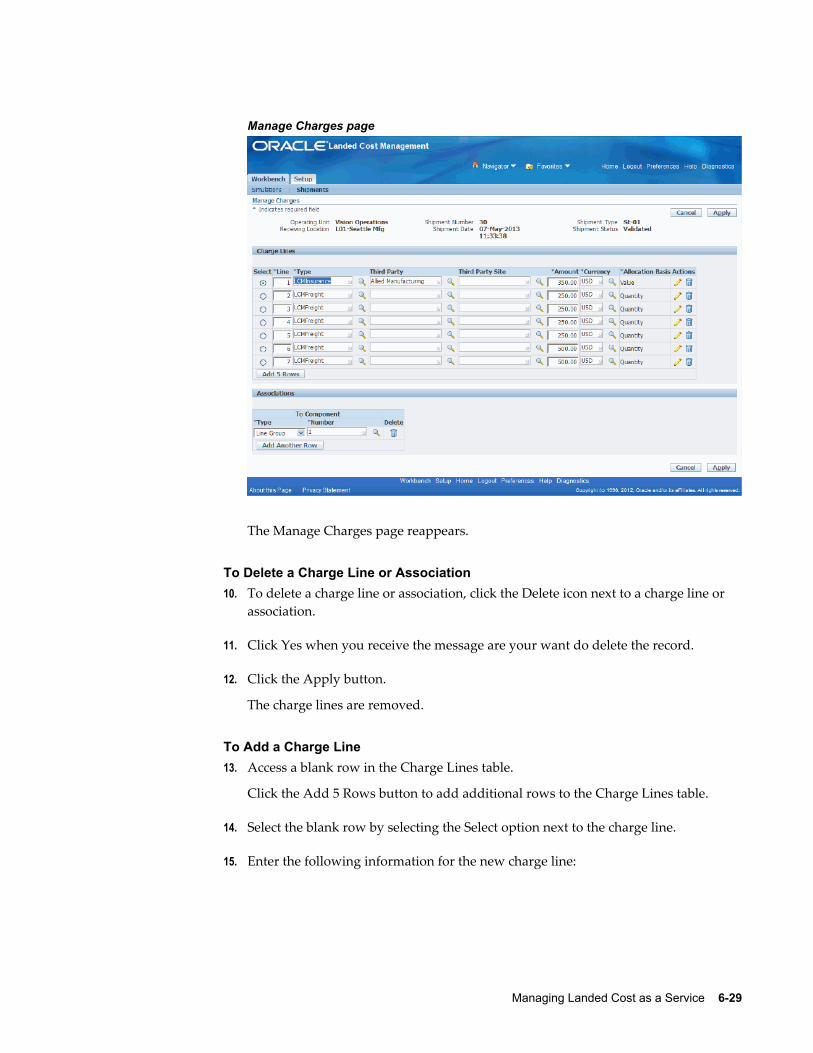
Managing Landed Cost as a Service 6-29
Manage Charges page
The Manage Charges page reappears.
To Delete a Charge Line or Association10. To delete a charge line or association, click the Delete icon next to a charge line or
association.
11. Click Yes when you receive the message are your want do delete the record.
12. Click the Apply button.
The charge lines are removed.
To Add a Charge Line13. Access a blank row in the Charge Lines table.
Click the Add 5 Rows button to add additional rows to the Charge Lines table.
14. Select the blank row by selecting the Select option next to the charge line.
15. Enter the following information for the new charge line:

6-30 Oracle Landed Cost Management Process Guide
Field Name Description
Type Select the type of charge line.
The Type field lists all of the cost factors available.
Third Party Select the third party for this charge line.
Third Party Site Select the third party site for this charge line.
Amount Enter the amount for the charge line.
Currency Enter the currency for the charge line.
Allocation Basis Displays the allocation basis for the charge line. Allocation Basis appears by default from the cost factor.
16. Add an association for the charge line by clicking the Add Another Row button in the Associations section of the page.
A row is added in the Associations section.
17. Select the Type of association for the charge line. Values are:
• Shipment
Select Shipment if you want the charge line amount to be prorated to all shipment lines that belong to the shipment.
• Line Group
Select Line Group if you want the charge line amount to be prorated to all shipment lines that belong to the specified shipment line group.
• Shipment Line
Select Shipment Line if you want the charge line amount to be fully allocated to the specified shipment line.
If you select Shipment, the shipment number appears in the Number field.
If you select Line Group or Shipment Line the Number field become available.
18. If you selected Line Group for the Type, select the line group in the Number field that you want to associate the charge line to.
Managing Landed Cost as a Service 6-31
19. If you selected Shipment Line for the Type, select the shipment line in the Number field that you want to associate the charge line to.
20. Click the Apply button.
The new charge line is added.
21. To update details for the charge line, click the Update icon next to the charge line.
The Update Charge Line page appears.
22. (Optional) Update the information for the charge line.
Note: You can create the charge line using this page or you can create charge lines from the Manage Charges page.
23. Indicate whether this charge line should be included in the landed cost by selecting the Included in the Landed Cost check box.
This check box appears selected by default.
24. Enter associations for the charge line.
For information, see Steps 12 through 15.
Note: You can create the charge line associations using this page or you can create associations from the Manage Charges page. The Associations section works the same in both pages.
25. Click the Apply button.
The charge line information is added and you are returned to the Manage Charges page.
26. Click the Apply button.
The charge line is added and you are returned to the previous page. In addition, theManage Associations page is updated to reflect the modifications. Shipment Status goes from Validated to Validation Required.
Updating Associations for a Shipment that is Not CompletedUse the Manage Associations page to maintain the charge line associations for a shipment that is not completed. Associations can be made from charge lines to shipments, shipment line groups, or shipment lines. The Manage Associations page displays the charge lines broken out by association. The charge lines display in a different association format than the Manage Charges page but they both still depict the
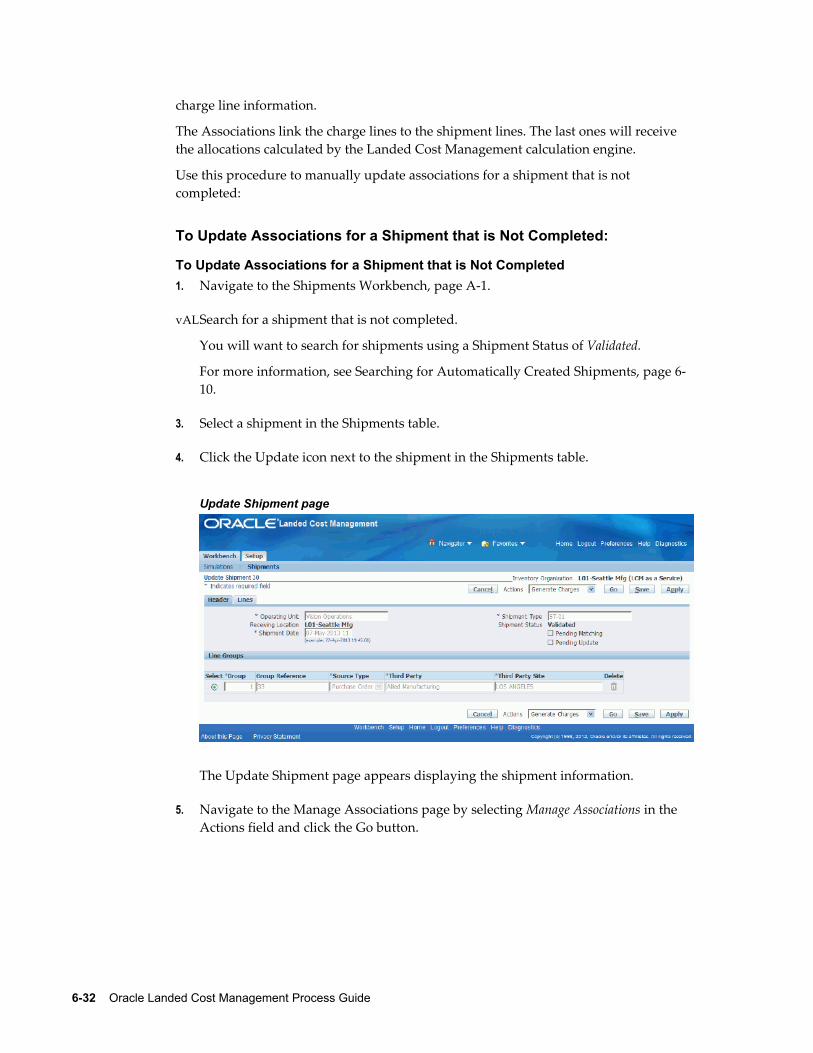
6-32 Oracle Landed Cost Management Process Guide
charge line information.
The Associations link the charge lines to the shipment lines. The last ones will receive the allocations calculated by the Landed Cost Management calculation engine.
Use this procedure to manually update associations for a shipment that is not completed:
To Update Associations for a Shipment that is Not Completed:
To Update Associations for a Shipment that is Not Completed1. Navigate to the Shipments Workbench, page A-1.
2. Search for a shipment that is not completed.
You will want to search for shipments using a Shipment Status of Validated.
For more information, see Searching for Automatically Created Shipments, page 6-10.
3. Select a shipment in the Shipments table.
4. Click the Update icon next to the shipment in the Shipments table.
Update Shipment page
The Update Shipment page appears displaying the shipment information.
5. Navigate to the Manage Associations page by selecting Manage Associations in the Actions field and click the Go button.
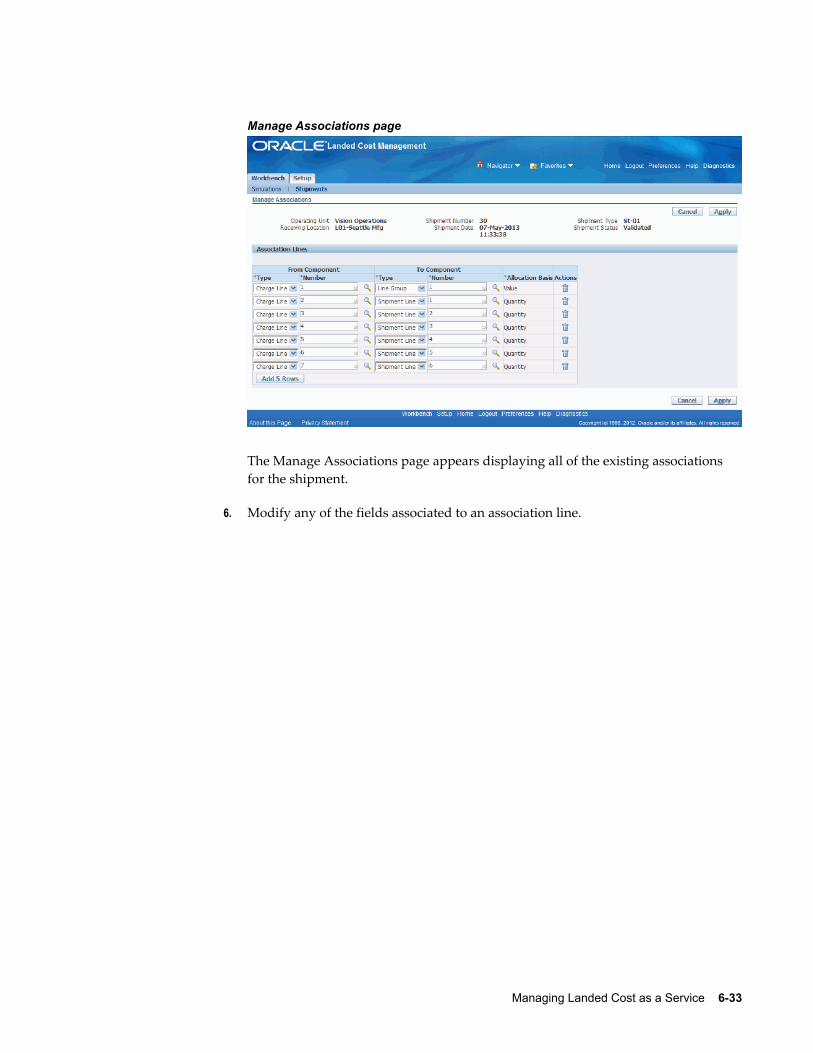
Managing Landed Cost as a Service 6-33
Manage Associations page
The Manage Associations page appears displaying all of the existing associations for the shipment.
6. Modify any of the fields associated to an association line.
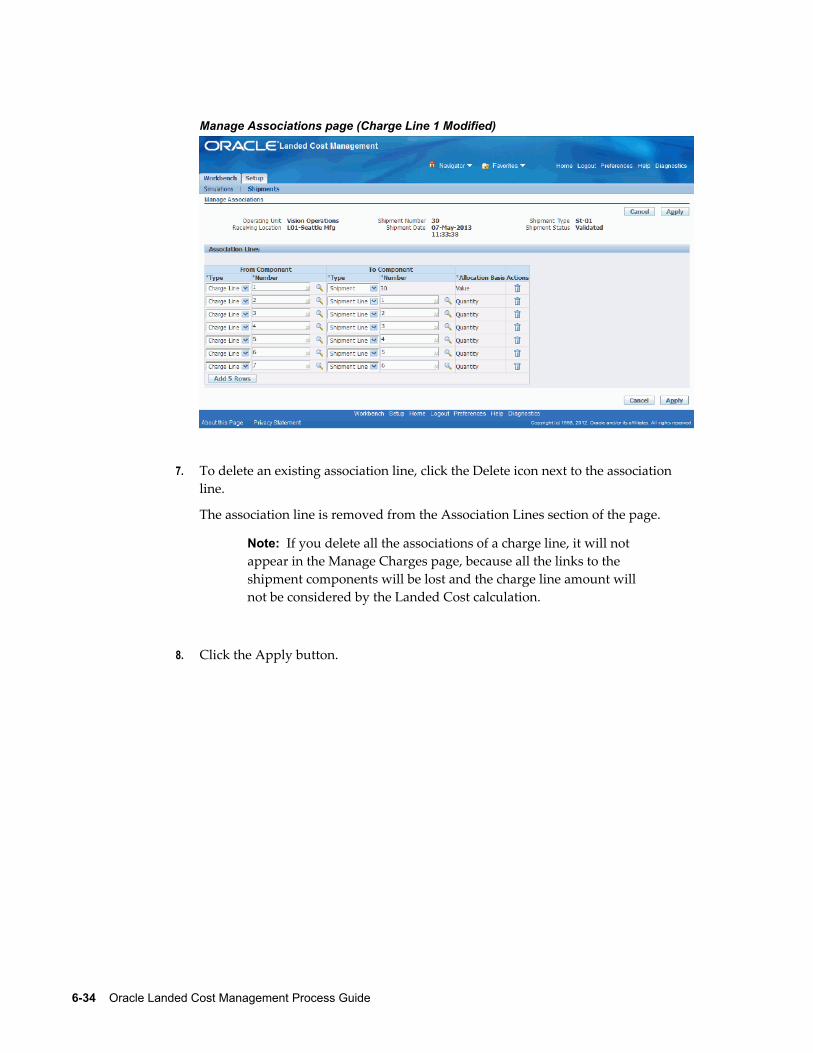
6-34 Oracle Landed Cost Management Process Guide
Manage Associations page (Charge Line 1 Modified)
7. To delete an existing association line, click the Delete icon next to the association line.
The association line is removed from the Association Lines section of the page.
Note: If you delete all the associations of a charge line, it will not appear in the Manage Charges page, because all the links to the shipment components will be lost and the charge line amount will not be considered by the Landed Cost calculation.
8. Click the Apply button.
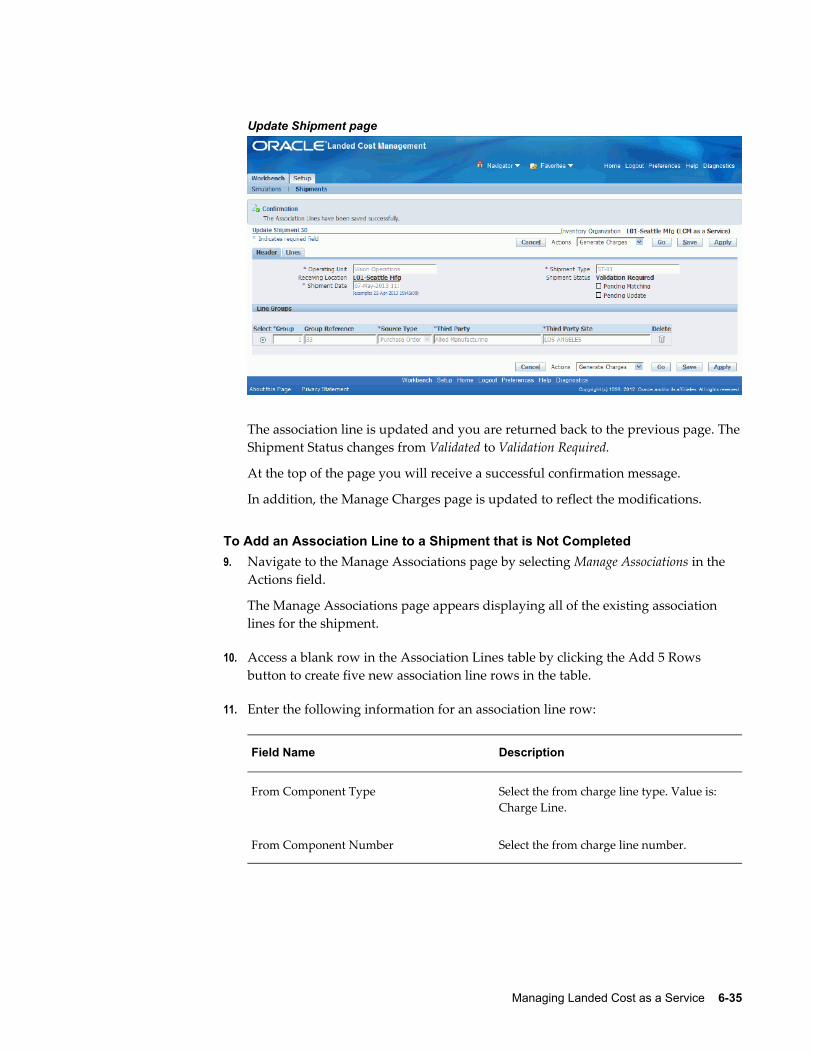
Managing Landed Cost as a Service 6-35
Update Shipment page
The association line is updated and you are returned back to the previous page. TheShipment Status changes from Validated to Validation Required.
At the top of the page you will receive a successful confirmation message.
In addition, the Manage Charges page is updated to reflect the modifications.
To Add an Association Line to a Shipment that is Not Completed9. Navigate to the Manage Associations page by selecting Manage Associations in the
Actions field.
The Manage Associations page appears displaying all of the existing association lines for the shipment.
10. Access a blank row in the Association Lines table by clicking the Add 5 Rows button to create five new association line rows in the table.
11. Enter the following information for an association line row:
Field Name Description
From Component Type Select the from charge line type. Value is: Charge Line.
From Component Number Select the from charge line number.
6-36 Oracle Landed Cost Management Process Guide
Field Name Description
To Component Type Select the type of charge line. Values are: Shipment, Line Group, or Shipment Line.
To Component Number Select the to component number that corresponds with the To Component Type.
For example, if you enter Line Group as the To Component Type then you would enter one of the shipment line group numbers for the shipment here.
If you select a To Component Type of Shipment, the To Component Number is automatically populated with the shipment number.
Allocation Basis Displays the charge line allocation basis. Values are: Quantity, Value, Volume, and Weight.
Allocation basis is automatically defaulted from the cost factors definition.
12. Click the Apply button.
The association line is added and you are returned back to the previous page. The Shipment Status changes from Validated to Validation Required.
At the top of the page you will receive a successful confirmation message.
In addition, the Manage Charges page is updated to reflect the modifications.
Validating a Shipment that is Not CompletedUse the Shipments Workbench or the Update Shipment page to validate the landed costmanagement shipment after charge modifications have been made to the shipment. TheValidate process is responsible for validating a given landed cost management shipment and the validations that are performed against the shipment include:
• Checking the purchase order quantity and price tolerance.
• Checking whether the Inventory accounting period is open.
If a shipment passes the validation, the Shipment Status is changed to Validated. If a shipment does not pass validation, the Shipment Status is changed to On Hold. The shipment will stay on hold until a user makes a correction. After the correction, the
Managing Landed Cost as a Service 6-37
shipment status for the shipment changes to Validation Required. One must then run the Validation process again.
The Validation process can be initiated by itself but the process is also automatically called when performing the Calculate process in Oracle Landed Cost Management.
Use this procedure to manually validate a shipment that is not completed:
To Validate a Shipment that is Not Completed (Shipments Workbench):1. Navigate to the Shipments Workbench, page A-1.
2. Search for a shipment that is not completed.
You will want to search for shipments using a Shipment Status of Validation Required
For more information, see Searching for Automatically Created Shipments, page 6-10.
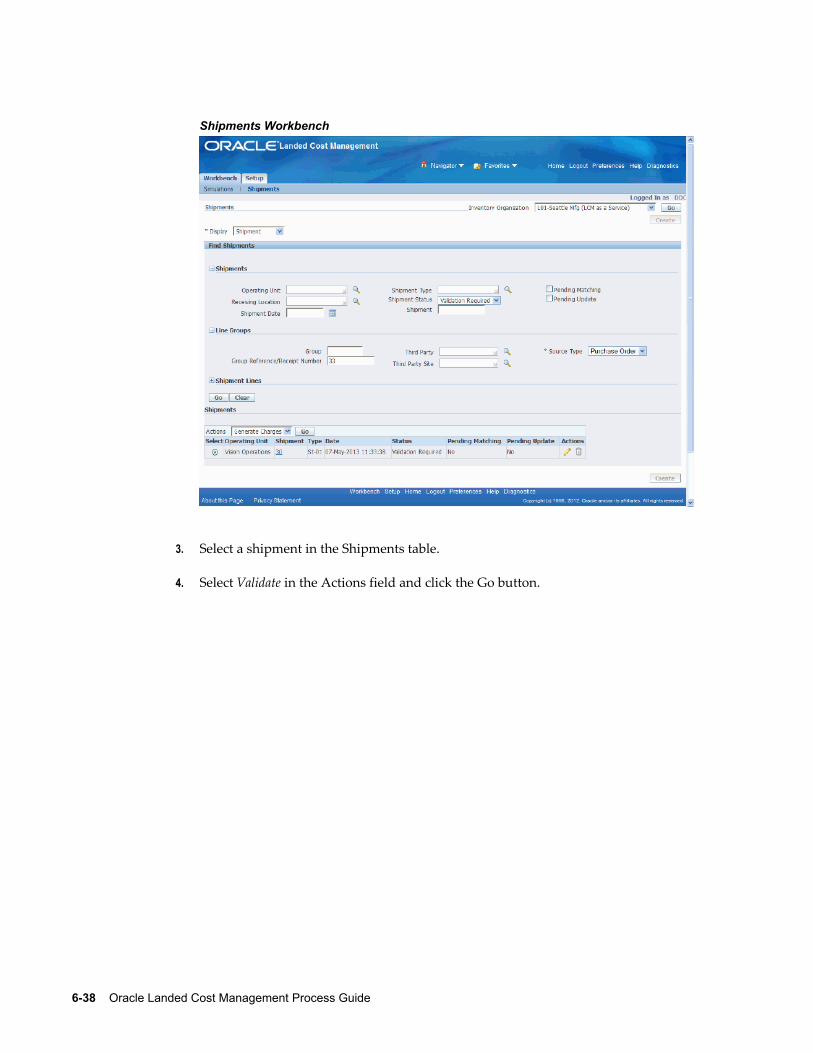
6-38 Oracle Landed Cost Management Process Guide
Shipments Workbench
3. Select a shipment in the Shipments table.
4. Select Validate in the Actions field and click the Go button.
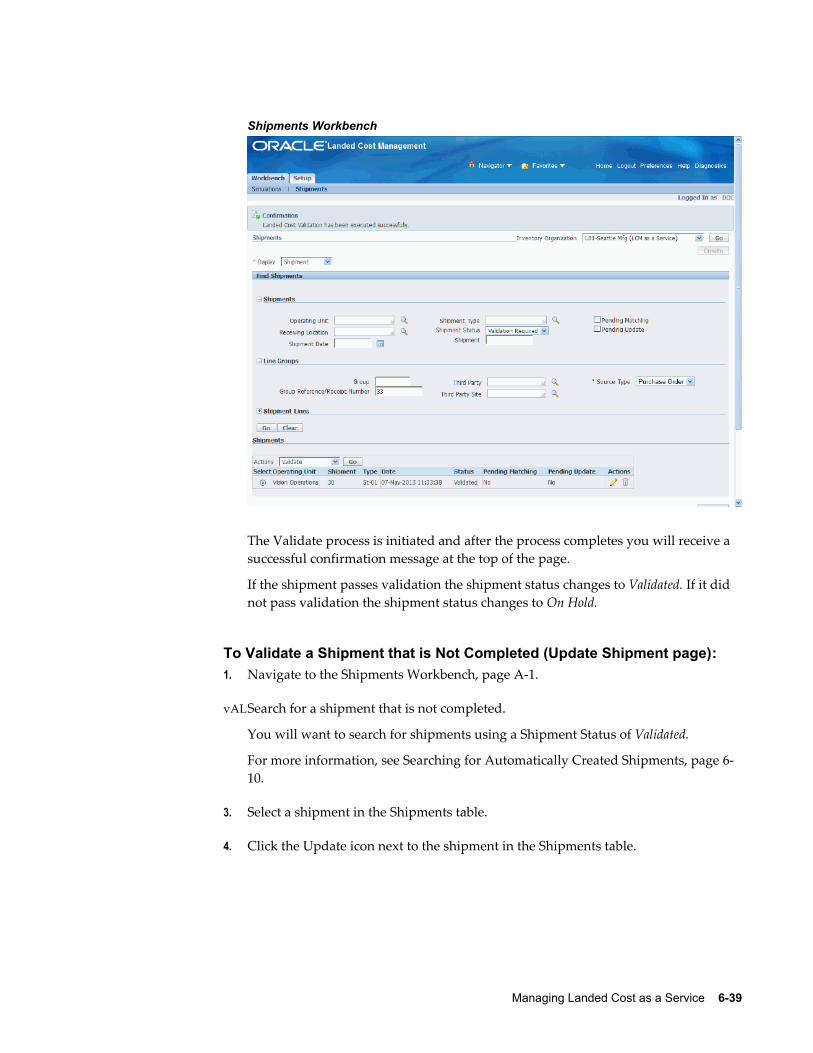
Managing Landed Cost as a Service 6-39
Shipments Workbench
The Validate process is initiated and after the process completes you will receive a successful confirmation message at the top of the page.
If the shipment passes validation the shipment status changes to Validated. If it did not pass validation the shipment status changes to On Hold.
To Validate a Shipment that is Not Completed (Update Shipment page):1. Navigate to the Shipments Workbench, page A-1.
2. Search for a shipment that is not completed.
You will want to search for shipments using a Shipment Status of Validated.
For more information, see Searching for Automatically Created Shipments, page 6-10.
3. Select a shipment in the Shipments table.
4. Click the Update icon next to the shipment in the Shipments table.
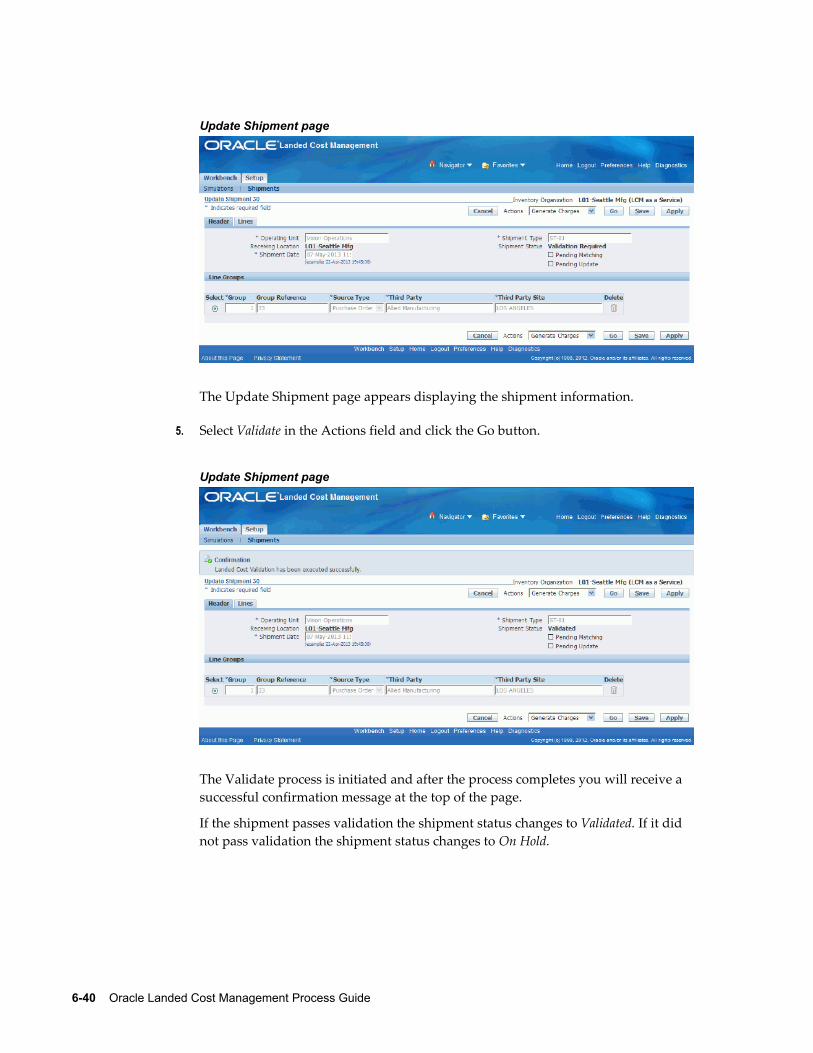
6-40 Oracle Landed Cost Management Process Guide
Update Shipment page
The Update Shipment page appears displaying the shipment information.
5. Select Validate in the Actions field and click the Go button.
Update Shipment page
The Validate process is initiated and after the process completes you will receive a successful confirmation message at the top of the page.
If the shipment passes validation the shipment status changes to Validated. If it did not pass validation the shipment status changes to On Hold.
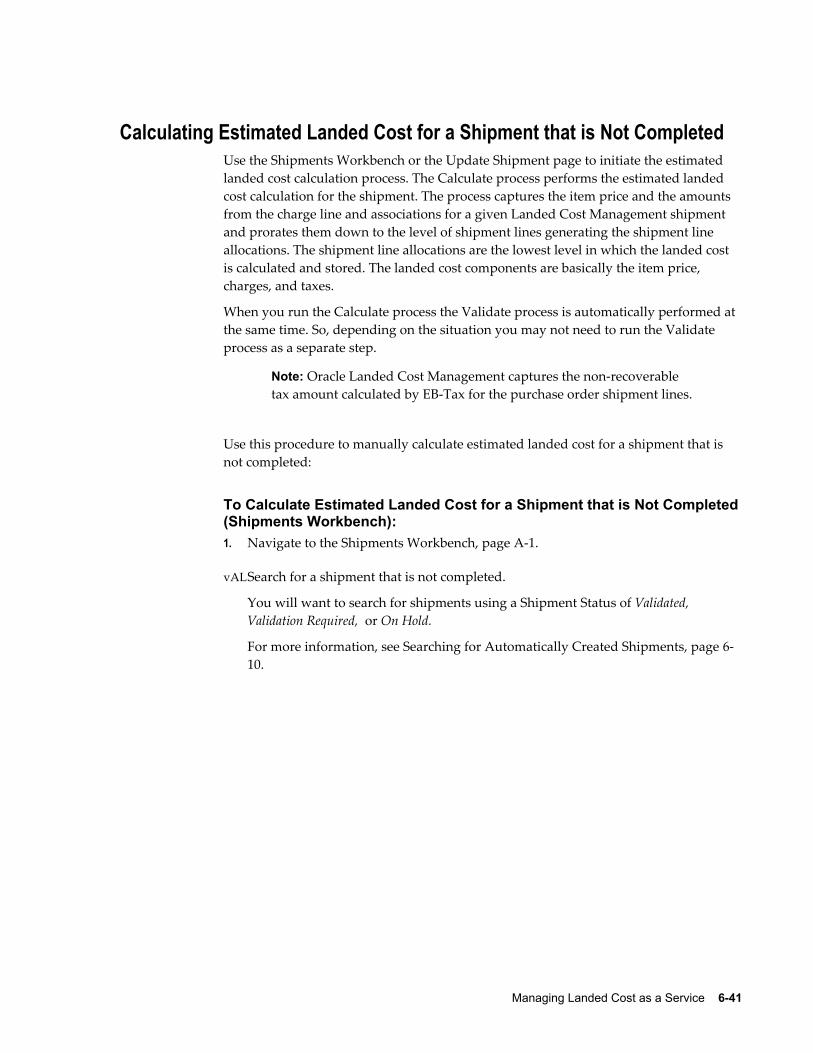
Managing Landed Cost as a Service 6-41
Calculating Estimated Landed Cost for a Shipment that is Not CompletedUse the Shipments Workbench or the Update Shipment page to initiate the estimated landed cost calculation process. The Calculate process performs the estimated landed cost calculation for the shipment. The process captures the item price and the amounts from the charge line and associations for a given Landed Cost Management shipment and prorates them down to the level of shipment lines generating the shipment line allocations. The shipment line allocations are the lowest level in which the landed cost is calculated and stored. The landed cost components are basically the item price, charges, and taxes.
When you run the Calculate process the Validate process is automatically performed at the same time. So, depending on the situation you may not need to run the Validate process as a separate step.
Note: Oracle Landed Cost Management captures the non-recoverable tax amount calculated by EB-Tax for the purchase order shipment lines.
Use this procedure to manually calculate estimated landed cost for a shipment that is not completed:
To Calculate Estimated Landed Cost for a Shipment that is Not Completed(Shipments Workbench):1. Navigate to the Shipments Workbench, page A-1.
2. Search for a shipment that is not completed.
You will want to search for shipments using a Shipment Status of Validated, Validation Required, or On Hold.
For more information, see Searching for Automatically Created Shipments, page 6-10.
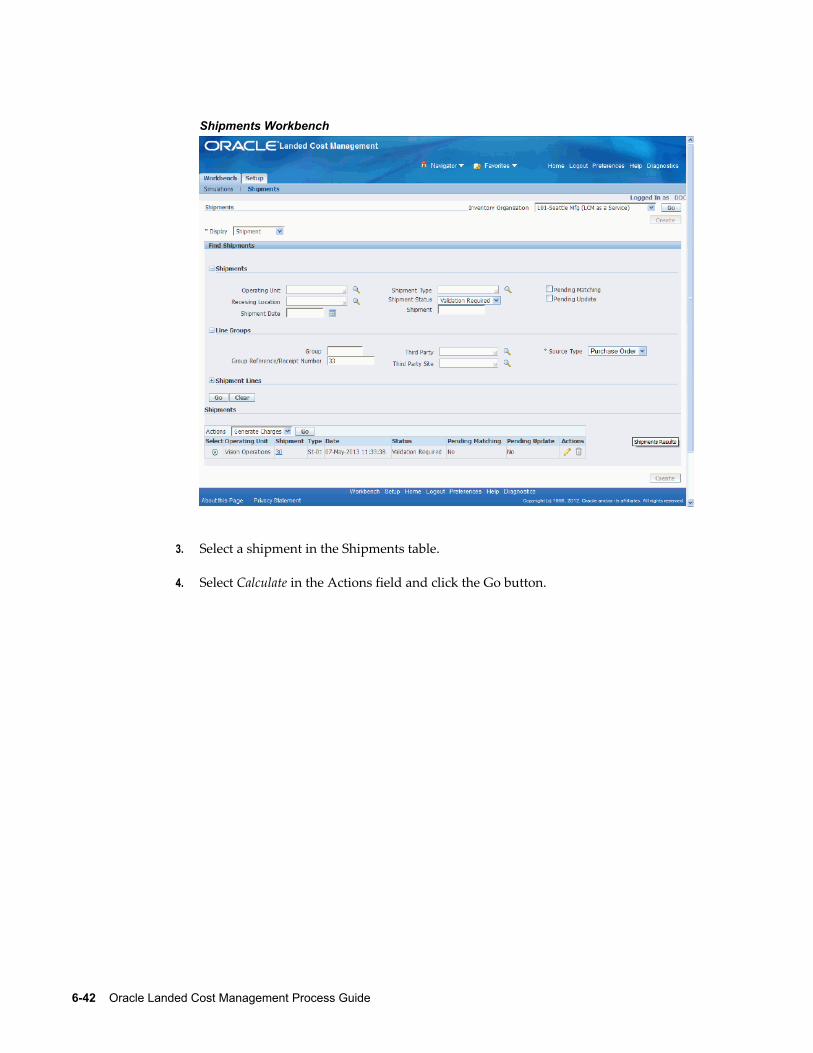
6-42 Oracle Landed Cost Management Process Guide
Shipments Workbench
3. Select a shipment in the Shipments table.
4. Select Calculate in the Actions field and click the Go button.
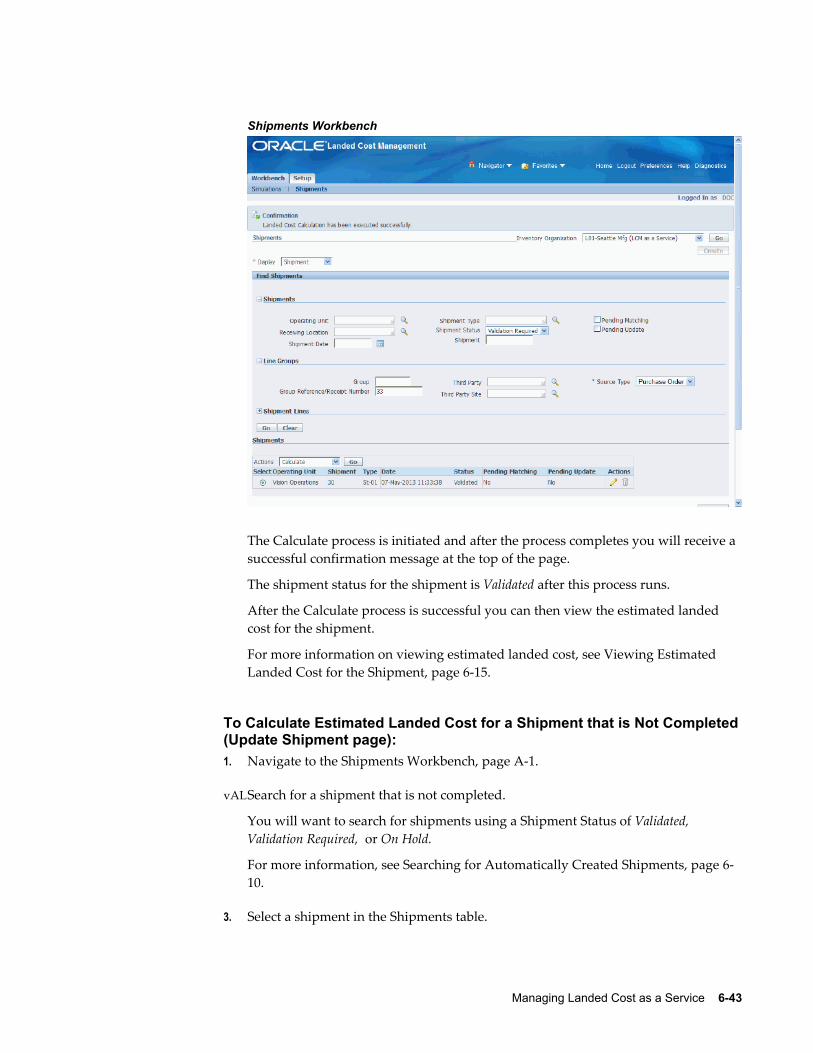
Managing Landed Cost as a Service 6-43
Shipments Workbench
The Calculate process is initiated and after the process completes you will receive a successful confirmation message at the top of the page.
The shipment status for the shipment is Validated after this process runs.
After the Calculate process is successful you can then view the estimated landed cost for the shipment.
For more information on viewing estimated landed cost, see Viewing Estimated Landed Cost for the Shipment, page 6-15.
To Calculate Estimated Landed Cost for a Shipment that is Not Completed(Update Shipment page):1. Navigate to the Shipments Workbench, page A-1.
2. Search for a shipment that is not completed.
You will want to search for shipments using a Shipment Status of Validated, Validation Required, or On Hold.
For more information, see Searching for Automatically Created Shipments, page 6-10.
3. Select a shipment in the Shipments table.
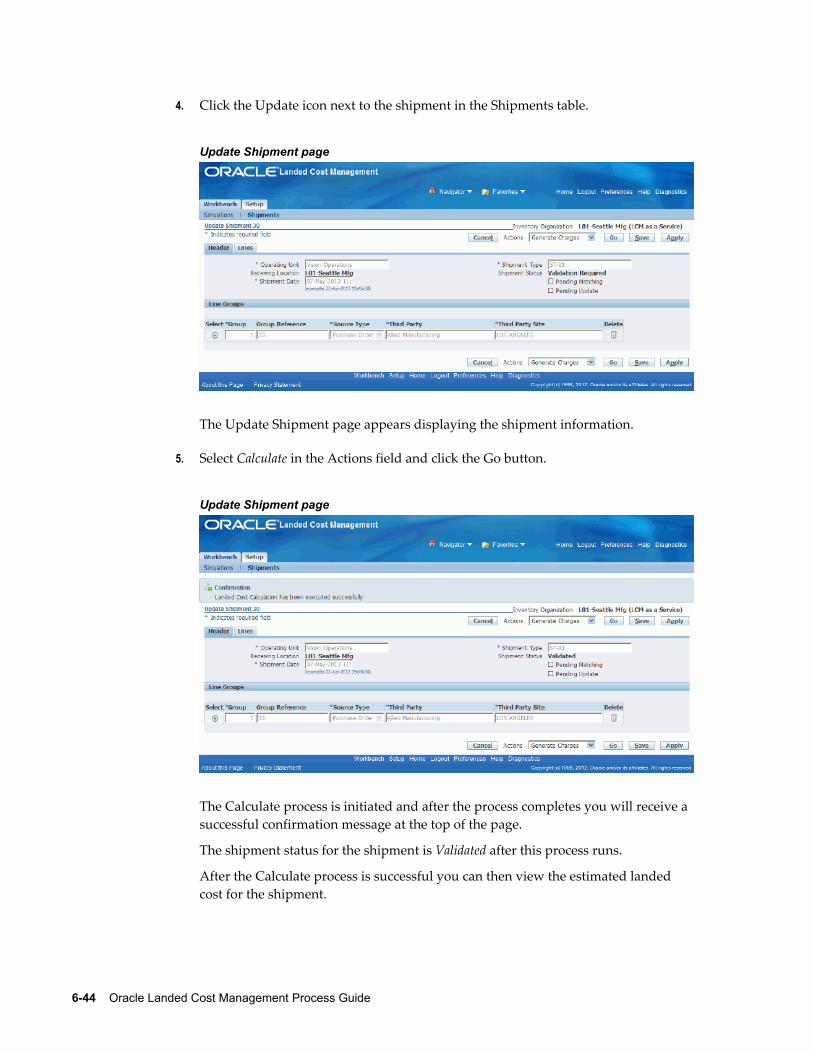
6-44 Oracle Landed Cost Management Process Guide
4. Click the Update icon next to the shipment in the Shipments table.
Update Shipment page
The Update Shipment page appears displaying the shipment information.
5. Select Calculate in the Actions field and click the Go button.
Update Shipment page
The Calculate process is initiated and after the process completes you will receive a successful confirmation message at the top of the page.
The shipment status for the shipment is Validated after this process runs.
After the Calculate process is successful you can then view the estimated landed cost for the shipment.
Managing Landed Cost as a Service 6-45
For more information on viewing estimated landed cost, see Viewing Estimated Landed Cost for the Shipment, page 6-15.
Submitting a Shipment that is Not Completed to ReceivingUse the Shipments Workbench or the Update Shipment page to initiate the Submit process. The Submit process performs all the tasks necessary to complete a landed cost management shipment related to estimated landed costs.
Use this procedure to submit a shipment that is not completed to Receiving:
Prerequisites❒ The estimated landed cost calculation has already been performed for the shipment
and then reviewed and managed until it is reflecting the correct amounts for the shipment.
To Submit a Shipment that is Not Completed to Receiving (Shipments Workbench):1. Navigate to the Shipments Workbench, page A-1.
2. Search for a shipment that is not completed.
You will want to search for shipments using a Shipment Status of Validated.
For more information, see Searching for Automatically Created Shipments, page 6-10.

6-46 Oracle Landed Cost Management Process Guide
Shipments Workbench
3. Select a shipment in the Shipments table.
4. Select Submit in the Actions field and click the Go button.

Managing Landed Cost as a Service 6-47
Shipments Workbench
The Submit process is initiated and after the process completes the shipment status changes to Completed.
To Submit a Shipment that is Not Completed to Receiving (Update Shipment page):1. Navigate to the Shipments Workbench, page A-1.
2. Search for a non completed shipment.
You will want to search for shipments using a Shipment Status of Validated.
For more information, see Searching for Automatically Created Shipments, page 6-10.
3. Select a shipment in the Shipments table.
4. Click the Update icon next to the shipment in the Shipments table.
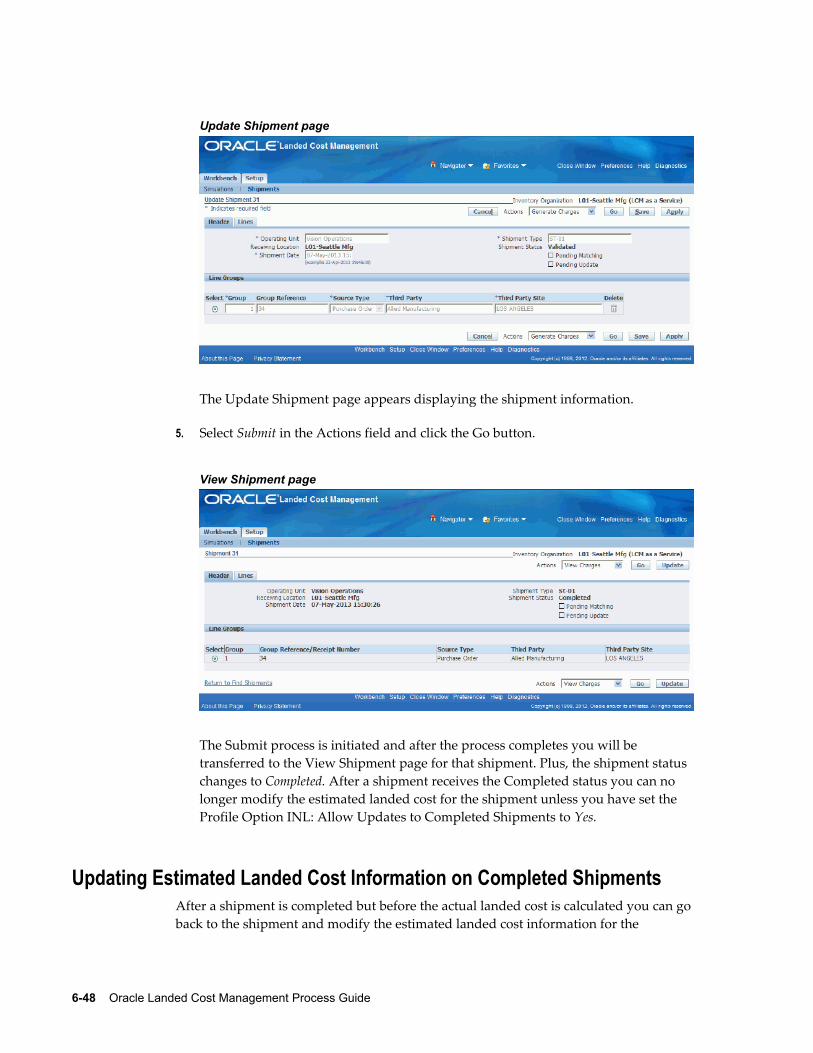
6-48 Oracle Landed Cost Management Process Guide
Update Shipment page
The Update Shipment page appears displaying the shipment information.
5. Select Submit in the Actions field and click the Go button.
View Shipment page
The Submit process is initiated and after the process completes you will be transferred to the View Shipment page for that shipment. Plus, the shipment status changes to Completed. After a shipment receives the Completed status you can no longer modify the estimated landed cost for the shipment unless you have set the Profile Option INL: Allow Updates to Completed Shipments to Yes.
Updating Estimated Landed Cost Information on Completed ShipmentsAfter a shipment is completed but before the actual landed cost is calculated you can goback to the shipment and modify the estimated landed cost information for the
Managing Landed Cost as a Service 6-49
shipment. This give you the ability to make changes or corrections to the estimated landed cost before the invoice arrives. Updating the estimated landed cost information after shipment completion enables you to keep the landed cost updated with new pricing information sent by the supplier and to accommodate the changes in freight charges, shipping methods and so on.
For more information on updating estimated landed cost information on completed shipments, see Understanding the Estimated Landed Cost Update Process, page 7-1 and the Updating Estimated Landed Cost Information on Completed Shipments chapter in this guide.
Calculating and Importing Actual Landed Cost for the ShipmentBefore you can view the actual landed cost for a shipment in Oracle Landed Cost Management a couple of concurrent programs (Matches Interface Import and Submit Pending Shipments) need to be executed. When using Landed Cost as a Service, Oracle recommends that these programs be scheduled to run periodically without any user intervention.
The Matches Interface Import program is responsible for importing the matched invoiceinformation from Oracle Payables into Oracle Landed Cost Management. During this program execution, all shipments that need to be resubmitted that are being impacted by the capture of actual amounts will be set as "Pending" shipments. Pending landed cost management shipments must be resubmitted, so that a new landed cost can be figured out as "actual landed cost" and the differences between estimated and actual landed costs can be sent to Oracle Cost Management.
Pending landed cost management shipments can be submitted through the Submit Pending Shipments concurrent program. The Submit Pending Shipments program calculates actual landed cost and then performs the submitting action again for the shipment. All of the routines necessary to recalculate landed costs and generate the Oracle Cost Management integration transactions are performed.
Use these procedures to calculate and import the actual landed cost:
Prerequisites❒ Invoices have already been created in Oracle Payables for the item and charges
(insurance, freight and so on) associated with the shipment. Plus, the invoices have been matched and validated.
To Run the Matches Interface Import Program1. Navigate to the Submit Request window, page A-1.
The Submit a New Request window appears asking for the type of request you want to submit.
2. Select the Single Request option and click the OK button.
6-50 Oracle Landed Cost Management Process Guide
The Submit Request window appears.
3. Select Matches Interface Import in the Name field.
4. Click the Submit button.
5. Click the No button in the Decision window.
6. To see the status of the concurrent request, navigate to the Requests window, page A-1.
The Find Requests window appears.
7. Click the Find button to view the status of all the requests.
The Requests window appears displaying all of the requests.
To Run the Submit Pending Shipments Program8. Navigate to the Submit Request window, page A-1.
The Submit a New Request window appears asking for the type of request you want to submit.
9. Select the Single Request option and click the OK button.
The Submit Request window appears.
10. Select Submit Pending Shipments in the Name field.
The Parameters window appears.
11. (Optional) Enter an Inventory Organization or an Inventory Organization and a Shipment Number and click the OK button.
To run the program for all of the available data do not enter any parameters.
12. Click the Submit button.
The Submit Pending Shipments program will skip the shipments that have pendingupdates and will finish with a warning status.
A message is included in the log stating that the shipment has not been processed and the "Submit" or "Discard Updates" action must be performed from the Shipments Workbench.
For more information on shipments that have pending updates, see the Updating Estimated Landed Cost on Completed Shipments chapter in this guide.
13. Click the No button in the Decision window.
14. To see the status of the concurrent request, navigate to the Requests window, page
Managing Landed Cost as a Service 6-51
A-1.
The Find Requests window appears.
15. Click the Find button to view the status of all the requests.
The Requests window appears displaying all of the requests.
Viewing Actual Landed Cost for the ShipmentUse the Shipment Hierarchy and Landed Cost Details pages to view the actual landed cost for a shipment. These pages itemize all of the allocation values that make up the total landed cost.
Using the Actual Matching History page you can view the detailed invoicing history forthe shipment line.
Plus, you can view the proportion of each landed cost component making up the total landed cost in a Pie Chart or Bar Graph and the unit landed cost calculations in the Calculation History graph.
Use this procedure to view actual landed cost for the shipment:
Prerequisites❒ Invoice information related to the landed cost management shipment has been
imported from Oracle Payables.
❒ Actual landed cost has been calculated for the shipment.
To View Actual Landed Cost for the Shipment:1. Navigate to the Shipments Workbench, page A-1.
The Shipments Workbench appears.
2. Search for shipments that were automatically created.
For more information, see Searching for Automatically Created Shipments, page 6-10.
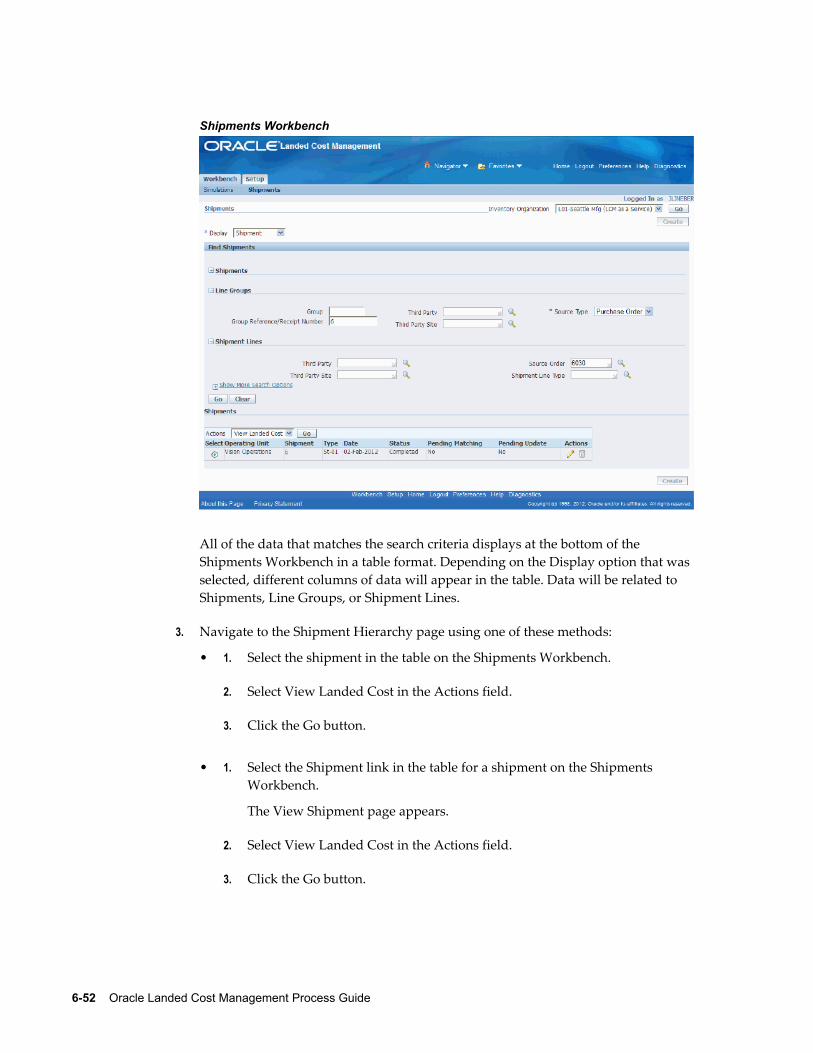
6-52 Oracle Landed Cost Management Process Guide
Shipments Workbench
All of the data that matches the search criteria displays at the bottom of the Shipments Workbench in a table format. Depending on the Display option that was selected, different columns of data will appear in the table. Data will be related to Shipments, Line Groups, or Shipment Lines.
3. Navigate to the Shipment Hierarchy page using one of these methods:
• 1. Select the shipment in the table on the Shipments Workbench.
2. Select View Landed Cost in the Actions field.
3. Click the Go button.
• 1. Select the Shipment link in the table for a shipment on the Shipments Workbench.
The View Shipment page appears.
2. Select View Landed Cost in the Actions field.
3. Click the Go button.
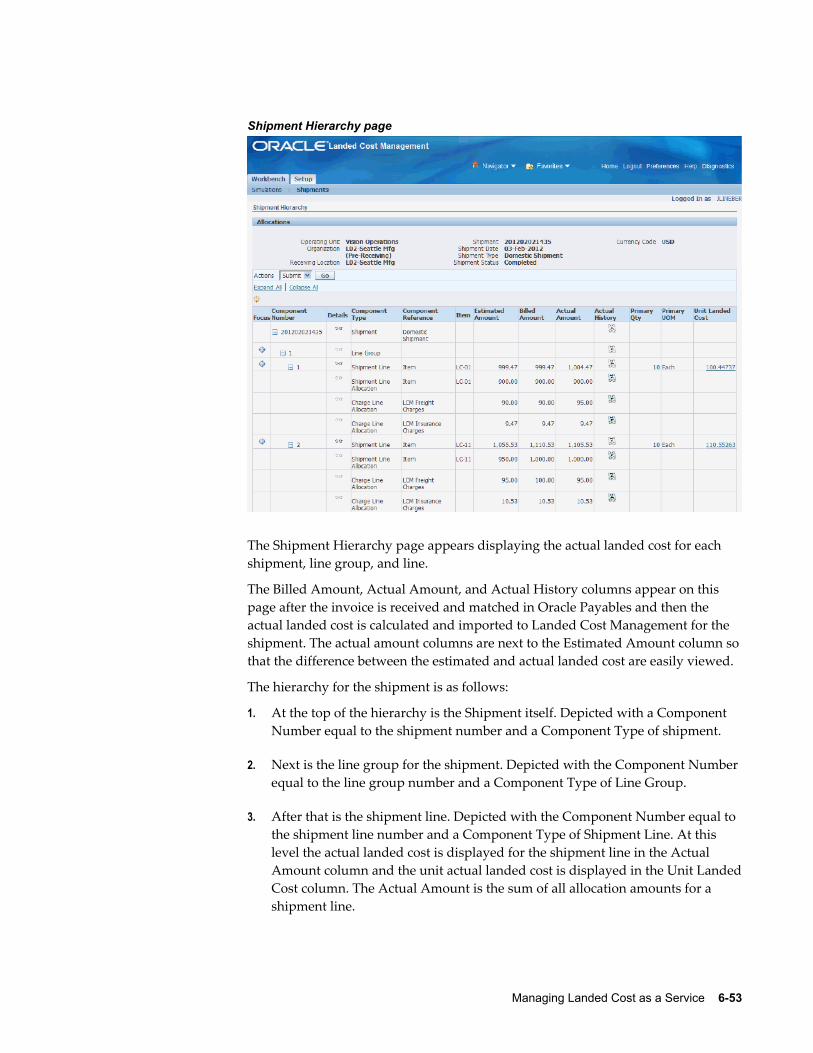
Managing Landed Cost as a Service 6-53
Shipment Hierarchy page
The Shipment Hierarchy page appears displaying the actual landed cost for each shipment, line group, and line.
The Billed Amount, Actual Amount, and Actual History columns appear on this page after the invoice is received and matched in Oracle Payables and then the actual landed cost is calculated and imported to Landed Cost Management for the shipment. The actual amount columns are next to the Estimated Amount column sothat the difference between the estimated and actual landed cost are easily viewed.
The hierarchy for the shipment is as follows:
1. At the top of the hierarchy is the Shipment itself. Depicted with a Component Number equal to the shipment number and a Component Type of shipment.
2. Next is the line group for the shipment. Depicted with the Component Number equal to the line group number and a Component Type of Line Group.
3. After that is the shipment line. Depicted with the Component Number equal to the shipment line number and a Component Type of Shipment Line. At this level the actual landed cost is displayed for the shipment line in the Actual Amount column and the unit actual landed cost is displayed in the Unit LandedCost column. The Actual Amount is the sum of all allocation amounts for a shipment line.

6-54 Oracle Landed Cost Management Process Guide
4. Finally, under each shipment line is the shipment line, charge line, and tax line allocations. Depicted with a Component Type equal to Shipment Line Allocation, Charge Line Allocation, or Tax Line Allocation and the specific cost factor displayed in the Component Reference field.
4. (Optional) To view the shipment or shipment line details, click the View Details icon in the Details column next to a shipment or shipment line.
The View Shipment page or the View Shipment Line page appear displaying the shipment or shipment line details.
5. To view the detailed invoicing history, click the View Actual History icon in the Actual History column next to an allocation line.
Note: The Actual History icon is only available for each allocation line. It is not available for the shipment, line group, or shipment lines levels.
Actual Matching History page
The Actual Matching History page appears displaying the details for the invoice history. The Actual Reference column displays the invoice number plus the distribution number.
6. To view landed cost details, click the Unit Landed Cost link for a shipment line.
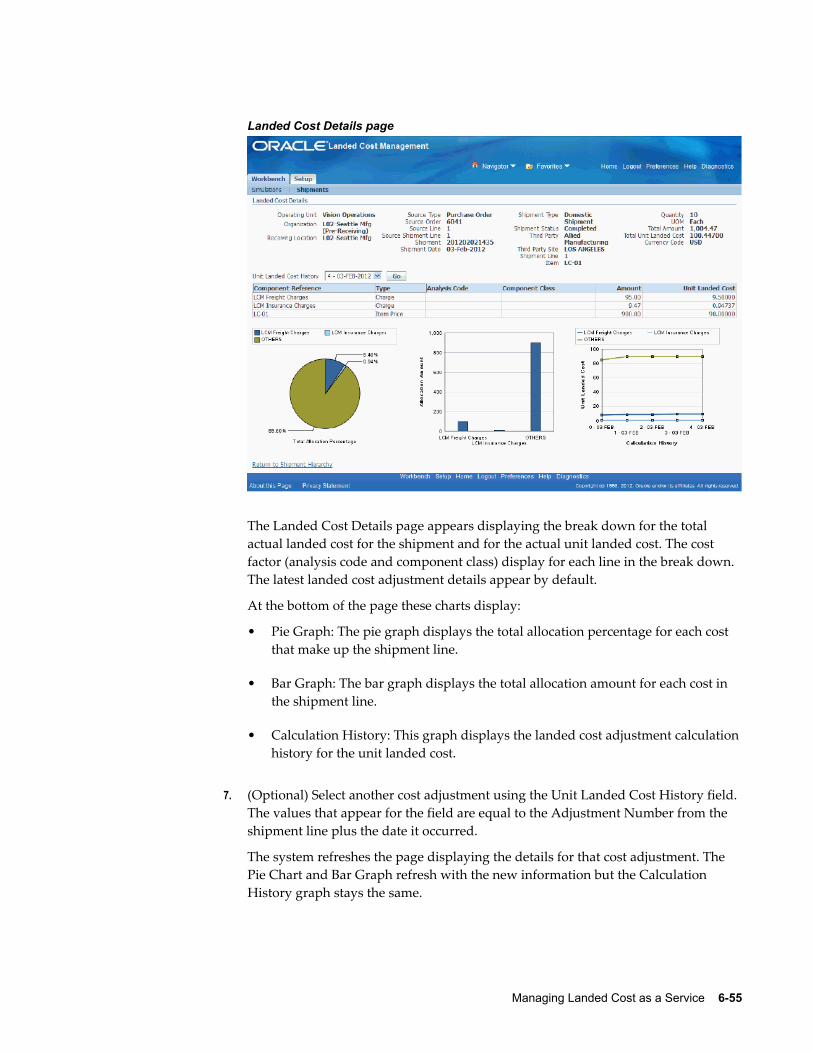
Managing Landed Cost as a Service 6-55
Landed Cost Details page
The Landed Cost Details page appears displaying the break down for the total actual landed cost for the shipment and for the actual unit landed cost. The cost factor (analysis code and component class) display for each line in the break down. The latest landed cost adjustment details appear by default.
At the bottom of the page these charts display:
• Pie Graph: The pie graph displays the total allocation percentage for each cost that make up the shipment line.
• Bar Graph: The bar graph displays the total allocation amount for each cost in the shipment line.
• Calculation History: This graph displays the landed cost adjustment calculationhistory for the unit landed cost.
7. (Optional) Select another cost adjustment using the Unit Landed Cost History field. The values that appear for the field are equal to the Adjustment Number from the shipment line plus the date it occurred.
The system refreshes the page displaying the details for that cost adjustment. The Pie Chart and Bar Graph refresh with the new information but the Calculation History graph stays the same.


Updating Estimated Landed Cost on Completed Shipments 7-1
7Updating Estimated Landed Cost on
Completed Shipments
This chapter covers the following topics:
• Understanding the Estimated Landed Cost Update Process
• Searching for Completed Shipments
• Updating Estimated Landed Cost Information on Shipment Lines
• Updating Estimated Landed Cost Information on Shipment Line Details
• Updating Estimated Landed Cost Information on Charge Lines
• Updating Estimated Landed Cost Information on Charge Line Details
• Processing Estimated Landed Cost Updates
• Discarding Estimated Landed Cost Updates to a Completed Shipment
• Viewing Estimated Landed Cost Information After Updates
Understanding the Estimated Landed Cost Update ProcessOracle Landed Cost Management enables you to update the estimated landed cost information associated with a completed shipment but before actual landed costs are calculated. This update process gives you flexibility to make changes or corrections to a shipment before the invoice arrives. This will provide you with the ability to keep the estimated landed cost up to date with the new pricing information sent by the supplier prior to the invoice or to adjust the estimated charge amount to accommodate changes such as, change of freight provider, shipping methods, and so on.
You can update estimated landed cost on completed shipments if you are managing landed cost as a pre-receiving application or as a service.
Important: The ability to update the estimated landed cost information on completed shipments is not supported by Oracle Process
7-2 Oracle Landed Cost Management Process Guide
Manufacturing (OPM) organizations.
To enable this update process all you need to do is set the Profile Option INL: Allow Updates to Completed Shipments to Yes. After this profile option is set you will be able to see and use the new estimated landed cost update functionality. Otherwise, this update functionality will not be available. The types of estimated landed cost information you can modify include:
• Item price
• Charge amount
• Currency exchange information
• Associations
Estimated Landed Cost Update High-Level Process FlowFollowing is a basic estimated landed cost update process flow:
1. Set the Profile Option INL: Allow Updates to Completed Shipments to Yes for the appropriate level (site, application, responsibility, or user).
For more information on setting up profile options, see Setting Up Landed Cost Management Profile Options, page 2-37 and Landed Cost Management Profile Options, page B-1.
2. Create a landed cost shipment and complete it using the Landed Cost Management application.
For more information, see Understanding Landed Cost as a Pre-Receiving Application, page 5-2 and Understanding Landed Cost as a Service, page 6-1.
3. Search for a completed landed cost shipment you want to update the estimated landed cost information for using the Shipments Workbench.
For more information, see Searching for Completed Shipments, page 7-3.
4. Click the Update icon next to a shipment or shipment line group using the Shipments Workbench.
5. (Optional) Update estimated landed cost information on the shipment lines for the shipment using the Update Shipment page and the Shipment Line Detail page.
You can enter a new item price and new currency conversion information for the shipment line.
For more information, see:
Updating Estimated Landed Cost on Completed Shipments 7-3
• Updating Estimated Landed Cost Information on Shipment Lines, page 7-7
• Updating Estimated Landed Cost Information on Shipment Line Details, page 7-10
6. (Optional) Update estimated landed cost information on the charge lines for the shipment using the Manage Charges page and the Manage Charge Line page.
You can enter a new charge amount and new currency conversion information for the existing charge lines on the shipment. Plus, you can create new charge lines or delete charge lines for the shipment.
For more information, see:
• Updating Estimated Landed Cost Information on Charge Lines, page 7-14
• Updating Estimated Landed Cost Information on Charge Line Details, page 7-18
7. (Optional) Discard the changes you made to the estimated landed cost information for the shipment using the Update Shipment page or the Shipments Workbench.
For more information, see Discarding Estimated Landed Cost Updates to a Completed Shipment, page 7-23.
8. Submit the shipment again to process the updates made to the estimated landed cost information using the Update Shipment page or the Shipments Workbench page.
This submit process performs these processes:
• Validates the shipment to make sure the updated information that was entered is correct.
• Recalculates the estimated landed cost for the shipment (Landed Cost Calculation Engine).
• Creates the estimated landed cost information adjustment lines that can be viewed using the Shipment Hierarchy and Landed Cost Details pages.
9. Continue with the processing of the landed cost shipment.
Searching for Completed ShipmentsUse the Shipments Workbench to search for completed shipments and to search for completed shipments where the estimated landed cost information has been updated but the changes are pending (Submit action has not been performed again).
Use this procedure to search for completed shipments:
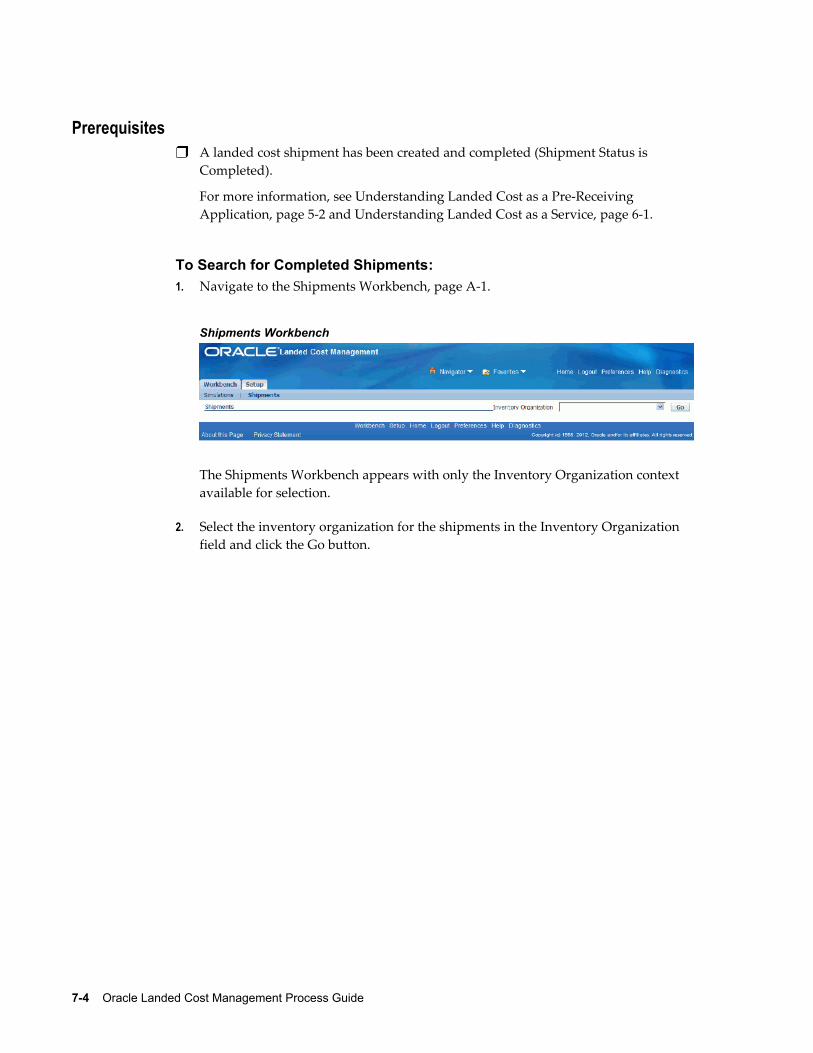
7-4 Oracle Landed Cost Management Process Guide
Prerequisites❒ A landed cost shipment has been created and completed (Shipment Status is
Completed).
For more information, see Understanding Landed Cost as a Pre-Receiving Application, page 5-2 and Understanding Landed Cost as a Service, page 6-1.
To Search for Completed Shipments:1. Navigate to the Shipments Workbench, page A-1.
Shipments Workbench
The Shipments Workbench appears with only the Inventory Organization context available for selection.
2. Select the inventory organization for the shipments in the Inventory Organization field and click the Go button.
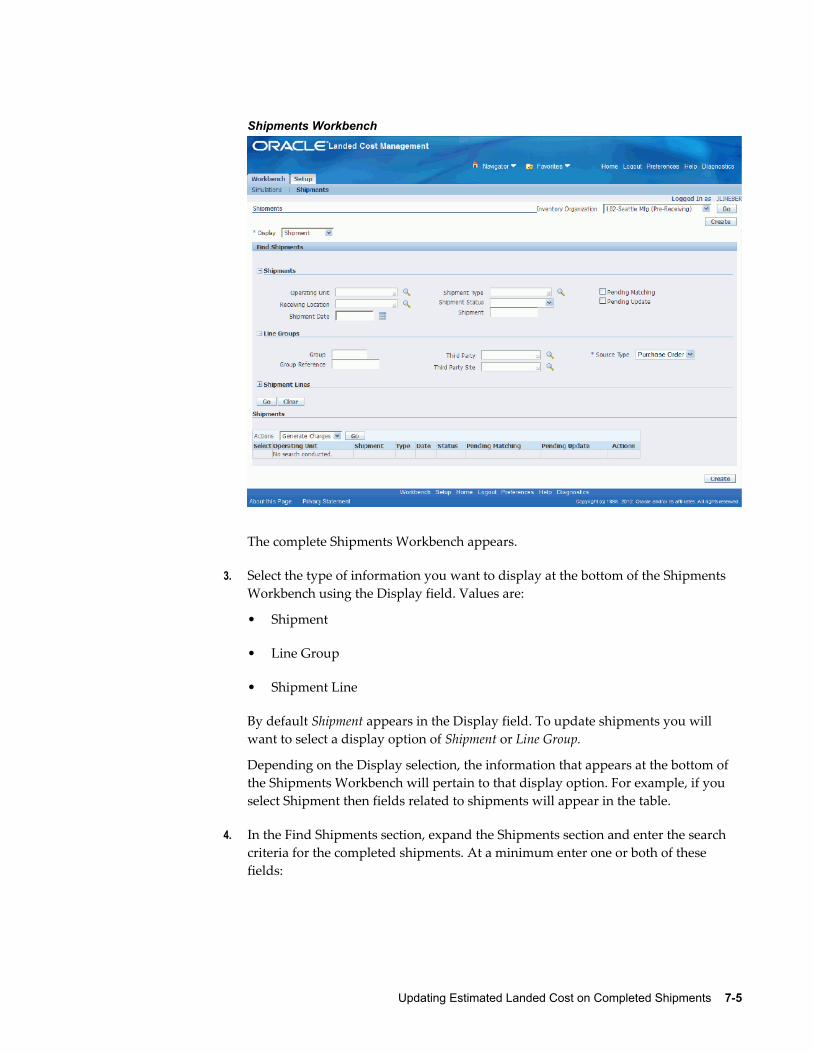
Updating Estimated Landed Cost on Completed Shipments 7-5
Shipments Workbench
The complete Shipments Workbench appears.
3. Select the type of information you want to display at the bottom of the Shipments Workbench using the Display field. Values are:
• Shipment
• Line Group
• Shipment Line
By default Shipment appears in the Display field. To update shipments you will want to select a display option of Shipment or Line Group.
Depending on the Display selection, the information that appears at the bottom of the Shipments Workbench will pertain to that display option. For example, if you select Shipment then fields related to shipments will appear in the table.
4. In the Find Shipments section, expand the Shipments section and enter the search criteria for the completed shipments. At a minimum enter one or both of these fields:
7-6 Oracle Landed Cost Management Process Guide
Shipment Status Select Completed as the status of the shipment.
Pending Update Select this check box if you want to search for shipments that have previously had estimated landed cost information updated on them but the changes are pending.
Otherwise, you can click the Go button without entering any search criteria and all of the available shipments in the Inventory Organization will display.
For more information on all the search criteria fields, see Updating Shipments, page5-18.
5. (Optional) In the Find Shipments region, expand the Line Groups section and enter the search criteria for the completed shipments.
For more information on all the search criteria fields, see Updating Shipments, page5-18.
6. (Optional) In the Find Shipments region, expand the Shipment Lines section and enter the search criteria for the completed shipments.
For more information on all the search criteria field, see Updating Shipments, page 5-18.
7. Click the Go button.
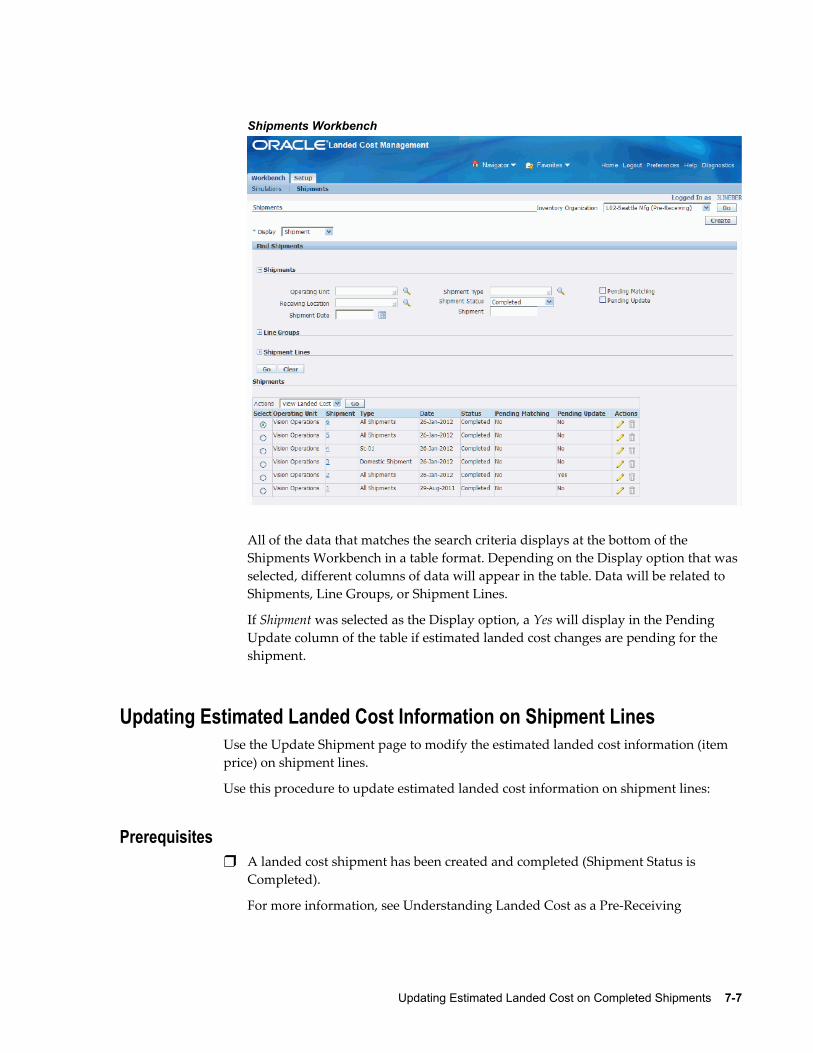
Updating Estimated Landed Cost on Completed Shipments 7-7
Shipments Workbench
All of the data that matches the search criteria displays at the bottom of the Shipments Workbench in a table format. Depending on the Display option that was selected, different columns of data will appear in the table. Data will be related to Shipments, Line Groups, or Shipment Lines.
If Shipment was selected as the Display option, a Yes will display in the Pending Update column of the table if estimated landed cost changes are pending for the shipment.
Updating Estimated Landed Cost Information on Shipment LinesUse the Update Shipment page to modify the estimated landed cost information (item price) on shipment lines.
Use this procedure to update estimated landed cost information on shipment lines:
Prerequisites❒ A landed cost shipment has been created and completed (Shipment Status is
Completed).
For more information, see Understanding Landed Cost as a Pre-Receiving
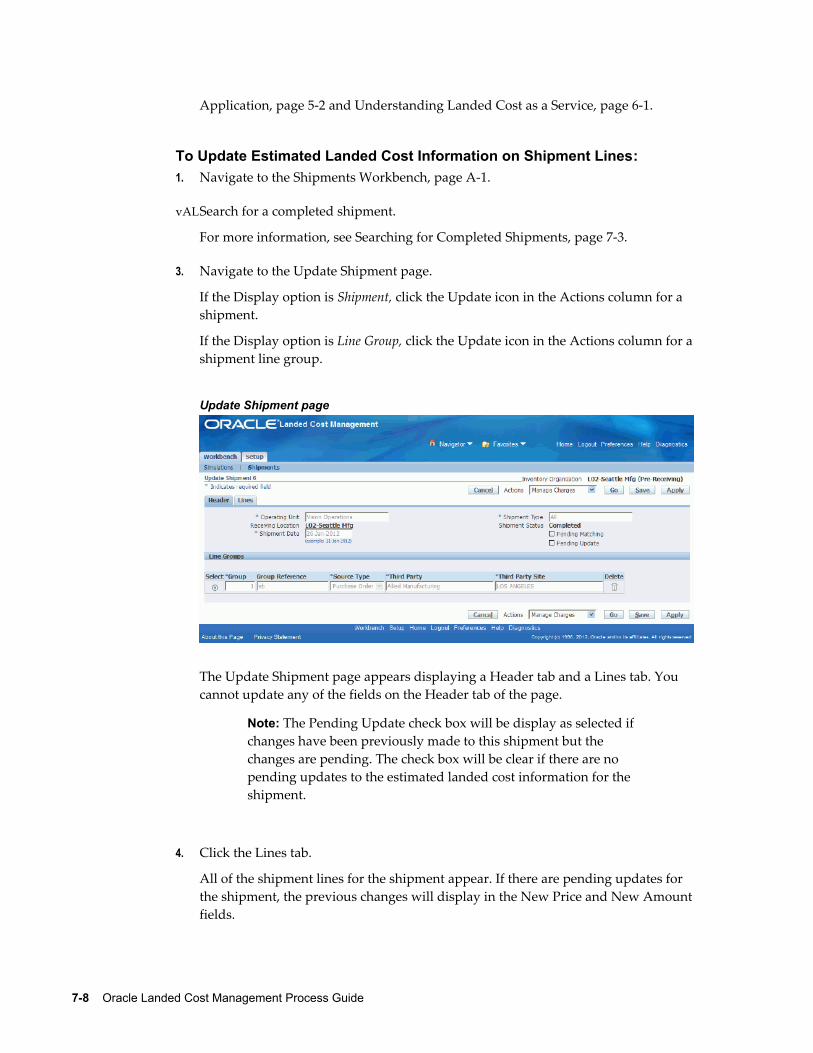
7-8 Oracle Landed Cost Management Process Guide
Application, page 5-2 and Understanding Landed Cost as a Service, page 6-1.
To Update Estimated Landed Cost Information on Shipment Lines:1. Navigate to the Shipments Workbench, page A-1.
2. Search for a completed shipment.
For more information, see Searching for Completed Shipments, page 7-3.
3. Navigate to the Update Shipment page.
If the Display option is Shipment, click the Update icon in the Actions column for a shipment.
If the Display option is Line Group, click the Update icon in the Actions column for ashipment line group.
Update Shipment page
The Update Shipment page appears displaying a Header tab and a Lines tab. You cannot update any of the fields on the Header tab of the page.
Note: The Pending Update check box will be display as selected if changes have been previously made to this shipment but the changes are pending. The check box will be clear if there are no pending updates to the estimated landed cost information for the shipment.
4. Click the Lines tab.
All of the shipment lines for the shipment appear. If there are pending updates for the shipment, the previous changes will display in the New Price and New Amountfields.
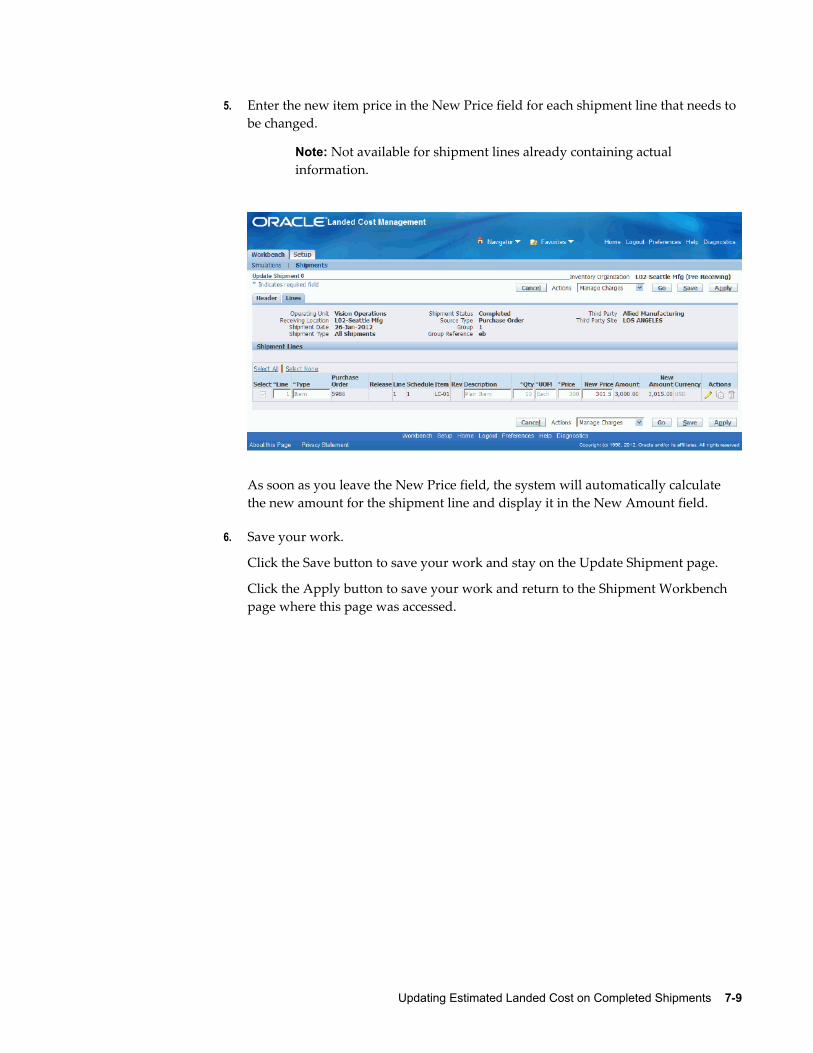
Updating Estimated Landed Cost on Completed Shipments 7-9
5. Enter the new item price in the New Price field for each shipment line that needs to be changed.
Note: Not available for shipment lines already containing actual information.
As soon as you leave the New Price field, the system will automatically calculate the new amount for the shipment line and display it in the New Amount field.
6. Save your work.
Click the Save button to save your work and stay on the Update Shipment page.
Click the Apply button to save your work and return to the Shipment Workbench page where this page was accessed.
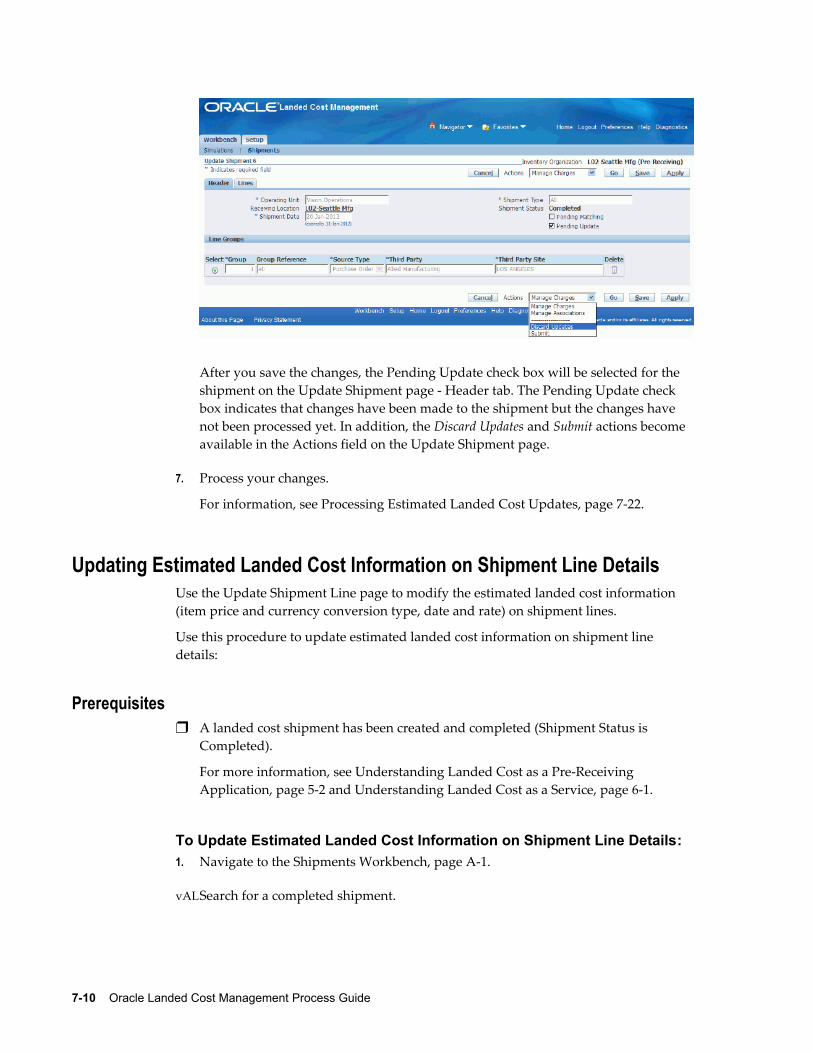
7-10 Oracle Landed Cost Management Process Guide
After you save the changes, the Pending Update check box will be selected for the shipment on the Update Shipment page - Header tab. The Pending Update check box indicates that changes have been made to the shipment but the changes have not been processed yet. In addition, the Discard Updates and Submit actions become available in the Actions field on the Update Shipment page.
7. Process your changes.
For information, see Processing Estimated Landed Cost Updates, page 7-22.
Updating Estimated Landed Cost Information on Shipment Line DetailsUse the Update Shipment Line page to modify the estimated landed cost information (item price and currency conversion type, date and rate) on shipment lines.
Use this procedure to update estimated landed cost information on shipment line details:
Prerequisites❒ A landed cost shipment has been created and completed (Shipment Status is
Completed).
For more information, see Understanding Landed Cost as a Pre-Receiving Application, page 5-2 and Understanding Landed Cost as a Service, page 6-1.
To Update Estimated Landed Cost Information on Shipment Line Details:1. Navigate to the Shipments Workbench, page A-1.
2. Search for a completed shipment.
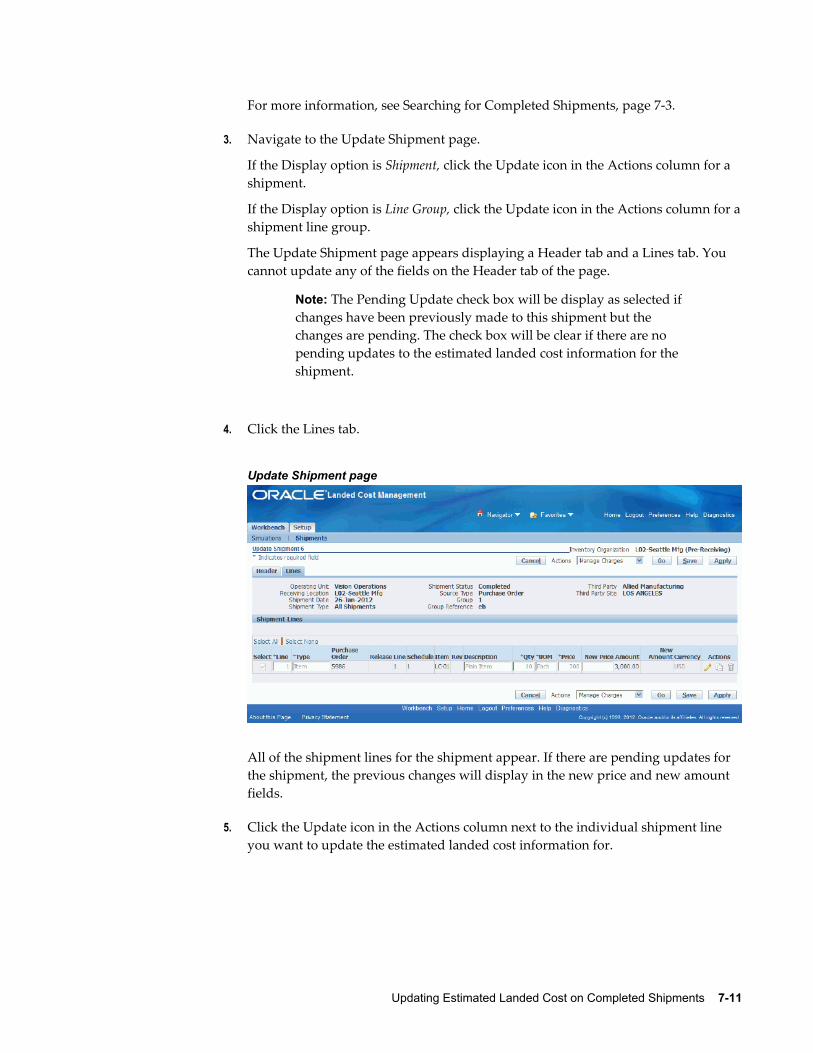
Updating Estimated Landed Cost on Completed Shipments 7-11
For more information, see Searching for Completed Shipments, page 7-3.
3. Navigate to the Update Shipment page.
If the Display option is Shipment, click the Update icon in the Actions column for a shipment.
If the Display option is Line Group, click the Update icon in the Actions column for ashipment line group.
The Update Shipment page appears displaying a Header tab and a Lines tab. You cannot update any of the fields on the Header tab of the page.
Note: The Pending Update check box will be display as selected if changes have been previously made to this shipment but the changes are pending. The check box will be clear if there are no pending updates to the estimated landed cost information for the shipment.
4. Click the Lines tab.
Update Shipment page
All of the shipment lines for the shipment appear. If there are pending updates for the shipment, the previous changes will display in the new price and new amount fields.
5. Click the Update icon in the Actions column next to the individual shipment line you want to update the estimated landed cost information for.

7-12 Oracle Landed Cost Management Process Guide
Update Shipment Line page
The Update Shipment Line page appears. If there are pending updates for the shipment, the previous changes will display in the New Price and New Amount fields and the New Conversion Type, New Conversion Date, and New Conversion Rate fields.
6. Update the estimated landed cost information associated with the shipment line details:
Note: Not available for shipment lines already containing actual information.
• Enter a new item price in the New Price field.
• Enter a new currency conversion type in the New Conversion Type field.
Note: The New Conversion Type field is only available when the purchase order currency is different than the functional currency.
• Enter a new currency conversion date in the New Conversion Date field.
Note: The New Conversion Date field is only available when the purchase order currency is different than the functional currency.
• Enter a new currency conversion rate in the New Conversion Rate field.
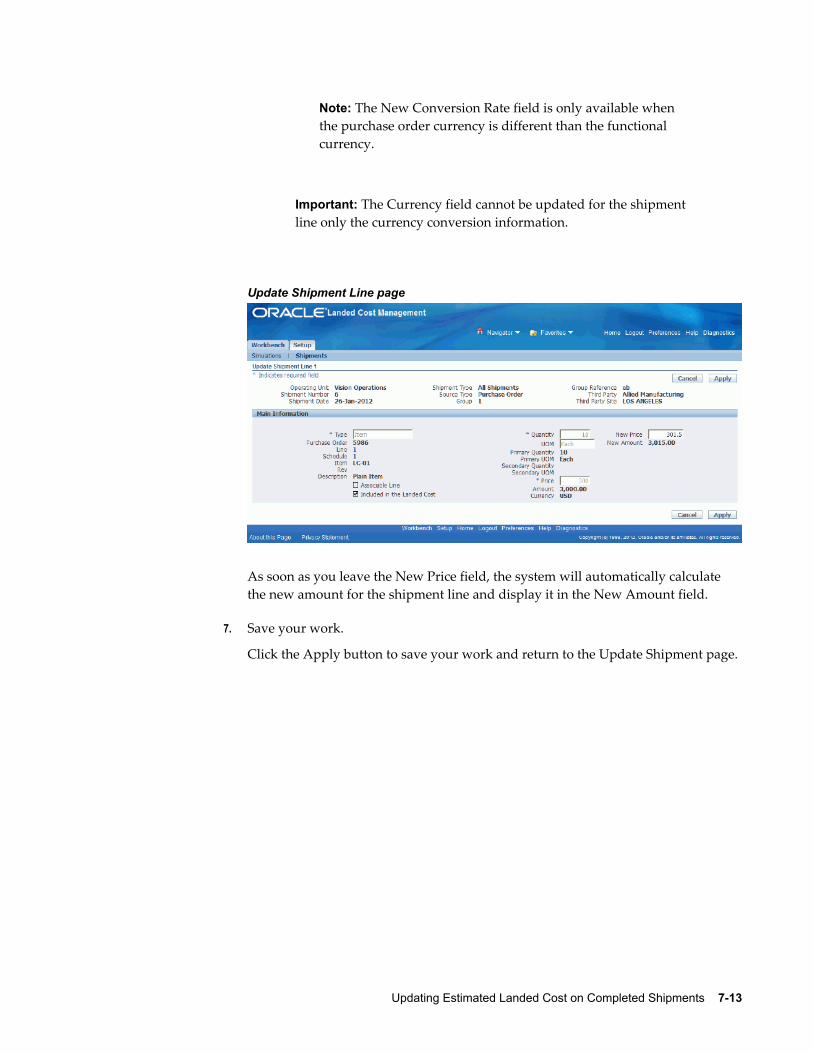
Updating Estimated Landed Cost on Completed Shipments 7-13
Note: The New Conversion Rate field is only available when the purchase order currency is different than the functional currency.
Important: The Currency field cannot be updated for the shipment line only the currency conversion information.
Update Shipment Line page
As soon as you leave the New Price field, the system will automatically calculate the new amount for the shipment line and display it in the New Amount field.
7. Save your work.
Click the Apply button to save your work and return to the Update Shipment page.
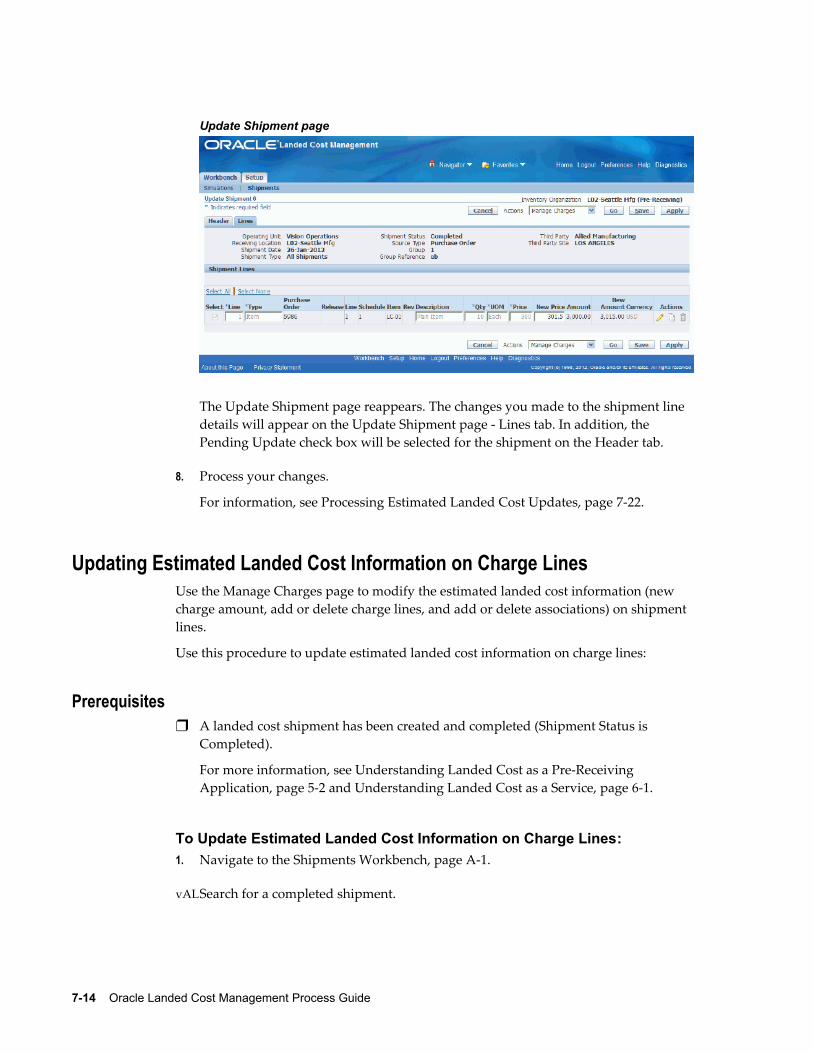
7-14 Oracle Landed Cost Management Process Guide
Update Shipment page
The Update Shipment page reappears. The changes you made to the shipment line details will appear on the Update Shipment page - Lines tab. In addition, the Pending Update check box will be selected for the shipment on the Header tab.
8. Process your changes.
For information, see Processing Estimated Landed Cost Updates, page 7-22.
Updating Estimated Landed Cost Information on Charge LinesUse the Manage Charges page to modify the estimated landed cost information (new charge amount, add or delete charge lines, and add or delete associations) on shipment lines.
Use this procedure to update estimated landed cost information on charge lines:
Prerequisites❒ A landed cost shipment has been created and completed (Shipment Status is
Completed).
For more information, see Understanding Landed Cost as a Pre-Receiving Application, page 5-2 and Understanding Landed Cost as a Service, page 6-1.
To Update Estimated Landed Cost Information on Charge Lines:1. Navigate to the Shipments Workbench, page A-1.
2. Search for a completed shipment.
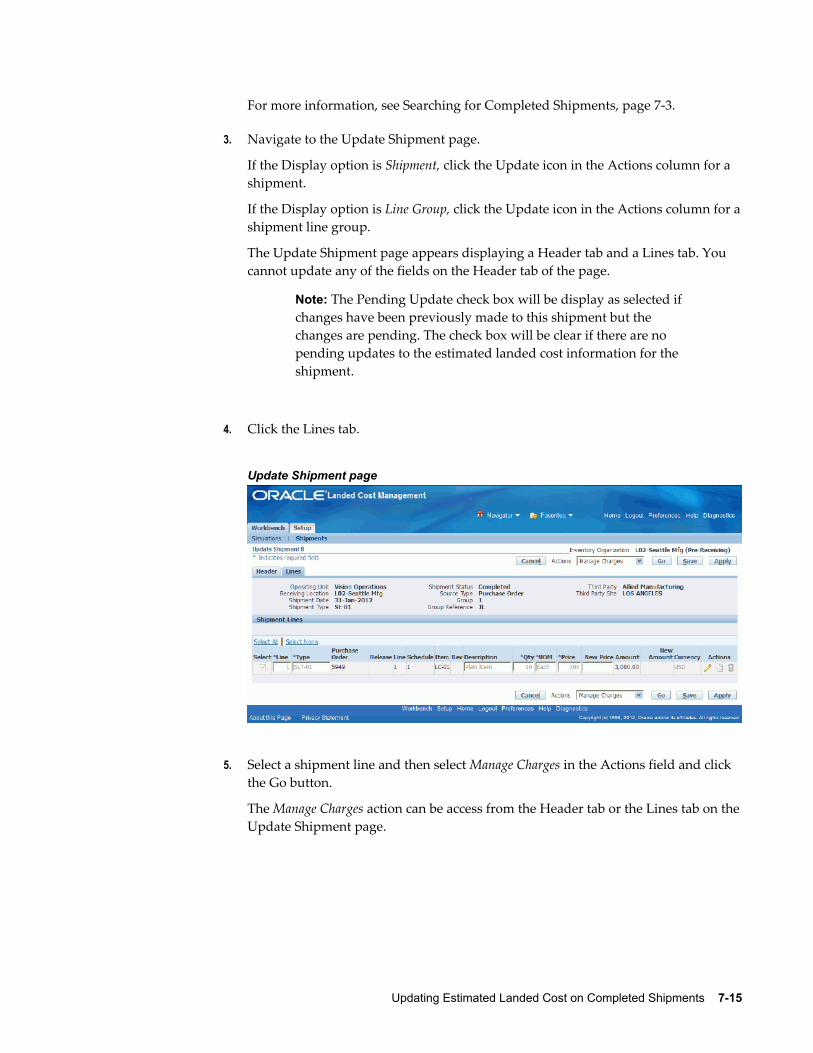
Updating Estimated Landed Cost on Completed Shipments 7-15
For more information, see Searching for Completed Shipments, page 7-3.
3. Navigate to the Update Shipment page.
If the Display option is Shipment, click the Update icon in the Actions column for a shipment.
If the Display option is Line Group, click the Update icon in the Actions column for ashipment line group.
The Update Shipment page appears displaying a Header tab and a Lines tab. You cannot update any of the fields on the Header tab of the page.
Note: The Pending Update check box will be display as selected if changes have been previously made to this shipment but the changes are pending. The check box will be clear if there are no pending updates to the estimated landed cost information for the shipment.
4. Click the Lines tab.
Update Shipment page
5. Select a shipment line and then select Manage Charges in the Actions field and click the Go button.
The Manage Charges action can be access from the Header tab or the Lines tab on theUpdate Shipment page.
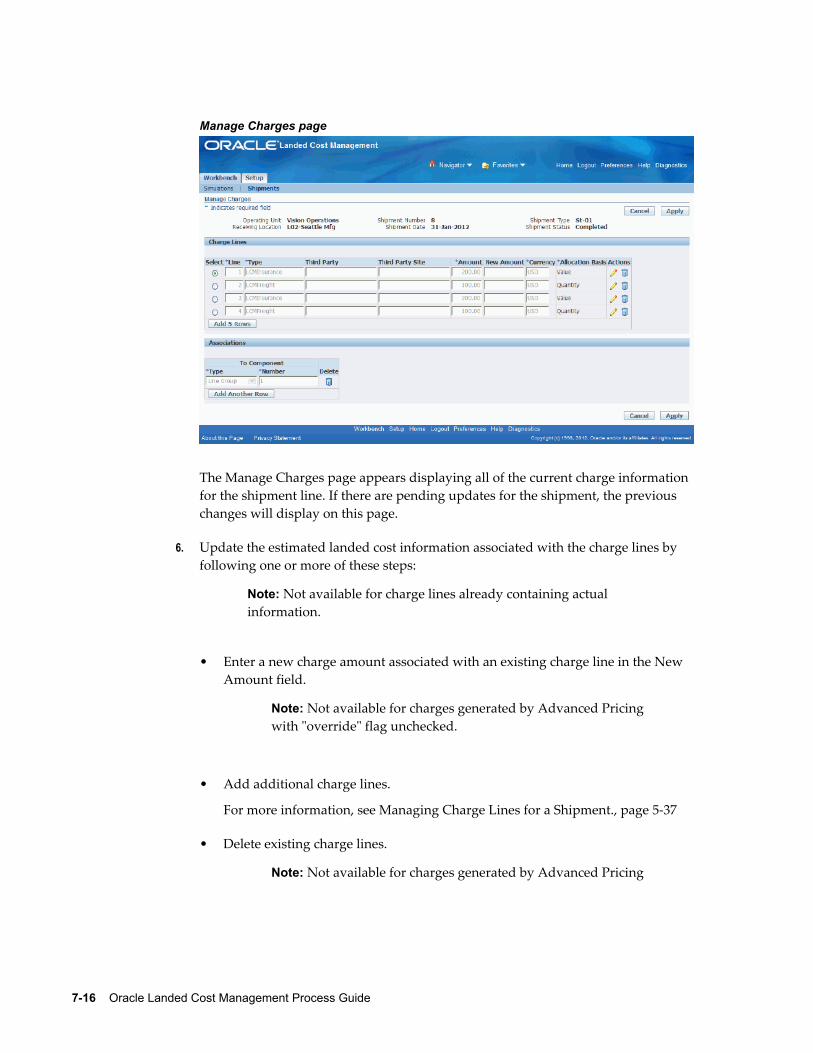
7-16 Oracle Landed Cost Management Process Guide
Manage Charges page
The Manage Charges page appears displaying all of the current charge information for the shipment line. If there are pending updates for the shipment, the previous changes will display on this page.
6. Update the estimated landed cost information associated with the charge lines by following one or more of these steps:
Note: Not available for charge lines already containing actual information.
• Enter a new charge amount associated with an existing charge line in the New Amount field.
Note: Not available for charges generated by Advanced Pricingwith "override" flag unchecked.
• Add additional charge lines.
For more information, see Managing Charge Lines for a Shipment., page 5-37
• Delete existing charge lines.
Note: Not available for charges generated by Advanced Pricing
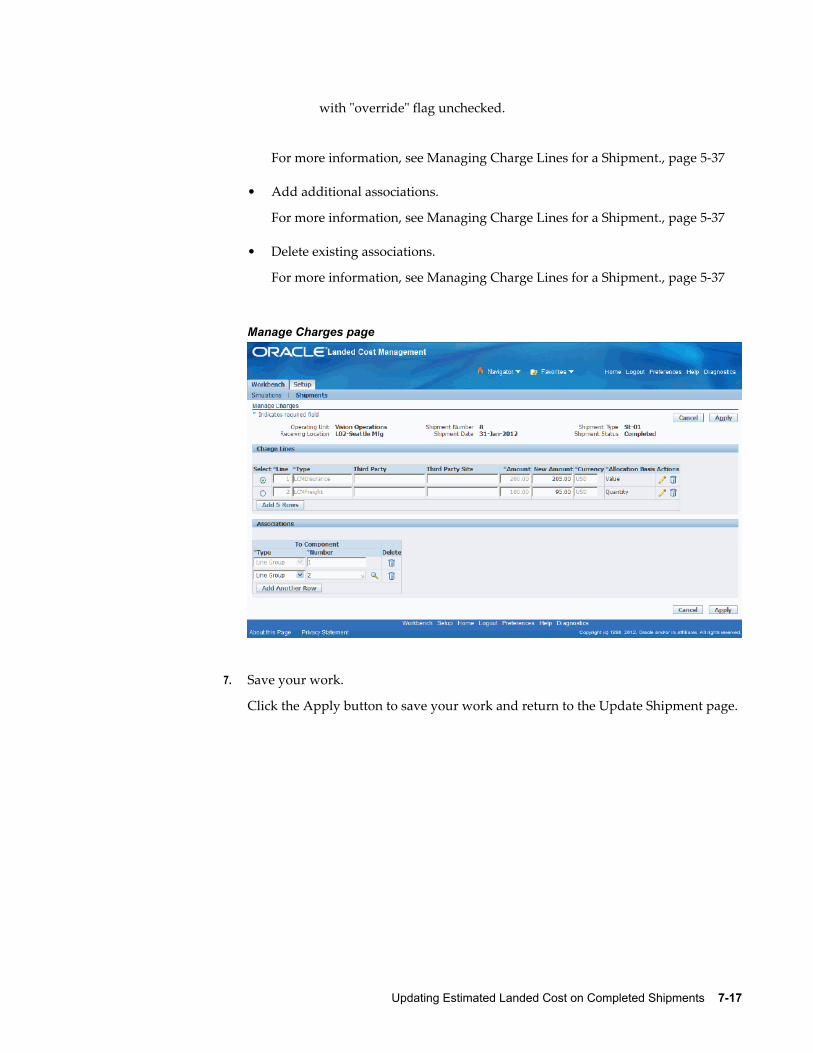
Updating Estimated Landed Cost on Completed Shipments 7-17
with "override" flag unchecked.
For more information, see Managing Charge Lines for a Shipment., page 5-37
• Add additional associations.
For more information, see Managing Charge Lines for a Shipment., page 5-37
• Delete existing associations.
For more information, see Managing Charge Lines for a Shipment., page 5-37
Manage Charges page
7. Save your work.
Click the Apply button to save your work and return to the Update Shipment page.
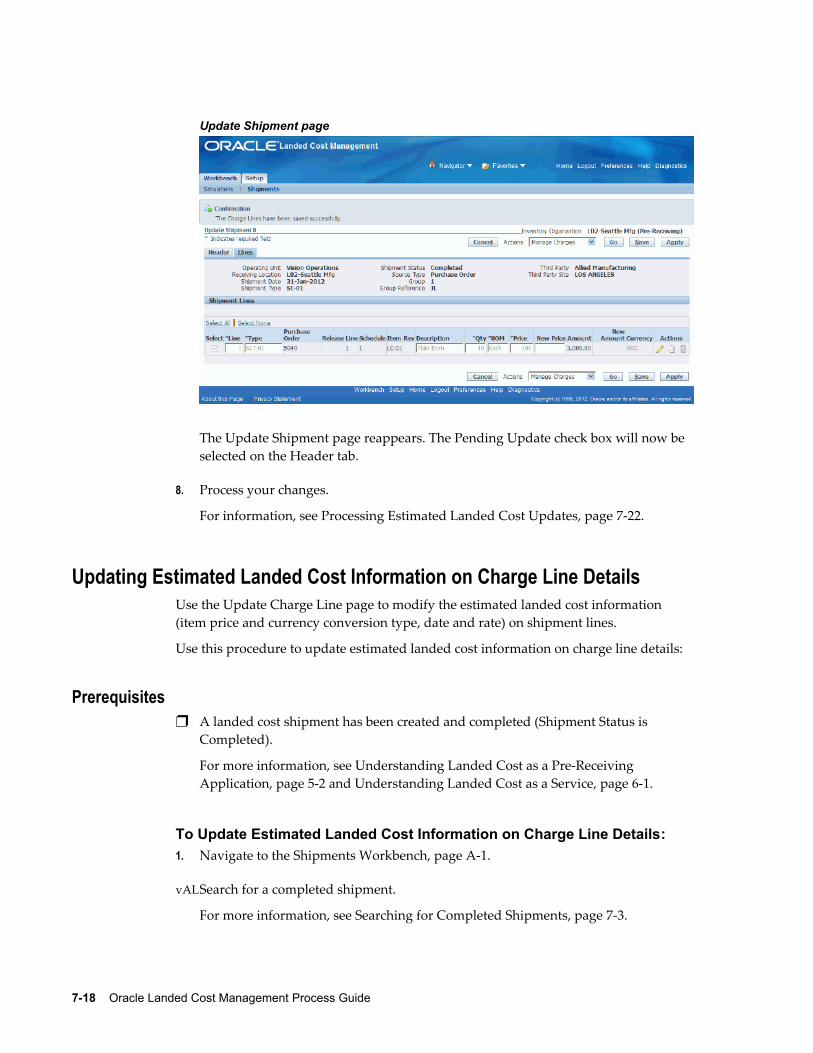
7-18 Oracle Landed Cost Management Process Guide
Update Shipment page
The Update Shipment page reappears. The Pending Update check box will now be selected on the Header tab.
8. Process your changes.
For information, see Processing Estimated Landed Cost Updates, page 7-22.
Updating Estimated Landed Cost Information on Charge Line DetailsUse the Update Charge Line page to modify the estimated landed cost information (item price and currency conversion type, date and rate) on shipment lines.
Use this procedure to update estimated landed cost information on charge line details:
Prerequisites❒ A landed cost shipment has been created and completed (Shipment Status is
Completed).
For more information, see Understanding Landed Cost as a Pre-Receiving Application, page 5-2 and Understanding Landed Cost as a Service, page 6-1.
To Update Estimated Landed Cost Information on Charge Line Details:1. Navigate to the Shipments Workbench, page A-1.
2. Search for a completed shipment.
For more information, see Searching for Completed Shipments, page 7-3.
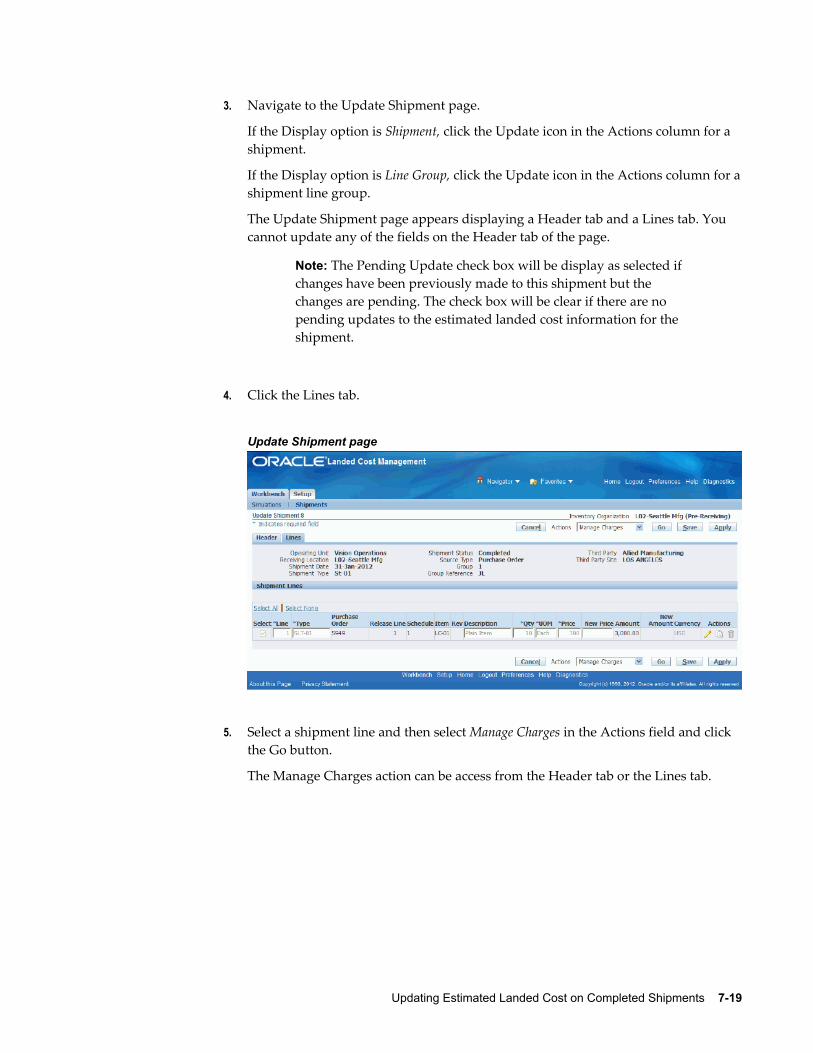
Updating Estimated Landed Cost on Completed Shipments 7-19
3. Navigate to the Update Shipment page.
If the Display option is Shipment, click the Update icon in the Actions column for a shipment.
If the Display option is Line Group, click the Update icon in the Actions column for ashipment line group.
The Update Shipment page appears displaying a Header tab and a Lines tab. You cannot update any of the fields on the Header tab of the page.
Note: The Pending Update check box will be display as selected if changes have been previously made to this shipment but the changes are pending. The check box will be clear if there are no pending updates to the estimated landed cost information for the shipment.
4. Click the Lines tab.
Update Shipment page
5. Select a shipment line and then select Manage Charges in the Actions field and click the Go button.
The Manage Charges action can be access from the Header tab or the Lines tab.
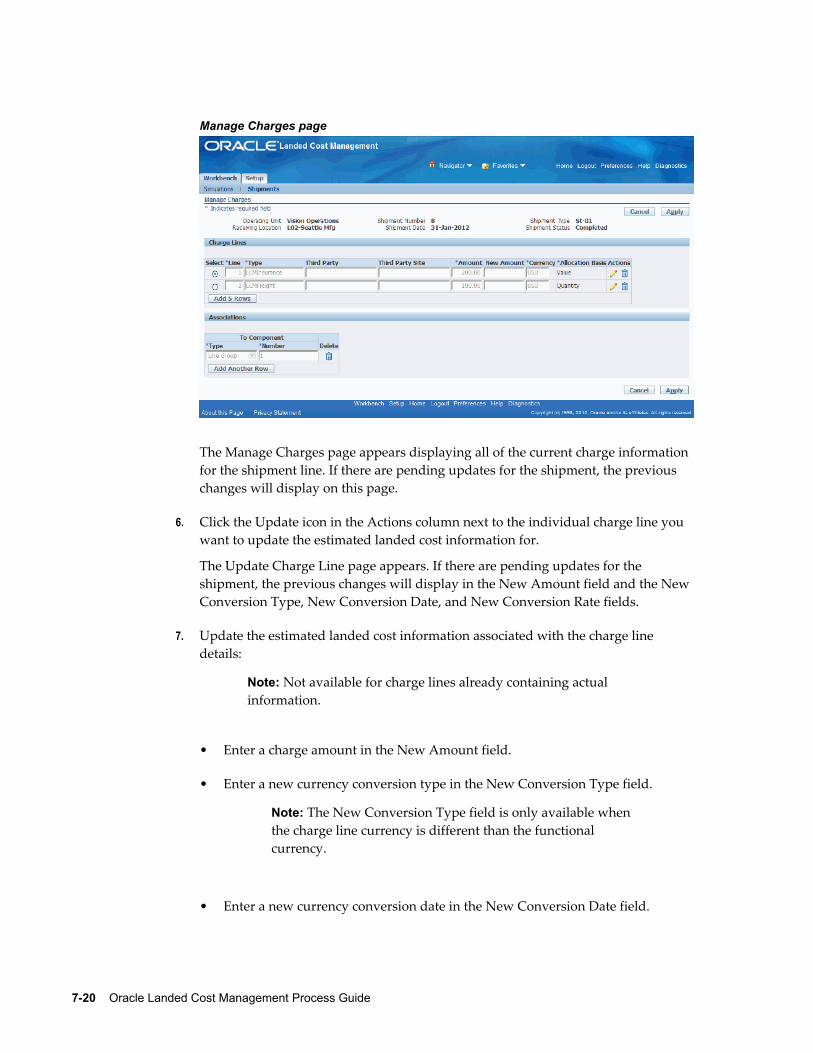
7-20 Oracle Landed Cost Management Process Guide
Manage Charges page
The Manage Charges page appears displaying all of the current charge information for the shipment line. If there are pending updates for the shipment, the previous changes will display on this page.
6. Click the Update icon in the Actions column next to the individual charge line you want to update the estimated landed cost information for.
The Update Charge Line page appears. If there are pending updates for the shipment, the previous changes will display in the New Amount field and the New Conversion Type, New Conversion Date, and New Conversion Rate fields.
7. Update the estimated landed cost information associated with the charge line details:
Note: Not available for charge lines already containing actual information.
• Enter a charge amount in the New Amount field.
• Enter a new currency conversion type in the New Conversion Type field.
Note: The New Conversion Type field is only available when the charge line currency is different than the functional currency.
• Enter a new currency conversion date in the New Conversion Date field.
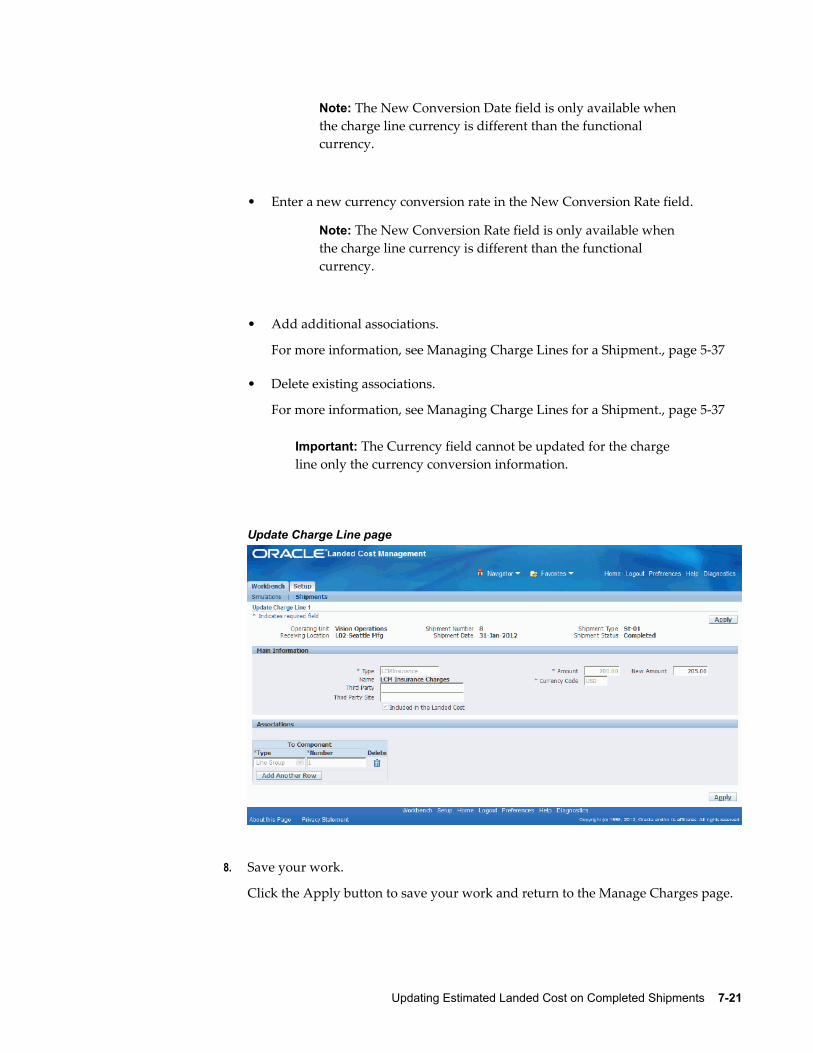
Updating Estimated Landed Cost on Completed Shipments 7-21
Note: The New Conversion Date field is only available when the charge line currency is different than the functional currency.
• Enter a new currency conversion rate in the New Conversion Rate field.
Note: The New Conversion Rate field is only available when the charge line currency is different than the functional currency.
• Add additional associations.
For more information, see Managing Charge Lines for a Shipment., page 5-37
• Delete existing associations.
For more information, see Managing Charge Lines for a Shipment., page 5-37
Important: The Currency field cannot be updated for the charge line only the currency conversion information.
Update Charge Line page
8. Save your work.
Click the Apply button to save your work and return to the Manage Charges page.
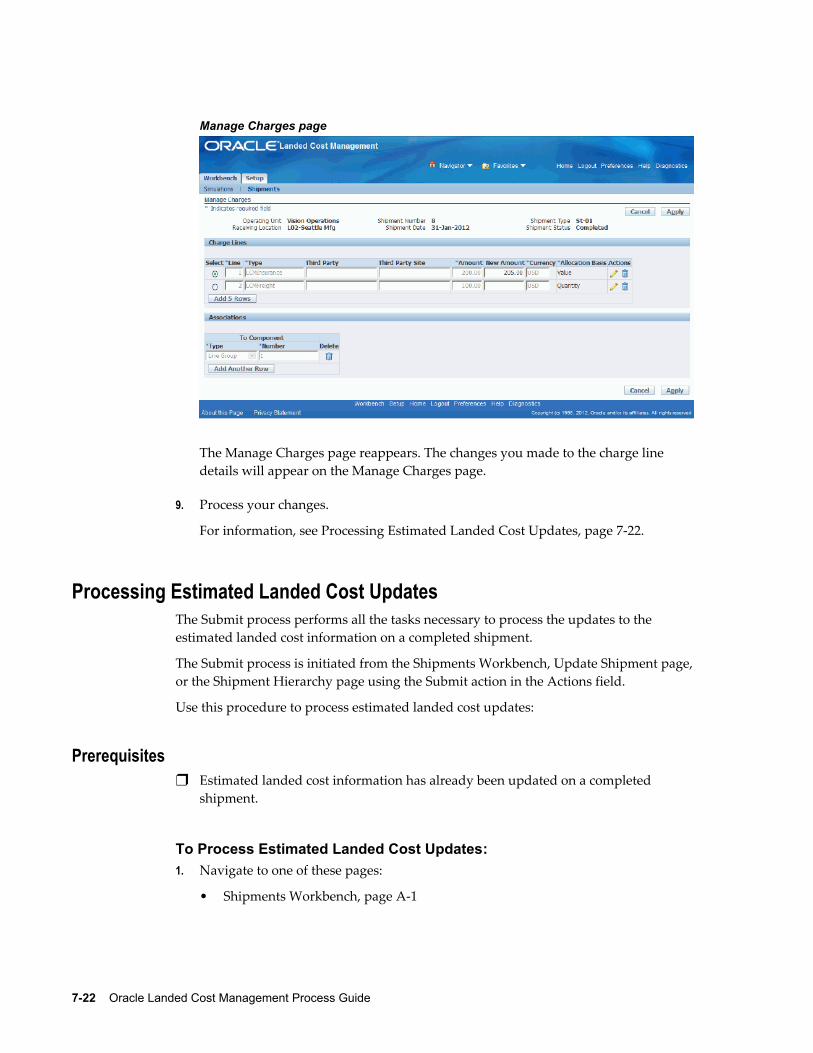
7-22 Oracle Landed Cost Management Process Guide
Manage Charges page
The Manage Charges page reappears. The changes you made to the charge line details will appear on the Manage Charges page.
9. Process your changes.
For information, see Processing Estimated Landed Cost Updates, page 7-22.
Processing Estimated Landed Cost Updates The Submit process performs all the tasks necessary to process the updates to the estimated landed cost information on a completed shipment.
The Submit process is initiated from the Shipments Workbench, Update Shipment page,or the Shipment Hierarchy page using the Submit action in the Actions field.
Use this procedure to process estimated landed cost updates:
Prerequisites❒ Estimated landed cost information has already been updated on a completed
shipment.
To Process Estimated Landed Cost Updates:1. Navigate to one of these pages:
• Shipments Workbench, page A-1
Updating Estimated Landed Cost on Completed Shipments 7-23
• Update Shipment, page A-1
• Shipment Hierarchy, page A-1 (viewing landed cost)
2. Select Submit in the Actions field and click the Go button.
This submit process is initiated and performs these processes:
• Validates the shipment to make sure the updated information that was entered is correct.
• Recalculates the estimated landed cost for the shipment (Landed Cost Calculation Engine).
• Creates the estimated landed cost information adjustment lines that can be viewed using the Shipment Hierarchy and Landed Cost Details pages.
The Shipment Hierarchy and Landed Cost Details pages will only display the new data after the landed cost recalculation. For example, if you enter $110.00 USD in the New Price field of a shipment line that has $100.00 USD in the Price field, the $110.00 USD will be only be reflected on the Shipment Hierarchy and Landed Cost Details pages after the landed cost recalculation, not before.
For more information on viewing estimated landed cost, see Viewing EstimatedLanded Cost for the Shipment, page 5-52.
If you perform the Submit action from the Update Shipment page after the process completes you will be transferred to the View Shipment page for that shipment.
The system also clears the Pending Update check box from the Update Shipment page.
Discarding Estimated Landed Cost Updates to a Completed ShipmentUse the Shipments Workbench or the Update Shipment page to discard the changes youmade to the estimated landed cost information on a completed shipment.
Use these procedures to discard estimated landed cost updates to a completed shipment:
Prerequisites❒ A landed cost shipment has been created and completed (Shipment Status is
Completed).
For more information, see Understanding Landed Cost as a Pre-Receiving Application, page 5-2 and Understanding Landed Cost as a Service, page 6-1.
❒ Estimated landed cost information has been changed on a completed shipment but
7-24 Oracle Landed Cost Management Process Guide
the changes have not been processed yet.
To Discard Estimated Landed Cost Updates to a Completed Shipment (Shipments Workbench):1. Navigate to the Shipments Workbench, page A-1.
2. Search for a completed shipment with updates pending.
For more information, see Searching for Completed Shipments, page 7-3.
3. Select the shipment or shipment line group in the results table.
4. Discard the estimated landed cost updates.
Select Discard Updates in the Actions field and click the Go button.
The system will undo the estimated landed cost changes you made to the shipment lines and put the shipment line information back to where it was when you started. In the upper portion of the page you will receive a confirmation message that the discard updates process was executed successfully. Plus, the Pending Update value for the shipment changes from Yes to No.
To Discard Estimated Landed Cost Updates to a Completed Shipment (Update Shipment Page):1. Navigate to the Shipments Workbench, page A-1.
2. Search for a completed shipment with updates pending.
For more information, see Searching for Completed Shipments, page 7-3.
3. Navigate to the Update Shipment page.
If the Display option is Shipment, click the Update icon in the Actions column for a shipment.
If the Display option is Line Group, click the Update icon in the Actions column for ashipment line group.
The Update Shipment page appears displaying a Header tab and a Lines tab.
Note: The Pending Update check box will be display as selected if changes have been previously made to this shipment but the changes are pending. The check box will be clear if there are no pending updates to the estimated landed cost information for the shipment.
4. Click the Lines tab.
Updating Estimated Landed Cost on Completed Shipments 7-25
5. Discard the estimated landed cost updates.
Select a shipment line and then select Discard Updates in the Actions field and click the Go button.
The system will undo the estimated landed cost changes you made to the shipment lines and put the shipment line information back to where it was when you started. After the discard process completes you will be transferred to the View Shipment page for that shipment.
Viewing Estimated Landed Cost Information After UpdatesAfter you have processed the updates to the estimated landed cost information on a shipment you can then view the new estimated landed cost for the shipment using the Shipment Hierarchy and Landed Cost Details pages.
For more information, see Viewing Estimated Landed Cost for the Shipment, page 5-52.


Part 4Analyzing Landed Cost Information

Monitoring and Analyzing Landed Cost Information 8-1
8Monitoring and Analyzing Landed Cost
Information
This chapter covers the following topics:
• Monitoring Daily Operations
• Analyzing Landed Cost
Monitoring Daily OperationsThe Monitor Daily Operations page displays the pending activities on the Landed Cost shipments and displays the necessary information for you to quickly identify transactions that must be corrected or require additional steps to complete the Landed Cost shipment life-cycle. You can filter and view transaction information from Oracle Landed Cost Management, Purchasing, and Receiving.
Note: If Oracle Endeca is installed and licensed in your environment, then refer to the Oracle E-Business Suite Endeca Integration and System Administration Guide for detailed information about the Endeca enhancements to the product.
Analyzing Landed CostThe Landed Cost Analysis page provides an in-depth understanding of the landed cost distribution across inventories, and includes supply information, item information, and purchase order information.
Note: If Oracle Endeca is installed and licensed in your environment, then refer to the Oracle E-Business Suite Endeca Integration and System Administration Guide for detailed information about the Endeca enhancements to the product.

Windows/Pages and Navigation Paths A-1
AWindows/Pages and Navigation Paths
Overview of Landed Cost Management Windows/Pages and Navigation Paths
The following table displays the default navigation path for each Oracle Landed Cost Management window or page.
• Text in brackets ([]) indicates a button.
• (I) indicates a icon.
• (T) indicates to select a tab.
• (M) indicates to select the menu option from the window.
To assist with clarification, the responsibility may be listed ahead of the navigation pathin the Navigator Menu Path column of the table. For example, System Administrator: System Profile Values. In this example, System Administrator is the responsibility.
Windows/Pages and Navigator Paths
Oracle Landed Cost Management Windows/Pages and Navigation Paths
Window/Page Navigator Menu Path
Actual Matching History Shipment Hierarchy > (I) View Actual History
Approve Document Purchasing: Purchase Orders > Purchase Orders > [Approve]
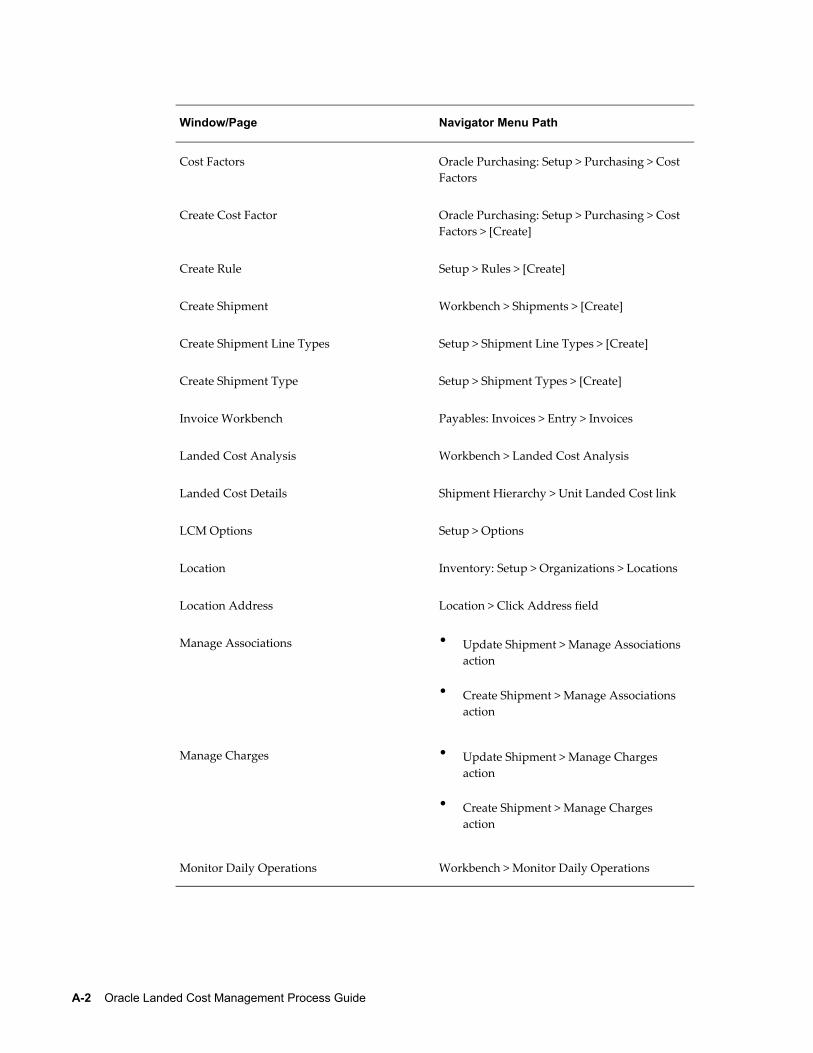
A-2 Oracle Landed Cost Management Process Guide
Window/Page Navigator Menu Path
Cost Factors Oracle Purchasing: Setup > Purchasing > Cost Factors
Create Cost Factor Oracle Purchasing: Setup > Purchasing > Cost Factors > [Create]
Create Rule Setup > Rules > [Create]
Create Shipment Workbench > Shipments > [Create]
Create Shipment Line Types Setup > Shipment Line Types > [Create]
Create Shipment Type Setup > Shipment Types > [Create]
Invoice Workbench Payables: Invoices > Entry > Invoices
Landed Cost Analysis Workbench > Landed Cost Analysis
Landed Cost Details Shipment Hierarchy > Unit Landed Cost link
LCM Options Setup > Options
Location Inventory: Setup > Organizations > Locations
Location Address Location > Click Address field
Manage Associations • Update Shipment > Manage Associations action
• Create Shipment > Manage Associations action
Manage Charges • Update Shipment > Manage Charges action
• Create Shipment > Manage Charges action
Monitor Daily Operations Workbench > Monitor Daily Operations
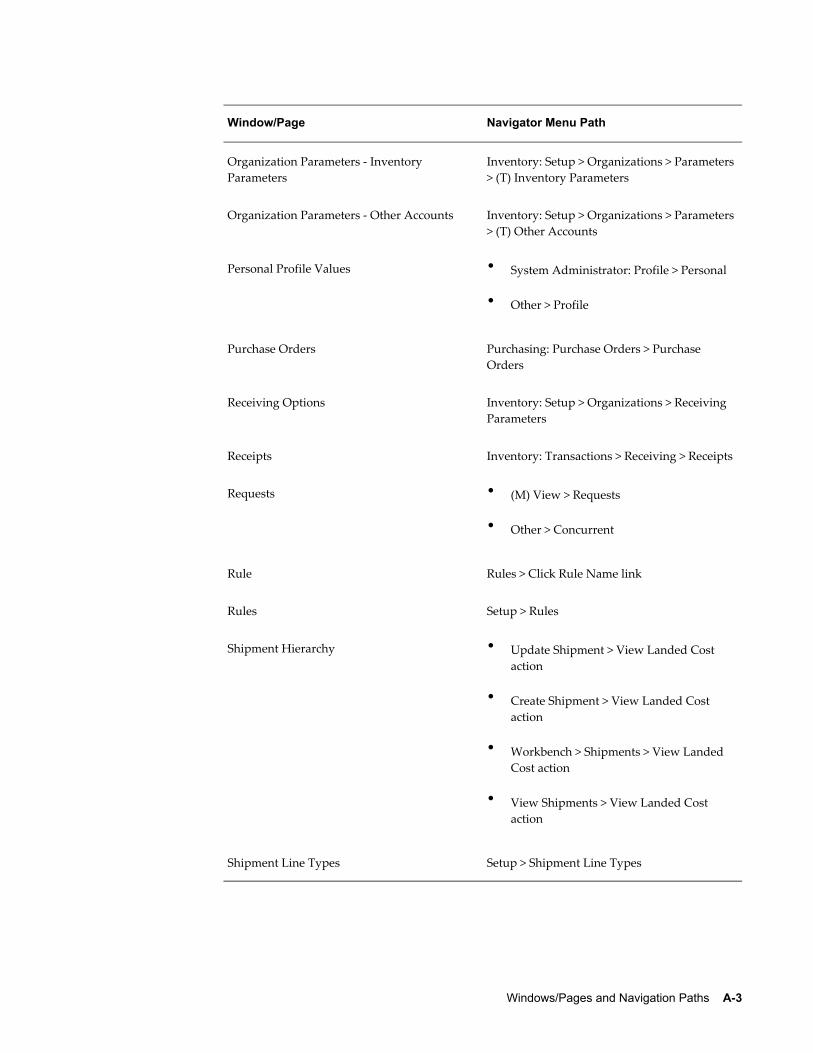
Windows/Pages and Navigation Paths A-3
Window/Page Navigator Menu Path
Organization Parameters - Inventory Parameters
Inventory: Setup > Organizations > Parameters> (T) Inventory Parameters
Organization Parameters - Other Accounts Inventory: Setup > Organizations > Parameters> (T) Other Accounts
Personal Profile Values • System Administrator: Profile > Personal
• Other > Profile
Purchase Orders Purchasing: Purchase Orders > Purchase Orders
Receiving Options Inventory: Setup > Organizations > Receiving Parameters
Receipts Inventory: Transactions > Receiving > Receipts
Requests • (M) View > Requests
• Other > Concurrent
Rule Rules > Click Rule Name link
Rules Setup > Rules
Shipment Hierarchy • Update Shipment > View Landed Cost action
• Create Shipment > View Landed Cost action
• Workbench > Shipments > View Landed Cost action
• View Shipments > View Landed Cost action
Shipment Line Types Setup > Shipment Line Types

A-4 Oracle Landed Cost Management Process Guide
Window/Page Navigator Menu Path
Shipment Types Setup > Shipment Types
Shipments Purchasing: Purchase Orders > Purchase Orders > [Shipments]
Shipments Workbench Workbench > Shipments
Submit Requests Other > Requests
System Profile Values System Administrator: Profile > System
Update Charge Line Manage Charges > (I) Update
Update Rule Setup > Rules > (I) Update
Update Shipment • Workbench > Shipments > Shipment or Line Group display > (I) Update
• View Shipment > [Update]
Update Shipment Line • Create Shipment > (T) Lines > (I) Update
• Update Shipment > (T) Lines > (I) Update
• View Shipment > (T) Lines > (I) View Details > [Update]
• Workbench > Shipments > Shipment Line display > (I) Update
• Workbench > Shipments > Shipment Line display > Line link > [Update]
Update Shipment Line Type • Setup > Shipment Line Types > (I) Update
• Setup > Shipment Line Types > Click Code link > [Update]

Windows/Pages and Navigation Paths A-5
Window/Page Navigator Menu Path
Update Shipment Type • Setup > Shipment Types > (I) Update
• Setup > Shipment Types > Click Code link> [Update]
View Charge Line View Manage Charges > (I) View Details
View Manage Associations View Shipment > View Associations action
View Manage Charges View Shipment > View Charges action
View Shipment Workbench > Shipments > Shipment link
View Shipment Line • Workbench > Shipments > Shipment link > (T) Lines > (I) View Details
• Workbench > Shipments > Shipment Line display > Line link

Profile Options B-1
BProfile Options
This appendix covers the following topics:
• Overview of Profile Options
• Landed Cost Management Profile Options
Overview of Profile OptionsDuring implementation, you can set values for profile options at various levels to specify how the Oracle Landed Cost Management application controls access to and processes data. The system administrator sets and updates profile values. For more information see, Setting User Profile Options in the Oracle Applications System Administrator's - Maintenance Guide.
The following profile options are unique to Oracle Landed Cost Management.
Landed Cost Management Profile OptionsYou can set the profile options described in this section in any order and at any level as indicated in the profile option tables:
• Site (S)
• Application (A)
• Responsibility (R)
• User (U)
In addition, most of the profile options have been provided with default values.
INL: Allow Updates to Completed ShipmentsThis profile determines whether you can make changes to completed shipments.
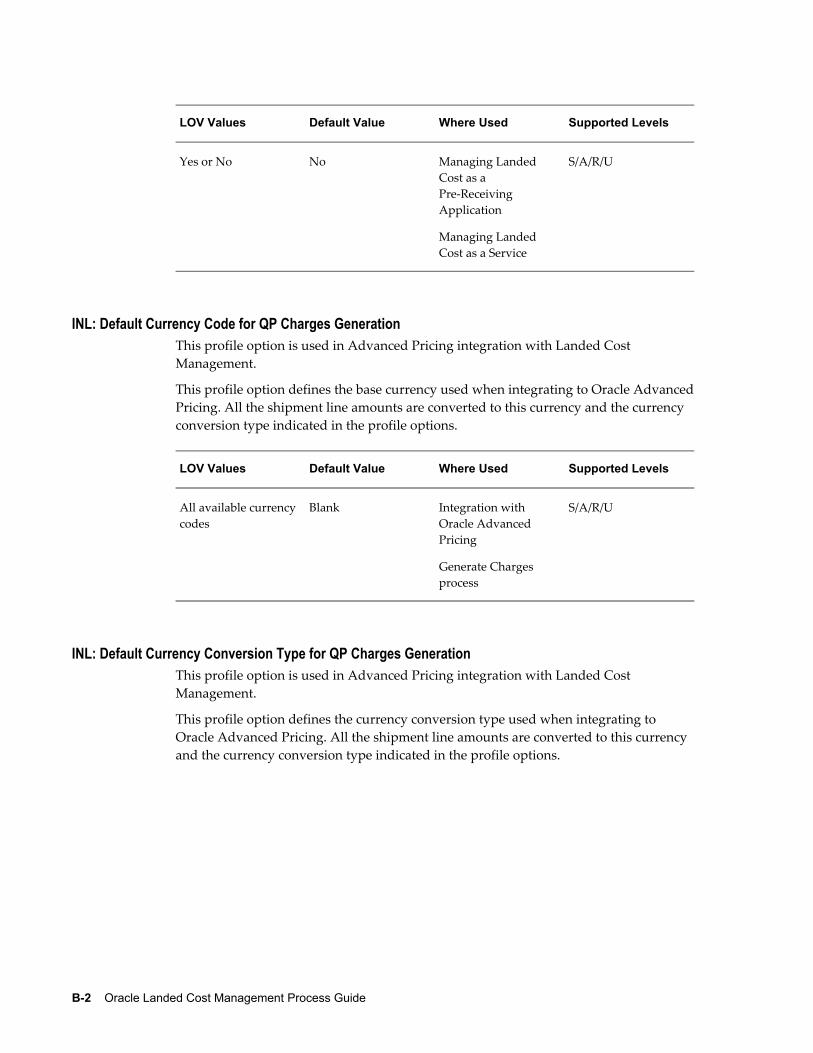
B-2 Oracle Landed Cost Management Process Guide
LOV Values Default Value Where Used Supported Levels
Yes or No No Managing Landed Cost as a Pre-Receiving Application
Managing Landed Cost as a Service
S/A/R/U
INL: Default Currency Code for QP Charges GenerationThis profile option is used in Advanced Pricing integration with Landed Cost Management.
This profile option defines the base currency used when integrating to Oracle AdvancedPricing. All the shipment line amounts are converted to this currency and the currency conversion type indicated in the profile options.
LOV Values Default Value Where Used Supported Levels
All available currencycodes
Blank Integration with Oracle Advanced Pricing
Generate Charges process
S/A/R/U
INL: Default Currency Conversion Type for QP Charges GenerationThis profile option is used in Advanced Pricing integration with Landed Cost Management.
This profile option defines the currency conversion type used when integrating to Oracle Advanced Pricing. All the shipment line amounts are converted to this currency and the currency conversion type indicated in the profile options.
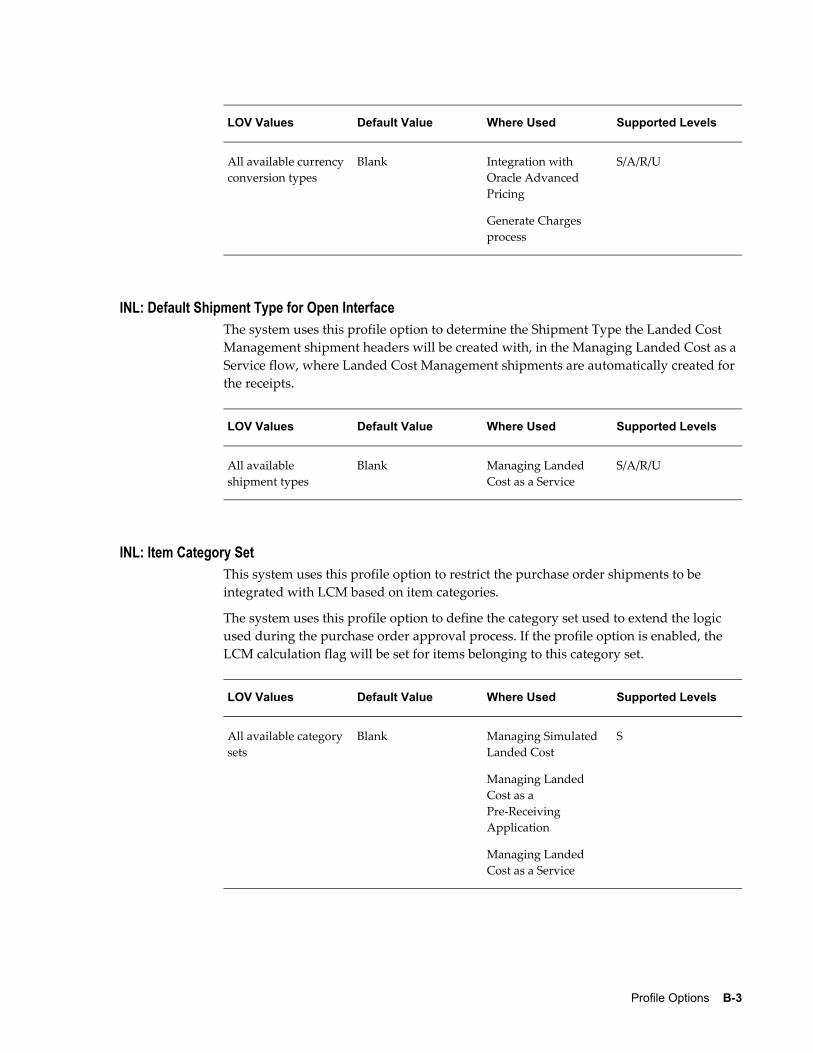
Profile Options B-3
LOV Values Default Value Where Used Supported Levels
All available currencyconversion types
Blank Integration with Oracle Advanced Pricing
Generate Charges process
S/A/R/U
INL: Default Shipment Type for Open InterfaceThe system uses this profile option to determine the Shipment Type the Landed Cost Management shipment headers will be created with, in the Managing Landed Cost as a Service flow, where Landed Cost Management shipments are automatically created for the receipts.
LOV Values Default Value Where Used Supported Levels
All available shipment types
Blank Managing Landed Cost as a Service
S/A/R/U
INL: Item Category SetThis system uses this profile option to restrict the purchase order shipments to be integrated with LCM based on item categories.
The system uses this profile option to define the category set used to extend the logic used during the purchase order approval process. If the profile option is enabled, the LCM calculation flag will be set for items belonging to this category set.
LOV Values Default Value Where Used Supported Levels
All available categorysets
Blank Managing Simulated Landed Cost
Managing Landed Cost as a Pre-Receiving Application
Managing Landed Cost as a Service
S
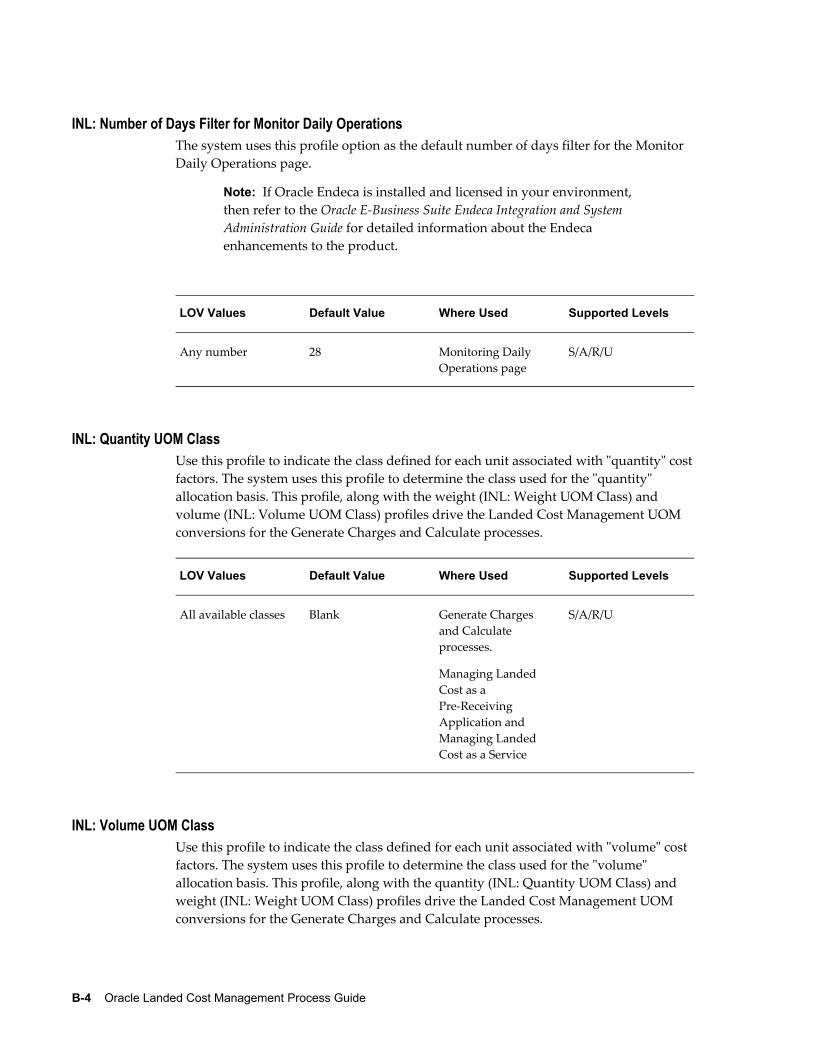
B-4 Oracle Landed Cost Management Process Guide
INL: Number of Days Filter for Monitor Daily Operations The system uses this profile option as the default number of days filter for the Monitor Daily Operations page.
Note: If Oracle Endeca is installed and licensed in your environment, then refer to the Oracle E-Business Suite Endeca Integration and System Administration Guide for detailed information about the Endeca enhancements to the product.
LOV Values Default Value Where Used Supported Levels
Any number 28 Monitoring Daily Operations page
S/A/R/U
INL: Quantity UOM ClassUse this profile to indicate the class defined for each unit associated with "quantity" costfactors. The system uses this profile to determine the class used for the "quantity" allocation basis. This profile, along with the weight (INL: Weight UOM Class) and volume (INL: Volume UOM Class) profiles drive the Landed Cost Management UOM conversions for the Generate Charges and Calculate processes.
LOV Values Default Value Where Used Supported Levels
All available classes Blank Generate Charges and Calculate processes.
Managing Landed Cost as a Pre-Receiving Application and Managing Landed Cost as a Service
S/A/R/U
INL: Volume UOM ClassUse this profile to indicate the class defined for each unit associated with "volume" cost factors. The system uses this profile to determine the class used for the "volume" allocation basis. This profile, along with the quantity (INL: Quantity UOM Class) and weight (INL: Weight UOM Class) profiles drive the Landed Cost Management UOM conversions for the Generate Charges and Calculate processes.
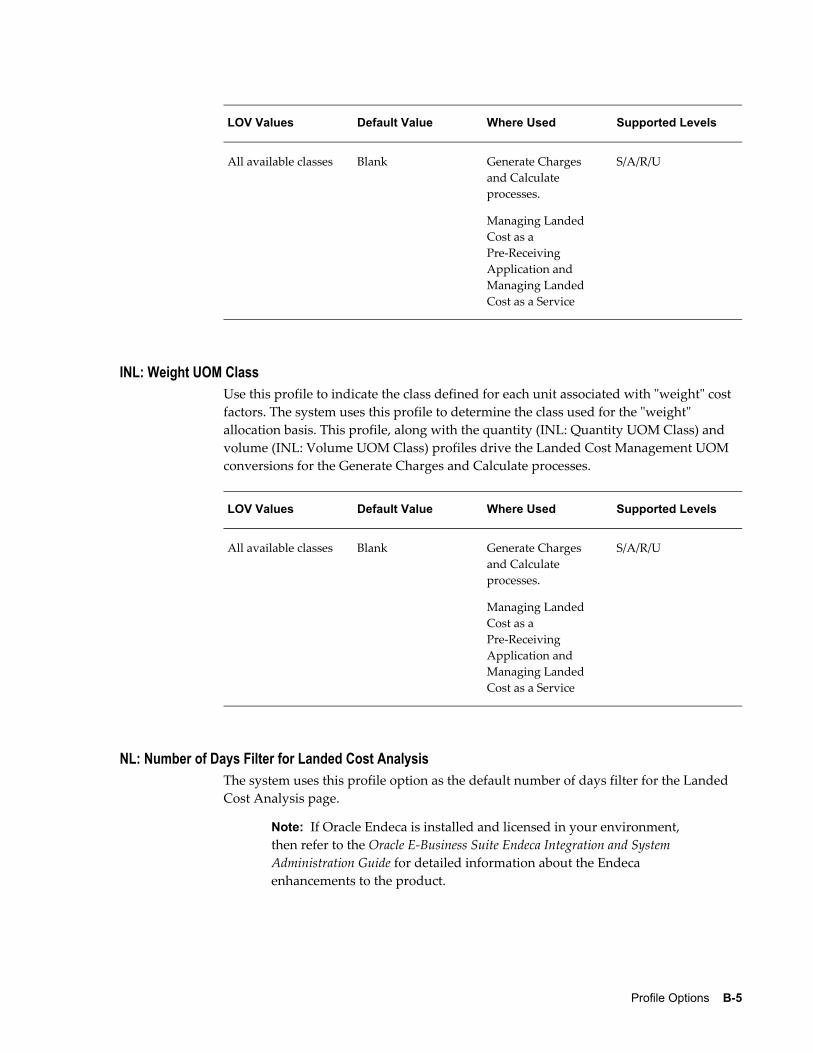
Profile Options B-5
LOV Values Default Value Where Used Supported Levels
All available classes Blank Generate Charges and Calculate processes.
Managing Landed Cost as a Pre-Receiving Application and Managing Landed Cost as a Service
S/A/R/U
INL: Weight UOM ClassUse this profile to indicate the class defined for each unit associated with "weight" cost factors. The system uses this profile to determine the class used for the "weight" allocation basis. This profile, along with the quantity (INL: Quantity UOM Class) and volume (INL: Volume UOM Class) profiles drive the Landed Cost Management UOM conversions for the Generate Charges and Calculate processes.
LOV Values Default Value Where Used Supported Levels
All available classes Blank Generate Charges and Calculate processes.
Managing Landed Cost as a Pre-Receiving Application and Managing Landed Cost as a Service
S/A/R/U
NL: Number of Days Filter for Landed Cost Analysis The system uses this profile option as the default number of days filter for the Landed Cost Analysis page.
Note: If Oracle Endeca is installed and licensed in your environment, then refer to the Oracle E-Business Suite Endeca Integration and System Administration Guide for detailed information about the Endeca enhancements to the product.
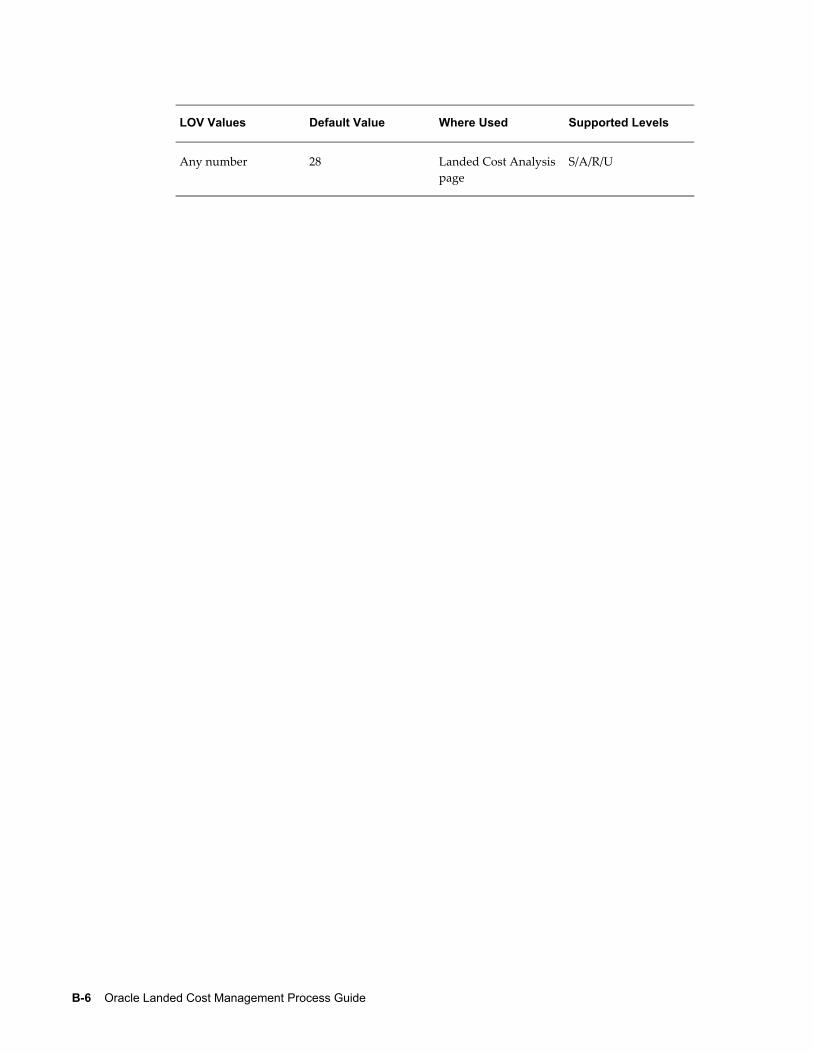
B-6 Oracle Landed Cost Management Process Guide
LOV Values Default Value Where Used Supported Levels
Any number 28 Landed Cost Analysispage
S/A/R/U
Index-1
Index
AActions field
understanding, 3-17actual landed cost
calculating, 5-57, 6-49importing, 5-57, 6-49viewing shipment
as a service, 6-51pre-receiving, 5-59
analyzinglanded cost, 8-1
associationsmanaging, 5-44updating shipment not completed
landed cost as a service, 6-31viewing shipment, 5-47
automatically created shipmentssearching, 6-10
Bbenefits
using Oracle Landed Cost Management, 1-3
CCalculate process, 5-50calculating
estimated landed costlanded cost as a service, 6-41
calculating estimated landed costshipment
landed cost as a service, 6-41
charge line detailsupdating estimated landed cost information, 7-18
charge linesmaintaining shipment not completed
landed cost as a service, 6-22managing, 5-37updating estimated landed cost information, 7-14viewing for shipment, 5-42
chargesgenerating for shipment, 5-36generating for shipment not completed
landed cost as a service, 6-19completed shipments
searching, 7-3cost factors
setting up, 2-9Cost Factors page, 2-9country
defining for Landed Cost Management, 2-5Create Cost Factor page, 2-9Create Shipment Line Type page, 2-12Create Shipment page, 5-8, 5-13
understanding, 3-8Create Shipment Type page, 2-14
Ddaily operations
monitoring, 8-1discarding
estimated landed cost updates to completed

Index-2
shipments, 7-23Display field
understanding, 3-4
EEndeca integration
landed cost analysis, 8-1monitor daily operations, 8-1
estimated landed costcalculating
pre-receiving shipment, 5-50viewing for landed cost as service, 6-15viewing for shipments (pre-receiving), 5-52
estimated landed cost informationdiscarding updates to completed shipments, 7-23importing from Receiving, 6-8processing updates, 7-22updating on charge line details, 7-18updating on charge lines, 7-14updating on completed shipments, 5-56, 6-48updating shipment line details, 7-10updating shipment lines, 7-7viewing after updates, 7-25
estimated landed cost updateprocess flow, 7-2
estimated landed cost update processoverview, 7-1
FFind Shipments section
understanding, 3-7
GGenerate Charges process, 5-36generating
chargeslanded cost as a service, 6-19
IInventory organization context
understanding, 3-4inventory organization options
setting up, 2-3
Llanded cost
analyzing, 8-1landed cost as a pre-receiving application
overview, 5-2process flow, 5-3
landed cost as a servicecalculating estimated landed cost shipment not completed, 6-41generating charges shipment not completed, 6-19maintaining charge lines shipment not completed, 6-22overview, 6-1process flow, 6-4searching for automatically created shipments,6-10submitting a shipment not completed, 6-45updating associations shipment not completed, 6-31validating shipment not completed, 6-36viewing estimated landed cost, 6-15
Landed Cost Details page, 5-52, 5-59, 6-15, 6-51Landed Cost Management
profile options, B-1landed cost management options
setting up, 2-35Landed Cost Management variance account
setting up, 2-3Landed Cost Management Workbench
overview, 3-1landed cost shipment
creating from a simulation, 4-19landed cost simulations
creating shipments from, 4-19managing, 4-8managing charges, 4-12managing simulation details, 4-12reviewing, 4-5
LCM Options page, 2-35location options
setting up, 2-5
Mmaintaining
Index-3
charge lineslanded cost as a service, 6-22
rules, 2-19Manage Associations page, 5-44, 6-31Manage Charges page, 5-37, 6-22, 7-14managing
charge lines for shipment, 5-37Matches Interface Import program, 5-57, 6-49monitoring
daily operations, 8-1
Ooptions
setting up landed cost management, 2-35Oracle Advanced Pricing
setting profile options, 2-11Oracle Landed Cost Management
benefits, 1-3integration other Oracle applications, 1-5overview, 1-1setting up profile options, 2-37
Oracle Landed Cost Management setup processoverview, 2-1
Organization Parameters - Inventory Parameters window, 2-3Organization Parameters - Other Accounts window, 2-3organizations
enabling for Landed Cost Management, 2-3overview
estimated landed cost update process, 7-1integration other Oracle applications, 1-5landed cost as a pre-receiving application, 5-2landed cost as a service, 6-1Landed Cost Management Workbench, 3-1shipment status, 3-23Shipments Workbench, 3-3
Ppages
Cost Factors, 2-9Create Cost Factor, 2-9Create Rule, 2-19Create Shipment, 5-8, 5-13Create Shipment Line Type, 2-12Create Shipment Type, 2-14
Landed Cost Details, 5-52, 5-59, 6-51as a service, 6-15
LCM Options, 2-35location, 2-5location address, 2-5Manage Associations, 5-44, 6-31Manage Charges, 5-37, 6-22, 7-14Organization Parameters - Inventory Parameters, 2-3Organization Parameters - Other Accounts, 2-3Receiving Options, 2-7Rule detail, 2-19Rules, 2-19Shipment Hierarchy, 5-52, 5-59, 6-51
as a service, 6-15Shipment Line Types, 2-12Shipments Workbench, 6-10, 6-19, 6-36, 6-41, 6-45, 7-3Shipment Types, 2-14Update Charge Line, 6-22, 7-18Update Rule, 2-19Update Shipment, 5-18, 5-25, 6-19, 7-7Update Shipment Line, 5-29, 7-10Update Shipment page, 6-36, 6-41, 6-45View Charge Line, 5-42View Manage Associations, 5-47View Manage Charges, 5-42View Shipment, 5-31, 5-33View Shipment Line, 5-35
procedureadd a charge line, 5-40
landed cost as a service, 6-29add an association line to a shipment that is not completed
landed cost as a service, 6-35add an association line to the shipment, 5-46add shipment lines to an existing shipment, 5-28calculate estimated landed cost for a shipmentthat is not completed (shipments workbench), 6-41calculate estimated landed cost for a shipmentthat is not completed (update shipment page), 6-43calculate estimated landed cost for the shipment, 5-51
Index-4
create landed cost management shipments, 5-9delete a charge line or association, 5-40
landed cost as a service, 6-29delete a shipment line type, 2-14delete shipment types, 2-19discard estimated landed cost updated to a completed shipment (shipments workbench), 7-24discard estimated landed cost updated to a completed shipment (update shipment page), 7-24enter shipment lines for a shipment, 5-13generate charges for a shipment that is not completed (shipments workbench), 6-20generate charges for a shipment that is not completed (update shipment page), 6-21generate charges for the shipment, 5-37process estimated landed cost updates, 7-22resubmit the shipment for actual landed cost calculation, 5-59run the Matches Interface Import program, 5-58, 6-49run the Shipments Interface Import program, 6-10run the Submit Pending Shipments program, 5-58, 6-50search for automatically created shipments, 6-11search for completed shipments, 7-4set up Advanced Pricing profile options, 2-11set up cost factors, 2-9set up Inventory organization options, 2-3set up landed cost management options, 2-36set up Oracle Landed Cost Management profile options, 2-40set up Receiving options, 2-7set up shipment line types, 2-13set up shipment types, 2-15submit a shipment that is not completed to receiving (shipments workbench)
landed cost as a service, 6-45submit a shipment that is not completed to receiving (update shipment page)
landed cost as a service, 6-47submit the shipment to Receiving, 5-56to delete a rule, 2-35to set up rules, 2-21
to update a rule, 2-32to view rules, 2-20update a specific shipment line, 5-29update associations for a shipment that is not completed
landed cost as a service, 6-32update associations for the shipment, 5-45update charge lines for a shipment that is not completed
landed cost as a service, 6-23update charge lines for the shipment, 5-38updated estimated landed cost information oncharge lines, 7-14update estimated landed cost information on charge line details, 7-18update estimated landed cost information on shipment line details, 7-10update estimated landed cost information on shipment lines, 7-8update shipment lines, 5-25update shipment line types, 2-13update shipments, 5-18update shipment types, 2-19validate a shipment, 5-49validate a shipment that is not completed (shipments workbench)
landed cost as a service, 6-37validate a shipment that is not completed (update shipment page)
landed cost as a service, 6-39view actual landed cost for the shipment, 5-60,6-51view a specific shipment line, 5-35view associations for the shipment, 5-47view charge lines for the shipment, 5-43view estimated landed cost for the shipment, 5-52
as a service, 6-15view shipment lines, 5-33view shipment line types, 2-12view shipments, 5-31view shipment types, 2-14
processesCalculate, 5-50Generate Charges, 5-36
landed cost as a service, 6-19Submit, 5-55
Index-5
Validate, 5-49process flow
estimated landed cost update, 7-2landed cost as a pre-receiving application, 5-3landed cost as a service, 6-4setting up Oracle Landed Cost Management, 2-2
processingestimated landed cost updates, 7-22
profile optionsAdvanced Pricing
set up for Oracle Landed Cost Management, 2-11
setting up Advanced Pricing, 2-11setting up Oracle Landed Cost Management, 2-37
programsMatches Interface Import, 5-57, 6-49Shipments Interface Import, 6-8Submit Pending Shipments, 5-57, 6-49
Rreceiving
setting up Oracle Landed Cost Management options, 2-7
receiving optionssetting up, 2-7
Receiving Options page, 2-7rules
maintaining, 2-19
Ssearching
completed shipments, 7-3setting up
landed cost management options, 2-35location options, 2-5
setting up Oracle Landed Cost Managementoverview, 2-1process flow, 2-2
shipmentcalculating estimated landed cost (pre-receiving), 5-50calculating estimated landed cost shipment not completed
landed cost as a service, 6-41
creating, 5-8entering lines, 5-13generating charges, 5-36importing and calculating actual landed cost, 5-57, 6-49maintaining charge lines, 6-22managing associations, 5-44managing charge lines, 5-37searching automatically created, 6-10submitting, 5-55submitting shipment not completed
landed cost as a service, 6-45updating, 5-18updating associations, 6-31validating, 5-49validating shipment not completed
landed cost as a service, 6-36viewing, 5-31viewing actual landed cost
as a service, 6-51pre-receiving, 5-59
viewing associations, 5-47viewing charge lines, 5-42viewing estimated landed cost
pre-receiving, 5-52Shipment Hierarchy page, 5-52, 5-59, 6-15, 6-51shipment line
updating specific line, 5-29viewing specific, 5-35
shipment line detailsupdating estimated landed cost information, 7-10
shipment linesupdating, 5-25updating estimated landed cost information, 7-7viewing, 5-33
shipment line typesmaintaining, 2-12
Shipment Line Types page, 2-12shipment not completed
calculating estimated landed costlanded cost as a service, 6-41
generating chargeslanded cost as a service, 6-19
maintaining charge lineslanded cost as a service, 6-22
Index-6
submittinglanded cost as a service, 6-45
updating associationslanded cost as a service, 6-31
validatinglanded cost as a service, 6-36
Shipments, Line Groups, or Shipment Lines tableunderstanding, 3-8
Shipments Interface Import program, 6-8shipment status
overview, 3-23Shipments Workbench, 6-10, 7-3
Actions field, 3-17Create Shipment page, 3-8Display field, 3-4Find Shipments section, 3-7Inventory Organization context, 3-4overview, 3-3Shipments, Line Groups, or Shipment Lines table, 3-8Update Shipment page, 3-10View Shipment page, 3-14
Shipments Workbench page, 6-36, 6-41, 6-45shipment types
maintaining, 2-14Shipment Types page, 2-14simulated landed cost
creating for a purchase order, 4-2understanding, 4-1
Submit Pending Shipments program, 5-57, 6-49Submit process, 5-55submitting
shipmentlanded cost as a service, 6-45
UUpdate Charge Line page, 7-18Update Shipment Line page, 5-29, 7-10Update Shipment page, 5-18, 5-25, 6-36, 6-41, 6-45, 7-7
understanding, 3-10updating
associationslanded cost as a service, 6-31
estimated landed cost information on completed shipments, 5-56, 6-48
VValidate process, 5-49validating
shipmentlanded cost as a service, 6-36
variance accountsetting for Landed Cost Management, 2-3
View Charge Line page, 5-42viewing
estimated landed cost landed cost as a service, 6-15
estimated landed cost information after updates, 7-25
View Manage Associations page, 5-47View Manage Charges page, 5-42View Shipment Line page, 5-35View Shipment page, 5-31, 5-33
understanding, 3-14