1. The Pyramid Napkin Fold This classy napkin folding technique is simple, fast, and can be made...
89
TABLE NAPKIN FOLDING
-
Upload
wilfred-clark -
Category
Documents
-
view
232 -
download
2
Transcript of 1. The Pyramid Napkin Fold This classy napkin folding technique is simple, fast, and can be made...
TABLE NAPKIN FOLDING
What is a table napkin?
Why is table napkin important?
How important is it?
Why is there a need to learn different table napkin folding?
a small piece of table linen that is used to wipe the mouth and to cover the lap in order to
protect clothing.

A napkin when creatively folded enhances the look of your table and the dining experience. There are many ways to fold cloth napkins, so choose one that reflects your style and personality. Select napkins with threads that are firmly woven such as cotton or linen because folds will hold better. You may also starch the napkins lightly to make it easier to fold.
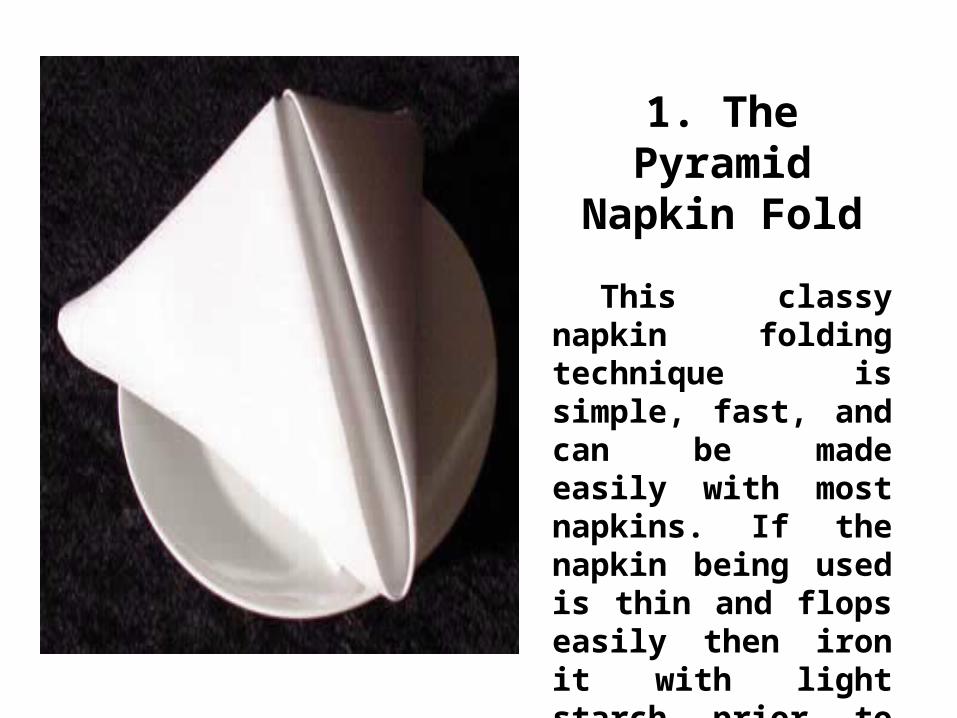
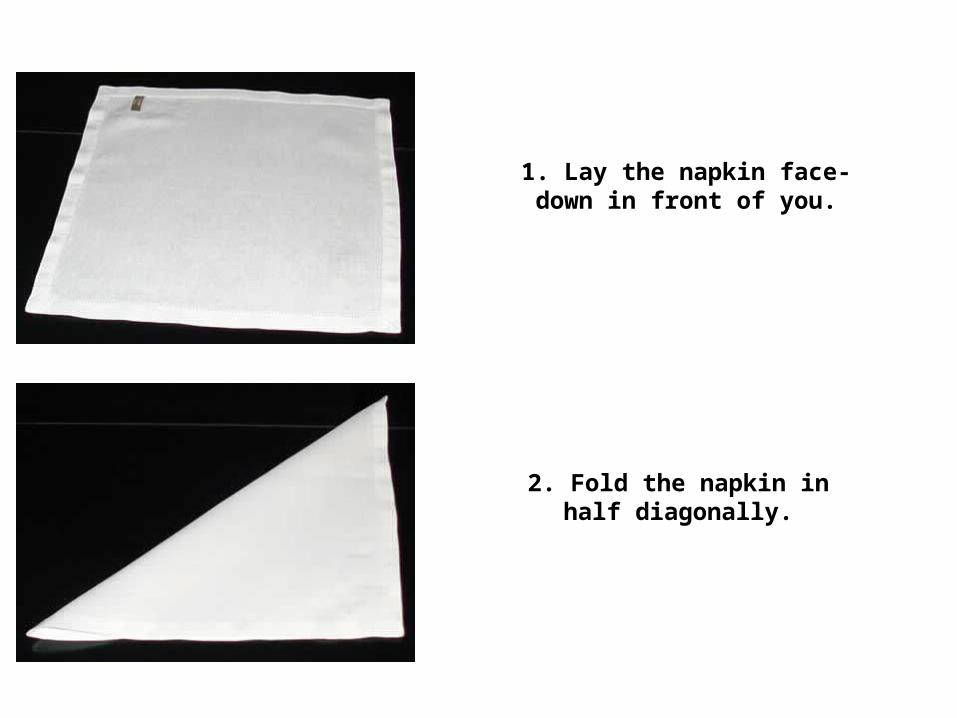
1. The Pyramid Napkin Fold
This classy napkin folding technique is simple, fast, and can be made easily with most napkins. If the napkin being used is thin and flops easily then iron it with light starch prior to folding and it will turn out perfectly!
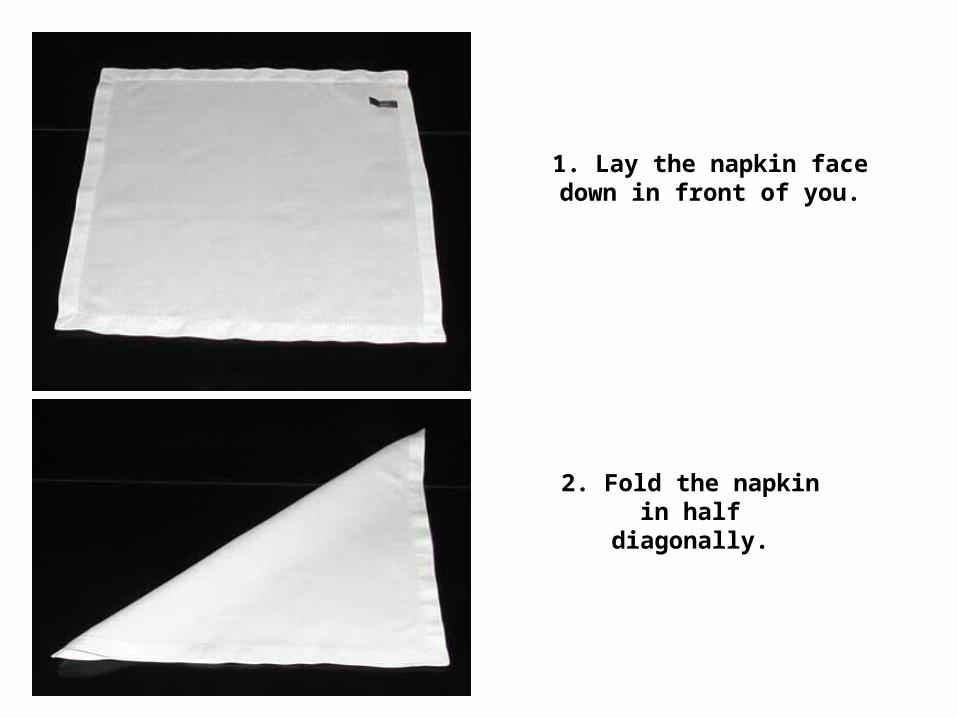
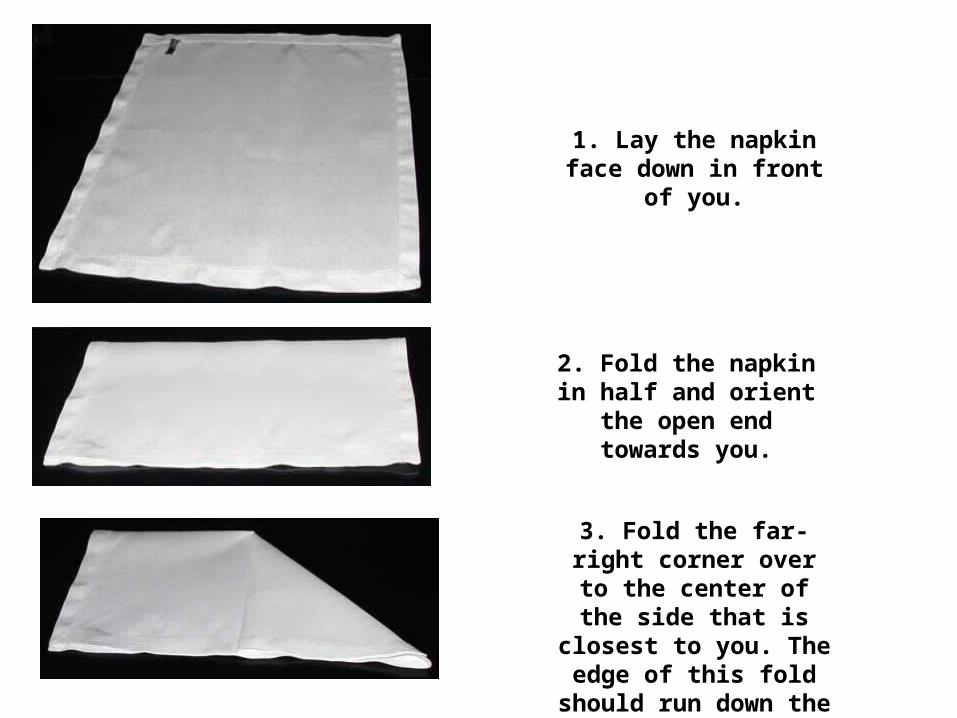
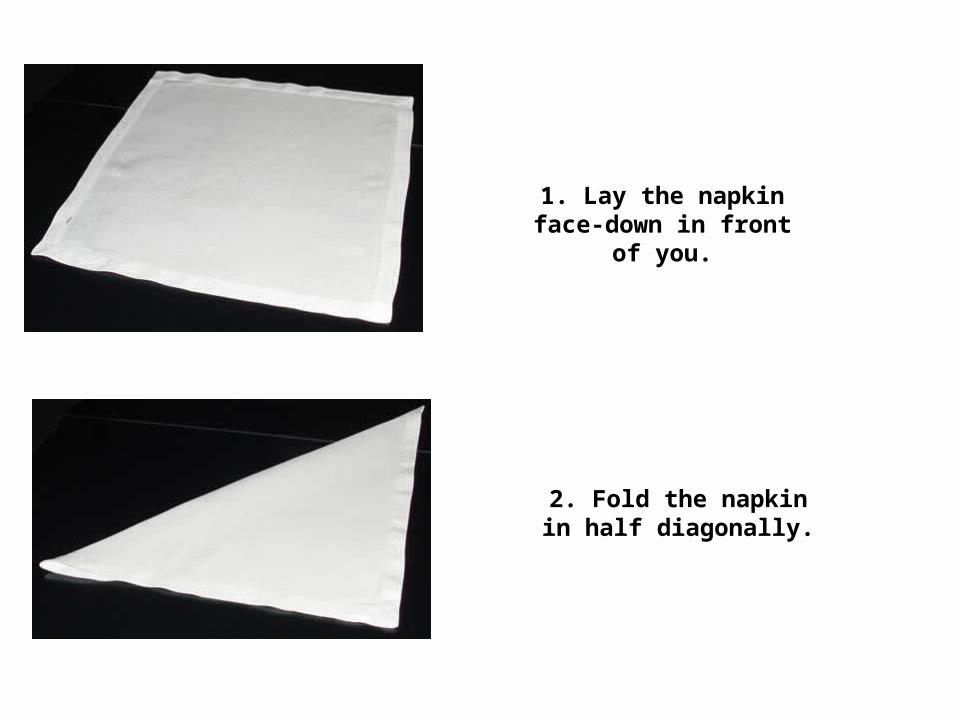
1. Lay the napkin face down in front of you.
2. Fold the napkin in half diagonally.
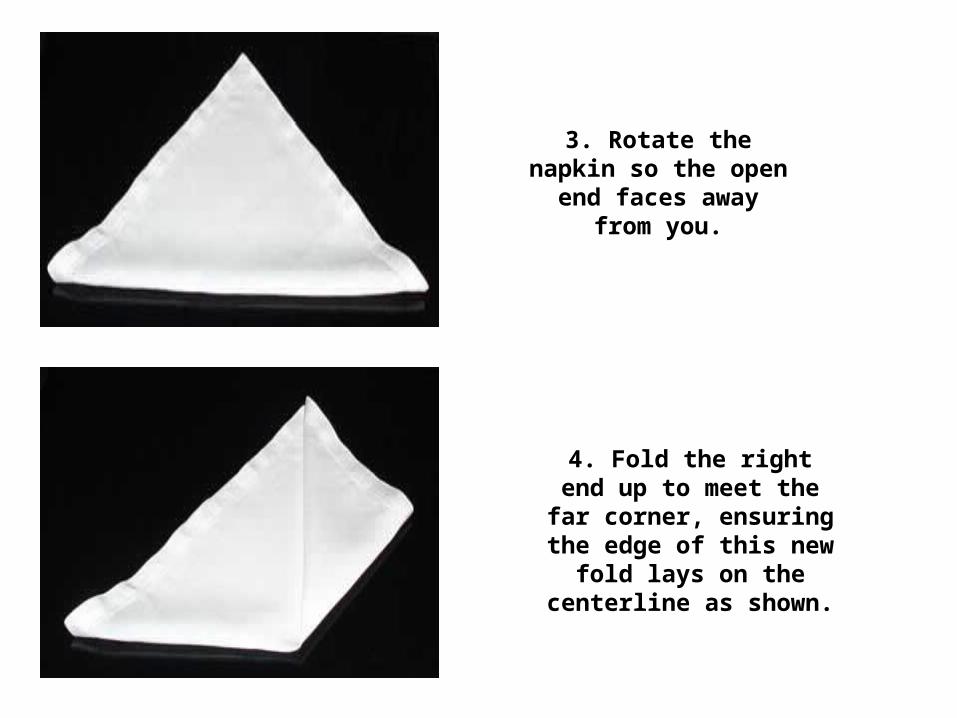
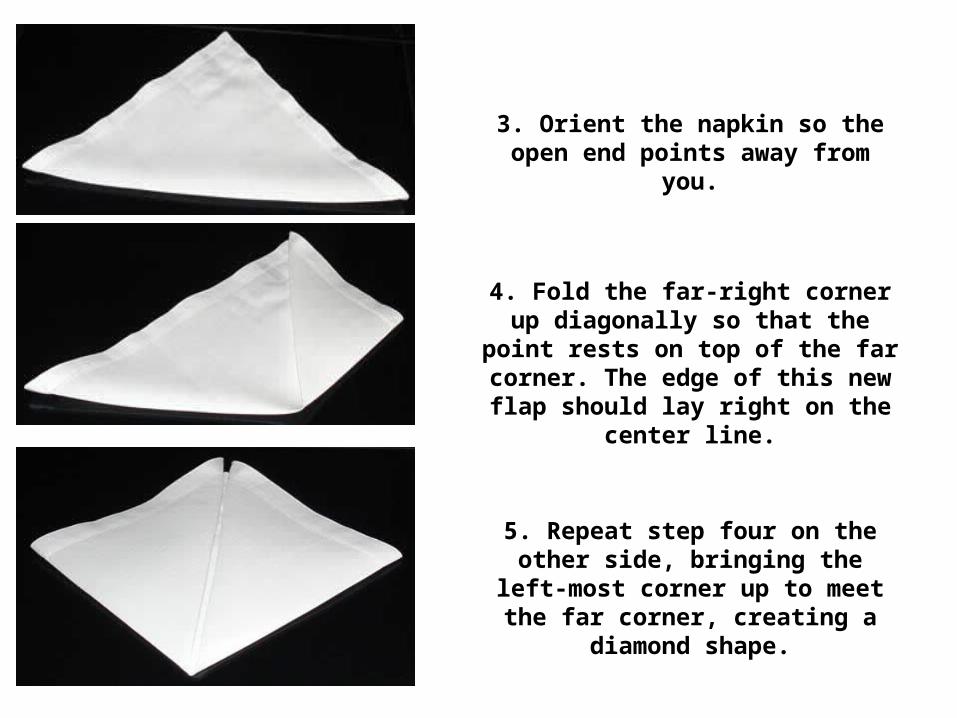
3. Rotate the napkin so the open end faces away
from you.
4. Fold the right end up to meet the far corner, ensuring the edge of this new fold lays on the centerline as shown.
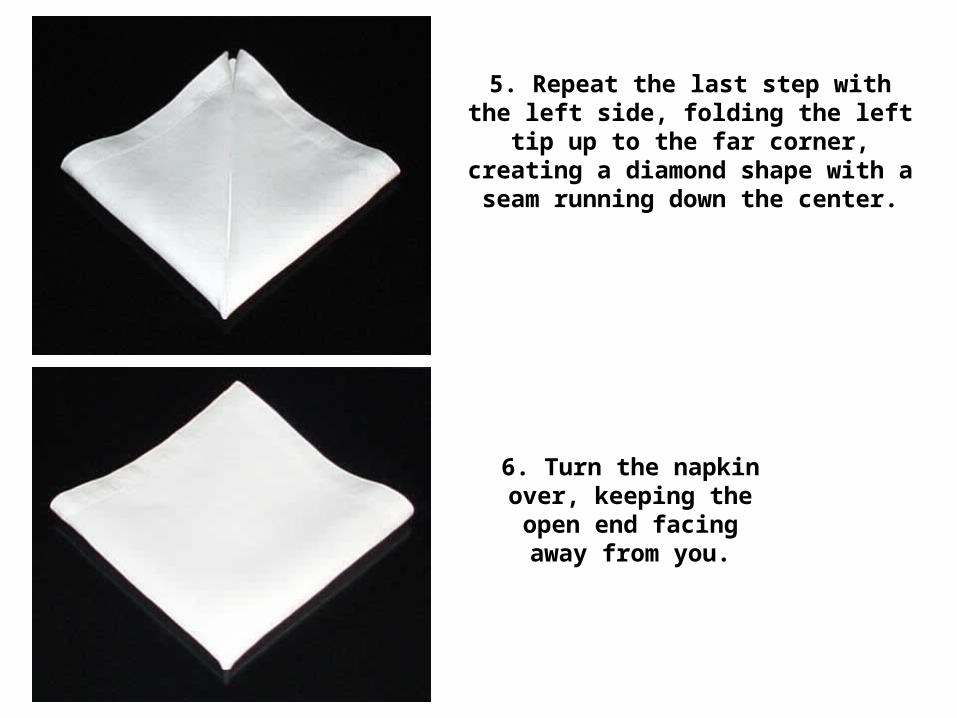
5. Repeat the last step with the left side, folding the left tip up to the far corner, creating a diamond shape with a seam
running down the center.
6. Turn the napkin over, keeping the open end facing
away from you.
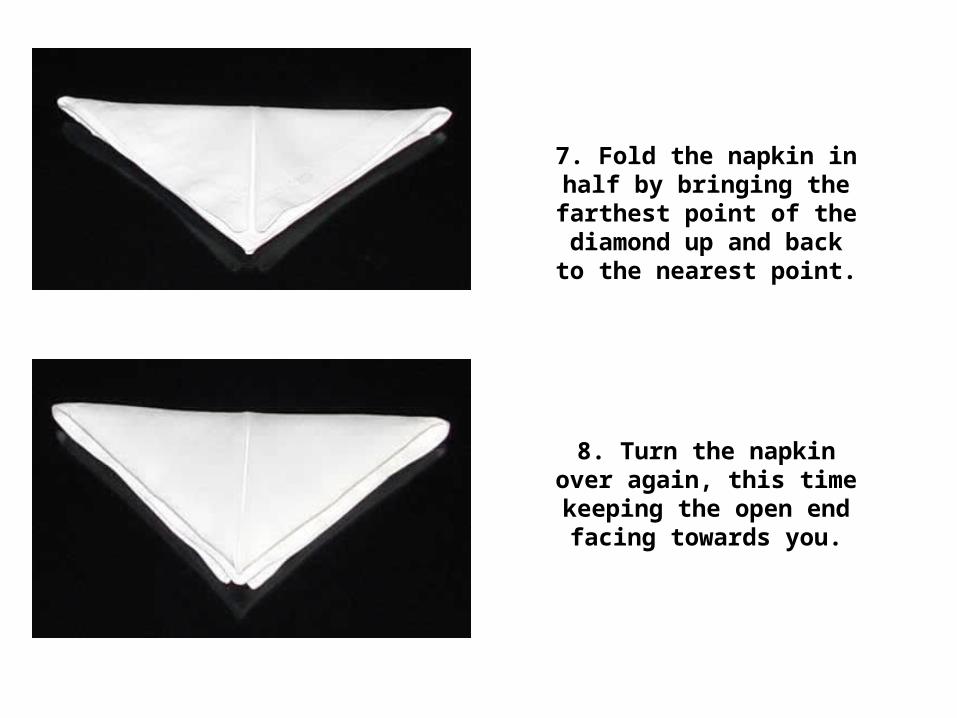
7. Fold the napkin in half by bringing the farthest point of the diamond up and back to
the nearest point.
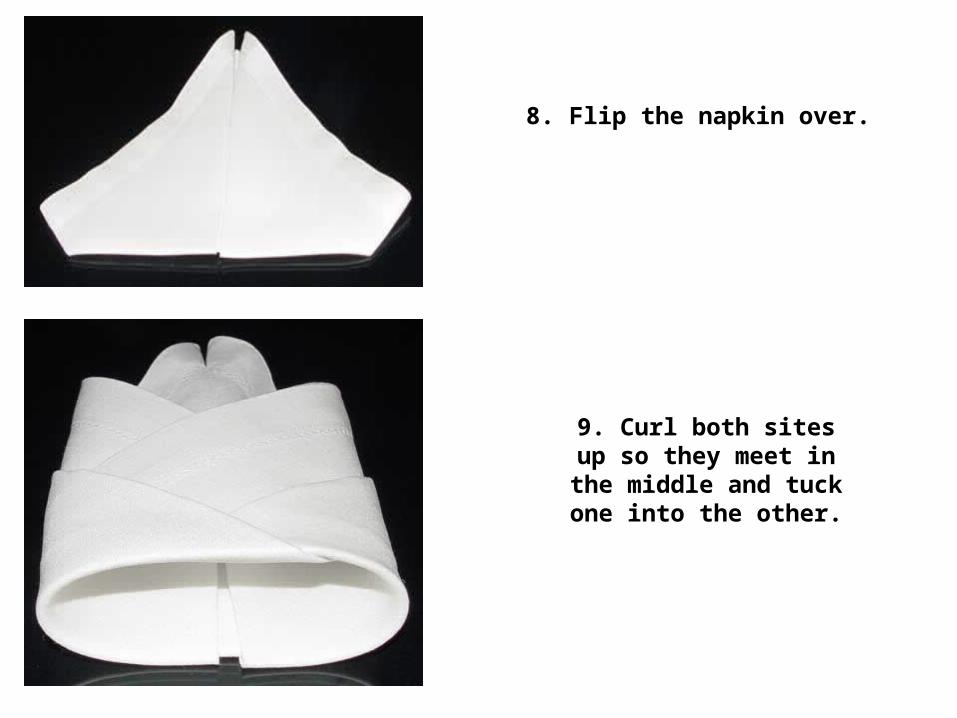
8. Turn the napkin over again, this time keeping the open
end facing towards you.
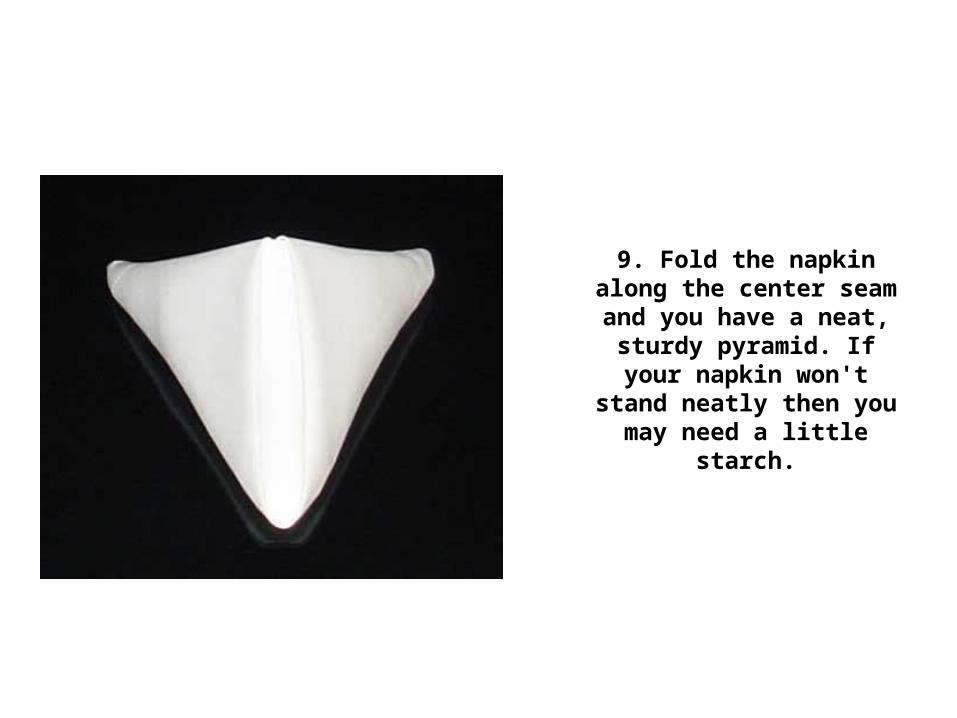
9. Fold the napkin along the center seam and you have a neat, sturdy pyramid. If your
napkin won't stand neatly then you may need a little
starch.
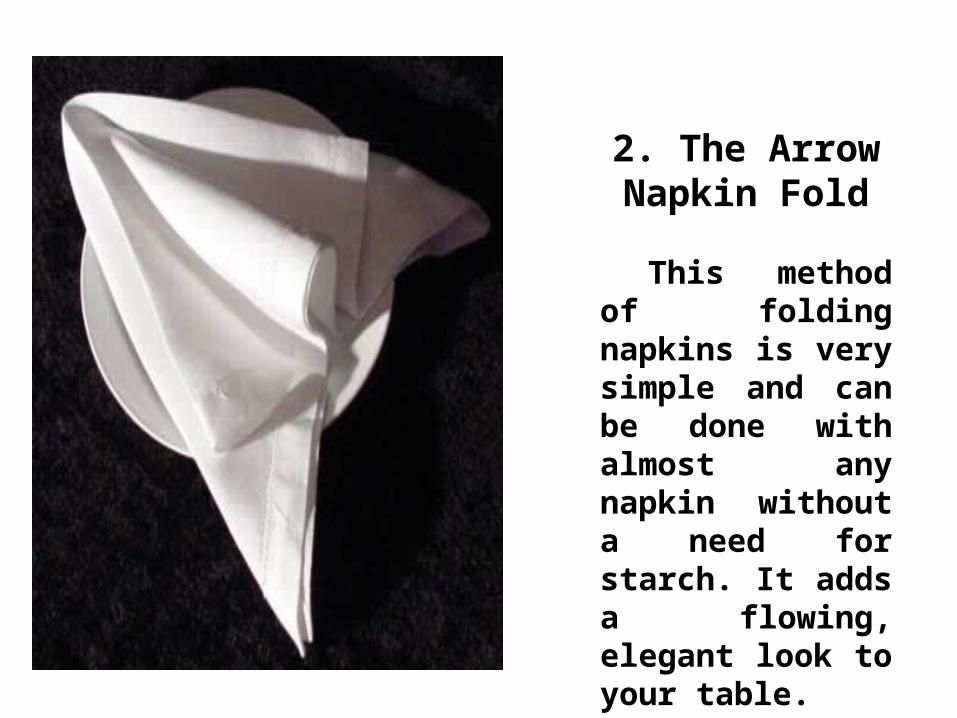
2. The Arrow Napkin Fold
This method of folding napkins is very simple and can be done with almost any napkin without a need for starch. It adds a flowing, elegant look to your table.
1. Lay the napkin face down in front of you.
2. Fold the napkin in half and orient the open end
towards you.
3. Fold the far-right corner over to the center of the
side that is closest to you. The edge of this fold should run down the center of the
napkin.

4. Repeat the last step with the other side, folding the far-left
corner in to rest along side the previous fold.
5. Fold the right-flap out diagonally so that it's outer edge runs even with the far
edge of the napkin.
6. Repeat the previous step on the other side, folding the left-flap out diagonally to meet the
far edge of the napkin.

7. Slide the left and the right sides together, allowing the napkin to bend at the farthest point. This will cause the flat, center part to bow. Pretty easy, huh?
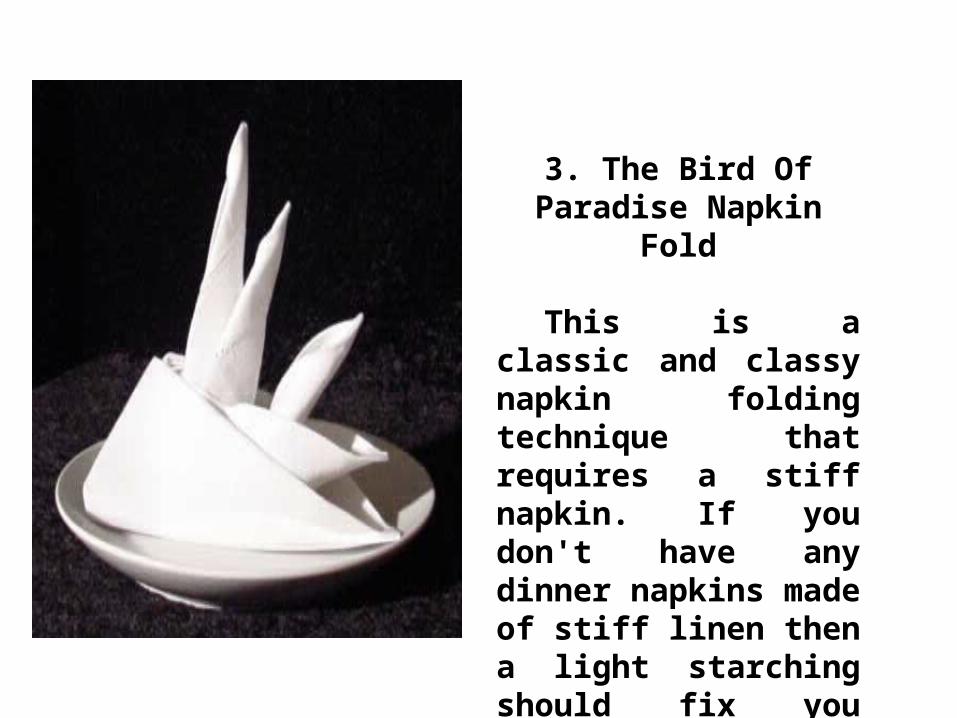
3. The Bird Of Paradise Napkin Fold
This is a classic and classy napkin folding technique that requires a stiff napkin. If you don't have any dinner napkins made of stiff linen then a light starching should fix you right up.
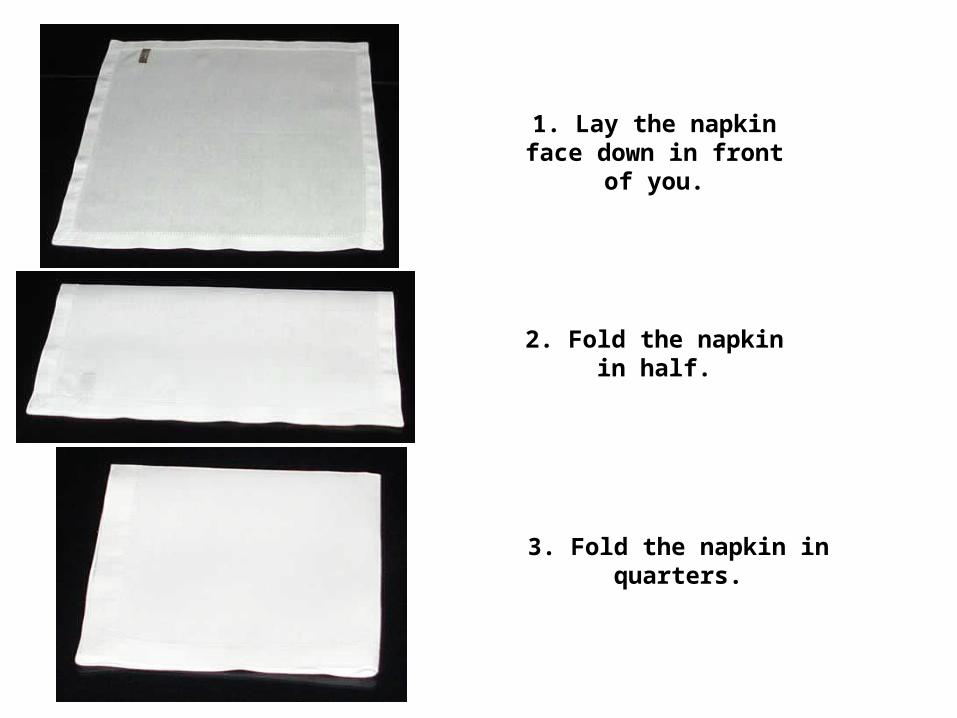
1. Lay the napkin face down in front of you.
2. Fold the napkin in half.
3. Fold the napkin in quarters.
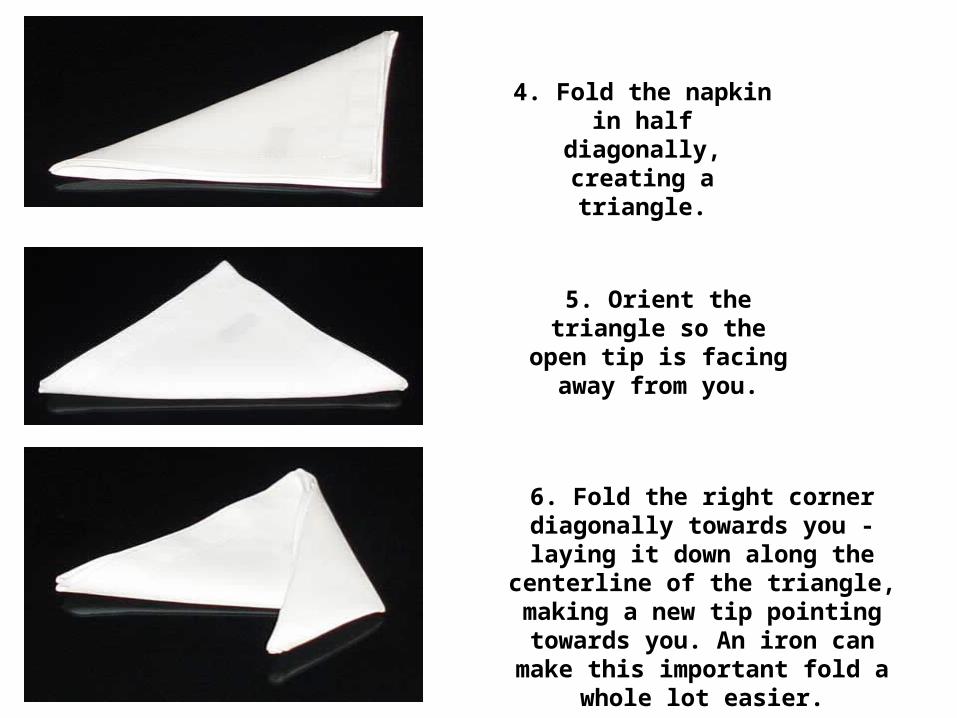
4. Fold the napkin in half diagonally, creating a
triangle.
5. Orient the triangle so the open tip is facing
away from you.
6. Fold the right corner diagonally towards you - laying it down along the
centerline of the triangle, making a new tip pointing towards you. An iron can make this important fold a whole lot
easier.
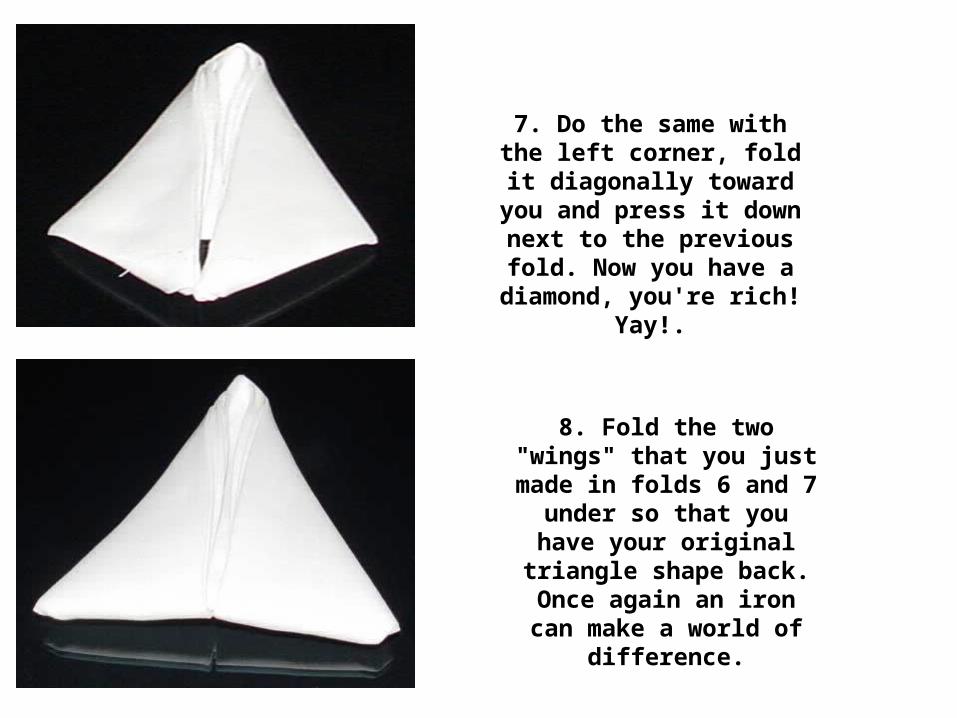
7. Do the same with the left corner, fold it diagonally
toward you and press it down next to the previous fold. Now
you have a diamond, you're rich! Yay!.
8. Fold the two "wings" that you just made in folds 6 and 7 under so that you have your original triangle shape back.
Once again an iron can make a world of difference.
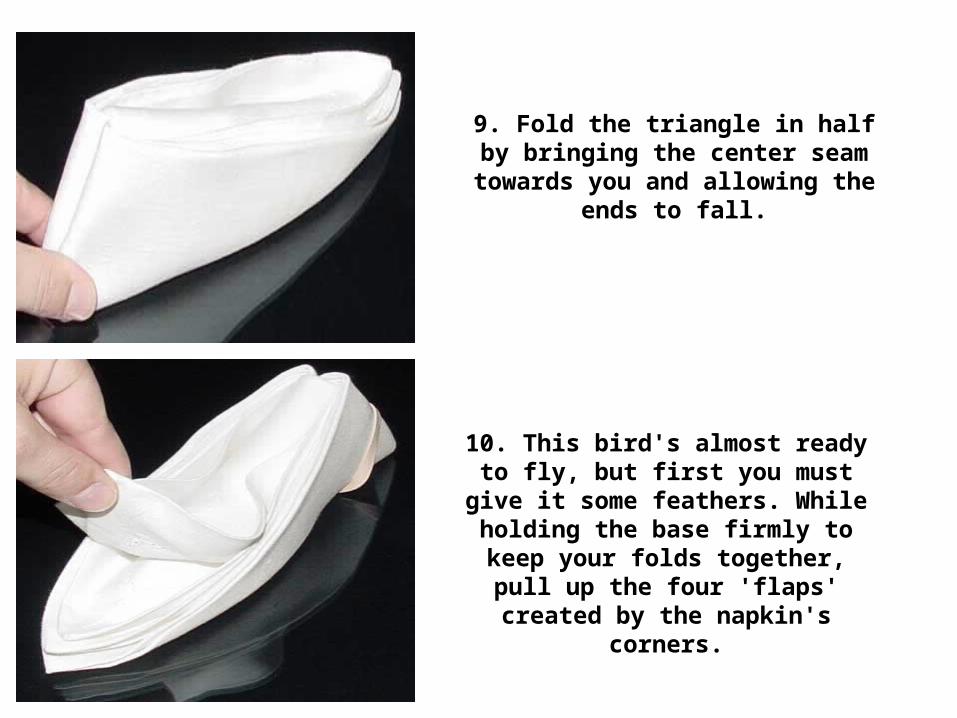
9. Fold the triangle in half by bringing the center seam towards you and
allowing the ends to fall.
10. This bird's almost ready to fly, but first you must give it some feathers.
While holding the base firmly to keep your folds together, pull up the four
'flaps' created by the napkin's corners.
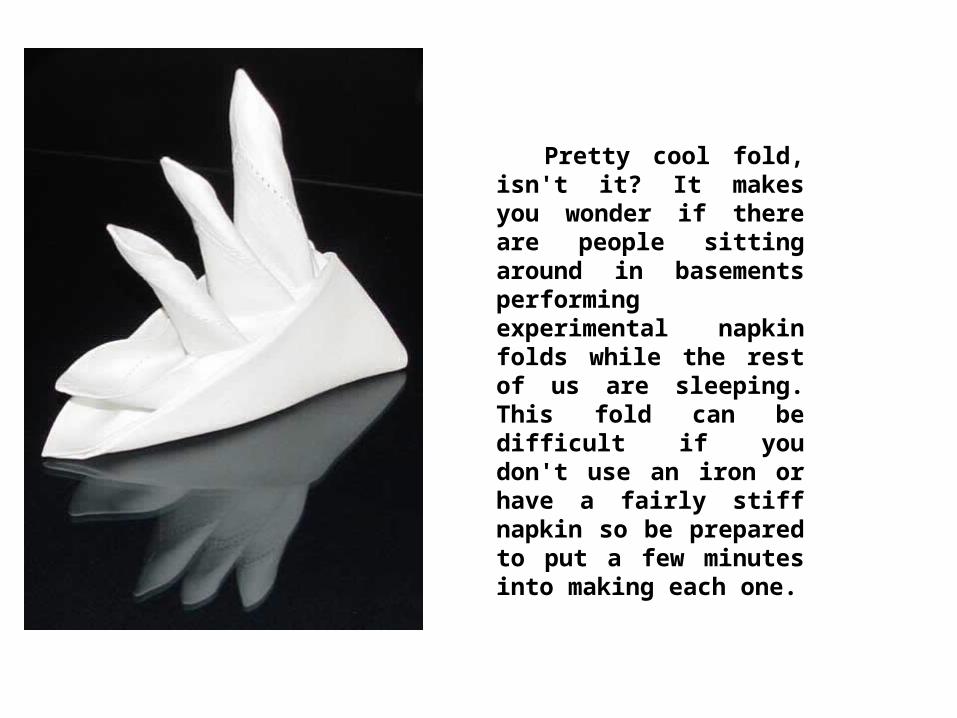
Pretty cool fold, isn't it? It makes you wonder if there are people sitting around in basements performing experimental napkin folds while the rest of us are sleeping. This fold can be difficult if you don't use an iron or have a fairly stiff napkin so be prepared to put a few minutes into making each one.

4. The Diamond Napkin Fold
Got some really limp napkins and want something nice to make without eating up too much time? Then this one's for you, if you're using thick/stiff napkins then an iron will help.

1. Lay the napkin face-down in front of you.
2. Fold the napkin in half and orient the open end toward you.
3. Fold the napkin into quarters.
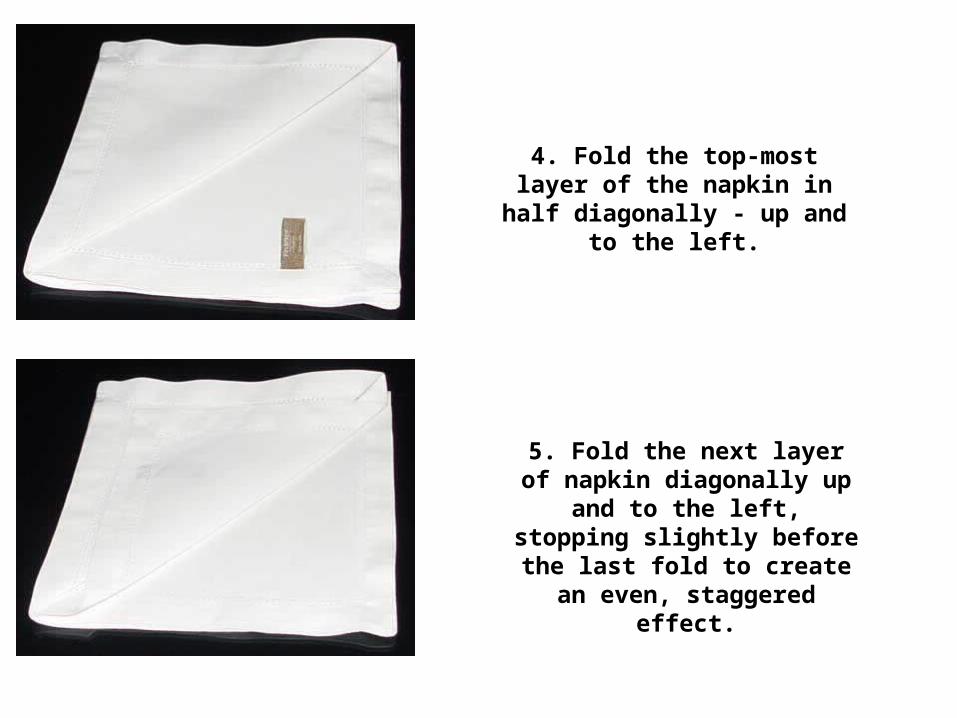
4. Fold the top-most layer of the napkin in half diagonally - up and to
the left.
5. Fold the next layer of napkin diagonally up and to the left,
stopping slightly before the last fold to create an even, staggered
effect.
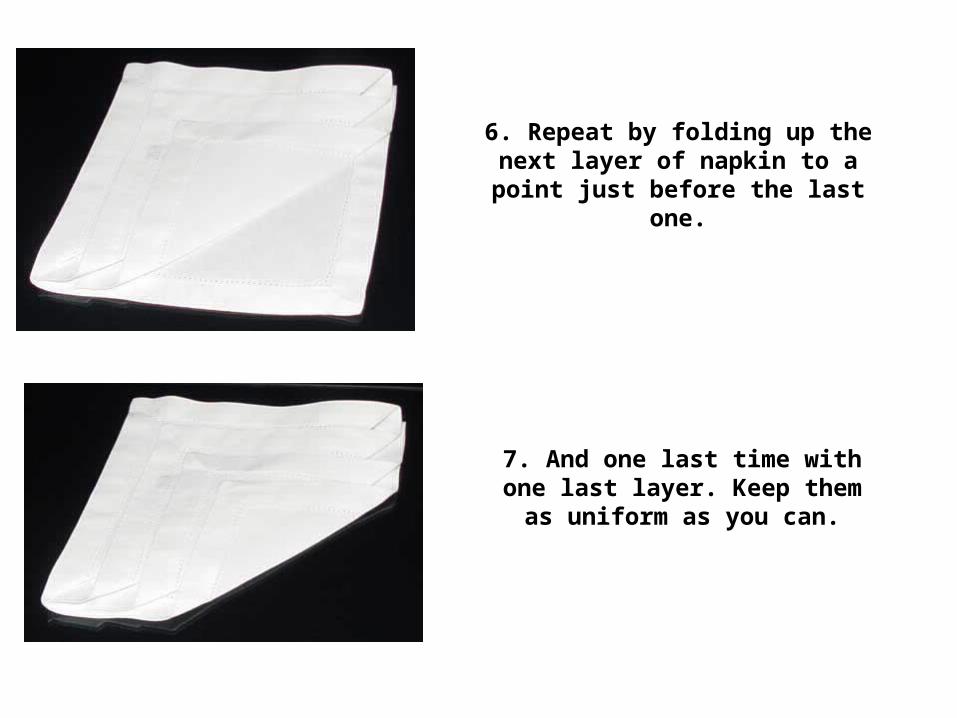
6. Repeat by folding up the next layer of napkin to a point just before the last
one.
7. And one last time with one last layer. Keep them as uniform as you
can.
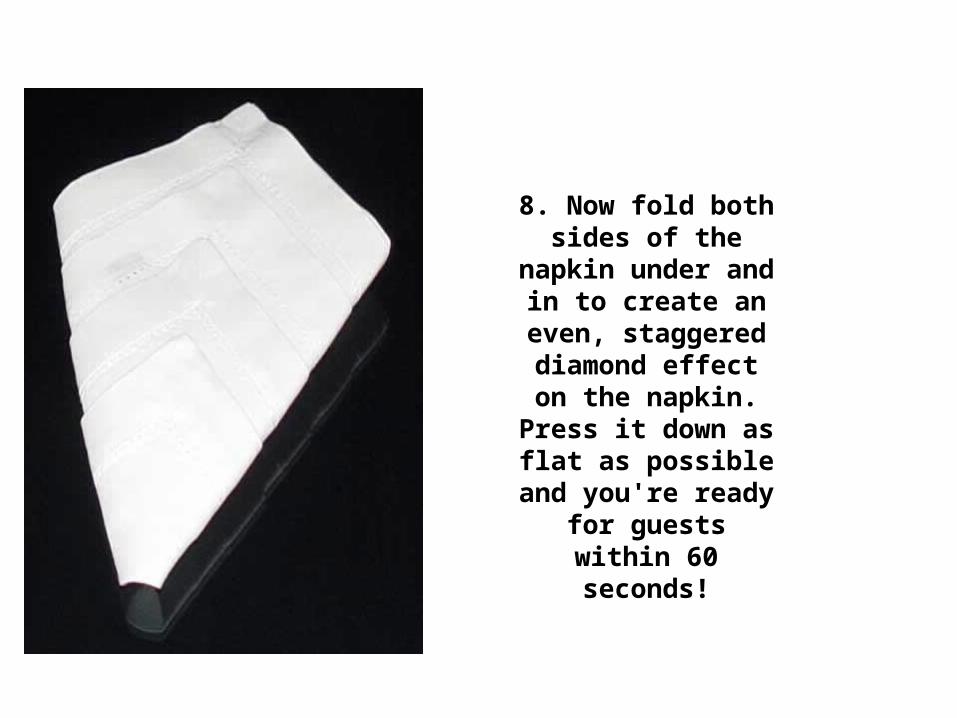
8. Now fold both sides of the napkin under and
in to create an even, staggered diamond
effect on the napkin. Press it down as flat as
possible and you're ready for guests within
60 seconds!
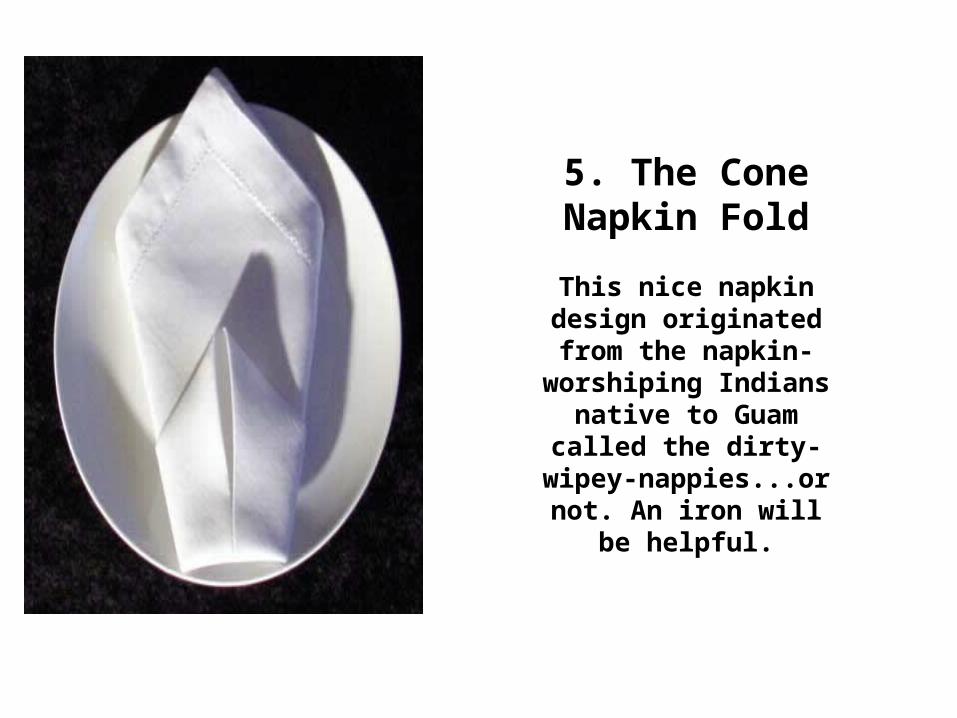
5. The Cone Napkin Fold
This nice napkin design originated from the
napkin-worshiping Indians native to Guam called the dirty-wipey-nappies...or
not. An iron will be helpful.
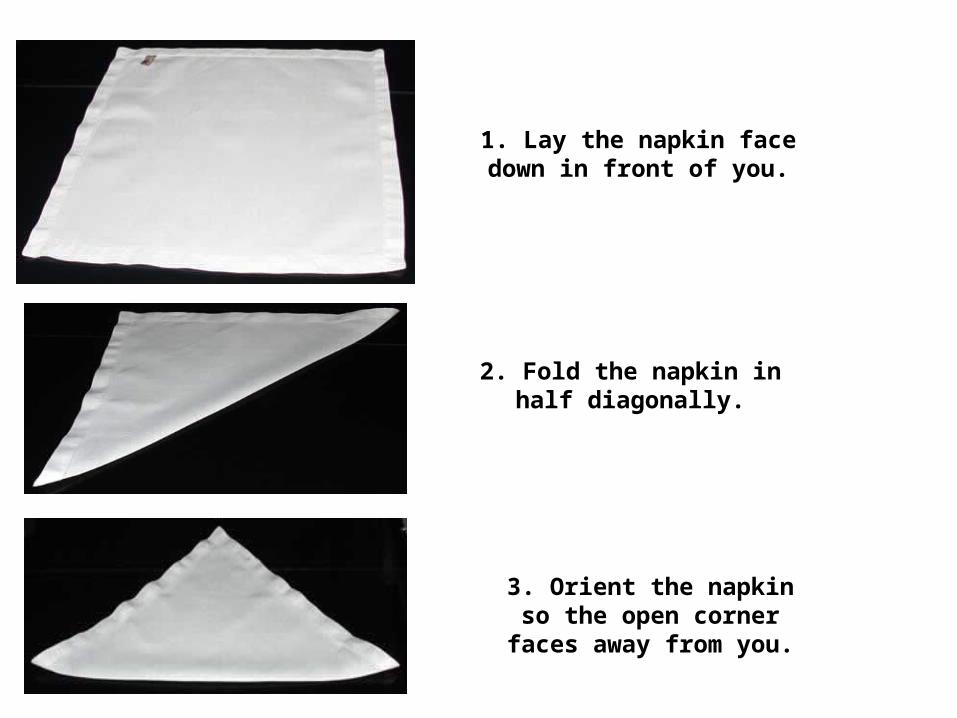
1. Lay the napkin face down in front of you.
2. Fold the napkin in half diagonally.
3. Orient the napkin so the open corner faces away from
you.
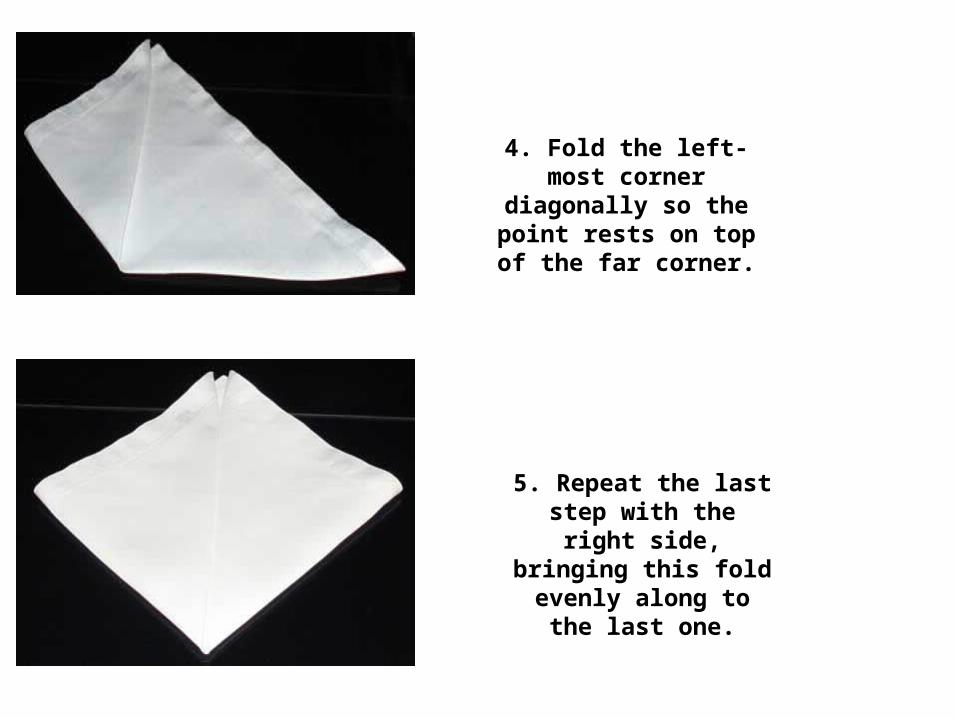
4. Fold the left-most corner diagonally so the point rests on top of the
far corner.
5. Repeat the last step with the right side,
bringing this fold evenly along to the last one.
6. Turn the napkin over, keeping the open ends
pointing away from you.
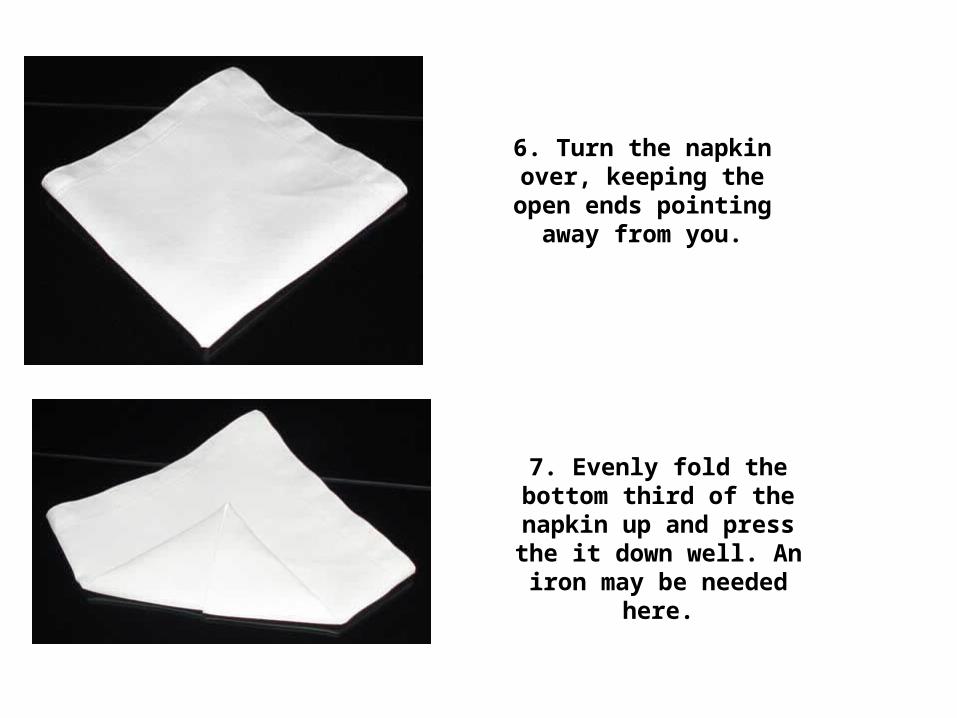
7. Evenly fold the bottom third of the napkin up and press the it down well. An iron may be needed here.
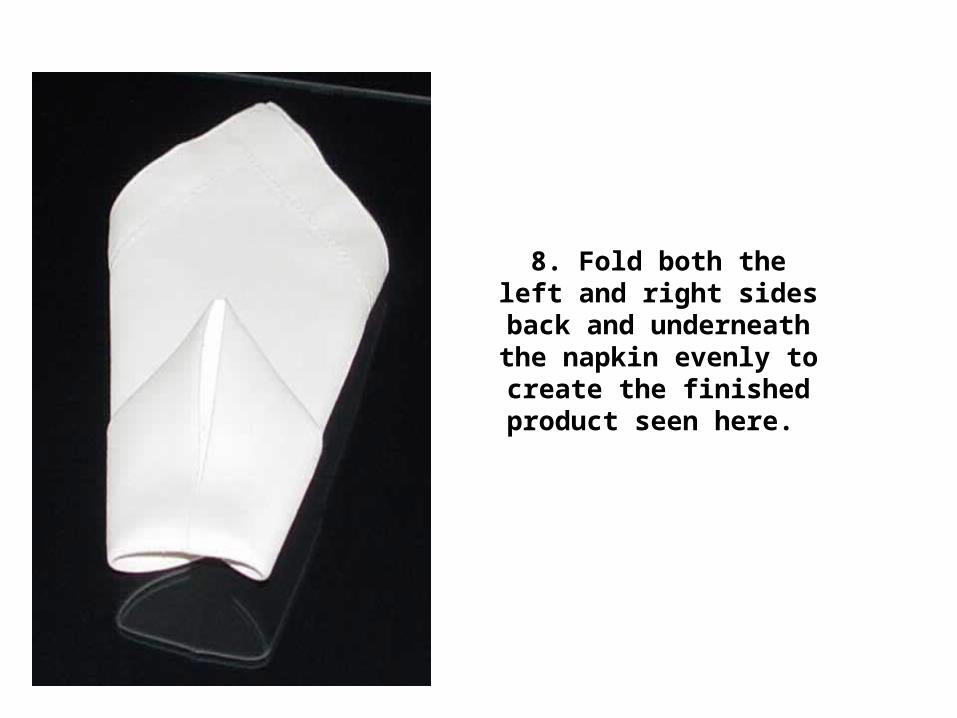
8. Fold both the left and right sides back and underneath the napkin evenly to create the finished product seen
here.
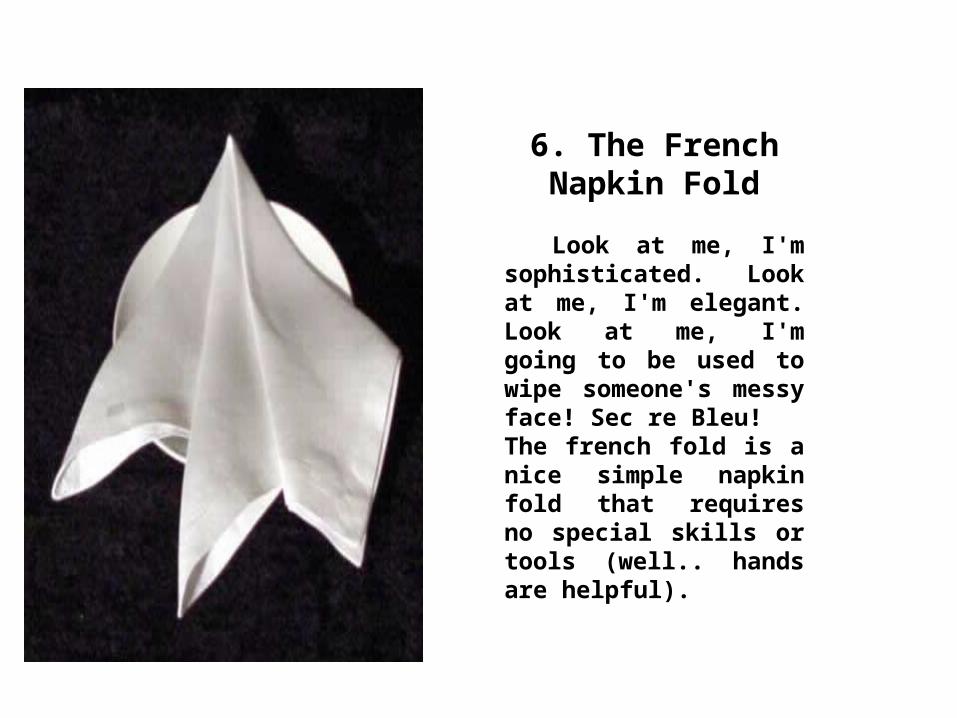
6. The French Napkin Fold
Look at me, I'm sophisticated. Look at me, I'm elegant. Look at me, I'm going to be used to wipe someone's messy face! Sec re Bleu!The french fold is a nice simple napkin fold that requires no special skills or tools (well.. hands are helpful).
1. Lay the napkin face-down in front of you.
2. Fold the napkin in half diagonally.
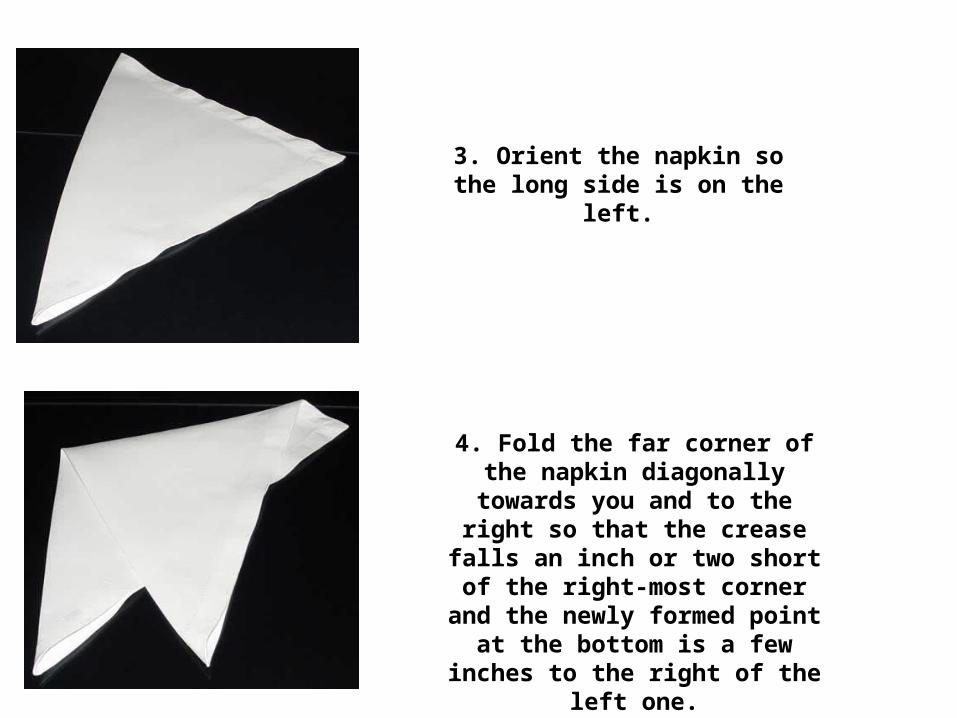
3. Orient the napkin so the long side is on the left.
4. Fold the far corner of the napkin diagonally towards you and to the
right so that the crease falls an inch or two short of the right-most corner and the newly formed point at the bottom is a few inches to the right of the left
one.
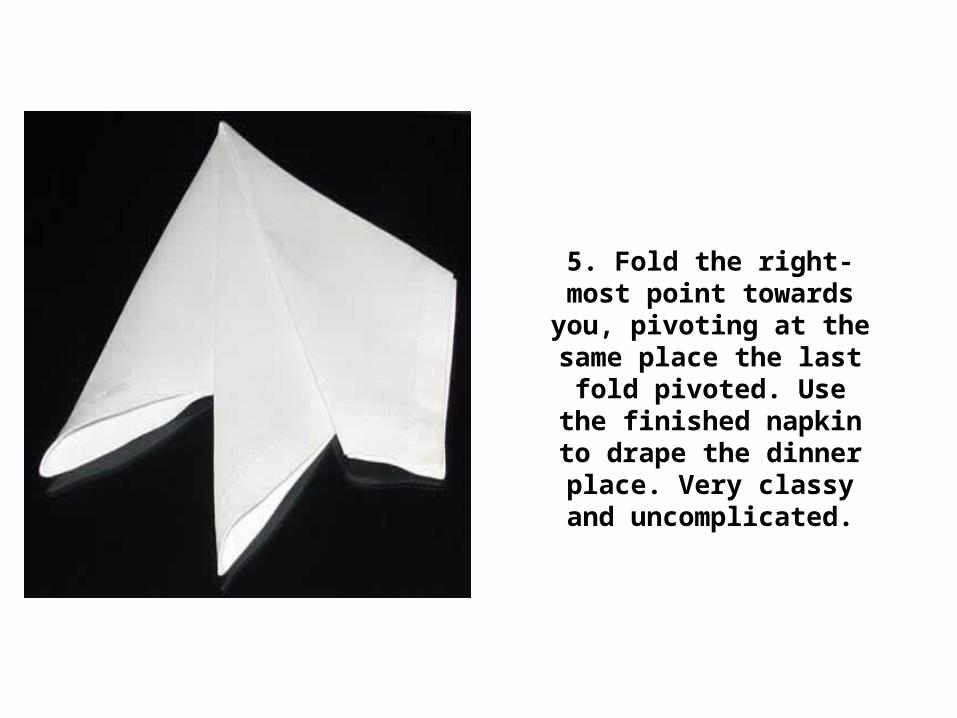
5. Fold the right-most point towards you, pivoting at the
same place the last fold pivoted. Use the finished
napkin to drape the dinner place. Very classy and
uncomplicated.
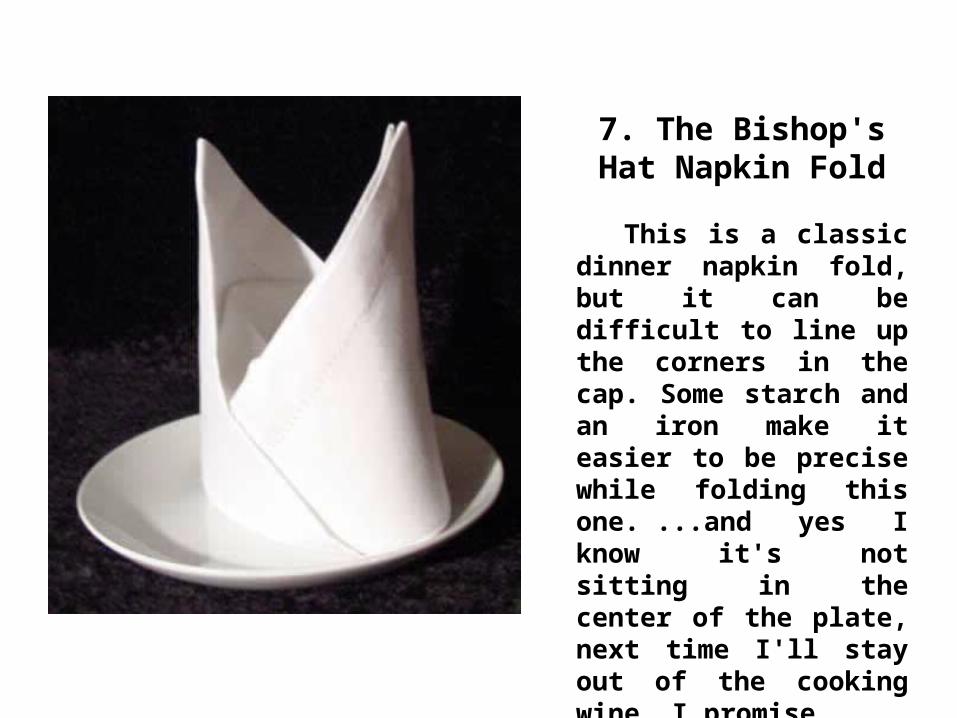
7. The Bishop's Hat Napkin Fold
This is a classic dinner napkin fold, but it can be difficult to line up the corners in the cap. Some starch and an iron make it easier to be precise while folding this one. ...and yes I know it's not sitting in the center of the plate, next time I'll stay out of the cooking wine, I promise.
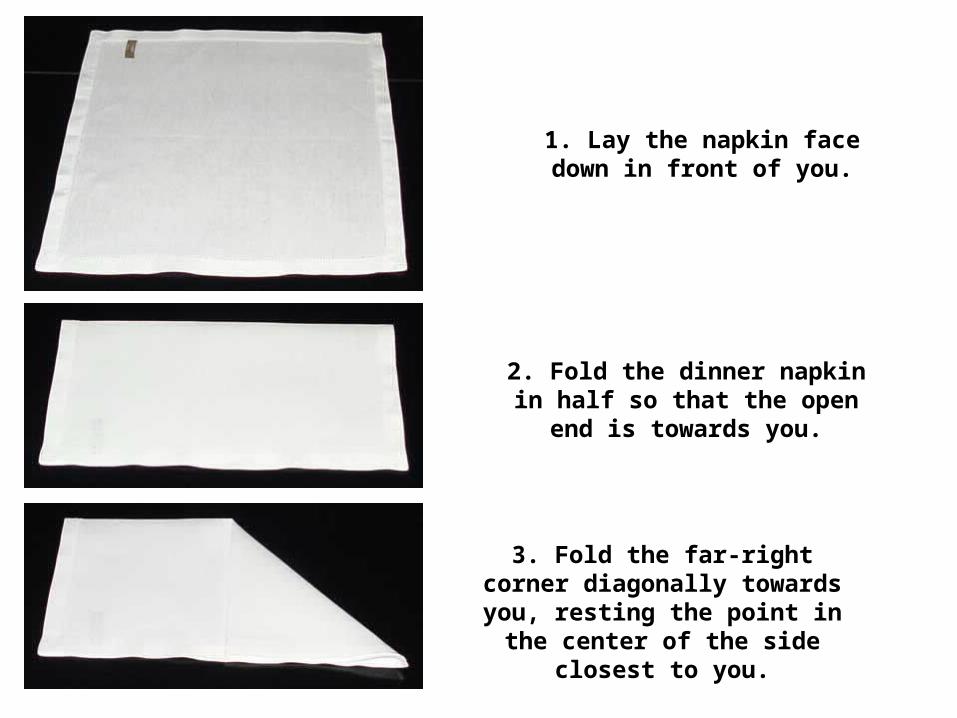
1. Lay the napkin face down in front of you.
2. Fold the dinner napkin in half so that the open end is towards you.
3. Fold the far-right corner diagonally towards you, resting the
point in the center of the side closest to you.

4. Fold the near-left corner diagonally away from you, resting it so that it lays
right next to the previous fold.
5. Flip the napkin over and orient it so it points to the far-left and to the near-
right.
6. Fold the bottom half of the napkin up and away from you, laying it so the far
edges run on top of one other.
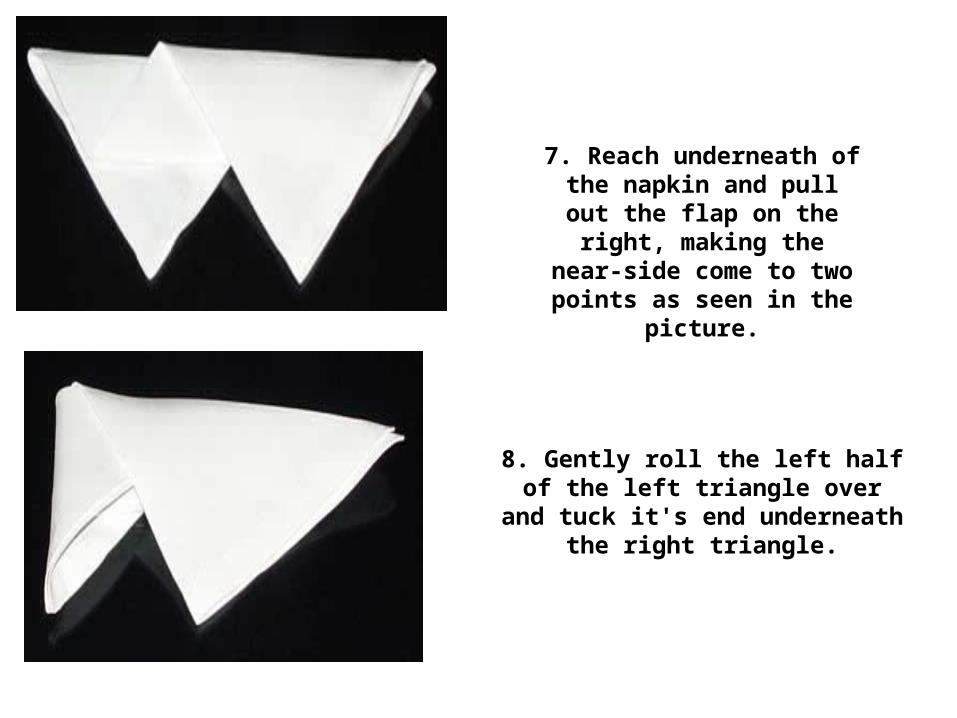
7. Reach underneath of the napkin and pull out the flap on the right, making the near-side come to two points as seen in
the picture.
8. Gently roll the left half of the left triangle over and tuck it's end underneath the right triangle.
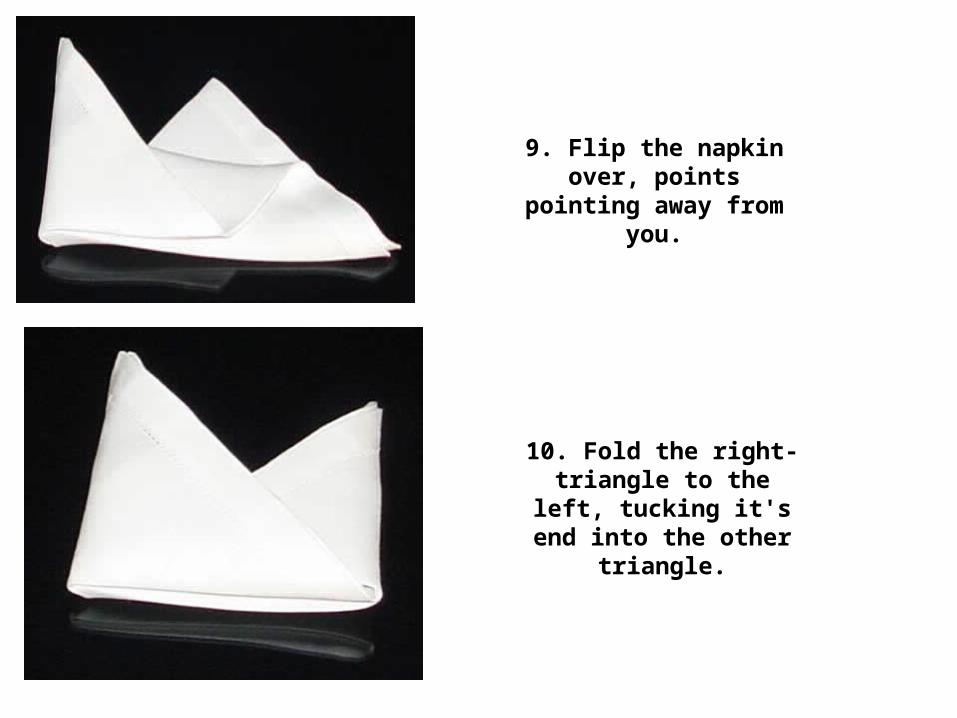
9. Flip the napkin over, points pointing away from you.
10. Fold the right-triangle to the left, tucking it's end into
the other triangle.
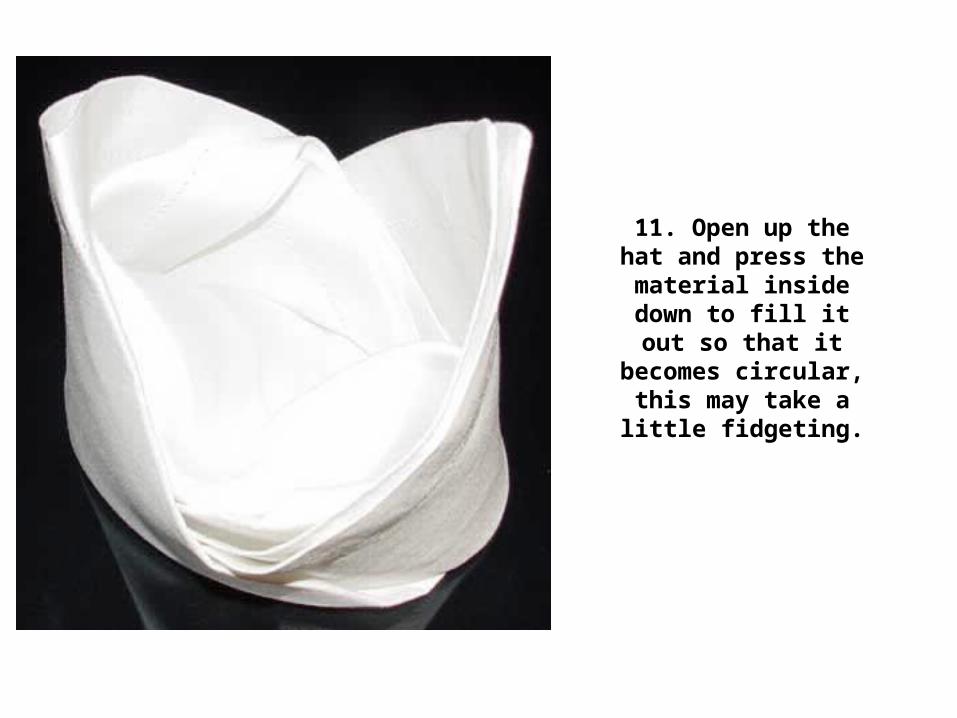
11. Open up the hat and press the material inside
down to fill it out so that it becomes circular, this may
take a little fidgeting.

There you go, now all you
need is a little bishop to wear it.
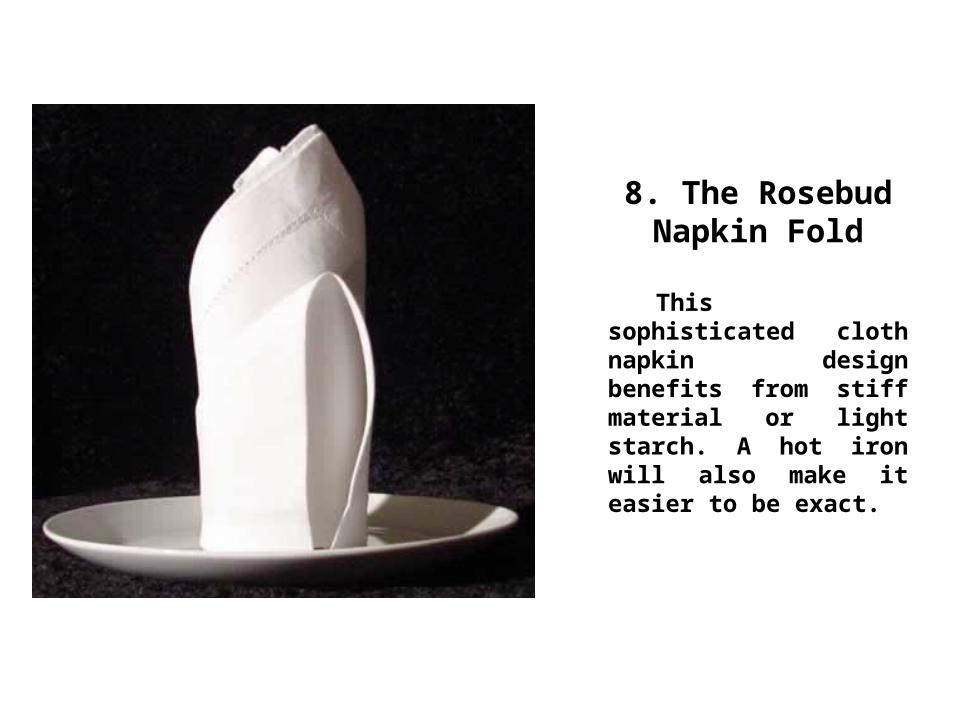
8. The Rosebud Napkin Fold
This sophisticated cloth napkin design benefits from stiff material or light starch. A hot iron will also make it easier to be exact.
1. Lay the napkin face-down in front of you.
2. Fold the napkin in half diagonally.
3. Orient the napkin so the open end points away from you.
4. Fold the far-right corner up diagonally so that the point rests on top of the far corner. The edge of this new flap should
lay right on the center line.
5. Repeat step four on the other side, bringing the left-most corner up to meet the far corner, creating a diamond shape.

6. Flip the napkin over while keeping the open end pointing away from you.
7. Fold the bottom of the napkin up about 3/4's of the way as shown and press the fold
down well.
8. Flip the napkin over.
9. Curl both sites up so they meet in the middle and tuck
one into the other.
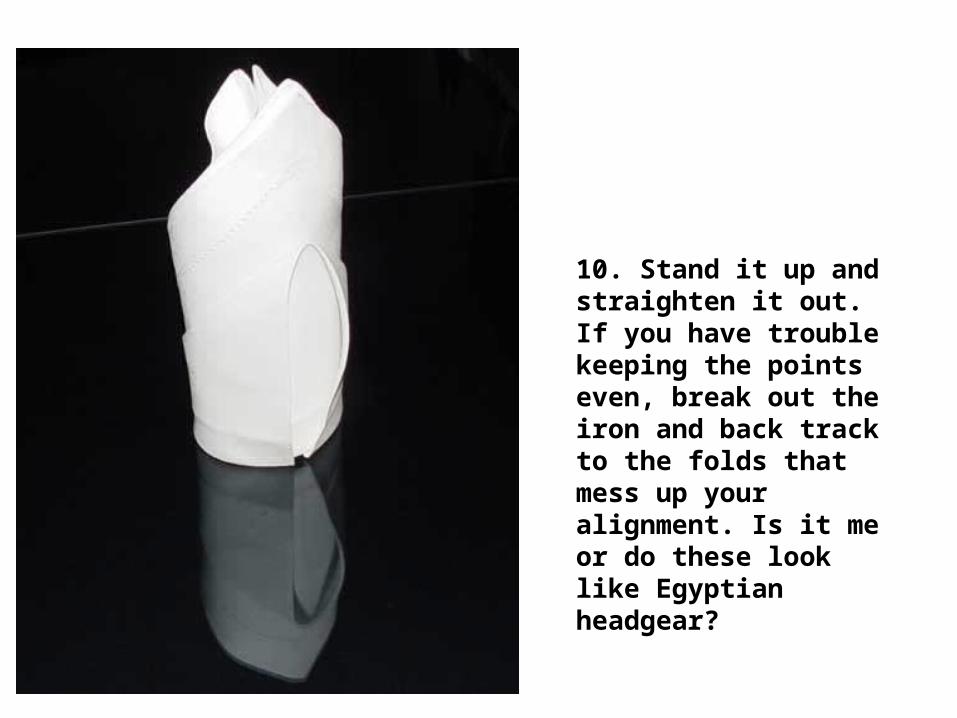
10. Stand it up and straighten it out. If you have trouble keeping the points even, break out the iron and back track to the folds that mess up your alignment. Is it me or do these look like Egyptian headgear?
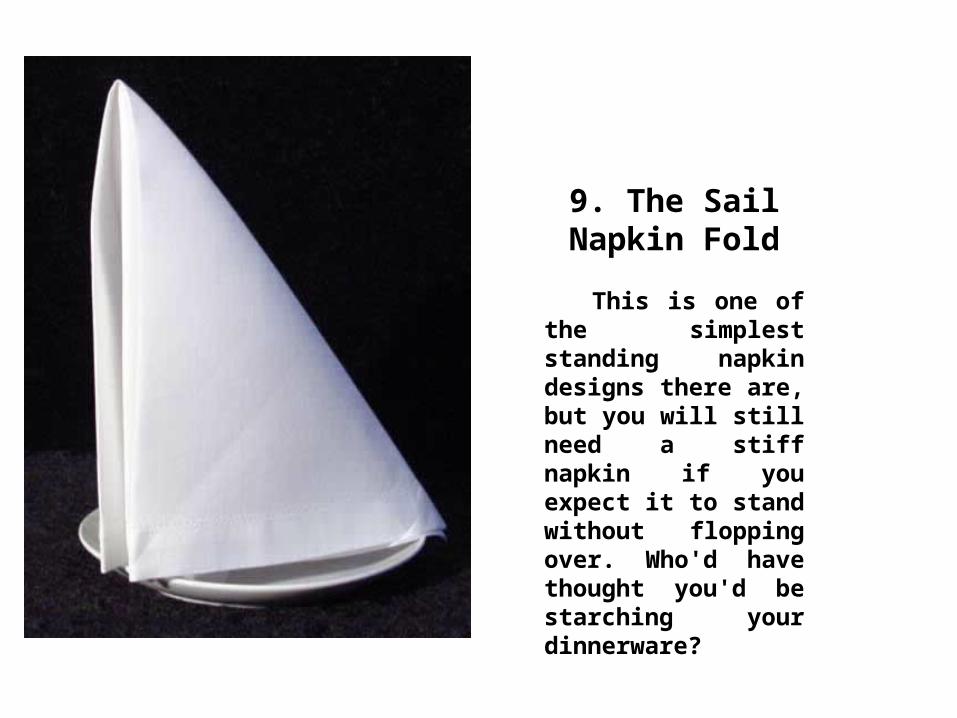
9. The Sail Napkin Fold
This is one of the simplest standing napkin designs there are, but you will still need a stiff napkin if you expect it to stand without flopping over. Who'd have thought you'd be starching your dinnerware?
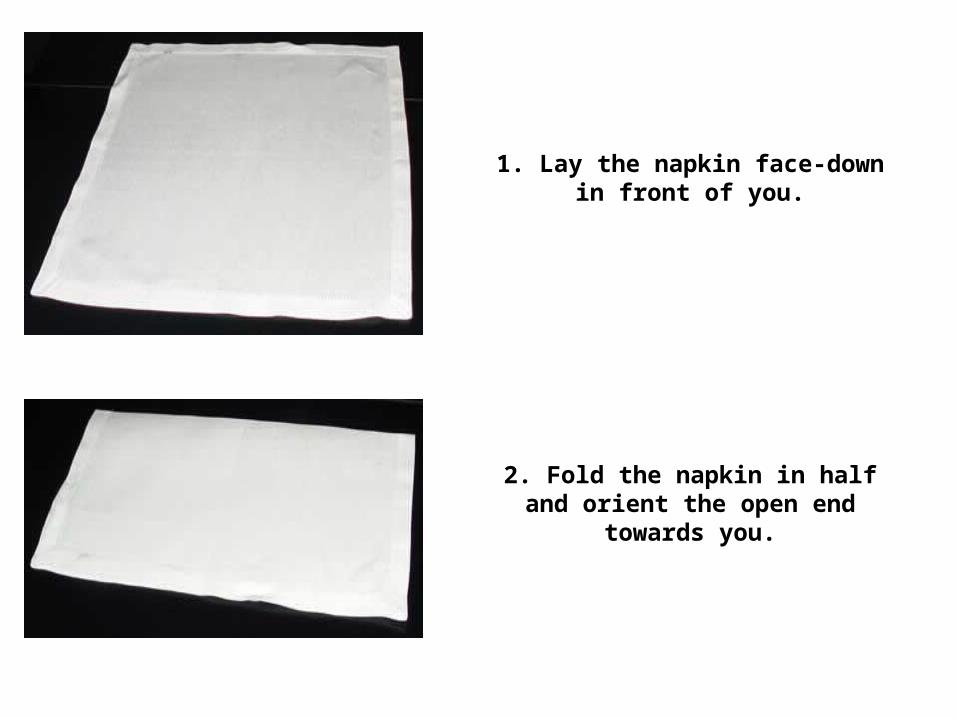
2. Fold the napkin in half and orient the open end towards you.
1. Lay the napkin face-down in front of you.
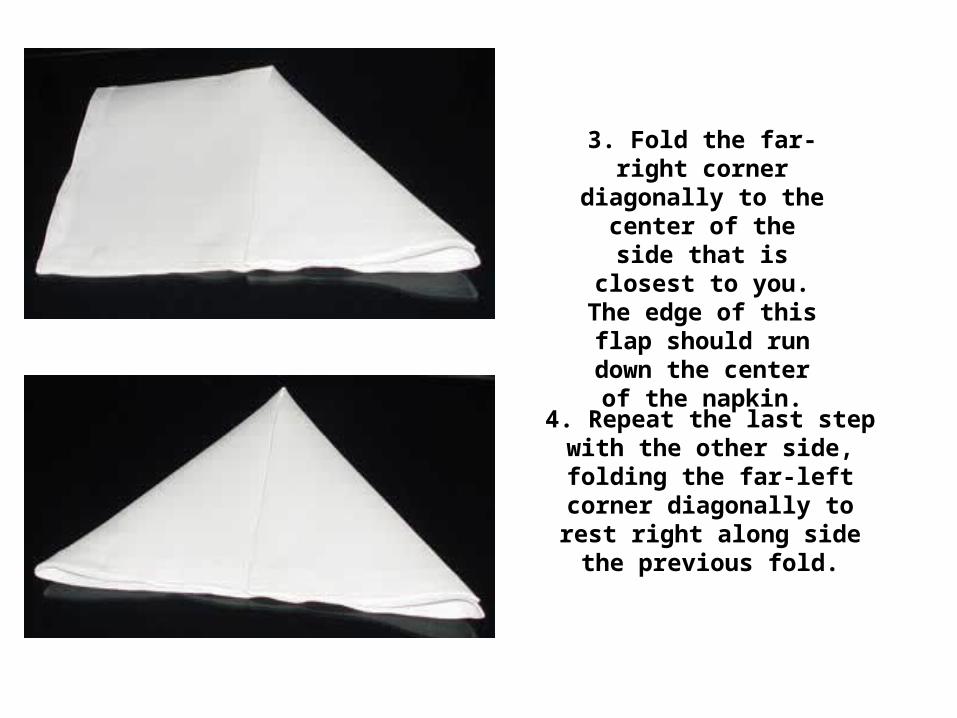
3. Fold the far-right corner diagonally to the center of the side that is closest to you. The edge
of this flap should run down the center of the
napkin.
4. Repeat the last step with the other side, folding the far-left corner diagonally to rest right along side the previous fold.
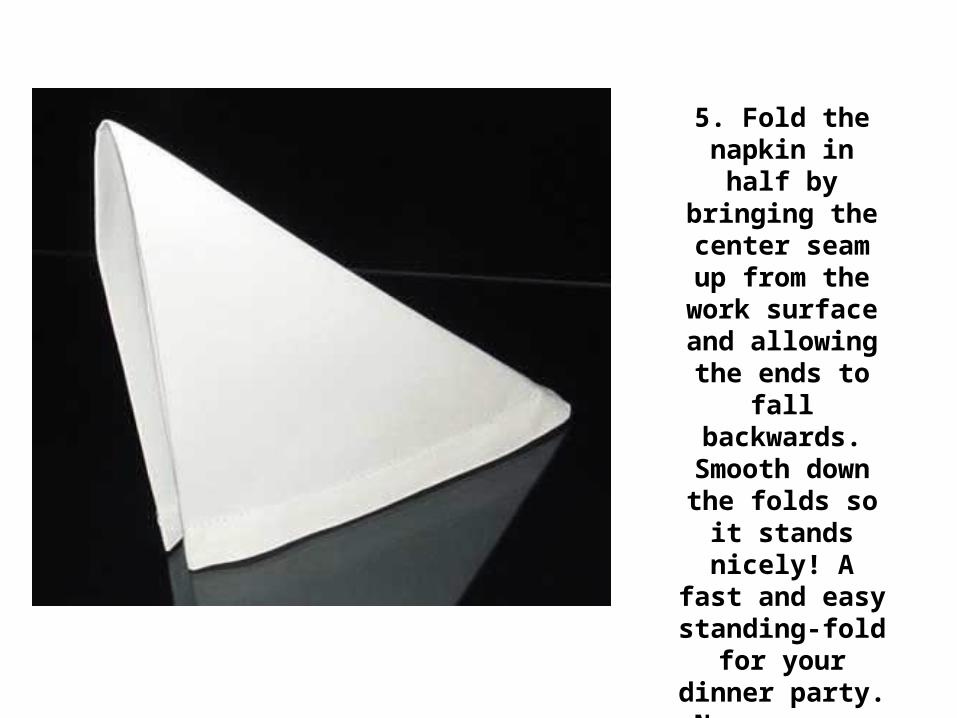
5. Fold the napkin in half by bringing
the center seam up from the work
surface and allowing the ends to fall backwards. Smooth down the folds so it stands nicely! A fast and easy standing-fold
for your dinner party. Now you can sail across the seas
on your dinner plates.
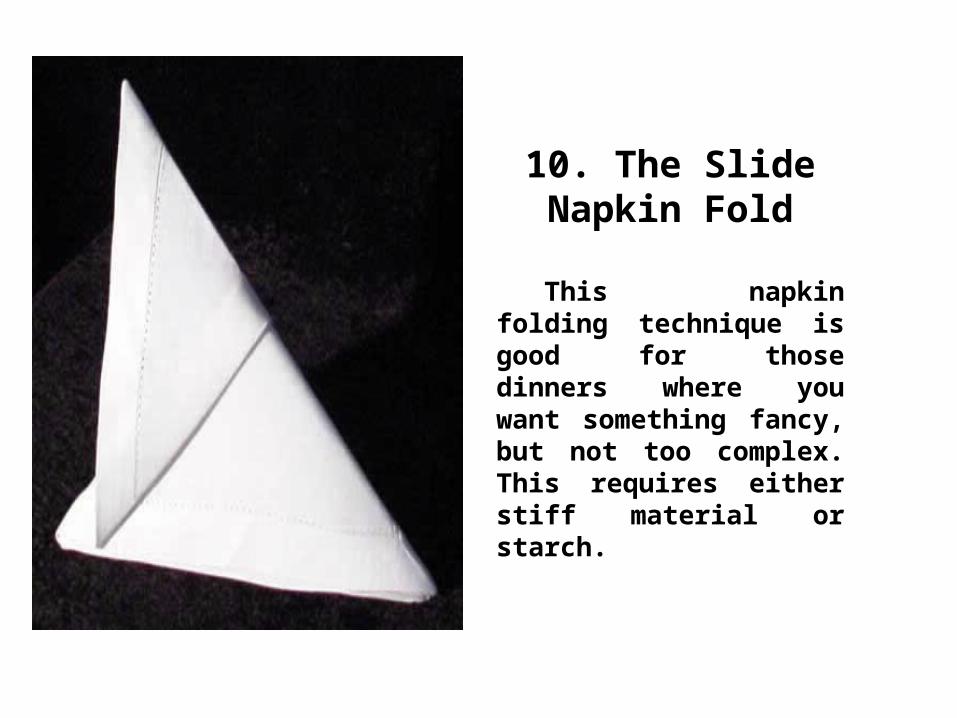
10. The Slide Napkin Fold
This napkin folding technique is good for those dinners where you want something fancy, but not too complex. This requires either stiff material or starch.
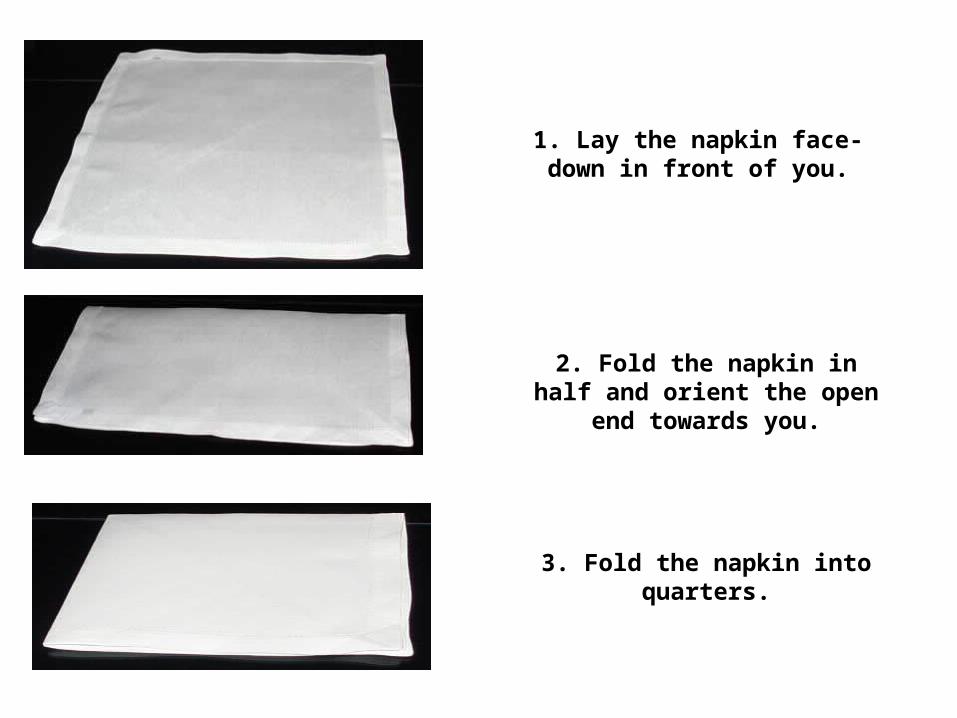
1. Lay the napkin face-down in front of you.
2. Fold the napkin in half and orient the open end towards you.
3. Fold the napkin into quarters.

4. Orient the napkin so that the open end is pointing away from you.
5. Fold the napkin in half by bringing the far end up to the front. Press this fold
down well.
6. Take the top-layer of napkin and fold it back, making a crease about 1/2"-1"
before the top.
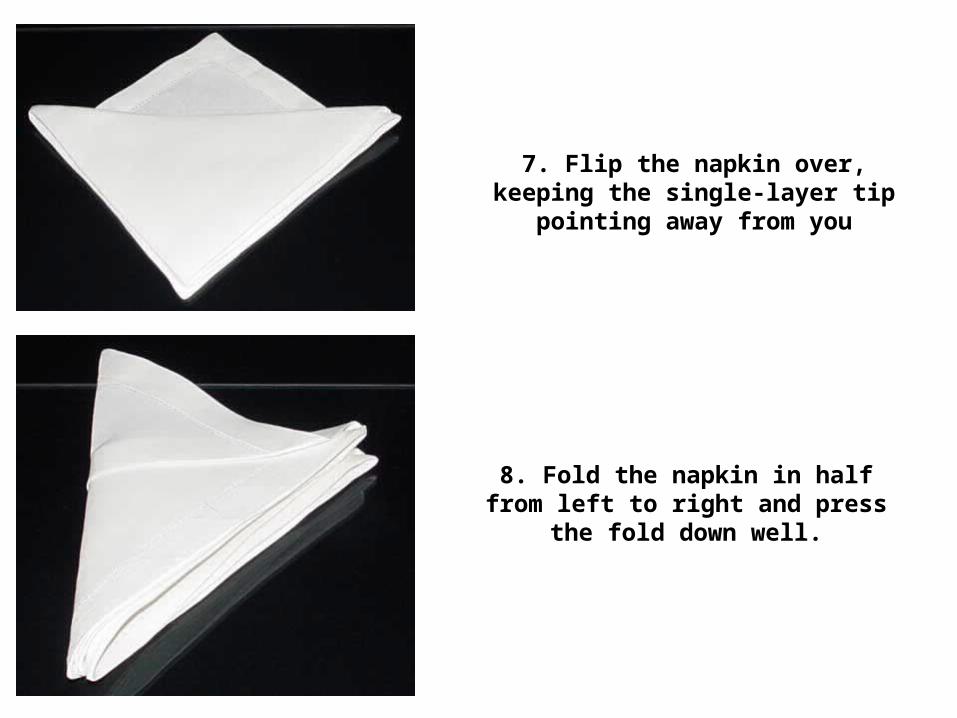
7. Flip the napkin over, keeping the single-layer tip pointing away from you
8. Fold the napkin in half from left to right and press the fold down well.
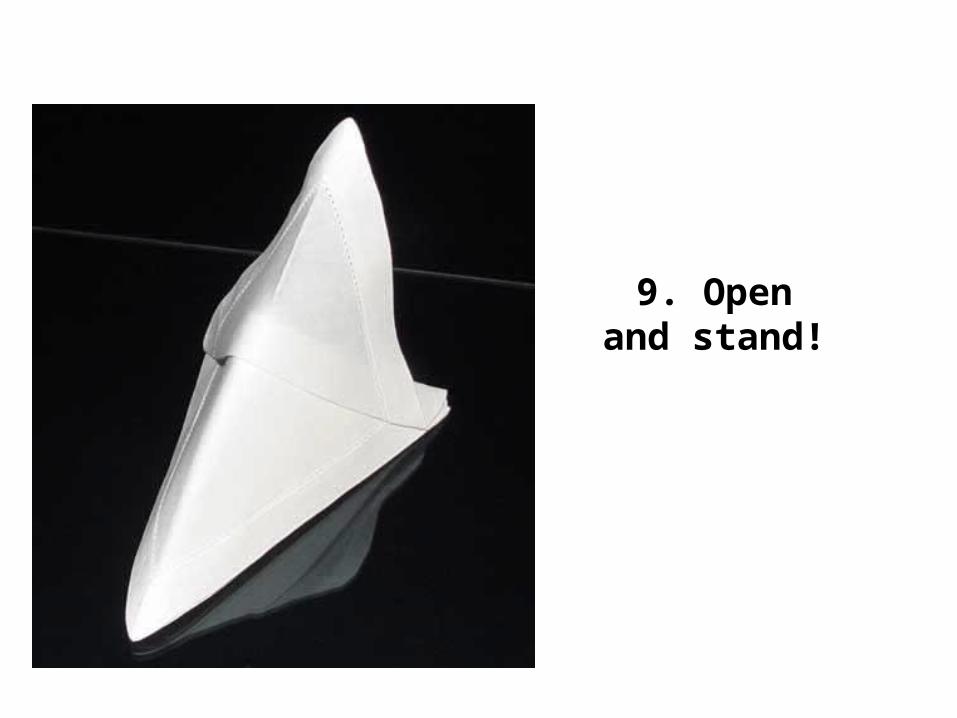
9. Open and stand!

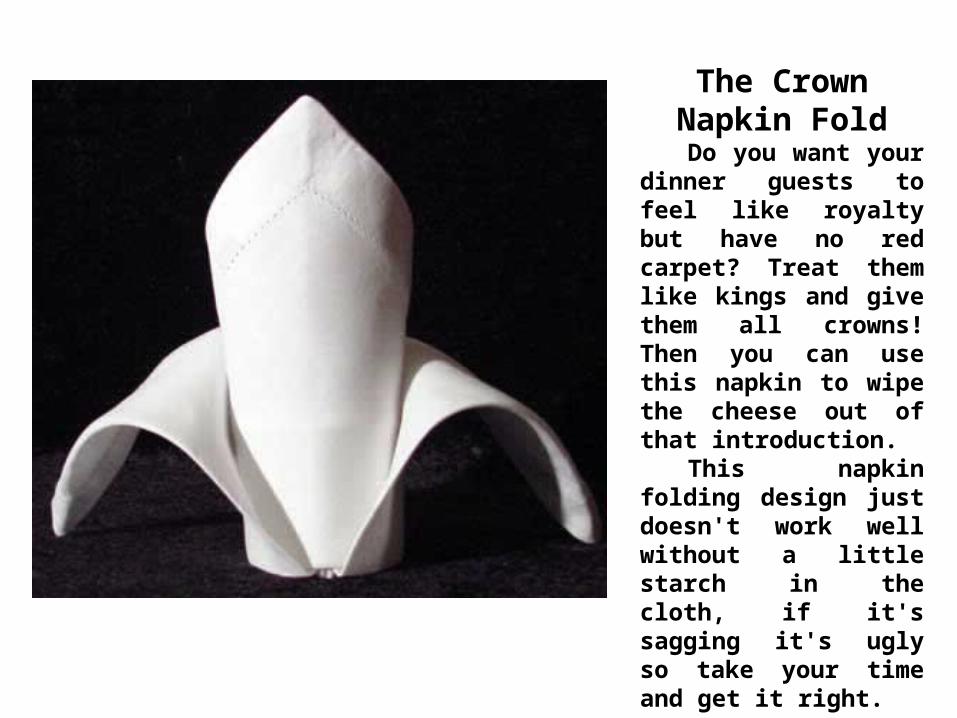
The Crown Napkin Fold
Do you want your dinner guests to feel like royalty but have no red carpet? Treat them like kings and give them all crowns! Then you can use this napkin to wipe the cheese out of that introduction.
This napkin folding design just doesn't work well without a little starch in the cloth, if it's sagging it's ugly so take your time and get it right.
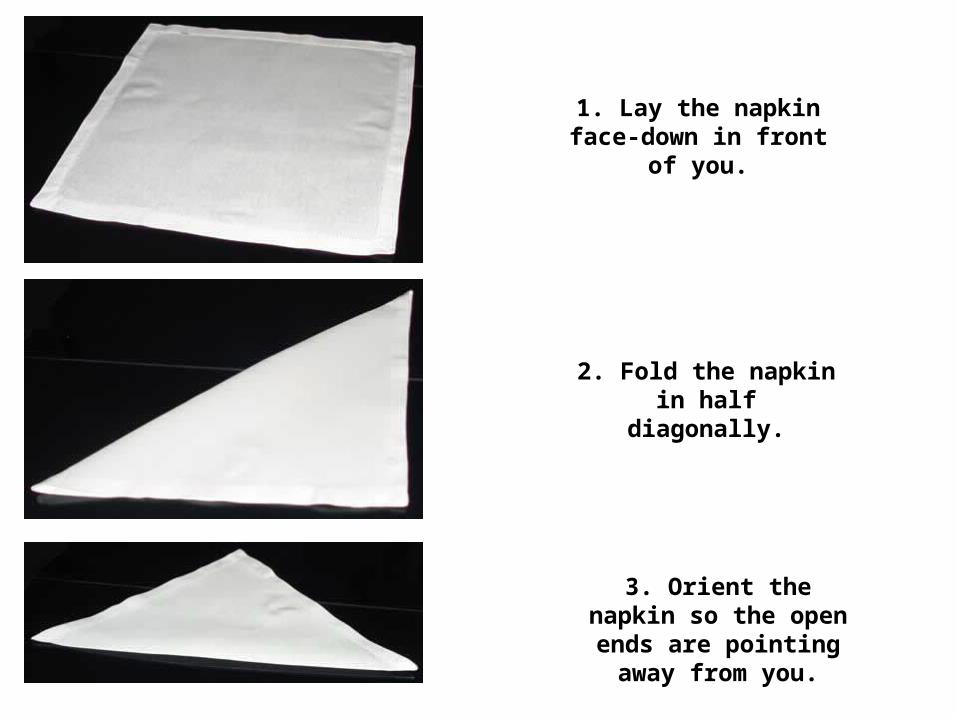
1. Lay the napkin face-down in front of you.
2. Fold the napkin in half diagonally.
3. Orient the napkin so the open ends are pointing
away from you.
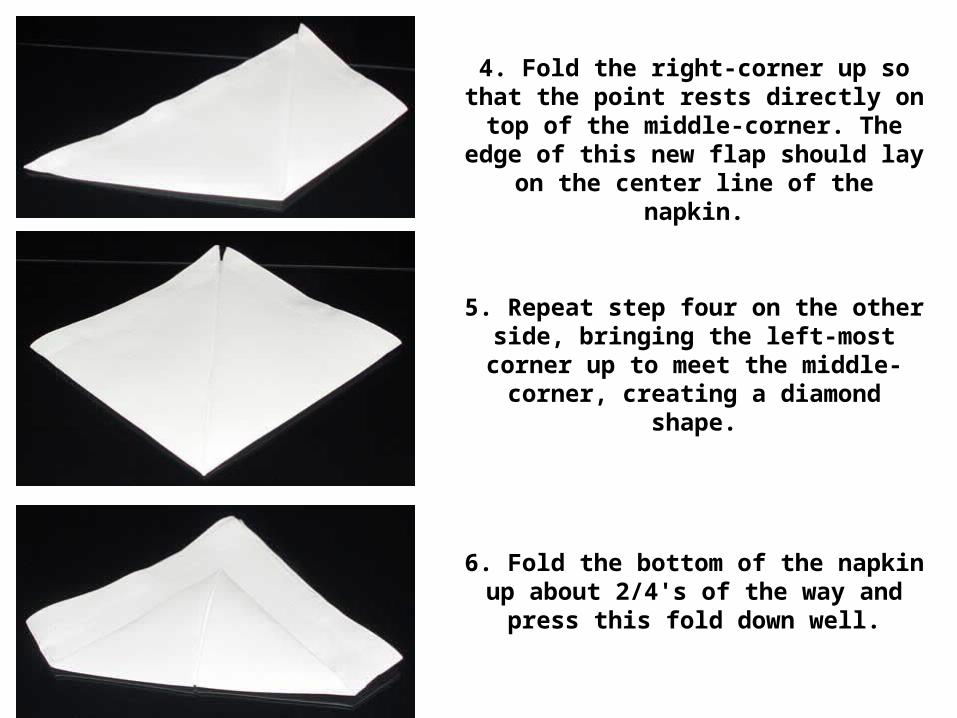
4. Fold the right-corner up so that the point rests directly on top of the middle-corner. The edge of this new flap should lay on the center
line of the napkin.
5. Repeat step four on the other side, bringing the left-most corner up to meet the middle-
corner, creating a diamond shape.
6. Fold the bottom of the napkin up about 2/4's of the way and press this fold down
well.
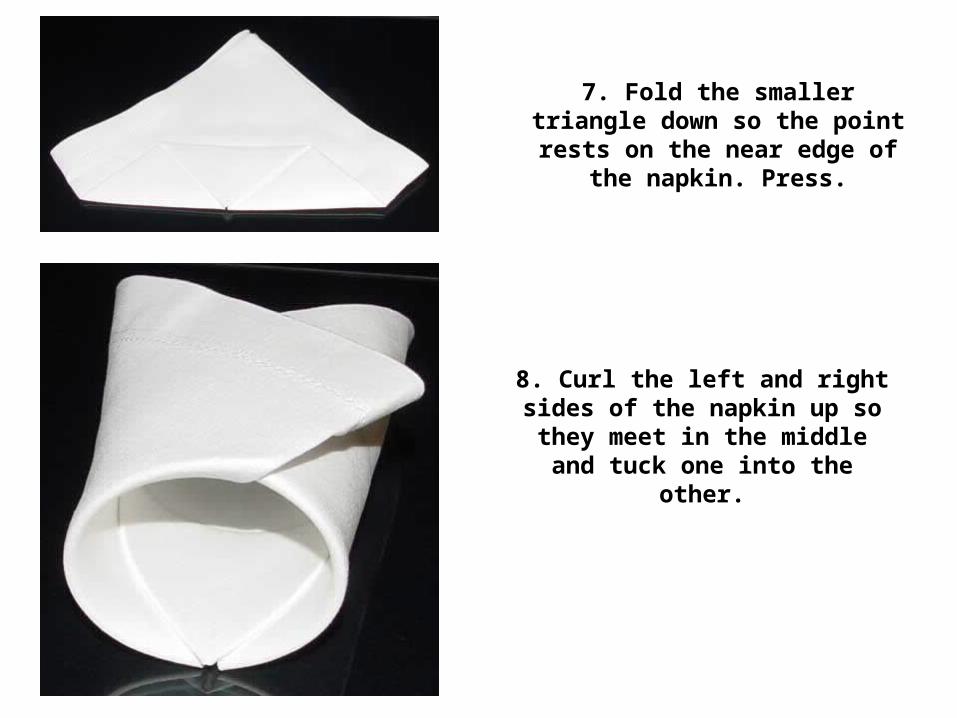
7. Fold the smaller triangle down so the point rests on the near edge of
the napkin. Press.
8. Curl the left and right sides of the napkin up so they meet in the middle
and tuck one into the other.
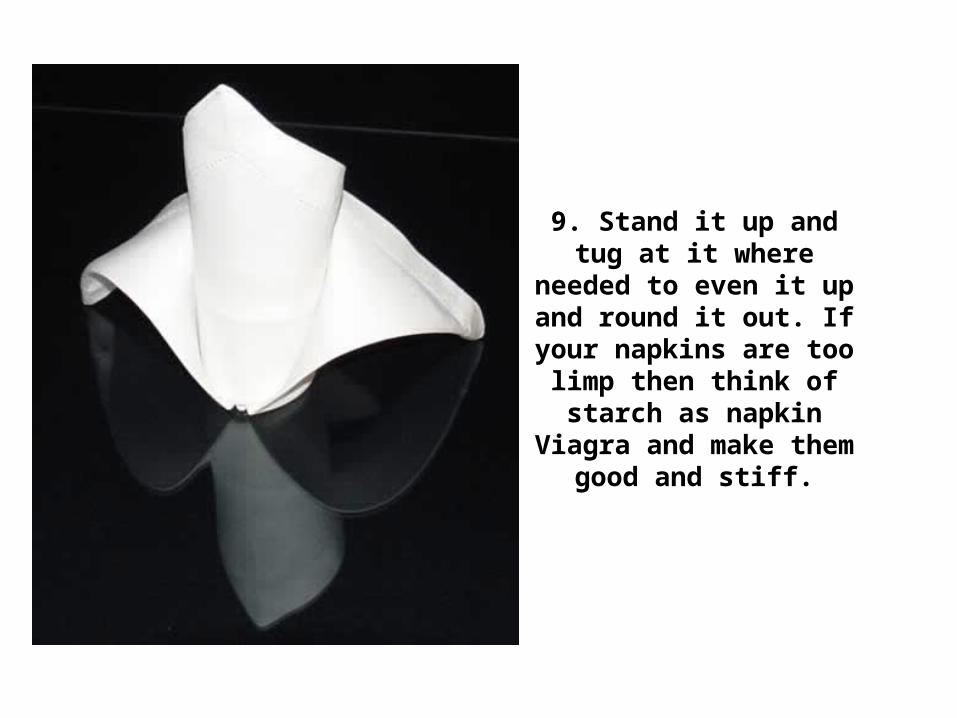
9. Stand it up and tug at it where needed to even it up
and round it out. If your napkins are too limp then think of starch as napkin
Viagra and make them good and stiff.
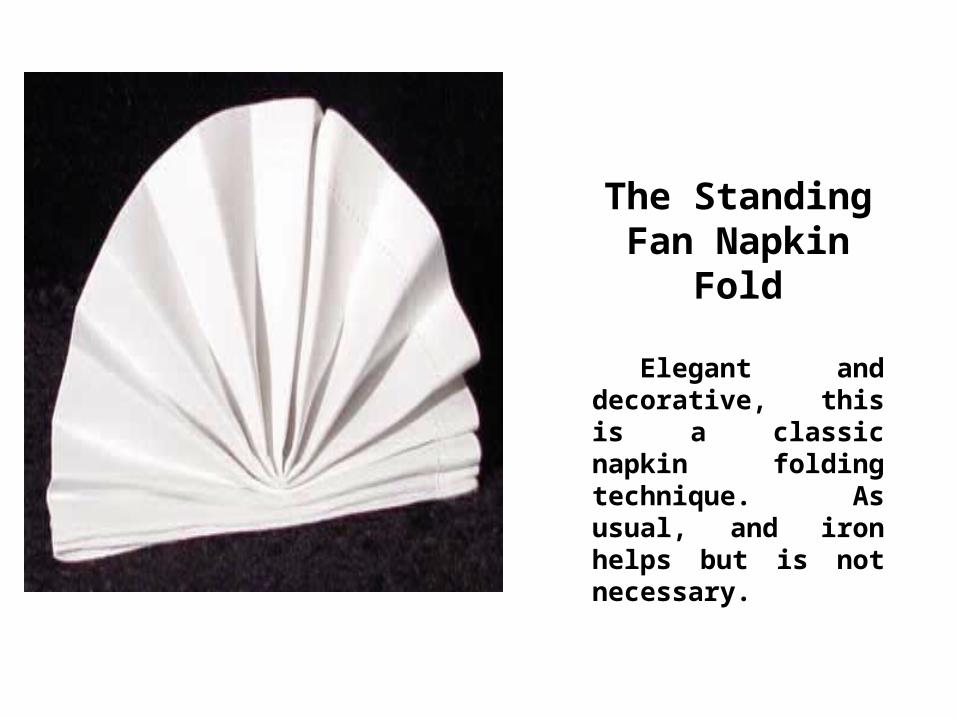
The Standing Fan Napkin Fold
Elegant and decorative, this is a classic napkin folding technique. As usual, and iron helps but is not necessary.
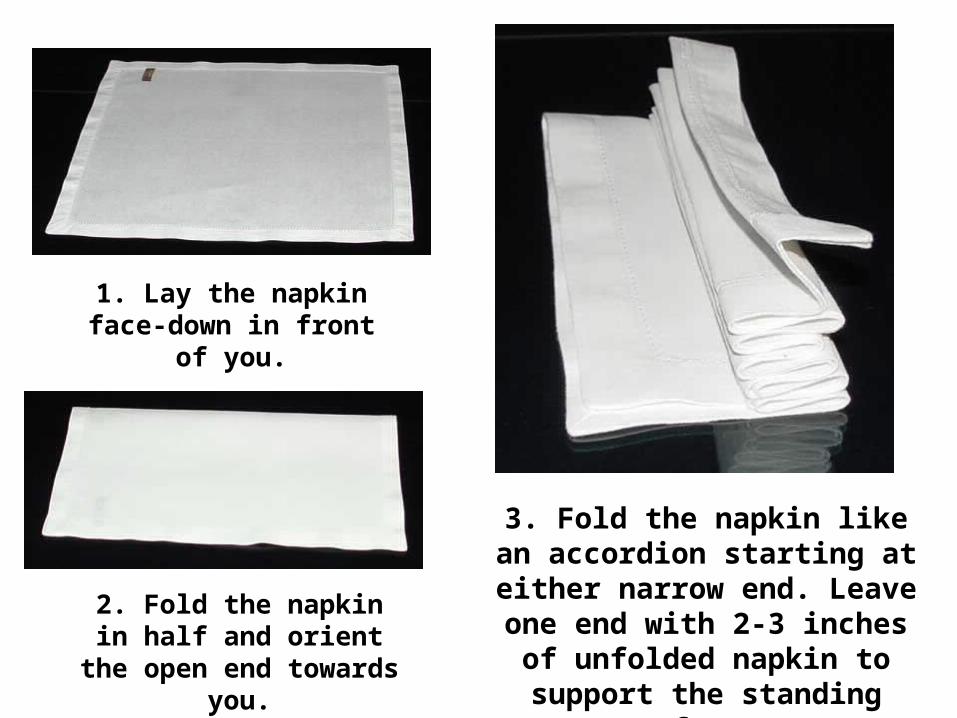
1. Lay the napkin face-down in front of you.
2. Fold the napkin in half and orient the open end towards
you.
3. Fold the napkin like an accordion starting at either narrow end. Leave one end with 2-3 inches of unfolded napkin to support the standing fan.
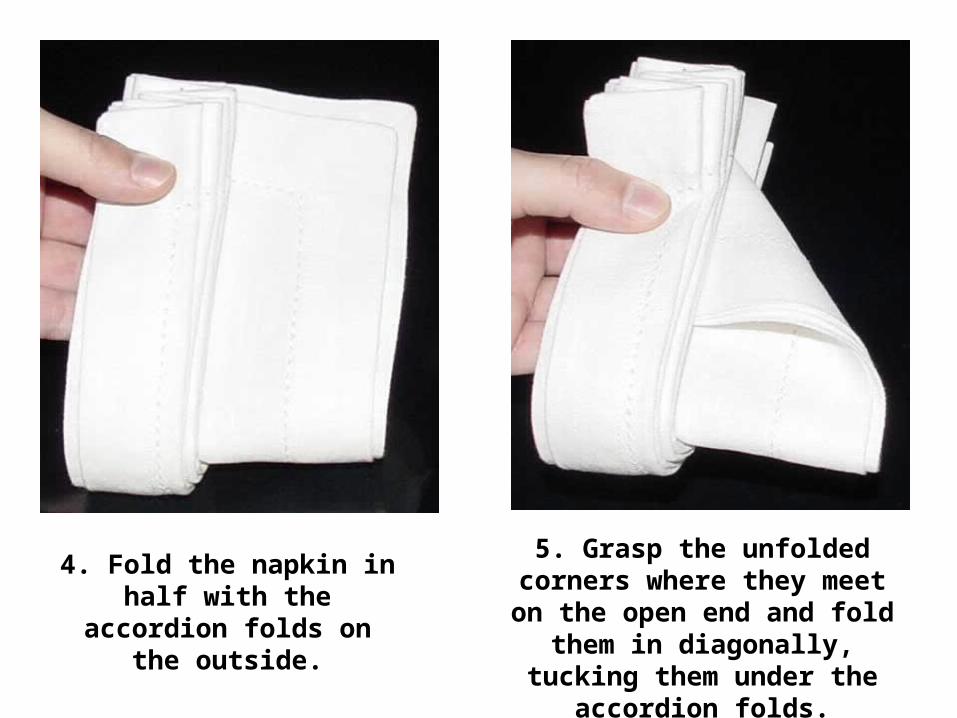
4. Fold the napkin in half with the accordion folds on the
outside.
5. Grasp the unfolded corners where they meet on the open end and fold
them in diagonally, tucking them under the accordion folds.

6. Open it and stand it up. A
beautiful fan for a beautiful dinner.

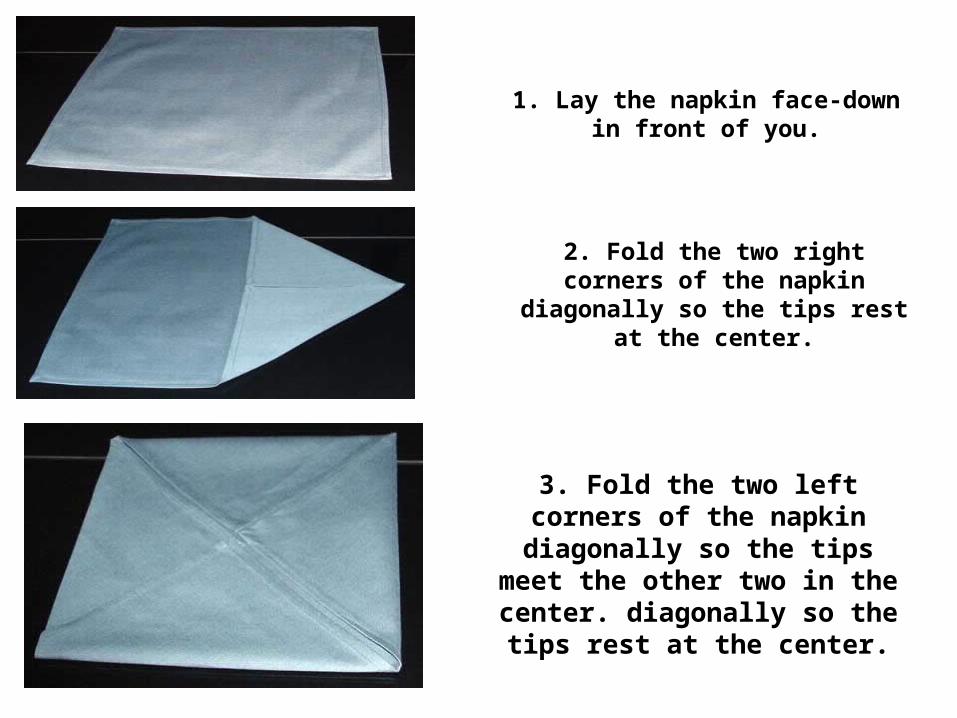
The Rose Napkin FoldDespite looking fairly elaborate, this fold is an
easy one, and it can be done with almost any variety of napkin. Display small bowls or glasses on top of these, or use them as novelty cocktail napkins.
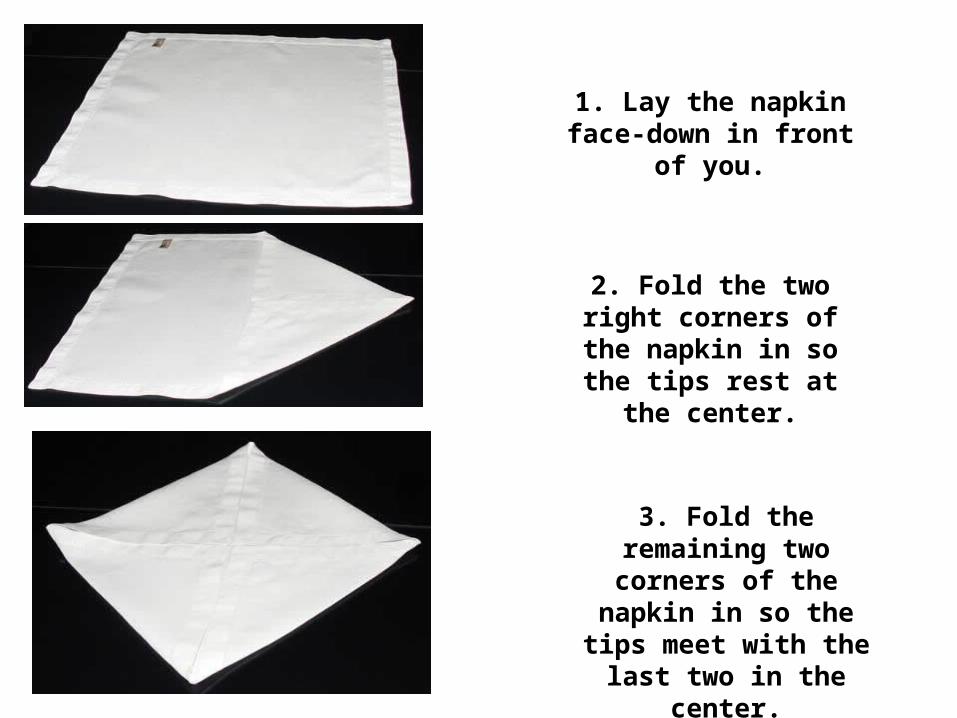
1. Lay the napkin face-down in front of you.
2. Fold the two right corners of the napkin in so the tips
rest at the center.
3. Fold the remaining two corners of the napkin in so the tips meet with the last
two in the center.
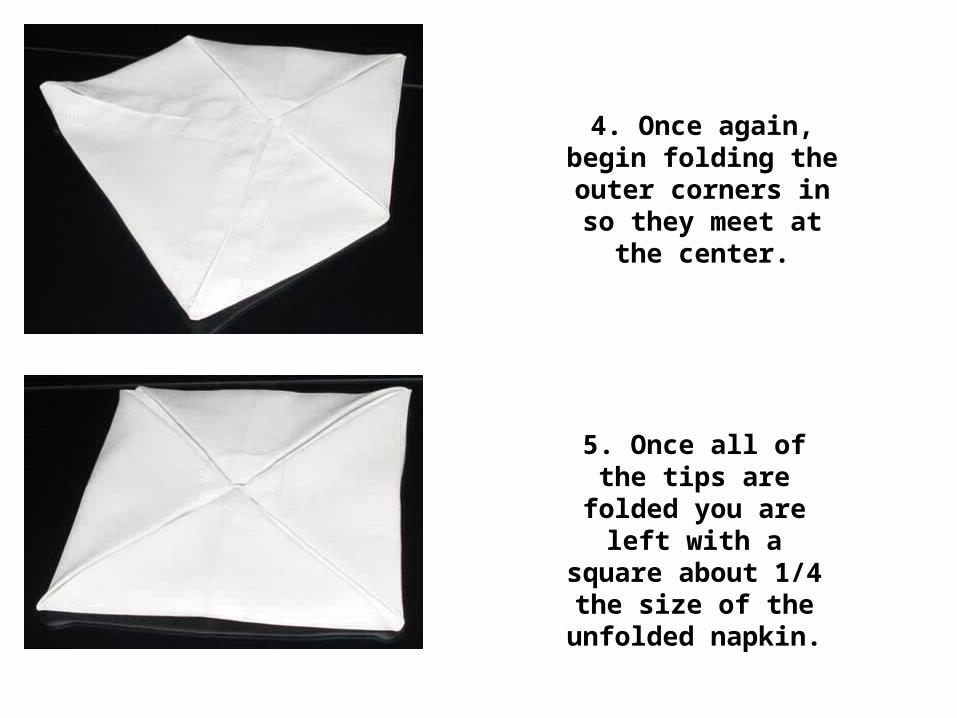
4. Once again, begin folding the outer corners
in so they meet at the center.
5. Once all of the tips are folded you are left with a square about 1/4 the size of the unfolded napkin.
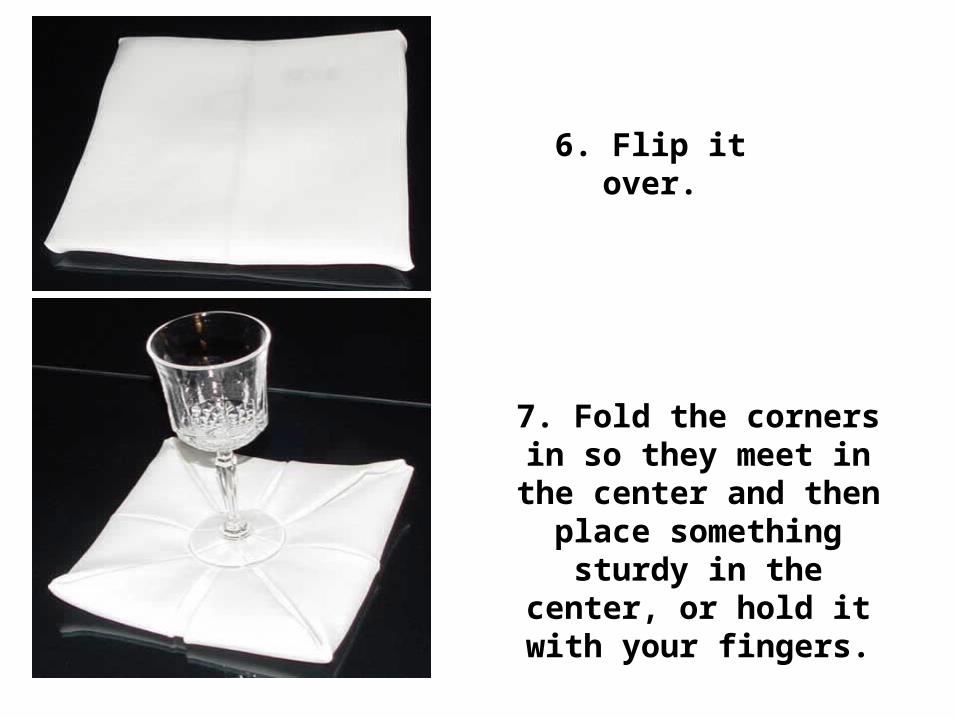
6. Flip it over.
7. Fold the corners in so they meet in the center and
then place something sturdy in the center, or hold
it with your fingers.

8. While maintaining downward pressure in the center of the napkin, reach
underneath each corner and pull out the flaps to create
petals.
9. Remove the center weight and your rose
should look as pictured here.
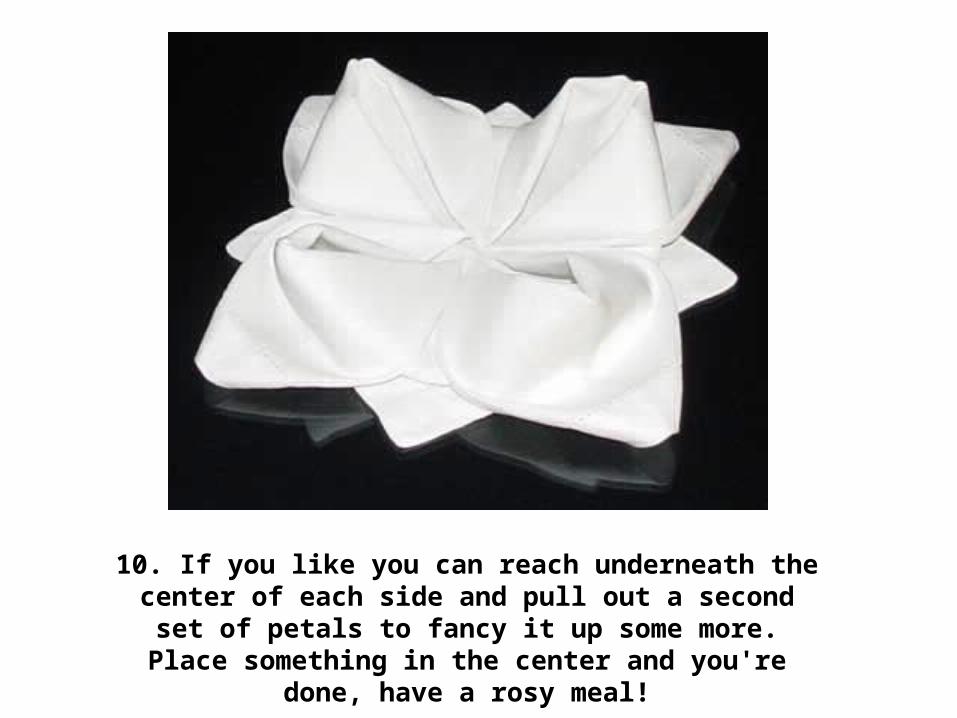
10. If you like you can reach underneath the center of each side and pull out a second set of petals to fancy it up some more. Place something in the center and you're done, have a rosy
meal!

The Necktie Napkin Fold
Now your guests can wipe food off of their expensive ties with... inexpensive ties! Isn't that special? This one's easier with limp napkins, but if you only have stiffies then an iron will make this simple to do. Remember that the larger the napkin is, the longer the tie will be.
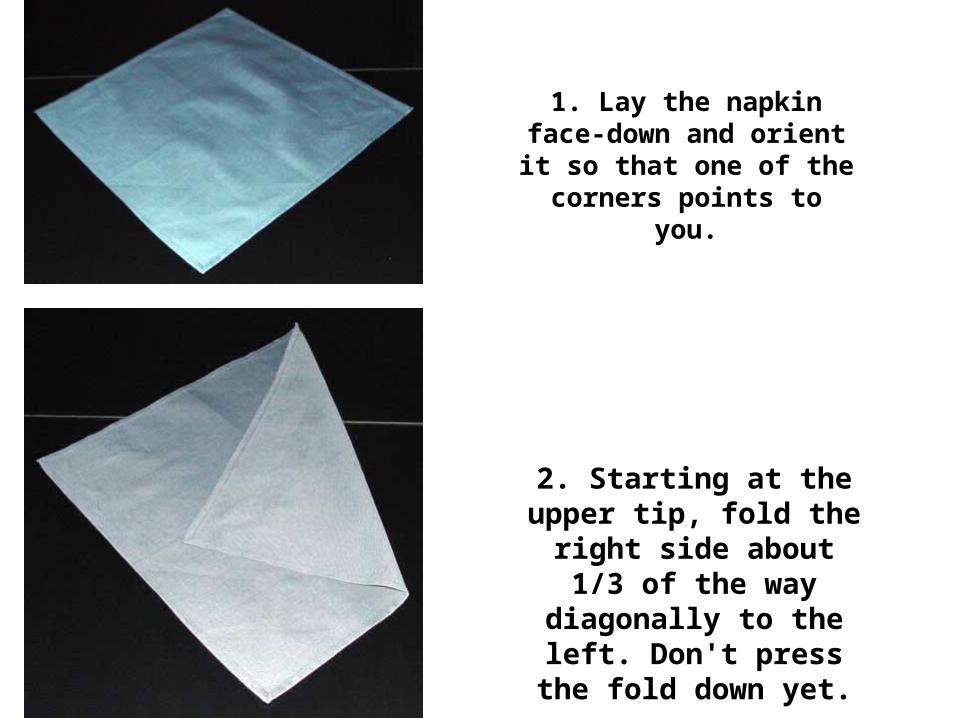
1. Lay the napkin face-down and orient it so that one of the
corners points to you.
2. Starting at the upper tip, fold the right side about 1/3 of the way diagonally to the
left. Don't press the fold down yet.

3. Repeat the last step with the left side and then adjust them both if needed so that both sides are symmetrical. Now press down the folds.
4. Fold the right side in about 1/3 of the way starting from
the upper tip, similar to what we did in the last two steps.
Don't press it down yet.

5. Repeat the last fold along the left side and adjust for symmetry. When you're happy with the shape of your tie, press the folds
down.
6. Fold the upper 1/3 of the tie
diagonally to the right so the tip of
the tie is perpendicular to he
lower part.
7. Turn the tie over so the tip is now
pointing left.
8. Wrap the tip around the top of the tie and
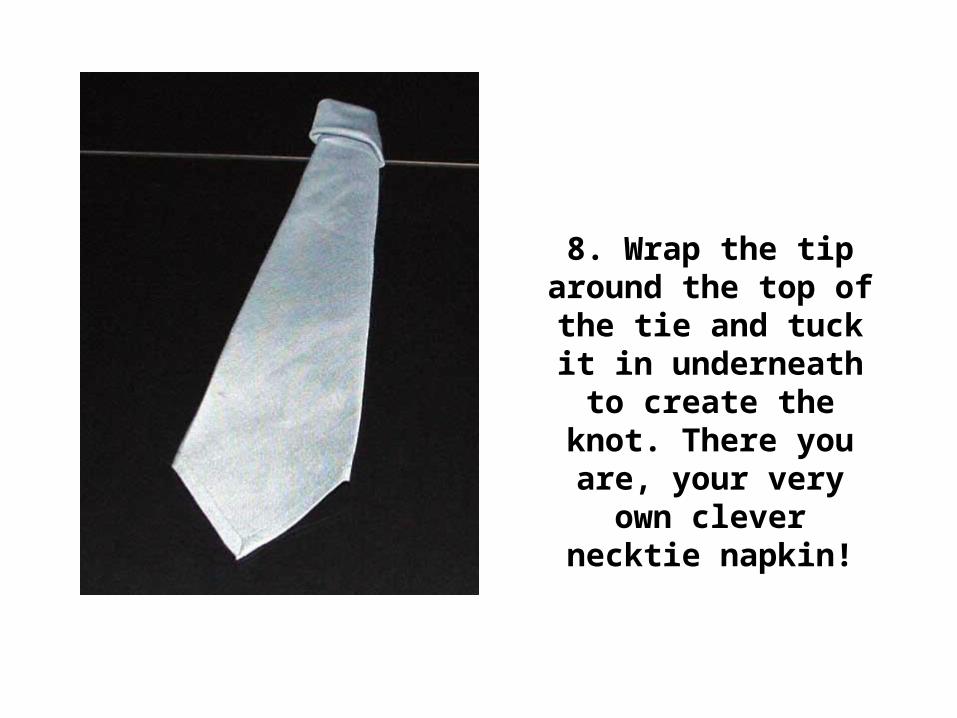
tuck it in underneath to create the knot. There you are, your very own clever necktie napkin!
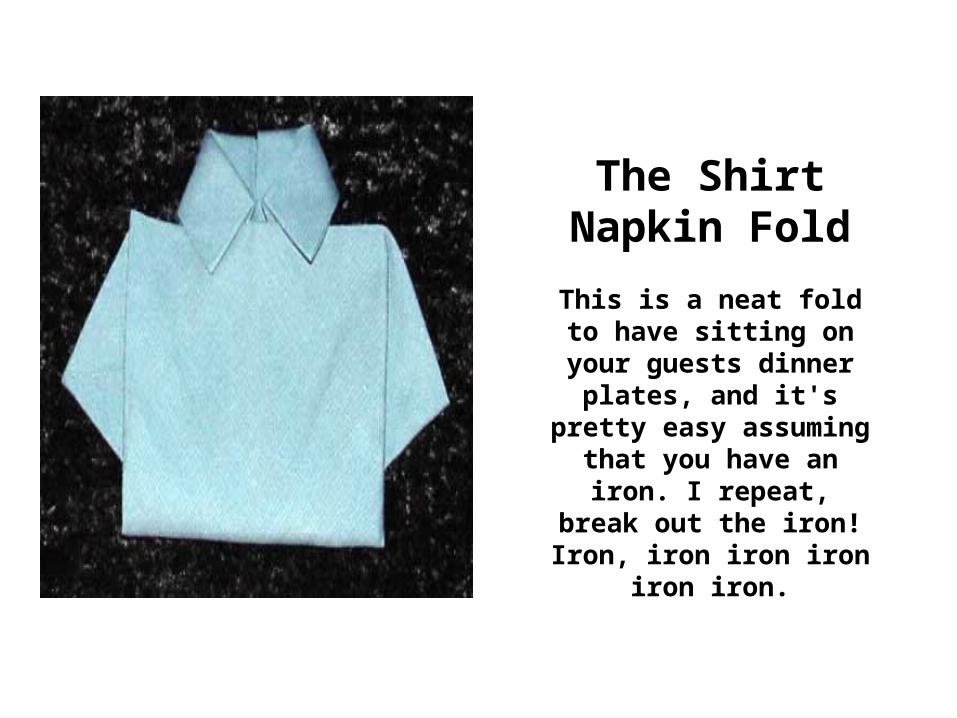
The Shirt Napkin Fold
This is a neat fold to have sitting on your guests dinner
plates, and it's pretty easy assuming that you have an iron. I repeat, break out the iron! Iron, iron iron iron iron
iron.
1. Lay the napkin face-down in front of you.
2. Fold the two right corners of the napkin diagonally so the tips rest at the
center.
3. Fold the two left corners of the napkin diagonally so the tips meet
the other two in the center. diagonally so the tips rest at the
center.

4. Fold the right side over so it's
edge rests on the napkins center-
line.
5. Fold the left side over to meet the last fold at the
center-line of the napkin.
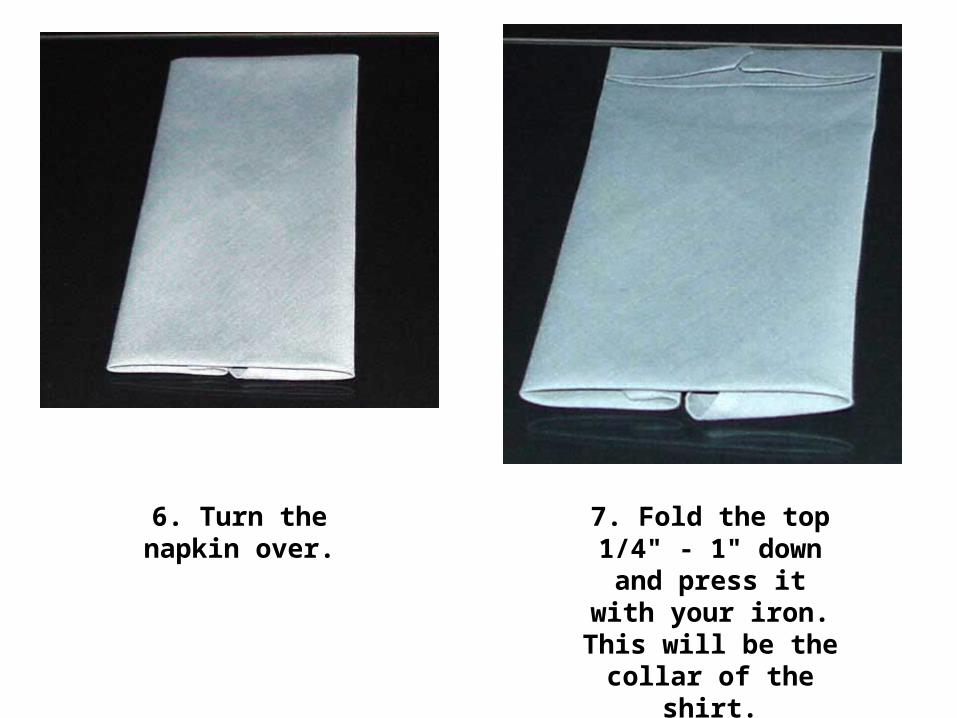
6. Turn the napkin over. 7. Fold the top 1/4" - 1" down and press it with your iron. This will be the collar of the shirt.
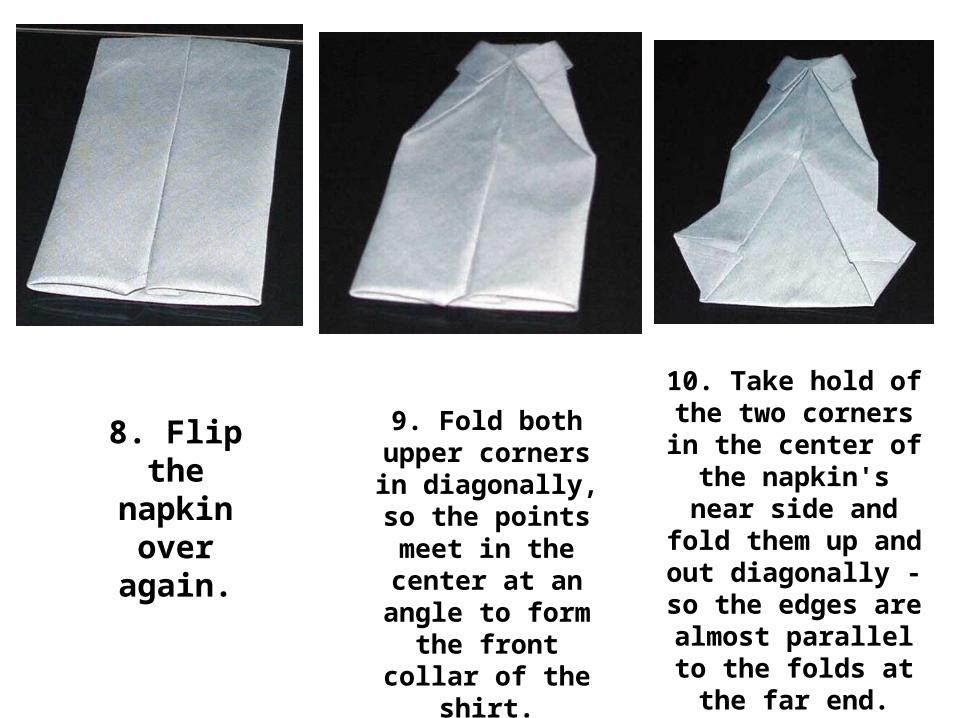
8. Flip the napkin
over again.
9. Fold both upper corners in diagonally, so the points meet in the center at an angle
to form the front collar of the shirt.
10. Take hold of the two corners in the
center of the napkin's near side and fold them up and out
diagonally - so the edges are almost
parallel to the folds at the far end. These will become the sleeves.
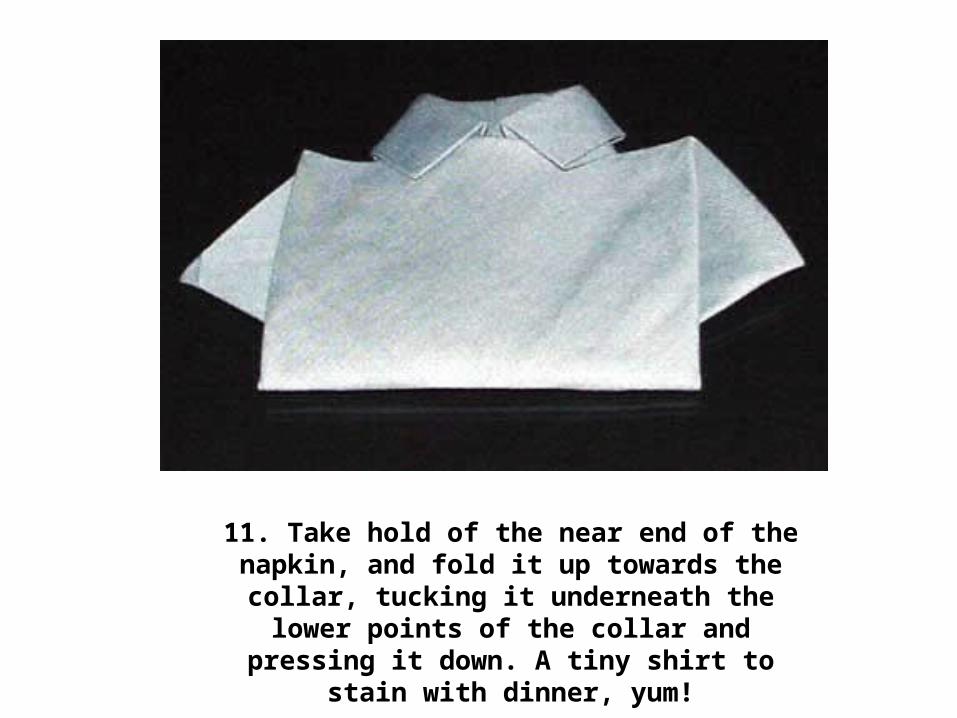
11. Take hold of the near end of the napkin, and fold it up towards the collar, tucking it underneath the lower points of the collar and pressing it down. A tiny shirt
to stain with dinner, yum!
Napkin Folding Ideas With
Napkin Rings
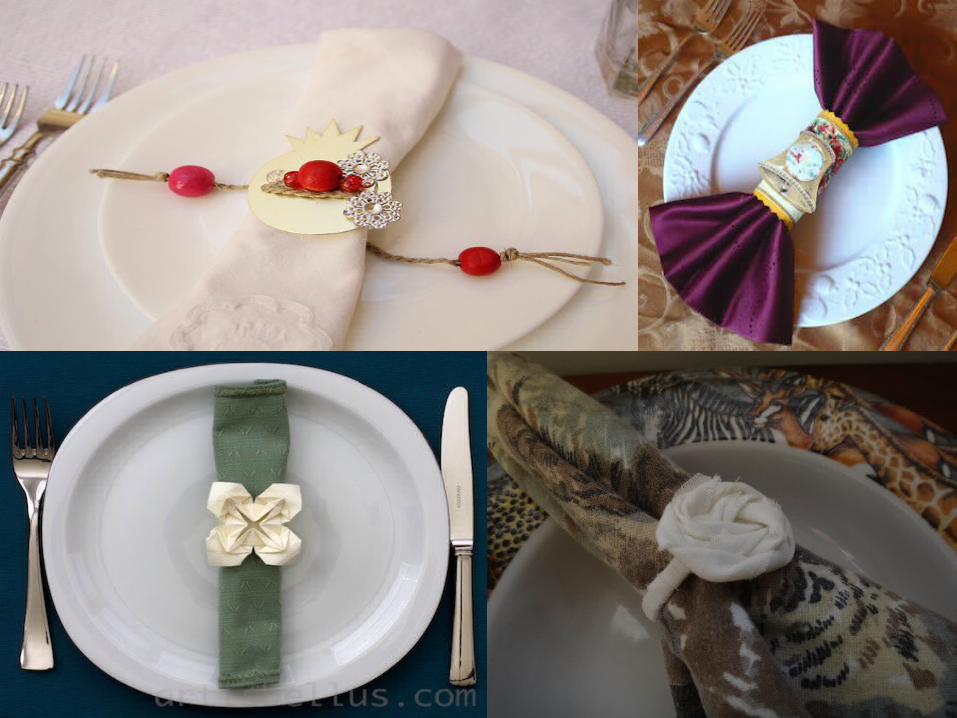
A table setting often reflects the mood and theme of a dinner party. Enhance the tables cape at your next event by presenting elegant napkin folds. There are several different types of dinner napkin folds that use napkin rings. The styles and difficulty of napkin folding vary from a basic fold to a complex design.

A beautifully set table is enhanced when you learn some simple napkin folding skills. A special table says that you really value your guests when you make the extra effort to set the table beautifully.

THANK YOU
MACKY