1 HP CHILLER - AquaEuroUSA HP Max-Chill Chiller Instructions.pdf · 1 HP CHILLER FOR TANKS UP TO...
7
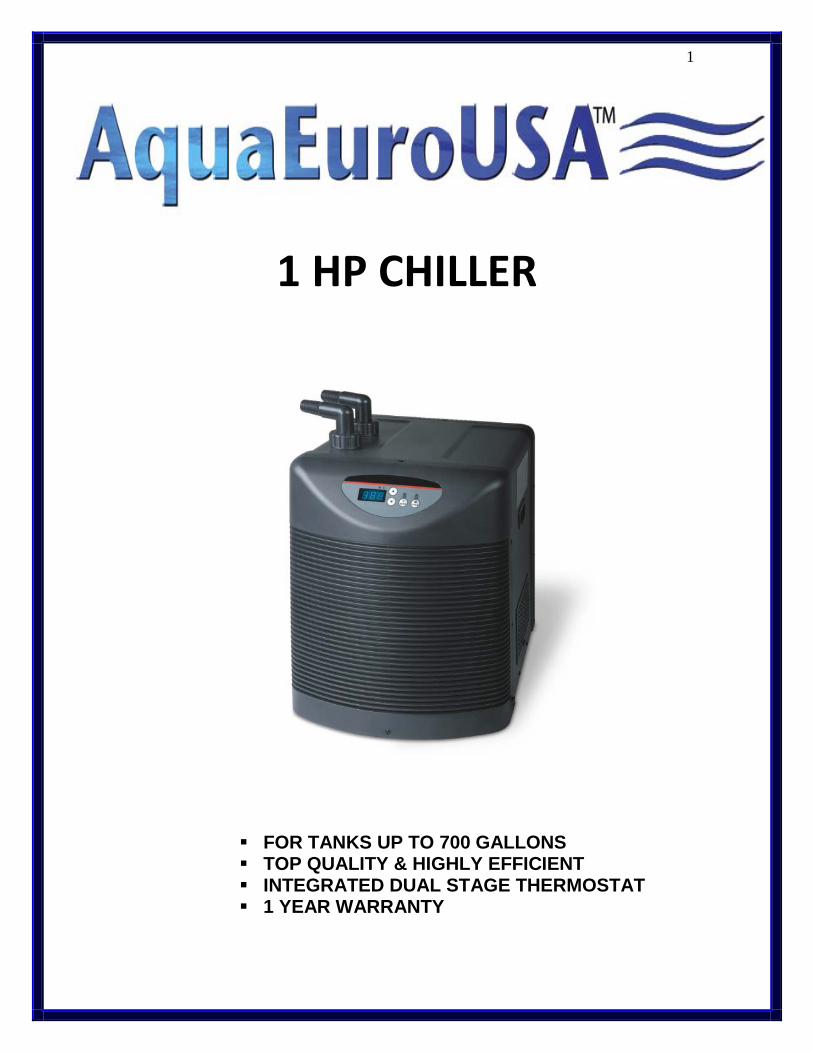
1 1 HP CHILLER FOR TANKS UP TO 700 GALLONS TOP QUALITY & HIGHLY EFFICIENT INTEGRATED DUAL STAGE THERMOSTAT 1 YEAR WARRANTY
-
Upload
nguyenhanh -
Category
Documents
-
view
249 -
download
10
Transcript of 1 HP CHILLER - AquaEuroUSA HP Max-Chill Chiller Instructions.pdf · 1 HP CHILLER FOR TANKS UP TO...
1
1 HP CHILLER
FOR TANKS UP TO 700 GALLONS TOP QUALITY & HIGHLY EFFICIENT INTEGRATED DUAL STAGE THERMOSTAT 1 YEAR WARRANTY
2
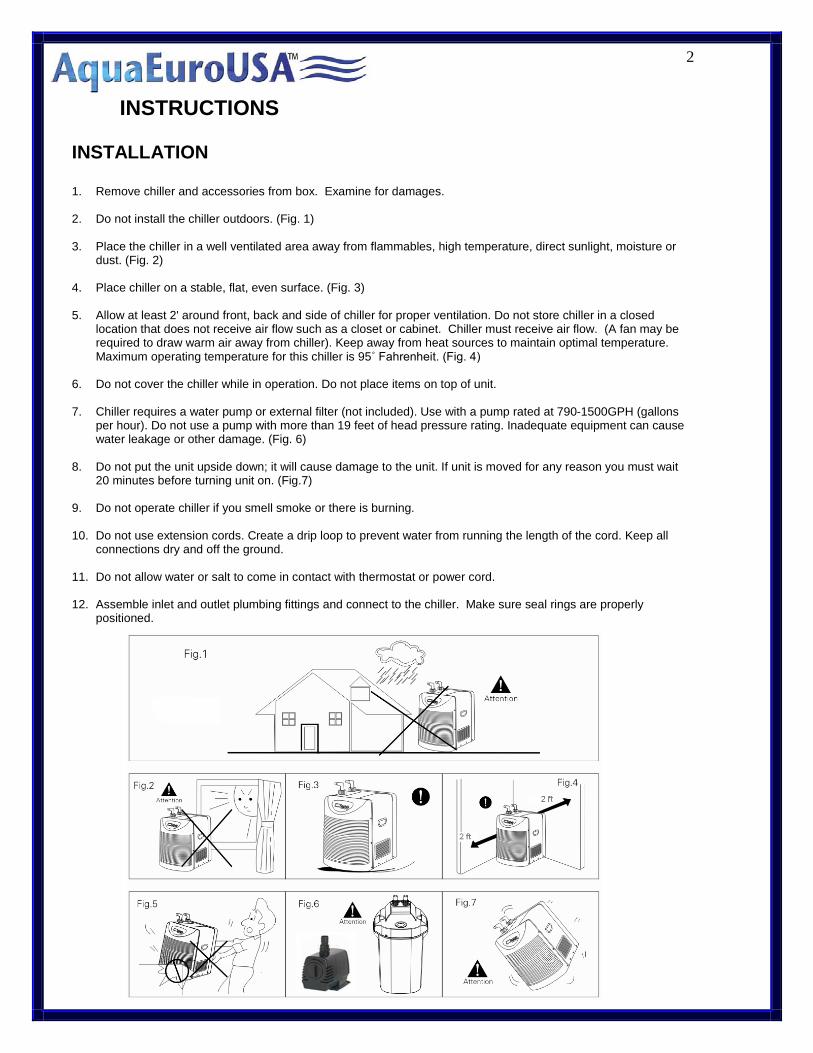
INSTRUCTIONS INSTALLATION 1. Remove chiller and accessories from box. Examine for damages. 2. Do not install the chiller outdoors. (Fig. 1)
3. Place the chiller in a well ventilated area away from flammables, high temperature, direct sunlight, moisture or
dust. (Fig. 2)
4. Place chiller on a stable, flat, even surface. (Fig. 3)
5. Allow at least 2' around front, back and side of chiller for proper ventilation. Do not store chiller in a closed location that does not receive air flow such as a closet or cabinet. Chiller must receive air flow. (A fan may be required to draw warm air away from chiller). Keep away from heat sources to maintain optimal temperature. Maximum operating temperature for this chiller is 95˚ Fahrenheit. (Fig. 4)
6. Do not cover the chiller while in operation. Do not place items on top of unit.
7. Chiller requires a water pump or external filter (not included). Use with a pump rated at 790-1500GPH (gallons
per hour). Do not use a pump with more than 19 feet of head pressure rating. Inadequate equipment can cause water leakage or other damage. (Fig. 6)
8. Do not put the unit upside down; it will cause damage to the unit. If unit is moved for any reason you must wait
20 minutes before turning unit on. (Fig.7)
9. Do not operate chiller if you smell smoke or there is burning.
10. Do not use extension cords. Create a drip loop to prevent water from running the length of the cord. Keep all connections dry and off the ground.
11. Do not allow water or salt to come in contact with thermostat or power cord.
12. Assemble inlet and outlet plumbing fittings and connect to the chiller. Make sure seal rings are properly
positioned.
3
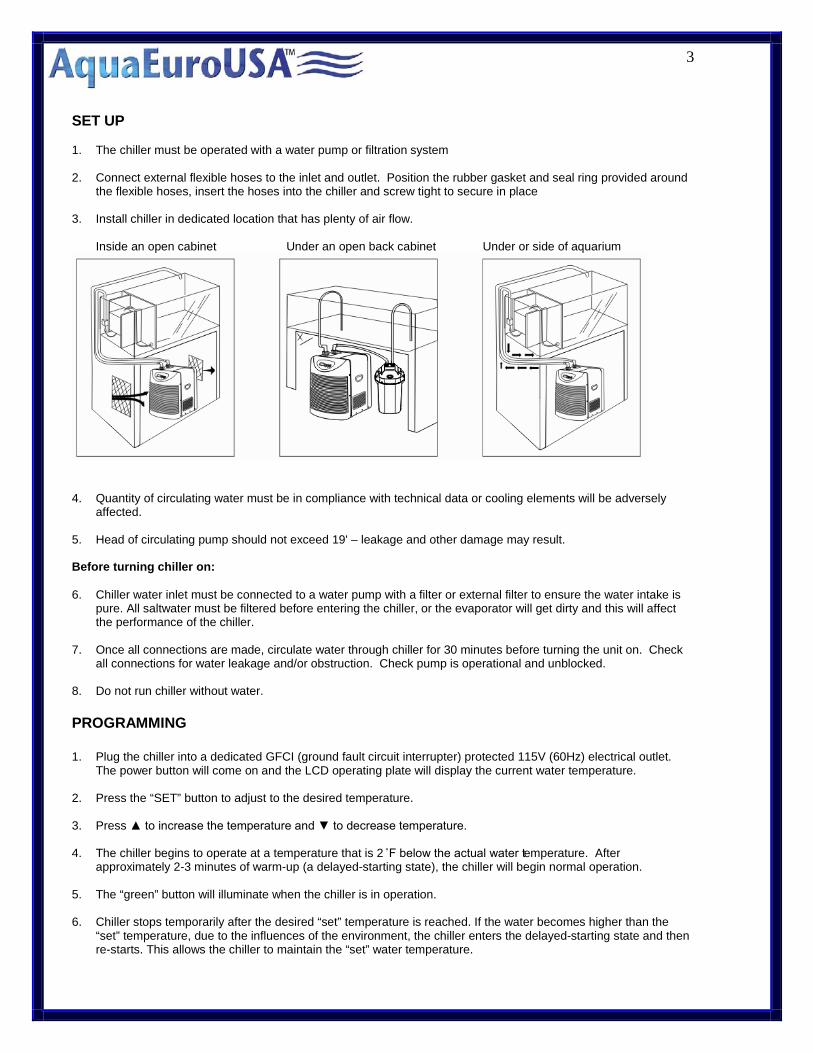
SET UP 1. The chiller must be operated with a water pump or filtration system 2. Connect external flexible hoses to the inlet and outlet. Position the rubber gasket and seal ring provided around
the flexible hoses, insert the hoses into the chiller and screw tight to secure in place
3. Install chiller in dedicated location that has plenty of air flow. Inside an open cabinet Under an open back cabinet Under or side of aquarium
4. Quantity of circulating water must be in compliance with technical data or cooling elements will be adversely affected.
5. Head of circulating pump should not exceed 19' – leakage and other damage may result.
Before turning chiller on:
6. Chiller water inlet must be connected to a water pump with a filter or external filter to ensure the water intake is pure. All saltwater must be filtered before entering the chiller, or the evaporator will get dirty and this will affect the performance of the chiller.
7. Once all connections are made, circulate water through chiller for 30 minutes before turning the unit on. Check
all connections for water leakage and/or obstruction. Check pump is operational and unblocked.
8. Do not run chiller without water.
PROGRAMMING 1. Plug the chiller into a dedicated GFCI (ground fault circuit interrupter) protected 115V (60Hz) electrical outlet.
The power button will come on and the LCD operating plate will display the current water temperature. 2. Press the “SET” button to adjust to the desired temperature.
3. Press ▲ to increase the temperature and ▼ to decrease temperature.
4. The chiller begins to operate at a temperature that is 2 ˚F below the actual water temperature. After
approximately 2-3 minutes of warm-up (a delayed-starting state), the chiller will begin normal operation.
5. The “green” button will illuminate when the chiller is in operation.
6. Chiller stops temporarily after the desired “set” temperature is reached. If the water becomes higher than the “set” temperature, due to the influences of the environment, the chiller enters the delayed-starting state and then re-starts. This allows the chiller to maintain the “set” water temperature.
4
MAINTENANCE
Warning: Do not touch chiller, cord or electrical plug with wet hands. Disconnect chiller from electricity (power supply) before performing maintenance, moving or adjusting chiller.
Every Month: 1. Disconnect from power supply. 2. Clean chiller filter. 3. Check water pump or filter supplying water to chiller to ensure good water flow. Clean water
pump/filter. 4. Rinse collected debris from the filter media, inlet & outlet fittings, hoses, pump impeller and
chamber cover with clean lukewarm tap water. 5. Clean housing with soft dry cloth. Do not use soap or detergents to clean any part of the chiller.
Every 6 Months:
1. Disconnect from power supply. 2. Clean filter pad, rinse filter with clean water to remove deposits, bacteria and impurities captured by
the filter. Air dry filter pad completely before replacing. 3. Use compressed air to clean debris and dust from the heat exhaust window.
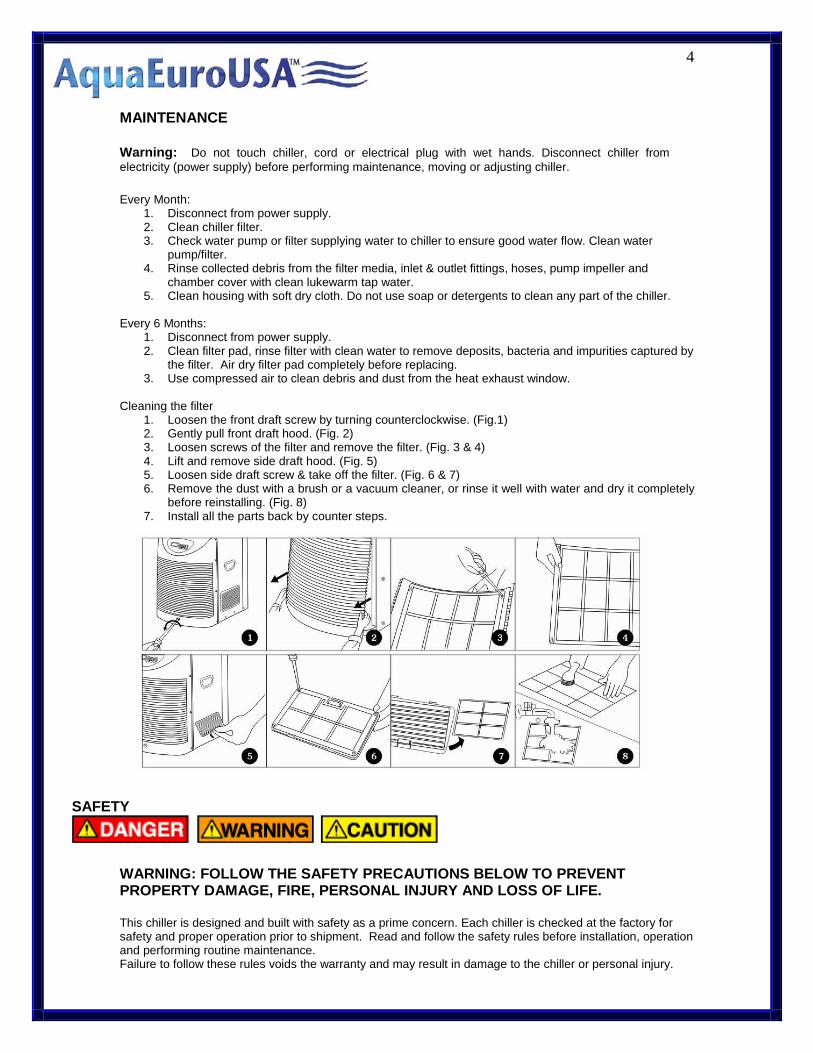
Cleaning the filter
1. Loosen the front draft screw by turning counterclockwise. (Fig.1) 2. Gently pull front draft hood. (Fig. 2) 3. Loosen screws of the filter and remove the filter. (Fig. 3 & 4) 4. Lift and remove side draft hood. (Fig. 5) 5. Loosen side draft screw & take off the filter. (Fig. 6 & 7) 6. Remove the dust with a brush or a vacuum cleaner, or rinse it well with water and dry it completely
before reinstalling. (Fig. 8) 7. Install all the parts back by counter steps.
SAFETY
WARNING: FOLLOW THE SAFETY PRECAUTIONS BELOW TO PREVENT PROPERTY DAMAGE, FIRE, PERSONAL INJURY AND LOSS OF LIFE.
This chiller is designed and built with safety as a prime concern. Each chiller is checked at the factory for safety and proper operation prior to shipment. Read and follow the safety rules before installation, operation and performing routine maintenance. Failure to follow these rules voids the warranty and may result in damage to the chiller or personal injury.
5
1. Do not attempt repairs by yourself. Do not try to repair a chiller that was damaged in shipment or damaged during use. Contact the manufacturer or your retailer in the event of malfunction.
2. Unplug chiller before putting on or taking off parts, before cleaning and when not in use. 3. Do not submerge chiller in water or other liquids, do not splash or let sit in pools of liquid. 4. Keep all connections dry and off the ground. 5. Do not touch electrical plug with wet hands to connect chiller to outlet. 6. Do not allow water or salt to come in contact with thermostat or power cords, plug or LCD. 7. Do not allow electrical components to get wet. If electrical components get wet, unplug the chiller
immediately. 8. Do not operate the chiller if cord or plug has been damaged in any way. 9. Do not operate chiller without water flow to the unit (evaporator housing may freeze up and
damage the chiller). 10. Before circulating water enters the chiller, it should be filtered to prevent sediment blockage. 11. Properly connect chiller to a three-pronged grounded outlet. 12. Connect chiller to a ground fault circuit interrupter (GFCI). 13. Only 115v (60Hz) electrical source should be used with chiller. 14. Leave a drip loop in the power cord to prevent water from running the length of the power cord and
reaching the power outlet. 15. Do not use extension cords. 16. Do not expose chiller to outside elements: sun, rain or dampness. 17. Do not have heat source (boiler, stove etc.) near chiller. 18. Use only manufacturer’s genuine replacement parts. The manufacturer is not responsible for
hazards caused by the use of unauthorized parts. 19. Keep a copy of this instruction sheet for reference.
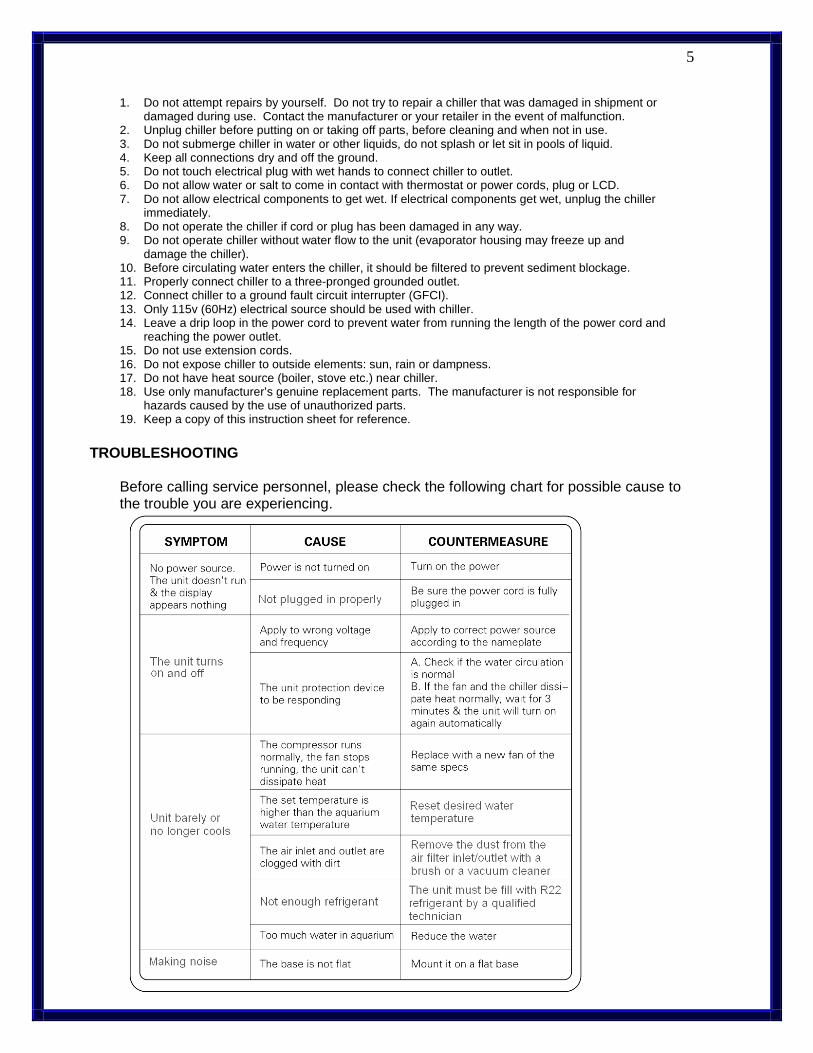
TROUBLESHOOTING Before calling service personnel, please check the following chart for possible cause to the trouble you are experiencing.
6
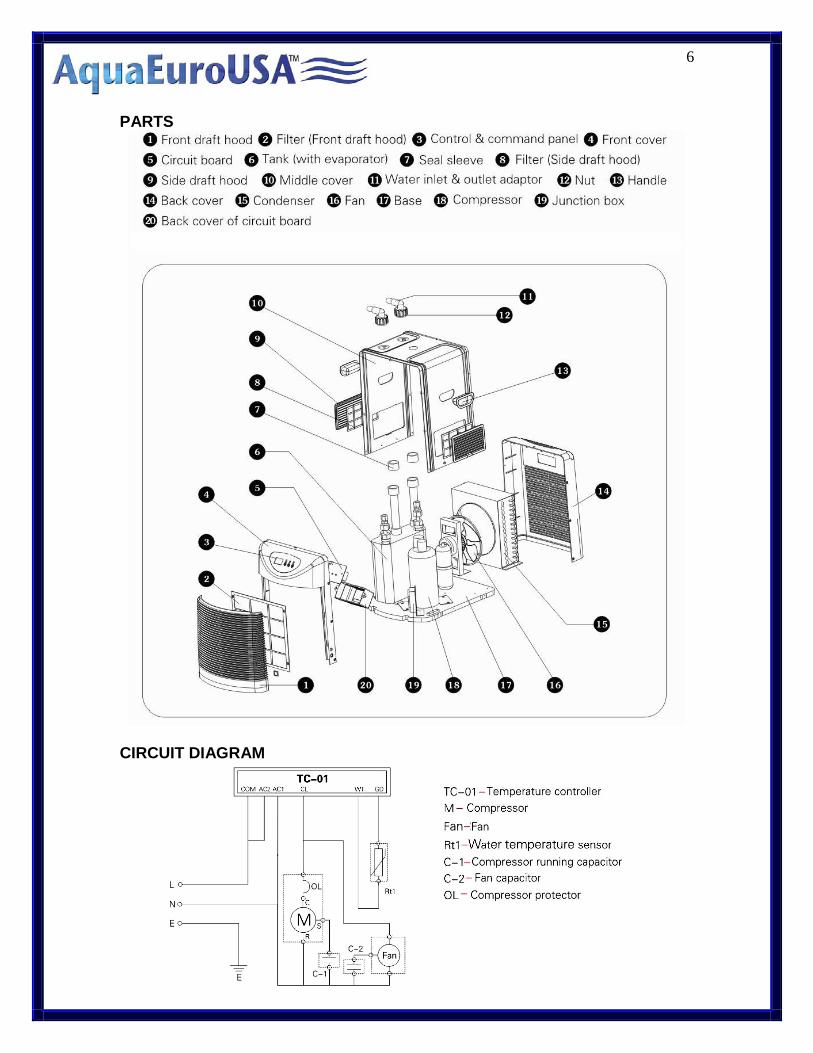
PARTS
CIRCUIT DIAGRAM
7
Aqua Euro USA™ One-Year Limited Warranty
Inspect chiller when it is received. If chiller is received damaged, notify the company you purchased from. Otherwise no claim can be made against the carrier.
Aqua Euro USA™ guarantees this product, to the original purchaser, against defects in components, materials and workmanship (that occur under normal use) for a period of ONE (1) YEAR from the date of retail purchase. The warranty is not transferable and is confined to the original retail purchaser only. The warranty does not extend to damages caused by power surges, saltwater corrosion, improper installation or any form of abuse. The warrant does not apply if (1) damages result from misuse, accident, lack of reasonable care or abuse, (2) the product is not purchased from Aqua Euro USA™ or an authorized dealer, (3) damage due to modification or alteration that is made to the product (4) wrong circuitry or unspecified electrical input to the chiller, (5) the site (location where the product is kept) conditions do not conform to the recommended operating conditions for the chiller, (6) the original brand name is removed, obliterated or altered from the product. Purchaser pays any postage, shipping and insurance fees to return chiller. If the needed repairs are covered by the warranty, the repairs will be made and purchaser will pay the return shipping charges. Again, in the event of product failure within the warranty period, please contact the store where the product was purchased for further instructions for repair or replacement. Repair or replacement will be carried out through Aqua Euro USA™ or its authorized dealers. A return authorization number and a copy of original purchase receipt are required for return of the defective product. After any repairs/replacement of the unit, this warranty will thereafter continue and remain in force only for the unexpired period of warranty. Moreover, the time taken for repair/replacement and in transit whether under the warranty or otherwise shall not be excluded from the warranty period. Limitation of Implied Warranties and Exclusion of Certain Damages. Limit of Liability: For any single claim, the limit of liability under this contract is the least of the cost of (1) authorized repairs, (2) replacement with a product or equal or greater value, (3) reimbursement for authorized repairs or replacement, or (4) the price that you paid for the product. (No cash refunds will be made). The total liability under this contract is the purchase price you paid for the product; in the event we replace the product or reimburse you for replacement of the product with another product of equal or greater value, we shall have satisfied all obligations owed under this contract.