1. Flowchart - READ SERVICE CAUTION FOR PROGRAMMING!
19
Page 1 of 19 2019 Mazda3 – Sudden Deceleration from False Brake Activation - Safety Recall 4219L Updated Jan 24, 2020 1. Flowchart - READ SERVICE CAUTION FOR PROGRAMMING! Repair C. Meter replacement and VCM Which software update is needed for the affected vehicle? Repair A. VCM only Repair B. VCM and IC Failure to follow Service Cautions may cause Module Damage! B. Update the VCM. B. Update the VCM. C. Update the meter (IC). B. Update the VCM. D. Check procedures after reprogramming. D. Check procedures after reprogramming. E. Attach the owner’s manual supplement document. E. Update the owner’s manual Complete the repair. A. Replace the instrument cluster.
Transcript of 1. Flowchart - READ SERVICE CAUTION FOR PROGRAMMING!
Page 1 of 19
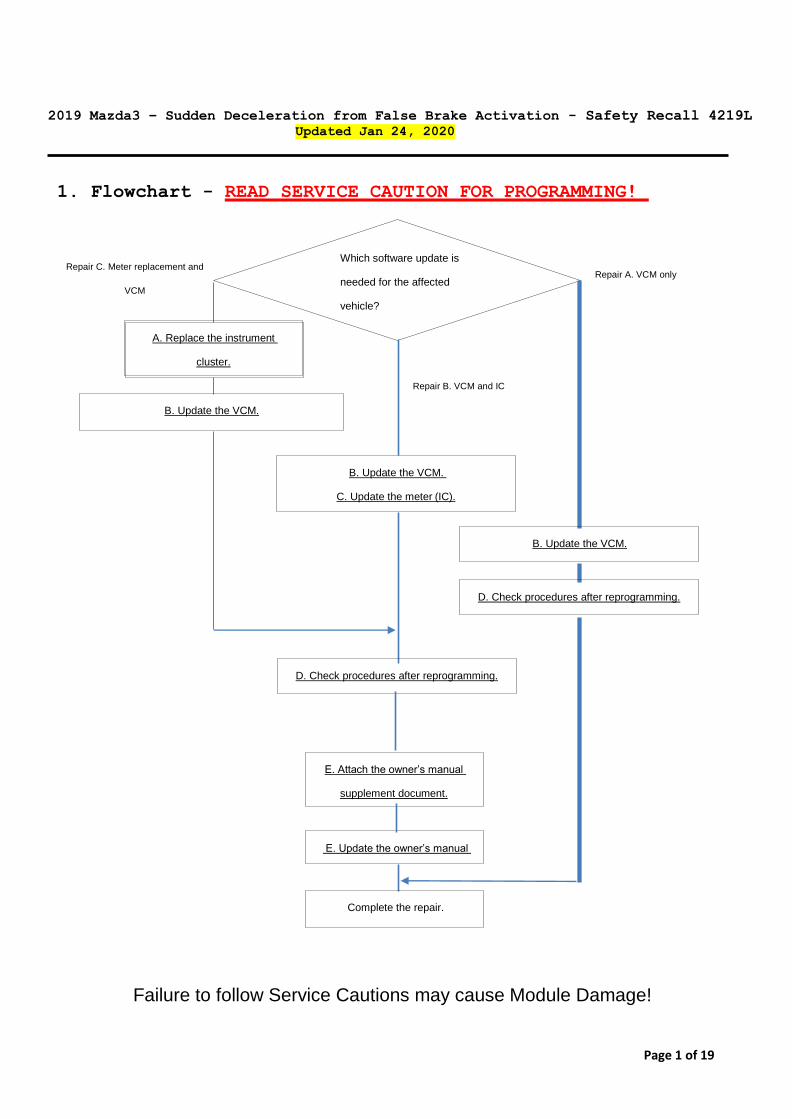
2019 Mazda3 – Sudden Deceleration from False Brake Activation - Safety Recall 4219L
Updated Jan 24, 2020
1. Flowchart - READ SERVICE CAUTION FOR PROGRAMMING!
Repair C. Meter replacement and
VCM
Which software update is
needed for the affected
vehicle?
Repair A. VCM only
Repair B. VCM and IC
Failure to follow Service Cautions may cause Module Damage!
B. Update the VCM.
B. Update the VCM.
C. Update the meter (IC).
B. Update the VCM.
D. Check procedures after reprogramming.
D. Check procedures after reprogramming.
E. Attach the owner’s manual
supplement document.
E. Update the owner’s manual
Complete the repair.
A. Replace the instrument
cluster.

Page 2 of 19
2. VEHICLE INSPECTION PROCEDURE
Verify that the vehicle is within the following ranges:
2019-2020 Mazda3 vehicles, equipped with smart brake support (SBS)
Model Subject VIN range Subject production date
range
Mazda3
built at MC
JM1 BP**** K1 100042 – 147655
JM1 BP**** L1 147656 – 154264
From September 25, 2018 through
October 19, 2019
Mazda3
built at MMVO
3MZ BP**** KM 100048 – 115055
3MZ BP**** LM 115095 – 124858
From January 15, 2019 through
October 23, 2019
The asterisk symbol “*” can be any letter or number.
- If the vehicle is within the above ranges, proceed to Repair Validation
and Repair Procedure A, B or C below depending on the vehicle.
- If the vehicle is not within the above ranges, return vehicle to the
customer or inventory.
Perform a Warranty Vehicle Inquiry using your eMDCS System and inspect
vehicle for Campaign Label Recall 4219L attached to the vehicle’s hood or
bulkhead. Refer to eMDCS System - Warranty Vehicle Inquiry Results table
below.
NOTE: Be sure to verify Recall number as the vehicle may have multiple
Recall labels.

Page 3 of 19
eMDCS System - Warranty Vehicle Inquiry Results:
If eMDCS displays: Campaign Label is: Action to perform:
RECALL 4219L OPEN Present Email Dealer Recall Help or
Contact Warranty Hotline at
(877) 727-6626 option 3 to
update vehicle history.
Not present Proceed to “REPAIR VALIDATION
AND PROCEDURES”.
RECALL 4219L CLOSED Present Return vehicle to inventory or
customer.
Not present Proceed to “3. CAMPAIGN LABEL
INSTALLATION”.
RECALL 4219L IS NOT
PRESENT
Does not apply Recall does not apply to this
vehicle. Return vehicle to
inventory or customer.
Repair Validation – Failure to follow Service
Caution may lead to module damage!
Repair Procedure - Follow
Steps
Repair A – Match VIN to Repair A VIN list
Vehicle requires VCM software update ONLY.
Repair A:
MMVO Production
LM118755 – 124858
Dates: 8/5/19 through 10/23/19
MC Production
L1150242 – 154264
Dates: 7/30/19 through 10/19/19
Proceed to Service Caution for
Reprogramming Pages 6 - 7
‘B. Reprogram the VCM.’ Page 8
‘D. Check procedures after
reprogramming.’ Page 18
Repair B - Match VIN to Repair B VIN list
Vehicle requires Instrument Cluster software update,
VCM software update, and CMU electronic owner’s manual
update.
Repair B:
MMVO Production
KM100048 – 114618
Dates: 1/15/19 through 7/01/19
LM115095 – 118752
Proceed to Service Caution for
Reprogramming Pages 6 - 7 then
‘B. Reprogram the VCM.’ Page 8
‘C. Reprogram the meter (IC).’
Page 13
‘D. Check procedures after
reprogramming.’ Page 18
‘E. Update the CMU electronic
owner’s manual.’ Page 18

Page 4 of 19
Dates: 7/01/19 through 7/25/19
MC Production
K1101936 – 147544
Dates: 11/5/18 through 6/28/19
L1147656 – 150225
Dates: 6/29/19 through 7/30/19
‘F. Attach the owner’s manual
supplement.’ Page 18
Repair C - Match VIN to Repair C VIN list
Vehicle requires Instrument Cluster replacement, VCM
software update, and CMU electronic owner’s manual
update.
Repair C: MC Production
K1100042 – 102178
Dates: 9/25/18 – 11/5/18
**No need to reprogram the
meter (IC)**
Proceed to Service Caution for
Reprogramming Pages 6 & 7 then
‘A. Replace the IC.’ Page 5
‘B. Reprogram the VCM.’ Page 8
‘D. Check procedures after
reprogramming.’ Page 18
‘E. Update the CMU electronic
owner’s manual.’ Page 18
‘F. Attach the owner’s manual
supplement.’ Page 18

Page 5 of 19
A. Replace the instrument cluster (see INSTRUMENT CLUSTER REMOVAL/INSTALLATION)
• When replacing the instrument cluster, perform the configuration to assure that the
system operates correctly. (See CONFIGURATION.)
Caution
• If the instrument cluster is left for a long time
with its screen facing down, grease applied to the
needles may spill and the needles may not operate
smoothly. When storing the instrument cluster, store
it with its screen facing upward.
1. Perform the following procedure.
(a) Perform manual configuration using the following procedure.
1) Connect MDARS to the DLC-2.
2) Switch the ignition ON (engine off or on).
3) Perform vehicle identification.
4) Select [Configuration] using MDARS.
5) Select [IC].
6) Perform manual configuration following the instructions on the screen.
(b) Switch the ignition OFF.
(c) Switch the ignition ON (engine off or on) to complete the instrument cluster automatic
configuration.

Page 6 of 19
Service Caution for Reprogramming
NOTE: Poor connection between the vehicle and MDARS and/or low voltage may
result in abnormal termination and/or data corruption.
a. Make sure that the following connections are firmly connected, and then do NOT
touch the VCM and DLC cable to prevent from causing
noise and poor connection.
- Between the vehicle-side connector and the DLC cable
- Between the PC-side connector and USB port of PC
b. Connect AC adapter to the PC in order to minimize any voltage fluctuation during
reprogramming
Do NOT use vehicle battery outlet as power source for the PC.
c. During reprogramming, connect GR8 battery charger,
Manual Mode set to 14.5 volts and continuous
charging to the vehicle to minimize any voltage
fluctuation. See the below screen shots to set the
GR8 battery charger correctly. DO NOT USE ANY OTHER
CHARGER!
GR8 Screenshots in order from left to right to set the correct stable charging
voltage.

Page 7 of 19
Before reprogramming, pay attention to the vehicle condition
and PC environment.
a. Turn off all the electrical loads, especially pay attention to A/C (blower),
audio, rear defogger and headlights.
b. Perform self-test and verify no DTC is stored. If any DTC is stored, fix the
concern and delete the DTC.
c. Disconnect all non-genuine aftermarket accessories.
d. Terminate all programs other than MDARS on the PC. This may extend reprogramming, PC
may freeze or it may cause other problems.
e. Perform reprogramming under proper Internet environment. Use Ethernet cable if
at all possible. If using a wireless network, make sure the signal connection
is strong and fast.
f. Be sure there is sufficient free space on the PC’s hard disc. Insufficient free
space (less than 1 GB) may result in PC freeze during reprogramming.

Page 8 of 19
B. Reprogram the VCM (Vehicle control module)
1. Thoroughly read the service cautions on the prior pages to avoid module damage!
2. Confirm VCI Settings before vehicle identification. Select ‘Change VCI’
CAUTION: The Instrument Cluster (IC) could be damaged if Step 2 is not performed
3. A Pop up screen will appear, click ‘OK’
4. Ensure “D_PDU_API_Bosch_Mazda_VCM_II” is selected (highlighted green)
5. Under VCI Device, ensure the proper VCM serial number is shown

Page 9 of 19
6. Vehicle identification begins automatically.
7. Reprogram the VCM (Vehicle control module)
Select

Page 10 of 19
Select
Select
Select

Page 11 of 19
Select
Select
Select

Page 12 of 19
This takes about 3 minutes to complete the Running Process.
After VCM reprogramming, verify the calibration file name with the chart below in
the screen of the (VCM) FILENAME.
Note: If VCM software update failure occurs, go to Service Alert SA-017/20
Calibration files information
NOTE: If the calibration file is with the suffix in the table or later, the meter
already has the modified calibration.
Country Model VCM filename after
reprogramming
Specification
U.S.A/Canada Mazda3
(BP)
BCKA-66S01-P 4SD
BEMD-66S01-N 5HB
BDTS-66S01-L 4SD (Mexico built)
Check current version at Calibration File
information below.
Select

Page 13 of 19
C. Reprogram the meter (IC)
Reprogram the meter (IC) using MDARS.
NOTE: Follow the attached “Service Caution for reprogramming” on pages 5 and 6.

Page 14 of 19
Select
Select

Page 15 of 19
Select
Select
Select

Page 16 of 19
It takes about 4 minutes to complete the running process. Select ‘Next’
when Running Process is finished.
Note: If IC software update failure occurs, go to Service Alert SA-017/20.
Select
Select

Page 17 of 19
After IC reprogramming, verify the calibration file name at current version with
the chart below in the screen of the (IC) FILENAME.
Calibration files information
NOTE:
• If the calibration file is with the suffix in the table or later, the IC already
has the modified calibration.
Country Model Meter (IC) filename after
reprogramming
U.S.A/Canada Mazda3 (BP) BDGF-66S14-L
Check current version at Calibration File
information below.
Select

Page 18 of 19
D. Check procedures after reprogramming
1. Check for DTC and confirm there is no stored DTC.
• DTC P2610:00 may be stored. If so, please start the engine and clear the DTC.
NOTE: DTC U2120:00, U2030:51 or/and U2500:82 (Related DTCs of Forward sensing
camera) may be stored and i-ACTIVSENSE warning light (amber) may turn on after
driving. These DTCs may not be stored just after reprograming. It may be stored
after driving. To avoid stored DTC, you need to put the FSC into sleep mode.
2. Put the Forward Sensing Camera (FSC) into sleep mode as follows:
• Disconnect MDARS
• Turn the ignition off and get out of the car
• Close and lock all doors
• Allow the vehicle to sit in this condition for 10 minutes or more
3. Verify the repair by starting the engine and making sure there is no MIL
illumination or abnormal warning lights present.
If any DTCs should remain after performing DTC erase, diagnose the DTCs according to
the appropriate troubleshooting section of the Workshop Manual.
E. Update the owner’s manual (OM) using USB – (see ELECTRONIC OWNERS MANUAL
UPDATE PROCEDURE)
F. Attach the Owner’s Manual Supplement
1. Go to MGSS and open the updated owner’s manual supplement titled: “4219L
– Owners Manual Supplement.pdf” and “4219L - Customer Acknowledgement Form.pdf”.
2. Print both documents at 100% size. You can cut the owner’s manual supplement paper
to match the owner’s manual page size for a cleaner look.
3. Place the supplement in the owner’s manual inside the storage pouch.
4. Give the copy of the Customer Acknowledgement Form along with the repair order to the
service consultant so the customer can sign and acknowledge they have received the
paper owner’s manual update and keep the copy for the dealer records.
5. Proceed to step 3, Campaign Label Installation

3. CAMPAIGN LABEL INSTALLATION:
1. Fill out a blue “Campaign Label” (9999-95-065A-06) with Campaign No:
“4219L”, your dealer code, today’s date.
2. Affix it to the hood or bulkhead as shown:
3. Return the vehicle to customer.