1. Beginner Tutorial · set of buttons to create and upload an XForm.€ The XForm contains the...
22
1. Beginner Tutorial . . . . . . . . . . . . . . . . . . . . . . . . . . . . . . . . . . . . . . . . . . . . . . . . . . . . . . . . . . . . . . . . . . . . . . . . . . . . . . . . . . . . . . . . . . . . 2 1.1 1. Set Up Your Project Space . . . . . . . . . . . . . . . . . . . . . . . . . . . . . . . . . . . . . . . . . . . . . . . . . . . . . . . . . . . . . . . . . . . . . . . . . . . . . . 2 1.2 2. Create the Application . . . . . . . . . . . . . . . . . . . . . . . . . . . . . . . . . . . . . . . . . . . . . . . . . . . . . . . . . . . . . . . . . . . . . . . . . . . . . . . . . . 3 1.3 3. Testing the Application . . . . . . . . . . . . . . . . . . . . . . . . . . . . . . . . . . . . . . . . . . . . . . . . . . . . . . . . . . . . . . . . . . . . . . . . . . . . . . . . . 7 1.4 4. Adding Form Logic . . . . . . . . . . . . . . . . . . . . . . . . . . . . . . . . . . . . . . . . . . . . . . . . . . . . . . . . . . . . . . . . . . . . . . . . . . . . . . . . . . . . 8 1.5 5. Creating the Follow Up Form . . . . . . . . . . . . . . . . . . . . . . . . . . . . . . . . . . . . . . . . . . . . . . . . . . . . . . . . . . . . . . . . . . . . . . . . . . . . 9 1.6 6. Setting Up Cases . . . . . . . . . . . . . . . . . . . . . . . . . . . . . . . . . . . . . . . . . . . . . . . . . . . . . . . . . . . . . . . . . . . . . . . . . . . . . . . . . . . . . 11 1.7 8. Loading Case Data . . . . . . . . . . . . . . . . . . . . . . . . . . . . . . . . . . . . . . . . . . . . . . . . . . . . . . . . . . . . . . . . . . . . . . . . . . . . . . . . . . . . 14 1.8 9. Closing Cases . . . . . . . . . . . . . . . . . . . . . . . . . . . . . . . . . . . . . . . . . . . . . . . . . . . . . . . . . . . . . . . . . . . . . . . . . . . . . . . . . . . . . . . . 19 1.9 10. Next Steps . . . . . . . . . . . . . . . . . . . . . . . . . . . . . . . . . . . . . . . . . . . . . . . . . . . . . . . . . . . . . . . . . . . . . . . . . . . . . . . . . . . . . . . . . . 22
Transcript of 1. Beginner Tutorial · set of buttons to create and upload an XForm.€ The XForm contains the...

1. Beginner Tutorial . . . . . . . . . . . . . . . . . . . . . . . . . . . . . . . . . . . . . . . . . . . . . . . . . . . . . . . . . . . . . . . . . . . . . . . . . . . . . . . . . . . . . . . . . . . . 21.1 1. Set Up Your Project Space . . . . . . . . . . . . . . . . . . . . . . . . . . . . . . . . . . . . . . . . . . . . . . . . . . . . . . . . . . . . . . . . . . . . . . . . . . . . . . 21.2 2. Create the Application . . . . . . . . . . . . . . . . . . . . . . . . . . . . . . . . . . . . . . . . . . . . . . . . . . . . . . . . . . . . . . . . . . . . . . . . . . . . . . . . . . 31.3 3. Testing the Application . . . . . . . . . . . . . . . . . . . . . . . . . . . . . . . . . . . . . . . . . . . . . . . . . . . . . . . . . . . . . . . . . . . . . . . . . . . . . . . . . 71.4 4. Adding Form Logic . . . . . . . . . . . . . . . . . . . . . . . . . . . . . . . . . . . . . . . . . . . . . . . . . . . . . . . . . . . . . . . . . . . . . . . . . . . . . . . . . . . . 81.5 5. Creating the Follow Up Form . . . . . . . . . . . . . . . . . . . . . . . . . . . . . . . . . . . . . . . . . . . . . . . . . . . . . . . . . . . . . . . . . . . . . . . . . . . . 91.6 6. Setting Up Cases . . . . . . . . . . . . . . . . . . . . . . . . . . . . . . . . . . . . . . . . . . . . . . . . . . . . . . . . . . . . . . . . . . . . . . . . . . . . . . . . . . . . . 111.7 8. Loading Case Data . . . . . . . . . . . . . . . . . . . . . . . . . . . . . . . . . . . . . . . . . . . . . . . . . . . . . . . . . . . . . . . . . . . . . . . . . . . . . . . . . . . . 141.8 9. Closing Cases . . . . . . . . . . . . . . . . . . . . . . . . . . . . . . . . . . . . . . . . . . . . . . . . . . . . . . . . . . . . . . . . . . . . . . . . . . . . . . . . . . . . . . . . 191.9 10. Next Steps . . . . . . . . . . . . . . . . . . . . . . . . . . . . . . . . . . . . . . . . . . . . . . . . . . . . . . . . . . . . . . . . . . . . . . . . . . . . . . . . . . . . . . . . . . 22

1. 2. 3.
1.
2.
3. 4. 5.
Beginner TutorialThis tutorial will introduce CommCare HQ and various functionality in the application designer. We are going tocreate an application that will be used for maternal health counselling. It will contain the following forms
Registration: Used to register pregnant women with the applicationFollow Up: Used for counselling during the pregnancy.Delivery: Used to register a birth has occurred and the outcome of the birth.
First we need to setup our CommCareHQ project space.
Set Up Your Project Space >>
1. Set Up Your Project Space
If you haven't already signed up for CommCareHQ, navigate to and register. Afterwww.commcarehq.orgregistration, you'll be prompted to create a Project Space. A Project Space represents the data, reports andapplications for a given project. Select a project name and continue.
Once your project space has been created (you will receive an email confirmation), you'll be navigated to the Report page. Here is a quick description of each of the sections in your domain.s
Reports: This will display the available reports for your project. There are reports to monitor the activity ofeach worker, view the submitted data and view errors on your devices. In addition, the data entered byworkers can be exported to Excel. Manage Data: This will allow you to modify the submitted data for your project. At the moment, this will allowyou to reassign cases from one user to another.Applications: This will allow you to view and edit the applications for your domain. Messages: This will allow you send SMS messages to one or more users in your project.Settings and Users: This will allow you modify project level settings for your application, create new web

5.
workers (access project using CommCareHQ) and create new mobile workers (access project applications).
Now we can create an application in the project space.
Create the Application >>
2. Create the Application
To get started creating our application, click on the Applications section. You'll be presented with a prompt to createyour first application.
Click on the link to create a new application. This will present you with the design page for the application. Theleft pane displays the modules and forms in your application. The right pane displays the settings for the selecteditem in the left pane.

The application settings page will allow you name the application, manage application languages and multimediaand change phone settings. For now, name the application and click the Save button. The name of yourapplication will not appear anywhere on the mobile - it's simply for you to keep track of your application.
Click on the "Untitled module" on the left. A module is a container for cases and forms that work over those cases. We will go into case management details later in this tutorial. For now, name the module "Pregnancy" and click theSave button. This module name will be displayed on the phone to group forms.
Click on the "Untitled form". Name this form "Registration" and save. Below the Form Settings section, there are aset of buttons to create and upload an XForm. The XForm contains the questions for the form. Click on Createwhich will take you to our form designer.

1. 2. 3. 4.
The upper left dropdown will let you add questions of different types to your form. The question tree represents theset of questions in your form. The middle pane will contain properties for the selected question.
For the registration form, we'd like to add the following questions:
Name of the Mother (Text Question)Age (Integer Question)Is Pregnant (Selection question with a Yes and No options)Estimated Date of Delivery (Date question)
Add a text question to the form. The middle pane should populate with information about the question. TheQuestion ID is a unique keyword for the question on the form. It will be used to refer to the question when writinglogic or calculations and when values are displayed in reports. The Display Text is the actual text displayed on thephone for your question. If your application contains multiple languages, each language will have its own DisplayText.
For this question, set the Question ID to "name" and the Display Text to "Name of the mother". We will also want tocheck "Is the question required?". This will force the user to enter a value before moving on to the next question.

Now lets add the age question. In the top left corner of the form designer, change the drop down to Integer Numberand click the "Add" button. An Integer Number question will only allow numbers to be entered. Set the Question IDto "age" and the Display Text to "Age".
To add the "Is Pregnant" question, we need to add a Single Select question. This question type will present a set ofchoices to the user and allow to select one of them. Add a Single Selection question to the form. Set the QuestionID to "is_pregnant" and the Display Text to "Is Pregnant".
To add choices for a select question, click the "Add Select Item" button. This button will only appear if a selectquestion is selected. Add two choices with item values of "yes" and "no" and Display Text of "1. Yes" and "2. No"respectively.
To add the date of delivery question, we first need to select the Is Pregnant Question. The selected item in the leftpane determines where in the question tree newly added questions are placed. If one of the options (for ex. No) isselected, the form designer will try add the new question as a child of the Is Pregnant question (which is invalid).
Add a Date question to the form. Change the Question ID to "edd" and the Display Text to "Estimated Date of

Delivery".
Now you're done your first form! Click the Save button and we can test the form and application.
Testing the Application >>
3. Testing the Application
To test the application, we first need to build it. Click on the Release Manager tab. The Release Manager lists allthe previous builds of your application. Click on the Make New Build button. A popup should appear asking you fora comment - comments are useful for tracking which changes you've made in the application since the last build. Since this is our first build, add a comment that states "added registration form" and click OK.
Once the build has completed, it will be listed on the page. To preview the application in a web browser, select theDeploy dropdown and click on Preview.
The preview will display a mock version of a phone in the web browser (note this requires Java to be installed). Ifyou need to install Java, you should restart your browser. The preview may take a few minutes to load.

If you'd like to test the application directly on a mobile phone, instructions can be found here: Set Up Mobile Phone
The first page of the application will ask you to login. Since we haven't created any mobile workers for our project,select Login as Admin. From this page, select Demo. If you're using the browser preview, you'll need to use thekeyboard to control the phone (clicking on the screen won't have any effect).
Play around with the registration form. There are a couple of issues. The form will allow you to enter estimateddelivery dates in the past. The delivery date question will display even if the woman is not pregnant. We'll addressthese issues in the next section.
Adding Form Logic >>
4. Adding Form Logic
We'll need to add some logic to the Registration form to prevent users from entering dates in the past into the EDDquestion and to prevent the EDD question from displaying if the woman is not pregnant.
Click on the Registration form in the left pane of the form designer, then click on the Edit button in the Xformssection. Once the form has opened, click on the EDD question. The middle pane contains a Logic Propertiessection.
The Display Condition is a logic expression that controls if a particular question is displayed (when the logic is true,the question will be displayed). In our case, we want EDD to display if the is_pregnant question has a response of"yes". Click on the Edit button next to the display condition and use the expression builder to define the followingstatement. First click on "Add Expression", then drag and drop questions from the left tree into the available textboxes. You can also manually type values into these text boxes.

Next, we need to update the EDD question to prevent dates in the past. This is done through a ValidationCondition. If a validation condition is false, the application will prevent the user from moving onto the next question. In our case, the EDD is only valid if it is greater than or equal to today's date. Use the expression builder to specifythe following expression. To compare a value to today's date, use the today() function. Note that a "." specifies thevalue of the currently selected question.
Save the form and build another version of the application to test the logic. Additional tips on defining form logic canbe found .here
Now that we are done with the Registration form, we can create a Follow Up form.
Creating the Follow Up Form >>
5. Creating the Follow Up Form
To create a follow up form, click on "Structure and Configuration", then on the "+ Form" button in the left pane.
The initial follow up form for this application will be relatively simple (we'll add more complexity later). We'll beadding the following questions:
Display Text Question ID Question Type Comment
Past TetanusVaccination?
past_tetanus Single Select (yes/no) This will determinewhether to ask follow upquestions about the firstand second tetanusvaccination injections.

Had Tetanus 1? tetanus_1 Single Select (yes/no) This question will recordwhether the mother hasreceived her first injectionfor the tetanus vaccination(if she hasn't alreadyreceived a vaccination inthe past).
Had Tetanus 2? tetanus_2 Single Select (yes/no) This question will recordwhether the mother hasreceived her secondinjection for the tetanusvaccination (if she hasn'treceived already receivedthe vaccination in thepast).
Update EDD? update_edd Single Select (yes/no). This question willdetermine whether todisplay a question toupdate the EDD.
New EDD new_edd Date A question to enter thenew EDD. This will onlyappear if the useranswers "yes" to "UpdateEDD?". Will also requirevalidation to ensure thedate is in the future.
We'd also like to only have the tetanus_1 and tetanus_2 questions appear when the past_tetanus question has ananswer of "no". Rather than duplicate the logic for each question, we can use a Group question type to group thetwo questions together. A Group question type can be used to provide a sub-title for a set of question and applythe same Display logic to all questions in the group (if a group is not shown, all the questions within the group willnot be shown).
Once you've added a past_tetanus question, instead of adding a Single Select question for "Had Tetanus 1", add aGroup question. Set the Question ID to "tetanus_group" and the Display Text to "Tetanus Questions". Select thegroup in the question tree on the left and add the tetanus_1 question. This will add this question as a child of thegroup. Do the same thing to add the tetanus_2 question. Its also possible to drag and drop the questions in thetree into and out of groups (or to rearrange them).
Select the tetanus_group and add the appropriate Display Logic (only display if past_tetanus is equal to "no").
Now add the "Update EDD?" and "New EDD" questions. These are not in the "Tetanus Questions" group. To addthem outside the group, click on "Previous Tetanus Vaccination" then the "Add" button. You will need to drag anddrop the questions to get them into the correct order.
Add the appropriate logic to the new_edd to make sure it only appears when update_edd is set to "yes" and thatonly a date in the future can be entered. Once you're done, the form should look like this.
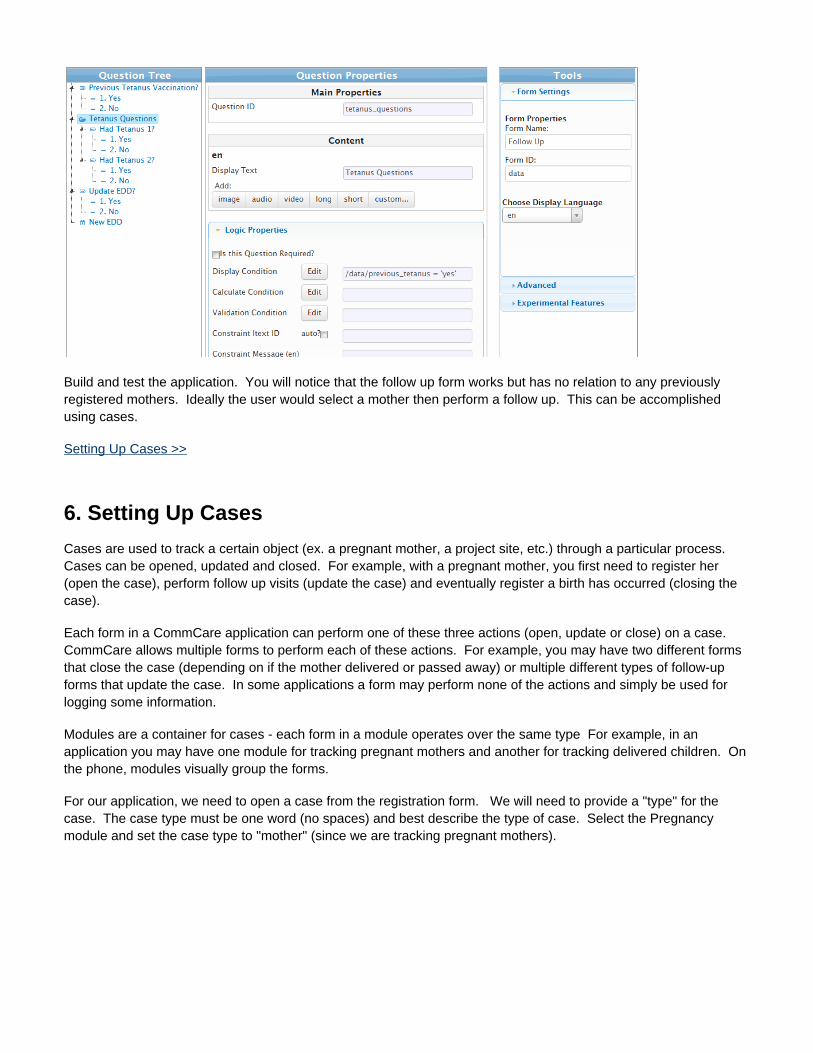
Build and test the application. You will notice that the follow up form works but has no relation to any previouslyregistered mothers. Ideally the user would select a mother then perform a follow up. This can be accomplishedusing cases.
Setting Up Cases >>
6. Setting Up Cases
Cases are used to track a certain object (ex. a pregnant mother, a project site, etc.) through a particular process. Cases can be opened, updated and closed. For example, with a pregnant mother, you first need to register her(open the case), perform follow up visits (update the case) and eventually register a birth has occurred (closing thecase).
Each form in a CommCare application can perform one of these three actions (open, update or close) on a case. CommCare allows multiple forms to perform each of these actions. For example, you may have two different formsthat close the case (depending on if the mother delivered or passed away) or multiple different types of follow-upforms that update the case. In some applications a form may perform none of the actions and simply be used forlogging some information.
Modules are a container for cases - each form in a module operates over the same type For example, in anapplication you may have one module for tracking pregnant mothers and another for tracking delivered children. Onthe phone, modules visually group the forms.
For our application, we need to open a case from the registration form. We will need to provide a "type" for thecase. The case type must be one word (no spaces) and best describe the type of case. Select the Pregnancymodule and set the case type to "mother" (since we are tracking pregnant mothers).

Now we need to configure our registration form to open cases. Select the registration form and scroll down to CaseConfiguration. Check "Opens a case". Each case must have a name - we'll name the mother's case according toher name. We can also choose to only open a case if the form was completed a certain way. In our application, weonly open cases if the woman was pregnant (the answer to "Is the mother pregnant?" was "Yes").
We may also want to track other information about the mother with the case. This information may be used in otherforms that work with the same case. In our application, we want to track the Estimated Date of Delivery as this willbe displayed and used in the follow up form. Check "Updates a case" and select the "Estimated Date of Delivery"as the question. The case property (a name for that piece of information) will be defaulted to the Question ID(edd). This name is not shown anywhere on the phone’s screen, so you can name it whatever best describes thatinformation to you. It must not contain any spaces.

We now need to configure our Follow Up form to allow the user to select a mother prior to opening the form. Selectthe follow up form and scroll down to the Case Management section. Select the "Requires" dropdown and choose"a case". We also want the Follow Up form to update the case if the user changes the EDD. Check "Updates thecase" and choose the "New EDD" question. We will need to manually change the case property to "edd" to updatethe existing "edd" case property.
The final update we need to make to the application is to configure the case display screens. These are used whendisplaying either a list of cases (the short version) or when displaying details for a particular case (the long version). To set these up, select the module and scroll down to the "Case Details" section. To add a case property to theshort or long select it in the list. For now, we will add "name" and "edd". We'll uncheck short from the "edd" so itwon't be displayed in the case list.

1. 2. 3.
4.
Create a new build of the application and play around with it either on an emulator or a phone. There are a fewimprovements we can make. The form will ask about a second tetanus vaccination injection even if the answer tothe first vaccination injection was no. It would also be nice to display the previously entered EDD when askingwhether to update it. To do this, we need to load data from the case into our follow-up form.
Loading Case Data >>
8. Loading Case Data
The follow up form is designed to be opened multiple times prior to a delivery. It doesn't make sense to ask allquestions each time this form is opened. For example, during the first follow up visit, if a mother answers that shehas already had a tetanus vaccination, those set of questions should not be asked again. To accomplish this, weneed to load information from the case into this follow up form so that it can be used in business logic.
We will update the form to do the following:
Save the past_tetanus, tetanus_1 and tetanus_2 information as part of the case.Load the previous answer for past_tetanus and use it to control whether to ask the question againLoad the previous answers for tetanus_1 and tetanus_2 and use to them to determine which questions toask.Load the EDD and display it when asking whether to update the EDD.
We need to change the form to include data nodes to store the existing case properties. A data node will not getdisplayed on the phone and simply serve to store some data that is used by the form. A data node can be loadedfrom a case property when the form is initially opened, or calculated based on the value of some other questions inthe form.
: Note It is also possible to load a case property into non-data question but you will need to also setup the caseupdate to write any changes to the value back to the case.
Open the form and edit it, adding data nodes to represent prev_edd, prev_past_tetanus, prev_tetanus_1 andprev_tetanus_2. It's a good idea to label these data nodes consistently (i.e. Onceprev_<case_property_name>). done your question tree should appear as follows.

Save the form and return to the main screen for the form. We'll need to save the values of past_tetanus, tetanus_1and tetanus_2 so that they can be used when the follow up form is opened in the future. Modify the "Updates thecase" section to include them.
We need to update the form to load the values from the case into our data nodes. Check "Loads data from thecase" and select each of our data nodes. The case property to load is defaulted to the ID of the question. As ourcase properties are named differently, we'll need to manually specify them as shown.

Now that we've loaded data into the form, we can update the logic in the form to rely on these previous values.
Update EDD
We'd like to display the previous value of the EDD when displaying the "Update EDD?" question. For example,instead of just asking "Update EDD?", we want to display "Current EDD is 01/06/2013. Change the EDD?". To dothis, we need to include the value of the prev_edd data node in the display text for the "Update EDD?" question. Todisplay the value of another question in the text of another, we use an <output ref="question path" /> tag. Thequestion path is typically /data/<question_id>. Change the Display text of the question to the "EDD is <outputref="/data/prev_edd" />. Change the EDD?"
Past Tetanus Vaccination
We need to update the display logic of the "Past Tetanus Vaccination" question. This question should only bedisplayed during the first follow up (if the previous answer to the question is blank). Select the "Past TetanusVaccination" question, and click on the "Edit" button next to the display condition. To test for a blank value, you canuse two quotations (indicating empty). Add the appropriate display logic to the question.

We also need to update the logic for the tetanus group to depend either on the current or previous answer to pasttetanus vaccination - the "Past Tetanus Vaccination?" question will not have a value if it is skipped due its displaylogic. Use the expression editor to change the display logic for the tetanus group. First change the "True whenALL of the expressions are true." to "True when ANY of the expressions are true.". Then add another expression tocheck if the value of "prev_past_tetanus" was "no".
Tetanus 1 Question
We want to continue to ask about the first tetanus vaccination until the mother receives it. Try figure out the displaylogic for this on your own. If you're stuck, correct logic is shown below.

1. 2.
We want to display this question if the previous answer for tetanus_1 was "no" if there the previous answer wasorblank. The previous answer will be blank the first time we go through this form for a case - we want the tetanus_1question to be displayed in this situation. The logic is shown below. Its important to note that the drop down hasbeen changed to "True when ANY of the expressions are true."
Tetanus 2 Question
We also want to continue to ask about the second tetanus vaccination until the mother receives it. However, weonly want to display this question if the mother has already received her first tetanus vaccination injection.
The logic for this is a little complex and can't be created using the expression editor. You will need to directly typethe logic expression. There are two parts to this expression that must be true to display the question:both
We should only ask about tetanus_2 if the mother has already received tetanus_1We only want to ask about tetanus_2 if the mother has not already received tetanus_2
The first part of this can be represented using "(/data/tetanus_group/tetanus_1 = "yes" or /data/prev_tetanus_1 ="yes")". We need to check both tetanus_1 and prev_tetanus_1 since the tetanus_1 question may not be answeredin this particular follow up visit (but may have been answered previously). Note that we refer to tetanus_1 as"/data/tetanus_group/tetanus_1" since it is inside the tetanus_group group.
The second part can be represented using (/data/prev_tetanus_2 = "" or /data/prev_tetanus_2 = "no"). We onlywant to ask about tetanus_2 if the user has not previously answered the question or had previously answered thatthey had not yet received it.
Since we only want to display the tetanus_2 question when of the above two conditions are true, we combineboththem using an operator. The full logic expression that we need to express is the following:and
(/data/tetanus_group/tetanus_1 = "yes" or /data/prev_tetanus_1 = "yes") and (/data/prev_tetanus_2 = "" or/data/prev_tetanus_2 = "no")
To manually enter the logic expression, open the expression editor for the tetanus_2 display condition and check "Advanced mode?". This will replace the expression editor buttons with a text box. Enter the expression wedefined above and click the "Save to Form" button.

Testing it Out
Create another build of the application and test it either in the phone or emulator. Try perform multiple follow upvisits with the same mother and make sure that everything is working okay. The last change that we'll make to theapplication is to create a Delivery form. This will be used to track the birth outcome and close the mother's case.
Closing Cases >>
9. Closing Cases
The Delivery form will record the birth outcome, number of children delivered and close the mother's case. When acase is closed it will no longer appear on the phone for doing follow-up visits. We want to add Delivery form withthe following questions.
Display Text Question ID Question Type Comment
Did the mother deliver? mother_deliver Single Select (yes/no) This question will controlwhether to close the caseand display of the otherquestions in the form.
Delivery Date delivery_date Date This question will needvalidation to ensure thedelivery date is today or inthe past.
Type of Delivery delivery_type Single Select(Caesarian/Vaginal)
Number of Children num_children Integer The number of childrenthat were delivered. Thisshould be defaulted to 1. This question is requiredand will also need tovalidation to ensure thatonly numbers 0 or greatercan be entered.

Gender gender Single Select(male/female)
The gender of the child. This should be repeatedfor each child that wasdelivered.
Birth Weight (kg) birth_weight Decimal The weight of the child. This should be repeatedfor each child that wasdelivered. Additionally, itwill need validation toensure that only positivebirth weights can berecorded.
We don't want our application to display any of the delivery information questions if the mother has not delivered. We can again use a group to apply the same display logic to all the questions in the form after the mother_deliverquestion. Call the group "Delivery Information" (delivery_information) and add the appropriate display logic. Addthe "Delivery Date" and "Type of Delivery" questions to this group.
Add an integer question for "Number of Children". This question will control the number of types to repeat thegender and birth weight questions. Check "Is this Question Required?" to force the user to enter a value and addvalidation logic to ensure that only positive values are entered. To default the value of this question to 1, open theAdvanced Properties section and change the "Default Data Value" to 1.

To repeat a question (or set of questions), we need to use a Repeat Group. This question will either repeat thequestions a set number of times (ex. number of children) or provide a prompt to allow the user to choose whether torepeat the questions again. The advanced property "Repeat Count" is used to set the repeat count. It must point toanother question and that question must have a value (this is why our Number of Children question is required).
Add a Repeat question to the delivery information group. Name it Child Questions (child_questions). Set the valueof "Repeat Count" property to "/data/num_children". Add the appropriate gender and birth weight questions to thisRepeat group.
Save the form and return to the main form screen. We want the Delivery form to require a mother be selected, savethe delivery date as part of the case and close the case if the mother has delivered. In the Case Configurationsection, set "Requires" to "a case". Modify the "Updates the case" section to include the delivery date.
As with creating cases, we can also conditionally close cases. Check "Closes the case" but add logic to only closeit if the mother delivered.

1. 2. 3. 4. 5. 6.
Now we've got a functional application that can create, update and close cases! Create a new build of theapplication and test it out in the emulator or mobile phone.
Next Steps >>
10. Next Steps
Our application can be extended in a number of different ways. We can expand the forms, add multimedia, createreferrals for a patient, or try the application out on an Android phone. We may want to start to view and manage thecollected data using CommCare HQ.
Managing Mobile Workers and Web UsersManaging Captured DataInstalling an Application on AndroidSetting Up Multimedia in the ApplicationCommon Logic and CalculationsAdditional Information on Managing Cases
Good luck in your application building!