00-7587H1 JEFSKFOR.qxd 10.2.16 4:10 PM ページ 2 TS-E17mm f/4L TS-E24mm f/3...
23
TS-E17mm f/4L TS-E17mm f/4L TS-E24mm f/3.5L II TS-E24mm f/3.5L II Instructions ENG
Transcript of 00-7587H1 JEFSKFOR.qxd 10.2.16 4:10 PM ページ 2 TS-E17mm f/4L TS-E24mm f/3...

TS-E17mm f/4L TS-E17mm f/4L TS-E24mm f/3.5L II TS-E24mm f/3.5L II
Instructions
EENNGG
00-7587H1_JEFSKFOR.qxd 10.2.16 4:10 PM ページ 2

ENG-1
Canon’s TS-E lenses are tilt-shift lensesdesigned for EOS cameras. The tilt-shiftmechanism enables photographers to controlthe depth of field and the area photographedand to correct image distortion, making itpossible to take sophisticated pictures thatcannot be shot using a conventional lens.
● To ensure that you make the most of the TS-E lensfunctionality, it is recommended that you shoot in thefollowing conditions.• Use an EOS camera with 100% viewfinder visibility
(EOS-1, EOS-1D or EOS-1Ds series) and use thelaser matte with grid focusing screen Ec-D
• Use Live View• Use a tripod
● On EOS cameras with a built-in flash, some partialrestrictions may apply to the shift and rotationfunctions.
Features1. Aspherical and UD lens elements result in
outstanding image delineation.2. SWC (Subwavelength Structure Coating)
dramatically reduces ghosting and flarecaused by light entering at an acute angle.
3. The lens can be tilted up to ±6.5° (for TS-E17mm f/4L) or ±8.5° (for TS-E24mm f/3.5LII), and shifted up to ±12mm.
4. The tilt and shift functions can be used singlyor in combination. The tilt and shift can switchfrom right angle to parallel using the TSrotation feature.
5. The lens can be rotated to change the tilt orshift direction.
6. A truly round aperture hole results in a nicerbackground blur.
Thank you for purchasing a Canon product.
02-7587_ENG 10.2.10 3:48 PM Page 1

ENG-2
a Safety Precautions
a Safety Precautions● Do not look at the sun or a bright light source
through the lens or camera. Doing so could result inloss of vision. Looking at the sun directly through thelens is especially hazardous.
● Whether it is attached to the camera or not, do notleave the lens under the sun without the lens capattached. This is to prevent the lens from concentratingthe sun’s rays, which could cause a fire.
● To mount/detach the lens, always move the tilt andshift scales to “0”. Fingers may get caught, or thecamera may be damaged.
● When you tilt or shift the lens, sharp portions of thetilt or shift mechanism are exposed and care shouldbe taken to avoid touching these portions.
● Do not operate the shift function while operating therotation function. You may be injured by having yourfingers caught.
Handling Cautions● If the lens is taken from a cold environment into a
warm one, condensation may develop on the lenssurface and internal parts. To prevent condensationin this case, first put the lens into an airtight plastic bagbefore taking it from a cold to warm environment. Thentake out the lens after it has warmed gradually. Do thesame when taking the lens from a warm environmentinto a cold one.
● Do not leave the lens in excessive heat such as in acar in direct sunlight. High temperatures can causethe lens to malfunction.
02-7587_ENG 10.2.10 3:48 PM Page 2

ENG-3
a Safety Precautions
Countermeasures for harmful raysThe TS-E17mm f/4L has a wide angle of view, and thelens protrudes from the front frame, so it can beaffected by harmful rays. To prevent flare and ghosting,cutting off the harmful rays entering the lens with a pieceof cardboard is recommended.Cutting off harmful rays is also recommended for TS-E24mm f/3.5L II, by using both the hood and the methodused for TS-E17mm f/4L.
Conventions used in this instruction
Warning to prevent lens or camera malfunctionor damage.
Supplementary notes on using the lens andtaking pictures.
This device complies with Part 15 of the FCC Rules. Operation issubject to the following two conditions: (1) This device may notcause harmful interference, and (2) this device must accept anyinterference received, including interference that may causeundesired operation.Do not make any changes or modifications to the equipmentunless otherwise specified in the instructions. If such changes ormodifications should be made, you could be required to stopoperation of the equipment.This equipment has been tested and found to comply with thelimits for a class B digital device, pursuant to part 15 of the FCCRules. These limits are designed to provide reasonable protectionagainst harmful interference in a residential installation. Thisequipment generates, uses and can radiate radio frequencyenergy and, if not installed and used in accordance with theinstructions, may cause harmful interference to radiocommunications.However, there is no guarantee that interference will not occur ina particular installation. If this equipment does cause harmfulinterference to radio or television reception, which can bedetermined by turning the equipment off and on, the user isencouraged to try to correct the interference by one or more ofthe following measures:• Reorient or relocate the receiving antenna.• Increase the separation between the equipment and receiver.• Consult the dealer or an experienced radio/TV technician for
help.
This Class B digital apparatus complies with Canadian ICES-003.
02-7587_ENG 10.2.10 3:48 PM Page 3

ENG-4
0.7
0.21
0.25
0.3
0.4
0.50.7
1
3
22
114
4
m
0.8
11.
21.
52
35
ft
CA
NO
N
LENS T
S-E 24mm
1:3.5
Nomenclature
For detailed information, reference page numbers are provided in parentheses (→ **).
114
Tilt knob (→ 10)
Lens mount index (→ 8)
Contacts
Shift index
Shift scale
Shift knob (→ 6, 12)
Depth-of-Field scale (→ 15)
Distance scale (→ 8, 15)
Distance index
Infrared index (→ 15)
Tilt index
Tilt scale
02-7587_ENG 10.2.10 3:48 PM Page 4

ENG-5
Nomenclature
For detailed information, reference page numbers are provided in parentheses (→ **).
Tilt lock knob (→ 10)
Tilt-lock button (→ 10)
TS rotation lock releasebutton (→ 14)
Shift lock knob (→ 12)
Filter mounting thread (→ 18)
Lens
Hood mount (→ 17)
TS-E17mm f/4L
Lens cap mount (→ 7)
Focusing ring (→ 8)
Tilt indexTilt scale
Shift index
Rotation lock releasebutton (→ 13)
Shift scale
02-7587_ENG 10.2.10 3:48 PM Page 5

ENG-6
About the Shift Knob CapShifting will be easier if the supplied shift knob cap is mounted (p.4).However, for EOS cameras with built-in flash, the cap will come in contact with the camera duringthe lens’ mounting/detaching, or during shift/rotation operation. The shift knob cap is recommendedfor use with EOS-1, EOS-1D, EOS-1Ds, and EOS 5D series.
The screw (length 2.2mm) originally in the shift knob cannot be used tokeep the shift knob cap in place. Always use the supplied screw.
Remove the shift knobscrew.
Mount the cap by squeezing it intothe shift knob, and then fix it usingthe supplied screw.To remove the cap, remove thescrew and pull out the cap.
Shift knob cap
Mounting screw (Length 3mm)
Use a watchmaker's screwdriver (Phillips head type) to remove or mountscrews.
02-7587_ENG 10.2.10 3:48 PM Page 6

ENG-7
Mounting/Removing the Lens Cap (TS-E17mm f/4L)
The lens of TS-E17mm f/4L protrudes from the front frame. To protect the lens, keep it covered withthe exclusive lens cap when not shooting.
● RemovingTo remove the cap, hold down the button on the sideand turn the cap in the direction of the arrow until theposition mark on the cap aligns with the red dot.
● AttachingTo attach the cap, align the cap’s attachment positionmark with the red dot on the front of the lens, thenturn the cap as shown by the arrow until the lens’ reddot is aligned with the cap’s stop position mark.
Do not use the strap to lift the lens while the lenscap is attaching the lens. The lens may fall andbreak.
The removed lens cap can be hooked on the tripodusing the supplied strap.
TS-E24mm
CA
NO
N L
ENSTS-E17mm
02-7587_ENG 10.2.10 3:48 PM Page 7

1. Mounting and Detaching the Lens
Focus a TS-E lens by turning the focusing ring.(Shots cannot be taken using the auto focus.)
See your camera’s instructions for details onmounting and detaching the lens.
2. Focusing
● When mounting or detaching the lens, alwaysensure that the tilt and shift scales are set to the“0” position.
● After detaching the lens, place the lens with therear end up to prevent the lens surface andcontacts from getting scratched.
● If the contacts get soiled, scratched, or havefingerprints on them, corrosion or faultyconnections can result. The camera and lensmay not operate properly.
● If the contacts get soiled or have fingerprints onthem, clean them with a soft cloth.
● If you remove the lens, cover it with the dustcap. To attach it properly, align the lens mountindex and the � index of the dust cap, and turnclockwise. To remove it, reverse the order.
● After using tilt or shift, readjust the focus.● The distance scale is only valid when the tilt
scale is set to the “0” position.
ENG-8
For cameras which allow Live View shooting,focusing using the LCD monitor’s magnified imageis recommended.
TS-E24mm
CANO
N L
ENS TS-E 24mm
02-7587_ENG 10.2.10 3:48 PM Page 8

ENG-9
3. Tilt FunctionTilting inclines the lens relative to the image plane. When the tilt scale is set to the “0” position, thefocusing and imaging planes are parallel. However, tilting puts the focusing plane at an angle to theimaging plane.
● Example 1 ● Example 2
To shoot so that all of an extensive subject is in focus, you must normally use a small aperture toobtain a large depth of field. But tilting allows you to keep all of the subject in focus even when thereis insufficient depth of field (Example 1). Or, by tilting in the opposite direction, you can focus on aspecific part of the subject (Example 2).
02-7587_ENG 10.2.10 3:48 PM Page 9
ENG-10
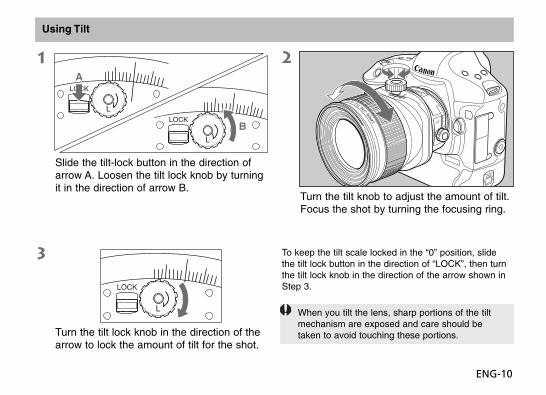
Slide the tilt-lock button in the direction ofarrow A. Loosen the tilt lock knob by turningit in the direction of arrow B.
Using Tilt
When you tilt the lens, sharp portions of the tiltmechanism are exposed and care should betaken to avoid touching these portions.Turn the tilt lock knob in the direction of the
arrow to lock the amount of tilt for the shot.
Turn the tilt knob to adjust the amount of tilt.Focus the shot by turning the focusing ring.
To keep the tilt scale locked in the “0” position, slidethe tilt lock button in the direction of “LOCK”, then turnthe tilt lock knob in the direction of the arrow shown inStep 3.
A
B
TS-E24mm
CANO
N L
ENS TS-E 24mm
02-7587_ENG 10.2.10 3:48 PM Page 10

ENG-11
4. Shift FunctionShifting moves the optical axis of the lens in parallel off the center of the imaging plane.Shift can be used to good effect in the situations shown below.
● If you photograph a subject such as abuilding with a normal lens, the top ofthe building tapers away. But by placingthe camera parallel to the building andshifting the lens, you can correct thistapering effect.
● When you are shooting a reflectivesubject, you can move the camera to aposition where the camera does notappear in the shot and then use shift totake the picture. This lets you keep thecamera out of the shot without havingto change the shot composition.
02-7587_ENG 10.2.10 3:48 PM Page 11

ENG-12
Using Shift
Turn the shift lock knob inthe direction of the arrow tolock the amount of shift forthe shot.
Loosen the shift lock knobby turning it in the directionof the arrow.
Turn the shift knob to adjustthe amount of shift. Focusthe shot by turning thefocusing ring.
When you shift the lens, sharp portions of the shift mechanism are exposed and care should be taken toavoid touching these portions. For EOS cameras with built-in flash, there may be contact with the lens whileyou operate the shift function.
● With large amounts of shift, the amounts of peripheral light at the top and bottom or left and right sides ofthe screen may differ, so shooting with a small aperture is recommended.
● The shift operation will be easier if the supplied cap is mounted on the shift knob (p.6).
TS-E24mm
CANO
N L
ENS TS-E 24mm
02-7587_ENG 10.2.10 3:48 PM Page 12

ENG-13
5. RotationThe rotation function enables you to change the direction of tilt orshift by rotating the tilt-shift mechanism.With the lens mounted on the camera, push the rotation lock releasebutton towards the mount and then turn the tilt-shift mechanism.
● The rotation mechanism can be rotated through ±90°. The lens clicks every30° and locks in place in the 90° position.
● When rotating the lens, set the tilt and shift scales to the “0” position.● Note that rotating the tilt-shift mechanism quickly while pressing on the
rotation lock release button may cause the shift lock knob to strike yourfingers.
● Do not operate the shift function while operating the rotation function.You may be injured by having your fingers caught.
● For EOS cameras with built-in flash, there may be contact with the lenswhile you operate the rotation function.
In order to prevent shifts in position while shooting, shooting whilerotation is locked, or shooting per click position is recommended.
02-7587_ENG 10.2.10 3:48 PM Page 13

ENG-14
Changing the Operation Direction of Tilt and Shift (TS rotation Function)
When the tilt and shift are used in a parallel direction,vignetting will occur in the areas marked in gray in the following table.
In order to prevent shifts in position while shooting, shootingwhile TS rotation is locked, or shooting per click position isrecommended.
By using the TS rotation function, the relationship of the tilt and shift’soperation direction can switch fromright angle to parallel.Press the TS rotation lock releasebutton in the mounting direction whilethe lens is mounted on the camera,and then turn the tilt component.
● There are clicks at the 45° position, andwill be fixed in either the right angle orparallel position.
8.5
8
7
6
5
4
3
24 5 6 7 8 9 10 11 12
8.5
8
7
6
5
4
3
24 5 6 7 8 9 10 11 12
8.5
8
7
6
5
46 7 8 9 10 11 12
6.5
6
5
4
3
2
6 7 8 9 10 11 12
6.5
6
5
4
37 8 9 10 11 12
6.5
6
5
4
38 9 10 11 12
Tilt amount (Degree(s))
TS-E17mm f/4L TS-E24mm f/3.5L II
Shift amount (mm)
Imaging Area
Vertical
Horizontal
Diagonal
Tilt and Shift direction
02-7587_ENG 10.2.15 4:40 PM Page 14

ENG-15
The depth of field is the distance in front of andbehind the plane of focus on the subject thatappears sharp. The depth of field is indicated bythe area between the depth-of-field scale linesbelow the distance scale.
The infrared index corrects the focus settingwhen using monochrome infrared film. Focus onthe subject in MF, then adjust the distancesetting by moving the focusing ring to thecorresponding infrared index mark.
6. Depth-of-Field Scale(TS-E24mm f/3.5L II)
7. Infrared Index(TS-E24mm f/3.5L II)
● The depth-of-field scale is only valid when thetilt scale is set to the “0” position.
● The depth-of-field scale is an approximateindicator. ● The infrared index position is based on a
wavelength of 800 nm.● Be sure to observe the manufacturer’s
instructions when using infrared film.● Use a red filter also when you take the picture.
Some EOS cameras cannot use infrared film. Seethe instructions for your EOS camera.
22 2211 114
3 mft
132 5
0.51.5
0.7
4 22 2211 114
3 mft
132 5
0.541.5
0.7
4
02-7587_ENG 10.2.10 3:48 PM Page 15

ENG-16
8. TS-E Tripod Adapter (Sold Separately) 9. ExposureWith some camera models, the tilt, shift androtation functions cannot be used when thecamera is mounted directly on a tripod. Whenthis happens, fit the optional TS-E tripod adapterinto the tripod mount socket on the camerabefore mounting the camera on the tripod.
Shots can be taken using AE (automaticexposure) as long as the tilt and shift scales areset to the “0” position.The use of AE is not recommended when thelens is tilted or shifted as exposure errors mayresult. It is recommended that you use theexposure values when the tilt and shift scalesare set to the “0” position as a guide and thentake the shot with as many exposure settings aspossible.
02-7587_ENG 10.2.10 3:48 PM Page 16
ENG-17
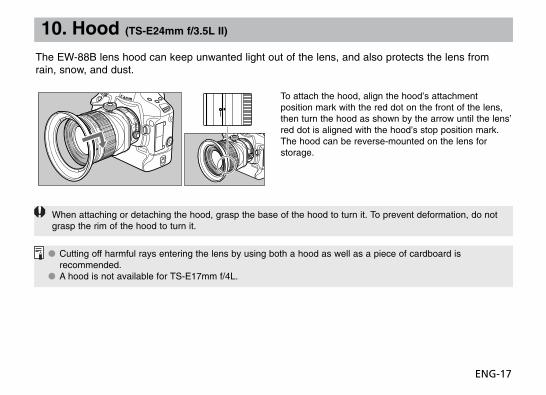
10. Hood (TS-E24mm f/3.5L II)
The EW-88B lens hood can keep unwanted light out of the lens, and also protects the lens fromrain, snow, and dust.
To attach the hood, align the hood’s attachmentposition mark with the red dot on the front of the lens,then turn the hood as shown by the arrow until the lens’red dot is aligned with the hood’s stop position mark.The hood can be reverse-mounted on the lens forstorage.
When attaching or detaching the hood, grasp the base of the hood to turn it. To prevent deformation, do notgrasp the rim of the hood to turn it.
● Cutting off harmful rays entering the lens by using both a hood as well as a piece of cardboard is recommended.
● A hood is not available for TS-E17mm f/4L.
TS-E24mm
CANO
N L
ENS TS-E 24mm
TS-E24mm
CANO
N L
ENS TS-E 24mm
02-7587_ENG 10.2.10 3:48 PM Page 17
ENG-18
You can attach filters to the filter mountingthread on the front of the lens.
11. Filters (Sold Separately)
(TS-E24mm f/3.5L II)
● Only one filter may be attached.● Use a polarizing Canon filter (82mm).
A filter cannot be used with TS-E17mm f/4L.
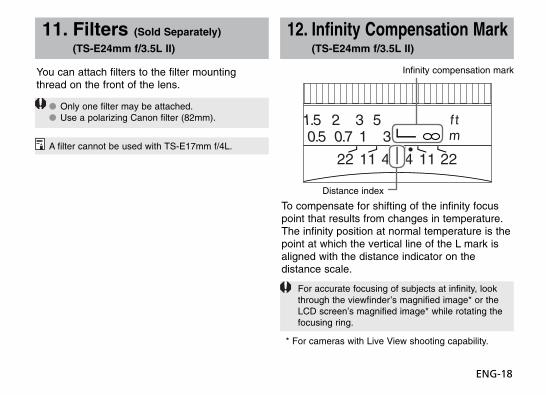
12. Infinity Compensation Mark(TS-E24mm f/3.5L II)
To compensate for shifting of the infinity focuspoint that results from changes in temperature.The infinity position at normal temperature is thepoint at which the vertical line of the L mark isaligned with the distance indicator on thedistance scale.
For accurate focusing of subjects at infinity, lookthrough the viewfinder’s magnified image* or theLCD screen’s magnified image* while rotating thefocusing ring.
* For cameras with Live View shooting capability.
22 2211 114
3 mft
132 5
0.51.5
0.7
4
Infinity compensation mark
Distance index
02-7587_ENG 10.2.10 3:48 PM Page 18

ENG-19
13. Extension Tubes(Sold Separately)
For TS-E24mm f/3.5L II, you can attachextension tube EF12 II for magnified shots. Theshooting distance and magnification are shownbelow.
EF12 II 182 198 0.85 0.51
Focusing DistanceRange (mm) Magnification (×)
Closedistance
Longdistance
Closedistance
Longdistance
● The extension tubes EF12 II and EF25 II cannotbe used with TS-E17mm f/4L.
● Although extension tube EF25 II can beattached on TS-E24mm f/3.5L II, it is notrecommended because the lens-to-subjectdistance will be very short.
02-7587_ENG 10.2.10 3:48 PM Page 19

ENG-20
TS-E17mm f/4L TS-E24mm f/3.5L IIFocal Length/Aperture 17mm f/4 24mm f/3.5Lens Construction 12 groups, 18 elements 11 groups, 16 elementsMinimum Aperture f/22 f/22
Angle of ViewDiagonal 104° 84°
(Normal)Vertical 70° 30’ 53°Horizontal 93° 74°
Min. Focusing Distance 0.25m (0.82ft.) 0.21m (0.69ft.)Max. Magnification 0.14× 0.34×Field of View 168 × 251mm (6.6 × 9.9inch) 72 × 107mm (2.8 × 4.2inch)Tilt amount ±6.5° ±8.5°Shift amount ±12mmTilt scale display 1° incrementsShift scale display 1mm incrementsRotation mechanism Locks at –90°, 0° and +90°, clicks every 30°TS Rotation mechanism Locks at right angle and parallel, and clicks at 45°
Specifications
02-7587_ENG 10.2.10 3:48 PM Page 20
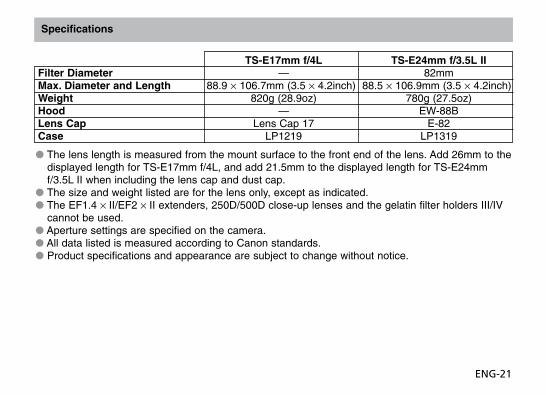
TS-E17mm f/4L TS-E24mm f/3.5L IIFilter Diameter — 82mmMax. Diameter and Length 88.9 × 106.7mm (3.5 × 4.2inch) 88.5 × 106.9mm (3.5 × 4.2inch)Weight 820g (28.9oz) 780g (27.5oz)Hood — EW-88BLens Cap Lens Cap 17 E-82Case LP1219 LP1319
ENG-21
Specifications
● The lens length is measured from the mount surface to the front end of the lens. Add 26mm to thedisplayed length for TS-E17mm f/4L, and add 21.5mm to the displayed length for TS-E24mmf/3.5L II when including the lens cap and dust cap.
● The size and weight listed are for the lens only, except as indicated.● The EF1.4 × II/EF2 × II extenders, 250D/500D close-up lenses and the gelatin filter holders III/IV
cannot be used.● Aperture settings are specified on the camera.● All data listed is measured according to Canon standards.● Product specifications and appearance are subject to change without notice.
02-7587_ENG 10.2.10 3:48 PM Page 21

CT1-8562-001 © CANON INC. 2009
00-8562(7587)H4_CID_Ver3.3 10.2.16 4:54 PM ページ 1