0 eCPIC Training Material: Investments Module – Implementing OMB BY2016 Budget Requirements This...
52
1 eCPIC Training Material: Investments Module – Implementing OMB BY2016 Budget Requirements This material is the property of the Federal government. Agencies which have a current inter-agency agreement have unrestrictive use except for distribution outside of Government unless authorized in writing by the General Services Administration.
-
Upload
allyson-carpenter -
Category
Documents
-
view
215 -
download
2
Transcript of 0 eCPIC Training Material: Investments Module – Implementing OMB BY2016 Budget Requirements This...

1
eCPIC Training Material:Investments Module – Implementing OMB BY2016 Budget Requirements
This material is the property of the Federal government. Agencies which have a current inter-agency agreement have unrestrictive use except for distribution outside of Government unless authorized in writing by the General Services Administration.

2
Date Description of Changes
July 31, 2014 Updates to reflect OMB BY16 guidance, including:- Updated all screenshots and descriptive text to reflect the enhancements to the user
interface and the latest version (v6.5) of eCPIC that implements the OMB BY 2016 requirements.
- Renamed all references to Exhibit 53 and 300 to (new names) in accordance with changes by OMB.
- Added a new section, “Agency IT Infrastructure Spending Summary”.- Added overview slides to introduce each major OMB process.
Investments Module and OMB Processes, Change Log

3
Investments Module and OMB Processes
Overview
Agency IT Portfolio Summary
Agency Cloud Spending Summary
Agency IT Infrastructure Spending
Major IT Business Case
Major IT Business Case Detail

4
Overview: Investments Module The purpose of this guide is to illustrate how to use the Investments module in eCPIC to provide the data on agency IT
investments required by OMB Circular A-11: Preparation, Submission, and Execution of the Budget. This guide presents ways to navigate the investments module, enter data into tables, submit changes to the baseline, check data
completion, and validate data according to OMB requirements.

5
Navigation Each year, based on changes made in the OMB IT Budget – Capital Planning Guidance, updates and enhancements are made to
eCPIC. This includes a new budget template known as the Major IT Business Case and Agency IT Portfolio processes (previously known as Exhibit 300 and Exhibit 53, respectively). Users can navigate to these processes within their investments by using the Browse Sections dropdown.
To navigate to these processes, select on the section or subsection headers in the Browse Sections dropdown or use the icon to work through the pages from start to finish.

6
Navigation To reduce data entry for major investment program managers, eCPIC automatically generates Agency IT Portfolio data from
information provided within the Major IT Business Case process. Therefore, a major investment owner who completes the eCPIC Major IT Business Case process will have automatically fulfilled their obligations for the Agency IT Portfolio as well, since these processes contain duplicate fields.
Note: Since data fields in eCPIC are managed independent from processes, updating an investment’s UII code or funding levels in one process (like the Major IT Business Case) will automatically update those values if they appear in another process (like the Agency IT Portfolio).
eCPIC Tip: Be sure to save your work often to avoid timing out and accidentally losing unsaved work. eCPIC has an automatic time-out feature to secure data in the application.

7
Toolbar The Investments module displays a toolbar of icons for common functions at the top of the page once the User selects a
particular investment. These icons enable users to manage, analyze, view, export, and share data in an investment. Hovering over any icon reveals the function of that icon.

8
Data Entry The Major IT Business Case, Agency IT Portfolio Summary, and other processes have many data fields and tables. Here are some
common data entry types you will encounter:
— Select Box:
— Free-Text Entry:
— Check Box:
— Radio Button:
Use your mouse to select one (or more, if applicable) valid answers from the select box.
Enter data directly into the field. A character count in the lower right indicates how many characters remain in the space limitation of the field.
Click in the check box to activate or deactivate a particular field.
Click on the radio button to select the desired option.

9
Data Entry Continued— Date Chooser:
— Read-Only:
— Data Grid (Table):
Enter a date directly into the field, or select the desired date from the calendar popup that appears when you click on the field.
Read-only fields cannot be altered by the user, and are indicated by a icon.
Click in the cell of the data grid to enter data manually or in the edit column of the desired row. For some grids, if there are numerical entries in the table, the table will automatically calculate row and column totals once the data is saved.

10
Export/Import Capabilities with Data Grids Users can enter data into the table by importing MS Excel spreadsheets. First, export tables to Excel by selecting the icon .
Edit or add data. Save the file and then import into eCPIC.
To import data, click on the ‘Toggle Excel Import’ button from within the data grid. This will expand the window and provide a row to allow users to map to the Excel file. Click ‘Browse’ and navigate to the Excel file and then click ‘Upload.’ A message will appear saying that the existing data will be overwritten. Click ‘OK.’ The eCPIC page will reload with the new data.

11
Investments Module and OMB Processes
Overview
Agency IT Portfolio Summary
Agency Cloud Spending Summary
Agency IT Infrastructure Spending
Major IT Business Case
Major IT Business Case Detail

12
Agency IT Portfolio Summary: Overview
The Agency IT Portfolio Summary, previously known as the Exhibit 53A, includes IT investment budget, management, and architecture information. This area will cover the Full Time Equivalents (FTE) table and Funding Sources table.
Although the Lifecycle Costs for Project Stages is also found in this process within eCPIC, it will be discussed in the Major IT Business Case area of the training guide.
New additions have been made to the Cloud Computing Costs subsection, which will be discussed in the area on Agency Cloud Spending Summary.

13
Initiative Definition Every process in eCPIC begins with the Initiative Definition subsection and the same six fields. These “header” data fields allow
Users and Administrators to define certain attributes of the investment. These definitions facilitate data analysis, archiving and retrieval, and configuration of consolidated business cases.
Explanation of data fields:— Template Name: A read-only field. Indicates which OMB A-11 template the current process derives from.— Consolidated Business Case: A Consolidated Business Case takes information from multiple separate investments in eCPIC
and consolidates them into one Major IT Business Case or Agency IT Portfolio item. Select either ‘Yes’ or ‘No’ in this field. — Investment Name: Enter the name of the investment.
— Point of Contact: Select a name from the dropdown, or click the ‘Add New Contact’ button to add a new contact.
— Revision Comment: A read-only field usually controlled by the system administrator. Revisions take snapshots of an investment at a point in time to save for archiving and analysis.
— Class: Select whether the investment is primarily related to IT or non-IT.

14
Descriptive Information: Unique Investment Identifier (UII) Information The ‘Descriptive Information: UII Information’ subsection contains some of the initiative questions from the previous section, as
well as several general questions related to the type of investment and status of investment. The fields in this section can also be located in the ‘Major IT Business Case process, Section A: General Information’. If you enter data in this table in either process, the change will be reflected in the other process.
If an investment’s UII code has changed since the previous year, users should select the “Change in Investment Status Identifier” which will appear on the Agency IT Portfolio.
The “Full UPI/UII Code” field is read-only. eCPIC automatically generates the investment’s full UII code based on the answers given to other questions on this page (Bureau, Two-Digit UII, Agency IT Portfolio part, etc.).
The “Previous (UII)” field is automatically updated by the eCPIC tool, but it can also be altered by the user if necessary.

15
Descriptive Information: Additional IT Portfolio Questions and BRM Mappings The ‘Descriptive Information: Additional IT Portfolio Questions and BRM Mappings’ subsections contain additional information
related to the IT investment.
For questions that allow the User to select multiple answers, such as ‘Supports Information Sharing and Access’, hold down the Control button and select your responses.
BRM Mapping indicates the predominant mission/business of the Agency. If desired up to four secondary services may be identified in the subsequent fields.

16
Financial: Funding Sources Table The Funding Sources table allows Users to allocate funds to the appropriate Internal or External Funding Agency. Select a
funding source and source type from the dropdown menus below the table and indicate whether the funding source is internal or external to the agency by checking the box. Select ‘Add Source’ to finish assigning the funding source to the table.
eCPIC auto-calculates the total rows and budget columns once the user clicks the save icon and information in the Total Yearly Budget section of the Funding Sources table is automatically updated.
This Funding Sources table can also found in the ‘Major IT Business Case: Section C: Lifecycle Costs: Funding Sources’ subsection. If you enter data in this table in either process, the change will be reflected in the other process.

17
Financial: Full Time Equivalents (FTE) Table The Financial: Government FTE’s subsection contains the FTE Table. This table is also found in the ‘Major IT Business Case:
Section C: Lifecycle Costs: Full Time Equivalents’ subsection. Enter the number of Government FTEs in the FTE table and then click the icon to calculate the totals.
eCPIC Tip: The Full Time Equivalent totals should align with the FTE Costs that have been allocated in the Lifecycle Costs table.

18
Agency IT Portfolio Summary – Review Investment Click on the Review Investment icon in the toolbar to show a list of the sections and subsections within the current process,
including how many data fields are complete or incomplete in each area. This button will appear in all subsections. The ‘Complete’ column shows the number of fields in each section or subsection that contain data. The ‘Incomplete’ column
shows the number of fields in each section or sub-section that do not contain data.

19
Investments Module and OMB Processes
Overview
Agency IT Portfolio Summary
Agency Cloud Spending Summary
Agency IT Infrastructure Spending
Major IT Business Case
Major IT Business Case Detail

20
Agency Cloud Spending Summary
The Agency Cloud Spending Summary, previously known as the Exhibit 53C, includes IT investment budget and management information by cloud computing deployment model and cloud computing service model. This process contains the same Cloud Computing Costs table found in the ‘Agency IT Portfolio Summary: Cloud Computing Costs’ subsection. When data is entered in one of the sections, it will automatically update in the other section.
21
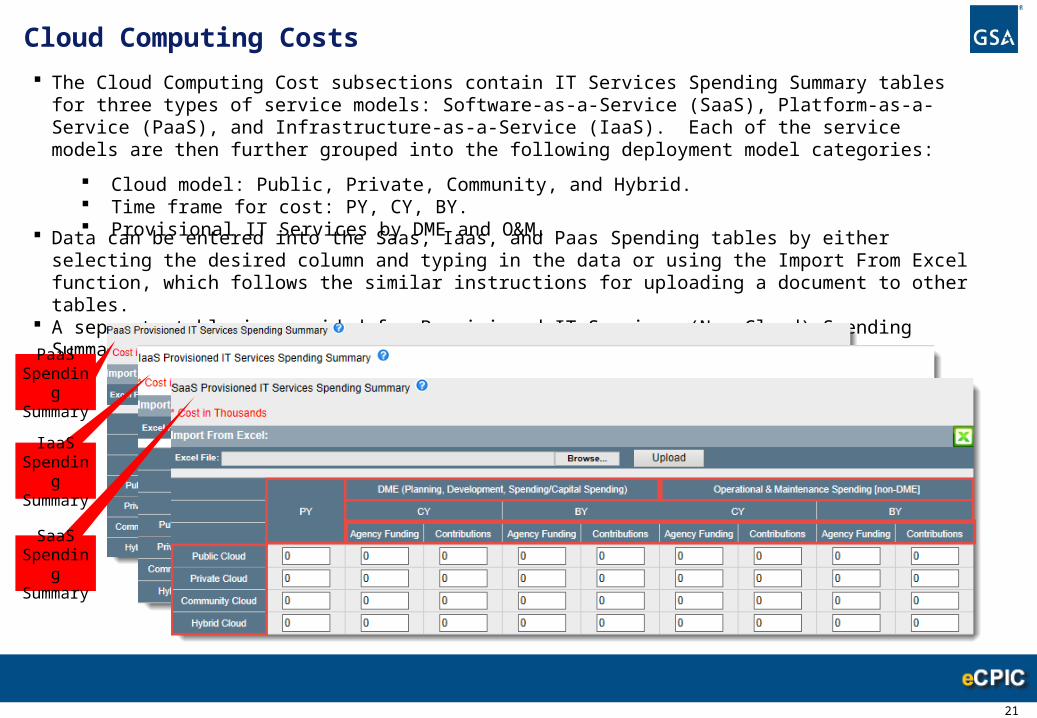
Cloud Computing Costs The Cloud Computing Cost subsections contain IT Services Spending Summary tables for three types of service models:
Software-as-a-Service (SaaS), Platform-as-a-Service (PaaS), and Infrastructure-as-a-Service (IaaS). Each of the service models are then further grouped into the following deployment model categories:
Cloud model: Public, Private, Community, and Hybrid. Time frame for cost: PY, CY, BY. Provisional IT Services by DME and O&M.
Data can be entered into the Saas, Iaas, and Paas Spending tables by either selecting the desired column and typing in the data or using the Import From Excel function, which follows the similar instructions for uploading a document to other tables.
A separate table is provided for Provisioned IT Services (Non-Cloud) Spending Summary.
PaaS Spending Summary
IaaS Spending Summary
SaaS Spending Summary

22
Investments Module and OMB Processes
Overview
Agency IT Portfolio Summary
Agency Cloud Spending Summary
Agency IT Infrastructure Spending
Major IT Business Case
Major IT Business Case Detail

23
Agency IT Infrastructure Spending Summary
The Agency IT Infrastructure Spending Summary is a new process in eCPIC based on new OMB requirements in BY16. This process contains a detailed spending breakdown on all aspects of an Agency’s IT Infrastructure. This information can be entered at the Investment level and is submitted to OMB at the agency level.

24
Agency IT Infrastructure Spending Summary Table Within the Agency IT Infrastructure Spending Summary subsection is the Agency IT Infrastructure Spending Summary table. This
table is broken down into three parts: Data Center, Telecom, and End User. Costs reported in the cost categories should incorporate all of an agency’s processing environments (e.g. production, development, test, training, disaster recover/continuity of operations.)
Data can be manually entered by clicking on the textbox and typing in the budget information or data can be imported using the excel import function.
To import data from an Excel document, click ‘Browse’. Once the ‘Choose File to Upload’ box loads, navigate to the desired file and click Open. Then, click ‘Upload’.
eCPIC Tip: Agencies can choose to enter data at the Investment, Portfolio, or OMB Submission package levels.

25
Investments Module and OMB Processes
Overview
Agency IT Portfolio Summary
Agency Cloud Spending Summary
Agency IT Infrastructure Spending
Major IT Business Case
Major IT Business Case Detail

26
Major IT Business Case
The Major IT Business Case, previously known as the Exhibit 300A, includes detailed IT investment budget and management information for Major IT Investments. Together, the Major IT Business Case and Major IT Business Case Details provide the budgetary and management information necessary for sound planning, management, and governance of IT investments.
This section will contain information related to some of the unique tables a user may need to enter data into. For information related to the Initiative Information and Descriptive Information/General Information (Section A), refer to Slides 12 and 13. For the Funding Sources and FTE tables (fields in Section C), see Slides 15 and 16.

27
Section B: Investment Detail – Requirements Table The ‘Major IT Business Case - Section B: Investment Detail’ section contains several different types of data fields, including
structured and unstructured data grids. One example of a structured data grid in this section is the Requirements table, which indicates if the investment addresses a
legislative mandate, presidential direction, or some other legal requirement. Descriptions of the requirement, URL links to the requirement, and PRM codes are also available.
Users can edit data by selecting a cell, entering the new data, and clicking the icon. Alternatively, Users can export and import the data to and from MS Excel following the import/export instructions on Slide 8.

28
Section B: Investment Detail – Integrated Program Team (IPT) Table Section B also contains unstructured data grids. Within ‘Section B: Investment Detail’ is the Integrated Program Team (IPT) table,
which lists the names and contact information for IPT members like IT specialists, capital planners, and performance specialists. Users can edit the IPT table, in the same way the Requirements table was edited, by selecting a cell, entering the new data, and
clicking the icon at the top of the page. Data in the IPT Member Role column can be changed by clicking on the cell and selecting an option from the drop down list. All other data in the table can be manually entered.
Users can add additional rows to unstructured data grids, similar to this, by clicking ‘Insert New Row’ at the bottom of the table. A new window will pop up and once the information is entered, click Update.
Alternatively, Users can export and import the data to and from MS Excel following the import/export instructions on Slide 8.

29
Section C: Lifecycle Costs – Lifecycle Costs for Project Stages Table The next section of the Major IT Business Case process contains the Lifecycle Costs for Project Stages table (shown below), as
well as duplicates of the Funding Sources table (Slide 14) and the FTE table (Slide 15), which are part of the Agency IT Portfolio. Additional details about each of these tables are explored in more depth in a separate training guide — “A-11 Funding Tables”.
Enter data in the Lifecycle Costs for Project Stages table by inserting funding figures directly into outlined cells.
eCPIC auto-calculates the Total and Subtotal rows in the table when the user hits the icon at the top of the page.
eCPIC Tip: For agencies looking to collect data at a more granular level, System Administrators can adjust to ‘Level’ setting.

30
Section C: Lifecycle Costs/Funding Sources – Balance Table At the top of the Lifecycle Costs for Project Stages table and the Funding Sources table, Users will be able to navigate to the
Balance table by clicking the icon. The Total Financial Breakdown table will open; this table compares the Summary of Funding Total (Total plus FTE Costs) and the Funding Sources Total for each budget year. The Balance row at the bottom is the difference between the two, and it should be equal to zero for a properly balanced investment. For a more detailed view, the User can see the differences between DME and SS activities in separate tables, which are also available in the window.

31
Section D: Acquisition/Contract Strategy – Contract/Task Orders Table The next section of the Major IT Business Case process contains the information related to Acquisition/Contract Strategy.
Updating the Acquisition/Contract Strategy table in eCPIC is similar to revising other tables within eCPIC. To add a new row (contract or task order) to the Contract/Task Orders table, click the ‘Insert New Row’ button and enter the
contract information in the pop-up window. Then click the ‘Update’ button. Alternatively, users can export the data to Excel or import new data from an Excel sheet by following the import/export
instructions on slide 8.
eCPIC Tip: Investment Owners can use the MS Excel import and export functionality to efficiently provide their Contracting Officers (CO) with the necessary table. Once updated, this table can then be returned to the Investment Owner for quick import into eCPIC.

32
Major IT Business Case Summary – Status of Completion The Review Investment icon in the toolbar shows project managers a list of the sections and subsections within the current
process, including how many data fields are complete or incomplete in each area. This button will appear in all subsections.

33
Investments Module and OMB Processes
Overview
Agency IT Portfolio Summary
Agency Cloud Spending Summary
Agency IT Infrastructure Spending
Major IT Business Case
Major IT Business Case Detail

34
Major IT Business Case Detail
The Major IT Business Case Detail, previously known as the Exhibit 300B, provides OMB with Budget Year and Current Year investment plans and performance data. Together, with the Major IT Business Case, these two processes provide the budgetary and management information necessary for sound planning, management, and governance of IT investments.
Information in the Initiative Definition and ‘Section A: General Information’ of the Major IT Business Case Detail process be carried over from the Major IT Business Case process. However, Sections B and C of the Major IT Business Case Detail process contain unique fields.

35
Section B: Projects Table ‘Section B: Project Plan and Execution Data’ contains information related to projects with activities underway in any portion of
CY or BY, regardless of where the project occurs in the investment lifecycle, as well as risk assessment information and contains the subsections Projects, Project Activities, and Project Execution Risks.
The Projects table can be found within the Projects subsection. This table has information related to projects with activities underway in any portion of CY or BY, regardless of where the project occurs in the investment lifecycle, as well as risk assessment information.
To enter a new project in the Projects table, select ‘Insert New Row’ and a new window will pop up to enter all of the information contained within a row.

36
Section B: Project Activities Table – Overview ‘Section B: Project Plan and Execution Data - Project Activities’ subsection contains a Master Cost & Schedule table, also referred
to as the Project Activities table. The table compares baseline allows for data input for relating to planned, projected, and actual costs and schedules.
Table Export OptionsImport/Export
Quick Guide
Expand All Rows
Edit
Delete Selected Activities
Select Table View
Add Activity Add SubactivityDuplicate Selected
ActivitiesUpdate/Reset
Values
MS Project Import
Show Table Legend
Data Entry Field Columns
Locked Entry

37
Section B: Project Activities Table – Views
Select View
The Project Activities table has a filter that allows users to view a particular set of columns: OMB Required View - displays only the columns that have been defined by OMB. All Fields View - displays all columns available in the table. EVM Fields View – displays all Earned Value Management (EVM)-related columns. Custom View – displays a list of columns, which a User can manually select to add to the view.
To select a particular view, users can click on the ‘Select View’ dropdown above the table and then choose the desired filter.

38
Section B: Project Activities Table – Parent-Child Activities Activities in the Project Activities table can be further divided into Subactivities. These Subactivities are also known as Child
activities, and the activity to which they are aligned is their Parent. If Child activities exist within a Parent activity, the row will have an icon to the left of the Edit column. Clicking on the
will display the Child activities indented below the Parent activity. Clicking on the arrow again will collapse the Child activities within their Parent row.
In the example below, Activity 1 is the parent row, and Activities 2 and 7 are the children rows aligned to it. Parent activities are shown in bold text.
Parent Activity
Child Activities

39
Section B: Project Activities - Breakdown The Federal IT Dashboard (ITDB) recognizes work breakdown structures at the lowest level activities being submitted. Therefore,
eCPIC submits the most granular level activities defined within the agency’s Project Activities table. Investment Owners are able to determine the appropriate WBS for their activities and eCPIC will automatically send only the
Parent’s activity name and description, with the OMB required Child/Grandchild planned and the actual baseline data.
Note: In the example below, all the activities in the purple boxes would be submitted to OMB. Note that activity 1.2 is a Level 2 activity, but will be submitted because it has no Level 3 children. Additionally, activity 1.3.1 has Level 4 children, and thus, activities 1.3.1.1, 1.3.1.2, and 1.3.1.3 will be submitted from this family.
1 2
1.21.1 1.3 2.22.1
1.1.1 1.1.2 1.3.1 1.3.2 1.3.3 2.1.1 2.1.2
1.3.1.1 1.3.1.2 1.3.1.3 2.1.2.1 2.1.2.3
Level 1
Level 2
Level 3
Level 4
This diagram is illustrative only, not an actual view from the eCPIC tool.

40
Duplicates selected rows. Deletes selected rows.
Section B: Project Activities Table – Adding/Deleting an Activity Users can add new activities to the Project Activities table as well as delete or duplicate existing ones. To add a new activity, click on the ‘Add Activity’ button below the table. An Add/Edit Activity window will appear. Enter the information for the new activity, then click the ‘OK’ button. To duplicate or delete a selected row(s), click on the ‘Duplicate Selected Activity(s)’ button or the ‘Delete Selected
Activity(s)’ button, respectively. Selecting either button will generate a message that warns the User that the action cannot be undone.
Add Activity

41
Section B: Project Activities – Adding a Sub Activity To add a sub activity to an activity, click on the ‘Add Sub Activity’ button. An ‘Add Sub Activity’ window will display.
1) Identify the new activity’s immediate Parent by selecting it from the list of activities and clicking the ‘Add’ button.
2) Click the ‘New’ button to open the Add/Edit Activity Window. Enter the new sub activity’s information, then click ‘OK’.
3) Click the ‘Save’ button in the ‘Add Sub Activity’ window to add the sub activity to the Project Activities table.

42
Section B: Project Activities – Editing Data In addition to automatically rolling up and calculating the Parent activity data, eCPIC also auto-calculates the Project Totals row,
located at the bottom of the table. Enter or edit activities data by directly clicking the cell that you would like to edit. Once selected, the data can be updated and
saved by selecting the icon. Note: System Administrators can “lock” certain columns for editing. If a column is locked, the icon will appear in the column
header. To edit a locked column, a user will have to complete a Performance Baseline Change Request (PBCR) form. Through the PBCR process, agencies can maintain an audit of baseline changes, and can analyze changes over time. The PBCR process will be briefly explained on the following slide and in greater detail in a subsequent training session.
SS Activities
DME Activities

43
Section B: Exporting Data from the Project Activities Table Follow this sequence of steps to export the data, which includes downloading the MS Project template, downloading the
XML file, and opening the XML file in the Template.
1. To download the MS Project eCPIC Template, click on the icon. This template has the columns and views needed to display the data from the Project Activities table. A Save As popup will appear.
2. Click Save to save the template as an .mpp file.
3. Next, to download the Project Activities Table data, click on the icon.
4. Click Save to save the template as a XML file.
5. To open the saved MS Template file (*.mpp) within Project 2007/2010, select File > Open.
6. After Open File window opens, select the file type of XML Format (*.xml) from the drop down list
7. Select the (*.xml) file downloaded previously and click Open.
8. The Import Wizard window will open.
Select ‘Append the data to the active project,’ then click the Finish button in order to continue loading the project file.

44
To import a file in XML format, click on the ‘MS Project Import’ toggle at the top of the table. Click in the Select field. A file window will appear, allowing the user to find and select the desired Project (*.xml) file. Click the ‘Open’ button, then click the ‘Upload’ button to import the file.
Section B: Project Activities – Importing XML Files
eCPIC Tip: Select the ‘Import/Export Quick Guide’ link for additional step-by-step assistance with importing or exporting the Project Activities table.

45
Section B: Project Activities – Performance Baseline Change Request (PBCR) To make changes to the project baseline when the
Performance Baseline Change Request (PBCR) functionality is active for an investment, Users will need to complete and submit a baseline change request.
Initiating a PBCR creates a copy of the baseline for editing. Once the PBCR is approved by the PBCR Manager or System Administrator, eCPIC updates the baseline with the PBCR details. The PBCR becomes the new baseline.
To initiate a PBCR, click on the icon in the ‘Project Activities’ subsection of the Major IT Business Case Detail process.
A PBCR window will appear (shown to the right). Enter the details of the Change Request.

46
Section B: Project and Operational Risks Table The ‘Section B: Project Plan and Execution Data - Project Execution Risks’ subsection is used to identify project and operational
risks. Project risks are project-specific (including projects, activities, planning, and maintenance), while operational risks address operational activities that are not reported as a part of a project.
Each risk can be assigned to the appropriate project, although this identification exercise can be completed without assigning risks to a project field (by assigning N/A in project field).
To add a new risk to the Project and Operational Risks table, select the ‘Insert New Row’ button and filling in the requested information and clicking ‘Update’. Existing risks can be updated through clicking in the edit column of the desired row.
Table Export Icon
Delete Row
Edit Row

47
Importing, exporting, and adding new rows to the Operational Performance Metrics tables involve the same icons and buttons that apply in other tables throughout this presentation.
Table C.1A Operational Performance provides results-specific metrics which are appropriate to the mission of the investment and its business owner or customer. As actual results are measured and reported to OMB, updates will be submitted using the C.1B Operational Performance Actual Results table.
For both Table C.1A and C.1B, to insert a new row, click ‘Insert New Row’ and enter the required information.
Section C.1A: Operational Performance Table
Table Import Link
Edit Row
Delete Row
Table Export Icon

48
To enter actual results for the metrics defined in the C.1A table, Users utilize the C.1B Operational Performance Actual Results table. When making monthly performance updates to this table, investment owners must add a new row to the table rather than updating an existing row to allow for proper submission to OMB.
eCPIC Tip: Performance metric actual results for past updates made to the ITDB should be set to Omit Synchronization so they are not accidentally edited and sent to the ITDB.
Section C.1B: Operational Performance Actual Results Table
Edit Row
Delete Row
Table Export Icon

49
Major IT Business Case Detail – Status of Completion The Review Investment icon in the toolbar shows project managers a list of the sections and subsections within the
current process, including how many data fields are complete or incomplete in each area. This button will appear in all subsections.

50
Major IT Business Case Detail – XML Validation To validate the data in Major IT Business Cases according to OMB requirements defined by the Extensible Markup Language
(XML) schema, click the icon in the toolbar. If the Major IT Business Case passes all OMB and business logic checks, the XML file will appear on the screen. If not, the user
will see an alert box. Click the ‘OK’ button in the alert box to continue.
Or:
eCPIC Tip: System administrators can customize the business logic settings in the Admin module, allowing them to tailor alerts based on agency submission priorities.

51
Major IT Business Case Detail – XML Validation, cont’d After selecting the ‘OK’ button in the alert box, the User will see the following screen:
A list of business logic warnings and errors
triggered by the Exhibit 300 data. “Error”
messages are meant to indicate that the Exhibit 300 will not pass OMB’s submission validation
schema until the issue is addressed. “Warning”
messages are only meant to alert PMs to potential
mistakes.
Navigation to the section of the
investment with the warning
Click to export this list of warnings and errors to MS Excel.
52
Further Reading
Further Reading – Refer to the following sections of the eCPIC User Guide for additional details on the material covered in this training session: Section 1.3: Navigating eCPIC Section 4.5: Updating Investment Data Section 4.12: Investment Review Screen Section 4.21: Investment Module Tables Training Session: A-11 Funding Tables Training Session: Earned Value Management (EVM)
![OMB APPROVAL OMB Number: 3235-0045 Estimated average … · Register cite, Federal Register date, and corresponding file number (e.g., SR-[SRO]-xx-xx). A material failure to comply](https://static.fdocuments.us/doc/165x107/5ea9ff0a06dd5d344e307b74/omb-approval-omb-number-3235-0045-estimated-average-register-cite-federal-register.jpg)