® Top zipForm Plus Tips Every REALTOR Must Know Amy A. Ulloa zipForm Products Coordinator...
21
® Top zipForm Plus Tips Every REALTOR Must Know Amy A. Ulloa zipForm Products Coordinator CALIFORNIA ASSOCIATION OF REALTORS ® ® ®
-
Upload
sharleen-moody -
Category
Documents
-
view
219 -
download
3
Transcript of ® Top zipForm Plus Tips Every REALTOR Must Know Amy A. Ulloa zipForm Products Coordinator...

®
Top zipForm Plus TipsEvery REALTOR Must Know
Amy A. UlloazipForm Products Coordinator
CALIFORNIA ASSOCIATION OF REALTORS
®
®
®

zipForm Tip #1Customize your zipForm Plus
®
®

About Me• Add your picture, update company information, and
save an email signature
Profile
Profile
Photo

Libraries• Organize Libraries of forms – the first library is
your default library on the All Forms tab
Profile
Profile
Organize

Settings• Select your eSign product, enable autosave, and
connect to outside services, such as Zapier
Profile
Profile
eSign

zipForm Tip #2Smart Form Features
®

Go Beyond
Print, Email, or eSign a Specific PageSelect a specific page or pages of a form when printing or sending that form.
1. Use the Print, Email, or eSign buttons to send multiple forms
2. Click the blue ▼ arrow
3. Click the Page(s) you want to send or printThe form will have a grey [-] icon in the top right once one or more page(s) are selected
4. Send or print the forms
Smart Forms
Select Page

RPAWS: Purchase
Agreement Financing Structure
Worksheet
Smart Forms

Auto-fills data into the RPA-CA FormSmart Forms

Type in comments in areas such as 3E of the RPA.
Smart Forms
1

Smart Forms
2
3
4
Document will appear as PDF in the transaction.

Form TOA appears at end of RPA-CA5
6
Smart Forms

Mutually Exclusive CheckboxesSmart Forms

Auto Add AddendumSmart Forms

zipForm Tip #3Time saving tools
®

Go Beyond
TemplatesSave forms, contacts, and documents to be used as forms packets through the Apply Template option when creating or editing a zipForm® Plus transaction file. Click TEMPLATES and then click New to create a template.
1. Name and Save your template2. Add forms, following the same
steps as creating a new transaction
3. Fill out key information, such as your brokerage name and address
4. Save your template5. Click TRANSACTIONS to use the
template
Shortcuts
New
TEMPLATES
Name
Save

Go Beyond
ClausesCommon paragraphs, sentences or phrases can be saved and inserted into form fields quickly. • Create and save clauses using the Clauses button on
the Transactions page.
How to insert a clause:
1. Click on a form field
2. Click the gray pencil button
3. Click the Insert Clause button
4. Select the Clause by Category and Title
5. Click Insert
Shortcuts2
1
3
4
5

zipForm Tip #4Entities as clients using zipLogix Digital Ink
®
®

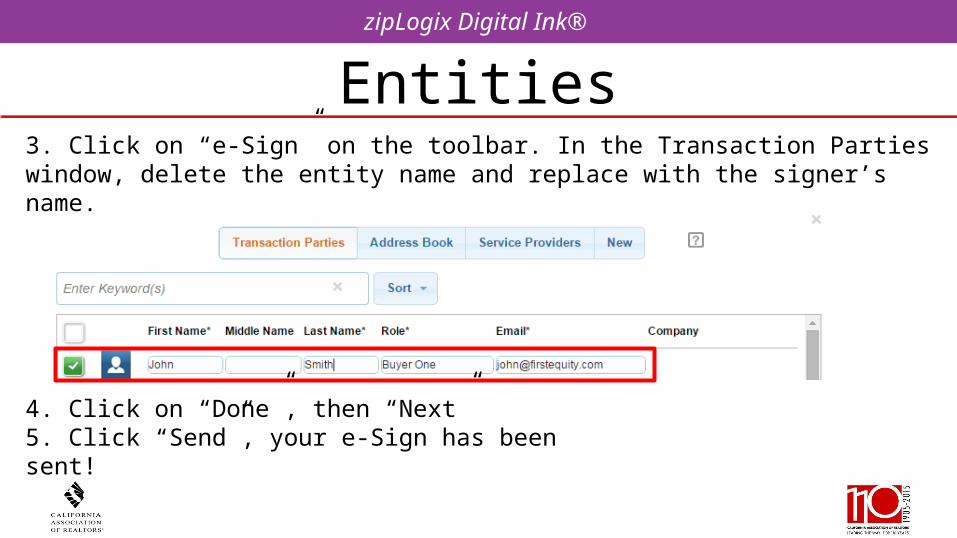
EntitieszipLogix Digital Ink®
1. Fill out RCSD 2. Fill out your RPA with the entities full name
EntitieszipLogix Digital Ink®
3. Click on “e-Sign” on the toolbar. In the Transaction Parties window, delete the entity name and replace with the signer’s name.
4. Click on “Done”, then “Next”5. Click “Send”, your e-Sign has been sent!