SolidWizesolidwize.com/wp-content/uploads/2013/09/5.5.1-SolidWize-Revolve... · SolidWize Online...
12
SolidWize Online SolidWorks Training Revolve: Half Pulley
Transcript of SolidWizesolidwize.com/wp-content/uploads/2013/09/5.5.1-SolidWize-Revolve... · SolidWize Online...

SolidWize Online SolidWorks Training
Revolve: Half Pulley

Step 1: Creating the Profile
Using Inch as the unit, create the following sketch on the Right Plane. Pay attention to the
relations and dimensions shown, especially the mid-point relation of the construction line.
Using the sketch fillet tool highlighted below, create two fillets at the indicated vertices. Use a fillet
radius of 0.25in.

The resulting sketch should look like the following:
Step 2: Revolving the Pulley
Using the Revolved Boss/Bass tool, revolve the sketch around the construction line. For
Direction 1, use a Blind-type revolve and angle of 90.00 degrees. Select the box next to Direction 2 and
use the same revolve type and angle as that of Direction 1.
The resulting revolved part should look like the following:
Step 3: Sketching the Lightening Holes
Create a sketch on the face highlighted below:

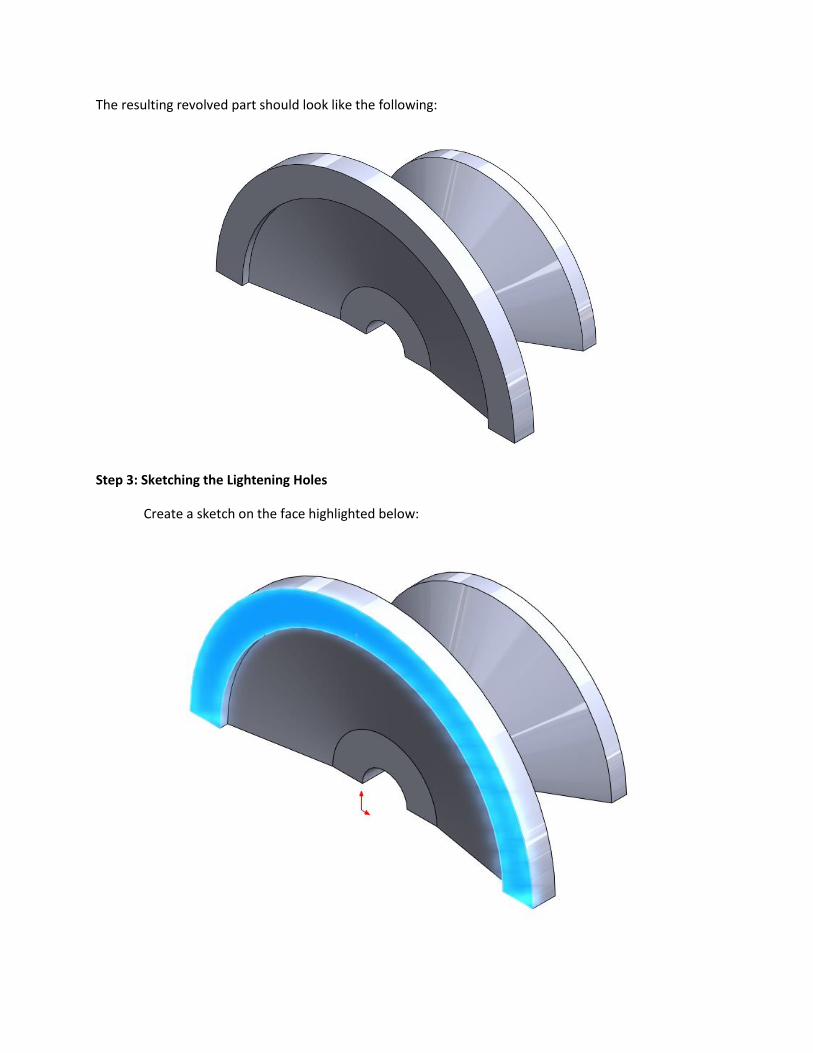
Create the following sketch. Notice the vertical relation between the center of the circle and the origin.
Step 4: Extrude Cut the Lightening Holes
Using the Extruded Cut tool, extrude cut the sketch using type Blind and a cut depth of 1.00in.

The result should look like the following:
Step 5: Sketching the Lightening Holes: Part 2
Create a sketch on the face highlighted below:
Create the following sketch. Notice the vertical relation between the center of the circle and the origin.
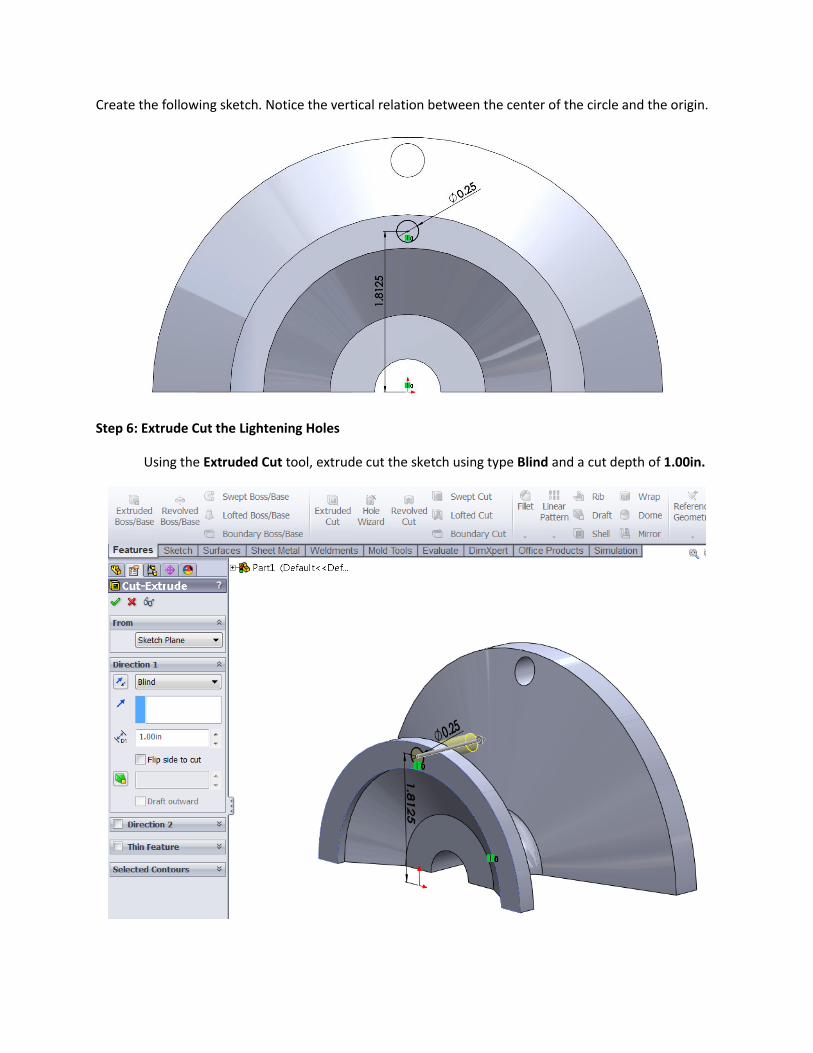
Step 6: Extrude Cut the Lightening Holes
Using the Extruded Cut tool, extrude cut the sketch using type Blind and a cut depth of 1.00in.

The result should look like the following:
Step 7: Circular Patterns
The Circular Pattern tool is found under the Linear Pattern tool found in the Features tab:

Using the Circular Pattern tool, select the inner circular edge (highlighted below) as the revolution
guide. Set the instance number to 4 instances and pattern angle of 75.00 deg.
Using the Circular Pattern tool again with the same number of instances and same pattern angle, select
the Reverse select tool (highlighted below) to pattern in the opposite direction.

The resulting part should look like the following:

Step 8: Adding Appearance
To add an appearance to the part, select the Appearance tab from the menu located on the
right of the display pane:
Select Appearances>Painted>Car and select gloss red.

To add the appearance, simply drag the gloss red image onto the display pane. By dragging it right onto
the display pane (the blank area around your part), the appearance is automatically applied to the entire
part. If you wanted to apply the appearance only to a particular face, feature, or body, drag the
appearance onto the desired face and select the desired options from the popup menu.
The resulting part should look like this:
Step 9: Save and Exit
Save the part as Revolve_HalfPulley.sldprt and exit the part.